

Page 1
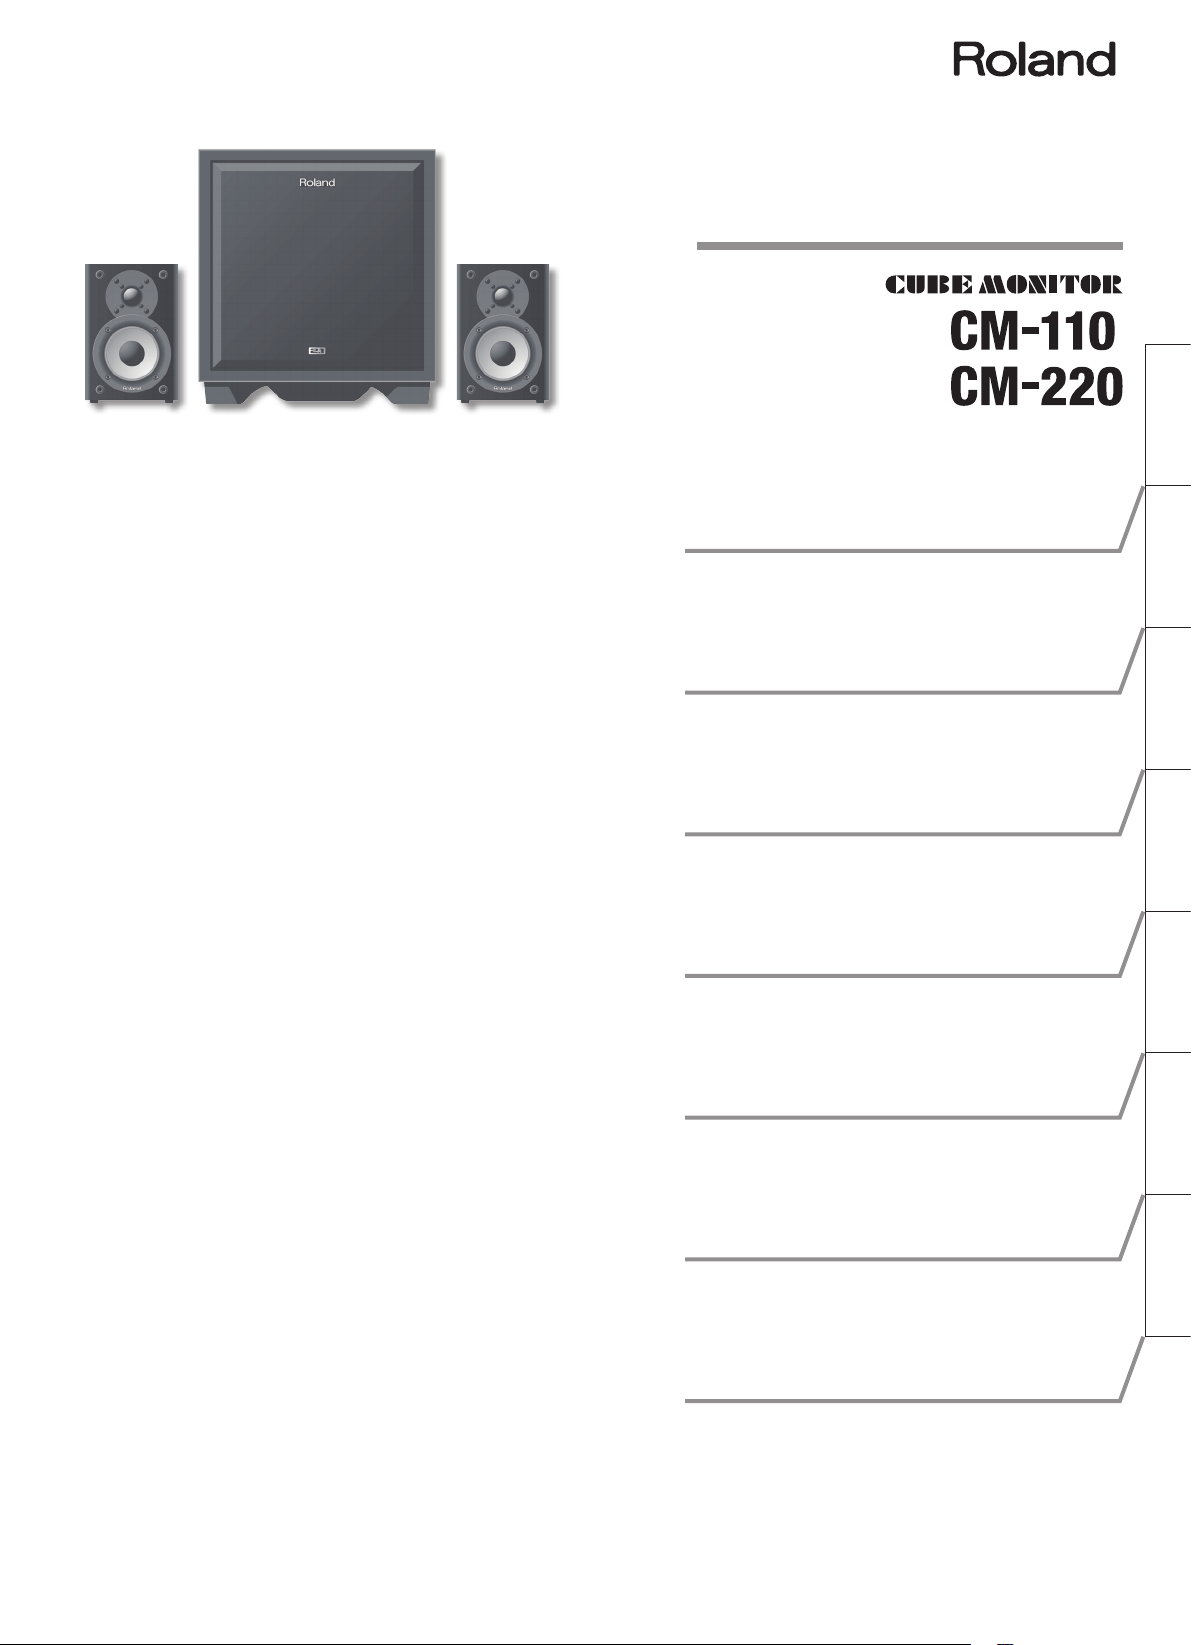
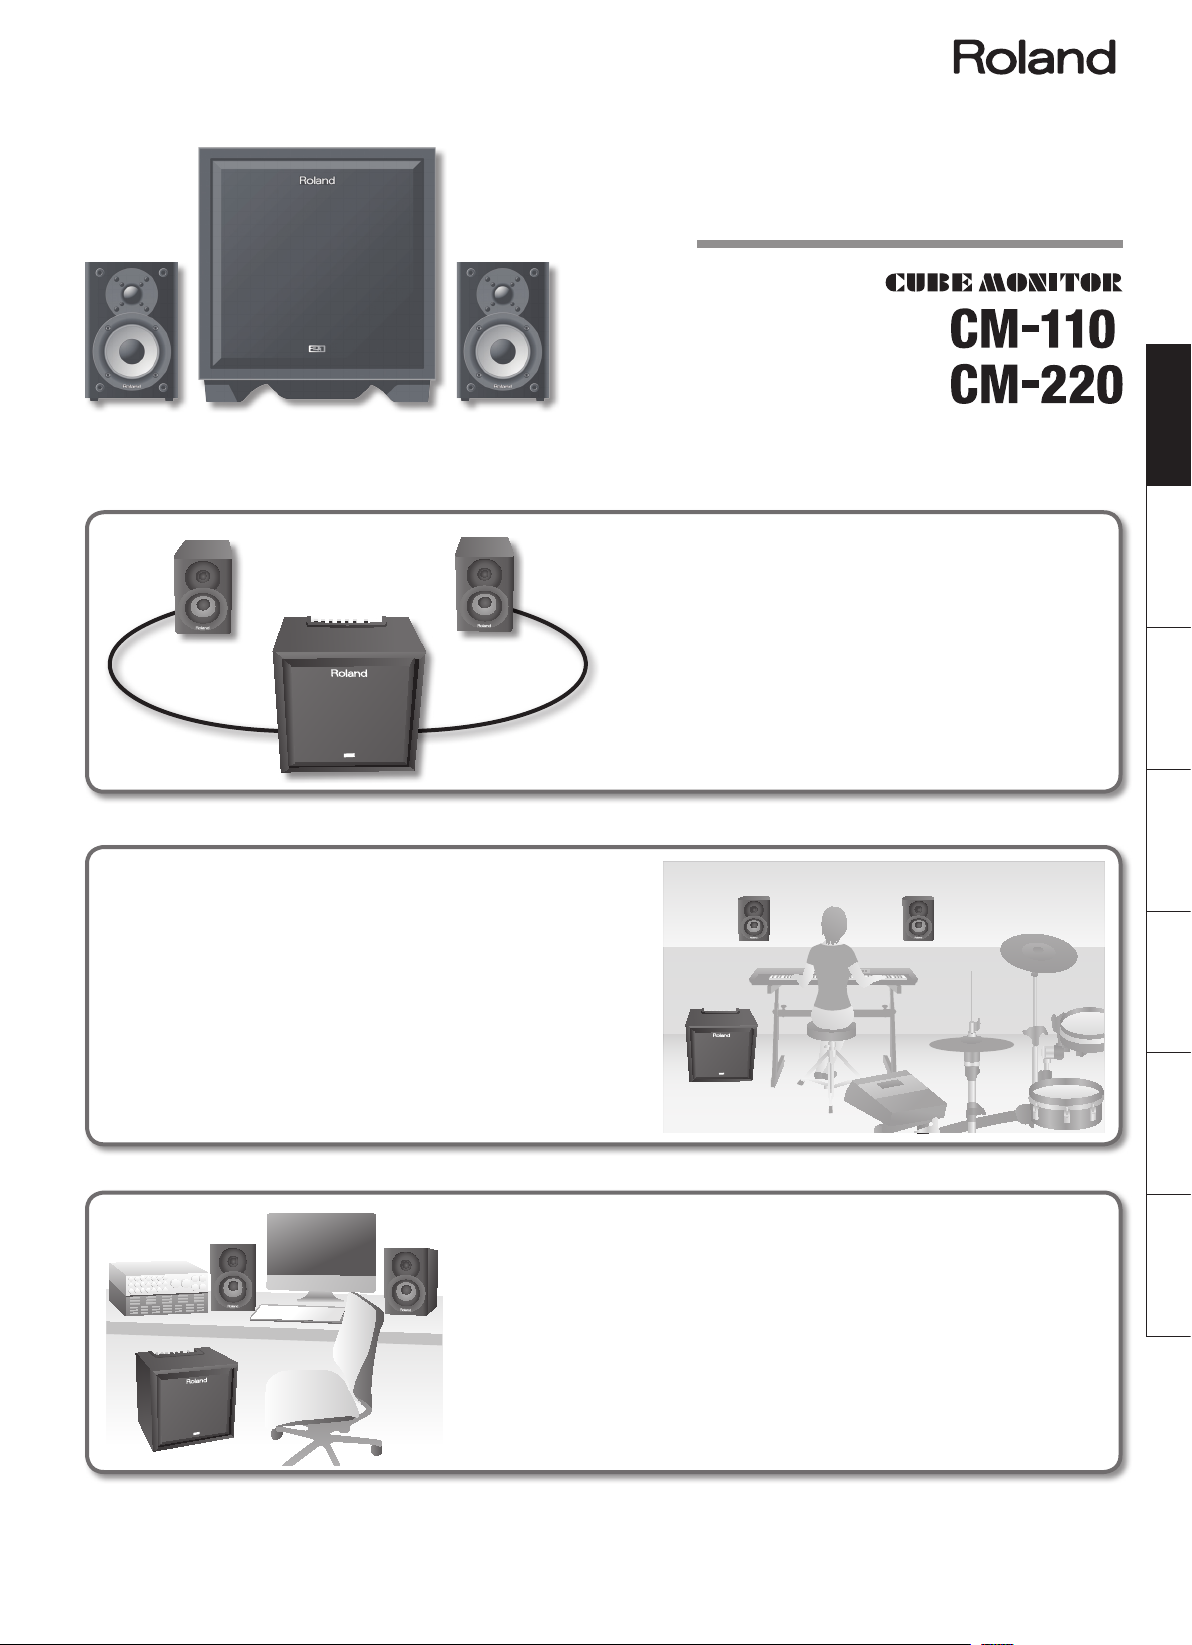
* The illustration shows the CM-220.
Owner’s Manual
Owner’s Manual
Bedienungsanleitung
Mode d’emploi
Manuale dell'utente
Deutsch Français Italiano Español Português NederlandsEnglish
Manual del usuario
Manual do proprietário
Gebruikershandleiding
Page 2
WARNING: To reduce the risk of fire or electric shock, do not expose this apparatus to rain or moisture.
CAUTION
RISK OF ELECTRIC SHOCK
DO NOT OPEN
ATTENTION: RISQUE DE CHOC ELECTRIQUE NE PAS OUVRIR
CAUTION: TO REDUCE THE RISK OF ELECTRIC SHOCK,
DO NOT REMOVE COVER (OR BACK).
NO USER-SERVICEABLE PARTS INSIDE.
REFER SERVICING TO QUALIFIED SERVICE PERSONNEL.
The lightning flash with arrowhead symbol, within an
equilateral triangle, is intended to alert the user to the
presence of uninsulated “dangerous voltage” within the
product’s enclosure that may be of sufficient magnitude to
constitute a risk of electric shock to persons.
The exclamation point within an equilateral triangle is
intended to alert the user to the presence of important
operating and maintenance (servicing) instructions in the
literature accompanying the product.
INSTRUCTIONS PERTAINING TO A RISK OF FIRE, ELECTRIC SHOCK, OR INJURY TO PERSONS.
IMPORTANT SAFETY INSTRUCTIONS
SAVE THESE INSTRUCTIONS
WARNING - When using electric products, basic precautions should always be followed, including the following:
1. Read these instructions.
2. Keep these instructions.
3. Heed all warnings.
4. Follow all instructions.
5. Do not use this apparatus near water.
6. Clean only with a dry cloth.
7. Do not block any of the ventilation openings. Install in
accordance with the manufacturers instructions.
8. Do not install near any heat sources such as radiators,
heat registers, stoves, or other apparatus (including
amplifiers) that produce heat.
9. Do not defeat the safety purpose of the polarized or
grounding-type plug. A polarized plug has two blades with
one wider than the other. A grounding type plug has two
blades and a third grounding prong. The wide blade or the
third prong are provided for your safety. If the provided plug
does not fit into your outlet, consult an electrician for
replacement of the obsolete outlet.
10. Protect the power cord from being walked on or pinched
particularly at plugs, convenience receptacles, and the
point where they exit from the apparatus.
11. Only use attachments/accessories specified
by the manufacturer.
12. Unplug this apparatus during lightning storms or when
unused for long periods of time.
13. Refer all servicing to qualified service personnel. Servicing
is required when the apparatus has been damaged in any
way, such as power-supply cord or plug is damaged, liquid
has been spilled or objects have fallen into the apparatus,
the apparatus has been exposed to rain or moisture, does
not operate normally, or has been dropped.
For the U.K.
WARNING:
IMPORTANT:
As the colours of the wires in the mains lead of this apparatus may not correspond with the coloured markings identifying
the terminals in your plug, proceed as follows:
The wire which is coloured GREEN-AND-YELLOW must be connected to the terminal in the plug which is marked by the
letter E or by the safety earth symbol or coloured GREEN or GREEN-AND-YELLOW.
The wire which is coloured BLUE must be connected to the terminal which is marked with the letter N or coloured BLACK.
The wire which is coloured BROWN must be connected to the terminal which is marked with the letter L or coloured RED.
THIS APPARATUS MUST BE EARTHED
THE WIRES IN THIS MAINS LEAD ARE COLOURED IN ACCORDANCE WITH THE FOLLOWING CODE.
GREEN-AND-YELLOW: EARTH, BLUE: NEUTRAL, BROWN: LIVE
Page 3
* The illustration shows the CM-220.
Owner’s Manual
Deutsch Français Italiano Español Português NederlandsEnglish
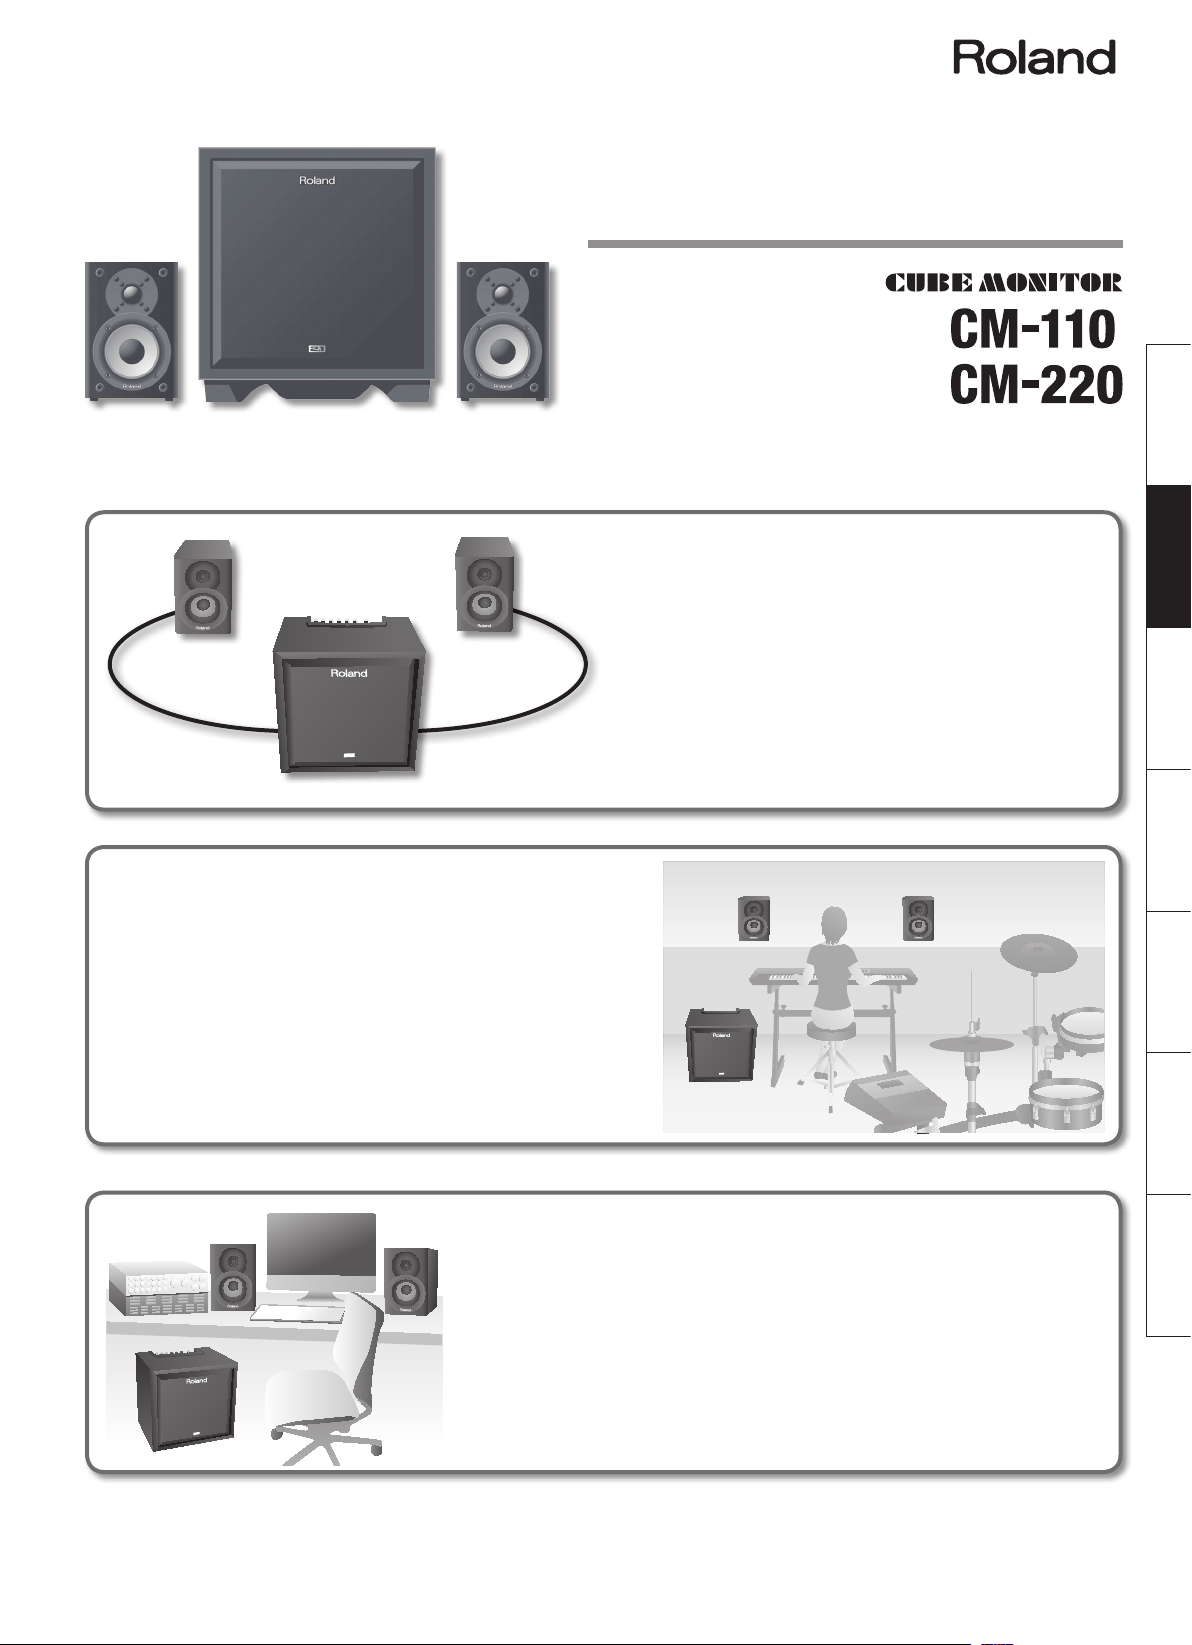
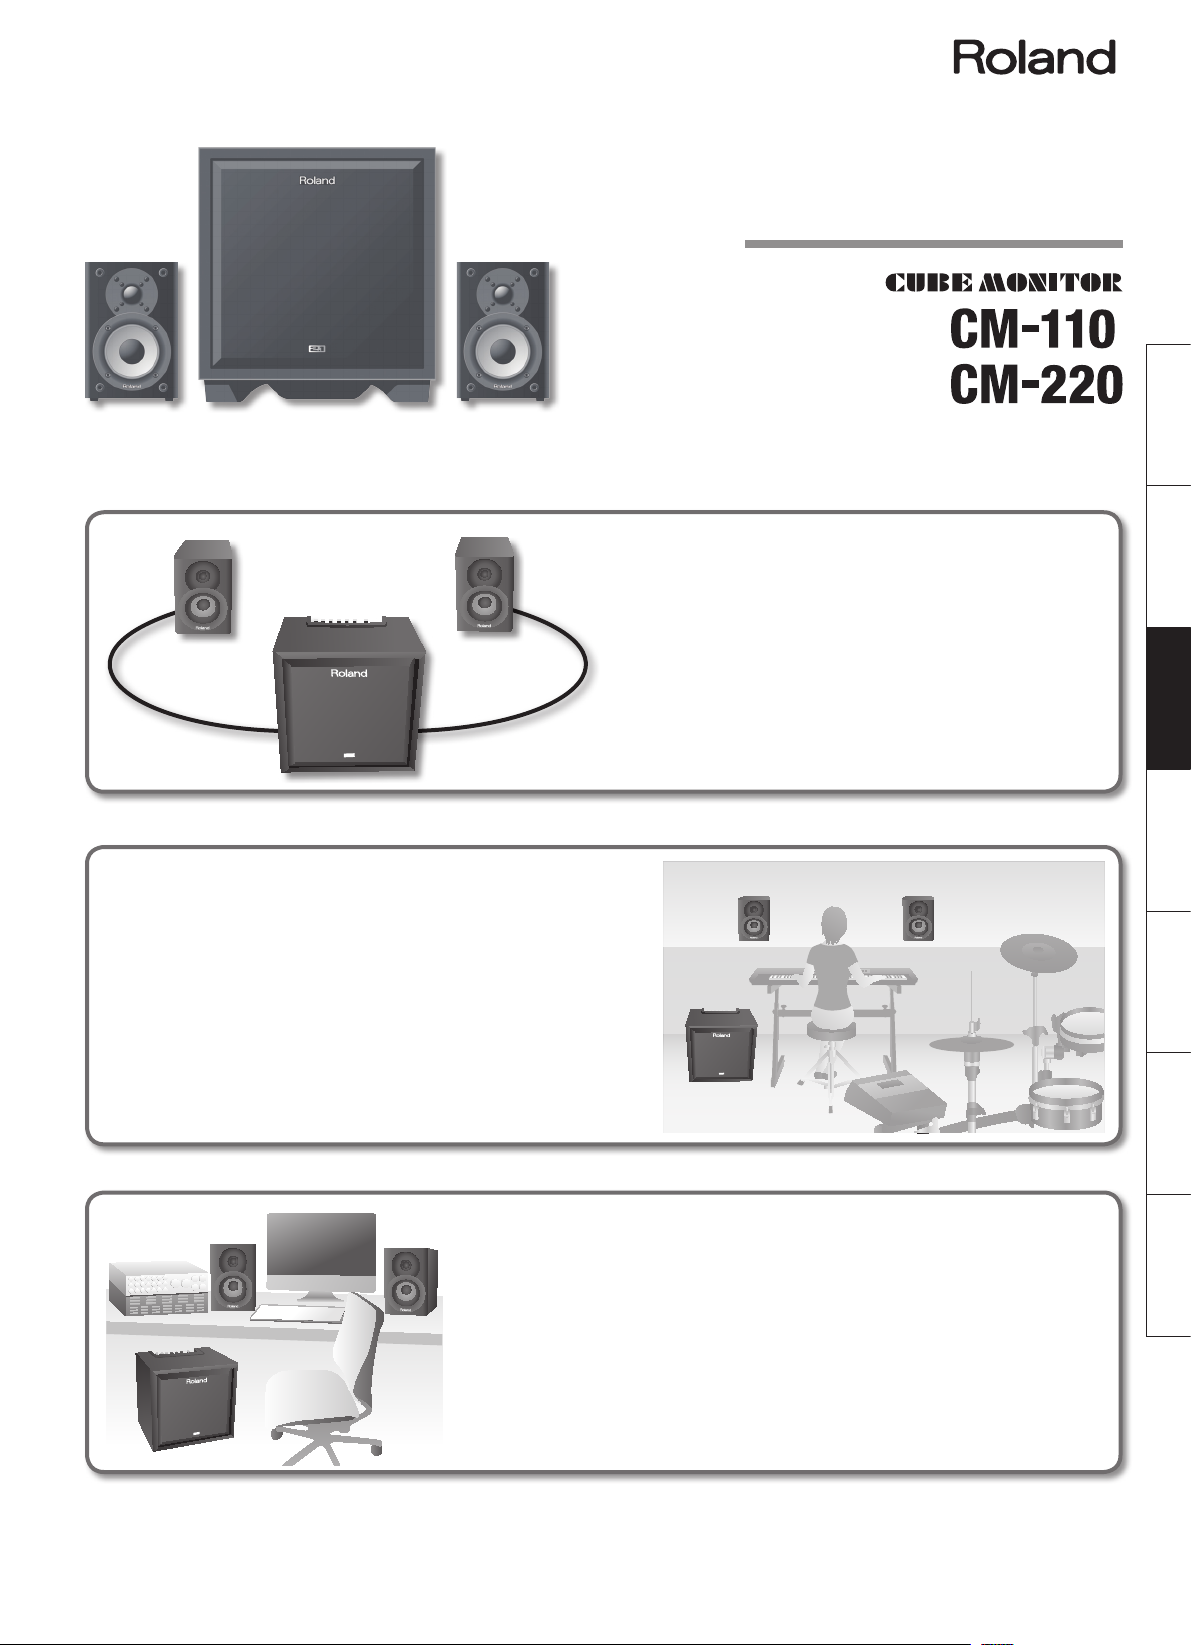
A Convenient 2.1 Channel
The set consists of a main unit (subwoofer) that
delivers rich, deep bass sound, plus two satellite
speakers.
Simple connections allow you to start enjoying
2.1 channel sound right away.
For Musical Instruments
The CM-220 provides an ample 200 W of total output
power, and the CM-110 provides 100 W.
Input sources can be mixed, allowing you to perform
with clear sound across the full range, from low to
high frequencies.
For Music Production
You can connect the system to your computer to obtain a highquality monitoring setup.
Its rich, deep bass sound also makes this system ideal for
listening.
Copyright © 2012 ROLAND CORPORATION
All rights reserved. No part of this publication may be reproduced in any form without the written permission of ROLAND CORPORATION.
Roland, CUBE MONITOR are either registered trademarks or trademarks of Roland Corporation in the United States and/or other countries.
Page 4
USING THE UNIT SAFELY
Before using this unit, carefully read the sections entitled: “IMPORTANT SAFETY INSTRUCTIONS”, “USING THE UNIT SAFELY” (p. 2), and “IMPORTANT NOTES” (p. 3). These
sections provide important information concerning the proper operation of the unit. Additionally, in order to feel assured that you have gained a good grasp of every
feature provided by your new unit, Owner’s Manual should be read in its entirety. The manual should be saved and kept on hand as a convenient reference.
About WARNING and CAUTION Notices
Used for instructions intended to alert the
user to the risk of death or severe injury
should the unit be used improperly.
Used for instructions intended to alert the
user to the risk of injury or material
damage should the unit be used
improperly.
* Material damage refers to damage or
other adverse effects caused with
respect to the home and all its
furnishings, as well to domestic animals
or pets.
ALWAYS OBSERVE THE FOLLOWING
WARNING
Connect mains plug of this model to a
mains socket outlet with a protective
earthing connection.
Do not open or perform any internal
modications on the unit.
Do not attempt to repair the unit, or
replace parts within it (except when this
manual provides specic instructions
directing you to do so). Refer all servicing
to your retailer, the nearest Roland
Service Center, or an authorized Roland
distributor, as listed on the “Information”
page.
Never install the unit in any of the
following locations.
• Subject to temperature extremes (e.g.,
direct sunlight in an enclosed vehicle,
near a heating duct, on top of heatgenerating equipment); or are
• Damp (e.g., baths, washrooms, on wet
oors); or are
• Exposed to steam or smoke; or are
• Subject to salt exposure; or are
• Humid; or are
• Exposed to rain; or are
• Dusty or sandy; or are
• Subject to high levels of vibration and
shakiness.
Make sure you always have the unit
placed so it is level and sure to remain
stable. Never place it on stands that could
wobble, or on inclined surfaces.
The unit should be connected to a power
supply only of the type described as
marked on the rear side of unit.
Use only the attached power-supply cord.
Also, the supplied power cord must not be
used with any other device.
Do not excessively twist or bend the
power cord, nor place heavy objects on it.
Doing so can damage the cord, producing
severed elements and short circuits.
Damaged cords are re and shock hazards!
2
About the Symbols
The symbol alerts the user to important instructions or
warnings.The specific meaning of the symbol is
determined by the design contained within the triangle. In
the case of the symbol at left, it is used for general
cautions, warnings, or alerts to danger.
The symbol alerts the user to items that must never be
carried out (are forbidden). The specific thing that must
not be done is indicated by the design contained within
the circle. In the case of the symbol at left, it means that
the unit must never be disassembled.
The symbol alerts the user to things that must be
carried out. The specific thing that must be done is
indicated by the design contained within the circle. In the
case of the symbol at left, it means that the power-cord
plug must be unplugged from the outlet.
WARNING
This unit, either alone or in combination
with an amplier and headphones or
speakers, may be capable of producing
sound levels that could cause permanent
hearing loss. Do not operate for a long
period of time at a high volume level, or
at a level that is uncomfortable. If you
experience any hearing loss or ringing
in the ears, you should immediately stop
using the unit, and consult an audiologist.
Do not place containers containing liquid
on this product. Never allow foreign
objects (e.g., ammable objects, coins,
wires) or liquids (e.g., water or juice) to
enter this product. Doing so may cause
short circuits, faulty operation, or other
malfunctions.
Immediately turn the unit o, remove the
power cord from the outlet, and request
servicing by your retailer, the nearest
Roland Service Center, or an authorized
Roland distributor, as listed on the
“Information” page when:
• The power-supply cord or the plug has
been damaged; or
• If smoke or unusual odor occurs; or
• Objects have fallen into, or liquid has
been spilled onto the unit; or
• The unit has been exposed to rain (or
otherwise has become wet); or
• The unit does not appear to operate
normally or exhibits a marked change
in performance.
When using the unit in locations where
children are present, be careful so no
mishandling of the unit can take place. An
adult should always be on hand to provide
supervision and guidance.
Protect the unit from strong impact.
(Do not drop it!)
Before using the unit in a foreign country,
consult with your retailer, the nearest
Roland Service Center, or an authorized
Roland distributor, as listed on the
“Information” page.
WARNING
Do not force the unit’s power-supply cord
to share an outlet with an unreasonable
number of other devices. Be especially
careful when using extension cords—the
total power used by all devices you have
connected to the extension cord’s outlet
must never exceed the power rating
(watts/amperes) for the extension cord.
Excessive loads can cause the insulation
on the cord to heat up and eventually
melt through.
CAUTION
The unit should be located so that its
location or position does not interfere
with its proper ventilation.
Always grasp only the plug on the
power-supply cord when plugging into, or
unplugging from, an outlet or this unit.
At regular intervals, you should unplug
the power plug and clean it by using
a dry cloth to wipe all dust and other
accumulations away from its prongs.
Also, disconnect the power plug from
the power outlet whenever the unit is to
remain unused for an extended period of
time. Any accumulation of dust between
the power plug and the power outlet can
result in poor insulation and lead to re.
Try to prevent cords and cables from
becoming entangled. Also, all cords and
cables should be placed so they are out of
the reach of children.
Never climb on top of, nor place heavy
objects on the unit.
Never handle the power cord or its plugs
with wet hands when plugging into, or
unplugging from, an outlet or this unit.
Before moving the unit, disconnect the
power plug from the outlet, and pull out
all cords from external devices.
Before cleaning the unit, turn o the unit
and unplug the power cord from the
outlet (p. 5).
Whenever you suspect the possibility of
lightning in your area, pull the plug on the
power cord out of the outlet.
The metal portions of the main unit
(subwoofer) may become hot, so take care
to avoid burns.
Do not remove the speaker grille and
speaker by any means. Speaker not user
replaceable. Shock hazardous voltages
and currents are present inside the
enclosure.
Page 5

IMPORTANT NOTES
Power Supply
• Do not connect this unit to same electrical outlet
that is being used by an electrical appliance that
is controlled by an inverter (such as a refrigerator,
washing machine, microwave oven, or air
conditioner), or that contains a motor. Depending
on the way in which the electrical appliance is
used, power supply noise may cause this unit to
malfunction or may produce audible noise. If it
is not practical to use a separate electrical outlet,
connect a power supply noise lter between this
unit and the electrical outlet.
• Before connecting this unit to other devices, turn
o all units. This will help prevent malfunctions
and/or damage to speakers or other devices.
• Although the LED is switched o, this does
not mean that the unit has been completely
disconnected from the source of power. If you
need to turn o the power completely, unplug the
power cord from the power outlet. For this reason,
the outlet into which you choose to connect the
power cord’s plug should be one that is within
easy reach and readily accessible.
• With the factory settings, the CM-110 and CM-220
will automatically be switched o approximately
4 hours after you stop playing or operating the
unit. If you don’t want the power to turn o
automatically, change the “AUTO OFF” setting to
“OFF” as described on p. 6.
Placement
• Using the unit near power ampliers (or other
equipment containing large power transformers)
may induce hum. To alleviate the problem, change
the orientation of this unit; or move it farther away
from the source of interference.
• This device may interfere with radio and television
reception. Do not use this device in the vicinity of
such receivers.
• Noise may be produced if wireless
communications devices, such as cell phones,
are operated in the vicinity of this unit. Such
noise could occur when receiving or initiating a
call, or while conversing. Should you experience
such problems, you should relocate such wireless
devices so they are at a greater distance from this
unit, or switch them o.
• Do not expose the unit to direct sunlight, place
it near devices that radiate heat, leave it inside
an enclosed vehicle, or otherwise subject it to
temperature extremes. Also, do not allow lighting
devices that normally are used while their light
source is very close to the unit (such as a piano
light), or powerful spotlights to shine upon the
same area of the unit for extended periods of time.
Excessive heat can deform or discolor the unit.
• When moved from one location to another where
the temperature and/or humidity is very dierent,
water droplets (condensation) may form inside
the unit. Damage or malfunction may result if
you attempt to use the unit in this condition.
Therefore, before using the unit, you must allow it
to stand for several hours, until the condensation
has completely evaporated.
• Do not allow rubber, vinyl, or similar materials to
remain on this unit for long periods of time. Such
objects can discolor or otherwise harmfully aect
the nish.
• Do not paste stickers, decals, or the like to this
instrument. Peeling such matter o the instrument
may damage the exterior nish.
• Depending on the material and temperature of
the surface on which you place the unit, its rubber
feet may discolor or mar the surface.
You can place a piece of felt or cloth under the
rubber feet to prevent this from happening. If you
do so, please make sure that the unit will not slip
or move accidentally.
• Do not put anything that contains water (e.g.,
ower vases) on this unit. Also, avoid the use of
insecticides, perfumes, alcohol, nail polish, spray
cans, etc., near the unit. Swiftly wipe away any
liquid that spills on the unit using a dry, soft cloth.
Maintenance
• For everyday cleaning wipe the unit with a soft,
dry cloth or one that has been slightly dampened
with water. To remove stubborn dirt, use a cloth
impregnated with a mild, non-abrasive detergent.
Afterwards, be sure to wipe the unit thoroughly
with a soft, dry cloth.
• Never use benzine, thinners, alcohol or solvents of
any kind, to avoid the possibility of discoloration
and/or deformation.
Additional Precautions
• Use a reasonable amount of care when using the
unit’s buttons, sliders, or other controls; and when
using its jacks and connectors. Rough handling
can lead to malfunctions.
• When connecting / disconnecting all cables, grasp
the connector itself—never pull on the cable. This
way you will avoid causing shorts, or damage to
the cable’s internal elements.
• A small amount of heat will radiate from the unit
during normal operation.
• To avoid disturbing your neighbors, try to keep the
unit’s volume at reasonable levels. You may prefer
to use headphones, so you do not need to be
concerned about those around you.
• When you need to transport the unit, package
it in the box (including padding) that it came
in, if possible. Otherwise, you will need to use
equivalent packaging materials.
• Some connection cables contain resistors. Do
not use cables that incorporate resistors for
connecting to this unit. The use of such cables
can cause the sound level to be extremely low,
or impossible to hear. For information on cable
specications, contact the manufacturer of the
cable.
• Otherwise, due to the structural design of this
instrument, small pets or other animals could end
up getting trapped inside it. If such a situation
is encountered, you must immediately turn o
the unit and disconnect the power cord from the
outlet. You should then consult with the retailer
from whom the instrument was purchased, or
contact the nearest Roland Service Center.
• Do not insert hands, ngers, etc, into the openings
in the unit. In particular, if the unit is to used in
households with small children, always provide
adult supervision to ensure that children keep
their hands and feet out of these openings.
• Company names and product names appearing
in this document are registered trademarks or
trademarks of their respective owners.
Deutsch Français Italiano Español Português NederlandsEnglish
3
Page 6

Check the Package Contents
☐ Main unit (subwoofer)
☐ Satellite speakers (two)
* You must use the included satellite speakers.
☐ Speaker covers (two)
You can attach these to the satellite speakers if
desired.
☐ Speaker cables (two)
* The illustration shows the main unit of the CM-220.
* You must use the included speaker cables.
☐ Power cord
☑ Owner’s manual (this document)
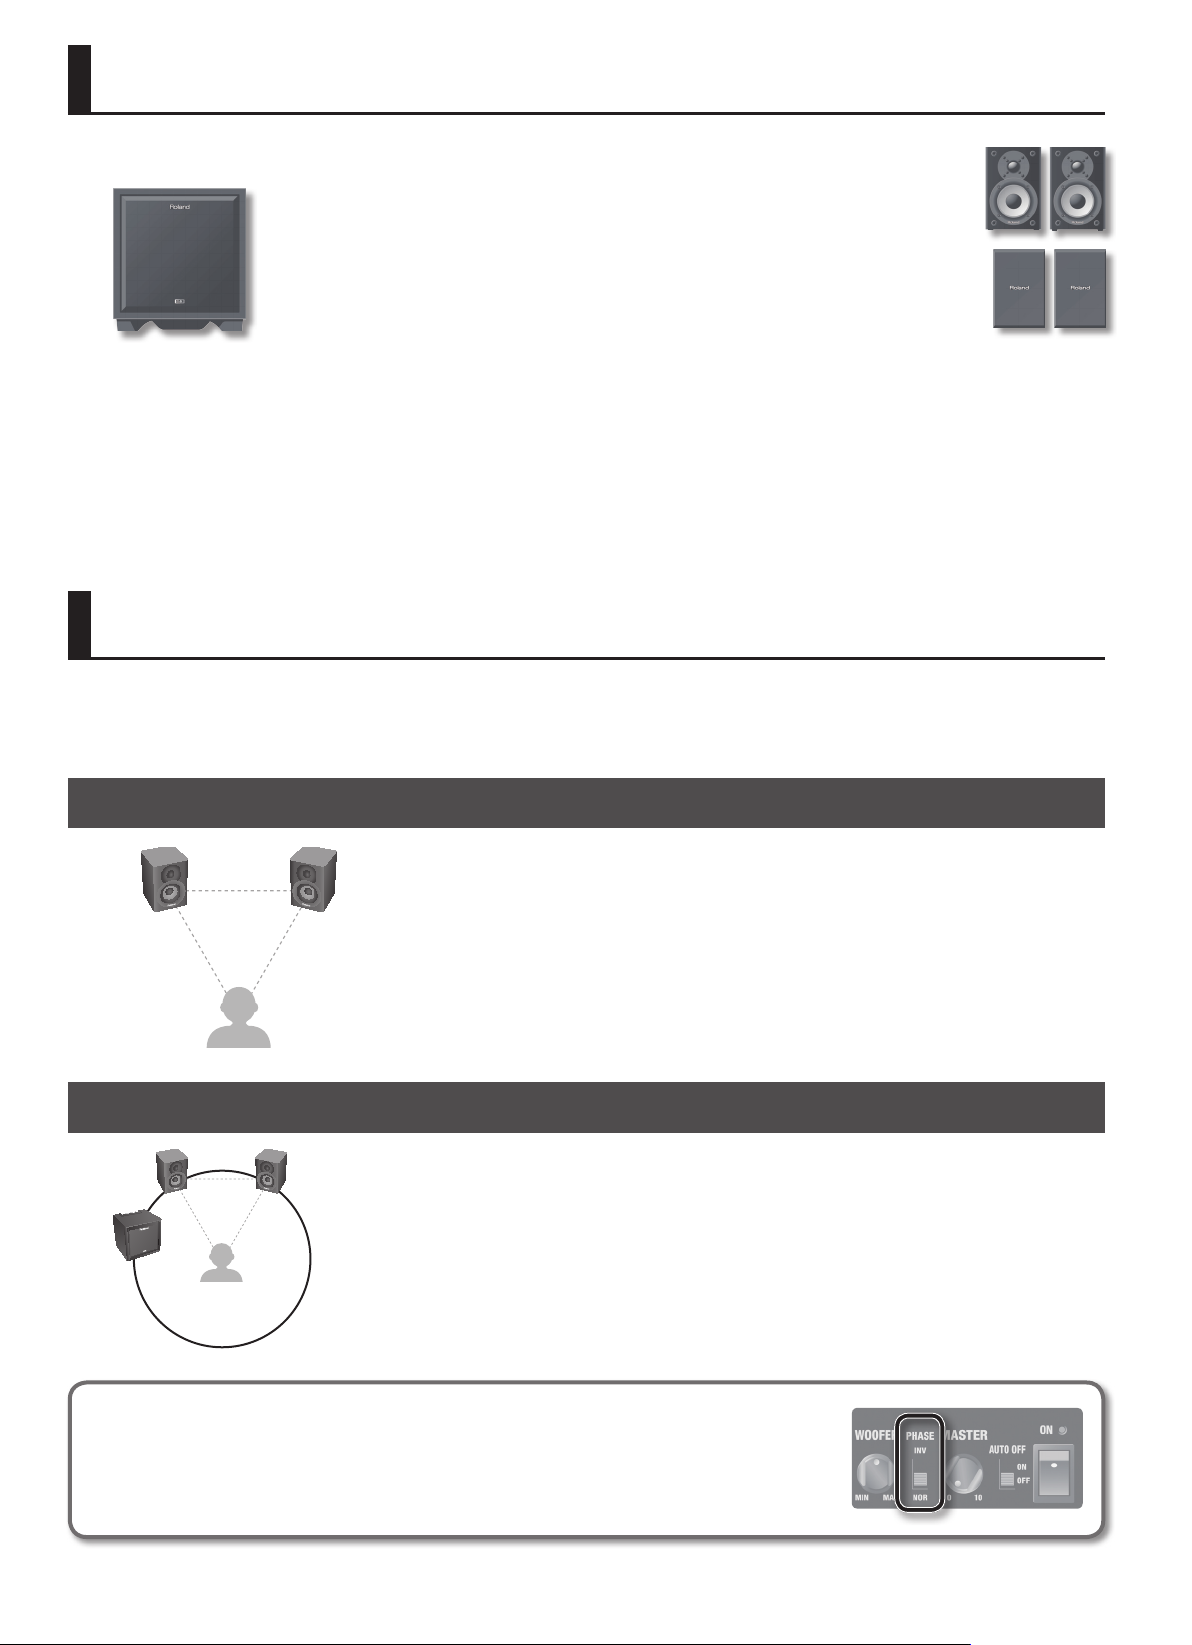
Placement
The volume and tone quality will be aected by how far from the wall you place the main unit and the satellite speakers, as well as by the material of
the wall and the characteristics of the oor. While you listen to the sound, adjust the position and volume as appropriate for your location.
Placing the Satellite Speakers
We recommend that you place the satellite speakers at two corners of an equilateral triangle, with the
listening position at the third corner.
Point the front of each satellite speaker so that it faces the listening position.
Placing the Main Unit
It’s best to place the main unit (subwoofer) at the same distance as the satellite speakers, with the listening position
at the center.
Ensuring a natural link between the main unit (subwoofer) and the satellite
speakers ([PHASE] switch)
The [PHASE] switch switches the phase of the main unit (subwoofer). Choose either the “NOR” (normal) or
“INV” (inverse) setting, whichever produces the most natural link between the main unit (subwoofer) and
the satellite speakers.
4
Page 7
Panel Descriptions
Rear Panel
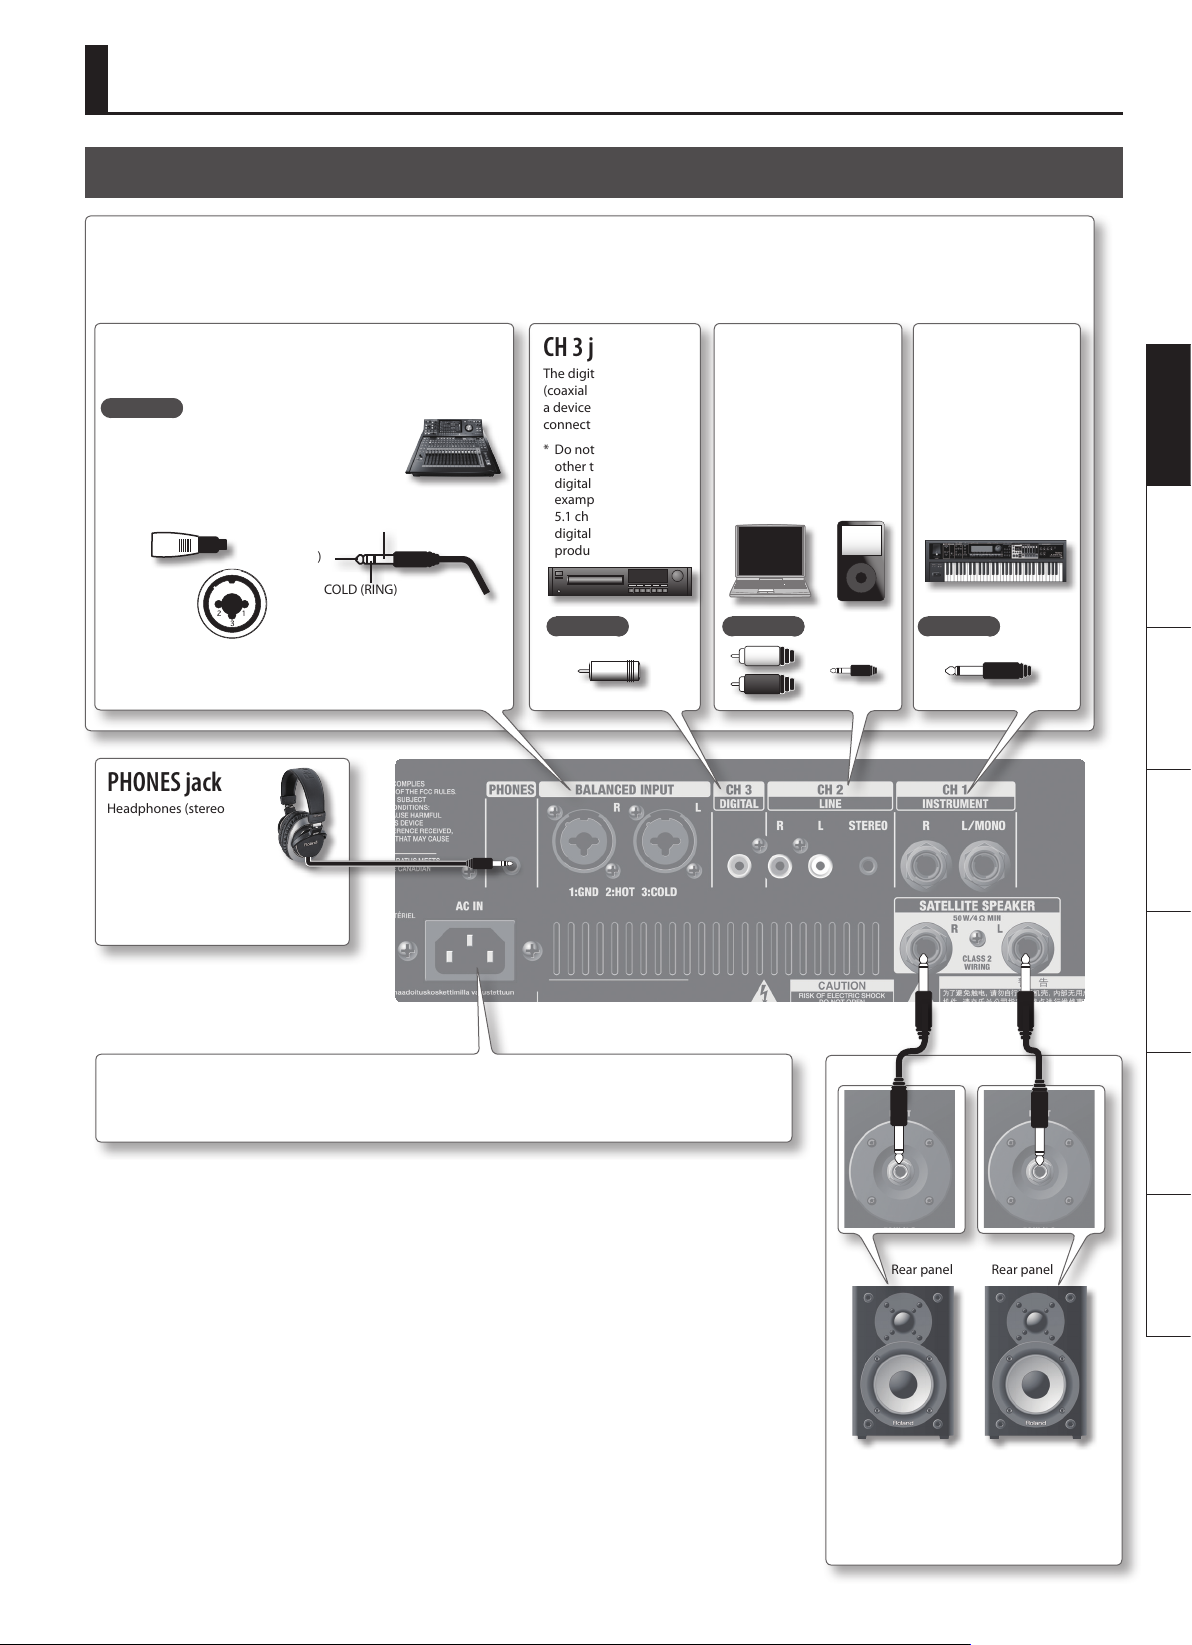
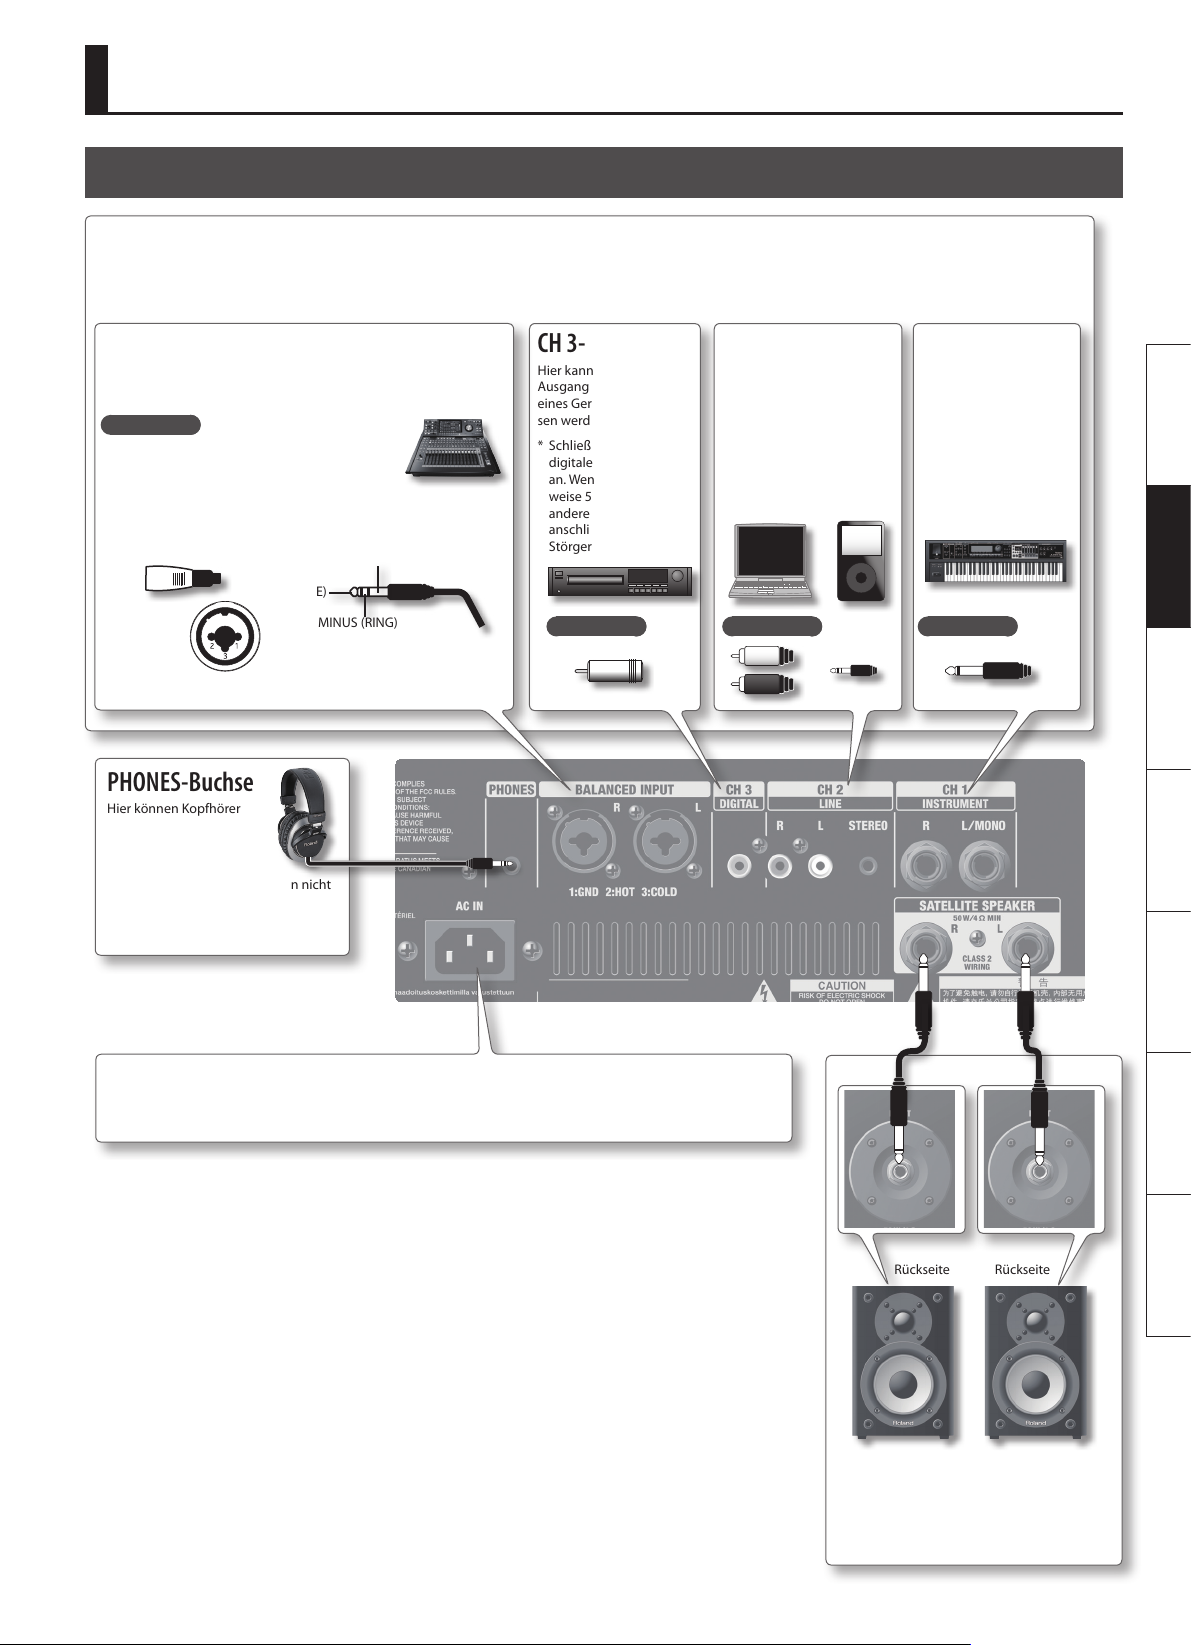
INPUT jacks
Here you can connect the audio source devices that you want to listen to. The signals from all jacks can be produced simultaneously.
* When connection cables with resistors are used, the volume level of equipment connected to the INPUT jacks may be low. If this happens, use connection cables that
do not contain resistors.
BALANCED INPUT jacks
A mixer or similar device can be connected here.
Jack type
* This instrument is equipped with balanced
(XLR/TRS) type jacks. Wiring diagrams for these
jacks are shown below. Make connections after
rst checking the wiring diagrams of other
equipment you intend to connect.
GND (SLEEVE)
HOT (TIP)
1: GND
2: HOT
3: COLD
COLD (RING)
PHONES jack
Headphones (stereo
mini-plug; sold separately)
can be connected here.
* If headphones are connected, sound
will not be output from the main unit
(subwoofer) or satellite speakers.
CH 3 jack
The digital output
(coaxial cable) of
a device can be
connected here.
* Do not input anything
other than a stereo
digital signal. For
example, inputting a
5.1 channel or other
digital signal will
produce noise.
Jack type Jack type Jack type
CH 2 jacks
A device such as television,
computer, or audio player
(with RCA phono plugs or
a stereo mini-plug) can be
connected here.
CH 1 jacks
A musical instrument
such as a keyboard
or V-Drums can be
connected here (1/4”
phone plugs).
Deutsch Français Italiano Español Português NederlandsEnglish
AC IN jack
Connect the included power cord here.
Rear panel Rear panel
SATELLITE SPEAKER jacks
Connect the included satellite speakers here.
* Do not connect anything other than the
included speaker cables.
5
Page 8

Turning the System On
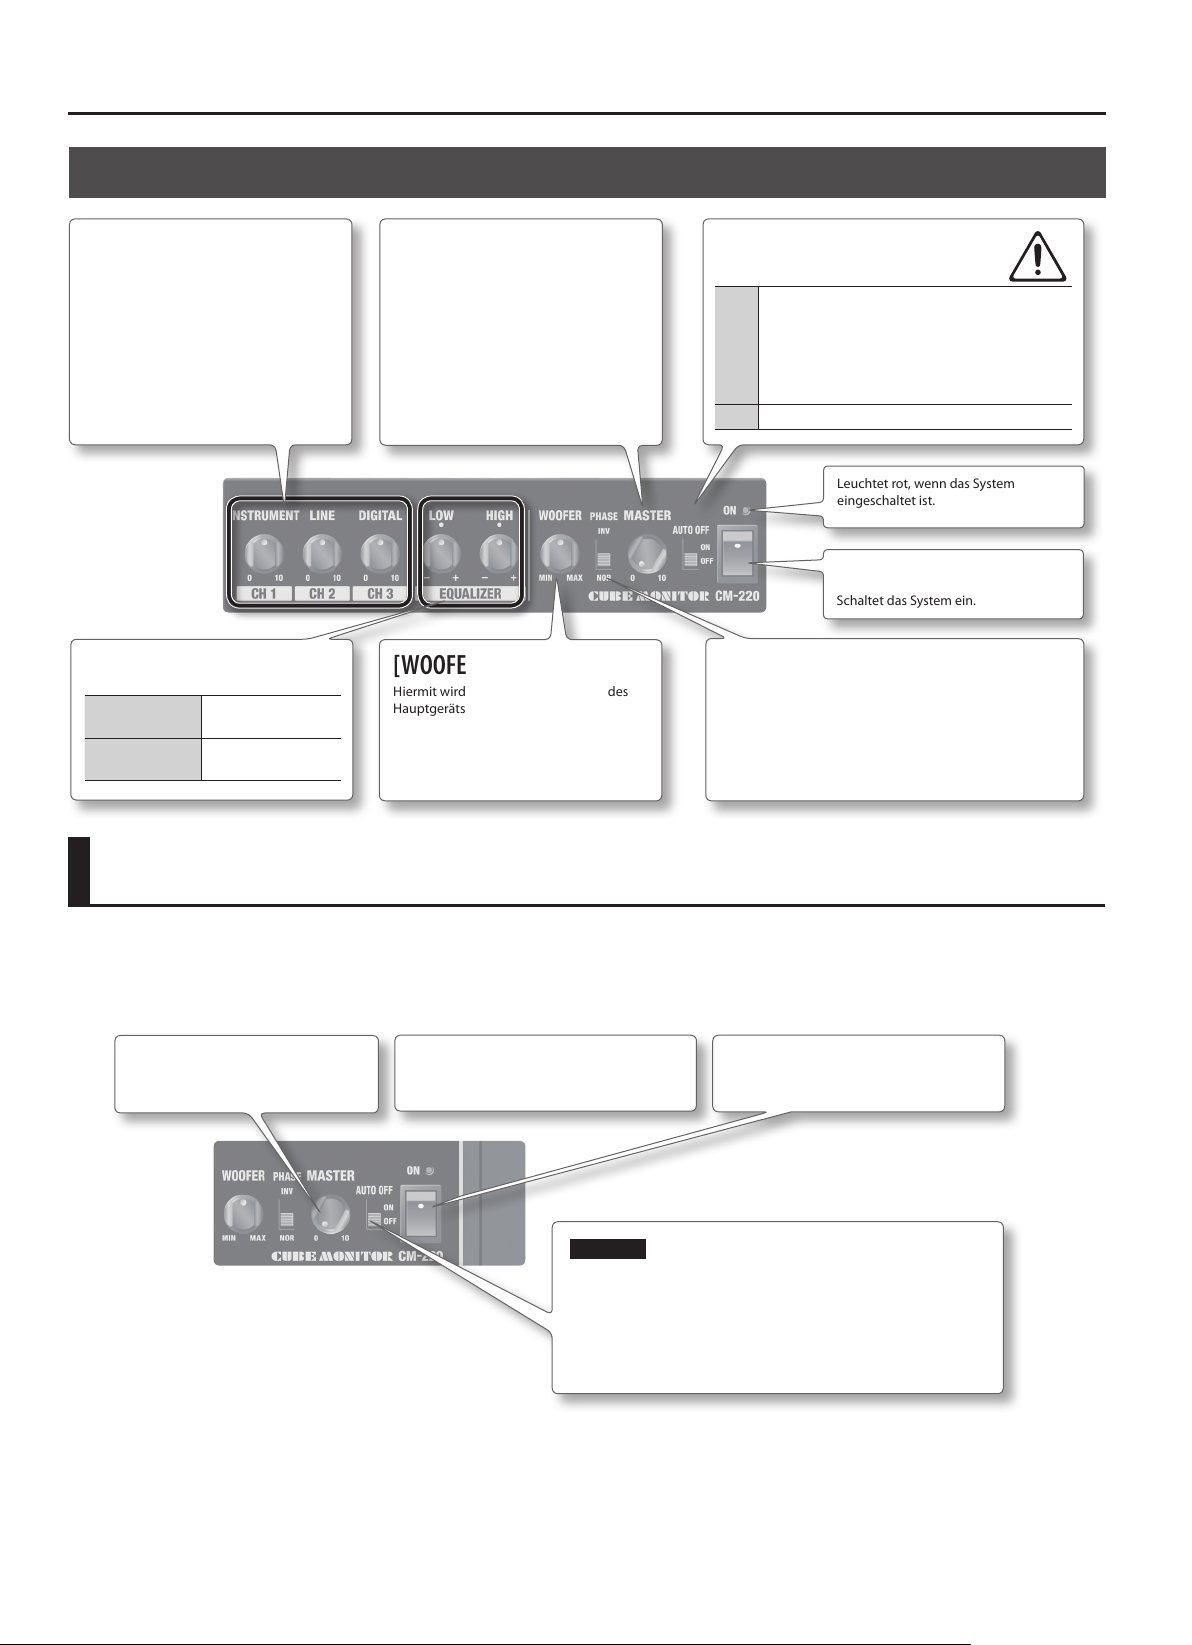
Top Panel
[CH 1], [CH 2], [CH 3] knobs
These adjust the volume of the sound
being input at the CH 1 jacks, CH 2 jacks,
and CH 3 jack.
EQUALIZER knobs
[LOW] knob
[HIGH] knob
Adjusts the volume of
the lower range.
Adjusts the volume of
the upper range.
[MASTER] knob
This adjusts the overall volume of the
output from the main unit (subwoofer) and
satellite speakers.
[WOOFER] knob
This adjusts the volume of the output from
the main unit (subwoofer).
[AUTO OFF] switch
The system will be turned o automatically
when 4 hours have passed without any input
ON
OFF The system will not turned o automatically.
signal being detected.
* To resume operation, turn the unit o, then
on again; or set the [AUTO OFF] switch to the
“OFF” position.
This will light in red when the system
is on.
[ON] switch
This turns the system on.
[PHASE] switch
This changes the phase of the sound that is output from the
main unit (subwoofer) (p. 4).
Turning the System On
* To prevent malfunction and/or damage to speakers or other devices, always turn down the volume, and turn o all devices before making any
connections.
* Once the connections have been completed, turn on your various devices in the order specied. By turning on devices in the wrong order, you risk
causing malfunction and/or damage to speakers and other devices.
1. Set the [MASTER] knob
to 0.
* This unit is equipped with a protection circuit. A brief interval (a few seconds) after turning on is required before the unit will operate normally.
* Before turning on/o the unit, always be sure to turn the volume down. Even with the volume turned down, you might hear some sound when
turning on/o the unit. However, this is normal and does not indicate a malfunction.
* If you need to turn o the power completely, unplug the power cord from the power outlet. Refer to “Power Supply” (p. 3).
equipment.
NOTE
This system will be turned o automatically when
approximately 4 hours have passed without any input signal
being detected.
If you don’t want the system to be turned o automatically,
set the [AUTO OFF] switch to the “OFF” position.
3. Turn the system on.2. Turn on the connected
6
Page 9
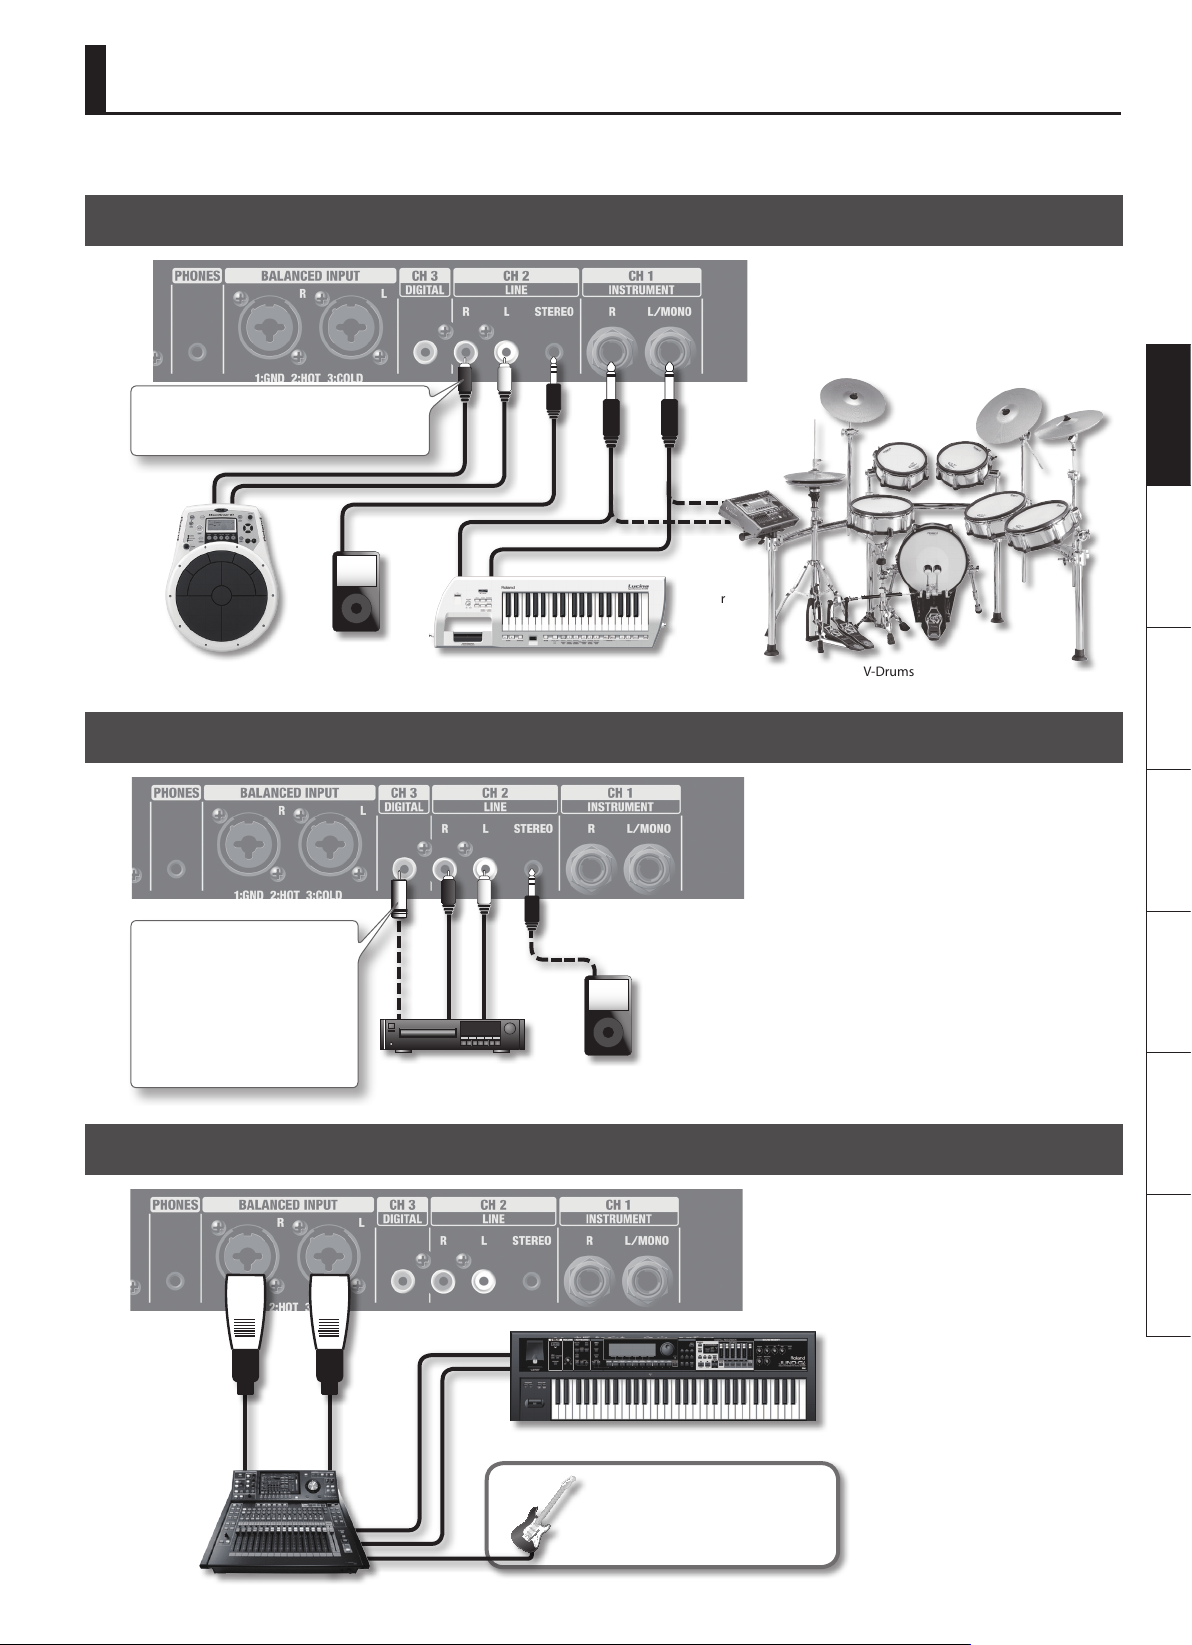
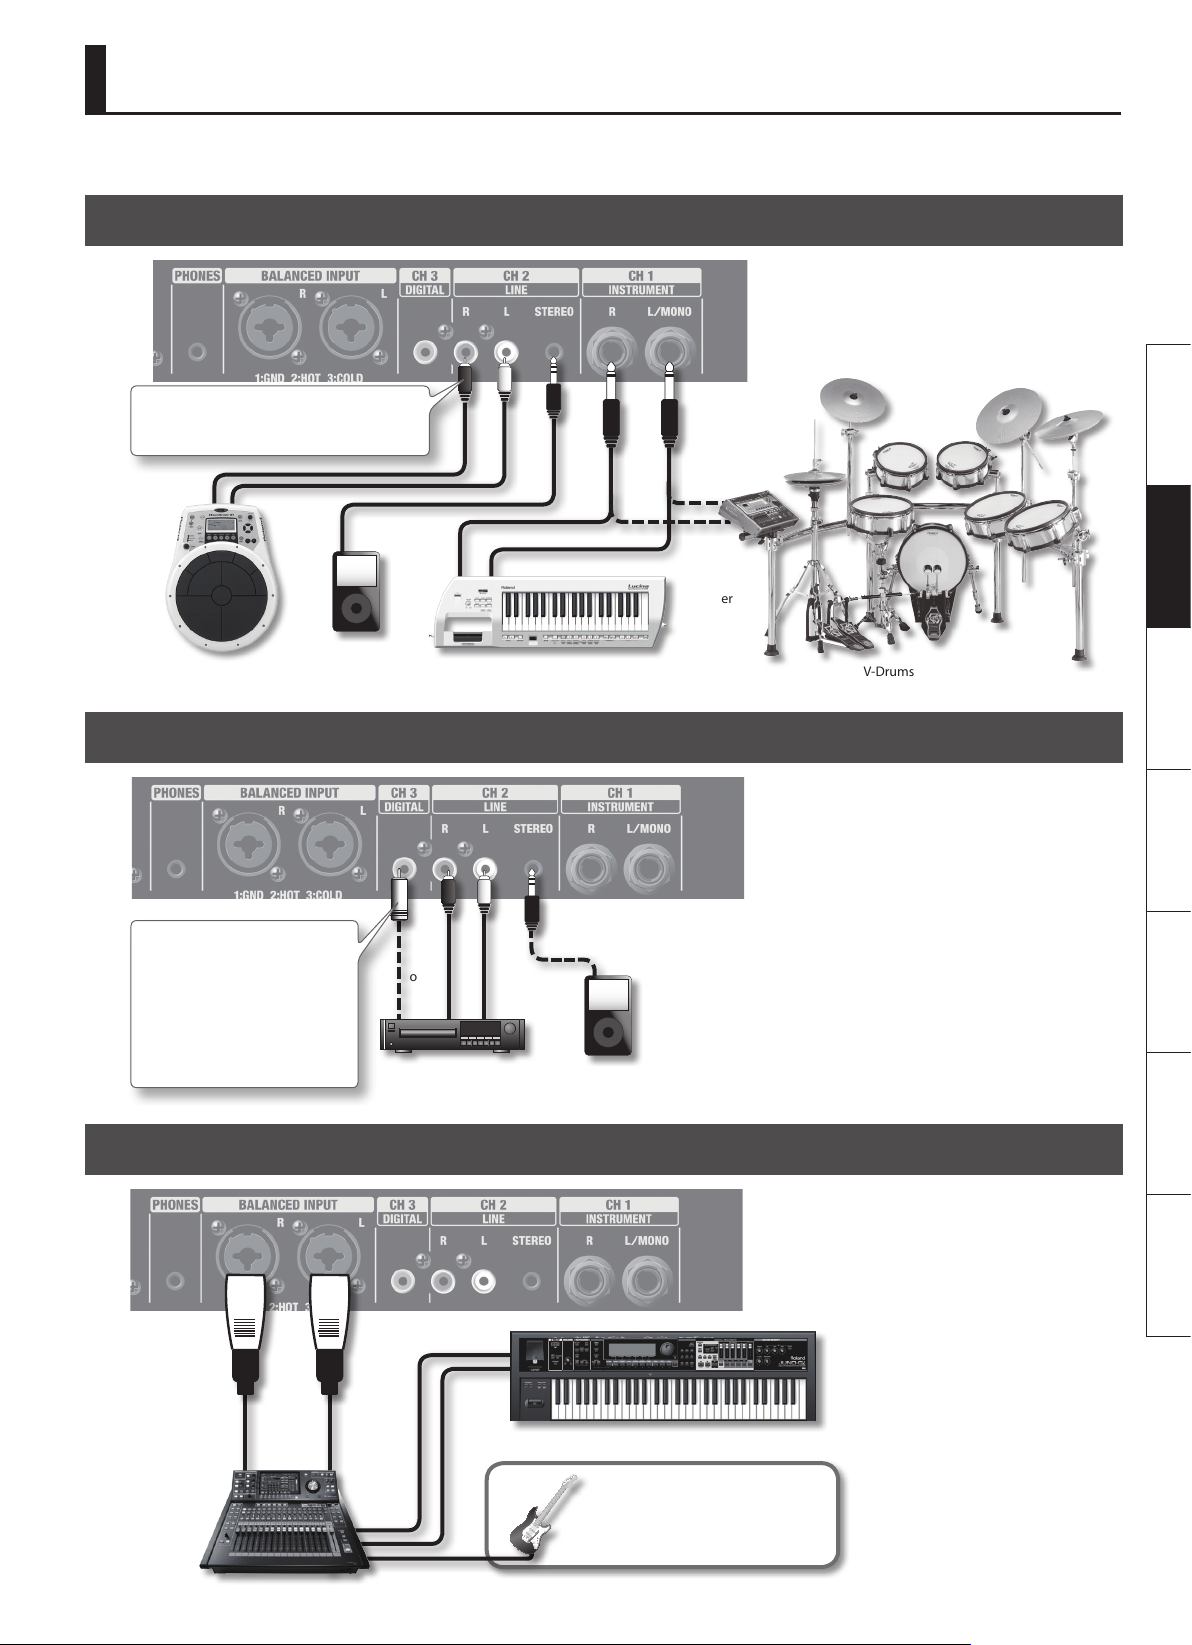
Connection Examples
Sound from all connected equipment can be played simultaneously.
Playing a Synthesizer or V-Drums Set
* Use an adapter cable (such as an RCA phono
to 1/4” phone adapter) as appropriate for
the device you’re connecting.
You can connect an audio player or other source, and
play it back simultaneously.
Deutsch Français Italiano Español Português NederlandsEnglish
or
V-DrumsSynthesizerPercussion Audio Player, etc.
Playing Music from a DVD Player or Audio Player
Do not input anything other than
a stereo digital signal to the CH
3 jack. Inputting a digital signal
such as 5.1 channel audio will
produce noise.
Set the connected device to its
“stereo” or “PCM” setting.
or
or
Audio playerDVD player
Playing Music from a Mixer
If your DVD player has a digital output jack, connect it to
the CH 3 jack for the best-quality playback.
Connect your mixer to the BALANCED INPUT jacks. This
allows you to use the system as a set of high-quality
monitors.
Mixer
Synthesizer
* Do not connect a guitar, bass,
or microphone directly to the
CM-110 or CM-220.
7
Page 10

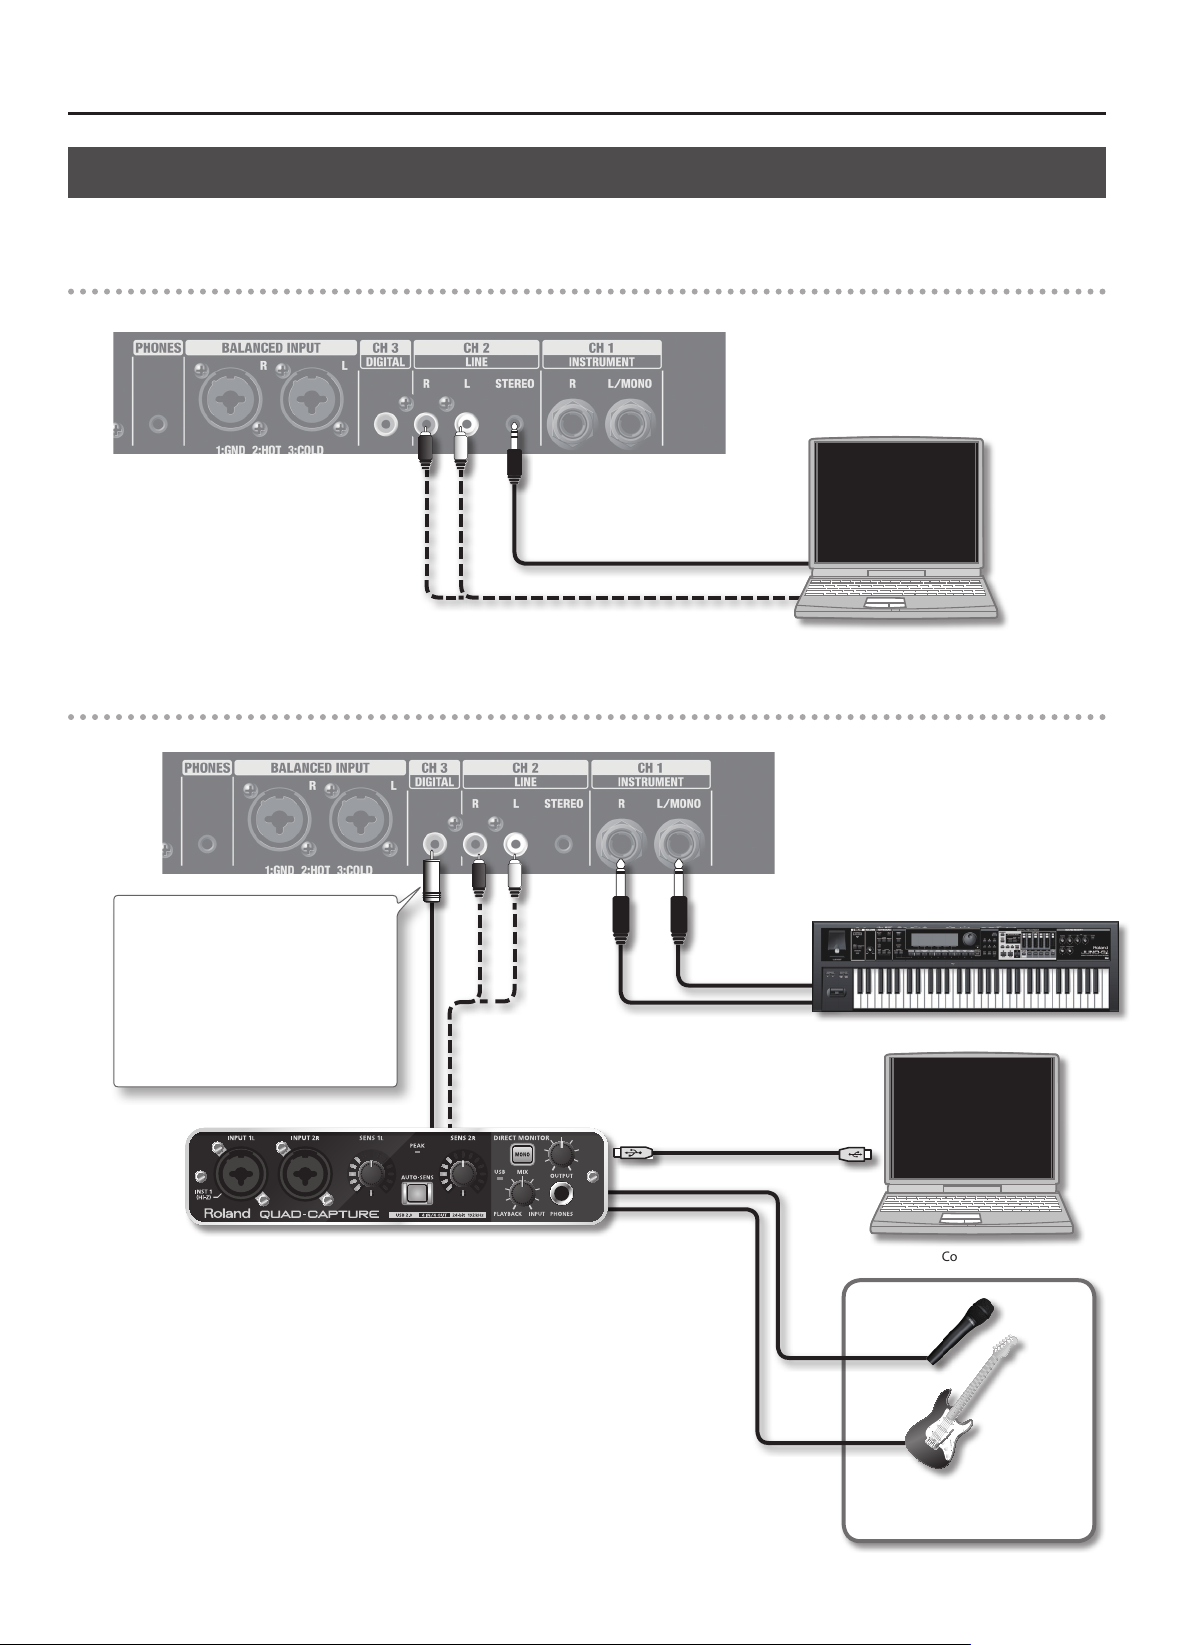
Connection Examples
Playing Music from a Computer
If you’re connecting a computer, the following types of connections are possible.
Connecting a computer via an analog connection
This is the simplest type of connection. Connect your computer’s headphone jack or line output to the LINE input.
or
Computer
Connecting a computer via a USB audio interface
You can play back sound from your computer via a USB audio interface.
Coaxial cable
* Do not input anything other than a
stereo digital signal. Inputting a digital
signal such as 5.1 channel audio will
produce noise.
* If your audio interface does not have
a coaxial output jack, use the analog
connection.
To the coaxial output jack
USB audio interface
or
To the analog output jacks
You can connect and play a
synthesizer at the same time.
Computer
* Do not connect a guitar, bass,
or microphone directly to the
CM-110 or CM-220.
8
Page 11
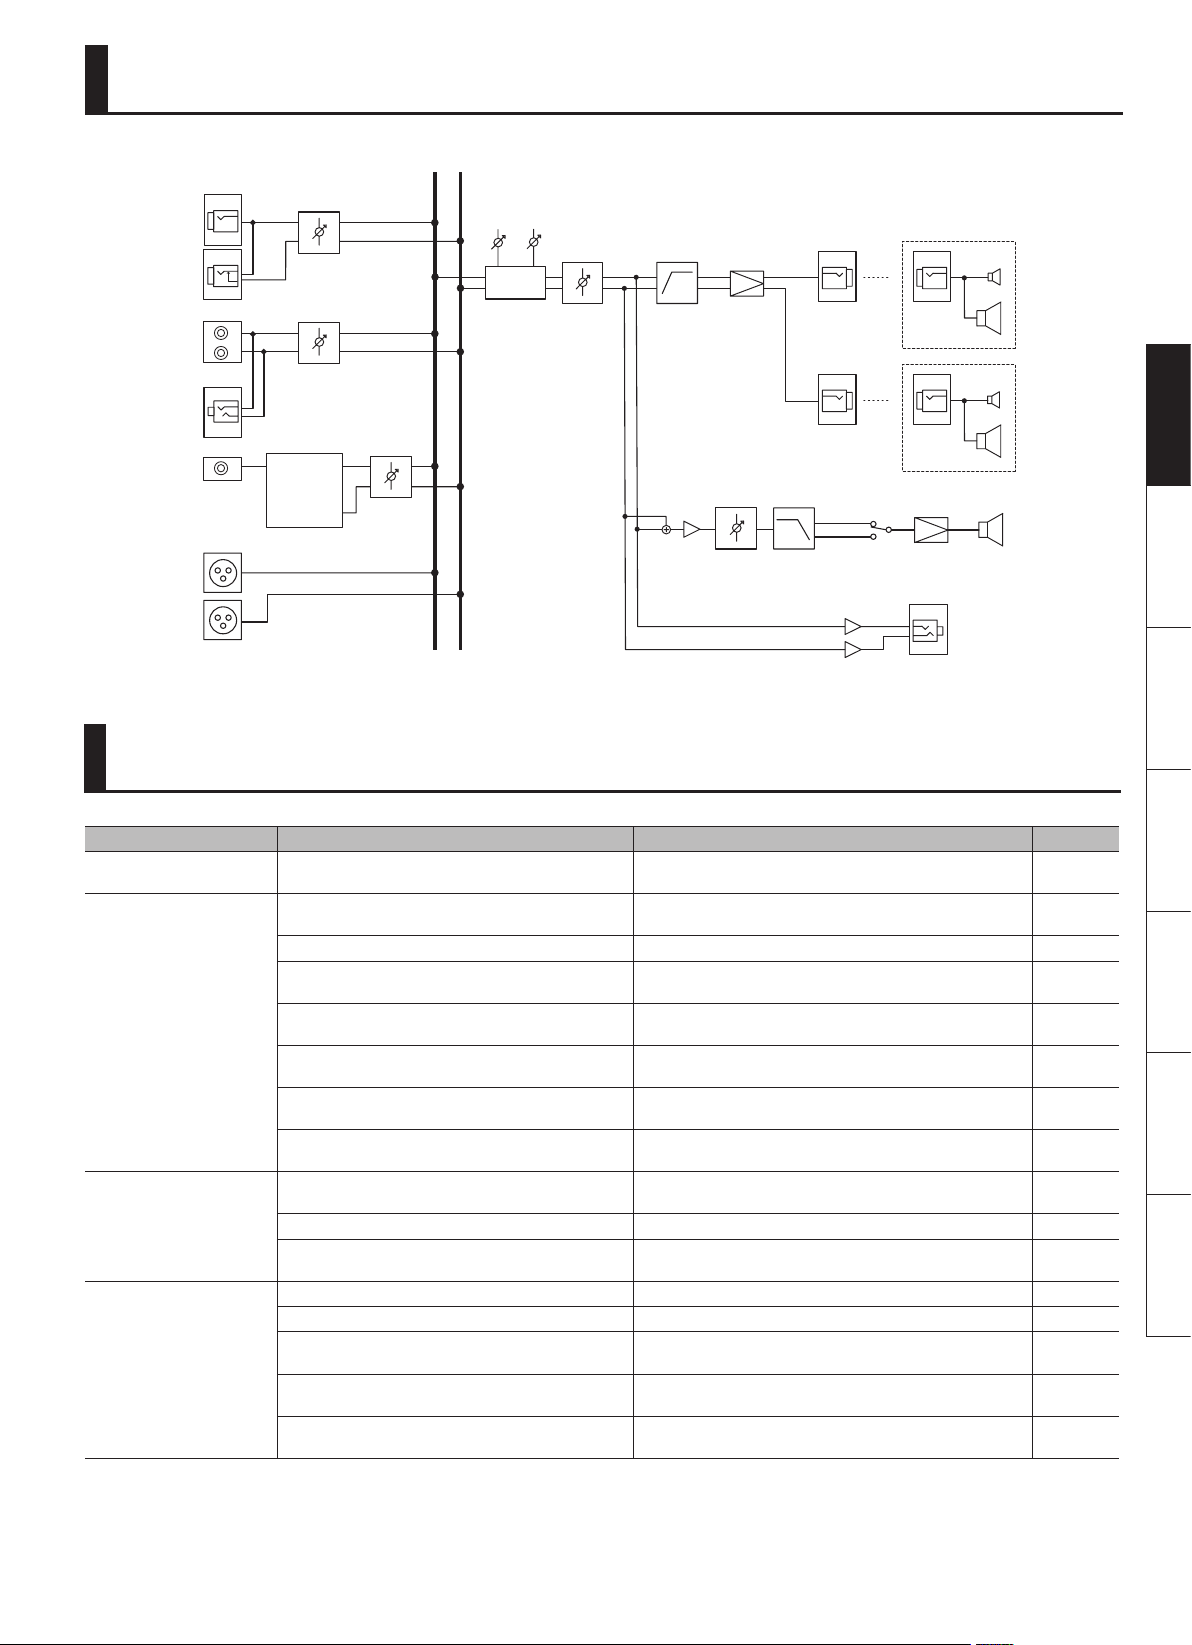
Block Diagram
CH1
L/MONO
R
L
R
STEREO
DIGITAL
BALANCED
INPUT
L
R
INSTRUMENT
CH2
LINE
RECEIVER
DAC
CH3
DIGITAL
RL
LOW HIGH
EQUALIZER
MASTER
HPF
POWER
AMP
WOOFER
SPEAKER
OUT
L
R
LPF PHASE
NOR
INV
SATELLITE SPEAKER
INPUT
INPUT
POWER
AMP
PHONES
Deutsch Français Italiano Español Português NederlandsEnglish
Troubleshooting
Problem Cause Action Page
System won’t turn on
No sound
Sound is distorted or noisy
Insucient volume
Is the Power cord correctly connected to an electrical
outlet?
Is the external equipment connected correctly?
Are each of the knobs adjusted correctly? Turn the knobs toward the right to raise the volume. p. 6
Could the Auto O function have operated?
Could you be inputting an analog signal to the CH 3 jack?
Could you be inputting a digital signal such as 5.1 channel
audio to the CH 3 jack?
Could you have connected speakers other than the
included satellite speakers?
Could you be using cables other than the included
speaker cables?
Could the respective knob be raised excessively?
Is the input level from the connected device appropriate? Lower the volume of the connected device. —
Could you be inputting a digital signal such as 5.1 channel
audio to the CH 3 jack?
Is each knob adjusted correctly? Turn the knobs toward the right to raise the volume. p. 6
Is the input level from the connected device appropriate? Raise the volume of the connected device. —
Could you have connected speakers other than the
included satellite speakers?
Could you be using cables other than the included
speaker cables?
Could you be using a connection cable that contain a
built-in resistor?
Make sure that the Power cord is correctly connected to an
electrical outlet.
Check the type of jack and plug, and make the correct
connections.
Turn the system o, then on again; or turn o the [AUTO OFF]
switch.
Connect a coaxial cable to the CH 3 jack, and connect the other
end to the digital output jack of your equipment.
Input a stereo digital signal. p. 7
Use the included satellite speakers. p. 4
Use the included speaker cables. p. 4
Turn the respective knob toward the left to adjust the volume
appropriately.
Input a stereo digital signal. p. 7
Use the included satellite speakers. p. 4
Use the included speaker cables. p. 4
When making connections to the INPUT jacks, use connection
cables that do not contain built-in resistors.
p. 5
—
p. 6
p. 5
p. 6
—
9
Page 12

Main Specications
Roland CM-110, CM-220: CUBE MONITOR
CM-110 CM-220
Rated Power Output
Nominal Input Level (1 kHz)
Input Impedance
Digital Input (CH 3)
Speakers
Controls
Connectors
Power Consumption 47 W 67 W
Dimensions
Weight
Accessories Power Cord, Speaker Cable (3.5 m) x 2, Owner’s Manual
Main Unit 16 cm (6.5 inches) 25 cm (10 inches)
Satellite Speaker 10 cm (4 inches, Magnetically-Shielded), 2 cm (3/4 inch, Magnetically-Shielded) (for each)
<Channel Control>
<Woofer Control>
<Master Control>
Main Unit
Satellite Speaker
Main Unit 13.3 kg / 29 lbs 6 oz 18.8 kg / 41 lbs 8 oz
Satellite Speaker 3.1 kg / 6 lbs 14 oz(for each)
100 W
(Main Unit 50 W + Satellite Speaker 25 W x 2)
CH 1 (INSTRUMENT): -20 dBu
CH 2 (LINE): -10 dBu
BALANCED INPUT: +4 dBu
CH 1 (INSTRUMENT): 10 k ohms
CH 2 (LINE): 10 k ohms
BALANCED INPUT: 10 k ohms
Format: Conformity with IEC60958
Sample Rate: 32 kHz to 192 kHz (automatically) (de-emphasis: OFF)
Word Length: 24 bit
[CH 1] (INSTRUMENT) volume knob
[CH 2] (LINE) volume knob
[CH 3] (DIGITAL) volume knob
[WOOFER] volume knob
[PHASE] switch
EQUALIZER [HIGH] knob, [LOW] knob
[MASTER] volume knob
[AUTO OFF] switch
[ON] switch
CH 1 (INSTRUMENT) jacks (L/MONO, R): 1/4-inch phone type
CH 2 (LINE) jacks (L, R, STEREO): RCA phono type, Stereo miniature phone type
CH 3 (DIGITAL) jack: RCA phono type
BALANCED INPUT jacks (L, R): XLR, 1/4-inch TRS phone type
PHONES jack: Stereo miniature phone type
SATELLITE SPEAKER jacks (only for dedicated Satellite Speakers)
AC IN jack
330 (W) x 327 (D) x 368 (H) mm
13 (W) x 12-7/8 (D) x 14-1/2 (H) inches
162 (W) x 197 (D) x 243 (H) mm
6-7/16 (W) x 7-13/16 (D) x 9-5/8 (H) inches
200 W
(Main Unit 100 W + Satellite Speaker 50 W x 2)
381 (W) x 376 (D) x 413 (H) mm
15 (W) x 14-13/16 (D) x 16-5/16 (H) inches
* 0 dBu = 0.775 Vrms
* In the interest of product improvement, the specications and/or appearance of this unit are subject to change without prior notice.
10
Page 13
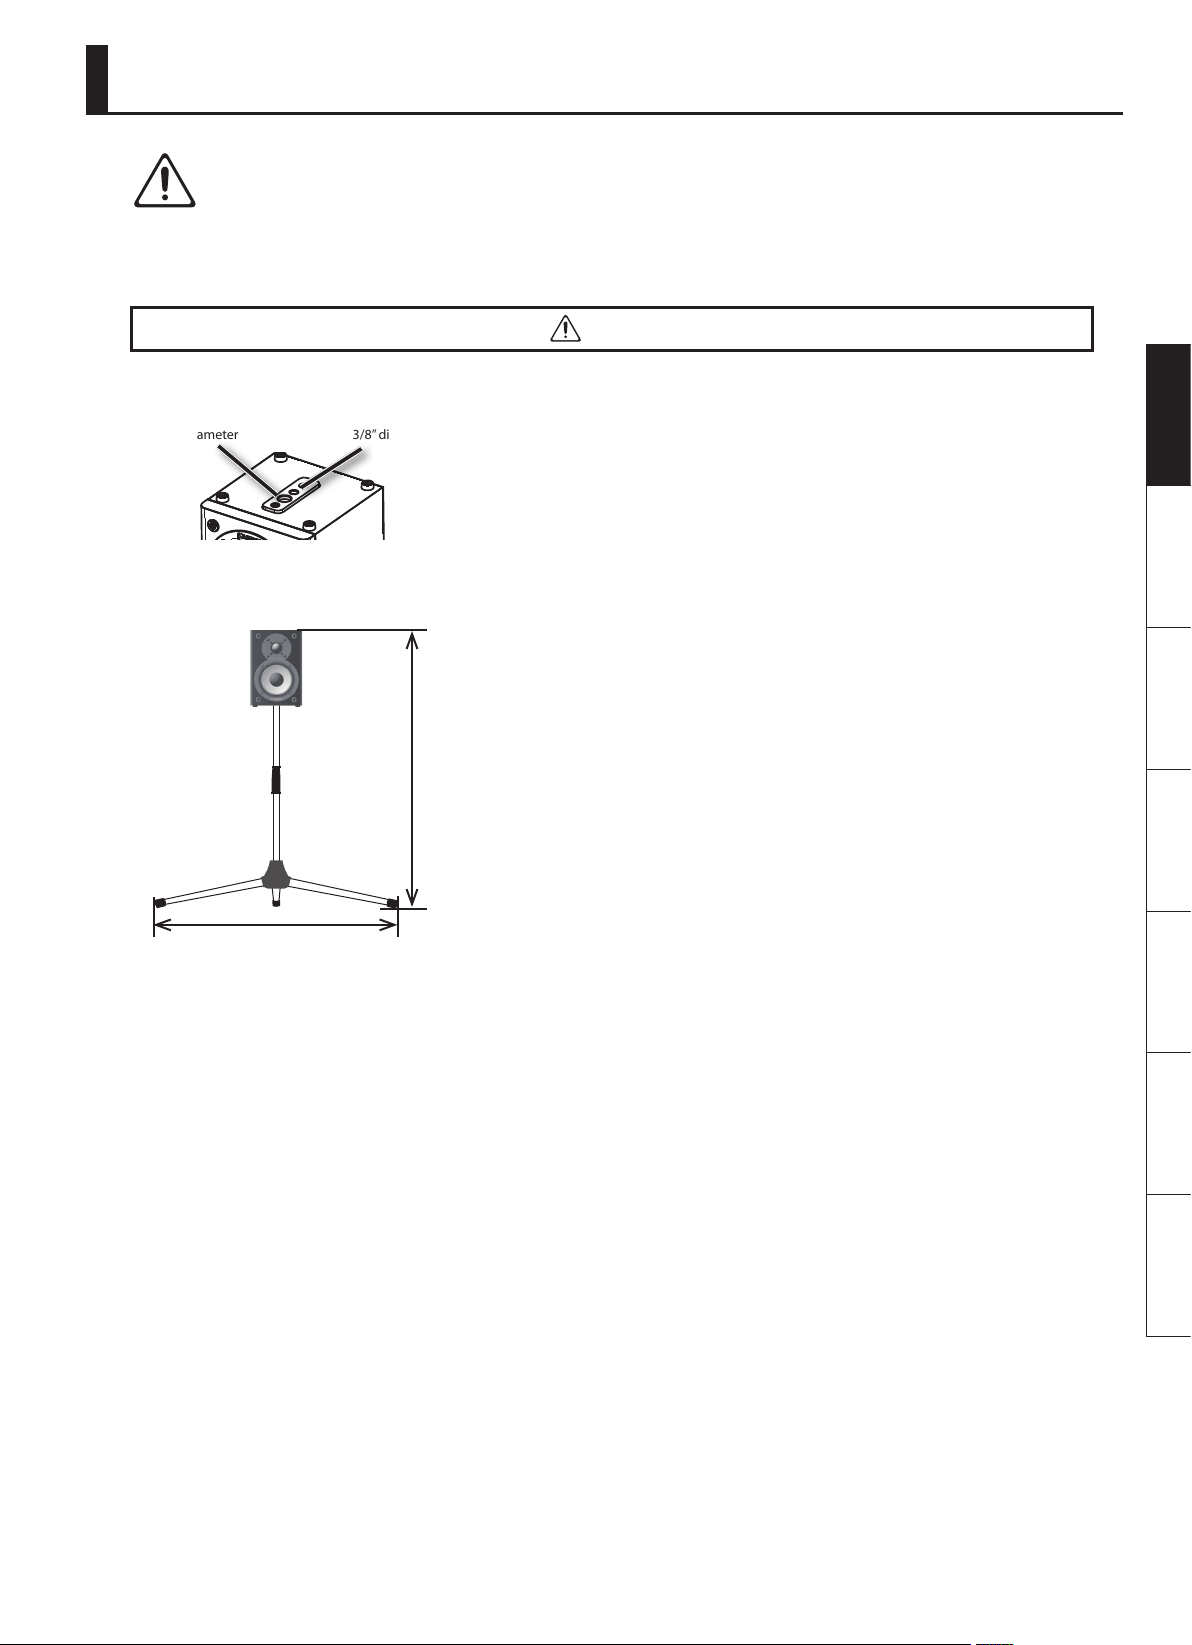
Using Microphone Stands
WARNING: The stability using microphone stands other than the folding stand integral with the speaker has not been evaluated for
safety and can result in hazardous injury to the user.
The satellite speakers are designed so that non-Roland specied microphone stands can be used to support them. By mounting the satellite speakers
on non-Roland specied microphone stands, you can position them at the optimal height for use as monitors or as a convenient PA system.
WARNING
The microphone stand holder on the bottom of each satellite speaker provides two holes: 3/8” and 5/8”. Use the hole that’s appropriate for your
microphone stand.
3/8” diameter5/8” diameter
• As shown in the illustration below, open the legs of the microphone stand (50 cm or more), and position it so that the total height (including the
satellite speaker) does not exceed 105 cm.
Deutsch Français Italiano Español Português NederlandsEnglish
105 cm (41-3/8”)
or less
50 cm (19-11/16”)
or more
• If the microphone stand is higher than 105 cm (including the satellite speaker), or if the legs are not spread out, the stand and speaker may tip
over, causing injury or damage.
• When using microphone stands to support the satellite speakers, do not place them at unstable or inclined locations. You must place the stand on
a stable and horizontal surface.
• Make sure to appropriately manage the cables connected to the satellite speakers so as to prevent accidents, such as might be caused by
someone tripping over them.
• To prevent the stand and speaker from tipping over, do not place anything on a satellite speaker mounted on a microphone stand.
• After mounting a satellite speaker on a microphone stand, be sure to verify that it does not wobble.
• Be sure to get the assistance of at least one other person when mounting a satellite speaker on a microphone stand, or when adjusting the height
of the microphone stand while the satellite speaker is mounted.
• Firmly tighten the hardware of the microphone stand so that the satellite speaker does not move to left or right.
• Take care not to pinch your ngers when mounting the satellite speaker.
• Use a microphone stand that is strong and durable, such as one made from aluminium or steel.
11
Page 14

Page 15
* Die Abbildung zeigt den CM-220.
Bedienungsanleitung
Deutsch Français Italiano Español Português NederlandsEnglish
Großartiges 2.1 Soundsystem
Das Paket besteht aus einem Hauptgerät
(Subwoofer), das einen vollen und
satten Bassklang liefert, sowie zwei
Satellitenlautsprechern.
Dank einfacher Anschlüsse können
Sie unverzüglich mit diesem System arbeiten.
Für Musikinstrumente
Der CM-220 bietet eine reichhaltige 200-WattGesamtausgangsleistung, der CM-110 bietet
100Watt.
Es können unterschiedliche Eingangsquellen
angeschlossen werden, da dieses Soundsystem eine
klare Wiedergabe des gesamten Frequenzspektrums
bietet.
Zur Musikproduktion
Sie können das System an Ihren Computer anschließen, um ein
Abhör-System bester Qualität zu erhalten.
Sein voller und satter Klang macht dieses System ideal für
Musikproduktionen.
Copyright © 2012 ROLAND CORPORATION
Alle Rechte vorbehalten. Kein Teil dieser Publikation darf in irgendeiner Form ohne schriftliche Genehmigung der ROLAND CORPORATION reproduziert werden.
Roland und CUBE MONITOR sind eingetragene Marken oder Marken der Roland Corporation in den USA und/oder anderen Ländern.
Page 16
SICHERER BETRIEB DES GERÄTS
Vor dem Betrieb des Geräts lesen Sie bitte die nachfolgend aufgeführten Abschnitte sorgfältig durch: „WICHTIGE SICHERHEITSANWEISUNGEN“, SICHERER BETRIEB DES
GERÄTES“ (S. 2) und „WICHTIGE HINWEISE“ (S. 3). Diese Abschnitte liefern wichtige Hinweise zum sicheren Betrieb des Geräts. Um einen vollständigen Überblick über alle
Funktionen des Geräts zu erhalten, sollten Sie diese Bedienungsanleitung vollständig durchlesen. Bewahren Sie diese Anleitung an einem Ort auf, an dem Sie bei Bedarf
schnell darauf zurückgreifen können.
WARNUNG
Betreiben Sie den Netzadapter nicht
zusammen mit einer zu großen Anzahl von
Geräten an einer einzigen Netzsteckdose.
Seien Sie besonders vorsichtig beim
Einsatz von Verlängerungskabeln – die
Gesamtleistung aller an der Verlängerung
betriebenen Geräte darf die für das
Verlängerungskabel angegebene
zulässige Leistung (Watt-/Ampere-Zahl)
nicht überschreiten. Übermäßige Last
kann dazu führen, dass sich die Isolierung
erhitzt und ggf. schmilzt.
VORSICHT
WARNUNG
Schließen Sie den Netzstecker des
Geräts an eine Netzsteckdose mit
Schutzleiterverbindung an.
Önen Sie das Gerät nicht, bzw. nehmen
Sie keine internen Änderungen am Gerät
vor.
Versuchen Sie nicht, das Gerät zu
reparieren oder darin enthaltene Teile
zu ersetzen (außer in Fällen, für die in
dieser Anleitung genaue Anweisungen
gegeben sind). Wenden Sie sich
bezüglich jeglicher Reparaturen an Ihren
Fachhändler, ein Roland Service Center in
Ihrer Nähe oder an einen der autorisierten
Roland-Vertriebspartner, die auf der Seite
„Information“ aufgelistet sind.
Stellen Sie das Gerät niemals in
Umgebungen mit folgenden
Bedingungen auf:
• Extreme Temperaturen (z.B. direktes
Sonnenlicht in einem geschlossenen
Fahrzeug, in der Nähe einer
Heizungsleitung, auf Wärmequellen)
• Feuchtigkeit (z.B. Bäder, Waschräume,
nasse Fußböden)
• Dampf oder Rauch
• Hoher Salzgehalt in der Luft
• Hohe Luftfeuchtigkeit
• Regen
• Staub oder Sand
• Starke Vibrationen oder
Erschütterungen
Achten Sie darauf, dass das Gerät immer
waagerecht und stabil steht. Platzieren Sie
es nicht auf wackeligen Ständern oder auf
schiefen Standächen.
Das Gerät darf ausschließlich an einen
Netzanschluss angeschlossen werden, der
den Informationen auf der Rückseite des
Geräts entspricht.
Verwenden Sie ausschließlich das
angeschlossene Netzkabel. Außerdem
darf das mitgelieferte Netzkabel nicht für
ein anderes Gerät eingesetzt werden.
Verdrehen oder biegen Sie das Netzkabel
nicht zu stark, und stellen Sie keine
schweren Gegenstände auf das Kabel.
Dadurch kann das Kabel beschädigt
werden, was zu Unterbrechungen und
Kurzschlüssen führen kann. Schadhafte
Kabel können Brände und elektrische
Schläge verursachen!
2
WARNUNG
Dieses Gerät kann einzeln oder in
Kombination mit einem Verstärker
und Kopfhörern oder Lautsprechern
Schallpegel erzeugen, die zu dauerhaftem
Gehörverlust führen können. Betreiben
Sie das Gerät nicht über längere Zeit mit
hoher oder unangenehmer Lautstärke.
Sobald Sie eine Beeinträchtigung Ihres
Gehörs oder ein Klingeln in den Ohren
bemerken, sollten Sie den Betrieb des
Geräts sofort einstellen und sich an einen
HNO-Arzt wenden.
Stellen Sie auf diesem Gerät keine mit
Flüssigkeiten gefüllten Behälter ab.
Achten Sie darauf, dass in das Gerät keine
Fremdkörper (z.B. brennbare Objekte,
Münzen oder Drähte) oder Flüssigkeiten
(z.B. Wasser oder Saft) eindringen. Dies
kann zu Kurzschlüssen, Fehlfunktion oder
sonstigen Störungen führen.
Wenn einer der folgenden Fälle eintritt,
schalten Sie das Gerät sofort aus, ziehen
Sie das Netzkabel aus der Steckdose, und
wenden Sie sich an Ihren Fachhändler,
ein Roland Service Center in Ihrer
Nähe oder an einen der autorisierten
Roland-Vertriebspartner, die auf der Seite
„Information“ aufgelistet sind:
• Das Netzkabel oder der Stecker wurde
beschädigt.
• Rauch oder ein ungewöhnlicher
Geruch tritt auf.
• Gegenstände oder Flüssigkeiten sind in
das Gerät gelangt.
• Das Gerät war Regen (oder sonstiger
Feuchtigkeit) ausgesetzt.
• Das Gerät scheint nicht normal zu
funktionieren oder seine Leistung weist
eine deutliche Änderung auf.
Wenn das Gerät in der Gegenwart von
Kindern verwendet wird, achten Sie darauf,
dass das Gerät nicht unsachgemäß bedient
wird. Es sollten immer beaufsichtigende
Erwachsene anwesend sein.
Schützen Sie das Gerät vor starken Stößen.
(Lassen Sie es nicht fallen!)
Bevor Sie das Gerät in einem anderen
Land betreiben, wenden Sie sich an Ihren
Fachhändler, ein Roland Service Center in
Ihrer Nähe oder an einen der autorisierten
Roland-Vertriebspartner, die auf der Seite
„Informationen“ aufgeführt sind.
Das Gerät und der Netzadapter sollten so
aufgestellt werden, dass deren Aufstellort
oder Position nicht die erforderliche
Luftzufuhr beeinträchtigt.
Fassen Sie das Netzkabel immer am
Stecker an, wenn Sie dieses in eine
Steckdose oder in das Gerät stecken oder
aus diesen herausziehen.
Sie sollten das Netzkabel in regelmäßigen
Abständen aus der Steckdose
herausziehen und die Kontakte am Stecker
mit einem trockenen Tuch von Staub
und anderen Ablagerungen befreien.
Ziehen Sie den Netzstecker auch dann
aus der Steckdose, wenn das Gerät
längere Zeit außer Betrieb ist. Jegliche
Staubansammlung zwischen Netzstecker
und Steckdose kann die Isolierung
beeinträchtigen und zu Bränden führen.
Sorgen Sie dafür, dass Kabel und
Leitungen nicht durcheinander geraten.
Achten Sie zudem darauf, dass sich alle
Kabel und Leitungen außerhalb der
Reichweite von Kindern benden.
Steigen Sie niemals auf das Gerät, und
stellen Sie keine schweren Gegenstände
darauf ab.
Fassen Sie das Netzkabel niemals mit
nassen Händen an, wenn Sie es in eine
Steckdose oder in das Gerät stecken oder
aus diesen herausziehen.
Bevor Sie das Gerät bewegen, ziehen Sie
das Netzkabel aus der Steckdose, und
ziehen Sie alle weiteren Kabel von/zu
externen Geräten ebenfalls heraus.
Bevor Sie das Gerät reinigen, schalten Sie
es aus, und ziehen Sie das Netzkabel aus
der Steckdose (S. 5).
Bei angekündigtem oder
heraufziehendem Gewitter sollten Sie
immer den Netzstecker aus der Steckdose
ziehen.
Die Metallteile des Hauptgeräts
(Subwoofer) können heiß werden,
vermeiden Sie daher Verbrennungen.
Entfernen Sie auf keinen Fall die
Lautsprecherabdeckung oder den
Lautsprecher. Der Lautsprecher darf nicht
durch den Benutzer ausgetauscht werden.
Innerhalb des Gehäuses treten Ströme
und Spannungen auf, die zu elektrischen
Schlägen führen können.
Page 17

WICHTIGE HINWEISE
Stromversorgung
• Schließen Sie dieses Gerät nicht an die gleiche
Netzsteckdose wie andere elektrische Geräte an,
die durch einen Wechselrichter gesteuert (z.B.
Kühlschrank, Waschmaschine, Mikrowellenherd
oder Klimaanlage) oder durch einen Motor
betrieben werden. Je nach Art und Weise, in der
das elektrische Gerät verwendet wird, können
die von ihm erzeugten Interferenzen in der
Netzversorgung zu Fehlfunktionen oder hörbaren
Störgeräuschen führen. Wenn es nicht möglich
ist, eine gesonderte Steckdose zu verwenden,
schalten Sie einen Netzentstörlter zwischen
dieses Gerät und die Netzsteckdose.
• Schalten Sie alle beteiligten Geräte aus, bevor
Sie dieses Gerät an andere Geräte anschließen.
Auf diese Weise können Sie Fehlfunktionen und/
oder Schäden an den Lautsprechern oder anderen
Geräten vermeiden.
• Auch wenn die LEDs erlöschen, bedeutet
dies nicht, dass das Gerät vollständig von der
Stromversorgung getrennt ist. Wenn Sie die
Stromversorgung ganz unterbrechen möchten,
ziehen Sie das Netzkabel aus der Netzsteckdose.
Aus diesem Grund sollte die Netzsteckdose, an der
dieses Gerät angeschlossen wird, in Reichweite
und leicht erreichbar sein.
• Der CM-110 und der CM-220 sind werkseitig
so eingestellt, dass sie nach ca. 4Stunden der
Inaktivität automatisch ausgeschaltet werden.
Wenn das Gerät nicht automatisch abgeschaltet
werden soll, ändern Sie die „AUTO OFF“Einstellungen zu „OFF“, wie auf S. 6 erläutert.
Aufstellung
• Der Einsatz des Geräts in der Nähe von
Leistungsverstärkern (oder anderen Geräten mit
großen Transformatoren) kann ein Brummen
verursachen. Um dieses Problem zu umgehen,
ändern Sie die Ausrichtung dieses Geräts, oder
stellen Sie es in größerer Entfernung zur Störquelle
auf.
• Dieses Gerät kann den Empfang von Radio- und
Fernsehsignalen stören. Verwenden Sie es deshalb
nicht in der Nähe solcher Empfangsgeräte.
• Wenn Geräte zur drahtlosen Kommunikation wie
Mobiltelefone in der Umgebung dieses Geräts
verwendet werden, können Geräusche entstehen.
Diese Geräusche können bei abgehenden oder
ankommenden Gesprächen oder während der
Verbindung entstehen. Sollten Sie Probleme dieser
Art haben, verwenden Sie die Mobilfunkgeräte
in größerer Entfernung zu diesem Gerät, oder
schalten Sie sie aus.
• Setzen Sie das Gerät keinem direkten Sonnenlicht
aus, stellen Sie es nicht neben Heizgeräten auf,
lassen Sie es nicht in einem geschlossenen
Fahrzeug liegen, und setzen Sie es auch sonst
keinen extremen Temperaturen aus. Achten
Sie auch darauf, dass Lichtquellen, deren Licht
normalerweise auf kurze Distanz verwendet
wird (z.B. eine Klavierlampe), oder kräftige Spots
nicht für längere Zeit immer die gleiche Stelle
des Gerätes beleuchten. Übermäßige Hitze kann
zu Verformungen oder Verfärbungen des Geräts
führen.
• Wenn das Gerät bei einem Transport aus kalter/
trockener Umgebung in eine feucht-warme
Umgebung gelangt, können sich Wassertröpfchen
(Kondensation) im Geräteinneren bilden. Es
können Schäden oder Fehlfunktionen auftreten,
falls Sie versuchen, das Gerät unter diesen
Bedingungen zu betreiben. Bevor Sie das Gerät
verwenden, lassen Sie es mehrere Stunden
lang stehen, bis die Kondensation vollständig
verdampft ist.
• Vermeiden Sie es, Gummi, Vinyl oder ähnliche
Materialien über längere Zeiträume auf das
Gerät zu legen. Diese Gegenstände könnten die
Oberäche des Geräts verfärben oder auf andere
Weise beeinträchtigen.
• Kleben Sie keine Sticker, Abziehbilder oder
ähnliches auf das Gerät. Beim Ablösen solcher
Materialien vom Gerät könnte die Oberäche
beschädigt werden.
• Je nach Material und Temperatur der Oberäche,
auf der Sie das Gerät aufstellen, können die
Gummifüße die Oberäche verfärben oder
beschädigen.
Um dies zu vermeiden, legen Sie ein Stück Filz
oder Sto unter die Gummifüße. Achten Sie in
diesem Fall jedoch darauf, dass das Gerät nicht
wegrutschen kann.
• Stellen Sie keine mit Wasser gefüllten Behälter
(z.B. Blumenvasen) auf das Gerät. Vermeiden Sie
den Einsatz von Insektiziden, Parfum, Alkohol,
Nagellackentferner, Sprühdosen usw. in der Nähe
des Gerätes. Wischen Sie umgehend jegliche
Flüssigkeiten, die auf das Gerät gelangen, mit
einem trockenen, weichen Tuch ab.
Wartung
• Für die normale Reinigung wischen Sie das
Gerät mit einem weichen, trockenen oder leicht
angefeuchteten Tuch ab. Um hartnäckigen
Schmutz zu entfernen, verwenden Sie ein mit
einer milden, nicht scheuernden Seifenlösung
getränktes Tuch. Wischen Sie sorgfältig mit einem
weichen, trockenen Tuch nach.
• Verwenden Sie kein Benzin oder
Verdünnungsmittel, Alkohol oder sonstige
Lösemittel, um Verfärbungen und/oder
Verformungen zu vermeiden.
Zusätzliche Vorsichtsmaßnahmen
• Seien Sie hinreichend vorsichtig bei Betätigung
der Tasten, Regler und anderer Bedienelemente
sowie beim Anschließen von Kabeln an
den Buchsen des Geräts. Eine unachtsame
Handhabung kann zu Fehlfunktionen führen.
• Wenn Sie Kabel anschließen oder abziehen,
ergreifen Sie das Kabel immer am Stecker – ziehen
Sie niemals am Kabel. Auf diese Weise vermeiden
Sie Kurzschlüsse und Schäden an den inneren
Bestandteilen der Kabel.
• Während des normalen Betriebs kann ein geringer
Wärmeanteil vom Gerät abgestrahlt werden.
• Halten Sie die Lautstärke des Geräts auf einem
vernünftigen Maß, um die Nachbarschaft nicht
unnötig zu stören. Sie können auch Kopfhörer
verwenden, so dass Sie auf Ihre Umgebung keine
Rücksicht zu nehmen brauchen.
• Wenn Sie das Gerät transportieren müssen,
verpacken Sie es möglichst im Originalkarton
(einschließlich des Verpackungsmaterials), in
dem es geliefert wurde. Anderenfalls sollten Sie
versuchen, ähnliches Packmaterial zu verwenden.
• Einige Anschlusskabel enthalten Widerstände.
Verwenden Sie für Anschlüsse an diesem Gerät
keine Kabel mit Widerständen. Die Verwendung
solcher Kabel kann dazu führen, dass der
Signalpegel sehr niedrig oder sogar unhörbar
ist. Informationen zu den technischen Daten von
Kabeln erhalten Sie vom jeweiligen Hersteller.
• Aufgrund der Bauart dieses Instruments könnten
kleine Tiere in das Innere gelangen und dort
eingeschlossen werden. Schalten Sie das Gerät in
diesem Fall unverzüglich aus, und ziehen Sie den
Netzstecker aus der Steckdose. Wenden Sie sich an
den Händler, bei dem Sie das Gerät gekauft haben
oder an das nächste Roland Service Center.
• Führen Sie keine Hände, Finger usw. in die
Önungen des Geräts ein. Bei Verwendung
des Geräts in Haushalten mit kleinen Kindern
sollte stets ein Erwachsener anwesend sein, um
sicherzustellen, dass Kinder ihre Hände und Füße
nicht in diese Önungen einführen.
• Die in diesem Dokument genannten
Unternehmens- und Produktnamen sind
eingetragene Marken oder Marken ihrer
jeweiligen Eigentümer.
Deutsch Français Italiano Español Português NederlandsEnglish
3
Page 18
Überprüfen des Packungsinhalts
☐ Hauptgerät (Subwoofer)
☐ Satellitenlautsprecher (zwei)
* Sie müssen die mitgelieferten
Satellitenlautsprecher verwenden.
☐ Lautsprecherabdeckungen (zwei)
Diese können auf Wunsch an den
Satellitenlautsprechern befestigt werden.
* Die Abbildung zeigt das Hauptgerät des CM-220.
☐ Lautsprecherkabel (zwei)
* Sie müssen die mitgelieferten Lautsprecherkabel verwenden.
☐ Netzkabel
☑ Bedienungsanleitung (dieses Dokument)
Aufstellung
Die Lautstärke und die Tonqualität sind davon abhängig, in welchem Abstand von der Wand Sie das Hauptgerät und die Satellitenlautsprecher
aufstellen sowie vom Material der Wand und den Eigenschaften des Fußbodens. Passen Sie die Position und die Lautstärke entsprechend Ihrem
Aufstellungsort an, während Sie Klang wiedergeben.
Aufstellen der Satellitenlautsprecher
Es wird empfohlen, die Satellitenlautsprecher in zwei Ecken eines gleichseitigen Dreiecks aufzustellen,
während sich die Hörposition in der dritten Ecke bendet.
Richten Sie die Vorderseite der Satellitenlautsprecher auf die Hörposition aus.
Aufstellen des Hauptgeräts
Es wird empfohlen, das Hauptgerät (Subwoofer) mit dem gleichen Abstand wie die Satellitenlautsprecher
aufzustellen, mit der Hörposition in der Mitte.
Sicherstellen eines natürlichen Klangs zwischen dem Hauptgerät (Subwoofer)
und den Satellitenlautsprechern ([PHASE]-Schalter)
Der [PHASE]-Schalter schaltet die Phase des Hauptgeräts (Subwoofer). Wählen Sie die Einstellung
„INV“ (invertiert) aus, falls der Klang bei der Einstellung „NOR“ (normal) ungewöhnlich dünn und
phasenverschoben sein sollte.
4
Page 19
Beschreibungen zum Bedienfeld
Rückseite
INPUT-Buchsen
Hier können Sie die Audioquellen anschließen, deren Klang Sie wiedergeben möchten. Die Signale aller Buchsen können gleichzeitig wiedergegeben werden.
* Wenn Verbindungskabel mit Widerständen verwendet werden, kann es sein, dass der Lautstärkepegel der an die INPUT-Buchsen angeschlossenen Geräte niedrig ist.
Verwenden Sie in diesem Fall Kabel ohne Widerstände.
BALANCED INPUT-Buchsen
Hier kann ein Mischpult oder ein ähnliches Gerät angeschlossen
werden.
Buchsentyp
* Dieses Gerät besitzt symmetrische XLR/
TRS-Buchsen. Anschlussdiagramme für
diese Buchsen sind unten abgebildet.
Nehmen Sie die Anschlüsse erst vor, nachdem Sie sich auch die
Anschlussdiagramme der anderen anzuschließenden Geräte
angesehen haben.
MASSE (MANTEL)
PLUS (SPITZE)
1: MASSE
2: PLUS
3: MINUS
MINUS (RING)
PHONES-Buchse
Hier können Kopfhörer
angeschlossen werden
(Stereo-Miniklinke).
* Falls ein Kopfhörer
angeschlossen ist, wird der Ton nicht
über das Hauptgerät (Subwoofer)
oder die Satellitenlautsprecher
ausgegeben.
CH 3-Buchse
Hier kann der digitale
Ausgang (Koaxialkabel)
eines Geräts angeschlossen werden.
* Schließen Sie nur ein
digitales Stereosignal
an. Wenn Sie beispielsweise 5.1-Kanal oder ein
anderes digitales Signal
anschließen, entstehen
Störgeräusche.
Buchsentyp Buchsentyp Buchsentyp
CH 2-Buchsen
Hier kann ein Fernsehgerät,
ein Computer oder ein
MP3-Player (mit Cinch
oder Stereo-Miniklinke)
angeschlossen werden.
CH 1-Buchsen
Hier kann ein
Musikinstrument wie ein
Keyboard oder V-Drums
angeschlossen werden
(mono oder stereo,
Klinke).
Deutsch Français Italiano Español Português NederlandsEnglish
Netzanschluss
Schließen Sie hier das mitgelieferte Netzkabel an.
Rückseite Rückseite
SATELLITE SPEAKER-Buchsen
Schließen Sie hier die mitgelieferten
Satellitenlautsprecher an.
* Schließen Sie nur die mitgelieferten
Lautsprecherkabel an.
5
Page 20
Einschalten des Systems
Das Bedienfeld
Regler [CH 1], [CH 2] und
[CH 3]
Hiermit wird die Lautstärke der an den
Buchsen CH 1, CH 2 und CH 3 eingehenden
Signale geregelt.
EQUALIZER-Regler
[LOW]-Regler
[HIGH]-Regler
Regelt die Lautstärke
der Bässe.
Regelt die Lautstärke
der Höhen.
[MASTER]-Regler
Hiermit wird die Gesamtausgangslautstärke
des Hauptgeräts (Subwoofer) und der
Satellitenlautsprecher geregelt.
[WOOFER]-Regler
Hiermit wird die Ausgangslautstärke des
Hauptgeräts (Subwoofer) geregelt.
[AUTO OFF]-Schalter
Das System wird automatisch ausgeschaltet, wenn
innerhalb von 4Stunden kein Eingangssignal
festgestellt wird.
ON
* Zum Fortsetzen des Betriebs schalten Sie das
Gerät aus und wieder ein, oder stellen Sie den
[AUTO OFF]-Schalter auf „OFF“.
OFF Das System wird nicht automatisch ausgeschaltet.
Leuchtet rot, wenn das System
eingeschaltet ist.
[ON]-Schalter
Schaltet das System ein.
[PHASE]-Schalter
Hiermit wird die Phase des vom Hauptgerät (Subwoofer)
ausgegebenen Klangs geändert (S. 4).
Einschalten des Systems
* Um Fehlfunktionen und/oder Schäden an Lautsprechern oder anderen Geräten zu vermeiden, regeln Sie stets die Lautstärke herunter, und
schalten Sie alle Geräte aus, bevor Sie eine Verbindung herstellen.
* Nachdem Sie die Verbindungen hergestellt haben, schalten Sie Ihre Geräte in der angegebenen Reihenfolge ein. Wenn Sie die Geräte in der
falschen Reihenfolge einschalten, besteht die Gefahr von Fehlfunktionen und/oder Schäden an Lautsprechern und anderen Geräten.
1. Stellen Sie den [MASTER]-
Regler auf null.
* Dieses Gerät ist mit einer Schutzschaltung ausgestattet. Nach dem Einschalten entsteht eine kurze Betriebspause von einigen Sekunden, bis das
Gerät normal arbeitet.
* Achten Sie immer darauf, die Lautstärke herunterzuregeln, bevor Sie das Gerät ein- oder ausschalten. Selbst bei heruntergeregelter Lautstärke
sind möglicherweise Geräusche zu hören, wenn Sie das Gerät ein- oder ausschalten. Dies ist normal und stellt keine Fehlfunktion dar.
* Wenn Sie die Stromversorgung ganz unterbrechen möchten, ziehen Sie das Netzkabel aus der Netzsteckdose. Weitere Informationen nden Sie
unter „Stromversorgung“ (S. 3).
angeschlossenen Geräte ein.
HINWEIS
Das System wird automatisch ausgeschaltet, wenn
innerhalb von ca. 4Stunden kein Eingangssignal festgestellt
wird.
Wenn das System nicht automatisch ausgeschaltet werden
soll, stellen Sie den [AUTO OFF]-Schalter auf „OFF“.
3. Schalten Sie das System ein.2. Schalten Sie die
6
Page 21
Anschlussbeispiele
Alle angeschlossenen Geräte können gleichzeitig wiedergegeben werden.
Wiedergeben von Synthesizer oder V-Drums
* Verwenden Sie ein für das angeschlossene
Gerät geeignetes Adapterkabel (z.B. von
Klinke auf Cinch).
Sie können einen MP3-Player oder eine andere Quelle
anschließen und diese gleichzeitig wiedergeben.
Deutsch Français Italiano Español Português NederlandsEnglish
oder
V-DrumsSynthesizerPercussion MP3-Player usw.
Wiedergeben von Musik von einem DVD-Player oder einem MP3-Player
Wenn Ihr DVD-Player über eine digitale Ausgangsbuchse
verfügt, schließen Sie diese zur Erzielung bestmöglicher
Wiedergabequalität an die CH 3-Buchse an.
Schließen Sie an die CH 3-Buchse
nur ein digitales Stereosignal an.
Wenn Sie beispielsweise 5.1-Kanal
oder ein anderes digitales
Signal anschließen, entstehen
Störgeräusche.
Stellen Sie das angeschlossene
Gerät auf „Stereo“ oder „PCM“.
oder
oder
MP3-PlayerDVD-Player
Wiedergeben von Musik von einem Mischpult
Schließen Sie das Mischpult an die BALANCED INPUTBuchsen an. Auf diese Weise können Sie das System als
qualitativ hochwertigen Abhör-Monitor verwenden.
Mischpult
Synthesizer
* Schließen Sie eine Gitarre, einen
Bass oder ein Mikrofon nicht
direkt an den CM-110 oder
CM-220 an.
7
Page 22
Anschlussbeispiele
Wiedergeben von Musik von einem Computer
Wenn Sie einen Computer anschließen, sind die folgenden Verbindungen möglich.
Anschließen eines Computers über eine analoge Verbindung
Dies ist die einfachste Verbindung. Schließen Sie die Kopfhörerbuchse oder den Line-Ausgang des Computers an den LINE-Eingang an.
oder
Computer
Anschließen eines Computers über die USB-Audioschnittstelle
Sie können Klang von Ihrem Computer über eine USB-Audioschnittstelle wiedergeben.
Koaxialkabel
* Schließen Sie nur ein digitales
Stereosignal an. Wenn Sie beispielsweise 5.1-Kanal oder ein anderes
digitales Signal anschließen, entstehen
Störgeräusche.
* Wenn Ihre Audioschnittstelle nicht über
eine Koaxialausgangsbuchse verfügt,
verwenden Sie die Analogverbindung.
Zu der Koaxialausgangsbuchse
USB-Audioschnittstelle
oder
Zu den Analogausgangsbuchsen
Sie können einen Synthesizer anschließen
und diesen gleichzeitig wiedergeben.
Computer
* Schließen Sie eine Gitarre, einen
Bass oder ein Mikrofon nicht direkt
an den CM-110 oder CM-220 an.
8
Page 23

Blockschaltbild
CH1
L/MONO
R
L
R
STEREO
DIGITAL
BALANCED
INPUT
L
R
INSTRUMENT
CH2
LINE
RECEIVER
DAC
CH3
DIGITAL
RL
LOW HIGH
EQUALIZER
MASTER
HPF
POWER
AMP
WOOFER
SPEAKER
OUT
L
R
LPF PHASE
NOR
INV
SATELLITE SPEAKER
INPUT
INPUT
POWER
AMP
PHONES
Deutsch Français Italiano Español Português NederlandsEnglish
Fehlerbehebung
Problem Ursache Maßnahme Seite
Das System lässt sich nicht
einschalten
Kein Ton
Der Ton ist verzerrt oder
verrauscht.
Unzureichende Lautstärke
Ist das Netzkabel ordnungsgemäß an einer Netzsteckdose
angeschlossen?
Sind die externen Geräte richtig angeschlossen?
Sind alle Regler richtig eingestellt? Drehen Sie die Regler nach rechts, um die Lautstärke zu erhöhen. S. 6
Ist möglicherweise die Auto O-Funktion aktiv?
Geben Sie möglicherweise ein analoges Signal an der
CH 3-Buchse ein?
Geben Sie möglicherweise ein digitales Signal wie
5.1-Kanal-Audio an der CH 3-Buchse ein?
Haben Sie möglicherweise andere Lautsprecher als die
mitgelieferten Satellitenlautsprecher angeschlossen?
Verwenden Sie möglicherweise andere Kabel als die
mitgelieferten Lautsprecherkabel?
Ist der entsprechende Regler möglicherweise zu weit
aufgedreht?
Ist der Eingangspegel des angeschlossenen Geräts zu
hoch?
Geben Sie möglicherweise ein digitales Signal wie
5.1-Kanal-Audio an der CH 3-Buchse ein?
Sind alle Regler richtig eingestellt? Drehen Sie die Regler nach rechts, um die Lautstärke zu erhöhen. S. 6
Ist der Eingangspegel des angeschlossenen Geräts zu
niedrig?
Haben Sie möglicherweise andere Lautsprecher als die
mitgelieferten Satellitenlautsprecher angeschlossen?
Verwenden Sie möglicherweise andere Kabel als die
mitgelieferten Lautsprecherkabel?
Verwenden Sie möglicherweise ein Verbindungskabel mit
integriertem Widerstand?
Stellen Sie sicher, dass das Netzkabel ordnungsgemäß an einer
Netzsteckdose angeschlossen ist.
Überprüfen Sie die Buchsen und Stecker, und nehmen Sie die
richtigen Anschlüsse vor.
Schalten Sie das System aus und wieder ein, und schalten Sie den
[AUTO OFF]-Schalter aus.
Schließen Sie ein Koaxialkabel an der CH 3-Buchse an, und
verbinden Sie das andere Ende mit der digitalen Ausgangsbuchse
Ihres Geräts.
Geben Sie ein digitales Stereosignal ein. S. 7
Verwenden Sie die mitgelieferten Satellitenlautsprecher. S. 4
Verwenden Sie die mitgelieferten Lautsprecherkabel. S. 4
Drehen Sie den entsprechenden Regler nach links, um die
Lautstärke anzupassen.
Verringern Sie die Lautstärke des angeschlossenen Geräts. —
Geben Sie ein digitales Stereosignal ein. S. 7
Erhöhen Sie die Lautstärke des angeschlossenen Geräts. —
Verwenden Sie die mitgelieferten Satellitenlautsprecher. S. 4
Verwenden Sie die mitgelieferten Lautsprecherkabel. S. 4
Verwenden Sie für Anschlüsse an die INPUT-Buchsen Verbindungskabel ohne integrierte Widerstände.
S. 5
—
S. 6
S. 5
S. 6
—
9
Page 24

Technische Daten
Roland CM-110, CM-220: CUBE MONITOR
CM-110 CM-220
Angegebene Ausgangsleistung
Nomineller Eingangspegel (1kHz)
Eingangsimpedanz
Digitaler Eingang (CH 3)
Lautsprecher
Bedienelemente
Anschlüsse
Stromverbrauch 47 W 67 W
Abmessungen
Gewicht
Im Lieferumfang enthalten Netzkabel, Lautsprecherkabel (3,5m) x 2, Bedienungsanleitung
Hauptgerät 12Zoll 10Zoll
Satellitenlautsprecher 4Zoll, magnetisch abgeschirmt, 3/4Zoll, magnetisch abgeschirmt (jeweils)
<Kanalsteuerung>
<Woofer-Steuerung>
<Master-Steuerung>
Hauptgerät 330 (B) x 327 (T) x 368 (H) mm 381 (B) x 376 (T) x 413 (H) mm
Satellitenlautsprecher 162 (B) x 197 (T) x 243 (H) mm
Hauptgerät 13,3 kg 18,8 kg
Satellitenlautsprecher 3,1 kg (je Lautsprecher)
100W
(Hauptgerät 50W + Satellitenlautsprecher 25W x 2)
CH 1 (INSTRUMENT): -20dBu
CH 2 (LINE): -10dBu
BALANCED INPUT: +4dBu
CH 1 (INSTRUMENT): 10kOhm
CH 2 (LINE): 10kOhm
BALANCED INPUT: 10kOhm
Format: Konform mit IEC60958
Abtastrate: 32kHz bis 192kHz (automatisch) (Entzerrung: OFF)
Wortlänge: 24Bit
[CH 1] (INSTRUMENT)-Lautstärkeregler
[CH 2] (LINE)-Lautstärkeregler
[CH 3] (DIGITAL)-Lautstärkeregler
[WOOFER]-Lautstärkeregler
[PHASE]-Schalter
EQUALIZER [HIGH]-Regler, [LOW ]-Regler
[MASTER]-Lautstärkeregler
[AUTO OFF]-Schalter
[ON]-Taster
CH 1 (INSTRUMENT)-Buchsen (L/MONO, R): Stereo-Klinke
CH 2 (LINE)-Buchsen (L, R, STEREO): RCA-Cinch, Stereo-Miniklinke
CH 3 (DIGITAL)-Buchse: RCA-Cinch
BALANCED INPUT-Buchsen (L, R): XLR, TRS-Klinke
PHONES-Buchse: Stereo-Miniklinke
SATELLITE SPEAKER-Buchsen (nur für die mitgelieferten Satellitenlautsprecher)
Netzanschluss
200W
(Hauptgerät 100W + Satellitenlautsprecher 50W x 2)
* 0 dBu = 0,775 Vrms
* Zur Verbesserung des Produkts sind Änderungen der technischen Daten und/oder des Designs dieses Geräts ohne vorherige Ankündigung
möglich.
10
Page 25

Verwenden von Mikrofonständern
WARNUNG: Die Sicherheit und Stabilität des Mikrofonständers wurde nur für den Klappständer in Verbindung mit dem Lautsprecher
geprüft. Eine abweichende Aufstellung wurde nicht geprüft und kann zu gefährlichen Verletzungen führen.
Die Satellitenlautsprecher sind so konstruiert, dass sie auf Mikrofonständern anderer Hersteller montiert werden können. Durch die Befestigung
der Satellitenlautsprecher auf Mikrofonständern anderer Hersteller können Sie diese in einer optimalen Höhe zur Verwendung als Monitor oder
PA-System positionieren.
WARNUNG
Die Befestigungsvorrichtung für Mikrofonständer auf der Unterseite der Satellitenlautsprecher besitzt zwei Bohrungen: 3/8” und 5/8”. Verwenden Sie
die für Ihren Mikrofonständer geeignete Bohrung.
Durchmesser 3/8”Durchmesser 5/8”
• Önen Sie die Beine des Mikrofonständers (mindestens 50cm), und stellen Sie ihn so auf, dass die Gesamthöhe einschließlich der
Satellitenlautsprecher 105cm nicht überschreitet (siehe Abbildung unten).
Deutsch Français Italiano Español Português NederlandsEnglish
höchstens
105cm
mindestens
50cm
• Wenn die Höhe des Mikrofonständers 105cm überschreitet (einschließlich der Satellitenlautsprecher), oder wenn die Beine nicht weit genug
aufgeklappt sind, kann der Ständer mit dem Lautsprecher umkippen, was zu Verletzungen und Beschädigungen führen kann.
• Platzieren Sie die Mikrofonständer mit den Satellitenlautsprechern nicht auf instabilen oder schrägen Böden. Der Ständer muss auf einer stabilen
und horizontalen Fläche aufgestellt werden.
• Achten Sie darauf, die an die Satellitenlautsprecher angeschlossenen Kabel sicher zu verlegen, damit es nicht zu Unfällen kommt, z.B., indem
jemand darüber stolpert.
• Stellen Sie nichts auf die auf dem Mikrofonständer befestigten Satellitenlautsprecher, damit diese nicht umkippen.
• Überprüfen Sie nach der Befestigung der Satellitenlautsprecher auf den Mikrofonständern, dass diese nicht wackeln.
• Lassen Sie sich bei der Befestigung der Satellitenlautsprecher auf dem Mikrofonständer oder bei der Höhenverstellung eines auf dem
Mikrofonständer befestigten Satellitenlautsprechers von mindestens einer Person helfen.
• Befestigen Sie den Mikrofonständer sicher, damit sich der Satellitenlautsprecher nicht seitlich bewegen kann.
• Achten Sie darauf, dass Sie sich nicht die Finger einklemmen, wenn Sie den Satellitenlautsprecher befestigen.
• Verwenden Sie einen robusten Mikrofonständer, z.B. einen aus Aluminium oder Stahl.
11
Page 26

Page 27
* Modèle CM-220 présenté.
Mode d’emploi
Deutsch Français Italiano Español Português NederlandsEnglish
Canal 2.1 pratique
L’ensemble se compose de deux enceintes
satellites et d’un caisson de graves qui fournit
des basses riches et profondes.
Les connexions simples permettent de proter
immédiatement des qualités du canal 2.1.
Pour les instruments de musique
Le modèle CM-220 fournit une puissance totale de
200W (100W pour le modèle CM-110).
Il est possible de mixer les entrées pour jouer un son
clair sur toute la gamme des fréquences.
Pour la production musicale
Vous pouvez connecter le système à votre ordinateur pour
obtenir un retour de qualité.
Grâce à ses basses riches et profondes, ce système est
également idéal pour l’écoute.
Copyright © 2012 ROLAND CORPORATION
Tous droits réservés. La reproduction intégrale ou partielle de cette publication est interdite sous quelque forme que ce soit sans l’autorisation écrite de ROLAND CORPORATION.
Roland, CUBE MONITOR sont des marques déposées ou des marques commerciales de Roland Corporation aux États-Unis et/ou dans d’autres pays.
Page 28
CONSIGNES DE SÉCURITÉ
Avant d’utiliser cet appareil, lisez attentivement les sections suivantes: «CONSIGNES DE SÉCURITÉ IMPORTANTES», «UTILISATION DE L'APPAREIL EN TOUTE SÉCURITÉ» (p.2)
et «REMARQUES IMPORTANTES» (p.3). Les pages qui suivent fournissent des informations importantes relatives au bon fonctionnement de l’appareil. En outre, pour être
sûr d’avoir bien intégré chacune des fonctionnalités fournies par votre appareil, il est nécessaire de lire le mode d’emploi dans son intégralité. Conservez ce manuel sous la
main an de vous y reporter au besoin.
AVERTISSEMENT
Ne branchez pas le cordon d’alimentation
sur une prise murale partagée avec
un nombre excessif d’appareils. Soyez
particulièrement vigilant lorsque vous
utilisez des rallonges: la puissance totale
utilisée par l’ensemble des appareils
branchés sur cette rallonge ne doit jamais
dépasser la puissance nominale (watts/
ampères) de la rallonge elle-même. Des
charges excessives peuvent provoquer
une surchaue de l’isolant du cordon et
éventuellement le faire fondre.
ATTENTION
AVERTISSEMENT
Branchez la prise électrique de l’appareil
dans une prise secteur murale équipée
d’une prise de terre.
N’ouvrez pas l’appareil et n’eectuez
aucune modication à l’intérieur.
N’essayez pas de réparer l’appareil ou de
remplacer des pièces (sauf si ce manuel
fournit des instructions spéciques à
cet égard). Pour toute intervention de
maintenance, contactez votre revendeur,
le centre de maintenance Roland le plus
proche ou un distributeur Roland agréé
(voir la page «Informations»).
N’installez jamais l’appareil dans des lieux
présentant les caractéristiques suivantes:
• soumis à des températures extrêmes
(exposés à la lumière directe du soleil
dans un véhicule fermé, près d’une
canalisation de chauage ou sur un
appareil émettant de la chaleur);
• embués (salles de bains, cabinets de
toilette, sols mouillés, etc.);
• exposés à la vapeur ou à la fumée;
• exposés au sel;
• exposés à l’humidité;
• exposés à la pluie;
• exposés à la poussière ou au sable;
• soumis à de fortes vibrations ou
secousses.
Vériez que l’appareil reste toujours stable
et horizontal. Ne disposez jamais l’appareil
sur un support susceptible d’osciller ou sur
une surface inclinée.
L’appareil doit être branché uniquement à
une prise de courant du type décrit sur sa
face arrière.
Utilisez exclusivement le cordon
d’alimentation fourni. De plus, ce cordon
d’alimentation ne doit pas être utilisé avec
un autre appareil.
Ne tordez pas et ne pliez pas
excessivement le cordon d’alimentation et
ne placez pas d’objets lourds dessus. Vous
risqueriez d’endommager le cordon et de
provoquer de graves dommages ou des
courts-circuits. Les cordons endommagés
présentent un risque d’incendie et
d’électrocution.
2
AVERTISSEMENT
Cet appareil, utilisé seul ou avec un
amplicateur et un casque ou des
haut-parleurs, peut produire des niveaux
sonores susceptibles d’entraîner une
perte auditive dénitive. Ne le faites pas
fonctionner trop longtemps à un volume
sonore élevé ou inconfortable. Si vous
constatez une perte auditive ou des
bourdonnements dans les oreilles, arrêtez
immédiatement d’utiliser l’appareil et
consultez un spécialiste.
Ne placez pas de récipients contenant du
liquide sur ce produit. Ne laissez aucun
objet (objets inammables, pièces de
monnaie, broches, ls, etc.), ni aucun
liquide quel qu’il soit (eau, jus de fruit, etc.)
s’introduire dans l’appareil. Vous risquez
de provoquer des courts-circuits ou un
dysfonctionnement.
Éteignez immédiatement l’appareil,
débranchez le cordon d’alimentation
de la prise de courant et demandez une
intervention de maintenance à votre
revendeur, au centre de maintenance
Roland le plus proche ou à un distributeur
Roland agréé (voir la page Informations),
dans les situations suivantes:
• la prise ou le cordon d’alimentation est
endommagé;
• en cas de fumée ou d’odeur
inhabituelle;
• des objets ou un liquide ont pénétré
dans l’appareil;
• l’appareil a été exposé à la pluie (ou s’est
retrouvé mouillé pour toute autre raison);
• l’appareil semble ne pas fonctionner
normalement ou a subi une nette
diminution de performances.
Lorsque vous utilisez l’appareil en
présence d’enfants, faites attention à
éviter toute manipulation incorrecte. Un
adulte doit toujours être présent pour la
surveillance.
Protégez l’appareil contre les chocs
violents.
(Ne le faites pas tomber!)
Avant d’utiliser l’appareil dans un pays
étranger, contactez votre revendeur, le
centre de service Roland le plus proche ou
un distributeur Roland agréé (voir la page
«Informations»).
L’appareil doit être placé dans un endroit
qui ne perturbe pas sa ventilation.
Saisissez toujours le cordon d’alimentation
par la prise lorsque vous voulez le
brancher ou le débrancher de la prise
secteur.
Vous devez régulièrement débrancher
le cordon d’alimentation et le nettoyer à
l’aide d’un chion sec an de débarrasser
les broches des poussières et autres dépôts
accumulés. Débranchez également la
prise électrique de la prise murale lorsque
l’appareil doit rester inutilisé pendant une
période prolongée. L’accumulation de
poussière entre la che et la prise secteur
peut entraîner une isolation insusante et
provoquer un incendie.
Évitez que les cordons d’alimentation
et les câbles ne s’emmêlent. Veillez
également à ce qu’ils restent hors de
portée des enfants.
Ne montez jamais sur l’appareil et ne
déposez pas d’objets lourds dessus.
Ne manipulez jamais le cordon
d’alimentation ou sa prise avec les mains
mouillées lorsque vous le branchez ou le
débranchez d’une prise secteur ou de cet
appareil.
Avant de déplacer l’appareil, débranchezle de la prise murale et débranchez les
cordons des appareils externes qui y sont
connectés.
Avant de nettoyer l’appareil, mettez-le
hors tension et débranchez le cordon
d’alimentation de la prise murale (p.5).
Lorsqu’il y a un risque d’orage dans
votre région, débranchez le cordon
d’alimentation de la prise murale.
Les parties métalliques du caisson de
graves pouvant devenir très chaudes,
faites attention de ne pas vous brûler.
Ne tentez en aucune manière de retirer la
grille du haut-parleur ou le haut-parleur
lui-même. Le haut-parleur ne doit pas
être remplacé par l’utilisateur. Il existe un
risque d’électrocution dû à la présence
de tensions et de courants électriques à
l’intérieur de l’enceinte.
Page 29

REMARQUES IMPORTANTES
Alimentation
• Ne branchez pas cet appareil sur la même prise
qu’un appareil électrique contrôlé par un variateur
(réfrigérateur, lave-linge, four micro-ondes,
climatiseur, etc.) ou qui comporte un moteur.
Suivant le mode d’utilisation de l’appareil
électrique, le bruit induit peut provoquer un
dysfonctionnement de l’appareil ou produire un
bruit audible. Si pour des raisons pratiques, vous
ne pouvez pas utiliser une autre prise électrique,
branchez un ltre antiparasite entre l’instrument
et la prise électrique.
• Avant de raccorder cet appareil à d’autres
équipements, mettez tous les appareils hors
tension. Cela évite tout dysfonctionnement et/ou
détériorations des enceintes ou d’autres appareils.
• Bien que les voyants DEL soient éteints lorsque
l’appareil est hors tension, cela ne signie pas
que l’appareil est complètement déconnecté de
toute source d’électricité. Si vous devez couper
complètement l’alimentation, débranchez le
cordon d’alimentation de la prise murale. C’est
pourquoi la prise sur laquelle vous choisissez de
brancher le cordon d’alimentation doit être proche
de l’appareil et facilement accessible.
• Avec les réglages d’usine, les modèles CM-110 et
CM-220 s’éteignent automatiquement au bout
de 4 heures lorsque vous arrêtez de jouer ou de
les utiliser. Si vous ne voulez pas que l’appareil
s’éteigne automatiquement, placez le réglage
AUTO OFF sur OFF (voir p.6).
Emplacement
• Lorsque l’appareil est utilisé à proximité
d’amplicateurs de puissance (ou de tout autre
appareil contenant de gros transformateurs de
puissance), un bourdonnement peut être audible.
Pour atténuer ce problème, changez l’orientation de
l’appareil ou éloignez-le de la source d’interférence.
• Cet appareil peut interférer avec la réception radio
et télévision. Ne l’utilisez pas à proximité de tels
récepteurs.
• Un bruit peut se faire entendre si des appareils de
communication sans l, tels que des téléphones
cellulaires, sont utilisés à proximité de l’appareil.
Ce bruit peut se produire lors de la réception ou de
l’émission d’un appel ou pendant une conversation
téléphonique. Lorsque vous rencontrez ce genre
de problèmes, vous devez soit déplacer les
appareils sans l concernés de façon à les éloigner
susamment de l’appareil, soit les éteindre.
• N’exposez pas l’appareil à la lumière directe du
soleil, ne le placez pas à proximité d’équipements
émettant de la chaleur, ne le laissez pas à
l’intérieur d’un véhicule fermé et ne le soumettez
pas à des températures élevées. Évitez également
de placer trop près de l’appareil des dispositifs
d’éclairage, qu’il s’agisse d’une lampe de piano ou
de puissants spots lumineux, an que l’appareil ne
soit pas exposé à cette source lumineuse pendant
trop longtemps. Une chaleur excessive peut
déformer ou décolorer l’appareil.
• Si vous déplacez l’appareil à un endroit où
la température et/ou l’humidité sont très
diérentes, des gouttelettes d’eau (condensation)
peuvent se former à l’intérieur. Si vous essayez
de vous en servir dans ces conditions, vous
risquez de l’endommager ou de provoquer des
dysfonctionnements. Par conséquent, avant
d’utiliser l’appareil, vous devez attendre quelques
heures, jusqu’à ce que la condensation soit
complètement évaporée.
• Veillez à ce que des objets en caoutchouc, en
vinyle ou d’une matière similaire ne restent pas sur
l’appareil pendant une longue période. Ces objets
risquent de décolorer ou d’endommager la nition
de l’appareil.
• Ne collez pas d’autocollants, de décalcomanies
ou autres sur cet appareil. Vous risqueriez
d’endommager la nition de l’appareil en les
retirant.
• Selon la matière et la température de la surface sur
laquelle vous placez l’appareil, il est possible que
les pieds en caoutchouc décolorent ou détériorent
la surface.
Pour éviter cela, vous pouvez intercaler un
morceau de feutre ou de chion sous les
pieds en caoutchouc. Dans ce cas, vériez que
l’appareil ne risque pas de glisser ou de bouger
accidentellement.
• Ne posez sur l’appareil aucun récipient contenant
de l’eau (un vase, par exemple). Évitez également
d’utiliser à proximité de l’appareil des produits
tels que des insecticides, du parfum, de l’alcool,
du vernis à ongles ou des atomiseurs. Essuyez
rapidement avec un tissu sec et doux toute trace
de liquide qui se serait répandue sur l’appareil.
Entretien
• Pour le nettoyage quotidien de l’appareil, utilisez
un chion sec et doux ou légèrement humidié
avec de l’eau. Pour retirer les salissures plus
tenaces, humectez un chion avec un détergent
léger, non abrasif. Ensuite, essuyez soigneusement
l’appareil avec un chion sec et doux.
• N’utilisez jamais d’essence, de diluant, d’alcool ou
de solvant d’aucune sorte, an d’éviter tout risque
de décoloration et/ou de déformation.
Précautions supplémentaires
• Manipulez avec susamment de précautions
les boutons, curseurs et autres commandes de
l’appareil, ainsi que les prises et les connecteurs.
Une manipulation brutale peut entraîner des
dysfonctionnements.
• Lors du branchement/débranchement de tous les
câbles, prenez le connecteur. Ne tirez jamais sur le
câble. Vous éviterez ainsi les courts-circuits ou la
détérioration des éléments internes du câble.
• En fonctionnement normal, l’appareil émet une
faible chaleur.
• Pour ne pas déranger vos voisins, essayez de
maintenir le volume de l’appareil à un niveau
raisonnable. Vous pouvez également utiliser un
casque d’écoute an de ne pas déranger votre
entourage.
• Lorsque vous devez transporter l’appareil, rangezle si possible dans son emballage d’origine (avec
les protections). Sinon, utilisez des matériaux
d’emballage équivalents.
• Certains câbles contiennent des résistances.
N’utilisez pas de câbles qui comportent des
résistances pour brancher cet appareil. Avec
ce type de câble, le niveau sonore peut être
extrêmement faible, voire inaudible. Pour plus
d’informations sur les caractéristiques techniques
du câble, contactez son fabricant.
• Du fait de la conception de cet instrument, il
est possible qu’un petit animal puisse y rester
enfermé. Dans ce cas, coupez immédiatement
l’alimentation et débranchez le cordon
d’alimentation de la prise murale. Consultez
ensuite le détaillant qui vous a vendu l’appareil ou
le centre de maintenance Roland le plus proche.
• N’insérez pas votre main, vos doigts, etc., dans
les ouvertures de l’appareil. Surtout si l’appareil
doit être utilisé dans des environnements où
se trouvent de jeunes enfants, la présence d’un
adulte est nécessaire pour veiller à ce que ces
derniers ne mettent pas leurs mains ou leurs pieds
dans les ouvertures de l’appareil.
• Les noms des sociétés et des produits
gurant dans ce document sont des marques
déposées ou des marques commerciales
détenues par leurs propriétaires respectifs.
Deutsch Français Italiano Español Português NederlandsEnglish
3
Page 30

Vériez le contenu de l’emballage
☐☐ Caisson☐de☐graves
☐☐ Enceintes☐satellites☐(2)
* Utilisez exclusivement les enceintes satellites
fournies.
☐☐ Caches☐des☐enceintes☐(2)
Vous pouvez les monter sur les enceintes si vous
le souhaitez.
* Caisson de graves du modèle CM-220.
☐☐ Câbles☐des☐enceintes☐(2)
* Utilisez exclusivement les câbles fournis.
☐☐ Cordon☐d’alimentation
☐☑ Mode☐d’emploi☐(ce☐document)
Emplacement
Le volume et la qualité du son sont aectés par la distance entre le mur et l’emplacement du caisson de graves et des enceintes satellites, ainsi que
par le revêtement du mur et les caractéristiques du sol. Pendant l’écoute, réglez la position et le volume en fonction de l’emplacement.
Placement☐des☐enceintes☐satellites
Nous recommandons de placer les enceintes satellites sur les deux angles d’un triangle équilatéral, la
position d’écoute se trouvant sur le troisième angle.
Orientez la face avant des enceintes de façon à faire face à la position d’écoute.
Placement☐du☐caisson☐de☐graves
Il est conseillé de placer la caisson de graves à la même distance que les enceintes, la position d’écoute étant au
centre.
Vérication☐de☐la☐liaison☐naturelle☐entre☐le☐caisson☐de☐graves☐et☐les☐enceintes☐
satellites☐(réglage☐[PHASE])
Les interrupteurs [PHASE] règlent la phase du caisson de graves. Sélectionnez le réglage «NOR» (normal)
ou «INV» (inverse) qui produit la liaison la plus naturelle entre le caisson de graves et les enceintes
satellites.
4
Page 31

Description des commandes, des réglages et des branchements
Face☐arrière
Prises☐d’entrée☐INPUT
Ces prises permettent de connecter les sources audio que vous voulez écouter. Les signaux de toutes les prises jack peuvent être reproduits simultanément.
* L’utilisation de câbles de connexion compostant des résistances peut diminuer le volume des appareils connectés sur les prises d’entrée (INPUT). Dans ce cas, utilisez
des câbles sans résistances.
Prises☐BALANCED☐INPUT
Vous pouvez connecter sur ces prises une table de mixage ou un
autre appareil similaire.
Type de prise
* Cet instrument est équipé de prises
symétriques (XLR/TRS) de type jack.
Les schémas de câblage de ces prises sont
indiqués ci-dessous. Eectuez les connexions après avoir vérié
les schémas de câblage des autres appareils que vous avez
l’intention de connecter.
GND (MANCHON)
HOT
1: GND (Terre)
2: HOT
(Tension)
3: COLD
(Négatif)
(POINTE)
COLD (BAGUE)
Prise☐PHONES
Vous pouvez connecter un
casque d’écoute sur cette
prise (mini-prise stéréo
vendue séparément).
* Si un casque est branché, le son ne
sera pas reproduit sur le caisson de
graves ou les enceintes.
Prise☐CH3
Vous pouvez connecter
sur cette prise la
sortie numérique (câble
coaxial) d’un appareil.
* N’envoyez pas d’autre
signal qu’un signal
stéréo numérique.
Par exemple, si vous
connectez un canal
5.1 ou un autre signal
numérique, la sortie
sera bruyante.
Type de prise Type de prise Type de prise
Prises☐CH2
Vous pouvez connecter
sur ces prises un appareil
tel qu’un téléviseur, un
ordinateur ou un lecteur
audio (avec des prises RCA
ou une mini-prise stéréo).
Prises☐CH1
Vous pouvez connecter
sur ces prises (prises
jack 6,35) un instrument
de musique (ex. clavier
ou batterie V-Drums).
Deutsch Français Italiano Español Português NederlandsEnglish
Prise☐AUX☐IN
Branchez le cordon d’alimentation fourni sur cette prise.
Panneau
arrière
Panneau
arrière
Prises☐SATELLITE☐SPEAKER
Branchez les enceintes satellites fournies sur
cette prise.
* Ne connectez pas autre chose que les câbles
d’enceintes fournis.
5
Page 32

Mise☐sous☐tension☐du☐système
☐Partie☐supérieure
Commandes☐[CH☐1],☐[CH☐2],☐
[CH☐3]
Ces commandes règlent le volume sonore
des entrées sur les prises jack CH 1, CH et
CH 3.
Commandes☐EQUALIZER
Commande
[LOW]
Commande
[HIGH]
Règle le volume des
basses fréquences.
Règle le volume des
hautes fréquences.
Commande☐[MASTER]
Règle le volume général du caisson de
graves et des enceintes satellite.
Commande☐[WOOFER]
Règle le volume de sortie du caisson de
graves.
Interrupteur☐[AUTO☐OFF]
Le système s’éteint automatiquement au bout
de 4 heures sans détection de signal en entrée.
ON
OFF Le système ne s’éteint pas automatiquement.
* Pour recommencer à utiliser l’appareil,
éteignez et rallumez l’appareil, ou mettez
l’interrupteur [AUTO OFF] en position OFF.
Ce voyant est allumé lorsque l’appareil
est sous tension.
Interrupteur☐[ON]
Allume ou éteint l’appareil.
Interrupteur☐[PHASE]
Modie la phase du son en sortie du caisson de graves (p.4).
Mise sous tension du système
* Pour éviter tout risque de dysfonctionnement et/ou de détérioration des enceintes et de votre matériel, réduisez systématiquement le volume au
minimum et éteignez tous les appareils avant d’eectuer le moindre branchement.
* Après avoir eectué les branchements, allumez les diérents appareils dans l’ordre indiqué. Si vous ne respectez cet ordre, vous risquez de
provoquer des dysfonctionnements et/ou de détériorer les enceintes et les autres appareils.
1. Réglez la commande
[MASTER] sur 0.
* Cet appareil est équipé d’un circuit de protection. Un délai de quelques secondes est nécessaire après la mise sous tension avant qu’il fonctionne
normalement.
* Avant d’allumer/éteindre l’appareil, n’oubliez pas de baisser le volume. Même si le volume est réglé au minimum, vous entendrez peut-être un son
lorsque vous allumez/éteignez l’appareil. Ce son est normal et il ne s’agit pas d’un dysfonctionnement.
* Si vous devez couper complètement l’alimentation, débranchez le cordon d’alimentation de la prise murale. Voir le paragraphe «Alimentation»
(p.3).
connectés.
REMARQUE
Le système s’éteint automatiquement au bout d’environ
4 heures sans détection de signal en entrée.
Si vous ne voulez pas que l’appareil s’éteigne
automatiquement, mettez l’interrupteur [AUTO OFF] en
position OFF.
3. Allumez le système.2. Allumez les appareils
6
Page 33

Exemples de branchements
Le son de plusieurs appareils peut être reproduit simultanément.
Jouer☐avec☐un☐synthétiseur☐ou☐une☐batterie☐V-Drums
* Utilisez un câble adaptateur (par exemple
une prise RCA ou un jack 6,35) en fonction
de l’appareil que vous connectez.
ou
Vous pouvez connecter un lecteur audio ou une autre
source sonore et la lire simultanément.
Deutsch Français Italiano Español Português NederlandsEnglish
Batterie V-DrumsSynthétiseurPercussions Lecteur audio, etc.
Lecture☐de☐musique☐venant☐d'un☐DVD☐ou☐d'un☐lecteur☐audio
Si votre lecteur DVD est équipé d’une prise de sortie
numérique, connectez-le à la prise CH3 pour une meilleure
qualité d’écoute.
N’envoyez pas d’autre signal
qu’un signal stéréo numérique à
la prise CH3. L’entrée d’un signal
numérique, par exemple un
canal5.1, produira du bruit.
Réglez l’appareil connecté sur
«stéréo» ou «PCM».
ou
ou
Lecteur audioLecteur DVD
Jouer☐de☐la☐musique☐à☐partir☐d'une☐table☐de☐mixage
Branchez votre table de mixage sur les prises BALANCED
INPUT. Cela permet d’utiliser le système comme un
ensemble de retour de qualité.
Table de mixage
Synthétiseur
* Ne connectez pas une guitare, une
basse ou un micro directement au
CM-110 ou au CM-220.
7
Page 34

Exemples☐de☐branchements
Jouer☐de☐la☐musique☐à☐partir☐d'un☐ordinateur
Si vous connectez un ordinateur, les types de connexions suivantes sont possibles.
Connexion☐analogique☐à☐un☐ordinateur
Il s’agit de la connexion la plus simple. Connectez la prise casque ou la sortie ligne de votre ordinateur à l’entrée LINE.
ou
Ordinateur
Connexion☐d’un☐ordinateur☐via☐l’interface☐audio☐USB☐
Vous pouvez lire le son sur votre ordinateur via une interface audio USB.
Câble coaxial
* N’envoyez pas d’autre signal qu’un signal
stéréo numérique. L’entrée d’un signal
numérique, par exemple un canal5.1,
produira du bruit.
* Si votre interface audio n’est pas équipée
d’une prise coaxiale de sortie, utilisez la
connexion analogique.
Vers la prise coaxiale de sortie
Interface audio USB
ou
Vers les prises de sortie analogique
Vous pouvez connecter un synthétiseur et
en jouer en même temps.
Ordinateur
* Ne connectez pas une guitare, une
basse ou un micro directement au
CM-110 ou au CM-220.
8
Page 35

Schéma fonctionnel
RL
CH1
L/MONO
STEREO
DIGITAL
R
L
R
BALANCED
INPUT
L
R
INSTRUMENT
CH2
LINE
RECEIVER
DAC
CH3
DIGITAL
LOW HIGH
EQUALIZER
MASTER
HPF
POWER
AMP
WOOFER
SPEAKER
OUT
L
R
LPF PHASE
NOR
INV
SATELLITE SPEAKER
INPUT
INPUT
POWER
AMP
PHONES
Deutsch Français Italiano Español Português NederlandsEnglish
Dépannage
Problème Cause Action Page
Le système ne s’allume pas
Aucun son
Le son est déformé ou
dégradé.
Volume trop faible
Le cordon d’alimentation est-il correctement branché sur
une prise secteur?
Les appareils externes sont-ils correctement branchés? Vériez le type des prises et faites les branchements corrects. —
Toutes les commandes sont-elles correctement réglées? Tournez les commandes vers la droite pour augmenter le volume. p.6
La fonction Auto O a-t-elle fonctionné?
Envoyez-vous un signal analogique à la prise CH3?
Envoyez-vous en entrée un signal numérique (ex. canal
audio 5.1) à la prise CH3?
Avez-vous connecté des enceintes autres que les
enceintes satellites fournies?
Utilisez-vous d’autres câbles que les câbles d’enceintes
fournis?
La commande correspondante est-elle réglée beaucoup
trop haut?
Le niveau d’entrée de l’appareil connecté est-il adéquat? Baissez le volume de l’appareil connecté. —
Envoyez-vous en entrée un signal numérique (ex. canal
audio 5.1) à la prise CH3?
Chaque commande est-elle correctement réglée? Tournez les commandes vers la droite pour augmenter le volume. p.6
Le niveau d’entrée de l’appareil connecté est-il adéquat? Augmentez le volume de l’appareil connecté. —
Avez-vous connecté des enceintes autres que les
enceintes satellites fournies?
Utilisez-vous d’autres câbles que les câbles d’enceintes
fournis?
Utilisez-vous un câble de connexion contenant une
résistance intégrée?
Vériez que le cordon d’alimentation est correctement branché
sur une prise secteur.
Éteignez et rallumez le système ou mettez l’interrupteur [AUTO
OFF] sur OFF.
Branchez un câble coaxial sur la prise CH 3 et connectez l’autre
extrémité à la prise de sortie numérique de votre appareil.
Envoyez un signal stéréo numérique. p.7
Utilisez les enceintes satellites fournies. p.4
Utilisez les câbles d’enceintes fournis. p.4
Tournez la commande correspondante vers la gauche pour régler
correctement le volume.
Envoyez un signal stéréo numérique. p.7
Utilisez les enceintes satellites fournies. p.4
Utilisez les câbles d’enceintes fournis. p.4
Lorsque vous connectez les prises INPUT, utilisez des câbles qui
ne contiennent pas de résistance intégrée.
p.5
p.6
p.5
p.6
—
9
Page 36

Principales caractéristiques
Roland☐CM-110,☐CM-220:☐CUBE☐MONITOR
CM-110 CM-220
Puissance de sortie nominale
Niveau d’entrée nominal (1kHz)
Impédance d’entrée
Entrée numérique (CH 3)
Enceintes
Commandes
Connecteurs
Consommation électrique 47 W 67 W
Dimensions
Poids
Accessoires Cordon d’alimentation, câble d’enceinte (3,5m) x 2, Manuel d’utilisation
Caisson de graves 16cm (6,5pouces) 25cm (10pouces)
Enceintes satellites 10cm (4pouces, blindage magnétique), 2cm (3/4pouce, blindage magnétique) (chacune)
<Commande des canaux>
<Commande du caisson de graves>
<Commande Master>
Caisson de graves 330 (L) x 327 (P) x 368 (H) mm 381 (L) x 376 (P) x 413 (H) mm
Enceintes satellites 162 (L) x 197 (P) x 243 (H) mm
Caisson de graves 13,3 kg 18,8 kg
Enceintes satellites 3,1 kg (chacune)
100W
(Caisson de graves 50W + enceinte satellite 2 x 25W)
CH 1 (INSTRUMENT): -20dBu
CH 2, (LINE): -10dBu
ENTRÉE SYMÉTRIQUE: +4dBu
CH 1 (INSTRUMENT): 10 kilo-ohms
CH 2, (LINE): 10 kilo-ohms
ENTRÉE SYMÉTRIQUE: 10 kilo-ohms
Format: conforme à la norme IEC60958
Fréquence d’échantillonnage: 32kHz à 192kHz (automatiquement) (déphasage: OFF)
Longueur des mots: 24bits
Commande volume [CH 1] (INSTRUMENT)
Commande volume [CH 2] (LINE)
Commande volume [CH 3] (DIGITAL)
Commande de volume [WOOFER]
Interrupteur [PHASE]
Commande EQUALIZER [HIGH], commande [LOW]
Commande de volume [MASTER]
Interrupteur [AUTO OFF]
Interrupteur [ON]
Prises CH 1 (INSTRUMENT) (L/MONO, R): jack 6,35
Prises CH 2 (LINE) (L, R, STEREO): type RCA, mini-jack stéréo
Prise CH 3 (DIGITAL): RCA phono
Prises BALANCED INPUT (L, R): XLR, jack 6,35 TRS
Prise PHONES: mini-jack stéréo
Prises SATELLITE SPEAKER (uniquement pour les enceintes satellites dédiées)
Prise AC IN
200W
(Caisson de graves 100W + enceinte satellite 2 x 50W)
* 0 dBu = 0,775 Ve
* Dans le but d’améliorer ce produit, ses caractéristiques techniques et/ou son aspect peuvent être modiés sans préavis.
10
Page 37

Utilisation de pieds de micro
AVERTISSEMENT : La stabilité lors de l’utilisation de pieds de micro autres que le pied pliant fourni avec les enceintes n’a pas été testée et
peut présenter un risque pour l’utilisateur.
Les enceintes satellites sont conçues pour être supportées par des pieds de micro non préconisés par Roland. Lorsque vous montez les enceintes sur
des pieds de micro non préconisés par Roland, vous pouvez les positionner à la hauteur optimale pour les utiliser comme retours ou comme système
de sonorisation.
☐AVERTISSEMENT
Le support du pied de micro de chaque enceinte satellite comporte 2trous: 3/8” et 5/8”. Utilisez le trou convenant à votre pied de micro.
Diamètre 3/8”Diamètre 5/8”
• Ouvrez les jambes du pied de micro (50cm minimum) et positionnez-le de façon que la hauteur totale (y compris l’enceinte satellite) ne soit pas
supérieure à 105cm (voir l’image ci-dessous).
Deutsch Français Italiano Español Português NederlandsEnglish
105 cm (41-3/8”) maxi
50 cm (19-11/16”) mini
• Si la hauteur est supérieure à 105cm (enceinte comprise) ou si les jambes ne sont pas totalement sorties, le pied et l’enceinte peuvent basculer, ce
qui peut détériorer le matériel ou blesser quelqu’un.
• Lorsque vous utilisez des pieds de micro pour supporter les enceintes satellites, ne les placez pas sur des surfaces instables ou inclinées. Vous
devez placer le pied sur une surface stable et horizontale.
• Vériez que les câbles connectés aux enceintes sont placés de façon à éviter tout accident, par exemple si quelqu’un se prend les pieds dedans.
• Pour éviter le basculement du pied et de l’enceinte, ne posez rien sur une enceinte montée sur un pied de micro.
• Après avoir monté une enceinte sur un pied de micro, vériez la stabilité de l’ensemble.
• Demandez l’aide d’au moins une personne pour monter une enceinte sur un pied de micro ou lorsque vous réglez la hauteur du pied quand
l'enceinte est montée.
• Serrez fort les xations du pied de micro de façon que l’enceinte ne se déplace pas à gauche ou à droite.
• Faites attention de ne pas vous pincer les doigts en montant l’enceinte satellite.
• Utilisez un pied de micro stable et robuste, par exemple en aluminium ou en acier.
11
Page 38

Page 39

* Nella gura è illustrato il modello CM-220.
Manuale dell'utente
Deutsch Français Italiano Español Português NederlandsEnglish
Sistema audio a 2.1 canali
Il set è costituito da un'unità principale
(subwoofer), che riproduce in modo ottimale i
bassi profondi, e da due altoparlanti satellite.
Con un semplice collegamento è possibile
attivare immediatamente il sistema audio a 2.1
canali.
Per strumenti musicali
Il dispositivo CM-220 ore ben 200 W di potenza di
uscita rispetto ai 100 W del modello CM-110.
È possibile mixare le sorgenti in modo da riprodurre
con chiarezza l'intera gamma dei suoni, dalle basse
alle alte frequenze.
Per la produzione musicale
È possibile collegare il sistema al computer per ottenere una
congurazione di monitoraggio di alta qualità.
La profondità dei bassi rende inoltre questo sistema ideale per
l'ascolto.
Copyright © 2012 ROLAND CORPORATION
Tutti i diritti riservati. Nessuna parte di questo documento può essere in alcun modo riprodotta senza autorizzazione scritta di ROLAND CORPORATION.
Roland e CUBE MONITOR sono marchi o marchi registrati di Roland Corporation negli Stati Uniti e/o in altri paesi.
Page 40

UTILIZZO SICURO DELL'UNITÀ
Prima di utilizzare questa unità, leggere attentamente le sezioni “ISTRUZIONI IMPORTANTI PER LA SICUREZZA”, “UTILIZZO SICURO DELL'UNITÀ” (p. 2) e “NOTE IMPORTANTI” (p. 3),
che contengono importanti informazioni sul corretto impiego dell'unità. È inoltre consigliabile leggere per intero il Manuale dell'utente, per assicurarsi di aver compreso
appieno tutte le funzioni oerte dalla nuova unità acquistata. Conservare il manuale e tenerlo a portata di mano per usarlo come riferimento.
AVVISO
Per collegare il cavo di alimentazione
dell'unità a una presa di corrente non
utilizzare una presa a cui è collegato
un numero eccessivo di altri dispositivi.
Prestare particolare attenzione quando
si utilizzano prolunghe: la potenza
massima utilizzata da tutti i dispositivi
collegati alla presa della prolunga non
deve mai superare la potenza prevista
(watt/ampere) per la prolunga in uso.
Carichi eccessivi possono causare il
surriscaldamento del materiale isolante
del cavo e provocarne la fusione.
ATTENZIONE
AVVISO
Collegare la spina dell'alimentazione di
questo modello a una presa dotata di
messa a terra.
Non aprire l'unità né eettuare modiche
interne sull'unità.
Non tentare di riparare l'unità o di sostituirne
parti interne, ad eccezione dei casi in cui
il presente manuale fornisca istruzioni
speciche indicando all'utente le modalità
di esecuzione di tali operazioni. Per qualsiasi
tipo di assistenza rivolgersi al proprio
fornitore, al Centro di assistenza Roland più
vicino o a un distributore Roland autorizzato,
come indicato nella pagina “Informazioni”.
Non installare l'unità in luoghi con le
caratteristiche indicate di seguito:
• Aree soggette a temperature eccessive
(ad esempio, la luce solare diretta in
un veicolo chiuso, vicino a una fonte
di calore, su apparecchiature che
generano calore);
• Ambienti umidi (ad esempio bagni,
lavanderie o su pavimenti bagnati);
• Aree esposte al vapore o al fumo;
• Ambienti soggetti a esposizione salina;
• Ambienti umidi;
• Ambienti esposti alla pioggia;
• Ambienti polverosi o sabbiosi;
• Ambienti soggetti a livelli elevati di
vibrazioni e tremolio.
Assicurarsi che l'unità sia sempre
posizionata in piano e in modo stabile. Non
posizionarla mai su aste che potrebbero
oscillare o su superci inclinate.
L'unità deve essere collegata a
un'alimentazione che sia solo del tipo
corrispondente a quanto indicato sul retro
dell'unità.
Utilizzare solo il cavo di alimentazione
in dotazione. Il cavo fornito non deve
inoltre essere utilizzato con nessun altro
dispositivo.
Non sottoporre a torsione né piegare in
modo eccessivo il cavo di alimentazione,
né posizionare oggetti pesanti su di esso.
In caso contrario, è possibile che il cavo
venga danneggiato causando la rottura di
elementi e producendo cortocircuiti. I cavi
danneggiati possono provocare incendi e
scosse elettriche.
AVVISO
Questa unità, sola o in abbinamento
con un amplicatore e cue o casse, è
in grado di produrre livelli di suono che
possono causare la perdita permanente
dell'udito. Non lasciare in funzione l'unità
per periodi di tempo prolungati a un
livello di volume elevato o fastidioso. Se
si verica perdita di udito o si avvertono
ronzii nelle orecchie, è necessario
interrompere immediatamente l'utilizzo
dell'unità e consultare uno specialista
dell'udito.
Non posizionare sull'unità alcun oggetto
contenente liquidi. Evitare che qualsiasi
tipo di oggetto (ad esempio materiale
inammabile, monete, spilli) o liquido
(acqua, bevande, ecc.) penetri nell'unità.
In caso contrario, potrebbero vericarsi
cortocircuiti, esecuzioni non corrette o
altri malfunzionamenti.
Spegnere immediatamente l'unità,
rimuovere il cavo di alimentazione dalla
presa e richiedere assistenza al proprio
fornitore, al Centro di assistenza Roland
più vicino o a un distributore Roland
autorizzato, in base all'elenco nella pagina
“Informazioni”, quando:
• il cavo di alimentazione o la spina è
danneggiata;
• si verica emissione di fumo o di odore
insolito;
• sull'unità sono caduti oggetti o sono
stati versati liquidi;
• l'unità è stata esposta a pioggia (o si è
bagnata in altro modo);
• l'unità non funziona normalmente o
manifesta un cambiamento evidente
nelle prestazioni.
Se si utilizza l'unità in luoghi in cui sono
presenti bambini, prestare attenzione
anché l'unità non venga maneggiata in
modo errato. È opportuna la supervisione
costante di un adulto.
Proteggere l'unità da impatti di forte
entità.
Prestare molta attenzione a non farla
cadere.
Prima di utilizzare l'unità in un paese
straniero, consultare il proprio fornitore,
il Centro di assistenza Roland più vicino o
un distributore Roland autorizzato, in base
all'elenco della pagina “Informazioni”.
Posizionare l'unità in modo tale da non
creare impedimenti per una corretta
ventilazione.
Aerrare solo la spina del cavo di
alimentazione quando lo si collega a una
presa o all'unità oppure lo si scollega da
esse.
A intervalli regolari, è necessario
scollegare la spina di alimentazione e
pulirla utilizzando un panno asciutto per
eliminare tutta la polvere e altri accumuli
dai relativi denti. Inoltre, scollegare la
spina dalla presa di alimentazione ogni
volta che l'unità deve restare inutilizzata
per un periodo di tempo prolungato.
Eventuali accumuli di polvere tra la spina
e la presa di alimentazione possono
provocare uno scarso isolamento elettrico
e causare incendi.
Evitare che cavi e li elettrici si
aggroviglino. Posizionare tutti i cavi e i li
elettrici fuori dalla portata dei bambini.
Evitare di salire sull'unità o di collocare
oggetti pesanti su di essa.
Non maneggiare il cavo di alimentazione o
le relative spine con mani bagnate quando
lo si collega o lo si scollega da una presa
o dall'unità.
Prima di spostare l'unità, scollegare la
spina dalla presa di alimentazione ed
estrarre tutti i cavi dai dispositivi esterni.
Prima di eettuare la pulizia dell'unità,
spegnerla e scollegare il cavo di
alimentazione dalla presa (p. 5).
Qualora si sospetti la possibilità di fulmini
nella zona, togliere la spina del cavo di
alimentazione dalla presa.
Le parti metalliche dell'unità principale
(subwoofer) possono diventare calde. Fare
attenzione a non scottarsi.
Non rimuovere in nessun modo la griglia
dell'altoparlante né l'altoparlante. Gli
altoparlanti non devono essere sostituiti
dall'utente. La custodia contiene elementi
sotto tensione e quindi pericolosi.
2
Page 41

NOTE IMPORTANTI
Alimentazione
• Non collegare l'unità alla stessa presa elettrica
utilizzata contemporaneamente da un altro
apparecchio elettrico controllato da un invertitore
(ad esempio un frigorifero, una lavatrice, un
forno a microonde o un condizionatore d'aria)
o contenente un motore. In base al modo in
cui l'apparecchio elettrico viene utilizzato, il
rumore dell'alimentazione potrebbe causare il
malfunzionamento dell'unità o produrre rumore
percepibile. Se non è possibile utilizzare una presa
elettrica separata, collegare un ltro per il rumore
dell'alimentazione tra l'unità e la presa elettrica.
• Spegnere tutti i dispositivi prima di collegarli a
questa unità per evitare malfunzionamenti e/o
danni agli altoparlanti o ad altri dispositivi.
• Il fatto che il LED sia spento non signica che
l'unità sia stata completamente scollegata
dall'alimentazione. Per disattivare completamente
l'alimentazione, scollegare il cavo di alimentazione
dalla presa di corrente. Per questo motivo, la
presa alla quale si sceglie di collegare la spina
di alimentazione deve essere immediatamente
disponibile e di facile accesso.
• Per impostazione predenita, i modelli CM-110
e CM-220 vengono spenti automaticamente
dopo circa 4 ore di inutilizzo. Se non si desidera
spegnere automaticamente l'unità, impostare
“AUTO OFF” su “OFF” come descritto a p. 6.
Posizionamento
• L'utilizzo dell'unità vicino ad amplicatori di
potenza (o altre apparecchiature contenenti
trasformatori di potenza di grandi dimensioni)
potrebbe causare un ronzio. Per ridurre il
problema, modicare l'orientamento dell'unità o
allontanarla dall'origine di interferenza.
• Questo dispositivo potrebbe interferire con la
ricezione di apparecchi radio e televisivi. Non
utilizzarlo in prossimità di tali ricevitori.
• Se si utilizzano dispositivi di comunicazione
wireless, ad esempio telefoni cellulari, in
prossimità dell'unità, è possibile che si produca
rumore. Tale rumore potrebbe vericarsi quando
si riceve o si avvia una chiamata o durante la
conversazione telefonica. Se si vericano tali
problemi, è necessario allontanare i dispositivi
wireless dall'unità o spegnerli.
• Non esporre l'unità alla luce solare diretta, non
posizionarla in prossimità di dispositivi che
irradiano calore, non lasciarla all'interno di
un veicolo chiuso né sottoporla in altri modi
a temperature eccessive. Evitare inoltre che
dispositivi luminosi solitamente utilizzati quando
la fonte di luce è molto vicina all'unità (ad
esempio, la luce sulla tastiera del piano) oppure
riettori potenti siano puntati sulla stessa area
dell'unità per lunghi periodi di tempo. Il calore
eccessivo può deformare o scolorire l'unità.
• Quando l'unità viene spostata da un luogo
a un altro in cui la temperatura e/o l'umidità
sono molto diverse, è possibile che si formino
delle goccioline d'acqua (condensa) all'interno
dell'unità. Se si tenta di utilizzare l'unità in
tali condizioni, potrebbero vericarsi danni o
malfunzionamenti. Pertanto, prima di utilizzare
l'unità, è necessario lasciarla spenta per diverse
ore nché la condensa non sia completamente
evaporata.
• Evitare che gomma, vinile o materiali di natura
simile restino a lungo sull'unità. Si tratta di oggetti
che potrebbero scolorire o comunque rovinare la
nitura del prodotto.
• Non incollare adesivi, decalcomanie o altri
ornamenti simili allo strumento. Quando si cerca di
staccare i residui di tali materiali, la vernice esterna
potrebbe infatti danneggiarsi.
• A seconda del materiale e della temperatura della
supercie su cui si appoggia l'unità, i piedini in
gomma potrebbero scolorirsi oppure rovinare la
supercie.
Per evitare che questo accada, posizionare un
feltrino o un panno sotto il piedino. In tal caso,
vericare che l'unità non possa scivolare o
muoversi accidentalmente.
• Non collocare oggetti contenenti acqua (ad
esempio, vasi di ori) sull'unità. Evitare inoltre
l'uso di insetticidi, profumi, alcool, smalto per
unghie, bombolette spray e simili vicino all'unità.
Asciugare prontamente eventuale liquido versato
sull'unità con un panno morbido e asciutto.
Manutenzione
• Per la pulizia quotidiana dell'unità utilizzare un
panno morbido e asciutto oppure leggermente
inumidito con acqua. Per rimuovere lo sporco
ostinato utilizzare un panno imbevuto di
un detergente delicato e non abrasivo.
Successivamente, asciugare completamente
l'unità con un panno soce e asciutto.
• Non utilizzare mai benzina, diluenti, alcool o
solventi di alcun tipo, per evitare la possibilità di
scoloritura e/o deformazione.
Precauzioni aggiuntive
• Utilizzare i pulsanti, i cursori o altri controlli,
nonché i jack e i connettori dell'unità prestando
ragionevole attenzione. Una manipolazione poco
attenta può causare malfunzionamenti.
• Quando si collegano/scollegano tutti i cavi, tenere
fermo il connettore senza mai tirare il cavo. In
tal modo si eviterà di causare cortocircuiti o di
danneggiare gli elementi interni del cavo.
• Durante il normale funzionamento l'unità può
emanare calore.
• Per evitare di arrecare disturbo ai vicini, cercare di
mantenere il volume dell'unità a livelli ragionevoli.
Se si desidera utilizzare un volume più elevato, è
consigliabile servirsi di cue.
• Per trasportare l'unità, imballarla nella scatola
originale, includendo l'imbottitura, se possibile. In
caso contrario, utilizzare materiali di imballaggio
equivalenti.
• Alcuni cavi di collegamento contengono
resistenze. Per collegare questa unità, non
utilizzare cavi con resistenze incorporate. L'utilizzo
di tali cavi può causare una riduzione eccessiva
del livello del suono o la produzione di suono
inudibile. Per informazioni sulle speciche dei cavi,
contattare il produttore del cavo.
• In considerazione del design strutturale dello
strumento, è possibile che piccoli animali, anche
domestici, possano rimanere intrappolati al suo
interno. In tal caso, spegnere immediatamente
l'unità e scollegare il cavo di alimentazione dalla
presa. Contattare quindi il rivenditore dal quale si
è acquistato lo strumento o il Centro di assistenza
Roland più vicino.
• Non mettere le mani o le dita nelle aperture
dell'unità. In particolare, se l'unità deve essere
utilizzata in un ambiente domestico in cui
sono presenti dei bambini, sarà necessaria la
supervisione di un adulto anché mani e piedi dei
bambini non si avvicinino mai a tali aperture.
• I nomi delle società e dei prodotti citati nel
presente documento sono marchi o marchi
registrati dei rispettivi proprietari.
Deutsch Français Italiano Español Português NederlandsEnglish
3
Page 42

Contenuto della confezione
☐ Unità principale (subwoofer)
☐ Altoparlanti satellite (due)
* È necessario utilizzare gli altoparlanti satellite
in dotazione.
☐ Coperture per altoparlanti (due)
È possibile applicarle agli altoparlanti satellite,
se lo si desidera.
* Nella gura è illustrata l'unità principale del modello CM-220.
☐ Cavi degli altoparlanti (due)
* È necessario utilizzare i cavi degli altoparlanti in dotazione.
☐ Cavo di alimentazione
☑ Manuale dell'utente (il presente documento)
Posizionamento
La qualità del volume e del tono dipende dalla distanza dal muro alla quale vengono posizionati l'unità principale e gli altoparlanti satellite, nonché
dal materiale con cui è costruito il muro e dalle caratteristiche del pavimento. Durante l'ascolto, modicare la posizione e il volume nel modo più
appropriato per l'ambiente.
Posizionamento degli altoparlanti satellite
È consigliabile posizionare gli altoparlanti satellite a due angoli di un triangolo equilatero, con la posizione
di ascolto in corrispondenza del terzo angolo.
Posizionare la parte anteriore di ogni altoparlante satellite di fronte alla posizione di ascolto.
Posizionamento dell'unità principale
È consigliabile posizionare l'unità principale (subwoofer) alla stessa distanza degli altoparlanti satellite, con la
posizione di ascolto al centro.
Come stabilire un collegamento naturale tra l'unità principale (subwoofer) e gli
altoparlanti satellite (interruttore [PHASE])
L'interruttore [PHASE] consente di impostare la fase dell'unità principale (subwoofer). Scegliere
l'impostazione “NOR” (normale) o “INV” (inversa), a seconda di quale delle due produce il collegamento
più naturale tra l'unità principale (subwoofer) e gli altoparlanti satellite.
4
Page 43

Descrizioni del pannello
Pannello posteriore
Jack INPUT
Consentono di collegare i dispositivi audio che si desidera utilizzare. I segnali possono essere prodotti simultaneamente da tutti i jack.
* Quando si utilizzano cavi di collegamento con resistenze, il livello del volume dell'apparecchiatura collegata ai jack INPUT potrebbe essere basso. In questo caso,
utilizzare cavi di collegamento che non contengano resistenze.
Jack BALANCED INPUT
Consente di collegare un mixer o un dispositivo analogo.
Tipo di jack
* Questo strumento è dotato di ingressi di tipo
bilanciato (XLR/TRS). Di seguito sono riportati
gli schemi elettrici di questi ingressi. Eseguire
i collegamenti solo dopo aver controllato
gli schemi elettrici delle altre apparecchiature che si intende
collegare.
GND (SLEEVE)
HOT (TIP)
1: GND
2: HOT
3: COLD
COLD (RING)
Jack PHONES
Consente di collegare le
cue (jack mini stereo,
venduto separatamente).
* Se le cue sono collegate,
il suono non viene emesso dall'unità
principale (subwoofer) o dagli
altoparlanti satellite.
Jack CH 3
Consente di collegare
l'uscita digitale (cavo
coassiale) di un dispositivo.
* Da questo jack è
possibile riprodurre
esclusivamente un
segnale digitale stereo.
Ad esempio, la riproduzione di un segnale a
5.1 canali o di un altro
tipo di segnale digitale
produrrà rumore.
Tipo di jack Tipo di jack Tipo di jack
Jack CH 2
Consentono di collegare
dispositivi quali televisori,
computer o lettori audio
(con jack phono RCA o un
jack mini stereo).
Jack CH 1
Consentono di collegare
strumenti musicali
quali tastiere o batterie
elettroniche (jack phono
da 1/4”).
Deutsch Français Italiano Español Português NederlandsEnglish
Jack AC IN
Consente di collegare il cavo di alimentazione in dotazione.
Pannello
posteriore
Pannello
posteriore
Jack SATELLITE SPEAKER
Consentono di collegare gli altoparlanti
satellite in dotazione.
* Collegare esclusivamente i cavi degli
altoparlanti in dotazione.
5
Page 44

Accensione dell'unità
Pannello superiore
Manopole [CH 1], [CH 2],
[CH 3]
Consentono di regolare il volume del suono
in ingresso dai jack CH 1, CH 2 e CH 3.
Manopole EQUALIZER
Manopola
[LOW]
Manopola
[HIGH]
Consente di regolare il volume
della gamma di basse frequenze.
Consente di regolare il volume
della gamma di alte frequenze.
Manopola [MASTER]
Consente di regolare il volume complessivo
dell'uscita dall'unità principale (subwoofer)
e dagli altoparlanti satellite.
Manopola [WOOFER]
Consente di regolare il volume dell'uscita
dall'unità principale (subwoofer).
Interruttore [AUTO OFF]
Il sistema viene spento automaticamente una volta
trascorse 4 ore senza che venga rilevato alcun
segnale di ingresso.
ON
* Per riprendere il funzionamento, spegnere e
riaccendere l'unità oppure impostare l'interruttore
[AUTO OFF] sulla posizione “OFF”.
OFF Il sistema non viene spento automaticamente.
Quando l'unità è accesa, emette una
luce rossa.
Interruttore [ON]
Consente di accendere l'unità.
Interruttore [PHASE]
Consente di cambiare la fase del suono in uscita dall'unità
principale (subwoofer) (p. 4).
Accensione dell'unità
* Per evitare malfunzionamenti e/o danni agli altoparlanti o ad altri dispositivi, abbassare sempre il volume e spegnere tutti i dispositivi prima di
eseguire qualsiasi collegamento.
* Dopo aver completato i collegamenti, accendere i vari dispositivi nell'ordine specicato. Se si segue un ordine di accensione errato, si rischia di
causare malfunzionamenti e/o danni agli altoparlanti e agli altri dispositivi.
1. Regolare la manopola
[MASTER] su 0.
* Questa unità è dotata di un circuito di protezione. Dopo l'accensione, è necessario attendere alcuni secondi prima che l'unità cominci a funzionare
normalmente.
* Prima di accendere o spegnere l'unità, assicurarsi sempre di abbassare il volume. Anche con il volume completamente abbassato è possibile che in
fase di accensione o spegnimento venga prodotto un suono. Questo comportamento è tuttavia normale e non indica un malfunzionamento.
* Per disattivare completamente l'alimentazione, scollegare il cavo di alimentazione dalla presa di corrente. Fare riferimento alla sezione
”Alimentazione” (p. 3).
apparecchiature collegate.
NOTA
Il sistema viene spento automaticamente una volta trascorse
circa 4 ore senza che venga rilevato alcun segnale di ingresso.
Se non si desidera che il sistema venga spento
automaticamente, impostare l'interruttore [AUTO OFF] sulla
posizione “OFF”.
3. Accendere l'unità.2. Accendere le
6
Page 45

Esempi di collegamenti
È possibile riprodurre simultaneamente il suono da tutte le apparecchiature collegate.
Riproduzione di musica da un sintetizzatore o una batteria elettronica
È possibile collegare un lettore audio o un'altra sorgente
audio e riprodurla simultaneamente.
* Utilizzare un cavo adattatore (ad esempio
un adattatore phono RCA o phone da 1/4”)
appropriato per il dispositivo da collegare.
o
Batterie elettronicheSintetizzatorePercussioni Lettore audio e così via
Deutsch Français Italiano Español Português NederlandsEnglish
Riproduzione di musica da un lettore DVD o un lettore audio
Se il lettore DVD è dotato di un jack di uscita digitale,
collegarlo al jack CH 3 per una riproduzione ottimale.
Dal jack CH 3 è possibile
riprodurre esclusivamente
un segnale digitale stereo. La
riproduzione di un segnale
digitale, quale un segnale audio a
5.1 canali, produrrà rumore.
Regolare il dispositivo collegato
sull'impostazione “stereo” o “PCM”.
o
o
Lettore audioLettore DVD
Riproduzione di musica da un mixer
Collegare il mixer ai jack BALANCED INPUT. Ciò consente
di utilizzare il sistema come un set di monitor di alta
qualità.
Mixer
Sintetizzatore
* Non collegare una chitarra,
un basso o un microfono
direttamente al modello CM-110
o CM-220.
7
Page 46

Esempi di collegamenti
Riproduzione di musica da un computer
Di seguito sono illustrati i tipi di collegamenti possibili per i computer.
Collegamento di un computer tramite una connessione analogica
Si tratta del tipo di collegamento più semplice. Consiste nel collegare il jack per le cue o l'uscita della linea del computer all'ingresso LINE.
o
Computer
Collegamento di un computer tramite un'interfaccia audio USB
È possibile riprodurre il suono dal computer tramite un'interfaccia audio USB.
Cavo coassiale
* Da questo jack è possibile riprodurre
esclusivamente un segnale digitale
stereo. La riproduzione di un segnale
digitale, quale un segnale audio a 5.1
canali, produrrà rumore.
* Se l'interfaccia audio non dispone di
un jack di uscita coassiale, utilizzare il
collegamento analogico.
Al jack di uscita coassiale
Interfaccia audio USB
o
Ai jack di uscita analogici
È possibile collegare e
suonare un sintetizzatore
contemporaneamente.
Computer
* Non collegare una chitarra, un basso
o un microfono direttamente al
modello CM-110 o CM-220.
8
Page 47

Diagramma a blocchi
RL
CH1
L/MONO
STEREO
DIGITAL
R
L
R
BALANCED
INPUT
L
R
INSTRUMENT
CH2
LINE
RECEIVER
DAC
CH3
DIGITAL
LOW HIGH
EQUALIZER
MASTER
HPF
POWER
AMP
WOOFER
SPEAKER
OUT
L
R
LPF PHASE
NOR
INV
SATELLITE SPEAKER
INPUT
INPUT
POWER
AMP
PHONES
Deutsch Français Italiano Español Português NederlandsEnglish
Risoluzione dei problemi
Problema Causa Azione Pagina
L'unità non si accende
Non viene riprodotto alcun
suono
Il suono è distorto o
disturbato
Il volume è insuciente
Il cavo di alimentazione è collegato correttamente a una
presa elettrica?
I dispositivi esterni sono collegati correttamente?
Tutte le manopole sono regolate correttamente? Ruotare le manopole a destra per aumentare il volume. p. 6
La funzione Auto O è attivata?
Si sta riproducendo un segnale analogico sul jack CH 3?
Si sta riproducendo un segnale digitale, quale un segnale
audio a 5.1 canali, sul jack CH 3?
Sono stati collegati altoparlanti diversi dagli altoparlanti
satellite in dotazione?
Si stanno utilizzando cavi diversi da quelli degli altoparlanti in dotazione?
La manopola corrispondente è stata regolata su valori
troppo elevati?
Il livello di ingresso del dispositivo collegato è appropriato?
Si sta riproducendo un segnale digitale, quale un segnale
audio a 5.1 canali, sul jack CH 3?
Ogni manopola è regolata correttamente? Ruotare le manopole a destra per aumentare il volume. p. 6
Il livello di ingresso del dispositivo collegato è appropriato?
Sono stati collegati altoparlanti diversi dagli altoparlanti
satellite in dotazione?
Si stanno utilizzando cavi diversi da quelli degli altoparlanti in dotazione?
Si sta utilizzando un cavo di collegamento che contiene
una resistenza incorporata?
Vericare che il cavo di alimentazione sia collegato correttamente
a una presa elettrica.
Vericare il tipo di jack e di connettore ed eseguire i collegamenti
corretti.
Spegnere e riaccendere l'unità oppure impostare l'interruttore
[AUTO OFF] su OFF.
Collegare un cavo coassiale al jack CH 3, quindi collegare l'altra
estremità al jack di uscita digitale dell'apparecchiatura.
Riprodurre un segnale digitale stereo. p. 7
Utilizzare gli altoparlanti satellite in dotazione. p. 4
Utilizzare i cavi degli altoparlanti in dotazione. p. 4
Ruotare la manopola verso sinistra per regolare il volume in
modo appropriato.
Abbassare il volume del dispositivo collegato. —
Riprodurre un segnale digitale stereo. p. 7
Alzare il volume del dispositivo collegato. —
Utilizzare gli altoparlanti satellite in dotazione. p. 4
Utilizzare i cavi degli altoparlanti in dotazione. p. 4
Per eseguire collegamenti ai jack INPUT, utilizzare cavi di
collegamento che non contengono resistenze incorporate.
p. 5
—
p. 6
p. 5
p. 6
—
9
Page 48

Speciche principali
Roland CM-110, CM-220: CUBE MONITOR
CM-110 CM-220
Emissione di potenza stimata
Livello di ingresso nominale (1 kHz)
Impedenza ingresso
Ingresso digitale (CH 3)
Altoparlanti
Controlli
Connessioni
Consumo energetico 47 W 67 W
Dimensioni
Peso
Accessori Cavo di alimentazione, cavo altoparlante (3,5 m) x 2, Manuale dell'utente
Unità principale 16 cm (6,5 pollici) 25 cm (10 pollici)
Altoparlante satellite 10 cm (4 pollici, con schermatura magnetica), 2 cm (3/4 pollici, con schermatura magnetica) (per ognuno)
<Controllo dei canali>
<Controllo dei woofer>
<Controllo principale>
Unità principale 330 (L) x 327 (P) x 368 (A) mm 381 (L) x 376 (P) x 413 (A) mm
Altoparlante satellite 162 (L) x 197 (P) x 243 (A) mm
Unità principale 13,3 kg 18,8 kg
Altoparlante satellite 3,1 kg (ciascuno)
100 W
(unità principale 50 W + altoparlante satellite 25 W x 2)
CH 1 (INSTRUMENT): -20 dBu
CH 2 (LINE): -10 dBu
BALANCED INPUT: +4 dBu
CH 1 (INSTRUMENT): 10 K ohms
CH 2 (LINE): 10 K ohms
BALANCED INPUT: 10 K ohms
Formato: conformità con IEC60958
Frequenza di campionamento: da 32 kHz a 192 kHz (automaticamente) (de-enfasi: OFF)
Lunghezza parole: 24 bit
Manopola volume [CH 1] (INSTRUMENT)
Manopola volume [CH 2] (LINE)
Manopola volume [CH 3] (DIGITAL)
Manopola volume [WOOFER]
Interruttore [PHASE]
Manopola EQUALIZER [HIGH], manopola [LOW]
Manopola volume [MASTER]
Interruttore [AUTO OFF]
Interruttore [ON]
Jack CH 1 (INSTRUMENT) (L/MONO, R): jack da 1/4"
Jack CH 2 (LINE) (L, R, STEREO): jack phono RCA, jack mini stereo
Jack CH 3 (DIGITAL): phono RCA
Jack BALANCED INPUT (L, R): XLR, jack TRS da 1/4"
Jack PHONES: jack mini stereo
Jack SATELLITE SPEAKER (solo per gli altoparlanti satellite dedicati)
Jack AC IN
200 W
(unità principale 100 W + altoparlante satellite 50 W x 2)
* 0 dBu = 0,775 Vrms
* Nell'interesse del miglioramento del prodotto, le speciche e/o l'aspetto di questa unità sono soggetti a modiche senza preavviso.
10
Page 49

Utilizzo di aste microfoniche
AVVISO: l’utilizzo di aste microfoniche diverse da quelle pieghevoli in dotazione con gli altoparlanti non è consigliato poiché potrebbe
risultare pericoloso e provocare lesioni all’utente.
Gli altoparlanti satellite possono essere utilizzati anche con aste microfoniche non prodotte da Roland. Quando si montano gli altoparlanti satellite su
aste microfoniche non prodotte da Roland, è possibile posizionarli all’altezza ottimale per l’utilizzo come monitor o come un comodo sistema PA.
AVVISO
Il supporto per asta microfonica alla base di ogni altoparlante satellite dispone di due fori, uno da 3/8” e uno da 5/8”. Utilizzare il foro appropriato per
l'asta microfonica in uso.
Diametro da 3/8”Diametro da 5/8”
• Come illustrato nella gura seguente, aprire le gambe dell'asta microfonica (50 cm o più) e posizionarla in modo che l'altezza totale (incluso
l'altoparlante satellite) non superi 105 cm.
Deutsch Français Italiano Español Português NederlandsEnglish
105 cm (41-3/8”)
o meno
50 cm (19-11/16”)
o più
• Se l'altezza dell'asta microfonica è superiore a 105 cm (incluso l'altoparlante satellite) o se le gambe non sono aperte, l'asta e l'altoparlante
potrebbero rovesciarsi, causando danni o lesioni.
• Se si montano gli altoparlanti satellite su aste microfoniche, non posizionare queste ultime su superci instabili o inclinate. L'asta deve essere
posizionata su un piano stabile e orizzontale.
• Assicurarsi di maneggiare in modo appropriato i cavi collegati agli altoparlanti satellite per evitare di inciampare su di essi e altri incidenti.
• Per evitare che l'asta e l'altoparlante si rovescino, non appoggiare oggetti su un altoparlante satellite montato su un'asta microfonica.
• Dopo aver montato un altoparlante satellite su un'asta microfonica, vericare che non traballi.
• Per montare un altoparlante satellite su un'asta microfonica o per regolare l'altezza dell'asta microfonica durante il montaggio dell'altoparlante,
farsi aiutare da almeno un'altra persona.
• Stringere saldamente l'asta microfonica in modo che l'altoparlante non si muova verso destra o sinistra.
• Durante il montaggio dell'altoparlante satellite, prestare attenzione a non farsi male alle mani.
• Utilizzare aste microfoniche resistenti e durevoli, ad esempio quelle in acciaio o in alluminio.
11
Page 50

Page 51

* La ilustración muestra el modelo CM-220.
Manual de instrucciones
Deutsch Français Italiano Español Português NederlandsEnglish
Práctico canal 2.1
El equipo consta de una unidad principal
(subaltavoz de graves) que aporta gran riqueza
y profundidad a los graves, y de dos altavoces
satélite.
Las sencillas conexiones le permiten empezar a
disfrutar inmediatamente del sonido del canal 2.1.
Para instrumentos musicales
El modelo CM-220 proporciona una generosa
potencia de 200 W de salida total, mientras que el
modelo CM-110 ofrece 100 W.
Las fuentes de entrada se pueden mezclar, lo que
aportará a sus interpretaciones un sonido nítido en
toda la gama tonal, desde las frecuencias bajas a las
altas.
Para producción de música
Puede conectar el sistema al ordenador para obtener una
conguración de monitorización de alta calidad.
La riqueza y profundidad de los graves hacen que este sistema
también sea ideal para escuchar música.
Copyright © 2012 ROLAND CORPORATION
Todos los derechos reservados. Se prohíbe la reproducción en cualquier formato de esta publicación, ya sea parcialmente o en su totalidad,
Roland y CUBE MONITOR son marcas comerciales registradas o marcas comerciales de Roland Corporation en Estados Unidos y/o en otros países.
sin la previa autorización por escrito de ROLAND CORPORATION.
Page 52

UTILIZACIÓN SEGURA DE LA UNIDAD
Antes de utilizar esta unidad, lea atentamente las secciones: "INSTRUCCIONES DE SEGURIDAD IMPORTANTES", "UTILIZACIÓN SEGURA DE LA UNIDAD" (pág. 2) y "NOTAS
IMPORTANTES" (pág. 3). En estas secciones encontrará información importante acerca de la utilización correcta de la unidad. También es aconsejable leer íntegramente el
manual del usuario para familiarizarse y conocer bien todas las funciones del equipo nuevo. Guarde el manual en un lugar accesible para consultarlo cuando le haga falta.
ADVERTENCIA
No enchufe el cable de alimentación de
la unidad a la misma toma de corriente
donde ya hay bastantes otros dispositivos
enchufados. Tenga especial cuidado si
utiliza cables de extensión. La corriente
total consumida por todos los dispositivos
conectados a la toma del cable de
extensión no debe sobrepasar nunca la
clasicación de potencia (vatios/amperios)
del cable. Una carga excesiva podría hacer
que se calentara el material de aislamiento
del cable y llegara a fundirse.
PRECAUCIÓN
ADVERTENCIA
Conecte el cable de alimentación eléctrica
de este modelo a una toma de corriente
con conexión a tierra.
No abra la unidad ni modique ninguno
de sus componentes internos.
No intente reparar la unidad ni sustituir
ninguna de sus piezas internas (salvo
cuando en este manual se proporcionen
instrucciones especícas que le indiquen
que lo haga). Si la unidad necesitara algún
tipo de reparación, póngase en contacto
con su proveedor, con el centro de servicio
Roland o con un distribuidor autorizado
de Roland; encontrará una lista de los
mismos en la página de información.
No instale nunca la unidad en los
siguientes lugares:
• Expuestos a temperaturas extremas
(por ejemplo, bajo la luz solar directa
en un vehículo cerrado, cerca de un
conducto de calefacción, encima de
algún equipo que genere calor, etc.).
• Mojados (por ejemplo, cuartos de baño
o suelos mojados).
• Expuestos al vapor o a humos.
• Expuestos a entornos salinos.
• Húmedos.
• Expuestos a la lluvia.
• Con polvo o arena.
• Expuestos a niveles altos de vibración
y sacudidas.
Asegúrese de que la unidad se coloca
siempre sobre una supercie plana,
nivelada y estable. Nunca la coloque sobre
soportes que puedan moverse ni sobre
supercies inclinadas.
La unidad se debe conectar a una fuente
de alimentación únicamente del tipo
descrito o según lo indicado en la parte
posterior de la unidad.
Utilice únicamente el cable de alimentación
suministrado con el equipo. Igualmente, el
cable de alimentación proporcionado no
debe emplearse con ningún otro aparato.
No doble ni retuerza excesivamente el
cable de alimentación, ni deje que haya
objetos pesados sobre él. Todo ello podría
dañar el cable, cortar sus elementos
o generar cortocircuitos. Los cables
dañados son peligrosos y pueden producir
incendios y descargas eléctricas.
ADVERTENCIA
Esta unidad, utilizada de manera
independiente o junto con un
amplicador y auriculares o altavoces,
puede generar niveles acústicos
susceptibles de provocar una pérdida
permanente de audición. No la utilice
durante periodos prolongados con un
nivel de volumen elevado o que resulte
molesto. Si experimenta pérdida de
audición o zumbido en los oídos, debe
dejar de utilizarla inmediatamente y
consultar a un otorrinolaringólogo.
No coloque ningún recipiente con agua
encima de este producto. No deje que
caigan objetos (p. ej. material inamable,
monedas, alambres) ni líquidos (p. ej. agua
o zumo) en el interior de este producto.
Si esto sucede podría producirse un
cortocircuito, provocar un funcionamiento
incorrecto o alguna otra deciencia.
Apague la unidad inmediatamente, retire
el cable de alimentación del enchufe y
póngase en contacto con su proveedor,
con el centro de servicio Roland más
cercano, o con un distribuidor autorizado
de Roland de los que se indican en la
página de información, siempre que:
• El enchufe o el cable de alimentación
estén dañados.
• La unidad genere humo u olores extraños.
• Haya caído algún objeto o se haya
derramado algún líquido en el interior
de la unidad.
• La unidad haya estado expuesta a la
lluvia o se haya mojado por algún otro
motivo.
• La unidad parezca no funcionar con
normalidad o muestre un cambio
notable en el rendimiento.
Cuando use la unidad en lugares donde
haya niños, tenga cuidado de que no se
manipule la unidad indebidamente. Debe
haber siempre un adulto que los supervise
y asesore.
Proteja la unidad contra los golpes.
(No deje que se caiga.)
Antes de utilizar la unidad en otro país,
póngase en contacto con su proveedor, el
centro de servicio Roland más cercano o
con un distribuidor autorizado de Roland;
encontrará una lista de los mismos en la
página de información.
La unidad se debe colocar en un lugar o
una posición que permitan su ventilación
adecuada.
Cada vez que enchufe o desenchufe el
cable de una toma de corriente o de esta
unidad, asegúrese de coger siempre el
cable de alimentación por el enchufe
propiamente dicho.
Desenchufe el enchufe del cable de
alimentación periódicamente y límpielo
con un paño seco para eliminar el polvo
y la suciedad de las patillas. Asimismo,
desenchufe el cable de alimentación de
la toma de corriente si la unidad no va a
utilizarse durante un periodo prolongado
de tiempo. La acumulación de polvo entre
el enchufe del cable de alimentación y
la toma de corriente puede afectar el
aislamiento y provocar un incendio.
Trate de evitar que se enreden los cables.
Además, todos los cables deben estar
fuera del alcance de los niños.
No se suba a la unidad, ni ponga objetos
pesados sobre ella.
Cuando vaya a enchufar o desenchufar
el cable de alimentación o su enchufe de
una toma de corriente o de esta unidad,
asegúrese siempre de tener las manos
secas.
Antes de mover la unidad, desconecte
el enchufe del cable de alimentación
de la toma y extraiga todos los cables
procedentes de dispositivos externos.
Antes de limpiar la unidad, apáguela y
desenchufe el cable de alimentación de la
toma de corriente (pág. 5).
Siempre que exista la posibilidad de
que se produzcan rayos en su región,
desconecte el enchufe del cable de
alimentación de la toma de corriente.
Las partes metálicas de la unidad principal
(subaltavoz de graves) podrían ponerse
calientes, así que tenga cuidado de no
quemarse.
No extraiga la rejilla del altavoz ni el
altavoz bajo ningún concepto. El usuario
no puede realizar las tareas de sustitución
del altavoz. Dentro de la carcasa hay
voltajes y corrientes peligrosos.
2
Page 53

NOTAS IMPORTANTES
Fuente de alimentación
• No conecte la unidad a la misma toma de corriente
utilizada por un aparato eléctrico controlado por
un inversor (como un frigoríco, una lavadora, un
microondas o un aparato de aire acondicionado)
o que tenga un motor. Dependiendo de cómo se
utilice dicho aparato eléctrico, el ruido de la fuente
de alimentación puede hacer que la unidad no
funcione correctamente o que produzca un ruido
perceptible. Si no fuera posible usar una toma de
corriente distinta, conecte un ltro de ruido de
fuente de alimentación entre la unidad y la toma
de corriente.
• Antes de conectar la unidad a otros dispositivos,
apáguelos todos. Esto contribuirá a prevenir
deciencias de funcionamiento o daños en los
altavoces u otros dispositivos.
• Aunque el LED esté apagado, esto no signica
que la unidad esté completamente desconectada
de la fuente de alimentación. Si necesita apagar
completamente el equipo, desenchufe el cable
de alimentación de la toma de corriente. Por este
motivo, la toma de corriente a la que conecte
el enchufe de alimentación eléctrica debe ser
fácilmente accesible.
• Con la conguración de fábrica, las unidades
CM-110 y CM-220 se apagarán de forma
automática aproximadamente a las 4 horas de
haber dejado de tocar o utilizar la unidad. Si no
desea que la unidad se apague automáticamente,
cambie el ajuste de "AUTO OFF" a "OFF" como se
explica en la pág. 6.
Ubicación
• La utilización del equipo cerca de amplicadores
de potencia (u otros equipos con transformadores
de energía de gran tamaño) puede producir
zumbidos. Para solucionar este problema, cambie
la orientación de la unidad o aléjela de la fuente
emisora de las interferencias.
• Este dispositivo puede producir interferencias
en la recepción de radio o televisión. No utilice el
dispositivo cerca de este tipo de receptores.
• La utilización de dispositivos de comunicación
inalámbricos cerca de la unidad, como teléfonos
móviles, puede originar ruidos. Este tipo de ruido
se puede producir al recibir o hacer una llamada,
o bien, durante la conversación. Si experimenta
este tipo de problemas, aleje los dispositivos
inalámbricos de la unidad o apáguelos.
• No exponga la unidad a la luz solar directa, no la
coloque cerca de dispositivos que emitan calor, no
la deje dentro de un vehículo cerrado ni la someta
a temperaturas extremas. No permita tampoco
que sistemas de iluminación (normalmente
utilizados con su fuente de luz muy próxima a la
unidad, por ejemplo una luz de piano) ni focos
de gran potencia estén encendidos en la misma
zona donde está la unidad durante periodos
prolongados de tiempo. El calor excesivo que
generan puede deformar o decolorar la unidad.
• Si se traslada la unidad a un lugar cuyas
condiciones de temperatura o humedad sean
sustancialmente diferentes, es posible que en
su interior se origine condensación. Si intenta
utilizar la unidad en estas circunstancias,
podrían producirse daños o deciencias de
funcionamiento. En consecuencia, antes de utilizar
el equipo déjelo en reposo varias horas para dar
tiempo a que la condensación se haya evaporado
por completo.
• No deje que objetos de caucho, vinilo o materiales
similares permanezcan sobre la unidad durante
largos periodos de tiempo. Este tipo de objetos
puede decolorar o dañar el acabado.
• No adhiera pegatinas, calcomanías ni elementos
similares a este instrumento. Al despegarlos del
instrumento se puede dañar el acabado exterior.
• En función del material y la temperatura de la
supercie sobre la que coloque la unidad, las
patas de goma de la misma podrían estropear o
decolorar la supercie.
Para evitar que esto suceda, coloque un paño o
similar debajo de las patas. Si hace esto último,
asegúrese de que la unidad no se pueda resbalar
ni caer accidentalmente.
• No coloque nada que contenga agua (por
ejemplo, un orero) sobre la unidad. Asimismo,
evite utilizar insecticidas, perfumes, alcohol,
esmalte de uñas, botes de aerosol, etc. en las
proximidades de la unidad. Seque rápidamente
todo líquido que se haya derramado sobre la
unidad con un paño suave y seco.
Mantenimiento
• Para la limpieza diaria utilice un paño suave y
seco, o ligeramente humedecido con agua. Para
eliminar la suciedad adherida, utilice un paño
impregnado con detergente suave y no abrasivo.
Seguidamente, no olvide secar bien la unidad con
un paño seco y suave.
• No utilice aguarrás, diluyente, alcohol ni disolvente
de ningún tipo para evitar que la unidad se
deforme y/o decolore.
Precauciones adicionales
• Tenga cuidado al utilizar los botones, mandos y
otros controles de la unidad, así como al usar los
enchufes y conectores. Una utilización incorrecta
puede dar lugar a deciencias de funcionamiento.
• Cada vez que conecte o desconecte algún cable,
sujete siempre el conector propiamente dicho,
es decir, no tire nunca del cable. De este modo
evitará provocar cortocircuitos o daños a los
elementos internos del cable.
• Durante el funcionamiento normal, la unidad
generará un poco de calor.
• Para evitar molestias a terceros, mantenga el
volumen de la unidad en un nivel razonable.
Podría interesarle utilizar los auriculares para
no tener que preocuparse de si molesta a otras
personas.
• Si tiene que transportar la unidad, siempre que sea
posible utilice la misma caja (incluido el material
de relleno protector) en la que la recibió. Si esto
no fuera posible, utilice materiales de embalaje
similares.
• Algunos cables de conexión incorporan
resistencias. No utilice cables con resistencias para
conectar esta unidad. Este tipo de cables puede
provocar que el nivel de sonido sea demasiado
bajo o prácticamente inaudible. Para obtener más
información sobre las especicaciones de cables,
póngase en contacto con el fabricante del cable
en cuestión.
• Debido al diseño estructural de este instrumento,
mascotas pequeñas u otros animales podrían
quedar atrapados en su interior. Si esto sucediera,
debe apagar inmediatamente la unidad y
desconectar el cable de alimentación de la toma
de corriente. A continuación, póngase en contacto
con el proveedor donde adquirió el instrumento o
con el centro de servicio Roland más cercano.
• No introduzca la mano, los dedos, etc. en las
aberturas de la unidad. En concreto, si la unidad
se utiliza en domicilios con niños pequeños, un
adulto debe supervisar en todo momento que los
niños tienen las manos y los pies alejados de las
aberturas.
• Los nombres de las empresas y los nombres de
los productos mencionados en este documento
son marcas comerciales registradas o marcas
comerciales de sus respectivos propietarios.
Deutsch Français Italiano Español Português NederlandsEnglish
3
Page 54

Compruebe el contenido de la caja
☐☐ Unidad☐principal☐(subaltavoz☐de☐graves)
☐☐ Altavoces☐satélite☐(dos)
* Utilice exclusivamente los altavoces satélite
incluidos.
☐☐ Cubiertas☐de☐altavoces☐(dos)
Si lo desea, puede colocárselas a los altavoces
satélite.
* La ilustración muestra la unidad principal del modelo CM-220.
☐☐ Cables☐de☐altavoces☐(dos)
* Utilice exclusivamente los cables de altavoces incluidos.
☐☐ Cable☐de☐alimentación
☐☑ Manual☐de☐instrucciones☐(este☐documento)
Ubicación
El volumen y la calidad tonal se verán afectados por la distancia a la que coloque la unidad principal y los altavoces satélite respecto de la pared, así
como por el material de construcción de la pared y las características del suelo. Mientras escucha el sonido, ajuste la posición y el volumen según sea
necesario para la posición en la que se encuentra.
Colocación☐de☐los☐altavoces☐satélite
Se recomienda colocar los altavoces satélite en dos de las esquinas de un triángulo equilátero, y dejar la
tercera esquina como la posición de escucha.
Coloque la parte frontal de cada altavoz satélite de forma que quede orientada hacia la posición de
escucha.
Colocación☐de☐la☐unidad☐principal
Lo ideal es colocar la unidad principal (subaltavoz de graves) a la misma distancia que los altavoces satélite, con la
posición de escucha en el centro.
Garantizar☐una☐conexión☐natural☐entre☐la☐unidad☐principal☐(subaltavoz☐de☐graves)☐
y☐los☐altavoces☐satélite☐(interruptor☐[PHASE])
El interruptor [PHASE] conmuta la fase de la unidad principal (subaltavoz de graves). Seleccione el
ajuste "NOR" (normal) o "INV" (inverso), el que ofrezca la conexión más natural entre la unidad principal
(subaltavoz de graves) y los altavoces satélite.
4
Page 55

Descripción de los paneles
Panel☐trasero
Conectores☐de☐entrada
Aquí puede conectar los dispositivos de audio que desea escuchar. Las señales procedentes de todos los conectores se pueden emitir simultáneamente.
* Si se utilizan cables de conexión con resistencias, el nivel del volumen del equipo conectado a los conectores de entrada puede ser bajo. En tal caso, utilice cables de
conexión sin resistencias.
Conectores☐BALANCED☐INPUT
Aquí puede conectar un mezclador o dispositivo similar.
Tipo de conector
* Este instrumento está equipado con
conectores balanceados tipo XLR/TRS. A
continuación se muestran los diagramas de
cableado de estos conectores. Efectúe las
conexiones después de consultar los diagramas de cableado de
los otros equipos que pretenda conectar.
GND (CUERPO)
HOT (PUNTA)
1: GND
2: HOT
3: COLD
COLD (ANILLO)
Conector☐PHONES
Aquí se conectan los
auriculares (mini clavija
estéreo; no incluida).
* Si los auriculares están
conectados, el sonido no saldrá por
la unidad principal (subaltavoz de
graves) ni por los altavoces satélite.
Conector☐CH☐3
Aquí puede
conectar la salida digital
(cable coaxial) de un
dispositivo.
* No envíe nada que no
sea una señal digital
estéreo. Por ejemplo,
la entrada de una
señal del canal 5.1
u otra señal digital
producirá ruido.
Tipo de conector Tipo de conector Tipo de conector
Conectores☐CH☐2
Aquí puede conectar
un dispositivo como
televisión, ordenador o
reproductor de audio (con
clavijas fono RCA o una
mini clavija estéreo).
Conectores☐CH☐1
Aquí puede conectar
un instrumento musical
como un teclado o
V-Drums (conectores
telefónicos de 1/4").
Deutsch Français Italiano Español Português NederlandsEnglish
Conector☐AC☐IN
Conecte aquí el cable de alimentación incluido.
Panel trasero Panel trasero
Conec tores☐SATELLITE☐SPEAKER
Conecte aquí los altavoces satélite incluidos.
* No conecte nada que no sean los cables de
altavoces incluidos.
5
Page 56

Encendido☐del☐sistema
☐Panel☐superior
Mandos☐[CH☐1],☐[CH☐2],☐[CH☐3]
Permiten ajustar el volumen del sonido
que entra en los conectores CH 1, los
conectores CH 2 y el conector CH 3.
Mandos☐de☐EQUALIZER
Mando
[LOW]
Mando
[HIGH]
Permite ajustar el volumen
de la gama más baja.
Permite ajustar el volumen
de la gama más alta.
Mando☐[MASTER]
Permite ajustar el volumen general de
salida de la unidad principal (subaltavoz de
graves) y de los altavoces satélite.
Mando☐[WOOFER]
Permite ajustar el volumen de salida de la
unidad principal (subaltavoz de graves).
Interruptor☐[AUTO☐OFF]
El sistema se apagará automáticamente cuando
hayan transcurrido 4 horas sin haber detectado
ON
OFF El sistema no se apagará ya automáticamente.
ninguna señal de entrada.
* Para reanudar la operación, apague la unidad
y luego vuelva a encenderla; o coloque el
interruptor [AUTO OFF] en la posición "OFF".
Se iluminará en rojo si el sistema está
encendido.
Interruptor☐[ON]
Enciende el sistema.
Interruptor☐[PHASE]
Permite cambiar la fase del sonido que emite la unidad
principal (subaltavoz de graves) (pág. 4).
Encendido del sistema
* Para evitar que los altavoces u otros dispositivos funcionen incorrectamente o sufran daños, baje siempre el volumen y apague todos los
dispositivos antes de realizar cualquier conexión.
* Una vez realizadas las conexiones, encienda los diferentes dispositivos en el orden indicado. Si los enciende en un orden incorrecto, corre el riesgo
de que se produzcan deciencias de funcionamiento o posibles daños en los altavoces y los demás dispositivos.
1. Ajuste el mando [MASTER]
en 0 (cero).
* Esta unidad está equipada con un circuito de protección. Después del encendido, es necesario esperar unos segundos para que la unidad
funcione con normalidad.
* Antes de encender o apagar la unidad, asegúrese siempre de bajar el volumen. Incluso con el volumen bajo, podría oírse algún sonido al encender
o apagar la unidad. No obstante, esto es normal y no indica ninguna deciencia de funcionamiento.
* Si necesita apagar completamente el equipo, desenchufe el cable de alimentación de la toma de corriente. Consulte la sección ”Fuente de
alimentación” (pág. 3).
conectado.
NOTA
Este sistema se apagará automáticamente cuando hayan
transcurrido unas 4 horas sin haber detectado ninguna
señal de entrada.
Si no desea que el sistema se apague automáticamente,
coloque el interruptor [AUTO OFF] en la posición "OFF".
3. Encienda el sistema.2. Encienda el equipo
6
Page 57

Ejemplos de conexión
El sonido de todos los equipos conectados se puede reproducir al mismo tiempo.
Tocar☐un☐sintetizador☐o☐equipo☐V-Drums
* Use un cable adaptador (como un
adaptador de clavija fono RCA a conector
telefónico de 1/4") según sea necesario para
el dispositivo que va a conectar.
Puede conectar un reproductor de audio u otra fuente,
y reproducirlo simultáneamente.
Deutsch Français Italiano Español Português NederlandsEnglish
o bien
V-DrumsSintetizadorPercusión Reproductor de audio, etc.
Reproducir☐la☐música☐de☐un☐reproductor☐de☐DVD☐o☐de☐audio
Si su reproductor de DVD tiene un conector de salida
digital, conéctelo al conector CH 3 para obtener la mejor
calidad de reproducción.
No envíe nada que no sea una
señal digital estéreo al conector
CH 3. La entrada de una señal
digital como el audio del canal 5.1
producirá ruido.
Ajuste el dispositivo conectado
en "Stereo" o "PCM".
o bien
o bien
Reproductor de audioReproductor de DVD
Reproducir☐la☐música☐de☐un☐mezclador
Conecte el mezclador a los conectores BALANCED INPUT.
Esto le permite usar el sistema como un conjunto de
monitores de alta calidad.
Mezclador
Sintetizador
* No conecte una guitarra, un bajo
o un micrófono directamente al
modelo CM-110 o CM-220.
7
Page 58

Ejemplos☐de☐conexión
Reproducir☐la☐música☐de☐un☐ordenador
Para conectar un ordenador, puede utilizar uno de los siguientes tipos de conexiones disponibles.
Conexión☐de☐un☐ordenador☐a☐través☐de☐una☐conexión☐analógica
Es el tipo de conexión más sencillo. Conecte el conector de los auriculares del ordenador o la salida de línea al conector de entrada LINE.
o bien
Ordenador
Conexión☐de☐un☐ordenador☐a☐través☐de☐una☐interfaz☐de☐audio☐USB
Puede reproducir el sonido de su ordenador a través de una interfaz de audio USB.
Cable coaxial
* No envíe nada que no sea una señal
digital estéreo. La entrada de una señal
digital como el audio del canal 5.1
producirá ruido.
* Si la interfaz de audio no tiene un conec-
tor de salida coaxial, use la conexión
analógica.
Al conector de salida coaxial
Interfaz de audio USB
o bien
A los conectores de salida analógica
Puede conectar y tocar un
sintetizador al mismo tiempo.
Ordenador
* No conecte una guitarra, un bajo
o un micrófono directamente al
modelo CM-110 o CM-220.
8
Page 59

Diagrama de bloques
RL
CH1
L/MONO
STEREO
DIGITAL
R
L
R
BALANCED
INPUT
L
R
INSTRUMENT
CH2
LINE
RECEIVER
DAC
CH3
DIGITAL
LOW HIGH
EQUALIZER
MASTER
HPF
POWER
AMP
WOOFER
SPEAKER
OUT
L
R
LPF PHASE
NOR
INV
SATELLITE SPEAKER
INPUT
INPUT
POWER
AMP
PHONES
Deutsch Français Italiano Español Português NederlandsEnglish
Solución de problemas
Problema Causa Acción Página
El sistema no se enciende
No hay sonido
El sonido se emite
distorsionado o con ruidos
Volumen insuciente
¿Está bien conectado el cable de alimentación a una toma
de corriente?
¿Está bien conectado el equipo externo?
¿Están todos los mandos ajustados correctamente? Gire los mandos hacia la derecha para subir el volumen. pág. 6
¿Es posible que la función de apagado automático esté
activa?
¿Podría estar enviándose una señal analógica al conector
CH 3?
¿Podría estar enviándose una señal digital como la de
audio del canal 5.1 al conector CH 3?
¿Es posible que haya conectado altavoces que no son los
altavoces satélite incluidos?
¿Es posible que haya usado cables que no son los cables
de altavoces incluidos?
¿Es posible que el mando en cuestión esté demasiado
alto?
¿Es adecuado el nivel de entrada del dispositivo
conectado?
¿Podría estar enviándose una señal digital como la de
audio del canal 5.1 al conector CH 3?
¿Están todos los mandos ajustados correctamente? Gire los mandos hacia la derecha para subir el volumen. pág. 6
¿Es adecuado el nivel de entrada del dispositivo
conectado?
¿Es posible que haya conectado altavoces que no son los
altavoces satélite incluidos?
¿Es posible que haya usado cables que no son los cables
de altavoces incluidos?
¿Es posible que esté usando un cable de conexión que
tiene una resistencia incorporada?
Asegúrese de que el cable de alimentación está bien conectado a
una toma de corriente.
Compruebe el tipo de conector y el enchufe, y realice las
conexiones oportunas.
Apague el sistema y vuelva a encenderlo; o desactive el interruptor
[AUTO OFF].
Conecte un cable coaxial al conector CH 3 y conecte el otro
extremo al conector de salida digital de su equipo.
Envíe una señal digital estéreo. pág. 7
Use los altavoces satélite incluidos. pág. 4
Use los cables de altavoces incluidos. pág. 4
Gire cada mando correspondiente hacia la izquierda para ajustar
el volumen adecuadamente.
Baje el volumen del dispositivo conectado. —
Envíe una señal digital estéreo. pág. 7
Suba el volumen del dispositivo conectado. —
Use los altavoces satélite incluidos. pág. 4
Use los cables de altavoces incluidos. pág. 4
Cuando realice conexiones a los conectores de entrada, utilice
cables de conexión sin resistencias incorporadas.
pág. 5
—
pág. 6
pág. 5
pág. 6
—
9
Page 60

Especicaciones principales
Roland☐CM-110,☐CM-220:☐CUBE☐MONITOR
CM-110 CM-220
Potencia nominal de salida
Nivel de entrada nominal (1 kHz)
Impedancia de entrada
Entrada digital (CH 3)
Altavoces
Controles
Conectores
Consumo 47 W 67 W
Dimensiones
Peso
Accesorios Cable de alimentación, cable de altavoz (3,5 m) x 2, Manual de instrucciones
Unidad principal 16 cm (6,5 pulgadas) 25 cm (10 pulgadas)
Altavoz satélite 10 cm (4 pulgadas, con protección magnética), 2 cm (3/4 pulgada, con protección magnética) (cada uno)
<Mando de canal>
<Mando de graves>
<Mando principal>
Unidad principal 330 x 327 x 368 mm (ancho x fondo x alto) 381 x 376 x 413 mm (ancho x fondo x alto)
Altavoz satélite 162 x 197 x 243 mm (ancho x fondo x alto)
Unidad principal 13,3 kg 18,8 kg
Altavoz satélite 3,1 kg (cada uno)
100 W
(Unidad principal 50 W + Altavoz satélite 25 W x 2)
CH 1 (INSTRUMENT): -20 dBu
CH 2 (LINE): -10 dBu
BALANCED INPUT: +4 dBu
CH 1 (INSTRUMENT): 10 kilo-ohmios
CH 2 (LINE): 10 kilo-ohmios
BALANCED INPUT: 10 kilo-ohmios
Formato: Conformidad con IEC60958
Velocidad de muestreo: 32 kHz a 192 kHz (automáticamente) (desacentuación: OFF)
Longitud de palabra: 24 bit
Mando de volumen [CH 1] (INSTRUMENT)
Mando de volumen [CH 2] (LINE)
Mando de volumen [CH 3] (DIGITAL)
Mando de volumen [WOOFER]
Interruptor [PHASE]
EQUALIZER: Mando [HIGH], mando [LOW]
Mando de volumen [MASTER]
Interruptor [AUTO OFF]
Interruptor [ON]
Conectores CH 1 (INSTRUMENT) (L/MONO, R): tipo telefónico de 1/4"
Conectores CH 2 (LINE) (L, R, STEREO): tipo fono RCA, tipo telefónico estéreo en miniatura
Conector CH 3 (DIGITAL): tipo fono RCA
Conectores BALANCED INPUT (L, R): XLR, tipo telefónico TRS de 1/4"
Conector PHONES: tipo telefónico estéreo en miniatura
Conectores SATELLITE SPEAKER (solo para los altavoces satélite dedicados)
Conector AC IN
200 W
(Unidad principal 100 W + Altavoz satélite 50 W x 2)
* 0 dBu = 0,775 Vrms
* Con el n de mejorar el producto, las especicaciones y/o el aspecto de la unidad pueden modicarse sin previo aviso.
10
Page 61

Uso de un soporte para micrófonos
ADVERTENCIA: No se ha evaluado si la estabilidad que ofrece el uso de soportes para micrófonos distintos al soporte plegable incluido
con el altavoz es segura o si puede dar lugar a que el usuario sufra lesiones.
Los altavoces satélite están diseñados de forma que se puedan utilizar instalados en un soporte para micrófonos que no es de Roland. Al montar los
altavoces satélite en soportes para micrófonos que no son de Roland, podrá colocarlos a una altura óptima para utilizarlos como monitores o como
un práctico dispositivo PA.
☐ADVERTENCIA
La sujeción del soporte para micrófonos situada en la parte inferior de cada altavoz satélite incluye dos oricios: 3/8" y 5/8". Utilice el oricio que
mejor se adapte al soporte para micrófonos que va a usar.
3/8" de diámetro5/8" de diámetro
• Tal como se muestra en la ilustración siguiente, abra las patas del soporte para micrófonos (50 cm o más) y colóquelo de forma que la altura total
(incluido el altavoz satélite) no supere los 105 cm.
Deutsch Français Italiano Español Português NederlandsEnglish
105 cm (41-3/8")
o menos
50 cm (19-11/16")
o más
• Si el soporte para micrófonos tiene una altura superior a 105 cm (incluido el altavoz satélite), o si las patas no están extendidas, el soporte y el
altavoz podrían volcar y caerse, y provocar lesiones o daños.
• Cuando use los soportes para micrófonos para sujetar los altavoces satélite, no los coloque en lugares inestables o inclinados. Debe colocar el
soporte en una supercie horizontal y estable.
• Asegúrese de organizar adecuadamente los cables conectados a los altavoces satélite para prevenir posibles accidentes, como los que podrían
producirse si alguien tropezara con ellos.
• Para evitar que el soporte y el altavoz se caigan, no coloque nada sobre un altavoz satélite montado en un soporte para micrófonos.
• Tras montar un altavoz satélite en un soporte para micrófonos, asegúrese de vericar que no se tambalea.
• Asegúrese de que le ayude como mínimo otra persona cuando vaya a montar un altavoz satélite en un soporte para micrófonos, o cuando ajuste
la altura del soporte para micrófonos estando el altavoz satélite montado en él.
• Apriete bien los mecanismos de sujeción del soporte para micrófonos de forma que el altavoz satélite no se mueva a izquierda ni a derecha.
• Tenga cuidado de no pillarse los dedos cuando monte el altavoz satélite.
• Use un soporte para micrófonos que sea sólido y duradero, por ejemplo los fabricados en aluminio o acero inoxidable.
11
Page 62

Page 63

* A ilustração mostra o CM-220.
Manual do Usuário
Deutsch Français Italiano Español Português NederlandsEnglish
Um Canal 2.1 Conveniente
O conjunto é composto por uma unidade
principal (subwoofer), que fornece um som grave
rico e profundo, e dois alto-falantes satélites.
Conexões simples permitem que você
comece a desfrutar de um som de 2.1 canais
imediatamente.
Para instrumentos musicais
O CM-220 tem uma potência plena de saída total de
200 W, e o CM-110, 100 W.
As fontes de entrada podem ser mixadas, permitindo
que você toque com um som claro em toda a faixa
de frequência, dos graves aos agudos.
Para Produção Musical
Você pode conectar o sistema ao seu computador para obter
uma conguração de monitoramento de alta-qualidade.
Seu som grave, rico e profundo também torna o sistema ideal
para escuta de música.
Copyright © 2012 ROLAND CORPORATION
Todos os direitos reservados. Nenhuma parte desta publicação deverá ser reproduzida de nenhuma forma sem permissão por escrito da ROLAND CORPORATION.
Roland e CUBE MONITOR são marcas registradas ou marcas comerciais da Roland Corporation nos Estados Unidos e/ou outros países.
Page 64

USO SEGURO DA UNIDADE
Antes de usar este equipamento, leia com atenção as seguintes seções: “INSTRUÇÕES IMPORTANTES DE SEGURANÇA”, “USO SEGURO DA UNIDADE” (p. 2), e “OBSERVAÇÕES
IMPORTANTES” (p. 3). Essas seções oferecem informações importantes referentes à operação apropriada da unidade. Além disso, para que você conheça todos os recursos
do seu novo equipamento, o Manual do Usuário deve ser lido por completo. O manual deverá ser guardado em local de fácil acesso para consultas futuras.
AVISO
Não force o cabo de alimentação da
unidade para compartilhar uma tomada
com um número excessivo de dispositivos.
Tenha cuidado especial ao utilizar cabos
de extensão. A potência total usada
por todos os dispositivos conectados
à tomada do cabo de extensão nunca
deverá exceder a potência nominal (watts/
amperes) do cabo de extensão. Cargas
excessivas podem aquecer o isolamento
do cabo e derretê-lo.
CUIDADO
AVISO
Conecte o cabo de energia desse modelo
a uma tomada usando uma conexão de
aterramento protetora.
Não abra nem realize nenhuma
modicação interna no equipamento.
Não tente reparar a unidade nem
substituir peças internas (exceto
quando este manual oferecer instruções
especícas para isso). Procure o
revendedor, o Centro de Ser viços da
Roland ou um distribuidor autorizado
da Roland, conforme listado na página
“Informações”.
Nunca instale a unidade em nenhum dos
lugares a seguir que estejam:
• Sujeitos a temperaturas extremas
(por exemplo, luz solar direta em
um veículo fechado, próximo a
duto de aquecimento, em cima de
equipamentos que gerem calor);
• Molhados (por exemplo, em banheiros
e pisos molhados);
• Expostos a vapor ou fumaça;
• Sujeitos à exposição a sal;
• Úmidos;
• Expostos à chuva;
• Empoeirados ou arenosos;
• Sujeitos a altos níveis de vibração e tremor.
Certique-se de que a unidade esteja
sempre apoiada no nível horizontal e
se mantenha estável. Nunca a deixe em
suportes que possam tombar ou em
superfícies inclinadas.
O equipamento deve estar conectado
a uma fonte de alimentação conforme
a especicação na parte traseira do
equipamento.
Use somente o cabo de alimentação
elétrica incluído com a unidade.
Vale lembrar também que o cabo de
alimentação fornecido não deve ser usado
com nenhum outro dispositivo.
Não torça nem entorte excessivamente o
cabo de alimentação, nem coloque objetos
pesados sobre ele. Isso pode danicar o
cabo, quebrando elementos e causando
curtos-circuitos. Cabos danicados criam
riscos de incêndio e choque.
AVISO
Esta unidade, sozinha ou combinada
com um amplicador e fones de ouvido
ou alto-falantes, pode produzir níveis de
som capazes de causar perda de audição
permanente. Não opere a unidade
por longos períodos em um nível de
volume alto ou desconfortável. Se você
sofrer qualquer perda de audição ou
sentir um zumbido nos ouvidos, pare
imediatamente de usar a unidade e
consulte um médico.
Não coloque recipientes que contenham
líquido sobre esse produto. Nunca permita
que objetos estranhos (ex.: objetos
inamáveis, moedas, os) ou líquidos
(ex.: água ou suco) entrem no produto.
Isso pode causar curtos-circuitos,
operação defeituosa ou outras disfunções.
Desligue imediatamente a unidade,
remova o cabo de força e procure o
revendedor, o Centro de Ser viços Técnicos
da Roland ou um distribuidor autorizado,
conforme listado da página “Informações”,
quando:
• O cabo de força ou o plugue estiver
danicado; ou
• Houver emissão de fumaça ou odor
anormal; ou
• Caírem objetos dentro da unidade ou
ela for atingida por algum líquido; ou
• A unidade tiver sido exposta à chuva
(ou tiver sido molhada); ou
• A unidade não estiver operando
normalmente ou apresentar uma
mudança signicativa de desempenho.
Ao usar a unidade em locais com crianças,
tenha cuidado para que a unidade não
seja manuseada de forma errada. Um
adulto deve sempre estar próximo para
supervisionar e orientar.
Proteja a unidade contra impactos fortes.
(Não a derrube!)
Antes de usar a unidade em um país
estrangeiro, consulte seu revendedor,
o Centro de Serviços da Roland mais
próximo ou um distribuidor autorizado da
Roland, conforme relacionados na página
“Informações”.
O aparelho deve ser posicionado de
modo que sua localização ou posição não
interra na sua ventilação adequada.
Segure sempre apenas o plugue da fonte
de alimentação quando for necessário
desconectá-lo de uma tomada de parede
ou desta unidade.
Em intervalos regulares, desligue o
plugue e limpe-o com um pano seco para
tirar toda poeira e outros acúmulos dos
contatos. Além disso, desconecte o plugue
da tomada sempre que a unidade car
inativa por longos períodos. Qualquer
acúmulo de poeira entre o plugue e a
tomada pode resultar na diminuição do
isolamento e causar incêndio.
Tente evitar que os os e os cabos se
entrelacem. Além disso, todos os os e
cabos devem ser colocados longe do
alcance de crianças.
Jamais suba na unidade nem coloque
objetos pesados sobre ela.
Nunca manipule o cabo de força ou
seus plugues com as mãos molhadas ao
conectá-los ou desconectá-los de uma
tomada ou desta unidade.
Antes de mover o equipamento,
desconecte o plugue da tomada e todos
os outros os dos dispositivos externos.
Antes de limpar a unidade, desligue a
energia e desconecte o cabo de força da
tomada (p. 5).
Sempre que suspeitar da possibilidade de
raios em sua área, desconecte o plugue do
cabo de força da tomada.
As partes de metal da unidade principal
(subwoofer) podem esquentar; por isso,
tenha cuidado para evitar queimaduras.
Nunca remova a grade do alto-falante
e o alto-falante de nenhuma forma. O
alto-falante não pode ser substituído
pelo usuário. O conjunto oferece risco de
choque devido a voltagens e correntes
internas.
2
Page 65

OBSERVAÇÕES IMPORTANTES
Fonte de Alimentação
• Não conecte esta unidade a uma tomada que
esteja sendo usada por um aparelho elétrico
controlado por um inversor (como geladeira,
máquina de lavar, forno de microondas ou ar
condicionado) ou que contenha um motor.
Dependendo de como o aparelho estiver sendo
usado, o ruído da fonte de alimentação poderá
causar defeitos na unidade ou produzir ruído
audível. Se não for conveniente usar uma tomada
separada, instale um ltro de ruído na fonte de
alimentação entre essa unidade e a tomada.
• Antes de conectar esta unidade a outros
dispositivos, desligue todas as unidades. Isso
evitará o mau funcionamento e/ou danos aos
alto-falantes ou a outros dispositivos.
• Embora o LED esteja desligado, isso não signica
que o equipamento foi totalmente desconectado
da fonte de alimentação. Caso precise desligar a
energia por completo, retire o cabo de força da
tomada. Por esse motivo, a tomada escolhida para
conectar o plugue do cabo de alimentação deve
ser de fácil e pronto acesso.
• Com a conguração de fábrica, o CM-110 e o CM220 desligam automaticamente aproximadamente
4 horas depois que você parar de tocar ou operar
a unidade. Se você não quiser que a unidade
desligue automaticamente, mude a conguração
"AUTO OFF" para "OFF" (desligado) conforme
descrito na p. 6.
Posicionamento
• Usar a unidade próxima a amplicadores de
potência (ou outros equipamentos que possuam
transformadores de potência grandes) pode
provocar zumbido. Para aliviar o problema, mude
a posição da unidade ou mova-a para mais longe
da fonte de interferência.
• Este dispositivo pode interferir na recepção
de rádio ou televisão. Não use este dispositivo
próximo a tais receptores.
• Poderão ocorrer ruídos caso dispositivos de
comunicação sem o como telefones celulares
sejam utilizados em áreas próximas à unidade. Tais
ruídos podem ocorrer ao receber ou iniciar uma
chamada ou durante a conversa. Se tiver esses
problemas, leve esses dispositivos sem o para
mais longe desta unidade ou desligue-os.
• Evite expor a unidade à luz solar direta, colocá-la
perto de dispositivos que irradiam calor, deixá-la
dentro de um veículo fechado ou sujeitá-la a
temperaturas extremas. Além disso, não deixe
dispositivos de iluminação, que normalmente são
usados com a fonte de iluminação muito próxima
da unidade (como luz de piano) ou reetores
potentes, iluminem a mesma área da unidade por
longos períodos. O calor excessivo pode deformar
ou descolorir a unidade.
• Gotículas de água (condensação) poderão se
formar dentro da unidade se ela for movida de
um lugar para outro que contenha níveis de
temperatura e/ou umidade muito diferentes. Se
você tentar usar a unidade nessas condições, isso
poderá causar danos ou mau funcionamento.
Portanto, antes de usar a unidade, você deverá
deixá-la de pé por várias horas até que a
condensação evapore completamente.
• Não permita que borracha, vinil ou materiais
semelhantes permaneçam por muito tempo
sobre a unidade. Tais objetos podem descolori-la
deformá-la.
• Não cole adesivos, decalques ou itens parecidos
neste instrumento. A remoção de tais materiais
do instrumento pode danicar o acabamento
externo.
• Dependendo do material e da temperatura da
superfície sobre a qual você colocar a unidade, os
pés borracha poderão perder a cor ou marcar a
superfície.
Você pode colocar um pedaço de feltro ou
pano sob os pés de borracha para impedir que
isso aconteça. Se zer isso, certique-se de
que a unidade não possa deslizar ou se mover
acidentalmente.
• Não coloque nada que contenha água (ex.: vasos
de ores) sobre o equipamento. Além disso, evite
o uso de inseticidas, perfumes, álcool, esmalte,
latas de spray, etc., próximo ao equipamento.
Remova rapidamente qualquer líquido derramado
sobre o equipamento usando um pano seco e
macio.
Manutenção
• Para a limpeza diária, passe um pano macio e seco
ou levemente umedecido sobre a unidade. Para
remover sujeiras mais persistentes, use um pano
umedecido com detergente neutro não abrasivo.
Em seguida, passe um pano macio e seco sobre a
unidade.
• Nunca use benzina, diluentes, álcool ou solventes
de nenhum tipo para evitar descoloração e/ou
deformação.
Precauções adicionais
• Tenha cuidado especial ao usar os botões, os
controles deslizantes ou outros controles da
unidade, bem como plugues e conectores.
Manuseá-los de forma abrupta pode causar
defeitos.
• Ao conectar / desconectar todos os cabos, segure
no próprio conector — nunca puxe o cabo. Dessa
forma, você evitará curtos-circuitos ou danos aos
elementos internos do cabo.
• Um pouco de calor será irradiado pelo
equipamento durante o funcionamento normal.
• Para não perturbar os vizinhos, tente manter a
unidade em um nível aceitável de volume. Você
pode usar fones de ouvido para não precisar se
preocupar com as pessoas ao seu redor.
• Quando for necessário transportar a unidade,
se possível coloque-a na caixa (incluindo os
acolchoamentos) em que ela veio. Caso contrário,
você precisará usar materiais de embalagem
equivalentes.
• Alguns cabos de conexão contêm resistores. Não
conecte cabos com resistores a esta unidade. O
uso desses cabos pode prejudicar o nível do som,
tornando-o baixo ou impossível de ser ouvido.
Para obter informações sobre especicações de
cabos, entre em contato com o fabricante do cabo.
• Devido ao projeto estrutural deste instrumento,
pequenos animais podem car presos dentro
dele. Se isso acontecer, desligue imediatamente
a unidade e desconecte o cabo de força da
tomada. Consulte então o revendedor do qual o
instrumento foi adquirido ou entre em contato
com o Centro de Serviços Técnicos da Roland.
• Não introduza mãos, dedos, etc. nas aberturas do
painel traseiro do equipamento. Em particular, se o
equipamento estiver sendo usado em residências
com crianças pequenas, certique-se sempre da
presença e supervisão de um adulto para que
nenhuma criança coloque as mãos ou os pés
nessas aberturas.
• Os nomes de companhias e produtos que
aparecem neste documento são marcas
comerciais ou marcas registradas de seus
respectivos proprietários.
Deutsch Français Italiano Español Português NederlandsEnglish
3
Page 66

Verique o conteúdo da embalagem
☐ Unidade principal (subwoofer)
☐ Alto-falantes satélites (dois)
* Você deve usar os alto-falantes satélites
incluídos.
☐ Proteções de alto-falante (duas)
Você poderá colocá-las nos alto-falantes
satélites, se desejar.
* A ilustração mostra a unidade principal do CM-220.
☐ Cabos de alto-falante (dois)
* Você deve usar os cabos de alto-falante incluídos.
☐ Cabo de força
☑ Manual do usuário (este documento)
Posicionamento
O volume e qualidade do som são afetados pela distância da parede em que você posiciona a unidade principal e os alto-falantes satélites, assim como
pelo material da parede e pelas características do piso. Enquanto você ouve o som, ajuste a posição e o volume apropriadamente para o seu local.
Posicionamento dos Alto-Falantes Satélites
Recomendamos posicionar os alto-falantes satélites nos dois vértices de um triângulo equilátero,
com a posição de escuta no terceiro vértice.
Aponte cada alto-falante satélite de forma que esteja voltado para a posição de escuta.
Posicionamento da Unidade Principal
É recomedável posicionar a unidade principal (subwoofer) na mesma distância dos alto-falantes satélites, com a
posição de escuta no centro.
Como assegurar um elo natural entre a unidade principal (subwoofer) e os
alto-falantes satélites (chave [PHASE])
A chave [PHASE] altera a fase da unidade principal (subwoofer). Escolha entre as congurações "NOR"
(normal) ou "INV" (invertida), aquela que produz o elo mais natural entre a unidade principal (subwoofer)
e os alto-falantes satélites.
4
Page 67

Descrição do Painel
Painel traseiro
Entradas INPUT
Aqui você pode conectar os dispositivos da fonte de áudio que deseja ouvir. Os sinais de todos os conectores podem ser tocados simultaneamente.
* Quando forem usados cabos de conexão com resistores, o nível de volume do equipamento conectado às entradas INPUT deverá ser baixo. Se isso acontecer, use
cabos de conexão que não tenham resistores.
Conector BALANCED INPUT:
Um mixer ou aparelho semelhante pode ser conectado aqui.
Tipo de conector
* Este instrumento está equipado com plugues
balanceados (XLR/TRS). Os diagramas de
cabeamento desses plugues são exibidos
abaixo. Faça as conexões depois de consultar
os diagramas de cabeamento de outros equipamentos que você
deseja conectar.
GND (LUVA)
QUENTE
1: TERRA
2: QUENTE
3: FRIO
(PONTA)
FRIO (ANEL)
Conector PHONES:
Fones de ouvido (mini-
plugue estéreo, vendido
separadamente) podem ser
conectados aqui.
* Se os fones de ouvido estiverem
conectados, o som não sairá dos
alto-falantes da unidade principal
(subwoofer) ou dos alto-falantes
satélites.
Conector CH 3
A saída digital (cabo
coaxial) de um
dispositivo pode ser
conectada aqui.
* Conecte apenas um
sinal de áudio digital.
Por exemplo, conectar
um sinal digital 5.1 ou
outro produz ruído.
Tipo de conector Tipo de conector Tipo de conector
Conectores CH 2
Um dispositivo como uma
televisão ou reprodutor
de áudio (com plugues de
fone RCA ou miniplugue estéreo) pode ser
conectado aqui.
Conectores CH 1
Um instrumento
musical como teclado
ou V-Drums pode
ser conectado aqui
(plugue de fone 1/4").
Deutsch Français Italiano Español Português NederlandsEnglish
Conector AC IN
Conecte aqui o cabo de força incluído.
Painel traseiro Painel traseiro
Conectores dos ALTO-FALANTES
SATÉLITES
Conecte aqui os alto-falantes satélites incluídos.
* Conecte somente os cabos dos alto-falantes incluídos.
5
Page 68

Como ligar o sistema
Painel superior
Botões [CH 1], [CH 2], [CH 3]
Ajustam o volume do som de entrada nos
conectores CH 1, CH 2 e CH 3;
Botões EQUALIZER
Botão [LOW]
Botão [HIGH]
Ajusta o volume das
freqüências graves.
Ajusta o volume das
freqüências agudas.
Botão [MASTER]
Ajusta o volume geral da saída da unidade
principal (subwoofer) e dos alto-falantes
satélites.
Botão [WOOFER]
Ajusta o volume de saída da unidade
principal (subwoofer).
Chave [AUTO OFF]
O sistema desliga automaticamente 4
horas depois que nenhum sinal de entrada for
ON
OFF O sistema será desligado automaticamente.
detectado.
* Para continuar a utilização, desligue a unidade
e ligue-a novamente ou desligue a chave
[AUTO OFF] colocando-a na posição "OFF".
A luz vermelha acenderá quando o
sistema estiver ligado.
Chave [ON]
Esta chave liga/desliga a unidade.
Chave [PHASE]
Altera a fase do som que a unidade principal (subwoofer)
envia (p. 4).
Como ligar o sistema
* Para evitar mau funcionamento e/ou danos aos alto-falantes ou a outros dispositivos, sempre diminua o volume e desligue todos os dispositivos
antes de fazer quaisquer conexões.
* Quando terminar de fazer as conexões, ligue os diversos dispositivos na ordem especicada. Se os dispositivos forem ligados na ordem errada,
isso poderá causar mau funcionamento e/ou danos aos alto-falantes e a outros dispositivos.
1. Ajuste o botão [MASTER]
em 0.
* Esta unidade está equipada com um circuito de proteção. É necessário um breve intervalo (alguns segundos) após a energização para que a
unidade possa operar normalmente.
* Antes de ligar/desligar a unidade, certique-se sempre de que o volume seja diminuído. Mesmo com o volume diminuído, você poderá ouvir
algum som ao ligar/desligar a unidade. Entretanto, isso é normal e não indica mau funcionamento.
* Caso precise desligar a energia por completo, retire o cabo de força da tomada. Consulte ”Fonte de Alimentação” (p. 3).
conectado.
OBSERVAÇÃO
O sistema desliga automaticamente aproximadamente
4 horas depois que nenhum sinal de entrada tenha sido
detectado.
Se você não quiser que o sistema desligue automaticamente,
ajuste a chave [AUTO OFF] na posição "OFF" (desligado).
3. Ligue o sistema2. Ligue o equipamento
6
Page 69

Exemplos de conexão
O som de todos os equipamentos conectados pode ser tocado simultaneamente.
Como tocar um sintetizador ou conjunto V-Drums
* Usar um cabo adaptador (como adaptador
RCA para fone 1/4") conforme apropriado
para o dispositivo que você está conectando.
ou
Você pode conectar um reprodutor de áudio ou outra
fonte e reproduzi-la simultaneamente.
Deutsch Français Italiano Español Português NederlandsEnglish
V-DrumsSintetizadorPercussão Reprodutor de áudio, etc.
Como tocar música de um reprodutor de DVD ou de áudio
Se o seu reprodutor de DVD tiver uma saída digital,
conecte-o ao conector CH 3 para obter melhor qualidade
de reprodução.
Conecte apenas um sinal de
áudio digital ao conector CH 3. A
conexão de outro sinal de áudio
digital, como o 5.1, produz ruído.
Ajuste o dispositivo conectado
para a conguração "estéreo" ou
"PCM".
ou
ou
Reprodutor de áudioReprodutor de DVD
Tocar música de um mixer
Conecte seu mixer nas conexões BALANCED INPUT. Isso
permite que você use o sistema como um conjunto de
monitores de alta qualidade.
Mixer
Sintetizador
* Não conecte uma guitarra, baixo
ou microfone diretamente ao
CM-110 ou CM-220.
7
Page 70

Exemplos de conexão
Como tocar música de um computador
Se você estiver conectando um computador, os seguintes tipos de conexões são possíveis.
Conexão de um computador através de conexão analógica
Essa é a forma mais simples de conexão. Conexão da saída de fone de ouvido ou de linha do computador na entrada LINE.
ou
Computador
Conexão de um computador através de uma interface de áudio USB
Você pode reproduzir sons a partir do computador através de uma interface de áudio USB.
Cabo coaxial
* Não conecte nada além de um sinal
digital estéreo. A conexão de outro sinal
de áudio digital, como o 5.1, produz
ruído.
* Se a interface de áudio não tiver uma
saída coaxial, use a conexão analógica.
Para a saída coaxial
Interface de áudio USB
ou
Para as saídas analógicas
Você pode conectar e tocar um
sintetizador ao mesmo tempo.
Computador
* Não conecte uma guitarra, baixo ou
microfone diretamente ao CM-110
ou CM-220.
8
Page 71

Diagrama em blocos
RL
CH1
L/MONO
STEREO
DIGITAL
R
L
R
BALANCED
INPUT
L
R
INSTRUMENT
CH2
LINE
RECEIVER
DAC
CH3
DIGITAL
LOW HIGH
EQUALIZER
MASTER
HPF
POWER
AMP
WOOFER
SPEAKER
OUT
L
R
LPF PHASE
NOR
INV
SATELLITE SPEAKER
INPUT
INPUT
POWER
AMP
PHONES
Deutsch Français Italiano Español Português NederlandsEnglish
Solução de Problemas
Problema Causa Ação Página
O sistema não quer ligar
Sem som
O som está distorcido ou
com ruídos.
Volume insuciente
O cabo de força está conectado corretamente à tomada
elétrica?
O equipamento externo está conectado corretamente?
Todos os botões estão ajustados corretamente? Gire os botões para a direita para aumentar o volume. p. 6
A função de desligamento automático está ativa?
Você está alimentando o conector CH 3 com um sinal
analógico?
Você está alimentando o conector CH 3 com um sinal
digital de áudio do tipo 5.1?
Você conectou alto-falantes que não sejam os altofalantes satélites incluídos?
Você está usando cabos que não sejam os cabos de
alto-falante incluídos?
O botão respectivo está excessivamente alto?
O nível de entrada do aparelho conectado é apropriado? Reduza o volume do aparelho conectado. —
Você está alimentando o conector CH 3 com um sinal
digital de áudio do tipo 5.1?
Todos os botões estão ajustados corretamente? Gire os botões para a direita para aumentar o volume. p. 6
O nível de entrada do aparelho conectado é apropriado? Aumente o volume do aparelho conectado. —
Você conectou alto-falantes que não sejam os altofalantes satélites incluídos?
Você está usando cabos que não sejam os cabos de
alto-falante incluídos?
Você está usando um cabo de conexão que contém uma
resistência embutida?
Verique se o cabo de força está conectado corretamente à
tomada elétrica.
Verique os tipos de conectores e plugues e faça as conexões
corretas.
Desligue o sistema e ligue-o novamente ou desligue a chave
[AUTO OFF].
Conecte um cabo coaxial ao conector CH 3 e conecte a outra
extremidade ao conector de saída digital de seu equipamento.
Alimente com um sinal digital estéreo. p. 7
Use os alto-falantes satélites incluídos. p. 4
Use os cabos de alto-falante incluídos. p. 4
Gire todos o botões respectivos para a esquerda e ajuste o
volume apropriadamente.
Alimente com um sinal digital estéreo. p. 7
Use os alto-falantes satélites incluídos. p. 4
Use os cabos de alto-falante incluídos. p. 4
Ao fazer as conexões nas entradas INPUT, use cabos conectores
que não contenham resistências embutidas.
p. 5
—
p. 6
p. 5
p. 6
—
9
Page 72

Especicações Principais
Roland CM-110, CM-220: MONITOR CUBE
CM-110 CM-220
Potência Nominal
Nível de entrada nominal (1 kHz)
Impedância de entrada
Entrada digital (CH 3)
Alto-falantes
Controles
Conectores
Consumo de energia 47 W 67 W
Dimensões
Peso
Acessórios inclusos Cabo de força, cabo do alto-falante (3,5 m) x 2, manual do proprietário
Unidade principal 16 cm (6,5 polegadas) 25 cm (10 polegadas)
Alto-falante satélite 10 cm (4 polegadas, blindado magneticamente), 2 cm (3/4 de polegada, blindado magneticamente) (cada um)
<Controle de canal>
<Controle do woofer>
<Controle mestre>
Unidade principal 330 (L) x 327 (P) x 368 (A) mm 381 (L) x 376 (P) x 413 (A) mm
Alto-falante satélite 162 (L) x 197 (P) x 243 (A) mm
Unidade principal 13,3 kg 18,8 kg
Alto-falante satélite 3,1 kg (para cada um)
100 W
(Unidade principal de 50 W + 2 Alto-falantes satélites
de 25 W)
CH 1 (INSTRUMENTO): -20 dBu
CH 2 (LINHA): -10 dBu
ENTRADA BALANCEADA: +4 dBu
CH 1 (INSTRUMENTO): 10 k ohms
CH 2 (LINHA): 10 k ohms
ENTRADA BALANCEADA: 10 k ohms
Formato: Em conformidade com IEC60958
Taxa de amostragem: 32 kHz a 192 kHz (automaticamente) (de-emphasis: DESLIGADO)
Resolução: 24 bit
Botão de volume [CH 1] (INSTRUMENTO)
Botão de volume [CH 2] (LINHA)
Botão de volume [CH 3] (DIGITAL)
Botão de volume [WOOFER]
Chave [PHASE]
Botão EQUALIZER [HIGH], botão [LOW]
Botão de volume [MASTER]
Chave [AUTO OFF]
Chave [ON]
Conectores CH 1 (INSTRUMENTO) (L/MONO, R): tipo fone de 1/4 de polegada
Conectores CH 2 (LINE) (L, R, STEREO): Tipo fone RCA, tipo fone miniatura estéreo
Conector CH 3 (DIGITAL): Tipo fone RCA
Entradas BALANCED INPUT (L, R): XLR, tipo fone TRS de 1/4 de polegada
Conector PHONES: Tipo fone miniatura estéreo
Conectores SATELLITE SPEAKER (apenas para alto-falantes satélites dedicados)
Conector AC IN
200 W
(Unidade principal de 100 W + 2 Alto-falantes satélites
de 50 W)
* 0 dBu = 0,775 Vrms
* Para aprimoramentos do produto, as especicações e/ou aparência desta unidade estão sujeitas a alterações sem aviso prévio.
10
Page 73

Como usar suportes de microfone
AVISO: A estabilidade de suportes de microfone diferentes do suporte dobrável integrado com alto-falante fornecido pela Roland não
foi avaliada quanto à segurança, e sua utilização pode causar ferimentos pessoais.
Os alto-falantes satélites foram projetados de forma que suportes de microfone não especicados pela Roland possam ser utilizados. Ao montar os
alto-falantes satélites em suportes de microfone de outros fabricantes, é necessário posicioná-los numa altura ótima para utilização como monitores
ou como um sistema PA conveniente.
AVISO
O xador de pedestal de microfone na parte inferior de cada alto-falante satélite possui dois orifícios: 3/8” e 5/8”. Use o orifício correto para seu
pedestal de microfone.
diâmetro de 3/8”diâmetro de 5/8”
• Como mostrado na ilustração abaixo, abra as pernas do suporte de microfone (50 m ou mais) e posicione-o de forma que a altura total (incluindo
o alto-falante satélite) não ultrapasse 105 cm.
Deutsch Français Italiano Español Português NederlandsEnglish
105 cm (41-3/8”)
ou menos
50 cm (19-11/16”)
ou mais
• Se o suporte de microfone for maior que 105 cm (incluindo o alto-falante satélite) ou se as pernas não se afastarem, o alto-falante poderá tombar,
ocasionando ferimentos ou danos.
• Ao usar suportes de microfone para sustentar os alto-falantes satélites, não os coloque em locais instáveis ou inclinados. Você precisa colocar o
suporte em uma superfície horizontal e estável.
• Assegure-se de manejar corretamente os cabos conectados nos alto-falantes satélites para prevenir acidentes, como os que podem ser causados
por pessoas ao tropeçarem neles.
• Para impedir que o suporte e o alto-falante tombem, não coloque nada sobre um alto-falante montado em um suporte de microfone.
• Depois de montar um alto-falante satélite em um suporte de microfone, verique se ele não está balançando.
• Tenha ao menos uma pessoa para ajudar na montagem do alto-falante satélite em um suporte de microfone ou ao ajustar a altura do suporte de
microfone quando o alto-falante satélite estiver montado.
• Aperte rmemente as ferragens do suporte de microfone para que o alto-falante satélite não se movimente lateralmente.
• Tenha cuidado para não prender os dedos ao montar o alto-falante satélite.
• Utilize um suporte de microfone resistente e durável, de preferência produzido com alumínio ou aço.
11
Page 74

Page 75

* In de afbeelding ziet u de CM-220.
Gebruikershandleiding
Deutsch Français Italiano Español Português NederlandsEnglish
Een handig 2.1-kanaal
Het systeem bestaat uit een hoofdunit
(subwoofer) die volle, diepe basgeluiden levert,
plus twee satellietluidsprekers.
Dankzij de simpele aansluitingen kunt u meteen
van 2.1-kanaals geluid genieten.
Voor muziekinstrumenten
De CM-220 heeft een uitgangsvermogen van 200 W.
Het uitgangsvermogen van de CM-110 is 100 W.
Invoerbronnen kunnen worden gemixt, zodat u bij
alle frequenties, van laag tot hoog, met helder geluid
kunt spelen.
Voor het produceren van muziek
U kunt het systeem op uw computer aansluiten om een
monitoring-opstelling van hoge kwaliteit te verkrijgen.
Met zijn volle, diepe basgeluid is dit systeem ook ideaal voor
luisteren.
Copyright © 2012 ROLAND CORPORATION
Alle rechten voorbehouden. Niets uit deze uitgave mag op enige manier worden gereproduceerd zonder schriftelijke toestemming van ROLAND CORPORATION.
Roland en CUBE MONITOR zijn handelsmerken of geregistreerde handelsmerken van Roland Corporation in de Verenigde Staten en/of andere landen.
Page 76

HET APPARAAT VEILIG GEBRUIKEN
Lees de onderstaande hoofdstukken zorgvuldig voordat u dit apparaat gebruikt: “BELANGRIJKE VEILIGHEIDSINSTRUCTIES”, “HET APPARAAT VEILIG GEBRUIKEN” (p. 2) en
“BELANGRIJKE OPMERKINGEN” (p. 3). Deze hoofdstukken bevatten belangrijke informatie over de juiste bediening van het apparaat. Om er bovendien zeker van te zijn dat u
elke functie van uw nieuwe apparaat goed begrijpt, leest u best de hele gebruikershandleiding. De handleiding moet als handig naslagwerk worden bewaard.
WAARSCHUWING
Laat de stroomkabel van het apparaat
geen stopcontact delen met een
buitensporig aantal andere apparaten.
Wees vooral voorzichtig met
verlengkabels - het totale stroomverbruik
van alle apparaten die u op de
verlengkabel hebt aangesloten, mag nooit
het maximumvermogen (watt/ampère)
voor de verlengkabel overschrijden.
Buitensporige belasting kan de isolatie
van de kabel verwarmen en uiteindelijk
doen smelten.
LET OP
WAARSCHUWING
Sluit de stroomkabel van dit apparaat aan
op een geaard stopcontact.
Open het apparaat niet en voer geen
interne wijzigingen uit.
Probeer het apparaat niet te herstellen
of onderdelen ervan te vervangen
(behalve als deze handleiding specieke
instructies geeft om dit te doen). Laat het
onderhoud uitvoeren door uw handelaar,
het dichtstbijzijnde Roland Service Center
of een erkende Roland-distributeur, zoals
vermeld op de pagina 'Informatie'.
Installeer het apparaat nooit op plaatsen
die:
• aan extreme temperaturen worden
blootgesteld (bijv. direct zonlicht in een
gesloten voertuig, in de buurt van een
verwarmingsleiding, op materiaal dat
warmte genereert);
• nat zijn (bijv. baden, wasruimten, op
natte vloeren);
• worden blootgesteld aan damp of rook;
• worden blootgesteld aan zout;
• vochtig zijn;
• worden blootgesteld aan regen;
• stog of zanderig zijn;
• aan hoge trillingsniveaus en schokken
worden blootgesteld.
Zorg ervoor dat het apparaat altijd
horizontaal en stabiel geplaatst is. Plaats
het nooit op een standaard die kan
wankelen of op aopende oppervlakken.
Het apparaat mag alleen worden
aangesloten op een voeding van het type
dat beschreven is of dat op de achterzijde
van het apparaat is aangeduid.
Gebruik alleen de bevestigde stroomkabel.
Sluit de meegeleverde stroomkabel ook
niet aan op andere apparaten.
Verdraai of buig de stroomkabel niet
overmatig en plaats er geen zware
voorwerpen op. Dit kan het snoer
zowel binnenin als aan de buitenkant
beschadigen en kortsluitingen
veroorzaken. Beschadigde kabels kunnen
brand of schokken veroorzaken!
WAARSCHUWING
Dit apparaat kan, apart of in combinatie
met een versterker en hoofdtelefoon of
luidsprekers, geluidsniveaus produceren
die permanente gehoorschade kunnen
veroorzaken. Gebruik het apparaat niet
langdurig op een hoog volumeniveau
of op een niveau dat oncomfortabel
is. Als u gehoorverlies of oorsuizingen
ervaart, moet u onmiddellijk stoppen
met het gebruik van het apparaat en een
audioloog raadplegen.
Plaats geen voorwerpen die vloeistoen
bevatten op dit product. Zorg ervoor
dat er nooit vreemde voorwerpen (bijv.
brandbaar materiaal, munten of draden)
of vloeistoen (bijv. water of vruchtensap)
in dit product terechtkomen. Dit kan
kortsluiting, storingen of andere defecten
veroorzaken.
Schakel het apparaat onmiddellijk uit,
trek het netsnoer uit het stopcontact en
vraag onderhoud aan bij uw handelaar,
het dichtstbijzijnde Roland Service Center
of een erkende Roland-distributeur, zoals
vermeld op de pagina "Informatie" als:
• het netsnoer of de stekker beschadigd is;
• rook of ongewone geuren ontstaan;
• objecten of vloeistof in het apparaat
zijn terechtgekomen;
• het apparaat aan regen werd
blootgesteld (of op een andere manier
nat is geworden);
• het apparaat niet normaal lijkt
te werken of opmerkelijk anders
functioneert.
Zorg bij gebruik op locaties waar kinderen
aanwezig zijn, dat het apparaat niet
verkeerd of ruw wordt behandeld. Er moet
altijd een volwassene in de buurt zijn om
te helpen en toezicht te houden.
Bescherm het apparaat tegen zware
schokken.
(Laat het niet vallen!)
Raadpleeg uw handelaar, het
dichtstbijzijnde Roland Service Center of
een erkende Roland-distributeur, zoals
wordt vermeld op de pagina 'Informatie',
voordat u het apparaat in het buitenland
gebruikt.
Het apparaat moet zo worden geplaatst
dat de ventilatie niet door de locatie of
positie wordt verstoord.
Pak altijd alleen de stekker van de
stroomkabel vast als u dit apparaat
aansluit op en verwijdert uit een
stopcontact.
U moet regelmatig de stekker loskoppelen
en schoonmaken met een droge doek
om al het stof en andere ophopingen
te verwijderen van de polen. Trek de
stekker ook uit het stopcontact als het
apparaat langere tijd niet wordt gebruikt.
Stofophoping tussen de stekker en het
stopcontact kan leiden tot slechte isolatie
en brand veroorzaken.
Zorg ervoor dat de snoeren en kabels niet
in de war raken. Zorg er ook voor dat alle
snoeren en kabels buiten het bereik van
kinderen blijven.
Klim nooit op het apparaat en plaats er
geen zware voorwerpen op.
Pak de stroomkabel of de stekkers
nooit met natte handen vast wanneer
u deze aansluit op of verwijdert uit een
stopcontact of dit apparaat.
Koppel het netsnoer los van het
stopcontact en verwijder alle snoeren uit
externe apparaten voordat u het apparaat
verplaatst.
Schakel het apparaat uit en trek het
netsnoer uit het stopcontact voordat u het
apparaat schoonmaakt (p. 5).
Trek het netsnoer uit het stopcontact als u
bliksem verwacht in uw omgeving.
De metalen delen van de hoofdunit
(subwoofer) kunnen heel warm worden.
Let dus op voor brandwonden.
Verwijder het luidsprekerrooster of de
luidspreker nooit. De luidspreker kan niet
door de gebruiker worden vervangen. In
de behuizing zijn spanningen en stromen
aanwezig die elektrische schokken kunnen
veroorzaken.
2
Page 77

BELANGRIJKE OPMERKINGEN
Stroomtoevoer
• Sluit dit apparaat niet aan op een stopcontact dat
tegelijkertijd wordt gebruikt door een elektrisch
apparaat dat door een signaalomzetter wordt
bestuurd (zoals een koelkast, wasmachine,
magnetron of airconditioner) of dat een motor
bevat. Afhankelijk van de manier waarop
elektrische apparaten worden gebruikt, kan
ruis van de stroomvoorziening defecten aan
dit apparaat of hoorbare ruis veroorzaken. Als
het niet praktisch is om een apart stopcontact
te gebruiken, plaats dan een ruislter voor de
stroomvoorziening tussen dit apparaat en het
stopcontact.
• Schakel alle apparaten uit voordat u dit apparaat
erop aansluit. Zodoende kunt u defecten en/of
schade aan luidsprekers of andere apparaten
voorkomen.
• Als de LED’s uitgeschakeld zijn, betekent dit niet
dat het apparaat volledig van de stroomtoevoer
is losgekoppeld. Om de stroom volledig uit te
schakelen, trekt u de stekker van het netsnoer
uit het stopcontact. Zorg er daarom voor dat u
het netsnoer aansluit op een stopcontact dat
gemakkelijk bereikbaar is.
• Met de fabrieksinstellingen worden de CM-110
en CM-220 automatisch uitgeschakeld wanneer
u ongeveer 4 uur lang niet hebt gespeeld of geen
gebruik van het apparaat hebt gemaakt. Als u wilt
voorkomen dat het apparaat automatisch wordt
uitgeschakeld, stelt u “AUTO OFF” op “OFF” in
(zie p. 6 voor meer informatie).
Plaatsing
• Als u het apparaat gebruikt in de buurt van
vermogensversterkers (of andere apparatuur
met grote transformatoren), kan dit gezoem
veroorzaken. Om dit probleem te verhelpen, kunt
u het apparaat anders richten of verder van de
storingsbron plaatsen.
• Dit apparaat kan de radio- en televisieontvangst
verstoren. Gebruik dit apparaat niet in de buurt
van dergelijke ontvangers.
• Er kan ruis ontstaan als draadloze
communicatieapparaten, zoals mobiele telefoons,
in de buurt van dit apparaat worden gebruikt.
Dergelijke ruis kan ontstaan als een oproep wordt
ontvangen of gemaakt of tijdens gesprekken.
Verplaats dergelijke apparaten zodat ze zich op
een grotere afstand van dit apparaat bevinden of
schakel ze uit als u dergelijke problemen ervaart.
• Stel het apparaat niet bloot aan direct zonlicht,
plaats het niet in de buurt van warmtebronnen,
laat het niet achter in een gesloten voertuig en
stel het op geen enkele andere wijze bloot aan
extreme temperaturen. Zorg er ook voor dat
hetzelfde deel van het apparaat niet langdurig
wordt verlicht door verlichtingsapparaten
waarvan de lichtbron zich doorgaans dicht bij
het apparaat bevindt (zoals een pianolamp) of
door krachtige spots. Overmatige warmte kan het
apparaat vervormen of verkleuren.
• Wanneer het apparaat naar een andere locatie
wordt verplaatst waar de temperatuur en/of
vochtigheid sterk verschilt, kunnen er
waterdruppels (condens) ontstaan in het apparaat.
Als u het apparaat in deze toestand probeert
te gebruiken, kunnen er schade of defecten
ontstaan. Voordat u het apparaat gebruikt, moet u
het daarom enkele uren ongemoeid laten, tot de
condens volledig is verdampt.
• Laat voorwerpen van rubber, vinyl of vergelijkbare
materialen niet langdurig op het apparaat liggen.
Dergelijke voorwerpen kunnen de afwerking
verkleuren of beschadigen.
• Plak geen stickers, plakplaatjes en dergelijke op
het apparaat. De afwerking kan beschadigd raken
als u het kleefmateriaal probeert te verwijderen.
• Afhankelijk van het materiaal en de temperatuur
van het oppervlak waarop u het apparaat plaatst,
kunnen de rubberen voetstukken mogelijk het
oppervlak verkleuren of ontsieren.
U kunt een stuk vilt of stof onder de rubberen
voetstukken plaatsen om dit te voorkomen. Zorg
er in dit geval voor dat het apparaat niet verschuift
of per ongeluk wordt verplaatst.
• Plaats geen voorwerpen die water bevatten (bijv.
bloemenvazen) op het apparaat. Vermijd ook
het gebruik van insecticiden, parfum, alcohol,
nagellak, spuitbussen, enz. in de nabijheid van het
apparaat. Verwijder onmiddellijk alle vloeistof die
op het apparaat gemorst wordt met een droge,
zachte doek.
Onderhoud
• Gebruik een zachte, droge doek of een doek die
licht bevochtigd is met water om het apparaat
dagelijks af te vegen. Gebruik een doek die
is bevochtigd met een zacht, niet-schurend
schoonmaakmiddel om hardnekkig vuil te
verwijderen. Veeg vervolgens het apparaat
grondig schoon met een zachte, droge doek.
• Gebruik geen benzine, verdunningsmiddelen,
alcohol of oplosmiddelen om verkleuring en/of
vervorming te voorkomen.
Extra voorzorgsmaatregelen
• Ga zorgvuldig te werk bij het gebruik van
de knoppen, schuifknoppen of andere
bedieningselementen van het apparaat en bij
het gebruik van aansluitingen en ingangen. Als u
ruw omgaat met de apparatuur, kan dit defecten
veroorzaken.
• Pak altijd de aansluiting vast als u kabels aansluit
of loskoppelt. Trek nooit aan de kabel. Op die
manier vermijdt u kortsluiting of schade aan de
inwendige elementen van de kabel.
• Tijdens normaal gebruik straalt het apparaat een
kleine hoeveelheid warmte uit.
• Houd het volume van het apparaat op een
acceptabel niveau zodat u uw buren niet stoort.
Misschien gebruikt u liever een hoofdtelefoon
en hoeft u zich geen zorgen te maken over uw
omgeving.
• Verpak het apparaat indien mogelijk in de doos
(inclusief opvulling) waarin het werd geleverd
als u het moet vervoeren. Gebruik anders
gelijkwaardige verpakkingsmaterialen.
• Sommige kabels bevatten weerstanden. Gebruik
geen kabels met weerstanden om op dit apparaat
aan te sluiten. Het gebruik van dergelijke kabels
kan het geluidsniveau extreem verlagen of geluid
zelfs onhoorbaar maken. Neem contact op met
de fabrikant van de kabel voor informatie over
kabelspecicaties.
• Er is een risico dat kleine dieren in het apparaat
geraken en vast komen te zitten. Als dit gebeurt,
moet u het apparaat onmiddellijk uitschakelen
en de stekker uit het stopcontact trekken. Neem
vervolgens contact op met de handelaar waar u
het apparaat hebt gekocht of het dichtstbijzijnde
Roland Service Center.
• Plaats uw handen of vingers niet in de openingen
in het achterpaneel van het apparaat. Bij gezinnen
met kleine kinderen dient een volwassene toezicht
te houden om te vermijden dat kinderen hun
handen of voeten in deze openingen plaatsen.
• Bedrijfsnamen en productnamen die in dit
document worden genoemd, zijn handelsmerken
of geregistreerde handelsmerken van hun
respectieve eigenaars.
Deutsch Français Italiano Español Português NederlandsEnglish
3
Page 78

Controleer de inhoud van het pakket
☐ Hoofdunit (subwoofer)
☐ Satellietluidsprekers (twee)
* U moet de bijgeleverde satellietluidsprekers
gebruiken.
☐ Luidsprekerdeksels (twee)
U kunt deze desgewenst aan de
satellietluidsprekers bevestigen.
* In de afbeelding ziet u de hoofdunit van de CM-220.
☐ Luidsprekerkabels (twee)
* U moet de bijgeleverde luidsprekerkabels gebruiken.
☐ Netsnoer
☑ Gebruikershandleiding (dit document)
Plaatsing
Het volume en de klankkwaliteit worden beïnvloed door de afstand tussen de hoofdunit en satellietluidsprekers enerzijds en de muur anderzijds, en
door het materiaal van de muur en de eigenschappen van de vloer. Stem de positie en het volume af op uw omgeving terwijl u muziek beluistert.
De satellietluidsprekers plaatsen
U kunt de satellietluidsprekers het beste in twee hoeken van een gelijkzijdige driehoek plaatsen, waarbij de
luisterpositie de derde hoek vormt.
Zorg dat de voorkant van elke satellietluidspreker naar de luisterpositie is gericht.
De hoofdunit plaatsen
Plaats de hoofdunit (subwoofer) bij voorkeur op dezelfde afstand als de satellietluidsprekers, met de luisterpositie
in het midden.
Zorg voor een natuurlijke koppeling tussen de hoofdunit (subwoofer) en de
satellietluidsprekers ([PHASE]-schakelaar)
Met de [PHASE]-schakelaar kunt u de fase van de hoofdunit (subwoofer) omschakelen. Kies de instelling
die de meest natuurlijke koppeling tussen de hoofdunit (subwoofer) en de satellietluidsprekers
produceert: “NOR” (normaal) of “INV” (inverse ofwel omgekeerd).
4
Page 79

Paneelbeschrijvingen
Achterpaneel
Ingangen
Hierop kunt u de audio-apparaten aansluiten waarnaar u wilt luisteren. De signalen van alle ingangen kunnen tegelijkertijd worden geproduceerd.
* Gebruik van verbindingskabels met weerstanden resulteert mogelijk in een laag volumeniveau van de apparaten die op de ingangen zijn aangesloten. Als dit het
geval is, gebruikt u verbindingskabels zonder weerstand.
BALANCED INPUT-ingangen
Hierop kunt u een mengpaneel of vergelijkbaar apparaat
aansluiten.
Type aansluiting
* Dit instrument is uitgerust met gebalanceerde
XLR/TRS-aansluitingen. Hieronder ziet u
bedradingsschema's voor deze aansluitingen.
Maak de aansluitingen nadat u de bedradingsschema's van
andere aan te sluiten apparaten hebt gecontroleerd.
GND (BUS)
HOT
1: GND
2: HOT
3: COLD
(PUNT)
COLD (RING)
PHONES-ingang
Hierop kunt u een
hoofdtelefoon (stereominiatuuraansluiting, apart
verkrijgbaar) aansluiten.
* Als een hoofdtelefoon is aangesloten,
wordt geen geluid uitgestuurd
via de hoofdunit (subwoofer) of
satellietluidsprekers.
CH 3-ingang
Hierop kunt u de digitale
uitgang (coaxkabel) van
een apparaat aansluiten.
* Deze ingang is
uitsluitend voor een
stereo digitaal signaal
bestemd. Als via deze
ingang een 5.1-kanaals
of ander digitaal signaal
binnenkomt, wordt ruis
geproduceerd.
Type aansluiting Type aansluiting Type aansluiting
CH 2-ingangen
Hierop kunt u een apparaat
zoals een tv, computer of
audiospeler (met RCAaansluitingen of een
stereominiatuuraansluiting)
aansluiten.
CH 1-ingangen
Hierop kunt u een
muziekinstrument zoals
een keyboard of V-Drums
(1/4"-monoaansluitingen)
aansluiten.
Deutsch Français Italiano Español Português NederlandsEnglish
Netstroomingang (AC IN)
Hierop sluit u het bijgeleverde netsnoer aan.
Achterpaneel Achterpaneel
SATELLITE SPEAKER-ingangen
Hierop sluit u de bijgeleverde
satellietluidsprekers aan.
* Gebruik voor aansluiting alleen de
meegeleverde luidsprekerkabels.
5
Page 80

Het systeem inschakelen
Bovenpaneel
[CH 1]-, [CH 2]-,
[CH 3]-regelaar
Hiermee kunt het volume regelen van het
geluid dat via de CH 1- en CH 2-ingangen
en de CH 3-ingang binnenkomt.
EQUALIZER-regelaars
[LOW]regelaar
[HIGH]regelaar
Hiermee kunt u het volume
van de lage tonen regelen.
Hiermee kunt u het volume
van de hoge tonen regelen.
[MASTER]-regelaar
Hiermee kunt u het algemene volume van
de output van de hoofdunit (subwoofer) en
satellietluidsprekers regelen.
[WOOFER]-regelaar
Hiermee kunt u het volume van de uitvoer
van de hoofdunit (subwoofer) regelen.
[AUTO OFF]-schakelaar
Het systeem wordt automatisch uitgeschakeld
wanneer 4 uur verstrijkt zonder dat een
ingangssignaal wordt gedetecteerd.
ON
* Als u het apparaat weer wilt gebruiken, schakelt
u het uit en vervolgens weer in of zet u de [AUTO
OFF]-schakelaar in de stand “OFF”.
OFF Het systeem wordt niet automatisch uitgeschakeld.
Dit brandt rood wanneer het systeem
ingeschakeld is.
[ON]-schakelaar
Hiermee schakelt u het systeem in.
[PHASE]-schakelaar
Hiermee wijzigt u de fase van het geluid dat door de
hoofdunit (subwoofer) wordt uitgevoerd (p. 4).
Het systeem inschakelen
* Zet het volume altijd lager en schakel alle apparaten uit voordat u aansluitingen maakt; hierdoor voorkomt u defecten en/of schade aan
luidsprekers of andere apparaten.
* Zodra u alle aansluitingen tot stand hebt gebracht, schakelt u de verschillende apparaten in de opgegeven volgorde in. Als u de apparaten in de
verkeerde volgorde inschakelt, kunnen er defecten optreden en/of kan er schade aan de luidsprekers en andere apparaten ontstaan.
1. Zet de [MASTER]-regelaar
op 0.
* Dit apparaat is uitgerust met een beveiligingscircuit. Na het inschakelen duurt het even (enkele seconden) voordat het apparaat normaal werkt.
* Zorg er altijd voor dat het volume dicht staat voordat u het apparaat inschakelt. Zelfs als het volume volledig op nul staat, kunt u nog geluid horen
wanneer u het apparaat in- of uitschakelt. Dit is echter normaal en wijst niet op een defect.
* Om de stroom volledig uit te schakelen, trekt u de stekker van het netsnoer uit het stopcontact. Raadpleeg “Stroomtoevoer” (p. 3).
apparatuur in.
OPMERKING
Het systeem wordt automatisch uitgeschakeld wanneer ongeveer
4 uur verstrijkt zonder dat een ingangssignaal wordt gedetecteerd.
Als u wilt voorkomen dat het systeem automatisch wordt
uitgeschakeld, zet u de [AUTO OFF]-schakelaar in de stand “OFF”.
3. Schakel het systeem in.2. Schakel de aangesloten
6
Page 81

Voorbeelden van aansluitingen
Geluid van alle aangesloten apparatuur kan tegelijk worden afgespeeld.
Een synthesizer of V-Drums-set bespelen
* Gebruik een adapterkabel (bijvoorbeeld een
adapter van een RCA-aansluiting naar een
1/4"-monoaansluiting) die geschikt is voor
het aan te sluiten apparaat.
U kunt een audiospeler of andere bron aansluiten en
deze tegelijk afspelen.
Deutsch Français Italiano Español Português NederlandsEnglish
of
V-DrumsSynthesizerPercussie Audiospeler enz.
Muziek op een dvd-speler of audiospeler afspelen
De CH 3-ingang is uitsluitend
voor een stereo digitaal signaal
bestemd. Als via deze ingang een
digitaal signaal zoals 5.1-kanaals
audio binnenkomt, wordt ruis
geproduceerd.
Zet het aangesloten apparaat op
de instelling “stereo” of “PCM”.
of
of
AudiospelerDvd-speler
Muziek via een mengpaneel afspelen
Als uw dvd-speler een digitale uitgang heeft, sluit deze
dan aan op de CH 3-ingang voor de beste afspeelkwaliteit.
Sluit uw mengpaneel op de BALANCED INPUT-ingangen
aan. Hierdoor kunt u het systeem als een set monitors
van hoge kwaliteit gebruiken.
Mengpaneel
Synthesizer
* Sluit een gitaar, bas of microfoon
niet rechtstreeks op de CM-110
of CM-220 aan.
7
Page 82

Voorbeelden van aansluitingen
Muziek vanaf een computer afspelen
Als u een computer aansluit, zijn de volgende soorten aansluitingen mogelijk.
Een computer via een analoge aansluiting verbinden
Dit is het eenvoudigste type aansluiting. Sluit de hoofdtelefoonaansluiting van uw computer of lijnuitgang op de LINE-ingang aan.
of
Computer
Een computer via een USB-audio-interface aansluiten
U kunt muziek vanaf uw computer afspelen via een USB-audio-interface.
Coaxkabel
* Deze ingang is uitsluitend voor een
stereo digitaal signaal bestemd. Als via
deze ingang een digitaal signaal zoals
5.1-kanaals audio binnenkomt, wordt ruis
geproduceerd.
* Als uw audio-interface geen coaxuitgang
heeft, gebruikt u de analoge aansluiting.
Naar de coaxuitgang
USB-audio-interface
of
Naar de analoge uitgangen
U kunt tegelijk een synthesizer
aansluiten en spelen.
Computer
* Sluit een gitaar, bas of
microfoon niet rechtstreeks op
de CM-110 of CM-220 aan.
8
Page 83

Blokdiagram
CH1
L/MONO
R
L
R
STEREO
DIGITAL
BALANCED
INPUT
L
R
INSTRUMENT
CH2
LINE
RECEIVER
DAC
DIGITAL
CH3
RL
LOW HIGH
EQUALIZER
MASTER
HPF
POWER
AMP
WOOFER
SPEAKER
OUT
L
R
LPF PHASE
NOR
INV
SATELLITE SPEAKER
INPUT
INPUT
POWER
AMP
PHONES
Deutsch Français Italiano Español Português NederlandsEnglish
Problemen oplossen
Probleem Oorzaak Corrigerende handeling Pagina
Het apparaat kan niet worden
ingeschakeld
Geen geluid
Het geluid wordt vervormd
of er is ruis
Onvoldoende volume
Is het netsnoer correct aangesloten op een stopcontact? Zorg dat het netsnoer correct is aangesloten op een stopcontact. p. 5
Is de externe apparatuur correct aangesloten?
Is elke regelaar correct ingesteld? Draai de regelaars naar rechts om het volume te verhogen. p. 6
Is de automatische uitschakelfunctie misschien
geactiveerd?
Komt er misschien een analoog signaal via de CH
3-ingang binnen?
Komt er misschien een digitaal signaal (bijvoorbeeld
5.1-kanaals audio) via de CH 3-ingang binnen?
Hebt u misschien andere luidsprekers aangesloten dan de
meegeleverde satellietluidsprekers?
Gebruikt u misschien andere kabels dan de meegeleverde
luidsprekerkabels?
Staat de respectieve regelaar misschien te hoog?
Is het ingangsniveau van het aangesloten apparaat juist? Verlaag het volume van het aangesloten apparaat. —
Komt er misschien een digitaal signaal (bijvoorbeeld
5.1-kanaals audio) via de CH 3-ingang binnen?
Is elke regelaar correct ingesteld? Draai de regelaars naar rechts om het volume te verhogen. p. 6
Is het ingangsniveau van het aangesloten apparaat juist? Verhoog het volume van het aangesloten apparaat. —
Hebt u misschien andere luidsprekers aangesloten dan de
meegeleverde satellietluidsprekers?
Gebruikt u misschien andere kabels dan de meegeleverde
luidsprekerkabels?
Gebruikt u misschien een kabel met interne weerstand?
Controleer het type ingang/aansluiting en stekker en zorg ervoor
dat de aansluitingen correct zijn.
Schakel het systeem uit en vervolgens weer in, of zet de [AUTO
OFF]-schakelaar op OFF.
Sluit een coaxkabel op de CH 3-ingang aan en verbind het andere
uiteinde met de digitale uitgang van uw apparatuur.
Zorg dat een stereo digitaal signaal wordt ingevoerd. p. 7
Gebruik de meegeleverde satellietluidsprekers. p. 4
Gebruik de meegeleverde luidsprekerkabels. p. 4
Draai de respectieve regelaar naar links om het volume aan te
passen.
Zorg dat een stereo digitaal signaal wordt ingevoerd. p. 7
Gebruik de meegeleverde satellietluidsprekers. p. 4
Gebruik de meegeleverde luidsprekerkabels. p. 4
Gebruik kabels zonder interne weerstand wanneer u apparaten
op de ingangen aansluit.
—
p. 6
p. 5
p. 6
—
9
Page 84

Belangrijkste specicaties
Roland CM-110, CM-220: CUBE MONITOR
CM-110 CM-220
Nominaal uitgangsvermogen
Nominaal ingangsniveau (1 kHz)
Ingangsimpedantie
Digitale ingang (CH 3)
Luidsprekers
Bedieningselementen
Aansluitingen
Stroomverbruik 47 W 67 W
Afmetingen
Gewicht
Accessoires Netsnoer, luidsprekerkabel (3,5 m) x 2, gebruikershandleiding
Hoofdunit 16 cm 25 cm
Satellietluidspreker 10 cm (magnetisch afgeschermd), 2 cm (magnetisch afgeschermd) (per stuk)
<Kanaalbedieningselement>
<Wooferbedieningselement>
<Master-bedieningselement>
Hoofdunit 330 (B) x 327 (D) x 368 (H) mm 381 (B) x 376 (D) x 413 (H) mm
Satellietluidspreker 162 (B) x 197 (D) x 243 (H) mm
Hoofdunit 13,3 kg 18,8 kg
Satellietluidspreker 3,1 kg (per stuk)
100 W
(hoofdunit 50 W + satellietluidspreker 25 W x 2)
CH 1 (INSTRUMENT): -20 dBu
CH 2 (LINE): -10 dBu
BALANCED INPUT: +4 dBu
CH 1 (INSTRUMENT): 10 k ohm
CH 2 (LINE): 10 kohm
BALANCED INPUT: 10 kohm
Formaat: conformiteit met IEC60958
Samplefrequentie: 32 kHz t/m 192 kHz (automatisch) (verzwakking: UIT)
Woordlengte: 24 bits
[CH 1] (INSTRUMENT)-volumeregelaar
[CH 2] (LINE)-volumeregelaar
[CH 3] (DIGITAL)-volumeregelaar
[WOOFER]-volumeregelaar
[PHASE]-schakelaar
EQUALIZER [HIGH]-regelaar, [LOW]-regelaar
[MASTER]-volumeregelaar
[AUTO OFF]-schakelaar
[ON]-schakelaar
CH 1 (INSTRUMENT)-ingangen (L/MONO, R): 1/4"-monoaansluiting
CH 2 (LINE)-ingangen (L, R, STEREO): RCA-aansluiting, stereominiatuuraansluiting
CH 3 (DIGITAL)-ingang: RCA-aansluiting
BALANCED INPUT-ingangen (L, R): XLR, 1/4-inch TRS-aansluiting
PHONES-ingang: stereominiatuuraansluiting
SATELLITE SPEAKER-ingangen (alleen voor speciale satellietluidsprekers)
Netstroomingang (AC IN)
200 W
(hoofdunit 100 W + satellietluidspreker 25 W x 2)
* 0 dBu = 0,775 Vrms
* Wegens productverbeteringen kunnen de specicaties en/of het uiterlijk van dit apparaat zonder voorafgaande kennisgeving worden gewijzigd.
10
Page 85

Microfoonstandaards gebruiken
WAARSCHUWING: De veiligheid en stabiliteit van het apparaat kunnen niet worden gegarandeerd wanneer u andere
microfoonstandaards gebruikt dan de vouwstandaard die bij de luidspreker hoort. Het gebruik van andere standaards kan schade of
letsels aan de gebruiker veroorzaken.
De satellietluidsprekers zijn zo ontworpen dat microfoonstandaards die niet door Roland zijn geproduceerd, als ondersteuning kunnen worden
gebruikt. Als u de satellietluidsprekers monteert op microfoonstandaards die niet door Roland zijn geproduceerd, kunt u deze op de ideale hoogte
plaatsen die nodig is voor gebruik als monitor of als handig PA-systeem.
WAARSCHUWING
De microfoonstandaardhouder aan de onderkant van elke satellietluidspreker is voorzien van twee gaten, met een diameter van respectievelijk
3/8 inch (1 cm) en 5/8 inch (1,6 cm). Gebruik het gat dat geschikt is voor uw microfoonstandaard.
3/8 inch (1 cm) diameter5/8 inch (1 cm) diameter
• Spreid de poten van de microfoonstandaard (minimaal 50 cm) en plaats de standaard zodanig dat de totale hoogte inclusief satellietluidspreker
niet meer dan 105 cm is (zie de volgende afbeelding).
Deutsch Français Italiano Español Português NederlandsEnglish
Maximaal 105 cm
Minimaal 50 cm
• Als de microfoonstandaard (inclusief satellietluidspreker) hoger dan 105 cm is of als u de poten niet goed spreidt, bestaat het risico dat de
standaard en luidspreker omvallen, en schade of letsel veroorzaken.
• Als u de satellietluidsprekers op microfoonstandaards monteert, plaatst u deze niet op een wankele of schuine ondergrond. Plaats ze op een
stabiel en horizontaal oppervlak.
• Zorg dat de kabels die op de satellietluidsprekers zijn aangesloten, veilig worden opgeborgen, om struikelpartijen en andere ongelukken te
voorkomen.
• Plaats geen voorwerpen op een satellietluidspreker die op een microfoonstandaard is gemonteerd. Hierdoor kunnen de standaard en luidspreker
omvallen.
• Controleer na het monteren van een satellietluidspreker op een microfoonstandaard of het geheel stabiel is.
• Roep altijd de hulp in van ten minste één andere persoon wanneer u de satellietluidspreker op een microfoonstandaard installeert of wanneer u
de hoogte van de standaard aanpast terwijl de satellietluidspreker erop is gemonteerd.
• Draai de onderdelen van de microfoonstandaard stevig vast, zodat de satellietluidspreker niet naar links of rechts schuift.
• Pas op dat uw vingers niet klem komen te zitten wanneer u de satellietluidspreker monteert.
• Gebruik een microfoonstandaard die sterk en duurzaam is en bijvoorbeeld uit aluminium of staal is gemaakt.
11
Page 86

Page 87

MEMO
Page 88

This product complies with the requirements of EMCD 2004/108/EC and LVD 2006/95/EC.
For EU Countries
This Class B digital apparatus meets all requirements of the Canadian Interference-Causing Equipment Regulations.
Cet appareil numérique de la classe B respecte toutes les exigences du Règlement sur le matériel brouilleur du Canada.
NOTICE
AVIS
For the USA
FEDERAL COMMUNICATIONS COMMISSION
RADIO FREQUENCY INTERFERENCE STATEMENT
This equipment has been tested and found to comply with the limits for a Class B digital device, pursuant to Part 15 of the
FCC Rules. These limits are designed to provide reasonable protection against harmful interference in a residential
installation. This equipment generates, uses, and can radiate radio frequency energy and, if not installed and used in
accordance with the instructions, may cause harmful interference to radio communications. However, there is no guarantee
that interference will not occur in a particular installation. If this equipment does cause harmful interference to radio or
television reception, which can be determined by turning the equipment off and on, the user is encouraged to try to correct the
interference by one or more of the following measures:
– Reorient or relocate the receiving antenna.
– Increase the separation between the equipment and receiver.
– Connect the equipment into an outlet on a circuit different from that to which the receiver is connected.
– Consult the dealer or an experienced radio/TV technician for help.
This device complies with Part 15 of the FCC Rules. Operation is subject to the following two conditions:
(1) this device may not cause harmful interference, and
(2) this device must accept any interference received, including interference that may cause undesired operation.
This equipment requires shielded interface cables in order to meet FCC class B limit.
Any unauthorized changes or modifications not expressly approved by the party responsible for compliance could void the user’s
authority to operate the equipment.
For Canada
WARNING
This product contains chemicals known to cause cancer, birth defects and other reproductive harm, including lead.
For C.A. US (Proposition 65
)
MEMO
Page 89

For EU Countries
This product complies with the requirements of EMCD 2004/108/EC and LVD 2006/95/EC.
For the USA
FEDERAL COMMUNICATIONS COMMISSION
RADIO FREQUENCY INTERFERENCE STATEMENT
This equipment has been tested and found to comply with the limits for a Class B digital device, pursuant to Part 15 of the
FCC Rules. These limits are designed to provide reasonable protection against harmful interference in a residential
installation. This equipment generates, uses, and can radiate radio frequency energy and, if not installed and used in
accordance with the instructions, may cause harmful interference to radio communications. However, there is no guarantee
that interference will not occur in a particular installation. If this equipment does cause harmful interference to radio or
television reception, which can be determined by turning the equipment off and on, the user is encouraged to try to correct the
interference by one or more of the following measures:
– Reorient or relocate the receiving antenna.
– Increase the separation between the equipment and receiver.
– Connect the equipment into an outlet on a circuit different from that to which the receiver is connected.
– Consult the dealer or an experienced radio/TV technician for help.
This device complies with Part 15 of the FCC Rules. Operation is subject to the following two conditions:
(1) this device may not cause harmful interference, and
(2) this device must accept any interference received, including interference that may cause undesired operation.
This equipment requires shielded interface cables in order to meet FCC class B limit.
Any unauthorized changes or modifications not expressly approved by the party responsible for compliance could void the user’s
authority to operate the equipment.
For Canada
NOTICE
This Class B digital apparatus meets all requirements of the Canadian Interference-Causing Equipment Regulations.
AVIS
Cet appareil numérique de la classe B respecte toutes les exigences du Règlement sur le matériel brouilleur du Canada.
For C.A. US (Proposition 65
WARNING
This product contains chemicals known to cause cancer, birth defects and other reproductive harm, including lead.
)
Page 90

For EU Countries
For China
Page 91

Information
AFRICA
EGYPT
Al Fanny Trading O ce
9, EBN Hagar Al Askalany Street,
ARD E1 Golf, Heliopolis,
Cairo 11341, EGYPT
TEL: (022)-417-1828
REUNION
MARCEL FO-YAM Sarl
25 Rue Jules Hermann,
Chaudron - BP79 97 491
Ste Clotilde Cedex,
REUNION ISLAND
TEL: (0262) 218-429
SOUTH AFRICA
T.O.M.S. Sound & Music (P ty)Ltd.
2 ASTRON ROAD DENVER
JOHANNESBURG ZA 2195,
SOUTH AFRICA
TEL: (011) 417 3400
Paul Bothner(PTY)Ltd.
Royal Cape Park, Unit 24
Londonderry Road, Ottery 7800
Cape Town, SOUTH AFRICA
TEL: (021) 799 4900
ASIA
CHINA
Roland Shanghai Electronics
Co.,Ltd.
5F. No.1500 Pingliang Road
Shanghai 200090, CHINA
TEL: (021) 5580-0800
Roland Shanghai Electronics
Co.,Ltd. (BEIJING OFFICE)
3F, Soluxe For tune Building
63 West Dawang Road, Chaoyang
District, Beijing, CHINA
TEL: (010) 5960-2565
HONG KONG
Tom Lee Music
11/F Silvercord Tower 1
30 Canton Rd
Tsimshatsui, Kowloon,
HONG KONG
TEL: 852-2737-7688
Parsons Music Ltd.
8th Floor, Railway Plaza, 39
Chatham Road South, T.S.T,
Kowloon, HONG KONG
TEL: 852-2333-1863
INDIA
Rivera Digitec (India) Pvt. Ltd.
411, Nirman Kendra Mahalaxmi
Flats Compound O . Dr. Edwin
Moses Road, Mumbai-400011,
INDIA
TEL: (022) 2493 9051
INDONESIA
PT. Citra Intirama
Ruko Garden Shopping Arcade
Unit 8 CR, Podomoro City
Jl.Letjend. S.Parman Kav.28
Jakarta Barat 11470, INDONESIA
TEL: (021) 5698-5519/5520
KOREA
Cosmos Corporation
1461-9, Seocho-Dong,
Seocho Ku, Seoul, KOREA
TEL: (02) 3486-8855
MALAYSIA/
SINGAPORE
Roland Asia Paci c Sdn. Bhd.
45-1, Block C2, Jalan PJU 1/39,
Dataran Prima, 47301 Petaling
Jaya, Selangor, MALAYSIA
TEL: (03) 7805-3263
PHILIPPINES
G.A. Yupangco & Co. Inc.
339 Gil J. Puyat Avenue
Makati, Metro Manila 1200,
PHILIPPINES
TEL: (02) 899 9801
When you need repair service, call your nearest Roland Service Center or authorized Roland
distributor in your country as shown below.
TAIWAN
ROLAND TAIWAN ENTERPRISE
CO., LTD.
9F-5, No. 112 Chung Shan
North Road Sec. 2 Taipei 104,
TAIWAN R.O.C.
TEL: (02) 2561 3339
THAILAND
Theera Music Co. , Ltd.
100-108 Soi Verng Nakornk asem,
New Road,Sumpantawong,
Bangkok 10100, THAILAND
TEL: (02) 224-8821
VIET NAM
VIET THUONG CORPORATION
386 CACH MANG THANG TAM ST.
DIST.3, HO CHI MINH CITY,
VIET NAM
TEL: (08) 9316540
OCEANIA
AUSTRALIA/
NEW ZEALAND
Roland Corporation
Australia Pty.,Ltd.
38 Campbell Avenue
Dee Why West. NSW 2099,
AUSTRALIA
For Australia
TEL: (02) 9982 8266
For New Zealand
TEL: (09) 3098 715
CENTRAL/LATIN
AMERICA
ARGENTINA
Instrumentos Musicales S.A.
Av.Santa Fe 2055
(1123) Buenos Aires, ARGENTINA
TEL: (011) 4508-2700
BARBADOS
A&B Music Supplies LTD
12 Webster Industrial Park
Wildey, St.Michael, BARBADOS
TEL: (246) 430-1100
BRAZIL
Roland Brasil Ltda.
Rua San Jose, 211
Parque Industrial San Jose
Cotia - Sao Paulo - SP, BRAZIL
TEL: (011) 4615 5666
CHILE
Comercial Fancy II S.A.
Rut.: 96.919.420-1
Nataniel Cox #739, 4th Floor
Santiago - Centro, CHILE
TEL: (02) 688-9540
COLOMBIA
Centro Musical Ltda.
Cra 43 B No 25 A 41 Bododega 9
Medellin, COLOMBIA
TEL: (574) 3812529
COSTA RICA
JUAN Bansbach Instrumentos
Musicales
Ave.1. Calle 11, Apartado 10237,
San Jose, COSTA RICA
TEL: 258-0211
CURACAO
Zeelandia Music Center Inc.
Orionweg 30
Curacao, Netherland Antilles
TEL: (305) 5926866
DOMINICAN REPUBLIC
Instrumentos Fernando Giraldez
Calle Proyecto Central No.3
Ens.La Esperilla
Santo Domingo,
DOMINICAN REPUBLIC
TEL: (809) 683 0305
ECUADOR
Mas Musika
Rumichaca 822 y Zaruma
Guayaquil - ECUADOR
TEL: (593-4) 2302364
EL SALVADOR
OMNI MUSIC
75 Avenida Norte y Final Alameda
Juan Pablo II,
Edi cio No.4010 San Salvador,
EL SALVADOR
TEL: 262-0788
GUATEMALA
Casa Instrumental
Calzada Roosevelt 34-01,zona 11
Ciudad de Guatemala,
GUATEMALA
TEL: (502) 599-2888
HONDURAS
Almacen Pajaro Azul S.A. de C.V.
BO.Paz Barahona
3 Ave.11 Calle S.O
San Pedro Sula, HONDURAS
TEL: (504) 553-2029
MARTINIQUE
Musique & Son
Z.I.Les Mangle
97232 Le Lamentin,
MARTINIQUE F.W.I.
TEL: 596 596 426860
Gigamusic SARL
10 Rte De La Folie
97200 Fort De France
MARTINIQUE F.W.I.
TEL: 596 596 715222
MEXICO
Casa Veerkamp, s.a. de c.v.
Av. Toluca No. 323, Col. Olivar
de los Padres 01780 Mexico D.F.,
MEXICO
TEL: (55) 5668-6699
NICARAGUA
Bansbach Instrumentos
Musicales Nicaragua
Altamira D'Este Calle Principal
de la Farmacia 5ta.Avenida
1 Cuadra al Lago.#503
Managua, NICARAGUA
TEL: (505) 277-2557
PANAMA
SUPRO MUNDIAL, S.A.
Boulevard Andrews, Albrook,
Panama City, REP. DE PANAMA
TEL: 315-0101
PARAGUAY
Distribuidora De Instrumentos
Musicales
J.E. Olear y ESQ. Manduvira
Asuncion, PARAGUAY
TEL: (595) 21 492147
PERU
Audionet
Distribuciones Musicales SAC
Juan Fanning 530
Mira ores
Lima - PERU
TEL: (511) 4461388
TRINIDAD
AMR Ltd
Ground Floor
Maritime Plaza
Barataria TRINIDAD W.I.
TEL: (868) 638 6385
URUGUAY
Todo Musica S.A.
Francisco Acuna de Figueroa
1771
C.P.: 11.800
Montevideo, URUGUAY
TEL: (02) 924-2335
VENEZUELA
Instrumentos Musicales
Allegro,C.A.
Av.las industrias edf.Guitar import
#7 zona Industrial de Turumo
Caracas, VENEZUELA
TEL: (212) 244-1122
EUROPE
BELGIUM/FRANCE/
HOLLAND/
LUXEMBOURG
Roland Central Europe N.V.
Houtstraat 3, B-2260, Oevel
(Westerlo) BELGIUM
TEL: (014) 575811
CROATIA
ART-CENTAR
Degenova 3.
HR - 10000 Zagreb, CROATIA
TEL: (1) 466 8493
CZECH REP.
CZECH REPUBLIC DISTRIBUTOR
s.r.o
Voctárova 247/16
180 00 Praha 8, CZECH REP.
TEL: (2) 830 20270
DENMARK
Roland Scandinavia A/S
Skagerrakvej 7 Postbox 880
DK-2100 Copenhagen,
DENMARK
TEL: 3916 6200
FINLAND
Roland Scandinavia As, Filial
Finland
Vanha Nurmijarventie 62
01670 Vantaa, FINLAND
TEL: (0) 9 68 24 020
GERMANY/AUSTRIA
Roland Elektronische
Musikinstrumente HmbH.
Oststrasse 96, 22844 Norderstedt,
GERMANY
TEL: (040) 52 60090
GREECE/CYPRUS
STOLLAS S.A.
Music Sound Light
155, New National Road
Patras 26442, GREECE
TEL: 2610 435400
HUNGARY
Roland East Europe Ltd.
2045. Törökbálint, FSD Park 3. ép.,
HUNGARY
TEL: (23) 511011
IRELAND
Roland Ireland
E2 Calmount Park, Calmount
Avenue, Dublin 12,
Republic of IRELAND
TEL: (01) 4294444
ITALY
Roland Italy S. p. A.
Viale delle Industrie 8,
20020 Arese, Milano, ITALY
TEL: (02) 937-78300
NORWAY
Roland Scandinavia Avd.
Kontor Norge
Lilleakerveien 2 Postboks 95
Lilleaker N-0216 Oslo,
NORWAY
TEL: 2273 0074
POLAND
ROLAND POLSKA SP. Z O.O.
ul. Kty Grodziskie 16B
03-289 Warszawa, POLAND
TEL: (022) 678 9512
PORTUGAL
Roland Systems Group EMEA, S.L.
Branch O ce Porto
Edifício Tower Plaza
Rotunda Eng. Edgar Cardoso
23, 9ºG
4400-676 Vila Nova de Gaia,
PORTUGAL
TEL: (+351) 22 608 00 60
ROMANIA
FBS LINES
Piata Libertatii 1,
535500 Gheorgheni, ROMANIA
TEL: (266) 364 609
RUSSIA
Roland Music LLC
Dorozhnaya ul.3,korp.6
117 545 Moscow, RUSSIA
TEL: (495) 981-4967
SERBIA
Music AP Ltd.
Sutjeska br. 5 XS - 24413 Palic,
SERBIA
TEL: (024) 539 395
SLOVAKIA
DAN Acoustic s.r.o.
Povazská 18.
SK - 940 01 Nové Zámky,
SLOVAKIA
TEL: (035) 6424 330
SPAIN
Roland Systems Group EMEA, S.L.
Paseo García Faria, 33-35
08005 Barcelona, SPAIN
TEL: 93 493 91 00
SWEDEN
Roland Scandinavia A/S
SWEDISH SALES OFFICE
Mårbackagatan 31, 4 tr.
SE-123 43 Farsta, SWEDEN
TEL: (0) 8 683 04 30
SWITZERLAND
Roland (Switzerland) AG
Landstrasse 5, Postfach,
CH-4452 Itingen, SWITZERLAND
TEL: (061) 975-9987
UKRAINE
EURHYTHMICS Ltd.
P.O.Box: 37-a.
Nedecey Str. 30
UA - 89600 Mukachevo, UKRAINE
TEL: (03131) 414-40
UNITED KINGDOM
Roland (U.K.) Ltd.
Atlantic Close, SWANSEA SA7 9FJ,
UNITED KINGDOM
TEL: (01792) 702701
MIDDLE EAST
BAHRAIN
Moon Stores
No.1231&1249 Rumaytha
Building Road 3931,
Manama 339, BAHRAIN
TEL: 17 813 942
IRAN
MOCO INC.
Jadeh Makhsous Karaj (K-9),
Nakhe Zarin Ave.
Jalal Street, Reza Alley No.4
Tehran 1389716791, IRAN
TEL: (021)-44545370-5
ISRAEL
Halilit P. Greenspoon & Sons
Ltd.
8 Retzif Ha'alia Hashnia St.
Tel-Aviv-Yafo ISRAEL
TEL: (03) 6823666
JORDAN
MUSIC HOUSE CO. LTD.
FREDDY FOR MUSIC
P. O. Box 922846
Amman 11192, JORDAN
TEL: (06) 5692696
KUWAIT
EASA HUSAIN AL-YOUSIFI &
SONS CO.
Al-Yousi Service Center
P.O.Box 126 (Safat) 13002,
KUWAIT
TEL: 00 965 802929
LEBANON
Chahine S.A.L.
George Zeidan St., Chahine Bldg.,
Achra eh, P.O.Box: 16-5857
Beirut, LEBANON
TEL: (01) 20-1441
OMAN
TALENTZ CENTRE L.L.C.
Malatan House No.1
Al Noor Street, Ruwi
SULTANATE OF OMAN
TEL: 2478 3443
QATAR
AL-EMADI TRADING &
CONTRACTING CO.
P.O. Box 62, Doha, QATAR
TEL: 4423-554
SAUDI ARABIA
aDawliah Universal Electronics
APL
Behind Pizza Inn
Prince Turkey Street
aDawliah Building,
PO BOX 2154,
Alkhobar 31952,
SAUDI ARABIA
TEL: (03) 8643601
SYRIA
Technical Light & Sound Center
PO Box 13520 Bldg No.49
Khaled Abn Alwalid St.
Damascus, SYRIA
TEL: (011) 223-5384
TURKEY
ZUHAL DIS TICARET A.S.
Galip Dede Cad. No.33
Beyoglu, Istanbul, TURKEY
TEL: (0212) 249 85 10
U.A.E.
Zak Electronics & Musical
Instruments Co. L.L.C.
Zabeel Road, Al Sherooq Bldg.,
No. 14, Ground Floor, Dubai,
U.A.E.
TEL: (04) 3360715
NORTH AMERICA
CANADA
Roland Canada Ltd.
(Head O ce)
5480 Parkwood Way Richmond B.
C., V6V 2M4, CANADA
TEL: (604) 270 6626
Roland Canada Ltd.
(Toronto O ce)
170 Admiral Boulevard
Mississauga On L5T 2N6,
CANADA
TEL: (905) 362 9707
U. S. A.
Roland Corporation U.S.
5100 S. Eastern Avenue
Los Angeles, CA 90040-2938,
U. S. A.
TEL: (323) 890 3700
As of Feb. 1, 2011 (ROLAND)
Page 92

Copyright © 2012 ROLAND CORPORATION
All rights reserved. No part of this publication may be reproduced in any form without the written permission of ROLAND CORPORATION.
Roland, CUBE MONITOR are either registered trademarks or trademarks of Roland Corporation in the United States and/or other countries.
* 5 1 0 0 0 2 7 4 0 6 - 0 1 *
 Loading...