

Page 1
© 2021 Roland Corporation
Roland Cloud Connect
Owner’s Manual
03
Page 2

Contents
Initial Startup Operations .....................3
Using Roland Cloud Connect ..................9
Home Screen Operations ................................9
Tone List Screen Operations ................................12
Installing a Wave/Model Expansion ..........................14
Search Screen Operations ...............................15
Connect Screen Operations .............................17
Add a Device You Want to Connect ...........................18
Delete a Connected Device. . . . . . . . . . . . . . . . . . . . . . . . . . . . . . . . . 20
Setting Screen Operations ..............................21
2
Page 3
To Contents
Initial Startup Operations
NOTE
5 A smartphone that is compatible with the
Bluetooth® version 5.0 standards is required. Turn
on the Bluetooth® function of your smartphone.
5 If you’re using an Android device, turn on location
data or the location switch.
1. Turn on your Roland Cloud Connect-
compatible device and connect the WC-1.
2. Tap the “Roland Cloud Connect” app.
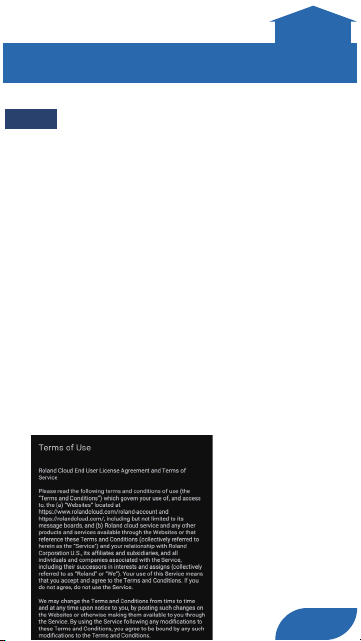
The “Terms of Use” are shown.
* Enable the Bluetooth® function and location
data when the app prompts you to do so during
startup.
3
Page 4

To Contents
3. Read the Terms of Use and tap “Agree”.
The Login screen appears.
Tap here to create a new
Roland account.
Tap here if you’ve
forgotten your password.
4. Enter the e-mail address and password
you registered for your Roland account.
4
Page 5

To Contents
5. Tap “Log in”.
The Device Setup screen appears.
* Enable the Bluetooth® function and location
data when the app prompts you to do.
6. Hold down the button on the WC-1 for at
least three seconds.
The function indicator LED on the WC-1 blinks.
* The connection is initiated even if you execute
“RESET SETTINGS” from the menu on the device
to which the WC-1 is connected. For details,
refer to the owner’s manual of the connected
device.
5
Page 6

To Contents
The access point selection screen appears, after
waiting for a while.
Tap here to connect to a 2.4
GHz wireless network that
has the stealth function
enabled, enter the SSID and
password, and select the
security method.
* You can’t connect to a
5 GHz wireless network
that has the stealth
function enabled.
You may need to congure
the MTU (maximum
transmission unit) settings,
depending on the wireless
network device. Tap here to
congure the MTU setting if
necessary.
7. Tap the wireless network to which the
WC-1 is to be connected.
A password input screen appears.
6
Page 7
To Contents
8. Input the password of the wireless
network.
9. Tap “Connect”.
The app’s introductory screen is shown until
the connection is made.
The Home screen appears once the connection
is successful.
7
Page 8

To Contents
NOTE
5 The access points to which the WC-1 can connect
are as follows. You cannot connect to any other
access points. Edit the access point settings.
Adapted Channel
Standards IEEE 802.11 a/b/g/n 2.4 GHz, 5 GHz
Security
2.4 GHz band 1, 2, 3, 4, 5, 6, 7, 8, 9, 10, 11
5G Hz band 36, 40, 44, 48, 52, 56, 60, 64
WPA3-PSK (AES)
WPA2-PSK (AES/TKIP)
WPA-PSK (AES/TKIP)
5 This device does not support connection via
proxy server.
5 You can’t connect to a 5 GHz wireless network
that has the stealth function enabled.
8
Page 9

Using Roland Cloud Connect
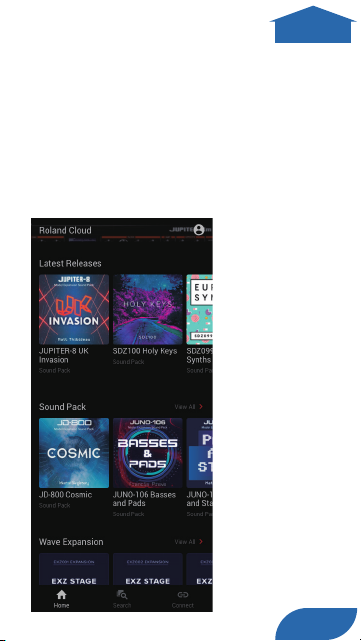
Home Screen Operations
Displays the Setting screen.
&Setting Screen Operations
Tap an item here to see a
list of tones included in the
selected contents.
&Tone List Screen Operations
Latest Releases
Shows information for the
contents available on Roland
Cloud.
Sound Pack
Shows a list of tones included
in the selected sound pack.
&Search Screen Operations &Connect Screen Operations
To Contents
9
Page 10

Contents available on Roland Cloud
Wave Expansion/Model Expansion
When you tap on an installed
wave expansion or model
expansion, a list of the tones
included is shown.
&Tone List Screen Operation
When you tap on a wave
expansion or model expansion
that isn’t installed, “Install” is
shown.
* You must install the
wave expansion or
model expansion on the
connected device in order
to use the tones in that
wave/model expansion.
&Installing a Wave/Model Expansion
History
Shows the history of tones
loaded.
To Contents
10
Page 11
To Contents
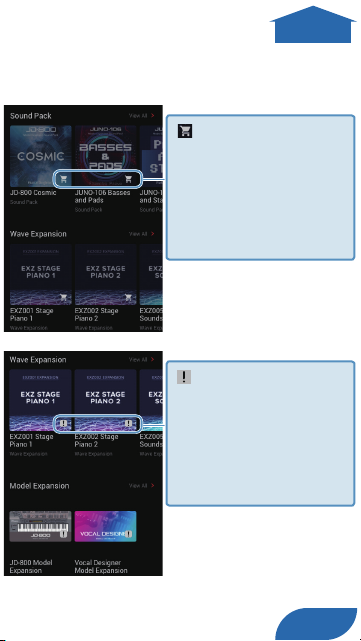
Instead of the artwork for each of the contents, you may see an
icon indicating the installation status or that the license hasn’t been
installed.
“
” (cart) icon
Indicates contents that you
cannot access under your current
membership plan.
Tap here to open the
membership (subscription)
purchase screen.
“
” icon
Indicates contents that must
be installed on the connected
device.
Tap here to install.
11
Page 12

To Contents
Tone List Screen Operations
This lets you listen to the demo
song.
Add Like/Remove Like
Adds a“ ” (Like) to the content,
or remove it.
You can lter the tone by “
on the search screen.
&Search Screen Operations
Write tone to device
Writes the tone to the bank of
Tapping on tone name
loads the tone to your
connected device. (*1)
(*1) The tones are loaded into the current part of the connected
device (this may dier depending on the specications of that
device).
If the part to which you are trying to load does not support that
tone (for example, when trying to load a diatonic tone into a
rhythm part), the tone is not loaded.
the connected device.
&Writing tone to a connected device
”
12
Page 13

To Contents
Writing tone to a connected device
1. Tap “ ” icon for the tone name on the
tone list screen, and tap “Write tone to
device”.
2. Select where you want to write the tone
and tap “Write”.
Write destination
3. Once you see the dialog box conrming
that you want to write the tone, tap “OK”.
13
Page 14

To Contents
Installing a Wave/Model Expansion
1. Tap “Install”.
2. Once you see the dialog box conrming
that you want to install, and tap “OK”.
A list of the tones included in the expansion is
shown after installation is complete.
14
Page 15
To Contents
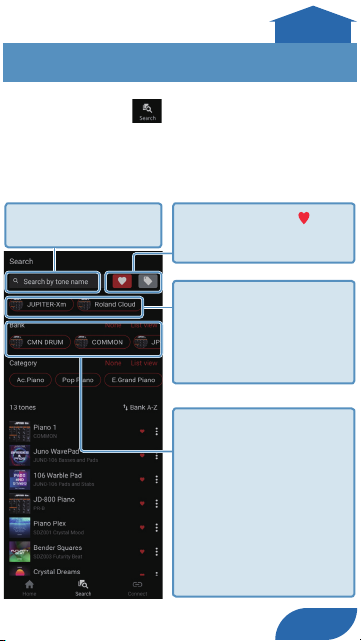
Search Screen Operations
Search screen: Tap
The contents available on Roland Cloud or the tones
on your connected device are shown. You can search
by tone name, category, bank and more.
Input a tone name to
search for.
Filters your search by “ ” (Like)
or tags attached to the tone.
Select what to search for.
5 Tones on the connected
device
5 Tones included in sound
packs on Roland Cloud
Bank
Filters the search by bank on
the connected device.
None/ALL
Excludes/includes all banks
from the search.
List view
Banks are shown as a list.
15
Page 16
To Contents
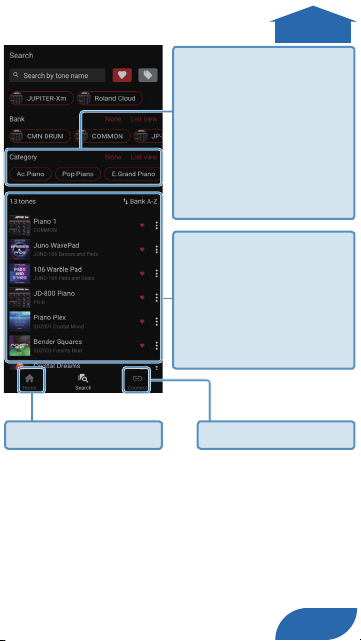
Categories
Filters the search by tone
category.
None/ALL
Excludes/includes all banks
from the search.
List view
Categories are shown as a list.
Search results are shown as
a list.
&Tone List Screen Operations
* If the app is running
slowly, please try to set
more specic search
options.
&Connect Screen Operations &Home Screen Operations
16
Page 17

To Contents
Connect Screen Operations
Connect screen: Tap
Use this screen to switch between connected
devices, to add devices you want to connect to
Roland Cloud and to delete connected devices.
Displays the list for the WC-1 on which setup (connection
settings) has nished.
&Delete a Connected Device
Shows information for the
device connected to the app.
This appears only when an
update program is available
for the WC-1.
Shows the devices that are
online (ready to connect).
Tap to switch between
connected devices.
&Add a Device You Want to Connect
&Search Screen Operations &Home Screen Operations
17
Page 18

To Contents
Add a Device You Want to Connect
1. Tap “Device Setup”.
The Device Setup screen appears.
* Enable the Bluetooth® function and
location data when the app prompts
you to do.
2. Hold down the button on the
WC-1 for at least three seconds.
The function indicator LED on the WC-1 blinks.
* The connection is initiated even if you execute
“RESET SETTINGS” from the menu on the device
to which the WC-1 is connected. For details,
refer to the owner’s manual of the connected
device.
The access point selection screen
appears, after waiting for a while.
3. Tap the wireless network
to which the WC-1 is to be
connected.
A password input screen appears.
18
Page 19

4. Input the password of the
wireless network.
5. Tap “Connect.”
The Home screen appears once the connection
is successful.
NOTE
Once the WC-1 settings are reset from the
connected device, the WC-1 network settings
(SSID and password) are initialized. To connect
to a wireless network after resetting, add a
connected device again.
To Contents
19
Page 20

To Contents
Delete a Connected Device
1. Tap the “ ” icon of the WC-1 to delete.
2. Tap “Unregister” in the dialog box that
appears.
20
Page 21
To Contents
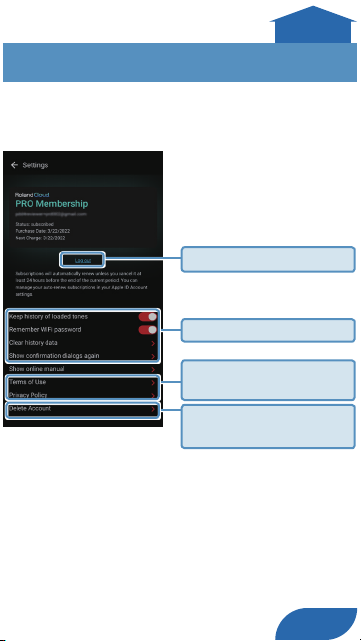
Setting Screen Operations
On this screen, you can check a membership, and
congure the app’s settings.
Log out from app
App settings
Terms and other text are
shown
This deletes your Roland
account.
21
 Loading...