

Page 1
このたびは、BOSS CD-R/RW ドライブ・ユニット CDI-BR-1 をお買い
上げいただきまして、ありがとうございます。
この機器を正しくお使いいただくために、ご使用前に
•
「安全上のご注意」(P.2〜3)
•
「使用上のご注意」(P.3)
をよくお読みください。
また、この機器の優れた機能を十分ご理解いただくためにも、取扱説明
書をよくお読みください。取扱説明書は必要なときにすぐに見ることが
できるよう、手元に置いてください。
©
2002 ボス株式会社
本書の一部、もしくは全部を無断で複写・転載することを禁じます。
02899390 ’02-3-B3-11N
Page 2
安全上のご注意
安全上のご注意
火災・感電・傷害を防止するには
注意の意味について警告と
取扱いを誤った場合に、使用者が
警告
注意
死亡または重傷を負う可能性が想
定される内容を表わしています。
取扱いを誤った場合に、使用者が
傷害を負う危険が想定される場合
および物的損害のみの発生が想定
される内容を表わしています。
※物的損害とは、家屋・家財およ
び家畜・ペットにかかわる拡大
損害を表わしています。
以下の指示を必ず守ってください
警告 警告
001
● この機器を使用する前に、以下の指示
と取扱説明書をよく読んでください。
......................................................................................................
002a
● この機器を分解したり、改造したりし
ないでください。
......................................................................................................
003
● 修理/部品の交換などで、取扱説明書
に書かれていないことは、絶対にしな
いでください。必ずお買い上げ店また
はローランド・サービスに相談してく
ださい。
......................................................................................................
004
● 次のような場所での使用や保存はし
ないでください。
○温度が極端に高い場所(直射日光の
当たる場所、暖房機器の近く、発熱
する機器の上など)
○水気の近く(風呂場、洗面台、濡れ
た床など)や湿度の高い場所
○雨に濡れる場所
○ホコリの多い場所
○振動の多い場所
......................................................................................................
図記号の例
は、注意(危険、警告を含む)を表わしていま
す。
具体的な注意内容は、 の中に描かれています。
左図の場合は、「一般的な注意、警告、危険」を
表わしています。
は、禁止(してはいけないこと)を表わしてい
ます。
具体的な禁止内容は、 の中に描かれています。
左図の場合は、「分解禁止」を表わしています。
●は、強制(必ずすること)を表わしています。
具体的な強制内容は、●の中に描かれています。
左図の場合は、「電源プラグをコンセントから抜
くこと」を表わしています。
007
●この機器を、ぐらついた台の上や傾い
た場所に設置しないでください。必ず
安定した水平な場所に設置してくださ
い。
.....................................................................................................
011
●この機器に、異物(燃えやすいもの、
硬貨、針金など)や液体(水、ジュー
スなど)を絶対に入れないでください。
.....................................................................................................
013
● お子様のいるご家庭で使用する場合、
お子様の取り扱いやいたずらに注意し
てください。必ず大人のかたが、監視
/指導してあげてください。
.....................................................................................................
014
●この機器を落としたり、この機器に強
い衝撃を与えないでください。
.....................................................................................................
022d
●CDI-BR-1 を取り付ける前に、BR1180 の電源を切って ACアダプター
をコンセントから外してください。
.....................................................................................................
2
Page 3
注意
104
● 接続したコードやケーブル類は、繁雑
にならないように配慮してください。
特に、コードやケーブル類は、お子様
の手が届かないように配慮してくださ
い。
......................................................................................................
106
● この機器の上に乗ったり、機器の上に
重いものを置かないでください。
......................................................................................................
115b
● 指定の機器(BR-1180)だけに取り付
け、取り付け時には指定されたネジだ
けを外してください。
......................................................................................................
118
● ネジを外した場合は、小さなお子様が
誤って飲み込んだりすることのないよ
うお子様の手の届かないところへ保管
してください。
......................................................................................................
使用上のご注意
291a
2 〜 3 ページに記載されている「安全上のご注
意」以外に、次のことに注意してください。
設置について
354a
●直射日光の当たる場所や、発熱する機器の近く、
閉め切った車内などに放置しないでください。変
形、変色することがあります。
355
●故障の原因になりますので、雨や水に濡れる場所
で使用しないでください。
修理について
451a
●お客様がこの機器を分解、改造された場合、以後
の性能について保証できなくなります。また、修
理をお断りする場合もあります。
453a
●当社では、この製品の補修用性能部品(製品の機
能を維持するために必要な部品)を、製造打切後
6 年間保有しています。この部品保有期間を修理
可能の期間とさせていただきます。なお、保有期
間が経過した後も、故障箇所によっては修理可能
の場合がありますので、お買い上げ店、または最
寄りのローランド・サービスにご相談ください。
962a
※製品の仕様および外観は、改良のため予告なく変
更することがあります。
3
Page 4

CDI-BR-1 の取り付け
警告
022d
•
CDI-BR-1を取り付ける前に、BR-1180の電源を切ってACアダプターをコンセント
から外してください。
928
929
901
912
913
本体を裏返す際は、ボタン、つまみなどを破損しないように、新聞や雑誌などを重ねて本体
•
の四隅や両端に敷いてください。また、その際、ボタン、つまみなどが破損しないような位
置に配置してください。
本体を裏返す際は、落下や転倒を引き起こさないよう取扱いにご注意ください。
•
使用するプラス・ドライバーは、ネジの頭に合ったものを使ってください(No.2 のドライ
•
バー)。ネジの頭に合っていないと、ネジの頭をつぶしてしまうことがあります。
CDI-BR-1だけを取り付け、指定されたネジだけを外してください。
•
取り付け開口部で手を切らないように注意してください。
•
CDI-BR-1は、静電気により部品が破壊される恐れがあります。CDI-BR-1を取り扱うときは、
•
次の点に注意してください。
•
CDI-BR-1 を持つときは、あらかじめ何らかの金属に触れて、体や衣類にたまっている
静電気を放電してください。
•
BR-1180にケーブル類を接続するときは、ケーブルのもう一端がカーペットなどの静電
気を起こしやすいものに触れないようにしてください。
•
CDI-BR-1を無理に押し込まないでください。装着しにくい場合、いったん CDI-BR-1 を外し
てやり直してください。
•
取り付けを終えたら、正しく取り付けられていることを再度確認してください。
4
Page 5
CDI-BR-1の取り付け
BR-1180と接続機器の電源を切り、ACアダ
1.
プター、その他の接続コードをすべて取り
外します。
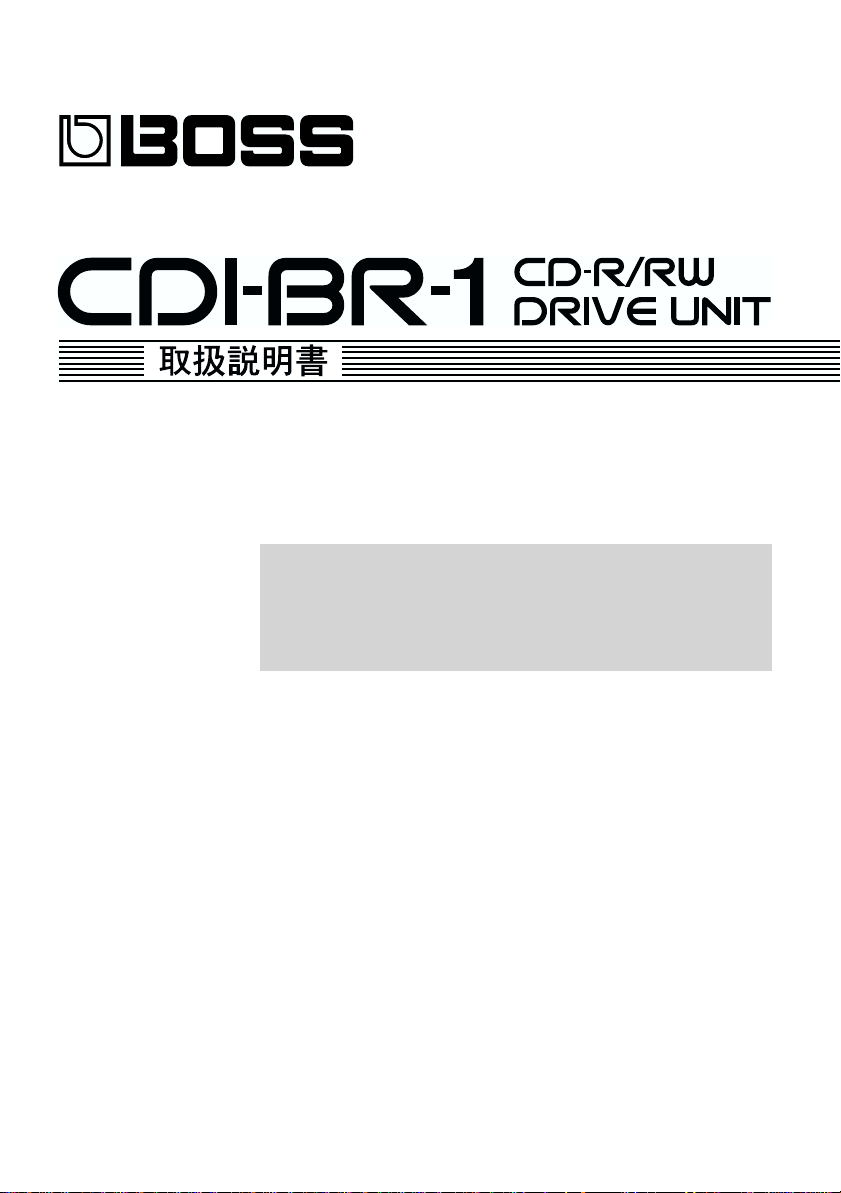
BR-1180 を裏返し、図の位置のネジを外し
2.
てカバーを外します。
fig.01
(B)
(A)
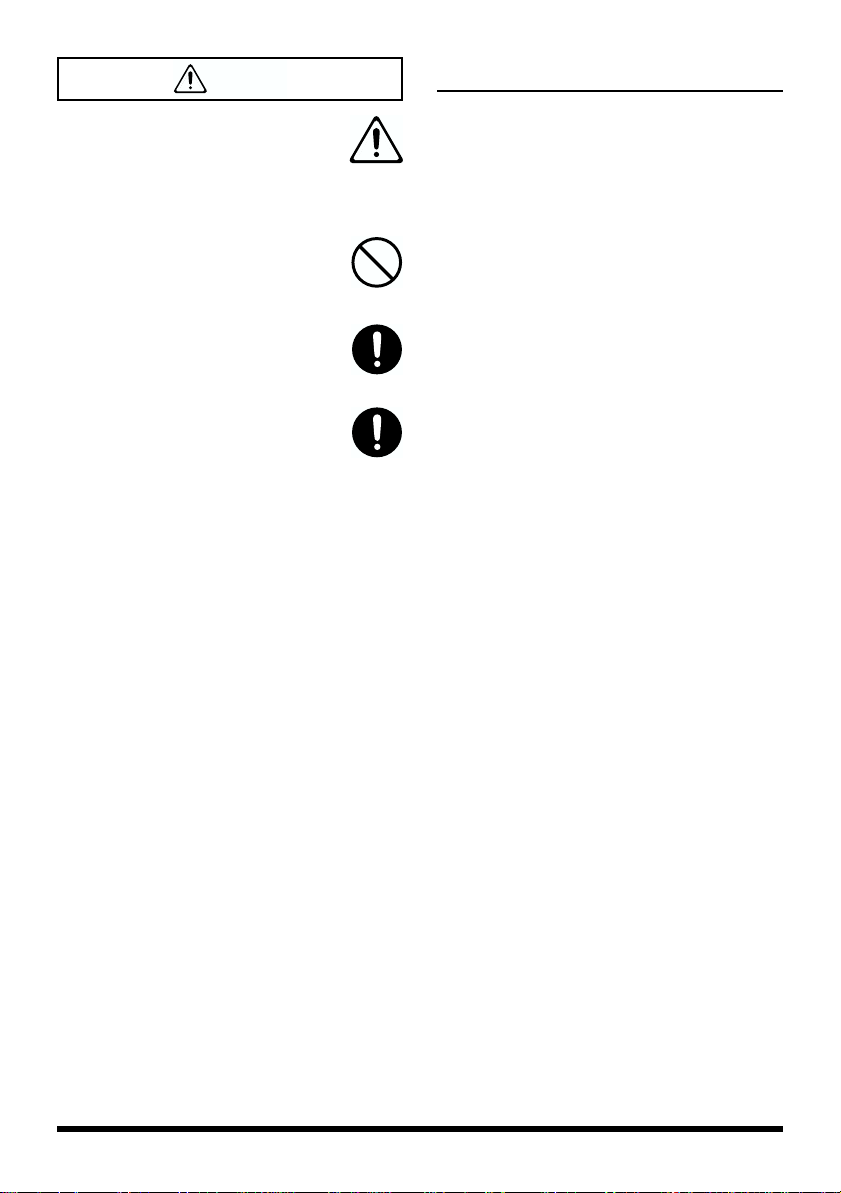
CDI-BR-1のコネクターを、BR-1180のソケッ
3.
トの向きに合わせて確実に差し込みます。
fig.02
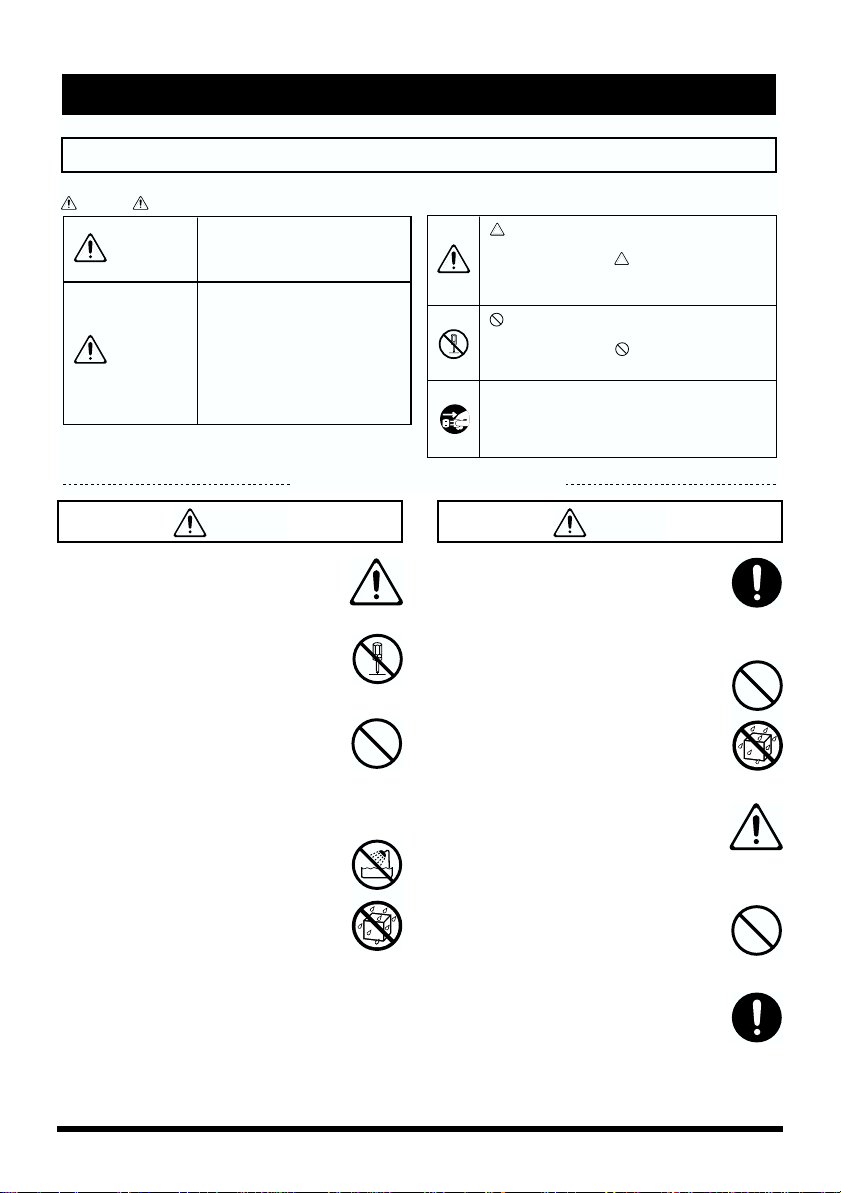
4.
BR-1180 とCDI-BR-1 の取り付け用の穴が
合うように、CDI-BR-1 を図のように置き
ます。
fig.03
カバーの(A)と(B)の部分が、取り外す
5.
前とは逆の位置になるようにしてカバーを
もとの位置に戻します。
fig.04
(A)
(B)
CDI-BR-1 の付属ネジを図の位置(C)に仮止
6.
めし、次にカバーの取り付けネジを仮止めし
たら、すべてのネジを確実に締めます。
fig.05
(C)
(C)
(C)
7.
BR-1180 を元に戻します。
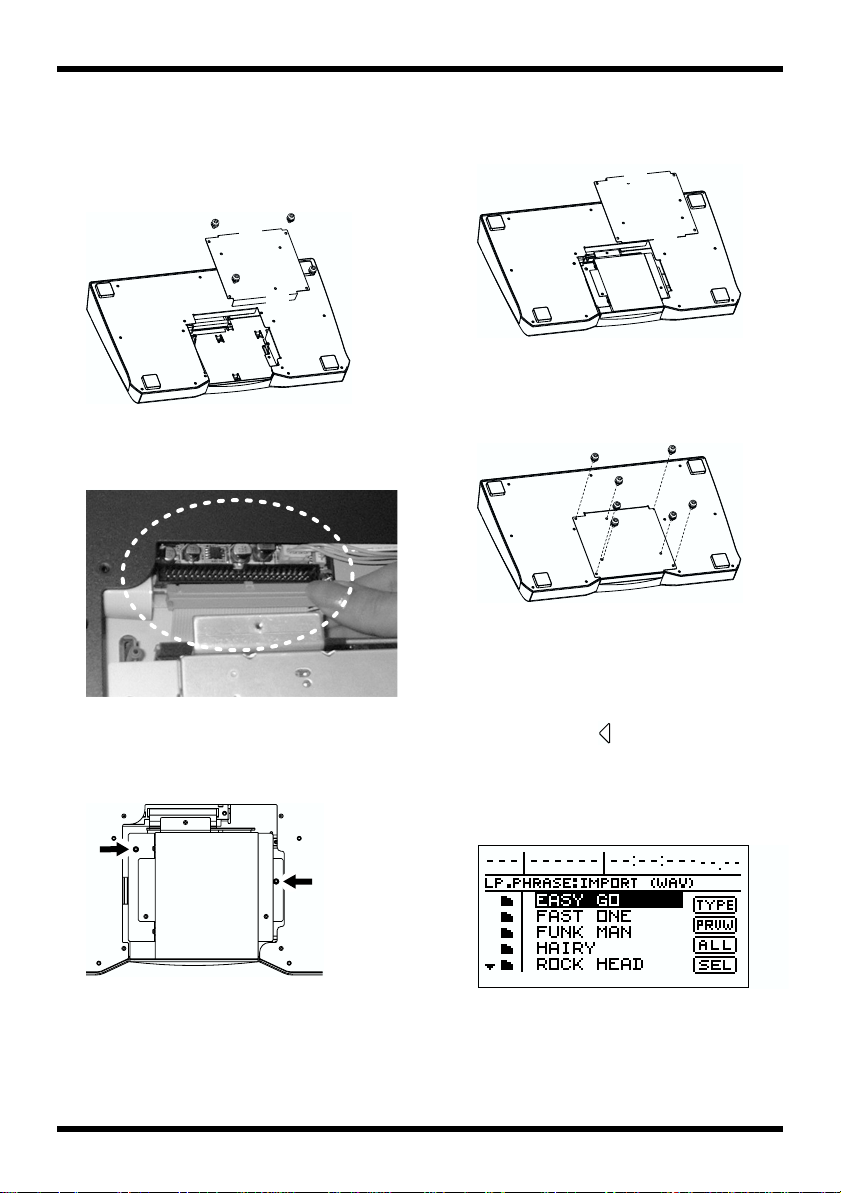
8.
動作チェックをします。
付属 CD-ROM を CDI-BR-1 にセットし、
[LOOP PHRASE IMPORT]を押します。
次に CURSOR[ ]を押してIMPORT
アイコンを選び[ENTER]を押します。
CDI-BR-1 の取り付けが正しく行われてい
るときは、付属 CD-ROM のデータが読み
込まれて次の画面が表示されます。
fig.06
※ 画面が表示されないときは、『電源を切る』
(BR-1180 取扱説明書 P.30)の操作で一旦
電源を切り、操作 1 からやり直してくださ
い。
5
Page 6

Memo ...
Page 7

Page 8

Page 9

Owner’s Manual
Thank you, and congratulations on your choice of the BOSS CDI-BR-1
CD-R/RW Drive Unit.
Before using this unit, carefully read the sections entitled:
• USING THE UNIT SAFELY (p. 2–3)
• IMPORTANT NOTES (p. 3)
These sections provide important information concerning the proper
operation of the unit. Additionally, in order to feel assured that you
have gained a good grasp of every feature provided by your new unit,
Owner’s manual should be read in its entirety. The manual should be
saved and kept on hand as a convenient reference.
Copyright © 2002 BOSS CORPORATION
All rights reserved. No part of this publication may be reproduced in
any form without the written permission of BOSS CORPORATION.
02899390 ’02-3-B3-11N
Page 10

USING THE UNIT SAFELY
Used for instructions intended to alert
the user to the risk of death or severe
injury should the unit be used
improperly.
Used for instructions intended to alert
the user to the risk of injury or material
damage should the unit be used
improperly.
* Material damage refers to damage or
other adverse effects caused with
respect to the home and all its
furnishings, as well to domestic
animals or pets.
001
• Before using this unit, make sure to
read the instructions below, and the
Owner’s Manual.
..................................................................................................
002a
• Do not open or perform any internal
modifications on the unit.
..................................................................................................
003
• Do not attempt to repair the unit, or
replace parts within it (except when
this manual provides specific instructions directing you to do so). Refer all
servicing to your retailer, the nearest
Roland Service Center, or an authorized Roland distributor, as listed on
the "Information" page.
..................................................................................................
004
• Never use or store the unit in places
that are:
•
Subject to temperature extremes
(e.g., direct sunlight in an enclosed
vehicle, near a heating duct, on top
of heat-generating equipment); or are
• Damp (e.g., baths, washrooms, on
wet floors); or are
• Humid; or are
• Exposed to rain; or are
• Dusty; or are
• Subject to high levels of vibration.
..................................................................................................
The symbol alerts the user to important instructions
or warnings.The specific meaning of the symbol is
determined by the design contained within the
triangle. In the case of the symbol at left, it is used for
general cautions, warnings, or alerts to danger.
The symbol alerts the user to items that must never
be carried out (are forbidden). The specific thing that
must not be done is indicated by the design contained
within the circle. In the case of the symbol at left, it
means that the unit must never be disassembled.
The ● symbol alerts the user to things that must be
carried out. The specific thing that must be done is
indicated by the design contained within the circle. In
the case of the symbol at left, it means that the powercord plug must be unplugged from the outlet.
007
• Make sure you always have the unit
placed so it is level and sure to remain
stable. Never place it on stands that
could wobble, or on inclined surfaces.
..................................................................................................
011
• Do not allow any objects (e.g.,
flammable material, coins, pins); or
liquids of any kind (water, soft drinks,
etc.) to penetrate the unit.
..................................................................................................
013
• In households with small children, an
adult should provide supervision until
the child is capable of following all the
rules essential for the safe operation of
the unit.
..................................................................................................
014
• Protect the unit from strong impact.
(Do not drop it!)
..................................................................................................
022d
• Before installing the CDI-BR-1, you
must first always turn off the BR-1180
and unplug the AC adaptor.
..................................................................................................
2
Page 11

104
• Try to prevent cords and cables from
becoming entangled. Also, all cords
and cables should be placed so they
are out of the reach of children.
..................................................................................................
106
• Never climb on top of, nor place heavy
objects on the unit.
..................................................................................................
115b
• Install the CDI-BR-1 only into the
specified unit (BR-1180). Remove only
the specified screws during the installation.
..................................................................................................
118
• Should you remove screws, make sure
to put them in a safe place out of
children's reach, so there is no chance
of them being swallowed accidentally.
..................................................................................................
IMPORTANT NOTES
291a
In addition to the items listed under “USING
THE UNIT SAFELY” on page 2–3, please read
and observe the following:
Placement
354a
• Do not expose the unit to direct sunlight,
place it near devices that radiate heat, leave it
inside an enclosed vehicle, or otherwise
subject it to temperature extremes. Excessive
heat can deform or discolor the unit.
355
• To avoid possible breakdown, do not use the
unit in a wet area, such as an area exposed to
rain or other moisture.
962a
* In the interest of product improvement, the
specifications and/or appearance of this unit
are subject to change without prior notice.
3
Page 12

Installation of the CDI-BR-1
022d
• Before installing the CDI-BR-1, you must first always turn off the BR-1180 and unplug
the AC adaptor.
CAUTION
928
• When turning the unit upside-down, get a bunch of newspapers or magazines, and place
them under the four corners or at both ends to prevent damage to the buttons and controls.
Also, you should try to orient the unit so no buttons or controls get damaged.
929
• When turning the unit upside-down, handle with care to avoid dropping it, or allowing it to
fall or tip over.
• Use a Phillips screwdriver that is suitable for the size of the screw (a number 2 screwdriver).
If an unsuitable screwdriver is used, the head of the screw may be stripped.
• Install only the specified CDI-BR-1. Remove only the specified screws.
• Be careful not to cut your hand on the edge of the installation bay.
901
• To avoid the risk of damage to internal components that can be caused by static electricity,
please carefully observe the following whenever you handle the CDI-BR-1.
901-1
901-4
912
913
• Before you touch the CDI-BR-1, always first grasp a metal object (such as a water pipe),
so you are sure that any static electricity you might have been carrying has been
discharged.
• Before you connect any cables, make sure they do not carry a static electricity charge.
Such charges can be transmitted, for example, if the other end of the cable has been in
contact with a carpet (or other object) where there is a static electricity buildup.
• Never use excessive force when installing a CDI-BR-1. If it doesn't fit properly on the first
attempt, remove the board and try again.
• When CDI-BR-1 installation is complete, double-check your work.
4
Page 13

1.
Turn off the power to the BR-1180 and
any connected devices, and disconnect the
AC adapter and all other connector cables.
2.
Turn the BR-1180 over, remove the screws
at the positions shown in the figure, and
remove the cover.
fig.01
(B)
(A)
3.
Align the CDI-BR-1’s connector with the
BR-1180’s socket and insert the connector
securely.
fig.02
Installation of the CDI-BR-1
5.
Replace the cover with the positions of
the (A) and (B) sections of the cover are
reversed relative to their positions prior
to the cover’s removal.
fig.04
Tighten the screws included with the CDI-
6.
(A)
(B)
BR-1 in the positions indicated in the
figure (C) until snug, tighten the cover
attachment screws until they are snug, and
then securely tighten all of the screws.
fig.05
(C)
(C)
(C)
4.
Position the CDI-BR-1 as shown in the
figure so that the CDI-BR-1’s and BR1180’s attachment holes are aligned.
fig.03
7.
Turn the BR-1180 back over to its original
position.
8.
Check the operation of the unit.
Place the included CD-ROM in the CDI-BR1, then press [LOOP PHRASE IMPORT].
Next, press CURSOR [ ] to select
“IMPORT,” then press [ENTER].
If the CDI-BR-1 has been installed correctly,
the data on the included CD-ROM is
loaded, and the following screen appears.
fig.06
* If the screen does not appear, first follow the
instructions in “Turning off the power” (p. 30
in the BR-1180 Owner’s Manual) to turn off
the unit’s power, then carry out the procedure
again starting from Step 1.
5
Page 14

Installation du CDI-BR-1
022d
• Coupez toujours l'alimentation et débranchez le câble d'alimentation avant
d'entreprendre l'installation de la carte CDI-BR-1.
PRECAUTION
• Utiliser un tournevis cruciforme correspondant à la taille de la vis (un tournevis numéro 2).
En cas d’utilisation d’un tournevis inapproprié, la tête de la vis pourrait être endommagée.
• Installez uniquement la carte CDI-BR-1 spécifiée. Retirez uniquement les vis spécifiées.
• Veillez à ne pas vous couper les doitgs sur le bord de l’ouverture d’installation.
901
• Veuillez suivre attentivement les instructions suivantes lorsque vous manipulez la carte CDIBR-1 pour éviter tout risque de dommages aux pièces internes par l'électricité statique.
901-1
901-4
912
913
• Touchez toujours un objet métallique (comme un tuyau) avant de manipuler la carte
CDI-BR-1, pour vous assurer de vous décharger de toute l'électricité statique que vous
auriez pu accumuler.
• Avant de connecter tout cable, assurez-vous qu’il ne contient aucune charge d’electricite
statique. De telles charges peuvent etre transmises, par exemple, si l’autre extremite du
cable touche a un tapis (ou autre objet) ou il y a accumulation d’electricite statique.
• N'usez jamais de force excessive lorsque vous installez une carte CDI-BR-1. Si elle ne s'ajuste
pas adéquatement au premier essai, retirez-la et essayez à nouveau.
• Une fois l'installation de la carte CDI-BR-1 terminée, revérifiez si tout est bien installé.
6
Page 15

1.
Coupez l’alimentation du BR-1180 et de
tous les appareils connectés, débranchez
l’adaptateur AC et tous les autres câbles
de connexion.
2.
Tournez le BR-1180 sens dessus dessous,
retirez les vis situées aux endroits
montrés dans l’illustration et retirez le
couvercle.
fig.01
(B)
Installation du CDI-BR-1
5.
Remettez le couvercle de façon à ce que la
position des sections (A) et (B) soient
inversée par rapport à leur position avant
que vous retiriez le couvercle.
fig.04
(A)
(B)
(A)
3.
Alignez le connecteur du CDI-BR-1 et la
prise du BR-1180, puis insérez solidement
le connecteur.
fig. fig.02
4.
Placez le CDI-BR-1 comme le montre
l’illustration pour que les trous de
fixation du CDI-BR-1 et du BR-1180
soient alignés.
fig.03
6.
Serrez les vis fournies avec le CDI-BR-1
aux positions indiquées dans l’illustration
(C) jusqu’à ce qu’elles soient bien ajustées,
serrez les vis de fixation du couvercle
jusqu’à ce qu’elles soient bien ajustées
puis serrez fermement toutes les vis.
fig.05
(C)
(C)
(C)
7.
Remettez le BR-1180 dans sa position originale.
8.
Vérifiez le fonctionnement de l’appareil.
Placez le CD-ROM inclus dans le CDI-BR-1,
puis appuyez sur [LOOP PHRASE IMPORT].
Appuyez ensuite sur CURSOR [ ] pour
sélectionner « IMPORT », puis appuyez sur
[ENTER]. Si le CDI-BR-1 a été installé
correctement, les données du CD-ROM inclus
sont chargées et l’écran suivant s’affiche.
fig.06
* Si l’écran ne s’affiche pas, suivez d’abord les
instructions données sous « Turning off the
power » (p. 30 du Guide d’utilisation du BR-
1180) pour couper l’alimentation de l’appareil,
puis reprenez la procédure à partir de l’étape 1.
7
Page 16

For EU Countries
This product complies with the requirements of European Directive 89/336/EEC.
For the USA
FEDERAL COMMUNICATIONS COMMISSION
RADIO FREQUENCY INTERFERENCE STATEMENT
This equipment has been tested and found to comply with the limits for a Class B digital device, pursuant to Part 15 of the
FCC Rules. These limits are designed to provide reasonable protection against harmful interference in a residential
installation. This equipment generates, uses, and can radiate radio frequency energy and, if not installed and used in
accordance with the instructions, may cause harmful interference to radio communications. However, there is no guarantee
that interference will not occur in a particular installation. If this equipment does cause harmful interference to radio or
television reception, which can be determined by turning the equipment off and on, the user is encouraged to try to correct the
interference by one or more of the following measures:
– Reorient or relocate the receiving antenna.
– Increase the separation between the equipment and receiver.
– Connect the equipment into an outlet on a circuit different from that to which the receiver is connected.
– Consult the dealer or an experienced radio/TV technician for help.
This device complies with Part 15 of the FCC Rules. Operation is subject to the following two conditions:
(1) This device may not cause harmful interference, and
(2) This device must accept any interference received, including interference that may cause undesired operation.
Unauthorized changes or modification to this system can void the users authority to operate this equipment.
This equipment requires shielded interface cables in order to meet FCC class B Limit.
For Canada
NOTICE
This Class B digital apparatus meets all requirements of the Canadian Interference-Causing Equipment Regulations.
AVIS
Cet appareil numérique de la classe B respecte toutes les exigences du Règlement sur le matériel brouilleur du Canada.
 Loading...