

Page 1
Quick Start
EASY GUID
E
.ecord
g
2.E
r
ase
.
C
D
B
acu
p
5.aaoe
6.Overdub
7.Reh
e
ars
al3
.
Wri
t
e(S
D CD
)
TRACKTIME
S
PEAKE
R
POWER
PHANTOMOVER
0
d
B
3
1
2
R
EXITMEN
U
SPEE
D
C
ANCE
C
REPEA
T
CDSD
C
ARDFFFINALIZEREW
EJECT
MOD
E
M
ARKE
R
A
B
C
LINE/PHON
OOUM
T
Copyright © 2010 ROLAND CORPORATION
All rights reserved. No part of this publication may be reproduced in any form without the written
permission of ROLAND CORPORATION.
Roland is a registered trademark of Roland Corporation in the United States and/or other countries.
* 5 1 0 0 0 1 3 1 1 8 - 0 1 *
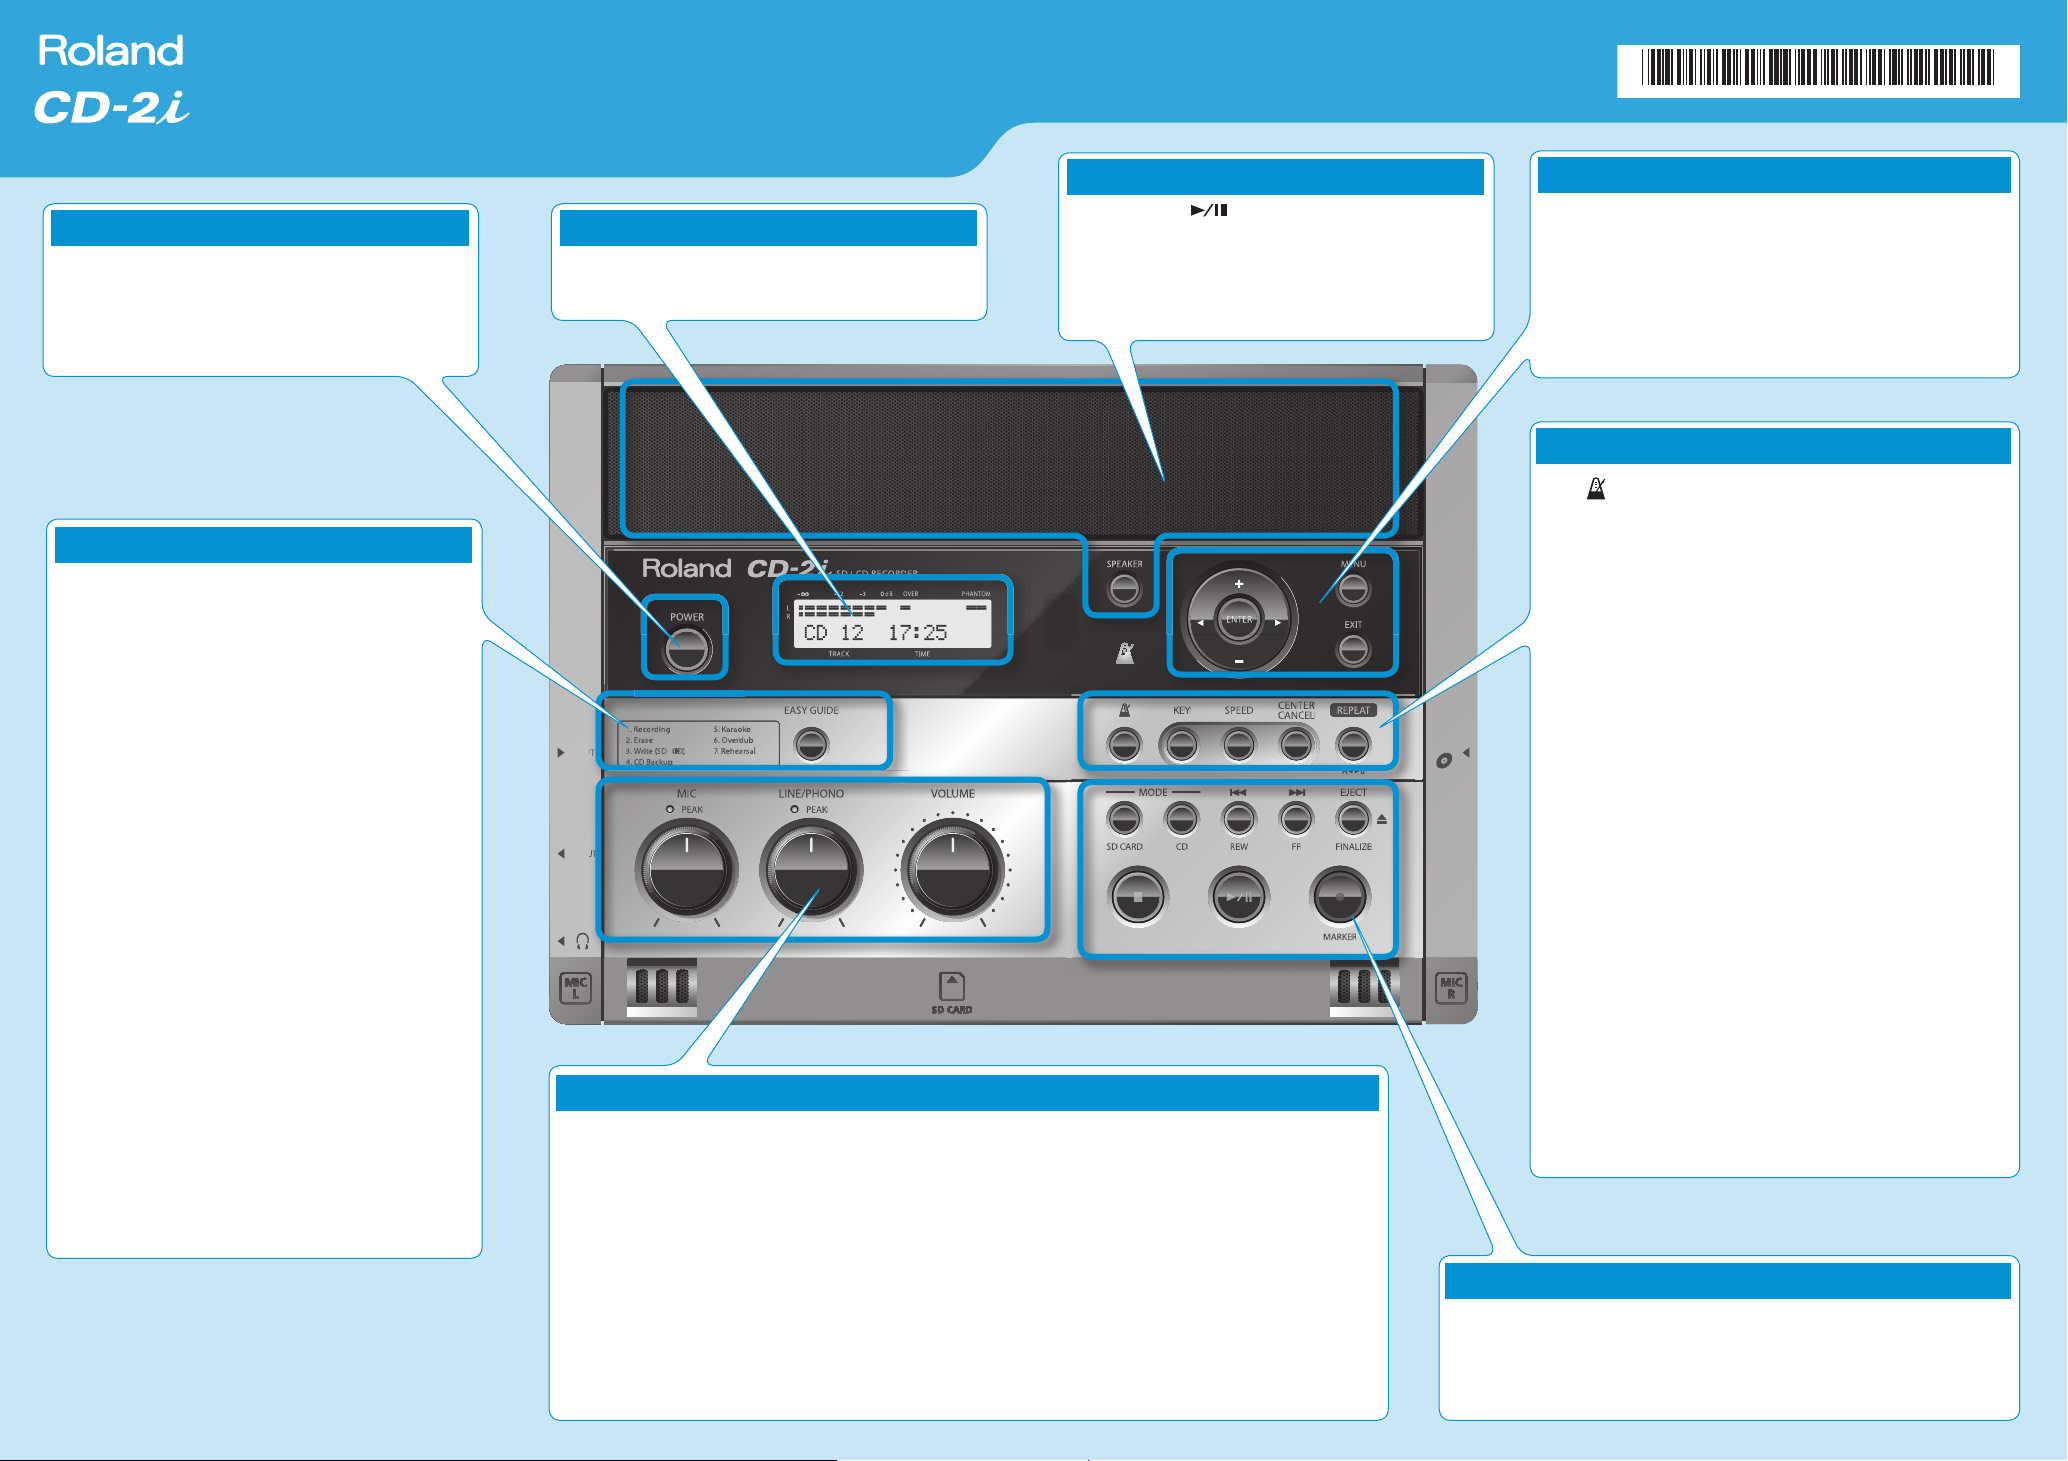
Turn on the Power
To turn the power on/o , press and hold the button until the
indication in the display changes.
*
If you’re operating the CD-2i on batteries, you won’t be
able to perform CD-related operations such as recording,
playing, or writing songs, etc. Nor will it be possible to use
phantom power.
Take Advantage of the Easy Guide
Press the button a number of times to select what you want
to do.
In the display, navigate through the settings and steps for the
operation you selected.
1. Recording
Make settings that are appropriate for your
performance or situation, and then record.
2. Erase
Erase unwanted data from media.
3. Write SD CD
Choose the desired songs from an SD memory card,
and use them to create a CD.
Display
Various information is shown here.
POWER
INPUT
OUTPUT
1. Recording
2. Erase
4. CD Backup
5. Karaoke
6. Overdub
7. Rehearsal3. Write (SD CD)
MIC LINE/PHONO VOLUME
PEAK PEAK
-
L
R
EASY GUIDE
SD / C D REC ORDER
0dB
-3-
12
TRACK TIME
Internal Stereo Speakers
Simply press the [ Play/Pause] button to hear sound
immediately.
The speakers can be turned on/o with the press of a single
button.
If you connect headphones, the speakers are automatically
turned o .
Edit
Here you can make settings for the CD-2i and perform editing
operations.
Press [MENU] to access the editing screen.
Use the cursor keys to move the cursor or edit the parameter values.
Press [ENTER] to con rm your selection.
By pressing [EXIT] a number of times, you can return to the song
information screen.
Practice Your Music
• Metronome
This sounds the metronome. The metronome will start/stop
each time you press the button.
MENUSPEAKER
PHANTOMOVER
EXIT
CENTER
SPEEDKEY
CDSD CARD FF FINALIZEREW
CANCEL
REPEAT
CD
A B
EJECTMODE
• KEY
This lets you change the pitch of the playback sound.
The key setting changes the pitch in semitone steps. This is
a convenient way to transpose a song to a di erent key for
more comfortable singing.
The pitch setting changes the pitch in steps of 1/100th of a
semitone. This allows you to make ne adjustments to the
pitch in order to match the CD playback to an instrument’s
tuning.
• SPEED
This lets you change the playback speed.
You can choose either a mode in which the pitch is una ected
by the speed change, or a mode in which the pitch will
change together with the speed.
4. CD Backup
Create a duplicate of a CD.
The SD memory card must have enough free space to
hold the CD you want to back up.
5. Karaoke
Use the Center Cancel function to create karaoke data.
6. Overdub
Using an existing song as backing, record a new
performance on top of it.
This creates new song data separately from the
existing song.
7. Rehearsal
Automatically set the input level for recording.
Adjust the Volume
• MIC knob
This adjusts the mic input level. Set this so that the peak indicator lights brie y during the loudest portions of the
song you’ll be recording.
This knob has no e ect if the [MIC LEVEL] switch located on the left panel is set to AUTO.
If you use the Rehearsal function to set the level automatically, the actual level will not match the position of the
knob.
• LINE/PHONO IN knob
This adjusts the input level from the line/phono jacks.
• VOLUME knob
This adjusts the volume of the output from the speakers or headphones.
MARKER
• CENTER CANCEL
This lets you eliminate the sound that’s heard from the center,
such as the vocal or melody. Using this, you can enjoy singing
or playing your instrument to the background provided by
the CD playback.
• REPEAT
This lets you repeatedly play back a speci ed region of the
song.
During playback, press this button once to set point “A” and
press it a second time to specify point “B.” Playback will begin
repeating between points “A” and “B.” If you press the [REPEAT]
button during repeat playback, the repeat function will be
cancelled and playback will proceed through the song.
Record and Play Back
Use the MODE buttons to select either SD or CD.
To eject the CD, press the [EJECT] button. If you eject a CD that allows additional
recording, a con rmation screen will ask whether you want to nalize the disc (i.e.,
disable additional recording, making the disc playable on other CD players).
Page 2
Record Your Performance
CD
FF FINALIZEREW
A B
EJECT
SPEEDKEY
CANCEL
CENTER
REPEAT
EXIT
MENUSPEAKER
CD
CDSD CARD FF FINALIZEREW
A B
EJECTMODE
SPEEDKEY
CANCEL
CENTER
REPEAT
EXIT
MENUSPEAKER
CD
CDSD CARD FF FINALIZEREW
A B
EJECTMODE
SPEEDKEY
CANCEL
CENTER
PEAK
LINE/PHONO VOLUME
EASY GUIDE
REPEAT
EXIT
MENUSPEAKER
POWER
PHANTOMOVER
TRACK TIME
0dB
-3-
12
L
R
-
SD / C D REC ORDER
5. Karaoke
6. Overdub
7. Rehearsal3. Write (SD CD)
Create a CD from the Recorded Performance
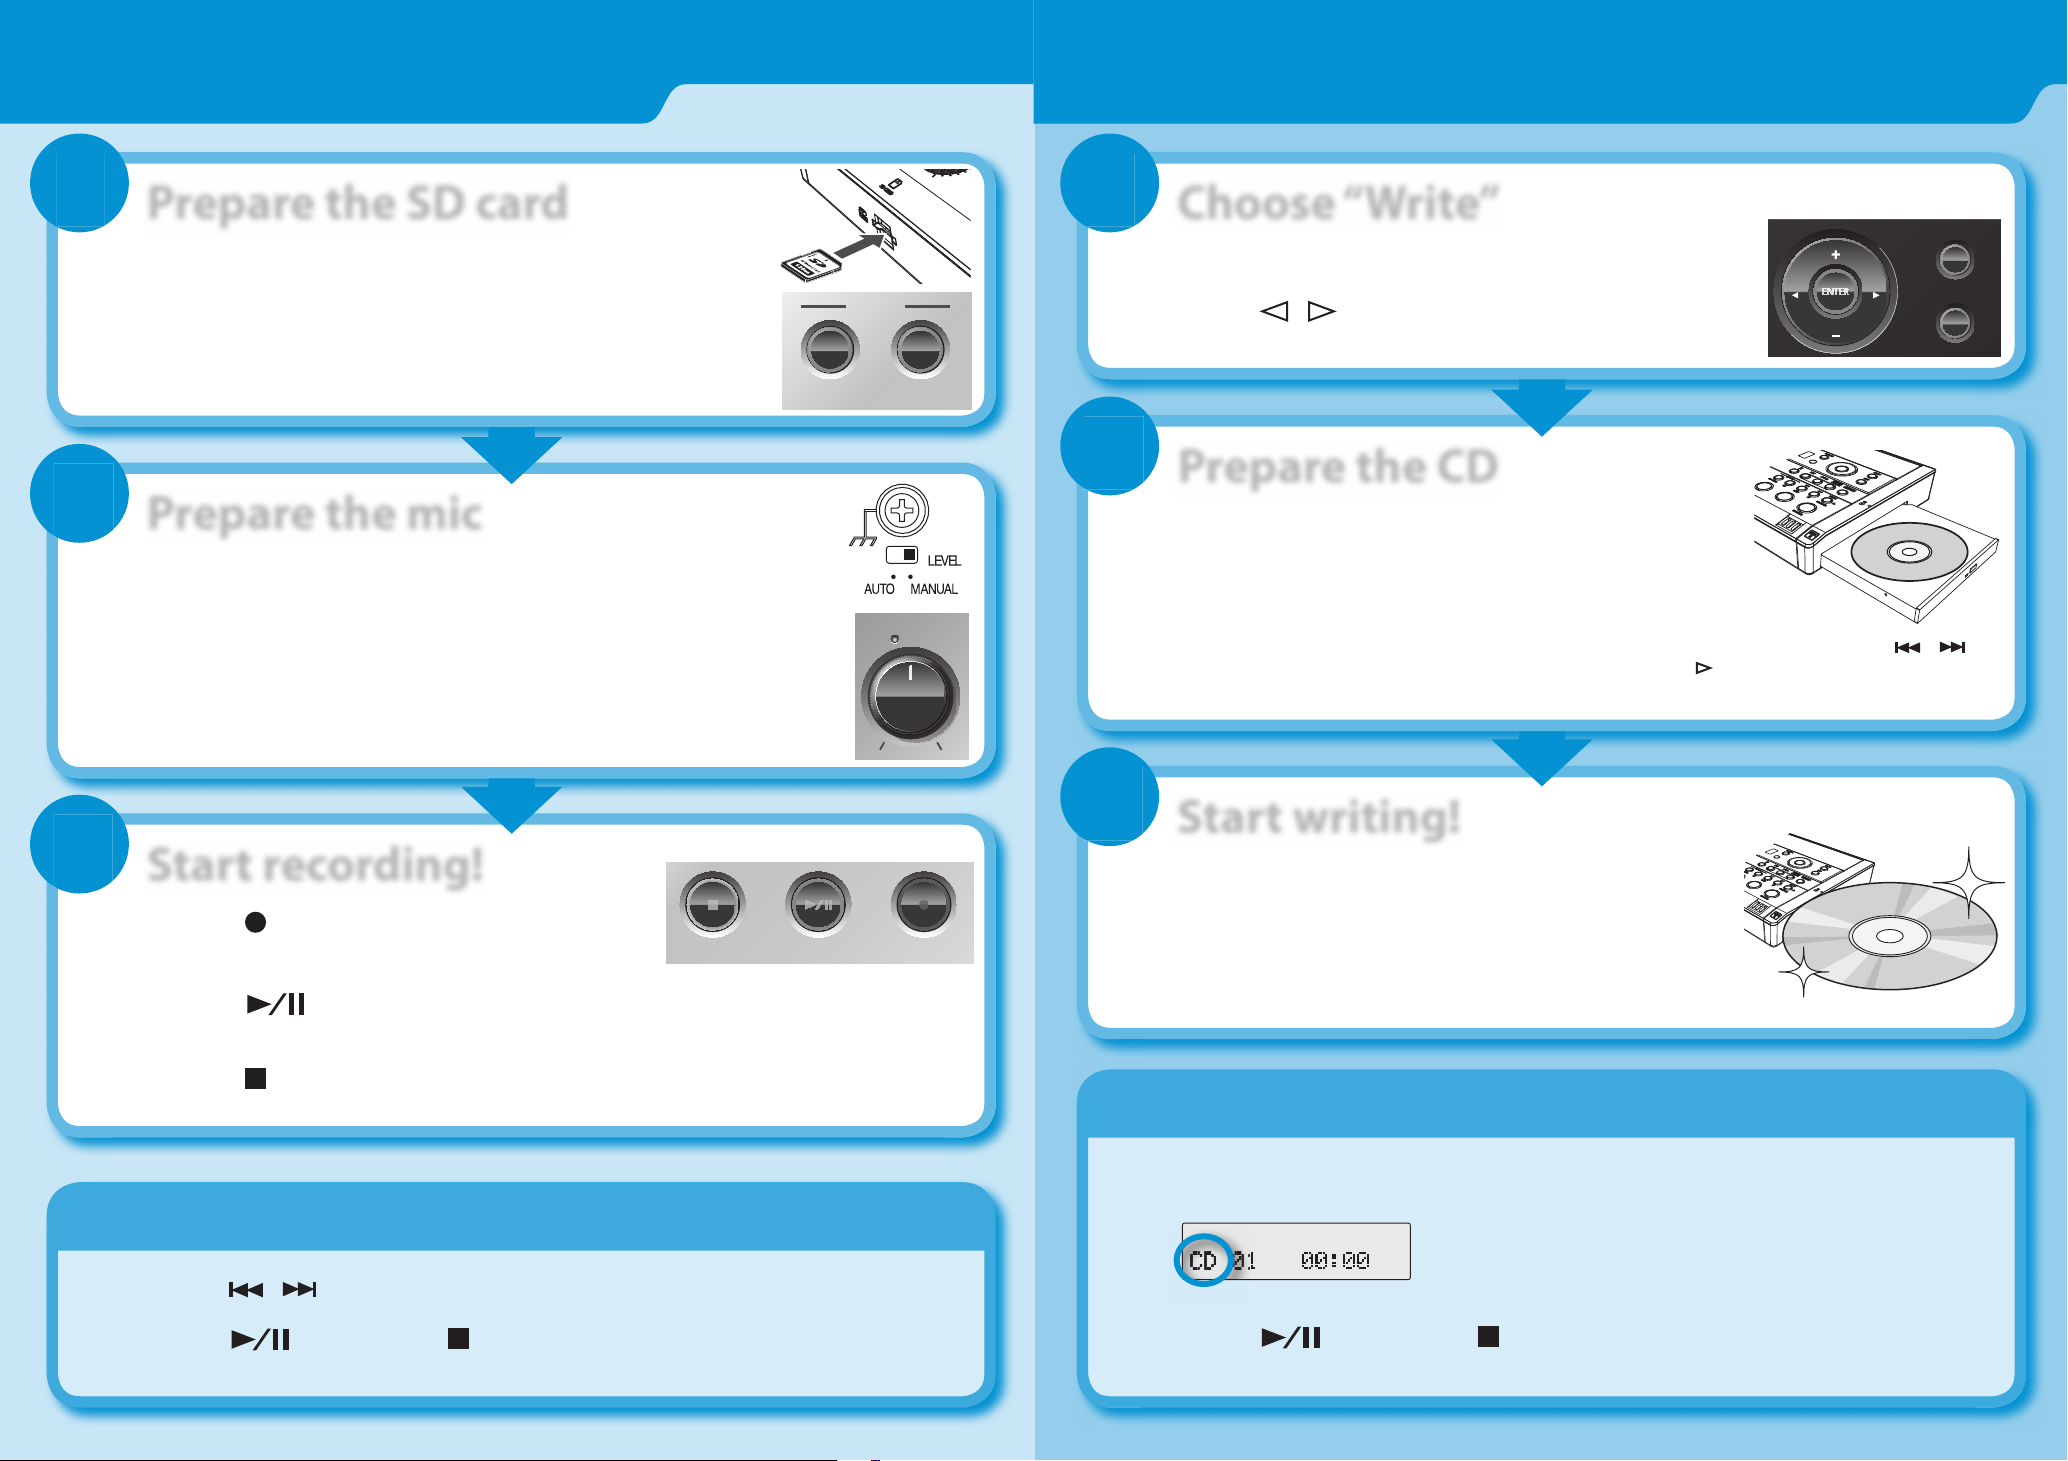
1 1
Prepare the SD card Choose “Write”
1. Insert the card.
2. Press the [SD CARD] button.
* If you want to record directly to CD-R/CD-RW, press the [CD] button.
MODE
CDSD CARD
2
2
Prepare the mic
1. Set the [MIC LEVEL] switch to MANUAL.
2. Use the [MIC input] knob to adjust the input level.
The optimal input level is achieved when the peak indicator located above the knob lights brie y
during the loudest portions of the performance.
* If desired, you can use the Easy Guide’s Rehearsal function to automatically set the optimal
level while you rehearse.
MIC
PEAK
1. Press the [MENU] button.
2. Use the [ ] [ ] buttons to choose “CD-R/RW Write (SD
CD).”
Prepare the CD
1. Insert a CD-R/RW disc.
2. Choose whether you want to write all songs from the
SD card, or just a selected song.
* If you want to write all songs, press [ENTER]. If you want to write a selected song, press [EXIT] and use the [ ] [ ]
buttons to select a song. When the display indicates “CD Track Set OK,” press [
] button.
MENU
EXIT
3
Start recording!
1. Press the [ Record/Marker] button to
enter recording-standby mode.
2. Press the [
your performance.
Play/Pause] button to begin recording. Start
3. Press the [ Stop] button to stop recording.
Listen to the recorded sound
1. Use the [ ] [ ] buttons to select a song.
2. Use the [
Play/Pause] or [ Stop] buttons to play or stop.
3
Start writing!
1. Choose “FINALIZE Are You Sure?”
MARKER
2. Press the [ENTER] button.
3. Your new audio CD will be completed in four or ve minutes.
Listen to the completed CD
1. Place the CD in the CD tray.
When the CD is detected, the following screen will appear.
The left side of the screen will indicate “CD.”
2. Use the [
Play/Pause] or [ Stop] buttons to play or stop.
 Loading...