

Page 1
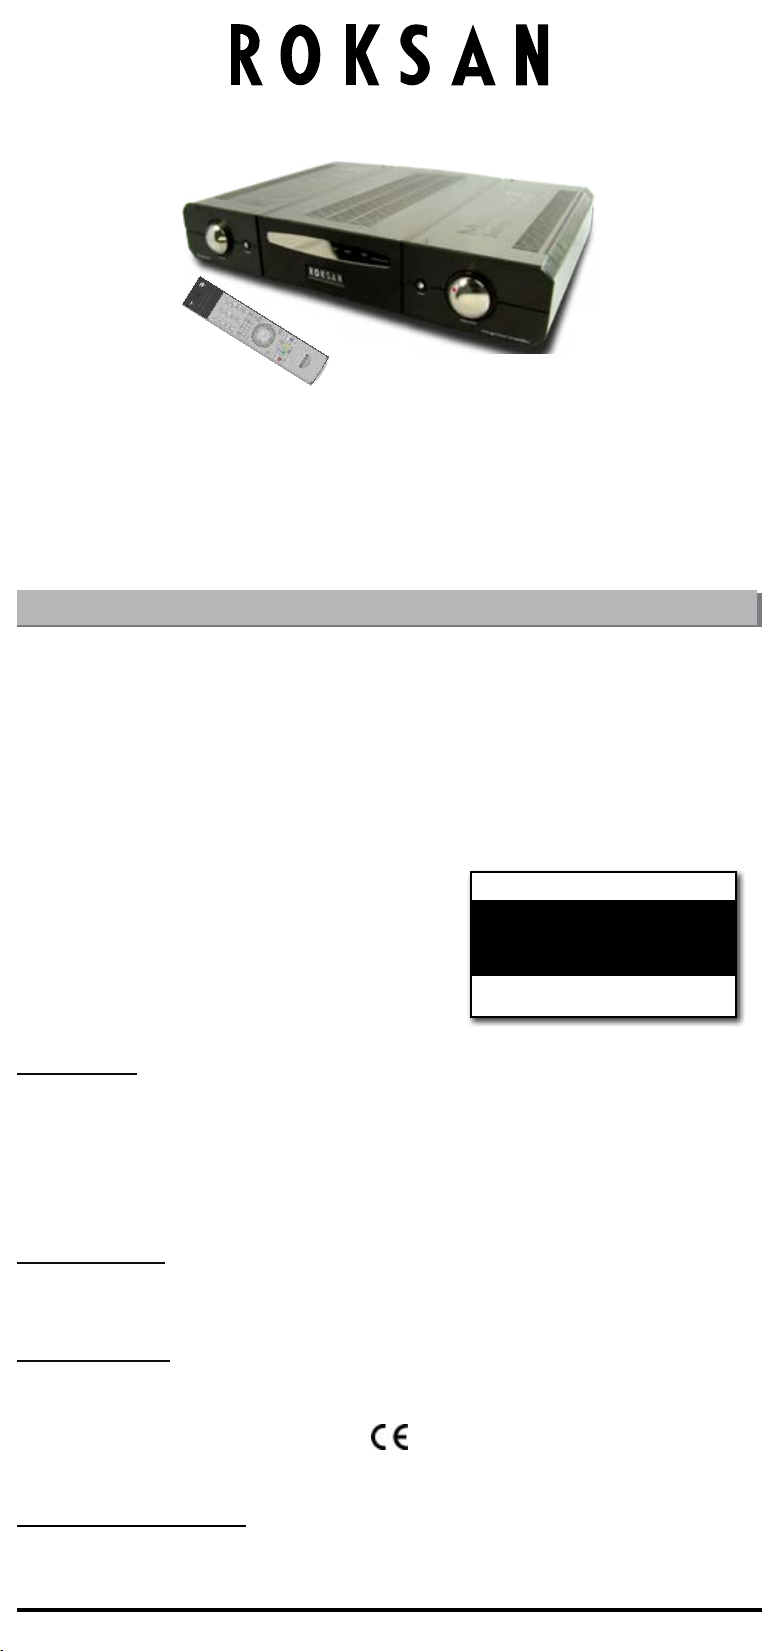
Caspian M2 Integrated Amplier User Manual
Roksan Audio Ltd
Jubilee Close
Townsend Lane
London NW9 8TR
Tel: +44 (0)20 8900 6801 Fax: +44 (0)20 82052644
Email: [email protected] Web: www.roksan.co.uk
INTRODUCTION
Congratulations on your purchase of the ROKSAN M2 Integrated Amplifier. This amplifier is designed and
manufactured to the highest specification and rigorously tested to offer you many years of trouble-free
pleasure.
Your M2 Integrated Amplifier is the heart of your hi-fi system. Its correct installation, set-up and operation
will have a profound influence on the sonic performance of the entire hi-fi installation.
Please read the contents of this manual thoroughly. It will help you to understand your hi-fi equipment
better and enhance your listening pleasure.
This manual is divided into the following sections:
• Safety Instructions (Accompanying card)
• Introduction
• Caution
• Installation
• Setup
• Operation
• Troubleshooting
• Guarantee
• Notes
• Specifications
M2 Integrated Amplier
ROKSAN WARRANTY REGISTRATION
VISIT
http://www.roksan.co.uk/rw.php
In Case Of Difculty
Call: +44(0)20 8900 6801
UNPACKING
Included in the packing of your M2 Integrated Amplifier you will find:
• One mains lead fitted with the correct mains power plug for your country
• One Roksan learning system remote handset (RMX-111) and USB lead
• One RMX111 - Remote User Manual
After removing these items please retain all packing materials. Correct packing is necessary for
transportation of your M2 Integrated Amplifier.
MAINTENANCE
After disconnecting the amplifier from the mains supply, the cabinet and front panel may be cleaned with a
lightly dampened soft cloth or chamois leather. Avoid using abrasives or solvents.
EU DIRECTIVES
This product is designed to comply with the legal provisions of EU Directives 89/3336/EC and 72/23/EC.
The standards which have been applied are those which were in force at the time of the introduction of
this product.
This product bears the CE mark.
This product is compliant to EN 60065.
This product must be earthed. Please ensure that other equipment connected to it is earthed according
to the manufacturer’s instructions.
Caspian M2 Integrated Amplifier User Manual
Page 1
Page 2
CAUTION
M2 Integrated Amplier
AC MAINS SUPPLY
Your M2 Integrated Amplifier is set to operate from a fixed supply voltage which is marked on a label next to
the mains input plug. Before connecting the mains lead please check that your mains supply corresponds to
this label as below:
230V Products …………………………………. Voltage Range: 220V – 240V
115V Products …………………………………. Voltage Range: 100V – 120V
100V Products …………………………………. Voltage Range: 90V – 110V
The mains lead supplied with this product has an IEC mains socket which plugs into the IEC connector on
the unit’s rear panel. The other end is normally attached to the appropriate mains plug for your country. In
the UK this is the standard UK10A plug.
This plug should ordinarily not be removed from the lead. If you do remove it, please dispose of it safely so
that it cannot be plugged into a mains socket whilst in a potentially dangerous condition. We suggest that
you obtain from your dealer a complete replacement lead.
Should you move to another area where either the mains voltage or the mains plugs are different from those
as supplied with your Integrated Amplifier, please contact the appointed ROKSAN distributor for assistance.
Please observe correct mains polarity at all times.
The Integrated Amplifier mains fuses are located on the rear panel next to the IEC mains connector. These
must only be replaced by the fuse type and rating as described on the fuse rating label on the rear panel of
the unit.
If the equipment is likely to be unused for some time, unplug it from the mains supply.
GENERAL CAUTIONS
FCC WARNING
This equipment may generate or use Radio Frequency energy. The user may lose the right to operate this
equipment if unauthorised modifications are made.
INTERFERENCE
Properly installed, this unit should not cause harmful interference to radio communications, There is,
however, no guarantee that such interference will not occur in a specific installation. If interference arises
(which you can determine by switching the unit off and on) you could try to remedy this problem by the
following:
Re-orient or re-locate the receiving antenna
Increase the distance between the Integrated Amplifier and receiver
Connect the unit to a different mains circuit from that of the receiver
Consult your ROKSAN appointed dealer or an experienced Radio/TV technician for help and advice
LOCATION
Your M2 Integrated Amplifier should be located in a well ventilated area and kept away from sources of heat,
dust, humidity and direct sunlight.
The Integrated Amplifier may be positioned either as a free standing unit or alongside another audio/video
product. Never place the Integrated Amplifier on carpet or any surface likely to hinder normal ventilation.
Never allow liquids or other objects to fall into the unit.
This unit contains no user serviceable parts. DO NOT remove any panels or attempt to service it
yourself. Unauthorised servicing will void the warranty.
INSTALLATION
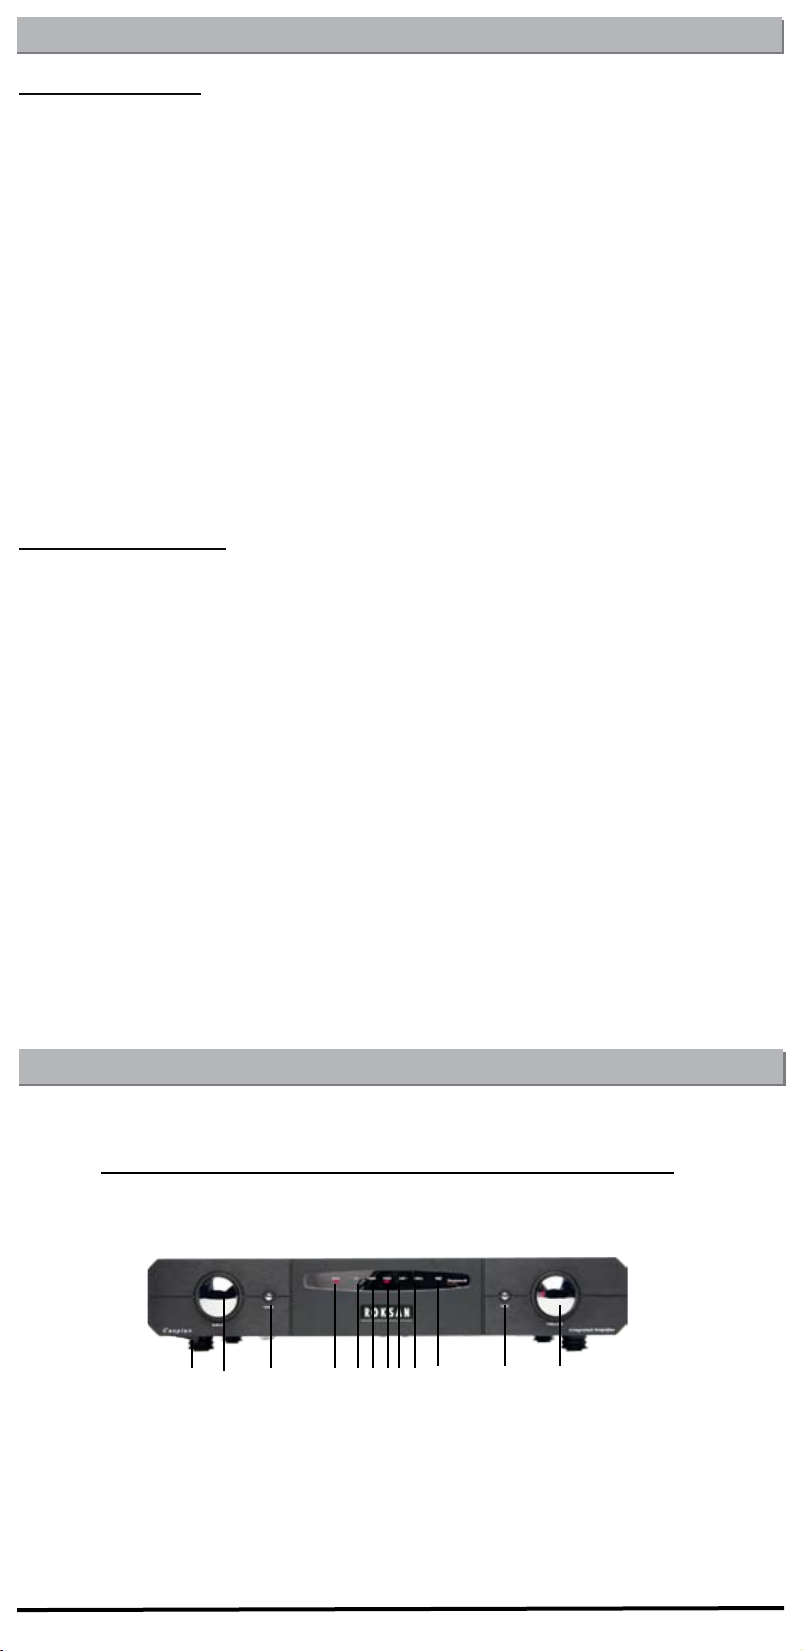
Roksan M2 Integrated Amplifier - Front Panel View
1. Input Selector
2. Mode Button
3. Mode Indicator
4. CD Input Indicator
5. Tuner Input Indicator
6. Video Input Indicator
1 2
3
4 5 6 7 8 9
M2 Integrated Amplier
101211
7. Line 1 Input Indicator
8. Line 2 Input Indicator
9. Tape Monitor Indicator
10. Tape Monitor Button
11. Volume Control
12. AC Mains Switch
Page 2Caspian M2 Integrated Amplifier User Manual
Page 3
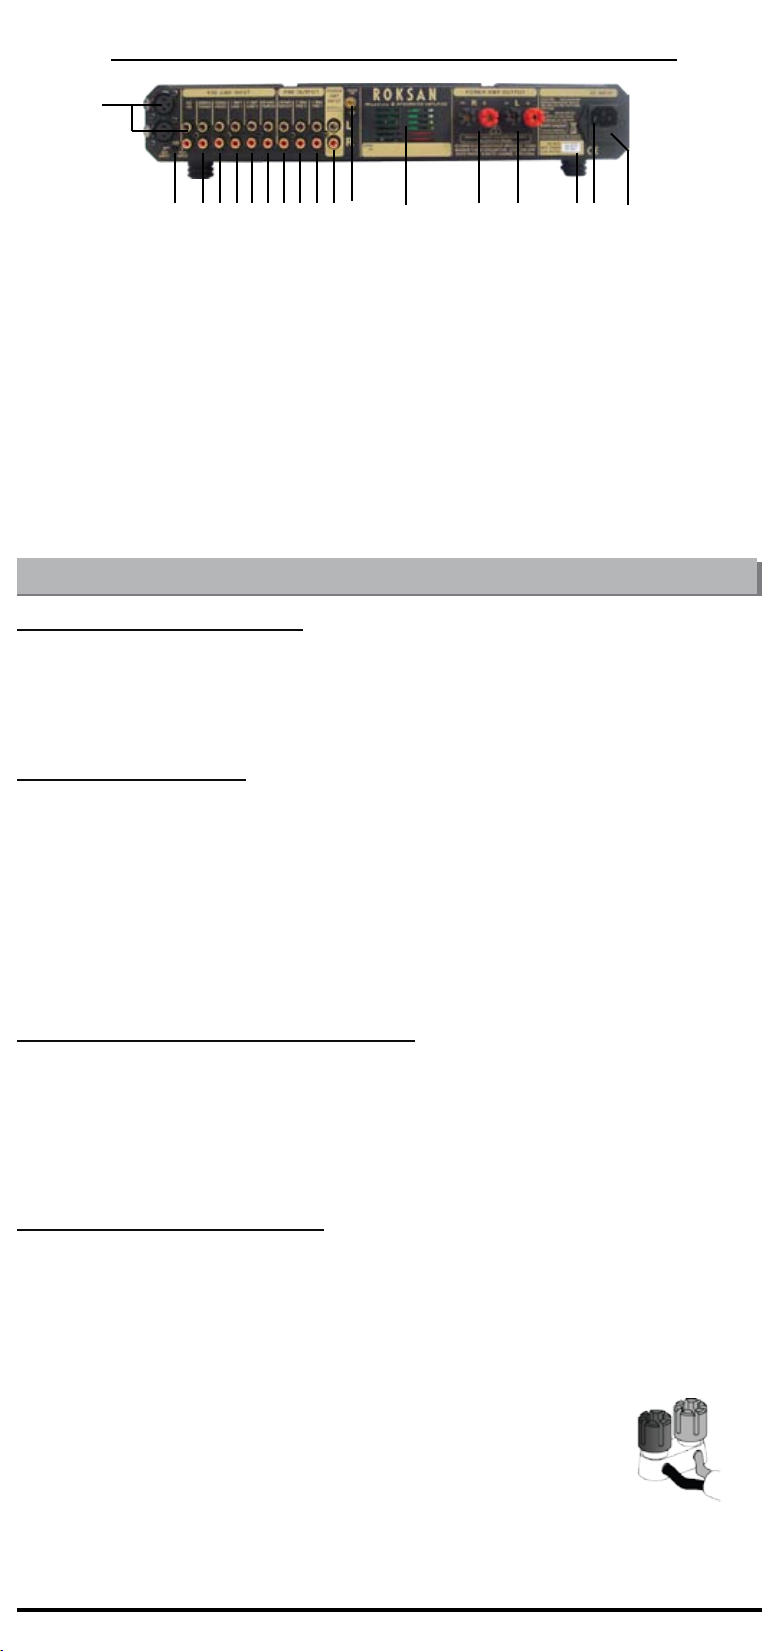
Roksan M2 Integrated Amplifier - Rear Panel View
1
1a 1016
2 3 4 5 6 7 8 9
1. CD Input (RCA or balanced XLR;selectable
with Switch 1a)
2. TUNER Input
3. VIDEO Input
4. LINE 1 Input
5. LINE 2 Input
6. TAPE Input
7. TAPE Output
8. PRE 2 Ouput (Multi-Amping or Subwoofer)
9. PRE 1 Output (Multi-Amping or Subwoofer)
SETUP
17
POWER AMP Input (Requires internal
10.
modification to activate)
11. Right Speaker Output Terminal
12. Left Speaker Output Terminal
13. Voltage & Fuse Label
14. AC Mains Input
15. AC Mains Fuseholder
16. Chassis Ground Terminal
17. Vent
12 131114
15
M2 Integrated Amplier
CONNECTING MAINS POWER
Please refer to front & rear panel view on Page 2 & 3. The moulded IEC connector of the supplied mains
lead should be plugged into the socket (14) on the rear of the unit first and then plugged into the mains
supply. The Mains power switch (12) is on the left front underside of the Integrated Amplifier.
This switch can be left on; if however the amplifier is likely to be unattended for a long period,
switch it off and unplug the mains lead from the wall.
SIGNAL CONNECTIONS
Signal Input connections:
There are five Inputs (1 – 5) on your M2 Integrated Amplifier in addition to the Tape Input (6). All these
inputs are line level inputs and will accept virtually all currently available source components.
All the inputs use gold plated RCA Phono Connectors (CD input is switchable via Switch 1a to gold
plated Balanced XLR) and should be connected according to the standard convention – Right Channel
– Red; Left Channel – Black or White.
Also in accordance with standard practice, the Upper row of RCA Sockets carries the Left
Channel and the Lower carries the Right Channel.
The Input Sockets are labelled with their legends upside down as well as the normal way round to assist
you should you be connecting an input from a position in front of and above the amplifier.
Phono Input Connections For Phono Use:
As your M2 Integrated Amplifier is a line level unit you cannot connect a turntable directly to it but
will need a dedicated phono preamplifier. The ROKSAN range of Phono Amplifiers accept
conventional moving coil and moving magnet cartridges and have custom equalisation for the
outstanding ROKSAN Shiraz cartridge. For a demonstration of ROKSAN state of the art turntable
reproduction contact your authorised retailer.
• IMPORTANT NOTE: For optimum performance it is recommended to use high quality interconnect cables such as ROKSAN HDC-03A high definition analogue cable.
LOUDSPEAKER CONNECTIONS
The right and left loudspeakers are connected to the amplifier via the rear panel binding posts (11) and
(12) respectively. There are two basic types of cable –
• Figure of 8 cable has two insulated conductors which lie parallel, either side by side, or
spaced by insulation.
• Overall sheathed cable has both conductors insulated and enclosed in an overall plastic sheath.
Carefully remove any overall sheath or split the figure 8 cable to a depth of about 75mm (3”). Carefully
strip the insulation on each wire to a depth of about 12mm (1/2”) exposing the bare core. If the conductor
is stranded, twist the strands together on each conductor.
Unscrew the binding post. There is a cross-hole about 5mm from the panel end
of the binding post. Insert the bared conductor through the hole and tighten the
binding post securely making sure that there are no loose strands or bare ends
protruding through the post.
Carefully observe polarity ensuring that the RED (+) speaker terminal is
connected to the RED (+) amplifier terminal and the BLACK (-) speaker terminal to the
BLACK (-) amplifier terminal.
When both left and right channels are connected to their respective speakers the amplifier is ready for
use.
Page 3Caspian M2 Integrated Amplifier User Manual
Page 4
• IMPORTANT NOTE: For optimum performance it is recommended to use high quality cables
such as ROKSAN HDC-03S high definition Loudspeaker Cable. Many speaker cables such as
the ROKSAN HDC-03S are directional. Please observe this directionality. DO NOT use speaker
cable with conductor size less than 16 AWG (1.6mm Diameter). The Binding posts accept
conductor sizes up to 12 AWG.
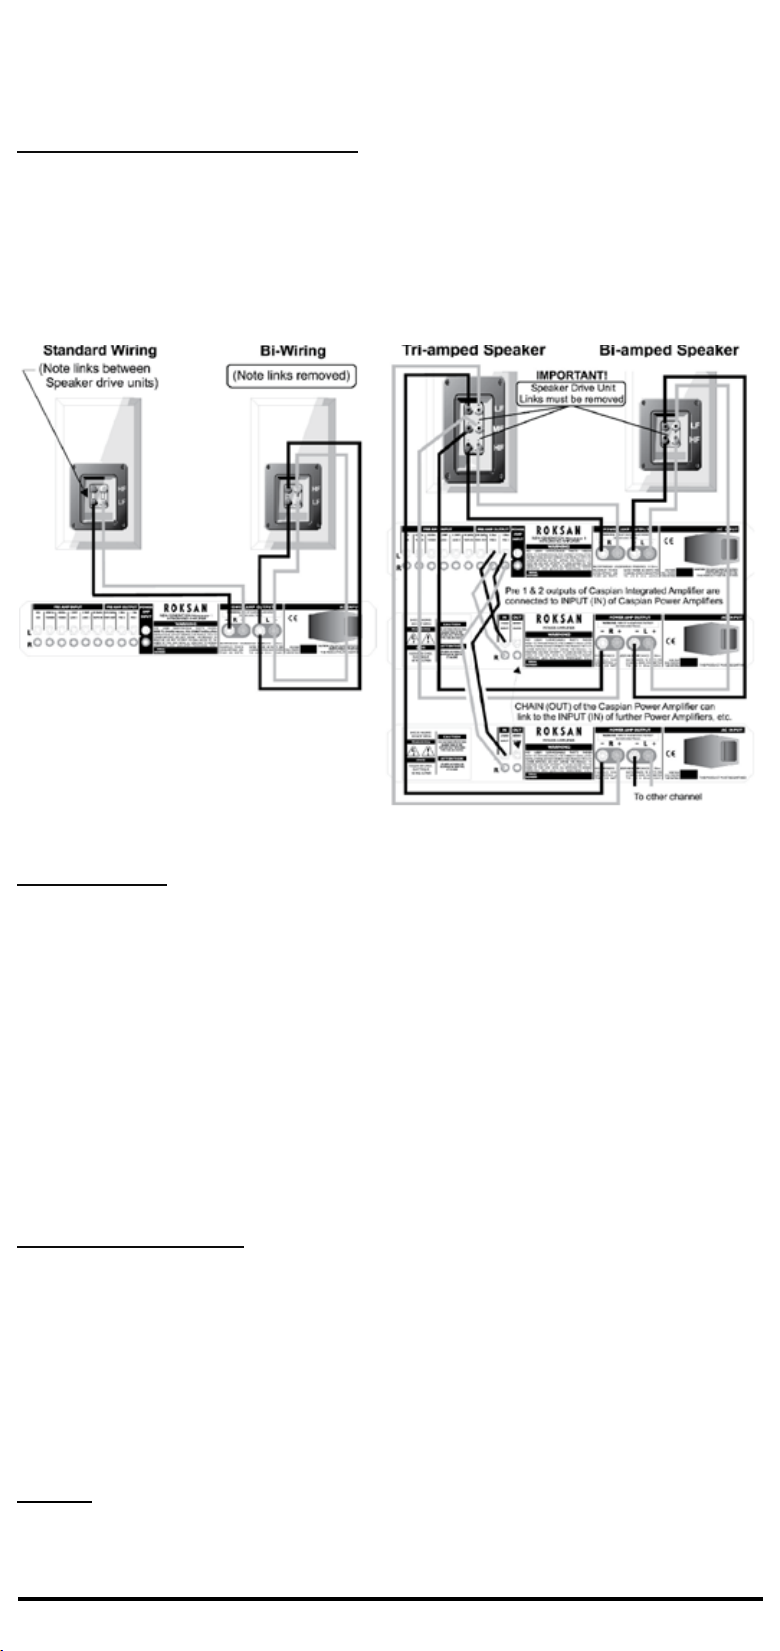
MULTI-WIRING AND MULTI-AMPING
Multi-Amping The Loudspeakers
If the Loudspeakers utilise more than one drive unit with individual input terminals, for example a
Tweeter and a Woofer, then the loudspeaker performance will benefit from Bi-Amping. Dedicating
one amplifier to the Tweeter and another to the Woofer isolates them from each other reducing
distortion and increasing reserved power. Speakers work far better with most amplifiers when
Multi-Amped than using one yet more powerful amplifier. Note: Bi-Wiring reduces the impedance
seen by the Woofer and the Tweeter and is a first step towards Bi-Amping.
Please refer to the front and rear panel views.
SWITCHING ON
The Mains power switch (12) is on the left front underside of the Integrated Amplifier. This switch should
be left ON for normal operation. If unattended for a long period, the Mains power should be switched OFF
and the lead disconnected from the power supply.
You can activate your M2 Integrated Amplifier in two ways:
1. Press the MODE button (2) once.
2. Rotate the INPUT selector (1) in either direction by one step.
3. NOTE:Only the Power Button on the remote handset activates/de-activates the amplifier.
4. Please note the remote handset MODE button only activates/de-activates -20dB Mute (see below)
When switched ON your M2 Integrated Amplifier runs a self-test and the amplifier enters WARM-UP mode
and the MODE indicator light (3) will glow RED. The amplifier is now ready for use.
Once the M2 is On the MODE indicator light (3) will glow RED. The amplifier will automatically select the
CD input and the CD input indicator light (4) will glow.
USING THE CONTROLS
MODE CONTROL
The MODE button on the Front Panel has the following functions:
• It activates the amplifier.
• Pressing the MODE button once with the amplifier activated will mute the volume level by 20dB.
The MODE indicator light will glow ORANGE. The amplifier remains fully functional in this mode.
Another single press un-mutes the amplifier and the MODE indicator light will revert to RED.
• With the amplifier activated, a sustained press on the MODE button reverts the amplifier to Warmup, all the input indicator lights will be extinguished and the MODE indicator light will glow GREEN.
NOTE:
When you bring the M2 out of WARM-UP having switched it ON at the Mains, the input selector will default
to CD (as described previously).
If, however, the M2 has been put into Warm-up from the MODE button on the front panel, bringing it out
Caspian M2 Integrated Amplifier User Manual Page 4
Page 5

of Warm-up will restore previously selected input, tape and mute values. Bringing the M2 out of Warm-up by
moving the INPUT Selector one step in either direction also leaves these amplifier settings unaffected.
INPUT SELECTOR SWITCH
The INPUT Selector is an endless rotary switch that moves round one click at a time. It connects each signal
source to the amplifier by rotating through the Inputs with the exception of
TAPE. Rotating the Selector continuously clockwise will select inputs in this sequence:
CD – TUNER – VIDEO – LINE1 – LINE2 – CD - …
Rotating the Selector anti-clockwise reverses the above sequence.
Whenever an input is selected the appropriate indicator light will glow.
VOLUME CONTROL
The VOLUME Control is a precision device. It follows a logarithmic law so that its response approximates
that of the human ear. There is an illuminated indicator on the volume control to clearly show the appropriate
volume setting.
When you select an input source, the INPUT Selector connects the selected source to the amplifier and
connects this source to the Tape Output Sockets of the Caspian thus enabling you to record.
The Tape Monitor is an override. Pressing the TAPE Button (10) connects the output of your tape deck to the
M2, overriding the selected input. However, the selected input is left connected to the recording input of your
tape deck. If you have a suitable tape deck, this facility enables you to record a programme whilst monitoring
its playback.
When the TAPE Button is depressed, the TAPE Indicator light glows and the selected source Indicator remains
illuminated.
The input selector remains functional when the Tape Monitor is ON, allowing a range of sources to be recorded.
Pressing the TAPE Button, toggles between Tape Monitor ON and OFF.
TROUBLESHOOTING
If you suspect your ROKSAN M2 CD Player is not operating properly, first check all the connections carefully.
Pay particular attention to input and output connections. RCA plugs should be fully inserted- a frequent cause
of problems is that RCA plug surrounds do not make proper contact. Below are some commonly encountered
problems with suggestions for possible cure. The list is not exhaustive: If you have any unresolved problems,
please consult your appointed ROKSAN dealer or distributor.
SYMPTOM LIKELY CAUSE SUGGESTED REMEDY
No power AC Mains lead not inserted
properly Unit not switched on
at front
No output on
one or both
channels
Very low sound
output
CD input has no
sound
Poor speaker
imaging, lack of
Bass output
Amplifier in stand-by mode
(MODE light GREEN)
Missing or bad input signal
connection
Incorrect speaker connection Check speaker output connections on rear
Wrong input selected Select correct input, ascertain source is working
Tape Monitor selected Deselect Tape Monitor
Over heating Allow amplifier to cool, increase ventillation or
Amplifier set in MUTE position Deselect MUTE (check volume setting first)
CD RCA/XLR switch in wrong
position
Loudspeakers connected out
of phase
Ensure AC Mains lead is fully inserted
Switch unit on at front left underside
Press MODE button on front panel to set
amplifier in operational mode (MODE light
RED)
Check all input connections
panel
use at lower volume
Switch to RCA or XLR as appropriate
Check polarity of speaker connections
(especially important if Multi-wiring, MultiAmping)
M2 Integrated Amplier
Hum from
speakers
Incorrect Grounding Check Mains polarity and grounding on all
connected equipment
Caspian M2 Integrated Amplifier User Manual Page 5
Page 6

REMOTE CONTROL
Please Refer to RMX-111 User Manual
M2 Integrated Amplierw
SPECIFICATION
Inputs 5 Line & Tape RCA Gold plated
CD Input also switchable to XLR Balanced Gold plated
Input Impedance 47kΩ
Input Sensitivity (85W) Line 240mV
Outputs Gold plated RCA Tape & 2 Preamplifier
Output Voltage 240mV (Tape Out)
700mV (Pre Out)
Power Outputs Loudspeaker, L & R
Output Power 85Watts,into8Ω
both channels driven
125Watts,into4Ω
both channels driven
Power Supply 350VA Ultra Low Noise Toroidal Transformer
60VA Ultra Low Noise Transformer Preamp Section Toroidal
5 Regulated Supply Rails
Current Output 60 Amps Peak to Peak
Damping Factor 160(8Ω)
Frequency response -3dB, <1Hz – 90kHz
Gain 40dB Overall (Pre & Power)
9.3dB Preamplifier
30.7dB Power Amplifier
Harmonic Distortion 0.002%1kHz,0.015%20kHz10W-8Ω
0.0025%1kHz,0.03%20kHz50W-8Ω
Signal to Noise Ratio Line 108dBa (ref. 500mV)
85dBa(ref.1W,8Ω)
Power Source 100V – 120V 50Hz / 60Hz
220V – 240V 50Hz / 60Hz
(via Mains inlet filter)
Power Consumption < 230 W
Dimension 432 x 330 x 70 (W x D x H) mm
432 x 330 x 80 (including feet)
Weight 13 Kg
M2 Integrated Amplier
All specifications are liable to change without prior notice. E&OE
GUARANTEE
Your ROKSAN Product is guaranteed against any defect in materials and workmanship for a period of
five years from the date of purchase.
This guarantee only becomes effective once your product has been registered within fourteen days of
purchase. Roksan reserves the right to ask for a copy of your purchase invoice.
This guarantee excludes:
1. Damage caused due to accident, misuse, neglect and incorrect installation, adjustment or repair.
2. Liability for damage or loss during transit from the retailer or purchaser to ROKSAN or its authorised
distributor for the purposes of repair or inspection.
Carriage costs to ROKSAN shall be borne by the consignor.
All claims under this warranty must be made through an authorised ROKSAN retailer. If equipment returned for repair to ROKSAN is found on inspection to comply with the product specification ROKSAN
reserves the right to make a charge for examination and return carriage. Unauthorised servicing will void
this guarantee.
Warranty will only be valid when the product is bought through the authorized retailer. All the warranty issues will be dealt through the selling retailer.
Warranty registration can be done online at: http://www.roksan.co.uk/rw.php
M2 Integrated Amplier
Caspian M2 Integrated Amplifier User Manual Page 6
 Loading...