

Rokinon IOLS-C, IOLS-E Instruction Manual
Thank you for purchasing the Rokinon Lens Station model
IOLS-C designed exclusively for Rokinon AF Canon EF Mount
lenses. It allows you to connect Rokinon AF Canon EF Mount
lenses to your computer to update firmware, calibrate, and
customize focus, and aperture parameters with the use of
Rokinon Lens Manager Software.
CAUTIONS
To prevent damage please fully familiarize yourself with the
following:
• Only Rokinon AF Canon EF Mount lenses should be connected
to a Rokinon IOLS-C Lens Station.
• Do not connect any other Rokinon lens types, mount types or
lens brands.
• The Lens Station is not compatible with any mount adapters.
• When attaching the Lens Station, position the front of the lens
face down with lens cap on (mount facing up) on a stable surface.
• In the case of a large lens, please carefully position and hold it in
a manner that will prevent it from falling over.
• Only use the supplied USB cable. Using a different cable can
cause problems.
INCLUDED COMPONENTS:
• Lens Station IOLS-C
• Instruction Manual
• USB Cable
• Canon EF Mount Body Cap
PRODUCT SPECIFICATIONS
• Interface: USB 2.0 / Bus Power (5.0V±5% / 500mA)
• Diameter x Height: 3.07” x 0.99” (78.1mm x 25mm)
• Weight: 2.3oz (64.2g)
• Operating Environment: Temperature 32°F ~ 104°F (0°C
~ 40°C) Humidity : 30~70% (No Condensation)
• System requirements: Screen resolution of 1024 x 768 or
higher / USB 2.0 port -1GB of RAM or more / 1GB of HDD
space or more - Windows: Windows 7 ~ Windows 10 Mac OS: Mac OS X Ver.10.9 ~ 10.12
Canon EF Mount Lens Station
Instruction Manual
Class B equipment: Korean Class B ITE
This equipment has been registered with
electromagnetic compatibility for household
purposes
and can be used in residential areas.
Certification Number : MSIP-REM-s8c-lens-station
The product exterior, specifications, and contents of
this manual are subject to change without notice.
rokinon.com
facebook.com/rokinonlenses
ROKINON® is owned and operated solely by Elite Brands Inc.
©2018, Elite Brands Inc., Rokinon Division, New York, NY 10005
Toll Free: 800.441.1100
Phone: 212.947.7100
support@rokinon.com
USER GUIDE
1) Install the Rokinon Lens Manger Instruction Manual
and Software onto your computer.
a) Please go to Rokinon.com/downloads and click on “Lens
Station Software”.
b) Depending on the operating system of your computer click on
and download either “Lens Instruction Manual for Windows”
or “Lens Instruction Manual for Mac”.
c) Depending on the operating system of your computer click on
and download either “Lens Manager for Windows – Sony”
(Requires OS-Windows 7 or higher) or “Lens Manager for
Mac– Sony” (Requires Mac OS 10.9-10.12).
2) Attach the lens.
a) Remove the Lens Station’s body cap.
b) Remove the rear lens cap of your Rokinon AF Canon EF
lens.
c) Position the lens with its front lens cap on and its front facing
down (mount facing up) on a stable surface.
d) Align the white index mark (dot) on the lens with the red index
mark (dot) of the Lens Station.
e) Do not press the lens release button on the Lens Station
when mounting the lens.
f) Rotate the lens station in the direction labeled “close” on the
rear of the Lens Station until it “clicks” and locks in place.
3) Connect the Lens Station to your computer.
a) Use the supplied USB cable to connect the Lens Station.
b) Read and familiarize yourself with the Instruction Manual.
c) Start Lens Manager and update the firmware or customize
the features of your Rokinon AF Canon EF lens.
d) Close Lens Manager when completed.
4) Detach the lens.
a) Remove the USB cable from the Lens Station.
b) While holding down the lens release button on the Lens
Station, rotate the Lens Station in the direction labeled
“open” on the rear of the Lens Station until it stops.
Separate the Lens Station from the lens.
c) Attach the rear lens cap of your Rokinon AF Canon EF lens.
d) Attach the Lens Station’s body cap.
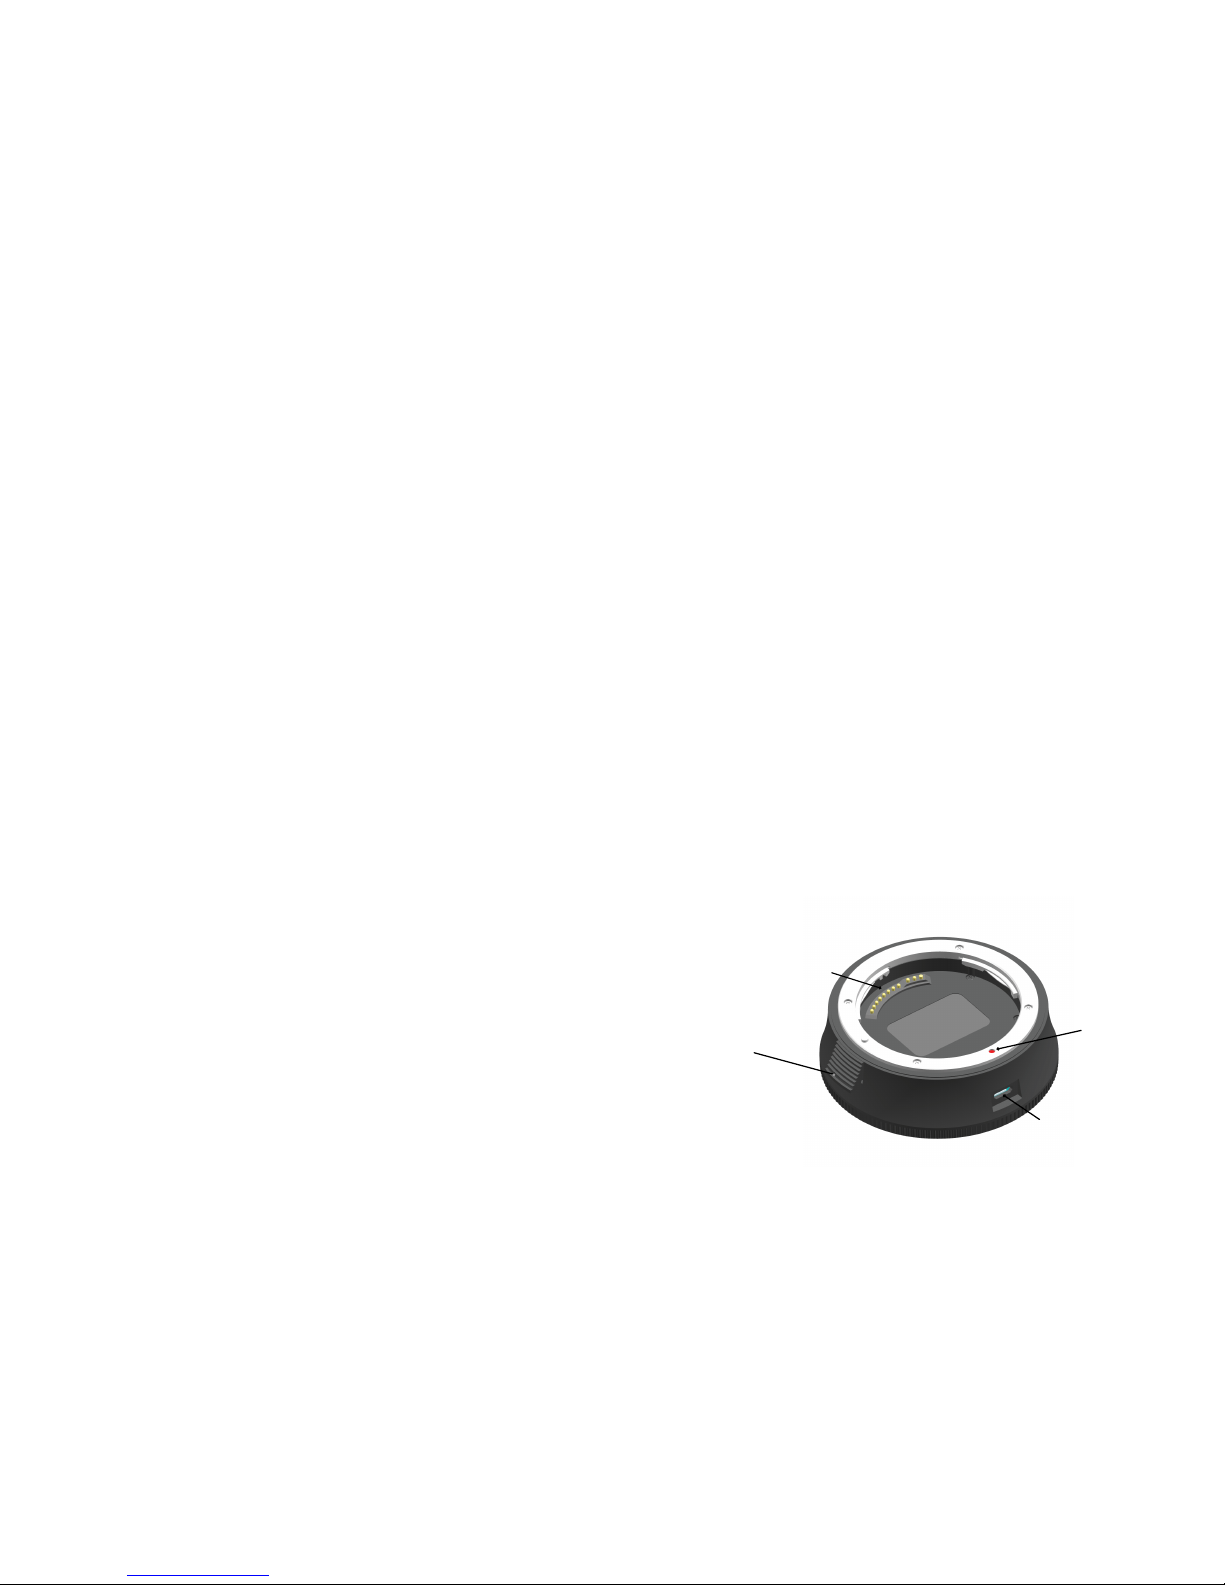
PARTS
USB connection
terminal
Lens mount
index mark
Electronic
contacts
Lens release
button
 Loading...