

Rointe K series Instruction Manual
MANUAL DE INSTRUCCIONES
MONTAJE, INSTALACIÓN, PUESTA EN
MARCHA Y FUNCIONAMIENTO
BEDIENUNGSANLEITUNG
MONTAGE, ANBRINGUNG, INBETRIEBNAHME
UND FUNKTIONSWEISE
MANUAL DE INSTRUÇÕES
MONTAGEM, INSTALAÇÃO, LIGAÇÃO
E FUNCIONAMENTO
INSTRUCTIONS MANUAL
MOUNTING, INSTALLATION,
STARTING AND OPERATION

ESPAÑOL .....................................................................................................13
ENGLISH ........................................................................................................3
DEUTSCH .....................................................................................................25
PORTUGUÊS .................................................................................................37
Muchas gracias por elegir los radiadores eléctricos digitales de bajo consumo del modelo SERIE K, con
un exclusivo programador electrónico de temperatura y horario, fabricados con componentes de máxima
calidad pensados en usted. Los radiadores eléctricos digitales de bajo consumo SERIE K han superado los
más exigentes controles de calidad para cumplir con los más rigurosos requerimientos en seguridad y
eficiencia energética. Gracias al OPTIMIZER ENERGY PLUS, exclusivo del Sistema ROINTE, sus radiadores
eléctricos digitales de bajo consumo obtienen el máximo ahorro energético.
Antes de comenzar a usar los radiadores eléctricos digitales de bajo consumo SERIE K le recomendamos que
lea con atención este manual, para poder obtener su correcto funcionamiento con las máximas garantías.
Vielen Dank, daß Sie sich für die digitalen elektrischen Niedrigverbrauch-Heizkörper unseres Modells SERIE
K entschieden haben. Es verfügt über eine einzigartige elektronische Temperatur- und Zeitprogrammierung,
die mit Bauteilen der besten Qualität für Sie hergestellt wurde. Die digitalen elektrischen NiedrigverbrauchHeizkörper SERIE K haben die anspruchsvollsten Qualitätskontrollen bestanden, um auch die striktesten
Sicherheitsauflagen und Energieeffizienzanforderungen zu erfüllen.
Dank dem nur in ROINTE-Produkten verwendeten OPTIMIZER ENERGY PLUS System, erreichen unsere
digitalen elektrischen Niedrigverbrauch-Heizkörper die größtmögliche Energieeinsparung.
Vor dem Gebrauch der digitalen elektrischen Niedrigverbrauch-Heizkörper SERIE K empfehlen wir Ihnen,
diese Anleitung aufmerksam zu lesen, um ein fehlerfreies Funktionieren in jedem Falle sicherzustellen.
Agradecemos sua escolha pelos radiadores elétricos digitais de baixo consumo do modelo SÉRIE K. Nossos
aparelhos são dotados de um exclusivo programador eletrônico de temperatura e horário, e são fabricados
com componentes de máxima qualidade pensados em você. Os radiadores elétricos digitais de baixo consumo
SÉRIE K superaram os mais exigentes controles de qualidade para cumprir com os mais rigorosos requisitos
de segurança e eficiência energética. Graças ao OPTIMIZER ENERGY PLUS, exclusivo do Sistema ROINTE,
nossos radiadores elétricos digitais de baixo consumo obtém a máxima economia energética.
Antes de começar a utilizar os radiadores elétricos digitais de baixo consumo SÉRIE K lhe recomendamos
que leia com atenção este manual para assegurar seu correto funcionamento com a máxima garantia.
Thank you very much for choosing the low consumption K SERIES digital electric radiators with an exclusive
electronic time and temperature programmer, made with maximum quality components especially for
you. The low consumption K SERIES digital electric radiators have passed the strictest quality controls to
satisfy the most rigorous safety and energy efficiency requirements. Thanks to the OPTIMIZER ENERGY
PLUS, exclusive to the ROINTE SYSTEM, the low consumption K SERIES digital electric radiators achieve
the maximum energy saving.
Before using the low consumption K SERIES digital electric radiators, we recommend that you read this
instruction manual in order to ensure correct operation.

3
ENGLISH
TABLE OF CONTENTS
1. DESCRIPTION OF THE “K SERIES ” RADIATOR ......................................................................4
1.1. Front panel parts ...............................................................................................................4
1.2. Switching On & Off (stand-by) ...........................................................................................5
1.3. Setting the day and time .................................................................................................... 6
1.4. Blocking the control panel ................................................................................................6
1.5. Temperature selection ......................................................................................................6
1.6. Manual / Automatic functions ............................................................................................6
1.7. Menu/Programming function ............................................................................................ 6
1.8. Open window function .................................................................................................. 7
1.9. Screen brightness function................................................................................................ 7
2. INSTALLATION & MOUNTING........................................................................................... 8
2.1. Mounting ...................................................................................................................... 8
2.2 Fixing the supports ........................................................................................................ 9
3. MAINTENANCE & CLEANING ................................................................................................ 10
4. INSTALLATION & SAFETY PRECAUTIONS (EN 60335 STANDARDS) ................................. 10
4.1. Installation precautions ..................................................................................................10
4.2. Safety precautions ........................................................................................................... 10
5. GUARANTEE ............................................................................................................................ 11
4
1. DESCRIPTION OF THE “K SERIES ” RADIATOR
1.1. Front panel parts
TFT DISPLAY
CONTROL PANEL
5
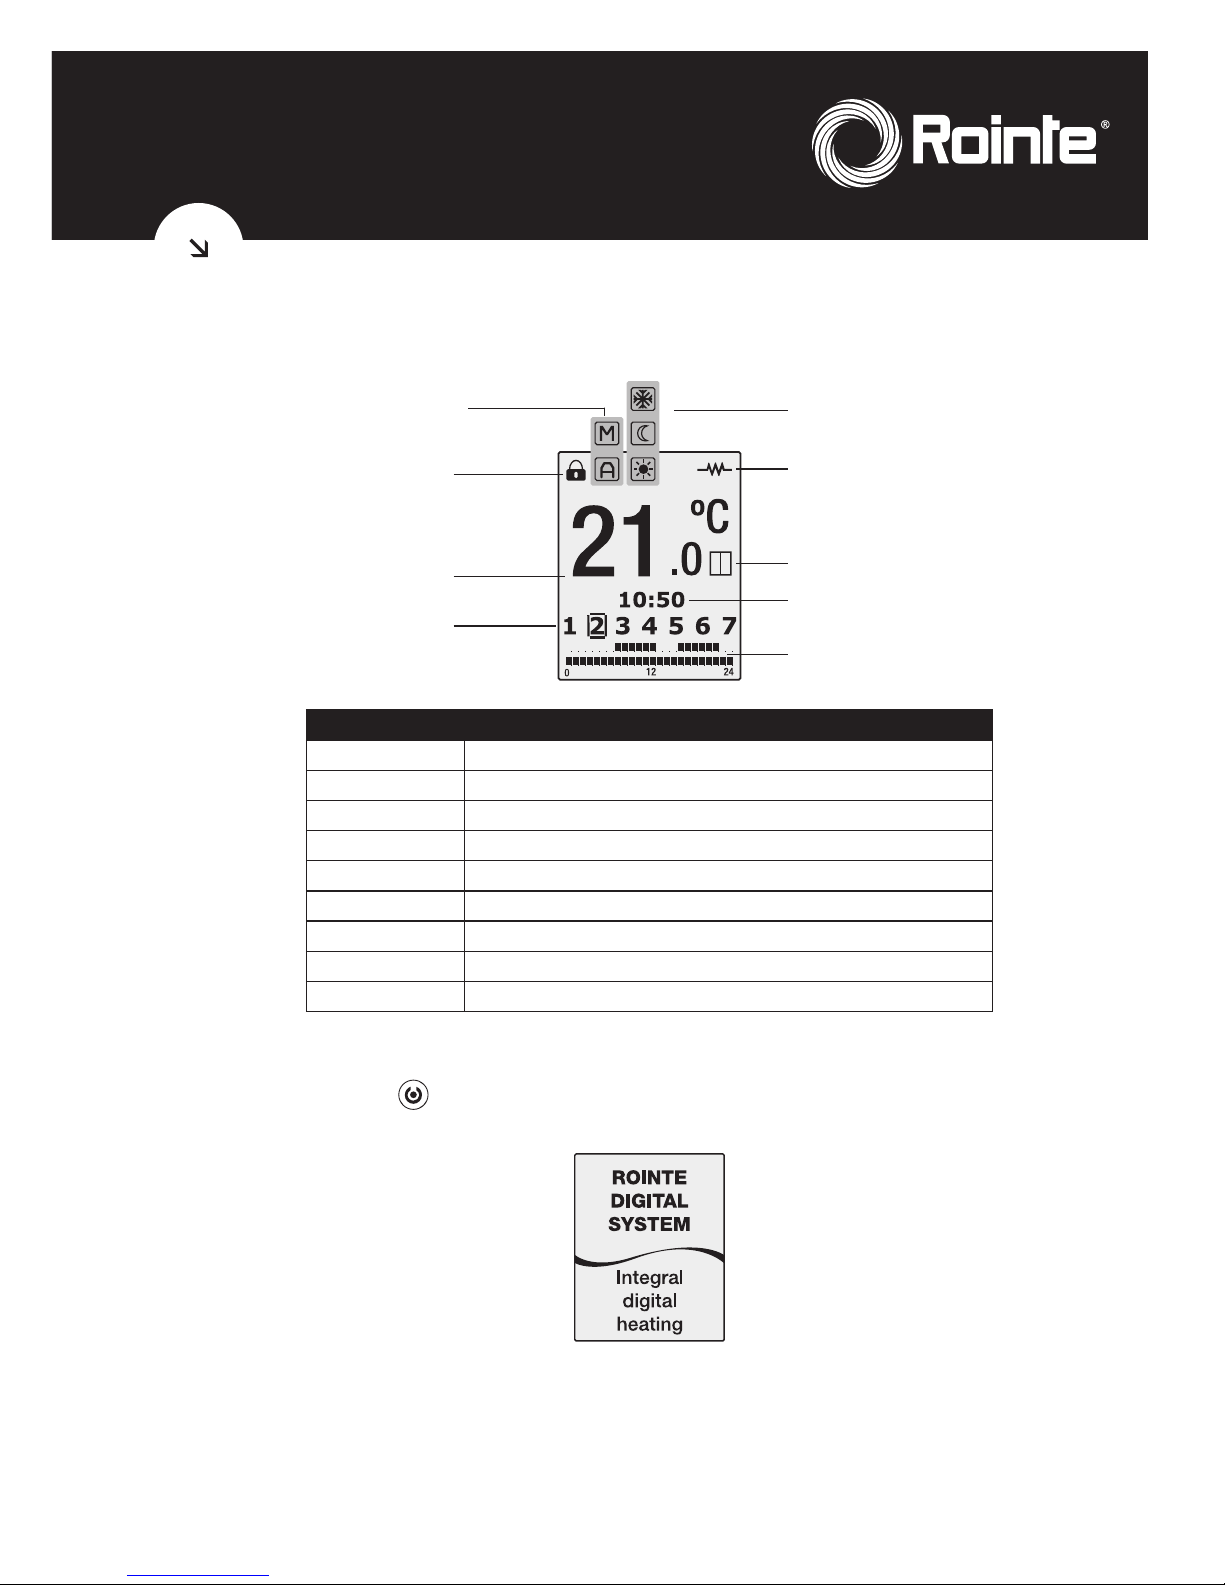
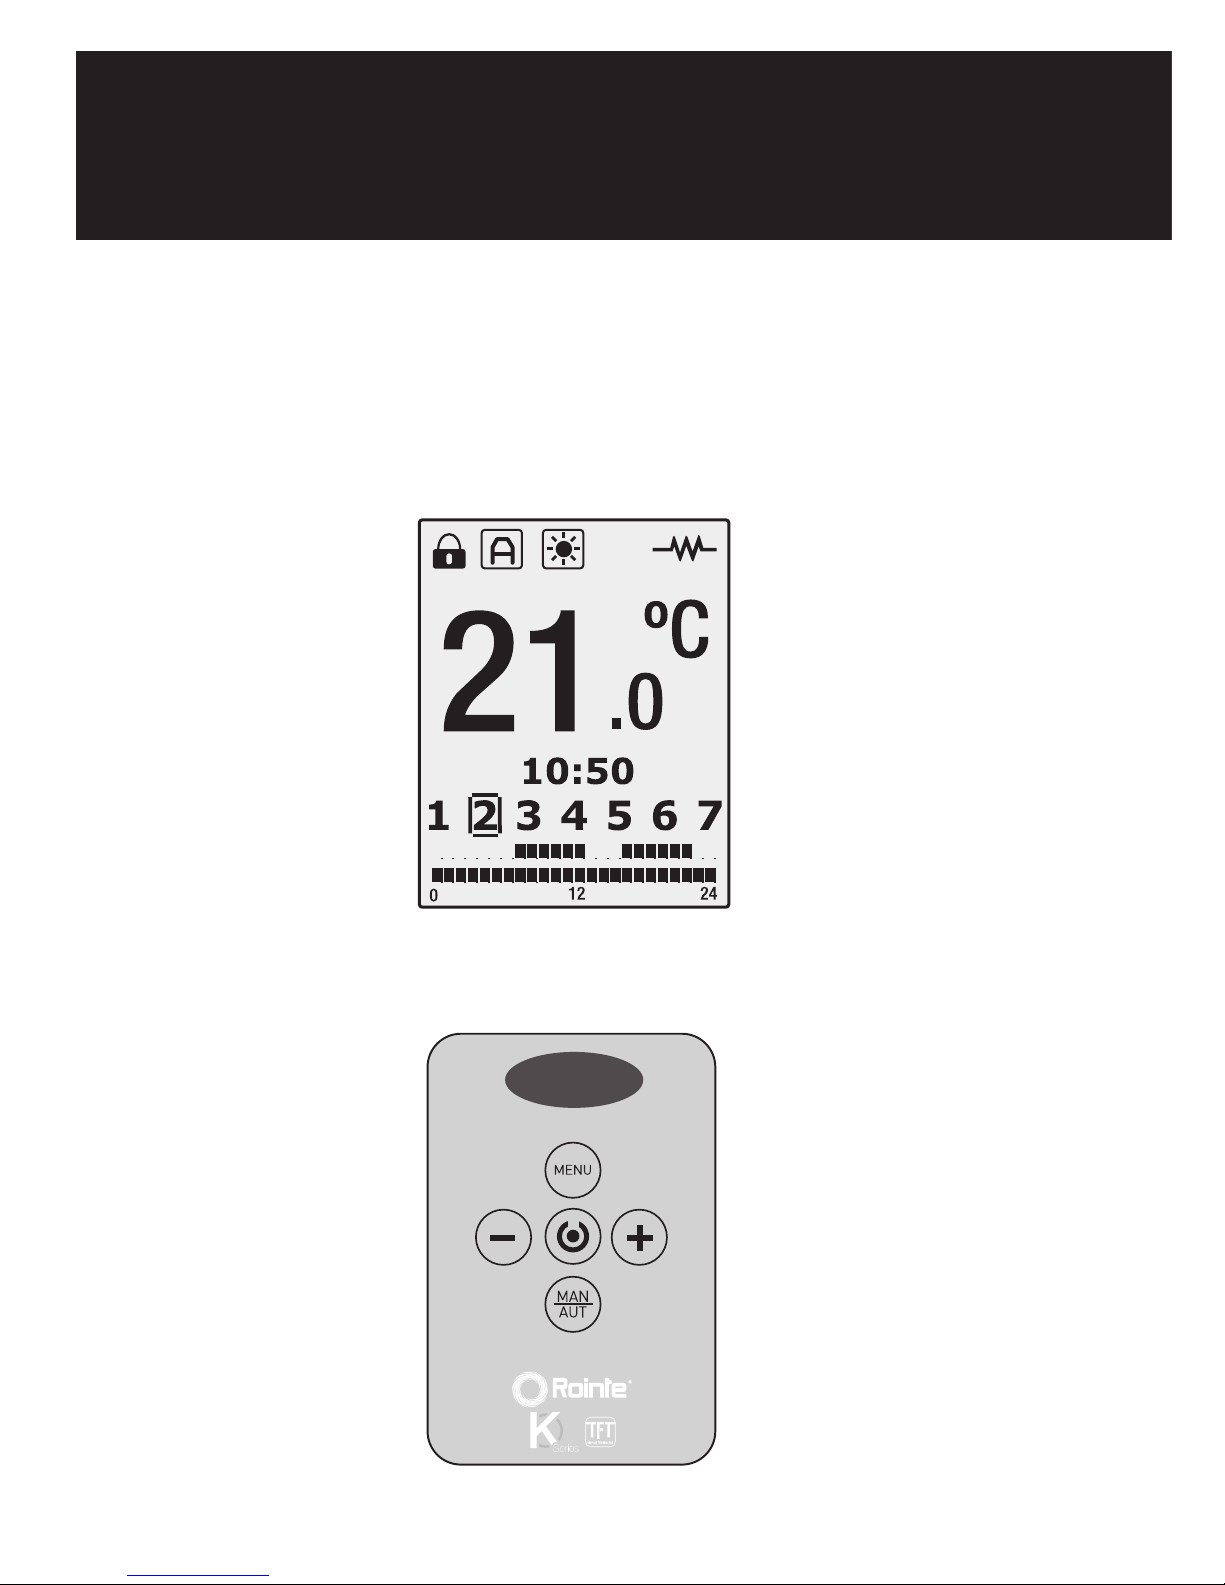
1.1.1. TFT display symbols
SEGMENT INDICATION
1
PROGRAMMING
2
DAYS OF THE WEEK
3
TIME OF DAY
4
TEMPERATURE SELECTED
5
LOCKING THE CONTROL PANEL
6
MANUAL/AUTOMATIC FUNCTION
7
COMFORT/ECONOMY/ANTI-FROST MODE
8
RADIATOR ON
9
OPEN WINDOW FUNCTION
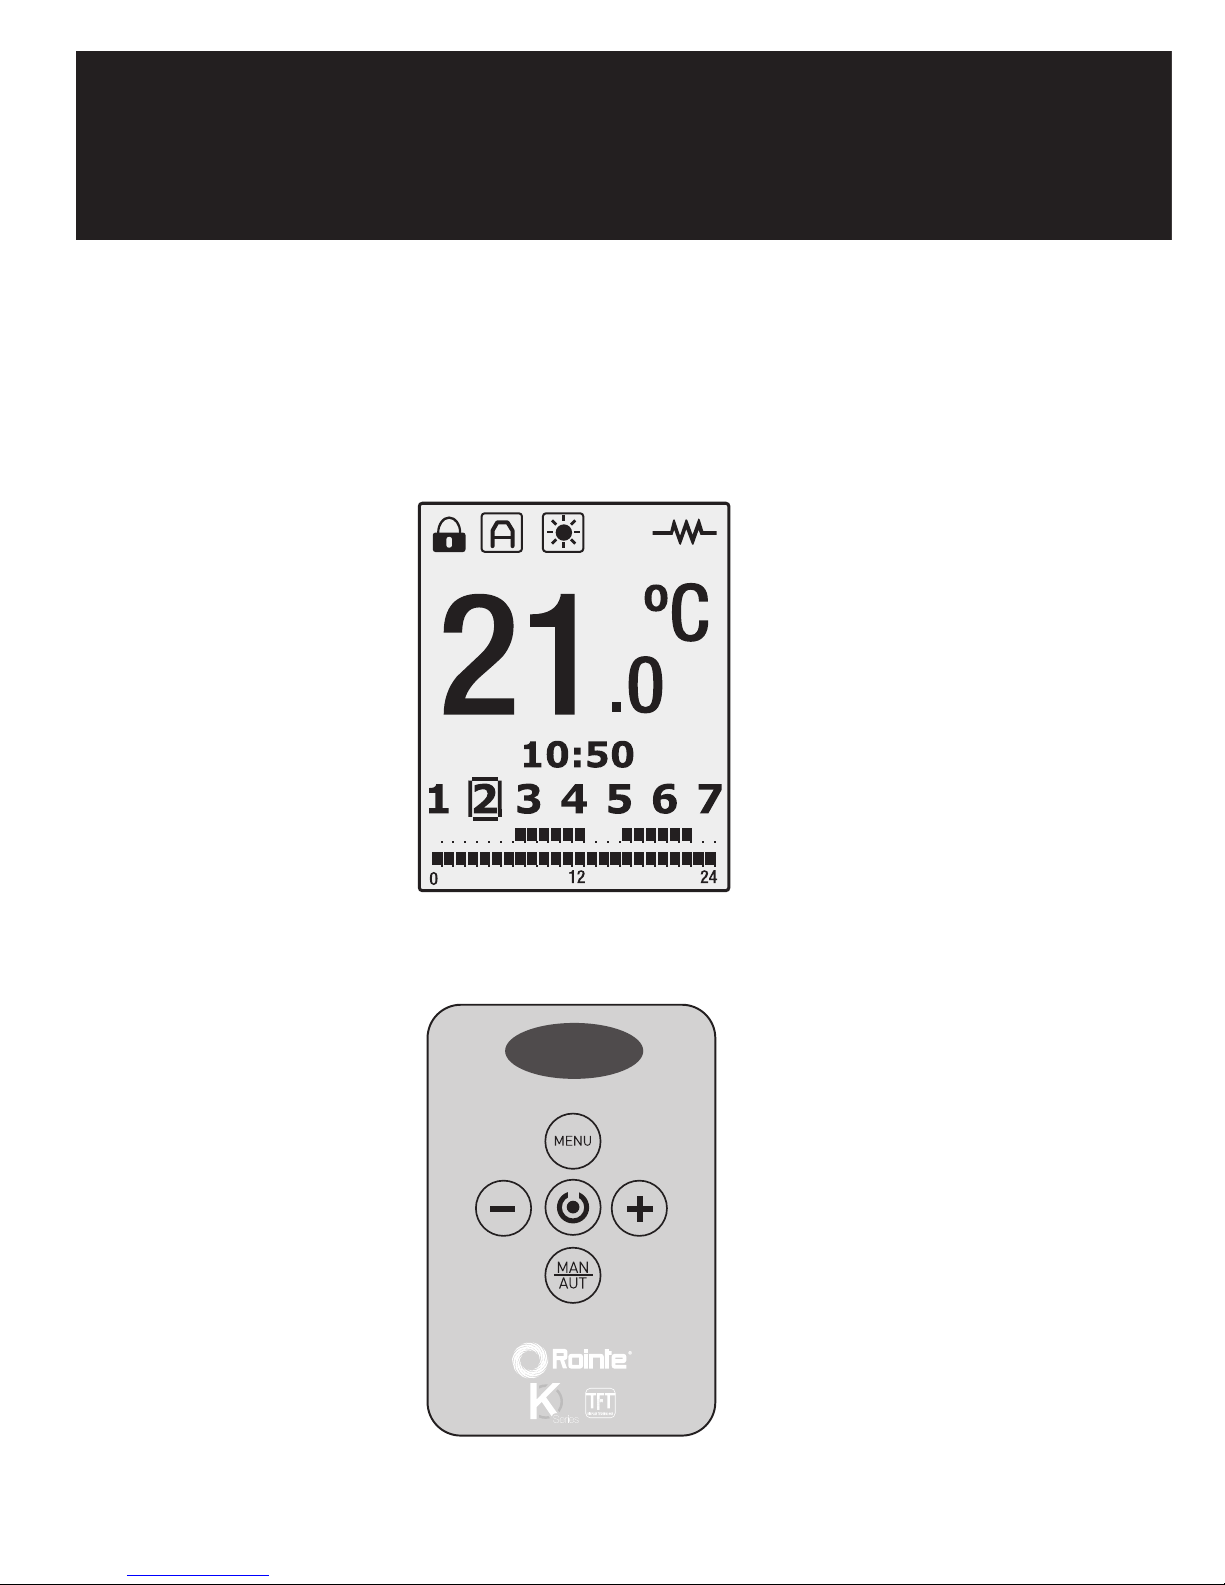
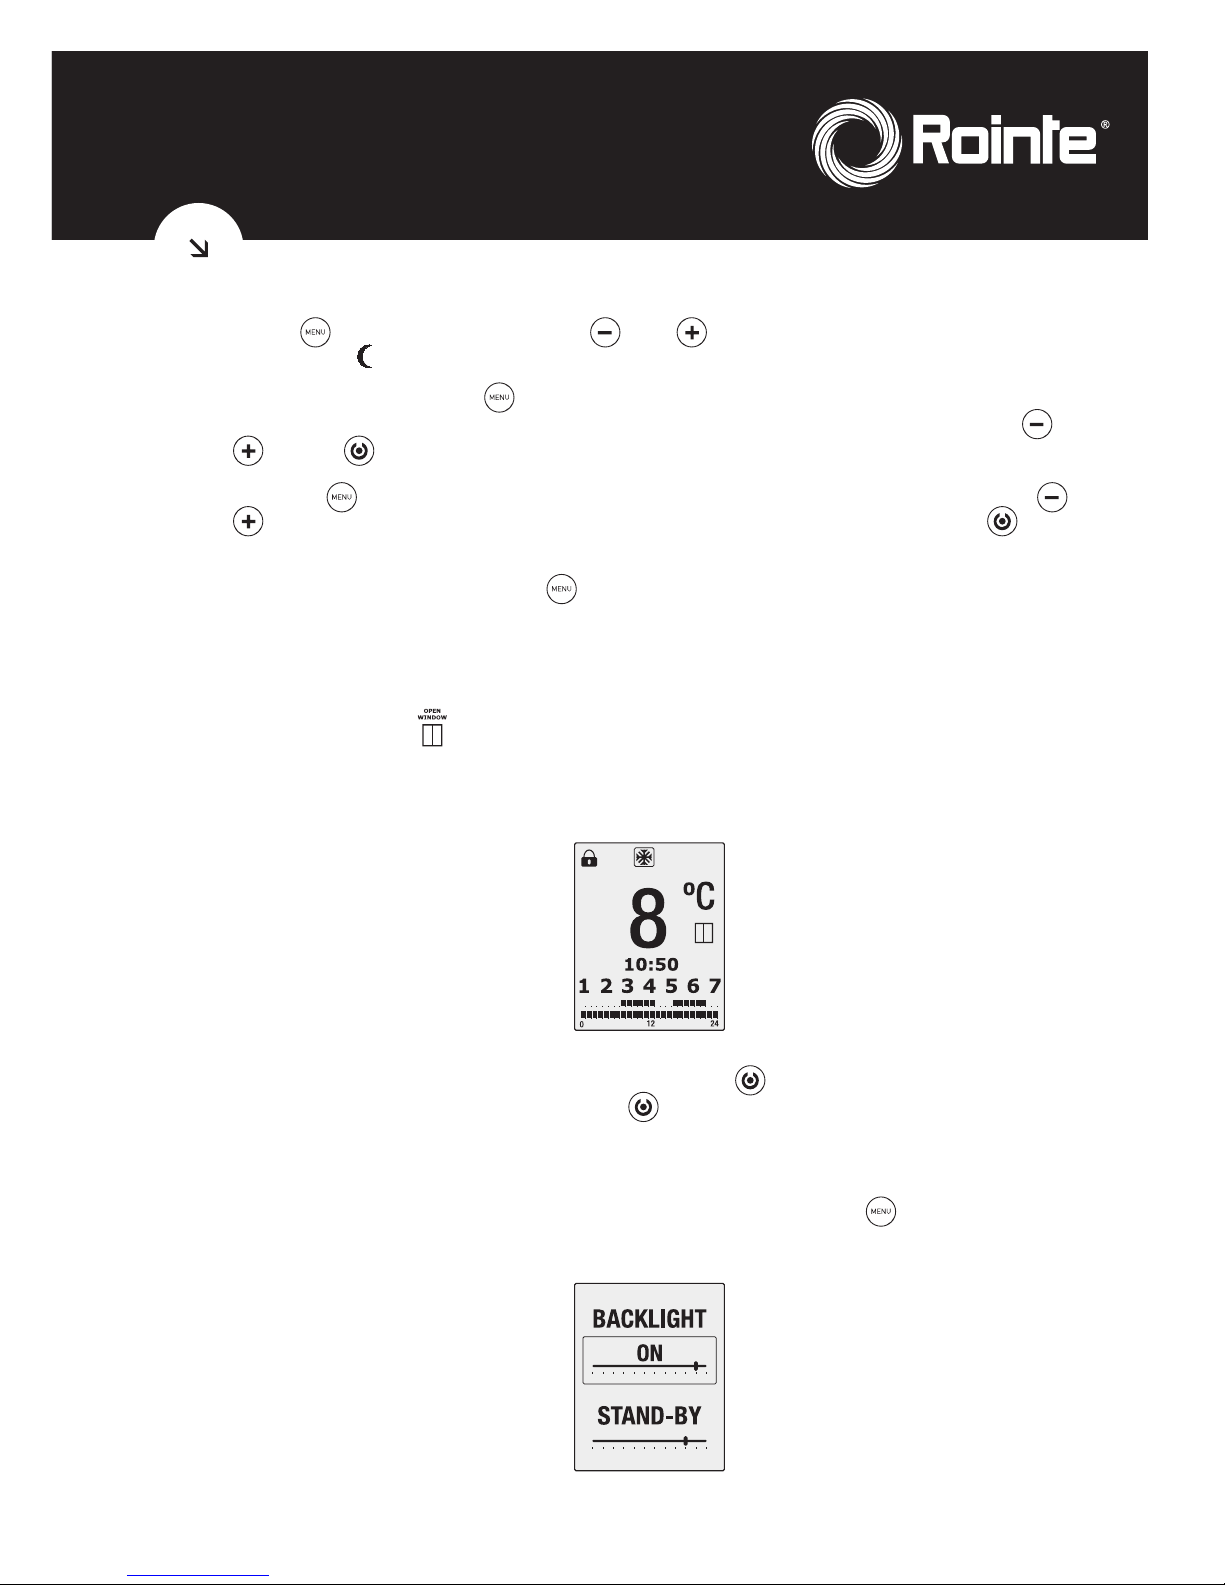
1.2. Switching On & Off (stand-by)
By pressing the key
, we can switch the radiator on or off. The following image will appear
on the screen when switched on:
The screen will automatically go into sleep mode if no button is pushed for 10 seconds. By
pushing the button again the radiator will go into standby mode with the word “Standby”
appearing followed by the Rointe logo.
1
2
3
4
5
6
7
8
9
6
1.3. Setting the day and time
By pressing the button
for 3 seconds, we can access the time and date adjust feature to
adjust the time and date of our radiator.
Pressing the button
, flashes up the hours, minutes and days of the week according to the
number of times it is pressed. With the buttons and we can alter the current settings.
To leave the time and date adjust feature, wait 30 seconds or press
after the date select.
1.4. Blocking the control panel
By pressing the keys
and , at the same time for 3 seconds, we block the control panel,
the control panel symbol is activated, and the keys will not respond when pressed. The
following symbol will appear on the screen if any button is pushed:
To unblock, press again the keys and , at the same time for 3 seconds.
1.5. Temperature selection
By pressing or we change the temperature. When the room temperature is lower than
the one set, the radiator comes on, the symbol appearing.
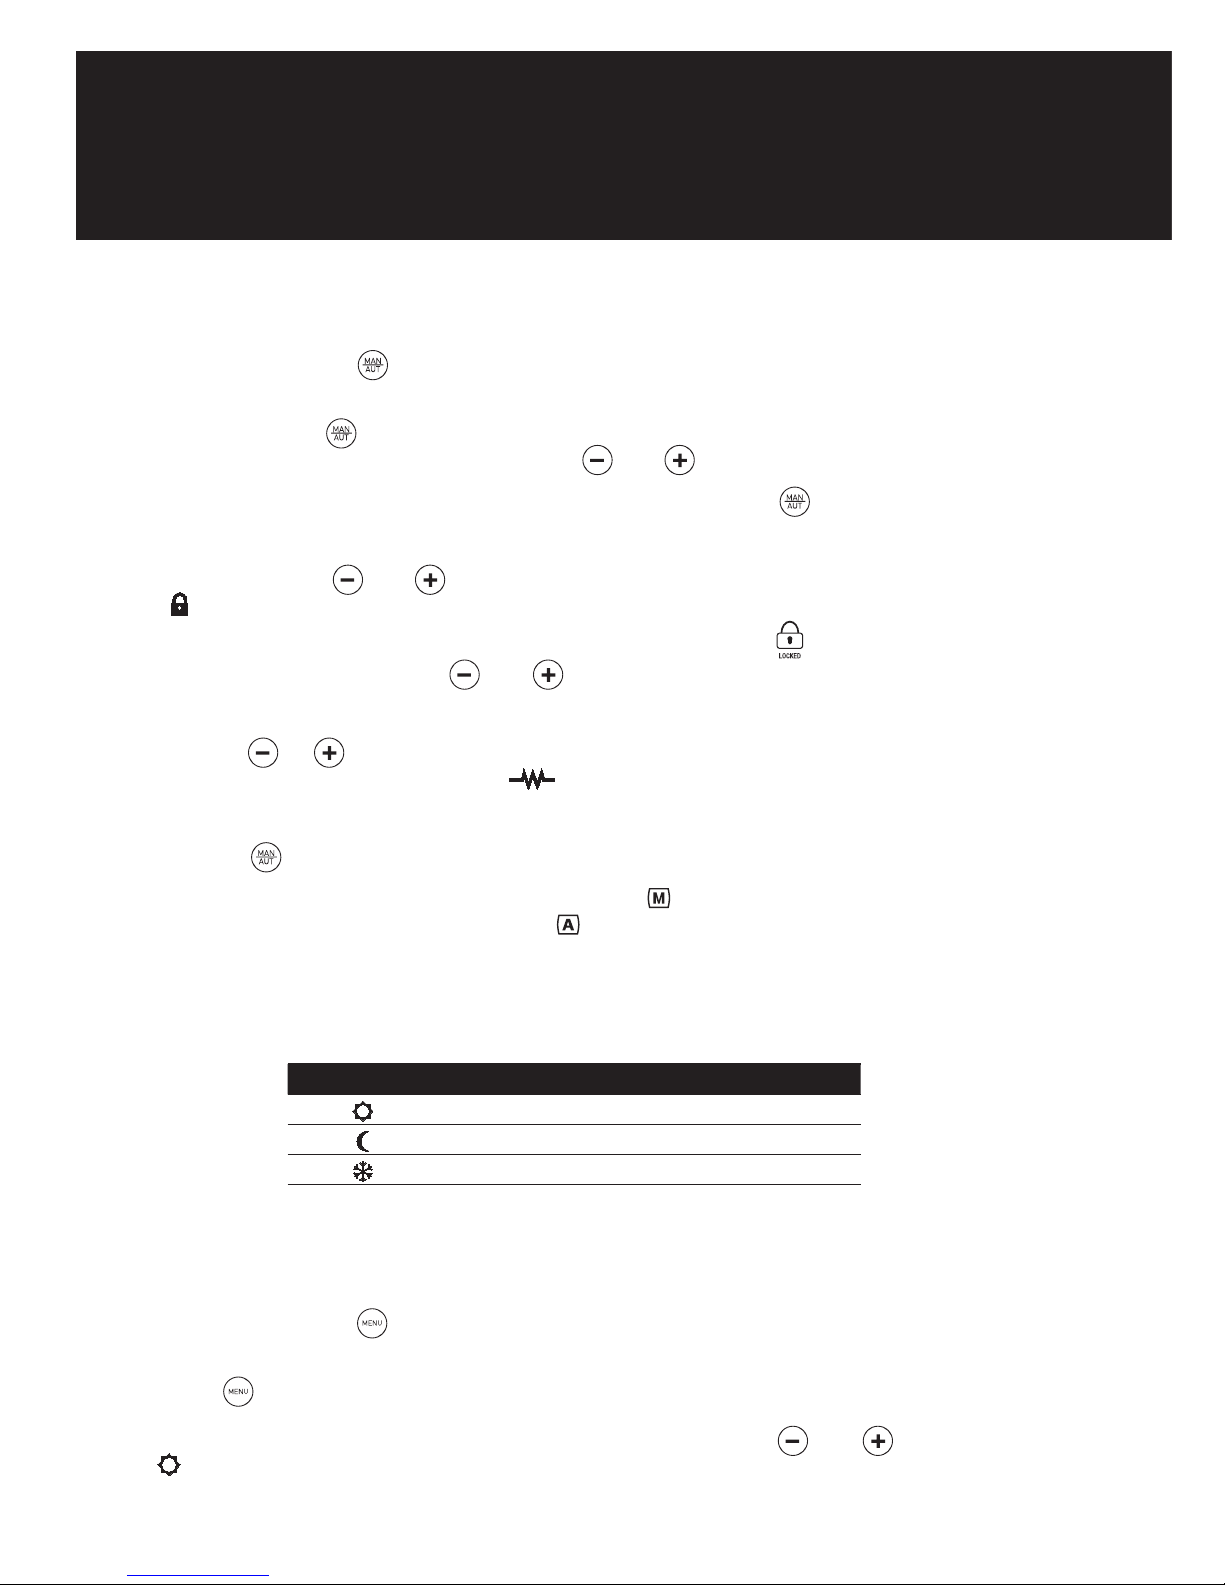
1.6. Manual / Automatic functions
By pressing
we change between the Manual and Automatic functions.
When the Manual function is selected, the symbol appears on the display. When the
Automatic function is selected, the symbol appears on the display.
1.6.1. Manual function
This enables to choose between the modes of operation COMFORT, ECO and ANTI-FROST,
changing the temperature as indicated in Section 1.5.
ICON MODE TEMPERATURE RANGE
COMFORT 20ºC – 30ºC
ECO 15ºC – 19,5ºC
ANTI-FROST 8ºC
1.6.2. Automatic function
This mode activates the programming set on the radiator.
1.7. Menu/Programming function
By repeatedly pressing
we can see the programming that is saved in the radiator for each
day. Pressing only once shows day one, twice shows day two and so on.
Pressing
for 3 seconds allows you to program the radiator directly:
1. Select the CONFORT temperature setting (20ºC to 30ºC), using
and . The symbol
and the temperature will flash.
7
2. Press and we can select using and the ECO temperature (15ºC to 19.5ºC).
The symbol and the temperature will flash.
3. After pressing the button
once again, the numbers of the week will start flashing and
show as SEL1, SEL2, SEL3…. We can go forwards and backwards using the button and
. Press to select the day that we wish to program.
4. Pressing , takes us to the hour we wish to program. To change the hours use the or
, buttons. The hours selected will show as (0h, 1h, 2h,…). By pressing the button,
we can select hour by hour the mode required: CONFORT, ECO or OFF.
5.
To finish the programming press or leave it for 30 seconds without pressing any buttons.
1.8. “Open Window” function
This function is activated when the probe detects a reduction of 4º in respect of the set
temperature during 30 minutes. On activation the following image will appear on the radiator
display for 5 seconds:
When the “Open window” function is activated, the following screen will appear showing that
the anti-frost mode is activated:
This function will be active for 2 hours. If the button is pushed during this period the
radiator will switch off. Pushing the button again will switch on the radiator without the
“Open window” function being switched on.
1.9. Screen brightness function
You can change the brightness of the screen by pushing the button for 3 seconds when
the product is in manual mode. Entering this mode you will see the following screen:
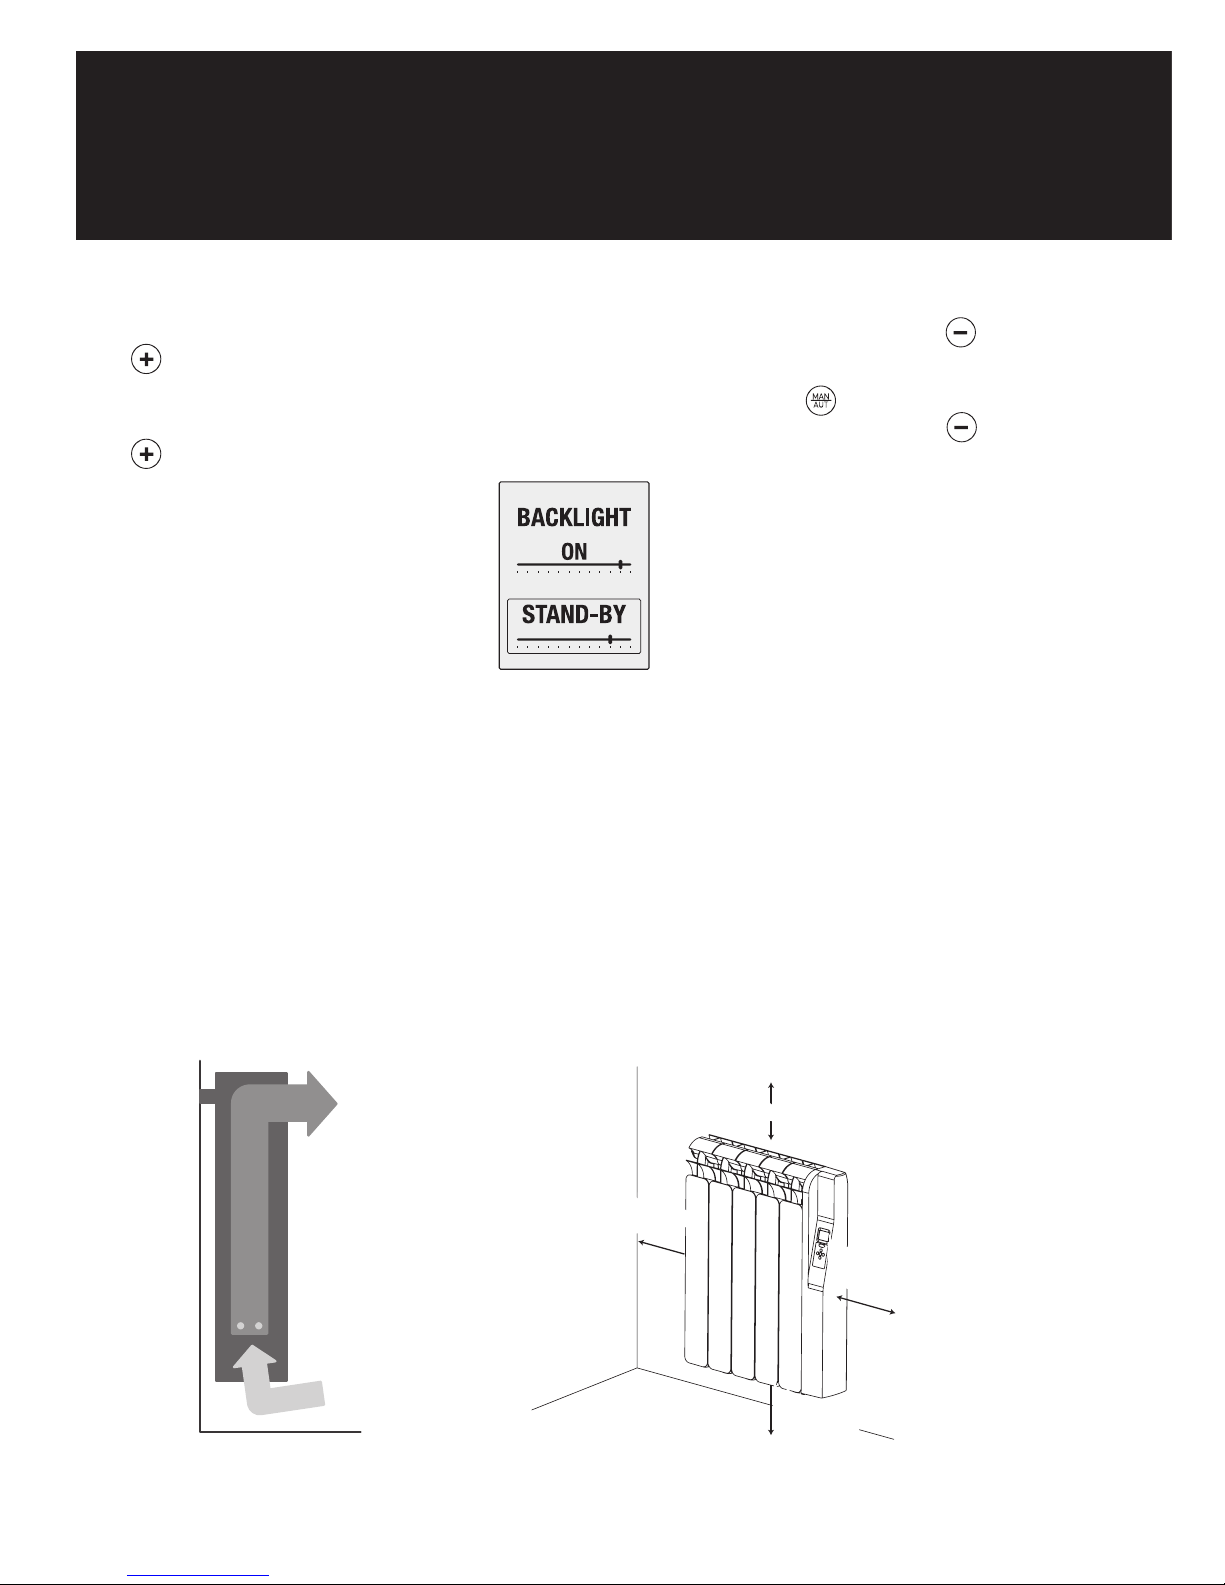
8
In ON mode you can increase or decrease the brightness of the screen by using the and
buttons.
You can change the “Standby” mode brightness by pushing the button
to move the frame
to the “STAND-BY” position. You can then adjust the brightness by pushing the same and
keys.
To finish the programming wait for 10 seconds without pressing any buttons.
2. INSTALLATION & MOUNTING
The radiator must never be installed immediately below a power point.
In bathrooms, the radiator must never be installed where the switches and other devices may
be within the reach of someone in the shower or bathtub.
2.1. Mounting
The K SERIES radiator works by means of natural air convection (Figure 1). In order to achieve
optimal functioning and an even distribution of heat, the lower part of the radiator, once
mounted on the wall, must be at least 10 to 12 cm from the floor, and 30 cm at the most.
Fig. 1 Fig. 2
Minimum
10 cm.
Minimum
10 cm.
Minimum 10 cm.
Minimum
10 cm.
9
As for the sides and above, a minimum distance of between 10-12 cm must be left from any
wall or brickwork in order for it to function correctly (Figure 2).
2.2. Fixing the supports
Inside the packaging you will find a fixing kit and in the base of the radiator you will find a
security support.
• Choose the right part of the wall.
• Place the mounting stencil on the wall, marking the places for the holes.
• Remove the stencil and make the holes in the wall.
•
Fix the top supports using the plugs and screws provided, or others suitable for the
wall type.
• Check the correct positioning of the lower support.
• Place the radiator in the top supports.
• Screw the lower support to the wall.
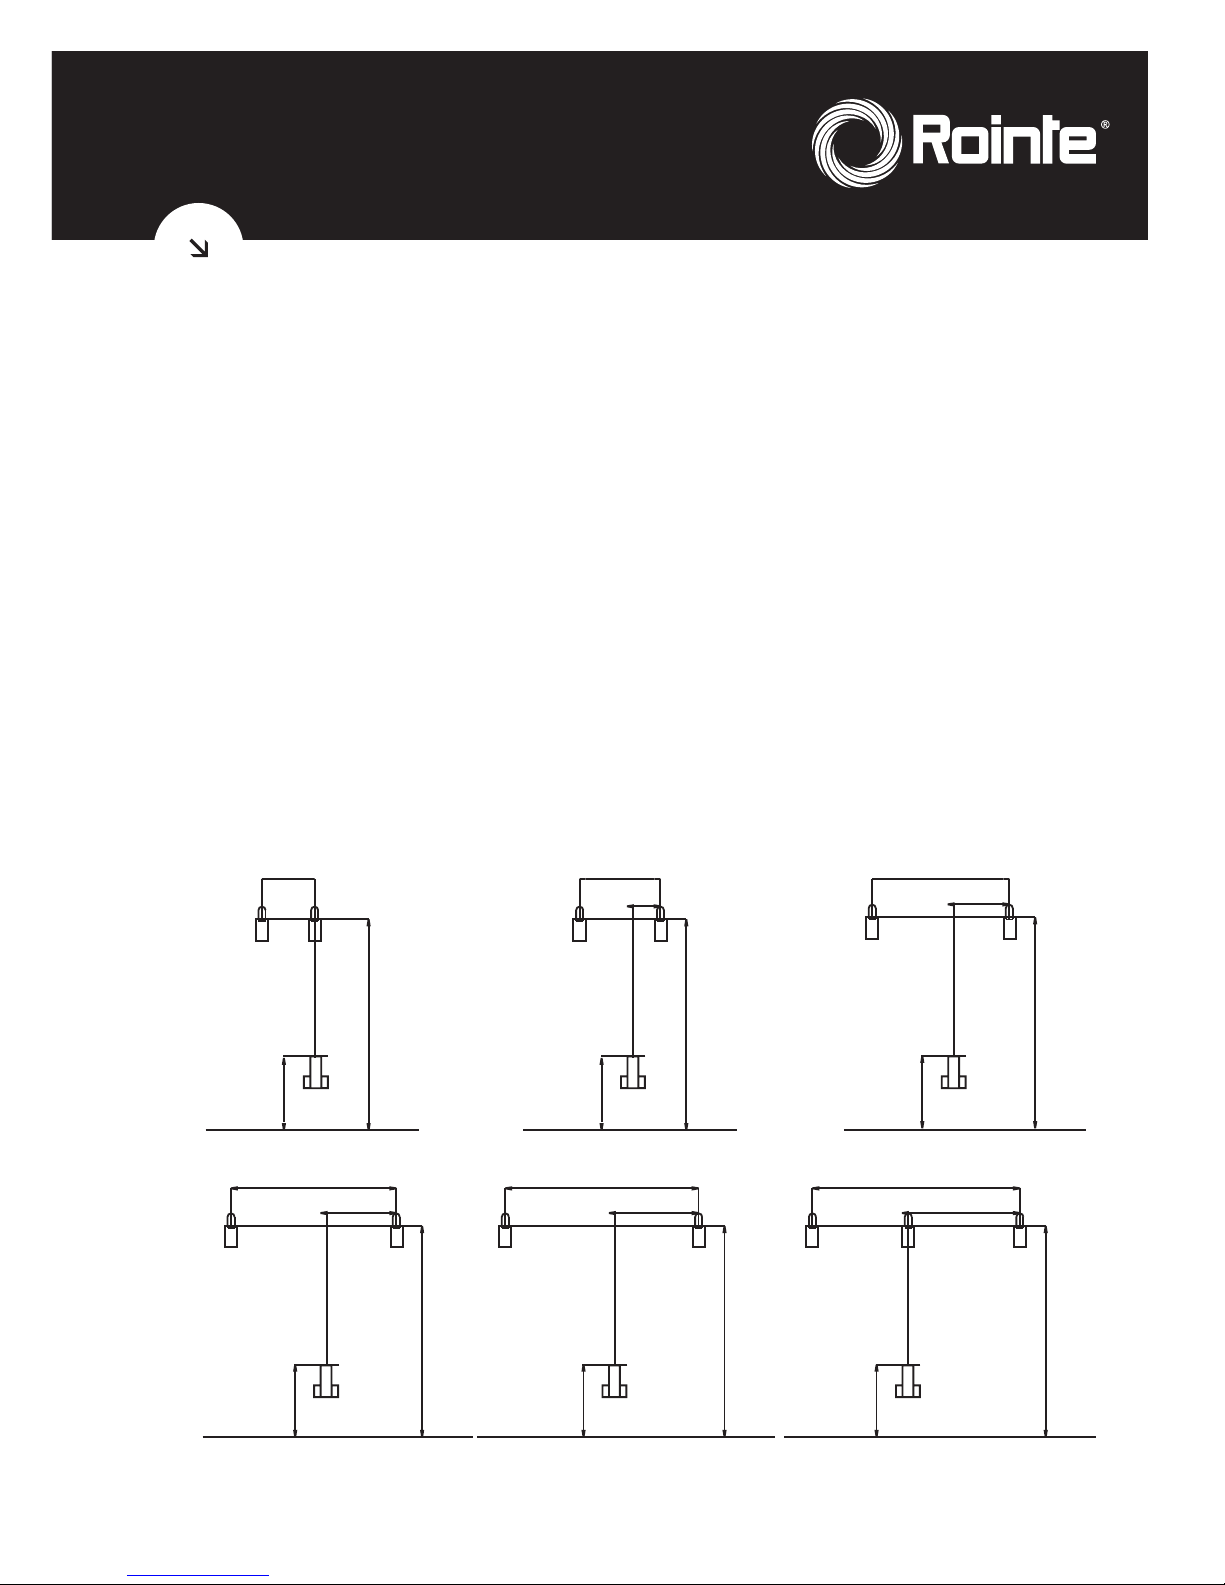
Installing template measures depending on the model:
KI0330RAD
Floor
215 mm
215 mm
680 mm
680 mm
81 mm
81 mm 162 mm
243 mm 324 mm 406 mm
243 mm 406 mm
568 mm 730 mm 893 mm
680 mm
680 mm
680 mm
680 mm
215 mm
215 mm
215 mm
215 mm
Floor Floor
FloorFloorFloor
KI0990RAD
KI0550RAD
KI1210RAD KI1430RAD / KI1600RAD
KI0770RAD
10
3. MAINTENANCE & CLEANING
The radiator does not require any type of maintenance. We recommend that all parts of the
radiator are kept clean (behind, underneath, upper fins etc.). Do not use any abrasive product on
the aluminium. Clean it with a damp cloth and a pH neutral soap, and the stencil with a dry cloth.
4. INSTALLATION & SAFETY PRECAUTIONS (EN 60335 STANDARDS)
Before switching on the radiator, please read the “Installation & Safety Precautions” in detail
first, to ensure the correct operation of the radiator.
4.1. Installation precautions
The radiator is designed for household or residential use. You are advised to have the radiator
installed by an authorized dealer or personnel. Make sure the radiator is properly connected
to 220V - 230V, and is earthed.
4.2. Safety precautions
This product is not intended to be used by persons (including children) with reduced physical,
sensory, or mental capacities, or have no experience or knowledge of the product, except if
they are supervised or instructed in the use of the product by a person who is responsible
for his or her safety.
Children must be supervised at all times to ensure that they do not play with the product.
This radiator heater is filled with the exact amount of special oil that does not need any
maintenance. Any repairs requiring the opening of the oil tank must only be done by ROINTE
or its after-sales service, who should also be notified should an oil leak be noticed.
The regulations on discarding oil when the heater is being disposed of must be observed.
If the power cable is damaged, it must be replaced by the manufacturer, its after-sales
service or authorized personnel in order to avoid any damage.
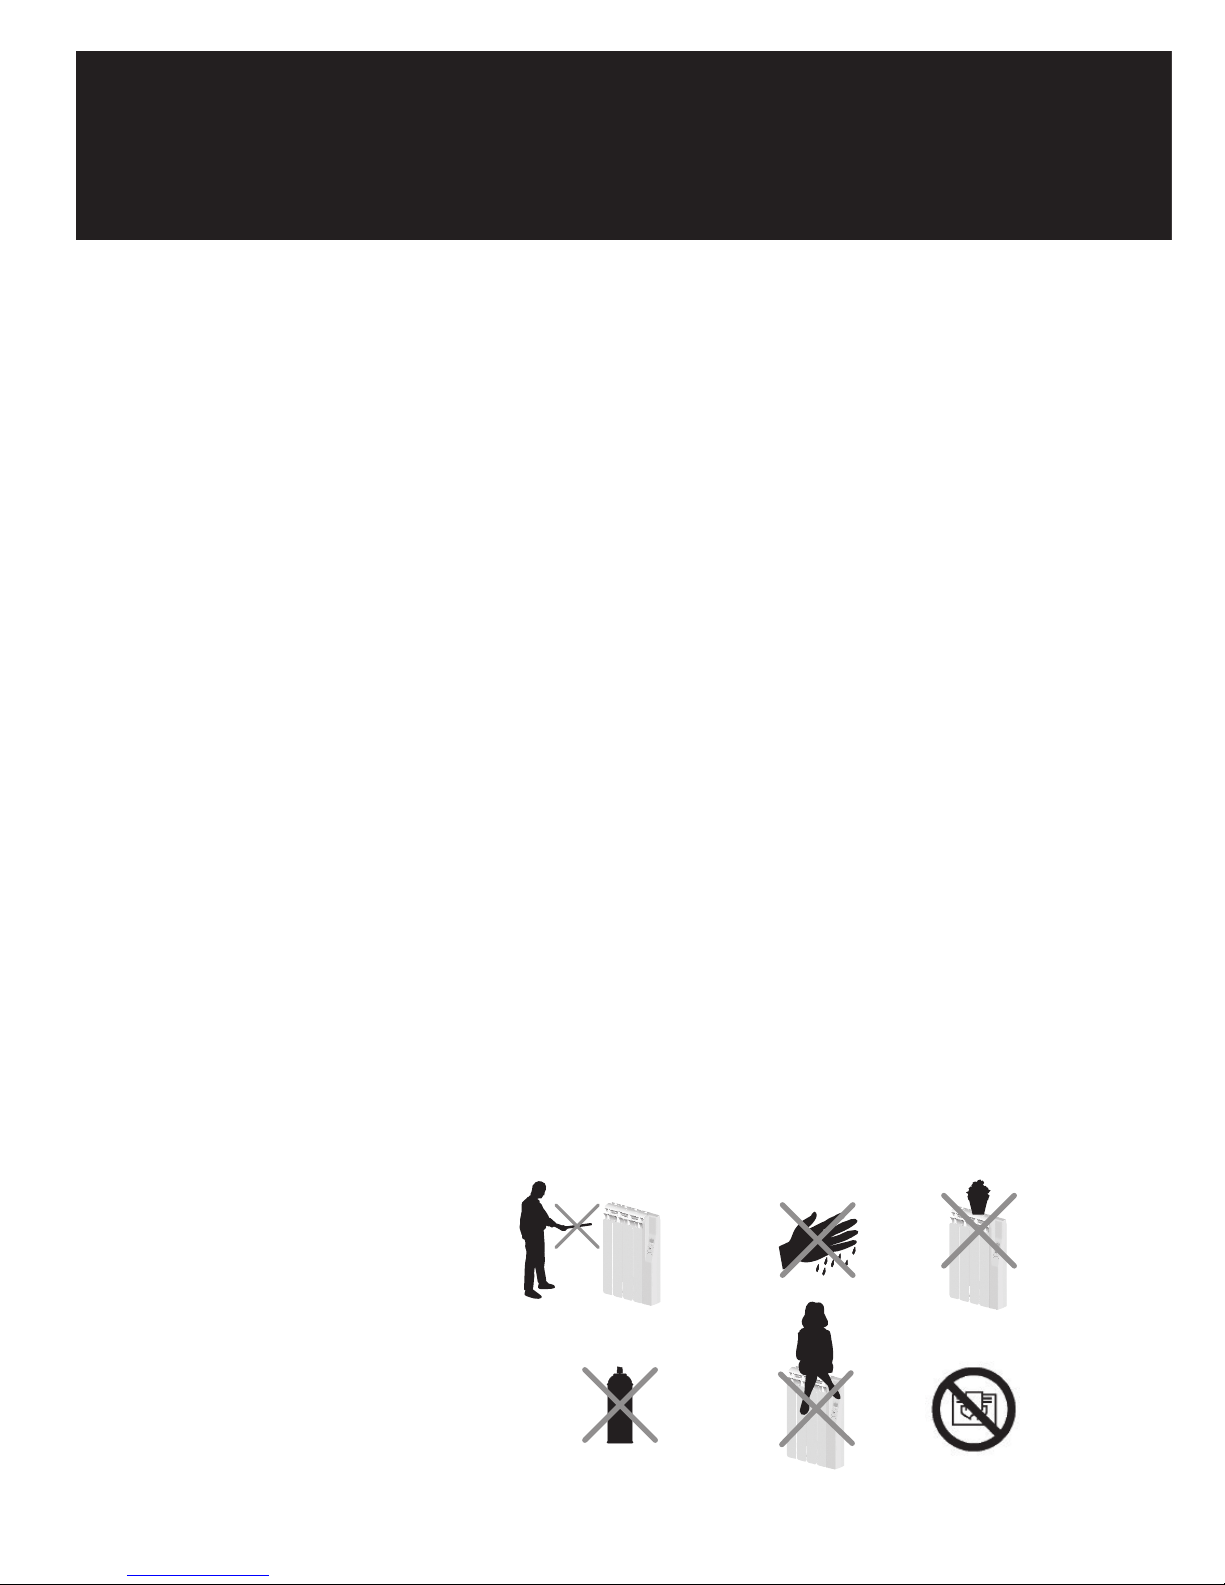
WA RNING! In order to avoid
overheating, don’t cover the heater.
Don’t insert any kind of object in the
air vents. Never use with wet hands.
Don’t place any containers with
water, such as glasses, vases, etc. on
the radiator. Don’t use insecticides,
paints or aerosols on the radiator.
Don’t sit on the radiator or place
anything in front of it.

11
European Directive 2002/96/EC
Under the European Directive 2002/96/EC on waste electrical and electronic equipment (WEEE),
the apparatus cannot be disposed in the usual council bins and containers. They must be
separated to optimize the recovery and recycling of all of the components and materials and
reducing the impact to human health and the environment. The symbol of the container crossed
out over a horizontal line marks all of ROINTE’s products to remind the consumer of the
obligation to separate them on disposal.
The consumer should contact the local authority or original point of sale to learn more about
the correct disposal of this product.
5. GUARANTEE
5.1. If your ROINTE radiator needs to be sent to the guarantee service, send it to the dealer /
installer where it was purchased. In the event of any problems, you can contact ROINTE on
its TECHNICAL ASSISTANCE HELPLINE 0845 604 5987 or e-mail us at rointe@rointe.co.uk
5.2. ROINTE guarantees this product is free from defects in material, design and workmanship
at the time of its purchase and for the immediately following period of 120 months regarding
aluminium and leaktightness, and 24 months for electric and electronic parts.
5.3. If the radiator fails to work properly during the guarantee period, due to defects in design,
materials or workmanship, ROINTE shall repair or replace the radiator, whichever it considers
to be more advisable, in the terms and conditions stated below:
5.3.1. The guarantee shall only be covered if the original Certificate of Guarantee issued to the
buyer by the dealer or installer is presented, and when the guarantee states the radiator serial
number and model (on the technical data label) and its date of purchase. ROINTE reserves
the right to refuse the guarantee service when this information has been removed or changed
following the original purchase of the product.
The original receipt or invoice shall only be accepted as proof of purchase when presented to
the dealer or installer that sold the product.
5.3.2. The guarantee shall only be applicable to cases regarding defects in materials, design
and workmanship, and shall never cover any damages due to the following:
5.3.2.1. Incorrect use of the product for other than normal purposes or failure to observe the
instructions given by ROINTE regarding the use and maintenance of the radiator, as well as
the installation or use of the product in a way that fails to comply with the applicable technical
safety standards.
5.3.2.2. Repairs made by unauthorized repair shops or the opening of the radiator by
unauthorized persons.
5.3.2.3. Unforeseen circumstances beyond the control of ROINTE, such as lightning, fire,

12
floods, public disorder, etc.
5.3.2.4. The repairs or replacements covered in this guarantee do not permit any extension
or new beginning of the guarantee period.
The repairs or replacements covered in this guarantee shall be made with functionally
equivalent reconditioned units. The faulty parts or pieces removed shall become the property
of ROINTE.
5.3.2.5. This guarantee does not affect the buyer’s statutory rights under the current national
laws, or the buyer’s rights against those of the dealer or installer arising from the contract
of sale.
5.3.2.6. In the event of there being no national legislation applicable, this guarantee shall
be the buyer’s sole protection. ROINTE, its offices, dealers and installers shall not be held
liable for any type of damages, whether fortuitous or accidental, arising from the failure to
observe any of the regulations related with this product.
MODEL
NO. OF
ELEM.
POWER TENSION HEIGHT WIDTH DEPTH
INST.
DEPTH
WEIGHT
KI0330RAD 3 330 W 230 V~ 600 mm 365 mm 98 mm 118 mm 10 kg
KI0550RAD 5 550 W 230 V~ 600 mm 525 mm 98 mm 118 mm 14 kg
KI0770RAD 7 770 W 230 V~ 600 mm 690 mm 98 mm 118 mm 18 kg
KI0990RAD 9 990 W 230 V~ 600 mm 850 mm 98 mm 118 mm 22 kg
KI1210RAD 11 1,200 W 230 V~ 600 mm 1,010 mm 98 mm 118 mm 26 kg
KI1430RAD 13 1,400 W 230 V~ 600 mm 1,195 mm 98 mm 118 mm 30 kg
KI1600RAD 15 1,600 W 230 V~ 600 mm 1,340 mm 98 mm 118 mm 34 kg

13
ESPAÑOL
ÍNDICE DE CONTENIDOS
1. DESCRIPCIÓN DEL RADIADOR “SERIE K” ...........................................................................................14
1.1. Partes del panel frontal ................................................................................................... 14
1.2. Encendido y apagado (stand-by) ..................................................................................... 15
1.3. Ajustar día y hora ............................................................................................................. 16
1.4. Bloqueo de teclado .......................................................................................................... 16
1.5. Selección de temperatura ............................................................................................... 16
1.6. Función Manual/Automático ........................................................................................... 16
1.7. Función Menú/Programación ............................................................................................ 16
1.8. Función “Ventana abierta”........................................................................................... 17
1.9. Función iluminación de pantalla ..................................................................................... 18
2. COLOCACIÓN Y MONTAJE ...................................................................................................... 19
2.1. Montaje.............................................................................................................................. 19
2.2. Colocación de los anclajes .......................................................................................... 19
3. MANTENIMIENTO Y LIMPIEZA ...........................................................................................20
4. PRECAUCIONES DE INSTALACIÓN Y SEGURIDAD (NORMATIVA UNE-EN 60335) ............. 21
4.1. Precauciones de instalación ........................................................................................... 21
4.2. Precauciones de seguridad............................................................................................. 21
5. GARANTÍA ............................................................................................................................... 22
14
1. DESCRIPCIÓN DEL RADIADOR “SERIE K”
1.1. Partes del panel frontal
DISPLAY TFT
TECLADO

15
1.1.1. Partes del display TFT
SEGMENTO INDICACIÓN
1
FRANJA DE PROGRAMACIÓN
2
DÍAS DE LA SEMANA
3
HORA
4
TEMPERATURA
5
BLOQUEO DE TECLADO
6
FUNCIÓN MANUAL/AUTOMÁTICA
7
MODO CONFORT/ECONÓMICO/ANTIHIELO
8
RADIADOR EN CONSUMO
9
FUNCIÓN VENTANA ABIERTA
1.2. Encendido y apagado (stand-by)
La tecla apaga o enciende el radiador Serie K. Al encender el radiador aparecerá la siguiente
imagen de bienvenida en el display TFT:
Pasados 10 segundos sin pulsar ninguna tecla, la iluminación de la pantalla pasará al modo
reposo de forma automática. Si estando encendido se pulsa de nuevo la tecla
, el radiador
pasará al modo “Stand By”, apareciendo la palabra “STAND BY” seguido del logotipo de
ROINTE.
1
2
3
4
5
6
7
8
9
 Loading...