

Page 1

Power Supply IC Series for TFT-LCD Panels
High-precision
Gamma Correction ICs with built-in DAC
BD8132FV, BD8139AEFV
●Description
These gamma correction voltage generation ICs feature built-in DACs and provide a single-chip solution with setting control
via serial communications, a high-precision 10-bit DAC, an output amp (18-channel or 10-channel), and Vcom.
●Features
1) Single-chip design means fewer components
2) Built-in 10 bit DAC (18ch: BD8132FV, 10ch: BD8139AEFV)
3) Built-in DAC output amp
4) Built-in Vcom amp
5) Built-in auto-read function
6) 3-line serial interface (BD8132FV) or 2-wire serial (BD8139AEFV)
7) Thermal shutdown circuit
8) SSOP-B40 package (BD8132FV) / HTSSOP-B40 package (BD8139AEFV)
●Applications
These ICs can be used with TFT LCD panels used by large-screen and high-definition LCD TVs.
●Absolute maximum ratings (Ta = 25°C)
Parameter Symbol Limit Unit
Power supply voltage 1 DVcc 7 V
Power supply voltage 2 Vcc 20 V
REFIN voltage REF 20 V
Amp output current capacity Io 50*1 mA
Junction temperature Tjmax 150 ℃
Power dissipation
Operating temperature range Topr -30 to +85 ℃
Storage temperature range Tstg -55 to +150 ℃
*1 Must not exceed Pd.
*2 Reduced by 9.0 mW/°C over 25°C, when mounted on a glass epoxy board (70 mm 70 mm 1.6 mm).
*3 Reduced by 12.8 mW/°C over 25°C, when mounted on a glass epoxy board (70 mm 70 mm 1.6 mm).
●Recommended Operating Ranges
Parameter Symbol
Power supply voltage 1 DVcc 2.3 4.0 V
Power supply voltage 2 Vcc 6 18 V
REFIN voltage REF 6 18 V
Amp output current capacity Io — 40 mA
Serial clock frequency (BD8132FV) fCLK — 5 MHZ
2 wire serial frequency (BD8139AEFV) fCLK — 400 kHz
OSC frequency (BD8132FV) fosc 10 200 kHz
OSC frequency (BD8139AEFV) fosc — 400 kHz
BD8132FV
BD8139AEFV 1600*3
Pd
Min. Max.
112 5*2
Limit
No.09035EBT02
mW
Unit
www.rohm.com
© 2009 ROHM Co., Ltd. All rights reserved.
1/20
2009.07 - Rev.B
Page 2

BD8132FV, BD8139AEFV
●Electrical Characteristics
BD8132FV(Unless otherwise specified, Vcc = 15 V, DVcc = 3.3 V, Ta = 25℃)
Parameter Symbol
[REFIN]
Sinking current Iref 25 50 75 µA REF = 10 V
[Gamma correction amp block]
Output current capacity Io 150 300 — mA DAC = 3V, OUTx = 0 V
Load stability ∆V — 5 20 mV Io = +10 mA to -10 mA, OUTx = 6 V
Slew rate SR — 3.5 — V/µS Ro = 100 k, Co = 100 pF *
OUT max. output voltage VOH VCC-0.16 VCC-0.1 — V Io = -5 mA
OUT min. output voltage VOL — 0.15 0.24 V Io = 5 mA
[Common amp block]
Input bias current Ib — 0 1 µA VFB = 6 V
Output current capacity Io 150 300 — mA DAC = 3V, OUTx = 0 V
Load stability ∆V — 5 20 mV Io = +10 mA to -10 mA, OUTx = 3 V
Slew rate SR — 3.5 — V/µS Ro = 100 k, Co = 100 pF *
Input voltage range VFB 0 — VDAC V Ro = 100 k, Co = 100 pF *
OUT max. output voltage VOH VCC-0.16 VCC-0.1 — V Io = -5 mA
OUT min. output voltage VOL — 0.15 0.24 V Io = 5 mA
[DAC]
Resolution Res — 10 — Bit
Nonlinearity error LE -2 — 2 LSB Ideal line error: 00A to 3F5
Differential linearity error DLE -2 — 2 LSB 1 LSB ideal increase error: 00A to 3F5
[OSC]
Oscillating frequency fosc — 80 — kHz Internal frequency mode
[Control signals]
Sinking current Ictl — 16 25 µA
Threshold voltage VTH 0.7 — 2.6 V DVCC = 3.3 V
Reset time trst — 45 — µs CCT = 1000 pF
[Overall]
Total supply current Icc — 20 — mA When all output voltages are set to 5 V.
Min. Typ. Max.
Limit
Unit Condition
Technical Note
www.rohm.com
© 2009 ROHM Co., Ltd. All rights reserved.
2/20
2009.07 - Rev.B
Page 3

BD8132FV, BD8139AEFV
●Electrical Characteristics
BD8139AEFV (Unless otherwise specified, Vcc = 15 V, DVcc = 3.3 V, Ta = 25℃)
Parameter Symbol
[REFIN]
Sinking current Iref 25 50 75 µA REF = 10V
[Gamma correction amp block]
Output current capacity Io 150 300 — mA DAC = 3 V, OUTx = 0 V
Load stability ∆V — 5 20 mV Io = +10 mA to -10 mA, OUTx = 6 V
Slew rate SR — 3.5 — V/µs Ro = 100 k, Co = 100 pF *
OUT max. output voltage VOH Vcc-0.16 Vcc-0.1 — V Io = -5 mA
OUT min. output voltage VOL — 0.1 0.16 V Io = 5 mA
[Common amp block]
Input bias current Ib — 0 1 µA VFB = 6 V
Output current capacity Io 150 300 — mA DAC = 3 V, OUTx = 0 V
Load stability ∆V — 5 20 mV Io = +10 mA to -10 mA, OUTx = 3 V
Slew rate SR — 3.5 — V/µS Ro = 100 k, Co = 100 pF *
Input voltage range VFB 0 — VDAC V Ro = 100 k, Co = 100 pF *
OUT max. output voltage VOH Vcc-0.16 Vcc-0.1 — V Io = -5 mA
OUT min. output voltage VOL — 0.1 0.16 V Io = 5 mA
[DAC]
Resolution Res — 10 — Bit
Nonlinearity error LE -2 — 2 LSB Ideal line error: 00A to 3F5
Differential linearity error DLE -2 — 2 LSB 1 LSB ideal increase error: 00A to 3F5
[OSC]
Oscillating frequency fosc — 210 — kHz Internal frequency mode
[Control signals]
Sinking current Ictl — 16 25 µA Except for osc_mode
Sinking current Ioscm 26 33 40 µA Only osc_mode
Min. output voltage VSDA — — 0.4 V ISDA = 3.0 mA *
Sinking current ILi -10 — 10 µA 0.4 V to 0.9 V DVCC
Threshold voltage VTH 0.7 — 2.6 V DVCC = 3.3 V
Reset time trst — 45 — µs CCT = 1000 pF
[Overall]
Total supply current Icc — 18 — mA When all output voltages are set to 5 V.
Min. Typ. Max.
Limit
Unit Condition
Technical Note
www.rohm.com
© 2009 ROHM Co., Ltd. All rights reserved.
3/20
2009.07 - Rev.B
Page 4

BD8132FV, BD8139AEFV
●Reference Data
(Unless otherwise specified, Ta = 25℃, BD8132FV and BD8139AEFV)
40
25
BD8132F V
℃
-30
℃
V]
CC[
35
30
25
SUPPLY CURRENT : ICC[mA] ,
85
20
15
10
℃
5
0
0 5 10 15 20
SUPPLY VOLTAGE : V
Fig. 1 VCC Total Supply Current Fig. 2 Total Supply Current vs Temperature
40
35
30
18V
25
20
15
10
5
SUPPLY CURRENT : ICC[mA] ,
0
-30 - 10 10 30 50 70
AMBIENT TEMPER ATU RE : Ta[℃]
15V
30
25
BD8139AEFV
20
15
10
85℃
25℃ -30℃
5
SUPPLY CURRENT : ICC[mA] .
0
0 5 10 15 20
SUPPLY VOLTAGE : VCC[V]
20
15
18V
15V
10
5
SUPPLY CURRENT : ICC[mA] .
0
-30 - 10 10 30 50 70
AMBIENT TEMPER ATU RE : Ta [℃]
Fig. 4 VCC Total Supply Current
Fig. 5 Total Supply Current vs Temperature
15.5
15
-3 0 ℃
25℃
85℃
1.5
1
14.5
OUTPUT VOLTAGE : VO[V]
14
0 5 10 15 20
SOURCE C UR REN T : IF[mA]
Fig. 7 High Output Voltage
0.5
OUTPUT VOLTAGE : VO[V]
0
0 5 10 15 20
SINK CURRENT : IF[mA]
Fig. 8 Low Output Voltage
BD8132F V
6V
BD8139AEFV
6V
-3 0 ℃25℃85℃
Technical Note
2
BD8132F V
1.5
.
1
85℃ 25℃
0.5
SUPPLY CUR REN T : IDD [m A]
0
01 2345 67
SUPPLY VOLTAGE : VDD[ V]
Fig. 3 VDD Total Supply Current
2
1.5
85℃ 25℃
1
0.5
SUPPLY CURRENT : IDD[mA]..
0
0123 4567
SUPPLY VOLTAGE : D VCC[V]
Fig. 6 VDD Total Supply Current
14
12
10
85℃
8
6
4
2
OUTPUT VOLTAGE : VO[V]
0
-400 -300 - 200 - 100 0 100 200
25℃
-3 0 ℃
OUTPUT CURRENT : IAMP[mA]
Fig. 9 Output Current Capacity
-
BD8139AEF V
-3 0 ℃
www.rohm.com
© 2009 ROHM Co., Ltd. All rights reserved.
4/20
2009.07 - Rev.B
Page 5

BD8132FV, BD8139AEFV
]
Ou
pu
o
age
[
]
A
●Reference Data
(Unless otherwise specified, Ta = 25℃, BD8132FV and BD8139AEFV)
Gain [dB]
80
60
Phase
40
Gain
20
0
100 1
10K
100K 1M
FREQUENCY : f [Hz]
Fig. 10 Open Loop Waveform Fig. 11 Power-on Reset Time
10M
100
80
60
40
20
0
-20
-40
-60
-80
-100
1000
100
10
Phase [deg]
1
Reset Time [ms] .
0.1
0.01
0.0001 0.001 0.01 0.1 1 10
CT C APACITOR : CT[μF]
VCC=15V
VI=4V
RL=100kΩ
CL=100pF
TA=2 5℃
10
V
8
6
lt
t V
4
t
2
0
0 5 10 15 20 25 30 35 40 45 50
Fig. 13 Slew Rate Waveform
TIME [usec]
(High-Amplitude)
6
4
2
0
Input Voltage [V]
VCC=15V
VI=40mV
RL=100kΩ
CL=100pF
TA=2 5℃
5.10
5.05
5.00
4.95
Output Voltage [V]
4.90
0 5 10 15 20 25 30 35 40 45 50
TIME [usec
Fig. 14 Slew Rate Waveform
(Small Signal)
10.2
VCC=15V
VI=5V
CS=100pF
RS=100Ω
CL=100pF
RL=1kΩ
T=0.1us
t
TA=2 5℃
10.1
9.9
Output Voltage [V]
9.8
0 0.1 0.2 0.3 0.4 0.5 0.6 0.7 0.8 0.9 1.0
Fig. 16 Load Response Waveform
TIME [usec]
(RL = 1 k Pull-down)
-20 0 20
2
1.5
1
0.5
Input Current [mA]
0
INL [LSB]
-0.5
-1
-1.5
-2
0 200 400 600 800 1000
step
Fig. 17 Integral Linearity Error
2.55
2.50
2.45
Technical Note
100
80
60
40
Reset Time [uS]
20
0
-40 -20 0 20 40 60 80 100
AMBIENT TEMPERATUR E : Ta[℃]
Fig. 12 Power-on Reset Time
vs Temperature
VCC=15V
VI=5V
CS=100pF
RS=100Ω
CL=100pF
RL=1kΩ
T=0.1us
t
TA=2 5℃
Input Voltage [V]
10.2
10.1
9.9
Output Voltage [V]
9.8
0 0.1 0.2 0.3 0.4 0.5 0.6 0.7 0.8 0.9 1.0
Fig. 15 Load Response Waveform
2
1.5
1
0.5
0
-0.5
DNL [LSB]
-1
-1.5
-2
0 200 400 600 800 1000
Fig. 18 Differential Linearity Error
+20mA -20m
TIME [usec]
(RL = 1 k Pull-up)
step
-20 0 20
Input Current [mA]
www.rohm.com
© 2009 ROHM Co., Ltd. All rights reserved.
5/20
2009.07 - Rev.B
Page 6
BD8132FV, BD8139AEFV
A
K
Technical Note
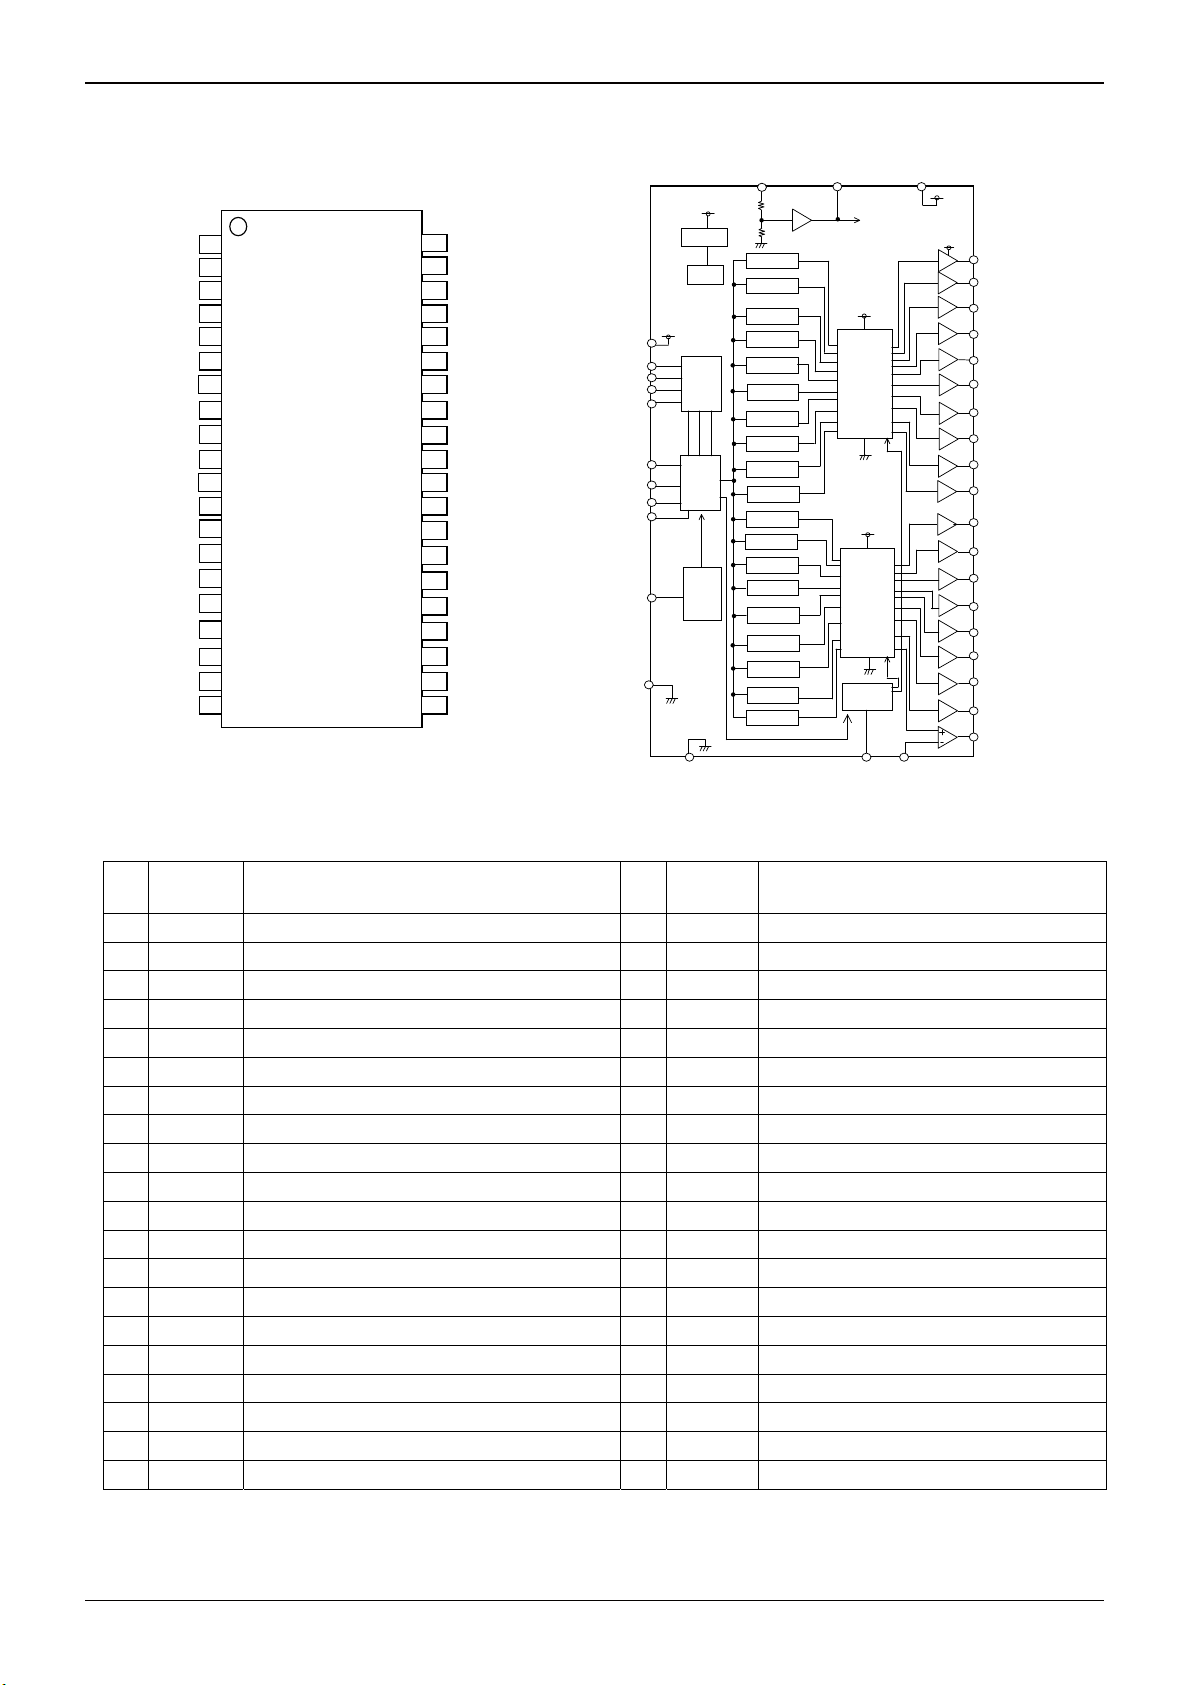
●Pin Assignment Diagram ●Block Diagram
[BD8132FV]
LATCH
SDIN
CLK
SDOUT
GND
R/W
CS
MEMDO
MEMDI
OSC
CC
DV
NC
CC
V
CC
V
REFIN
VDAC
CT
DGND
GND
GND
V0
V1
V2
V3
V4
V5
V6
V7
V8
V9
V
VB
VC
VD
VE
VF
VG
VH
Vcom
FB
MENDO
SDOUT
DVCC
CS
R/W
MENDI
LATCH
CL
SDIN
CT
DGND
11
7
6
9
8
1
3
2
4
17
18
DVCC
DGND
GND
GND
DVCC
VREF
TSD
AUTO
Read
Serial
I/F
Power
On
Reset
5
REFIN
15 16
100k
Ω
100k
Ω
Register 0
Register 1
Register 2
Register 3
Register 4
Register 5
Register 6
Register 7
Register 8
Register 9
Register A
Register B
Register C
Register D
Register E
Register F
Register G
Register H
Register I
VDAC
VDAC
VDAC
DAC
LOGIC
DAC
LOGIC
OSC
10 21
VDAC
OSC FB
VCC
13
VCC
VCC
2
×
2
×
2
×
×2
2
×
2
×
2
×
2
×
2
×
2
×
2
×
×2
2
×
2
×
2
×
2
×
2
×
2
×
2
×
2
×
Fig. 19 Pin Assignment Diagram & Block Diagram
●Pin Name and Function
Pin
No.
Pin
name
Function
Pin
No.
Pin
name
Function
1 LATCH Serial latch input 21 FB Vcom amp negative feedback input
2 SDIN Serial data input 22 Vcom Vcom output pin
3 CLK Serial clock input 23 VH Gamma correction output pin
4 SDOUT Serial data output 24 VG Gamma correction output pin
5 GND GND input 25 VF Gamma correction output pin
6 R/W Auto-read on/off input (On = Low, Off = High) 26 VE Gamma correction output pin
7 CS External memory selection output 27 VD Gamma correction output pin
8 MEMDO External memory output data signal 28 VC Gamma correction output pin
9 MEMDI External memory input data signal 29 VB Gamma correction output pin
10 OSC Tuning clock I/O 30 VA Gamma correction output pin
11 DVCC Logic power supply input 31 V9 Gamma correction output pin
12 NC — 32 V8 Gamma correction output pin
13 VCC Buffer amp power supply input 33 V7 Gamma correction output pin
14 VCC Buffer amp power supply input 34 V6 Gamma correction output pin
15 REFIN DAC reference input 35 V5 Gamma correction output pin
16 VDAC DAC voltage output 36 V4 Gamma correction output pin
17 CT Power-on reset capacitance connection pin 37 V3 Gamma correction output pin
18 DGND DAC GND input 38 V2 Gamma correction output pin
19 GND GND input 39 V1 Gamma correction output pin
20 GND GND input 40 V0 Gamma correction output pin
40
39
38
37
36
35
34
33
32
31
30
29
28
27
26
25
24
23
22
V0
V1
V2
V3
V4
V5
V6
V7
V8
V9
VA
VB
VC
VD
VE
VF
VG
VH
Vcom
www.rohm.com
© 2009 ROHM Co., Ltd. All rights reserved.
6/20
2009.07 - Rev.B
Page 7

BD8132FV, BD8139AEFV
A
A
A
A
Technical Note
●Pin Assignment Diagram ●Block Diagram
[BD8139AEFV]
1
2
NC
OSC
SLAVE/AR
OSC_MODE
SDA
SCL
DGND
DACGND
NC
NC
CT
DVcc
NC
REFIN
NC
NC
VDAC
NC
GND
NC
NC
NC
V0
V1
V2
V3
V4
V5
V6
V7
V8
V9
VCOM
FB
NC
Vcc
NC
NC
DVcc
SCL
SDA
SLAVE/AR
DGND
DACGND
REFIN VDAC
16 19 23
100k
DVcc
VREF
TSD
DVcc
14
1
1
2
2
2wire
8
serial
7
CT
I/F
5
Power
On
13
Reset
DGND
9
DACGND
10
Ω
100k
Ω
Register 0
Register 1
Register 2
Register 3
Register 4
Register 5
Register 6
Register 7
Register 8
Register 9
Register A
GND
40
GND
VDAC
DAC
LOGIC
OSC
6
OSC_MODE
VDAC
4
OSC
Vcc
Fig. 20 Pin Assignment Diagram & Block Diagram
●Pin Name and Function
Pin
No.
1 A1
2 A2
Pin
name
Function
Slave/address setting pin
Auto-read/word address setting pin (1)
Slave/address setting pin
Auto-read/word address setting pin (2)
Pin
No.
Pin
name
Function
21 NC —
22 NC —
3 NC — 23 VCC Buffer amp power supply input
4 OSC Tuning clock I/O 24 NC —
5 SLAVE/AR Slave/auto-read selection pin 25 FB Vcom amp negative feedback input
6 OSC_MODE OSC switching pin 26 Vcom Vcom output pin
7 SDA Serial data input (2 wire serial) 27 V9 Gamma correction output pin 9
8 SCL Serial clock input (2 wire serial) 28 V8 Gamma correction output pin 8
9 DGND GND input 29 V7 Gamma correction output pin 7
10 DACGND DAC GND input 30 V6 Gamma correction output pin 6
11 NC — 31 V5 Gamma correction output pin 5
12 NC — 32 V4 Gamma correction output pin 4
13 CT Power-on reset capacitance connection pin 33 V3 Gamma correction output pin 3
14 DVCC Logic power supply input 34 V2 Gamma correction output pin 2
15 NC — 35 V1 Gamma correction output pin 1
16 REFIN DAC reference input 36 V0 Gamma correction output pin 0
17 NC — 37 NC —
18 NC — 38 NC —
19 VDAC DAC voltage output 39 NC —
20 NC — 40 GND GND input
VCC
×
×
×
×2
×
×
×
×
×
×
×
×2
2
2
2
2
2
2
2
Vcc
2
2
2
V0
36
35
V1
34
V2
33
V3
32
V4
31
V5
30
V6
29
V7
28
V8
27
V9
26
Vcom
25
FB
www.rohm.com
© 2009 ROHM Co., Ltd. All rights reserved.
7/20
2009.07 - Rev.B
Page 8

BD8132FV, BD8139AEFV
●Block Operation
・VDAC Amp
The VDAC Amp amplifies the voltage applied to REFIN by 0.5x and outputs it to the VDAC pin. Connect a 1 µF phase
compensation capacitor to the VDAC pin.
・DAC LOGIC
The DAC LOGIC converts the 10-bit digital signal read to the register to a voltage.
・Amp
The Amp amplifies the voltage output from the DAC LOGIC by 2x. Input includes a sample and hold function and is
refreshed by the OSC.
・OSC
The OSC generates the frequency that determines the Amp's refresh time.
External input can be selected using serial input. (For the BD8139AEFV, external input is selected using the external pin.)
・Power On Reset
When the digital power supply DVCC is activated, each IC generates a reset signal to initialize the serial interface,
auto-read functionality, and registers.
Adding a 1,000 pF capacitor to the CT pin ensures that reset operation can be performed reliably, without regard to the
speed with which the power supply starts up.
・TSD (Thermal Shut Down)
The TSD circuit turns output off when the chip temperature reaches or exceeds approximately 175°C in order to prevent
thermal destruction or thermal runaway. When the chip returns to a specified temperature, the circuit resets.
The TSD circuit is designed only to protect the IC itself. Application thermal design should ensure operation of the IC
below the thermal shutdown detection temperature of approximately 175°C.
・Register
A serial signal (consisting of 10-bit gamma correction voltage values) input using the serial interface or I
held for each register address. Data is initialized by the reset signal generated during a power-on reset.
・Serial I/F(BD8132FV)
The serial interface uses a 3-line serial data format (LATCH, CLK, SDIN). It is used to set gamma correction voltages,
specify register addresses, and select OSC I/O.
・2 wire serial I/F(BD8139AEFV)
The serial interface uses a 2-line serial data format (SCL, SDA). It is used to set gamma correction voltages and specify
register addresses.
・Autoread
The BD8132FV uses the R/W, CLK, CS, and MEMDO pins to enable automatic reading of the IC's 1 kbit microwire type
external memory.
The BD8139AEFV uses the SCL and SDA pins to enable automatic reading of the 2 wire serial bus format external
memory.
Technical Note
2
C bus interface is
www.rohm.com
© 2009 ROHM Co., Ltd. All rights reserved.
8/20
2009.07 - Rev.B
Page 9

BD8132FV, BD8139AEFV
A
Technical Note
[BD8132FV]
●Serial communications
The serial data control block consists of a register that stores data from the LATCH, CLK, and SDIN pins, and a DAC circuit
that receives the output from this register and provides adjusted voltages to other IC blocks.
When the IC's power supply is activated, the reset function operates to set the register to a preset value. The first bit is for
testing use only and should always be set to 0. The next bit is used to select the OSC mode. Inputting a value of 0 selects
internal frequency mode and uses a frequency of 80 kHz. Entering a value of 1 selects external frequency mode. Input an
external clock signal from the OSC pin.
LATCH
CLK
SDIN
Clock control
Serial data control block diagram
d11
d10
d12
d13
d14
d15
d16
OUT0 to OUTI
registers
DAC
Shift register
d9
d8
10 bits
d7
d6
d5
d4
d3
d2
d1
d0
5 bits
1 bit
1 bit
OSC
mode
Tes t
mode
ddress
decoder
Fig. 21 Serial Block Diagram
(1) Serial communications timing
The 17-bit serial data input from the SDIN pin is read into the shift register using the rising edge of the signal input to the
CLK pin. This data is then loaded to the DAC register using the rising edge of the signal input to the LATCH pin.
If the data loaded into the shift register while the LATCH pin is low consists of less than 17 bits, the loaded data is
discarded. If the data exceeds 17 bits, the last 17 bits to be loaded are treated as valid.
LATCH
CLK
SDIN
d0 d1 d2 d3 d4 d5 d6 d7 d8 d9 d10
Serial c ommunic ations timing
1
d1
d12
d13
d14
d15
d16
Fig. 22 Serial Communications Timing Chart
(2) Serial data
The following table illustrates the format of serial data input to the SDIN pin.
First → →Last
d0 d1 d2 d3 d4 d5 d6 d7 d8 d9 d10 d11 d12 d13 d14 d15 d16
0 X Register address Data
Register
Address
d2 d3 d4 d5 d6 d7 to d16
Behavior when data increases
Preset value
Register 0 0 0 0 0 0 V0 voltage value increases 00000 00000
Register 1 0 0 0 0 1 V1 voltage value increases 00000 00000
Register 2 0 0 0 1 0 V2 voltage value increases 00000 00000
Register 3 0 0 0 1 1 V3 voltage value increases 00000 00000
Register 4 0 0 1 0 0 V4 voltage value increases 00000 00000
Register 5 0 0 1 0 1 V5 voltage value increases 00000 00000
Register 6 0 0 1 1 0 V6 voltage value increases 00000 00000
Register 7 0 0 1 1 1 V7 voltage value increases 00000 00000
Register 8 0 1 0 0 0 V8 voltage value increases 00000 00000
Register 9 0 1 0 0 1 V9 voltage value increases 00000 00000
Register A 0 1 0 1 0 VA voltage value increases 00000 00000
Register B 0 1 0 1 1 VB voltage value increases 00000 00000
Register C 0 1 1 0 0 VC voltage value increases 00000 00000
Register D 0 1 1 0 1 VD voltage value increases 00000 00000
Register E 0 1 1 1 0 VE voltage value increases 00000 00000
Register F 0 1 1 1 1 VF voltage value increases 00000 00000
Register G 1 0 0 0 0 VG voltage value increases 00000 00000
Register H 1 0 0 0 1 VH voltage value increases 00000 00000
Register I 1 0 0 1 0 Vcom voltage value increases 00000 00000
www.rohm.com
© 2009 ROHM Co., Ltd. All rights reserved.
9/20
2009.07 - Rev.B
Page 10

BD8132FV, BD8139AEFV
W
A
A
Technical Note
●Auto-read function
The auto-read function enables the IC's 1 kbit microwire type external memory to be automatically read.
This block operates in synchronization with the external input CLK's falling edge to output the external memory chip select
signal CS as well as the memory read data signal MEMDO.
The read data signal consists of a start bit for the external memory, a read code, and a read address. When this signal is sent
to the external memory, the memory outputs the data corresponding to the indicated address. Data output from the memory
is read from the MEMDI pin, and this block automatically generates the serial DATA and LATCH signals and writes the
memory data to the register. Memory reads are synchronized to the CLK's falling edge.
Read addresses start from address 00H and repeat until address 12H, so data must be stored from address 00H to address 12H.
The auto-read function is controlled using the R/W signal. Read access to the external memory is performed continuously
while the R/W signal is low. To access the external memory from another device, the R/W signal must be set to high. When
the R/W signal is set to high, the CS and MEMDO pins enter a high-impedance state.
R/W
Auto-read timing
CLK
CS
MEMDO
ddress 00H
Start bit and read code
ddress 01H
High-impedance
High-impedance
MEMDI
INTERNAL
DATA
INTERNAL
LATCH
Memory data
D15 to D0
D15 to D0
Fig. 23 Auto-read Timing Chart
MSB
D15 D14 D13 D12 D11 D10 D9 D8 D7 D6 D5 D4 D3 D2 D1 D0
d1 d2 d3 d4 d5 d6 d7 d8 d9 d10 d11 d12 d13 d14 d15 d16
OSC
mode
Register address DAC data
External m emory data form at
LSB
Fig. 24 External Memory Data Table
●Serial communications timing chart ●Auto-read timing chart
LATCH
CLK
SDIN
tLC
tSC
tWL tWH
tCL
tLA
R/W
C
MEMDO
MEMDI
CS
tRC
tCDO
tCCS
tDIC
tCR
Fig.25 Fig.26
tR
www.rohm.com
© 2009 ROHM Co., Ltd. All rights reserved.
10/20
2009.07 - Rev.B
Page 11

BD8132FV, BD8139AEFV
Technical Note
●Timing standard values
Parameter Symbol
Min. Typ. Max.
Limit
Latch setup time tLC 0.1 — — µs
SDIN setup time tSC 0.1 — — µs
RW setup time tRC 0.1 — — µs
MEMDI setup time tDIC 0.1 — — µs
Clock high time tWH 0.1 — — µs
Clock low time tWL 0.1 — — µs
Latch hold time tCL 0.1 — — µs
RW hold time tCR 0.1 — — µs
LATCH high time tLA 0.6 — — µs
RW high time tRW 0.6 — — µs
MEMDO delay time tCDO — — 0.1 µs
CS delay time tCCS — — 0.1 µs
●Gamma correction output setting (BD8132FV and BD8139AEFV)
Equation (1) describes the relationship between the gamma correction output voltage (V0 to VH) and the DAC setting.
Output voltage (V0 to VH) = [(DAC setting + 1) / 1,024] (REFIN / 2) 2 (1)
The Vcom voltage can be set by attaching resistor R1 between the Vcom and FB pins and resistor R2 between the FB and
GND pins.Equation (2) describes the relationship between the Vcom voltage and the DAC setting when using these resistors.
Output voltage (Vcom) = [(DAC setting + 1) / 1,024] (REFIN / 2) (R1 + R2) / R2 (2)
DAC
Vcom
R1
FB
R2
Fig. 27 Vcom Voltage Setting Circuit Diagram
●Power supply sequence
Activate the digital power supply DV
CC before the VCC power supply to prevent IC malfunctions due to undefined logic in the digital
circuit. Input serial data after canceling the power-on reset. When turning off the IC's power supplies, turn off VCC and then DVCC.
V
CC
REFIN
DV
CC
LATCH
CLK
SDIN
・・・
・・・
・・・
・・・
tDS
・・・
・・・
tSV
・・・
tVcc
・・・
tVR
・・・
・・・
・・・
・・・
tVD
tRV
Fig. 28 Power Supply Sequence Diagram
●Power supply sequence standard values
Parameter Symbol
Min. Typ. Max.
Limit
Unit Condition
Serial input timing tDS 100 — — µs Cct = 1000 pF
VCC activation timing tSV 0 10 — µs
REFIN activation timing tVR 0 10 — µs
REFIN off timing tRV 0 10 — µs
Power supply off timing tVD 0 10 — µs
VCC startup timing tVCC 1 — — ms
Unit
www.rohm.com
© 2009 ROHM Co., Ltd. All rights reserved.
11/20
2009.07 - Rev.B
Page 12

BD8132FV, BD8139AEFV
Technical Note
[BD8139AEFV]
●Serial communications
The 2 wire serial control block consists of a register that stores data from the SCL and SDA pins and a DAC circuit that
receives the output from this register and provides adjusted voltages to other IC blocks.
When the IC's power supply is activated, the reset function operates to set the register to a preset value.
SCL
SDA
Auto-read
+
Acknowledge
EEPROM
Word address setting
A1
A2
CT
Shift register
STAN/INC
V0 to VA registers
Parity check
DAC
Fig. 29 2 wire serial Control Block Diagram
(1) 2 wire serial timing chart
Slave mode (SLAVE/AR = low; supports write mode only; A0 = low)
Fig. 30 2 wire serial Timing Chart (Slave)
Of device addresses A7 to A0, A7 to A3 and A0 are specific to the gamma correction voltage generation IC and should
be set as follows: (A7 to A0) = 11101(A2)(A1)0.
A1 and A2 can be set externally. Because these signals are pulled down internally, they are set to 0 when in the open
state. When setting them to 1, connect them to the DVcc power supply. For this reason, A1 and A2 can be used to
create 4 setting combinations. When using only slave mode, a maximum of 4 BD8139AEFV ICs can be connected to
the 2 wire serial line.
The lower 4 bits of the second byte are used to store the register address. The following table describes the
correspondence between register addresses and amp output. The third and fourth bytes are used to store the gamma
correction voltage setting. The LSB acts as a parity check bit. The method for setting the LSB is described below.
Register name
Address
W3 W2 W1 W0 Data (9:0)
Behavior when data increases
Preset value
Register 0 0 0 0 0 V0 voltage value increases 00_0000_0000
Register 1 0 0 0 1 V1 voltage value increases 00_0000_0000
Register 2 0 0 1 0 V2 voltage value increases 00_0000_0000
Register 3 0 0 1 1 V3 voltage value increases 00_0000_0000
Register 4 0 1 0 0 V4 voltage value increases 00_0000_0000
Register 5 0 1 0 1 V5 voltage value increases 00_0000_0000
Register 6 0 1 1 0 V6 voltage value increases 00_0000_0000
Register 7 0 1 1 1 V7 voltage value increases 00_0000_0000
Register 8 1 0 0 0 V8 voltage value increases 00_0000_0000
Register 9 1 0 0 1 V9 voltage value increases 00_0000_0000
Register A 1 0 1 0 Vcom voltage value increases 00_0000_0000
Register 0-A 1 1 1 1 V0-Vcom voltage value increases 00_0000_0000
www.rohm.com
© 2009 ROHM Co., Ltd. All rights reserved.
12/20
2009.07 - Rev.B
Page 13

BD8132FV, BD8139AEFV
Technical Note
●SDA serial data map
SLAVE mode(SLAVE/AR=L)
First (MSB) Last (LSB)
Byte
7 6 5 4 3 2 1 0
bit
1 Device address (11101<A2><A1>) 0
2 Don’t Care Register address
3 data(9:3) PC
4 data(2:0) Don’t Care PC
It needs 4 byte for slave mode.
When register address “1111”, it is updated same data on all addresses.
Auto-read mode (SLAVE/AR = high)
The auto-read function enables automatic reading of the I
2
C bus interface's 1 kbit built-in memory.
When the reset signal is cleared, automatic reads from EEPROM begin.
In auto-read mode, A1 and A2 serve as the EEPROM word address setting pins.
When A1 and A2 are both set to low, read access is available for word addresses 0 through 21.
A2 A1 Read start word address Read end word address
L L 0 (00h) 21 (h)
H L 32 (20h) 53 (35h)
L H 64 (40h) 85 (55h)
H H 96 (60h) 117 (75h)
The following table describes the 22-word data format read from the EEPROM.
Word 7 6 5 4 3 2 1 0 Output
1 Data (9:3) PC
2 Data (2:0) Don’t Care PC
3 Data (9:3) PC
4 Data (2:0) Don’t Care PC
V0
V1
⋮ ⋮
21 Data (9:3) PC
22 Data (2:0) Don’t Care PC
Vcom
The first and second words are used for the V0 setting, while the third and fourth words are used for the V1 setting. Including
the Vcom setting, a total of 22 words of data are read. The LSB for all words contains an even parity check (PC). The LSBs
for all EPROM data settings should be set. (Where the number 1 represents an even number.)
<Example of setting for EEPROM>
A1=L,A2=L REFIN 15 V
data
EEPROM WORD
ADDRESS
1 00h V0① 1 1 1 0 0 1 0 0 1110010011 915 13.418 V0
2 01h V0② 0 1100000
3 02h V1① 1 0 1 1 1 1 1 0 1011111010 762 11.177 V1
4 03h V1② 0 1000001
5 04h V2① 1 0 1 0 1 0 1 0 1010101100 684 10.034 V2
6 05h V2② 1 0000001
7 06h V3① 0 1 1 1 1 0 0 0 0111100001 481 7.061 V3
8 07h V3② 0 0100001
9 08h V4① 1 0 0 0 1 1 1 0 1000111110 574 8.423 V4
10 09h V4② 1 1000000
11 0Ah V5① 1 0 0 0 0 0 0 1 1000000000 512 7.515 V5
12 0Bh V5② 0 0000000
13 0Ch V6① 0 1 0 1 0 1 0 1 0101010111 343 5.039 V6
14 0Dh V6② 1 1100001
15 0Eh V7① 0 1 0 1 1 1 1 1 0101111111 383 5.625 V7
16 0Fh V7② 1 1100001
17 10h V8① 0 1 0 0 1 0 1 1 0100101010 298 4.380 V8
18 11h V8② 0 1000001
19 12h V9① 0 0 0 1 1 1 1 0 0001111010 122 1.802 V9
20 13h V9② 0 1000001
21 14h VCOM① 1 1 1 1 1 1 1 1 1111111111 1023 7.500 VCOM
22 15h VCOM② 1 1100001 R1=R2
※Must set “1” at d7 of 16ch.
BD8139AEFV d7 d6 d5 d4 d3 d2 d1 d0 bin dec
Setting
voltage
www.rohm.com
© 2009 ROHM Co., Ltd. All rights reserved.
13/20
2009.07 - Rev.B
Page 14

BD8132FV, BD8139AEFV
(B)
or(A)
Technical Note
●Timing Chart
Fig. 31 2-wire serial Timing Chart (Auto-Read)
Only the EEPROM device address A3 = A2 = A1 = low is supported.
The auto-read function specifies the read start word address in EEPROM write mode. Then after resending the start signal,
the data is read in read mode. When the parity check detects an error, a stop signal is sent and the auto-read function is
repeated until no error is detected.If the auto-read function never completes, the EEPROM data settings should be reviewed.
・When operating in auto-read mode, a maximum of 2 BD8139AEFV ICs (A and B) can be connected to the I2C bus line.
When using 2 ICs, change the CT pin capacitance value to avoid auto-read timing collisions. The following figure
illustrates auto-read timing when using 2 ICs.
DVCC
CT(A)
CT(B)
Autoread(A)
Err
Autoread
Error(B)
Fig 32 Auto-Read Timing Chart
Set the CT pin capacitance as follows:
Using an inappropriate capacitance setting may result in auto-read timing collisions, making it impossible to read data properly.
BD8139AEFV A CT = 1000 pF Scatter: Within 5%
BD8139AEFV B CT = 3300 pF Scatter: Within 5%
●2 wire serial bus data timing
tR tF tHIGH
SCL
tHD:STA tSU:DAT tLOW
tHD:DAT
SDA
(IN)
tBUF
tDH tPD
SDA
(OUT)
SCL
tSU:STA tHD:STA tSU:STO
tI
SDA
* SDA latches at the SCL rising edge.
START BIT STOP BIT
Fig 33
www.rohm.com
© 2009 ROHM Co., Ltd. All rights reserved.
14/20
2009.07 - Rev.B
Page 15

BD8132FV, BD8139AEFV
Technical Note
●Timing standard values
FAST-MODE
Parameter Symbol
2.3 V ≤ DV
CC ≤ 4.0 V
Unit
Min. Typ. Max.
SCL frequency fSCL — — 400 kHz
SCL high time tHIGH 0.6 — — µs
SCL low time tLOW 1.2 — — µs
Rise Time tR — — 0.3 µs
Fall Time tF — — 0.3 µs
Start condition hold time tHD:STA 0.6 — — µs
Start condition setup time tSU:STA 0.6 — — µs
SDA hold time tHD:DAT 100 — — ns
SDA setup time tSU:DAT 100 — — ns
Acknowledge delay time tPD 0.1 — 0.9 µs
Acknowledge hold time tDH 0.1 — — µs
Stop condition setup time tSU:STO 0.6 — — µs
Bus release time tBUF 1.2 — — µs
●Power supply sequence
Activate the digital power supply DV
CC before the VCC power supply to prevent IC malfunctions due to undefined logic in the digital
circuit. Input serial data after canceling the power-on reset. When turning off the IC's power supplies, turn off VCC and then DVCC.
CC
V
REFIN
DV
SCL
SDA
CC
tDS
・・・
・・・
・・・
・・・
・・・
tSV
tVR
tVcc
・・・
・・・
・・・
・・・
・・・
tRV
tVD
Fig. 34 Power Supply Sequence Diagram
●Power supply sequence standard values
Parameter Symbol
Min. Typ. Max.
Limit
Unit Condition
Serial input timing tDS 100 — — µs Cct = 1000 pF
VCC activation timing tSV 0 10 — µs
REFIN activation timing tVR 0 10 — µs
REFIN off timing tRV 0 10 — µs
Power supply off timing tVD 0 10 — µs
VCC startup timing tVCC 1 — — ms
www.rohm.com
© 2009 ROHM Co., Ltd. All rights reserved.
15/20
2009.07 - Rev.B
Page 16

BD8132FV, BD8139AEFV
A
A
A
A
●Closing time for auto-read
(Input VCC ~ Beginning auto-read ~ Taking time for auto-read, when 2use.)
0.9DVcc
DVcc
Vcc
R1
uto-read for one
R2
uto-read for other
Vout
First gamma output)
(
0.9Vout
Vout
Final gamma output)
(
t5
t1 t2 t2 t3 t4
Fig. 35
Time from input V
CC until final gamma output
t total1 = t1 + t2 x 2 + t3 + t4
min. typ. max
t1 108 169 240
t2 730 1160 1660
t3 156 248 356
t4 - - 145
t total 1724 2737 4061
Unit : µsec
Time from input voltage until first gamma output (condition of input VCC already)
t total2 = t1 + t5
min. typ. max
t1 108 169 240
t5 194 308 442
t total 302 477 682
※CT1=1000pF, CT2=3300pF, scatter within 5%
Unit : µsec
Technical Note
0.9Vout
www.rohm.com
© 2009 ROHM Co., Ltd. All rights reserved.
16/20
2009.07 - Rev.B
Page 17

BD8132FV, BD8139AEFV
●When it inputs VCC, it outputted the gamma output voltage.
Technical Note
Vcc
0.1Vcc
0.9Vcc
tVcc
V0
V1
・
・
・
・
V9
tref
Tref
Fig. 36
DAC 1ch supports all gamma output amps by sample/hold function.
So, each amp operates reflesh by Tref.
Min. Typ. Max.
Tref 63 101 145
Unit : µsec
Reflesh time of each amp is following.
tref = Tref / 11ch
Under condition of the small difference between setting voltage of amp and slew rate of VCC is fast, when it inputs VCC, it is
possible that output voltage come from behind next output voltage.
V0 = VDAC×2× (n0 : Setting voltage of 10bit)
V1 = VDAC’×2×
n0 + 1
n1+ 1
VDAC’ = VDAC + ×tref (SR : Slew rate of V
2
CC)
Condition of non-reverse-voltage is following
V0-V1>0
n0 + 1
> 1 +
n1 + 1
SR×tref
2VDAC
Under condition of the big difference between output voltage or slew rate of V
CC is slow, reverse-voltage don’t occur much.
Worst condition is following.
n0 / n1 > 1.0469
Notice that the setting voltage between V0 and V1 is within 720mV.
It is possible for reverse of voltage in transition.
www.rohm.com
© 2009 ROHM Co., Ltd. All rights reserved.
17/20
2009.07 - Rev.B
Page 18

BD8132FV, BD8139AEFV
Technical Note
●Input equivalent circuit diagrams
[BD8132FV]
1.LATCH 2.SDIN 3.CLK
6.RW 9.MEMDI
DVCC
4.SDOUT 7.CS 8.MEMDO 10.OSC 15.REFIN
V
CC
DV
CC
DV
CC
4k
10
VCC
Ω
Ω
GND
1kΩ
GND
4kΩ
200kΩ
GND
16.VDAC
VCC
50kΩ
GND
10Ω
200k
Ω
GND
17.CT 21.FB
DVCC
88k
Ω
1kΩ
200k
Ω
114k
Ω
GND
100k
Ω
GND
22.Vcom
GND
100k
Ω
VCC
10Ω
23.VH 24.VG 25.VF 26.VE 27.VD
28.VC 29.VB 30.VA 31.V9 32.V8
33.V7 34.V6 35.V5 36.V4 37.V3
38.V2 39.V1 40.V0
GND
VCC
30kΩ
30kΩ
10Ω
Fig.37 I/O Equivalent Circuit Diagrams
[BD8139AEFV]
1.A1 2.A2 5.STAN/INC
6.OSC_MODE
(Pull down R 100kΩ)
DVCC
4kΩ
200kΩ
GND
19.VDAC
VCC
7.SDA 8.SCL 4.OSC 16.REFIN
CC
CC
GND
DV
200k
Ω
10Ω
CC
DV
4kΩ
GND
13.CT 25.FB
DVCC
VCC
V
100k
Ω
GND
26.Vcom
VCC
100k
Ω
50kΩ
GND
27.V9 28.V8 29.V7 30.V6 31.V5
32.V4 33.V3 34.V2 35.V1 36.V0
GND
VCC
30kΩ
30kΩ
10Ω
www.rohm.com
© 2009 ROHM Co., Ltd. All rights reserved.
88k
Ω
1kΩ
GND
200k
114k
Ω
Ω
1kΩ
GND
Fig.38 I/O Equivalent Circuit Diagrams
18/20
10Ω
GND
2009.07 - Rev.B
Page 19

BD8132FV, BD8139AEFV
Technical Note
●Notes for use
1) Absolute maximum ratings
Use of the IC in excess of absolute maximum ratings such as the applied voltage or operating temperature range may
result in IC damage. Assumptions should not be made regarding the state of the IC (short mode or open mode) when such
damage is suffered. A physical safety measure such as a fuse should be implemented when use of the IC in a special
mode where the absolute maximum ratings may be exceeded is anticipated.
2) GND potential
Ensure a minimum GND pin potential in all operating conditions.
3) Setting of heat
Use a thermal design that allows for a sufficient margin in light of the power dissipation (Pd) in actual operating conditions.
4) Pin short and mistake fitting
Use caution when orienting and positioning the IC for mounting on printed circuit boards. Improper mounting may result in
damage to the IC. Shorts between output pins or between output pins and the power supply and GND pins caused by the
presence of a foreign object may result in damage to the IC.
5) Actions in strong magnetic field
Use caution when using the IC in the presence of a strong magnetic field as doing so may cause the IC to malfunction.
6) Testing on application boards
When testing the IC on an application board, connecting a capacitor to a pin with low impedance subjects the IC to stress.
Always discharge capacitors after each process or step. Ground the IC during assembly steps as an antistatic measure,
and use similar caution when transporting or storing the IC. Always turn the IC's power supply off before connecting it to or
removing it from a jig or fixture during the inspection process.
7) Ground wiring patterns
When using both small signal and large current GND patterns, it is recommended to isolate the two ground patterns,
placing a single ground point at the application's reference point so that the pattern wiring resistance and voltage
variations caused by large currents do not cause variations in the small signal ground voltage. Be careful not to change the
GND wiring patterns of any external components.
8) Regarding input pin of the IC
This monolithic IC contains P+ isolation and P substrate layers between adjacent elements in order to keep them isolated.
P/N junctions are formed at the intersection of these P layers with the N layers of other elements to create a variety of
parasitic elements.For example, when the resistors and transistors are connected to the pins as shown in Fig.39, a
parasitic diode or a transistor operates by inverting the pin voltage and GND voltage.The formation of parasitic elements
as a result of the relationships of the potentials of different pins is an inevitable result of the IC's architecture. The
operation of parasitic elements can cause interference with circuit operation as well as IC malfunction and damage. For
these reasons, it is necessary to use caution so that the IC is not used in a way that will trigger the operation of parasitic
elements, such as the application of voltages lower than the GND (P substrate) voltage to input and output pins.
(Pin A)
P
+
N N
P
Resistor
N
~
~
P
Parasitic element
GND
P
+
Transistor (NPN)
B
(Pin B)
P+
N N
Parasitic elements
C
E
~
~
N
P
N
P substrate
GND
Fig.39 Example of a Simple Monolithic IC
(Pin B)
GND
P
+
(Pin A)
C
B
~
~
E
GND
Parasitic
elements
~
~
Parasitic
element
GND
9) Overcurrent protection circuits
An overcurrent protection circuit designed according to the output current is incorporated for the prevention of IC damage
that may result in the event of load shorting. This protection circuit is effective in preventing damage due to sudden and
unexpected accidents. However, the IC should not be used in applications characterized by the continuous operation or
transitioning of the protection circuits. At the time of thermal designing, keep in mind that the current capacity has negative
characteristics to temperatures.
10) TSD (Thermal shutdown) circuit
This IC incorporates a built-in TSD circuit for the protection from thermal destruction. The IC should be used within the
specified power dissipation range. However, in the event that the IC continues to be operated in excess of its power
dissipation limits, the attendant rise in the chip'
s junction temperature Tj will trigger the TSD circuit to turn off all output
power elements. The circuit automatically resets once the junction temperature Tj drops.
Operation of the TSD circuit presumes that the IC's absolute maximum ratings have been exceeded. Application designs
should never make use of the TSD circuit.
11) Testing on application boards
At the time of inspection of the installation boards, when the capacitor is connected to the pin with low impedance, be sure
to discharge electricity per process because it may load stresses to the IC. Always turn the IC's power supply off before
connecting it to or removing it from a jig or fixture during the inspection process. Ground the IC during assembly steps as
an antistatic measure, and use similar caution when transporting or storing the IC.
www.rohm.com
© 2009 ROHM Co., Ltd. All rights reserved.
19/20
2009.07 - Rev.B
Page 20

BD8132FV, BD8139AEFV
●Ordering part number
B D 8 1 3 2 F V - E 2
Part No.
SSOP-B40
HTSSOP-B40
1.0Max.
7.8 ± 0.3
1.8 ± 0.1
7.8±0.2
0.625
0.85±0.05
5.4 ± 0.2
0.1
5.4±0.1
1
0.08±0.05
(MAX 13.95 include BURR)
40
1
0.65
(MAX 13.95 include BURR)
1PIN MARK
0.65
Part No.
8132 : 3-line serial
8139A: 2 wire serial
13.6 ± 0.2
0.22 ± 0.1
13.6±0.1
(8.4)
0.24
0.08 S
0.08
2140
20
21
20
+0.05
−0.04
M
(3.2)
0.1 S
(Unit : mm)
4
0.17
S
0.08
(Unit : mm)
0.5 ± 0.2
0.15 ± 0.1
+6
−4
1.2 ± 0.2
0.5 ± 0.15
+0.05
−0.03
M
Package
FV: SSOP-B40
EFV: HTSSOP-B40
<Tape and Reel information>
Embossed carrier tapeTape
Quantity
Direction
of feed
<Tape and Reel information>
Quantity
Direction
of feed
2000pcs
E2
The direction is the 1pin of product is at the upper left when you hold
()
reel on the left hand and you pull out the tape on the right hand
Reel
Embossed carrier tape (with dry pack)Tape
2000pcs
E2
The direction is the 1pin of product is at the upper left when you hold
()
reel on the left hand and you pull out the tape on the right hand
Reel
Packaging and forming specification
E2: Embossed tape and reel
1pin
Order quantity needs to be multiple of the minimum quantity.
∗
1pin
Order quantity needs to be multiple of the minimum quantity.
∗
Technical Note
Direction of feed
Direction of feed
www.rohm.com
© 2009 ROHM Co., Ltd. All rights reserved.
20/20
2009.07 - Rev.B
Page 21

Notes
No copying or reproduction of this document, in part or in whole, is permitted without the
consent of ROHM Co.,Ltd.
The content specied herein is subject to change for improvement without notice.
The content specied herein is for the purpose of introducing ROHM's products (hereinafter
"Products"). If you wish to use any such Product, please be sure to refer to the specications,
which can be obtained from ROHM upon request.
Examples of application circuits, circuit constants and any other information contained herein
illustrate the standard usage and operations of the Products. The peripheral conditions must
be taken into account when designing circuits for mass production.
Great care was taken in ensuring the accuracy of the information specied in this document.
However, should you incur any damage arising from any inaccuracy or misprint of such
information, ROHM shall bear no responsibility for such damage.
The technical information specied herein is intended only to show the typical functions of and
examples of application circuits for the Products. ROHM does not grant you, explicitly or
implicitly, any license to use or exercise intellectual proper ty or other rights held by ROHM and
other par ties. ROHM shall bear no responsibility whatsoever for any dispute arising from the
use of such technical information.
Notice
The Products specied in this document are intended to be used with general-use electronic
equipment or devices (such as audio visual equipment, ofce-automation equipment, communication devices, electronic appliances and amusement devices).
The Products specied in this document are not designed to be radiation tolerant.
While ROHM always makes efforts to enhance the quality and reliability of its Products, a
Product may fail or malfunction for a variety of reasons.
Please be sure to implement in your equipment using the Products safety measures to guard
against the possibility of physical injury, re or any other damage caused in the event of the
failure of any Product, such as derating, redundancy, re control and fail-safe designs. ROHM
shall bear no responsibility whatsoever for your use of any Product outside of the prescribed
scope or not in accordance with the instruction manual.
The Products are not designed or manufactured to be used with any equipment, device or
system which requires an extremely high level of reliability the failure or malfunction of which
may result in a direct threat to human life or create a risk of human injury (such as a medical
instrument, transportation equipment, aerospace machiner y, nuclear-reactor controller,
fuel-controller or other safety device). ROHM shall bear no responsibility in any way for use of
any of the Products for the above special purposes. If a Product is intended to be used for any
such special purpose, please contact a ROHM sales representative before purchasing.
If you intend to export or ship overseas any Product or technology specied herein that may
be controlled under the Foreign Exchange and the Foreign Trade Law, you will be required to
obtain a license or permit under the Law.
Thank you for your accessing to ROHM product informations.
More detail product informations and catalogs are available, please contact us.
ROHM Customer Support System
www.rohm.com
© 2009 ROHM Co., Ltd. All rights reserved.
http://www.rohm.com/contact/
R0039
A
 Loading...