

Page 1
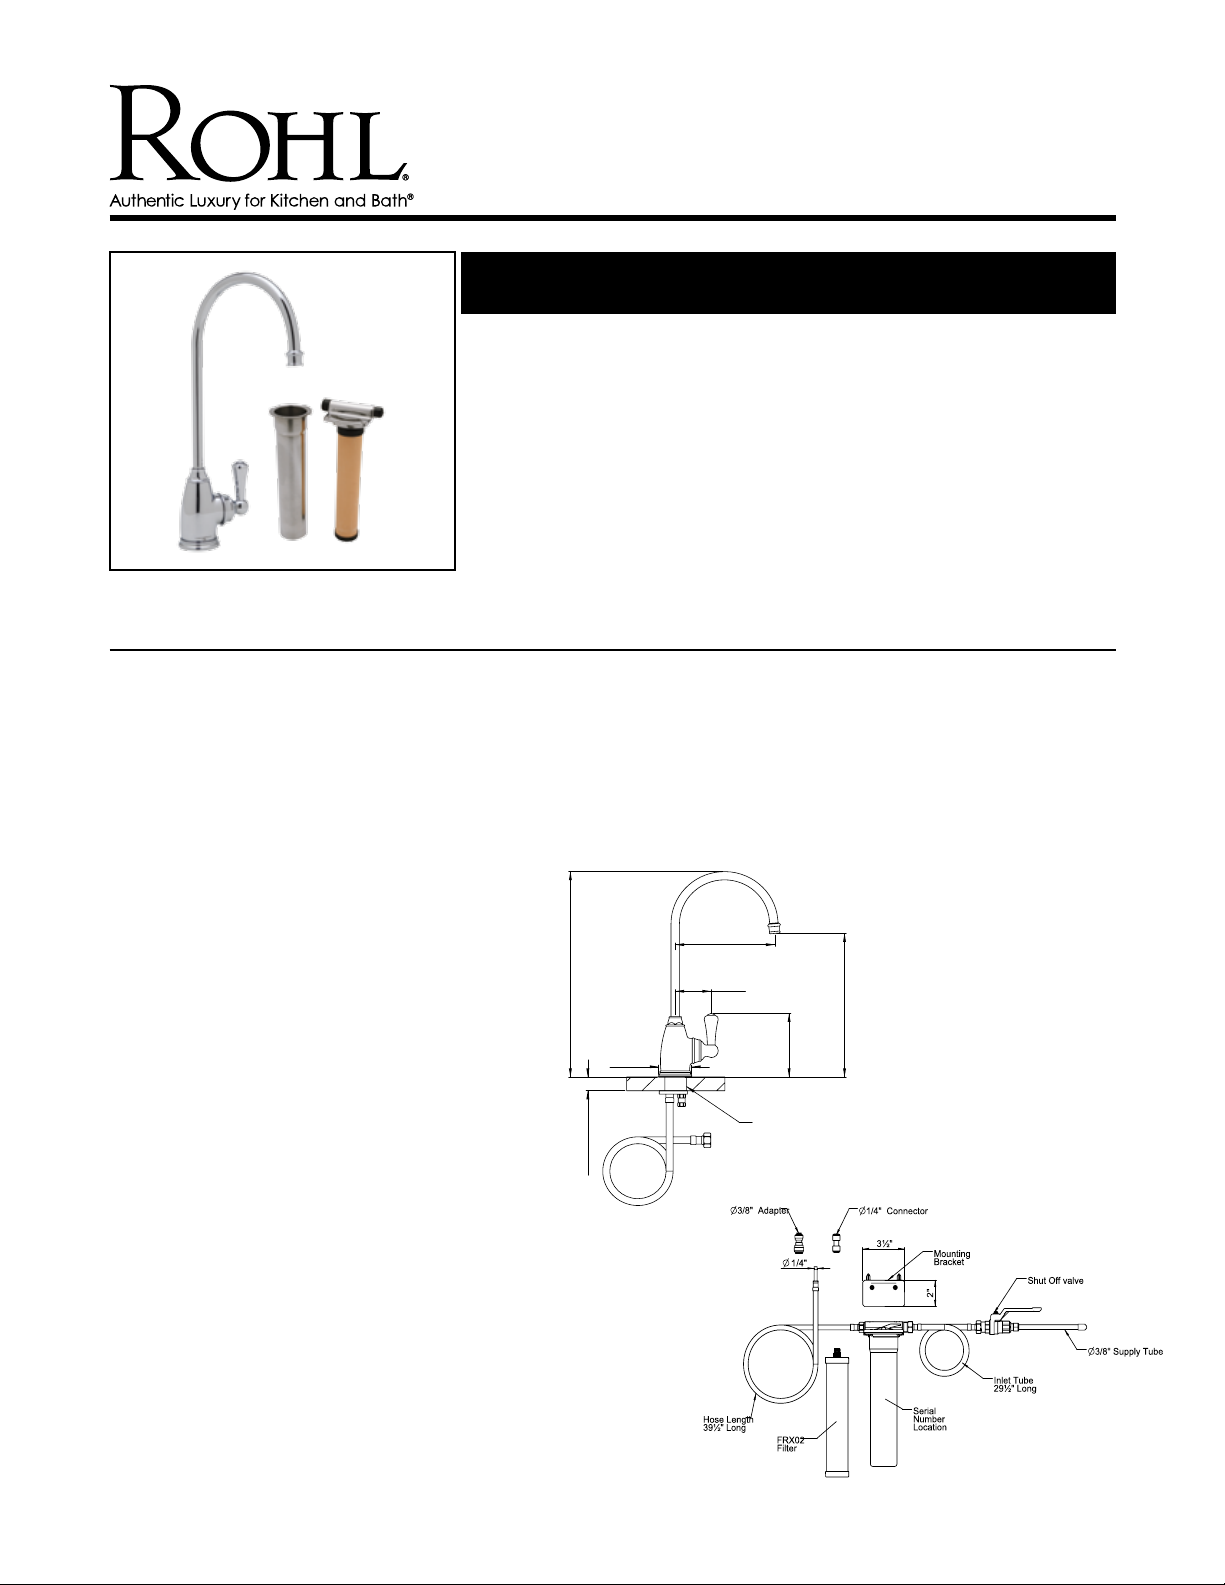
ø1 1/4" HOLE
11 3/4"
5 3/4"
4"
2ø "
2"
8"
1 3/4" MAX
www.rohlhome.com
TRADITIONAL C-SPOUT FILTER FAUCET & FILTER PACKAGE
Perrin & Rowe® Filtration
U.KIT1625L
FEATURES
U.162 5 L
• Metal lever handle only
• Faucet made in England
• Ceramic disc control cartridge
• Not suitable for R.O. systems or instant
hot systems
• 5 3/4” reach swivel spout
• 11 3/4” overall height
• 1 3/4” max. installation depth on deck
• Filtered water .5 GPM
U.1812-2
• Complete with stainless steel housing, wall
mount bracket, connections and Katadyn filter
• Does not come with faucet
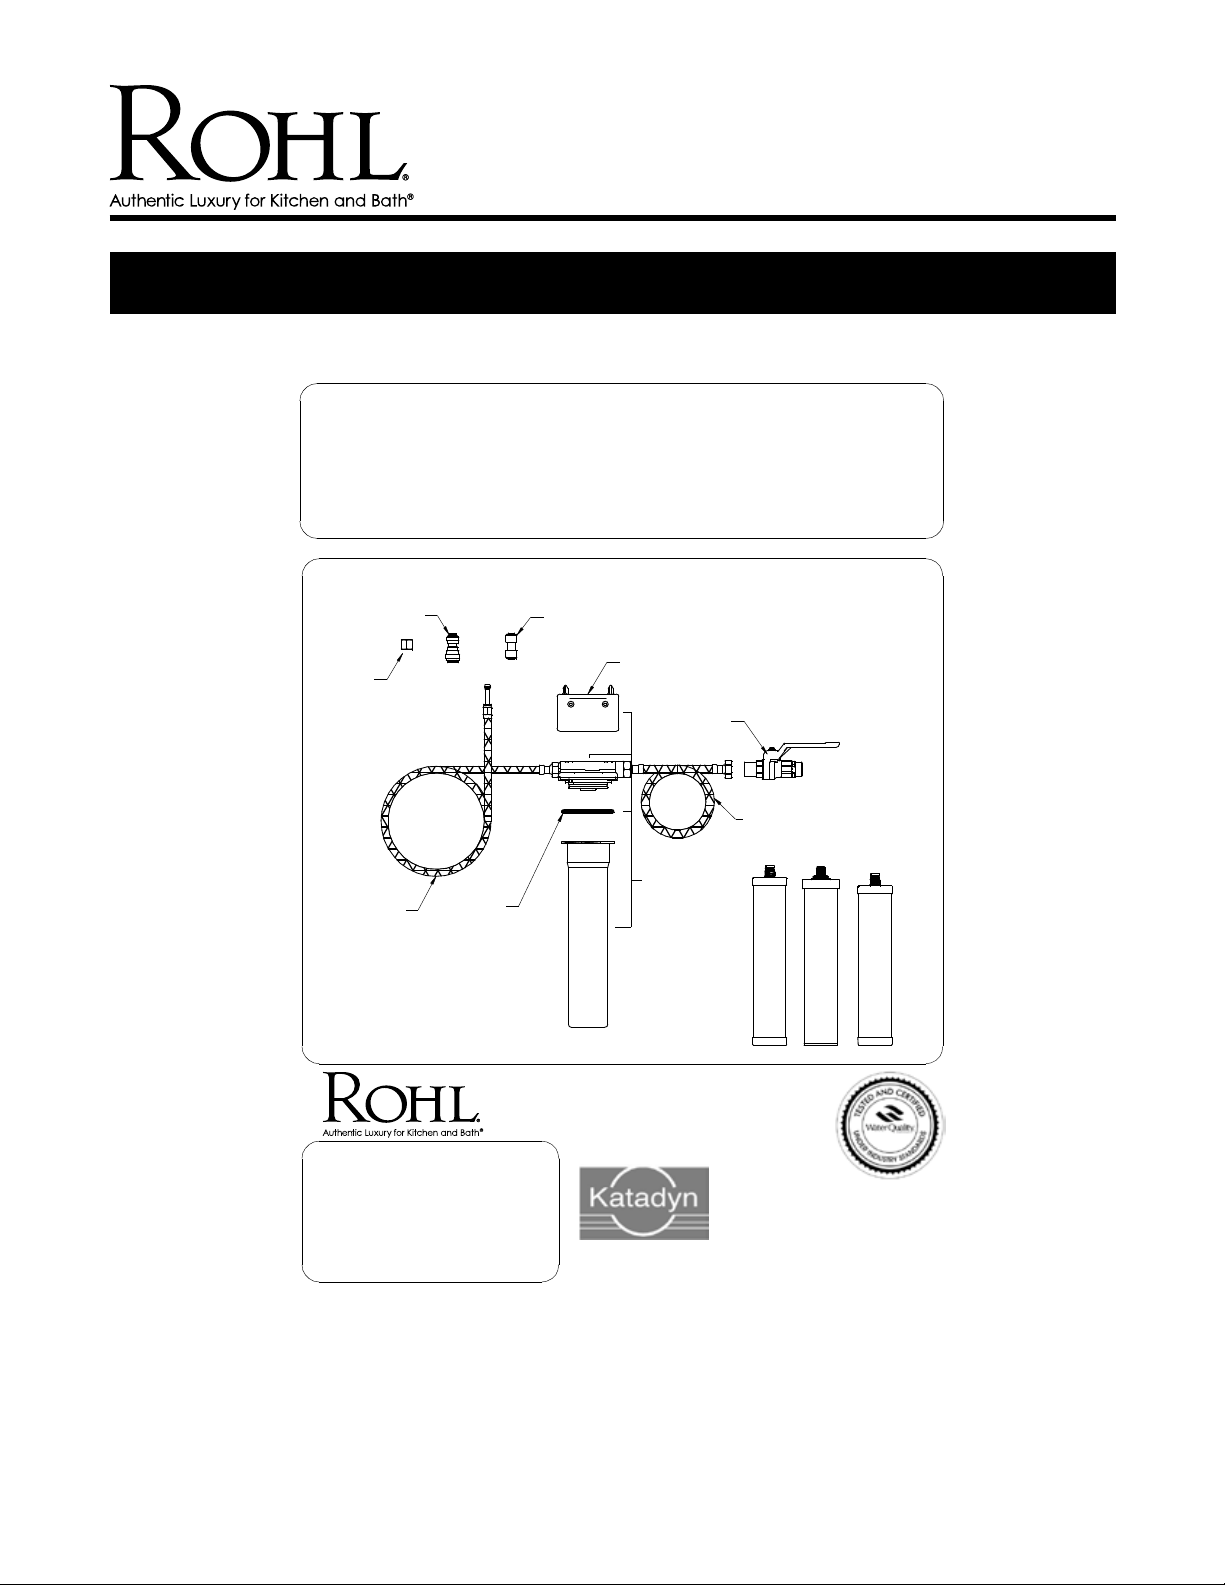
• Package includes:
- 1/4” tube x 3x8” F hose
- 1/2”F x 1/2F hose
- 1/4” brass nut and compression sleeve
- 3/4” tube x 1/4” tube John Guest connection
- 1/4” tube x 1/4” tube John Guest connection
- Plastic mounting bracket
- FRX02 filter
- Stainless Steel housing, 2 part cannister with
twist connection
- 1/2”M x 1/2”M brass shut off valve
• Installed under deck
• We recommend the use of a professional
plumber for installation
COLORS/FINISHES
• Polished Chrome
WARRANTY
• Limited Lifetime
• Polished Nickel
• English Bronze
• Satin Nickel
• Inca Brass*
* Inca Brass available by special
order only
Consult your local ROHL showroom for additional information and specifications. For complete warranty details and a list of showrooms, go to www.rohlhome.com.
Page 2
INSTALLATION INSTRUCTIONS
The Triflow Kitchen Collection
Filter Installation Guide
www.rohlhome.com
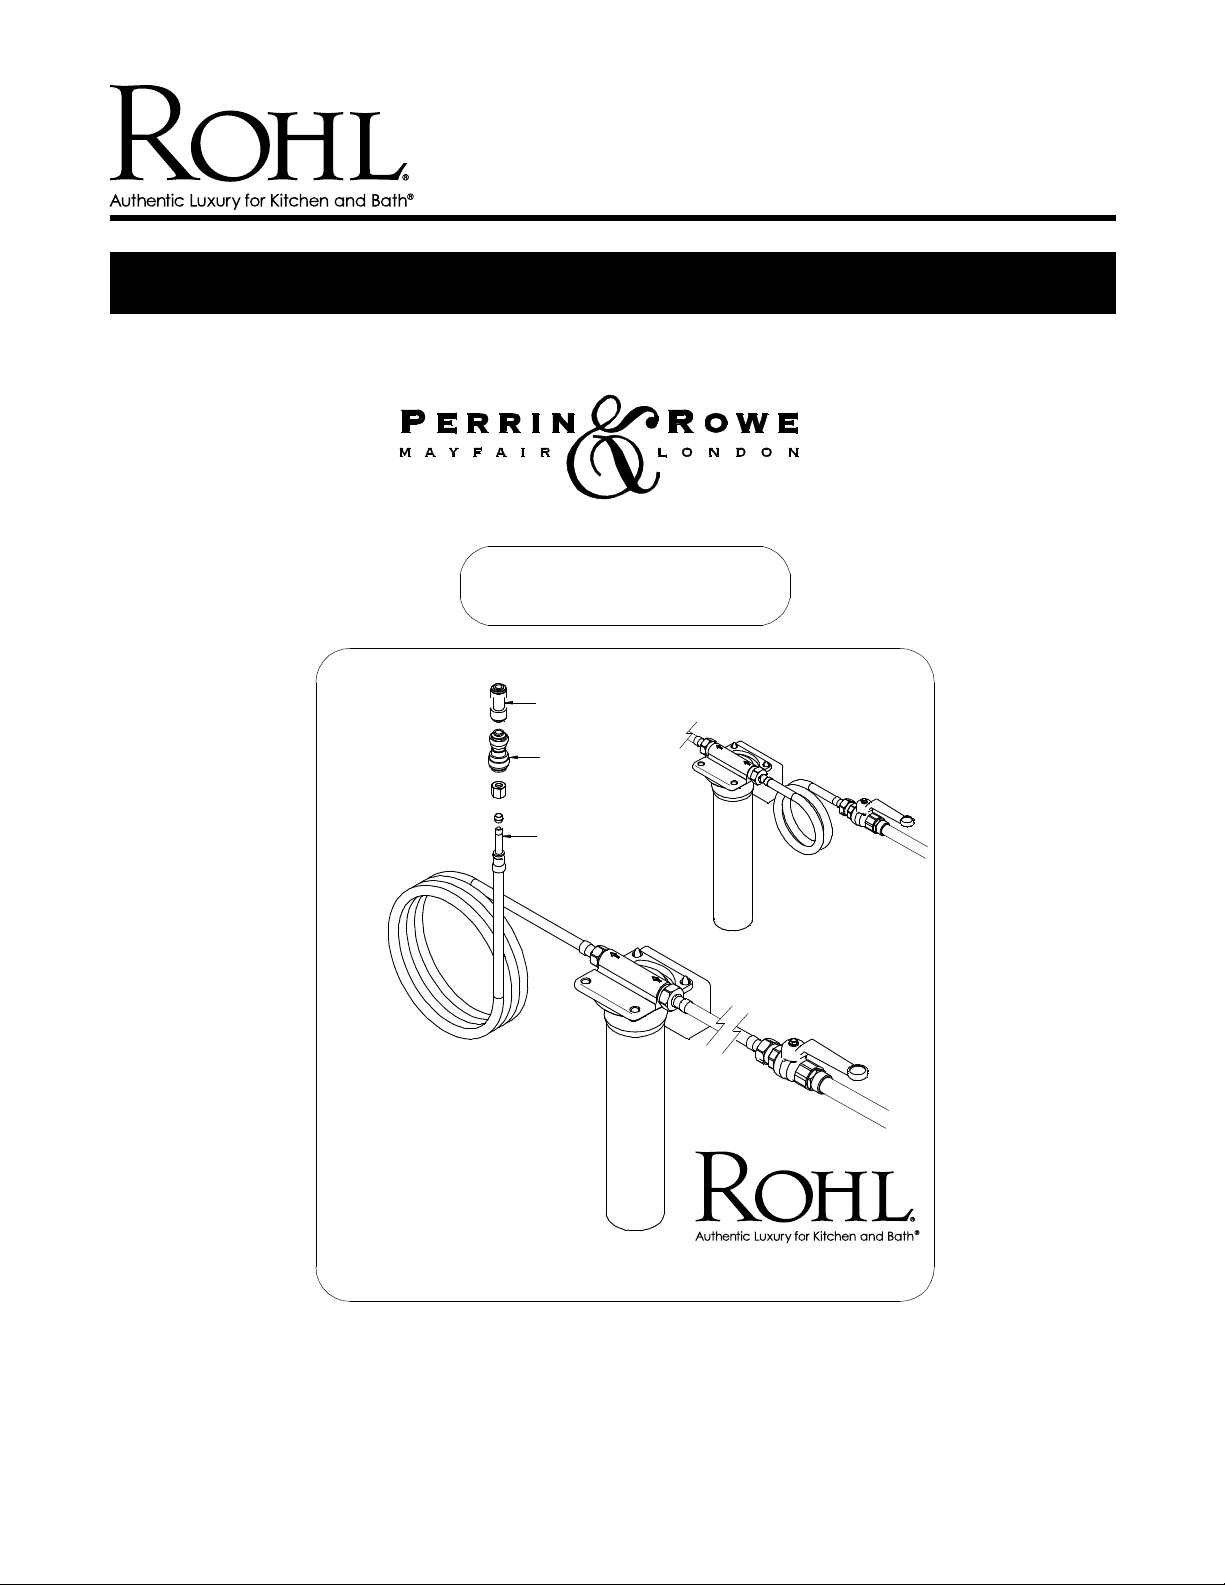
• U.1812 Triflow Filter
Fitted with U.1802
filter
Temp Range:
Max 85°C/185°F
Recommended
Working Pressure:
Min 1.7bar/25psi
Max 5bar/75psi
Please register your new product.
Complete the enclosed registration card, or call Toll free on 1-800 787 1066.
O
1/4" to O1/4"
PUSH FIT
O
1/4" to O3/8"
PUSH FIT
O
1/4"
• U.1816 Pre-Filter
Fitted with U.1620
filter
800.777.9762.
Consult your local ROHL showroom for additional information and specifications. For complete warranty details and a list of showrooms, go to www.rohlhome.com.
Page 3
www.rohlhome.com
CARE & MAINTENANCE
Wipe down after use to avoid water spotting and mineral build up.
7
6
Turn on the main supply valve.
Run the filtered water for 2 minutes to
flush the system, and carefully check
the system for leaks. The system is
now ready for use.
For optimum filter performance when
using the U.1802 filter cartridge use
the stop valve to set a water flow of
0.4gpm to 0.5gpm max.
5
Shut off mains supply. A stop valve was
supplied with the system for this purpose,
and will be located on the adjacent pipe work.
If you plan to be away from home for extended
periods, carry out the procedures above, to prevent
the risk of freezing. Freezing will invalidate the
warranty.
Turn the filtered lever on the faucet to the
on position. This will confirm the water supply
is off, and release the pressure in the system.
To Winterize the Unit
8
Pre-filter Installation
Pre Filter
U.1816
Filter
U.1812
Remember to
leave room for
servicing the
cartridge on
both housings.
Flow direction
8Recommende d "
To Filter
Tap
From Stop
Valve
To Filtered
Tap
Filter
U.1812
Check the
hose length
for distance.
If installing a Pre-filter follow steps 1-3 for the
second bracket taking into account the hose
length supplied from the Pre-filter to the filter.
Tighten the hoses from the stop valve to the
housings following the flow of the water shown on
the cap. When installing the Pre-filter the system
flows from the stop valve to the Pre-filter and on to
the filter housing and then up to the filter tap.
IMPORTANT NOTES
Do not use with water, that is microbiologically unsafe or of unknown quality without adequate disinfection
before or after the system. Systems certified for cyst reductions may be used on disinfected waters that may
contain filterable cysts.
Please ensure that the installation complies with applicable State & local plumbing codes.
System is to be supplied with cold water only.
INSTALLATION INSTRUCTIONS
The Perrin and Rowe Collection
Filter Installation Guide
Congratulations on the purchase of your Perrin and Rowe/Triflow filtration Product. Correctly installed and with
sensible care, this product will give you many years of trouble free service.
IMPORTANT INFORMATION
These are instructions for Triflow filters and the optional add on pre-filter version of the model
you are installing. Please read carefully to ensure correct installation.
Before you proceed... We recommend you engage the services of a registered plumber
to install this product.
In addition to the guide below it is essential that the written information overleaf is
carefully read and understood.
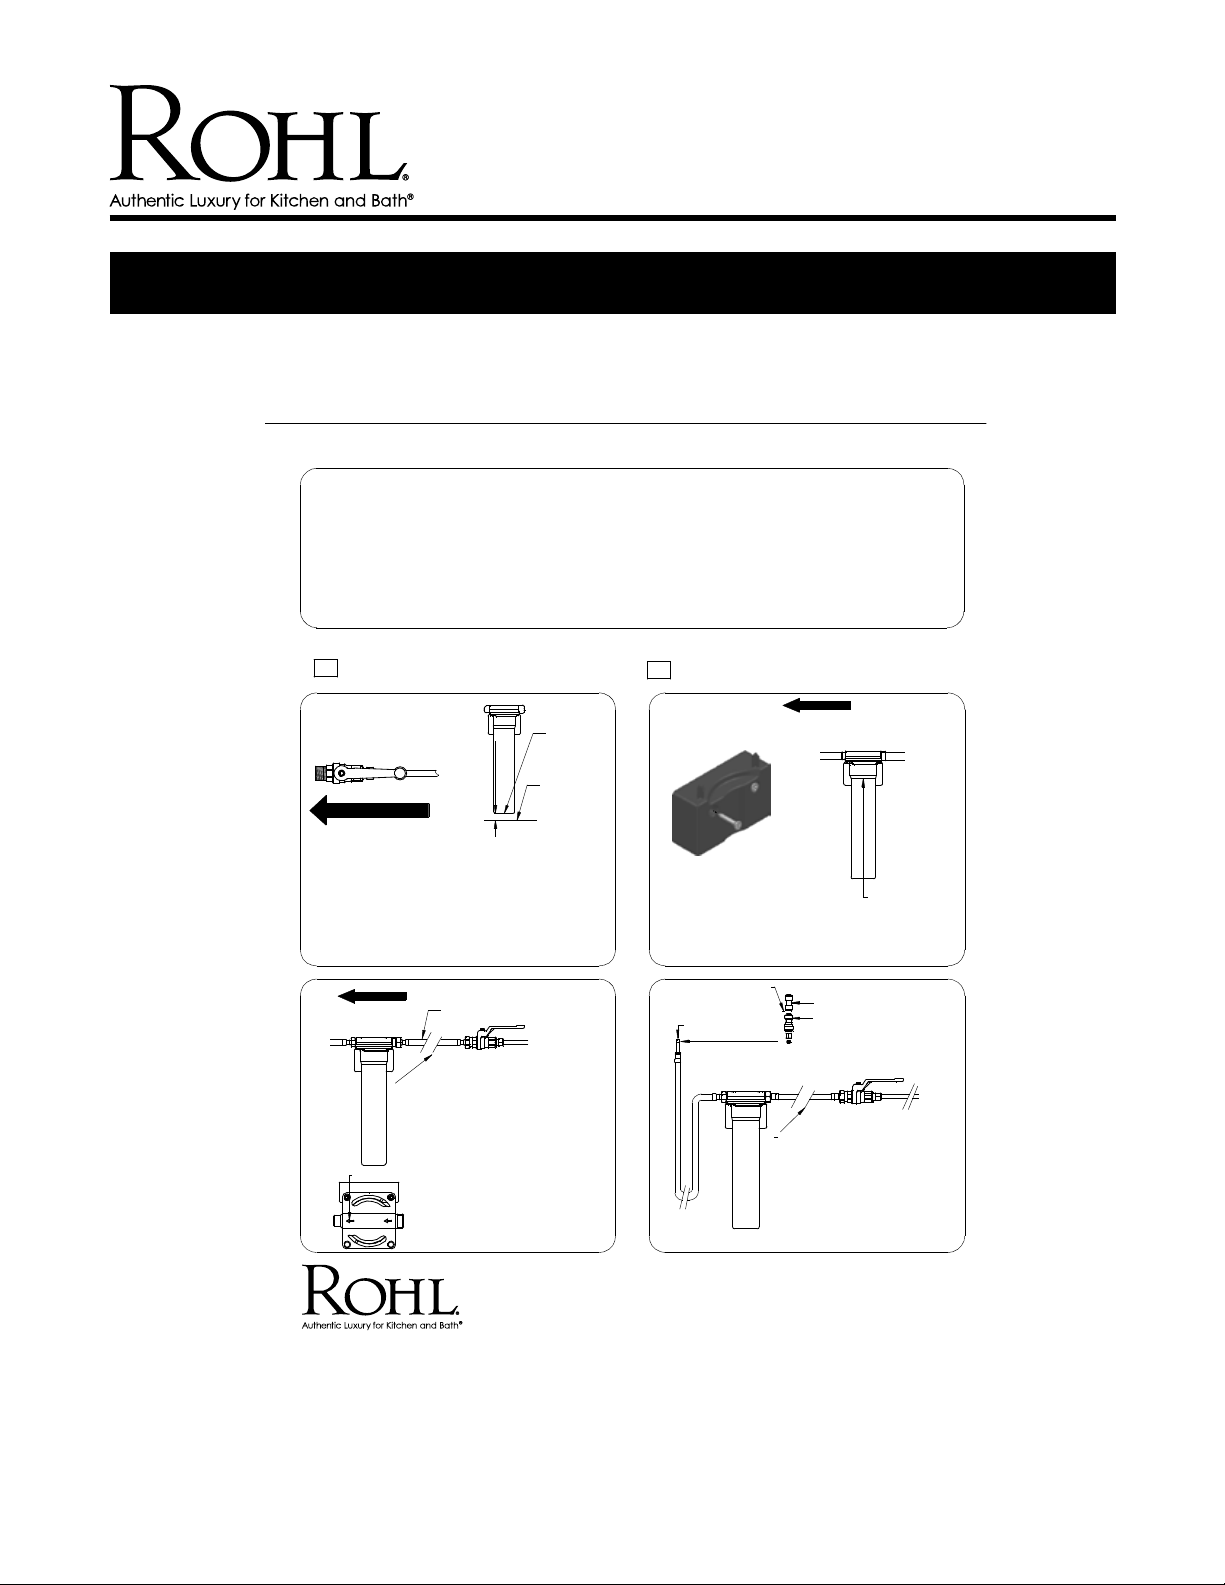
Preparation for Installer
Flush the plumbing system befor e
installing the Kitchen product.
1
ø3/8"
Main Cold Feed
Flow Direction
Install the supplied
stop valve in an easily
accessible area to allow
access to turn off the
water supply in the
future, for servicing
and cartridge
replacement.
3
To Filtered
Tap
Flow direction
Base of
1 "
Minimum
cabinet
Position the filter housing
leaving room around it
for future access and
cartridge replacement.
Mark the screw holes
ready for pilot holes.
Leave room for the
Pre-filter housing if
necessary.
Supplied
hose
Allow room
around the
housing
Ensure you have the correct fittings to connect
to the filter faucet
2
Drill the pilot holes
and screw the filter
housing bracket in
position. Making
sure to keep as
level as possible.
Filter
Connection
4
Kit
ø1/4" Connector
Flow direction
Check the hose
length for distance
Filter
U.1812
Remember to
leave room
for servicing
the cartridge
on both
housings.
ø1/4" to ø1/4" Connector
ø1/4" to ø3/8"
Connector
Main cold
feed
Filter
U.1812
INSTALL
PRE-FILTE R
HERE.
(Follow steps
7 to 8)
Flow direction
Tighten the hoses from
the stop valve to the
housings following the
flow of the water
shown on the cap.
If installing a Pre-filter
the system flows from
the stop valve to the
Pre-filter and on to the
filter housing and then
up to the filter tap.
3 Parker
Irvine, CA 92618
800-777-9762
www.rohlhome.com
To Filter
Tap
Install
Pre-filter
here.
(Follow
steps 7 to 8)
With the supplied connector kit
connect the hose from the
filter housing to the filter tap
using one of the connectors.
Consult your local ROHL showroom for additional information and specifications. For complete warranty details and a list of showrooms, go to www.rohlhome.com.
Page 4
INSTALLATION INSTRUCTIONS
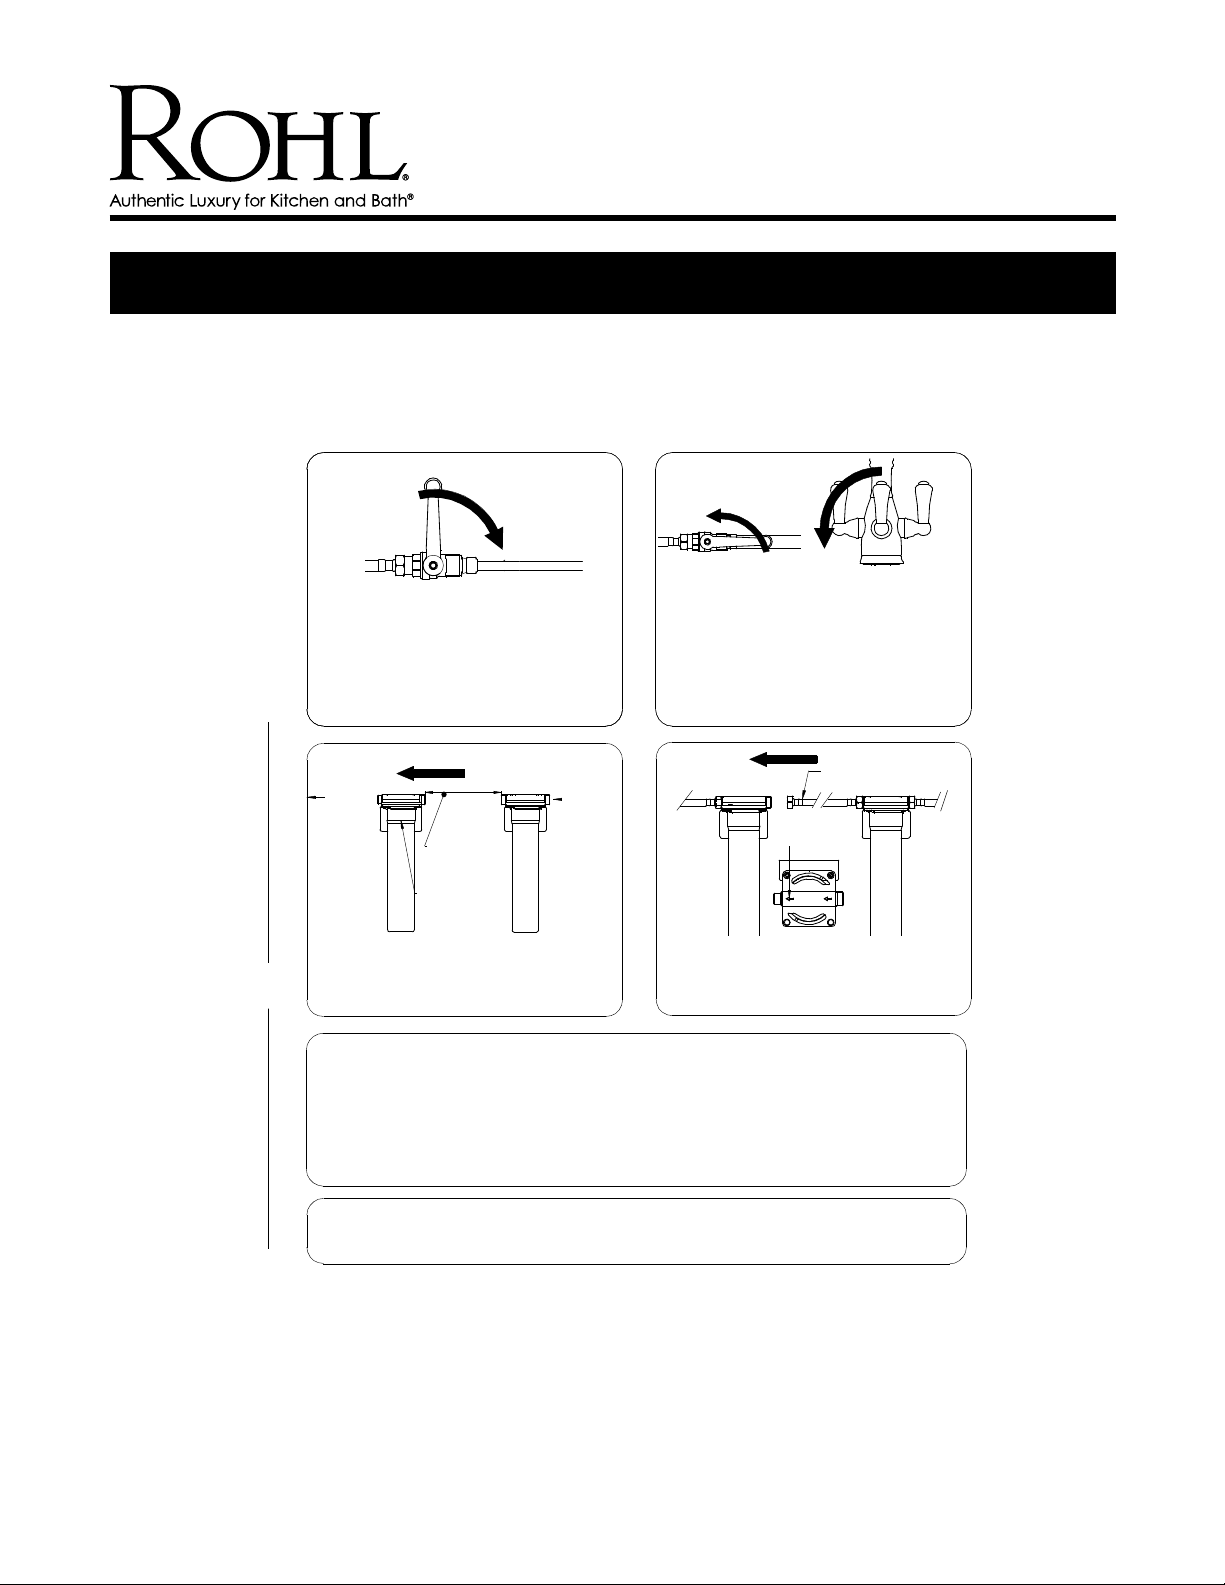
5
Turn on the main supply valve.
Run the filtered water for 2 minutes to
flush the system, and carefully check
the system for leaks. The system is
now ready for use.
For optimum filter performance when
using the U.1802 filter cartridge use
the stop valve to set a water flow of
0.4gpm to 0.5gpm max.
www.rohlhome.com
To Winterize the Unit
6
Shut off mains supply. A stop valve was
supplied with the system for this purpose,
and will be located on the adjacent pipe work.
If you plan to be away from home for extended
periods, carry out the procedures above, to prevent
the risk of freezing. Freezing will invalidate the
warranty.
Turn the filtered lever on the faucet to the
on position. This will confirm the water supply
is off, and release the pressure in the system.
Pre-filter Installation
7
To Filter
Tap
Filter
U.1812
If installing a Pre-filter follow steps 1-3 for the
second bracket taking into account the hose
length supplied from the Pre-filter to the filter.
Flow direction
Check the
hose length
for distance.
Remember to
leave room for
servicing the
cartridge on
both housings.
8Recommende d "
From Stop
Valve
Pre Filter
U.1816
8
To Filtered
Tap
Filter
U.1812
Tighten the hoses from the stop valve to the
housings following the flow of the water shown on
the cap. When installing the Pre-filter the system
flows from the stop valve to the Pre-filter and on to
the filter housing and then up to the filter tap.
Flow direction
Supplied
hose
Flow direction
To Stop
Valve
Pre Filter
U.1816
IMPORTANT NOTES
Do not use with water, that is microbiologically unsafe or of unknown quality without adequate disinfection
before or after the system. Systems certified for cyst reductions may be used on disinfected waters that may
contain filterable cysts.
Please ensure that the installation complies with applicable State & local plumbing codes.
System is to be supplied with cold water only.
CARE & MAINTENANCE
Wipe down after use to avoid water spotting and mineral build up.
Consult your local ROHL showroom for additional information and specifications. For complete warranty details and a list of showrooms, go to www.rohlhome.com.
Page 5
INSTALLATION INSTRUCTIONS
The Triflow Kitchen Collection
Filter Installation Guide
Temp Range:
Max 85°C/185°F
Recommended
Working Pressure:
Min 1.7bar/25psi
Max 5bar/75psi
Please register your new product.
Complete the enclosed registration card, or call Toll free on 1-800 787 1066.
• U.1812 Triflow Filter
Fitted with U.1802
filter
O
1/4" to O1/4"
PUSH FIT
O
1/4" to O3/8"
PUSH FIT
O
1/4"
ROHL WARRANTY POLICY
All products supplied by RO HL carry warranties against manufacturing defects.
Triflow products carry a Limited Lifetime Warranty.
ROHL LLC will provide fr ee of charge, as its options, replacement part(s) or pr oduct (or a comparable
alternative product) to replace those which have proven defective in materials or workmanship.
For full ROHL LLC WARRANTY please contact ROHL or visit www.rohlhome.com
SPARES
www.rohlhome.com
9.03619
9.160002
9.280733
Cartridge Service
ROHL
Triflow
Suite 400,
3 Parker
6325 Sandburg Road
Irvine, CA 92618
Minneapolis,
MN 55427
800-777-9762
www.rohlhome.com
9.050137
9.030366
9.310629
9.130617
9.280732
9.311005
The U.1812 Inline Filter System has been
tested & certified by the Water Quality
Association according to NSF/ANSI 42 &
53 for the performance claims as verified
and substantiated by the test data.
Katadyn of Switzerland
Exclusive manufacturers of the FRX02 Filter Cartridges for Triflow
Perrin and Rowe is a registered trademark of TCL Ltd. 9001816U Issue 6
Consult your local ROHL showroom for additional information and specifications. For complete warranty details and a list of showrooms, go to www.rohlhome.com.
 Loading...