

www.rohlhome.com
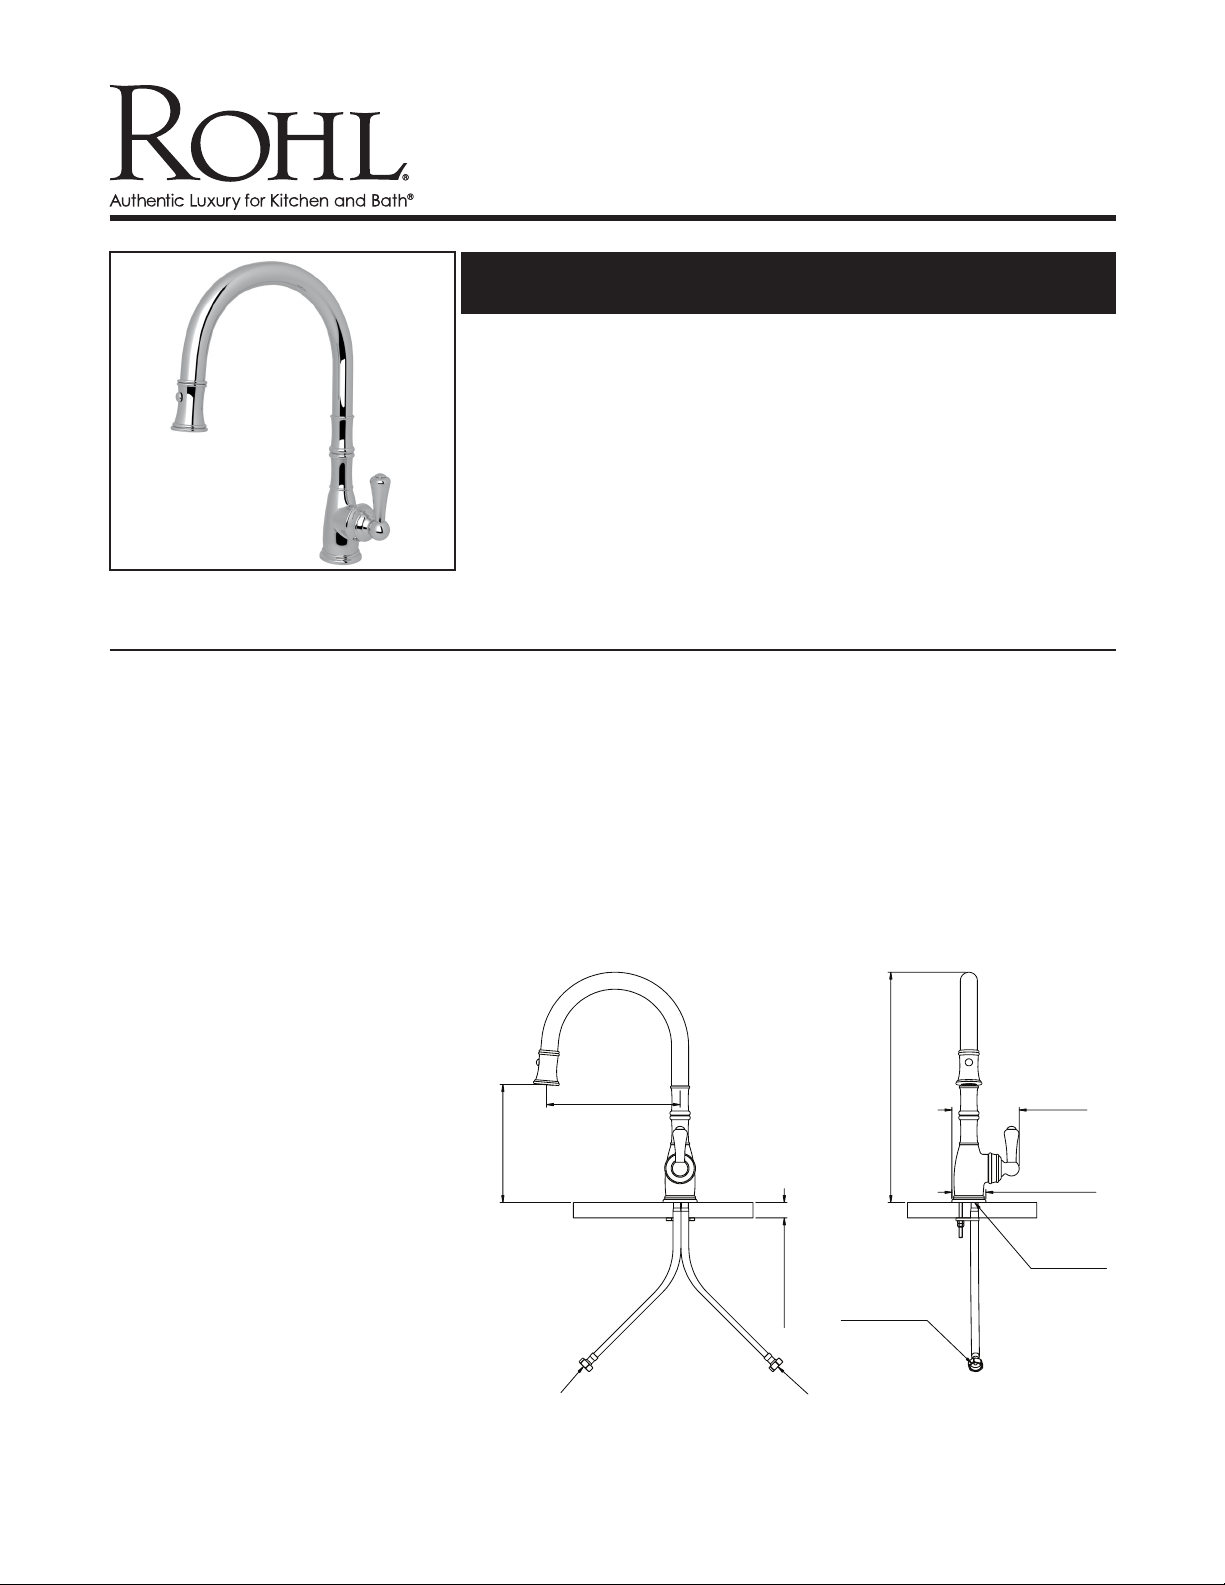
PERRIN & ROWE® TRADITIONAL PULL-DOWN FAUCET
Perrin & Rowe® Kitchen
ROHL Pull-Out/Pull-Down
U. 474 4
FEATURES
• Brass construction
• Metal lever
• CNC machined
• Dual spray with lock in modes
• 1 3/4” max installation deck depth
• ¼-turn ceramic disc control cartridge
• 9 ¼” reach, swivel C-spout
• Retractable pull-down metal handspray with
magnetic docking
• Nylon hose
• 1.8 GPM
• Requires 2 ½” clearance from backsplash to
center of faucet hole
• Handcrafted in UK
8 1/4”
COLORS/FINISHES
• Polished Chrome
• Polished Nickel
• Satin Nickel
• English Bronze
• Inca Brass*
9 1/4”
WARRANTY
• Limited Lifetime
* Inca Brass available by
special order only
16”
4 5/8”
Ø2 3/8”
Ø1 3/8”
HOLE
1/2” NPSM
3 1/4” MAX
HOT SUPPLY COLD SUPPLY
Consult your local ROHL showroom for additional information and specifications. For complete warranty details and a list of showrooms, go to www.rohlhome.com.
INSTALLATION INSTRUCTIONS
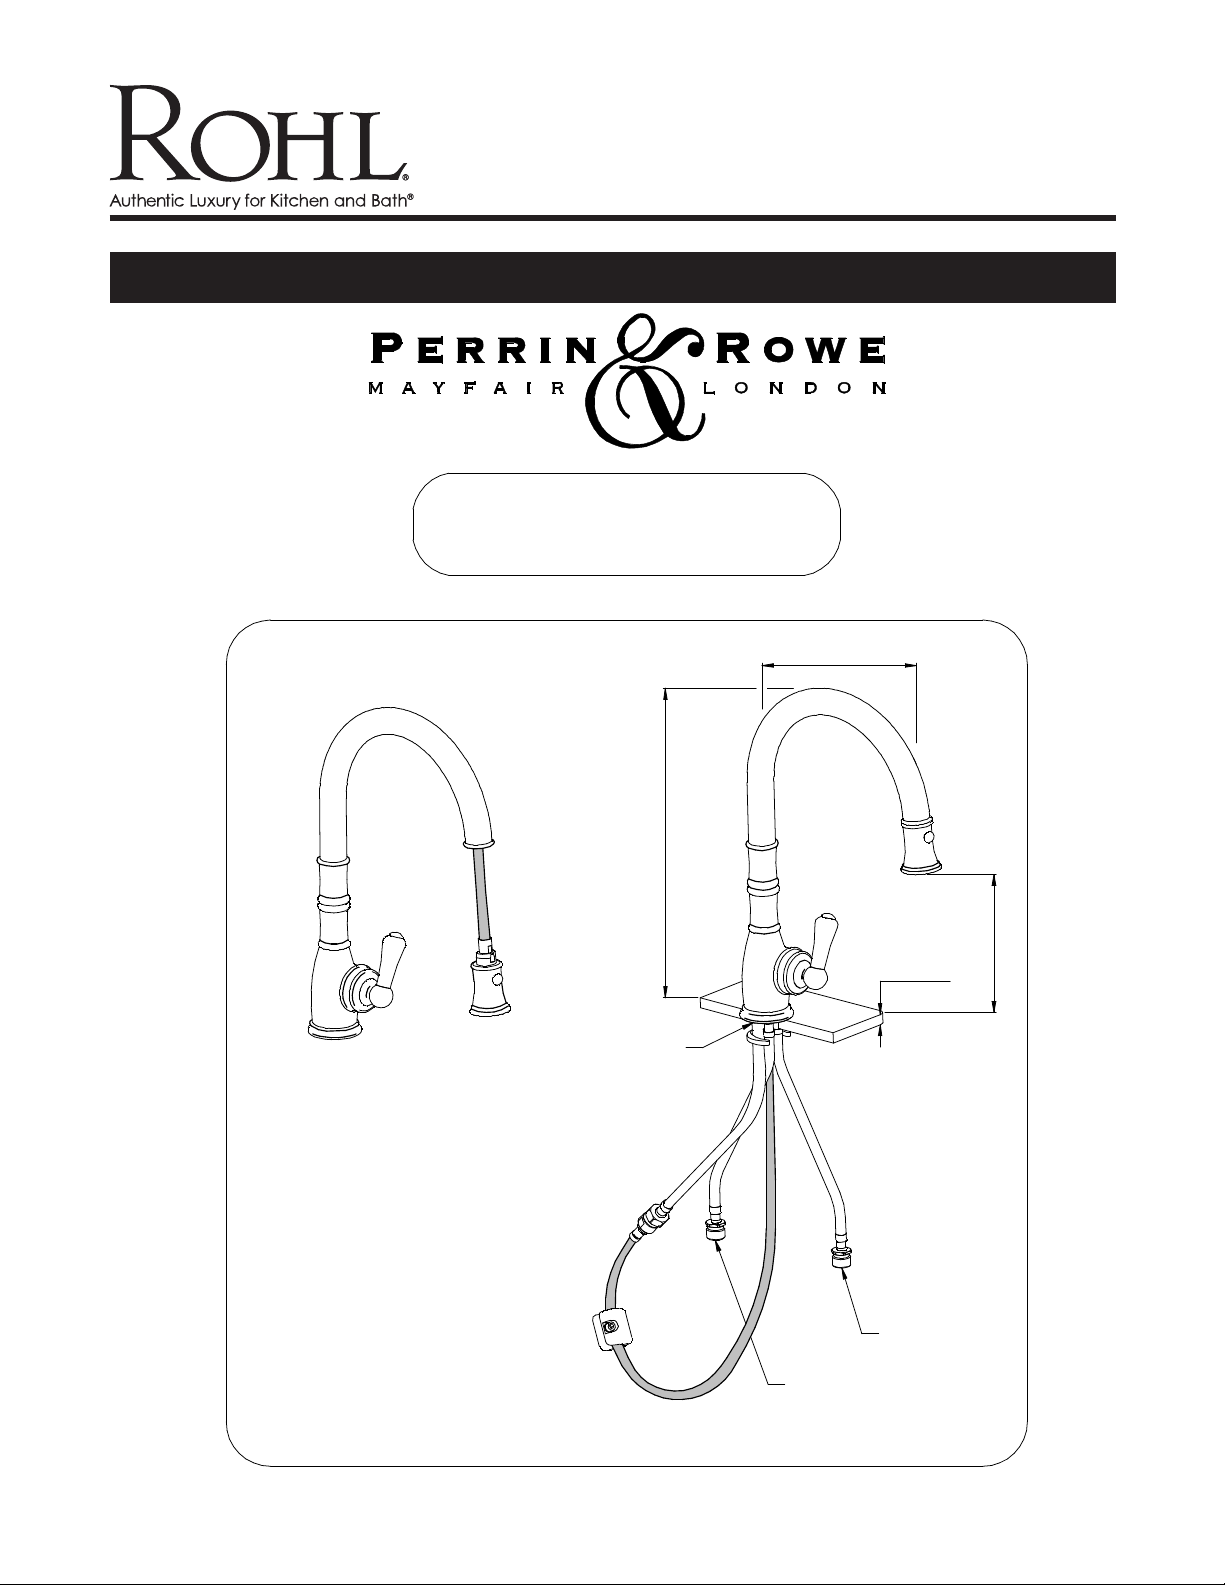
The Country Kitchen Collection
Installation & User Guide
U.4744 Country Kitchen Pull Down
www.rohlhome.com
9 1/2"
16 1/8"
1 3/8" Hole
Temp Range:
Min 1°C/34°F
Max 85°C/185°F
Recommended
Working Pressure:
Min 1bar/15psi
Max 5bar/75psi
Ideal performance obtained with equal hot & cold pressures.
Hot In
1/2"
1 3/4"
Max
Cold In
1/2"
8 3/4"
Consult your local ROHL showroom for additional information and specifications. For complete warranty details and a list of showrooms, go to www.rohlhome.com.

www.rohlhome.com
CARE & MAINTENANCE
Wipe down after use to avoid water spotting and mineral build up.
Occasional cleaning with warm soapy water, followed by a polish with a soft cloth is all that is required to keep the
plated finish in good condition.
Do not use proprietary abrasive liquids, powders, or pads to clean the faucet. Do not use any products
with ammonia bleach or limescale remover. You will damage the plated finish and void your guarantee.
BEFORE USE
• Carefully check the installation for leaks.
• If further b
uilding work is to be carried out in the vicinity, cover the product to avoid damaging the finish.
• Please ensure that the installation complies with local plumbing codes.
4 Test pull down
19 1/2
"
Max
To turn the faucet on push the lever
inwards toward the body.
5 Operation
Hot water
Cold water
INSTALLATION INSTRUCTIONS
The Country Kitchen Collection
Installation & User Guide
Congratulations on the purchase of your Perrin & Rowe kitchen product. Correctly installed and with sensible care,
this product will give you many years of trouble free service.
IMPORTANT INFORMATION
Before you proceed... We recommend you engage the services of a registered plumber to
install this product.
For ease of possible future servicing, we also recommend the fitting of conveniently placed
isolating valves.
In addition to the guide below it is essential that the written information overleaf is carefully
read and understood.
Preparation Check Box for Installer
Flush the plumbing system before
installing the kitchen product.
1 Installation
Base
Seal
Nuts
2 Attach weight to hose
Base Ring
Securing Clamp
Box Spanner
(Included)
Once unpacked remove clamp plate and hose weight
ready for installation.
Before installing the product, leave a gap of 1 1/2"
minimum from the center of the work surface hole to
any walls or shelves (see image in section 5).
Insert the flexible connections through the work
surface hole Ø1.3/8" ensuring that the base ring and
rubber seal are in place between mixer and mounting
surface. Ensure the mixer is orientated correctly.
Secure mixer using the clamping plate and nut. (A
box spanner is provided). It is recommended to
install a stop value to the mains supply.
Please note: The rubbe
item and must be fitted.
r base seal is an essential
3 Weight adjustment
Insert hose in to
weight and secure
together with the
screw and washer
provided, using the
hex key provided.
Ensure that the
weight is fixed in
place.
Important note:
Do not overtighten
the screw.
Consult your local ROHL showroom for additional information and specifications. For complete warranty details and a list of showrooms, go to www.rohlhome.com.
The weight can be
moved to vary the
amount of extension
required.
Extension
More
Extension
Less

INSTALLATION INSTRUCTIONS
www.rohlhome.com
4 Test pull down
5 Operation
To turn the faucet on push the lever
inwards toward the body.
Hot water
Cold water
Ensure there is ample room in the space under the work
surface for the hoses and weight to move freely. Test that the
spray head extends far enough by pulling it out.
The spray head should retract smoothly and fix back in place
comfortably.
19 1/2
"
Max
Connect Hot & Cold water supplies. For ease of servicing it is
recommended that stop valves be fitted to water supplies. Take
care in ensuring the flexible hoses are installed without kinks or
twists.
Important note: Ensure that the hose for the spray is
securely in place and fed through the plastic hose guide. This
ld prevent the spray hose from becoming twisted with the
shou
hot and cold inlet hoses.
Ensure all connections are firmly tightened.
To change the flow of water from the inner jet to the
outer spray, with the water running slide the button
downwards. The spray will return to the inner jet after
turning the faucet off.
1 1/2" Min.
Inner Jet
Outer Spray
BEFORE USE
• Carefully check the installation for leaks.
• If further b
• Please ensure that the installation complies with local plumbing codes.
uilding work is to be carried out in the vicinity, cover the product to avoid damaging the finish.
CARE & MAINTENANCE
Wipe down after use to avoid water spotting and mineral build up.
Occasional cleaning with warm soapy water, followed by a polish with a soft cloth is all that is required to keep the
plated finish in good condition.
Do not use proprietary abrasive liquids, powders, or pads to clean the faucet. Do not use any products
with ammonia bleach or limescale remover. You will damage the plated finish and void your guarantee.
Consult your local ROHL showroom for additional information and specifications. For complete warranty details and a list of showrooms, go to www.rohlhome.com.

www.rohlhome.com
U.4744 Country Kitchen Pull Down
The Country Kitchen Collection
Installation & User Guide
Temp Range:
Min 1°C/34°F
Max 85°C/185°F
Recommended
Working Pressure:
Min 1bar/15psi
Max 5bar/75psi
Ideal performance obtained with equal hot & cold pressures.
INSTALLATION INSTRUCTIONS
ROHL WARRANTY POLICY
All products supplied by ROHL carry warranties against manufacturing defects.
Perrin & Rowe products carry a Limited Lifetime Warranty.
ROHL LLC will provide free of charge, as its options, replacement part(s) or product (or a comparable alternative
product) to replace those which have proven defective in materials or workmanship.
For full ROHL LLC WARRANTY please contact ROHL or visit www.rohlhome.com
SPARES
9.28746
9.25066
9.03744
9.19403
9.18380*
9.15744
9.26400
9.28302
9.201210*
9.13841
9.19840
9.12745*
9.280737
9.17744*
9.24745*
9.26760*
9.01340*
9.25744
Aerator Kit
9.26745
* Where indicated please specify color
SPARE PARTS & SERVICE
Perrin & Rowe products are manufactured in the UK, using the latest
technology and built to the highest quality sta
3 Parker
Irvine
CA 92618
(714) 557-1933
www.rohlhome.com
Consult your local ROHL showroom for additional information and specifications. For complete warranty details and a list of showrooms, go to www.rohlhome.com.
We would like to thank you for purchasing a Perrin & Rowe product and
take this opportunity to invite you to look at other luxury products by us.
Please contact us to recieve our latest catalogue.
Perrin & Rowe is a regis tered trademark. 9004744U Issue 1
ndards.
 Loading...