

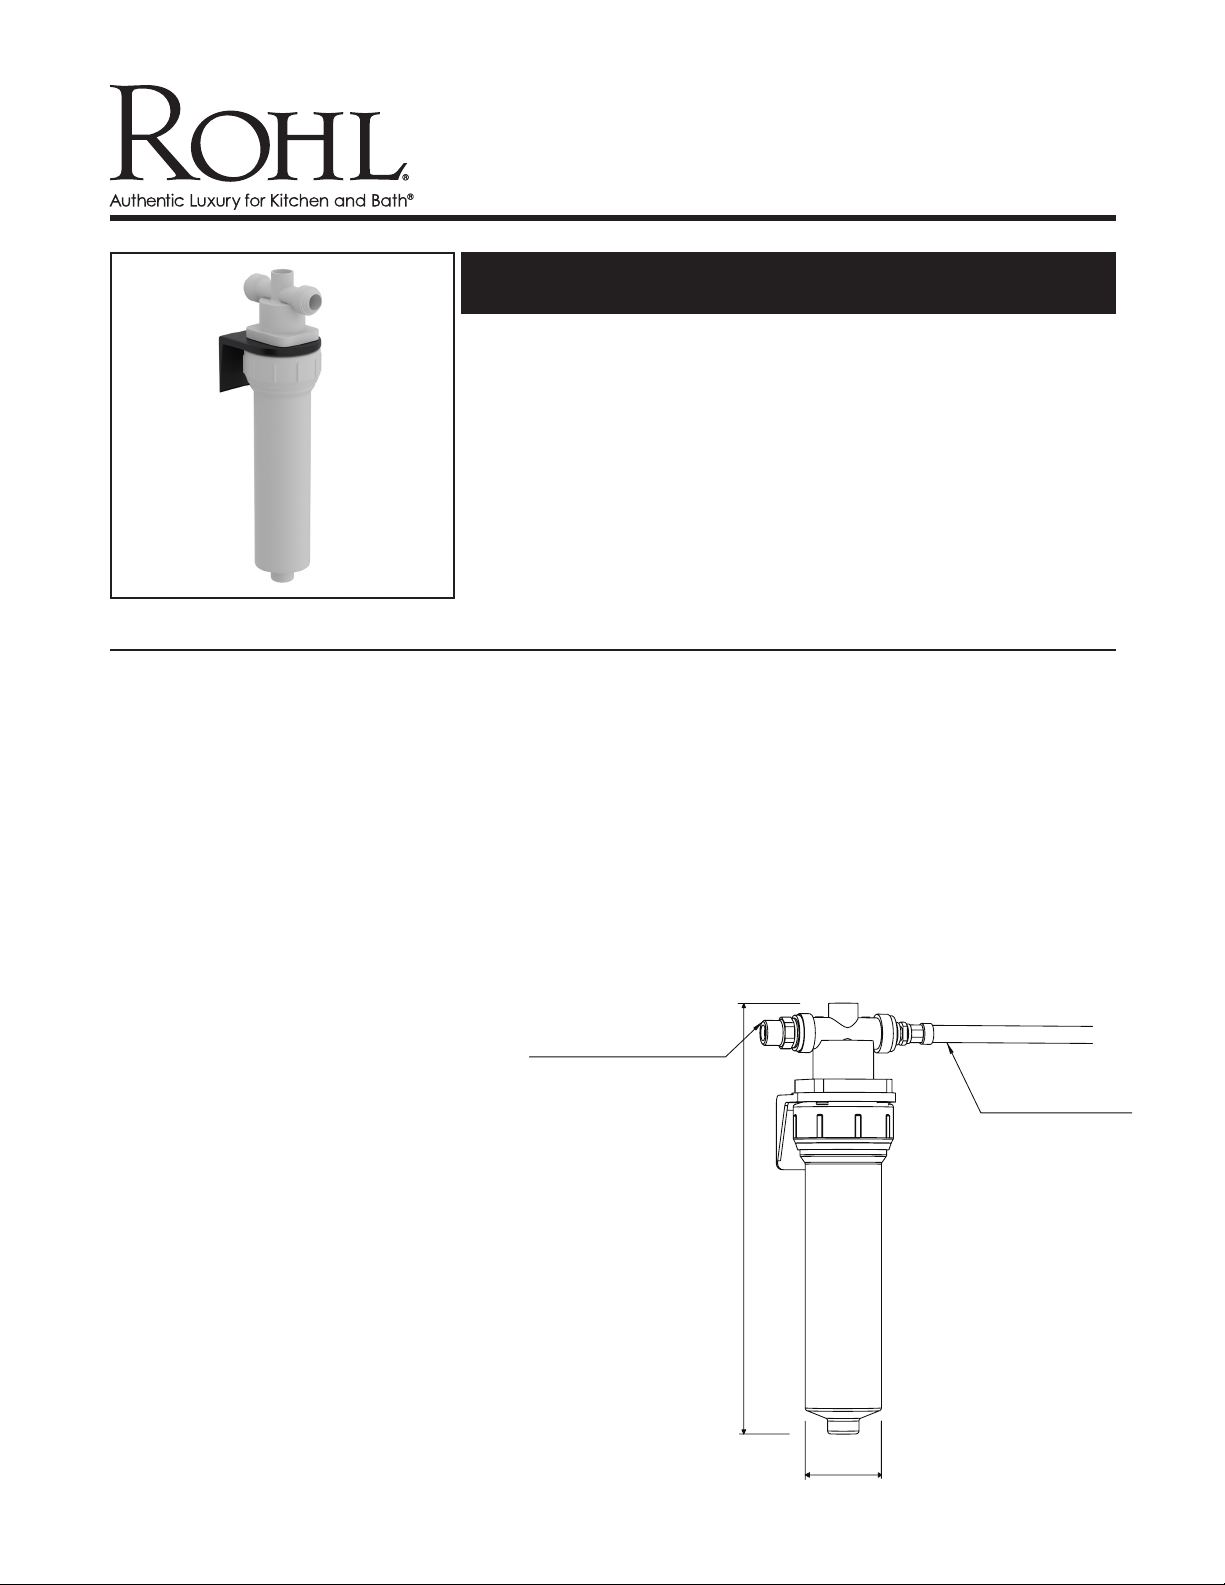
HOT WATER INLINE FILTER WITH CARTRIDGE
Perrin & Rowe® Kitchen Filtered Hot Water Dispensers
U.1106
www.rohlhome.com
FEATURES
• High quality lter cartridge removes chemicals, bacteria
and other contaminates.
• Sanitary, quick change lter cartridge makes
replacement easy
• Order U.PRF1 for hot water replacement lter cartridge
every 6 months
COLORS/FINISHES WARRANTY
• Hot Water Filter
INLET FROM FAUCET
• Limited Lifetime
TO HOT TANK
11 3/4”
* PLEASE ALLOW 12 1/2”
(MINIMUM) TO
ALLOW FOR FILTER
REPLACEMENT.
Ø2"
Consult your local ROHL showroom for additional information and specications. For complete warrant y details and a list of showrooms, go to www.rohlhome.com.
INSTALLATION INSTRUCTIONS
www.rohlhome.com
•
• Instant Hot Tap
•
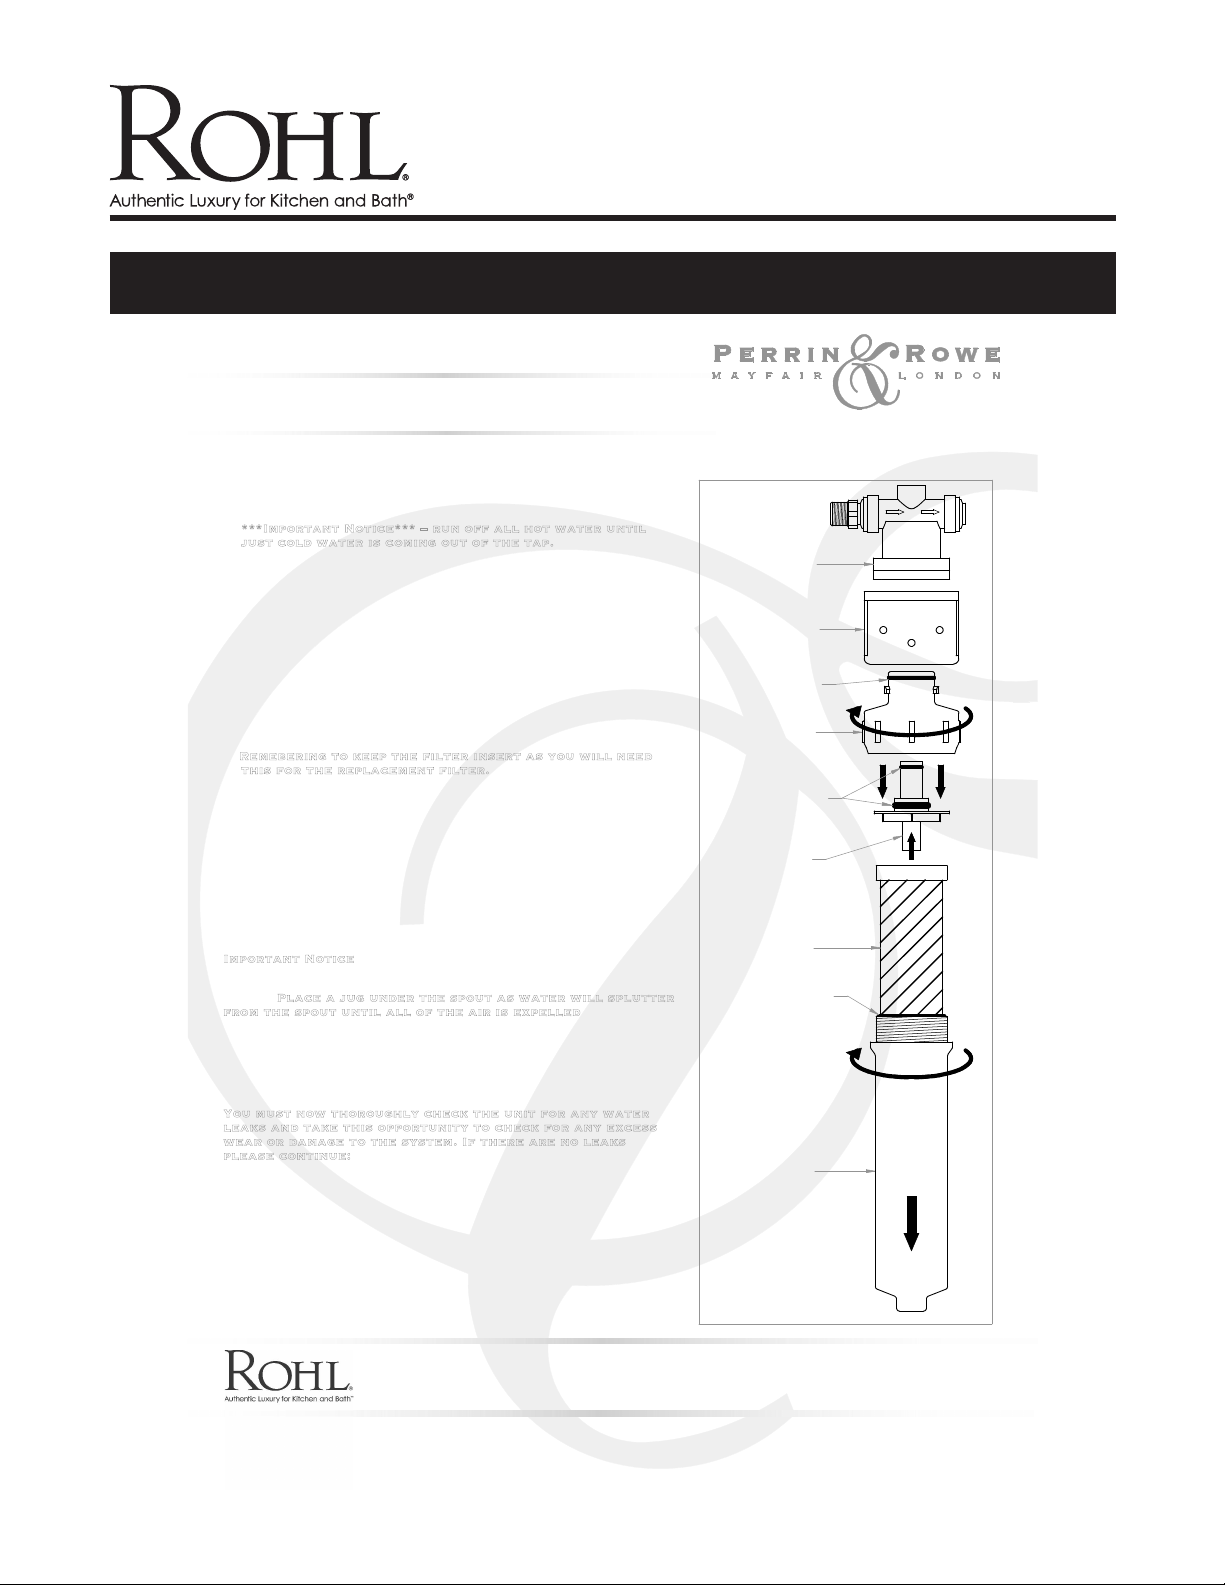
• CARTRIDGE REPLACMENT
The filter cartridge in y our instant hot tap system needs to be c hanged every six months in orde r to
Changing the filter cartri dge is a simple matter:
1. Switch off the heater tank either at the mains or by pressing
the centre button on the heater tank touch screen.
***I mportant Notice* ** – run off al l hot w ater until
just cold wa ter is c oming out of t he tap.
2. Place a small bowl under the filter housing sump to catch the
small amount of water that will be released when removing the
filter housing sump.
3. Turn the filter housing sump anti-clockwise a quarter turn, to
allow the filter housing sump to drop down from the filter
housing head.
4. Once the sump is removed, unscrew the filter housing cap
from the sump and tip any water out of the sump into the bowl
or sink.
5. Remove the old filter by pulling the filter from the cap.
6. Dispose of the old filter in the normal household waste bin.
Remeberin g to keep the f ilter in sert as you will need
this for the replace ment fil ter.
7. Fit the new filter by pushing the filter insert into the top of
the filter then into the cap; you may need to wet the ‘O’ seals in
the top of
the filter as shown in the attached drawing referenced A.
Always inspect the 'O' seals for damage; for replacements use
contact details below.
8. Screw the sump back onto the cap (Ensuring that the ‘O’ seal
is in place), referenced B.
9. Push the filter housing sump back into the filter housing head
and turn clockwise until it stops.
Important Notice
The filter is now ready to use – it is vitally important that you
follow the process below to ensure that all air is bled from the
Place a j ug unde r the sp out as w ater wil l splut ter
system.
from the spout u ntil all of the air is expelled
Operate the instant hot tap lever to dispense water, run-off at
least 0.35 gallons of water, let the system rest for at least 30
seconds and run another 0.35 gallons of water, repeat this at
least one more time – your instant hot water tap should now be
ready for use.
You must now thoroughly check th e unit f or any w ater
leaks an d take t his oppor tunity to check for an y excess
wear or damage t o the system. If there are no l eaks
please co ntinue:
10. Now switch the heater tank back on at the mains, or by
pressing the button in the centre of the heater tank touch
screen.
11. Set the desired temperature by pressing the right hand
button until the desired temperature is displayed (usually 98
degrees)
12. Press the left hand button to confirm the temperature
setting.
13. The heater tank will now heat up to the desired temperature
and once completed the system is ready for use.
ensure the system works at its optimu m performance.
FILTER
HOUSING
HEAD
FILTER
MOUNT
BRACKET
'O' SEALS
(A)
FILTER
HOUSING
CAP
'O' SEALS
(A)
FILTER
INSERT
FILTER
'O' SEAL
.
(B)
FILTER
HOUSING
SUMP
®
Should you require any advice, or a quic k solution to a problem with this product please
contact in the first instance the supplier/sh owroom from which it was purchased.
• T: 1-800-777-9762 • E: rohlinfo@rohlhome.com • W: www.rohlhome.com
1
9001914U
Issue
Consult your local ROHL showroom for additional information and specications. For complete warrant y details and a list of showrooms, go to www.rohlhome.com.

INSTALLATION INSTRUCTIONS
www.rohlhome.com
•
• Instant Hot Tap
• Filter Installation
Fixing Mounting Bracket
1.
FILTER
MOUNTING
BRACKET
MOUNTING
SCREWS X2
FILTER
SUMP
Attaching Hoses
2.
DIRECTION
OF FLOW
G3/8"
BRAIDED
HOSE FROM
TAP
•
IT IS VERY IMPORTANT THAT BEFORE YOU STAR T INSTALLING THIS
FILTER SYSTEM YOU ENSURE YOU HAVE READ THE INST ALL
GUIDES THAT CAME WITH THE TAP AND THE HEATER TANK.
First you will need to remove the filter sump. This
can be done by turning the sump a quarter turn
anti-clockwise and pulling down.
Fix the filter mounting bracket to the inside of the
cupboard with the screws provided, using the
bracket as a template for drilling the holes.
Alternatively make use of the supplied adhesive
pad, ensuring the mounting area is clean by using
the wipe provided.
Making sure:
- There is enough room underneath the filter
11 " MIN
housing for filter replacement and maintainence.
- The housing is close enough to the heater tank &
tap so that hoses are not over stretched.
- The housing is accessible for future maintainence
& filter replacement.
** Make s ure all h oses are free o f kinks * *
Attach the G3/8" braided hose from the tap to the
threaded side of the filter housing.
PUSH-FIT
BRAIDED
HOSE TO
HEATER
TANK
Attach the threaded end of the push-fit braided hose
to the top of the heater tank as shown below.
Re-fit the Filter Sump to the Mounting Bracket.
Please n ow thorou ghly chec k the u nit for a ny
water lea ks befor e you c ontinue.
®
3.
System Layout
PUSH-FIT BRAIDED
HOSE TO HEATER
BRAIDED
HOSE FROM
G3/8"
TAP
DIRECTION
OF FLOW
TANK
9/16"
DOMESTIC
HOT IN
9/16"
COLD IN
9/16"
FLOW REGULATOR
Should you require any advice, or a quick sol ution to a problem with this product please
contact in the first instance the supplier/show room from which it was purchased.
• T: 1-800-777-9762 • E: rohlinfo@rohlhome.com • W: www.rohlhome.com
Important Notice
The filter is nearly ready to use – it is
vitally important that you ensure that
all air is bled from the system. Do this
by:
Place a jug under the spout as water
will splutter from the spout until all
of the air is expelled.
Operate the instant hot tap lever
to dispense water, run-off at
least 0.35 gallons of water, let
the system rest for at least 30
seconds and run another 0.35
gallons litres of water, repeat at
least one more time – your instant
hot water tap should now be
ready for use.
9001914U
Issue
1
Consult your local ROHL showroom for additional information and specications. For complete warrant y details and a list of showrooms, go to www.rohlhome.com.
 Loading...