

www.rohlhome.com
3 3/4”
L=7 7/8”
1/2” NPT
L=59”
1 3/8”
Ø 2 3/4”
Ø 1 1/16”
Ø 2 3/4”
13 3/4”
2 7/16”
MAX
6”
2 1/8”
MAX
6 1/2”
8 1/4”
11”
6 1/2”
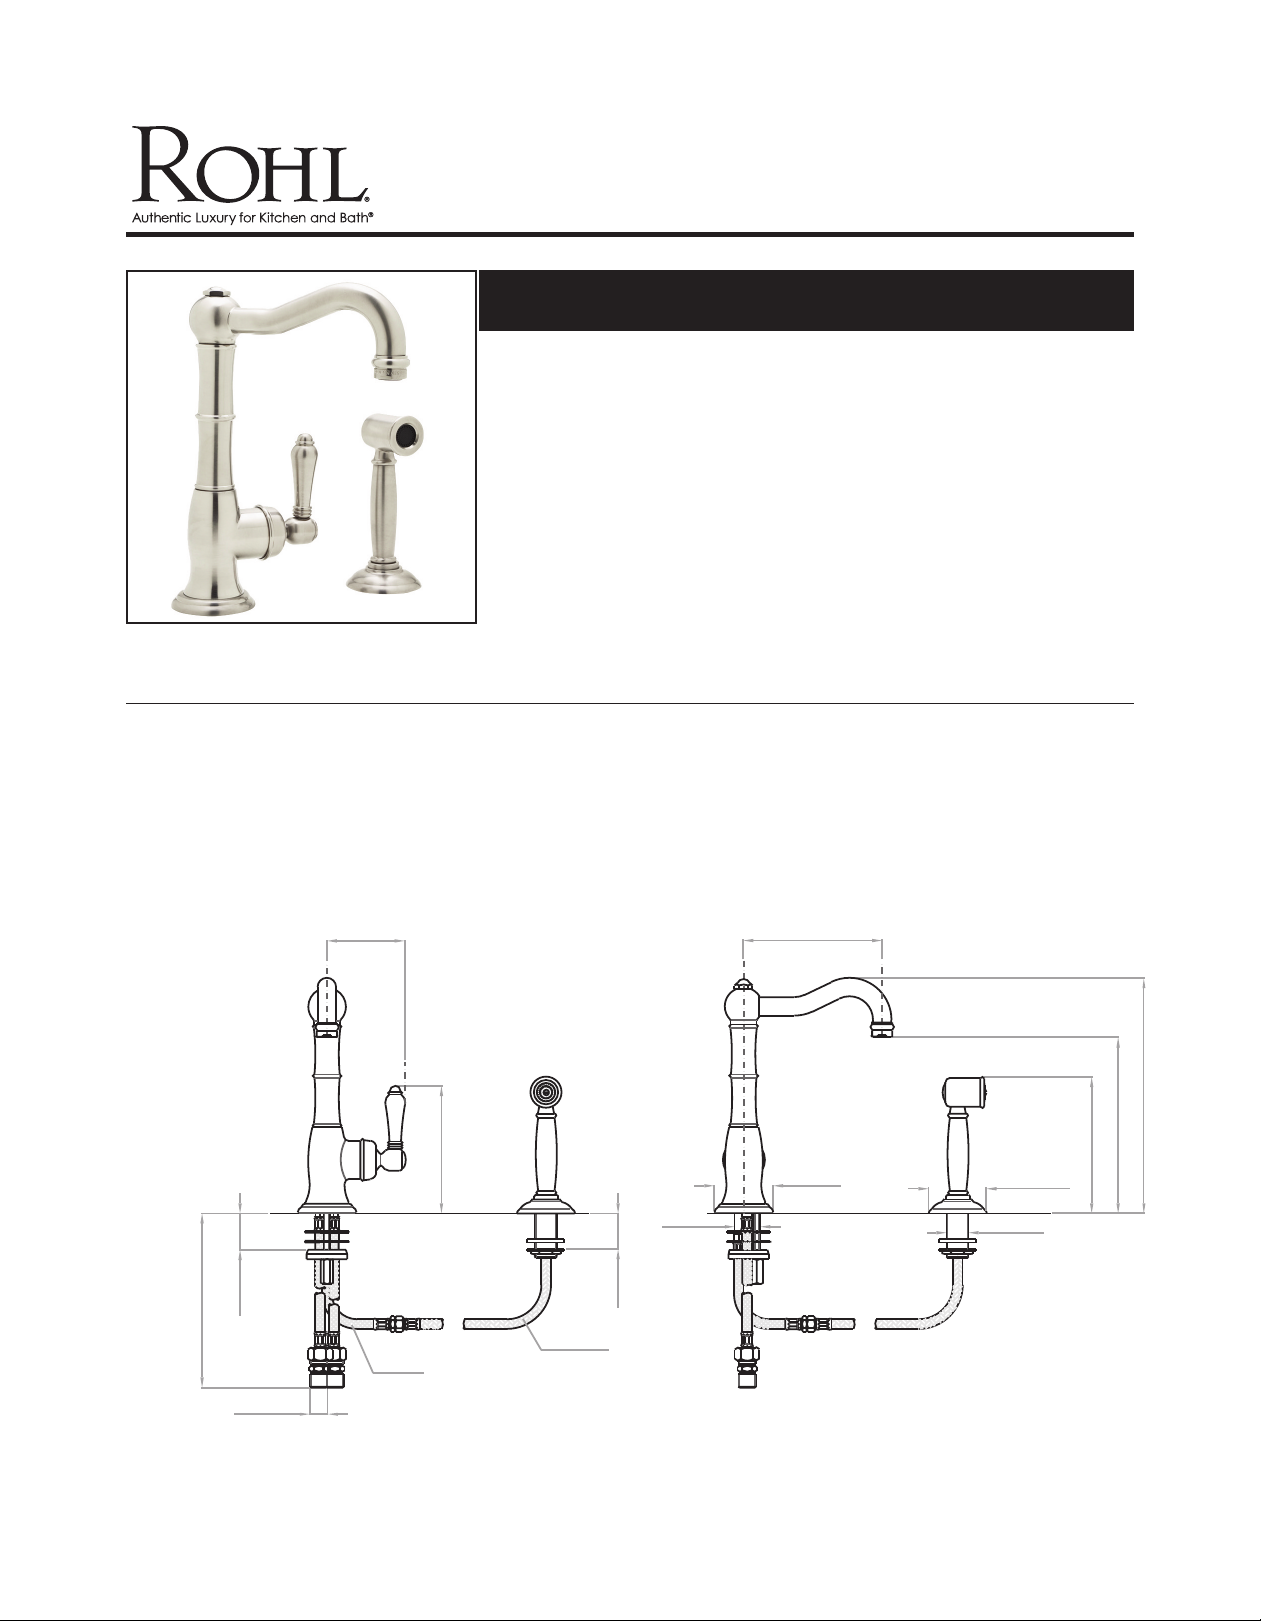
Cinquanta Single Lever 6 1/2” Column Spout
Bar Faucet
ROHL Country Kitchen Collection
A3650/6.5LPWS
A3650/6.5LMWS
A3650/6.5LP
A3650/6.5LM
FEATURES FINISHES WARRANTY
• Ceramic disc single lever cartridge
• 11” spout height
• 6 1/2" spout reach
• 1 3/8” hole cutout
• 1/2" NPT flexible supplies
• 2 7/16” max depth installation
• 1.5GPM
• Requires 3 1/4” clearance from backsplash
• Polished Chrome
• Polished Nickel
• Satin Nickel
• Tuscan Brass
• Inca Brass
(Porcelain Lever with Handspray)
(Metal Lever with Handspray)
(Porcelain Lever without Handspray)
(Metal Lever without Handspray)
• Limited Lifetime*
* No Warranty on Tuscan
Brass Finish (TCB)
Consult your local ROHL showroom for additional information and specifications. For complete warranty details and a list of showrooms, go to www.rohlhome.com.
1
SPOUT RING SET
C7593SET
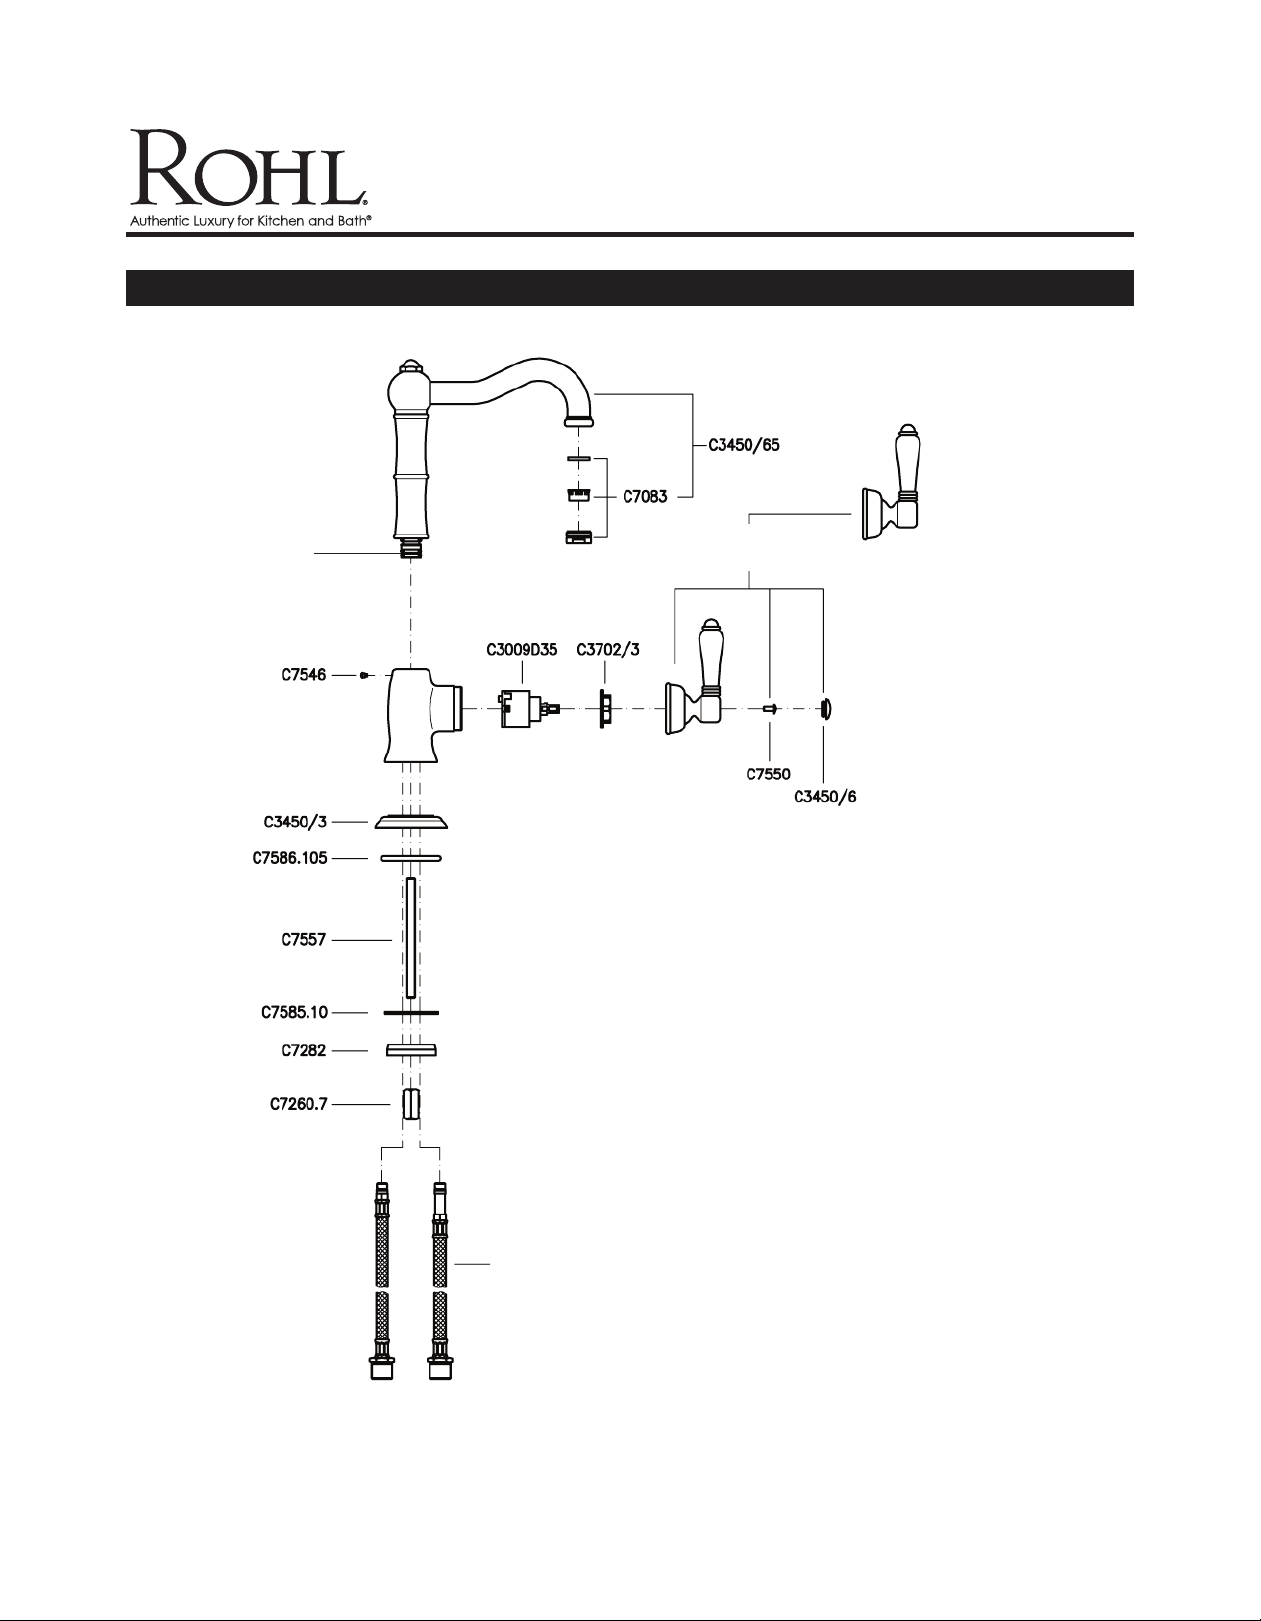
A3650/6.5 Spare Parts
C7775NM
(Metal)
ww.rohlhome.com
w
C7776NP
Porcelain)
(
A5556CR
Consult your local ROHL showroom for additional information and specifications. For complete warranty details and a list of showrooms, go to www.rohlhome.com.
2
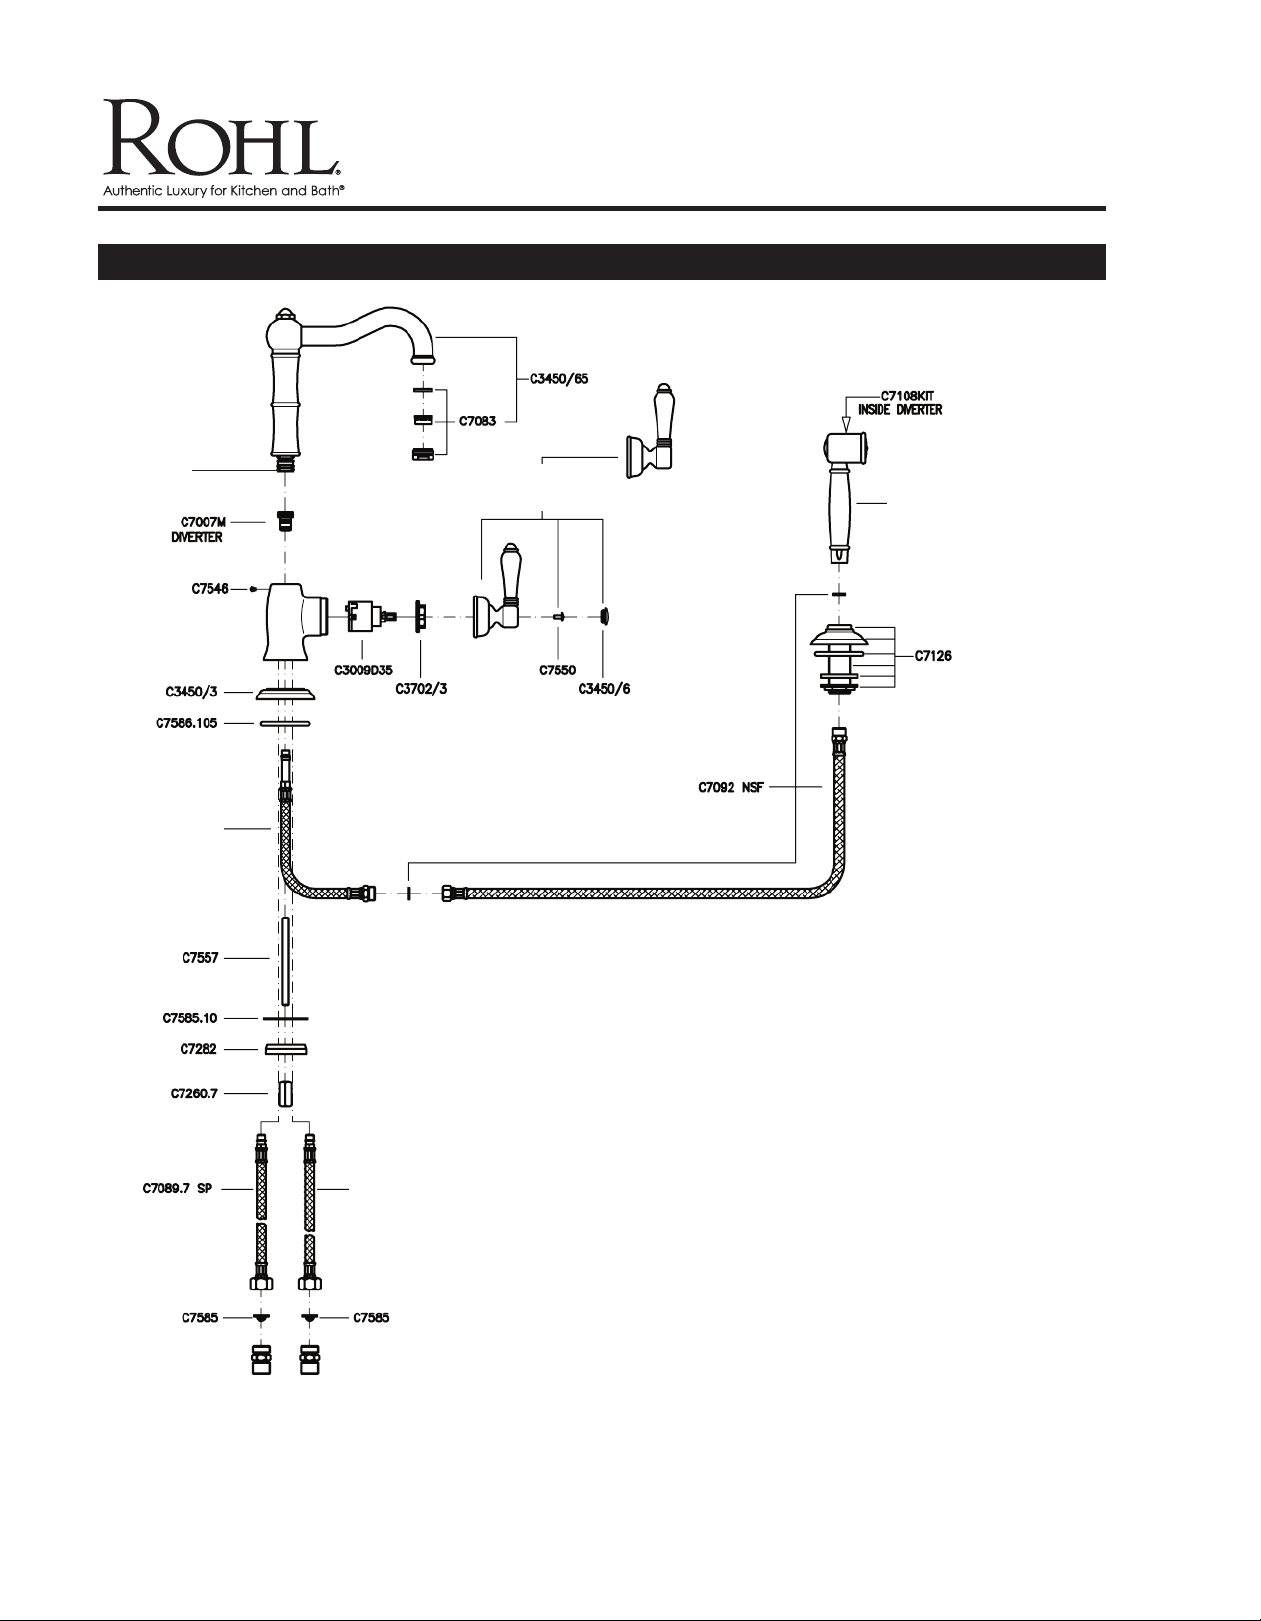
A3650/6.5WS Spare Parts
www.rohlhome.com
SPOUT RING SET
C7593SET
C3608/4
C7775NM
(Metal)
C7776NP
(Porcelain)
C7108N
A5556CR
Consult your local ROHL showroom for additional information and specifications. For complete warranty details and a list of showrooms, go to www.rohlhome.com.
3
Installation Instructions
www.rohlhome.com
Consult your local ROHL showroom for additional information and specifications. For complete warranty details and a list of showrooms, go to www.rohlhome.com.
4

Installation Instructions
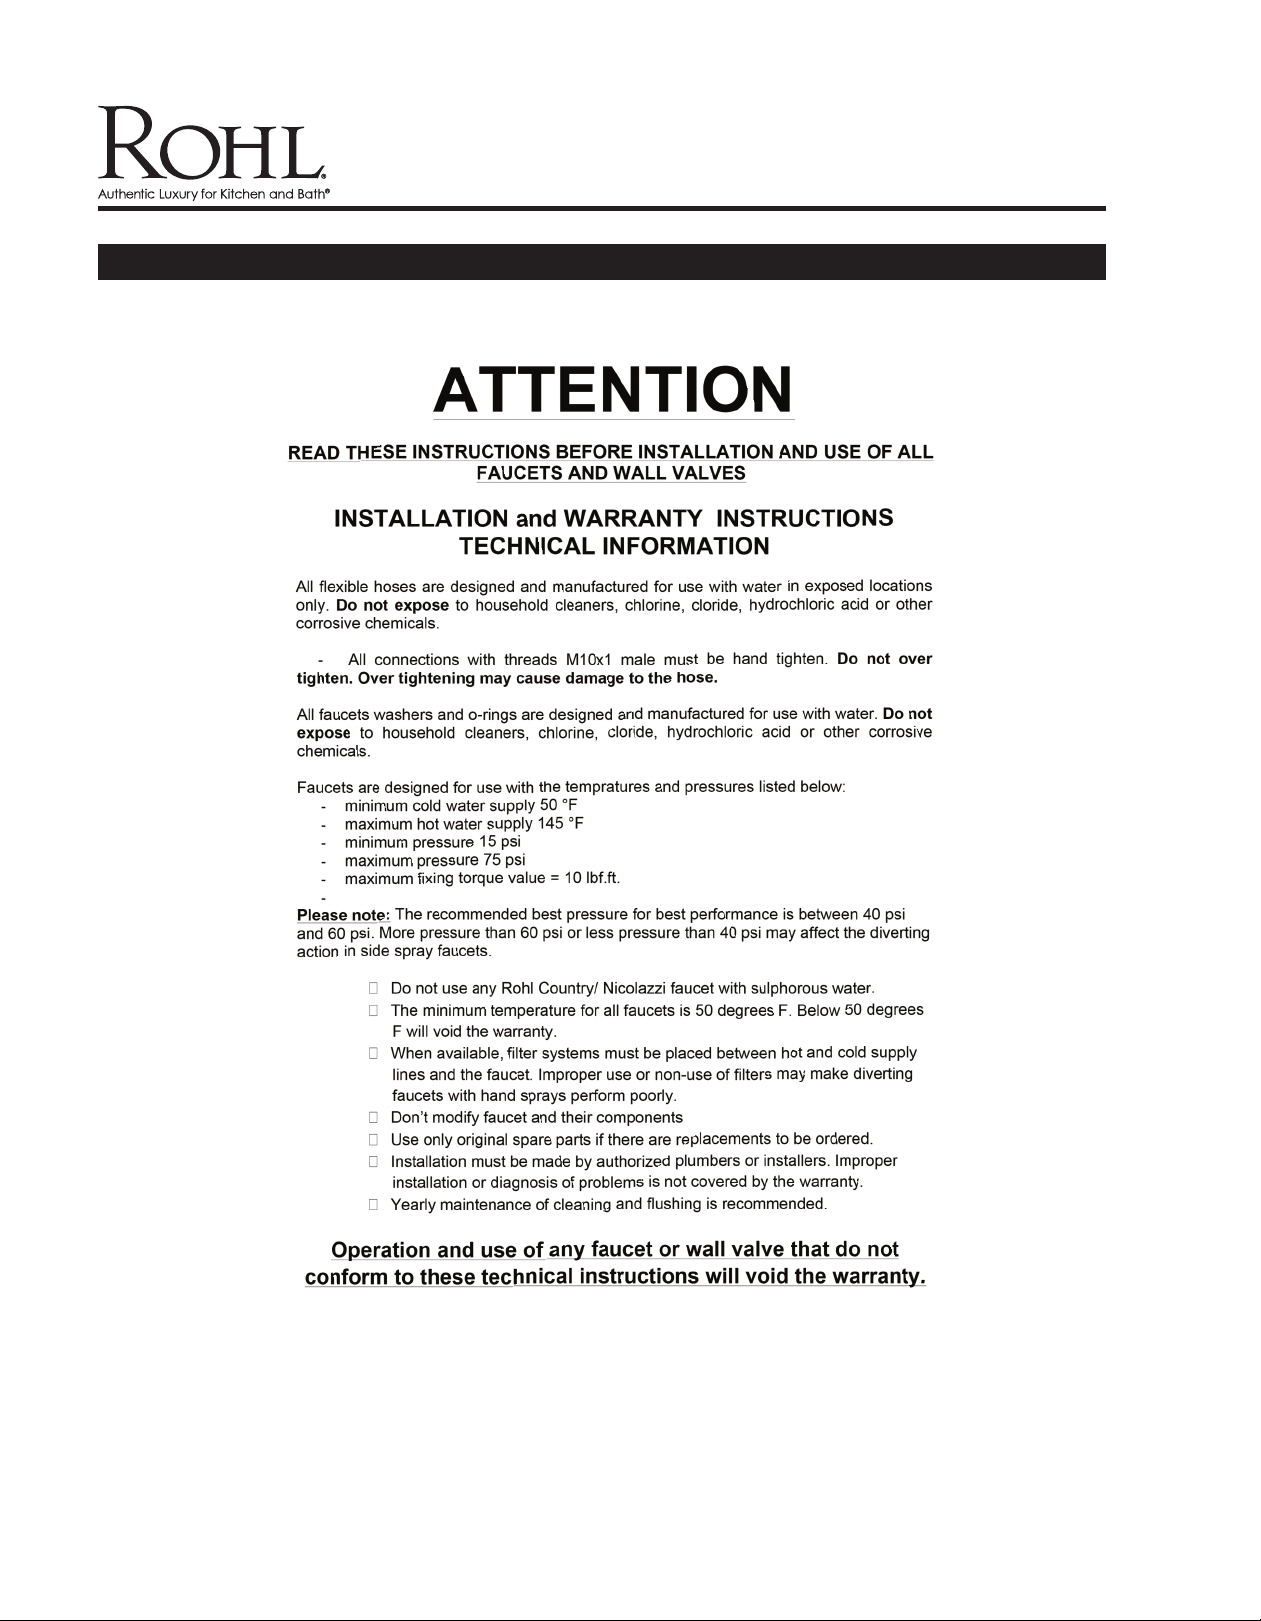
INSTALLATION AND CARE & MAINTENANCE GUIDE
Installation Guide
www.rohlhome.com
Consult your local ROHL showroom for additional information and specifications. For complete warranty details and a list of showrooms, go to www.rohlhome.com.
5

Installation Instructions
www.rohlhome.com
Consult your local ROHL showroom for additional information and specifications. For complete warranty details and a list of showrooms, go to www.rohlhome.com.
6

Installation Instructions
INSTALLATION OF SINGLE HOLE FAUCET WITH SIDESPRAY
MODELS INCLUDE:
DUAL LEVER MODELS: A1679WS, A1676WS
SINGLE TOP LEVER MODELS: A3606WS, A3608, A3479
SINGLE LEVER SIDE LEVER MODELS: A3650WS
Model A3608WS shown
www.rohlhome.com
Install the supply hoses into the body
- Note: hand tighten only, do not over tighten.
Install mounting stud securely or verify it is installed.
Consult your local ROHL showroom for additional information and specifications. For complete warranty details and a list of showrooms, go to www.rohlhome.com.
7

Insert faucet into mounting hole.
www.rohlhome.com
Installation Instructions
Consult your local ROHL showroom for additional information and specifications. For complete warranty details and a list of showrooms, go to www.rohlhome.com.
8

Installation Instructions
www.rohlhome.com
Under the sink, stack the half ring rubber gasket - 6, the half ring
mouting plate - 7, then the mounting nut -9 onto the stud.
Consult your local ROHL showroom for additional information and specifications. For complete warranty details and a list of showrooms, go to www.rohlhome.com.
9

Installation Instructions
www.rohlhome.com
Check the position on the sink of the faucet, then tighten the nut with a 13mm wrench.
Note: the under deck mounting surface must be flat. If the mounting surface is
irregular, the nut may not be secured, and the faucet will be loose on the sink.
Consult your local ROHL showroom for additional information and specifications. For complete warranty details and a list of showrooms, go to www.rohlhome.com.
10

Installation Instructions
Insert the hand spray escutcheon into the sink hole
•
Please note:
main body of the faucet.
• Install the rubber washer -13, the flat metal washer -14, then the nut -15. Secure on the deck, but
o not over tighten.
d
make sure the hand spray hole is a minimum of 4 3/4” away from the
www.rohlhome.com
4
3
/4
”
Consult your local ROHL showroom for additional information and specifications. For complete warranty details and a list of showrooms, go to www.rohlhome.com.
11

Installation Instructions
www.rohlhome.com
• Install the black hand spray hose to the supply from the faucet under the sink.
- Guide the 9mm male end up through the escutcheon.
- Install the hand spray with the required flat washer with screen on top of the sink.
• Connect the supply lines to the hot and cold supplies securely.
- Please note:
will prevent debris from entering the diverter.
•Turn on the water for the hot and cold.
• Check the diverting action by operating the hand shower.
Please note:
hand spray that is acceptable. Due to water conditions, a 100% diverting action is not
always possible.
• Check for leaks.
Consult your local ROHL showroom for additional information and specifications. For complete warranty details and a list of showrooms, go to www.rohlhome.com.
make sure the rubber washers with the screens are used. These screens
If there is a 99% divert or small trickle of water out the spout when using the
12

Installation Instructions
www.rohlhome.com
Consult your local ROHL showroom for additional information and specifications. For complete warranty details and a list of showrooms, go to www.rohlhome.com.
13

Installation Instructions
www.rohlhome.com
Consult your local ROHL showroom for additional information and specifications. For complete warranty details and a list of showrooms, go to www.rohlhome.com.
14

Installation Instructions
THE O-RING MUST BE ALWAYS PALACED
BETWEEN THE HAN DSPRAY AND HOSE VALVES
www.rohlhome.com
Spare Parts
RING
Consult your local ROHL showroom for additional information and specifications. For complete warranty details and a list of showrooms, go to www.rohlhome.com.
15

Installation Instructions
LOW FLOW OR NO FLOW TROUBLESHOOTING INSTRUCTIONS
(ALL MODELS: A3608 shown)
Current kitchen faucets have a flow rate of 1.5 GPM from the aerator and the hand
spray.
If you are experiencing low flow from the spout: Do not change the cartridge
• Unscrew and clean the aerator 1
• Unscrew and clean the filters inside the supply connections. 3
• Check the supply lines for kinks or obstructions. 3
• Make sure the supply line stops are fully on. Not shown
If you faucet has a hand spray, and your hand spray has obstructed flow or
no flow:
www.rohlhome.com
• Check the hand spray hose for kinks.5
• Unscrew and clean the hand spray filter.4
• Clean the aerator in the hand spray. 2
4
5
Consult your local ROHL showroom for additional information and specifications. For complete warranty details and a list of showrooms, go to www.rohlhome.com.
16
 Loading...