

Page 1
®
R&S
ZN-Z15x
Calibration Units
User Manual
(=UÉÍ2)
1337596302
Version 02
User Manual
Page 2

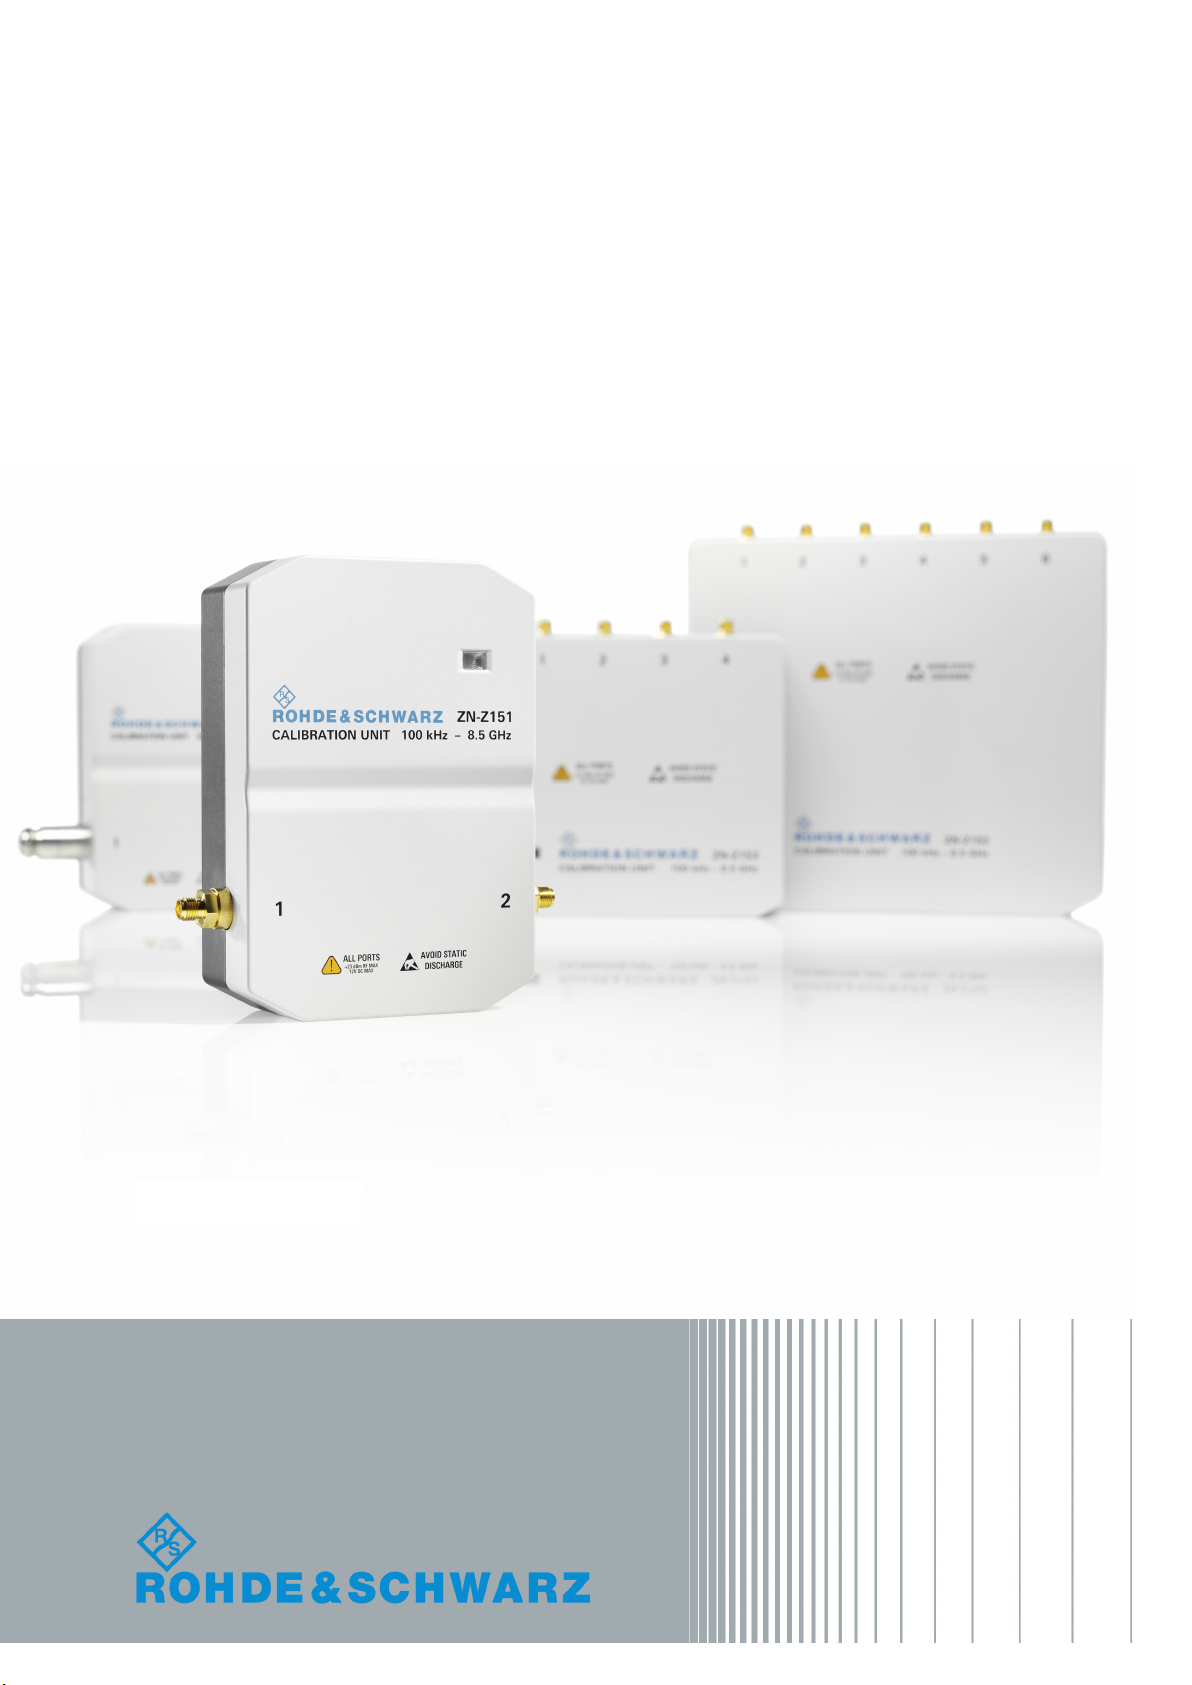
This User Manual describes the following R&S ZN-Z15x models:
●
R&S®ZN-Z150, N (f), 2 ports, 5 kHz to 6 GHz (1335.6710.72)
●
R&S®ZN-Z151, SMA (f), 2 ports, 100 kHz to 8.5 GHz (1317.9134.32)
●
R&S®ZN-Z151, N (f), 2 ports, 100 kHz to 8.5 GHz (1317.9134.72)
●
R&S®ZN-Z152, SMA (f), 6 ports, 100 kHz to 8.5 GHz (1319.6003.36)
●
R&S®ZN-Z153, SMA (f), 4 ports, 100 kHz to 8.5GHz (1319.6178.34)
●
R&S®ZN-Z156, 1.85 mm (f), 2 ports, 5 GHz to 67 GHz (1332.7239.02)
User Manual 1326.5080.02 covers the R&S®ZN-Z154 calibration unit.
© 2018 Rohde & Schwarz GmbH & Co. KG
Mühldorfstr. 15, 81671 München, Germany
Phone: +49 89 41 29 - 0
Fax: +49 89 41 29 12 164
Email: info@rohde-schwarz.com
Internet: www.rohde-schwarz.com
Subject to change – Data without tolerance limits is not binding.
R&S® is a registered trademark of Rohde & Schwarz GmbH & Co. KG.
Trade names are trademarks of the owners.
R&S®ZN-Z15x is abbreviated as R&S ZN-Z15x
Page 3
R&S®ZN-Z15x
Contents
1 Safety Instructions................................................................ 3
2 USB Connection to the Network Analyzer.......................... 5
3 Function of the Status LED...................................................6
4 Performing an Automatic Calibration.................................. 7
5 Accuracy Considerations..................................................... 7
6 User Characterization............................................................8
7 microSD Card.........................................................................8
Contents
8 Mounting the Calibration Unit.............................................. 8
1 Safety Instructions
This calibration unit has been designed and tested in accordance with the EC
Certificate of Conformity and has left the manufacturer’s plant in a condition fully
complying with safety standards.
General safety considerations
To maintain this condition and to secure safe operation, you must observe
all instructions and warnings given in this manual and in the user manual of
the R&S® network analyzer.
3User Manual 1337.5963.02 ─ 02
Page 4

R&S®ZN-Z15x
Safety Instructions
RF Connection
1.1 USB Connection to the Analyzer
●
The calibration unit is intended for direct connection to a network analyzer of
the R&S®ZVx or R&S®ZNx family, following the instructions below and in the
analyzer’s help systems.
●
The length of the connecting USB cable should not exceed 3 m. It is recommended to use the cable delivered with the calibration unit.
●
You can connect several calibration units to the different USB ports of the analyzer. You can also connect cal units and other devices (mouse, USB memory
stick etc.) simultaneously.
●
An unused calibration unit may remain connected to the USB port while the
network analyzer is performing measurements. It must be disconnected during a firmware update.
●
It is safe to connect or disconnect the calibration unit while the network analyzer is operating. Never connect or disconnect the unit while data is being
transferred between the analyzer and the unit. Never connect the unit during a
firmware update.
1.2 ESD Protective Measures
To protect the calibration unit against Electrostatic Discharge (ESD) damage use
the wrist strap and grounding cord supplied with the network analyzer and connect yourself to the GND connector at the front panel. For details, refer to the
"Getting Started" guide of your analyzer.
1.3 RF Connection
The maximum RF input power of the calibration unit is beyond the RF output
power range of the analyzer, so there is no risk of damage if the device is directly
connected to the test ports. If you use an external power amplifier, make sure that
the maximum RF input power of the calibration unit quoted in the data sheet is
never exceeded.
4User Manual 1337.5963.02 ─ 02
Page 5

R&S®ZN-Z15x
USB Connection to the Network Analyzer
1.4 Automatic Calibration
A calibration unit is an integrated solution for automatic calibration of several network analyzer ports.
The unit contains calibration standards that are electronically switched when a
calibration is performed. The calibration kit data for the internal standards is
stored in the calibration unit, so that the analyzer can calculate the error terms
and apply the calibration without any further input.
Automatic calibration is in general faster and more secure than manual calibration:
●
There is no need to connect several standards manually. The number of
standards to be connected quickly increases with the number of ports.
●
Invalid calibrations due to operator errors (e.g. wrong standards or improper
connections) are almost excluded.
●
No need to handle calibration kit data.
●
The internal standards do not wear out because they are switched electronically.
Scope of this document
This User Manual gives a brief introduction to the unit’s connection and use.
For detailed information, refer to the help system of your network analyzer.
The R&S ZN-Z15x calibration units differ in the number of calibration ports
and the connector types. For an overview, refer to the data sheet.
2 USB Connection to the Network Ana-
lyzer
The calibration unit provides the following connectors:
●
A 5 pin ruggedized (R&S ZN-Z156) or a USB Type-B connector at the rear,
used to power-supply and control the unit. A USB cable for connection to the
network analyzer is provided with the calibration unit.
5User Manual 1337.5963.02 ─ 02
Page 6

R&S®ZN-Z15x
●
Two, four or six RF connectors numbered 1 to 6, to be connected to the test
Function of the Status LED
ports of the analyzer. The connector type is equal for all ports either of type N
(f), SMA (f) or 1.85 mm (f).
To connect the unit
1. Switch on and start up your network analyzer.
2. Wear a grounded wrist strap; see Chapter 1.2, "ESD Protective Measures",
on page 4.
3. Connect the USB Type-A connector of the USB cable to any of the USB TypeA connectors on the front or rear panel of the analyzer. You can also connect
the unit before switching on the analyzer.
4. Wait until the operating system has recognized and initialized the new hardware. After completing the initialization, the Status LED will switch to green.
5. The unit is ready to be used as outlined below.
3 Function of the Status LED
The LED on top of the Calibration Unit informs about the actual status of the
device. The different states have the following meaning:
OFF The calibration unit is not connected or defective.
Red The micro controller is running but there is no USB communication with the
network analyzer. With an actual network analyzer firmware, this status
should only appear for a short time after connecting the calibration unit.
Blinking red During the boot sequence of the network analyzer, the LED might show a fast
blinking red until the operating system is started. The LED switches between
red and green, until the firmware comes up.
Green The calibration Unit is ready use.
Blinking orange Data transfer between the calibration unit and the network analyzer. Do not
disconnect the USB cable.
Blinking blue Calibration in progress .
6User Manual 1337.5963.02 ─ 02
Page 7

R&S®ZN-Z15x
Performing an Automatic Calibration
4 Performing an Automatic Calibration
After connection and initialization, you can use the calibration unit as follows:
1. Connect n analyzer ports (n = 1 to 6, depending on your analyzer and calibration unit model and the number of ports to be calibrated) to n arbitrary ports of
the calibration unit.
2. Perform the automatic calibration for the selected number of ports using the
automatic calibration function of the analyzer. For details, refer to your analyzer’s help system.
3. Remove the test cables from the unit, connect your DUT instead and perform
calibrated measurements.
5 Accuracy Considerations
To ensure an accurate calibration, please observe the following items:
●
Do not use adaptors between the calibration unit and the test ports.
●
After connecting the unit to the USB port, allow for a sufficient warm-up time
(see data sheet) before starting the calibration.
●
To ensure best accuracy, the analyzer automatically reduces the source power
to –10 dBm. If the test setup contains a large attenuation, deactivate Automatic Power Reduction for Calibration Unit in the Calibration tab of the System Configuration dialog and ensure an input power of –10 dBm at the ports
of the calibration unit (please also refer to the data sheet).
The calibration type depends on the number of ports and of the analyzer type. If a
single port is calibrated, the analyzer uses a reflection calibration type (e.g. Full
One Port / Refl OSM). For 2 and more ports, you can choose among several calibration types.
7User Manual 1337.5963.02 ─ 02
Page 8

R&S®ZN-Z15x
User Characterization
6 User Characterization
The calibration unit offers the possibility to store multiple user characterization
data files either on its internal flash memory or on the microSD card (R&S ZNZ152, R&S ZN-Z153). This can be done by using the "Characterize Cal Unit"
function of your analyzer. For details, refer to the analyzer’s help system.
7 microSD Card
On the rear of the R&S ZN-Z152 and R&S ZN-Z153 calibration units is a microSD
card slot. The microSD card can be used to store user characterization data. The
factory data is always stored on the internal memory. It is recommended to use
only the microSD card that is shipped with the calibration unit. Before removing or
inserting the card, disconnect the USB connection of the calibration unit.
8 Mounting the Calibration Unit
To mount the calibration unit e.g. on a wafer prober, remove the elastic buffers on
the bottom of the housing. There are either two threads (R&S ZN-Z156) or four
threads for use of M2.5 screws.
8User Manual 1337.5963.02 ─ 02
 Loading...