

Page 1
R&S®RT-ZHD07/15/16/60
High Voltage Differential Probe
User Manual
(B0Iæ2)
1800.2588.02 ─ 01
User Manual
Page 2

This User Manual describes the following R&S®RT-ZHD models and options:
●
R&S®RT-ZHD07 (1800.2307.02)
●
R&S®RT-ZHD15 (1800.2107.02)
●
R&S®RT-ZHD16 (1800.2207.02)
●
R&S®RT-ZHD60 (1800.2007.02)
© 2018 Rohde & Schwarz GmbH & Co. KG
Mühldorfstr. 15, 81671 München, Germany
Phone: +49 89 41 29 - 0
Fax: +49 89 41 29 12 164
Email: info@rohde-schwarz.com
Internet: www.rohde-schwarz.com
Subject to change – Data without tolerance limits is not binding.
R&S® is a registered trademark of Rohde & Schwarz GmbH & Co. KG.
Trade names are trademarks of their owners.
The following abbreviations are used throughout this manual: R&S®RT-ZHD is abbreviated as R&S RT-ZHD. R&S®RTO is abbrevi-
ated as R&S RTO.
Page 3

R&S®RT-ZHD07/15/16/60
Contents
1 Product Description...............................................................................5
2 Putting into Operation......................................................................... 20
3 Characteristics of Differential Probes................................................28
4 Typical Characteristics of the R&S RT-ZHD...................................... 33
5 Maintenance and Service.................................................................... 41
6 Dimensions of the Probe.....................................................................43
7 Functional Check................................................................................. 44
Contents
3User Manual 1800.2588.02 ─ 01
Page 4

R&S®RT-ZHD07/15/16/60
Contents
4User Manual 1800.2588.02 ─ 01
Page 5
R&S®RT-ZHD07/15/16/60
1 Product Description
Product Description
Key Features and Key Characteristics
1.1 Key Features and Key Characteristics
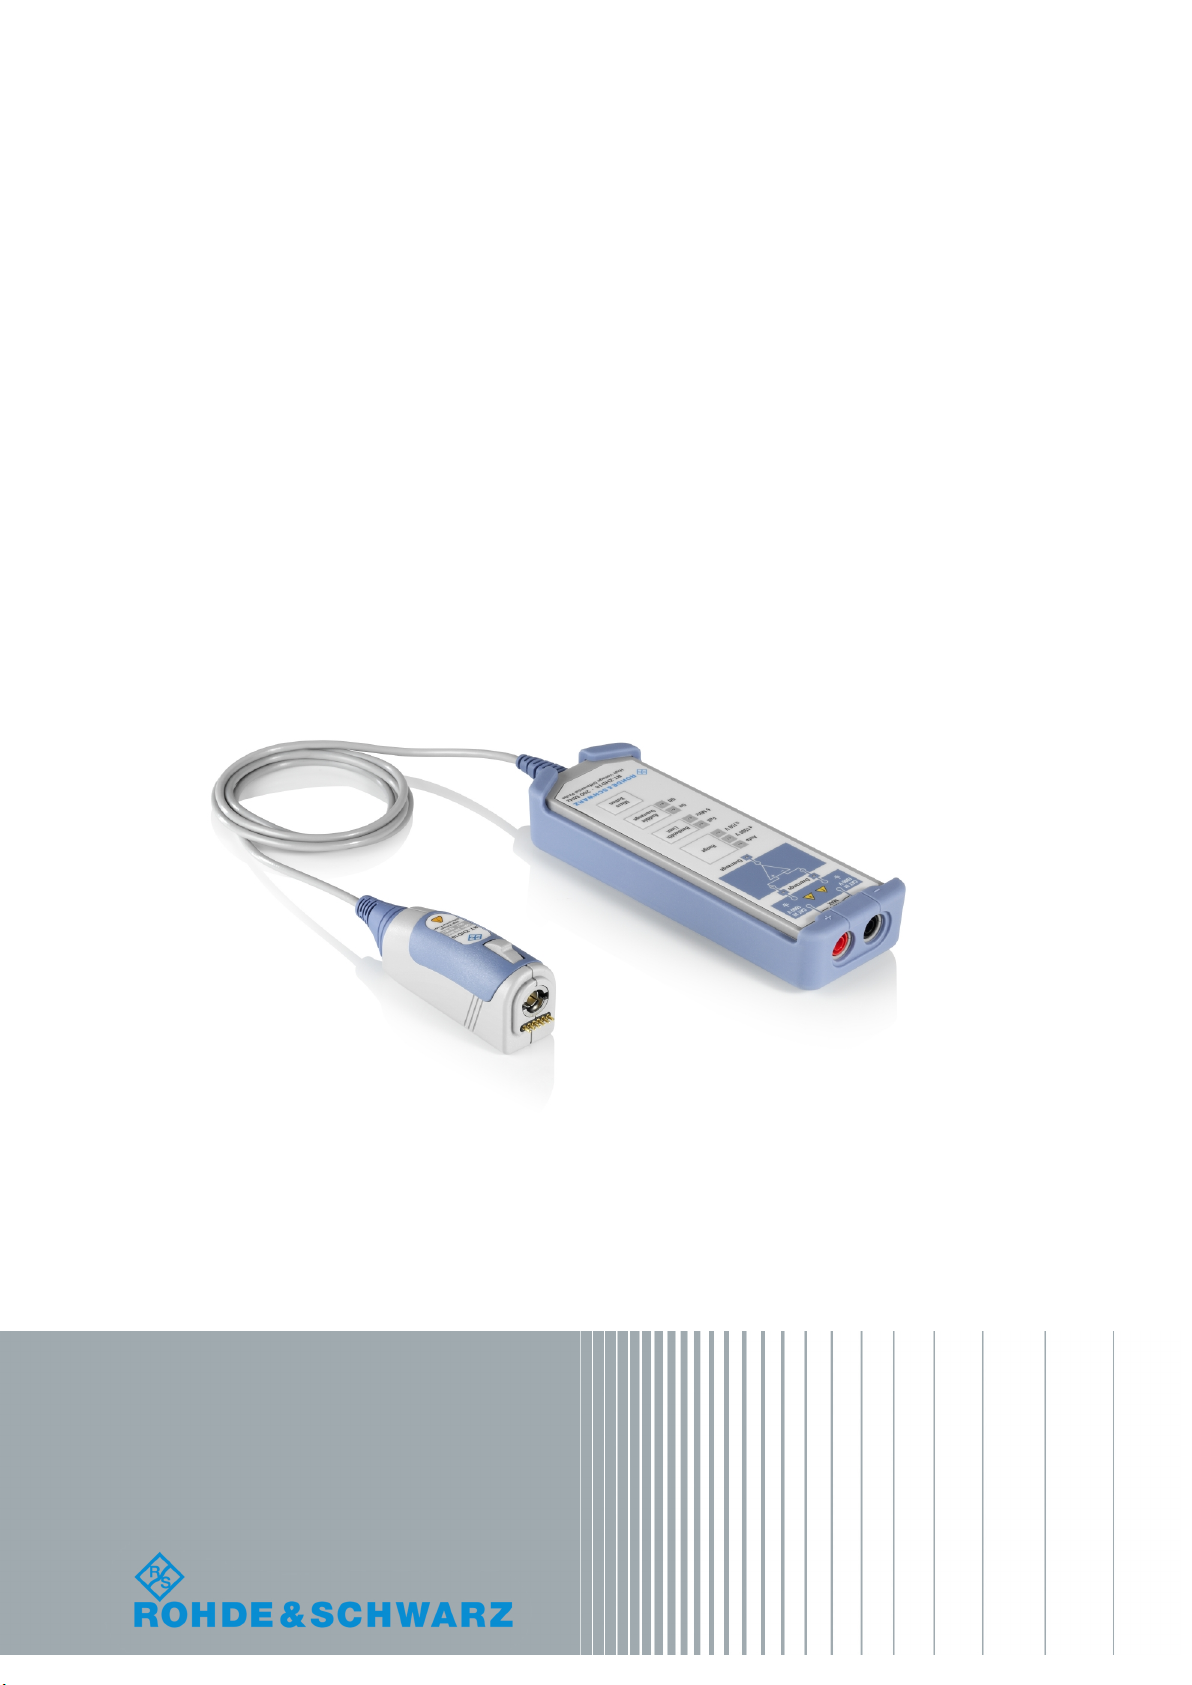
The R&S RT-ZHD high voltage differential probe is designed to safely measure high
voltage floating circuits using a grounded oscilloscope. The probe extends the measurement capability of oscilloscopes in measuring electronic power converters, inverters, motor speed controls, switch mode power supplies and many other applications.
The R&S RT-ZHD high voltage differential probe conforms to the safety requirements
for CAT III measurement instruments and pollution degree 2 according to IEC
61010-031. The maximum working voltage between each input lead and earth ground
applies for all attenuation settings.
Since the probe is equipped with Rohde & Schwarz probe interface, it can be connected to any Rohde & Schwarz base unit that is compatible with this interface. However
not all base units provide full software functionality.
1.1.1 Key Characteristics
The key characteristics of the probe are the following:
Figure 1-1: View of the probe
5User Manual 1800.2588.02 ─ 01
Page 6
R&S®RT-ZHD07/15/16/60
Table 1-1: Key characteristics
Product Description
Key Features and Key Characteristics
Parameter R&S RT-ZHD07 R&S RT-
ZHD15/16
Bandwidth DC - 200 MHz DC - 100 MHz
(RT-ZHD15)
DC - 200 MHz
(RT-ZHD16)
Dynamic range
(differential input)
Operating voltage window
(each pin to GND)
Differential Offset ±1000 V ±2000 V ±2000 V
Diff. input resistance 5 MΩ 10 MΩ 40 MΩ
Diff. input capacitance 2.5 pF 2 pF 2 pF
R&S ProbeMeter, measurement error < 0.1 % < 0.1 % < 0.12 %
Maximum input voltage to earth (each terminal) 300 V CAT III
Attenuation high: ±750 V ±1500 V ±6000 V
Attenuation low: ±75 V ±150 V ±600 V
±750 V ±1500 V ±6000 V
1000 V CAT III
600 V CAT II
600 V RMS /
4500 V
PK
1000 V RMS/
6800 V
PK
R&S RT-ZHD60
DC - 100 MHz
1000 V CAT III
1750 V RMS/
6800 V
PK
1.1.2 Key Features
Micro button
The micro button is located at the probe head. The micro button can be configured via
the base unit. By pressing it, you can remotely control different functions on the base
unit.
For details, see Chapter 2.6, "Micro Button", on page 25.
R&S ProbeMeter
The R&S ProbeMeter measures the DC voltage of the input signal directly at the probe
tip. It provides a continuous high-precision DC voltage measurement that is independent of the settings of the oscilloscope and in parallel to the time domain measurement.
If activated on the base unit, the measurement value is displayed on the screen of the
Rohde & Schwarz oscilloscope.
For details, see Chapter 2.8, "R&S ProbeMeter", on page 27.
The R&S ProbeMeter simultaneously records both differential and common mode DC
voltages.
6User Manual 1800.2588.02 ─ 01
Page 7

R&S®RT-ZHD07/15/16/60
Overrange indication
There are two different indications for overrange:
●
Input overrange indicates an overrange of an input signal against earth.
●
Output overrange lights up if the differential voltage is too high even if the voltage
to earth is within the specification.
Each overrange condition is indicated by an individual red LED (3 LEDs in total) and a
common buzzer signal. The buzzer can be switched off.
Switchable bandwidth limit
The R&S RT-ZHD contains a switchable analog low pass with a cutoff frequency of 5
MHz. For measurements with long leads, it is convenient to reduce overshot and noise
by activating the bandwidth limit.
Switchable attenuation
The R&S RT-ZHD has three attenuation modes:
Product Description
Key Features and Key Characteristics
●
"Auto": (default on start-up and preset)
The attenuation of the probe is automatically selected by the oscilloscope and
depends on the vertical scaling of the scope.
●
"Attenuation high"
You can select the attenuation of the probe and it is not changed by the vertical
scope settings. In this mode, you reach the maximum measurable differential voltages.
●
"Attenuation low"
You can select the attenuation of the probe and it is not changed by the vertical
scope settings. If the attenuation is changed from "high" to "low", the sensitivity is
changed by the factor of 10 and the measurable differential voltage is divided by a
factor of 10.
Press the range button of the probe to change the mode.
Attenuation setting vs. maximum measurable voltages
The attenuation setting has only an impact on the maximum measurable differential
voltage between the two input voltages, but does not reduce the maximum input voltage itself.
Data memory
The probe includes an integrated data memory with individual probe correction parameters (e.g. gain, delay, offset). These correction parameters are read out and processed by the Rohde & Schwarz oscilloscope. As a result, the probe offers a high
degree of accuracy so that additional calibration procedures are not required.
7User Manual 1800.2588.02 ─ 01
Page 8
R&S®RT-ZHD07/15/16/60
Product Description
Measurement Categories
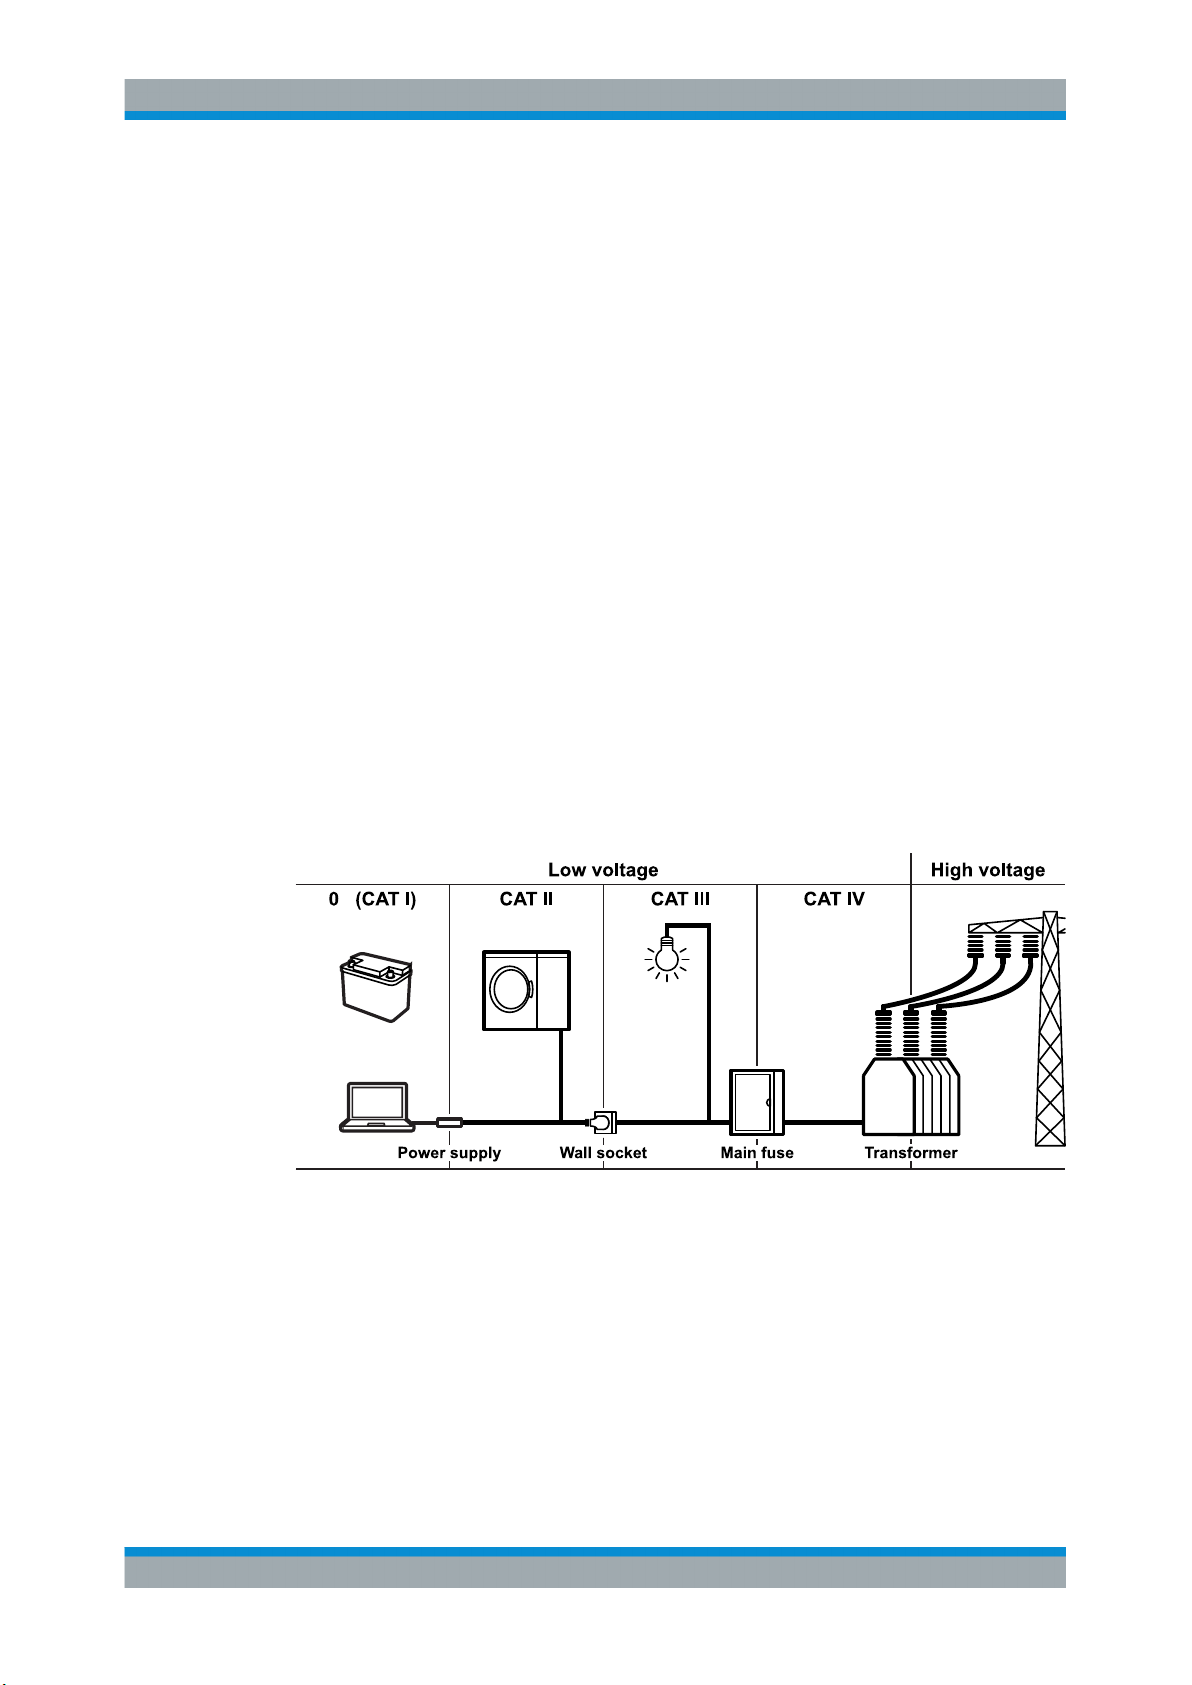
1.2 Measurement Categories
To ensure safe operation of measurement instruments, IEC 61010-2-030 defines particular safety requirements for testing and measuring circuits. The standard introduces
measurement categories that rate instruments on their ability to resist short transient
overvoltages that occur in addition to the working voltage of the instrument and can
exceed the working voltage many times over.
Measurement categories are distinguished as follows:
●
O - Instruments without rated measurement category
For measurements performed on circuits not directly connected to mains, for example, electronics, circuits powered by batteries, and specially protected secondary
circuits. This measurement category is also known as CAT I.
●
CAT II:
For measurements performed on circuits directly connected to the low-voltage
installation by a standard socket outlet, for example, household appliances and
portable tools.
●
CAT III:
For measurements performed in the building installation, such as junction boxes,
circuit breakers, distribution boards, and equipment with permanent connection to
the fixed installation.
●
CAT IV:
For measurements performed at the source of the low-voltage installation, such as
electricity meters and primary overcurrent protection devices.
Figure 1-2: Examples of measurement categories
The higher the category, the higher the expected transient overvoltage. Overvoltages
can overload a circuit and cause electrical and physical damage. Therefore, use the
measurement instrument only in electrical environments for which the instrument is
rated.
The measurement categories correspond to the overvoltage categories of the
IEC60664 standards. Working voltages stated in context with measurement categories
are always specified as effective voltages V (RMS) against earth ground.
8User Manual 1800.2588.02 ─ 01
Page 9

R&S®RT-ZHD07/15/16/60
Product Description
Pollution Degrees
1.3 Pollution Degrees
The pollution degree classifies the amount of dry pollution and condensation that may
occur in the environment. Products must be used only in the environment for which
they are rated.
●
Pollution Degree 1:
No pollution or only dry, nonconductive pollution occurs. The pollution has no
effect. Products of this category are generally encapsulated, hermetically sealed,
or used only in clean rooms.
●
Pollution Degree 2:
Normally only dry, nonconductive pollution occurs. Occasionally a temporary conductivity that is caused by condensation must be expected. Temporary condensation occurs only when the product is out of service. The typical location is an office,
laboratory or home environment.
●
Pollution Degree 3:
Conductive pollution, or dry, nonconductive pollution that becomes conductive due
to condensation. The typical environment are sheltered locations where neither
temperature nor humidity is controlled, for example, industrial manufacturing areas.
The location is usually protected from direct sunshine, rain, and direct wind.
●
Pollution Degree 4:
The pollution generates persistent conductivity caused by conductive dust, rain, or
snow. This is typical for outdoor locations.
9User Manual 1800.2588.02 ─ 01
Page 10
R&S®RT-ZHD07/15/16/60
Product Description
Precautions
1.4 Precautions
Shock hazard caused by high voltages
To avoid electric shock and personal injury, and to prevent damage to the probe or any
other products connected to it, observe the following instructions:
●
The probe and the measurement instrument must be grounded.
The probe is grounded with the shell of the BNC connector through the grounding
of the measurement instrument.
●
Never use the probe in measurement environments higher than measurement category III.
●
Do not apply effective voltages greater than the maximum rated voltage between
either input of the probe and earth ground, or between both inputs.
●
Make sure that all accessories comply with measurement category III. The accessory with the minor CAT value defines the CAT value of the whole measurement
chain.
●
Do not operate the probe without covers.
●
Do not use the probe in wet, damp or explosive atmospheres.
Make sure that the surface of the probe is completely dry before connecting the
inputs.
●
Avoid exposed circuitry. Do not touch exposed connections and components when
power is on.
Remove jewelry, watches, and other metallic objects.
●
Do not operate the probe if any part is damaged, or with suspected failures. If you
detect or suspect any damage to the probe, have it inspected by qualified service
personnel.
Operating only by electrically skilled persons
Voltages higher than 30 V RMS or 42 V peak or 60 V DC are regarded as hazardous
contact voltages. Make sure that only electrically skilled persons may use the R&S
ZHD for measurements on hazardous contact voltages. This working condition require
special education and experience to perceive risks and to avoid hazards which electricity can create.
10User Manual 1800.2588.02 ─ 01
Page 11
R&S®RT-ZHD07/15/16/60
Product Description
Unpacking the Instrument
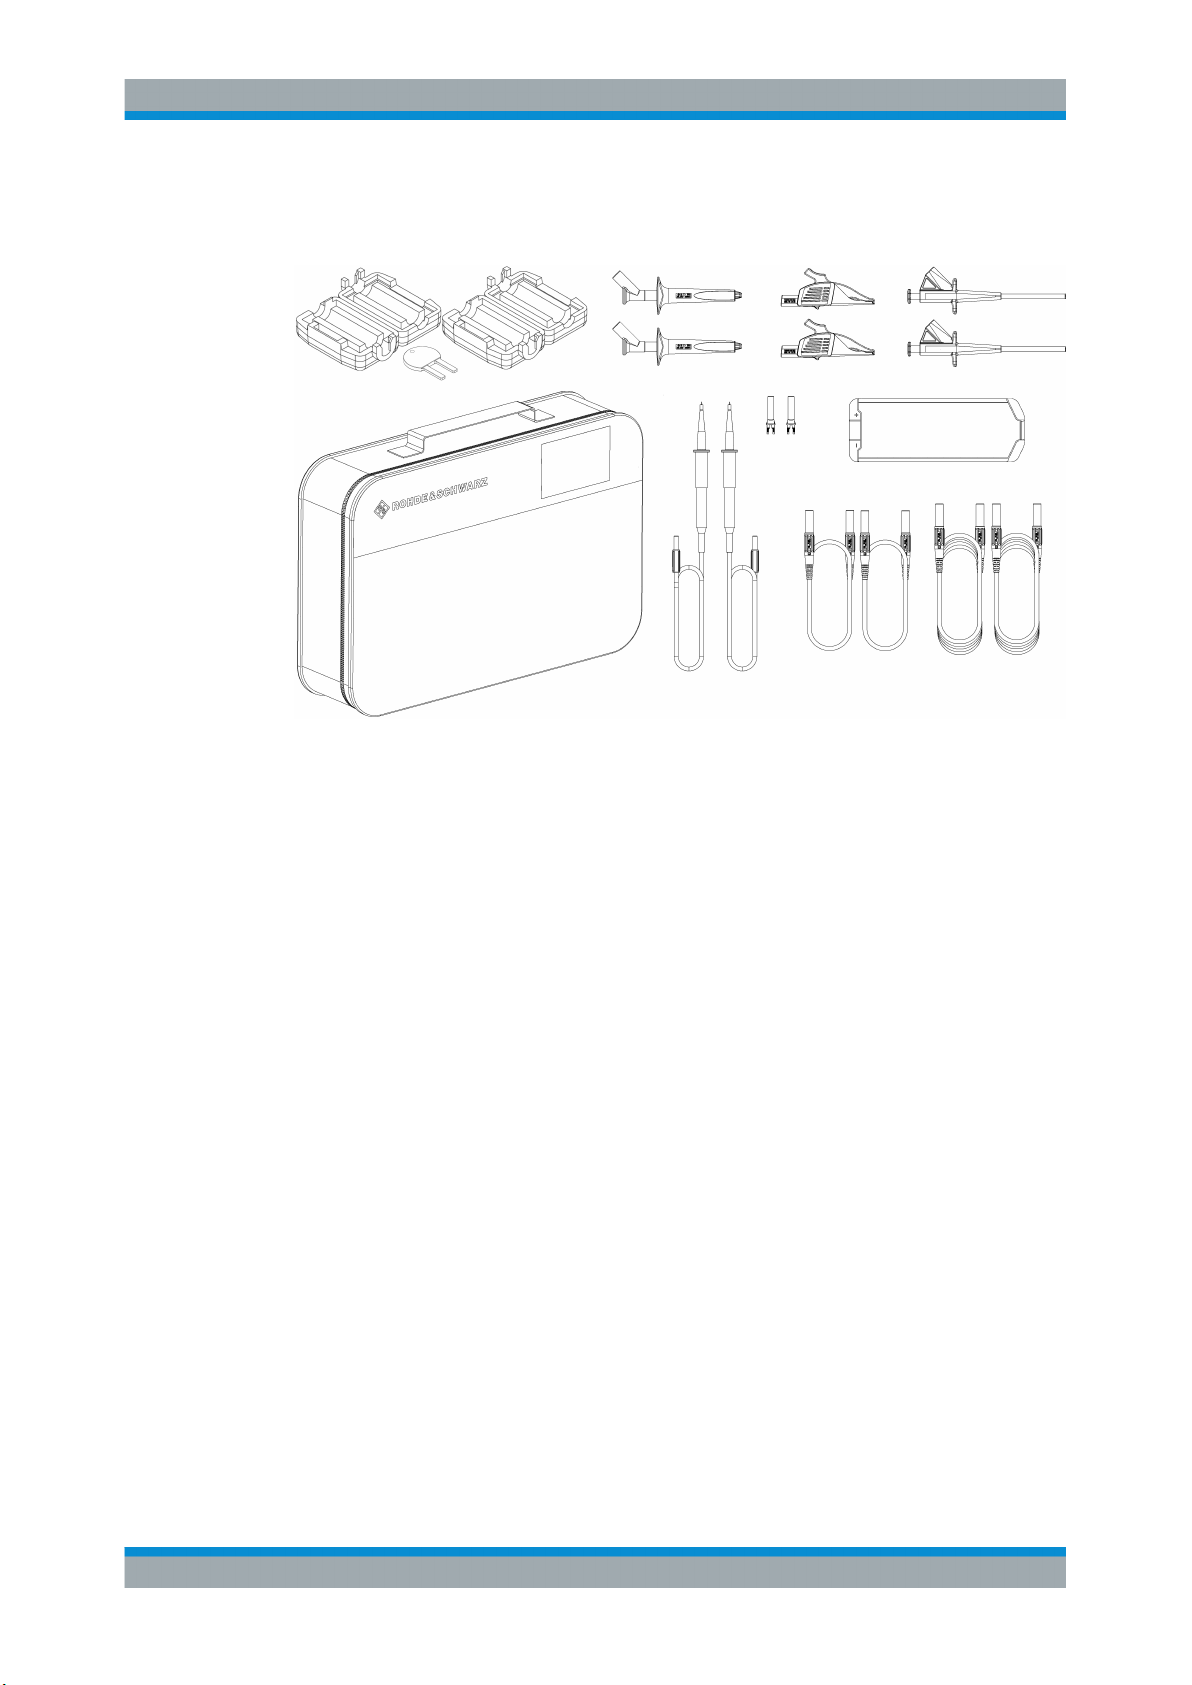
1.5 Unpacking the Instrument
Figure 1-3: R&S RT-ZHD probe with accessories
The following items are included in the delivery:
●
R&S RT-ZHD high voltage differential probe
●
Carrying case
●
Pince clip (black and red)
●
Safety Alligator clips (black and red)
●
Test clips (black and red)
●
Leads 17 cm (black and red)
●
Leads 100 cm (black and red)
●
Spade terminal (black and red)
●
Test Leads (black and red)
●
User manual
●
R&S RT-ZHD data sheet
●
Calibration certificate
●
Documented calibration values (if ordered)
●
Two hinged ferrite cores with opening key
1.5.1 Inspecting the Contents
●
Inspect the package for damage.
Keep a damaged package and the cushioning material until the contents have
been checked for completeness and the device has been tested.
11User Manual 1800.2588.02 ─ 01
Page 12

R&S®RT-ZHD07/15/16/60
If the packaging material shows any signs of stress, notify the carrier and your
Rohde & Schwarz service center. Keep the package and cushioning material for
inspection.
●
Inspect the probe.
If there is any damage or defect, or if the R&S RT-ZHD high voltage differential
probe does not operate properly, notify your Rohde & Schwarz service center.
●
Inspect the accessories.
If the contents are incomplete or damaged, notify your Rohde & Schwarz service
center.
Accessories supplied with the device are listed in Chapter 1.6.6, "Accessories and
Items", on page 17.
Product Description
Description of the Probe
1.6 Description of the Probe
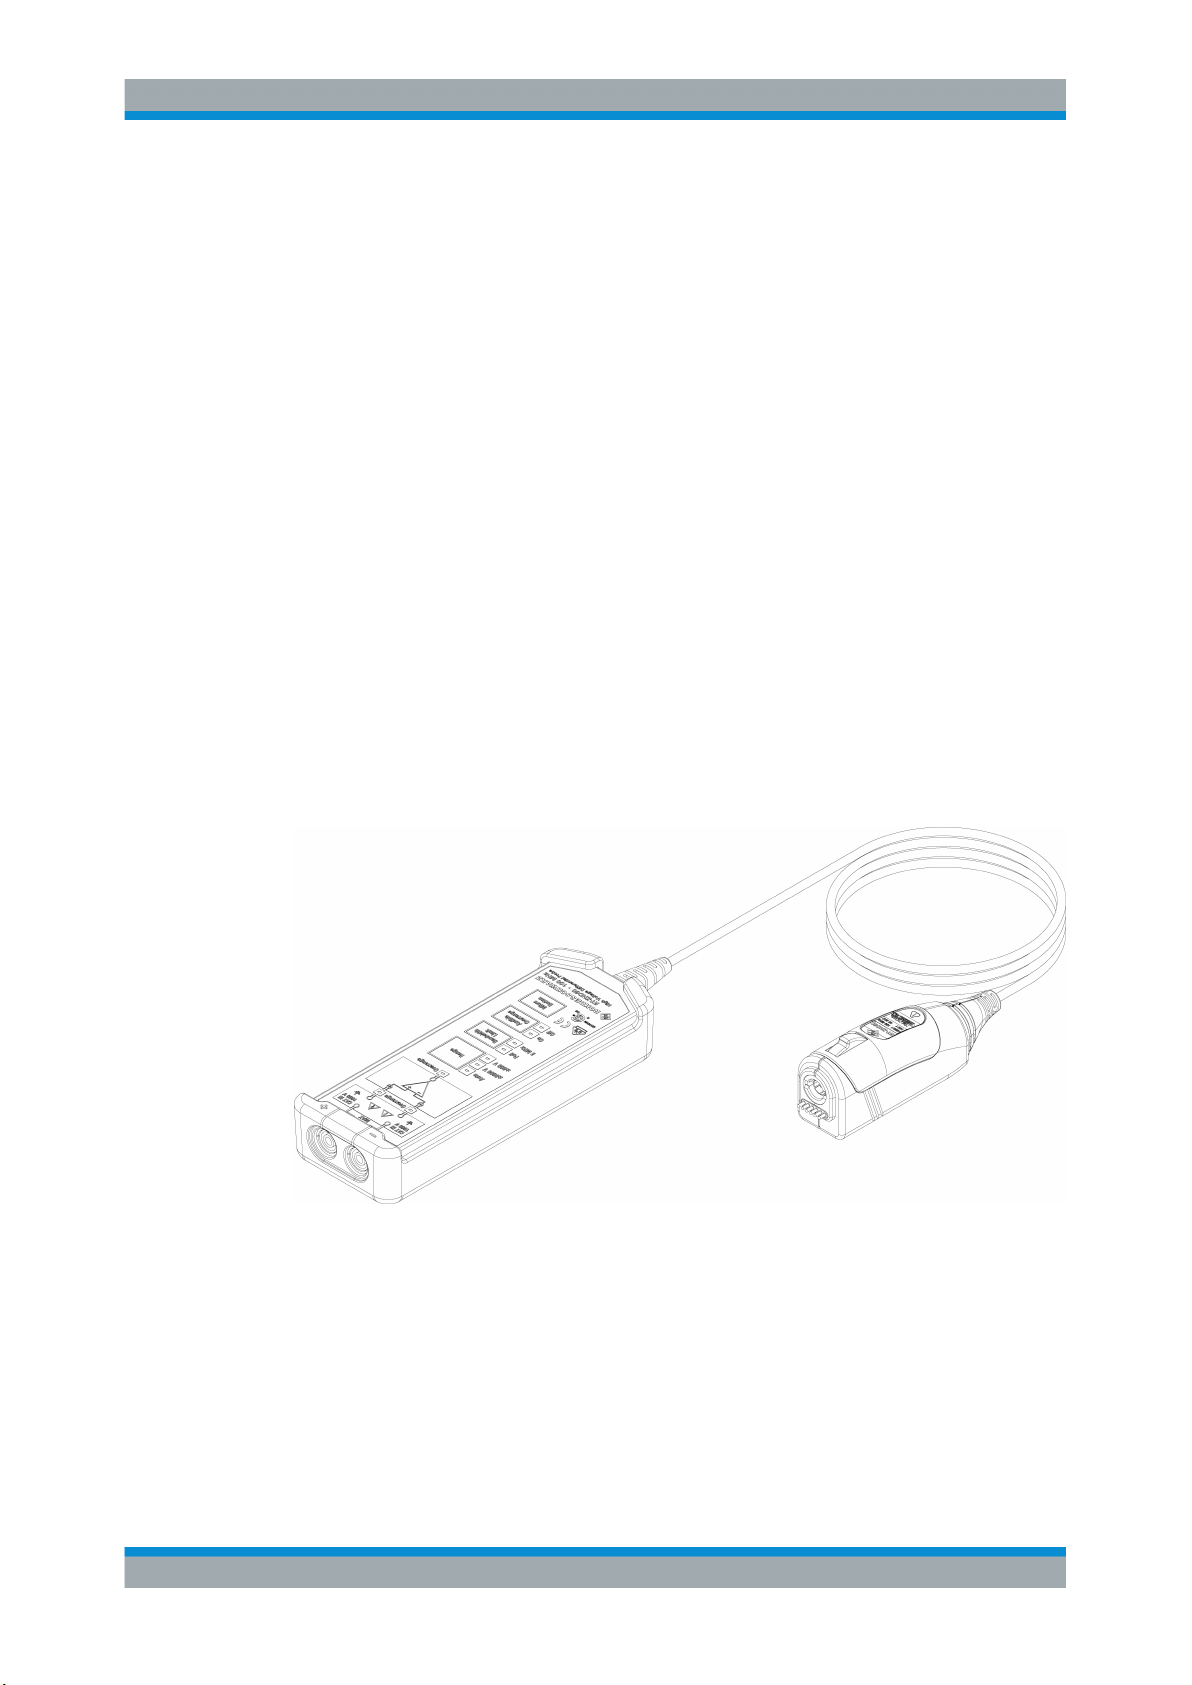
The R&S RT-ZHD consists of the probe control box, two input leads, a probe cable and
a probe box.
Figure 1-4: R&S RT-ZHD probe
1 = Probe control box
2 = Input leads
3 = Safety banana plug (4 mm)
4 = Probe cable
5 = Probe box
12User Manual 1800.2588.02 ─ 01
Page 13

R&S®RT-ZHD07/15/16/60
Product Description
Description of the Probe
1.6.1 Probe Control Box
Contains the high-voltage divider, the active differential amplifier and other electronic
components. All components are designed to ensure safe operation at hazardous contact voltages within the specified working voltage and measurement category. In particular, all air gaps and creeping distances comply with all current safety standards to
protect the user, the measurement object, and the probe against any harm or damage.
The active differential amplifier takes the difference between the positive and negative
signal input voltages. The probe transfers this difference signal to the oscilloscope.
Common mode voltages are rejected.
The controls and indicators of the probe control box are described in Chapter 1.6.5,
"Controls and Indicators", on page 15.
1.6.2 Probe Cable
Connects the probe control box to the probe box. Its length of around 150 cm allows
for a comfortable working distance to the base unit.
1.6.3 Input Leads
Provide flexible contact to the DUT even in confined physical conditions. The input
leads are pluggable and can easily be substituted by other measurement leads with a
4 mm safety banana plug. However, the maximum performance can only be achieved
with the delivered short leads (17 cm) in combination with the safety alligator clips. The
4 mm safety banana plugs can be used to contact the DUT directly, or to connect suitable contact accessories like the pince clip delivered with the probe.
See also: Chapter 2.4, "Connecting the Probe to the DUT", on page 23.
1.6.4 Probe Box
The probe box connects the probe and the oscilloscope via the Rohde & Schwarz
probe interface. The Rohde & Schwarz probe interface contains a male precision 7 mm
(276 mil) BNC connector and six pogo pin connectors. This interface provides the
required supply voltage and is also used to simultaneously transmit analog signals and
digital data. All the analog voltages required by the probe are generated in the probe
box. This approach ensures that it will be possible to operate future probes on any
base unit that features a Rohde & Schwarz probe interface.
13User Manual 1800.2588.02 ─ 01
Page 14
R&S®RT-ZHD07/15/16/60
Risk of interface damage
Connect the probe only to a base unit or an adapter that has a Rohde & Schwarz interface. Do not connect the probe to a commercially available BNC jack, as this can
cause irreparable damage to the interface. From the outside, the 7 mm coaxial connector looks like a standard BNC connector. However, it is constructed differently and is
capable of a significantly higher frequency limit.
Product Description
Description of the Probe
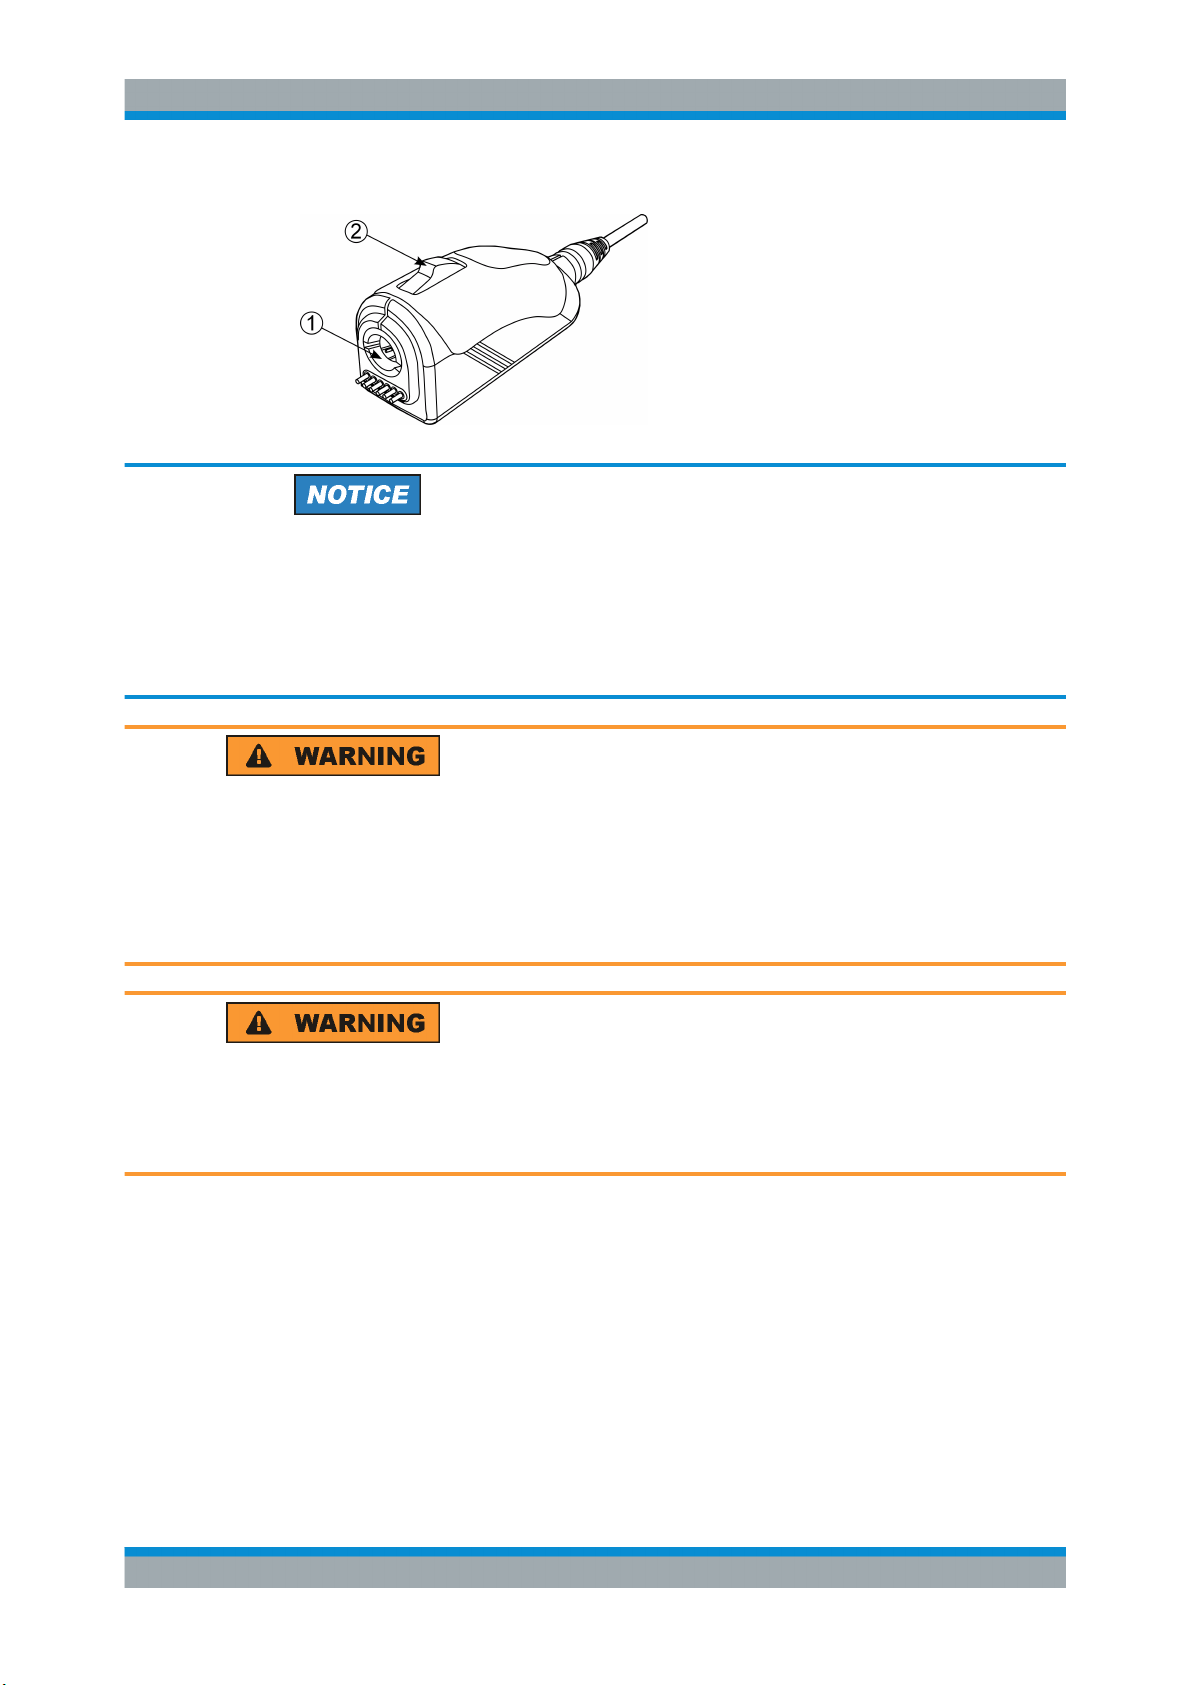
(1) Rohde & Schwarz probe interface with 7 mm
(276 mil) coaxial connector and 6 pogo pins
(2) Release knob
Shock hazard caused by high voltages
The attached input leads have a jacket wear indicator. If the input lead's jacket is
excessively worn, a different jacket color becomes visible. If you see this color indicator, do not use the probe lead.
If other input leads were used, make sure that they fulfil the safety requirements for
your measurement. Do not use 4 mm banana plugs without protection against contact.
Influence of the accessory to the CAT rating
The CAT rating goes along with the minor rating of the accessory used for a specific
measurement. E.g. the usage of the spade terminals reduces the CAT of the whole
measurement set to CAT II. This is independent from the used R&S RT-ZHD.
14User Manual 1800.2588.02 ─ 01
Page 15

R&S®RT-ZHD07/15/16/60
Product Description
Description of the Probe
1.6.5 Controls and Indicators
Figure 1-5: Probe control box
1 = Overrange indicators at each of the inputs
2 = Overrange indicator at the output
3 = Attenuation ratio switch
4 = Bandwidth limit 5 MHz
5 = Audible overrange on/off
6 = Micro Button (function programmable)
Attenuation ratio switch
Sets the attenuation dependent of the probe:
15User Manual 1800.2588.02 ─ 01
Page 16

R&S®RT-ZHD07/15/16/60
Table 1-2: Attenuation and maximum peak voltages of R&S RT-ZHD
Probe type Attenuation high (att. high) Attenuation low (att. low)
Product Description
Description of the Probe
Att. Max. Voltage Att. Max. Voltage
RT-ZHD07 250 : 1 750 V
RT-ZHD15/16 500 : 1 1500 V
RT-ZHD60 1000 : 1 6000 V
pk
pk
pk
25 : 1 75 V
50 : 1 150 V
100 : 1 600 V
pk
pk
pk
The setting with lower attenuation is characterized by less noise.
The selected attenuation does not influence the allowed working voltage, measurement category, and the usable common mode range. Thus, setting the attenuation
does not cause a hazardous situation or a measurement error due to inadmissible
common mode voltages.
Audible overrange on/off
Whenever an overrange condition occurs, the buzzer generates a continuous audible
alarm. This button toggles ON/OFF of the audible signal.
Overrange indicator at the input terminals
The overrange indicator lights red if the voltage of the single ended input signal to GND
exceeds the dynamic input range limit of the probe. In this case, the signal on the
probe output may not accurately represent the signal on the probe input.
Overrange indicator at the output terminal
The overrange indicator lights red if the voltage of the differential signal exceeds the
dynamic range limit at the output of the probe. In this case, the signal on the probe output may not accurately represent the signal on the probe input.
Micro Button
The micro button provides easy and quick access to important functions of the
Rohde & Schwarz oscilloscope. After a function has been assigned, pressing the micro
button remotely controls this specific function on the base unit. For example, "Continuous Run" and "AutoZero" are commonly assigned to the micro button.
To assign a function to the micro button with the Rohde & Schwarz oscilloscope:
► "Vertical" menu > "Probe Setup" > "Ch" tab > "Micro button action"
For more details on the available functions and settings for the micro button, refer to
the "User Manual" of the Rohde & Schwarz oscilloscope.
16User Manual 1800.2588.02 ─ 01
Page 17

R&S®RT-ZHD07/15/16/60
Product Description
Description of the Probe
1.6.6 Accessories and Items
1.6.6.1 Accessories Supplied
Table 1-3 shows the accessories that are supplied with the R&S RT-ZHD high voltage
differential probe.
Table 1-3: Supplied accessories
Item Quantity Description
2 Test clip
Maximum rating: 1000 V (RMS) CAT IV
2 Pincer clip Maximum rating: 1000 V
(RMS) CAT III
2 Safety Alligator clip Maximum rating:
1000 V (RMS) CAT III
2 Spade terminal
Maximum rating: 1000 V (RMS) CAT II
Opening ∅ 2 mm and 4.1 mm
(No protective shroud: Do not plug if
high voltage is on)
17User Manual 1800.2588.02 ─ 01
Page 18

R&S®RT-ZHD07/15/16/60
Item Quantity Description
Product Description
Description of the Probe
2 Long Leads (100cm)
Maximum rating: 1000 V (RMS) CAT III
2 Short Leads (17cm)
Maximum rating: 1000 V (RMS) CAT III
2 Test leads
Maximum rating: 1000 V (RMS) CAT III
1 Two hinged ferrite cores
With key for easier opening
1 Soft case with foam inlay
18User Manual 1800.2588.02 ─ 01
Page 19

R&S®RT-ZHD07/15/16/60
Shock hazard caused by high voltages
Always check the working voltage and measurement category of the accessory. If
these values are smaller than the values of the R&S RT-ZHD probe, make sure not to
exceed the accessory limits.
Product Description
Description of the Probe
1.6.6.2 Service Accessories
To order accessories for servicing the probe, contact your Rohde & Schwarz service
center. The following accessories are available:
Table 1-4: Service accessories
Item Description
R&S RT-ZK1 The service kit is used to calibrate the R&S RT-
R&S RT-ZHD Service Manual The service manual contains a detailed description
All service accessories and items can be ordered from your Rohde &Schwarz service
center.
ZHD, to make performance tests and for servicing.
The service kit includes all adapters and accessories to connect the probe to the required measuring
instruments
of the performance test to verify the probe specifications, and other important service procedures
19User Manual 1800.2588.02 ─ 01
Page 20

R&S®RT-ZHD07/15/16/60
2 Putting into Operation
The R&S RT-ZHD high voltage differential probe has been designed to withstand a
moderate amount of physical and electrical stress. Treat the probe with care. It can be
damaged if excessive force is applied to it.
Shock hazard caused by high voltages
To avoid electric shock and personal injury, and to prevent damage to the probe or any
other products connected to it, make sure that the shell of the BNC output connector
(see Chapter 1.6.4, "Probe Box", on page 13) is safely connected to protective ground.
Usually, the osilloscope is connected to protective ground and ensures the grounding
of the instrument and the probe.
Never connect the probe to the DUT before grounding is ensured!
The probe cable and the probe control box should be kept away from hazardous voltages.
Putting into Operation
Risk of device damage due to physical stress
Prevent the probe from receiving mechanical shock.
Always handle the probe by the probe tip module or probe box.
Avoid putting excessive strain on the probe cable or exposing it to sharp bends.
Store the probe in a shock-resistant case such as the foam-lined shipping case that
came with the probe.
Avoid spilling liquids on the probe.
Risk of device damage due to excess power
Voltages above the specified limits of the R&S RT-ZHD high voltage differential probe
may damage the probe. Do not exceed the specified limits.
During operation, the probe slightly heats up. This is normal behavior and not a sign of
malfunction.
20User Manual 1800.2588.02 ─ 01
Page 21

R&S®RT-ZHD07/15/16/60
Putting into Operation
Connecting the Probe to the Oscilloscope
2.1 Installation
This section introduces the use of the R&S RT-ZHD high voltage differential probe,
which has been designed for use with Rohde & Schwarz oscilloscopes.
Supported oscilloscopes
All settings of the base unit described in this section refer to Rohde & Schwarz oscilloscopes. These base units support the full software functionality of the R&S RT-ZHD
probes. If any other oscilloscope is used, differences in settings and menu navigation
may be possible.
For further information see the data sheet.
2.2 Connecting the Probe to the Oscilloscope
The R&S RT-ZHD high voltage differential probe has been designed for use withRohde & Schwarz oscilloscopes.
1. Connect the probe box (1) to the Rohde & Schwarz probe interface of the base unit
(2). The probe snaps in when connected properly to the port.
Figure 2-1: Connecting the probe to the Rohde
&
Schwarz oscilloscope
2. To disconnect, press the release button (3) and pull the probe box away from the
front panel of the base unit.
3. Ensure that the R&S RT-ZHD and the scope working properly by checking the performance, see Chapter 7, "Functional Check", on page 44.
In this example, the scope must show a rectangle signal with about 1 VPK.
21User Manual 1800.2588.02 ─ 01
Page 22

R&S®RT-ZHD07/15/16/60
Putting into Operation
Identification of the Probe
Figure 2-2: Checking the performance of R&S RT-ZHD and the R&S RTO
2.3 Identification of the Probe
When the probe is connected to the oscilloscope, the oscilloscope recognizes the
probe and reads out the probe-specific parameters.
22User Manual 1800.2588.02 ─ 01
Page 23

R&S®RT-ZHD07/15/16/60
The oscilloscope settings for attenuation and offset are automatically adjusted.
As soon as the probe is connected to the oscilloscope and the settings are adjusted,
the waveform is shown for the channel to which the probe is connected.
1. On the "Vertical" menu, select "Probe Setup".
2. On the left side of the "Setup" tab, select the channel to which the probe is connected.
The complete probe information is shown on the "Probe Attributes" tab.
Putting into Operation
Connecting the Probe to the DUT
2.4 Connecting the Probe to the DUT
Shock hazard caused by high voltages
Before connecting the probe to the test circuit, make sure that probe is connected to
the measuring instrument and the instrument is properly grounded.
Ensure a stable connection between the DUT and the probe. Switch off the test circuit
while connecting and disconnecting the probe leads.
The finger guard provides protection. Keep your fingers behind the finger guard.
1. Connect the clips to the input leads (4 mm safety banana plugs).
2. Do not touch the unsafe area during a measurement.
23User Manual 1800.2588.02 ─ 01
Page 24

R&S®RT-ZHD07/15/16/60
Putting into Operation
Reducing noise induction
Figure 2-3: Hand held / unsafe areas
3. Connect the clips to the DUT.
4. Connect the input leads to the probe control box (4 mm safety banana jack).
Shock hazard caused by high voltages
Disconnect the probe from the DUT before disconnecting the probe from the measuring instrument.
Keep the probe control box and the probe cable away from the circuit being measured.
2.5 Reducing noise induction
Twist the input leads to cancel noise that is induced into the input leads.
Input leads that form a large loop area pick up any radiated electromagnetic field that
passes through the loop. The fields induce noise in the input leads that appears as a
differential mode signal. Twisting the leads minimizes the loop area.
24User Manual 1800.2588.02 ─ 01
Page 25

R&S®RT-ZHD07/15/16/60
Figure 2-4: Leads, untwisted
Figure 2-5: Leads, twisted
Putting into Operation
Offset Compensation
2.6 Micro Button
The micro button provides easy and quick access to important functions of the
Rohde & Schwarz oscilloscope. After a function has been assigned, pressing the micro
button remotely controls this specific function on the base unit. For example, "Continuous Run" and "AutoZero" are commonly assigned to the micro button.
To assign a function to the micro button with the Rohde & Schwarz oscilloscope:
► "Vertical" menu > "Probe Setup" > "Ch" tab > "Micro button action"
For more details on the available functions and settings for the micro button, refer to
the "User Manual" of the Rohde & Schwarz oscilloscope.
2.7 Offset Compensation
The offset compensation function can compensate a DC component of the input signal
between the positive and negative input, even in front of the active amplifier in the
probe control box. This is particularly helpful if single-ended signals are measured with
a differential probe, for example, with the negative input socket connected to ground.
These signals often have a superimposed DC component, which can be compensated
using the offset compensation on the probe.
25User Manual 1800.2588.02 ─ 01
Page 26

R&S®RT-ZHD07/15/16/60
Putting into Operation
Offset Compensation
Figure 2-6: Differential offset compensation voltage for single-ended measurement (negative signal
Only differential DC offsets can be compensated. It is
socket connected to ground e.g. RT-ZHD15 attenuation low)
not possible to compensate for
common mode DC offsets using the offset compensation function. For a definition of
differential and common mode input voltages, see Chapter 3, "Characteristics of Differ-
ential Probes", on page 28.
To set the offset compensation on the front panel
1. Press the vertical POSITION knob until the "Offset" setup is shown on the display.
2. Turn the vertical POSITION knob.
To set the offset compensation using the probe menu
1. On the "Vertical" menu, select "Probe Setup".
2. Select the channel.
3. Tap the offset field you want to adjust.
Additionally, the probe offers automatic offset compensation by means of the micro
button. A single push of the button compensates the DC component of the measurement signal which is particularly helpful during measurements of input signals with different DC offsets (see also Chapter 2.6, "Micro Button", on page 25).
To assign "Set offset to mean" to the micro button
► "Vertical" menu > "Probe Setup" > "Ch" tab > "Micro button action" = "Set offset to
mean"
For more details on setting the offset compensation voltage, refer to the "User Manual"
of the R&S oscilloscope.
26User Manual 1800.2588.02 ─ 01
Page 27

R&S®RT-ZHD07/15/16/60
Putting into Operation
R&S ProbeMeter
2.8 R&S ProbeMeter
The integrated voltmeter can measure DC voltages with high precision compared to
the oscilloscope's DC accuracy. The DC measurement is performed continuously and
in parallel to the time domain measurement of the oscilloscope. High-precision measurements are achieved through immediate digitization of the measured DC voltage at
the probe control box.
The R&S ProbeMeter measures the differential and common mode DC voltages simultaneously and without reconnecting the probe. For a definition of differential and common mode input voltages, see Chapter 3, "Characteristics of Differential Probes",
on page 28.
To activate the R&S ProbeMeter:
► "Vertical" menu > "Probe Setup" > "Ch" tab > "ProbeMeter" = 'on'
After the R&S ProbeMeter has been activated, the measured values are displayed on
the screen of the oscilloscope.
Advantages of the R&S ProbeMeter:
●
Enables the check of DC voltages with different levels without having to adjust the
measurement range of the oscilloscope.
●
Provides a simple means of setting the oscilloscope's trigger level and vertical scaling if a waveform is not visible.
●
Offers a unique way to detect unexpected or inadmissible common mode voltages,
e.g. bias points - measurement of common mode DC voltages without reconnecting the probe.
●
Independent of oscilloscope settings for offset, position, vertical scale, horizontal
scale, and trigger.
●
Independent of probe settings for measurement mode and gain
●
True DC measurement (integration time > 100 ms), not mathematical average of
displayed waveform.
●
Measurement range ±maximum allowable voltage +offset compensation setting.
Maximum measurement accuracy is achieved when offset compensation is
switched off.
●
The measurement is independent from the scale of the oscilloscope.
●
High measurement accuracy and low temperature sensitivity.
27User Manual 1800.2588.02 ─ 01
Page 28

R&S®RT-ZHD07/15/16/60
2
np
cm
npin
VV
V
VVV
cmvcminvdmout
VAVAV
3 Characteristics of Differential Probes
A differential probe has three sockets: the positive signal socket (+), the negative signal socket (-), and the signal output which is connected to ground.
Characteristics of Differential Probes
Figure 3-1: Input voltages on a differential probe
Multiple input voltages can be defined for a differential probe:
●
Differential mode input voltage (Vin, Vdm)
Voltage between the positive and negative signal sockets
●
Positive single-ended input voltage (Vp)
Voltage between the positive signal socket and the ground socket
●
Negative single-ended input voltage (Vn)
Voltage between the negative signal socket and the ground socket
●
Common mode input voltage (Vcm)
Mean voltage of positive and negative signal sockets referred to the ground socket,
respectively
Two of these voltages are independent values, the other two can be calculated:
Typically, the differential and the common mode input voltages are used to describe
the behavior of a differential probe.
The output voltage V
posing the voltages generated from the differential mode input voltage and from the
common mode input voltage:
, which is displayed on the base unit, is obtained by superim-
out
28User Manual 1800.2588.02 ─ 01
Page 29

R&S®RT-ZHD07/15/16/60
vcm
vdm
A
A
CMRR
Characteristics of Differential Probes
Dynamic Range and Operating Voltage Window
In this equation, A
is the amplification of the differential mode input voltage and A
vdm
is the amplification of the common mode input voltage.
An ideal differential probe is expressed as A
= 1 and A
vdm
= 0. In this case, the dis-
vcm
played voltage exactly equals to the differential input voltage Vin between the two signal sockets, and the common mode input voltage is suppressed.
3.1 Common Mode Rejection Ratio (CMRR)
An ideal differential probe outputs a voltage that depends only on the differential input
voltage Vin between positive and negative input, and suppresses the common mode
voltages. This is equivalent to an infinite common mode rejection ratio (CMRR).
In contrast, real probes have a finite CMRR, resulting in a small part of the common
mode voltage visible in the output signal. The CMRR is defined as the ratio of the
amplifications of differential and common mode input signals:
Example:
If a differential input voltage of 1 V yields an output voltage of 10 mV (A
a common mode input voltage of 1 V an output voltage of 0.1 mV (A
CMRR is 100 (40 dB).
= 0.01) and
vdm
= 0.0001), the
vcm
vcm
A high CMRR is important if significant common mode signals are encountered at the
probe input, for example:
●
DC voltages for setting the operating points of active DUTs
●
Different ground levels of probe and DUT, e.g. floating DUTs
●
An interference that couples equally to both conductors of a differential transmission line
●
Probing on ground-referenced signals. In this case, the common mode component
is always equal to half of the input voltage.
3.2 Dynamic Range and Operating Voltage Window
Two separate specifications are necessary to characterize the permissible input voltage range of a differential voltage probe:
●
The dynamic range (or "differential mode range") designates the maximum differential voltage Vin that may occur between the positive and negative signal pin.
●
At the same time, the two voltage values at each of the two signal pins Vp and V
referenced to the common ground must not exceed a specific limit value. This limi-
n
29User Manual 1800.2588.02 ─ 01
Page 30

R&S®RT-ZHD07/15/16/60
tation is referred to as the operating voltage window (some manufacturers also use
the less precise term "common mode range" for the same parameter).
If one of these ranges is exceeded, an unwanted signal clipping may occur.
Characteristics of Differential Probes
Dynamic Range and Operating Voltage Window
Figure 3-2: Dynamic range and operating voltage window for both attenuation ratios 50:1 and 500:1
(e.g. R&S RT-ZHD15)
The dependencies of dynamic range, operating voltage window and attenuation ratio
are shown in Figure 3-2. The dynamic range between the positive and negative signal
pins depends on the selected attenuation. The operating voltage window between
each of the signal pins and common ground is not affected by the attenuation.
The Figure 3-3 shows several examples for permissible and impermissible inputs.
30User Manual 1800.2588.02 ─ 01
Page 31

R&S®RT-ZHD07/15/16/60
Characteristics of Differential Probes
Dynamic Range and Operating Voltage Window
Figure 3-3: Signal curves (e.g. R&S RT-ZHD15)
a) = Two signals of ±750 V and opposing phase are applied to positive and negative inputs. At the peaks,
the probe is driven with an input voltage of ±1500 V between the positive and negative signal pin. The
dynamic range limit is reached.
b) = The negative signal pin is connected to ground, the positive pin is driven with an input voltage of
±1500 V. Dynamic range and operating voltage window are used completely. Note that the oscilloscope
displays the same waveform as with example a).
c) = Dynamic range limit is exceeded. The oscilloscope displays a clipped signal.
d) = Operating voltage window is exceeded. The oscilloscope displays a clipped signal.
Signal clipping
Only differential input signals are detected by the probe and displayed by the base unit.
The probe suppresses common mode signals. Therefore, the probe indicates an overvoltage at the input terminals by LED and by a buzzer signal (can be switched off).
Clipping of HF-signals
The overvoltage indication works well on DC-signals. AC-signal (frequencies above
some kHz) are not covered by the overvoltage indication.
31User Manual 1800.2588.02 ─ 01
Page 32

R&S®RT-ZHD07/15/16/60
Characteristics of Differential Probes
Maximum Voltage Input
3.3 Maximum Voltage Input
The R&S RT-ZHD high voltage differential probe is rated for CAT III environments with
following maximum working voltages between each input lead and earth ground.:
●
R&S RT-ZHD07:
– 300 V CAT III
– 600 V CAT II
– 600 V RMS / 4500 V
●
R&S RT-ZHD15:
PK
– 1000 V CAT III
– 1000 V RMS / 6800 V
●
R&S RT-ZHD16:
PK
– 1000 V CAT III
– 1000 V RMS / 6800 V
●
R&S RT-ZHD60:
PK
– 1000 V CAT III
– 1750 V RMS / 6800 V
PK
Thus, it can be used to measure electrical devices or installations of categories 0 (I), II,
or III if the effective value of the measured voltage against earth ground does not
exceed the maximum working voltage.
See also: Chapter 1, "Product Description", on page 5.
The rating ensures that the probe is protected against short transient overvoltages as
long as the maximum working voltage limit is observed.
Shock hazard caused by high transient overvoltages
Never use the R&S RT-ZHD probe for measurements in a higher category or at higher
effective working voltages than specified!
Do not use the probe to measure effective working voltages higher than the specified
voltage between each input lead and earth ground even if the effective differential voltage is lower than the specified voltage.
The maximum working voltage is derated for higher frequencies. Refer to the R&S RTZHD data sheet for the specification of voltage derating over frequency.
32User Manual 1800.2588.02 ─ 01
Page 33

R&S®RT-ZHD07/15/16/60
4 Typical Characteristics of the R&S RT-ZHD
The R&S RT-ZHD differential probe provides an electrical connection between the
DUT and the oscilloscope. The probe transfers the voltage of the electrical signal tapped off the DUT to the oscilloscope, where it is displayed graphically. Although a probe
has a wide variety of specifications, these specifications can be grouped into two
classes of basic requirements:
●
High signal integrity of the transferred signal:
With an ideal probe, the output signal that is transferred to the base unit would be
identical to the input signal between the probe tips, and signal integrity would be
extremely high. Every real probe, however, transfers the input signal in altered
form. A good probe causes only minimum alterations. How the probe can fulfill this
requirement is mainly determined by its bandwidth and CMRR.
●
Low loading of the input signal:
Every probe is a load for the signal to be measured. This means that the signal to
be measured changes when the probe is connected. A good probe causes only a
minimum change to the signal, so that the function of the DUT is not adversely
affected. How the probe can fulfill this requirement is mainly determined by its input
impedance.
Typical Characteristics of the R&S RT-ZHD
Improve the Signal Integrity
The parameters of a R&S RT-ZHD probe are specified for the short leads and the
safety alligator clips between the probe and the DUT. With longer or shorter connections, the connection inductance has a significant effect on the measurement.
4.1 Improve the Signal Integrity
To improve the signal integrity, apply the two hinged ferrite cores. Snap in the ferrites
to the probe cable near to the probe control box.
Figure 4-1: Probe cable with additional hinged ferrite cores
33User Manual 1800.2588.02 ─ 01
Page 34

R&S®RT-ZHD07/15/16/60
Typical Characteristics of the R&S RT-ZHD
Bandwidth
Figure 4-2: Improvement with additional hinged ferrite cores
In Figure 4-2, you can see the improvement in the signal integrity. The curve "Step with
ferrite" is artificially delayed for 8 ns for a better view. The ferrite cores do not add any
additional delay. The most significant improvement can be seen with the R&S RTZHD60 in the "Mode">"Attenuation High" and 5 MHz low pass (LP) on.
4.2 Bandwidth
The bandwidth (BW) of a probe is one of its specific parameters. The bandwidth of the
probe and the bandwidth of the base unit together form the system bandwidth. The following explanations refer to the probe itself, but can also be applied to the entire system.
34User Manual 1800.2588.02 ─ 01
Page 35

R&S®RT-ZHD07/15/16/60
Typical Characteristics of the R&S RT-ZHD
Bandwidth
Figure 4-3: Amplitude frequency response of the R&S RT-ZHD (Attenuation 'High')
Figure 4-4: Amplitude frequency response of the R&S RT-ZHD (Attenuation 'Low')
The bandwidth:
●
Specifies the maximum frequency at which a purely sinusoidal signal is still trans-
ferred at 70 % (–3 dB) of its amplitude, see Figure 4-3.
35User Manual 1800.2588.02 ─ 01
Page 36

R&S®RT-ZHD07/15/16/60
●
Specifies the transferable spectrum for other waveforms. E.g., with square wave
signals, the fifth harmonic should still be within the bandwidth for a high signal
integrity.
●
Determines the minimum measurable signal rise time. The rise time t
probe is inversely proportional to its bandwidth. The following approximation
applies:
Typical Characteristics of the R&S RT-ZHD
Step Response
of the
rise
4.3 Step Response
In addition to bandwidth, a constant amplitude frequency response of the probe is decisive for high signal integrity. All frequency components are transferred with the same
gain so that the input signal is displayed without distortion.
Figure 4-5 and Figure 4-6 show a typical step response of all R&S RT-ZHD differential
probes up to 30 ns. The propagation delay is normalized to the beginning of the step.
The amplitude is normalized to the steady state value.
Figure 4-5: Step response of the R&S
RT-ZHD (Attenuation 'High')
36User Manual 1800.2588.02 ─ 01
Page 37

R&S®RT-ZHD07/15/16/60
Typical Characteristics of the R&S RT-ZHD
Step Response
Figure 4-6: Step response of the R&S RT-ZHD (Attenuation 'Low')
The behavior of all R&S RT-ZHD is similar for more than 30 ns after a step. The curves
in Figure 4-7 and Figure 4-8 show the step response of the R&S RT-ZHD16 probe, as
a typical example.
Figure 4-7: Typical step response e.g. of the R&S
RT-ZHD16 (Attenuation 'High')
37User Manual 1800.2588.02 ─ 01
Page 38

R&S®RT-ZHD07/15/16/60
Typical Characteristics of the R&S RT-ZHD
CMRR
Figure 4-8: Typical step response e.g. of the R&S RT-ZHD16 (Attenuation 'Low')
4.4 CMRR
The CMRR is good for low-frequency signals, but it continuously decreases for higher
frequencies. Therefore, the CMRR is usually specified as a function of frequency.
The figure below shows a typical CMRR with a symmetrical connection for an R&S RTZHD differential probe. An asymmetrical connection to the test point can decrease the
CMRR. To achieve the best possible CMRR, the connection to the DUT should always
be as symmetrical as possible.
38User Manual 1800.2588.02 ─ 01
Page 39

R&S®RT-ZHD07/15/16/60
Typical Characteristics of the R&S RT-ZHD
CMRR
Figure 4-9: Typical CMRR of the R&S RT-ZHD probe as a function of frequency (Attenuation 'High')
Figure 4-10: Typical CMRR of the R&S RT-ZHD probe as a function of frequency (Attenuation 'Low')
39User Manual 1800.2588.02 ─ 01
Page 40

R&S®RT-ZHD07/15/16/60
Typical Characteristics of the R&S RT-ZHD
Signal Loading of the Input Signal
4.5 Signal Loading of the Input Signal
The previous section explained the transfer function and step response of the probe.
This section describes how the probe influences the input signal. The input signal loading caused by the probe is determined by its input impedance. In general, the probe
causes only low signal loading because its input impedance is usually much greater
than the source impedance of the test circuit.
The resulting input impedance versus frequency is indicated in Figure 4-11.
Figure 4-11: Magnitude of the single-ended input impedance of the R&S RT-ZHD probe as a function
of frequency
40User Manual 1800.2588.02 ─ 01
Page 41

R&S®RT-ZHD07/15/16/60
5 Maintenance and Service
Maintenance and Service
Cleaning
5.1 Service Strategy
Like all Rohde & Schwarz devices, Rohde & Schwarz probes are of high quality and
require only minimum service and repair. However, if the probe needs to be serviced,
contact your Rohde & Schwarz service center. Return a defective probe to the Rohde
& Schwarz service center for diagnosis and exchange.
You can return the R&S RT-ZHD high voltage differential probe for calibration. The service personnel will perform the required tests.
5.2 Returning the Probe for Servicing
Use the original packaging to return your Rohde & Schwarz probe to your
Rohde & Schwarz service center. A list of all service centers is available on:
www.services.rohde-schwarz.com.
If you cannot use the original packaging, consider the following:
1. Use a sufficiently sized box.
2. Protect the probe from damage and moisture (e.g. with bubble wrap).
3. Use some kind of protective material (e.g. crumpled newspaper) to stabilize the
probe inside the box.
4. Seal the box with tape.
5. Address the package to your nearest Rohde & Schwarz service center.
5.3 Cleaning
Device damage caused by cleaning agents
Cleaning agents contain substances that may damage the device; for example, solvent
may damage the labeling or plastic parts.
Never use cleaning agents such as solvents (thinners, acetone, etc.), acids, bases or
other substances
41User Manual 1800.2588.02 ─ 01
Page 42

R&S®RT-ZHD07/15/16/60
To clean the exterior of the probe, use a soft cloth moistened with either distilled water
or isopropyl alcohol. Before using the probe again, make sure to dry it completely.
Maintenance and Service
Discarding the Probe
5.4 Calibration Interval
The recommended calibration interval for R&S RT-ZHD high voltage differential probe
is two years. For servicing, send the probe to your nearest Rohde & Schwarz service
center (see Chapter 5.2, "Returning the Probe for Servicing", on page 41).
5.5 Discarding the Probe
Handle and dispose the probe in accordance with local regulations.
42User Manual 1800.2588.02 ─ 01
Page 43

R&S®RT-ZHD07/15/16/60
6 Dimensions of the Probe
With the accessory for specified operation conditions, the R&S RT-ZHD has the following dimensions:
Dimensions of the Probe
Figure 6-1: Dimensions of the R&S RT-ZHD probe with accessories
43User Manual 1800.2588.02 ─ 01
Page 44

R&S®RT-ZHD07/15/16/60
7 Functional Check
The functional check is used to confirm the basic operation of the R&S RT-ZHD high
voltage differential probe using simple measurement equipment.
The functional check is not suitable for verifying compliance with the probe specifications, since the test results are influenced by the oscilloscope used.
Functional Check
44User Manual 1800.2588.02 ─ 01
Page 45

R&S®RT-ZHD07/15/16/60
1. Connect the R&S RT-ZHD probe to an R&S oscilloscope as described in Chap-
ter 2, "Putting into Operation", on page 20.
2.
Connect the safety alligator clip to the square wave output of the oscilloscope.
3.
Connect the other safety alligator clip to the probe ground connector of the
oscilloscope.
4. Press the PRESET and then the AUTOSET key on the oscilloscope.
5. Set the attenuation ratio on the probe to "Attenuation high" (e.g. 1500 V range).
A square wave with 1 V amplitude is displayed on the oscilloscope screen and
should not disappear if one of the following changes are made:
● The attenuation of the probe is manually set to "Attenuation low" (e.g. 150 V for
● The bandwidth limit of the probe is activated.
Interchange the safety alligator clips and redo step 4 and step 5.
Functional Check
the R&S RT-ZHD15).
Improve the displayed test signal
The high attenuation factor (e.g. 1000 with R&S RT-ZHD60) is responsible for high
noise on the relative low test signal. For stable triggering, it is convenient to narrow the
trigger bandwidth. Afterwards the noise of the signal could be reduced by averaging
(e.g. 20 waveforms).
45User Manual 1800.2588.02 ─ 01
 Loading...