


R&S®TA-TRS
RF Performance Testing
User Manual
(?LëË2)
1528936102
Version 05

This manual applies to the following options:
●
R&S QuickStep Sequencer (1528.9049.02)
●
R&S QS-ETM (1528.9110.02)
●
R&S QS-ETMU (1529.9126.02)
The contents of this manual correspond to R&S QuickStep Sequencer version 4.60 or higher.
The firmware of the instrument uses several valuable open source software packages. For information, see the "Open Source
Acknowledgment" document, which is available for download from the customer web section on GLORIS, the global
Rohde & Schwarz information system: https://extranet.rohde-schwarz.com.
Rohde & Schwarz would like to thank the open source community for their valuable contribution to embedded computing.
© 2021 Rohde & Schwarz GmbH & Co. KG
Mühldorfstr. 15, 81671 München, Germany
Phone: +49 89 41 29 - 0
Email: info@rohde-schwarz.com
Internet: www.rohde-schwarz.com
Subject to change – data without tolerance limits is not binding.
R&S® is a registered trademark of Rohde & Schwarz GmbH & Co. KG.
Trade names are trademarks of the owners.
1528.9361.02 | Version 05 | R&S®TA-TRS
The following abbreviations are used throughout this manual: R&S® is abbreviated as R&S ; e.g. R&S®TA-TRS is abbreviated as
R&S TA-TRS.

R&S®TA-TRS
2.1 EN303340....................................................................................................................... 6
2.1.1 One Box Setup................................................................................................................6
2.1.2 Multi Box Setup............................................................................................................... 7
2.2 EN303345....................................................................................................................... 8
2.2.1 One Box Setup................................................................................................................8
2.2.2 Multi Box Setup............................................................................................................... 9
2.3 EN303372-2.................................................................................................................. 11
2.3.1 One Box Setup.............................................................................................................. 11
Contents
Contents
1 R&S TA-TRS Overview...........................................................................5
2 Prerequisites.......................................................................................... 6
2.3.2 Multi Box Setup............................................................................................................. 12
3 Starting TA-TRS....................................................................................14
3.1 Quickstep Setup..........................................................................................................14
3.2 Instrument Setup Menu.............................................................................................. 15
3.2.1 QS-ETM........................................................................................................................ 15
4 Test Setup............................................................................................. 18
4.1 EN303340 & EN303372 Automated Test Setup.........................................................18
4.2 EN303340 & EN303372 Automated Test Setup with Camera.................................. 19
4.3 EN303345 Automated Test Setup.............................................................................. 21
5 Test Configuration............................................................................... 24
5.1 Test Properties............................................................................................................ 24
5.1.1 File Settings.................................................................................................................. 24
5.1.2 ReRun Settings............................................................................................................. 24
5.1.3 General Dialog.............................................................................................................. 25
5.1.4 Compensation Dialog....................................................................................................32
5.1.5 Remote Control DUT Dialog......................................................................................... 33
5.1.6 Signal Mode List Dialog................................................................................................ 33
5.2 Test Cases....................................................................................................................35
5.2.1 EN303340..................................................................................................................... 35
5.2.2 EN303345 Test Case.................................................................................................... 40
3User Manual 1528.9361.02 ─ 05

R&S®TA-TRS
5.2.3 EN303372-2 Test Case.................................................................................................44
6.1 Compensating Losses................................................................................................46
6.1.1 Compensation Setup.....................................................................................................48
6.1.2 Instrument Configuration...............................................................................................49
6.1.3 Status............................................................................................................................ 51
6.1.4 Result and Normalization Tab....................................................................................... 51
6.1.5 Compensation File Save / Open................................................................................... 52
6.2 Learning DUT IR Commands..................................................................................... 52
6.2.1 RedRat Prerequisites.................................................................................................... 52
6.2.2 Start RedRat................................................................................................................. 54
6.2.3 Teaching RedRat...........................................................................................................56
Contents
6 Test Preparation................................................................................... 46
6.2.4 Constructing Sequences............................................................................................... 58
6.3 AVB Camera Setup......................................................................................................60
6.3.1 AVB Camera Prerequisites............................................................................................61
6.3.2 AVB Camera Connection Test with Pylon Software...................................................... 61
6.3.3 AVB Camera Test Setup................................................................................................63
7 Test Status and Results.......................................................................71
7.1 Test with Auto Mode................................................................................................... 71
7.2 Test with Full Manual Mode........................................................................................72
7.3 Test with Semi Manual Mode......................................................................................73
7.4 Test with Simple Manual Mode.................................................................................. 74
7.5 Test Result................................................................................................................... 75
Index......................................................................................................77
4User Manual 1528.9361.02 ─ 05

R&S®TA-TRS
R&S TA-TRS Overview
1 R&S TA-TRS Overview
R&S TA-TRS is a sequencer software tool that is used together with R&S BTC and
certain accessories to provide the user with test automation and test reporting capabilities. The software features a user-friendly interface and unique test configurations such
as compensation loss, multiple interfering signals and smart learning of DUT control
via infrared remote control.
Used together with the R&S Broadcast Instruments, it offers users easy execution and
management of test cases for product validation and production testing. Offers an
automated test platform to perform RF and interoperability tests. In these tests, you
verify your product in accordance to the ETSI standards.
The test suite is designed to optimize the testing time. The versatile configuration
allows you to tailor the tests according to your different requirements, for example you
can perform the tests only on a subset of test signals.
The key facts are as followed:
●
Supports all test cases for EN 303340, EN 303345 and EN 303372-2
●
Automated detection of picture failure point for video and audio
●
Optional camera solution for automated error detection on TV screens
●
Intuitive state-of-the-art GUI with signal path loss compensation
●
Reproducible and consistent test results
●
Future-proof solution since more standards can easily be integrated into the software solution
5User Manual 1528.9361.02 ─ 05

R&S®TA-TRS
2.1 EN303340
2 Prerequisites
These required equipment need to be installed before using R&S TA-TRS:
●
Required hardware and operating system
– Standard PC
– Windows 7 as 64 bit version, including service pack 1 and universal C runtime
update (KB2999226) or Windows 8.1, Windows 10 (capped by Windows 7 only
if uses with AVBCAM)
●
R&S QuickStep sequencer software tool V4.60
●
Broadcast Test Center (R&S BTC) firmware version 02.32 or higher.
The following provides information for one or multiple box setup requirements.
Prerequisites
EN303340
2.1.1 One Box Setup
R&S BTC test instrument with the following options:
BTC - Main Signal
●
Broadcast Test Center (R&S BTC)
●
Baseband Generator first channel (R&S BTC-B1)
●
Baseband Generator second channel (R&S BTC-B2)
●
Baseband Main Module, two I/Q paths to RF (R&S BTC-B12)
●
RF Path A, 100 kHz to 3 GHz (R&S BTC-B3103)
●
RF Path B, 100 kHz to 3 GHz (R&S BTC-B3203)
●
Extended Baseband Routing (R&S BTC-K8)
●
Multimedia Generator Suite (R&S BTC-K20 Included in base unit)
●
Arbitrary Waveform Generator (R&S BTC-K35)
●
Basic Stream library (R&S LIB-K70)
●
DVB-T/DVB-H Coder (R&S BTC-K501)
●
DVB-T2 Coder (R&S BTC-K516)
●
DTV Interferers (R&S WV-K1114)
●
AV Distortion Analysis (R&S VT-K2111)
●
HDMI RX 300 MHz (R&S VT-B2361)
●
Power Measurement (R&S BTC-K2055)
●
Power Sensor that BTC supports
●
RedRat IR Remote Controller (R&S BTC-Z)
Camera option for DUT with screen like TV
●
AVB Camera Software (R&S BTC-KT3329)
6User Manual 1528.9361.02 ─ 05

R&S®TA-TRS
Prerequisites
●
Camera accessories (R&S BTC-Z3329)
Required files in R&S BTC
●
Stream files: After installing TA-TRS in the PC, TimeCodeTRP.zip file is saved
under
C:\Users\Public\Documents\Rohde-Schwarz\QuickStep\Projects\
●
TimeCodeTRP.zip: Unzip and copy them into D:\TSGEN\AVBrun\
– Grouper_576i_50.trp
– Grouper_720p_50.trp
– Grouper_720p_50_Camera.trp
– Colorbar_720p_50.trp
●
Interferer signals: After installing TA-TRS in the PC,
EN303340_interferer_files_V2.zip file is saved under
C:\Users\Public\Documents\Rohde-Schwarz\QuickStep\Projects\
●
EN303340_interferer_files_V2.zip: Unzip and copy them into
D:\ARB\DTV_INTERFERERS\
– LTE_BS-idle_V3_synth.wv
– LTE_BS-100PC_synth.wv
– Short_UE-Video-Stream_V2.wv
– DVB-T_8MHz.wv (SFU-K354)
EN303340
2.1.2 Multi Box Setup
R&S BTC (1path) and R&S SFE instruments with the following options:
BTC - Main Signal
●
Broadcast Test Center (R&S BTC)
●
Baseband Generator first channel (R&S BTC-B1)
●
Baseband Generator second channel (R&S BTC-B2)
●
Baseband Main Module, one I/Q path to RF (R&S BTC-B11)
●
RF Path A, 100 kHz to 3 GHz (R&S BTC-B3103)
●
Multimedia Generator Suite (R&S BTC-K20 Included in base unit)
●
Basic stream library (R&S LIB-K70)
●
DVB-T/DVB-H Coder (R&S BTC-K501)
●
DVB-T2 Coder (R&S BTC-K516)
●
AV Distortion Analysis (R&S VT-K2111)
●
HDMI RX 300 MHz (R&S VT-B2361)
●
Power Measurement (R&S BTC-K2055)
●
Power Sensor that BTC supports
●
RedRat IR Remote Controller (R&S BTC-Z)
SFE - Interferer Signal
●
Broadcast Tester (R&S SFE)
7User Manual 1528.9361.02 ─ 05

R&S®TA-TRS
Prerequisites
●
Memory Expansion (R&S SFE-B3)
●
ARB Waveform Generator (R&S SFE-K35)
●
DTV Interferers (R&S SFU-K354)
Camera option for DUT with screen like TV
●
AVB Camera Software (R&S BTC-KT3329)
●
Camera accessories (R&S BTC-Z3329)
Required files in R&S BTC
●
Stream files: After installing TA-TRS in the PC, TimeCodeTRP.zip file is saved
under
C:\Users\Public\Documents\Rohde-Schwarz\QuickStep\Projects\
●
TimeCodeTRP.zip: Unzip and copy them into D:\TSGEN\AVBrun\
– Grouper_576i_50.trp
– Grouper_720p_50.trp
– Grouper_720p_50_Camera.trp
– Colorbar_720p_50.trp
EN303345
Required files in R&S SFE
●
Interferer signals: After installing TA-TRS in the PC,
EN303340_interferer_files_V2.zip file is saved under
C:\Users\Public\Documents\Rohde-Schwarz\QuickStep\Projects\
●
EN303340_interferer_files_V2.zip: Unzip and copy them into
D:\ARB\DTV_INTERFERERS\
– LTE_BS-idle_V3_synth.wv
– LTE_BS-100PC_synth.wv
– Short_UE-Video-Stream_V2.wv
– DVB-T_8MHz.wv (SFU-K354)
2.2 EN303345
The following provides information for one or multiple box setup requirements.
2.2.1 One Box Setup
R&S BTC test instrument with the following options:
BTC - Main Signal
●
Broadcast Test Center (R&S BTC)
●
Baseband Generator first channel (R&S BTC-B1)
●
Baseband Generator second channel (R&S BTC-B2)
●
Baseband Main Module, two I/Q paths to RF (R&S BTC-B12)
●
RF Path A, 100 kHz to 3 GHz (R&S BTC-B3103)
8User Manual 1528.9361.02 ─ 05

R&S®TA-TRS
●
RF Path B, 100 kHz to 3 GHz (R&S BTC-B3203)
●
Extended Baseband Routing (R&S BTC-K8)
●
Multimedia Generator Suite (R&S BTC-K20 Included in base unit)
●
AM/FM RDS RDBS Coder (R&S BTC-PK570)
●
DAB/DAB+/T-DMB Coder (R&S BTC-PK511)
●
T-DMB/DAB Streams (R&S LIB-K51)
●
DRM/DRM+ Coder (R&S BTC-PK519)
●
DRM/DRM+ MDI Stream Library (R&S LIB-K60)
●
Analog A/V RX (R&S VT-B2370)
●
Audio Analysis (R&S VT-K2150)
●
Power Measurement (R&S BTC-K2055)
●
Power Sensor that BTC supports
●
RedRat IR Remote Controller (R&S BTC-Z)
Required files in R&S BTC
●
FM and AM noise source. Above BTC2.30, It is default files under
D:\AUDIOPLAYER\CCIR559\
– AWGN_CCIR559_4500Hz_120s_V3.wav
– AWGN_CCIR559_15kHz_120s_V3.wav
●
DAB stream(LIB-K51 option): Copy them into D:\TSGEN\TDMB_DAB\DAB\
– RED_Sine+_120s_eti_ni_file.dab_c
– PRODUCT-STREAM-01_V1.0.eti
– PRODUCT-STREAM-02_V1.0.eti
●
DRM stream(LIB-K60 option): Copy them into D:\TSGEN\DRM\
– HF.DCP_C
– LFMF.DCP_C
– VHF.DCP_C
– HF_wanted.DCP_C
– HF_unwanted.DCP_C
– LFMF_wanted.DCP_C
– LFMF_unwanted.DCP_C
– VHF_wanted.DCP_C
– VHF_unwanted.DCP_C
Prerequisites
EN303345
2.2.2 Multi Box Setup
R&S BTC(1path) and R&S SFE instruments with the following options:
SFE - Main Signal
●
Broadcast Tester (R&S SFE)
●
Memory Expansion (R&S SFE-B3)
●
AM/FM/RDS Coder (R&S SFE-K170)
9User Manual 1528.9361.02 ─ 05

R&S®TA-TRS
●
TRP Player (R&S SFE-K22)
●
T-DMB/DAB Coder (R&S SFE-K11)
●
T-DMB/DAB Streams (R&S SFU-K221)
●
DRM/DRM+ Coder (R&S BTC-PK519)
●
DRM/DRM+ MDI Stream Library (R&S LIB-K60)
BTC - Interferer Signal
●
Broadcast Test Center (R&S BTC)
●
Baseband Generator first channel (R&S BTC-B1)
●
Baseband Generator second channel (R&S BTC-B2)
●
Baseband Main Module, one I/Q path to RF (R&S BTC-B11)
●
RF Path A, 100 kHz to 3 GHz (R&S BTC-B3103)
●
Multimedia Generator Suite (R&S BTC-K20 Included in base unit)
●
AM/FM RDS RDBS Coder (R&S BTC-K570)
●
DAB/DAB+/T-DMB Coder (R&S BTC-K511)
●
T-DMB/DAB Streams (R&S LIB-K51)
●
DRM/DRM+ Coder (R&S BTC-PK519)
●
DRM/DRM+ MDI Stream Library(R&S LIB-K60)
●
Analog A/V RX (R&S VT-B2370)
●
Audio Analysis (R&S VT-K2150)
●
Power Measurement (R&S BTC-K2055)
●
Power Sensor that BTC supports
●
RedRat IR Remote Controller (R&S BTC-Z)
Prerequisites
EN303345
Required files in R&S SFE
●
DAB stream(SFU-K221option): Copy them into D:\TSGEN\TDMB_DAB\DAB\
– RED_Sine+_120s_eti_ni_file.dab_c
– PRODUCT-STREAM-01_V1.0.eti
– PRODUCT-STREAM-02_V1.0.eti
●
DRM stream(LIB-K60 option): Copy them into D:\TSGEN\DRM\
– HF.DCP_C
– LFMF.DCP_C
– VHF.DCP_C
– HF_wanted.DCP_C
– HF_unwanted.DCP_C
– LFMF_wanted.DCP_C
– LFMF_unwanted.DCP_C
– VHF_wanted.DCP_C
– VHF_unwanted.DCP_C
10User Manual 1528.9361.02 ─ 05

R&S®TA-TRS
Required files in R&S BTC
●
FM and AM noise source: Above BTC2.30, It is default files under
D:\AUDIOPLAYER\CCIR559\
– AWGN_CCIR559_4500Hz_120s_V3.wav
– AWGN_CCIR559_15kHz_120s_V3.wav
DAB stream(LIB-K51 option): Copy them into D:\TSGEN\TDMB_DAB\DAB\
– RED_Sine+_120s_eti_ni_file.dab_c
– PRODUCT-STREAM-01_V1.0.eti
– PRODUCT-STREAM-02_V1.0.eti
●
DRM stream(LIB-K60 option): Copy them into D:\TSGEN\DRM\
– HF.DCP_C
– LFMF.DCP_C
– VHF.DCP_C
– HF_wanted.DCP_C
– HF_unwanted.DCP_C
– LFMF_wanted.DCP_C
– LFMF_unwanted.DCP_C
– VHF_wanted.DCP_C
– VHF_unwanted.DCP_C
Prerequisites
EN303372-2
2.3 EN303372-2
The following provides information for one or multiple box setup requirements.
2.3.1 One Box Setup
R&S BTC test instrument with the following options:
BTC - Main Signal
●
Broadcast Test Center (R&S BTC)
●
Baseband Generator first channel (R&S BTC-B1)
●
Baseband Generator second channel (R&S BTC-B2)
●
Baseband Main Module, two I/Q paths to RF (R&S BTC-B12)
●
RF Path A, 100 kHz to 3 GHz (R&S BTC-B3103)
●
RF Path B, 100 kHz to 3 GHz (R&S BTC-B3203)
●
Extended Baseband Routing (R&S BTC-K8)
●
Multimedia Generator Suite (R&S BTC-K20 Included in base unit)
●
Basic stream library (R&S LIB-K70)
●
DVB-S/DVB-S2, DSNG Coder (R&S BTC-PK508)
●
Additive White Gaussian Noise (AWGN) (R&S BTC-K1040)
11User Manual 1528.9361.02 ─ 05

R&S®TA-TRS
Prerequisites
EN303372-2
●
AV Distortion Analysis (R&S VT-K2111)
●
HDMI RX 300 MHz (R&S VT-B2361)
●
Power Measurement (R&S BTC-K2055)
●
Power Sensor that BTC supports
●
RedRat IR Remote Controller (R&S BTC-Z)
Camera Option for DUT with screen like TV
●
AVB Camera Software (R&S BTC-KT3329)
●
Camera accessories (R&S BTC-Z3329)
Required files in R&S BTC
●
Stream files: After installing TA-TRS in the PC, TimeCodeTRP.zip file is saved
under
C:\Users\Public\Documents\Rohde-Schwarz\QuickStep\Projects\
●
TimeCodeTRP.zip: Unzip and copy them into D:\TSGEN\AVBrun\
– Grouper_576i_50.trp
– Grouper_720p_50.trp
– Grouper_720p_50_Camera.trp
– Colorbar_720p_50.trp
2.3.2 Multi Box Setup
R&S BTC(1path) and R&S SFE instruments with the following options:
BTC - Main Signal
●
Broadcast Test Center (R&S BTC)
●
Baseband Generator first channel (R&S BTC-B1)
●
Baseband Main Module, one I/Q path to RF (R&S BTC-B11)
●
RF Path A, 100 kHz to 3 GHz (R&S BTC-B3103)
●
Multimedia Generator Suite (R&S BTC-K20 Included in base unit)
●
Basic Stream Library (R&S LIB-K70)
●
DVB-S/DVB-S2, DSNG Coder (R&S BTC-K508)
●
Additive White Gaussian Noise (AWGN) (R&S BTC-K1040)
●
AV Distortion Analysis (R&S VT-K2111)
●
HDMI RX 300 MHz (R&S VT-B2361)
●
Power Measurement (R&S BTC-K2055)
●
Power Sensor that BTC supports
●
RedRat IR Remote Controller (R&S BTC-Z)
SFE - Interferer Signal
●
Broadcast Tester (R&S SFE)
●
Memory Expansion (R&S SFE-B3)
●
DVB-S/DVB-DSNG Coder (R&S SFE-K3)
●
DVB-S2 Coder (R&S SFE-K8)
12User Manual 1528.9361.02 ─ 05

R&S®TA-TRS
Prerequisites
EN303372-2
●
TRP Player(R&S SFE-K22)
Camera Option for DUT with screen like TV
●
AVB Camera Software (R&S BTC-KT3329)
●
Camera accessories (R&S BTC-Z3329)
Required files in R&S BTC
●
Stream files: After installing TA-TRS in the PC, TimeCodeTRP.zip file is saved
under
C:\Users\Public\Documents\Rohde-Schwarz\QuickStep\Projects\
●
TimeCodeTRP.zip: unzip and copy them into D:\TSGEN\AVBrun\
– Grouper_576i_50.trp
– Grouper_720p_50.trp
– Grouper_720p_50_Camera.trp
– Colorbar_720p_50.trp
Required files in R&S SFE
●
Stream files: After installing TA-TRS in the PC, TimeCodeTRP.zip file is saved
under
C:\Users\Public\Documents\Rohde-Schwarz\QuickStep\Projects\
●
TimeCodeTRP.zip: unzip and copy them into D:\TSGEN\AVBrun\
– Grouper_576i_50.trp
– Grouper_720p_50.trp
– Grouper_720p_50_Camera.trp
– Colorbar_720p_50.trp
13User Manual 1528.9361.02 ─ 05
R&S®TA-TRS
3.1 Quickstep Setup
Starting TA-TRS
Quickstep Setup
3 Starting TA-TRS
To start using TA-TRS:
●
Install R&S Quickstep
●
Insert the Quickstep Dongle and connect with the instrument.
●
Start the R&S Quickstep from the Windows "Start" menu
The following descries the steps need to be setup and configure in Quickstep to run
TA-TRS:
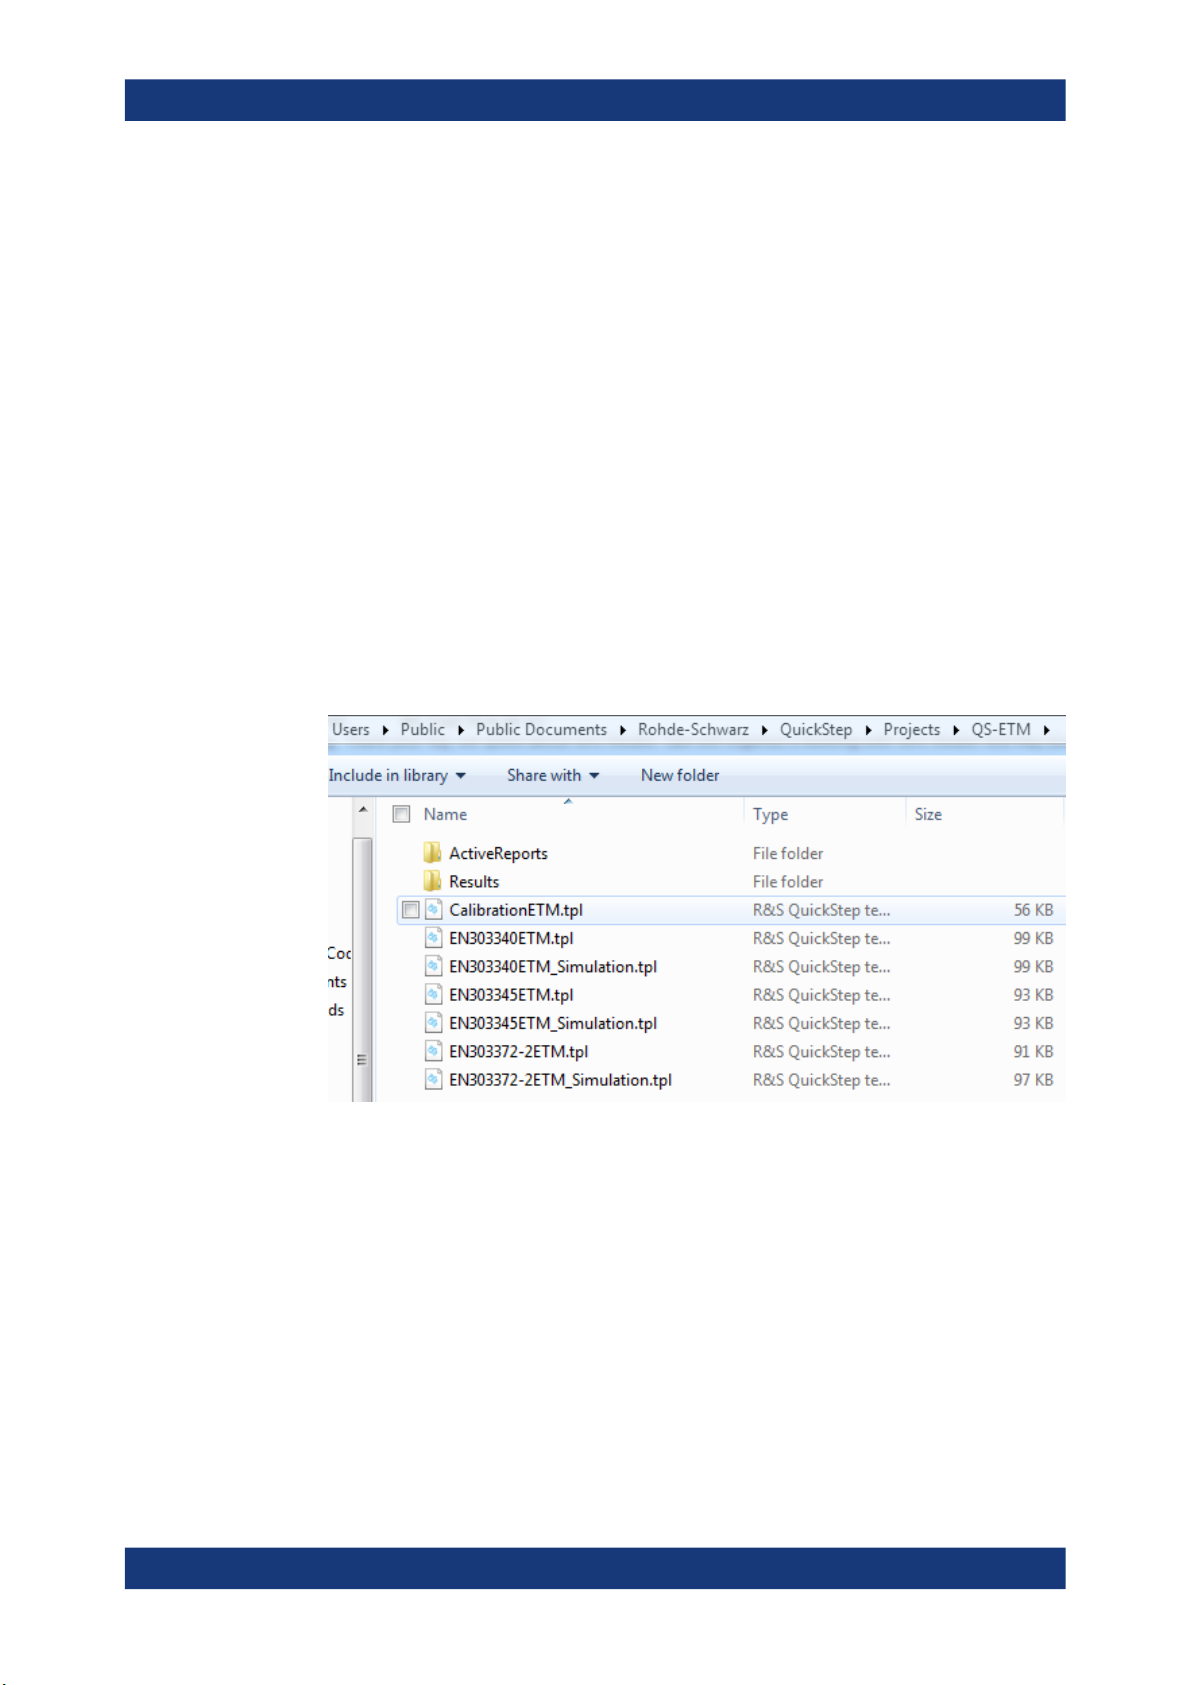
1. Open QuickStep.
2. Select Test Project (.tpl file) - for file with _Simulation naming convention runs
without instruments for demo purpose.
Figure 3-1: Test project files for ETM
a) Under
C:\Users\Public\Documents\Rohde-Schwarz\QuickStep\
Projects\, The folder (QS-ETM) and files are created by installer automati-
cally.
b) QS-ETM: Test projects files for multi legacy instrument solution
3. Over at the "Test Steps" under "Test Project Browser", check that the test plan is
loaded correctly.
14User Manual 1528.9361.02 ─ 05

R&S®TA-TRS
Starting TA-TRS
Instrument Setup Menu
Figure 3-2: Test plan name check
4. Set report name, type, path
a) Click "Test Cases" under "Test Procedure Before/After"
b) Set "Report Name"
Default name is "R&S EN303340 Test Report" for EN303340
c) Set "Report Type"
● Default Report type is DOC (Word file)
● Available format: HTML, PDF, PDF + HTML, DOC
d) Set "Report Path"
Default Report path is "C:\QuickStep_Report\EN303340\" for EN303340
Figure 3-3: Report name, type, and path setting
3.2 Instrument Setup Menu
3.2.1 QS-ETM
1. Over at the "Test Steps" under "Test Project Browser", select the Test Plan
15User Manual 1528.9361.02 ─ 05

R&S®TA-TRS
Starting TA-TRS
Instrument Setup Menu
Figure 3-4: Instrument setup menu
2. In the"Instrument" combo box, select setup
3. EN303340 / EN303372-2 setup list
● BTC 2 Path
● BTC + SFx
● BTC + SFx +VTx
● SFU + SFx +VTx
4. EN303345 setup list
● BTC 2 Path
● BTC 2 Path + UPx
● SFx + BTC
● SFx + BTC + UPx
5.
Figure 3-5: Configure VISA resource
Click "VISA"
6. Enter correct information Visa Resource
16User Manual 1528.9361.02 ─ 05

R&S®TA-TRS
Starting TA-TRS
Instrument Setup Menu
User can input any Visa Resource information or make it blank for instruments that are
not used. For empty information, there is warning message. However, user can ignore
it
17User Manual 1528.9361.02 ─ 05

R&S®TA-TRS
4.1 EN303340 & EN303372 Automated Test Setup
Test Setup
EN303340 & EN303372 Automated Test Setup
4 Test Setup
There are different test setups for different standard manually and automatically. All the
different test setups describes in following sub section.
The following setups are for EN303340/EN303372 automated testing for DUT without
screen like set-top box. Based on K8 (Baseband routing) option, additional coupler or
combiner is required. Legacy instrument option allows using SFU and SFE as an interferer signal with 1 path BTC.
Figure 4-1: Instrument setup without K8 option for DUT without screen
Figure 4-2: Instrument setup with K8 option for DUT without screen
18User Manual 1528.9361.02 ─ 05

R&S®TA-TRS
Test Setup
EN303340 & EN303372 Automated Test Setup with Camera
Figure 4-3: Instrument setup with legacy instrument for DUT without screen (Optional)
There is a limitation when you use K8 option. Dynamic range between two signals like
wanted signal and unwanted signal is 56 dB. So, result is more than 56 dB, report
shows >56 dB.
The above setup consists of the following:
●
Computer: TA-TRS installed connected to BTC via LAN or GPIB
●
BTC: Proper options that mentioned in Chapter 2, "Prerequisites", on page 6
●
Matching pad: DUT input is 75 ohm and BTC output is 50 ohm
●
RedRat/RedRatX: DUT control for channel searching using IR (infrared) signal,
which connected to computer. You need to run learning process to create control
sequence before testing
●
Coupler or Combiner: without K8 option, it is required to combine two signals
●
Cables: RF cables, HDMI cable, LAN cables
4.2 EN303340 & EN303372 Automated Test Setup with Camera
Please do not use router to connect camera and BTC with PC. It drops transmission
data rate from camera and cause missing frame.
The following setup is for EN303340/EN303372 automated testing with AVB Camera
for DUT with screen like TV.
19User Manual 1528.9361.02 ─ 05

R&S®TA-TRS
Test Setup
EN303340 & EN303372 Automated Test Setup with Camera
Figure 4-4: Instrument setup without K8 option for DUT with screen
Figure 4-5: Instrument setup with K8 option for DUT with screen
20User Manual 1528.9361.02 ─ 05

R&S®TA-TRS
Test Setup
EN303345 Automated Test Setup
Figure 4-6: Instrument setup with legacy instrument for DUT with screen (Optional)
The above setup consists of the following:
●
Computer: TA-TRS installed connected to BTC via LAN. HDMI port is required with
camera setup
●
BTC: Proper options that mentioned in Chapter 2, "Prerequisites", on page 6
●
Matching pad: DUT input is 75 ohm and BTC output is 50 ohm
●
RedRat/RedRatX: DUT control for channel searching using IR (infrared) signal,
which connected to computer. You need to run learning process to create control
sequence before testing
●
Coupler or Combiner: Without K8 option, it is required to combine two signals
●
Cables: RF cables, HDMI cable, LAN cables
●
AVB Camera software and camera: Camera capture TV screen and stream to PC
via LAN. AVB camera software in PC detects correct video and output it to BTC via
HDMI
●
USB to LAN adapter: Main LAN port in PC is for camera. The adapter is for BTC
control
4.3 EN303345 Automated Test Setup
The following setups are for EN303345 automated testing for Radio receiver DUT like
analog or digital radio. Based on K8 (Baseband routing) option, additional coupler or
combiner is required. Legacy instrument option allows using SFU and SFE as a main
signal only because SFx does not have audio player which requires to play CCIR noise
source for interferer signal.
21User Manual 1528.9361.02 ─ 05

R&S®TA-TRS
Test Setup
EN303345 Automated Test Setup
Figure 4-7: Instrument setup without K8 option for Radio receiver
Figure 4-8: Instrument setup with K8 option for Radio receiver
22User Manual 1528.9361.02 ─ 05

R&S®TA-TRS
Test Setup
EN303345 Automated Test Setup
Figure 4-9: Instrument setup with legacy instrument for Radio receiver (Optional)
There is a limitation when you use K8 option. Dynamic range between two signals like
wanted signal and unwanted signal is 56 dB. So, result is more than 56 dB, report
shows >56 dB.
The above setup consists of the following:
●
Computer: TA-TRS installed connected to BTC via LAN or GPIB
●
BTC: Proper options that mentioned in Chapter 2, "Prerequisites", on page 6
●
UPL/UPV: Audio quality measurement
●
Matching pad: DUT input is 75 ohm and BTC output is 50 ohm
●
RedRat/RedRatX: DUT control for channel searching using IR (infrared) signal,
which connected to computer. You need to run learning process to create control
sequence before testing
●
Coupler or Combiner: without K8 option, it is required to combine two signals
●
Cables: RF cables, HDMI cable, LAN cables
23User Manual 1528.9361.02 ─ 05

R&S®TA-TRS
5.1 Test Properties
Test Configuration
Test Properties
5 Test Configuration
Several dialogs are provided for further test case configuration. The parameters in
these dialogs apply to all test cases in the test suite.
Figure 5-1: Test configuration menu
5.1.1 File Settings
For the File Section, there are three functions as follows:
●
Open Test Setting: Load existing test setting.
●
Open Default Setting: Reset all settings back to default.
●
Save Test Setting: Save the setting for the test for loading in future.
Figure 5-2: File settings menu
5.1.2 ReRun Settings
ReRun features provide convenient test plan and report file generation. Whenever test
is done, TA-TRS generates report file (PDF, HTML, WORD) based on you setting. In
addition, the log file, which contains all test result information, is automatically generated in the same location with the same filename. Using the log file, you can use below
menus.
24User Manual 1528.9361.02 ─ 05
 Loading...