

Rohde&Schwarz R&S®RTO/RTO6/RTP-K91 DDR3 Compliance Test Manual

R&S®RTO-K91, R&S®RTO6-K91,
R&S®RTP-K91
DDR3 Compliance Test
User Manual
(;ÜåÕ2)
1178877102
Version 07

This document describes the following DDR3 Compliance Test Procedures:
●
R&S®RTO-K91 (1337.8891.02)
●
R&S®RTO6-K91 (1801.6993.02)
●
R&S®RTP-K91 (1337.8840.02)
© 2021 Rohde & Schwarz GmbH & Co. KG
Mühldorfstr. 15, 81671 München, Germany
Phone: +49 89 41 29 - 0
Email: info@rohde-schwarz.com
Internet: www.rohde-schwarz.com
Subject to change – data without tolerance limits is not binding.
R&S® is a registered trademark of Rohde & Schwarz GmbH & Co. KG.
Trade names are trademarks of the owners.
1178.8771.02 | Version 07 | R&S®RTO-K91, R&S®RTO6-K91, R&S®RTP-K91
Throughout this manual, products from Rohde & Schwarz are indicated without the ® symbol , e.g. R&S®ScopeSuite is indicated as
R&S ScopeSuite.

R&S®RTO-K91, R&S®RTO6-K91, R&S®RTP-K91
Contents
1 R&S ScopeSuite Overview....................................................................7
2 Preparing the Measurements................................................................9
2.1 Test Equipment..............................................................................................................9
2.1.1 Soldering Guide for Modular Probes...............................................................................9
2.2 Installing Software and License.................................................................................. 9
2.3 Setting Up the Network...............................................................................................10
2.4 Starting the R&S ScopeSuite..................................................................................... 11
2.5 Connecting the R&S RTO/RTO6/RTP........................................................................ 11
2.6 Report Configuration.................................................................................................. 13
3 Performing Tests..................................................................................14
Contents
3.1 Starting a Test Session...............................................................................................14
3.2 Configuring the Test................................................................................................... 15
3.2.1 General Test Settings....................................................................................................16
3.2.2 Test Configuration for DDR3......................................................................................... 18
3.3 Initiating the Test.........................................................................................................21
3.4 Getting Test Results....................................................................................................22
3.5 Starting DDR3 Tests....................................................................................................23
4 Timing Tests......................................................................................... 24
4.1 Clock Timing................................................................................................................24
4.1.1 Test Equipment............................................................................................................. 24
4.1.2 Performing the Tests..................................................................................................... 24
4.1.3 Test Setup..................................................................................................................... 25
4.1.4 Measurements.............................................................................................................. 25
4.2 Data Timing..................................................................................................................27
4.2.1 Test Equipment............................................................................................................. 27
4.2.2 Performing the Tests..................................................................................................... 27
4.2.3 Test Setup..................................................................................................................... 28
4.2.4 Measurements.............................................................................................................. 29
4.3 Strobe Timing.............................................................................................................. 30
4.3.1 Test Equipment............................................................................................................. 30
3User Manual 1178.8771.02 ─ 07

R&S®RTO-K91, R&S®RTO6-K91, R&S®RTP-K91
4.3.2 Performing the Tests..................................................................................................... 30
4.3.3 Test Setup..................................................................................................................... 31
4.3.4 Measurements.............................................................................................................. 32
4.4 Command Timing........................................................................................................34
4.4.1 Test Equipment............................................................................................................. 34
4.4.2 Performing the Tests..................................................................................................... 34
4.4.3 Test Setup..................................................................................................................... 35
4.4.4 Measurements.............................................................................................................. 36
4.5 Address Timing........................................................................................................... 37
4.5.1 Test Equipment............................................................................................................. 37
4.5.2 Performing the Tests..................................................................................................... 37
4.5.3 Measurements.............................................................................................................. 38
4.6 Chip Select Timing......................................................................................................39
Contents
4.6.1 Test Equipment............................................................................................................. 39
4.6.2 Performing the Tests..................................................................................................... 39
4.6.3 Test Setup..................................................................................................................... 40
4.6.4 Measurements.............................................................................................................. 40
4.7 Clock Enable Timing...................................................................................................41
4.7.1 Test Equipment............................................................................................................. 41
4.7.2 Performing the Tests..................................................................................................... 41
4.7.3 Test Setup..................................................................................................................... 42
4.7.4 Measurements.............................................................................................................. 42
5 Electrical Tests..................................................................................... 44
5.1 Single-Ended Signals................................................................................................. 44
5.1.1 Input Slew Rate for ADD and CMD...............................................................................44
5.1.2 Input Slew Rate for DQ and DM....................................................................................46
5.1.3 AC & DC Input Levels for ADD and CMD..................................................................... 48
5.1.4 AC Input Levels for CK and DQS..................................................................................50
5.1.5 Output Slew Rate for DQ.............................................................................................. 52
5.1.6 AC & DC Output Levels for DQ.....................................................................................53
5.1.7 AC Overshoot & Undershoot for ADD and CMD...........................................................55
5.1.8 AC Overshoot & Undershoot for CK, DQ, DQS, and DM..............................................57
5.2 Differential Signals......................................................................................................59
4User Manual 1178.8771.02 ─ 07

R&S®RTO-K91, R&S®RTO6-K91, R&S®RTP-K91
5.2.1 AC Input Levels for CK and DQS..................................................................................59
5.2.2 AC Differential Cross Point Voltage for CK................................................................... 61
5.2.3 Differential Output Slew Rate for DQS..........................................................................63
5.2.4 Differential AC Output Levels for DQS..........................................................................65
6 Debug Tests..........................................................................................68
6.1 Trigger Write Cycle......................................................................................................68
6.1.1 Test Equipment............................................................................................................. 68
6.1.2 Performing the Tests..................................................................................................... 68
6.1.3 Test Setup..................................................................................................................... 69
6.1.4 Measurements.............................................................................................................. 69
6.2 Trigger Read Cycle......................................................................................................69
6.2.1 Test Equipment............................................................................................................. 69
Contents
6.2.2 Performing the Tests..................................................................................................... 69
6.2.3 Test Setup..................................................................................................................... 70
6.2.4 Measurements.............................................................................................................. 70
5User Manual 1178.8771.02 ─ 07

R&S®RTO-K91, R&S®RTO6-K91, R&S®RTP-K91
Contents
6User Manual 1178.8771.02 ─ 07

R&S®RTO-K91, R&S®RTO6-K91, R&S®RTP-K91
1 R&S ScopeSuite Overview
The R&S ScopeSuite software is used with R&S RTO/RTO6/RTP oscilloscopes. It can
be installed on a test computer or directly on the oscilloscope. For system requirements, refer to the Release Notes.
R&S ScopeSuite Overview
The R&S ScopeSuite main panel has several areas:
●
"Settings": connection settings to oscilloscope and other instruments also default
report settings
●
"Compliance Tests": selection of the compliance test
●
"Demo": accesses demo test cases that can be used for trying out the software
without having a connection to an oscilloscope
●
"Help": opens the help file, containing information about the R&S ScopeSuite configuration
●
"About": gives information about the R&S ScopeSuite software
●
"Tile View": allows a personalization of the compliance test selection
You can configure which tests are visible in the compliance test section and which
are hidden, so that only the ones you use are displayed.
► To hide a test from the "Compliance Tests" view, do one of the following:
7User Manual 1178.8771.02 ─ 07

R&S®RTO-K91, R&S®RTO6-K91, R&S®RTP-K91
a) Right-click on the compliance test you want to hide.
The icon of the test changes, see Figure 1-1. Now with a left click you can hide
the test.
Figure 1-1: Unpin icon
b) Click on "Title View" to show a list of the available test cases. By clicking a test
case in the show list, you can pin/unpin it from the main panel.
R&S ScopeSuite Overview
8User Manual 1178.8771.02 ─ 07

R&S®RTO-K91, R&S®RTO6-K91, R&S®RTP-K91
2 Preparing the Measurements
2.1 Test Equipment
For DDR3 compliance tests, the following test equipment is needed:
●
R&S RTP with 4 channels and minimum 8 GHz bandwidth, or
R&S RTO2000 with 4 channels and minimum 4 GHz bandwidth
R&S RTO6 with 4 channels and minimum 4 GHz bandwidth
●
R&S RTO/RTO6/RTP-K91 DDR3 compliance test option (required option, installed
on the R&S RTO/RTO6/RTP)
●
4 modular probes, R&S ZM90 with 9 GHz bandwidth. See also Chapter 2.1.1,
"Soldering Guide for Modular Probes", on page 9.
●
4 modular probe tips R&S RT-ZMA10
●
The free-of-charge R&S ScopeSuite software, which can be installed on a computer or directly on the R&S RTO/RTO6/RTP.
Preparing the Measurements
Installing Software and License
2.1.1 Soldering Guide for Modular Probes
All single-ended signals such as ADD, CMD, DQ, DM, CS, CKE should be soldered in
such a way that the signal is connected to the + part on the probe tip. The ground of
the signal is connected to the - part on the same probe tip.
All differential signals such as CK, DQS should be soldered differentially:
●
The + signal is connected to the + part on the probe tip.
●
The - signal is connected to the - part on the same probe tip.
●
The ground of the signal is connected to the ground of the same probe tip.
2.2 Installing Software and License
The preparation steps are performed only once for each computer and instrument that
are used for testing.
Uninstall older versions of the R&S ScopeSuite
If an older version of the R&S ScopeSuite is installed, make sure to uninstall the old
version before you install the new one. You can find the version number of the current
installation in "Help" menu > "About". To uninstall the R&S ScopeSuite, use the Windows " Control Panel" > "Programs".
For best operation results, we recommend that the installed firmware versions of the
R&S ScopeSuite and the oscilloscope are the same.
9User Manual 1178.8771.02 ─ 07

R&S®RTO-K91, R&S®RTO6-K91, R&S®RTP-K91
To install the R&S ScopeSuite
1. Download the latest R&S ScopeSuite software from the "Software" section on the
Rohde & Schwarz R&S RTO/RTO6/RTP website:
www.rohde-schwarz.com/product/rtp.html
www.rohde-schwarz.com/product/rto.html
2. Install the R&S ScopeSuite software:
● On the computer that is used for testing, or
● On the R&S RTO/RTO6/RTP.
For system requirements, refer to the Release Notes.
To install the license key on the R&S RTO/RTO6/RTP
► When you got the license key of the compliance test option, enable it on the oscil-
loscope using [Setup] > "SW Options".
For a detailed description, refer to the R&S RTO/RTO6/RTP user manual, chapter
"Installing Options", or to the online help on the instrument.
Preparing the Measurements
Setting Up the Network
2.3 Setting Up the Network
If the R&S ScopeSuite software runs on a test computer, the computer and the testing
oscilloscope require a LAN connection.
There are two ways of connection:
●
LAN (local area network): It is recommended that you connect to a LAN with DHCP
server. This server uses the Dynamic Host Configuration Protocol (DHCP) to
assign all address information automatically.
If no DHCP server is available, or if the Tabor WX2182B or WX2182C is used for
automatic testing, assign fixed IP addresses to all devices.
●
Direct connection of the instruments and the computer or connection to a switch
using LAN cables: Assign fixed IP addresses to the computer and the instruments
and reboot all devices.
To set up and test the LAN connection
1. Connect the computer and the instruments to the same LAN.
2. Start all devices.
3. If no DHCP server is available, assign fixed IP addresses to all devices.
4. Ping the instruments to make sure that the connection is established.
5. If VISA is installed, check if VISA can access the instruments.
a) Start VISA on the test computer.
b) Validate the VISA address string of each device.
10User Manual 1178.8771.02 ─ 07

R&S®RTO-K91, R&S®RTO6-K91, R&S®RTP-K91
See also:
●
Chapter 2.5, "Connecting the R&S RTO/RTO6/RTP", on page 11
2.4 Starting the R&S ScopeSuite
To start the R&S ScopeSuite on the test computer or on the oscilloscope:
► Double-click the R&S ScopeSuite program icon.
To start the R&S ScopeSuite on the instrument, in the R&S RTO/RTO6/RTP firmware:
► In the "Apps" dialog, open the "Compliance" tab.
2.5 Connecting the R&S RTO/RTO6/RTP
Preparing the Measurements
Connecting the R&S RTO/RTO6/RTP
If the R&S ScopeSuite is installed directly on the instrument, the software detects the
R&S RTO/RTO6/RTP firmware automatically, and the "Oscilloscope" button is not
available in the R&S ScopeSuite.
If the R&S ScopeSuite software runs on a test computer, the computer and the testing
oscilloscope require a LAN connection, see Chapter 2.3, "Setting Up the Network",
on page 10. The R&S ScopeSuite software needs the IP address of the oscilloscope to
establish connection.
1. Start the R&S RTO/RTO6/RTP.
2. Start the R&S ScopeSuite software.
3. Click "Settings" > "Oscilloscope".
11User Manual 1178.8771.02 ─ 07

R&S®RTO-K91, R&S®RTO6-K91, R&S®RTP-K91
Preparing the Measurements
Connecting the R&S RTO/RTO6/RTP
4. Enter the IP address of the oscilloscope.
To obtain the IP address: press the Rohde & Schwarz logo at the top-right corner
of the oscilloscope's display.
5. Click "Get Instrument Information".
The computer connects with the instrument and gets the instrument data.
12User Manual 1178.8771.02 ─ 07

R&S®RTO-K91, R&S®RTO6-K91, R&S®RTP-K91
If the connection fails, an error message is shown.
2.6 Report Configuration
In the "Report Configuration" menu, you can select the format of the report and the
details to be included in the report. You can also select an icon that is displayed in the
upper left corner of the report.
Also, you can enter common information on the test that is written in the "General Information" section of the test report.
Preparing the Measurements
Report Configuration
13User Manual 1178.8771.02 ─ 07
R&S®RTO-K91, R&S®RTO6-K91, R&S®RTP-K91
3 Performing Tests
3.1 Starting a Test Session
Performing Tests
Starting a Test Session
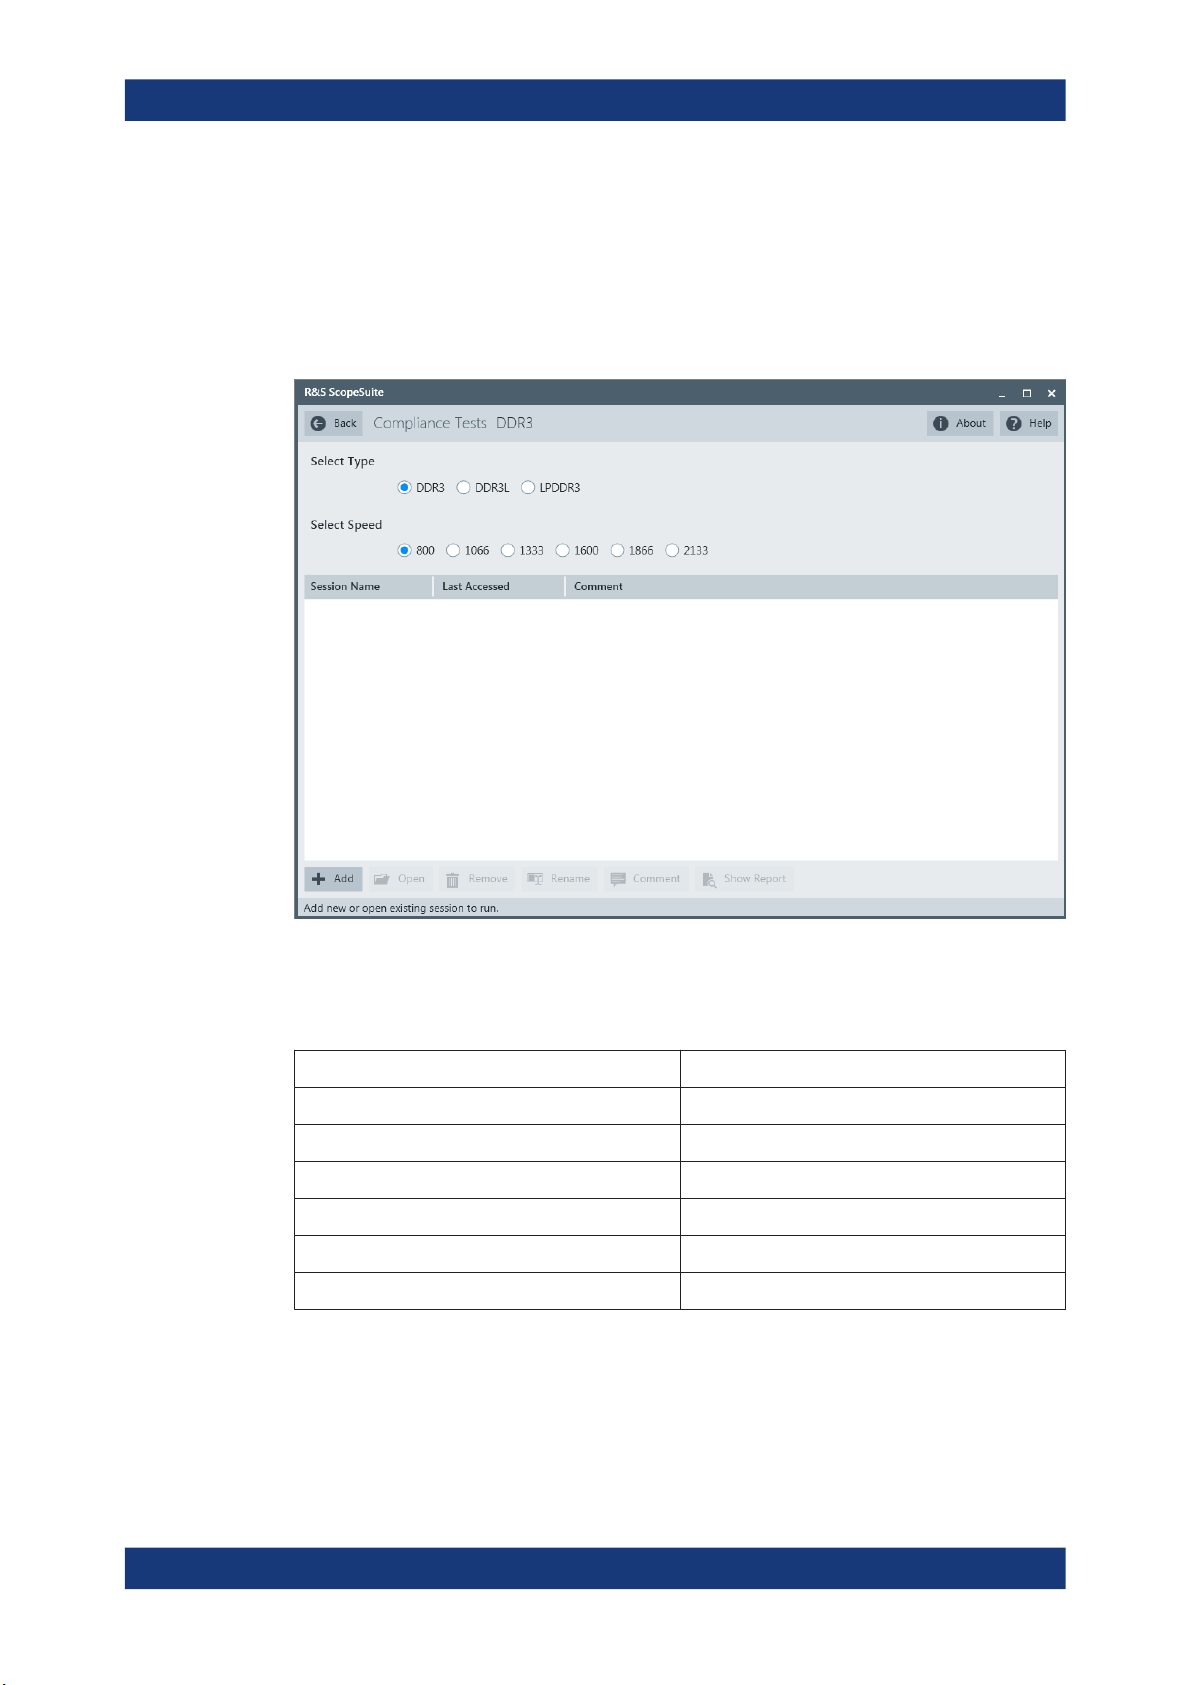
After you open a compliance test, the "Session Selection" dialog appears. In this dialog, you can create new sessions, open or view existing report.
The following functions are available for handling test sessions:
Function Description
"Add" Adds a new session
"Open" Opens the selected session
"Remove" Removes the selected session
"Rename" Changes the "Session Name"
"Comment" Adds a comment
"Show report" Generates a report for the selected session
To add a test session
1. In the R&S ScopeSuite window, select the compliance test.
2. In the "Session Selection" dialog press "Add".
3. If necessary change the "Session Name"
14User Manual 1178.8771.02 ─ 07

R&S®RTO-K91, R&S®RTO6-K91, R&S®RTP-K91
To open a test session
1. In the R&S ScopeSuite window, select the compliance test.
2. In the "Session Selection" dialog, select the session you want to open and double
click on it.
Alternatively, select the session and press "Open".
To show a report for a test session
1. In the R&S ScopeSuite window, select the compliance test.
2. In the "Session Selection" dialog, select the session you want the report for and
press "Show report".
3.2 Configuring the Test
Performing Tests
Configuring the Test
1. In the R&S ScopeSuite window, select the compliance test to be performed:
● "DDR3"
2. Open a test session, see Chapter 3.1, "Starting a Test Session", on page 14.
3. Adjust the "Properties" settings for the test cases you want to perform.
4. Click "Limit Manager" and edit the limit criteria, see Chapter 3.2.1.1, "Limit Man-
ager", on page 17.
5. If you want to use special report settings the "Report Config" tab to define the format and contents of the report. Otherwise the settings defined in "RSScopeSuite" >
"Settings" > "Report" are used. See Chapter 2.6, "Report Configuration",
on page 13.
6. Click "Test Checked"/"Test Single" and proceed as described in the relevant test
case chapter.
15User Manual 1178.8771.02 ─ 07

R&S®RTO-K91, R&S®RTO6-K91, R&S®RTP-K91
3.2.1 General Test Settings
Performing Tests
Configuring the Test
Each session dialog is divided into several sections:
●
"Properties": shows the settings that can be made for the test case selected on the
left side of the dialog. You can differentiate between the "All" and the sub test properties
In the "All" > "Properties" tab you can configure the settings for all test cases in the
current session. Once you change and save a setting in this tab, the changes will
be done for all test in the sessions. At the same time, there will be a special marking for the functions that have different settings for different sub tests.
●
"Limit Manager": sets the measurement limits that are used for compliance testing,
see Chapter 3.2.1.1, "Limit Manager", on page 17.
●
"Results": shows an overview of the available test results for this session.
●
"Instruments": defines instruments settings for connecting to external devices, that
are specific for this test session.
When a session is first created the global settings ("RSScopeSuite" > "Settings" >
"Instruments") are copied to the session. This "Instruments" tab can be used to
change those copied defaults.
●
"Report Config": defines the format and contents of the report for this session.
16User Manual 1178.8771.02 ─ 07

R&S®RTO-K91, R&S®RTO6-K91, R&S®RTP-K91
When a session is first created the global settings ("RSScopeSuite" > "Settings" >
"Report") are copied to the session. This "Report Config" tab can be used to
change those copied defaults.
●
"Test Checked"/ "Test Single": starts the selected test group.
3.2.1.1 Limit Manager
The "Limit Manager" shows the measurement limits that are used for compliance testing.
Each limit comprises the comparison criterion, the unit, the limit value A, and a second
limit value B if the criterion requires two limits.
You can set the values to defaults, change the values in the table, export the table in
xml format, or import xml files with limit settings.
► Check and adjust the measurement limits.
Performing Tests
Configuring the Test
17User Manual 1178.8771.02 ─ 07

R&S®RTO-K91, R&S®RTO6-K91, R&S®RTP-K91
Performing Tests
Configuring the Test
3.2.2 Test Configuration for DDR3
The test configuration consists of some test-specific configuration settings. The values
for the settings in this tab depend on the selected "Speed" and "Type" of standard.
18User Manual 1178.8771.02 ─ 07

R&S®RTO-K91, R&S®RTO6-K91, R&S®RTP-K91
Performing Tests
Configuring the Test
Figure 3-1: Configuration for DDR3 compliance tests
Signals
Selects the channel for the specified signal.
For electrical tests consider also how many test signals are enabled. For example, if
only the ADD/CMD signal is selected, only ADD/CMD signal is used to run the test. If
both the ADD and the CMD signals are selected, test is run using ADD signal first, followed by the CMD signal.
The following signals are available according to the selected test case:
"ADD"
"CMD"
"CK"
"DQS"
"DQ"
"DM"
"CS"
"CKE"
Address signal.
Command signal.
Differential clock input signal.
Data strobe signal.
Data input/output signal.
Data mask signal.
Chip select signal.
Clock enable signal.
19User Manual 1178.8771.02 ─ 07

R&S®RTO-K91, R&S®RTO6-K91, R&S®RTP-K91
Threshold Settings
The following threshold settings are defined:
"VDD"
Power Supply: 1.5 V +/- 0.075 V
Performing Tests
Configuring the Test
"V
"
REF
"VSS"
"V
"
DDQ
"VTT"
"V
"
SSQ
"AC Level for
Reference voltage
Ground
DQ Power Supply: 1.5 V +/- 0.075 V
VTT = V
DDQ
/2
DQ Ground
AC level for the command address.
CA"
"DC Level for
DC level for the command address.
CA"
"AC Level for
AC level for the data input/output signal.
DQ"
"DC Level for
DC level for the data input/output signal.
DQ"
Average Window
Sets the average window in periods.
Record Length
Sets the number of waveform samples in one waveform record.
Burst Count
Sets the burst count.
Speed Bin
Selects which speed bin is used for the tests.
CAS Latency (CL)
Selects the value for the CAS latency. This is the delay, measured in clock cycles,
between the internal read command and the availability of the first bit of output data.
CAS Write Latency (CWL)
Selects the value for the CAS write latency. This is the delay, measured in clock cycles,
between the internal write command and the availability of the first bit input data.
Export Waveforms
Enables you to export a waveform. You can later load the waveforms to run the tests in
the offline mode, see Offline Execution.
You can define an export directory, or use the default one:
MyDocuments\Rohde-Schwarz\RSScopeSuite\<Version>\Waveforms\
<ComplianceTest>\<SubTest>\<Speed>\<SessionName>
For example:
20User Manual 1178.8771.02 ─ 07

R&S®RTO-K91, R&S®RTO6-K91, R&S®RTP-K91
MyDocuments\Rohde-Schwarz\RSScopeSuite\4.10.0\Waveforms\DDR3\
DDR3\1333\DDR3_1333_20180413_144116
Offline Execution
Performing Tests
Initiating the Test
If enabled, allows you to use exported waveforms as a source for the execution of the
compliance test.
You can select one waveform for each needed signal.
3.3 Initiating the Test
To perform compliance tests, the device under test is connected to the test board in a
test-specific way. Using a probe, the test board is connected with the R&S RTO/RTO6/
RTP. The probe connections are test-specific. The R&S ScopeSuite guides you stepby-step through the connection setup and the test sequence.
1. Set the test setup on a nonconductive, static-approved work surface.
2. In the R&S ScopeSuite window, select the compliance test.
3. Open a test session, see Chapter 3.1, "Starting a Test Session", on page 14.
21User Manual 1178.8771.02 ─ 07
 Loading...