

Page 1

Products: Rohde&Schwarz Smart Instruments™ Family300 (SM300, FS300, FS315, AM300, UP300/350)
Rohde&Schwarz
Smart Instruments™ Family300
Basic Programming Guide
Introduction to the fundamentals of programming the R&S Smart Instruments™ Family 300 in different
development environments.
W.Blanz 06/2007 – 1MA73_07E
Page 2

Table of Contents
R&S Smart Instruments™ Family300 Basic Programming
Guide
1 Introduction ............................................................................................. 3
2 Basic Details about Smart Instruments™ ............................................... 3
3 Installing Instrument Drivers ................................................................... 4
4 Instrument Drivers................................................................................... 6
5 Integrating Drivers into a Project............................................................. 6
6 Using "FS300 Basic Measurement" for the First Time ......................... 15
7 "Resource String" and "Virtual Instrument Name" ................................ 17
8 Where to Find Help on the Driver Functions......................................... 19
9 Which Data Type to Use ....................................................................... 19
10 References............................................................................................ 21
11 Appendix: Contact our hotline............................................................... 22
12 Keywords .............................................................................................. 23
1MA73 2 Rohde & Schwarz
Page 3
R&S Smart Instruments™ Family300 Basic Programming
Guide
1 Introduction
Rohde&Schwarz provides instrument drivers available for all Smart
Instruments™. These drivers allow you to access instruments from various
programming environments under Microsoft Windows XP/2000. The
"Smart Instruments™ Programming Guide" deals with programming the
Smart Instruments™ Family300 utilising these drivers from within different
programming languages (C/C++, Visual Basic, LabView,
LabWindows/CVI). Use of this facility requires some basic prior knowledge
of programming in the individual languages.
2 Basic Details about Smart Instruments™
The Smart Instruments™ Family300 is operated by remote control via the
USB host port. This means that the operating system used for remote
control purposes must provide in-house USB support. The drivers
described below support the Microsoft Windows XP and Microsoft
Windows 2000 operating systems.
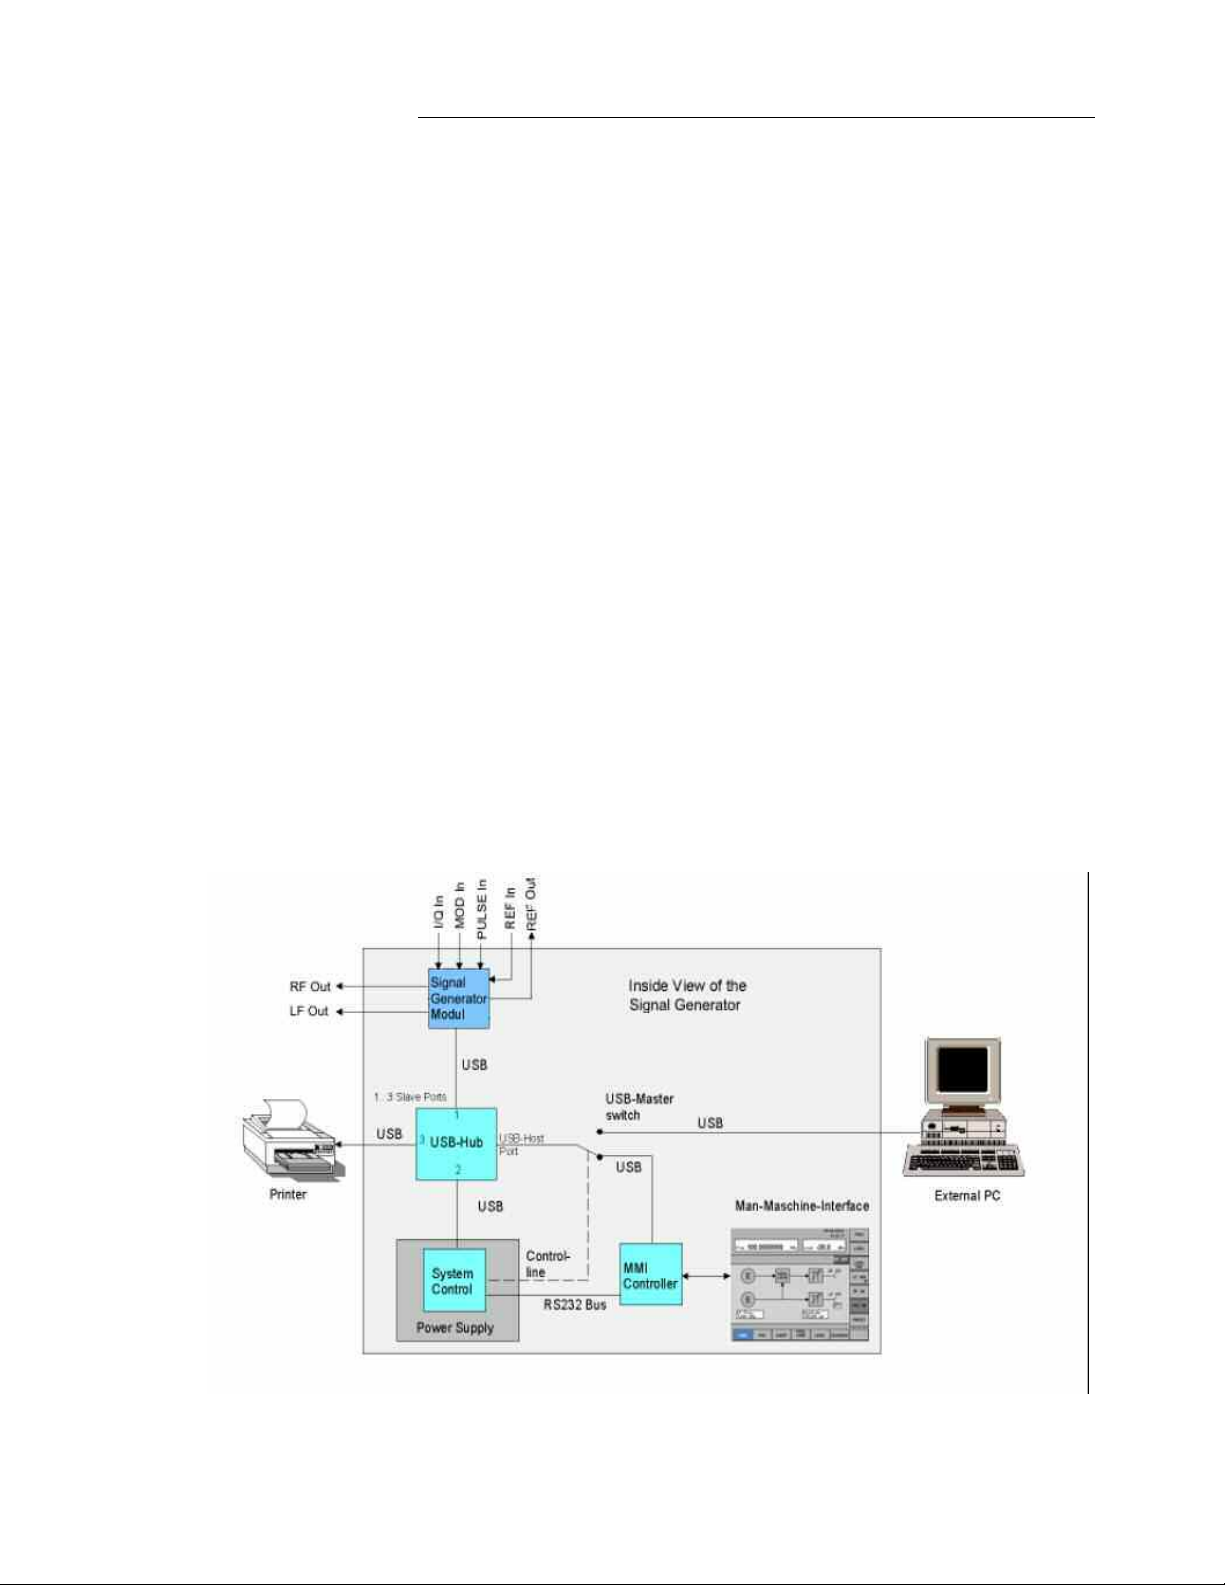
Each Family300 instrument consists of two USB instruments, namely a
measurement and/or generator module, and the system controller
associated with the instrument platform in the power supply. A dedicated
USB driver has to be installed in Windows for each of these USB
instruments. Windows either asks you to install the appropriate device
driver or continues automatically if a driver has already been installed for
these instruments. The USB drivers are automatically installed in the
Windows system when the instrument driver is installed (see 3 Installing
Instrument Drivers).
Figure 1: Configuration for Smart Instruments™ (SM300)
1MA73 3 Rohde & Schwarz
Page 4

R&S Smart Instruments™ Family300 Basic Programming
Guide
3 Installing Instrument Drivers
The instrument drivers can be obtained from the Rohde&Schwarz web site
(http://www.rohde-schwarz.de/drivers/overview.html
latest versions of the instrument drivers together with examples and
installations notes.
The following should be noted when installing and using the drivers: if a
VISA library has been installed on your PC, the instrument drivers are
embedded in its directory structure (e.g. C:\VXIPNP). If this is not the case,
the path to be used must be specified on installation and must also be set
in the development environments. The following document assumes that a
VISA library has been installed; this is a component of all National
Instruments development environments (e.g. LabWindows/CVI and
LabView) and of Agilent VEE.
The Rohde&Schwarz web site offers you a choice of three different drivers
for each instrument, but only two of the installation packages contain the
complete drivers for control.
VXI Plug&Play Instrument Driver:
). The site contains the
This driver package installs the basic driver together with all the necessary
DLLs, LIBs and Include files, plus the Windows USB drivers, for operating
the instrument concerned by remote control.
LabView:
The driver package is configured in the same way as the VXIplug&play
instrument driver package, but in this case libraries for use within National
Instruments LabView are also included (see VXIplug&play Instrument
Driver).
LabWindows/CVI:
In contrast to the two packages mentioned above, this driver package
contains only the LabWindows/CVI function panel (fp) file, the C sources, a
ReadMe file and the Help files. However, to be able to use the instrument
driver, one of the two packages mentioned above must be installed first.
1MA73 4 Rohde & Schwarz
Page 5
R&S Smart Instruments™ Family300 Basic Programming
Guide
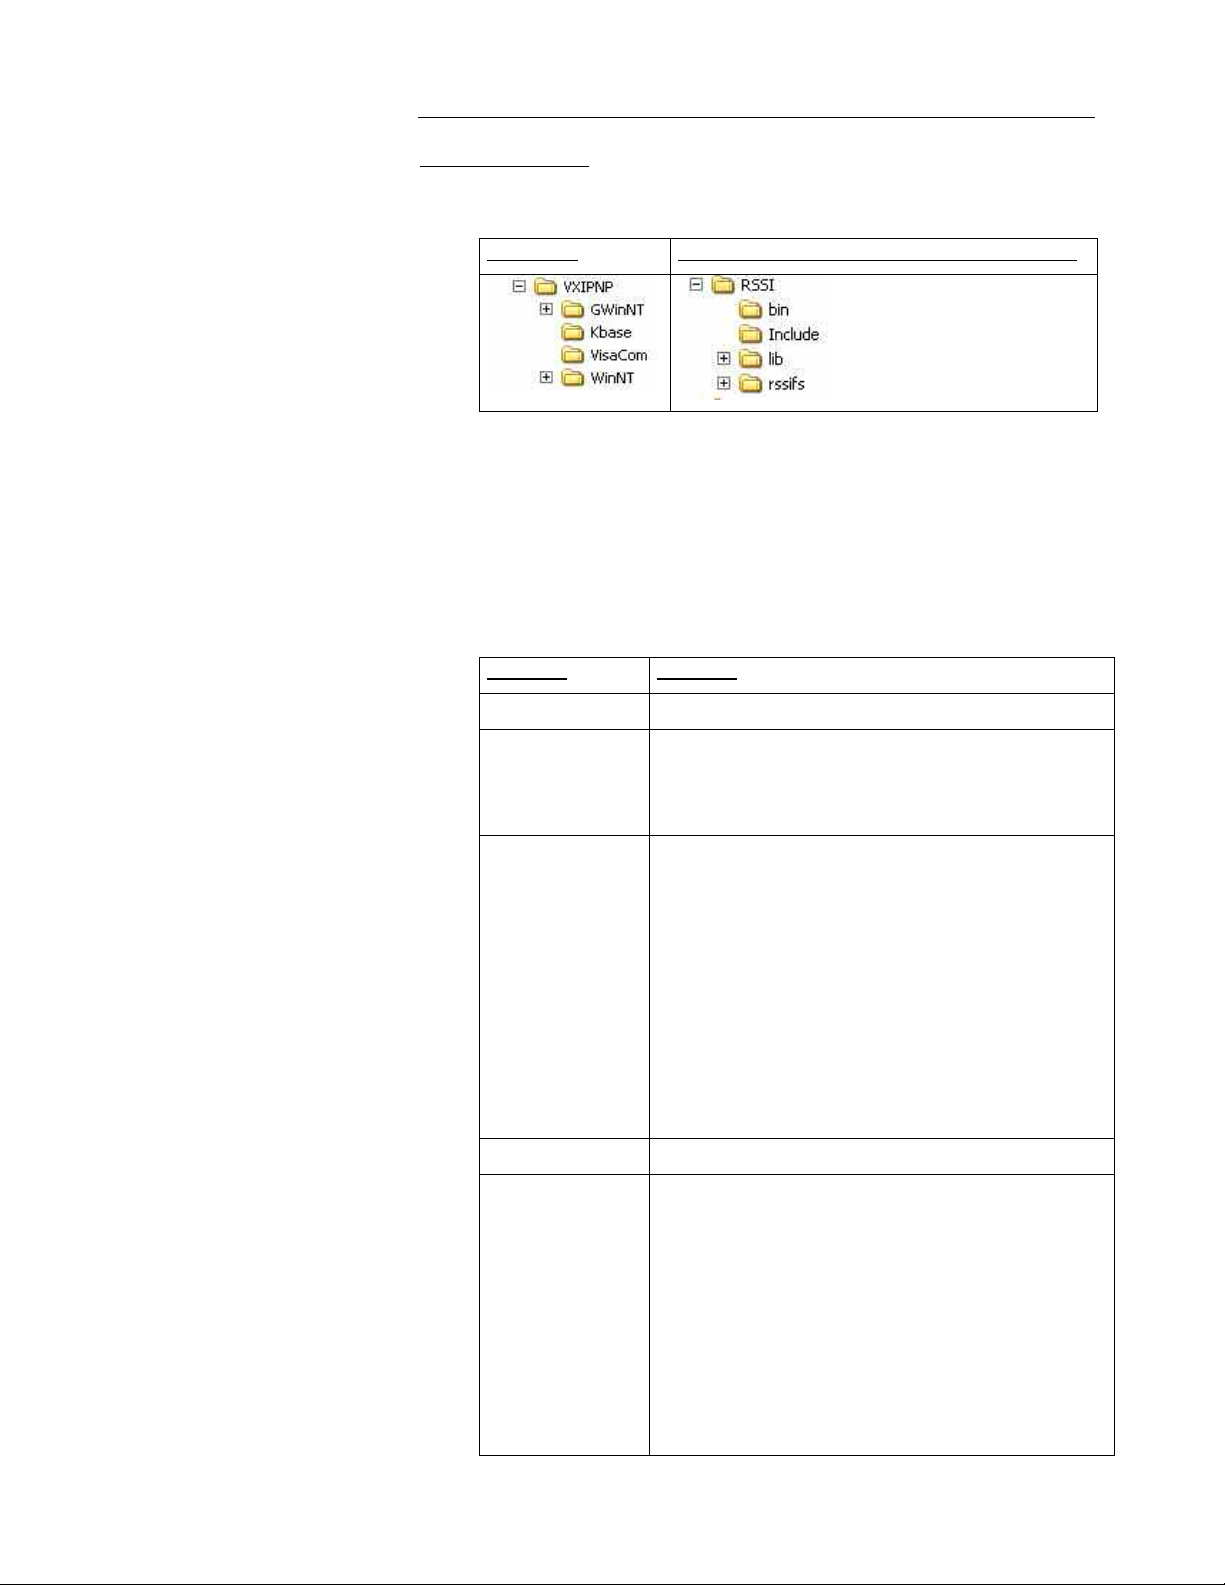
Directory structure:
After the instrument drivers are installed directory structures can differ,
depending whether or not the VISA library is installed on your PC.
With VISA
In an installation with the VISA library you find the same directories and
files in the sub-directory "WinNT" as you would find when VISA is not
installed.
The following list of directories and files refers to the FS300 spectrum
analyzer.
Directory
\bin Instrument driver DLL (e.g. rssifs_32.dll)
\lib Library files (e.g. rssifs.lib)
Without VISA (standard installation directory)
Contents
\bc (Borland C)
\msc (Microfsoft C)
\include Header files
- rssitype.h (type declarations for the Smart
Instruments™ for C)
- SiControl.h (type declarations for the basic
driver for C (internal to the driver))
- rssifs.h (FS300 type and function
declarations for C)
- rssifs.bas (FS300 type and function
declarations for Visual Basic)
\Kbase Empty by default
\rssifs (in this case for the FS300)
- license.pdf (license notices)
- readme.txt (release notes)
- rssifs.c (instrument driver sources)
- rssifs.chm (HTML based Help)
- rssifs.def (export description)
- rssifs.fp (LabWindows/CVI front panel file)
- RSSIFS.HLP (Windows Help)
1MA73 5 Rohde & Schwarz
Page 6

R&S Smart Instruments™ Family300 Basic Programming
Guide
4 Instrument Drivers
The Smart Instruments™ Family300 has instrument drivers which can be
used within Windows in all programming languages that can access DLLs.
The instrument drivers consist of different DLLs which carry out various
control tasks. The USB driver rssifs.sys serves as an interface for Windows
USB driver support. The SiControl DLL enables instrument-specific driver
components to access measurement modules with the aid of a common
interface. The instrument driver DLLs rssixx_32.dll (where xx stands for the
particular instrument, e.g. rssifs_32.dll for the FS300 spectrum analyzer)
provide the programmer with instrument-specific functions. The following
sections cover these in particular.
- UnInst.isu (uninstall information)
\GWinNT LabView files
- rssifs.chm (HTML based Help)
- rssifs_xx.mnu (several LabView menu
files)
- rssifs.llb (LabView library)
5 Integrating Drivers into a Project
The following section describes how to use instrument drivers in different
programming environments within Windows using an FS300 spectrum
analyzer as an example. Since development environments change in the
course of time, the integration sequence may also change with the advent
of a new version. The programming environment version is therefore
specified at the beginning of each section.
Visual C/C++
The following process refers to Microsoft Visual C++ 6.0.
To use the instrument driver in a Visual C++ project, you can proceed in
either of two ways:
o Use the LIB file as the interface for the DLL
o Import the DLL with the aid of LoadLibrary in runtime
The functions of the instrument driver are available to be called in either
method.
Using the LIB file
To use the LIB file as the interface for the DLL, the file must be integrated
into the project. Do this by following the menu sequence Project->Project
1MA73 6 Rohde & Schwarz
Page 7
R&S Smart Instruments™ Family300 Basic Programming
Guide
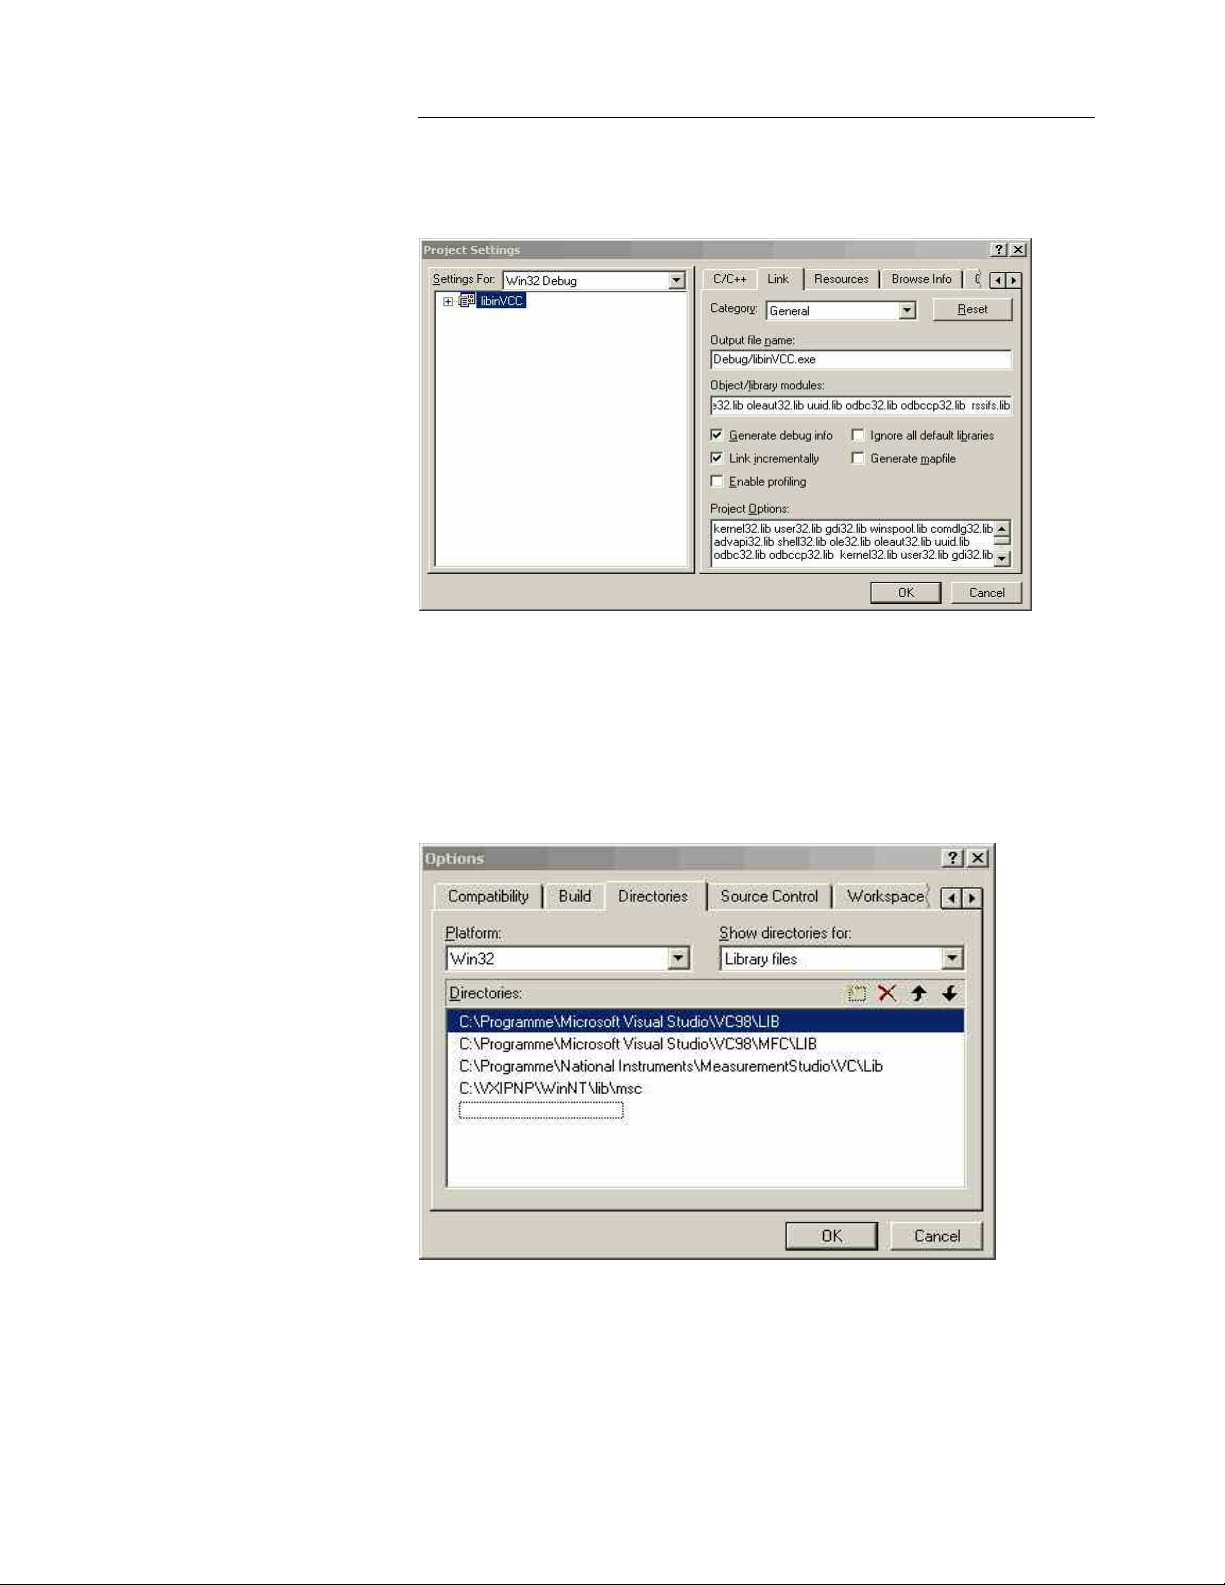
Settings->Link "Object/Library Modules" and entering the desired LIB file,
e.g. rssifs.lib for the FS300 spectrum analyzer.
Figure 2: Adding the LIB file to the current project
The compiler must be notified of the path so that it can find the LIB file.
You therefore need to add a new search path for LIB files by using the
menu sequence Tools->Options..->Directory. As mentioned above (section
3 Installing Instrument Drivers) the search path to the files can vary
according to the type of installation.
Figure 3: Adding the search path for LIB files
In order to declare the functions and data types of the instrument driver
within your project, you must integrate the C header files into your project
and define the Include path if this has not already been done. Do this by
proceeding as described in the case of the LIB file, but in this case choose
"Include files".
1MA73 7 Rohde & Schwarz
Page 8

R&S Smart Instruments™ Family300 Basic Programming
Guide
Figure 4: Adding the search path for C header files
The general settings for your Visual C++ project have now been entered.
The header files must now be integrated into those of your modules which
are intended to call the driver functions. As usual in C and C++ this is done
by using #include.
In order to declare the functions and data types, the two header files rssixx.h
and rssitypes.h must be integrated (see also 9 Which Data Type to Use).
Example: #include <rssifs.h>
#include <rssitypes.h>
Importing the DLL in runtime
DLLs are integrated during the runtime of the program. Note that in this case
every function that is going to be used must be explicitly integrated, making
this a very time-consuming method. The next section shows in principle how
to do this, using the functions of rssifs_32.dll as an example.
The function rssifs_init is used to initialize an instrument. It is structured as
follows:
ViStatus _VI_FUNC rssifs_init (ViRsrc resourceName, ViBoolean IDQuery,
ViBoolean resetDevice,
ViPSession instrSession);
Information on data types can be found in file rssitypes.h.
Please note that the path to the header files must be specified in this case
also (see 3 Installing Instrument Drivers).
1MA73 8 Rohde & Schwarz
Page 9

R&S Smart Instruments™ Family300 Basic Programming
Guide
Example:
#include <rssitype.h>
#include <rssifs.h>
typedef ViStatus (RSSIFSINIT)(ViRsrc , ViBoolean ,ViBoolean ,
ViPSession );
HINSTANCE hInstance;
RSSIFSINIT* pFunction;
/* variables for function call */
ViRsrc resourceName = "USB::0xAAD::0x6::100015";
ViBoolean IDQuery = TRUE;
ViBoolean resetDevice = TRUE;
ViPSession instrSession= 0;
ViStatus Result = 0;
int main(int argc, char*argv[]){
hInstance=::LoadLibrary("c:\\VXIPNP\\WinNT\\bin\\rssifs_32.dll");
pFunction =(RSSIFSINIT*)::GetProcAddress(hInstance, "rssifs_init");
/* function call */
Result=(*pFunction)( resourceName, IDQuery, resetDevice,
&instrSession);
return(0); }
Visual Basic
The following process refers to Microsoft Visual Basic 6.0.
Integrating the reference
To integrate the instrument drivers as reference in Visual Basic, carry out the
steps described below within your project. When you have created your new
project you can use the menu sequence Project->References... to integrate
the instrument drivers.
1MA73 9 Rohde & Schwarz
Page 10

R&S Smart Instruments™ Family300 Basic Programming
Guide
Figure 5: Integrating the reference
Figure 6: Selecting the reference
If the instrument drivers are not listed, use the Browse button to search for
the DLL in the installation directory where the instrument driver is located
(e.g. c:\VXIPnP\WinNT\bin\).
1MA73 10 Rohde & Schwarz
Page 11

R&S Smart Instruments™ Family300 Basic Programming
Select "Browse" to search for the DLL
Guide
The following DLLs are available:
Instrument driver
FS300 and FS315 spectrum
analyzers
SM300 signal generator rssism_32.dll
AM300 arbitrary/function
generator
UP300 and UP350 audio
analyzers
DLL name
rssifs_32.dll
rssiam_32.dll
rssiup_32.dll
Figure 7: Searching for the reference
National Instruments LabView
The following process refers to National Instruments LabView Express
7.0.
In order to integrate the Family300 drivers as standard drivers in
LabView, after installation of the LabView drivers it is necessary for the
complete directory (with VISA: c:\VXIpnp\GWIN\rssixx and without
VISA: myinstallationdrive:\rssifs\LabView) to be copied to LabView
directory "inst.lib". If LabView is already open, you must close it and reopen it in order to use the instrument drivers.
The drivers are then available in the block diagram at Functions->Input>Instruments Drivers.
National Instruments LabWindows/CVI
The following process refers to National Instruments LabWindows/CVI
7.0.
After installation of the LabWindows/CVI driver the fp (front panel) file
can be included in the project. It is then available under "Instruments".
1MA73 11 Rohde & Schwarz
Page 12

R&S Smart Instruments™ Family300 Basic Programming
on the project file
Guide
Right mouse-click
Figure 8: FS300 instrument in the project
Proceed as follows:
o Right mouse-click on the project file
o Select "Add file" -> in this case the fp file (e.g. select rssifs.fp for the
FS300 driver).
1MA73 12 Rohde & Schwarz
Figure 9: Adding the fp file to the project
Page 13

R&S Smart Instruments™ Family300 Basic Programming
Guide
Agilent VEE
The following process refers to Agilent VEE Pro 7.0.
In order to use the driver under Agilent VEE, the instrument driver must
be created with the aid of the "Instrument Manager" function.
Figure 10 Agilent VEE Instrument Manager
A new instrument can be created in the “Instrument->Add..“ submenu. The
interface type plays no part in this and you can press OK to confirm.
Figure 11 Agilent VEE Add Interface/Device
The name and address of the instrument are specified in the next stage of
entering settings (the interface type does not need to be set). Choose
"Advanced" settings, to configure the instrument by selecting the Plug&play
Driver tab. For example in this case you would need to select the driver for
the FS300 (rssifs) from the "Plug&play Driver Name" list. You then need to
1MA73 13 Rohde & Schwarz
Page 14

R&S Smart Instruments™ Family300 Basic Programming
Guide
enter its resource string or the virtual instrument name (see 7 "Resource
String" and "Virtual Instrument Name").
Figure 12 Agilent VEE Plug&play Driver
When the OK button is clicked the instrument is available in the Instrument
Manager.
Figure 13 Agilent VEE Instrument Manager with the configured FS300
An FS300 object complete with all functions is then available on the Agilent
VEE user interface via "Create I/O Object -> Plug&play Driver".
1MA73 14 Rohde & Schwarz
Page 15

R&S Smart Instruments™ Family300 Basic Programming
Guide
Figure 14 Agilent VEE FS300 object
6 Using "FS300 Basic Measurement" for the First Time
Now that the drivers are available under the individual development
environments, the following sections deal with a typical application that has
been programmed for all four development environments. Different
mechanisms for inputs and outputs are used, depending on the
development environment concerned.
What the application does
The application uses an FS300 to execute basic settings. The table shows
the instrument driver functions with which the setting or action concerned is
executed.
Setting/action
Opening the instrument rssifs_init
Setting the reference level rssifs_confRefLevel
Setting the start and stop frequency rssifs_confStartStopFrq
Setting the resolution bandwidth and the
video bandwidth (RBW and VBW)
Stopping the measurement rssifs_actAbort
Setting the sweep points per trace rssifs_confSweepPoints
Starting the measurement rssifs_actSendTrg
Reading off a trace rssifs_readCompleteSweepData
Closing the instrument rssifs_close
Tips on debugging the application
Drivers in the Smart Instruments™ Family300 are supplied along with a
program called SiScan. This program enables developers to test the
instrument settings whilst program development is in progress. This saves
the effort involved in continually reading back the instrument settings within
the application.
Instrument driver function
rssifs_configureBandwidth
1MA73 15 Rohde & Schwarz
Page 16

R&S Smart Instruments™ Family300 Basic Programming
Guide
Figure 15: SiScan (Smart Instruments™ Scanning Tool)
The SiMonitor is a component of the SiScan program, and displays the
Register of the instrument that is to be controlled. Since polling the Register
affects the speed of the instrument, it would be better to display only those
that will also be used in the remote control application. More detailed
information on using the SiMonitor can be found in the associated Help file.
Selecting the
instrument with
the right-hand
mouse button
Abbildung 16 Starting SiMonitor
1MA73 16 Rohde & Schwarz
Page 17

R&S Smart Instruments™ Family300 Basic Programming
Guide
Figure 17: SiMonitor (part of the SiScan tool)
7 "Resource String" and "Virtual Instrument Name"
When initializing an instrument, an object known as a "resource string" is
used for addressing (e.g. USB::0x0AAD::0x0006::100015 for an FS300
with the serial number 100015). A resource string comprises the following:
Resource string USB::0x0AAD::0x0006::100015
Port USB
Manufacturer (vendor)
identification code (VID)
Instrument identification
code (PID)
Serial number 100015 (serial number of the FS300)
0x0AAD (Rohde&Schwarz)
0x0006 (FS300)
1MA73 17 Rohde & Schwarz
Page 18

R&S Smart Instruments™ Family300 Basic Programming
Guide
When programming the Smart Instruments™ Family300 the instrument
identification code and the serial number change in accordance with the
instrument. The following table lists the instrument identification codes for
the whole Smart Instruments™ Family300:
Instrument
Instrument identification
code
AM300 0x0005
FS300 0x0006
FS315 0x0028
SM300 0x0007
UP300/350 0x0008
To simplify the task of exchanging instruments, such as in measurement
systems, you have the option to enter logical instrument names. These are
substitutes for resource strings in the form described above. The call to the
function rssixx_init changes as follows when logical instrument names are
in use:
Initialising the instrument
USB::0x0AAD::0x0006::100015 rssifs_init("USB::0x0AAD::0x0006::100015",..)
Analyser1 rssifs_init("Analyser1",..)
Logical instrument names are set with the aid of the SiScan program.
Selecting the
instrument with
the right-hand
mouse button
Figure 18 Adding a logical name via SiScan
Figure 19 Entering the logical instrument name via SiScan
1MA73 18 Rohde & Schwarz
Page 19

R&S Smart Instruments™ Family300 Basic Programming
Guide
8 Where to Find Help on the Driver Functions
You can find online Help and sample demo programs for each driver.
Online Help
The Help files are installed along with the driver. Text-based Windows Help
files (e.g. rssifs.hlp) and HTML-based Help (e.g. rssifs.chm) are included in
the installation packages in each case.
Demo programs
To make it easier to start programming the instruments, demo programs
and application notes for the various instruments (e.g. FS300, SM300 and
AM300) are available via the Rohde&Schwarz home page under the
keyword Smart Instruments™
http://www.rohde-schwarz.com/appnotes/overview.html
9 Which Data Type to Use
Information on data types can be found in file rssitype.h and in the table
below. The data types in rssitype.h are based on the data types in the VISA
standard. The instrument drivers can thus also be used in VISA-based
applications. Please note in this respect that it is not permissible to
integrate the type definitions from the file rssitype.h.
1MA73 19 Rohde & Schwarz
Page 20

R&S Smart Instruments™ Family300 Basic Programming
Guide
1MA73 20 Rohde & Schwarz
Page 21

10 References
R&S Smart Instruments™ Family300 Basic Programming
Guide
The following list contains a summary of the web sites and documents that
deal with programming Smart Instruments™.
FS300/315 Spectrum Analyzer Driver
LabWindows/CVI (http://www.rohde-
schwarz.com/driver/FS300LabWindowsCVI.html)
LabVIEW (http://www.rohde-schwarz.com/driver/FS300LabView.html
VXIplug&play Instrument Driver for VEE, Visual Basic, Visual C++, Borland
C++ etc. (http://www.rohde-schwarz.com/driver/FS300VXIplugplay.html
FS300 Remote Control Manual
AM300 Arbitrary Waveform Generator Driver
LabWindows/CVI (http://www.rohde-
schwarz.com/driver/AM300LabWindowsCVI.html)
LabVIEW (http://www.rohde-schwarz.com/driver/AM300LabView.html
VXIplug&play Instrument Driver for VEE, Visual Basic, Visual C++, Borland
C++ etc. (http://www.rohde-schwarz.com/driver/AM300VXIplugplay.html
SM300 Signal Generator Driver
LabWindows/CVI (http://www.rohde-
schwarz.com/driver/SM300LabWindowsCVI.html)
LabVIEW (http://www.rohde-schwarz.com/driver/SM300LabView.html
VXIplug&play Instrument Driver for VEE, Visual Basic, Visual C++, Borland
C++ etc. (http://www.rohde-schwarz.com/driver/SM300VXIplugplay.html
)
)
)
)
)
)
UP300/350 Audio Analyzer Driver
LabWindows/CVI (http://www.rohde-
schwarz.com/driver/UP300LabWindowsCVI.html)
LabVIEW (http://www.rohde-schwarz.com/driver/UP300LabView.html
VXIplug&play Instrument Driver for VEE, Visual Basic, Visual C++, Borland
C++ etc. (http://www.rohde-schwarz.com/driver/UP300VXIplugplay.html
Web sites
Smart Instruments™ home page (http://www.smartinstruments.de/)
Rohde&Schwarz home page (http://www.rohde-schwarz.de/)
Rohde&Schwarz application notes (http://www.rohde-
schwarz.com/appnotes/overview.html)
1MA73 21 Rohde & Schwarz
)
)
Page 22

R&S Smart Instruments™ Family300 Basic Programming
Guide
Rohde&Schwarz driver (http://www.rohde-
schwarz.com/drivers/overview.html)
Additional information
National Instruments VISA (http://www.ni.com/visa/)
11 Appendix: Contact our hotline
Should you have any questions or ideas concerning the instrument please
contact our hotline:
Phone : ++49-1805-124242
FAX : ++49-89-4129-13777
e-mail : CustomerSupport@rohde-schwarz.com
1MA73 22 Rohde & Schwarz
Page 23

12 Keywords
R&S Smart Instruments™ Family300 Basic Programming
Guide
USB Universal Serial Bus (http://www.usb.org)
USB driver This refers to a Windows specific driver that makes
the basic communication with the instrument
available to the Windows operating system via the
USB.
Instrument driver The instrument driver forms the interface between
the USB driver and the controlling program. It
provides instrument-specific control functions to
the user/programmer.
VISA This Virtual Instrument System Architecture (VISA)
specification defined by the VXI Plug-n-Play
Alliance is an important step in the direction of plug
and play interoperability between test and
measurement software, instruments and
controllers. The VISA framework standardizes the
I/O layer between instrument drivers and
controllers and supports GPIB, GPIB-VXI, VXI,
MXI, Ethernet TCP/IP and Serial bus controllers
and interfaces.
PID Product Identification (used in VISA resource
string)
VID Vendor Identification (used in VISA resource
string)
1MA73 23 Rohde & Schwarz
 Loading...