

Page 1

R&S®ESH3-Z6
V-Network 5µH / 50 Ω
Manual
(;ÜñP2)
1178993202
Manual
Version 01
Page 2

This document describes the R&S®ESH3-Z6.
© 2019 Rohde & Schwarz GmbH & Co. KG
Mühldorfstr. 15, 81671 München, Germany
Phone: +49 89 41 29 - 0
Fax: +49 89 41 29 12 164
Email: info@rohde-schwarz.com
Internet: www.rohde-schwarz.com
Subject to change – Data without tolerance limits is not binding.
R&S® is a registered trademark of Rohde & Schwarz GmbH & Co. KG.
Trade names are trademarks of their owners.
1178.9932.02 | Version 01 | R&S®ESH3-Z6
Throughout this manual, products from Rohde & Schwarz are indicated without the ® symbol , e.g. R&S®ESH3-Z6 is indicated as
R&S ESH3-Z6.
Page 3

R&S®ESH3-Z6
1 Safety Instructions for LISNs
Safety Instructions for LISNs
Products from the Rohde & Schwarz group of companies are manufactured according
to the highest technical standards. To use the products safely, follow the instructions
provided here and in the product documentation. Keep the product documentation
nearby and offer it to other users.
Use the LISN only for its intended use and within its performance limits. Intended use
and limits are described in the product documentation such as the data sheet, manuals
and the safety instructions brochure. If you are unsure about the appropriate use, contact Rohde & Schwarz customer service.
Line impedance stabilization networks (LISNs) are designed according to CISPR
16-1-2 (EN 55016-1-2) and do not meet the permissible limit for the leakage current as
defined in EN 61010-1. In addition, LISNs do not provide basic insulation, rated as
measurement category II (protection class 1). Therefore, only electrically skilled people
may connect, set up and use LISNs.
LISNs can thus pose hazardous and even life-threatening risks.
●
Electrical shock because of a high leakage current and live parts if the LISN is not
grounded.
●
Electrical shock because the LISN does not have a fuse in the measuring circuit.
●
Burns and fire hazard caused by overheating of the housing. Overheating can
occur if the ventilation is insufficient or if the cables' cross-section is too small.
These users also need sound knowledge of at least one of the languages in which the
user interfaces and the product documentation are available.
If any part of the LISN is damaged or broken, stop using the LISN. Never open the casing of the LISN. Only service personnel authorized by Rohde & Schwarz are allowed to
repair the LISN. Contact Rohde & Schwarz customer service at http://www.customer-
support.rohde-schwarz.com.
Lifting and carrying the product
If the product is heavy, you cannot move or carry it on your own. A single person can
only carry a maximum of 18 kg safely, depending on age, gender and physical condition. Look up the weight in the data sheet. To move the product safely, you can also
use lifting or transporting equipment such as lift trucks or forklifts. Follow the instructions provided by the lifting or transporting equipment manufacturer.
Choosing the operating site
Only use the LISN indoors in rooms equipped with a protective earth connection (for
example EMC test rooms).
The product casing is not waterproof and water that enters the casing can electrically
connect the casing with live parts. This can lead to electric shock, serious personal
injury or death if you touch the casing.
3Manual 1178.9932.02 ─ 01
Page 4

R&S®ESH3-Z6
Safety Instructions for LISNs
You can operate the product up to an altitude of 2000 m above sea level. The product
is suitable for pollution degree 2 environments where nonconductive contamination can
occur.
For more information on environmental conditions such as ambient temperature and
humidity, see the data sheet.
Setting up the instrument
Always place the LISN on a stable, flat and level surface with the bottom of the LISN
facing down. Make sure that the air supply is not obstructed from any side.
Place the LISN on a nonflammable base, for example a metal plate, to prevent a fire if
the ventilation system fails or if it gets too hot.
If the instrument has foldable feet, always fold the feet completely in or out to ensure
stability. The feet can collapse if they are not folded out completely or if the LISN is
moved without lifting it. The foldable feet are designed to carry the weight of the instrument, but not an extra load.
Observe the applicable national regulations and standards as part of the installation
process.
Protective ground connection
Always establish a protective ground connection before connecting the LISN to a
power source.
A protective ground protects you from electrically live parts on the casing caused by
high leakage currents. High leakage currents can cause electric shock, serious personal injury or death if you touch the casing.
Ground cables must have a sufficient cross-section that complies with
VDE 0100-540 part 5-54 (IEC 60364-5-54).
Validate that the ground connection is safe.
The ground connection must remain until the LISN has been disconnected from the
power source.
If the LISN has an auxiliary voltage: Secure the test setup with a second protective
ground. The second ground connection protects you from live parts if the ground connection of the auxiliary cable fails.
Connecting to power
The product is an overvoltage category II product and must be connected to a fixed
installation used to supply energy-consuming equipment such as household appliances and similar loads. Be aware that electrically powered products have risks, such as
electric shock, fire, personal injury or even death.
Keep to the protective measures given by VDE 0100-410 (IEC60634-4-41) while working with the LISN.
4Manual 1178.9932.02 ─ 01
Page 5

R&S®ESH3-Z6
Safety Instructions for LISNs
Take the following measures for your safety:
●
Use double-insulated connecting cables with characteristics suitable for the application:
– Appropriate minimum cross-section.
– Appropriate minimum voltage rating.
Select the cable based on the maximum power consumption of the device under
test, the fuse rating of the building installation and the cable length. When installing
the supplied cable sockets, observe the assembly instructions and the requirements of the manufacturer.
●
By design, LISNs do not have a fuse in the measuring circuit. Therefore, you have
to make sure that the operating circuit between the power supply and the LISN's
power connector is fused correctly.
●
Only use the power cable delivered with the product. It complies with country-specific safety requirements.
●
Only use intact cables and route them carefully so that they cannot be damaged.
Check the power cables regularly to ensure that they are undamaged. Also ensure
that nobody can trip over loose cables.
●
Only connect the product to a power source with a maximum fuse protection
according to the datasheet.
●
Ensure that you can disconnect the product from the power source at any time.
Pull the power plug to disconnect the product. The power plug must be easily
accessible. If the product is integrated into a system that does not meet these
requirements, provide an easily accessible circuit breaker at the system level.
●
If the LISN has an auxiliary voltage: Before taking the LISN auxiliary voltage into
operation, ensure that the voltage and frequency indicated on the product match
the available power source. If the values do not match, contact Rohde & Schwarz
customer service.
If the ventilation system is powered by an auxiliary voltage, always connect the
auxiliary voltage before taking the LISN into operation. Operation without the ventilation system leads to overheating and can cause a fire.
Using accessories
Select accessories that are suitable for the instrument and the measurement task,
especially if they are not manufactured by Rohde & Schwarz.
Measurement accessories such as current clamps or artificial hands must comply with
the measurement category of your test setup.
Cleaning the product
Use a dry, lint-free cloth to clean the product. When cleaning, keep in mind that the
casing is not waterproof. Do not use liquid cleaning agents.
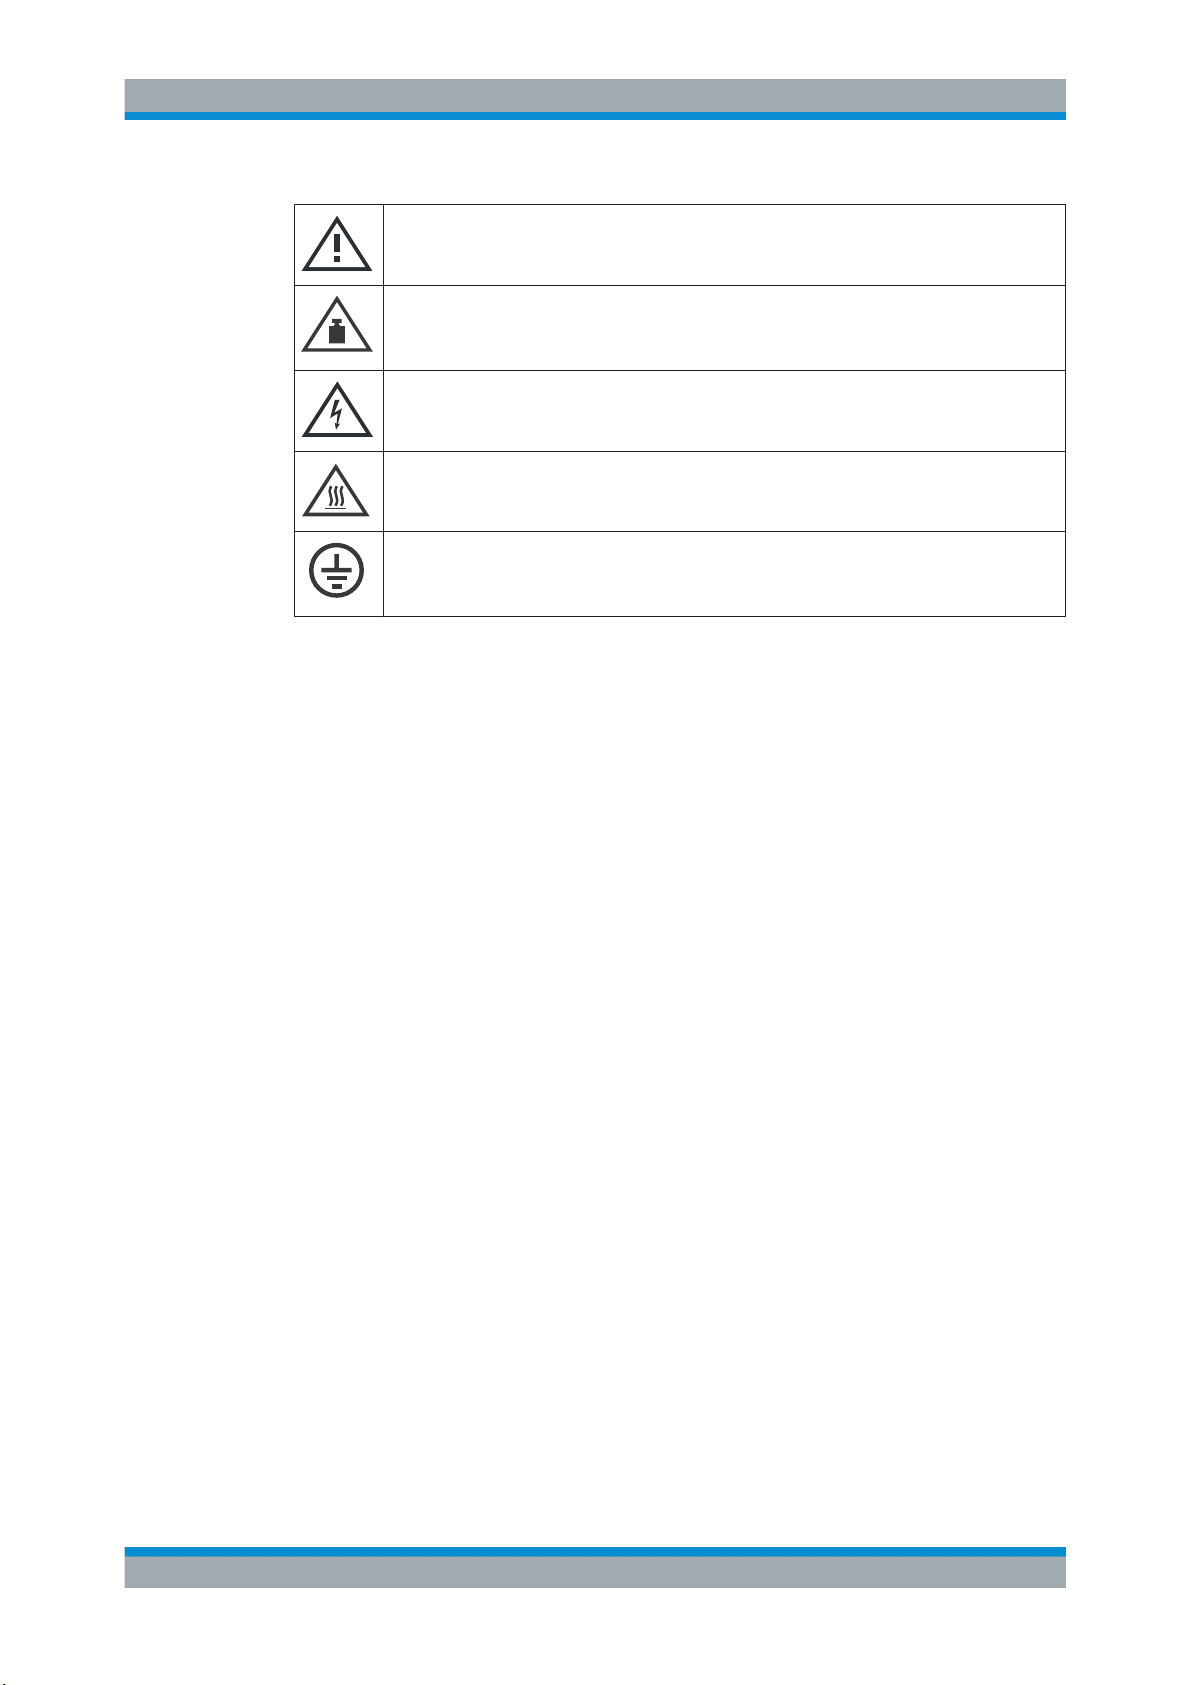
Meaning of safety labels
Safety labels on the product warn against potential hazards.
5Manual 1178.9932.02 ─ 01
Page 6
R&S®ESH3-Z6
Safety Instructions for LISNs
Potential hazard
Read the product documentation to avoid personal injury or product damage.
Heavy product
Be careful when lifting, moving or carrying the product. Carrying the product requires at least
two people or transport equipment.
Electrical hazard
Indicates live parts. Risk of electric shock, fire, personal injury or even death.
Hot surface
Do not touch. Risk of skin burns. Risk of fire.
Protective conductor terminal
Connect this terminal to a grounded external conductor or to protective ground. This protects
you against electric shock should an electric problem occur.
6Manual 1178.9932.02 ─ 01
Page 7

R&S®ESH3-Z6
2 Introduction
Introduction
V-networks are devices that are used to measure disturbance voltages on mainsdependent loads. For measurements, they are usually inserted between the power
supply and the equipment under test (EUT). The RF port provides the means to connect them to a test receiver and analyze the EUT characteristics.
The main features of a V-network are to:
●
Supply the EUT with AC supply voltage or DC supply voltage.
●
Provide a standardized load impedance.
●
Isolate the test circuit from power supply disturbances.
●
Deliver unsymmetric disturbance voltage generated by the EUT to the test receiver
in a defined manner.
The R&S ESH3-Z6 in particular is a single phase V-network that corresponds to a 5 µH
inductor. It complies to the requirements specified in CISPR 25.
Unpacking the R&S ESH3-Z6
1. Carefully remove the R&S ESH3-Z6 from the box it was delivered in.
2. Check the R&S ESH3-Z6 for any damage.
Retain the original packing material. If the instrument needs to be transported or
shipped later, you can use the material to protect the control elements and connectors.
7Manual 1178.9932.02 ─ 01
Page 8

R&S®ESH3-Z6
3 Instrument Tour
Instrument Tour
Figure 3-1: Front view (labeled To Equipment Under Test)
1 = Ground terminal X2.2
2 = Safety cap
3 = Power connector X2.1 (for EUT)
4 = RF output (to test receiver)
5 = Ground plate (contains 2 notches for ground cable connection)
13 245
8Manual 1178.9932.02 ─ 01
Page 9

R&S®ESH3-Z6
Instrument Tour
13 24
Figure 3-2: Rear view (labeled To Power Source)
1 = Ground terminal X1.2
2 = Safety cap
3 = Power connector X1.1 (to power source)
4 = Ground plate (contains 2 notches for ground cable connection)
9Manual 1178.9932.02 ─ 01
Page 10

R&S®ESH3-Z6
4 Test Setup
Test Setup
Putting the R&S ESH3-Z6 into operation
1. Remove the nut that secures the safety cap (both front and back).
2. Remove the safety cap.
DANGER! Risk of electric shock. Before you connect the V-network to the power
3.
source, you have to connect the R&S ESH3-Z6 to a protective ground terminal. An
unearthed R&S ESH3-Z6 is live. Touching a live electrical device causes serious
personal injury, or even death.
The protective ground connection must remain until you have disconnected the Vnetwork from the power supply.
Connect the R&S ESH3-Z6 to a reference ground.
a) Connect the ground terminals X1.2 and X2.2 to a protective ground terminal.
b) Screw on the safety nuts to secure the ground cables.
c) If required by the test setup: Connect the ground plate to a protective ground
terminal via the notches in the ground plate.
The R&S ESH3-Z6 has a single current path from X1.1 to X2.1. Therefore, the
ground terminals may only be used as a return line if the EUT and its generator
use reference ground as a return line (for example in case of low-voltage networks).
If the supply lines are isolated from the reference ground, you have to feed each
line into a separate R&S ESH3-Z6 as shown in Figure 4-1. In that case, you have
to connect both V-networks to a protective ground terminal.
4. Make sure that the R&S ESH3-Z6 gets enough ventilation.
5. Connect the EUT to the power connector on the front side.
6. Connect the power connector on the back side of the R&S ESH3-Z6 to the power
source.
Route the cables as specified by CISPR or as if no V-network were there.
7. Put the safety caps back on.
8. Secure the safety caps with the nut.
NOTICE! Risk of intrument damage. We recommend to keep the test receiver dis-
9.
connected when you turn the power on or off. High power pulses that occur while
turning the power on and off can damage the test receiver.
Connect the RF output to the RF input of a test receiver with a 50 Ω coaxial cable.
The test receiver shows the disturbance voltages in dBµV.
10Manual 1178.9932.02 ─ 01
Page 11

R&S®ESH3-Z6
Test Setup
X1.1
X1.2
R&S
ESH3-Z6
Power
source
X1.1
X1.2
Figure 4-1: Test setup with two V-networks
Taking the R&S ESH3-Z6 out of operation
R&S
ESH3-Z6
X2.1
X2.2
X3
EUT
Test
receiver
X2.1
X2.2
X3
DANGER! Risk of electric shock. Always disconnect the R&S ESH3-Z6 from the
1.
power source before disconnecting it from anything else, especially the protective
ground. An unearthed R&S ESH3-Z6 is live. Touching a live electrical device causes serious personal injury, or even death.
The protective ground connection must remain until you have disconnected the Vnetwork from the power supply.
Disocnnect the R&S ESH3-Z6 from the power source.
2. Disconnect all other cables.
11Manual 1178.9932.02 ─ 01
Page 12

R&S®ESH3-Z6
5 Service
Service
The V-network R&S ESH3-Z6 supplies the EUT with power during measurements and
terminates the RFI voltage source of the EUT with a defined equivalent circuit |Z| =
5 µH // 50 Ω. Refer to Table 5-1 for the limit values of |Z|X2.
The EUT can be fed with a 100 A continuous current via X1.1, L1, X2.1. C1 and and L1
form a lowpass filter that isolates the EUT and test receiver from interference coming
from the supply network.
The RFI voltage (0.1 MHz to 200 MHz) generated by the EUT is routed via the highpass flter C2 and X3 to the test receiver with an input impedance of 50 Ω.
Attenuation between X2 and X3 is high in the lower frequency range. which is due to
the impedance |Z| of the V-network and the highpass filter action of C2. The source
impedance at X2 is 50 Ω for this measurement. Attenuation measurements according
to Chapter 5.2.4, "Voltage Division Factor (VDF) X2 – X3", on page 17 therefore only
serve to check for proper operation of the R&S ESH3-Z6. Under real measurement
conditions, the source impedance of the EUT is undefined and unknown.
Resistors R2, R6 and R7 discharge capacitors C1 and C2. Resistors R3, R4 and R5
dampen the resonance caused by winding capacitances of the coil.
Block diagram
Power
source
X1
IF
input filter
R&S ESH3-Z6
Figure 5-1: Block diagram for R&S
ESH3-Z6
AN
artificial network
CC
coupling circuit
X2
EUT
X3
receiver
Test
12Manual 1178.9932.02 ─ 01
Page 13

R&S®ESH3-Z6
5.1 Test Equipment
Service
Perfomance Test
Type of equipment
Power supply Channel 1: +10 V /
Digital multimeter 600 V, 20 A,
Vector network
analyzer
Connector reduction
Attenuator 10 dB / BNC-M /
Termination 50 Ω 50 Ω / 1 W / BNC-
T-branch 50 Ω / BNC-F Type normally used
Short termination
BNC
Power supply cable Power supply cable
Recommended
characteristics or
features
10 A
AC/DC
5 kHz … 3 GHz R&S ZNB4
Xn – BNC
(Remark: Xn – bolt
termination)
BNC-F
M
Short termination
BNC-M
with M8 lug and
reference voltage
conductor.
Recommended
model
HMP 4040 3629.6776.04 DC resistance
Agilent 34401A
R&S UDS 5
R&S ZVR
Type normally used
in industry
in industry
Type normally used
in industry
Current conductor
S ≥ 2.5 mm
Voltage reference
conductor S ≥
0.75 mm
2
2
R&S Order No. Application
1311.6010.22
5719.6119.00 2 pcs
3631.0771.00 2 pcs
2 pcs
2 pcs
5.2 Perfomance Test
● GND (PE) Resistance Check..................................................................................13
● Power Conductor Resistance Check...................................................................... 14
● Impedance measurement X2 (CISPR 25 - Ed 4: 2016)..........................................15
● Voltage Division Factor (VDF) X2 – X3...................................................................17
● Reflection VSWR of X3...........................................................................................19
5.2.1 GND (PE) Resistance Check
Test equipment
●
DC power supply
●
Digital multimeter
●
2x power supply cable
13Manual 1178.9932.02 ─ 01
Page 14

R&S®ESH3-Z6
Perfomance Test
Preparing the EUT
1. Set channel 1 of the DC power supply to 3 V, current limit 10 A.
DANGER! Do not connect the R&S ESH3-Z6 to mains voltage for the test. Con-
2.
necting the R&S ESH3-Z6 to the mains voltage poses hazardous or even lifethreatening risks to the operator.
Arrange the test setup for X1.2 - X2.2 bolts as shown in Fig. 2.
The current conductors connect to output slots of power supply. The voltage reference conductors connect to the reference slots (signed SENSE) of power supply.
3. Tighten the torque of M8 nuts: 8 Nm to 10 Nm.
4. Turn on the DC power supply.
DC power
supply
+
Service
DMM
+
X1.1
Power in
Figure 5-2: Test setup for GND resistance check
Performing the test
► Read out the voltage of the PE conductor on the digital multimeter.
The GND (PE) resistance must be ≤ 6 mΩ.
Note: Calculate the GND (PE) resistance from the voltage drop at the test current.
X1.2
R&S ESH3-Z6
X2.1
X2.2
X3
Power out
RF out
5.2.2 Power Conductor Resistance Check
Test equipment
●
DC power supply
●
Digital multimeter
●
2x power supply cable
Preparing the EUT
1. Set the DC power supply to 3 V, current limit 10 A.
DANGER! Do not connect the R&S ESH3-Z6 to mains voltage for the test. Con-
2.
necting the R&S ESH3-Z6 to the mains voltage poses hazardous or even lifethreatening risks to the operator.
14Manual 1178.9932.02 ─ 01
Page 15

R&S®ESH3-Z6
Perfomance Test
Arrange the test setup for X1.1 - X2.1 bolts as shown in Fig. 3.
The current conductors connect to output slots of power supply. The voltage reference conductors connect to the reference slots (signed SENSE) of power supply.
3. Tighten the torque of M8 nuts: 8 Nm to 10 Nm.
4. Turn on the DC power supply.
DC power
supply
+
DMM
+
Service
X1.1
Power in
Figure 5-3: Test setup for conductor resistance test
Performing the test
► Read out the voltage of the AN conductor on the digital multimeter.
The power conductor resistance must be ≤ 6 mΩ.
Note: Calculate the power conductor resistance from the voltage drop at the test
current.
X1.2
R&S ESH3-Z6
X2.1
X2.2
X3
Power out
RF out
5.2.3 Impedance measurement X2 (CISPR 25 - Ed 4: 2016)
Test equipment
●
Vector network analyzer
●
BNC 50 Ω terminator
●
2x adapter Xn - BNC-F
Preparing the EUT
DANGER! Do not connect the R&S ESH3-Z6 to mains voltage for the test. Con-
1.
necting the R&S ESH3-Z6 to the mains voltage poses hazardous or even lifethreatening risks to the operator.
Arrange the test setup as shown in Fig. 4.
2. Install the Xn - BNC-F adapter on X1 and X2 connectors.
3. Tighten the torque of M8 nuts: 8 Nm to 10 Nm.
4. Connect the BNC 50 Ω termination to the BNC adapter installed on X3.
15Manual 1178.9932.02 ─ 01
Page 16

R&S®ESH3-Z6
Service
Perfomance Test
5. Connect the BNC short termination to the BNC adapter installed on X1.
6. Connect Port 1 to the X2 connector.
VNA
Port 1 Port 2
Short
Figure 5-4: Test setup for impedance measurement
X1.2
R&S ESH3-Z6
X1.1
X2.1
X2.2
X3
50
Performing the test
The test is a S11 measurement on the vector network analyzer.
1. Standardize Port 1 by OSM method.
2. Test the impedance of the artificial network conductor in the frequency range from
100 kHz to 200 MHz.
According to CISPR 25, edition 4: 2016, the deviation from the impedance shown
in Table 5-1 must be ≤±20 % in frequency range 100 kHz to 100 MHz.
Table 5-1: Impedance limits
Frequency Impedance Low limit Upper limit
0.10 MHz 3.20 Ω 2.56 Ω 3.84 Ω
0.15 MHz 4.79 Ω 3.83 Ω 5.75 Ω
0.20 MHz 6.37 Ω 5.09 Ω 7.64 Ω
0.30 MHz 9.45 Ω 7.56 Ω 11.34 Ω
0.40 MHz 12.41 Ω 9.93 Ω 14.89 Ω
0.50 MHz 15.23 Ω 12.18 Ω 18.27 Ω
0.70 MHz 20.34 Ω 16.27 Ω 24.41 Ω
1.00 MHz 26.64 Ω 21.31 Ω 31.97 Ω
1.50 MHz 33.88 Ω 27.10 Ω 40.65 Ω
2.00 MHz 38.26 Ω 30.61 Ω 45.92 Ω
2.50 MHz 40.97 Ω 32.77 Ω 49.16 Ω
3.00 MHz 42.70 Ω 34.16 Ω 51.24 Ω
4.00 MHz 44.65 Ω 35.72 Ω 53.59 Ω
5.00 MHz 45.66 Ω 36.53 Ω 54.79 Ω
7.00 MHz 46.59 Ω 37.27 Ω 55.90 Ω
16Manual 1178.9932.02 ─ 01
Page 17

R&S®ESH3-Z6
Perfomance Test
Frequency Impedance Low limit Upper limit
10.00 MHz 47.10 Ω 37.68 Ω 56.53 Ω
15.00 MHz 47.39 Ω 37.91 Ω 56.87 Ω
20.00 MHz 47.49 Ω 37.99 Ω 56.99 Ω
30.00 MHz 47.56 Ω 38.05 Ω 57.07 Ω
50.00 MHz 47.60 Ω 38.08 Ω 57.12 Ω
70.00 MHz
100.00 MHz 47.61 Ω 38.09 Ω 57.14 Ω
108.00 MHz
120.00 MHz
150.00 MHz
170.00 MHz
200.00 MHz
1
not in CISPR 24-Ed 4:2016
1
1
1
1
1
1
47.61 Ω 38.09 Ω 57.13 Ω
47.61 Ω 38.09 Ω 57.14 Ω
47.62 Ω 38.09 Ω 57.14 Ω
47.62 Ω 38.09 Ω 57.14 Ω
47.62 Ω 38.09 Ω 57.14 Ω
47.62 Ω 38.09 Ω 57.14 Ω
Service
5.2.4 Voltage Division Factor (VDF) X2 – X3
Test equipment
●
Vector network analyzer
●
2x BNC 10 dB attenuator
●
BNC T - Branch
●
BNC 50 Ω terminator
●
2x adapter Xn - BNC-F
Preparing the EUT, part 1
DANGER! Do not connect the R&S ESH3-Z6 to mains voltage for the test. Con-
1.
necting the R&S ESH3-Z6 to the mains voltage poses hazardous or even lifethreatening risks to the operator.
Arrange the test setup as shown in Figure 5-5.
2. Install the Xn - BNC-F adapter on X1 and X2 connectors.
3. Tighten the torque of M8 nuts: 8 Nm to 10 Nm.
4. Connect the BNC 50 Ω termination to the BNC adapter installed on X3.
5. Connect the Port 1 and Port 2 through two BNC 10 dB attenuator and BNC Tbranch.
6. Connect the BNC T-branch output to the X2 connector.
17Manual 1178.9932.02 ─ 01
Page 18

R&S®ESH3-Z6
Service
Perfomance Test
VNA
Port 1 Port 2
Short
X1.1
X1.2
R&S ESH3-Z6
X2.1
X2.2
X3
Figure 5-5: Test setup 1 for voltage division factor X2 - X3
10 dB
50
10 dB
Performing the test, part 1
The test is a S21 measurement on the vector network analyzer.
► Normalize Port 1 - Port 2 of the vector network analyzer.
Preparing the EUT, part 2
DANGER! Do not connect the R&S ESH3-Z6 to mains voltage for the test. Con-
1.
necting the R&S ESH3-Z6 to the mains voltage poses hazardous or even lifethreatening risks to the operator.
Arrange the test set-up as shown in Figure 5-6.
2. Connect the Port 2 through the BNC 10 dB attenuator to the X3 connector.
3. Connect the BNC 50 Ω termination to the BNC T – Branch input.
VNA
Port 1 Port 2
10 dB
Short
X1.1
X1.2
R&S ESH3-Z6
X2.1
X2.2
X3
Figure 5-6: Test setup 1 for voltage division factor X2 - X3
Performing the test, part 2
► Read out the voltage division factor of conductor in frequency range 100 kHz to
200 MHz.
Target values:
● 100 kHz to 150 kHz: S21 ≤ 1.5 dB to ≤ 1 dB (linearly decreasing with logarithm
of frequency)
● 150 kHz to 100 MHz: S21 ≤ 1 dB
● 100 MHz to 200 MHz: S21 ≤ 1 dB to ≤ 2 dB (linearly increasing with logarithm
of frequency)
50
10 dB
18Manual 1178.9932.02 ─ 01
Page 19

R&S®ESH3-Z6
5.2.5 Reflection VSWR of X3
[dB]
2
1.5
1
100
kHz
Figure 5-7: Limits for voltage division factor X2 - X3
Test equipment
●
Vector network analyzer
●
BNC 50 Ω terminator
●
2x adapter Xn - BNC-F
150
kHz
Perfomance Test
100
200
MHz
MHz
Service
Preparing the EUT
DANGER! Do not connect the R&S ESH3-Z6 to mains voltage for the test. Con-
1.
necting the R&S ESH3-Z6 to the mains voltage poses hazardous or even lifethreatening risks to the operator.
Arrange the test setup as shown in Fig. 5.
2. Install the Xn - BNC-F adapter on X1 and X2 connectors.
3. Tighten the torque of M8 nuts: 8 Nm to 10 Nm.
4. Connect the BNC 50 Ω termination to the BNC adapter installed on X2.
5. Connect the Port 1 to the X3 connector.
VNA
Port 1 Port 2
Short
Figure 5-8: Test setup for VSWR of X3
X1.2
R&S ESH3-Z6
X1.1
X2.1
50
X2.2
X3
19Manual 1178.9932.02 ─ 01
Page 20

R&S®ESH3-Z6
Performing the test
The test is a S11 measurement on the vector network analyzer.
1. Standardize Port 1 by OSM method.
2. Select VSWR format in dB.
3. Read out the VSWR in the frequency range from 1 MHz to 200 MHz.
Target values:
● 1 MHz to 10 MHz: < -2 dB to < -18 dB (linearily decreasing with logarithm of
frequency)
● 10 MHz to 100 MHz: < -18 dB
● 100 MHz to 200 MHz: < -18 dB to < -15 dB (linearily increasing with logarithm
of frequency)
1
MHz
-2
10
MHz
100
MHz
200
MHz
Service
Repair
-15
-18
[dB]
Figure 5-9: Limits for VSWR of X3
5.3 Repair
Although the V-network R&S ESH3-Z6 has no active components, the DC resistances
of current path X1.1-X2.1 can deteriorate due to overIoading, corrosion or mechanical
deformation.
Faults can be localized and remedied in accordance with Chapter 5.2, "Perfomance
Test", on page 13.
20Manual 1178.9932.02 ─ 01
Page 21

R&S®ESH3-Z6
6 Circuit Diagram
Circuit Diagram
Figure 6-1: Circuit diagram for the R&S ESH3-Z6
21Manual 1178.9932.02 ─ 01
Page 22

R&S®ESH3-Z6
7 Contacting Customer Support
Contacting Customer Support
Technical support – where and when you need it
For quick, expert help with any Rohde & Schwarz equipment, contact one of our Customer Support Centers. A team of highly qualified engineers provides telephone support and works with you to find a solution to your query on any aspect of the operation,
programming or applications of Rohde & Schwarz equipment.
Up-to-date information and upgrades
To keep your instrument up-to-date and to be informed about new application notes
related to your instrument, please send an e-mail to the Customer Support Center stating your instrument and your wish. We will make sure that you get the right information.
Europe, Africa, Middle East
Phone +49 89 4129 12345
customersupport@rohde-schwarz.com
North America
Phone 1-888-TEST-RSA (1-888-837-8772)
customer.support@rsa.rohde-schwarz.com
Latin America
Phone +1-410-910-7988
customersupport.la@rohde-schwarz.com
Asia/Pacific
Phone +65 65 13 04 88
customersupport.asia@rohde-schwarz.com
China
Phone +86-800-810-8228 / +86-400-650-5896
customersupport.china@rohde-schwarz.com
22Manual 1178.9932.02 ─ 01
Page 23

R&S®ESH3-Z6
8 Disposal
Disposal
Rohde & Schwarz is committed to making careful, ecologically sound use of natural
resources and minimizing the environmental footprint of our products. Help us by disposing of waste in a way that causes minimum environmental impact.
Electrical and electronic equipment
A product that is labeled as follows cannot be disposed of in normal household waste
after it has come to the end of its service life. Even disposal via the municipal collection
points for waste electrical and electronic equipment is not permitted.
Figure 8-1: Labeling in line with EN 50419
Rohde & Schwarz has developed a disposal concept for the ecofriendly disposal or
recycling of waste material. As a manufacturer, Rohde & Schwarz completely fulfills its
obligation to take back and dispose of electrical and electronic waste. Contact your
local service representative to dispose of the product.
23Manual 1178.9932.02 ─ 01
 Loading...