

Page 1

TABLE OF CONTENTS
Table of Contents
Introduction
Features
Turn On/Turn Off page 2
Console Division, Combination Memory and
Piston Locations page 2
Console Display and Menus page 3
Combination Action with Four Memory Levels page 3
–Unlocking a Combination Memory page 4
–Setting the Pistons page 4
–Locking a Combination Memory page 5
Special Feature page 5
–Pedal to Great Piston Coupler page 5
795 User Menu Lists
–795 User Menu Items page 6
–795 MIDI Menu Items page 7
–795 User (Headphone) Menu Items page 8
Couplers page 9
Reversibles page 9
Expression Shoes page 9
Great/Pedal Unenclosed page 9
All Swells page 9
Crescendo page 9
–Unlocking the Crescendo page 10
–Setting the Crescendo Sequence page 10
–Locking the Crescendo page 11
–Restoring the Factory Crescendo Setting page 11
Tremulants page 11
–Adjusting the Tremulant Settings page 12
Tutti page 12
–Viewing the Tutti Setting page 12
–Unlocking the Tutti page 12
–Setting the Tutti page 13
–Locking the Tutti page 13
–Restoring the Factory Tutti Setting page 13
Melody Coupler page 13
–Setting the Range of the Melody Coupler page 13
i
page 1
page 2
i
Page 2

Bass Coupler page 14
–Setting the Range of the Bass Coupler page 14
Transposer page 14
Master Tuning page 14
–Locking and Unlocking the Master Tuning page 15
–Adjusting the Pitch page 15
Temperaments page 15
–Ancient Temperaments: Pythagorean page 16
–Ancient Temperaments: Mean-Tone page 16
–Well Temperaments: Kirnberger page 16
–Well Temperaments: Werckmeister I and III page 16
–Well Temperaments: Young I and II page 16
–Well Temperaments: Equal page 16
–Selecting a Temperament page 17
Digital Dynamic Wind™ page 17
Wind Stabilizer page 17
–Adjusting the Wind Stabilizer page 18
Random Detuning page 18
Expression Range Adjustments page 18
–Setting the Expression Range page 19
Voice Palette
TM
page 19
-Accessing the Voice Palette page 20
-Unlocking the Voice Palette page 20
-Locking the Voice Palette page 20
Master Volume Control page 21
–Adjusting the Master Volume page 21
Audio Save page 21
–Saving Audio Control Settings page 21
Stereo Headphone Jack page 21
–Adjusting the Headphone Settings page 21
Auxiliary Inputs page 22
–Adjusting the Auxiliary Inputs page 22
Stereo Line Outputs page 22
–Adjusting the Stereo Line Outputs page 22
Digital Reverberation page 23
–Setting the Reverb Volume page 23
–Setting the Reverb Type page 23
–Setting the Reverb Time page 23
Antiphonal On/Main Off page 24
Pipes page 24
Pipes Off/Ancillary On page 24
Console Lamp Dimmer page 24
–Adjusting Console Lamps page 24
ii
Page 3

Automatic Shutdown Timer page 25
MIDI (Musical Instrument Digital Interface) page 26
–MIDI Channel Assignments page 26
–Selecting a MIDI Sound page 26
–Previewing Various MIDI Sounds page 26
Roland GS Standard Support page 27
–Setting the GS Variation (Bank Number) page 27
MIDI Sounds in Combination Pistons page 28
–Saving a MIDI Sound in a Combination Piston page 28
Additional MIDI Settings page 28
MIDI Note Velocity page 29
–Setting Fixed Velocity page 29
–Setting Expression Velocity page 29
–Setting Keyboard Velocity page 30
Octave Shift page 30
–Shifting the Octave of a MIDI Sound page 30
MIDI Channel Assignment page 30
–Assigning MIDI Channels page 31
MIDI Save page 31
–Saving MIDI Control Settings page 31
Sustain Switch page 31
Additional MIDI Settings on Combination Pistons page 31
–Saving MIDI Settings on a Combination Piston page 31
Enabling/Disabling MIDI Master Channels page 32
–Enabling or Disabling a MIDI Master Channel page 32
MIDI Stop Changes page 33
–Selecting MIDI Stop Change Settings page 33
–Using Pistons to Control
a Second Rodgers Console page 34
MIDI Local Control page 34
–Enabling or Disabling MIDI Local Control page 34
MIDI Sequencer Update page 34
–Enabling or Disabling MIDI Sequencer Update page 34
MIDI Device ID page 35
–Setting the MIDI Device ID page 35
Saving a Combination Memory page 35
MIDI Connections page 36
iii
Page 4

Rodgers 795 Stop Specification page 37
Console Dimensions page 38
Factory Default Combination Settings page 39
–Restoring the Factory Default
Combination Settings page 39
Suggested Registrations page 40
Great Organ page 40
Pedal Organ page 40
Swell Organ page 41
Blank Chart for Favorite MIDI Sounds (Great) page 42
Blank Chart for Favorite MIDI Sounds (Swell) page 43
Blank Chart for Favorite MIDI Sounds (Pedalboard) page 44
Care and Maintenance page 45
–Console and Pedalboard page 45
–Keyboards and Stop Tabs page 45
–Pipes on Pipe-Augmented Instruments page 45
Safety Instructions page 46
Radio and Television Interference Notice (FCC Notice) page 47
Caution Notice page 48
MIDI Implementation Chart page 49
iv
Page 5

INTRODUCTION
Grand, glorious sound is the hallmark of the Rodgers 795. Providing a rich and spacious
ensemble sound complemented by crystal-clear definition, the Rodgers 795 will take you to
new musical heights, while sustaining the tradition of quality, craftsmanship and innovation
you’ve come to expect from Rodgers.
Parallel Digital Imaging (PDI™), Rodgers’ proprietary software-based technology that
has revolutionized the digital organ world, permits each note of every stop of the Rodgers 795
to be individually tuned, leveled and voiced after installation, just like an organ with windblown pipes.
With remarkable flexibility, superior sound and the option of adding real pipes at any
time, the Rodgers 795 is a perfect choice for any home, concert or worship setting.
Built entirely in Oregon by dedicated, expert craftsmen, our consoles are meticulously
hand-crafted of hardwoods and veneers, and are designed to the exacting standards of the
American Guild of Organists.
This manual will help with the exploration of the expansive capabilities and the variety of
features and functions offered by this instrument. As highly sophisticated as the Rodgers 795
is, it's features are easy to use and easy to access, creating a most satisfying musical
experience for the player and listener alike.
The Rodgers 795 is a wonderful example of Rodgers’ commitment to celebrate tradition
while creating the future. From the first notes that sound forth from the Rodgers 795 to the
endless possibilities of sound developed over the years to come, we think you will agree
Rodgers is indeed the sound choice!
Rodgers Simply Sounds Better!
1
Page 6
FEATURES
To get started, here is a tour of the basic operations of the Rodgers 795:
TURN ON/TURN OFF
To turn the organ on, press the top part of the rocker switch to the left of the coupler
tablets. “RODGERS 795 CLASSIC ORGAN” or your personalized greeting will appear in the
Console Display. The organ will perform a self diagnostic test of its systems within a few
seconds. When completed, the Console Display will read “TRANSPOSER 0”; the Rodgers
795 is now ready to play. To turn the power off, press the lower part of the rocker switch.
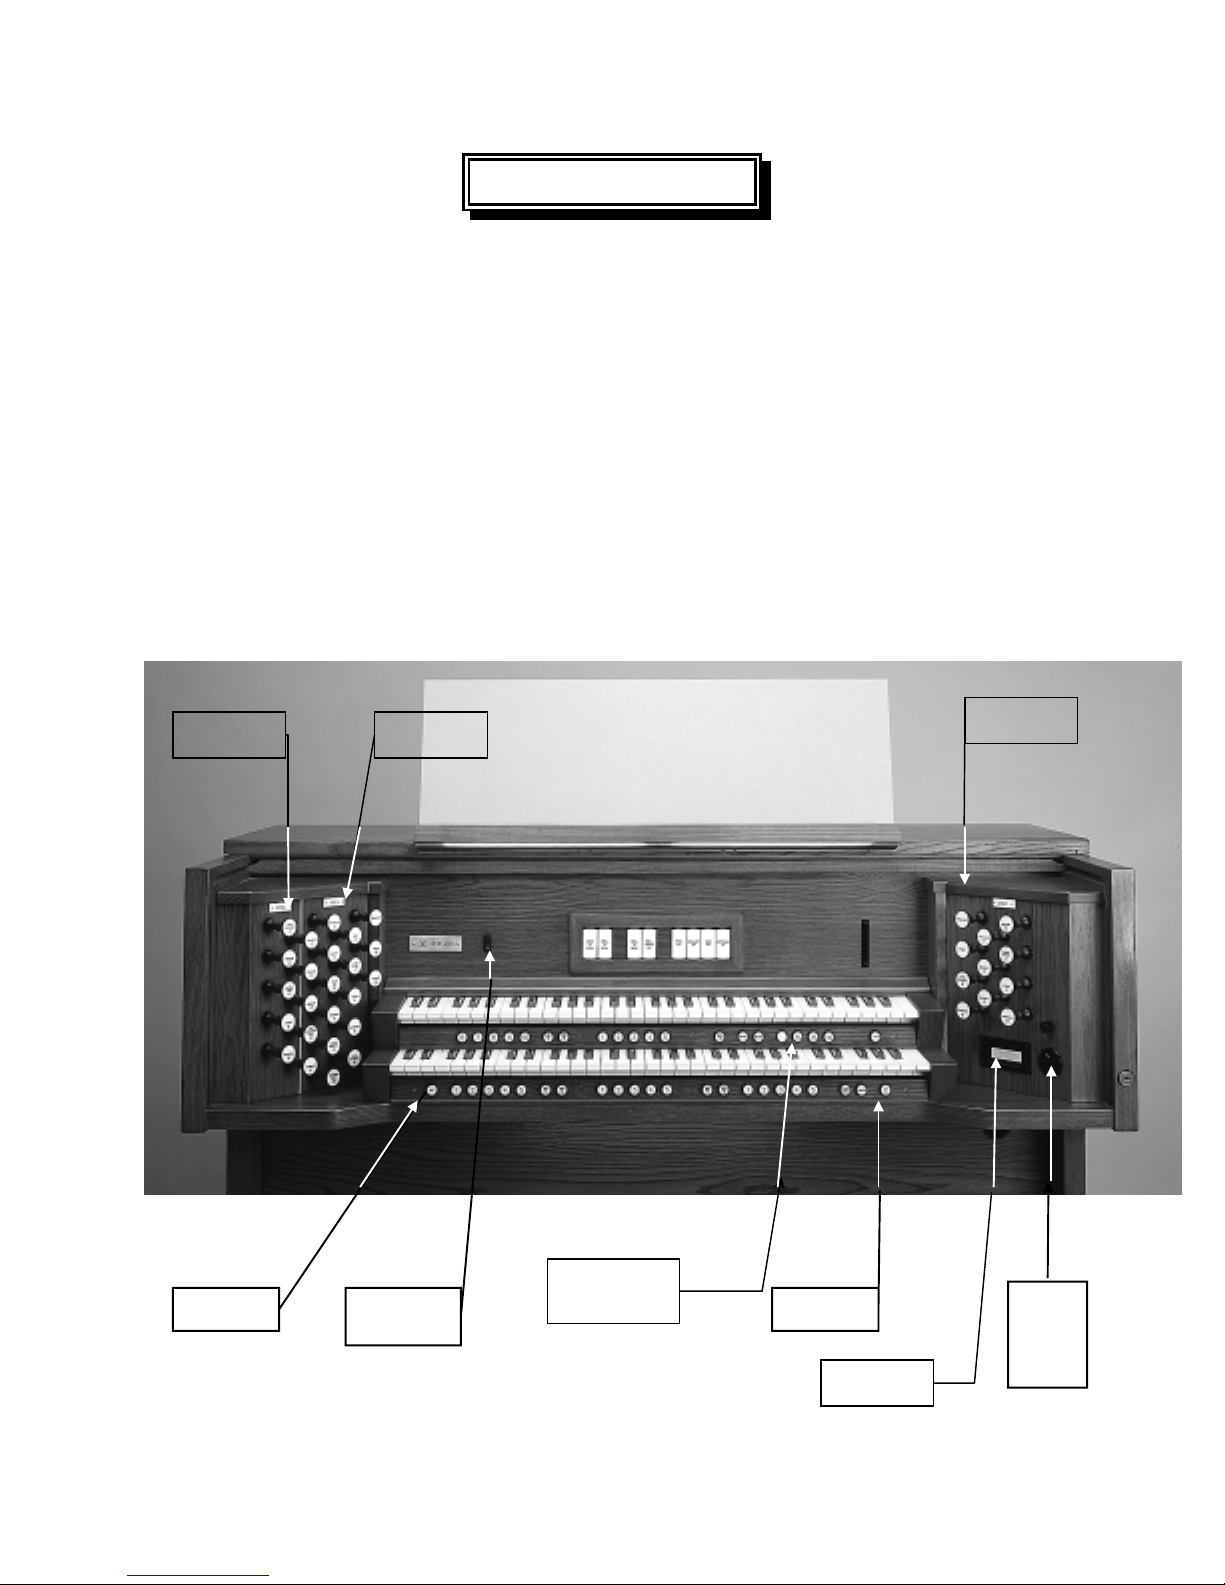
CONSOLE DIVISION, COMBINATION MEMORY
AND PISTON LOCATIONS
PEDAL
DIVISION
SET
PISTON
SWELL
DIVISION
POWER
SWITCH
MEMORY LEVEL
PISTONS
M1, M2, M3, M4
GENERAL
CANCEL
CONSOLE
DISPLAY
GREAT
DIVISION
SELECT
KNOB
AND
ALPHA
DIAL
2
Page 7

CONSOLE DISPLAY AND MENUS
The Rodgers 795 is equipped with a two-line Console Display window located on the
right stop jamb. This display normally indicates the Transposer setting, and can also be used
to alter many other organist preferences including MIDI settings and Tremulant rate and
depth.
Two controls are used to select and operate the features of the Console Display. The
smaller knob, located near the Console Display, is called the Select Knob and is used to select
different menu items to be changed. When the Console Display reads “TRANSPOSER 0”,
this knob controls the Transposer function. The larger flush dial is called the Alpha Dial, and
is used to change a menu setting which has been selected.
To move to a new menu or to a new setting in the same menu in the Console Display,
hold SET and turn the Select Knob. Note: Once any menu other than the Transposer menu
has been selected, it is no longer necessary to hold SET to select further menus.
The blinking square in the Console Display, called the cursor, indicates the setting which
is currently selected. Rotating the Alpha Dial will change the value of any selected setting.
There are three different menus. The User Menu accesses organ and audio settings such
as, Tremulant settings, Master Volume, and Auxiliary Input controls. This menu is accessed
by holding SET and turning the Select Knob counter clockwise (left) from the Transposer
menu.
The second menu controls MIDI settings and is accessed by holding SET and turning the
Select Knob clockwise (right) from the Transposer menu.
The third menu is similar to the Users Menu, but is only available when headphones are
used. Note: Please refer to the “Stereo Headphone Jack” section.
To return to the Transposer display from any other menu item, simply press General
Cancel.
COMBINATION ACTION WITH FOUR MEMORY LEVELS
The Rodgers 795 features a combination action easily changed by the organist from the
console. The organist can pre-select registrations and make rapid changes in tone color using
this advanced system.
Rodgers’ microprocessor combination action is a specially refined four-memory system.
This effectively multiplies the number of physical pistons on the console by four.
The 10 General pistons simultaneously affect all stops and controls on the Great, Swell
and Pedal. All manual and pedal registrations may be changed by pressing a General piston.
3
Page 8

There are five Divisional pistons for each manual division. The Great and Swell
Divisionals are operated by pistons located under each respective manual. The Divisional
pistons independently affect all stops and MIDI controls on the Great, Swell or Pedal. Each
division's registration may be changed independently by pressing a Divisional piston.
Swell Divisional
Pistons
General
Pistons
1-10
General
Pistons
1-5
Great
Divisional
Pistons
1-5
General
Pistons
6-10
Pedal
Divisional
Pistons
1-5
A combination memory must be unlocked to set pistons. Once the pistons are set, the
combination memory may be locked again to prevent accidental change.
UNLOCKING A COMBINATION MEMORY:
1. Press and hold M1, M2, M3 or M4 located under the Swell manual to the right for
approximately five seconds. “USING INTERNAL MEMORY” appears, followed
by "MEMORY (#) LOCKED".
2. While continuing to hold the memory piston, rotate the Alpha Dial in either
direction until the Console Display reads “MEMORY (#) UNLOCKED.”
3. Release the memory piston. The memory is now unlocked.
SETTING THE PISTONS:
1. Select a memory by pressing M1, M2, M3 or M4. Note: Pistons cannot be set if
the memory is locked. Please refer to the “Unlocking a Combination Memory”
section above.
2. Select the desired stops.
3. Press and hold the SET piston, located under the Great manual to the far left.
4
Page 9

4. While holding SET, press the desired combination piston. Then release both
pistons.
LOCKING A COMBINATION MEMORY:
1. Press and hold M1, M2, M3 or M4 for approximately five seconds. “USING
INTERNAL MEMORY” appears in the Console Display first, followed by
“MEMORY (#) UNLOCKED” .
2. While continuing to hold the memory piston, rotate the Alpha Dial in either
direction until the Console Display reads “MEMORY (#) LOCKED.”
3. Release the memory piston. The memory is now locked.
SPECIAL FEATURE - PEDAL STOPS CAN BE SET TO BE CONTROLLED BY
GREAT PISTONS:
PEDAL TO GREAT PISTON COUPLER
This feature allows the Great divisional pistons to also operate the like-numbered Pedal
divisional pistons. When this mode is selected, pressing a Great divisional piston will also
light the corresponding Pedal divisional piston. Also, stops stored on the Great and Pedal
divisional piston may be set by holding SET and pressing a Great divisional piston. To
Change the Pedal to Great Piston Coupler Mode:
• From the Transposer menu display, press and hold SET, then turn the Select knob
counterclockwise to locate the PED TO GT PISTON COUPLER menu item. The
SET piston may be released once the Transposer menu item is no longer displayed.
PED TO GT PISTON
COUPLER
• Use the Adjust dial to change the setting to ON or OFF. The setting will be
remembered when the organ is turned off. (The default setting is OFF.)
• Press General Cancel to return to the Transposer display.
5
Page 10
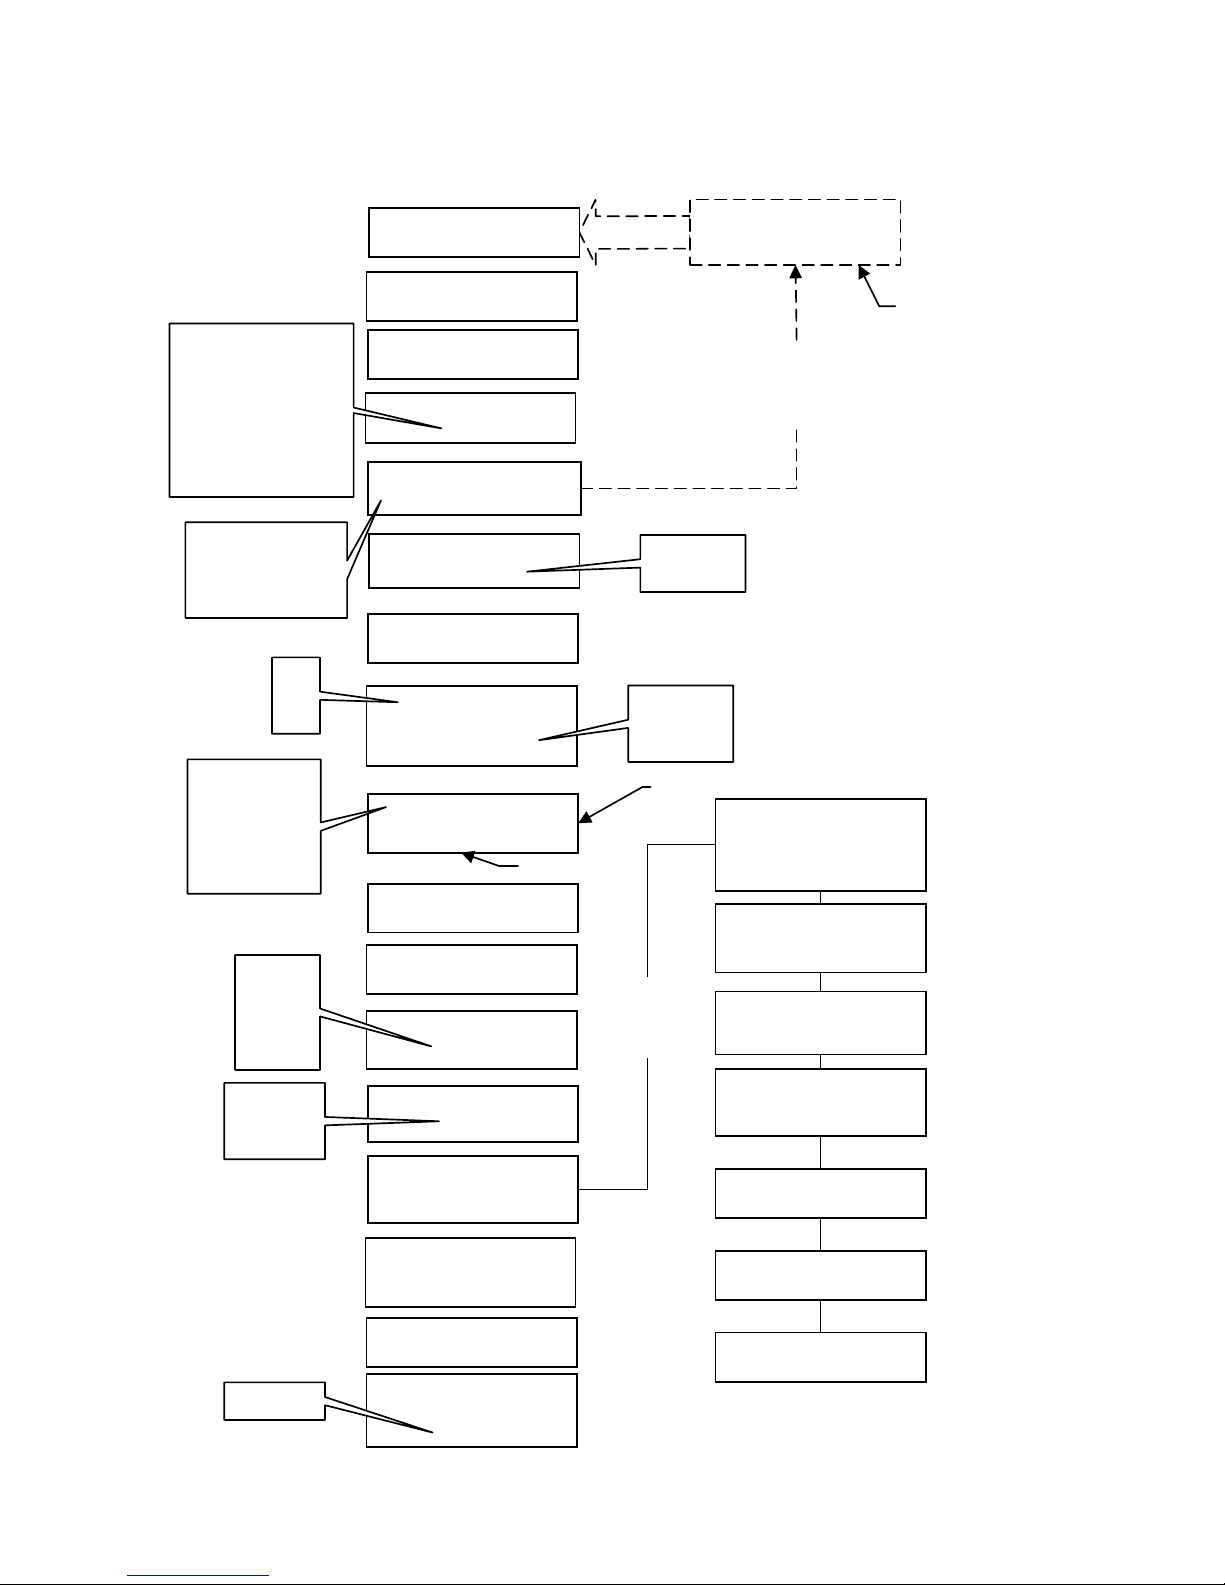
795 User Menu Items
Hold SET, turn SELECT knob
EQUAL
MEAN-TONE
PYTHAGOREAN
KIRNBERGER
WERCKMEISTER I
WERCKMEISTER III
YOUNG I
YOUNG II
counterclockwise.
TRANSPOSER
4b thru 4#
VOICE PALETTE
MENU
VOICE PALETTE
(UN) LOCKED
TEMPERAMENT
²²²²
MASTER TUNING
²²²²²²²²²²²²²
TRANSPOSER
TUNING A=
This menu item appears
when MASTER TUNING
MANUAL ADJ ONLY
²
²²².²
427.7 thru 452.8
(± ½ SEMITONE)
is ADJUSTABLE or
LOCKED A=440
ADJUSTABLE
MANUAL ADJ
ONLY
PD
GT
SW
GT MAIN
GT SPARE
GT FLUTE
GT FLUTEVIB
SW MAIN
SW SPARE
SW FLUTE
SW FLUTEVIB
ROOM1
ROOM2
ROOM3
HALL1
HALL2
SHORT
NORMAL
LONG
CONSOLE LAMPS
²²²²
WIND STABILIZER
OFF, ½, ON
MINIMUM
²²
EXPR:
²²²²²²²²
²² ²²²²
RATE:
TREM
DEPTH:
²
-9 thru 9
²
MASTER VOLUME
-20.00 thru 5.00 dB
REVERB VOLUME
OFF, -31.25 thru 6.25 dB
REVERB TYPE
²²²²
REVERB TIME
²²²²
BRIGHT
DIM
PPPP
PPP
NORMAL
-9 thru 9
Use the
ALPHA DIAL
to select these
menu items.
AUX MAIN
VOLUME
OFF, -31.25 THRU
6.25dB
AUX MAIN
BALANCE
-10.00 thru 10.00 dB
AUX ANT VOLUME
OFF, -31.25 THRU
6.25dB
AUX ANT
BALANCE
-10.00 thru 10.00 dB
AUX
OFF, -31.25 THRU 6.25dB
AUX INPUTS TO
ANTIPH CTLS
LINE OUT GAIN
ON/OFF
PED TO GT PISTON
²²²²²²²²²²
OFF, ON
0 thru 18.75 dB
COUPLER
²²²²
AUX BASS
-14.00 thru 14.00 dB
AUX TREBLE
-14.00 thru 14.00 dB
AUX GAIN BOOST
0 thru 18.75 dB
6
Page 11

795 MIDI Menu Items
Hold SET, turn SELECT knob
clockwise.
TRANSPOSER
²² ²
²²²
²
CH
²²²
VAR=
1 thru 16
(GT ONLY)
²
OFF, 0 thru 127OFF, 1 thru 128
GTA
GTB
SWA
SWB
PDA
PDB
MIDI
PGM=
FM EXP, 1 thru 128
GT
SW
PD
OFF
STP
PST
S&P
²² ²
MIDI
²²² ²²²²
VEL :
CH
²
MIDI KEYBOARD
VELOCITY :
²²
MIDI ²² MASTER
CHNL :
²²²²
MIDI STOP CHANGES
RCV :
²²²
SEND :
²²²
MIDI LOCAL
CONTROL :
²²
UP 2
UP 1
NORM
DN 1
DN 2
LIGHT
NORMAL
HEAVY
OFF
RCV ONLY
SEND ONLY
SEND & RCV
OFF
STP
PST
S&P
MIDI SEQUENCER
UPDATE
²²
MIDI DEVICE ID
²²
SEQ PORT MODE
²²²²²²²²
ON, OFF
ON, OFF
1, 17 THRU 32
MIDI
PC-1
PC-2
COMPUTER
7
Page 12

795 User (Headphone) Menu Items
Hold SET, turn SELECT knob
counterclockwise.
NOTE:
Headphones must be plugged in for these menu
items to appear. See previous page (USER MENU)
for items not related to use of headphones.
HEADPHONE
²²²²²
²²²²
dB
Use the
ALPHA DIAL
to select these
menu items.
HEADPHONE
VOLUME
OFF, -67.50 thru 11.25 dB
HEADPHONE
BALANCE
-10.00 thru 10.00 dB
HEADPHONE BASS
-14.00 thru 14.00 dB
HEADPHONE
TREBLE
-14.00 thru 14.00 dB
8
Page 13

COUPLERS
The Rodgers 795 has intermanual couplers, which enable stops of one division to be
played on another keyboard or pedalboard. Examples of intermanual couplers are SWELL
TO GREAT 8', SWELL TO PEDAL 8' and GREAT TO PEDAL 8'. These couplers are
located on the lighted tabs above the keyboards.
REVERSIBLES
The Rodgers 795 is equipped with reversible pistons. These control certain couplers,
stops and functions. Press the piston to turn on, and press again to turn off. All reversible
pistons light when engaged.
EXPRESSION SHOES
The Rodgers 795 has two expression shoes. The left expression shoe controls the voices
in the Great and Pedal divisions, and the right expression shoe controls the voices in the Swell
division. (See also CRESCENDO below).
GREAT/PEDAL UNENCLOSED
In most classical pipe organs, the Great and Pedal divisions are unenclosed and are
unaffected by expression shoes. To accomplish this, the Great/Pedal Unenclosed piston may
be selected.
When the GT/PD UNENCL piston is lit, the Great and Pedal divisions remain at
maximum volume regardless of the position of the Great/Pedal expression shoe. The Swell is
still expressed with the right expression shoe.
When the CRESC and GT/PD UNENCL pistons are engaged simultaneously, the Swell is
expressed from the left expression shoe, and the right expression shoe becomes a Crescendo
pedal. The Great and Pedal divisions remain unexpressed and at maximum volume.
ALL SWELLS
For ease of expression control using only one shoe, press the CRESC piston. When it is
lit, the Great, Pedal and Swell divisions are expressed with the Great expression shoe.
CRESCENDO
The Swell expression shoe can become a crescendo shoe when the crescendo piston is
engaged. The crescendo piston (CRESC) is located to the left of the General Cancel piston.
When the CRESC piston is lit, the right expression shoe will gradually add a predetermined
selection of stops as the shoe is pressed forward. It does not affect the stops already in use, but
merely adds to them. Stops added by the Crescendo shoe do not light.
9
Page 14

There is a lighted Crescendo/Tutti indicator located on the stop rail to the far right, with
eight lighted green segments to indicate the progressive stages of the Crescendo as the pedal is
depressed.
The selection of stops to be added by the Crescendo shoe may be set by the organist.
The Crescendo must first be unlocked to set a crescendo sequence. Once the sequence is
set, it may be locked again to prevent accidental change.
UNLOCKING THE CRESCENDO:
1. Press and hold the CRESC piston for approximately five seconds until
“CRESCENDO LOCKED” appears in the Console Display.
2. While continuing to hold CRESC, rotate the Alpha Dial either direction until the
Console Display reads “CRESCENDO UNLOCKED.”
3. Release the CRESC piston. The Crescendo is unlocked.
SETTING THE CRESCENDO SEQUENCE:
1. Press and hold the SET piston.
2. Press the CRESC piston. The piston flashes, and the Console Display reads:
CRESC SET MODE
STD STAGE 1
The stops and couplers currently set on stage one of the 63 stages in the Crescendo
sequence turn on.
3. The current sequence may be viewed by advancing through the stages one at a time
using the Alpha Dial. At each stage, the stage number (1 to 63) is indicated in the
Console Display, and the stops and couplers set at this stage turn on.
4. To add a stop to the sequence, go to the stage where the stop is to be added, turn
the stop on, and press SET. More than one stop may be added on the same stage.
5. To delete a stop, go to the first stage in which the stop turns on, turn the stop off,
and press SET.
6. Each stop can be turned on at any stage and turned off at any later stage. As an
example, assume the GREAT FLUTE CELESTE II is to turn on at stage 1 and off
at stage 25. Go to stage 1, turn on the GREAT FLUTE CELESTE II, and press
SET. Then go to stage 25, turn off the GREAT FLUTE CELESTE II, and press
SET.
7. To clear the entire Crescendo sequence (stages 1 through 63), hold SET and press
General Cancel (0). This also resets the current stage number to 1 so that a new
sequence can be entered.
10
Page 15

8. When building a completely new sequence, it is advisable to first write the new
sequence down without numbers, then assign stage numbers from 1 to 63 to each
stop or group of stops in the sequence. Sometimes there are more stages than stops
in the sequence, so it is necessary to skip some stages to make the sequence end at
or near stage 63. If this is not done, the sequence ends before the Crescendo Pedal
is fully depressed.
9. To exit the “CRESC SET MODE” menu at any time, press General Cancel. Any
changes in the sequence made up to this point are saved.
Note: If the original factory setting is desired, please refer to the “Restoring the Factory
Crescendo Setting” section below.
LOCKING THE CRESCENDO:
1. Press and hold the CRESC piston for approximately five seconds until
“CRESCENDO UNLOCKED” appears in the Console Display.
2. While continuing to hold CRESC, rotate the Alpha Dial either direction until the
Console Display reads “CRESCENDO LOCKED.”
3. Release CRESC. The Crescendo is locked.
RESTORING THE FACTORY CRESCENDO SETTING:
1. Press and hold the CRESC piston for approximately five seconds. The Console
Display reads “CRESCENDO LOCKED” or “CRESCENDO UNLOCKED”,
change to “CRESCENDO UNLOCKED.”
2. While continuing to hold CRESC, press and hold SET for an additional five
seconds. The Console Display reads “CRESCENDO FACTORY DEFAULT”.
3. Release both pistons.
TREMULANTS
Tremulants create a change in pitch (sharp and flat), amplitude (volume) and timbre (tone
quality). The use of the tremulant adds warmth to solo or small ensemble combinations. It is
not common to use tremulants in larger classical ensembles. In some romantic ensembles,
tremulants are used judiciously. In some gospel and evangelical musical traditions, tremulants
with a faster and deeper excursion are frequently used.
There are two types of tremulant controls on the Rodgers 795. The Divisional tremulants
(Great and Swell) affect only the stops in the respective division. There is one General
tremulant, the FLUTE II (FLT TREM II piston) tremulant, which affects all manual flute stops
simultaneously.
All tremulants may be individually adjusted for rate and depth by performing the
following procedure:
11
Page 16

ADJUSTING THE TREMULANT SETTINGS:
1. Starting from the TRANSPOSER display, press and hold the SET piston.
2. Turn the Select Knob counter clockwise (left) until the Console Display reads:
GT MAIN TREM
RATE 0 DEPTH 0
3. Turn the Select Knob until the cursor is on the tremulant name. Note: Please refer
to the “795 User Menu Items” section for a list of tremulant names.
4. Rotate the Alpha Dial until the Console Display reads the tremulant to be adjusted.
5. Turn the Select Knob until the cursor is on the rate.
6. Rotate the Alpha Dial until the Console Display reads the desired tremulant rate.
Note: The range is from -9 to +9. The rate setting may be previewed by selecting a
corresponding stop and playing a note while the adjustment is made.
7. Turn the Select Knob clockwise to move the cursor to Depth, then adjust as with
the Rate.
TUTTI
There are times when a full organ registration is needed immediately. The Tutti on the
Rodgers 795 can be set with any combination of stops. Press the TUTTI piston to access the
Tutti combination. These pistons are reversible, so simply press again to cancel. When Tutti
is in use, the top four segments of the Crescendo/Tutti indicator light red. The
Crescendo/Tutti indicator is located on the stop rail to the far right. Stops and couplers set on
Tutti add to the registration selected by the knobs/tabs, but do not light the additional stop
controls.
VIEWING THE TUTTI SETTING:
1. Press and hold the TUTTI piston or toe piston.
2. While holding the TUTTI piston, press the SET piston. The stops of the Tutti
setting light.
Note: Tutti cannot be set unless it is unlocked.
UNLOCKING THE TUTTI:
1. Press and hold the TUTTI piston for approximately five seconds until “TUTTI
LOCKED” appears in the Console Display.
2. While continuing to hold TUTTI, rotate the Alpha Dial either direction until the
Console Display reads “TUTTI UNLOCKED.”
3. Release the TUTTI piston. The Tutti is unlocked.
12
Page 17

SETTING THE TUTTI:
1. Select the desired stops.
2. Press and hold the SET piston, and press the TUTTI piston. The Tutti is set.
LOCKING THE TUTTI:
1. Press and hold the TUTTI piston for approximately five seconds until “TUTTI
UNLOCKED” appears in the Console Display.
2. While continuing to hold TUTTI, rotate the Alpha Dial either direction until the
Console Display reads “TUTTI LOCKED.”
3. Release TUTTI. The Tutti is locked.
RESTORING THE FACTORY TUTTI SETTING:
1. Press and hold the TUTTI piston for approximately five seconds.. The Console
Display reads “TUTTI LOCKED” or “TUTTI UNLOCKED”. Change to
"UNLOCKED".
2. While continuing to hold TUTTI, press and hold SET for an additional five
seconds. The Console Display reads “TUTTI FACTORY DEFAULT”.
3. Release both pistons.
MELODY COUPLER
The Melody Coupler (MELODY) is located on lighted reversible piston, and lights when
it is engaged.
When MELODY is lit, any selected stop or MIDI voice in the Swell division sounds from
the highest key being played on the Great manual. This allows a solo melody and an
accompaniment to be played on the same manual.
In its default setting, the Melody Coupler affects keys 25 through 61 on the Great manual.
The lower end of its range is programmable and may be extended down to key 13 or up to key
49.
Note: The Melody Coupler can also be set in General combination pistons.
SETTING THE RANGE OF THE MELODY COUPLER:
1. Press and hold the SET piston, and press MELODY which begins flashing.
2. Release the SET piston.
3. While the Melody piston is flashing, press a key which corresponds to the lowest
note the range is to extend. Any note from key 13 to key 49 may be selected.
After the selected key has been pressed, the Melody Coupler turns off. Note: When
a key is pressed to set the range, no sound is heard even if stops are on, so no
disturbance is made if programming during a performance.
13
Page 18

4. To use the new range, press MELODY. This range is saved when the organ is
turned off.
BASS COUPLER
The name of this feature is derived from the historical term “Basso Continuo” meaning
throughbass. When the Bass Coupler is engaged, it will light. Any selected stops or couplers
in the Pedal division will sound from the lowest key being played on the Great manual. This
provides a pedal bass sound without actually playing the pedalboard. The Bass Coupler
(BASS) is located on a lighted reversible piston.
In the default setting, the Bass Coupler affects keys 1 through 24 of the Great manual, but
its range is programmable up to key 32 (top of the pedalboard range).
SETTING THE RANGE OF THE BASS COUPLER:
1. Press and hold the SET piston, and press the BASS piston which begins flashing.
2. Release the SET piston.
3. While BASS is flashing, press a key which corresponds to the highest note the
range is to extend. Any note from key 1 to key 32 may be selected. After the
selected key has been pressed, BASS turns off. Note: When a key is pressed to set
the range, no sound is heard even if stops are on, so no disturbance is made if
programming during a performance.
4. To use the new range, press BASS. This range is saved when the organ is turned
off.
Note: The Bass Coupler can only be set in General combination pistons.
TRANSPOSER
The Transposer is the default menu setting in the Console Display. Turning the Select
Knob while “TRANSPOSER 0” is displayed lowers the pitch of the organ up to four
semitones (half steps) and raises the pitch up to four semitones. The Transposer returns to “0”
when General Cancel is pressed. Note: In order to select menu items other than the
Transposer, it is necessary to first hold SET, and then turn the Select Knob.
MASTER TUNING
The Rodgers 795 can easily and quickly be tuned to a piano or musical instrument not at
standard concert pitch (A=440.0). The range of the Master Tuning is one-half semitone sharp
or flat.
If the instrument has been augmented with pipes, the Master Tuning feature is used to
bring the electronics in tune with the pipes. The pitch will return to A=440.0 when the organ
is turned off. Adjustments to the tuning cannot be made unless the Master Tuning is
unlocked.
14
Page 19

UNLOCKING THE MASTER TUNING:
1. Press and hold the SET piston.
2. Turn the Select Knob counter clockwise (left) until the Console Display reads:
MASTER TUNING
LOCKED A=440.0
3. Rotate the Alpha Dial until the Console Display reads “ADJUSTABLE” or
“MANUAL ADJ ONLY”.
4. Press General Cancel to return to the Transposer menu. Note: The Console
Display reads “TRANSPOSER 0 TUNING A=440.0” (default setting) when the
Master Tuning is unlocked.
ADJUSTING THE PITCH:
1. Make sure the Master Tuning is unlocked.
2. The Console Display reads:
TRANSPOSER 0
TUNING A = 440.0
3. Rotate the Alpha Dial to adjust the tuning.
Note: When the organ is turned off, the tuning will return to the default setting
(A=440.0).
TEMPERAMENTS
In recent years, there has been a renewed interest in authentic interpretation of organ
literature written before the adoption of Equal Temperament tuning. Until the middle of the
18th century, the relative pitches of the notes of the scale were chosen to favor music written
in key signatures with few sharps or flats; more remote keys produced varying degrees of
aural distress. Many composers of the day utilized moderately out of tune intervals to evoke
momentary tension to the listener. With the adoption of the Equal Temperament (“WellTempered”) tuning system, almost universal today, all keys became equally out of tune, and
the intentions of these earlier composers were lost, to some degree.
The Rodgers 795 offers a choice of eight temperaments: Equal, Mean-Tone, Kirnberger,
Werckmeister I, Werckmeister III, Young I, Young II and Pythagorean. This selection of
temperaments allows the organist to hear these historical works as their composers heard
them, or to explore the application of unequal temperament to new music.
15
Page 20

Ancient Temperaments
Pythagorean: Pythagoras (582-500 B.C.) was a brilliant Greek
theorist and mathematician. The Pythagorean temperament is
characterized by pure fifths and fourths. The Pythagorean theory
founded a diatonic scale which served as a model throughout the
Middle Ages.
Mean-Tone: Mean-Tone temperament improves on the
Pythagorean tuning by slightly contracting each of the four fifths
needed to generate a major third. Major thirds and in-tune fifths
are slightly narrow, and the differences between the major and
minor seconds are smoothed out. Many artists now prefer MeanTone temperaments when performing 15th through 17th century
repertoire.
J.S. Bach’s Well Tempered Clavier, written in 1722 and 1738-42, is a collection of 24
paired preludes and fugues written in every major and minor key. The title refers to the use of
a temperament in which all keys are satisfactorily in tune, but not necessarily an absolutely
equal temperament.
Well Temperaments
Kirnberger: Johann Philipp Kirnberger (1721-1783) was a German
composer and pupil of Bach from 1739-41. His temperament
favored pure fifths, as in the Pythagorean model, but performance
was improved in many keys.
Werckmeister I and III: Andreas W erckmeister experimented with
temperaments in the latter part of the 17th century. In
Werckmeister I he further refined the Mean-Tone temperament. In
Werckmeister III, four tones are practically tuned identical to Equal
Temperament (C, D#, F# and A).
Young I and II: Young Temperaments offer further refinements to
the Mean-Tone model, except with slightly higher pitched sharps.
Equal: Equal Temperament is the modern standard which utilizes a
succession of 12 semitones of equal size, allowing performance in
all keys successfully. The fifths are slightly narrowed and the
upward thirds are considerably sharp, but unlimited modulation
from key to key is possible.
16
Page 21

SELECTING A TEMPERAMENT:
1. Press and hold the SET piston.
2. Turn the Select Knob counter clockwise (left) until the Console Display reads:
TEMPERAMENT
EQUAL
3. Release SET.
4. Rotate the Alpha Dial until the desired temperament appears.
5. Press General Cancel to return to the Transposer menu.
Note: When the organ is turned off, the temperament will return to Equal.
DIGITAL DYNAMIC WIND
™
Part of the personality of an individual pipe organ relates to the steadiness of the wind
supply to the pipes. Because air is an elastic medium, there is some amount of “give” in the
wind supply of every pipe instrument. Some organs exhibit more unsteadiness than others,
according to the type of wind regulators used (single or multiple reservoirs, schwimmer
regulators, etc.). A small amount of unsteadiness in the wind helps the listener to identify the
sound as that of a wind-blown instrument, although too much can be distracting. Certain
types of music, though, seem to gain charm from a less-than-perfect wind system.
Another characteristic of pipe organs involves changes in pitch which occur in individual
pipes when playing large numbers of pipes together. These pitch changes are due both to
variations in wind pressure as the wind demand becomes greater and to the influence of the
sound from neighboring pipes. This latter effect is greatest upon large-scale flute voices and
least upon narrow-scaled string voices. Even though this results in significant detuning, the
human ear seems to perceive instead an increase in ensemble effect.
Rodgers’ exclusive Digital Dynamic Wind (patent pending) emulates these characteristics
by modeling the behavior of pipe organ wind regulating devices and the response of pipes to a
slightly unsteady wind supply. Some independent ranks have their own “software reservoir,”
and each voice is programmed to respond to wind variations in the same way its equivalent
pipe rank or ranks would respond.
In order to adjust the behavior of the organ wind system, a “WIND STABILIZER” menu
is provided in the Console Display. This stabilizer operates in much the same way as does the
stabilizer control provided on some pipe instruments. In the “OFF” position, the wind has a
noticeable unsteadiness in the playing of rapid passages or large chords. The “1/2” position
reduces this unsteadiness somewhat, and the “ON” position makes the wind steady under all
conditions. The position is saved when the organ is turned off.
WIND STABILIZER
17
Page 22

ADJUSTING THE WIND STABILIZER:
1. Press and hold the SET piston.
2. Turn the Select Knob counter clockwise (left) to “WIND STABILIZER”.
3. Release SET.
4. Rotate the Alpha Dial to select “OFF”, “1/2”, or “ON”.
RANDOM DETUNING
One of the essential ingredients of a pipe organ ensemble arises from the small amount of
pitch error in each pipe. No matter how carefully an instrument is tuned, small changes in
temperature or humidity causes the pipes to drift from their original pitches. Reed pipes are
especially prone to drift over time due to “creeping” of the tuning wire with cyclic
temperature variations.
The Random Detuning feature causes selected notes to receive a small amount of
detuning. The amount of detuning is chosen at random for each note of each voice. Some
notes will not be detuned at all. The number of notes detuned and the maximum amount of
detuning are selected for each voice to mimic the behavior of an equivalent pipe set. For
instance, reeds will exhibit more pitch error than flues. Because the detuning is random, there
is no degradation of the overall temperament of the instrument and the amount of detuning is
no more than one would experience in a recently-tuned pipe instrument.
This detuning process happens each time the organ is turned on. Once computed, the
pitch of each note remains constant. Thus, the tuning will be a little different, as it would be
with a pipe organ, each time the organ is used. The amount of Random Detuning present in
the organ will be set by a Rodgers representative during final voicing.
EXPRESSION RANGE ADJUSTMENTS
The minimum volume of each division when its Expression Shoe is closed can be
adjusted to suit specific musical needs or personal tastes. The “MINIMUM EXPR:” menu
allows three settings— “NORMAL”, “ppp”, and “pppp”. The “NORMAL” setting produces
the amount of expression obtained on most pipe instruments with typical swell shades. The
“ppp” setting produces a greater range than the “NORMAL” setting, and the “pppp” setting
produces the amount of expression one might expect from very heavy and thick swell shades.
The settings do not affect the sound at all when the expression shoe is open.
There are special settings of the Expression Range that can be selected when installing a
pipe/electronic combination organ. When speakers for the enclosed division (Swell) are
placed inside a pipe organ swell box, the digitally sampled electronic stops in those divisions
can sound at a constant volume by setting the Expression Range to “Unenclosed”. Then the
expression of those stops, like the pipes in the swell box, will be controlled by the swell
shades.
18
Page 23

SETTING THE EXPRESSION RANGE:
1. Press and hold the SET piston.
2. Turn the Select Knob counter clockwise (left) to “ MINIMUM EXPR:”, and place
the cursor over the division name.
3. Rotate the Alpha Dial to select the desired division.
4. Turn the Select Knob clockwise (right). The cursor moves to the bottom line.
4. Rotate the Alpha Dial to select the desired expression range. If the expression
shoe is closed and notes are played on voices in the division being adjusted, the
change is heard immediately. All expression range settings are saved when the
organ is turned off.
VOICE PALETTE
™
Many of the speaking stops on the Rodgers 795 can play additional voices which are
selectable through the Voice Palette™ menu. These voices are:
DIVISION TILT TAB VOICE PALETTE
PEDAL:
16' Subbass 16' Bourdon
4' Choralbass 4' Nachthorn
16' Posaune 16' Basson
GREAT:
8' Principal 8' Diapason
8' Flûte Celeste II 8' Erzähler Celeste II
4' Octave 4' Principal
2' Super Octave 2' Waldflöte, 2' Fifteenth
8' Cromorne 8' Trompete
Chimes Harpsichord
SWELL:
8' Geigen Principal 8' Viole
16' Basson 16' Fagot
Note: The drawknobs with small dots above the stop name denote where a palette voice is
located.
The voices located on one stop control cannot be played simultaneously. However, a
stop’s primary voice may be stored on one combination piston, and its Voice Palette selection
may be stored on another combination piston
19
Page 24

ACCESSING THE VOICE PALETTE:
1. Press and hold the SET piston.
2. Turn on the stop to be changed. For example, select the 16' Subbass in the Pedal.
The Console Display reads:
PD SUBBASS 16=
*SUBBASS 16*
3. Rotate the Alpha Dial to view the available Voice Palette selection. The voice
may be previewed as it is selected.
The voice selections made using this procedure can be saved in General and Divisional
combination pistons. All drawknobs return to their default voices as labeled when the organ
is turned off.
In order to save Voice Palette selections in combination pistons, the Voice Palette must
first be unlocked. This locking feature only prevents “blind” changes to Voice Palette
selections; manual changes are always possible.
UNLOCKING THE VOICE PALETTE:
1. Press and hold the SET piston.
2. Turn the Select Knob counter clockwise (left). The Console Display reads:
VOICE PALETTE
LOCKED
3. Rotate the Alpha Dial to unlock the Voice Palette. Voice Palette selections can
now be stored in combination pistons.
When the Voice Palette is locked, combination pistons will not affect Voice Palette
selections, even selections previously saved in combination pistons.
LOCKING THE VOICE PALETTE:
1. Press and hold the SET piston.
2. Turn the Select Knob counter clockwise (left). The Console Display reads:
VOICE PALETTE
UNLOCKED
3. Rotate the Alpha Dial to lock the Voice Palette.
20
Page 25

Special situations and individual preferences sometimes require a temporary change in
the overall volume of the organ. This is easily accomplished.
ADJUSTING THE MASTER VOLUME:
1. Press and hold the SET piston.
2. Turn the Select Knob to “MASTER VOLUME”.
3. Rotate the Alpha Dial to obtain the desired volume level. Note: An Audio Save
may be performed to save this setting as the default. Please refer to the “Audio
Save” section.
AUDIO SAVE
Changes made to audio settings are temporary and are lost when the organ is turned off
unless those settings are saved. This can be done by performing the following procedure.
SAVING AUDIO CONTROL SETTINGS:
1. While in any Audio Menu, hold SET, then press and hold General Cancel for
approximately five seconds.
2. Continue holding both pistons until the Console Display reads:
AUDIO CONTROL
SETTINGS SAVED
3. Release SET and General Cancel.
Any changes made to any audio control settings are saved when the organ is turned off.
STEREO HEADPHONE JACK
The console is equipped with a 1/4" stereo headphone jack located on the Connector
Panel under the keydesk to the right. Plugging a set of headphones into this jack disables the
sound from all speakers, and disables any pipe ranks connected to the instrument. When
using headphones, the “MASTER VOLUME” menu is replaced with the “HEADPHONE”
menu. This menu allows the adjustment of Volume, Balance, Bass, and Treble heard through
the headphones. These adjustments do not affect the organ speakers in normal playing mode.
Note: Please refer to the “795 User (Headphone) Menu Items” section.
ADJUSTING THE HEADPHONE SETTINGS:
1. Press and hold SET.
2. Rotate the Select Knob counter clockwise (left) until the Console Display reads
“HEADPHONE”, and place the cursor on the top line.
21
Page 26

3. Release SET.
4. Rotate the Alpha Dial to select the setting to be adjusted (“VOLUME”,
“BALANCE”, “BASS”, or “TREBLE”).
5. Turn the Select Knob clockwise (right) to place the cursor on the bottom line.
6. Rotate the Alpha Dial to set the desired value.
AUXILIARY INPUTS
The Rodgers 795 is equipped with stereo Auxiliary Input Jacks (one for the left channel
and one for the right channel) located on the Connector Panel under the keydesk to the right.
When using these input jacks, audio signals from other sound generating devices like
synthesizers, MIDI sound modules, and tape players are mixed into the organ’s main audio
system. A series of Console Display menu controls is used to adjust the characteristics of the
Auxiliary Input sound.
ADJUSTING THE AUXILIARY INPUTS:
1. Press and hold the SET piston.
2. Turn the Select Knob counterclockwise (left) to “AUX”, and place the cursor on
the top line.
3. Release SET.
4. Rotate the Alpha Dial to select the desired control.
5. Turn the Select Knob clockwise (right) to place the cursor on the bottom line.
6. Rotate the Alpha Dial to obtain the desired effect. Note: An Audio Save may be
performed to save this setting as the default. Please refer to the “Audio Save”
section.
STEREO LINE OUTPUTS
The Rodgers 795 is equipped with stereo Line Outputs also located on the Connector
Panel. When using these outputs the divisions of the organ (Great, Swell, and Pedal) are
heard in stereo. There is no specific channel assignment (left or right) given to these divisions.
The volume may be adjusted by performing the following procedure:
ADJUSTING THE STEREO LINE OUTPUTS:
1. Press and hold the SET piston.
2. Turn the Select Knob counter clockwise (left) to “LINE OUT GAIN”.
3. Release SET.
4. Rotate the Alpha Dial to adjust the volume .
Note: An Audio Save may be performed to save this setting as the default. Please
refer to the “Audio Save” section.
22
Page 27
DIGITAL REVERBERATION
The Rodgers 795 features an internal digital reverberation system. The volume, length
and type of reverberated sound can be individually changed. Any changes made to the
reverberation settings from this menu are temporary and are lost when the organ is turned off,
unless they are saved by performing the Audio Save procedure. Note: An Audio Save may be
performed to save this setting as the default. Please refer to the “Audio Save” section.
SETTING THE REVERB VOLUME:
1. Press and hold the SET piston.
2. Turn the Select Knob counter clockwise (left) until the Console Display reads
“REVERB VOLUME”. Release SET.
3. Rotate the Alpha Dial to set the desired reverb level (OFF, -31.25 through 6.25
dB). Note: An Audio Save may be performed to save this setting as the default.
Please refer to the “Audio Save” section.
SETTING THE REVERB TYPE:
1. Press and hold the SET piston.
2. Turn the Select Knob counter clockwise (left) until the Console Display reads
“REVERB TYPE”. Release SET.
3. Rotate the Alpha Dial to set the desired reverb type (“ROOM 1”, “ROOM 2”,
“ROOM 3”, “HALL 1” or “HALL 2”). Note: An Audio Save may be performed to
save this setting as the default. Please refer to the “Audio Save” section.
SETTING THE REVERB TIME:
1. Press and hold the SET piston.
2. Turn the Select Knob counter clockwise (left) until the Console Display reads
“REVERB TIME”. Release SET.
3. Rotate the Alpha Dial to set the desired reverb time (“SHORT”, “NORMAL” or
“LONG”). Note: An Audio Save may be performed to save this setting as the
default. Please refer to the “Audio Save” section.
23
Page 28

ANTIPHONAL ON/MAIN OFF
The 795 is prepared with ANTIPHONAL ON (ANT ON)/MAIN OFF lighted pistons
which can operate an additional speaker system. An antiphonal speaker system is usually
installed at the opposite end of the building from the main organ allowing greater musical
flexibility. The ANTIPHONAL ON piston activates this additional speaker system, and the
MAIN OFF piston turns off the main organ. Note: If the MAIN OFF piston is engaged, the
ANTIPHONAL ON piston must be engaged or the organ will not sound through either
system.(It is possible for the installer to change the function of these pistons.)
PIPES
Any digital sampled rank in the Rodgers 795 may be replaced by a real wind-blown pipe
rank. Partial pipe ranks may be extended to full compass using Rodgers’ exclusive voicing
software with an existing sampled voice. Preparations for controlling real expression shutters
are already included in the organ software. Note: Please refer to the “Expression Range”
section.
Contact your authorized Rodgers representative for additional information.
PIPES OFF/ANCILLARY ON
If the Rodgers 795 is equipped with pipe ranks, certain stops will control pipe voices and
other stops will control digitally sampled voices. There are two tabs affecting the pipe stops
of all divisions simultaneously (ANC ON and PIPES OFF).
When the ANC ON tab is engaged, electronic voices play from the pipe stops. When the
PIPES OFF tab is engaged, the real wind blown pipes turn off. Note: If the PIPES OFF tab is
engaged, the ANC ON tab must also be engaged for the stop(s) to sound.
CONSOLE LAMP DIMMER
The illumination of the music rack, lighted stop tabs, and pedal lamps is adjusted by
performing the following procedure.
ADJUSTING THE CONSOLE LAMPS:
1. Press and hold the SET piston.
2. Turn the Select Knob counter clockwise (left) until the Console Display reads:
CONSOLE LAMPS
BRIGHT
3. Release SET.
4. Rotate the Alpha Dial to the desired intensity. The intensity choices are bright or
dim.
24
Page 29

Note: When the organ is turned off, this setting is saved.
AUTOMATIC SHUTDOWN TIMER
When the organ is on and left unattended, the power automatically turns off after two
hours. Operating any key, stop, or control resets the timer for another two hours.
Playing the organ from a remote MIDI keyboard or sequencer will also reset the timer.
25
Page 30

MIDI
(Musical Instrument Digital Interface)
Rodgers organs have some of the most advanced MIDI capabilities in the world, offering
a great variety of sound possibilities. These sounds are accessed by the MIDI coupler pistons
located on the piston rails. Two MIDI sounds can be played simultaneously from the Great,
Swell and Pedal divisions.
The MIDI coupler pistons control the following MIDI channels:
Great Manual Channel 1* MIDI GT A
Great Manual Channel 5 MIDI GT B
Swell Manual Channel 2 MIDI SW A
Swell Manual Channel 6 MIDI SW B
Pedal Manual Channel 3 MIDI PED A
Pedal Manual Channel 7 MIDI PED B
* May be changed to any of the sixteen MIDI channels.
SELECTING A MIDI SOUND:
Selecting a MIDI sound is also known as Sending a Program Change:
1. Press and hold the SET piston, then press a MIDI coupler piston. The MIDI
coupler piston flashes, indicating a sound selection can be made. This is called the
MIDI Set Mode. The Console Display reads:
MIDI GT A CH 1
PGM=121 VAR=0
2. Select the desired sound (Program Change) number from the sound module
instrument chart(s) provided with the sound module. Press a key on the Great,
Swell or Pedal. Note: Program Changes 1-61 are sent by the Great keys, Program
Changes 62-122 by the Swell keys, and Program Changes 123-128 by the Pedal
notes. Once the key is pressed, the Console Display returns to “TRANSPOSER
0”.
PREVIEWING VARIOUS MIDI SOUNDS:
A variety of MIDI sounds may be previewed before making a selection. To listen to
various MIDI sounds:
1. Press and hold the SET piston, then press a MIDI coupler piston. The MIDI
coupler piston flashes. Continue to hold SET.
26
Page 31

2. By continuing to hold SET, the organ will remain in the MIDI Set Mode.
3. Press the key corresponding to the Program Change number of the desired MIDI
sound. Note: Please refer to the sound module instrument chart(s) provided with
the sound module.
4. Release SET to play the sound being previewed.
5. To preview another MIDI sound, hold SET and press another key to select another
Program Change number.
6. Press the MIDI coupler piston or General Cancel to exit the MIDI Set Mode.
When in the MIDI Set Mode, selecting a different Program Change number may also be
done by turning the Select Knob until the cursor in the Console Display is over the Program
Change number. Rotate the Alpha Dial until the desired number is selected. Press the MIDI
coupler piston.
For advanced MIDI applications there are times when no Program Change is to be sent by
a MIDI coupler piston. Then the Program Change number may be set to “OFF” by pressing a
key which has no associated Program Change number (a high Pedal note, for example), or by
turning the Alpha Dial past Program #128 until “PGM OFF” appears in the Console Display.
ROLAND GS STANDARD SUPPORT
In the past, most MIDI sound modules provided a maximum of 128 sounds. These were
selected by using MIDI Program Change messages, but they did not define standard sound
assignments for those messages. For example, one sound module may have had a trumpet on
Program Change #39, yet another sound module would have chimes on #39. It was difficult
at best for musicians to work with no standardization of sounds. With the creation of General
MIDI (GM), a standard list of sounds was defined, but only for the 128 sounds in the first
bank, Bank 0.
The Roland GS Standard honors that same standard list of sounds for Bank 0, but also
allows access to more than those 128 sounds. By selecting another bank using the Bank
Select message, the GS Standard provides an additional 127 banks (also called variations),
each containing 128 sounds. This allows for the possibility of up to 16,384 total sounds.
Many manufacturers of MIDI sound modules have added or will soon add support for this
standard, which is an upward extension of the current General MIDI Standard.
The MIDI menu on the Console Display enables the organist to choose a GS Bank Select
message for each MIDI coupler piston which is saved on combination pistons.
SETTING THE GS VARIATION (BANK NUMBER):
1. Press and hold SET, then press a MIDI coupler piston. The piston flashes,
indicating the MIDI Set Mode is active. The Console Display reads:
27
Page 32

MIDI GT A CH 1
PGM=121 VAR=0
2. Turn the Select Knob clockwise (right). The cursor moves to the Variation Field
(“VAR”) in the menu. Note: The variation numbers for sounds in the MIDI sound
module are listed in the sound module instrument chart(s) provided with the sound
module.
3. To choose the desired Variation (bank) number, rotate the Alpha Dial until the
correct variation number is displayed. Variation 0 is the normal General MIDI
bank. OFF may also be selected to prevent a MIDI coupler piston from sending
Bank Select messages.
4. Select a Program Change number, or return to the Transposer menu by pressing the
MIDI coupler piston or General Cancel.
The variation selected is saved in combination pistons along with the other MIDI settings.
MIDI SOUNDS IN COMBINATION PISTONS
Once a MIDI sound has been set on a MIDI coupler piston, the same Program Change
number is sent each time the coupler piston is activated. The sound is also saved on any
combination piston that includes that MIDI coupler piston.
Each MIDI coupler piston has a number of associated settings which may be changed in
the Console Display. These settings along with the MIDI sound can be saved in a
combination piston. Each combination piston may include one or more MIDI coupler pistons.
The MIDI coupler piston settings can be saved at any time using the MIDI Save procedure.
The saved settings are retained when the organ is turned off.
SAVING A MIDI SOUND IN A COMBINATION PISTON:
After selecting a MIDI sound on a MIDI coupler piston, this can be saved on a General
or Divisional combination piston for immediate recall. If organ voices are also wanted, press
desired combination piston, or turn on the organ voices.
1. Select a MIDI sound on a MIDI coupler piston.
2. Press and hold the SET piston, then press the combination piston where the MIDI
sound is to be saved.
3. Release both pistons.
ADDITIONAL MIDI SETTINGS
There are many MIDI settings that can be saved. If the settings are changed and not
saved, the original MIDI settings (default settings) return when the organ is turned off. MIDI
settings that can be changed and saved include MIDI note velocity, octave shift, and MIDI
transmit and receive parameters.
28
Page 33

Changes made to MIDI settings are temporary and are lost when the organ is turned off
unless those settings are saved. Note: A MIDI Save may be performed to save a MIDI setting
as the default. Please refer to the “MIDI Save” section.
MIDI NOTE VELOCITY
MIDI note velocity controls the attack quality and loudness of MIDI sounds. To sound
authentic, instruments such as the piano and other percussion instruments require a greater
and more pronounced attack than instruments such as the flute or oboe. The velocity can be
individually selected on each MIDI coupler piston, and these settings can then be saved on
combination pistons. The three types of MIDI note velocity on the Rodgers 795 are Fixed
Velocity, Expression Velocity, and Keyboard Velocity.
Fixed Velocity:
The same velocity value is used for all notes of the keyboard or
pedalboard, and can be set to any value from 2 to 127.
SETTING FIXED VELOCITY:
1. Hold the SET piston, then press the MIDI coupler piston. The piston flashes.
Release both pistons.
2. Turn the Select Knob clockwise (right) until the cursor moves to the second menu
screen and is positioned in the Velocity field (“VEL”).
3. Rotate the Alpha Dial to select the desired velocity value (2-127).
4. Press either the flashing MIDI coupler piston or General Cancel to exit. Note: A
MIDI Save may be performed to save this setting as the default. Please refer to the
“MIDI Save” section.
Expression Velocity:
This velocity is controlled by the expression shoes and is not
affected by the attack of the keys. The volume (MIDI Main Volume, Control Change #7) is
set to maximum when this setting is in use.
SETTING EXPRESSION VELOCITY:
1. Hold the SET piston, then press the MIDI coupler piston. The piston flashes.
Release both pistons.
2. Turn the Select Knob clockwise (right) until the cursor moves to the second menu
screen and is positioned in the Velocity field (“VEL”).
3. Rotate the Alpha Dial to select Expression Velocity (“FM EXP”).
4. Press either the flashing MIDI coupler piston or General Cancel to exit. Note: A
MIDI Save may be performed to save this setting as the default. Please refer to the
“MIDI Save” section.
29
Page 34

Keyboard Velocity: This setting individually senses the velocity of each note of the
keyboard. There are three sensitivity levels that can be selected.
SETTING KEYBOARD VELOCITY:
1. Hold the SET piston, then press the MIDI coupler piston. The piston flashes.
Release both pistons.
2. Turn the Select Knob clockwise (right) until the cursor moves to the second menu
screen and is positioned in the Velocity field (“VEL”).
3. Rotate the Alpha Dial to select Keyboard Velocity (“FM KBD”).
4. Turn the Select Knob clockwise (right) until the cursor moves to the fourth menu
screen and is positioned in the Keyboard Velocity field (“KEY VEL”).
5. Rotate the Alpha Dial to select the desired velocity value (“LIGHT”, “NORMAL”
or “HEAVY”).
6. Press either the flashing MIDI coupler piston or General Cancel to exit. Note: A
MIDI Save may be performed to save this setting as the default. Please refer to the
“MIDI Save” section.
The MIDI Note Velocity can be individually set for each MIDI coupler piston. Note: The
MIDI Note Velocity settings do not affect the sampled organ voices.
OCTAVE SHIFT
Normally all MIDI coupler pistons play at standard pitch (middle C = note 60). The
Octave Shift setting can be set to cause any sound on a MIDI coupler piston to play one or two
octaves above or below standard pitch.
SHIFTING THE OCTAVE OF A MIDI SOUND:
1. Hold the SET piston, and press the MIDI coupler piston.
2. Turn the Select Knob clockwise (right) until the cursor moves to “NORM” on the
second MIDI menu screen.
3. Rotate the Alpha Dial to the desired setting (“UP 2”, “UP 1”, “NORM”, “DN 1” or
“DN 2”).
4. Press either the flashing MIDI coupler piston or General Cancel to exit. Note: A
MIDI Save may be performed to save this setting as the default. Please refer to the
“MIDI Save” section.
MIDI CHANNEL ASSIGNMENT
Using the Rodgers 795 as a MIDI keyboard controller for sequencing may require channel
assignment of the MIDI GT A coupler piston. All other MIDI coupler pistons transmit on
fixed channels. To reset the transmit channel of MIDI GT A, perform the following
procedure.
30
Page 35

ASSIGNING MIDI CHANNELS:
1. Hold the SET piston, then press MIDI GT A. The coupler piston flashes.
2. Turn the Select Knob clockwise (right) until the cursor moves to the channel
number.
3. Rotate the Alpha Dial to set the channel number.
4. Press either the flashing MIDI coupler piston or General Cancel to exit.
The channel number for MIDI GT A coupler piston can be saved in the settings on a
combination piston or saved permanently by performing the MIDI Save procedure. Note: A
MIDI Save may be performed to save this setting as the default. Please refer to the “MIDI
Save” section.
MIDI SAVE
Changes made to MIDI settings are temporary and will be lost when the organ is turned
off unless those settings are saved. This is done by performing the following procedure.
SAVING MIDI CONTROL SETTINGS:
1. While in any MIDI menu, make the desired changes.
2. To save, press and hold the SET piston, then press and hold General Cancel for
approximately five seconds.
2. Continue holding both pistons until the Console Display reads:
ALL MIDI
SETTINGS SAVED
3. Release both pistons.
SUSTAIN SWITCH
A foot switch is located on the top left edge of the Great/Pedal expression shoe. This
switch will sustain MIDI sounds playing from MIDI GT A coupler piston. Press the switch to
sustain, release to stop.
ADDITIONAL MIDI SETTINGS ON COMBINATION PISTONS
After additional MIDI settings have been selected on a MIDI coupler piston, these
settings can be saved on any General or corresponding Divisional combination piston.
SAVING MIDI SETTINGS ON A COMBINATION PISTON:
1. Select the MIDI coupler piston (and organ stops, if desired).
2. Press and hold the SET piston.
31
Page 36

3. Press the desired combination piston.
4. Release both pistons.
The factory default settings for the MIDI coupler pistons are:
MIDI GT A = CH 1*
Program Change (PGM) = OFF
Variation (VAR) = 0
Octave Transpose = NORM
Velocity (VEL) = 64
* This channel will be different for each MIDI coupler piston. Note: Please refer to the
MIDI channel list at the beginning of the MIDI section.
Remember, MIDI default settings can be changed by performing a MIDI Save procedure.
ENABLING/DISABLING MIDI MASTER CHANNELS
The Rodgers 795 reserves several MIDI channels for recording and playback of the organ
using a MIDI sequencer. One channel is reserved for each division as follows:
Great Master Channel Notes and Expression 12
Swell Master Channel Notes and Expression 13
Pedal Master Channel Notes and Expression 14
The organ sends and receives MIDI information on these channels unless they are
disabled. It may be necessary to disable one or more Master Channels when using the organ
console as a MIDI keyboard controller in multi-track or multi-layer sequencing, to avoid
duplicating note data on multiple tracks.
ENABLING OR DISABLING A MIDI MASTER CHANNEL:
1. Press and hold the SET piston, and turn the Select Knob clockwise (right) to
“MIDI MASTER CHANNEL”.
2. Place the cursor on the division name field (“GT”, “SW”, or “PED”).
3. Rotate the Alpha Dial until the desired selection is displayed.
4. Turn the Select Knob clockwise (right) to move the cursor to the channel status
field (“OFF”, “RCV ONLY”, “SEND ONLY”, “SEND & RCV”).
5. Rotate the Alpha Dial to set the Master Channel status for this selection. Note:
Turning a manual’s Master Channel off prevents the organ from sending or
receiving notes or expression on that channel.
6. Press General Cancel to exit.
32
Page 37

MIDI STOP CHANGES
When sequencing or controlling another Rodgers console from the Rodgers 795, stop
selections are normally transmitted and received using MIDI System Exclusive messages.
This allows the stops selected during sequencing to play back accurately.
If desired, the organ stops may be controlled using MIDI Program Changes rather than
System Exclusive messages. These Program Changes will control the organ pistons rather
than the individual stops. The System Exclusive method normally offers the optimum control
over registration, since it does not require the organ pistons to be set up beforehand. The use
of piston Program Changes for stop control is most useful when controlling a Rodgers organ
from a remote MIDI keyboard or when controlling a second Rodgers console other than a
Rodgers 795 via MIDI.
The MIDI Stop Change menu item allows the organist to control the transmission and
reception of System Exclusive (SysEx) Stop Control messages and Piston Program Change
messages. Settings in this menu are saved when the organ is turned off.
Note: Piston Program Change messages are transmitted and received on the organ
Master Channels and should not be confused with the Program Change messages used to
select sounds from MIDI coupler pistons.
SELECTING MIDI STOP CHANGE SETTINGS:
1. Press and hold the SET piston, then turn the Select Knob clockwise (right) to
“MIDI STOP CHANGE”.
2. Turn the Select Knob to choose “RCV” or “SEND”.
3. Rotate the Alpha Dial to select the following options.
The Receive Field (“RCV”) has four positions:
“OFF” Console ignores both SysEx and Program Changes
“STP” Console receives only SysEx messages
“PST” Console receives only Piston Program Changes
“S&P” Console receives both SysEx and Program Changes
The Send Field (“SEND”) has the same four positions:
“OFF” Console does not send either SysEx or Program Changes
“STP” Console sends only SysEx messages
“PST” Console sends only Piston Program Changes
“S&P” Console sends both SysEx and Program Changes
Program Changes 1-10 on any Master Channel will activate the organ General Pistons of
like number. Program Change 20 on any Master Channel will activate the organ’s General
Cancel piston. Program Changes 21-25 on any Master Channel will activate the organ
Divisional Pistons for the division corresponding to that Master Channel.
33
Page 38

USING PISTONS TO CONTROL A SECOND RODGERS CONSOLE:
1. Connect the MIDI Sequencer Output of the master console to the Sequencer Input
of the slave console.
2. On the master console, enable piston transmission by turning the Select Knob until
the cursor is in the Send Field (“SEND”) of the MIDI Stop Change menu.
3. Rotate the Alpha Dial until the Console Display reads “SEND: PST”.
4. On the slave console, enable piston reception by turning the Select Knob until the
cursor is in the Receive Field (“RCV”) of the MIDI Stop Change menu.
5. Rotate the Alpha Dial until the Console Display reads “RCV: PST”.
MIDI LOCAL CONTROL
When in the “OFF” position, MIDI Local Control allows the organ console to play MIDI
sounds only, disabling the organ voices. When in the “ON” position, the organ will function
normally. In the OFF position, organ voices can still be played by a sequencer or by a remote
keyboard connected to the 795 MIDI IN jack.
ENABLING OR DISABLING MIDI LOCAL CONTROL:
1. Press and hold the SET piston, then turn the Select Knob clockwise (right) to
“MIDI LOCAL CONTROL”.
2. Release SET.
3. Rotate the Alpha Dial to choose “ON” or “OFF”. This selection is temporary. The
organ will always return to MIDI “LOCAL CONTROL ON” when the organ is
turned off.
4. Press General Cancel to exit.
MIDI SEQUENCER UPDATE
MIDI Start, Stop and Continue messages generated by a sequencer are accepted by the
organ only when the MIDI Sequencer Update is enabled.
ENABLING OR DISABLING MIDI SEQUENCER UPDATE:
1. Press and hold the SET piston, then turn the Select Knob clockwise (right) to
“MIDI SEQUENCER UPDATE”.
2. Release SET.
3. Rotate the Alpha Dial to choose “ON” or “OFF”. This selection is temporary. The
organ will always return to MIDI “SEQUENCER UPDATE ON” when the organ
is turned off.
4. Press General Cancel to exit.
Note: The organ uses the sequencer control messages to automatically record the stop
and expression status at the beginning of a sequence.
34
Page 39

MIDI DEVICE ID
MIDI Device ID allows the organist to select the MIDI Device identification number used
in System Exclusive Stop Control messages. Normally, the organ both sends and recognizes
an ID number of 17. Stop Control messages with other ID numbers will be ignored.
This ID number can be changed to allow independent control over multiple organ
consoles connected via MIDI or to facilitate storing multiple sets of registration information
on a sequencer recording. The number can be set to 1, or 17 through 32. Setting the ID to 1
produces Stop Control messages which are compatible with older Rodgers PDI and
C-Series organs. The ID always returns to 17 when the organ is turned off.
SETTING THE MIDI DEVICE ID:
1. Press and hold the SET piston, then turn the Select Knob clockwise (right) to
“MIDI DEVICE ID”.
2. Rotate the Alpha Dial to set the desired ID number.
3. Press General Cancel to exit.
SAVING A COMBINATION MEMORY
The contents of any combination memory may be saved into a MIDI sequencer and later
reloaded into the organ.
1. Connect the Sequencer MIDI IN to the organ Sequencer MIDI OUT. Connect the
Sequencer MIDI OUT to the organ Sequencer MIDI IN.
2. Start the sequencer in Record mode.
3. Wait until after any count-in measures, then hold the SET piston and momentarily
press the memory piston (M1, M2, M3 or M4) for the memory to be copied to the
sequencer.
4. Release SET and wait until the Console Display reads:
MEMORY COPIED TO
SEQUENCER PORT
5. Stop the MIDI Sequencer, or wait a few seconds and repeat steps 3 and 4 above to
send another memory to the sequencer. Always leave a few measures of space
between memories.
To reload a memory from the sequencer, first connect the sequencer following the steps
above. Then continue:
1. Play back the recorded memory as a song would be played back.
35
Page 40

2. When the memory contents have been correctly received, the memory piston
corresponding to the memory on the sequencer recording flashes. At this point, the
contents of the memory are stored in a temporary holding area in the console.
3. Stop the sequencer playback.
4. Press and hold SET, then press the memory piston for the desired destination.
Note: This need not be the same memory as the memory whose piston is flashing.
When copying more than one memory to the sequencer, it is necessary to wait a few
measures between saving individual memories, or place them on different tracks. This
procedure will reduce confusion regarding the location of the memories on the sequencer.
When playing back the memories, play only one at a time. Each time the organ starts to
receive a new memory, it discards any previous information in the temporary holding area. It
is necessary to transfer each memory to its destination memory in the organ before playing
back the next.
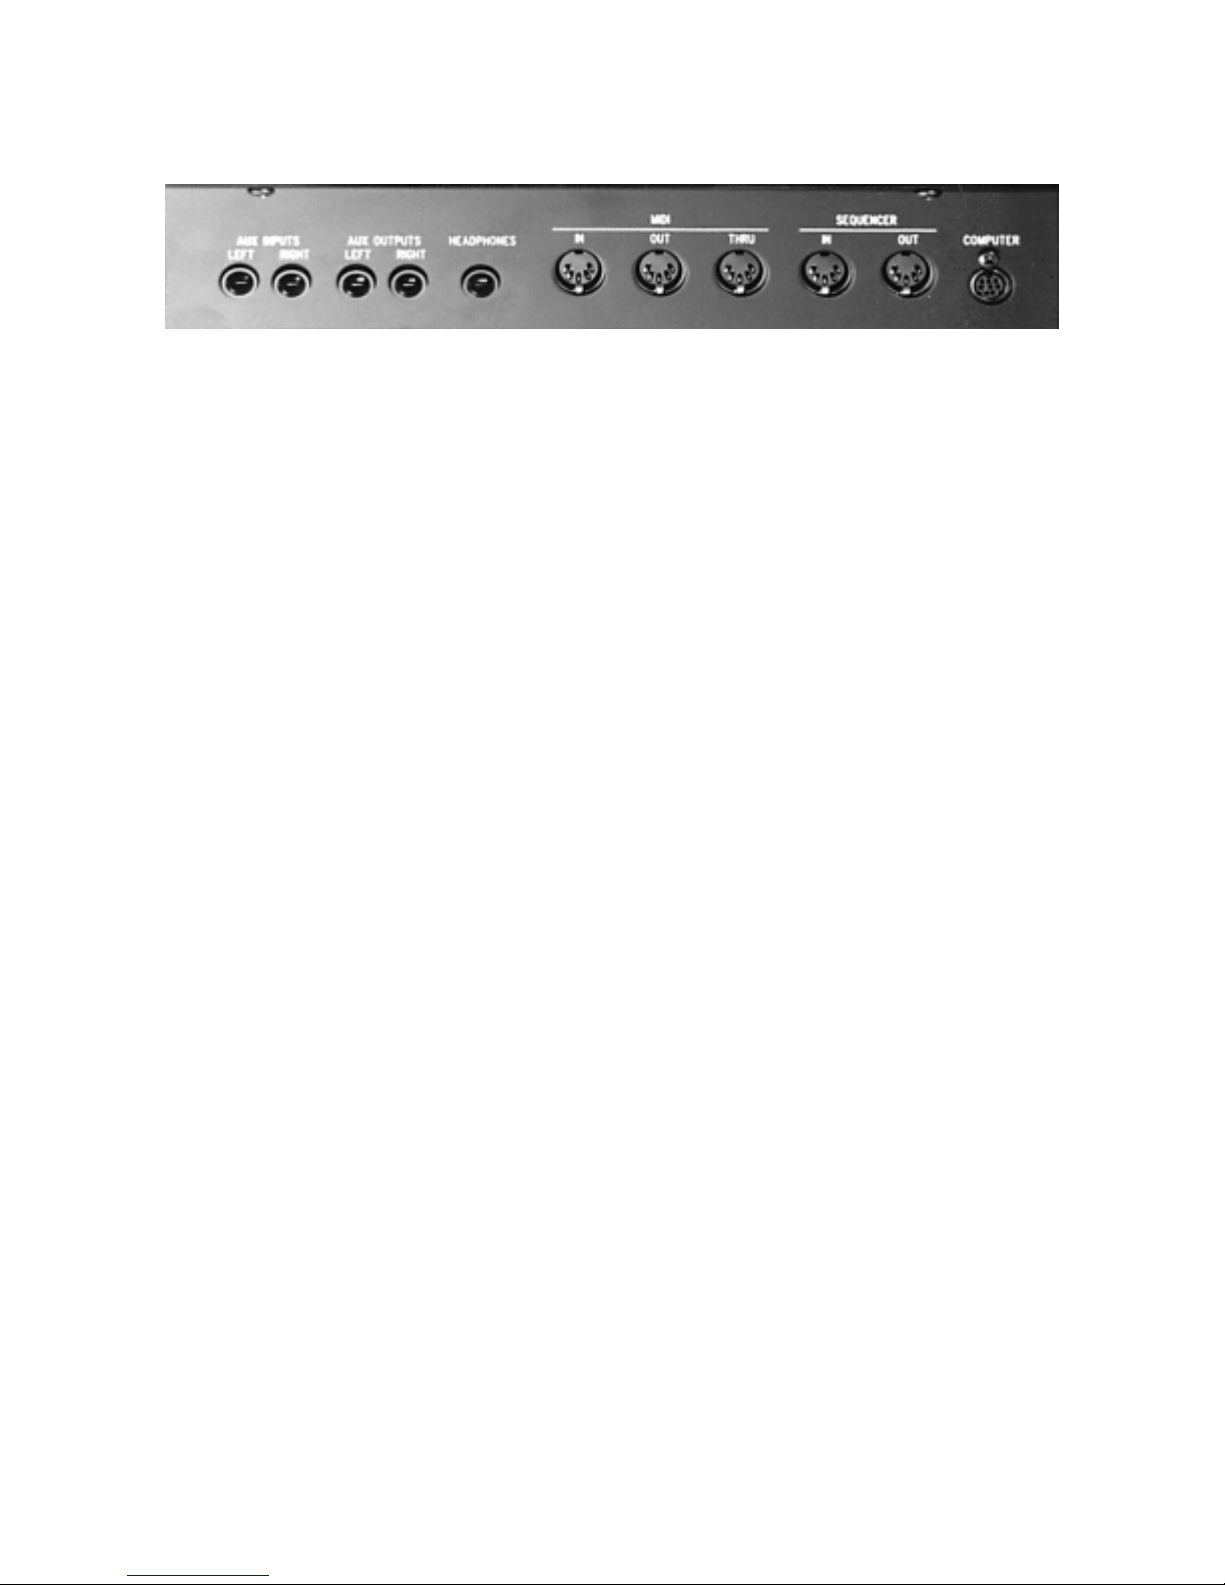
MIDI CONNECTIONS
Always connect a sequencer to the Sequencer IN/OUT ports on the organ.
sequencer must not be in “Soft Thru” mode.
Any other MIDI instruments or keyboards
should use the ports labeled “MIDI.”
The
36
Page 41

RODGERS 795
STOP SPECIFICATION
[alternate Voice Palette stop names listed in ( )]
(Drawknobs indicated with '*')
GREAT SWELL
*01. Principal 8' (
*02. Gedackt 8' *02. Geigen Principal 8'
*03. Gemshorn 8' *03. Viole Celeste II 8'
*04. Flute Celeste II 8' (
*05. Octave 4' (
*06. Gedackt 4' *06. Copula 4'
*07. Superoctave 2' (
*08. Mixture IV *08. Flute a Bec 2'
*09. Cromorne 8' (
*10. Chimes (
*11. Tremulant *11. Basson 16' (
12. Swell *12. Trompette 8'
13. MIDI Great A (LP) *13. Oboe 8'
14. MIDI Great B (LP) *14. Tremulant
PEDAL
*01. Principal 16'
*02. Subbass 16' (
*03. Bourdon Doux 16' (LP) = Lighted Piston
*04. Octave 8' Melody (LP)
*05. Gedackt 8' Bass (LP)
*06. Choralbass 4' (
*07. Mixture IV Ancillary On (TAB)
*08. Posaune 16' (
*09. Trompete 8' Main Off (TAB)
*10. Rohrschalmei 4' Antiphonal On (TAB)
11. Great to Pedal (TAB)
12. Swell to Pedal (TAB)
13. MIDI Pedal A (LP)
14. MIDI Pedal B (LP) Generals 1-10, Thumb (LP) & Toepistons
Diapason 8')
Erzahler Celeste II 8')
Principal 4')
Fifteenth 2', Waldflote 2')
Trompete 8')
Harpsichord)
Bourdon 16')
Nachthorn 4')
Basson 16')
*01. Bourdon Doux 16'
(Viole 8')
*04. Bourdon 8'
*05. Prestant 4'
*07. Nazard 2-2/3'
*09. Tierce 1-3/5'
*10. Plein Jeu IV
Fagot 16')
15. Swell Unison Off (TAB)
16. MIDI Swell A (LP)
17. MIDI Swell B (LP)
GENERAL CONTROLS
Pipes Off (TAB)
Flute Tremulant II (LP)
COMBINATION ACTION
Swell 1-5 Thumbpistons (LP)
Great 1-5 Thumbpistons (LP)
Pedal 1-5 Thumbpistons (LP)
SET and General Cancel (0) Thumbpistons
37
Page 42

38
SWELL
MIDI
ONPDSET
54231
78M4M3M2M191
GT
ON
MIDI
SW
ON
MIDI
OFF
MAINONANT
TUTTI
ANCONPIPES
OFF
BASSPRINCIPAL
SWELL
TO
PEDALPEDAL
TO
GREAT
4
SUPER
OCTAVEIVMIXTURE TREMULANTCHIMESOCTAVE TREMULANT
OFF
UNISON
SWELL
4
PRESTANTNAZARD
2
2
3
8
BOURDON GEDACKT8GEDACKTOCTAVE8GEDACKT
4
CHORAL
BASS16SUBBASS
1616
(SW)
61861
POSAUNE
284 48 2
TROMPETTE
8
MELODY
8
OBOECOPULA
FLUTE
a
BEC
BOURDON
DOUX
BOURDON
DOUX BASSON CROMORNEPRINCIPAL
61
PEDAL GREATSWELL
CROMORNE
(GT)
4
GEMSHORN8II
GEMSHORN
CELESTE8TIERCE
1
3
5
IV
PLEIN
JEU
(SW)
8
CELESTE
GEMSHORNIISWELL
TO
GREAT
FLUTE
TREMII
ALL
SWELLS
GENERAL
RODGERS 751/790/795
520.7mm
[
20.5"
]
337.9mm
[
13.3"
]
759.2mm
[
29.9"
]
396.2mm
[
15.6"
]
812.8mm
[
32.0"
]
1204.9mm
[
47.5"
]
1489.0 mm
[58.6"]
1253.6mm
[
49.4"
]
SIDE VIEW
1481.3mm
[
58.4"
]
405.1mm
[
16.0"
]
771.7mm
[
30.4"
]
463.0mm
[
18.2"
]
1485.9mm
[
58.5"
]
355.6mm
[
14.0"
]
762.3mm
[
30.0"
]
730.6mm
[
28.8"
]
1203.8mm
[
47.4"
]
647.7mm
[
25.5"
]
RIGHTLEFTRIGHTLEFT
HEADPHONES
MIDI
THRUOU T
SEQUENCER
IN OUTIN
AUX OUTPUTSAUX INPUTS
COMPUTER
GT-PED
RODGERS
BACK VIEW
TOP VIEW
FRONT VIEW
Model 751 Shown
Page 43

FACTORY DEFAULT
COMBINATION SETTINGS
The Rodgers 795 is shipped from the factory with default settings on combination
memories 1 and 2. Registrations on M1 and M2 can be changed, but if the original factory
default settings are desired, they can be restored by performing the following procedure:
RESTORING THE FACTORY DEFAULT COMBINATION SETTINGS:
1. Press and HOLD the memory select piston (M1, M2, M3 or M4) for approximately
five seconds. The display will show “LOCKED” or “UNLOCKED.”
2. While HOLDING the memory piston, press and HOLD the set piston an additional five
seconds. The display will read “MEMORY n FACTORY DEFAULT.”
3. Release both pistons. (Note : Each memory must be individually restored by the
following procedure above.)
39
Page 44
SUGGESTED REGISTRATIONS
The following pages of registrations are to be used as guidelines for selecting appropriate
stops to match broad suggestions given in most printed organ literature. There will be
variances of registration depending upon the music, acoustics of the room and the spirit of the
performance.
GREAT ORGAN
FLUTE STRING SOLO REEDS
Gedackt 8' Gemshorn 8' Cromorne 8'
FOUNDATIONS
Gedackt 8'
Gemshorn 8'
p
FOUNDATIONS
Principal 8'
Gedackt 8'
Prestant 4'
m f
FOUNDATIONS
Principal 8'
Gedackt 8'
Prestant 4'
Superoctave 2'
PEDAL ORGAN
SOFT BASS FLUTES FOUNDATIONS
Bourdon Doux 16' Subbass 16' Subbass 16'
Octave 8'
FOUNDATIONS
Principal 16'
Subbass 16'
Octave 8'
f
FOUNDATIONS
Principal 16'
Subbass 16'
Octave 8'
Choralbass 4'
ff
Principal 16'
Subbass 16'
Octave 8'
Choralbass 4'
Mixture IV
Posaune 16'
FULL PEDAL
f
mf
40
Page 45
SWELL ORGAN
STRING STRING CELESTE 8' SOLO FLUTES
Viole 8' Viole Celeste II 8' Bourdon 8'
Copula 4'
or
FOUNDATIONS
Bourdon 8'
Viole 8'
P
FOUNDATIONS
Bourdon 8'
Viole 8'
Octave 4'
mf
FOUNDATIONS
Bourdon 8'
Viole 8'
Octave 4'
f
Copula 4'
Plein Jeu IV
CORNET SOLO REEDS FULL SWELL
Bourdon 8'
Copula 4'
Nazard 2 2/3'
Flûte à Bec 2'
Tierce 1 3/5'
Tremulant optional
Trompette 8'
Oboe 8'
or
Bourdon Doux 16'
Bourdon 8'
Viole 8'
Octave 4'
Plein Jeu IV
Basson 16'
Trompette 8'
Note: For the instrument’s increased versatility, a Unison Off is included in the Swell
division. This allows a MIDI sound to be selected and played by itself on the Swell, yet any
Swell organ voices that are selected are silent. Those selected Swell organ voices can then be
coupled to the Great via the Swell to Great coupler.
41
Page 46
GREAT MANUAL:
PROGRAM CHANGE NUMBERS 1 THROUGH 61
1
2
3
4
5
6
7
8
9
10
11
12
13
14
15
16
17
18
19
20
21
22
23
24
25
26
27
28
29
30
31
32
33
34
35
36
37
38
39
40
41
42
43
44
45
46
47
48
49
50
51
52
53
54
55
56
57
58
59
60
61
42
Page 47

SWELL MANUAL:
PROGRAM CHANGE NUMBERS 62 THROUGH 122
62
63
64
65
66
67
68
69
70
71
72
73
74
75
76
77
78
79
80
81
82
83
84
85
86
87
88
89
90
91
93
95
97
98
100
102
103
105
107
109
110
112
114
115
117
119
121
122
92
94
96
99
101
104
106
108
111
113
116
118
120
43
Page 48

PEDALBOARD:
PROGRAM CHANGE NUMBERS 123 THROUGH 128
123
124
125
126
127
128
44
Page 49

CARE AND MAINTENANCE
As with any fine musical instrument, reasonable care is necessary to protect your
investment. Normally no difficulties should be experienced, as only the finest component
parts are used by Rodgers. If your instrument should require service, your Rodgers Service
Representative is fully equipped and qualified to handle any service problems which may
arise.
Your new Rodgers organ is not only a fine musical instrument, but also a fine piece of
custom-made furniture finished to hold its attractiveness through generations of use. Only the
best woods are used, carefully checked for uniformity of grain and intensity of figure and
carefully hand assembled. Each finish coat is thoroughly dried before the next coat is applied.
A final catalytic process protective coat makes the Rodgers console impermeable to many
harmful substances. The resulting finish is lasting and easy to keep looking beautiful.
Following are a few tips on caring for your Rodgers organ.
CONSOLE AND PEDALBOARD
A frequent dusting with a soft, clean cloth is usually all that is required. A fine quality
furniture oil will enhance the beauty of the wood. Always wipe the surfaces with the grain,
using straight, even strokes.
Since extreme cold, heat or exposure to sunlight may injure the finish of any fine piece of
furniture, neither the console nor finished speaker cabinets should be placed over a heat
register or near a window.
KEYBOARDS AND STOP TABS
Keyboards and tabs should be cleaned with a soft cloth slightly dampened with water and
a mild soap. Avoid dripping water between the keys. DO NOT USE SOLVENTS (alcohol,
gasoline, carbon tetrachloride, etc.).
PIPES ON PIPE-AUGMENTED INSTRUMENTS
To keep the pipes beautiful, refrain from handling them without gloves. The pipes should
never be handled or touched by anyone but a qualified organ service representative.
45
Page 50

INSTRUCTIONS PERTAINING TO A RISK OF FIRE,
ELECTRIC SHOCK OR INJURY TO PERSONS
IMPORTANT SAFETY INSTRUCTIONS
WARNING:
INCLUDING THE FOLLOWING:
WHEN USING THIS INSTRUMENT, ALWAYS FOLLOW BASIC SAFETY PRECAUTIONS,
AFETY INSTRUCTIONS
S
1. Read all the instructions before using, adjusting or
repairing this instrument.
2. To reduce the risk of injury, supervise children closely
when they are around the instrument. 11. Do not walk on or place objects on top of the power
3. Use this instrument only in the manner recommended by
Rodgers Instrument LLC. 12. Do not pull the cord to unplug. Hold the plug when
Do not use this instrument near water i.e. near a
4
swimming pool or a damp /wet room.
Use of this instrument, either alone or in combination
5.
with an amplifier and headphones or speakers, may be
capable of producing sound levels that could cause
permanent hearing loss. DO NOT operate for a long
period of time at a high volume level or a t a level tha t i s
uncomfortable. If you experience any hearing loss or
ringing in the ears, you should consult an audiologist.
Locate the instrument so its position does not interfere
6.
with its proper ventilation.
Locate the instrument away from heat sources such as
7.
radiators, heat registers or other products that radiate
heat directly onto the instrument.
Protect the instrument from dust as much as possible.
8.
Connect the instrument to a power source only of the
9.
type described in the operating instructions or as marked
on the instrument. Do NOT attempt to defeat the
grounding connection of the three-prong attachment
plug. This is a safety feature. If you are unable to insert
the plug into the outlet, contact an electrician to replace
your obsolete outlet. Do NOT defeat the safety purpose
of the plug.
10. Unplug the power cord of the instrument from the power
source when left unattended for a long period of time.
cord.
unplugging from the power source.
13.
When setting up with other instruments or peripherals,
follow the procedures in accordance with Rodgers’
owner’s manual.
14.
Take care that objects do not fall or liquids spill into the
instrument.
15.
Service the instrument with qualified service personnel
when:
a. The power cord or plug has been damaged.
b. Objects have fallen or liquid has spilled into
the instrument.
c. The instrument has been exposed to rain
or other weather damage.
d. The instrument does not appear to operate
normally or exhibits a marked change in
performance.
e. The instrument has been dropped or the
enclosure has been damaged.
Do not attempt to service the instrument beyond that
16.
described in the owner’s manual. Refer all other
servicing to qualified technical service personnel.
WARNING: THIS INSTRUMENT MUST BE EARTH GROUNDED.
You must GROUND instruments equipped with a TYPE AC, 3 WIRE GROUNDED PLUG.
SAVE THESE INSTRUCTIONS
46
Page 51

FCC Notice
Radio and Television Interference
Rodgers Parallel Digital Imaging Organs use and generate small amounts of radio-frequency
(RF) energy. The instrument complies with the limits set for Class B computing devices. FCC
Rules, Part 15, Subpart J define the limits for radio and television interference in a residential
installation.
EMC (Electromagnetic Compatibility)
Rodgers Parallel Digital Imaging Organs also comply with the following International EMC
Standards:
Radiated Emissions EN55022 Class B
Conducted Emissions EN55022 Class B
Voltage Fluctuation EN61000-3-3
Harmonics EN61000-3-2
EFT/Burst Immunity EN50082-1
Radiated Immunity EN50082-1
Follow the installation and the use instruction in the manual, or the instrument could potentially
cause interference with some radio or television reception. In the unlikely event this occurs, we
encourage the user to try the following corrective measures:
9 Turn the instrument OFF to see if it is the actual source of the interference.
9 Disconnect the peripheral devices and their input/output cables one at a time. If
the interference stops, it is caused by the peripheral device or its I/O cable.
9 Try coiling and uncoiling the instrument’s power cord in different ways.
9 Connect the instrument’s power cord to a power outlet on a different circuit.
9 Move the instrument further away from the radio or television receiver.
9 Turn the radio or television receiver until the interference stops.
9 Connect the radio or television receiver to a different power circuit.
9 Reorient or move the receiver antenna further away from the instrument.
Consider installing a rooftop antenna with coaxial cable lead-in between the
antenna and receiver.
9 Consult the nearest Rodgers dealer for more information if the above corrective
measures don’t remove the interference.
9
47
Page 52

CAUTION
RISK OF ELECTRIC
SHOCK
ATTENTION:
RISQUE OF CHOC ELECTRIQUE NE PAS OUVRIR
CAUTION: TO REDUCE THE RISK OF
ELECTRICAL SHOCK:
DO NOT REMOVE COVER OR BACK.
NO USER-SERVICABLE PARTS INSIDE.
REFER SERVICING TO QUALIFIED
SERVICE PERSONNEL.
TO REDUCE THE RISK OF
WARNING
FIRE OR ELECTRIC
SHOCK, DO NOT EXPOSE
THIS APPLIANCE TO RAIN
OR MOISTURE.
PATENTS
G.B. 1312161
F.R.G. 22 02 658
CANADIAN 951550
(1994)
The lightning flash with arrowhead symbol,
within an equilateral triangle, is intended to
alert the user to the presence of uninsulated
"dangerous voltage" with the product's
enclosure that may be of sufficient magnitude
to constitute a risk of electrical shock to
persons.
The exclamation point within the equilateral
triangle is intended to alert the user to the
presence of important operating instructions in
the literature accompanying the product.
Notice to Users
Information in this document is subject to change without notice. No part
of this manual may be translated into any language, stored in a retrieval
system, reproduced or transmitted in any form or by any means,
electronic or mechanical, including photocopying and recording, for any
purpose without the express written permission of
Rodgers Instruments LLC
RODGERS INSTRUMENTS LLC
1300 N.E. 25th Avenue
Hillsboro, Oregon 97124
(503) 648-4181
RODGERS IN CANADA
5480 Parkwood Way
Richmond, B.C. V6V 2M4
(604) 270-6332
Copyright 1999. Rodgers Instruments LLC, a member of the Roland Group. All rights reserved. Printed in the United States of America, September 1998.
Rodgers, Rodgers Classic Organs, Parallel Digital Imaging, Voice Palette, DVM and PDI are trademarks of Rodgers Instruments LLC, Hillsboro, Oregon
48
Page 53

Rodgers Model: 795 MIDI Implementation Chart Version: 1.0
Function Transmitted Recognized Remarks
Basic Default: 1-3, 12-14 *1 12-14 *1 12=Gt
13=Sw 14=Ped
Channel Changed: 1-16 MIDI GT A only
Default: Mode 3 Mode 3
Mode Messages: X X
Altered: *************** ***************
Note 8-124 36-96
Number True Voice
Velocity Note On: O X
Note Off: O X
After Keys: X X
Touch Channel: X X
Pitch Bender X X
0 O X GS Bank Select
7 O O Div Expression on each
Master Channel
Control (12-14 as listed above)
Change
64 O X MIDI GT A Channel
Program 1-128 (1-12, 20-26) Ch. 12-14 only;
Change True # *************** *************** activates comb. p isto ns
System Exclusive O *2 O *2
System :Song Pos X X
:Song Sel X X
Common :Tune X X
System :Clock X X
Real Time :Commands X O *3
Aux :Local ON/OFF X X
Mes- :All Notes Off O (123) O (123)
sages :Active Sense O O
:Reset X X
Notes: *1 Able to choose between O and X.
*2 SysEx used for stop changes, combination memory dumps.
*3 Received Start sends current stop and expression status.
Received Stop restores expression to shoe positions.
Received Continue sets expression to values at last Stop.
Mode 1: OMNI ON, POLY Mode 2: OMNI ON, MONO O : Yes
Mode 3: OMNI OFF, POLY Mode 4: OMNI OFF, MONO X : No
49
Page 54
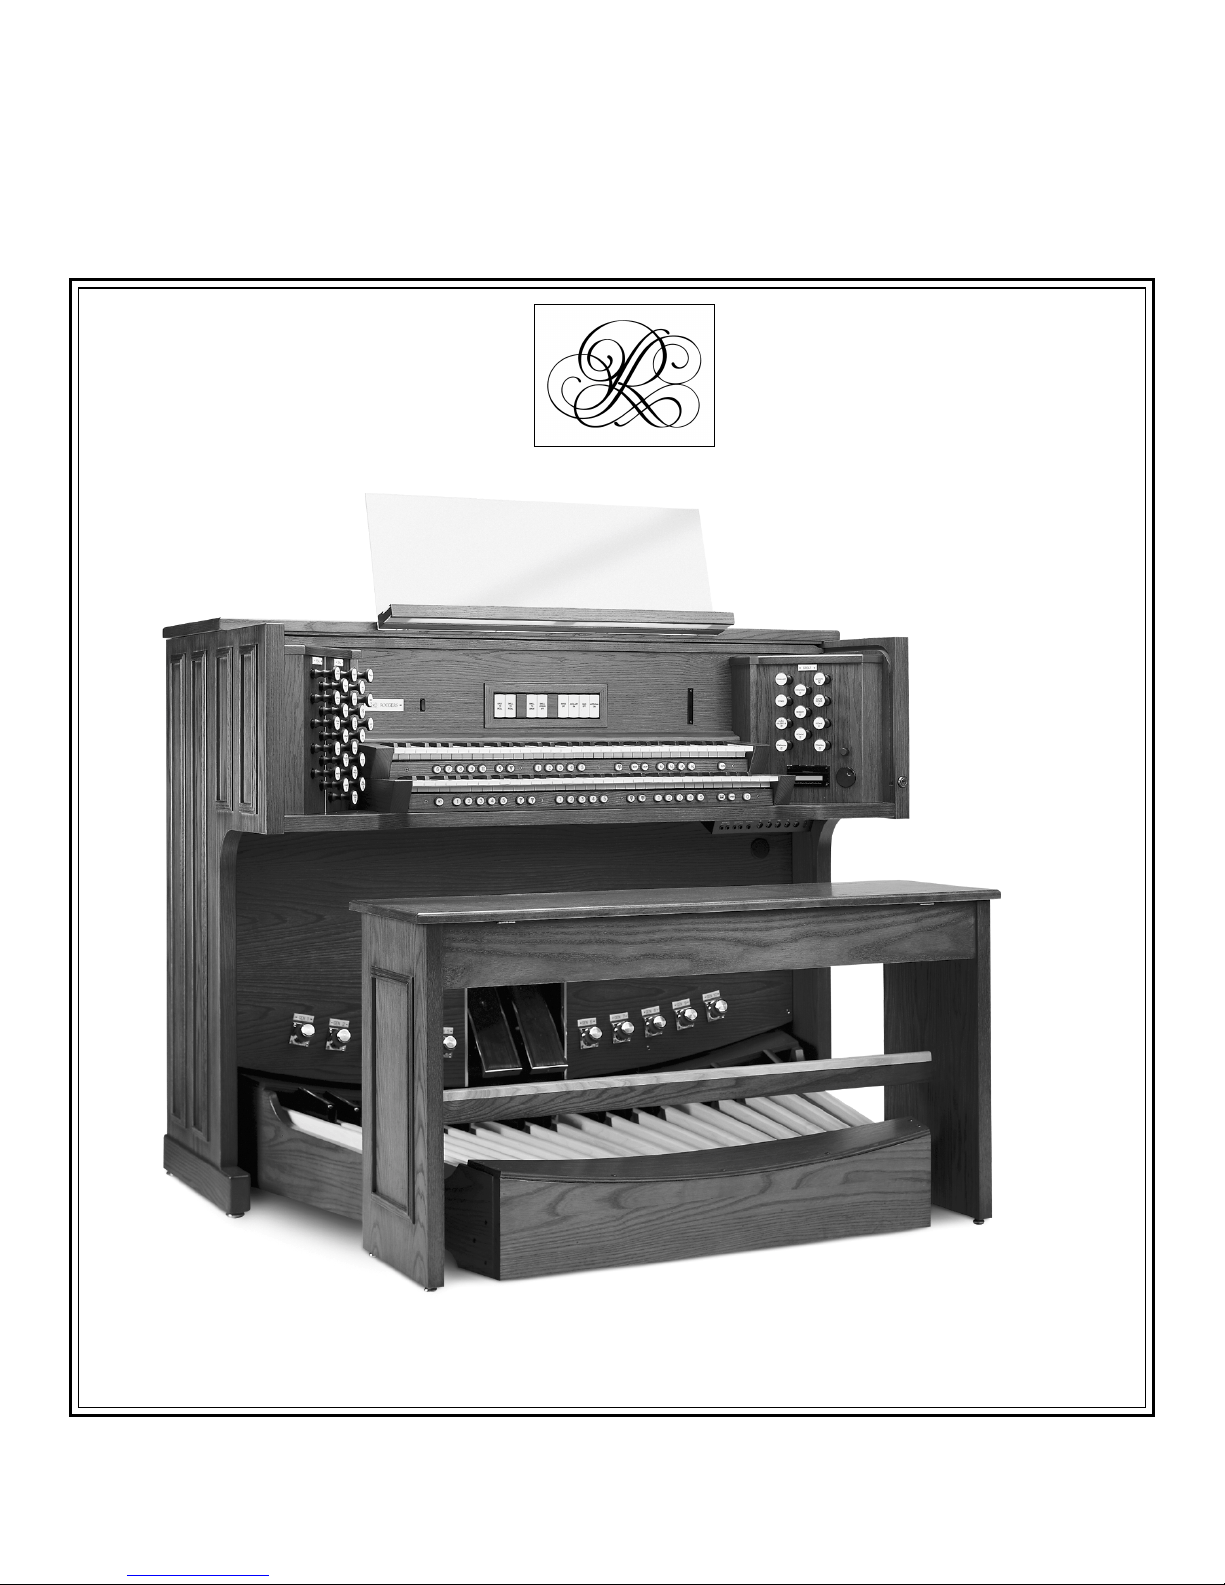
Rodgers 795 Owner’s Manual
Page 55

Page 56

INSTRUMENTS LLC
1300 N.E. 25th AVENUE, HILLSBORO, OREGON 97124 • (503) 648-4181
1905-797C
 Loading...