

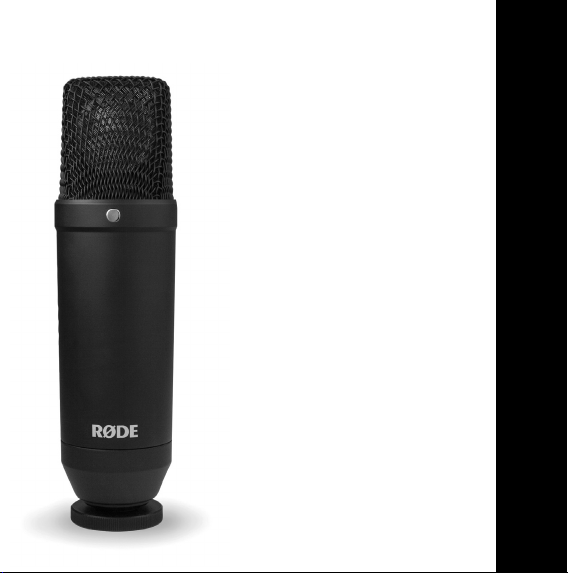
NT1
World’s Quietest
1” Cardioid Condenser
Microphone
1
www.rodemic.com/nt1
INSTRUCTION MANUAL ENGLISH

2
The NT1 is a studio quality condenser microphone, designed for
highly detailed sound reproduction. It features a cardioid polar
pattern, meaning that it will pick up sound from directly in front of
the microphone, and reject sound from the rear of the mic. This
pickup pattern allows for recording of the desired sound source
while reducing the sound of other instruments or sound sources.
The NT1 is not only ideal for recording music, but is a fantastic
microphone for podcasting and voiceovers, as well as sound design.
The extremely low inherent noise of the NT1 also makes it perfect
for recording very quiet sound sources.
Introduction

Features
• Large capsule (1”) with gold-plated membrane
• Cardioid polar pattern
®
• Internal Rycote
• Ultra-low noise transformerless circuitry
• State-of-the-art surface mount electronics
• Heavy-duty matte black fi nish
• Gold plated output connectors
• Designed & manufactured in Australia
• Free 10 year extended warranty when you register online at
www.rodemic.com/warranty
Lyre® based capsule shock mounting system
3

4
The NT1 is covered by a limited warranty for one (1) year from the
date of purchase. This can be extended free of charge to a full ten
(10) year warranty by registering your microphone online by visiting
our website as above.
Warranty
Register your NT1 now and
validate your free 10 year warranty.
Scan the QR code with a smartphone, or visit
www.rodemic.com/warranty
Specifi cations
5
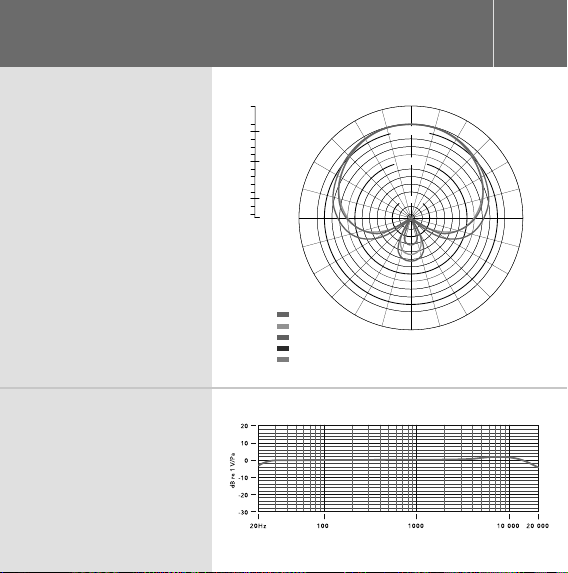
Polar Response
Frequency
Response
+5.0
0.0
-2.0
-4.0
-6.0
-8.0
-10.0
-12.0
-14.0
-16.0
-18.0
-20.0
-22.0
-24.0
-25.0
90˚ 270˚
dB rel. 1V/Pa
Frequency:
500 Hz:
1000 Hz:
4000 Hz:
8000 Hz:
14000 Hz:
0˚
-2.0
-10.0
-20.0
180˚
6
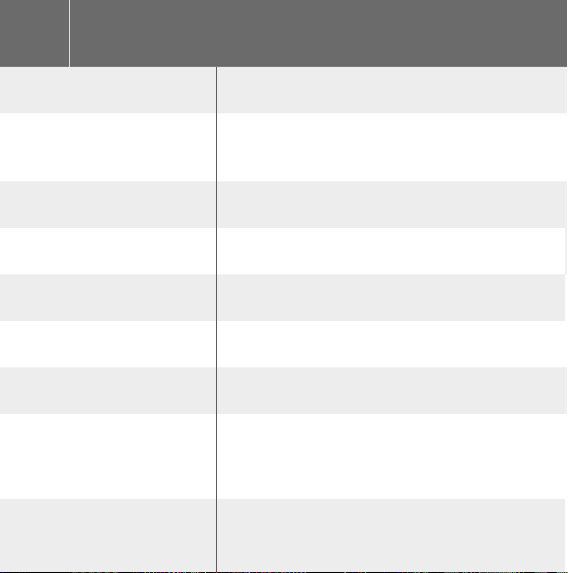
Specifi cations
Acoustic Principle
Active Electronics
Directional Pattern
Frequency Range
Output Impedence
Equivalent Noise
Maximum Output
Sensitivity
Dynamic Range
Pressure Gradient
JFET impedance converter with
bipolar output buffer
Cardioid
20Hz ~ 20kHz
100 Ω
4.5 dBA SPL (as per IEC651)
+8 dBu (1kHz, 1% THD into 1K Ω load
-29 dB re 1V/Pa
(35mV @ 94dB SPL)
± 2dB @ 1kHz
128 dB SPL

7
Maximum SPL
Signal / Noise
Power Requirements
Output Connection
Net Weight
Accessories
132 dB SPL
90 dBA SPL (as per IEC651)
24V phantom power
48V phantom power
3 Pin XLR
Balanced output between pin 2 (+),
pin 3 (-) and pin 1 (ground)
395g
SMR shock mount
Microphone Dust Cover

8
Connect all cables before supplying phantom power to the
microphone and never remove the microphone cable while the
power is connected.
The NT1 requires 48V DC (P48) or 24V DC (P24) phantom power.
If the mixer or preamp does not contain this phantom power
requirement, then an external phantom power supply is needed.
Some phantom power supplies do not supply the voltage at which
they are rated. If the required voltage is not supplied, the dynamic
range and general performance of the microphone will be reduced.
We strongly suggest the use of a reputable high quality power
supply. Damage caused by a faulty power supply is not covered
under warranty.
Powering the NT1

What is Phantom Power?
All condenser microphones require a power source to operate the
internal circuitry of the microphone.
Phantom power is a DC voltage, supplied to the microphone
through the XLR cable, providing the microphone circuit with the
power it requires to operate, without the need for an external
microphone power supply.
Most mixing desks, audio interfaces, and preamp units have a
phantom power switch inbuilt. If your equipment doesn’t have a
phantom power supply, an external one can be purchased and used
in-line between the preamp and the NT1. Be sure to check that your
phantom power supply is either P48 (48V DC) or P24 (24V DC) to
operate the NT1 correctly.

10
Mounting the NT1
The SMR shock mount
The NT1 is supplied with
the SMR shock mount.
Featuring suspension based
around the Rycote® Lyre®
system, it is designed to
isolate the microphone from
mechanical noise caused
by vibrations, bumps, and
other low frequency noises
in the recording space.
To mount the NT1, fi rst
remove the threaded ring
from the bottom of the
microphone. From there,
place the microphone in
the mount from above, and
attach the ring underneath
the mount to secure the
microphone in place.
Diagram 1 Mounting the NT1 in the
SMR shock mount
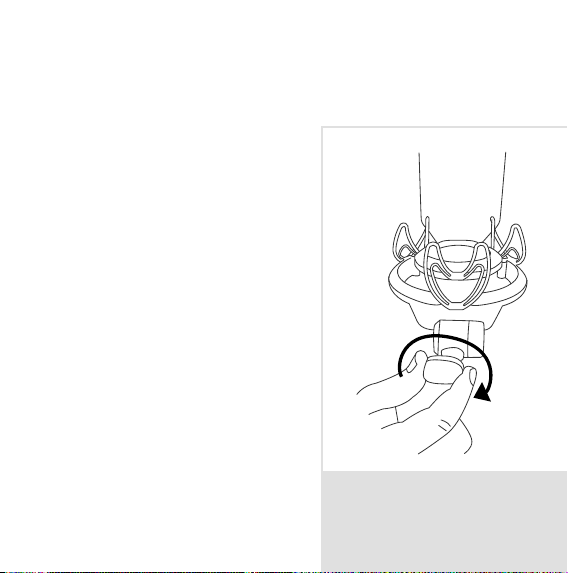
When changing the mic position, always be sure to loosen the
adjustment knob fi rst to ensure you do not damage the shock mount.
When recording vocals, always use the supplied pop fi lter, mounted
in front of the microphone. The
pop fi lter will prevent plosives
(hard ‘P’, ‘B’, ‘T’ and ‘K’ sounds)
from overloading the microphone’s
capsule.
For close miking of instruments,
such as guitar cabinets, the front of
the SMR can be removed to allow
closer microphone placement. To
remove the front plate, remove the
two allen keys from above.
RM2
The RØDE RM2 ring mount is
available as an optional accessory.
It can be used in situations where
the NT1 needs to be mounted in
close proximity to instruments or
in any tight space where the SMR
won’t quite fi t.
Diagram 2 Adjust the angle of
the microphone by twisting the
adjustment knob on the SMR.
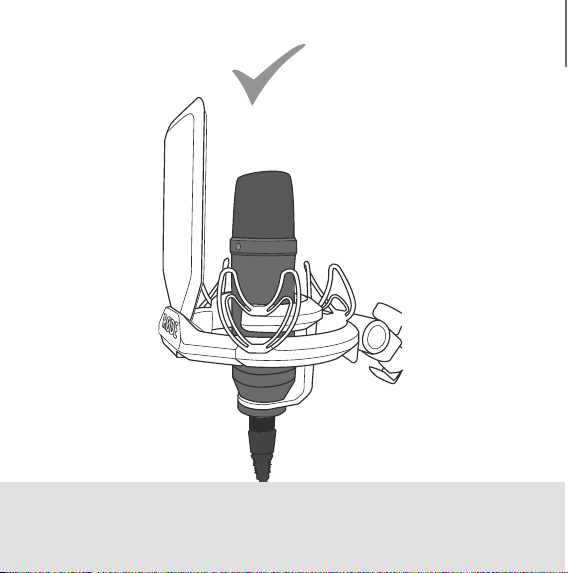
Diagram 3 Always use the pop fi lter when recording vocals, to
prevent plosives.

General Operation
The gold dot on the face of the NT1 indicates the front of the
microphone, and the pickup area of the capsule. The gold dot should
always be facing towards the sound source that you wish to record.
When recording any sound source, whether it be vocals, instruments
or anything else, always spend time experimenting with mic placement
to ensure you are picking up the best possible sound. Adjust the
microphone position as many times as you need to achieve this, rather
than attempting to compensate with EQ and other processing tools
later on.
If you are recording through an interface, channel strip or mixing desk
with an inbuilt EQ section, always begin by setting the EQ fl at (no cut or
boost) or turn it off if possible.
Once the preferred sound has been achieved through mic placement,
any processing such as EQ, compression, reverb and other effects can
be added to enhance the sound of your recording.
EQ is always best used sparingly, and when attempting to change the
sound of a recording in any way you should always start by ‘cutting’ any
unwanted frequencies, rather than boosting the other frequencies.
As with other aspects of the recording process, fi nding the right sound
is always a matter of experimentation, and you should always go with
whatever sounds best to you. Listen with your ears, not with your eyes!
13

14
There are no set rules when it comes to microphone placement,
but the tips below are a great starting point to achieve great results
in most scenarios. Don’t be afraid to experiment with your own mic
placements to produce the sound that you’d like to pick up with
your NT1.
Microphone placement
Recording vocals
• We strongly recommend using the supplied pop shield
attachment for all vocal recording. This aids in minimising
plosive sounds (hard ‘P’, ‘B’, ‘T’ and ‘K’ sounds) that produce
a sudden jet of air which can cause the capsule to overload
and produce a ‘popping’ sound.
• Moisture on the microphone capsule can cause problems for
any condenser microphone. Using the pop shield will reduce
the risk of this occurring.
• Placement of the microphone relative to the vocalist may
be varied on several factors including room acoustics, the
vocal performance, and whether the vocalist has a high or
deep voice.

An ideal reference is to begin with the NT1 with the pop shield
attached, mounted directly in front of the vocalist, approximately
15cm (6”) away. The pop shield will assist in keeping the performer
at a constant minimum distance from the microphone and helps
to maintain reasonable recording levels. Moving the vocalist a little
closer will make the vocal sound more intimate and full, while
moving the vocalist back will give the vocal a little more ‘air’ or
room sound, and will reduce the proximity effect (increased bass or
low frequency response when the sound source is very close).
Experimentation should be made with the angle from which the
microphone is addressed, as different results can be achieved when
the vocalist is ‘off-axis’ to the microphone (and the gold dot).
To watch a video showing
microphone placement techniques
for vocals, scan this code with your
smartphone or visit rodetv.com
15
Recording electric guitar/bass
To mic up a guitar or bass amplifi er (as opposed to direct input of
that instrument) a microphone may be placed close to the
loudspeaker of the amplifi er, directed slightly to the side (off-axis)
of the speaker (see Diagram 4).
In the absence of a PAD it may be necessary to move the mic
further from the speaker to avoid signal distortion when loud
volume is used.
Even small adjustments in the microphone’s position can produce
a very different sound when close-miking speakers, so
experimentation here is a must!
Diagram 4 Position the mic slightly off-centre to the speaker.
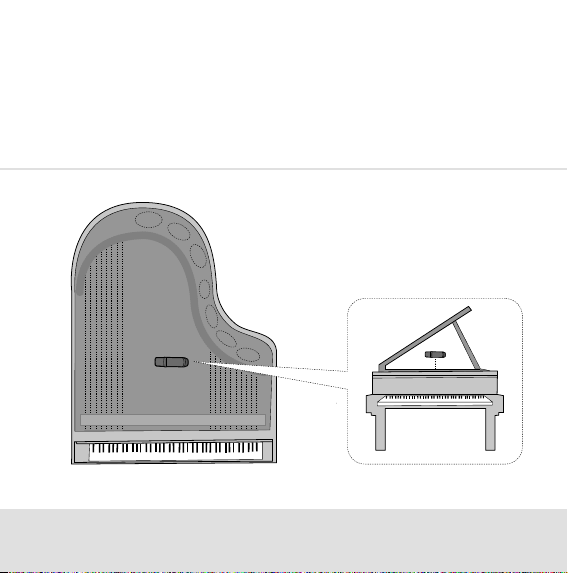
Recording piano (mono)
To record a piano using a single microphone, place the mic
approximately 60cm (2’) above the centre of the sound board,
aimed slightly towards the front of the piano (see Diagram 5).
60cm
Diagram 5 Place the mic approximately 60cm above the soundboard.
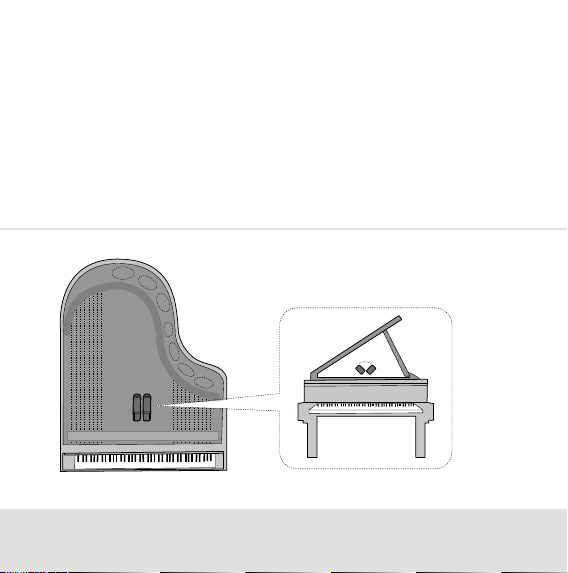
Recording piano (stereo)
To record a piano using a matched pair of NT1s using X/Y stereo
technique, the matched microphones should be angled 90 - 110
degrees to each other, over the hammers, with one mic aimed
towards the lower strings and the other to the higher strings
(see Diagram 6). The gold dots should face the piano.
Thus a stereo image can be achieved, with lower frequencies
recorded on the left, and higher frequencies on the right.
90°-110°
Diagram 6 Recording piano in stereo.
Recording acoustic guitar (mono)
A common (single) microphone position when recording acoustic
guitar is between 20 – 30cm (8-12”) away from the front of
the instrument, where the neck and body meet. Angle the mic
towards the position between the sound hole and the neck joint of
the guitar. Adjust the distance and position to fi ne tune the desired
response. This will depend on the instrument, style of playing, and
the desired sound.
8-12"
Diagram 7 Recording acoustic guitar with one mic.
Recording acoustic guitar (two microphones)
An alternative technique is to combine a small capsule
microphone (like the NT5 or NT55) close to the guitar, with a large
capsule mic like the NT1 at a distance of around 1m (3’). The
individually captured sounds recorded by each microphone can
then be mixed as desired.
6-8" 3'
Diagram 8 Recording acoustic guitar with two mics.
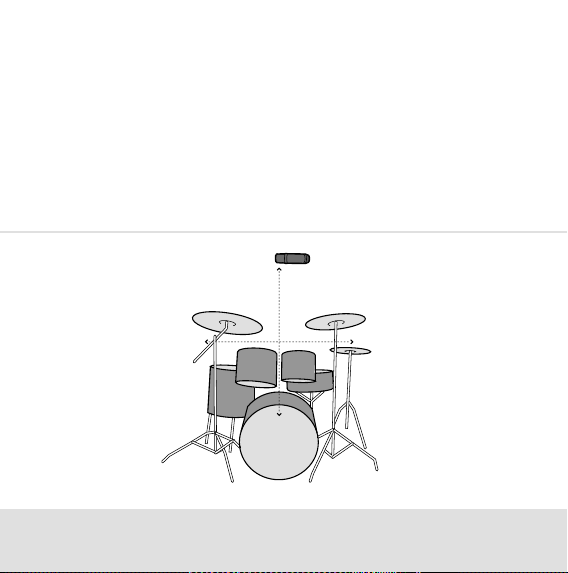
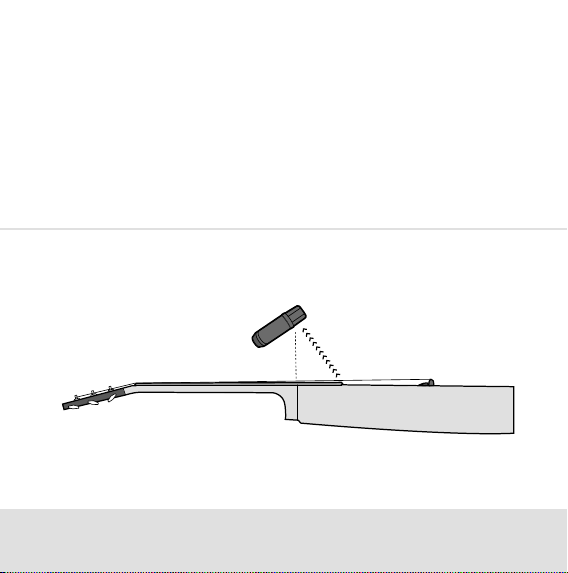
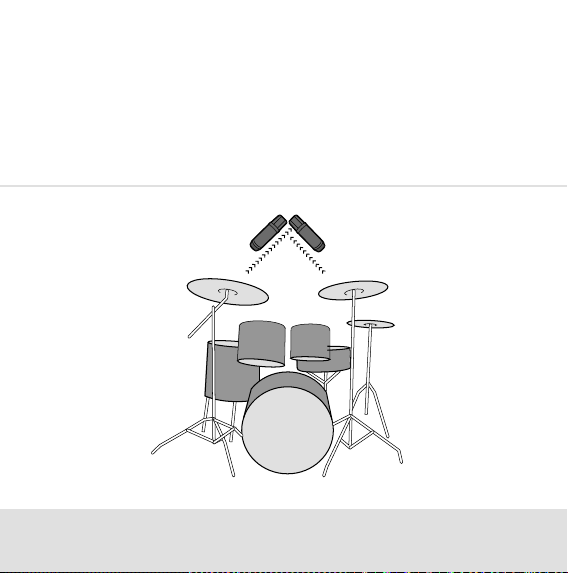
Recording drums (one mic)
There are various ways to record drum kits. Single mics ‘overhead’,
multiple mics (X/Y or spaced pair) or multiple mics close to
individual drums and cymbals (‘close miking’).
To record a kit using a single microphone we suggest that you begin
by placing the mic above the direct centre of the kit at the same
height as the kit is wide, with the front of the microphone (gold dot)
facing down.
Diagram 9 Recording drums with one mic.
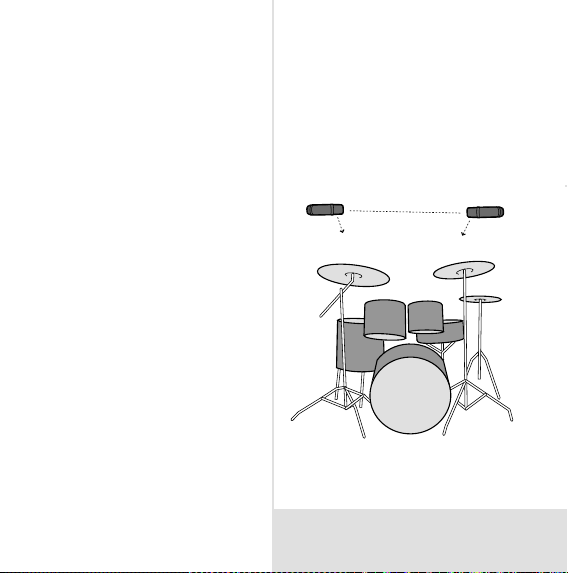
Recording drums
1-2m
(overheads spaced)
To record a kit using two
overhead microphones they
should be placed at a similar
height to the single technique
and, depending on the kit size,
approximately 1-2m (3-6’) apart.
The fi rst mic should be at an
equal distance from the snare
drum as the second mic is from
the kick drum. This will ensure
that the kick and snare are in
the centre of the stereo image,
and minimise phase problems,
as the sound wave from the
kick and snare will reach the
microphones at the same time.
Using a cable or a pair of
drumsticks as a measure can
be a useful way to help match
the distances and work out the
correct mic positioning.
Diagram 10 Recording drums
with two overhead spaced mics.
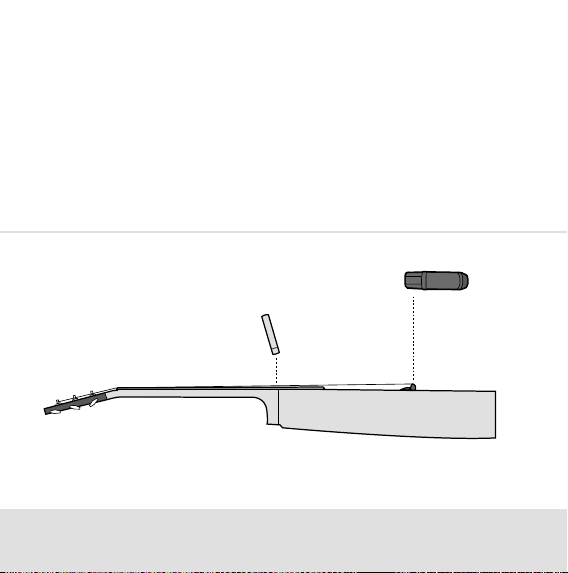
Recording drums (overheads XY)
To record a kit using a matched pair of microphones in X/Y stereo
technique, the microphones should be placed in the location of the
single mic technique, with the front of each microphone (gold dot)
pointing down and at an angle of 90 - 110 degrees to each other.
Diagram 11 Recording drums with two overhead XY mics.

24
After use the NT1 should be removed from its shock mount, wiped
with a dry, soft cloth and placed in the supplied protective dust
cover or supplied zip case.
Alternatively if the mic is being used regularly, we strongly suggest
you cover the mic with the supplied protective dust cover. This can
simply be slipped over while the mic is still in the shock mount.
Be sure to place the moisture-absorbent crystals (supplied) at
the head of the microphone when in storage, so as to absorb any
moisture present. Eventually this pack of crystals will need to be
dried. This is indicated by the crystals turning pink in colour. They
can easily be re-used by placing them in an oven at 100 - 150
degrees celsius for approximately ten minutes. The crystals will
operate effectively again once they have turned blue.
Safety and maintenance

Support
If you experience any problem, or have any questions regarding your
RØDE microphone, fi rst contact the dealer who sold it to you.
If the microphone requires a factory authorised service, return will
be organised by that dealer.
We have an extensive distributor/dealer network, but if you have
diffi culty getting the advice or assistance you require, please do not
hesitate to contact us directly.
Alternatively please visit www.rodemic.com/support for contact
details and a list of Frequently Asked Questions.
Importers & distributors
For a full list of international importers and distributors, visit our
website at www.rodemic.com/distributors.
25

26
International
107 Carnarvon Street
Silverwater NSW 2128 Australia
USA
2745 N Raymond Ave
Signal Hill CA 90755
USA
PO Box 91028
Long Beach CA 90809-1028
USA
Contact RØDE

NT1
1”-Nieren-
Kondensator mikrofon
mit minimalem
Eigenrauschen
27
www.rodemic.com/nt1
BEDIENUNGSANLEITUNG DEUTSCH

28
Das NT1 ist ein Kondensatormikrofon für Studioanwendungen mit
einer ebenso differenzierten wie detaillierten Klangwiedergabe.
Es weist eine Nierencharakteristik auf und greift daher nur den
Schall an der Vorderseite ab (der Schall an der Mikrofonrückseite
wird ignoriert). Zweck dieser Richtcharakteristik ist, dass eine
Schallquelle gezielt abgenommen wird – Signale im Hintergrund
und an den Seiten sind merklich leiser.
Das NT1 eignet sich übrigens nicht nur für Aufnahmezwecke,
sondern auch für Podcasts, zum Nachvertonen von Filmen usw.
Mit seinem extrem niedrigen Eigenrauschen eignet sich das NT1
hervorragend für die Abnahme relativ leiser Schallquellen.
Vorweg

Merkmale
• Große Kapsel (1”) mit goldbedampfter Membran.
• Nierencharakteristik.
®
• Interne elastische Rycote
• Transformatorlose Schaltungstechnik mit extrem geringem
Eigenrauschen.
• Wegweisende Elektronik.
• Robustes Gehäuse in Mattschwarz.
• Vergoldete Ausgangsstecker.
• Entwickelt und hergestellt in Australien.
• Kostenlose 10-Jahres-Garantie für online registrierte
Mikrofone (www.rodemic.com/warranty)
Lyre®-Lagerung.
29

30
Für das NT1 gilt eine Garantiefrist von 2 Jahren ab dem
Erstkaufdatum. Diese kann jedoch kostenlos auf zehn (10) Jahre
verlängert werden, indem man das Mikrofon wie oben erwähnt
registriert.
Garantie
Registrieren Sie Ihr NT1 jetzt,
um Ihre kostenlose 10-JahresGarantie zu aktivieren.
Scannen Sie den QR-Code mit Ihrem
Smartphone oder surfen Sie zu
www.rodemic.com/warranty

Technische Daten
31
Richtcharakteristik
Übertragungsbereich
+5.0
0.0
-2.0
-4.0
-6.0
-8.0
-10.0
-12.0
-14.0
-16.0
-18.0
-20.0
-22.0
-24.0
-25.0
90˚ 270˚
dB rel. 1V/Pa
Frequency:
500 Hz:
1000 Hz:
4000 Hz:
8000 Hz:
14000 Hz:
0˚
-2.0
-10.0
-20.0
180˚

32
Technische Daten
Akustisches Prinzip
Aktive Elektronik
Richtcharakteristik
Übertragungsbereich
Ausgangsimpedanz
Eigenrauschen
Max. Ausgangspegel
Empfi ndlichkeit
Dynamikbereich
Grenzschalldruck
Druckgradient
JFET-Impedanzwandler mit bipolarem
Ausgangspuffer
Niere
20Hz~20kHz
100Ω
Schalldruck von 4.5dBA (gemäß IEC651)
+8dBu (1kHz, 1% Klirrfaktor an 1kΩ)
–29dB re 1V/Pa
(35mV @ 94dB Schalldruck)
±2dB @ 1kHz
Schalldruck von 128dB
132dB

33
Fremdspannungsabstand
Spannungsanforderungen
Ausgang
Nettogewicht
Zubehör
90dBA (gemäß IEC651)
24V-Phantomspeisung
48V-Phantomspeisung
XLR, 3 Stifte
Symmetrischer Ausgang:
Pin 2 (+), Pin 3 (–) und Pin 1 (Masse)
395g
SMR Spinne
Staubhaube für Mikrofone

34
Schließen Sie alle Kabel an, bevor Sie die Phantomspeisung für
das Mikrofon aktivieren und lösen Sie die Kabelverbindung niemals,
solange die Speisung noch aktiv ist.
Das NT1 erfordert eine Phantomspeisung mit einer
Gleichstromspannung von 48V (P48) oder 24V (P24). Wenn das
verwendete Mischpult bzw. der Vorverstärker diese Spannung
nicht liefern kann, muss eine externe Stromversorgung verwendet
werden.
Bestimmte Speisungsquellen liefern nicht die angegebene
Spannung. Das führt zu einer Verringerung des Dynamikbereichs
und der allgemeinen Leistung des Mikrofons.
Verwenden Sie daher eine hochwertige Stromversorgung
einer angesehenen Marke. Schäden, die von einer defekten
Stromversorgung herrühren, fallen nicht unter die
Garantiebestimmungen.
Speisung des NT1

Was ist Phantomspeisung?
Die Schaltungen eines Kondensatormikrofons funktionieren nur,
wenn sie mit Strom versorgt werden.
“Phantomspeisung” ist eine Gleichstromspannung, die dem
Mikrofon über das XLR-Kabel zugeführt wird. Somit entfällt die
Notwendigkeit einer Batterie oder anderen externen Speisung.
Die meisten Mischpulte, Audioschnittstellen und Vorverstärker
können Phantomspeisung liefern. Wenn das bei Ihrem Gerät nicht
der Fall ist, können Sie eine externe Speisungseinheit kaufen und
zwischen dem Vorverstärker und dem NT1 anschließen. Bedenken
Sie, dass das NT1 eine P48- (48V) oder P24-Gleichstromspannung
(24V) erfordert.

36
Montage des NT1
Die SMR Spinne
Das NT1 wird mit einer
SMR Spinne geliefert.
Die elastische Rycote®
Lyre®-Aufhängung isoliert
das Mikrofon gegen
mechanische Störungen
(Vibrationen, Stößen)
und andere tieffrequente
Störquellen.
Vor der Installation muss
der Gewindering an der
Unterseite des NT1 gelöst
werden. Schieben Sie das
Mikrofon von der Oberseite
her in die Halterung und
drehen Sie den Ring wieder
so weit an, bis das Mikrofon
festsitzt.
Abbildung 1 Installation des NT1
in der SMR Spinne.

Wenn Sie das Mikrofon woanders aufstellen möchten, müssen Sie
zuerst die Einstellschraube lösen, um Schäden an der Spinne zu
vermeiden.
Für Gesangsaufnahmen sollten Sie unbedingt den Popfi lter vor
dem Mikrofon anbringen, um zu verhindern, dass Verschlusslaute
(energische “P”-, “B”-, “T”- und
“K”-Laute) die Mikrofonkapsel
überfordern.
Für “Close Miking”-Abnahmen
von Instrumenten oder
Verstärkern kann die Vorderseite
der SMR entnommen werden – so
kann das Mikrofon noch näher an
die Schallquelle gestellt werden.
Zum Entfernen der Frontplatte
brauchen Sie nur die beiden
Inbusschrauben von oben her zu
entnehmen.
RM2
RØDE bietet auch eine optionale
RM2 Ringhalterung an. Diese
können Sie verwenden, wenn sich
das SMR als zu sperrig erweist.
Abbildung 2 Ändern Sie den
Mikrofonwinkel, indem Sie an
der Einstellschraube der SMR
drehen.

38
Der goldene Punkt auf dem Gehäuse des NT1 zeigt die Vorderseite
und folglich die Einsprechrichtung an. Das Mikrofon (der goldene
Punkt) muss immer auf die Schallquelle gerichtet werden, die
aufgenommen werden soll.
Vor der eigentlichen Aufnahme der Schallquelle (Gesang,
Musikinstrument usw.) sollten Sie mehrere Mikrofonplatzierungen
ausprobieren, bis Sie die Stelle gefunden haben, an der das Signal
am besten klingt. Nehmen Sie sich genügend Zeit hierfür, weil man
die Klangqualität mit Equalizern und anderen Bearbeitungen nie so
gut hinbekommt wie bei einer optimalen Mikrofonierung.
Wen Sie eine Audioschnittstelle, einen Channel Strip oder ein
Mischpult mit Klangregelung verwenden, sollten Sie letztere
deaktivieren oder sonst neutral einstellen.
Suchen Sie erst die günstigste Mikrofonplatzierung und verwenden
Sie erst danach einen EQ, Kompressor, Halleffekt usw., dessen
Einstellungen nicht unbedingt aufgenommen zu werden brauchen.
Die Klangregelung sollte so spärlich wie möglich ausfallen. Wenn
Sie sie verwenden möchten, sollten Sie immer zuerst störende
Frequenzen abschwächen (statt die übrigen anzuheben).
Allgemeine Bedienung

Wie so oft bei einer Aufnahme muss man ein wenig mit der
Mikrofonierung usw. experimentieren, um den bestmöglichen
Sound zu fi nden. Bedenken Sie ferner, dass sich jeder etwas
anderes unter einem “Optimal-Sound” vorstellt. Und noch etwas:
Verlassen Sie sich vor allem auf Ihre Ohren statt auf Ihre Augen!
Abbildung 3 Für Gesangsaufnahmen muss der Popfi lter benutzt werden,
um Pops zu vermeiden.

40
Obwohl es keine allgemeingültigen Regeln für die
Mikrofonplatzierung gibt, bilden die nachfolgenden Tipps bestimmt
einen guten Ausgangspunkt. Scheuen Sie sich jedoch nicht vor
Experimenten und stellen Sie das NT1 auch ruhig mal anders auf.
Mikrofonplatzierung
Gesangsaufnahmen
• Für Gesangsaufnahmen sollten Sie auf alle Fälle den
beiliegenden Popschutz verwenden. Nur dann werden die
starken Windstöße von Verschlusslauten (energische “P”-,
“B”-, “T”- und “K”-Laute) nämlich abgefangen und machen
sich nicht als tieffrequente Plops bemerkbar.
• Ein zweiter Vorteil des Popschutzes ist das Abfangen von
Feuchtigkeit, die sich also nicht auf der Kapsel ablagern und
Störungen verursachen kann.
• In welchem Winkel und Abstand sich das Mikrofon zum
Sänger befi nden muss, richtet sich nach so unterschiedlichen
Faktoren wie der Raumakustik, dem Gesangsstil und der
Stimmlage (hoch oder tief).
Beginnen Sie mit folgender Faustregel: Bringen Sie den Popschutz
am NT1 an und stellen Sie es ca. 15cm vom Sänger entfernt auf.

Der Popschutz hilft dem Sänger bei der Einhaltung eines mehr
oder weniger gleichen Abstands zum Mikrofon, was sich u.a. positiv
auf den Aufnahmepegel auswirkt. Je näher sich der Mund am
Mikrofon befi ndet, desto voller und “intimer” klingt die Stimme.
Bei einem größeren Abstand werden mehr Rauminformationen
aufgenommen. Allerdings spielt der Nahbesprechungseffekt
(starker Bassanteil im Signal, wenn sich der Mund ganz nahe beim
Mikrofon befi ndet) dann keine Rolle mehr.
Experimentieren Sie auch einmal mit einer “Off-Axis”Mikrofonierung, d.h. einer leicht versetzten Aufstellung im
Verhältnis zum Mund (wenn sich der goldene Punkt nicht mehr
genau davor befi ndet).
Wir haben ein Video über die
gängigen Mikrofonierungsverfahren
für Gesang vorbereitet. Scannen Sie
einfach diesen Code oder surfen Sie
zu rodetv.com
41

Aufnahme elektrischer Gitarren/Bässe
Für die Abnahme eines Gitarren- oder Bassverstärkers (statt des
aus dem Instrument kommenden Signals) müssen Sie das Mikrofon
etwas außerhalb der Achse des Lautsprechers (“Off-Axis”) stellen.
Siehe Abbildung 4.
Wenn der Vorverstärker keine PAD-Funktion bietet, müssen Sie
das Mikro etwas weiter vom Verstärker entfernt aufstellen, um
Übersteuerung des Mikrofons zu vermeiden. Selbst kleinste
Positionsänderungen des Mikrofons können zu drastischen SoundUnterschieden führen. Probieren Sie daher unbedingt mehrere
Platzierungen aus!
Abbildung 4 Das Mikrofon muss auf eine Stelle leicht außerhalb der
Lautsprechermitte gerichtet werden.

Aufnahme eines Klaviers in Mono
Wenn Sie ein Klavier mit nur einem Mikrofon aufnehmen (müssen),
sollte es sich ±60cm über der Mitte des Resonanzbodens befi nden
und leicht zur Vorderseite des Klaviers geneigt werden (siehe
Abbildung 5).
60cm
Abbildung 5 Ordnen Sie das Mikrofon ±60cm über dem Resonanzboden an.

Stereo-Aufnahme eines Klaviers
Wenn Sie ein Klavier mit einem abgestimmten NT1-Paar im X/YVerfahren aufnehmen möchten, muss der Winkel zwischen den
beiden Mikros 90~110° betragen. Die Mikrofone sollten sich über
den Hämmern befi nden – richten Sie eines auf die Bass- und das
andere auf die Diskantsaiten. Die goldenen Punkte müssen zum
Klavier gerichtet sein. Siehe Abbildung 6.
Mit dieser Mikrofonierungstechnik erzielt man ein breites
Stereobild – die tiefen Frequenzen befi nden sich eher links, die
hohen eher rechts.
90°-110°
Abbildung 6 Aufnahme eines Klaviers in Stereo

Mono-Aufnahme einer akustischen Gitarre
Eine oft gewählte Mikrofonposition für die Abnahme einer
akustischen Gitarre befi ndet sich 20~30cm vor dem Hals/KorpusÜbergang. Richten Sie das Mikrofon auf die Stelle zwischen dem
Schalloch und dem Halsende. Variieren Sie den Abstand und die
Position eventuell, um einen noch besseren Sound zu erzielen.
Bedenken Sie, dass sich der Sound auch entscheidend nach der
Spieltechnik richtet.
8-12"
Abbildung 7 Aufnahme einer akustischen Gitarre mit einem Mikrofon

Aufnahme einer akustischen Gitarre mit
zwei Mikrofonen
Eine oft verwendete Aufnahmetechnik beruht auf der Kombination
eines Kleinmembranmikrofons (NT5 oder NT55) in unmittelbarer
Nähe der Gitarre mit einem Großmembranmikro wie dem NT1 in
einem Abstand von ±1m. Die mit den Mikrofonen abgegriffenen
Signale können dann den eigenen Vorlieben entsprechend
gemischt werden.
6-8" 3'
Abbildung 8 Aufnahme einer akustischen Gitarre mit zwei Mikrofonen

Schlagzeugaufnahme mit einem Mikrofon
Es gibt mehrere Ansätze für Schlagzeugaufnahmen: Ein
“Overhead”-Mikrofon, zwei Mikrofone (X/Y oder breitere Aufstellung)
oder die Einzelabnahme aller Trommeln und Becken (“Close
Miking”).
Wenn Sie nur ein Mikrofon für das Schlagzeug verwenden, sollte
es sich über dem Zentrum des Kits befi nden. Die Aufstellungshöhe
sollte der physischen Breite des Schlagzeugs entsprechen. Der
goldene Punkt (Einsprechseite) muss nach unten gerichtet sein.
Abbildung 9 Schlagzeugaufnahme mit einem Mikrofon

Schlagzeugaufnahme mit zwei Overheads
1-2m
Wenn Sie zwei Mikrofone für das Schlagzeug verwenden dürfen,
müssen diese sich in der gleichen Höhe wie im vorigen Beispiel (je
nach der Schlagzeugbreite)
und ±1~2m voneinander
entfernt befi nden. Beide
Mikrofone müssen sich gleich
weit von der Bassdrum und
Snare entfernt befi nden. Mit
einem XLR-Kabel (oder zwei
Schlagzeugstöcken), dessen
Enden Sie jeweils über der
Mitte der Bassdrum und Snare
aufhängen können Sie sehr
leicht ermitteln, wo sich die
beiden Mikrofone befi nden
müssen. Der gleiche Abstand
sollte deshalb gewählt werden,
weil sich die Bassdrum und
Snare dann in der Mitte des
Stereobildes befi nden (wenn
man die beiden Spuren hart
links/rechts “pant”) und weil
man damit Phasenprobleme
(Laufzeitunterschiede)
vermeidet.
Abbildung 10 –
Schlagzeugaufnahme mit zwei
gespreizten Overhead-Mikrofonen

XY-Schlagzeugaufnahme mit zwei Overheads
Wenn Sie das Schlagzeug mit einem abgestimmten Paar im X/YStereoverfahren aufnehmen möchten, müssen die Mikrofone genau
wie bei Verwendung nur eines Mikros aufgestellt werden, d.h. mit
dem goldenen Punkt nach unten und in einem 90~110°-Winkel zu
einander.
Abbildung 11 Schlagzeugaufnahme mit zwei Overhead-Mikrofonen in
XY-Konfi guration

50
Nach der Verwendung muss das NT1 aus der Spinne geholt, mit
einem weichen, trockenen Tuch abgewischt und im beiliegenden
Staubschutzbeutel oder Reißverschlussetui verstaut werden.
Wenn Sie das Mikrofon häufi g benutzen, brauchen Sie es nicht
jedes Mal auszubauen. Bitte bedecken Sie es in längeren
Spielpausen jedoch mit dem Staubschutz: Er kann einfach über das
Mikrofon in der Spinne gestülpt werden.
Für die Lagerung des Mikrofons ist darauf zu achten, dass sich
die (beiliegenden) feuchtigkeitsabsorbierenden Kristalle im
Beutel o.ä. befi nden. Nach einer Weile müssen diesen Kristalle
vermutlich getrocknet werden, und zwar wenn sie einen RosaSchein bekommen. Legen Sie sie dann ungefähr zehn Minuten bei
100~150°C in den Backofen. Wenn die Kristalle wieder einen blauen
Schein haben, können sie erneut verwendet werden.
Pfl ege und Wartung

Support
Falls Sie Fragen zu oder Probleme mit Ihrem RØDE-Mikrofon
haben, wenden Sie sich bitte zunächst an Ihren Händler. Nur ein
Händler kann das Mikrofon bei Bedarf nämlich zur Reparatur
einreichen.
Wir verfügen über ein breit gespanntes Vertriebs-/Händlernetz.
Falls Ihnen dennoch niemand in der Nähe helfen kann, können Sie
sich direkt mit uns in Verbindung setzen.
Unter www.rodemic.com/support fi nden Sie bei Bedarf eine
Aufl istung der am häufi gsten gestellten Fragen (FAQ).
Vertriebsstellen und Import
Unter www.rodemic.com/distributors fi nden Sie eine Übersicht
aller Vertriebsstellen.
51

52
International
107 Carnarvon Street
Silverwater NSW 2128 Australien
USA
2745 N Raymond Ave
Signal Hill CA 90755
USA
PO Box 91028
Long Beach CA 90809-1028
USA
Kontaktaufnahme mit RØDE

NT1
Micrófono de
condensador
cardioide de 1”
increíblemente
silencioso
53
www.rodemic.com/nt1
MANUAL DE INSTRUCCIONES ESPAÑOL

54
El NT1 es un micrófono de condensador con calidad de estudio,
diseñado para una reproducción altamente detallada del sonido. El
mismo cuenta con un patrón polar cardioide, lo que signifi ca que el
micrófono capta el sonido directamente desde el frente y rechaza
el sonido en su parte posterior. Este patrón de captación permite la
grabación de la fuente de sonido deseada al tiempo que reduce el
ruido de otros instrumentos o fuentes de sonido.
El NT1 no es ideal solamente para grabación de música, también
es un micrófono fantástico para podcasting y voces en off, como así
también para diseño de sonido. El ruido inherente extremadamente
bajo del NT1 también lo hace perfecto para la grabación de fuentes
de sonido con niveles muy bajos.
Introducción

Características
• Cápsula grande (1”) con membrana bañada en oro
• Patrón polar cardioide
• Sistema de montaje interno interno de cápsula basado en
• Circuito sin transformador de ultra bajo ruido
• Montaje de la electrónica superfi cial de última generación
• Acabado en negro mate resistente
• Conectores de salida bañados en oro
• Diseñado y fabricado en Australia
• Gratis 10 años de garantía extendida cuando se registra online
®
®
Lyre
Rycote
en www.rodemic.com/warranty
55

56
El NT1 tiene una garantía limitada de un (1) año desde la fecha de
compra. La garantía puede ampliarse gratuitamente hasta diez (10)
años registrando el micrófono online a través de nuestro sitio web,
de la forma descrita a continuación.
Garantía
Registre su micrófono NT1 ahora
y obtenga sus 10 años de garantía
gratuita.
Escanee el código QR con un Smartphone o
visite www.rodemic.com/warranty

Especifi caciones
57
Respuesta polar
Respuesta
de frecuencia
+5.0
0.0
-2.0
-4.0
-6.0
-8.0
-10.0
-12.0
-14.0
-16.0
-18.0
-20.0
-22.0
-24.0
-25.0
90˚ 270˚
dB rel. 1V/Pa
Frequency:
500 Hz:
1000 Hz:
4000 Hz:
8000 Hz:
14000 Hz:
0˚
-2.0
-10.0
-20.0
180˚

58
Especifi caciones
Principio acústico
Electrónica activa
Patrón direccional
Gama de frecuencia
Impedancia de salida
Ruido equivalente
Salida máxima
Sensibilidad
Rango dinámico
SPL máximo
Gradiente de presión
Convertidor de impedancia JFET con
búfer de salida bipolar
Cardioide
20Hz~20kHz
100Ω
SPL de 4.5dBA (de acuerdo con IEC651)
+8dBu (1kHz, 1% THD en una carga de 1kΩ)
–29dB re 1V/Pa
(SPL de 35mV @ 94dB)
±2dB @ 1kHz
SPL de 128dB
132dB

59
Relación señal/ruido
Requisitos
de alimentación
Conexión de salida
Peso neto
Accesorios
90dBA (de acuerdo con IEC651)
Alimentación phantom de 24V
Alimentación phantom de 48V
XLR con 3 patas
Salida balanceada:
clavija 2 (+), clavija 3 (–) y clavija 1 (tierra)
395g
Amortiguador SMR
Cubierta antipolvo para el micrófono

60
Conecte todos los cables antes de proveer alimentación phantom
al micrófono y nunca quite el cable del mismo mientras la
alimentación se encuentre conectada.
El NT1 requiere 48V DC (P48) o 24V DC (P24) de alimentación
phantom. Si la consola de mezclas o el pre amplifi cador no posee
alimentación phantom, es necesario el uso de una fuente de
alimentación phantom externa.
Algunas fuentes de alimentación phantom no proporcionan el
voltaje nominal. Si el voltaje suministrado no es el requerido, el
rango dinámico y el rendimiento general del micrófono se verá
reducido.
Nosotros recomendamos el uso de una fuente de alimentación de
buena calidad. Los daños causados por la fuente de alimentación
no están cubiertos por la garantía.
Alimentar el NT1

Que es una fuente de alimentación phantom?
Todos los micrófonos de condensador requieren una fuente de
alimentación para la operación del circuito interno del micrófono.
La fuente de alimentación phantom es una corriente continua
(DC), proporcionada al micrófono a través del cable XLR, brindando
al circuito del micrófono la alimentación que este necesita para
funcionar, sin la necesidad de una fuente de alimentación de
micrófono externa.
La mayoría de las consolas de mezclas, interfaces de audio y pre
amplifi cadores poseen una fuente de alimentación phantom con
un switch integrado. Si su equipo no posee fuente de alimentación
phantom, puede adquirir una externa y utilizarla en la línea entre el
pre amplifi cador y el NT1. Asegúrese de verifi car que su fuente de
alimentación phantom sea P48 (48V DC) o P24 (24V DC) para operar
correctamente el NT1.

62
Montaje del NT1
El soporte
amor tiguador SMR
El micrófono NT1 incluye
el soporte amortiguador
SMR. Con una suspensión
basada en el sistema
Rycote® Lyre®, diseñada
para aislar el micrófono del
ruido mecánico causado por
vibraciones, golpes y otros
ruidos de baja frecuencia en
el entorno de grabación.
Para montar el NT1, primero
quite el anillo roscado
de la parte inferior del
micrófono. A continuación,
coloque el micrófono en la
parte superior del soporte
y coloque el anillo debajo
del soporte para fi jar el
micrófono en su lugar.
Diagrama 1 Montando el micrófono
NT1 en el soporte amortiguador SMR.

Al cambiar la posición del micrófono, siempre asegúrese de afl ojar
la perilla de ajuste en primer lugar, para asegurarse de que no se
dañe el soporte amortiguador.
Cuando graba voces, siempre utilice
el fi ltro pop, montado en el frente del
micrófono. El fi ltro evitará oclusivas
(“P”, “B”, “T” duras y los sonidos “K”)
que sobrecargan la cápsula.
Para microfoneo cercano de
instrumentos, tal como gabinetes de
amplifi cadores de guitarra, el frente del
SMR puede ser removido para permitir
una ubicación del más cercana del
micrófono. Para quitar la placa frontal,
simplemente quite las dos llaves Allen
de la parte superior.
RM2
El anillo de montaje RØDE RM2 está
disponible como accesorio opcional.
Este puede ser utilizado en situaciones
donde el NT1 necesita ser montado
cerca de de instrumentos o en
cualquier espacio reducido en donde el
SMR no quepa.
Diagrama 2
Ajuste el angulo del
micrófono girando la perilla
de ajuste en el SMR.

64
El punto dorado en la cara del NT1 indica el frente del micrófono y
el área de captación de la cápsula. El micrófono (y el punto dorado)
siempre debe apuntar hacia la fuente de sonido que desea grabar.
Cuando graba cualquier fuente de sonido, sean voces, instrumentos
musicales o cualquier otro sonido, siempre tómese algún tiempo
para experimentar con la ubicación del micrófono, para asegurarse
que esta capturando el mejor sonido posible. Ajuste la posición
del micrófono tantas veces como necesite para lograrlo, en
lugar de compensar posteriormente con un ecualizador u otras
herramientas de procesamiento.
Si esta grabando a través de una interfaz, tira de canal o consola
de mezclas que poseen una sección de ecualización integrada,
siempre comience por ajustar el ecualizador de forma plana (sin
corte ni realce) o desconéctelo si es posible.
Una vez que el sonido de su elección ha sido alcanzado a través
de la ubicación del micrófono, puede ser agregado cualquier
procesamiento, como ecualización, compresión, reverb y otros
efectos para mejorar el sonido de su grabación.
Siempre es mejor usar el ecualizador con moderación y, al intentar
modifi car el sonido de una grabación siempre debe comenzar por
Operación general

"cortar" las frecuencias no deseadas, en lugar de realzar otras
frecuencias.
Como con otros aspectos del proceso de grabación, encontrar el
sonido correcto es siempre una cuestión de experimentación y debe
optar por lo que sea que suene mejor para usted. Escuche con su
oídos, no con sus ojos!
65
Diagrama 3 Siempre use un fi ltro pop cuando graba voces, para prevenir
ruidos no deseados.

66
No hay reglas fi jas en cuanto a la ubicación del micrófono, pero
los siguientes consejos son un buen punto de partida para lograr
grandes resultados en la mayoría de los escenarios. No tema
experimentar con sus propias posiciones de micrófono para
producir el sonido que desea capturar con su NT1.
Ubicación del micrófono
Grabación de voces
• Le recomendamos usar el accesorio fi ltro anti pop incluído
para la grabación de voces. Esto ayuda a minimizar los
sonidos explosivos (“P”, “B”, “T” duras y los sonidos “K”) que
producen un fl ujo repentino de aire que puede hacer que la
cápsula se sobrecargue y producir un sonido de pop.
• La humedad en la cápsula puede causar problemas en
cualquier micrófono de condensador, sin embargo el uso de
un fi ltro anti pop reduce el riesgo de que esto ocurra.
• La ubicación del micrófono en relación al vocalista puede
variar según varios factores incluyendo la acústica de la
sala, el desempeño vocal y si el vocalista tiene una voz alta o
profunda.
Una referencia ideal es comenzar con el micrófono NT1 con el fi ltro

anti pop colocado, montado directamente en frente del vocalista,
aproximadamente a unos 15cm de distancia. El fi ltro anti pop
ayudará a mantener al vocalista a una distancia mínima constante
del micrófono y además ayuda a mantener niveles de grabación
razonables. Moviendo al vocalista un poco más cerca del micrófono
hará que el sonido de la voz sea más íntimo y completo, mientras
que alejar al vocalista del micrófono hará que el sonido de la voz
tenga un poco mas de “aire” o espacio y se reducirá el efecto de
proximidad (bajos realzados o respuesta de baja frecuencia cuando
la fuente de sonido está muy cerca).
La experimentación se debe hacer con el ángulo de dirección del
micrófono, ya que se pueden lograr resultados diferentes cuando el
vocalista está “fuera de eje” con el micrófono (y el punto dorado).
Para ver un video mostrando
técnicas de ubicación de
micrófonos para voces, escanee
este código con su Smartphone
o visite rodetv.com
67

Grabar una guitarra eléctrica/un bajo
Para microfonear un amplifi cador de guitarra o bajo (contrario a
la entrada directa de dicho instrumento) un micrófono puede ser
colocado cerca del altavoz del amplifi cador, dirigido ligeramente
hacia el lado (fuera del eje) del altavoz. Ver diagrama 4.
En ausencia de un PAD de atenuación puede ser necesario mover
el micrófono mas allá del altavoz a fi n de evitar la distorsión del
sonido cuando se utilizan volúmenes altos. Incluso los pequeños
ajustes en la posición del micrófono puede producir un sonido muy
diferente cuando microfonea los altavoces de cerca, por lo que es
necesario experimentar.
Diagrama 4 Coloca el micro ligeramente descentrado del altavoz.

Grabar un piano en mono
Para grabar un piano usando un solo micrófono, ubique el
micrófono aproximadamente a 60cm sobre el centro del arpa del
piano, dirigido ligeramente hacia la parte delantera del piano.
60cm
Diagrama 5 Coloca el micro aproximadamente 60cm por encima
del tornavoz.

Grabar un piano en estéreo
Para grabar un piano usando un par de micrófonos gemelos NT1
usando la técnica estéreo X/Y, los micrófonos gemelos deben
ser colocados en un ángulo de 90~110° el uno del otro, sobre los
martillos con un micrófono dirigido hacia las cuerdas más bajas y
el otro para las cuerdas más altas. Los puntos dorados deben estar
apuntando hacia abajo de cara al piano. Ver diagrama 6.
Usando esta técnica, se puede lograr una gran imagen estéreo, con
las frecuencias más bajas grabadas en el izquierdo y las mas altas
en el derecho.
90°-110°
Diagrama 6 Grabar un piano en estéreo

Grabar una guitarra acústica en mono
Una posición común de micrófono (uno solo) cuando graba
guitarras acústicas es colocarlo a 20~30cm del frente del
instrumento, donde se unen el mástil y el cuerpo del instrumento.
Apunte el micrófono hacia la posición entre la boca de la guitarra
y la del mástil de la guitarra. Ajuste la distancia y la posición para
sintonizar “fi namente” la respuesta deseada. Esto dependerá del
instrumento, estilo de ejecución y el sonido deseado.
8-12"
Diagrama 7 Grabar una guitarra acústica con un micrófono

Grabar una guitarra acústica (dos micrófonos)
Una técnica diferente es combinar un micrófono de cápsula
pequeña (como el NT5 o NT55) cerca de la guitarra, con un
micrófono de cápsula grande como el NT1 a una distancia
de alrededor de 1m. Los sonidos capturados y grabados
individualmente por cada micrófono pueden ser entonces
mezclados como desee.
6-8" 3'
Diagrama 8 Grabar una guitarra acústica con dos micrófonos

Grabar una batería con un micrófono
Hay varias maneras de grabar baterías. Un solo micrófono
“aéreos”, múltiples micrófonos (X/Y o par espaciado) o múltiples
micrófonos cerca de tambores y platillos individuales (“microfoneo
cercano”).
Para grabar una batería utilizando un solo micrófono sugerimos
que comience por colocar el micrófono sobre el centro directo de la
batería a la misma altura que su ancho, con la parte delantera del
micrófono (punto dorado) hacia abajo.
Diagrama 9 Grabar una batería con un micrófono

Grabar una batería (aéreos espaciados)
1-2m
Para grabar un kit usando dos micrófonos aéreos, estos deben
ser colocados a una altura similar que en la técnica de micrófono
simple y, dependiendo del tamaño de la batería, aproximadamente
a unos 1~2m de separación.
La distancia entre el primer
micro y la caja debería ser
la misma que la distancia
entre el segundo micro y el
bombo. Esto asegurará que el
bombo y el redoblante están
en el centro de la imagen
estéreo si los micrófonos
están paneados totalmente
a los lados y minimizará
los problemas de fase,
garantizando que la onda de
sonido desde el bombo y el
redoblante llegan a ambos
micrófonos a la vez.
Puede resultar útil utilizar un
cable o un par de baquetas
para medir las distancias y
calcular la posición correcta
de los micros.
Diagrama 10 Grabar una batería con
dos micrófonos aéreos espaciados

Grabar una batería (aéreos XY)
Para grabar una batería usando un par de micrófonos gemelos en la
técnica estéreo X/Y, los micrófonos deben ser colocados en la misma
ubicación que en la técnica de un solo micrófono, con el frente de
cada uno (punto dorado) apuntando hacia abajo y en un ángulo de
90~110° uno en relación al otro.
Diagrama 11 Grabar una batería con dos micrófonos aéreos XY

76
Luego de utilizar su micrófono NT1 debe retirarlo del soporte
amortiguador, limpiarlo con un paño suave seco y colocarle la tapa
protectora contra el polvo o colocarlo en el estuche con cierre,
ambos incluídos.
Alternativamente, si el micrófono esta siendo usado con
regularidad, le sugerimos que lo cubra con la funda protectora
incluída. Esta puede ser deslizada sobre el micrófono mientras está
todavía en el soporte amortiguador.
Asegúrese de colocar los cristales absorbentes de humedad
(provistos) en la cabeza del micrófono cuando lo almacene, con la
fi nalidad de absorber cualquier humedad presente. Eventualmente
este paquete de cristales necesitará ser secado. Esto es indicado
por los cristales cuando cambian su color a rosado. Cuando
cambian pueden ser reutilizados colocándolos en un horno a
100~150°C por aproximadamente diez minutos. Los cristales
operarán efectivamente una vez mas cuando hayan cambiado a
color azul.
Seguridad y mantenimiento

Atención al cliente
Si experimenta algún problema o tiene alguna pregunta referente al
micrófono RØDE, póngase en contacto con el distribuidor donde lo
adquirió. Si el micrófono necesita alguna reparación autorizada por
la fábrica, el mismo distribuidor se encargará de su devolución.
Nuestra red de distribuidores es muy extensa, pero si tiene
difi cultades para obtener los consejos o la asistencia deseados, no
dude en contactar directamente con nosotros.
También puede visitar www.rodemic.com/support, donde
encontrará los datos de contacto y una lista con las preguntas más
frecuentes.
Importadores y distribuidores
En nuestro sitio web www.rodemic.com/distributors encontrará la
lista completa de importadores y distribuidores internacionales.
77

78
Internacional
107 Carnarvon Street
Silverwater NSW 2128 Australia
EE.UU.
2745 N Raymond Ave
Signal Hill CA 90755
USA
PO Box 91028
Long Beach CA 90809-1028
USA
Contacta con RØDE

79
NT1
Microphone à
condensateur
cardioïde 1” ultra
silencieux
www.rodemic.com/nt1
FRANÇAIS
MODE D’EMPLOI

80
Le NT1 est un micro à condensateur de qualité studio, conçu
pour une restitution sonore extrêmement précise. Unidirectionnel
(cardioïde), il ne capte que le son produit devant le micro et
rejette les sons venant de l’arrière. Cette directivité permet de
n’enregistrer que la source voulue tout en réduisant le niveau des
sources environnantes.
Le NT1 est idéal pour l’enregistrement de musique mais convient
aussi très bien pour la création de podcasts, de doublages de fi lms
etc. Affi chant un bruit propre extrêmement bas, le NT1 se prête
parfaitement à l’enregistrement de sources de faible niveau.
Introduction

Caractéristiques
• Grande capsule (1”) avec membrane plaquée or
• Directivité cardioïde
®
®
• Suspension élastique interne Rycote
• Circuit sans transformateur à niveau de bruit ultra faible
• Electronique de pointe
• Finition noire mate robuste
• Connecteur de sortie plaqué or
• Conçu et fabriqué en Australie
• Extension gratuite de la garantie à 10 ans si vous enregistrez
votre micro en ligne (www.rodemic.com/warranty)
Lyre
81

82
Le NT1 est couvert par une garantie limitée d’un (1) an à partir de
la date d’achat. Cette garantie peut être étendue gratuitement à dix
(10) ans si vous enregistrez votre microphone en ligne sur notre site
web (voyez ci-dessous).
Garantie
Enregistrez maintenant votre NT1
et activez votre extension de garantie
gratuite à 10 ans.
Scannez le code QR avec votre smartphone
ou rendez-vous sur le site
www.rodemic.com/warranty

Fiche technique
83
Réponse
directionnelle
Réponse en
fréquence
+5.0
0.0
-2.0
-4.0
-6.0
-8.0
-10.0
-12.0
-14.0
-16.0
-18.0
-20.0
-22.0
-24.0
-25.0
90˚ 270˚
dB rel. 1V/Pa
Frequency:
500 Hz:
1000 Hz:
4000 Hz:
8000 Hz:
14000 Hz:
0˚
-2.0
-10.0
-20.0
180˚

84
Fiche technique
Principe acoustique
Electronique active
Directivité
Réponse en fréquence
Impédance de sortie
Bruit équivalent
Niveau de sortie max.
Sensibilité
Plage dynamique
Gradient de pression
Convertisseur d’impédance JFET avec
tampon de sortie bipolaire
Cardioïde
20Hz~20kHz
100Ω
4.5dBA SPL (conformément à IEC651)
+8dBu (1kHz, 1% DHT sous 1kΩ)
–29dB re 1V/Pa
(35mV @ 94dB SPL)
±2dB @ 1kHz
128dB SPL

85
Pression sonore (SPL)
maximum
Rapport signal/bruit
Alimentation
Fiche de sortie
Poids net
Accessoires
132dB
90dBA (IEC651)
Alimentation fantôme de 24V
Alimentation fantôme de 48V
XLR à 3 broches
Sortie symétrique:
broche 2 (+), broche 3 (–) et broche 1 (masse)
395g
Suspension SMR
Protection antipoussière du micro

86
Branchez tous les câbles avant d’envoyer une alimentation fantôme
au micro et ne débranchez jamais le câble du micro tant que
l’alimentation est activée.
Le NT1 nécessite une alimentation fantôme à tension continue de
48V (P48) ou 24V (P24). Si la console ou le préampli ne fournit pas
d’alimentation fantôme, il faut un boîtier d’alimentation fantôme
externe.
Certains boîtiers d’alimentation ne fournissent pas la tension
annoncée. Cela entraîne une diminution de la plage dynamique et
des performances générales du microphone.
Nous vous conseillons vivement d’opter pour une alimentation de
qualité d’une marque renommée. Les dommages engendrés par
une alimentation défectueuse ne sont pas couverts par la garantie.
Alimenter le NT1

Qu’est-ce que l’alimentation fantôme
Les circuits d’un micro à condensateur ont besoin d’une
alimentation électrique pour fonctionner.
L’alimentation fantôme fournit un courant continu au micro par
le câble XLR et évite de devoir recourir à une pile ou à un boîtier
d’alimentation externe.
La plupart des consoles de mixage, des interfaces audio et des
préamplis peuvent délivrer une alimentation fantôme. Si ce n’est
pas le cas de votre matériel, vous pouvez acheter un boîtier
d’alimentation et le brancher entre le préampli et le NT1. Vérifi ez
que l’alimentation fantôme fournie convient au NT1: il lui faut une
tension continue de 48V (P48) ou 24V (P24).

88
Montage du NT1
Suspension SMR
Le NT1 est fourni avec la
suspension SMR. Dans la
suspension basée sur le
système Rycote® Lyre®, le
micro est isolé des bruits
mécaniques engendrés par
les vibrations, les chocs ou
bruits à basses fréquences
environnants.
Pour installer le NT1,
dévissez l’anneau fi leté du
bas du micro. Insérez le
micro dans la suspension
par le haut et attachez-le
en serrant l’anneau sous la
suspension jusqu’à ce que le
micro soit bien fi xé.
Illustration 1 Installation du NT1
dans la suspension SMR.

Si vous voulez changer la position du micro, desserrez toujours
la molette de réglage au préalable pour ne pas endommager la
suspension.
Quand vous enregistrez le chant,
montez toujours le fi ltre anti-pop
devant le micro pour éviter que
les plosives (les sons “P”, “B”, “T”
et “K” énergiques) ne surchargent
la capsule.
Pour les prises de son
rapprochées d’instruments ou
d’amplis, vous pouvez retirer
la partie avant de la SMR pour
rapprocher davantage le micro de
la source. Pour retirer la partie
avant, dévissez simplement les
deux vis à 6 pans par le haut.
RM2: RØDE propose aussi un
anneau de fi xation RM2 en option.
Vous pouvez l’utiliser quand
le NT1 doit être installé dans
des endroits exigus où la SMR
prendrait trop de place.
Illustration 2 Réglez l’angle
du micro en tournant la molette
de la suspension SMR.

Illustration 3 Enregistrez toujours le chant avec le fi ltre anti-pop pour
éviter les problèmes dus aux plosives.

Fonctionnement général
Le point doré sur le NT1 indique l’avant du micro et l’endroit où la capsule
capte les signaux. Le micro (le point doré) doit toujours être dirigé vers la
source de signal devant être enregistrée.
Avant l’enregistrement de la source (chant, instrument de musique
etc.), prenez le temps d’essayer plusieurs emplacements pour le micro
jusqu’à ce que vous trouviez celui qui permet de capter le meilleur signal.
Changez la position du micro autant de fois que nécessaire pour obtenir
un résultat optimal plutôt que de tenter de compenser ultérieurement
les faiblesses de l’enregistrement à coup d’égalisation et d’autres
traitements.
Si vous utilisez une interface, une tranche de canal ou une console de
mixage avec égalisation, désactivez cette dernière ou choisissez un
réglage neutre (ni atténuation ni accentuation).
Cherchez à obtenir le meilleur son possible à travers l’emplacement
du micro. Cela permet d’utiliser l’égalisation, la compression, la
réverbération et autres effets ultérieurement, sans les enregistrer.
L’égalisation est à consommer avec modération et si vous devez
l’utiliser, commencez par atténuer les fréquences indésirables plutôt que
d’accentuer les autres.
La captation au micro nécessite souvent quelques essais et tâtonnements
pour trouver le son qui sonne le mieux (et ce choix est inévitablement
subjectif). L’important est de se fi er à ses oreilles bien plus qu’à ses yeux!
91

92
Bien qu’il n’existe pas de règles générales pour le placement
des micros, les conseils suivants constituent un bon point de
départ. N’hésitez pas à faire différents essais avant de choisir
l’emplacement défi nitif du NT1.
Placement du micro
Enregistrement de la voix
• Pour enregistrer la voix, nous recommandons vivement
d’utiliser le fi ltre anti-pop fourni. Il minimise l’effet des
plosives (des “P”, “B”, “T” et “K” énergiques) engendrant un
déplacement d’air brutal qui frappe la capsule et génère des
“pops”.
• Le fi ltre anti-pop rend également un autre service en
protégeant la capsule contre l’humidité et en évitant ainsi les
problèmes qui y sont liés.
• L’angle et la distance du micro par rapport au chanteur
dépend de différents facteurs comme l’acoustique de la pièce,
le style du chanteur et sa voix (aiguë ou grave).
Commencez par la position de référence: installez l’anti-pop et
placez le NT1 devant le chanteur, à une distance de 15cm environ.
L’anti-pop aide le chanteur à rester à une distance minimum plus

ou moins constante du micro et permet d’obtenir des niveaux
d’enregistrement relativement cohérents. Plus le chanteur est
proche du micro, plus sa voix a un son plein et “intime”. Plus le
chanteur s’éloigne du micro, plus l’enregistrement contient des
informations acoustiques et plus l’effet de proximité (accentuation
du grave quand la bouche est très proche du micro) diminue.
N’hésitez pas à faire des essais en plaçant le micro hors axe, c’està-dire en décalant l’angle du micro (du point doré) par rapport à la
bouche du chanteur.
Nous avons réalisé une vidéo
montrant des techniques de
placement de micro pour le
chant. Scannez ce code avec votre
smartphone ou rendez-vous sur le
site rodetv.com
93

Enregistrement de guitare/basse électrique
Pour enregistrer un ampli de guitare ou de basse (au lieu du signal
sortant directement de l’instrument), placez le micro devant le
haut-parleur en l’orientant légèrement vers le côté (hors axe).
Si le préampli ne dispose pas de fonction PAD, il peut être
nécessaire d’éloigner un peu le micro du haut-parleur pour éviter
toute distorsion du signal. Même d’infi mes variations de la position
du micro peuvent changer le son de façon drastique. Pour la prise
de son rapprochée, les essais sont absolument incontournables!
Illustration 4 Placez le micro légèrement hors axe central par rapport au
haut-parleur.

Enregistrement mono de piano
Pour enregistrer un piano avec un seul micro, placez-le au-dessus
du centre de la table d’harmonie, à environ 60cm, et dirigez-le
légèrement vers l’avant du piano. Voyez l’illustration 5.
60cm
Illustration 5 Placez le micro environ 60cm au-dessus de la
table d’harmonie.

Enregistrement stéréo de piano
Si vous enregistrez un piano avec un couple appairé de NT1 selon la
technique X/Y, l’angle des deux micros doit être de 90~110°. Placez
les micros au-dessus des marteaux en orientant un micro vers les
cordes graves et l’autre vers les cordes aiguës. Les points dorés
doivent être dirigés vers le piano. Voyez l’illustration 6.
Cette technique permet d’obtenir une superbe image stéréo avec
les basses fréquences à gauche et les hautes fréquences à droite.
90°-110°
Illustration 6 Enregistrement stéréo de piano

Enregistrement de guitare acoustique avec un micro
Pour l’enregistrement d’une guitare acoustique avec un micro,
celui-ci est souvent placé 20~30cm devant la jonction entre le
manche et la caisse. Orientez le micro vers la position comprise
entre la rosace et la jonction du manche et de la caisse. Ajustez la
distance et la position pour obtenir le meilleur son possible.
Le son obtenu dépend aussi largement de l’instrument et de la
technique de jeu.
8-12"
Illustration 7 Enregistrement de guitare acoustique avec un micro

Enregistrement de guitare acoustique avec
deux micros
Une technique alternative consiste à combiner un micro à petite
membrane (comme le NT5 ou le NT55) placé à proximité immédiate
de la guitare et un micro à grande membrane comme le NT1 placé
à environ 1m. Les signaux captés par les deux micros peuvent
ensuite être mixés selon des préférences personnelles.
6-8" 3'
Illustration 8 Enregistrement de guitare acoustique avec deux micros

Enregistrement de la batterie avec un micro
Il y a plusieurs façons d’enregistrer une batterie: vous pouvez
utiliser un micro overhead, deux micros (confi guration X/Y ou
espacée) ou capter chaque fût et cymbale individuellement (prise de
son de proximité).
Pour enregistrer une batterie avec un seul micro, commencez par
le placer directement au-dessus du centre de la batterie à une
hauteur correspondant à la largeur de la batterie. Dirigez le point
doré (l’avant du micro) vers le bas.
Illustration 9 Enregistrement de la batterie avec un micro

Enregistrement de la batterie avec 2
1-2m
overheads espacés
Si vous utilisez deux micros pour enregistrer la batterie, placez-les
à une hauteur identique à l’exemple précédent (égale à la largeur
de la batterie) et à 1~2m l’un de l’autre.
Le premier micro doit se
trouver à une distance de la
caisse claire égale à celle
séparant le deuxième micro
de la grosse caisse. De cette
façon, la caisse claire et la
grosse caisse se trouvent au
centre de l’image stéréo (avec
une ouverture maximale du
panoramique des deux pistes)
et vous évitez les problèmes
de phase en veillant à ce
que les ondes sonores
atteignent les deux micros
simultanément.
Servez-vous d’un câble ou
de baguettes de batterie
pour mesurer facilement les
distances et placer les micros
correctement.
Illustration 10 Enregistrement
de la batterie avec deux micros
overhead espacés
 Loading...