

Page 1
Bitte bewahren Sie die Verpackung des Modells sorgfältig auf. Beim
Abstellen des Modells bietet sie den besten Schutz. Ein mit beigelegten Zurüstteilen aufgerüstetes Modell passt nur bedingt wieder in die
Originalverpackung hinein, da diese aus Gründen der Transportsiche-
rung sehr eng sein muss. Es empehlt sich, die Originalverpackung an
gewissen Stellen mit einem scharfen Messer auszuschneiden. Kleinere
Teile des Modells, wie z.B. Puffer, sind wegen Detailtreue als aufgerüstete Steckteile ausgeführt und sind daher mit dem Grundkörper
nicht ganz fest verbunden. Beim selbstverschuldeten Verlust möchten
Sie bitte ein solches Teil neu bestellen. ( In diesem Fall können Sie
diese Teile auf dem Ersatzteilweg nachbestellen, eine Reklamation
kann nicht geltend gemacht werden.) • Don‘t throw your box in the
dustbin. If your model is not in use this box will keep it safe. If kits
are mounted on a wagon it will be slightly tight when placing it in
the original box. This guarantees safe transport. It is therefore recommanded to cut out certain parts of the original box. To keep the model
like the original, smaller parts (e.g. buffers) had been manufactured
separately from the body and are not tightly xed on it. Therefore they
probably can get lost. In this case you certainly may reorder them but
a complaint would not be acceptable. • Veuillez conserver ce mode
d’emploi ainsi que l’emballage en vue d’un futur emploi. L’emballage
se prête particulièrement bien pour stocker et protêger votre modèle lorqu’il n’est pas en service. • Un wagon entièrement êquipê
de ses pièces de nition ne rentre plus dans son emballage qu’après
avoir dégagé la place nécessaire à l’aide d’un coûteau n et bien
guisé aux endroits cù sont montés ces piéces. La stabilité et la sécurite
de l’emballage lors du transport du modèle de l’usine à votre detallant
(ou même à vous) impose une réduction au stricte minimum de toute place découpée et non utilisée, raison pour laquelle ces d´coupes
ne peuvent malheureusement pas être aménagées déjà en usine. •
Quelques petites pièces de nition (des tampons p. e.) ne sont pas
moulées d’un seul bloc avec leurs bases, mais séparément rapportées
en vue d’une réalisation plus détaillée. Cela implique le risque de
perte de ces composants. Dans ce cas, vous pouvez commander ces
pièces aux S.A.V. ROCO; nous ne pouvons cependant pas donner suite
à une r´clamation èventuelle à cause de ces pièces perdues. • Heeft
u uw model voorzien van alle insteekdeeltjes, dan past deze niet meer
precies in de doos. Na voorzichtig passen snijdt u met een scherp mes
eerst enige stukjes uit deze doos en u heeft de beste bescherming
voor uw kostbare model bereikt.
Bitte diese Beschreibung zum späteren Gebrauch aufbewahren! •
Please retain these instructions for further reference! • Pière de bien
vouloir con- server ce mode d’emploi en vue d’une future utilisation!
• Conservate queste istruczioni per un futuro utiliozzo! • Deze handleiding altijd bewaren.
12
Achtung! Bei unsachgemäßem Gebrauch besteht Verletzungs- gefahr durch funktionsbedingte scharfe Kanten und Spitzen • Attention! At an incorrect use there exists danger of hurting because
of cutting edgesand tips • Attention! II y a danger de blessure à un
emploi incorrect à cause des aiguilles et arêtes vives! • Voorzichtig! Bij
ondoelmatig gebruik bestaat verwondigsgevaar door scherpe zijkanten en uitsteeksels! • Attenzione! Un inap-propriato uso comporta
pericolo di ferimenti attraverso punte e spignoli taglienti! • Atencion!
Un emploe incorrecto puede causar causar heridas debido a las puntas
y aristas agudas! • Atencao! Por utilizacao incorrecta existe o perigo
de estragos, em virtude de cortes nas abas e nas pontas! • Bemaerk!
Ved ukorrekt brug kan de funktionsbetingede skarpe kanter og spidser
forvolde skade! • Proxoch! Hakatallhlh crhoh egkleiei kin
dunouz mkrot raumatismn, exaipax kopterwn akmwn kai
proexocwqn.
Änderungen von Konstruktion und Ausführung vorbehalten! • We reserve the right to change the construction and design! • Nous nous ré-
servons le droit de modier la construction et le dessin! • Ci riserviamo
il diritto di variare la costruzione e il design! • Verandering van model
en constructie voorbehouden.
CZ/SK - Návod na montáž stavebnice: Před stavbou pečlivě prostudujte příložený návod s vyobrazením. Jednotlivé dily odděIte od licích
rámečku a začistěte modelářským nožem nebo pilníkem. Díly roztřídte
dle vyobrazení a postupně slepujte podle pořadi jednotlivých stavebnich kroku. K lepení používejte lepidla určená pro plastikové stavebince.
Modelleisenbahn GmbH
A-5101 Bergheim
Plainbachstraße 4
Email: [email protected]
Tel.: 00800 5762 6000
(kostenlos/ free of charge/ gratuit)
International: +43 820 200 668
(kostenpichtig/ chargeable / avec des coûts)
(Zum Ortstarif aus dem Festnetz / local tariff for landline / prix d‘une appel loca-
le depuis du téléphone xe - Mobilfunk / Mobile max. 0,42€/min. incl. VAT)
AT|D|CH
CE
Modelleisenbahn GmbH
A-5101 Bergheim
8073778-920 II/19
Alter/Age
14
+
73778
73779
Bedienungsanleitung
Operating Manual
Instrukcja obs³ugi
H0-Modell:
Diesellokomotive ST44, PKP
H0-model:
Diesellocomotive ST44, PKP
Modèle H0:
Lokomotywa spalinowa ST44, PKP
Inhaltsverzeichnis
Table of Contents
Spis treści
Inbetriebnahme .............................. 2
D
Wartung und Pege ..................... 11
Starting locomotive operation ...... 10
GB
Maintenance of the mode .............. 3
Rozruch .......................................... 4
PL
Konserwacja i pielęgnacja .............. 9
Fig. 1 – 6 ................................................6 + 7
Fig. 7 – 8 ................................................5 + 8
Page 2
D D
Inbetriebnahme Ihrer Lokomotive Wartung und Pege des Modells
Auspacken des Modells: Das Modell vorsichtig
mit der Folie aus der Packung herausziehen (Fig. 1).
Betriebsbedingungen: Es empehlt sich, das
Modell 30 Minuten vorwärts und 30 Minuten
rückwärts ohne Belastung einlaufen zu lassen,
damit Ihr Modell einen optimalen Rundlauf
und beste Zugkraft bekommt. Der kleinste befahrbare Radius für dieses Modell ist R2 des ROCO-Gleissystems (R2 = 358 mm).
Der einwandfreie Lauf Ihrer Lokomotive ist nur auf
sauberen Schienen gewährleistet. Hierzu empfehlen wir den ROCO-Schienenreinigungswagen
Art.-Nr. 46400 und bei etwas stärkerer Verschmutzung den ROCO-Schienenreinigungs-Gummi
Art.-Nr. 10002.
Aufrüstung: Sie können für Ihren Fahrbetrieb unter verschiedenen Kupplungen wählen (Fig. 2). Wir
empfehlen den Einsatz der ROCO-Kurzkupplung.
Im beigelegten Zurüstbeutel nden Sie auch kleine
vorbildgetreue Steckteile für eine erweiterte Aufrüstung Ihres Modells (Fig. 2), die Sie bitte vorsichtig
montieren. Achtung! Kleben nur mit ausdrücklichem Hinweis.
Mehrzugbetrieb: Zuerst Lokgehäuse abnehmen (Fig. 3). Danach den Brückenstecker aus der
Schnittstelle entfernen (diesen sorgsam aufbewahren). Danach den Stecker des Steuerbausteins
lagerichtig einsetzen (siehe Fig. 8).
Damit Ihnen Ihr Modell lange Freude bereitet, sind
regelmäßig (ca. alle 30 Betriebsstunden) gewisse
Servicearbeiten notwendig:
1. Reinigung der Radstromkontakte: Rad-
stromkontakte können auf unsauberen Schienen
leicht verschmutzen. Entfernen Sie vorsichtig
mit einem kleinen Pinsel den Schmutz an den in
Fig. 5 gekennzeichneten Stellen.
2. Schmierung: Versehen Sie die im Schmierplan in Fig. 4 gekennzeichneten Stellen mit nur
kleinen Öltropfen. Dazu zuerst das Lokgehäuse abnehmen (Fig. 3). Wir empfehlen den ROCO
Öler Art.-Nr. 10906. Fürs Schmieren der Getriebeteile (Zahnräder, Schnecke) empfehlen wir das
ROCO-Spezialfett Art.-Nr. 10905. Im Falle der
Schmierung diese Teile nicht ölen.
3. Haftreifenwechsel: Zuerst <<DG od. GD>>
abnehmen (Fig. 5). Danach den Radsatz herausnehmen und die Haftreifen mit einer Nadel od.
mit einem feinen Schraubendreher abziehen (Fig.
6). Beim Aufziehen der neuen Haftreifen darauf
achten, dass diese sich nicht verdrehen.
4. Kohlebürstenwechsel: Lokgehäuse abnehmen (Fig. 3). Danach wird der Motor ausgebaut
und die Kohlebürsten ausgewechselt (Fig. 7).
Zusammenbau: Bitte achten Sie beim Zusammenbau auf die richtige Lage der Kontakte.
2
11
Page 3
GB GB
Starting locomotive operation Maintenance of the model
Unwrap model: Take out the model cautiously
with foil (g. 1).
Operating instructions: Before use is advisable to let the loco go around about 30 minutes forwards an 30 minutes backwards without load, to
obtain an optomal circuit and best tractive power.
The smallest radius this model should run is R2 of
the ROCO track system (R2 = 358 mm).
Your locomotive will run smoothly on clean tracks
only. For this purpose we recommend using item
no. 46400, ROCO track cleaning van, or item
no. 10002, ROCO track cleaning rubber, for
remo-ving heavy dirt.
Fittings: Operation is possible with different
couplings (g. 2). We recommend using the ROCO
close coupling.
In the enclosed accessory bag you will nd small
kits to be tted on your locomotive. Please mount
them cautiously.
Attention! Use glue only if indicated (g. 2).
Running in digital mode:
Remove the jumper from the interface.
Finally put the plug of the chip into the interface
as shown in g. 8.
To enjoy your model for a long time, it is necesary to service it regulary (i.e. after it has been in
ope-ration for approximately 30 hours).
1. Cleaning of wheel contacts: Wheel contacts easily get dirty on tracks which are not entirely clean. Use a small brush to remove dirt from
spots marked in g. 5.
2. Lubrication: Apply tiny oil drops to spots
marked in g. 4. Prior to lubrication dismantle locomotive (g. 3). We recommend using item no.
10906, ROCO oiler. For lubrication the gearparts
(e.g. cogwheels, worm) we whould recommended
our ROCO special grease (item no. 10905).
Attention: Please do not oil these parts when
using our grease.
3. Change of traction tyre: Remove the <<DG
od. GD GB>> (g. 5). Take out wheel set and
remove traction tyre using a pin or a ne
screwdriver (g. 6). When pressing on the new
traction tyre please avoid twisting it.
4. Carbon Brush Changing: First remove loco
body (g. 3), and then the motor (g. 7).
Assembly: During assembly please take care of
correct position of contacts.
10
3
Page 4
PL PL
Konserwacja i pielęgnacjaRozruch
Rozpakowanie modelu: Lokomotywę wyciąg-
nąć ostrożnie z opakowania pociągając za folię
(Fot. 1).
Warunki eksploatacji: Zalecamy krótki okres docierania. Przez pierwszych 30 minut lokomotywa
powinna poruszać się ze średnią prędkością. Najmniejszy promień, po którym model ten może się
poruszać to R2 (358 mm) w systemie torów ROCO.
Lokomotywa może poruszać się bez usterek tylko
na czystych szynach. Zalecamy stosowanie wagonu do czyszczenia szyn ROCO, nr artykułu 46400,
a przy mocniejszym zabrudzeniu gumkę do czyszczenia szyn ROCO, nr artykułu 10002.
Wyposażenie: Do łączenia kolejek można stosować rożne sprzęgi (Fot. 2). Zalecamy stosowanie
krótkiego sprzęgu ROCO.
W załączonym woreczku z wyposażeniem znajdują się także małe, wiernie odtworzone detale z
dodatkowym wyposażeniem lokomotywy (Fot. 2),
należy je montować bardzo ostrożnie na wtyk.
Uwaga! Klejenie stosować tylko wtedy, gdy
nakazuje tego instrukcja.
Jazda kilku pociągów: Najpierw zdjąć obudowę lokomotywy (Fot. 3). Następnie wyjąć
zworkę z interfejsu (starannie przechować). Na
koniec osadzić prawidłowo zworkę modułu sterowania (Fot. 8).
Aby lokomotywa sprawiała przez długi czas satysfakcję, należy wykonywać przy niej regularnie (co ok.
30 godzin pracy) określone czynności serwisowe:
1. Czyszczenie styków kó³ prądowych: Styki
kół prądowych łatwo zabrudzić na zanieczyszczonych szynach. Małym pędzelkiem usunąć ostrożnie
zabrudzenia z miejsc pokazanych na fot. 5.
2. Smarowanie: W miejsca pokazane na schemacie smarowania na fot. 4 należy dać małe kropelki oleju. W tym celu najpierw zdjąć obudowę
lokomotywy (fot. 3). Zalecamy stosowanie olejarki
ROCO, nr art. 10906. Do smarowania elementów
przekładni (koła zębate, ślimak) zalecamy stosowanie specjalnego smaru ROCO, nr art. 10905. Na
tak posmarowane części nie należy dawać oleju.
3. Wymiana szczotek węglowych: Zdjąć obudowę lokomotywy (fot. 5). Następnie wymontować silnik i wymienić węglowe
szczotki (fot. 6).
4. Wymiana opaski ko³a napędowego:
Opaskę koła napędowego ściągnąć igłą lub miniaturowym wkrętakiem (fot. 7). Podczas zakładania
nowej opaski na koło napędowe nie przekręcić jej.
Montaż: Podczas montażu należy zwrócić uwagę
na prawidłowe położenie styków.
498
Page 5
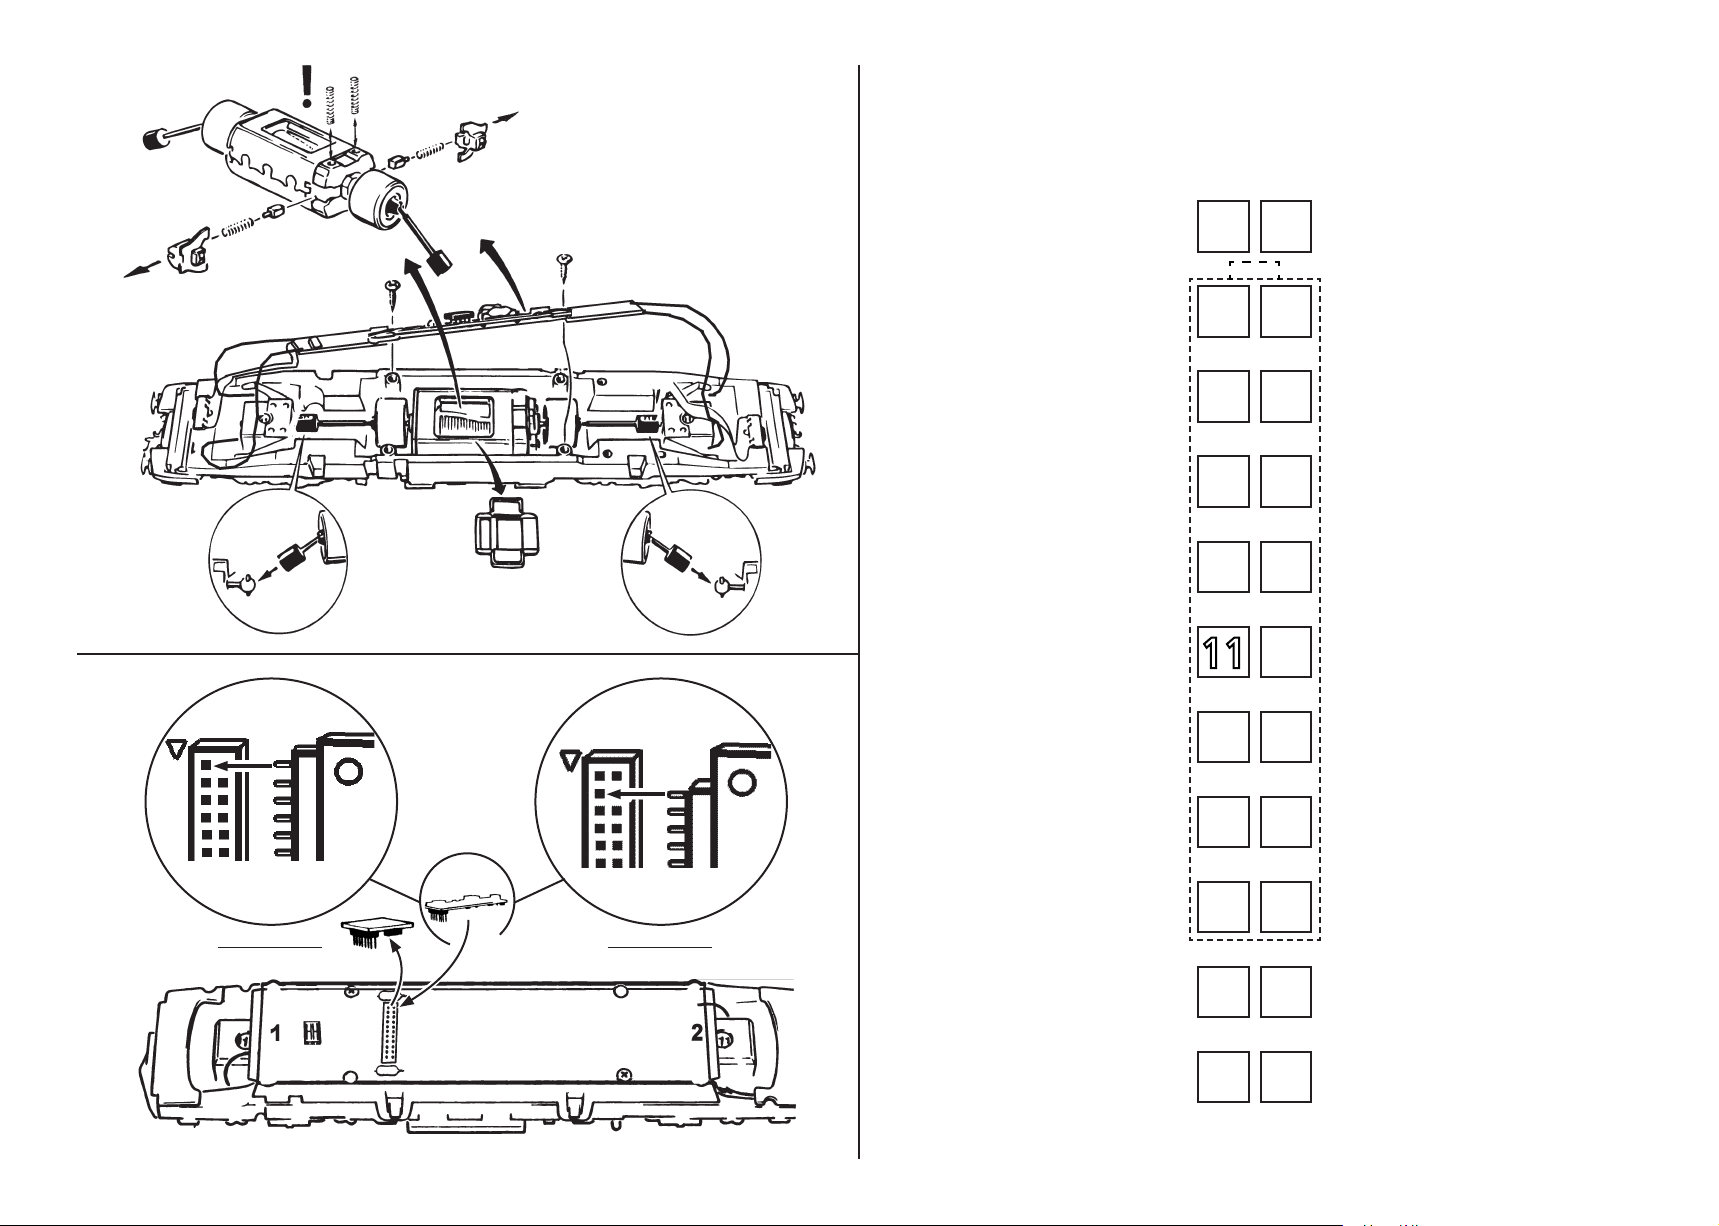
Fig. 7
1.
4.
2.
1.
Ausgangsbelegung / Decoder interface
GPIO/C
Zugbus-Clock / GPIO/B
1
3
2
Plux16
4
Aux. 3
GPIO/A / Zugbus-Data
Fig. 8
3.
!
Decoder 22-pin Decoder 16-pin
Masse GND
Stirnlicht FS 1
Front light, Drivers cab 1
Czołowe oświetlenie stanowiska maszynisty 1
V (+)
Verdrehschutz
Twist protection
Ochrona przed skręcaniem
Stirnlicht FS 2
Front light, Drivers cab 2
Czołowe oświetlenie stanowiska maszynisty 2
Lautsprecher A
Speaker A
Głośnik A
Lautsprecher B
Speaker B
Głośnik B
5
7
9
13
15
17
6
8
10
12
14
16
18
DC (+) Elko
Motor rechts (+)
Engine right (+)
Silnik prawy (+)
Motor links (-)
Engine left (-)
Silnik lewy (-)
Schiene rechts / Schleifer
Track right / Pick up
Szyna prawy / ślizgacz
Schiene links/ Schienen
Track left / Tracks
Szyna lewy / Szyny
Aux. 1 rotes Schlusslicht ,FS 2
Aux. 1 red Taillight, Drivers cab 2
Aux. 1 czerwone światło końcowe 2
Aux. 2 rotes Schlusslicht, FS 1
Aux. 2 red Taillight, Drivers cab 1
Aux. 2 czerwone światło końcowe 1
Aux. 4
Aux. 6
19
21
20
22
Aux. 5
Aux. 7
5
Page 6
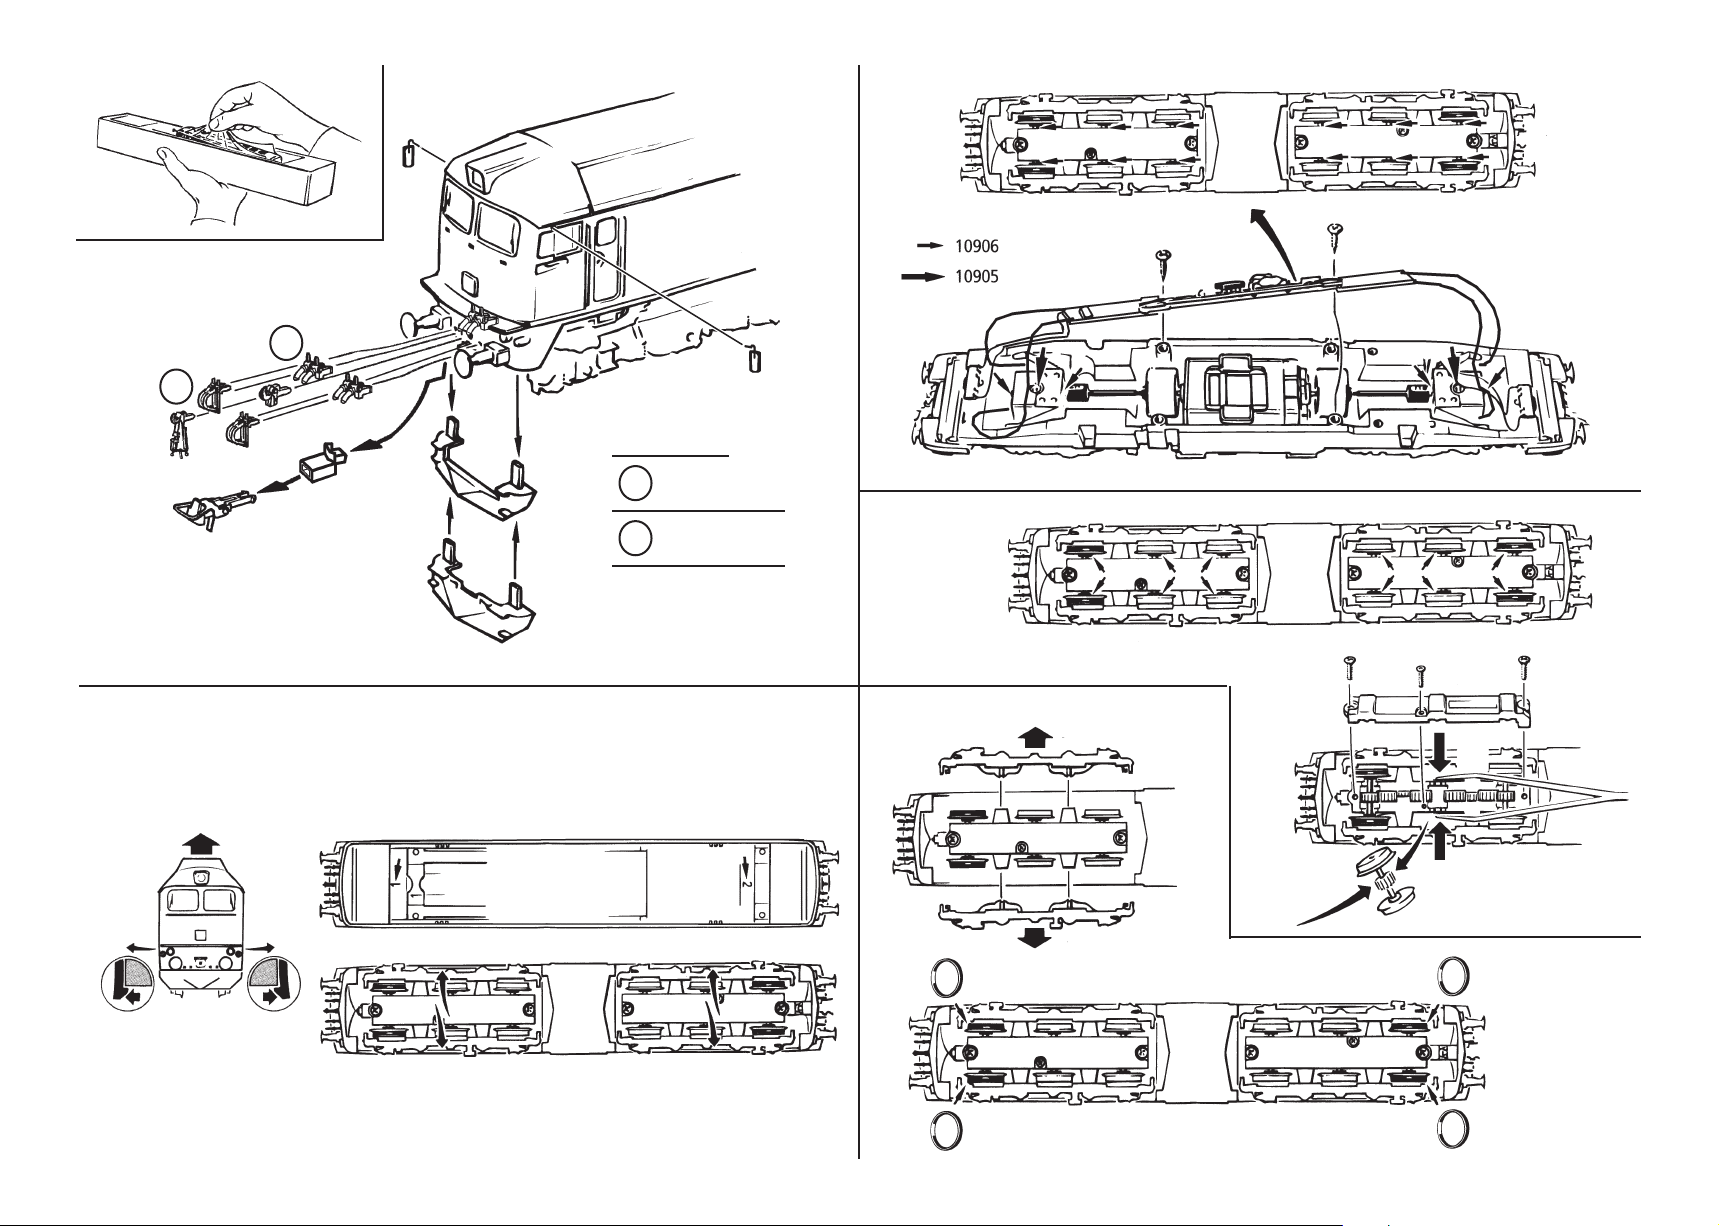
Fig. 1 Fig. 2 Fig. 4
Fig. 3
V
?
2.
1.
3.
wahlweise
optional
?
do wyboru
nur für Vitrine
Only for showcase
V
Tylko do witryny
1.
1.
2.
1.
1.
1.
Fig. 5
1.
3.
2.
1. 1.
6
1.
3.
4.
2.
Fig. 6
1.
1.
7
 Loading...