

Page 1
www.roco.cc
Dampokomotive Rh 38, ÖBB
Steam locomotive Rh 38, ÖBB
Locomotive vapeur Rh 38, ÖBB
72124
PluX
1
72125
Handbuch
Manual
Manuel
72124.indd 1 05.04.2019 12:24:01
Page 2
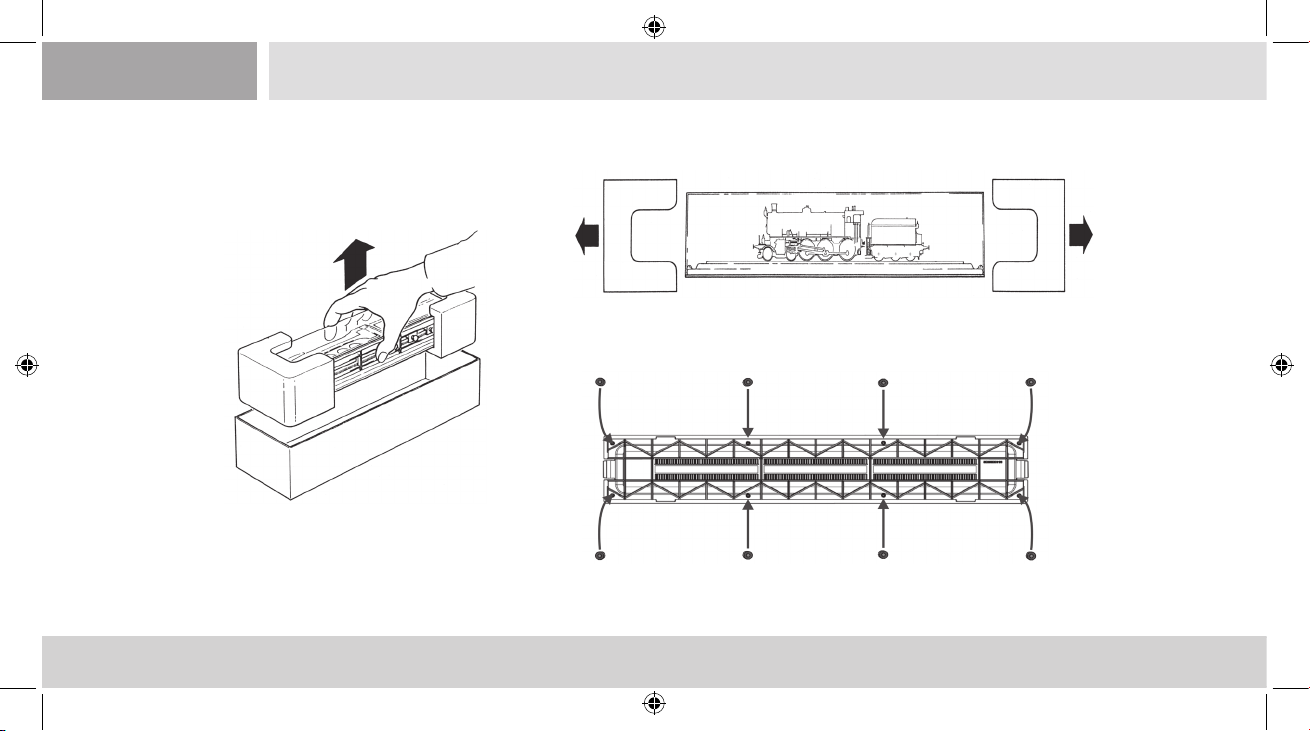
Auspacken des Modells! / Unwrap model!/ Disimballaggio del modello!
2. 2.
1.
3.
2
72124.indd 2 05.04.2019 12:24:03
Page 3
5.
7.
7.
4.
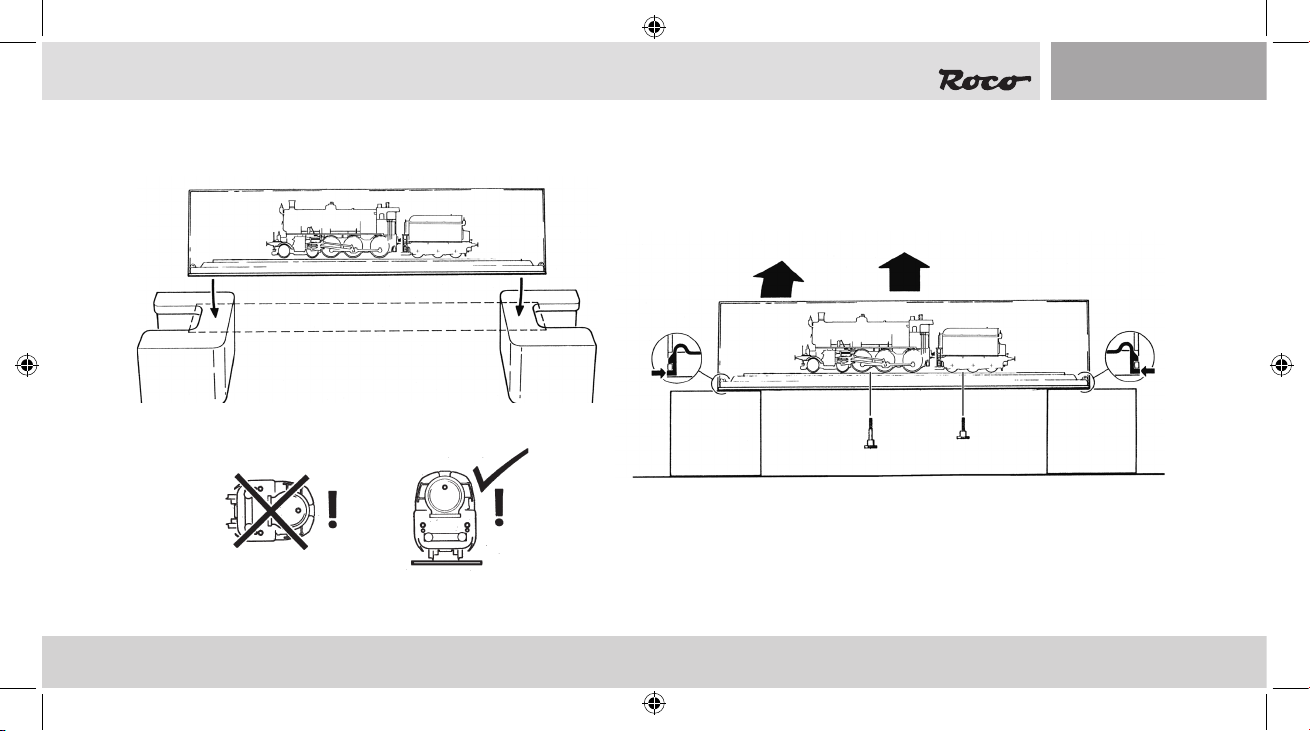
Auspacken des Modells! / Unwrap model!/ Disimballaggio del modello!
6.
7.
5.
5.
5.
72124.indd 3 05.04.2019 12:24:05
3
Page 4
Inhaltsverzeichnis
Einleitung .............................................................................. 5
Der Sounddecoder (für Artikel 72125)
▪ Funktionstastenbelegung der Rh 38 ......................... 18 – 19
Inbetriebnahme ihrer Lokomotive
▪ Vor der ersten Inbetriebnahme ............................................ 7
▪ Einfahren des Modells ......................................................... 7
▪ Betriebsbedingungen ..........................................................8
▪ Lokeinstellungen ...............................................................20
▪ CV-Liste der Rh 38 ....................................................20 – 21
▪ Betrieb mit DCC-Zentrale (MULTIMAUS®) ........................... 22
▪ Zusatzfunktion ..................................................................22
▪ Aufrüstung .....................................................................8 – 9
▪ Nachrüsten eines Seuthe Dampfgenerators .......................10
Ersatzteilliste ................................................................ 62 – y
▪ Nachrüsten eines PluX Decoders (Nur für Artikel 72124) ..11
Wartung und Pege Ihres Modells
▪ Entkuppeln von Lok und Tender.........................................12
▪ Reinigung der Radstromkontakte ...................................... 13
▪ Schmierung .......................................................................14
▪ Haftreifenwechsel ..............................................................16
▪ Schleiferwechsel (nur für Artikel ) ..................................... 16
▪ Kohlebüstenwechsel .......................................................... 17
Zeichenerklärung
Plux
Gleichstrom mit Schnittstelle
22
Gleichstrom mit Sound und Decoder
▪ Zusammenbau ...................................................................17
4
72124.indd 4 05.04.2019 12:24:05
Page 5
Einleitung
Lieber Modellbahnfreund,
vielen Dank für den Kauf unseres Modells der Rh 38.4110. Die vorliegende Betriebsanleitung soll Ihnen helfen, die umfangreichen
Funktionen Ihrer Rh 38.4110 zu nutzen.
Wir wünschen viel Vergnügen und eine Gute Fahrt!
Ihr Roco-Team
5
72124.indd 5 05.04.2019 12:24:05
Page 6
Zum Vorbild
Dampokomotive Reihe 109 / 209 / 38
Von der privaten Österreichischen Südbahn Gesellschaft wurde diese formschöne Dampokomotive ab 1910 für die immer schwe-
rer werdenden Schnellzüge auf deren Hauptstrecke Wien – Triest beschafft. Von 1910 bis 1914 wurden für das österreichische
Netz der Südbahn insgesamt 44 Lokomotiven von der Lokomotivfabrik der StEG (Österreichisch-Ungarische Staatseisenbahngesellschaft) in Wien, der Lokomotivfabrik Wiener Neustadt und der Wiener Lokomotivfabrik Floridsdorf geliefert. Die Lokomotiven
der Reihe 109 stellten den Abschluss und Höhepunkt der 2´C-Maschinen in Österreich dar. Mit ihnen konnte die damalige Reisezeit zwischen Wien und Triest von 13,5 auf 10,5 Stunden herabgesetzt werden. Nach Verstaatlichung des österreichischen Teiles
der Südbahn 1923 kamen die 17 Loks zu den Österreichischen Bundesbahnen (damals BBÖ) als Reihe 209, da die Nummer 109
dort schon besetzt war. Die Deutsche Reichsbahn übernahm 1938 alle 17 Loks der BBÖ als Baureihe 38.41. Die Ausmusterung der
letzten italienischen Lokomotiven der Serie 653 fand 1940 statt, nachdem die Strecken von Triest nach Udine und Venedig elektri-
ziert worden waren. 11 Lokomotiven wurden noch von den ÖBB in das neue Nummernschema als Reihe 38 übernommen. Einige
der Lokomotiven wurden noch mit Giesl-Ejektor und Siederohr-Drosselung ausgerüstet, was sparsameren Kohleverbrauch und höhere Leistung zur Folge hatte. Die letzten Maschinen wurden im Jahr 1967 vom regulären Betriebsdienst der ÖBB ausgemustert.
1992 wurde die 38.4101 als 109.13 des Technischen Museums Wien wieder aufgearbeitet, sie wird heute vom 1. Österreichischen
Straßenbahn- und Eisenbahn-Klub (ÖSEK) in Strasshof betriebsfähig gehalten.
6
72124.indd 6 05.04.2019 12:24:05
Page 7
Inbetriebnahme ihrer Lokomotive
▪ Vor der ersten Inbetriebnahme
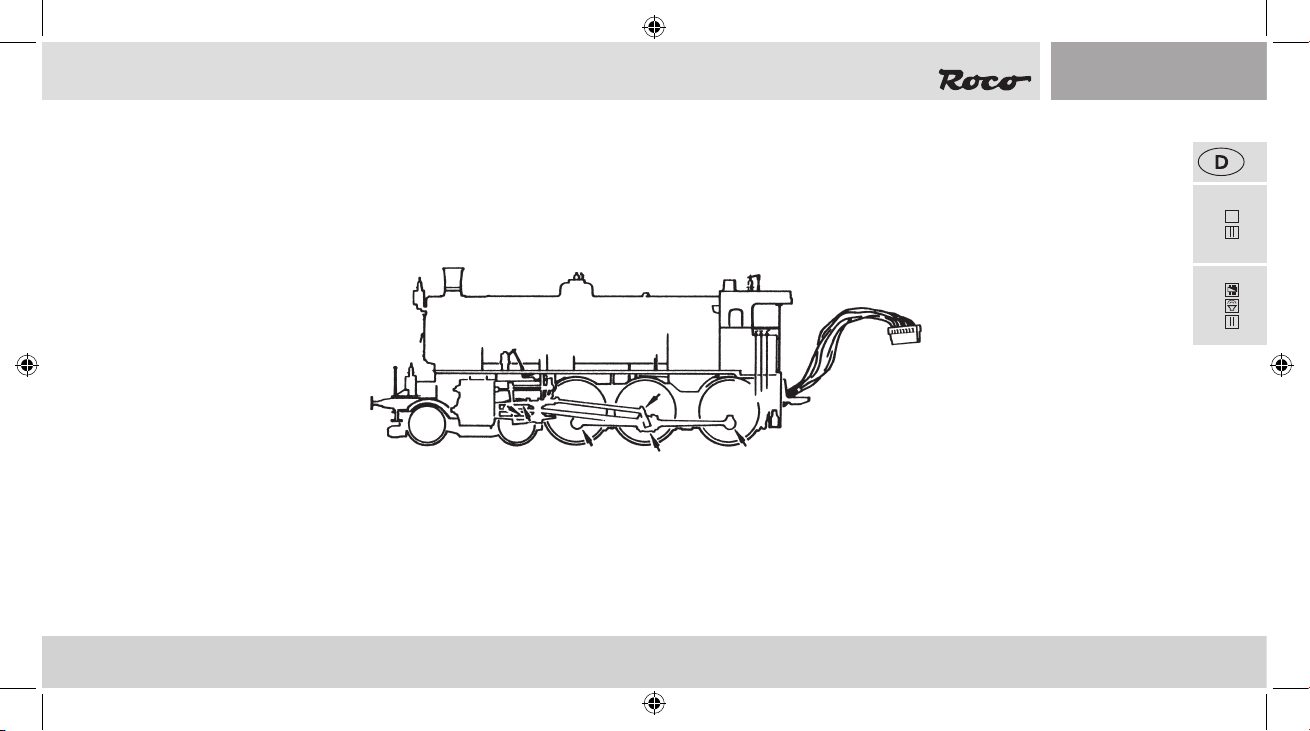
Um schlechte Laufeigenschaften oder Schäden zu vermeiden müssen die Kuppelstangenlager vor der ersten Inbetriebnahme an Ihrer Lokomotive geölt werden. Hierzu empfehlen wir den ROCO-Öler 10906.
72124
72125
▪ Einfahren des Modells
Es empehlt sich, die Lok 30 Minuten vorwärts und 30 Minuten rückwärts ohne Belastung einlaufen zu lassen, damit Ihr Modell einen optimalen Rundlauf und beste Zugkraft bekommt.
7
72124.indd 7 05.04.2019 12:24:05
22
PluX
Page 8
▪ Betriebsbedingungen
72124
PluX
22
72125
Nur für Vitrine
?
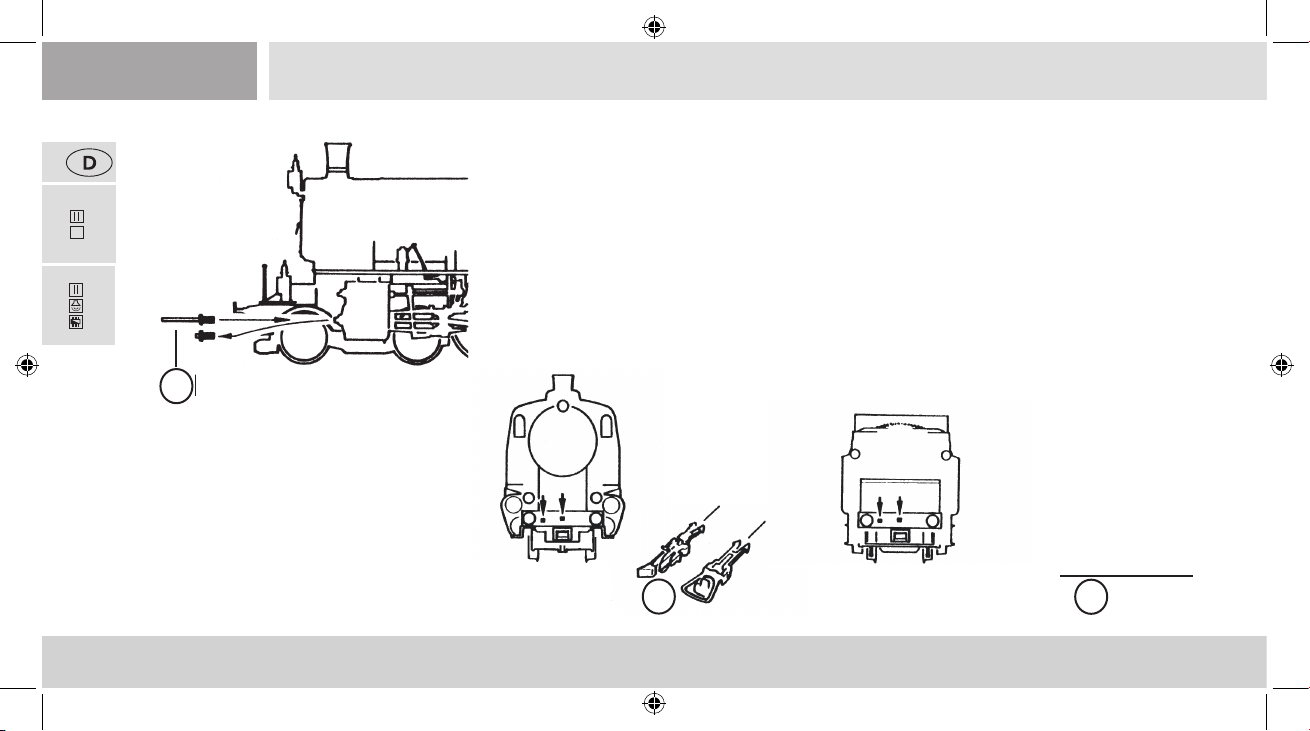
Der kleinste befahrbare Radius für dieses Modell ist R3 (419,6 mm) des ROCO-Gleissystems
Modell mit Kolbenschutzrohre). Radius R2 (358 mm) ist nur bedingt und ohne Kolbenschutzrohre befahrbar.
Der einwandfreie Lauf Ihrer Lokomotive ist nur auf sauberen Schienen gewährleistet. Hierzu
empfehlen wir den ROCO-Schienenreinigungswagen Art. Nr. 46400 und bei etwas stär-
kerer Verschmutzung den ROCO-Schienen-Reinigungsgummi Art. Nr. 10002.
▪ Aufrüstung
Sie können für ihren Fahrbetrieb unter
verschiedenen Kupplungen wählen. Wir
empfehlen den Einsatz der ROCO-Kurz-
kupplung.
?
8
72124.indd 8 05.04.2019 12:24:06
Wahlweise
?
Page 9
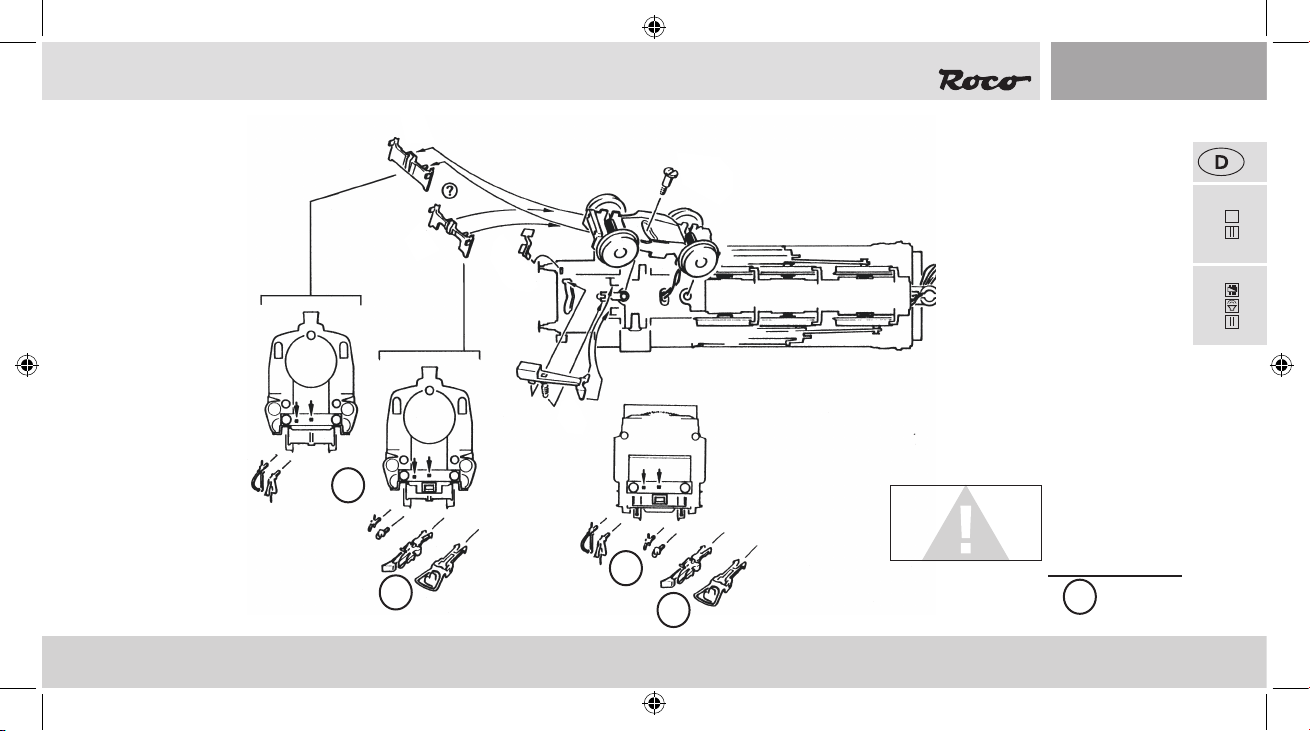
▪ Aufrüstung
4.
2./6.
3.
1./7.
Im beigelegten Zurüstbeutel nden Sie
auch kleine vorbildgetreue Steckteile für
eine erweiterte Aufrüstung Ihrer Lokomotive, die Sie bitte vorsichtig montieren.
22
PluX
72124
72125
?
Kleben nur mit
audrücklichen
Hinweis!
?
?
?
72124.indd 9 05.04.2019 12:24:07
Wahlweise
?
9
Page 10
▪ Nachrüsten eines Seuthe-Dampfgenerators
72124
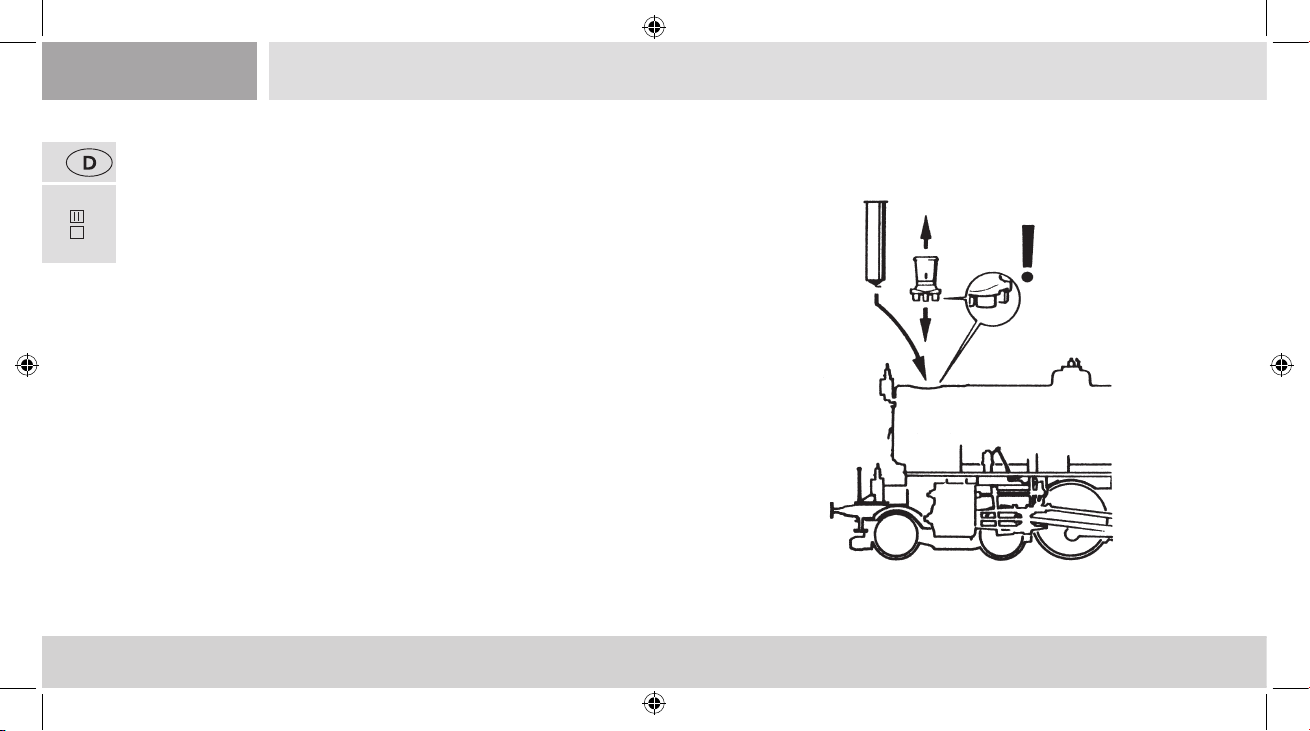
Zuerst den Rauchfang abnehmen und dann den Seuthe Dampfgenerator Nr. 10 (für
PluX
22
den analogen DC-Betrieb oder Nr. 11 (für Digitalen DC-Betrieb) einbauen.
Bei einem eingebauten Dampfgenerator im Digitalbetrieb mit einem nachgerüsteten
Decoder 10880 ist mit der F1 Taste das Ein- und Ausschalten des Dampfgenerators
2.
möglich.
Funktionen im Betrieb mit Brückenstecker (= Analogetrieb):
– Lichtwechsel (Fahrtrichtungsabhängig)
– Rauchgenerator Seuthe 10 (falls nachgerüstet)
Funktionen im Betrieb mit nachgerüstetem Decoder (= Digitalbetrieb):
F0 = Lichtwechsel (Fahrtrichtungsabhängig)
F1 = Rauchgenerator Seuthe 11 (falls nachgerüstet)
10
72124.indd 10 05.04.2019 12:24:08
1.
3.
Page 11
▪ Nachrüsten eines PluX (nur für Artikel 72124)
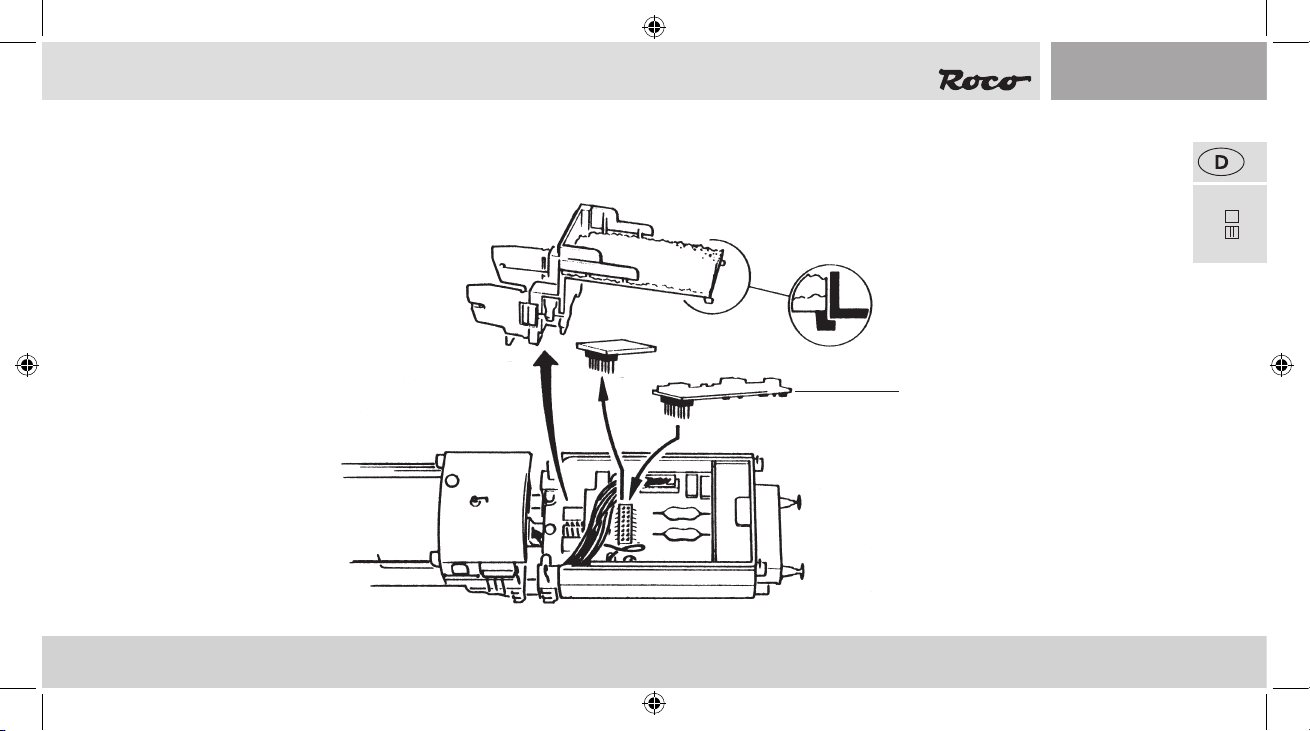
Den Brückenstecker aus der Schnittstelle entfernen (sorgsam Aufbewahren). Zuletzt den Stecker des Steuerbausteines lagerichtig einsetzen.
22
PluX
72124
1.
Decoder 16-pin
2.
3.
11
72124.indd 11 05.04.2019 12:24:08
Page 12
Wartung und Pege des Modells
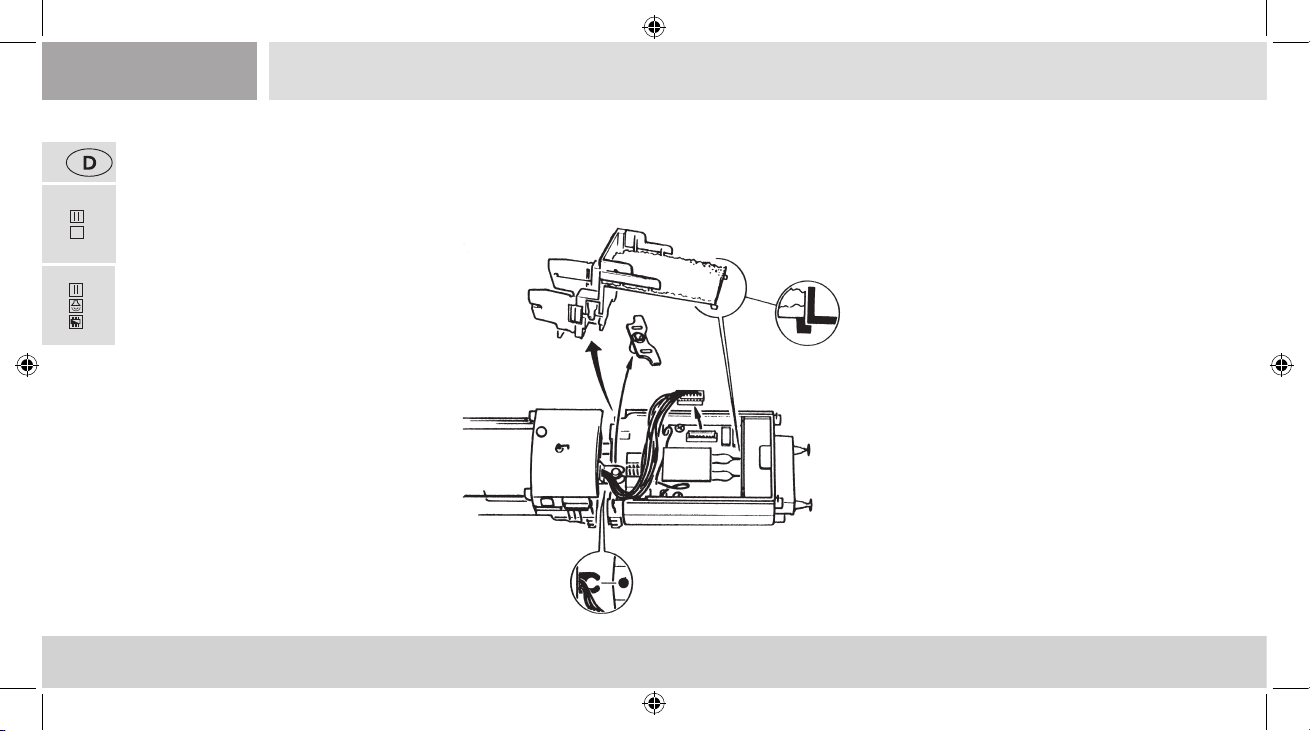
Damit Ihnen Ihre Lokomotive lange Freude bereitet, sind regelmäßig (ca. alle 30 Betriebsstunden) gewisse Servicearbeiten zweckmäßig.
72124
Bevor Sie mit der Pege und Wartung des Modells beginnen entkuppeln Sie zuerst die Lokomotive vom Tender.
PluX
22
▪ Entkuppeln von Lok und Tender
72125
2.
1.
3.
4.
12
72124.indd 12 05.04.2019 12:24:08
Page 13
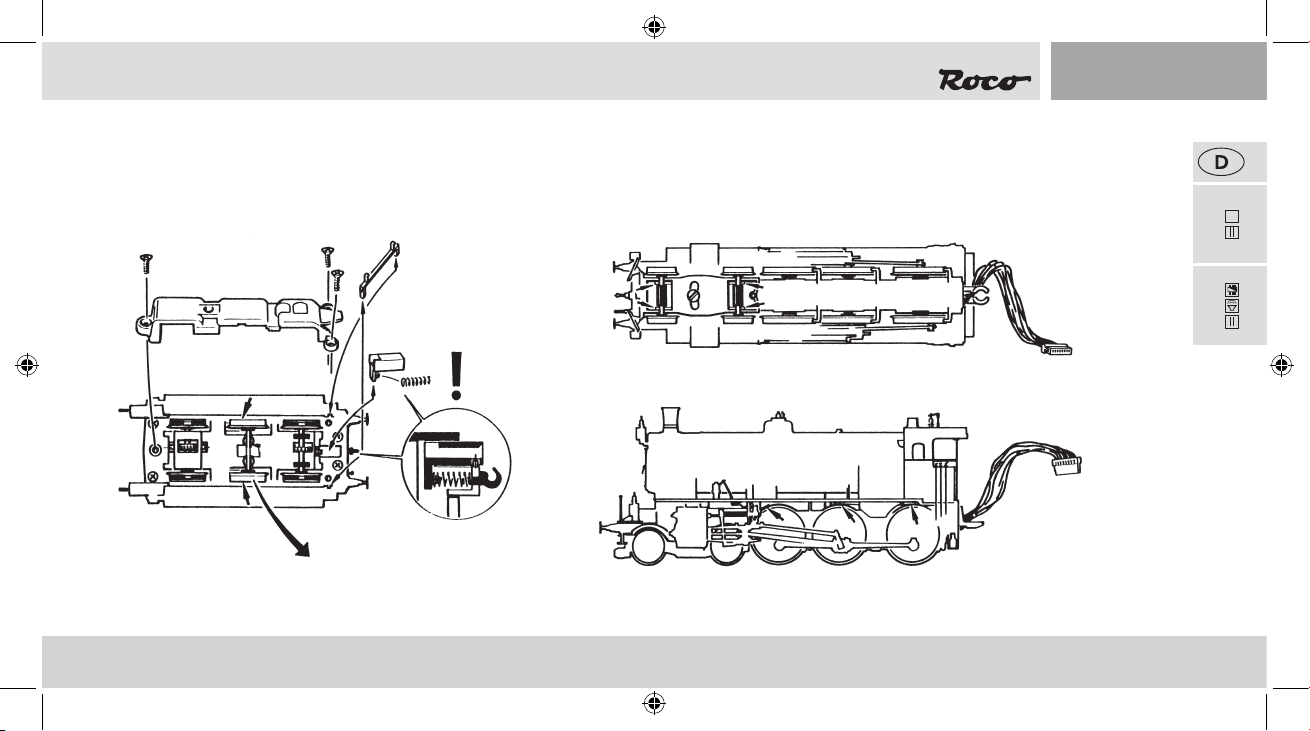
▪ Reinigung der Radstromkontakte
Radstromkontakte können auf unsauberen Schienen leicht verschmutzen. Bitte entfernen Sie vorsichtig mit einem kleinen Pinsel den Schmutz
an den gekennzeichneten Stellen.
22
PluX
72124
2.
1.
2.
72125
3.
13
72124.indd 13 05.04.2019 12:24:08
Page 14
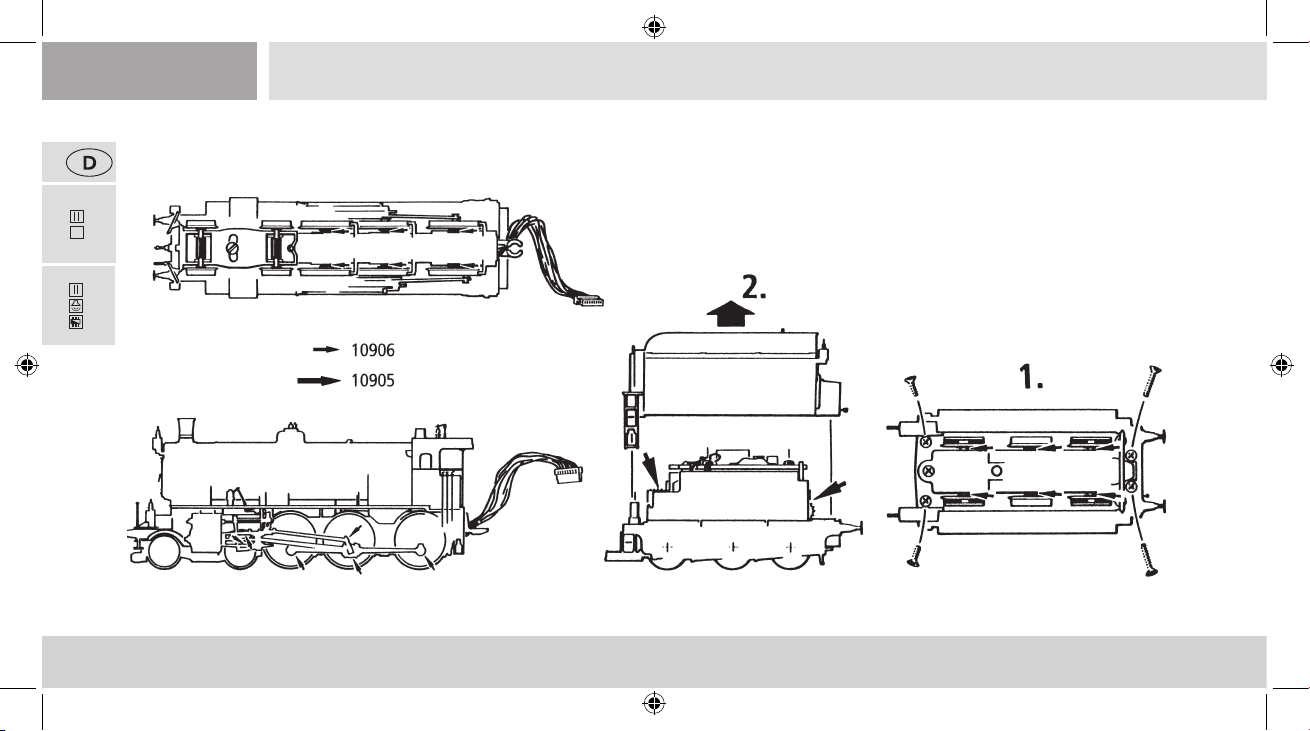
▪ Schmierung
Versehen Sie die im Schmierplan gekennzeichneten Stellen mit nur kleinen Öltropfen. Wir empfehlen den ROCO-Öler Art. Nr 10906.
72124
PluX
22
Zur Schmierung der Getriebeteile (Zahnräder, Schnecke) empfehlen wir das
ROCO-Spezialfett 10905. Im Falle der Schmierung diese Teile bitte nicht ölen.
72125
14
72124.indd 14 05.04.2019 12:24:08
Page 15
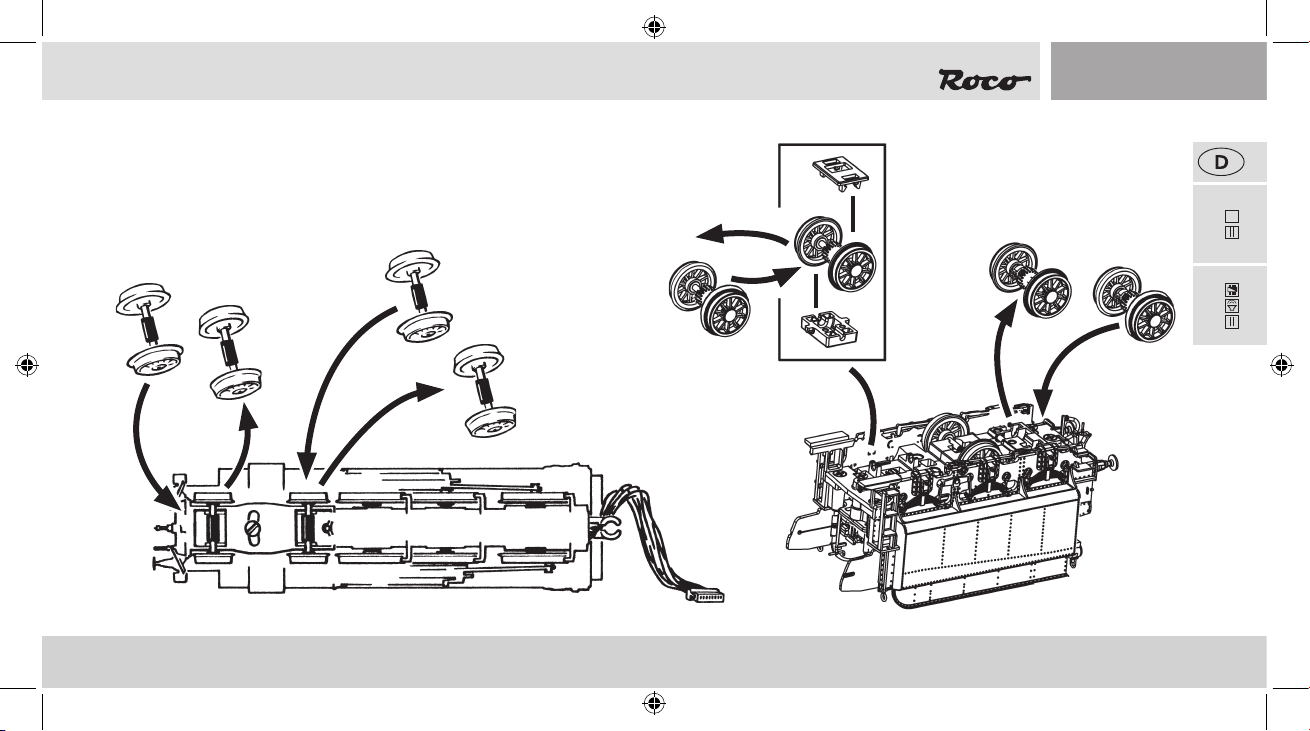
Auf nicht optimal verlegten Gleisanlagen können möglicherweise die werkseitig montierten vorbildgerechten, niederen Spurkränze der Vorlauf- und Tenderachsen aus den
Schienen springen. Zur Abhilfe bieten wir Ihnen unter der Art.-Nr. 135685 einen
Achsensatz mit höheren Spurkränzen an, den Sie auf dem Ersatzteilweg entgeltlich
bei Ihrem ROCO-Fachhändler erwerben können.
72124
72125
15
72124.indd 15 05.04.2019 12:24:09
22
PluX
Page 16
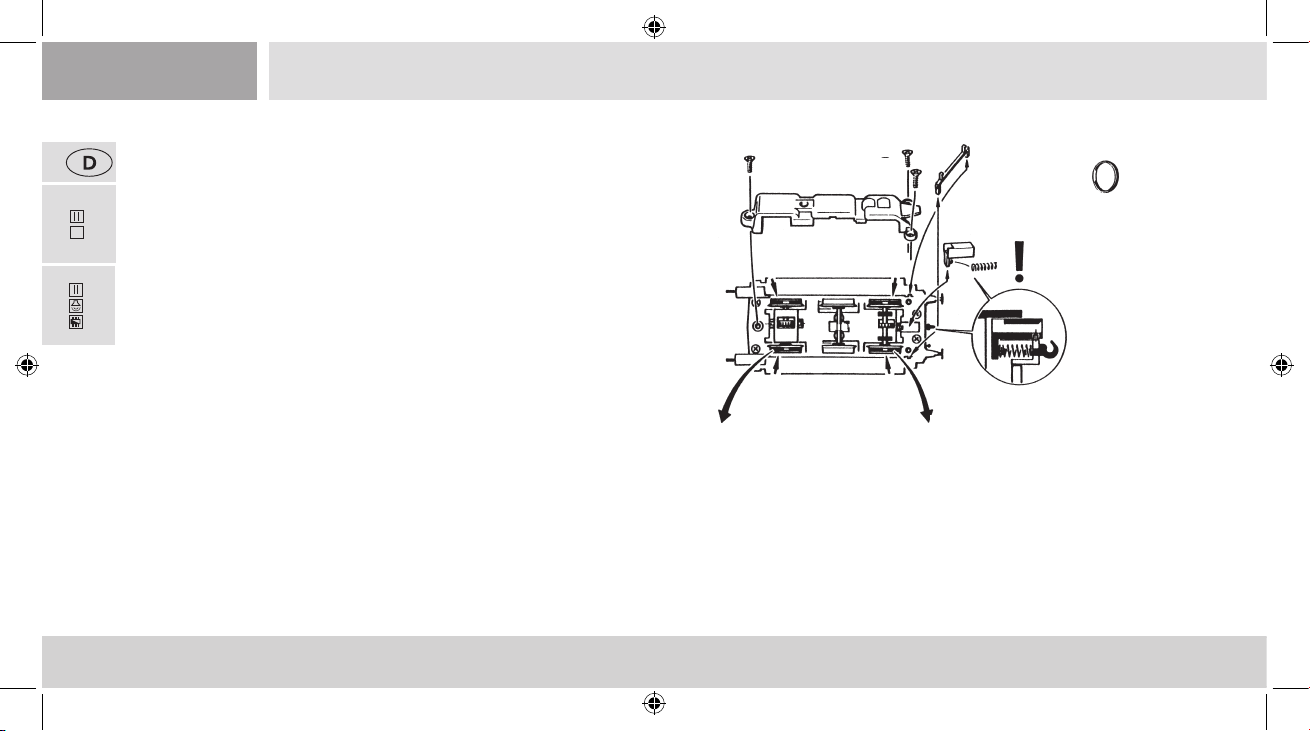
▪ Haftreifenwechsel
Zuerst den Getriebeboden abnehmen.
Achten Sie vor der Herausnahme von Achsen auf die ursprüngliche
72124
Lage der Radkontakte!
PluX
22
Die Haftreifen mit einer Nadel oder mit einem feinen Schraubendre-
72125
her abziehen. Beim Aufziehen der neuen Haftreifen bitte darauf achten, dass dieser sich nicht verdreht.
2.
2.
1.
4x
3.
16
72124.indd 16 05.04.2019 12:24:09
3.
Page 17
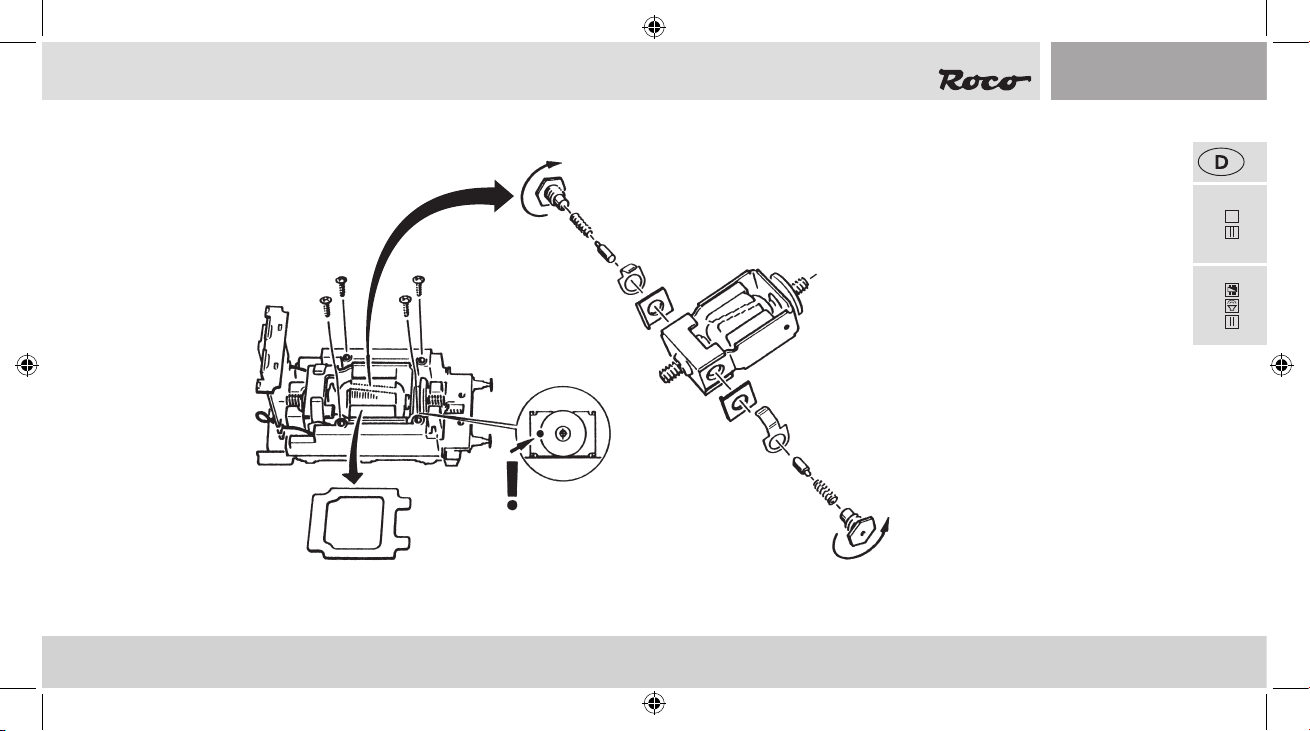
▪ Kohlebürstenwechsel
Tendergehäuse abnehmen: siehe Kapitel Schmierung. Danach wird der Motor ausgebaut und die Kohlebürsten ausgewechselt.
22
PluX
3.
72124
1.
72125
2.
▪ Zusammenbau
Achten Sie beim Zusammenbau wieder auf die richtige Lage der Kontakte!
17
72124.indd 17 05.04.2019 12:24:09
Page 18
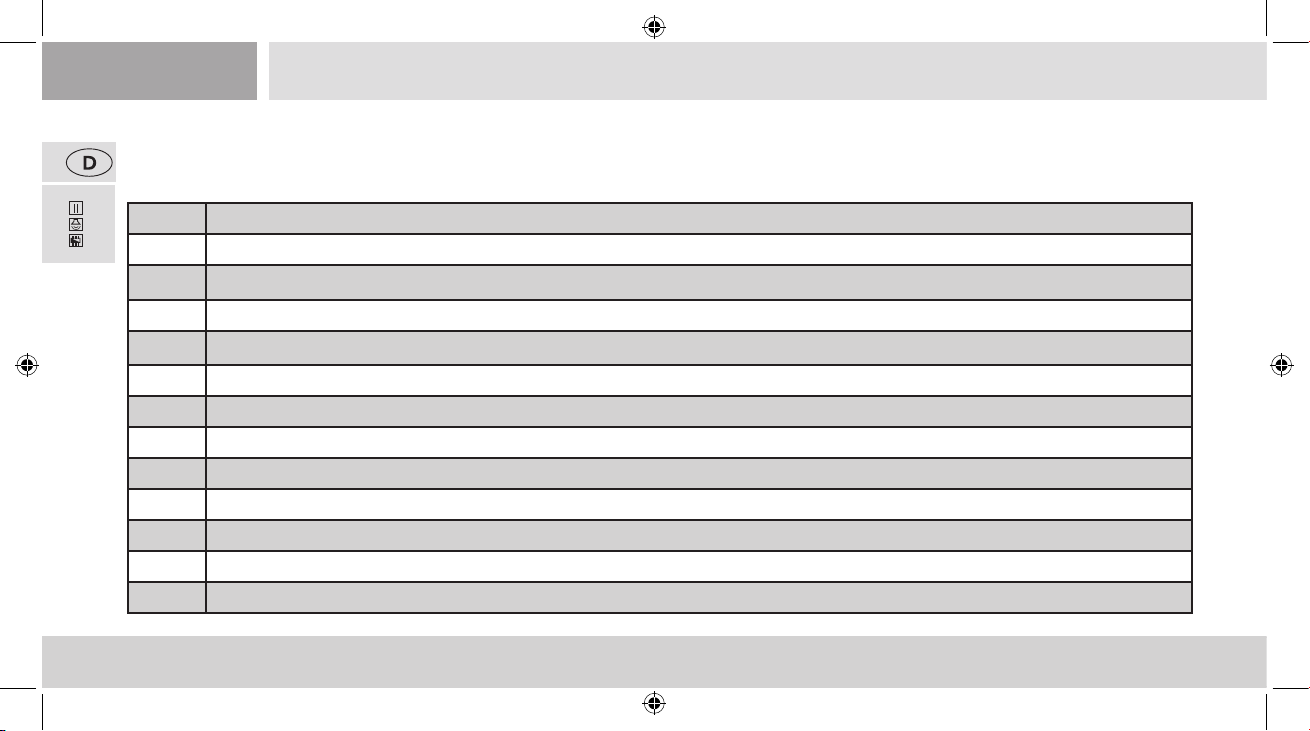
Der Sounddecoder
▪ Funktionstastenbelegung der RH 38 (Auslieferungszustand)
72125
Die Lok ist ab Werk auf die Adresse 03 eingestellt
F-Taste Funktion für 72125
F0 Spitzenlichter
F1 Sound
F2 Pff kurz
F3 Pff lang
F4 Schaffnerpff
F5 Kuppeln
F6 Rangiergang
F7 Kurvenquietschen (nur bei F1 und Fahrt)
F8 Sanden
F9 Luftpumpe
F10 Injektor 1
F11 Kohleschaufeln
18
72124.indd 18 05.04.2019 12:24:09
Page 19
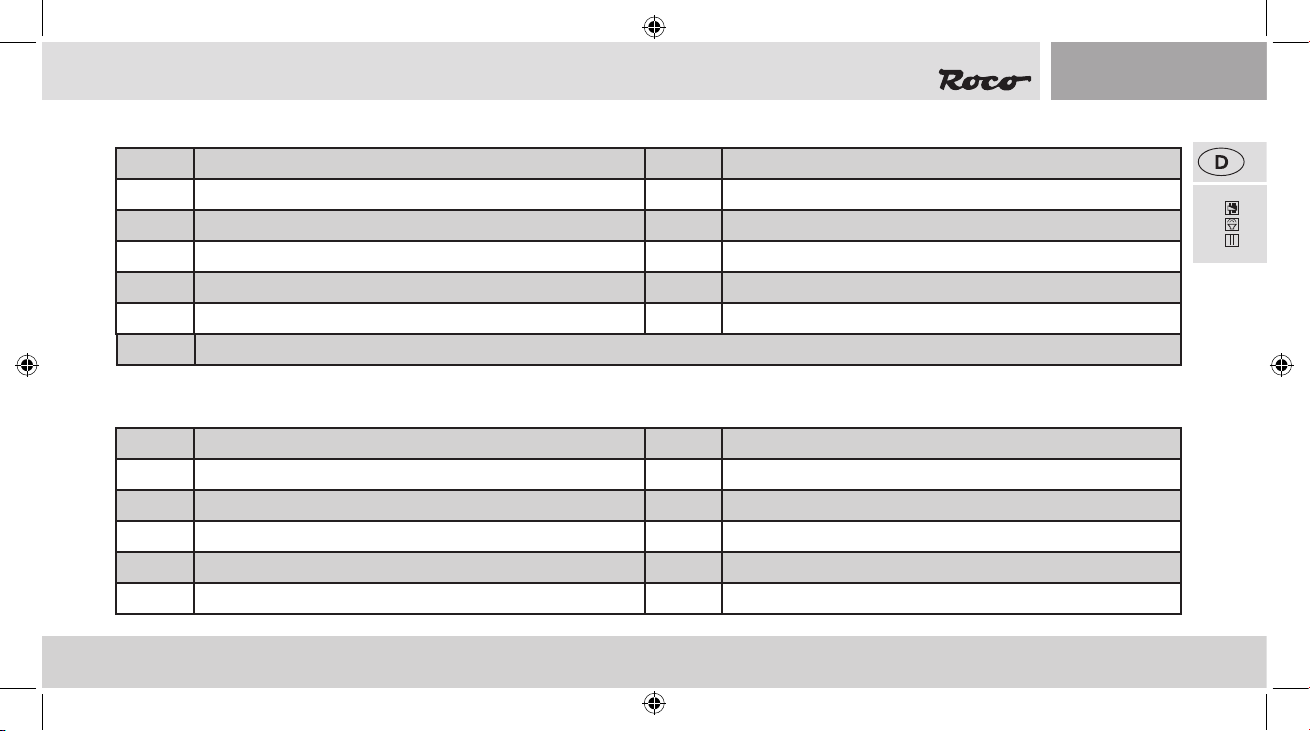
F-Taste Funktion für 72125 F-Taste
F12 Injektor 2 F18 Pff kurz
F13 Entwässern F19 Pff lang
F14 Mute-Taste F20 Wasserfassen
72125
F15 Lichtmaschine F21 Lautstärke +
F16 Hilfsbläser F22 Lautstärke -
F17 Abschlammen
▪ Funktionstastenbelegung der RH 38 im Motorola® Betrieb.
Die Lok ist ab Werk auf die Adresse 03 eingestellt
F-Taste Funktion für Motorola Adresse 1 F-Taste Funktion für Motorola Adresse 2
F0 Spitzenlichter
F1 Sound F1 Kuppeln
F2 Pff kurz F2 Rangiergang
F3 Pff lang F3 Kurvenquietschen
F4 Schaffnerpff F4 Sanden
19
72124.indd 19 05.04.2019 12:24:10
Page 20
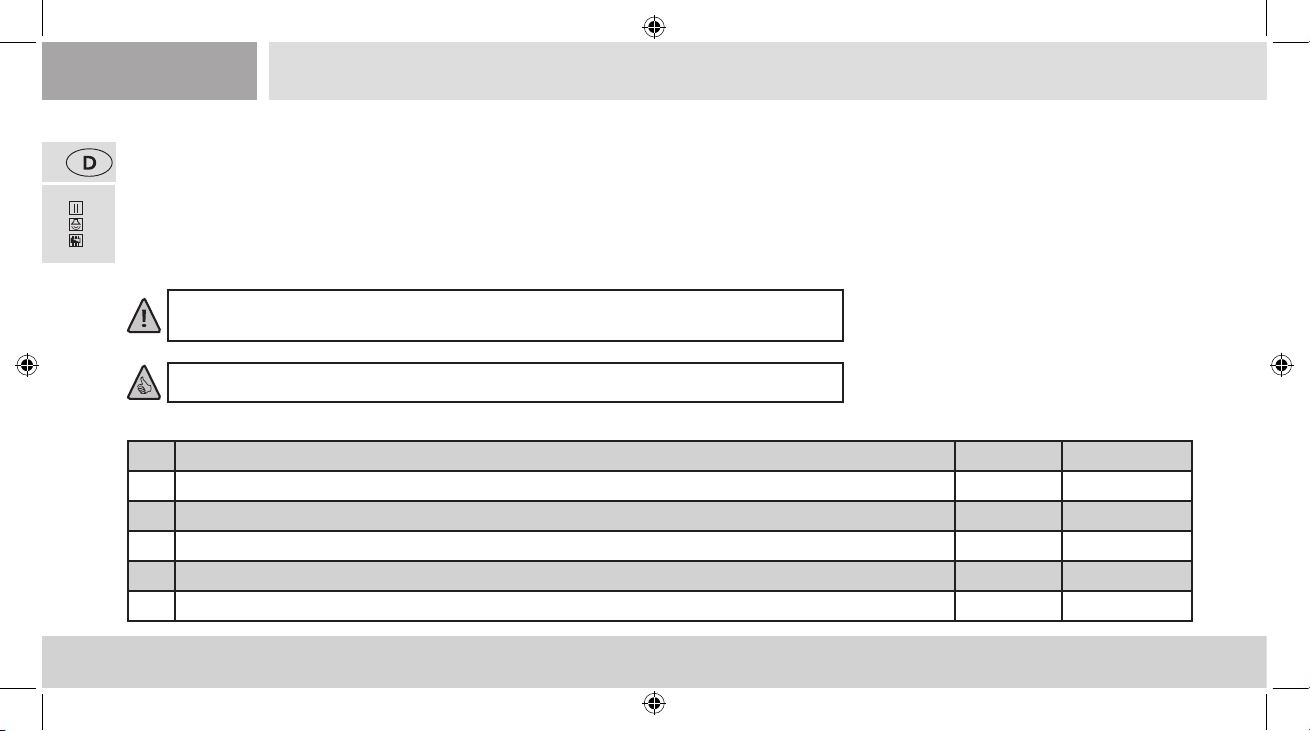
▪ Lokeinstellungen
Der in dieser Lok enthaltene Sounddecoder der Firma ZIMO wurde optimal auf die Lok eingestellt. Dennoch können Sie viele Decoder-Eigenschaf-
ten Ihren Wünschen anpassen. Dazu lassen sich bestimmte Parameter (die so genannten CVs – Conguration Variable – oder Register) verändern.
72125
Prüfen Sie aber vor jeder Programmierung, ob diese tatsächlich notwendig ist. Falsche Einstellungen können dazu führen, dass der Decoder
nicht richtig reagiert.
Für einen hohen Fahrkomfort ist der Decoder werkseitig auf 28/128 Fahrstufen vorprogrammiert. Damit ist er mit allen modernen DCC- (MULTIMAUS®) und Motorola®-Steuergeräten einsetzbar.
Der Sounddecoder wurde speziell für die zusätzlichen Funktionen verändert und darf
nicht gegen einen im Handel erhältlichen Decoder ausgetauscht werden.
Soll die Lok umprogrammiert werden, darf nur die Lok auf dem Programmiergleis stehen.
▪ CV-Liste der RH 38
CV Name Werte Default Werte
1 Adresse (= kurze Adresse) 01 – 99 3
2 Anfahrspannung (kleinste Kriechgeschwindigkeit) 01 – 252 4
3 Beschleunigungszeit (vom Stillstand bis Maximalgeschwindigkeit) 00 – 255 30
4 Bremszeit (von Maximalgeschwindigkeit bis Stillstand) 00 – 255 16
5 Maximalgeschwindigkeit 00 – 252 170
20
72124.indd 20 05.04.2019 12:24:10
Page 21
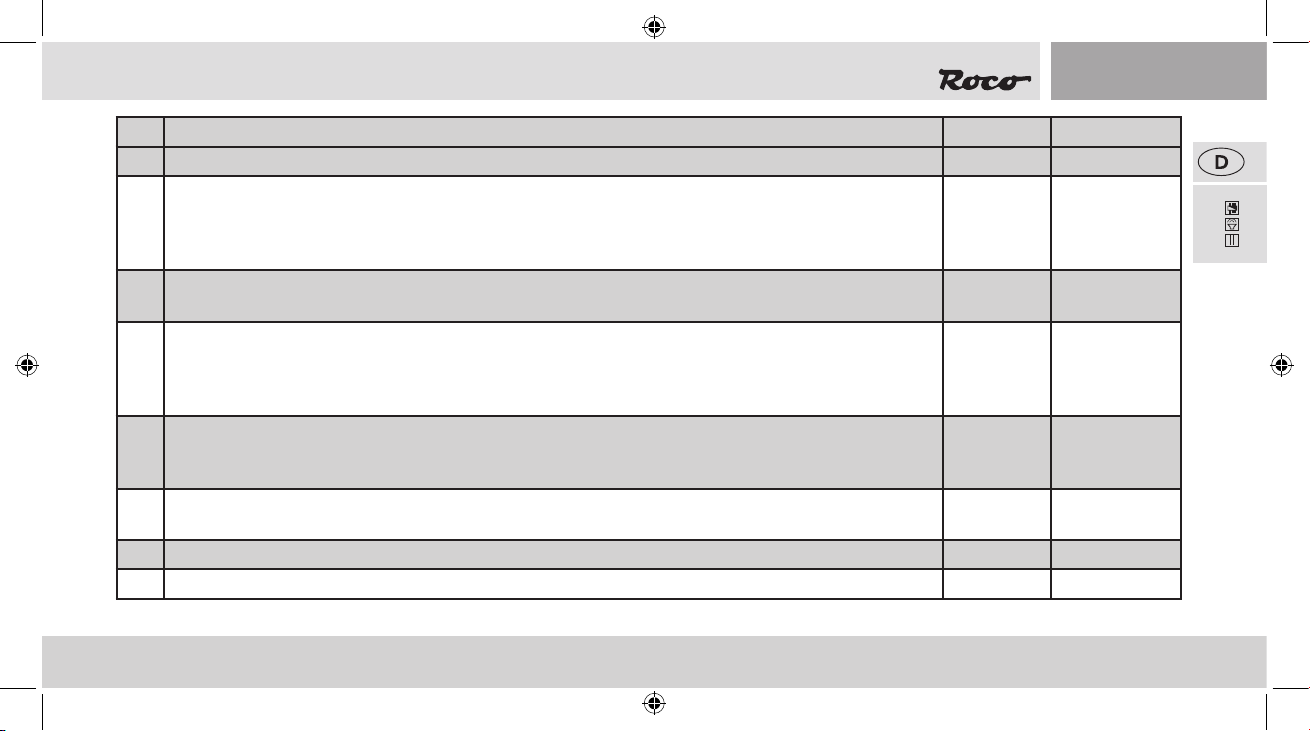
CV Name Werte Default Werte
6 Mittengeschwindigkeit (bei mittlerer Fahrstufe) - Wert 1 entspricht 1/3 von Vmax. (CV5) 00 – 252 1
7 Decoderversionsnummer (nur lesen! Lesbar nur an lesefähigen Verstärkern/Zentralen).
Wichtig! Für die Nutzung der MULTIMAUS® zum Erreichen von CV´s größer als CV255: Mit der kurzfristigen
Programmierung der CV7 wird nur der anschließende Programmierzugriff mit dem Wert 10 um 100 CV-Plätze
erhöht (also CV166 greift dann z.B. auf CV266 zu!) Wert 20 um 200 CV-Plätze erhöht
8 Reset-Funktion Zurücksetzen aller Werte auf Werkseinstellung; (An lesefähigen Verstärkern/Zentralen ist die Her-
08 = Reset
72125
stellererkennung lesbar)
13 Analogmodus F1 bis F8 (00 – keine Funktion im Analogmodus)
00 – 255 1
01 – Funktion F1 02 – Funktion F2 04 – Funktion F3 08 – Funktion F4
16 – Funktion F5 32 – Funktion F6 64 – Funktion F7 128 – Funktion F8
Achtung! Beim Aktivieren von mehreren Funktionen über die CV‘s im Analogbetrieb, kommt es zur gleichzeitigen Ausführung
14 Analogmodus F9 bis F12, sowie Stirnlicht
00 – 255 195
01 – Stirnlicht vorne | 02 – Stirnlicht hinten | 04 – Funktion F9 | 08 – Funktion F10 | 16 – Funktion F11
32 – Funktion F12 | 64 – Analogbetrieb ohne Verzögerung möglich (CV3, CV4) | 128 –Analogbetrieb geregelt
17+18Lange Adresse (Vorraussetzung: In CV29 ist die lange Adresse eingeschalten) 100 – 9999
29 Einstellungen 14
266 Gesamtlautstärke aller Geräusche 00 – 255 64
21
72124.indd 21 05.04.2019 12:24:10
Page 22
72125
▪ Betrieb mit DCC-Zentrale (MULTIMAUS®)
Da die (MULTIMAUS®) über 20 Funktionstasten und einer Lichttaste verfügt, ist die Bedienung besonders komfortabel.
Programmierarten
Wir empfehlen: Direkt CV-Programmierung (byteweise) oder POM-Modus (Programmierung am Hauptgleis). Das Programmieren ist im
Handbuch der (MULTIMAUS®) beschrieben.
Auslesen:
Mit einer entsprechenden Ausrüstung (z.B. / Z21® / z21® / z21start®) können Sie die Werte byte- und bitweise auslesen.
▪ Zusatzfunktionen
Eine Fülle anderer, jedoch wohl recht selten benötigter Einstellmöglichkeiten hinsichtlich Fahrstufenkurve, Lastnachregelungseinstellung oder
Geräuschsynchronisation können Sie im ausführlichen Handbuch in Erfahrung bringen. Bitte beachten Sie hierzu die Anleitung MX645P22
auf www.zimo.at
22
72124.indd 22 05.04.2019 12:24:10
Page 23
Table of Content
Introduction ........................................................................ 24
The Sounddecoder (for 72125)
▪ Rh 38 function key allocation (delivery state) ............37 – 38
Starting locomotive operation
▪ Prior to initial commissioning ............................................ 26
▪ Running the model in ........................................................ 26
▪ Operating instructions ....................................................... 27
▪ Locomotive Settings .......................................................... 39
▪ CV- list for the Rh 38 .................................................39 – 40
▪ Operation with a DCC Command Station (MULTIMAUS®) ...... 41
▪ More Functions .................................................................41
▪ Fittings ......................................................................27 – 28
▪ Retrofitting a Seuthe steam generator ..............................29
Replacement parts ....................................................... 62 – y
▪ Retrofitting a PluX (only for item 72124)...........................30
Maintenance of the model
▪ Decoupling of locomotive and tender ................................31
▪ Cleaning of wheel contact .................................................32
▪ Lubrication ........................................................................33
▪ Replacement of traction tyres ............................................35
▪ Replacement of the carbon brushes .................................. 36
▪ Assembly ...........................................................................36
72124.indd 23 05.04.2019 12:24:10
Signs & symbols
Plux
Direct current with interface
22
Direct current with sound and decoder
23
Page 24
Introduction
Dear model railway fan,
Thank you very much for purchasing our Rh 38 model. These operating instructions will help you to take advantage of the comprehensive functions of your Rh 38.
We hope that you enjoy your product and wish you a pleasant journey!
Your Roco Team
24
72124.indd 24 05.04.2019 12:24:10
Page 25
The Original
Steam locomotive series 109 / 209 / 38
This elegantly-designed steam locomotive was procured by the private Österreichische Südbahn Gesellschaft from 1910 for the
increasingly heavy express trains on their main route from Vienna to Trieste. From 1910 to 1914, a total of 44 locomotives were
supplied for the Austrian Südbahn (south) railway network by the locomotive factories StEG (Österreichisch-Ungarische Staatseisenbahngesellschaft) in Vienna, Lokomotivfabrik Wiener Neustadt and the Lokomotivfabrik Floridsdorf (Vienna). The 109 series
locomotives simultaneously represented the conclusion and the zenith of 2’C engines in Austria. Using them, it was possible
to reduce travel times between Vienna and Trieste from 13.5 to 10.5 hours. After the nationalisation of the Austrian part of the
Südbahn in 1923, the 17 locomotives went to the Österreichische Bundesbahnen (at the time designated BBÖ) as the 209 series,
because the number 109 had already been assigned. In 1938, the Deutsche Reichsbahn took over all 17 of the BBÖ locomotives
and renamed them class 38.41 engines. The last Italian 653 series locomotives were withdrawn from service in 1940, after the
routes from Trieste to Udine and Venice had been electried. 11 locomotives were then taken over by the ÖBB as the series 38 in
a new numbering scheme. Some of these were also equipped with a Giesl ejector and boiler tube throttle, which facilitated more
economic use of coal and a higher performance. The last engines were withdrawn from regular ÖBB service in the year 1967.
In 1992, the 38.4101 was remanufactured as the 109.13 by the Technisches Museum Wien; today it is kept operational by the 1.
österreichischer Straßenbahn- und Eisenbahnklub (ÖSEK) in Strasshof.
25
72124.indd 25 05.04.2019 12:24:10
Page 26
Starting locomotive operation
▪ Prior to initial commissioning
72124
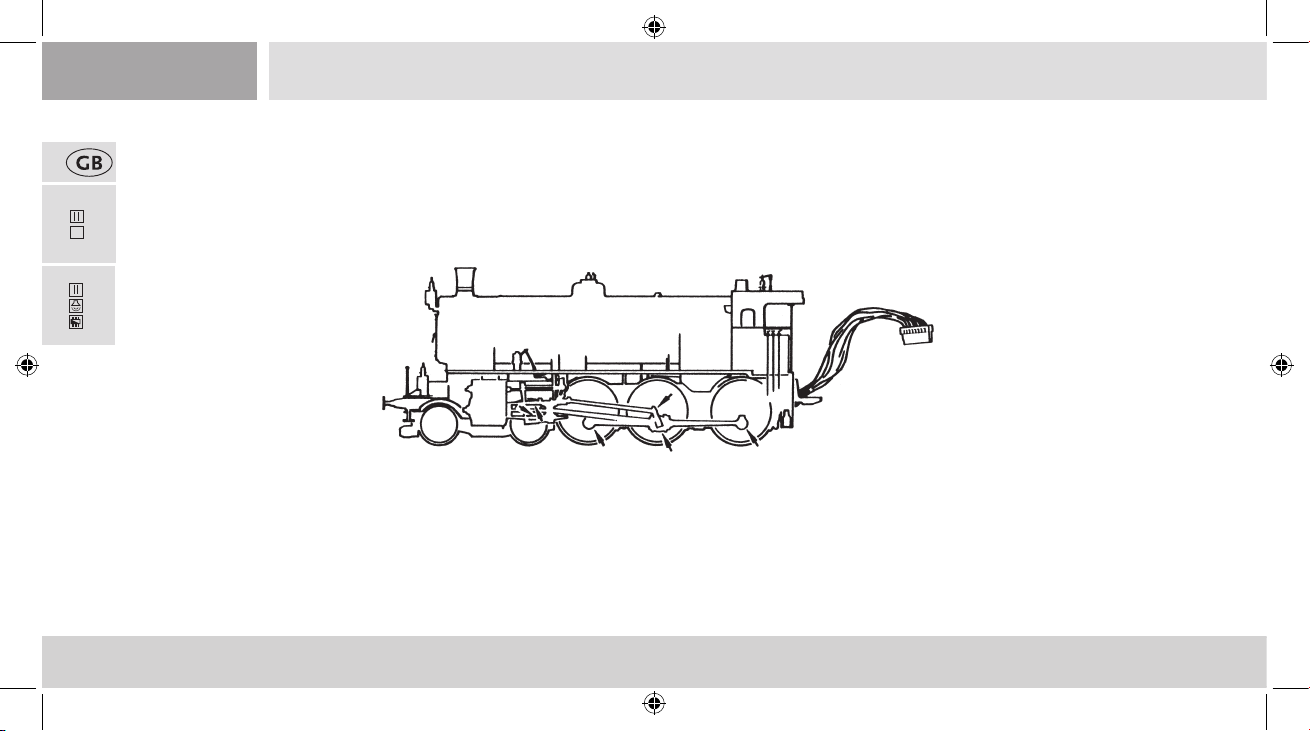
In order to prevent poor running characteristics or damage from occurring, the coupling rod bearings on your locomotive must be oiled prior
PluX
22
to undertaking the initial commissioning. We recommend using the ROCO oiler 10906
72125
▪ Running the model in
During the rst ve minutes the locomotive should run at medium speed. Before use is advisable to let the loco go around about 30 minutes
forwards and 30 minutes backwards without load, to obtain and aptimal circuit and best tractive power.
26
72124.indd 26 05.04.2019 12:24:10
Page 27
▪ Operating instructions
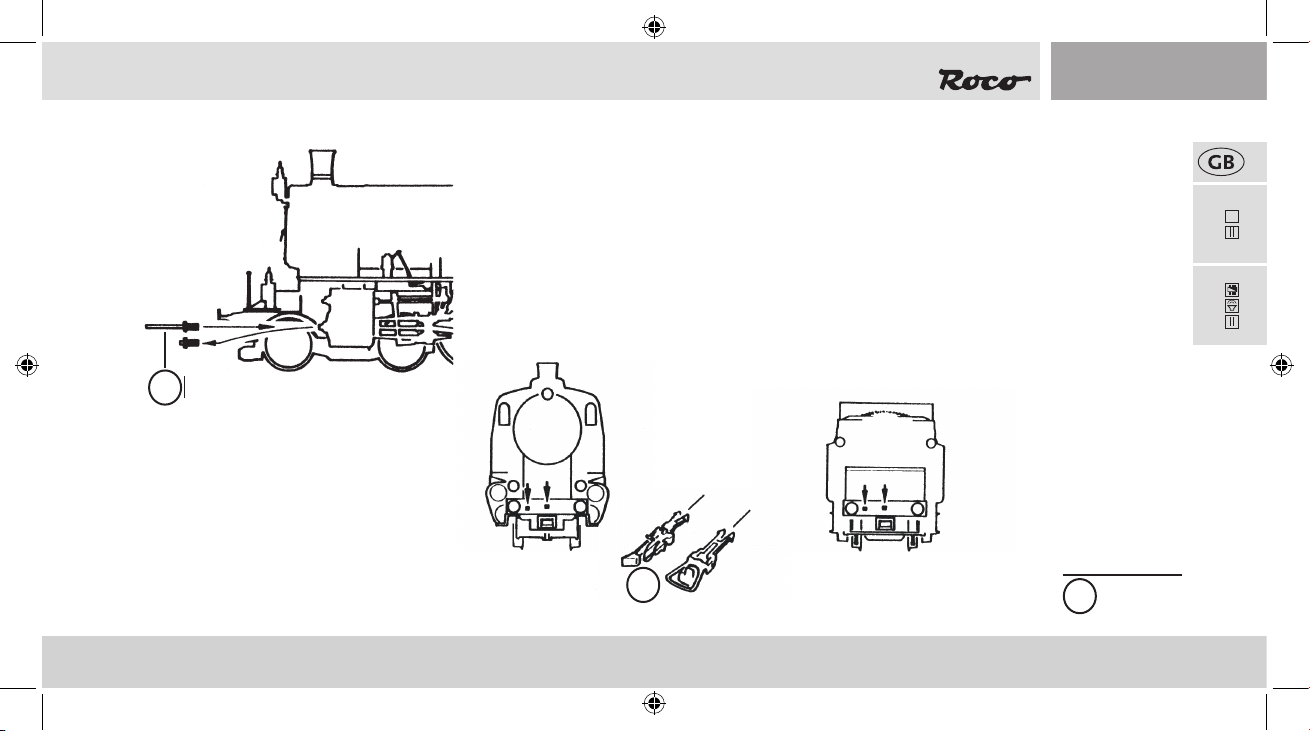
The smallest radius this model should run is R3 or rather R2 of the Track system (model without tubes protecting pistons). Your locomotive will run smoothly on clean tracks only. For
this purpose we recommend using item no. 46400, Roco track cleaning van, or item no.
10002, Roco track cleaning rubber, for removing heavy dirt.
72124
72125
Only for showcase
?
▪ Fittings
Operation is possible with different couplings. We recommend using the Roco close
coupling.
?
72124.indd 27 05.04.2019 12:24:10
?
Optional
27
22
PluX
Page 28
72124
PluX
22
▪ Fittings
4.
1./7.
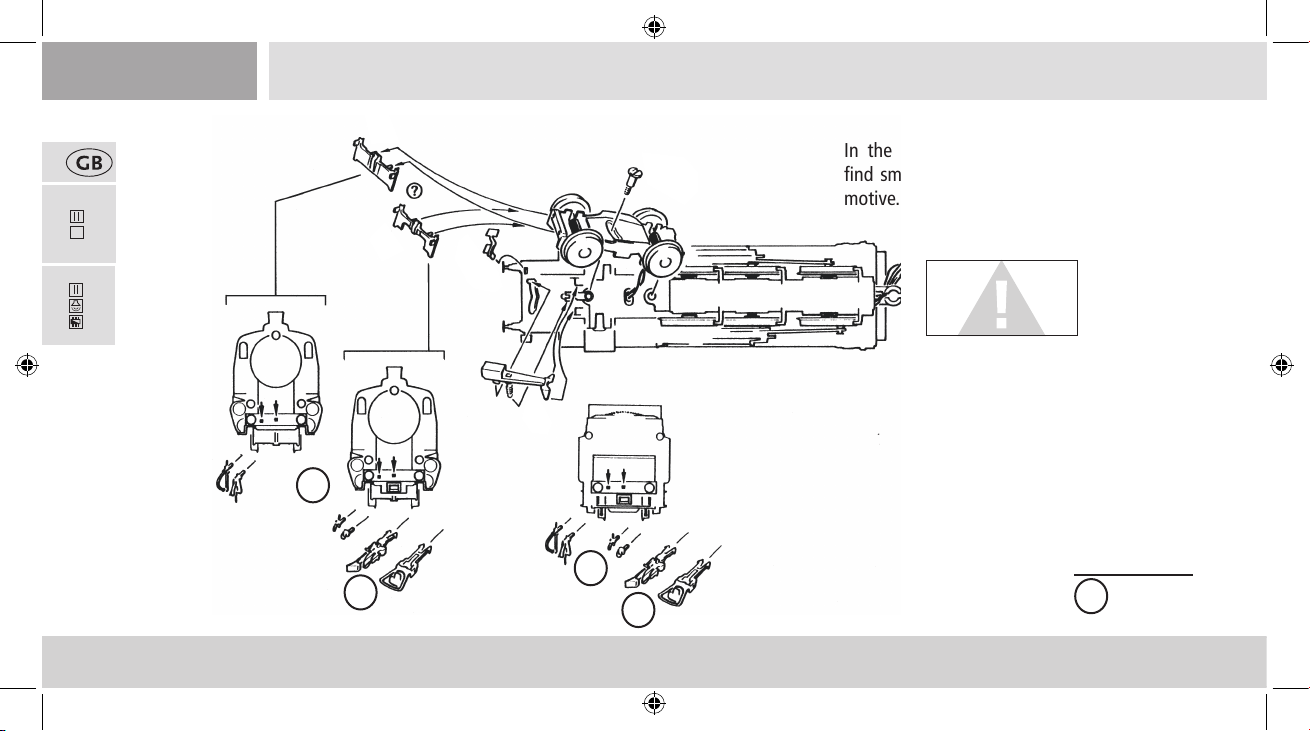
In the enclosed accessory bag you will
nd small kits to be tted on your locomotive. please mount them cautiously.
72125
2./6.
Use glue
only if
indicated!
3.
?
?
?
?
28
72124.indd 28 05.04.2019 12:24:11
?
Optional
Page 29
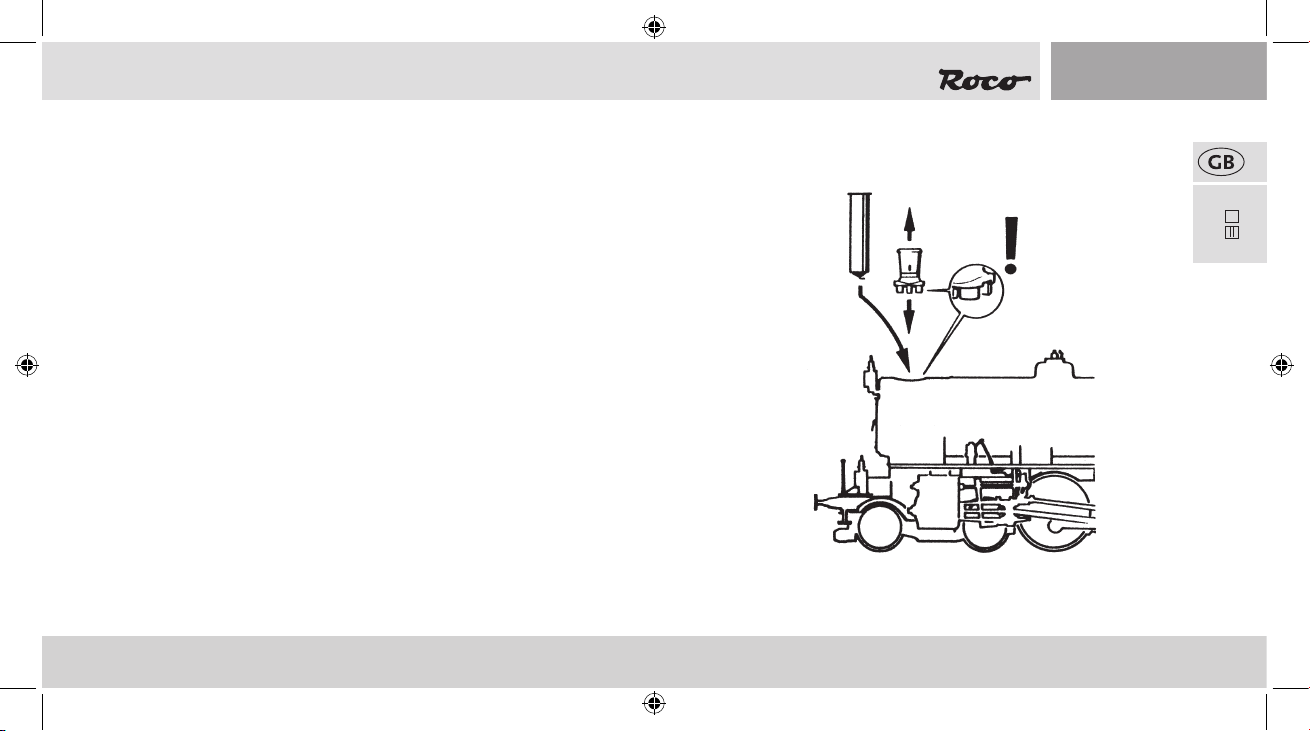
▪ Retrofitting a Seuthe steam generator
First remove the chimney hood and then install the Seuthe steam generator no. 10
(for analogue DC operation) or no. 11 (for digital DC operation).
When dealing with a steam generator installed in digital mode complete with a
retrotted 10880 decoder, it is possible to switch the steam generator on and off via
2.
1.
72124
3.
the F1 key.
Functions when operated with bridge plugs (= analogue operation):
– Light change (dependent upon direction of travel)
– Seuthe 10 smoke generator (if retrotted)
Functions when operating with a retrotted 10880 decoder (= digital operation)
F0 = Light change (dependent upon direction of travel)
F1 = Seuthe 11 smoke generator (if retrotted)
29
72124.indd 29 05.04.2019 12:24:11
22
PluX
Page 30
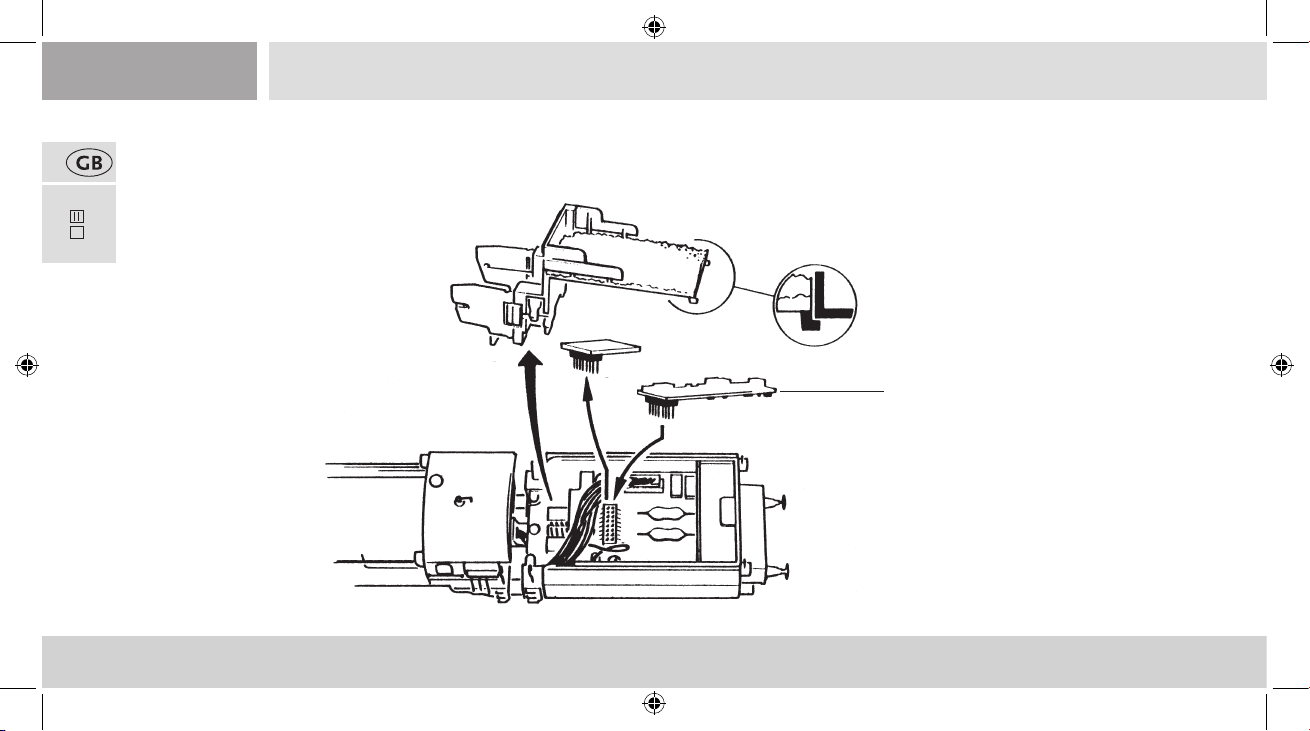
▪ Retrofitting a Plux 10880 decoder (only for Item 72124)
72124
PluX
22
1.
Decoder 16-pin
2.
3.
30
72124.indd 30 05.04.2019 12:24:11
Page 31
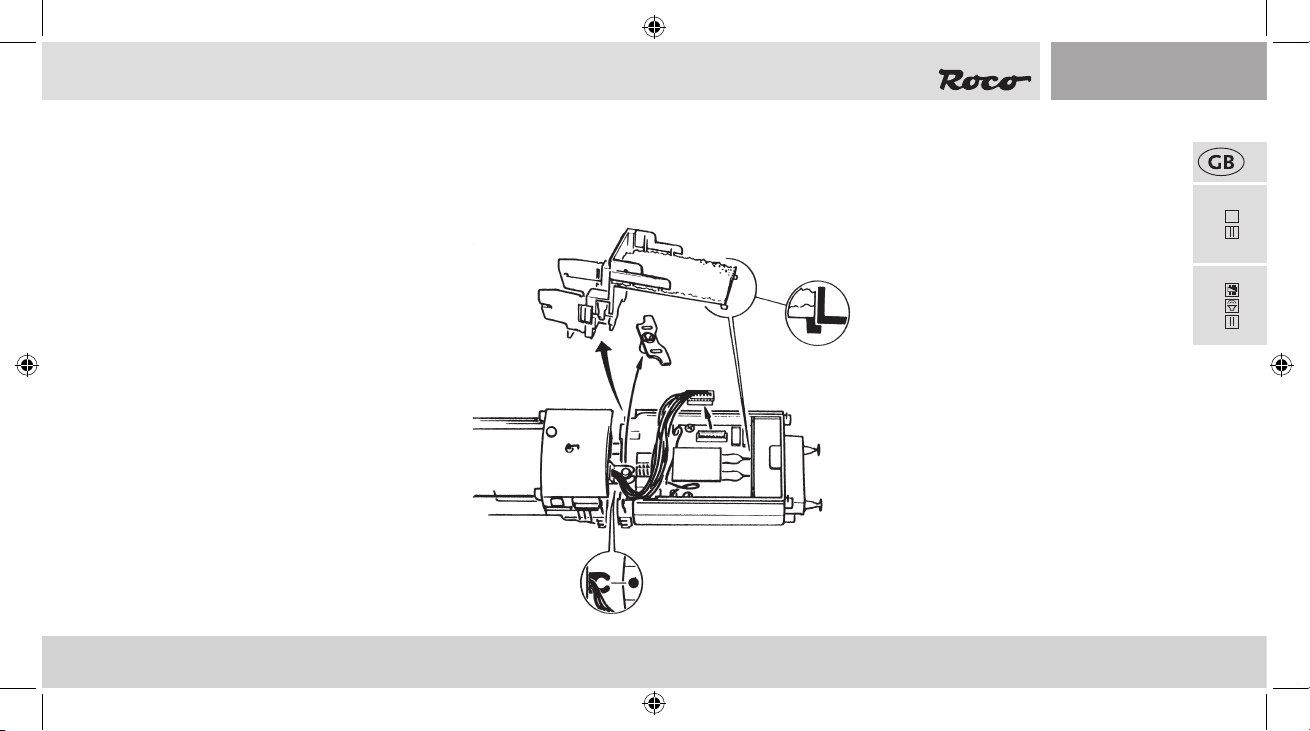
Maintenance of the model
In order to ensure that your locomotive provides you with many years of pleasure, certain service work at regular intervals (approx. every 30
operating hours) is advisable. Before commencing care and maintenance work on the model, rst uncouple the locomotive from the tender.
▪ Decoupling of locomotive and tender
22
PluX
72124
72125
1.
2.
3.
4.
31
72124.indd 31 05.04.2019 12:24:11
Page 32
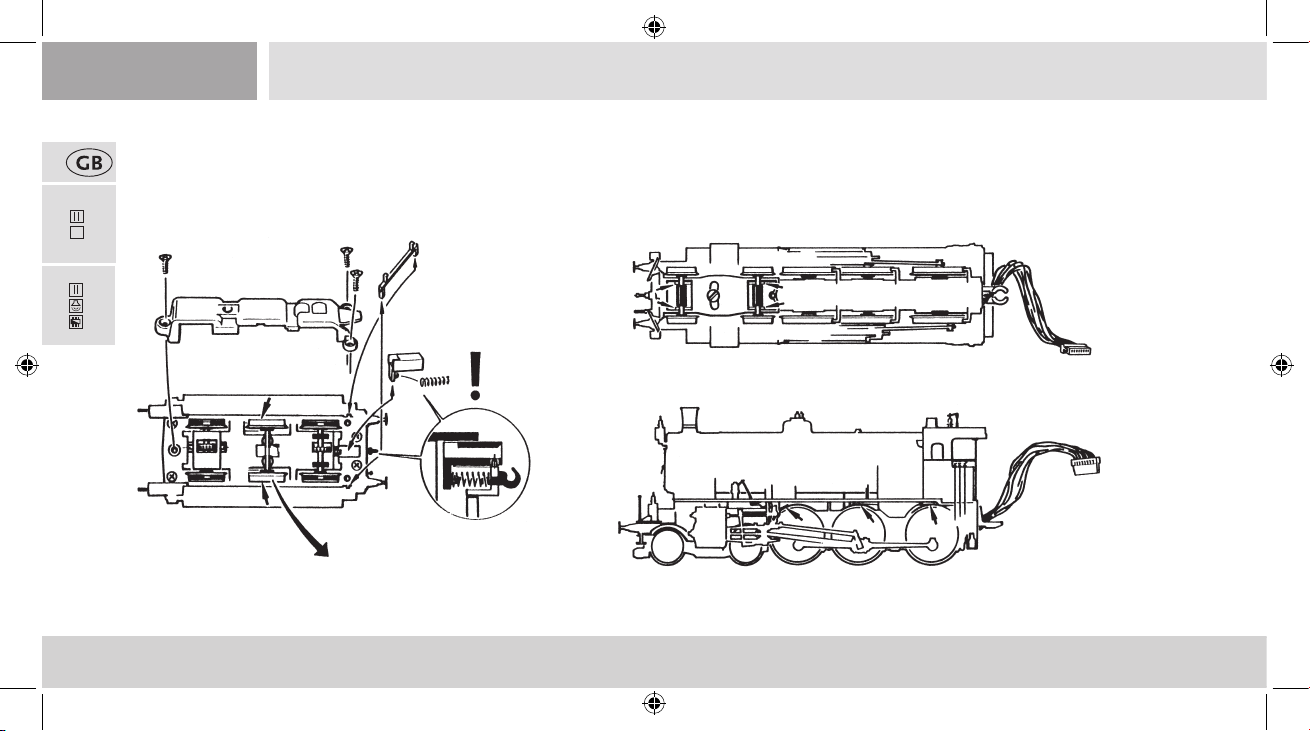
▪ Cleaning of the wheel-current contacts
Wheel contacts easily get dirty on tracks which are not entirely clean. Use a small brush to remove dirt from spots after having removed the
Loco body or gear cover.
72124
PluX
22
1.
72125
2.
2.
3.
32
72124.indd 32 05.04.2019 12:24:11
Page 33
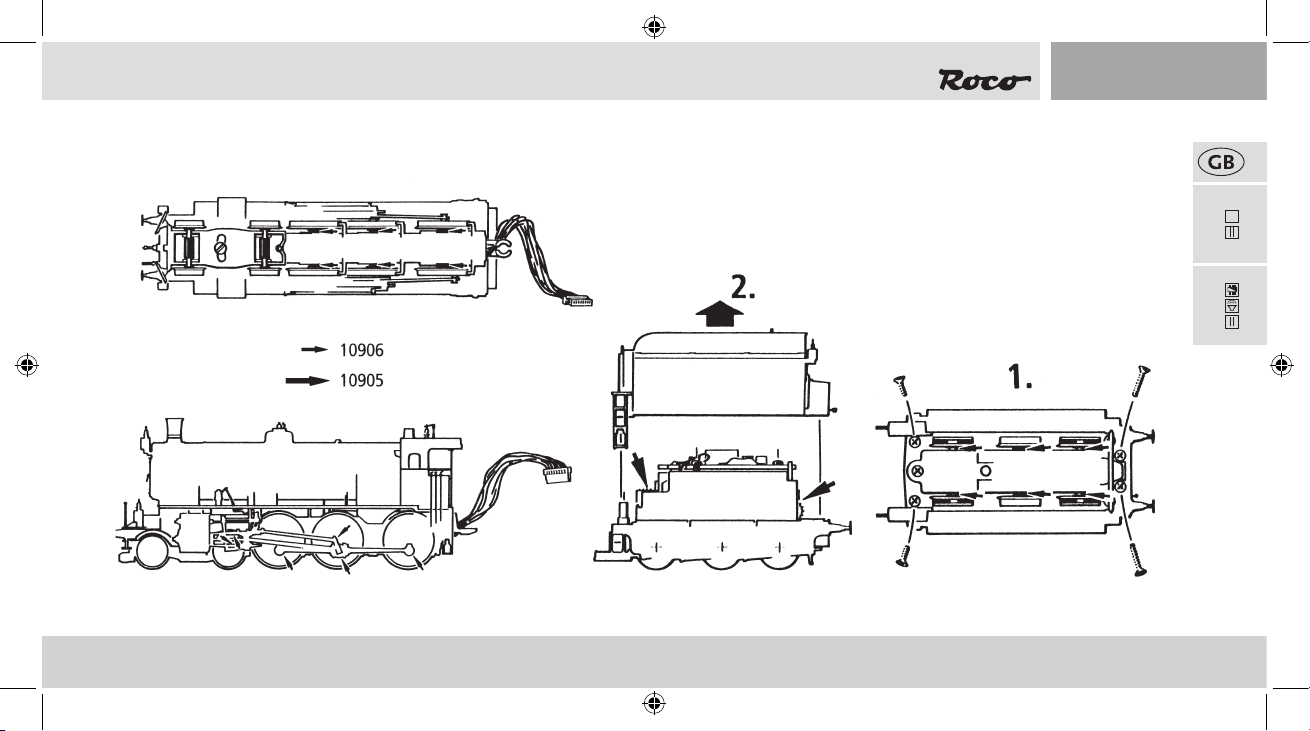
▪ Lubrication
Only apply small oil Droplets onto the positions as marked in the lubrication plan. We recommend ROCO oiler Art. No. 10906.
In order to lubricate the transmission parts (gear wheel, screw), we recommend
using ROCO special grease 10905. If lubricated, do not oil these parts.
72124
72125
33
72124.indd 33 05.04.2019 12:24:11
22
PluX
Page 34
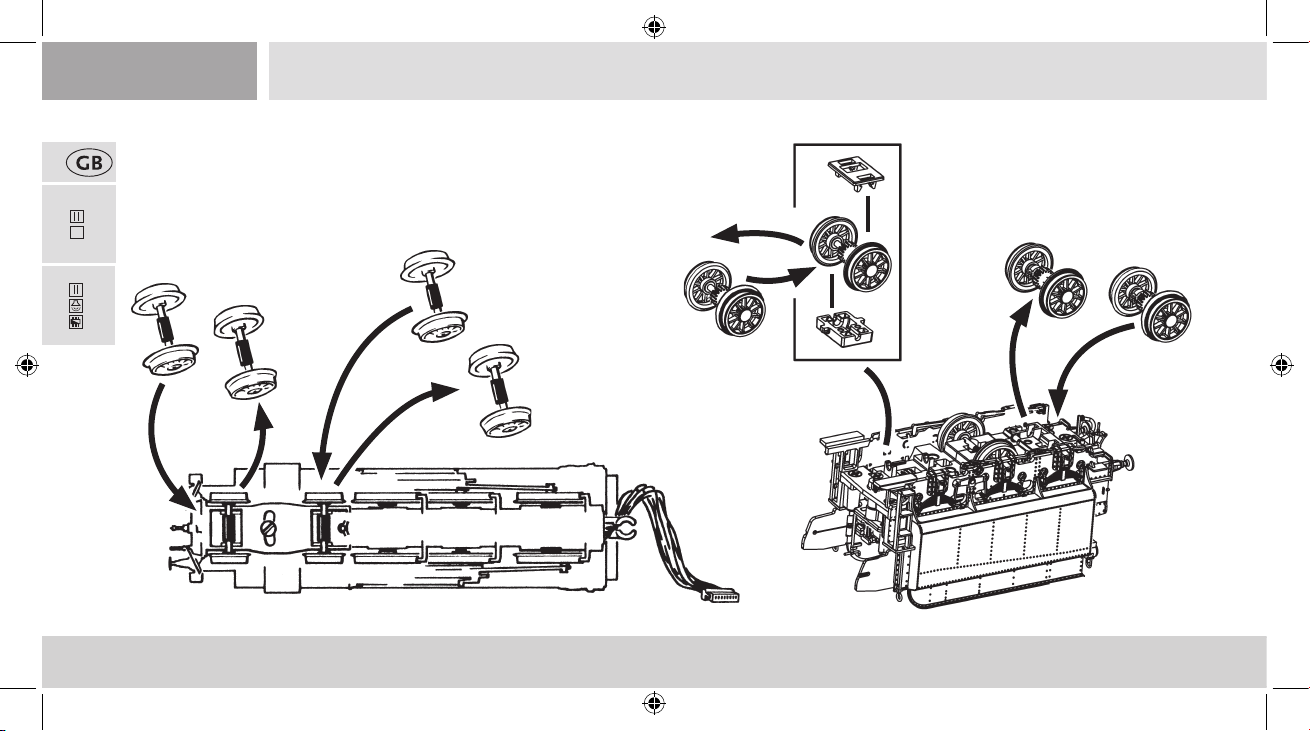
When using tracks which have not been optimally laid, it is possible that the prototy-
pical low wheel anges which have been mounted on the leading and tender axles at
the factory can jump off the tracks. This problem can be remedied with an axle set with
72124
high wheel anges which have the Art. No. 135685 and can be purchased through
your ROCO dealer.
PluX
22
72125
34
72124.indd 34 05.04.2019 12:24:11
Page 35
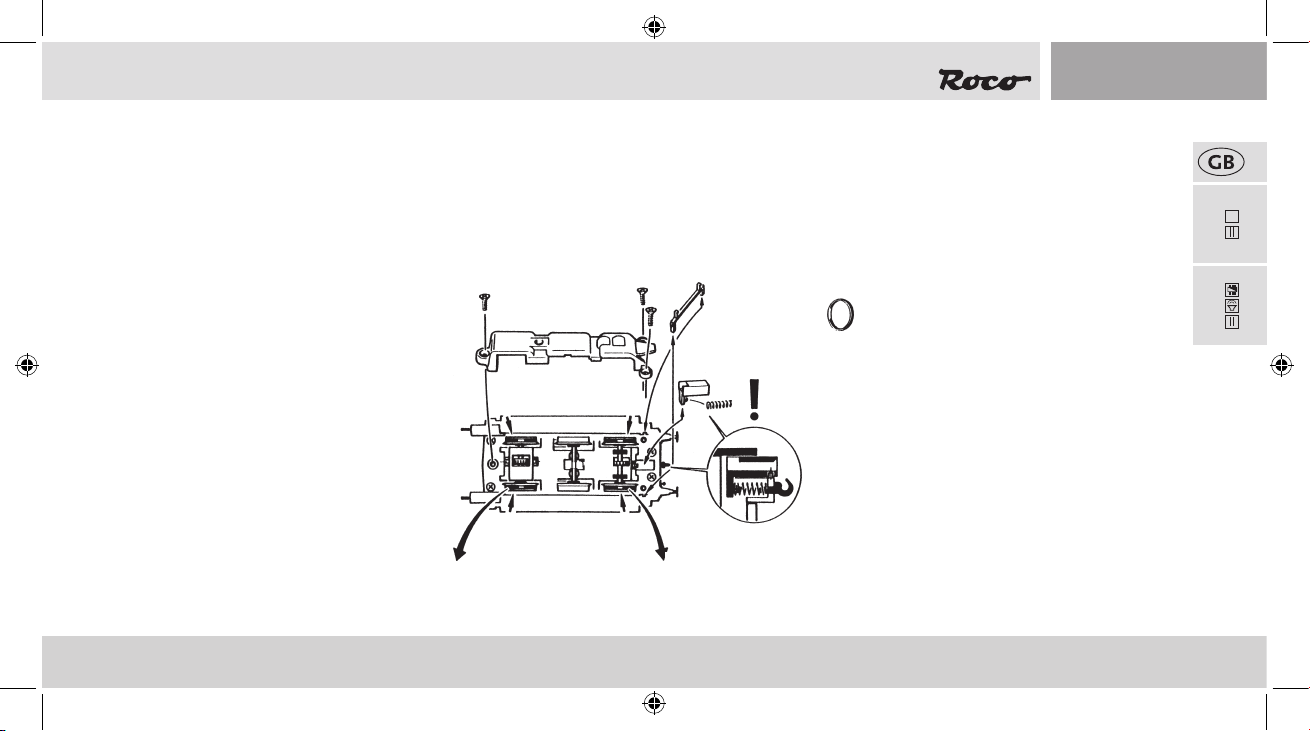
▪ Replacement of traction tyres
Pay attention to the original position of the wheel contacts prior to removing the axles.
Remove gear box cover. Remove the traction tyres using a needle or a thin screwdriver. When applying the new traction tyres, please ensure
that they do not rotate.
22
PluX
72124
3.
1.
4x
72125
35
2.
2.
3.
72124.indd 35 05.04.2019 12:24:12
Page 36
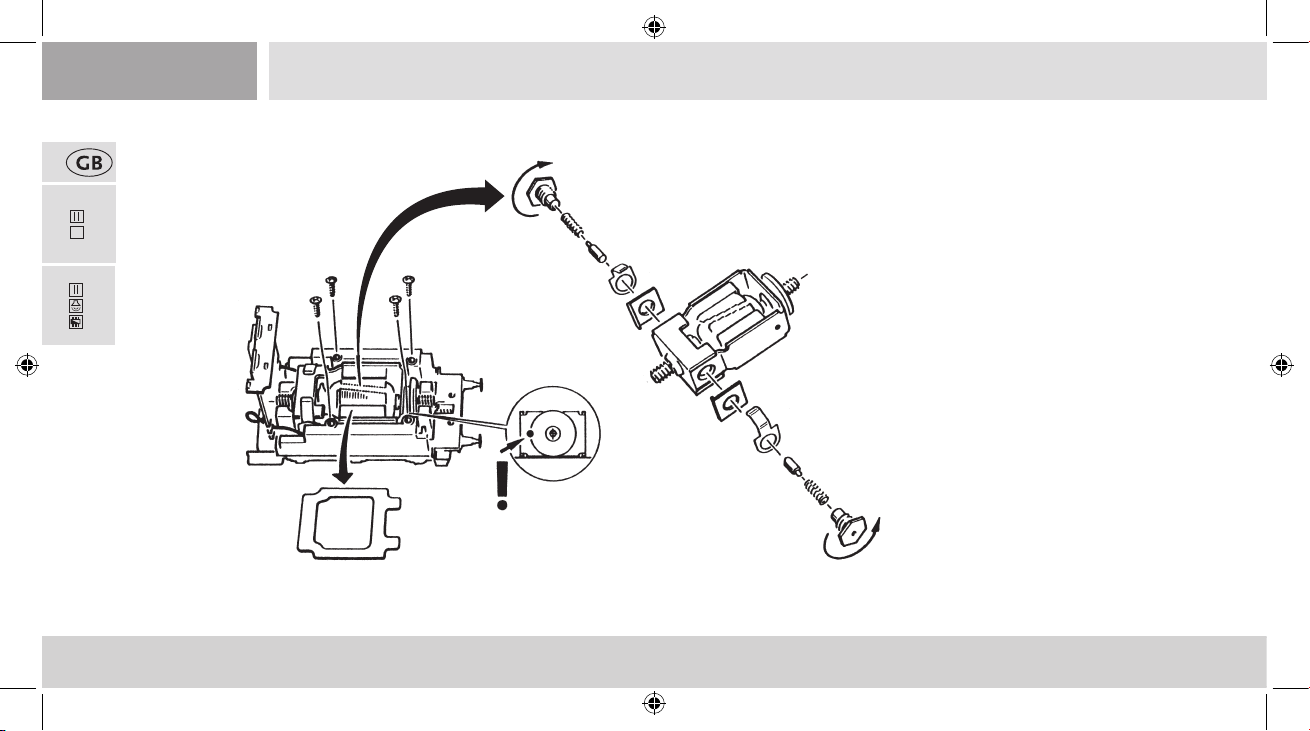
▪ Carbon Brush Changing
First remove tender body see chapter: Lubrication
72124
PluX
22
3.
72125
1.
2.
▪ Assembly
Pay attention to the correct position of the contacts during assembly.
36
72124.indd 36 05.04.2019 12:24:12
Page 37
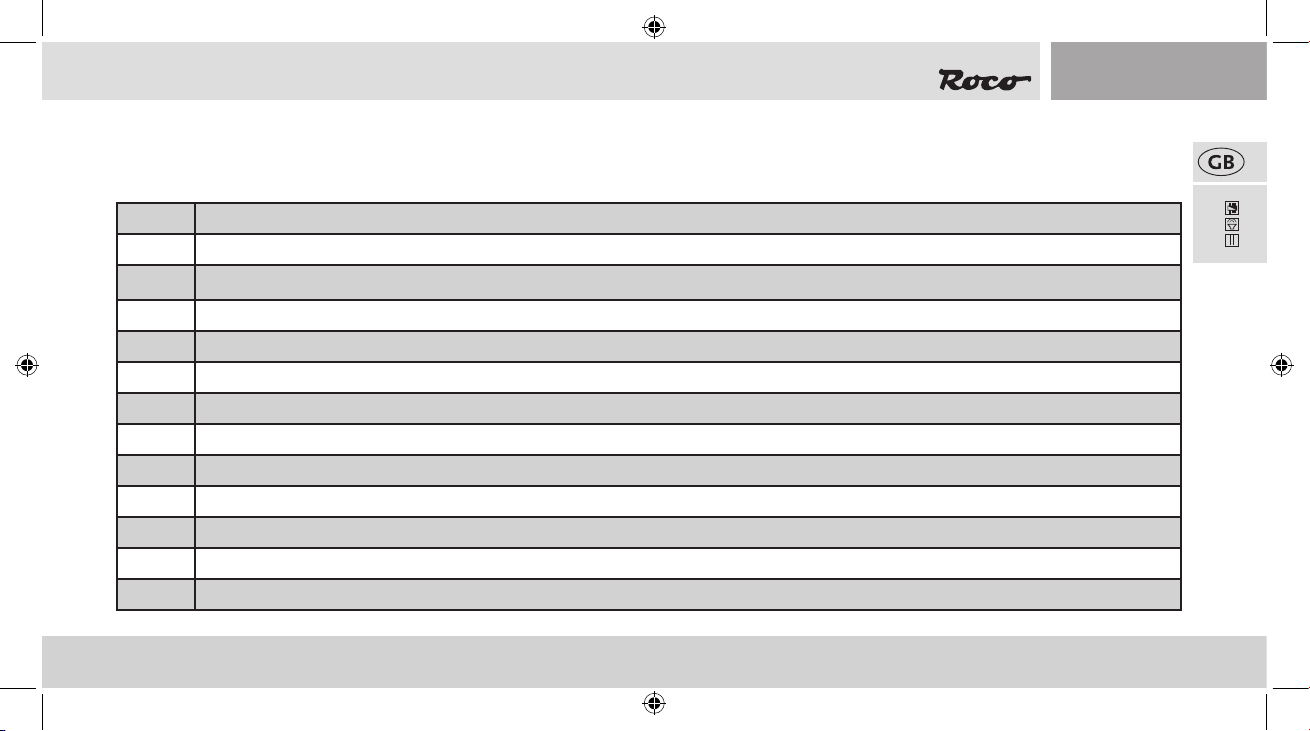
The Sounddecoder
▪ Rh 38 function key allocation (delivery state)
The factory-set default address of the lok is 03.
F-Key Function for 72125
F0 Light on/off
F1 Sound on/off
F2 Whistle short
F3 Whistle long
F4 Conductor whistle
F5 Coupling noise
F6 Shunting gear
F7 Curve squeaking (only with F1 and whilst driving)
F8 Sanding
F9 Air pump
F10 Injector 1
F11 Scoop of coal
72124.indd 37 05.04.2019 12:24:12
72125
37
Page 38
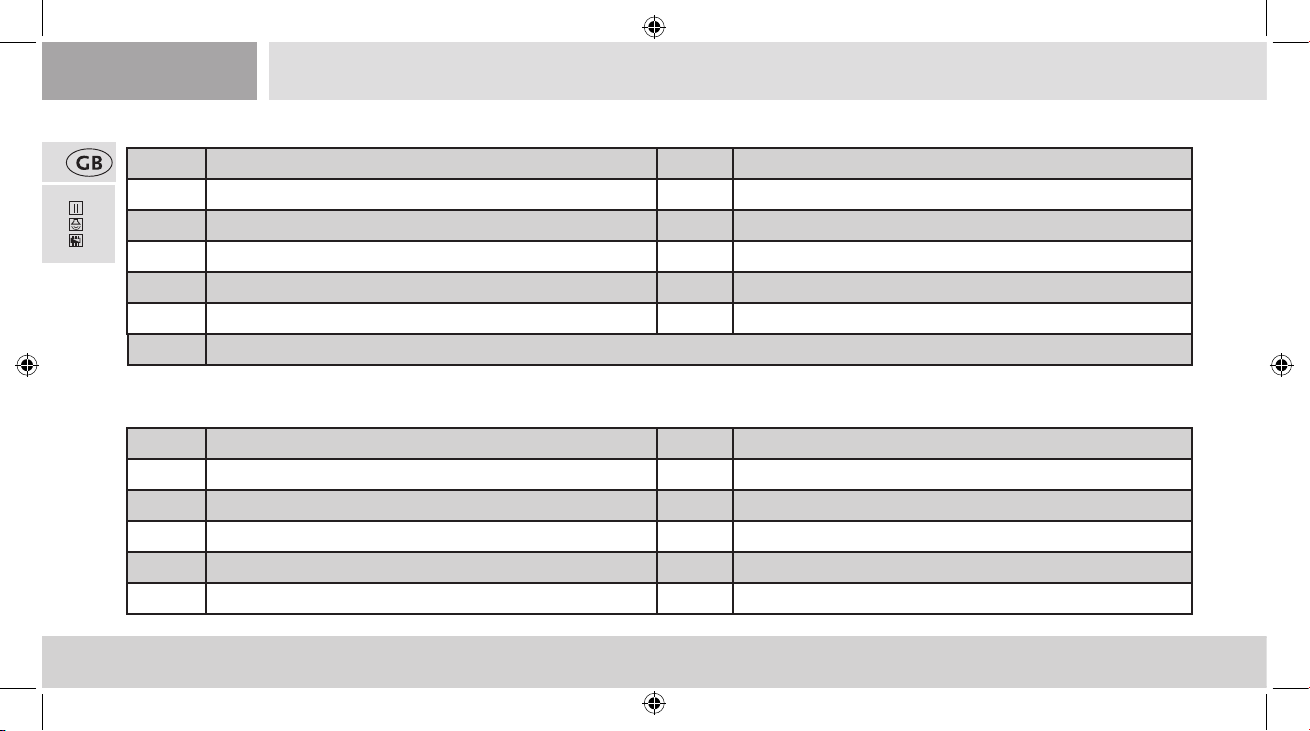
F-Taste Funktion für 72125 F-Taste
72125
F12 Injector 2 F18 Whistle short
F13 Drain F19 Whistle long
F14 Mute-Key F20 Water drum
F15 Generator F21 Volume +
F16 Blower F22 Volume -
F17 Blow-down
▪ Rh 38 function key allocation for Motorola
The factory-set default adress of the lok is 03.
®
F-Key Function for Motorola address 1 F-Key Function for Motorola address 2
F0 Front light
F1 Sound F1 Coupling noise
F2 Whistle short F2 Shunting gear
F3 Whistle long F3 Curve squeaking (only with F1 and whilst driving)
F4 Conductor whistle F8 Sanding
38
72124.indd 38 05.04.2019 12:24:12
Page 39
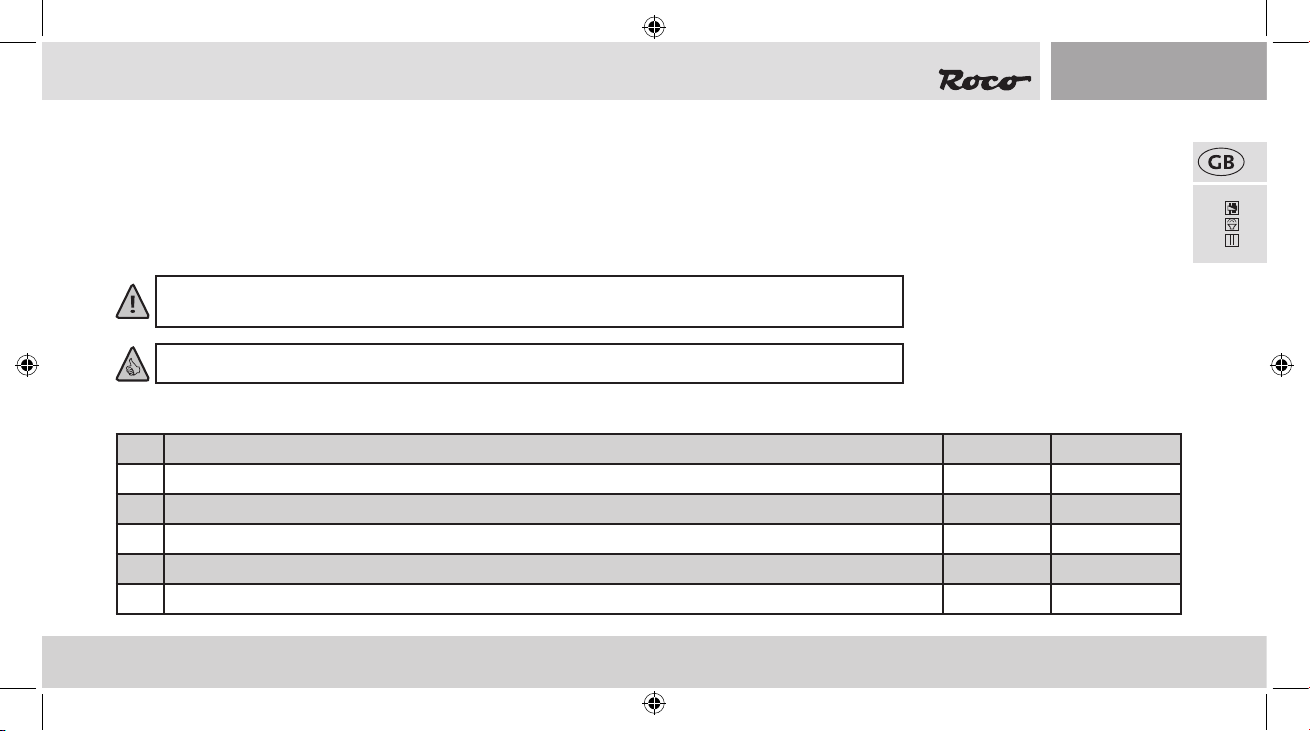
▪ Locomotive Settings
The Sounddecoder has been optimally adjusted to this locomotive. You can still adapt numerous decoder properties to your wishes however.
Certain parameters (referred to as CVs – Conguration Variable – or register) can be amended.
Please check before each programming if this is really necessary. Incorrect settings can result in the decoder not reacting correctly.
The decoder is preprogrammed with 128/28 speed steps at the factory for a high level of comfort. This means that it can be used together with
all of the modern DCC (MULTIMAUS®) and Motorola® control devices.
72125
The Sounddecoder has been especially modied for the additional functions and must not be
replaced with a decoder which is available from a retailer.
If the locomotive is to be reprogrammed, only the locomotive is to be on the programming track.
▪ CV-List of the Rh 38
CV Name Value Default Value
1 Address (= short address) 01 – 99 3
2 Minimum speed (lowest creeping speed) 01 – 252 4
3 Start-up delay (from standstill to maximum speed) 00 – 255 30
4 Braking delay (from maximum speed to stand-still) 00 – 255 16
5 Maximum speed 00 – 252 170
39
72124.indd 39 05.04.2019 12:24:12
Page 40
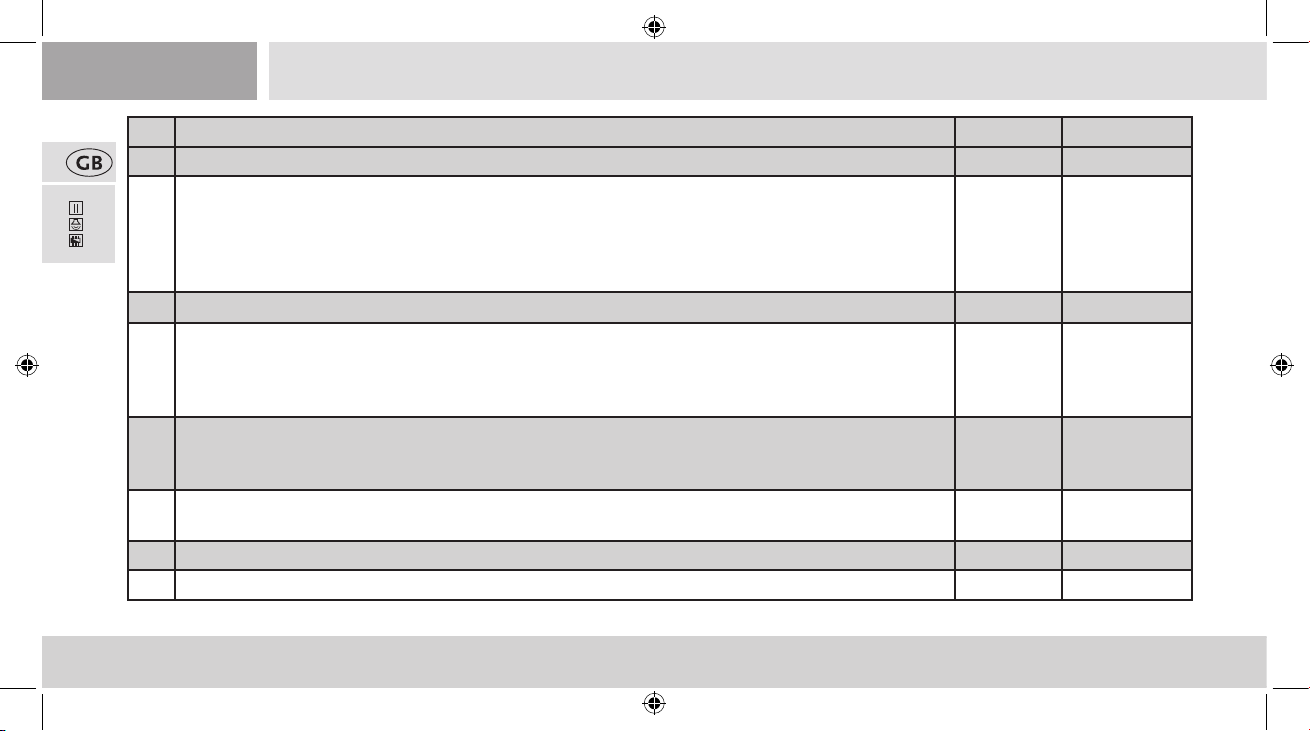
CV Name Value Default Value
6 Medium speed (at medium running step) - Value 1 corresponds to 1/3 of Vmax. (CV 5) 00 – 252 1
72125
7 Decoder Version Number (only read! Readable only on reading-capable ampliers/centres).
Important! Please note when using the MULTIMAUS® in order to achieve CVs greater than CV255: when
undertaking a short-term programming of CV7, only the subsequent programming access with the value 10 is
increased by 100 CV places (meaning CV166 then accesses CV266 for example). The value 20 is increased
by 200 CV places.
8 Resetting of all values to the default settings; (With readable amplifiers/controllers, the manufacturer ID is readable) 08 = Reset
13 Analogue modes F1 - F8 (00 – no function in analogue mode)
00 – 255 1
01 – Function F1 02 – Function F2 04 – Function F3 08 – Function F4
16 – Function F5 32 – Function F6 64 – Function F7 128 – Function F8
Attention! Several things happen at the same time when several functions are activated via CV’s in analogue operation.
14 Analogue modes F9 - F12
00 – 255 195
01 – Locomotive headlight (front) | 02 – Locomotive headlight (rear) | 04 – Function F9
08 – Function F10 | 16 – Function F11 | 32 – Function F12
17+18Long address (requirement: corresponding CV29 long address setting is activated) 100 – 9999
29 Settings 14
266 Total Volume of all Sounds 00 – 255 64
40
72124.indd 40 05.04.2019 12:24:12
Page 41
▪ Operation with a DCC Command Station (MULTIMAUS®)
As the (MULTIMAUS®) has 20 function keys and a light button, can be especially comfortably operated.
Programming modes:
72125
The locomotive and carriages react to all DCC programming modes.
We recommend: direct CV programming (byte by byte) or POM mode (programming on main track).
The programming is described in the MULTIMAUS® manual.
Reading CVs:
With the appropriate equipment (e.g. / Z21® / z21® / z21start®), you can read the value byte by byte and bit by bit.
▪ More Functions
You can find out about a range of other possible set-tings, which are probably very rarely needed, relating to drive speed curve, load control
setting or noise synchronization from the detailed handbook. This can be downloaded as a pdf document MX645P22 from www.zimo.at.
41
72124.indd 41 05.04.2019 12:24:12
Page 42
Indice
Introduzione .......................................................................45
Messa in funzione della locomotiva
▪ Prima della prima messa in funzione .................................45
▪ Rodaggio del modello .......................................................45
▪ Condizioni di funzionamento ............................................46
▪ Equipaggiamento ...................................................... 46 – 47
▪ Riattrezzaggio di un generatore di vapore Seuthe .............48
▪ Aggiunta di un decoder PluX (Solo per articolo 72124) .....49
Manutenzione e cura del modello
Il Sounddecoder (Solo per articolo 72159)
▪ Disposizione dei tasti funzione
della Locomotiva Rh38 (Stato della fornitura) ........... 56 – 57
▪ Impostazioni della locomotiva ...........................................58
▪ Liste CV Rh 38 ........................................................... 58 – 60
▪ Funzionamento con centrale DCC (MULTIMAUS®) ............. 60
▪ Funzione supplementare ...................................................60
Lista dei pezzi di ricambio .......................................... 62 – y
▪ Sgancio della locomotiva e del tende ................................ 50
▪ Pulizia dei contatti per la corrente delle ruote ................... 51
▪ Lubricazione .................................................................... 52
▪ Sostituzione delle ruote aderenti ...................................... 54
▪ Sostituzione delle spazzole di carbone .............................. 55
▪ Assemblaggio .................................................................... 55
42
72124.indd 42 05.04.2019 12:24:12
Spiegazione dei simbli
Plux
Corrente continua con interfaccia
22
Corrente continua con sound e decoder
Page 43
Introductione
Carissimo appassionato,
Grazie innite per aver acquistato il nostro modellino della Rh 38.4110.
Queste istruzioni per l‘uso sono state pensate per aiutarla a utilizzare le moltissime funzioni del Suo Rh 38.4110.
Le auguriamo buon divertimento e buon viaggio!
Il team Roco
43
72124.indd 43 05.04.2019 12:24:12
Page 44
Riguardo al modello
Locomotiva a vapore serie 109 / 209 / 38
L‘azienda privata Österreichische Südbahn Gesellschaft ha costruito nel 1910 questa elegante locomotiva a vapore per i sempre più pesanti
treni espressi della tratta principale Vienna – Trieste. Dal 1910 al 1914 per la rete austriaca della Ferrovia Meridionale la fabbrica locomotive
di StEG (Österreichisch-Ungarische Staatseisenbahngesellschaft) di Vienna, la fabbrica locomotive di Wiener Neustadt e la fabbrica locomotive
viennese di Floridsdorf hanno prodotto un totale di 44 locomotive. Le locomotive della serie 109 rappresentavano la punta di diamante delle
macchine 2C in Austria. Grazie ad esse era possibile ridurre l‘allora durata del viaggio tra Vienna e Trieste da 13,5 a 10,5 ore. Successivamente
alla statalizzazione della parte austriaca della Ferrovia Meridionale nel 1923 le 17 locomotive sono passate alle Österreichische Bundesbahnen
(allora BBÖ) venendo classicate come serie 209, essendo il numero 109 già assegnato. Nel 1938 la Deutsche Reichsbahn ha poi acquisito
tutte e 17 le locomotive di BBÖ come serie 38.41. Il ritiro delle ultime locomotive italiane della serie 653 ha avuto luogo nel 1940, dopo che
le tratte da Trieste a Udine e Venezia sono state elettricate. 11 locomotive sono state nuovamente acquisite da ÖBB come serie 38. Alcune
locomotive erano ancora equipaggiate con eiettore Giesl e strozzamento del tubo bollitore, con conseguenti maggiore consumo di carbone ed
elevate prestazioni. Le ultime macchine sono state dismesse nel 1967 dal regolare esercizio operativo di ÖBB.
Nel 1992 la 38.4101 è stata rimessa a nuovo e catalogata con il codice 109.13 del Technisches Museum Wien e attualmente è mantenuta in
stato funzionante dal 1. Österreichischer Straßenbahn- und Eisenbahnklub (ÖSEK) presso il Museo Ferroviario di Strasshof.
44
72124.indd 44 05.04.2019 12:24:12
Page 45
Messa in funzione della locomotiva
▪ Avant la première mise en marche
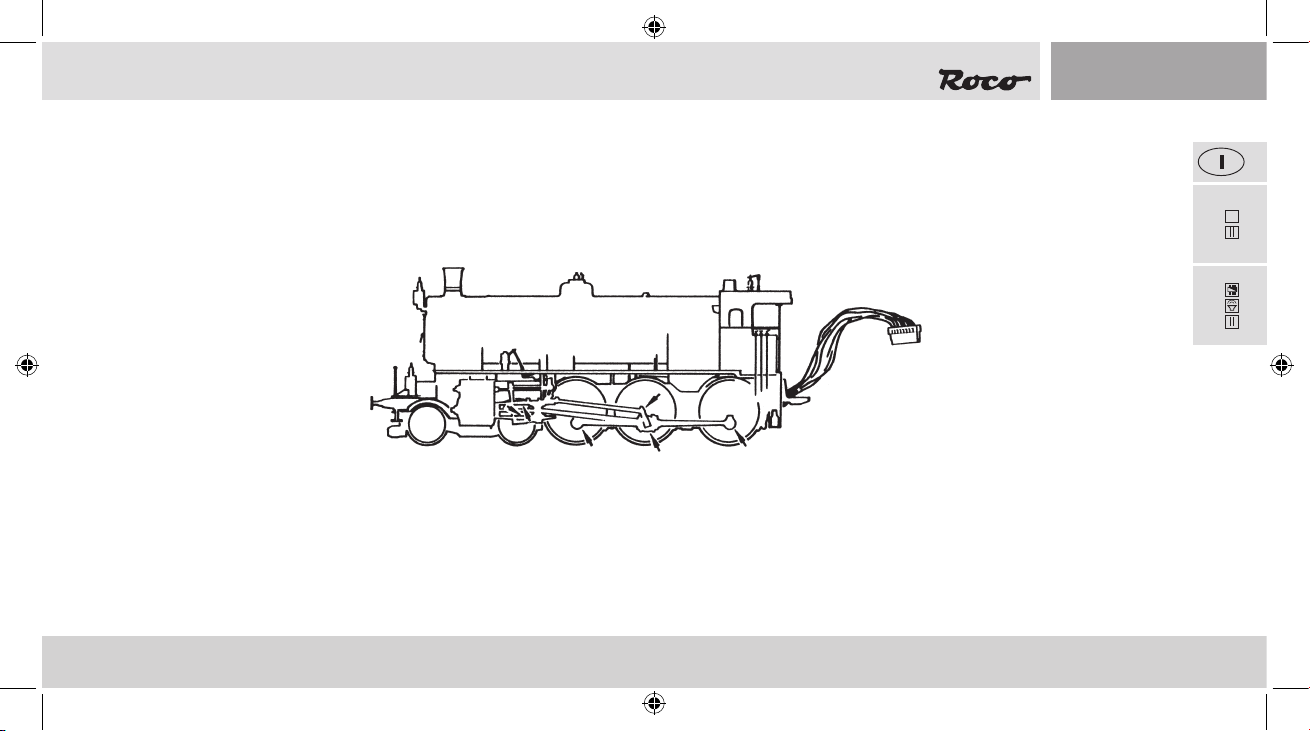
Per prevenire proprietà di scorrimento errati o danni è necessario che prima della prima messa in funzione vengano lubricati sulla locomotiva
i cuscinetti delle aste di giunzione. A tal ne consigliamo l’oleatore ROCO 10906.
72124
72125
▪ Rodaggio del modello
Si consiglia di far funzionare la locomotiva per 30 minuti in avanti e per 30 minuti indietro senza alcun carico afnché il Vostro modello
possa ottenere una circolazione ottimale ed una migliore forza di trazione.
45
45
72124.indd 45 05.04.2019 12:24:13
22
PluX
Page 46
▪ Condizioni di funzionamento
72124
PluX
22
72125
▪Equipaggiamento
Per il funzionamento è possibile scegliere
tra diversi giunti Consigliamo di utilizzare il
giunto corto ROCO.
46
46
72124.indd 46 05.04.2019 12:24:13
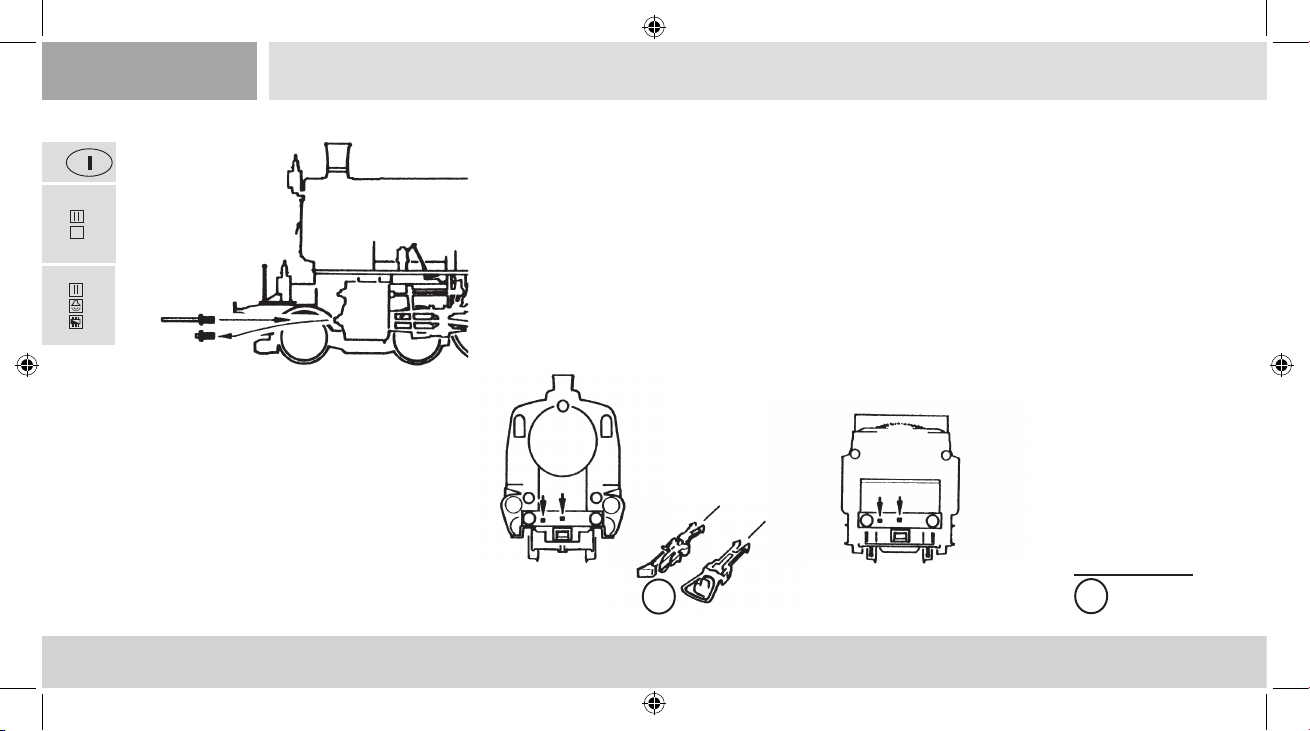
Il raggio più piccolo percorribile per questo modello è R2 (419,6 mm) del sistema di binari
Roco. Il funzionamento perfetto della locomotiva è garantito solo su binari puliti.
Consigliamo a tal ne di usare l’automotrice per la pulizia dei binari ROCO Nr. art. 46400
ed in caso di maggiori impurità la gomma per la pulizia dei binari ROCO N. art. 10002.
A scelta
?
?
Page 47
▪ Equipaggiamento
4.
1./7.
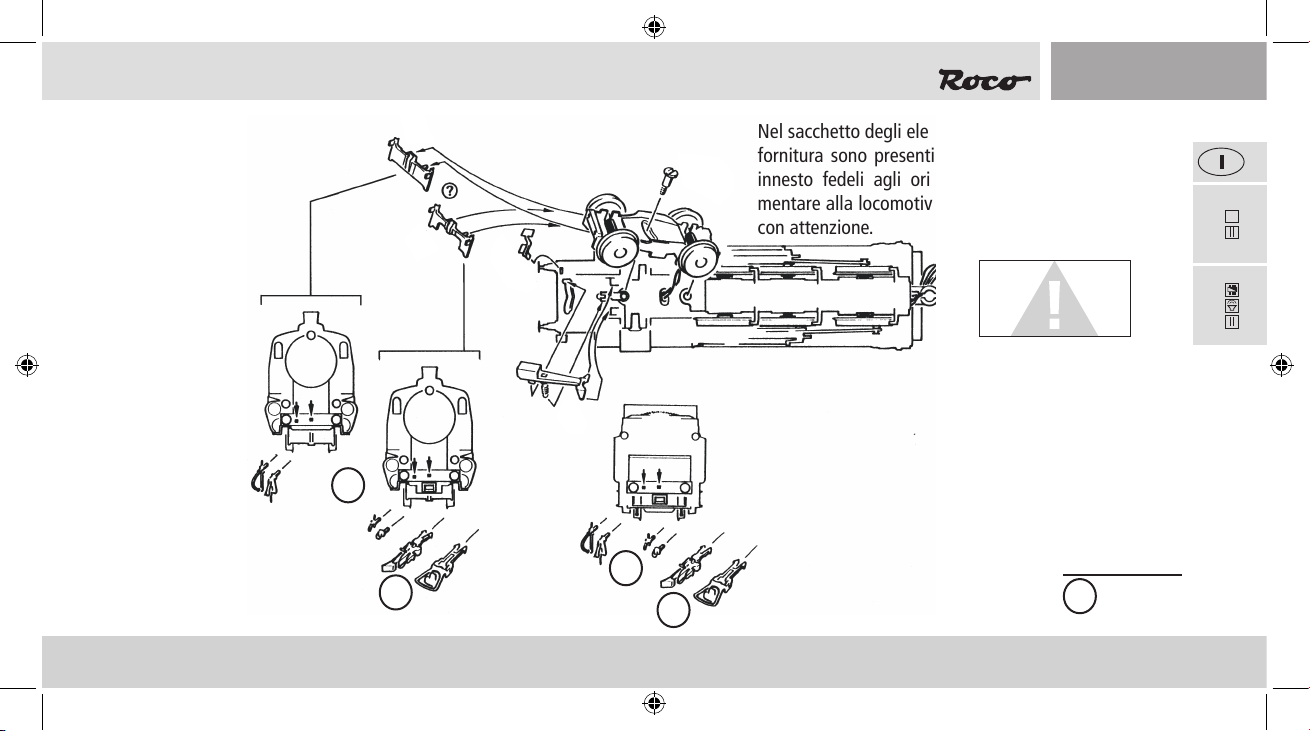
Nel sacchetto degli elementi aggiuntivi compreso nella
fornitura sono presenti anche dei piccoli elementi ad
innesto fedeli agli originali per un’aggiunta supplementare alla locomotiva i quali devono essere montati
con attenzione.
72124
2./6.
Incollare solo se
è presente un
apposito avviso!
72125
3.
?
?
?
?
72124.indd 47 05.04.2019 12:24:13
?
A scelta
47
47
22
PluX
Page 48
▪ Riattrezzaggio di un generatore di vapore Seuthe
72124
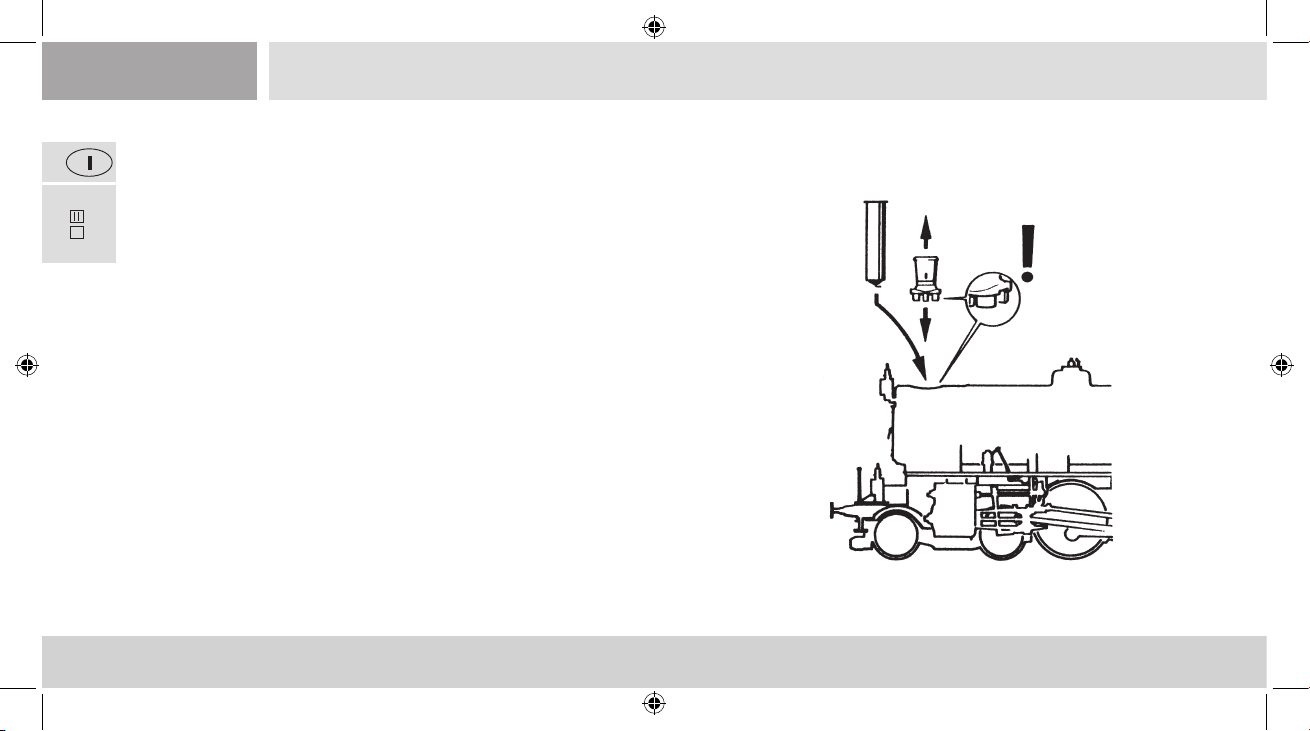
Per prima cosa è necessario rimuovere il fumaiolo, quindi montare il generatore di
vapore Seuthe n. 10 (per il funzionamento CC analogico o n. 11 (per il funzionamen-
PluX
22
to CC digitale).
1.
Con un generatore di vapore integrato in modalità di funzionamento digitale e decoder 10880 riattrezzato, premendo il tasto F1 è possibile abilitare e disabilitare il
generatore di vapore.
2.
3.
Funzioni durante il funzionamento con connettore a ponticello (=modalità di funzionamento analogica):
- Cambio luce bianco/rosso (dipendente dalla direzione di marcia)
- Generatore di fumo Seuthe 10 (se riattrezzato)
Funzione durante il funzionamento con decoder riattrezzato (=modalità di funzionamento digitale):
F0 = Cambio luce bianco/rosso (dipendente dalla direzione di marcia)
F1 = Generatore di fumo Seuthe 11 (se riattrezzato)
48
72124.indd 48 05.04.2019 12:24:13
Page 49
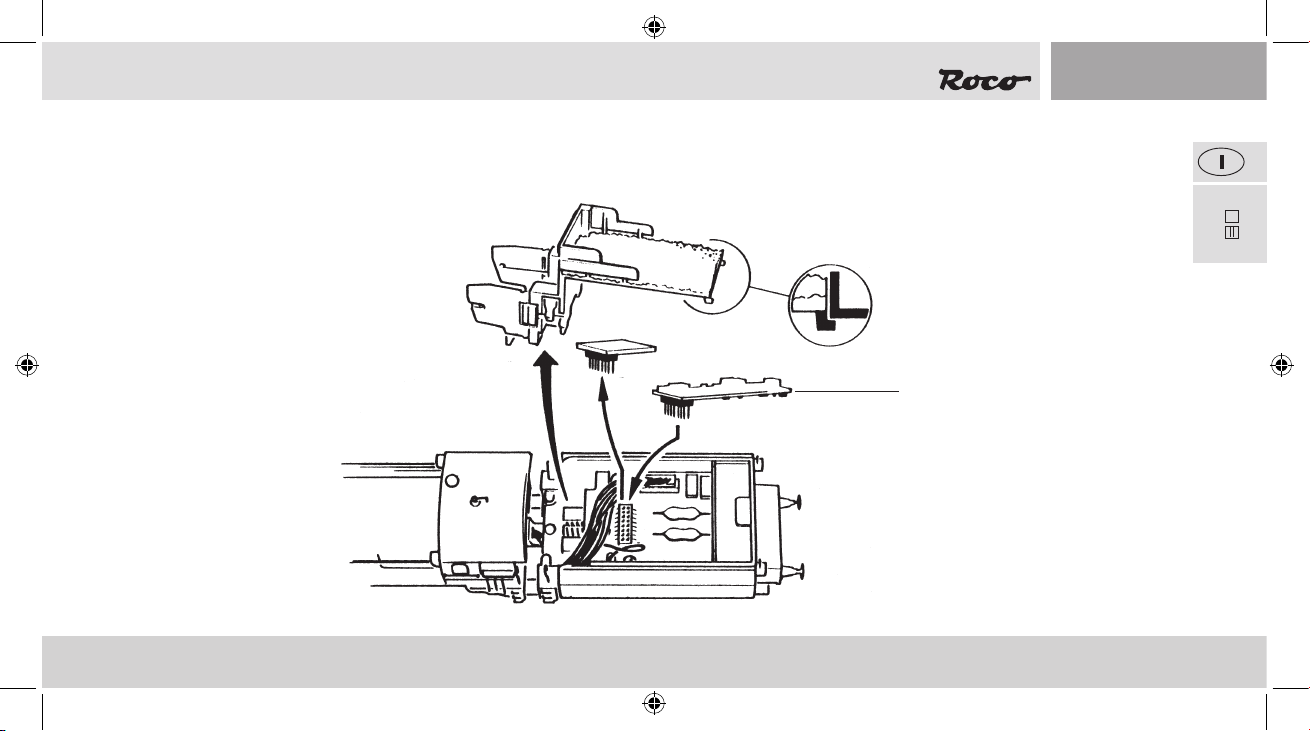
▪ Aggiunta di un decoder PluX (solo per articolo 72124)
22
PluX
72124
1.
Decoder 16-pin
2.
3.
49
72124.indd 49 05.04.2019 12:24:13
Page 50
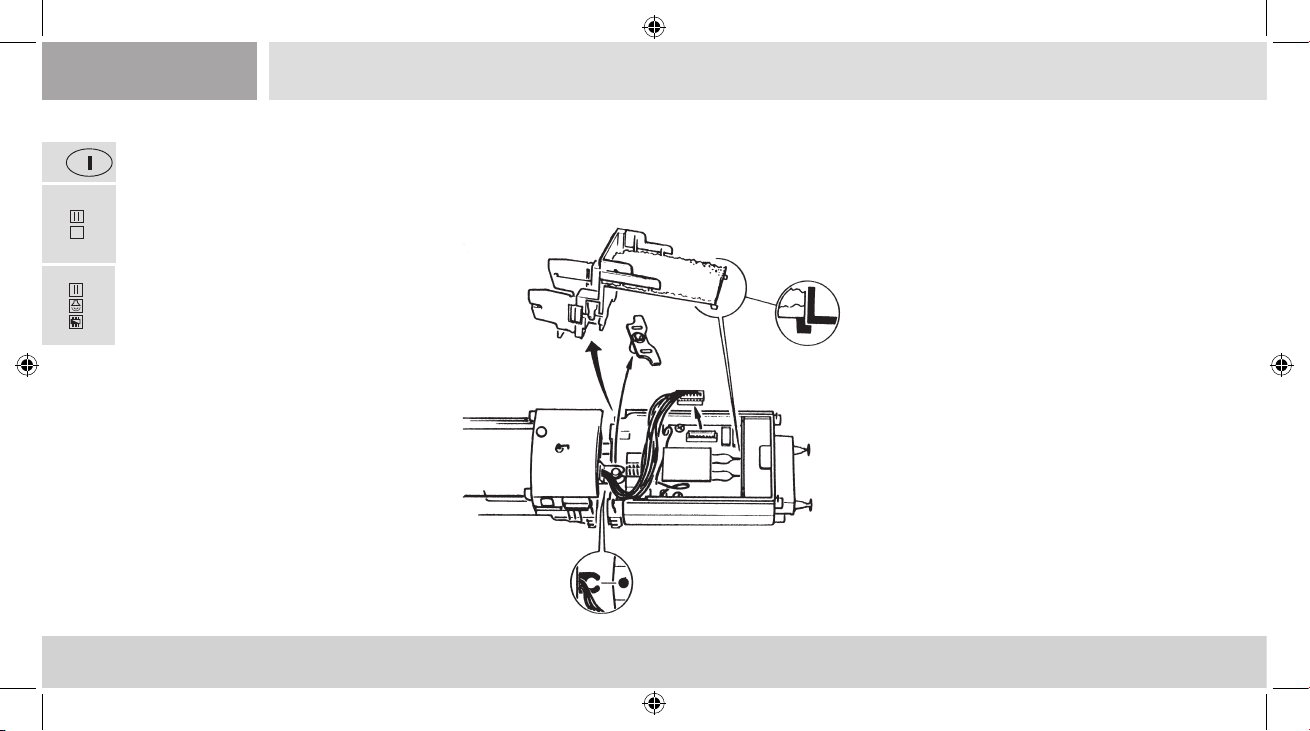
Manutenzione e cura del modello
Afnché la locomotiva vi possa dare delle soddisfazioni per molto tempo è necessario sottoporla regolarmente (ca. ogni 30 ore di funzionamento) a determinati interventi di manutenzione.
72124
Prima di procedere con la cura e la manutenzione del modello, sganciare prima la locomotiva dal tender.
PluX
22
▪ Sgancio della locomotiva e del tende
72125
2.
1.
3.
4.
50
50
72124.indd 50 05.04.2019 12:24:13
Page 51
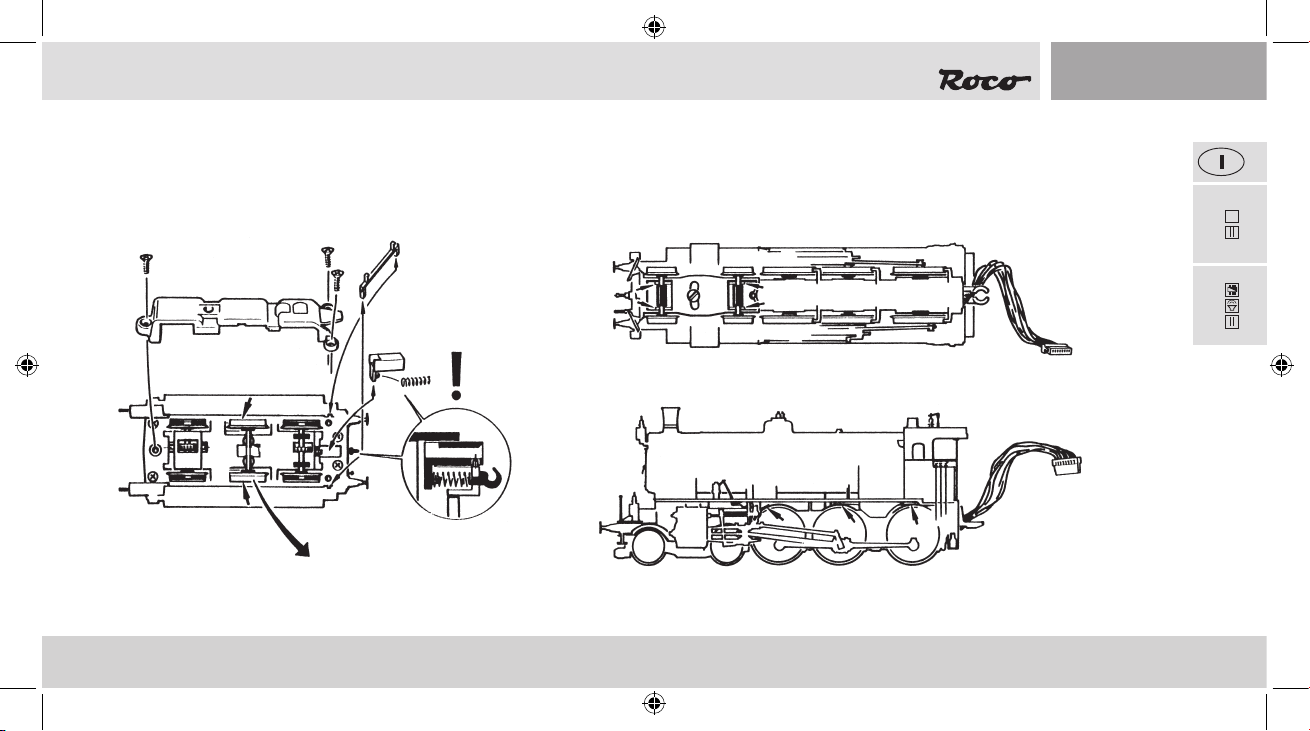
▪ Pulizia dei contatti per la corrente delle ruote
I contatti si possono sporcare facilmente in presenza di binari poco puliti. Usando un piccolo pennello, rimuovere con cura lo sporco sui punti
contrassegnati.
22
PluX
72124
2.
1.
2.
72125
3.
51
51
72124.indd 51 05.04.2019 12:24:14
Page 52
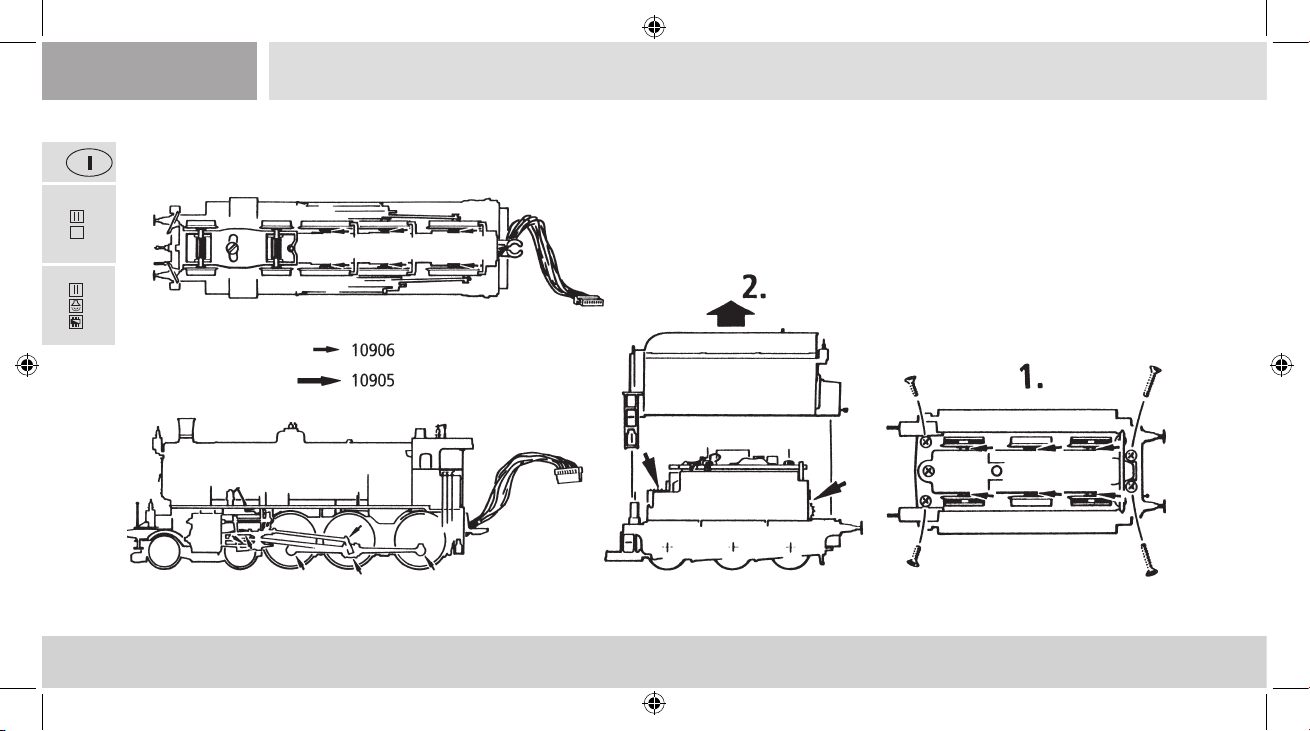
▪ Lubricazione
Applicare poche gocce d’olio sui punti contrassegnati nello schema di lubricazione. Consigliamo l’utilizzo dell’oleatore ROCO N. art. 10906.
72124
PluX
22
72125
52
52
72124.indd 52 05.04.2019 12:24:14
Per la lubricazione dei componenti di trazione (ruote dentate, coclea)
consigliamo di usare il grasso speciale Roco 10905. In caso di lubricazione,
non applicare olio su questi componenti.
Page 53
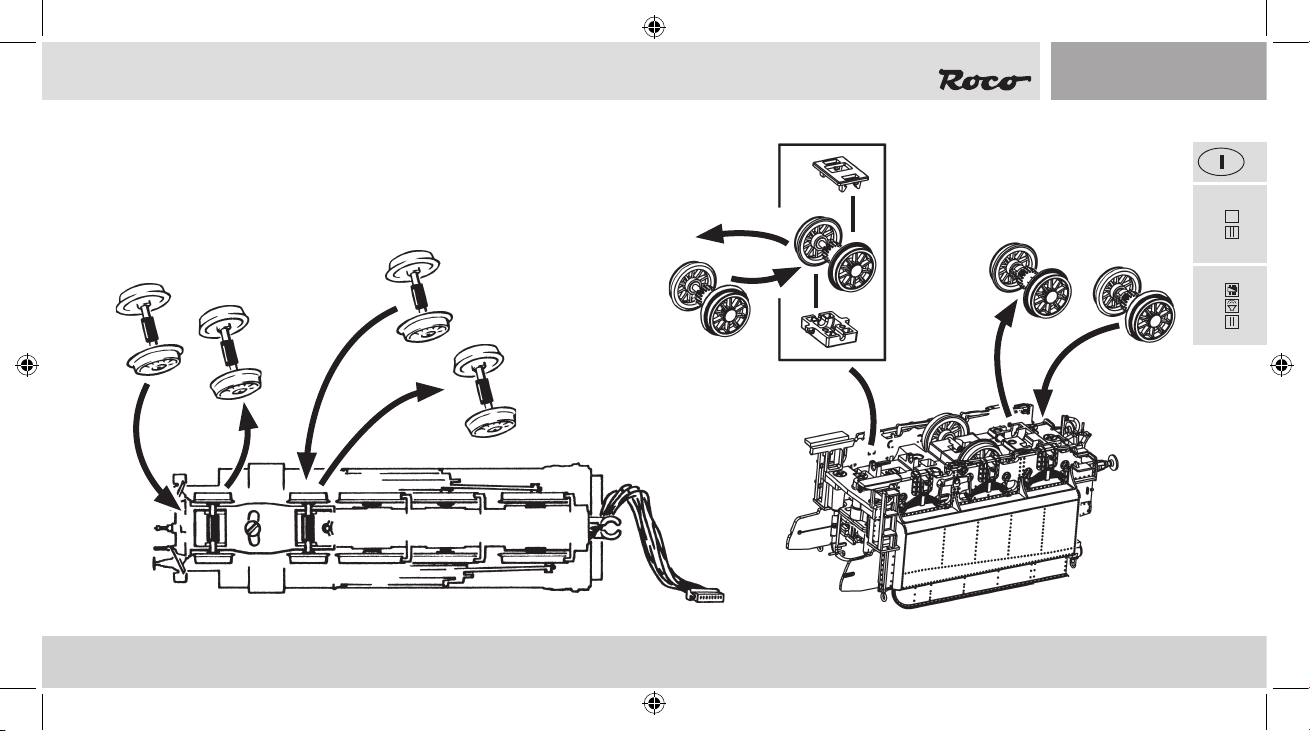
Su impianti di binari, posati in maniera non ottimale, potrebbero saltare dai binari
i bordini più bassi dell’asse di avanzamento e quello tender. Per eliminare questo
problema, Vi offriamo – con il numero di articolo 135685 – una serie di assi con
bordini più alti. Questo set potrà essere acquistato come pezzo di ricambio presso il
Vostro rivenditore ROCO.
72124
72125
53
53
72124.indd 53 05.04.2019 12:24:14
22
PluX
Page 54
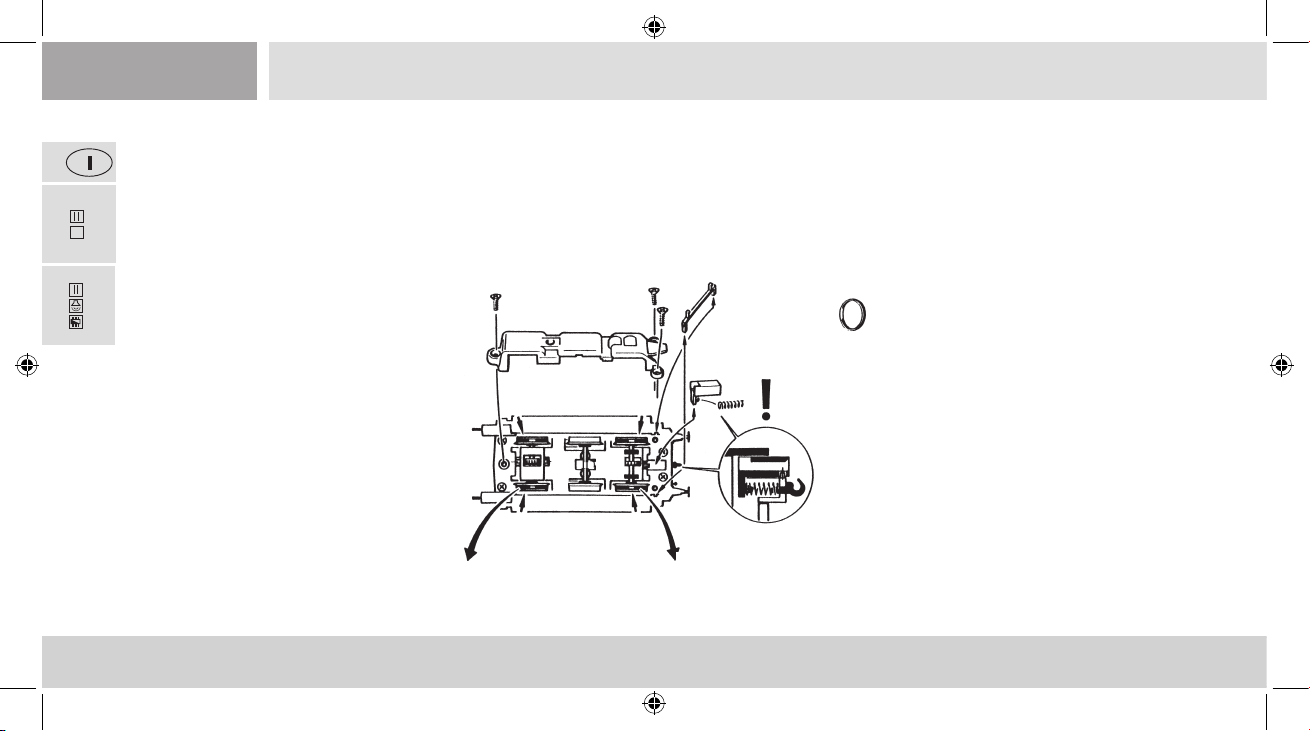
▪ Sostituzione delle ruote aderenti
Per prima cosa rimuovere il copricarrello.
Rimuovere le ruote aderenti con un ago o un cacciavite sottile. Quando si montano nuove ruote aderenti, si prega di accertarsi che non si
72124
spostino.
PluX
22
72125
2.
2.
1.
4x
3.
54
54
72124.indd 54 05.04.2019 12:24:14
3.
Page 55
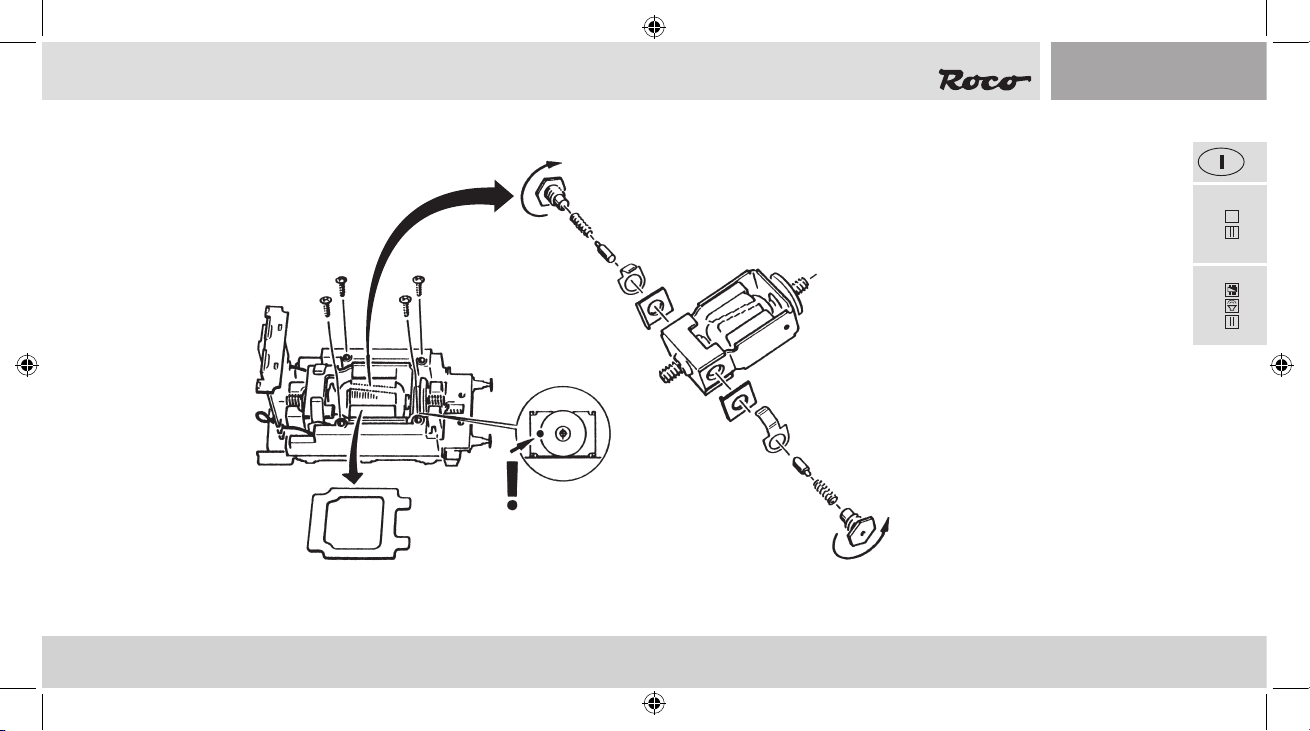
▪ Sostituzione delle spazzole di carbone
Rimuovere l’alloggiamento del tender (vedi capitolo: Lubricazione) Quindi smontare il motore e sostituire le spazzole di carbone.
22
PluX
3.
72124
1.
72125
2.
▪ Assemblaggio
Durante l’assemblaggio accertarsi che i contatti si trovino nella giusta posizione!
55
55
72124.indd 55 05.04.2019 12:24:14
Page 56
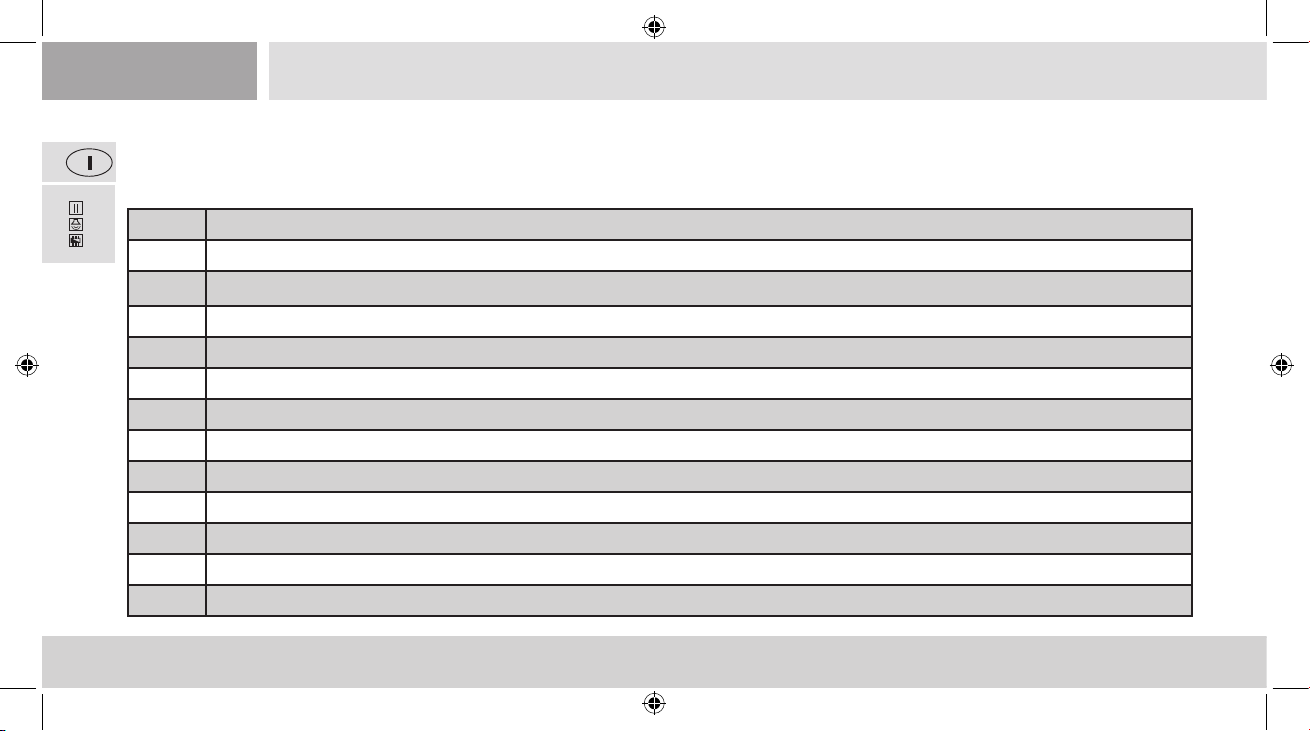
Il Sounddecoder
▪ Disposizione dei tasti funzione della Locomotiva Rh 38 (Stato della fornitura)
72125
Di serie la locomotiva è impostata all’indirizzo 03
F-Tasti Funzione per 72125
F0 Luce on/off
F1 Romore della corsa on/off
F2 Fischio
F3 Fischio
F4 Fischio del controllore
F5 Aggancio respingenti
F6 Manovra
F7 Stridio curva
F8 Sabbiatura
F9 Pompa dell‘aria
F10 Iniettore 1
F11 Pale carbone
56
72124.indd 56 05.04.2019 12:24:14
Page 57
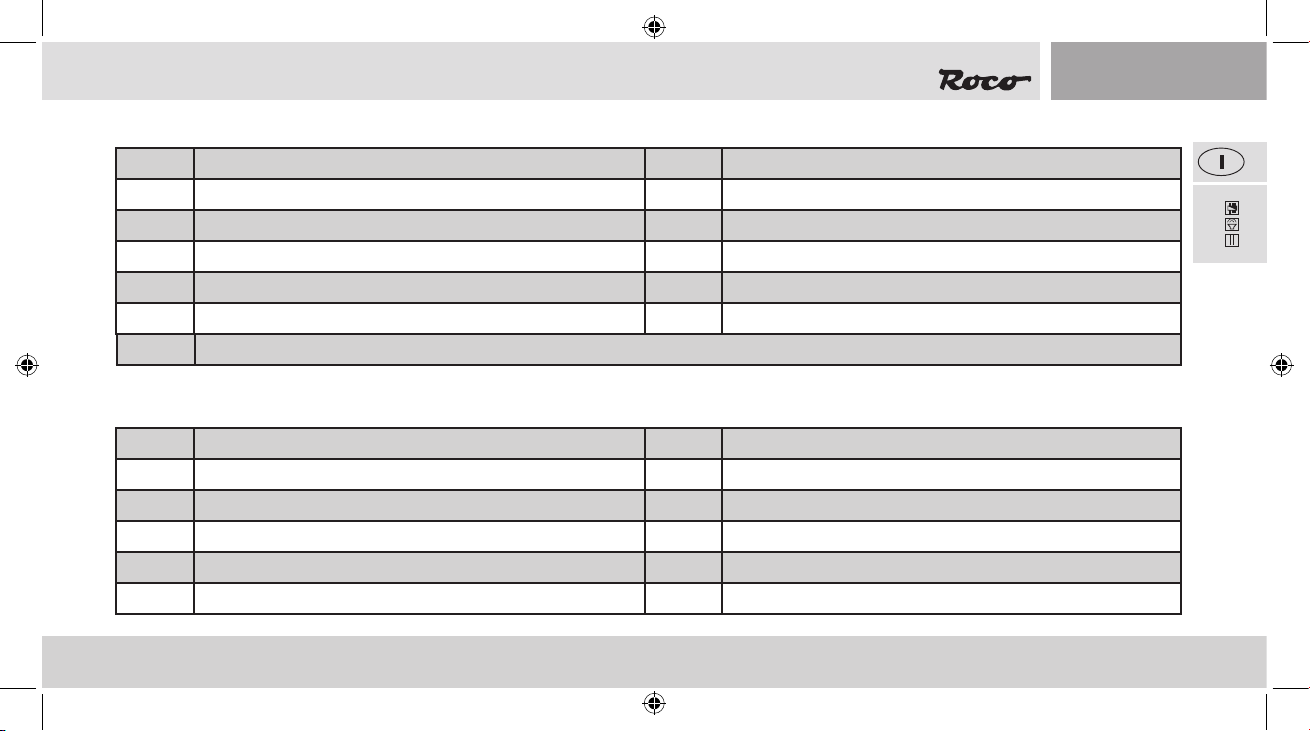
F-Tasti Funzione per 72125 F-Tasti
F12 Iniettore 2 F18 Fischio
F13 Drenaggio (solo con Tasti F1) F19 Fischio
F14 Mute-tasti F20 Carico acqua
72125
F15 Dinamo F21 Volume +
F16 Sofante F22 Volume -
F17 Svuotamento caldaia
▪Disposizione dei tasti funzione della Motorola
®
Di serie la locomotiva è impostata all’indirizzo 03
F-Tasti Funzione per Motorola Adresse 1 F-Tasti Funzione per Motorola Adresse 2
F0 Luce on/off
F1 Romore della corsa on/off F5 Aggancio respingenti
F2 Fischio F6 Manovra
F3 Fischio F7 Stridio curva
F4 Fischio del controllore F8 Sabbiatura
57
72124.indd 57 05.04.2019 12:24:14
Page 58
▪ Impostazioni della locomotiva
Il Sounddecoder compreso nella locomotiva della ditta ZIMO è stato impostato in modo ottimale sulla locomotiva. Ciononostante è possibile
adattare alle proprie esigenze diverse proprietà del decoder. A tal ne è possibile modicare determinati parametri (i cosiddetti CV – Conguration
72125
Variable – o registri).
Prima di ogni programmazione è quindi necessario vericare se sia effettivamente necessario. Le impostazioni non corrette possono non far funzionare correttamente il decoder.
Per questo elevato comfort di guida, il decoder è impostato di serie a 28/128 livelli di marcia. In questo modo è impiegabile con tutti i dispositivi
di comando moderni DCC (MULTIMAUS®) e Motorola2).
Il Sounddecoder è stato modicato specicamente per le funzioni supplementari e non deve essere sostituito con un
decoder disponibile in commercio.
Quando la l
ocomotiva deve essere riprogrammata, sul binario di programmazione può trovarsi solo la locomotiva.
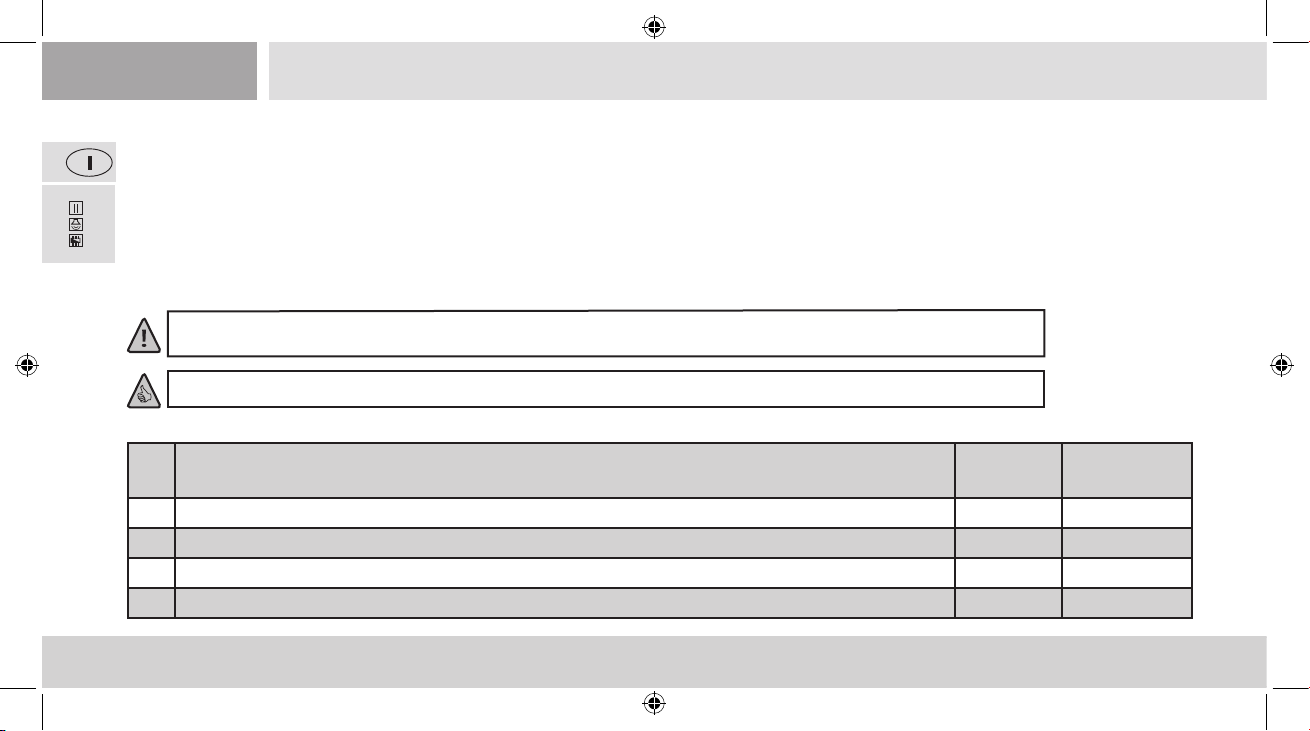
▪ Liste CV RH 38
CV Nom Valeurs
ajustables
1 Indirizzo (= breve indirizzo) 01 – 99 3
2 Tensione di avviamento (velocità più bassa) 01 – 252 4
3 Tempo di accelerazione (da fermo no alla velocità massima) 00 – 255 30
4 Tempo di frenata (dalla velocità massima no all’arresto) 00 – 255 16
58
72124.indd 58 05.04.2019 12:24:14
Valeurs stan-
dard
Page 59
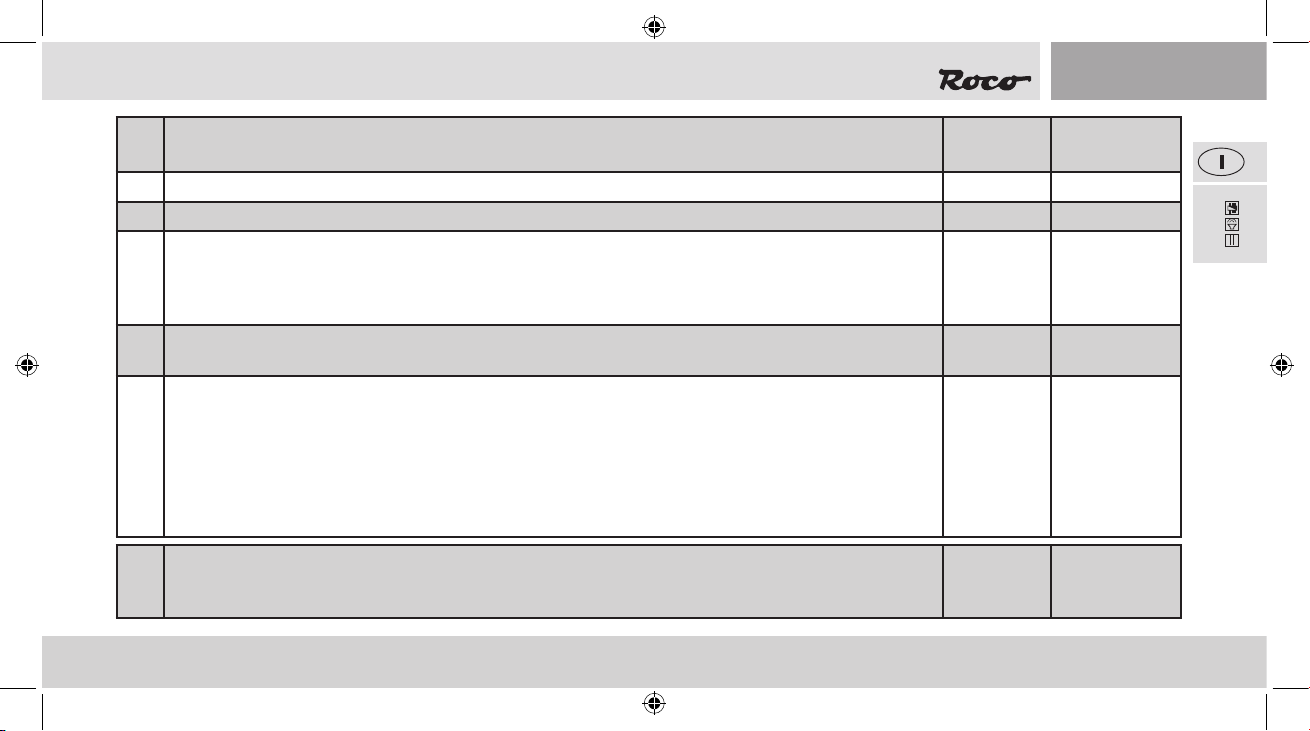
CV Nom Valori Valori
predeniti
5 Velocità massima 00 – 252 170
6 Velocità media (con livello di marcia medio) Il valore 1 corrisponde a 1/3 di Vmax. (CV5) 00 – 252 1
7 Codice versione del decoder (solo lettura! Leggibile solo su amplicatori / centrali con capacità di lettura).
Importante! Per l’utilizzo della multiMAUS per il raggiungimento di CV superiori a CV255: Con la breve
programmazione del CV7 viene aumentato solo il successivo accesso di programmazione con il valore 10 di
100 posizioni CV (quindi CV166 accede ad es. a CV266!) Valore 20 aumentato di 200 CV
Funzione reset Ripristino di tutti i valori alle impostazioni di fabbrica; (Su amplicatori/centrali con capacità di lettura è
8
leggibile il codice identicativo del produttore)
13 Modalità analogica da F1 no a F8 (00 – nessuna funzione nella modalità analogica)
01 – Funzione F1 02 – Funnzione F2
04 – Funzione F3 08 – Funnzione F4
16 – Funzione F5 32 – Funzione F6
64 – Funzione F7 128 – Funzione F8
Attenzione! Quando si attivano più funzioni attraverso i CV nel funzionamento analogico, si eseguono
contemporaneamente diverse esecuzioni
08 = Reset
00 – 255 1
72125
14 Modalità analogica da F9 ad F12 e luce frontale
01 – Luce frontale anteriore | 02 – Luce frontale posteriore | 04 – Funzione F9
08 – Funzione F10 | 16 – Funzione F11 | 32 – Funzione F12
72124.indd 59 05.04.2019 12:24:14
00 – 255 195
59
Page 60
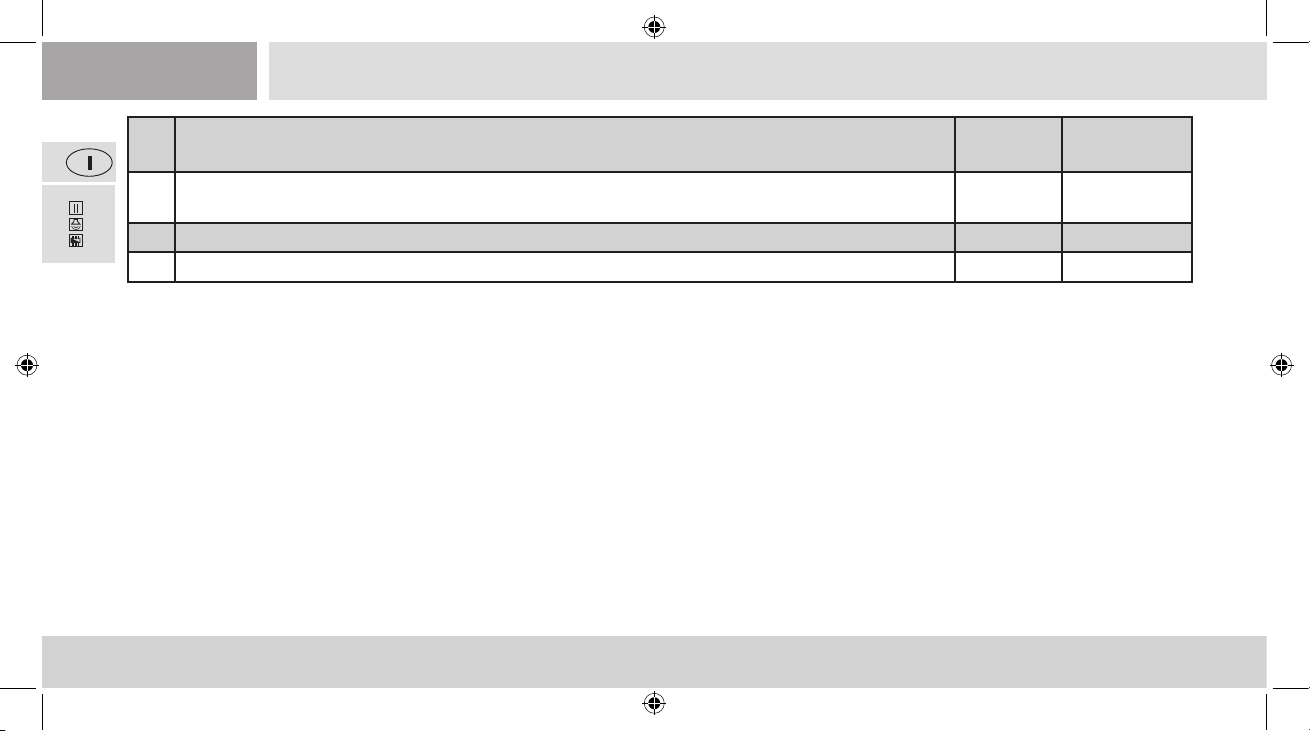
CV Nom Valori Valori
predeniti
72125
17+18Indirizzo lungo (Presupposto: In CV29 è attivato l’indirizzo lungo) 100 – 9999
29 Impostazioni 14
266 Livello di rumorosità complessivo di tutti i rumori 00 – 255 64
▪ Funzionamento con centrale DCC (MULTIMAUS®)
Poiché il MULTIMAUS® dispone di 20 tasti funzione ed un tasto luminoso, il funzionamento è particolarmente semplice.
Tipi di programmazione
Consigliamo: Programmazione diretta CV (a byte) o modalità POM (programmazione sul binario principale). La programmazione è descritta
nel manuale del MULTIMAUS®.
Lettura:
Con una determinata esecuzione (ad es. Z21® / z21® / z21start®) è possibile leggere i valori per byte e bit.
60
72124.indd 60 05.04.2019 12:24:14
Page 61
72124
PluX
22
61
72124.indd 61 05.04.2019 12:24:15
Page 62
PluX
22
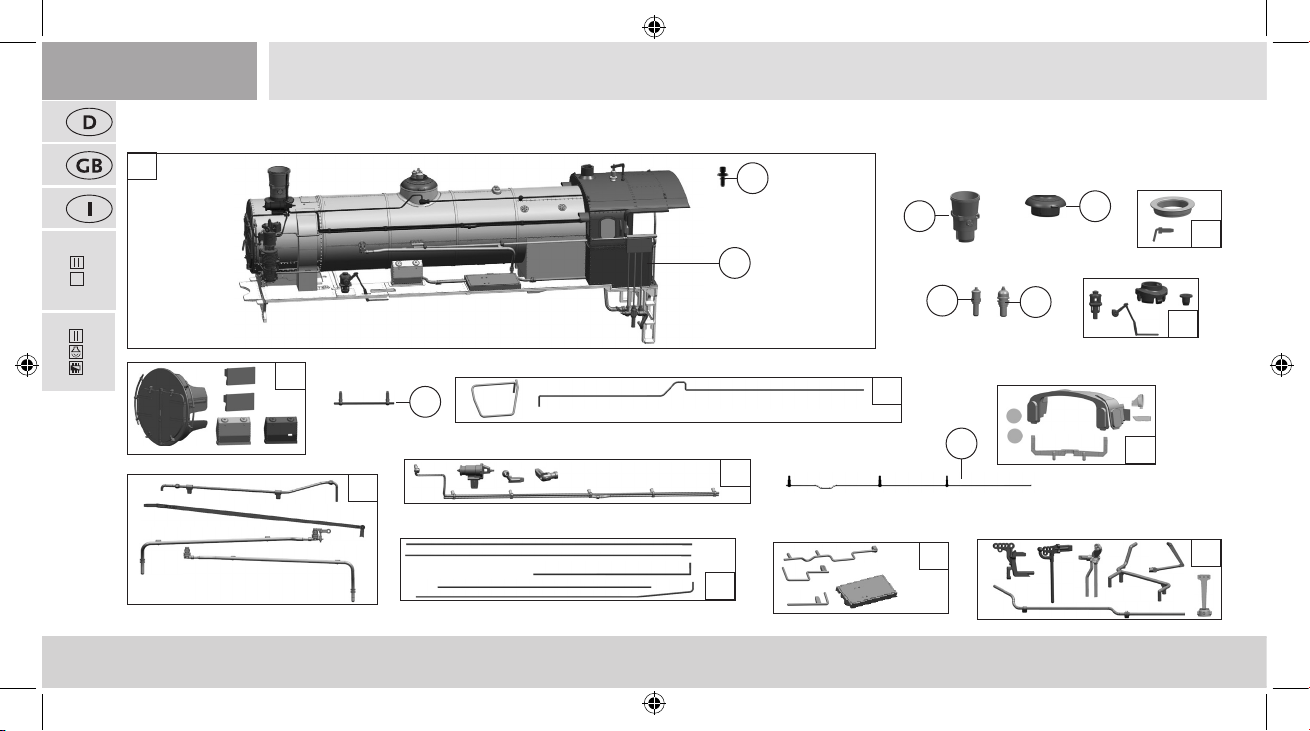
Ersatzteilliste / Replacement parts / Liste des pièces de rechange
1
7
16
19
72124
2
72125
10
18
17
6
13
11
9
8
14
Symbolische Darstellung / Symbolic Illustration
62
72124.indd 62 05.04.2019 12:24:16
5
4
3
12
15
Page 63
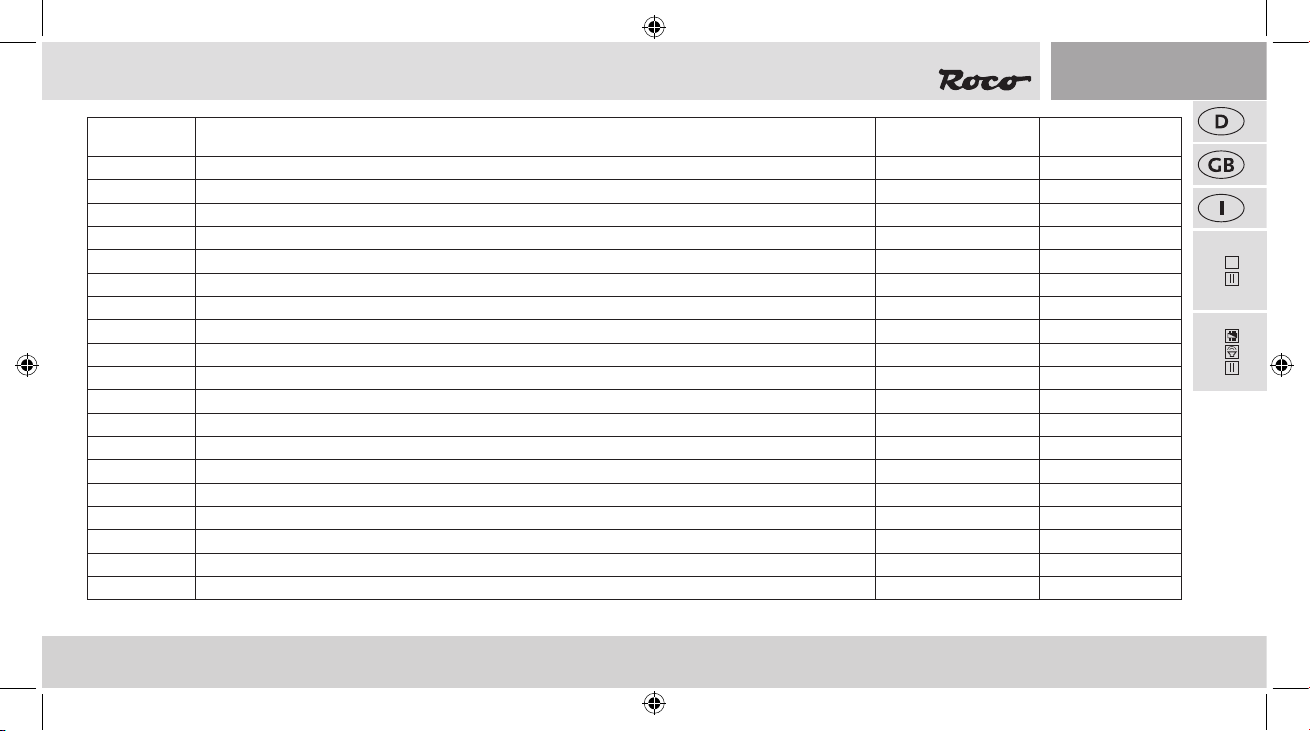
Pos. Nr. / Pos.no. Art.-Nr. / Art.no. Beschreibung / Description
Preisgruppe /Price bracket
1 Kessel kpl. Betr.Nr. 38.4110 / Boiler ass. 38.4110 142838 37
2 Führerhaus komplett / Drivers cab assembly 142839 20
3 TS - Rauchfang... / Part set chimney ... 133568 9
4 TS - Domring... / Part set dome ring... 135739 10
5 Ventil / Valve 121868 4
6 Ventil / Valve 121869 4
7 Lokpfeife / Loco whistle 122727 6
72124
8 TS - Pumpenleitungen / Part set pump lines 135740 6
9 TS - Leitungen / Part set lines 135743 6
10 TS - Rauchkammertür,.. / Part set Smoke chamber door,. 142841 11
72125
11 TS - Leitungen / Part set lines 133943 12
12 TS - Fenster, Lichtleiter / Part set window, light treanmission bar 135722 11
13 Kesselgriff / Boiler handrail 133582 8
14 Steuerleitungen / Control lines 133617 8
15 TS - Hebel,... / Part set lever,... 133580 9
16 Rauchfang / Chimney 137035 5
17 TS - Leitungen / Part set lines 137037 8
18 Rauchkammergriff / Handrail 142842 4
19 Domdeckel / Domecover 142840 6
63
72124.indd 63 05.04.2019 12:24:16
22
PluX
Page 64
PluX
22
1
4
72124
72125
12
2
13
15
17
5
9
6
7
14
10
8
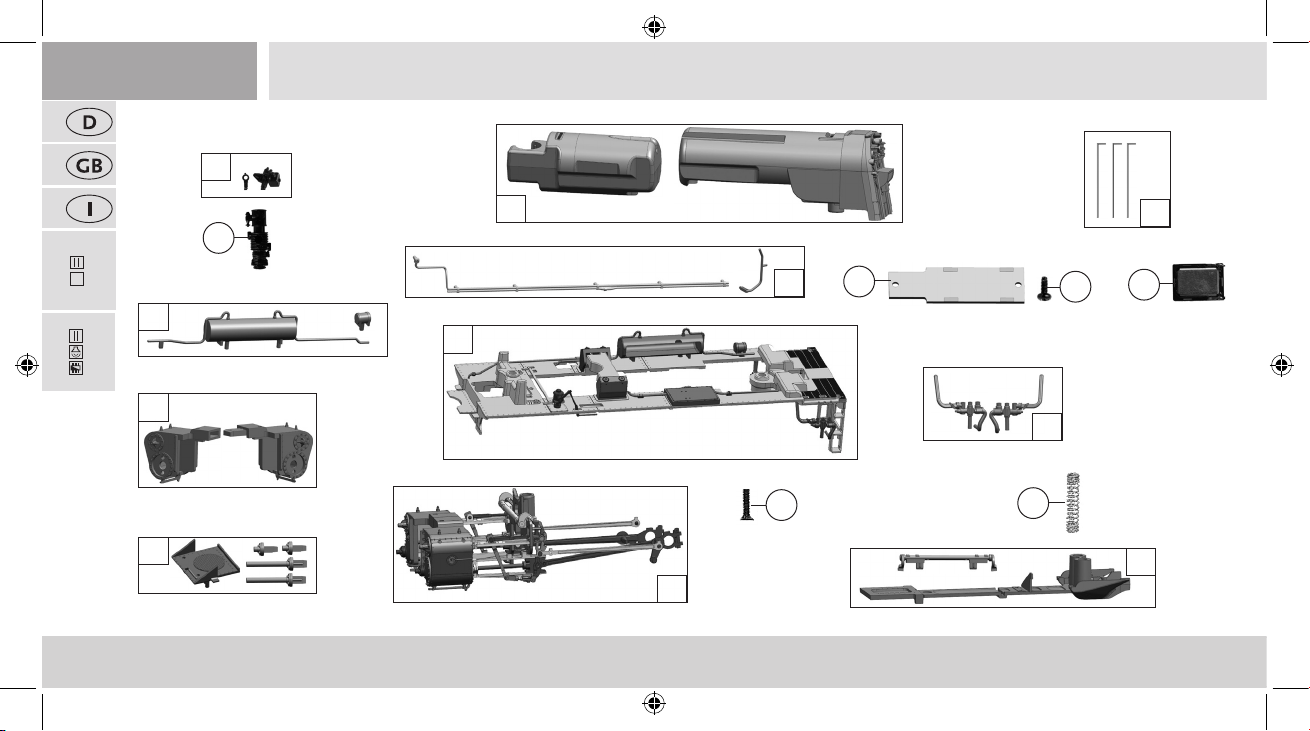
Symbolische Darstellung / Symbolic Illustration
64
72124.indd 64 05.04.2019 12:24:17
3
16
11
Page 65
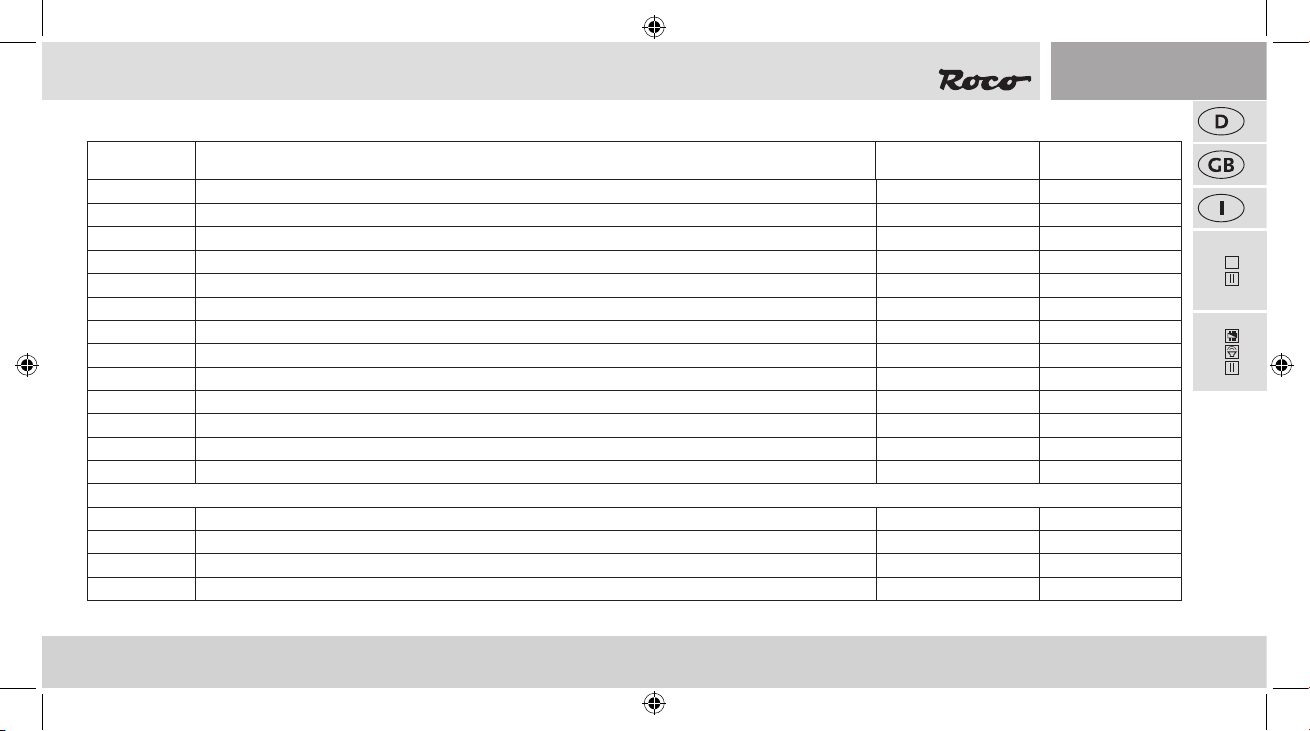
Pos. Nr. / Pos.no. Art.-Nr. / Art.no. Beschreibung / Description
Preisgruppe /Price bracket
1 TS - Luftpumpe / Part set air pump 122730 6
2 Luftpumpe / Air pump 122731 4
3 Stellhebel / Lever 133618 5
4 TS - Kesselgewicht... / Part set weight... 135738 14
5 Umlauf komplett / Running board assembly 135736 23
6 TS - Injektoren / Part set injectors 133581 14
72124
7 SK-Schraube M2x8 / SK-Screw M2x8 120189 3
8 Steuerung komplett / Steering assebly 135729 27
9 TS - Zylinderblock / Part set cylinder block 133937 10
72125
10 TS - Kolbenschutzrohr... / Part set piston protection tube 135719 8
11 TS - Abdeckung,... / Part set cover,... 133564 8
12 TS - Luftkessel / Part set air boiler 135744 5
13 TS - Leitungen / Part set lines 137038 7
Sound
14 Kontaktfeder / Contact spring 116876 3
15 Lautsprecherplatine / Printed circuit for loud speaker 133613 11
16 Lautsprecher / Loudspeaker 129524 16
17 GF-Schraube M1,6x4 / GF-Screw M1,6x4 114850 3
65
72124.indd 65 05.04.2019 12:24:17
22
PluX
Page 66
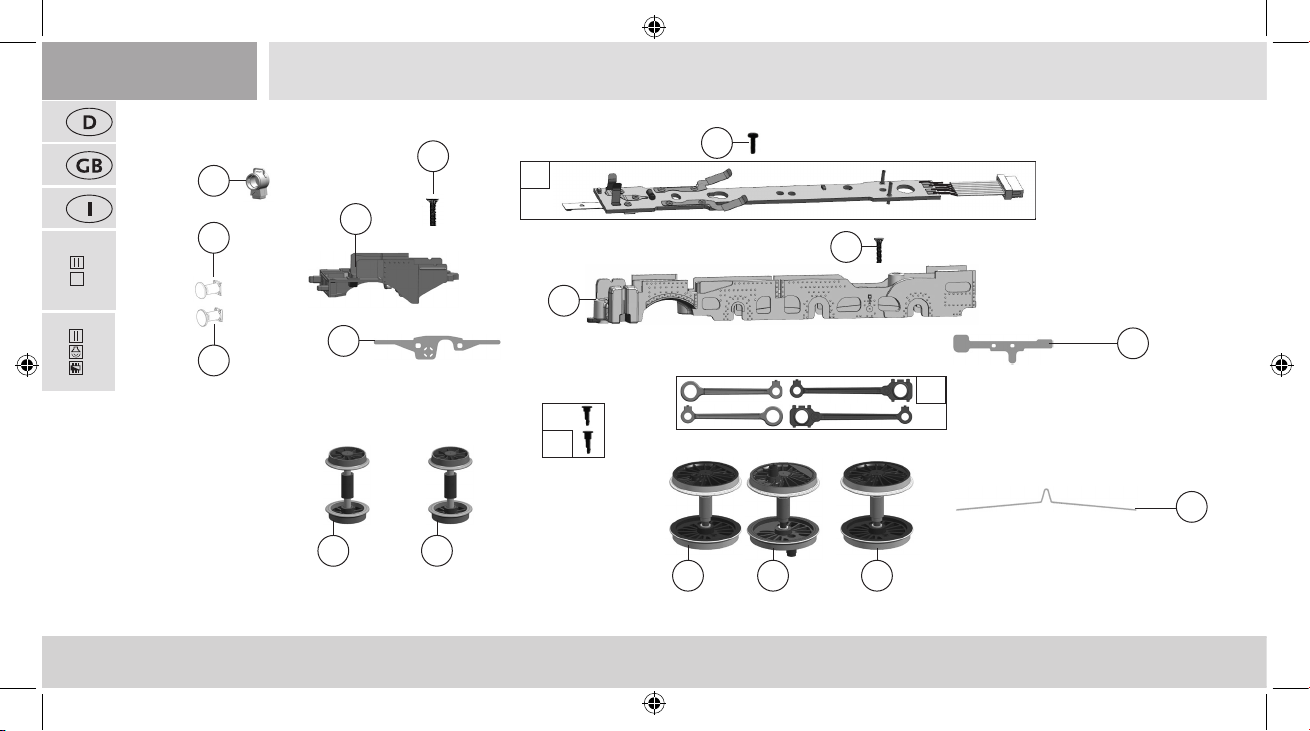
PluX
22
2
1
4
16
72124
72125
6
3
17
7
11
5
10
9
14
14
121312
Symbolische Darstellung / Symbolic Illustration
66
72124.indd 66 05.04.2019 12:24:17
8
15
Page 67
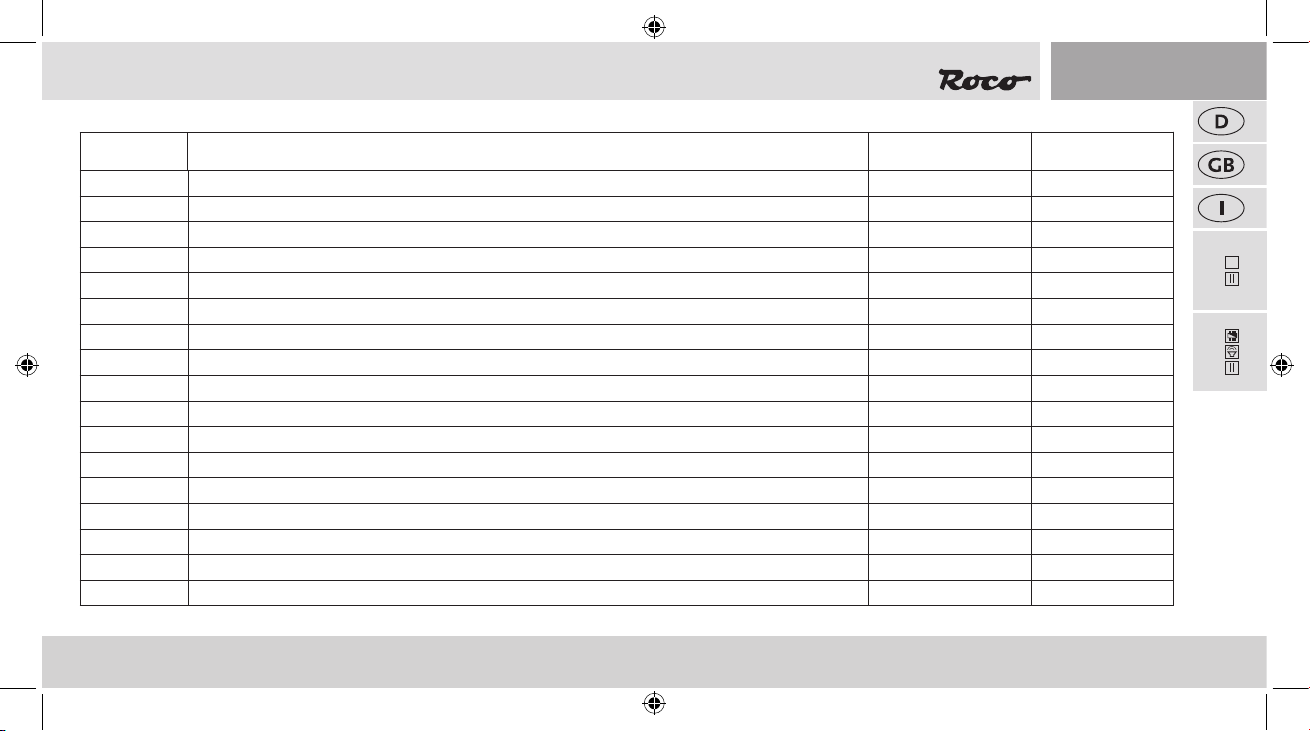
Pos. Nr. / Pos.no. Art.-Nr. / Art.no. Beschreibung / Description
Preisgruppe /Price bracket
1 Loklampe / Loco lamp / Lampe de locomotive 135728 11
2 SK-Schraube M2x5 / SK-Screw M2x5 / SK-Vis M2x5 115205 3
3 Pufferbohle / Buffer beams / Butoirs 135720 7
4 Lok-Radkontaktplatine / Loco wheel-contact printed circuit / Roue de loco circuit de contact 133958 26
5 Puffer ach / Buffer at / Tampon plat 131058 5
6 Puffer gewölbt / Buffer vaulted / Tampon incurvée 131059 5
72124
7 Lokgrundrahmen / Loco main frame / Loco châssis 133593 16
8 Radkontakt / Wheel contakt/ Contact roue 133602 6
9 TS-Kuppelbolzen / Part set pin / Jeu de chaume 133981 6
72125
10 TS-Kuppelstangen / Part set coupling rods / Jeu de barres d‘accouplement 135723 12
11 Vorlaufradkontakt / Wheel contact / Contacter inducteur 133601 6
12 Kuppelradsatz / Wheelset / Roues 135724 18
13 Treibradsatz / Wheelset / Roues 135725 18
14 Vorlaufradsatz / Wheelset / Roues 110452 14
15 Achsfeder / Axle spring / Ressort de l‘essieu 133597 4
16 GF-Schraube M1,6x4 / GF-Screw M1,6x4 / GF-Vis M1,6x4 114850 3
17 SK-Schraube M1,6x7 / SK-Screw M1,6x7 / SK-Vis M1,6x7 116493 3
67
72124.indd 67 05.04.2019 12:24:17
22
PluX
Page 68
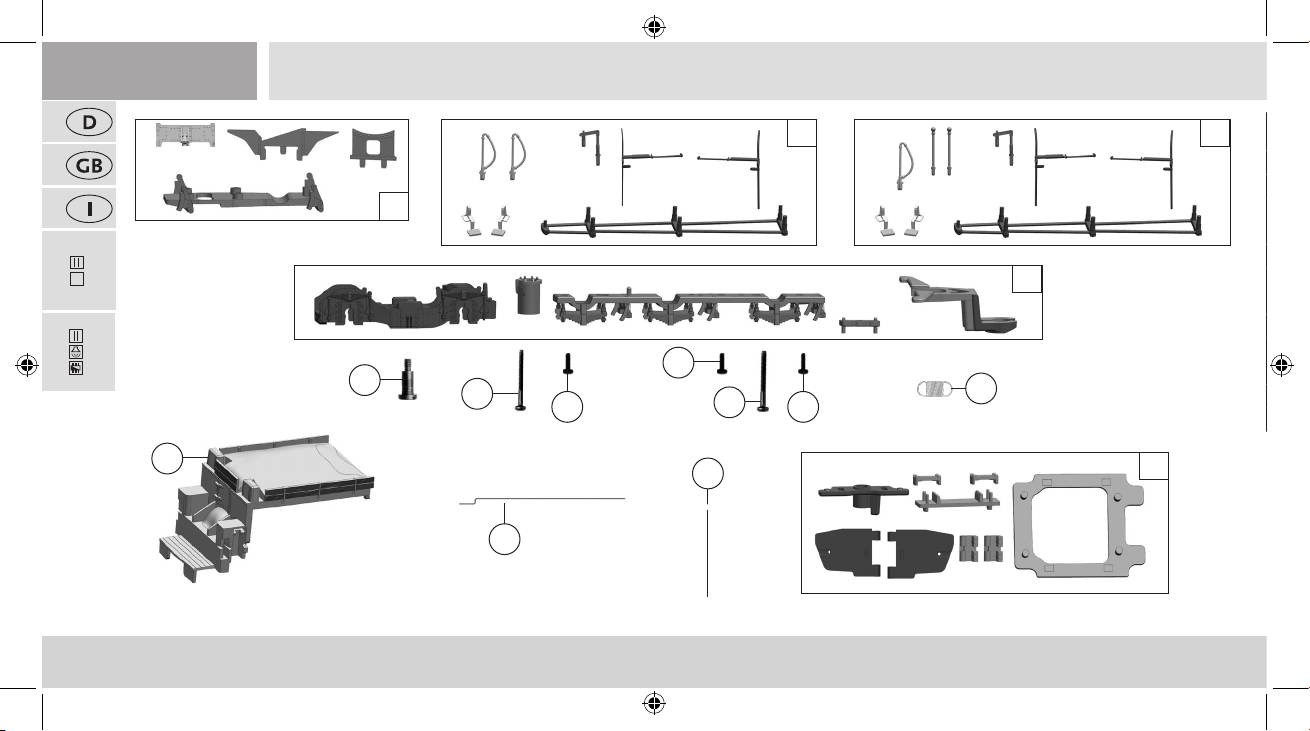
PluX
22
1
1 TS - Bremsgestänge,... / Part set brake linkage,... 133576 8
2 TS - Lokboden,... / Part set loco bottom,... 133566 7
3 TS - Bremsgestänge,... / Part set brake linkage,... 135713 14
4 Ansatzschraube / Screw / 133797 5
5 Zugfeder / Spring 86249 3
6 GF-Schraube M1,6x4 / GF-Screw M1,6x4 114850 3
7 GF-Schraube M2x18 / GF-Screw M2x18 115062 3
8 Kohleaufsatz lackiert / Coal part coated 135716 18
9 TS - Tendertür,... / Part set tender door,... 133571 9
10 Türfeder / Door spring 133604 6
11 Drahtstift / Pin 110641 4
12 TS - Stützen,... / Part set support,... 135715 8
3
12
72124
2
72125
4
7
6 6
8
10
Symbolische Darstellung / Symbolic Illustration
68
72124.indd 68 05.04.2019 12:24:18
6
7
5
11
9
Page 69
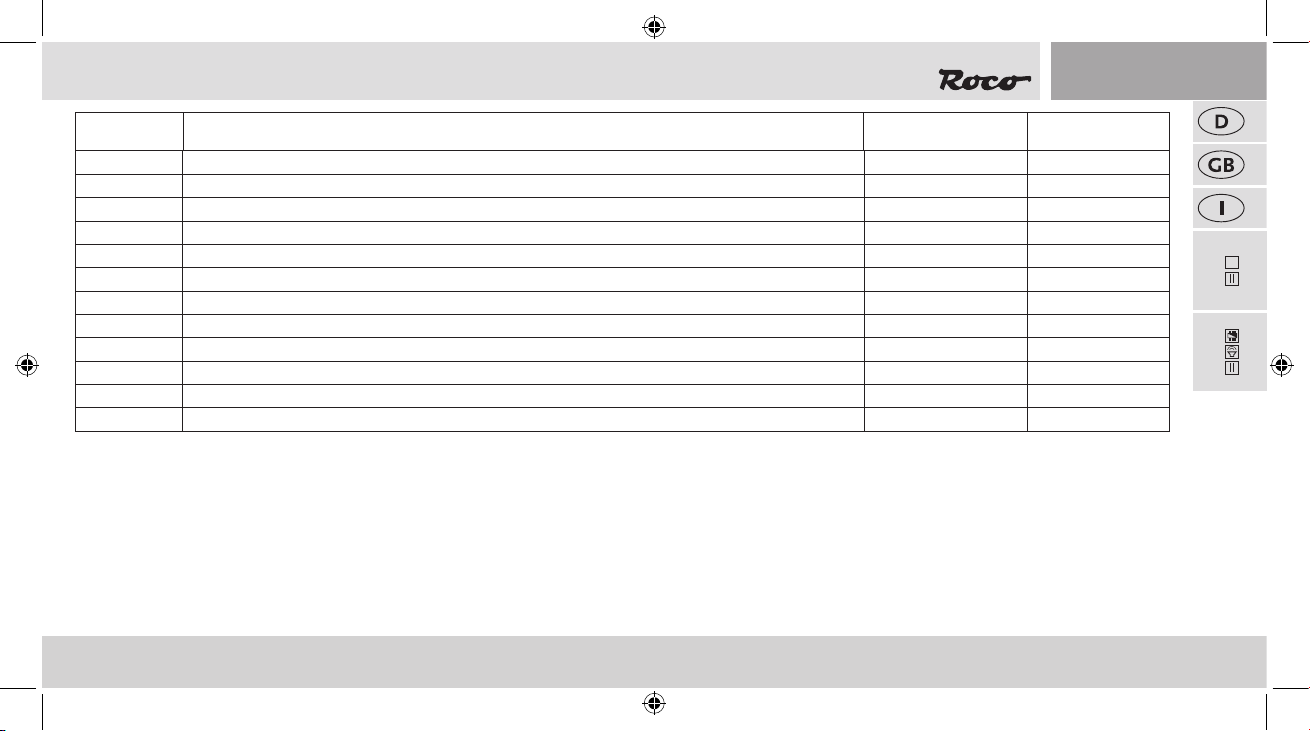
Pos. Nr. / Pos.no. Art.-Nr. / Art.no. Beschreibung / Description
Preisgruppe /Price bracket
1 TS - Bremsgestänge,... / Part set brake linkage,... 133576 8
2 TS - Lokboden,... / Part set loco bottom,... 133566 7
3 TS - Bremsgestänge,... / Part set brake linkage,... 135713 14
4 Ansatzschraube / Screw / 133797 5
5 Zugfeder / Spring 86249 3
6 GF-Schraube M1,6x4 / GF-Screw M1,6x4 114850 3
7 GF-Schraube M2x18 / GF-Screw M2x18 115062 3
72124
8 Kohleaufsatz lackiert / Coal part coated 135716 18
9 TS - Tendertür,... / Part set tender door,... 133571 9
10 Türfeder / Door spring 133604 6
72125
11 Drahtstift / Pin 110641 4
12 TS - Stützen,... / Part set support,... 135715 8
69
72124.indd 69 05.04.2019 12:24:18
22
PluX
Page 70
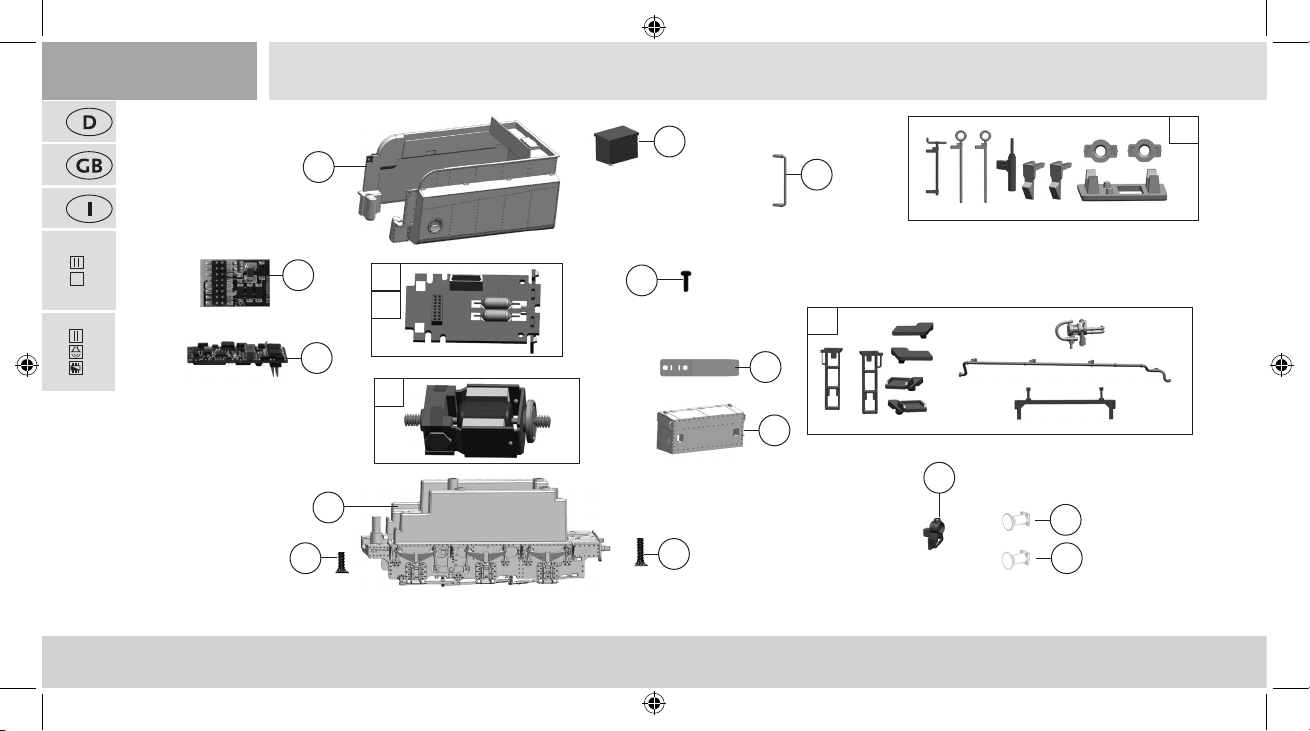
72124
PluX
22
17
1
15
4
3
72125
19
18
2
6
5
8
7
10
16
9
13
Symbolische Darstellung / Symbolic Illustration
70
72124.indd 70 05.04.2019 12:24:19
14
11
12
Page 71
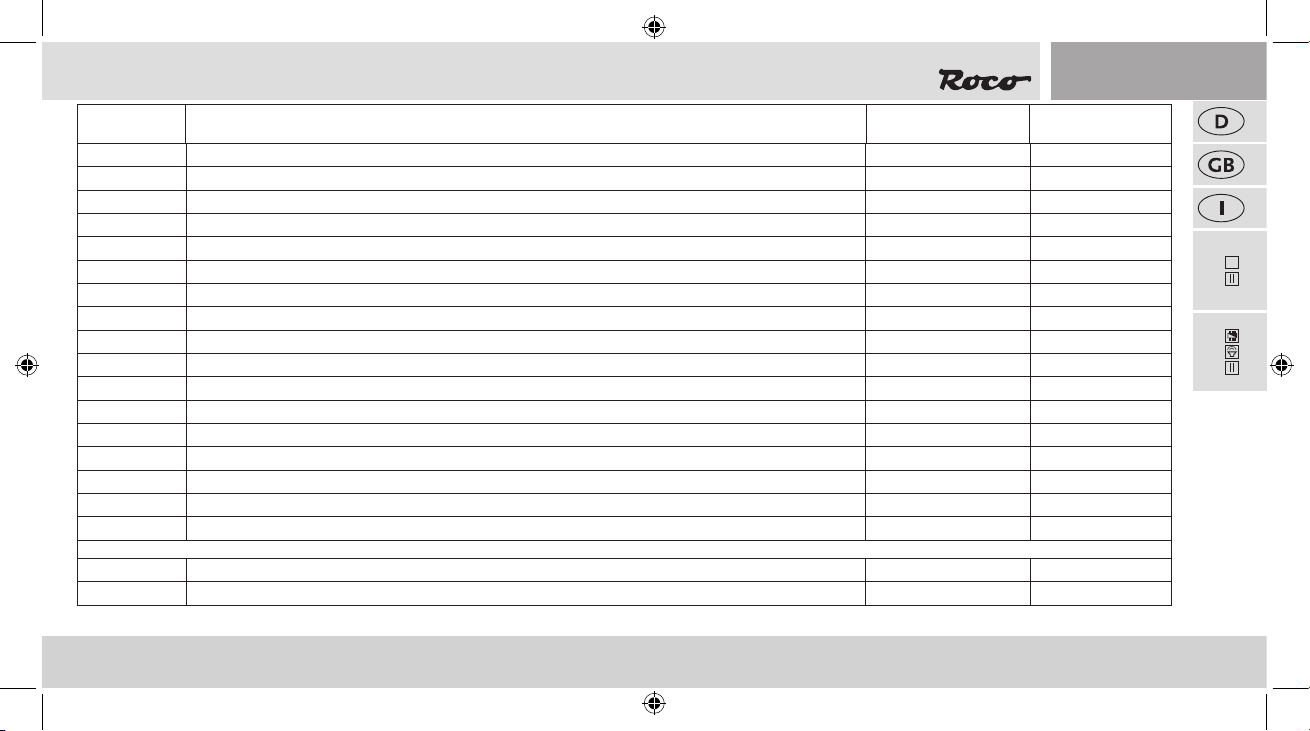
Pos. Nr. / Pos.no. Art.-Nr. / Art.no. Beschreibung / Description
1 Tendergehäuse / Tender body 142836 18
2 Tenderplatine komplett / Printed circuit assembly for tender 134102 19
3 Brückenstecker 16 Plux / Connector 16plux 129630 10
4 TS - Handgriff,... / Part set handrail,... 133573 8
5 TS - Leiter,... / Part set ladder,... 135660 8
6 GF-Schraube M1,6x4 / GF-Screw M1,6x4 114850 3
7 Motor / Motor 133609 28
8 Radkontakt / Wheel contakt 133608 6
9 Tendergrundrahmen / Tender main frame 142837 13
10 Werkzeugkasten / Toolbox 135731 12
11 Puffer ach / Buffer at 131058 5
12 Puffer gewölbt / Buffer vaulted 131059 5
13 SK-Schraube M1,6x5 / SK-Screw M1,6x5 115317 3
14 SK-Schraube M1,6x8 / SK-Screw M1,6x8 115655 3
15 Handgriff / Handrail 135717 4
16 Tenderlampe / Tender lamp 136144 8
17 Spind klein / Small locker 137032 4
Sound
18 Tenderplatine komplett / Printed circuit assembly for tender 133963 19
19 Sounddecoder / Sounddecoder 129300 39
Preisgruppe /Price bracket
22
PluX
72124
72125
71
72124.indd 71 05.04.2019 12:24:19
Page 72
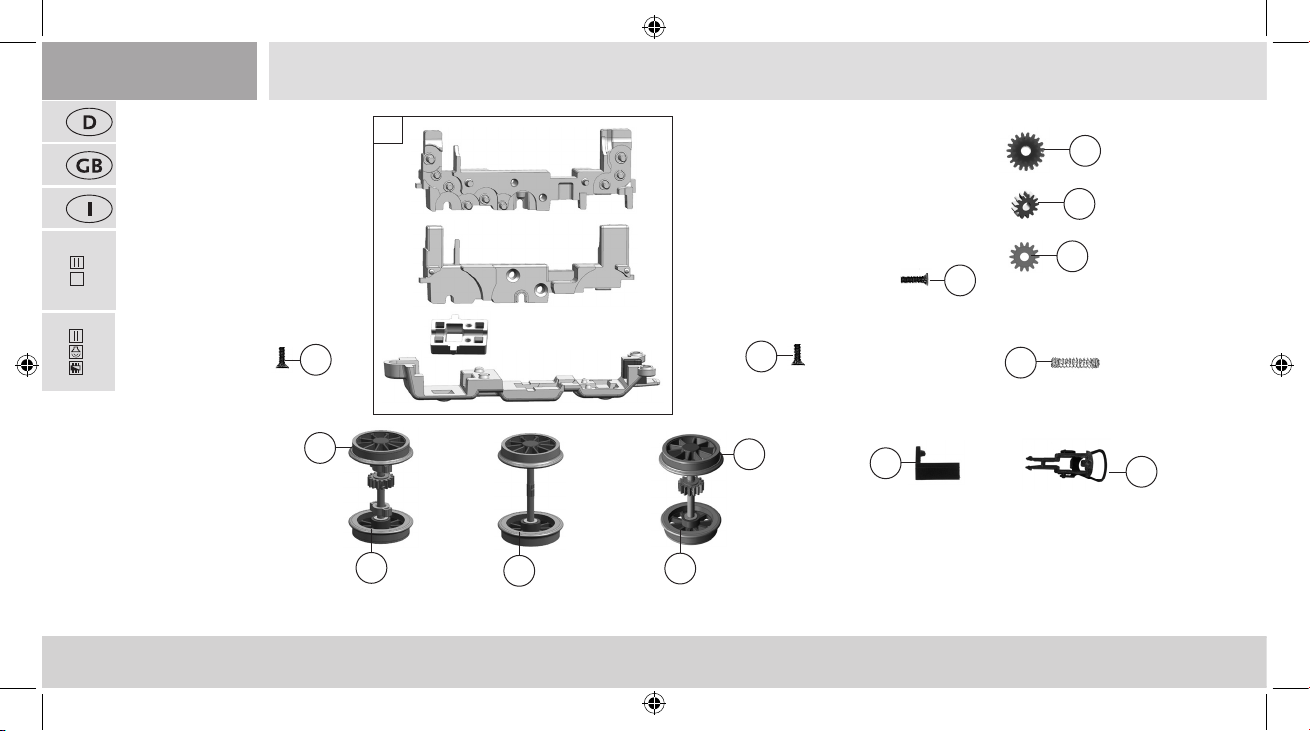
PluX
22
1
2
3
72124
4
8
72125
10
9
7
5
6
9
10
11
Symbolische Darstellung / Symbolic Illustration
72
72124.indd 72 05.04.2019 12:24:20
12
13
Page 73
Pos. Nr. / Pos.no. Art.-Nr. / Art.no. Beschreibung / Description
Preisgruppe /Price bracket
1 Getriebesatz 4tlg. / Gear set 4-parts / Engrenage set 4 pcs. 133589 18
2 Schneckenzahnrad doppelt / Worm gear doubled / Réducteur à deux reprises 86400 4
3 Zahnrad Z=13 / Gear Z=13 / équipement Z=13 86518 3
4 Zahnrad Z=14 / Gear Z=14 / équipement Z=14 133605 6
5 Druckfeder / Compression spring / Le ressort de compression 110690 4
6 Standardkupplung / Standard coupling / Couplage standard 89246 6
7 Tenderdeichsel / Tender drawbar / Tendre arbre 125942 8
72124
8 SK-Schraube M1,6x8 / SK-Screw M1,6x8 / SK-Vis M1,6x8 115655 3
9 SK-Schraube M1,6x5 / SK-Screw M1,6x5 / SK-Vis M1,6x5 115317 3
10 Haftrings.10Stk.10,5-13,5mm / Set w. traction tieres 10pcs / Ensemble d‘anneau de liaison 10 pcs 133238 10
72125
11 Tenderradsatz m. HR m.ZR / Wheelset w. traction tieres w. gear / Engrenages offres 133606 18
12 Tenderradsatz o.HR o.ZR / Wheelset without traction tieres/gear / Frontière engrenages 135733 17
13 Tenderradsatz m. HR m.ZR / Wheelset w. traction tieres w. gear / Engrenages offres 135734 18
73
72124.indd 73 05.04.2019 12:24:20
22
PluX
Page 74
PluX
22
3
1
2
72124
72125
o. Abb. / no ill.
7
Glasbox Oberteil
Glass box upper part
Boîte de verre partie supérieure
5
o. Abb. / no ill.
8
Box Unterteil
Box bottom
Fond de boîte
74
72124.indd 74 05.04.2019 12:24:20
6
4
Page 75
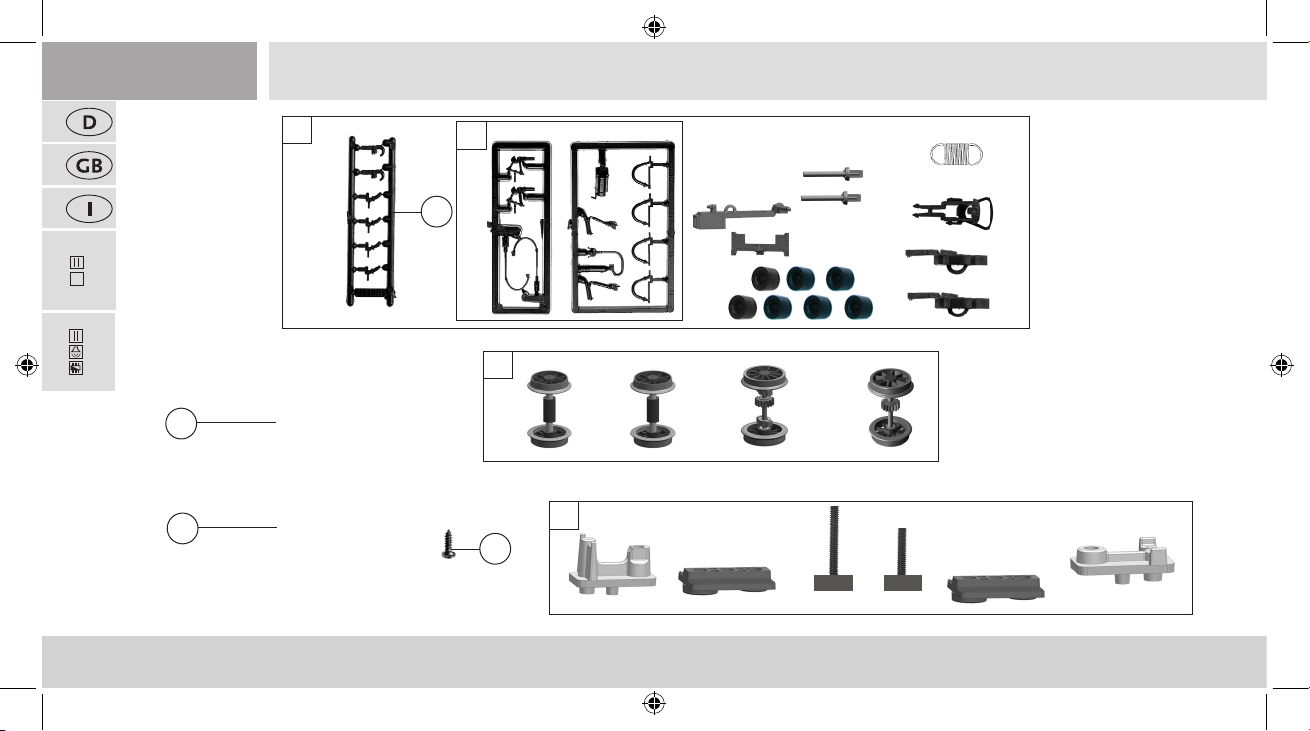
Pos. Nr. / Pos.no. Art.-Nr. / Art.no. Beschreibung / Description
Preisgruppe /Price bracket
1 Steckteilesatz / Part set / Jeu de 108322 7
2 Steckteilesatz / Part set / Jeu de 107808 4
3 Zurüstbeutel / Bag with accessories / Sac avec 136703 12
4 TS-Verpackung / Part set packaging / Jeu de conditionnement 96317 10
5 TS-Austauschradsatz / Part set replacement wheelset / Jeu de roues de remplacement 135685 28
6 Schraube 2,2x6,5 / Screw 2,2x6,5 / Vis 2,2x6,5 111304 3
7 Glasbox Oberteil / Glass box upper part / Boîte de verre partie supérieure 96233 11
72124
8 Box Unterteil / Box bottom / Fond de boîte 96232 11
72125
75
72124.indd 75 05.04.2019 12:24:20
22
PluX
Page 76
Bitte bewahren Sie die Verpackung des Modells sorgfältig auf. Beim Abstellen des Modells bietet sie den besten Schutz. Ein mit beigelegten Zurüstteilen aufgerüstetes Modell paßt nur bedingt wieder in die Originalverpackung hinein, da diese aus Gründen der Transportsicherung sehr eng sein muß. Kleinere Teile
des Modells, wie z.B. Puffer, sind wegen Detailtreue als aufgerüstete Steckteile ausgeführt und sind daher mit dem Grundkörper nicht ganz fest verbunden.
Beim selbstverschuldeten Verlust möchten Sie bitte ein solches Teil neu bestellen. (In diesem Fall können Sie diese Teile auf dem Ersatzteilweg nachbestellen,
eine Reklamation kann nicht geltend gemacht werden.) Achtung! Bei unsachgemäßem Gebrauch besteht Verletzungsgefahr durch funktionsbedingte scharfe
Kanten und Spitzen! Änderungen von Konstruktion und Ausführung vorbehalten!
Don‘t throw your box in the dustbin. If your model is not in use this box will keep it safe. If kits are mounted on a wagon it will be slightly tight when placing it
in the original box. This guarantees safe transport. To keep the model like the original, smaller parts (e.g. buffers) had been manufactured separately from the
body and are not tightly xed on it. Therefore they probably can get lost. In this case you certainly may reorder them but a complaint would not be acceptable.
Attention! At an incorrect use there exists danger of hurting because of cutting edges and tips! We reserve the right to change the construction and design!
Veuillez conserver ce mode d’emploi ainsi que l’emballage en vue d’un futur emploi. L’emballage se prête particulièrement bien pour stocker et protêger
votre modèle lorqu’il n’est pas en service. Un wagon entièrement êquipê de ses pièces de nition ne rentre plus dans son emballage qu’après avoir dégagé la
place nécessaire à l’aide d’un coûteau n et bien guisé aux endroits cù sont montés ces piéces. La stabilité et la sécurite de l’emballage lors du transport du
modèle de l’usine à votre detallant (ou même à vous) impose une réduction au stricte minimum de toute place découpée et non utilisée, raison pour laquelle
ces d´coupes ne peuvent malheureusement pas être aménagées déjà en usine. Quelques petites pièces de nition (des tampons p. e.) ne sont pas moulées
d’un seul bloc avec leurs bases, mais séparément rapportées en vue d’une réalisation plus détaillée. Cela implique le risque de perte de ces composants.
Dans ce cas, vous pouvez commander ces pièces aux S.A.V. ROCO; nous ne pouvons cependant pas donner suite à une réclamation èventuelle à cause de
ces pièces perdues. Attention! II y a danger de blessure à un emploi incorrect à cause des aiguilles et arêtes vives! Nous reservons le droit de modier la
construction et le dessin!
Modelleisenbahn GmbH
A-5101 Bergheim
Plainbachstraße 4
Email: [email protected]
Tel.: 00800 5762 6000
(kostenlos/ free of charge/ gratuit)
International: +43 820 200 668
(kostenpichtig / chargeable / avec des
coûts - Zum Ortstarif aus dem Festnetz /
local tariff for landline / prix d‘une appel
locale depuis du téléphone xe - Mobilfunk / Mobile max. 0,42€/min. incl. VAT)
AT|D|CH
www.roco.cc
Alter/Age
14
+
CE
Modelleisenbahn GmbH
A-5101 Bergheim
807212420 IV / 2019
72124.indd 76 05.04.2019 12:24:21
 Loading...