

Page 1
12
Page 2

2 11
Betriebsbedingungen: Es empfiehlt sich, die Lok
30 Minuten vorwärts und 30 Minuten rückwärts
ohne Belastung einlaufen zu lassen, damit Ihr
Modell einen optimalen Rundlauf und beste
Zugkraft bekommt. Der kleinste befahrbare Radius für dieses Modell ist R2 des ROCO-Gleissystems (R2 = 358 mm).
Der einwandfreie Lauf Ihrer Lokomotive ist nur auf
sauberen Schienen gewährleistet. Hierzu empfehlen wir den ROCO-Schienenreinigungswagen
Art. Nr. 46400 und bei etwas stärkerer Verschmutzung den ROCO-Schienen-Reinigungs-
gummi Art. Nr. 10002.
Damit Ihnen Ihre Lokomotive lange Freude bereitet, sind regelmäßig (ca. alle 30 Betriebsstunden)
gewisse Servicearbeiten zweckmäßig:
1.
Reinigung der Radstromkontakte: Radstrom-
kontakte können auf unsauberen Schienen leicht
verschmutzen. Bitte entfernen Sie vorsichtig
mit einem kleinen Pinsel den Schmutz an den in
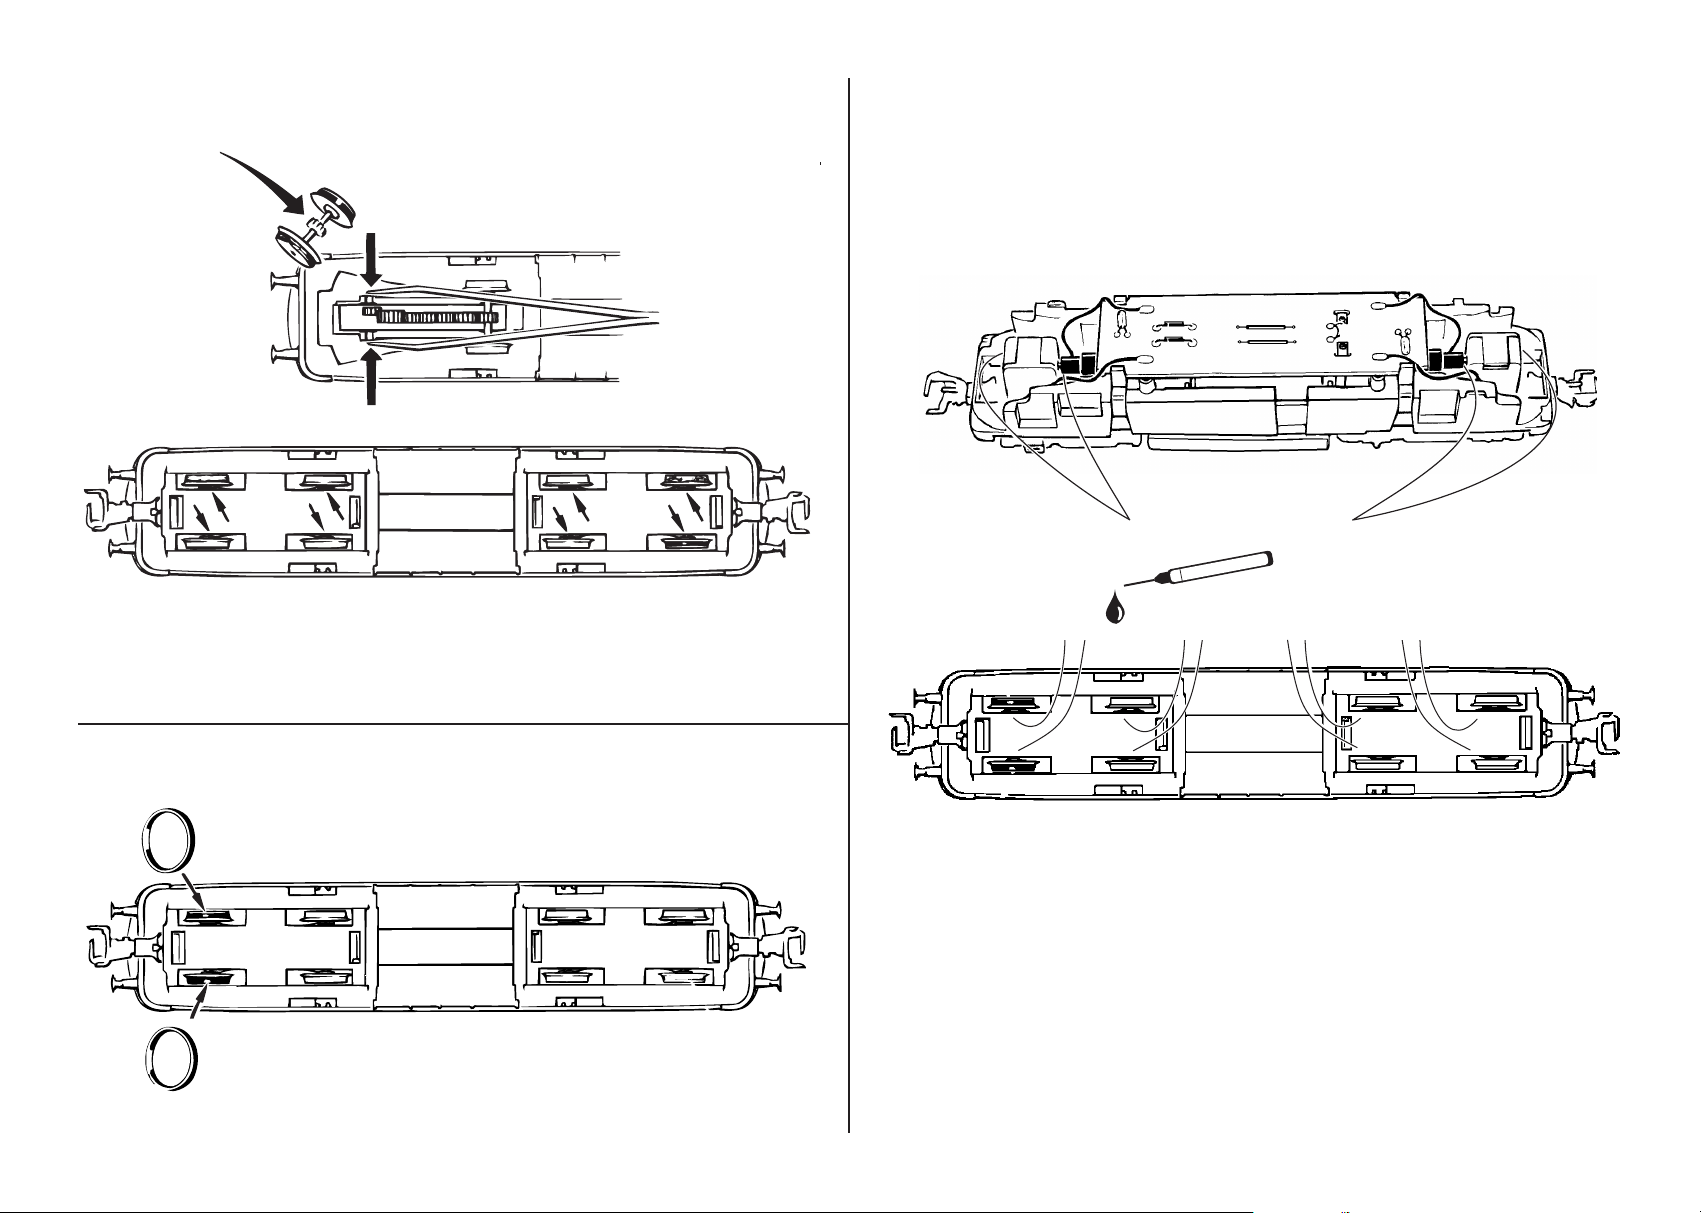
Fig. 4 gekennzeichneten Stellen. Dazu zuerst die
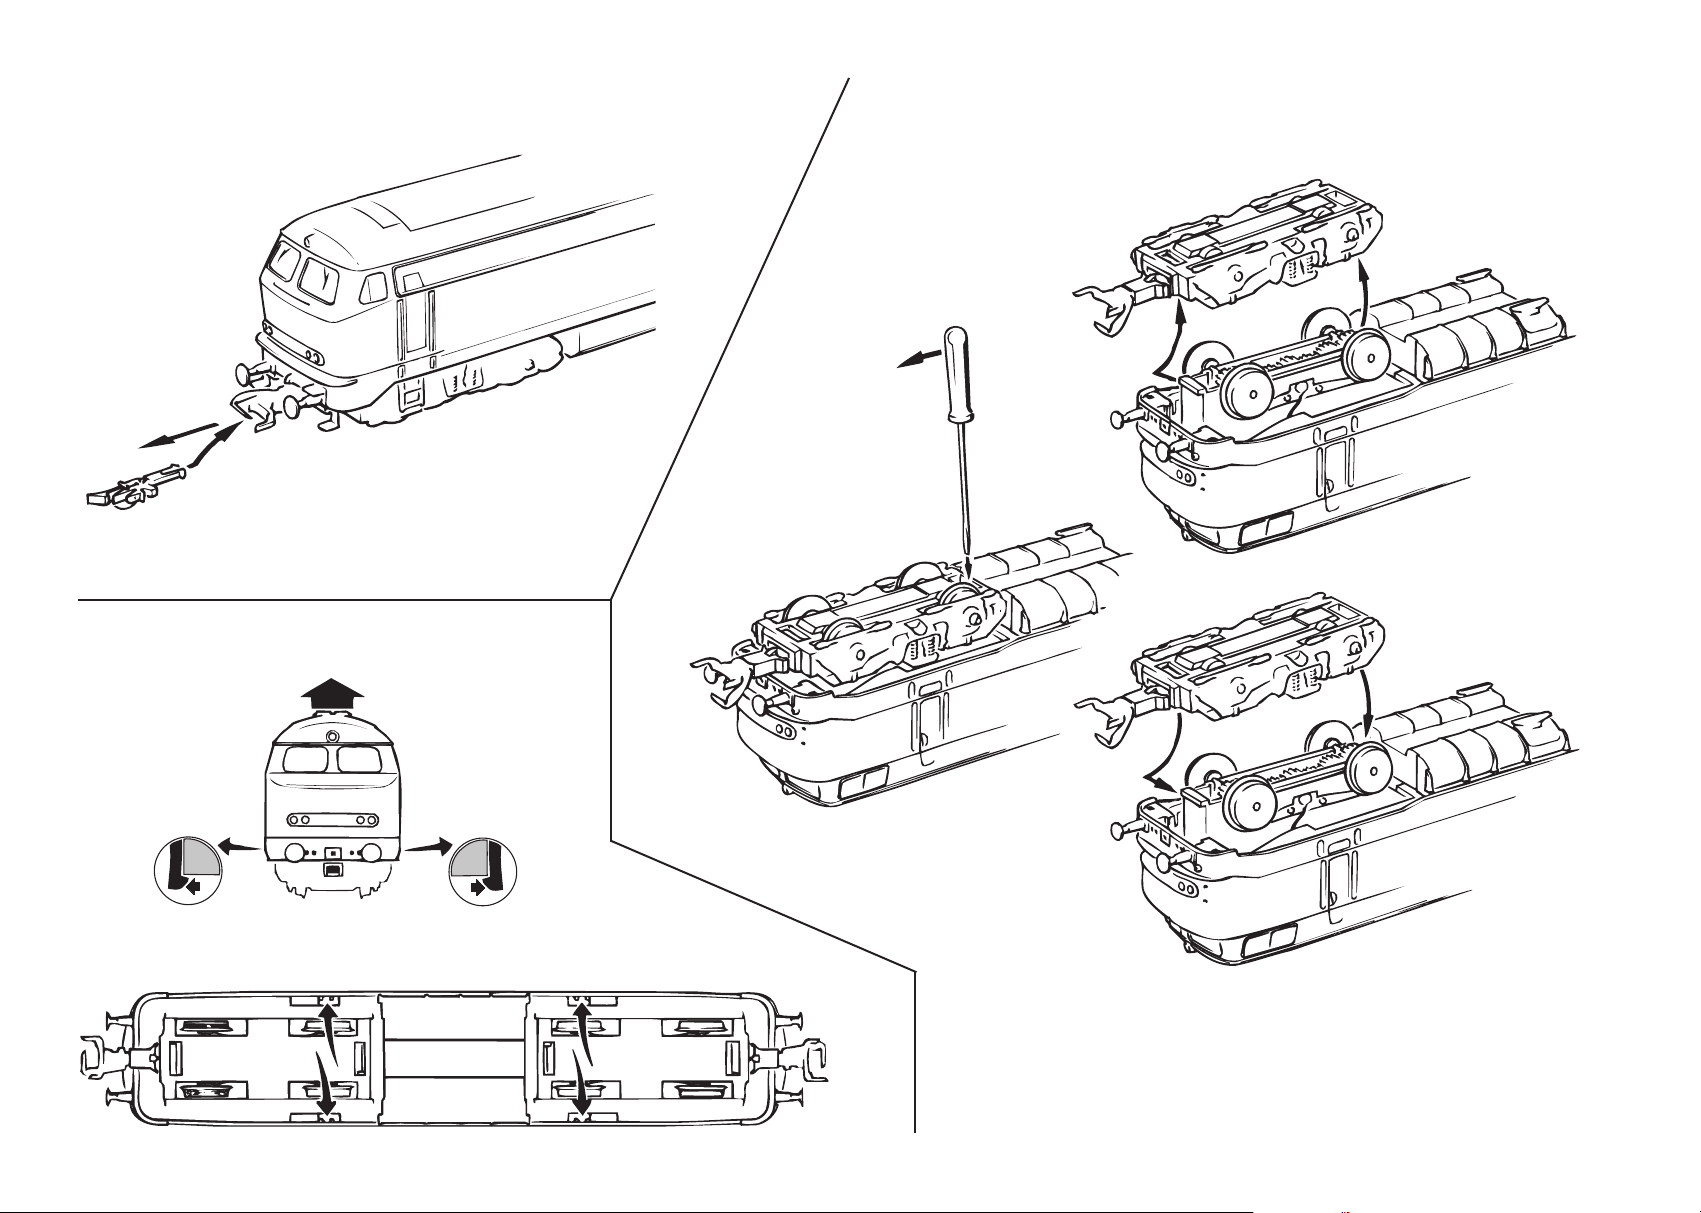
Drehgestellblende abnehmen (Fig. 3).
Zusammenbau
2.
Schmierung: Versehen Sie die im Schmierplan
in Fig. 6 gekennzeichneten Stellen mit nur kleinen
Öltropfen. Dazu zuerst das Lokgehäuse abneh-
men (Fig. 2). Wir empfehlen den ROCO-Öler Art.
Nr. 10906.
Zusammenbau
Inbetriebnahme Ihrer Lokomotive
D
Wartung und Pflege des Modells
D
3. Haftreifenwechsel: Zuerst die Drehgestellblenden abnehmen (Fig. 3). Danach den Haftreifen
mit einer Nadel oder einem feinen Schraubendreher abziehen (Fig. 5). Beim Aufziehen des neuen
Haftreifens bitte darauf achten, dass dieser sich
nicht verdreht.
Zusammenbau
Wir wünschen gute Fahrt!
Aufrüstung:
Sie können für Ihren Fahrbetrieb un-
ter verschiedenen Kupplungen wählen (Fig.1).Wir
empfehlen den Einsatz der ROCO-Kurzkupplung.
Page 3
10 3
Pour garantir un fonctionnement impeccable de
votre modèle au fil de longues années veuillez
assurer régulièrement (environ tous les 30 heures
d’exploitation) certains travaux d’entretien:
1.
Nettoyage des lames de contact aux roues:
Les lames de contact risquent de s’encrasser
rapidement sur des voies poussiéreuses (fig. 3).
Veuillez enlever la poussière aux endroits marqués
à la fig. 4 à l’aide d’un petit pinceau souple.
L’assemblage
2.
Graissage: N’appliquez qu’une tout petite
goutte aux endroits indiqués par le plan de
graissage (fig. 6) après avoir démonté la caisse de
votre locomotive (fig. 2). Nous vous recommandons
le graisseur à huile ROCO réf. 10906.
L’assemblage
Conditions de r
odage: Afin d’assurer les
meilleures conditions de marche tranquille et de
traction puissante à votre modèle nous vous
conseillons un rodage du modèle de 30 minutes
environ en marche avant et d’autres 30 minutes
en marche arrière. Pendant cette période la marche
doit se faire »haut le pied«. Le rayon minimal
admissible du modèle present est fixé à 358 mm,
soit le rayon R2 des voies ROCO.
Une marche impeccable de votre modèle n’est
réalisable que sur des voies vraiment propres. A
ces fins nous vous recommandons notre wagon-
nettoyeur ROCO réf. 46400 ou - en cas d’un
encrassement plus considérable de la voie - notre
gomme de nettoyage ROCO réf. 10002.
Entretien préventif du modèleMise en service de votre locomotive
F F
Les attelages: En vue d’une exploitation pratique
sur votre réseau vous pouvez choisir parmi plusieurs
types d’attelages conformes aux différents systèmes
d’attelage pratiqués en H0 (voir fig. 1). Nous vous
recommandons l’emploi de l’attelage court
ROCO.
3.
Échange des bandages d’adhérence:
Démontez d’abord le couvercle du carter des
engrenages (fig. 3). Déloguez ensuite les essieux
bandagées et enlevez, à l’aide d’une aiguille ou
d’un tourne-vis fin les bandages d’adhérence
(fig. 5). Lors du montage des nouveaux bandages
veuillez veiller à ce que les bandages ne soient
pas tordues.
L’assemblage
Bon voyage!
Page 4

4 9
Operating instructions: Before use is advisable
to let the loco go around about 30 minutes forwards and 30 minutes backwards without load, to
obtain an optimal circuit and best tractive power.
The smallest radius this model should run is R2 of
the ROCO track system (R2 = 358 mm).
Your locomotive will run smoothly on clean tracks
only. For this purpose we recommend using item
no. 46400, Roco track cleaning van, or item
no. 10002, Roco track cleaning rubber, for
removing heavy dirt.
To enjoy your locomotive for a long time, it is
necessary to service it regularly (i.e. after it has
been in operation for approximately 30 hours).
1.
Cleaning of wheel contacts: Wheel contacts
easily get dirty on tracks which are not entirely
clean. Use a small brush to remove dirt from
spots marked in fig. 4.Prior to cleaning the remove
gear cover (fig. 3).
Assembly
2.
Lubrication: Apply tiny oil drops to spots
marked in fig. 6. Prior to lubrication dismantle
locomotive (fig. 2). We recommend using item no
10906, Roco oiler.
Assembly
GB
Maintenance of the modelStarting locomotive operation
GB
Fittings: Operation is possible with different
couplings (fig. 1). We recommend using the Roco
close coupling.
Running in digital mode:
First remove loco
body (fig. 3). Then remove the jumper from the
interface. Finally put the plug of the chip into the
interface (fig. 8).
3.
Change of traction tyre: Remove gear cover
(fig. 3). Take out wheel set and remove traction
tyre using a pin or a fine screwdriver (fig.5).When
pressing on the new traction tyre please avoid
twisting it.
Assembly
Off you go!
Page 5
6 7
Fig. 1 Fig. 3
Fig. 2
1.
1.
1.
1.
2.
4.
3.
2.
2.
Page 6
8 5
Fig. 4 Fig. 6
Fig. 5
1.
1.
2.
ROCO-Öler Art.-Nr 10906
ROCO oiler item 10906
Graisseur ROCO réf. 10906
Page 7
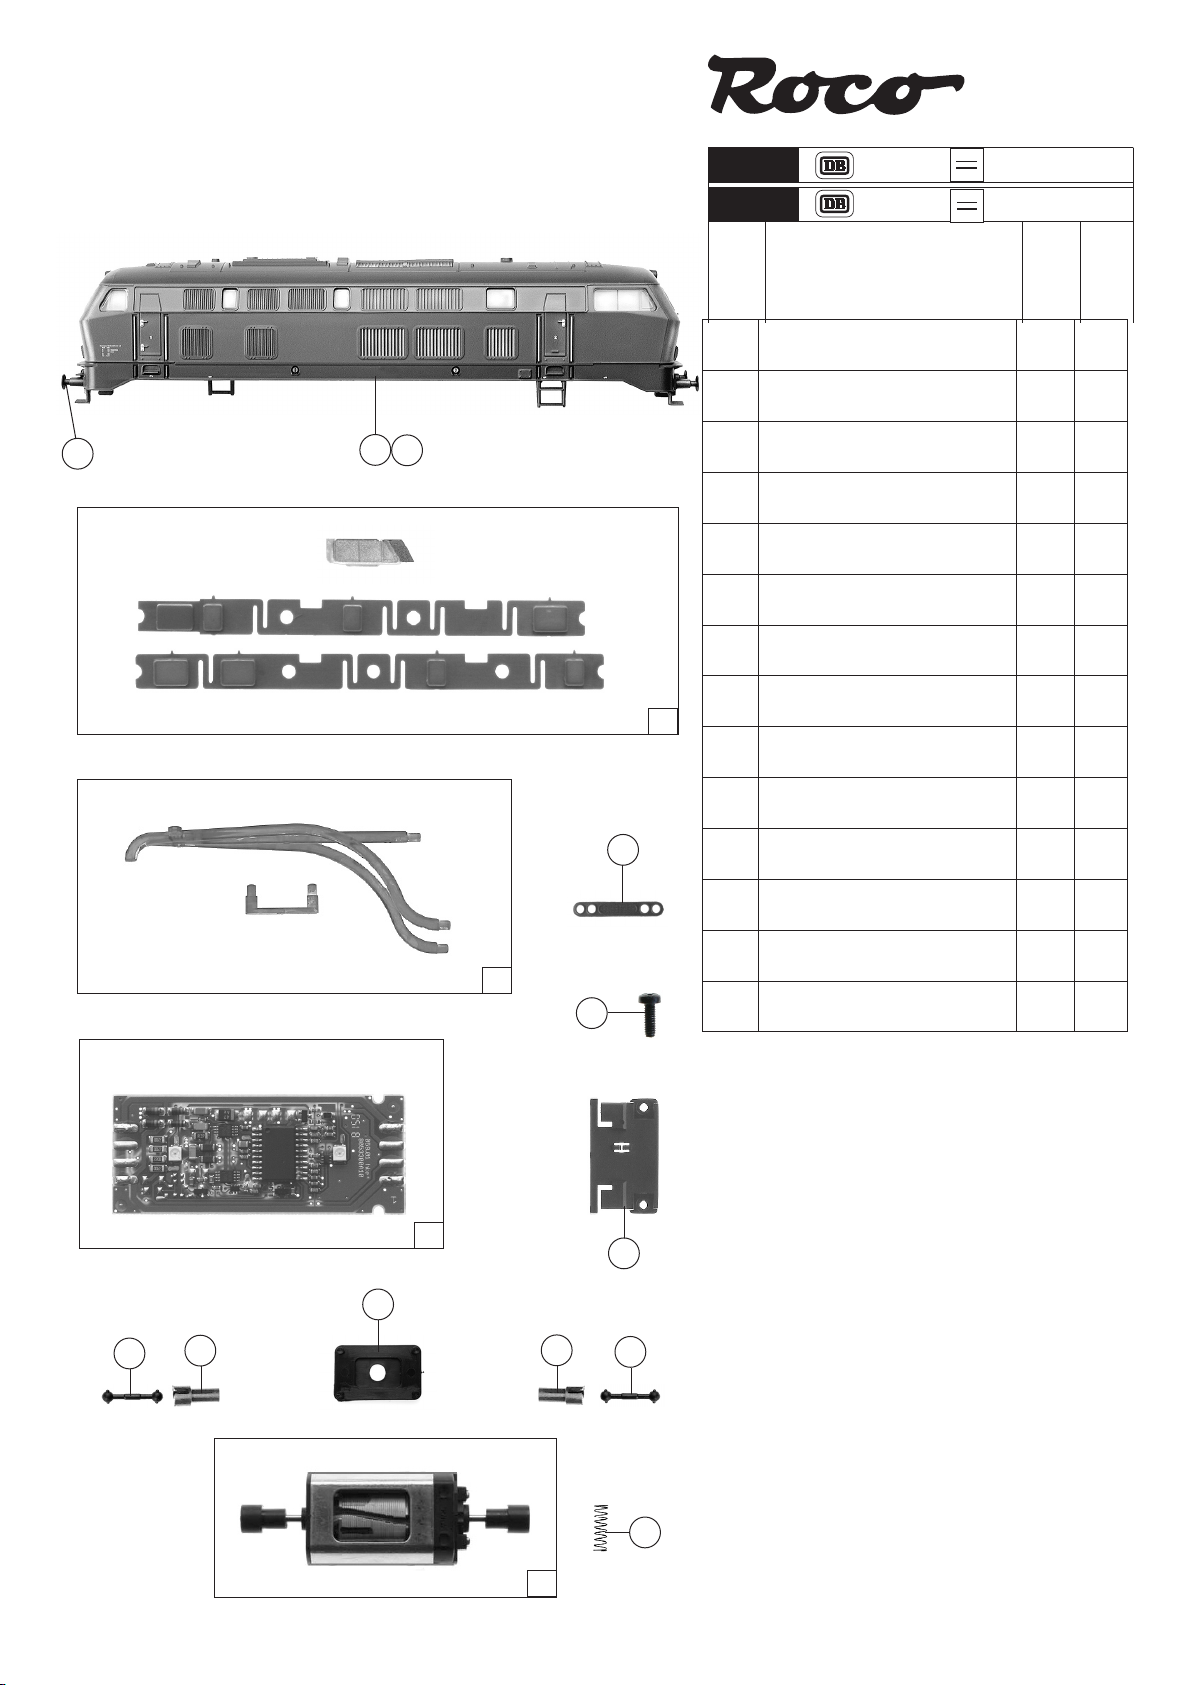
Ersatzteilliste
Replacement Parts
Symbolische Darstellung
Symbolic Illustration
51230
51231
Pos. Nr.
Pos.no.
1 Kardanwelle
Cardan shaft
2 Kardanschale lang
Cardan bearing long
11
3
12
9
4
13
7
3 Puffer
Buffer
4 Lichtblende
Light cover
5 Motor
Motor
6 Distanzplättchen
Spacer
7 GF-Schraube M2x6
Screw M2x6
8 Motorkontaktfeder
Motor contact spring
9 Fenstersatz
Windows set
10 Platinenverankerung
Printed circuit holder
11 Gehäuse kpl. Betr. Nr. 218 158-4 f 51231
Body assembly no. 218 158-4 f. 51231
12 Gehäuse kpl. Betr. Nr. 218 178-2 f. 51230
Body assembly no. 218 178-2 f. 51230
13 Lichtleitstäbesatz
Lights transmisson set
14 Playtime Platine
Playtime printed circuit
218
218
Beschreibung
Description
Art.-Nr.
Art.no.
87099 3
87100 3
88532 2
91405 10
112137 57
113017 3
114828 2
116812 2
116673 8
120508 2
120509 58
120510 58
120511 12
120939 58
Preisgruppe
Price bracket
14
10
6
1
2
2
1
8
Änderungen in Konstruktion und Ausführung vorbehalten
5
We reserve the right to change the construction and specification
Auflage 07/2006
Edition 07/2006
Best. Nr. 841982 Blatt 1476
Order no. 841982 Page 1476
1
Page 8
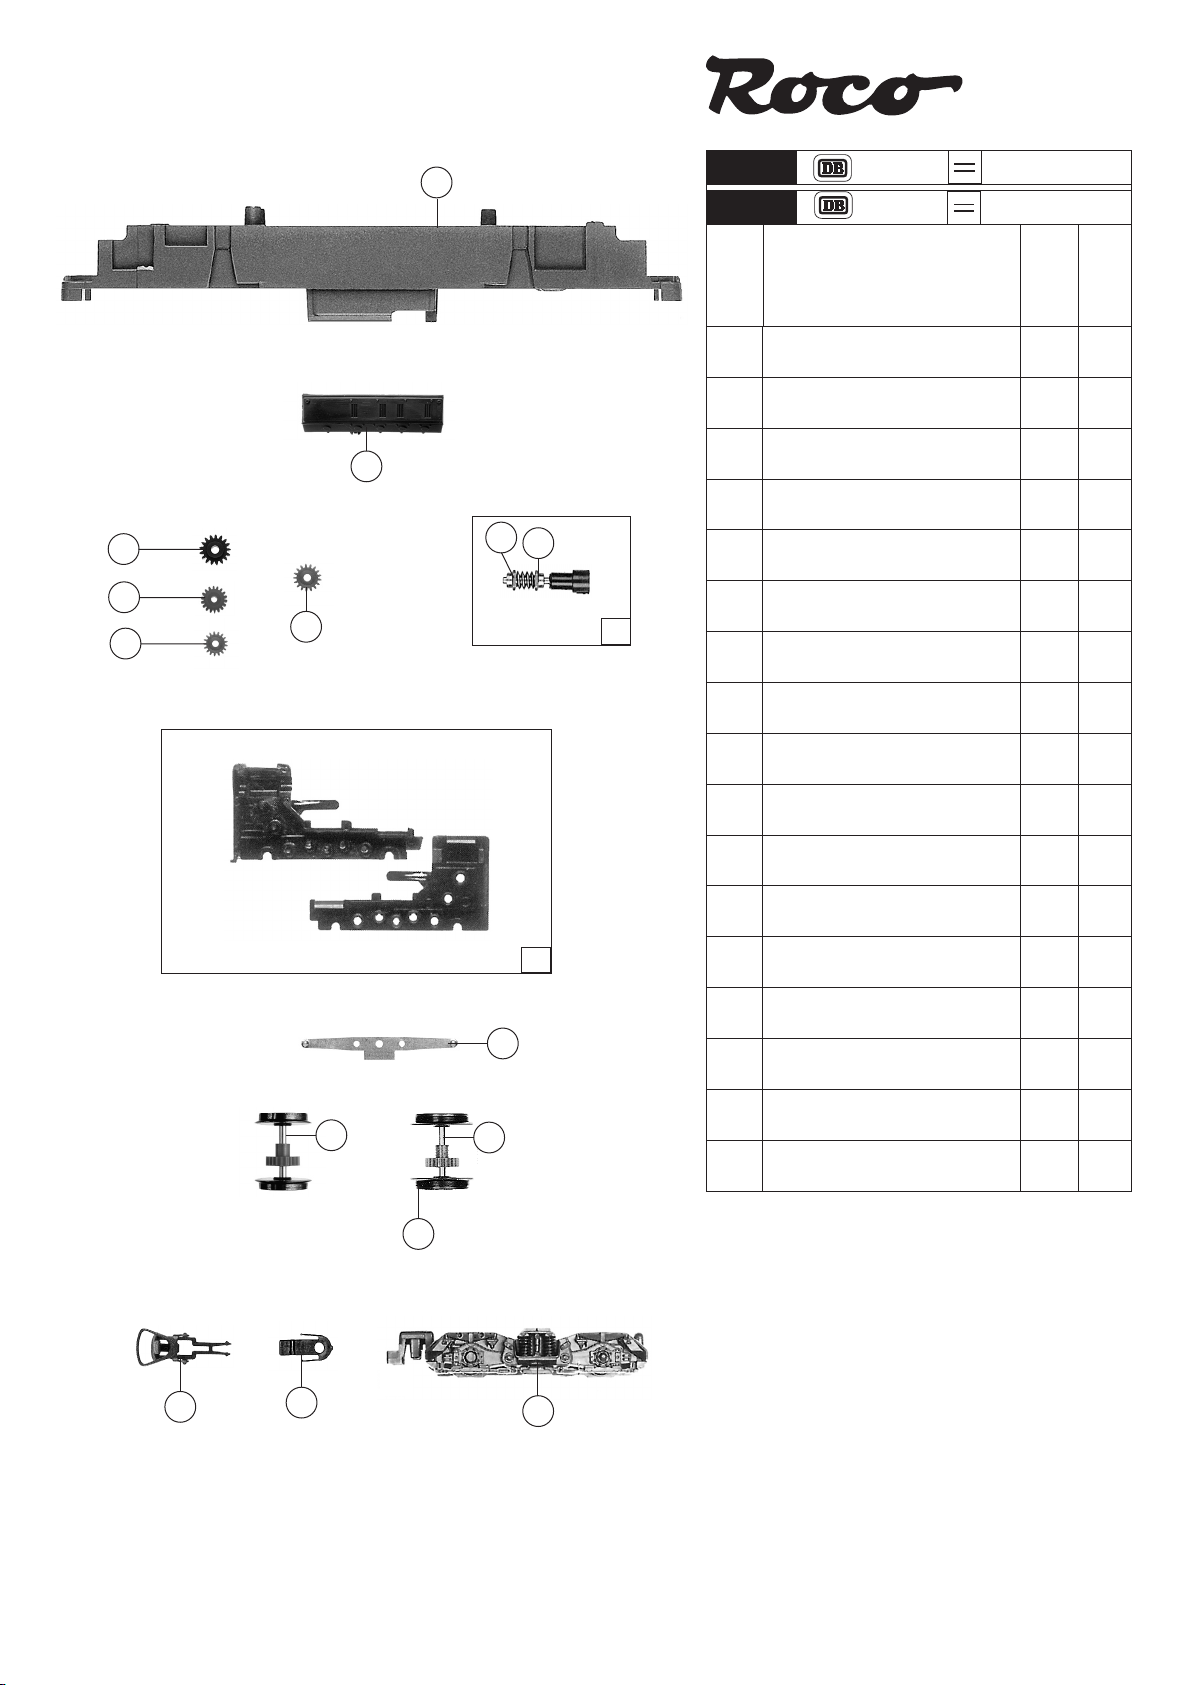
Ersatzteilliste
Replacement Parts
2
14
16
17
51230
51231
Pos. Nr.
Pos.no.
1 Haftringesatz
Traction tyre set
2 Zahnrad15/14
Gear wheel 15/14
3 Zahnrad Z=24
9
15
5
3
8
11
6
12
13
Gear wheel Z=24
4 Standardkupplung kpl.
Standard coupling ass.
5 Schneckenachslager
Worm axle bearing
6 Radkontakt
Wheel current contact strip
7 Kupplungskammer
Coupling holder
8 Schneckensatz
Worm set
9 Werkzeugkasten
Tool kit
10 Drehgestellblende
Bogie frame
11 Getriebesatz
Gear set
12 Radsatz
Wheelset
13 Radsatz mit 2 Haftringen
Wheelset with 2 traction tires
14 Zwischenzahnrad
Gear wheel
15 Anlaufscheibe 4x2.1x0.01
Washer disc
16 Zahnrad Z=16
Gear wheel Z=16
17 Rahmen
Main frame
218
218
Beschreibung
Description
Art.-Nr.
Art.no.
40069 ---
86490 4
86520 2
89246 5
89749 6
89943 2
100829 2
105073 24
106993 3
112460 20
112461 20
112462 18
112463 20
112464 2
114622 2
117617 2
120507 30
Preisgruppe
Price bracket
1
4
7
10
Ersatzteile erhalten Sie bei Ihrem Fachhändler,
oder Ihrer Landesvertretung:
You can order your Replacement Parts at your
local dealer, your country representative:
2
 Loading...