

READ
FOR
INSTRUCTIONS
THIS
ENTIRE
PROPER
SETUP,
AND
OPERATION
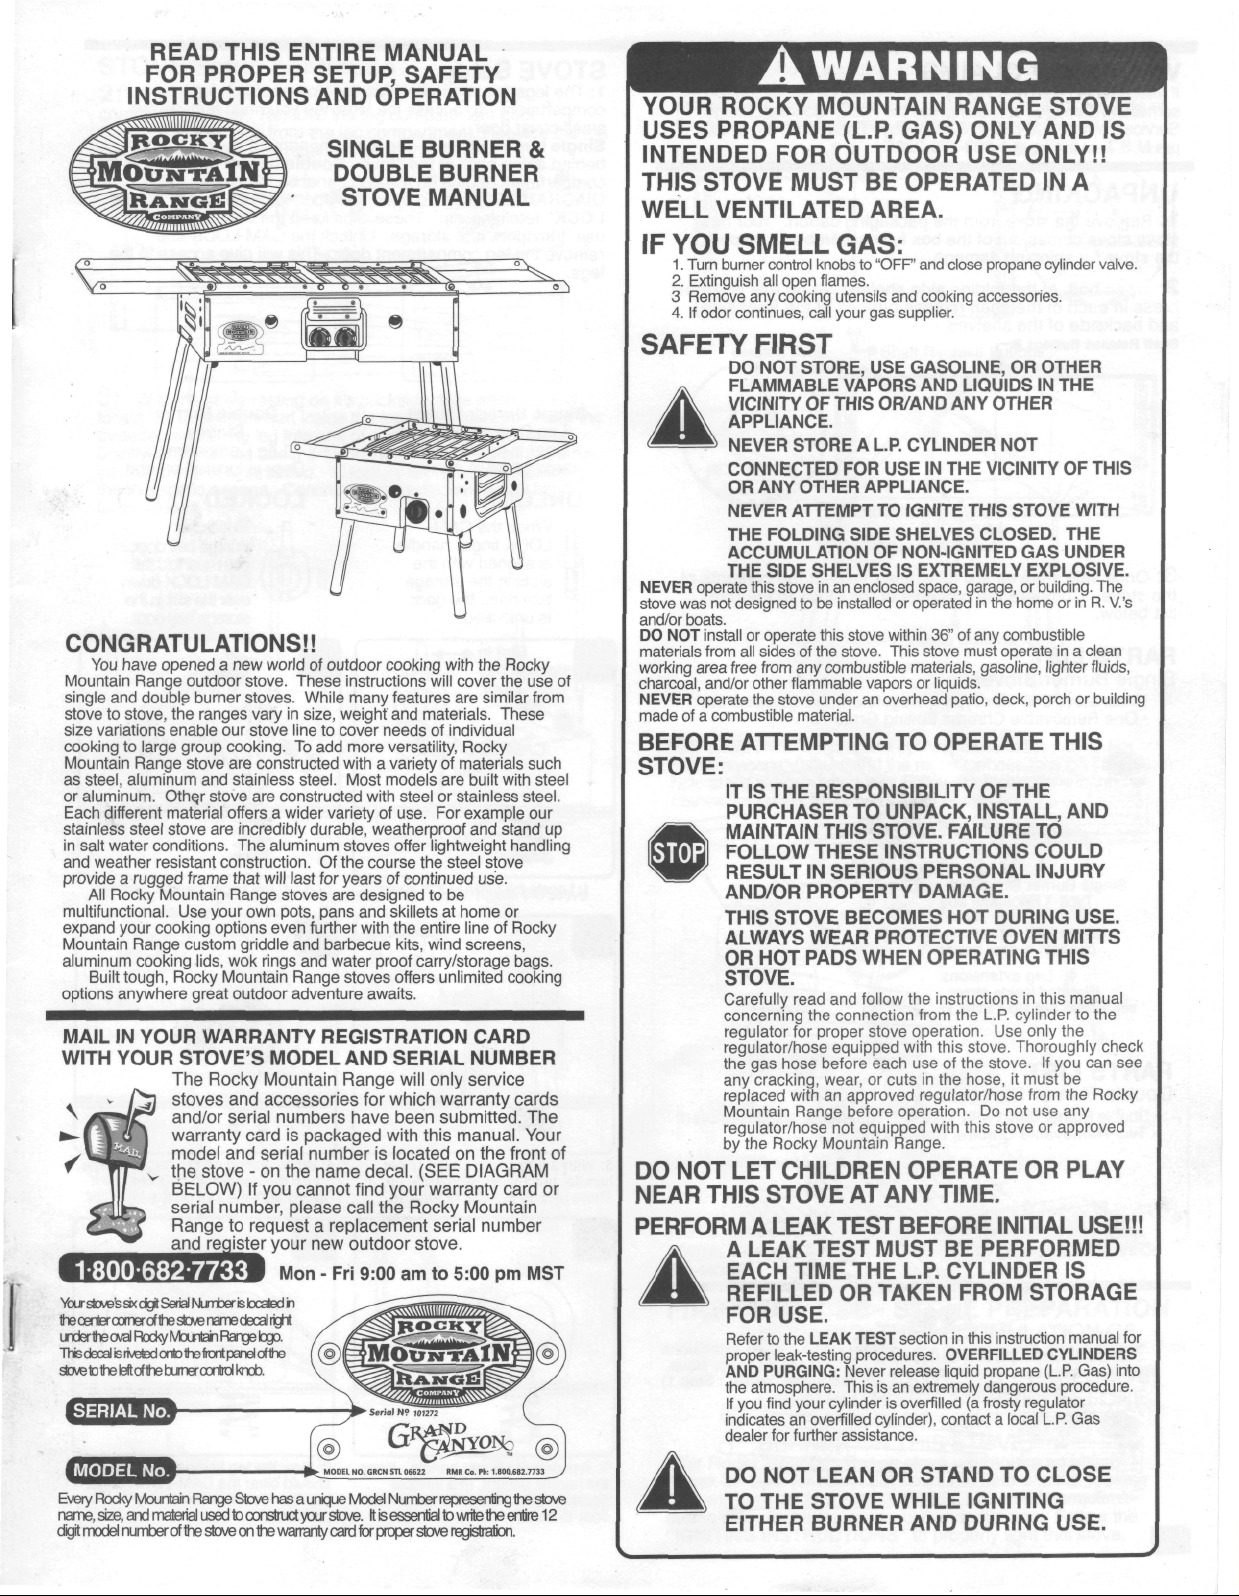
SINGLE
DOUBLE
STOVE
I
CONGRATULATIONS!!
You
have
Mountain Range outdoor stove. These instructions will cover
single
stove
size variations enable
cooking
Mountain Range stove
as
steel, aluminum
or
aluminum.
Each different material
stainless
in
salt water conditions.
and
weather resistant construction.
provide a rugged
All
multifunctional.
expand your cooking options even further with
Mountain Range custom griddle
aluminum cooking lids,
Built tough, Rocky Mountain Range stoves offers unlimited cooking
options anywhere great outdoor adventure awaits.
MAIL
WITH
opened
and
double burner stoves. While many features
to
stove,
to
large group cooking.
Othe,r
steel
Rocky Mountain Range stoves
IN
YOUR
YOUR
18006827733
Your
stwes
six
the
decal
corner
cval
is
riveted
left
dgl
of
Rocky
of
the
No,
the
the
center
under
This
sto^tolTE
SERIAL
a new
the
ranges vary
our
and
stove
offers a wider variety
stove
are
frame
Use
your
WARRANTY
STOVE'S
The
Rocky
stoves
and/or
serial
warranty
model
and
the
stove
BELOW)
serial
number,
Range
and
register
Serial
Number
sfcwe
name
Mountah
burner
the
Range
font
roriW
onto
world
of
outdoor
in
size,
stove line
are
constructed with a variety
stainless steel. Most models
are
incredibly
The
aluminum stoves
that
will
own
wok
rings
MODEL
Mountain
and
accessories
numbers
card
serial
- on the
If you
to
request a replacement
your
is
located
decal
right
logo.
panel
of
the
knob.
weight
to
cover needs
To add
more versatility, Rocky
constructed with steel
durable,
last
pots, pans
and
and
is
packaged
number
cannot
please
new
Mon - Fri
h
weatherproof
Of the
course
for
years
are
designed
and
barbecue kits, wind screens,
water proof carry/storage bags.
REGISTRATION
AND
Range
for
have
is
name
decal.
find
call
outdoor
9:00
MANUAL
SAFETY
BURNER
BURNER
MANUAL
cooking
of
of
with
the
with
and
skillets
SERIAL
which
located
your
are
materials. These
of
individual
of
materials such
are
built
or
stainless steel.
use.
For
example
offer
continued
the
will
been
Rocky
am to
and
lightweight handling
the
steel stove
to be
at
home
entire line
CARD
NUMBER
only
service
warranty
submitted.
this
manual.
on the
(SEE
DIAGRAM
warranty
Mountain
serial
stove.
5:00
&
the
Rocky
the use of
similar from
with steel
our
stand
up
use.
or
of
Rocky
cards
The
Your
front
card
or
number
pm
MST
of
AWARNING
YOUR ROCKY
USES
PROPANE
INTENDED
THIS
STOVE
WELL
IF
VENTILATED
YOU
SMELL
1.
Turn burner control knobs
2.
Extinguish
3
Remove
4.
If
odor continues, call your
SAFETY
DO
FLAMMABLE
VICINITY
APPLIANCE.
NEVER
CONNECTED
OR
NEVER
THE
ACCUMULATION
NEVER
stove
and/or
DO
NOT
materials from
working area free from
charcoal,
NEVER
made
BEFORE
STOVE:
DO NOT LET
NEAR
PERFORM A LEAK
THE
operate this stove
was not
designed
boats.
install
or
all
and/or other flammable vapors
operate
of a
combustible
ATTEMPTING
IT
IS THE
PURCHASER
MAINTAIN
FOLLOW
RESULT
AND/OR
THIS
ALWAYS
OR
STOVE.
Carefully
concerning
regulator
regulator/hose equipped with this stove. Thoroughly check
the gas
any
replaced
Mountain Range before operation.
regulator/hose
by
the
THIS
A
LEAK TEST MUST
EACH
REFILLED
FOR
Refer
proper leak-testing procedures. OVERFILLED CYLINDERS
AND
the
If
you
indicates
dealer
MOUNTAIN
FOR
MUST
all
open flames.
any
cooking
FIRST
NOT
STORE,
OF
STORE A L.P.
ANY
OTHER
ATTEMPT
FOLDING
SIDE
SHELVES
to be
operate this stove within
sides
of the
any
the
stove under
material.
RESPONSIBILITY
THESE
IN
PROPERTY
STOVE
WEAR
HOT
PADS
read
the
for
proper stove operation.
hose before each
cracking, wear,
with
Rocky
CHILDREN
STOVE
TIME
USE.
to the
LEAK TEST section
PURGING: Never release liquid propane (L.P. Gas) into
atmosphere. This
find your cylinder
an
overfilled cylinder), contact a local L.P.
for
further assistance.
RANGE
(L.P. GAS)
OUTDOOR
BE
ONLY
USE
OPERATED
AREA.
GAS:
to
"OFF"
and
close propane cylinder valve.
utensils
and
cooking
gas
supplier.
USE
VAPORS
THIS
FOR USE IN THE
SIDE
in an
installed
stove. This stove must operate
combustible
GASOLINE,
OR/AND
CYLINDER
APPLIANCE.
TO
IGNITE
SHELVES
OF
NON-IGNITED
IS
enclosed space, garage,
EXTREMELY
or
operated
materials,
or
an
overhead patio, deck, porch
TO
TO
THIS
an
Mountain
UNPACK,
STOVE.
INSTRUCTIONS
SERIOUS
DAMAGE.
BECOMES
PROTECTIVE
WHEN
and
follow
connection from
approved
not
the
use of the
or
cuts
equipped with this stove
Range.
accessories.
LIQUIDS
ANY
OTHER
NOT
VICINITY
THIS
CLOSED.
in the
gasoline,
OR
STOVE
combustible
AND
36" of any
liquids.
OPERATE
OF THE
INSTALL,
FAILURE
PERSONAL
HOT
DURING
OVEN
OPERATING
instructions
the
L.P. cylinder
Use
in the
regulator/hose
stove.
hose,
it
Do not use any
OPERATE
AT ANY
TEST
THE
OR
TAKEN FROM STORAGE
is
TIME.
BEFORE
L.P.
an
extremely dangerous procedure.
is
overfilled
INITIAL
BE
PERFORMED
CYLINDER
in
this instruction manual
(a
frosty regulator
STOVE
AND IS
ONLY!!
IN A
OTHER
IN THE
OF
THIS
WITH
THE
GAS
UNDER
EXPLOSIVE.
or
building.
home
or in R.
in a
clean
lighter
fluids,
or
building
THIS
AND
TO
COULD
INJURY
USE.
MITTS
THIS
in
this manual
to the
only
the
If you can see
must
be
from
the
Rocky
or
approved
OR
PLAY
USE!!!
IS
Gas
The
V.'s
for
MODEL
Every
name,
digit
model
Rocky
size,
No.
Mountain
and
material
number
of
Range
the
used
stove
Stove
has a unique
to
constructyour
on
the
warranty
Model
stove.
card
for
It
is
proper
Number
essential
stove
representing
to
write
the
registration.
the
entire
stove
12
DO
NOT
TO
LEAN
THE
STOVE WHILE IGNITING
OR
EITHER BURNER
STAND
AND
DURING USE.
TO
CLOSE
WARRANTY CLAIMS
If
after opening your
something damaged
Service
Dept.:
pm
M.S.T.
or fax us at 1
new
Rocky Mountain Range stove,
or
1-800-682-7733
missing, call
-303-279-2265.
the
Monday - Friday 9:00
Rocky Mountain Range
UNPACKING
1:
Remove
stove stove comes
the
stove
2:
Open both
press
and
backside
Shelf
Release
3:
Once side shelves
the
stove.
list
below.
PARTS
Single
•
Main Stove Unit with Type-1 Regulator/hose (assembled)
•
One
the
for
shipping damage.
in
of the
each
of the
of the
Buttons
Compare
stove from
out of the box
•—TL
the
packaging carton. Your
fully assembled. Inspect
folding side shelves.
shelf release buttons
shelves.
Shelf
Release
are
fully open, inspect
the
contents
of the
LIST
Burner Stoves:
Removable Chrome Boiling Grate
To do
at the
Shelf
stove
Chrome
Release
the
to the
you
find
am to
5:00
new
this
you
front
side
contents
parts
Boiling
must
of
Grate
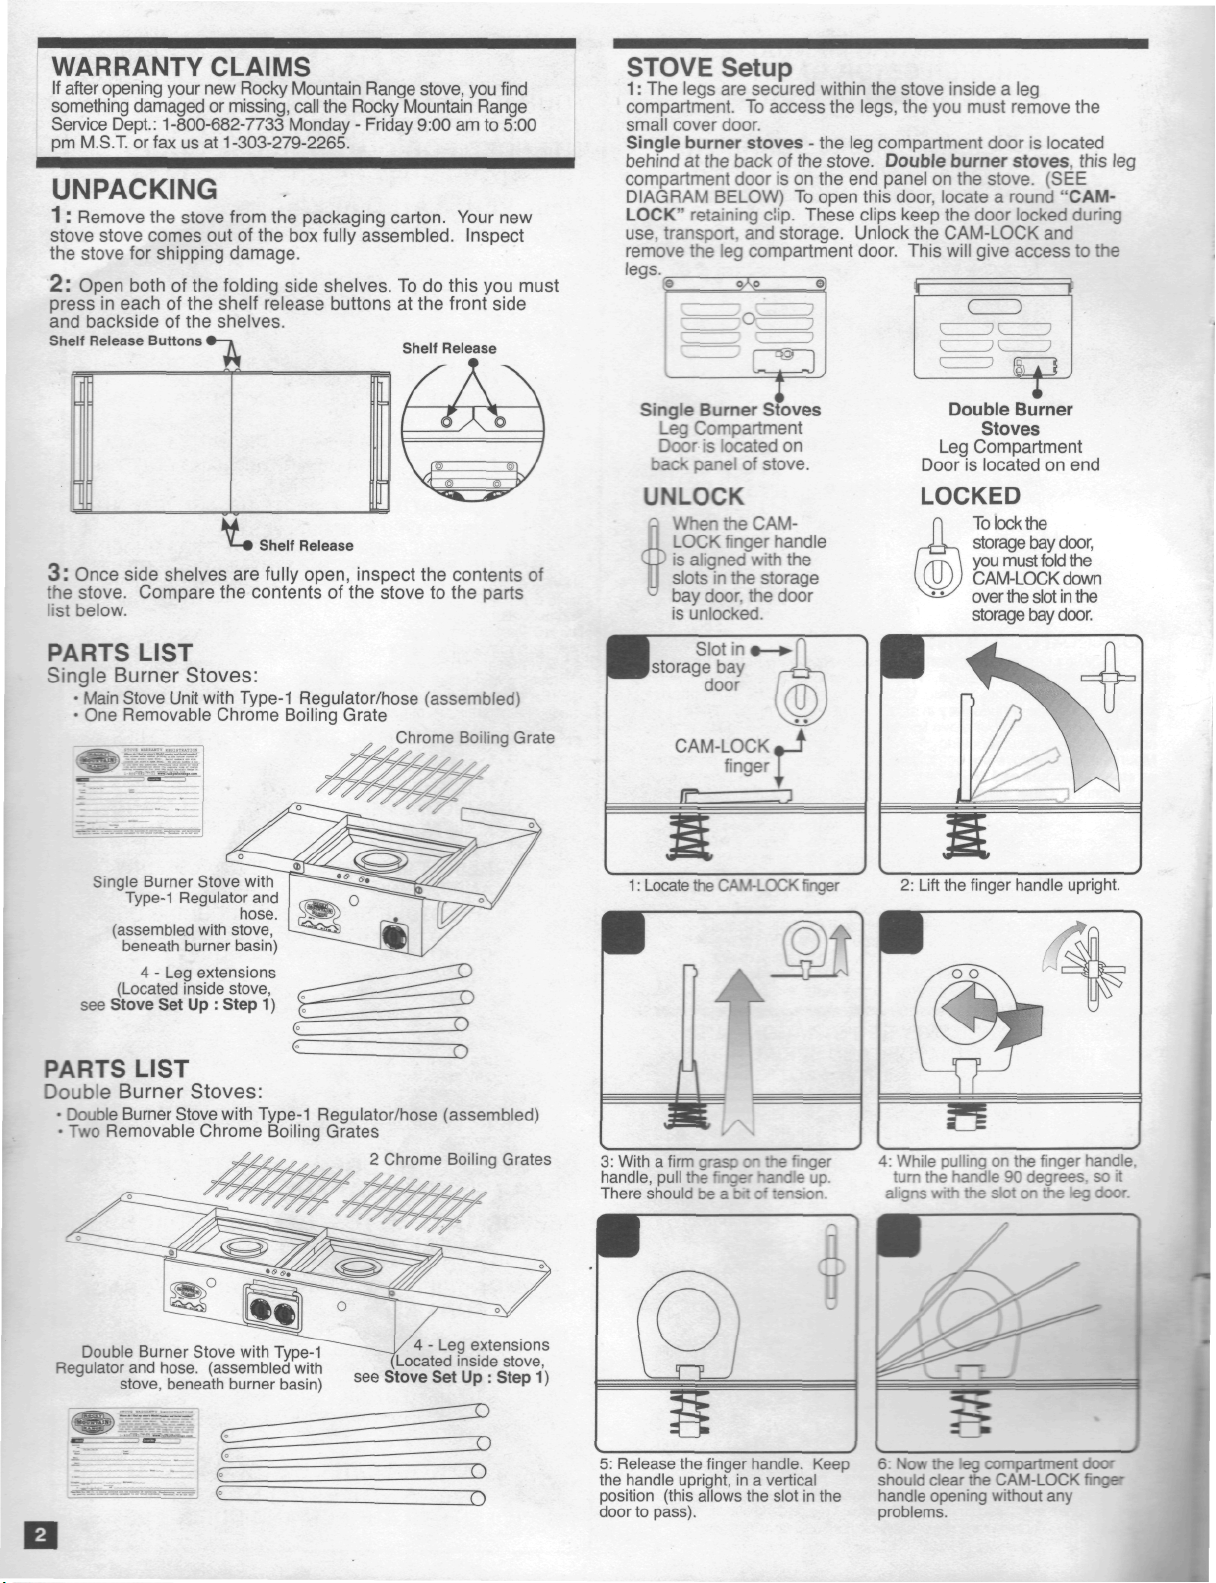
STOVE Setup
1:
The
legs
are
compartment.
small cover door.
Single burner stoves
behind
at the
compartment door
DIAGRAM
LOCK"
retaining
use,
transport,
remove
the leg
legs.
Single
Leg
Door
secured within
To
access
back
of the
BELOW)
Burner
Compartment
is
is on the end
To
clip.
and
storage. Unlock
compartment door. This will give access
oA°
~e)
Stoves
located
r
s:ove.
on
UNLOCK
When
the
finger
in the
door,
Slot
bay
door
CAM with
the
in
i
finger
handle
the
storage
door
K«_t
T
LOCK
is
aligned
slots
bay
is
unlocked.
Jstorage
CAM-LOG
the
the
- the leg
stove.
open this door, locate a round "CAM-
These clips keep
t
stove inside
legs,
the you
compartment door
Double
panel
on the
the
=i
Door
a leg
must remove
is
burner
stove. (SEE
the
door locked during
CAM-LOCK
Double Burner
Stoves
Leg
Compartment
is
located
located
stoves,
and
on end
LOCKED
To
lock
the
storage
bay
must fold
the
slot
bay
door,
in
door.
you
CAM-LOCK down
over
storage
the
this
to the
the
the
leg
Single
Burner
Stove
Type-1
Regulator
(assembled
beneath
4 - Leg
(Located
see
Stove
PARTS
Double
Burner Stoves:
•
Double Burner
• Two
Removable Chrome Boiling Grates
Double
Regulator
Set Up :
LIST
Burner
and
hose,
stove,
inside
Stove
beneath
with
and
hose.
with
stove,
burner
basin)
extensions
stove,
Step
with Type-1 Regulator/hose (assembled)
Stove
with
(assembled
burner
1)
Type-1
basin)
with
2
see
Chrome
4 - Leg
Located
Stove
ID
T)
Boiling
extensions
inside
Set Up :
Grates
stove,
Step
1)
1:
Locate
3:
With a firm
handle,
pull
There
should
the
CAM-LOCK
grasp
the • -ce-
be a bit
finger
2:
o
nger
Lift
the
4:
While pulling
turn
the
aligns
with
finger
handle
trie
handle
on the
90
slot
on the leg
upright.
finger
degrees,
handle.
so it
door.
5:
Release
the
handle
position
door
to
the
upright,
(this
pass).
finger
allows
handle.
in a
the
vertical
slot
in the
Keep
6:
Now the leg
should
clear
handle
opening
problems.
compartment door
the
CAM-LOCK
without
any
finge-

STOVE
2:
Open
compartment door. Remove
Remove
compartment door
Setup continued
the
CAM-LOCK aligned with
all
four legs from
Compartment
the leg
and
resecure using
Leg
Door
nnn
3:
With
the
locate
the
threaded
Gently
internal
the
firmly seated.
threaded insert inside
end of the leg
insert
bolt
threads
to
stove resting
the leg
that
is
threaded.
engage. Continue turning clockwise until
on
into
about 1 1/2
the leg
it's
the
one of
inches until
Carefully
the
compartment door.
compartment. Replace
the
backside, take each
leg.
See
corner holes
turn
slot
in leg
CAM-LOCK^
of the
contacts
leg and
A.
stove.
allowing
Figure
the leg
clockwise
the leg
Place
leg is
the
the
5:
With
the
stove
the
folding side shelves. Each shelf
pressing
the
Shelf
the
stove. Swing both
Release Buttons
standing
shelf release buttons
side
on
shelves
level
firm
ground,
is
quickly unlocked
at the
front
open
until
Shelf
open
both
and
they
Release Buttons
by
backside
stop.
of
of
Figure
A
Threaded
End of Leg
41
After
each
upright onto legs.
leg has
been firmly seated into place, rotate
the
stove
6:
Finally,
reasons,
of the
for
extend
stove.
place
storage
proper propane
safety
hole
manual
NOTE: When
always
the
the
propane cylinder close
fully
extend
bay
using
the
regulator through
the
door. Follow
cylinder
the
stove
regulator/hose
the
instructions
connection.
in the
freestanding
the
large hole underside
to the
through
stove.
the
in
this
position,
For
bottom
FIRST TIME
Your
Rocky Mountain Range stove will
"break-in"
This
during
"IGNITING
burn
will
burn
manufacturing,
USE -
WARNING:
NON-IGNITED
SHELVES
OPEN BOTH SIDE SHELVES BEFORE
ATTEMPTING
BURNER
for
about
off any
INSTRUCTIONS"
STOVE PREPARATION
THE
IS
EXTREMELY EXPLOSIVE.
ON
THIS
5-10
excess grease,
assembly,
ACCUMULATION
GAS
UNDER
TO
LIGHT EITHER
STOVE.
minutes before initial cooking.
to
require
oil or
and
properly
paint acquired
shipping. Follow
light
THE
an
initial
this
OF
SIDE
the
stove.
E

CONNECTING TYPE-1 REGULATOR
READ
THE TAG ON
REGULATOR/HOSE
TANK
BEFORE ATTEMPTING
CONNECT
PROPANE
Make
sure
the
position.
Double
check
completely
hand wheel clockwise until
Remove
discard this cap. Always
cylinder.
Holding
the
over
the
on the
the
threaded
regulator
black coupling
coupling.
Propane
Cyfrtter
Hand-Wheel
-km
clockwise
iriUsepsto
Cylinder
Valve
cap
THE
NOTE:
For
Type-1
Cylinder Connection Device (Regulator). This Type-1
Regulator
Cylinders ONLY.
Cylinder,
the
Type
i
Connection
Device
(Regulator)
equipped
stove
burner
the
propane cylinder valve
closed.
To
the cap
that protects
Type-1 regulator
end of the
is
centered into
to the
Type-1
thread
TYPE-1
safety requirements, this stove
is
designed
If you own a
Type-1 Regulator equipped with this stove will
1
on
this
THE
CYLINDER.
control
close
the
propane cylinder valve, turn
it
comes
the
use the cap
in one
cylinder valve. Make sure
cylinder.
Threaded
cylinder
valve
REGULATOR
to fit New
Style Type-1 Propane (L.P. Gas)
P.O.L. style Propane (L.P. Gas)
YOUR
AND
PROPANE
TO
STOVE
knobs
to a
cylinder valve thread.
supplied with
hand, insert
the
cylinder valve. Hand tighten
Be
handwheel
_^
A*
TO THE
are in the
to
make sure
complete stop.
the
sure
not to
Regulator
coupling
•
Black
coupling
(Hand
tighten
only!)
AND
PROPANE
is
equipped with
Propane
"OFF"
it is
Do not
the
L.P.
black coupling
the
cross-thread
with
71
r
P.O.L.
(L.P. Gas)
Cylinder
JJ
the
black
not
Style
nipple
the
a
fit!
Hose
LEAK TESTING PREPARATION
To
perform a leak test properly,
of
50%
water
preferred
and
and 50%
works
dish soap
the
best.
you
in a
Use a
will a need
to mix a
cup. Liquid dish soap
clean
basting
brush
wide paint brush.
AWARNING
Do
not use any
testing.
regulator
Thoroughly check
If
you can see any
be
replaced with
Mountain Range before operation.
equipped
only.
Do not
stove without parts specified/approved
Range.
LEAK
IF YOU
CLOSE
NEAREST
ASSISTANCE!!!
1:
Make sure
2:
With
the
it
stops.
3:
Brush
4:
If you
have a leak!!
all
connections
NOTE:
USE
Remove propane cylinder from stove. Call Rocky Mountain
Range customer service line
5:
After
type
of
may
household
erode
and
These
hose.
DO NOT
LEAK
NEVER
TO
ALWAYS
OUTSIDE
KEEP
FROM
SMOKE
TEST.
USE A
CHECK
PERFORM
IN A
OPEN
THE
the gas
cracking, wear,
an
approved regulator/hose from
with
the
Yellowstone
attempt
to
TEST
CANNOT
THE
the
regulator connected
valve
the
A.
The
B.
Regulator, hose,
connector.
C.
All
collar, seam
bottom support ring).
hear
IF
HISSING
THIS
STOVE!!!
performing a leak
STOP
CYLINDER
L.P.
GAS
the
burner control knob
on the
propane cylinder counterclockwise until
soap
and
entire propane cylinder valve assembly.
propane cylinder welds (cylinder valve
any
hissing
Turn cylinder valve
and
repeat
OR
Close
cleaning
damage
LIGHTER
FOR
WELL
FLAMES
STOVE
agents
any
plastic
WHILE
LEAKS.
THE
VENTILATED
AND
DURING
or
PERFORMING
OR
LEAK
SPARKS
hose before each
or
cuts
in the
The
replace this
must
A GAS
VALVE
DEALER
regulator
be
used
or any
other part
by
Rocky Mountain
LEAK,
AND
FOR
FURTHER
CALL
is in the
to the
cylinder valve, turn
water
at
middle
mixture
or see any
the
on the
and
black coupling
of the
cylinder,
growing
off
immediately. Retighten
leak test (steps
BUBBLING CONTINUES,
cylinder
test,
at: 1
-800-682-7733.
close
the
valve
propane
immediately.
solvents
parts
and/or
OPEN
TEST
THIS
TEST.
use of the
hose,
and
with
this
IMMEDIATELY
YOUR
"OFF" position.
following areas:
and the
bubbles,
1 - 4).
cylinder
solution
is
or
1"
for
leak
the
FLAME
AREA.
AWAY
stove.
it
must
the
Rocky
hose
stove
of
this
you
DO NOT
valve.
A
Type
-1
Propane Connection Devices
CGA & ANSI standards
New
Style Type
Propane (L.P. Gas)
Cylinder
-1
are in
and
regulations.
accordance with
Regulator
and
coupling
Bottom
Support
Ring
•
Cylinder
Valve
Assembly

BURNER
IGNITION
AWARNING
COMPLETELY EXTEND
OUT
FROM
BEFORE ATTEMPTING
BURNER(S)!
EXTEND
STORAGE
DO
NOT
BURNER
BE
SURE BOTH BURNER CONTROL KNOB(S)
ARE
TURNED
ATTEMPTING
•
If the
flame goes
IMMEDIATELY
FIVE
MINUTES
TO
REIGNITE
•
Always ignite burners
•
Use a
long wooden match
burner(s).
•
Keep
long
burners when
turn
FOR GAS TO
THE
hair, loose clothing, head
lighting
THE
THE
STORAGE
IF YOU
THE
BAY,
FAIL
REGULATOR/HOSE FROM
IT MAY
REGULATOR/HOSE
BAY OF THE
TO
IGNITE
TO
MELT
THE
COMPLETELY
AND
CATCH
SMOKE WHILE LIGHTING EITHER
ON
THIS
STOVE.
TO THE
TO
out
while
the
burner control knobs
LIGHT
the
"OFF"
stove
POSITION
THE
BURNER(S).
is
being
lit or in
to
"OFF." WAIT
CLEAR BEFORE ATTEMPTING
BURNER(S).
one
side
at a
time.
or
loog
the
neck lighter
stove.
and
arms clear
to
ignite
STOVE
THE
FIRE!!!
BEFORE
use,
the
of the
4:
Ignite a long wooden match
insert
the lit
match
CAUTION
Do
Not
control
"HIGH"
This setting emits
propane
ignition.
5;
Push
_'_
turn
the
burner
knob directly
to
ignite
the
for
safe burner
in the
counterclockwise
should
ignite after
If
the
flame goes
knob
to
(five)
minutes
"OFF"
out or
immediately. Close
to
reignite
again.
FLAME
This
knobs.
temperature
CONTROL
stove
is
equipped with
This enables
of
each
or
or
lighter into
'
~
\\
to
burner.
too
much
burner control knob
toward
the
1-3
does
"WHITE DOT".
seconds.
not
light
the
the
burner.
& THE
Follow
EFFECTIVE
one or two
you to
precisely regulate
burner
for
every outdoor cooking demand.
long neck lighter.
the
burner ignition hole.
SLOWLY
\
Turn
knob
WHITE
light
the
and
SLOWLY turn
The
burner
in 4-5
seconds, turn control
L.P.
cylinder valve. Wait
igniting
detailed burner control
steps
USE OF
the
flame
Now
the
to the
DOT
burner.
HEAT
and
control
to
5
1-5
IMPORTANT:
INSTRUCTIONS BELOW
IGNITION
Before
ground.
be
tipped
1 I
Double check
position.
OF
attempting
Place
the
over
Completely extend
so the
Lower
Handle
READ
AND
FOR
EITHER BURNER
to
light
the
burner(s),
propane cylinder next
or
tripped
on.
the
regulator/hose from bottom
burner control knob(s)
Rivet.
PROPER
Double Burner Stove
BURNER
CONTROLS KNOBS
The
"OFF"
position
control knob
directly under
handle rivet.
When turned
position
the
knob
clicks
position.
To
light
the
.and
turn
2:
Completely open both side shelves. Open
cylinder
valve
on the
is
located
the
lower
to
"OFF"
burner control
and
locks into
stove, push
the
control
by
turning
in
the
metal
cylinder valve counterclockwise until
31
Locate
the 1
burner
the
front
you
of the
inch burner ignition hole under
wish
to
use.
The
burner ignition hole(s)
stove, located respectively under
burner(s).
Double
Burner
Stove
Single Burner
Stove
FOLLOW
THE
AND
ON THE
STOVE.
set the
to the
stove
are in the
Single Burner Stove
BURNER
The
"OFF" position
control
knob
directly under
on
the
front
When
turned
position
knobs clicks
position.
To
light
the
turn
the
counterclockwise.
handwheel
it
stops.
'
Burner Ignition Holes
Burner
SAFE
stove
on
firm level
so it
will
of
stove.
"OFF"
©
o
CONTROLS KNOB
on the
is
located
the
silver rivet
of the
stove.
to
"OFF"
the
burner control
and
locks into
stove, push
control knob,
the
propane
on the
the
are on
the
Ignition
in and
desired
Hole
not
OFF-
Always
the
"OFF"
check both burner controls
position when connecting
the
are in
propane
cylinder, before lighting either burner, during non-use
and
storage. After
control knobs
to
using
"OFF"
first. Then close
the
stove,
turn
the
the
burner
propane
cylinder valve.
SIMMER
control knob represents
setting.
The
susceptible
this heat setting
conditions
either burner
HIGH/BOIL - "EXTREMELY
the
most powerful flame
"HIGH/BOIL"
This heat setting
Rocky
Mountain Range Custom Griddles and/or
Barbecue Grill Kits. This temperature output
for
most cooking needs,
and
utilized
Those
of you who use
to
be
very careful
stove
when deep frying
temperature
point
and
urge
everyone
long
stem
adjust
the
- The
"WHITE DOT"
"SIMMER," a very
"SIMMER"
to
flameouts. Therefore,
not be
and
constant attention
is on
is
heat
setting
used
in
this setting
ideal
can
rapidly burn foods cooked
and
for
for
fuel
canning
and it
for
strictly what
it
describes
this stove
and pay
setting will
constant attention
on
"HIGH/BOIL".
quickly
possibly start a grease
who
deep
frys
food
thermometer. Constantly
stove's heat output
on
to a
on the
burner
low
is
somewhat
we
be
or
given
recommend
windy
when
gusty
potential flameouts.
HOT" - delivering
hungry setting,
and
boiling
ONLY.
is too hot
should
be
reserved
-"BOILING."
for
deep frying need
to the
This
take
oil
past
fire.
this stove
its
We
also strongly
to use a
monitor
safe
oil
heat
on
flash-
and
temperature when deep frying.
MED/BBQ
designed
Custom
way
for use
BBQ
to get the
everything cooked
temperature
become more accustomed
slight turn
decrease
setting.
with
Rocky
of the
the
The
the
this stove
Mountain
LOW/GRIDDLE - This heat setting
specifically
Mountain
Range
- A
heat setting specifically
with
the
Rocky
Grill
Kits . "MED/BBQ"
hearty
and
zesty flavors
on the BBQ
Mountain Range
Grill
Kit.
variation around this setting.
to the
flame output, just
burner control knob will increase
burners
Custom Barbecue Grill
designed
temperature
and can be
Range
dealer.
for use
Custom
to
your
Kit is not
purchased through your
with
All
the
Steel Griddle Kits.
is a
out of
There
As you
desired
Rocky
perfect
is
some
or
included
is
This temperature setting superbly produces golden
brown
pancakes,
minutes.
dutch
Steel
It is
ovens,
Griddle
and can be
bacon,
eggs
and
ideal
for use
and
other cookware.
Kit is not
included
hash-browns
with most cast-iron skillets,
The
Custom
with
the
this
in
All
stove
purchased through your Rocky Mountain
Range dealer.
a

PREPARE
1:
Turn
the
the
regulator/hose
or
the
Propane Cylinder Valve
cylinder clockwise until
plug over
STOVE
burner
control
from
the
propane cylinder valve opening after
Align
setting
control
lower
FOR
knob(s)
by
it
the
the
stops. Disconnect
propane cylinder. Place
"OFF
on the
burner
knob
with
handle
rivet
TRANSPORT
to the
turning
the
1
the
"OFF"
position.
metal handwheel
the
the
valve
the
Close
on
cap
2: The
Griddle
Kit
can be
place atop
lock both side shelves.
extended
through
and/or
the
the
Propane
Cylinder
Hand-
Wheel
turn
clockwise
to
close
Cylinder
thread
Barbecue Grill
burner basins
Be
sure each shelf release button
locking hole
cap
for
on the
Valve
Kit
along
storage
shelf end.
the
with
or
boiling
transport. Close
has
Threaded
cylinder
valve
grates,
and
completely
laaS3
HA
\
-
motauO
9gnBi
3:
Once
the
turn
the
slot
on the teg
leg by
of
the
compartment
•
•
LOCK
1
Compartment
4:
After
back
through
or
bend
transport
side shelves have been locked
stove onto it's backside. Rotate
compartment door. Then remove
gently turning them counter clockwise. Return each
range inside
over
the
the
by the
the leg
door
flat
against
Leg
Door
•
stove
the
hose excessively.
storage compartment. Replace
and
secure CAM-LOCK
the teg
compartment door.
is
sufficiently cool, tuck
hole
in the
storage
front chrome carry handle.
Now
and
i
9f1T
bay.
your stove
and
secured atop
align
the
the
with a twist.
,9£!
the
Be
the
leg in the
the teg
the
CAM-
not to
to
stove,
to the
bottom
kink
CAM-LOCK
door. Remove each
Lay
regulator/hose
careful
is
ready
•
9VOS8

THE
EFFECTIVE
THE
HOT
USE OF
STOVE
DURING
BECOMES
USE.
PROTECTIVE
WHEN
NEVER
OPERATING
LEAVE
UNATTENDED
DO
NOT LET
PLAY
AROUND
CHILDREN
TIME.
NOTE:
Your
Rocky
temperature
personal
and
safety,
operate
range
it is
this
stove
Mountain
ideal
for all
essential
in the
section!
A
correct flame will burn blue with a hint
(See
diagram
output, check
(The
venturi tube
for
BAD
Yellow
below)
If
your
plugged burner holes
is the
burner's
silver pipe that runs from
Flame
•-*•
HEAT
(continued)
EXTREMELY
ALWAYS
GLOVES
THE
WHILE
OR
THIS
STOVE.
STOVE
IN
USE.
OVEN
OPERATE
THE
Range
STOVE
is a
AT ANY
stove
cooking methods.
that
you
read,
understand,
methods described
of
yellow
at the tip of the
flames
are
yellow
or a
possible clogged venturi tube
with
the
brass valve manifold
GOOD
WEAR
MITTS
OR
with a wide
For
your
in
this
flame.
a low
heat
Burner
MAINTENANCE & CLEANING
STOVE
Mountain Range
operation.
cooking, clean your chromed cooking grates regularly with a wire brush.
For
with a nonmetal brush
basins will
some
burners
stove
underneath
cleaning
don't
Range
VENTURI
insects
when
manifold
connects
checking
Before preforming this procedure,
the
burner
and
UNIT:
Wipe
large baked-on spills,
get a bit
steel wool cleans
or
burner basins,
is
used.
stove's
or
repair.
lose
them. With a little care
Stove will provide years
that
will
the
stove
to the
to the
and
cleaning
control
disconnect
1:
Bend a small
A
clothing
2:
Tie a
3:
Through
knob
valve
4:
Remove excess
Good consistent care
stove
will ensure years
up
spills
and
rusty
the
The
stove's
burner
Be
careful
CLEANING:
nest inside your venturi tubes. These tubes
is
upside-down. Each venturi runs from
large
round
burner. Prevent fires
out any
knob
is in the
the
L.P.
cylinder from
hanger
small
piece
the
venturi
manifold,
of
your
new
Rocky
of
as
they
happen,
use a
mild biodegradable detergent, scrub
rinse with a garden hose. Burner
in
humid
locations.
burner
it
makes a stinky smoky mess next time
are
equipped
area.
Removal
to
replace each door after removal
and
of
reliable service.
opening
nests that
be
"OFF"
hook
on one end of a
works great
of
cloth
tube
push
debris,
dependable
the
sooner
and
Beware
of the
nests,
A bit of
basins.
with a clean
of
this
maintance your Rocky Mountain
of
spiders, wasps,
burner basin,
in the
venturi tube
may
clog this venturi tube.
sure
the
grill
position,
the
stove.
or a
plastic coated wire will
to the end of the
opening
and
pull
and
at the
the
use and
the
elbow
Do not try to
out or
door allows
the
and
by
has
completely cooled,
close
the
cylinder
flexible
wire.
hook.
burner
wire
back
dead
insects
efficient
better.
After
and
grease
repaint
access door
for
and
are
visible
valve
then
regularly
valve,
do
control
and
with
burner
and
the
the
so you
other
fine.
forth.
wire
HIGH
TEMPERATURE
AWARNING
DO
NOT
LEAN
TO
THE
STOVE
EITHER
FLIP
BEFORE
burners
be
This
THE
when
placed
will
help
BOILING:
boiling,
upsidedown
prevent
HIGH TEMPERATURE BOILING
All
Rocky
Mountain
factory,
with
position
all
flammable
allowing
flow
to the
NOTE: When using
freestanding
the
regulator
the
stove.
legs.
with
at
materials.
the
stove frame
burners
position,
and
BURNER
CHROME
Due to the
it is
recommended
so the two
any
warping
Range
stoves
Always
least
the
always
hose from
a 36"
This
and air
stove
fully
the
operate
distance
to
stay cooler with
vents
in the
underside
BOILING
OR
STAND
WHILE
AND
TOO
IGNITING
DURING
GRATES OVER!
high
temperature
that
support
of the
AND
HIGH ELEVATION COOKING.
come
the
from
also
helps
that
surround
"•When
extend
the
bars
are
chrome boiling grates.
equipped
stove
in the
sides
of the
the
stove
the
maximum
the
boiling,
chrome boiling grates
upsidedown
bars
are
facing
CLOSE
USE.
output
boiling
facing
from
the
standing
stove
breathe,
stove.
turn
so the
up.
of the
grate
up.
to
thus
oxygen
the
support
Brass
Valve
Manifold
WINTERIZING
THE
AWARNING
ALWAYS
WITH
VALVE
NEVER
DIRECT
DO
AN
FOLLOW
RECOMMENDATION
AND
CYLINDERS.
If
the
Rocky Mountain Range stove
prolonged periods
stove
and
1:
2:
from the
the
3:
the tegs
4:
cooking
barbecue
cool
5:
6:
dry. away from
offers a complete line
your
bags help contain
and
cooking accessories.
Make sure both burner control knobs
Close
the
propane
stove. Recap
propane cylinder inside
Completely take down
inside
Remove
dry
Completely wipe down
Once
cooking gear from
cooking
the
all
cooking accessories like chrome boiling grates, aluminum
cover, windscreens,
grill kits. Clean
place.
the
stove
insects,
accessories
STORE PROPANE CYLINDERS
CYLINDER VALVE CLOSED
CAPPED AND/OR PLUGGED.
STORE
SUNLIGHT.
NOT
STORE PROPANE CYLINDERS
ENCLOSED AREA.
THE
MANUFACTURES
STORAGE
,
of
time, care should
cylinder
storage bay,
is
ready
the
valve.
or
plug
the
any
enclosed area
the
stove, folding
and
any
cooking utensils, griddle kits
and
store cooking accessories indoors
the
exterior
for
storage, choose a location that
dust
and
of
the
mess
moisture.
waterproof Stove
elements. During transport these heavy duty
and
grime that
when
in
•
Venturi
Opening
STOVE
THE
PROPANE CYLINDER
FOR
OF ALL
is not
are in the
Disconnect
cylinder valve opening.
tucking
of the
use.
PROPER
PROPANE
going
be
up the
Rocky
and
may
to be
taken
to
"OFF" position.
the
propane
or in
direct sunlight.
side shelves, placing
the
regulator inside
stove with a mild cleaner.
Mountain
Accessory bags
come from
AND
used
winterize
cylinder
Do not
and
is
Range
the
stove
IN
USE
for
the
store
the
stove.
in a
clean
to
protect
IN
and

ONE
YEAR
Rocky
Mountain Range warrants this product
defects
in
and
workmanship
reasonable conditions
year
from
date
of
and
purchase.
material,
in the
CLAIMS: This warranty extends only
The
Rocky
LIMITED
purchase.
original
warranty
the
for
which warranty claim
through
For
receipt
is
limited
product through
one of its
transportation costs prepaid
Mountain
Range
this reason,
of
purchase.
to
may ask for
we
RMR's
replacing
one of its
is
made must
authorized dealers with
and
WARRANTY
under
home,
to the
strongly urge
obligation
or
repairing,
authorized dealers.
accompanied with a receipt
original purchase. Collect shipments will
RETURNS:
warranty
product caused
misuse, improper,
repairs
used
beyond
ROCKY
RESPONSIBLE
All
does
made
for
commercial
that
returns must
not
extend
by or
or
abnormal usage, paint damage,
by an
unauthorized
or
specifically
be
pre-authorized
to any
attributable
rental purposes.
set
forth
MOUNTAIN RANGE COMPANY
OR
LIABLE
FOR
product
to
freight damage, abuse,
RMR
above
INDIRECT, SPECIAL,
CONSEQUENTIAL DAMAGES ARISING
CONNECTION
PRODUCT
ECONOMIC
REVENUE
COSTS
CONSEQUENTIAL DAMAGES
SOME STATES
LIMITATION
DAMAGES.
NOTAPPLYTO
HEREUNDER
WARRANTIES
MERCHANTABILITY
PURPOSE
TERMS
ALLOW LIMITATIONS
WARRANTY
LIMITATION
This warranty gives
have
other rights
ROCKY
WITH
OR
OTHER DAMAGES WITH RESPECT
LOSS,
LOSS
OR
PROFITS, LOSS
OF
REMOVAL, INSTALLATION,
DO NOT
OF
INCIDENTAL
OF
ALLOW
ACCORDINGLY,
THE USE OR
YOU.
THE
IS IN
AND ANY
IS
LIMITED
SET
FORTH HEREIN. SOME
WARRANTY EXTENDED
LIEU
OF
IMPLIED
OR
FITNESS
IN ITS
ON HOW
PERFORMANCE
PROPERTY, LOSS
OF
ENJOYMENT
OF
WHATSOEVER NATURE.
THE
OR
CONSEQUENTIAL
THE
ABOVE LIMITATION
ANY
AND ALL
WARRANTIES
FOR A
SCOPE
LONG
LASTS. ACCORDINGLY,
MAY
NOT
APPLY
TO
YOU.
you
specific legal rights.
which
vary from
state
MOUNTAIN RANGE
EXCLUSION
AND
STATES
to be
normal
for a
period
original purchaser.
your
original
you to
under
at
RMR's option,
All
be
received
freight
and
not be
accepted.
by
or
damage
dealer
or for
No
other warranty
is
authorized
IS NOT
OUT OF OR IN
OF
OR
OR
OTHER
OTHER
OF
PARTICULAR
DURATION
DO NOT
AN
IMPLIED
THE
ABOVE
You may
to
state.
free from
working
of one
receipt
keep
the
this
products
by RMR
other
RMR.
This
to a
or
products
by
RMR.
OR
OF THE
TO
ANY
USE,
MAY
TO THE
also
(1)
of
of
Rocky
Mountain Range®
Printed
is a
6804
in the USA - ©
registered trademark
E.
48th Ave., Suite E Denver,
Copyright 2000
of
Rocky
CO
80216
- All
Rights Reserved.
Mountain Range.
 Loading...