

Page 1
RS2317K
CORDLESS IMPACT WRENCH EN
Page 2

Page 3
RS2317K
a
b
7
6
5
4
3
2
1
D
E1
E2
A
B
C
Page 4
CORDLESS IMPACT WRENCH EN
4
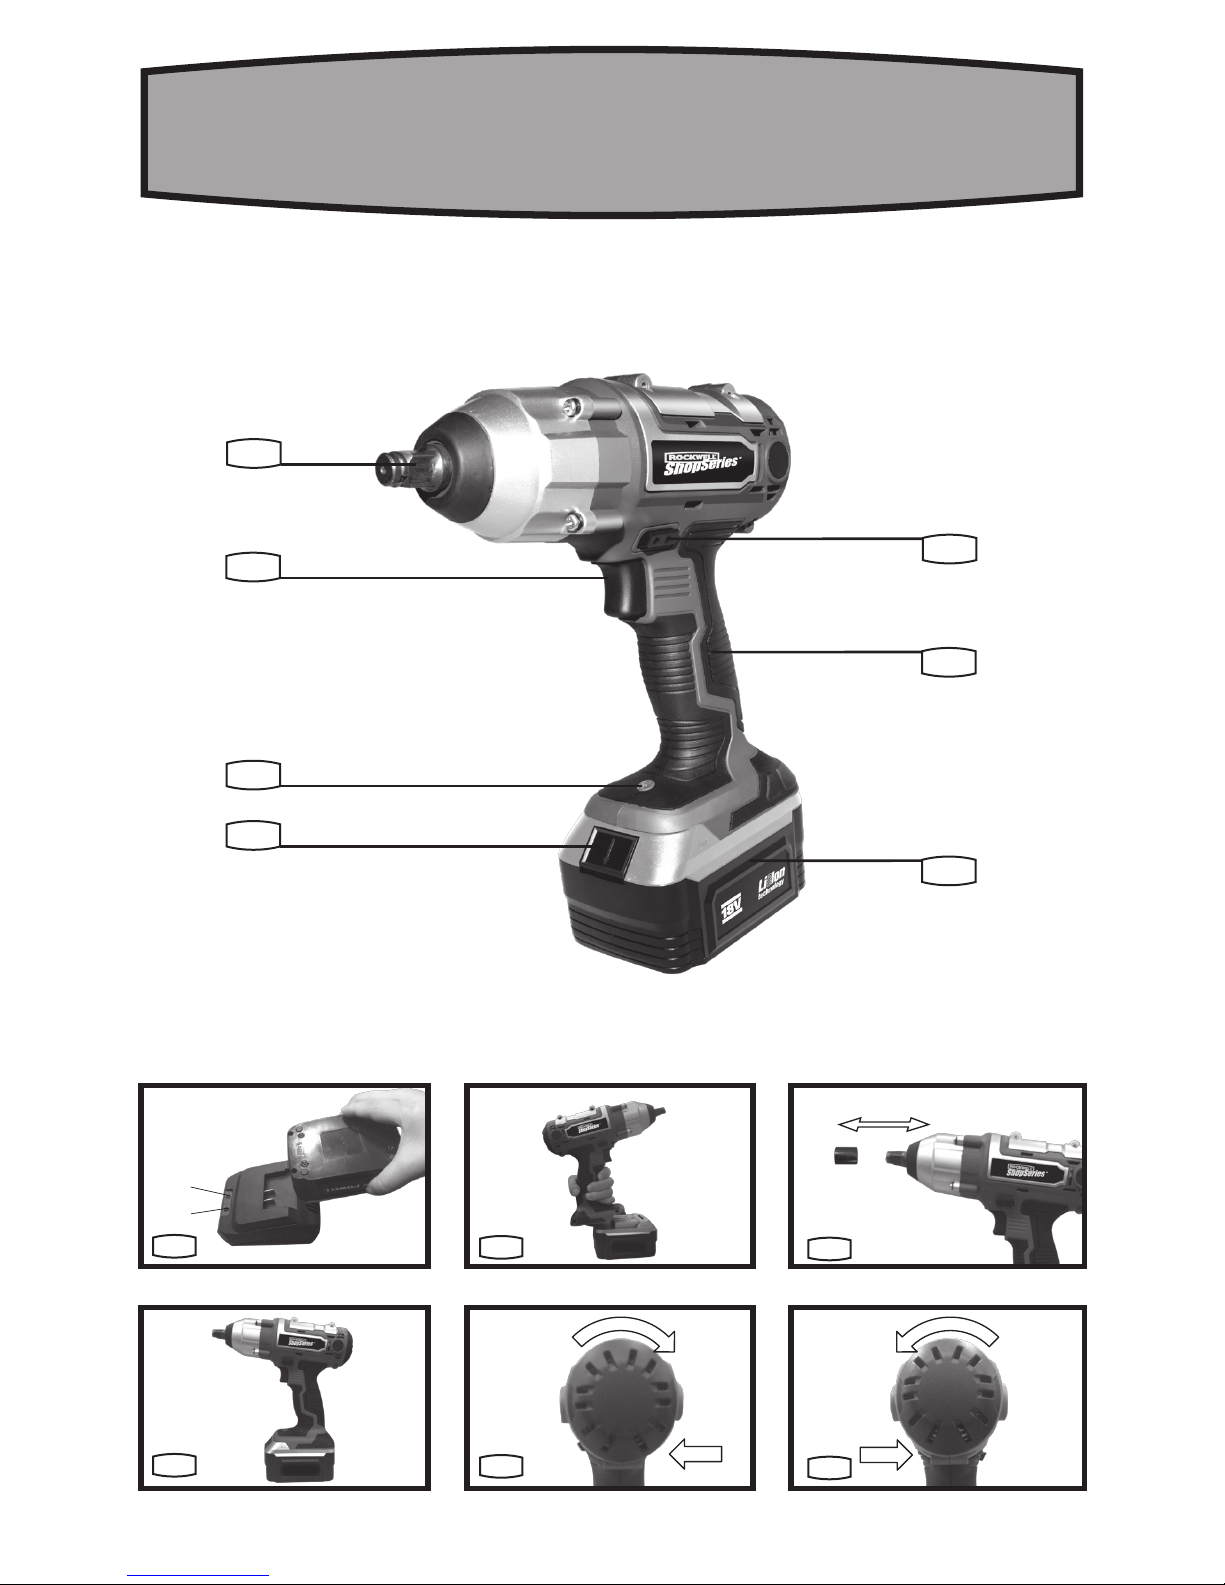
COMPONENT LIST
FORWARD, REVERSE ROTATION AND LOCK CONTROL
SOFT GRIP HANDLE
BATTERY PACK *
BATTERY PACK LATCH
LED LIGHT
ON/OFF SWITCH WITH VARIABLE SPEED CONTROL
TOOL HOLDER
*Not all the accessories illustrated or described are included in standard delivery.
1
2
3
4
5
6
7
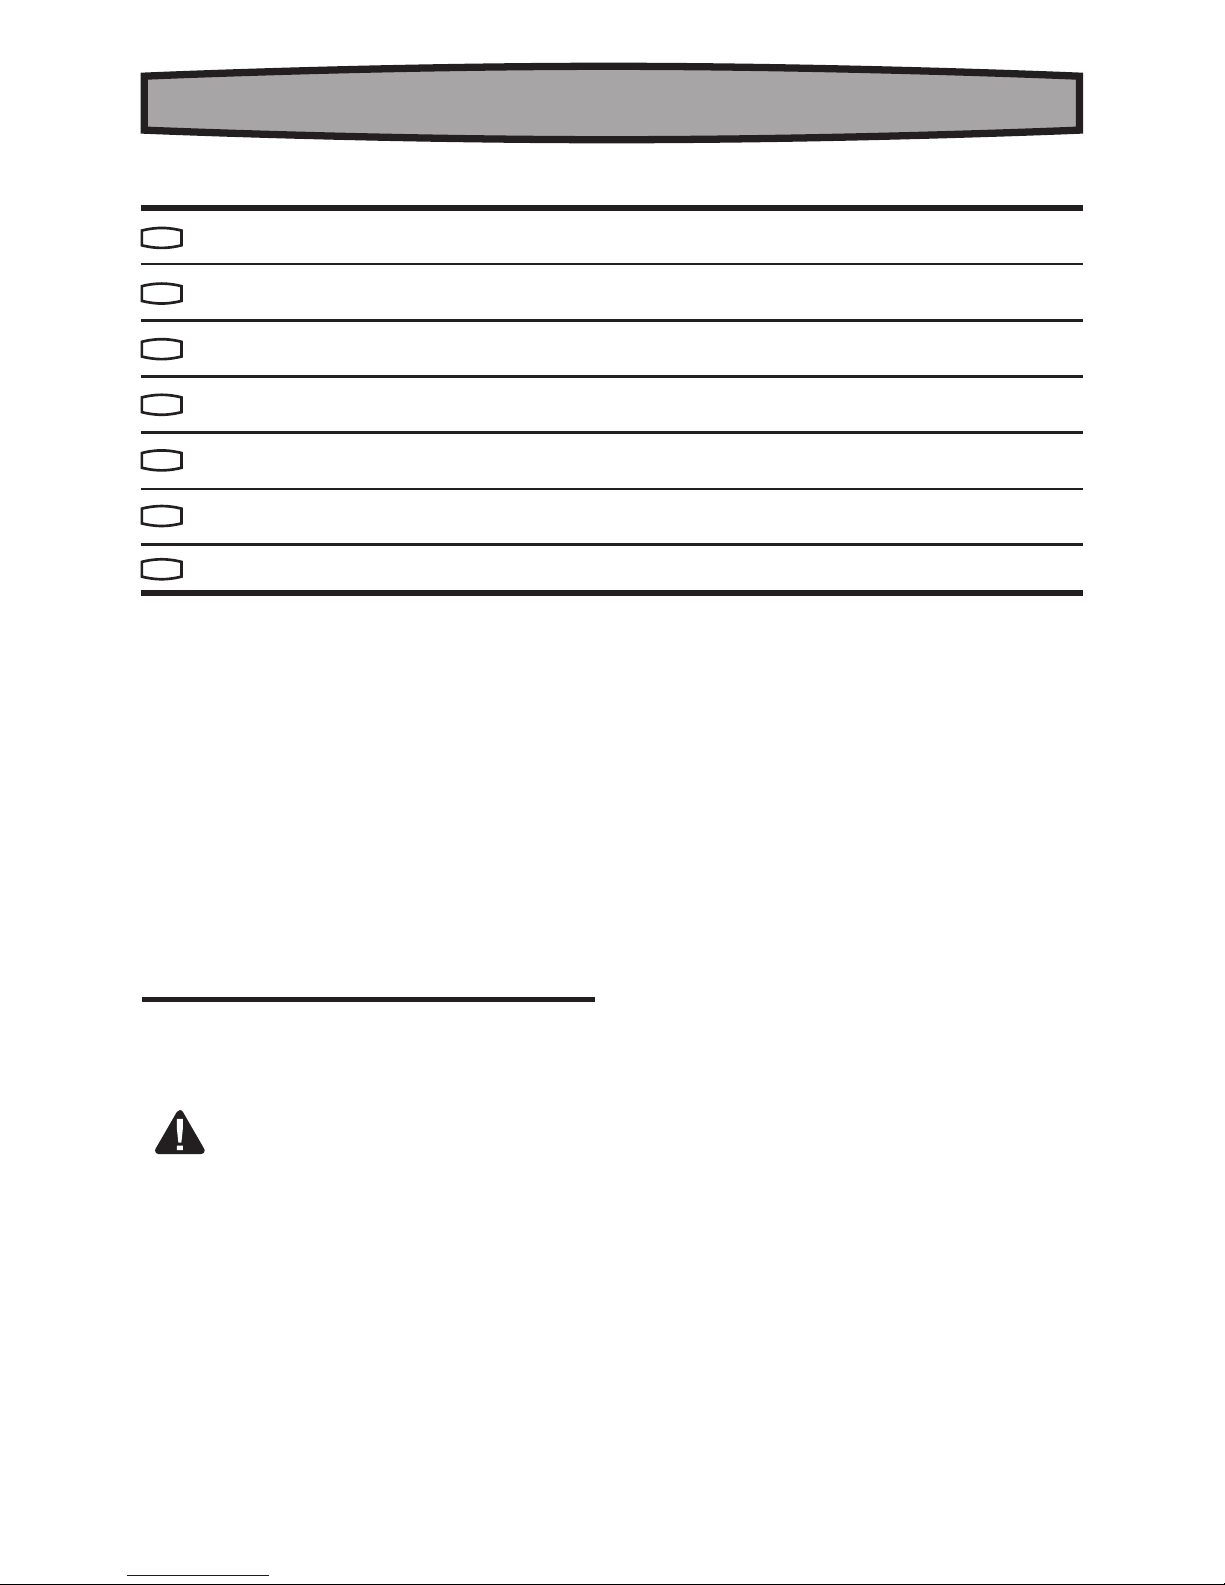
ACCESSORIES
3.0Ah Li-Ion battery pack 1
2hr charger 1
Socket(19/21mm) 2
Use good quality accessories marked with a wellknown brand name. Choose the type according to the
work you intend to undertake. Refer to the accessory
packaging for further details. Store personnel can
assist you and offer advice.
GENERAL POWER TOOL SAFETY
WARNINGS
WARNING: Read all safety warnings and all
instructions. Failure to follow the warnings
and instructions may result in electric shock, fire and/
or serious injury.
Save all warnings and instructions for future
reference.
The term “power tool” in the warnings refers to your
mains-operated (corded) power tool or batteryoperated (cordless) power tool.
1. WORK AREA SAFETY
a) Keep your work area clean and well lit . Cluttered
or dark areas invite accidents.
b) Do not operate power tools in explosive
atmospheres, such as in the presence of
ammable liquids, gases or dust.
Power tools
create sparks which may ignite the dust or fumes.
c) Keep bystanders, children, and visitors away
while operating a power tool. Distractions can
cause you to lose control.
2. ELECTRICAL SAFETY
a) Power tool plugs must match the outlet. Never
modify the plug in any way. Do not use any
adapter plugs with earthed (grounded) power
tools.Unmodified plugs and matching outlets will
reduce risk of electric shock.
b) Avoid body contact with earthed or grounded
surfaces such as pipes, radiators, ranges
and refrigerators. There is an increased risk of
electric shock if your body is earthed or grounded.
c) Do not expose power tools to rain or wet
conditions.
Water entering a power tool will
increase the risk of electric shock.
d) Do not abuse the cord. Never use the cord for
carrying, pulling or unplugging the power tool.
Keep cord away from heat, oil, sharp edges
or moving parts.
Damaged or entangled cords
increase the risk of electric shock.
e) When operating a power tool outdoors, use an
extension cord suitable for outdoor use. Use of
a cord suitable for outdoor use reduces the risk of
electric shock.
Page 5

5
CORDLESS IMPACT WRENCH EN
f) Recommendation for the use of a residual
current device with a rated residual current of
30 mA or less.
3. PERSONAL SAFETY
a) Stay alert, watch what you are doing and use
common sense when operating a power tool. Do
not use a power tool while you are tired or under
the inuence of drugs, alcohol or medication. A
moment of inattention while operating power tools
may result in serious personal injury.
b) Use personal protective equipment. Always
wear eye protection. Protective equipment
such as dust mask, non-skid safety shoes, hard
hat, or hearing protection used for appropriate
conditions will reduce personal injuries.
c) Prevent unintentional starting. Ensure the
switch is in the off-position before connecting
to power source and/or battery pack, picking
up or carrying the tool.
Carrying power tools
with your finger on the switch or energising power
tools that have the switch on invites accidents.
d) Remove adjusting keys or wrench before
turning the tool on
. A wrench or a key left
attached to a rotating part of the power tool
may result in personal injury.
e) Do not overreach. Keep proper footing and
balance at all times
. This enables better control
of the power tool in unexpected situations.
f) Dress properly. Do not wear loose clothing or
jewellery. Keep your hair, clothing and gloves
away from moving parts. Loose clothes, jewellery
or long hair can be caught in moving parts.
g) If devices are provided for the connection of
dust extraction and collection facilities, ensure
these are connected and properly used. Use of
these devices can reduce dust-related hazards.
4. POWER TOOL USE AND CARE
a) Do not force the power tool. Use the correct
power tool for your application. The correct
power tool will do the job better and safer at the
rate for which it was designed.
b) Do not use the power tool if the switch does not
turn it on and off. Any power tool that cannot be
controlled with the switch is dangerous and must
be repaired.
c) Disconnect the plug from the power source
and/or the battery pack from the power tool
before making any adjustments, changing
accessories, or storing power tools. Such
preventive safety measures reduce the risk of
starting the power tool accidentally.
d) Store idle power tools out of the reach of
children and do not allow persons unfamiliar
with the power tool or these instructions
to operate the power tool. Power tools are
dangerous in the hands of untrained users.
e) Maintain power tools. Check for misalignment
or binding of moving parts, breakage of parts
and any other condition that may affect the
power tools operation. If damaged, have the
power tool repaired before use. Many accidents
are caused by poorly maintained power tools.
f) Keep cutting tools sharp and clean. Properly
maintained cutting tools with sharp cutting edges
are less likely to bind and are easier to control.
g) Use the power tool, accessories and tool bits
etc. in accordance with these instructions and
in the manner intended for the particular type
of power tool, taking into account the working
conditions and the work to be performed. Use of
the power tool for operations different from those
intended could result in a hazardous situation.
5. BATTERY TOOL USE AND CARE
a) Recharge only with the charger specied by the
manufacturer. A charger that is suitable for one
type of battery pack may create a risk of fire when
used with another battery pack.
b) Use power tools only with specically
designated battery packs. Use of any other
battery packs may create a risk of injury and fire.
c) When battery pack is not in use, keep it away
from other metal objects, like paper clips, coins,
keys, nails, screws or other small metal objects,
that can make a connection from one terminal
to another. Shorting the battery terminals
together may cause burns or a fire.
d) Under abusive conditions, liquid may be ejected
from the battery; avoid contact. If contact
accidentally occurs, ush with water. If liquid
contacts eyes, additionally seek medical
help. Liquid ejected from the battery may cause
irritation or burns.
6. SERVICE
a) Have your power tool serviced by a qualied
repair person using only identical replacement
Page 6
CORDLESS IMPACT WRENCH EN
6
parts. This will ensure that that safety of the
power tool is maintained.
SAFETY WARNINGS FOR IMPACT
WRENCHES
1. Hold power tool by insulated gripping surfaces,
when performing an operation where the
fastener may contact hidden wiring. Fasteners
contacting a “live” wire may make exposed metal
parts of the power tool “live” and could give the
operator an electric shock.
General Safety Warnings
WARNING: Read all safety warnings and all
instructions. Failure to follow the warnings and
instructions may result in electric shock, fire and/or
serious injury.
Save all warnings and instructions for future
reference.
- This appliance is not intended for use by persons
(including children) with reduced physical,
sensory or mental capabilities, or lack of
experience and knowledge, unless they have been
given supervision or instruction concerning use
of the appliance by a person responsible for their
safety.
- Children should be supervised to ensure that they
do not play with the appliance.
Additional safety instructions for your Battery
Charger
1. Before charging, read the instructions.
2. For charge Li-ion battery pack only.
3. If the supply cord is damaged, it must be replaced
by the manufacturer, its service agent or similarly
qualified persons in order to avoid a hazard.
4. The battery terminal not connected to the chassis
has to be connected first. The other connection is
to be made to the chassis, remote from the battery
and fuel line. The battery charger is then to be
connected to the supply mains.
5. After charging, disconnect the battery charger
from the supply mains. Then remove the chassis
connection and then the battery connection.
6. Do not charge a leaking battery.
7. Do not use chargers for works other than those for
which they are designed.
8. Before charging, ensure your charger is matching
the local AC supply.
9. The charging device must be protected from
moisture.
10. Do not use the charging device in the open.
11. Do not short out the contacts of battery or
charger.
12. Respect the polarity “+/-“ when charging.
13. Do not open the unit and keep out of the reach of
children.
14. Do not charge the batteries of other manufactures
or ill-suited models.
15. Ensure that the connection between the battery
charger and battery is correctly positioned and is
not obstructed by foreign bodies.
16. Keep battery charger’s slots are free of foreign
objects and protect against dirt and humidity.
Store in a dry and frost-free place.
17. When charging batteries, ensure that the battery
charger is in a well-ventilated area and away from
inflammable materials. Batteries can get hot
during charging. Do not overcharge any batteries.
Ensure that batteries and chargers are not left
unsupervised during charging.
18. Do not recharge non-rechargeable batteries, as
they can overheat and break.
19. Longer life and better performance can be
obtained if the battery pack is charged when the
air temperature is between 18
o
C and 24oC. Do not
charge the battery pack in air temperatures below
4.5oC, or above 40.5oC. This is important as it can
prevent serious damage to the battery pack.
Page 7
7
CORDLESS IMPACT WRENCH EN
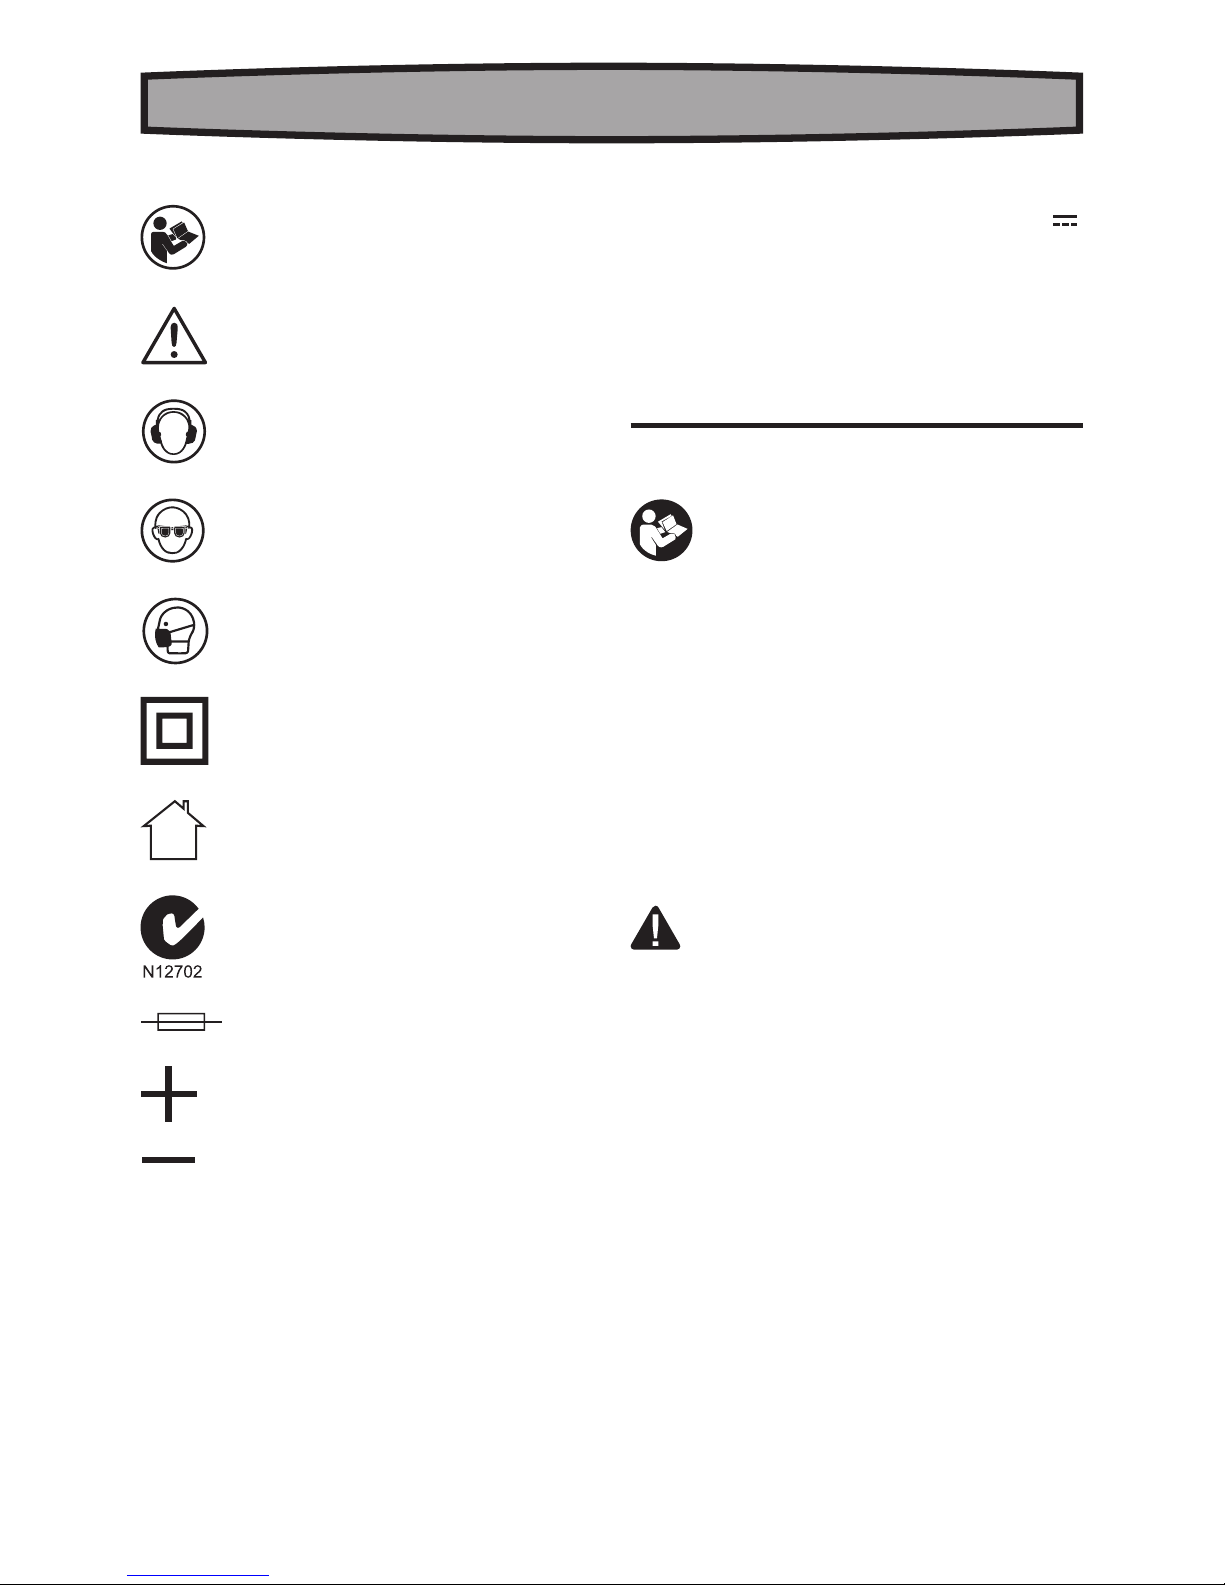
SYMBOLS
To reduce the risk of injury, user must read
in struction manual
Warning
Wear ear protection
Wear eye protection
Wear dust mask
Double insulation
Indoor use only
C-Tick approval mark
Fuse
T2A time lag fuse with rated current of 2A
Positive terminal
Negative terminal
TECHNICAL DATA
Voltage
No-load speed
Impact rate
Max torque
Square drive
Battery capacity
Weight
18
0-2300/min
0-3000/min
380N.m
1/2 ˝
3.0Ah Li-Ion
3.1kg
OPERATING INSTRUCTIONS
NOTE: Before using the tool, read the
instruction book carefully.
BEFORE PUTTING INTO OPERATION
A) CHARGING THE BATTERY (See Fig. A)
CHARGING PROCEDURE
1) Plug the charger into an appropriate outlet. The
Green light (a) will be on.
2) Slide the battery pack (3) onto the charger, Green
light (a) will be off and the light (b) will be red to
indicate the charging process has started.
3) After 2 hours, the pack will be fully charged, Red
light (b) will be off, and Green light (a) will be
on.Unplug the charger and remove the battery
pack.
WARNING! When battery charge runs out after
continuously use or exposure to direct sunlight
or heat, allow time for the tool to cool down before
re-charging to achieve the full charge.
In a warm environment or after heavy use, the battery
pack may become too hot. Allow time for the battery
to cool down before recharging.
B) BATTERY CHARGING
The battery charger supplied is matched to the Li-Ion
battery installed in the machine. Do not use another
battery charger.
The Li-Ion battery is protected against deep discharging. When the battery is empty, the machine
is switched off by means of a protective circuit: The
chuck no longer rotates.
In a warm environment or after heavy use, the battery
pack may become too hot to permit charging. Allow
time for the battery to cool down before recharging.
If you want to store the tool for a long time, please
recharge it each 6-10 months to protect the battery
pack.
Page 8
CORDLESS IMPACT WRENCH EN
8
C) TO REMOVE OR INSTALL BATTERY PACK (See Fig. B)
Depress the Battery Pack Latch (4) to release and
slide the battery pack out from your tool. After recharge, slide it back into your tool. A simple push and
slight pressure will be sufficient.
OPERATION
Intended Use
This tool is intended to tighten and loosen nuts within
the respective range of dimension
ASSEMBLY
CAUTION:
• Always be sure that the tool is switched off and
the battery cartridge is removed before carrying
out any work on the tool.
Selecting correct socket
Always use the correct size socket for bolts and nuts.
An incorrect size socket will result in inaccurate and
inconsistent fastening torque and/or damage to the
bolt or nut.
Installing or removing socket (See Fig. C)
Align the socket with the four square sides and push
it onto the anvil of the tool until it locks into place. Tap
it lightly if required.
To remove the socket, simply pull it off.
1. ON/OFF SWITCH (See Fig. D)
Press the On/Off Switch to turn the tool on.
Release the on/off switch to turn the tool off.
2. VARIABLE SPEED
This tool has a variable speed switch that delivers
higher speed and higher torque with increased trigger
pressure. Speed is controlled by the amount of switch
trigger depression.
WARNING: Do not operate for long periods
at low speed because excess heat will be
produced internally.
3. SWITCH LOCK
The switch trigger can be locked in the OFF position.
This helps to reduce the possibility of accidental
starting when not in use. To lock the switch trigger,
place the direction of rotation selector in the center
position.
4. REVERSIBLE (See Fig.E1 E2)
For fastening the bolt/nuts, press the forward rotation
marked “ ” (lever is moved to the left).
For loosening bolt/nuts press the reverse rotation
marked “ ” (lever is moved to the right).
WARNING: Never change the direction of
rotation when the chuck is rotating, wait until
it has stopped!
5. LED LIGHT
To turn on the light simply press the on/off switch.
When you release the on/off switch, the light will be
off.
LED light increases visibility-great for dark or
enclosed area.
ATTENTION! The LED light could not face to eyes
directly.
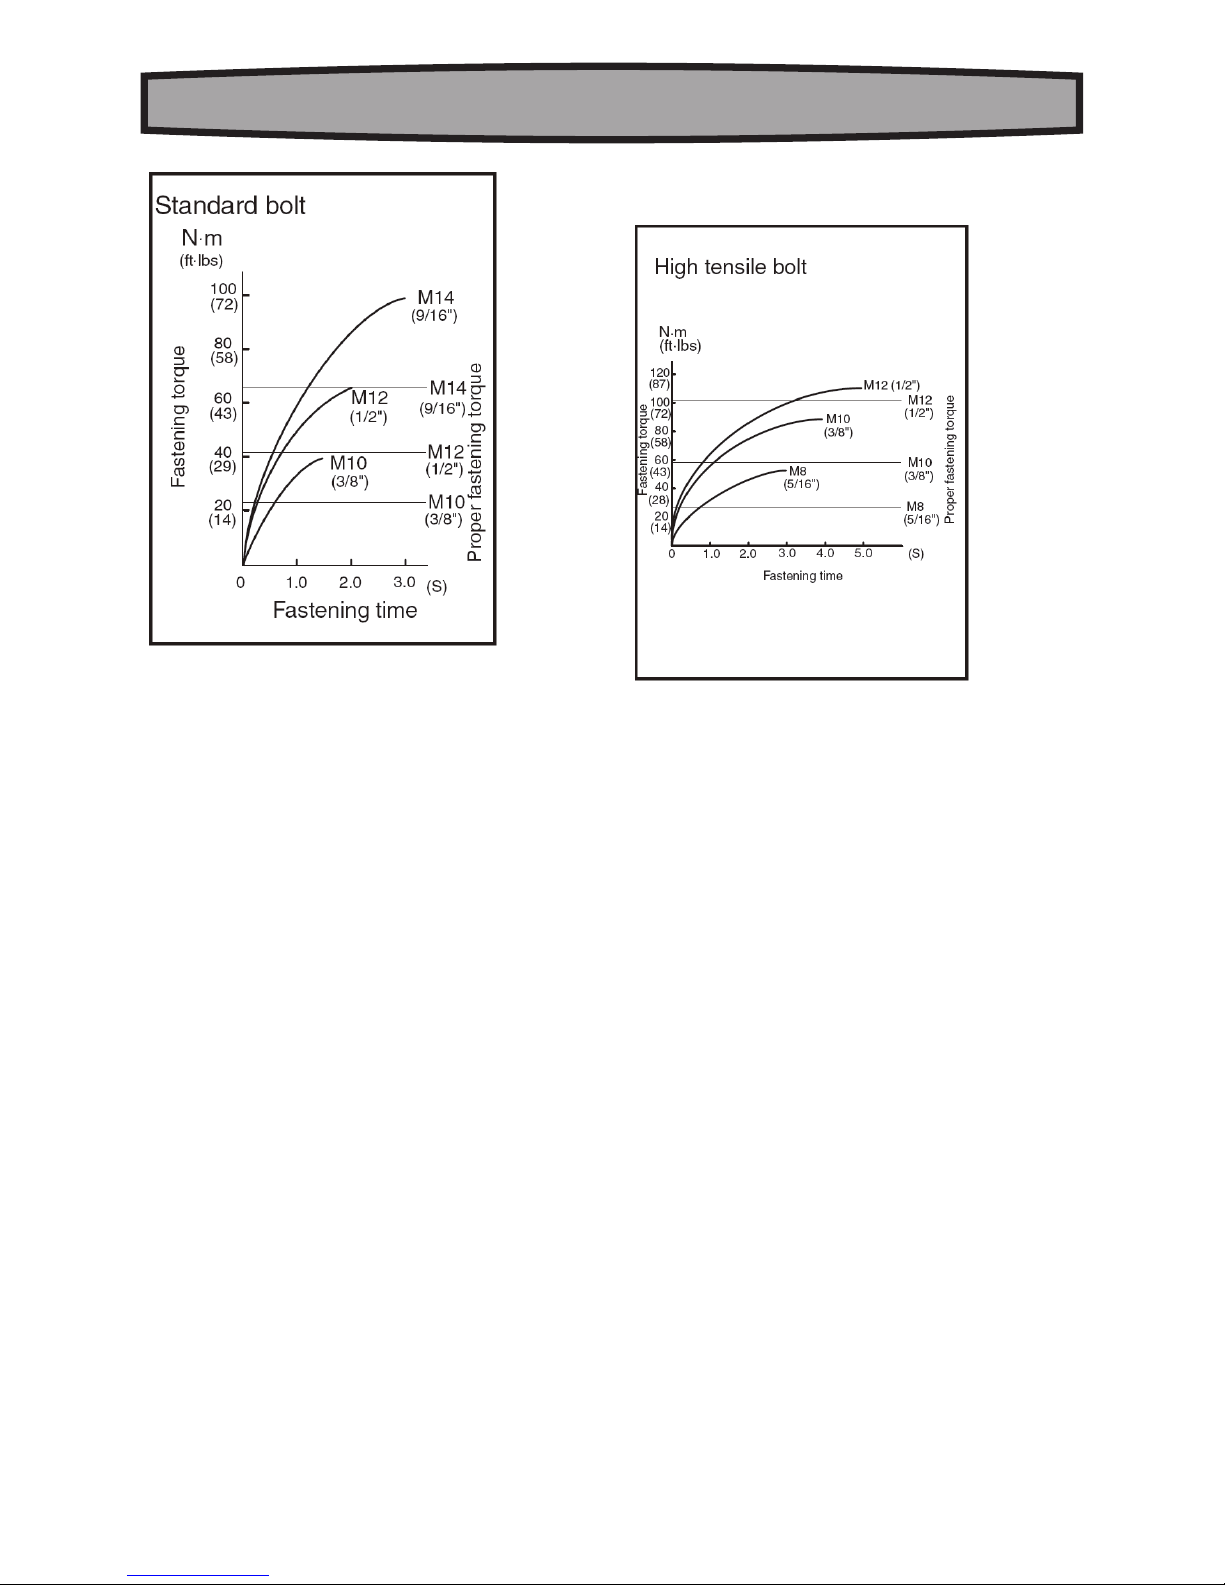
6. FASTENING TORQUE
1) The proper fastening torque may differ depending
upon the kind or size of the bolt, the material of
the workpiece to be fastened, etc. The relation
between fastening torque and fastening time is
shown in the figures.
Hold the tool firmly and place the socket over the
bolt or nut. Turn the tool on and fasten for the
proper fastening time.
NOTE:
• When fastening bolt/nut M8 (5/16”) or smaller,
carefully adjust pressure on the switch trigger so
that the screw is not damaged.
• Hold the tool pointed straight at the bolt or nut.
• Excessive fastening torque may damage the bolt/
nut or socket. Before starting your job, always
perform a test operation to determine the proper
fastening time for your bolt or nut. Especially for
the bolt smaller than M8 (5/16”), perform the above
test operation to prevent the trouble on socket or
bolt, etc.
Page 9
9
CORDLESS IMPACT WRENCH EN
2) • If the tool is operated continuously until the
battery cartridge has discharged, allow the tool to
rest for 15 minutes before proceeding with a fresh
battery.
The fastening torque is affected by a wide variety
of factors including the following. After fastening,
always check the torque with a torque wrench.
a. When the battery cartridge is discharged almost
completely, voltage will drop and the fastening
torque will be reduced.
b. Socket
• Failure to use the correct size socket will cause a
reduction in the fastening torque.
• A worn socket (wear on the hex end or square end
) will cause a reduction in the fastening torque.
c. Bolt
• Even though the torque coefficient and the class of
bolt are the same, the proper fastening torque will
differ according to the diameter of bolt.
• Even though the diameters of bolts are the same,
the proper fastening torque will differ according
to the torque coefficient, the class of bolt and the
bolt length.
d. The use of the universal joint or the extension
bar somewhat reduces the fastening force of the
impact wrench.
Compensate by fastening for a longer period of
time.
e. The manner of holding the tool or the material
of driving position to be fastened will affect the
torque.
f. Operating the tool at low speed will cause a
reduction in the fastening torque.
7. TEMPERATURE DEPENDENT OVERLOAD PROTECTION
When using as intended for the power tool cannot be
subject to overload. When the load is too high or the
allowable battery temperature of 75°C is exceeded,
the electronic control switches off the power tool until
the temperature is in the optimum temperature range
again.
8. PROTECTION AGAINST DEEP DISCHARGING
The Li-ion battery is protected against deep
discharging by the “Discharging Protection System”.
When the battery is empty, the machine is switched
off by means of a protective circuit: The inserted tool
no longer rotates. When this occurs your tool will not
switch on. Remove and recharge the battery pack.
Page 10

CORDLESS IMPACT WRENCH EN
10
PROBLEM SOLUTION
1. WHY DOES THE IMPACT WRENCH NOT TURN ON WHEN
YOU PRESS THE SWITCH?
The forward and reverse switch, which is on top of the
trigger, is positioned in the lock function. Unlock the
forward and reverse switch putting it into the required
rotation position. Push the trigger and the impact
wrench will start to rotate.
2. I CANNOT FIT THE BATTERY INTO THE BATTERY
CHARGER. WHY?
a) Check if the charger and the battery pack are
specifically designed for working together.
b) The battery can be inserted into the charger only
in one direction. Inster the battery to the slot, the
indicator light should be red when the battery is
charging.
3. REASONS FOR DIFFERENT BATTERY PACK WORKING
TIMES.
Charging time issues, as above, and having not used
a battery pack for a prolonged time will reduce the
working life of the battery pack. This can be corrected
after several charge and discharge operations by
charging & working with your Impact Wrench. Do not
re-charge your battery pack below 0oC and above
30oC as this will affect performance.
REASONS FOR DIFFERENT
CHARGING TIMES
The charging time can be affected by many reasons
which are not defects in your product.
a) If the battery pack is only partly discharged it may
be re-charged in less than 2 hour.
b) If the battery pack and ambient temperature are
very cold then re-charging may take 2-2.5 hours.
c) If the battery pack is very hot it will not re-charge
because the internal temperature safety cutout
will prevent it. If the battery pack is very hot you
must remove your battery pack from the charger
and allow your battery pack to cool first to
ambient temperature and then recharging can be
started.
MAINTENANCE
Your power tool requires no additional lubrication or
maintenance.
There are no user serviceable parts in your power
tool. Never use water or chemical cleaners to clean
your power tool. Wipe clean with a dry cloth. Always
store your power tool in a dry place. Keep the motor
ventilation slots clean. Keep all working controls free
of dust. Occasionally you may see sparks through the
ventilation slots. This is normal and will not damage
your power tool.
Staple your purchase receipt here
Before returning this product for
warranty or any other reason, please call.
POSITEC AUSTRALIA PTY LIMITED
ABN 14 101 682 357
Unit 15, 23 Narabang Way Belrose 2085 NSW
Australia
FREE CALL 1300 889 028
EMAIL:of[email protected]
Page 11

Page 12

MADE IN PRC
Copyright © 2013, Positec. All Rights Reserved.
2SIW001PK11000A0
 Loading...