


HIGH FREQUENCY OSCILLATING TOOL PAGE 5 ENG
HERRAMIENTA OSCILATORIA DE ALTA FRECUENCIA PAGE 12 ESP
OUTIL À OSCILLATION DE HAUTE FRÉQUENCE
RK5100K/RK5100K.1
RK5101K/RK5102K
PAGE 20 FRE

Thank you for purchasing a ROCKWELL power tool. We are condent that you will
appreciate the quality of the product and you will be entirely satised with your
purchase. Please read carefully the user safety and operating instructions on how to
operate this product correctly within safety norms and regulations.
Gracias por su compra de un producto ROCKWELL. Estamos seguros de que apreciará
la calidad del producto y de que estará completamente satisfecho con su compra. Lea
cuidadosamente las instrucciones de seguridad y de operación para obtener mayor
información acerca de cómo utilizar éste producto correctamente dentro de las normas
y reglas de seguridad.
Merci d’avoir choisi un produit de marque ROCKWELL. Nous sommes certains que vous
apprécierez la qualité de ce produit et qu’il saura vous satisfaire. Pour être renseigné
sur toutes les méthodes de travail correctes et sécuritaires répondant aux normes
et règlements de sécurité, veuillez lire attentivement la notice de sécurité et de
fonctionnement présentée.
Visit us on the web at www.rockwelltools.com
RK5100K/RK5100K.1/RK5101K/RK5102K
3
4
11
21
16 19
10
20
12
17
5
25
13
14
15 18
21 22
23 24
97 86
RK5100K/RK5100K.1/RK5101K/RK5102K
F
D1
B1
B2 C1
A1 A2
C2
C3
D2
E

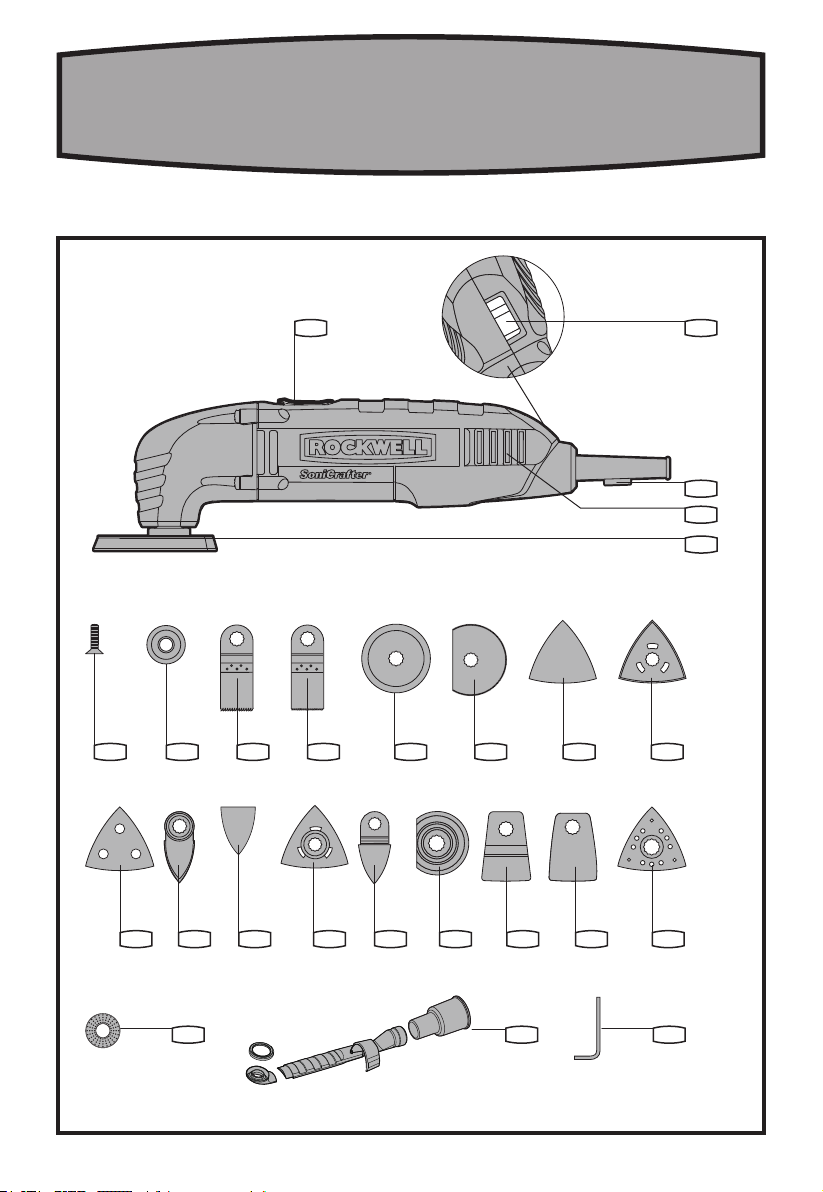
SoniCrafter® ENG
COMPONENT LIST
1
ON/OFF SWITCH
2
VARIABLE SPEED CONTROL (RK5101K /RK5102K)
3
KEY STORAGE
4
VENTING SLOTS
5
BOLT
6
FLANGE
7
PRECISION WOOD CUTTING BLADE*
8
UNIVERSAL END CUT BLADE
9
HSS SAW BLADE*
10
HSS SEMICIRCLE SAW BLADE
11
SANDING PAD (UNPERF ORATED) *
12
SANDING SHEET*
13
SANDING PAD (PERFORATED) *
14
PERFORATED SANDING SHEETS*
15
SANDING FINGER PAD*
16
SANDING FINGER SHEET*
17
TRIANGULAR CARBIDE RASP*
18
FINGER-SH APE CARBIDE RASP*
19
CARBIDE GRIT SEMICIRCLE SAW BLADE*
20
RIGID SCRAPER BLADE*
21
FLEXIBLE SCRAPER BL ADE*
22
FELT POLISHING PA D*
23
ACCESSORIES ADAPTER
24
DUST EXTRACTION DEVICE
25
ALLEN KE Y
* Not all t he access ories illu strate d or describ ed are stan dard wit h every mod el.
5

6
SoniCrafter® ENG
ACCESSORIES
We recommend that you purchase your accessories
from the same store that sold you the tool. Use good
quality accessories with a well-known brand name.
Choose the type according to the work you intend to
undertake. Refer to the accessory packaging for further
details. Store personnel can assist you and offer advice.
GENERAL POWER TOOL SAFETY
WARNINGS
WARNING! Read all instructions. Failure to follow
all instructions listed below may result in electric
shock, re and/or serious injury. The term “power tool”
in all of the warnings listed below refers to your electric
(corded) power tool or battery-operated (cordless)
power tool.
SAVE T HESE INST RUCTION S
1. WORK A REA SA FETY
a) Keep your wo rk area clea n and well li t. Cluttered
benches and dark areas invite accidents.
b) Do not operate power tools in explosive
atmospheres, such as in the presence of ammable
liqui ds, gases o r dusts. Power tools create sparks
which may ignite the dust or fumes.
c) Keep by-standers, children, and visitors away
whil e operatin g a power too l. Distractions can cause
you to lose control.
2. ELE CTRICA L SAFET Y
a) Power tool plugs must match the outlet. Never
modify the plug in any way. Do not use any adapter
plugs w ith grou nded power t ools. Unmodied plugs
and matching outlets will reduce risk of electric
shock.
b) Avoid body contact with grounded surfaces such
as pipes, radiators, ranges and refrigerators. There
is an increased risk of electric shock if your body is
grounded.
c) Do not expose power tools to rain or wet
conditions. Water entering a power tool will increase
the risk of electric shock.
d) Do not a buse the co rd. Never u se the cord f or
carrying, pulling or unplugging the power tool.
Keep cord away from heat, oil, sharp edges or
movi ng parts . Damaged or entangled cords increase
the risk of electric shock.
e) When operating a power tool outdoors, use an
exte nsion cord s uitable f or outdoo r use. Use of
a cord suitable for outdoor use reduces the risk of
electric shock.
3.PERSONAL SAFETY
a) Stay alert, watch what you are doing and use
common sense when operating a power tool. Do
not use a power tool while you are tired or under
the in uence of dr ugs, alco hol or medic ation. A
moment of inattention while operating power tools
may result in serious personal injury.
b) Use safety equipment. Always wear eye
protection. Safety equipment such as dust mask,
non-skid safety shoes, hard hat, or hearing protection
used for appropriate conditions will reduce personal
injuries.
c) Avoi d accident al star ting. Ens ure the swi tch is in
the of f-posi tion befo re pluggin g in. Carrying power
tools with your nger on the switch or plugging in
power tools that have the switch on invites accidents.
d) Remove any adjusting key or wrench before
turn ing the powe r tool on. A wrench or a key left
attached to a rotating part of the power tool may result
in personal injury.
e) Do not overreach. Keep proper footing and
balance at all times. This enables better control of
the power tool in unexpected situations.
f) Dre ss proper ly. Do not we ar loose clo thing or
jewelry. Keep your hair, clothing and gloves away
from m oving par ts. Loose clothes, jewelry or long
hair can be caught in moving parts.
g) If de vices are p rovided f or the conne ction of du st
extraction and collection facilities, ensure these
are con nected an d properl y used. Use of these
devices can reduce dust-related hazards.
4.P OWER TOOL U SE AND CAR E
a) Do not force the power tool. Use the correct
power t ool for you r applicat ion. The correct power
tool will do the job better and safer at the rate for
which it was designed.
b) Do not use the power tool if the switch does not
turn i t on and off . Any power tool that cannot be
controlled with the switch is dangerous and must be
repaired.
c) Disconnect the plug from the power source
and/or the battery pack from the power tool before
making any adjustments, changing accessories,
or storing power tools. Such preventive safety

7
SoniCrafter® ENG
measures reduce the risk of starting the power tool
accidentally.
d) Store idle power tools out of the reach of children
and do not allow persons unfamiliar with the power
tool or these instructions to operate the power tool.
Power tools are dangerous in the hands of untrained
users.
e) Maintain power tools. Check for misalignment
or binding of moving parts, breakage of parts and
any other condition that may affect the power tools
operation. If damaged, have the power tool repaired
befor e use. Many accidents are caused by poorly
maintained power tools.
f) Keep cutting tools sharp and clean. Properly
maintained cutting tools with sharp cutting edges are
less likely to bind and are easier to control.
g) Use the power tool, accessories and tool bits etc.,
in acco rdance wi th these in struct ions and in th e
manne r intended f or the par ticular t ype of pow er
tool, taking into account the working conditions
and the work to be performed. Use of the power tool
for operations different from those intended could
result in a hazardous situation.
5.SERVICE
a) Have your power tool serviced by a qualied
repair person using only identical replacement
parts. This will ensure that the safety of the power tool
is maintained.
ADDITIONAL SAFETY INSTRUCTIONS
FOR YOUR TOOL
1. Never use your Sonicrafter® for wet applications.
2. Always wear eye protection.
3. Always wear ear protection during extended periods
of operation.
4. Always wear a dust mask if the operation is dusty.
5. Always inspect and remove all nails and screws, etc.
from timber before sanding.
6. Always check walls and ceilings to avoid hidden
power cables and pipes. A metal detector can be
obtained from any good DIY store for this purpose.
7. If possible, use clamping devices or other suitable
means to secure the workpiece to a rm surface.
8. Use the original accessories provided, no others.
9. Only use accessories in good condition. Do not use
torn or worn accessories.
10. Do not use a damaged plug or cord, if damaged
have them repaired. Always be aware of the cord
location.
11. Do not abuse the cord. Never use the cord to carry
the tools or pull the plug from the outlet. Keep cord
away from heat, oil, sharp edges or moving parts.
Replace damaged cords immediately.
12. Do not restart the cutting operation in the
workpiece. Let the tool reach full speed and
carefully re-enter the cut.
13. Unplug your tools before mounting or replacing
accessories.
14. Do not “jam” the cut-off saw blade or apply
excessive pressure. Do not attempt to make an
excessive depth of cut.
15. Keep your hands away from cutting area. Do not
reach under the material being cut.
16. Hold power tools by insulated gripping surfaces
when performing an operation where the cutting
tool may contact hidden wiring or its own cord.
Contact with a ”live” wire will make exposed metal
parts of the tool “live” and shock the operator.
17. The operating instructions and the enclosed safety
information should be kept carefully for later use
and enclosed with the machine, should it be passed
on or sold.
WARNING!
While working with this power tool, hand/
arm vi bration s occur. Adopt the correct working
practices in order to reduce the exposure to
vibration.
CAUTION: Do not l et famili arity wi th your
SoniCrafter® make yo u careles s. Remember
that a careless fraction of a second is sufcient to
cause severe injury.
18. Save thes e instruc tions. Refer to them frequently
and use them to instruct others who may use this
tool. If someone borrows this tool, make sure they
have these instructions.
WARNING! Some dust created by power
sanding, sawing, grinding, drilling and
other construction activities contains chemicals
known to cause cancer, birth defects or other
reproductive harm. Some examples of these
chemicals are:
a) lead from lead-based paint
b) crystalline silica from bricks and cement and other
masonry products
c) arsenic and chromium from chemically-treated
lumber

8
SoniCrafter® ENG
Your risk to these exposures varies, depending on
how often you do this type of work. To reduce your
exposure to these chemicals:
a) work in a well ventilated area
b) work with approved safety equipment, such as
those dust masks that are specically designed to
lter out microscopic particles.
Avoid prolonged contact with dust from power
sanding, sawing, grinding, drilling and other
construction activities. Wear protective clothing
and was h exposed a reas with s oap and wat er.
Allowing dust to get into your mouth, eyes, or lay
on the skin may promote absorption of harmful
chemicals.
WARNING: Use of th is tool can ge nerate an d/
or disburse dust, which may cause serious
and permanent respiratory or other injury.
Always use NIOSH/OSHA approved respiratory
protection appropriate for the dust exposure.
Direc t partic les away fr om face and bo dy.
EXTENSION CORDS
USE PROPER EXTENSION CORD. Make sure your
TABL E 1 MINIMUM GA GE FOR CORD
extension cord is in good condition. When using an
extension cord, be sure to use one heavy enough to
carry the current your product will draw. An undersized
cord will cause a drop in line voltage resulting in loss of
power and overheating. Table 1 shows the correct size
to use depending on cord length and nameplate ampere
rating. If in doubt, use the next heavier gage. The
smaller the gage number, the heavier the cord.
DOUBL E INSULAT ION
The tool is double insulated. This means that all the
external metal parts are electrically insulated from the
main power supply. This is done by placing insulation
barriers between the electrical and mechanical
components making it unnecessary for the tool to be
grounded.
IMPOR TANT NOT E
Be sure the power supply is the same as the voltage
given on the rating plate. The tool is tted with a two-
core power cord and plug.
Remove the power plug from socket before carrying out
any adjustment or servicing.
Rating Volts Total length of cord in feet
Ampere 120V 25ft. 50ft. 100 ft. 150 ft.
More Than Not More Than AWG
0
6
10
6
10
12
18
18
16
16
16
16
16
14
14
12 16 14 12 Not Recommended
14
12
12

9
SoniCrafter® ENG
SYMBOLS TECHNICAL DATA
To reduce the risk of injury, user must read
instruction manual
Warning
Wear ear protection
Wear eye protection
Wear dust mask
Double insulation
Model RK5100K RK 510 0K .1 RK5101K RK5102K
Rated
voltage
Rated
current
Oscillations
speed
Oscillations
angle
Protection
class
Weight 2.8 Lbs
120 V~60 Hz
2.3 A
20000 /min 11000-20000 /min
3.2 °
/II
OPERATING INSTRUCTIONS
NOTE: Before using the tool, read the instruction
book carefully.
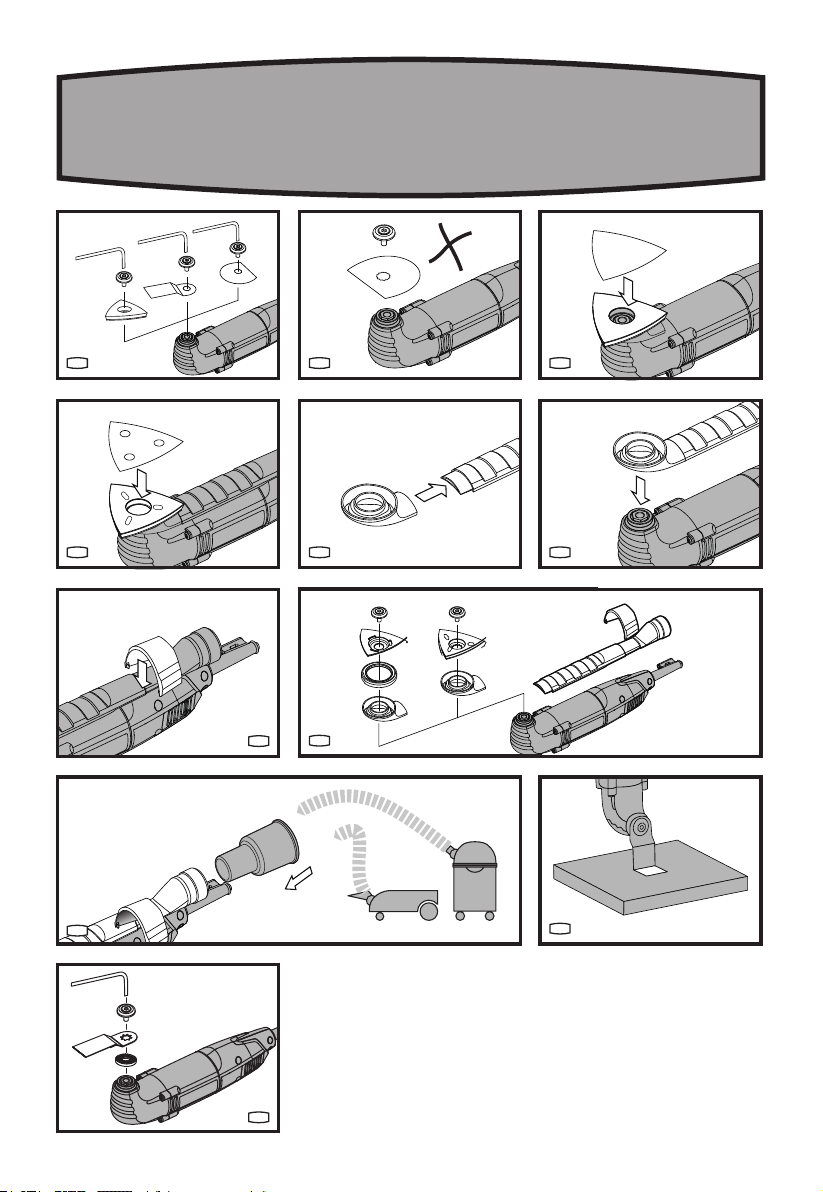
1. MOUNTING ACCESSORIES (See A 1 , A2)
CAUTION: For all work or when changing
application tools, always wear protective gloves.
Avoid danger of injury from the sharp edges of the
application tools. Application tools can become very
hot while working, presenting danger of burns!
WARNING: To reduce the risk of injury, do not let
the end cut blades or any saw blades face back
toward the user’s hand.
Unscrew the bolt (8) and remove the ange (9).
Clean the tool holder, the application tool and the bolt
(8) and ange (9).
Place the application tool exactly onto the hex-shaped
tool holder. Note that the application tool has a ush t.
Reposition the ange and tighten the bolt (8) using the
supplied Allen key.
2. AD APTER( 23)(See F )
Accessories of other brands( Fein®, Bosch®, and
Dremel® ) can be tted onto the SoniCrafter® brand tool
using the adapter.
NOTE: Fein is a registered trademark of C. & E. Fein
GmbH. Bosch is a registered trademark of Robert
Bosch GmbH. Dremel is a registered trademark of
Credo Technology Corporation.

10
SoniCrafter® ENG
3. MOUN TING / CHA NGING THE SA NDING SHEE T (See
B1,B2)
Align the sanding sheet and press it onto the sanding
pad by hand.
Align the holes of the perforated sanding sheets with
the holes of the perforated sanding pads when used.
(See B2)
Firmly press the power tool with the sanding sheet
against a at surface and briey switch the power tool
on. This provides for good adhesion and prevents
premature wear.
If one point has become worn, pull off the sanding
sheet, turn it 120° and replace.
4. MOU NTING THE SU CTION DE VICE(Se e C,D)
WARNING: Before mounting or replacing
application tools or accessories, pull the
power plug.
This preventative safety measure eliminates danger
from accidentally starting the power tool. Mount the
suction device as shown in C1-D2.(RK5102K)
5. OPERATING THE ON/OFF SWITCH
- Switching the power tool ON:
Slide switch (17) forward (I).
- Switching the power tool OFF:
Slide switch (17) backward (0).
6. USING THE VARIABLE SPEED CONTROL
(RK5101K,RK 5102K)
Select oscillation frequency (speed) while the motor is
running.
The variable speed control (18) can be used to set
the optimum oscillating frequency according to the
accessories used and the respective application.
High oscillation frequency:
Sanding, sawing, rasping and polishing stone and
metal.
Low oscillation frequency:
Polishing varnishes.
7. SECURI NG THE WORK PIECE
CAUTION: Before working with your tool make
sure that no power cords will be damaged.
8. SA NDING
Typical application: wood, metal; small areas, especially
corners, edges and places difcult to access.
Select high oscillation frequency (for variable speed
models).
Sand with a constant movement and light pressure.
Heavy pressure does not increase the removal – the
sanding sheet merely wears faster.
9. SAWING WITH THE SEMICIRCLE SAW B LADE
Typical application: wood, plastics, sheet metal.
Select high oscillation frequency (for variable speed
models).
The saw blade lasts longer if the wear is distributed
evenly. To ensure an even distribution, loosen the saw
blade, rotate it and retighten rmly.
10. SAW ING WITH T HE UNIVE RSAL END CU T SAW BLA DE
(See E )
WARNING: The sawing teeth are very sharp. Do
not touch during mounting and application.
The workpiece must be inserted rmly or clamped
tightly before it is cut.
Typical application: wood, plaster board, soft plastics
and metal (e. g. nails).
When plunging and sawing use a slight pendulum
motion, to allow sufcient chip removal.
11. SC RAPING
Typical application: Scraping off old varnish or
adhesives, removing glued carpeting, e. g. on stairs or
other small to medium-sized surfaces.
Select medium / high oscillation frequency (for variable
speed models).
WORKING HINTS FOR YOUR TOOL
If your power tool becomes too hot, especially when
used at low speed, set the speed to maximum and run
it with no load for 2-3 minutes to cool the motor. Avoid
prolonged usage at very low speeds. Always keep the
blade sharp.
Always ensure the workpiece is rmly held or clamped
to prevent movement.
Any movement of the material may affect the quality of
the cutting or sanding nish.
Start your tool before working and turn it off only after
you stop working.
Do not start sanding without having the sandpaper
tted.
Do not allow the sandpaper to wear away , it will damage
the sanding pad. The guarantee does not cover sanding
pad wear and tear.
Use coarse grit paper to sand rough surfaces, medium

11
SoniCrafter® ENG
grit for smooth surfaces and ne grit for the nishing
surfaces. If necessary, rst make a test run on scrap
material.
Excessive force will reduce the working efciency
and cause motor overload. Replacing the accessory
regularly will maintain optimum working efciency.
MAINTAIN TOOLS WITH CARE
Remove the plug from the socket before carrying out
any ad justmen t, serv icing or mai ntenance .
Your power tool requires no additional lubrication or
maintenance. There are no user serviceable parts in
your power tool. Never use water or chemical cleaners
to clean your power tool. Wipe clean with a dry cloth.
Always store your power tool in a dry place. Keep the
motor ventilation slots clean. Keep all working controls
free of dust. Occasionally you may see sparks through
the ventilation slots. This is normal and will not damage
your power tool.
If the supply cord is damaged, it must be replaced by
the manufacturer, its service agent or similarly qualied
persons in order to avoid a hazard.
WARRANTY
LIMI TED 30-DA Y EXCHAN GE POLICY
During the rst 30 days after date of purchase, you may
exchange a tool which does not work properly due to
defects in materials or workmanship by returning the
power tool to the retailer where it was purchased. To
receive a replacement power tool, you must present
a dated proof of purchase and return all original
equipment packaged with the original product. The
replacement power tool will be covered by the limited
warranty for the balance of the Two year period from the
date of the original purchase.
LIMITED TWO YEAR WARRANTY
The manufacturer warrants that, for a period of 2 years
from the date of purchase, this product shall be free of
defects in materials and workmanship. We will repair
or replace, at our option, this tool during the warranty
period, provided that the tool is sent postage prepaid to
an approved service center with all original equipment
and a dated proof of purchase.
WHAT I S NOT COVER ED
This warranty applies only to the original purchaser at
retail and is not transferable. This warranty does not
apply to accessories or batteries.
This warranty does NOT cover malfunction, failure or
defects due to:
a) abnormal use, abuse, neglect, accidents, alteration or
repairs by other than approved ser vice centers
b) commercial or rental use.
The manufacturer makes no warranties, representations
or promises as to the quality or performance of its
power tools other than those specically stated in this
warranty.
FOR SE RVICE
Contact the toll free helpline at 866-514-7625 to be
directed to an approved service center. When you send
the tool for warranty service, you must also include a
dated proof of purchase.
ADDITIONAL LIMITATIONS
Any implied warranty granted under state law, including
warranties of merchantability or tness for a particular
purpose, are limited to Two years from the date of
purchase. The manufacturer is not responsible for
direct, indirect, incidental or consequential damages.
Some states and provinces do not allow limitations on
how long an implied warranty lasts and/or do not allow
the exclusion or limitation of incidental damages, so the
above limitations and exclusions may not apply to you.
This warranty gives you specic legal rights, and you
may also have other rights which vary from state to state
or province to province.
The manufacturer declines any responsibility in
regards to civil liability arising from abusive use or not
in conformity with proper use and maintenance of the
machine as described in the operator’s manual.
After the purchase, the manufacturer recommends
proper maintenance of the machine and to read the
opera tor’s man ual befor e using the m achine.


Model No. Position Part No. remark description Qty
RK5101K, RK5102K 1 50016150 screw 1
RK5101K, RK5102K 2 50016151 Flange 1
RK5101K, RK5102K 5 50016152 Spindle 1
RK5101K, RK5102K 6 50016153 Retaining Oil Seals 1
RK5101K, RK5102K 7 50004352 Ring 1
RK5101K, RK5102K 8 50003157 Bearing 1
RK5101K, RK5102K 9 50014347 Bearing 1
RK5101K, RK5102K 10 50002840 Self tapping screw 4
RK5101K, RK5102K 11 50016154 Fore Housing 1
RK5101K, RK5102K 12 50016155 Pendulum Fork 1
RK5101K, RK5102K 13 50003085 Ring 1
RK5101K, RK5102K 15 50013673 O-ring 1
RK5101K, RK5102K 16 50016157 Bracket Support 1
RK5101K, RK5102K 17 50003140 Bearing 1
RK5101K, RK5102K 18 50016945 Armature 1
RK5101K, RK5102K 19 50016159 Dust Proof Ring 1
RK5101K, RK5102K 20 50016161 Wind Baffle Ring 1
RK5101K, RK5102K 21 50002796 Self tapping screw 2
RK5101K, RK5102K 22 50016946 Stator 1
RK5101K, RK5102K 23 50016165 Inner Wire 2
RK5101K, RK5102K 24 50016166 Inner Wire 2
RK5101K, RK5102K 25 50002803 Self tapping screw 4
RK5101K, RK5102K 26 50002833 Self tapping screw 2
RK5101K, RK5102K 27 50017067 Rear Cover 1
RK5101K, RK5102K 28 50017068 Speed Adjustment Knob 1
RK5101K, RK5102K 29 50016963 Carbon Brush set 1
RK5101K, RK5102K 30 50017069 Power Supply Board 1
RK5101K, RK5102K 31 50016951 for US Power Cord 1
RK5101K, RK5102K 32 50000718 Cord protector 1
RK5101K, RK5102K 33 50016947 Housing 1
RK5101K, RK5102K 34 50016164 Needle Bearing 1
RK5101K, RK5102K 35 50016175 Switch Lever 1
RK5101K, RK5102K 36 50016952 Trigger 1
RK5101K, RK5102K 37 50017070 for US Rated Label 1
RK5101K, RK5102K 42 50003082 Ring 1
RK5101K, RK5102K 44 50016178 Spanner 1
RK5101K, RK5102K 45 50016309 Screw 1
RK5101K, RK5102K 46 50016156 Ball Bearing 1
RK5101K, RK5102K 48 50016961 Brush Bracket Assmebly 2 1
RK5101K, RK5102K 49 50016962 Brush Bracket Assmebly 1 1
RK5101K, RK5102K 50 50016160 Proof Ring 1
RK5101K, RK5102K 51 50016944 Washer 1
RK5101K, RK5102K 52 50014017 O-ring 1
RK5101K, RK5102K 101 50016179 Transmission Housing Asm 1
RK5101K, RK5102K 102 50016960 Housing Asm 1
RK5101K, RK5102K 103 50016959 Rotor Asm 1
RK5101K, RK5102K 104 50017071 Speed Contorl Asm 1
 Loading...