

Page 1
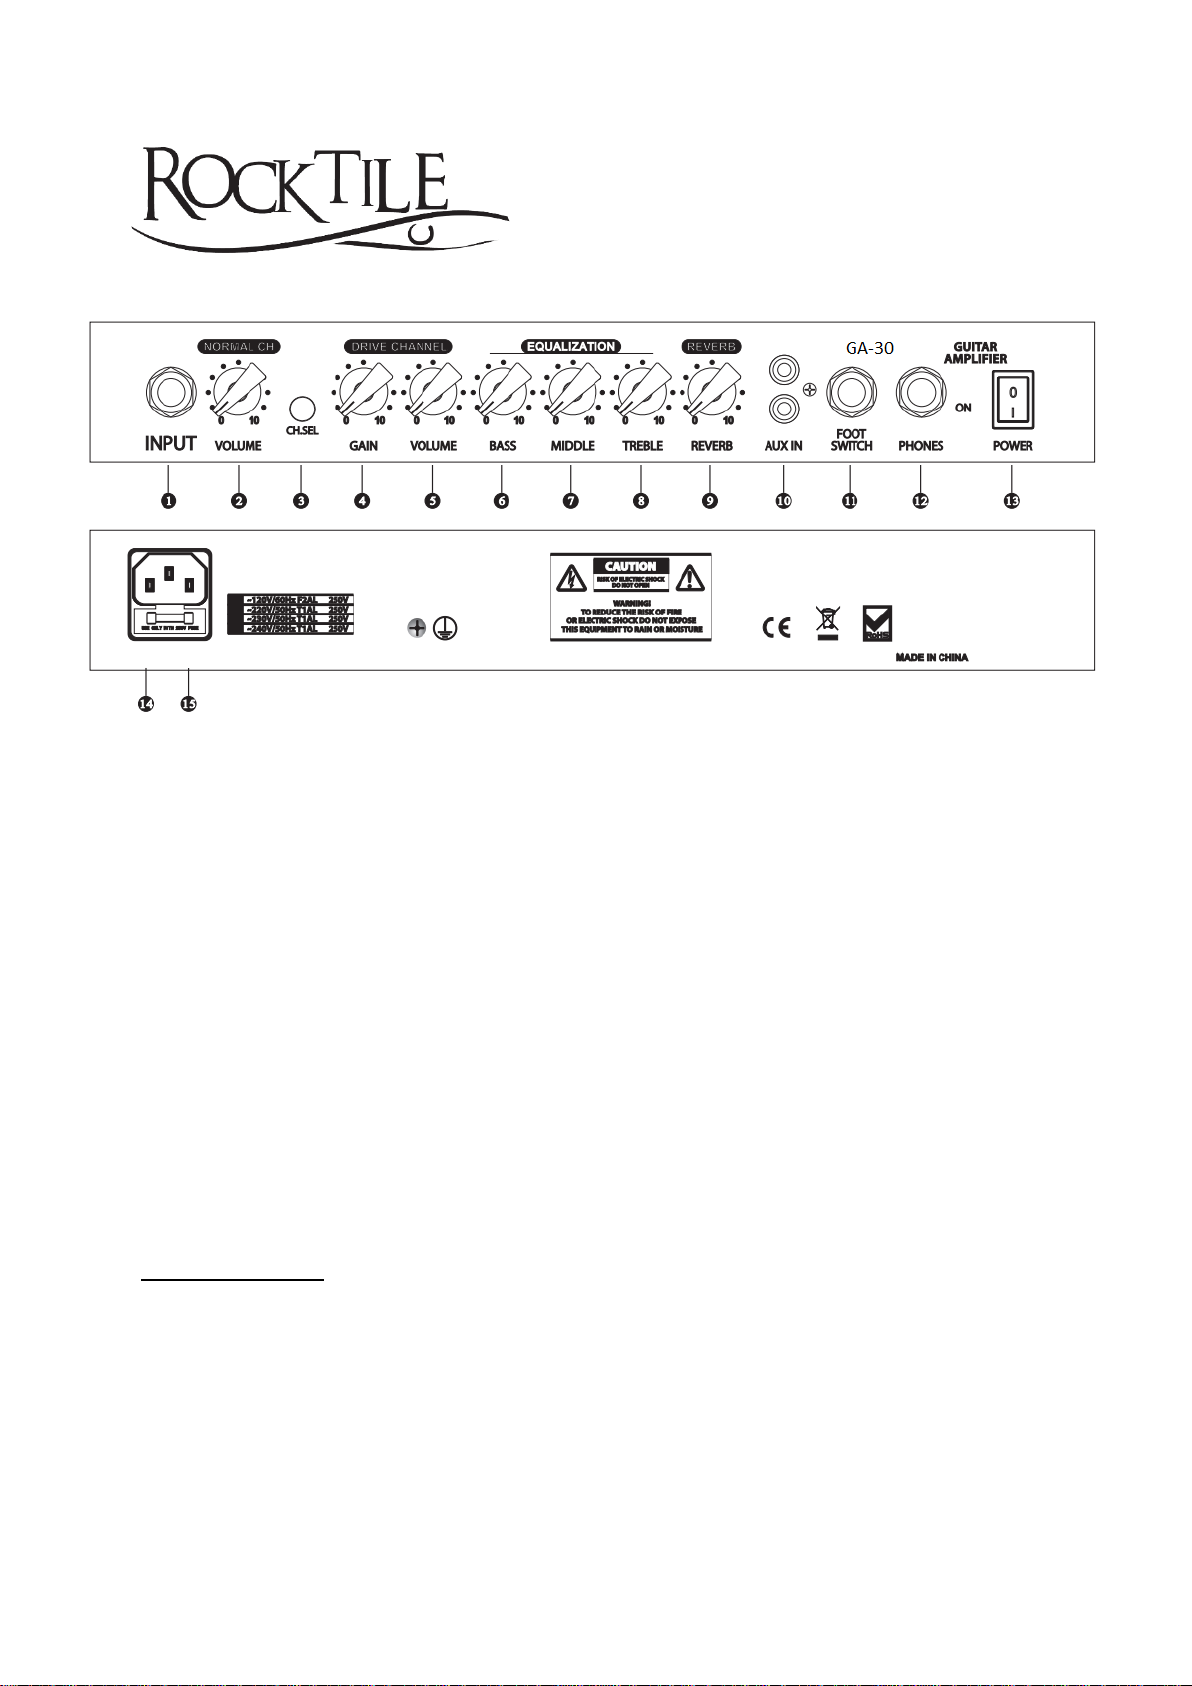
GA-30 Mark 30 Watt Gitarrenverstärker
Bedienungsanleitung
1. Eingangsbuchse: Schließen Sie hier Ihr
Instrument an
2. Lautstärke: Regeln Sie hier die Lautstärke
des Clean Kanals
3. Kanalauswahl (Clean/Drive): Wählen
Sie hier Ihren Kanal
4. Gain Regler (Drive Kanal): Wählen Sie
hier die Intensität des Gains
5. Lautstärke (Drive Kanal): Regeln Sie
hier die Lautstärke des Drive Kanals
6. Tiefen Einstellung: Stellen Sie hier den
Anteil der Bässe ein
7. Mitten Einstellung: Stellen Sie hier den
Anteil der Mitten ein
8. Höhen Einstellung: Stellen Sie hier den
Anteil der Höhen ein
9. Reverb Intensität: Wählen Sie hier die
Intensität des Halls
10. AUX Eingangsbuchse: Schließen Sie hier
ein AUX-fähiges Gerät (z.B. Handy) an
11. Fußpedal (Kanalwahl): Schließen Sie
hier ein Fußpedal an um zwischen Cleanund Drive-Kanal zu wechseln
12. Kopfhöreranschluss: Schließen Sie hier
einen Kopfhörer an, um lautlos Üben zu
können
13. An/Ausschalter: Hiermit schalten Sie das
Gerät ein oder aus
14. Verbaute Sicherung
15. Stromanschluss: Schließen Sie hier das
Netzkabel an
Wichtige Hinweise:
- Setzen Sie das Gerät keinem direkten Wasser aus, da ansonsten die Gefahr eines
Stromschlages besteht.
- Lassen Sie Ihre am Verstärker angeschlossene Gitarre nicht unbeaufsichtigt mit aufgedrehter
Lautstärke stehen.
- Neonröhren oder UV-Lichtquellen in unmittelbarer Nähe können ein leichtes Brummen
erzeugen.
- Nutzen Sie dieses Gerät immer mit einer angemessenen Lautstärke, da hohe Lautstärken auf
Dauer Ihrem Gehör schaden.
- Stecken Sie Ihre Kopfhörer nur an wenn das Gerät ausgeschaltet ist.
Page 2

WEEE/CE-Erklärung
Ihr Produkt wurde mit hochwertigen Materialien und Komponenten entworfen und hergestellt, die
recycelbar sind und wiederverwendet werden können. Dieses Symbol bedeutet, dass elektrische und
elektronische Geräte am Ende ihrer Nutzungsdauer vom Hausmüll getrennt entsorgt werden müssen.
Bitte entsorgen Sie dieses Gerät bei Ihrer örtlichen kommunalen Sammelstelle oder im Recycling
Center. Bitte helfen Sie mit, die Umwelt, in der wir leben, zu erhalten.
Technische Änderungen und Änderungen im Erscheinungsbild vorbehalten. Alle Angaben
entsprechen dem Stand bei Drucklegung. Für die Richtigkeit und Vollständigkeit der enthaltenen
Beschreibungen, Abbildungen und Angaben übernimmt Musikhaus Kirstein GmbH keinerlei Gewähr.
Abgebildete Farben und Spezifikationen können geringfügig vom Produkt abweichen. Musikhaus
Kirstein GmbH - Produkte sind nur über autorisierte Händler erhältlich. Distributoren und Händler
sind keine Handlungsbevollmächtigten von Musikhaus Kirstein GmbH und haben keinerlei Befugnis,
die Musikhaus Kirstein GmbH in irgendeiner Weise, sei es ausdrücklich oder durch schlüssiges
Handeln, rechtlich zu binden. Diese Bedienungsanleitung ist urheberrechtlich geschützt. Jede
Vervielfältigung, bzw. jeder Nachdruck, auch auszugsweise, und jede Wiedergabe der Abbildungen,
auch in verändertem Zustand, ist nur mit schriftlicher Zustimmung der Firma Musikhaus Kirstein
GmbH gestattet.
Musikhaus Kirstein GmbH
Bernbeurener Str. 11
86956 Schongau – Germany
Telefon/Phone: 0049-8861-909494-0
Telefax/Fax: 0049-8861-909494-19
Page 3
Funktionen und Bedienung
Rocktile CL-118 Clip-Stimmgerät, chromatisch
ArtikelNr.: 00059156
Vielen Dank, daß Sie sich für das Rocktile CL-118 Clip-Stimmgerät entschieden haben. Bitte befolgen Sie die
Anweisungen in dieser Anleitung und Sie werden lange Zeit Freude an Ihrem Stimmgerät haben
1) Lesen Sie diese Anleitung vor dem Einschalten genau durch
2) Bitte befolgen Sie alle Vorsichtsmaßnahmen und heben Sie diese Anleitung auf um gegebenenfalls
darin zu einem späteren Zeitpunkt nachlesen zu können.
3) Vermeiden Sie Kontakt mit Feuchtigkeit und Wasser. Verwenden Sie zum Reinigen nur ein
trockenes, weiches Tuch
4) Vermeiden Sie die Nähe von Wärmequellen, wie Heizgeräten oder direkte Sonneneinstrahlung.
5) Öffnen Sie das Gerät nicht und lassen Sie alle eventuellen Reparaturen von Fachpersonal
ausführen. Sollte das Gerät beschädigt sein, Wasser eingedrungen sein oder sonstige Defekte
aufweisen bringen Sie das Gerät zum Hersteller oder in eine Fachwerkstatt.
6) Entsorgen Sie leere Batterien nur an dafür vorgesehenen Sammelstellen und nicht im Hausmüll
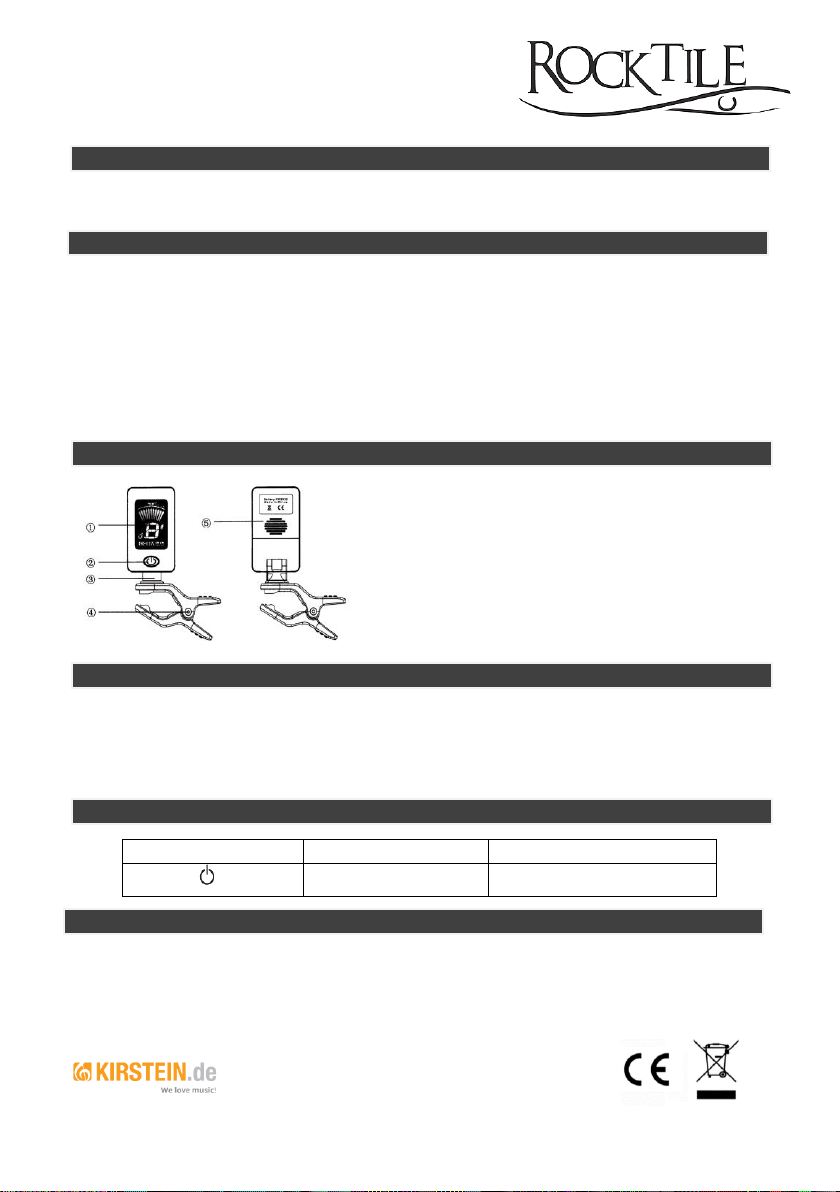
1. LCD-Bildschirm: Zeigt Vorgänge an
2. EIN/Aus-/Funktionstaste: Ändert die Funktionen des
Stimmgerätes oder schaltet es ein oder aus.
3. Achse
4. Clip: Zum Anbringen an das Instrument
5. Batteriefach
Bitte legen Sie den Akku (im Lieferumfang enthalten) wie folgt ein.
1. Drücken Sie auf die Vorderseite des Akkufachs und schieben Sie ihn zurück, um den Deckel zu entfernen.
2. Legen Sie die Batterie mit dem Minuspol nach innen in das Fach. Bitte setzen Sie die Vorderseite der
Abdeckung ein und drücken Sie sie zum Schließen.
3. Nach dem Einlegen der Batterie drücken Sie die EIN/AUS-/Funktionstaste um das Gerät einzuschalten.
4. Der Tuner wird nach ca. 3 Minuten automatisch ausgeschaltet, wenn er nicht bedient wird.
A4 Frequenz: 440Hz
Tuning-Artikel: Chromatisch [C], Gitarre [G], Bass [B], Geige [V], Ukulele C [Uc], Ukulele D [Du]
Abstimmbereich: 0A (27,5 Hz) -8C (4186,01 Hz)
Gewicht: 19 g
Dimension: 50 (L) X26 (B) X76 (H) mm
Hinweis: Ukulele C ist für den Standardmodus (4G 3C 2E 1A)
Ukulele D ist eine Note höher (4A 3D 2F1B)
Musikhaus Kirstein GmbH
Bernbeurener Strasse 11 86959 Schongau / Germany Phone 0049-8861-909494-0 / Fax 0049-909494-19
Taste
Drücken
2 Sekunden gedrückt halten
Tuning-Elemente
auswählen
On/Aus
Vorsichtsmaßnahmen
Einführung
Teilebezeichnungen und Funktionen
Spezifikationen
Batterie wechseln
Page 4
Rocktile CL-118 Chromatic Cliptuner
Article No.: 00059156
Thank you for buying the Rocktile CL-118 cliptuner. By following the instructions found in this user
manual, you can look forward to exceptional performance from your tuner for years to come.
1. Do not disassemble or repair this tuner by yourself.
2. Do not use or store the tuner in areas with high temperature, high humidity, high dust or areas
susceptible to static or electric shock.
3. Do not drop this Tuner
4. Do not use strong cleaners or solvents to clean this tuner.
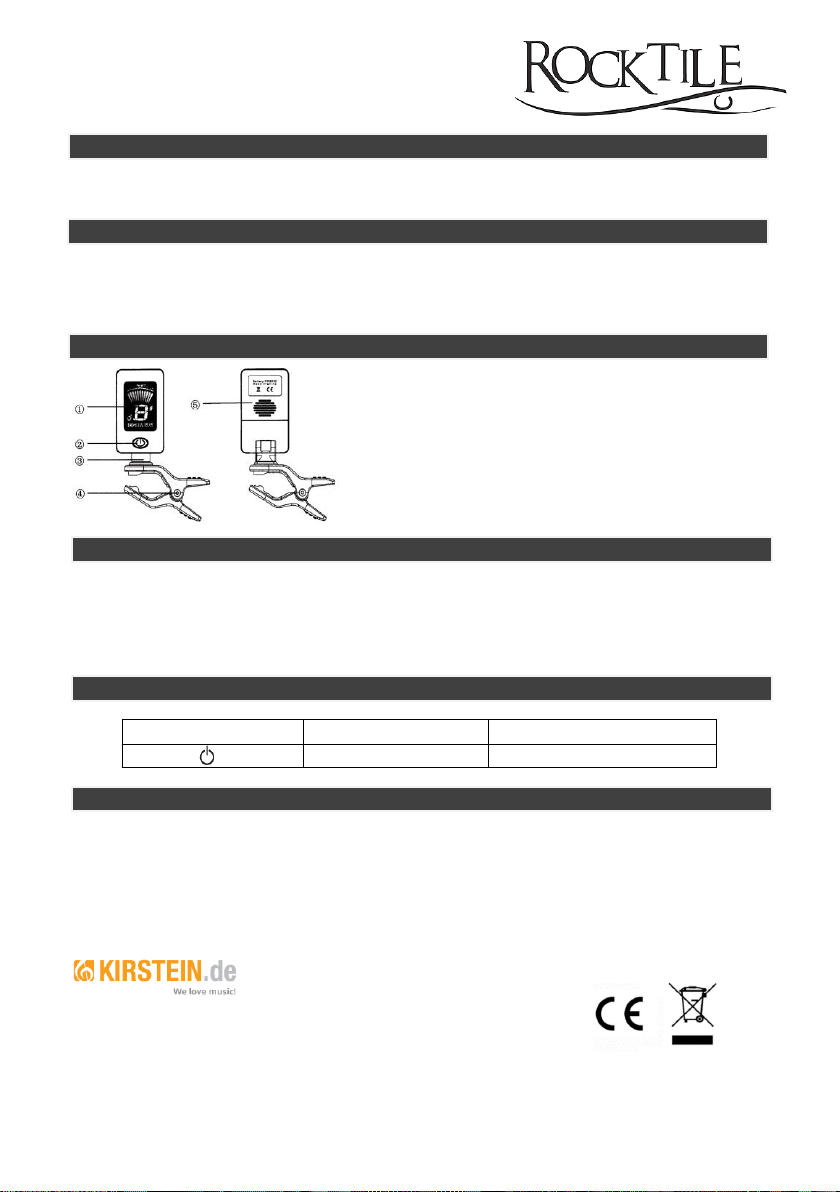
1. LCD Screen: Displays operations
2. ON-/OFF/Function Button: Changes functions of the unit
3. Axis
4. Clip: Use to attach to instrument
5. Battery Compartment
Please load in the battery (included in the package) by following steps.
1. Press the front of the battery cover and then slide back to remove cover.
2. Put the battery into compartment with negative pole facing inward. Please insert the front of cover then
push to close, can also use equipped screw to lock the cover.
3. After inserting the battery, push the ON-/OFF/Function (2sec.) and the unit will be on and in tuner mode.
4. The tuner will be power off automatically after 3 minutes if no operation.
A4 Frequency: 440Hz
Tuning Item: Chromatic [C], Guitar [G], Bass [B], Violin [V], Ukulele C [Uc], Ukulele D [Uc]
Tuning Range: 0A (27.5Hz) -8C (4186.01Hz)
Weight: 19g
Dimension: 50(L) X26 (W) X76(H) mm
Notice: Ukulele C is for standard mode (4G 3C 2E 1A)
Ukulele D is one note higher (4A 3D 2F1B)
Musikhaus Kirstein GmbH
Bernbeurener Strasse 11
86959 Schongau / Germany
Phone 0049-8861-909494-0 / Fax 0049-909494-19
Button
Press
Press and hold 2 seconds
Select Tuning Items
Power ON/OFF
Safety instructions
Introduction
Part names and functions
Replace Battery
Specifications
Functions and Operation
Page 5

SHAMAN Electric
Handbuch für E-Gitarre
Version 07/2021
Unser Handbuch E-Gitarre wird ständig überarbeitet und ergänzt.
Solltest Du Fragen zum Booklet, Anregungen oder Kritik haben, wende Dich gerne an
[email protected]
Page 6

Inhaltsverzeichnis
Wir ziehen andere Saiten auf (Saitenwechsel) ........................................................................................ 3
Freude nennt man auch gute Stimmung (Stimmen der Gitarre) ............................................................ 8
Mit elektronischer Hilfe ....................................................................................................................... 8
Ohne Stimmgerät ................................................................................................................................ 8
Nachstimmen ...................................................................................................................................... 9
Sitzt, wackelt und hat Luft ..................................................................................................................... 10
Im Sitzen ............................................................................................................................................ 10
Im Stehen .......................................................................................................................................... 11
Microplastik (Der Umgang mit Plektren) .............................................................................................. 12
Alles im Griff (Die wichtigsten Griffe) .................................................................................................... 12
Schlag auf Schlag (Die wichtigsten Schlagmuster) ................................................................................ 15
Los geht’s (Wir spielen ohne Noten) ..................................................................................................... 16
Ich kann auch anders (Picking) .............................................................................................................. 18
Spiel nach Noten ............................................................................................................................... 19
Erstes Stück ....................................................................................................................................... 24
Spiel nach Tabulatur .......................................................................................................................... 24
Wer schön klingen will, muss nicht leiden (keine Schmerzen an den Fingerkuppen) .......................... 26
Page 7

Wir ziehen andere Saiten auf (Saitenwechsel)
Gitarrensaiten werden nur gewickelt und geknotet. Du schaffst das, ich weiß es!
Gehe sicher, dass Du die richtigen Saiten, bzw. die richtige Gitarre (E-Gitarre) hast:
ACHTUNG:
Solltest Du eine Klassikgitarre oder eine Westerngitarre besitzen, benötigst Du andere Saiten!
Nylonsaiten haben auf diesen beiden Gitarrenarten nichts verloren.
Page 8
Erstmal runter mit den alten Schnüren.
Am einfachsten ist es, jeweils drei Saiten zu wechseln. Nimm also erstmal die drei dickeren
Basssaiten ins Visier. Um diese abzunehmen, drehst Du so lange an den zugehörigen Stimmwirbeln,
bis diese drei Saiten Deiner Gitarre ganz schlaff am Instrument hängen. Fummel sie nun aus den
Mechaniken heraus und ziehe das Ball-End aus den Saitenhaltern. Hier gibt es einige unterschiedliche
Systeme die wir später noch genauer betrachten. Die entspannte Saite kann man auch einfach in der
Mitte durchschneiden, um sich das Abnehmen etwas zu erleichtern. Die restlichen Saiten bleiben
noch auf dem Instrument. So stellst Du sicher, dass der Sattel dort bleibt, wo er hingehört und Du
keine Kleinteile verlierst. Nun führst Du die drei Basssaiten in die Öffnungen am Seitenhalter ein.
Solltest Du dir beim Saitenverlauf nicht ganz sicher sein, kannst Du dich an den alten, noch am
Instrument verbliebenen Saiten orientieren.
Bei E-Gitarren gibt es einige unterschiedliche Systeme, wie die Saiten am Steg gehalten werden.
Sollte Dein Saitenhalter so aussehen, führst Du das spitze Ende der neuen Saite einfach von Hinten
gerade durch das Loch im Saitenhalter. Das Ball-End der Saite verklemmt sich im Saitenhalter und
hält somit die Saite.
Page 9
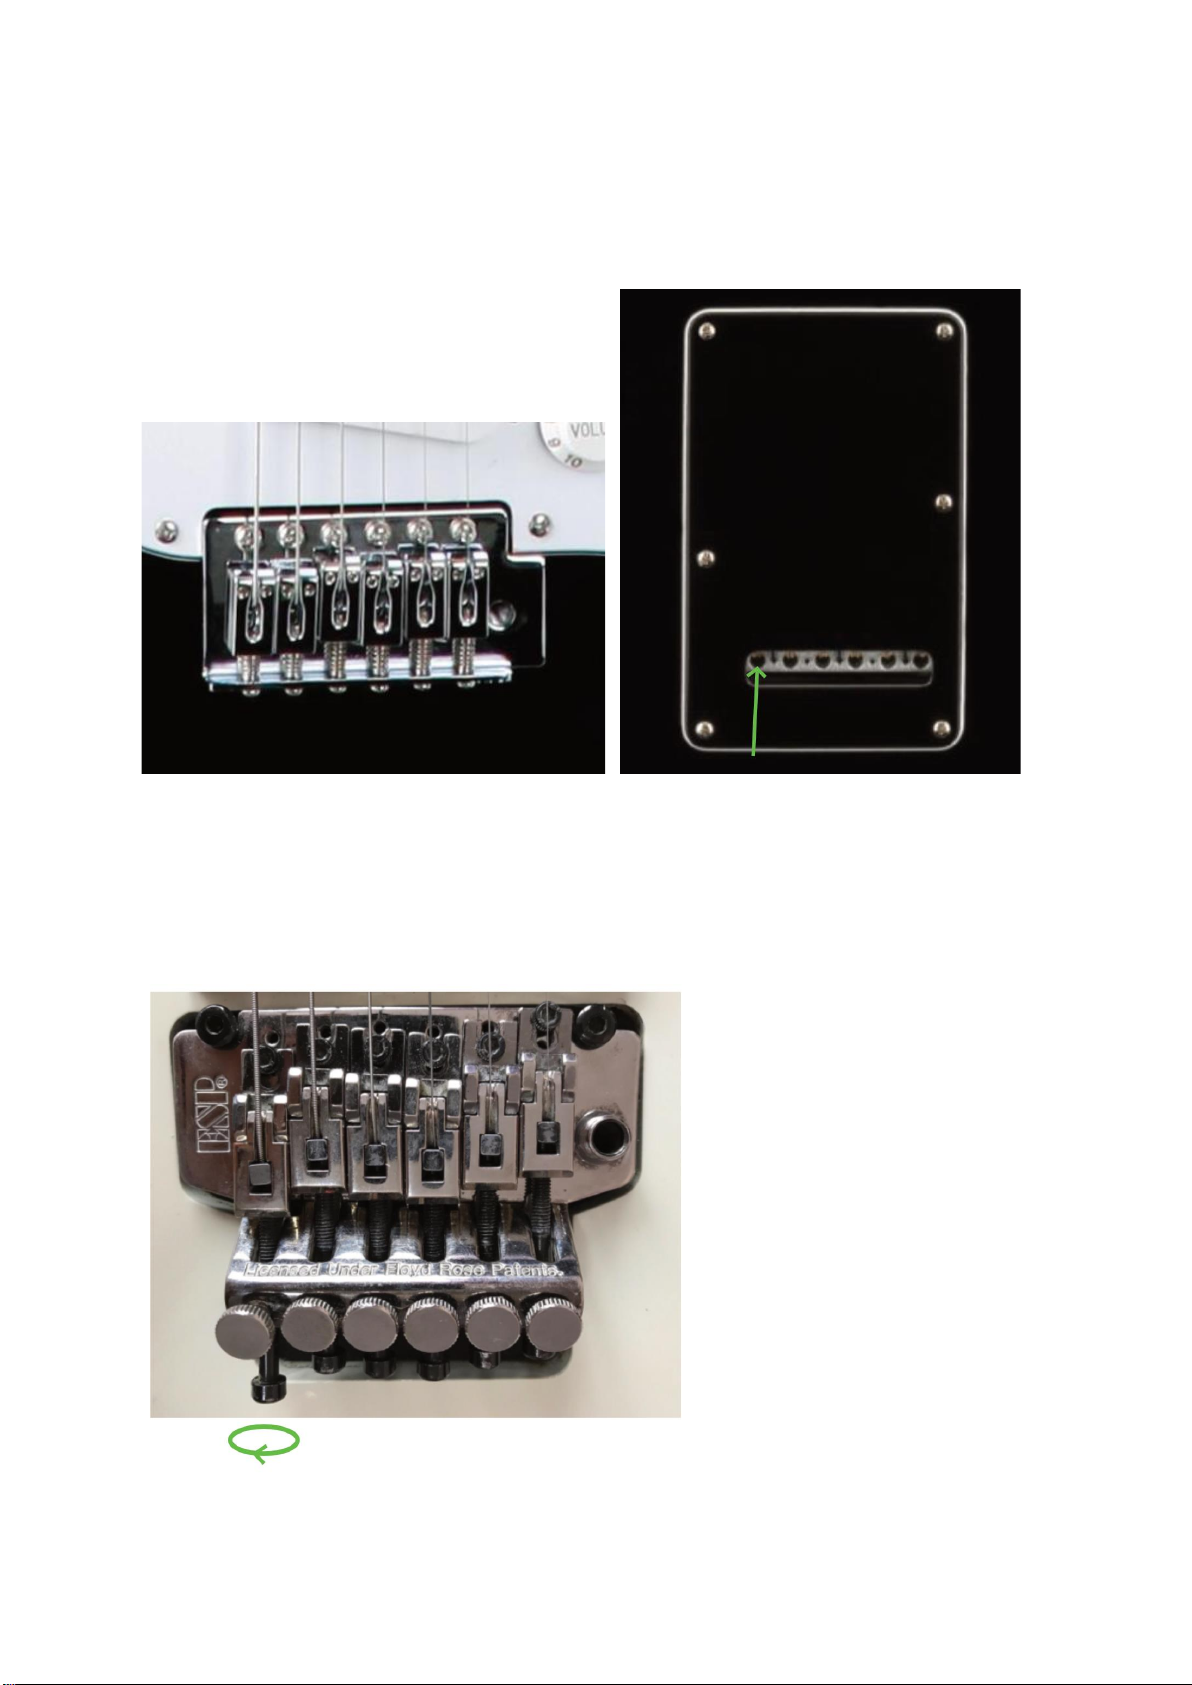
Sollte Dein Saitenhalter so aussehen, führst Du das spitze Ende der neuen Saite von der Rückseite
Deiner Gitarre durch den Saitenhalter. Das Ball-Eind Deiner Saite verschwindet durch das Loch in der
Rückseite der Gitarre und hält somit die Saite.
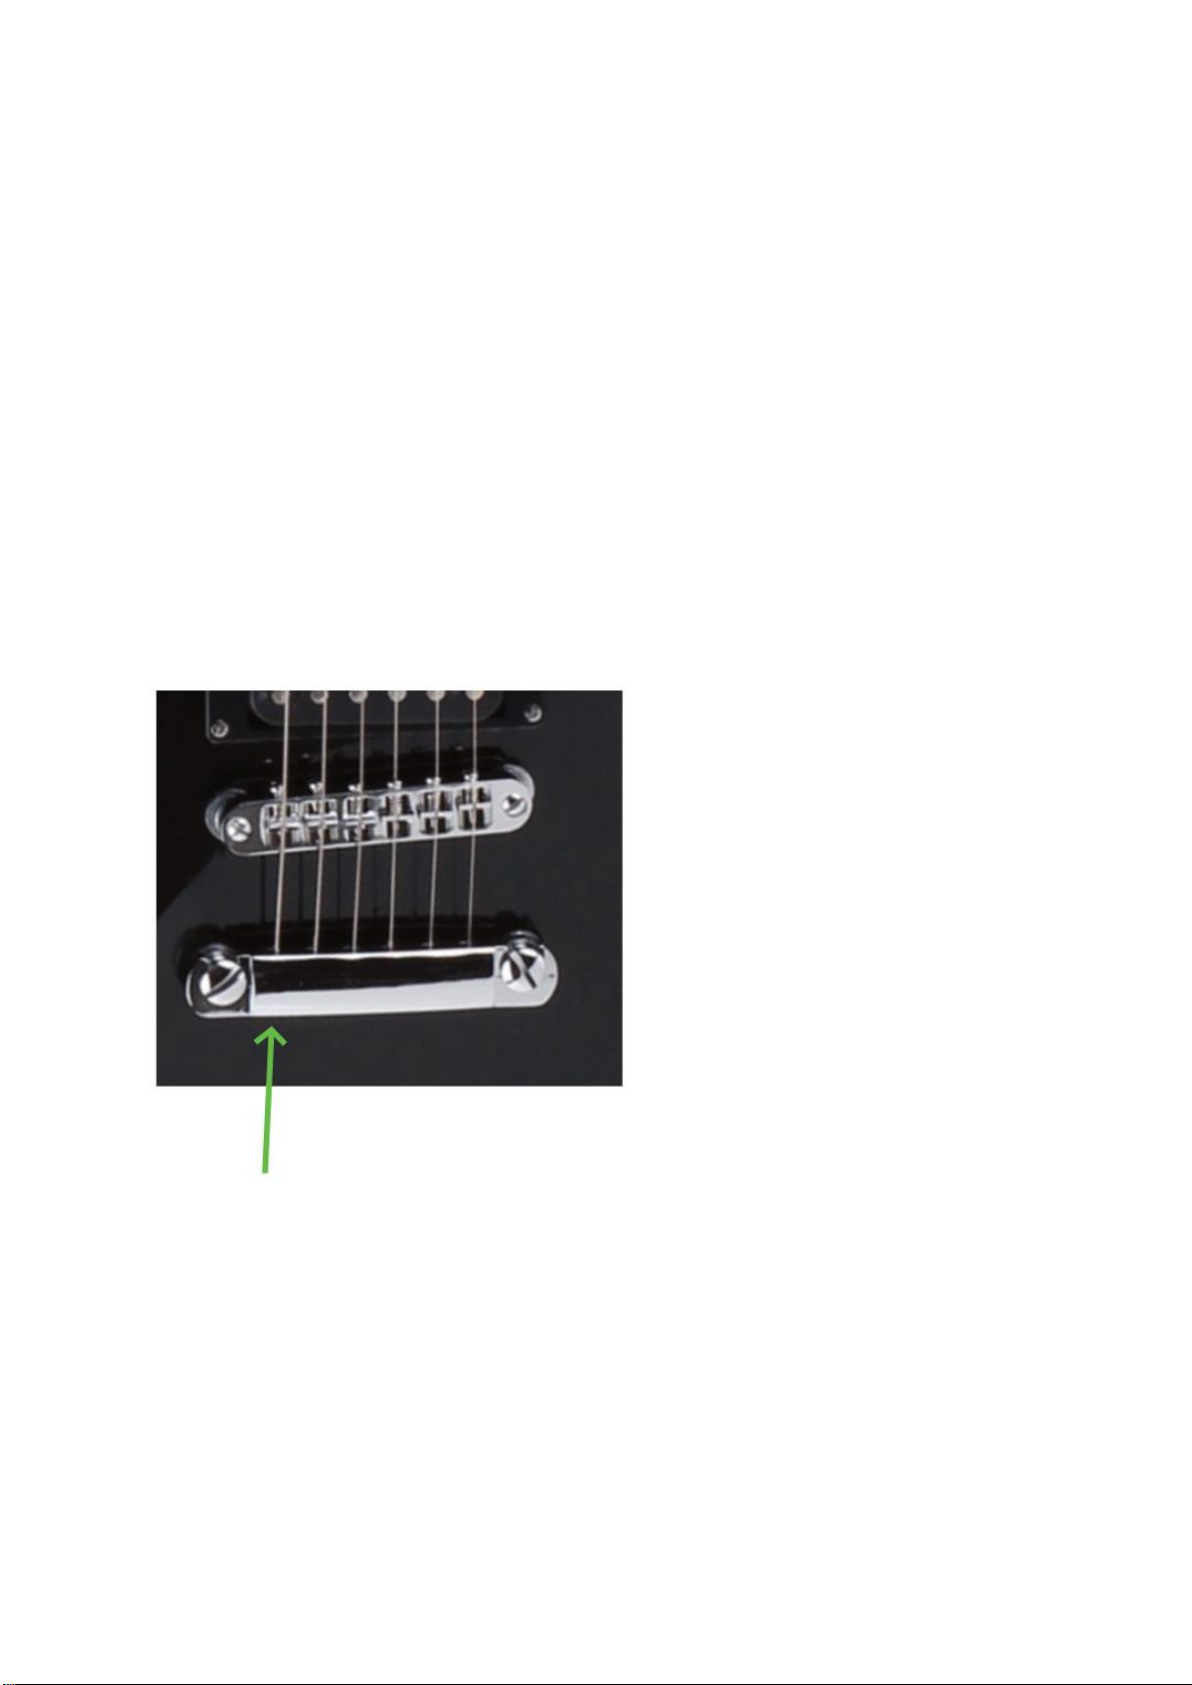
Es gibt auch Systeme, be welchen die Saite per Schraubklemme im Saitenhalter gehalten wird. Hier
wird das Ball-End der neuen Saite nicht benötigt und bei der Montage abgezwickt. Ein solches System
sieht z.B. so aus:
Page 10
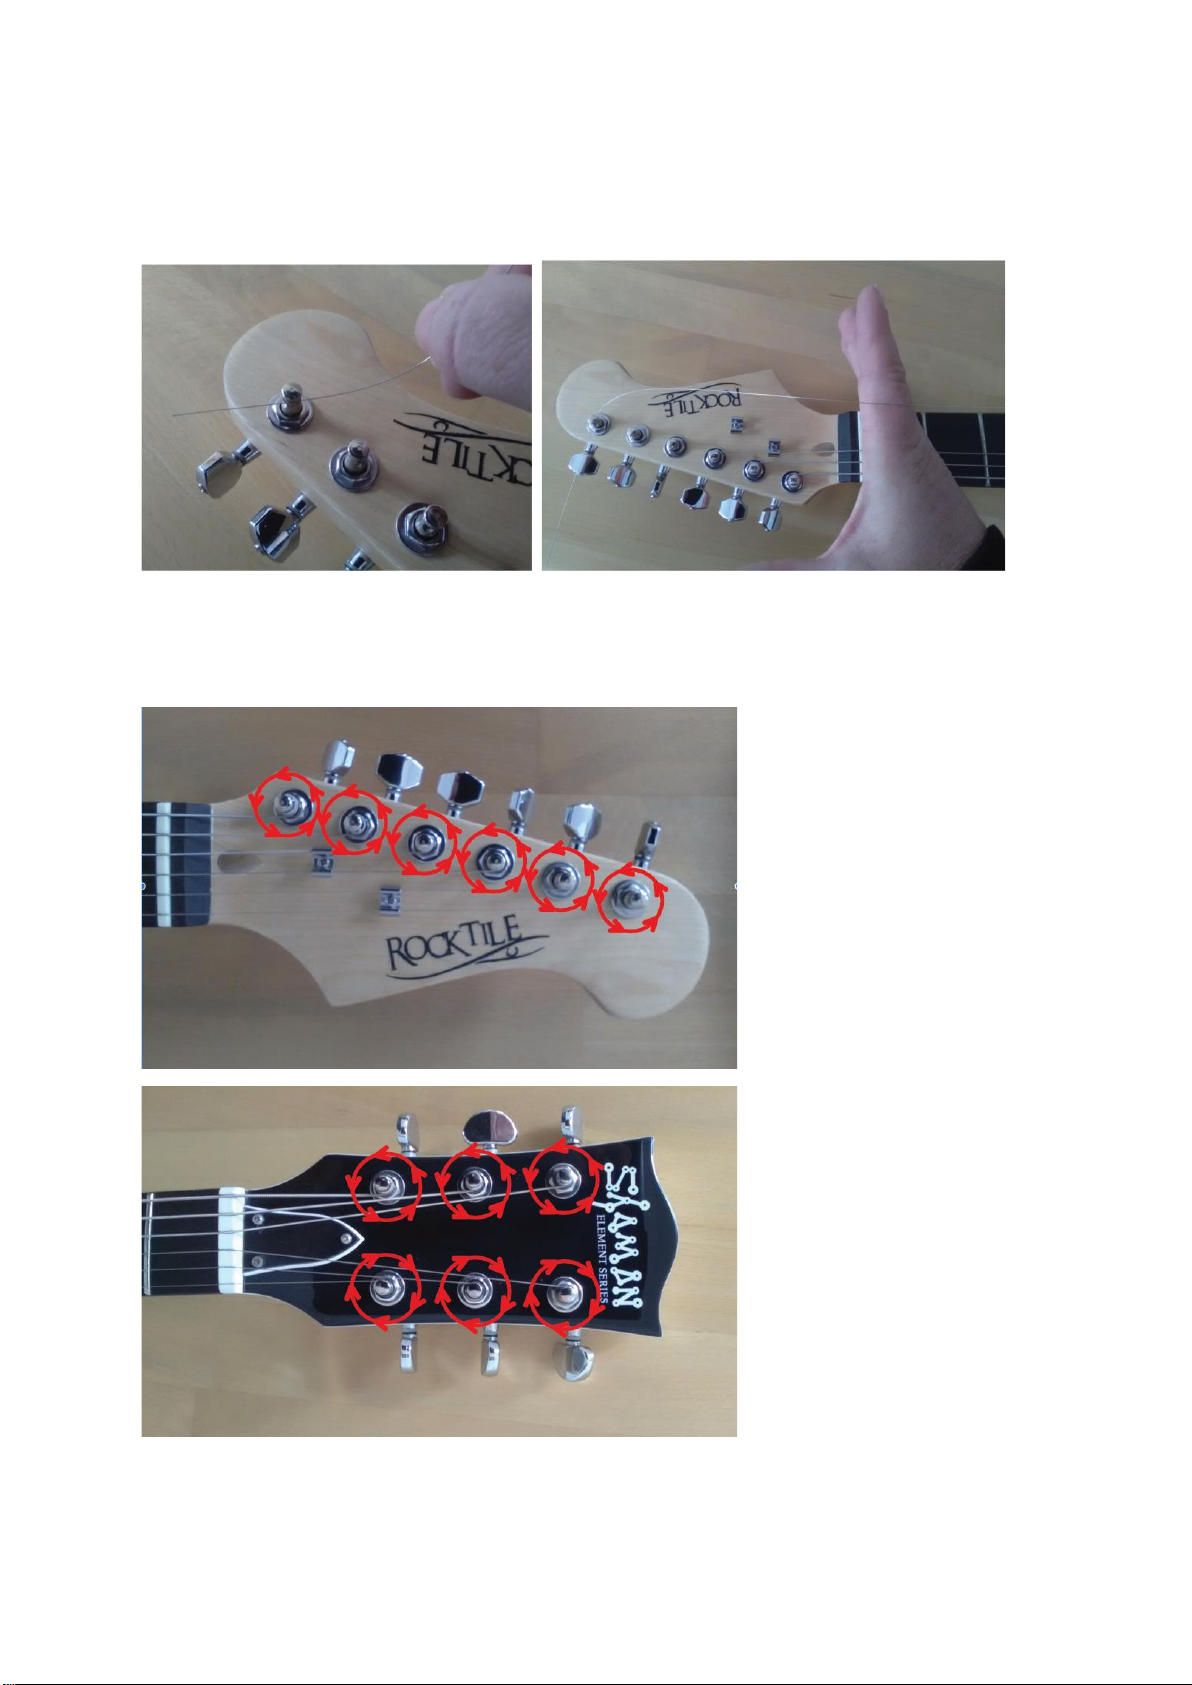
Als nächstes wird das andere Ende durch das kleine Loch in der Walze der Mechanik geführt und so
weit durchgezogen, bis die Saite locker über Deine zweite, am Sattel senkrecht gestellte Hand läuft.
Nun kannst Du am entsprechenden Wirbel drehen. Die Walze muss sich von der Mitte der Kopfplatte
wegbewegen, dann drehst Du richtig.
Page 11

Drehe nur so weit, bis die Saite sicher hält. Die Wicklungen auf der Walze der Mechanik kannst Du
mit den Fingern noch etwas zusammenschieben. Das hält nicht nur besser, sondern sieht auch
schöner aus. Das Stimmen kommt später. Zu viel Saitenspannung wäre hier fehl am Platz.
Nun geht’s weiter mit den Diskantsaiten. Nimm jetzt die drei dünnsten Saiten von Deiner Gitarre ab.
Auch hier befestigst Du erst einmal alle Saiten am Saitenhalter.
Auch bei den Diskantsaiten gilt die aufgestellte Hand als Maßstab bei der Befestigung des anderen
Endes an der Stimmmechanik. Wie gehabt, muss sich die Walze der Stimmmechanik zum Spannen
der Saite von der gedachten Mittellinie der Kopfplatte wegdrehen. Drehe nur so weit, bis die Saite
sicher hält. Das Stimmen kommt ja bald. Zu viel Saitenspannung wäre hier fehl am Platz.
Die aus der Stimmmechanik herausragenden Überstände lässt Du sicherheitshalber noch am
Instrument.
Sieh Dir nun Deine Gitarre, die Saiten und alle Befestigungen nochmal genau an. Sind die Ball-Ends
am Saitenhalter komplett in ihrem Sitz und haben sicheren Halt? Sehen die Wicklungen an den
Stimmwirbeln gut aus? Laufen die Saiten sauber in den dafür vorgesehenen Vertiefungen des Sattels
und sauber über die Saitenreiter? Dann hast Du’s geschafft. Wir beide sollten stolz auf Dich sein!
Fleißarbeit für Fortgeschrittene:
Hals einstellen und Intonation.
Bespannt man seine Gitarre mit Saiten anderer Stärke, ändert sich auch die Spannung und somit der
Saitenzug, welcher auf das Instrument wirkt. Dies kann zur Folge haben, dass sich die Intonation
(Bundreinheit) und/oder die Bespielbarkeit (Saitenlage) Deiner Gitarre ändert.
Benutzt Du z.B. deitlich dickere Saiten, wird sich dein Gitarrenhals weiter nach vorne Krümmen (Hast
Du ein Tremolo an der Gitarre, geben übrigens auch dessen Federn weiter nach) und der Abstand der
Saiten vom Griffbrett wird sich erhöhen. Du musst also beim Spielen viel fester drücken. Bei
dünneren Saiten verliert der Hals einen Teil seiner Krümmung und es kann vorkommen, dass die
Saiten an den Bünden anstoßen. Die Gitarre scheppert und schnarrt.
Die Bundreinheit stellt man an den Saitenreitern ein. Die Saitenlage justiert man mit dem Halsstab
und je nach Gitarrenmodell mit dem Steg oder den Saitenreitern.
Da diese Arbeit etwas Erfahrung bedarf, um ein brauchbares Ergebnis zu erreichen und nichts an der
Gitarre zu beschädigen, empfehlen wir Dir dies im Fachgeschäft erledigen zu lassen. Solltest Du es
dennoch selbst versuchen wollen, sind hierzu Online-Tutorials eine gute Informationsquelle. Die
Grundlagen erfährst Du hier:
https://www.kirstein.de/Gitarre-Bass-einstellen/
Page 12

Freude nennt man auch gute Stimmung (Stimmen der Gitarre)
Das Stimmen der Gitarre kann nach dem Gehör oder mittels eines Stimmgeräts erfolgen.
Bei neu aufgezogenen Saiten empfiehlt es sich ein Stimmgerät zu nutzen, da es hier sehr leicht
vorkommen kann, dass man die Saite zu sehr spannt und den schönen neuen Saitensatz bereits
demoliert.
Mit elektronischer Hilfe
Beginne das Stimmen mit der A-Saite (5th). Solltest Du kein Stimmgerät haben, kannst Du einfach
eine Handy-App oder einen kostenfreien Online-Tuner benutzen.
So einen Tuner findest Du z.B. unter https://tuner-online.com/de/ zur sofortigen Nutzung im
Browser. Dein Mikrofon muss hierfür natürlich aktiviert sein.
Stimmgeräte für den Hausgebrauch sind jedoch mittlerweile sehr günstig und eine Anschaffung lohnt
sich auf jeden Fall.
Ob Du mit oder ohne Stimmgerät stimmst, bleibt Dir überlassen. Sehr wichtig ist es jedoch, beim
Stimmen die richtige Oktavlage zu erwischen. Das Stimmgerät merkt zwar, ob Du den richtigen Ton
erwischt hast, es merkt aber nicht, ob Du aus Versehen eine Oktave zu hoch oder zu tief gestimmt
hast. Selbst ein geübtes Gehör tut sich hier manchmal schwer. Hier empfehlen wir Dir, unser kurzes
Online-Video „Konzertgitarre Stimmen - Leersaiten“ anzuhören und mit den Saiten Deiner Gitarre zu
vergleichen. Sicher ist sicher.
https://youtu.be/I-ot4yYDlkc
Eine deutlich zu hoch gestimmte Saite wird zwangsläufig reißen und könnte im allerschlimmsten Fall
sogar Deine Gitarre beschädigen.
Ohne Stimmgerät
Hast Du die A-Saite richtig gestimmt und kein Stimmgerät zur Hand, kannst Du mit einem kleinen
Trick ganz einfach die anderen Saiten stimmen.
Greifst Du die tiefe E-Saite am 5ten Bund, sollte sie genauso klingen wie die bereits gestimmte ASaite. Achte hier auch wieder darauf, die richtige Oktave zu erwischen und nicht zu hoch zu stimmen.
Greifst Du nun die A-Saite am 5ten Bund, klingt sie wie die nächsthöhere, also wie die D-Saite.
Die D-Saite greifst Du am 5ten Bund um die G-Saite zu stimmen.
Page 13
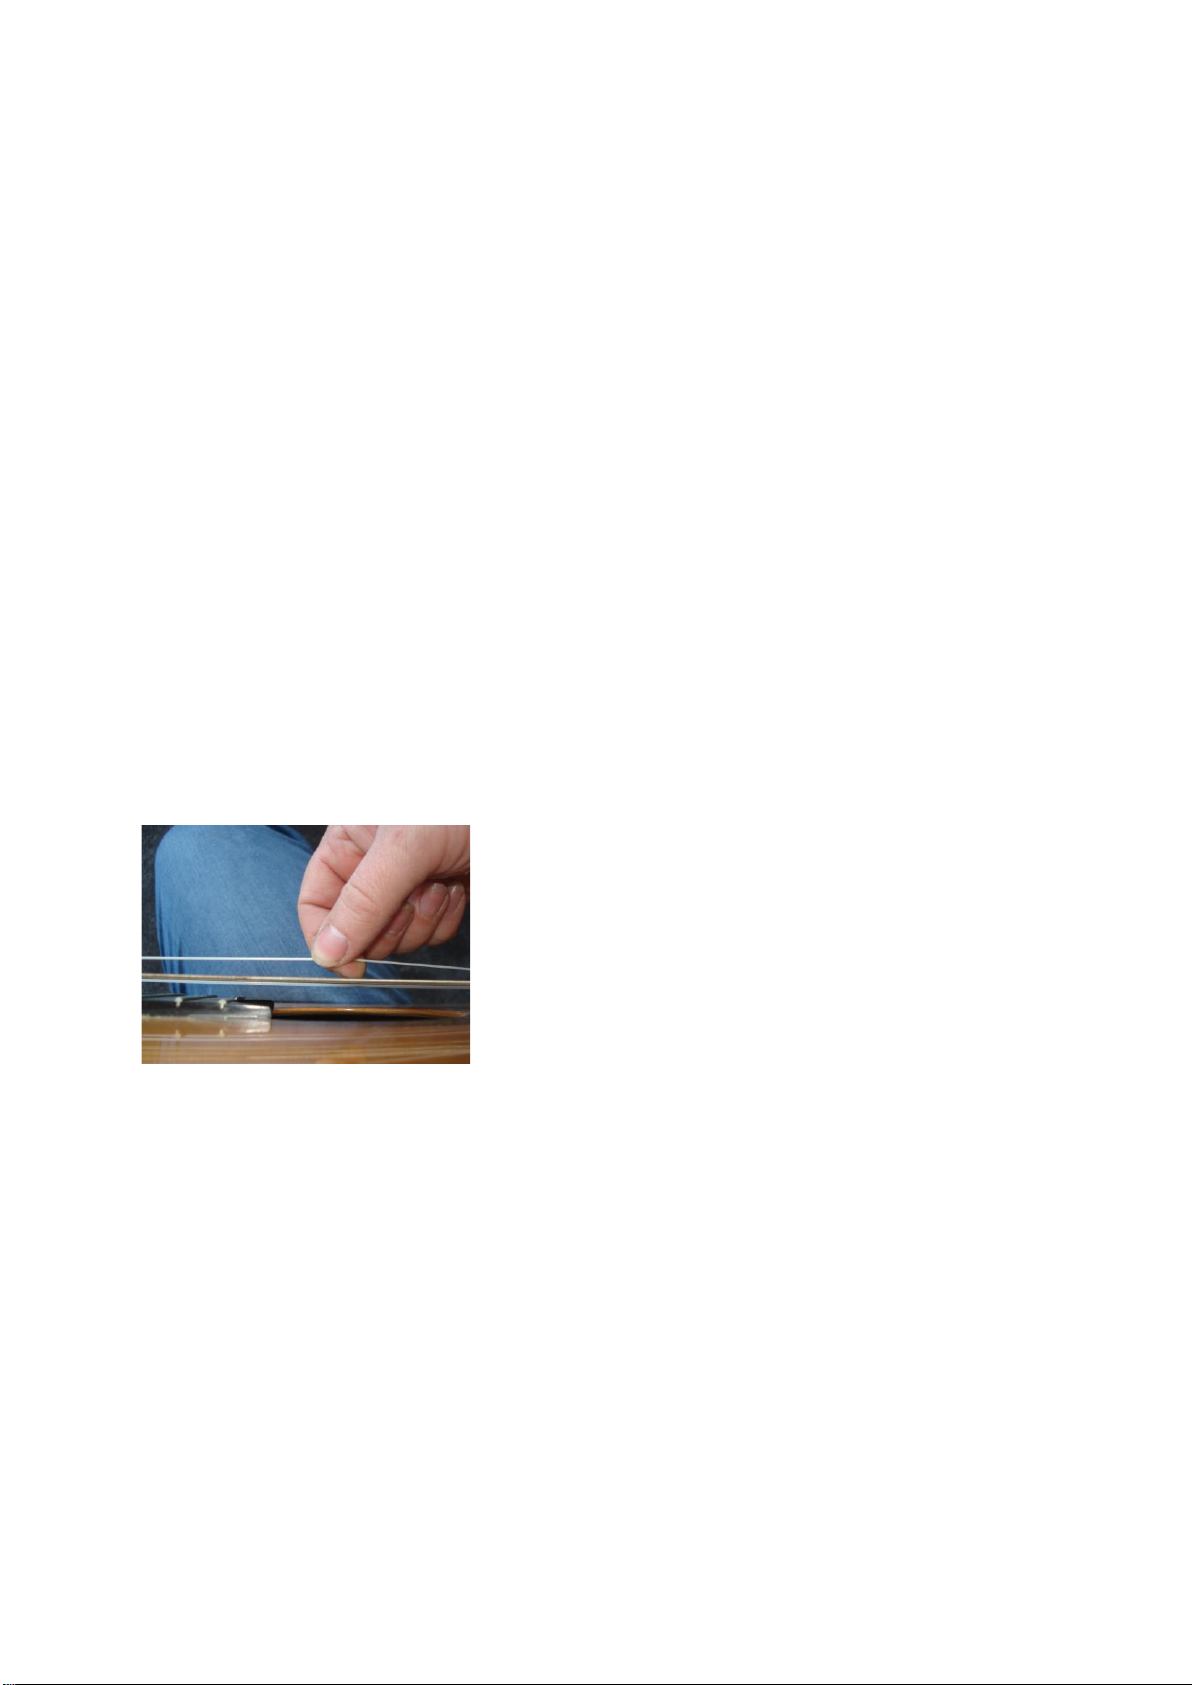
Nun kommt die Ausnahme:
Die G-Saite, also die dickste nicht umwickelte Saite, drückst Du nur am 4ten Bund, um die
nächsthöhere H-Saite zu stimmen (Achtung! Bei Stimmgeräten wird die H-Saite oft als B angezeigt, da
diese auf Englisch als B bezeichnet wird).
Die H-Saite greifst Du wieder am 5ten Bund, um die hohe E-Saite zu stimmen.
Am Schluss kannst Du noch die tiefe und die hohe E-Saite gleichzeitig spielen, um zu testen, ob alles
richtig gelaufen ist. Leicht nachbessern wirst Du evtl. nochmal müssen.
Nachstimmen
Anfänglich halten Gitarrensaiten noch relativ schlecht die Stimmung. Dies liegt hauptsächlich daran,
dass sich die Befestigungsknoten am Steg und die Wicklung an den Stimmmechaniken erstmal richtig
festziehen müssen. Auch die Saite selbst dehnt sich noch ein wenig. Hier hilft es sehr, direkt nach
dem Stimmen der Saite, diese ein wenig (ca. 2cm) von der Gitarre wegzuziehen und gleich darauf
nochmal zu stimmen. Diesen Vorgang wiederholst Du einige Male (je nachdem, wie gut Du die
Knoten festgezogen hast, ca. 3-10 Mal) bis die Saite die Stimmung vorerst hält. Ärgere Dich nicht,
falls die Gitarre am nächsten Tag wieder verstimmt sein sollte. Richtig stimmstabil ist eine
Gitarrensaite beim Normal-Nutzer zu Hause erst nach 1-2 Wochen.
Page 14
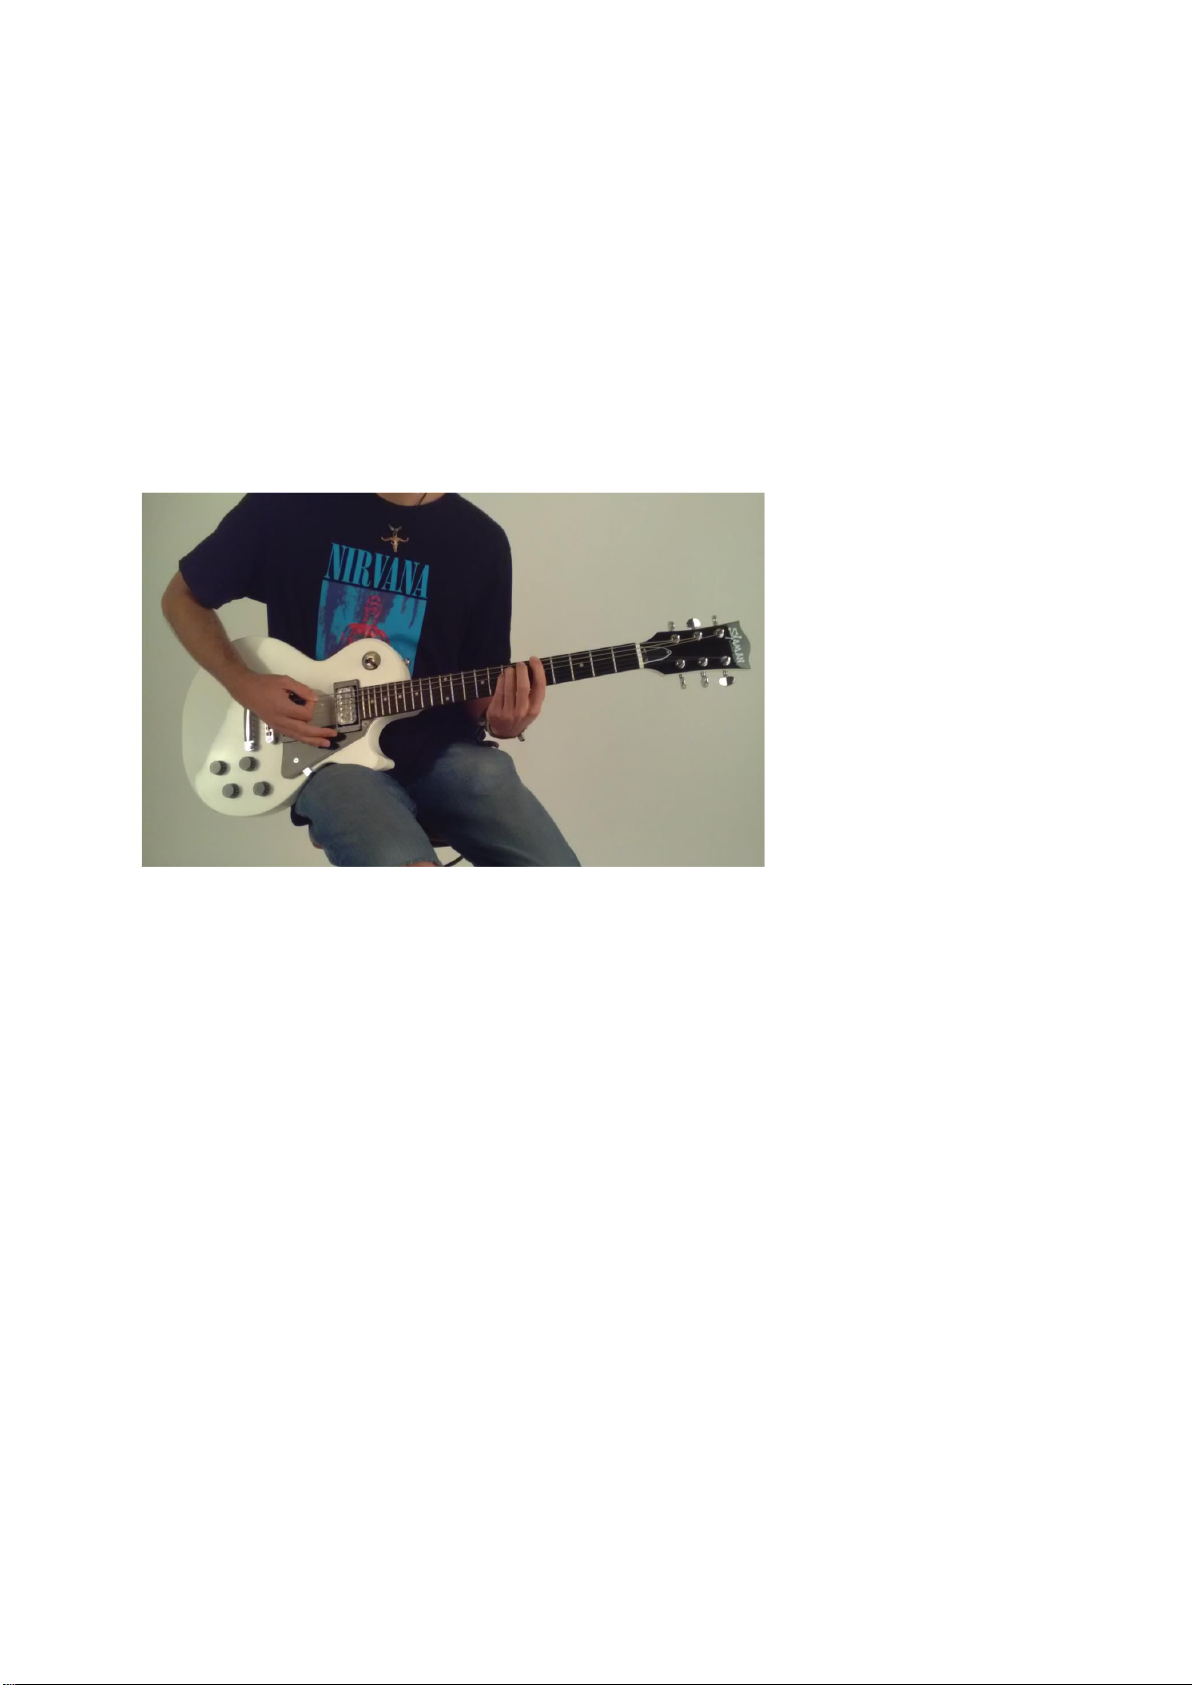
Sitzt, wackelt und hat Luft
Die richtige Haltung kann Dir beim Gitarre spielen besonders das Greifen mit der linken Hand sehr
erleichtern. Hierzu gibt es zwei Grundhaltungen.
Im Sitzen
Hierzu legt man die Gitarre auf dem rechten Oberschenkel ab. Die Beine können je nach Sitzhöhe
breit nebeneinander stehen, oder verschränkt sein. Der Gitarrenhals verläuft leicht aufsteigend, fast
waagerecht.
Bei dieser Haltung ist es wichtig, eine Position zu finden, bei welcher Du den linken Arm nicht zu weit
ausstrecken musst, die rechte Schulter aber nicht nach vorne klappt. Versuche hier einfach mal ohne
zu spielen, eine lockere Sitzhaltung hinzubekommen, bei der Du die Schultern entspannt nach unten
hängen lassen kannst. Dein Rücken sollte gerade und nicht nach einer Seite verdreht sein. Die Gitarre
muss entspannt und ohne Kraftaufwand sicher auf Deinem Oberschenkel liegen bleiben.
Je weiter Du den Gitarrenhals nach vorn von Dir wegschiebst, umso weiter wirst Du Dein linkes
Handgelenk bei schwierigen Griffen abwinkeln müssen und somit Deinen Fingern das Greifen
schwerer machen. Bei schwer zu greifenden Barré-Griffen ist zum Beispiel meist lediglich ein zu stark
abgewinkeltes Handgelenk das Problem.
Je weiter Du den Gitarrenhals zu Dir heranziehst, umso weiter wird Deine rechte Schulter nach vorne
klappen und Dir das Zupfen oder Schlagen mit der rechten Hand erschweren.
Übe am besten vor jedem Gitarrenspiel 1-2 Minuten das Sitzen und so lustig das klingt, wird Dir das
Spielen bald viel leichter fallen.
Page 15
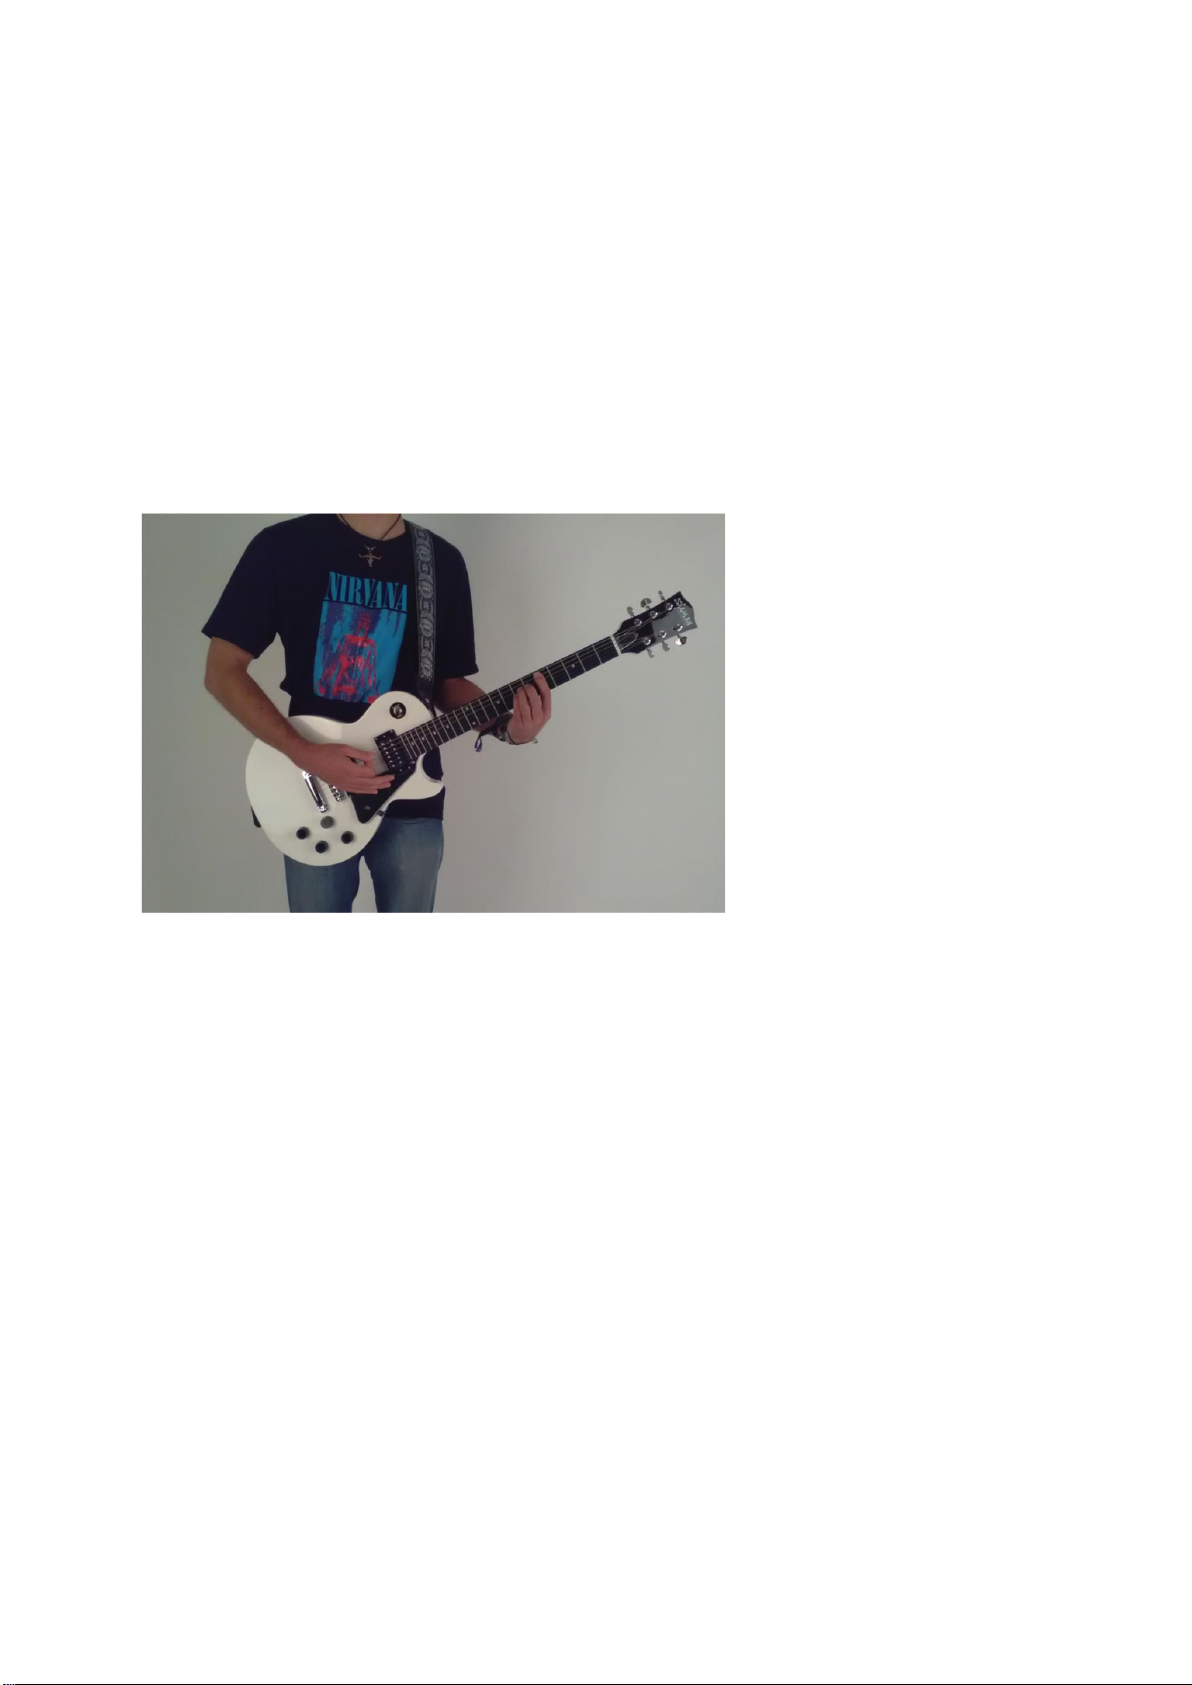
Im Stehen
Bei dieser Haltung hängt die Gitarre an einem Gitarrengurt über Deine Schulter. Wie lang der Gurt
eingestellt sein sollte, hängt stark vom Musikstiel und Deiner persönlichen Vorliebe und Anatomie
ab. Als Anhaltspunkt gilt hier, je höher die Gitarre hängt, umso weniger musst Du das Handgelenk
Deiner linken Hand abwinkeln, was das Greifen erleichtert. Versuche hier am besten, analog zur
Positionsfindung beim Sitzen, durch Ausprobieren Deine individuelle Haltung zu finden. Wichtig ist
hier einfach, dass Deine Schultern locker hängen bleiben können und Du dich locker und entspannt
fühlst, wenn die linke Hand den Gitarrenhals und die rechte Hand die Saiten ungefähr in Position des
Schalllochs berühren.
Eine goldene Regel zur Haltung der Gitarre gibt es nicht, da jeder Spieler, die unterschiedlichen
Gitarrenformen und natürlich auch jeder Musikstil eine etwas andere Haltung bedingt.
Wenn es sich jedoch entspannt anfühlt, bist Du sehr wahrscheinlich auf dem richtigen Weg. Fühle
hier immer wieder in Dich hinein. Ein gerader Rücken und locker hängende Schultern sind mehr als
die halbe Miete.
Page 16
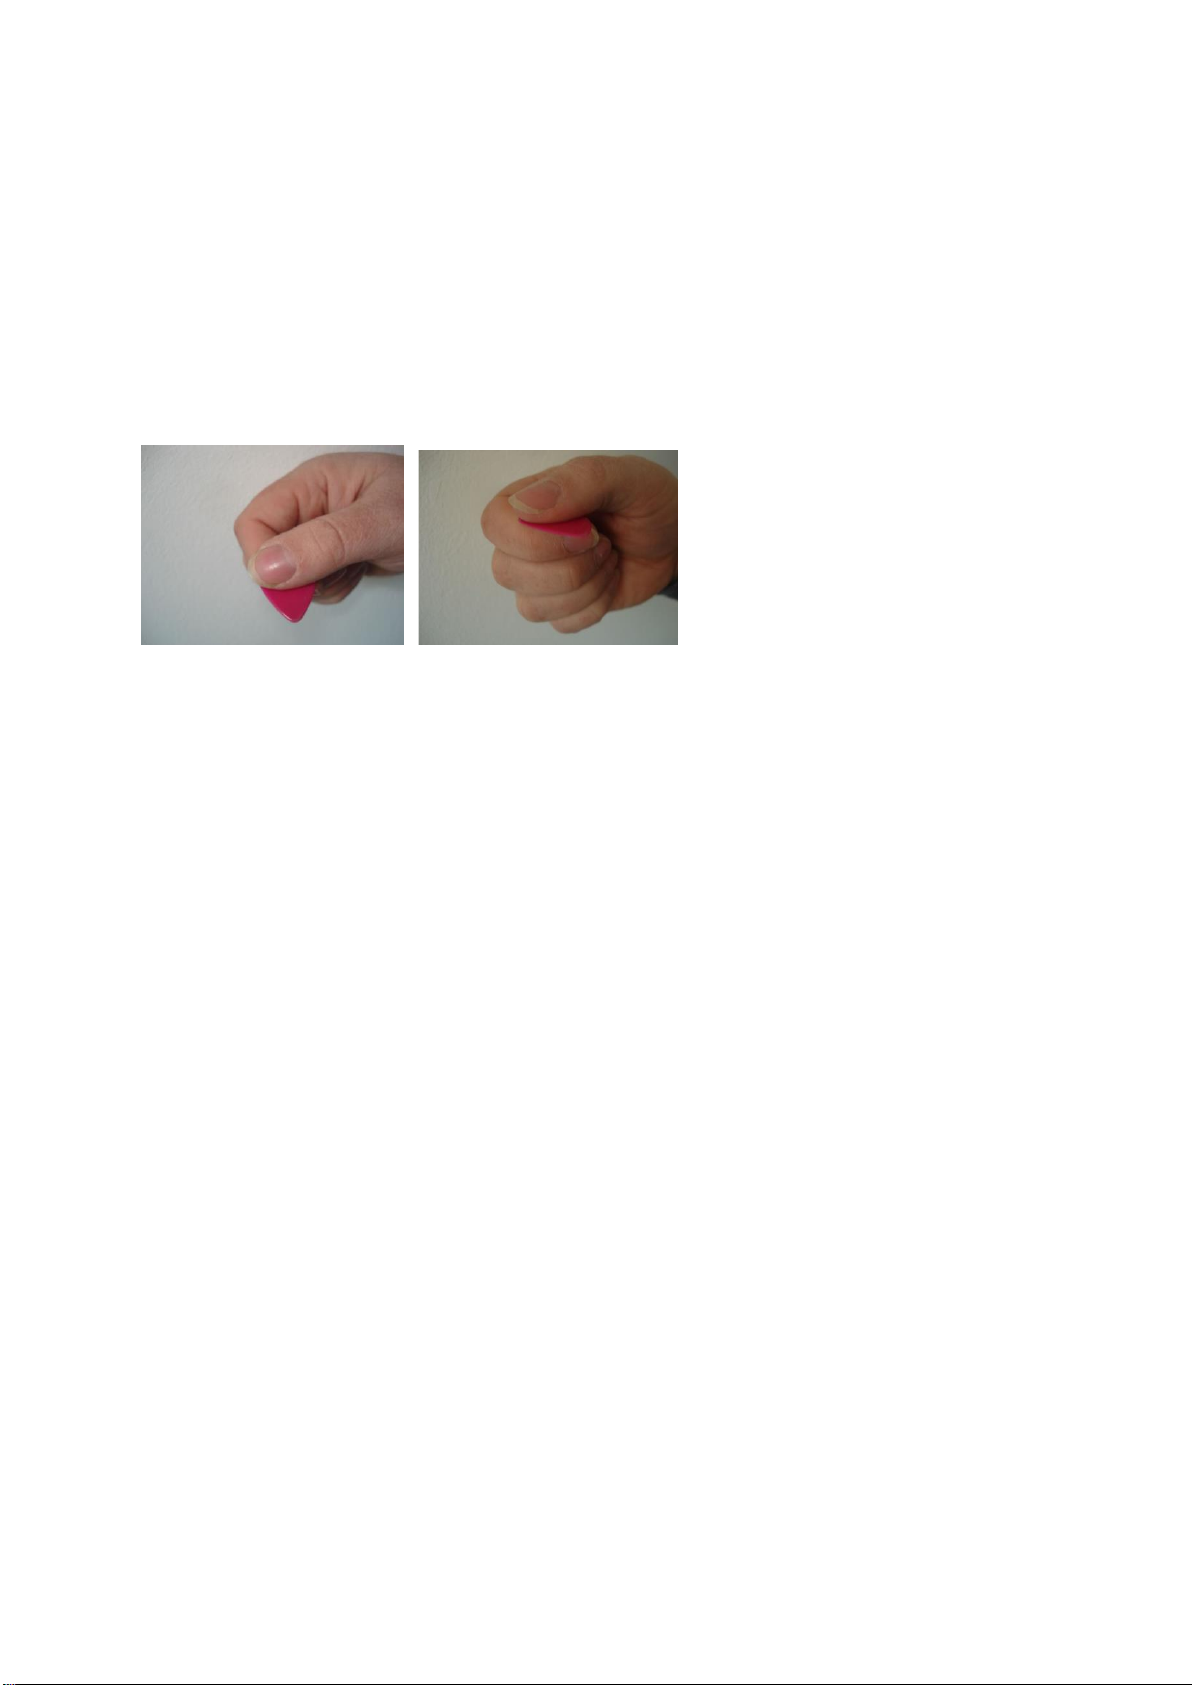
Microplastik (Der Umgang mit Plektren)
Ob Du mit oder ohne Plektrum spielen möchtest, bleibt Dir überlassen. Auch der Musikstil, welcher
gespielt werden soll, hat natürlich Einfluss auf die Wahl eines Plektrums.
Das Pic sollte locker zwischen Daumen und Zeigefinger sitzen.
Gerade als Einsteiger ist es manchmal schwer herauszufinden, wie tief das Pic in die Saiten eingreifen
muss, um einen guten Klang zu erzeugen, aber nicht aus der Hand zu fallen. Es empfiehlt sich, mit
einem sehr weichen Pic zu starten, solltest Du noch keine Erfahrung mit diesem Hilfsmittel haben. Ein
weicheres Pic ist viel leichter in der Hand zu behalten, hat aber nicht die Kraft und Anschlagstärke
wie ein hartes Pic.
Als Faustregel kannst Du die Härte des Pics der Härte Deiner Musikrichtung anpassen. Grundsätzlich
wird im Heavy Metal mit härteren Pics gespielt als in der Popmusik. Hier gibt es aber natürlich viele
stilistische Ausnahmen.
Alles im Griff (Die wichtigsten Griffe)
Viele Lieder der modernen Popmusik basieren auf wenigen Akkorden. Mit 3-4 erlernten Griffmustern
kannst Du bereits einen ganzen Abend für Stimmung am Lagerfeuer sorgen. Es gibt hunderte Videos
im Internet zu Liedern mit 3 und 4 Akkorden.
Die wichtigsten Akkorde für den schnellen Einstieg ins Gitarrenspiel sine G-Dur, e-Moll, C-Dur und DDur
Page 17
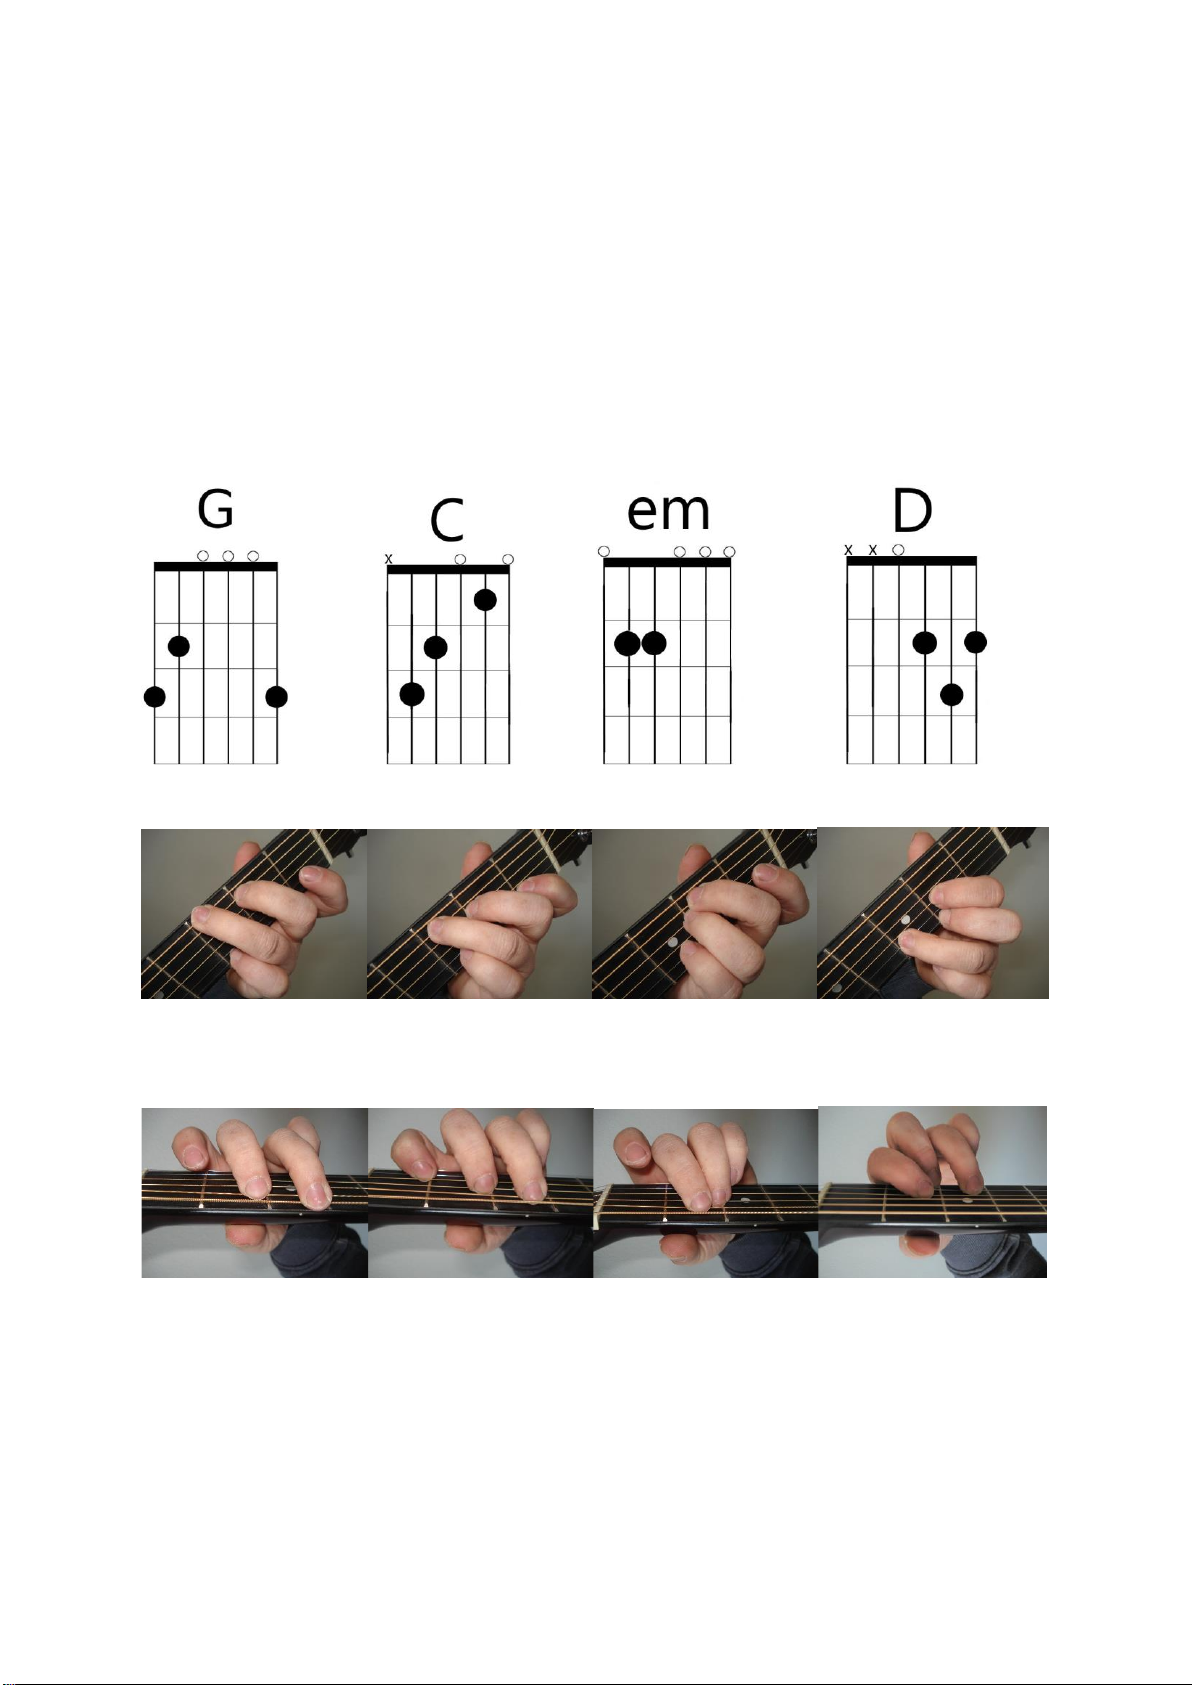
Diese Akkorde siehst Du hier in Griffschrift und als Foto.
Die Griffschrift zeigt symbolisiert die sechs Saiten der Gitarre. Links die tiefste und ganz rechts die
höchste Saite. Der dicke Querstrich symbolisiert den Sattel und die dünneren Querstriche die
einzelnen Bünde. So ist z.B. der oberste der dünnen Querstriche der erste Bund. Die schwarzen
Punkte zeigen die Position der einzelnen Finger. (Sollten sich in anderen Grifftabellen Zahlen in den
schwarzen Punkten befinden, bezeichnen diese den jeweiligen Finger, den man für diesen Ton
benutzen sollte). Steht über dem Sattel ein kleines X, sollte diese Saite nicht mit angeschlagen
werden. Steht über dem Sattel ein kleines O, bedeutet dies, dass diese Saite leer mitschwingt, also
mit angeschlagen werden sollte, obwohl sie mit keinem Finger der linken Hand gegriffen wird.
So sollten die einzelnen Griffe in etwa aus Deiner Sicht aussehen.
Achte beim Greifen darauf, dass Deine Finger möglichst nah an den Bundstäbchen aufgesetzt
werden.
Page 18
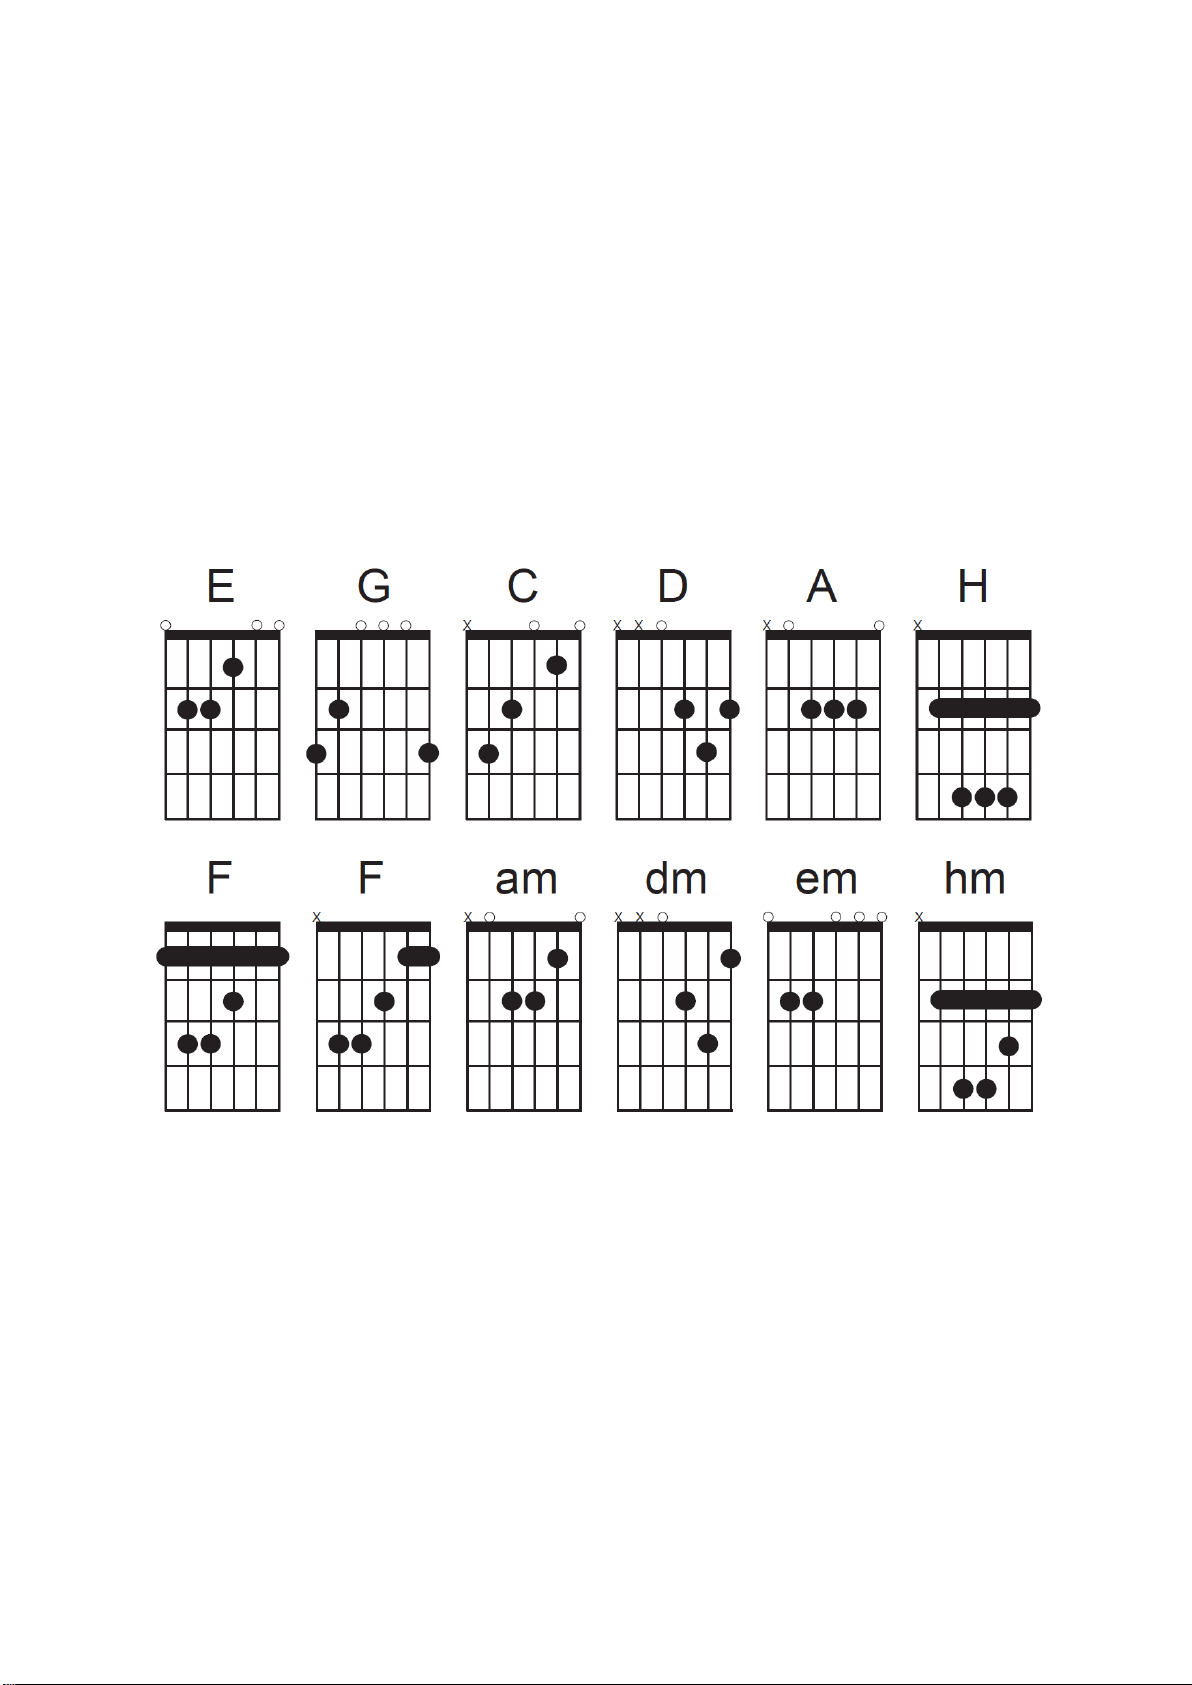
Hier siehst Du eine kleine Zusammenstellung der wichtigsten Griffe.
Nach dem eben gezeigten Schema kannst Du alle Akkorde dieser Grifftabelle auf Deiner Gitarre
nachmachen.
Natürlich gibt es sehr viele weitere Akkorde, die man als Gitarrist früher oder später lernen sollte.
Hier gibt es zahlreiche ausführliche Grifftabellen im Handel und zahllose Tipps im Internet. Bei der
kleinen Zusammenfassung einfacher Akkorde siehst Du auch schon drei Akkorde (H,F,hm) welche mit
Barré gegriffen werden. Dargestellt wird dies durch einen langen Balken (wie z.B. am ersten Bund des
F-Dur Akkords). Hier legst Du einfach den Zeigefinger flach über die betreffenden Saiten. Da dies am
Anfang noch relativ schwer fällt, beinhaltet die kleine Akkordsammlung auch eine vereinfachte
Griffweise des F-Dur Akkords, bei welcher Du lediglich die dünnsten zwei Saiten Deiner Gitarre mit
dem vorderen Fingerglied deines Zeigefingers gleichzeitig drücken musst.
Page 19

Schlag auf Schlag (Die wichtigsten Schlagmuster)
Um Deine Gitarre richtig zum Klingen zu bringen, reicht es natürlich nicht, lediglich mit der linken
Hand die Akkorde zu greifen. Die rechte Hand muss die Akkorde anschlagen. Hierzu gibt es viele
unterschiedliche Techniken. Du kannst den Daumen, die Finger, ein Plektrum oder Kombinationen
der unterschiedlichen Schlagtechniken nutzen.
Am Anfang wird es am einfachsten sein, mit dem Daumen zu starten.
Greife einen beliebigen Akkord (z.B. e-Moll) und versuche folgendes Schlagmuster.
Hierbei streifst Du immer von oben nach unten über die Gitarrensaiten und zählst dabei
1,2,3,4,1,2,3,4,1,2,3,4,….
Wenn dies sicher klappt, versuchst Du es mit einer Auf- und Abbewegung. Du streifst mit dem
Daumen von oben nach unten und von unten nach oben.
Hierbei zählst Du 1und2und3und4und1und2und….. Bei den Zahlen streifst Du wie gewohnt nach
unten und bei den „unds“ nach oben.
Nun kannst Du beginnen, einzelne Schläge Deiner Auf und Abbewegung wegzulassen
Hier siehst Du Bilder zu unterschiedlichen Mustern wie
1und2und3und4und oder 1und2und3und4und oder auch 1und2und3und4und
Jetzt kannst Du mal versuchen, den Daumen beim Hinunterstreichen durch Deinen Ringfinger zu
ersetzen. Das Nach-oben-Streichen übernimmt weiterhin der Daumen. Der Klang ändert sich hier
merklich. Die Bewegung bleibt jedoch fast die gleiche.
Hier sind Deiner Kreativität keine Grenzen gesetzt.
Page 20

Los geht’s (Wir spielen ohne Noten)
In vielen Liederbüchern stehen lediglich Akkordsymbole über dem Liedtext.
Versuche hier erstmal, den Text ohne Gitarre im richtigen Rhythmus zu singen oder zu sprechen.
Im nächsten Durchgang greifst Du die Akkorde wie in der Akkordtabelle oben gezeigt ab dem Wort,
über dem der Akkordname steht. Mache dies, bis Du die Akkordwechsel ohne Pausen in Deiner
Textwiedergabe hinbekommst. Erst wenn das richtig klappt (Du musst hier ehrlich zu Dir sein und
nicht sagen „wird dann schon gehen…“), nimmst Du die rechte Hand mit einem beliebigen
Schlagmuster (anfänglich am besten das einfachste, erste gezeigte Muster) hinzu.
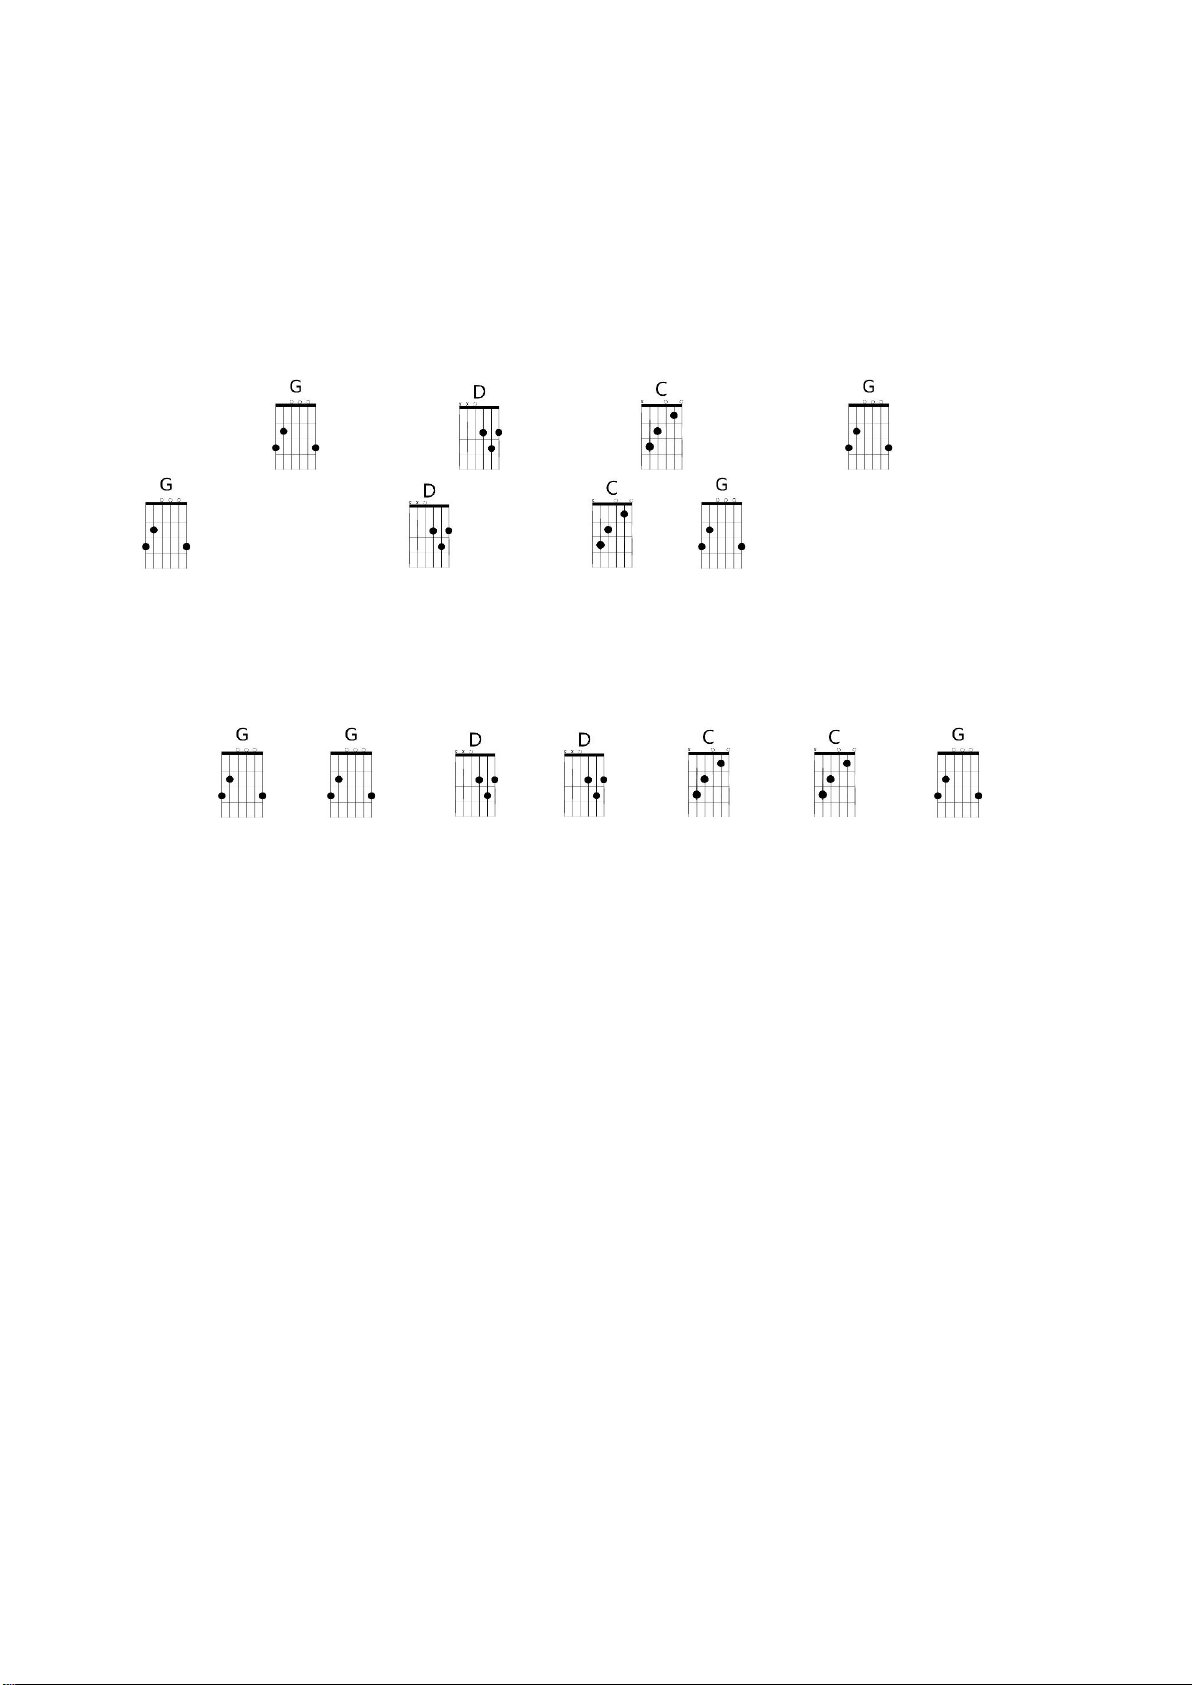
Teste es doch einfach mal mit Let It Be:
Sprich einfach den Text und wechsle die Akkorde genau zu den blau geschriebenen Wörtern.
When I find (G-Dur) myself in times (D-Dur) of trouble, mother (e-Moll) Mary comes (C-Dur)
to me, speaking (G-Dur) words of wisdom (D-Dur) , let it be (C-Dur) (G-Dur)
And in (G-Dur) my hour of darkness (D-Dur) she is standing (e-Moll) right in front (C-Dur) of me,
speaking (G-Dur) words of wisdom (D-Dur), let it be (C-Dur) (G-Dur)
Schlage nun jeden Akkord einmal (beim blauen Wort) an, indem Du mit dem Daumen von oben nach
unten die Töne anstreichst. Ich würde Dir empfehlen, die tiefste Saite nicht anzuschlagen. Beginne
einfach Deine Schlagbewegung so ca. auf der A- oder D-Saite (also der zweit- oder drittdicksten).
Einsteigertip gegen schmerzende Finger:
Wenn Du Dich bei G-Dur noch schwer tust, kannst Du hier ein wenig schummeln. Du greifst lediglich
den Ton auf der hohen E-Saite und schlägst nur die Nylonsaiten an. Das Anschlagen der Basssaiten
und natürlich dann auch die restlichen Finger des G-Dur Akkords kannst Du weglassen, ohne dass es
merklich schlechter klingt.)
Page 21
Wenn Du die Strophe rhythmisch draufhast kannst Du gerne mal mitsingen. Der erste Ton der
Gesangsstimme ist ein D, somit kannst Du einfach Deine D-Saite (dünnste umwickelte Saite) ohne zu
greifen anzupfen, um den richtigen ersten Ton für das „When“ Deines Gesangsparts zu finden.
Nun geht’s zum Refrain. Der hat sogar noch einen Akkord weniger:
Let it be (G-Dur) , let it be (D-Dur) , let it be (C-Dur) oh let it be (G-Dur) , whisper (G-Dur)
words of wisdom (D-Dur) , let it be (C-Dur) , (G-Dur)
Wenn Du den Refrain draufhast, kannst Du hier jeden Akkord im Rhythmus 2x anschlagen.
Also z.B.
Let it be , let it be , let it be oh let it be ,……
Viel Spaß beim Angeben…
Page 22
Ich kann auch anders (Picking)
Möchte man nicht nur ganze Akkorde, sondern Akkordbrechungen und Melodien spielen, benötigt
man natürlich viel Übung und zusätzliches Wissen. Auch das Noten- oder Tabulaturlesen kann hier
das Erlernen neuer Stücke erleichtern. Es reicht hier meist nicht, lediglich einzelne Akkordmuster
auswendig zu lernen. Nun muss man wissen, wo die einzelnen Noten auf den unterschiedlichen
Gitarrensaiten gegriffen bzw. angeschlagen werden.
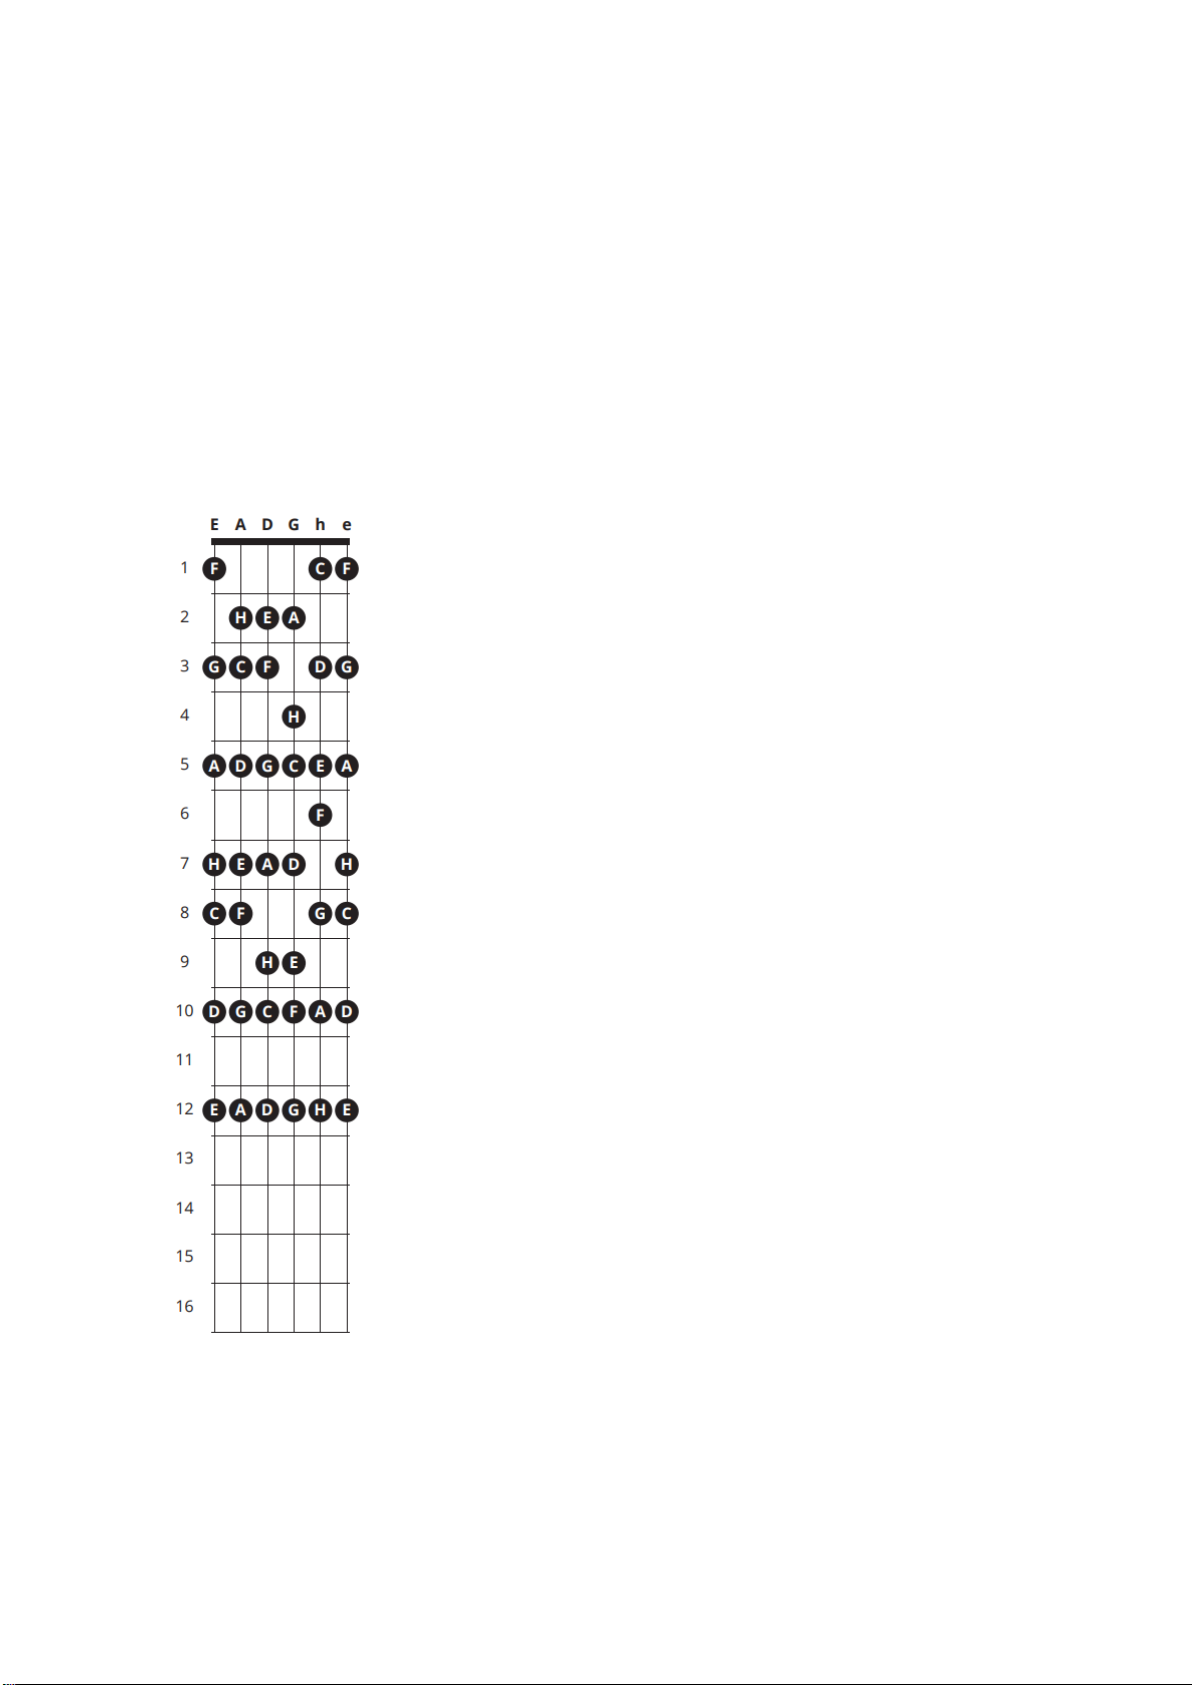
Hier eine Übersicht der Ganztöne bis zum 12ten Bund Deiner
Gitarre. (Oberhalb des 12ten Bundes, also 13ter Bund usw. beginnt
die Tonanordnung wieder von vorn. Die Töne am 13ten Bund
entsprechen also den Tönen am ersten, die am 14ten Bund denen
am zweiten usw.)
Page 23
Spiel nach Noten
Das Notenlesen ist gar nicht so schwer, wie viele denken. Es gibt ja eigentlich nur 7 unterschiedliche
Töne. Wenn Du Dir also jeden Tag nur drei Noten merkst, hast Du es bereits in weniger als drei Tagen
drauf.
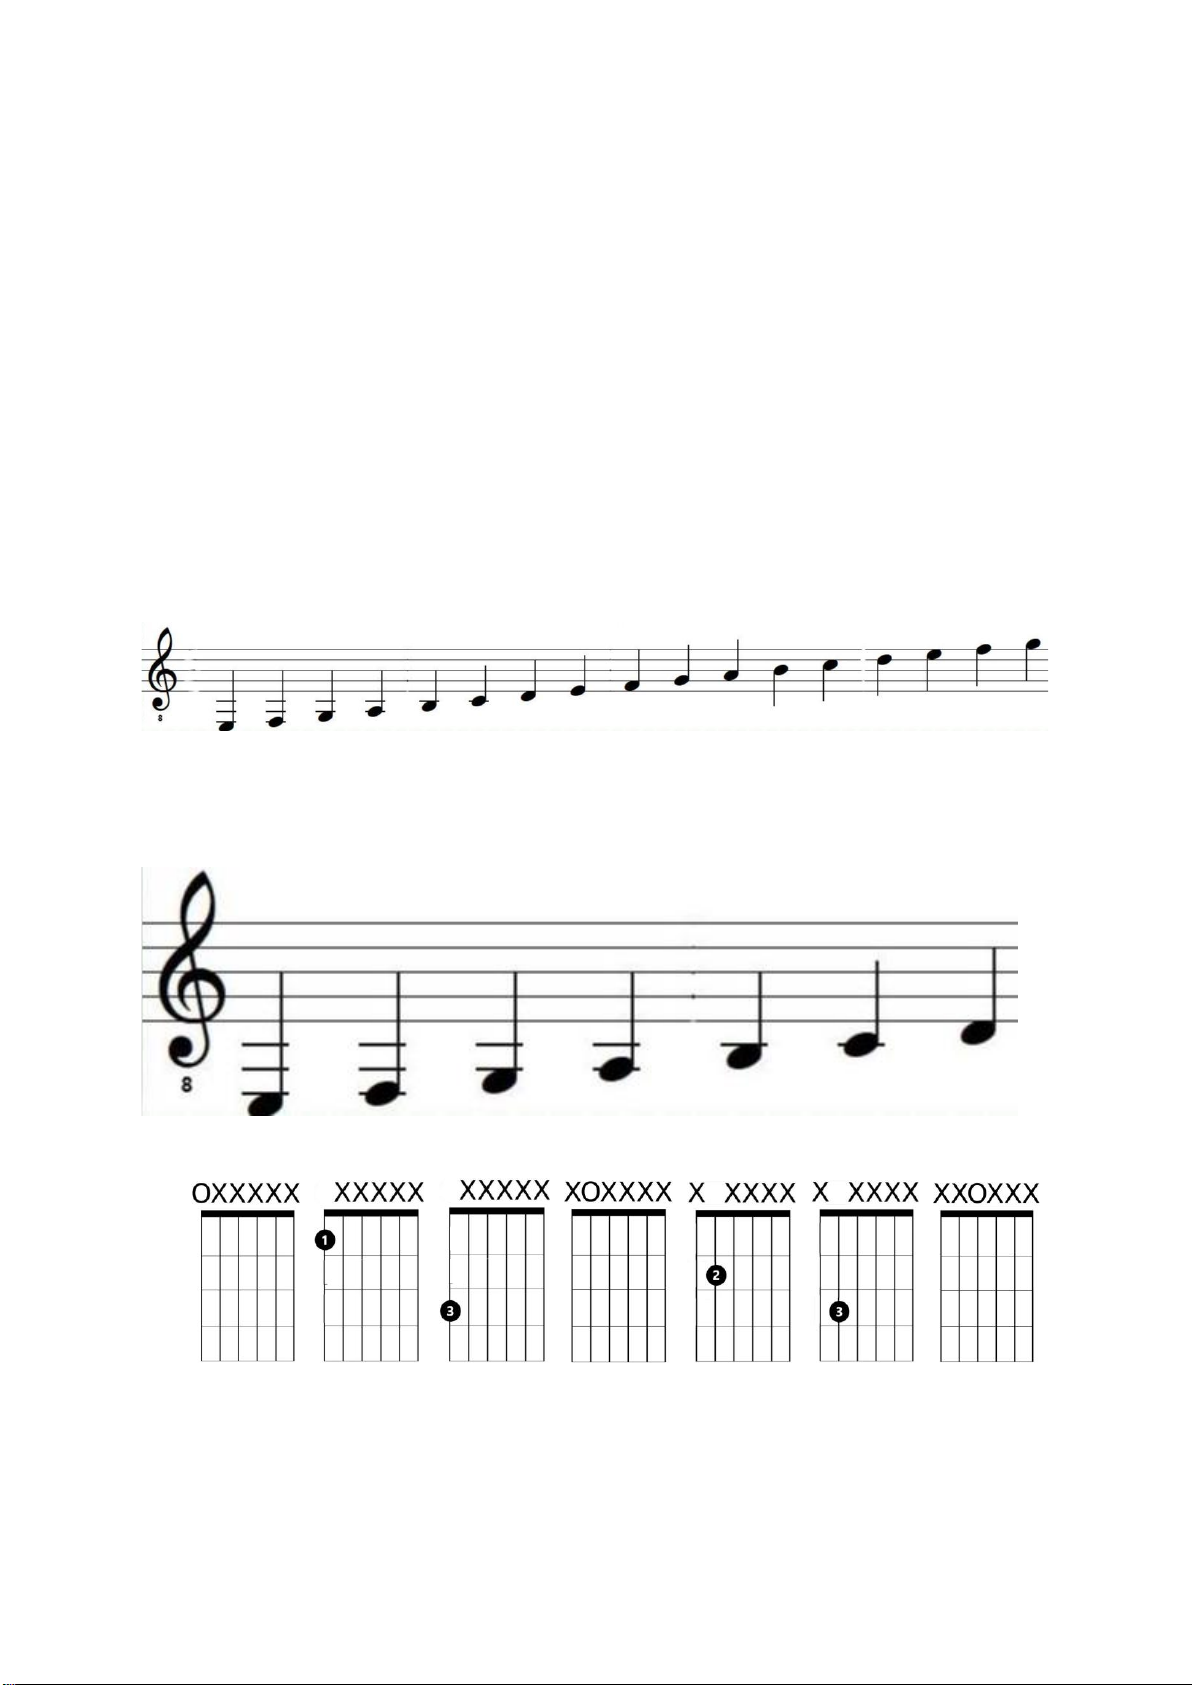
Hier eine Übersicht des Tonumfangs der Gitarre bis zum 3ten Bund. Jeder Ton der Tonleiter kommt
hier mehrmals vor. E, F, und G kommen dreimal und A, H, C und D jeweils zweimal vor.
E F G A H C D E F G A H C D E F G
Zum leichteren Verständnis siehst Du den Ton nun als Note und darunter als Griffsymbol, welches Du
bereits von der Griffschrift im vorhergehenden Kapitel kennst.
Page 24
Page 25
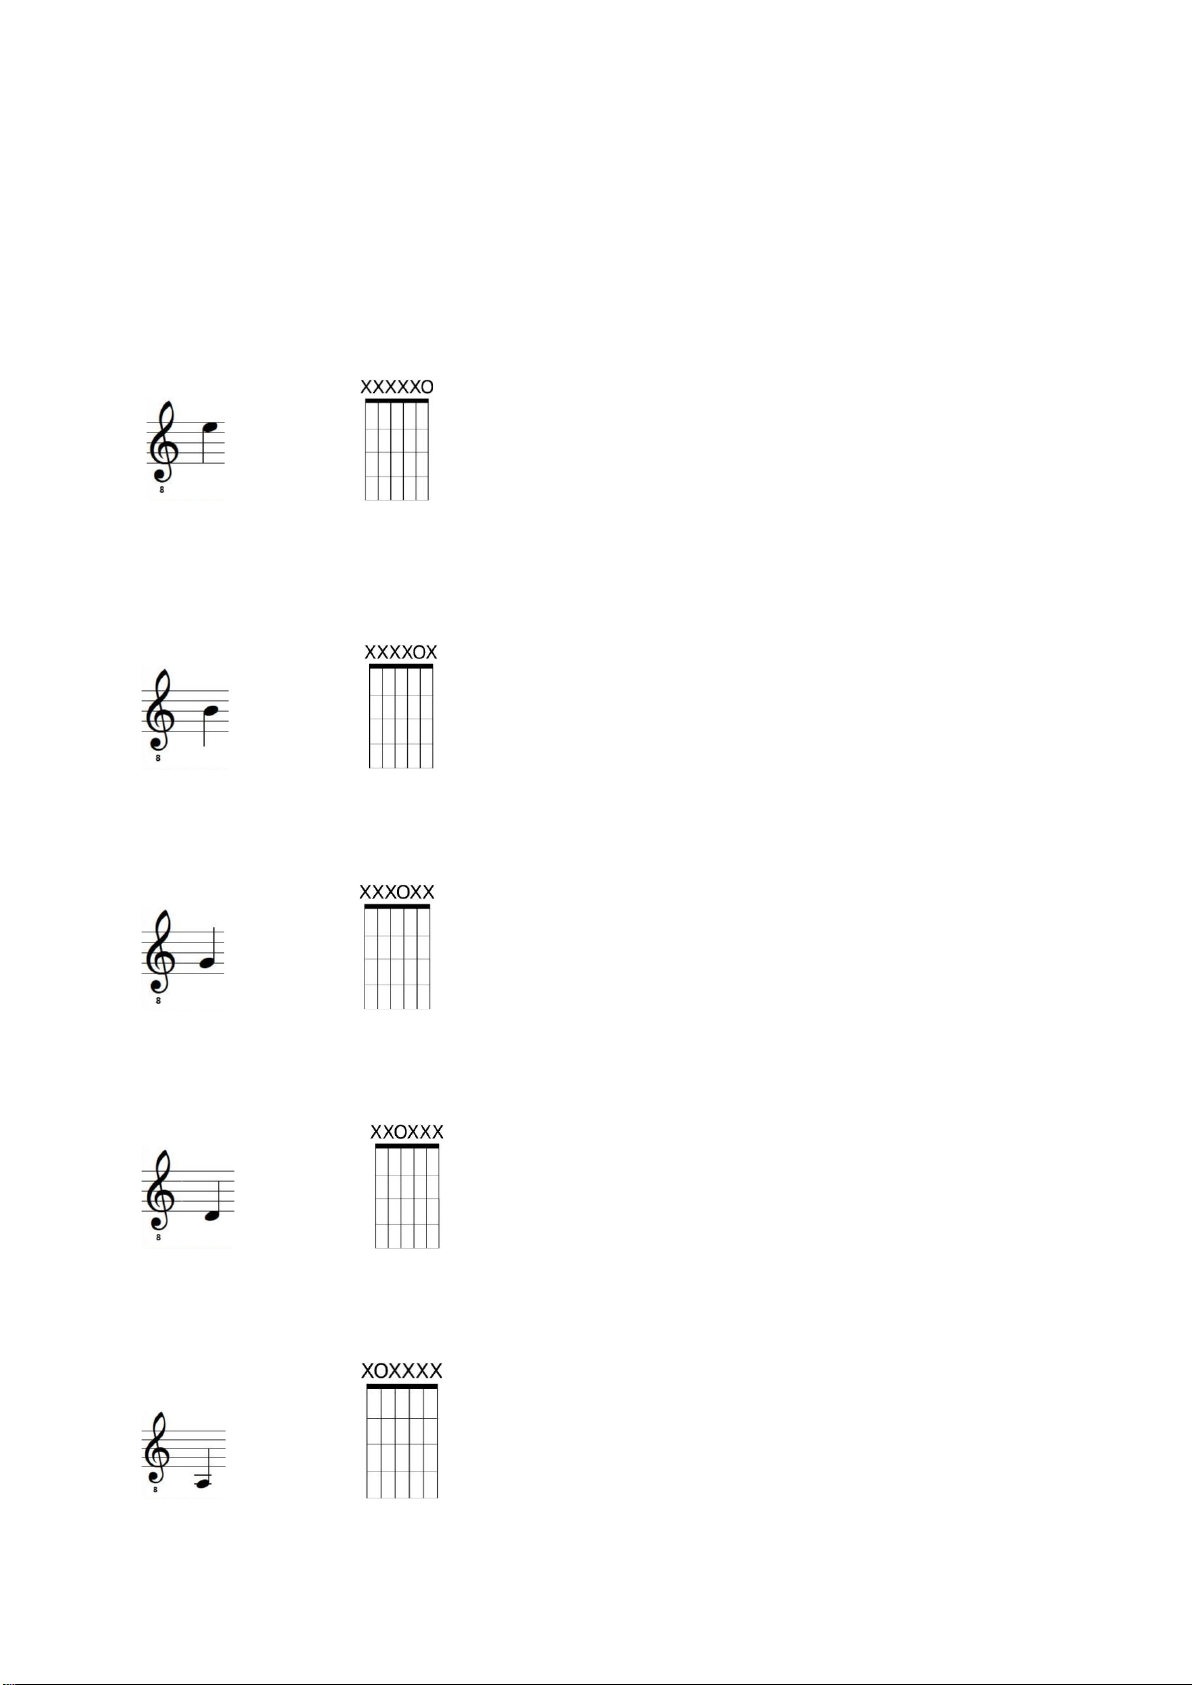
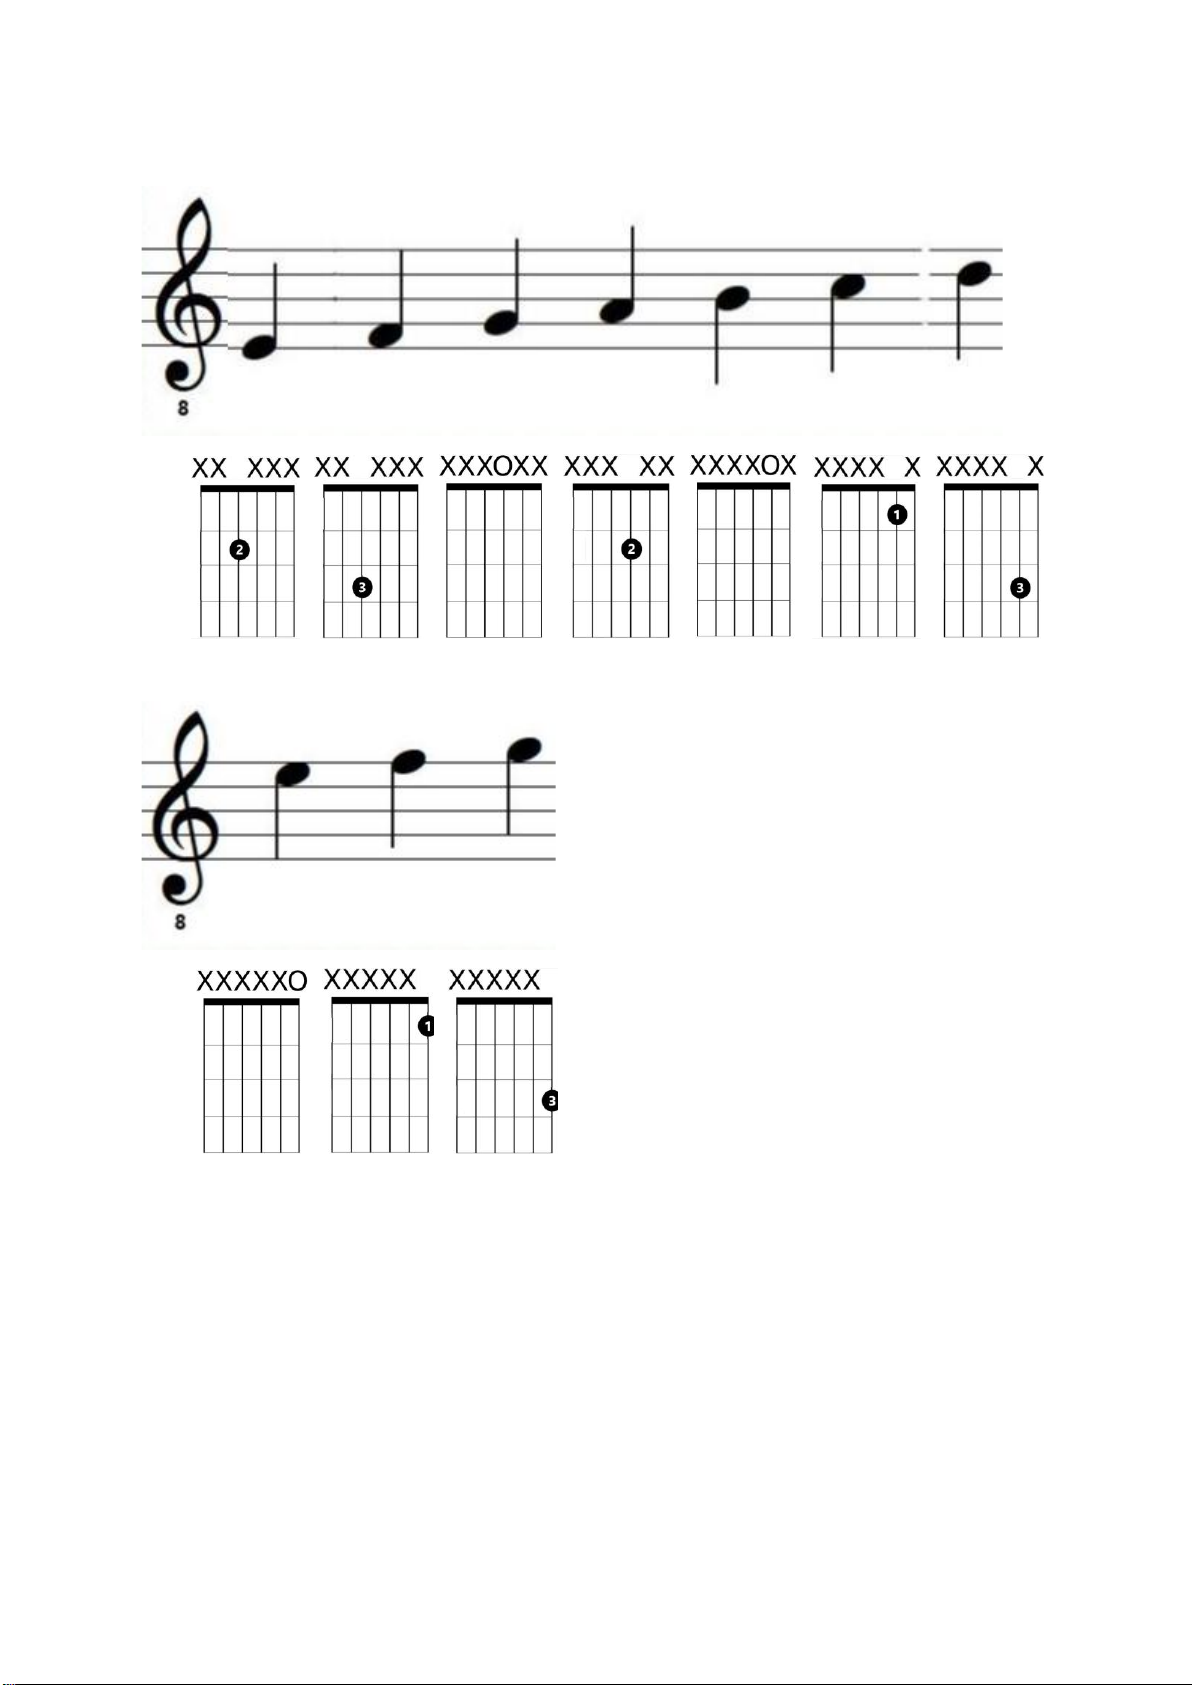
Wir lernen erstmal die Noten, welche zu den Leersaiten Deiner Gitarre gehören (E,A,D,G,H). Das sind
die Töne, die entstehen wenn Du eine bestimmte Saite anzupfst, aber keinen Ton mit der linken
Hand greifst.
Die hohe E-Saite, also die dünnste Saite Deiner Gitarre, wird oft auch als erste bzw. 1st bezeichnet.
In der Notenschrift sieht ihr Klang so aus:
als Griffschrift
Die H-Saite (international und auf den meisten Stimmgeräten heißt diese Saite übrigens B) ist die
zweitdickste Saite oder 2nd Deiner Gitarre. Diese wird folgendermaßen notiert:
als Griffschrift
Die G-Saite (3rd) ist die dickste der drei Nylonsaiten und wird auf diese Weise notiert:
als Griffschrift
Die D-Saite (4th) ist die dünnste der drei umwickelten Saiten:
als Griffschrift
A-Saite(5th)
als Griffschrift
Page 26
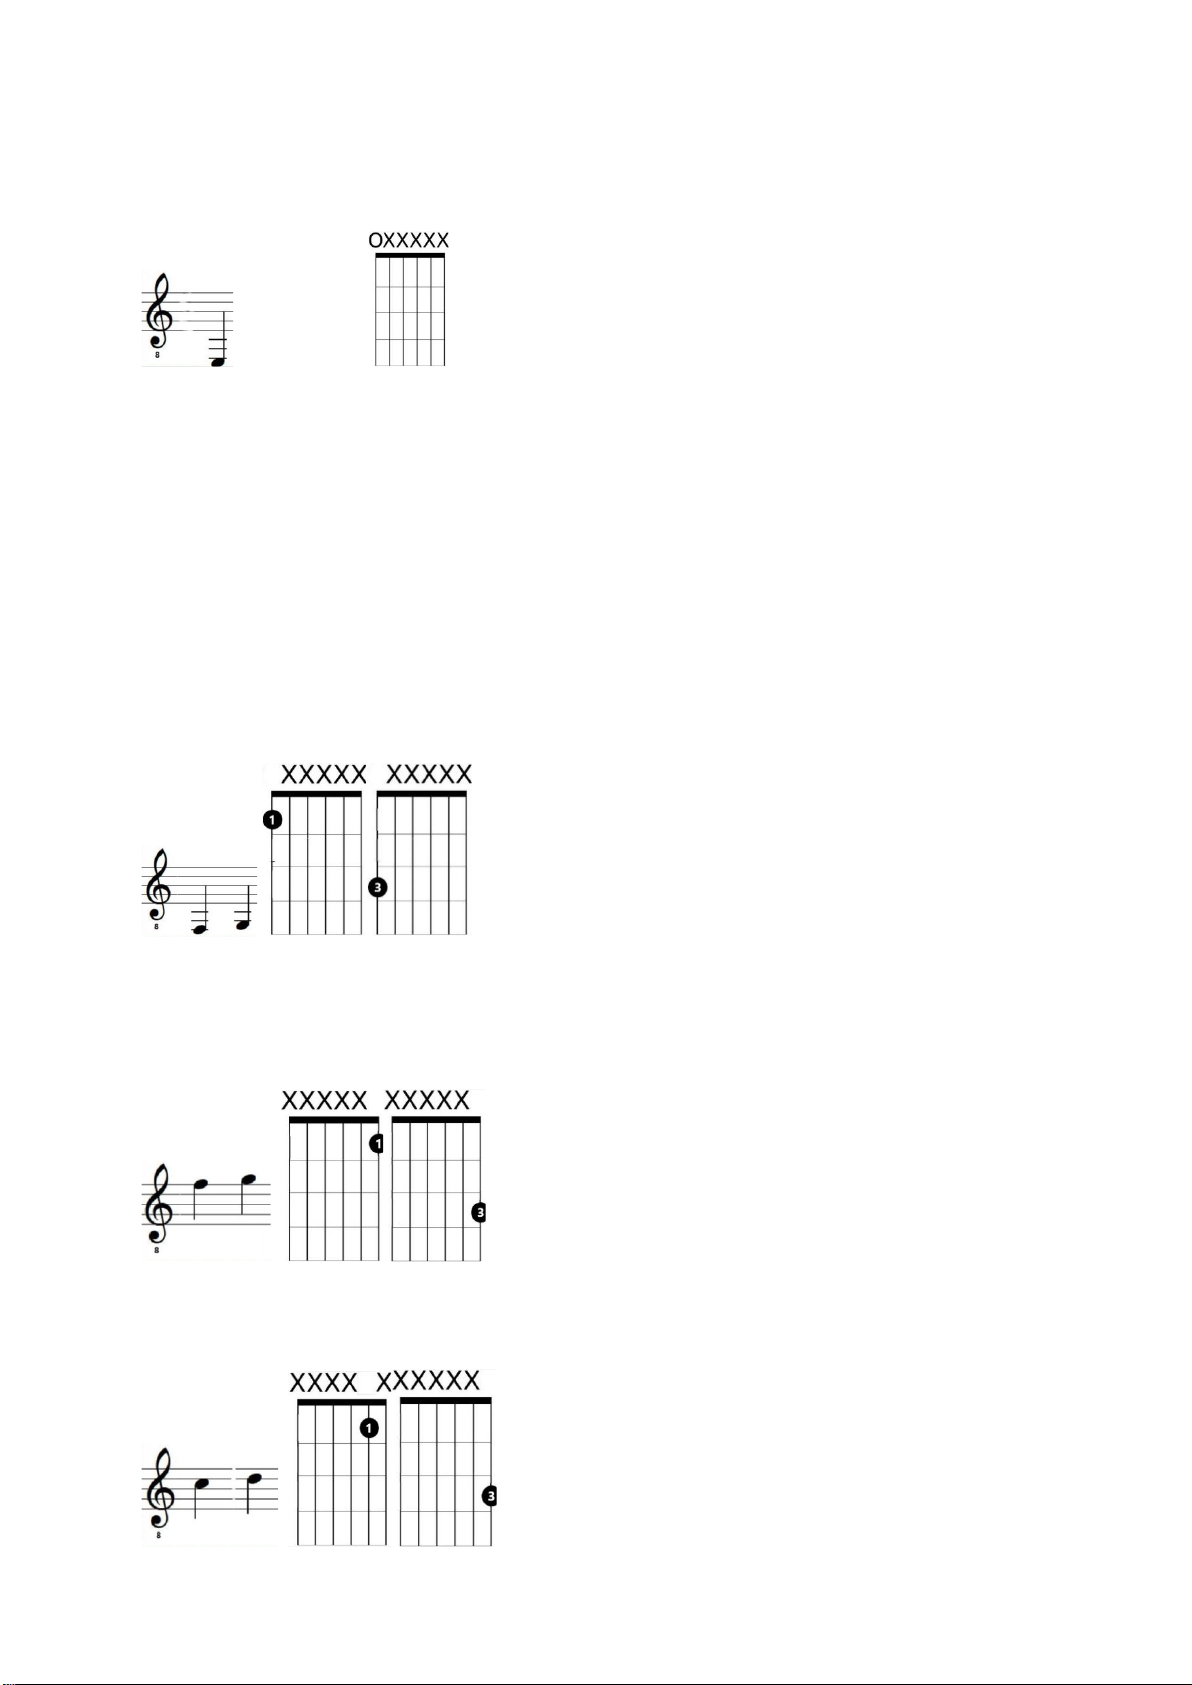
Die dickste Saite Deiner Gitarre ist die tiefe E-Saite (6th). Diese sieht in Notenschrift so aus.
als Griffschrift
Versuche, Dir erstmal diese Saiten mit den dazugehörigen Notensymbolen einzuprägen. Die ersten 5
Noten wären hiermit schon gelernt. Vom Ton E kennst Du nun bereits zwei Schreibweisen.
Nun lernen wir die noch fehlenden 2 neuen Töne (F,C) und einige alte Bekannte in anderen
Tonhöhen.
Diese werden jeweils am ersten oder dritten Bund der H-Saite oder der beiden E-Saiten gegriffen:
Greifst Du auf der tiefen E-Saite am ersten Bund, erklingt ein F und am dritten ein G.
Dies ist auf der hohen E-Saite genauso.
Greifst Du auf der H-Saite am ersten Bund erklingt ein C und am dritten ein D.
Page 27
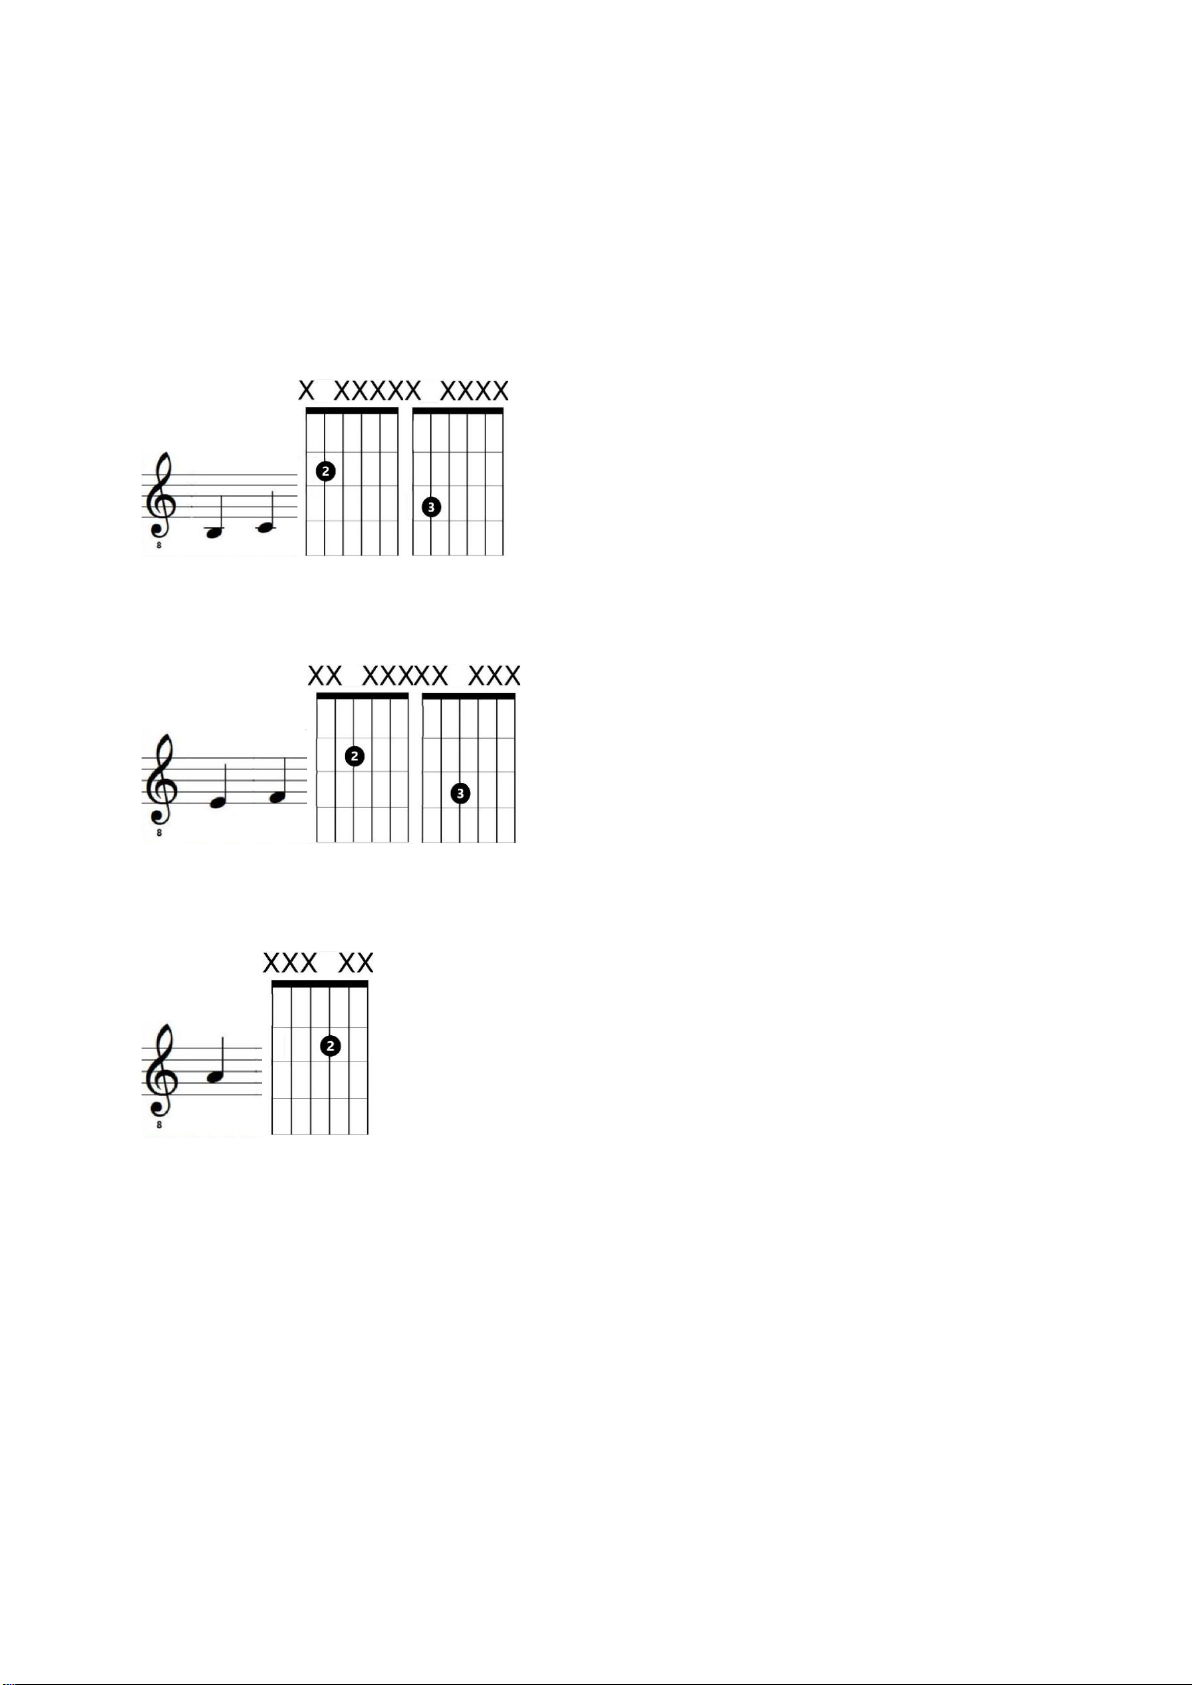
Als letzten Schritt lernen wir noch die Töne auf der A-, D- und G-Saite. Diese Töne kennst Du alle
schon in anderen Tonhöhen.
Die zu erlernenden Ganztöne liegen hier am zweiten und dritten Bund, bei der G-Saite sogar nur am
zweiten.
Greifst Du also auf der A-Saite am zweiten Bund, erklingt ein H und am dritten ein C.
Auf der D-Saite greifst Du am zweiten Bund ein E und am dritten Bund ein F.
Und auf der G-Saite liegt am zweiten Bund ein A.
Übe diese drei Abschnitte des Notenlernens, bis Du die einzelnen Töne des Tonumfangs bis zum
dritten Bund sicher am Notenbild erkennst und nachspielen kannst.
Page 28

Erstes Stück
Wir fangen mit einem ganz einfachen Stück an, welches viele von Euch evtl. bereits schon mal gehört
haben.
Um dieses Stück spielen zu können, benötigen wir lediglich zwei neu zu erlernende Töne. Diese
beiden Töne spielst Du jeweils mit dem Zeigefinger (1ter Finger) Deiner linken Hand.
Das Dis liegt einen halben Ton über dem D und wird am ersten Bund der D-Saite gegriffen.
Das Es ist einen halben Ton unter dem E und somit eigentlich der gleiche Ton wie das Dis. Das Es
greifst Du somit ebenfalls mit dem Zeigefinger am ersten Bund der D-Saite.
Spiele die Töne mit dem Daumen oder dem Plektrum.
Spiel nach Tabulatur
Eine weitere Notationsweise ist die Tabulatur. Diese Schrift zeigt Dir immer, welchen Bund welcher
Saite Du zu welchem Zeitpunkt drücken musst. Sie ist also eigentlich nichts anderes als unsere
Übungen zur Notenlehre im vorangegangenen Kapitel.
Die Zeilen sind keine Notenlinien mehr, sondern symbolisieren die 6 Saiten der Gitarre. Die oberste
Zeile steht für die hohe E-Saite (also die dünnste Saite Deiner Gitarre).
Die unterste Zeile symbolisiert die tiefe E-Saite (die dickste Saite).
Bei der Tabulaturschreibweise wird durch eine Zahl der Bund angegeben, an welchem der jeweilige
Ton gegriffen wird. Diese Zahl bekommt auch noch einen Notenhals, um die Tondauer anzuzeigen.
Eine 0 auf der Linie der hohen E-Saite bedeutet also, dass die Saite leer angezupft wird. Eine 1 auf der
Linie der hohen E-Saite bedeutet, man greift diese Saite am ersten Bund (symbolisiert also den Ton
F).
Page 29
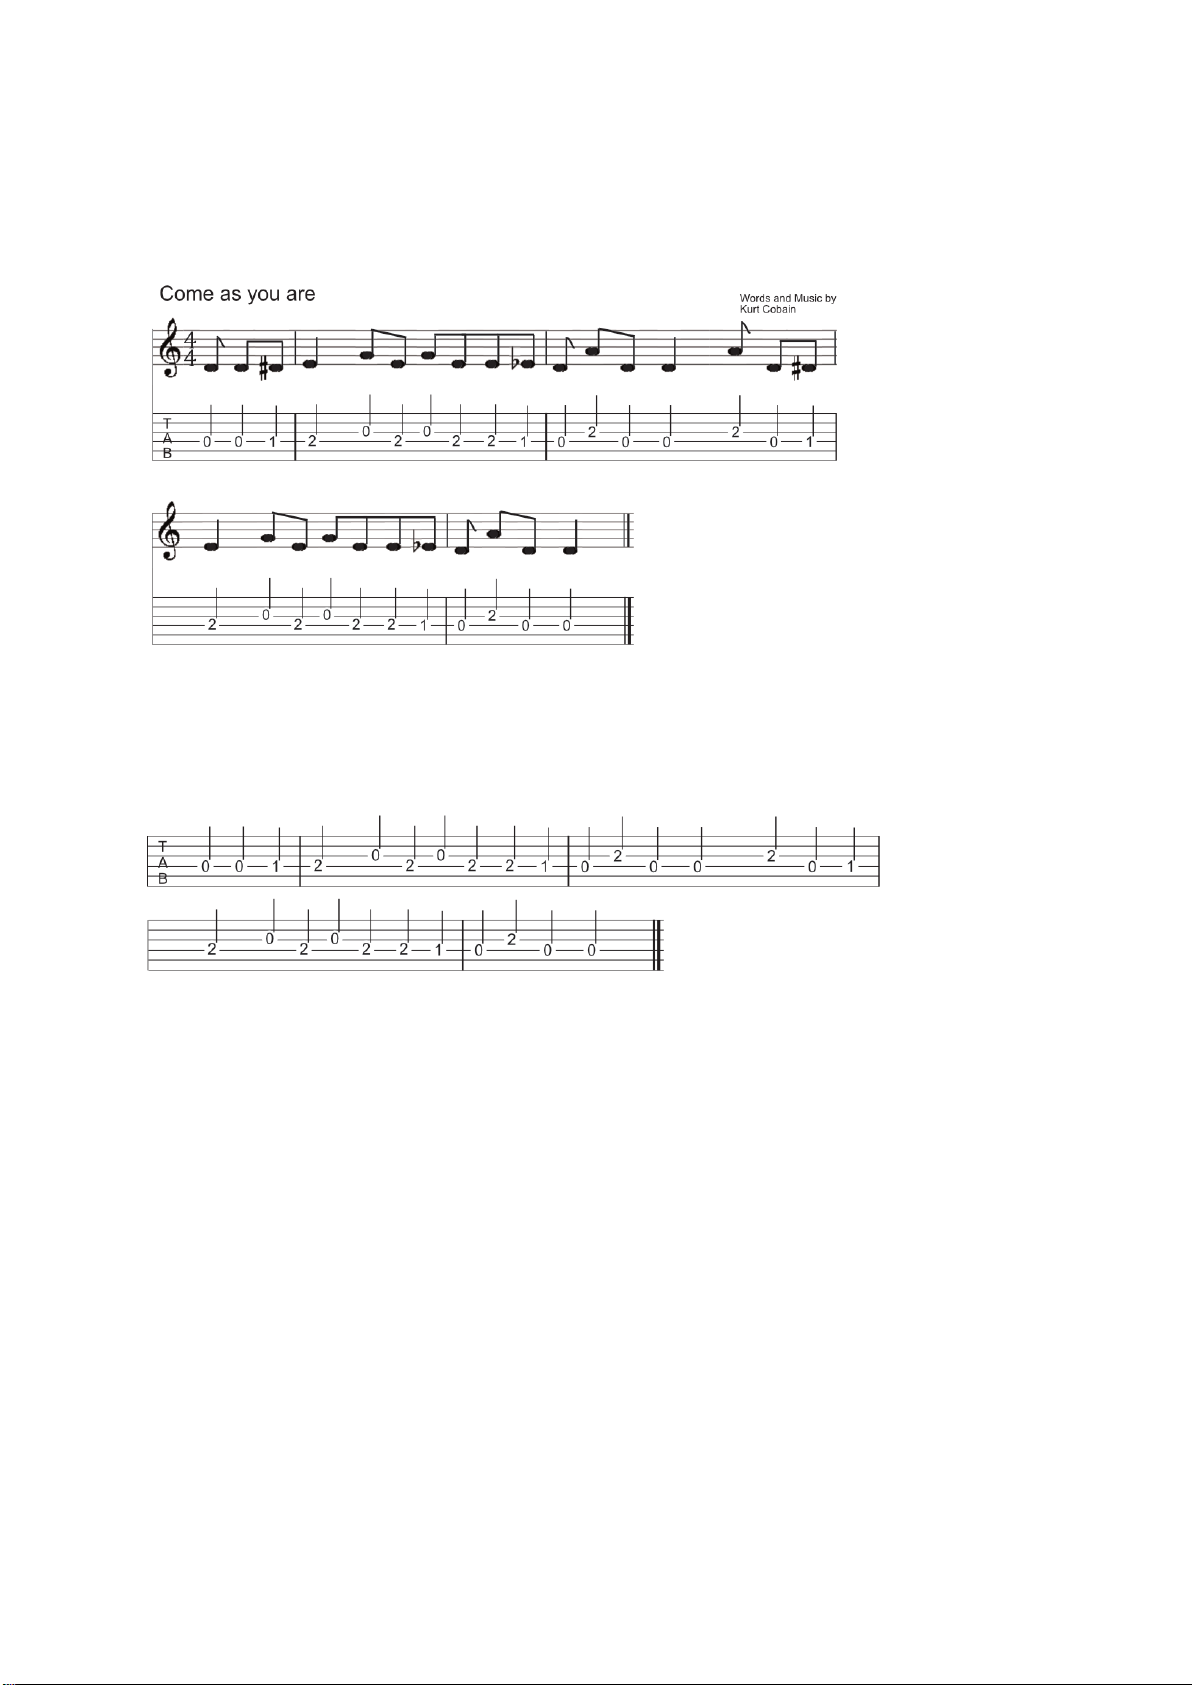
Hier siehst Du das vorherige Stück als Tabulaturschrift. Probiere es einfach mal aus.
Und nochmal als reine Tabulatur:
Page 30

Wer schön klingen will, muss nicht leiden (keine Schmerzen an den
Fingerkuppen)
Gerade am Anfang kann es leicht vorkommen, dass Dir beim Üben die Fingerkuppen weh tun.
Natürlich hast Du hier noch nicht so eine dicke Hornhaut wie ein Profi. Meist ist der Großteil dieser
Schmerzen hausgemacht. Achte darauf, die Saiten nur so fest zu drücken, wie unbedingt nötig. Auch
die Dauer des Drucks sollte sich auf die Dauer des gespielten Tones beschränken.
Als Übung kannst Du einen E-Dur-Akkord (später zur Abwechslung die unterschiedlichsten Akkorde)
greifen, die Finger aber nur ohne Druck auf die Saiten legen. Nun zupfst Du die einzelnen Saiten und
testest, wie wenig Du drücken musst, bis der einzelne Ton sauber klingt. Ist der Ton ausgeklungen,
nimmst Du den Druck sofort wieder weg, lässt den Finger aber weiter auf der Saite liegen. Je näher
der Finger am Bundstäbchen liegt, umso leichter ist der Ton zu greifen. Achte immer darauf, dass
Deine Finger so nahe wie möglich am Bundstäbchen des gegriffenen Tones (also so weit wie möglich
von den Stimmwirbeln entfernt) auf dem Griffbrett liegen.
Bewerte uns:
Wir hoffen, Du hast genauso viel Freude am Gitarrenspielen wie wir.
Musik ist einfach eine ganz tolle Sache.
Unsere Gitarrensaiten, Plektren und das Online-Handbuch sind mit viel Hingabe konzipiert.
Sollte sich unsere Arbeit in Deinen Augen gelohnt haben, würden wir uns über eine Bewertung auf
AMAZON freuen.
http://kir.st/79AU
Page 31

Page 32

Table of Contents
Instruction Manual
日本語 安全にお使いいただくために ........................................................ 1
メンテナンスマニュアル ............................................................... 3
調整マニュアル ............................................................................. 8
ENGLISH Maintenance Manual ................................................................... 35
Adjustment Manual ...................................................................... 40
DEUTSCH Wartungs- und Pfl egehinweise .................................................... 67
Einstellungsanleitung .................................................................. 72
FRANÇAIS Manuel dʼentretien ....................................................................... 99
Réglage manuel ........................................................................ 104
ESPAÑOL Manual de mantenimiento ......................................................... 131
Manual de ajustes ..................................................................... 136
ITALIANO Manuale di manutenzione ......................................................... 163
Manuale di regolazione ............................................................. 168
ᒦᆪ
Guitar Electronics .............................................................................................. 227
Guitar Controls .................................................................................................. 228
ᆒઐۣዸ၄ݿ
ࢯᑳ၄ݿ
.................................................................................... 200
............................................................................. 195
Thank you for purchasing an Ibanez guitar. In order to keep your guitar in the
best possible condition, please read this manual for information on care and
adjustment.
Page 33
はじめにお読みください
日本語 安全にお使いいただくために
安全にお使いいただくために
注意
本製品をお買い上げいただきまして、まことにありがとうござい
ます。この冊子では、安全にお使いいただく上でお気をつけてい
ただきたい点と、お手入れの際の注意点がまとめてあります。
表示記号について
本書では、本機を安全に正しくご使用いただき、あなたや他の
人々への危害や財産への損害を未然に防ぐために事項を下記の記
号で表示しています。
この表示を無視して、誤った取り扱いをす
警告
注意
お願い
●外部要因によって生じた本機の故障、不具合などの損害に
つきましては、当社は一切の責任を負いかねますので、あ
らかじめご了承ください。
ると、人が死亡または重傷を負う可能性が
想定される内容を示しています。
この表示を無視して、誤った取り扱いをす
ると、人が傷害を負う可能性が想定される
内容および物的損害のみの発生が想定され
る内容を示しています。
この表示を無視して、誤った取り扱いをす
ると、本商品の本来の性能を発揮できな
かったり、機能停止をまねく内容を示して
います。
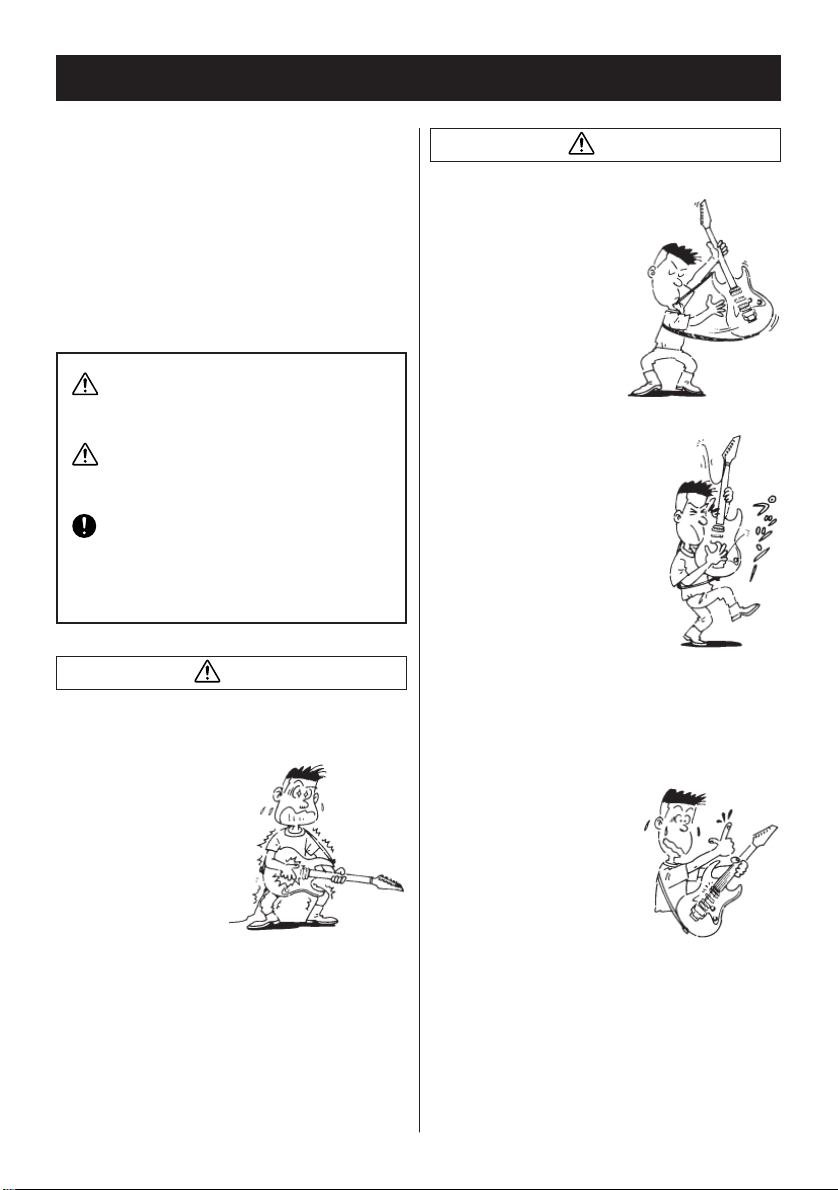
警告
湿気の多い場所では演奏しないでください。
感電の恐れがありますので、直接雨がかかる野外や風呂場などの
湿気の多い場所では演奏しないでください。
楽器を振り回さないでください。
プロのステージアクションをまね
て、演奏中にギターを振り回した
り体のまわりでギターを回したり
すると、ギターがストラップから
外れたりし、まわりの人に当たっ
てけがをさせるなどの事故の原因
になりますのでおやめください。
演奏中に顔を楽器に近づけないでください。
ギターの低音弦やベース等の太い弦が切
れた場合、手や顔に当たってけがをする
恐れがあります。弦が切れる前にこまめ
に新しいものと交換してください。特に
目に弦が当たった場合などは失明の危険
がありますので演奏中に弦に顔を近づけ
ることはおやめください。
ギター、ベース用弦は消耗品です。弦が
古くなっていると、通常の弾きかたをし
ているにもかかわらず(特別に強く弾い
たりしなくても)、演奏中に弦が切れて
しまう場合があります。
極端な大音量で鳴らさないでください。
ギターアンプ、ヘッドフォンを使用する場合に、長時間大音量で
使用していると回復できない難聴になる恐れがあります。またア
ンプの故障の原因にもなりますので、極端な大音量での使用は避
けてください。
さびた弦を使わないでください。
弦(特にギターの1、2、3弦)が
さびてくると、弦で指を切ってけが
をする恐れがあります。こまめに弦
を新しいものと交換してください。
ストラップがゆるんだまま演奏しないでください。
ストラップを使って立って演奏する場合は、ストラップが確実に
ストラップビンにかかっていることを確認してください。ギター
が足の上などに落下してけがをする恐れがあります。
ピックガードの尖ったところに注意してください。
エレクトリックギターの一部のモデルでは、デザイン上ピックカー
ドの先端部分が非常に鋭くなっています。ピッキングの際やクロス
で清掃するときなどにけがをしないようにご注意ください。
1
Page 34
注意
お願い
フレットのエッジ部分でのけがに注意してください。
ギターのネックは木製品ですので、モデルによってはまれにネック
の乾燥によってフレットがネックからはみ出してくることがありま
す。このような状態で演奏すると、フレットの端で手を傷つける恐
れがあります。万一このようになった場合は、直ちに演奏を中止し
てお買い求めになった販売店に修理を依頼してください。
無理に弦を張らないでください。
弦を張る場合は、本来の音程以上に強く巻かないよう、チューニン
グをしながら丁寧に巻いてください。必要以上に強く弦を巻いてし
まうと、新品の弦であっても切れてけがをする恐れがあります。
また、切れた弦が目に当たった場合などは失明の危険がありますの
で、弦を交換する際は、弦に顔を近づけることはおやめください。
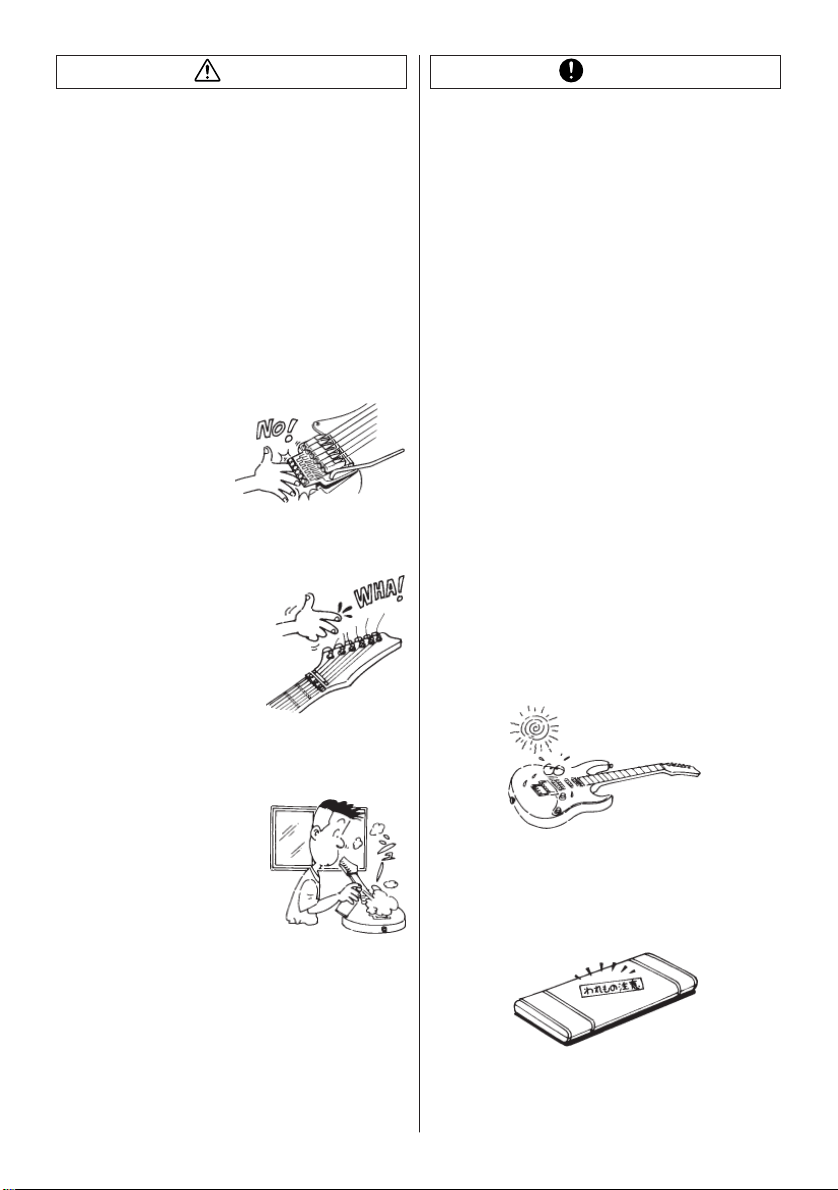
トレモロに指をはさまないよう注意してください。
トレモロシステムには弦の張力
を支えるために非常に強いばね
を使用しています。弦を交換す
る場合など、トレモロ部分で指
をはさんでけがをしないように
ご注意ください。
弦で手を傷つかないよう注意してください。
弦の切断部分(特にギターの1、2、
3弦)は非常に鋭くなっており、直接
触れると手を傷つける恐れがありま
す。特にギターのヘッドをクロスな
どで清掃する場合に、糸巻きの部分
に手が当たってけがをしないように
ご注意ください。弦を交換したら、
弦の余った部分が指に当たらない程
度まで短く切っておきましょう。
古くなった電池を楽器に入れたままにしないで
ください。
乾電池を使用した製品では、乾電池の液漏れ等にご注意くださ
い。また、乾電池は使用しない場合でも自然に放電してしまう特
性がありますので、定期的に交換することをおすすめします。乾
電池を捨てる場合は、自治体、電気店等の専用の回収箱をご利用
ください。また、使用済みの乾電池を火の中に入れると爆発する
恐れがあり非常に危険です。
ギターの表面を樹脂製品などに接触させたまま
保管しないでください。
樹脂製品や家具などの塗装されたものに、ギターの表面を直接長
時間接触させた場合、色移りしたり溶着したりしてお互い損なう
恐れがあります。ギターケース、バッグに入れておくか、布製の
袋に入れるなどして直接それらに接触しないように保管してくだ
さい。
ベンジン、シンナーでは拭かないでください。
ギターの表面をクリーニングする場合にベンジン、シンナー等の
薬品を使用すると、変質したり変色したりする恐れがあります。
ギター用として販売されているクリーナーをご使用ください。
保管、運送などでは以下のような点にお気をつけ
てください。
●ギターは木製品です。投げたり落としたりすると容易に破損し
てしまいます。丁寧にお取り扱いください。
●高温・多湿の場所、砂やほこりの多い場所を避け、換気の良い
場所に保管してください。
●
直射日光が当たると、塗装等の色があせてくる恐れがあります。
●雨の中で演奏するなどしてギターに直接水分がかかったり、
炎天下での演奏など高温の場所に長時間さらされると、ボ
ディー、ネック等の木部に狂いを生じる恐れがあります。
換気の悪い場所ではスプレー式クリーナーを使
わないでください。
スプレー式のギタークリーナーなど
を使用する場合は、換気に注意して
ください。風通しの悪い場所で使用
すると中毒症状を起こす恐れがあり
ます。また可燃性のものは火気に十
分注意して作業してください。
ケースのふたやバッグのファスナーを開けたま
ま持ち運ばないでください。
ギターケース、バッグに入れて持ち運ぶ場合は、ケースの留め金
やファスナーがしっかりとかかっていることを確認してくださ
い。ふたが開いてギターが落下する場合があります。
2
●宅急便などを利用して輸送する場合は専用のハードギターケー
スを使用するか、丈夫なカートンを使用して緩衝材を十分つ
めて梱包し、ワレモノ扱いにしてください。楽器店で購入し
たときのカートンは運送用には適していない場合があり、そ
のまま出荷すると破損する恐れがあります。
Page 35

メンテナンス
メンテナンスマニュアル
付属品
マルチツール トレモロアーム
1.5mm 2mm 2.5mm 3mm 4mm
PREMIUMシリーズ
Edgeトレモロ・ブリッジ
PREMIUMシリーズ
Edge-ZeroIIw/ZPS
PREMIUMシリーズ
ZRトレモロ・ブリッジw/ZPS2
PREMIUMシリーズ
Tight-EndRブリッジ
EdgeⅢトレモロ・ ○○○○○ジッリブ
FAT6トレモロ・ ○○○○ジッリブ
FAT10トレモロ・ ○○○○ジッリブ
FXEdgeⅢブリッジ ○○○
FXEdgeⅢ-8 ブリッジ ○○○
ジブラルタルスタンダード
6/7/8/9ブリッジ
SAT10トレモロ・ブリッジ ○ ○ ○○
SAT-ProⅡトレモロ・ブリッジ ○ ○ ○○
STDトレモロ・ ○ジッリブ
STD-DLトレモロ・ ○ジッリブ
Tight-Tuneブリッジ ○ ○○
ZRトレモロ・ブリッジw/ZPS2 ○ ○ ○○
SynchroniZRトレモロ・ブリッジ ○ ○
ジブラルタル08ブリッジ/クイッ
クチェンジ08テールピース
○ ○
○ ○
○ ○
○
○ ○ ○
六角レンチ
○○○○SPZ/wIIoreZ-egdE
○○○○SPZo/wIIoreZ-egdE
○○ジッリブdnE-thgiT
8mmパイ
プレンチ
○
日本語
DiMarzio社製ピックアップ搭載モデルには、ポールピース高調整用六角レンチが付属します。※
7弦用Edge-Zero2トレモロ・ブリッ
ジw/ZPS3Fe搭
載モデルには、強化スプリングが付属します。※
3
Page 36
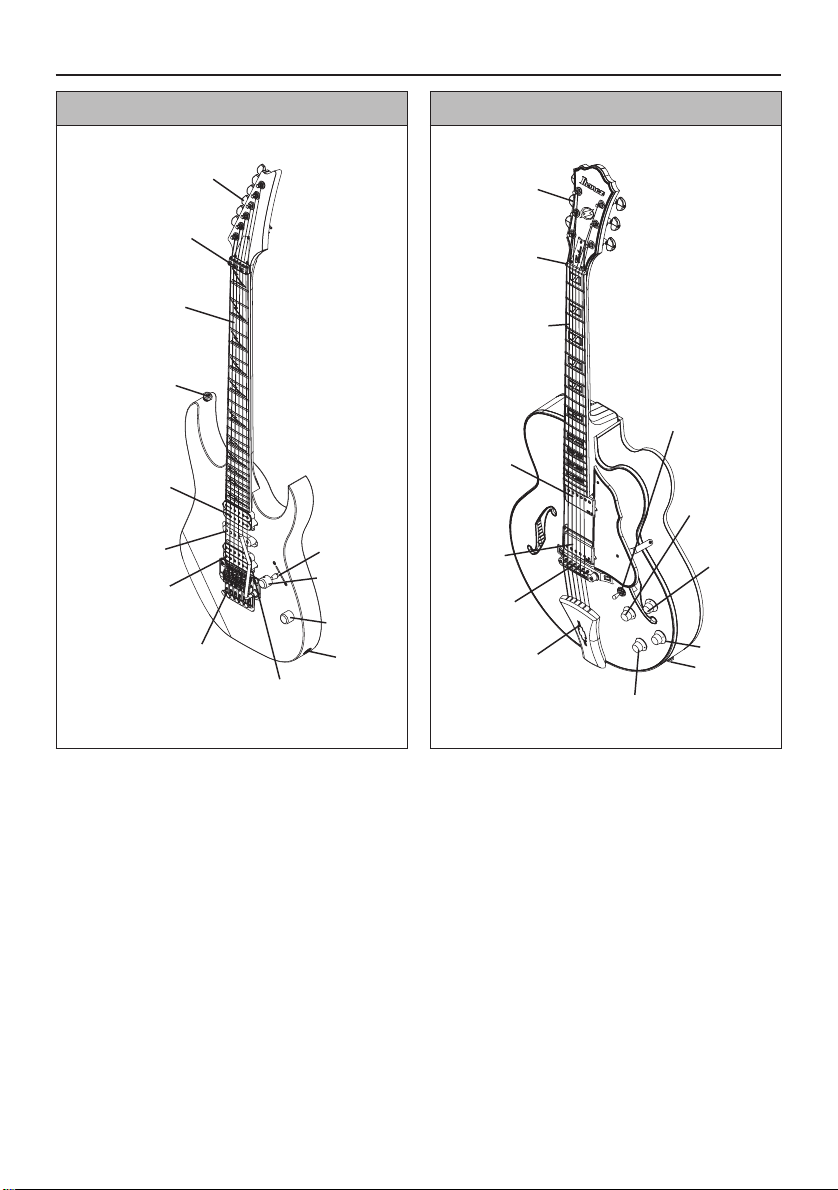
本体各部の名称
エレクトリックギター セミ、フルアコースティックギター
糸巻き(ペグ)
ロッキング ナット
指板
(フィンガーボード)
ストラップ ピ ン
ネックピックアップ
ミド ル
ピックアップ
ブリッジ
ピックアップ
トレモロ
トレモロアーム
ピックアップ
セレクター
ボリューム
トーン
出力ジャック
糸巻き(ペグ)
ナット
指板
(フィンガーボード)
ネック
ピックアップ
ブリッジ
ピックアップ
ブリッジ
テールピース
ピックアップ
セレクター
出力ジャック
ネックピックアップトーン
ネック
ピックアップ
ボリューム
ブリッジ
ピックアップ
ボリューム
ブリッジ
ピック
アップ
トーン
イラストはIbanezの代表的なモデルです。お買い求めのギターが必ずしもイラストと一致しない場合があります。※
トレモロ/ブリッジの調整については、搭 載されているトレモロ/ブリッジにより異なります。※
詳しくは該当のトレモロ/ブリッジ項をご確認ください。
各モデルのコントロールについては、「CONTROLS」項(P228)をご確認ください。※
4
Page 37
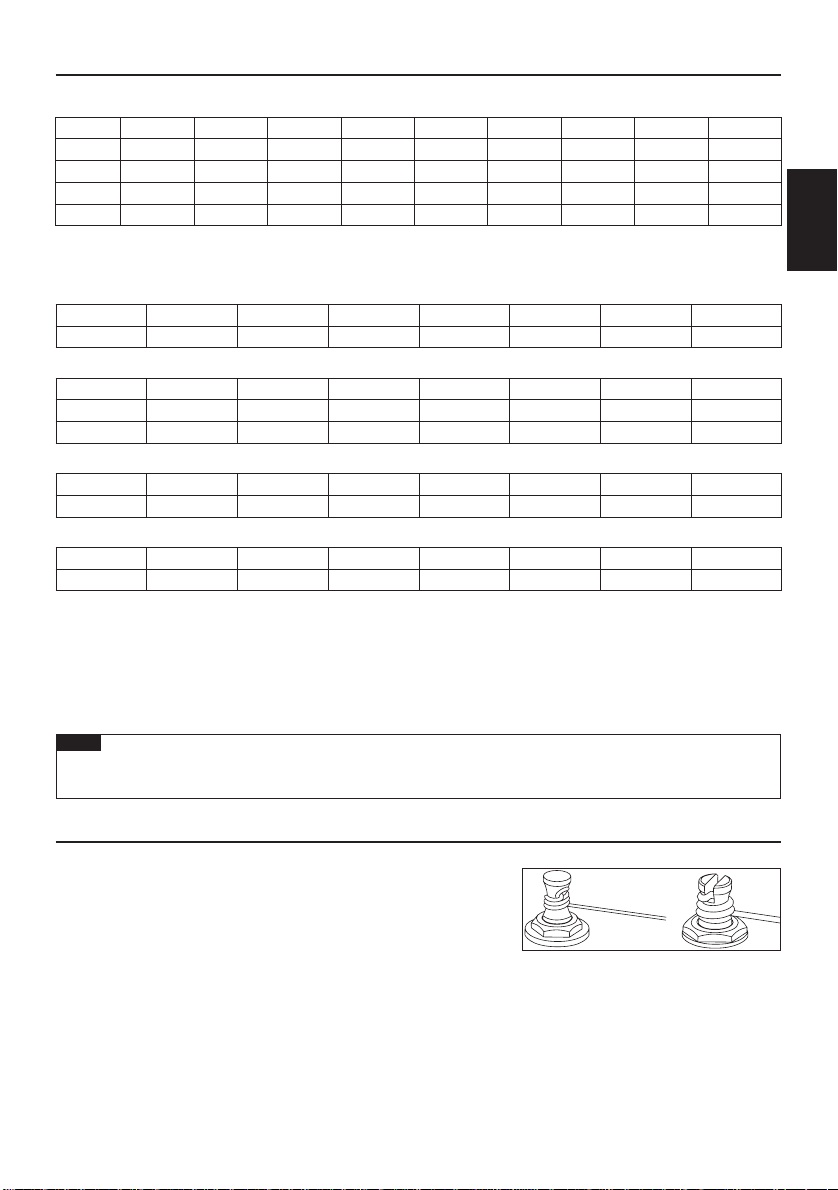
チューニング
Ibanezのギターは、出荷時に下記のチューニングで各部の調整を行っています。
1st
6-strings
7-strings
8-strings
9-strings
例外として、下記のモデルがあります。
Baritoneguitar
RGD、APEX
6-strings
7-strings
MTM100
TAM10
演奏、調整の際はチューニングメーターや音叉等を使用し、各弦の開放音を上記の音程にチューニングしてくださ
い。音程が高い場合は一度弦を緩めて音程を少し下げた後、巻き上げながら音程を合わせるようにするとチュー
ニングが安定しやすくなります。表の音程以外でチューニングをする場合、または標準と異なるゲージの弦を使用
する場合には、ネックの調整やイントネーションの調整が必要になる場合があります。
ネックの調整、イントネーションの調整についてはそれぞれ「ネック調整」項(P6)、「弦長(イントネーション)」項
(P6)をご確認ください。
E
E
D#
E
1st 2nd 3rd 4th 5th 6th 7th 8th
B F# D A E B - -
1st 2nd 3rd 4th 5th 6th 7th 8th
C# G# E B F# B - -
1st 2nd 3rd 4th 5th 6th 7th 8th
E B G D A E B E
1st
D
D
2nd
B
B
A#
B
2nd
A
A
3rd
G
G
F#
G
4th
3rd
5th
D
D
C#
D
F
F
A
A
G#
A
4th
6th
E
E
D#
E
C
C
5th
G
G
7th
-
B
A# F
B
6th
D
D
8th
F#
9th
-
-
-
-
-
C#
7th
-
A
日本語
ご注意
極端なチューニングやエレキギター弦以外の弦の使用は、部品の破損や思わぬ怪我に繋がることがありますの•
でご注意ください。
弦の交換
弦は使用しているうちに劣化し性能が低下するため、ビレや音程の狂
いが生じることがあります。
弦に錆や変色が見られる場合や、音質の低下、音のビリつきが酷くなっ
たと感じた場合には弦を交換してください。
全ての弦を同時期に交換されることをお勧めします。
折れ、ねじれ、傷等がある弦は本来の性能を発揮できませんので、ご使
用にならないでください。
弦は糸巻き(ペグ)のポストから下へ2〜3回、長さにして5〜7cmを目安に、弦が交差しないように巻きます。
交換作業は全ての弦を一度に外してしまわずに1本ずつ交換を行うことで、ネックにかかる急激な力の変化やトレ
モロのバランスを崩してしまうリスクを軽減できます。
※トレモロ/ブリッジに取り付けられた弦の着脱方法は、搭載されているトレモロ/ブリッジにより異なります。
詳しくは該当のトレモロ/ブリッジ項をご確認ください。
5
Page 38
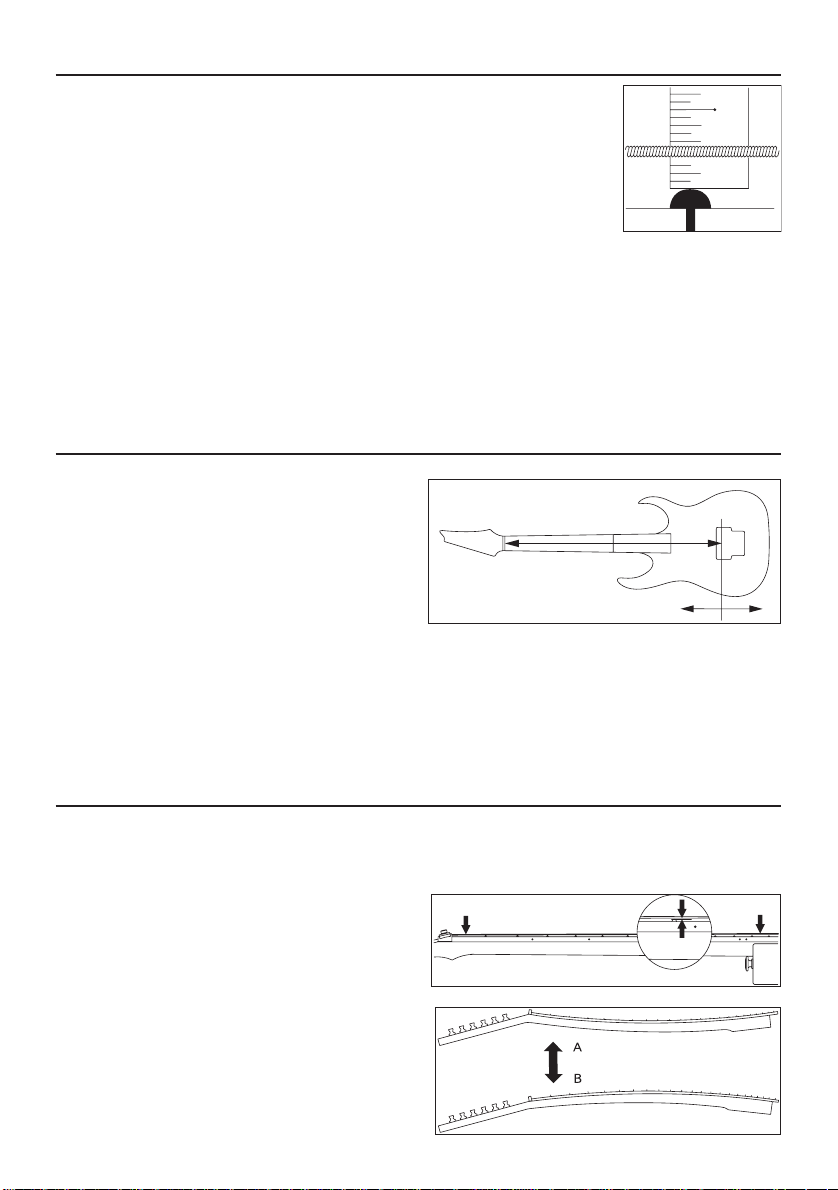
弦高
弦高とはフレットと弦との距離のことです。
弦高の測定は、正確にチューニングを行った後、14フレットに定規をあて、フレットの
先端から弦の下端までの距離を測定します。
弦高の目安は、1弦で1.5〜1.7mm、6弦で2.0mm〜2.2mmです。
7弦ギターの場合は7弦で2.2mm〜2.4mm、8弦ギターは8弦で2.4mm〜2.6mmに
なります。
上記の弦以外の弦高は、1弦から最低音弦へ向かって徐々に隙間が大きくなるように設定してください。
弦高が高すぎると演奏性が悪化し、低すぎると弦ビレや音詰まり、サスティーンの劣化等を招きます。
弦高を適正な値にしても弦ビレや音詰まりが発生する場合には、ネックの反りを調整する必要がある可能性があ
ります。
詳しくは「ネック調整」項(P6)をご確認ください。
弦高調整の方法は、搭載されているトレモロ/ブリッジの種類によって異なります。詳しくは該 当トレ モ ロ / ブリッジ 項 を※
ご確認ください。
弦長(イントネーション)
弦のゲージを変更したり、変則チューニングでギターを
使用する場合には、全てのフレットで正しい音程が得ら
れるように、弦の長さ(イントネーション)を調整する必
要があります。
正確にチューニングを行った後、演奏時の状態にギタ
ーを持ち、各弦の12フレットを押さえたときの音と、12
フレット上でのハーモニクス音とを比較します。
12フレット上でのハーモニクス音よりも12フレットを押
さえたときの音の方が音程が低い場合は、トレ モ ロ /ブ
リッジのサドルを前方に動かして弦長を短くします。12フレットを押さえたときの音の方が高い場合は、サドルを
後方に動かして弦長を長くします。
12F
正確なイントネーション調整を行うため、チューニングメーターを使用してください。※
サドル位置の調整方法は、搭載されているトレモロ/ブリッジにより異なります。詳しくは該当のトレモロ/ブリッジ項をご※
確認ください。
ネック調整
ネックには常に弦の張力がかかっており、チューニングの状態や弦のゲージを変更したときだけでなく、温度や湿
度の変化によっても反り具合が微妙に変化します。
適正な弦高調整とチューニングを行ってもビレや音詰まりが発生する場合は、ネックの 反り具 合 を 確 認し、調整す
る必要があります。
1ネックの状態を確認します。
正確にチューニングを行った後、演奏時の状態にギターを
持ち、1弦の1フレットと、ネックとボディの接合部分に最も
近いフレットの両方を押さえた状態で、8フレットでの弦と
フレットとの隙間を 測ります。
同様に最低音弦でも測定し、それぞれの隙間が
0.3mm〜0.5mmになるように調整します。
2 隙間が0.3mmよりも小さい場合は、ネ
り付けられ たアジャストナットを六角レンチ やソケットレ
ンチを使用してA方向へ回して、ネックを順反り方向へ動
かします。
ックのヘッド側に取
6
8th fret
Page 39
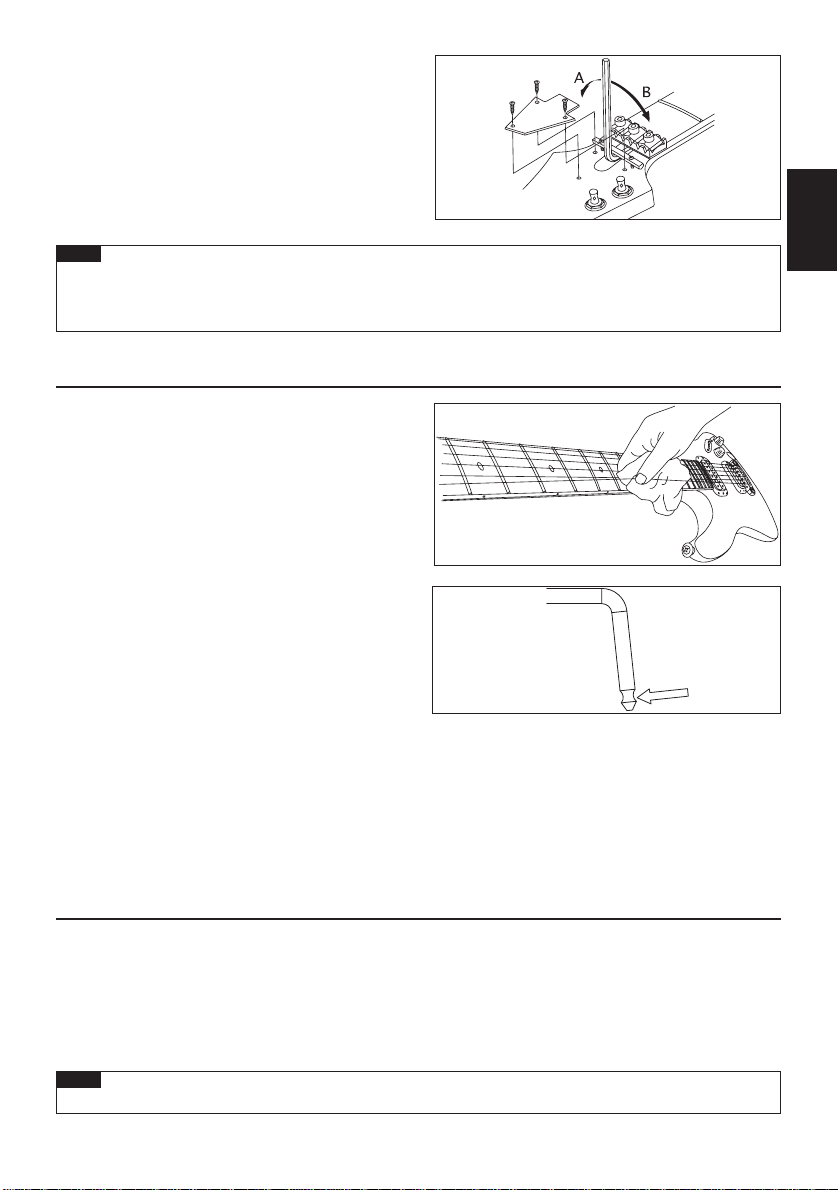
3 隙間が0.5mmよりも大きい場合は、アジャストナットをB
方向に回して、ネックを逆反り方向に動かします。
アジャストナットは1/4回転を目安に、チューニングを確認※
しながら少しずつ行ってください。
ご注意
ネックの調整には十分な注意が必要です。•
無理な調整は故障の原因となりますので、正しく調整ができない場合はお買い求めの楽器店または弊社へご相
談ください。
お手入れ
演奏後は錆の発生を防ぐため、弦の裏側やフレット、
ブリッジサドルやナット等の金属部品に付着した汗や油
を拭き取ってください。金属部品に付着した埃や汚れ等
は部品の機能に障害を及ぼすことがありますのでご注
意下さい。
通常の拭きあげでは除去できない汚れは、少量の油を
染み込ませた柔らかい布を使用して除去します。
トレモロアームを回したときに異音が発生する場合は、
トレモロアーム先端の窪み部分にグリスを塗布してくださ
い。
日本語
塗装面のお手入れは、揮発性の薬品や研磨剤の使用は避け、楽器専用のポリッシュを染み込ませた柔らかい布で
丁寧に拭きあげてください。
オイルフィニッシュ仕上げのボディーやネックの汚れを除去する場合は、消しゴムや#1000以上の細目のサンドペ
ーパー、#0000のスチールウール等を使用してください
年に1〜2回、家具用等の無色の仕上げオイルやガンオイルを少量使用して拭きあげると、乾燥を防止することが
できます。
塗装が施されていない指板面には、指板用のオイルや良質のレモンオイル等を少量含ませた布で、フレットの際
まで丁寧に拭いてください。
バッテリー
プリアンプやイコライザー等を搭載したギターには、バッテリーが使用されています。
音量が小さくなる、音が歪む等機能の低下が見られる場合は、バッテリーを交換してください。
006P(9V)のバッテリーを搭載するモデルと、単三(1.5V)2本を搭載するモデルがあります。
お買い上げのギターに搭載されているバッテリーの種類をご確認の上、同じタイプのバッテリーをご使用ください。
バッテリーはボディー裏側のバッテリーボックスに収納されています。
バッテリー搭載モデルは出力ジャックが電源スイッチを兼ねており、ジャックにプラグを挿入することで電源がオ
ンになります。
ご注意
バッテリーの消耗を防ぐため、長時間ご使用にならない場合はジャックからプラグを抜いて保管してください•
7
Page 40
ギターブリッジ
調整マニュアル
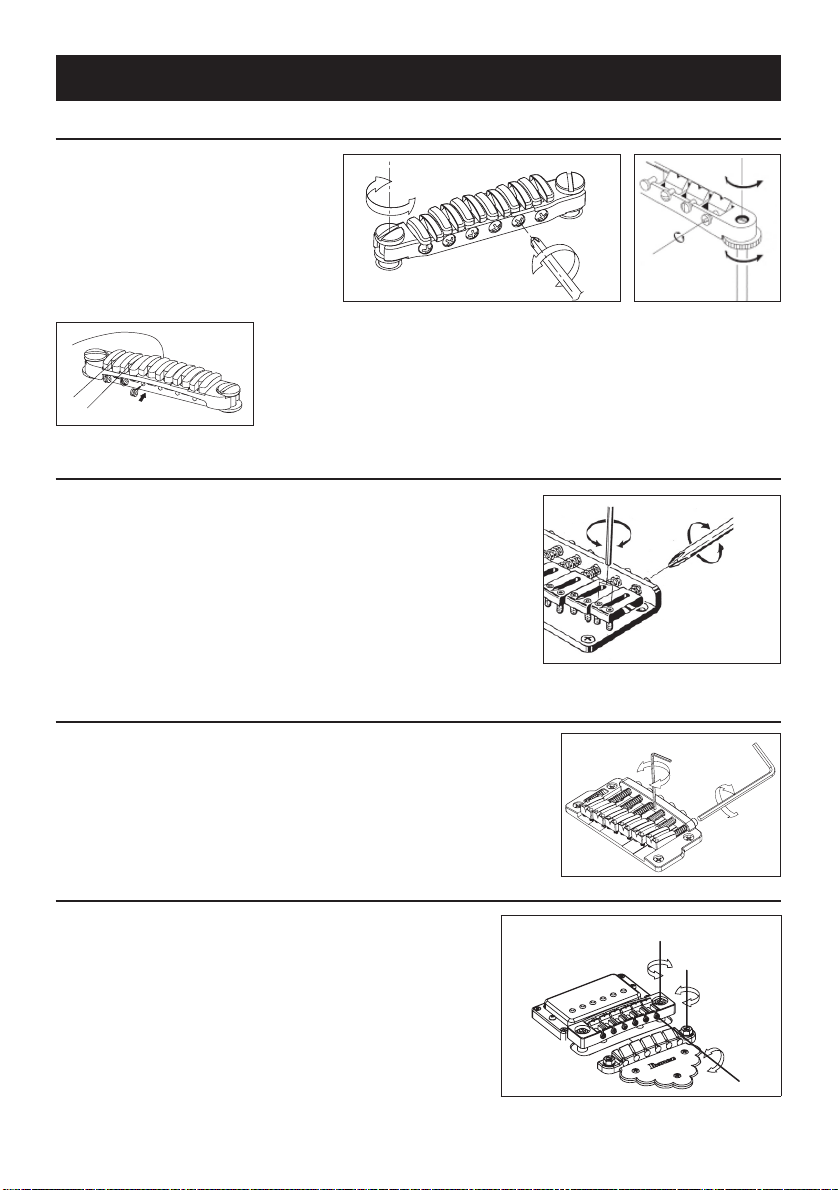
ジブラルタルIII(ギター、ベース)、CB3&フルチューンIII、ARTブリッジ
弦高はブリッジ両側にある弦高調整スク
リュー(A)をマイナスドライバーで回して
調整します。イントネーション調整は、ブ
リッジ後部の調整スクリュー(B)をプラス
あるいはマイナスドライバー、または付属
の六角レンチで回し、サドルを移動させて
調整します。
CB3ブリッジの弦交換は、ブリッジ前部から弦穴を通過させて行います。
ジブラルタルⅢブリッジの弦高調整の際は、スクリューを無理に回してネジ穴が傷※
つかないよう、十分に弦をゆるめてから行ってください。
フィックスドブリッジ
弦はギターボディー裏側から、弦止めフェラルを通して取り付けます。
弦高は各サドルの高さを付属の六角レンチ(1.5mm)で回して調整しま
す。イントネーションはブリッジ後方から各サドルのイントネーション
調整ボルトをプラスドライバーで回して調整します。
7弦用/8弦用も調整方法は同じです。※
(A)
GIBRALTARIII,CB3
(B)
(B)
FULLTUNEII,
ART1,ART2
(A)
ジブラルタルスタンダード(II)・ブリッジ
弦はギターのボディ裏側から、弦止めフェラルを通して取り付けます。
弦高は各サドルの高さを付属の六角レンチ(1.5mm)で回して調整します(A)。
イントネーションはブリッジ後方から各サドルのイントネーション調整ボル
トを付属の六角レンチ(2.5mm)で回して調整します(B)。
7弦用/8弦用/9弦用も調整方法は同じです。※
ジブラルタル08ブリッジ/クイックチェンジ08テールピース
弦高は、ブリッジ左右のスタッドボルト(A)をマイナスドライバーで
回して調整します。調整の際には、あらかじめ付属のパイプレンチ
を使用しロックナットを緩めておき、調整後は再びロックナットを
締めてブリッジを固定してください。各サドルのイントネーション
調整はイントネーション調整ボルト(C)を回して行います。
テールピースは、両側のアジャストボルト(B)をマイナスドライバー
で回して高さを調整する事ができます。テールピースを高く設定す
る程弦のテンションが弱まり、タッチが柔らかくなります。調整の
際にはブリッジと同様に、あらかじめロックナットを緩め、調整後
再び固定してください。ブリッジ及びテールピースのロックナット
が緩んでいると、弦ビレや共振の原因となります。
8
(A)
(B)
A
B
C
Page 41
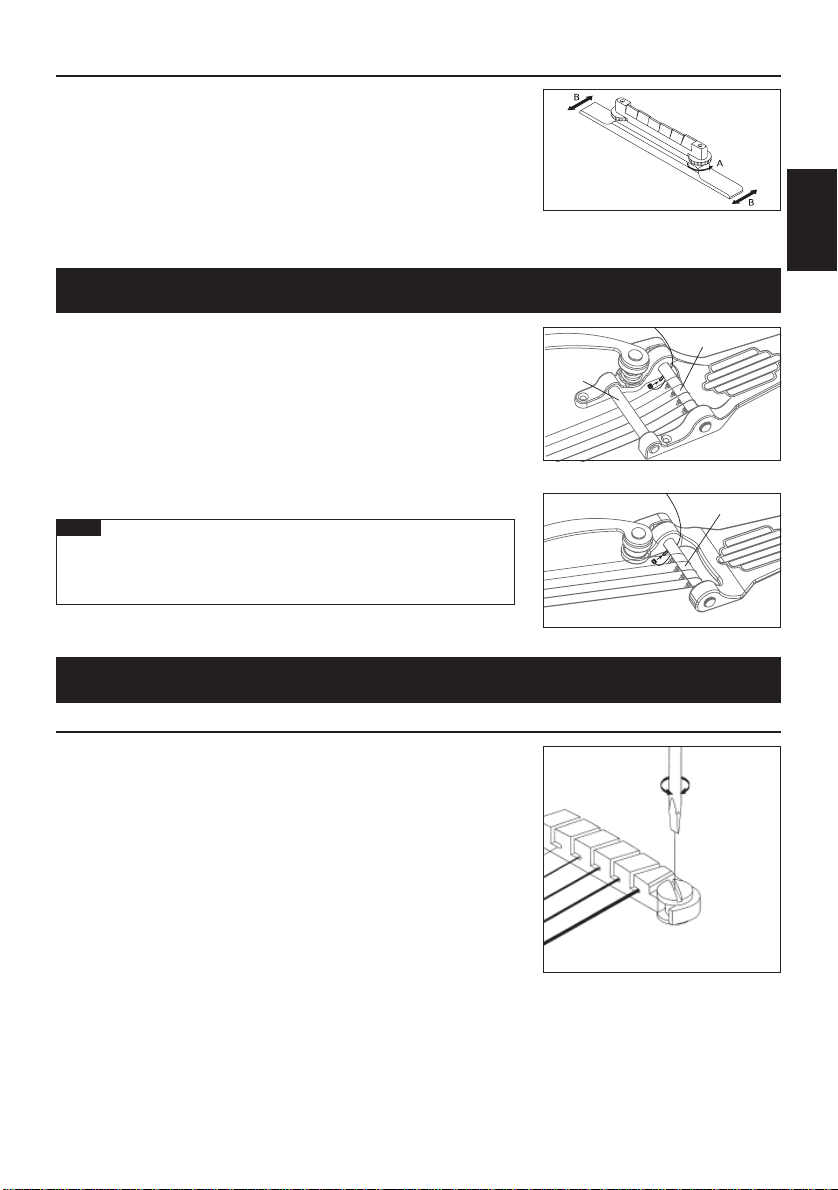
アジャスタブルアーチトップブリッジ
弦高調整は、ブリッジ左右のアジャスト・スピナー(A)を指で回して、ブ
リッジ全体の高さを調整します(各弦の調整は行えません)。
イントネーション調整は、弦を緩めてブリッジ全体を前後させて調整し、
チューニングを行ってからイントネーションを確認します。正しいイント
ネーションが得られるまで同じ調整を繰り返してください。また、ブリッジ
が倒れないよう注意して行ってください。
弦交換を行うときは、ブリッジの位置がずれないよう、弦を1本ずつ交換することをお勧めします。
ビンテージビブラート
弦交換は1本ずつ行います。ボールエンドをバー(B)のポストに取り付
け、バーの上を渡し、糸巻きに弦を巻きます。リテイナーバー(A)のあ
るモデル(VBX60、VBS80)は、バーの上を渡した後リテイナーバーの下
を通過させ、糸巻きに弦を巻きます。交換作業の間は、絶えず弦を糸巻
き側に軽く引寄せて、ボールエンドがポストから外れないよう注意して
ください。
弦がブリッジサドルに正しく位置していることを確認しながらチューニ
ングを行います。チューニングまでの作業が完了した後、次の弦の交換
に移ってください。全ての弦の交換が完了した後、再度全体のチューニ
ングを行います。
ご注意
全ての弦を一度に取り外すと、ギターにかかるテンションの急激な変
化により、ギター各部の状態に大きな影響を与える恐れがあります。弦
交換は1本ずつ行ってください。
(A)
日本語
(B)
VBX60
VBS80
(B)
VBF70
テールピース
クイックチェンジIII テールピース
テールピース本体左右のスタッド・ボルトをマイナスドライバーやコイ
ンで回して、テールピースの高さを調整します。
弦交換を行う時は、テールピースの溝に通し、ボールエンドをテール
ピース後方に引っ掛けます。
(C)
QUIKCHANGEIII
9
Page 42
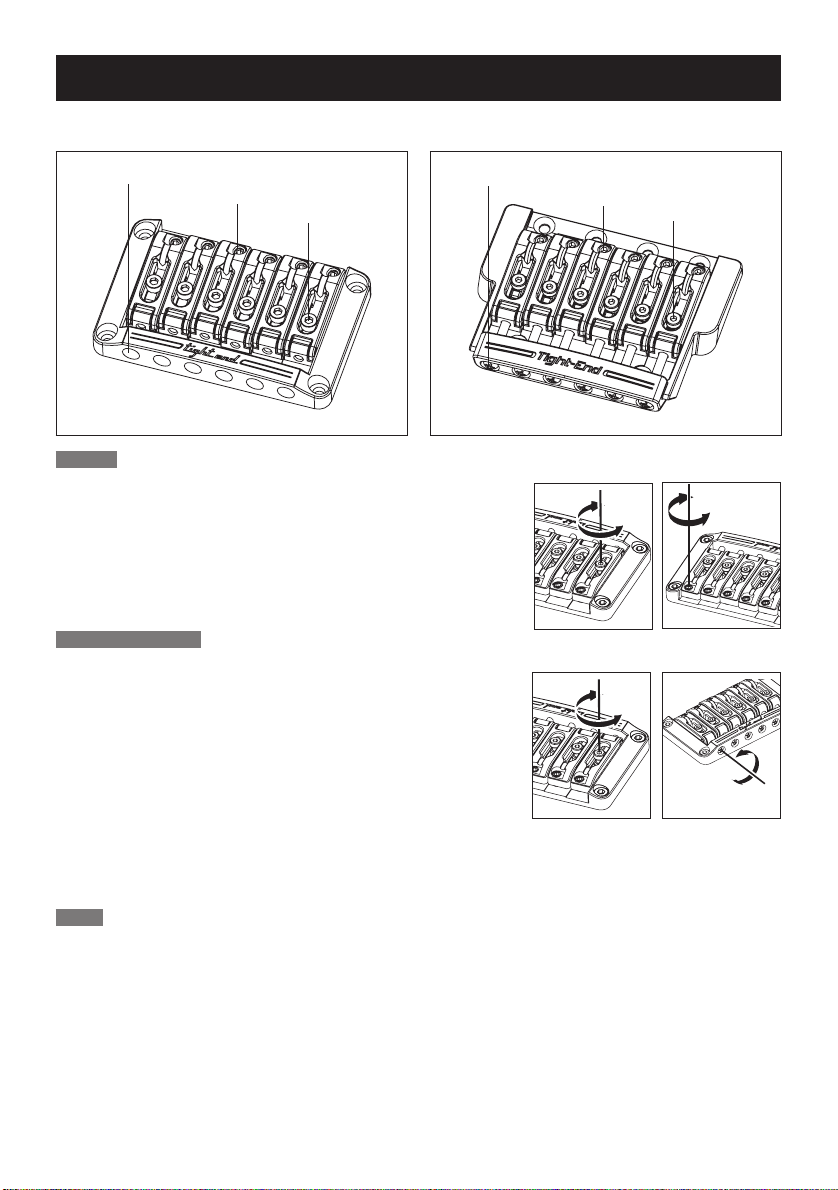
Tight-Endブリッジ/Tight-EndRブリッジ(6弦用/7弦用)
Tight-Endブリッジ■ Tight-EndRブリッジ■
イントネーション調整ボルト
弦高調整
1サドル・ロッ
2サドルの高さ調整スクリューを六角レンチ(
を調整します。
調整が終わりましたら、サドル・ロック・ボルト締めてください。※
イントネーション調整
1
サドル・ロック・ボ ルト を 六角レンチ(2mm)で緩めます。
2イントネーション調整ボルトをプラスドライバーで回して、サドル位置
高さ調整スクリュー
サドル・ロック・ボ ルト
ク・ボ ルト を 六 角 レ ン チ(2mm)で緩めます。
2mm)で回して、サドルの高さ
イントネーション調整ボルト
を調整します。
高さ調整スクリュー
サドル・ロック・ボ ルト
3サドル・ロック・ボ ルト を 六角レンチ(2mm)で締め、イントネーション
調整スクリューをプラスドライバーで時計方向に軽く(サドルの位置
に影響が出ない程度)に締めます。
イントネーションの確認は、正しいチューニングで行ってください。※
弦交換
弦をギターのボディ裏側から、弦
止めフェラルを通して 取り付 けます。
10
Page 43
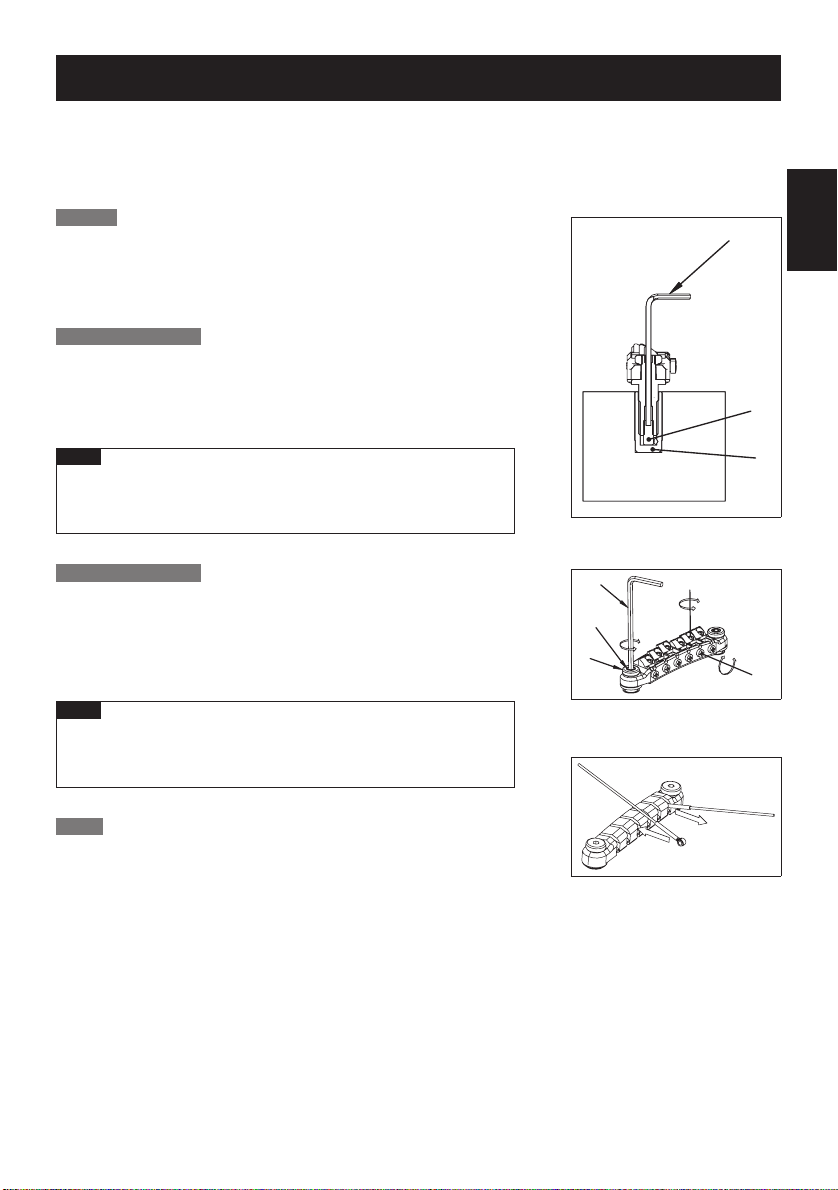
Tight-Tuneブリッジ
Tight-Tuneブリッジは、ブリッジの各可動部分をロックすることにより、無駄な振動を抑え、効率の良いサステイ
ンを得られるブリッジです。ブリッジにはより強固にブリッジとボディを固定するためのスタッド・ロック機能を
備えています。また、テールピースにはボールエンドが外れないように保持するボールエンド・ロック機能を装備
しました。
弦高調整
ブリッジ本体左右のロック・ナット(D)を緩め、六角レンチ(3mm)で
スタッド・ボルト(E)を回して、ブリッジ全体の高さを調整します(各弦
の調整は行えません)。調整が完了した後、ロック・ナットを締めてくだ
さい。
スタッド・ロック機能
弦高調整を終えた後、六角レンチ(2mm)でスタッドボルト内部にあるス
タッド・ロック・ボルト(B)を時計回りに回します。スタッド・ロック・
ボルトがアンカーナット(C)に接触し、それ以上回らなくなるまで締め込
んでください。
A
B
日本語
ご注意
弦高の調整を行うときは、必ずスタッド・ロック・ボルト(B)を六角レン
チ(2mm)で反時計回りに十分に緩めてから行ってください。破損の
原因になります。
イントネーション調整
調整するサドルのサドル・ロッ
ネーション調整スクリュー(H)をプラスドライバーで 回してサドル位 置を調整
し、チュー ニング を行ってからイントネーションを確認します。正しい イントネー
ションが得られるまで同じ調整を繰り返した後、サドル・ロック・ボ ルト を 締 め て
くだ さ い 。
ご注意
ク・ボ ルト(G)をプラスドライバーで緩め、イント
イントネーション調整ボルト(H)が緩い場合、共振を起こすことがあり
ます。その場合はサドルが動かない程度にイントネーション調整ボル
トを軽く締めてください。
弦交換
弦のボールエンドをテールピースの溝に、
(J)
の向きで取り付けま す。ボー
ルエンド・ロック機能により、ボールエンドが保持されます。弦を外す場合
(K)
の方向に弦を引っ張ると簡単に取り外すことができます。
は、
C
F
E
D
G
H
K
J
11
Page 44
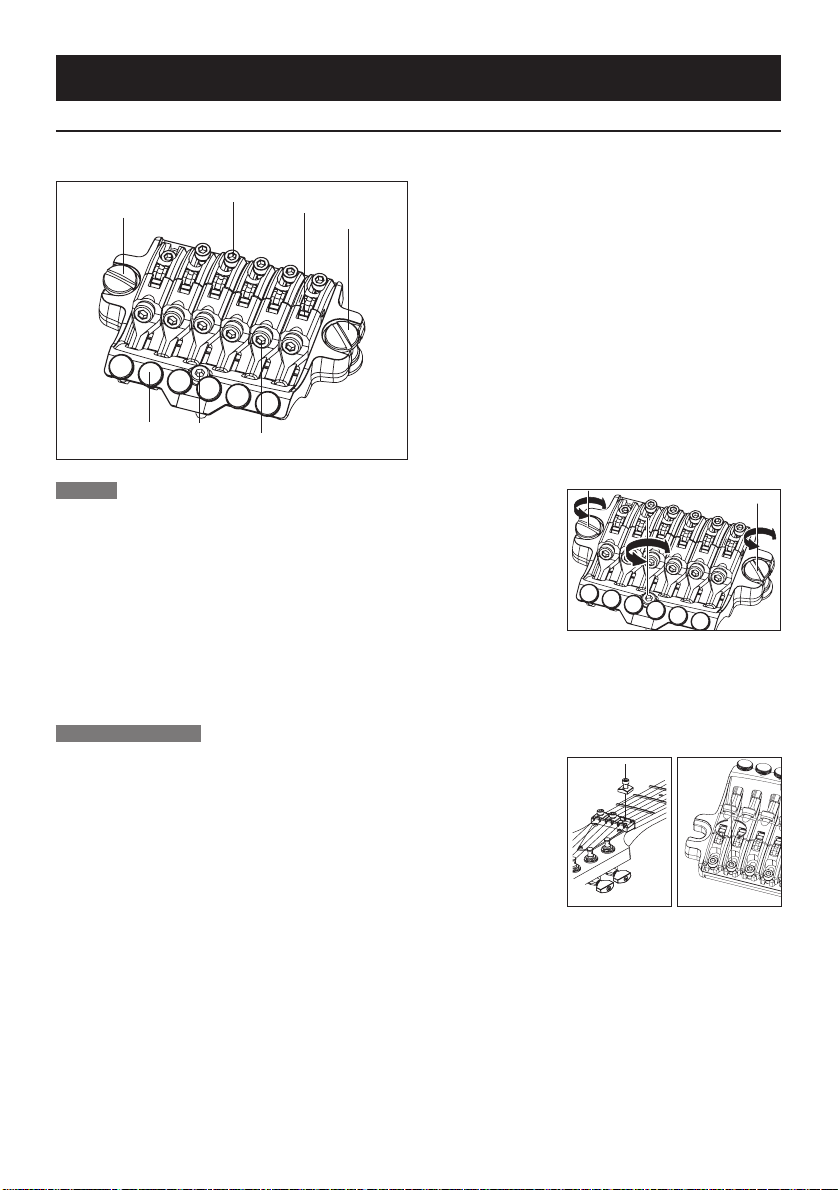
ロッキングブリッジ
FXEDGEIII/FXEDGEIII-8ブリッジ
FXEdgeIII■
1
6
弦高調整
1ブリッジ本体左右のメイン・ス
体の高さを動かして弦高を調整します(各弦ごとの調整は行えません)。
2
5
3
1
4
タッドをマイナスドライバーで回して、トレ モ ロ 全
1メインスタッド
2サドル・ロック・ボ ルト
3ストリング・ホ ル ダ ー・ブロック
4ストリング・ストッパ ー・ボ ル ト
5リアスタッド
6ファイン・チュー ニング・ボ ルト
2リア・スタ
ッドを六 角レンチ(3mm)で回して、ブリッジがギターのボディー表面
とおおよそ平行に
なるように調整します。
リア・スタッドの調整でも弦高が変化しますので、最終的な弦高の確認はリア・スタッドを調整した 後 行ってくだ※
さい。またメイン・スタッドの調整の際は、無理に回してネジ穴が傷つかないよう、十分に弦を緩めてから行って
くだ さ い 。
イントネーション調整
1ロッキング・ナ
十分に弦を緩めます。
2サドル・ロック・ボ ルト を 六 角 レ ン チ(2mm)で緩め、サドル位置を調整します。
イントネーションの確認は、サド ル・ロック・ボルトがしっかりと締まった状態で、※
正しいチューニングで 行ってください。調整が終わりましたら、サド ル・ロック・ボ
ルトとロッキング・ナットのプレッシャー・パ ッド・ボ ル ト を 締 め てくだ さ い 。
ットのプレッシャー・パ ッド・ボ ルト を 六 角 レ ン チ(3mm)で緩め、
12
Page 45
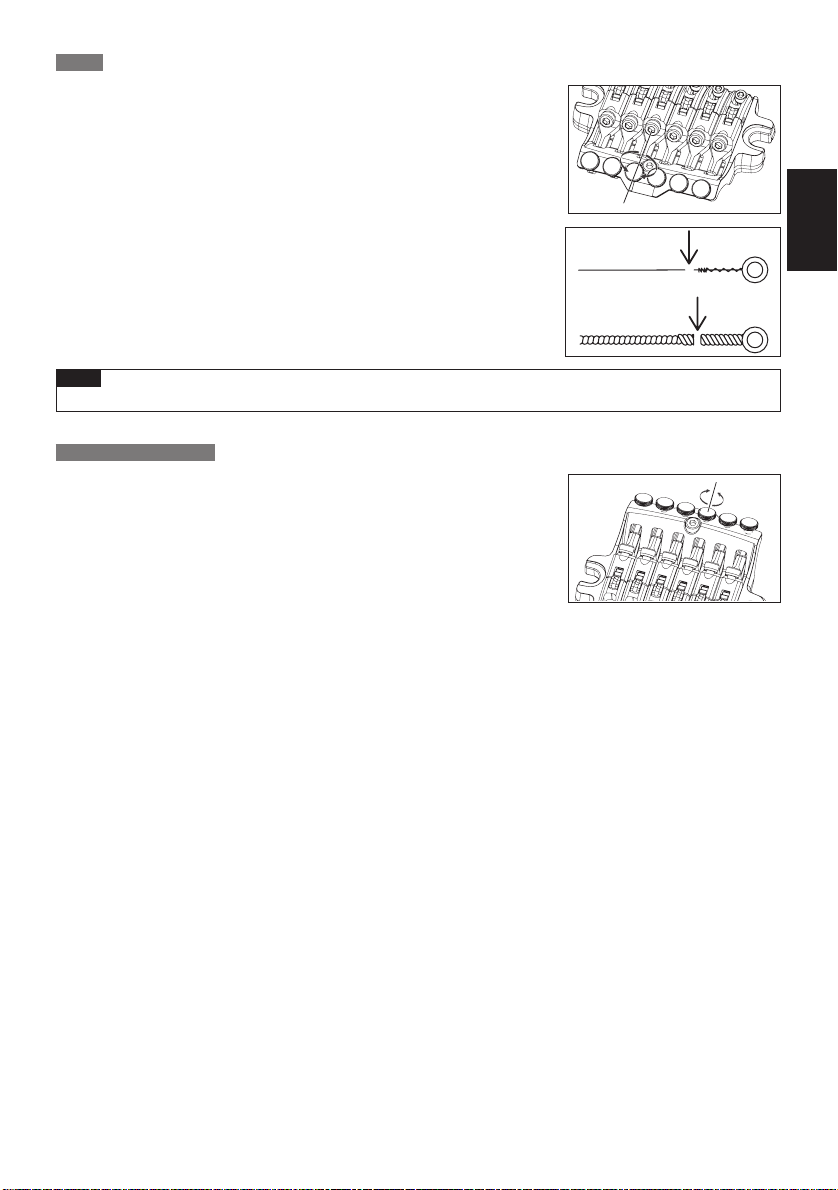
弦交換
1ロッキング・ナ
糸巻き から弦を取り外します。
2ブリッジ本体のストリング・スト
ルから弦を引き抜いて取り外します。
3新しい弦は先端のボールエ
4ボールエンドを切り落と
ックとの間に挿入し、ストリング・ストッパ ー・ボルトを締めて弦を固定します。
5糸巻きで弦を巻き上げ、チ
6チューニング完了後、ロッキ
ます。
ご注意
ットのプレッシャー・パ ッド・ボ ルト を 六 角 レ ン チ(3mm)で緩め、
ッパ ー・ボ ルト を 六 角 レ ン チ(3mm)で緩め、サド
ンド部分をニッパー等で切り落とします。
した側の弦の先端をサドルとストリング・ホ ル ダ ー・ブロ
ューニングを行います。
ング・ナットのプレッシャー・パ ッド・ボ ルト を 締 め
チューニングを行う前に、ストリング・ストッパ ー・ボルトがしっかりと締め付けられていることを確認してください。•
ファイン・チューニング
ロッキング・ナットで弦を ロックした 後でも 、ファイン・チューナーによって各弦の
チューニングの微調整が行えます。
チューニングの前に、あらかじめ全てのファイン・チュー ニ ング・ボルトを可動範囲
の中央付近に調整しておくと、弦をロックした後の調整幅を広く持たせることがで
きます。
日本語
13
Page 46
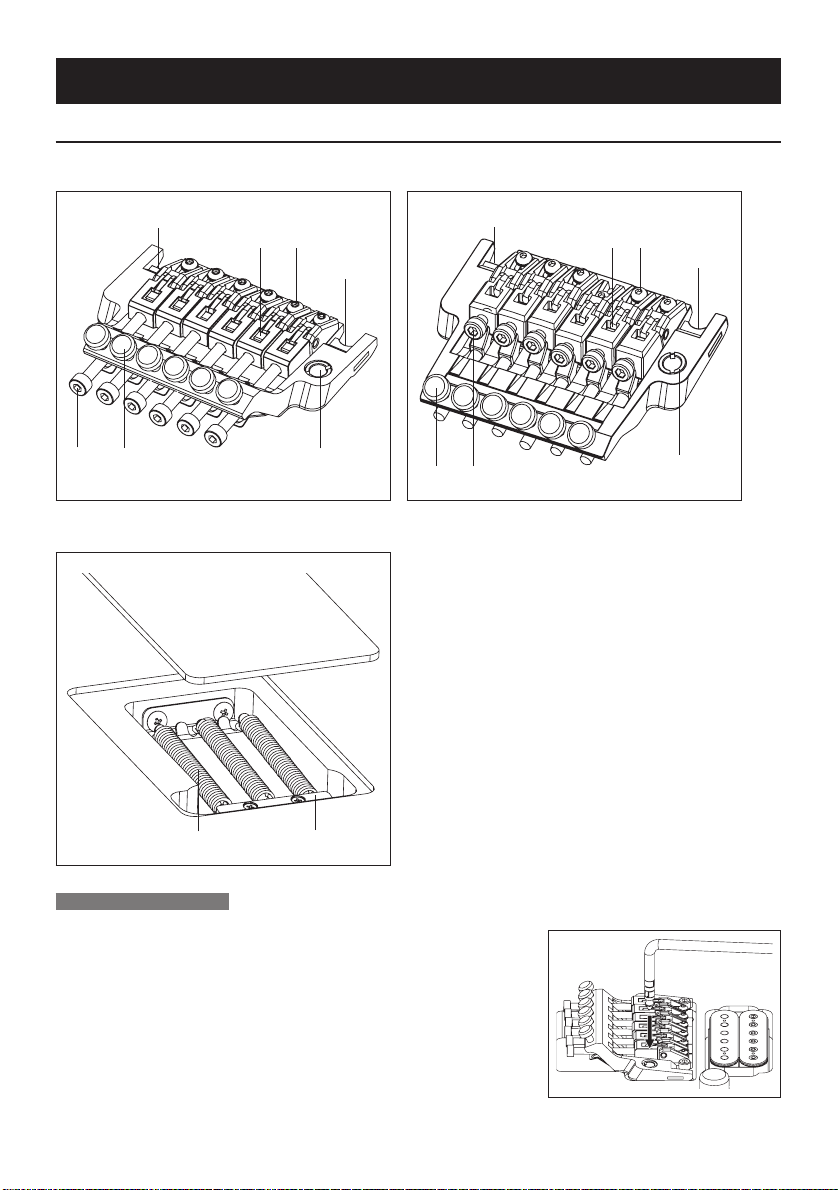
ロッキングトレモロ
EDGEトレモロブリッジ
Edge■ Lo-ProEdge■
1
3
2
1
6
5
4
1
3
2
1
56
4
背面■
1ナイフエッジ
2サドル・ロック・ボ ル ト
3ストリング・ホ ル ダ ー・ブロック
4アームソケット
5ストリング・ストッパー・ボ ル ト
6ファイン・チューニング・ボ ルト
7トレモロ・スプリング
8スプリング・ロック
7
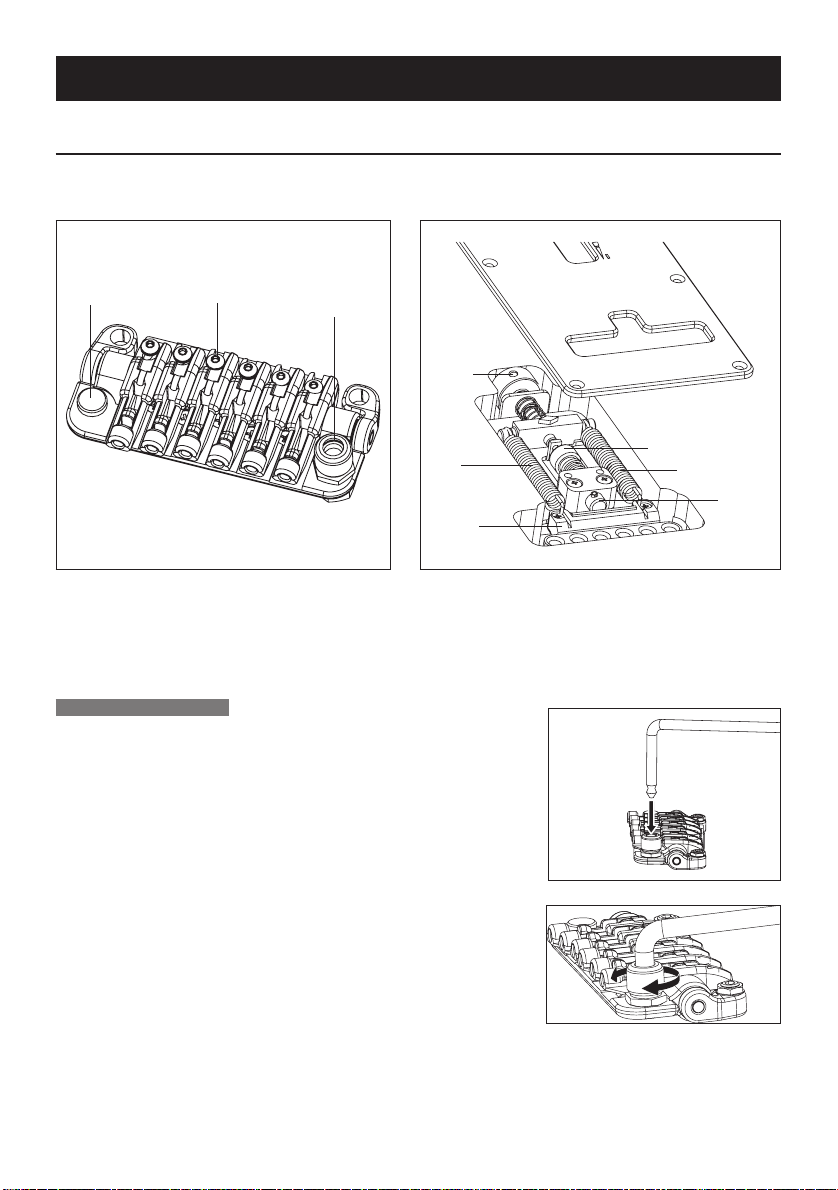
トレモロアームの取り付け
トレモロアームは挿し込み式です。ベースプレートのアームソケットに、トレ
1
モロアームのコー ナー部 分 を持って、テフロンワッシャが完全に隠れるまで
確実に挿し込
みます。
8
14
Page 47
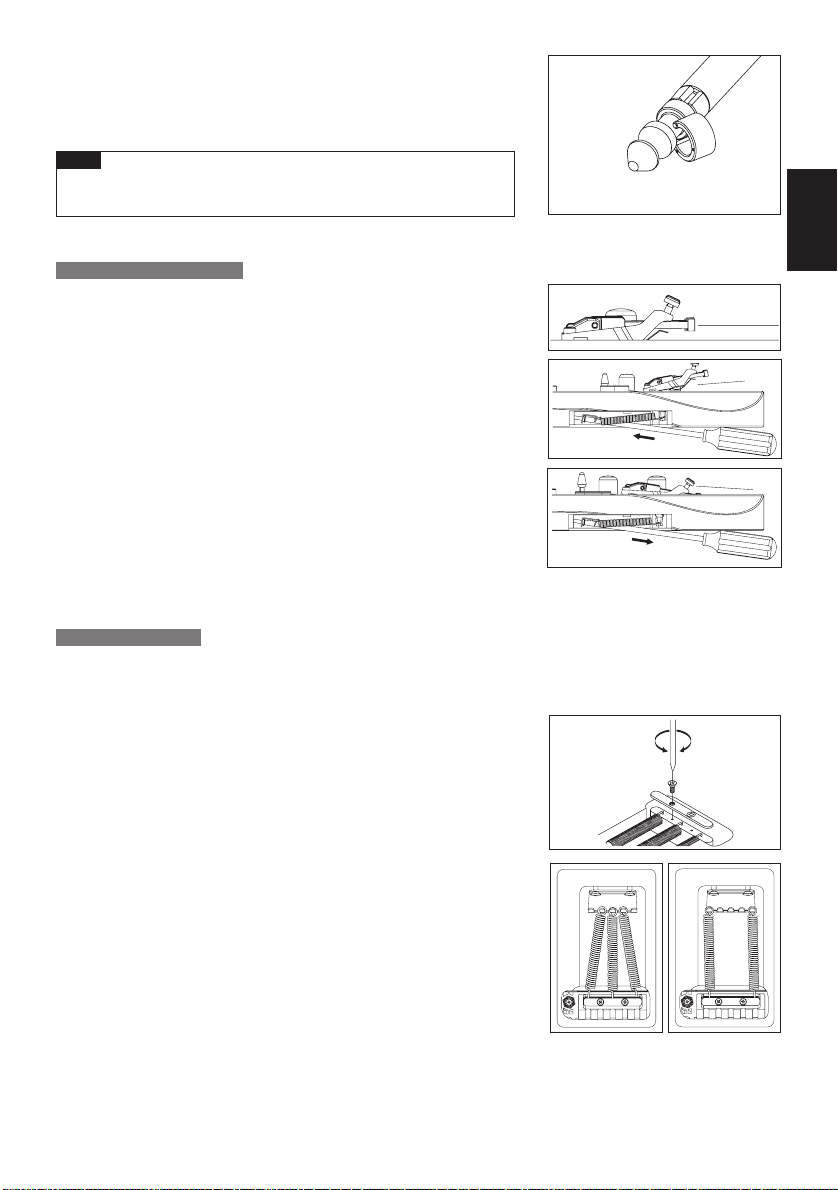
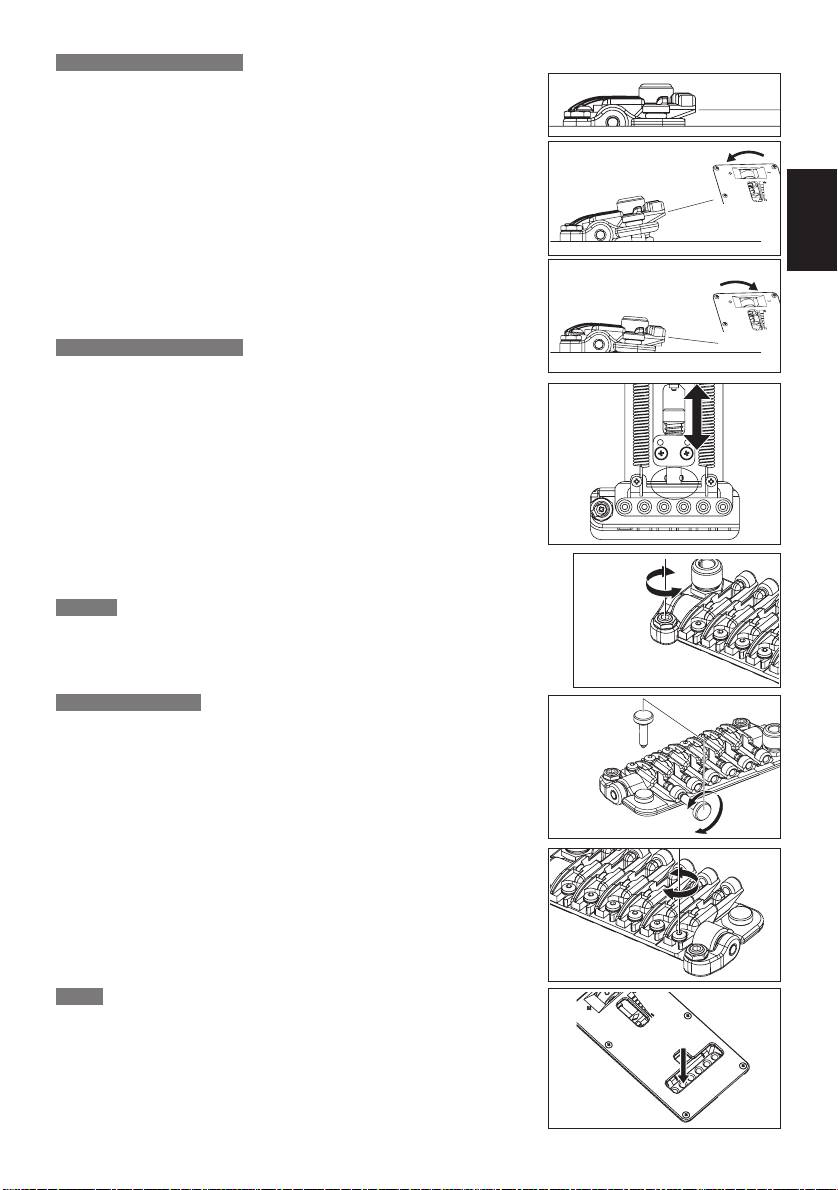
2トレモロアームの締め付けは、テフロンワッシャの着脱で調整します。
数が増えるほど締め付けが増し、全 て 外 すとフリーに なります。テフロン
ワッシャはスリット部分から斜めに着脱します。
ご注意
テフロンワッシャを装着していても十分な締め付けが得られなくな•
った場合は、新しいワッシャと交換してください。
トレモロの取り付け角度調整
トレモロの取り付け角度は、弦の張力とギターのボディー裏側に装着されたトレ
モロ・スプリングの張力とのバランスで調整します。トレモロがギターのボディー
表面とおおよそ平行になるように調整することで、最も優れた性能を発揮しま
す。
1
正しくチューニングした 状態で、トレモロの傾きを確認します。
2トレモロが前方へ傾いている場合は、ボディー 裏 側 のトレモロ・スプリン
グ・カバーのスリットからプラスドライバーを挿し込み、スクリューを締
め込 んでトレモロ・スプリングの張力を強くします。
3トレモロが後方へ傾いている場合は、スクリューを緩め、トレ モ ロ・スプ
リングの張力を弱めます。
トレモロの角度調整は、トレ モ ロ・スプリングの張力を調整するたびに弦とスプリングとの張力バランスが変化するた※
め、チューニングに影響を及ぼします。チューニングを繰り返しな がら調 整してください。
トレモロ・スプリング
工場出荷時は、3
たり、ダウンチューニングで使用するなど弦とトレモロ・スプリングとの張力バランスが大きく変化する場合には、トレモ ロ・
スプリングの数や取り付け方の変更が必要になる場合があります。
1
スプリングロックをプラスドライバーで取り外します。
本のトレ モ ロ・スプリングが並行に取り付けられた状態でセットアップされています。弦のゲージを変更し
日本語
2張力を強めたい場合は、外側の2本のトレモロ・スプリングを斜めに取
り付けます。
3張力を弱めたい場合は、中 央 のトレモロ・スプリングを 取り外しま す。
4本 以 上 のトレ モ ロ・スプリングを装着する場合は、スプリングロックを取り付け
ているスクリュー穴を利用して取り付けます(スプリングロックは装着できなくな
ります)。
15
Page 48
ご注意
トレモロ・スプリングの着脱は弦を十分に緩めてから行ってください。また、全てのスプリングを外すとトレモ•
ロがギターから外れますのでご注意下さい。
再度トレモロを取り付ける際は、トレモロのナイフエッジをスタッドボルトの溝に確実に挿し込んだ状態でト•
レモロ・スプリングを取り付けてください。
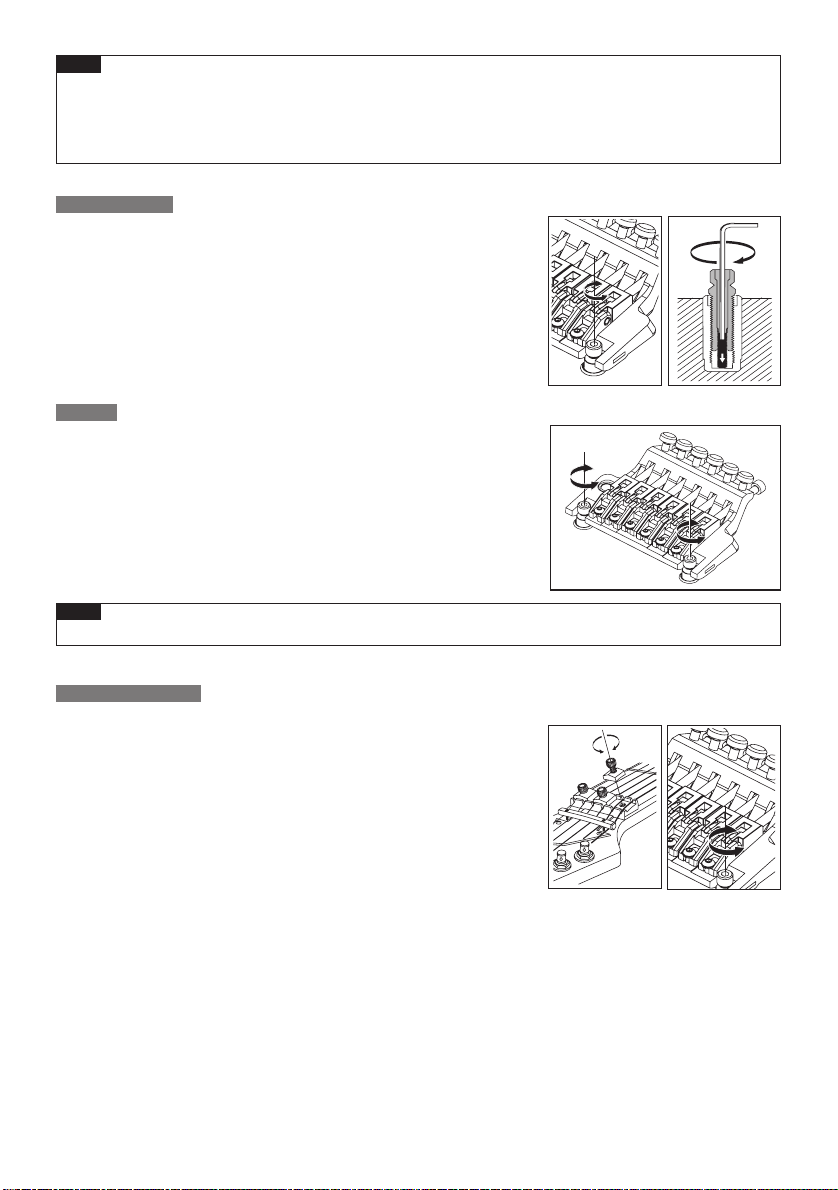
スタッド・ロック
Edge/Lo-ProEdgeトレモロ・ブリ
1
六角レンチ(1.5mm)をスタッドボルト上部の穴から挿入します。
2スタッド・ロック・ボルトを時計方向に回し、スタッド・ロック・ボ ルト が ア
ッジは、スタッド・ロック機能を備えています。
ンカーナットに接触して回らなくなるまで締め込みます。
スタッド・ロックは、スタッド・ロック・ボルトを緩めると解除されます。※
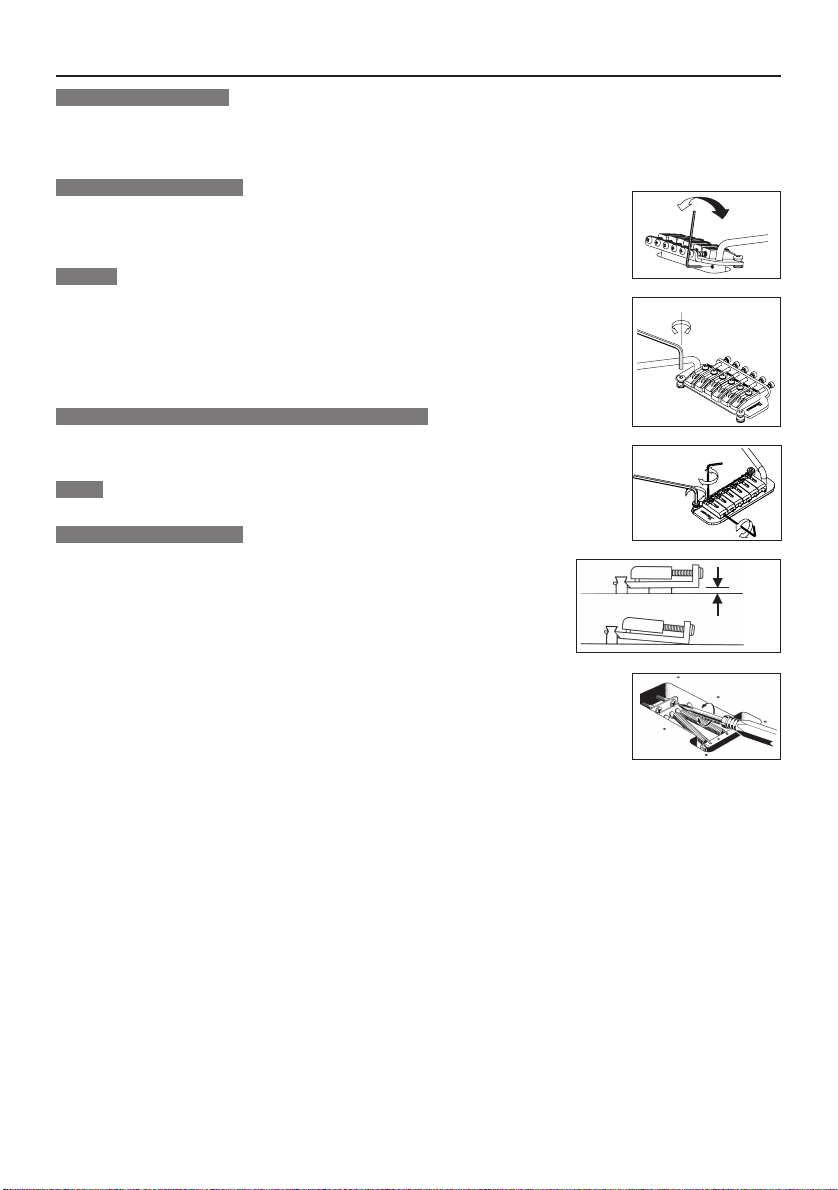
弦高調整
トレモロ本体左右のスタッドボルトを六角レンチ(
の高さを動かして弦高を調整します(各弦ごとの調整は行えません)。
ご注意
4mm)で回して、トレ モ ロ 全 体
弦高調整は、スタッド・ロックが解除されて いることを確 認してから行ってください。•
イントネーション調整
1
ロッキング・ナットのプレッシャー・パ ッド・ボ ルト を 六 角 レ ン チ(3mm)
で緩め、十分に弦を緩めます。
2サドル・ロック・ボ ルト を 六 角 レ ン チ(2mm)で緩め、サドル位置を調整
します。
イントネーションの確認は、サド ル・ロック・ボルトがしっかりと締まった状態※
で、正しいチュー ニング で行ってください。調整が終わりましたら、サドル・ロ
ック・ボルトとロッキング・ナットのプレッシャー・パ ッド・ボ ル ト を 締 め てくだ
さい。
16
Page 49
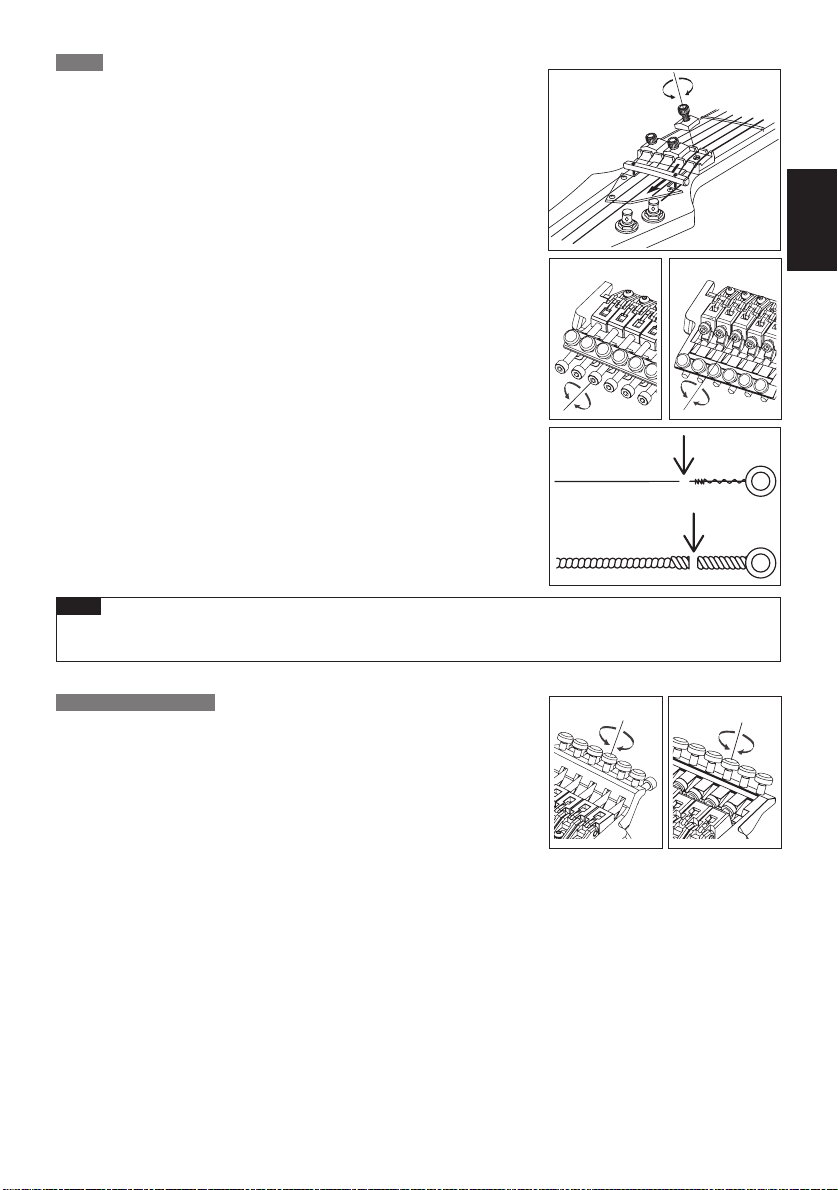
弦交換
1
ロッキング・ナットのプレッシャー・パ ッド・ボ ルト を 六 角 レ ン チ(3mm)
で緩め、糸巻 きから弦を取り外します。
2トレモロ本体のストリング・ストッパ ー・ボ ル ト を 六 角 レ ン チ(3mm)で緩
め、サドルから弦を引き抜いて取り外します。
3新しい弦は先端のボールエンド部分をニッパー等で切り落とします。
4ボールエンドを切り落とした側の弦の先端をサドルとストリング・ホ ル
ダー・ブロックとの間に挿入し、ストリング・ストッパ ー・ボ ルト を 締 め て
弦を固定します。
5糸巻きで弦を巻き上げ、チューニングを行います。
6チューニング完了後、ロッキング・ナットのプレッシャー・パ ッド・ボ ル ト
を締めます。
全ての弦を一度に取り外すとトレモロの取り付け角度が大きく変化するた※
め、弦交換は1本ずつ行うことをお勧めします。全ての弦を一度に取り外す場
合にはトレモロの取り付け角度が大きく変化しないよう、トレモロ下部にクロ
ス等を挟んで固定するとチューニングが比較的容易に行えます。
ご注意
チューニングを行う前に、ストリング・ストッパ ー・ボルトがしっかりと締め付けられていることを確認してくだ•
さい。
ファイン・チューニング
ロッキング・ナットで弦をロックした後でも、ファイン・チューナーによって
各弦のチューニングの微調整が行えます。
チューニングの前に、あらかじめ全てのファイン・チューニング・ボルトを可
動範囲の中央付近に調整しておくと、弦をロックした後の調整幅を広く持たせ
ることができます。
EDGE
EDGE
日本語
Lo-Pro EDGE
Lo-Pro EDGE
17
Page 50
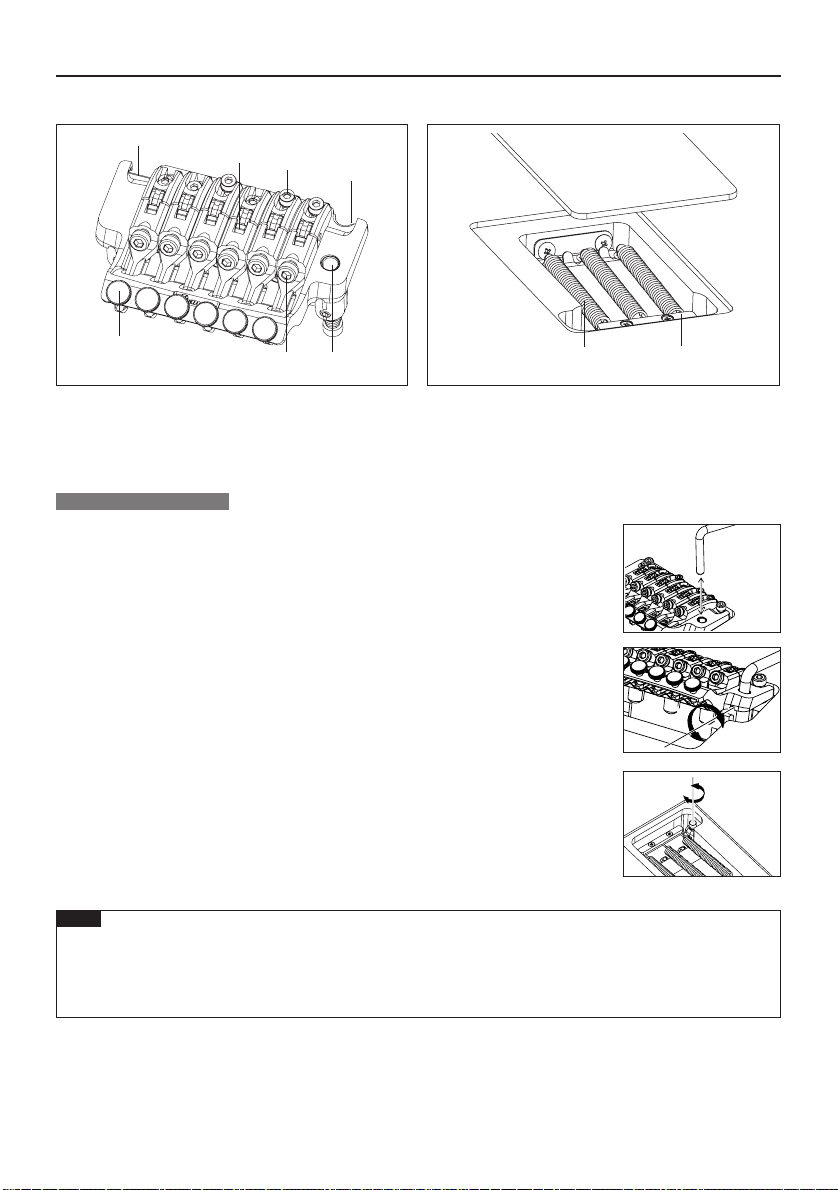
EDGEIIIトレモロ・ブリッジ
正面■ 背面■
1
3
2
1
6
1
ナイフエッジ
2
サドル・ロッ
3
ストリング・ホ ル ダ ー・ブロック
4
アームソケット
トレモロアームの取り付け
1トレモロアームは挿し込み式です。ベ
トレモロアームのコーナー部分を持って確実に挿し込みます。
ク・ボ ルト
54
ースプレートのアームソケットに、
5
ストリング・スト
6
ファイン・チュ
7
トレモロ・スプリング
8
スプリング・ロッ
ーニング・ボ ルト
7
ッパ ー・ボ ルト
ク
8
※EGEN8に搭載されているEDGEIIIHermanLiVer.のトレモロアームはねじ込み式
です。トレモロアームをアームソケットに挿入後、回転させて締め込みます。
2トレモロアームの締め付けは、トレモ ロ・ブロック側面の調整穴から、トルク調整スクリュ
ーを六角レンチ(2mm)で回して調整します。
トルク調整スクリューを時計回りに締めこむとトレモロアームの締め付けが増し、
緩めると締め付けも緩くなります。
3トレモロアームの高さは、ギター裏側のトレモロ・スプリング・カ バ ーを取り外し、トレ モ
ロ・ブロック底面にある高さ調整スクリューを六角レンチ(3mm)で回して調整します。時
計回りに締め込むほど取り付け高さは高くなります。
ご注意
トレモロアームのトルク調整スクリューは、上記以外にトレモロ・ブロック下部にも設けられています。•
トレモロ・ブロック下部のトルク調整スクリューは出荷時に調 整されていますが、調整が必要になった場合は
トレモロ本体をギターから取り外した状態で 行ってください。
トレモロアームを取り付ける前に、トルク調 整スクリューに緩 み や脱落がない 事を確 認してください。•
18
Page 51
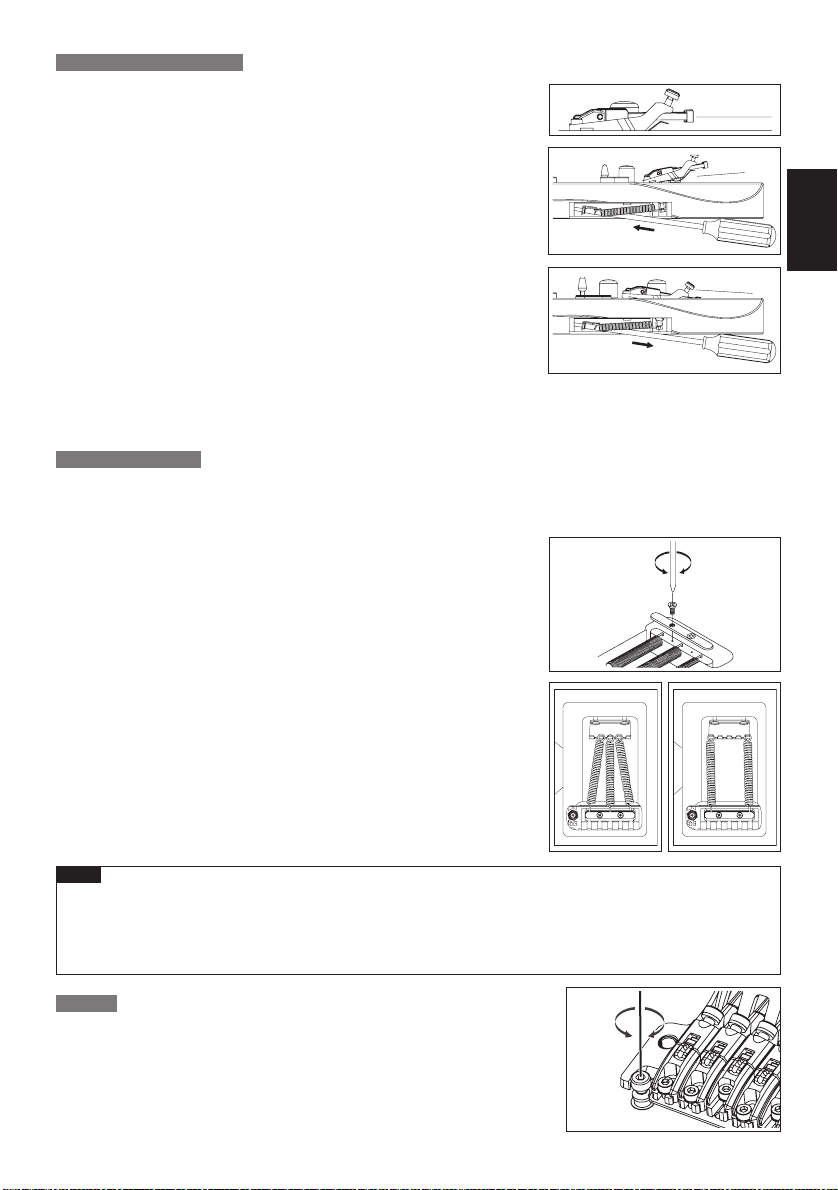
トレモロの取り付け角度調整
トレモロの取り付け角度は、弦の張力とギターのボディー裏側に装着され
たトレモロ・スプリングの張力とのバランスで調整します。トレモロ が ギ タ
ーのボディー表面とおおよそ平行になるように調整することで、最も優れ
た性能を発揮します。
1正しくチューニングした 状態で 、トレモロの傾きを確認します。
2トレモロが前方へ傾いている場合は、ボ
カバーのスリットからプラスドライバーを挿し込み、スクリューを締め込んで
トレモロ・スプリングの張力を強くします。
3トレモロが後方へ傾いている場合はスクリューを緩め、トレ モ ロ・スプリング
の張力を弱めます。
トレモロの角度調整は、トレ モ ロ・スプリングの張力を調整するたびに弦とスプリングとの張力バランスが変化するた※
め、チューニングに影響を及ぼします。チューニングを繰り返しな がら調 整してください。
トレモロ・スプリング
ディー裏 側 のトレ モ ロ・スプリング・
工場出荷時は、3 本 のトレ モ ロ・スプリングが並行に取り付けられた状態でセットアップされています。
弦のゲージを変更したり、ダウンチューニングで使用するなど弦とトレモロ・スプリングとの張力バランスが大きく
変化する場合には、トレ モロ・スプリングの数や取り付け方の変更が必要になる場合があります。
1スプリングロックをプラスドライバーで 取り外します。
2張力を強めたい場合は、外側の2本の
けます。
3張力を弱めたい場合は、中 央のトレ モ ロ・スプリングを取り外します。
トレモロ・スプリングを斜めに取り付
日本語
4本 以 上 のトレモロ・スプリングを装着する場合は、スプリングロックを取り
付けているスクリュー穴を利用して取り付けます(スプリングロックは装着
できなくなります)。
ご注意
トレモロ・スプリングの着脱は弦を十分に緩めてから行ってください。また、全てのスプリングを外すとトレ モロ•
がギターから外れますのでご注意下さい。
再度トレモロを取り付ける際は、トレモロのナイフエッジをスタッドボルトの溝に確実に挿し込んだ 状態でトレ•
モロ・スプリングを 取り付 けてください。
弦高調整
トレモロ本体左右のスタッドボルトを六角レンチ(3mm)で回して、トレ モ ロ
全体の高さを動かして弦高を調整します(各弦ごとの調整は行えません)。
19
Page 52
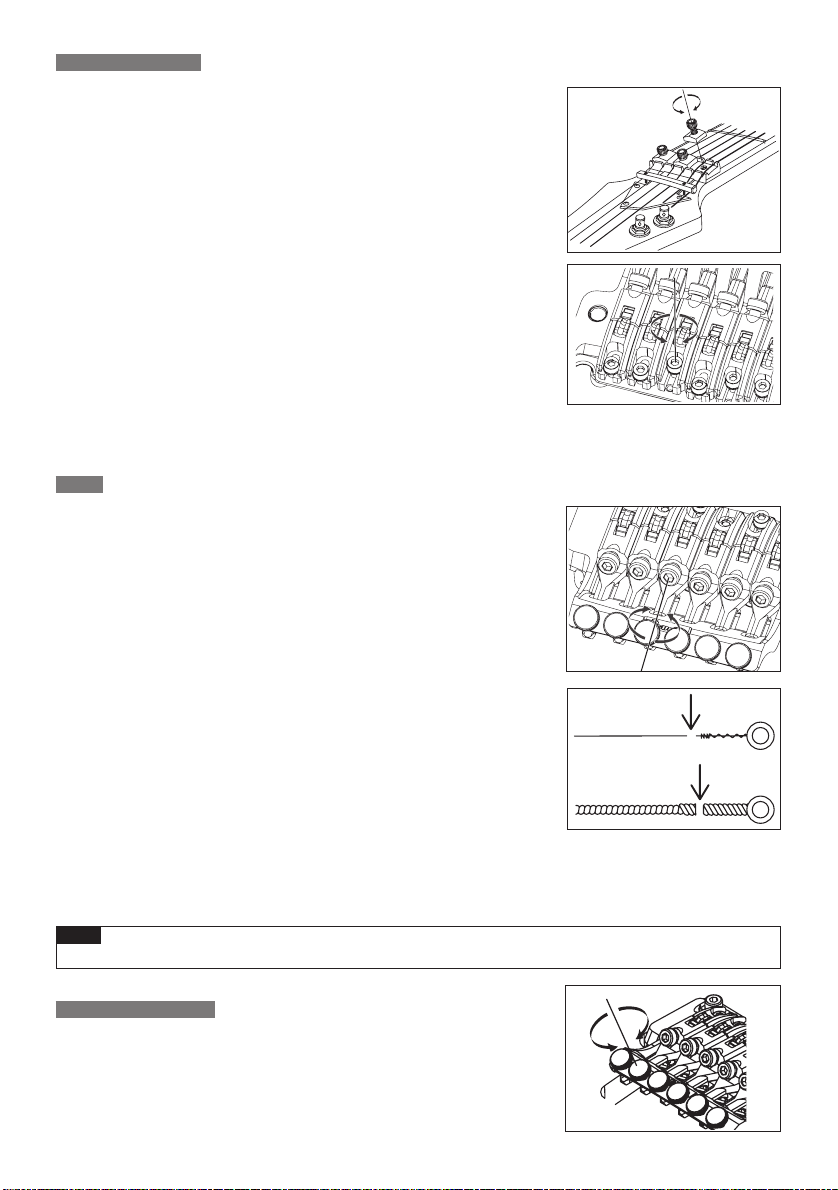
イントネーション調整
1ロッキング・ナ
十分に弦を緩めます。
ットのプレッシャー・パ ッド・ボ ルト を 六 角 レ ン チ(3mm)で緩め、
2サドル・ロッ
イントネーションの確認は、サド ル・ロック・ボルトがしっかりと締まった状態で、正しいチューニングで 行ってください 。※
調整が終わりましたら、サドル・ロック・ボ ルトとロッキング・ナットのプレッシャー・パ ッド・ボ ルト を 締 め て くだ さ い 。
弦交換
1ロッキング・ナ
糸巻き から弦を取り外します。
2トレモロ本体のストリング・スト
ルから弦を引き抜いて取り外します。
3新しい弦は先端のボールエ
4ボールエンドを切り落と
ックとの間に挿入し、ストリング・ストッパ ー・ボルトを締めて弦を固定します。
5糸巻きで弦を巻き上げ、チ
6チューニング完了後、ロッキ
ます。
ク・ボ ルト を 六 角 レ ン チ(2mm)で緩め、サドル位置を調整します。
ットのプレッシャー・パ ッド・ボ ルト を 六 角 レ ン チ(3mm)で緩め、
ッパ ー・ボ ルト を 六 角 レ ン チ(3mm)で緩め、サド
ンド部分をニッパー等で切り落とします。
した側の弦の先端をサドルとストリング・ホ ル ダ ー・ブロ
ューニングを行います。
ング・ナットのプレッシャー・パ ッド・ボ ルト を 締 め
全ての弦を一度に取り外すとトレモロの取り付け角度が大きく変化するため、弦交換は1本ずつ行うことをお勧めしま※
す。全ての弦を一度に取り外す場合にはトレモロの取り付け角度が大きく変化しないよう、トレモロ下部にクロス等を挟
んで固定するとチューニングが比較的容易に行えます。
ご注意
チューニングを行う前に、ストリング・ストッパ ー・ボルトがしっかりと締め付けられていることを確認してください。•
ファイン・チューニング
ロッキング・ナットで弦 をロックした後でも、ファイン・チューナーによって各
弦のチューニングの微調整が行えます。
チューニングの前に、あらかじめ全てのファイン・チュー ニング・ボ ル ト を 可 動
範囲の中央付近に調整しておくと、弦をロックした後の調整幅を広く持たせる
ことがで き ま す。
20
Page 53
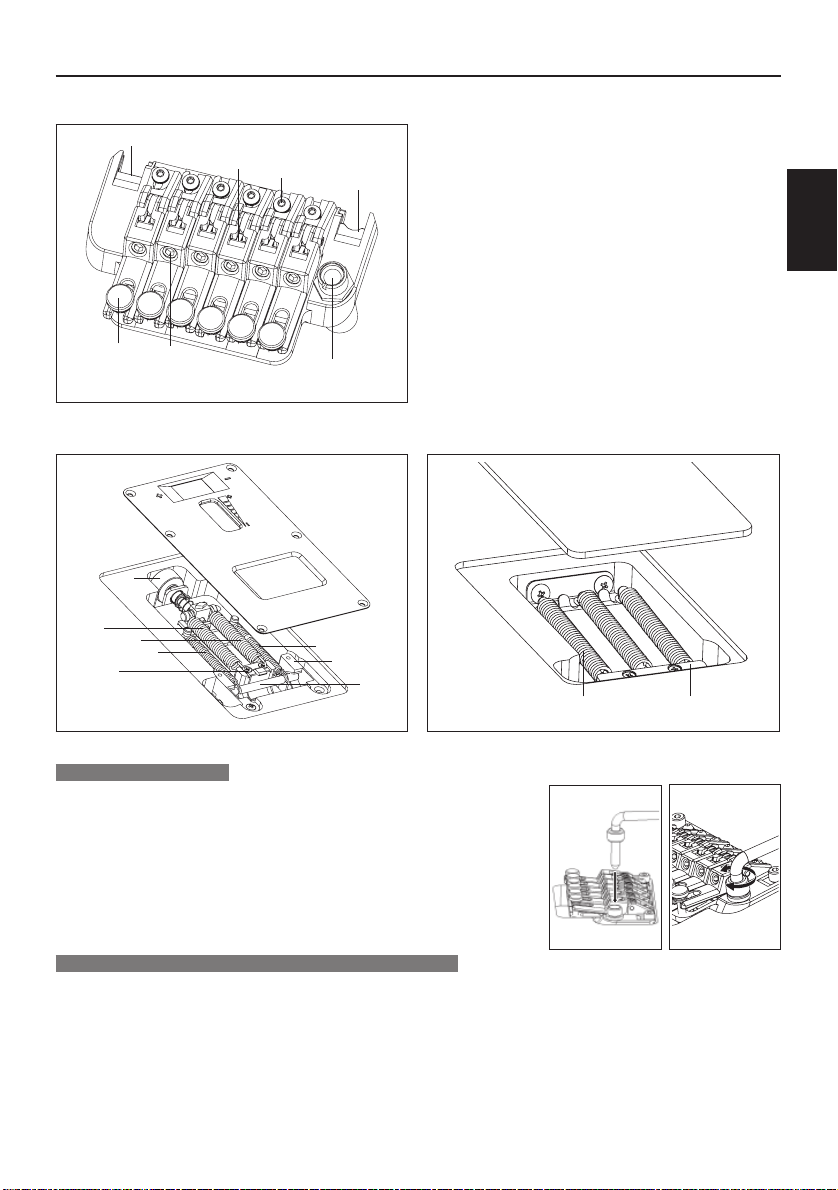
EDGE-ZERO2トレモロ・ブリッジ
正面■
1
6
5
3
2
1
4
背面■ 1 背面■ 2
B
7
7
8
A
8
9
:
1 ナイフエッジ
2 サドル・ロック・ボルト
3 ストリング・ホルダー・ブロック
4 アームソケット
5 ストリング・ストッパー・ボルト
6 ファイン・チューニング・ボルト
7 メイン・スプリング
8 サブ・スプリング
9 ストッパー
: ストップ・ロッド
A トレモロ・ブロック
B スプリング調整ノブ
C トレモロ・スプリング
D スプリング・ロック
日本語
C
D
トレモロアームの取り付け
1トレモロアームはトルク調整キャップ一体型の挿し込み式です。ベースプレ
ートの ア ー ムソケットに
トレモロアームを差し込みます。
2トルク調整キャップを締め 、トレモロアームを固定します。トルク調整キャップ
を締め込むほど、トレモロアームの締め付けが増します。
トレモロの取り付け角度調整/ゼロ・ポイント・システムの調整
・ゼロ・ポイント・システム非搭載モデル
トレモロの取り付け角度は、弦の張力とギターのボディー裏側に装着されたトレモロ・スプリングの張力とのバラ
ンスで調整します。
トレモロがギターのボディー表面とおおよそ平行になるように調整する事で、最も優れた性能を発揮します。
21
Page 54
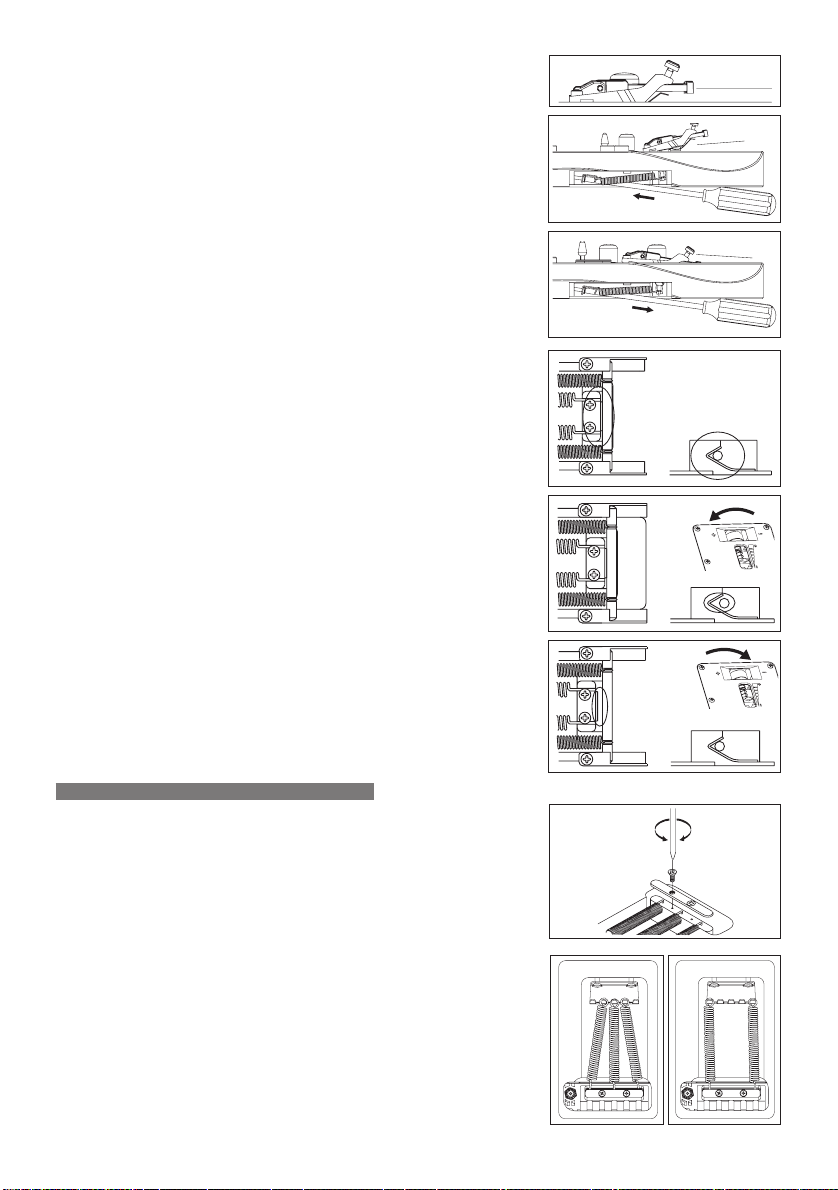
1正しくチューニングした 状態で 、トレモロの傾きを確認します。
2トレモロが前方へ傾いている場合は、ボ
ーのスリットからプラスドライバーを挿し込み、スクリューを締め込んでトレモ
ロ・スプリングの張力を強くします。
3トレモロが後方へ傾いている場合はスクリューを緩め、トレ
張力を弱めます。
トレモロの角度調整は、トレ モ ロ・スプリングの張力を調整するたびに弦とス※
プリングとの張力バランスが変化するため、チューニングに影響を及ぼしま
す。チューニ ングを繰り返しな がら 調整してください 。
・ゼロ・ポイント・システム搭載モデル
ディー裏 側 のトレ モ ロ・スプリング・カバ
モロ・スプリングの
トレモロの取り付け角度は、弦の張力とギターのボディー裏側に装着され
たゼロ・ポ イ ント・システムとのバランスで調整します。Edge-Zero2トレモ
ロ・ブリッジは、ゼロ・ポ イ ント・システムを正しく調整するとトレモロがギタ
ーのボディー表面とおおよそ平行になるように設計されており、その状態
で最も優れた性能を発揮します。
ゼロ・ポ イント・システムが正しく調整された状態とは、ストップ・ロッドが
トレモロ・ブ ロ ックと密 着し、且つストップ・ロッドがストッパーに接した状
態を指します。
1正しくチューニングした 状態で 、ゼロ・ポ イ ント・システムを 確 認しま す。
2ストップ・ロ
ロッドを 押し上 げ ている)場合は、ボディー裏側のスプリング調整ノブをプラ
ス方 向 に 回してメイン・スプリングの張力を強くします。
ッドがストッパーに接していない(トレ モロ・ブロックがストップ・
3トレモロ・ブロ
いている)場合は、スプリング調整ノブをマイナス方向に回してメイン・スプリ
ングの張力を弱めます。
トレモロ・スプリング/ゼロ・ポイント・システム
・ゼロ・ポイント・システム非搭載モデル
ックがストップ・ロッドと密着していない(トレモロが後方に傾
工場出荷時は、3 本 のトレ モ ロ・スプリングが並行に取り付けられた状態で
セットアップされています。
弦のゲージを変更したり、ダウンチューニングで使用するなど弦とトレモ
ロ・スプリングとの張力バランスが大きく変化する場合には、トレモロ・スプ
リングの数や取り付け方の変更が必要になる場合があります。
1スプリングロックをプラスドライバーで 取り外します。
2張力を強めたい場合は、外側の2本の
けます。
3張力を弱めたい場合は、中
央のトレ モ ロ・スプリングを取り外します。
トレモロ・スプリングを斜めに取り付
4本 以 上 のトレモロ・スプリングを装着する場合は、スプリングロックを取り
付けているスクリュー穴を利用して取り付けます(スプリングロックは装着
できなくなります)。
22
Page 55
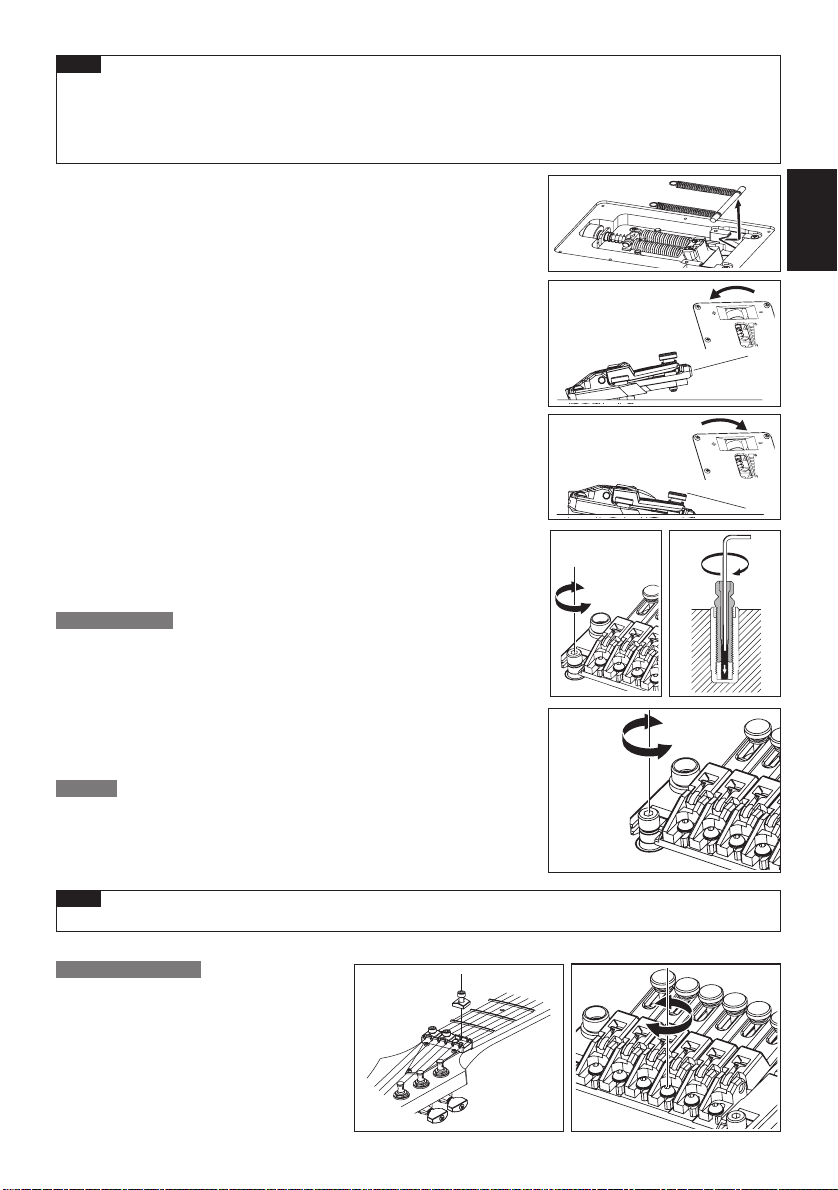
ご注意
トレモロ・スプリングの着脱は弦を十分に緩めてから行ってください。•
また、全てのスプリングを外すとトレモロがギターから外れますのでご注意 下さい。
再度トレモロを取り付ける際は、トレモロのナイフエッジをスタッドボルトの溝に確実に挿し込んだ 状態でトレ•
モロ・スプリングを 取り付 けてください。
・ゼロ・ポイント・システム搭載モデル
ゼロ・ポ イント・システムを解除することで通常のフローティング・ブリッジ
としても使用できます。
ゼロ・ポ イント・システムを 解 除したトレモロの取り付け角度は、弦の張力
とトレ モ ロ・ブロックに装着されたメイン・スプリングの張力とのバランス
で調整します。
トレモロがギターのボディー表面とおおよそ平行になるように調整する事
で、最も優れた性能を発揮します。
1アーム・アップした状態(トレ モロ・ブロックがストップ・ロッドから離れた状態)
で、ストップ・ロッドとサブ・スプリングを 取り外します。
2正しくチューニングした 状態で 、ト
レモロの傾きを確認します。
日本語
3トレモロが前方へ傾いている場合は、ス
てメイン・スプリングの張力を強くします。
4トレモロが後方へ傾いている場合はスプリング調整ノブをマイナス方向に回
してメイン・スプリングの張力を弱めます。
ゼロ・ポイント・システムを解除したトレモロの角度調整は、トレ モ ロ・スプリン※
グの張力を調整するたびに弦とスプリングとの張力バランスが変化するため、
チューニングに影響を及ぼします。チューニングを繰り返しな がら調整してく
ださい。
スタッド・ロック
プリング調整ノブをプラス方向に回し
Edge-Zero2トレモロ・ブリッジは 、スタッド・ロック機能を備えています。
1六角レンチ(2mm)をスタッドボルト上部の穴から挿入します。
2スタッド・ロック・ボルトを時計方向に回し、スタッド・ロック・ボ ルト が ア ン
カーナットに接触して回らなくなるまで締め込みます。
スタッド・ロックは、スタッド・ロック・ボルトを緩めると解除されます。※
弦高調整
トレモロ本体左右のスタッドボルトを六角レンチ(3mm)で回して、トレ モ
ロ全体の高さを動かして弦高を調整します(各弦ごとの調整は行えませ
ん)。
ご注意
弦高調整は、スタッド・ロックが解除されていることを確認してから行ってください。•
イントネーション調整
1ロッキング・ナ
ルトを 六 角 レンチ(3mm)で緩め、十分に弦
を緩めます。
ットのプレッシャー・パ ッド・ボ
2サドル・ロック・ボ ルト を 六 角 レ ン チ(2mm)
で緩め、サドル位置を調整します。
23
Page 56
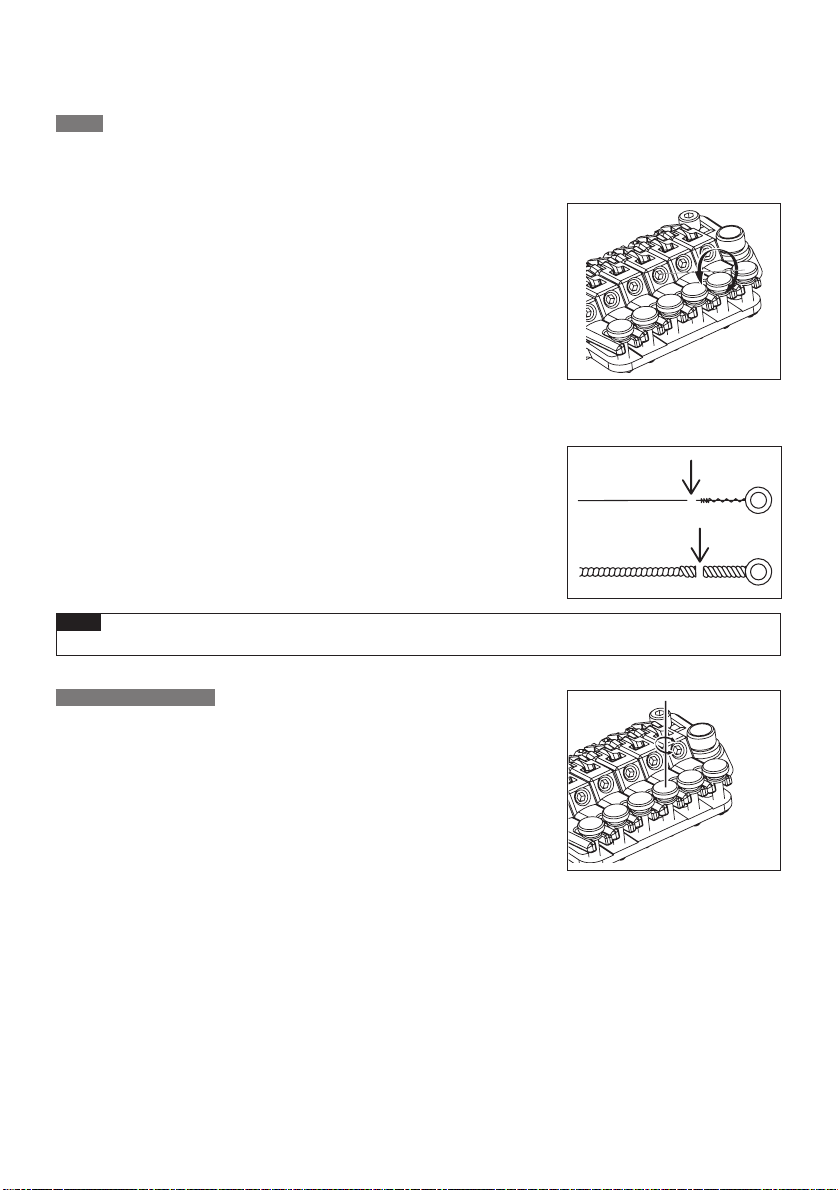
イントネーションの確認は、サド ル・ロック・ボルトがしっかりと締まった状態で、正しいチューニングで 行ってください 。※
調整が終わりましたら、サドル・ロック・ボ ルトとロッキング・ナットのプレッシャー・パ ッド・ボ ルト を 締 め て くだ さ い 。
弦交換
1ロッキング・ナ
ットのプレッシャー・パ ッド・ボ ルト を 六 角 レ ン チ(3mm)で緩め、糸 巻きから弦 を取り外します。
2トレモロ本体のストリング・スト
ルから弦を引き抜いて取り外します。
3新しい弦は先端のボールエ
4ボールエンドを切り落と
ックとの間に挿入し、ストリング・ストッパ ー・ボルトを締めて弦を固定します。
5糸巻きで弦を巻き上げ、チューニングを行います。
6チューニング完了後、ロッキ
ゼロ・ポ イント・システム非搭載のトレモロ・ブリッジは、全ての弦を一度に取り※
外すとトレモロの取り付け角度が大きく変化するため、弦交換は1本ずつ行うこ
とをお勧めします。全ての弦を一度に取り外す場合にはトレモロの取り付け角
度が大きく変化しないよう、トレモロ下部にクロス等を挟んで固定するとチュー
ニングが比較的容易に行えます。
ご注意
ッパ ー・ボ ルト を 六 角 レ ン チ(3mm)で緩め、サド
ンド部分をニッパー等で切り落とします。
した側の弦の先端をサドルとストリング・ホ ル ダ ー・ブロ
ング・ナットのプレッシャー・パ ッド・ボルトを締めます。
チューニングを行う前に、ストリング・ストッパ ー・ボルトがしっかりと締め付けられていることを確認してください。•
ファイン・チューニング
ロッキング・ナットで弦 をロックした後でも、ファイン・チューナーによって各弦
のチューニングの微調整が行えます。
チューニングの前に、あらかじめ全てのファイン・チュー ニング・ボ ル ト を 可 動
範囲の中央付近に調整しておくと、弦をロックした後の調整幅を広く持たせる
ことがで き ま す。
24
Page 57
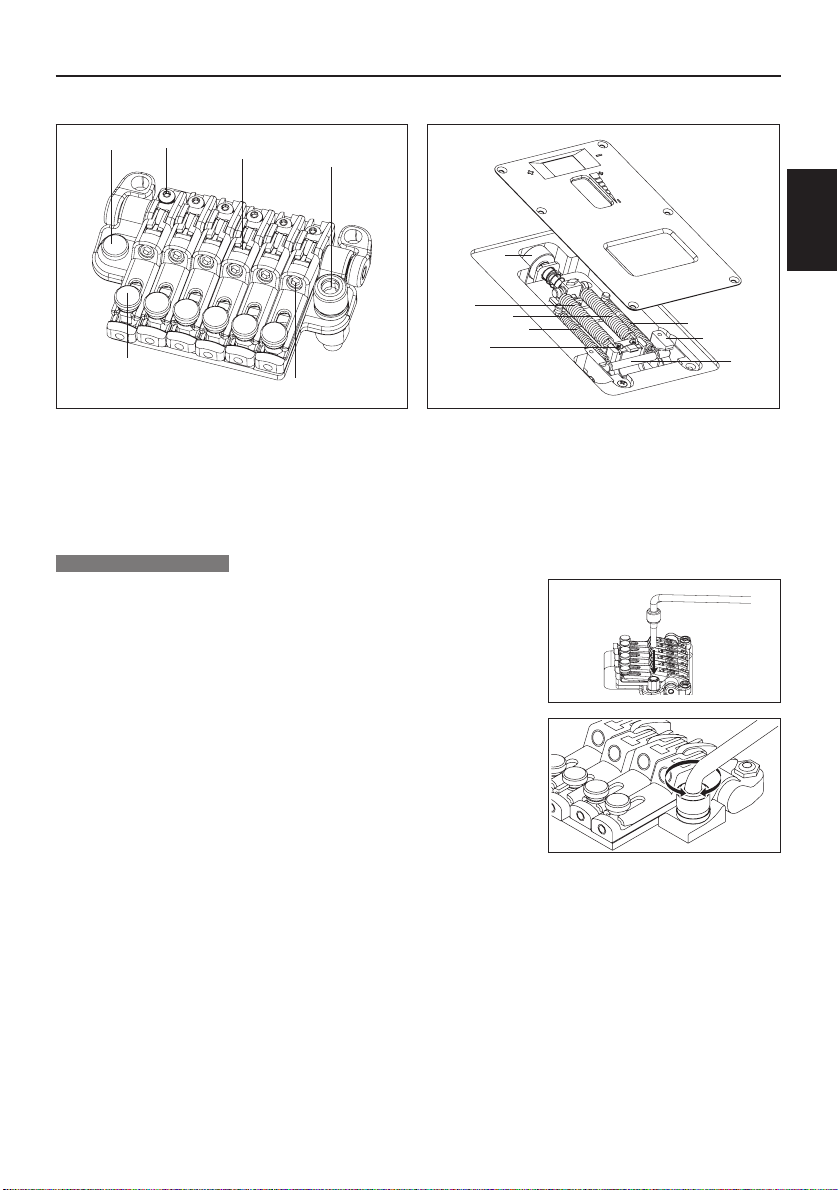
ZRトレモロ・ブリッジ
正面■ 背面■
1
6
5
2
3
4
日本語
B
7
7
8
A
8
9
:
1 サドル・ロック・ボルト
2 ストリング・ホルダー・ブロック
3 アームソケット
4 ストリング・ストッパー・ボルト
5 ファイン・チューニング・ボルト
6イントネーション調整ボルト
7 メイン・スプリング
8 サブ・スプリング
9 ストッパー
: ストップ・ロッド
A トレモロ・ブロック
B スプリング調整ノブ
トレモロアームの取り付け
1トレモロアームはトルク調整キャップ一体型の挿し込み式です。ベ
トのアームソケットにトレ モロアームを差し込みます。
2トルク調整キャップを締め 、ト
レモロアームを固定します。トルク調 整キャップ
を締め込むほど、トレモロアームの締め付けが増します。
ースプレー
25
Page 58
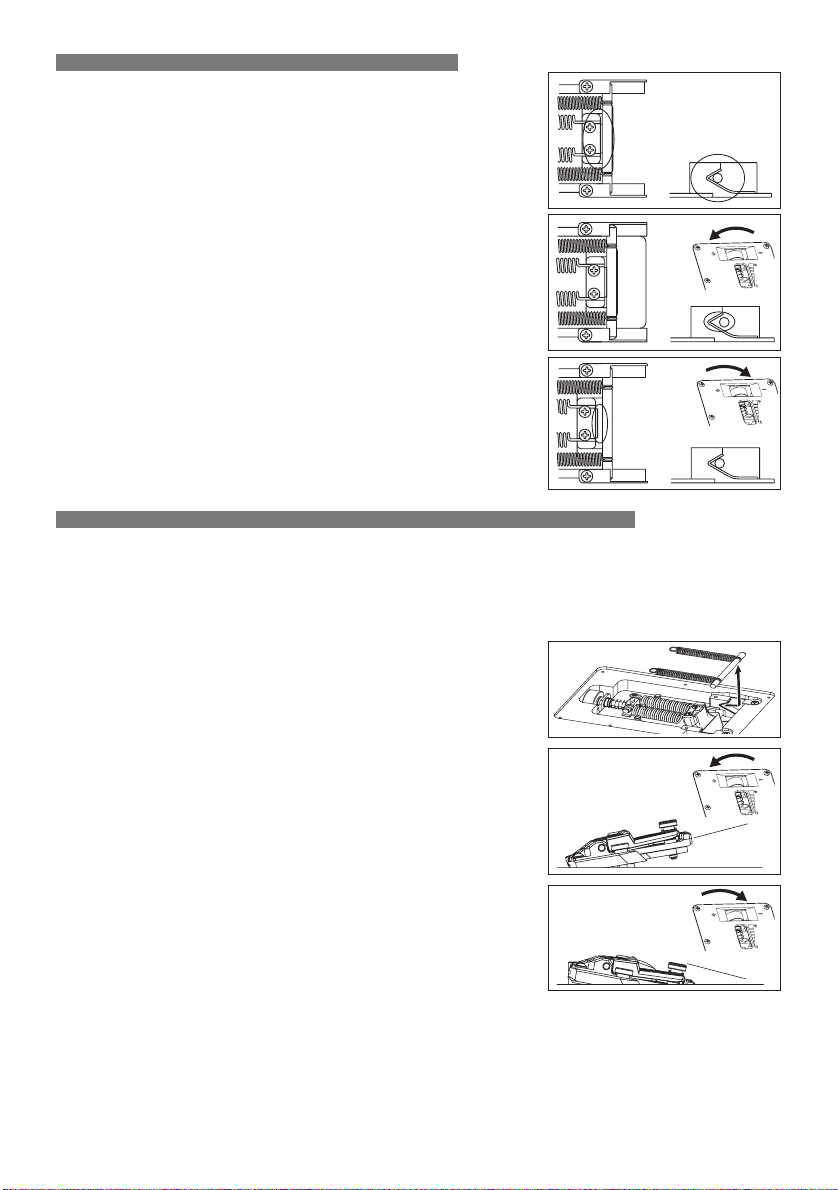
トレモロの取り付け角度調整/ゼロ・ポイント・システムの調整
トレモロの取り付け角度は、弦の張力とギターのボディー裏側に装着され
たゼロ・ポ イ ント・システムとのバランスで調整します。
ZRトレ モ ロ・ブリッジは、ゼロ・ポ イ ント・システムを正しく調整するとトレモ
ロがギターのボディー表面とおおよそ平行になるように設計されており、
その状態で最も優れた性能を発揮します。ゼロ・ポ イ ント・システムが正し
く調整された状態とは、ストップ・ロッドがトレモロ・ブ ロックと密 着し、且つ
ストップ・ロッドがストッパーに接した状態を指します。
1正しくチューニングした状態で、ゼロ・ポイント・システムを確認しま
す。
2ストップ・ロッドがストッパーに接していない(トレモロ・ブロックが
ストップ・ロッドを押し上げている)場合は、ボディー裏側のスプリン
グ調整ノブをプラス方向に回してメイン・スプリングの張力を強くしま
す。
3トレモロ・ブロックがストップ・ロッドと密着していない(トレモロが
後方に傾いている)場合は、スプリ
メイン・スプリングの張力を弱めます。
ゼロ・ポイント・システムの解除(通常のフローティング・トレモロとして使用する場合)
ング調整ノブをマイナス方向に回して
ゼロ・ポ イント・システムを解除することで通常のフローティング・ブリッジとしても使用できます。
ゼロ・ポ イント・システムを 解 除したトレモロの取り付け角度は、弦の張力とトレモロ・ブロックに装着されたメイ
ン・スプリングの張力とのバランスで調整します。
トレモロがギターのボディー表面とおおよそ平行になるように調整する事で、最も優れた性能を発揮します。
1アーム・アップした状態(トレ モロ・ブロックがストップ・ロッドから離れた状
態)で、ストップ・ロッドとサブ・スプリングを 取り外しま す。
2正しくチューニングした状態で、トレモロの傾きを確認します。
3トレモロが前方へ傾いている場合は、スプリング調整ノブをプラス方向
に回してメイン・スプリングの張力を強くします。
4トレモロが後方へ傾いている場合は、スプリング調整ノブをマイナス方
してメイン・スプリングの張力を弱めます。
向に回
ゼロ・ポ イント・システムを解除したトレモロの角度調整は、トレ モ ロ・スプリングの張力を調整するたびに弦とスプリン※
グとの張力バランスが変化するため、チューニングに影響を及ぼします。チューニング を 繰り返しながら調 整してくださ
い。
26
Page 59
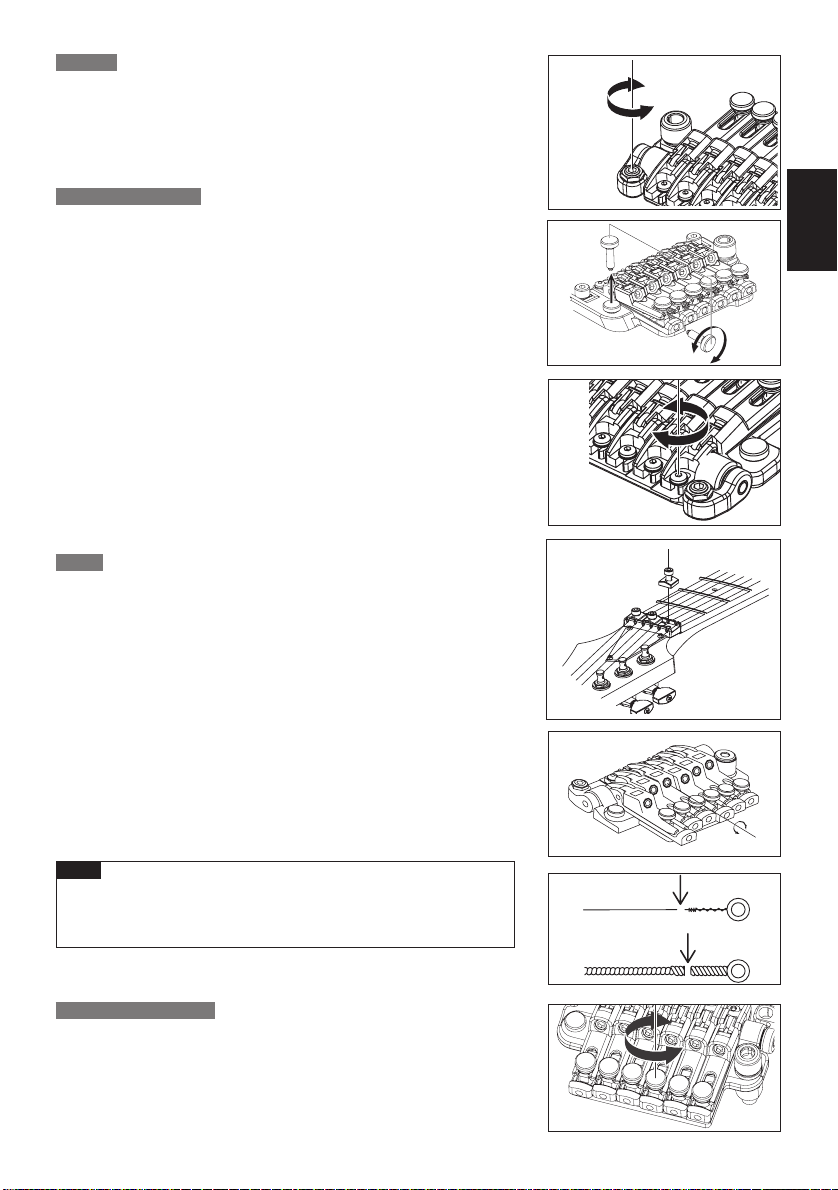
弦高調整
トレモロ本体左右のスタッドボルトを六角レンチ(3mm)で回して、トレ モ
ロ全体の高さを動かして弦高を調整します(各弦ごとの調整は行えませ
ん)。
イントネーション調整
1トレモロ本体に収納されているイントネーション調整ボルトを取り外し、
サ
ドル後部の調整穴にボルトの先端がトレモロ本体の壁に接触するまで締
め込みます。
2サドル・ロッ
ルトを回してサドル位置を調整します。
イントネーションの確認は、サド ル・ロック・ボルトがしっかりと締まった状態※
で、正しいチュー ニング で行ってください。チューニングは、ロッキング・ナット
のプレッシャー・パ ッド・ボ ル ト を 六 角 レ ン チ(3mm)で緩めてから行ってくだ
さい。調整が終わりましたら、サドル・ロック・ボルトとロッキング・ナットのプ
レッシャー・パ ッド・ボ ルト を 締 め 、イントネーション調整ボルトをトレモロ本
体に収めてください。
弦交換
1ロッキング・ナ
め、糸 巻きから弦を取り外します。
2トレモロ本体のストリング・スト
サドルから弦を引き抜いて取り外します。
3新しい弦は先端のボールエンド部分をニッパー等で切り落とします。
4
ボールエンドを切り落とした側の弦の先端をサドルとストリング・ホ ル ダ ー・
ブロックとの間に挿入し、ストリング・ストッパ ー・ボルトを締めて弦を固定しま
す。
5糸巻きで弦を巻き上げ、チューニングを行います。
6チューニング完了後、ロッキ
めます。
ご注意
ク・ボ ルト を 六 角 レ ン チ(2mm)で緩め、イントネーション調整ボ
ットのプレッシャー・パ ッド・ボ ルト を 六 角 レ ン チ(3mm)で緩
ッパ ー・ボ ルト を 六 角 レ ン チ(3mm)で緩め、
ング・ナットのプレッシャー・パ ッド・ボ ルト を 締
チューニングを行う前に、ストリング・ストッパ ー・ボルトがしっかりと•
締め付けられていることを確認してください。
日本語
ファイン・チューニング
ロッキング・ナットで弦 をロックした後でも、ファイン・チューナーによって
各弦のチューニングの微調整が行えます。
チューニングの前に、あらかじめ全てのファイン・チュー ニング・ボ ル ト を 可
動範囲の中央付近に調整しておくと、弦をロックした後の調整幅を広く持
たせることができます。
27
Page 60
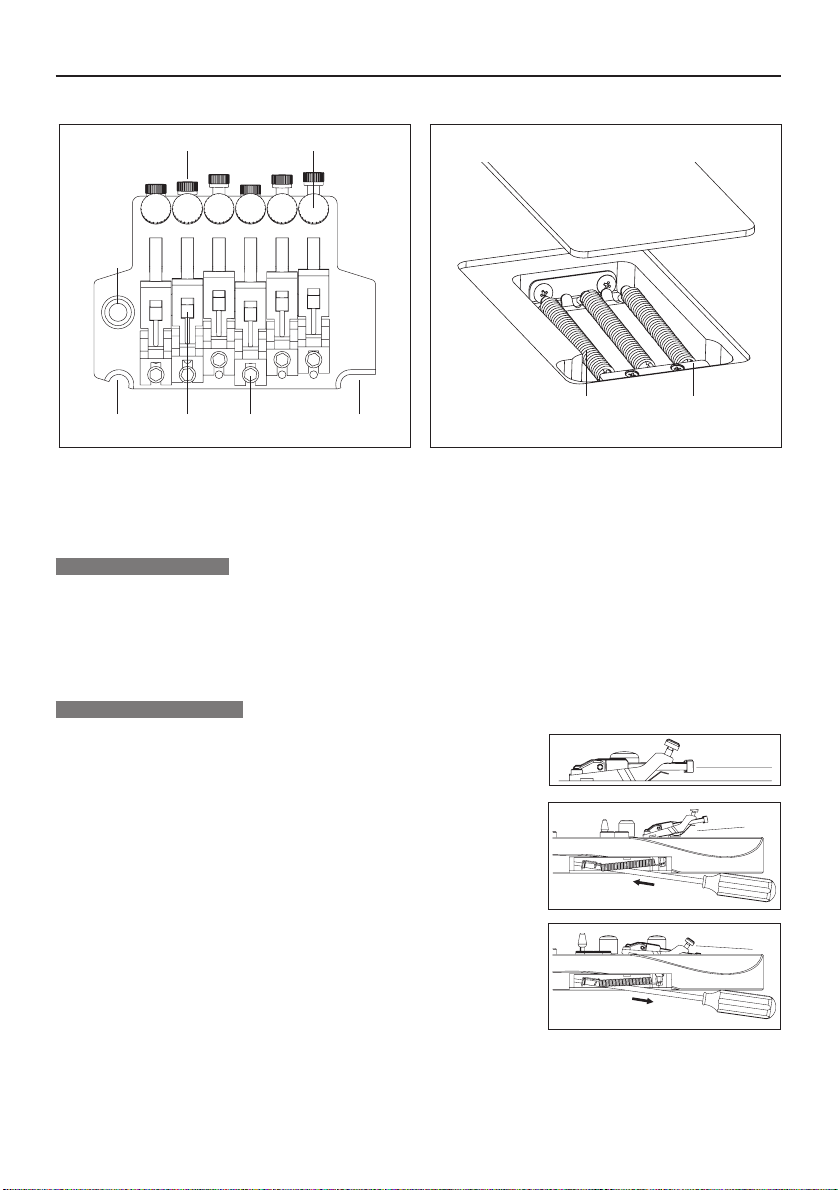
STD-DLトレモロ・ブリッジ
正面■ 背面■
56
4
1
1 ナイフエッジ
2 サドル・ロック・ボルト
3 ストリング・ホルダー・ブロック
4 アームソケット
トレモロアームの取り付け
1トレモロアームはトルク調整キャップ一体型の挿し込み式です。
ベースプレートのアームソケットにトレモロアームを差し込みます。
2トルク調整キャップを締め、トレモロアームを固定します。
トルク調整キャップを締め込むほど、トレモロアームの締め付けが増します。
トレモロの取り付け角度調整
123
5 ストリング・ストッパー・ボルト
6 ファイン・チューニング・ボルト
7 トレモロ・スプリング
8 スプリング・ロック
トレモロの取り付け角度は、弦の張力とギターのボディー裏側に装着され
たトレモロ・スプリングの張力とのバランスで調整します。
トレモロがギターのボディー表面とおおよそ平行になるように調整するこ
とで、最も優れた性能を発揮します。
1正しくチューニングした状態で、トレモロの傾きを確認します。
2トレモロが前方へ傾いている場合は、ボディー裏側のトレモロ・スプリン
グ・カバーのスリットからプラスドライバーを挿し込み、スクリューを
締め込んでトレモロ・スプリングの張力を強くします。
7
8
3トレモロが後方へ傾いている場合は、スクリューを緩め、トレモロ・ス
プリングの張力を弱めます。
トレモロの角度調整は、トレ
め、チューニングに影響を及ぼします。
チューニングを繰り返しな がら調 整してください。
モロ・スプリングの張力を調整するたびに弦とスプリングとの張力バランスが変化するた※
28
Page 61
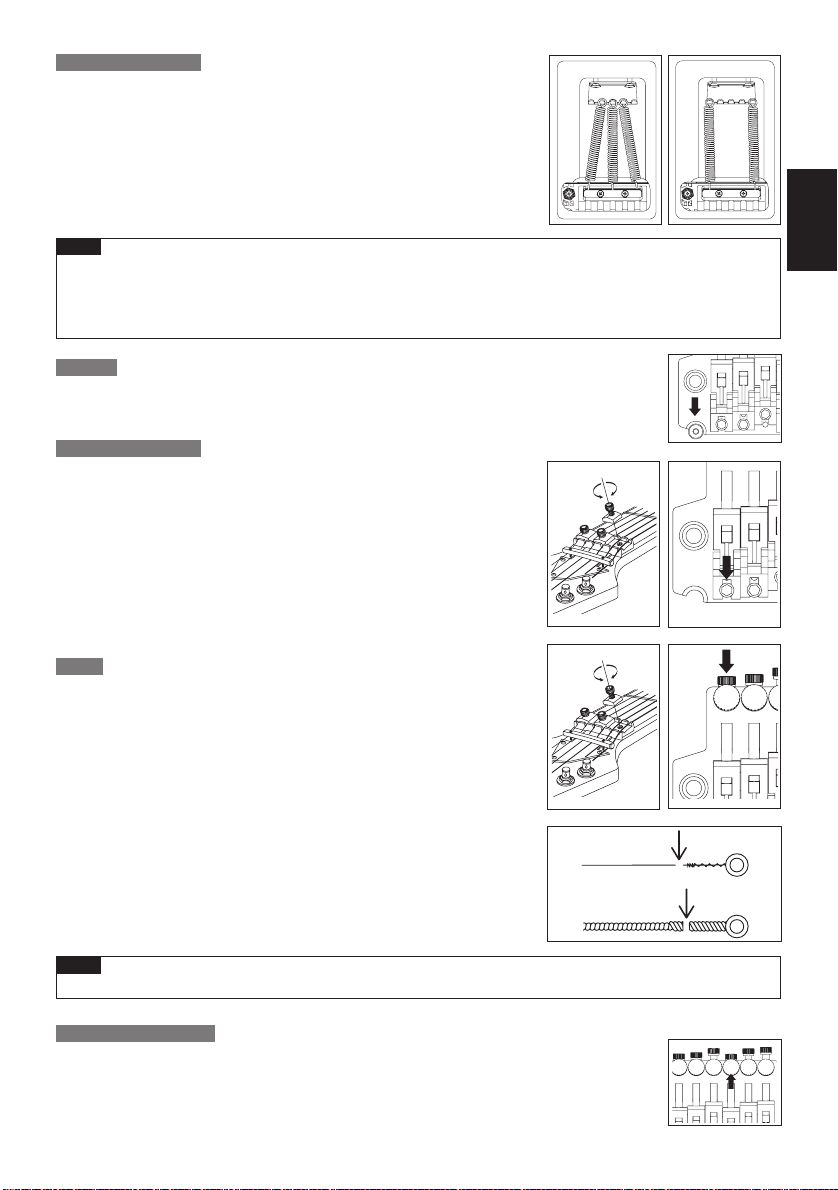
トレモロ・スプリング
工場出荷時は、3 本 のトレ モ ロ・スプリングが並行に取り付けられた状態で
セットアップされています。
弦のゲージを変更したり、ダウンチューニングで使用するなど弦とトレモロ・
スプリングとの張力バランスが大きく変化する場合には、トレモロ・スプリン
グの数や取り付け方の変更が必要になる場合があります。
1張力を強めたい場合は、外側の2本のトレモロ・スプリングを斜めに取り
付けます。
2張力を弱めたい場合は、中央のトレモロ・スプリングを取り外します。
ご注意
トレモロ・スプリングの着脱は弦を十分に緩めてから行ってください。•
また、全てのスプリングを外すとトレモロがギターから外れますのでご注意 下さい。
再度トレモロを取り付ける際は、トレモロのナイフエッジをスタッドボルトの溝に確実に挿し込んだ 状態でトレ•
モロ・スプリングを 取り付 けてください。
弦高調整
トレモロ本体左右のスタッドボルトを六角レンチ(3mm)で回して、トレモロ全体の高さを動か
して弦高を調整します(各弦ごとの調整は行えません)。
イントネーション調整
1ロッキング・ナットのプレッシャー・パッド・ボルトを六角レンチ
(3mm)で緩め、十分に弦を緩めます。
2サドル・ロック・ボルトを六角レンチ(2mm)で緩め、サドル位置を調
整します。
イントネーションの確認は、サドル・ロック・ボルトがしっかりと締ま※
った状態で、正しいチューニングで行ってください。調整が終わりまし
たら、サドル・ロック・ボルトとロッキング・ナットのプレッシャー・
パッド・ボルトを締めてください。
日本語
弦交換
1ロッキング・ナットのプレッシャー・パッド・ボルトを六角レンチ(3mm)
で緩め、糸巻きから弦を取り外します。
2トレモロ本体のストリング・ストッパー・ボルトを六角レンチ(3mm)
で緩め、サドルから弦を引き抜いて取り外します。
3新しい弦は先端のボールエンド部分をニッパー等で切り落とします。
4ボールエンドを切り落とした側の弦の先端をサドルとストリング・
ホルダー・ブロックとの間に挿入し、ストリング・ストッパー・ボルト
を締めて弦を固定します。
5糸巻きで弦を巻き上げ、チューニングを行います。
6チューニング完了後、ロッキング・ナットのプレッシャー・パッド・ボ
ルトを締めます。
全ての弦を一度に取り外すとトレモロの取り付け角度が大きく変化するた※
め、弦交換は1本ずつ行うことをお勧めします。全ての弦を一度に取り外
す場合にはトレモロの取り付け角度が大きく変化しないよう、トレモロ下
部にクロス等を挟んで固定するとチューニングが比較的容易に行えます。
ご注意
チューニングを行う前に、ストリング・ストッパ ー・ボルトがしっかりと締め付けられていることを確認してください。•
ファイン・チューニング
ロッキング・ナットで 弦 をロックした後でも、ファイン・チューナーによって各
弦のチューニングの微調整が行えます。チューニングの前に、あらかじめ全てのファイン・チュ
ーニング・ボルトを可動範囲の中央付近に調整しておくと、弦をロックした後の調整幅を広く持
たせることができます。
29
Page 62
ノンロッキングトレモロ
SynchroniZR(シンクロナイザー)
正面■ 背面■
3
1サドル・ロック・ボ ルト
2アームソケット
3イントネーション調整ボルト
トレモロアームの取り付け
1トレモロアームは挿し込み式です。
ベースプレートのアームソケットに、トレモロアームのコーナー部分を
持って、カチッと音がするまで確実に挿し込みます。
1
2
8
4
7
4トレモロ・スプリング
5アームアップ・ストッパー
6アームアップ・ストッパー・ノブ
7トレモロ・ブロック
8スプリング調整ノブ
6
4
5
2トレモロアームの締め付けは、トルク調整キャップで調整します。時計
方向に回すと締め付けが増し、逆に回すと締め付けが緩くなります。
30
Page 63
トレモロの取り付け角度調整
トレモロの取り付け角度は、弦の張力とギターのボディー裏側に装着され
たトレモロ・スプリングの張力とのバランスで調整します。トレモロがギター
のボディー表面とおおよそ平行になるように調整する事で、最も優れた性
能を発揮します。
1正しくチューニングした状態で、トレモロの傾きを確認します。
2トレモロが前方へ傾いている場合は、ボディー裏側のスプリング調整ノ
ブをプラス方向に回してトレモロ・スプリングの張力を強くします。
3トレモロが後方へ傾いている場合は、スプリング調整ノブをマイナス方
向に回してトレモロ・スプリングの張力を弱めます。
フローティング状態でのトレモロの角度調整は、トレ
力を調整するたびに弦とスプリングとの張力バランスが変化するため、チュ
ーニングに影響を及ぼします。チュー ニングを 繰り返しながら調整してくだ
さい。
アーム・アップ・ストッパー
モロ・スプリングの張※
SynchroniZRは、アーム・アップ・ストッパー機能を備えています。
アーム・アップ側を固定することで、フローティング状態を解除します。
1トレモロがギターのボディー表面とおおよそ平行に調整されている事を
確認します。
2トレモロ・スプリング・カバーを外し、アーム・アップ・ストッパー・
ノブを回して、アーム・アップ・ストッパーの先端がトレモロ・ブロッ
クに接するように調整します。
3トレモロがギターのボディ表面とおおよそ平行になっていることを再度
確認し、スプリング調整ノブをプラス方向に数回転させます。
トレモロ・ス
チューニングが安定しないことがあります。チューニングの際にそのような
症状が見られる場合は、スプリング調整ノブをさらにプラス方向に回してください。
弦高調整
プリングの張力が弱いと、トレ モ ロ・ブロックが弦に引っ張られて※
トレモロ本体左右のスタッドボルトを六角レンチ(3mm)で回して、トレ モ ロ 全
体の高さを動かして弦高を調整します(各弦ごとの調整は行えません)。
日本語
イントネーション調整
1トレモロ本体に収納されているイントネーション調整ボルトを取り外
し、サドル後部の調整穴にボルトの先端がトレモロ本体の壁に接触する
まで締め込みます。
2サドル・ロック・ボルトを六角レンチ(2mm)で緩め、イントネーショ
ン調整ボルトを回してサドル位置を調整します。
イントネーションの確認は、サド
で、正しいチュー ニングで行ってください。調整が終わりましたら、サドル・ロ
ック・ボルトとロッキング・ナットのプレッシャー・パ ッド・ボ ル ト を 締 め 、イント
ネーション調整ボルトをトレモロ本体に収めてください。
弦交換
ル・ロック・ボルトがしっかりと締まった状態※
弦をギターのボディー裏側から、トレ モ ロ・ブロックを通して取り付けます。
31
Page 64
SAT/FAT/STDトレモロ
トレモロアームの取り付け
トレモロアームはトレモロプレートのアーム取り付け穴に挿し込むだけで取り付けられます。
FAT6トレモロのみトレモロアームはスクリュータイプのアームを採用しています。FAT6,STDのトレモロアームは時
計方向に回しながら装着を行います。また、反時計方向に回すことにより取り外しができます。
トレモロアームのトルク調整
1
トレモロアーム取り付け部後方のトレモロブロック上にアームのトルク調整スク
リューがあります。トレモロをダウンさせた状態で付属の1.5mm六角レンチで調整
し、アームの取り付け固さが変えられます。
弦高調整
2
トレモロ全体の高さは付属の3mm六角レンチで左右のトレモロスタッドを回し、ト
レモロプレートの高さを変えて調整します。スムースなトレモロアクションの
ために左右の高さはできるだけ均等にあるように調整してください。
3
サドルごとに弦高調整が可能なタイプのブリッジは、付属の1.5mm六角レンチでサド
ルごとに調整スクリューを回して弦高の微調整を行います。
イントネーション調整(SATPRO2,SAT10,FAT6,FAT10,STD)
5
イントネーション調整はプラスドライバーまたは六角レンチを使用して調整スク
リューを回しサドルを前後させます。
弦交換
新しい弦はギターの裏側からトレモロブロックを通して取り付けてください。
トレモロの取り付け角度調整
SAT/FATトレモロは通常、アームダウン、アップの両方向が行えるフローティ
ングと呼ばれる状態で使用します。
トレモロの取り付け角度は弦の張力と、ギターボディーの裏側に装着されたトレ
モロスプリングの張力バランスで調整します。正しくチューニングした状態で、
ギターボディー裏のトレモロスプリングカバー内のトレモロスプリングフックの
スクリューをプラスドライバーで回します。トレモロが前方へ傾きすぎている場
合は、トレモロスプリングの力が弱いため、スクリューを締め込んでスプリング
を長くします。逆にトレモロが後方へ傾きすぎている場合は、スプリングの力が強すぎま
すので、スクリューをゆるめ、スプリングを短くします。
トレモロをギターボディーに密着させる場合、トレモロスプリングの張力を余分に強めて
おくことで、チョーキング時にも他の弦の音程変化のない、より安定した状態が得られま
す。(アームダウンは堅くなります。)
トレモロ取り付け角度の調整は、トレモロスプリングの長さを変えるたびにチューニン※
グがくるってしまいますので、何度もチューニングを繰り返しながら、根気よく調整してください。
1
2
3
2
5
約3mm
・トレモロスプリング
フローティング状態は、通常3本のスプリングを用いることが一般的です。3本のスプリングでも力が足りない場
合は、両側の2本を斜めにフックにかけることで、更に力を強めることができます。逆に3本では力が強すぎる場
合は、中央の1本を外し、両側の2本だけを使用します。また、トレモロをボディーに密着させる場合は、スプリ
ングを4本以上に増やして、完全にトレモロを固定する場合もあります。
トレモロスプリングの取り付け、取り外しは、かならず完全に弦をゆるめた状態で注意深く行ってください。
32
Page 65

日本語
33
Page 66

保証規定
1. 当保証書は、取扱説明書の指示内容に従った適切なご使用にも関らず本製品が故障した場合においての
み、ご購入日より1年間の無償修理をお約束するものです。
保証修理をご希望の場合は、お買い求め頂いた販売店様に当保証書と一緒に本製品をお持ち込みの上、ご
依頼下さい。尚、インターネット等通信販売ご利用の場合も同様に、お買い求め頂いた販売店様が受付窓口
になります。
2. 本製品を販売店様に持ち込まず、販売店様へ送付される場合、それに要する費用は保証期間内であっても
お客様のご負担となります。又、輸送中に生じた損傷、故障に関しては保証対象外となりますのでご注意下さ
い。
3. 保証期間内であっても以下の場合には有償修理となります。
① 当保証書の提示が無い場合。
② お買上げ年月日、お客様名、販売店名等が無記入のもの、または記入事項が改ざんされたもの。もしくは
偽造されたもの。
③ 不適切な使用方法(取扱説明書の指示内容に反する誤った取扱い等)や過酷な使用・保管状況(気温・湿
度・日照等)、およびお客様側の不注意(転倒・落下等)により生じた損傷ならびに故障。
④ 故障の原因が本製品および付属品以外の接続機器や使用環境に求められる場合。
⑤ 弊社以外による修理、改造加工等が原因の場合。
⑥ 電池や弦、真空管など消耗品の劣化によるもの。
⑦ 天災(地震・洪水・突風他)、人災(火事・浸水他)、交通事故等により生じた損傷ならびに故障。
⑧ 中古品、並行輸入品、個人売買品。
4. 当保証書は再発行いたしませんので、紛失しないよう本製品と一緒に大切に保管してください。
5. 当保証書は他人に譲渡できません。
6. 本製品に初期不良が疑われる場合は、使用を中止して速やかにお買い求め頂いた販売店様までご連絡くだ
さい。
7. 本製品の故障、またはその使用によって生じた直接、間接の損害については当社はその責任を負いません。
8. 当保証書は日本国内においてのみ有効です。
9. その他ご不明な点に関しましては、お買い求め頂いた販売店様にご相談ください。
※ 当保証書は、お買い求めいただいた本製品に対し弊社から適正なアフターサービスを提供する事を目的に
作成されており、記載いただいたお客様の個人情報は第三者に開示、譲渡、貸与することはありません。ただ
し下記の場合を除きます。
* あらかじめお客様の同意が得られている場合。
* お客様からのお問い合わせに対する回答を目的に、星野楽器販売株式会社の関連会社や販売店等に
開示することが必要と認められる場合。
* 統計データとしてお客様個人を識別できない状態に加工した場合。
34
Page 67

Maintenance
ENGLISH MAINTENANCE MANUAL
ATTACHMENTS
Multi-tool Tremolo arm
1.5mm 2mm 2.5mm 3mm 4mm
PREMIUM series
Edge tremolo bridge
PREMIUM series
Edge-ZeroⅡ w/ZPS
PREMIUM series
ZR tremolo bridge w/ZPS2
PREMIUM series
Tight-End R bridge
EdgeⅢ tremolo bridge ○ ○○○○
Edge-ZeroⅡ w/ ZPS ○ ○ ○○
Edge-ZeroⅡ w/o ZPS ○ ○ ○○
FAT6 tremolo bridge ○ ○ ○○
FAT10 tremolo bridge ○ ○ ○○
FX EdgeⅢ bridge ○○○
FX EdgeⅢ-8 bridge ○○○
Gibraltar Standard 6/7/8 bridge ○ ○ ○
SAT10 tremolo bridge ○ ○ ○○
SAT-ProⅡ tremolo bridge ○ ○ ○○
STD tremolo bridge ○
STD-DL tremolo bridge ○
Tight-End bridge ○○
Tight-Tune bridge ○ ○○
ZR tremolo bridge w/ZPS2 ○ ○ ○○
SynchroniZR tremolo bridge ○ ○
GIBRALTAR BRIDGE 08 /
QUICK CHANGE 08 TAILPIECE
○ ○
○ ○
○ ○
○
HEX key wrench
8mm socket
wrench
ENGLISH
○
Models equipped with DiMarzio pickups are shipped with an HEX key wrench for adjusting the height of the pole pieces. ※
Seven-string guitars equipped with an Edge-Zero Ⅱ※ tremolo bridge w/ZPS3Fe are supplied with heavy-duty
springs.
35
Page 68
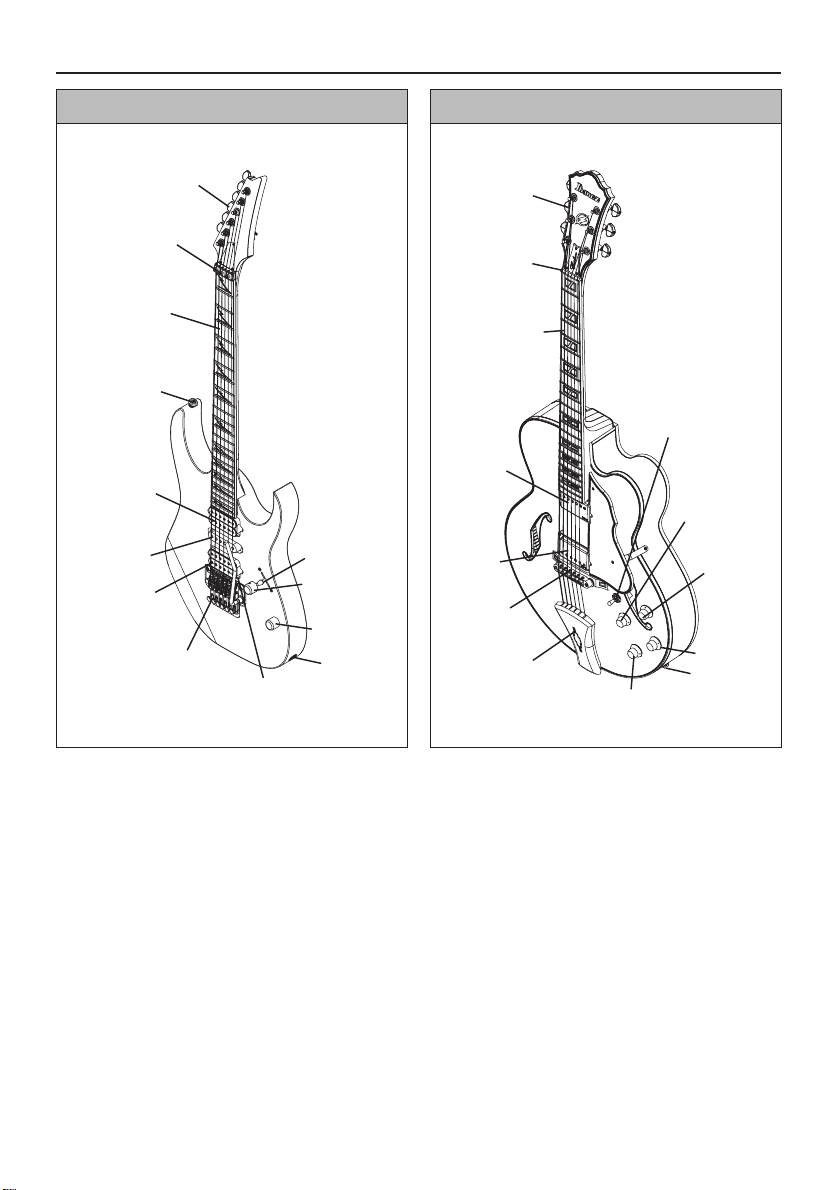
GUITAR PART IDENTIFICATION
Electric Guitar Semi or Full Acoustic Guitar
TUNING MACHINE (PEG)
LOCKING NUT
FINGER BOARD
STRAP PIN
NECK PICKUP
MIDDLE
PICKUP
BRIDGE
PICKUP
TREMOLO
TREMOLO ARM
PICKUP
SELECTER
VOLUME
TONE
OUTPUT JACK
TUNING MACHINE
(PEG)
NUT
FINGER
BOARD
NECK
PICKUP
BRIDGE
PICKUP
BRIDGE
TAILPIECE
PICKUP
SELECTER
NECK PICKUP TONE
NECK
PICKUP
VOLUME
BRIDGE
PICKUP
VOLUME
BRIDGE
PICKUP
TONE
OUTPUT JACK
These illustrations show typical Ibanez models. The guitar you purchased might not match the illustration. ※
Tremolo/bridge adjustments will differ depending on the type of tremolo/bridge that is installed. ※
For details, refer to the applicable tremolo/bridge section.
For details on the controls of each model, refer to the “Controls” section (p.228). ※
36
Page 69
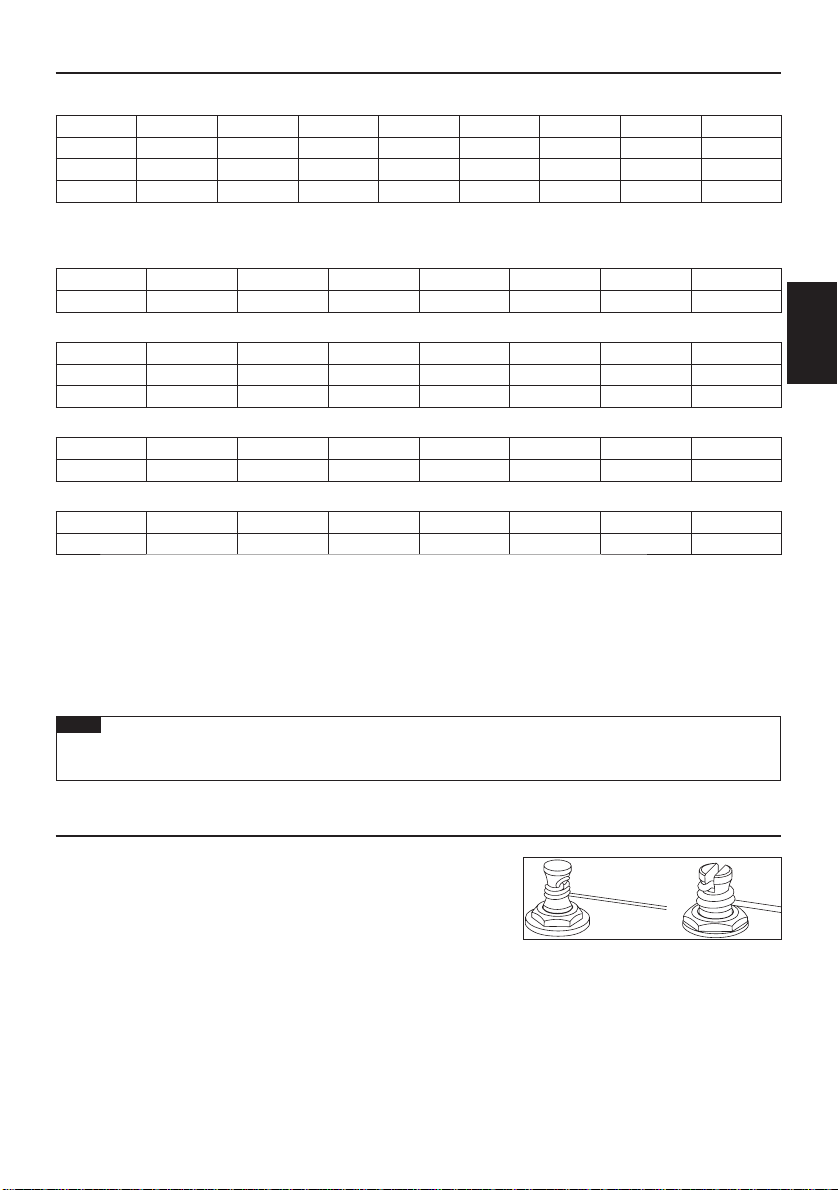
TUNING
When shipped from the factory, Ibanez guitars are set up using the following tunings.
1st 2nd 3rd 4th 5th 6th 7th 8th
6-strings E4 B3 G3 D3 A2 E2 - 7-strings E4 B3 G3 D3 A2 E2 B1 8-strings D#4 A#3 F#3 C#3 G#2 D#2 D#2 F1
Note that following models are set up differently.
Baritone guitar
1st 2nd 3rd 4th 5th 6th 7th 8th
B F# D A E B - -
RGD、APEX
1st 2nd 3rd 4th 5th 6th 7th
6-strings D4 A3 F3 C3 G2 D2 7-strings D4 A3 F3 C3 G2 D2 A1
MTM100
1st 2nd 3rd 4th 5th 6th 7th 8th
C# G# E B F# B - -
TAM10
1st 2nd 3rd 4th 5th 6th 7th 8th
E B G D A E B E
Use a tuner or tuning fork to tune up the sound of each open string to the above frequencies. If the pitch
is higher than the above frequency, loosen the string to lower the pitch, and wind the string in small
increments to tune it up. This is an easy way to stabilize your tuning. You may need to adjust the neck or the
intonation if you tune your guitar to pitches other than those shown in these tables, or if you use strings of
other than standard gauge.
For details on adjusting the neck or the intonation, refer to the sections “NECK ADJUSTMENT” (p. 38) or
“INTONATION” (p. 38).
ENGLISH
Memo
Please note that extreme tuning or use of strings not intended for electric guitar may cause parts to break, •
and may cause unexpected injury.
STRING REPLACEMENT
Strings will deteriorate over time, causing buzzing or inaccurate
pitch. Replace the strings whenever your strings begin to rust or
become discolored. We recommend that you replace all of the
strings as a set at the same time. Bent, twisted, or damaged strings
will not produce the appropriate quality sound and therefore should
not be used.
Wind the string around the tuning machine post two or three times from above, using about 5--7 cm of length
and taking care that the string does not cross itself. The strings should be replaced one by one instead of
removing all the strings at once. This is done to avoid stress on the neck and to reduce the risk of affecting
tremolo balance.
The method for removing and installing strings attached to a tremolo/bridge will differ depending on the type of
※
tremolo/bridge.
For details, refer to the section for the tremolo/bridge installed on your guitar.
37
Page 70
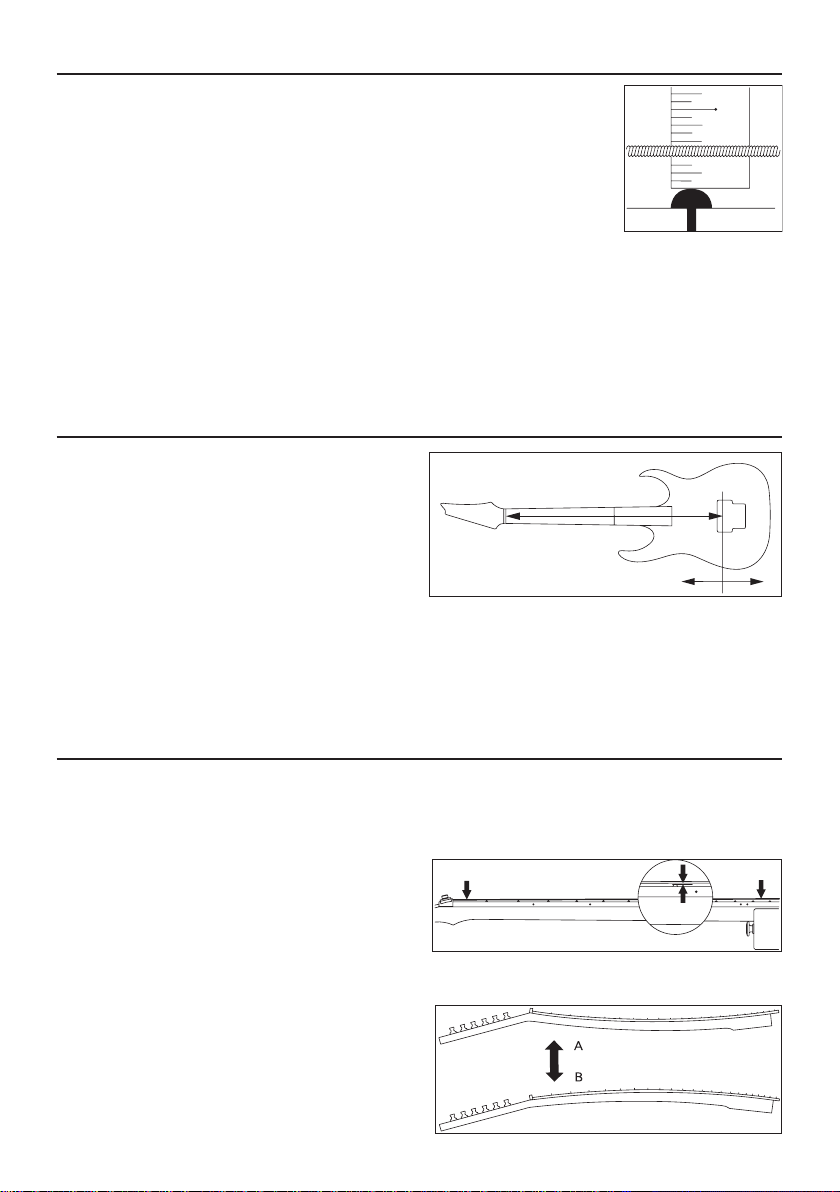
STRING HEIGHT
Action refers to the distance between the frets and the string.
To measure the action, tune the guitar accurately; then place a ruler at the 14th
fret and measure the distance from the top of the fret to the bottom of the string.
In general, this distance should be 1.5--1.7 mm for the fi rst string, and 2.0 mm--
2.2 mm for the sixth string.
For a seven-string guitar, the seventh string should be at 2.2 mm--2.4 mm. For an
eight-string guitar, the eighth string should be at 2.4 mm--2.6 mm.
For strings other than those listed above, adjust the action so that the distance gradually increases from the
fi rst string toward the lowest string.
If the action is too high, the instrument will be diffi cult to play. If the action is too low, you may experience
string buzz, muted notes, or poor sustain.
If you experience string buzz or muted notes even when the action is adjusted correctly, you might need to
adjust the neck bow.
For details, refer to “Neck” (p. 38).
The method of adjusting the action will depend on the type of tremolo/bridge with which your guitar is equipped. ※
For details, refer to the appropriate tremolo/bridge section.
INTONATION
If youʼve changed string gauges or are using your
guitar with an alternative tuning, youʼll need to adjust
the string length (intonation) to ensure that the
correct pitch is sounded at all frets.
After tuning your guitar accurately, hold the guitar in
playing position and compare the pitch of each string
12F
pressed down at the 12th fret with the pitch of the
harmonic played at the 12th fret.
If the pitch of the fretted note at the 12th fret is
lower than the harmonic at that fret, move the saddle of the tremolo/bridge forward to shorten the string.
Conversely, if the pitch of the fretted note is higher than the pitch of the harmonic, move the saddle backward
to lengthen the string.
Use a tuning meter to ensure accurate intonation adjustments. ※
The method of adjusting the saddle position will differ depending on the installed model of tremolo/bridge. For ※
details, refer to the section for the tremolo/bridge thatʼs installed on your guitar.
NECK ADJUSTMENT
The neck is constantly bearing the tension of the strings, and its curvature will be subtly affected not only by
the state of tuning and the string gauge, but also by changes in temperature and humidity.
If you experience problems such as string buzz or muted notes even after the action and tuning are adjusted
correctly, you should check and adjust the curvature of the neck.
1 Check the curvature of the neck.
After tuning accurately, hold the guitar in playing
position. Then press the fi rst string at the fi rst fret and
also at the fret that is nearest to the point where the
neck joins the body, and measure the gap between the
string and fret at the eighth fret.
In the same wa
string, and make adjustments so that the gaps are in
the range of 0.3 mm--0.5 mm.
y, measure this gap for the lowest
8th fret
2 If the gap is less than 0.3 mm, use the HEX key wrench
or socket wrench included with the guitar to turn the
truss rod nut located at the headstock end of the neck
in direction ʻAʼ, causing the neck curvature to be more
convex.
38
Page 71
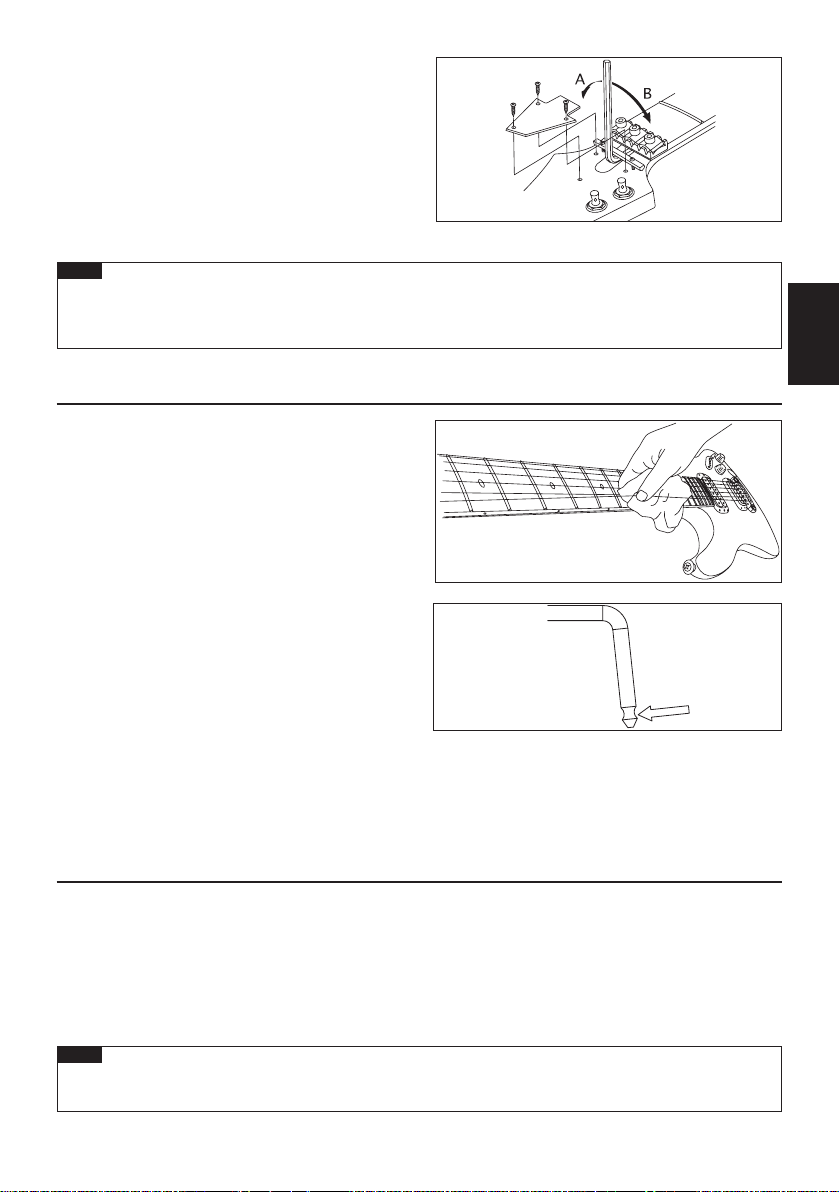
3 If the gap is greater than 0.5 mm, turn the HEX key wrench
or socket wrench in direction ʻBʼ, causing the neck
curvature to be more concave.
Adjust the truss rod nut in small increments of a quarter ※
turn, checking the tuning while you do so.
Memo
You must take care when adjusting the neck.•
Forced adjustments can damage your guitar. If you are unable to adjust the neck correctly, please contact
your Ibanez authorized dealer.
CLEANING
After playing, wipe sweat and oil off metal parts such
as the underside of the strings, the frets, bridge
saddles and nut. This will help to prevent rust.
Dirt or dust that adheres to metal parts may adversely
affect their function. Wipe off stubborn dirt with a soft
cloth moistened with a small amount of oil.
If the tremolo arm should squeak when turning, apply
some grease to the notch on the shorter side of the
tremolo arm.
To clean the fi nished surface, do not use volatile or
abrasive cleaning compounds; instead gently wipe
using a soft cloth with polish formulated specifi cally
for musical instruments.
To clean off dirt that has adhered to an oil fi nished body or neck, use a pencil eraser, fi ne sandpaper of #1000
or fi ner grade, or #0000 steel wool. You can prevent drying by polishing once or twice a year with a colorless
furniture fi nish oil or gun oil applied to #0000 steel wool or a cloth. Unfi nished fi ngerboards should be
carefully wiped with a cloth moistened with a small amount of fi ngerboard oil or high-quality lemon oil, wiping
carefully to the edge of the frets.
ENGLISH
BATTERY
If your guitar has a built-in pre-amplifi er or equalizer, it will be powered by a battery. Replace the battery when
you notice that the volume level has decreased or the sound has become distorted.
Some models use a 006P (9V) battery, and other models use two AA (1.5V) batteries.
Check the type of batteries used by your guitar, and replace them with the same type of batteries.
The batteries are found in the battery box located on the back of the body.
On models equipped with a battery, the output jack also functions as a power switch; inserting a plug into the
jack will turn on the power.
Memo
To prevent the battery from running down, remove the plug from the output jack if you will not be using •
it for an extended period.
39
Page 72
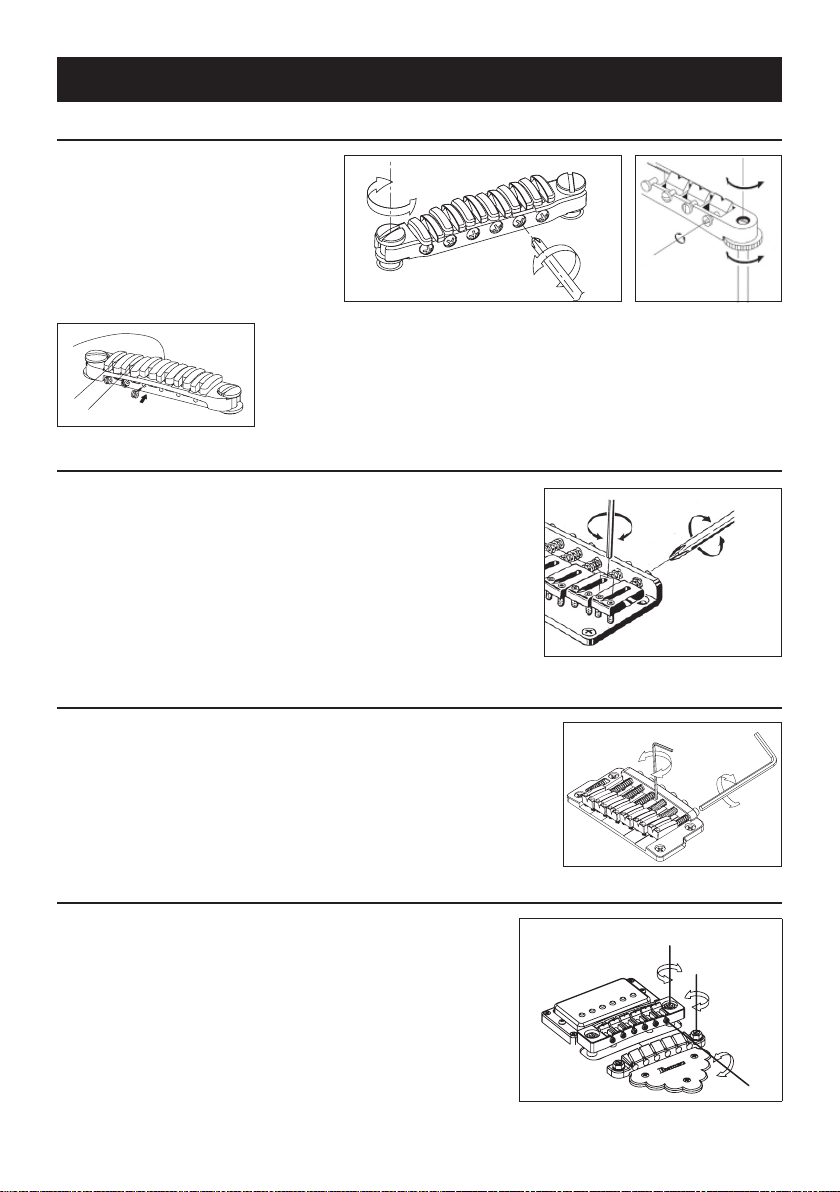
Guitar Bridges
ADJUSTMENT MANUAL
GIBRALTAR III (GUITAR & BASS), CB3, & FULL TUNE III, ART1, ART2
The action can be adjusted by using a slot
head (-) screwdriver to turn the adjustment
bolt at either end (A).
Intonation can be adjusted by moving the
saddle forward or backward by turning the
intonation adjustment screw (B) at the rear
of the bridge. You can use either a Phillips (+),
a fl at head (-) screwdriver, or the optional
hex wrench.
REPLACING THE STRINGS : CB3
Install strings by inserting them from the front of the bridge.
Before adjusting the action on the Gibraltar III bridge, loosen the strings suf- ※
fi ciently so that you will not need to turn the screws with excessive force, which
could damage the screw holes.
HARDTAIL BRIDGE
To change strings, thread the new strings through the string grommets
located on the back of the guitar and bring them up and over the
saddle. The intonation can be adjusted by adjusting the saddle forward
or backward using a Phillips (+) head screwdriver on the intonation
adjustment screw at the rear of the bridge. String height is controlled by
raising or lowering the small HEX key screws using a wrench on either side of
the saddle.
The adjustment method is the same for 7-string and 8-string models. ※
(A)
GIBRALTAR III, CB3
(B)
(B)
FULL TUNE II,
ART1, ART2
(A)
GIBRALTER STANDARD BRIDGE (7-STRING / 8-STRING MODELS)
To install a new string, pass it through the string stopper ferrule from the back
of the guitar body.
To adjust the height of the strings, use a 1.5mm hexagonal wrench to turn and
adjust the height of each saddle (A).
To adjust the intonation, use a 2.5mm hexagonal wrench to turn the intonation
adjustment screws of each saddle on the back of the bridge (B).
The adjustment method is the same for 7-string and 8-string models. ※
(A)
GIBRALTAR BRIDGE 08 / QUICK CHANGE 08 TAILPIECE
To adjust the string height, turn the stud bolts located at the left and right
ends of the bridge (A) using a slotted (-) screw driver. Before adjustment,
loosen the lock nut using an 8mm nut driver. After adjustment, tighten the
lock nut again to x the bridge.
To adjust the tailpiece height, turn the adjustment screws (B) on both
sides with a slotted (-) screw driver. Before adjustment, loosen the lock
nut. After adjustment, x it again in the same way as the bridge. If the
lock nut of the bridge and tailpiece is loose, it may cause distortion or
resonance. Raising the tailpiece will reduce the string tension, which will
provide a softer feel and make it easier to bend the strings.
To adjust the intonation of each saddle, turn the intonation adjustment
screw using a slotted (-) screw driver (C).
40
A
B
(B)
C
Page 73
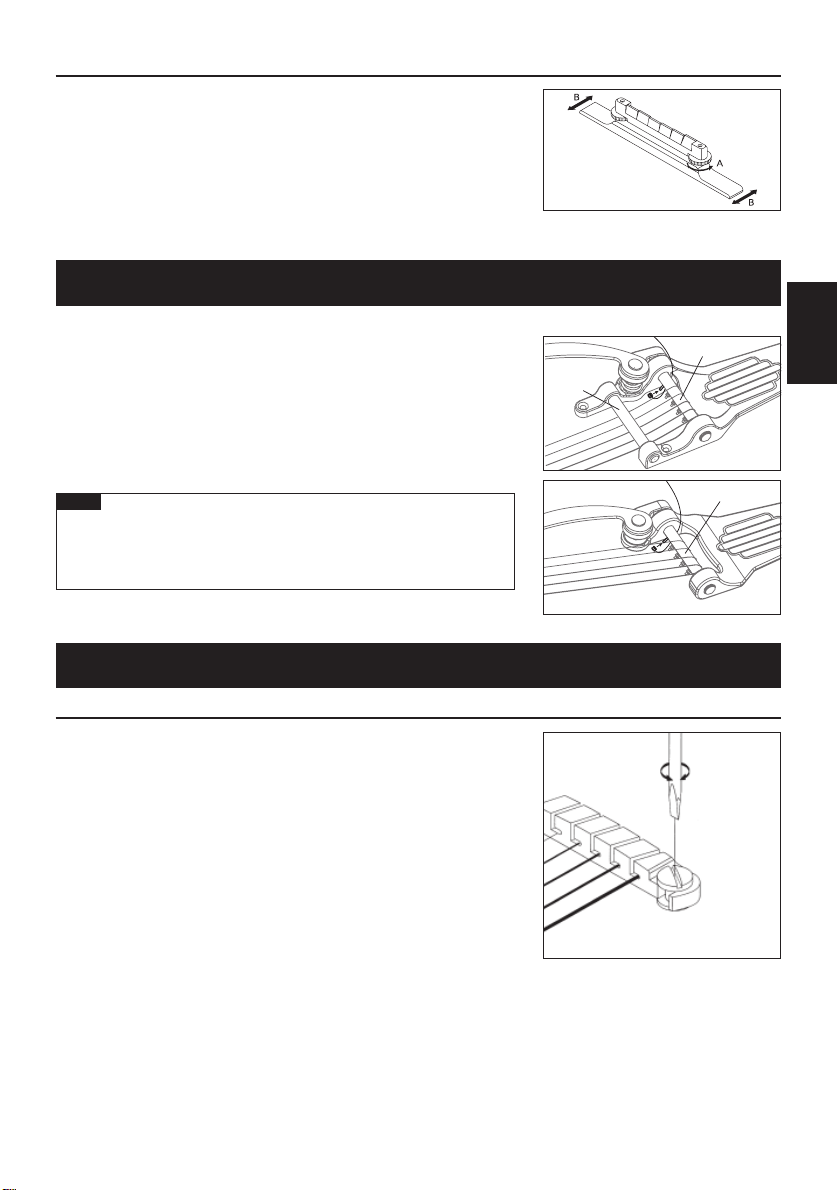
ADJUSTABLE ARCH TOP BRIDGE
To adjust the string height, adjust the height of the entire bridge by using your
fi ngers to turn the thumb wheel screws (A) located at either side of the bridge.
(It is not possible to individually adjust the height of each string.)
To adjust the intonation, loosen the strings and move the entire bridge
forward or backward; then tune the guitar and check the intonation. Repeat
this adjustment until the intonation is correct. Take care that the bridge does
not fall over.
When replacing the strings, it is recommended that they be replaced one by
one so that the bridge does not become displaced.
Vintage Vibrato
Replace the strings one by one. Fix the ball end onto the post of the bar (B), extend the string over the bar, and then
wrap it around the peg. For a model with a retainer bar (A), VBX60/VBX80,
pass the string over the bar and then beneath the retainer bar before
wrapping it around the peg. While replacing strings, always pull the string
lightly toward the headstock and exercise care not to allow the ball-end
to go off the post. Check that the string is correctly placed on the saddle
while tuning. After completing tuning, proceed to replacement of the next
string. After fi nishing replacing all strings, carry out tuning again for the
entire unit.
Memo
Removing all strings at the same time may have a serious impact
on the state of each section of the guitar due to sudden changes
of tension imposed on the guitar. Be sure to replace the strings
one by one.
(A)
(B)
VBX60
VBS80
(B)
VBF70
Tailpieces
QUIK CHANGE TAILPIECES
To adjust the height of the tailpiece, turn the stud bolt on the right and left
ends of the tailpiece with a slot head screwdriver or a coin.
To install a new string, pass it through the slot of the tailpiece and hook
the ball end into the back of the tailpiece.
(C)
ENGLISH
QUIK CHANGE III
41
Page 74
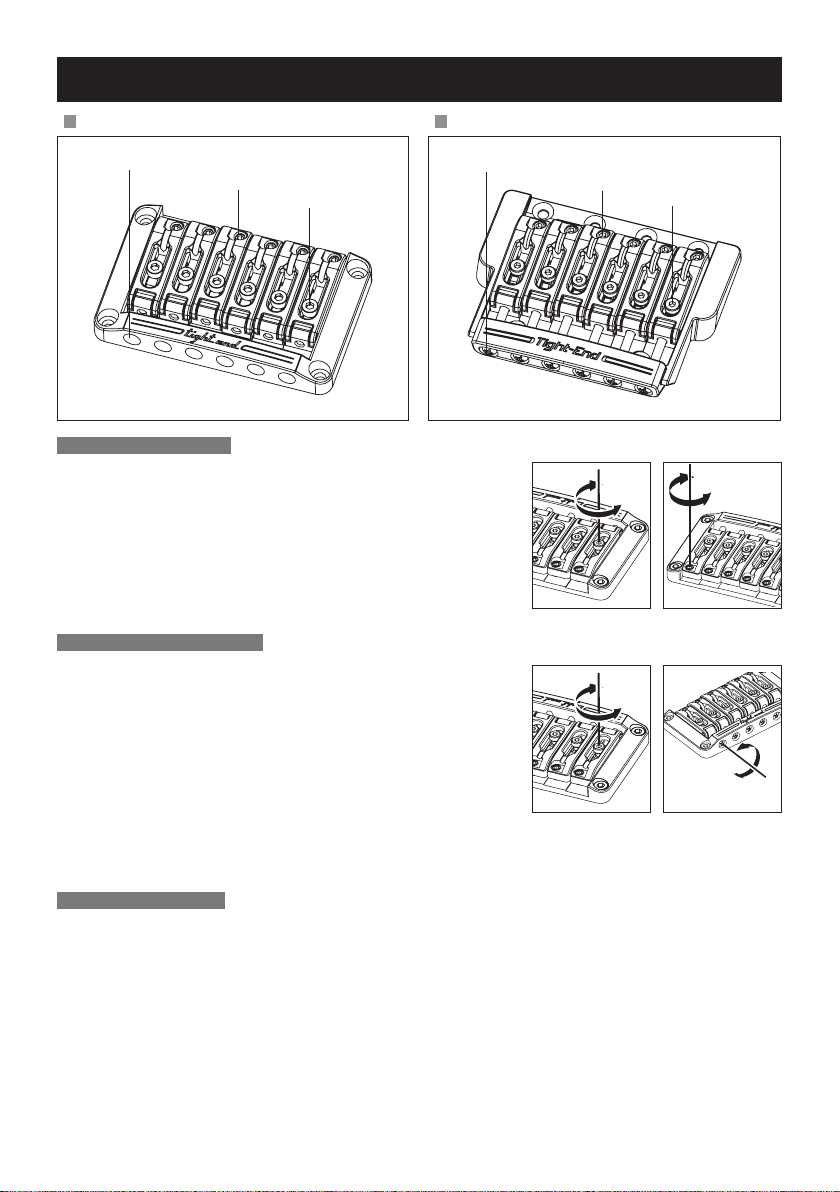
Tight-End bridge / Tight-End R bridge (for 6-string and 7-string)
Tight-End Tight-End
Intonation adjustment bolt
String height adjustment screw
Saddle lock bolt
ADJUSTING THE ACTION
1 Use an HEX key wrench (2 mm) to loosen the saddle lock bolts.
2 To adjust the saddle height, use the HEX key wrench (2 mm) to turn the
saddle height adjustment screws.
When youʼve fi nished making adjustments, tighten the saddle lock bolts. ※
ADJUSTING THE INTONATION
1 Use an HEX key wrench (2 mm) to loosen the saddle lock bolts.
2 Use a Phillips screwdriver to adjust the saddle position by turning the
intonation adjustment bolt.
3 Use an HEX key wrench (2 mm) to tighten the saddle lock bolts, and use
a Phillips screwdriver to lightly tighten the intonation adjustment screw
in the clockwise direction. (Tighten lightly, so as not to affect the saddle
position.)
Intonation adjustment bolt
String height adjustment screw
Saddle lock bolt
Makesurethattheguitaristunedcorrectlybeforeyouchecktheintonation.※
STRING REPLACEMENT
To install a new string, pass it through the string stopper ferrule from the back of the guitar body.
42
Page 75
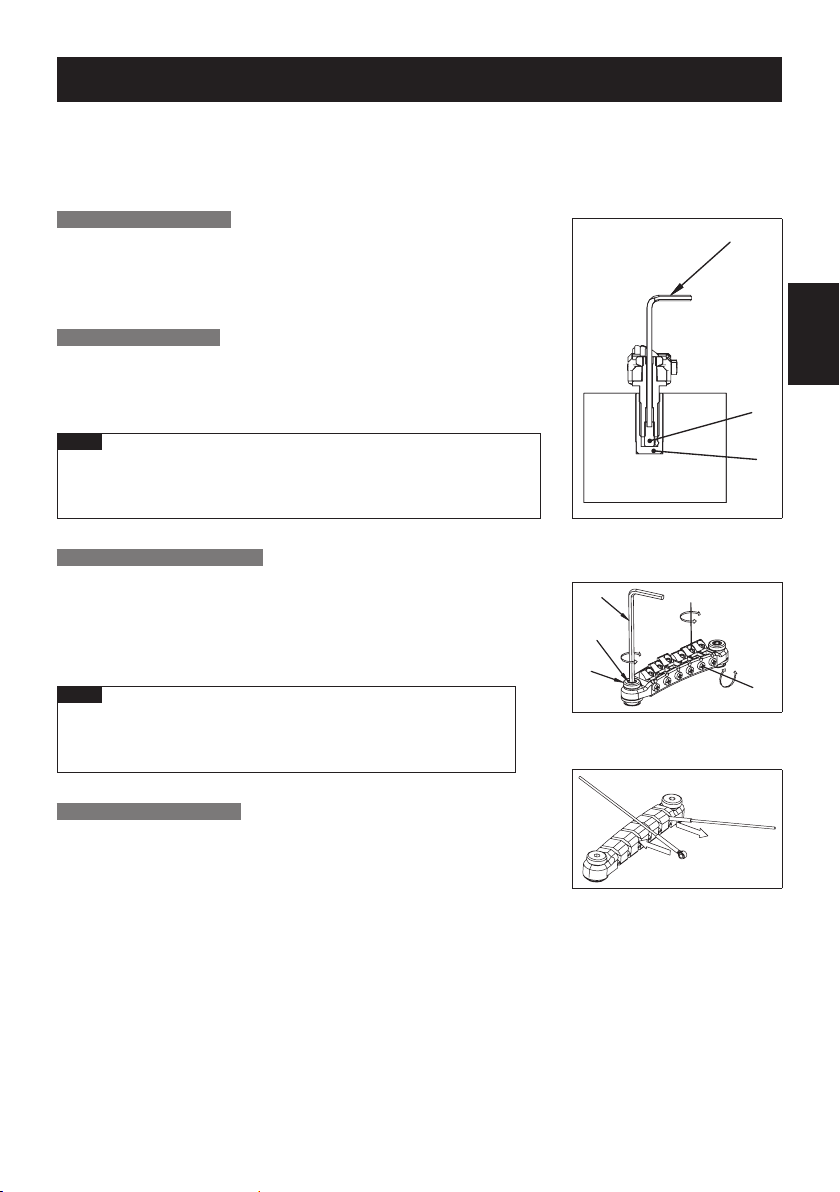
TIGHT-TUNE BRIDGE
The Tight-Tune bridge achieves the optimum level of stability and sound transference while suppressing unnecessary
vibrations by allowing each movable part of the bridge to be locked. The bridge has a stud lock function for fi xing the
bridge more securely onto the body. Furthermore, the tailpiece is equipped with a ball-end lock function to retain the
ball end so that it will not come off.
ADJUSTING THE ACTION
Loosen the locking nuts (D) on the right and left sides of the bridge unit,
and adjust the height of the bridge unit by turning the stud lock screws (E)
with a 3 mm HEX key wrench. Note that it is not possible to adjust the height of
individual strings. After completing the adjustment, tighten the locking nuts.
STUD LOCK FUNCTION
After adjusting the action, turn the stud lock bolt (B) clockwise inside the
stud bolt with a 2 mm HEX key wrench. Keep tightening until the stud lock bolt
contacts the anchor bolt (C) and the bolt cannot be turned any further.
Memo
When adjusting the action, be sure to fully loosen the stud lock bolt
(B) beforehand by turning it counterclockwise with a 2 mm HEX key
wrench. Otherwise, damage may occur.
ADJUSTING THE INTONATION
Loosen the saddle lock screws (G) with a Phillips screwdriver, and turn the
intonation adjustment screw (H) with a Phillips screwdriver to adjust the
saddle position. Tune the guitar and check the intonation. Repeat these
adjustments until the required intonation is reached, and then tighten the
saddle lock screws.
Memo
A loose intonation adjustment screw (H) may cause resonance. If
this occurs, gently tighten the intonation adjustment screw, exercising care not to allow the saddle to move.
A
ENGLISH
B
C
F
E
D
G
H
REPLACING THE STRINGS
Insert the ball-end of the string into the slot of the tailpiece in the
direction shown by arrow (J). The ball-end lock function retains the ballend. To remove the string, pull it toward direction (K).
K
J
43
Page 76
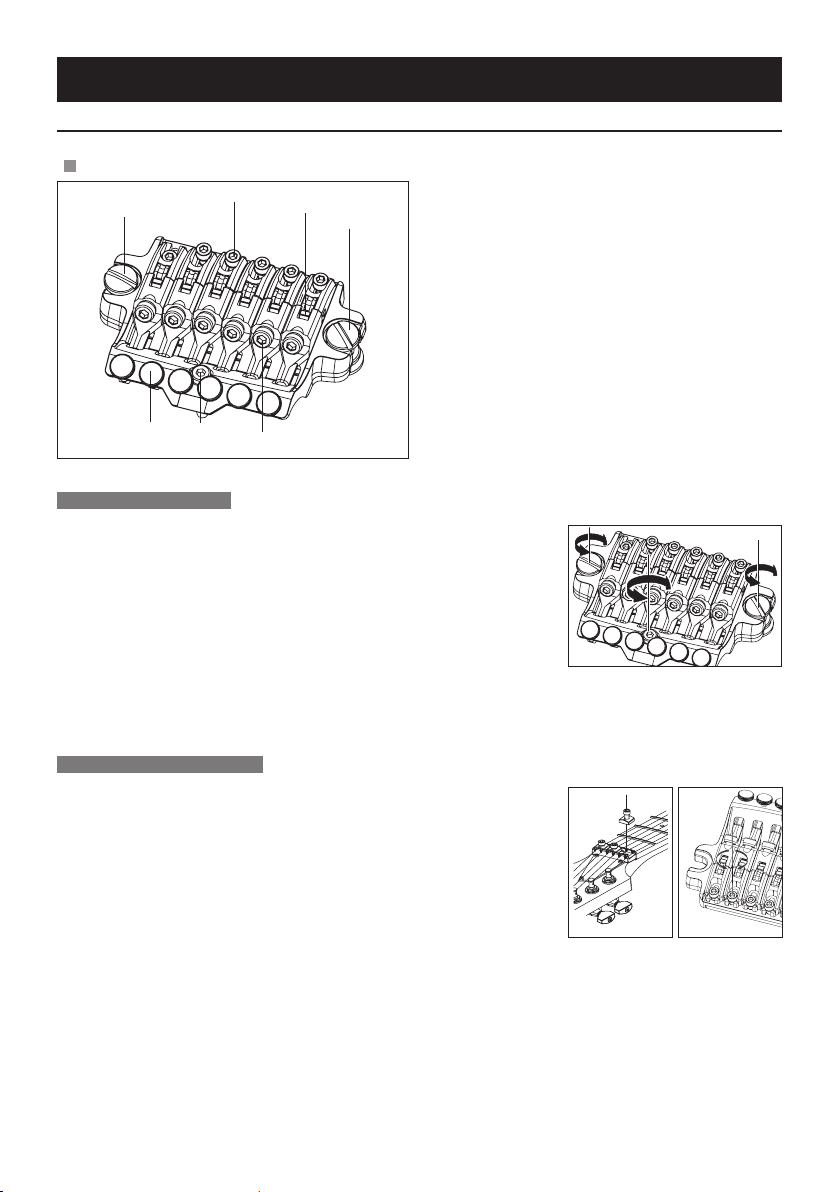
Locking Bridge
FX EDGE III/FX EDGE III-8 BRIDGE
FX Edge III
1
6
ADJUSTING THE ACTION
1 To adjust the string height, use a slotted screwdriver to turn the main
studs at the left and right of the bridge unit to adjust the height of the entire
tremolo unit. (It is not possible to adjust the height of individual strings.)
2 Use an HEX key wrench (3 mm) to turn the rear studs, adjusting them so
that the bridge is approximately parallel with the surface of the guitar body.
2
5
3
1
4
1 Main stud
2 Saddle lock bolt
3 String holder block
4 String stopper bolt
5 Rear stud
6 Fine tuning bolt
As the action will change when you adjust the rear studs, it is recommended ※
that you check the fi nal action after youʼve adjusted the rear studs.
To prevent the screw holes from being damaged, loosen the strings suffi ciently before you adjust the main studs so
that you will not have to use excessive force when turning the studs.
ADJUSTING THE INTONATION
1 Use an HEX key wrench (3 mm) to loosen the pressure pad bolts of the locking
nut, and loosen the strings suffi ciently.
2 Use an HEX key wrench (2 mm) to loosen the saddle lock bolt, and adjust the
saddle position.
Before checking the intonation, fi rmly tighten the saddle lock bolts and tune ※
the guitar correctly. When youʼve fi nished making adjustments, tighten the
saddle lock bolts and the pressure pad bolts of the locking nut.
44
Page 77
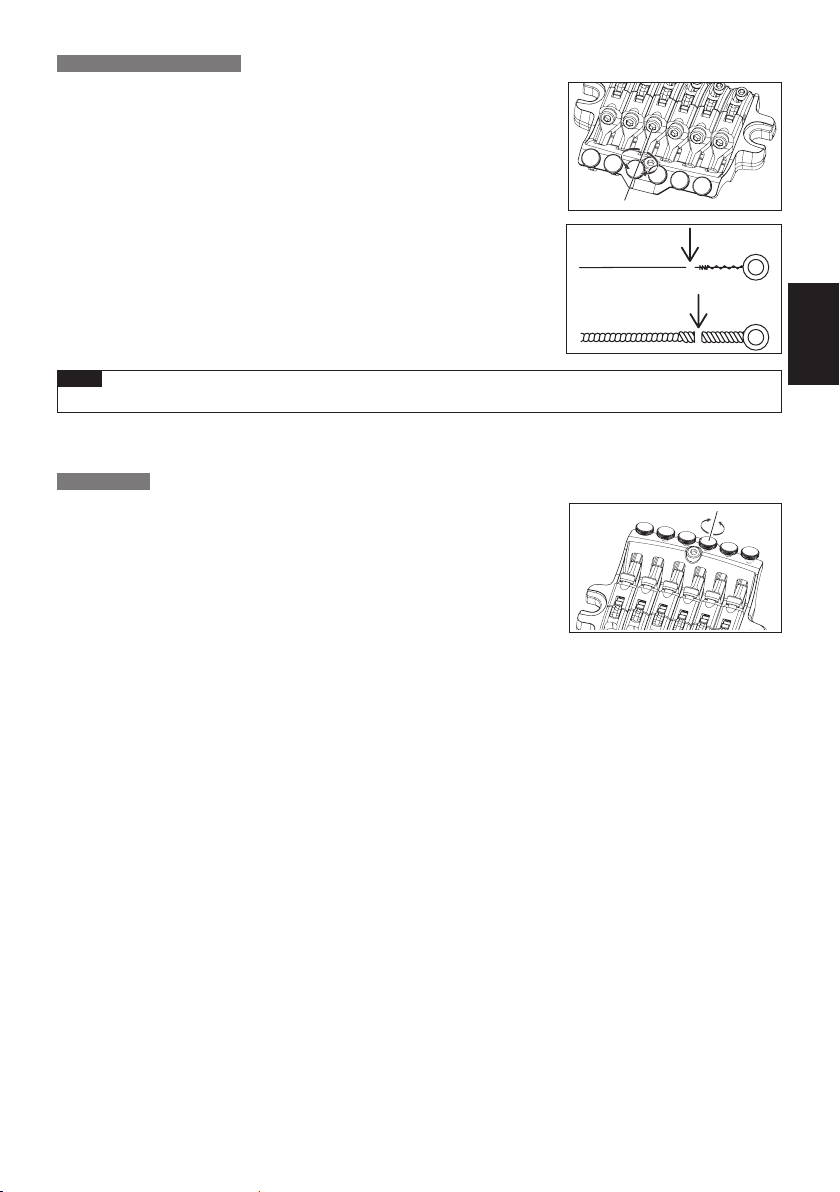
REPLACING THE STRINGS
1 Use an HEX key wrench (3 mm) to loosen the pressure pad bolts of the
locking nut, and remove the string from the tuning peg.
2 Use an HEX key wrench (3 mm) to loosen the string stopper bolt of the bridge
unit, then pull the string out of the saddle and remove it.
3 Use wire cutters to cut off the ball end of the new string.
4 Insert the tip of the string from which you cut off the ball end between the
saddle and the string holder block, and tighten the string stopper bolt to
fasten the string.
5 Wind the string onto the tuning peg, and tune it.
When youʼve fi nished tuning, tighten the pressure pad bolts of the locking nut
6
Memo
.
Before you tune, make sure that the string stopper bolts are fi rmly tightened.•
FINE TUNING
Even after youʼve used the locking nuts to lock the strings, you can use the fi ne
tuners to fi ne-tune each string.
The range of adjustment after the strings are locked will be widest if you leave
all fi ne-tuning bolts near the center of their adjustable range before you tune.
ENGLISH
45
Page 78
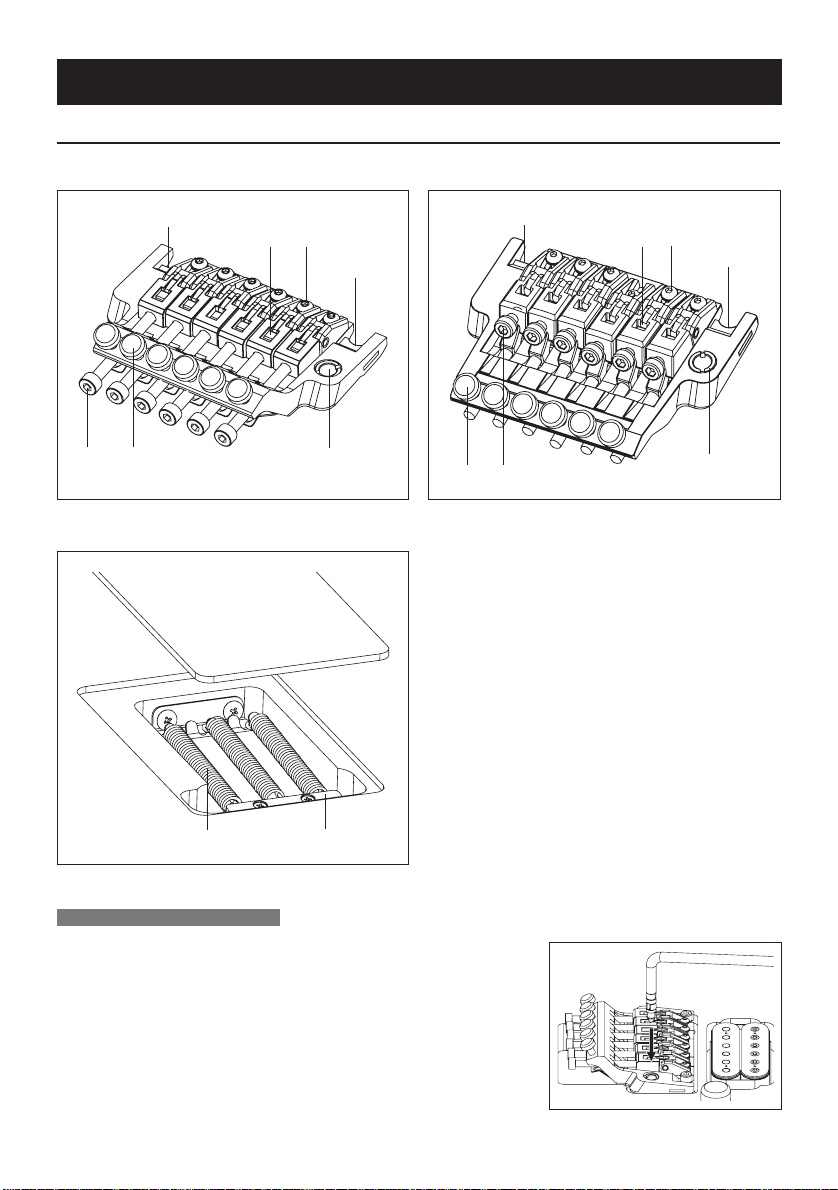
Locking Tremolos
EDGE TREMOLO BRIDGE
Edge■ Lo-Pro Edge■
1
2
3
1
5
6
4
1
2
3
1
56
4
Rear■
1 Knife edge
2 Saddle lock bolt
3 String holder block
4 Tremolo arm socket
5 String stopper bolt
6 Fine tuning bolt
7 Tremolo spring
8 Spring lock
7
ATTACHING THE TREMOLO ARM
1
The tremolo arm employs a snap-in/snap-out design. Hold the corner of the
tremolo arm, and press it fi rmly into the arm socket of the base plate.
8
46
Page 79
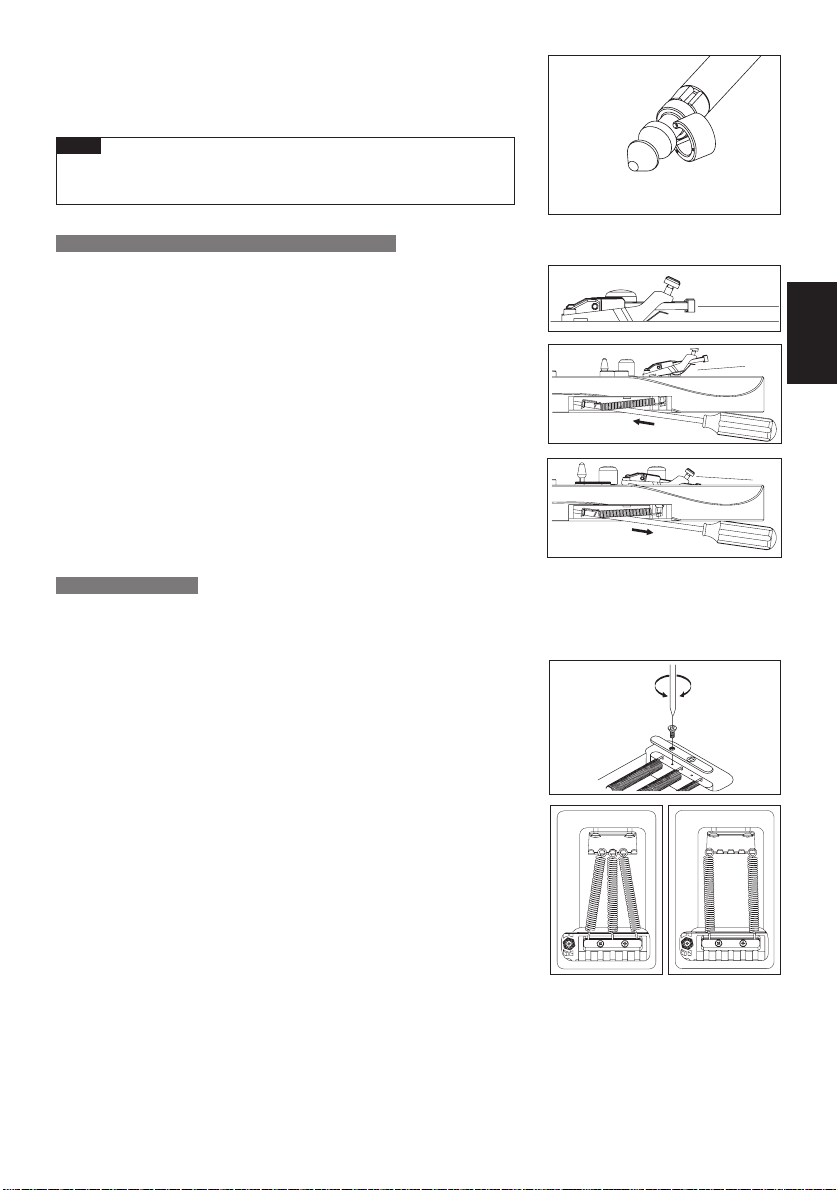
2
The tightness of the tremolo arm attachment can be adjusted by adding or
removing Tefl on washers. Using a larger number of washers will make the
attachment tighter, and removing all the washers will leave the arm free. The
Tefl on washers can be added or removed diagonally via the slit.
Memo
If the arm is no longer held fi rmly in place even after youʼve added •
Tefl on washers, replace the old Tefl on washers with new ones.
ADJUSTING THE TREMOLO ATTACHMENT ANGLE
The tremolo attachment angle is adjusted by changing the balance between
the str
ing tension and the tension of the tremolo springs installed on the back
of the guitar body. Youʼll obtain the optimal performance by adjusting this so
that the tremolo is approximately horizontal to the surface of the guitar body.
With the guitar tuned correctly, check the angle of the tremolo.
1
2
If the tremolo is tilted toward the front, insert a Philips screwdriver through the
slit in the tremolo spring cover on the back of the body, and tighten the screw
to increase the tension of the tremolo springs.
3
If the tremolo is tilted toward the rear, loosen the screw to decrease the tension of the tremolo springs.
The tremolo angle adjustment will affect the tuning, because the balance ※
of tension between the strings and the springs will change each time you
adjust the tension of the tremolo springs. Youʼll need to tune repeatedly
while making this adjustment.
TREMOLO SPRINGS
When the guitar is shipped from the factory, it is set up with three tremolo springs installed in parallel. If the balance of
tension betw
gauges or are using a dropped tuning, you may need to change the number of tremolo springs or change the way in
which they are installed.
Use a Philips screwdriver to remove the spring lock.
1
een the strings and the tremolo springs has changed signifi cantly, such as when youʼve switched string
ENGLISH
2
If you want to increase the tension, install the outer two tremolo springs
diagonally.
3
If you want to decrease the tension, remove the center tremolo spring.
If you want to install four or more tremolo springs, attach them using the
screw holes that were being used to attach the spring lock. (It will no longer
be possible to attach the spring lock.)
47
Page 80
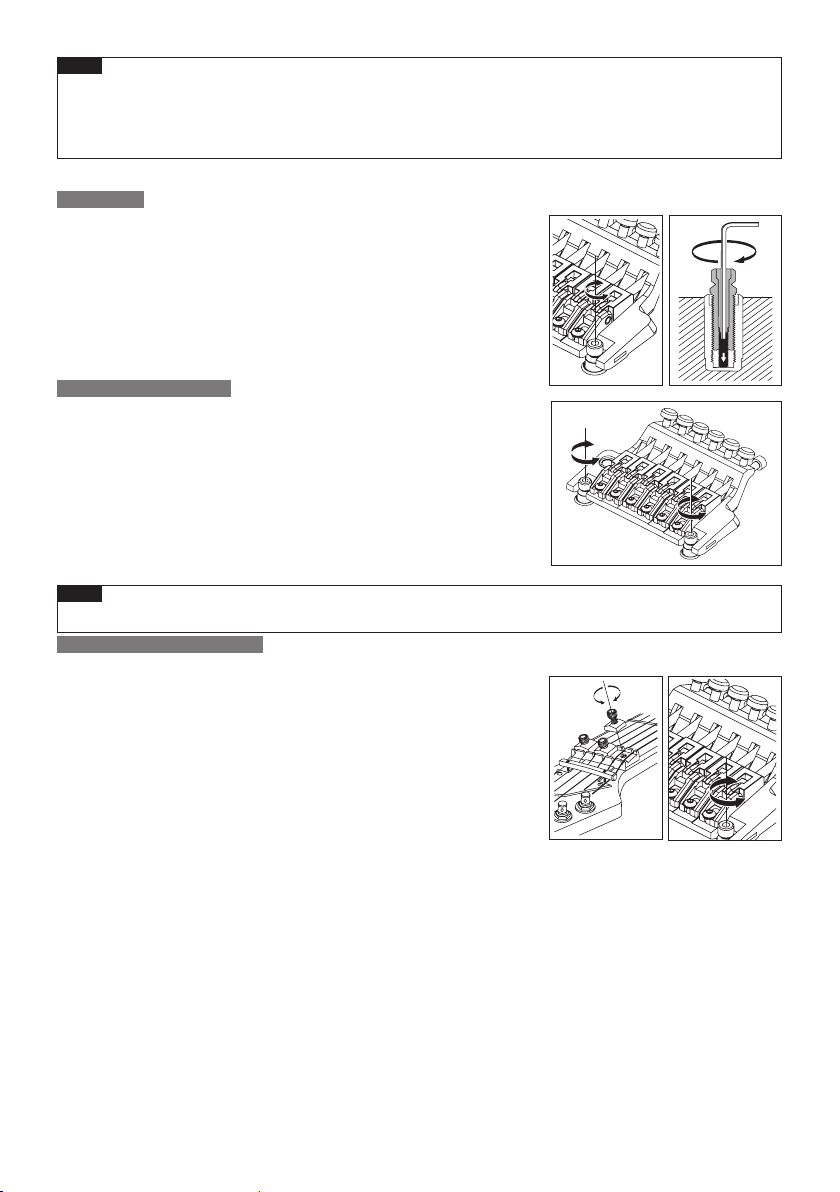
Memo
Loosen the strings suffi ciently before you install or remove tremolo springs. Be aware that if you remove •
all of the springs, the tremolo unit will detach from the guitar.
To reattach the tremolo, insert the knife edge of the tremolo securely into the groove of the stud bolts, •
and then install the tremolo springs.
STUD LOCK
The Edge/Lo-Pro Edge tremolo bridge uses a stud lock mechanism.
1
Insert an HEX key wrench (1.5 mm) through the hole in the top of the stud bolt.
2
Turn the stud lock bolt clockwise, tightening it until it contacts the anchor nut
and can no longer rotate.
The stud lock will be released when you loosen the stud lock bolt. ※
ADJUSTING THE ACTION
To adjust the height of the entire tremolo unit, use an HEX key wrench (4mm)
to turn the stud bolts located at the left and right of the tremolo unit. (It is not
possible to make adjustments for each string individually.)
Memo
Make sure that the stud lock is released before you adjust the action.•
ADJUSTING THE INTONATION
Use an HEX key wrench (3 mm) to loosen the pressure pad bolts of the locking
1
nut, and loosen the strings suffi ciently.
2
Use an HEX key wrench (2 mm) to loosen the saddle lock bolts, and adjust the
saddle position.
Before checking the intonation, fi rmly tighten the saddle lock bolts and ※
tune the guitar correctly. When youʼve fi nished making adjustments,
tighten the saddle lock bolts and the pressure pad bolts of the locking nut.
48
Page 81
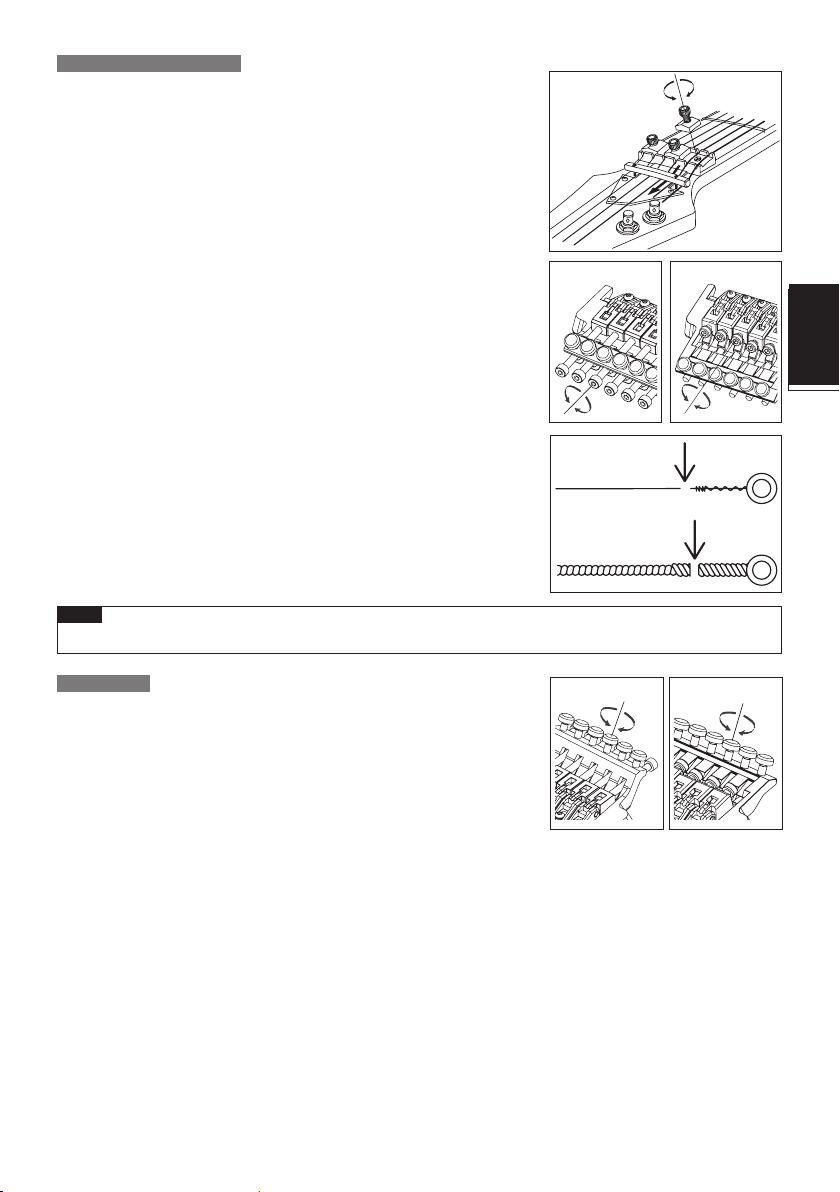
REPLACING THE STRINGS
Use an HEX key wrench (3 mm) to loosen the pressure pad bolts of the locking
1
nut, and remove the string from the tuning peg.
2
Use an HEX key wrench (3 mm) to loosen the string stopper bolt of the tremolo
unit; then pull the string out of the saddle and remove it.
3
Use wire cutters to cut off the ball end of the new string.
4
Insert the tip of the string from which you cut off the ball end between the
saddle and the string holder block, and tighten the string stopper bolt to fasten
the string.
5
Wind the string onto the tuning peg, and tune it.
6
When youʼve fi nished tuning, tighten the pressure pad bolts of the locking nut.
Removing all strings at the same time will cause the tremolo attachment ※
angle to change signifi cantly, so we recommend that you replace the
strings one at a time. If you remove all strings at the same time, tuning will
be easier if you wedge a piece of cloth below the tremolo to secure it so
that the tremolo attachment angle wonʼt change signifi cantly.
Memo
Before you tune, make sure that the string stopper bolts are fi rmly tightened.•
EDGE
Lo-Pro EDGE
ENGLISH
FINE TUNING
Even after youʼve used the locking nuts to lock the strings, you can use the
fi ne tuners to fi ne-tune each string.
The range of adjustment after the strings are locked will be widest if you
leave all fi ne-tuning bolts near the center of their adjustable range before you
tune.
EDGE
Lo-Pro EDGE
49
Page 82
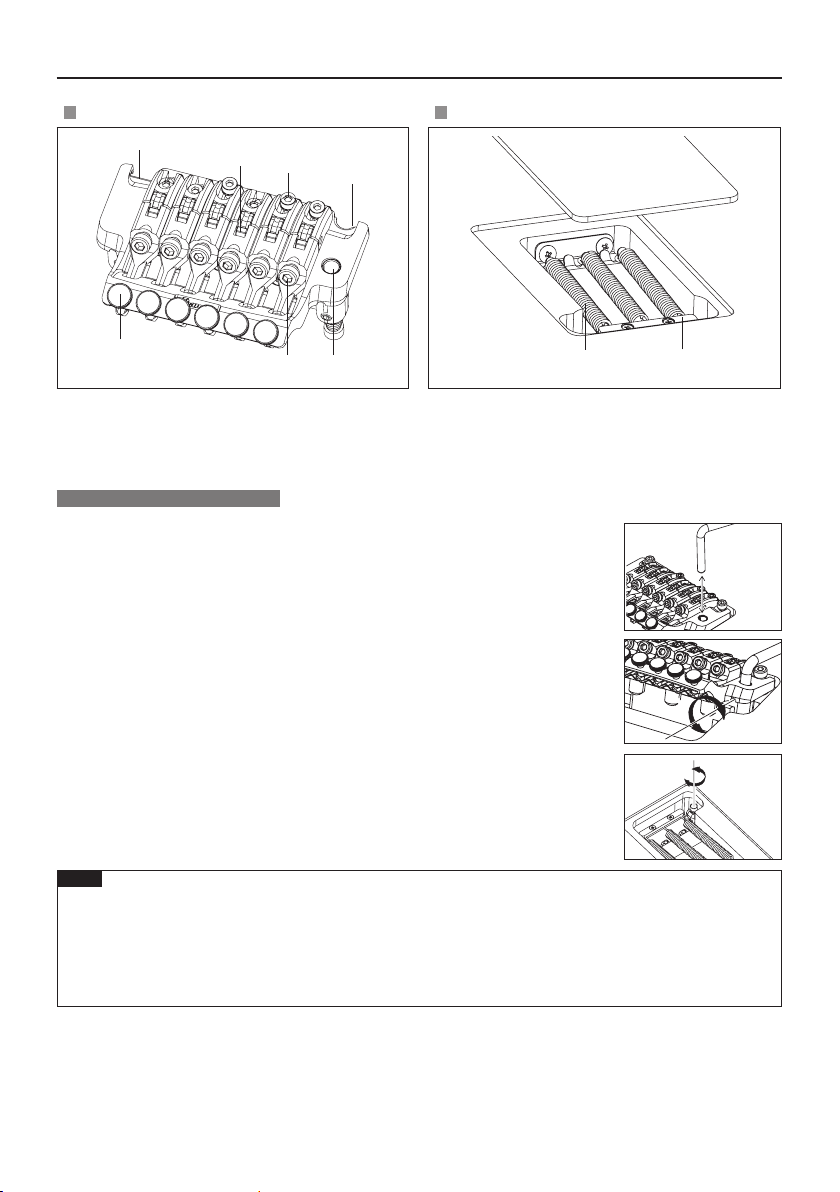
EDGE III TREMOLO BRIDGE
Overview Rear
1
3
2
1
6
1
knife edge
2
saddle lock bolt
3
string holder block
4
tremolo arm socket
ATTACHING THE TREMOLO ARM
1 The tremolo arm employs a snap-in/snap-out design. Hold the corner of
the tremolo arm, and press it fi rmly into the arm socket of the base plate.
5 4
5
string stopper bolt
6
fi ne tuning bolt
7
tremolo spring
8
spring lock
7
8
※ a si 8NEGE eht no dellatsni .reV iL namreH III EGDE eht fo mra olomert ehT
screw-in type.
After inserting the tremolo arm into the arm socket, rotate it to fasten it in
place.
2 To adjust the tightness of the tremolo arm, use an HEX key wrench (2 mm) to adjust
the torque adjustment screw via the adjustment hole on the side of the tremolo block.
Tightening the torque adjustment screw clockwise will make the tremolo arm
tighter; loosing the screw will make the arm looser.
3 To adjust the height of the tremolo arm, remove the tremolo spring cover on the back
of the guitar and use an HEX key wrench (3 mm) to turn the height adjustment screws
located on the bottom of the tremolo block. Tightening the screws clockwise will
increase the height.
Memo
In addition to the one described above, the tremolo arm also has a torque adjustment screw located at •
the bottom of the tremolo block.
The torque adjustment screw at the bottom of the tremolo block is already adjusted when the guitar is
shipped from the factory; if it should require adjustment, remove the tremolo unit from the guitar and
then adjust the screw.
Before attaching the tremolo arm, make sure that the torque adjustment screw has not come loose or fallen out.•
50
Page 83
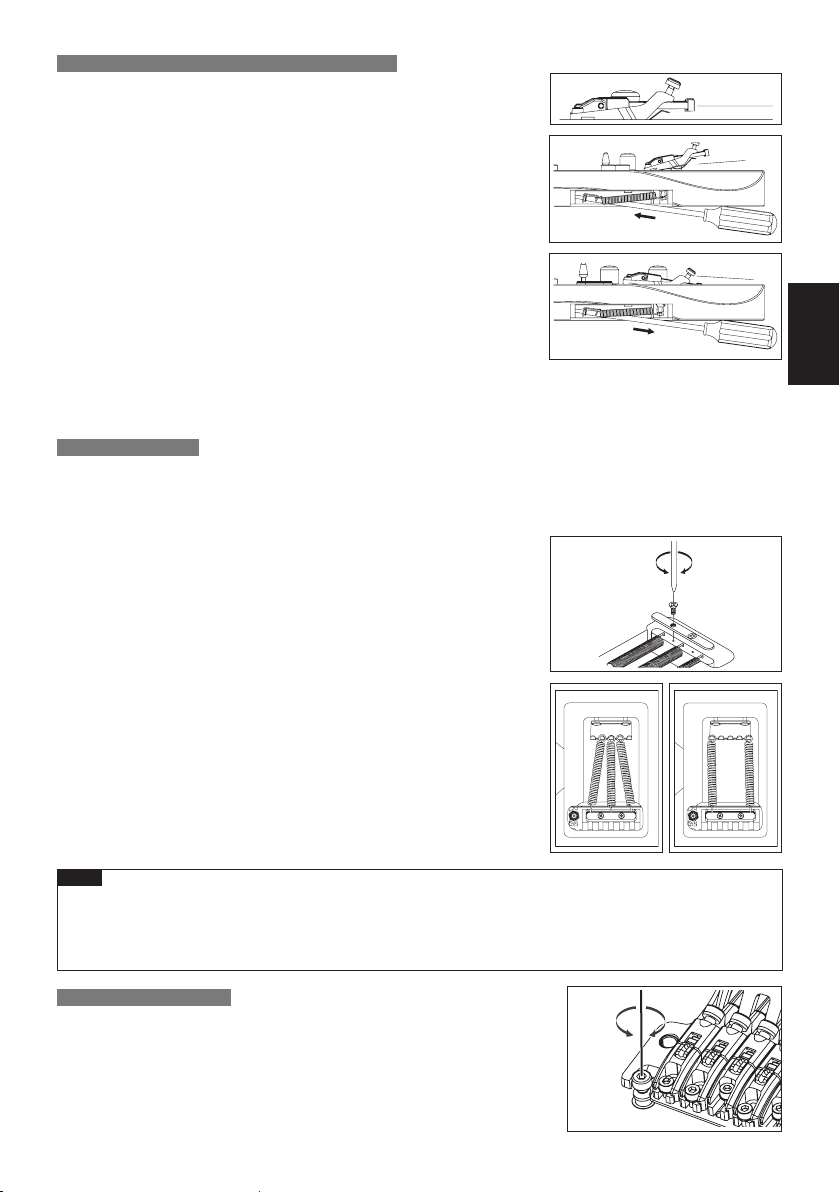
ADJUSTING THE TREMOLO ATTACHMENT ANGLE
The tremolo attachment angle is adjusted by changing the balance
between the string tension and the tension of the tremolo springs
installed on the back of the guitar body. Youʼll obtain the optimal
performance by adjusting this so that the tremolo is approximately
horizontal to the surface of the guitar body.
1 With the guitar tuned correctly, check the angle of the tremolo.
If the tremolo is tilted toward the front, insert a cross slot screwdriver through
2
the slit in the tremolo spring cover on the back of the body, and tighten the
screw to increase the tension of the tremolo springs.
3
If the tremolo is tilted toward the rear, loosen the screw to decrease the ten-
sion of the tremolo springs.
The tremolo angle adjustment will affect the tuning, because the balance of tension between the strings and the ※
springs will change each time you adjust the tension of the tremolo springs. Youʼll need to tune repeatedly while
making this adjustment.
TREMOLO SPRINGS
When the guitar is shipped from the factory, it is set up with three tremolo springs installed in parallel.
If the balance of tension between the strings and the tremolo springs has changed signifi cantly, such as when
youʼve switched string gauges or are using a dropped tuning, you may need to change the number of tremolo
springs or change the way in which they are installed.
1 Use a cross slot screwdriver to remove the spring lock.
2 If you want to increase the tension, install the outer two tremolo springs
diagonally.
ENGLISH
3 If you want to decrease the tension, remove the center tremolo spring.
If you want to install four or more tremolo springs, attach them using the
screw holes that were being used to attach the spring lock. (It will no
longer be possible to attach the spring lock.)
Memo
Loosen the strings suffi ciently before you install or remove tremolo springs.•
Be aware that if you remove all of the springs, the tremolo unit will detach from the guitar.
To reattach the tremolo, insert the knife edge of the tremolo securely into the groove of the stud bolts, •
and then install the tremolo springs.
ADJUSTING THE ACTION
To adjust the height of the entire tremolo unit, use an HEX key wrench (3 mm)
to turn the stud bolts located at the left and right of the tremolo unit. (It is
not possible to make adjustments for each string individually.)
51
Page 84
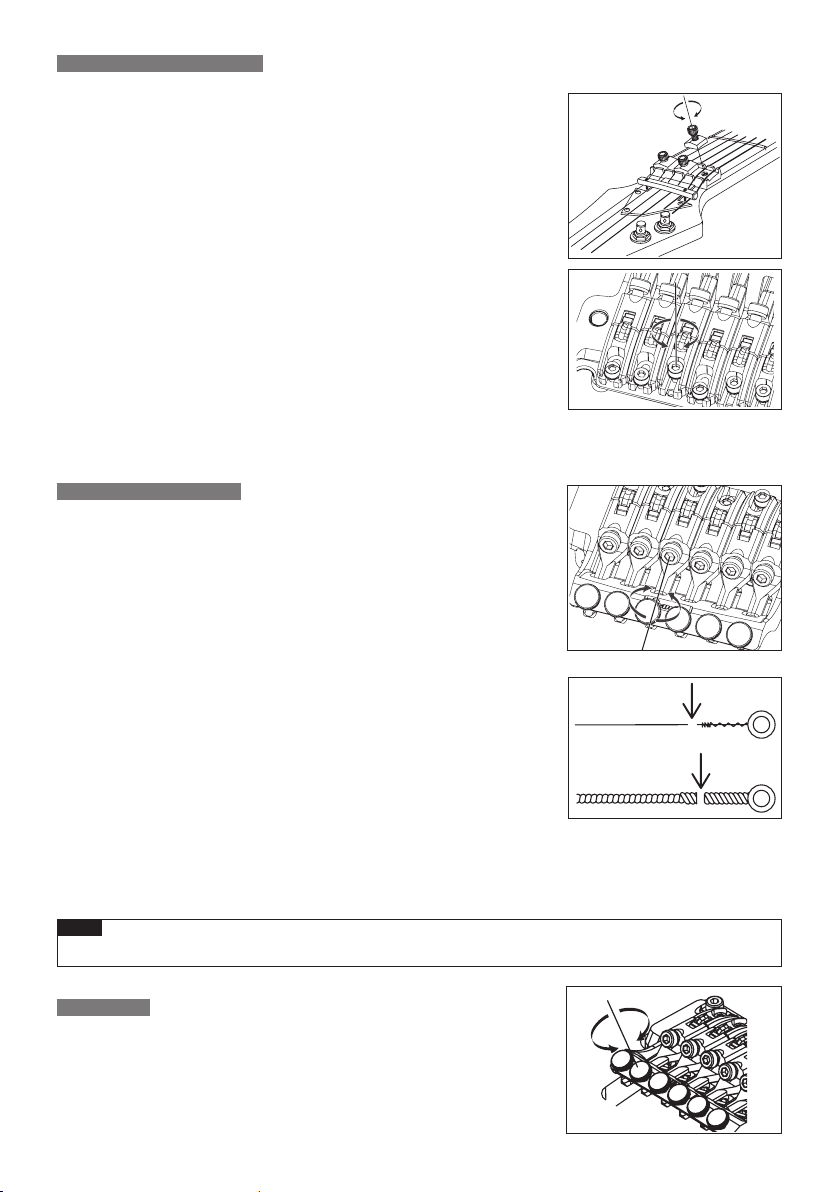
ADJUSTING THE INTONATION
1 Use an HEX key wrench (3 mm) to loosen the pressure pad bolts of the locking
nut, and loosen the strings suffi ciently.
2 Use an HEX key wrench (2 mm) to loosen the saddle lock bolts, and adjust the
saddle position.
Before checking the intonation, fi rmly tighten the saddle lock bolts and tune the guitar correctly. When youʼve
fi nished making adjustments, tighten the saddle lock bolts and the pressure pad bolts of the locking nut.
REPLACING THE STRINGS
1 Use an HEX key wrench (3 mm) to loosen the pressure pad bolts of the locking
nut, and remove the string from the tuning peg.
2 Use an HEX key wrench (3 mm) to loosen the string stopper bolt of the tremolo
unit; then pull the string out of the saddle and remove it.
3 Use wire cutters to cut off the ball end of the new string.
4 Insert the tip of the string from which you cut off the ball end between the
saddle and the string holder block, and tighten the string stopper bolt to
fasten the string.
5 Wind the string onto the tuning peg, and tune it.
6
When youʼve fi nished tuning, tighten the pressure pad bolts of the locking nut.
Removing all strings at the same time will cause the tremolo attachment angle to change signifi cantly, so we rec- ※
ommend that you replace the strings one at a time. If you remove all strings at the same time, tuning will be easier
if you wedge a piece of cloth below the tremolo to secure it so that the tremolo attachment angle wonʼt change
signifi cantly.
Memo
Before you tune, make sure that the string stopper bolts are fi rmly tightened.•
FINE TUNING
Even after you've used the locking nuts to lock the strings, you can use
the fi ne tuners to fi ne-tune each string.
The range of adjustment after the strings are locked will be widest if you
leave all fi ne-tuning bolts near the center of their adjustable range before
you tune.
52
※
Page 85
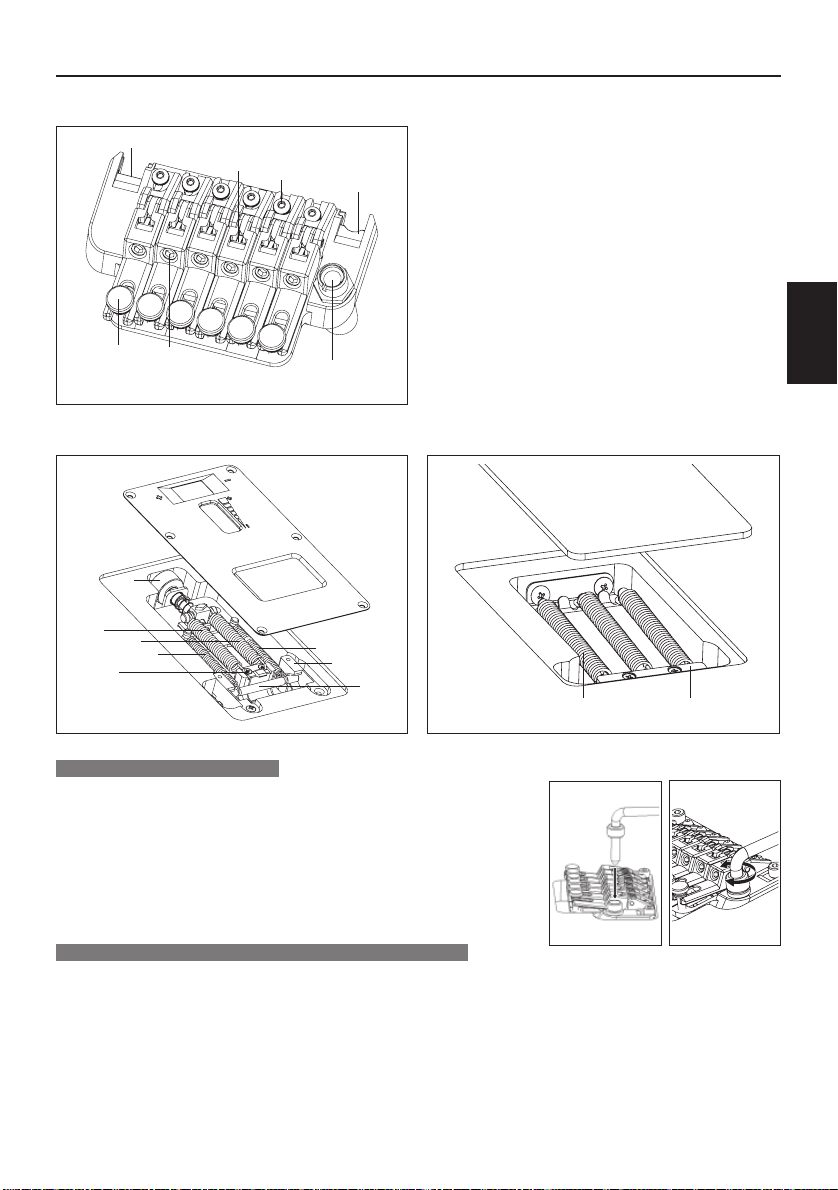
EDGE-ZERO2 TREMOLO BRIDGE
Overview■
1
6
5
3
2
1
4
Rear■ 1 Rear■ 2
B
7
7
8
A
8
9
:
1 knife edge
2 saddle lock bolt
3 string holder block
4 tremolo arm socket
5 string stopper bolt
6 fi ne tuning bolt
7 main spring
8 sub spring
9 stopper
: stop rod
A tremolo block
B spring adjustment knob
C tremolo spring
D spring lock
ENGLISH
C
D
ATTACHING THE TREMOLO ARM
1 The tremolo arm employs a one-piece snap-in design with an adjustable-
torque cap. Insert the tremolo arm into the arm socket of the base plate.
2 Tighten the torque adjustment cap to secure the tremolo arm. The tremolo
arm will become tighter as you tighten the torque adjustment cap.
TREMOLO ANGLE ADJUSTMENT / ZERO POINT SYSTEM TREMOLO
ANGLE ADJUSTMENT / ZERO POINT SYSTEM ADJUSTMENT
・ Models not equipped with the zero point system
The tremolo attachment angle is adjusted by changing the balance between the string tension and the
tension of the tremolo springs installed on the back of the guitar body. Youʼll obtain the best performance by
adjusting the tremolo arm so that it is approximately parallel with the surface of the guitar body.
53
Page 86
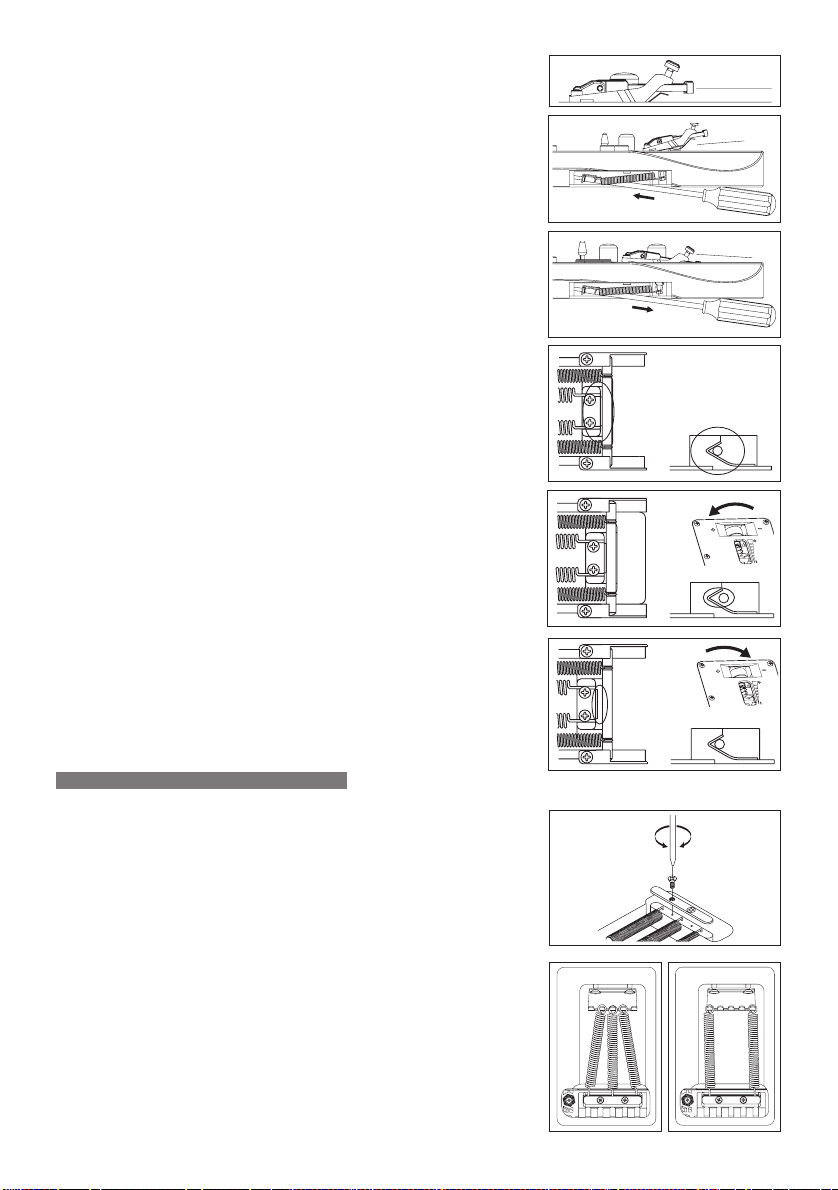
1 With the guitar tuned correctly, check the angle of the tremolo.
2 If the tremolo is tilted forward, insert a Philips screwdriver through the
slit in the tremolo spring cover on the back of the body, and tighten the
screws to increase the tension of the tremolo springs.
3 If the tremolo is tilted toward the rear, loosen the screws to weaken the
tension of the tremolo springs.
Because the balance of tension between the strings and the springs will ※
change each time y
ing the tremolo angle will affect the tuning. Youʼll need to tune the guitar
repeatedly while performing this adjustment.
ou adjust the tension of the tremolo springs, adjust-
・Models equipped with the z
ero point system
The angle at which the tremolo is attached is adjusted by the balance
between the tension of the strings and the zero point system installed
on the back of the guitar body. The Edge-Zero 2 tremolo bridge is
designed so that when the zero point system is correctly adjusted,
the tremolo will be approximately parallel with the surface of the guitar
body, and will perform optimally when in that state.
When the zero point system is correctly adjusted, the stop rod will be
in fi rm contact with the tremolo block and the stop rod will be touching
the stopper.
1 With the guitar tuned correctly, check the zero point system.
2 If the stop rod is not touching the stopper (i.e., if the tremolo block is
pushing up the stop rod), turn the spring adjustment knob located on the
back of the body toward the “plus” direction to tighten the main spring.
3 If the tremolo block is not in fi rm contact with the stop rod (i.e., if the
tremolo is tilted toward the rear), turn the spring adjustment knob toward
the “minus” direction to loosen the main spring.
TREMOLO SPRING / ZERO POINT SYSTEM
・Models not equipped with the zero point system
When shipped from the factory, the guitar is set up with three tremolo
springs installed in parallel.
If the balance of tension between the strings and the tremolo springs
has changed signifi cantly, such as when you switch to a different gauge
of strings or use a dropped tuning, you may need to change the number
of tremolo springs or change the way in which they are installed.
1 Use a Philips screwdriver to remove the spring lock.
2 If you want to increase the tension, install the outer two tremolo springs
diagonally.
3 If you want to decrease the tension, remove the center tremolo spring.
If you want to install four or more tremolo springs, attach them using the
screw holes that were being used to attach the spring lock. (It will no
longer be possible to attach the spring lock.)
54
Page 87
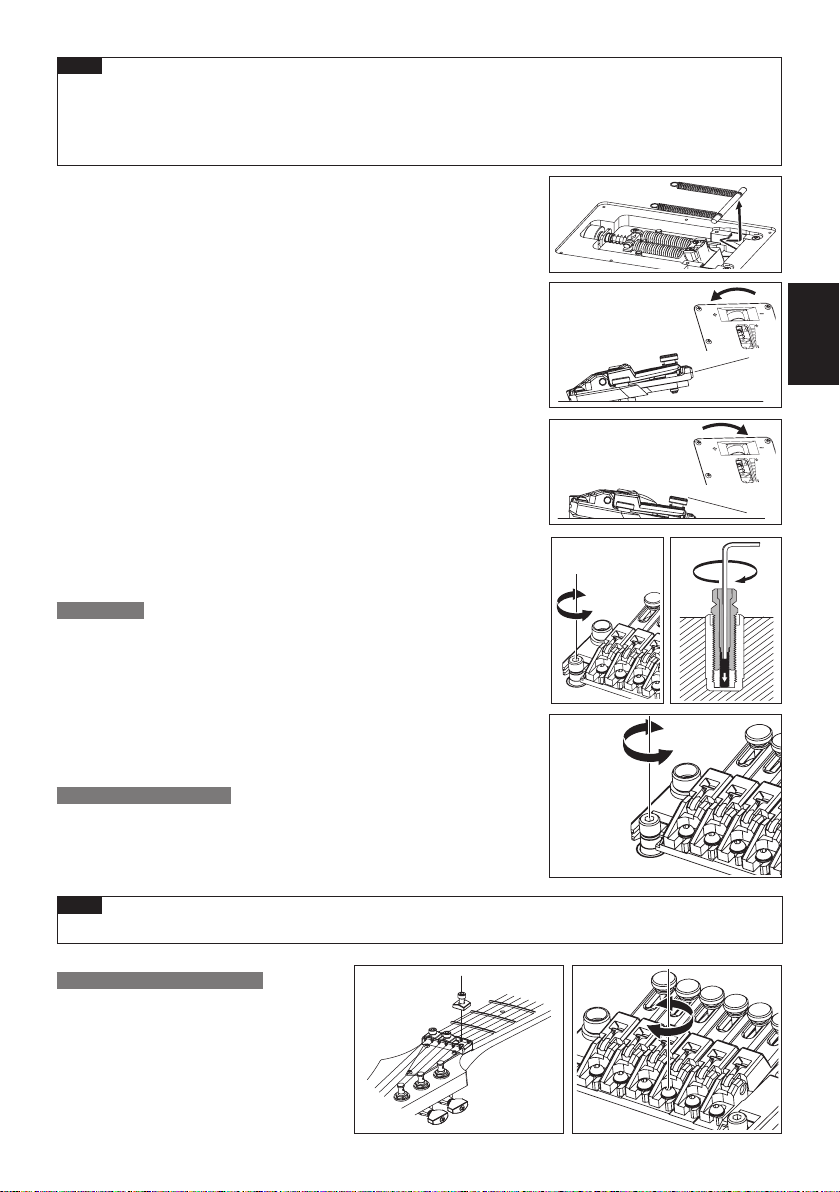
Memo
Loosen the strings suffi ciently before you install or remove tremolo springs.•
Be aware that if you remove all of the springs, the tremolo unit will detach from the guitar.
To reattach the tremolo, insert the knife edge of the tremolo securely into the groove of the stud bolts, and •
then install the tremolo springs.
・Models equipped with the zero point system
By disabling the zero point system you can use the unit as a
conventional fl oating bridge.
When the zero point system is disabled, the angle at which the tremolo
is attached will be adjusted by the balance between the tension of the
strings and the tension of the main springs attached to the tremolo
block.
For optimal performance, adjust the tremolo so that it is approximately
parallel with the surface of the guitar body.
1 While holding the arm in the upward position (i.e., with the tremolo block
away from the stop rod), remove the stop rod and the sub-spring.
2 With the guitar tuned correctly, check the angle of the tremolo.
3 If the tremolo is tilted toward the front, turn the spring adjustment knob
toward the “plus” direction to tighten the main spring.
4 If the tremolo is tilted toward the rear, turn the spring adjustment knob
toward the “minus” direction to loosen the main spring.
The tuning will be affected when you adjust the tremolo angle with the zero ※
point system disabled, because the balance between the tension of the
strings and the springs will change each time you adjust the tension of the
tremolo springs. Y
STUD LOCK
ouʼll need to tune repeatedly while making this adjustment.
The Edge-Zero2 tremolo bridge uses a stud lock mechanism.
ENGLISH
1
Insert an HEX key wrench (2 mm) through the hole in the top of the stud bolt.
2 Turn the stud lock bolt clockwise, tightening it until it contacts the anchor
nut and can no longer rotate.
The stud lock will be released when you loosen the stud lock bolt. ※
ADJUSTING THE ACTION
To adjust the height of the entire tremolo unit, use an HEX key wrench
(3 mm) to turn the stud bolts located at the left and right of the tremolo
unit. (It is not possible to make adjustments for each string individually.)
Memo
Before you tune, make sure that the string stopper bolts are fi rmly tightened.•
ADJUSTING THE INTONATION
1 Use an HEX key wrench (3 mm) to loosen
the pressure pad bolts of the locking nut,
and loosen the strings suffi ciently.
2 Use an HEX key wrench (2 mm) to loosen
the saddle lock bolts, and adjust the saddle
position.
55
Page 88
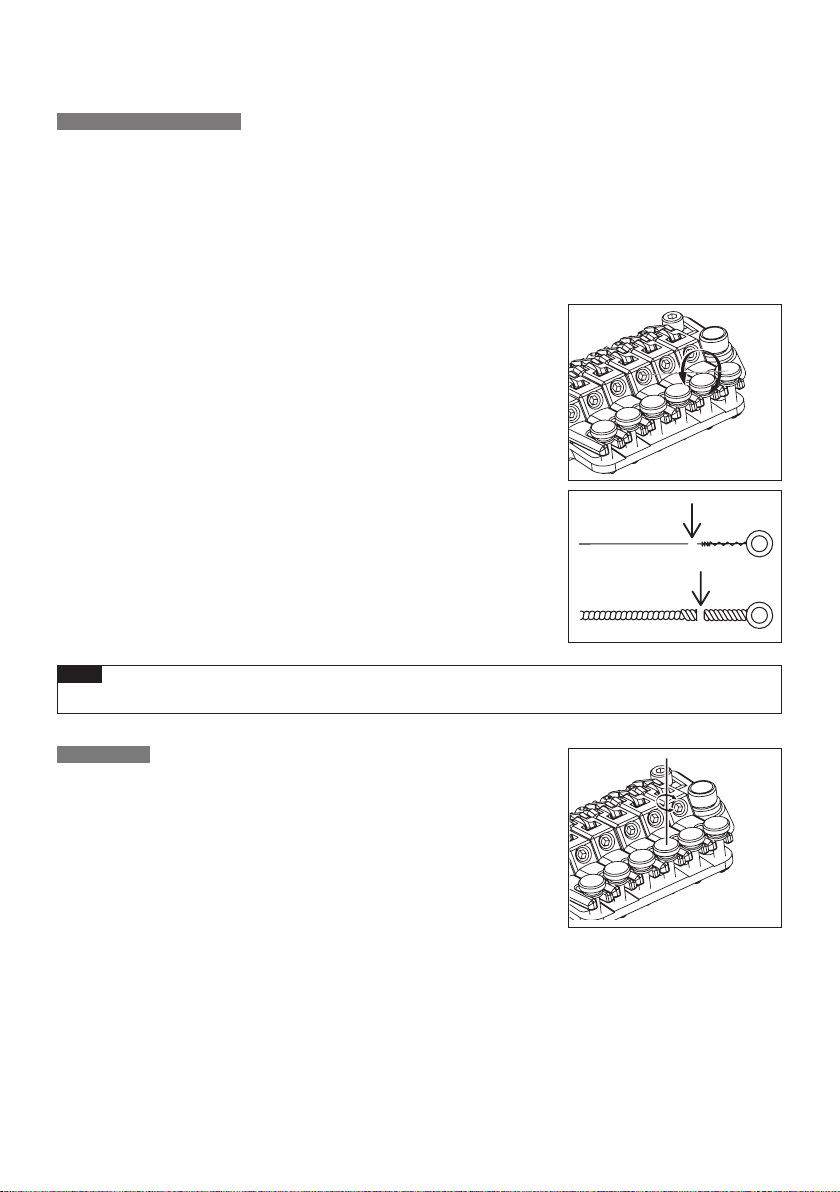
Before checking the intonation, fi rmly tighten the saddle lock bolts and tune the guitar correctly. When youʼve ※
fi nished making adjustments, tighten the saddle lock bolts and the pressure pad bolts of the locking nut.
REPLACING THE STRINGS
1 Use an HEX key wrench (3 mm) to loosen the pressure pad bolts of the locking nut, and remove the string from the
tuning peg.
2 Use an HEX key wrench (3 mm) to loosen the string stopper bolt of the tremolo unit; then pull the string out of the
saddle and remove it.
3 Use wire cutters to cut off the ball end of the new string.
4 Insert the tip of the string from which you cut off the ball end between the
saddle and the string holder block, and tighten the string stopper bolt to
fasten the string.
5 Wind the string onto the tuning peg, and tune it.
When youʼve fi nished tuning, tighten the pressure pad bolts of the locking nut.
6
On tremolo bridges not equipped with the zero cross system, removing all ※
strings at the same time will cause the tremolo attachment angle to change
signifi cantly, so we recommend that you replace the strings one at a time. If
you remove all strings at the same time, tuning will be easier if you wedge a
piece of cloth below the tremolo to secure it so that the tremolo attachment
angle wonʼt change signifi cantly.
Memo
Before you tune, make sure that the string stopper bolts are fi rmly tightened.•
FINE TUNING
Even after youʼve used the locking nuts to lock the strings, you can use the
fi ne tuners to fi ne-tune each string.
The range of adjustment after the strings are locked will be widest if you
leave all fi ne-tuning bolts near the center of their adjustable range before
you tune.
56
Page 89
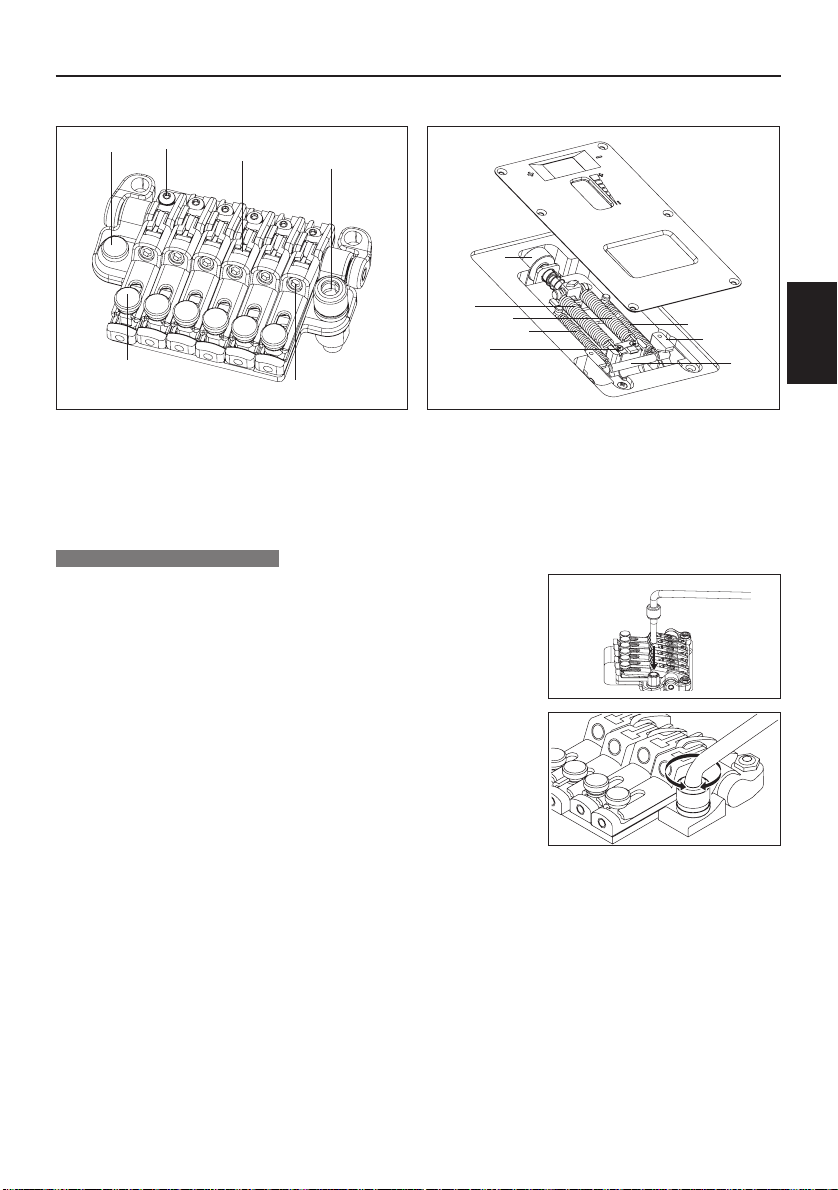
ZR TREMOLO BRIDGE
Overview■ Rear■
1
6
5
2
3
4
B
ENGLISH
7
7
8
A
8
9
:
1 saddle lock bolt
2 string holder block
3 tremolo arm socket
4 string stopper bolt
5 fi ne tuning bolt
6 intonation adjustment bolt
7 main spring
8 sub spring
9 stopper
: stop rod
A tremolo block
B spring adjustment knob
ATTACHING THE TREMOLO ARM
1 The tremolo arm employs a one-piece snap-in design with an adjustable-
torque cap. Insert the tremolo arm into the arm socket of the base plate.
2 Tighten the torque adjustment cap to secure the tremolo arm. The tremolo
arm will become tighter as you tighten the torque adjustment cap.
57
Page 90
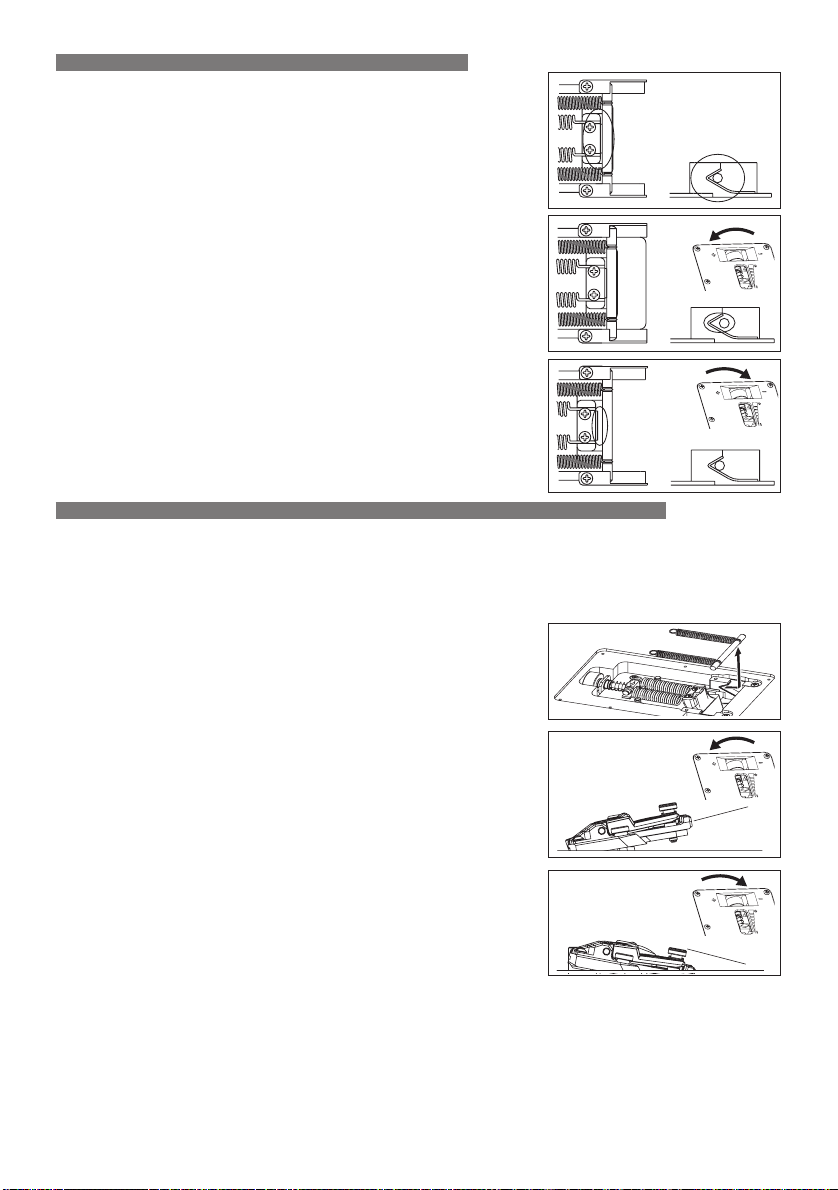
ANGLE ADJUSTMENT / ZERO POINT SYSTEM ADJUSTMENT
The tremolo attachment angle is adjusted by changing the balance between
ing tension and the tension of the zero point system installed on
the str
the back of the guitar body. The ZR tremolo bridge is designed so that the
tremolo will be approximately parallel with the surface of the guitar body
when the zero point system is adjusted correctly, and will perform optimally
in this state. When the zero point system is correctly adjusted, the stop rod
will be in fi rm contact with the tremolo block and the stop rod will be touching
the stopper.
With the guitar tuned correctly, check the zero point system.
1
2 If the stop rod is not touching the stopper (i.e., if the tremolo block is
pushing up the stop rod), turn the spring adjustment knob located on the
back of the body toward the “plus” direction to tighten the main spring.
3 If the tremolo b
tremolo is tilted toward the rear), turn the spring adjustment knob toward
the “minus” direction to loosen the main spring.
DISABLING THE ZERO POINT SYSTEM (USING THE UNIT AS A
DISABLING THE ZERO POINT SYSTEM (USING THE UNIT AS A CONVENTIONAL FLOATING
By disabling the zero point system you can also use the unit as a conventional fl oating bridge.
When the z
between the tension of the strings and the tension of the main springs attached to the tremolo block.
For optimal performance, adjust the tremolo so that it is approximately parallel with the surface of the guitar body.
While holding the arm in the upward position (i.e., with the tremolo block
1
away from the stop rod), remove the stop rod and the sub-spring.
2 With the guitar tuned correctly, check the angle of the tremolo.
3 If the tremolo is tilted toward the front, turn the spring adjustment knob
ward the “plus” direction to tighten the main spring.
to
4 If the tremolo is tilted to
toward the “minus” direction to loosen the main spring.
lock is not in fi rm contact with the stop rod (i.e., if the
ero point system is disabled, the angle at which the tremolo is attached will be adjusted by the balance
ward the rear, turn the spring adjustment knob
※The tuning will be affected when you adjust the tremolo angle with the zero point system disabled, because the
balance between the tension of the strings and the springs will change each time you adjust the tension of the
tremolo springs. Youʼll need to tune repeatedly while making this adjustment.
58
Page 91
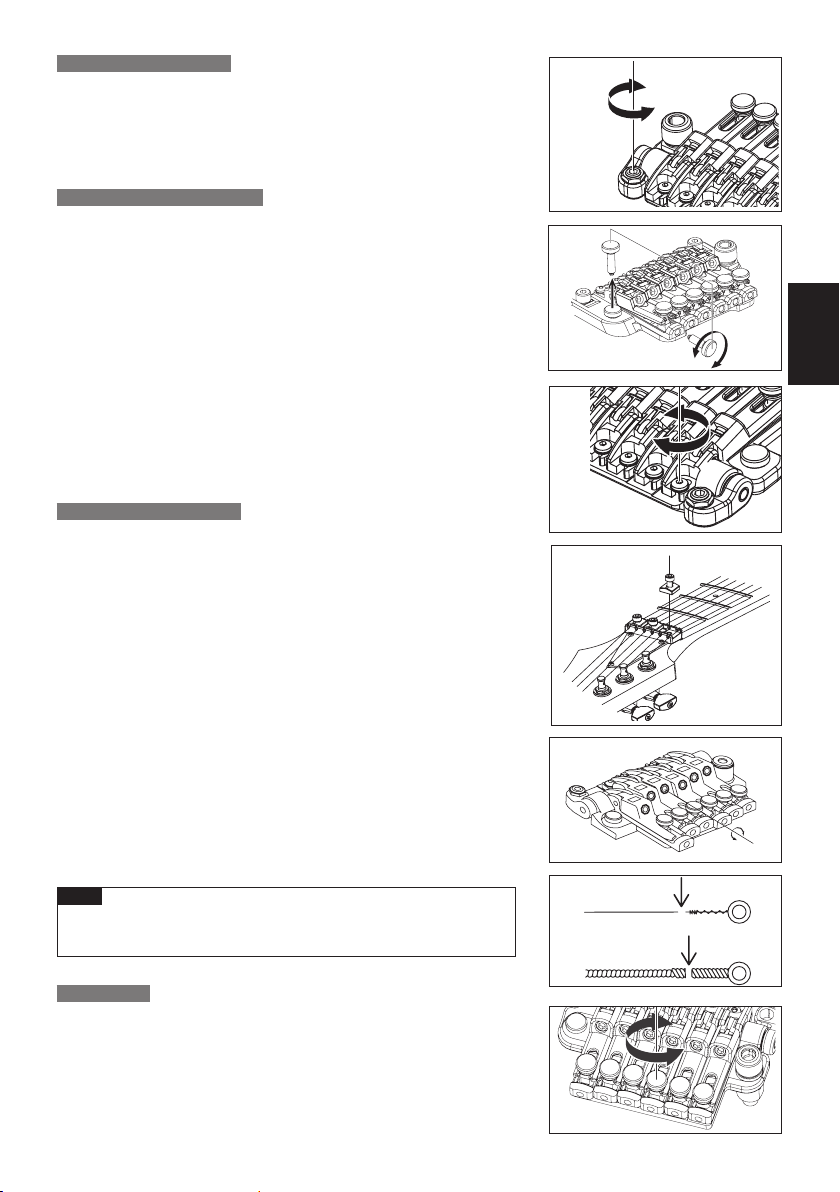
ADJUSTING THE ACTION
To adjust the height of the entire tremolo unit, use an HEX key wrench
(3 mm) to turn the stud bolts located at the left and right of the tremolo
unit. (It is not possible to make adjustments for each string individually.)
ADJUSTING THE INTONATION
1 Remove the intonation adjustment bolts stored inside the tremolo unit, and
screw them into the adjustment holes at the back of the saddle until the
tip of each bolt contacts the wall of the tremolo unit.
2 Use an HEX key wrench (2 mm) to loosen the saddle lock bolt, and turn
the intonation adjustment bolt to adjust the saddle position.
Before checking the intonation, fi rmly tighten the saddle lock bolts and ※
tune the guitar correctly. Before tuning, use an HEX key wrench (3 mm)
to loosen the pressure pad bolts of the locking nut. When youʼve fi nished
making adjustments, tighten the saddle lock bolts and the pressure pad
bolts of the locking nut, and store the intonation adjustment bolts inside
the tremolo unit.
REPLACING THE STRINGS
1 Use an HEX key wrench (3 mm) to loosen the pressure pad bolts of the
locking nut, and remove the string from the tuning peg.
2 Use an HEX key wrench (3 mm) to loosen the string stopper bolt of the
tremolo unit; then pull the string out of the saddle and remove it.
3 Use wire cutters to cut off the ball end of the new string.
4 Insert the tip of the string from which you cut off the ball end between the
saddle and the string holder block, and tighten the string stopper bolt to
fasten the string.
5 Wind the string onto the tuning peg, and tune it.
ENGLISH
6
When youʼve fi nished tuning, tighten the pressure pad bolts of the locking nut.
Memo
Before you tune, make sure that the string stopper bolts are fi rmly •
tightened.
FINE TUNING
Even after youʼve used the locking nuts to lock the strings, you can use
the fi ne tuners to fi ne-tune each string.
The range of adjustment after the strings are locked will be widest if
you leave all fi ne-tuning bolts near the center of their adjustable range
before you tune.
59
Page 92
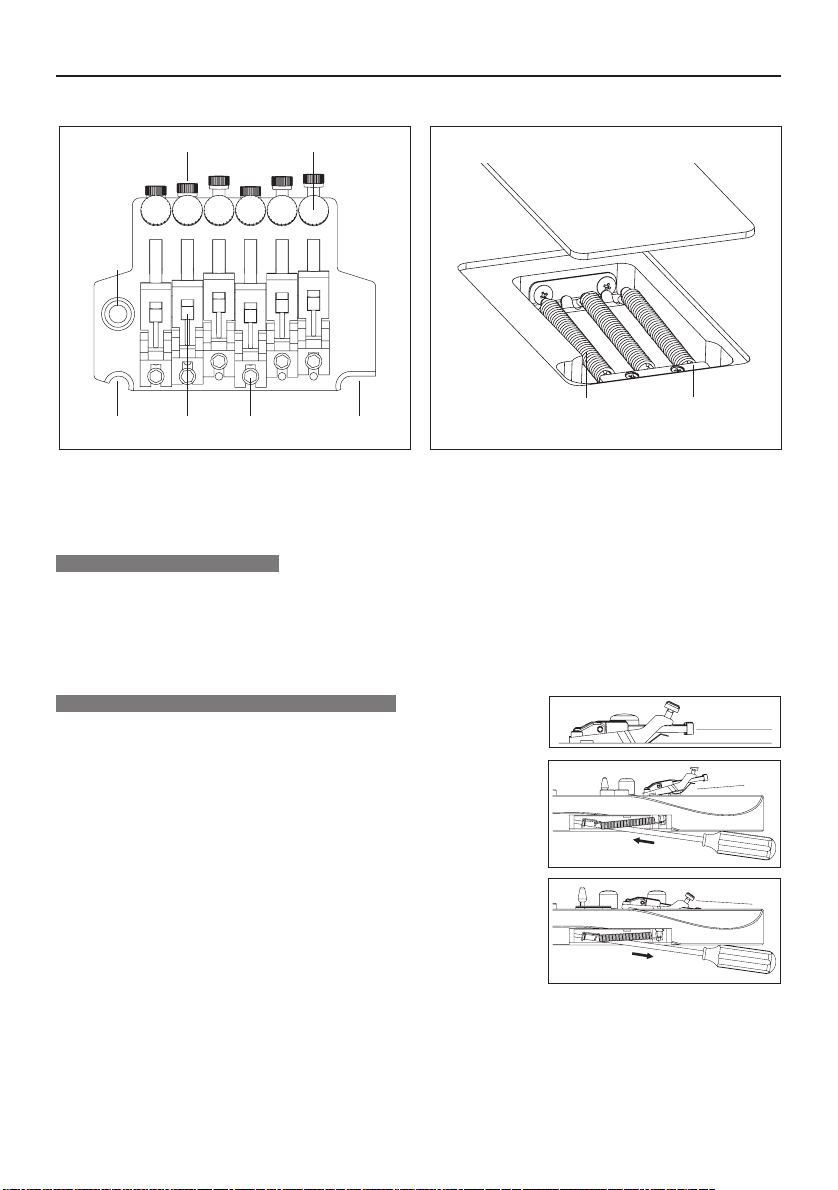
STD-DL TREMOLO BRIDGE
Overview■ Rear■
56
4
1
1 knife edge
2 saddle lock bolt
3 string holder block
4 tremolo arm socket
ATTACHING THE TREMOLO ARM
1 The tremolo arm employs a one-piece snap-in design with an adjustable-torque cap.
Insert the tremolo arm into the arm socket of the base plate.
2 Tighten the torque adjustment cap to secure the tremolo arm.
The tremolo arm will become tighter as you tighten the torque adjustment cap.
ADJUSTING THE TREMOLO ATTACHMENT ANGLE
123
5 string stopper bolt
6 fi ne tuning bolt
7 tremolo spring
8 spring lock
The tremolo attachment angle is adjusted by changing the balance
between the string tension and the tension of the tremolo springs
installed on the back of the guitar body.
Yo u ʼll obtain the optimal performance by adjusting this so that the
tremolo is approximately horizontal to the surface of the guitar body.
1 With the guitar tuned correctly, check the angle of the tremolo.
2 If the tremolo is tilted toward the front, insert a Philips screwdriver through
the slit in the tremolo spring cover on the back of the body, and tighten the
screw to increase the tension of the tremolo springs.
If the tremolo is tilted toward the rear, loosen the screw to decrease the ten-
3
sion of the tremolo springs.
7
8
The tremolo angle adjustment will affect the tuning, because the balance of tension between the strings and the ※
springs will change each time you adjust the tension of the tremolo springs. Youʼll need to tune repeatedly while
making this adjustment.
60
Page 93
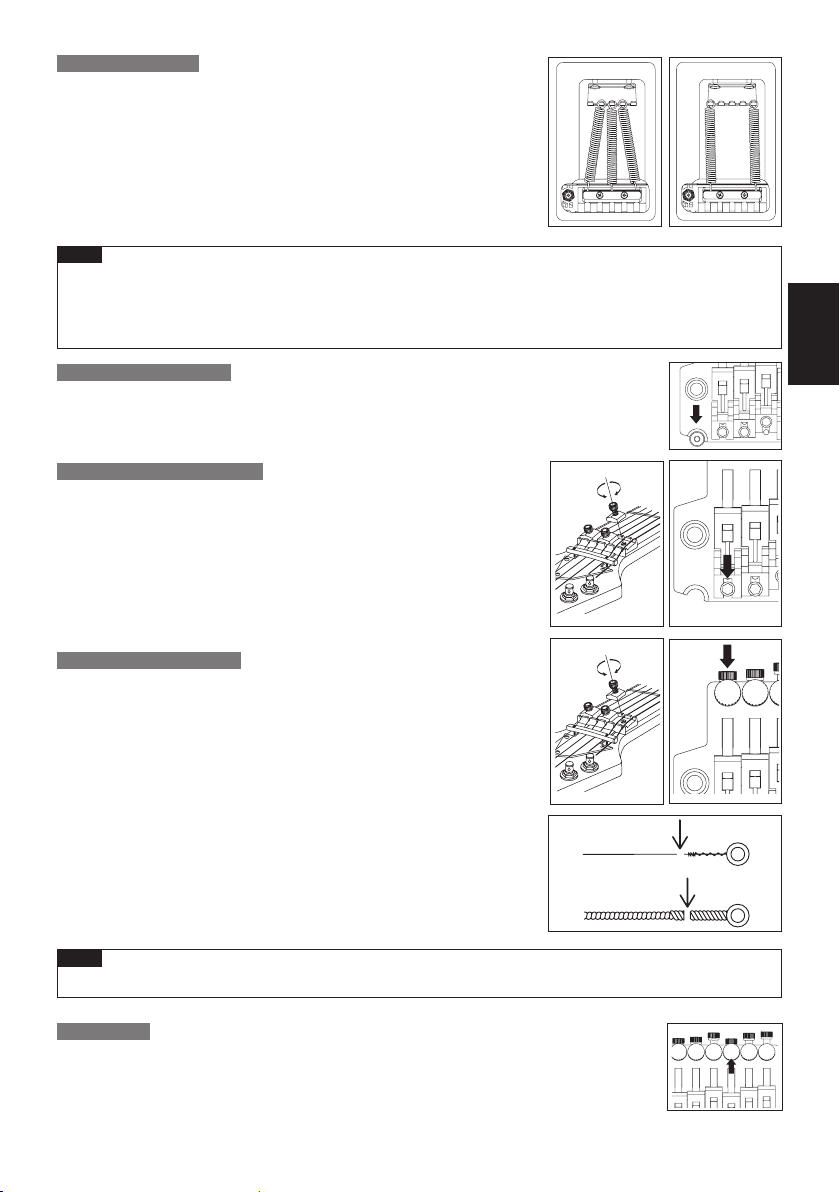
TREMOLO SPRINGS
When the guitar is shipped from the factory, it is set up with three tremolo
springs installed in parallel.
If the balance of tension between the strings and the tremolo springs has
changed signifi cantly, such as when youʼve switched string gauges or are
using a dropped tuning, you may need to change the number of tremolo
springs or change the way in which they are installed.
1 If you want to increase the tension, install the outer two tremolo springs
diagonally.
2 If you want to decrease the tension, remove the center tremolo spring.
Memo
Loosen the strings suffi ciently before you install or remove tremolo springs.•
Be aware that if you remove all of the springs, the tremolo unit will detach from the guitar.
To reattach the tremolo, insert the knife edge of the tremolo securely into the groove of the stud bolts, •
and then install the tremolo springs.
ADJUSTING THE ACTION
To adjust the height of the entire tremolo unit, use an HEX key wrench (3mm) to turn the stud
bolts located at the left and right of the tremolo unit. (It is not possible to make adjustments
for each string individually.)
ADJUSTING THE INTONATION
1 Use an HEX key wrench (3 mm) to loosen the pressure pad bolts of the locking
nut, and loosen the strings suffi ciently.
2 Use an HEX key wrench (2 mm) to loosen the saddle lock bolts, and adjust
the saddle position.
Before checking the intonation, fi rmly tighten the saddle lock bolts and ※
tune the guitar correctly. When youʼve fi nished making adjustments,
tighten the saddle lock bolts and the pressure pad bolts of the locking nut.
ENGLISH
REPLACING THE STRINGS
1 Use an HEX key wrench (3 mm) to loosen the pressure pad bolts of the
locking nut, and remove the string from the tuning peg.
2 Use an HEX key wrench (3 mm) to loosen the string stopper bolt of the
tremolo unit; then pull the string out of the saddle and remove it.
3 Use wire cutters to cut off the ball end of the new string.
4 Insert the tip of the string from which you cut off the ball end between the
saddle and the string holder block, and tighten the string stopper bolt to
fasten the string.
5 Wind the string onto the tuning peg, and tune it.
6
When youʼve fi nished tuning, tighten the pressure pad bolts of the locking nut
Removing all strings at the same time will cause the tremolo attachment ※
angle to change signifi cantly, so we recommend that you replace the
strings one at a time. If you remove all strings at the same time, tuning will
be easier if you wedge a piece of cloth below the tremolo to secure it so
that the tremolo attachment angle wonʼt change signifi cantly.
Memo
.
Before you tune, make sure that the string stopper bolts are fi rmly tightened.•
FINE TUNING
Even after youʼve used the locking nuts to lock the strings, you can use
the fi ne tuners to fi ne-tune each string.
The range of adjustment after the strings are locked will be widest if you leave all fi ne-tuning
bolts near the center of their adjustable range before you tune.
61
Page 94
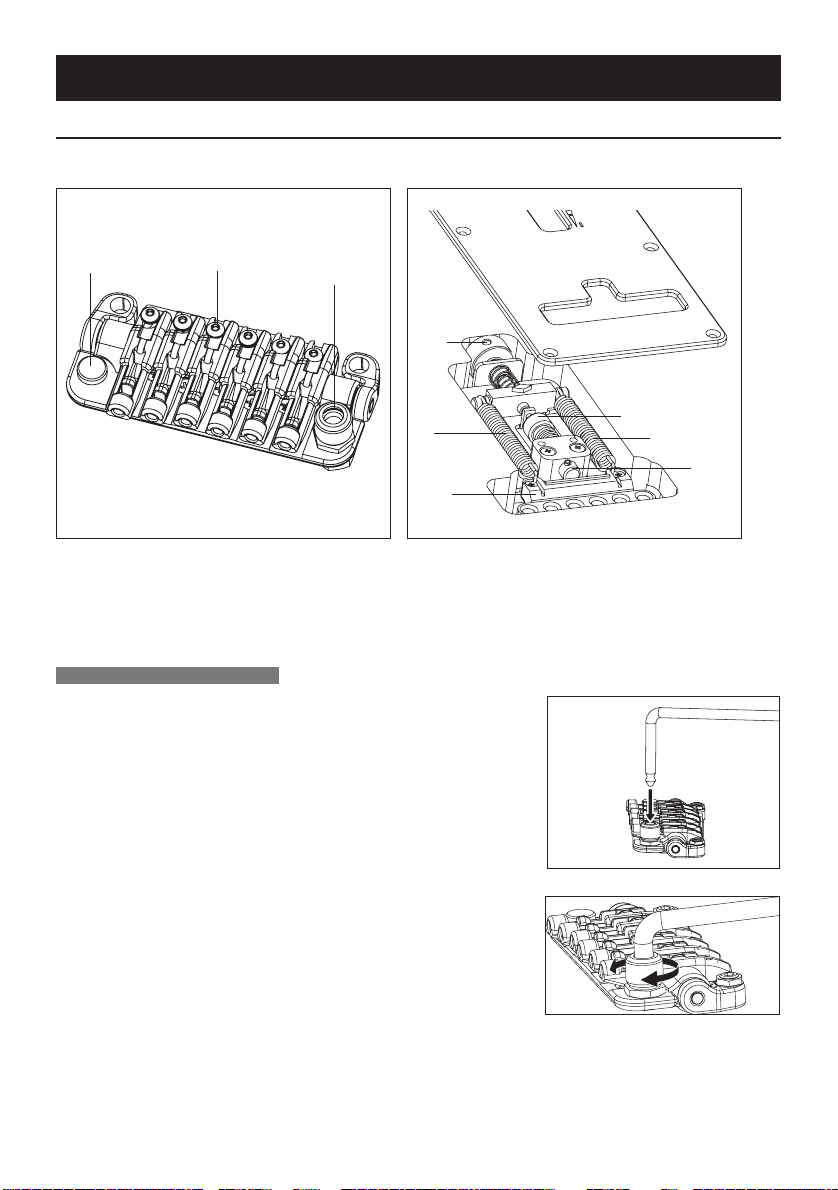
Non Locking Tremolo
SynchroniZR
Overview■ Rear■
3
1Saddlelockbolt
2Tremoloarmsocket
3Intonationadjustmentbolt
ATTACHING THE TREMOLO ARM
1 The tremolo ar
Holding the corner of the tremolo arm, press it fi rmly into the arm socket
of the base plate until it clicks into place.
1
m employs a snap-in design.
2
8
4
7
4Tremolospring
5Tremoloblockstopper
6Tremoloblockstopperknob
7Tremoloblock
8Springadjustmentknob
6
4
5
2 The tightness of the tremolo arm can be adjusted by the torque
adjustment cap. Turning the cap clockwise will make the arm tighter, and
turning it counterclockwise will make the arm looser.
62
Page 95
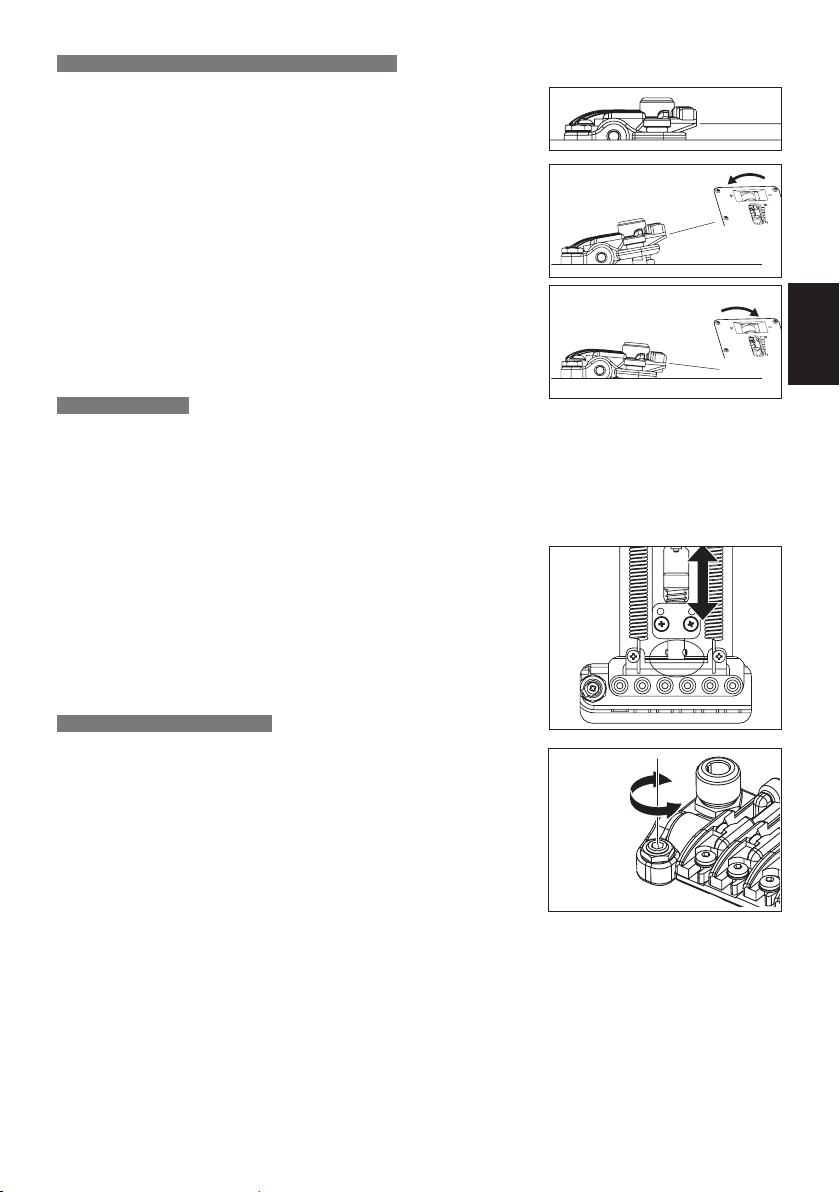
ADJUSTING THE TREMOLO ATTACHMENT ANGLE
Theangleatwhichthetremoloisattachedisadjustedbythebalance
betweenthetensionofthestringsandthetensionofthetremolo
springsinstalledinthebackoftheguitarbody.
Thetremolowillperformoptimallywhenadjustedsothatitis
approximatelyparallelwiththesurfaceoftheguitarbody.
1 With the guitar tuned correctly, check the angle of the tremolo.
2 If the tremolo is tilted forward, turn the spring adjustment knob located on
the back of the body toward the “plus” direction to tighten the tremolo
springs.
3 bonk tnemtsujda gnirps eht nrut ,raer eht drawot detlit si olomert eht fI
toward the “minus” direction to loosen the tremolo springs.
Becausethebalanceoftensionbetweenthestringsandthespringswillchange※
eachtimeyouadjustthetensionofthetremolosprings,adjustingthetremolo
angleinthefloatingstatewillaffectthetuning.Youʼllneedtotunetheguitar
repeatedlywhileperformingthisadjustment.
ARM-UP STOPPER
TheSynchroniZRhasanarm-upstopperfeature.Thisfeaturedisablesthefloatingstatebylockingthearmuprangeofmovement.
1 Make sure that the tremolo is adjusted so that it is approximately parallel with the surface of the guitar body.
2 stcatnoc reppots pu-mra eht fo pit eht taht os bonk reppots pu-mra eht nrut dna ,revoc gnirps olomert eht evomeR
the tremolo block.
3 nrut dna ,ydob ratiug eht fo ecafrus eht htiw lellarap yletamixorppa si olomert eht taht ta
the spring adjustment knob several times in the “plus” direction.
Ifthetremolospringtensionistooweak,thetremoloblockwillbe※
pulledbythestrings,possiblycausingthetuningtobeunstable.Ifyou
experiencethisproblemwhiletuning,turnthespringadjustmentknob
evenfartherinthe“plus”direction.
ht erus ekam niaga ecnO
ENGLISH
STRING HEIGHT ADJUSTMENT
Toadjustthestringheight,adjusttheheightoftheentiretremolo
unitbyusinganHEXkeywrench(3mm)toturnthestudboltslocatedat
theleftandrightofthetremolounit.(Itisnotpossibletoindividually
adjusttheheightofeachstring.)
63
Page 96
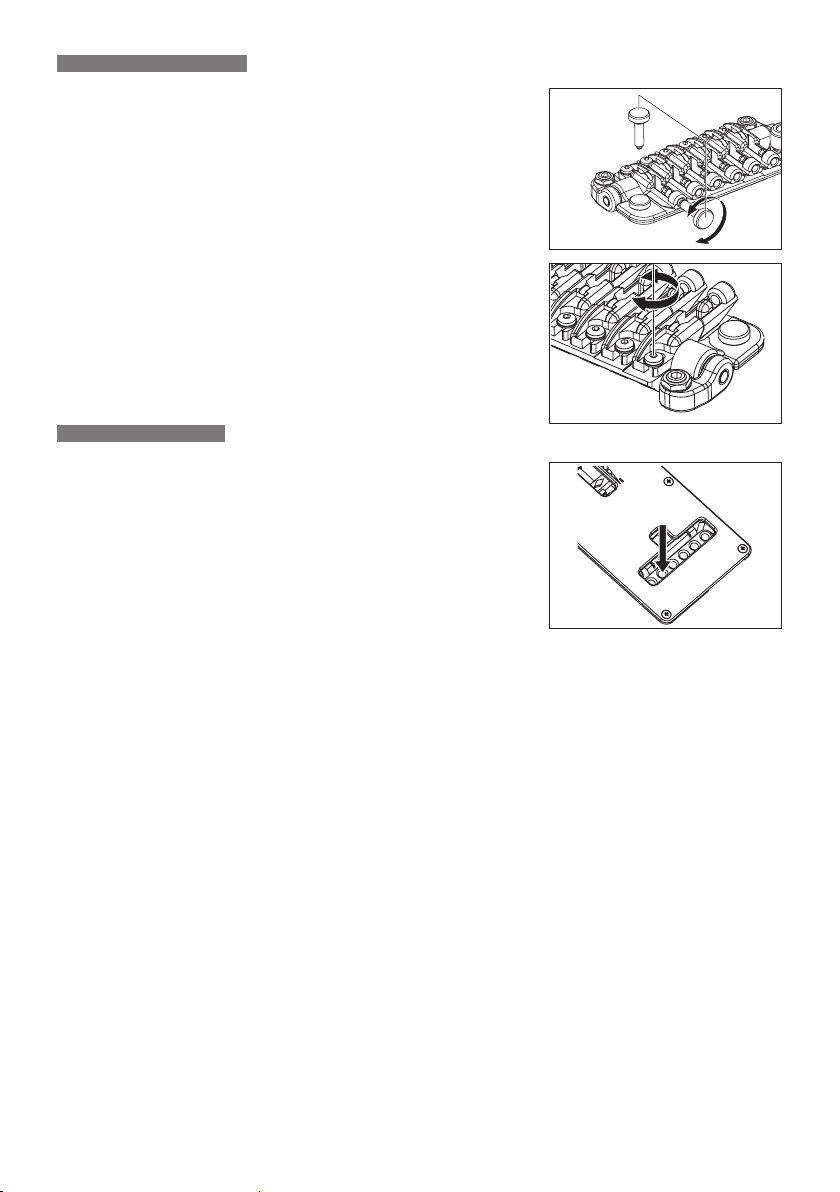
INTONATION ADJUSTMENT
1 Remove the intonation adjustment bolts stored in the tremolo unit, and
screw them into the adjustment holes at the rear of the saddle until the
bolt tips touch the wall of the tremolo unit.
2 Use an HEX key wrench (2 mm) to loosen the saddle lock bolt, and turn the
intonation adjustment bolt to adjust the saddle position.
Beforecheckingtheintonation,firmlytightenthesaddlelockboltsand※
tunetheguitarcorrectly.Whenyouʼvefinishedmakingadjustments,
tightenthesaddlelockboltsandthepressurepadboltsofthelocking
nut,andstoretheintonationadjustmentboltsinsidethetremolounit.
STRING REPLACEMENT
Installnewstringsbypassingthemthroughthetremoloblockfrom
thebacksideoftheguitarbody.
64
Page 97
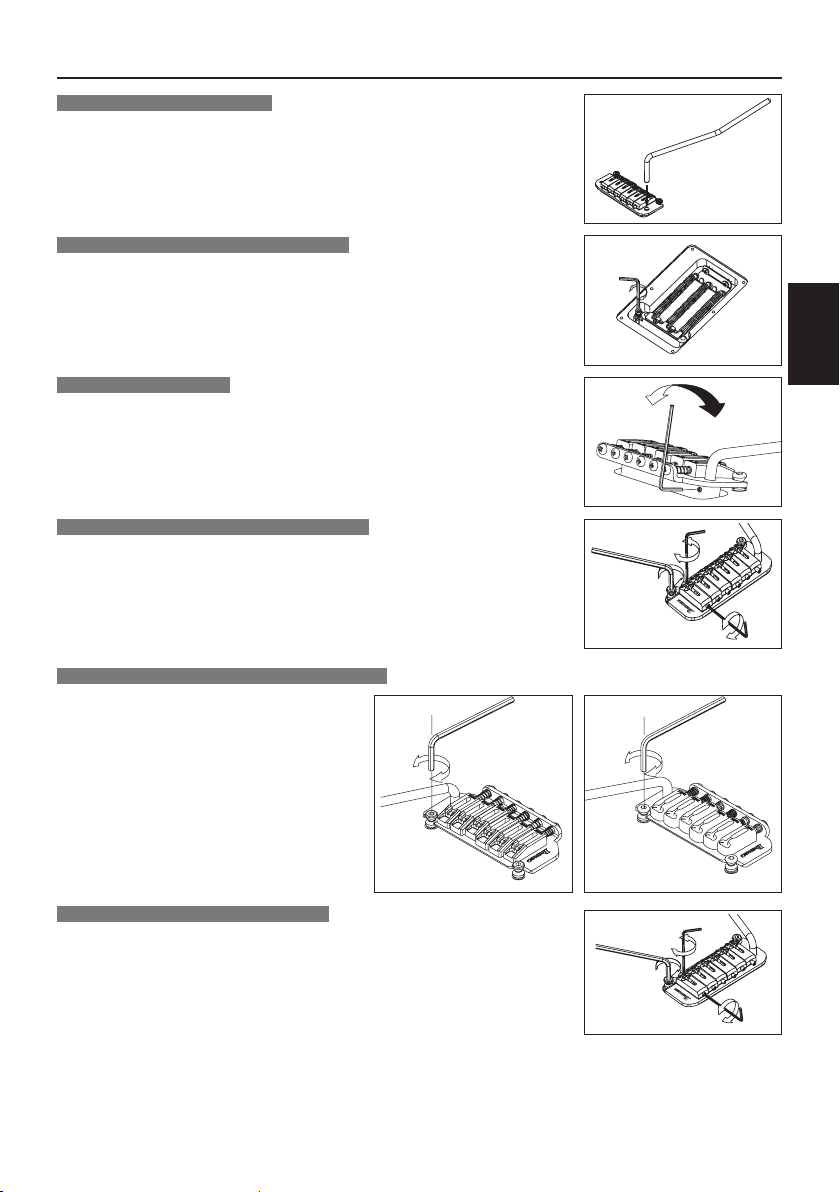
FAT/SAT/STD TREMOLO
TREMOLO ARM INSTALLATION
The tremolo arm can be inserted and removed very easily. Insert the arm
into the armhole on the tremolo base plate. Pull up on the arm to remove it.
TREMOLO ARM ADJUSTMENT (SAT PRO2)
To adjust the height of the arm, remove the tremolo spring cover from
the back of the guitar, and use a 3 mm HEX key wrench to turn the height
adjustment screw attached to the bottom of the tremolo block. Tightening this
in the clockwise direction will raise the height.
ARM ROTATION TORQUE
The rotation torque of the arm can be adjusted by raising the tremolo and
inserting a 1.5mm HEX key in the screw (A) on the tremolo block,
Turning this screw clockwise will tighten the arm torque and turning the
screw counter clockwise will loosen the arm torque.
ENGLISH
(A)
ADJUSTING THE STRING HEIGHT (SAT PRO2)
To adjust the action of each string, use a 1.5 mm HEX key wrench to turn the screw on
the saddle (C). The overall height can be adjusted on either side of the SAT PRO2 tremolo
unit. To adjust the height, use a 3 mm HEX key wrench to turn the stud (D) located on
either side of the unit. Use caution when adjusting the height of the entire tremolo unit;
adjust both sides to the same height to ensure optimum tremolo operation.
ADJUSTING THE STRING HEIGHT (FAT10/SAT10)
The height adjustment of the tremolo can be
raised or lowered by adjusting the pivot studs
(C)
(C) that the tremolo mounts on. These are
located at either side of the front of the bridge.
Clockwise lowers the tremolo and counter
clockwise raises the tremolo.
FAT10
INTONATION ADJUSTMENT (SAT PRO2)
To adjust the intonation, use a 1.5 mm HEX key wrench to turn the screw
located at the rear of the saddle (E). Turn the screw clockwise to move the
saddle toward the rear, or counter-clockwise to move the saddle forward.
(C)
(D)
(E)
(C)
SAT10
(C)
(D)
(E)
SAT PRO2
65
Page 98
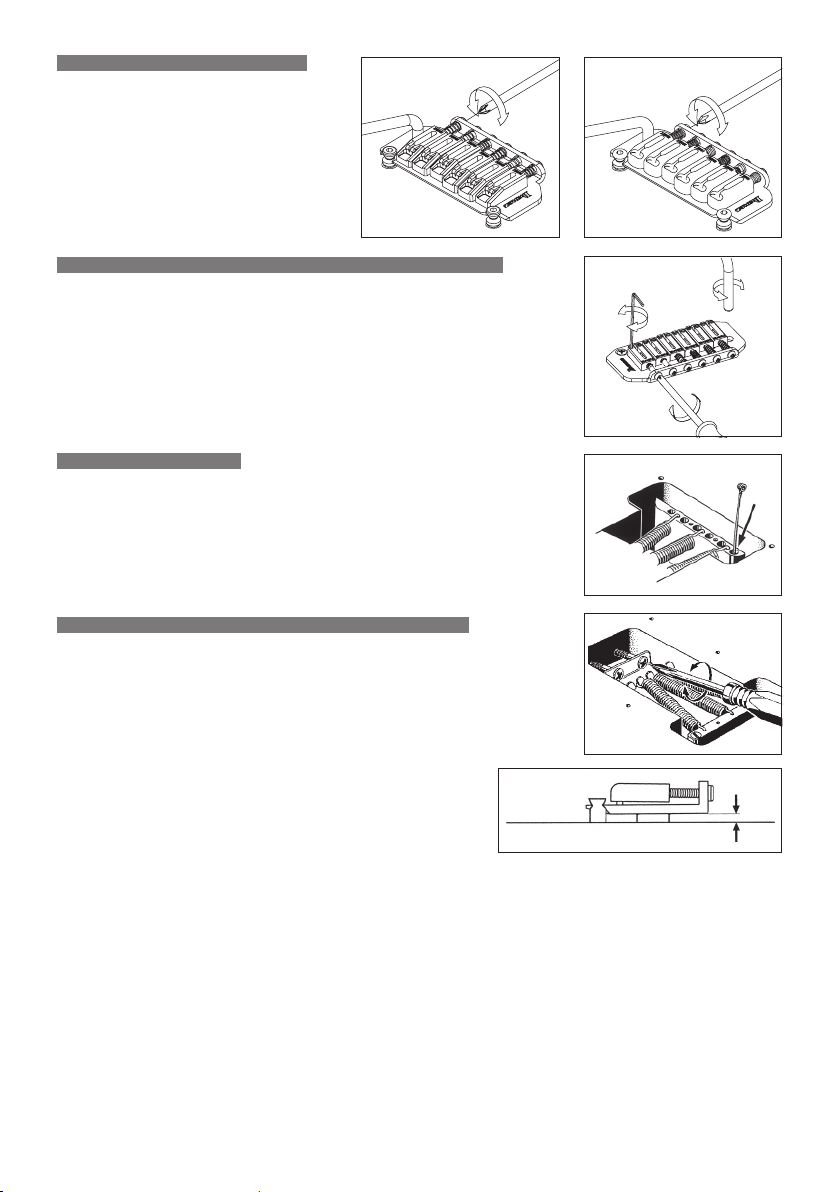
INTONATION ADJUSTMENT (FAT10/SAT10)
The intonation can be adjusted
by adjusting the saddle forward
or backward using a cross slot
screwdriver (+) on the intonation
adjustment screw at the rear of the
bridge.
FAT10 SAT10
ADJUSTING THE INTONATION & THE STRING HEIGHT (FAT 6/STD)
The intonation can be adjusted by adjusting the saddle forward or
backward using a cross slot screwdriver (+) at the rear of the bridge.
String height is controlled by raising or lowering the small allen
screws using a wrench on either side of the saddle.
REPLACING THE STRINGS
To replace strings, thread the new strings through the string holes
located on the back of the guitar. The strings are then threaded through
the tremolo block and up and over the saddle.
FAT/SAT (EXPECT FAT6) ADJUSTING THE TREMOLO SPRING
A standard tremolo can be adjusted so that the pitch can be raised
when the tremolo arm is pulled up to loosen the tremolo springs located
under the tremolo cavity on the back of the guitar. One disadvantage of
this procedure is that it can cause the pitch to go sharp if string breaks.
To remedy this, adjust the tremolo plate so it sits fl ush on the body by
tightening the tremolo springs. Choose the number and placement of
the tremolo springs according to the string gauge and the
tremolo adjustment .
66
Floating PARALLEL
Page 99

Wartung
DEUTSCH WARTUNGS- UND PFLEGEHINWEISE
ANBAUTEN
Multi-
PREMIUM-Serie Edge-Tremolosteg
PREMIUM-Serie Edge-Zero II mit
ZPS
PREMIUM-Serie ZR-Tremolosteg
mit ZPS2
PREMIUM-Serie Tight-End-R-Steg ○
Edge-III-Tremolosteg ○ ○○○○
Edge-Zero II mit ZPS ○ ○ ○○
Edge-Zero II ohne ZPS ○ ○ ○○
FAT6-Tremolosteg ○ ○ ○○
FAT10-Tremolosteg ○ ○ ○○
FX-Edge-III-Steg ○○○
FX-Edge-III-8-Steg ○○○
Gibraltar Standardsteg 6/7/8 -Steg ○ ○ ○
SAT10-Tremolosteg ○ ○ ○○
SAT-Pro-II-Tremolosteg ○ ○ ○○
STD-Tremolosteg ○
STD-DL-Tremolosteg ○
Tight-End-Steg ○○
Tight-Tune-Steg ○ ○○
ZR-Tremolosteg mit ZPS2 ○ ○ ○○
SynchroniZR-Tremolosteg ○ ○
SAITENHALTER GIBRALTAR 08 /
QUICK CHANGE 08 TAILPIECE
Tremolo-
tool
○ ○
○ ○
○ ○
hebel
Innensechskantschlüssel
1.5mm 2mm 2.5mm 3mm 4mm
8-mm-Steck-
schlüssel
DEUTSCH
○
Modelle, die mit DiMarzio-Tonabnehmern ausgestattet sind, werden mit einem Innensechskantschlüssel zur
※
Höheneinstellung der Polkerne geliefert.
Siebensaitige Gitarren, die mit einem Edge-Zero-II-Tremolosteg mit ZPS3Fe ausgestattet sind, werden mit hoch- ※
belastbaren Federn ausgeliefert.
67
Page 100
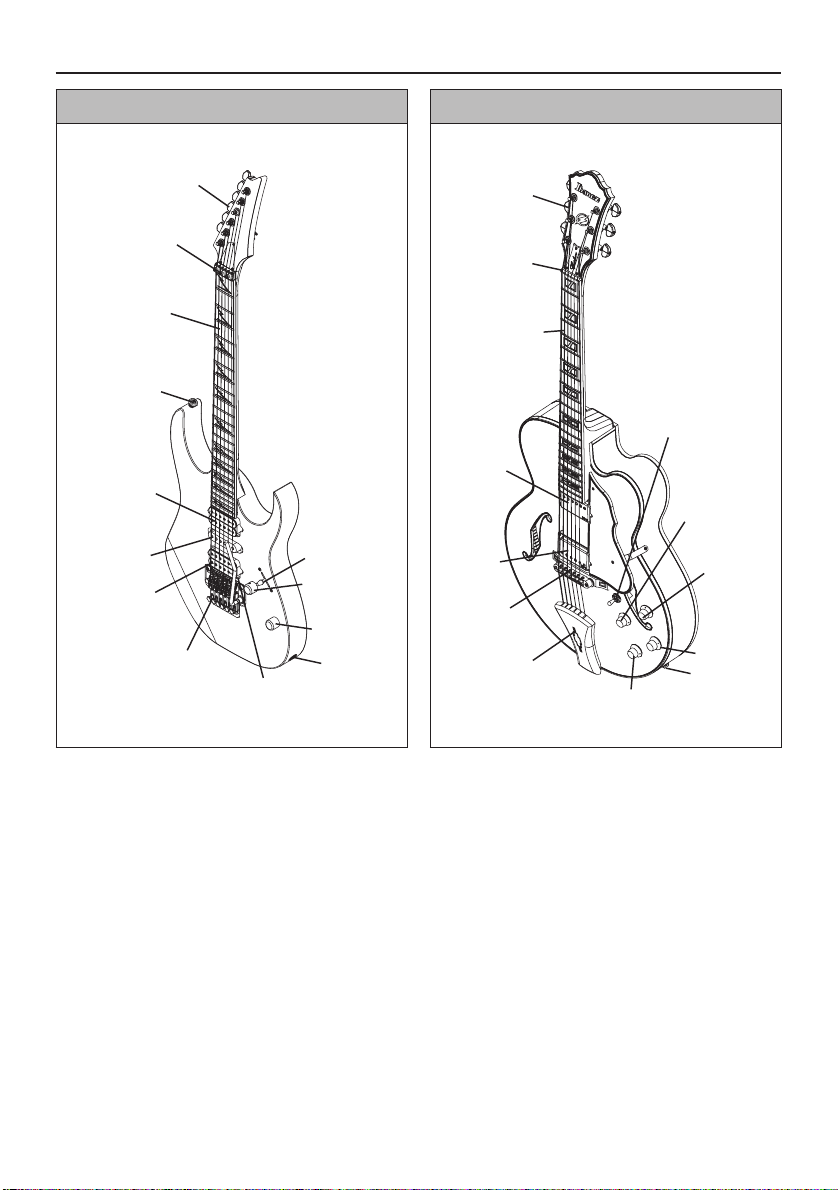
IDENTIFIKATION DER GITARRENTEILE
E-Gitarre Halb- oder Vollakustische Gitarre
MECHANIK (WIRBEL)
KONTERMUTTER
GRIFFBRETT
TRAGRIEMEN-STIFT
NECK PICKUP
HALS-PICKUP
MITTEL-PICKUP
TREMOLO
TREMOLOHEBEL
PICKUP-WÄHLER
VOLUME
(Lautstärke)
KLANG
AUSGANGSBUCHSE
MECHANIK (WIRBEL)
MUTTER
GRIFFBRETT
HALS-PICKUP
BRIDGE
PICKUP
BRIDGE
SAITENHALTER
HALS-PICKUP KLANG
PICKUPWÄHLER
HALS-PICKUP
LAUTSTÄRKE
BRIDGEPICKUP
LAUTSTÄRKE
BRIDGEPICKUP KLANG
AUSGANGSBUCHSE
Diese Abbildungen zeigen typische Modelle von Ibanez. Es ist evtl. nicht genau die von Ihnen erworbene Gitarre ※
abgebildet.
Die Einstellungen von Tremolo und Steg hängen von der Art des montierten Tremolos/Stegs ab. ※
Näheres fi nden Sie im entsprechenden Abschnitt zu Tremolo/Steg.
Näheres zu den Einstellmöglichkeiten der einzelnen Modelle fi nden Sie im Abschnitt ※
„CONTROLS (Einstellelemente)“ (S. 228).
68
 Loading...