

Page 1

Page 2

Thank you for choosing the AA-30/60.
Please read this manual carefully to take full advantage of the practical features of the AA30/60. We also recommend that you keep this manual in a safe and easily accessible place
for future reference.
Before switching on and using the appliance for the first time, be sure to read the safety
instructions to avoid injury or damage to the appliance.
Content
Safety precautions and precautionary measures ............................................................... 3
Rocktile AA-30 Eric - Connections and operation ............................................................... 4
Rocktile AA-60 Eric - Connections and operation ............................................................... 5
WEEE Declaration ............................................................................................................. 6
2
Page 3

Safety precautions and precautionary measures
Always place the appliance securely on a level surface to avoid
injury from the appliance falling over.
Do not place any devices that can heat up (e.g. lighting equipment
or fog machines) on the unit.
Never touch the mains cable or the unit when it is wet, as this may
cause an electronic shock.
Do not clean the housing with solvents or other chemical-based cleaning agents.
Keep the unit away from rain and moisture.
Damage caused by non-compliance with this user manual is not covered by the warranty.
The dealer accepts no liability for any resulting defects or problems.
Before connecting, make sure that the mains cable is in perfect condition.
Only touch the mains cable by the plug.
Avoid contact of the mains cable with other cables.
Do not bend or twist the cable and do not place any objects on it.
Always use this device at an appropriate volume, as high volumes can damage your hearing
in the long run. If you experience hearing problems or ringing in your ears, consult a
specialist immediately.
Make sure that no objects or liquids of any kind get into the unit.
Disconnect the unit from the mains during thunderstorms.
Switch off the unit immediately and unplug the mains adapter from the socket if:
- The power supply unit, the power cable or the plug is damaged
- Smoke or unusual odour occurs
- Objects have fallen into the unit or liquid has been spilled on the unit.
- The unit has been exposed to moisture
- The unit does not function properly or there is a significant change in performance
Do not leave guitars connected to the amplifier with the volume turned up.
Neon tubes or UV light sources in the immediate vicinity can produce a slight hum.
Only plug in headphones when the unit is switched off.
3
Page 4
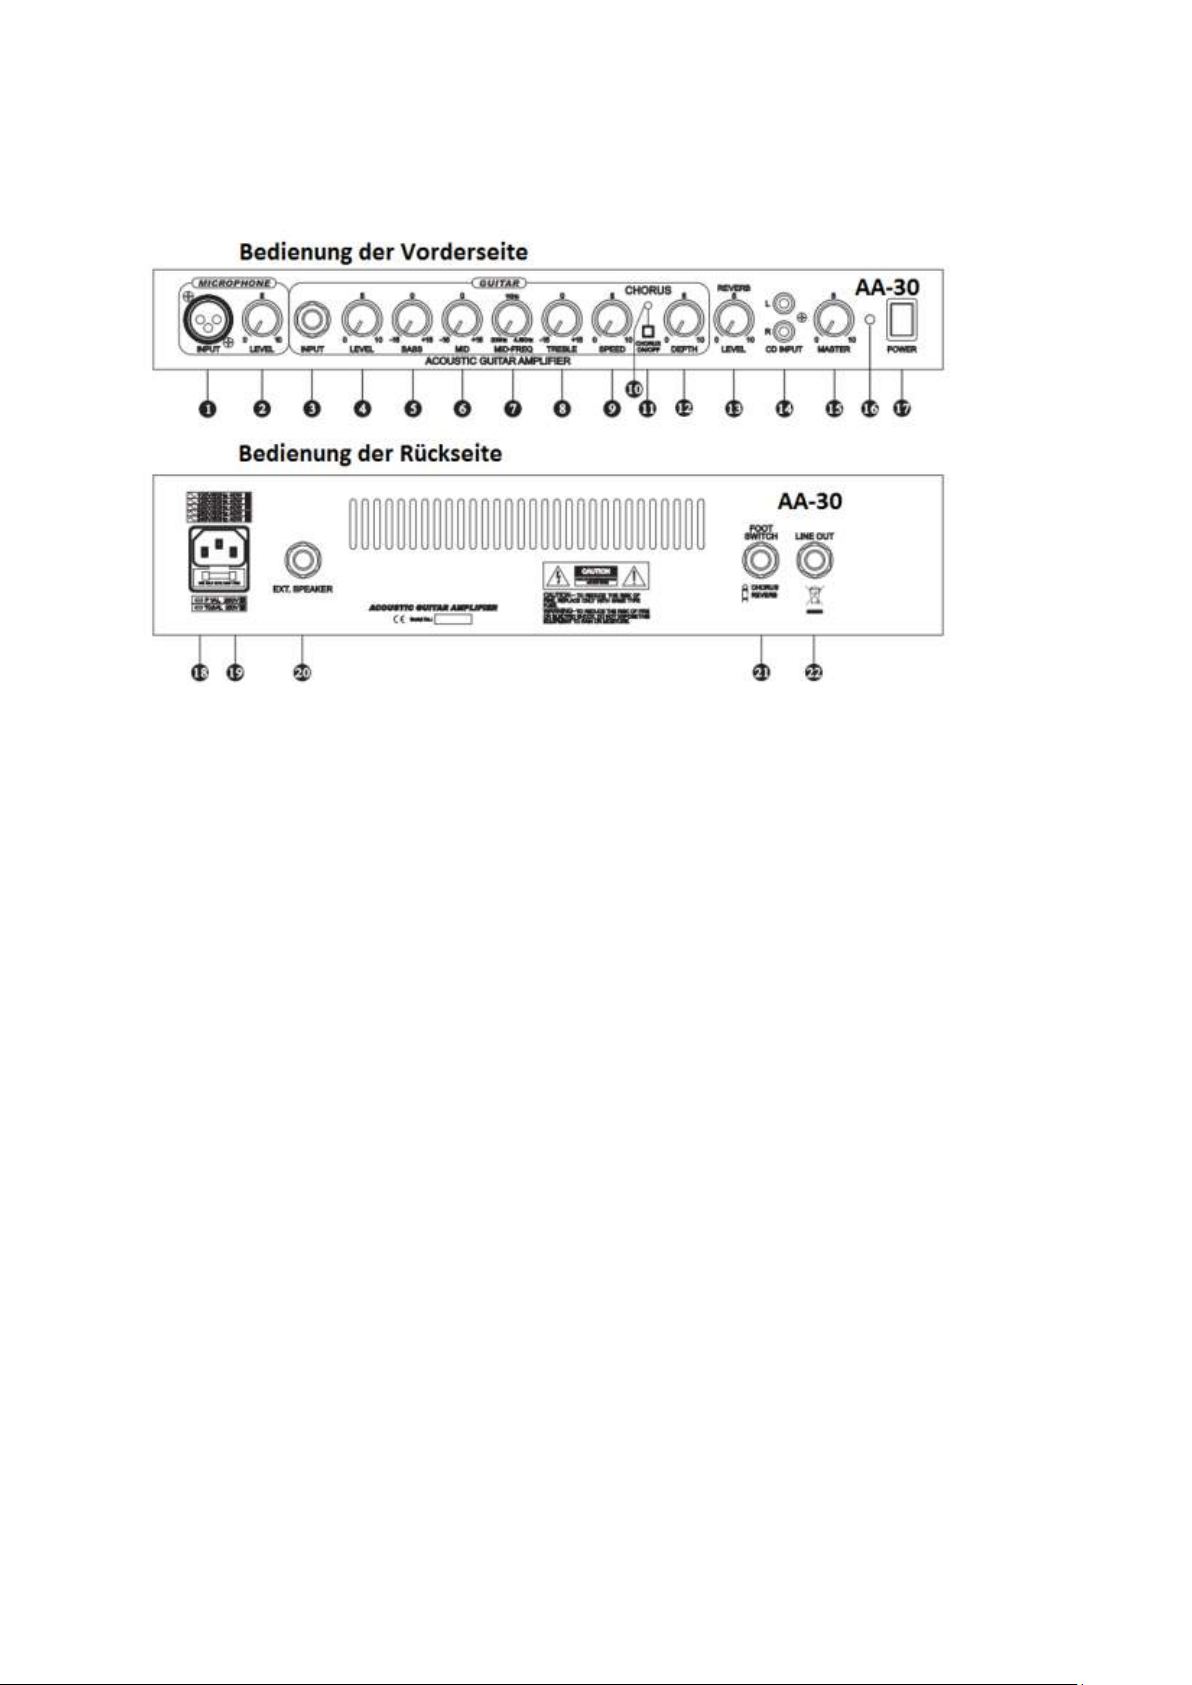
Rocktile AA-30 Eric - Connections and operation
1. Microphone input (combo jack): Connect a dynamic microphone to this jack via XLR
or 6.3mm jack cable.
2. Microphone Volume: Adjust the volume of the microphone channel here.
3. Guitar input: Connect your guitar here via a 6.3 mm jack cable.
4. Guitar Volume: Adjust the volume of the guitar channel here.
5. Bass control: Adjusts the amount of bass in the mix.
6. Mids control: Adjusts the amount of mids in the mix.
7. Mid-frequency control: Select here in which frequency range the mid-frequency control
is effective.
8. Treble control: Adjusts the amount of treble in the mix.
9. Chorus Tempo control: Adjust the speed of the chorus here.
10. Chorus LED: Signals that chorus is activated.
11. Chorus switch: Switch the chorus effect on or off here.
12. Effect depth control: Select the intensity of the chorus here.
13. Reverb control: Adjusts the amount of reverb effect.
14. AUX input: Connect an AUX-capable device (e.g. mobile phone) here.
15. Volume control: Adjust the overall volume here.
16. Power LED: Indicates that the unit is switched on.
17. On/Off switch: Use this to switch the unit on or off.
18. Fuse
19. Power connection: Connect the supplied mains cable here.
20. External speaker connection: This connection is used to connect to an external
passive speaker box. Use at least 8 Ohm resistance.
21. Foot pedal connector: Connect an external foot pedal to this connector to turn the
chorus or reverb effect on or off.
22. Line Out: This output is used to connect to mixers or audio interfaces to transmit
unfiltered pre-amp signals.
4
Page 5
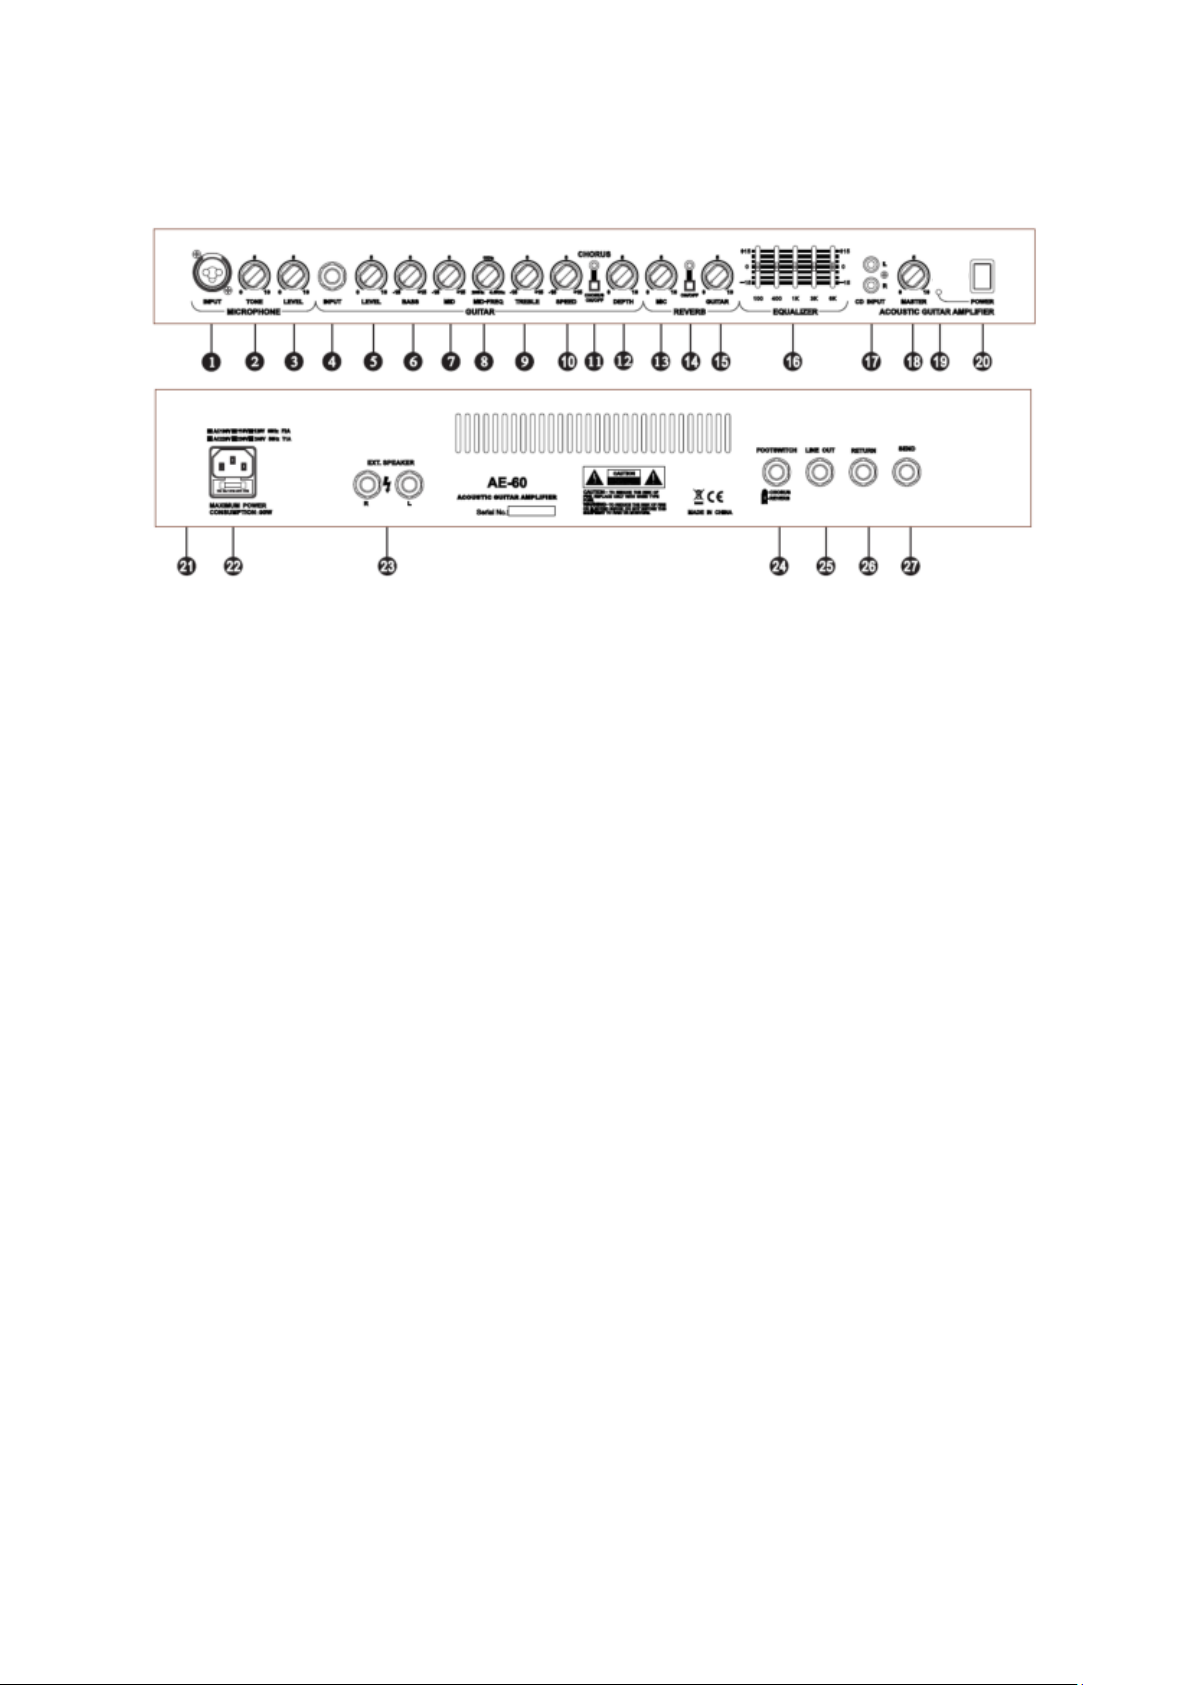
Rocktile AA-60 Eric - Connections and operation
1. Microphone input (combo jack): Connect a dynamic microphone to this jack via XLR
or 6.3mm jack cable.
2. Microphone tone control: Here you can control the frequency range of the microphone.
3. Microphone Volume: Adjust the volume of the microphone channel here.
4. Guitar input: Connect guitars here via 6.3 mm jack cable.
5. Guitar Volume: Adjust the volume of the guitar channel here.
6. Bass control: Adjusts the amount of bass in the mix.
7. Mids control: Adjusts the amount of mids in the mix.
8. Mid-frequency control: Select here in which frequency range the mid-frequency control
is effective.
9. Treble control: Adjusts the amount of treble in the mix.
10. Chorus Tempo control: Adjust the speed of the chorus here.
11. Chorus switch: Switch the chorus effect on or off here.
12. Effect depth control: Select the intensity of the chorus here.
13. Microphone Reverb: Use this control to select the intensity of the reverb effect for the
microphone channel.
14. Reverb switch: Switch the reverb effect on or off here.
15. Guitar Reverb: Select the intensity of the reverb effect for the guitar channel here.
16. Equalizer: 5-band equalizer with a processing range of 15 dB.
17. AUX input: Connect an AUX-capable device (e.g. mobile phone) here.
18. Volume control: Adjust the overall volume here.
19. Power LED: Indicates that the unit is switched on.
20. On/Off switch: Use this to switch the unit on or off.
21. Power information: Information about the required power supply.
22. Power connection: Connect the supplied mains cable here.
23. External speaker connection: This connection is used to connect to an external
passive speaker box.
24. Foot pedal connector: Connect an external foot pedal to this connector to turn the
chorus or reverb effect on or off.
25. Line Out: This output is used to connect to mixers or audio interfaces to transmit
unfiltered pre-amp signals.
26. Return: Connect the output of external effect processors here.
27. Send: Connect the input of external effect processors here.
5
Page 6

WEEE Declaration
Your product has been designed and manufactured with high quality materials
and components that can be recycled and reused. This symbol means that
electrical and electronic equipment must be disposed of separately from
household waste at the end of its useful life. Please dispose of this appliance at
your local municipal collection point or recycling centre. Please help to preserve
the environment in which we live.
Subject to technical changes and changes in appearance. All information is correct at the
time of going to press. Musikhaus Kirstein GmbH accepts no responsibility for the accuracy
and completeness of the descriptions, illustrations and information contained therein. Colours
and specifications shown may differ slightly from the product. Musikhaus Kirstein GmbH products are only available through authorised dealers. Distributors and dealers are not
authorised agents of Musikhaus Kirstein GmbH and have no authority to legally bind
Musikhaus Kirstein GmbH in any way, either expressly or by implication. These operating
instructions are protected by copyright. Any duplication or reprinting, even of extracts, and
any reproduction of the illustrations, even in modified form, is only permitted with the written
consent of Musikhaus Kirstein GmbH.
Musikhaus Kirstein GmbH
Bernbeurener Str. 11
86956 Schongau - Germany
Telefon/Phone: 0049-8861-909494-0
Telefax/Fax: 0049-8861-909494-19
6
 Loading...