


RJ461AX 61 KEY MUSIC
KEYBOARD WITH ALEXA
User Guide

Important Information
Besureto obey the following information so as not to harm yourself or others or damage this instrument or
other external equipment.
Power adapter:
Please use only the specified AC adapter supplied with the product. An incorrect or faulty
adapter can cause damage to the electronic keyboard.
Do not place the AC adapter or power cord near to any source of heat such as radiators or
other heaters.
To avoid damaging the power cord, please ensure that heavy objects are not placed on it and
that it is not subject to stress or over bending.
Check the power plug regularly and ensure it is free from surface dirt. Do not insert or unplug
the power cord with wet hands.
Do not open the body of the electronic keyboard:
Do not open the electronic keyboard or try to disassemble any part of it. If the device is not
functioning correctly, please stop using it and send it to a qualified service agent for repair.
Use of the electronic keyboard:
To avoid damaging the appearance of the electronic keyboard or damaging the internal parts
please do not place the electronic keyboard in a dusty environment, in direct sunlight or in places
where there are very high or very low temperatures.
Do not place the electronic keyboard on an uneven surface. To avoid damaging internal parts do
not place any vessel holding liquid onto the electronic keyboard as spillage may occur.
Maintenance:
To clean the body of the electronic keyboard wipe it with a dry, soft cloth only.
Connection:
To prevent damage to the speaker of the electronic keyboard please adjust the volume of any
peripheral device to the lowest setting and gradually adjust the volume accordingly to an
appropriate level once the music is playing.
During operation:
Do not use the keyboard at the loudest volume level for a long period.
Do not place heavy objects onto the keyboard or press the keyboard with undue force.
The packaging should be opened by a responsible adult only and any plastic packaging should be
stored or disposed of appropriately.
Specification
Specifications are subject to change without notice.
Page | 2

Contents
Important Information ....................................................................................................................................... 2
Controls, Indicators and External Connections ................................................................................................ 5
Front Panel .................................................................................................................................................. 5
External Connections .................................................................................................................................. 6
LCD Display ................................................................................................................................................ 6
Preparation Before First Use ............................................................................................................................ 7
Power .......................................................................................................................................................... 7
Use of AC/DC power adapter: ................................................................................................................ 7
Battery operation: ................................................................................................................................... 7
Jacks and Accessories ................................................................................................................................ 7
Using headphones:................................................................................................................................. 7
Connecting an Amplifier or Hi-Fi Equipment: ......................................................................................... 8
Connecting a Sustain Pedal ................................................................................................................... 8
Connecting an iPad or Android device: .................................................................................................. 8
Connecting a phone or audio device to the AUX Input to play music through the keyboard:................. 8
Connecting a Laptop or PC: ................................................................................................................... 9
Connecting a Microphone:.................................................................................................................... 10
Connecting USB Flash-drive or TF card:.............................................................................................. 10
Setup for Amazon Alexa Operation ................................................................................................................ 11
Prerequisites for Setup .............................................................................................................................. 11
Overview ................................................................................................................................................... 11
Essential Setup Steps in Detail (RockJam APP and WiFi Setup) ............................................................. 11
Optional Setup Steps in Detail (Amazon Alexa APP and Piano Teacher Skill) ......................................... 15
Keyboard Operation ....................................................................................................................................... 17
Power and Volume .................................................................................................................................... 17
Power control:....................................................................................................................................... 17
Adjustment of the Master Volume: ....................................................................................................... 17
Tone .......................................................................................................................................................... 18
Effect & Control ......................................................................................................................................... 18
Dual Tone Keyboard:............................................................................................................................ 18
Split Keyboard: ..................................................................................................................................... 19
Sustain:................................................................................................................................................. 19
Vibrato: ................................................................................................................................................. 20
Transpose:............................................................................................................................................ 20
Page | 3

Metronome: .......................................................................................................................................... 21
Panel Percussion Instruments: ............................................................................................................. 21
Rhythm ...................................................................................................................................................... 22
Selecting the rhythm: ............................................................................................................................ 22
Start / Stop:........................................................................................................................................... 22
Sync:..................................................................................................................................................... 23
Fill in: .................................................................................................................................................... 23
Accompaniment Volume Adjustment:................................................................................................... 24
Tempo Adjustment: .............................................................................................................................. 24
Chord Accompaniment .............................................................................................................................. 25
Single Finger Chords: ........................................................................................................................... 25
Multi Finger Chords: ............................................................................................................................. 25
Chord Tones: ........................................................................................................................................ 26
Intro / Ending: ....................................................................................................................................... 26
Recording Function ................................................................................................................................... 27
Rhythm Programming ............................................................................................................................... 27
Demo Songs:............................................................................................................................................. 28
Setting Memories M1, M2 and M3 ............................................................................................................ 28
Teaching Modes ........................................................................................................................................ 29
Single Key Course: ............................................................................................................................... 29
Synchronised Course: .......................................................................................................................... 29
Concert Course: ................................................................................................................................... 29
Progressive Learning:........................................................................................................................... 30
Appendix I. Percussion Instruments ............................................................................................................... 31
Appendix VI. Chord Tables ............................................................................................................................ 38
Single Finger Chords................................................................................................................................. 38
Fingered Chords........................................................................................................................................ 39
Appendix VII. RockJam Keyboard APP ......................................................................................................... 40
Appendix VIII. Technical Specification ........................................................................................................... 41
FCC & IC Statement ...................................................................................................................................... 42
FCC Statement .................................................................................................................................... 42
Product Disposal Instructions (European Union) ........................................................................................... 42
Page | 4

Controls, Indicators and External Connections
17. Music Volume -
18. Music Volume +
19. EQ
20. Memory
21. Memory Storage 1
22. Memory Storage 2
23. Memory Storage 3
24. Bluetooth Control
25. Alexa Control
26. Teach 1
27. Record
28. Teach 2
29. Program
30. Teach 3
31. Playback
32. Start / Stop
33. Intro / Ending
34. Fill In
35. Sync
36. Single
37. Fingered
38. Chord Tone
39. Chord Off
40. Demo
41. Rhythm
42. Tone
43. Metronome
44. Number Buttons
45. Keyboard Playing Area
46. Chord Playing area
47. Tones List
48. LCD Screen
49. Rhythms List
Front Panel
1. Speaker
2. Power Switch
3. Main Volume
4. Tempo +/-
5. Transpose +/-
6. Amp Volume +/-
7. Chord Volume +/-
8. Sustain
9. Percussion
10. Piano
11. Vibrato
12. Dual Tone
13. Split
14. Play/ Pause
15. Rewind
16. Fast Forward
Page | 5
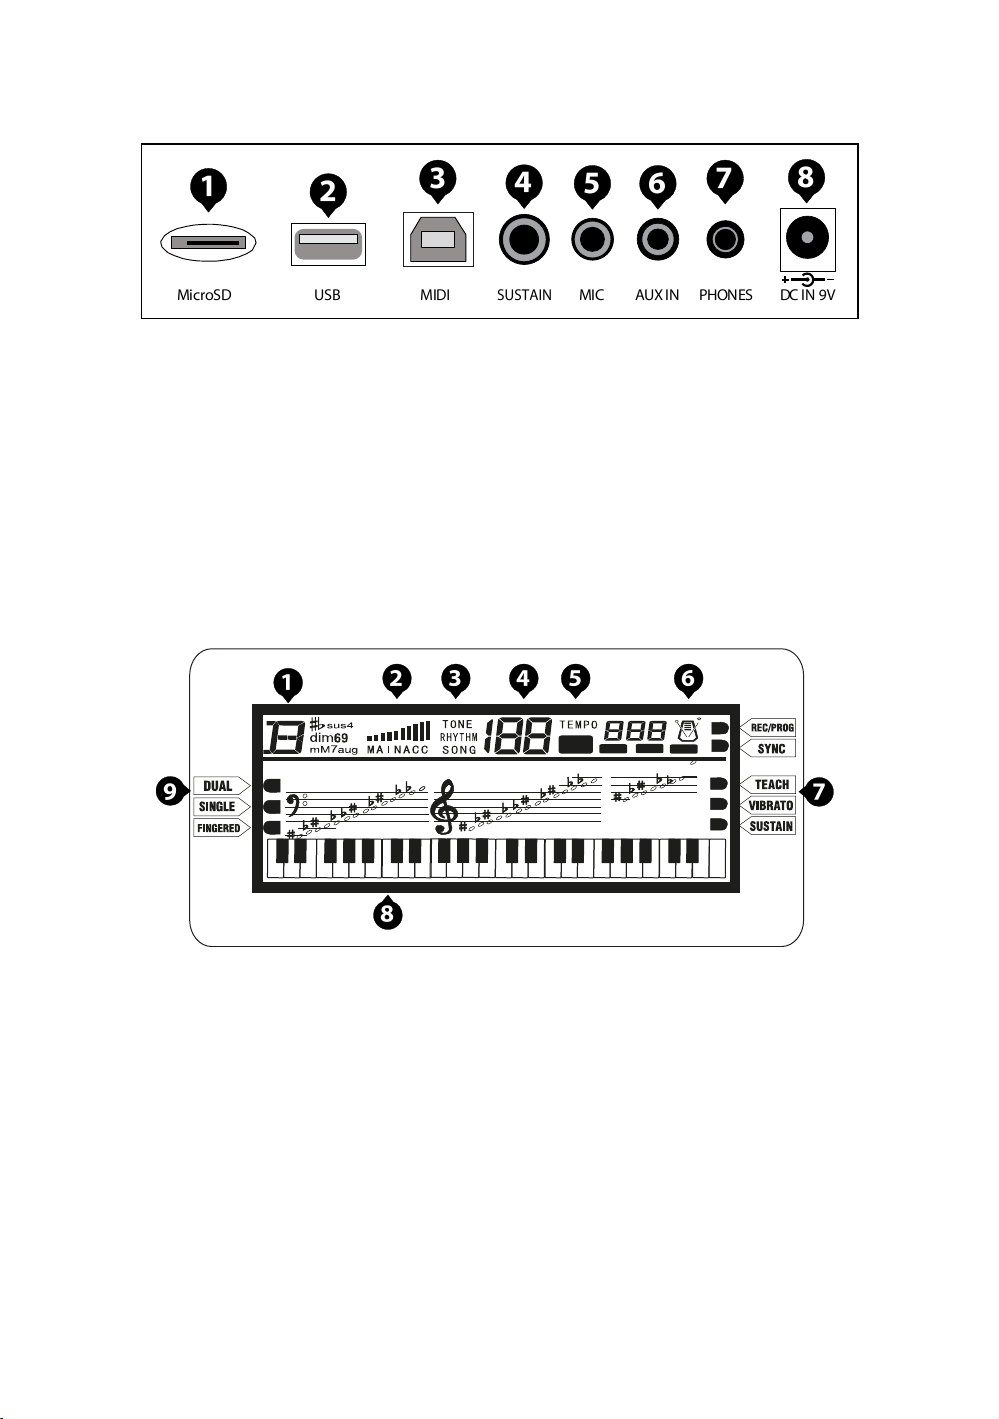
External Connections
1. TF Card Slot
2. USBMP3 Input
3. MIDI Input/Output
4. Sustain Pedal Input
5. MIC Input
6. AUX IN
7. Headphone Output
8. DC IN
LCD Display
1. Playing chord indication
2. Volume level display
3. TONE, RHYTHM or DEMO song
4.
Digital display for song, rhythm and tone number
5.
Tempo value of rhythm and song (bpm)
6.Metronome for rhythm and song
7. Mode Indicators 1
8. Key Indicator
9. Mode Indicators 2
Page | 6

Preparation Before First Use
Power
Use of AC/DC power adapter:
Please use the AC/DC power adapter that came with the electronic keyboard or a power adapter with DC
12V output voltage and 1,000mA output current with a centre positive plug. Connect the DC plug of the
power adapter into the DC12V power socket on the rear of the keyboard and then connect the other end into
the mains wall socket and switch on.
USA / Canada UK
Caution: When the keyboard is not in use you should unplug the power adapter from the mains power
socket.
Battery operation:
Open the battery lid on the underneath of the electronic keyboard and insert 6 x 1.5V Size D alkaline
batteries. Ensure the batteries are inserted with the correct polarity and replace the battery lid.
Caution: Do not mix old and new batteries. Do not leave batteries in the keyboard if the keyboard is not
going to be used for any length of time. This will avoid possible damage caused by leaking batteries.
Jacks and Accessories
Using headphones:
Connect the 3.5mm headphone plug into the [PHONES] jack on the rear of the keyboard. The internal
speaker will cut off automatically once headphones are connected. Headphones with inline volume control
are included.
Page | 7

Connecting an Amplifier or Hi-Fi Equipment:
This electronic keyboard has a built in speaker system but it can be connected to an external amplifier or
other hi-fi equipment. First turn off thepower to the keyboard and any external equipment you are looking to
connect. Next insert one end of a stereo audio cable (not included) into the LINE IN or AUX IN socket on the
external equipment and connect the other end into the [PHONES] jack on the rear of the electronic keyboard.
Connecting a Sustain Pedal
This electronic keyboard has a 6.35mm socket for connecting a sustain pedal (not included). Connect the
sustain pedal to the 6.35mm socket.
Connecting an iPad or Android device:
The Keyboard can be connected to an Apple or Android device through the MIDI output. This allows you to
play music through an app. Connect the USB B type plug into the MIDI output at the back of the keyboard.
USB cables for Android and Apple are not included but can be bought from Amazon or eBay.
Note: Android 6.0 and upwards are required for MIDI function.
Recommended App:„Simply Piano‟ by Joytunes available from Google Play or Apple App Store.
Connecting a phone or audio device to the AUX Input to play music through the keyboard:
Page | 8

This keyboard has a built-in speaker system that can be used to play music from your phone or mobile
device. Insert one end of a stereo audio cable into the AUX IN socket on the back of the keyboard and
connect the other end into your phone or audio device. Make sure the keyboard is switched on. Use the
volume control of the phone to control the music volume. AUX in cable not included.
Connecting a Laptop or PC:
You can connect the keyboard to a laptop or PC device and work with various 3rd partyMIDI software for
recording and playing back songs using midi files. Connect a cable with USB B type plug into the MIDI
output at the back of the keyboard and then connect the USB Atype plug to the PC or Laptop. USB cable for
PC/Laptop connection is not included.
Page | 9

Connecting a Microphone:
Connect the 3.5mm microphone plug into the [MIC] jack on the rear of the keyboard.
Connecting USB Flash-drive or TF card:
To play MP3s through the Keyboard Speakers, place files onto either a USB flash-drive or TF card. Insert
the card into the input slot at the rear of the Keyboard.The first song will play.
• Touch the button to Play or Pause playback.
•
Touch the or buttons to go to the last or next song
• Touch the or buttons to increase or decrease the playback volume
• Touch the button to adjust the playback tone.There are 6 different tone settings, each press will
cycle to the next setting.
Page | 10

Setup for Amazon Alexa Operation
Prerequisites for Setup
In order to setup the keyboard for use with Amazon Alexa you will need the following:
A smartphone or tablet with Android or Apple iOS (iPhone, iPad etc.)
A WiFi connection
An active Amazon account
Overview
In order to setup for use with Amazon Alexa there are 3 essential steps as follows:
Download and install the Alexa companion APP „RockJam Keyboard‟ on your smartphone or
tablet device.
Using the companion APP connect the keyboard to your WiFi network.
Register the keyboard to your Amazon account.
In addition you can install an Alexa skill to help you learn to play as follows:
Install Amazon Alexa APP to your smart device
Search for and enable the „Piano Teacher‟ skill
Essential Setup Steps in Detail (RockJam APP and WiFi Setup)
Download and install the Alexa companion APP „RockJam Keyboard‟ on your smartphone or tablet device
from the Google Play store (Android) or the Apple App Store (iPhone, iPad).
At first power on, the keyboard should enter network connection mode. If this does not happen or you wish
to use the keyboard on a different WiFi connection then proceed as follows to initiate the network connection.
Page | 11

Press and hold the blue Alexa button as shown for over 5 seconds to enter network connection mode.
Open the „RockJam Keyboard‟ APP on your
smart device and you will be prompted to
connect to the WiFi network of the keyboard.
Open the WiFi setings on your smart device
and connect to the keyboard WiFi network,
RockJam_RJ461AX_XXXX. If the WiFi
network cannot be found then return back to
the „RockJam Keyboard‟ APP and click on
„Could not find RockJam RJ461AX_XXXX?‟
Then follow the on screen instructions and try
again.
The keyboard will respond with, “Entering Network Connection Mode”
Page | 12

You will then be asked to select your home
WiFi network and enter the WiFi passcode.
Note that only a 2.4 GHz WiFi connection can
be used. Click Next and the keyboard will
connect to your home WiFi.
You will then be asked to register your keyboard to an Amazon account.
Note: You will not have any Alexa functionality for the keyboard if you skip this step.
Your smart device will then connect back to
your home WiFi network. At this point, both
your keyboard and smart device will be
connected to your home WiFi.
Page | 13

You can test the succesful registration of the keyboard by asking Alexa a simple question. Press the blue
Alexa button on the keyboard and say something like, “What‟s the time?”. Alexa should respond with the
current time.
For full details of additional functionality offered by the „RockJam Keyboard‟ companion APP refer to
Appendix VII.
Page | 14

Optional Setup Steps in Detail (Amazon Alexa APP and Piano Teacher
Download and install the Amazon Alexa APP on your smartphone or tablet device from the Google
Play store (Android) or the Apple App Store (iPhone, iPad).Once you have signed in make sure you
have the RockJam keyboard added as a device, open the menu in the Alexa APP and access Skills
and Games.
Skill)
Page | 15

Search for and enable the
Piano Teacher skill.
Once enabled, press the blue Alexa button on the keyboard and
say, “Open Piano Teacher”. The Piano Teacher skill should then
start. To exit the Piano Teacher skill, press the blue Alexa
button on the keyboard and then say, “Exit”.
Page | 16

Keyboard Operation
Power and Volume
Power control:
Press the [POWER] button to turn the power on and again to turn the power off.The LED screen will light up
to indicate power on. (Wi-Fi is activated)
Adjustment of the Master Volume:
To change the volume, turn the MAIN VOLUME dial.
Page | 17

Tone
Tone Selection:
When the keyboard is switched on the default TONE is „‟00‟‟Grand Piano.To change the tone, press
theTONE button first and then punch in a number code on the keypad by pressing the corresponding
digits0-9. Tones can also be changed by using the [+ / -] buttons on the key pad.Refer toAppendix III for afull
list of the available tones and codes.
Effect & Control
Dual Tone Keyboard:
DualTone mode allows the keyboard to mix two tones and play them at the same time.To switch on Dual
Tone Keyboard mode press the [DUALTONE] button.The LCD display will show that Dual tone mode is
active by showing a flag indicator.The first tone will be fixed as the tone that was selected before the
[DUALTONE] button was pressed.The second tone can be freely selected by pressing the corresponding
digits on the numerical keypad. Press the [DUALTONE] button again to exit DualTone mode.
Page | 18

Split Keyboard:
To switch on Split Keyboard mode press the [SPLIT] button. The keyboard will split into two keyboards at the
24th key from the left.In Split Keyboard mode the pitch of the left hand keys are raised by one octave. Press
the [SPLIT] button again to exit Split Keyboard mode.
Sustain:
Press the [SUSTAIN] button to enter Sustain mode. The LCD display will display that [SUSTAIN] is on.
Once this mode is selected the sound of each note played is prolonged. Pressingthe [SUSTAIN] button
again will turn the sustain feature off and exit this mode.
Page | 19
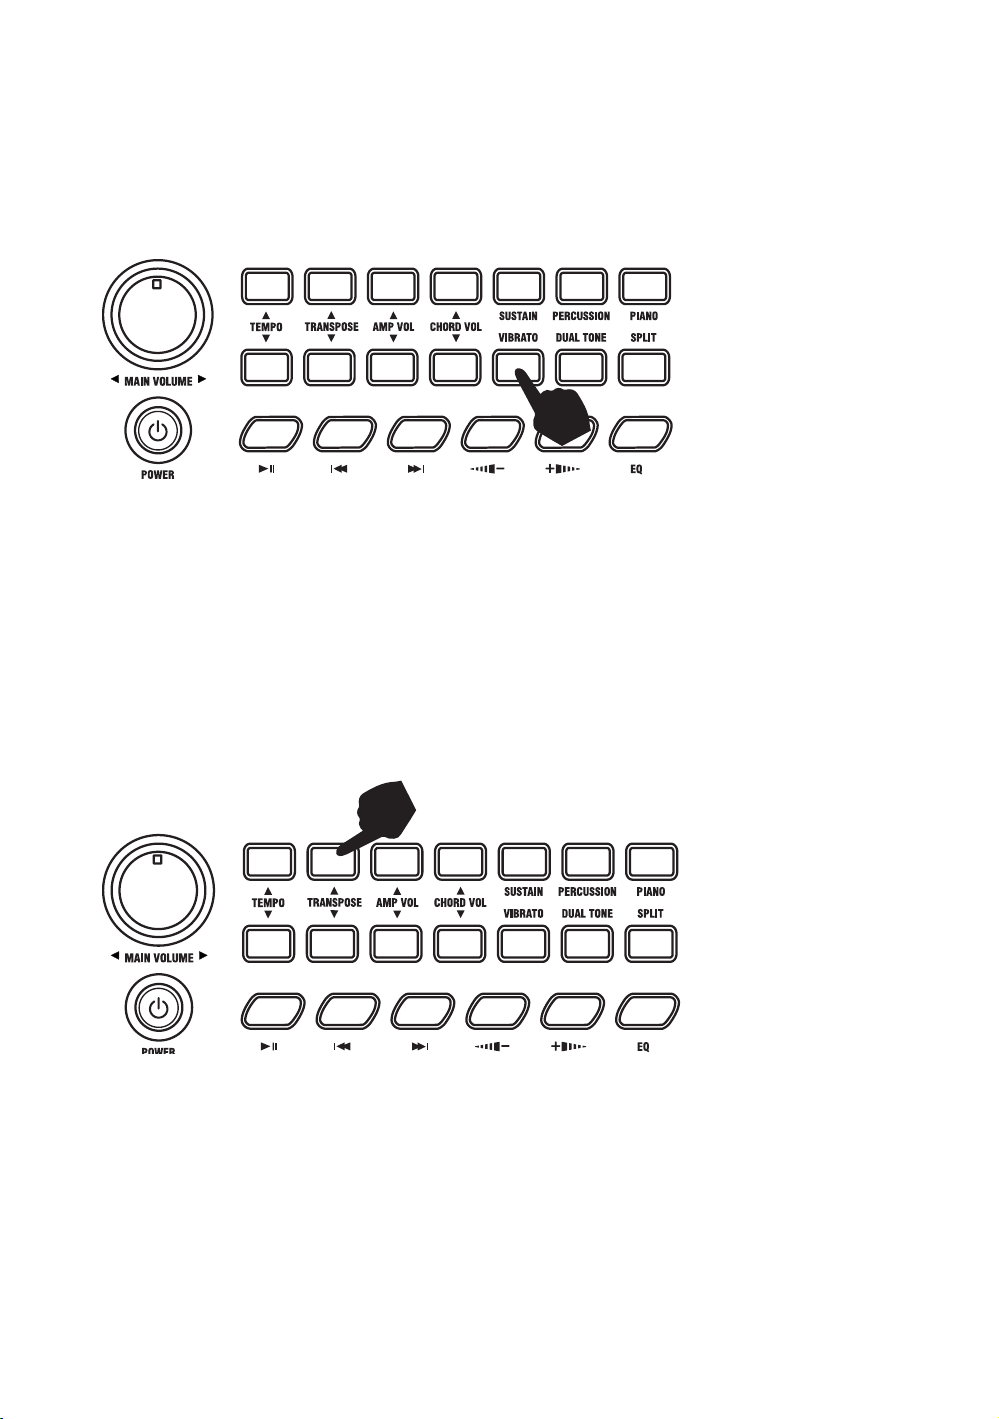
Vibrato:
Press the [VIBRATO] button to enter Vibrato mode. The LCD display will display that [VIBRATO] is on. Once
this mode is selected each time a note is played a trembling effect is added to the end of the note. Pressing
the [VIBRATO] button again will turn the Vibrato feature off and exit this mode.
Transpose:
Press the [TRANSPOSE] buttons to alter the musical scale of the note being played. You can adjust the
scale by 6 levels upwards or downwards. Pressing both the [TRANSPOSE] buttons at the same time will
revert the musical scale to 00. The transpose level is reset to 00 after power off and on.
Page | 20

Metronome:
Press the [METRONOME] button to start the tick-tock beat.There are four beats to choose from. Depending
on what the performance needs, you can touch the [TEMPO] buttons tospeed up or slow down the beat.
Press the [METRONOME] button repeatedly to cycle through to the available beat patterns.The LCD display
will indicate the beat you have chosen.The metronome effect is added to the music once you start
playing.To exit this mode touch the [START/STOP] or[METRONOME] button again.
Panel Percussion Instruments:
When the [PERCUSSION] button is pressed all the keyboard‟s keys can be used to play percussion
sounds.Press the [PERCUSSION] button again to exit Percussion mode. Refer toAppendix I. for a table of
the 61 percussion sounds available
Page | 21

Rhythm
Selecting the rhythm:
You can choose from any of the 200 built in rhythms. Please refer to the Appendix II. for the detailed rhythm
table. Press the [RHYTHM] button to enter the rhythm selection function. The LCD display will show the
current rhythm number. You can select the rhythm you require by pressing the corresponding digits on the
numerical keypad or by pressing the + / - buttons.
Start / Stop:
With a rhythm selected, press the [Start/Stop] button start or stop playing the chosen rhythm.
Page | 22

Sync:
Touch the [SYNC] button to select the synchronised accompaniment function.Then press any of the first
19 keys on the left hand side of the keyboard to start the selected rhythm playing.Touch the
[START/STOP] button to stop the rhythm and exit the sync function.
Fill in:
While playing a rhythm you can add a rhythmic fill if you touch the [FILLIN] button during playback.After the
fill-in, the rhythm will continue playing as normal.
Page | 23

Accompaniment Volume Adjustment:
TheAccompaniment Volume can be adjusted by pressing the [ACCOMPVOLUME] buttons.The LCD display
will show the volume as it is adjusted.The adjustment range has 10 levels which are displayed as a bar
graph on the LCD display. Pressing both the [ACCOMPVOLUME ] buttons at the same time will return
theAccompaniment Volume to the default level (level 006). Note:The Main Volume control will alsoaffect the
output level of the accompaniment.At power, on the accompaniment volume will reset to thedefault level.
Tempo Adjustment:
Press the [TEMPO] buttons to adjust the tempo of the rhythm, metronome, or demo songs.The adjustment
range is 30-240 bpm. Pressing both the [TEMPO] buttons at the same time will revert the tempo to the
default, for the rhythm selected.At power on the tempo will be 120 bpm.
Page | 24

Chord Accompaniment
Single Finger Chords:
Press the [SINGLE] button to activate the single finger chord function.The LCD screen will flag which
function is activated. With a rhythm playing, chords are played by pressing a key in the chord area on the
left hand side of the keyboard (keys 1-19).The finger patterns required are shown inAppendix VI.The
played chord is displayed in the top left corner of the LCD display.Touch the [START/ STOP] button to
start or stop the chord accompaniment.
Multi Finger Chords:
Press the [FINGERED] button to activate the multi-finger chord function.The LCD screen will flag which
function is activated. With a rhythm playing, chords are played by pressing keys in the chord area on the
lefthand side of the keyboard (keys 1-19).The finger patterns required are shown inAppendix VI.The played
chord is displayed in the top left corner of the LCD display.Touch the [START/ STOP] button to start or stop
the chord accompaniment. Note: For this function, it is important to use the finger patterns shown
inAppendix VI.
Page | 25
 Loading...