


ELECTRONISCHES SCHLAGZEUG
BEDIENUNGSANLEITUNG
GUIDE UTILISATEUR POUR L'ENSEMBLE DE
PERCUSSIONS ELECTRONIQUES
RDB205
ELECTRONIC DRUM SET
USER MANUAL
6

1
Operation Warning
Instruction for Prevention of Fire, Electric Shock, & Physical Injury
About Warning & Caution Signs
WARNING
This sign indicates the risk of serious physical injury or
even death. Please operate the machine according to
instructions.
CAUTION
This sign indicates the risk of serious physical injury
and even death. Please operate the machine according
to instructions.
to household, furniture, pets, and etc.
About Signs
This sign indicates a warning or caution. Please read the accompanied
instruction to prevent any dangers.
This sign indicates any forbidden activity.
This sign indicates an instructional procedure for users to follow with.
ALWAYS FOLLOW THE INSTRUCTIONS AS
DESCRIBED BELOW

2
Anweisung zum Schutz vor Brand, Stromschlag und Körperverletzung
Zu den Warnungs- und Vorsichtszeichen
WARNHINWEIS
Dieses Symbol weist Sie auf mögliche schwere
Verletzungsgefahren oder sogar Todesgefahr hin.
Bedienen Sie bitte die Maschine vorschriftsmäßig.
ACHTUNG
Dieses Symbol weist Sie auf mögliche schwere
Verletzungsgefahren oder sogar Todesgefahr hin.
Bedienen Sie bitte die Maschine vorschriftsmäßig.
Zu den Zeichen
Dieses Zeichen weist auf Warnung oder Vorsicht hin. Bitte lesen Sie
die begleitende Anleitung, um drohende Gefahren zu vermeiden.
Dieses Zeichen weist auf verbotene Tätigkeiten hin.
Dieses Zeichen weist auf Vorgehensprozeduren hin, denen Benutzer
folgen müssen.
FOLGEN SIE IMMER DEN FOLGENDEN
ANWEISUNGEN
Betriebswarnung
*Sachschaden steht für jegliche Schäden oder schädliche
Wirkungen für den Haushalt, Möbel, Haustiere, usw.
3
Instructions pour prévenir les risques d'incendie, d'électrocution et de blessures physiques
A propos des signaux d'avertissement et d'attention
AVERTISSEMENT
Ce signe indique un risque de blessure physique grave
ou même de mort. Veuillez utiliser l'appareil
conformément aux instructions.
ATTENTION
Ce signe indique un risque de blessure physique grave
et même de mort. Veuillez utiliser l'appareil
conformément aux instructions.
A propos des signes
Ce signe indique une mise en garde ou un avertissement. Veuillez lire
les instructions jointes afin d'éviter tout danger.
Ce signe indique toute activité interdite.
Ce signe indique une procédure d'instructions à suivre par les
utilisateurs.
SUIVEZ TOUJOURS LES INSTRUCTIONS
DECRITES CI-DESSOUS
Avertissement pour le fonctionnement
*La dégradation du matériel fait référence à tout dommage
ou effet indésirable survenu au foyer, au mobilier, aux
animaux de compagnie, etc.

4
WARNING WARNHINWEIS
Please read the following
instruction before operation.
Do not open or, in any way, modify
the machine or adapter.
Do not attempt to repair the
machine, or replace any internal
parts by yourself, unless instructed
to do so by the manual. In case
of technical need, please contact
with your retailer, or their customer
service, or any recognized retailers
printed on the information page.
Do not store or operate the machine
under the following described
conditions:
• Near areas with extreme
temperature. (For example, in
the car under the sun, near a heat
venting pipe, and etc.)
• In very humid environments.
(For example, in the bathroom, in
• Exposing to rain.
• In the sand.
• In shaking & unstable
environments.
Operate the machine with the
recommended support stands and
accessories only.
For proper operation, make sure
that the support stands are placed
to support the machine safely and
stably.
Lesen Sie die Anleitung vor
Inbetriebnahme aufmerksam durch.
Das Gerät oder den
Wechselstromadapter nicht ö nen
oder in irgendeiner Weise modifizieren.
Versuchen Sie nicht, irgendwelche
Teile der Maschine zu reparieren,
ersetzen oder warten, wenn dies
nicht in der Benutzeranleitung speziell
empfohlen wird.Bei technischen Fragen,
kontaktieren Sie bitte Ihren Einzelhändler,
oder dessen Kundendienst, oder jeglichen
anerkannten Einzelhändler, dessen Kontakt
auf der Informationsseite gedruckt ist.
Lagern und verwenden Sie die Maschine
nicht unter folgenden Bedingungen:
• Neben Bereichen mit extremen
Temperaturen. (zum Beispiel im Auto
mit Sonneneinstrahlung, neben einer
Entlüftungsleitung, usw.)
• In sehr feuchten Umgebungen. (Zum
Beispiel im Badezimmer, in der Toilette,
auf einem nassen Boden, usw.)
• Umgebungen, die dem Regen ausgesetzt
sind.
• Im Sand.
• In bebenden und instabilen Umgebungen.
Betreiben Sie das Gerät nur mit den
empfohlenen Ständern und Zubehör.
Für den ordnungsgemäßen Betrieb, vergewissern
Sie sich, dass der Ständer auf flachem
und ebenem Grund gestellt ist, so dass
das Gerät sicher und stabil getragen wird.

5
AVERTISSEMENT
Veuilles lire les instructions suivantes
avant la mise en marche.
N'ouvrez et ne modifiez en aucun
cas l'adaptateur secteur de
l'appareil.
N'essayez pas de réparer l'appareil ou de
remplacer des composants internes
vous-même, à moins que cela ne soit
explicitement préconisé dans le guide
utilisateur. En cas de problème
technique, veuillez contacter votre revendeur
ou son service client, ou n'importe quel
revendeur officiel indiqué sur la page
d'informations.
Ne stockez pas et n'utilisez pas l'appareil dans
les conditions décrites ci-dessous :
• Près de zones ayant des températures
extrêmes. (par exemple dans la voiture
en plein soleil, près d'une bouche de
ventilation, etc.)
• Dans des environnements très humides.
(par exemple dans la salle de bain, aux toilettes,
sur un sol humide, etc.)
• Sous la pluie.
• Dans le sable.
• Dans des environnements mouvants et
instables.
Utilisez l'appareil uniquement avec les
supports et les accessoires
recommandés.
Pour garantir un bon fonctionnement, veuillez
vous assurer que les supports sont
toujours placés sur un sol plat et stable
afin de porter l'appareil de façon sûre et
stable.
WARNING
Use only the included adapter. Make
sure that the voltage of the socket
matches the voltage indicated on
your adapter to prevent damage or
electric shock.
Please do not over-twist or overbend the power cable, or place any
objects on it. Doing so may result in
electric shock.
Please do not operate the machine
with high volume over a long period
of time regardless of using an
damage to your hearing. Should
any hearing discomfort results, stop
using the machine and consult a
hearing doctor.
Prevent letting any object like coins
or pins, or any liquid slip inside the
machine.
6
Verwenden Sie ausschließlich den
beinhalteten Adapter. Stellen Sie sicher,
dass die vom Netzgerät benötigte
Spannung der Spannung der Steckdose
entspricht, um elektrische Schläge oder
Schäden zu verhindern.
Drehen oder biegen Sie das Stromkabel
nicht übermäßig, oder stellen Sie keine
Gegenstände darauf. Andernfalls könnte
es einen Kurzschluss verursachen, der ein
Brand oder einen elektrischen Schlag
auslösen kann.
Bitte bedienen Sie die Maschine nicht
über längerer Zeit mit hoher Lautstärke,
selbst wenn Sie einen Verstärker oder
einen Kopfhörer verwenden, um jegliche
Beeinträchtigung Ihres Gehörs zu vermeiden.
Sollten Sie ein Gehör-Unwohlsein feststellen,
schalten Sie das Gerät sofort aus und
konsultieren Sie einen Ohrenarzt.
Lassen Sie keine Gegenstände wie
Münzen oder Nadeln, oder Flüssigkeiten
in das Gerät gelangen.
WARNHINWEIS
Utilisez uniquement l'adaptateur
secteur inclus. Assurez-vous que la
tension de la prise correspond à la
tension indiquée sur votre adaptateur
afin d'éviter tout dommage ou choc
électrique.
N'entortillez et ne tordez pas le câble
d'alimentation, ni ne placez d'objets
dessus. Cela pourrait entrainer un choc
électrique.
Veuillez ne pas utiliser l'appareil à un
volume élevé sur une période de temps
prolongée, même si vous utilisez un
amplificateur ou un casque, dans le but
d'éviter tout dommage auditif. Si vous deviez
rencontrer un inconfort auditif, arrêtez
d'utiliser l'appareil et consultez un
spécialiste de l'ouïe.
Évitez de laisser tomber tout objet tel
que des pièces ou des aiguilles, ou des
liquides dans l'appareil.
AVERTISSEMENT

7
Should any of the following
situations result, please stop
operation and remove the adapter
from the socket, and consult with
your retailer, the nearest customer
service, or any of the recognized
retailers listed on the information
page:
• The adapter or the power cable is
damaged.
• An object, or liquid has slipped
into the interior of the machine.
• The machine has been exposed
in rain, or has got wet.
• The machine is not operating
or is operating with noticeable
problems.
If there were children in the
household, the adults should
be responsible of ateaching the
children to follow the safety
precautions explained in the
manual.
Do not share the power supply with
.emit emas eht ta sretpada ynam oot
When using an extension power
supply, please make sure that the
total power usage does not exceed
the limit stated on the extension
power supply. Doing so may result
When using the machine in other
countries, please consult your
retailer, the nearest customer
service, or any of the recognized
retailers listed on the information
page.
Im Falle einer der folgenden Situationen, bitte
unterbrechen Sie den Betrieb und ziehen Sie den
Stecker aus der Steckdose, und fragen Sie Ihren
Einzelhändler, den nächsten Kundendienst, oder
jeglichen anerkannten Einzelhändler, dessen
Kontakt auf der Informationsseite
steht:
• Der Stromadapter oder das Stromkabel ist
beschädigt.
• Ein Gegenstand oder Flüssigkeit ist in das
Innere des Gerätes geraten.
• Das Gerät wurde Regen ausgesetzt oder ist
nass geworden.
• Das Gerät funktioniert nicht oder funktioniert
mit nennenswerten Problemen.
Falls sich Kinder im Haushalt befinden, sollten
die Erwachsenen dafür verantwortlich sein,
den Kindern beizubringen, wie die
Sicherheitsmaßnahmen, die in der
Anleitung beschrieben sind, befolgt
werden müssen.
Verwenden Sie die Steckdose nicht mit zu vielen
Adaptern zur gleichen Zeit. Falls Sie ein
Verlängerungskabel verwenden, vergewissern
Sie sich bitte, dass der gesamte
Stromverbrauch nicht die Obergrenze
überschreitet, die auf dem
Verlängerungskabel angegeben ist.Andernfalls
könnten die Kabel Schmelzen und ein Brand
verursacht werden.
Falls Sie das Gerät in anderen Ländern
verwenden, fragen Sie bitte Ihren
Einzelhändler, den nächsten
Kundendienst, oder jeglichen
anerkannten Einzelhändler, dessen Kontakt auf
der Informationsseite steht.
WARNHINWEISWARNING

8
Si l'une des situations suivantes se produisait,
arrêtez immédiatement d'utiliser l'appareil et
retirez l'adaptateur secteur de la prise et
contactez votre revendeur, le service client le
plus proche, ou n'importe quel revendeur officiel
listé sur la page d'informations.
• L'adaptateur ou le câble d'alimentation est
endommagé.
• Un objet ou du liquide s'est introduit à
l'intérieur de l'appareil.
• L'appareil a été exposé à la pluie ou a été
mouillé.
• L'appareil ne fonctionne pas ou fonctionne
avec des problèmes non négligeables.
Si des enfants se trouvent dans le foyer, les
adultes sont responsables d'expliquer aux
enfants comment suivre les précautions
de sécurité expliquées dans ce manuel.
N'utilisez pas l'alimentation électrique avec trop
d'adaptateurs en même temps. Si vous utilisez
une rallonge électrique, assurez-vous que la
consommation de courant totale ne
dépasse pas la limite indiquée sur la
rallonge électrique. Cela pourrait faire
fondre les câbles et provoquer un incendie.
Lorsque vous utilisez votre appareil dans
d'autres pays, veuillez contacter votre
revendeur, le service client le plus
proche, ou n'importe quel revendeur
officiel listé sur la page d'informations.
AVERTISSEMENT
Always place the machine and the
When inserting or removing the
power cable into/from the socket or
the machine, always grab the plug
instead of the cable.
If you plan not to operate the
machine for a long period of time,
please remove the adapter from the
socket.
To prevent the cables from tangling,
place the cables out of reach of
children.
Do not place heavy objects on the
machine.
When moving the machine, or
during insertion/removal of the
plug, always use dry hands.
remove the adapter from the socket
before cleaning the machine.
When there is a risk of lightning
strike, please remove the adapter
from the socket.
CAUTION

9
Placez toujours l'appareil et l'adaptateur
dans des espaces bien ventilés.
Lorsque vous branchez ou débranchez le
câble d'alimentation dans/de la prise de
courant ou de l'appareil, tenez toujours
la fiche plutôt que le câble.
Si vous prévoyez de ne pas utiliser
l'appareil pendant une période de
temps prolongée, veuillez retirer
l'adaptateur de la prise.
Afin d'empêcher les câbles de s'entortiller,
placez ces derniers hors de portée des
enfants.
Ne placez pas d'objets lourds sur
l'appareil.
Lorsque vous déplacez l'appareil, ou
lorsque vous insérez, retirez la fiche,
assurez-vous d'avoir les mains sèches.
En cas de risque de foudre,
veuillez débrancher l'adaptateurde la
prise.
ATTENTIONACHTUNG
Stellen Sie immer das Gerät und den
Adapter in Zonen mit einer guten
Luftströmung.
Wenn Sie das Stromkabel in die/aus der
Steckdose oder Maschine stecken,
halten Sie immer den Stecker anstelle
des Kabels.
Falls Sie vorhaben, das Gerät für eine
längere Zeit nicht zu verwenden, ziehen
Sie bitte den Stecker aus der Steckdose.
Um Kabelgewirr zu vermeiden, legen Sie
die Kabel außerhalb der Reichweite
von Kindern.
Stellen Sie keine schweren
Gegenstände auf die Maschine.
Wenn Sie das Gerät bewegen, oder
wenn Sie den Stecker ein-/ausstecken,
vergewissern sie sich immer, dass Sie
trockene Hände haben.
Bitte schalten Sie das Gerät aus und
ziehen Sie den Netzstecker aus der
Steckdose bevor Sie das Gerät reinigen.
Im Fall einer Gefahr eines in
unmittelbarer Nähe einschlagenden
Blitzes, ziehen Sie bitte den Adapter
aus der Steckdose.
Veuillez éteindre l’appareil et retirez
l'adaptateur de la prise avant de nettoyer.

10
Power Supply
• Do not share the power supply with other
electronics that can produce cable statics,
for example, electric motors.
• It is normal for direct current (DC) to
produce heat with extended usage, and
there is no need to be worried.
• Before connecting the machine to other
prevent damage.
Placement/Location
• Operating the machine near a post-
converters, buzzing may result. To prevent
this problem, please change the machine’s
facing direction, or place the machine away
from the interrupting sources.
• This machine may interfere with the
radios and televisions. Please do not
operate the machines near them.
• Do not place the machine under sun, or
near any heat source, as high temperature
may cause the machine to deform or
discolor.
• To prevent permanent damage, please do
not expose the machine to moist or in humid
environments.
Maintenance
• For normal cleaning, please use soft
cloth with little or no moist for wiping. For
tougher spots, use neutral-pH and wear-free
cleaner then use dry soft cloth to wipe clean.
• Never use volatile oil, diluting solutions,
alcohol, or any other kinds of solvents to
prevent the machine from deforming or
discoloring.
Additional Precautions
• During operation, please handle with care
to prevent any damage.
• Do not hit or press against the display
screen.
• Always grab the heads of cables during
insertion / removal to prevent damage to the
cables or the machine.
• To prevent disturbing your neighbors,
please operate the machine at an acceptable
volume, or use a headphone, especially at
nights.
• Although the machine is designed to
minimize unwanted noise during operation,
the percussive sound may still pass through
noise. Please be careful not to let such
sound disturb your neighbors, especially at
nights.
• When transporting the machine, please
When using cables from other companies,
please note the following:
Some cables may consist of resistors,
which may be incompatible and result in
extremely low volume. For information
consult with the manufacturers.
• Please do not hit the pads with excessive
force to prevent the risk of hurting your
Precautions
Please read the following precautions aside from the safety instructions.

11
Stromversorgung
• Teilen Sie die Stromversorgung nicht mit
anderen elektronischen Apparaten, die
Kabel-Statik produzieren können, wie, zum
Beispiel, elektrische Motoren.
• Es ist normal, dass DC-Strom Hitze
produziert, wenn das Gerät für eine längere
Zeit benutzt wird, und Sie brauchen sich
deshalb keine Sorgen zu machen.
• Schalten Sie das Gerät immer aus bevor
Sie es an andere Apparate anschließen, um
Schäden-Risiken zu vermeiden.
Platzierung/Standort
• Falls Sie das Gerät in der Nähe eines
Nach-Verstärkers oder Geräten, die einen
Hochleistungswandler verwenden, kann ein
Summen entstehen.Um dieses Problem zu
verhindern, wechseln Sie bitte die Richtung
des Gerätes, oder stellen Sie es entfernt von
der Störungsquelle hin.
• Dieses Gerät kann Radios und Fernseher
stören. Bitte betreiben Sie das Gerät nicht in
deren Nähe.
• Stellen Sie das Gerät nicht in die pralle
Sonne und neben großen Wärmequellen, da
hohe Temperaturen da Gerät verformen oder
verfärben können.
• Um dauerhafte Beschädigungen zu
vermeiden, setzen Sie das Gerät nicht
Feuchtigkeit aus oder stellen Sie es nicht in
feuchten Umgebungen.
Wartung
• Für schwierigere Stellen, verwenden Sie einen
verschleißfreien Reiniger mit einem neutralen pH,
und dann verwenden Sie ein trockenes weiches
Tuch, um das Gerät sauber zu wischen.
• Verwenden Sie auf keinen Fall ätherisches Öl,
Verdünnungslösungen, Alkohol, oder jegliche Art
von Lösungsmittel, damit das Gerät nicht verformt
oder verfärbt wird.
Zusätzliche Vorkehrungen
• Während des Betriebs bitte mit Vorsicht
behandeln, um Schäden zu vermeiden.
• Nicht den Bildschirm anschlagen oder
darauf drücken.
• Wenn Sie Kabel ein/ausstecken, halten Sie
immer das Kopfende, um nicht die Kabel oder
das Gerät zu beschädigen.
• Um nicht Ihre Nachbarn zu stören, betreiben
Sie das Gerät bitte an einer akzeptablen
Lautstärke, oder verwenden Sie Kopfhörer,
besonders nachts.
• Selbst wenn das Gerät konzipiert wurde, um
ungewollte Nebengeräusche zu verhindern,
kann der Perkussions-Ton jedoch durch den
Boden und Wände gehen, was ungewollte
Geräusche erzeugen kann. Bitte achten Sie darauf,
dass dieser Ton nicht Ihre Nachbarn stört,
besonders nachts.
• Wenn Sie das Gerät transportieren, verwenden
Sie bitte dieselben oder ähnliche Füllmaterial
und Schachtel.
• Bitte verwenden Sie zum Anschluss ozielle
Kabel. Falls Sie Kabel eines anderen Herstellers
verwenden, beachten Sie bitte Folgendes:
Einige Kabel können aus Kaltleiter bestehen,
was nicht vereinbar sein mag und eine sehr
schwache Lautstärke verursachen kann. Zu
weiteren Informationen bezüglich der
Spezifikationen der Kabel, kontaktieren Sie bitte
deren Hersteller.
• Bitte schlagen Sie nicht mit Gewalt auf die Pads,
um dabei nicht Ihre Finger zu verletzen.
Vorsichtsmaßnahmen
Lesen Sie bitte die folgenden Vorsichtsmaßnahmen neben den Sich erheitsmaßnahmen.

12
Alimentation
• Ne partagez pas l'alimentation électrique
avec d'autres appareils électroniques qui
risquent de produire de l'électricité statique,
par exemple des moteurs électriques.
• Il est normal que le courant direct (CD)
produise de la chaleur lors d'une utilisation
prolongée, et il n'y a pas de quoi s'en inquiéter.
• Avant de connecter l'appareil à d'autres
équipements, éteignez toujours l'appareil pour
éviter tout dommage.
Disposition/emplacement
• L'utilisation de l'appareil près d'un
post-amplificateur ou des appareils utilisant
des convertisseurs haute tension, peut
provoquer un bourdonnement. Afin d'éviter ce
problème, veuillez changer l'orientation de
l'appareil, ou bien éloignez l'appareil des
sources de perturbation.
• Cet appareil peut interférer avec les postes
radio et téléviseurs. Veuillez ne pas utiliser
l'appareil à proximité de ces derniers.
• Ne placez pas l'appareil au soleil ou près
d'une source de chaleur, car une température
élevée peut déformer ou décolorer l'appareil.
• Afin d'éviter tout dommage permanent,
n'exposez pas l'appareil à l'humidité ou dans
des environnements humides.
Maintenance
• Pour le nettoyage normal, veuillez utiliser un
chion doux sec ou légèrement humide pour
l'essuyer. Pour les endroits plus diciles, utilisez un
nettoyant au pH neutre et non abrasif, puis utilisez
un chion doux pour essuyer.
• N'utilisez jamais d'huile volatile, de solutions
diluantes, d'alcool ou tout autre type de solvant
afin d'éviter que l'appareil ne se déforme ou se
décolore.
Précautions supplémentaires
• Pendant le fonctionnement, veuillez
manipuler l'appareil avec précaution afin
d'éviter tout dommage.
• Ne pas frapper ou appuyer sur l'écran.
• Lors du branchement/débranchement,
saisissez toujours la tête des câbles afin
d'éviter d'endommager les câbles ou l'appareil.
• Afin d'éviter de déranger vos voisins, veuillez
utiliser l'appareil à un volume acceptable, ou
utilisez le casque, surtout la nuit.
• Bien que l'appareil soit conçu pour minimiser
les bruits parasites lors du fonctionnement, le son
de percussion peut malgré tout traverser les murs
et le sol, provoquant un bruit innatendu. Veillez à ce
que de tels sons ne dérangent pas vos voisins,
surtout pendant la nuit.
• Lorsque vous transportez l'appareil, veuillez
utiliser la boîte et le rembourrage originaux ou un
emballage similaire.
• Veuillez utiliser des câbles ociels pour
connecter l’appareil. Si vous utilisez des câbles
d'autres constructeurs, veuillez prendre en
compte ceci :
Certains câbles se composent de résistances, ce
qui peut être incompatible et entraîner un volume
extrêmement bas. Pour plus d'informations
concernant les spécifications des câbles, veuillez
contacter les constructeurs.
• Veuillez ne pas heurter les pads avec une force
excessive, afin d'éviter tout risque de vous blesser
aux mains.
Précautions
Veuillez lire les précautions suivantes en plus des instruction s de sécurité

13
P1 P2 P3
Floor Pad
Bodenpad
Ø3.81 (cm) Stopper Ø2.22 (cm) Stopper
Ø3.81 (cm) Stopper Ø2.22 (cm) Stopper
Ø3.81 (cm) Butoir Ø2.22 (cm) Butoir
4+2
P5
Wing-Bolt
Flügelschraube
32+4
P6
Nut
Mutter
x4 x2
x2
A1
Sound Module MS310
Soundmodul MS310
Module audio MS310
x1
B1
Drum Stick(1 set)
Trommelschlegel (1 Paar)
Baguettes de batterie (1 paire)
x1
L1
Adapter
Netzadapter
Adaptateur
x1
Accessories / Zubehör / Accessoire
A2
Pad
x5
B2
User Manual
Bedienungsanleitung
x1
L2
x4
L-L Mono Sound Cable (Black) L : 100cm
Câble audio mono G-G (noir) L : 100 cm
L-L Mono-Soundkabel (schwarz) L : 100cm
A3
Hi-Hat Controller
Hit-Hat Kontrolle
Contrôle du Charleston
x1
A4
Bass Drum Controller
Basstrommel Kontrolle
Contrôle de la grosse caisse
x1
B3
Cable Tie
Kabelbinder
Guide utilisateur Attache de câble
x2
L3
x2
L4
L-L Stereo Sound Cable (Blue)
Câble audio stéréo G-G (bleu)
L-L Stereo-Soundkabel (blau)
x1
L-L Mono Sound Cable (Black)L : 150cm
L-L Mono-Soundkabel (schwarz)L : 150cm
Câble audio mono G-G (noir)L : 150 cm
Parts / Teile / Pièces
28+2
P4
Cross-Bolt
Querschraube
Pad de sol
Vis papillon ÉcrouVis en croix
Pad
Pad

14
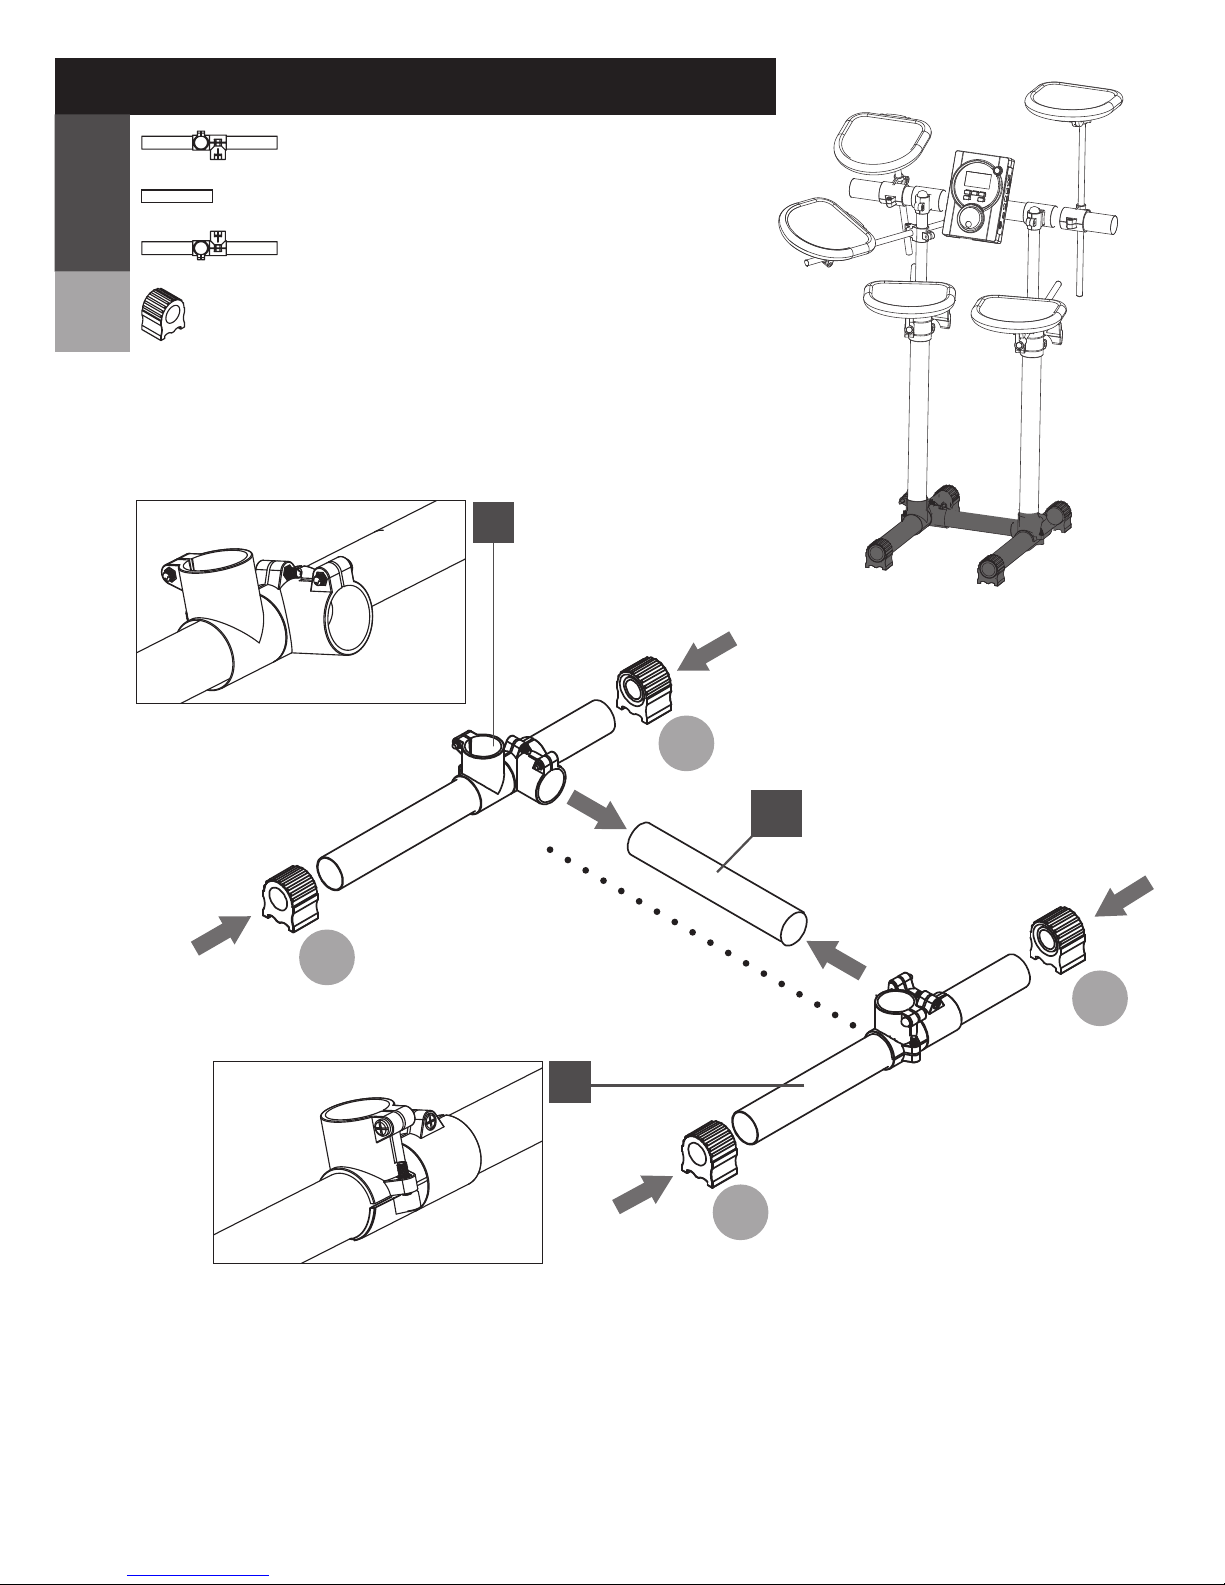
S up port St and / Ständer / Support
40
cm × 1
x 2
20 cm
× 1
40 cm × 1
x 2
40 cm
× 2
40 cm × 2
57 cm
× 1
40 cm
× 4
S 1
S 2
S 3
S 4
S 5
S 6
S 7
S 8
20 cm
× 1
Ø3 .8 1 cm
Ø3 .8 1 cm
Ø3 .8 1 cm
Ø3 .8 1 cm
Ø3 .8 1 cm
Ø1.27cm
Ø1.27cm
Ø2.22cm
Conn ec tors / Anschlüsse / Connecteurs
C1 C2 C 3
Ø1. 27
Pa d Co nnector
Pa d Anschluss
Ø3.81 - Ø2.22
Co nnector
Anschluss
C 4
Ø1.27 - Ø2.22
Co nnector
Anschluss
C 5 C 6
Ø3.81 - Ø2.22
Einstellbarer Anschluss
x5
x2
x2 x2 x3
Ø3.81 - Ø1.27
Connector
Anschluss
Pad Connecteur Connecteur
Connecteur Réglable
Connecteur
Adjustable Con nector
(Orange)
(Orange)
Ø3.81(cm)
U-shape Plate & Double Screws
U-förmige Platte & Doppel-Schrauben
Connecteur
Plaque en forme de U & vis doubles
×1

15
68
Expansion
/ Erweiterung
/ Extension
Connectors / Anschlüsse / Connecteurs
C3C1
C2
16
123
89
C4 C5
17
P1
P1
P1
P1
20cm
S2
40cm
S1
40cm
S3
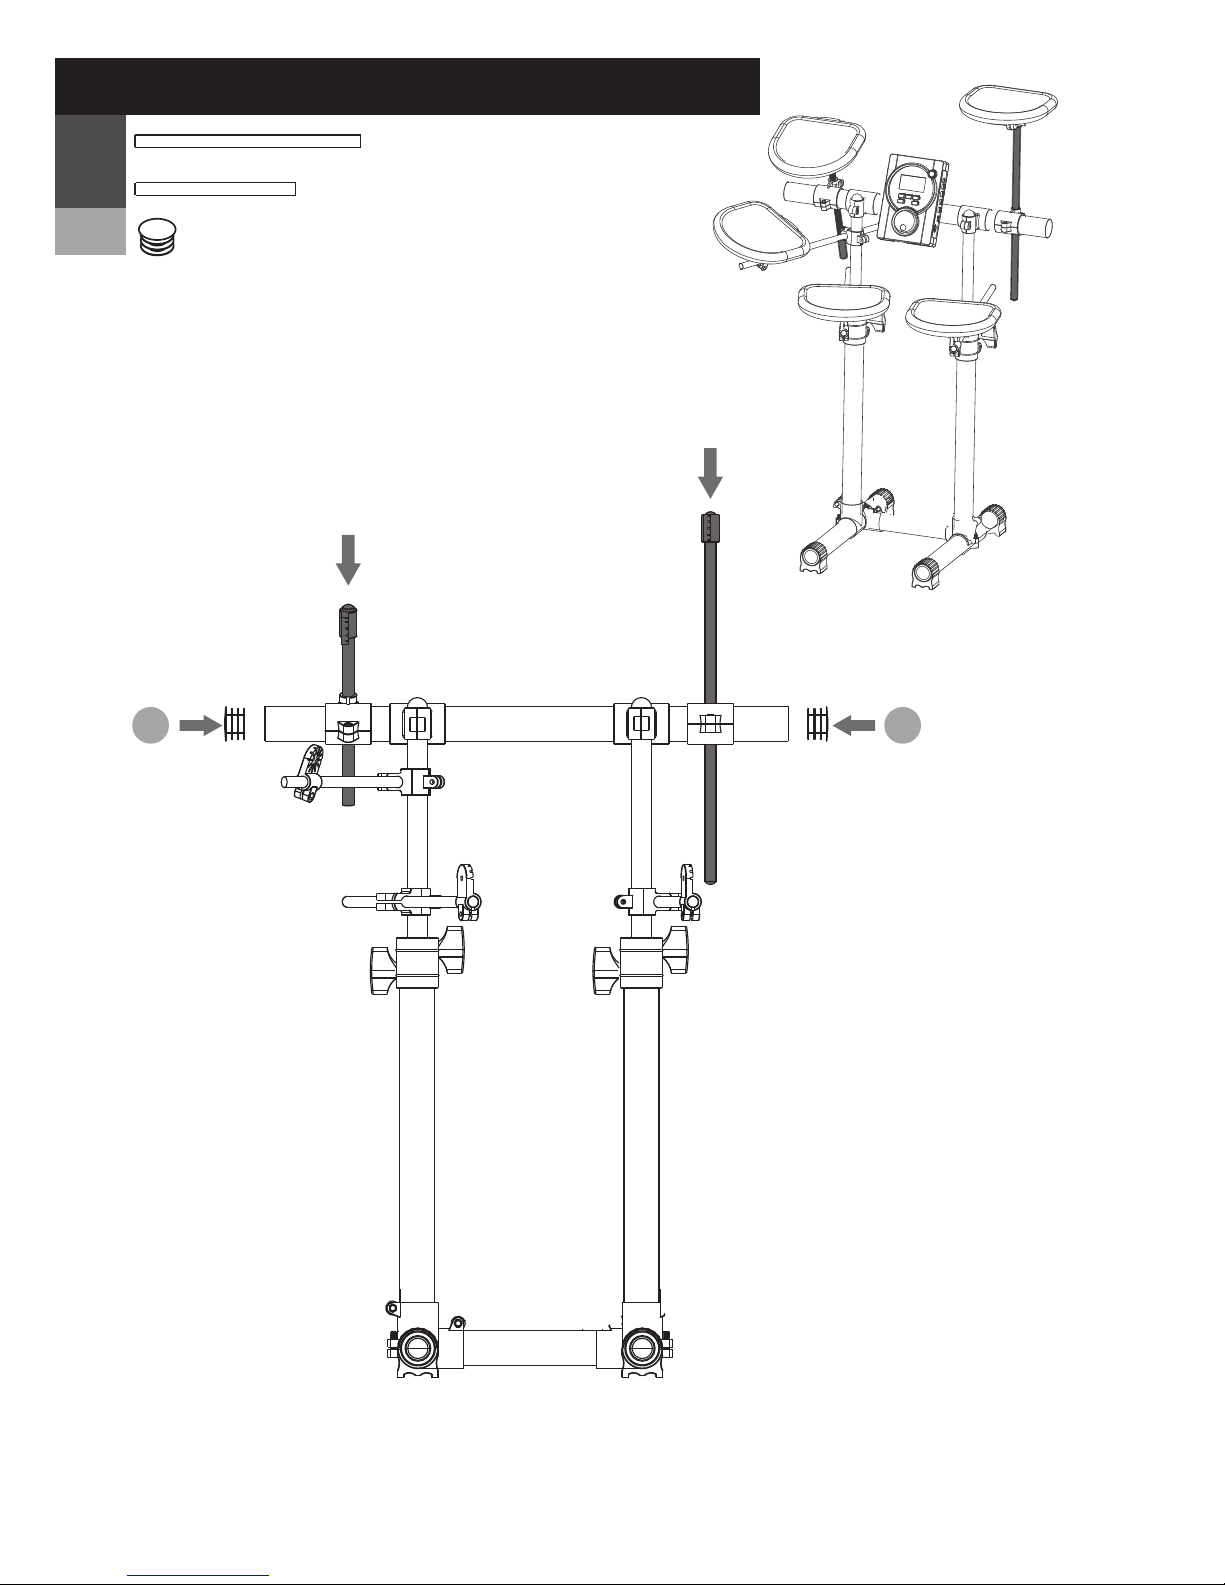
Step 1 / Schritt 1 / Étape 1
S1
(40cm) x1 (left / links / gauche)
S2
(20cm) x1 (center / Zentrum / centre)
S3
(40cm) x1 (right / rechts / droit)
P1
x4
Ø3.81cm
Ø3.81cm
Ø3.81cm

18
Step 2 / Schritt 2 / Étape 2
S4
(40cm) x2
S5
(40cm) x2
(57cm) x1
S6
!
Please note
the direction of the screw.
!
Bitte beachten Sie
die Verschraubungsrichtung.
!
Veuillez tenir compte
du sens de vissage.
x2
x2
x2
x3
S6
S4
40cm
40cm
S5
Ø2.22cm
Ø3.81cm
Ø3.81cm
(Orange)
(Orange)

19
Step 3 / Schritt 3 / Étape 3
(40cm) x3
S8
40cm
S8
40cm
S8
20
Step 4 / Schritt 4 / Étape 4
S8
S9
(40 cm) x1
(20 cm) (left / links / gauche)
(right / rechts / droit)
x1
x2
P2
P2 P2

21
Step 5 / Schritt 5 / Étape 5
A2
x5
T1 x10
T2
x10
C2
x5
Depression
Vertiefung
Convex
Gewölbe
Dépression Convexe
Below are examples of wrong assembly.
Hierunter finden Sie Beispiele von falschen Zusammenstellungen.
Vous trouverez ci-dessous des exemples d'un mauvais montage.
T1
T1
C2
T2
T2
A2

22
Mounting on the stand
Aufbauen des Ständers
Montage du support
A1
x1
C6 x1
Position the Sound
Module onto the Bar and
fold the U-Shape Plate
upwards around the bar.
Secure the U-Shape Plate
to the back of the Sound
Module with Screws.
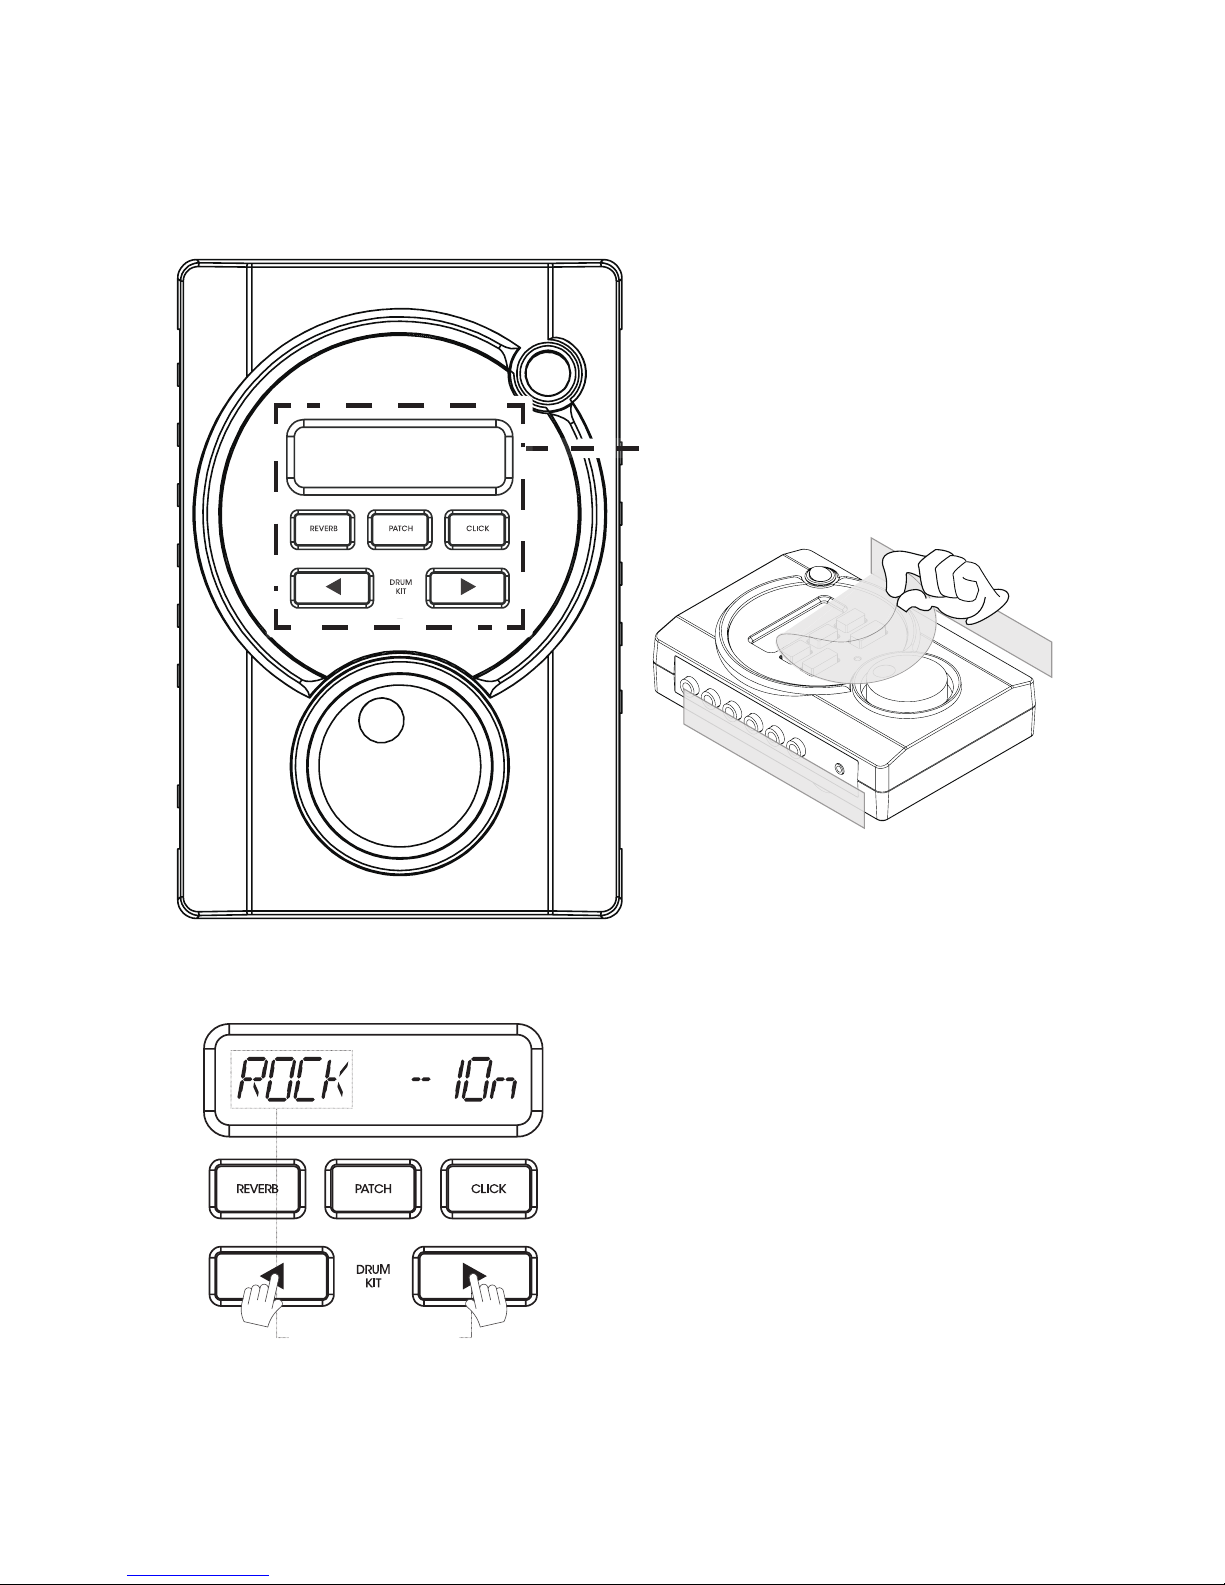
Remove the protective
Platzieren Sie das
Soundmodul auf die Stange
und biegen Sie die
U-Förmige Platte nach oben,
um die Stange herum.
Befestigen Sie die
U-Förmige Platte an der
Hinterseite des
Soundmoduls mit
Schrauben.
Entfernen Sie die Schutzfolie
A1
C6
Placez le module de son sur
la barre et pliez la plaque en
forme de U vers le haut,
autour de la barre.
Fixez la plaque en forme de
U à l'arrière du module de
son à l'aide de vis.
Retirez le film de protection.

23
(B lack / schwarz / Noir )
(B lack / schwarz / Noir )
(B lack / schwarz / Noir )
② SNARE / KLEINE TROMMEL / CAISSE CLAIRE
③ TOM1
⑧ ⑧ T OM2
⑦ CYMBAL 2 / BECKEN 2 / CYMBALE 2
(B lack / schwarz / Noir )
⑤ HI-H AT CTRL/ HI-H AT CTRL / CTRL CHARLESTON
⑥ BA SS DRUM CTRL / BASSTROMMEL CTRL / CTRL GROSSE CAISSE
S oun d Cab le / Sound-Kabel / Câble audio
x4
L2
L3
x2
Connec t the S ound
Cables to the Drum
Pa ds, Pedals and Sound
Module.
Schließen Sie die
Sound-Kabel an die
Trommelpads, die
Pedalen und das
Soundmodul.
Connectez les câbles
audio aux pads de
batterie, aux pédales
et au module audio.
Mono ca ble
(one bla ck line)
Stereo cable
(two black l ines)
L 2
L 3
Mono - Kabel
(ein schwarzer Strich)
Câble Mono
(une ligne noire)
Stereo - Kabel
(zwei schwarze Striche)
Câble Stéréo
(deux lignes noires )
(B lue / Blau / Bleu )
L 4
(B lue / Blau / Bleu )
L3
x1
①
HI-HAT /CHARLESTON
Hi - Hat
A3
Hi - Hat
Charleston
Bass Drum
BASSTROMMEL
Grosse caisse
A4
Cont r o ll er / Kontrolle / Contrôle
A3
x1
A4
x1
②
③
⑧
⑦
⑤ ⑥
①

24
④ CYMBAL1 and ⑦ CYMBAL2 must use Stereo Sound Cables
(blue, 2 parallel black lines at the tip) for connection to the Sound Module.
NOTE
④ BECKEN1 und ⑦ BECKEN2 müssen Stereo-Sound-Kabel verwenden (blau,
2 parallel schwarze Striche an der Spitze) für den Anschluss an das Soundmodul.
ANMERKUNG
④ CYMBALE1 et ⑦ CYMBALE2 nécessitent l'utilisation de câbles audio Stéréo
(bleu, 2 lignes noires parallèles sur la pointe) pour la conn exion au module audio.
REMARQUE
Conecting the Pads / Anschließen der Pads / Connecter les pads
⑧ TOM2
⑨
TOM3
⑦ CYMBAL2
/BECKEN 2 / CYMBALE2
⑦
⑨
⑧
⑩
/ DC-Eingang
/ ALIMENTATION CD
DC IN
MIDI OUT / MIDI-AUSGANG / SORTIE MIDI
MENU
⑤
HI-HAT CTRL
/HI-HAT CTRL /CTRL CHARLESTON
⑥ BASS DRUM CTRL
/ BASSTROMMEL CTRL
/ CTRL GROSSE CAISSE
① HI-H
CHARLESTON
AT
② SNARE
/ KLEINE TROMMEL
/ CAISSE CLAIRE
③ TOM1
④ CYMBAL1 / BECKEN 1
/ CYMBALE1
①
③
⑤
②
④
⑥
(Blue / Blau / Bleu)
(Black / Schwarz / Noir)
optional / optional / en option
headphone / Kopfhörer / Écouteurs
optional / optional / en option
optional / optional / en option
ADAPTER (5V1A)
/ ADAPTER (5V1A)
/ADAPTATEUR (5V1A)
⑩
BASS DRUM / BASSTROMMEL
/ Grosse caisse
LINE IN
/ LINE-EINGANG MIDI-AUSGANG
/ ENTREE LINE

25
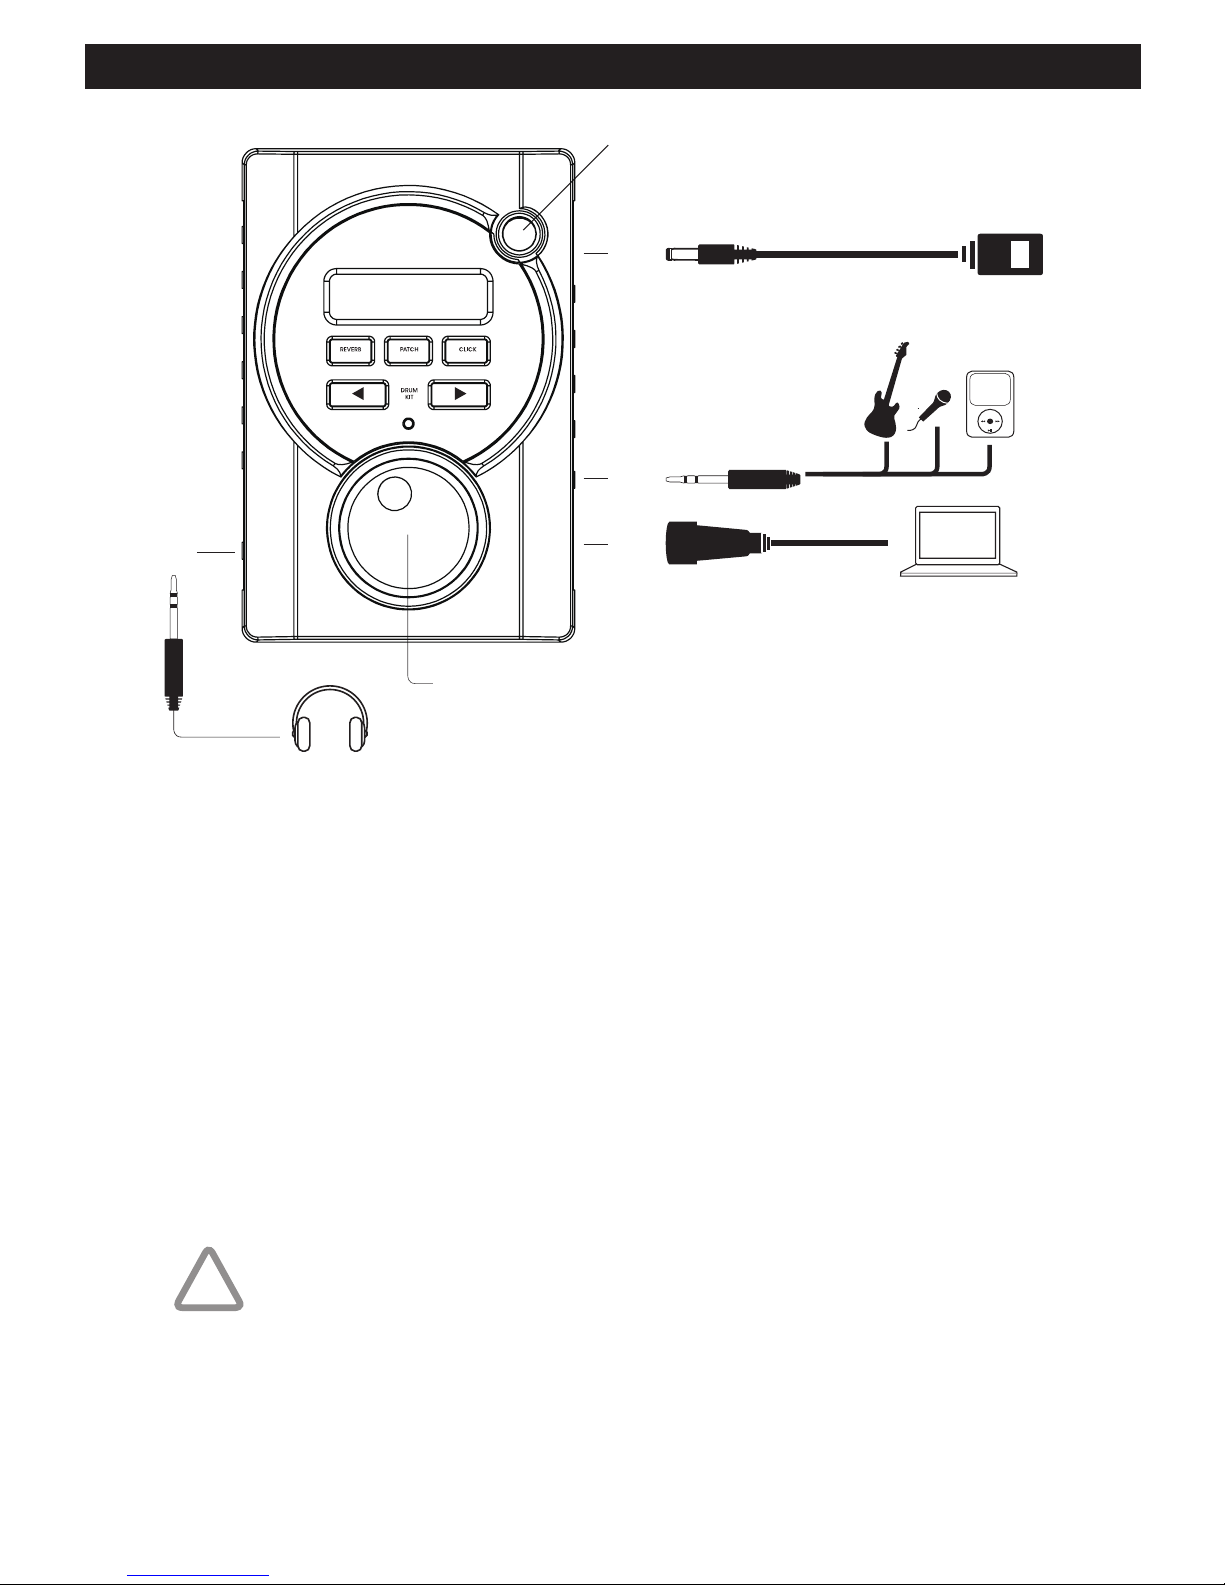
Console Control Introduction
① DC IN
For connection of the power adapter.
② PHONES
For connection of a headphone.
③ POWER
④ VOLUME
For adjusting the system volume.
NOTE
To prevent damage to speakers,
always turn down the volume before
inserting or removing sound cables.
⑤ LINE IN
For connection of a sound input
source like a portabl e m usic player,
a microphone, other instruments or
another sound source. The sound is
directed to both Phone and Line Out.
⑥ MIDI OUT
For connection of a sound input
source like a portabl e m usic player,
a microphone, other instruments or
another sound source. The sound is
directed to both Phone and Line Out.
About MIDI
MIDI (Musical Instrument Digita
ble
Interface) is an industry-standard
protocol that enables electronic
musical instruments, computers, and
other equipment to communicate,
control, and synchronize with each
other. MIDI allows computers,
synthesizers, MIDI controllers, sound
cards, samplers and drum machines
to control one another, and to
exchange system data.
②
③ POWER
①
⑤
MENU
⑥
④ VOLUME
Adapter must be 5V1A

26
Bedienungskonsole Einführung
① DC-EINGANG
Um den Netzadapter anzuschließen.
② PHONES
Um einen Kopfhörer anzuschließen.
③ POWER
④ LAUTSTÄRKE
Um die Lautstärke des Systems
einzustellen.
ANMERKUNG
Damit die Lautsprecher nicht beschädigt
werden, drehen Sie die Lautstärke
herunter, bevor Sie das Soundkabel
ein- oder ausstecken.
⑤ LEIN - EINGANG
Um eine Tonquelle anzuschließen, wie
einen tragbaren Musik - Player, ein Mikrofon,
andere Instrumente oder eine andere
Tonquelle. Der Ton wird sowohl zum
Kopfhörer und zum Lein - Ausgang gerichtet.
⑥ MIDI-AUSGANG
Damit die Lautsprecher nicht beschädigt
werden, drehen Sie die Lautstärke herunter,
bevor Sie das Soundkabel ein- oder
ausstecken.
Zum MIDI
MIDI (Musical Instrument Digitable
Interface) ist ein Industrie-Standard
Protokoll, das den Austausch, die
Kontrolle und die Synchronisierung von
musikalischen Daten zwischen
Musikinstrumenten, Computern und
weiteren Anlagen erlaubt.MIDI erlaubt
Computern, Synthesizer, MIDI-Kontrollen,
Sound-Karten, Sampler und
Trommel - Maschinen einander zu
kontrollieren, und Systemdaten
auszutauschen.
②
③ Strom
①
⑤
MENU
⑥
④ LAUTSTÄRKE
Der Adapter muss 5V1A sein
Schalten Sie den Strom ein / aus.
27
Introduction de la commande de la console
① ALIMENTATION CD
Pour connecter un câble d'alimentation.
② PHONES
Pour connecter un casque.
③ MARCHE
④ VOLUME
Pour ajuster le volume du système.
REMARQUE
Pour éviter d'endommager les haut-parleurs,
veuillez toujours baisser le volume avant
d'insérer ou de retirer des câbles audio.
⑤ LINE IN
Pour connecter une source d'entrée audio
telle qu'un lecteur de musique portable, un
microphone, d'autres instruments ou une
autre source audio. Le son est dirigé à la fois
vers la sortie casque et la sortie Line out.
⑥ MIDI OUT
Pour connecter une source d'entrée audio
telle qu'un lecteur de musique portable, un
microphone, d'autres instruments ou une
autre source audio. Le son est dirigé à la
fois vers la sortie casque et la sortie Line out.
Concernant la fonction MIDI
Le MIDI (Musical Instrument Digital
Interface) est un protocole standard de
l'industrie musicale permettant l’échange,
le contrôle et la synchronisation de données
entre instruments de musique électronique,
des ordinateurs et
d'autres équipements.
Le MIDI permet aux ordinateurs,
synthétiseurs, contrôles MIDI, cartes son,
samplers et batteries de se contrôler
mutuellement et d'échanger des données
systèmes.
②
③ MARCHE
①
⑤
MENU
⑥
④ VOLUME
L'adaptateur doit être de 5V1A
Interrupteur marche / arrêt

28
Metronome
Press this button to Switch to the
Metronome Display, above, and
Turn On the Metronome. While the
Metronome Display is shown, press
this button again to Turn Off the
Metronome. If the Metronome is not
Turned Off nor its settings adjusted,
the Metronome Display will eventually
revert back to the Drum Style & Sound
Set Display, and the Metronome will
continue to play.
Click Mode
(Metronome)
Beat Count
Press this button to Select the
Metronome’s Beat Count. The picture
of the Sound Module, above, displays
Selection of Beat Count 3/4. When
the Sound Module is turned on and
Switched to Metronome, the setting will
default to Beat Count 4/4.
Press these buttons to Adjust the
Tempo of the Beat Count. The Tempo
will be displayed as a 3 digit number,
with a minimum of 30 and a maximum
of 250 ; the picture of the Sound
Module, above, displays a Tempo of
118. When the Sound Module is turned
on and Switched to Click Mode, the
setting will default to a Tempo of 120.
Tempo

29
Metronom
Drücken Sie diese Taste, um den Metronom
anzuzeigen, darüber, und das Metronom
einzuschalten.Während der Metronom angezeigt
wird, drücken Sie nochmals diese Taste, um das
Metronom auszuschalten. Falls das Metronom
nicht ausgeschaltet ist, und die Parameter nicht
eingestellt sind, kann die Metronom-Anzeige
zurück zur Anzeige des Trommelstils und der
Toneinstellung schalten, und das Metronom
spielt weiter.
Click-Modus
(Metronom)
Drücken Sie diese Taste, um die Taktzählung
des Metronoms auszuwählen. Die Abbildung des
Soundmoduls, hierüber, zeigt die Auswahl der
Taktzählung 3/4.Wenn das Soundmodul
eingeschaltet ist und auf Metronom geschaltet ist,
schalten die Standardeinstellungen auf die
Taktzählung 4/4.
Drücken Sie diese Taste, um den Takt der
Taktzählung einzustellen. Das Tempo erscheint
als eine 3-Ziffern Nummer, mit einem Minimum
an 30 und einem Maximum an 250; die Abbildung
des Soundmoduls, hier oben, zeigt ein Tempo
von 118. Wenn das Soundmodul eingestellt ist
und sich im Klick-Modus befindet, geht die
Standardeinstellung auf ein Tempo von 120.
Tempo
(Takt)
Beat Count
(Taktzählung)

30
Métronome
Appuyez sur ce bouton pour passer à l'affichage
du métronome, au-dessus, et allumer le
métronome. Quand le métronome s'affiche,
appuyez de nouveau sur le bouton pour
éteindre le métronome. Si le métronome n'est
pas éteint et que ses paramètres ne sont pas
réglés, l'affichage du métronome peut laisser
place à l'affichage du style de percussion et de
la gamme sonore.
Mode Click
(Métronome)
Appuyez sur ce bouton pour sélectionner la
mesure du métronome. L'image du module
audio, ci-dessus, affiche la sélection de la
mesure 3/4. Lorsque le module audio est
allumé et réglé sur métronome, la mesure
4/4 sera paramétrée par défaut.
Appuyez sur ce bouton pour régler le tempo
de la mesure. Le tempo apparait comme un
numéro à trois chiffres, avec un minimum de
30 et un maximum de 250 ; l'image du module
audio, ci-dessus, affiche un tempo de118.
Lorsque le module audio est allumé et réglé
sur le mode Click, les paramètres par défaut
seront à un tempo de 120.
Tempo
Beat Count
(mesure)
31
Console Operation
Percussion Sound Module
Press these buttons to Select a Drum Style.
The Selected Drum Style will be displayed on
the left side of the Sound Module’s screen;
the picture of the Sound Module, above,
displays Selection of ROCK Style. When the
Sound Module is turned on, the setting will
default to ROCK Style.
Available Drum Styles: ROCK/ JAZZ/
METAL/ BLUES/ POWER/ TECHNO/
MARCH/ LATIN/ TAIKO/ TIMBALE/
FUSION
Drum Styles
Percussion Sound Module
& Metronome

32
Konsolbedienung
Perkussionen Soundmodul
Drücken Sie diese Tasten, um einen Trommelstil
auszuwählen Der ausgewählte Trommelstil erscheint
auf der linken Seite des Bildschirms des Soundmoduls;
die Abbildung des Soundmoduls, hier oben, zeigt die
Auswahl des ROCK-Stils.Wenn das Soundmodul
eingestellt ist, geht die Standardeinstellung auf den
ROCK-Stil.
Vorhandene Trommelstile: ROCK/ JAZZ/
METAL/ BLUES/ POWER/ TECHNO/ MARCH/
LATIN/ TAIKO/ TIMBALE/ FUSION
Trommelstile
(Drum Styles)
Perkussionen Soundmodul
& Metronom

33
Utilisation de la console
Module audio de percussion
Appuyez sur ces boutons pour sélectionner un style de
percussion. Le style de percussion sélectionné
s'affichera du côté gauche de l'écran du module audio
l'image du module audio ci-dessus affiche la sélection
du style ROCK. Lorsque le module audio est allumé,
les paramètres par défaut seront sur le style ROCK.
Styles de percussions disponibles : ROCK/
JAZZ/ METAL/ BLUES/ POWER/ TECHNO/
MARCH/ LATIN/ TAIKO/ TIMBALE/ FUSION
Drum Styles
(styles de percussions)
Module audio de percussion
& Métronome

34
NOTE
.
Press this button to Select a Sound Set
for the current Drum Style. There are
up to 4 Sound Sets per Drum Style.
TECHNO, MARCH, and TAIKO Styles
only have 1 Sound Set. The Selected
Sound Set Number will be displayed to
the right of a hyphen on the right side
of the screen; the picture of the Sound
Module, above, displays Selection of
Sound Set 1. When the Sound Module
is turned on, the setting will default to
Sound Set 1.
Sound Set
Press this button to Toggle Reverb
On or Off. The function of Reverb is
to simulate the component of sound
surrounding walls or objects, like an
echo. An
will be displayed
to the right of the Sound Set Number
to designate Reverb On. If the Sound
Module’s screen only displays a Drum
Style and a Sound Set, this designates
Reverb Off. When the Sound Module
is turned on, the setting will default to
Reverb Off.
Reverb

35
ANMERKUNG
Drücken Sie diese Taste, um eine
Toneinstellung für den aktuellen
Trommelstil auszuwählen. Es gibt bis
zu 4 Trommeleinstellungen pro
Trommelstil. TECHNO, MARCH, und
TAIKO Stile besitzen nur 1 Toneinstellung.
Die Nummer der ausgewählten
Toneinstellung erscheint auf der rechten
Seite des Bildschirms; die Abbildung des
Soundmoduls, hier oben, zeigt die Auswahl
der Toneinstellung 1 an.Wenn das
Soundmodul eingestellt ist, geht die
Standardeinstellung auf die
Toneinstellung 1.
Drücken Sie diese Taste, um den
Halleffekt ein - oder auszuschalten.
Die Halleffekt-Funktion dient dazu,
den Widerhall des Klangs auf
umliegenden Wänden oder Objekten
zu simulieren, wie ein Echo.
Ein
erscheint auf der rechten
Seite der Toneinstellungsnummer, um
anzuzeigen, dass der Halleffekt
(Reverb) eingeschaltet ist.Falls der
Bildschirm des Soundmoduls nur einen
Trommelstil und eine Toneinstellung
anzeigt, bedeutet dies, dass der
Halleffekt ausgeschaltet ist.
Reverb
(Halleffekt)
Toneinstellung
(Sound Set)
Beachten Sie die Stile & Sounds-Liste Seite für bestimmte Percussion - Sounds.

36
REMARQUE
Appuyez sur ce bouton pour sélectionner
une gamme sonore pour le style de
percussion actuel. Il y a jusqu'à 4 gammes
sonores par style de percussion.Les styles
TECHNO, MARCH, et TAIKO n'ont qu'1
seule gamme sonore.Le numéro de la
gamme sonore sélectionnée s'affiche à
droite d'un tiret du côté droit de l'écran
l'image du module audio ci-dessus affiche
la sélection de la gamme sonore 1.
Lorsque le module audio est allumé, les
paramètres par défaut seront sur la
gamme sonore 1.
Appuyez sur ce bouton pour allumer ou
éteindre l'écho (reverb). La fonction
Reverb (écho) sert à simuler la
composante du son renvoyé par les murs
et les objets qui se trouvent autour,
comme un écho.
Un
Reverb
(écho)
Sound Set
(Gamme sonore)
sera affiché à droite du numéro de la
gamme sonore afin d'indiquer que la fonction
Reverb (écho) est activée. Si l'écran du
module audio affiche un style de percussion
et une gamme sonore, cela signifie que l'écho
est désactivé.
Reportez-vous à la page de la liste des Styles & Sons pour les sons de percussion
spécifiques

Audio Sampling Frequency 16bit 44.1kHz WAV
Maximum Polyphony 32 notes
Voices 11 Categories, 168 high sound quality audio
Drum kits 32 preset drum modes
Sensor 128 level ultra realistic velocity sensor
Effect Reverb
Metronome 30-250 BPM, 3 kinds of beats
Wiring Terminal ,)oeretS 5.3(SENOHP ,)oeretS 5.3(NI ENIL
MIDI OUT(5-pin DIN), DC IN(AC adaptor)
Connectors Hi-Hat, Snare, Tom1, Tom2, Tom3, Cymbal1,
Cymbal2, Bass Drum, H.H.Ctrl, Bass Ctrl
Power DC 5V1A
Dimensions 17.5(W)x12(D)x5.5(H)cm
Audio-Abtast-Frequenz 16 Bit 44.1 kHz WAV
Maximale Polyphonie 32 Noten
Stimmen 11 Kategorien, 168 Hohe Tonqualität
Trommelsets 32 voreingestellte Trommelmodi
Sensor 128 Niveaus ultra realistischer Geschwindigkeitssensor
Effekt Reverb(Halleffekt)
Metronom 30-250 BPM, 3 Taktarten
Verdrahtung
MIDI-AUSGANG (5-pin DIN), DC-EINGANG (AC-Adapter)
LEIN-EINGANG (3.5 Stereo), KOPFHÖRER (3.5 Stereo),
Anschlüsse Hi-Hat, Snare, Tom1, Tom2, Tom3, Cymbal1,
Cymbal2, Bass Drum, H.H.Ctrl, Bass Ctrl
Strom DC 5V1A
Dimensionen 17.5(B)x12(T)x5.5(H)cm
Fréquence d'échantillonnage audio 16 Bit 44.1 kHz WAV
Polyphonie maximale 32 notes
Voix 11 Catégories, 168 sons de haute qualité audio
Ensembles de percussions 32 modes de percussions prédéfinis
Capteur Capteur de vitesse ultra réaliste 128 niveaux
Effet Écho
Métronome 30-250 BPM, 3 types de battements
Borne de raccordement
MIDI OUT (5 broches DIN), DC IN (adaptateur CA)
LINE IN (3.5 Stéréo), PHONES (3.5 Stéréo),
Connecteurs Hi-Hat, Snare, Tom1, Tom2, Tom3, Cymbal1,
Cymbal2, Bass Drum, H.H.Ctrl, Bass Ctrl
Alimentation CD 5V1A
Dimensions 17.5 l) x 12 (P) x 5.5 (H) cm
37

38
Styles & Sounds List / Liste der Stile und der Töne / Liste des styles et des sons
2 3 4 5 6 7 8
HI-HAT SNARE TOM1 TOM2 TOM3 CRASH1 CRASH2 BASS
HI-HAT SNARE TOM1 TOM2 TOM3 CRASH1 RIDE BELL BASS
HI-HAT SNARE TOM1 TOM2 SIDE STICK CRASH1
RIDE
CYMBAL
BASS
HI-HAT SNARE TOM1 TOM2 TOM3 CRASH1 CHINA COWBELL
HI-HAT SNARE TOM1 TOM2 TOM3 CRASH1 CRASH2 BASS
HI-HAT SNARE TOM1 TOM2 TOM3 CRASH1 RIDE BELL BASS
HI-HAT SNARE TOM1 TOM2 SIDE STICK CRASH1
RIDE
CYMBAL
BASS
HI-HAT SNARE TOM1 TOM2 TOM3 CRASH1 CHINA COWBELL
HI-HAT SNARE TOM1 TOM2 TOM3 CRASH1 CRASH2 BASS
HI-HAT SNARE TOM1 TOM2 TOM3 CRASH1 RIDE BELL BASS
HI-HAT SNARE TOM1 TOM2 SIDE STICK CRASH1
RIDE
CYMBAL
BASS
HI-HAT SNARE TOM1 TOM2 TOM3 CRASH1 CHINA COWBELL
HI-HAT SNARE TOM1 TOM2 TOM3 CRASH1 CRASH2 BASS
HI-HAT SNARE TOM1 TOM2 TOM3 CRASH1 RIDE BELL BASS
HI-HAT SNARE TOM1 TOM2 SIDE STICK CRASH1
RIDE
CYMBAL
BASS
HI-HAT SNARE TOM1 TOM2 TOM3 CRASH1 CHINA COWBELL
HI-HAT SNARE TOM1 TOM2 TOM3 CRASH1 CRASH2 BASS
HI-HAT SNARE TOM1 TOM2 TOM3 CRASH1 RIDE BELL BASS
HI-HAT SNARE TOM1 TOM2 SIDE STICK CRASH1
RIDE
CYMBAL
BASS
HI-HAT SNARE TOM1 TOM2 TOM3 CRASH1 CHINA COWBELL
HI-HAT SNARE TOM1 TOM2 SHOUT SCRAPE BEEP BASS
HI-HAT SNARE TOM1 TOM2 TOM3 CRASH1 CRASH2 BASS
RATTLE
LOW
CONGA
OPEN HIGH
CONGA
FLOOR
CONGA
MUTE HIGH
CONGA
HIGH
WOOD
BLOCK
COWBELL BASS
RATTLE
LOW
CONGA
OPEN HIGH
CONGA
FLOOR
CONGA
HIGH
WOOD
BLOCK
CRASH1 RIDE BELL BASS
RATTLE
SIDE
CONGA
OPEN HIGH
CONGA
FLOOR
CONGA
COWBELL CRASH1
RIDE
CYMBAL
BASS
HI-HAT SNARE TOM1 TOM2 TOM3 CHINA1 CHINA2 BASS
HI-HAT CONGA
HIGH
TIMBALE
LOW
TIMBALE
MUTE HIGH
CONGA
SPLASH
CYMBAL
RIDE
CYMBAL
BASS
HI-HAT SIDE STICK
HIGH
TIMBALE
LOW
TIMBALE
COWBELL
SPLASH
CYMBAL
RIDE
CYMBAL
BASS
HI-HAT SNARE TOM1 TOM2 TOM3 CRASH1 CRASH2 BASS
HI-HAT SNARE TOM1 TOM2
TOM3 CRASH1 RIDE BELL BASS
1
1
2
3
4
1
2
3
4
1
2
3
4
1
2
3
4
1
2
3
4
1
2
3
1
2
1
2
1 2 3 4 5 6 7 8
ROCK 1 HI-HAT SNARE TOM1 TOM2 TOM3 CRASH1 CRASH2 BASS
2 HI-HAT SNARE TOM1 TOM2 TOM3 CRASH1 RIDE BELL BASS
3
HI-HAT SNARE TOM1 TOM2 SIDE STICK CRASH1
RIDE
CYMBAL
BASS
4 HI-HAT SNARE TOM1 TOM2 TOM3 CRASH1 CHINA COWBELL
JAZZ 1 HI-HAT SNARE TOM1 TOM2 TOM3 CRASH1 CRASH2 BASS
2 HI-HAT SNARE TOM1 TOM2 TOM3 CRASH1 RIDE BELL BASS
3
HI-HAT SNARE TOM1 TOM2 SIDE STICK CRASH1
RIDE
CYMBAL
BASS
4 HI-HAT SNARE TOM1 TOM2 TOM3 CRASH1 CHINA COWBELL
METAL 1 HI-HAT SNARE TOM1 TOM2 TOM3 CRASH1 CRASH2 BASS
2 HI-HAT SNARE TOM1 TOM2 TOM3 CRASH1 RIDE BELL BASS
3
HI-HAT SNARE TOM1 TOM2 SIDE STICK CRASH1
RIDE
CYMBAL
BASS
4 HI-HAT SNARE TOM1 TOM2 TOM3 CRASH1 CHINA COWBELL
BLUES 1 HI-HAT SNARE TOM1 TOM2 TOM3 CRASH1 CRASH2 BASS
2 HI-HAT SNARE TOM1 TOM2 TOM3 CRASH1 RIDE BELL BASS
3
HI-HAT SNARE TOM1 TOM2 SIDE STICK CRASH1
RIDE
CYMBAL
BASS
4 HI-HAT SNARE TOM1 TOM2 TOM3 CRASH1 CHINA COWBELL
POWER 1 HI-HAT SNARE TOM1 TOM2 TOM3 CRASH1 CRASH2 BASS
2 HI-HAT SNARE TOM1 TOM2 TOM3 CRASH1 RIDE BELL BASS
3
HI-HAT SNARE TOM1 TOM2 SIDE STICK CRASH1
RIDE
CYMBAL
BASS
4 HI-HAT SNARE TOM1 TOM2 TOM3 CRASH1 CHINA COWBELL
TECHNO HI-HAT SNARE TOM1 TOM2 SHOUT SCRAPE BEEP BASS
MARCH HI-HAT SNARE TOM1 TOM2 TOM3 CRASH1 CRASH2 BASS
LATIN 1
RATTLE
LOW
CONGA
OPEN HIGH
CONGA
FLOOR
CONGA
MUTE HIGH
CONGA
HIGH
WOOD
BLOCK
COWBELL BASS
2
RATTLE
LOW
CONGA
OPEN HIGH
CONGA
FLOOR
CONGA
HIGH
WOOD
BLOCK
CRASH1 RIDE BELL BASS
3
RATTLE
SIDE
CONGA
OPEN HIGH
CONGA
FLOOR
CONGA
COWBELL CRASH1
RIDE
CYMBAL
BASS
TAIKO HI-HAT SNARE TOM1 TOM2 TOM3 CHINA1 CHINA2 BASS
TIMBALE 1
HI-HAT CONGA
HIGH
TIMBALE
LOW
TIMBALE
MUTE HIGH
CONGA
SPLASH
CYMBAL
RIDE
CYMBAL
BASS
2
HI-HAT SIDE STICK
HIGH
TIMBALE
LOW
TIMBALE
COWBELL
SPLASH
CYMBAL
RIDE
CYMBAL
BASS
FUSION 1 HI-HAT SNARE TOM1 TOM2 TOM3 CRASH1 CRASH2 BASS
2 HI-HAT SNARE TOM1 TOM2 TOM3 CRASH1 RIDE BELL BASS

39
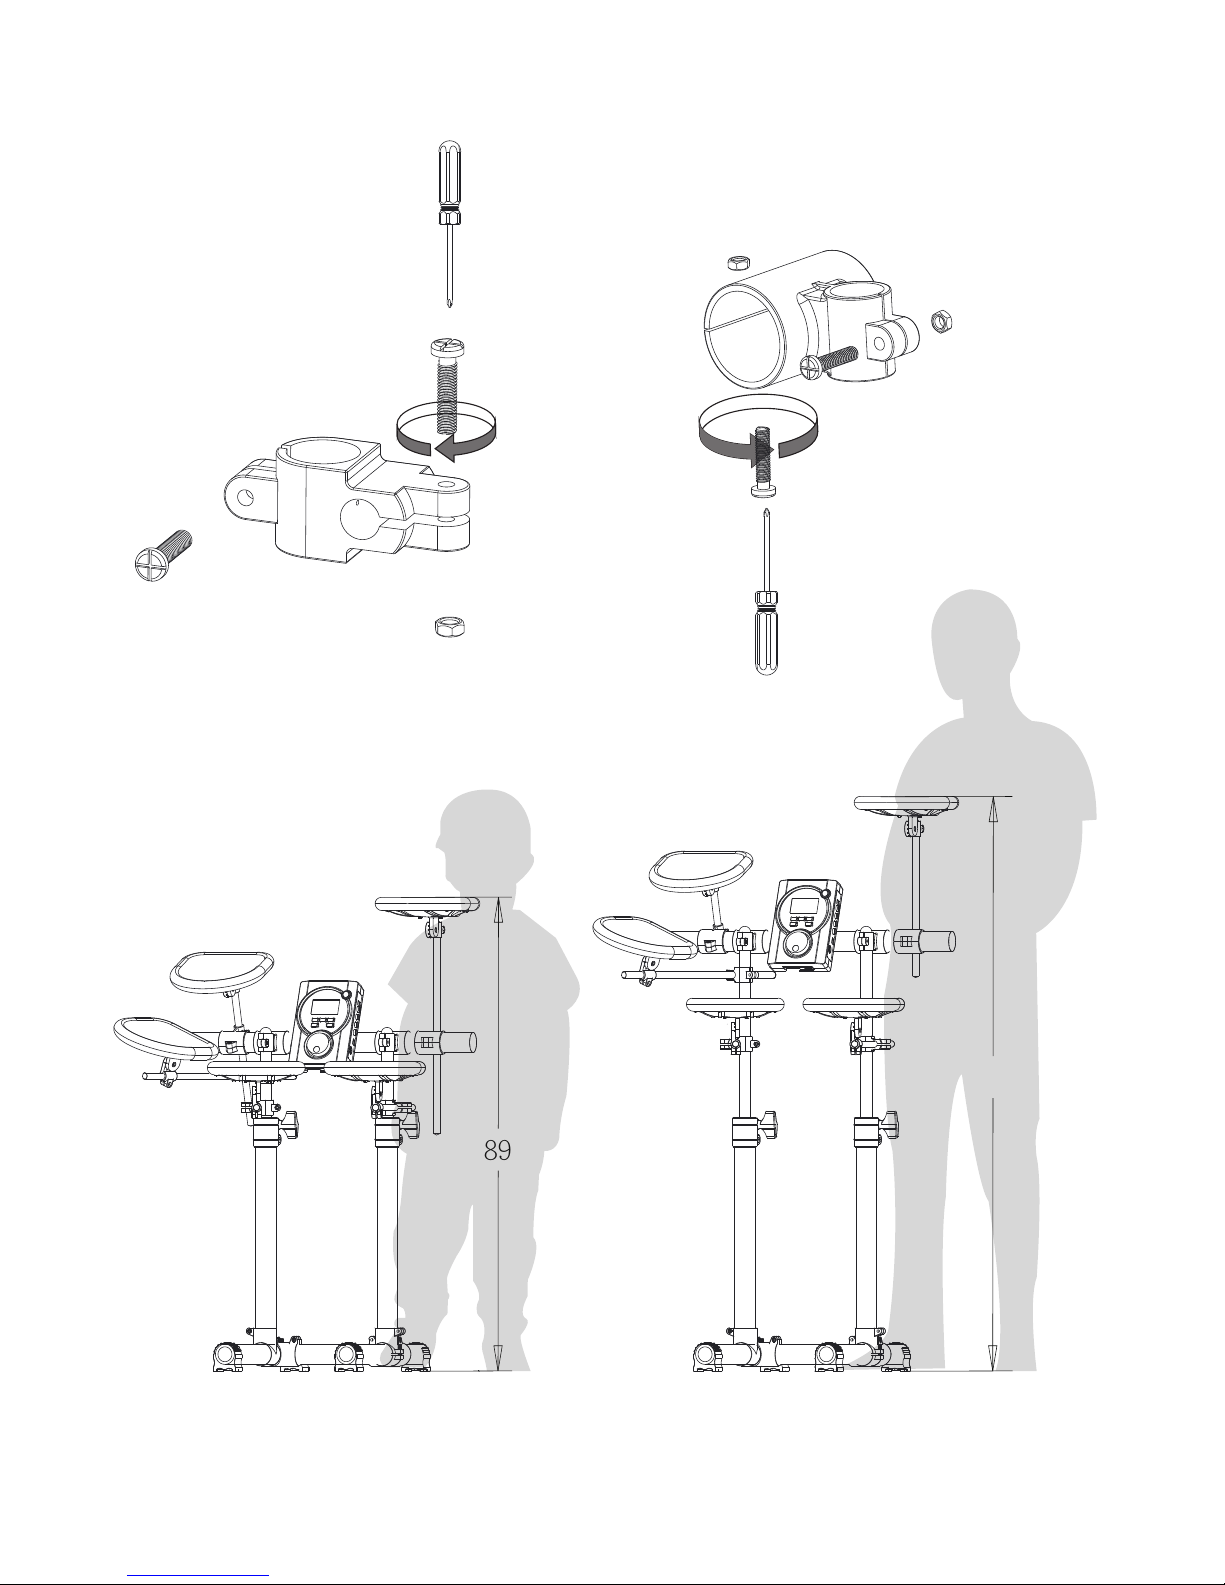
How to adjust hight :
Wie man die Höhe einstellt :
Comment régler la hauteur :
STEP1
Loose wing-bolts.
STEP2
Pull up or down the S5 pipe to adjust the height.
STEP3
Fasten wing - bolt.
SCHRITT1
Lockern Sie die Flügelschrauben.
SCHRITT2
Ziehen Sie das S5 - Rohr hoch oder runter, um
die Höhe einzustellen.
STEP3
Befestigen Sie die Flügelschrauben.
ETAPE1
Desserrez les vis papillon.
ETAPE2
Levez ou abaissez le tube S5 pour régler la hauteur.
ETAPE3
Resserrez les vis papillon.
OR
ODER
OU
 Loading...