

Page 1

INSTALLATION & OPERATION
Page 2
PECIFICATIONS
S
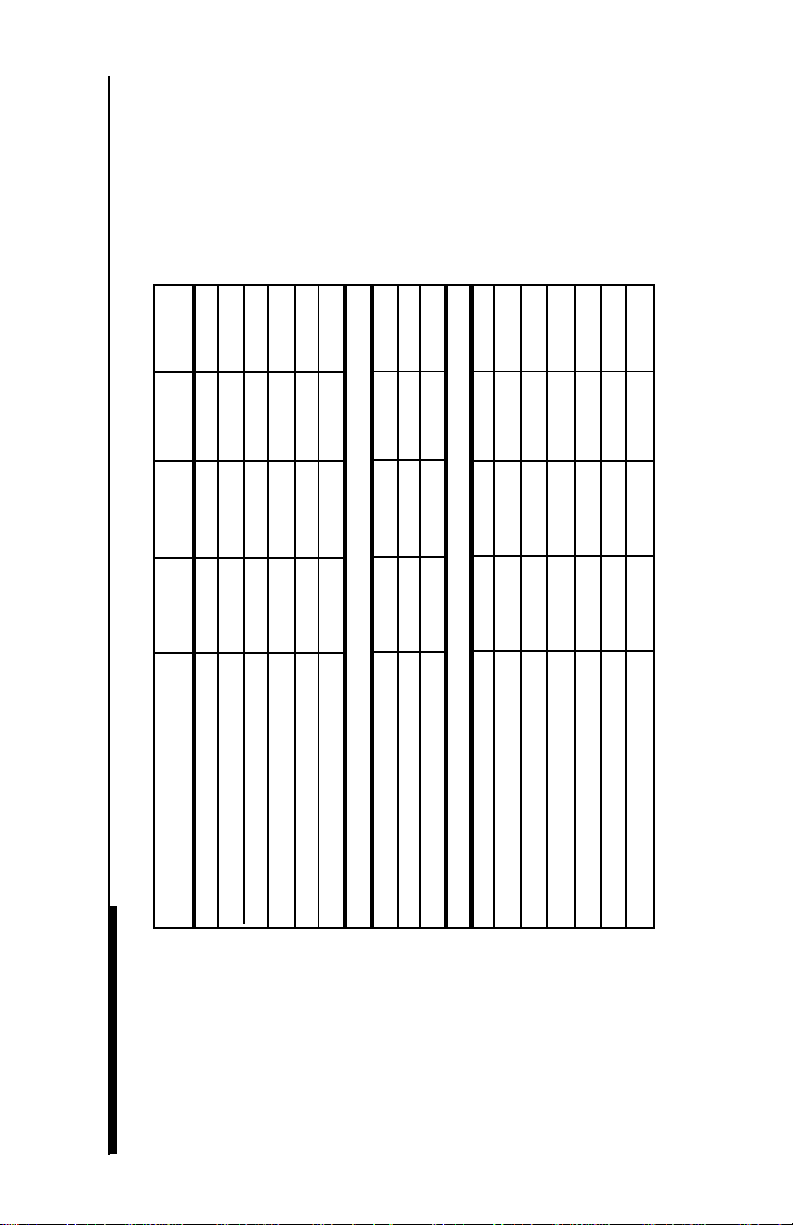
Model HPC1204 HPC1205 HPC1206 HPC1369
Nominal Diameter 4" 5" 6.5" 6" x 9"
Description 2-way 2-way 2-way 3-way
86dB 89dB 89dB 89dB
40/80 60/120 75/150 100/200
107Hz - 20kHz 101Hz - 20kHz 76Hz - 20kHz 49Hz - 20kHz
(Watts RMS/Peak)
(SPL@1w/1m)
Nominal Impedance 4Ω 4Ω 4Ω 4Ω
Frequency Response
Sensitivity
Power Handling
Features
foam foam foam foam
polypropylene polypropylene polypropylene polypropylene
Cone
Surround
– i –
polyethermide polyethermide polyethermide polyethermide
Tweeter
Installation
Speaker Grilles X X X X
93mm 114mm 144mm 155 x 222mm
3-21/32" 4-1/2" 5-21/32" 6-1/8" x 8-3/4"
Speaker Wire X X X X
Mounting Hardware XXXX
Mounting Diameter (inches)
47mm 54mm 65mm 78mm
1-27/32" 2-1/8" 2-9/16" 3-1/16"
Mounting Diameter (mm)
Mounting Depth (inches)
Mounting Depth (mm)
Specifications are subject to change without notice.
Page 3

Dear Customer,
Congratulations on your purchase of the world's finest brand of car audio speakers. At
Rockford Fosgate we are fanatics about musical reproduction at its best, and we are
pleased you chose our product. Through years of engineering expertise, hand craftsmanship and critical testing procedures, we have created a wide range of products that
reproduce music with all the clarity and richness you deserve.
For maximum performance we recommend you have your new Rockford Fosgate
product installed by an Authorized Rockford Fosgate Dealer, as we provide specialized
training through Rockford Technical Training Institute (RTTI). Please read your
warranty and retain your receipt and original carton for possible future use.
Great product and competent installations are only a piece of the puzzle when it comes
to your system. Make sure that your installer is using 100% authentic installation
accessories from Connecting Punch in your installation. Connecting Punch has
everything from RCA cables and speaker wire to Power line and battery connectors.
Insist on it! After all, your new system deserves nothing but the best.
To add the finishing touch to your new Rockford Fosgate image order your Rockford
wearables, which include everything from T-shirts and jackets to hats and sunglasses.
To get a free brochure on Rockford Fosgate products and Rockford wearables, in the U.S.
call 480-967-3565 or FAX 480-967-8132. For all other countries, call +001-480967-3565 or FAX +001-480-967-8132.
PRACTICE SAFE SOUND™
CONTINUOUS EXPOSURE TO SOUND PRESSURE LEVELS OVER
100dB MAY CAUSE PERMANENT HEARING LOSS. HIGH
POWERED
PRESSURE
AND
If, after reading your manual, you still have questions regarding this product,
we recommend that you see your Rockford Fosgate dealer. If you need further
assistance, you can call us direct at 1-800-669-9899. Be sure to have your serial
number, model number and date of purchase available when you call.
The serial number can be found on the outside of the box. Please record it in
the space provided below as your permanent record. This will serve as
verification of your factory warranty and may become useful in recovering your
speakers if they are ever stolen.
Serial Number: ________________________________
Model Number:________________________________
AUTOSOUND SYSTEMS MAY PRODUCE SOUND
LEVELS WELL OVER 130dB. USE COMMON SENSE
PRACTICE SAFE SOUND.
– ii –
Page 4

TABLE OF CONTENTS
Specifications ........................................................................................... i
Dear Customer ........................................................................................ ii
Introduction ............................................................................................. 1
Package Contents..................................................................................... 1
Installation ............................................................................................... 2
Warranty Information............................................................................... 3
International Information..........................................................................4
G
ETTING STARTED
Welcome to Rockford Fosgate! This manual is designed to provide
information for the owner, salesperson and installer. For those of you
who want quick information on how to install this product, please turn
to the
Installation Section
located by using the Table of Contents. We, at Rockford Fosgate, have
worked very hard to make sure all the information in this manual is
current. But, as we are constantly finding new ways to improve our
product, this information is subject to change without notice.
of this manual. Other information can be
Page 5

INTRODUCTION
This manual contains information on the construction, installation and
operation of the Punch High Performance (HPC) Full Range Speakers.
We recommend you keep this manual for future reference.
The Punch High Performance Full Range Speakers are a line of coaxial
(two-way) and triaxial (three-way) speakers designed to improve the
performance of factory installed car stereo systems. Sized to fit most
automotive applications, the Punch High Performance Full Range Speakers provide the first step to upgrading your factory system.
PACKAGE CONTENTS
1 Pair of Punch High Performance Full Range Speakers
1 Pair Grilles (HPC1204, HPC1205, HPC1206, HPC1369 only)
20' of 18 gauge Speaker Wire
Mounting Hardware
Installation & Operation Manual
INSTALLATION
Since some of these Punch High Performance Full Range Speakers are
most often used as direct replacements for stock speakers and are shipped
without grilles, some of the following instructions will not apply. For
custom installations see your Authorized Rockford Fosgate Dealer.
1. Determine where the speakers will be mounted. Ensure an area large
enough for the speaker to mount evenly. Be sure that the mounting
location is deep enough for the speaker to fit; if mounting in a door,
operate all functions (windows, locks, etc.) through their entire operating range to ensure there is no obstruction.
2. Refer to the specification chart to determine the proper diameter hole
to cut for your speaker model.
3. Using the plastic mounting ring as a template, mark the locations for
the mounting screws. Drill the holes with a 1/8" bit.
4. Feed the speaker wires through the cutout and the plastic mounting
ring (from the flat side) and connect to the speaker terminals. Be sure
to observe proper polarity when connecting the wires. The speaker's
positive terminal is indicated with a (+) or colored dot.
– 1 –
Page 6

INSTALLATION
5. Fit the ring and speaker to the cutout. Mount them using the
enclosed screws. Fit the grille inside the ring and press gently, but
firmly, into place.
Grille
Example of standard door installation
Grille
Mounting
Ring
Cut-Out
Mounting
Hole
Speaker
Mounting
Ring
Rear Deck
Cut-Out
Gasket
Speaker
Example of 6" x 9" rear-deck installation
– 2 –
Page 7

LIMITED WARRANTY INFORMATION
Rockford Corporation offers a limited warranty on Rockford Fosgate products on the
following terms:
• Length of Warranty
1 year on speakers 90 days on speaker B-stock (receipt required)
3 years on electronics 90 days on electronic B-stock (receipt required)
1 year on source units
• What is Covered
This warranty applies only to Rockford Fosgate products sold to consumers by
Authorized Rockford Fosgate Dealers in the United States of America or its
possessions. Product purchased by consumers from an Authorized Rockford
Fosgate Dealer in another country are covered only by that country’s Distributor
and not by Rockford Corporation.
• Who is Covered
This warranty covers only the original purchaser of Rockford product purchased
from an Authorized Rockford Fosgate Dealer in the United States. In order to
receive service, the purchaser must provide Rockford with a copy of the receipt
stating the customer name, dealer name, product purchased and date of purchase.
• Products found to be defective during the warranty period will be repaired or
replaced (with a product deemed to be equivalent) at Rockford's discretion.
• What is Not Covered
1. Damage caused by accident, abuse, improper operations, water, theft
2. Any cost or expense related to the removal or reinstallation of product
3. Service performed by anyone other than Rockford or an Authorized Rockford
Fosgate Service Center
4. Any product which has had the serial number defaced, altered, or removed
5. Subsequent damage to other components
6. Any product purchased outside the U.S.
7. Any product not purchased from an Authorized Rockford Fosgate Dealer
• Limit on Implied Warranties
Any implied warranties including warranties of fitness for use and merchantability
are limited in duration to the period of the express warranty set forth above. Some
states do not allow limitations on the length of an implied warranty, so this
limitation may not apply. No person is authorized to assume for Rockford Fosgate
any other liability in connection with the sale of the product.
• How to Obtain Service
Please call 1-800-669-9899 for Rockford Customer Service. You must obtain an
RA# (Return Authorization number) to return any product to Rockford Fosgate. You
are responsible for shipment of product to Rockford.
Ship to: Electronics
Rockford Corporation
Warranty Repair Department
2055 E. 5th Street
Tempe, AZ 85281
RA#:_________________
– 3 –
Ship to: Speakers
Rockford Acoustic Design
(Receiving-speakers)
609 Myrtle N.W.
Grand Rapids, MI 49504
RA#:_________________
Page 8

INTERNATIONAL
INFORMATION
Lea detenidamente las siguientes instrucciones de instalación del producto.
INTRODUCCIÓN
Este manual contiene información sobre la construcción, instalación y
funcionamiento de los altavoces de todo rango. Le recomendamos que
conserve el manual para futuras consultas.
INSTALACIÓN
La mayoria de estos altavoces se usan principalmente como reemplazo
directo de los altavoces de origen del vehiculo y no vienen equipados con
rejillas, por lo que algunas de las siguientes instrucciones no serán
aplicables. Para una instalación personalizada consulte a su distribuidor
autorizado Rockford Fosgate.
1. Determine donde han de montarse los altavoces. Asegúrese de que
hay espacio suficiente tanto de área como de profundidad para alojar
el altavoz. Si el montaje es en una puerta, todas las funciones han de
ser respetadas (alzacristales, cierres, etc.).
2. Consulte la hoja de caracteristicas para determinar el diametro del
agujero a realizar para su modelo de altavoz.
3. Use los anillos de montaje de plático como plantilla. Marque la
posición de los tornillos de anclaje.
4. Pase el cable de altovoz a través del anillo de plástico y conéctelo a
los terminales del altavoz. Observe la polaridad. El terminal positivo
está marcado con un punto.
5. Ajuste el anillo y el altavoz al orificio. Móntelo utilizando los tornillos
suministrados. Fije la rejilla en el anillo de plástico y presione
firmemente.
– 4 –
Page 9

Agujero de montaje
Rejilla
Anillo
Altavoz
Example of standard door installation
Rejilla
Anillo
Rear Deck
Orificio
E
SPAÑOL
Orificio
Gasket
Altavoz
Example of 6" x 9" rear-deck installation
– 5 –
Page 10

Veuillez liere les instructions suivantes pour l'installation de ces produits.
INTRODUCTION
Ce manuel contient des informations sur la construction, l'installation et
le fonctionnement des haut-parleurs large bande. Nous vous proposons
de garder ce manuel pour tout référence future.
Les haut-parleurs large bande sont des haut-parleurs à deux voies conçus
pour améliorer les performances des haut-parleurs installés d'origine.
Leurs tailles étant prévues pour les emplacements les plus courants, les
haut-parleurs large bande constituent le premier pas dans l'amélioration
des systèmes d'origine.
INSTALLATION
Comme certains de ces haut-parleurs sont souvent utilisés directement
en remplacement des haut-parleurs d'origine et sont livrés sans grilles
certaines des recommandations suivantes ne s'appliqueront pas. Pour
des installations personnalisés voyez votre dealer agréé Rockford Fosgate.
1. Déterminer l'endroit où le haut-parleur sera monté. Assurez-vous
que cet endroit est suffisamment large et profond pour monter le
haut-parleur de manière équilibrée. Si le haut-parleur est monté dans
une porte assurez-vous que toutes les commodités de la porte
fonctionnent complètement et correctement sans que le haut-parleur
ne leur fasse obstruction (lève-vitre, verrouillage, etc.).
2. Reportez-vous au tableau des spécifications techniques pour
déterminer le bon diamètre de coupe du trou destiné au haut-parleur.
3. Utilisez l'anneau en plastique comme modèle et localisez
l'emplacement des vis. Préforez les trous avec une méche de 3 mm.
4. Faites passer les fils de connexion au travers du trou et de l'anneau
en plastique et connectez les aux bornes du haut-parleur. Veuillez à
bien observer les polarités. La borne positive du haut-parleur est
marqué avec un point.
5. Fixez l'anneau et le haut-parleur autour du trou avec les vis livrées.
Placez la grille dans l'anneau et poussez la fermement.
– 6 –
Page 11

Trou de Montage
Grille
Anneau de
Montage
Haut-Parleur
Example of standard door installation
Grille
Anneau de Montage
Rear Deck
Découpe
Découpe
F
RANÇAIS
Gasket
Haut-Parleur
Example of 6" x 9" rear-deck installation
– 7 –
Page 12

Bitte lesen Sie diese Gebrauchsanleitung zuerst sorgfältig durch. Das kann
Sie vor falschem Einsatz, Ausfallen oder sogar Beschädigung des Produktes
oder Ihres Fahrzeuges schützen.
EINLEITUNG
Diese Einbauanleitung enthält Informationen über den Aufbau, für den
Einbau und über die Arbeitsweise der Vollbereichslautsprecher. Wir
empfehlen Ihnen, diese sorgfältig aufzubewahren.
Die Vollbereichslatusprecher sind Zwei-Wege Lautsprecher, die für die
Orginaleinbau-Plätze Ihres Fahrzeuges entwickelt und gefertigt werden.
Passend für die meisten Originaleinbau-Plätze und der erste Schritt zur
Verbesserung Ihrer Auto-HiFi Musikanlage.
EINBAU
Da einige Vollbereichslatusprecher als direkter Ersatz, für die vom
Hersteller mitgelieferten Lautsprecher dienen, treffen einige Punkte dieser
Bedienungsanleitung evtl auf Sie nicht zu. Bei Rückfragen wenden Sie
sich bitte an Ihren Rockford Händler.
1. Legen Sie den Einbauort des Lautsprechers fest. Seien Sie sicher, daβ
die Lautsprecher auf beiden Seiten passen. Stellen Sie fest, ob genung
Einbautiefe vorhanden ist. Beim Einbau in die Tür sollten Sie sich
vergewissern, daβ keine Funktion der Tür beeinträchtigt wird.
2. Sie finden unter “Specification” die richtigen Masse für den Ausschnitt.
3. Benutzen Sie en Einbauring als Schnittvorlage und markieren Sie die
Löcher für die Befestigungsschrauben. Bohren Sie dann dafür die
passenden Löcher.
4. Führen Sie die Lautsprecherkabel durch die Öffnung und durch den
Montagering und klemmen Sie dann den Lautsprecher den. Positiv ist
mit einem farbigen Punkt markiert.
5. Montieren Sie nun den Montagering und den Lautsprecher mit den
mitgelieferten Schrauben. Pressen Sie dann das Gitter vorsichtig aber
fest an.
– 8 –
Page 13

Einbau-Loch
Gitter
Einbau-Ring
Mitteltöner
Example of standard door installation
Ausschnitt
Gitter
Einbau-Ring
Rear Deck
Ausschnitt
Gasket
Mitteltöner
Example of 6" x 9" rear-deck installation
D
EUTSCH
– 9 –
Page 14

Si prega di leggere queste istruzioni per l'installazione del prodotto acquistato.
INTRODUZIONE
Questo manuale contiene informazioni sulla costruzione, installazione
e sul funzionamento degli altoparlanti a gamma intera Rockford Fosgate.
Vi raccomandiamo di conservare questo manuale per riferimento futuro.
Gli altoparlanti a gamma intera sono dei sistemi a due vie progettati per
esaltare le prestazioni dei sistemi hi-fi installati dai costruttori di automobili.
Dimensionati in modo da adattarsi a quasi tulle le predisposizioni delle
auto, questi altoparlanti consentono il primo passo per l'ingresso nel
mondo dell'hi-fi.
INSTALLAZIONE
Essendo gli altoparlanti a gamma estesa normalmente impiegati negli
alloggiamenti previsti dai costruttori delle auto ed essendo spediti senza
griglie, alcune delle indicazioni seguenti potrebbero non adattarsi al
Vostro caso. Per installazioni personalizzate contattate il Vostro installatore
autorizzato Rockford Fosgate.
1. Determinate la zona in cui installare gli altoparlanti. Assicuratevi che
lo spazio sia sufficiente ad un corretto posizionamento. Assicuratevi
anche che la profonditá sia sufficiente. Se l'installazione avviene in
una porta, controllate che tutte le parti meccaniche (meccanismi dei
vetri e chiusure centralizzate) possano funzionare nell'intero loro
arco operativo.
2. Fate riferimento alla tabella con le specifiche tecniche per determinare
il diametro del foro da praticare.
3. Impiegate l'anello in plastica di supporto della griglia come dima per
il posizionamento dei fori di fissaggio. Praticate fori da 3,5 mm.
4. Passate i cavi attraverso il foro e l'anello in plastica della griglia e
collegateli all'altoparlante. Controllate la polaritá (il positivo
sull'altoparlante é indicato da un pallino).
5. Accostate l'anello e l'altoparlante al foro e, impiegando le viti a
dotazione, fissate il tutto. Inserite la griglia al proprio posto e premetela
con delicatezza, ma fermanente alla propria posizione.
– 10 –
Page 15

foro di fissaggio
Altoparlante
Griglia
Anello di fissaggio
della griglia
Example of standard door installation
Griglia
Anello di fissaggio
della griglia
Rear Deck
foro
foro
Gasket
Altoparlante
Example of 6" x 9" rear-deck installation
– 11 –
ITALIANO
Page 16

Get maximum performance byGet maximum performance by
Get maximum performance by
Get maximum performance byGet maximum performance by
surfing for the ultimatesurfing for the ultimate
surfing for the ultimate
surfing for the ultimatesurfing for the ultimate
Punch system designs at:Punch system designs at:
Punch system designs at:
Punch system designs at:Punch system designs at:
www.rockfordfosgate.com www.rockfordfosgate.com
www.rockfordfosgate.com
www.rockfordfosgate.com www.rockfordfosgate.com
MADE IN CHINA
This product is designed and developed in the USA by a dedicated
group of American workers. However, due to the global nature of
manufacturing facilities and the loudspeaker parts industry in general,
some parts may be manufactured in other countries.
LIT10582
8/99 E.W.R.
Rockford Fosgate
Rockford Corporation
546 South Rockford Drive
Tempe, Arizona 85281 U.S.A.
In U.S.A., (480) 967-3565
In Europe, Fax (49) 8503-934014
In Japan, Fax (81) 559-79-1265
 Loading...