

Page 1
VSPEXPL
Vehicle Specific Punch
Ford Explorer ’91+
Specification
Reference
Sheet
VSP ENCLOSURE
FEATURES
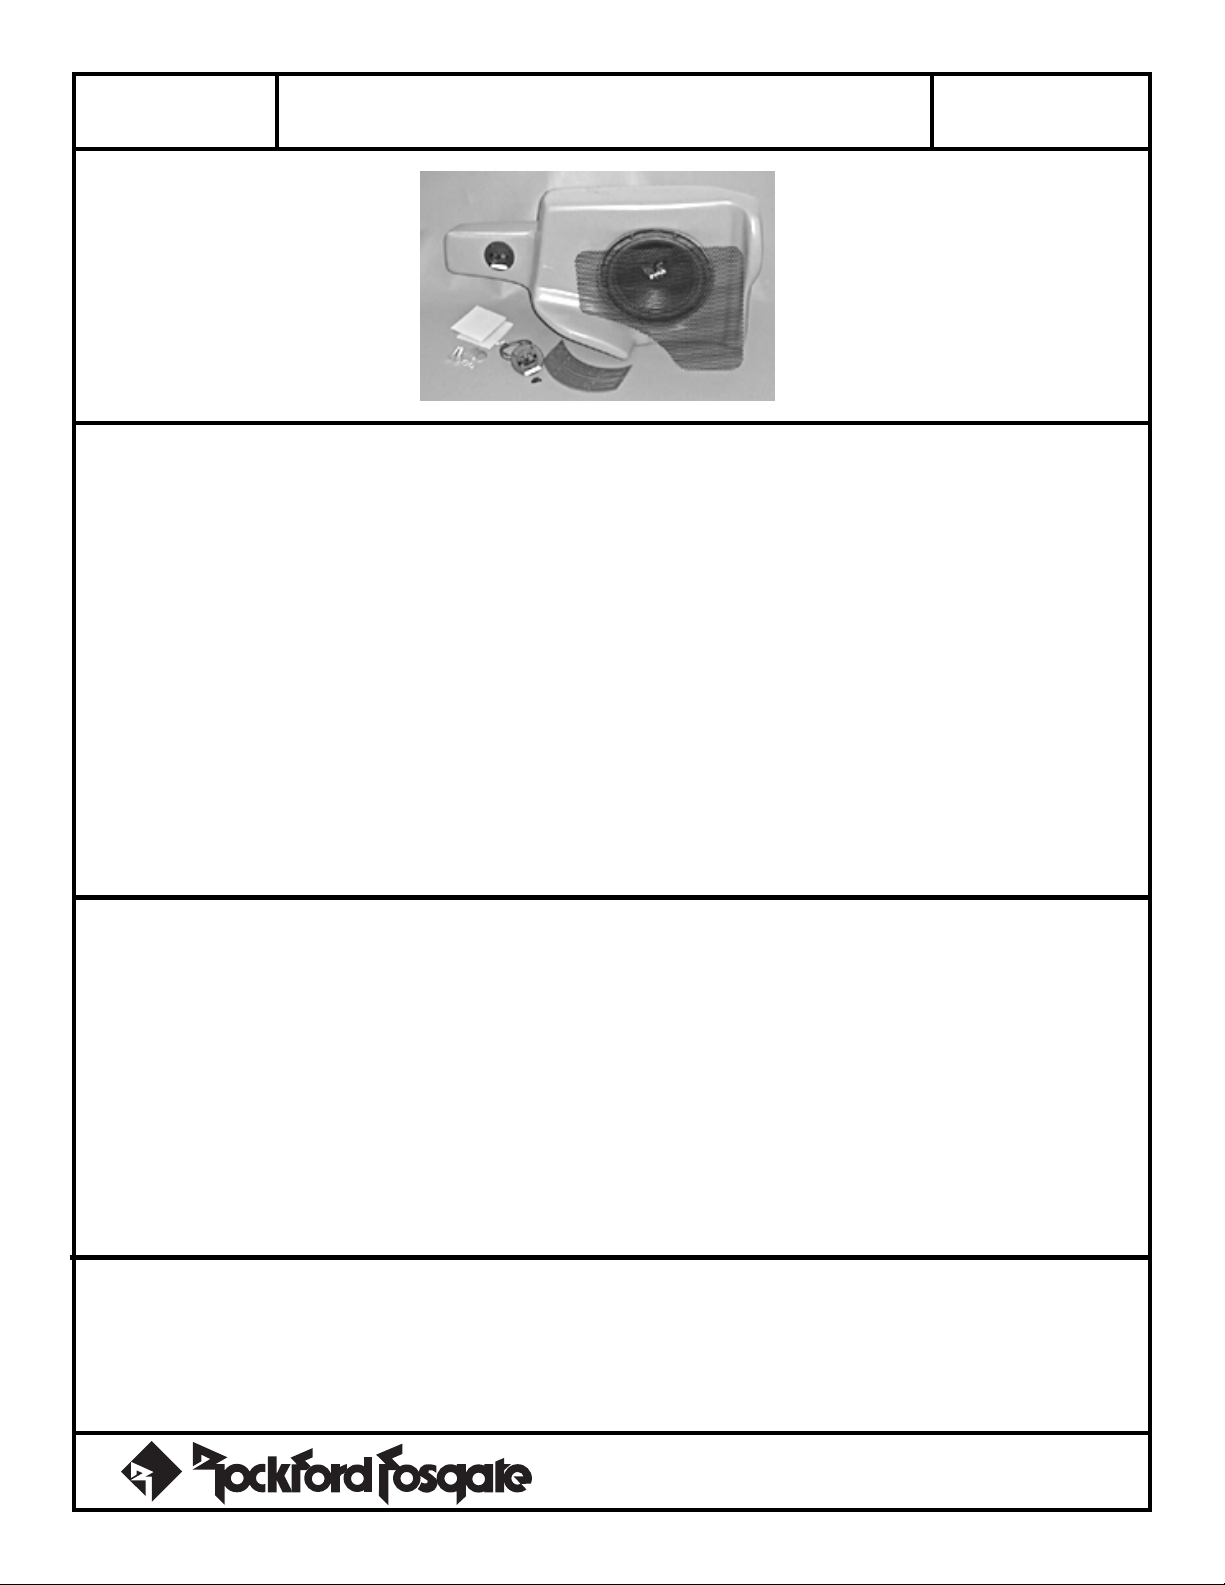
• Vehicle Specific – Custom molded to fit behind the right rear cargo pocket.
• Acoustic Suspension Enclosure – The VSP enclosure uses an acoustic
suspension design (sealed) for optimum performance. The enclosure is matched
to the woofer for deep bass output while requiring minimal operating space.
• Roto-Molded Urethane Construction – The use of Roto-Mold
manufacturing produces a composite enclosure with seamless construction. This
greatly increases rigidity to prevent the enclosure from flexing and allows custom
designs to be fabricated. The result is a radical, stronger, more reliable
enclosure.
PUNCH WOOFER
• PVA Cone – The cone material used is spruce pulp paper and provides the
necessary combination of weight and strength to allow high levels of output
without cone break up. The cone is also treated with a water resistant PolyVinyl
Acetate (PVA) Emulsion which increases cone rigidity and lowers distortion.
SPECIFICATIONS
VSP Enclosure
Frequency Response ..............................................24Hz-400Hz
Overall Dimensions ............................151⁄2”H x 291⁄4”W x 111⁄2”D
(39.37cm x 74.29cm x 29.21cm)
Weight (woofer supplied) ................................. 22 lbs. (9.98kg)
Punch Woofer
Speaker Model ..........................................................RFP-1410
Nominal Impedance.............................................................4Ω
Fs ...............................................................................24Hz
RE ...............................................................................3.6Ω
• Aluminum Voice Coil Former – The voice coil is made of
multiple layers of copper wound on a black, anodized aluminum
former. This improves the speaker’s power handling by efficiently
dissipating heat from the voice coil.
• Hyper-Extended Pole Piece – The pole piece has been extended
to provide a more linear magnetic field for the operation of the woofer.
This lowers distortion and provides the woofer with better low frequency
response.
• Vented Bumped Back Plate – The back plate has been stepped
deeper to allow the woofer more excursion for harder hitting bass.
Additionally, the back plate is vented with a radiused aerodynamic vent
that efficiently and quietly keeps the voice coil cool.
LE....................................................................... 2.5mH
QMS....................................................................... 4.08
QES ....................................................................... 0.27
QTS........................................................................ 0.25
VAS (ft3/liter) .................................................. 2.72 (77L)
XMAX (in/mm) ............................................ 0.31” (8mm)
SPL (dB @ 1w/1m) .................................................87dB
Power Handling (RMS/Peak) ........................ 200W/400W
Speaker Displacement (ft3/liter) ................... 0.06 (1.699L)
ACCESSORY PACK
(1) Input Terminal Cup (2) 3/8” – 16 x 11⁄4” Bolts (2) 3/8” Lock Washers (8) #10-32 x 3/4” Allen Screws
(4) Phillips Screws (2) 3/8” ID x 11⁄2” OD Washers (2) 4” x 4” Wax Squares (24”) Red/Black 16 gauge Speaker Wire
(4) Foam Woofer Gaskets (1) Pre-formed Wire Mesh Grille
®®
–1–
Specifications subject to change without notice
Page 2

Vehicle Specific Punch
VSPEXPL
The Vehicle Specific Punch (VSP) enclosure is supplied in kit form to allow custom finishing techniques. The unfinished surface
enables matching paint or carpet to be applied to the enclosure for seamless integration into the vehicle’s interior. In addition, the
input terminal cup can be positioned in the desired location where speaker wires can be conveniently routed from the amplifier to
the enclosure.
Ford Explorer ’91+
Installation
Reference
Sheet
IMPORTANT – Please follow these instructions carefully!!
The VSP enclosure is specially molded to fit particular vehicles. Be sure to attach the enclosure to the vehicle as
specified in this installation sheet for optimized bass output. Failure to install the enclosure as specified in this document may allow the enclosure to become detached from the vehicle and possibly cause personal injury.
Always use eye protection when drilling.
Never run wires underneath the vehicle. Run wires inside the vehicle and use rubber or plastic grommets
!
VSP ENCLOSURE PREPARATION
1. Select the desired location for the speaker terminal cup, and with a hole saw, cut a 2” diameter hole.
to protect wires routed through metal.
2. Using the speaker terminal cup as a template, mark the holes used to secure the cup to the enclosure.
Remove the cup and drill pilot holes using a 3/32” drill bit.
3. Carpet or paint the enclosure and the speaker grille to your desired color theme.
4. Connect the supplied speaker wire to the appropriate (+) and (–) terminals of the speaker cup.
Connect the RED wire to the (+) terminal and the BLACK wire to the (–) terminal.
5. Secure the speaker terminal cup to the enclosure using the (4) supplied Phillips screws. Connect
the speaker wires to the woofer and secure the woofer to the enclosure. Be sure to maintain
proper speaker polarity.
–2–
Page 3
VSPEXPL
Vehicle Specific Punch
Ford Explorer ’91+
VEHICLE PREPARATION
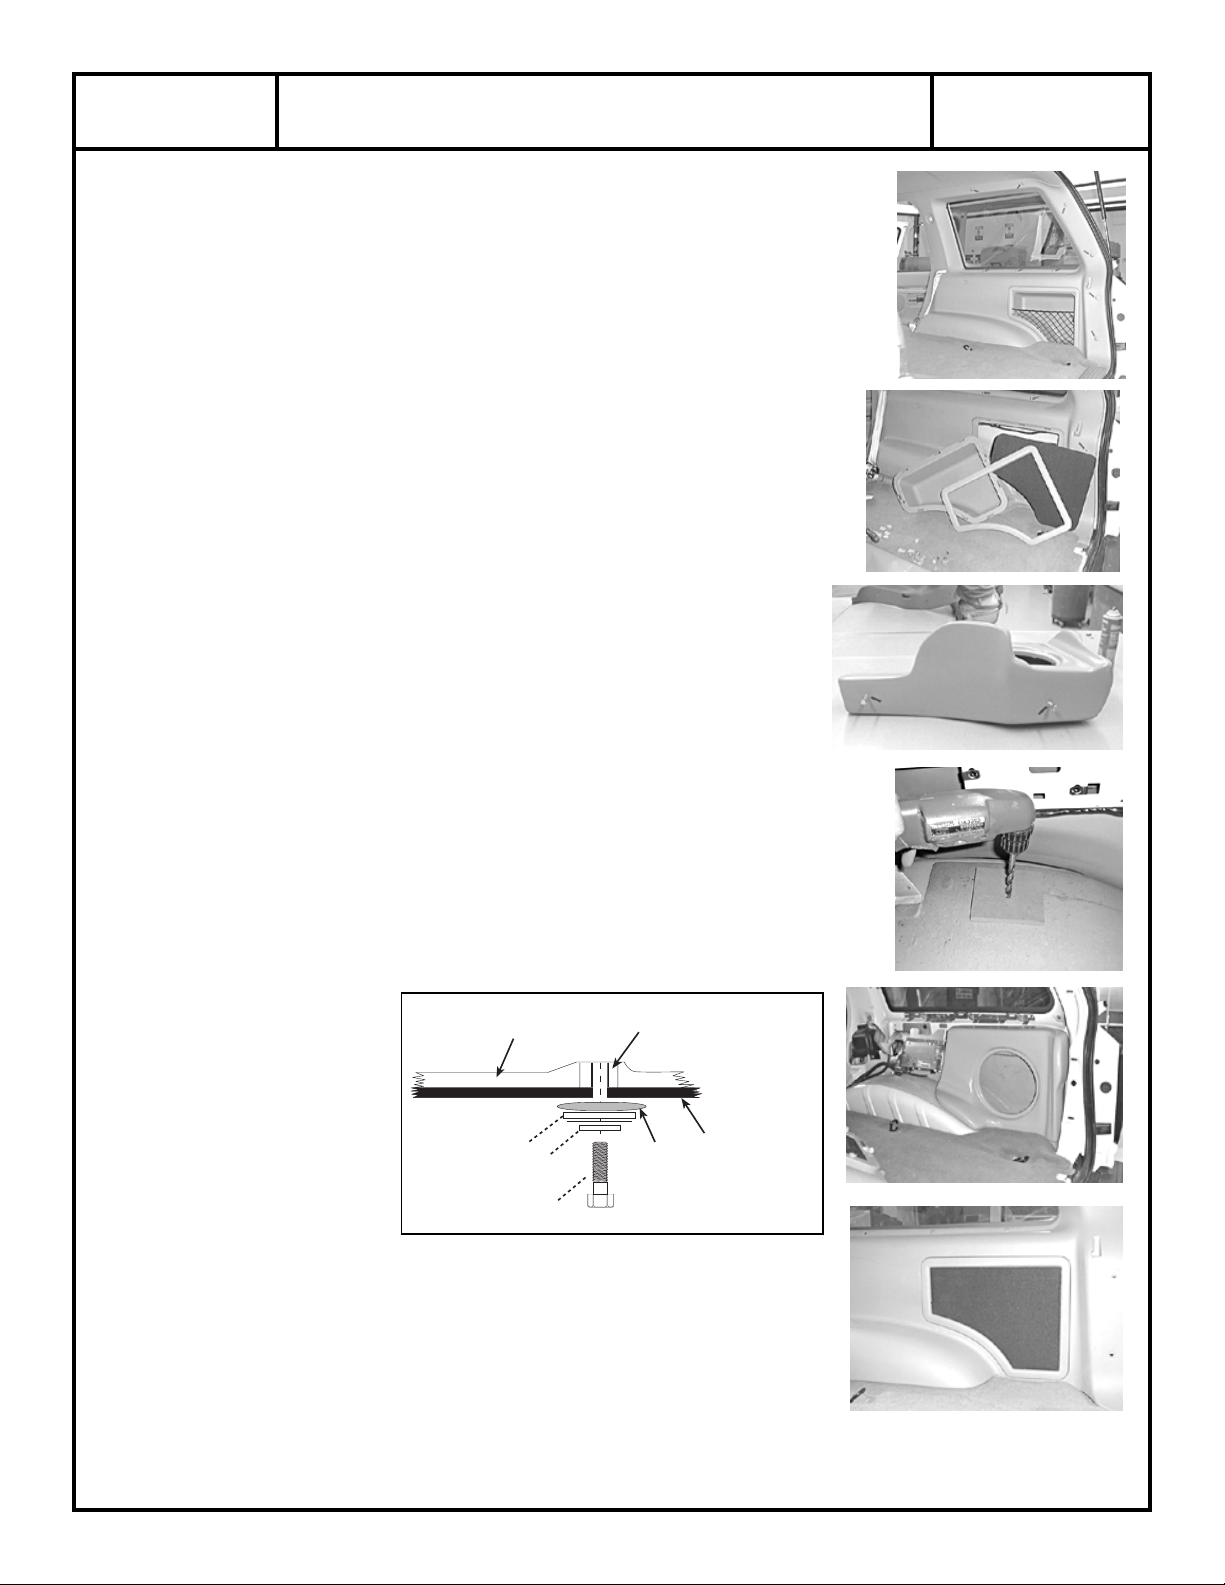
6. Remove the entire right rear panel from the vehicle. Remove the seat belt bracket
(with a Torx T-50 driver), the (3) Phillips screws used to secure the panel to the
floorboard, and the (9) press-in rivets. (See photo.)
7. Prepare the grille by carefully removing the (9) plastic clips that hold the cargo
pocket in place. Remove the cargo pocket and retainer net from the panel. Secure the
new wire mesh grille by replacing the (9) plastic clips.
8. Remove the (3) bolts from the factory amplifier (if installed) using a 5/16” socket.
Move the amplifier temporarily out of the way. NOTE: It is not necessary to disconnect
the amplifier’s wiring harness.
9. Thread the supplied bolts fully into the VSP enclosure and test fit the enclosure in the
vehicle. Be sure to remove any obstructions for proper installation.
10. Remove the backing from the wax squares and place them under the bolts. Press
down firmly on the enclosure to make an impression of the bolt heads into the wax
squares. Making sure not to move the wax squares, carefully remove the enclosure
from the vehicle.
Installation
Reference
Sheet
11. Check under the vehicle for brake or hydraulic lines before proceeding. Using a 1/2”
diameter drill bit, drill the holes through the fender well and the floor board using the
wax squares as your template.
VSP ENCLOSURE INSTALLATION
12. Connect the proper (+) and (–) speaker terminals from the amplifier to the enclosure.
13. The next procedure will require
2 people. While one person is
Enclosure Wall (urethane) Threaded Insert
molded into enclosure
positioning the VSP enclosure,
the second person should
insert the long bolts from the
underside of the vehicle. Put a
bead of silicone sealant
between the car sheet metal
and the washers. Screw the
Fender washer
Split lock washer
3/8” bolt
Bead of Silicone Sealant
Car’s sheet metal
bolts into the enclosure’s
threaded inserts and tighten
them. DO NOT OVERTIGHTEN.
14. After the bolts are tightened, spray rubberized undercoating over the bolts and over
any bare metal. This will prevent the metal from rusting and will prevent the bolts
from loosening due to vibrations.
15. Replace the factory amplifier, the entire side panel and the seat belt bracket.
16. If necessary, fine tune the system to find the proper bass level for your new VSP
woofer enclosure.
–3–
Page 4

L
IMITED
Rockford Corporation offers a limited warranty on Rockford Fosgate products on the following terms:
• Length of Warranty
1 year on VSP speakers (not the entire enclosure)
• What is Covered
This warranty applies only to Rockford Fosgate products sold to consumers by Authorized Rockford Fosgate Dealers in the United States
of America or its possessions. Product purchased by consumers from an Authorized Rockford Fosgate Dealer in another country are covered
only by that country’s Distributor and not by Rockford Corporation.
• Who is Covered
This warranty covers only the original purchaser of Rockford product purchased from an Authorized Rockford Fosgate Dealer in the United
States. In order to receive service, the purchaser must provide Rockford with a copy of the receipt stating the customer name, dealer name,
product purchased and date of purchase.
• Products found to be defective during the warranty period will be repaired or replaced (with a product deemed to be equivalent) at
Rockford's discretion.
• What is Not Covered
1. Damage caused by accident, abuse, improper operations, water, theft
2. Any cost or expense related to the removal or reinstallation of product
3. Service performed by anyone other than Rockford or an Authorized Rockford Fosgate Service Center
4. Any product which has had the serial number defaced, altered, or removed
5. Subsequent damage to other components
6. Any product purchased outside the U.S.
7. Any product not purchased from an Authorized Rockford Fosgate Dealer
W
ARRANTY
I
NFORMATION
• Limit on Implied Warranties
Any implied warranties including warranties of fitness for use and merchantability are limited in duration to the period of the express warranty
set forth above. Some states do not allow limitations on the length of an implied warranty, so this limitation may not apply. No person is
authorized to assume for Rockford Fosgate any other liability in connection with the sale of the product.
• How to Obtain Service
Please call 1-800-669-9899 for Rockford Customer Service. You must obtain an RA# (Return Authorization number) to return any product
to Rockford Fosgate. You are responsible for shipment of product to Rockford.
Ship to: Electronics
Rockford Corporation
Warranty Repair Department
2055 E. 5th Street
Tempe, AZ 85281
RA#:_________________
Ship to: Speakers
Rockford Acoustic Design
(Receiving-speakers)
609 Myrtle N.W.
Grand Rapids, MI 49504
RA#:_________________
MADE IN THE USA
This product is designed, developed and assembled in the USA by a dedicated group of American
workers. The majority of the components used in the construction of this product are produced by
American companies. However, due to the global nature of their manufacturing facilities and the
electronics parts industry in general, some parts may be manufactured in other countries.
Rockford Fosgate
Rockford Corporation
546 South Rockford Drive
Tempe, Arizona 85281 U.S.A.
In U.S.A., (602) 967-3565
In Europe, Fax (49) 850-3934-014
LIT10030
4/98
In Japan, Fax (81) 559-79-1265
www.rockfordfosgate.com
 Loading...