

Page 1

Installation assistance available at:
Printed in China
www.rockfordfosgate.com/rftech
Europe – EU Declaration of Conformity
This device complies with the essential requirements of the R&TTE Directive 1999/5/EC.
The following test methods have been applied in order to prove presumption of conformity with
the essential requirements of the R&TTE Directive 1999/5/EC:
ETSI EN 301 489-1 V1.9.2: 2011
ETSI EN 301 489-17 V2.2.1: 2012
ETSI EN 300 328 V1.8.1: 2012
EN 62479: 2010
EN 60065: 2002+A1: 2006+A11: 2008+ A2: 2010+ A12: 2011
IC Caution.
- English:
This device complies with Industry Canada licence-exempt RSS standard(s).
Operation is subject to the following two conditions: (1) This device may not
cause interference, and (2) This device must accept any interference,
including interference that may cause undesired operation of the device.
- French:
Le présentappareilestconforme aux CNR d'Industrie Canada
applicables aux appareils radio exempts de licence.
L'exploitationestautorisée aux deux conditions suivantes:
(1) l'appareil ne doit pas produire de brouillage, et
(2) l'utilisateur de l'appareildoit accepter tout
brouillageradioélectriquesubi, mêmesi le brouillageest
susceptible d'encompromettre le fonctionnement.
DIGITAL MEDIA
RECEIVER
PMX5
Design f
Serial Number: Date of Purchase:
or Shipborne
600 South Rockford Drive • Tempe, Arizona 85281 United States
Direct: (480) 967-3565 • Toll Free: (800) 669-9899
ROCKFORDFOSGATE.COM
0700
Installation & Operation
Page 2
Introduction
Specifications
Dear Customer,
Congratulations on your purchase of the world’s finest brand of audio
products. At Rockford Fosgate we are fanatics about musical reproduction at its best, and we are pleased you chose our product. Through
years of engineering expertise, hand craftsmanship and critical testing
procedures, we have created a wide range of products that reproduce
music with all the clarity and richness you deserve.
For maximum performance we recommend you have your new
Rockford Fosgate product installed by an Authorized Rockford Fosgate
Dealer, as we provide specialized training through Rockford Technical
Training Institute (RTTI). Please read your warranty and retain your
receipt and original carton for possible future use.
Great product and competent installations are only a piece of the puzzle
when it comes to your system. Make sure that your installer is using
100% authentic installation accessories from Rockford Fosgate in your
installation. Rockford Fosgate has everything from RCA cables and
speaker wire to power wire and battery connectors. Insist on it! After all,
your new system deserves nothing but the best.
To add the finishing touch to your new Rockford Fosgate image, order
your Rockford accessories, which include everything from T-shirts to
hats.
Visit our web site for the latest information on all Rockford products;
www.rockfordfosgate.com
or, in the U.S. call 1-800-669-9899 or FAX 1-800-398-3985. For all other coun
tries, call +001-480-967-3565 or FAX +001-480-966-3983.
-
Table of Contents
2 Introduction
3 Specifications
4 Design Features
5 Wiring
6 Installation/Mounting
7-10 Operation
Settings
Tuner (AM/FM/WB)
USB-iPod
AUX (Auxiliary Input)
®
Bluetooth
®
Pandora
11 Troubleshooting
12 Limited Warranty Information
If, after reading your manual, you still have questions regarding this product,
we recommend that you see your Rockford Fosgate dealer. If you need further
assistance, you can call us direct at 1-800-669-9899. Be sure to have your serial
number, model number and date of purchase available when you call.
©2015 Rockford Corporation. All Rights Reserved. PUNCH® and associated logos where applicable, are registered trademarks of Rockford Corporation in the United States and/or other
countries. iPhone and iPod are trademarks of Apple Inc., registered in the U.S. and other countries. The Bluetooth® word mark and logos are registered trademarks owned by Bluetooth SIG, Inc.
and any use of such marks by Rockford Corporation is under license. All other trademarks are the property of their respective owners. Specifications subject to change without notice.
“Made for iPod” and “Made for iPhone” mean that an electronic accessory has been designed to connect specifically to iPod, or iPhone, respectively, and has been certified by the developer
to meet Apple performance standards. Apple is not responsible for the operation of this device or its compliance with safety and regulatory standards. Please note that the use of this accessory
with iPod or iPhone may affect wireless performance.
Pandora, the Pandora logo, and the Pandora trade dress are trademarks or registered trademarks of Pandora Media, Inc. Used with permission. Pandora is only available in certain countries.
Please visit http://www.pandora.com/legal for more information.
Continuous exposure to sound pressure levels over 100dB may cause
permanent hearing loss. High powered auto sound systems may
produce sound pressure levels well over 130dB. Use common sense
Safety
This symbol with “WARNING” is intended to alert
the user to the presence of important instructions.
Failure to heed the instructions will result in
severe injury or death.
This symbol with “CAUTION” is intended to alert
the user to the presence of important instructions.
Failure to heed the instructions can result in
injury or unit damage.
To prevent injury and damage to the unit, please read and follow the instructions
in this manual. We want you to enjoy this system, not get a headache.
If you feel unsure about installing this system yourself, have it installed by a
qualified Rockford Fosgate technician.
Before installation, disconnect the battery negative (-) terminal to prevent damage
to the unit, fire and/or possible injury.
FCC Statement
This device complies with part 15 of the FCC Rules. Operation is
subject to the following two conditions:
(1) This device may not cause harmful interference, and
(2) this device must accept any interference received, including
interference that may cause undesired operation.
Any Changes or modifications not expressly approved by the
party responsible for compliance could void the user's authority to
operate the equipment.
Note: This equipment has been tested and found to comply with
the limits for a Class B digital device, pursuant to part 15 of the
FCC Rules. These limits are designed to provide reasonable
protection against harmful interference in a residential installation.
This equipment generates uses and can radiate radio
frequency energy and, if not installed and used in accordance with
the instructions, may cause harmful interference to radio
communications. However, there is no guarantee that interference
will not occur in a particular installation. If this equipment does
cause harmful interference to radio or television reception,
which can be determined by turning the equipment off and on,
the user is encouraged to try to correct the interference by one or
more of the following measures:
-Reorient or relocate the receiving antenna.
-Increase the separation between the equipment and receiver.
-Connect the equipment into an outlet on a circuit different from that
to which the receiver is connected.
-Consult the dealer or an experienced radio/TV technician for help.
PRACTICE SAFE SOUND
and practice safe sound.
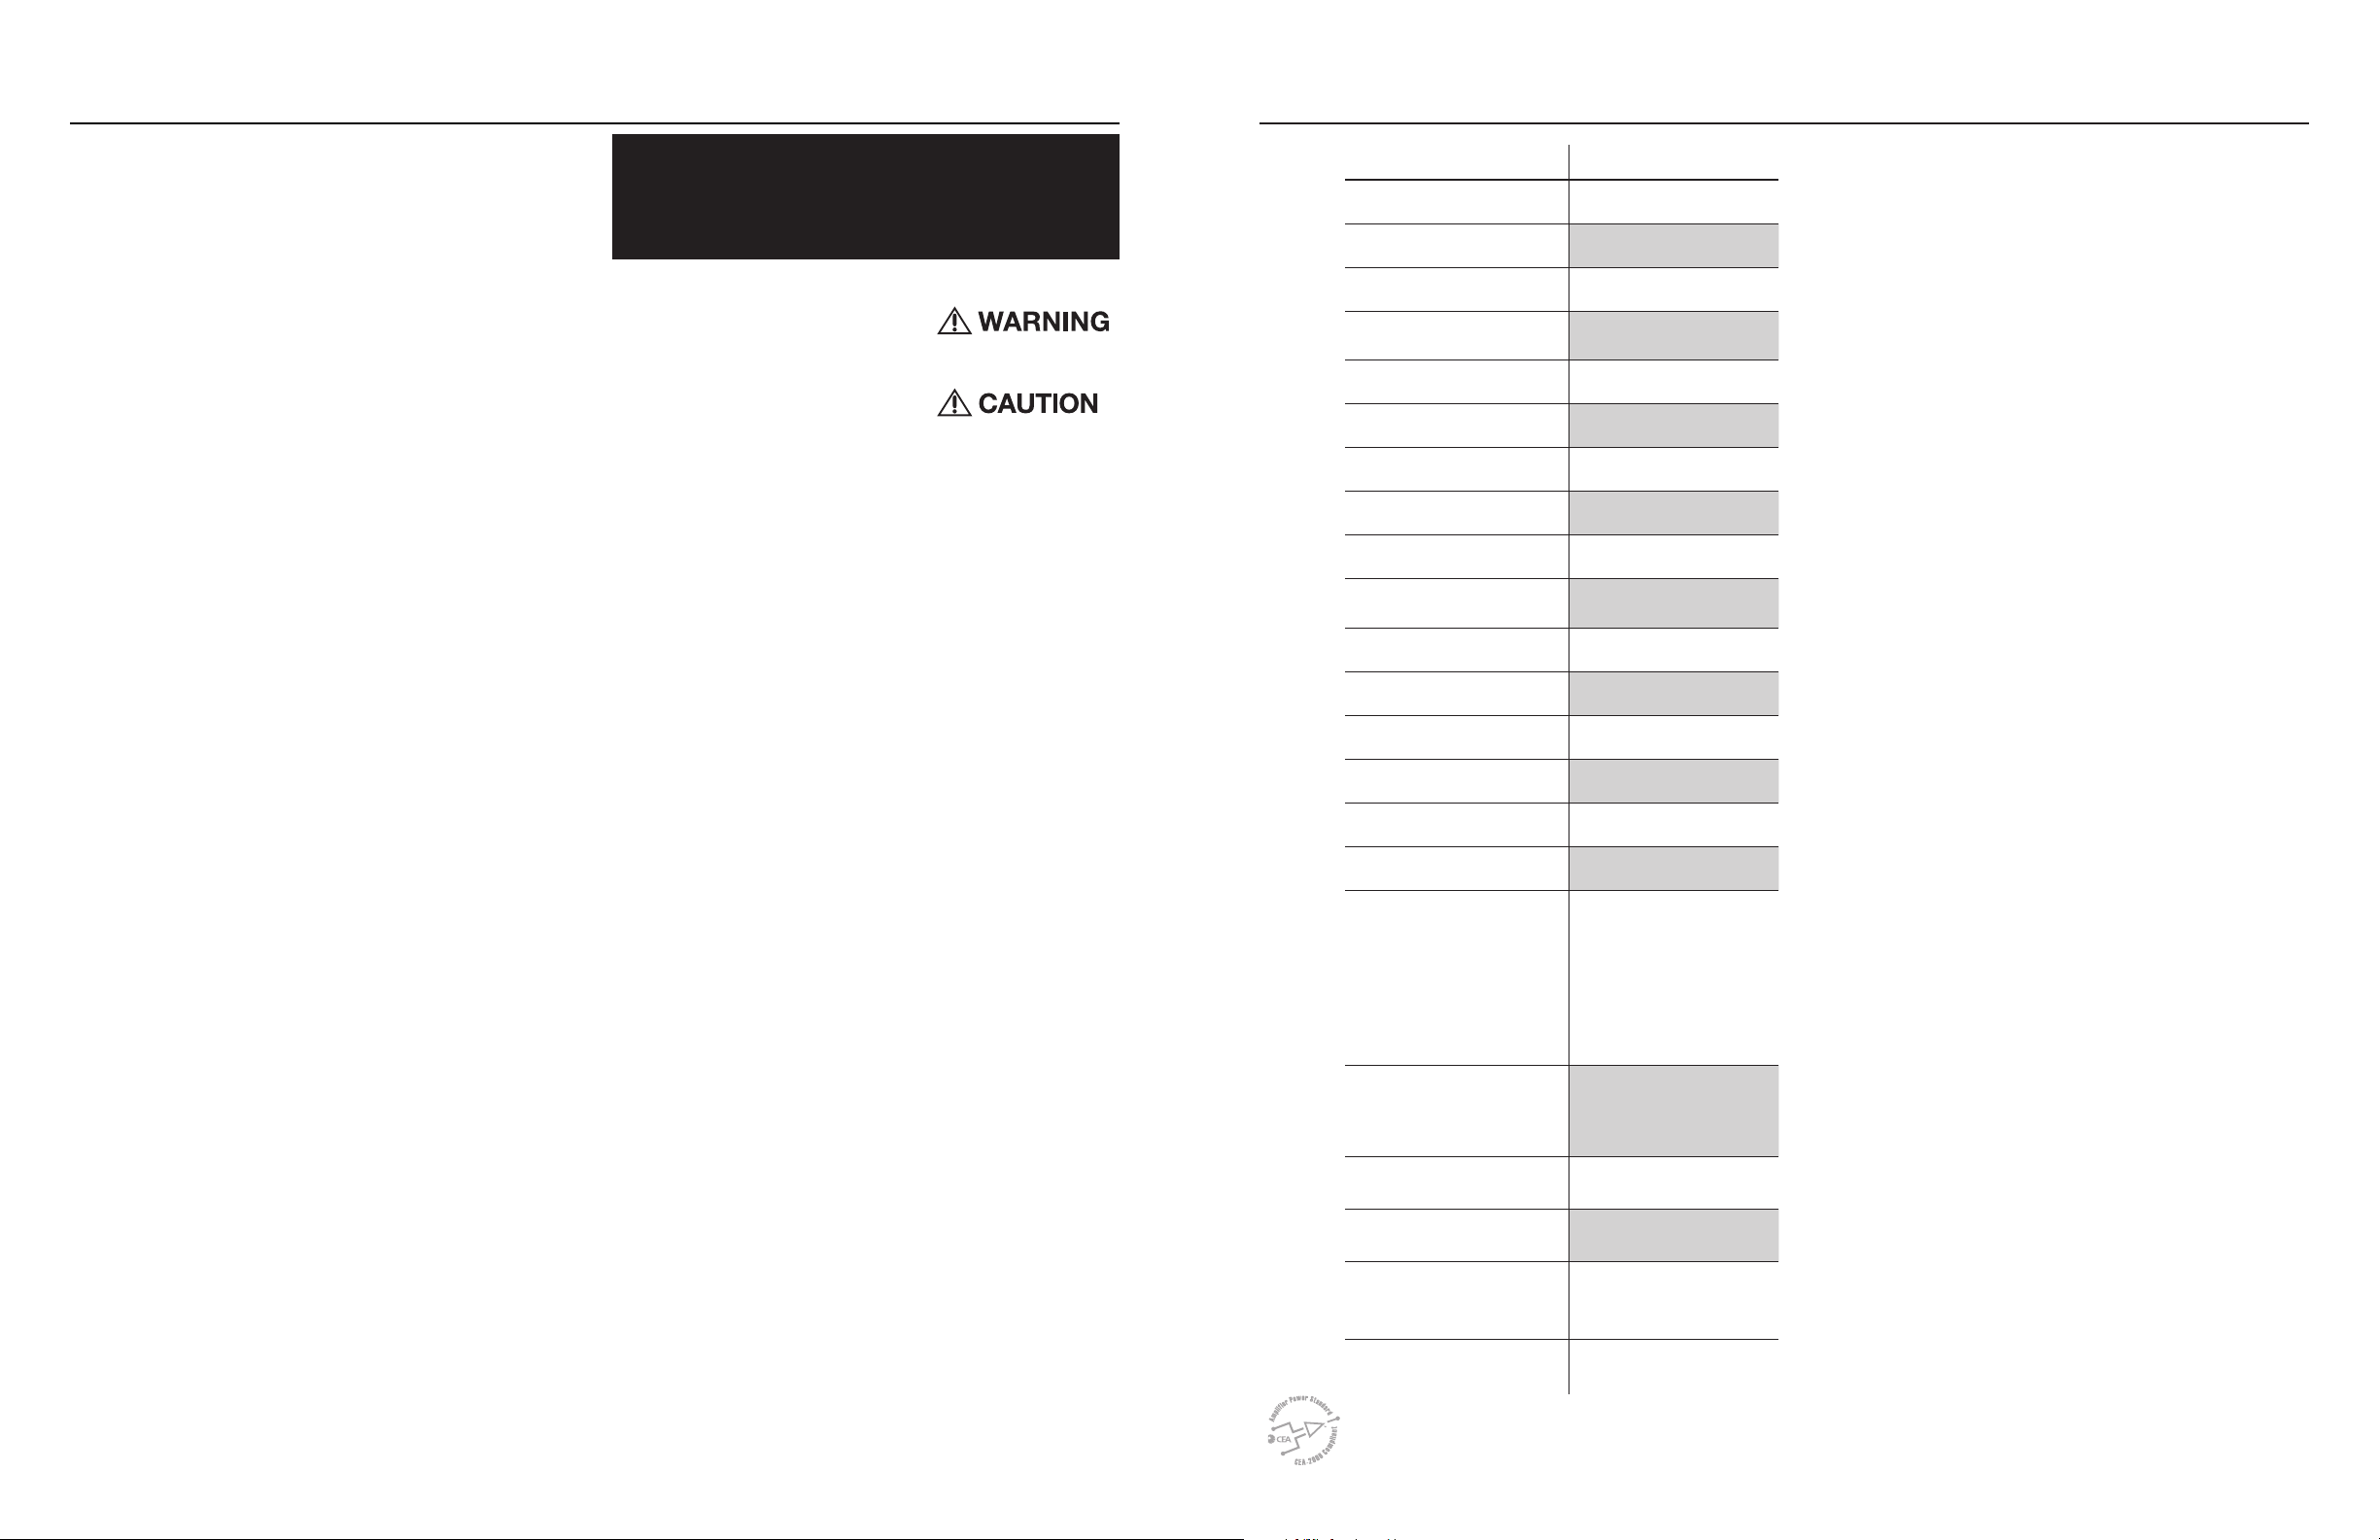
Model
Operating Voltage
Fuse Rating 15A
Idle Current 1A
Power Output
Max. RCA Output Voltage 2V
Output Impedance 500Ω
Frequency Response 20 - 20kHz
FM Frequency Range 87.5MHz - 107.9MHz
AM Frequency Range 530kHz - 1710kHz
WB Frequency Range
Tuner Presets 18 FM / 12 AM / 6 WB
Clock No Clock
Display 2.7” Color TFT
Bluetooth 3.0+EDR, A2DP
USB Compatibility 3.0
USB Output 1A
Made for iPhone Model Names-
Made for iPod Model Names
Android Compatibility Bluetooth
Audio File Compatibility MP3, WMA
Compatible Wired Remotes
Work Temperature -20 C---- +35 C
CEA 2006
Power ratings on Rockford Fosgate source units conform to CEA-2006 industry standards. These guidelines
mean your source unit’s output power ratings are REAL POWER numbers, not inflated marketing ratings.
PMX5
12V DC (10.8 to 15.6V )
25 W X 4 @ 4 Ohms RMS
50 W x 4 @ 2 Ohms Peak
162.4 - 162.55
(US & Canada)
iPhone 6 Plus
iPhone 6
iPhone 5S
iPhone 5C
iPhone 5
iPhone 4S
iPhone 4
iPhone 3GS
iPod Touch (5th generation)
iPod Touch (4th generation)
iPod Nano (7th generation)
iPod Nano (6th generation)
®
Only
PMX-1R, PMX-0R
(3 Remote Limit,
100 ft Total Wired Distance)
o o
32
Page 3
Design Features / Wiring Installation / Mounting
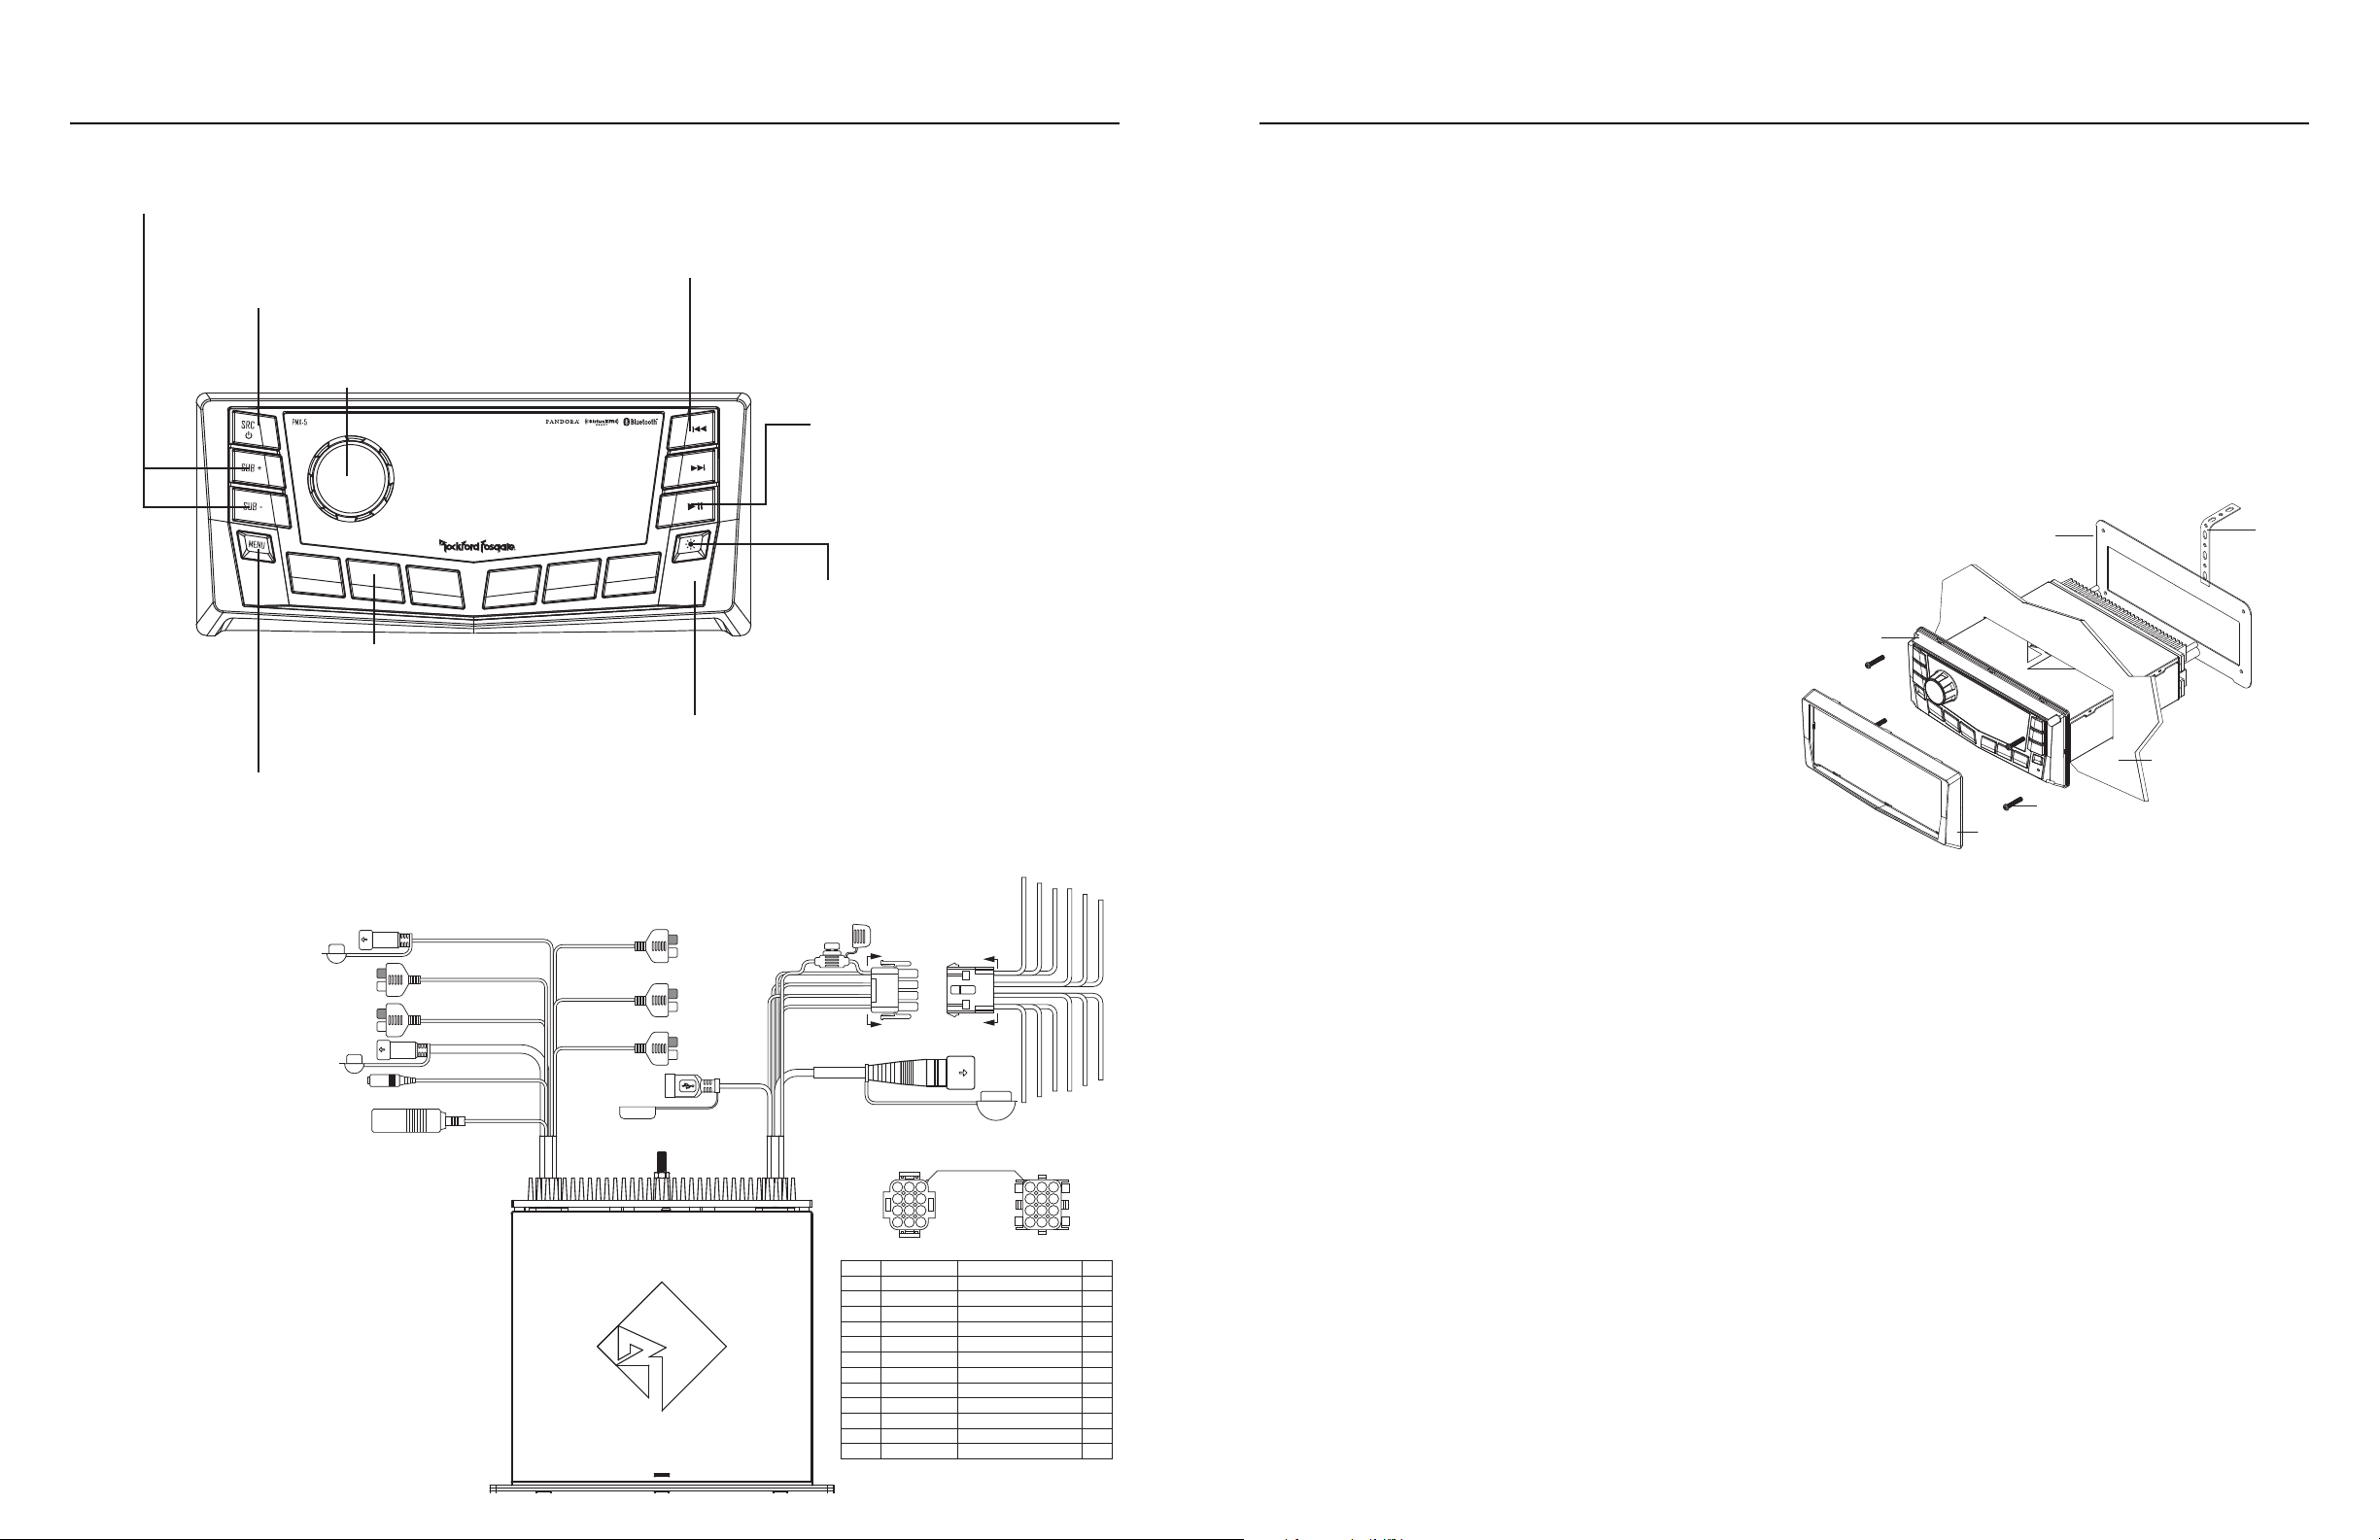
SUB Buttons
These buttons allow you to adjust the subwoofer output UP or DOWN (0-20).
SRC (Power) Button
This button allows you to switch between
sources and power the unit ON and OFF.
Rotary Encoder
This knob is for adjusting main volume, zone volumes,
menu navigation and setting adjustments.
1
2
PRESET buttons
These buttons allow you to set presets and
allow quick access to them once set. Simple
long press to retain the channel and short press
to recall the channel.
MENU button
This button gives you access to the main
settings of the unit by long pressing. Short
pressing will give you access to the settings for
the active source.
CAN BUS
RED(ZONE2 LINE OUT RIGHT)
WHITE(ZONE2 LINE OUT LEFT)
RED(AUX IN RIGHT)
WHITE(AUX IN LEFT)
SIRIUSXM
SWI
ANTENNA
A SXV300 Connect Vehicle Tuner is required
for SIRIUSXM. (Sold separately)
For vehicles with Steering Wheel Control
the use of the PAC SWI-RC or Metra Axxess
ASWC-1 interface module is required.
When the PAC unit is being used, set the
radio selection settings for Rockford. If the
Metra unit is being used, it settings are
automatically set up.(Sold separately)
REV / FWD button
Use this button to skip back and forward
through channels or tracks with a short press.
Long pressing will activate manual seek mode.
PLAY / PAUSE button
Pressing this button play or pause your music.
This button also acts as a MUTE when the
source is AUX & TUNER.
Contents
• Source Unit
• Trim Bezel
• Power / Speaker Harness
• Installation & Operation Manual
• Mounting Plate
• Screws
Installation Considerations
The following is a basic list of tools needed for installation:
• Volt/Ohm meter
• Wire strippers
• Wire crimpers
• Wire cutters
• #2 Phillips screwdriver
• Hand held drill w/ assorted bits
• Heat shrink tubing
• Soldering iron
• Solder
• Heat gun
Mounting
To mount the unit, you will need to find a flat surface with adequate clearance
behind that provides enough clearance for the unit and all it’s necessary wiring.
1. Once you have determined a mounting location, you will need to cut a
rectangular shaped hole in the panel (7” X 2.1” / 180mm X 52mm).
2. After the hole is cut slide the unit and wiring through the hole.
3. Slide the mounting plate over the backside of the unit and secure with the
supplied screws.
4. Next, install the back strap to the back of the unit to prevent the source unit
from excessive vibration.
5. Press on the trim bezel on the front side of the unit.
6. Plug in all wiring harnesses and cables. Refer to the wiring diagram for wire
harness connection types.
• Battery post wrench
This section focuses on some of the vehicle considerations for installing your
4
3
5
6
DIMMER button
Pressing this button will allow you to select
between the two brightness values for the
display.
new source unit. Pre-planning your system layout and best wiring routes will save
installation time. When deciding on the layout of your new system, be sure that
each component will be easily accessible for making adjustments.
If you feel unsure about installing this system yourself, have it installed by a
qualified Rockford Audio technician.
Source Unit
Mounting Plate
Back Strap
Before installation, disconnect the battery negative (-) terminal to prevent damage
to the unit, fire and/or possible injury.
RESET button
Pressing this button will reset the unit to factory
settings and clearing all saved settings. Use a
paper clip or small pick to press.
Before beginning any installation, follow these simple rules:
1. Be sure to carefully read and understand the instructions before attempting to
install the unit.
2. For safety, disconnect the negative lead from the battery prior to beginning
the installation.
Panel
Mounting Screws
Trim Bezel
3. For easier assembly, we suggest you run all wires prior to mounting your unit
in place.
4. Route all of the RCA cables close together and away from any high current
BLACK
GREEN
RED
BLACK
BLACK
BLACK
SUB - W OUT
PURPLE
REAR LINE OUT
BLACK
FRONT LINE OUT
GREY
USB
RED
WHITE
RED
WHITE
RED
WHITE
BLACK
RED
15A
FUSE
BLACK
A
A
REMOTE CABLE
ORIENTATION
1 2 3
4 5 6
7 8 9
10 11 12
SECTION A-A SECTION B-B
WIRE COLOR WIRE DEFINITION AW G
PIN #
1
ORANGE ILLUMINATION INPUT 20
2
GREEN/BLACK SPEAKER REAR LEFT (-) 20
GREEN SPEAKER REAR LEFT (+) 20
3
4
RED +12V ACC IGN SWITCH 16
5
WHITE/BLACK SPEAKER FRONT LEFT (-) 20
WHITE SPEAKER FRONT LEFT (+) 20
6
7
BLUE/WHITE 12V AMP REMOTE TURN ON 20
8
GREY/BLACK SPEAKER FRONT RIGHT (-) 20
GREY SPEAKER FRONT RIGHT (+) 20
9
10
BLACK GROUND (-) 16
11
PURPLE/BLACK SPEAKER REAR RIGHT (-) 20
PURPLE SPEAKER REAR RIGHT (+) 20
12
REDBLACK
B
B
GREEN/BLACK
PURPLE/BLACK
3 2 1
6 5 4
9 8 7
12 11 10
GREEN
ORANGE
WHITE/BLACK
WHITE
GRAY
PURPLE
BLUE/WHITE
GRAY/BLACK
wires.
5. Use high quality connectors for a reliable installation and to minimize signal
or power loss.
6. Think before you drill! Be careful not to cut or drill into gas tanks, fuel lines,
brake or hydraulic lines, vacuum lines or electrical wiring when working on
any vehicle.
7. Never run wires underneath the vehicle. Running the wires inside the vehicle
provides the best protection.
8. Avoid running wires over or through sharp edges. Use rubber or plastic
grommets to protect any wires routed through metal, especially the firewall.
9. ALWAYS protect the battery and electrical system from damage with proper
fusing. Install the appropriate fuse holder and fuse on the +12V power wire
within 18” (45.7 cm) of the battery terminal.
10. When grounding to the chassis of the vehicle, scrape all paint from the metal
to ensure a good, clean ground connection. Grounding connections should
be as short as possible and always be connected to metal that is welded to
the main body, or chassis, of the vehicle. Seatbelt bolts should never be used
for connecting to ground.
54
Page 4
Settings Operation
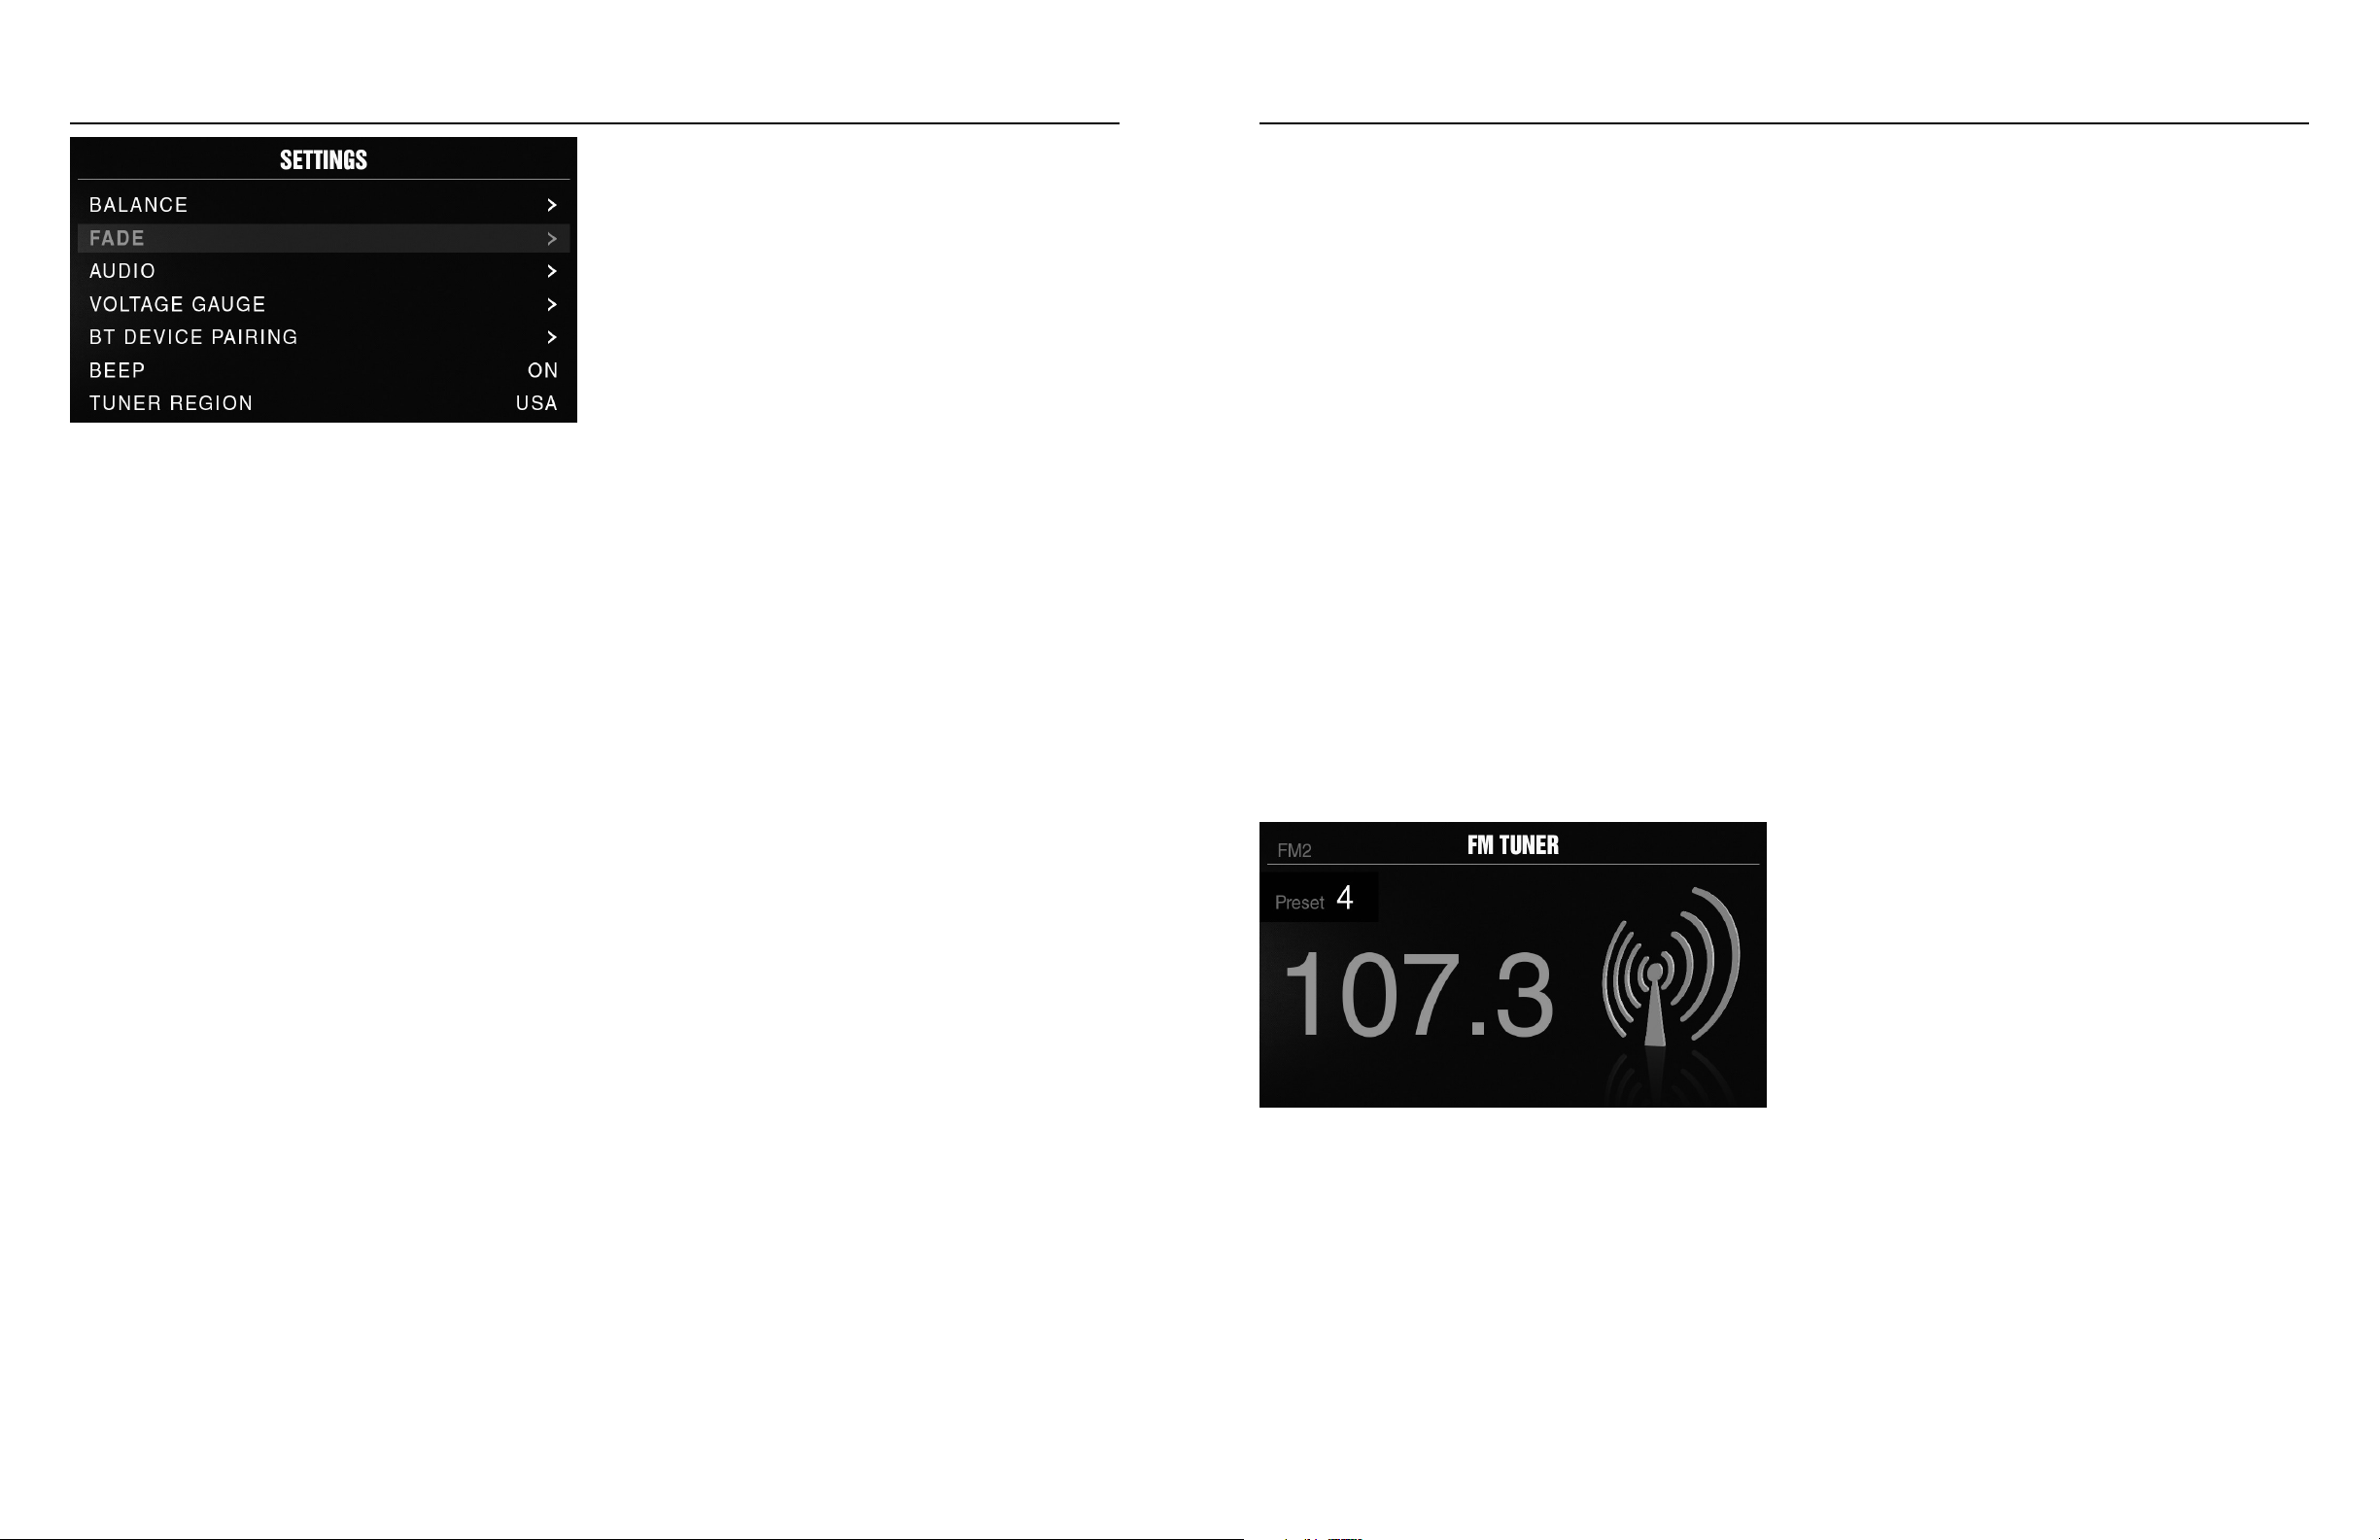
Source Unit Settings
To access the source unit’s settings, long press the MENU button until the
options appear. Rotate the encoder to scroll through the list of settings and
short press the encoder button to select the setting you wish to change. (ZON
ES>BALANCE>FADER>AUDIO>VOLTAGE GAUGE>BT PAIRING>BEEP>TUNER
REGION>SOFTWARE>FACTORY DEFAULT)
This source unit has a zero current draw when turned off. All of your settings and
presets will be saved along with your boat’s battery during storage.
ZONES
ZONE 1 / ZONE 2
To setup ZONE 1 or ZONE 2, short press the encoder button to access the
submenu. Rotate the encoder button to select ZONE options. (SOURCE >
RENAME > ENABLE/DISABLE/LOCK)
SOURCE
To select the source, short press the encoder button to access the submenu. Use
the rotary encoder to scroll through EQ Settings. (FM TUNER > AM TUNER > WB
TUNER > USB > AUX > BLUETOOTH > PANDORA > SIRIUSXM)
RENAME
To rename ZONE, short press the encoder button to set the first letter of the new
name. Once active, rotate encoder to adjust letters. Short press the encoder button
again to set the next letter. Repeat until ZONE has been renamed. Short press
MENU to exit and go back up one level.
ENABLE / DISABLE / LOCK
Short press the encoder button to access. Rotate the encoder button to select
ENABLE/DISABLE/LOCK. Selecting LOCK will enable ZONE 2 and LOCK the
source of ZONE 2 to ZONE 1.
BALANCE
Short press the encoder button to access BALANCE adjustment settings. Rotate
the encoder button to set output BALANCE.
FADER
Short press the encoder button to access FADER adjustment settings. Rotate the
encoder button to set output FADER.
AUDIO
To access the AUDIO settings, short press the AUDIO option from the MENU
screen. Rotate the encoder to scroll through the list of settings and short
press the encoder button to select the setting you wish to change. (7 BAND
EQ>CROSSOVER>PEQ>REAR RCA>AUX INPUT>SOURCE GAIN>INTERNAL
AMPLIFIER)
7 BAND EQ
Short press the encoder button to access the 7 BAND EQ settings. Use the
rotary encoder to scroll through the EQ settings. (FLAT > ROCK > CLASSIC >
ACOUSTIC > DANCE > ELECTRONIC > HIP-HOP > CUSTOM) When setting
up the CUSTOM EQ, short press the encoder button to set the first frequency.
Once active, rotate the encoder to adjust the frequency settings. Short press
encoder button again to access the next frequency. Repeat until all EQ settings are
complete. Short press the MENU button to exit and go back up one level.
CROSSOVER
Short press to access the CROSSOVER settings. Use the rotary encoder to select
the crossover zone options (FRONT>REAR>SUB). Short press the encoder to
adjust the frequency of the crossover (60Hz>80Hz>120Hz>APF). Short press
MENU to exit and go back up one level.
PUNCH EQ
Short press to access the PUNCH EQ settings. Use the rotary encoder to adjust
the gain output (0-12). Short press MENU to exit and go back up one level.
Punch EQ is an onboard equalizer with up to +18dB @ 45Hz and/or up to +12dB
boost at 12.5kHz
AUX INPUT
RENAME – To rename AUX, short press the encoder button to set the first letter
of the new name. Once active, rotate encoder to adjust letters. Short press the
encoder button again to set the next letter. Repeat until AUX has been renamed.
Short press MENU to exit and go back up one level.
ENABLE - Short press the encoder button to access options. Rotate the encoder
button to select if unit is discoverable. (ENABLE > DISABLE)
SOURCE GAIN
To adjust the level of device input gain, scroll through the inputs (FM TUNER>AM
TUNER>WB TUNER>USB>AUX>BLUETOOTH>PANDORA>SIRIUSXM) to the
device you want to adjust, short press the encoder button to access the gain
settings. Rotate the encoder button to set the level of gain. (-3dB > -2dB > -1dB >
0dB > +1dB > +2dB > +3dB)
INTERNAL AMPLIFIER
Short press to access the INTERNAL AMPLIFIER options. Use the rotary encoder
to select options (ON>OFF). When using an amplifier to power your speakers,
select OFF. If you are powering your speakers directly from the source unit, select
the INTERNAL AMPLIFIER to ON.
VOLTAGE GAUGE
To display the vehicle voltage, short press the encoder button on the VOLTAGE
GAUGE option.
BT DEVICE PAIRING
Short press the encoder button to access options. Rotate the encoder button to
select if unit is discoverable for pairing. (ENABLE > DISABLE) Once enabled, the
source unit is now discoverable and ready for pairing to your device. Open the
Bluetooth settings on your device to find the source unit labeled “Rockford PMX”
and select.
BEEP
Short press the encoder button to access the BEEP options. Rotate the encoder
button to turn system beep ON/ OFF.
TUNER REGION
To adjust, short press the encoder button to access. Rotate the encoder button to
select the TUNER REGION of your preference. (EUROPE > USA > RUSSIA > LATIN
> ASIA > JAPAN > MIDEAST > AUSTRALIA)
SOFTWARE
VERSION - Short press the encoder button to display the current firmware version
of the unit.
UPDATE - Short press the encoder button to update the firmware. Follow the
instructions on the screen when updating.
FACTORY DEFAULT
AUDIO – Short press the encoder button to access. Rotate the encoder button to
select YES/NO. Selecting YES will reset your unit back to factory default settings.
SYSTEM - Short press the encoder button to access. Rotate the encoder button to
select YES/NO. Selecting YES will reset your unit back to factory default settings.
Basic Operation
TURNING THE UNIT ON / OFF
Long press the SRC (Power) button to turn the unit ON or OFF
ADJUSTING THE VOLUME
Short press the encoder button to independently adjust the volume for a specific
zone (ZONE 1>ZONE>ALL). Rotate encoder knob left or right to desired volume
level (0-40). The current volume level will be displayed during adjustment.
ADJUSTING THE SUBWOOFER OUTPUT
Press the SUB + or SUB- buttons to adjust the output level (0-20).
ADJUSTING THE SCREEN BRIGHTNESS
Short press the SCREEN BRIGHTNESS button to adjust the brightness level.
There are two brightness levels.
SELECTING A SOURCE TO PLAY
Short press the SRC button to show the different source options (FM TUNER>AM
TUNER>WB TUNER>USB>AUX>BLUETOOTH>PANDORA>SIRIUSXM). Use the
rotary encoder or short press the SRC button to scroll through sources.
SELECTING A ZONE
Long press the encoder button to toggle between source zones (ZONE 1>ZONE 2)
Tuner Operation (FM/AM/WB)
To operate, use the rotary encoder to select the tuner source you want to listen to
(FM>AM>WB).
To AUTO SEEK stations, short press the FWD and REV buttons. To MANUAL
SEEK stations, long press the FWD and REV buttons to tune to the desired
frequency.
To MUTE the TUNER, short press the PLAY/PAUSE button.
FM BAND SETTINGS
To access the FM BAND SETTINGS, short press the MENU when using the FM
TUNER source. This will give you access to the settings specific to the FM TUNER
(FM>PRESETS>ADD PRESETS>REMOVE PRESETS>AUTO STORE>LOCAL).
PRESETS
Short press the encoder button to access the PRESETS list. Using this feature
allows to you see what PRESETS are saved on the unit.
ADD PRESETS
Short press the encoder button on the ADD PRESETS option. You will need to be
on both the station and PRESET group you want to add first (FM1>FM2>FM3).
Using this feature allows to you save stations to the unit. Once selected, use the
rotary encoder to select the PRESET number (1-6) you want the station saved to.
REMOVE PRESETS
Short press the encoder button on the REMOVE PRESETS option. You will need
to be under the PRESET group you want to adjust first (FM1>FM2>FM3). Using
this feature allows to you remove saved stations on the unit. Once selected, use
the rotary encoder to select the PRESET number (1-6) of the station you want
removed.
FM
Short press the encoder button to access the FM PRESET options
(FM1>FM2>FM3). Using this feature allows to you have separate tuner preset
groups to choose from. Use the rotary encoder button to scroll through the
TUNER groups and short press to select the group.
AUTO STORE
Short press the encoder button to access the AUTO STORE function. You will
need to be under the PRESET group you want to adjust first (FM1>FM2>FM3).
This feature automatically stores presets on the unit. It will stop when presets 1-6
are set. Select the next PRESET group and repeat to fill next set.
LOCAL
Short press the encoder button to access the LOCAL options. Once selected,
use the rotary encoder to select ON or OFF. The local option tunes to nearby
radio stations with sufficiently strong signals for good reception. In areas where
reception is poor, switching to distance tuning enables the unit to tune in to more
distant stations. Distance tuning is the default.
AM BAND SETTINGS
To access the AM BAND SETTINGS, short press the MENU when using the AM
TUNER source. This will give you access to the settings specific to the AM TUNER
(AM>PRESETS>ADD PRESETS>REMOVE PRESETS>AUTO STORE>LOCAL).
PRESETS
Short press the encoder button to access the PRESETS list. Using this feature
allows to you see what PRESETS are saved on the unit.
ADD PRESETS
Short press the encoder button on the ADD PRESETS option. You will need to be
on both the station and PRESET group you want to add first (AM1>AM2). Using
this feature allows you to save stations to the unit. Once selected, use the rotary
encoder to select the PRESET number (1-6) you want the station saved to.
REMOVE PRESETS
Short press the encoder button on the REMOVE PRESETS option. You will need
to be under the PRESET group you want to adjust first (AM1>AM2). Using this
feature allows you to remove saved stations on the unit. Once selected, use
the rotary encoder to select the PRESET number (1-6) of the station you want
removed.
AM
Short press the encoder button to access the FM PRESET options (AM1>AM2).
Using this feature allows you to have separate tuner preset groups to choose
from. Use the rotary encoder button to scroll through the TUNER groups and short
press to select the group.
AUTO STORE
Short press the encoder button to access the AUTO STORE function. You will
need to be under the PRESET group you want to adjust first (AM1>AM2). This
feature automatically stores presets on the unit. It will stop when presets 1-6 are
set. Select the next PRESET group and repeat to fill next set.
76
Page 5

Settings Operation
LOCAL
Short press the encoder button to access the LOCAL options. Once selected,
use the rotary encoder to select ON or OFF. The local option tunes to nearby
radio stations with sufficiently strong signals for good reception. In areas where
reception is poor, switching to distance tuning enables the unit to tune in to more
distant stations. Distance tuning is the default.
WB BAND SETTINGS
To access the WB BAND SETTINGS, short press the MENU when using the WB
TUNER source. This will give you access to the settings specific to the WB TUNER
(PRESETS>ADD PRESETS>REMOVE PRESETS).
PRESETS
Short press the encoder button to access the PRESETS list. Using this feature
allows to you see what PRESETS are saved on the unit.
ADD PRESETS
Short press the encoder button on the ADD PRESETS option. You will need to
be on both the station you want to add first. Using this feature allows to you save
stations to the unit. Once selected, use the rotary encoder to select the PRESET
number (1-6) you want the station saved to.
REMOVE PRESETS
Short press the encoder button on the REMOVE PRESETS option. You will need
to be under the PRESET group you want to adjust first (AM1>AM2). Using this
feature allows to you remove saved stations on the unit. Once selected, use
the rotary encoder to select the PRESET number (1-6) of the station you want
removed.
USB (iPod) Operation
After your device is connected to the source unit, this feature allows you to control
playback from your device directly from the unit. Select the USB source option on
the source unit.
To play or pause a song, short press the PLAY/PAUSE button.
To skip a track forward, short press the FWD button. To skip a track backwards,
short press the REV button.
To access USB specific settings, short press the MENU button for the list of
settings (BROWSER>REPEAT>SHUFFLE). Use the encoder to select the option to
change.
BROWSER
Short press the encoder button to access the BROWSER options (PLAYLISTS>
ARTISTS>ALBUMS>GENRES>SONGS>COMPOSERS>AUDIOBOOKS>PODCAS
TS). Using this feature allows you to search for tracks or songs by different types
of categories.
REPEAT
Short press the encoder button to access the REPEAT feature options
(OFF>ONE>ALL).
SHUFFLE
Short press the encoder button to access the SHUFFLE feature options
(OFF>ALL). This feature allows you to set your preference on shuffling tracks or
songs.
AUX Operation
After your device is plugged into the source unit, this feature allows you to play
music from your device. Select the AUX source option on the source unit and use
your plugged in device to control song/track selection, PLAY/PAUSE and track
skip FWD/REV.
Bluetooth® Operation
After your device is paired to the source unit, this feature allows you to control
playback from your device directly from the unit. Select the BLUETOOTH source
option on the source unit.
To play or pause a song, short press the PLAY/PAUSE button.
To skip a track forward, short press the FWD button. To skip a track backwards,
short press the REV button.
To access BLUETOOTH specific settings, short press the MENU button for the list
of settings (BROWSER>REPEAT>SHUFFLE). Use the encoder to select the option
to change.
BROWSER
Short press the encoder button to access the BROWSER options (PLAYLISTS>
ARTISTS>ALBUMS>GENRES>SONGS>COMPOSERS>AUDIOBOOKS>PODCAS
TS). Using this feature allows you to search for tracks or songs by different types
of categories.
REPEAT
Short press the encoder button to access the REPEAT feature options
(OFF>ONE>ALL). This feature allows you to set your preference on the amount of
times a track or song will repeat.
SHUFFLE
Short press the encoder button to access the SHUFFLE feature options
(OFF>ALL). This feature allows you to set your preference on shuffling tracks or
songs.
Pandora
This feature allows you to control the Pandora® app from the source unit directly
(Android users will have to use Bluetooth only, iOS users can use both USB and
Bluetooth). You will need to start the Pandora® app on your device first, then
select the Pandora® source option on the source unit. To use the “Thumbs Up”
feature, long press the SUB+ button. To use the “Thumbs down” feature, long
press the SUB - button.
To play or pause a song, short press the PLAY/PAUSE button.
To skip a track forward, short press the FWD button.
To access Pandora® specific settings, short press the MENU button for the list
of settings (STATIONS>BOOKMARKS>STATIONS MANAGE). Use the encoder to
select the option to change.
STATIONS
To adjust, short press the encoder button to access. Rotate the encoder button
to select your options (SHUFFLE>SORT DATE/A-Z>STATIONS). Selecting the
SHUFFLE option will shuffle your stations and selecting the SORT feature will
sort your stations by date added or alphabetically. You can also select your saved
stations directly from this list.
BOOKMARKS
To BOOKMARK an artist or track that is playing, short press the encoder button to
display your BOOKMARK options (ARTIST>TRACK). Select the option you wish to
use for bookmarking.
STATIONS MANAGE
To create stations, short press the encoder button to display your STATION
MANAGE options (CREATE FROM ARTIST> CREATE FROM TRACK> CREATE
FROM GENRE>DELETE). Selecting the CREATE FROM ARTIST OPTION allows
you to create a station from the artist that you are currently listening to. CREATE
FROM TRACK works similarly by creating a station from the current track being
played. If you create a station by selecting CREATE FROM GENRE, this will give
you music genres to select from to create your station. Selecting DELETE will
delete the now playing station.
Pandora, the Pandora logo, and the Pandora trade dress are trademarks or
registered trademarks of Pandora Media, Inc. Used with permission. Pandora is
only available in certain countries. Please visit http://www.pandora.com/legal for
more information.
®
98
Page 6
Operation Troubleshooting
SiriusXM
Only SiriusXM
®
®
brings you more of what you love to listen to, all in one place.
Get over 140 channels, including commerical-free music plus the best sports,
news, talk, comedy and entertainment. Welcome to the world of satellite radio. A
SiriusXM Vehicle Tuner and Subscription are required. For more information, visit
www.siriusxm.com
ACTIVATING YOUR SIRIUSXM SUBSCRIPTION
After installing your SiriusXM Connect Vehicle Tuner and antenna, power on your
source unit and select SiriusXM mode. You should be able to hear the SiriusXM
Preview channel on Channel 1. If you cannot hear the preview channels, please
check the installation instructions to make sure your SiriusXM Connect tuner is
properly installed.
After you can hear the Preview channel, tune to Channel 0 to find the Radio ID
of your tuner. In addition, the Radio ID is located on the bottom of the SiriusXM
Connect Vehicle Tuner and its’ packaging. You will need this number to activate
your subscription. Write the number down for reference.
Note: the SiriusXM Radio ID does not include the letters I, O, S or F.
In the USA, you can activate online or by calling SiriusXM Listener care:
• Visit www.siriusxm.com/activate now
• Call SiriusXM Listener Care at 1-866-635-2349
For Canadian Subscriptions, please contact:
• Visit www.siriusxm.ca/activatexm
• Call XM customer Care at 1-877-438-9677
As part of the activation process, the SiriusXM satellites will send an activation message to your tuner. When your radio detects that the tuner has received
the activation message, your radio will display: “Subscription Updated”. Once
subscribed, you can tune to channels in your subscription plan. Note, the activation process usually takes 10 to 15 minutes, but may take up to an hour. Your
radio will need to be powered on and receiving the SiriusXM signal to receive the
activation message.
HOW TO FIND THE RADIO ID
The SiriusXM Radio ID is required for activation and can be found by tuning to
Channel 0 as well as on the label found on the siriusXM connect tuner and its’
packaging. The Radio ID does not include the letters I, O, S or F.
SETTINGS
To access the SiriusXM SETTINGS, short press the MENU when using the
SiriusXM source. This will give you access to the settings specific to SiriusXM
(SXM>PRESETS>ADD PRESETS>REMOVE PRESETS>CHANNELS>CATEGORY).
SXM
Short press the encoder button to access the SiriusXM PRESET options
(SXM1>SXM2>SXM3). Using this feature allows to you have separate satellite
preset groups to choose from. Use the FWD and REV buttons to scroll through the
TUNER groups.
PRESETS
Short press the encoder button to access the PRESETS list. Using this feature
allows to you see what PRESETS are saved on the unit.
ADD PRESETS
Short press the encoder button on the ADD PRESETS option. You will
need to be on both the station and PRESET group you want to add first
(SXM1>SXM2>SXM3). Using this feature allows to you save stations to the unit.
Once selected, use the rotary encoder to select the PRESET number (1-6) you
want the station saved to.
REMOVE PRESETS
Short press the encoder button on the REMOVE PRESETS option. You will need
to be under the PRESET group you want to adjust first (SXM1>SXM2>SXM3).
Using this feature allows to you remove saved stations on the unit. Once selected,
use the rotary encoder to select the PRESET number (1-6) of the station you want
removed.
CHANNEL
Short press the encoder button on the CHANNEL option to select this feature. This
feature displays a complete listing of channels.
CATEGORY
Short press the encoder button on the CATEGORY option to select this feature.
This feature allows you to search channels based on their CATEGORY type.
DIRECT TUNING
Short press the encoder button on the DIRECT TUNING option to select this
feature. This feature allows you to directly tune to a station if you already know
the channel number. Rotate the encoder to until you reach the desired number and
press to enter your selection. Repeat until the channel number is completed.
PARENTAL CONTROLS
Short press the encoder button on the PARENTAL CONTROL option to select
this feature. This feature allows you to easily lock and unlock channels with
mature content. To turn this feature on, short press the encoder on PARENTAL
CONTROLS to select. You will be asked to enter a code to activate. Enter “1111”
for your code. Once the code is entered correctly, this will give you access to the
PARENTAL CONTROL features (LOCK CHANNELS>CHANGE MY CODE). Use the
encoder knob to scroll through the options and short press to select.
LOCK CHANNELS
Short press the encoder button on the LOCK CHANNELS option to select this
feature. This feature allows you to select certain channels to be locked out for
listening. When trying to listen to locked channels, you will need to enter the
correct access code to listen. Use the rotary encoder to input code.
CHANGE MY CODE
Short press the encoder button on the CHANGE MY CODE option to reset the
PARENTAL CONTROL access code. Use the rotary encoder to input code.
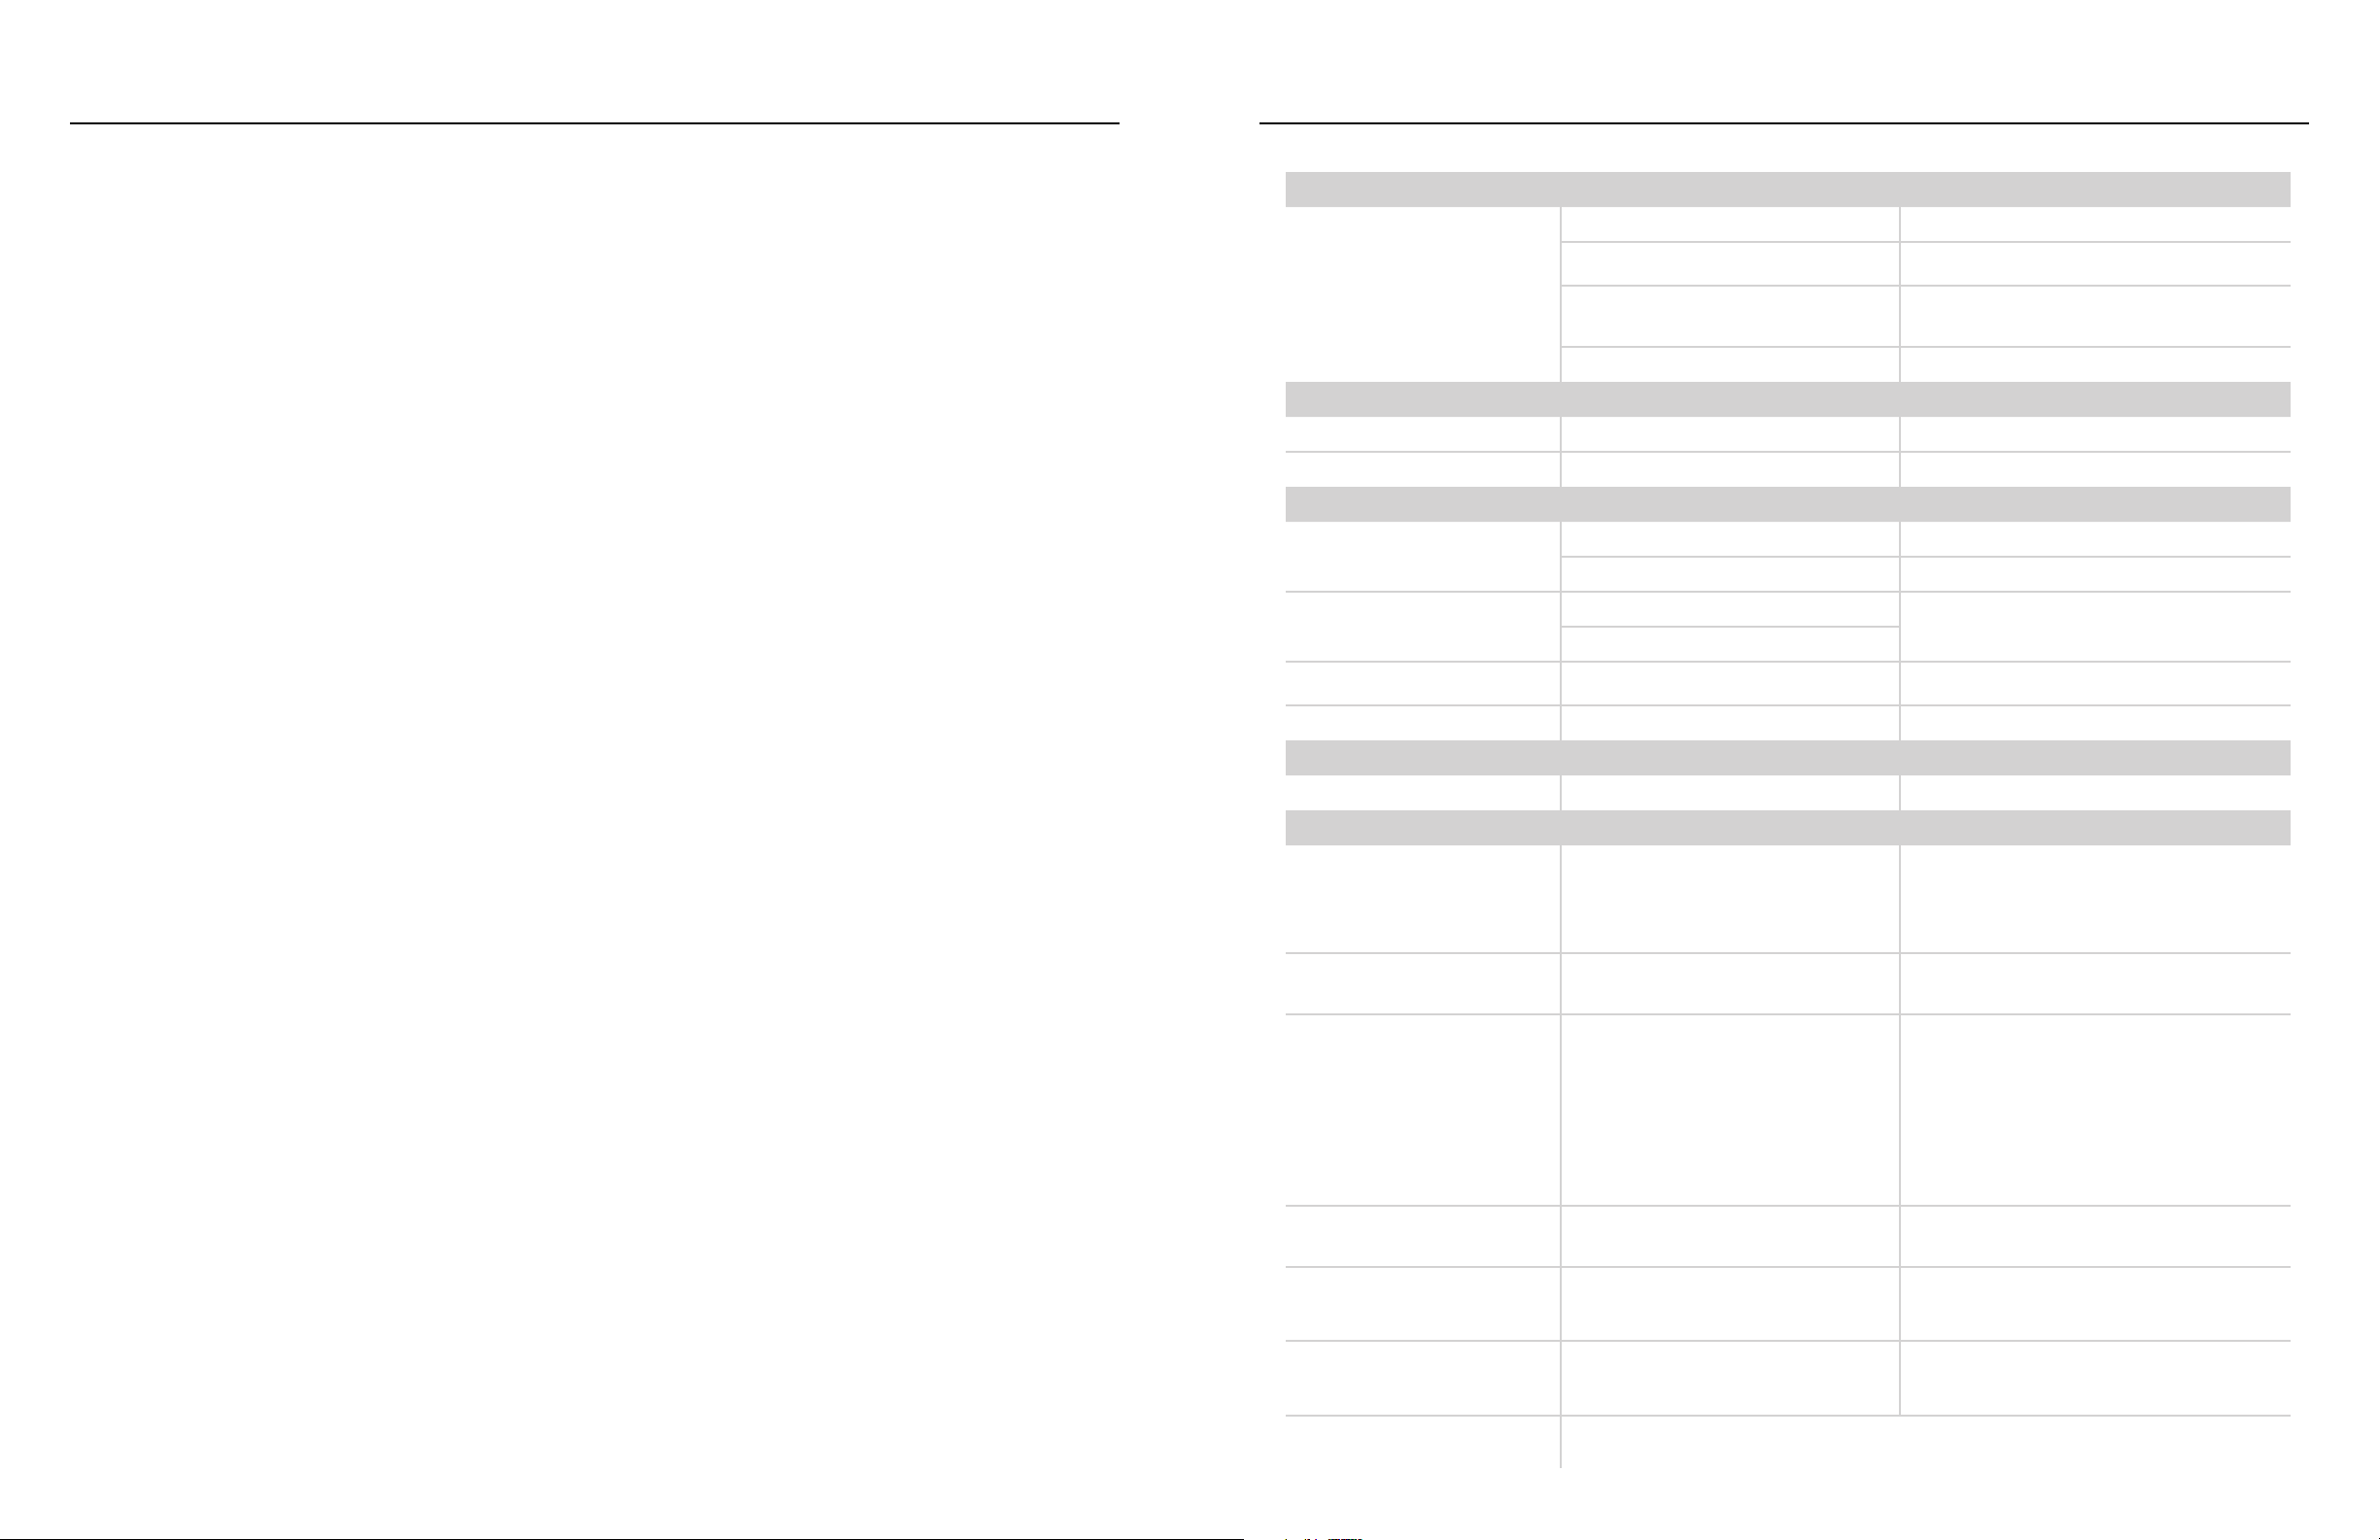
Symptom / Advisory Diagnosis Remedy
Basic
Blown fuse Check fuse of the unit, replace with correct rating.
If connected following the instructions, the unit will not operate with ignition
off.
Check battery, connections and fuses and repair or replace as necessary.
If voltage is above +16 volts, have the electrical system inspected by an
authorized service center.
Source unit does not turn on.
Vehicle’s ignition is off
Voltage applied to Red wire is not between 10.5 & 16 volts or
there is no voltage present
Unit is not properly grounded Check wiring and repair as necessary.
Radio Tuner
Tuner fails to tune any stations No antenna or disconnected or open connection in cable Check all connections and repair as necessary.
Unable to tune stations in seek mode You are in a weak signal area Make sure the tuner LOC mode is off.
USB Devices
USB device cannot be inserted
USB device is not recognized
No sound heard with the display “No File” shown No MP3/WMA files are stored on the USB device
Sound skips or is noisy MP3/WMA files are not created properly Use MP3/WMA files that are encoded correctly.
The USB device has been inserted in the wrong direction Reversing the connection direction of the USB device, try reinserting.
The USB device connector is broken Replace with a new USB device.
The USB device is damaged
Connectors are loose
Disconnect USB device and reconnect. If the device is still not recognized,
try replacing with a different USB device.USB does not work with Android
devices.
Store these files properly on the USB device. USB does not work with
Android devices.
AUX
MP3 is not playing back Writing error occurred. The MP3 format is not compatible. Make sure MP3 has been written in a supported format
SIRIUSXM
Verify that the antenna cable is connected to the SiriusXM Connect Tuner
Check Antenna
Check Tuner
No Signal
Subscription Updated
Channel Not Available
Channel Not Subscribed
Channel Locked
The radio has detected a fault with the SiriusXM antenna. The
antenna cable may be either disconnected or damaged.
The radio is having difficulty communicating with the SiriusXM
Connect Vehicle Tuner. The tuner may be disconnected or damaged.
The SiriusXM Connect Vehicle Tuner is having difficulty receiving
the SiriusXM satellite signal.
The radio has detected a change in your SiriusXM subscription
status. Press <<product specific button>> to clear the message.
The channel that you have requested is not a valid SiriusXM channel or he channel that you were listening to is no longer available.
You may also see this message briefly when first connecting a new
SiriusXM Connect Vehicle tuner.
The channel that you have requested is not included in your
SiriusXM subscription package or the channel that you were
listening to is no longer included in your SiriusXM subscription
package.
The channel that you have requested is Locked by the radio Parental Control feature. See page 10 for more information on the Parental Control
feature and how to access locked channels.
Inspect the antenna cable for damage and kinks. Replace the antenna if the
cable is damaged.
SiriusXM product are available at your local car audio retailer or online at
www.shop.siriusxm.com
Verify that the SiriusXM Connect Vehicle Tuner cable is securely connected
to the radio
Verify that your vehicle is outdoors with a clear view of the sky.
Verify that the SiriusXM magnetic mount antenna is mounted on a metal
surface on the outside the vehicle.
Move the SiriusXM antenna away from any obstructions.
Inspect the antenna cable for damage and kinks.
Consult the SiriusXM Connect Vehicle tuner installation manual for more
information on antenna installation. Replace the antenna if the cable is
damaged. SiriusXM products are available at your local car audio retailer or
online at www.shop.siriusxm.com.
Visit www.siriusxm.com or call 866-635- 2349 if you have questions about
your subscription.
Visit www.siriusxm.com for more information about the SiriusXM channel
lineup.
Visit www.siriusxm.com or call 866- 635-2349 if you have questions about
your subscription package or would like to subscribe to this channel.
1110
Page 7

Warranty
Rockford Corporation offers a limited warranty on Rockford Fosgate products on the following terms:
Length of Warranty
POWER Amplifiers – 2 Years
BMW® Direct Fit Speakers – 2 Years
Source Units – 1 Year
All other products – 1 Year
Any Factory Refurbished Product – 90 days (receipt required)
What is Covered
This warranty applies only to Rockford Fosgate products sold to consumers by Authorized Rockford Fosgate Dealers in the United States of America or its possessions.
Product purchased by consumers from an Authorized Rockford Fosgate Dealer in another country are covered only by that country’s Distributor and not by Rockford Corporation.
Who is Covered
This warranty covers only the original purchaser of Rockford product purchased from an Authorized Rockford Fosgate Dealer in the United States. In order to receive
service, the purchaser must provide Rockford with a copy of the receipt stating the customer name, dealer name, product purchased and date of purchase.
Products found to be defective during the warranty period will be repaired or replaced (with a product deemed to be equivalent) at Rockford’s discretion.
What is Not Covered
1. Damage caused by accident, abuse, improper operations,water, theft, shipping.
2. Any cost or expense related to the removal or reinstallation of product.
3. Service performed by anyone other than Rockford or an Authorized Rockford Fosgate Service Center.
4. Any product which has had the serial number defaced, altered, or removed.
5. Subsequent damage to other components.
6. Any product purchased outside the U.S.
7. Any product not purchased from an Authorized Rockford Fosgate Dealer.
Limit on Implied Warranties
Any implied warranties including warranties of fitness for use and merchantability are limited in duration to the period of the express warranty set forth above. Some states
do not allow limitations on the length of an implied warranty, so this limitation may not apply. No person is authorized to assume for Rockford Fosgate any other liability in
connection with the sale of the product.
How to Obtain Service
Contact the Authorized Rockford Fosgate Dealer you purchased this product from. If you need further assistance, call 1-800-669-9899 for Rockford Customer Service. You
must obtain an RA# (Return Authorization number) to return any product to Rockford Fosgate. You are responsible for shipment of product to Rockford.
EU Warranty
This product meets the current EU warranty requirements, see your Authorized dealer for details.
12
 Loading...