


Rocker Trimmer #201 #202 #602
Rocker Programmable #200 #400 #800 #1600

Gontents
Preface
2
Features
3
Preparation
4
Operation
6
ON and OFF
6
How to wear your hearing instrument 6
Rocker switch 8
Replacing the battery 10
Maintenance 1 I
Cleaning &changing tube
I I
Cleaning the instrument
12
Low batteryWarning
13
Battery caring
1
3
Troubleshoo ting Guide
14
Appendix
I6
Technical information
I6
Working Condition
17
FDA information I9

Congratulations! Welcome “Open-Fit" hearing
instrument-ROCKER. Please read this manual carefully
before use.
Intended use
Hearing instrument is a kind of electronic device which
amplifie s sound from your surro un d ing s. It is used to he lp
hearing impaired people recover hearing ability by
compensating for the hearing loss. Your OF is only one
type of hearing instruments.
Scope
This user manual only applies to ROCKER hearing
instrument.
Precautions
For patients with middle ear infection, it’s suggested not to
wear hearing instrument until cured or follow the doctor’s
advice.
Please consult your hearing healthcare professional first if
you have any questions about your hearing or your hearing
instrument.
THE MANUFACTURER RESERVES THE RIGHT TO
MODIFY THE TECHN ICA L SPECI F I CA TI ON S OF THE
PRODUCT WITHOUT ANY PRIOR NOTIC E.

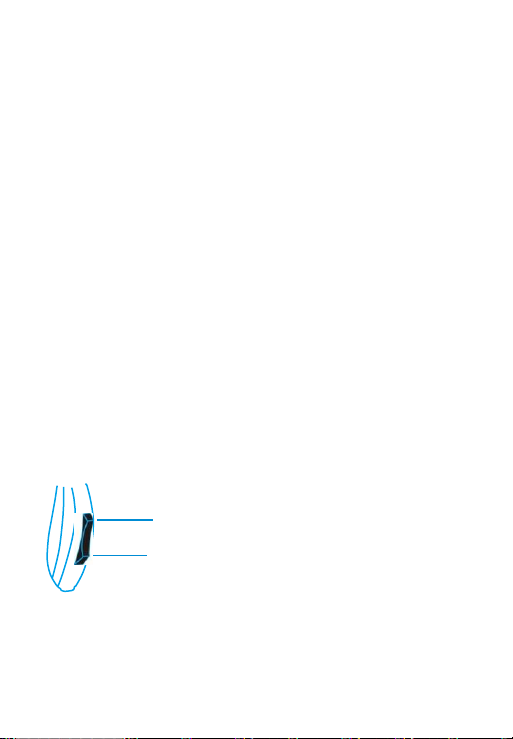
I
. Sound tube
2.
Front microphone
3.
Rocker swi tch
4.
Battery door
5.
Dome
6.
Retention lock
I .
Dome
2. Front microphone
3. Rocker switch
4. Batte ry d oo r
5. Retention lock
6. Sound tube
I
. Sound tube
2.
Front microphone
3.
Rear microphone
4.
Rocker swi tch
S. Battery doo r
6.
Dome
7. Retention lock
3
NOTICE: Please use closed dome to avoid whistling
when you maximum the gain.

Battery
The ROC KER uses a I OA o r a 3 I 2A batte ry. PI ease use th e
co rrect size of battery.
To upIoad a battery, p osition th e battery with the positive (+) s
ide up an d in se rt it into the battery c o mpartm ent section of th
e battery doo r.
If the battery is ins erted inc or rec tly or upside down, the
door will not close. Do not force the door clos ed.
CAUTIO N: Batteries are dangerous if swallowed! Keep
batteries out of the reac h of children. Seek immediate
m edical help when it happen.

Dome
Attac h th e do m e
Pu s h th e d o me over the gro oves on th e tu be o n mo un t it.
A Ctac h £h e sound tub e
To co nn
ect th e so u n d tu be with h eari ng aid, j u st twi st o r p
I ug
o
n to the adapto
r. D iffe
rent m ode
Is co
me with
diffe
rent
adapto rs.
Note:Your hearing aid is supplied with two tu bes.
RED I etteri ng i s fo r right ear.
BLU E lette ri ng is fo r left ear.
5

ONand OFF
TO TU RN O N - Ge ntly open th e ba tte ry d oo r, in se rt ba ttery
and c
I ose
th e do o r.
Th e devi ce is equi p ped with pow e r-on del ay fun ction, so it
n ee ds a few second to get sta rte d.
TO TU RN O FF - S i mpIy o pen the battery do o r co mpI
e te
Iy.
PIea se sto re the in str ument in sa fe and d r y
pI
ace .
Put on your hearing instrument
Befo re p ut o n yo u r h ea ri ng in st rume nt, p I ease cI
ean
yo
u r ea r and ma ke su re the batte ry do o r i s c
I o sed
p ro pe rly.
Fol
I ow
the p roe edu re fo r inserting you r instr um ent:
Step
I : H ol
d the so und tube;
Step 2: P lace the instrum ent ove r th e top of the ear;
Step 3: G ently i n se rt th e do m e in to e a r can a l;
Step 4: M ove the reten tio
n I oc
k and
pI ac e
it in to the bow
I of
yo u
r ea r.

Note: If swelling or redness occurs, discontinue use and
visit your hearing professional.
7
RockerSwitch
Th e ro cke r sw itc h se rve s as a vo1 u m e contro1 as we
11
as a m em o ry sw itc h.
Yo I u m e C o n t ro I
Press the upper part of the switch to increase the
vol ume.
Press the lower part to decrease the vol ume.
I•1e m o ry
Switc
h
Press and hot d the either part of the swi tch for 3
seconds to change the current program.
S h o rt P res s to in c rease vol um e I evel
Lo ng p r es s to switc h p rogram
Sh o rt P res s to dec re ase voI um e I evel
Lo ng p r es s to switc h p rogram
8


Replacing the battery
I . Switch off the hearing instrument by opening the battery door.
2. Remov e the old battery.
3. Remov e the protectiv e foil from the new battery.
4. Insert the new battery, be sure that the plus (+) is facing up.
5. Close the battery door.
Important: Ha ndle the battery door gentl y. T he opera tion requi res
only a m inimum force. If there is any resista nce when cl osing the
batte ry door, ensure that the ba ttery i s cor rectly inserted. The battery
door cannot be close d if the batter y is inserte d incorrectl y.
10

Cleaning&ChangingTube
Gleaning
Use a soft cloth to wipe the OF after use to remove any particles or
moisture. The Cleaning Tool is used to remove debris / wax from the
sound tubing and earbud.
Changing
I .
To remove tube gently rotate the sound tube holding the
instrument firmly.
2. Pull sound tube from the hearing instrument.
3. To clean, insert the cleaning tool through the nose cone end.
Thread all the way through the tube & earbud.
4. To reassemble or change sound tubing simply line up and push
tube until it snaps into place.

Cleaning the instrument
Ear wax is one of the main causes of hearing aids problems. Filter and
other devices are used for preventing wax from entering the
instrument.
It’ s sugg est ed cleanin g ear wax i n the morning before you insert
the instrument to your ear.
Clean your instrument with a sok, dry cloth and a small brush. Do
the cleaning on a soft table to avoid damage or scratch in case the
instrument falls.
Do not use water
or other fluids.
12

Lowbatterywarning
When you hear one short beep, it means that the battery is
running out. Intermittent warning exists until you replace the
battery.
The sound quality may be influen ce d after the first warning , this is
normal and can be remedi ed by inserti ng a fresh battery in the
hearing instrument.
Always remove the battery if your i nstrument is not in use for
long periods of time.
Battery caring
The performance of hearing instrument greatly depends on the
quality of the battery using.
I ) It
is important to use high- quality batteries. W ith reliable high -
quality batteries, you can avoid periodic hearing instrum en t
failures .
2) It is also important that the batteries are well packed be for e
use. Each battery is the refore provided with an adhesive labe l
which ensures the battery is sealed and fresh till use.
3) Ne ver leave an exhausted battery in the hearing instrum e nt .
Exhauste d battery may leak and it would damage the instrume nt.
13

TroubIeshooMngguide
SYMPTOM
POSSI BLE CAUS ES
SOLUTIONS
No sound
No battery
Insert the battery
Dead or low battery
Replace battery
Battery improperl y
inserted
Insert battery correctly
Wax or debris in the
microphon e or receiver
Clean the instrume nt,
remove and clean the
dome
Not loud
enough
Low battery
Replace battery
Excessiv e ear wax
Consult your physician
Volume set too low
Adjust the rocker
volume control
Wax or debris in the
microphon e or receiver
Clean both microph on e
and recei ve r with brush.
Remove and clean the
dome
Hearing loss change
Contact your hearing
care professional
Whistling,
feedback
Loose insertion of hearing
instrument
Remove and reinsert
Excessiv e ear wax
Consult your physician
Dome of improper size
Change domes of proper
size
Not clear or
distorted
sound
Low battery
Replace battery
Hearing instrume nt
damaged
Conta ct your hearing care
professional
Hearing instrume nt settings
not optimal
Conta ct your hearing care
professional
14

H el p with whi stli ng
Whi stli ng i s common fo r s mat I amplifi ers and is known as
'feedbac k'.
It
is caused by amplified sound from the h earing aid
getti ng back to th e mie rophone and being re-amp lified. Choose
a suitabl e earpiece is very important for bette r fitti ng.
The follow i ng ti ps wi ll help reduce the occurrence of feed back
whistl e:
I
. Red uce th e volume.
^Turn off or lower the volume before inserting the
i nstrum ent i n your ear.
2. Securely position th e instrument i nto your ear.
° Once the h earing aid is prope rly seated in you r ear, the
whi stli ng will gen eral Iy stop.
3. C I
ea r the wax o r d ebris in ea r can at.
* C h ec k yo u r ea r with help.
4. Change the ear pi ece o r tu bi ng.
*C hange a new one or a different size one.
° Make sure the tu bi ng is not broken or torn.

Tec h
IEC 60 I I 87/2005
ANSI
3.22-2003
Working condition
Temperatur e: -20º C to 60°C / -4º F to I 40º F
Relative humidity: *85%
Air pressure: 500 - 1100 kPa
3p
EQ in p ut Noise{de)
k
33
3p

16
Manufactuer
www.solarear.org
solarear@solarear.com.br.
0482
17

Spec ial statement:
° A hearing ai d w i ll not res tore normal heari ng and will not
prevent o r i mprove a h earing impai rment resulti ng from
organic conditions.
^ I n m ost case s infre quent u se of a h ea ring aid d oes n ot
permit a u ser to attain fu
I I
ben efit from it.
^ The u se of a he ari ng ai d is on Iy part of hearing habi litatio n
and may need to be supp lemente d by audi to ry training
and instructi on i n li pread i ng.
*
If
your heari ng in strument needs to be repaired, please
contact your sell er where you buy from firstly. Th e sell e r
would p rovi de you better solution.
If
you fai led to contact
with your sell er, please contact at sales@u snewsound.com,
the servi ce center would gi ve you proper sol ution.
18

FDA i nfo rmatio n
Warning to Hearing Aid Dispensers
A he ari ng aid dispenser sh ould advise a prospective hearing
ai d user to con sui t promptly w i th a li e ens ed physician
(preferably an ear specialist) before di spens i ng a heari ng ai d i f
the h earing aid dis pen ser determi nes through i nquiry, actual
obse r vation, or review of any other availab ie i nformation
concerning the p rospec tive user, that the prospective user
has any of the foil owing condi ti ons:
( i) Visi ble c ongenital or traumatic deformi ty of the ear.
( i i) History of active d rainage from the ear wi thin the
p revio us 90 days.
i i i) H istory of sudden or rapid Iy progressive heari ng loss
within the previous 90 days.
( iv) Acute or ch ron ie dizzi ness.
(v) Unilateral he ari ng loss of s u dden o r recent onset wi thin
the previou s 90 days.
(vi) Audiometri e air-bone gap equal to o r greater than 15
deci be
Is
at 500 hertz (Hz), I ,000 Hz, and 2,000 Hz.
(vii) Vis i bl e evidence of significant cerumen accumulation or
a foreign body in the ear canal.
(viii) ) Pain or di scomfort in th e ear.
20

Th e exerc ise of such a waiver is n ot in your best health
interest and its use is stro ngly discouraged.
Children with hearing loss
In addition to seeing a physician for a medical evaluation, a
chi ld with a heari ng loss should be directed to an audi ologist
for evaluation and rehabi litati on since hearing loss may cause
prob I ems in language deve lop ment and th e edu cational and
social growth of a child. An audi ologist is qualified by traini ng
and experience to assist in the eval uation and re habilitatio n
of a child w ith a heari ng loss.
2 I
NewSound
New sound,new life
E- mail: sales@us new sound.com
www.us new sound.com
Vers ion: 12
I I
B
 Loading...