


EZ720p
AHD MOBILE DVR
User Manual

AHD MOBILE DVR User Manual EZ720p
Table of Contents
Chapter 1 Overview.......................................................................................... 3
Chapter 2 Quick setup....................................................................................... 3
2.6 Vehicle Information setup....................................................................................................... 5
2.7 Disk Management................................................................................................................. 6
2.8 WiFi Setup........................................................................................................................... 6
2.9 Server Setup........................................................................................................................ 6
2.10 Net State........................................................................................................................... 7
Chapter 3 System Menu.................................................................................... 7
3.2 Video playback.................................................................................................................... 8
3.3 Video backup........................................................................................................................ 8
3.5 Date Time Setup................................................................................................................. 9
3.6 Vehicle information.......................................................................................................... 10
3.7 Preview setup................................................................................................................. 10
3.8 On/Off Setting................................................................................................................. 11
3.9 System information.......................................................................................................... 11
3.11 Server Setup................................................................................................................. 12
3.12 WiFi Setup.................................................................................................................... 12
3.13 Network State................................................................................................................. 14
3.15 Mode setup.................................................................................................................... 15
3.16 Main Stream................................................................................................................. 15
3.17 Sub Stream.................................................................................................................... 16
3.18 Recording OSD.............................................................................................................. 17
3.19 Image setup................................................................................................................. 17
3.20 Storage setup................................................................................................................. 17
3.22 User Management.......................................................................................................... 18
3.23 Restore........................................................................................................................... 19
3.24 Logout........................................................................................................................... 19
3.25 UART setting................................................................................................................. 20
3.26 UART-TTS........................................................................................................................ 20
3.26 UART-Serial Net.............................................................................................................. 20
3.27 Rear Camera Setup....................................................................................................... 21
3.29 Log inquiry.................................................................................................................... 22
3.30 Disk Management.......................................................................................................... 22
3.31 Import/Export................................................................................................................. 23
3.32 System Upgrading.......................................................................................................... 23
3.34 Input Alarm.................................................................................................................... 25
3.35 Video Loss.................................................................................................................... 26
3.36 Fatigue Driving Alarm.................................................................................................... 26
3.37 Over Speed Alarm.......................................................................................................... 27
3.38 Disk Error........................................................................................................................ 27
Chapter 4 Installation Best Practices............................................................ 28
2

AHD MOBILE DVR User Manual EZ720p
Chapter 1 Overview
EZ720p is a DVR designed for Analog HD vehicle monitoring. With a built-in high
performance image processor and advanced H.264 video compression technology, it
provides AHD video recording, storage and playback. It is WiFi capable (optional) for
remote monitoring, analysis and management. It features a smart power management
system, which can recognize the power level automatically. When the battery’s voltage is
lower than the safe operating value, the EZ720p will shutdown automatically and maintain
an ultra-low standby power consumption.
Chapter 2 Quick setup
2.1 EZ720p Installation
Please refer to “AHD MOBILE DVR Hardware User Manual (EZ720p)” for the SD card
installation and cable connections.
2.2 User Login
Use the remote control, or right-click the mouse to display the login screen. Please enter
your User Name, and Password, then click “OK” to enter the menu. (The default User
Name is admin, without a Password):
3

AHD MOBILE DVR User Manual EZ720p
Select Menu to start setup:
The System Menu is the starting point for setup and control:
2.3 Set up the System time
Time SYNC: Date and Time can be synchronized with GPS/BD
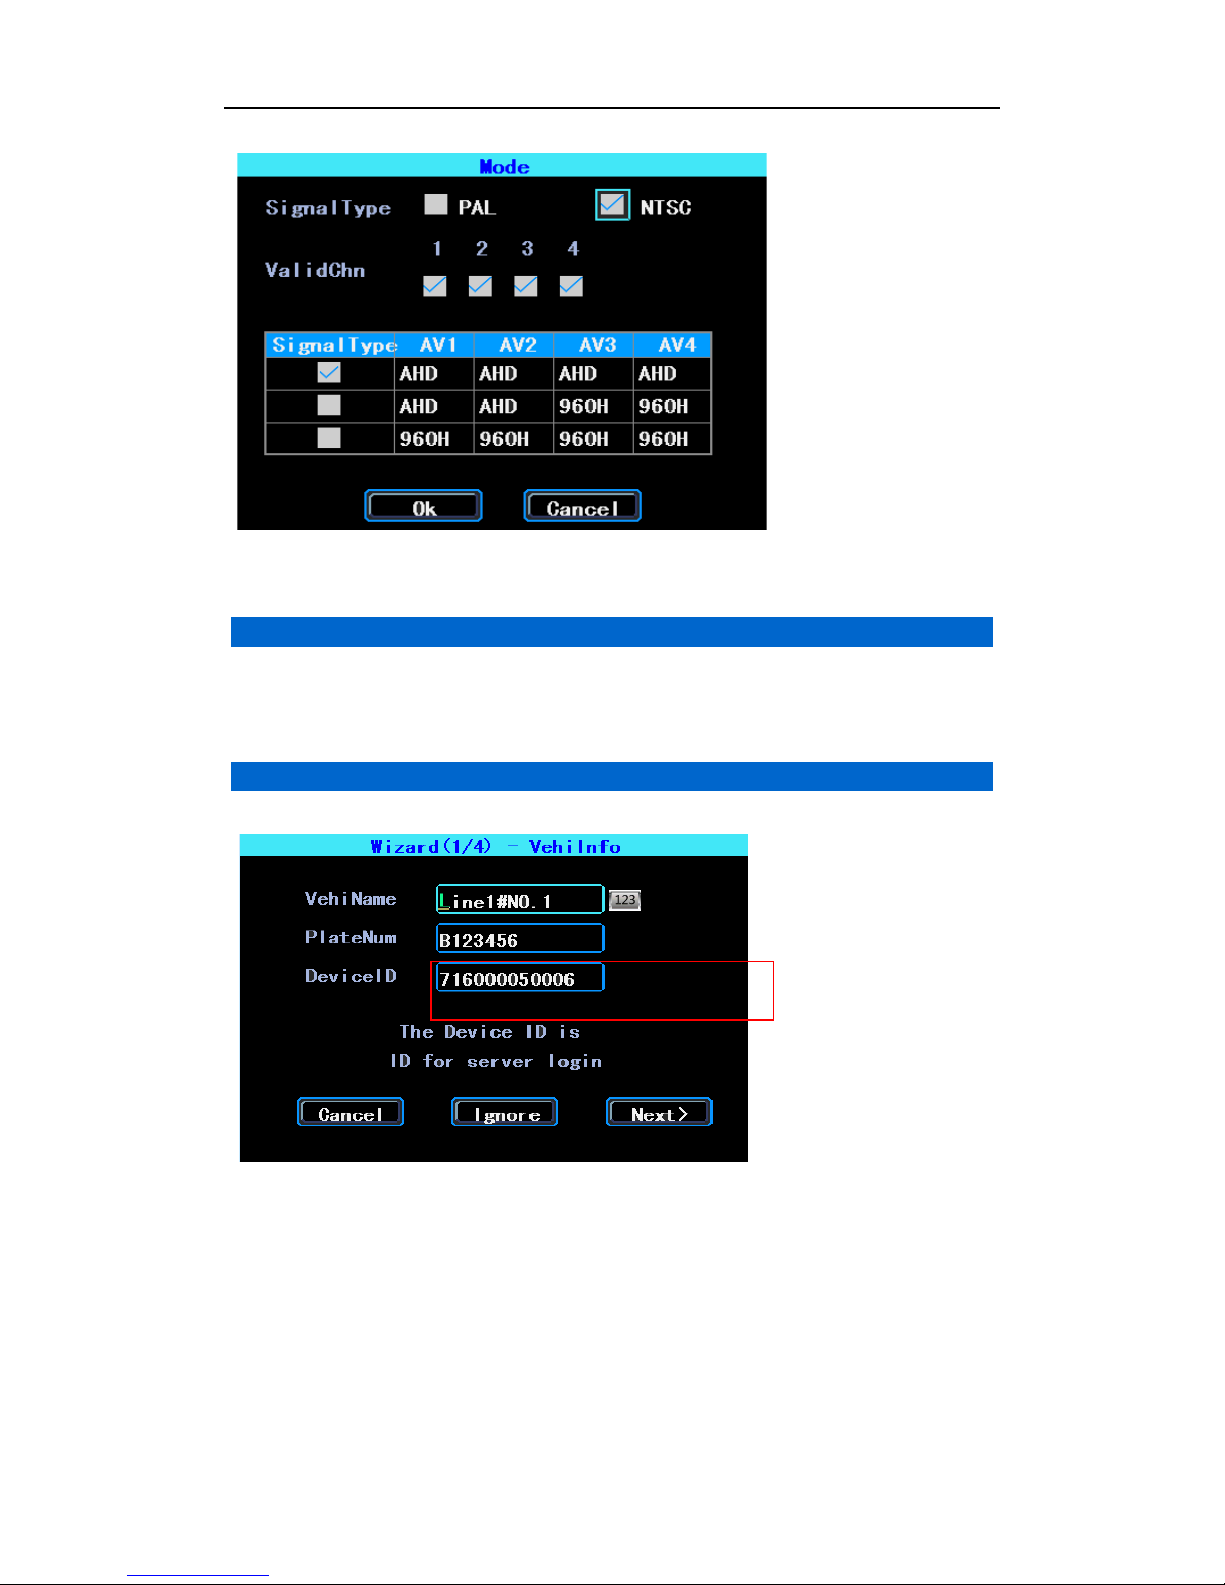
2.4 Set up cameras
Please set up your cameras’ Signal Type, Valid/Invalid. The DVR works with both AHD and
general cameras. If you use AHD cameras, please select the first Type; if you use general
cameras, please select the third Type, if you use both of general and AHD cameras, please
select the second Type.
4
AHD MOBILE DVR User Manual EZ720p
PS: If your cameras don’t display an image on the monitor, please check this setup.
2.5 Wizard
This Wizard will help you to quickly set up a EZ720p connected with the server. If your
DVR is without the WiFi option, you can ignore the step 1/4 and begin with step 2/4.
2.6 Vehicle Information setup
The EZ720p uses “EZ720p ID” to connect with a server, so please input the correct
EZ720p ID which was registered on the server for your EZ720p. The user can modify the
Vehicle Name and Plate Number according to their requirement. The Plate Number is the
vehicle’s plate number, and it will be displayed in the video.
5

AHD MOBILE DVR User Manual EZ720p
2.7 Disk Management
SD cards need to be formatted in the EZ720p when using them for the first time. If the
SD card was not detected by the EZ720p, please check the SD card latch to make sure it
is locked.
2.8 WiFi Setup
The EZ720p can store a maximum 6 WiFi ESSID (Access Points). It will search, match,
connect, and switch automatically. Click the corresponding blank to start WiFi setup. Next,
click “Search” to see the available WiFi Access Points in your area. Select one, enter its
password, then save.
2.9 Server Setup
IP (or Domain) is your server’s IP (or Domain), the Port should match your server setup.
6
AHD MOBILE DVR User Manual EZ720p
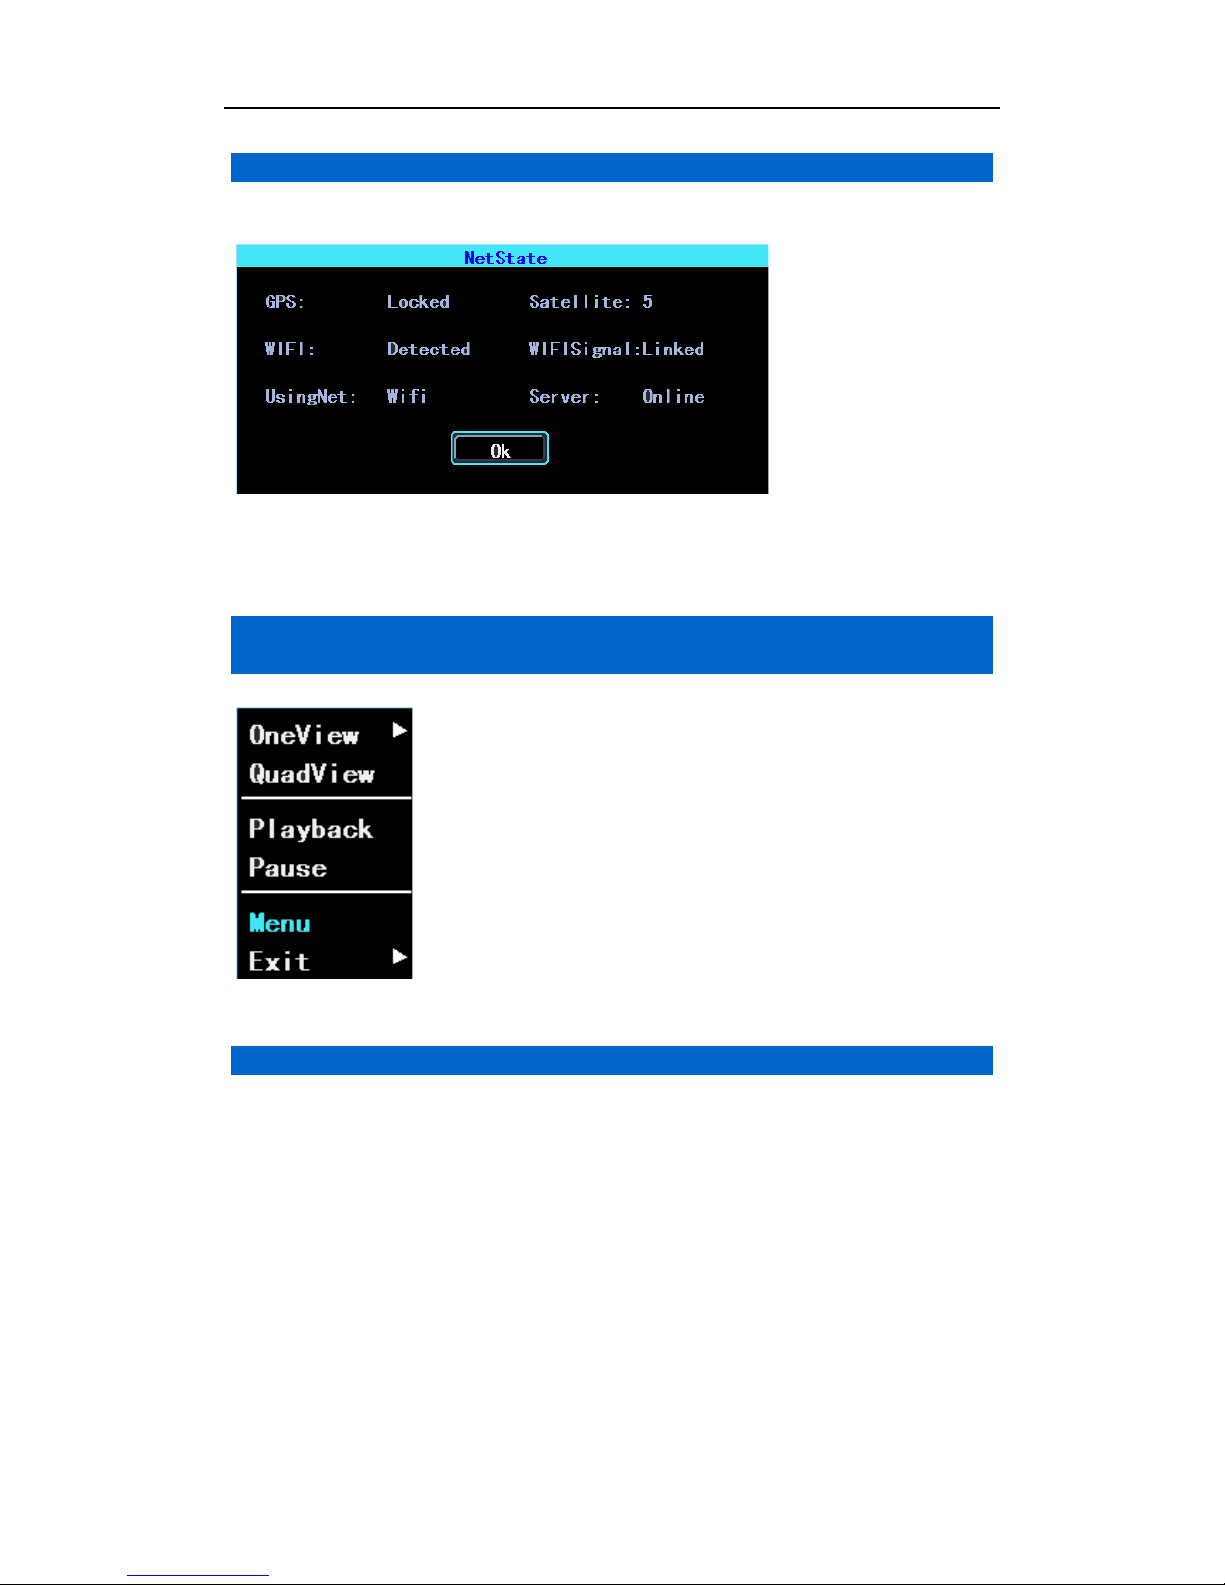
2.10 Net State
Net State: You can check the state of the network connection of your EZ720p here.
Server: Online, it means that the EZ720p connected to the server.
Chapter 3 System Menu
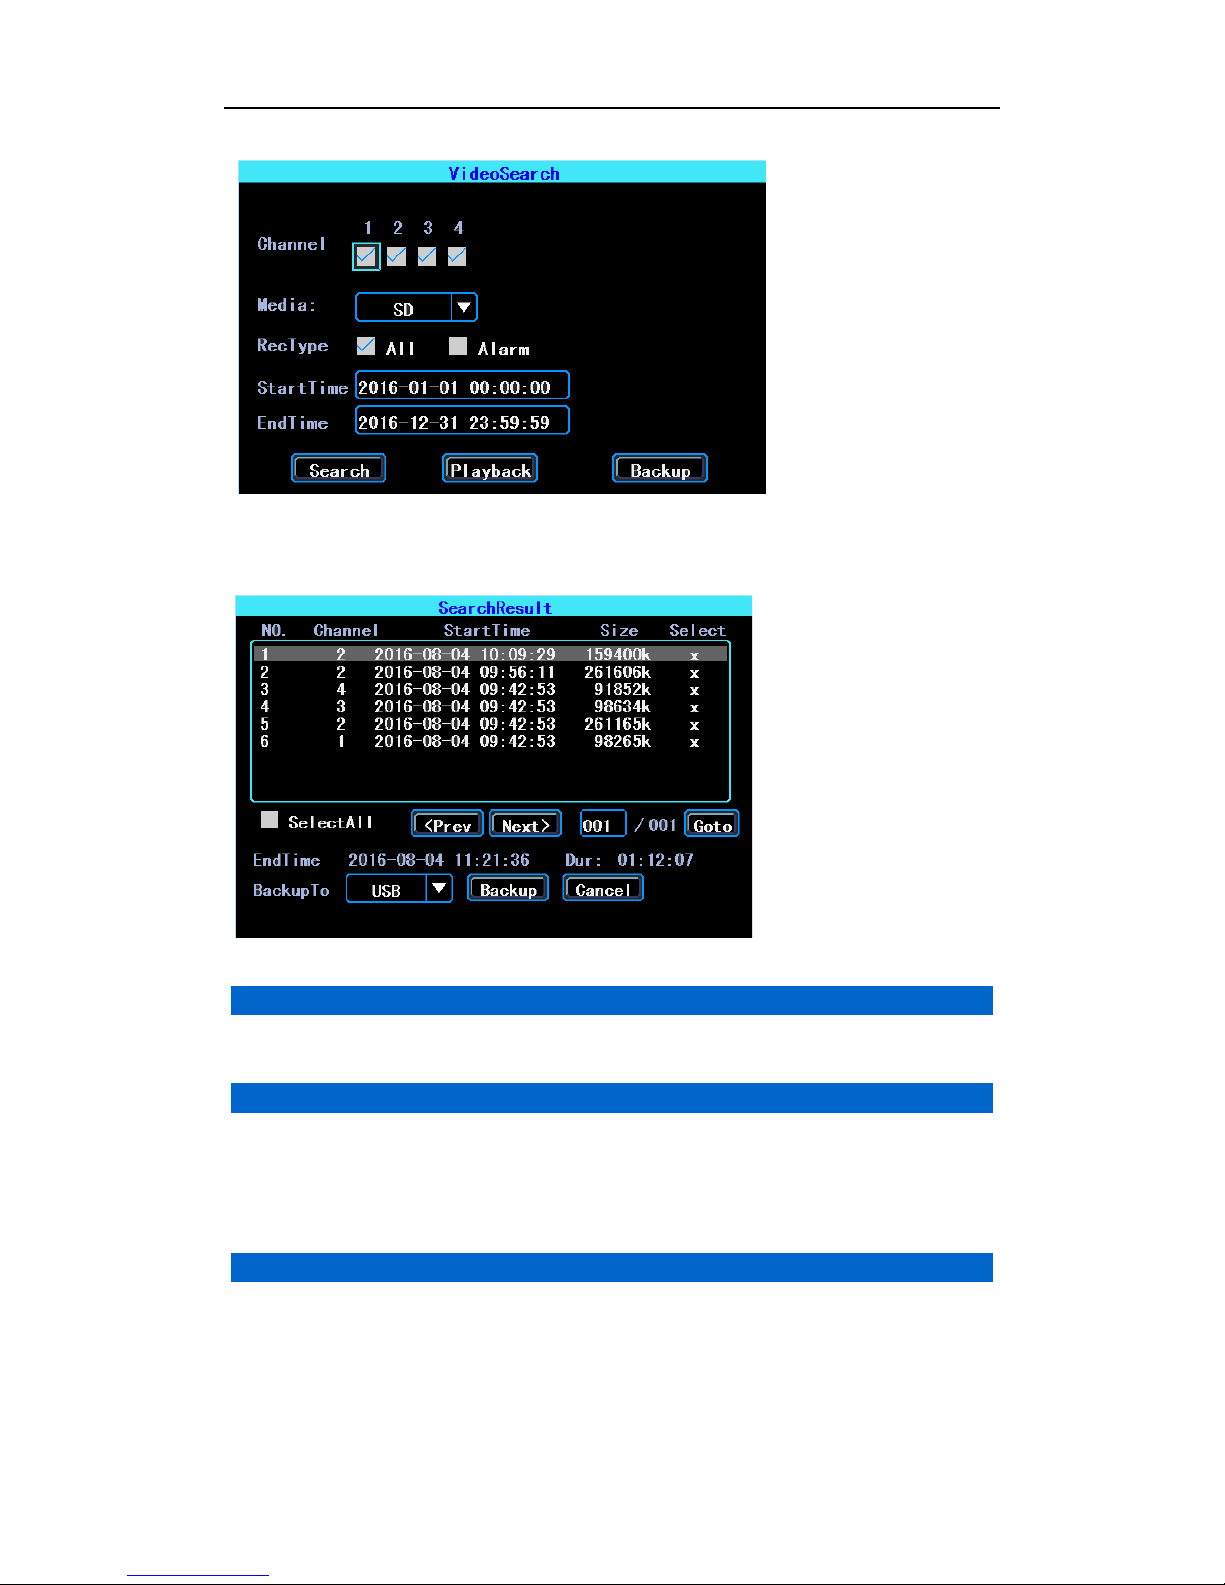
3.1 Video Playback
The EZ720p supports one channel video playback, Select “Playback” in the System menu,
then you will get the video searching interface, please search the video according to your
requirement.
7
AHD MOBILE DVR User Manual EZ720p
Note: The system will only show the latest 4,000 video file clips.
3.2 Video playback
Double click the video file in the video Search result Interface to playback the video.
3.3 Video backup
Select the video files in the video search results interface and use your U disk or SD card to
backup the videos. (The EZ720p supports USB time-delay detecting, you can insert the
USB disk after you have set up and clicked the “Backup” button.)
3.4 Basic Setup
The basic setup includes the very basic setup items such as Date/Time, Vehicle
Information, and Preview Etc.:
8

AHD MOBILE DVR User Manual EZ720p
3.5 Date Time Setup
Time synchronization: The system's date and time can be synchronized with GPS/BD.
9
AHD MOBILE DVR User Manual EZ720p
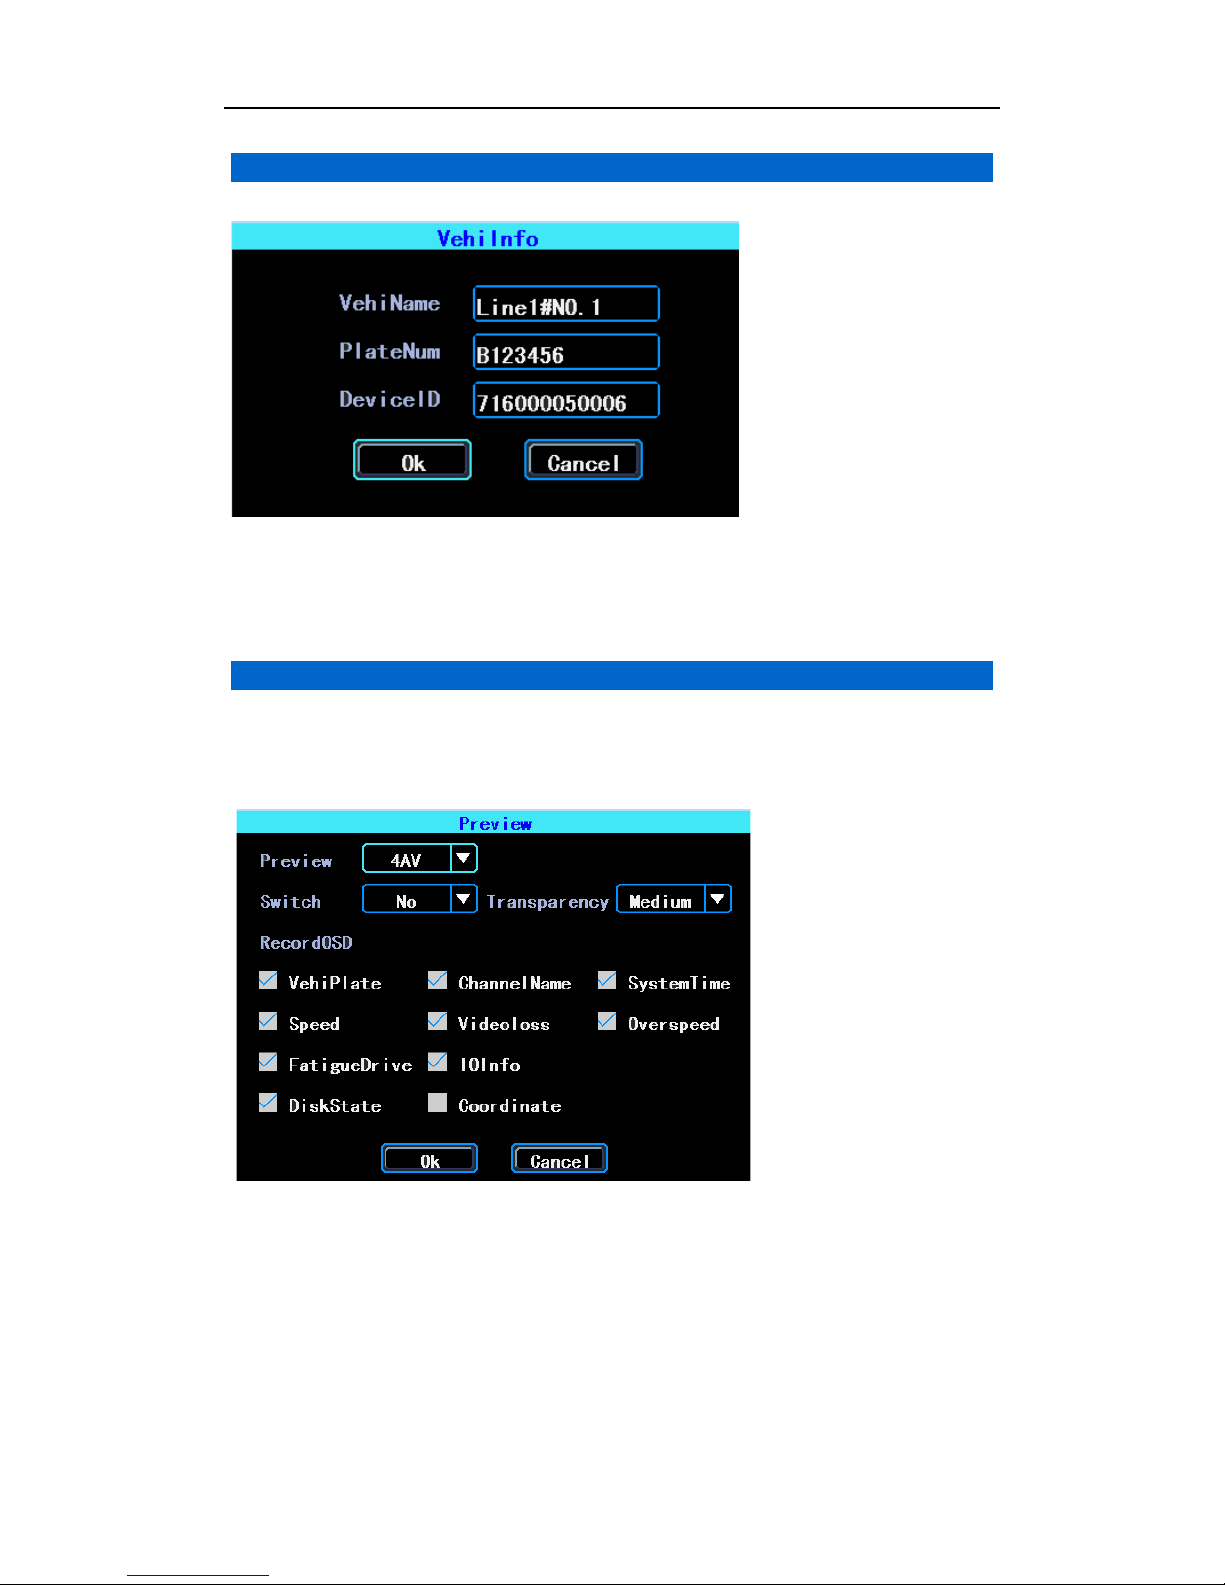
3.6 Vehicle information
EZ720p ID: This is the ID used to connect your EZ720p with the server. It should be the
same ID which you registered your EZ720p on the server.
3.7 Preview setup
Here you can setup the information which you want to overlay on the Preview image
(please note this is not overlaid on the recording image)
10
AHD MOBILE DVR User Manual EZ720p
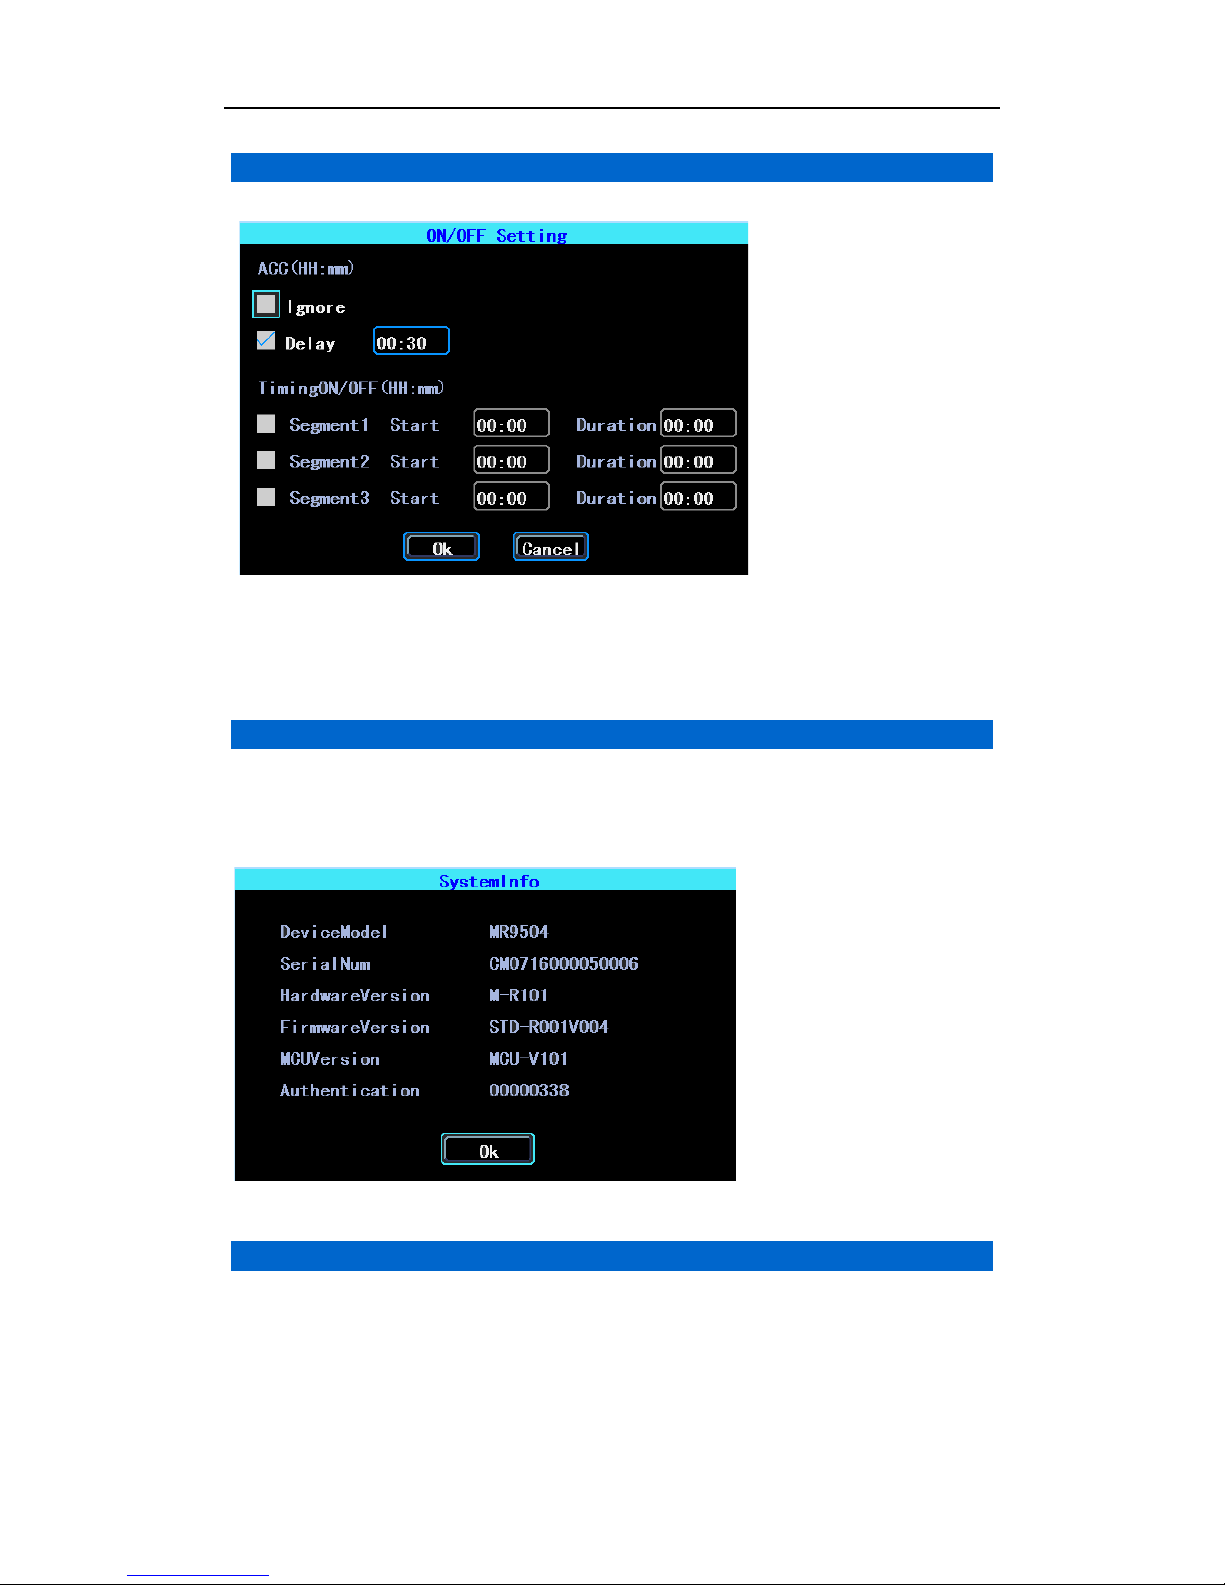
3.8 On/Off Setting
PS: The EZ720p’s power cable should be connected as per the Hardware User Manual,
otherwise, the On/Off setting will not work.
3.9 System information
System information includes: EZ720p Model, Serial Number, Hardware & Firmware version
etc.
3.10 Network setup
Network setup: This interface is used to set up the parameters which are required to
connect the EZ720p to a server.
11

AHD MOBILE DVR User Manual EZ720p
3.11 Server Setup
IP/Domain is the IP or domain of your EZ720p’s server.
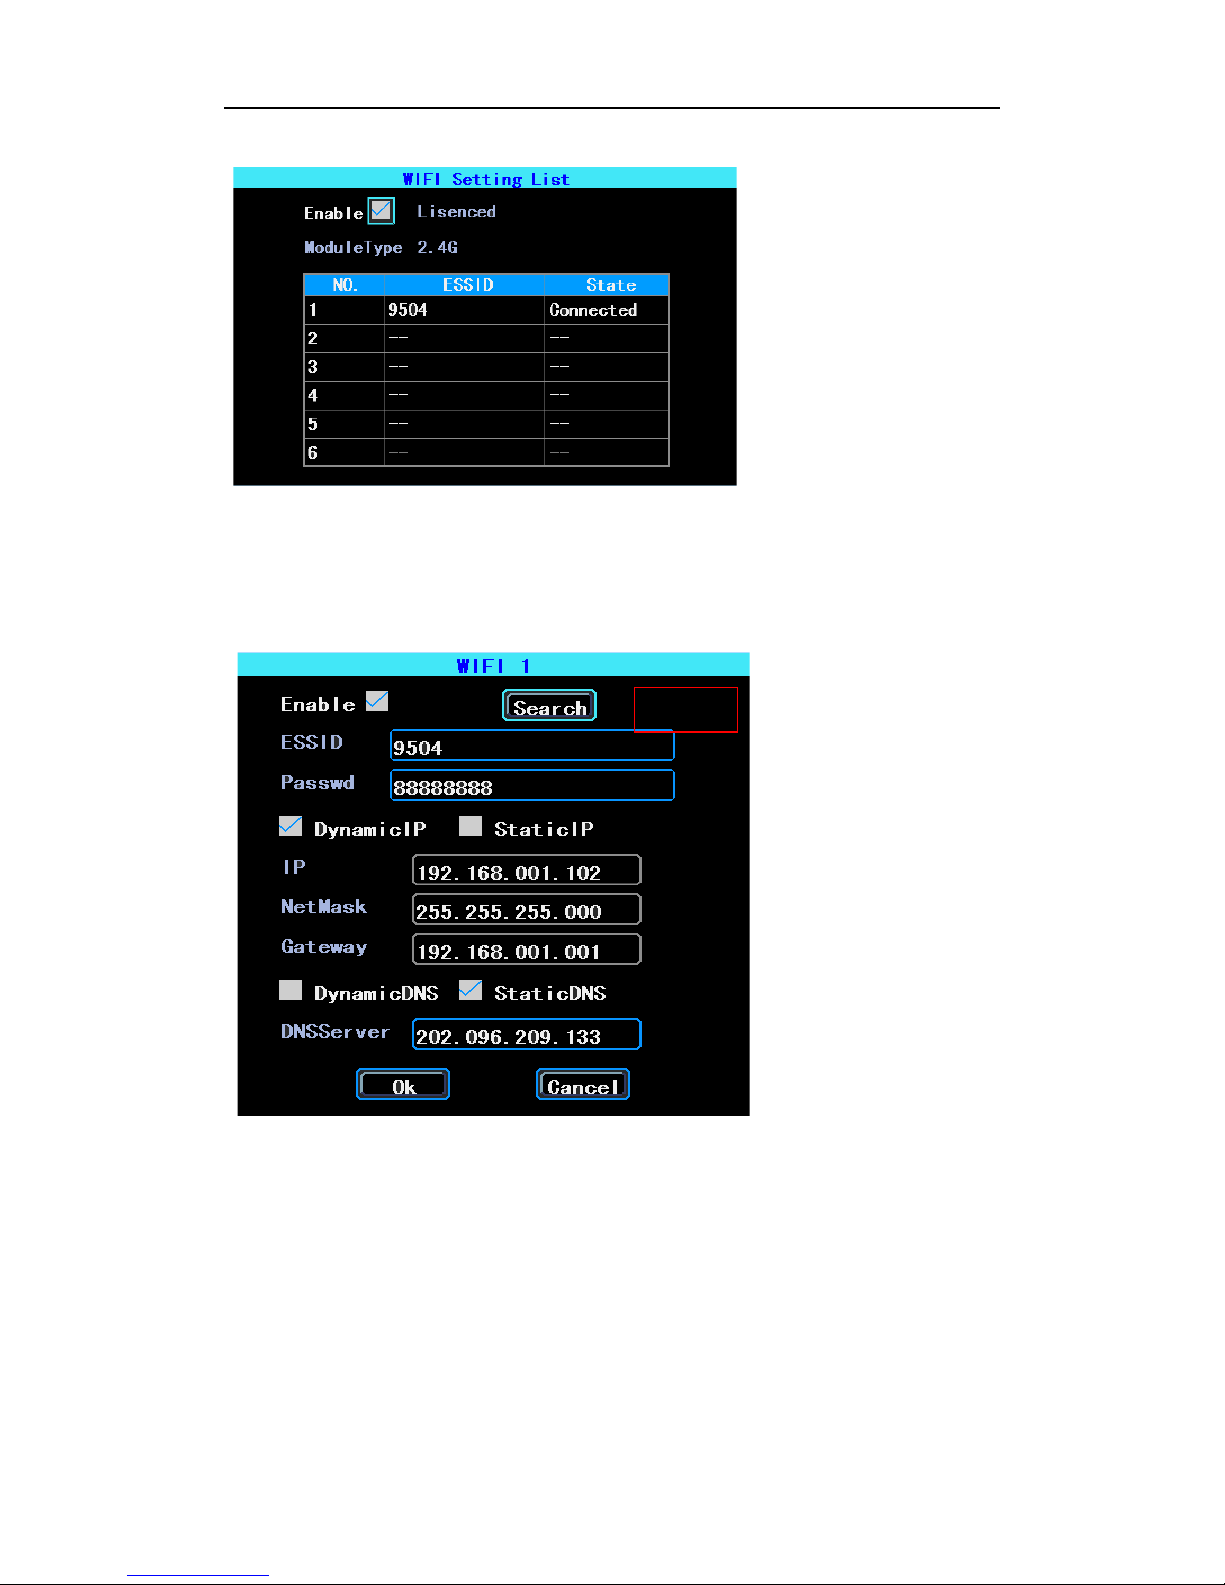
3.12 WiFi Setup
The EZ720p can save maximum 6 WiFi ESSID (Access Points). It will search, match,
connect, and switch automatically. Click the corresponding blank to start WiFi setup. Next,
click “Search” to see the available WiFi access points in your area. Select one, enter the
password, then save it.
12
AHD MOBILE DVR User Manual EZ720p
You can enter the ESSID of the WiFi AP manually, but you can also click “Search” to search
the available WiFi ESSIDs in your area.
13

AHD MOBILE DVR User Manual EZ720p
3.13 Network State
You can check the state of the network connection of your EZ720p here.
14
AHD MOBILE DVR User Manual EZ720p
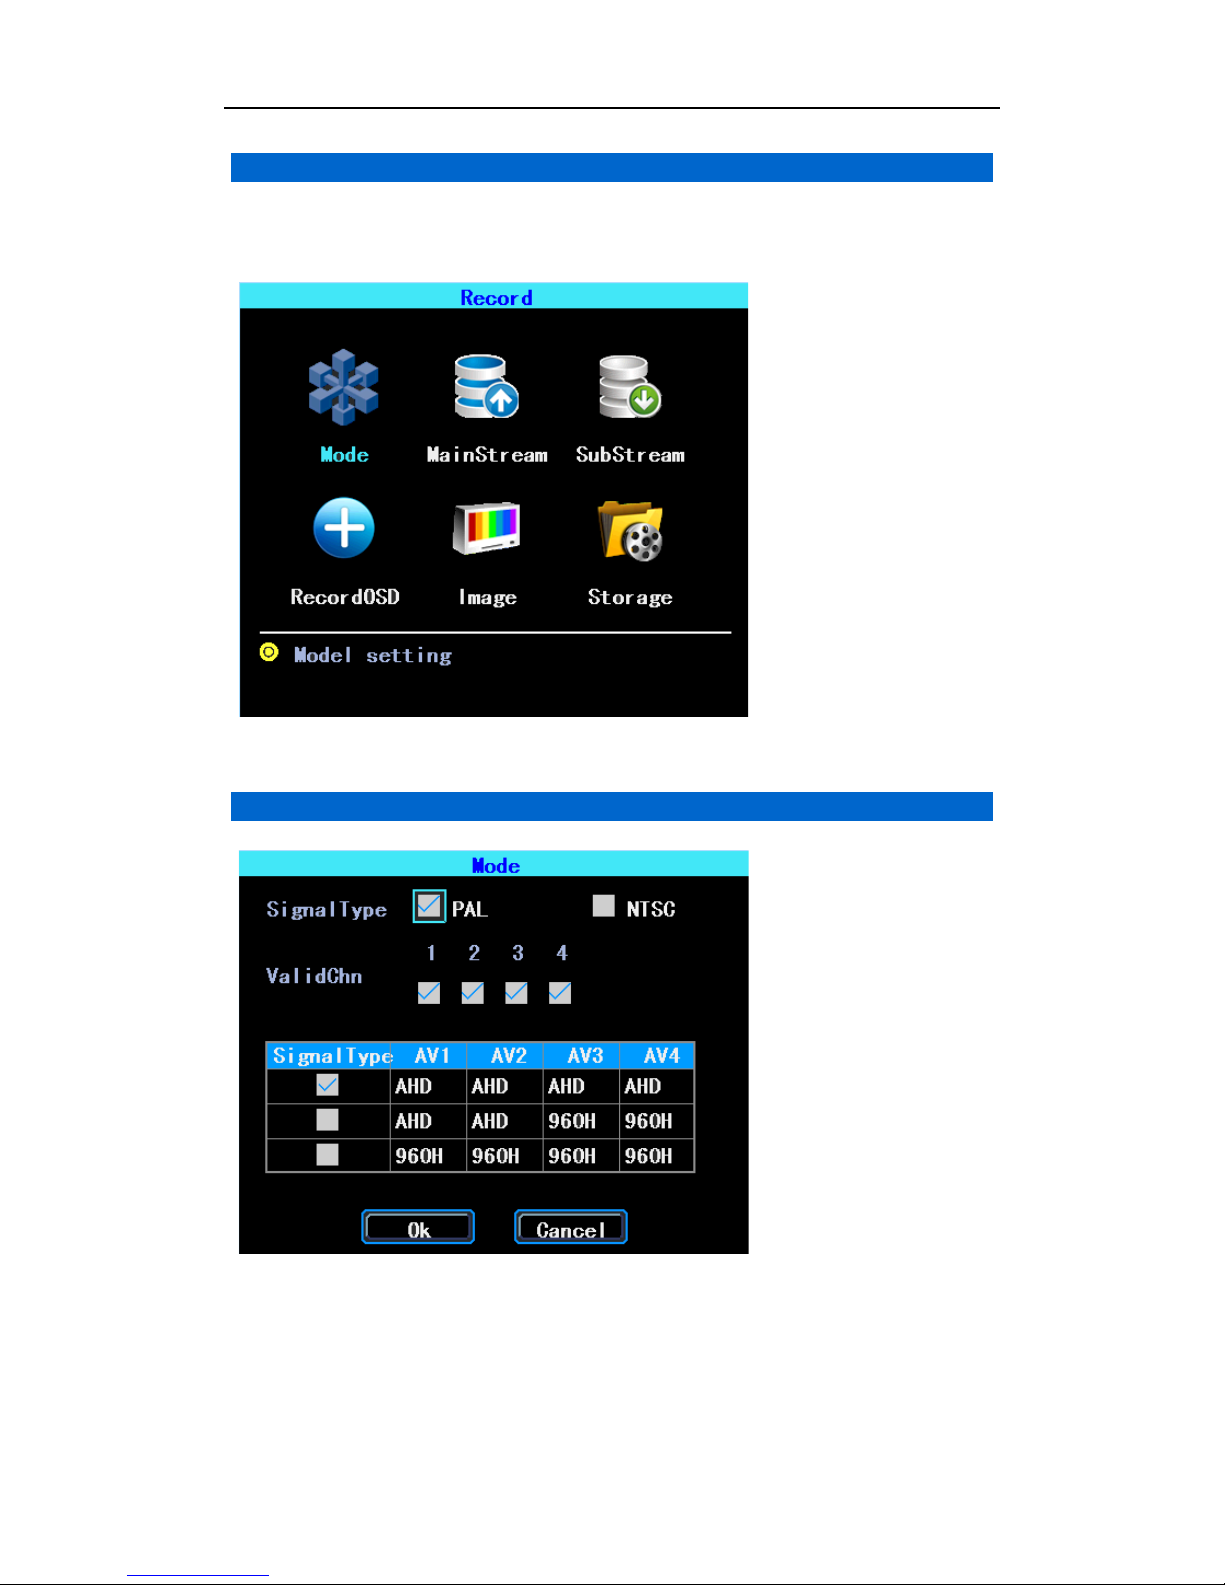
3.14 Recording Setup
Recording setup includes Mode, Main Stream, Sub Stream, Recording OSD, Image,
Storage.
3.15 CameraMode setup
Please set up your cameras’ Signal Type, Valid/Invalid. The DVR works with both AHD and
general cameras. If you use AHD cameras, please select the first Type, if you use general
cameras, please select the third Type, if you use both of general and AHD cameras, please
15

AHD MOBILE DVR User Manual EZ720p
select the second Type.
3.16 Main Stream
Main Stream is stored in local disk. This interface shows the current Main Stream setting
and the corresponding storage size, you can click any line to set up the corresponding
parameters.
PS: If Bit Rate is greater, the corresponding channel’s storage size will be greater.
3.17 Sub Stream
Sub Stream is used for network transmission and backup on the local disk.
16

AHD MOBILE DVR User Manual EZ720p
3.18 Recording OSD
Recording OSD is used to overlay the following information to video recording.
3.19 Image setup
Image setup is used to adjust to camera’s image effect, please set up it carefully.
17

AHD MOBILE DVR User Manual EZ720p
3.20 Storage setup
The EZ720p supports dual storage. Both of the Main Stream and Sub Stream can be
stored on the local disk, but each disk can only store one type of stream.
18

AHD MOBILE DVR User Manual EZ720p
3.21 Advanced setup
3.22 User Management
You can add, modify, delete users, and modify the login user name and privileges
3.23 Restore
Restore the default system setup parameters. System will reboot when restore finished.
See the following:
19

AHD MOBILE DVR User Manual EZ720p
There are 3 restore modes:
Normal Info: Restore all info except Vehicle info.
Vehicle Info: Restore vehicle info only.
All: Restore all info.
3.24 Logout
Logout will exit the menu automatically if there has been no activity in the set time range,
and return to operation.
3.25 UART setting
The EZ720p has 1 RS232 Interface.
3.26 UART-TTS
Select UART 0 to enter the UART setting interface.
20

AHD MOBILE DVR User Manual EZ720p
Select “TTS” in the “Function” drop-down box to configure the parameters as per the image
above.
3.26 UART-Serial Net
Select UART 0 to enter the UART setting interface.
Select “Serial Net” (Pass Through) in the drop-down box of “Function”. Configure the
parameters as shown in the image above.
3.27 Rear Camera Setup
Any channel can be used as rear camera--click “Zone” to set up the assistance lines.
21

AHD MOBILE DVR User Manual EZ720p
Figure 1.
Rear Camera setup
The assistance lines are adjustable (dragging the blue points)
3.28 EZ720p Maintenance
EZ720p maintenance includes the operation of basic maintenance, such as Log inquiry,
Disk management, Import/Export, Setup & Configuration, System Upgrading.
3.29 Log inquiry
Inquire the system’s running log according to the desired Log Type and Time Range.
22

AHD MOBILE DVR User Manual EZ720p
3.30 Disk Management
SD cards need to be formatted in the EZ720p before using them for the first time.
3.31 Import/Export
Import/Export is used to import or export the setup and configuration information for setup
in batch.
23

AHD MOBILE DVR User Manual EZ720p
Figure 2.
Import/Export
After setting up one EZ720p, export the setup parameters with your USB drive, then insert
that drive into another EZ720p’s USB port and re-power the EZ720p. The destination
DVR will retrieve the setup parameters automatically. (If you don’t want to re-power the
EZ720p, you can import the setup parameters in the menu, seen above)
3.32 System Upgrading
Format your U disk as FAT32 type and copy the upgrading file to the root directory of the U
disk. Then re-power the EZ720p, to upgrade automatically. If you don’t want to re-power
the EZ720p, you can upgrade it within the menu “Import/Export”. Select the upgrading
type, click OK, then insert the U disk. The system will detect the U disk data and upgrade
automatically.
Note: You can insert the U disk with the upgrade file, then re-power the EZ720p, to
24

AHD MOBILE DVR User Manual EZ720p
upgrade automatically. You can also upgrade the EZ720p remotely from PC CMS software
if your EZ720p has the WiFi option and is connected with the server via WiFi.
3.33 Alarm Setup
Alarm setup interface includes the setting related to all alarm types, such as I/O alarm,
Video Loss, Fatigue Driving, Over Speed and Disk Error.
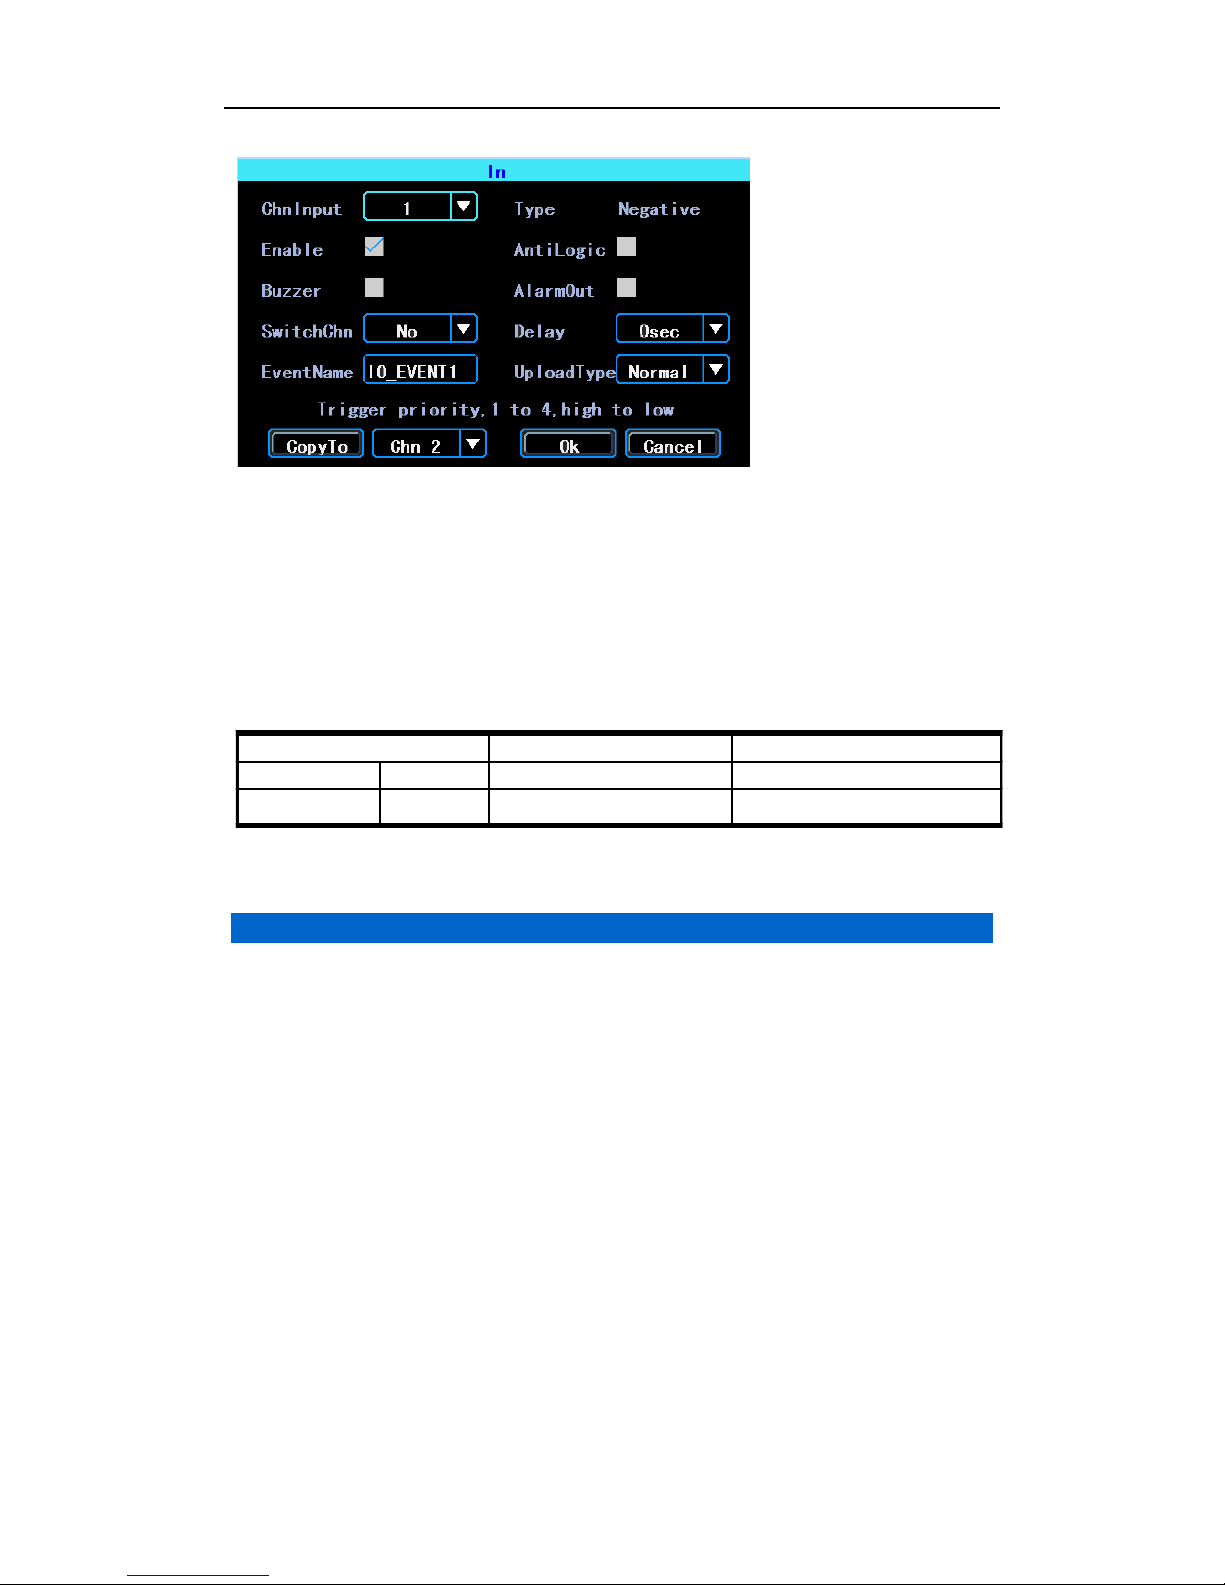
3.34 Input Alarm
The EZ720p has 4 alarm inputs: 2 are Positive Trigger, 2 are Negative Trigger.
25
AHD MOBILE DVR User Manual EZ720p
There are three input modes: high level, low level and open. For positive trigger, the
normal trigger level is high, but if the reversed logic is enabled, the trigger level is changed
to low level and open. It is same for negative trigger.
Alarm Input Trigger status list
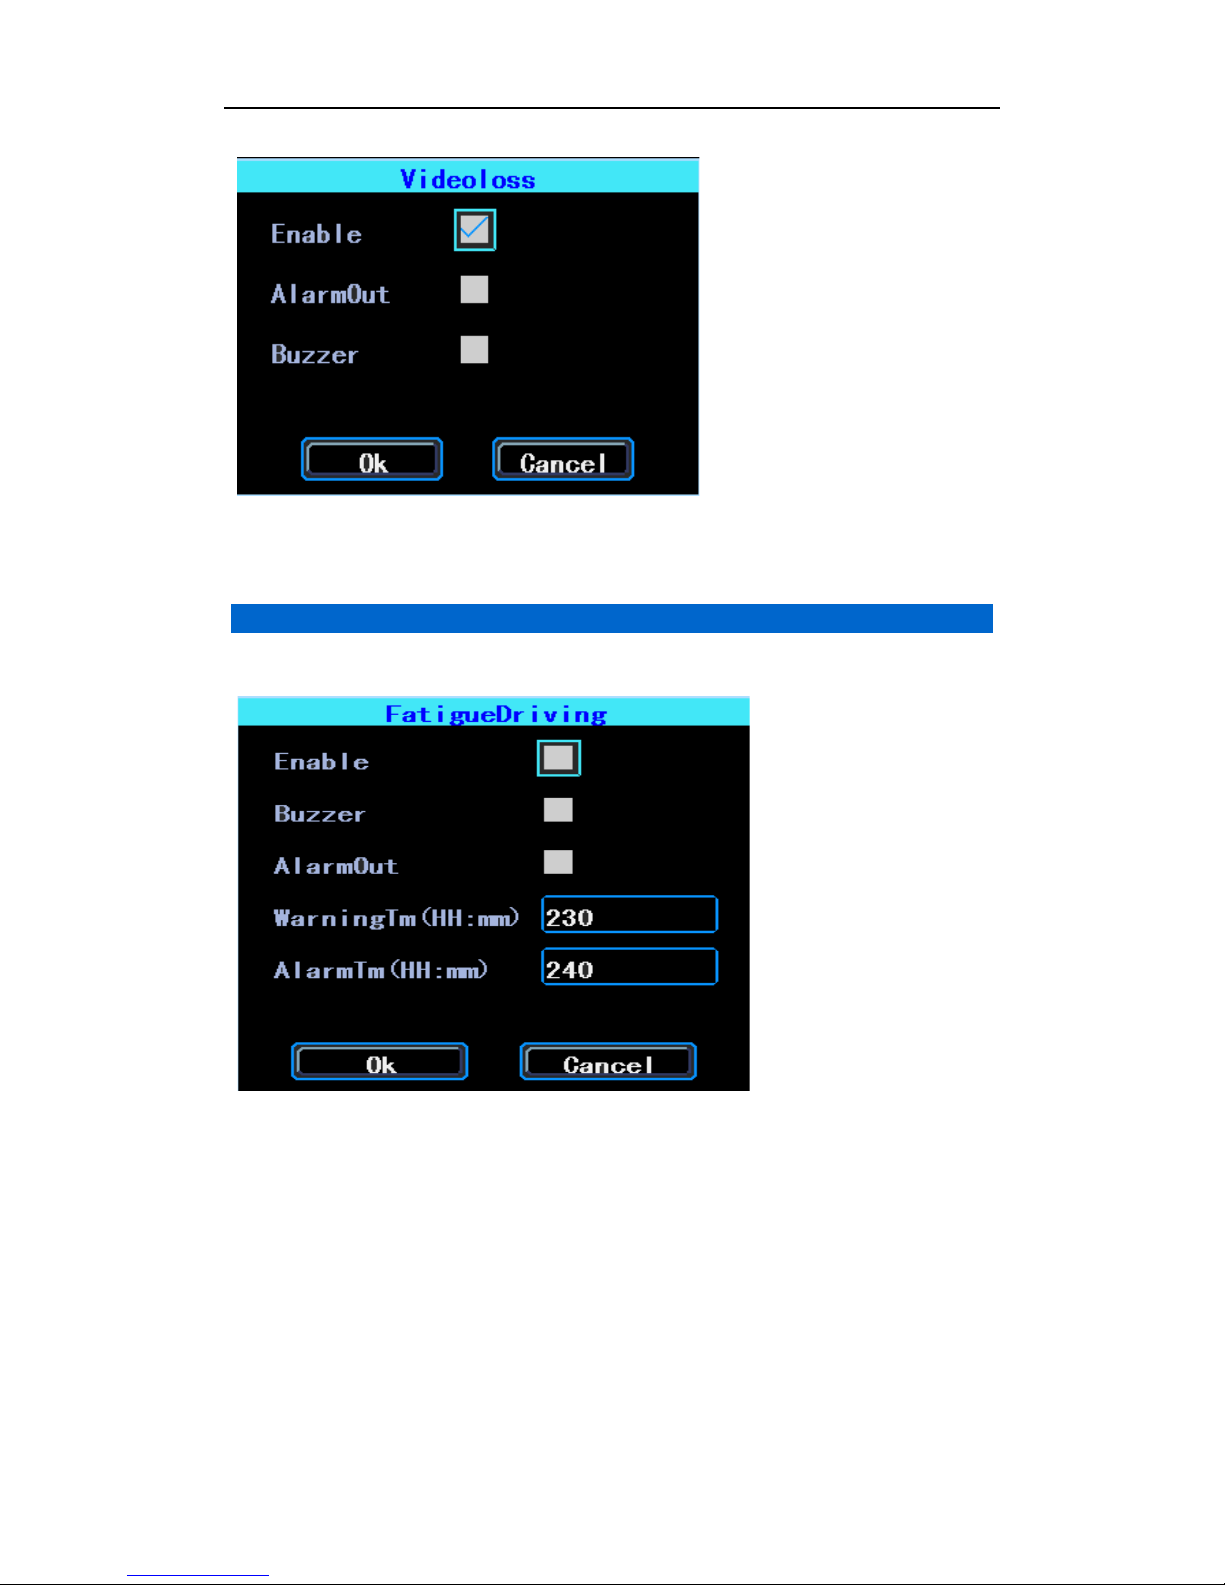
3.35 Video Loss
Video Loss alarm will be triggered if there is no camera, or the wrong type camera is
connected to a valid channel.
26
Alarm Trigger Positive trigger Negative trigger
Reverse Logic No High level Low level
Reverse Logic Yes Low level/Open High level/Open
AHD MOBILE DVR User Manual EZ720p
3.36 Fatigue Driving Alarm
The Fatigue Driving time is calculated from the EZ720p start time.
27

AHD MOBILE DVR User Manual EZ720p
3.37 Over Speed Alarm
3.38 Disk Error
28

AHD MOBILE DVR User Manual EZ720p
Chapter 4 Installation Best Practices
For safe operation and long service life, please observe these warnings when
installing and using the EZ720p:
1. When you receive the product, please open the box and check the
EZ720p and its accessories. If anything is damaged or missing, please
contact your seller.
2. When installing and operating the EZ720p, please observe standard
electronic and wiring practices.
3. Please ensure that the power source is within the range of 10-36V DC, to
prevent damage to equipment.
4. The EZ720p must be operated within the permitted temperature and
humidity ranges.
5. Ensure that the DVR is installed securely, with adequate space for
ventilation. Never install or operate in wet or damp areas, or areas of
excess heat.
6. The installation and operation should be compliant with all prevailing
practices and codes.
29
 Loading...