

Page 1
Mini MP 160 V.V.
Mini MP 190 V.V.
Mini MP 240 V.V.
Mini MP 190 Combi
Mini MP 240 Combi
Page 2

We reserve the right to alter at any time without notice the technical specifications of this appliance.
None of the information contained in this document is of a contractual nature. Modifications may be made at any time.
© All rights reserved for all countries by: ROBOT-COUPE s.n.c.
OPERATING INSTRUCTIONS
1
Page 3

SUMMARY
WARRANTY
IMPORTANT WARNING
YOU HAVE JUST PURCHASED
A MINI POWER MIXER
SWITCHING ON THE APPLIANCE
• Advice on electrical connections
OPERATING THE APPLIANCE
• Starting and stopping the power mixer
• Variable-speed operation
WORKING POSITION
ASSEMBLING / DISMANTLING
USES & EXAMPLES
HYGIENE
CLEANING
• Motor unit
• Foot and bell
• Blade and emulsifying disc
• Whisk
MAINTENANCE
• Blade
• Whisk
• Foot seal
TECHNICAL SPECIFICATIONS
• Weight
• Dimensions
• Working height
• Noise level
• Electrical data
SAFETY
PROBLEMS
STANDARDS
TECHNICAL DATA
• Exploded views
• Electrical and wiring diagrams
(Page 13)
3
Page 4

ROBOT-COUPE S.N.C., LIMITED WARRANTY
Your new ROBOT-COUPE appliance
is warranted to the original buyer
for a period of one year from the
date of sale if you bought it from
ROBOT-COUPE
S.N.C.
If you bought your ROBOT-COUPE
product from a distributor your
product is covered by your distributor’s warranty (Please check
with your distributor terms and
conditions of the warranty).
The ROBOT-COUPE S.N.C. limited
warranty is against defects in
material and/or workmanship.
THE FOLLOWING ARE NOT
COVERED BY THE ROBOT-COUPE
S.N.C
. WARRANTY:
1-Damage caused by abuse, misuse,
dropping, or other similar damage caused by
or resulting from failure to follow assembly,
operating, cleaning, user maintenance or
storage instructions.
2-Labour to sharpen and/ or replacements for
blades which have become blunt, chipped or
worn after a normal or excessive period of use.
3-Materials or labour to replace or repair
scratched, stained, chipped, pitted, dented or
discoloured surfaces, blades, knives, attachments
or accessories.
4-Any alteration, addition or repair that has
not been carried out by the company or an
approved ser vice agency.
5-Transportation of the appliance to or from
an approved service agency.
6-Labour charges to install or test new attach-
ments or accessories (i.e., bowls, discs, blades,
attachments) which have been arbitrarity replaced.
7-The cost of changing direction-of-rotation of
electric motors (Installer is responsible).
8-SHIPPING DAMAGES. Visible and latent
defects are the responsibility of the freight
carrier. The consignee must inform the carrier
and consignor immediately, or upon discovery in
the case of latent defects.
KEEP ALL ORIGINAL CONTAINERS AND
PACKING MATERIALS FOR CARRIER INSPECTION.
Neither ROBOT-COUPE
companies or any of its distributors, directors,
agents, employees, or insurers will be liable for
indirect damage, losses, or expenses linked to
the appliance or the inability to use it.
S.N.C. nor its affiliated
The ROBOT-COUPE S.N.C. warranty
is given expressly and in lieu of all
other warranties, expressed or
implied, for merchantability and
for fitness toward a particular purpose and constitutes the only warranty made by ROBOT-COUPE
S.N.C. France.
4
Page 5

WARNING
IMPORTANT WARNING
KEEP THESE INSTRUCTIONS IN A SAFE PLACE
WARNING : In order to limit accidents such as electric shocks or personal injury, and in order to limit material damage due to misuse
of the appliance, please read these instructions carefully and follow them strictly. Reading the operating instructions will help you get to
know your appliance and enable you to use the equipment correctly. Please read these instructions in their entirety and make sure that
anyone else who may use the appliance also reads them beforehand.
UNPACKING
• WARNING - some of the tools are very sharp e.g.
blades, etc..
INSTALLATION
• We recommend that you install your appliance on
its wall frame.
CONNECTION
• Always check that your mains supply corresponds
to that indicated on the identification plate on the
motor unit and that it can withstand the amperage.
• Never plug your appliance into the mains supply
before placing it inside the preparation bowl.
HANDLING
• Always take care when handling the blades, as
they are extremely sharp.
ASSEMBLY PROCEDURES
• Follow the various assembly procedures carefully
(see page 7) and make sure that all the attachments
are correctly positioned.
USE
• Never try to override the safety systems
• Never insert an object into the preparation.
• Never switch the appliance on unless it has been
placed in the preparation bowl.
• Before dismantling the foot, bell or whisk always
check that the power mixer is unplugged.
• We recommend that you tilt the appliance at
a slight angle to prevent the bell from touching the
bottom of the container.
WARNIN G
Procedure to follow if the stick blender is accidentally
immersed during use.
1) Do not touch either the power mixer, the bowl or the
work surface.
2) Unplug the mixer’s power cord from the wall socket.
3) Remove the power mixer from the preparation.
4) Tilt the power mixer to drain off as much liquid as
possible.
5) Do not switch the power mixer back on, as there is
still a risk of electrocution.
6) Send the power mixer to a Robot-Coupe approved
after-sales service to have the electrical components
cleaned and dried.
CLEANING
• As a precaution, always unplug your appliance
before cleaning it.
• Always clean the appliance and its attachments at
the end of each cycle.
• Never immerse the motor unit in water.
• For parts made from aluminum, use cleaning
fluids intended for aluminum.
• For plastic parts , do not use detergents that are
too alkaline (e.g., containing too much caustic soda
or ammonia).
• Robot-Coupe can in no way be held responsible for
the user’s failure to follow the basic rules of cleaning
and hygiene.
MAINTENANCE
• Before opening the motor housing, it is absolutely
vital to unplug the appliance.
• Check the seals and washers regularly and ensure
that the safety devices are in good working order.
• It is particularly important to maintain and check
the attachments since certain ingredients contain
corrosive agents, e.g. citric acid.
• Never operate the appliance if the power cord
or plug has been damaged or if the appliance fails
to work properly or has been damaged in any way.
• Do not hesitate to contact your local Maintenance
Service if something appears to be wrong.
5
Page 6
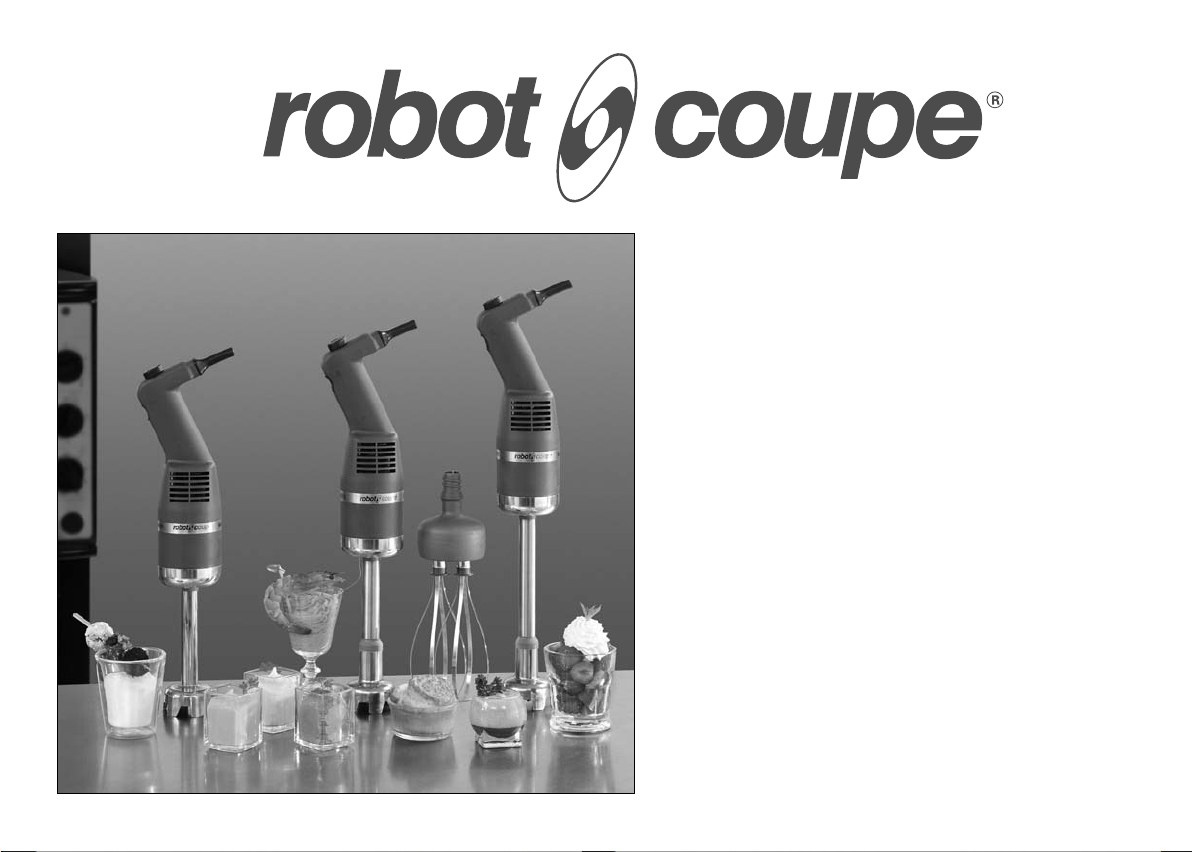
YOU HAVE JUST PURCHASED
A MINI POWER MIXER
The new Mini MP 160 V.V., Mini MP 190 V.V., Mini
MP 240 V.V., Mini MP 190 Combi and Mini MP 240
Combi models are the latest additions to Robot-
Coupe’s range of power mixer. They have been specially designed for processing smaller quantities.
They are fitted with a foot, blades and an emulsifying disc which can be entirely dismantled, and
their tubes measure 160, 190 and 240 mm long
respectively.
Models
Min i M P 1 60 V.V.
Min i M P 1 90 V.V.
Min i M P 2 40 V.V.
Mini MP 190 Combi
Mini MP 240 Combi
These power mixer are tools which are totally adapted
to the needs of professionals. They will enable you to
make soups, vegetables purées and cereal preparations without any effort.
The whisk function is ideal for making pancake batter,
mayonnaise, beaten egg whites, chocolate mousse,
butter sauces, whipped cream or smooth fromage
frais.
The whisk is composed with a metallic gear box
even more resistant when processing pan cakes or
mashed potatoes.
The variable-speed function will enable you to
adjust the speed to suit each preparation and to start
the processing at a lower speed in order to reduce
splashing.
Speed
variation
•
•
•
•
•
6
Mixer
attachment
160 mm
190 mm
240 mm
190 mm 185 mm
240 mm 185 mm
Whisk
attachment
Each power mixer is supplied with a wall support
for easy storage.
The simple design of these appliances allows the
assembly and dismantling of the moving parts in no
time at all, to ease maintenance and cleaning.
These instructions contain important information that
will enable you to extract the greatest return on your
investment.
We therefore strongly advise you to read these
instructions carefully before using the appliance.
SWITCHING ON
THE APPLIANCE
• ADVICE ON ELECTRICAL CONNECTIONS
This class II appliance (double insulation) requires a
single-phase alternating current but does not need
an earthed socket. The universal-type motor is fitted
with an interference suppressor.
The power supply must be protected by a
differential circuit breaker and a 10 A fuse.
Check that you have a standard 10/16 A
single-phase socket.
Make sure that the voltage of your power supply
matches that shown on the identification plate of
your appliance.
Robot-Coupe supplies these models with different
types of motors:
230 V / 50 Hz for power supplies of:
220 V to 240 V.
120 V / 60 Hz
220 V / 60 Hz
The power mixer is supplied with a single-phase
plug connected to a power cord.
OPERATING THE APPLIANCE
• STARTING AND STOPPING
1. Plug your appliance into
the mains, making sure you
do not press the button
(BC).
2. Insert the foot into the
preparation.
3. Press the control button
(BC), and the power mixer
will start up.
4. To stop the power mixer,
release the control button
(BC).
• VARIABLE-SPEED OPERATION
Follow steps 1 to 4 above, then:
5. Change the speed of the motor by turning the
variable speed button (MV) towards the maximum
or minimum as required.
Whisk function (Mini MP 190 Combi, Mini MP 240
Combi): speed between 350 and 1 560 rpm.
For making mashed potatoes, you need to process at
low speed for a good quality result.
Mixer function (Mini MP 160 V.V., Mini MP 190 V.V.,
Mini MP 240 V.V., Mini MP 190 Combi, Mini MP
240 Combi): speed between 2 000 and 12 500 rpm.
It is advisable to start at a low speed when using the
whisk.
With the self-regulating speed system
have selected a speed, it will remain constant, even
if the consistency of your mixture changes.
, once you
Page 7
WORKING POSITION
For a more ergonomic
approach, we recommend
that you hold the handle of
the appliance in one hand
and the container in the other .
It is a good idea to lean forward slightly, making sure
that the bell does not touch
the bottom of the container.
Always make sure that the bell is sufficiently immersed
to avoid splashing and that the air vents of the motor
unit does not come into contact with any liquid.
For optimum efficiency, two thirds of the foot should
be immersed in the preparation.
• WHISK FUNCTION
You can also hold the
appliance by the handle
with one hand, leaving the
other hand free to hold the
bowl, if necessary.
touching the sides of the bowl. For maximum
efficiency, at least one-fifth of the whisk length should
be immersed. We also strongly advise you to start
the processing at a low speed.
ASSEMBLING/
DISMANTLING
• BLADE FUNCTION
Attaching the tube to the motor unit.
- Check that the appliance is not plugged in.
- Insert the threaded section right into the
housing of the motor unit.
B
- Turn the tube in the direction of the arrow (see
figure) until it is locked into place moderately
tightly.
A
Attaching the bell to the tube
- Check that the machine is not plugged in.
- Insert the threaded section into the housing
A
of the bell. Turn the bell in the direction of the arrow
(see drawing) until it starts to tighten.
TURN TO ATTACH BELL
Mini MP 190 V.V.
Mini MP 190 Combi
Mini MP 240 V.V.
Mini MP 240 Combi
Removing the bell from the foot
- Check that the machine is not plugged in.
- Turn the bell in the direction of the arrow (see
drawing) to detach it from the tube.
TURN TO REMOVE BELL
B
While you process the preparation, we recommend
that you move the whisks
around in the bowl, in order
to ensure that the mixture is
completely homogeneous.
We strongly advise you to
keep the whisks from
Mini MP 160 V.V.
Mini MP 190 V.V.
Mini MP 240 V.V.
Removing the tube from the motor unit
- Check that the appliance is unplugged.
- Turn the tube in the opposite direction to when you
assembled it until it is completely unscrewed.
Mini MP 190 V.V.
Mini MP 190 Combi
Mini MP 240 V.V.
Mini MP 240 Combi
7
Page 8
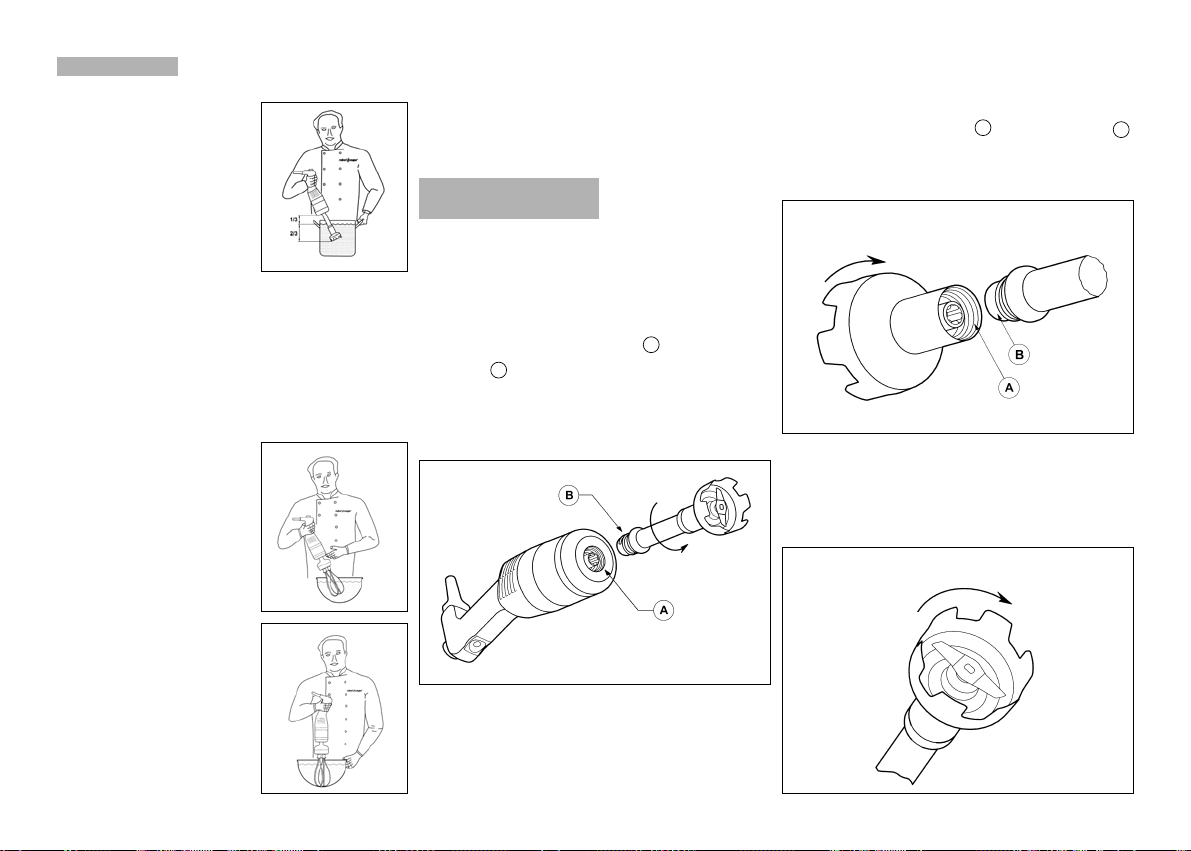
Removing the blade
- To remove the blade safely, hold them with the tool
provided or an oven glove or a thick cloth.
- Using the removal tool, unscrew the drive
coupling.
- As soon as the drive coupling has been unscrewed,
the blade can be removed for cleaning.
B
LADE LOCKING
B
LADES WITH WATERTIGHT SEALS
B
ELL
REMOVAL
DIRECTION
D
RIVE COUPLING
B
LADE LOCKING
BLADE REMOVAL
BLADE REMOVAL
BLADE
FOOT
Mini MP 160 V.V.
Mini MP 190 V.V.
Mini MP 190 Combi
Mini MP 240 V.V.
Mini MP 240 Combi
8
Installing the emulsifying disc
- In order to install it safely, introduce the disc into
the bell, then hold it in place using the locking
tool.
- Next, turn the drive coupling with this tool until it
starts to tighten.
Removing the emulsifying disc
- The disc can be removed in exactly the same way
as the blades.
B
LADE LOCKING
S
OLID EMULSIFYING DISC
B
ELL
REMOVAL
DIRECTION
D
RIVE COUPLING
B
LADE LOCKING
BLADE REMOVAL
BLADE REMOVAL
FOOT
EMULSIFYING DISC
Mini MP 160 V.V.
Mini MP 190 V.V.
Mini MP 190 Combi
Mini MP 240 V.V.
Mini MP 240 Combi
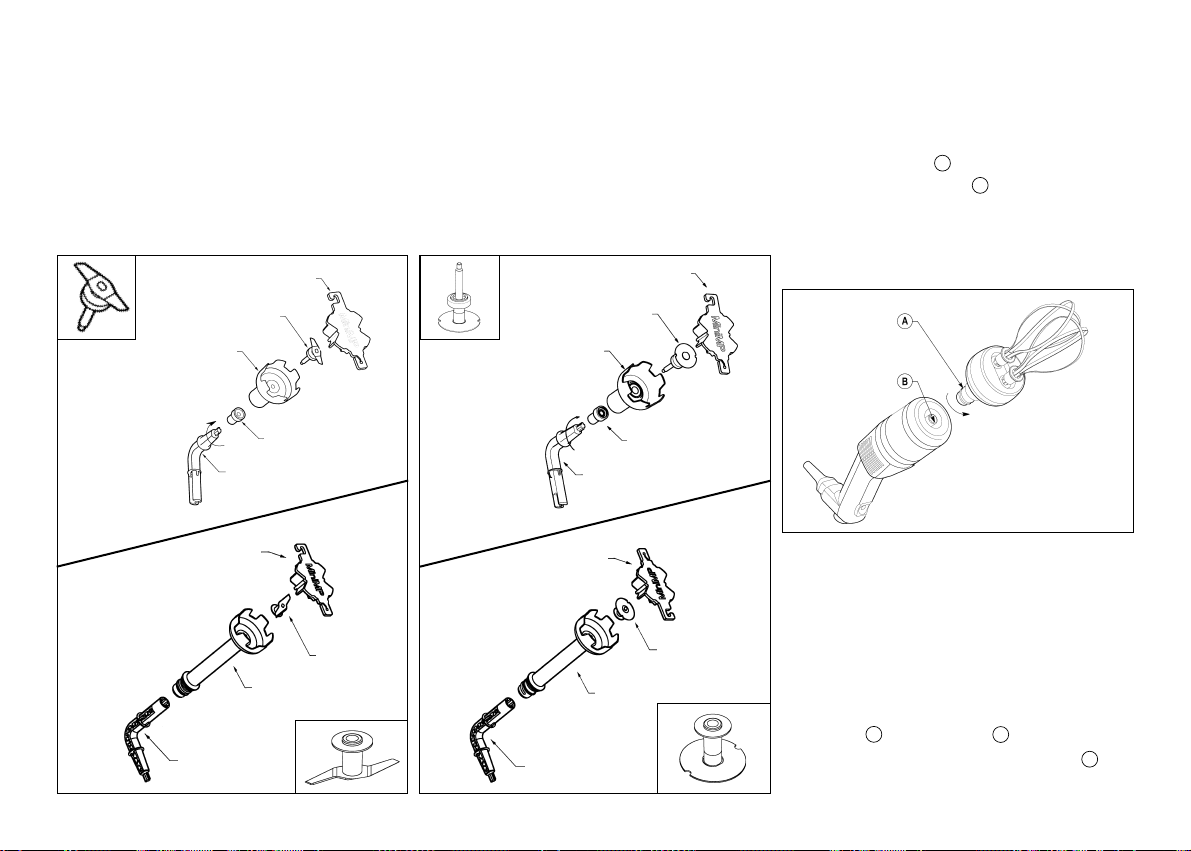
• WHISK FUNCTION
(Mini MP 190 Combi and Mini MP 240 Combi)
Attaching the gear box to the motor unit.
- Check that the machine is not plugged in.
- Align the flat side of the conical part of the
gear box with the catch on the inside of the
aluminium casing.
- Turn the gear box in the direction of the arrow
(see figure) until it is locked into place moderately
tightly.
Removing the casing
- Check that the machine is not plugged in.
- Turn the gear box in the opposite direction to that
used when attaching it.
Fitting the whisks into the gear box
- Grasp the holder in one hand.
- With the other hand, take the first whisk and insert
the shaft into the bore of the gear box
A
drive shaft. Make sure the drive lugs are
properly aligned with the notches.
A
B
B
D
Page 9

- As you push the whisk into the gear box drive
C
shaft , rotate it slightly in order to slot the drive
lugs into the notches of the drive shaft ,
thereby locking the whisk into place inside the
shaft.
- To check that the whisk is properly fixed inside the
C
shaft , gently tug the metal wires.
- Repeat this procedure with the second whisk. If
you cannot push it in properly, remove it, rotate it
90° and start again.
Removing the whisks from the gear box
Pull the ejector in
direction to the arrow,
gripping the ejector
in one hand and the
B
holder in the other.
E
A
The foot, the blades, Emulsifying disc and the
whisks can be entirely dismantled, (Robot-
Coupe’s exclusive patented system), thereby
C
ensuring easy cleaning, perfect hygiene and
simple maintenance.
USES & EXAMPLES
The mixer function carries out all types of mixing in
small quantities in a minimum of time, and we thus
recommend you to supervise carefully all food
preparations in order to obtain the best results.
CATERING AND RESTAURANT WORK
• Soups, creamed soups
• Vegetable purees : carrots, spinach, celery,
turnips, French beans, potatoes etc.
• Mousses : vegetable, fish
• Fruit compotes
• Sauces : green, rouille, remoulade, cream
emulsions, tomato or parsley
• Bisques : langoustines and shellfish
• Pancake batter
• Chocolate mousse, butter cream, Whipped cream
• Cheese soufflé
HYGIENE
The equipment must be clean at all stages of
production.
It is vital to clean the power mixer thoroughly
between each job using a detergent or disinfectant.
• N.B. NEVER USE PURE BLEACH
- Dilute the detergent/disinfectant following the
manufacturer’s instructions on the label.
- Scrub well if necessary.
- Leave the disinfectant/detergent to take effect if
necessary.
- Rinse thoroughly.
- Dry properly using a clean cloth.
CLEANING
WARNING
As a precaution, always unplug your appliance
before cleaning it (risk of electrocution).
After using the power mixer in a hot preparation,
cool the bottom of the foot in cold water before dismantling the bell from the foot.
After completion of preparation, clean immediately
to prevent food from sticking to surfaces.
• MOTOR UNIT
Never put the motor unit and its handle in water,
clean them with a damp cloth or a sponge.
• FOOT AND BELL
It is possible to proceed in two ways:
• Simple cleaning procedure
- Place the foot and bell into a suitable container
with water and switch on for a few seconds to
clean the bell and the foot.
- After unplugging the appliance - essential -, making
sure that no water finds its way into the foot.
9
Page 10

- Detach the bell from the foot to avoid a build-up
of condensation (Mini MP 190 V.V., Mini MP
240 V.V., Mini MP 190 Combi and Mini MP
240 Combi).
• Complete cleaning procedure
- Unplug the power mixer.
- Rinse the bell under the tap.
- Remove the bell from the foot, then remove the
blades. Be careful to avoid damaging the surface
of the blade shaft and the watertight seals. Do not
use too strong a detergent when cleaning the
parts.
- Ensure that all the different parts are thoroughly
dried before reassembly.
• BLADE AND EMULSIFYING DISC
In order to clean the appliance thoroughly, the
blades and the disc must be removed from the bell
beforehand.
After they have been cleaned, make sure you
always dry the disc or blades properly to avoid
oxidation.
• WHISK
The whisks can be cleaned either by hand or in a
dishwasher.
Never immerse the gear box in water.
Never put in the dishwasher the gear box.
Clean it with a slightly damp cloth or sponge.
10
IMPORTANT
Check that your detergent is suitable for
cleaning plastic parts. Some washing agents are
too alkaline (e.g. high levels of caustic soda or
ammonia) and totally incompatible with certain
types of plastic, causing them to deteriorate
rapidly.
MAINTENANCE
• BLADE
The performance of the cut essentially depends on
the state of your blades and their wear. The blades
are subject to wear and as such need to be replaced
from time to time to ensure the consistent quality of
the end product.
You are also advised to change, at the same time,
the washer and the watertight seals.
• WHISK
The success of your preparation will depend
essentially on the state of the metal wires and their
amount of wear and tear. They should therefore be
replaced from time to time in order to ensure
optimum quality of the finished product.
• FOOT SEAL
In order to maintain a per fect watertight seal
between the foot and the bell it is necessary to
check the wear of the seal regularly and replace it if
necessary.
WARNING
Fromtimetotime,check:
- The state of the button’s watertight membrane.
Even the tiniest cracks will allow liquid to seep in.
- The state of the blender housing. This, should not
show any signs of cracking or any abnormal
openings which could allow access to the live
components.
TECHNICAL
SPECIFICATIONS
• WEIGHT AND DIMENSIONS (in mm)
Page 11

Models
Mini MP
160 V. V.
Mini MP
190 V. V.
Mini MP
240 V. V.
Mini MP
190 Combi
Mini MP
240 Combi
Dimensions (mm) Weight (Kg)
A B C D E F
78 430 65 160 1,41 1,94
78 470 65 190 1,44 1,97
78 520 65 240 1,47 2,00
78 470 65 190 255 100 1,95 2,68
78 520 65 240 255 100 1,98 2,70
Net Gross
• WORKING HEIGHT
We recommend that you ensure that the container is
placed on a stable and solid work surface.
• NOISE LEVEL
The equivalent continuous sound level when the foot
is not immersed in anything is less than 70 dB (A).
• ELECTRICAL DATA
Single-phase machine Mini MP 160 V.V.
Motor
Mixer Speed Power Intensity
(rpm) (watts) (Amp.)
230 V/50 Hz 2000 to 12500 220 1.1
120 V/60 Hz 2000 to 12500 215 1.9
220 V/60 Hz 2000 to 12500 200 1
Single-phase machine Mini MP 190 V.V.
Motor
Mixer Speed Power Intensity
(rpm) (watts) (Amp.)
230 V/50 Hz 2000 to 12500 250 1.3
120 V/60 Hz 2000 to 12500 245 2.4
220 V/60 Hz 2000 to 12500 230 1.2
Single-phase machine Mini MP 240 V.V.
Motor
Mixer Speed Power Intensity
(rpm) (watts) (Amp.)
230 V/50 Hz 2000 to 12500 270 1.5
120 V/60 Hz 2000 to 12500 265 2.6
220 V/60 Hz 2000 to 12500 250 1.4
Single-phase machine Mini MP 190 Combi
Motor
230 V/50 Hz
120 V/60 Hz
220 V/60 Hz
Mixer Speed Whisk Speed Power Intensity
(rpm) (rpm) (watts) (Amp.)
2000 to 12500 350 to 1560
2000 to 12500 350 to 1560
2000 to 12500 350 to 1560
250 1.3
245 2.4
230 1.2
Single-phase machine Mini MP 240 Combi
Motor
230 V/50 Hz
120 V/60 Hz
220 V/60 Hz
Mixer Speed Whisk Speed Power Intensity
(rpm) (rpm) (watts) (Amp.)
2000 to 12500 350 to 1560
2000 to 12500 350 to 1560
2000 to 12500 350 to 1560
270 1.5
265 2.6
250 1.4
SAFETY
WARNIN G
The blades are extremely sharp.
Handlewithcare.
ROBOT-COUPE power mixers are equipped with a
safety system comprising of a :
- safety control button,
- safeties on motor: thermal and overload protection.
• Safety control button
This safety mechanism prevents any unintentional
starting of the power mixer. In fact, it is necessary to
press down two buttons to start the power mixer.
In order to start the machine, read the paragraph
entitled OPERATING THE APPLIANCE (page 6).
• Thermal and overload protection
If there is an obstruction in the container (a spoon
or utensil) or the machine is exposed to over
use/overload, the thermal safety mechanism
automatically stop the motor. In this case, wait for
the power mixer to cool down completely before
restarting, see paragraph entitled OPERATING THE
APPLIANCE (page 6).
REMEMBER
Never tr y to override the locking and safety
mechanisms.
Never insert an object into the preparation.
Never switch the appliance on unless it has been
placed in the preparation bowl.
Before dismantling the foot or bell, always check
that the power mixer is unplugged.
We recommend that you tilt the power mixer at
a slight angle to prevent the bell from
touching the bottom of the container.
11
Page 12

PROBLEMS
STANDARDS
At first, try to identify precisely what has caused the
power mixer to stop.
• If it is due to a powercut if the appliance has
been unplugged.
- Release the control button (BC).
- Check the power supply.
- Restart the power mixer following the paragraph
entitled OPERATING THE APPLIANCE (page 6).
• If you cannot locate the cause of the problem
- Release the control button (BC).
- Unplug the power mixer.
- Check :
- the plug,
- that the blades are free to rotate in the bell,
- the state of the power cord,
- that the drive shaft is free to rotate. To do this,
remove the bell and test the rotation of the end of
the drive shaft manually.
If a malfunction occurs which is not on our list of
possible faults, consult your retailer or return the
appliance to the after-sales service.
MACHINES IN COMPLIANCE WITH:
• The following European directives and related
national legislation:
- Modified "machinery" directive 98/37/EEC,
2006/42/EEC,
- "Low voltage" directive 73/23/EEC,
2006/95/EEC,
- "EMC" directive 89/336/EEC, 2004/108/EEC,
- "Materials and parts in food contact" directive
89/109/EEC,
- Commission Directive 2002/72/EC of 6 August
2002 relating to plastic materials and articles
intended to come into contact with foodstuffs.
• The following European harmonized standards
and standards setting out health and safety rules:
- We certify that the Mini MP comply with
the essential requirements of the standard
EN 292 - 1 and 2: machine safety - general design
principles,
- EN 60204 -1 (2006).
- For hand-held blenders and whisk : EN 12853.
(Procedure to follow if the stick blender is
accidentally immersed during use).
12
Page 13

TECHNICAL DATA
13
Page 14

141516171819202122
Page 15

Page 16

Page 17

Page 18

Page 19

Page 20

Page 21

Page 22

Page 23

23
Page 24

25
Page 25

FABRIQUÉ EN FRANCE PAR ROBOT-COUPE S.N.C.
Administration Commerciale France
& Service Après-Vente
Tél.:0385695000-Fax:0385695007
12, avenue du Maréchal Leclerc - BP 134
71305 Montceau-en-Bourgogne Cedex
email : france@robot-coupe.fr
Agence de Service Après-Vente
pour la Région Parisienne
Tél. : 01 43 98 88 15 - Fax : 01 43 74 36 26
48, rue des Vignerons
BP 157
94305 Vincennes Cedex - France
Export Department
Tel.:+33143988833-Fax:+33143743626
48, rue des Vignerons - BP 157
94305 Vincennes Cedex - France
http://www.robot-coupe.com - email : international@robot-coupe.com
Réf. : 410 294 - 09/2008 - Nouveaux Mini MP - Anglais
 Loading...