

Page 1

Robotic Mower
RS635 Pro S, RS625 Pro, RS615 Pro, RS615u
EN
User Guide
See how
to install
Original Operating Instructions
Page 2

1/Learn
Your Lawn
I’m
Robomow,
nice to
meet you.
Your safety is important to us -
Please review this Manual carefully for all safety warnings and
take extra caution to keep both children and pets off the lawn
when Robomow is in operation.
Page 3

1
Safety first.....................
2
Installation...................
13
Quick reference..............
46
Page 4

2
Safety first
IMPORTANT!
READ CAREFULLY BEFORE USE
KEEP FOR FUTURE REFERENCE
Warning decal definitions
Safety warnings & precautions
Safety features
Do not allow children to use or operate the mower.
Children must be supervised at all times.
Page 5

3
Warning
decal definitions
1 2 3 4 5 6 7
This symbol indicates that the mains electricity is double
insulated
Do not dispose of the mower or any of its parts as unsorted
municipal waste. They should be collected separately.
This product conforms to applicable EU directives.
1. This is a dangerous power tool. Exercise care when
operating and follow all safety instructions and warnings.
2. Read the Safety Manual carefully before operating your
mower.
3. Be careful of thrown objects during operation.
4. Keep a safe distance from the mower while it is operating.
Keep people, especially children, pets and bystanders
away from the area where the mower is operating.
5. CAUTION – Do not touch rotating blade. Keep hands and
feet away and do not lift the mower from the ground.
6. Activate the disabling device before working on or lifting
the mower (see Section 3.b).
7. Do not ride the mower.
Page 6

4
A. Before you begin
1. Read this Safety Manual carefully before operating
the mower to become familiar with its controls
and proper use.
2. Never allow children, persons with reduced
physical, sensory or mental capabilities or lack of
experience and knowledge or people unfamiliar
with these instructions to use the machine. Local
regulations may restrict the age of the operator.
3. You are responsible for accidents or for harm to
other people or their property.
4. It is your responsibility to inform your neighbors
about the risks, and that it is forbidden to enter
your lawn while the mower is operating.
5. If your lawn is open to the street and/or your
neighbors,
you must be present during the mower’s
operation to prevent others from accessing your
lawn. Alternatively, you must protect / fence your
lawn so that others do not access the mower during
operation.
B. Preparations
1. Ensure the correct installation of the Perimeter
Wire, as instructed.
2. Inspect periodically the area where the mower is
used and remove all stones, sticks, cones, wires
and other foreign objects.
3. Periodically visually inspect to verify that the
blade is not worn or damaged. Replace a worn or
damaged blade (Part No. MRK6101A).
Safety warnings &
precautions
Page 7

5
C. Operation
IMPORTANT SAFETY WARNING!
Do not leave the mower to operate unattended if you
know that there are pets, children or people in the
vicinity. Never mow while people (especially children)
or pets are nearby.
1. Do not operate the mower if any safety feature or any part
is damaged, worn or inoperable.
2. Keep hands and feet away from the cutting blade and
other
moving parts.
3. Always switch off the Safety Switch before lifting it or
planning to operate any adjustments.
4. Never pick up or carry the mower while the motors are running.
5. Do not touch the blade before it has completely stopped rotating.
6. Do not use the mower for any purpose other than cutting lawn.
7. Keep all guards, shields, safety devices, and sensors in
place. Repair or replace damaged parts, including decals.
8. Set the weekly program at times when there are no people
on the grass.
9. Do not connect a damaged power cord to the supply, or
touch a damaged cord before it is disconnected from the
supply as it can lead to contact with live parts.
10. Keep the extension power cord away from the blade to
prevent the mower from damaging it. A damaged power
cord can lead to contact with live parts.
11. If the power cord becomes damaged or entangled during
use, detach it from the mains by pulling the plug from the socket.
12. In the event of accident or breakdown whilst the mower is
operating, immediately press the red STOP button.
Page 8

6
IMPORTANT! It is recommended to keep the
original packaging for shipping purposes.
Long distances:
When transporting your mower over long distances,
switch off the Safety Switch.
D. Transportation
Within the working area:
1. Press the STOP button to
stop the mower.
2. Use the Remote Control.
(available as an accessory
or via the mobile App) to
drive it from one place to
another.
3. In case of different ground
height level, switch off the
Safety Switch, and carry
the mower by its carrying
handle (lift the STOP button
for that).
Page 9

7
E. Using the remote control (manual mowing)
1. Mow only in daylight or in good artificial light, and avoid
operating on wet grass.
2. Do not operate the mower barefoot or wearing open
sandals. Always wear substantial footwear and long
trousers; always make sure of your footing on slopes.
3. Use extreme caution when reversing the direction of the
mower towards you.
4. Always switch on the motor according to the instructions
while standing away from the blade.
5. Do not mow manually in slopes greater than 15 degrees
or where a firm footing is not possible.
F. Batteries
1. Do not open or damage the battery pack.
2. The Battery Pack contains electrolytes. In case of an
electrolyte leakage from the Battery Pack, the following
actions should be taken:
• Skin contact: Wash the contact areas off immediately
with water and soap.
• Eye contact: Immediately flush the eyes with plenty of
clean water for at least 15 minutes, without rubbing.
• Get medical assistance.
3. Ensure that the battery is charged using the correct
charger recommended by the manufacturer. Incorrect use
may result in electric shock, overheating or leakage of
corrosive liquid from the battery.
Page 10

8
G. Maintenance and special instructions
1. Always switch off the Safety Switch before clearing
blockage/checking/cleaning/working on the mower,
or after striking a foreign object to inspect the
machine for damage. Never attempt to service or
adjust the mower while it is in operation.
2. In case of abnormal vibrations, stop the mower,
switch off the Safety Switch and check for any
damage of the blade. Replace a worn or damaged
blade (Part No. MRK6101A) to preserve balance. If
the vibration continues, call for service.
3. Use heavy gloves when inspecting or servicing the blade.
4. Do not perform maintenance barefoot or wearing
open sandals. Always wear suitable work shoes
and long trousers.
5. Replace worn or damaged parts for your safety.
6. Use only original equipment and accessories. It is not
permitted to modify the original design of the mower.
All modifications are made at your own risk.
7. Ensure that only replacement cutting means of
the right type (Part No. MRK6101A) are used.
8. Maintenance/servicing/cleaning of the mower should
be according to manufacturer’s instructions.
9. Keep all nuts, bolts and screws tight to be sure
the machine is in safe working condition.
WARNING!
When there is a risk of a lightning storm, disconnect
the Perimeter Wire from the Base Station /Perimeter
Switch and the Power Supply 230 V/120 V plug from
the power outlet.
Page 11

9
H. Product end of use
1. The mower and its accessories should be collected
separately at the end of their life to prevent waste electrical
and electronic equipment from ending up in landfill sites,
and to protect and improve the quality of the environment.
2. Do not dispose of the mower or any other of its parts
(including the Power Supply and Base Station) as unsorted
municipal waste - they should be collected separately.
3. Ask your local distributor/dealer about return and
collection systems availability.
4. Do not dispose of the battery pack in a fire, and do not
place used batteries in your household trash.
5. The battery must be collected, recycled, or disposed of in
an environmentally sound manner.
Page 12

10
WARNING!
Your mower is equipped with numerous built-in
safety features. However, the mower is a hazardous
device with a sharp blade, which can cause major
injury to anyone who comes in contact with it.
Therefore, it is absolutely forbidden to be on the
lawn while the mower is working. Alternatively,
halt the mower’s operation when people (especially
children) or pets are to stay or play on the lawn.
A. Child Lock
The Child Lock prevents unintended operation of
the mower by an accidental press of one of the
buttons. Only pressing two buttons in the right
order will initiate the operation. It is required to
activate the Child Lock feature if children under
age 6 may come in contact with the mower.
B. Anti-Theft/Disabling Device
The Anti-Theft/Disabling Device system function
will prevent anyone from using or driving the
mower unless they have a valid code to enter. You
will be prompted to enter a four digit code of your
choice to use as your personal security code. It is
highly recommended to activate this feature to
prevent operation of the mower by children or
people who are unfamiliar with the mower or not
allowed to use it.
Safety
features
Page 13

11
C. Lift Sensor
If the mower is raised from the ground during the blade’s
operation, the blade will stop rotating immediately.
D. Tilt Sensor
If the mower is tilted up towards a vertical position, the
blade will stop immediately.
E. Obstruction Sensor
Your mower detects interfering obstacles in its way during
operation. When the mower collides with an obstacle, it
will stop the rotation of the blade immediately, will stop
movement in that direction and reverse itself away from
the obstacle.
F. Emergency Stop Button
Pressing the STOP button at any time during operation will
stop the mower and the blade immediately.
G. Safety Switch
Switching off the Safety Switch will prevent any operation
of the mower. It is required to switch it off before lifting the
mower and before any maintenance is done.
H. Base Station/Perimeter Switch and
Perimeter Wire
The mower cannot operate without a Perimeter Wire
installed and activated through the Base Station/Perimeter
Switch. In the event the Perimeter Wire signal is turned
off, the mower will stop operating.
Page 14

12
Let’s get
started.
Can’t wait
to mow your
lawn.
Page 15

13
Welcome
to a friendly home
Congratulations on on your purchase! You are just a few
steps away from meeting your best team player. Very soon
you will come to count on your new friend to do a perfect job.
It will independently depart from its base on predetermined
days and times, mow your lawn and return to base for
charging.
A preinstalled perimeter wire sets the boundaries (a “virtual
wall”) for your mower. It will be laid around the edges of your
lawn and objects that you want to protect.
The mower moves randomly within its working area, as
defined by the perimeter wire. This kind of random movement
provides the perfect cut and ensures complete coverage of
your lawn.
Page 16

14
In addition, it follows the perimeter wire, when it mows the
edges of your lawn to give it a perfect finish.
Good-looking lawns are achieved by consistent mowing,
which is exactly what a robotic mower provides.
After following the clear installation instructions, you will be
ready to enjoy your free time, while your new friend looks
after your lawn.
Page 17

15
So where are we headed?
Correct installation of your mower will ensure maximum
results. This is what it takes to prepare it to do a perfect job
for you:
Know Your Lawn
What’s your lawn type?
Get Started
Choose Base Station location
Power Up
Plug it in
Ready, Set, Test
Setup and trial run
Lay the Wire
Lay out the
“virtual boundary”
Page 18

16
What’s in the Box
The product
Your new Robotic Mower
Base Station
This is where the mower
recharges itself
Extension Cable
20 m (65 ft) low voltage
cable to connect the mower
to the Power Supply unit
Perimeter Wire
Marks the working area
for the mower
Power Supply
The power supply for
charging your mower
User Guide
USER
GUIDE
Page 19

17
Ready? Let’s begin...
Blade Tool
For safe removal of the
blades
Spare Plot Connector
For connecting the
Perimeter Wire to
the Base Station
RoboRuler
For measuring the Perimeter Wire’s
distance from the lawn’s edge
Base Station Stakes (x6)
For affixing the Base
Station to the ground
Fuse
For preventing battery
discharge during storage
Wire Pegs
For securing the wire
to the ground
Wire Connectors
For splicing the Perimeter
Wire in case of a cut
Page 20
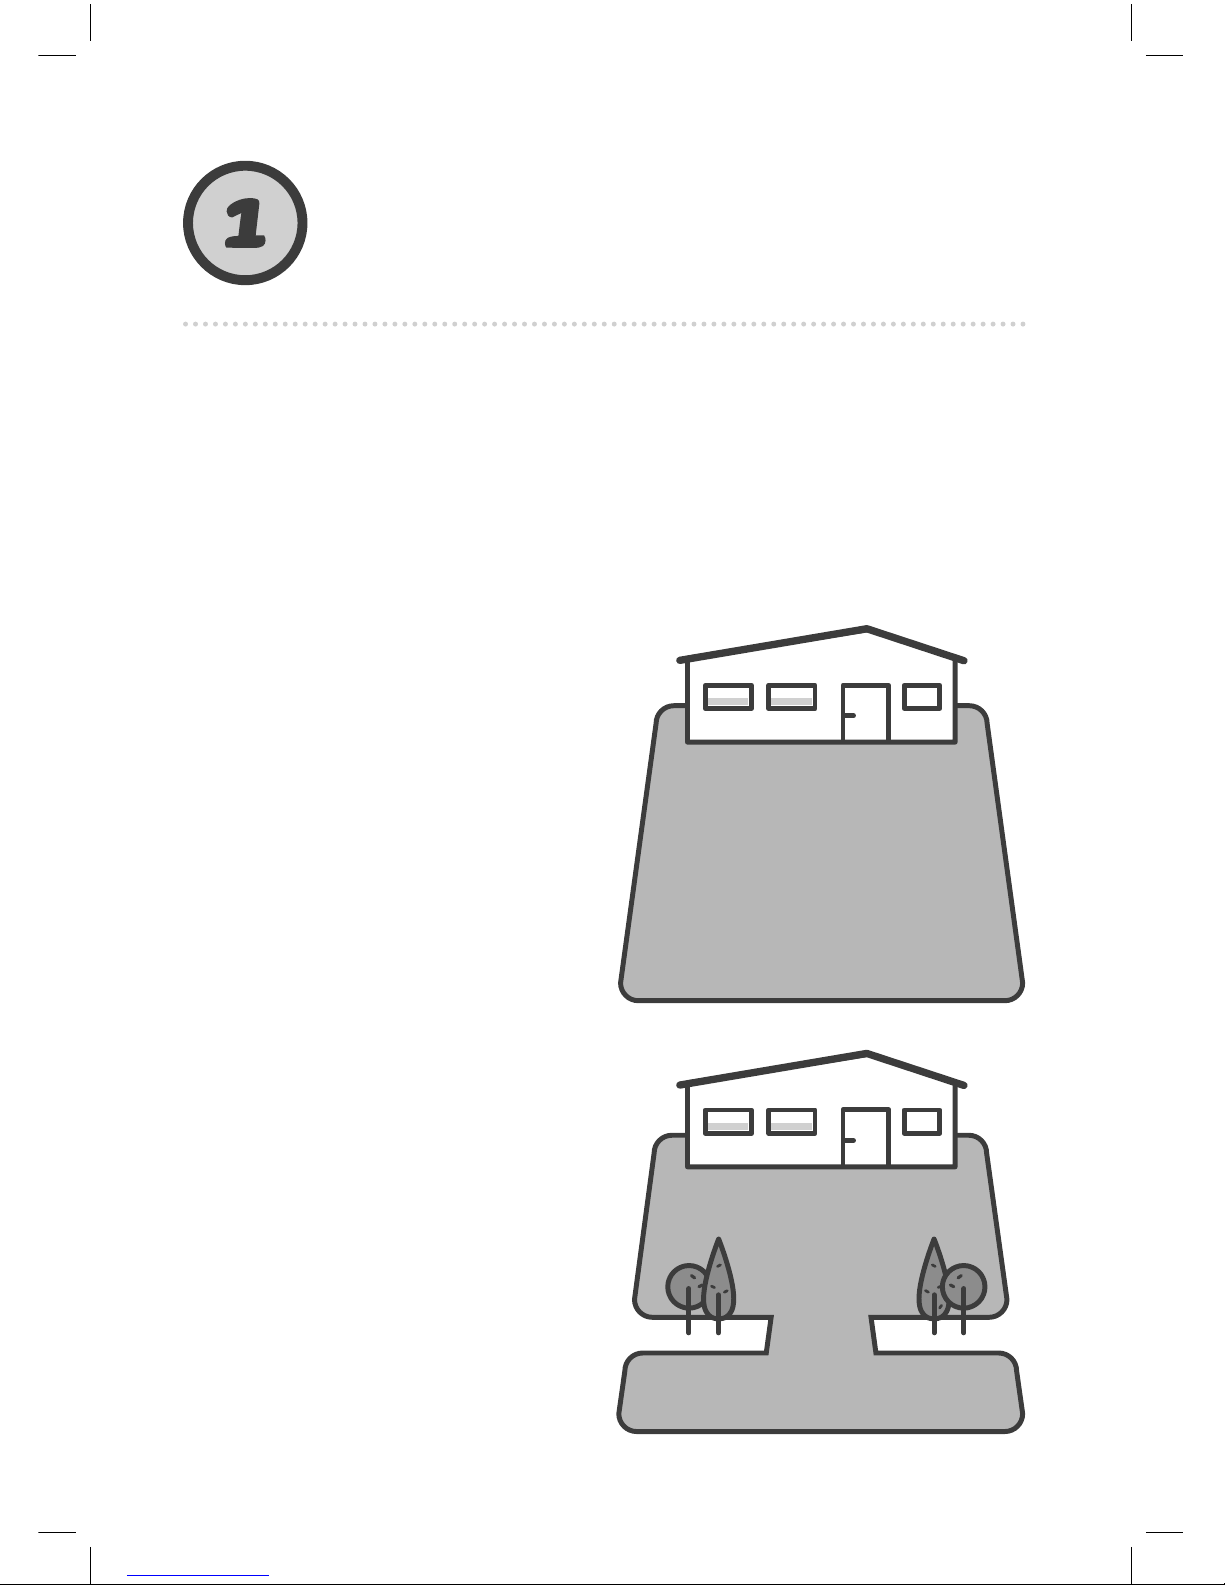
18
Type A
Main Zone only
Your lawn area is one
continuous zone and all
areas of the lawn are wide
enough for the mower
to navigate through (at
least 4 m (14 ft) wide at its
narrowest point).
Main Zone
Main Zone
Sub Zone
Understanding your lawn will save you unnecessary
mistakes and make the installation process easier and
more straight-forward.
Know
Your Lawn
Type B
Main Zone + Sub Zone
Your lawn consists of more
than one zone. These zones
are connected by a narrow
passage (1.5-4 m / 4.5-14 ft
wide). The mower can drive
between these zones to mow
the entire area.
You can also skip some later sections in this manual that are
not relevant to your lawn type.
So, what does your lawn look like?
Page 21
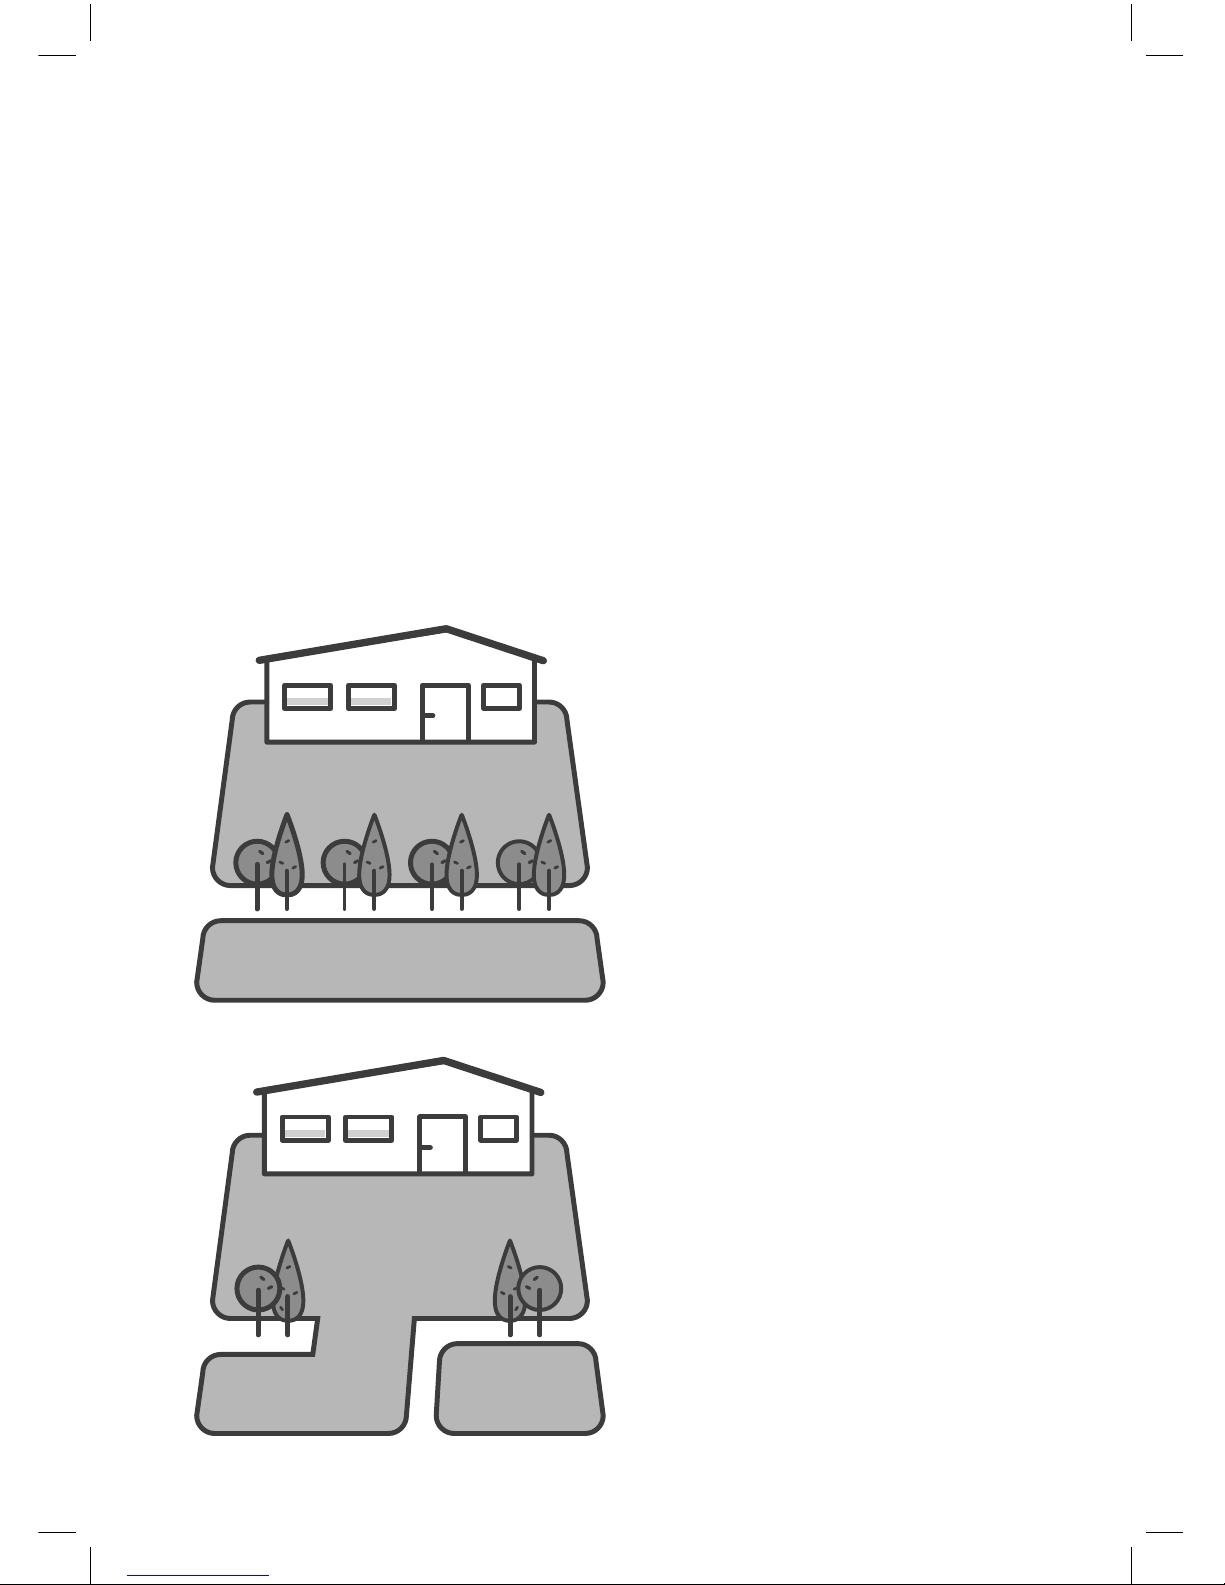
19
Main Zone
Main Zone
Sub Zone
Separated Zone
Separated
Zone
Type D
Main Zone + Sub Zone +
Separated Zone
Some areas of your lawn are
connected to the Main Zone
by a narrow pass (up to 4 m
/ 14 ft wide) and some areas
are totally separated from
the Main Zone by a fence,
sidewalk, pathway or
other obstacle, and the mower
can’t drive between them.
Type C
Main Zone +
Separated Zone
Your lawn consists of two
or more zones that are not
connected (separated by a
fence, sidewalk, pathway or
other obstacle). The mower
cannot drive between these
zones.
Page 22
20
The Base Station is where your mower recharges, and where
the perimeter wire starts and ends. In this installation step, you
are going to determine a proper location for the Base Station.
Choose locations for the Base Station &
Power Supply unit
Get
Started
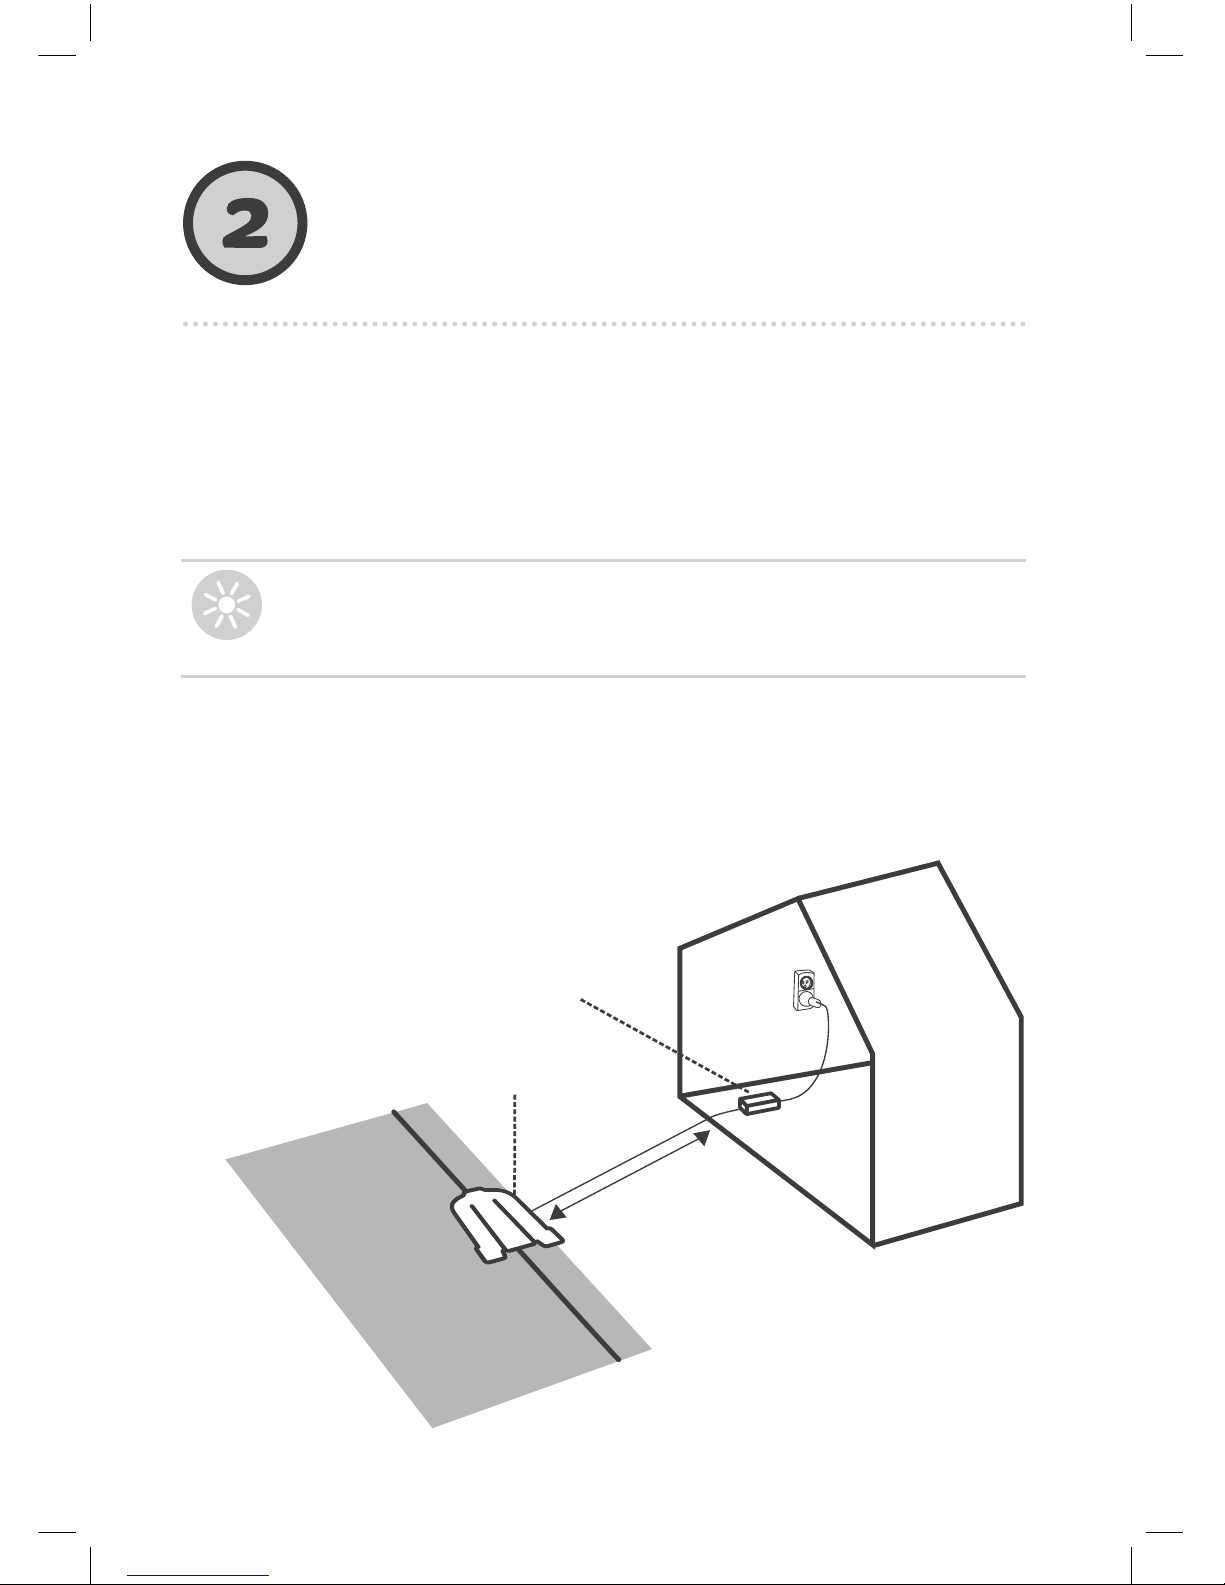
Consideration A
Up to a max. of 20 m (65 ft) from a
power outlet
Where should you place your Base Station?
The Base Station will be installed at a later stage, after the
Perimeter Wire is in place.
TIP
Power
Supply unit
Base Station
20 m (65 ft)
Extension cable
[low voltage]
Page 23
21
TIPS
• If there are additional zones in your lawn, place the Base
Station within the largest zone
• Make sure the ground is even and flat, and that there are no slopes
• Keep a minimum of 1 meter / 3.3 feet from a sprinkler head
to avoid damaging the mower’s internal components
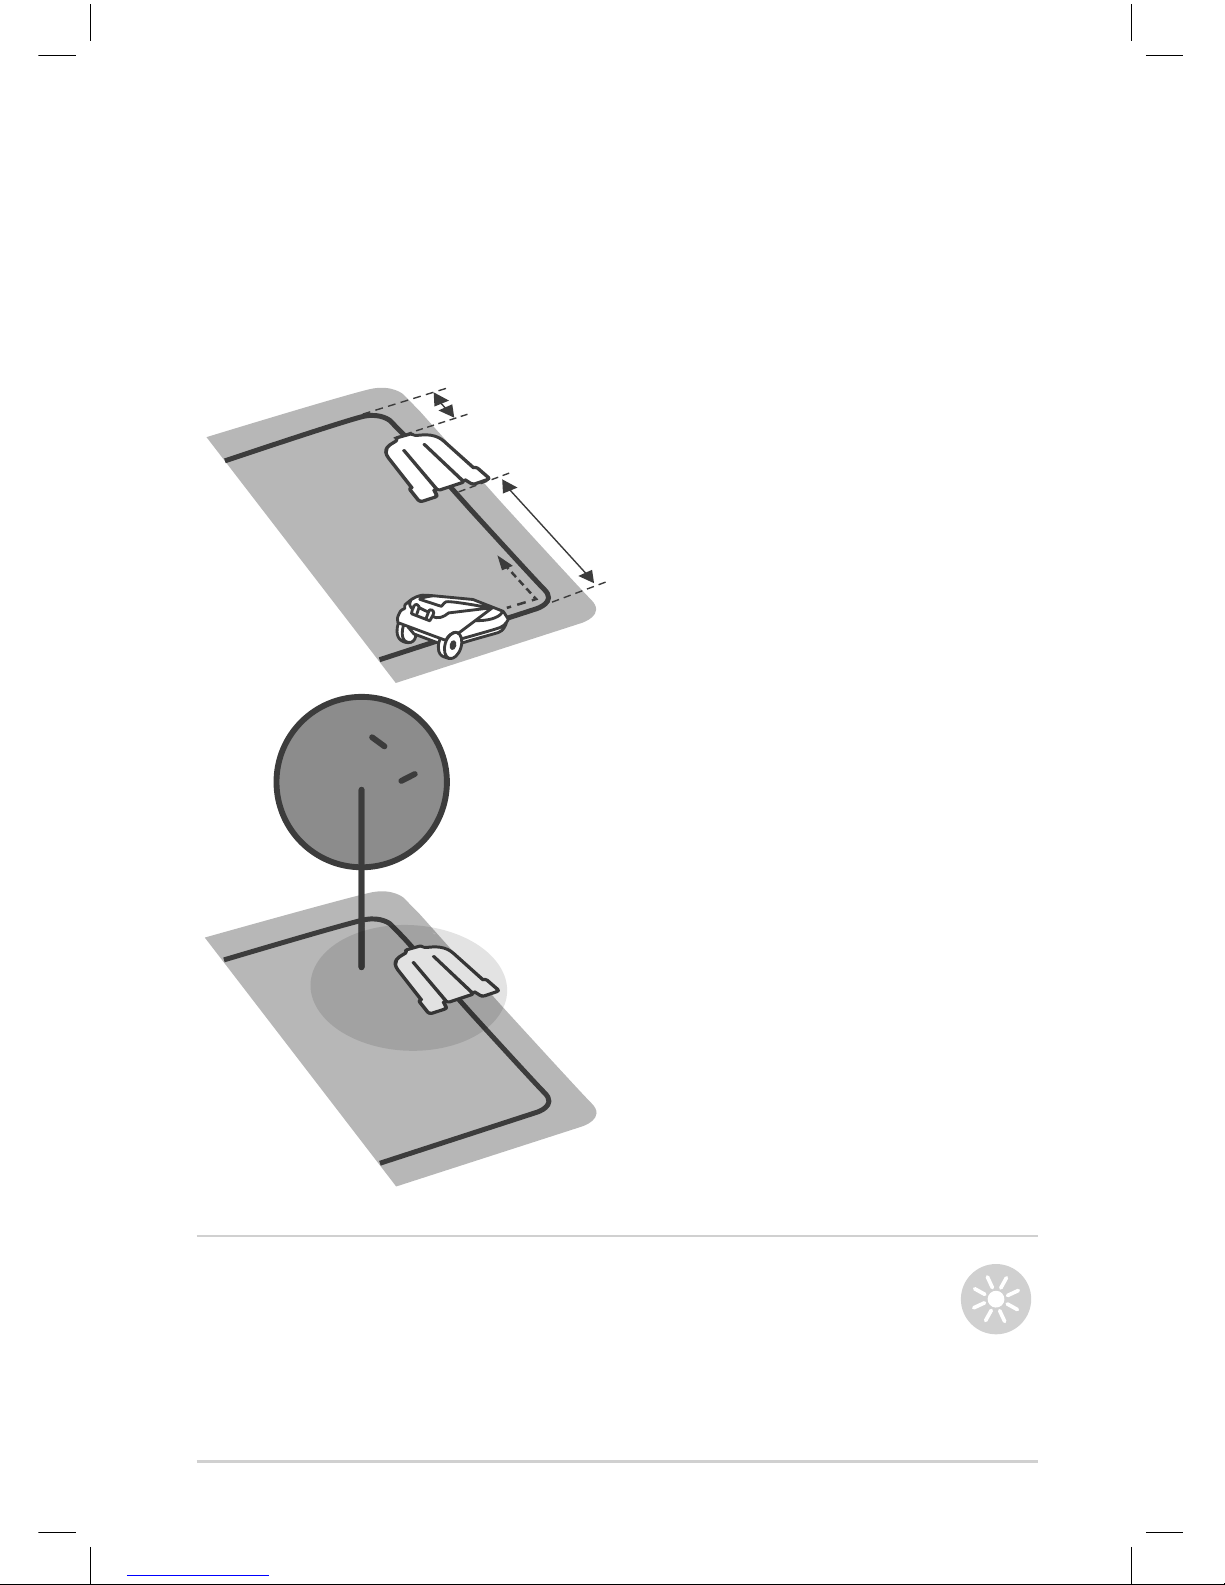
Consideration B
A min. of 3 m [10 ft] of straight
wire in front of the base and a
min. of 30 cm (1 ft) behind the
base to allow smooth docking
Consideration C
In a flat and shady spot
Min. 3m (10 ft )
Min. 30 cm (1 ft )
Page 24
22
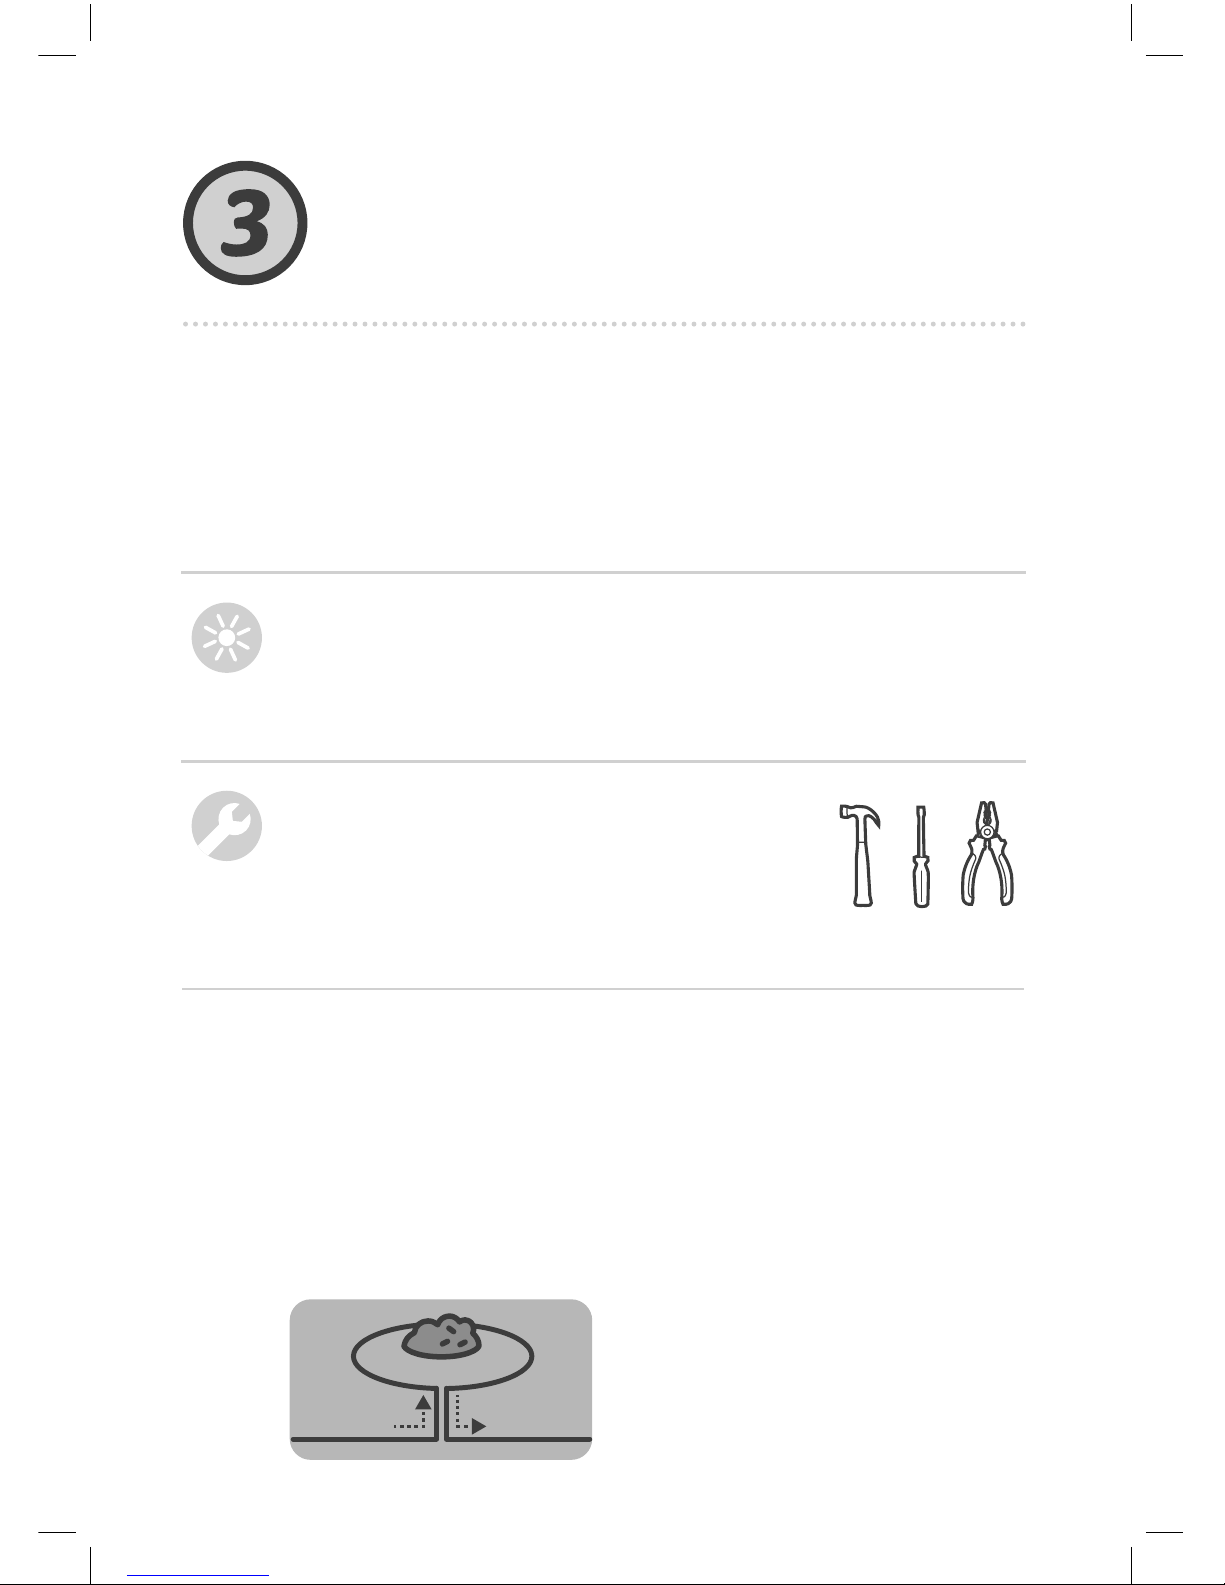
• Have your mower’s package nearby.
• Be sure to cut your grass with your old mower one last time
before you start wiring. This will make inserting pegs easier and
help ensure that the mower doesn’t cut the wire.
WHAT
YOU’LL
NEED
• Hammer
• Small, flat & Phillips screwdrivers
• Combination pliers
Lay the perimeter wire (“virtual boundary”), which
defines the working area for the mower.
Lay
the Wire
TIPS
Soft Obstacles
Soft obstacles are flower beds,
ponds or small trees. They need to
be protected by creating Perimeter
Islands.
OBSTACLES
Now you’re ready to install the Perimeter Wire.
Let’s take it step by step.
... A sunny day and a sunny mood :)
First Things First: Obstacles and Slopes
Before you put a single peg into the ground, take note of any
obstacles or slopes.
Page 25
23
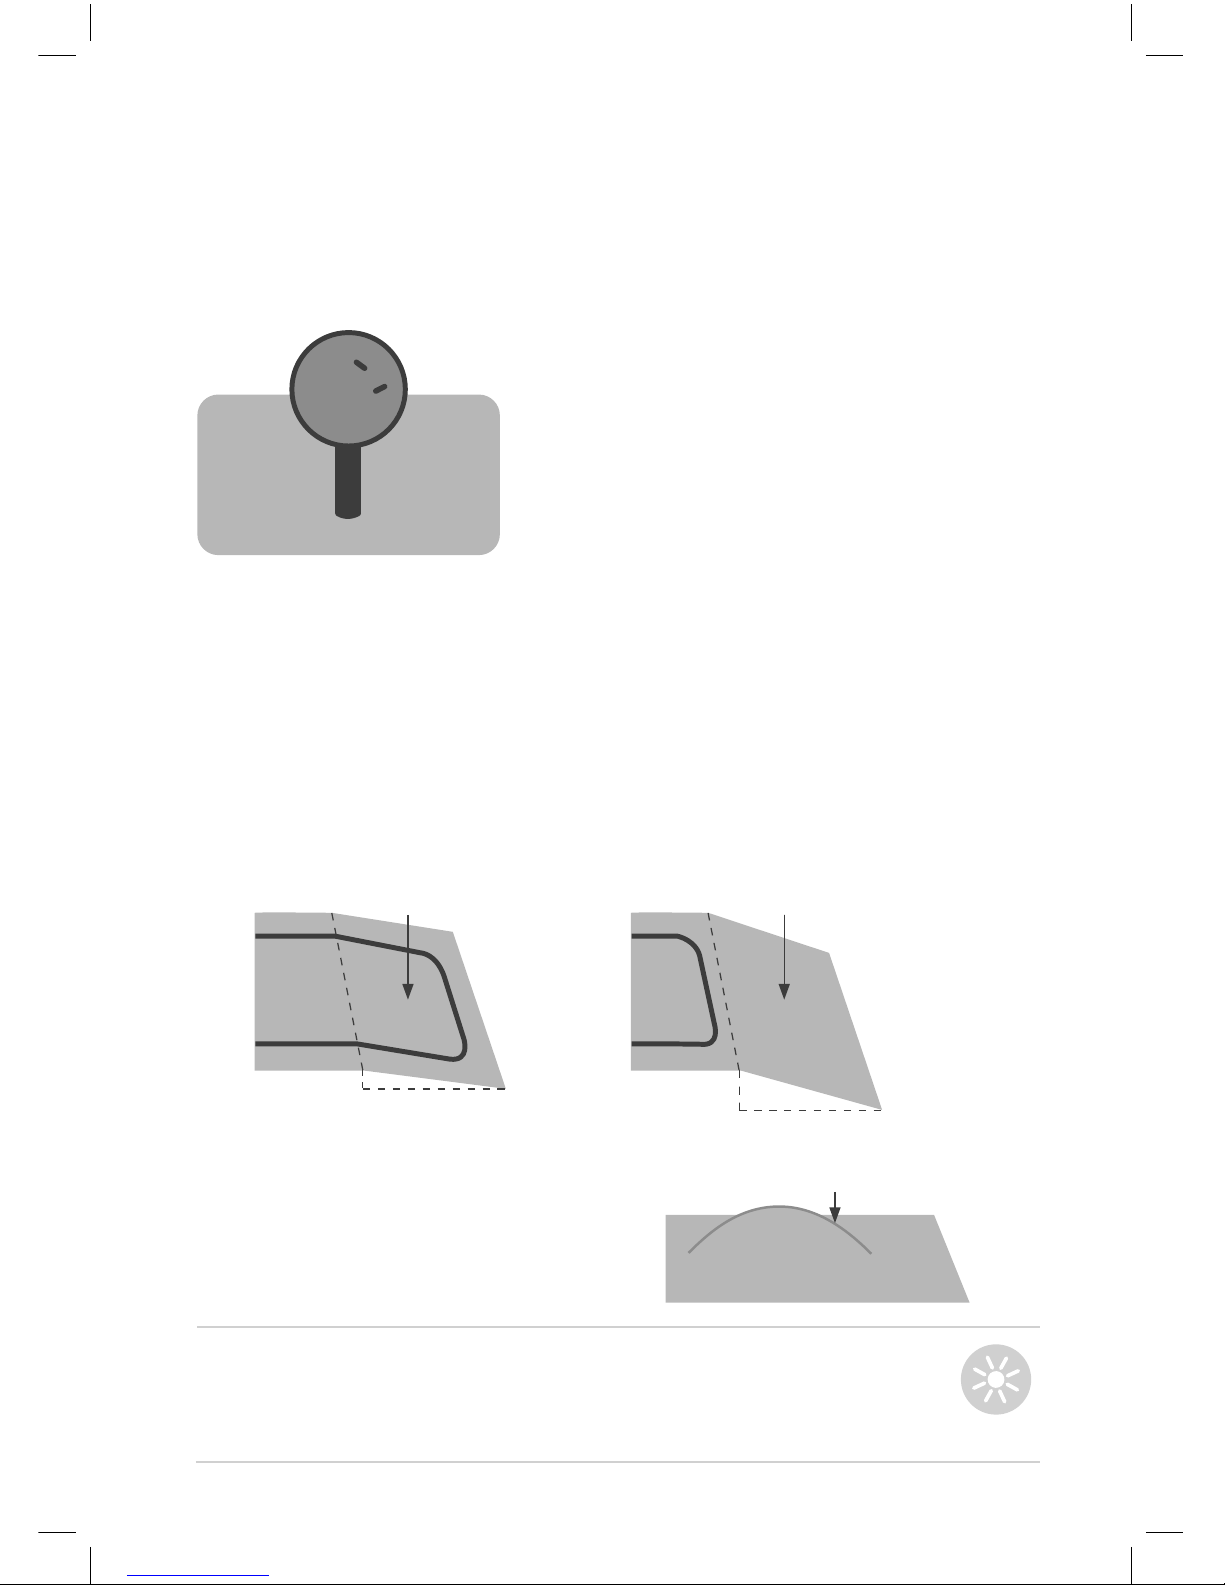
The slope is too steep if...
The mower tilts off the ground while climbing it. Exclude such
slopes from the cutting area.
SLOPES
Hard Obstacles
Hard obstacles are vertical, rigid
and higher than 15 cm (6 in), such as
trees or telephone poles.
If a Hard Obstacle has a diameter under
10 cm (4 in), it must be protected by a
Perimeter Island. If the diameter is
larger, it’s not necessary.
Slopes along the edge
To ensure your mower doesn’t slip off the lawn, especially
when the grass is wet, the Perimeter Wire must exclude a
slope along the edge of your lawn with an incline of over 15% that is, 15 cm rise per 1 m [6 in rise per 3 ft].
TIP
Slopes within the Lawn
Your mower can mow areas within
the lawn with a slope of up to 35%
[35 cm rise per 1 m/14 in rise per 3 ft].
Max 35%
Less than
15 cm / 6 in
Less than 15%
1 m / 3 ft
More than 15%
1 m / 3 ft
More than
15 cm / 6 in
Page 26
24
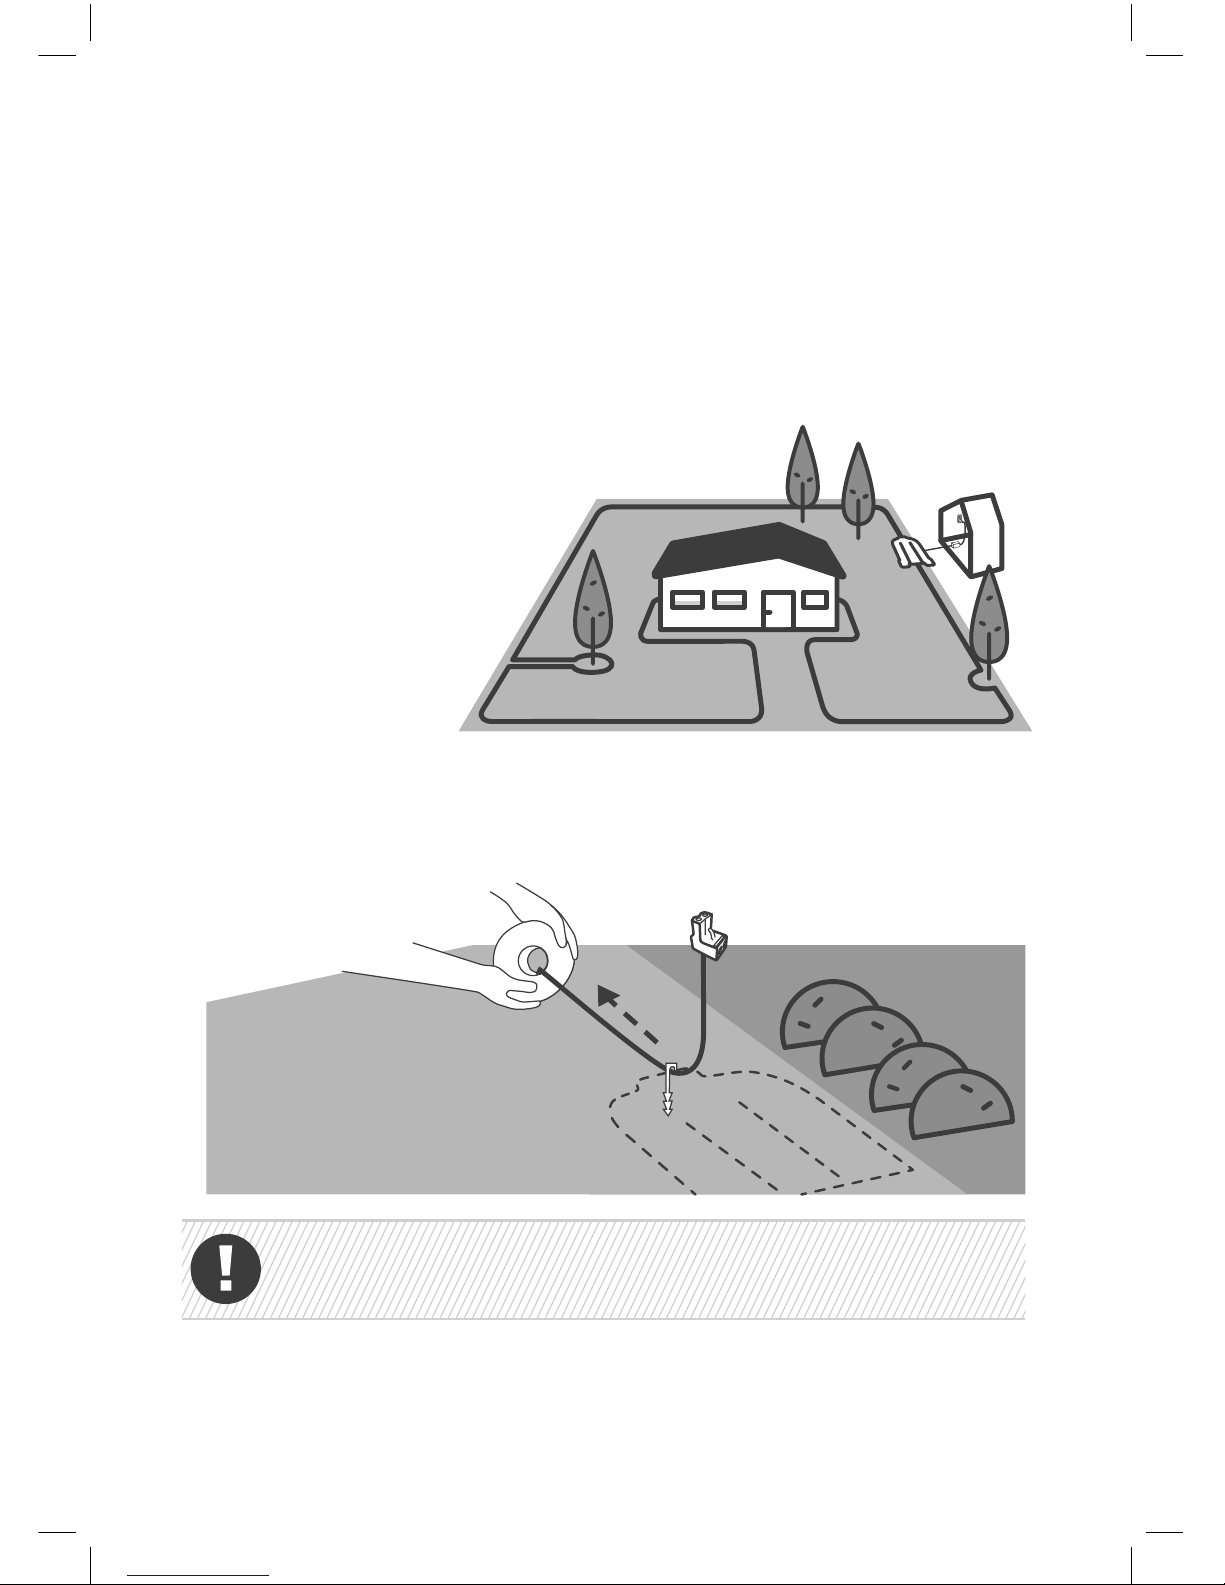
Lay it loosely along the perimeter as you walk along the lawn
edge. If you get to any area/object that needs special care,
make sure you carefully lay the Perimeter Wire as described in
the following sections.
Start unwinding the wire counter-clockwise around the lawn,
starting at the Base Station’s location.
Peg
Once a tail is made, put the
first peg into the ground to
secure the end of the wire
Perimeter
Wire
A. Make a Good Start
Before you begin, walk along the edge
of your lawn and plan how to set up the
Perimeter Wire. Take
note of all obstacles
and slopes.
Pull out approx. 30 cm (1 ft) of wire through the hole in the
spool’s plastic covering and peg the beginning of the wire to the
ground where you intend to install your Base Station.
Page 27
25
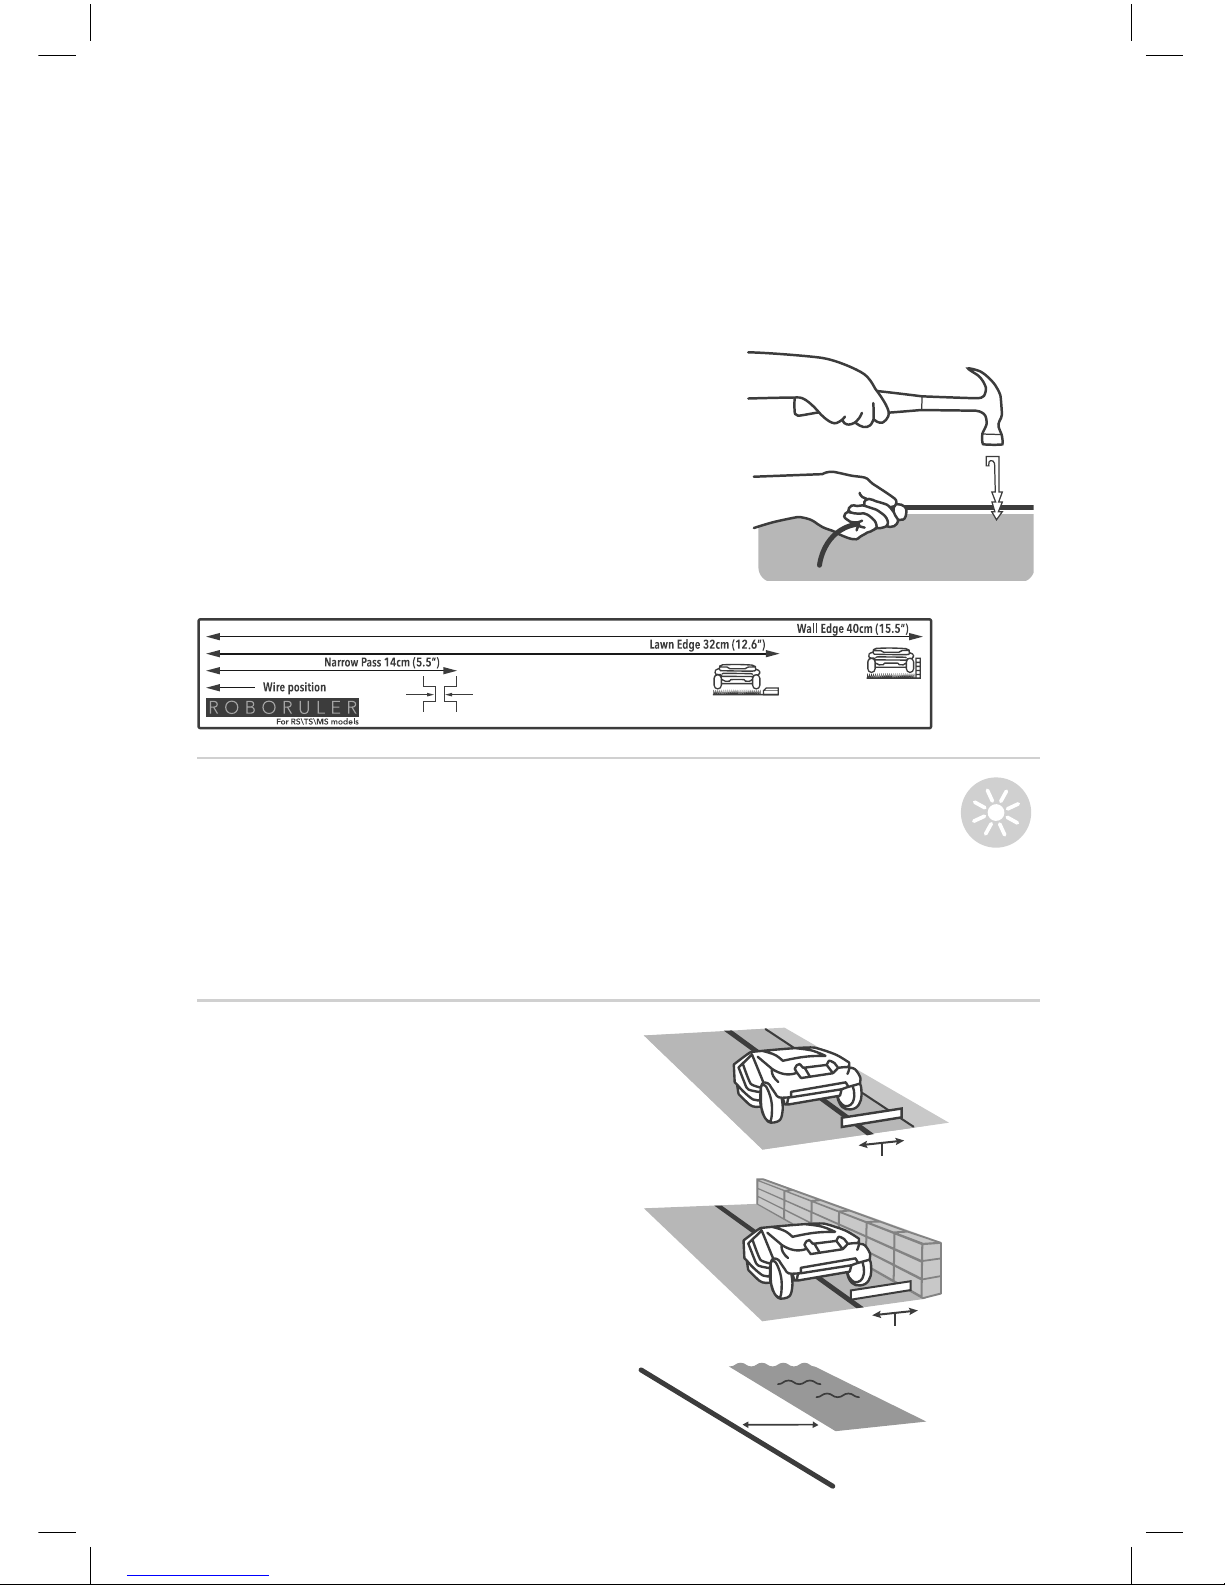
• Insert pegs every few meters/feet and at corners. At this
early stage, set a minimal number of pegs. You will insert all
necessary pegs later.
• Pull the wire tight while hammering the pegs to their final
depth in the ground.
•
Take care not to damage irrigation pipes.
TIPS
32 cm (1 ft)
Leave a minimum of 1.2 m (4 ft) if the
edge of the lawn borders water.
When the edge is flat or a drop, use
the short distance of the RoboRuler.
When the edge is a wall (more than
2 cm/ 1” above the ground level), use
the longer distance of the RoboRuler.
40 cm (1.3 ft)
B. Maintain Proper Distance
The Perimeter Wire is secured to
the ground by the pegs supplied
with the product. Use the RoboRuler to
determine the distances you should leave
between the Perimeter Wire and the lawn’s
edge and obstacles.
Min 1.2m
(4ft)
Page 28
26
Left turns
45˚
• It is not necessary to bury the Perimeter Wire, though you
may do so, up to 5 cm (2 in) deep.
• Burying the wire along exposed areas, such as pavements,
is usually recommended.
•
If additional Perimeter Wire is required in order to complete
the setup, you can extend it using the waterproof Wire
Connectors provided (see section 5-G “Splicing the
Perimeter Wire”).
TIPS
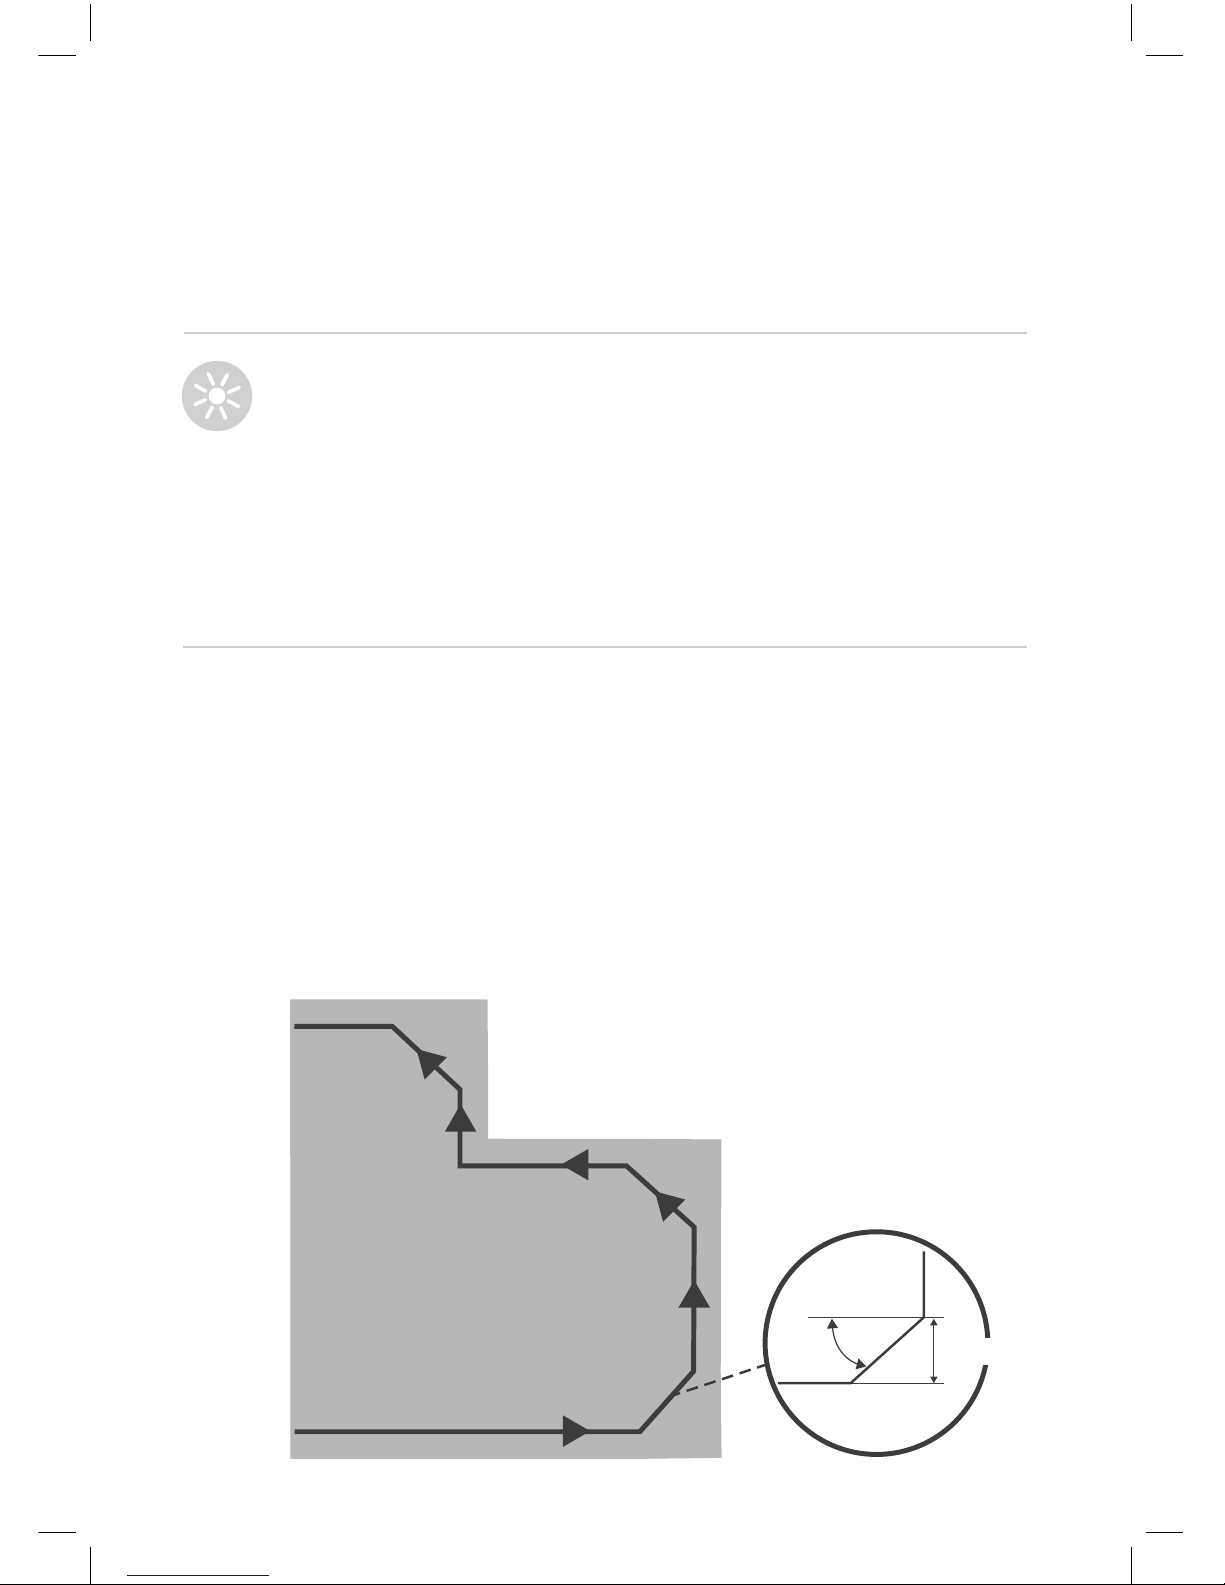
C. Make Smooth Turns
Maintain a 45° angle at all left-turn corners when laying the
wire along the perimeter.
20 cm / 8 in
Page 29
27
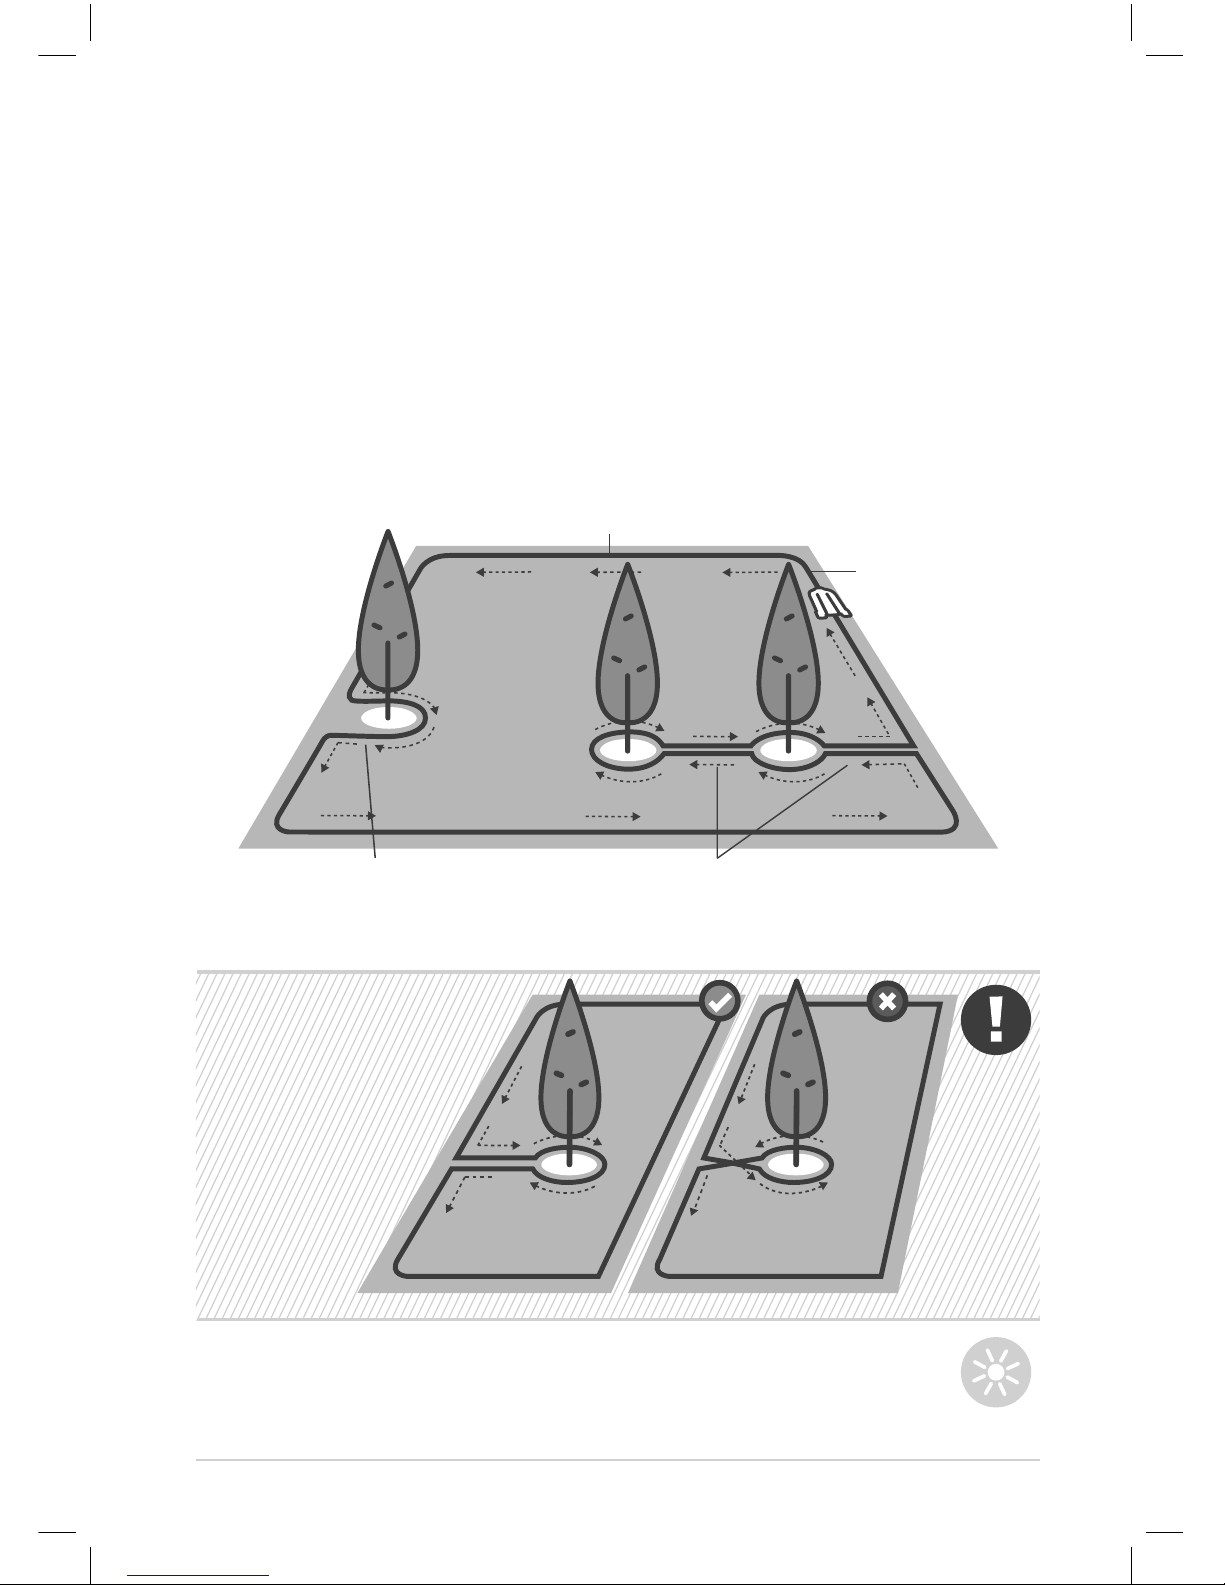
• Wires leading to and from an island should be fastened with
the same peg
• Perimeter Islands should either be rectangular or round
Set the Perimeter
Wire clockwise around
the obstacle, otherwise
the mower will drive
into the Perimeter
Island or won’t be
able to mow the
area around it
properly.
TIPS
D. Protect Soft Obstacles
Objects such as flower beds, ponds, or small trees must be
protected by setting Perimeter Islands.
Keep min. 1.5 m (5 ft) between
islands; if obstacles are closer
together, use one island.
If the distance between an island and the
perimeter wire is lower than 1.5 m (5 ft),
make the obstacle part of lawn’s edge.
Perimeter Wire position
Perimeter Wire
Page 30
28
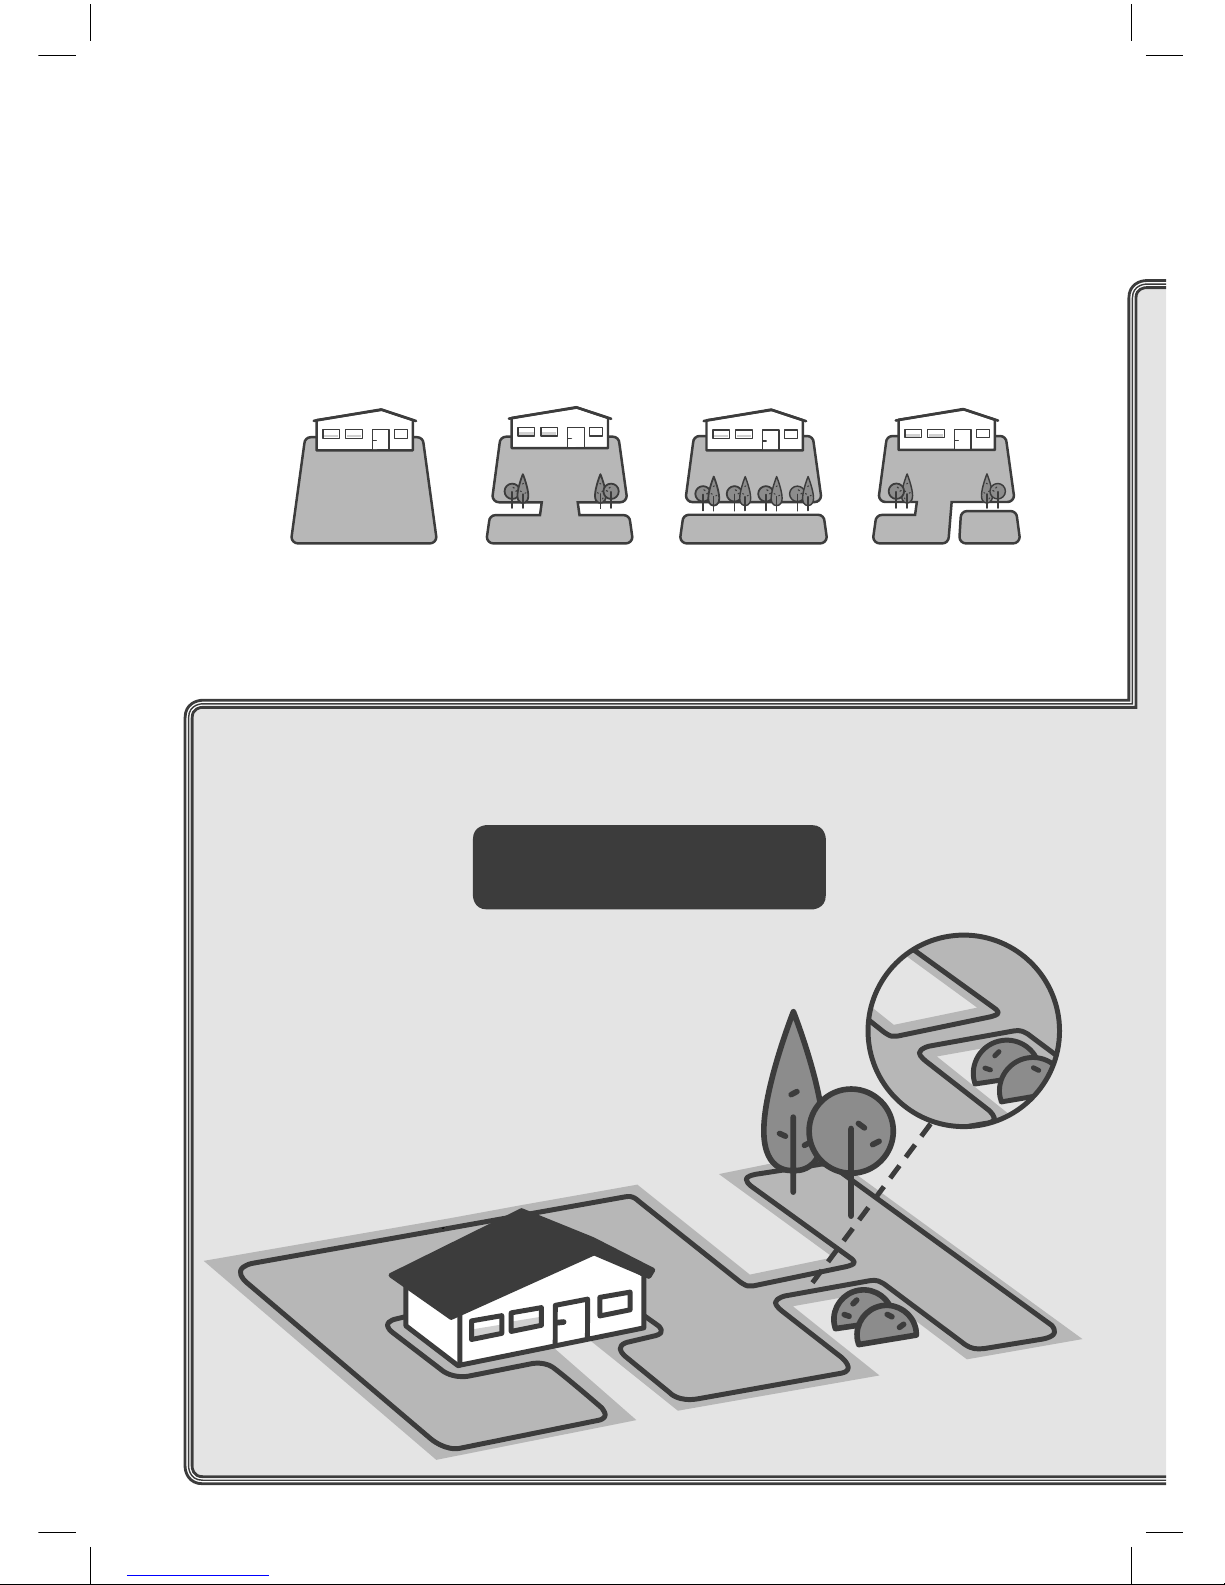
Type A
Main Zone only
Type B
Main Zone +
Sub Zone
Type C
Main Zone +
Separated Zone
Type D
Main Zone +
Sub Zone +
Separated Zone
Main Zone
Separated Zone
Main Zone
Main Zone
Sub Zone
Main Zone
Sub Zone
Separ.
Zone
Recall Your Lawn Type
Sub
Zone
Main Zone
Narrow
Pass
Main Zone
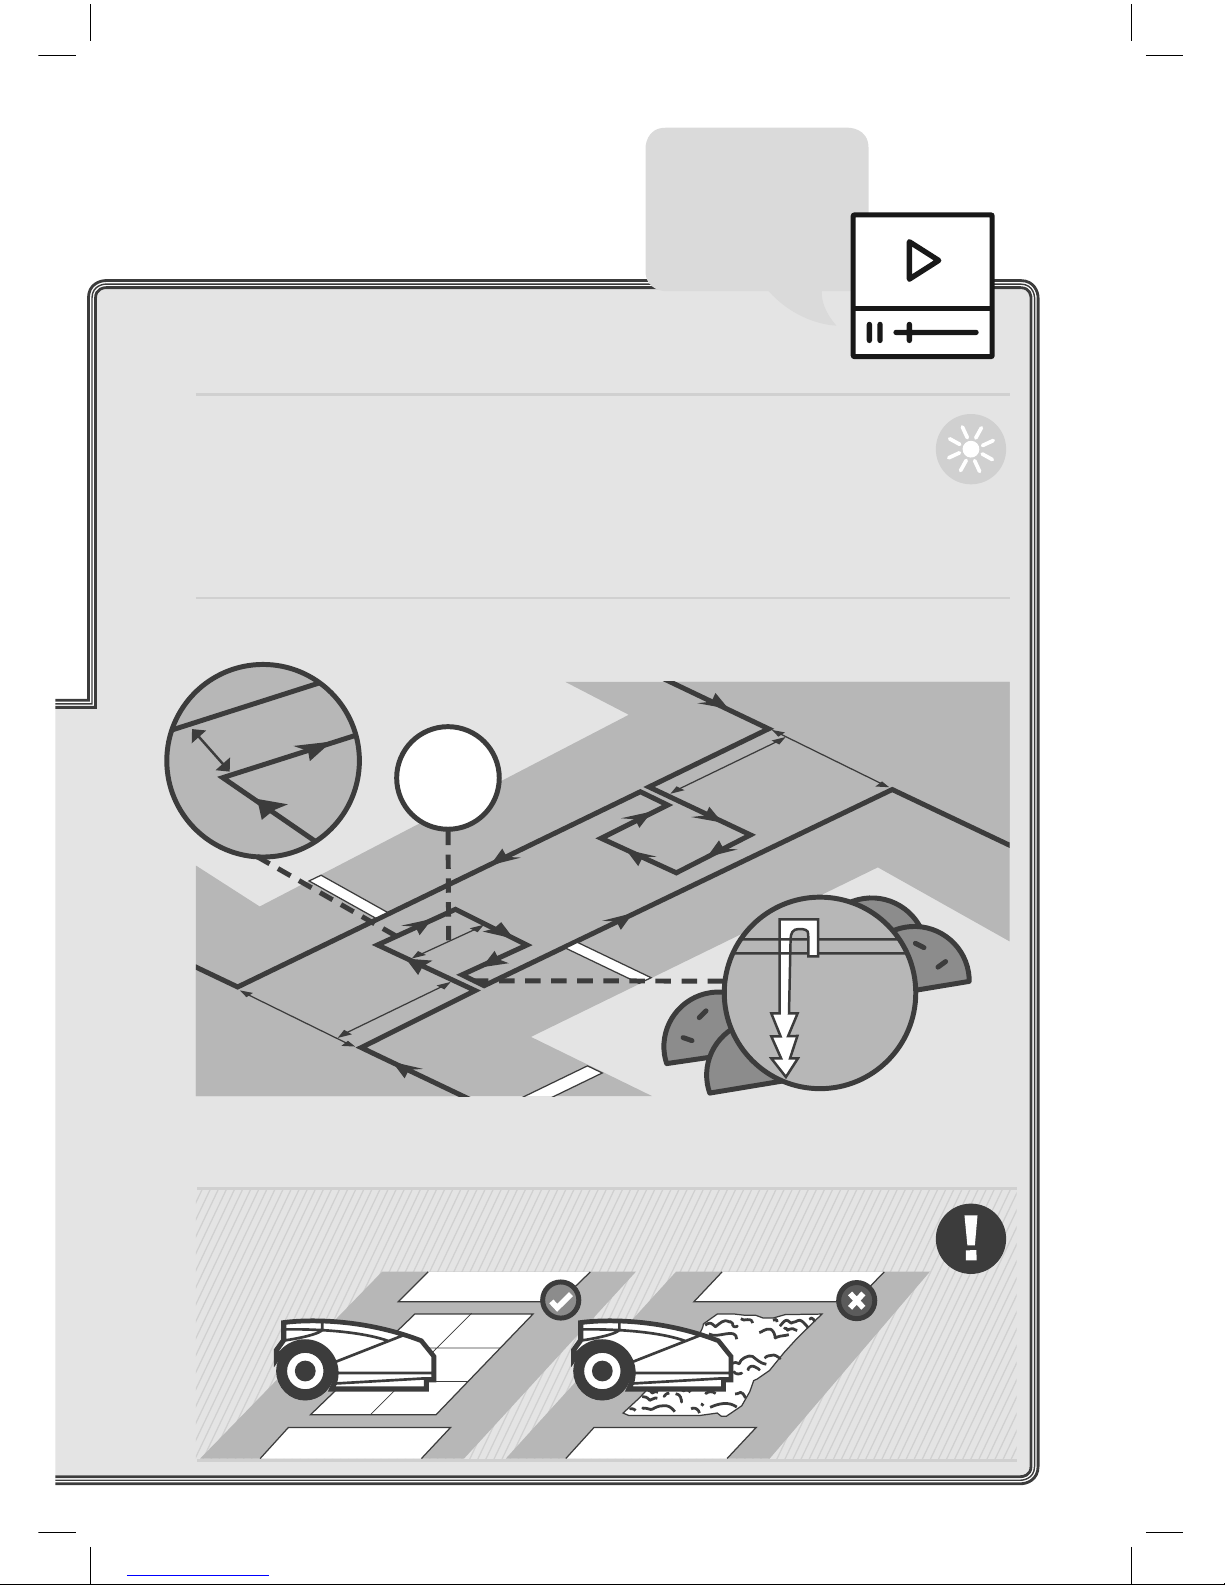
A Narrow Pass connects
the Main Zone with a Sub Zone.
To allow your mower to drive
through, it should be at least
1 m (3.5 ft) wide.
Don’t have a Sub Zone?
Skip this section!
E. How to Wire a Sub Zone
Type B / Type D
Page 31
14 cm [5.5 in]
32 cm
[12.6 in]
Main Zone
Sub Zone
Two wires
under
same peg
70 cm [27.5 in]
Min 50 cm (19.7 in)
Min 50 cm (19.7 in)
70 cm [27.5 in]
29
• If a Narrow Pass is shorter than 2 m [7 ft], set up only one
square Perimeter Island in the passage
• Take care to wire Narrow Passes correctly to ensure that the
mower doesn’t cross into different zones spontaneously while
mowing
Narrow Passes should be firm, level, and smooth.
TIPS
A helpful video
is available
online
Page 32
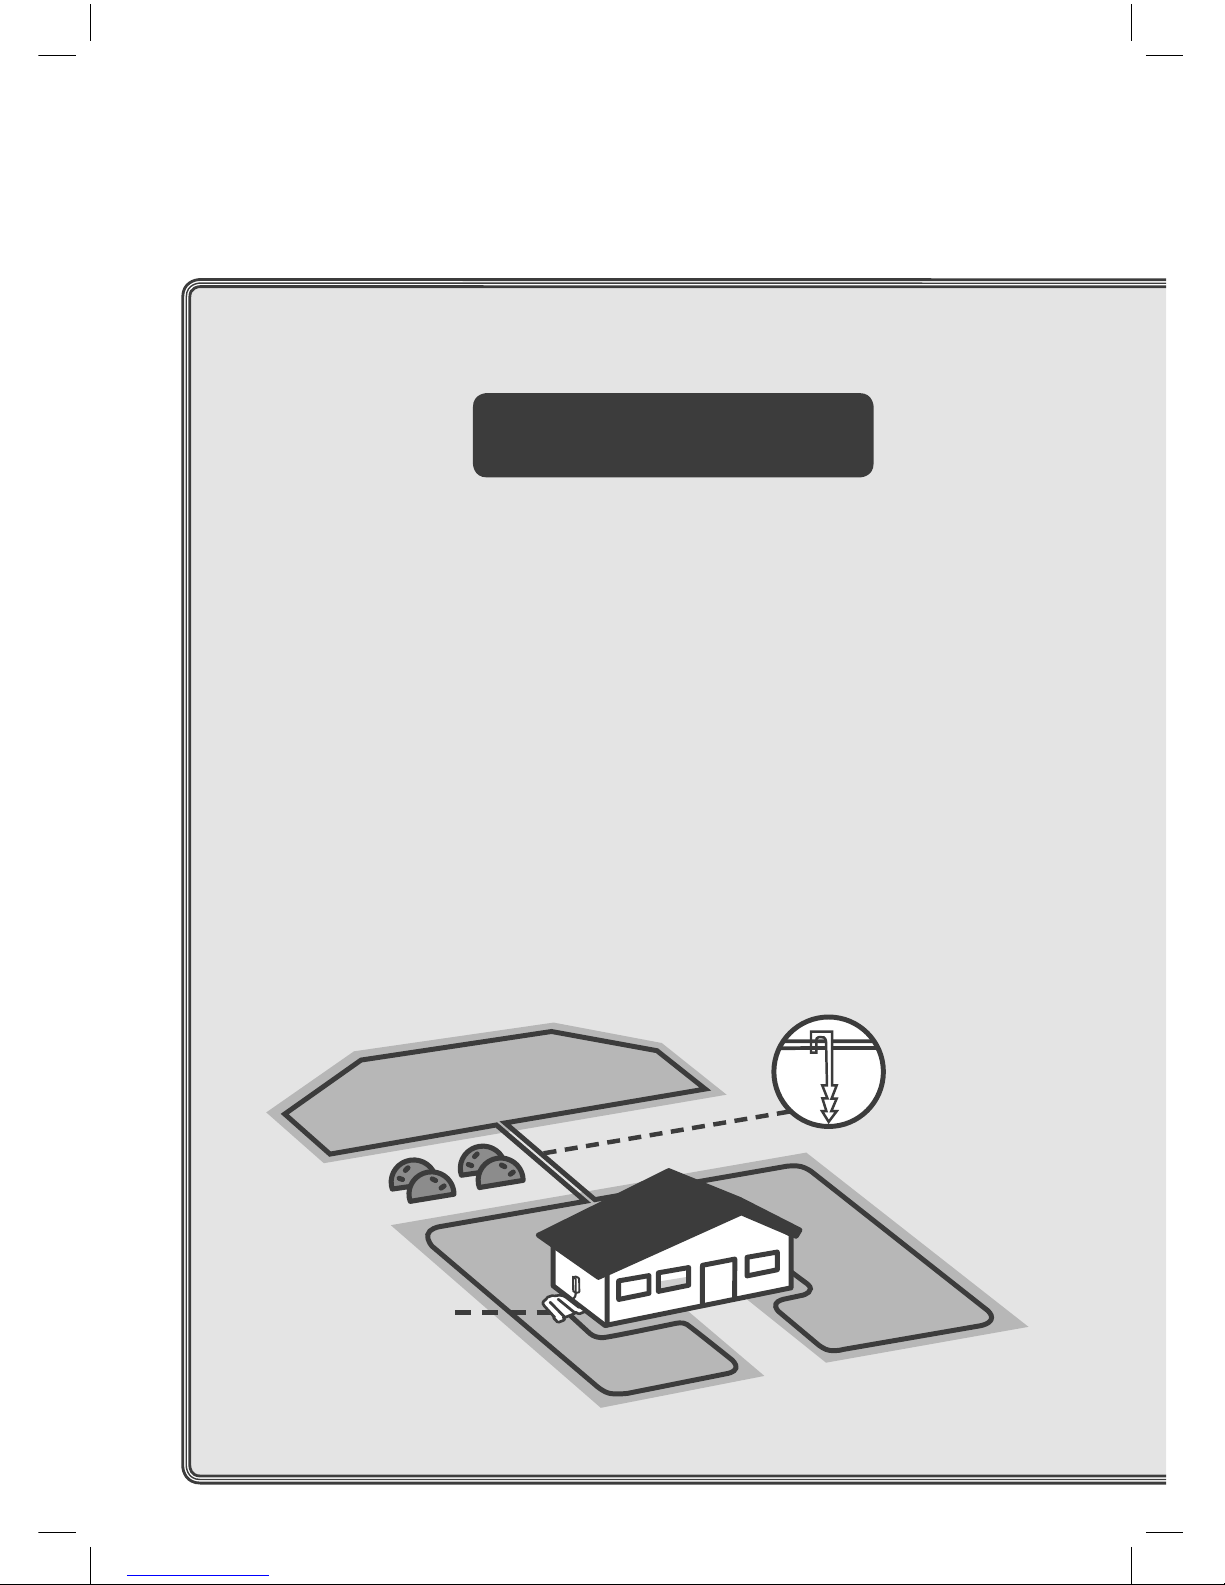
30
Two wires
under
same peg
Base Station
Separated Zone smaller than
200 m
2
(2150 ft
2
)
OPTION 1
Extend the Perimeter Wire from the Main Zone,
over the obstacle.
F. How to Wire a Separated Zone
Don’t have a Separated Zone?
Skip this section!
Type C / Type D
If your Separated Zone is larger than 120 m2/1291 ft
2
(200 m2/2150 ft2 for models over 3000 m2/30000 ft2), your mower
won’t be able to finish it in a single operation. Therefore, it is
recommended to wire it separately and connect it to its own
Base Station.
If your Separated Zone is smaller than 120 m
2
/1291 ft2
(200 m2/2150 ft2 for models over 3000 m2/30000 ft2), you can wire
it in one of two ways.
Page 33
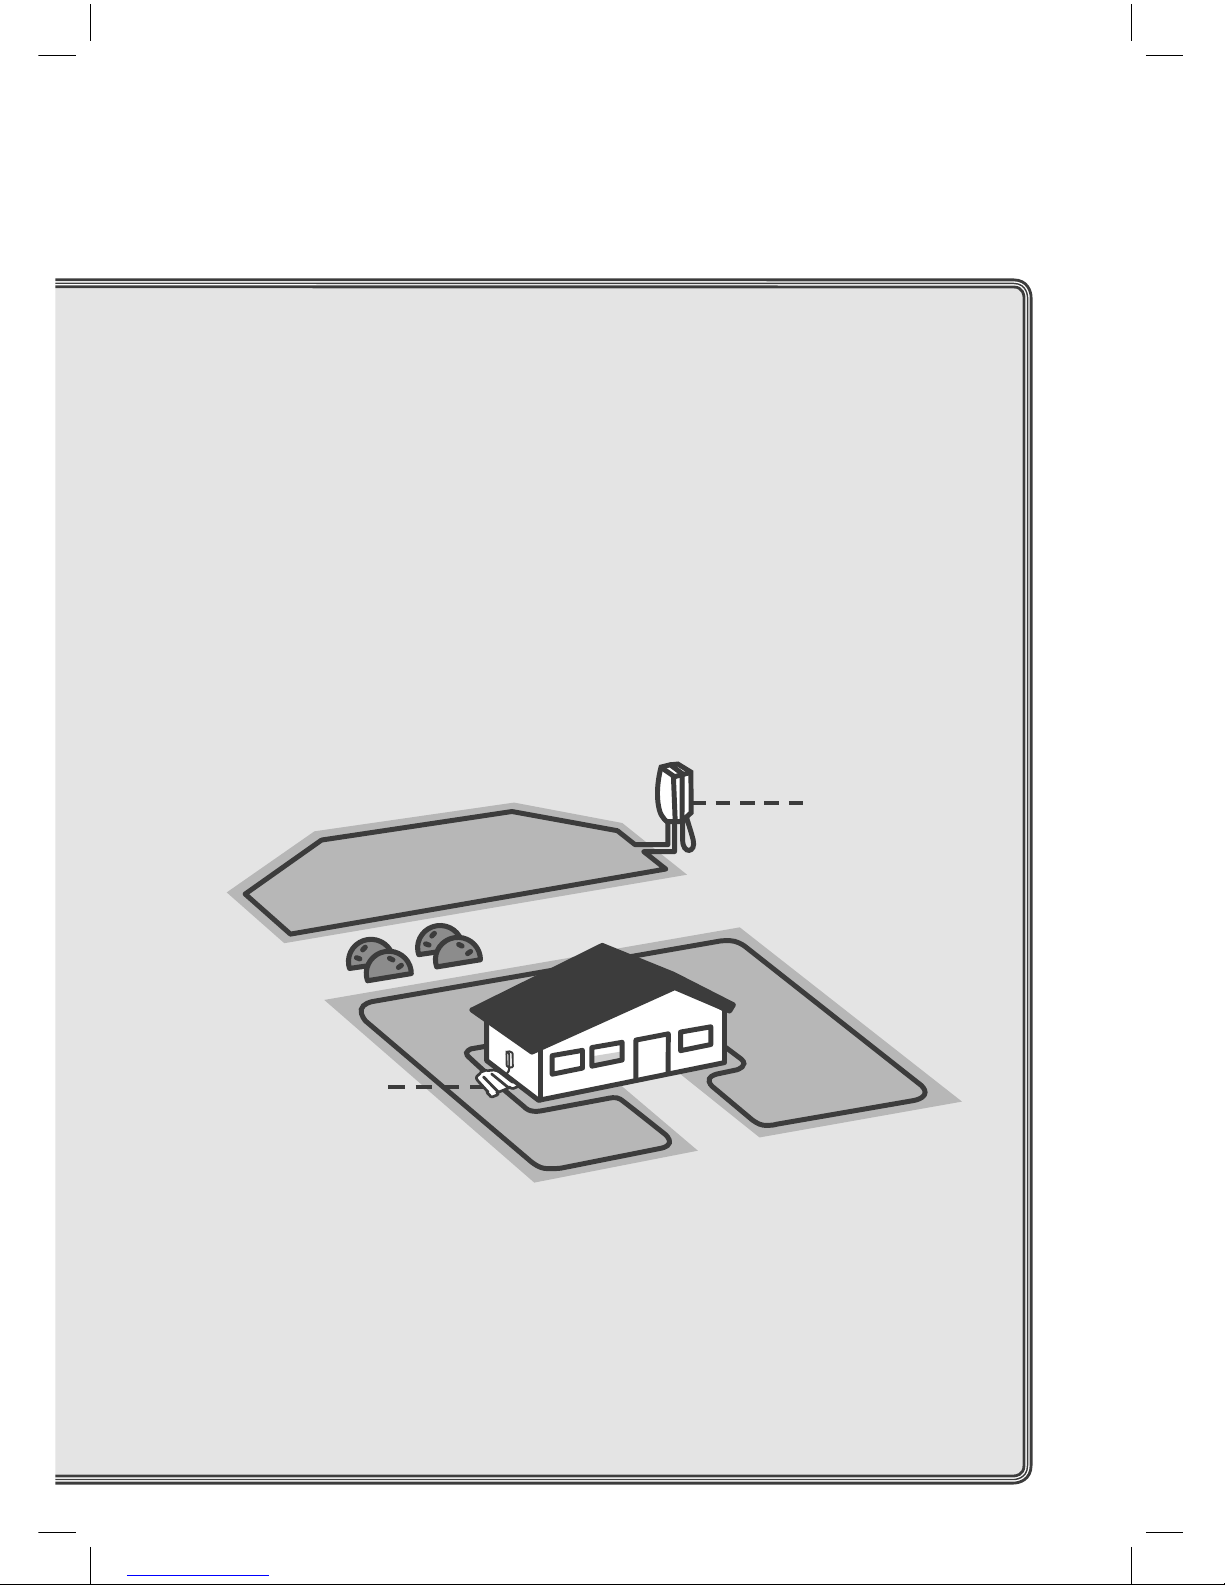
31
OPTION 2
Wire the Zone separately and connect it to a Perimeter Switch
(optional accessory).
Perimeter
Switch
Separated Zone smaller than
200 m
2
(2150 ft
2
)
Main Zone
Power Supply unit
and Base Station
Page 34
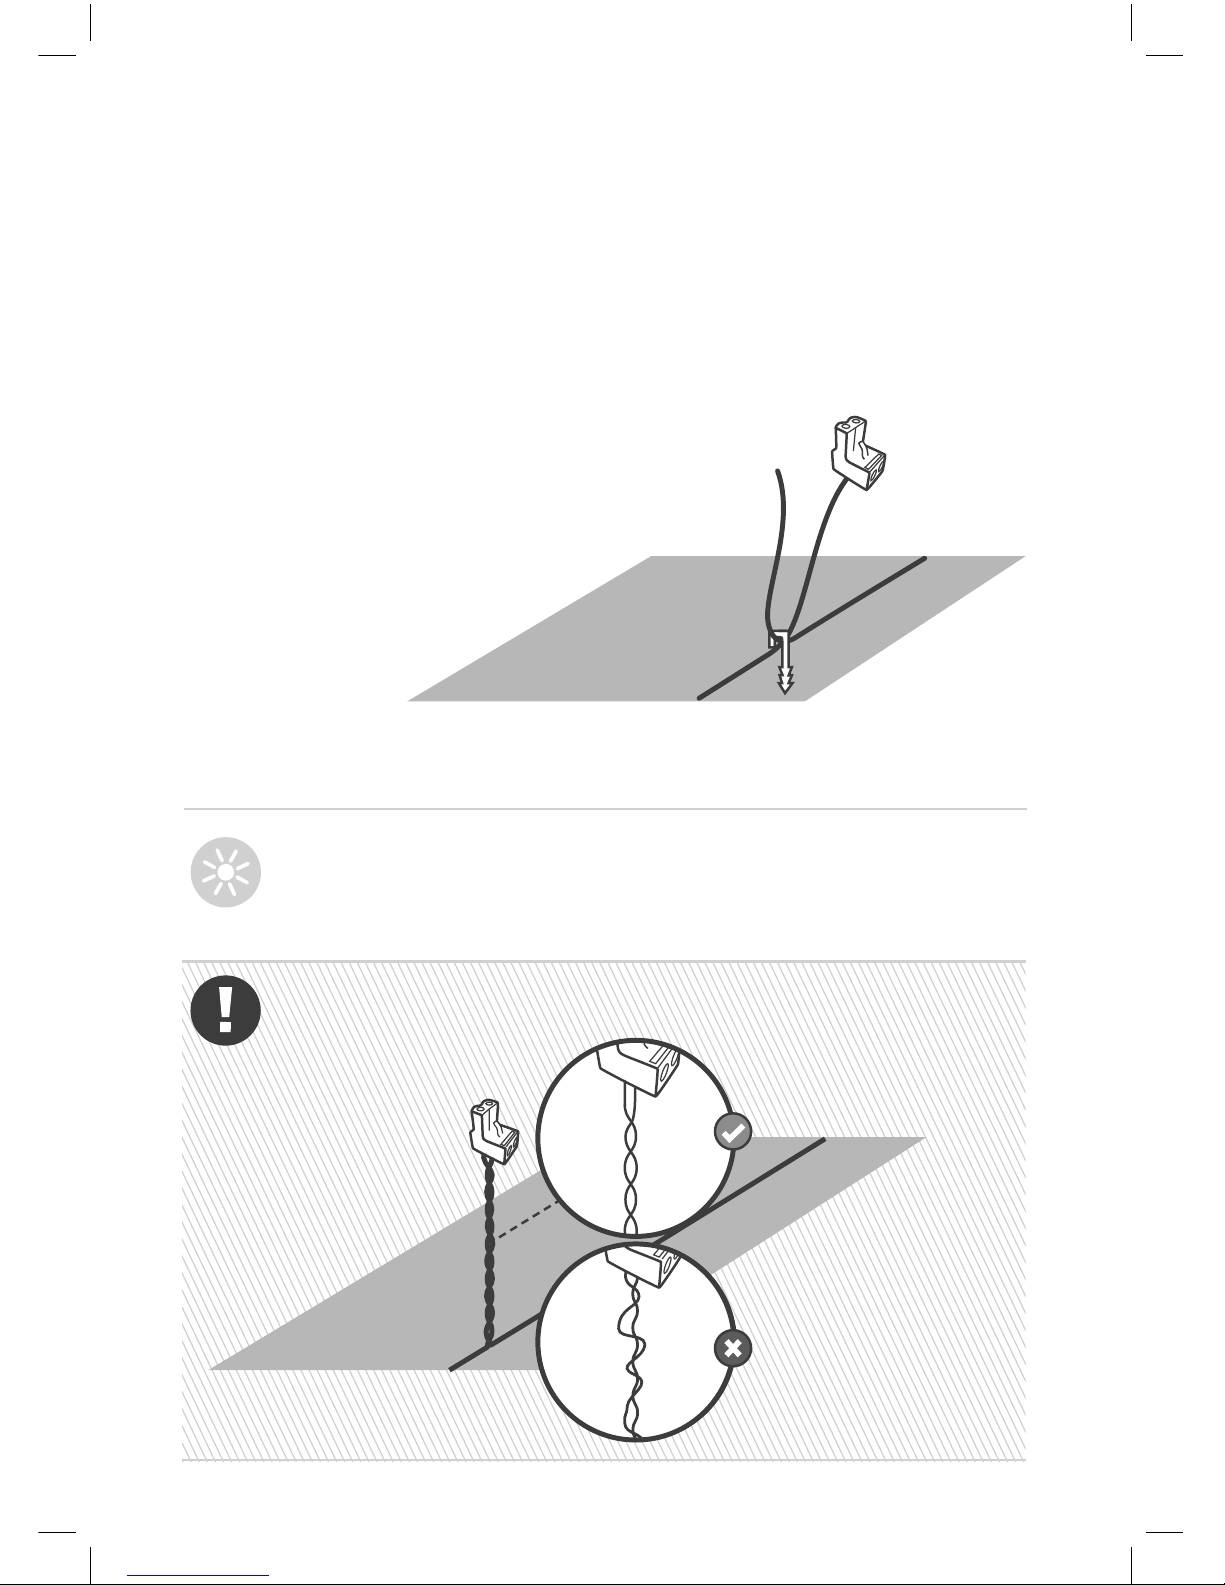
32
Once the Perimeter Wire has
been laid completely, the two
ends of the wire that meet at the
Base Station should be joined
together.
G. Complete Wire Setup
• Use the same peg to fasten both tail ends of the wire
to the ground
• Trim the ends so both wires are the same length
TIPS
Make sure you twist the two wires together properly.
Page 35
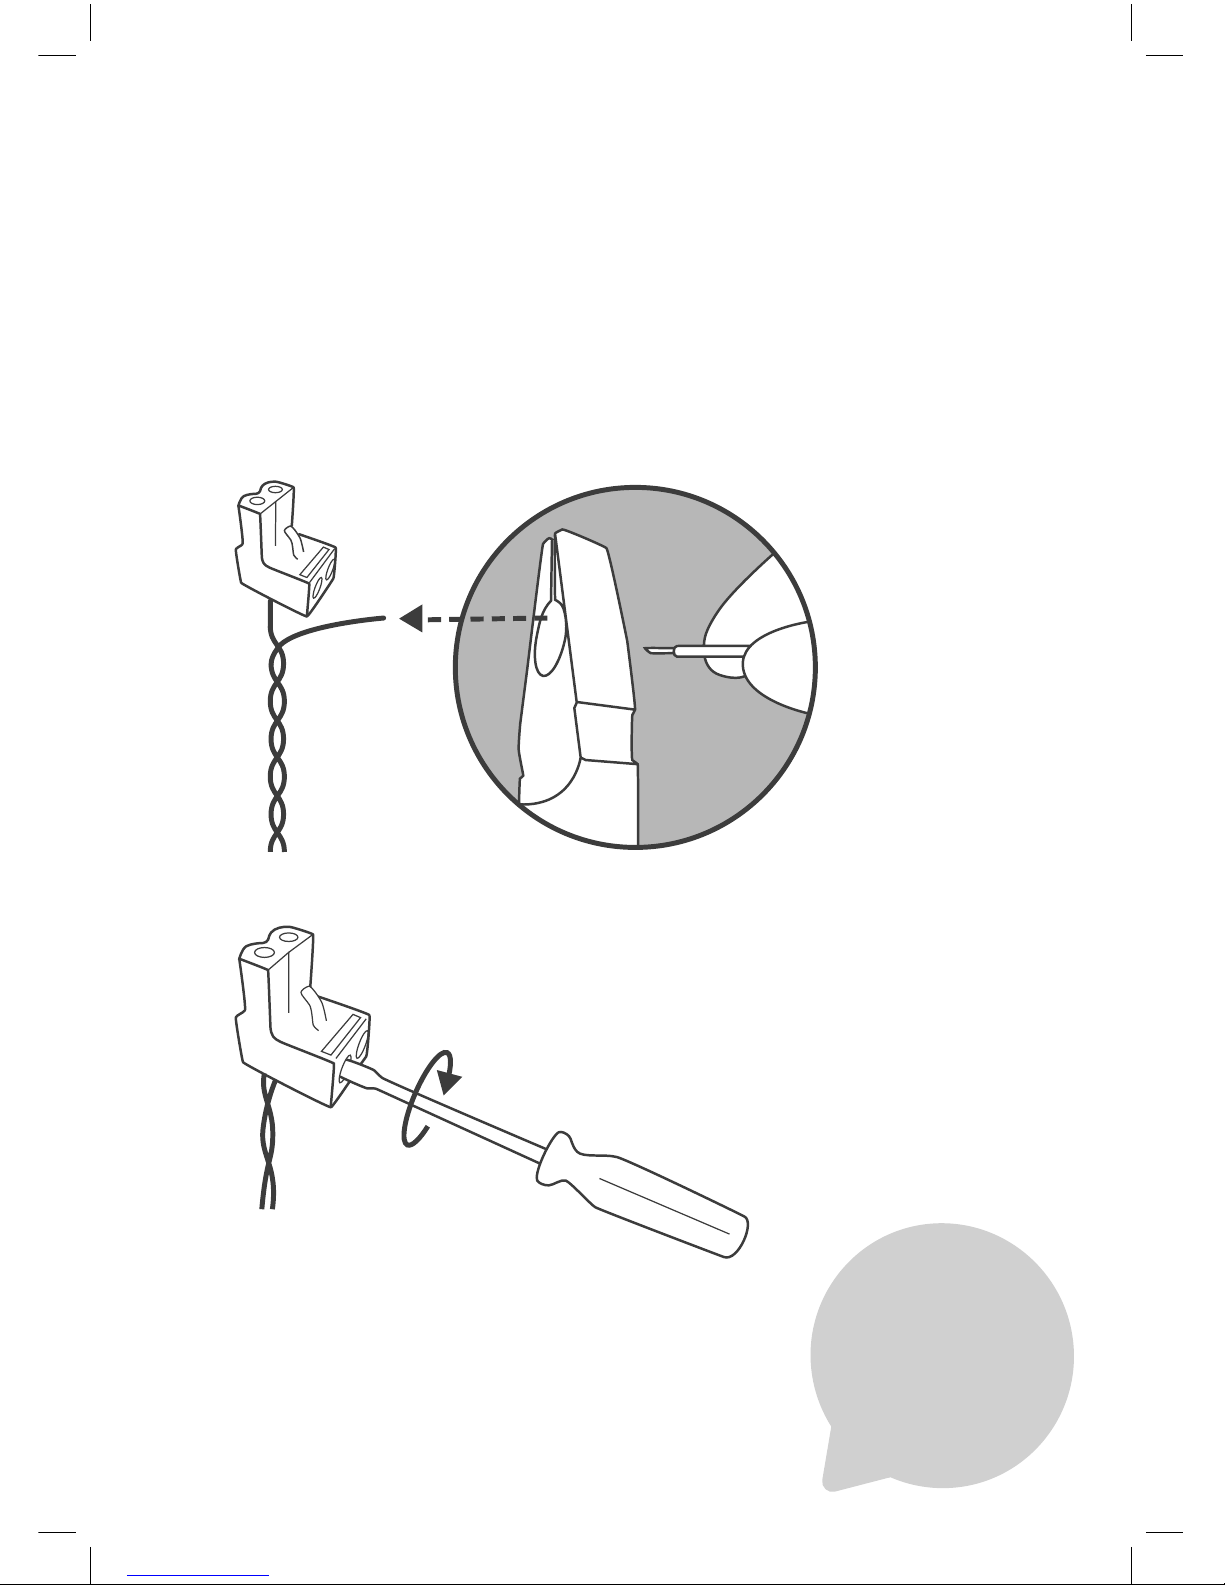
33
Strip back 5 mm (0.2 in) of insulation from the wire ends,
insert the twisted wire into the connector and secure it using a
small flat screwdriver.
Yay! You’ve
done the
hardest
part!
Page 36
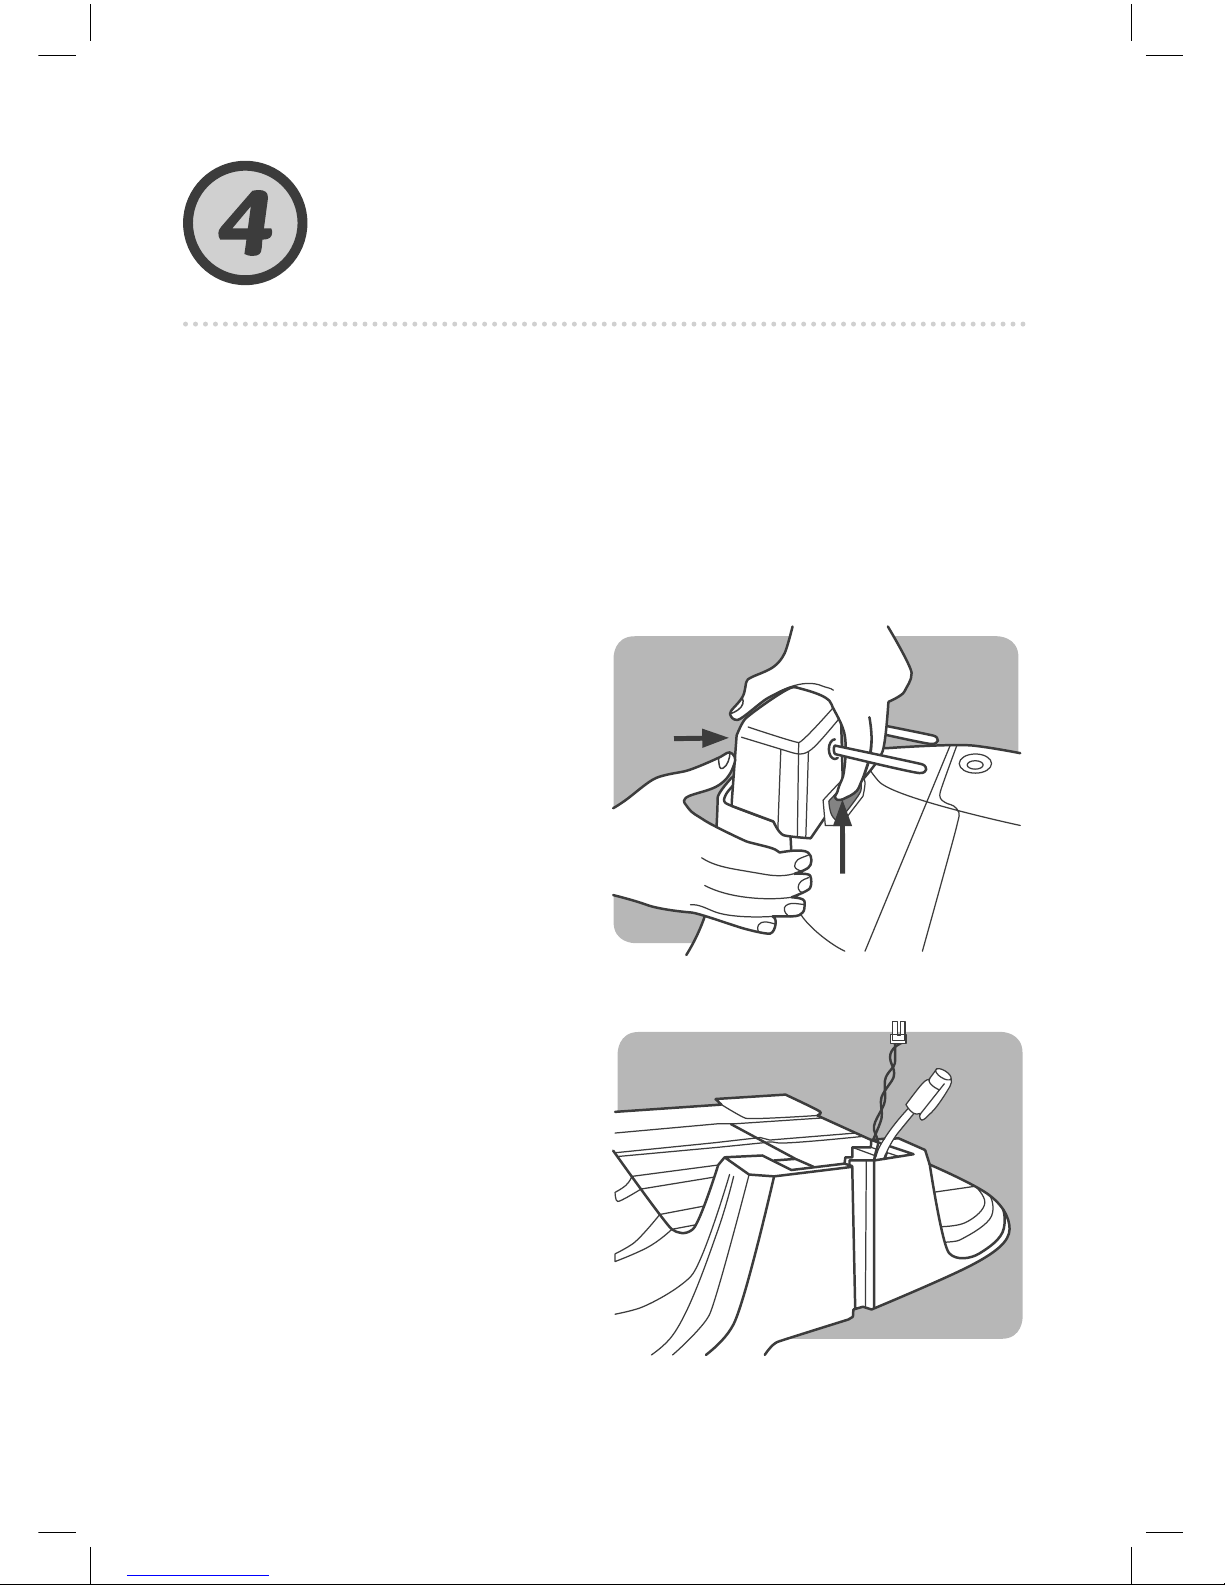
34
Feed both the Perimeter
Wire (A) and the
extension cable (B)
through the slot in the
rear side of the Base
Station.
A. Install and Connect the Base Station
Power
Up
B
Push
A
Pull
A B
Place the Base Station in
its planned location.
Remove the Base
Station’s head from
the Base:
A.
Pull the lever upward.
B.
Push the Base Station’s
head from the front side in
the direction marked.
Install and connect the Base Station and Power Supply
Page 37
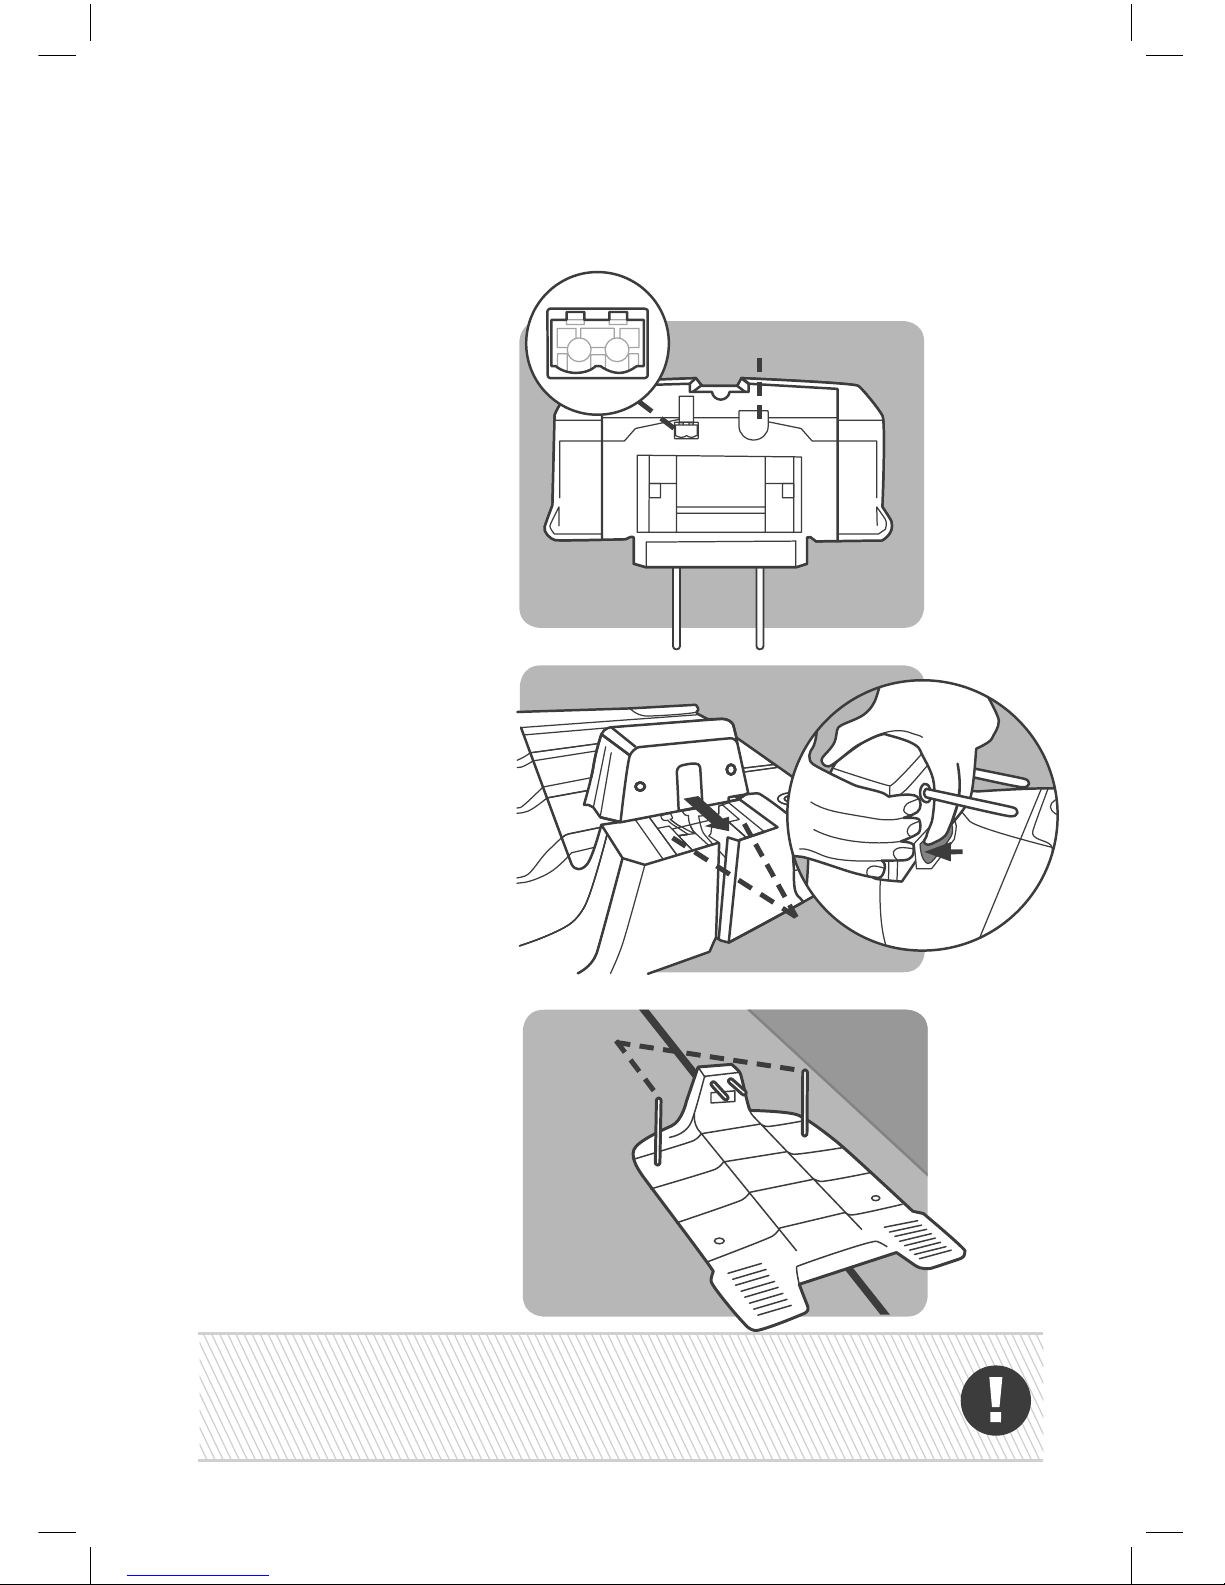
C
35
Feed the Extension Cable
into the Power Supply unit.
Slide the Base Station’s
head back into place on
the sliders (C). Make sure
it is inserted properly all
the way through. Press
the
lever down until it clicks
in place.
Attach the Perimeter Wire
connector to point A on
the Base Station’s head.
Attach the 20 m (65 ft)
extension cable to point
B on the Base Station’s
head.
Place the Base Station in
its location and align it so
that it’s centered over the
Perimeter Wire. Insert
two stakes as shown. The
remaining stakes will be
inserted at a later stage.
Insert
2 rear
stakes
BA
Be careful not to damage irrigation pipes when hammering
down the stakes.
Press &
Click
Page 38
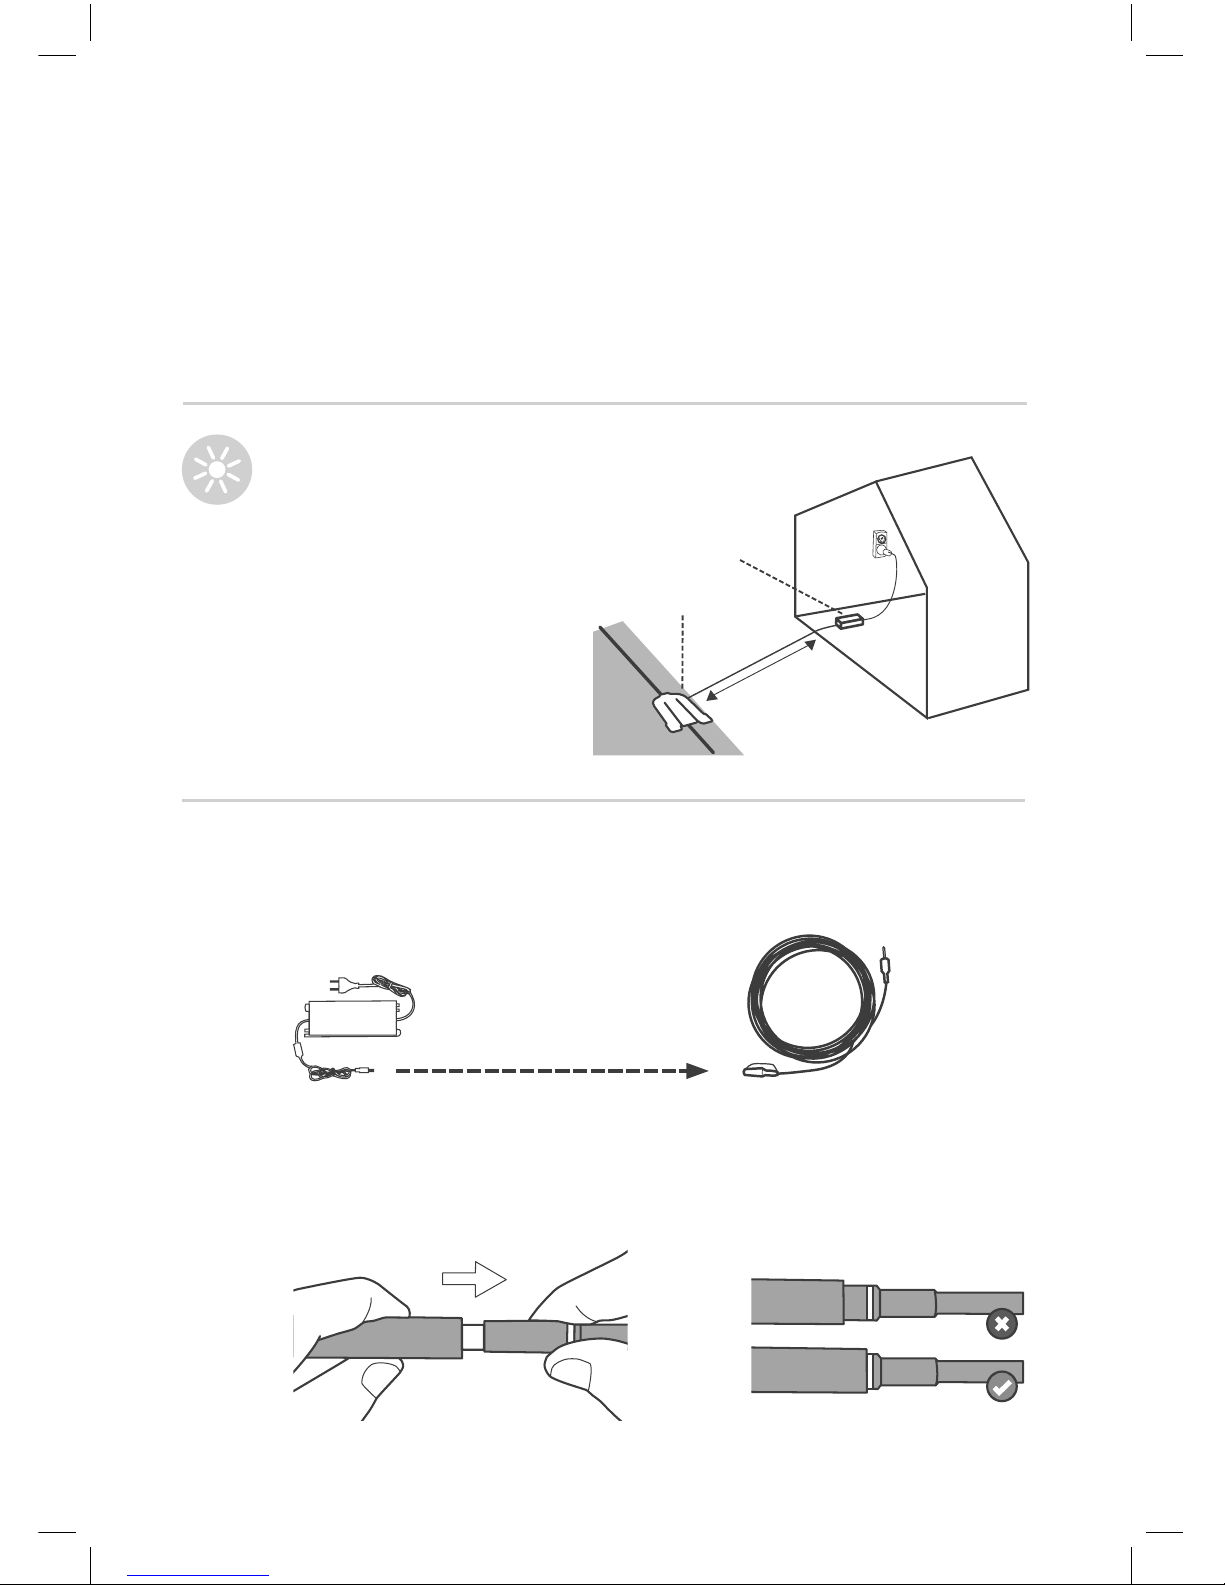
B. Connect the Power Supply unit
Consider the following
in order to select a proper
location for the Power
Supply unit:
• Select a suitable location
near a power outlet
• Position it outside the lawn
perimeter
• A dry and sheltered
location is preferable
TIP
Power
Supply unit
Base
Station
20 m (65 ft)
Extension cable
[low voltage]
Make sure the connector is inserted the whole way
up to the white mark.
Connect the DC cable from the Power Supply unit to
the 20 m (65 ft) extension cable.
36
Page 39
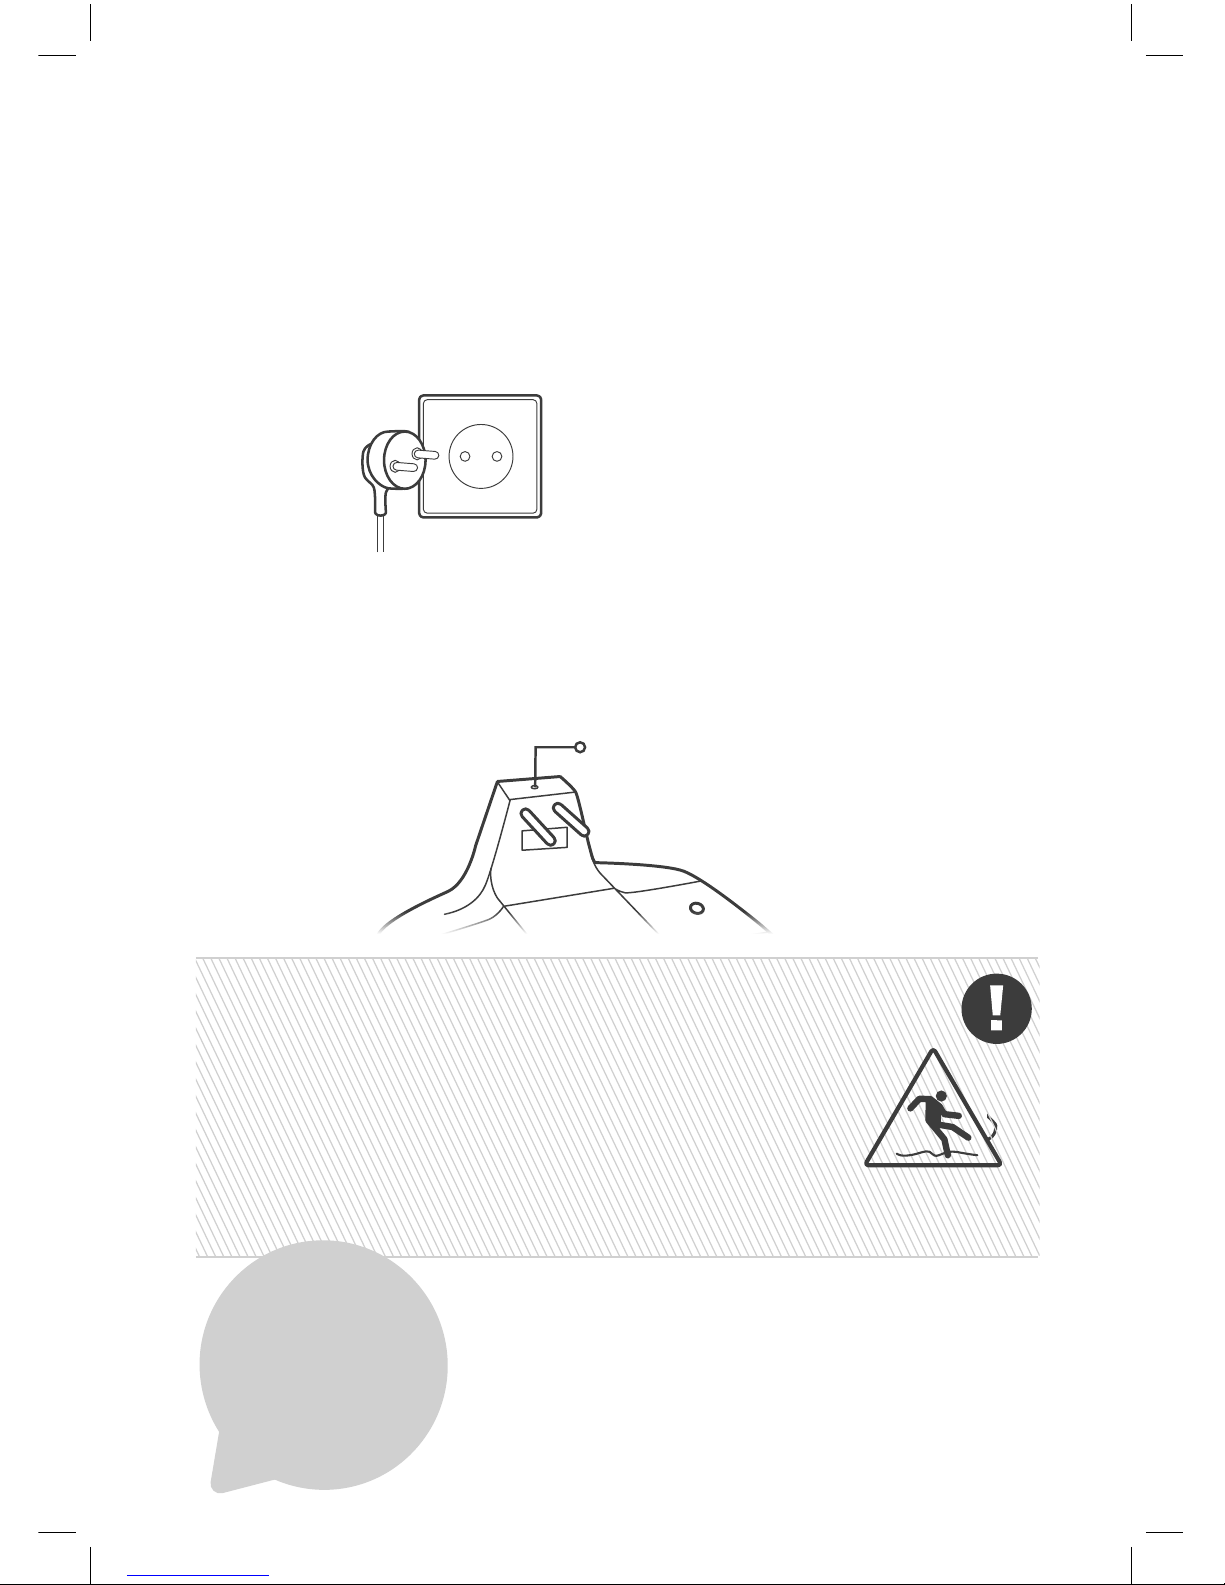
Connect the Power Supply unit to a regular power outlet.
LED indication
Now you should see the LED indication on the Base Station
blinking green (if the mower is outside), or steady green (if the
mower is inside the Base Station).
The Extension Cable from the Power Supply to the Base
Station should be securely fastened to the ground! It
should never present a tripping hazard.
The Extension Cable should cross ONLY over soft
surfaces. It should not cross over hard surfaces (e.g.,
sidewalk, driveway) where it cannot be securely fastened.
Caution
Just one
more step
to go...;)
37
Page 40
38
Congratulations! Now you are ready to give it a whirl.
WHAT YOU’LL NEED:
• The mower
• Remaining Pegs
• Remaining Base Station stakes
... A glass of champagne (or equivalent)
A. Start up
There are a few things to do before your mower can start.
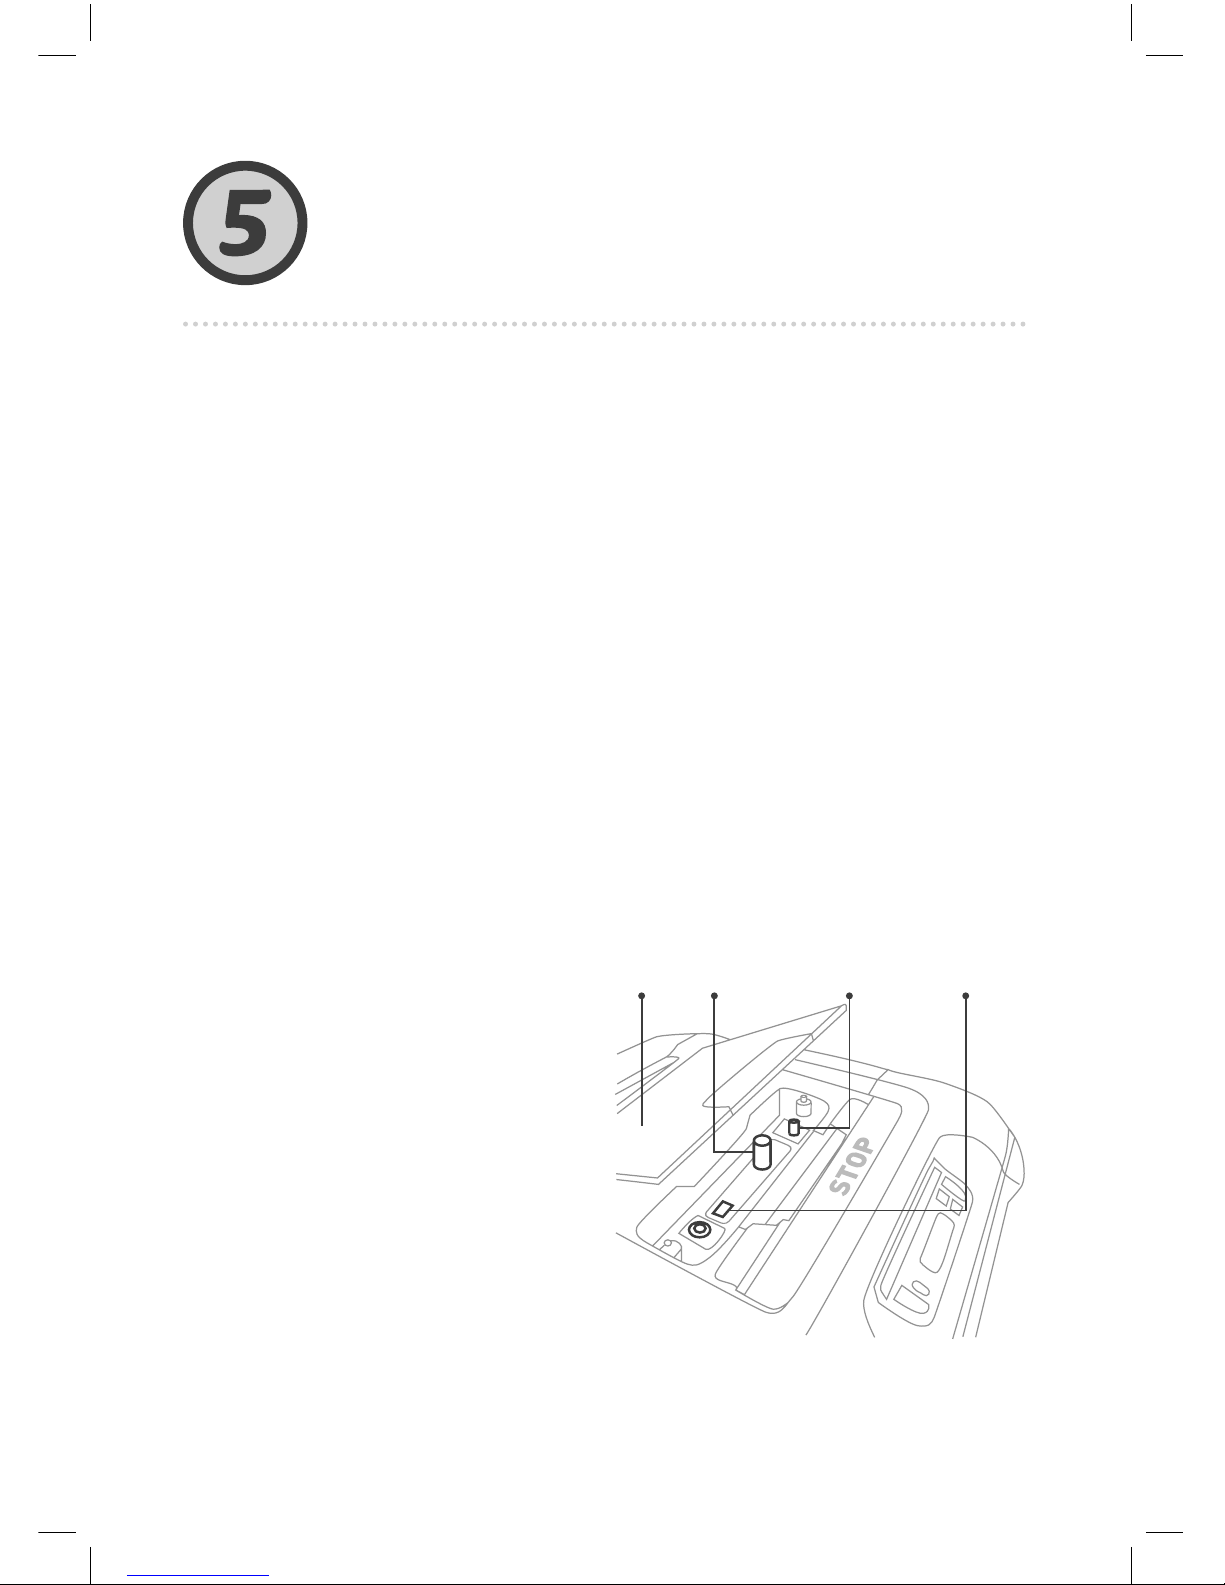
Ready, Set,
Test
Adjust the cutting height
(20-80 mm/0.8-3 in)
by turning the mowing
height adjustment knob
while pushing it down.
Prepare your mower and give it a test drive.
Cover
Door
Mowing Height
Adjustment
Knob
Mowing
Height
Indicator
Safety
Switch
Page 41
39
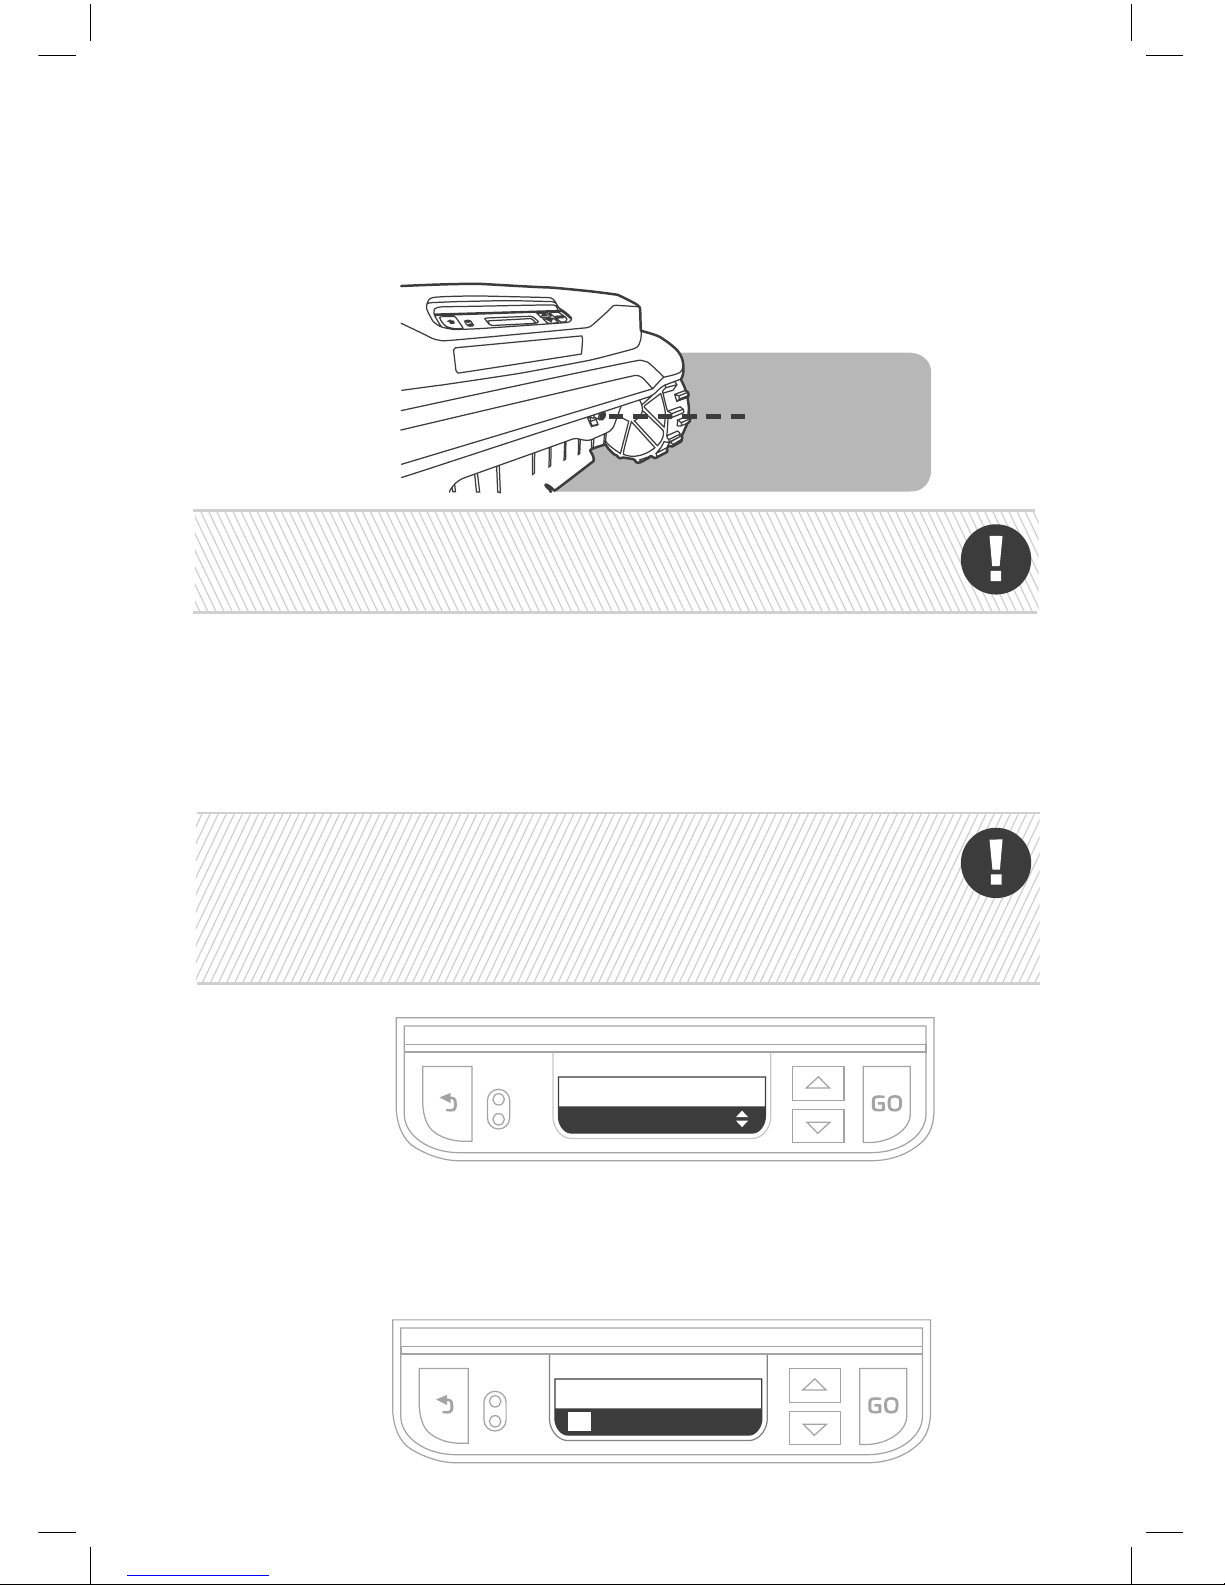
Caution
Make sure the fuse holder is fully screwed in.
Switch on the Safety Switch.
Caution
Your mower has enough power to complete the
configuration. Then, before mowing for the first time, you’ll
need to do a first-time charge that will take up to 24 hours.
B. Set Basic Settings
Follow the instructions on the screen for a quick initial configuration.
Set Language
Select language
English
Scroll with the arrows to select the desired value.
Press GO to confirm the selection and move to the next item.
To go back a step or cancel an action, press the back arrow.
Set Date
Set Date
OK
17 / 09 / 2016
Insert the fuse.
Fuse
Page 42
40
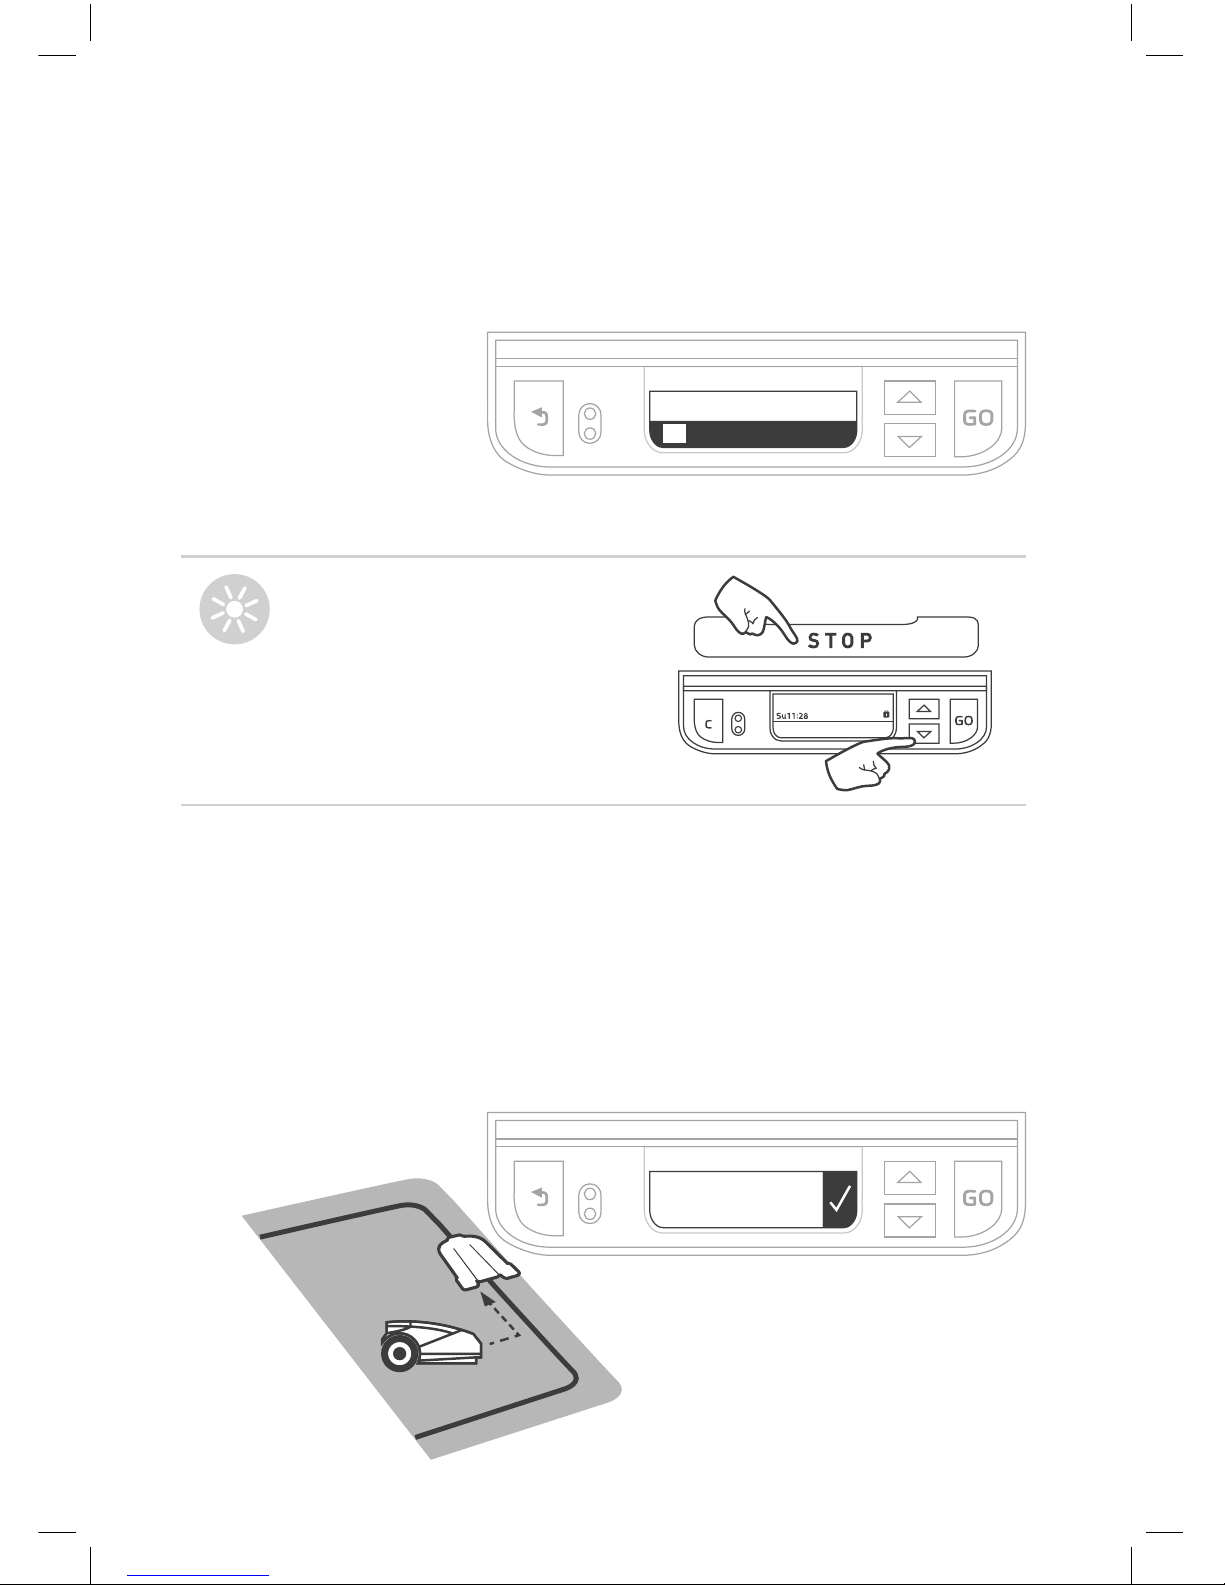
Test Base
Station Position
C. Test Base Station Position
Place the mower on the lawn, 3 m (10 ft) in front of the
entrance to the Base Station, facing the Perimeter Wire, and
press GO to start the test.
TIPS
To restart the setup
at any time, press and
hold STOP + down
arrow together for at
least 4 seconds.
Set Time
Set Time
OK
13 : 45
Page 43
41
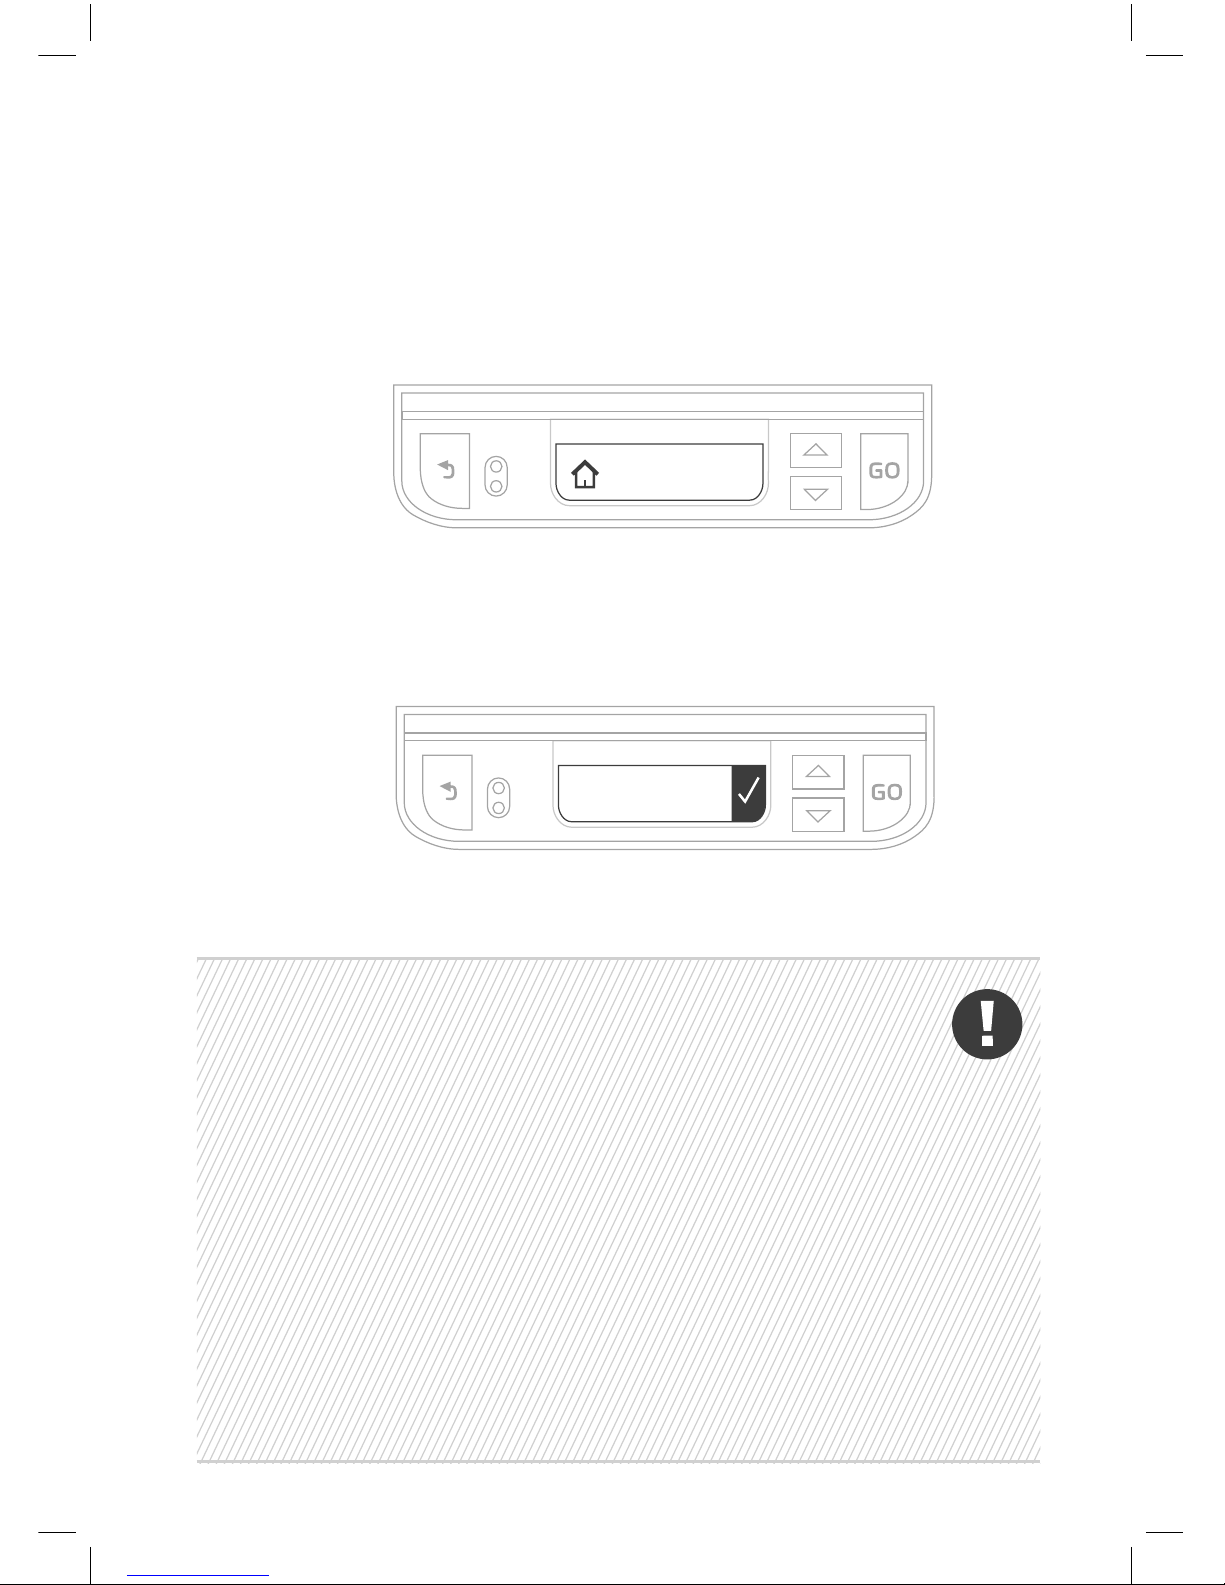
The mower will drive to the Base Station and enter it.
Next, it will drive out and wait in front of the Base Station and
tell you to Peg Base. Insert the remaining four stakes into the
Base Station. Press GO.
Peg
Base
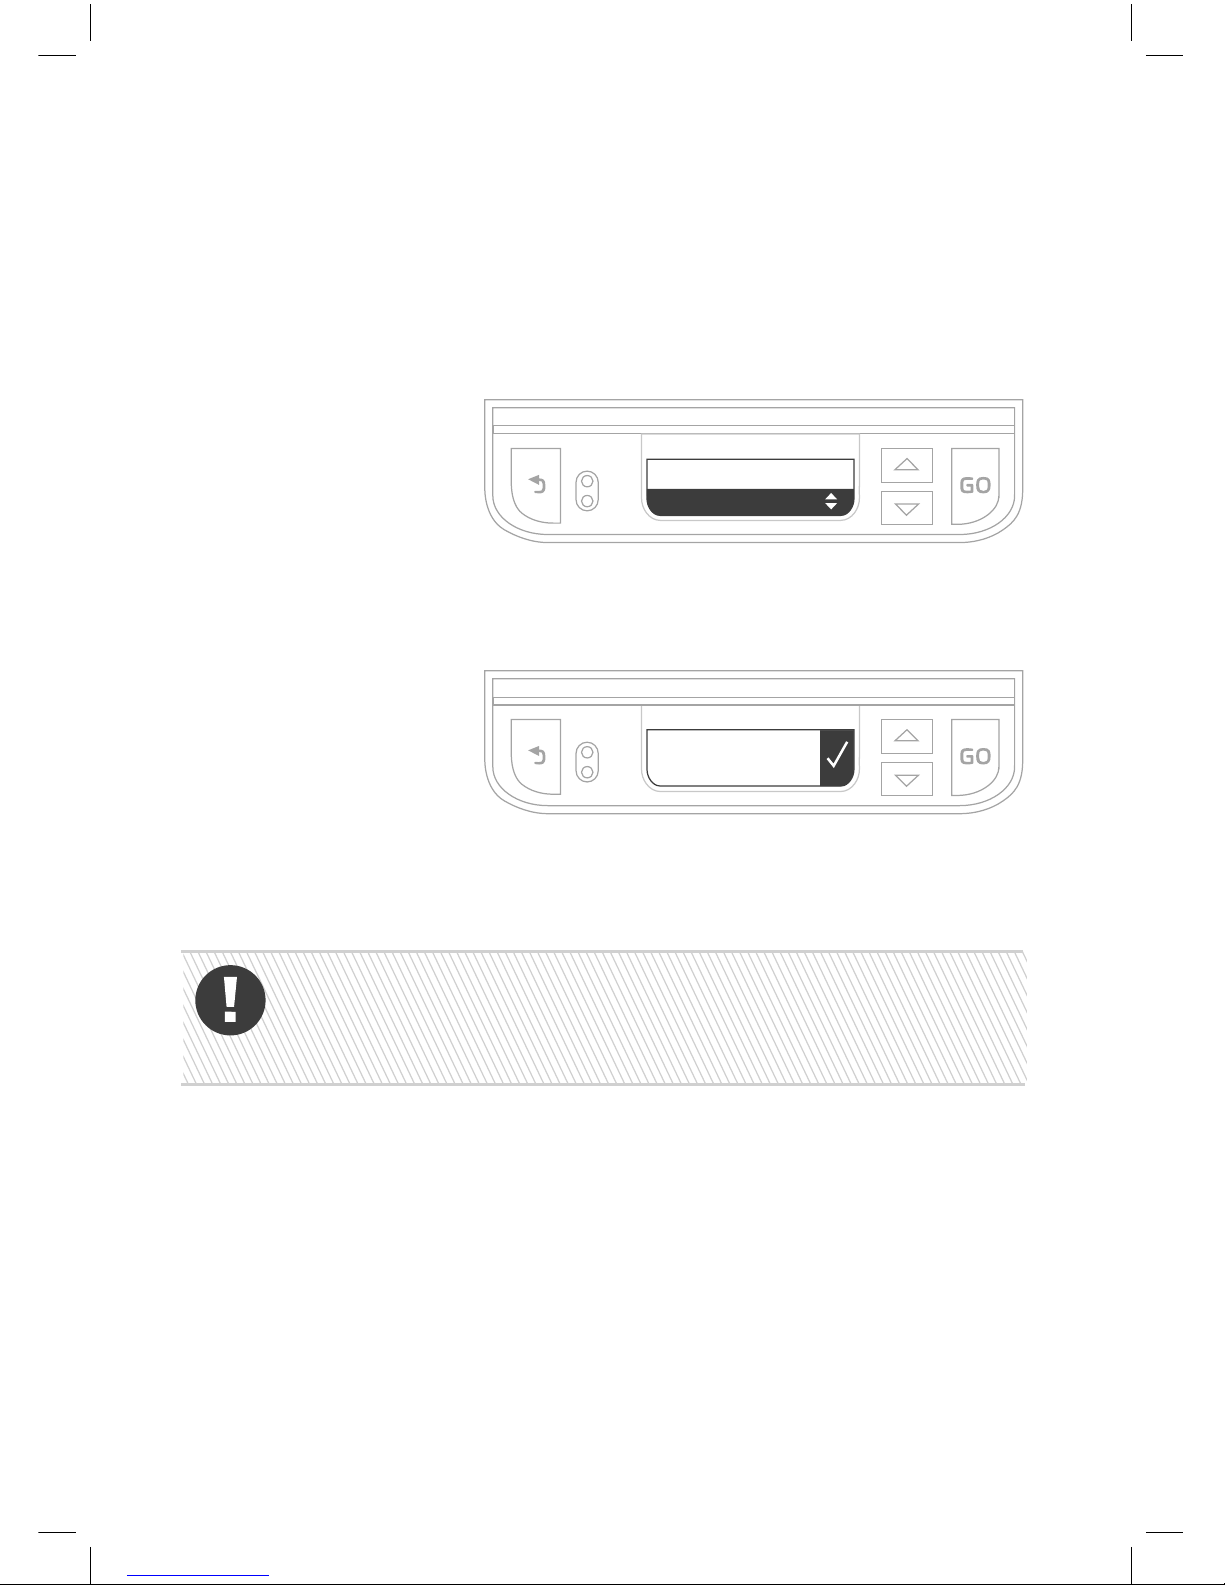
• If the “No wire signal” message is displayed, check
that the Power Supply unit, extension cable and Base
Station wires are all connected properly. Check for
possible Perimeter Wire cuts.
• If the “Change wires in plot connector” message is
displayed, swap the wires at the plot connector.
• If the “Reposition Base Station” message is displayed,
check that the Base Station is aligned with the
Perimeter Wire. Move any obstacles preventing entry
into the Base Station.
• Be careful not to damage irrigation pipes when
hammering down the stakes.
Searching
Base
Page 44
42
E. Add Sub Zones
The mower will now prompt you to add any additional
Sub Zone(s). Select X to skip this section if you don’t have any
Sub Zones.
If you select the Sub Zone option, the mower will travel along
the wire to the Sub Zone on its own. When it is at least 5 m (16
ft) inside the Sub Zone, press STOP and select the area size of
the Sub Zone. After finishing the process, the mower will drive
back to the Base Station.
D. Test Perimeter Wire
Walk alongside as the mower tours the perimeter. At the end of
a successful tour the message “Wire test succeeded!” will be
displayed and the mower will reenter the Base Station. Press GO.
If the “Adjust wire” message is displayed and the mower stops
and drives backwards, move the wire slightly inward and press
GO to continue the wire test.
Test Wire
Position
Main Zone Area?
200-300 m
2
Enter the size of your Main Zone area. When you see the
message “Test wire position,” it means your mower is ready
to test. Press GO. It will start driving.
Page 45
43
Don’t worry if your lawn looks patchy for the first few days.
It will even out after the first few mows!
Caution
• The Safety Switch should be set to ‘On’ during charging
• Don’t touch the blades
• Never mow when people, especially children or pets, are
nearby.
• Make sure the lawn is clear of debris
G. Charge your mower
Place your mower on the Base Station and let it fully charge
before its first mow (up to 24 hours). Once it is fully charged, it
will depart automatically according to its mowing schedule.
F. Finish Installing the Perimeter Wire
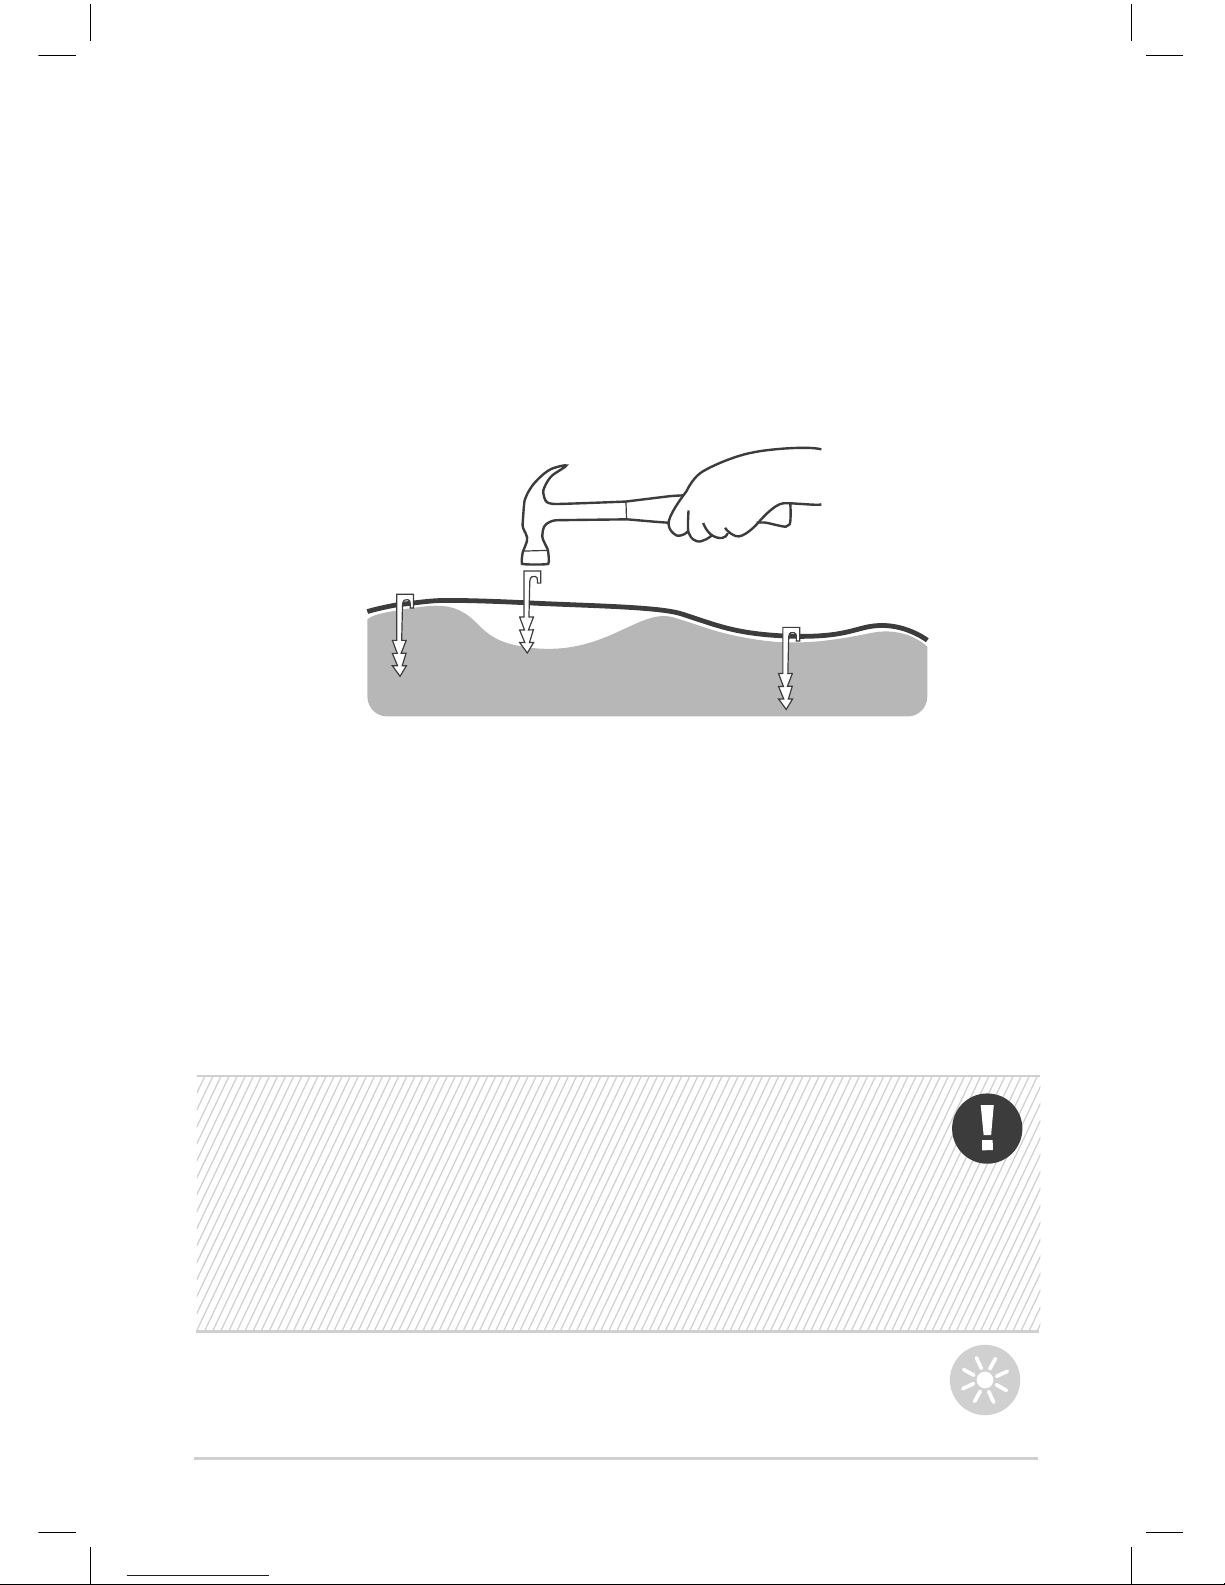
Insert the remaining pegs along the Perimeter Wire, approx.
1 m (3.3 ft) apart.
Hammer the extension cable into the ground so it’s not a
tripping hazard.
TIP
Page 46
44
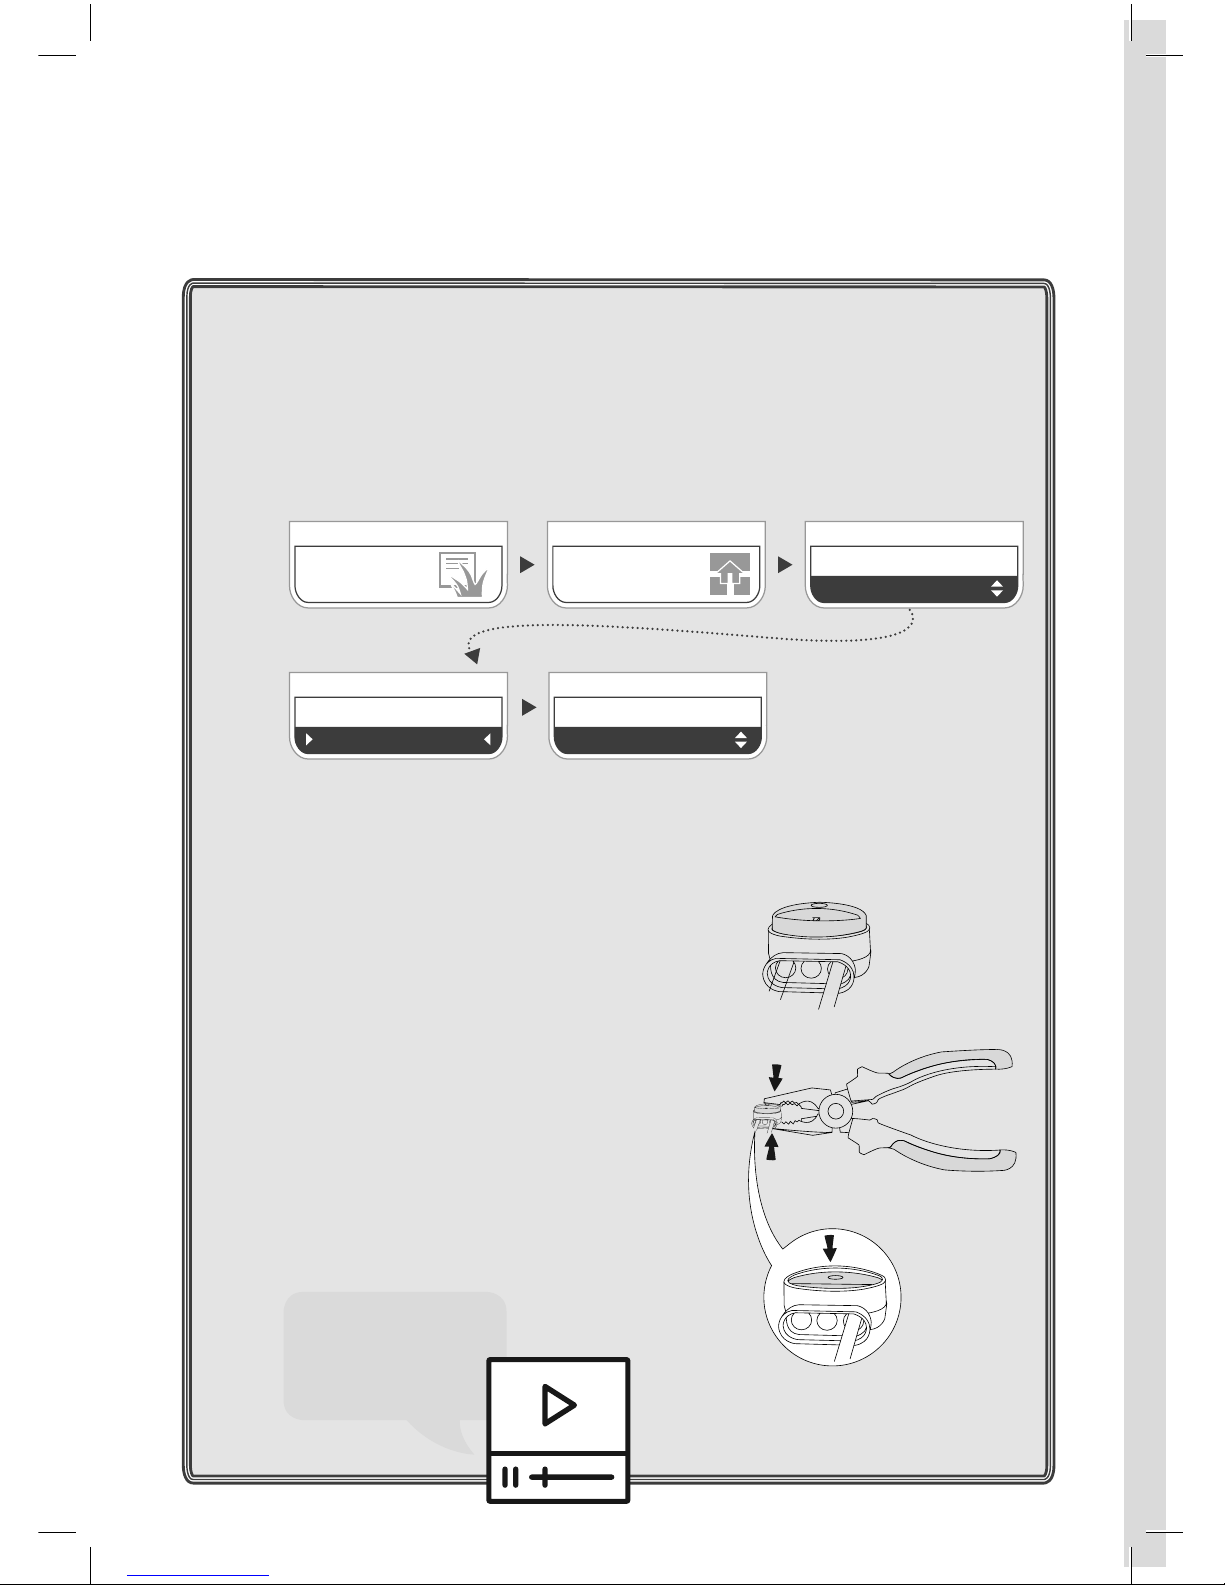
A. Are there any Separated Zones?
For lawns that have completely noncontiguous
Separated Zones, the area of these zones needs to be
programmed separately.
B. Splicing the Perimeter Wire
(as needed)
Zones
Add
Sub Zone
Separated Zone
Zones A Area
200 - 300 m
2
Lawn
Options
Zones
• Insert both wire ends into
the leftmost and rightmost
positions on the connector.
• Verify that the wires are fully
inserted into the connector.
• Use a pair of pliers to press
the button on top of the
connector. The button should
be fully pressed, without
damaging the connector.
A helpful video
is available
online
Page 47

45
Well Done!
Now relax, and let your
mower do the work.
Page 48
46
Knowing your mower
Menu structure
Automatic operation
Manual operation
Features - how to
Periodic maintenance
Troubleshooting
FAQs
Page 49
47
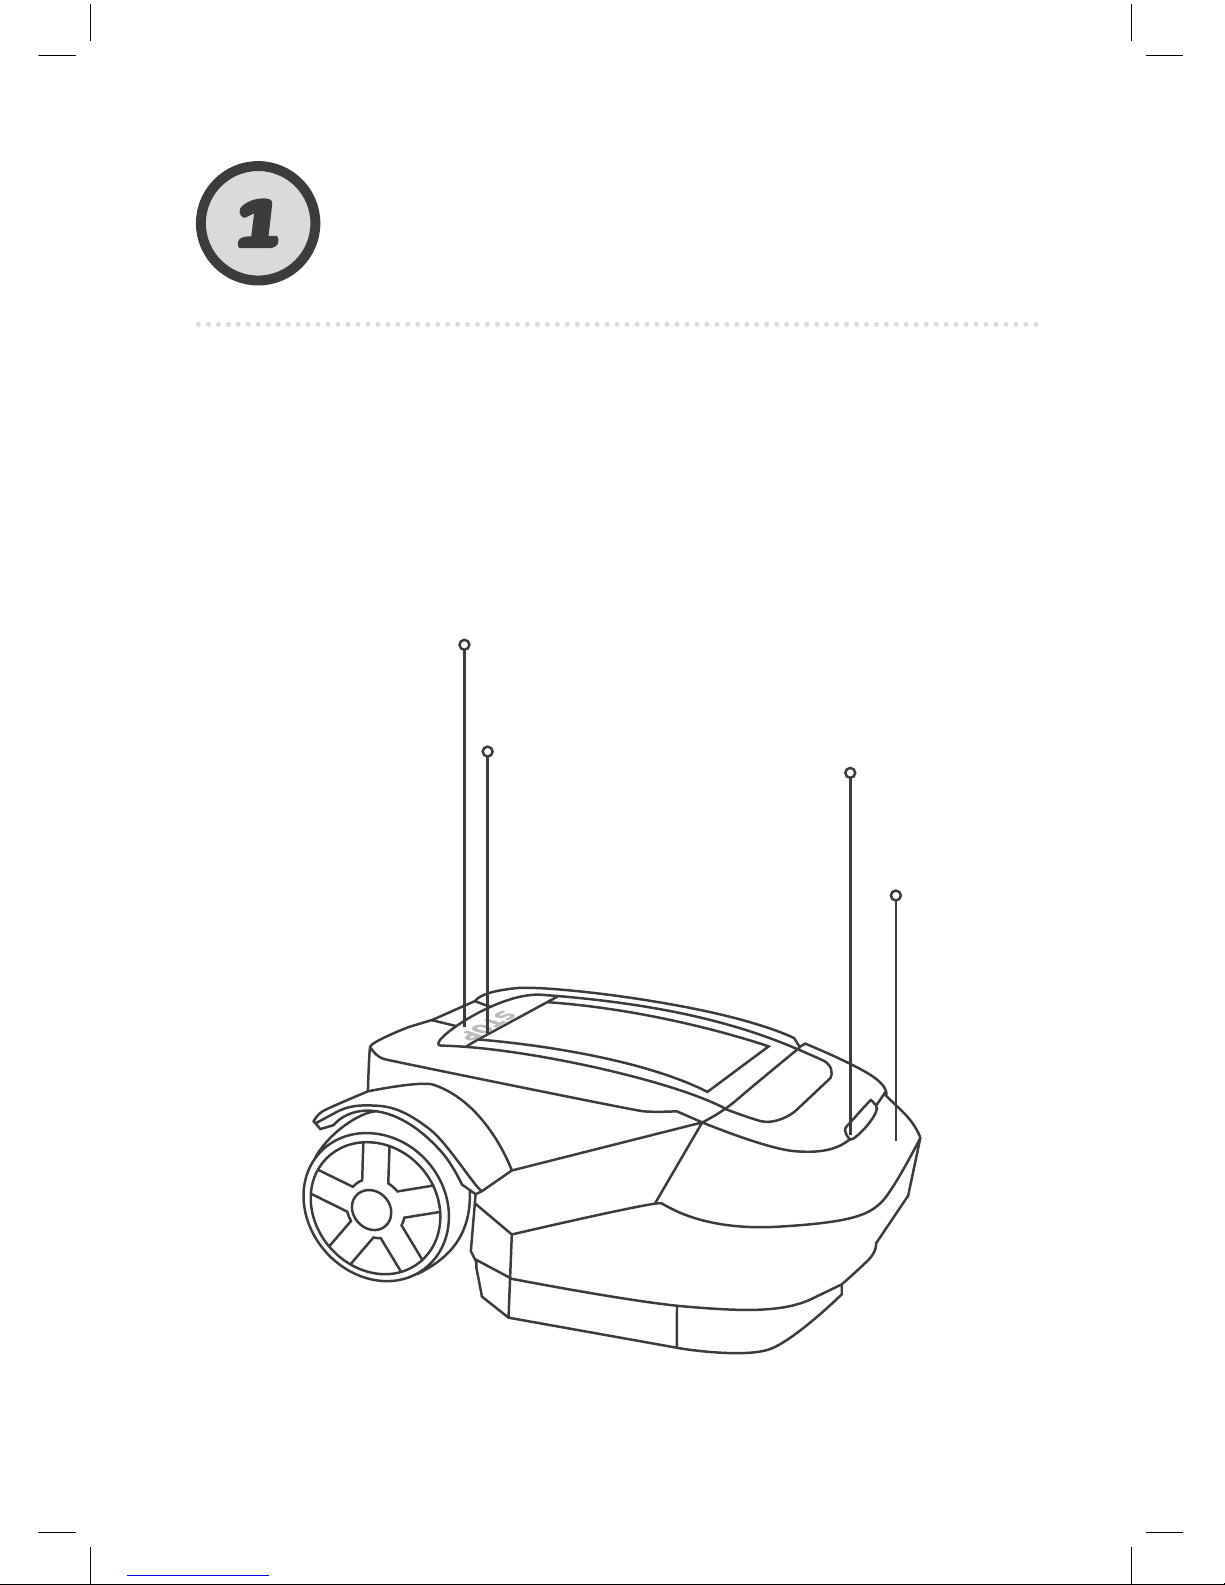
In order to fully enjoy your mower, learn about its different parts
and messages. Understanding how it works and “interacts”
will lead to its smooth and easy operation.
Knowing your
mower
External Parts
Operating Panel
Operating Light
STOP Button /
Carrying Handle
Touch
Sensitive
Bumper
Page 50
48
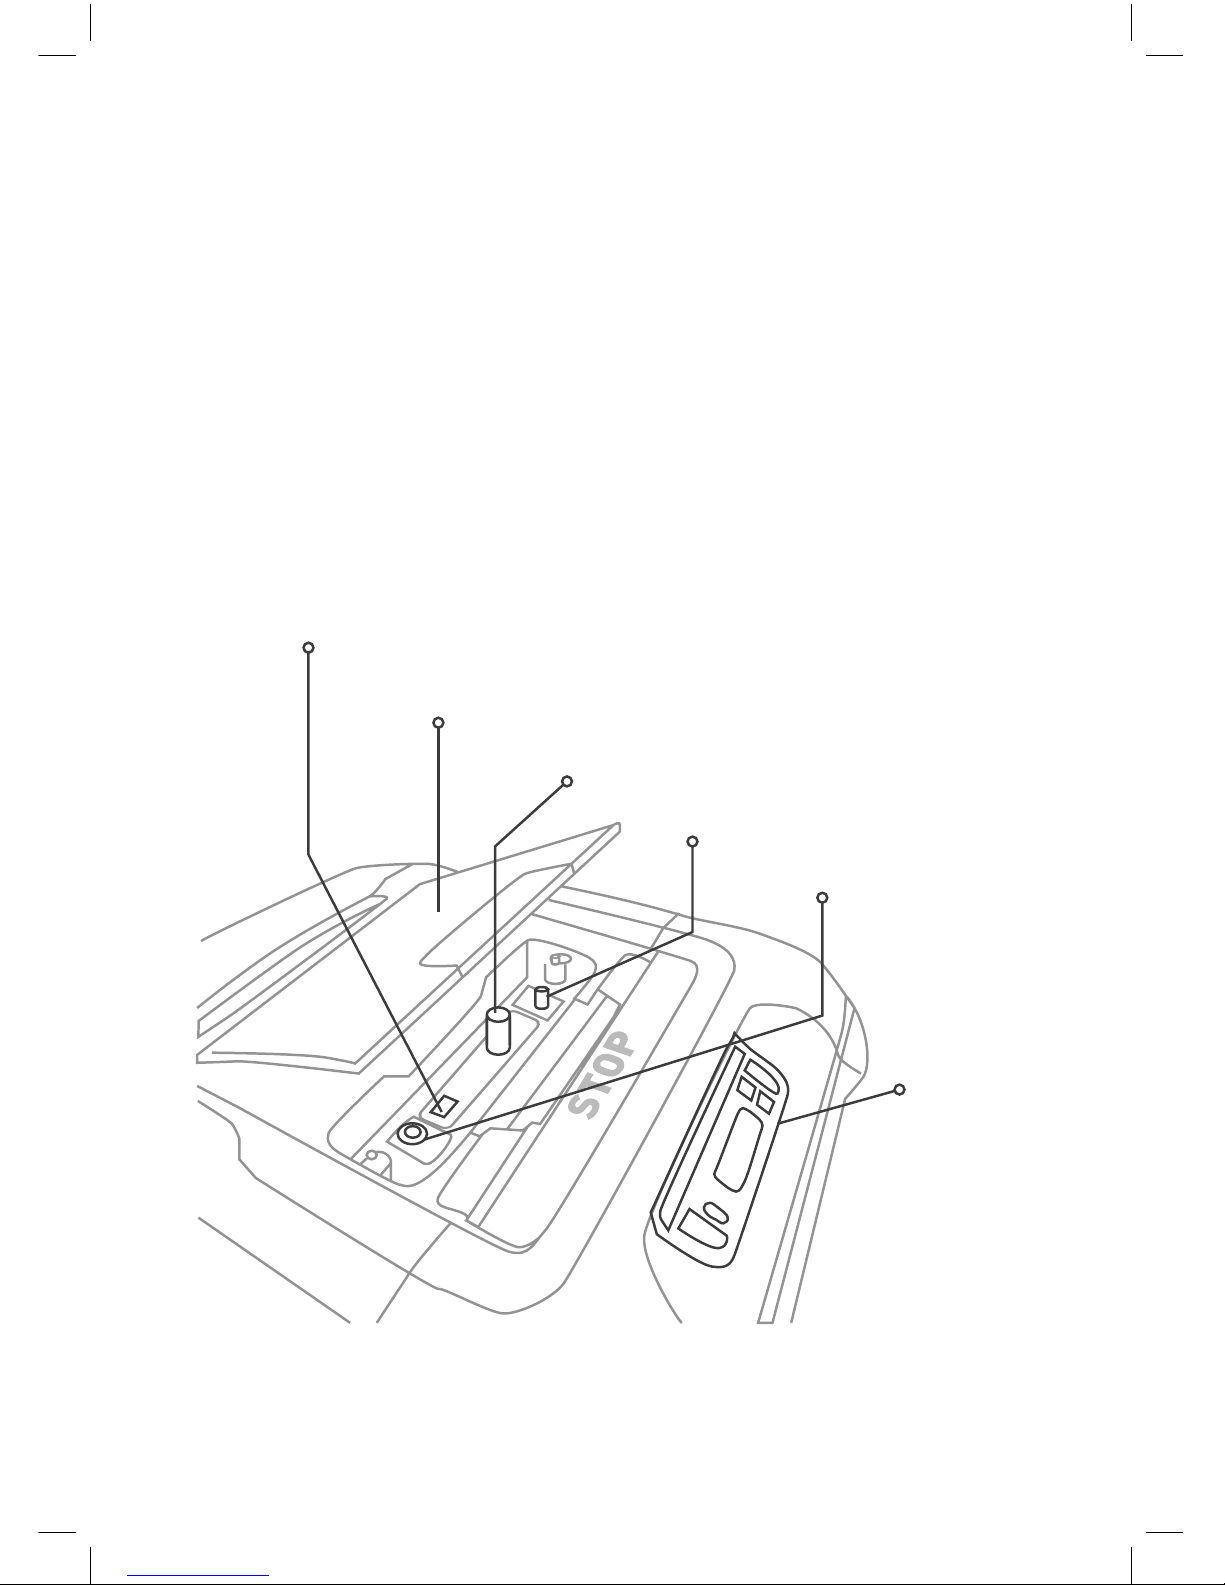
Under the Hood Parts
Cover Door
Mowing Height Adjustment Knob
Safety Switch
Fuse Storage
Mowing Height Indicator
Operation
Panel
Page 51
49
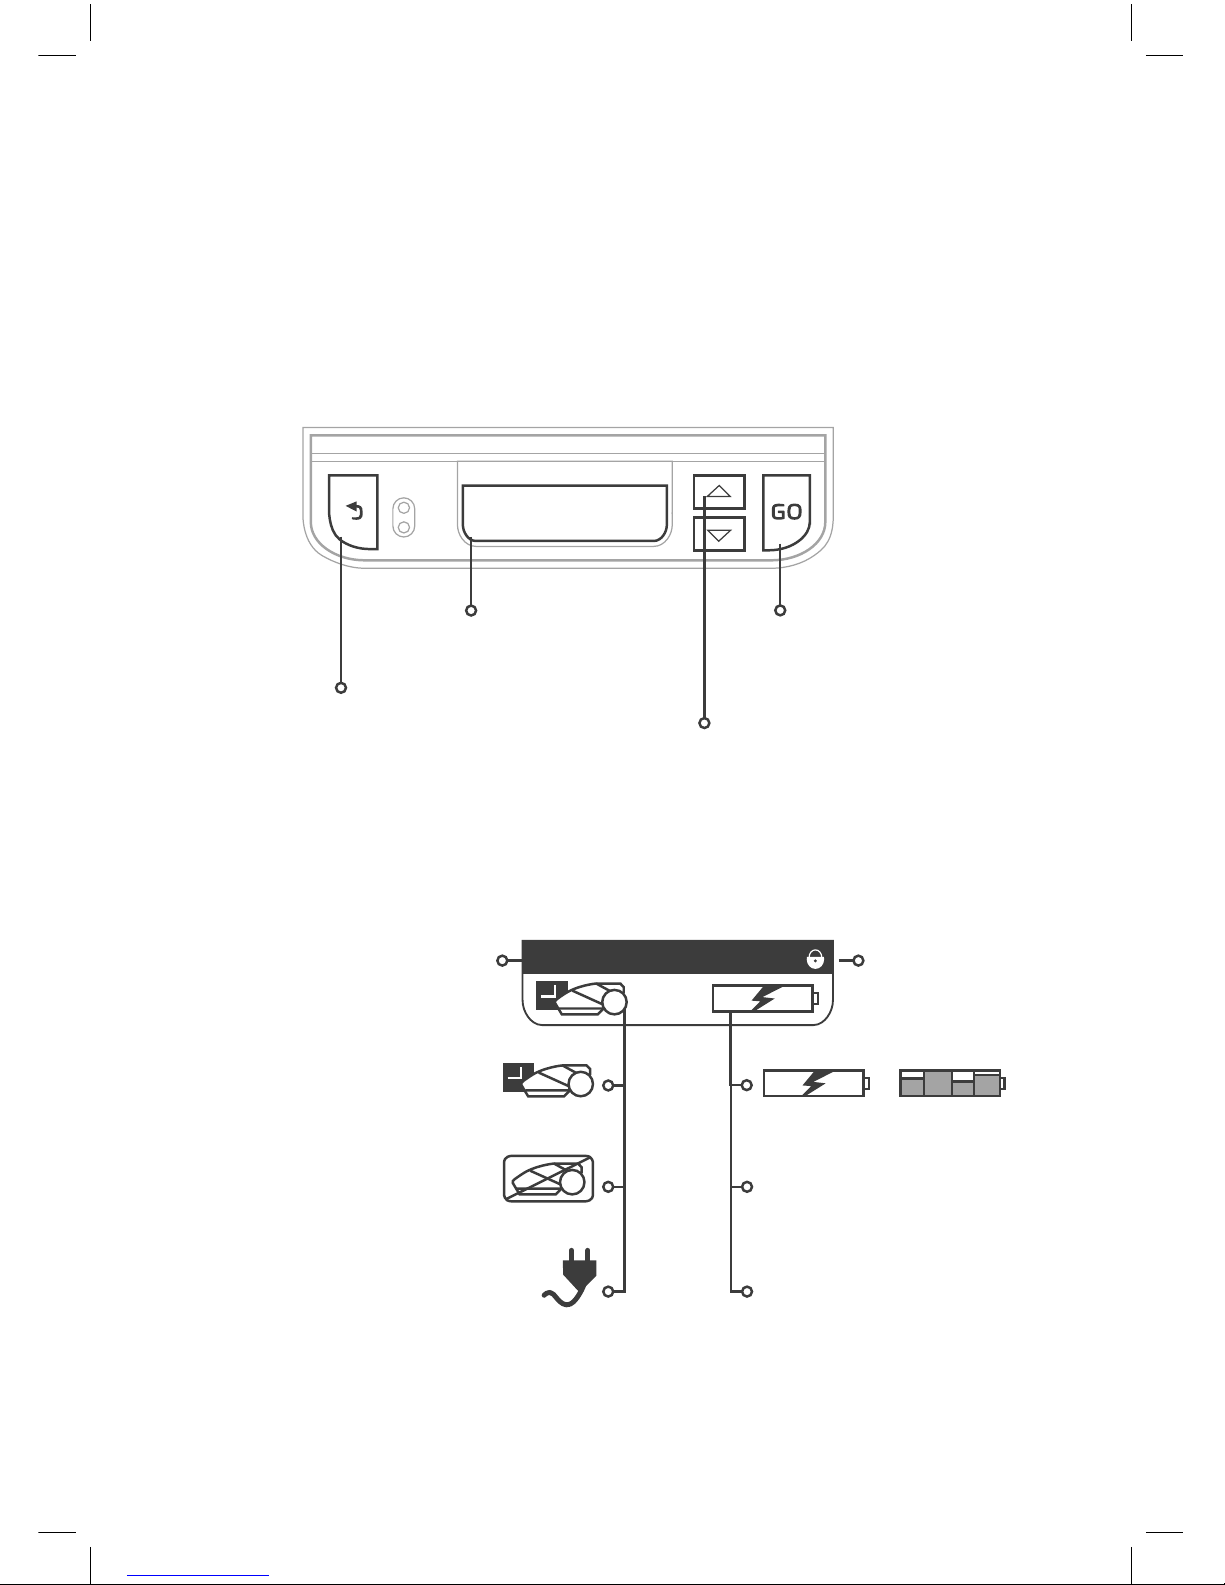
Operation Panel
LCD display
LCD Display window
Scroll arrows for
menu selection
Go button is used
to Select a menu
option or confirm a
displayed message.
Back button is used to
cancel a selection or go one
step back in the menu.
Battery is charging /
balancing battery cells
Anti-theft is
activated
Current Day
and Time
Battery is fully charged
Ready
Next operation time.
Displayed when a
mowing cycle is
completed and the
battery is fully charge.
Mo 06:00
Mowing Schedule is On
Mowing Schedule is Off
Mower is in winter charging
Su 11:28
Page 52
50
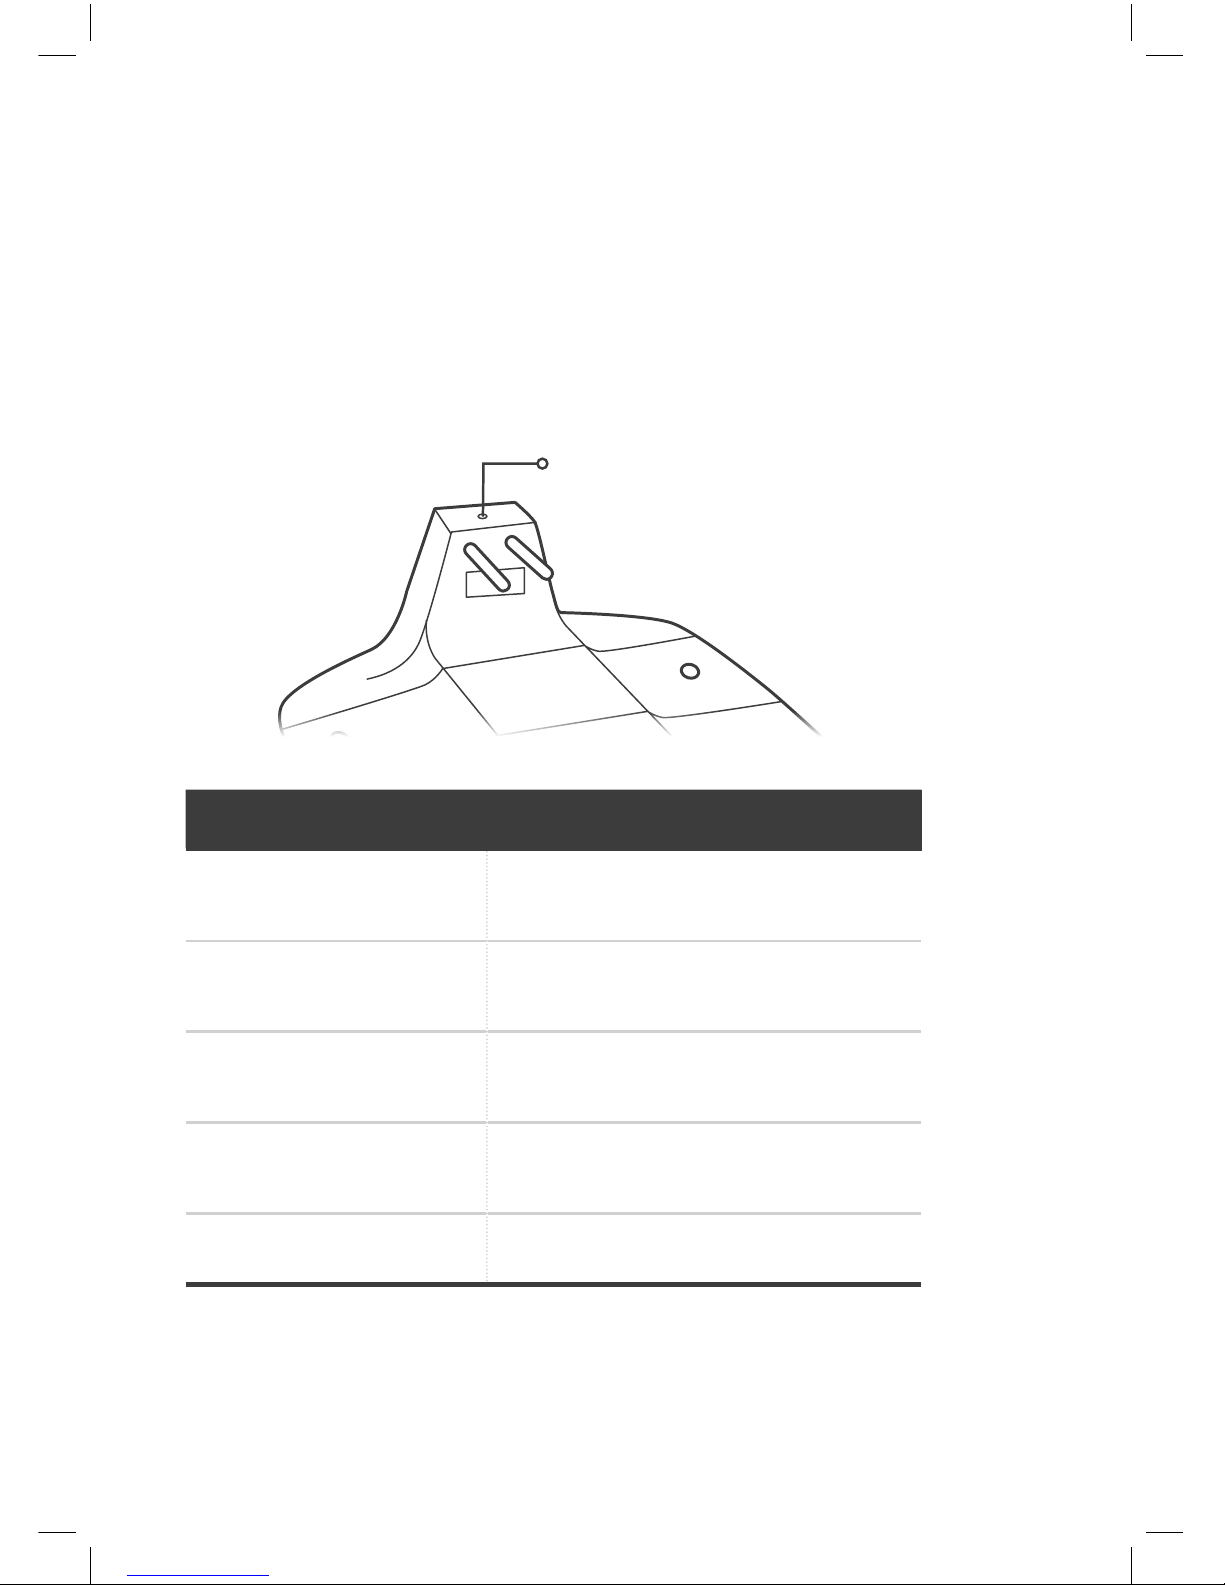
Base Station LED indication
LED indication
Indication Meaning
Steady green Perimeter wire signal is OK; the
mower is inside the base
Blinking green Perimeter wire signal is OK; the
mower is outside the base
Blinking red fast Perimeter wire is damaged or
disconnected
Blinking red slow Poor perimeter wire connection or
the wire is too long
Steady red Faulty power supply
Page 53
51
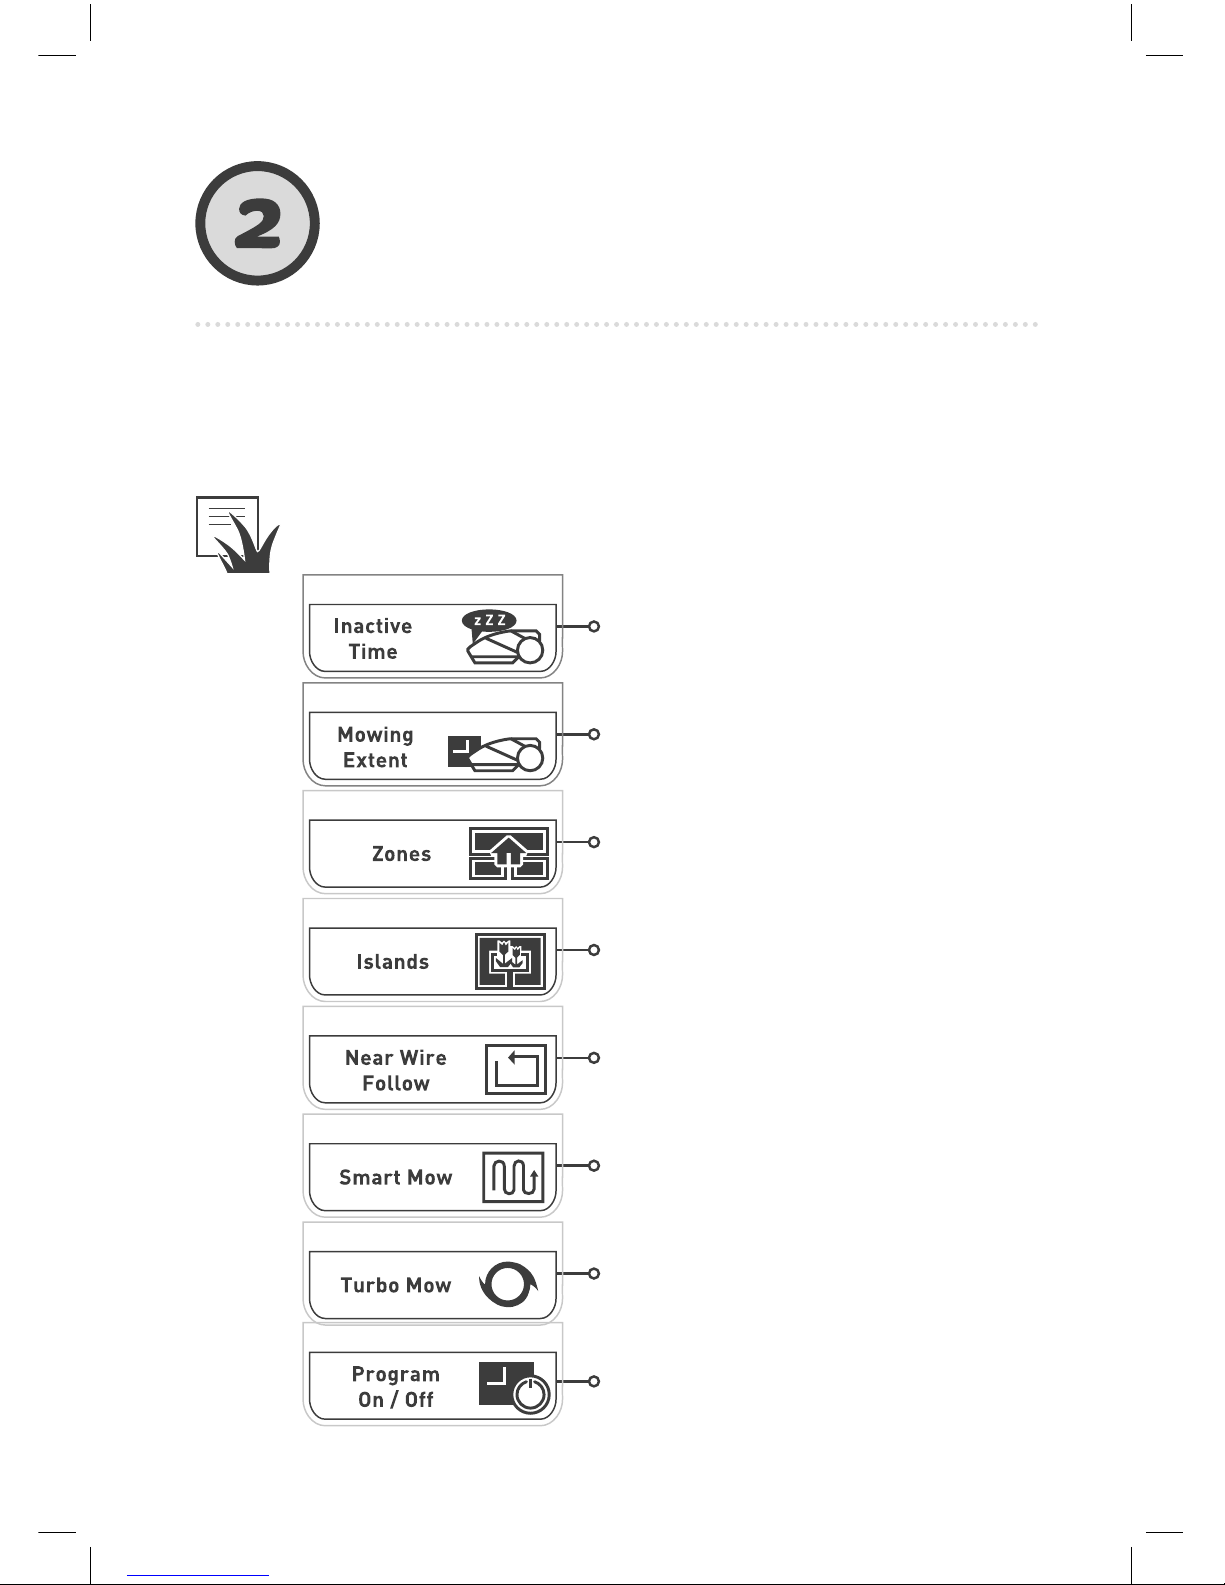
For a full description of all menu items, please refer to our online
Help Center.
Navigate the menus by using the arrows and make a selection
by pressing Go.
Menu
structure
Lawn Options
Configure lawn and mowing parameters
Inactive Time
Set mowing-free times
Mowing Extent
Set how often to mow
your lawn
Islands
Switch Islands feature on/off
Near Wire Follow
Reduce wheel tracks
along lawn’s edge
Smart Mow
Increase mowing efficiency
Turbo Mow
Enable faster and stronger
cut (use for first cut of the
season)
Zones
Add, remove or edit zones
Program On/Off
Enable/Disable automatic
operation by zone
Page 54
52
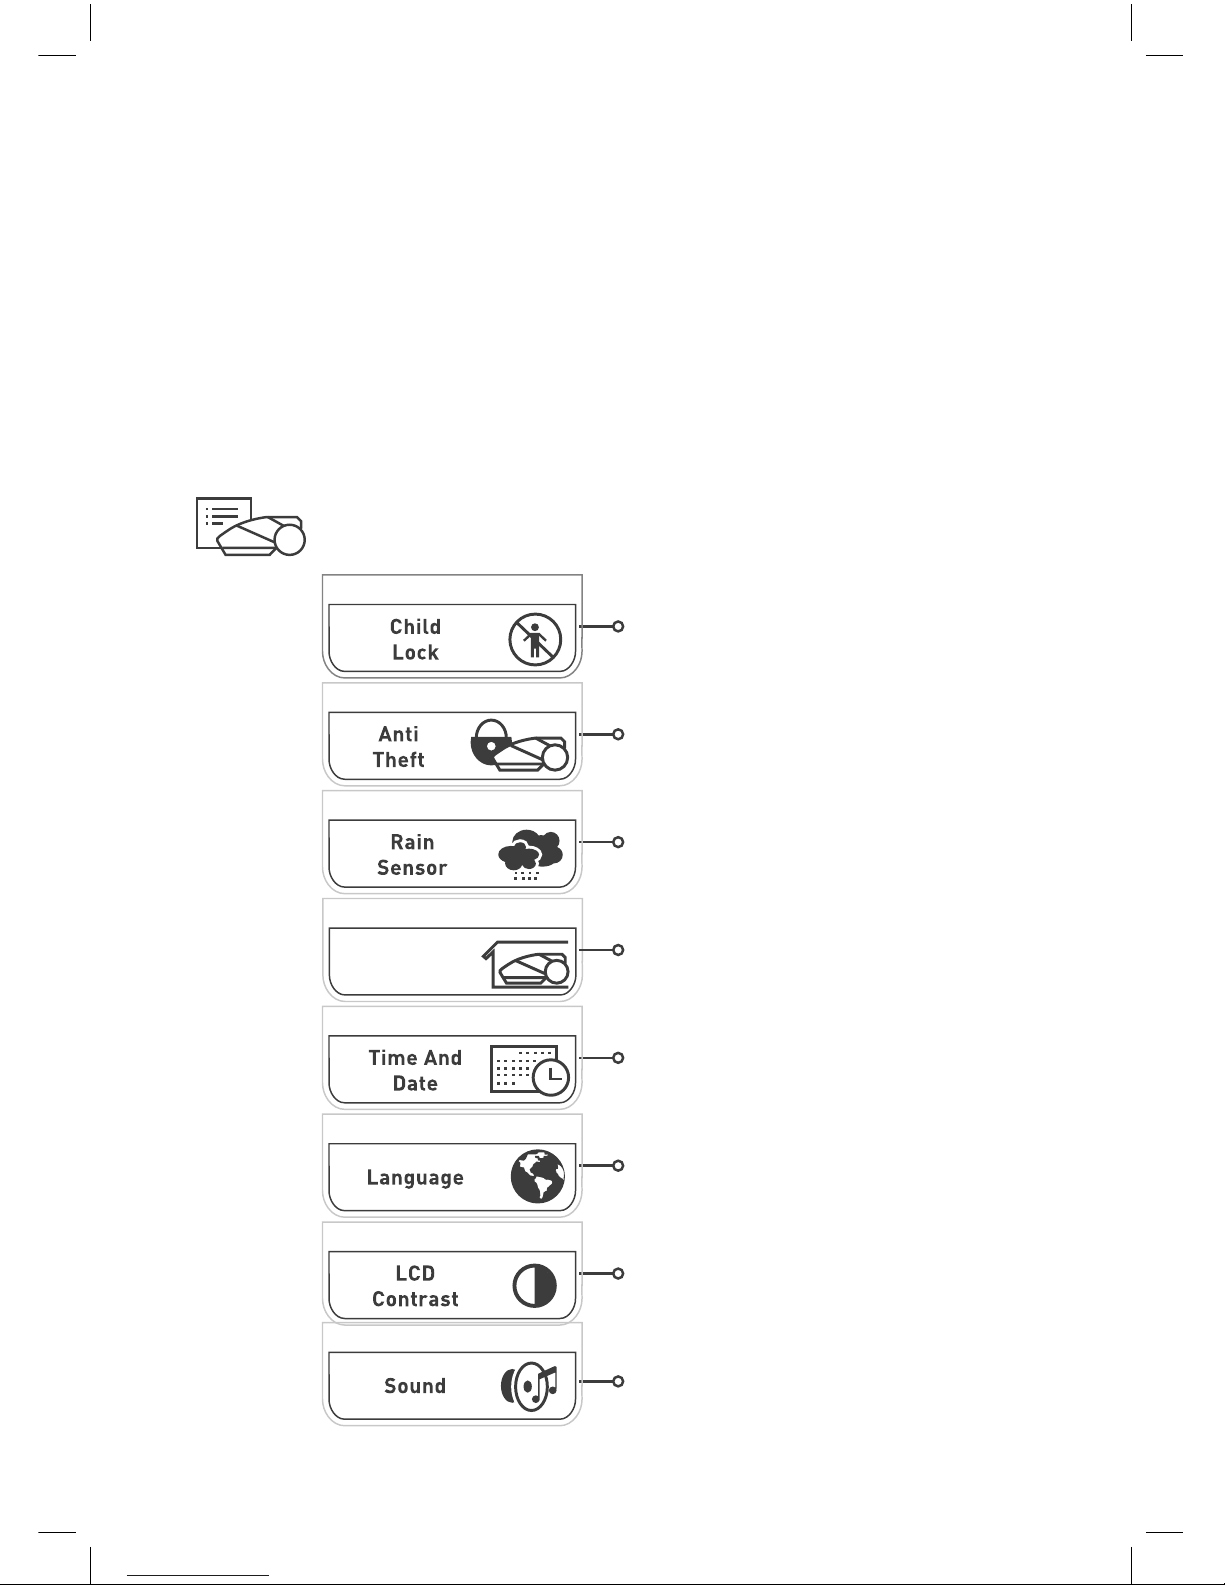
Mower Options
Configure user preferences
Sound
Turn Sound on/off
Time and Date
Set date & time
Rain Sensor
Automatically halt operation
in rain/humid weather
Anti - Theft
PIN Code protection and
alarm in case of theft
Language
Change mower’s
menu language
LCD Contrast
Adjust the LCD’s contrast
Child Lock
Lock the keypad to prevent
accidental press
RoboHome
RoboHome accessory on/off
RoboHome
Page 55

53
• The Area size setting automatically determines the required
mowing time for your lawn - the duration of a “Mowing Cycle”
• The mower usually performs several consecutive mowing
operations until it completes a full Mowing Cycle
• Each mowing operation starts at predetermined times, once
the mower is fully charged
• You can restrict automatic operation at particular times via
the Inactive Time setting
• Once a Mowing Cycle is completed, the mower will stay in the
Base Station until the next cycle begins
• The interval between mowing cycles is defined by the Mowing
Frequency setting
• If required, extra mowing time can be added via the Mowing
Hours setting to improve mowing results.
Learn how to configure automatic operation and manually
bypass/override it when needed
Automatic
operation
Tell your mower how often to mow
Mowing Frequency* controls the periodicity of mowing cycles. The
higher the frequency, the more frequently your lawn will be mowed and
vice versa.
Mowing frequencies:
Low - 1 Mowing Cycle per week
Medium - 2 Mowing Cycles per week
High - Lawn is mowed daily
*This option is only available for zones with a Base Station.
Page 56
54
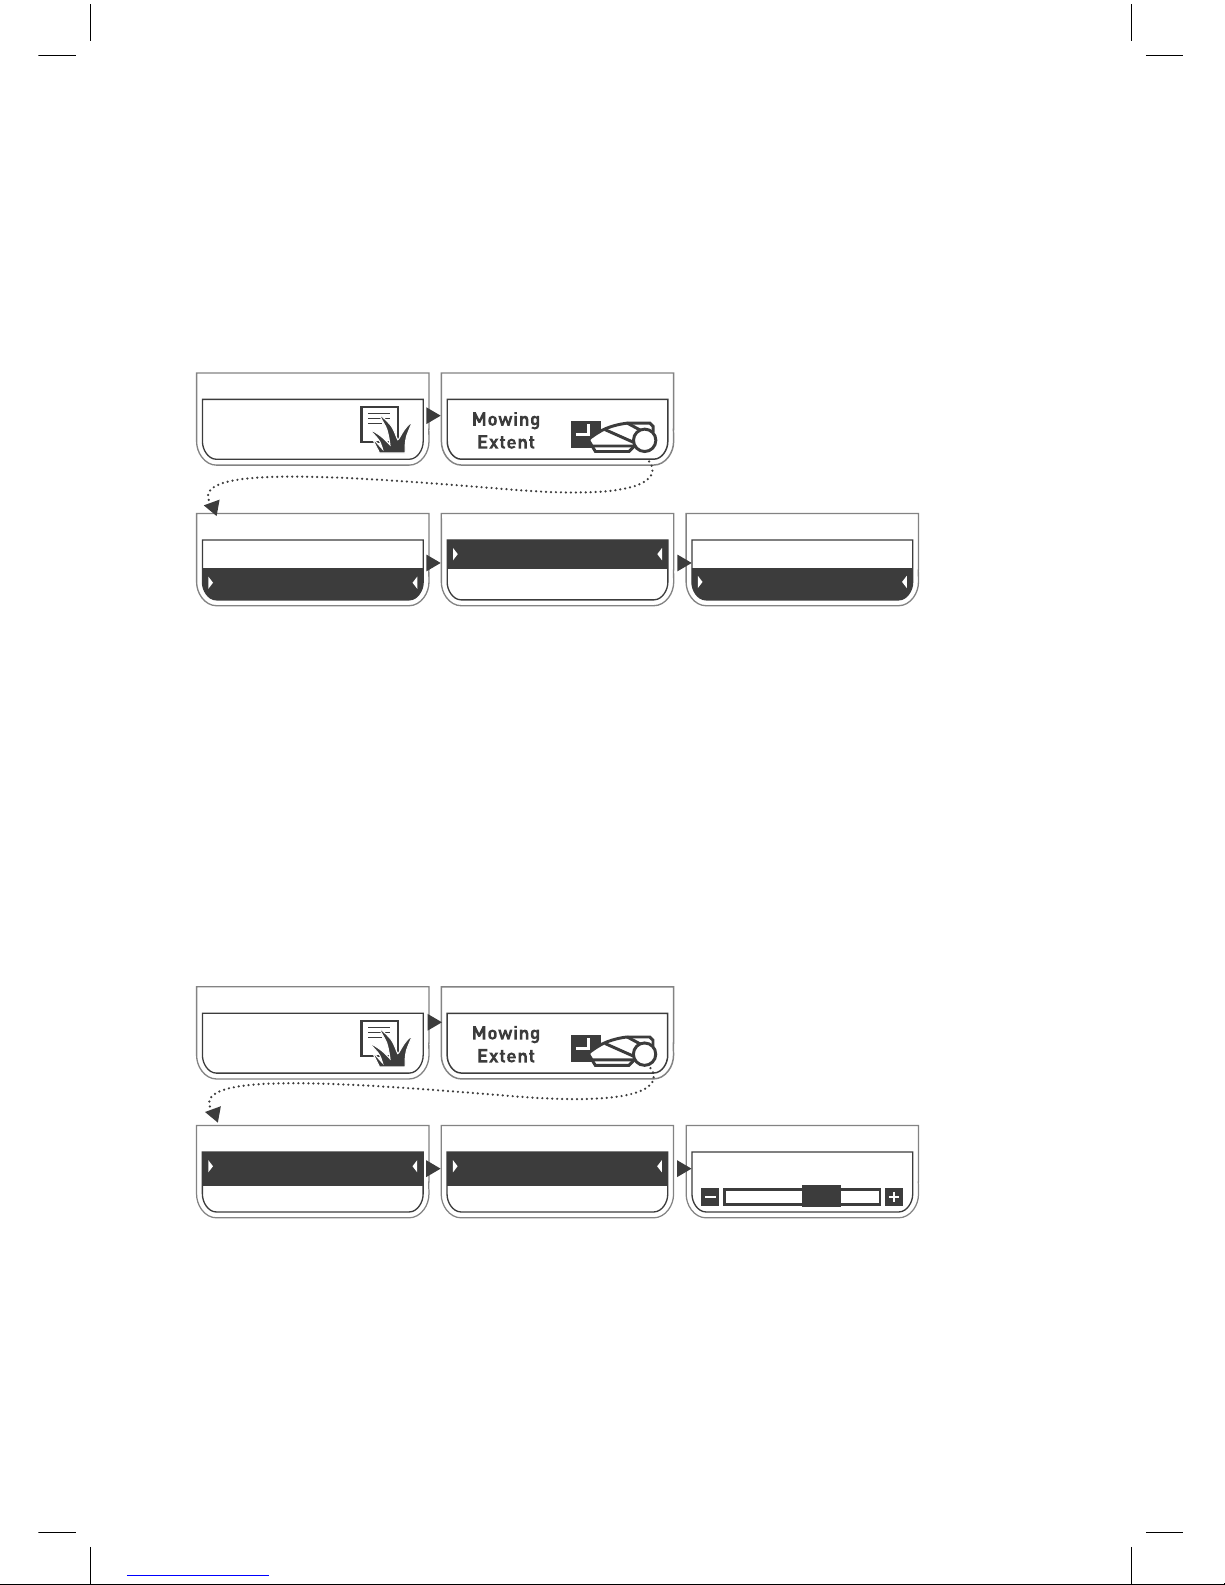
When you need extra mowing time
If the mowing results are not satisfactory, the ‘Mowing Hours’
option allows adjusting the duration of the mowing cycle
allocated for your area setting (by percentage):
Scroll to select “
Mowing
Hours
”.
Press Go
.
Scroll to select “
All Zones
”/
”
By Zone
”. If “By Zone” is
selected, scroll to select
the zone. Press Go.
Scroll to change Mowing
Hours percentage.
The default is 0%.
Lawn
Options
Scroll to select
“Mowing
Extent ”
from the Lawn
Option Menu.
Press Go
.
Mowing Hours
Mowing Frequency
All Zones
By Zone
Set Mowing Hours
10%
Scroll to select
“Mowing Frequency”.
Press Go to select Days.
Scroll to select “
All
Zones
”/”
By Zone
”. If “By
Zone” is selected, scroll to
select zone. Press Go.
Scroll to change mowing
frequency.
The default frequency is
Medium.
Scroll using the arrows to
select “Mowing Extent”
from the Lawn Option
Menu
Lawn
Options
All Zones
By Zone
Mowing Frequency
Medium
Mowing Hours
Mowing Frequency
Page 57
55
Scroll to select
“Program On/Off ”
from the Lawn Option Menu.
Press Go
.
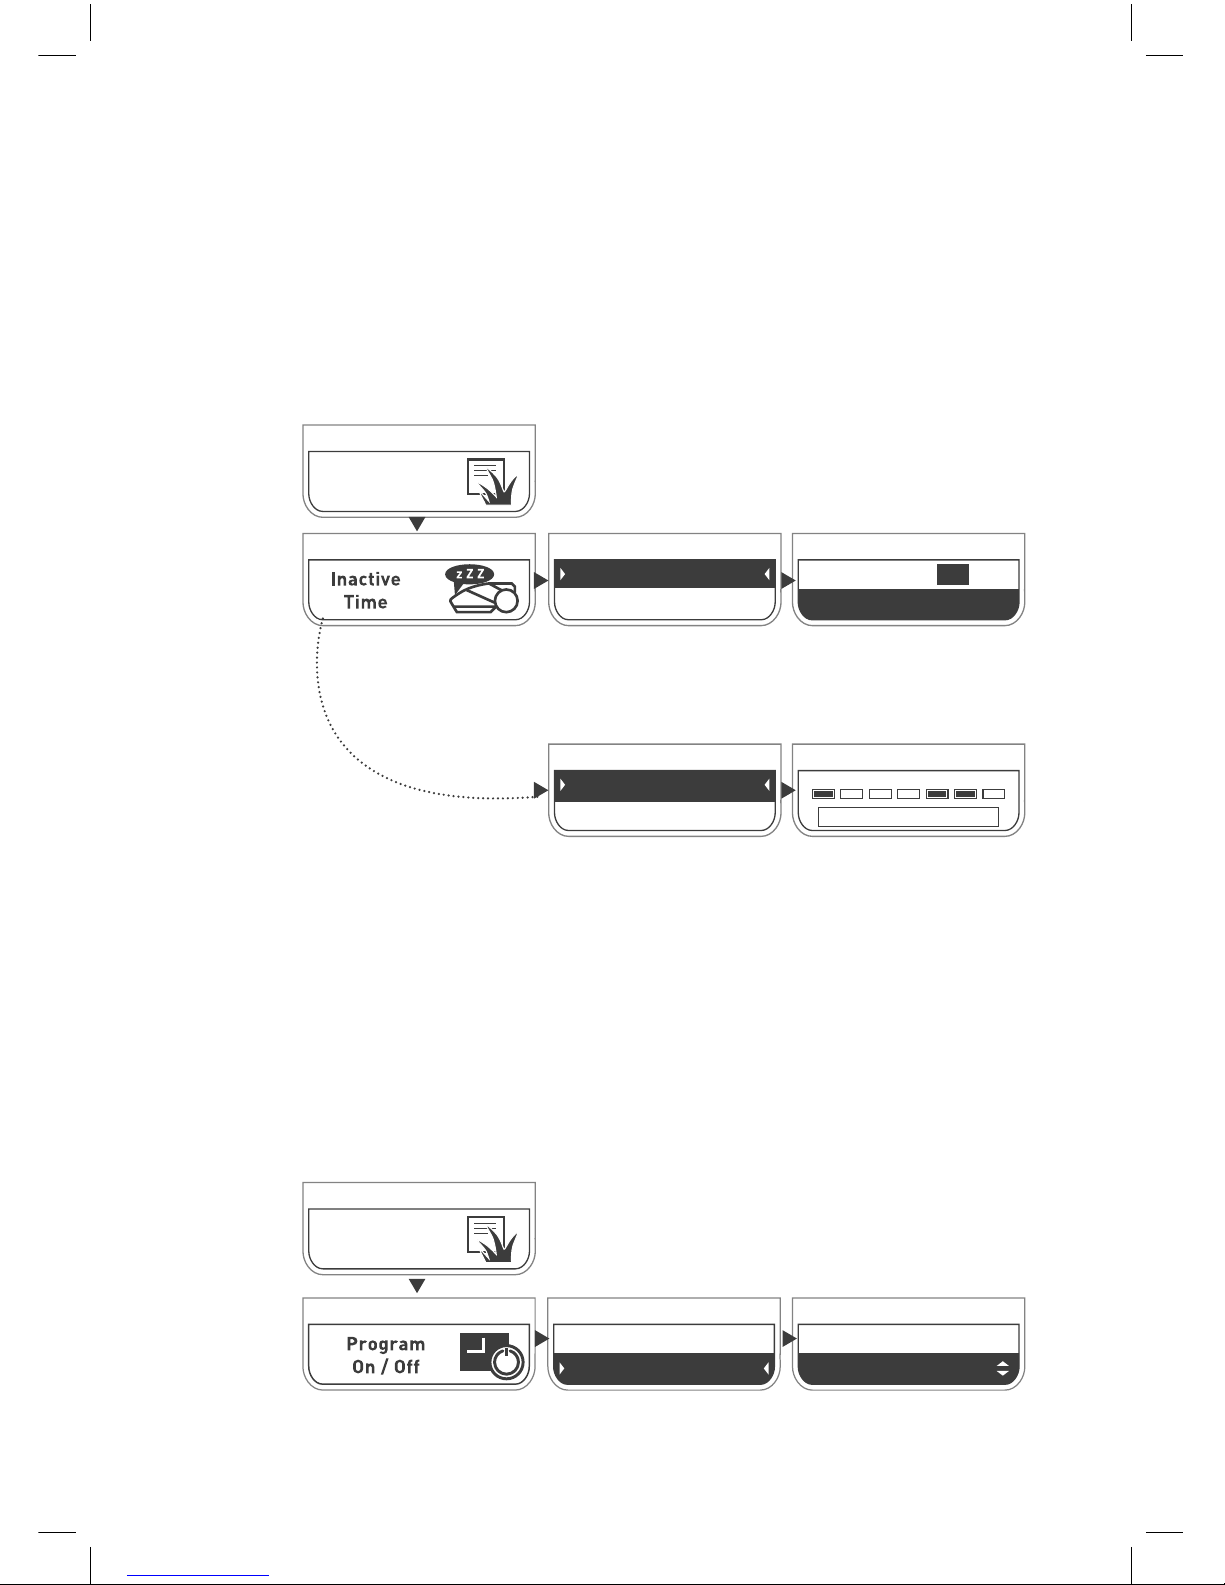
To set specific “mowing free” days and hours:
Press Go to select “Days”
Scroll to select day(s).
Press Go to toggle between active and
inactive. A black box means the day is
Inactive.
Scroll to select “
All Zones
”/ ”
By Zone
”. If “By Zone” is
selected, scroll to select zone. Press Go.
Scroll using the arrows to select
“Inactive
Time” from the Lawn Option menu.
Scroll to select between 1st or 2nd
time slot and press Go. You can
configure up to 2 time slots.
Scroll to toggle the inactive window
On/Off. Press Go. Set the start and end
times for this time slot. Scroll to select
OK. Press Go.
Lawn
Options
Scroll and press Go to
select On/Off.
Lawn
Options
The Program On/Off menu allows pausing automatic operation
in a particular zone of your lawn.
When Program is set to Off in a particular zone, the mower will
skip the operation in that zone, but will continue to mow the
edge of the entire lawn anyway.
Pause automatic operation for a specific zone
Days
Hours
Mo Tu We Th Fr Sa Su
OK
Hours 1 - On
Hours 2 - Off
Hours 1 - ON
23:00 - 06:00 OK
Program
On
All Zones
By Zone
Page 58
56
Manual
operation
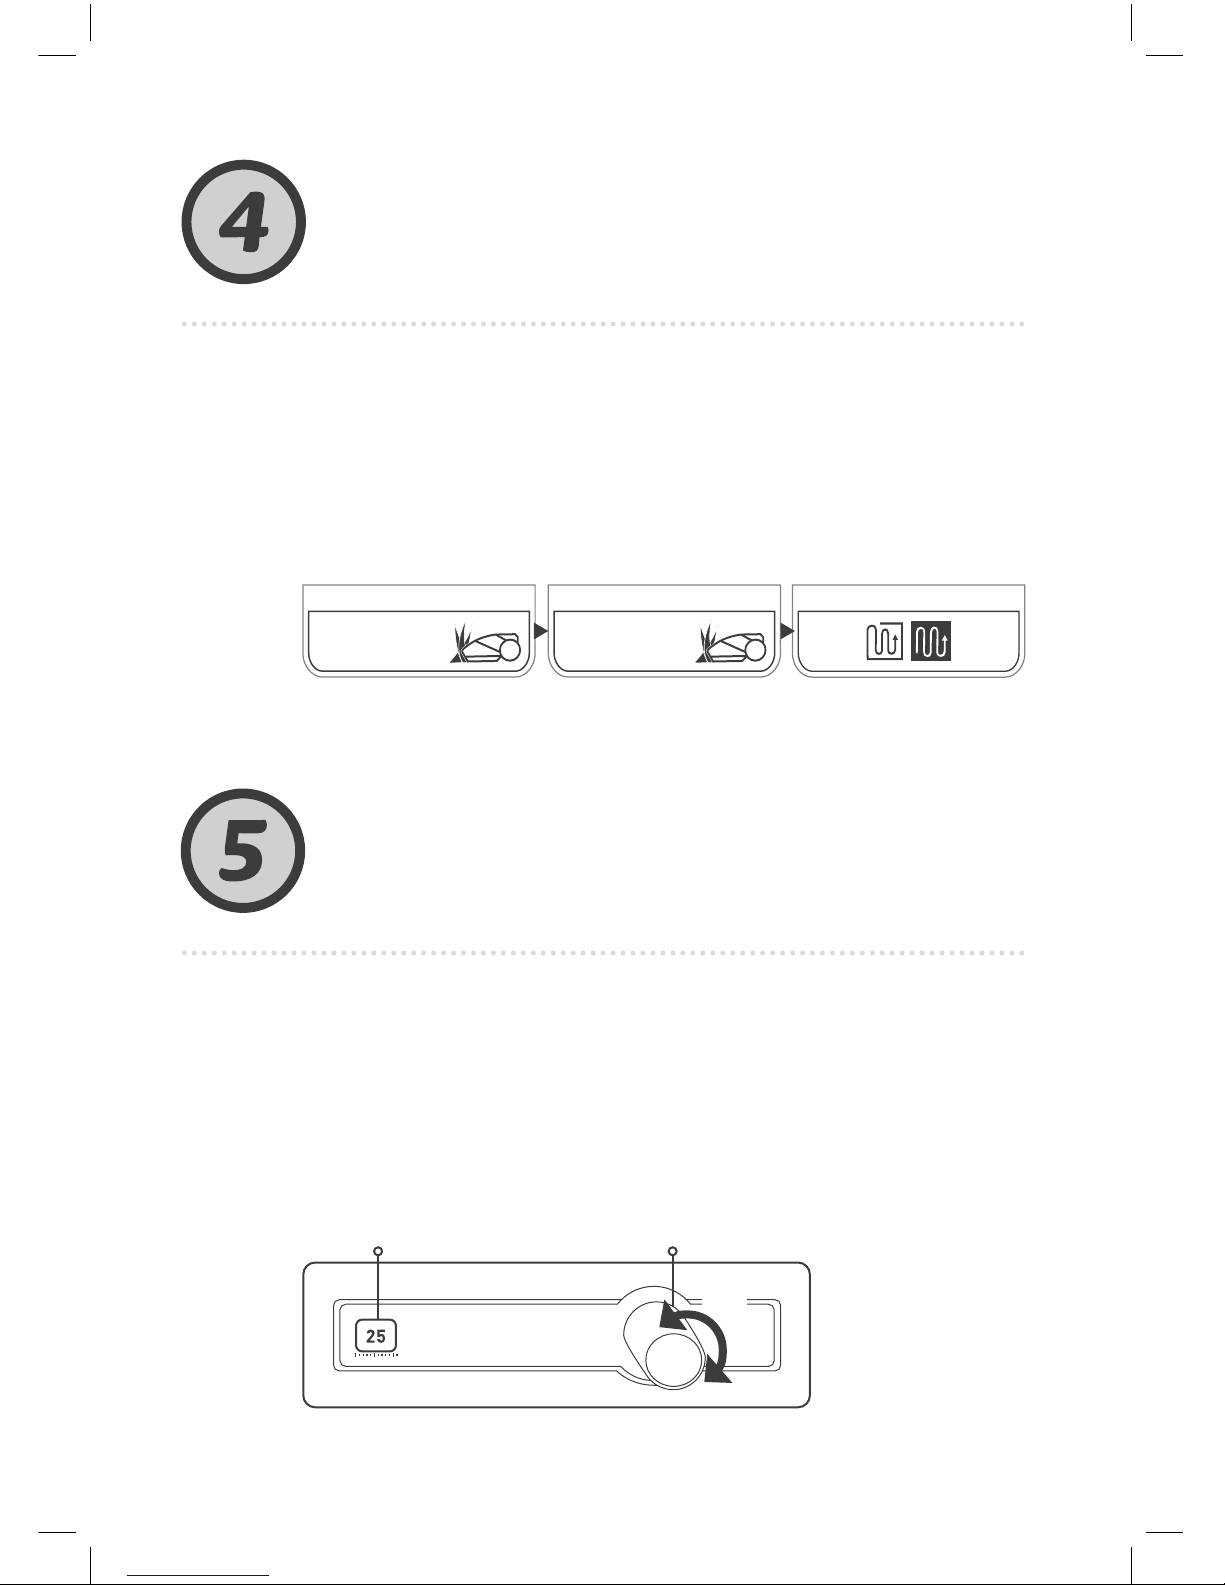
Manual Operation is used when you want to start a mowing
operation, regardless of the mowing schedule.
Manual Operation with or without edging
To initiate Manual Operation:
Scroll to the zone you want
the mower to mow.
Press Go.
Press
Go
.
Scroll to the operation mode
(Edge+Mow or Mow Only).
Press Go.
PUSH
AB
Features how to
Adjusting the mowing height
• Lift the Bumper Door at the top of the mower.
• Set the mowing height by turning knob (A) while pushing
it down. The cutting height is displayed to the left of knob (B)
• The mowing height’s range is 20-80 mm (0.8-3 in)
Zone
Main
Zone
A
Page 59
57
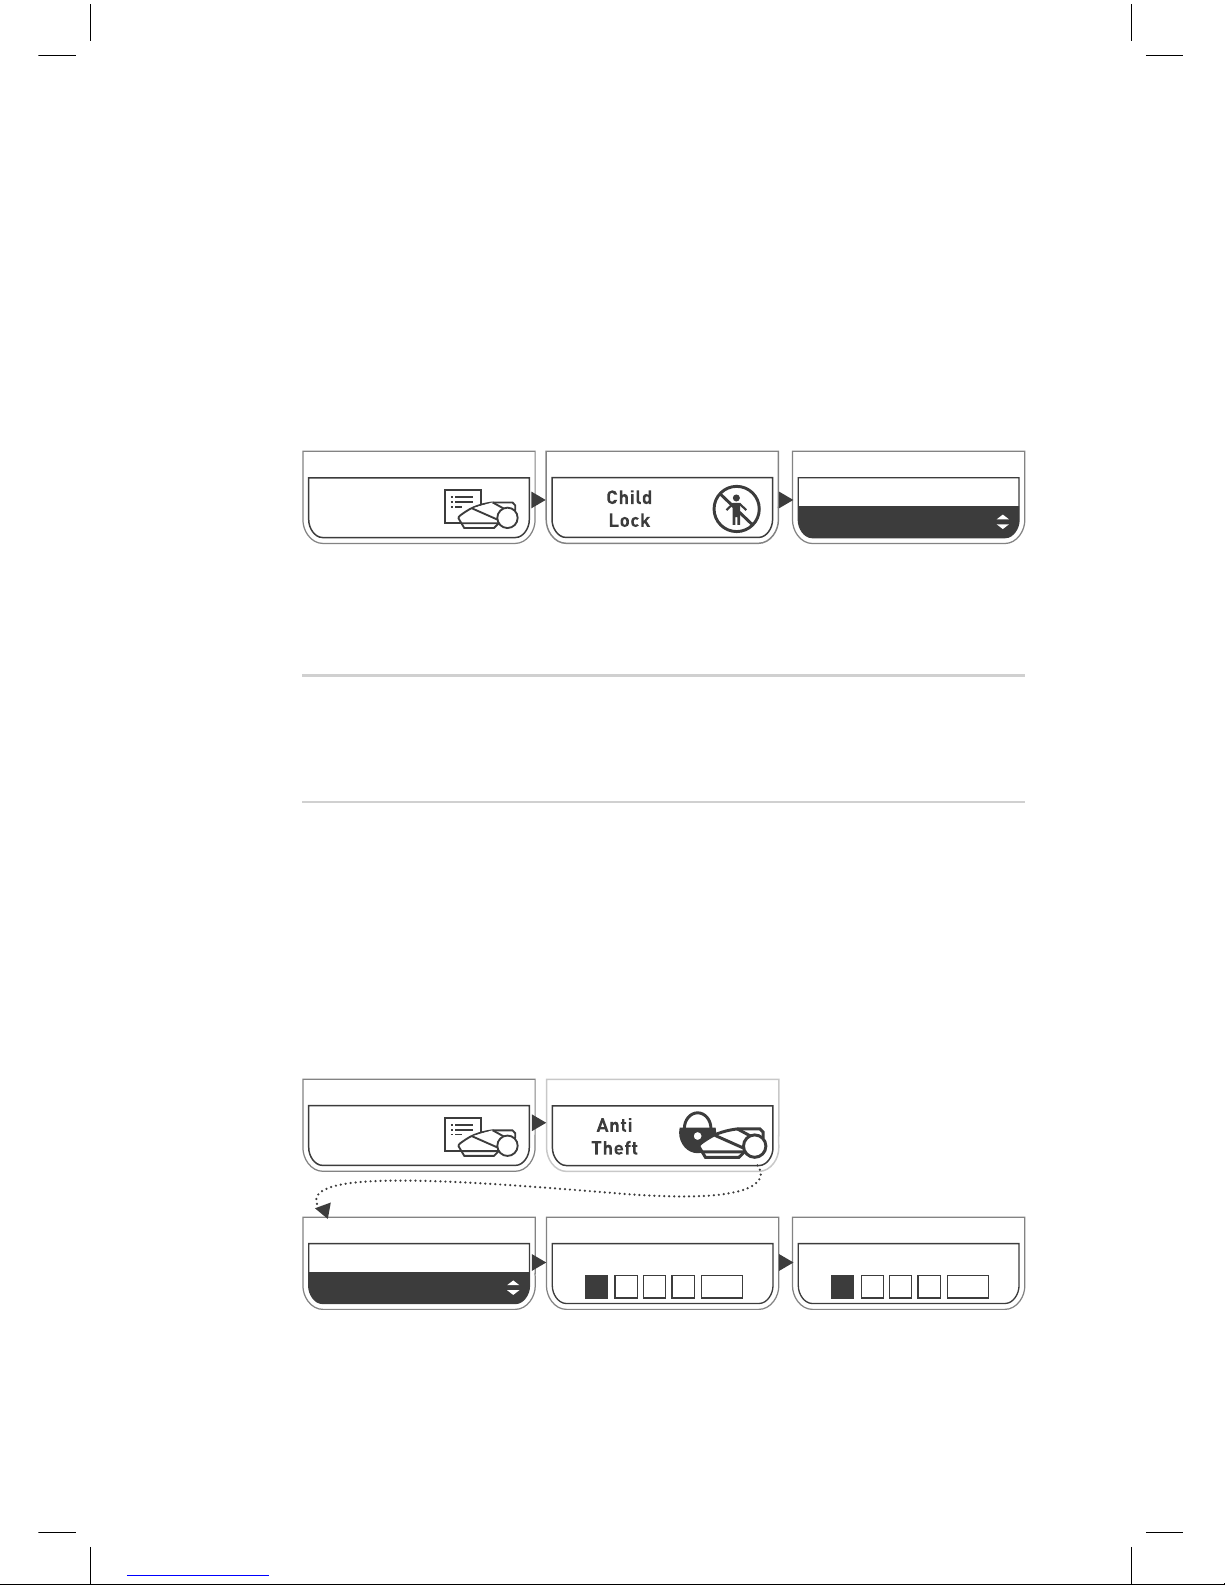
To temporarily release keys locked:
Press Up arrow, and then Back.
The keys will relock after 30 min. without user intervention.
Anti-Theft / Disabling Device feature
The Anti-Theft / Disabling Device prevents anyone from using or
driving your mower unless they have a valid code to enter. In
addition, it sets off an alarm in the event of unintended removal
of the mower from its designated area. By default, this feature
is turned Off. To turn it On for the first time:
Scroll using the arrows to
select “Anti-Theft” from
the Mower Option Menu
Scroll to set the PIN Code.
Press Go after each digit,
to move to the next one.
Press Go to OK.
Reenter the same 4-digit
PIN Code to confirm.
Press Go to OK.
Scroll to select “On”.
Press Go.
Anti Theft
On
Anti Theft
0 0 0 0 OK
Anti Theft
1 0 0 0 OK
Mower
Options
Child Lock
This feature is turned Off by default. To turn this feature on:
Scroll using the arrows to
select “Child Lock” from
the Mower
Option Menu
Press Go.
Scroll to select On/Off.
Press Go.
Mower
Options
Child Lock
Off
Page 60
58
To allow better maintenance and to keep your mower in good
condition, it is recommended to take it to a certified dealer for
service prior to winter storage.
Periodic
maintenance
Once a month:
• Inspect the underside of the mower. Clean if necessary.
Carefully scrape the collected grass debris (using a small
stick or similar object) from under the mowing deck.
• Check the Perimeter Wire and add pegs where it is loose
and not tight to the ground. In case of seasonal changes in
the lawn, make sure to adjust the wire accordingly.
• Inspect the Base Station, clean it from mud and debris to
allow proper docking.
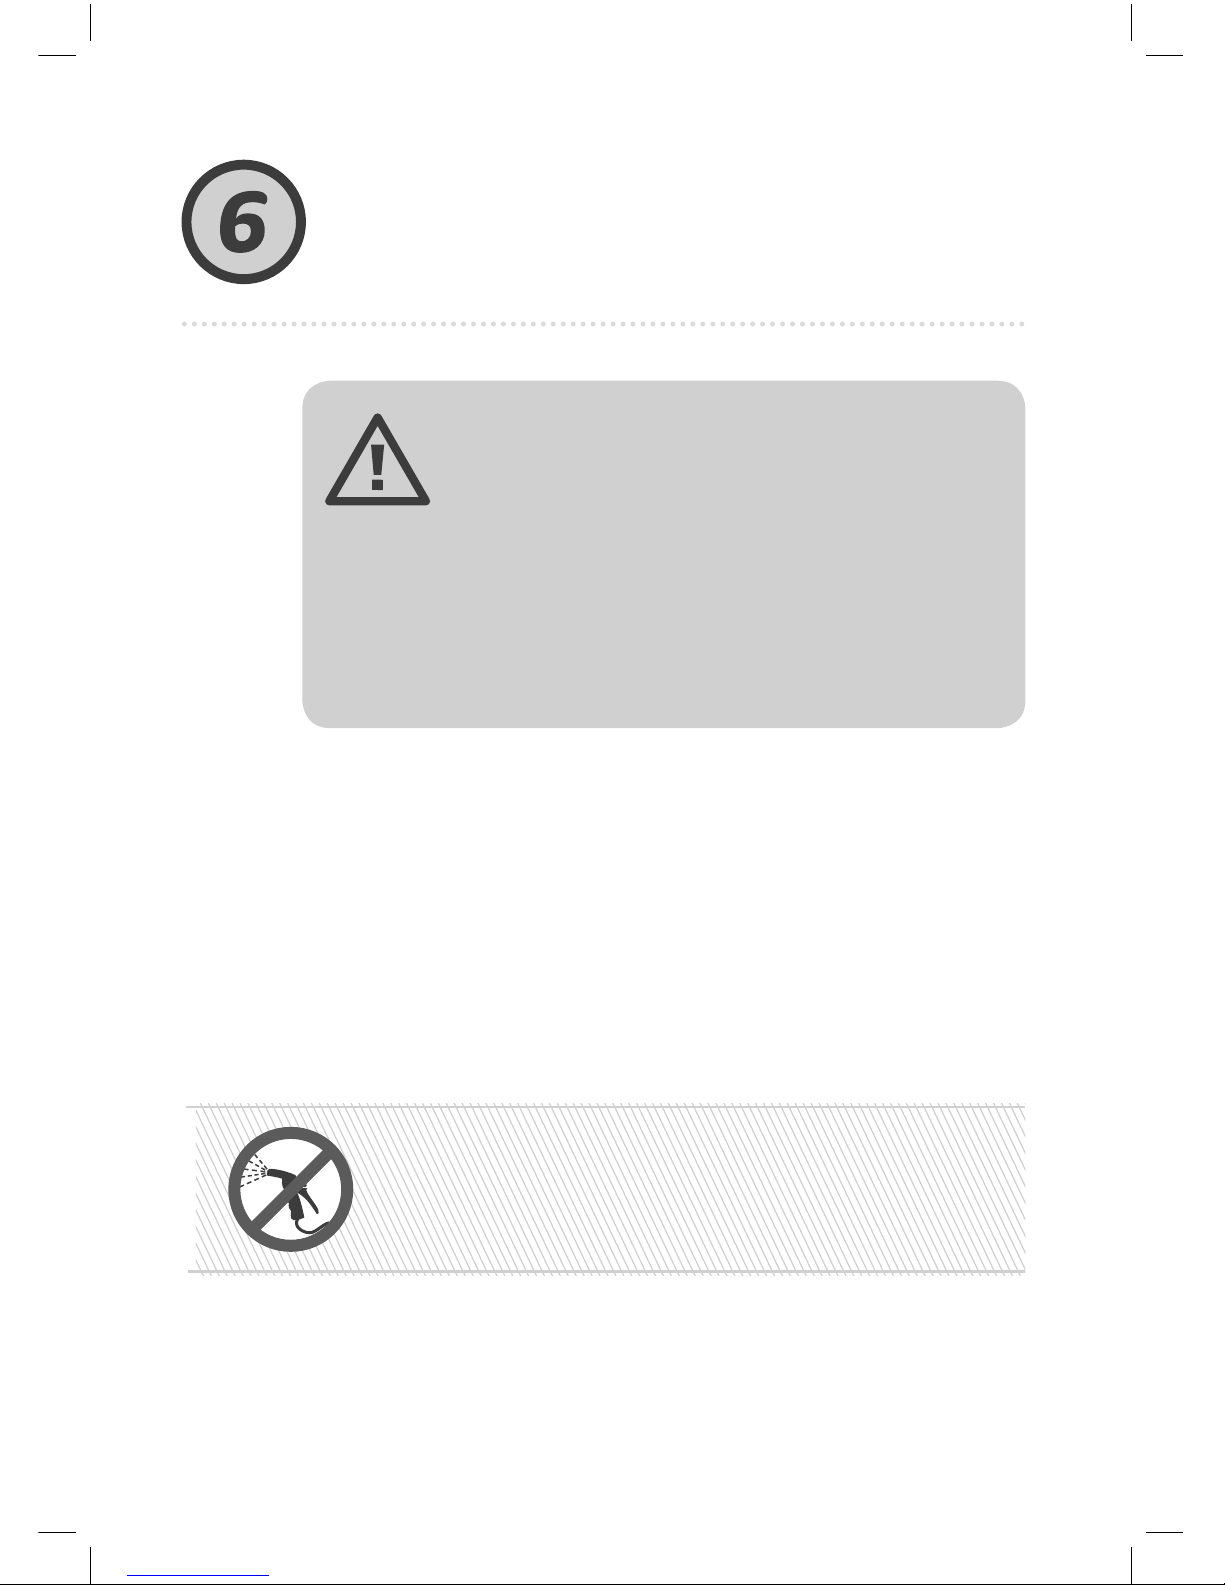
WARNING
Severe injury and damage hazard!
Always turn the Safety Switch off before lifting the mower.
Blades are very sharp. They can cause severe cuts or
lacerations. Always wear heavy work gloves when working
with or around the blades. NEVER use a damaged or broken
blade. NEVER sharpen the blade manually.
IMPORTANT!
NEVER use a high pressure water to clean the mower.
Liquids can damage components. Use only a damp or
wet cloth to wipe the surface clean after scraping.
Page 61
59
Troubleshooting
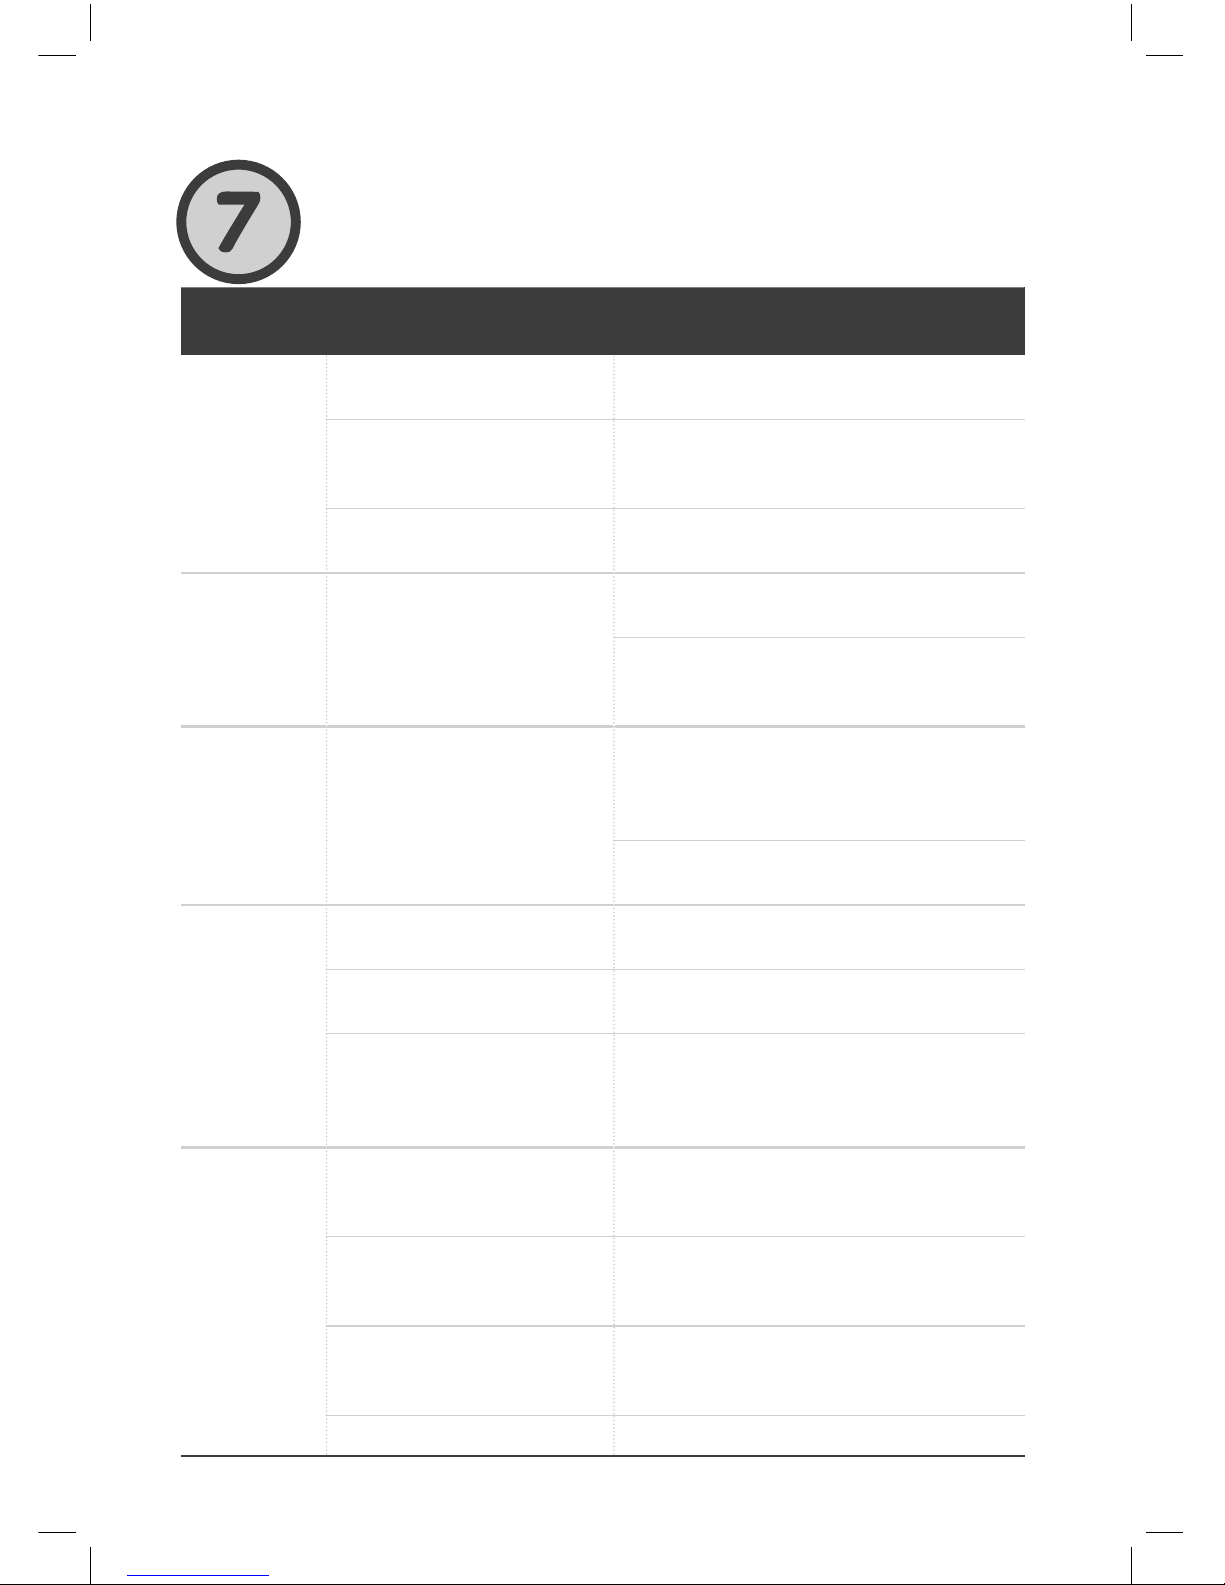
Message
Displayed
Probable
Cause / Event
Corrective
Action
Cross
Outside
The Perimeter Wire is too
close to the edge.
Move the wire towards the inner side of
the lawn.
The lawn slope near the
edge is too big and causes
the mower to slip outside.
Do not include areas with very steep
slopes.
The lawn’s edge is too
bumpy.
Fill holes and pits along the edge till
level with the ground.
Stuck
In Place
The mower got stuck in
place. It cannot continue
driving.
Check the ground for holes or
indentations. Fill it with some earth.
Check if the Perimeter Wire is not
too close to the edge. Move the wire
towards the inner side of the lawn.
Check Mow
Height
Mowing system is in
overload due to very tall
grass or an obstacle that is
stuck or wrapped around
the blades.
Switch off the Safety Switch and inspect
the blades. Remove any foreign object
or excessive clogging inside the mowing
deck.
Raise the mowing height and switch the
TurboMode on.
Check
Power
There is a temporary power
cut.
Confirm that the Power Supply unit is
plugged in into mains.
The Power Supply unit is
not plugged in properly.
Confirm the Power Supply is plugged in.
There is no charging
source detected.
Clean the charging contacts on
the Base Station and verify proper
connection of the Base Station to the
Power Supply unit.
No Wire
Signal
/ Waiting
for Signal
Power Supply unit is
unplugged or there is a
temporary power cut.
Make sure the Base Station is
connected to the mains supply.
Signal generator may need
to be restarted.
Disconnect the Power Supply from the
mains supply and reconnect after 10
seconds.
The Perimeter Wire is not
connected to the Base
Station.
Check the connection of the Perimeter
Wire to the Base Station.
The Perimeter Wire is cut. Check for cuts in the Perimeter Wire.
Page 62

60
Frequently
asked questions
Mower does not dock properly and sometimes misses Base
Station’s contacts
The entrance to the Base Station is not flat. Fill some ground
to flatten the lawn around the Base Station to allow smooth
entrance. Make sure the Perimeter Wire is straight and
centered all the way under the Base Station.
Mud, dirt or leaves got stuck to the Front Wheel. This raises the
front of the mower and causes it to miss the charging contacts
of the Base Station. Clean the Front Wheel and make sure it
rotates freely on its axis.
The Base Station is placed on a sloped area: Move the Base
Station to a relatively level ground.
Poor quality mowing
The blades may be dull. Switch off the Safety Switch and try
swapping between blades or replacing them. Use heavy gloves
when inspecting blades.
The grass may be wet. For the best cut, operate the mower
when the grass is dry. It is recommended not to mow in the
early morning hours.
Patchy and uneven mowing
Minimize Inactive Time to allow the mower to complete
Mowing Cycle quicker. If it is the fast growing season - reduce
the time between mowing cycles via the Mowing Frequency
setting. Increase the allocated mowing time via the Mowing
Hours setting to compensate for the lawn’s shape complexity.
Mower does not depart from base for a long time
Press and hold the UP for 1 second while the mower is in the
Base Station. The non-depart reason code will be displayed
for 3 seconds. Refer to our online Help Center for a detailed
description of non-depart codes.
Page 63

1/Learn
Your Lawn
Contact
us!
DOC6011G_EN
 Loading...