

Page 1
ROBOT CONSTRUCTION KIT
Q
Q
0
and
Q
Construct more than 30 models withR
, R
R
Page 2
List
BASICS
Battle Bot
Black/White Flag
Walking Bot
Sidecar
Soccer Bot
06
11
27
43
63
81
Page 3
My own Robot #1
97
Bug Bot
Transport Bot
Shooting Bot
Craysh Bot
Cleaning Bot
My own Robot #2
101
117
135
155
169
189
!#
Page 4
RQ
+
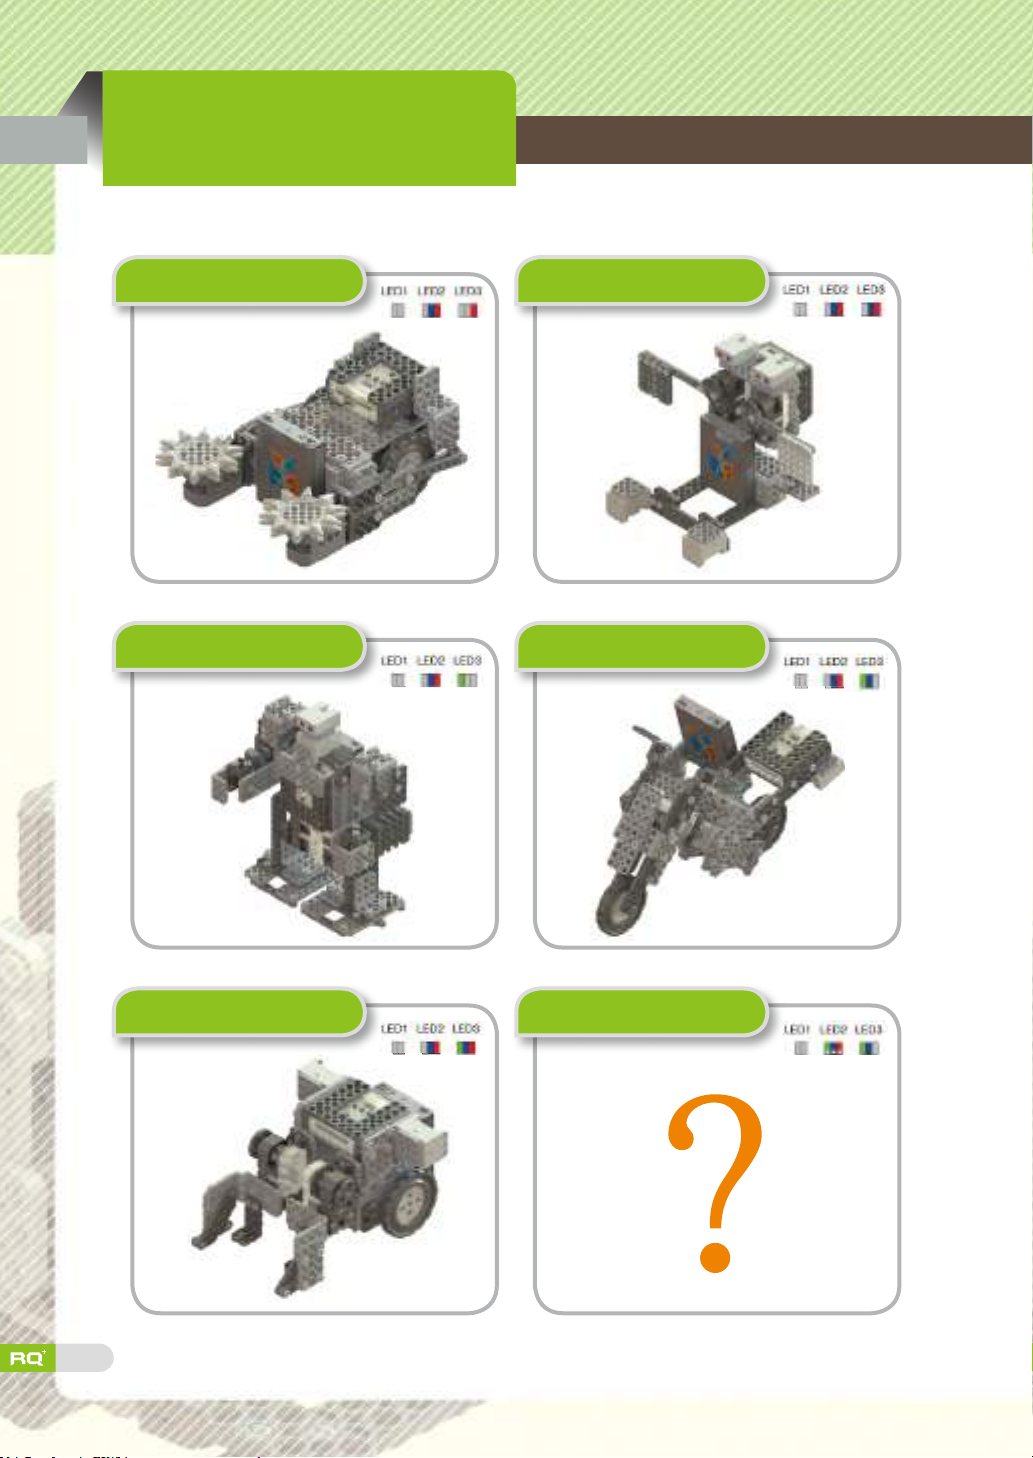
120 Robot
Ch1. Battle Bot
Ch3. Walking Bot
Ch2. Black/White Flag
Ch4. Sidecar
06
Ch5. Soccer Bot
Ch6. My own Robot #1
Page 5

Ch7. Bug Bot
Ch8. Transport Bot
Ch9. Shooting Bot
Ch11. Cleaning Bot
Ch10. Craysh Bot
Ch12. My own Robot #2
07
Page 6
RQ
+
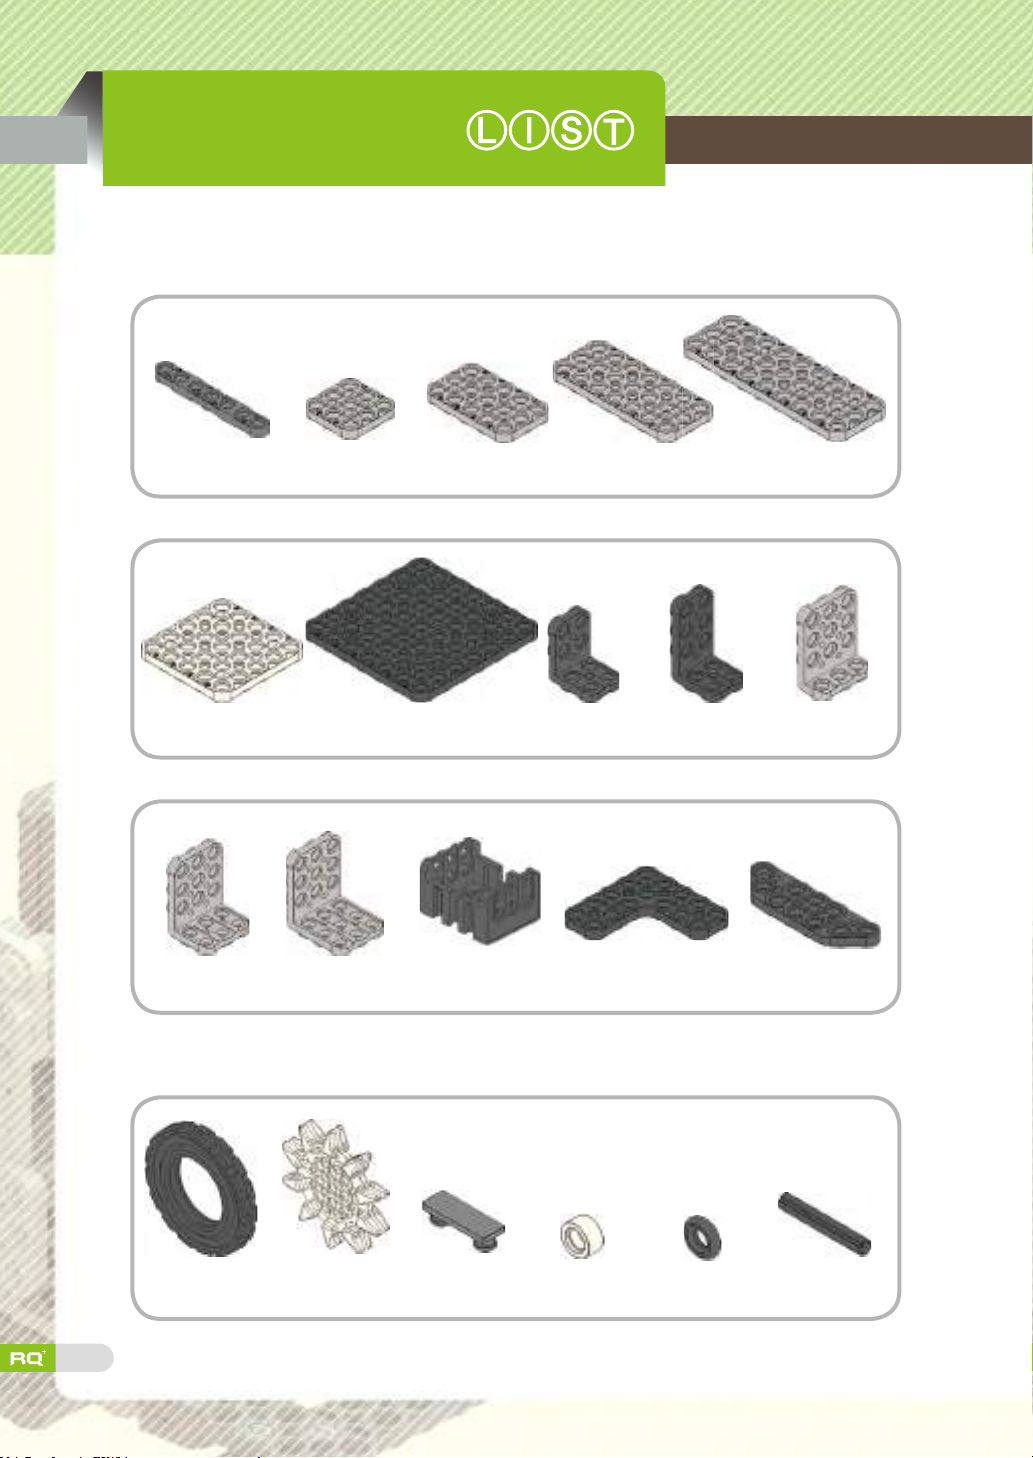
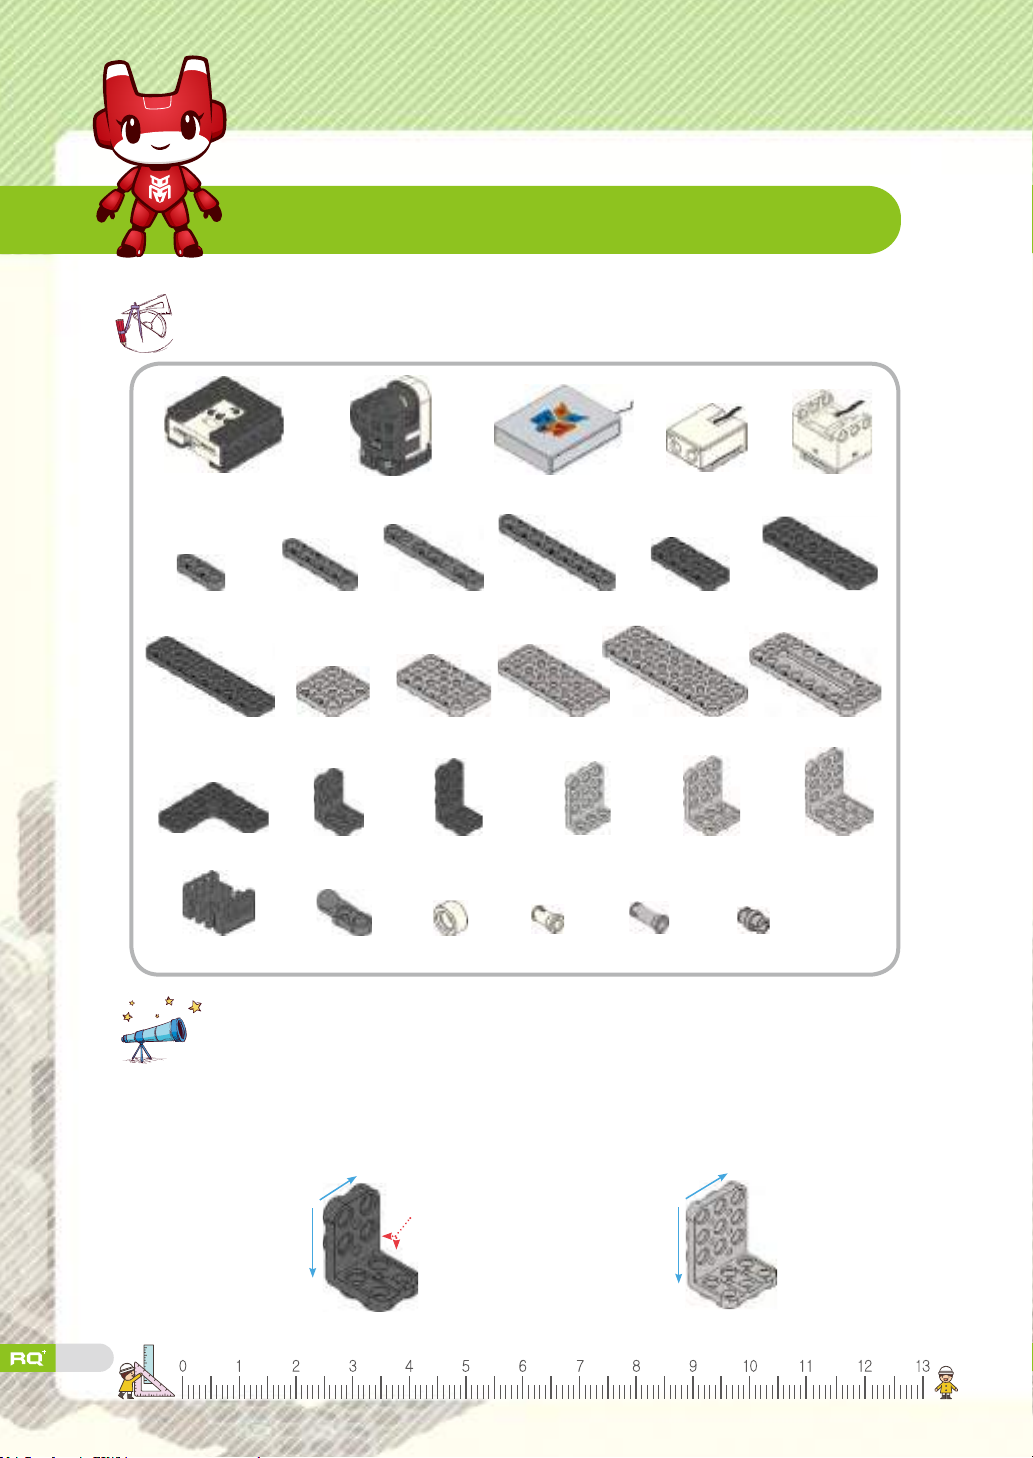
Frame
120 Part
1×7 frame X4
5×5 frame X2
3×5 L frame X2
3×3 frame X2 3×5 frame X4 3×7 frame X2 3×9 frame X2
7×7 frame X2
3×6 L frame X2 Big U frame X2 Right angle frame X2
2×4 L frame X2 2×5 L frame X2 3×4 L frame X6
Opposite angle
frame X2
08
Tire X2 Big gear X2 Rubber pad X4 Spacer X4 Locking ring X8
Small axis X4
Page 7
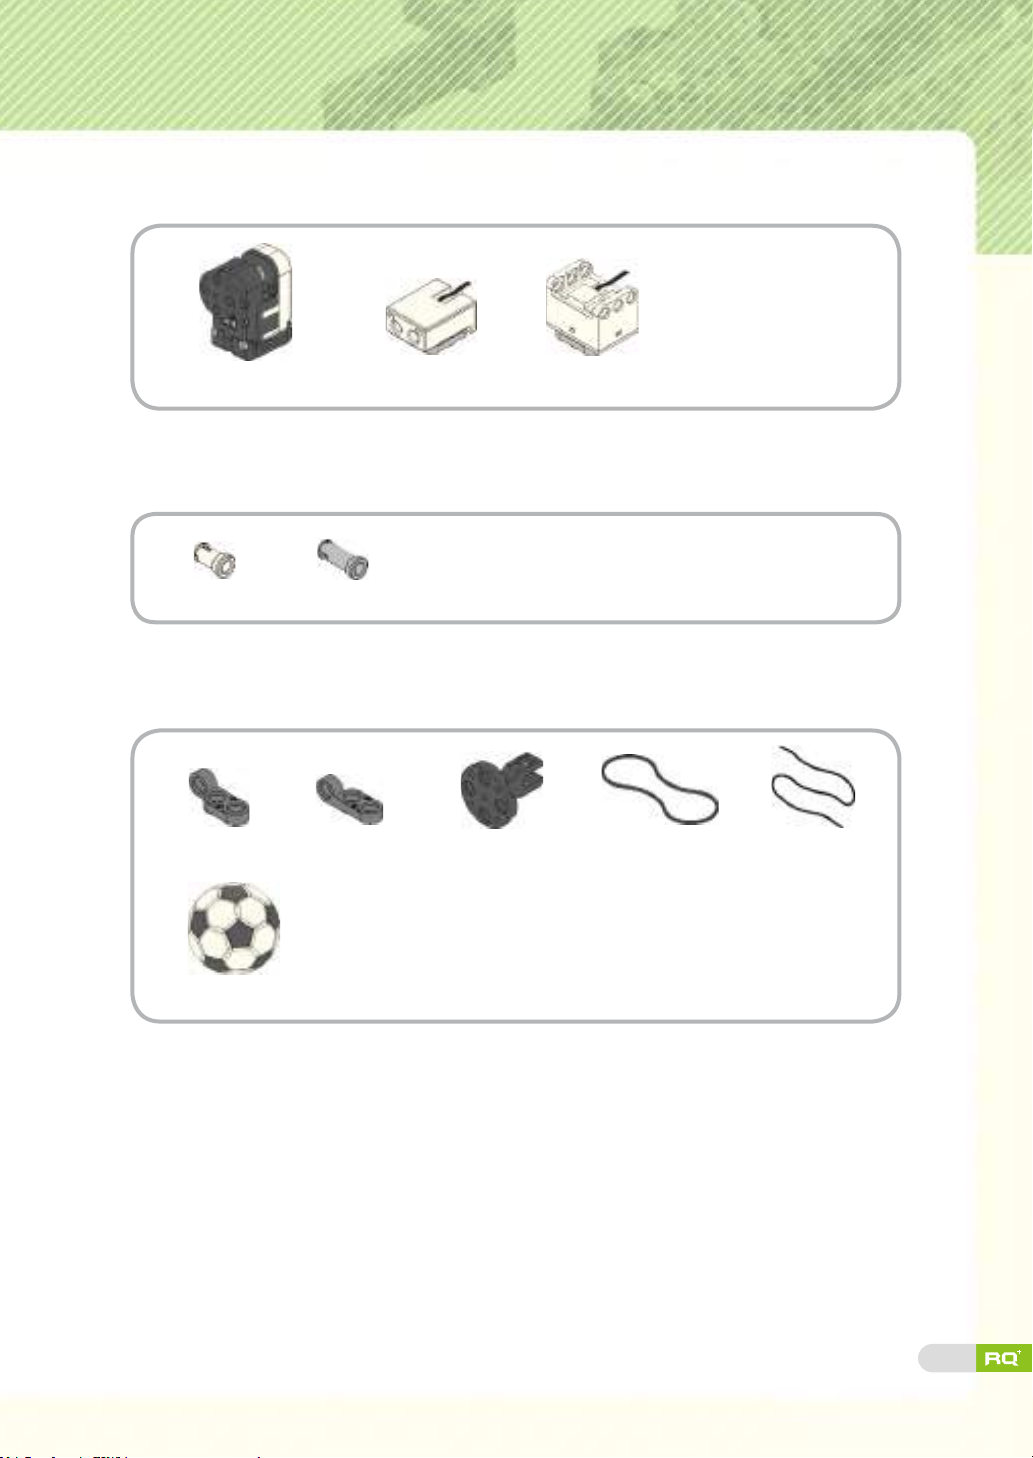
Electronics Parts
Smart servo (ID00, 01) X2
Rivet set
2s rivet
3s rivet
Joint and Others
Hinge A X3
Hinge B X3 Joint frame X2 Rubber ring X3 Short string X2
LED X1 Touch sensor X1
Soccer ball X1
Hinge A and Hinge B can be distinguished by its colors and letter A or B written on.
※
Be careful that Hinge A is white color but it is described as black color in RQ+120
and RQ+130.
09
Page 8

Warnings
• Power S/W is built in the smart controller. Insert power device
(AAA battery) and connect to power connector of smart controller.
Power off smart controller while your robot is not in use.
• Use the given electronic parts in RQ
Check the cable insert port carefully again not to misconnect.
• Do not use in humid environment, near water, wet place, or near other
electric goods. The electronics part may be damaged.
• Do not pull out the cables or throw the assembled robot as the parts (frames,
electronics parts) may break.
• Do not take out batteries or cables while robot is operating or moving to
prevent damages.
• Electric current ows in set-up / standby mode. Power-off the smart controller
when the robot is not in use.
• Place the robot parts away from baby or toddler. In any case of swallowing
parts, contact doctor immediately.
• Do not operate the robot near you or facing you.
Do not use a peeled off battery or damaged battery as it may lead to re or burn skin.
•
• Clean up all RQ
+
parts after you build or play with your robot.
+
to connect with smart controller.
Let's meet RQ+ family!
10
RQ Mong
This troublemaker always runs out of patience
for curiosity. RQ Mong!
RQ Ro
This smart RQ Ro enjoys
RQ Me
This cute little RQ Me always worry about
things!
reading!
Page 9
1. Battle Bot
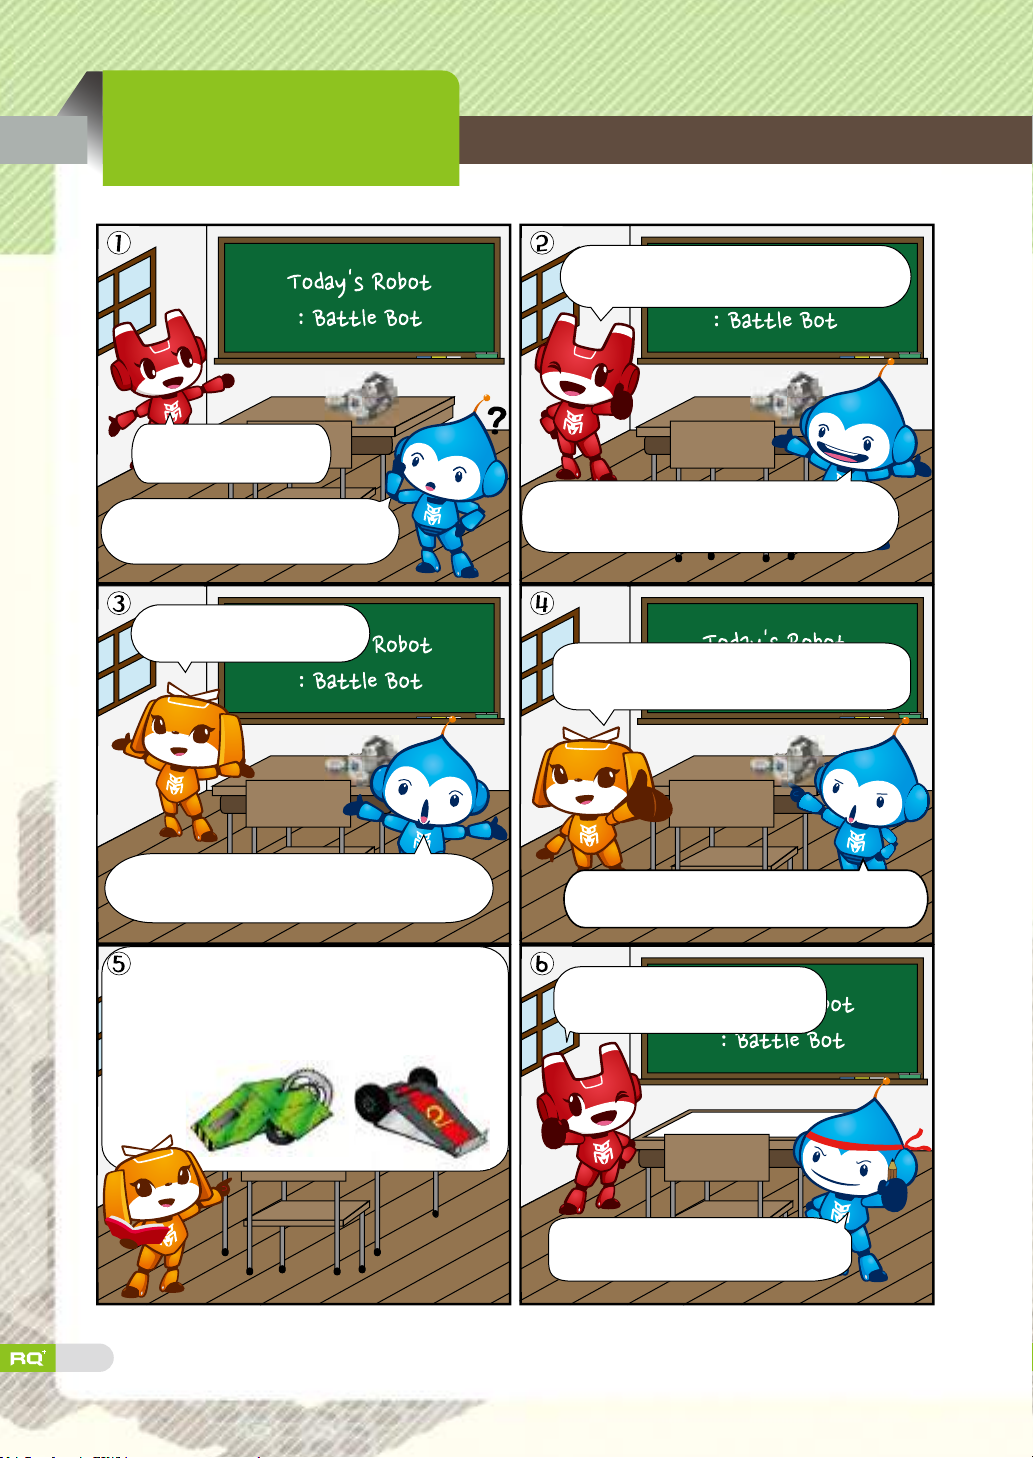
We're building
Battle Bot today!
Battle Robot Competition
I will give my robot a weapon that
can vertically rotate on the back.
There are two weapons that can
rotate horizontally!
If so, I'm going to add
the inclined plane.
Inclined plane? How do you atack with
the inclined plane?
Battle robot can use different tools for
attack and defense.
So when you make a battle robot, you need
to come up with a good strategy.
Well, then I will add lift to my robot
so it can turn over its opponent.
You can dodge or push the opponent
outside the ring.
Oh my... So both attack and
defense are possible!
Can we have a battle robot
competition?
11
Sure! we could make our own
game rules!
Page 10
Today's Robot Class
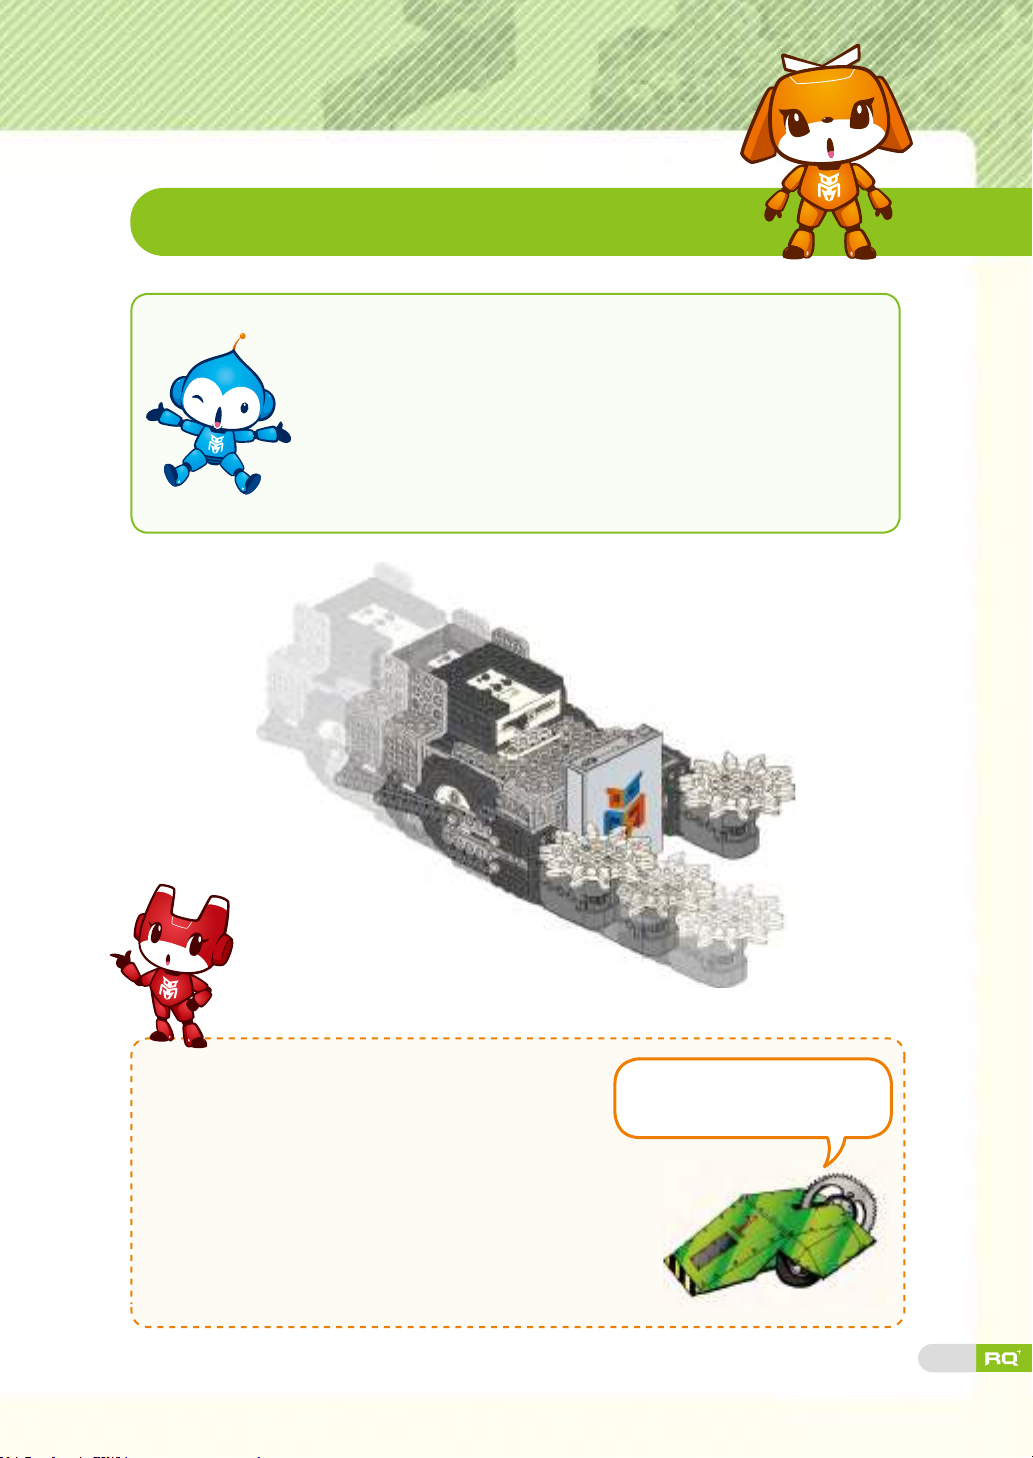
Battle Bot can use a rotating weapon by using a gearwheel
type gear. Rotating weapon is used to attack the opposite
robot during the fight. The robot can move freely because
smart servos are used as wheels, and it can also punch with
the link structure to move forward or backward. What other
principles are applied in this robot other than these functions?
Let's assemble the Battle Bot and play a robot game.
After overseas battle robot game was
introduced in early 2000, the rst robot battle
game as well as other small scale robot games
were hosted in Korea.
In 2005, there was a TV show called Robot power
that mainly showed battle robot games. Initially, this
game was called 'ghting game', but the term 'battle
robot' was coined in 2005 as the word was used at
a Korean robot competition.
Well, I can turn the opposite
robot over with the inclined side
and rotating weapons.
12
Page 11
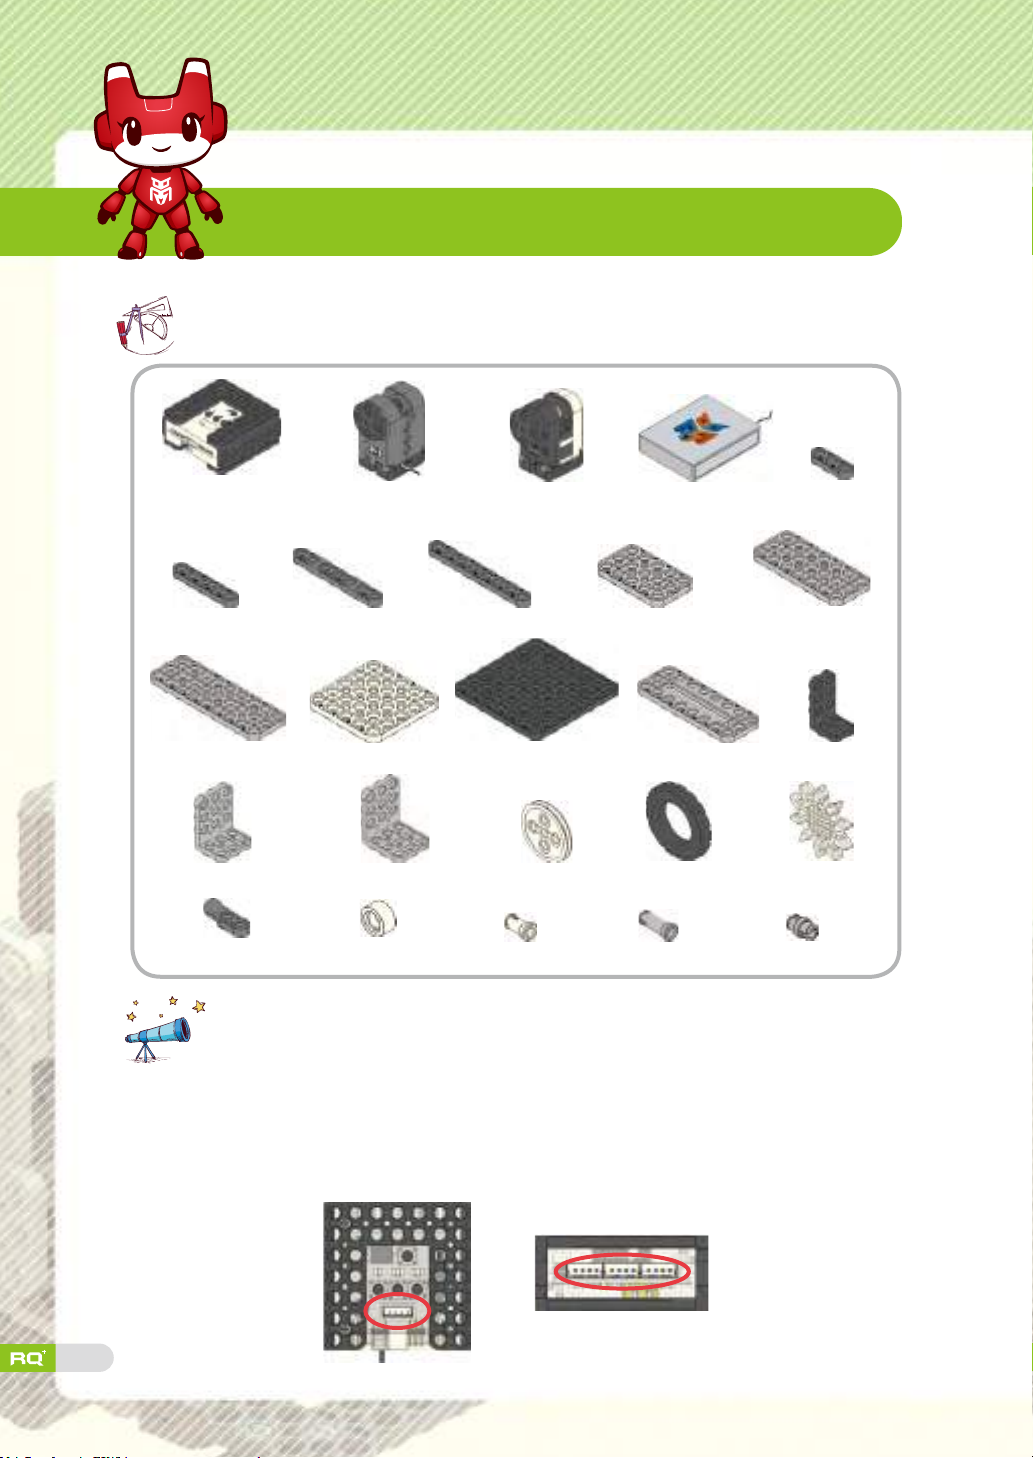
Robot Assembly
Prepare robot parts.
Smart controller X1
1×5 frame
3×9 frame
3×5 L frame
Ball frame
X4
X4
X5
X1
Tips.
R. motor (ID29,30) X2 Smart servo (ID00,01) X2 Battery case X1
1×7 frame
5×5 frame
3×6 L frame
Spacer
X1
1×8 frame
X1
X6
X2
X4
7×7 frame
Wheel
X34
2s rivet
3×5 frame
X1
X2
X6
3×8 slide frame X22×5 L frame X4
X2
Tire
X16
3s rivet
1×3 frame
3×7 frame
Big gear
Double rivet
X4
X1
X2
X64
Smart controller has 4 smart servo ports. You can connect smart servo to any of
4 smart servo ports regardless of the ID number. However, you have to follow
the assembly guide when you build a robot and check the smart servo ID.
13
Page 12

Step 1
X2
Tip
Smart servo (ID00) X1
Wheel X1
Tire X1
Double rivet X2
Step 2
Tip
Assemble smart servo
ID01 same as ID00.
1×3 frame
7×7 frame
3×6 L frame X2
X2
X1
2s rivet X4
3s rivet X4
Assemble the short
side of 3×6 L frame.
14
Page 13

Step 3
Smart servo (ID01)
Tip
2s rivet X4
Smart servo (ID00)
Step 1
Step 4
3×9 frame
2s rivet
Double rivet
15
Tip
X3
X4
X2
Page 14
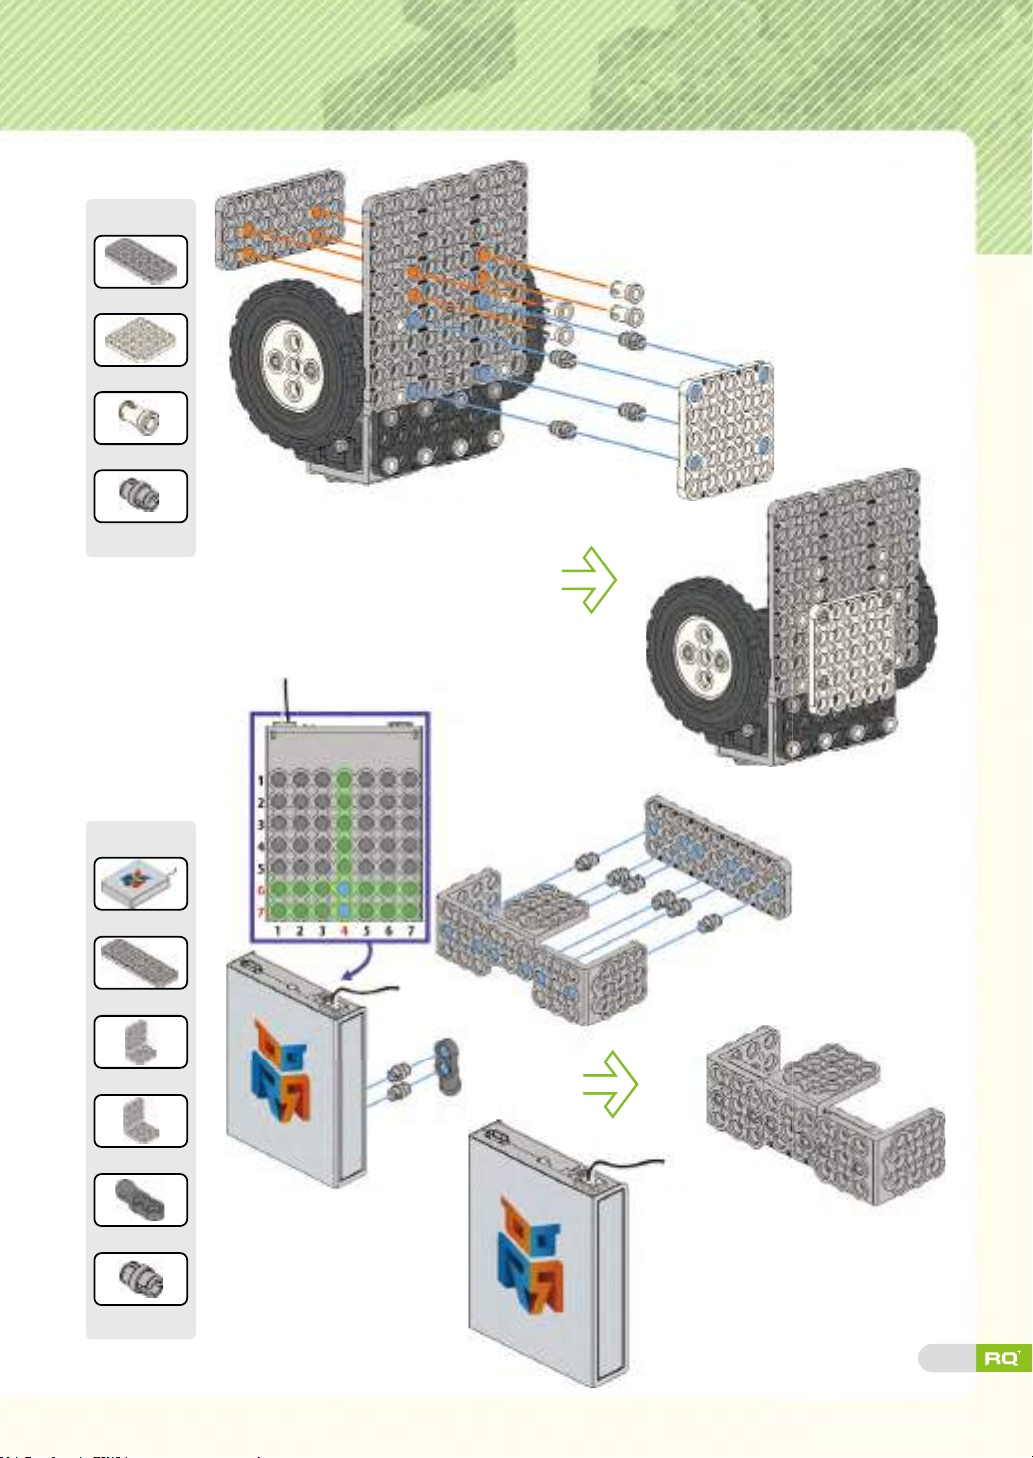
Step 5
Tip
3×7 frame
5×5 frame
2s rivet
Double rivet X4
X1
X1
X4
Step 6
Tip
Battery case X1
3×9 frame
3×5 L frame
3×6 L frame
Ball frame
Double rivet X8
X1
X1
X2
X1
16
Page 15

Step 7
Tip
Double rivet X4
Step 8
Tip
3×6 L frame X2
2s rivet
17
Step 5
X6
Page 16
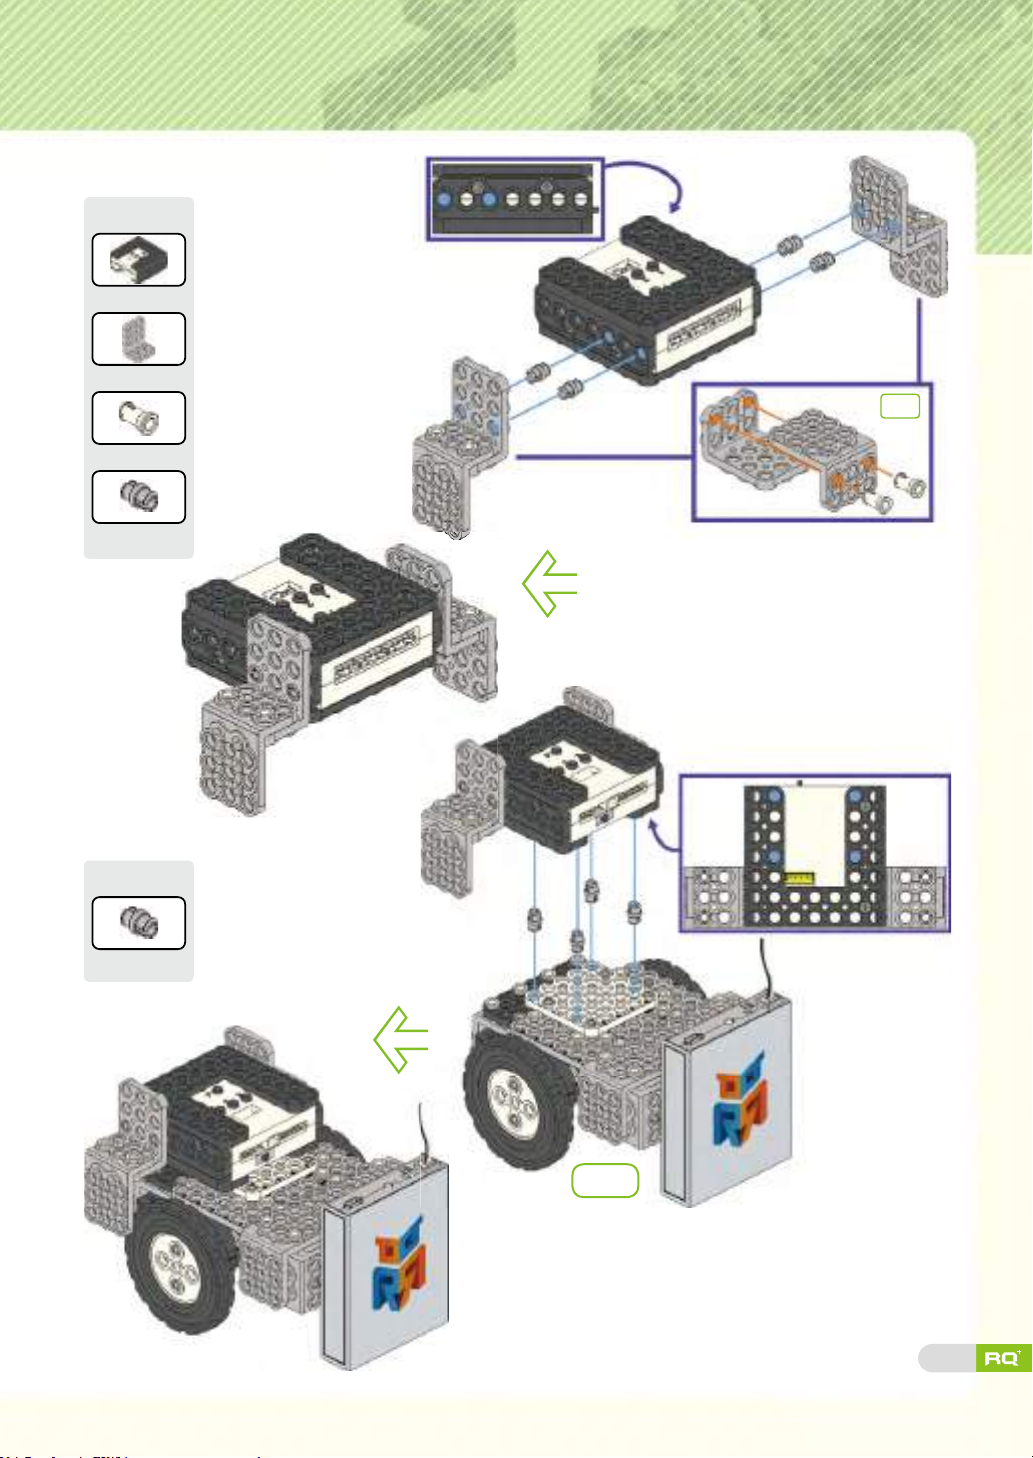
Step 9
Tip
Smart controller X1
3×5 L frame X4
2s rivet X4
Double rivet X4
X2
Step 10
Tip
Double rivet X4
Step
8
18
Page 17
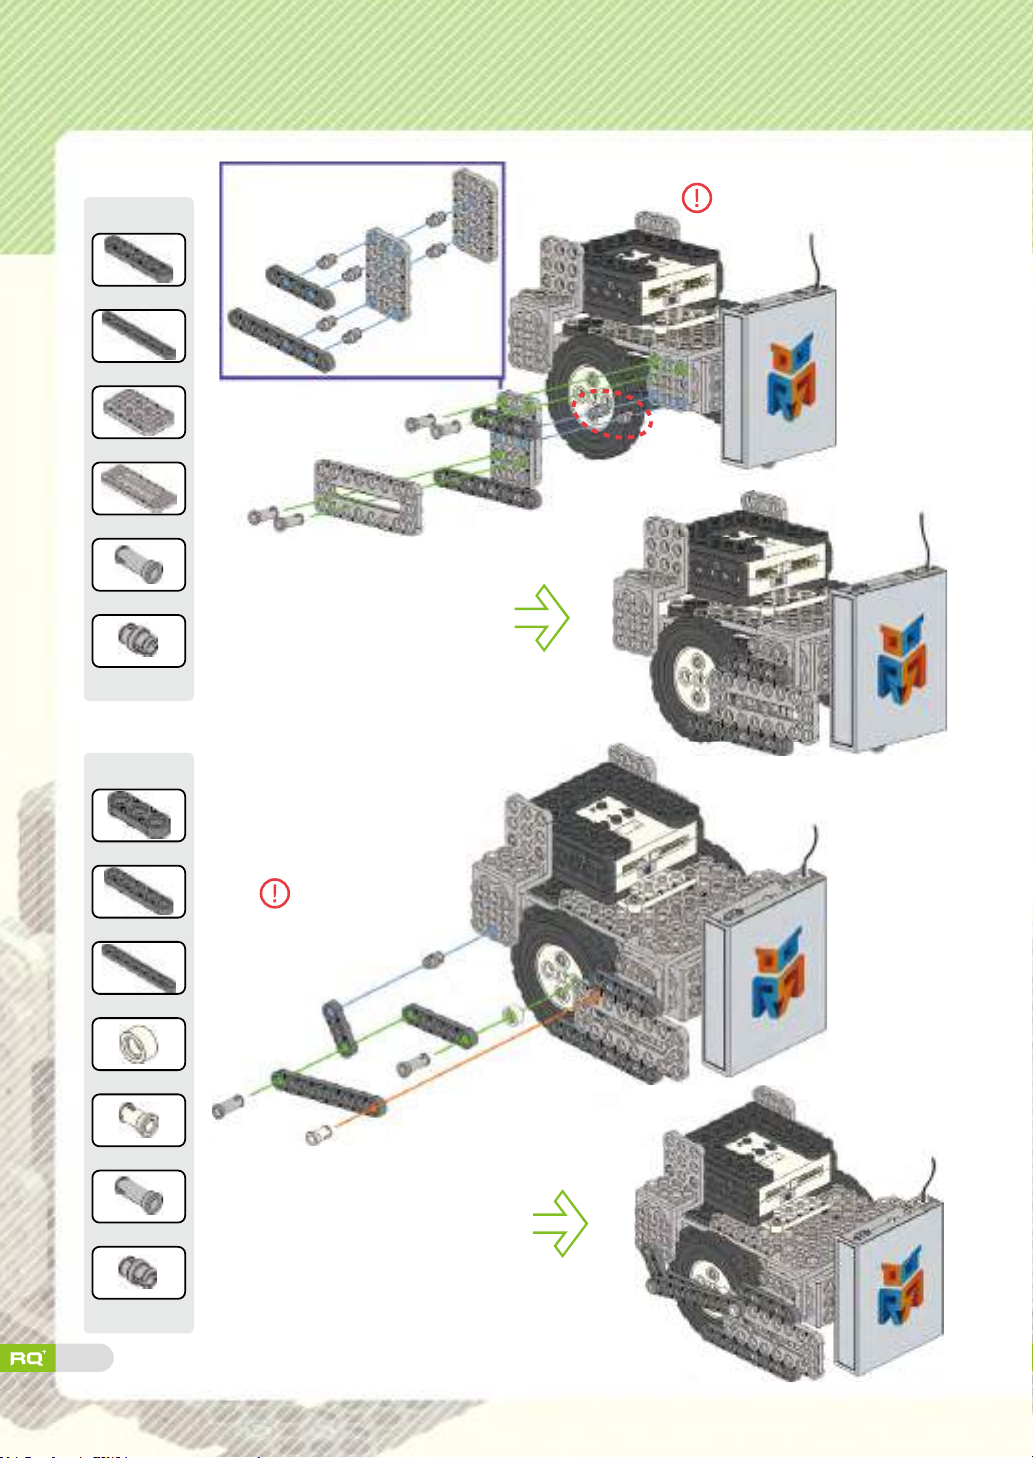
Step 11
Tip
Insert double rivet
parts rst.
1×5 frame
1×8 frame
3×5 frame
3×8
Double rivet X8
X1
X1
X2
slide frame X1
X4
3s rivet
Step 12
Tip
1×3 frame X1
①
1×5 frame X1
1×8 frame X1
Spacer X1
2s rivet X1
3s rivet X2
Double rivet X1
19
Assemble the
parts in order.
③
②
①
④
Page 18
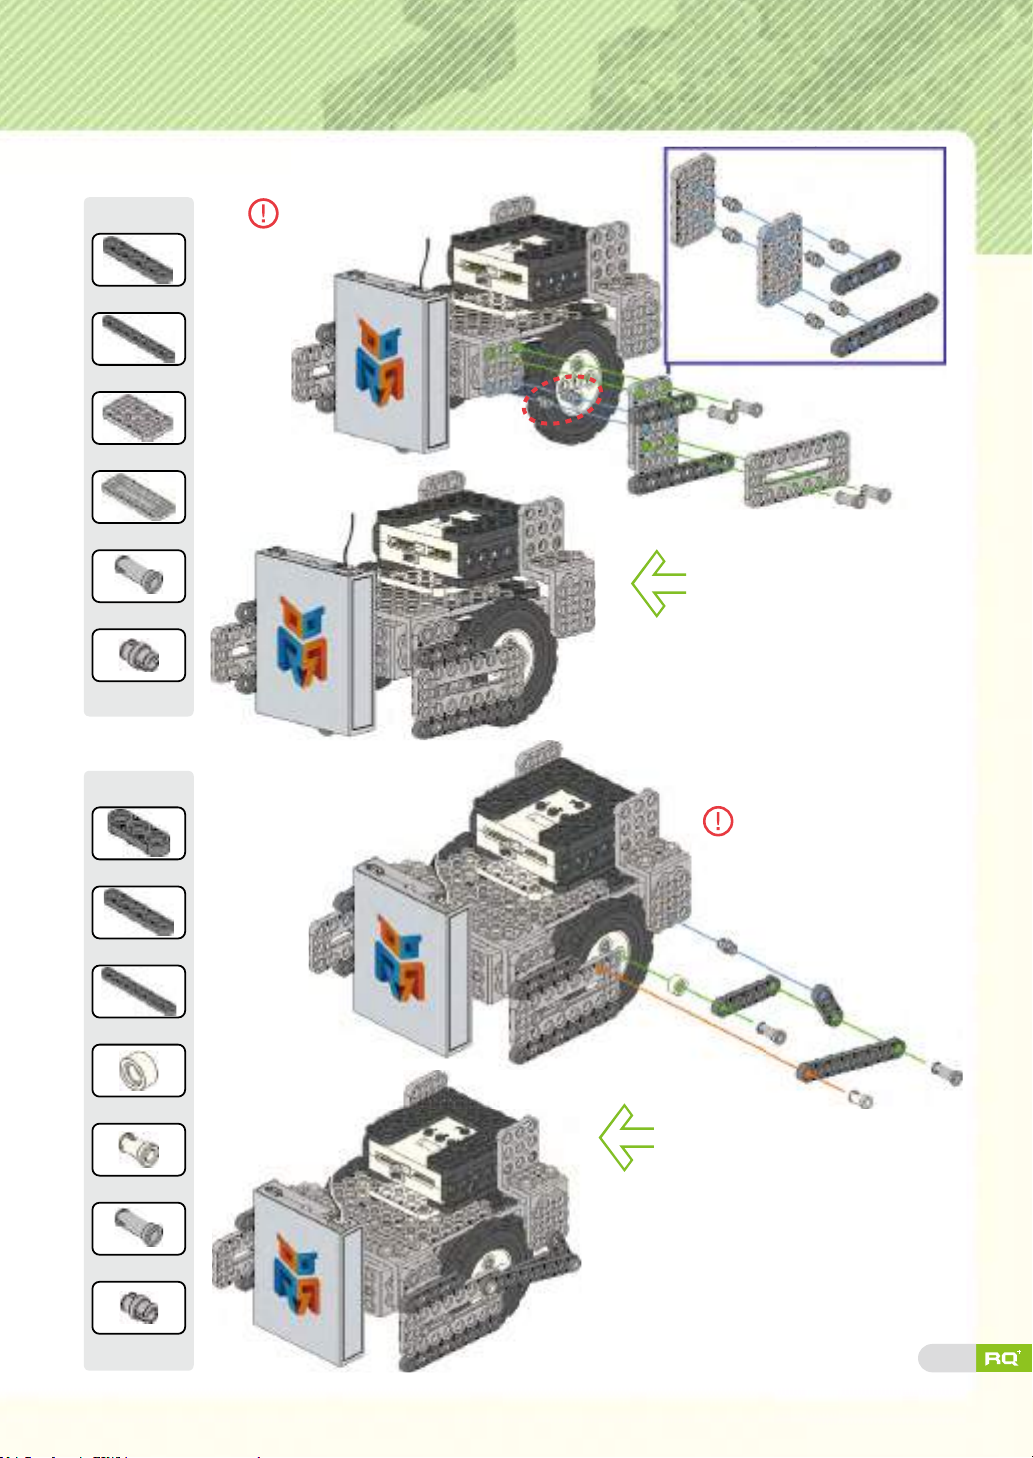
Step 13
Tip
1×5 frame
1×8 frame
3×5 frame
3×8
Double rivet
X1
X1
X2
slide frame X1
X4
3s rivet
X8
Step 14
Tip
1×3 frame
X1
Insert double rivet
parts rst.
Assemble the
parts in order.
1×5 frame
1×8 frame
X1
Spacer
X1
2s rivet
X2
3s rivet
Double rivet
X1
X1
X1
③
②
①
④
20
Page 19
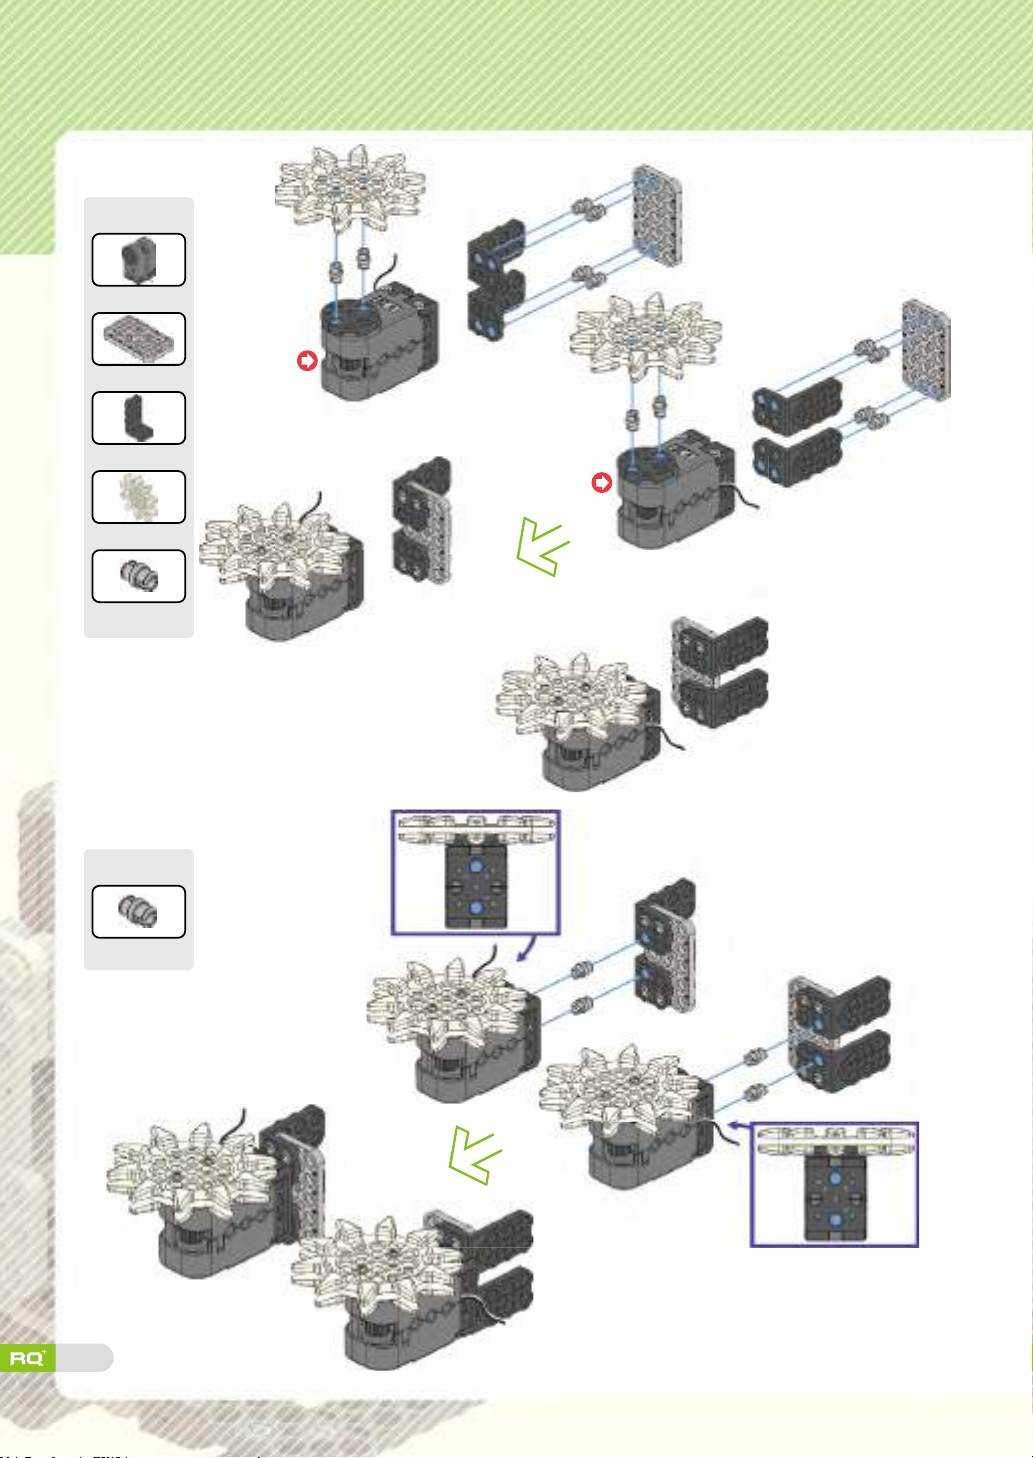
Step 15
Tip
R. motor(ID29,30)
3×5 frame
2×5 L frame
Big gear
Double rivet X12
X2
X2
X4
X2
Step 16
Tip
R. motor
(ID29)
R. motor
(ID30)
Double rivet
21
X4
Page 20

Step 17
Tip
X4
2s rivet
R. motor
(ID29)
R. motor
(ID30)
Step 14
Pay attention to the
cable connecting ports
and direction.
Step 18
R. motor (ID29) Power
R. motor (ID30)
22
Page 21
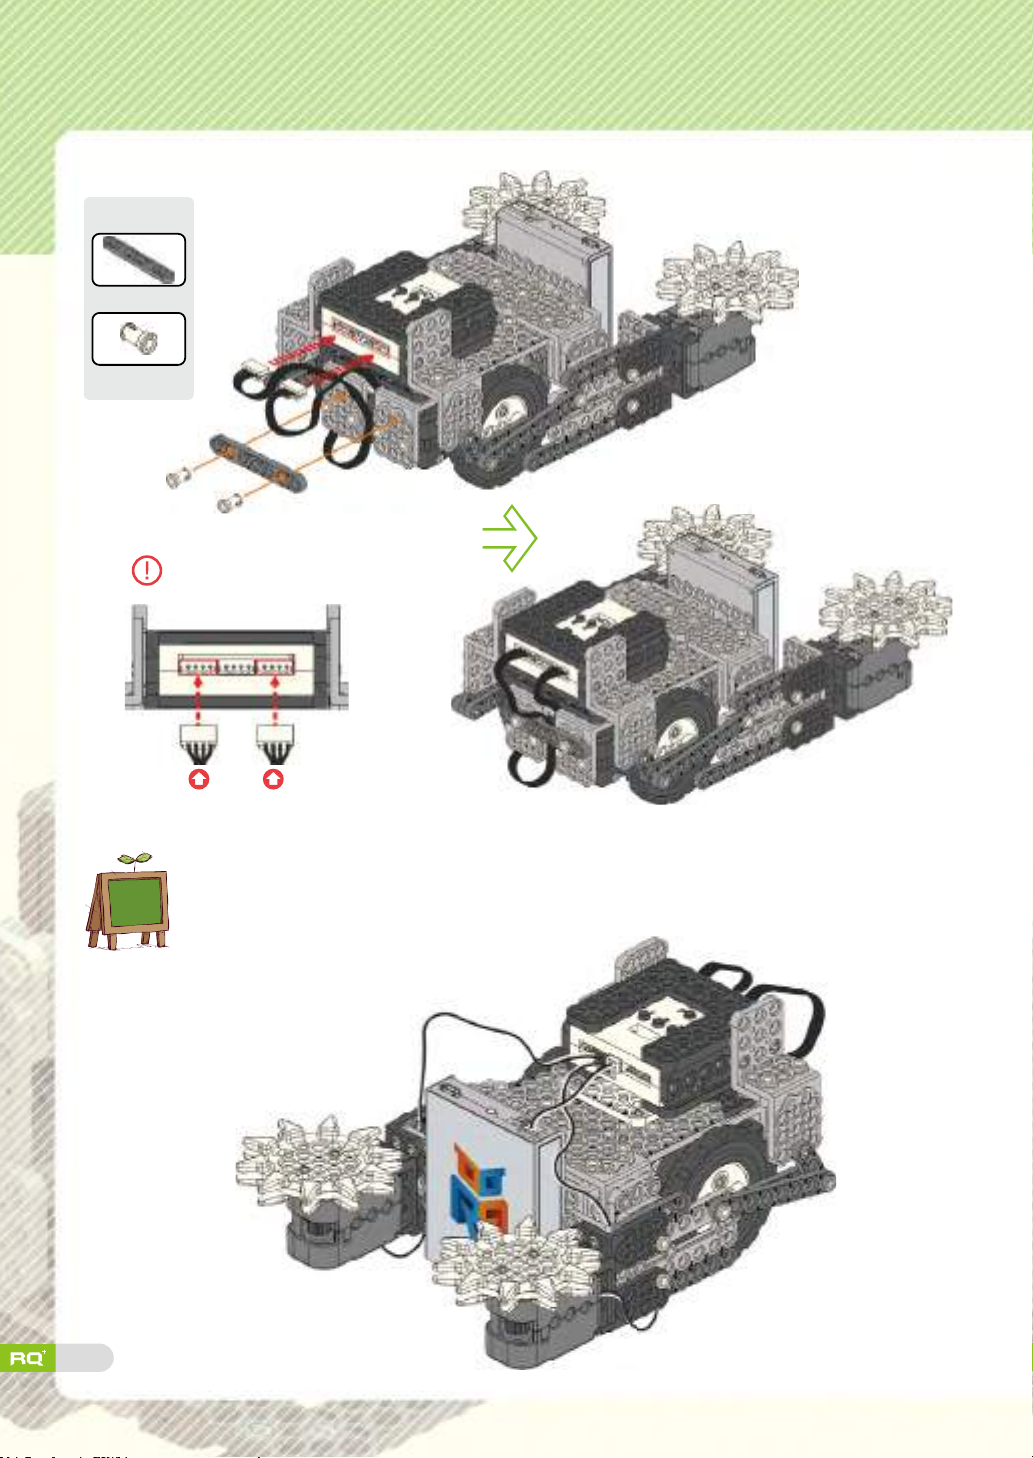
Step 19
Tip
1×7 frame X1
2s rivet X2
You can connect two servos to
any other smart servo ports.
Smart servo
(ID00)
completion
23
Smart servo (ID01)
★
'Battle Robot' is ready!
★
Page 22
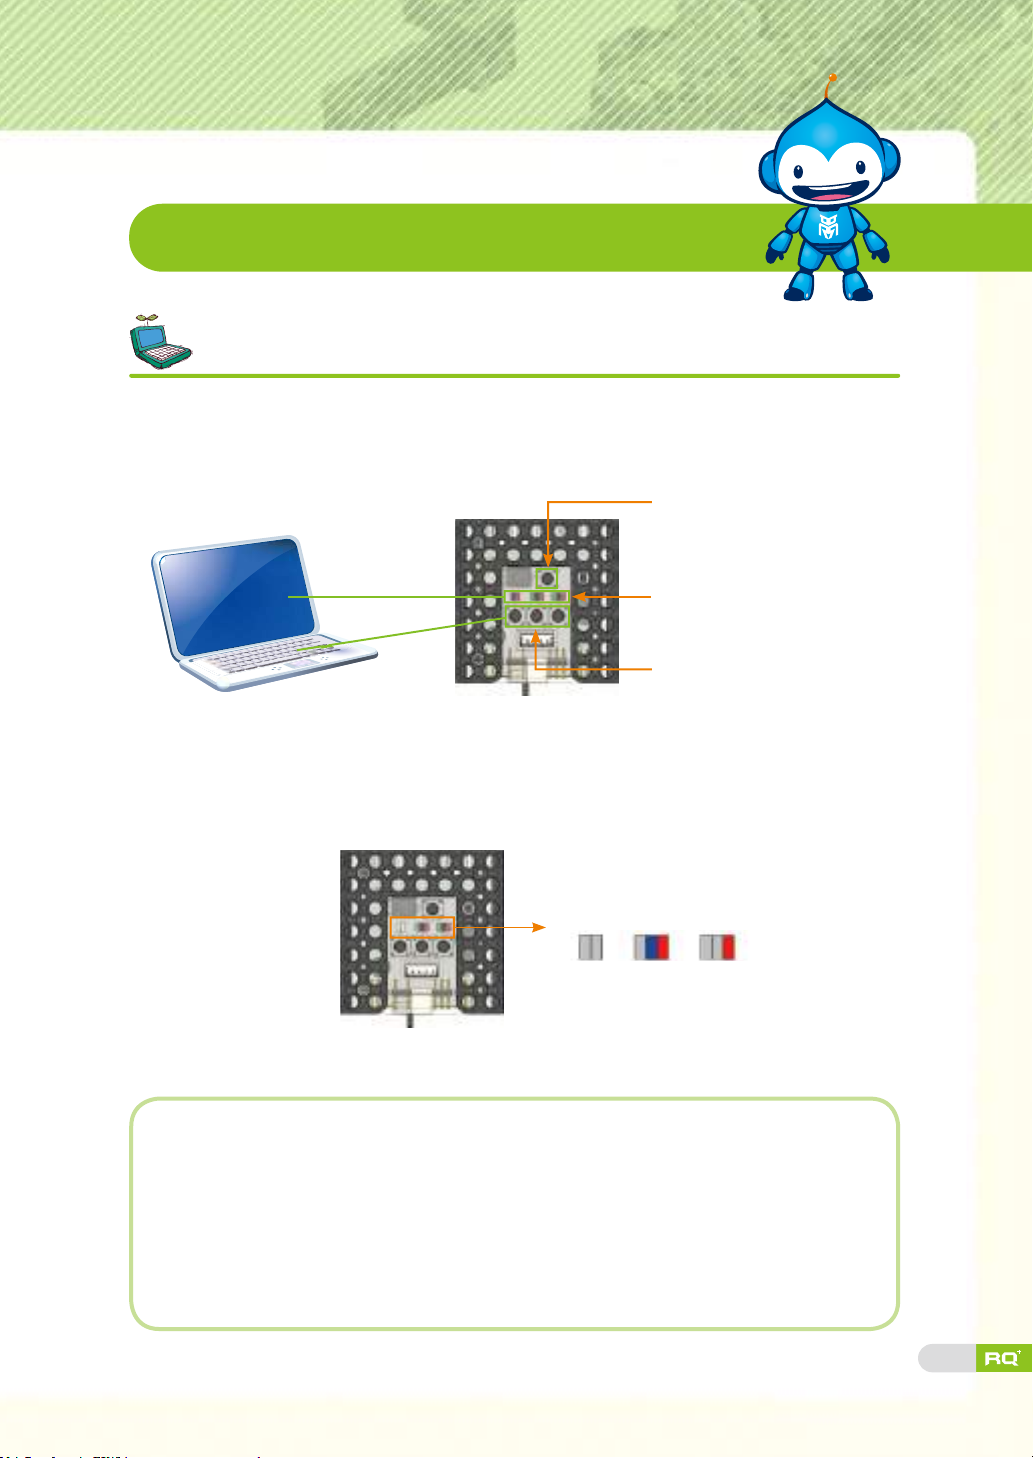
Robot Experience
Set-up 'Battle Bot' robot model
There are various LEDs and buttons in smart controller. LED indicates input
or output value like monitor while buttons work as the keyboard for PC.
Button P
LED1, LED2, LED3
from left side
Button 1, 2, 3 from left side
First : Turn on the smart controller to enter <set-up mode>.
Second
:
Press button 2 or button 3 on smart controller to set-up 'Battle Bot'
robot model. The buttons work as a keyboard for PC.
Program the robot for proper operation.
LED1 LED2 LED3
Third : Press button P on smart controller to enter <standby mode>.
When robot is not working, check the following and reassemble.
1. When Battle Bot is not moving :
▶ Check power connection and power switch, and Battle Bot robot model set-up.
2. When Battle Bot gear is not moving back and forth :
▶ Refer to the assembly guide and check slide frame and smart servo ID.
24
Page 23
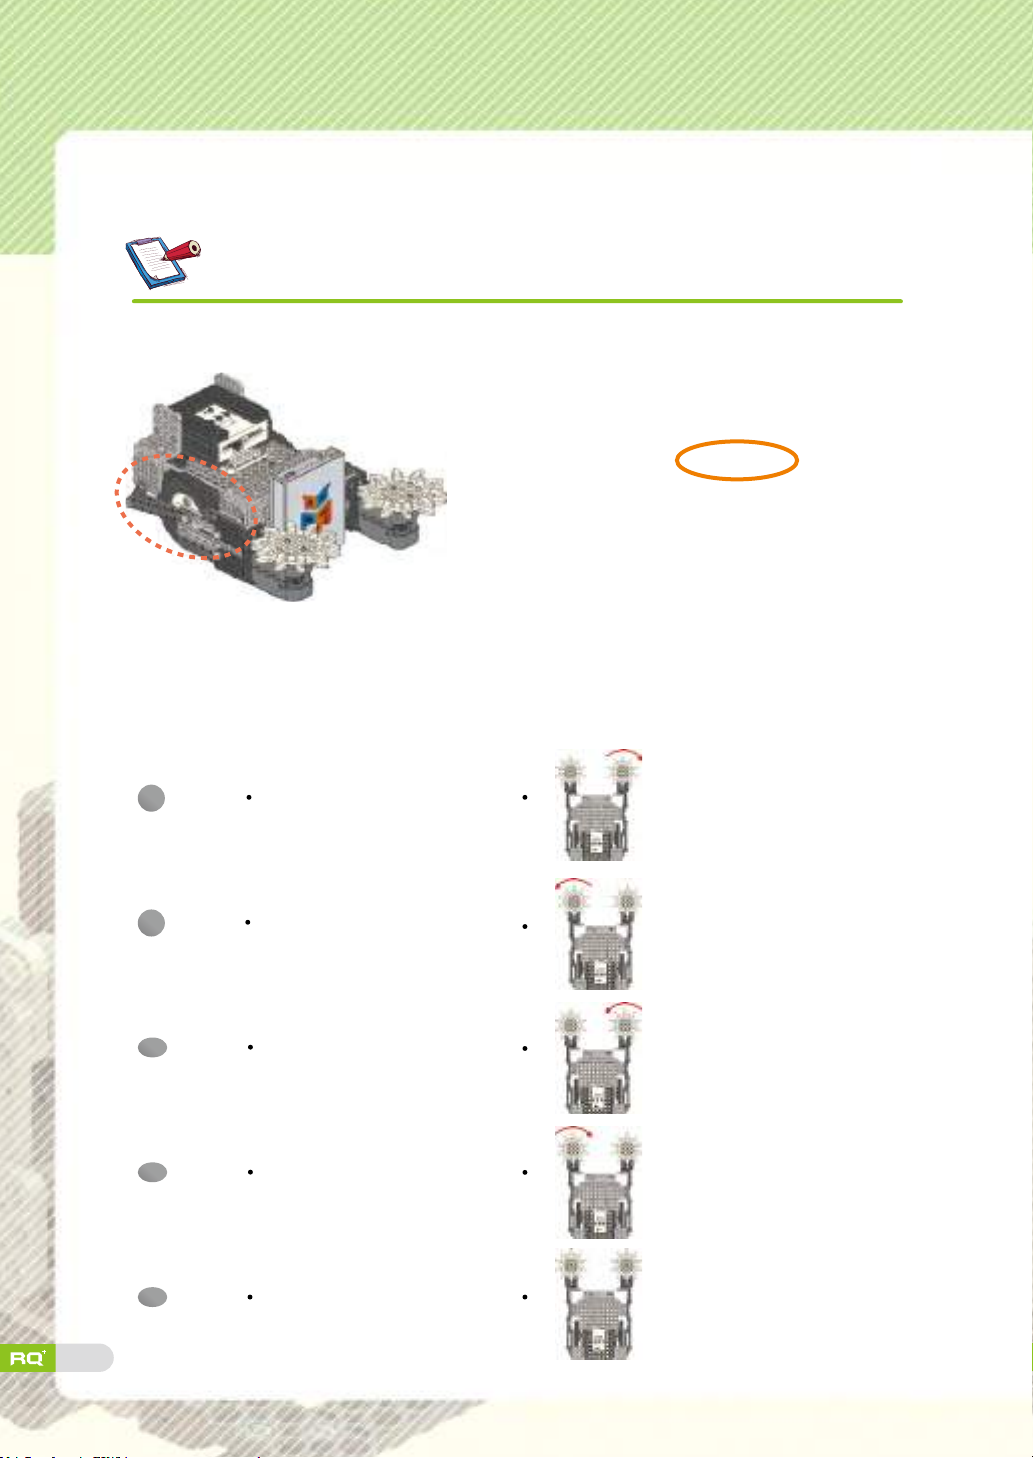
Check movement and assembly.
1. Read below and write correct answers.
Battle Bot uses structure
to move smart servos, and make gears
move back and forth for punch motion.
2. Match the IR remote controller buttons with the corresponding action.
A
button
Right gear rotates
towards the outside.
25
B
1
2
3
button
button
button
button
Left gear rotates towards
the outside.
Right gear rotates
towards the inside.
Left gear rotates towards
the inside.
Stop left and right gears.
Page 24
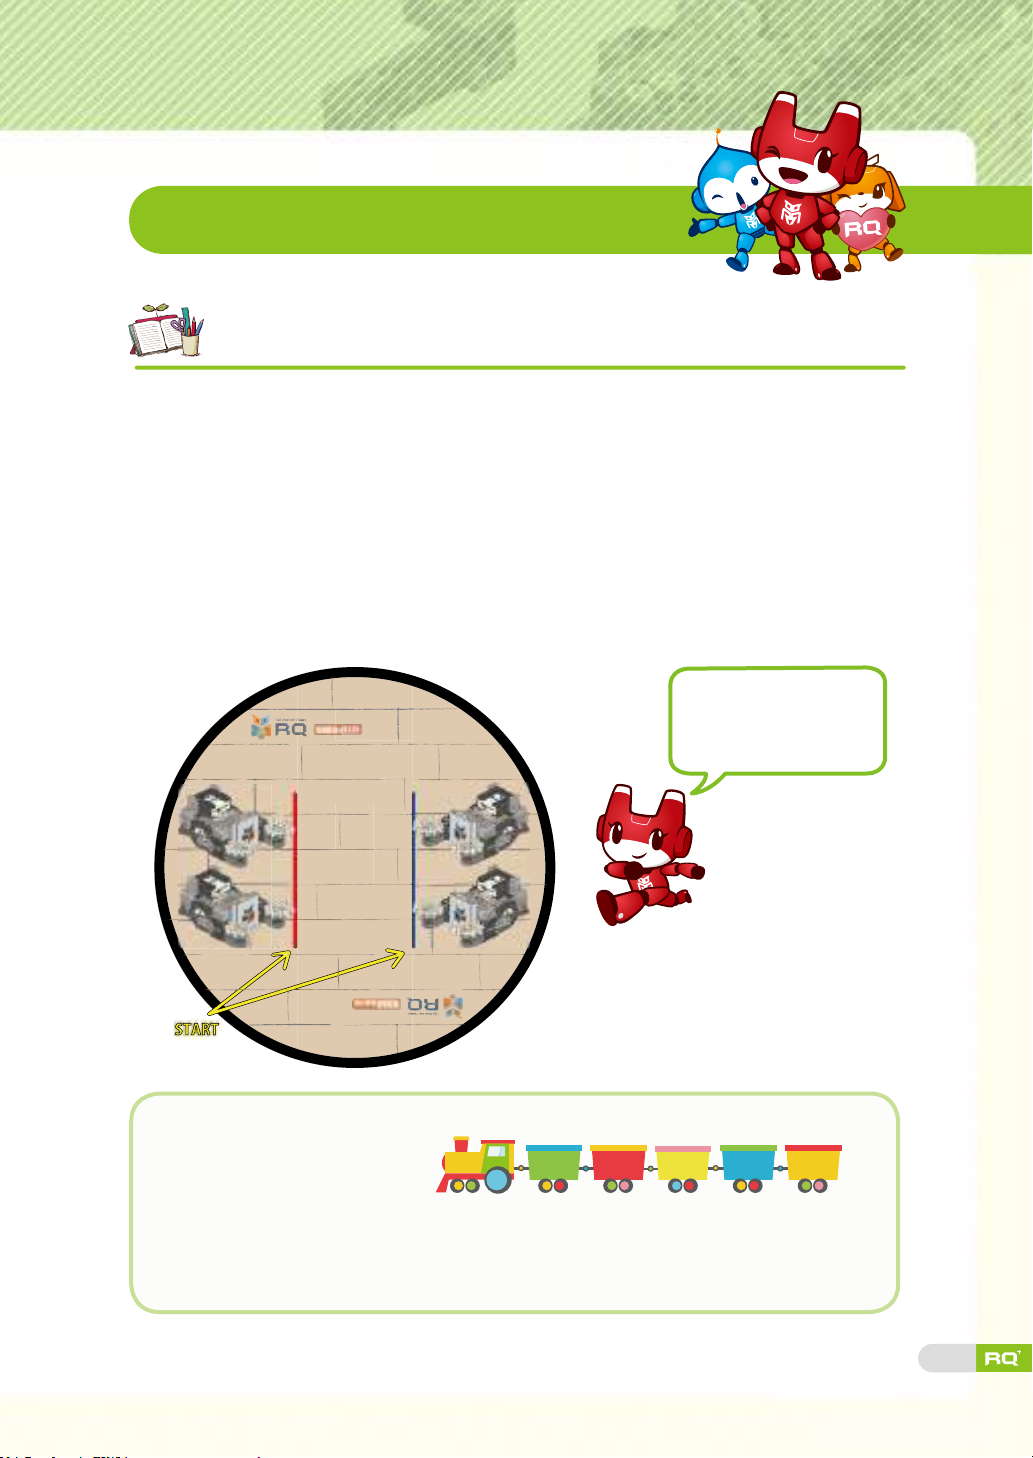
Robot Play
Play Battle Robot game.
Play Battle Robot game with your Battle Bot which can move freely and rotate
gears. To win, push the opponent outside the ring or break the opponent.
•
Play game in teams or individually.
•
Each ght is 3 minutes long, and you win if you push opposite player outside the
ring or damage the opponent.
(Example of damages: gear, rotation motor or frames falling apart)
•
In case two robots get tangled for over 10 seconds, restart from 'START' position.
You may not adjust the robot when you restart.
Think of strategies
on how to attack and
defense.
Describe your 'Battle Bot'.
◈
• Robot level?
• What was the most fun about it?
• What was the most difcult thing?
• Check your robot with your teacher.
Very easy Easy Average Difficult
Ver y
difficult
26
Page 25
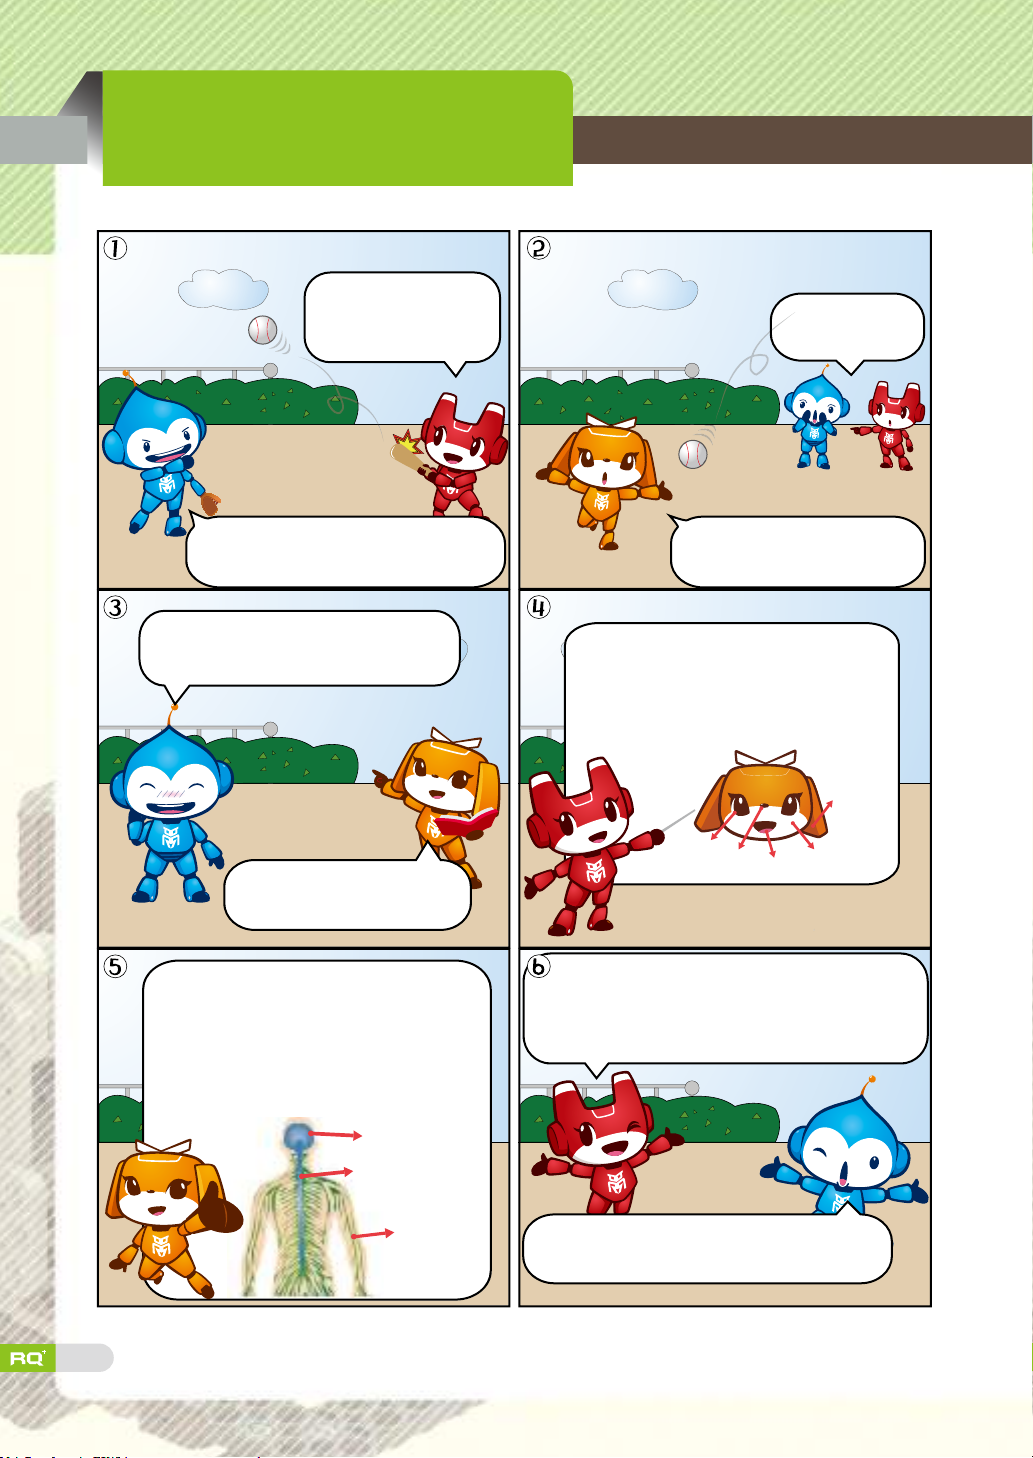
2. Black/White flag
The first hitter hits
the ball!
Is it a homerun?
Our body - Stimulation / Reaction
Oh no! The ball!
Watch out!
The baseball genius, Mong player
throws a ball!
I'm sorry!
But how did you dodge the ball?
Our body reacts to the
external stimulation.
As you shouted "Watch out!", the sound
came into my ear's sensory organ, and it
went to peripheral nervous to spinal cord
and brain. And I can feel the stimulation.
Yikes! Be careful when you
play baseball!
We have five senses - sight, smell,
taste, hearing and touch. Sensory organ
is responsible for these five senses.
Hearing
Sight
Smell
Brain and spinal cord receive external
stimulation, and give orders to muscles and
locomotive organs to protect your body.
Taste
Touch
27
Brain
Spinal cord
Peripheral
nervous
system
I didn't know our body could do that!
It's great!
Page 26

Today's Robot Class
Blue/White ag game is to follow the command saying either
to raise the blue flag or the white flag or lower the blue or
white ag. And such commands must be followed immediately
and quickly. Back/White flag game is based on this game.
To light the LEDs (red or blue) on the black or white ag, you
press the IR remote controller button, or touch sensor. Then
the black or white flag is raised or lowered according to the
button you have pressed. You can control smart servo position
freely, so the ags can be moved up, down or horizontally!
Game speed gets faster
for higher levels.
Mmm~ Let's focus
Bring it on!
Prepare a blue and a white ag, and play with friends.
1. Pick one friend and make a team.
2. Give instructions to the other friend, such as
'raise blue ag', 'lower white ag', 'don't lower white
ag', and 'raise blue ag' quickly.
3. Change your role with your friend after you give 10
instructions. Whoever is better at following the
instruction correctly wins this game.
28
Page 27
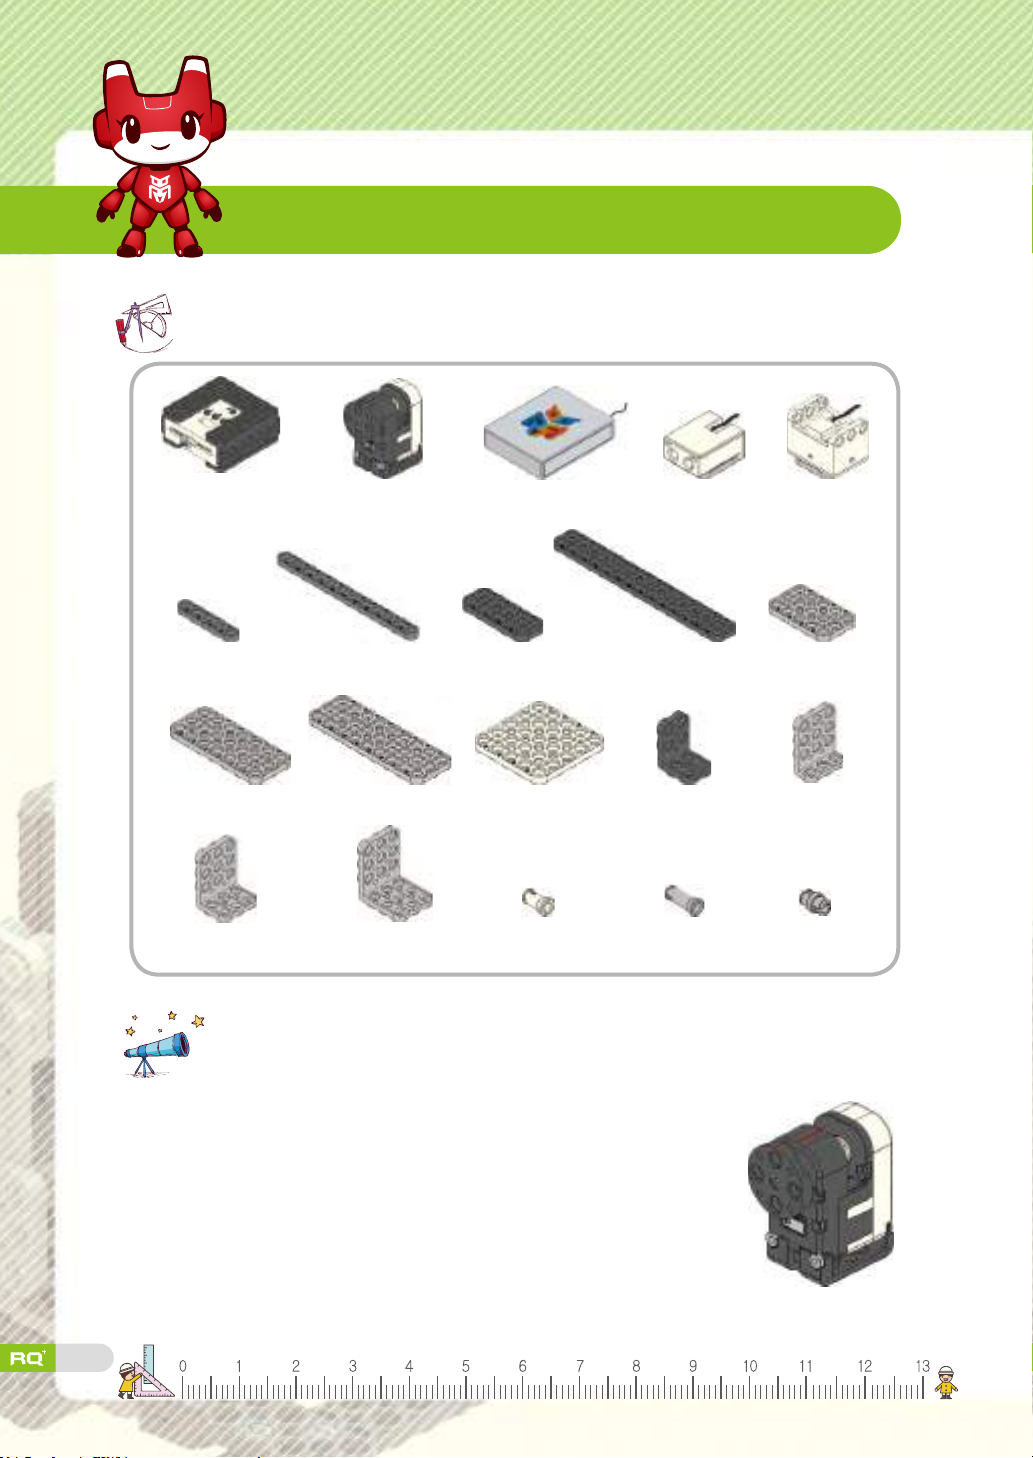
Robot Assembly
Prepare robot parts.
Smart controller X1
1×5 frame X1
3×7 frame X4
3×5 L frame X4 3×6 L frame X3 2s rivet X49 3s rivet X8 Double rivet X30
Smart servo (ID00,01) X2
1×12 frame X2 2×5 frame X2 2×15 frame X3 3×5 frame X3
3×9 frame X4 5×5 frame X1 2×4 L frame X2 3×4 L frame X2
Battery case X1 LED X2 Touch sensor X2
Tips.
• The rear part of smart servo is transparent while rotation
motor is all black. This is to show the LED light of smart
servo. You can control smart servo to rotate as well as to
move the position angle.
• Smart servo and front horn part have 'home' mark as shown
in the image on the right. Match these two 'home' marks
when you assemble the robot.
29
Page 28
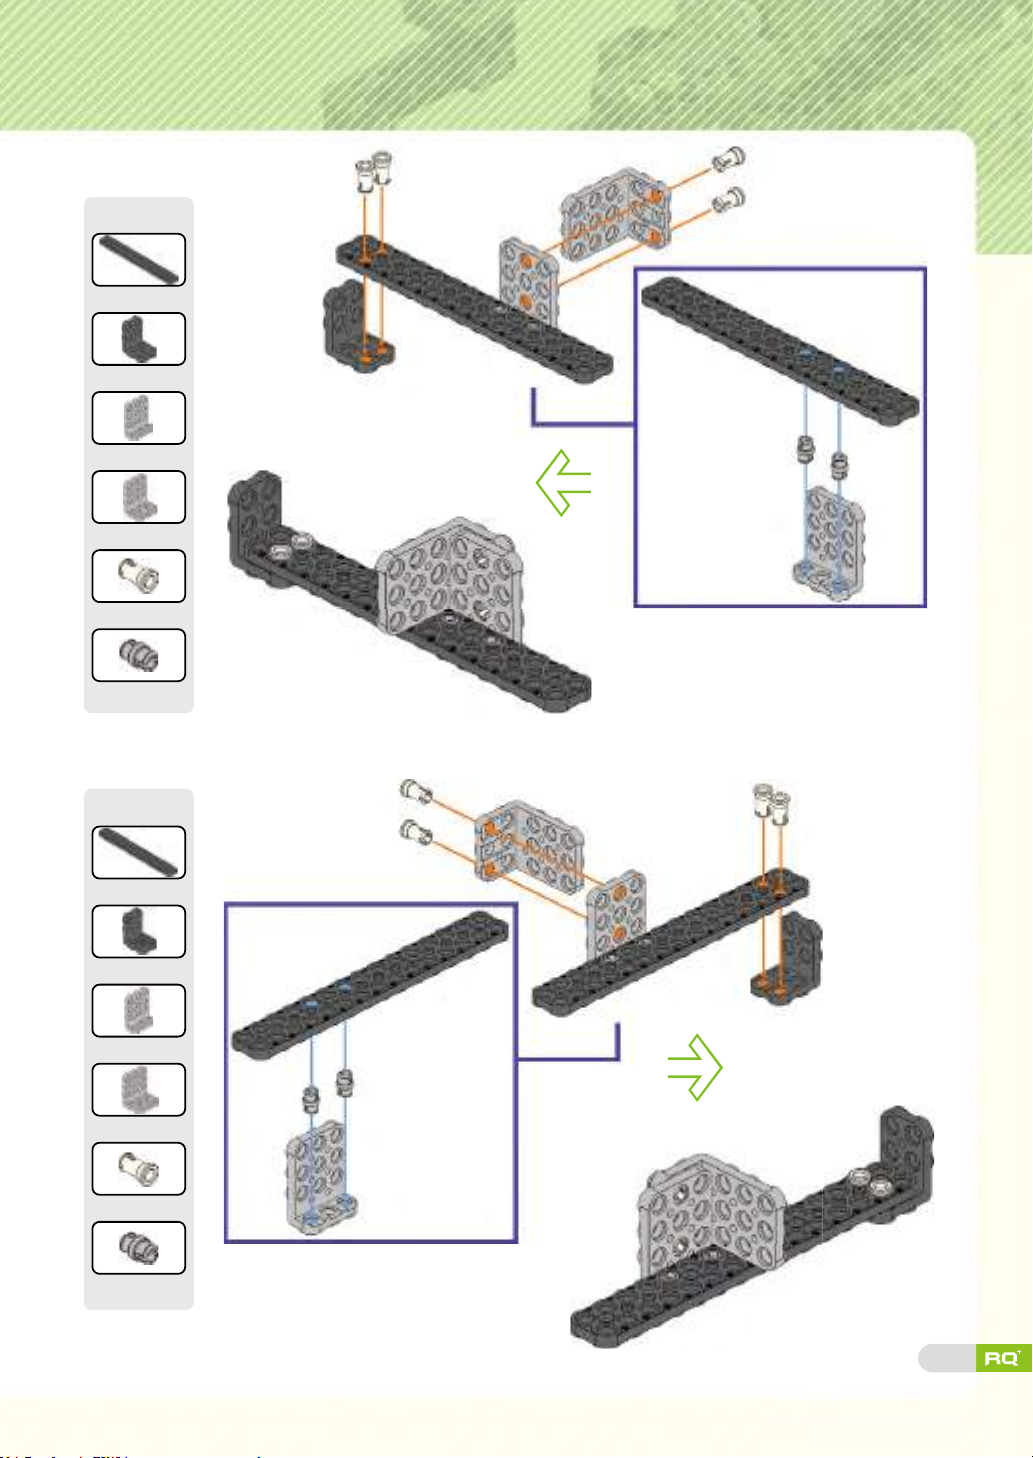
Step 1
Tip
2×15 frame X1
2×4 L frame X1
3×4 L frame X1
3×5 L frame X1
2s rivet X4
Double rivet X2
Step 2
Tip
2×15 frame X1
2×4 L frame X1
3×4 L frame X1
3×5 L frame X1
2s rivet X4
Double rivet X2
30
Page 29
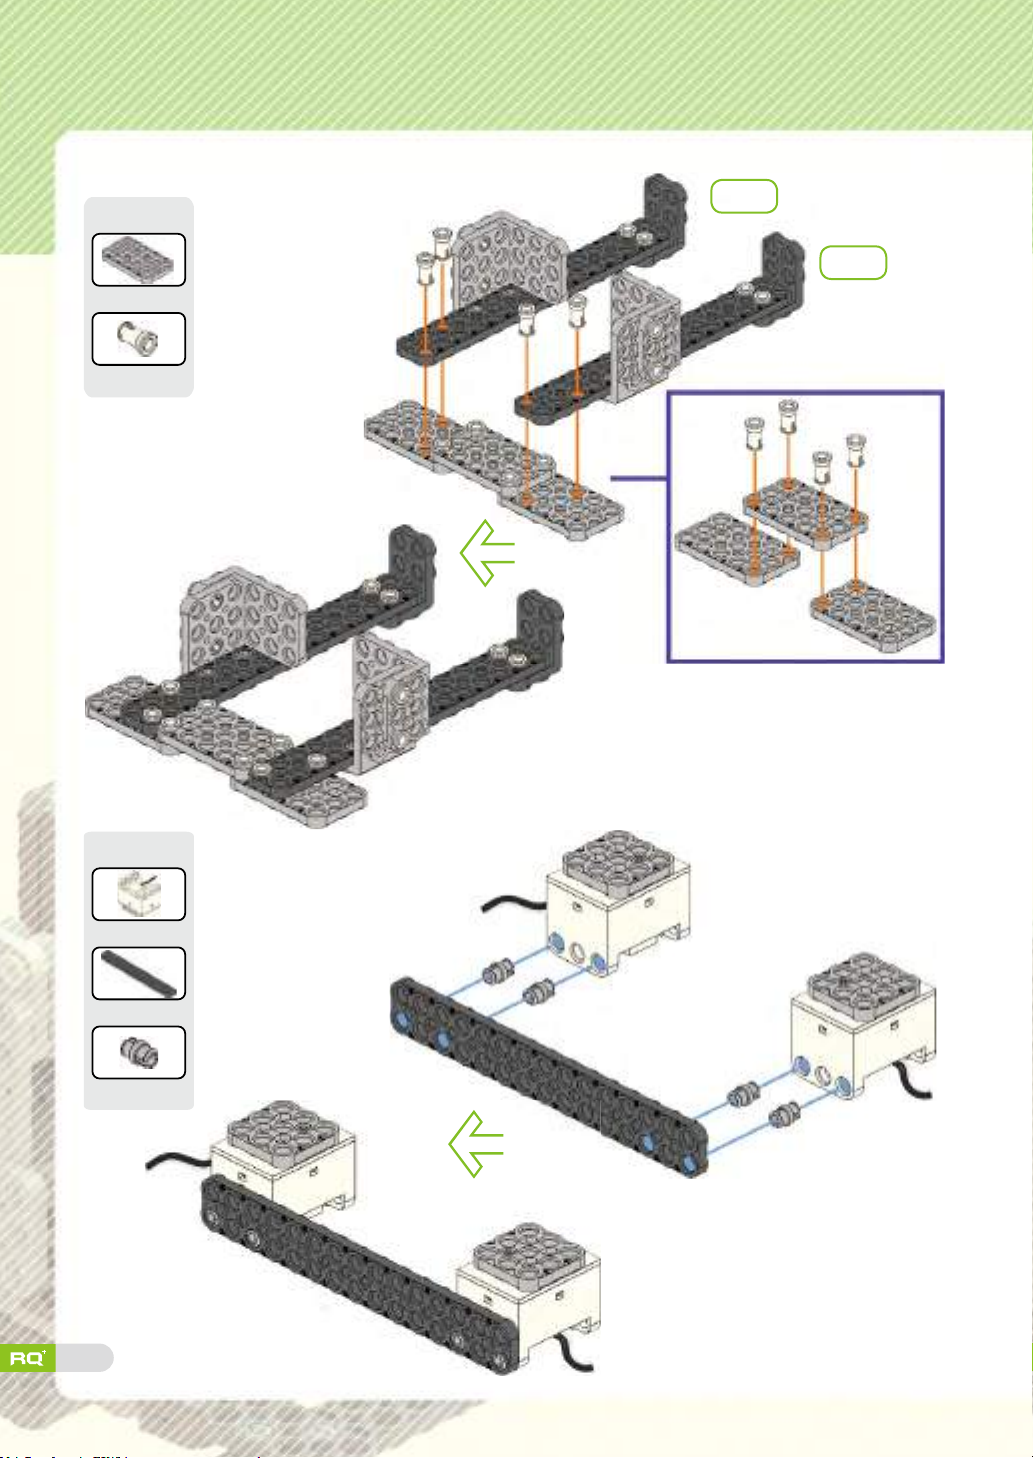
Step 3
Tip
3×5 frame X3
2s rivet X8
Step 2
Step
1
Step 4
Tip
Touch sensor X2
2×15 frame X1
Double rivet X4
31
Page 30

Step 5
Tip
2s rivet X4
Step 3
Step 6
Tip
3×7 frame X2
3×9 frame X1
3×6 L frame X1
3s rivet X4
32
Page 31
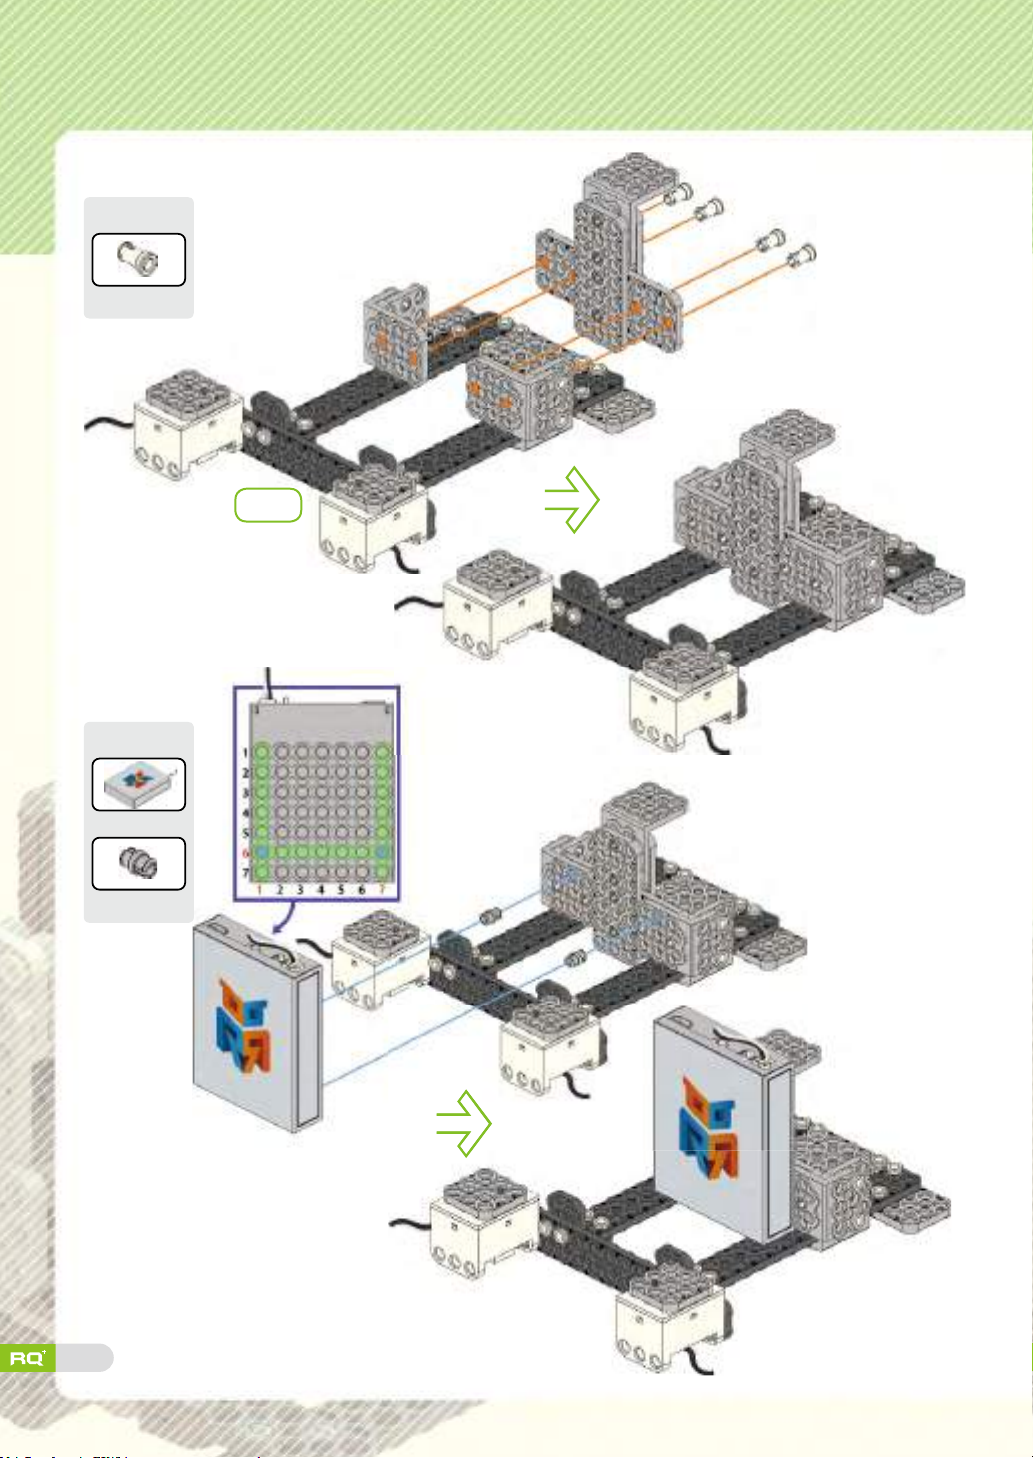
Step 7
Tip
2s rivet X4
Step 8
Tip
Step 5
Battery case X1
Double rivet X2
33
Page 32
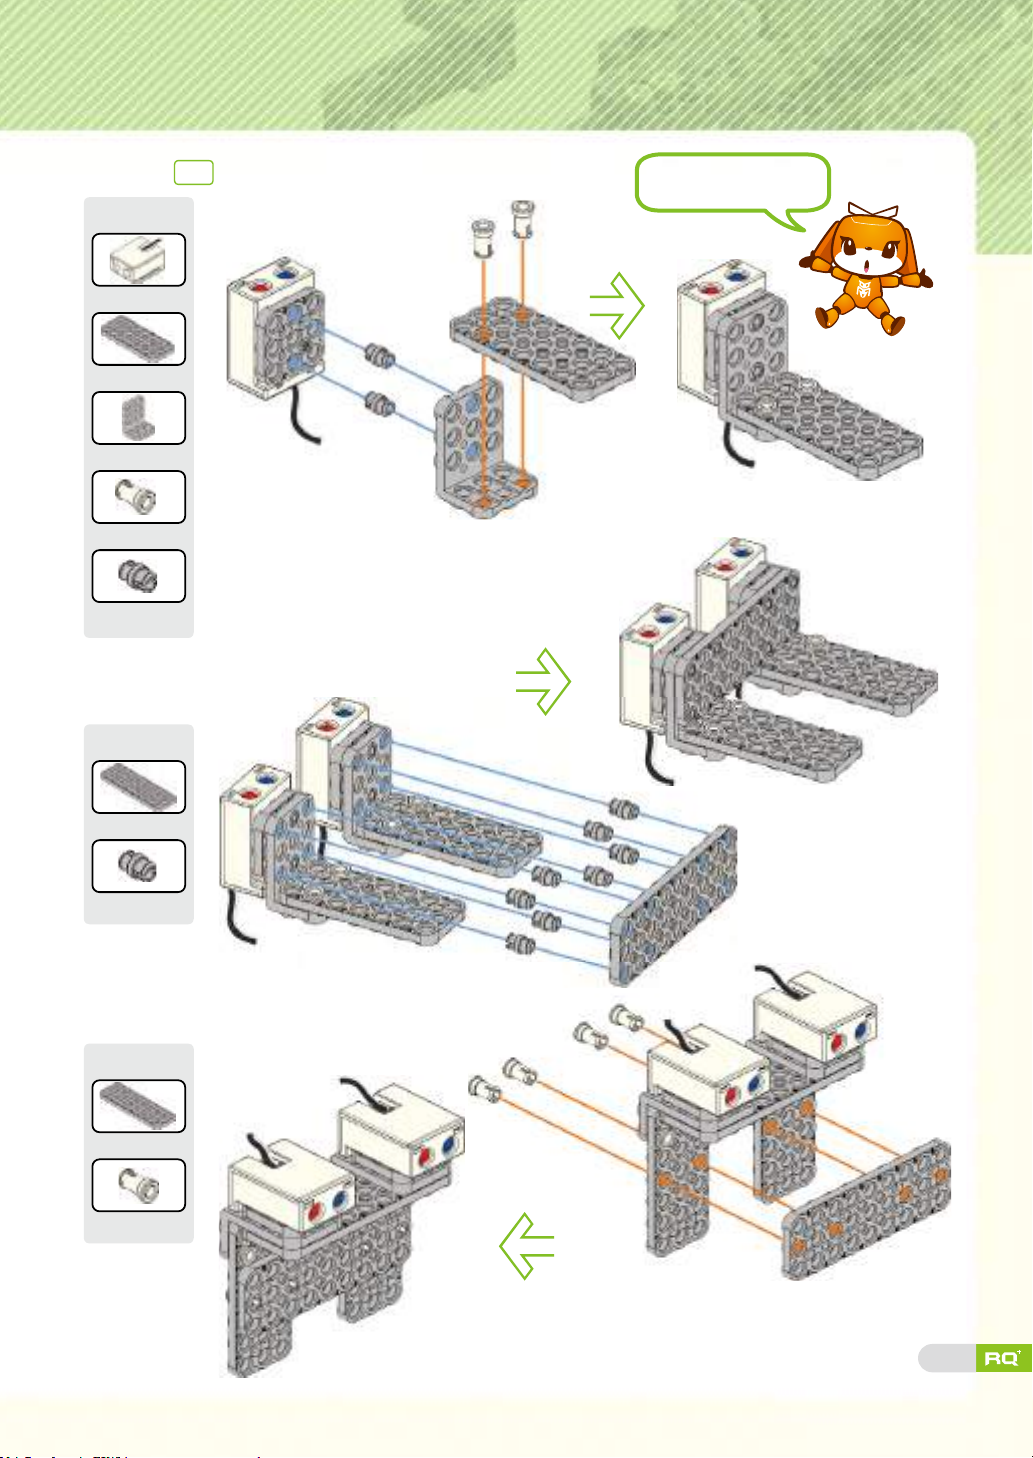
Step 9
Tip
LED X1
3×7 frame X1
3×5 L frame X1
2s rivet X2
Double rivet X2
Step 10
Tip
X2
Assemble two sets.
3×9 frame X1
Double rivet X8
Step 11
Tip
3×9 frame X1
2s rivet X4
34
Page 33
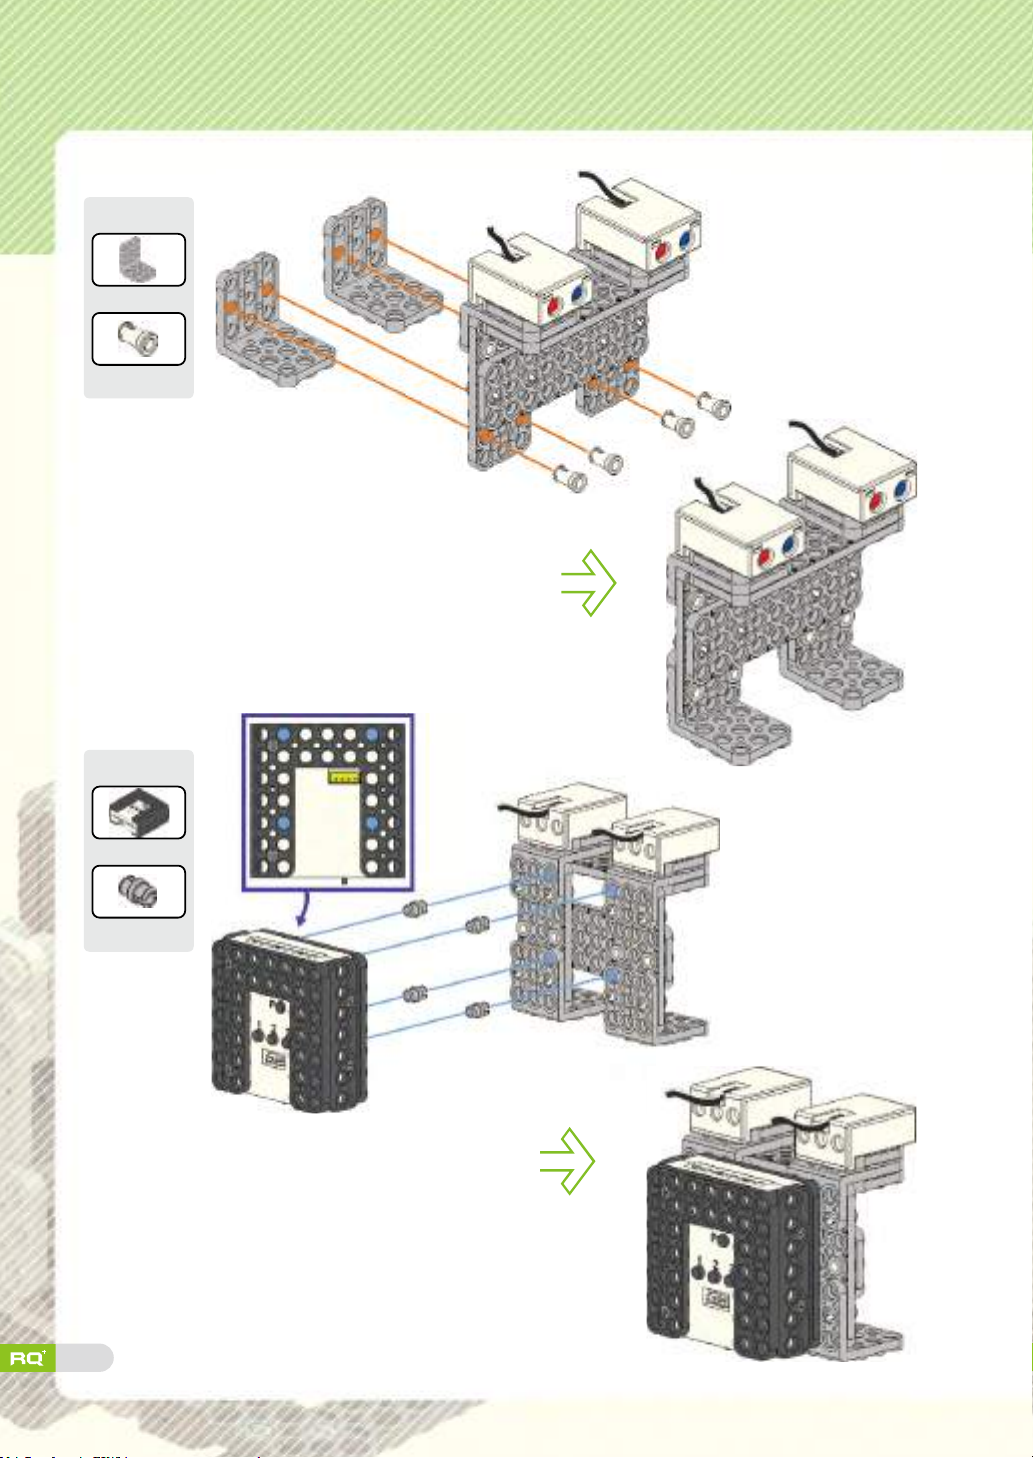
Step 12
Tip
3×6 L frame X2
2s rivet X4
Step 13
Tip
Smart controller
Double rivet X4
X1
35
Page 34
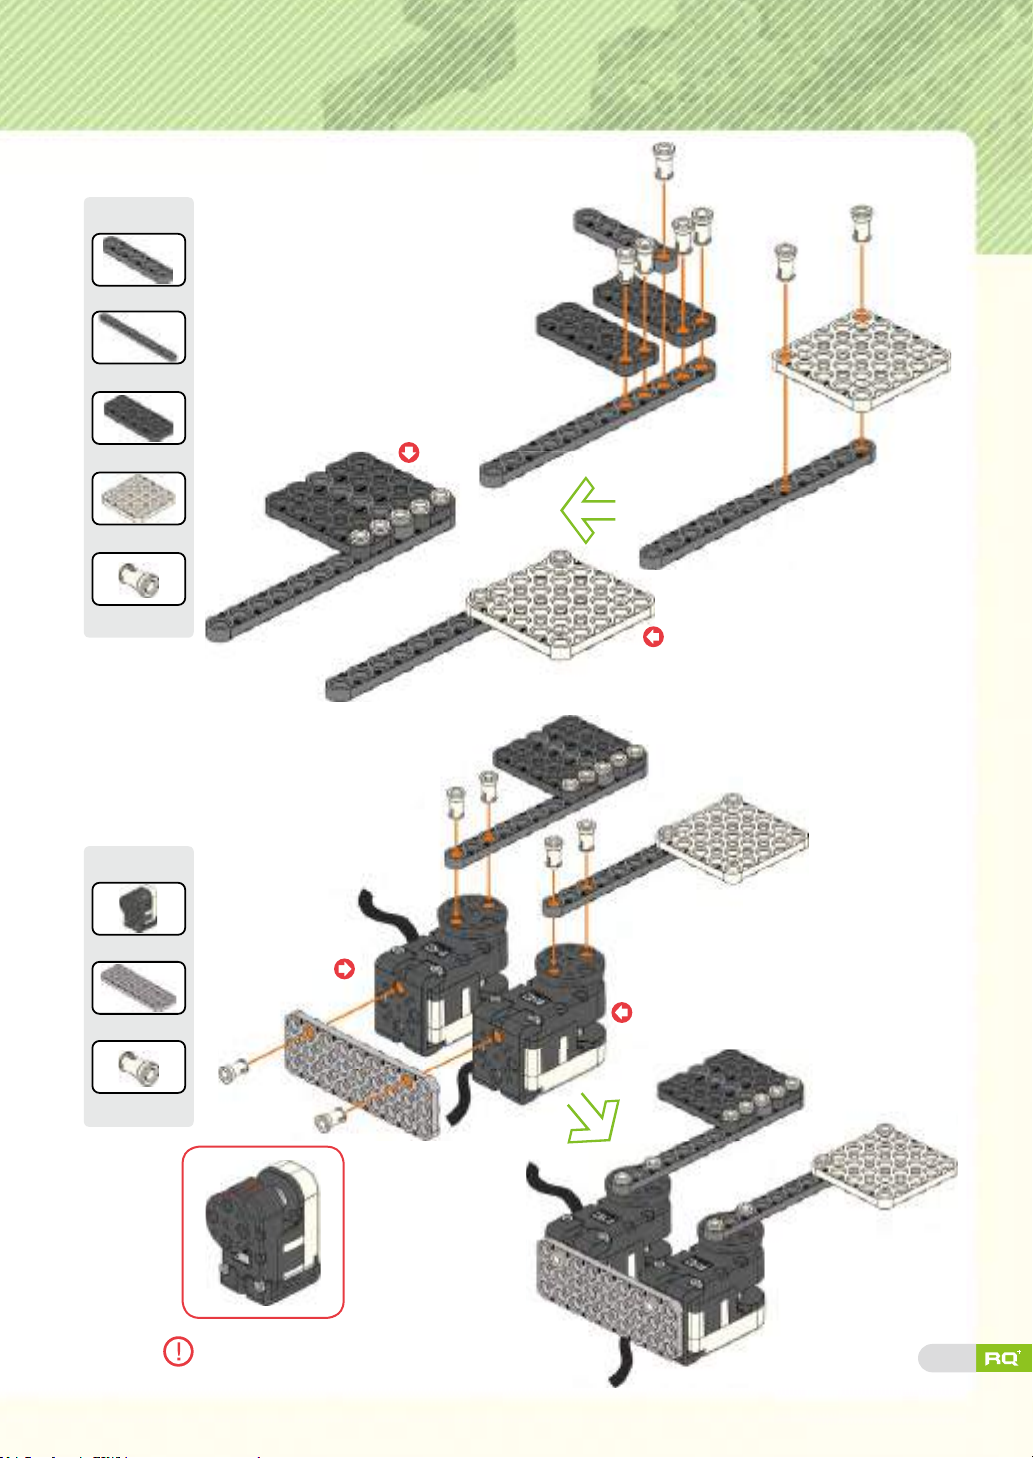
Step 14
Tip
1×5 frame X1
1×12 frame X2
2×5 frame X2
5×5 frame X1
2s rivet X7
Black Flag
White Flag
Step 15
Tip
Smart servo(ID00,0 1) X2
3×9 frame X1
2s rivet X6
Smart servo
(ID00)
Match two 'home' marks to
12 o'clock position.
Smart servo
(ID01)
36
Page 35
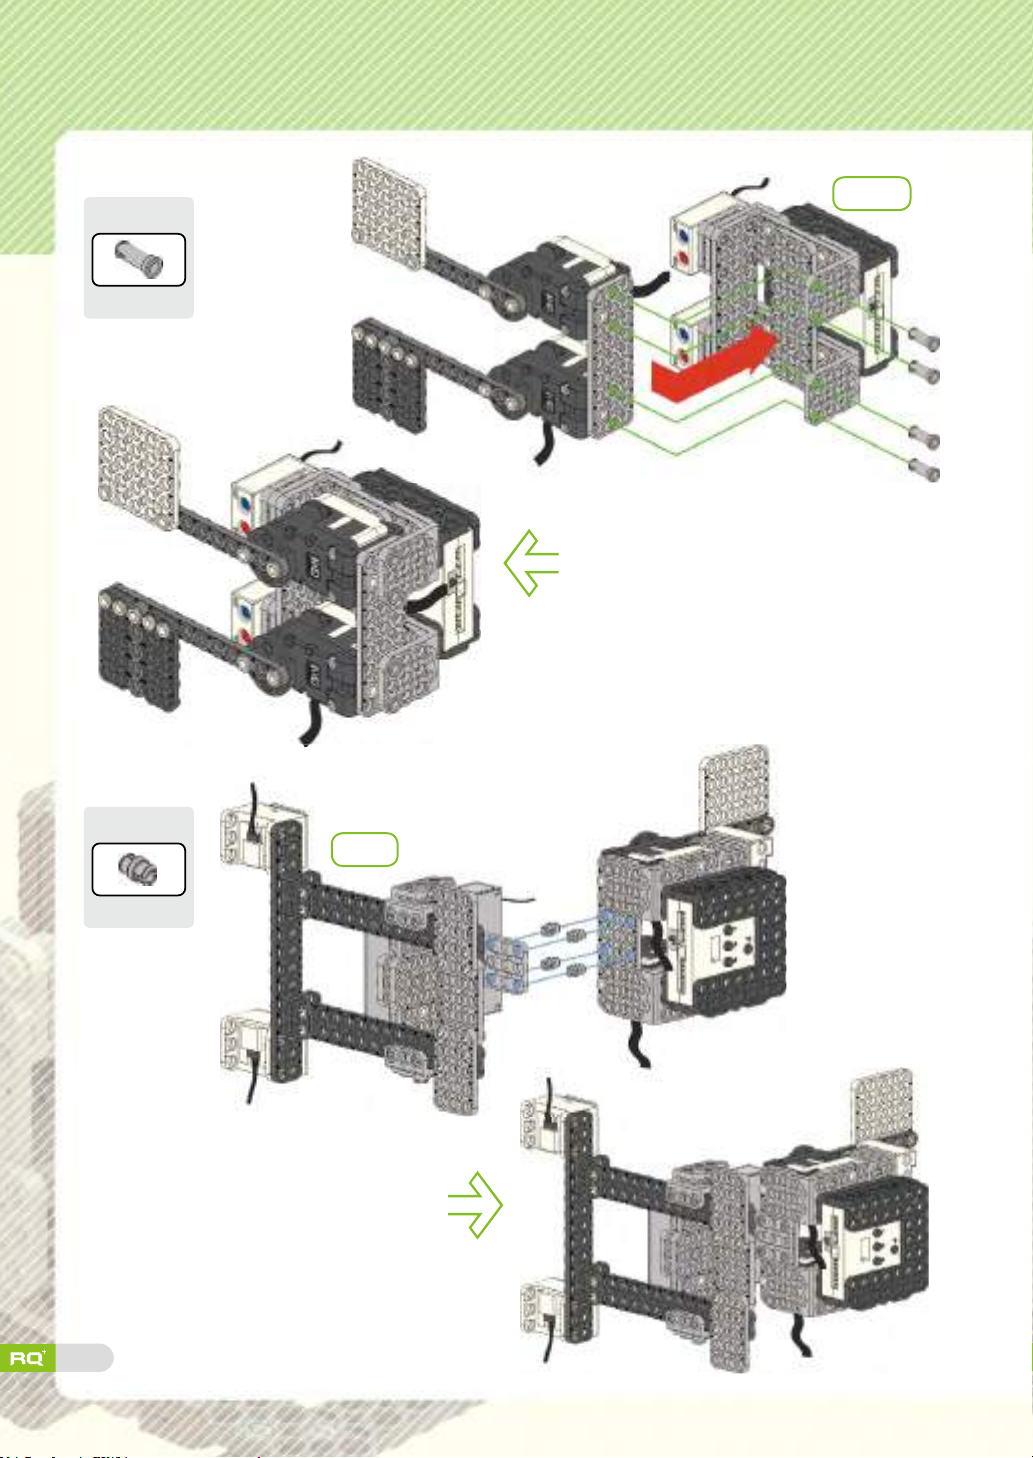
Step 16
Tip
3s rivet X4
Step
13
Step 17
Tip
Double rivet X4
37
Step 8
Page 36
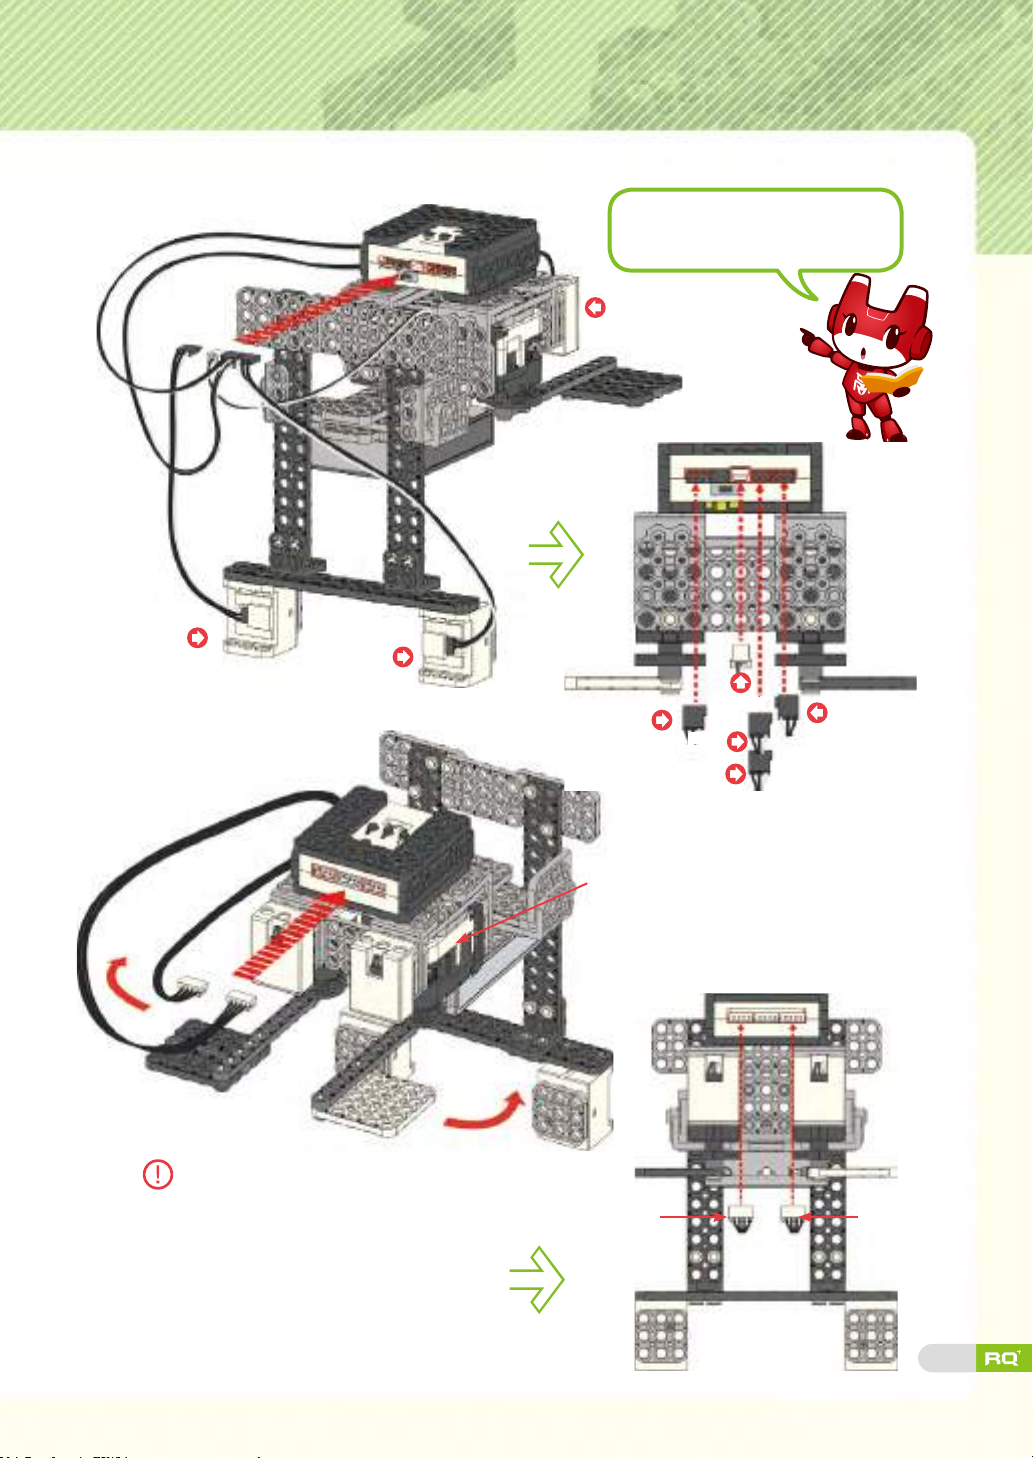
Step 18
Touch
sensor 1
Pay attention to the cable
connecting position and direction!
LED1
Step 19
Touch sensor 3
Touch sensor 1
Spread the black and white ag to outside.
Smart servo (ID01) Smart
PowerPower
LED1
LED1
LED2
LED2
Smart servo (ID01)
Touch
sensor 3
servo (ID00)
38
Page 37
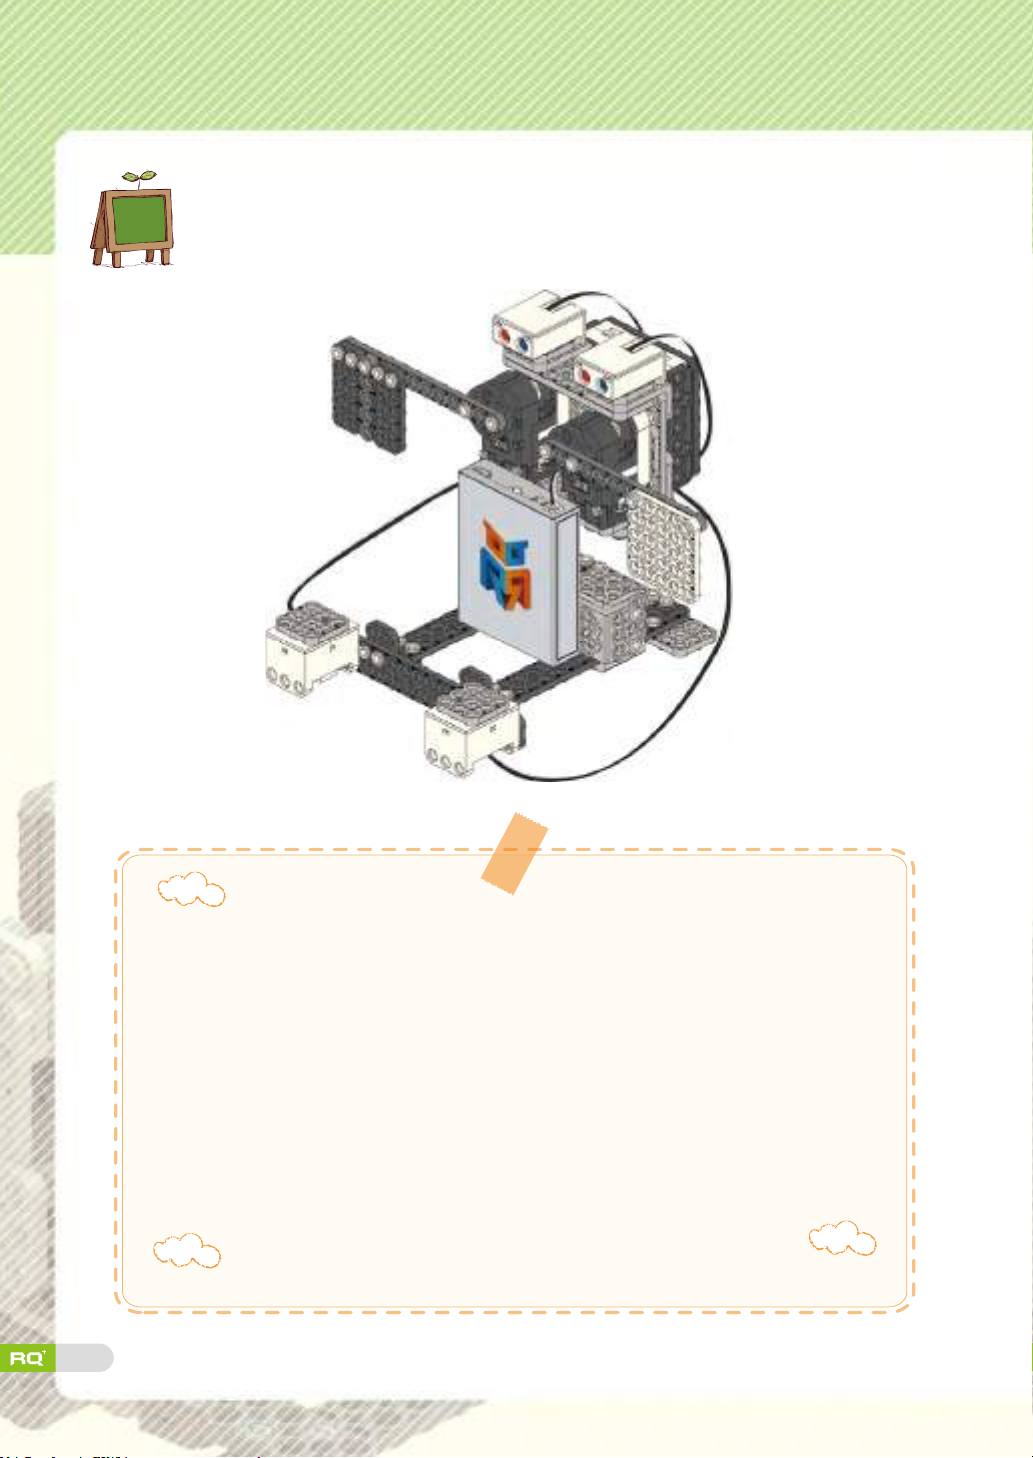
completion
'Black/White ag' robot is ready!
★
★
39
Page 38
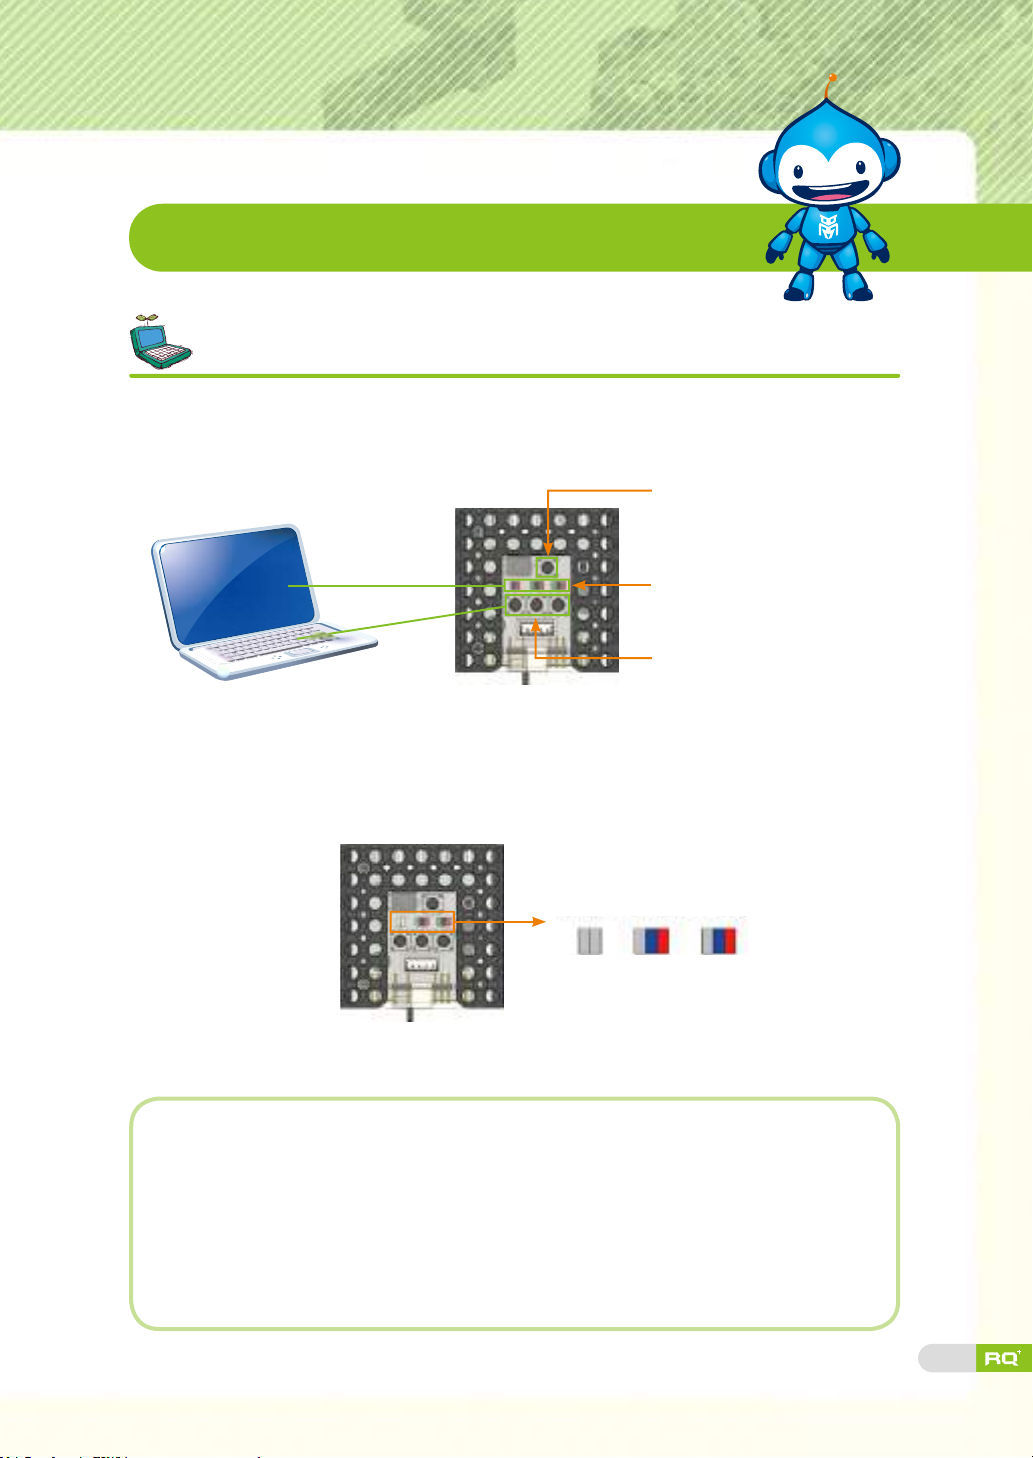
Robot Experience
Set-up 'Black/White ag' robot model
There are various LEDs and buttons in smart controller. LED indicates input
or output value like monitor while buttons work as the keyboard for PC.
Button P
LED1, LED2, LED3
from left side
Button 1, 2, 3 from left side
First : Turn on the smart controller to enter <set-up mode>.
Second
:
Press button 2 or button 3 on smart controller to set-up
'Black/White ag' robot model. The buttons work as a keyboard for PC.
Program the robot for proper operation.
LED1 LED2 LED3
Third : Press button P on smart controller to enter <standby mode>.
Check below and assemble again if robot is not working properly.
1. When Black/White ag is not moving :
▶ Check power connection and robot model set-up.
2. When Black ag and white ag move in reverse direction :
▶ See STEP15 and check smart servo ID00 and ID01 connection.
▶ See STEP18 and check LED and touch sensor cable connection.
40
Page 39
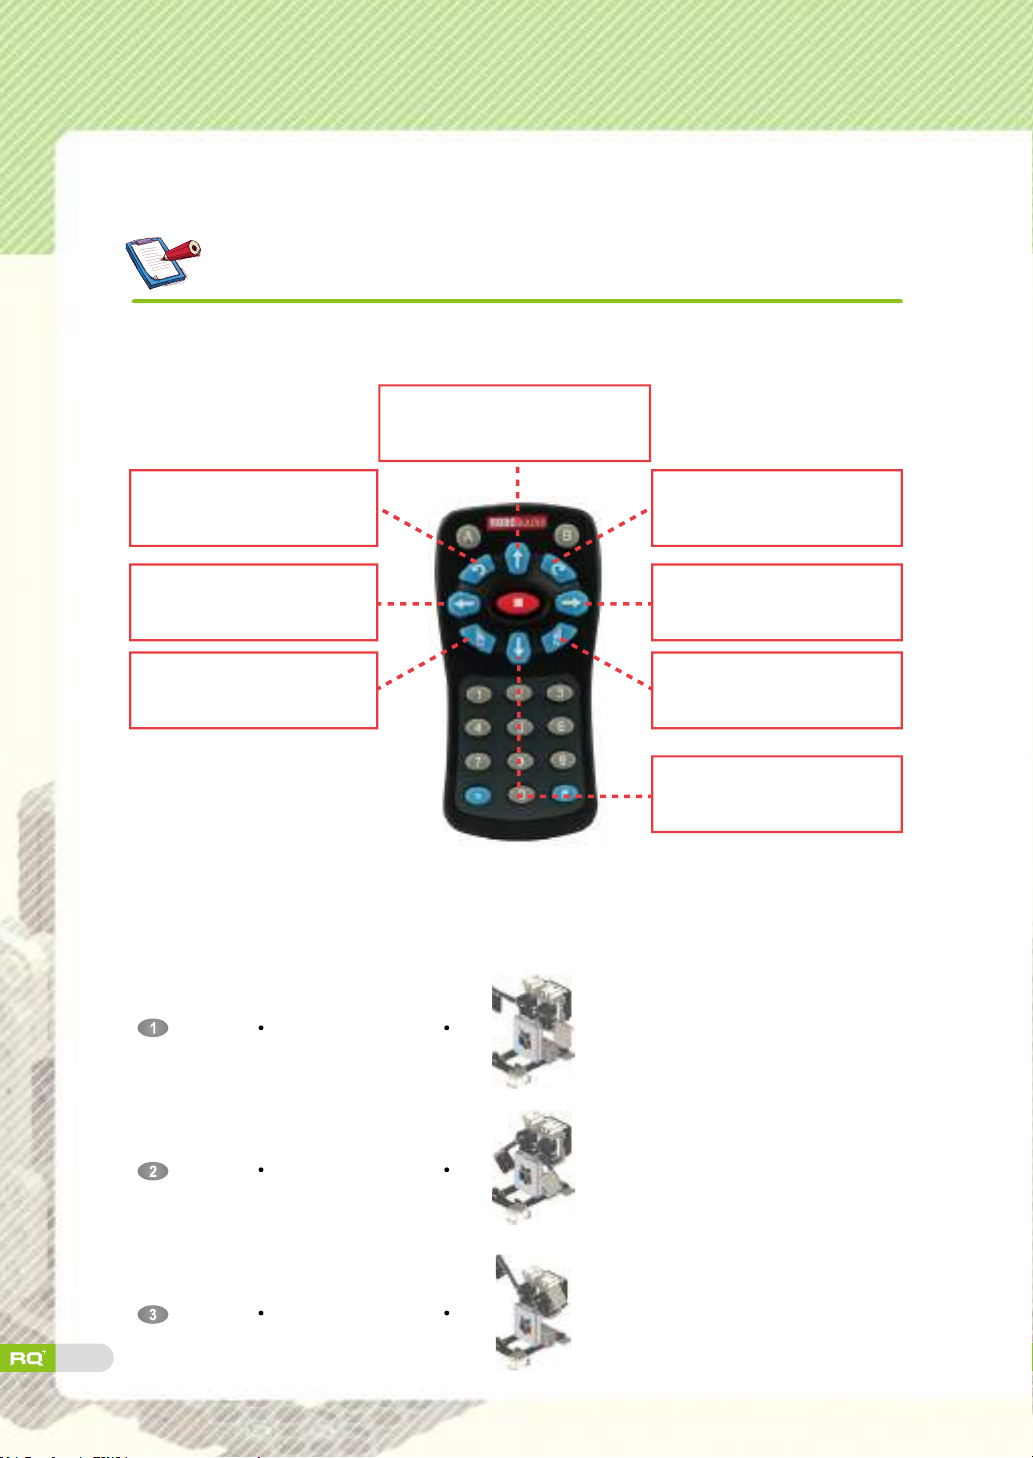
Check movement and assembly.
1. Press each IR remote controller button and describe what each button does.
41
2. Match the IR remote controller buttons with the corresponding action.
button
button
button
Black and White ags move
horizontally.
Black and White ags go down.
Black and White ags go up.
Page 40

Robot Play
Play Black/White ag game.
Two LEDs are connected to the Black/White flag robot. Press IR remote
controller button to move the black or white ag up or down following the sign
given with blue or red LED light.
•
Press '#' + '1' buttons or IR remote controller together to start the game.
→ '#' + '1' (Level 1), '#' + '2' (Level 2), '#' + '3' (Level 3)
•
Control the black ag for left LED light, and control the white ag for right LED light.
→ Use the IR remote controller button to control black/white flags as below.
•
If you press a button correctly , you will hear the ringing, otherwise, you hear a short beep.
•
If you press a wrong button 3 times out of 10, you lose. If you press a wrong button
less than 3 times, you can go up to the next level.
Black ag UP when blue light ON.
Black ag DOWN when red light ON.
Keep current position when blue and red lights ON.
White ag UP when blue light ON.
White ag DOWN when red light ON.
Keep current position when blue and red lights ON
Describe your 'Black/White ag' robot.
◈
• Robot level?
• What was the most fun about it?
• What was the most difcult thing?
• Check your robot with your teacher.
Black/White ags UP when two LEDs are blue.
Black/White ags DOWN when two LEDs are red.
Black/White ags UP
Black ag UP White ag UP
Keep position
Black ag DOWN
Very easy Easy Average Difficult
Keep position
White ag DOWN
Both ags DOWN
Ver y
difficult
42
Page 41

3. Walking Bot
Hey, squirrel! Hey, Squirrel!
Do a handspring! ♬
Look at the squirrel sitting on the tree!
It's so stable without falling!
Hold a center of gravity.
Because it holds the center
of gravity with its tail.
Center of gravity?
It is the unique point at the center of a
distribution of mass in space.
Center of
rectangular
So not to fall, giraffe holds up the
body with four legs.
There is a center of gravity inside of
our body as well!
We can stand up more stable when we
open our arms and legs.
Center of
triangle
Center of
Look at the giraffe drinking water!
And his posture is a little...
circle
Giraffe has a long and heavy head, so it could
fall down while drinking.
Ah~ Not easy to stand
on one leg.
There is a center of gravity in our
belly button!
We don't fall down when the side of
mass is the same for both sides!
43
Page 42
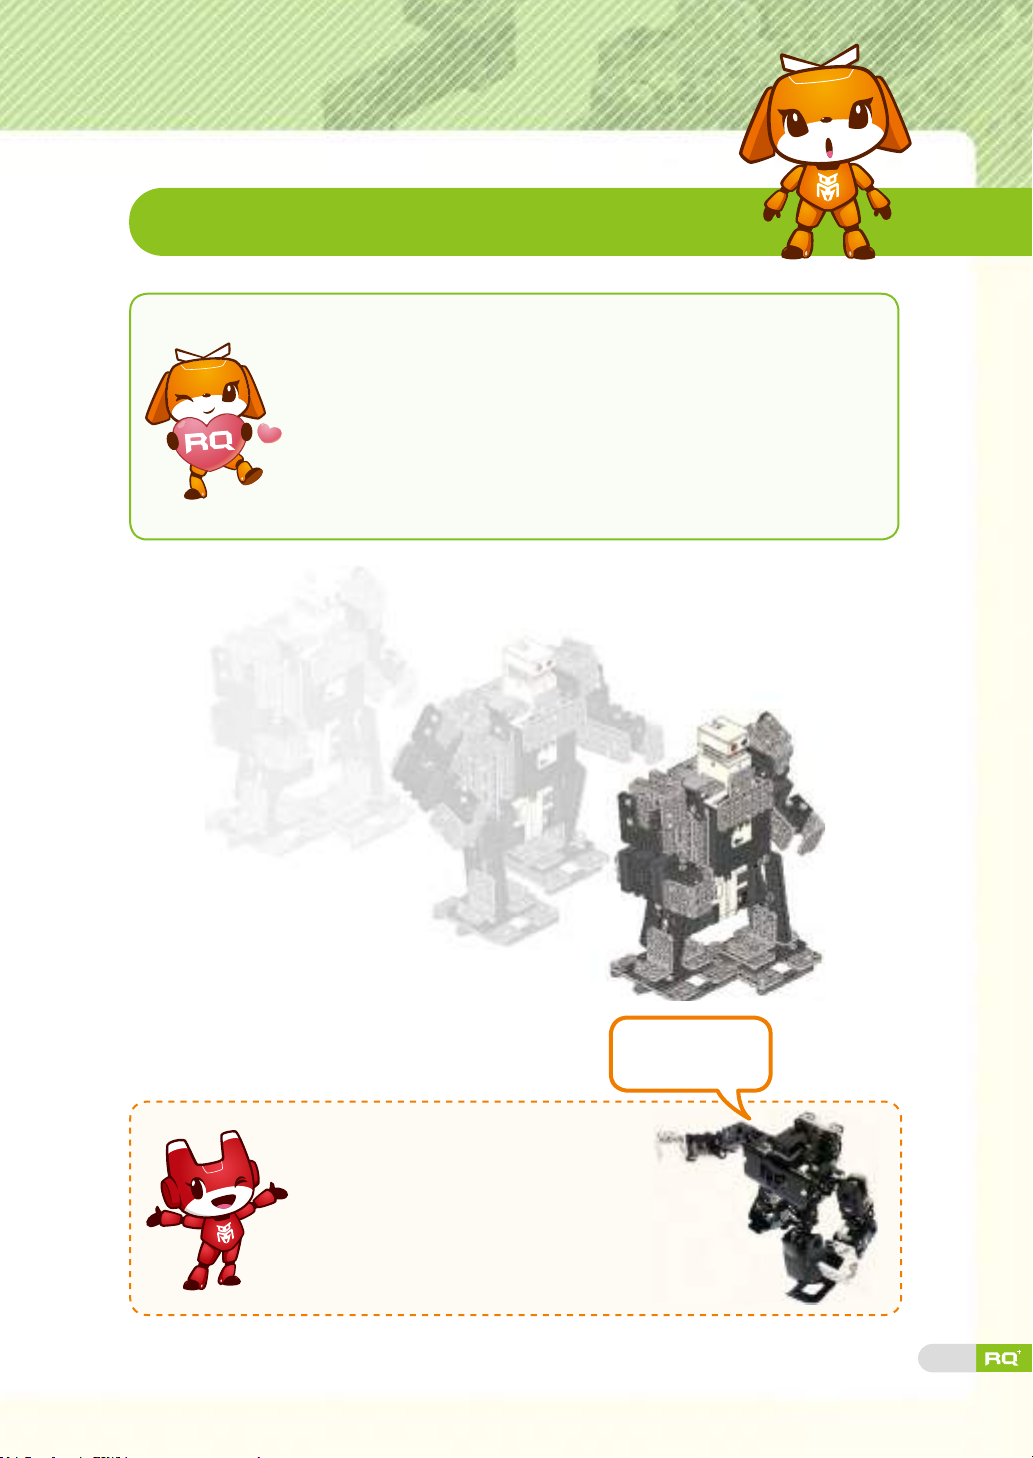
Today's Robot Class
Walking Bot has to hold its center of gravity in order to walk with
two legs. Center of gravity refers to a point to be balanced in
order not to fall down. Robot does not fall when the weight of
both side is the same with the center of gravity as the center.
Robot falls down if the weight of each side is different. So we
can stand up comfortably when we use two legs and two arms.
We feel more comfortable when we lie down because the
center of gravity is located on the bottom side.
I can move freely
and naturally!
'RQ-HUNO' is a human-like
intelligent robot that uses 16 smart servos.
If you nd the precise center of gravity of
RQ-HUNO, it can walk, run, do taekwondo,
play hockey and dance really well!
44
Page 43
Robot Assembly
Prepare robot parts.
Smart controller
1×3 frame
2×9 frame
Right angle
Big U frame
X4
X4
X2
X2
Tips.
X1
Smart servo (ID00,01) X2
1×5 frame
3×3 frame X2 3×5 frame X5 3×7 frame X6 3×9 frame X6 3×8 slide frame X2
2×4 L frame X4 2×5 L frame X2 3×4 L frame X6 3×5 L frame X6 3×6 L frame X6
X4
Ball frame
1×7 frame
X2
Spacer X62s rivet
Battery case
X4
1×8 frame
X94
X1
X4
3s rivet
LED
2×5 frame
X22
X1
Touch sensor
X4
2×7 frame
Double rivet X50
X1
X4
Walking Bot uses various type of L frames. See the assembly guide carefully
to see what kind of L frame is used in each step. And pay attention to frame
position and direction when assembling.
column
row
45
column
row
• 2 col. L frame is black.
4 L frame consists of 2 col. X4 rows holes.
• 2×
Pay attention to two different
sides of L frame.
• 3 col. L frame is gray.
5 L frame consists of 3 col. X5 rows holes.
• 3×
Page 44
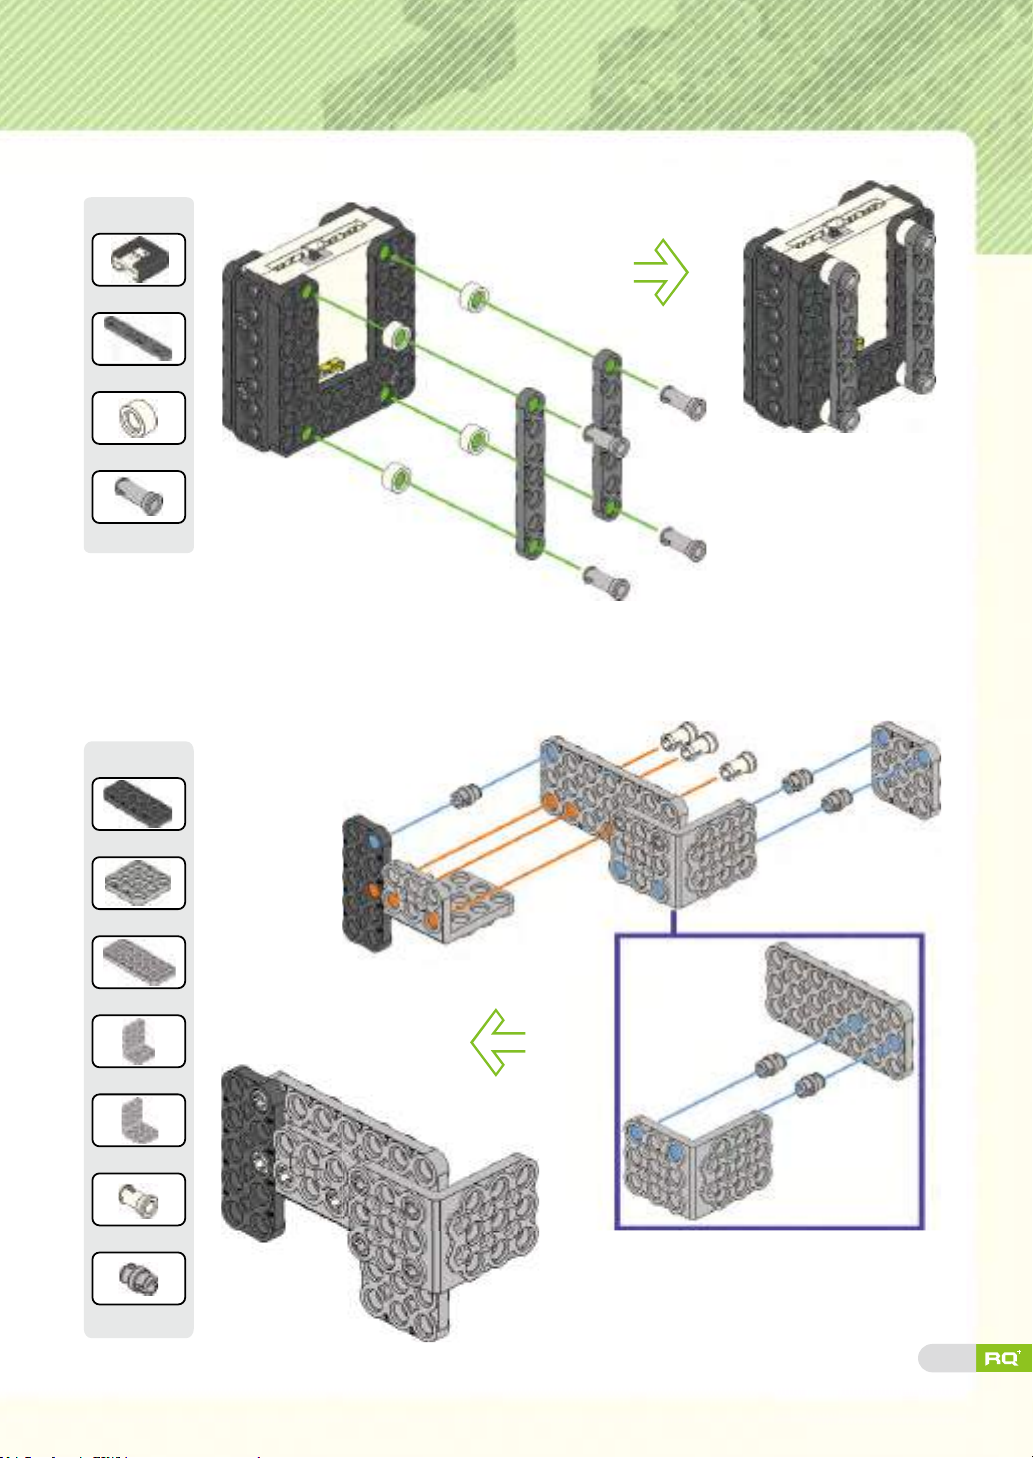
Step 1
Tip
Smart controller X1
1×7 frame X2
Spacer X4
3s rivet X4
Step 2
Tip
2×5 frame X1
3×3 frame X1
3×7 frame X1
3×5 L frame X1
3×6 L frame X1
2s rivet X3
Double rivet X5
46
Page 45

Step 3
Tip
2×5 frame X1
3×5 frame X1
2s rivet X4
Double rivet X3
Step 4
Tip
Step 1
2×5 frame X1
3×3 frame X1
3×7 frame X1
3×5 L frame X1
3×6 L frame X1
2s rivet X3
Double rivet X5
47
Page 46
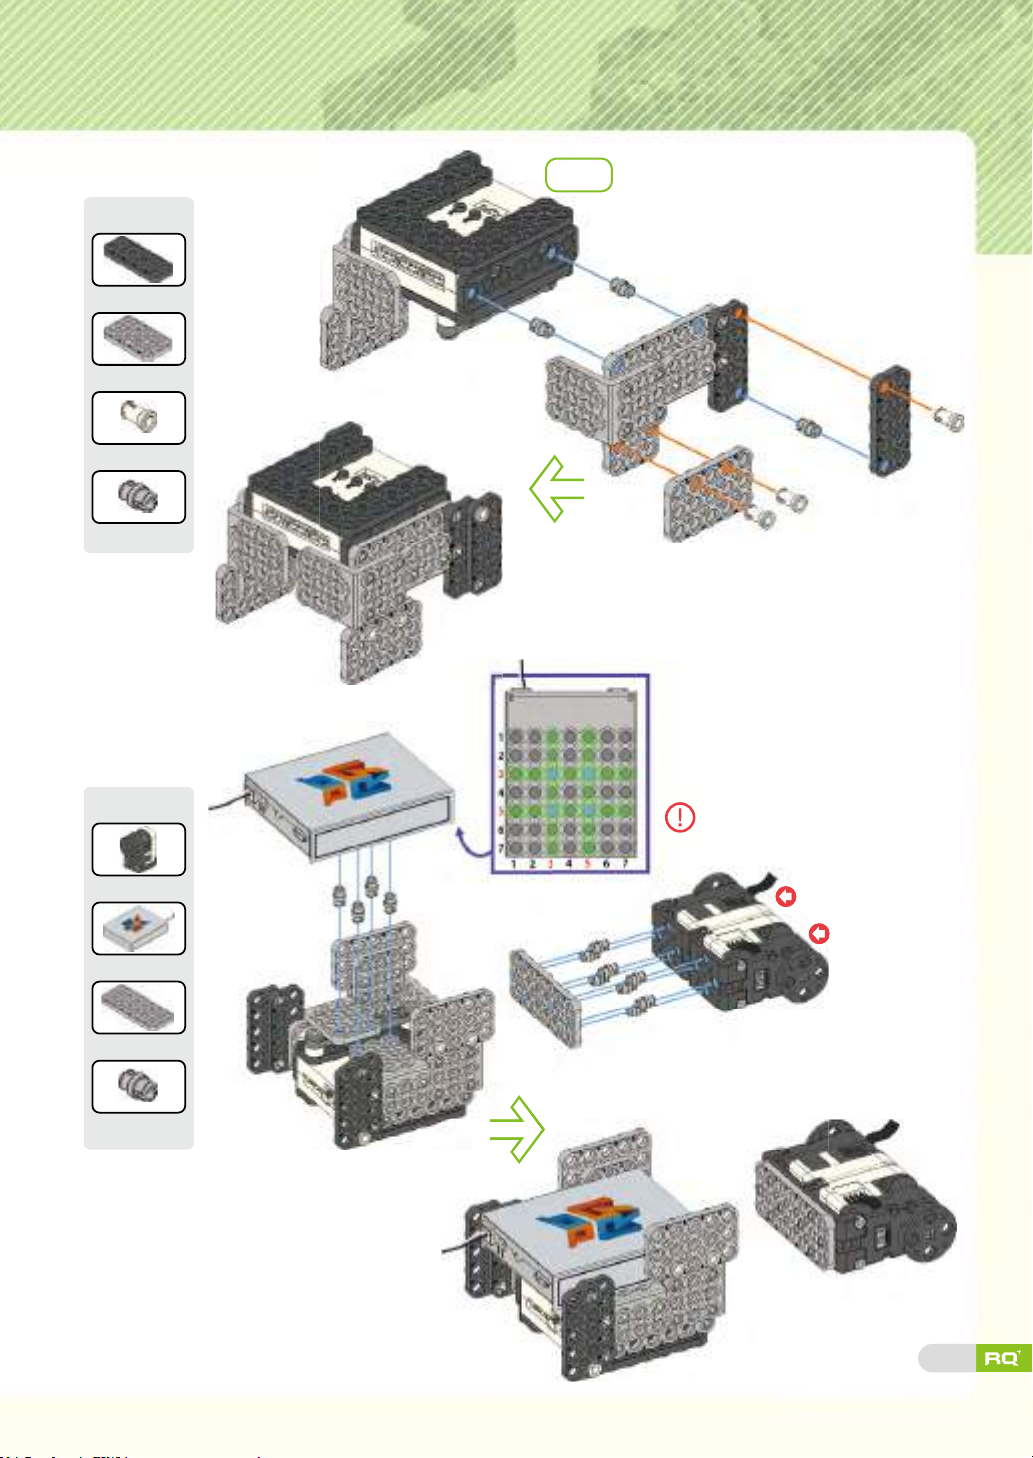
Step 5
Tip
2×5 frame X1
3×5 frame X1
2s rivet X3
Double rivet X3
Step 3
Step 6
Tip
Smart servo(ID00,01 )
Battery case X1
3×7 frame X1
Double rivet X12
Match two 'home' marks between
front-horn and smart servo.
X
2
Smart servo (ID00)
Smart servo
(ID01)
48
Page 47
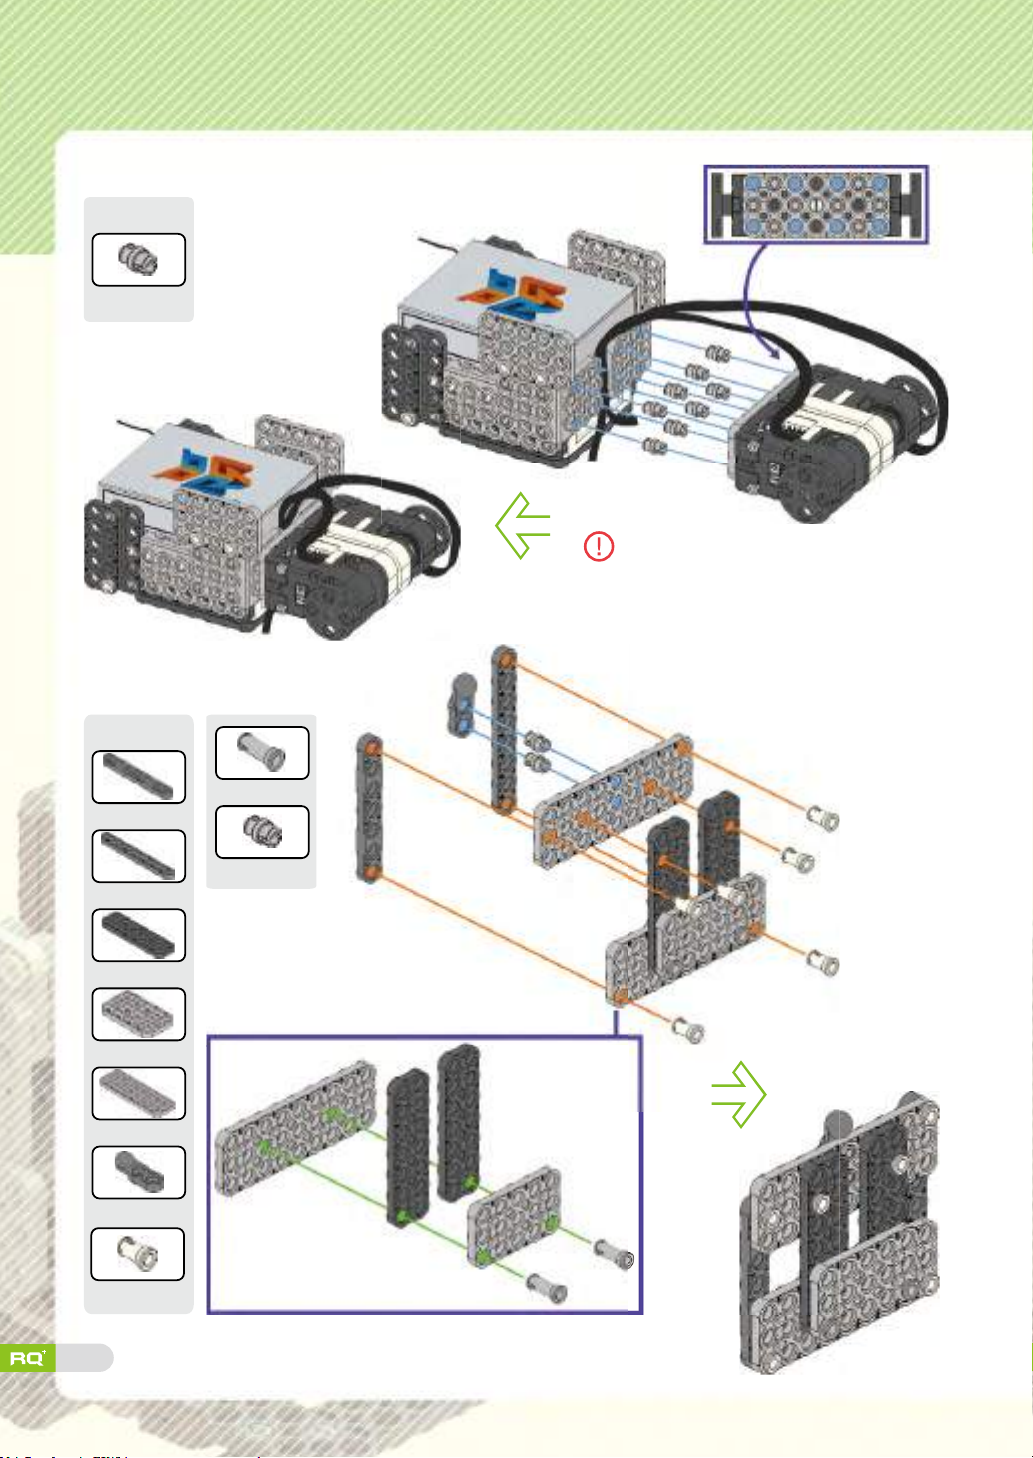
Step 7
Tip
Double rivet X8
Step 8
Tip
Arrange smart servo cables as
shown in the picture.
1×7 frame X1
1×8 frame X1
2×7 frame X2
3×5 frame X1
3×9 frame X2
Ball frame X1
2s rivet X6
49
3s rivet X2
Double rivet X2
Page 48

Step 9
Tip
1×3 frame X2
2×9 frame X2
3×8 slide frame
3×5 L frame X1
3×6 L frame X1
3s rivet X4
X
1
Double rivet X2
Step 10
Tip
1×5 frame X2
1×8 frame X1
3×4 L frame X1
Spacer X1
2s rivet X3
3s rivet X1
50
Page 49
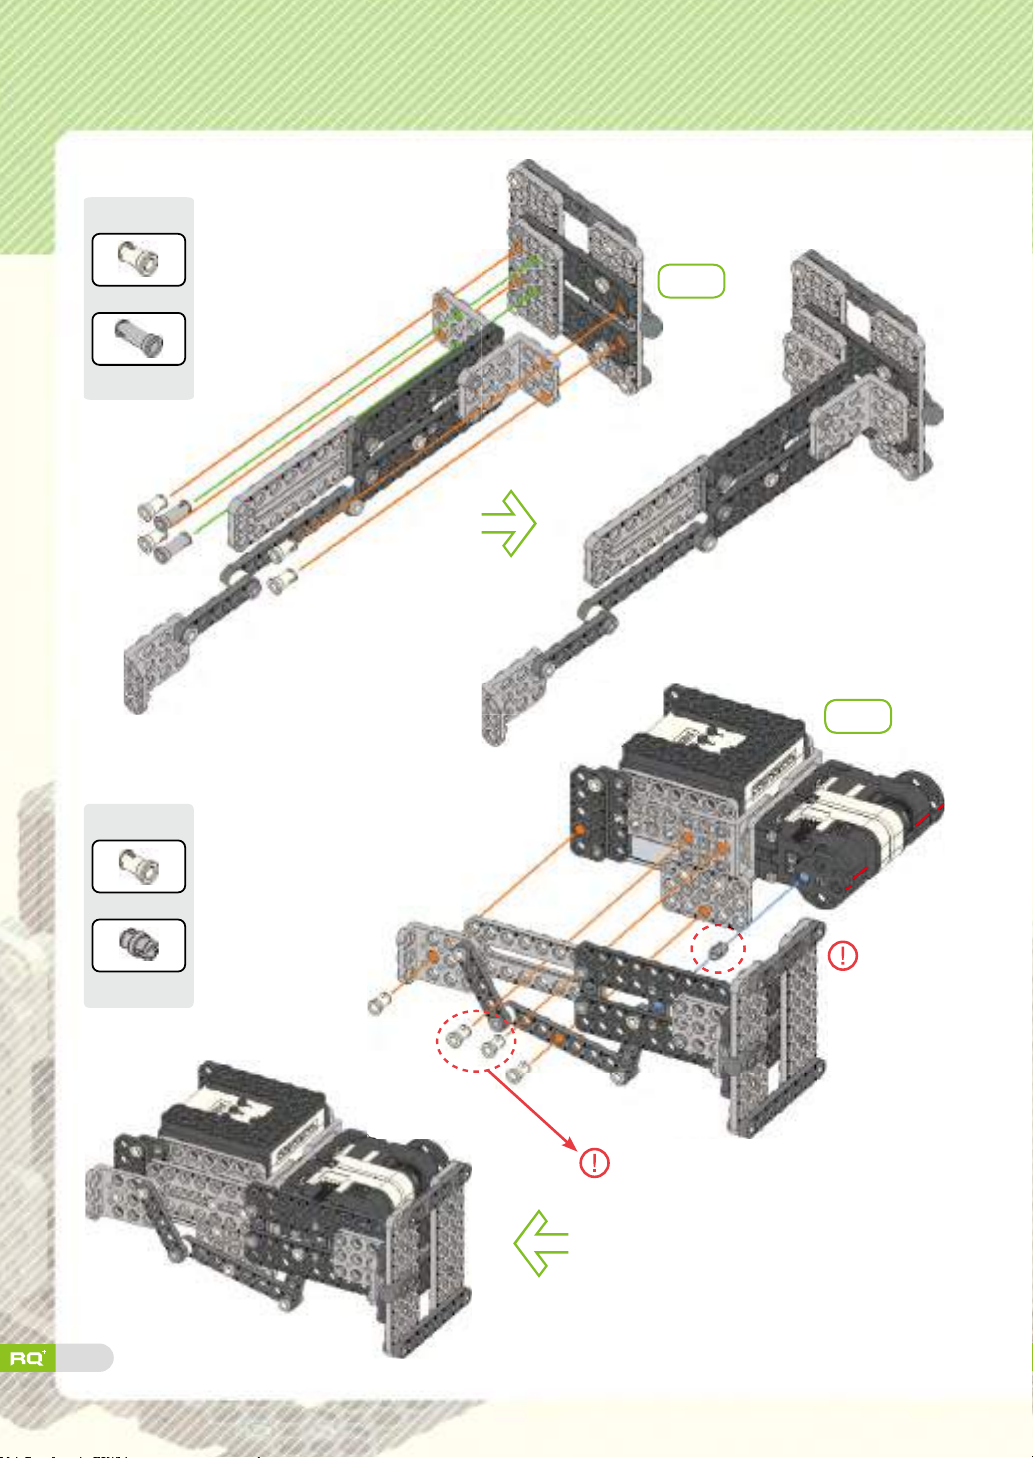
Step 11
Tip
2s rivet X4
3s rivet X2
Step 12
Tip
Step 8
Step
7
2s rivet X4
Double rivet X1
51
Insert
double
rivet rst.
Put 2s rivets into 3×8 slide frames.
Page 50
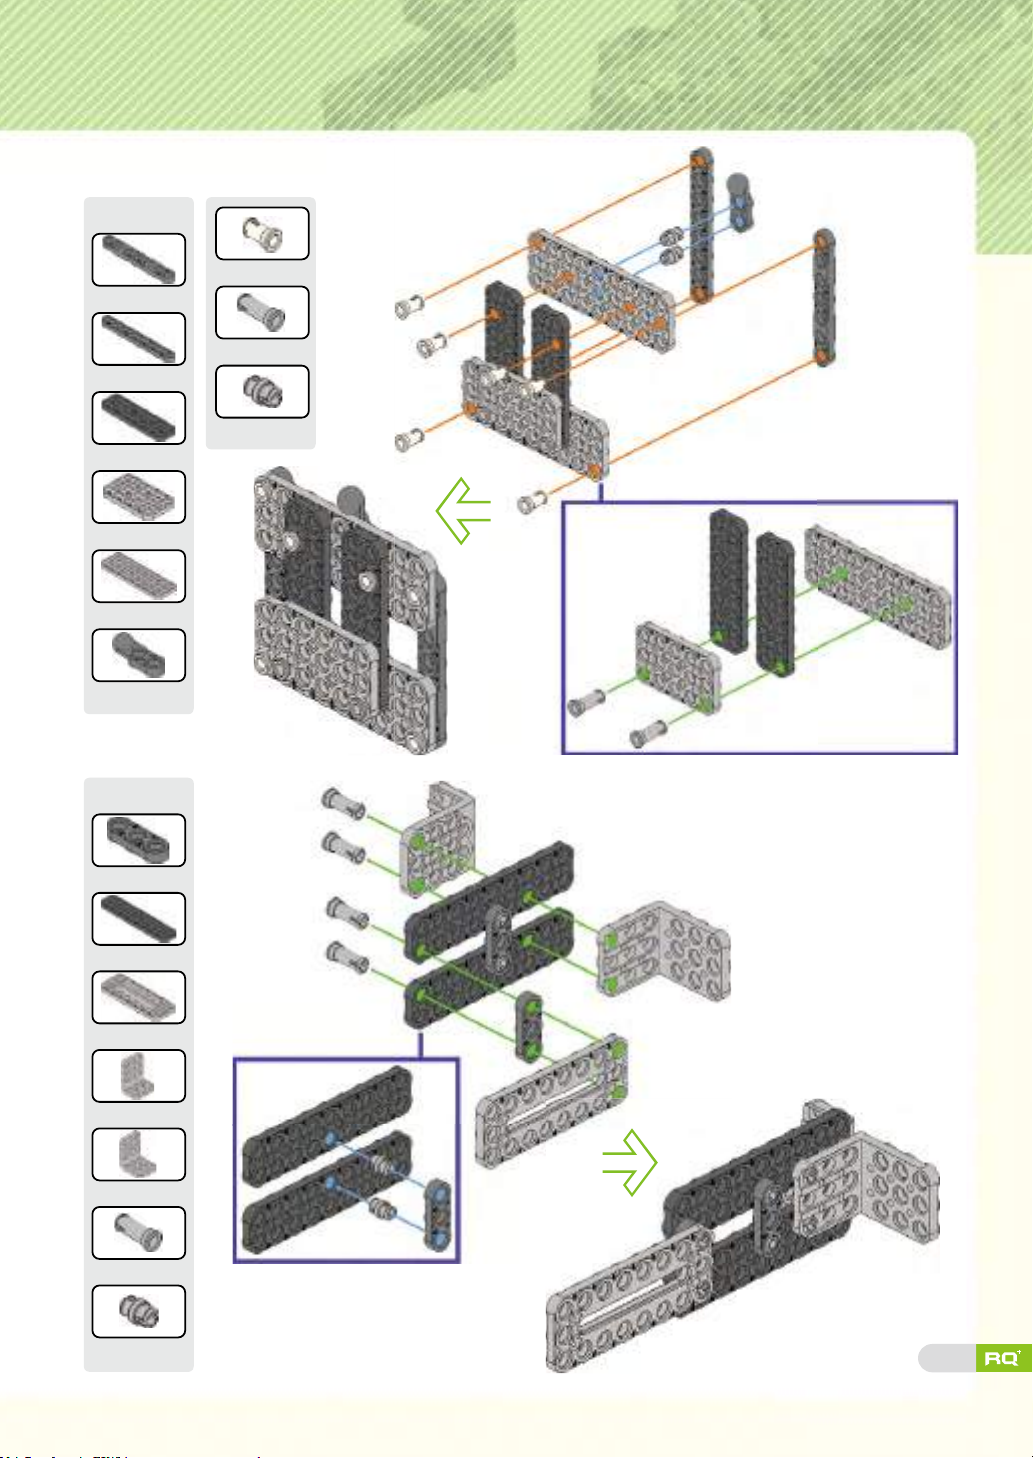
Step 13
Tip
1×7 frame X1
1×8 frame X1
2×7 frame X2
3×5 frame X1
3×9 frame X2
Ball frame X1
2s rivet X6
3s rivet X2
Double rivet X2
Step 14
Tip
1×3 frame X2
2×9 frame X2
3×8 slide frame X1
3×5 L frame X1
3×6 L frame X1
3s rivet X4
Double rivet X2
52
Page 51
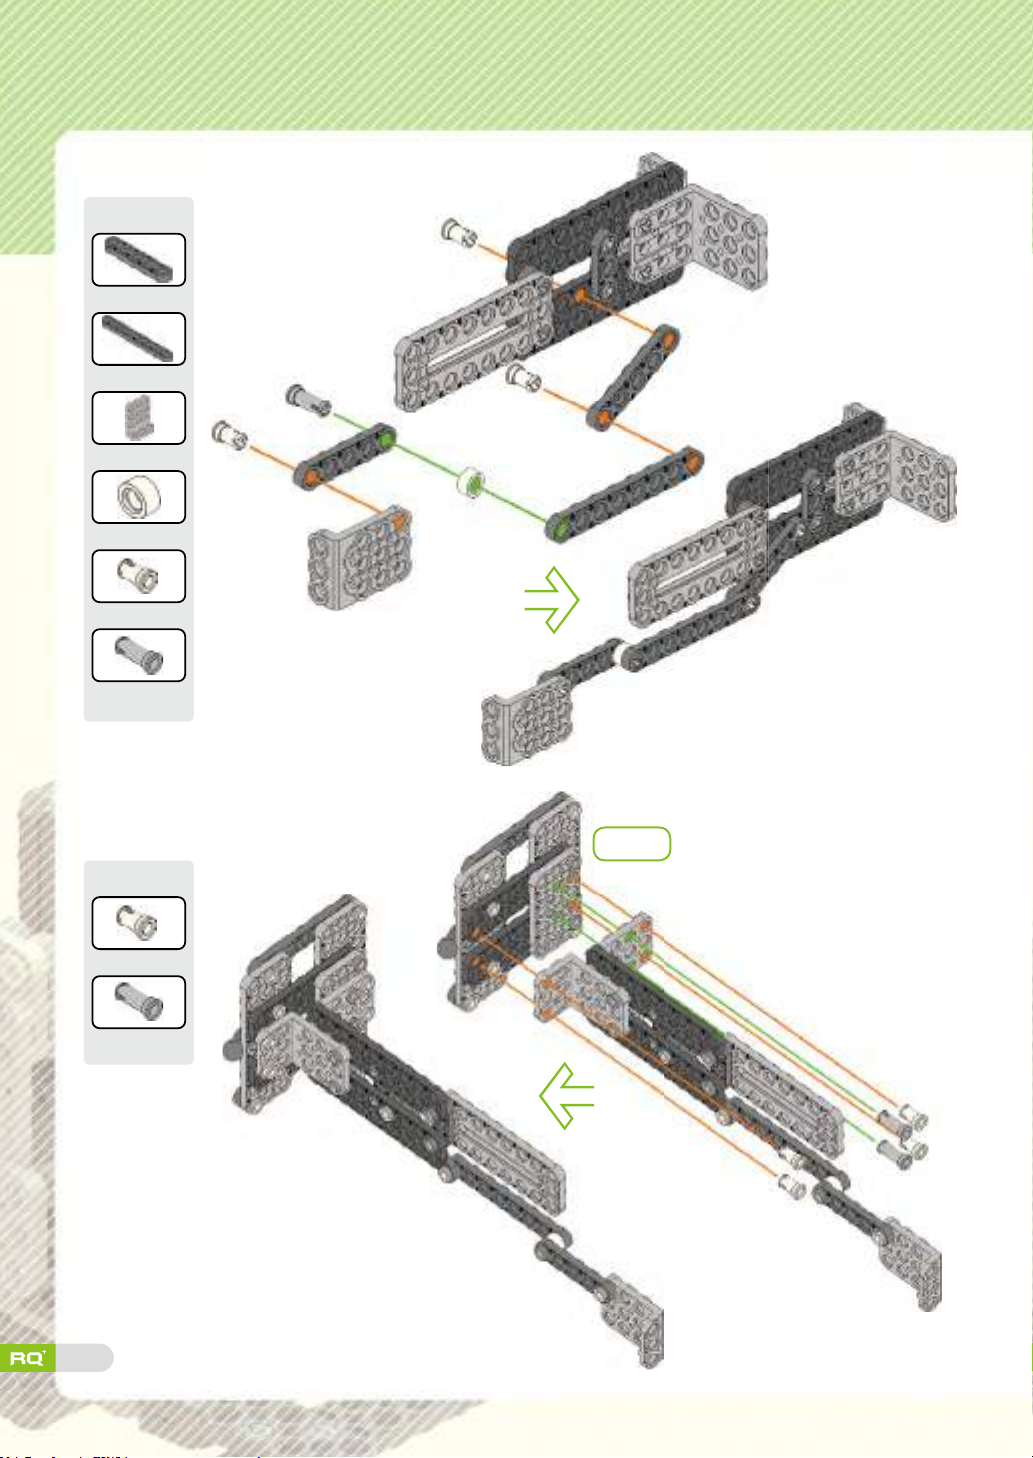
Step 15
Tip
1×5 frame X2
1×8 frame X1
3×4 L frame X1
Spacer X1
2s rivet X3
3s rivet X1
Step 16
Tip
2s rivet X4
3s rivet X2
53
Step 13
Page 52
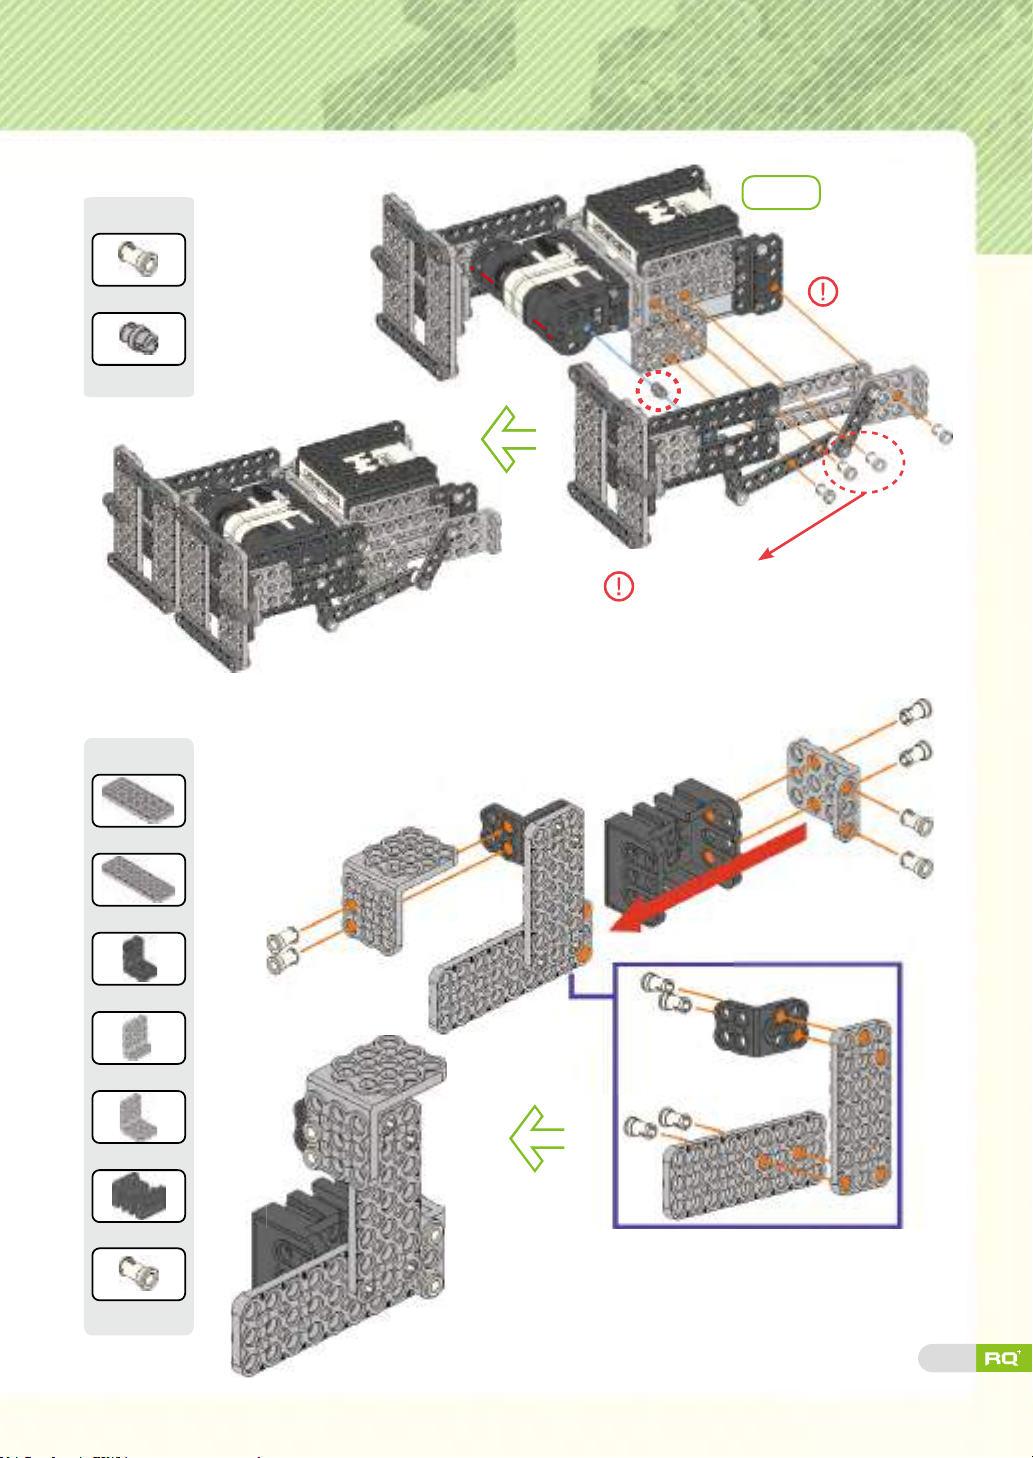
Step 17
Tip
Step 12
2s rivet X4
Double rivet X1
Step 18
Tip
3×7 frame X1
Put 2s rivets into 3
Insert double
rivet rst.
×
8 slide frames.
3×9 frame X1
2×4 L frame X1
3×4 L frame X1
3×6 L frame X1
Big U frame X1
2s rivet X10
54
Page 53
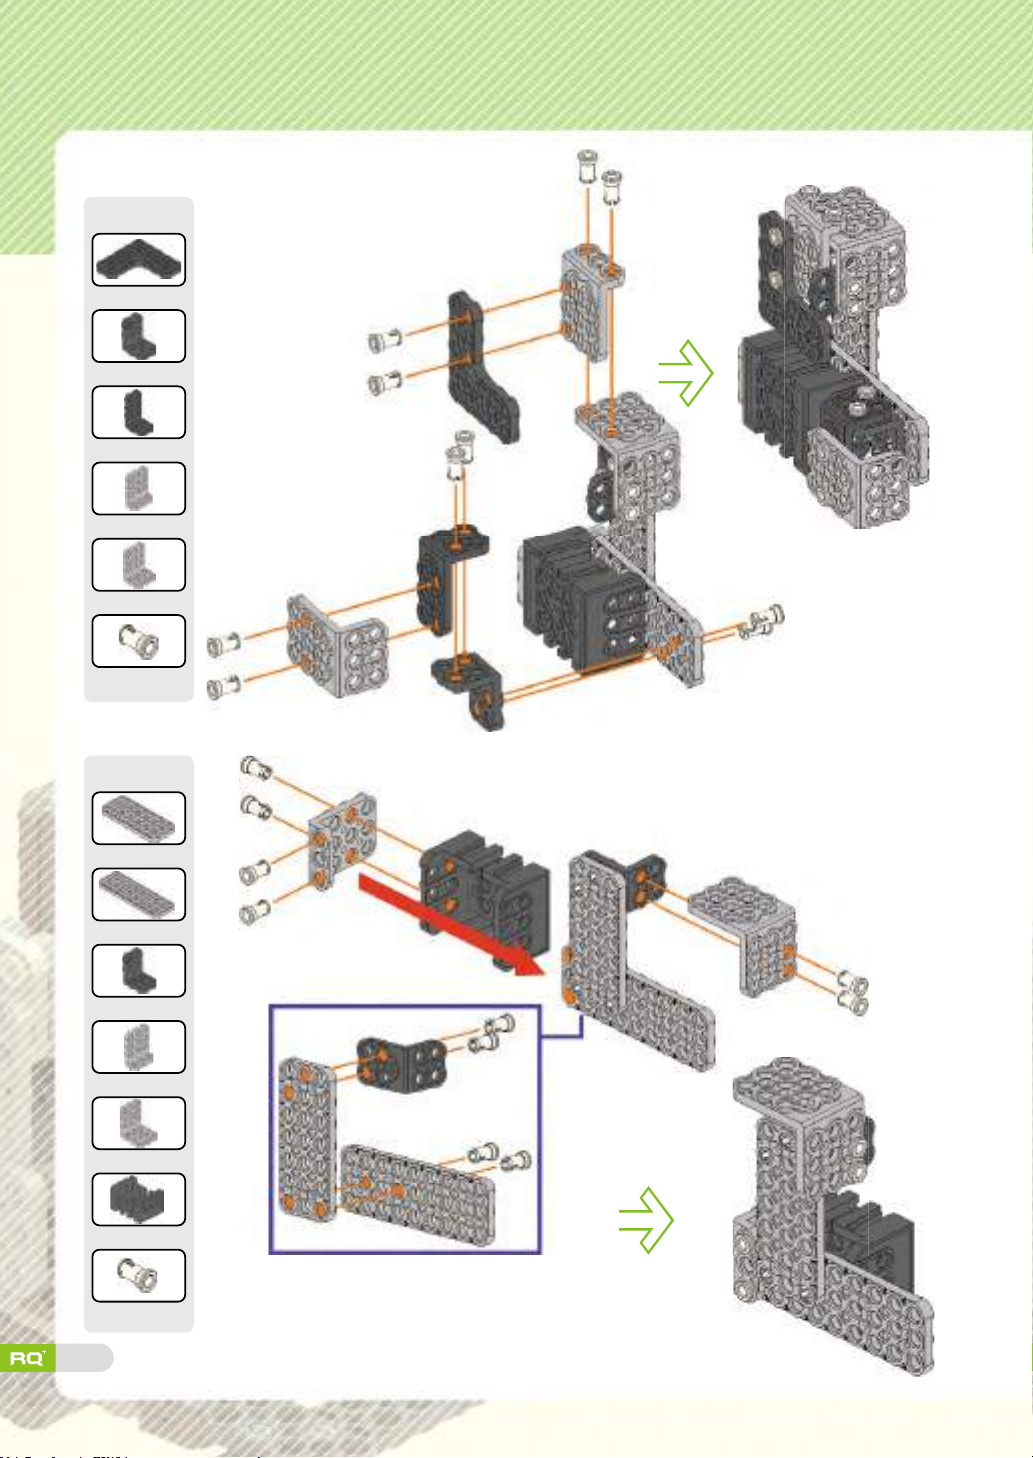
Step 19
Tip
Right angle X1
2×4 L frame X1
2×5 L frame X1
3×4 L frame X1
3×5 L frame X1
2s rivet X10
Step 20
Tip
3×7 frame X1
3×9 frame X1
2×4 L frame X1
3×4 L frame X1
3×6 L frame X1
Big U frame X1
2s rivet X10
55
Page 54
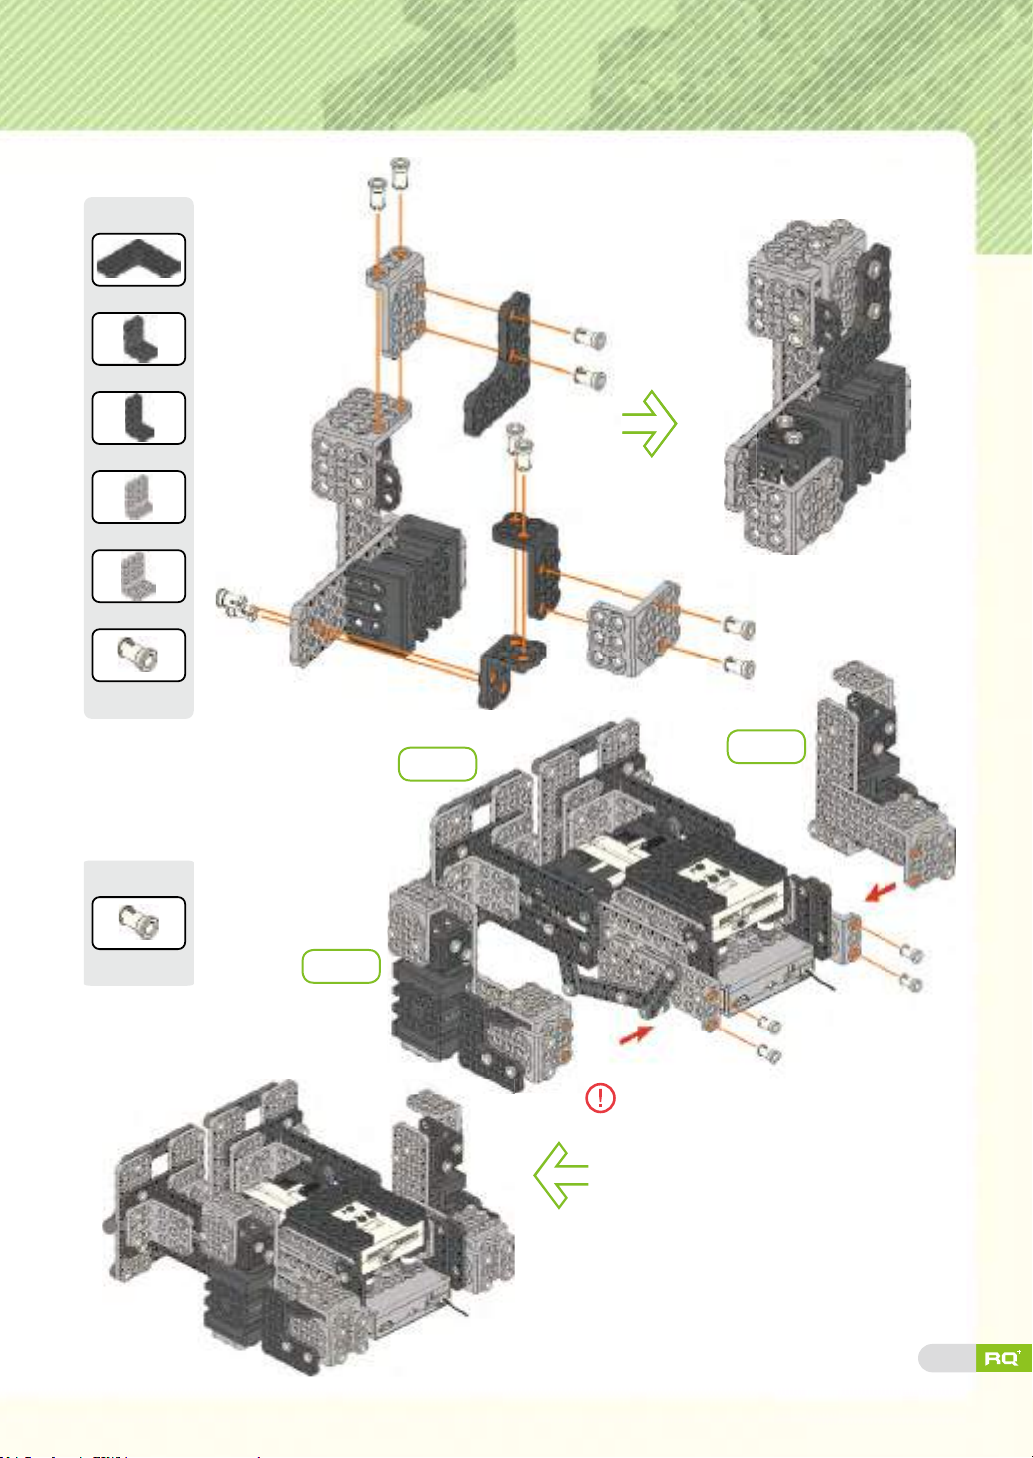
Step 21
Tip
Right angle X1
2×4 L frame X1
2×5 L frame X1
3×4 L frame X1
3×5 L frame X1
2s rivet X10
Step 22
Tip
2s rivet X4
Step
Step 17
Step 19
21
Assemble 3×6 L frame goes
down and 3×4 L frame goes up.
56
Page 55
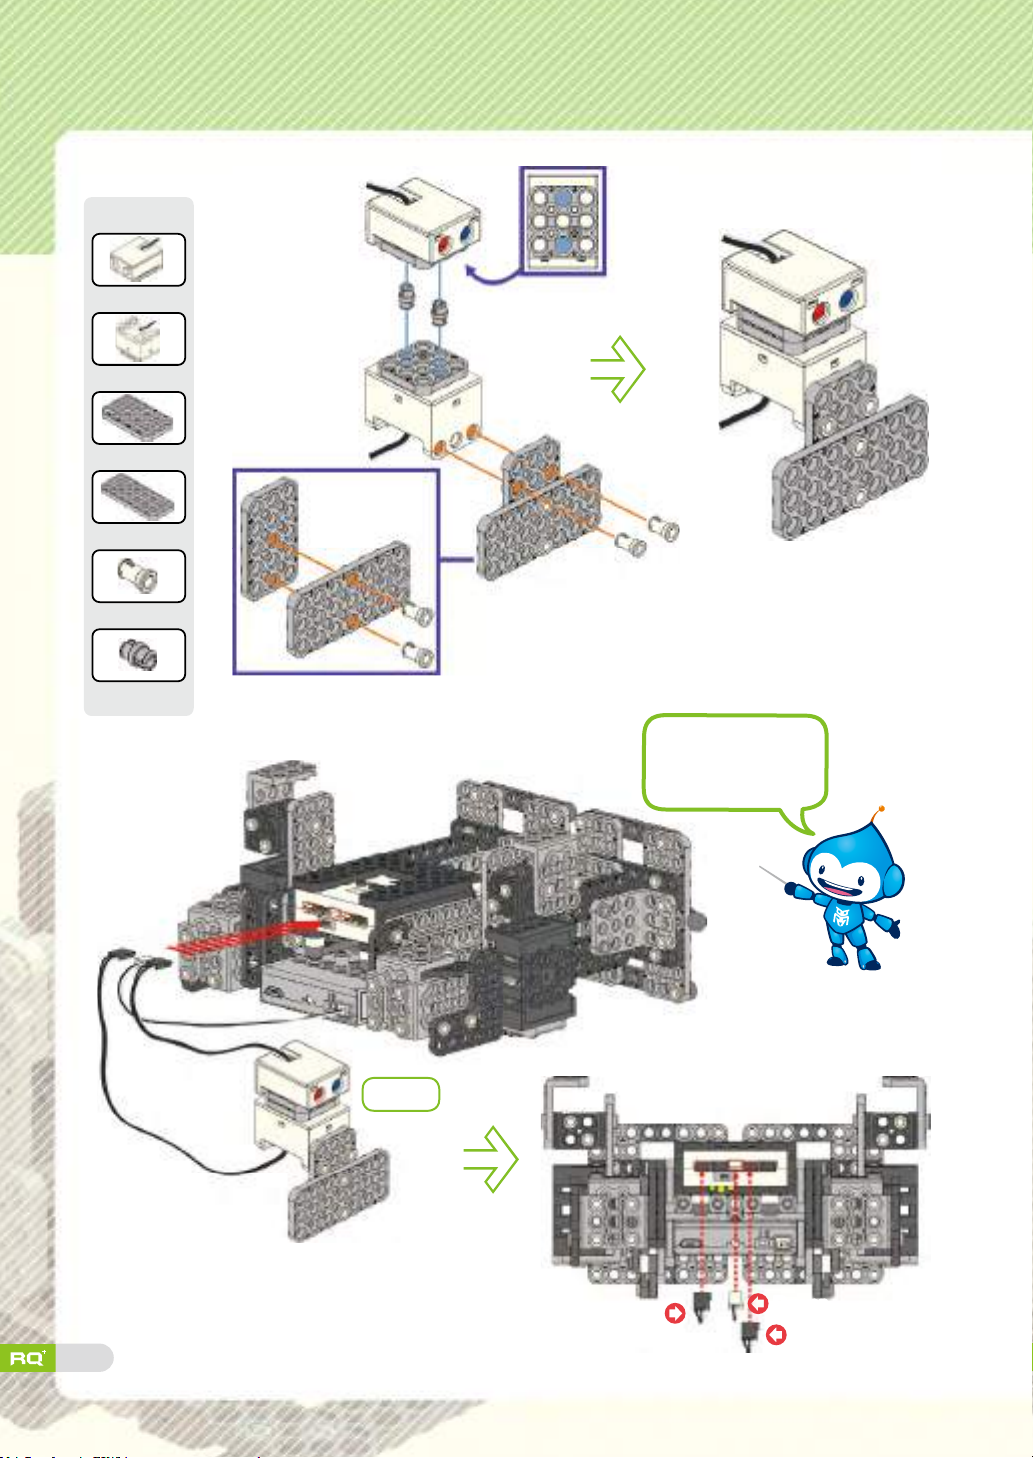
Step 23
Tip
LED X1
Touch sensor X1
3×5 frame X1
3×7 frame X1
2s rivet X4
Double rivet X2
Step 24
Pay attention to the
cable connection
and direction!
57
Step 22
Touch sensor
PowerPower
LED
Page 56
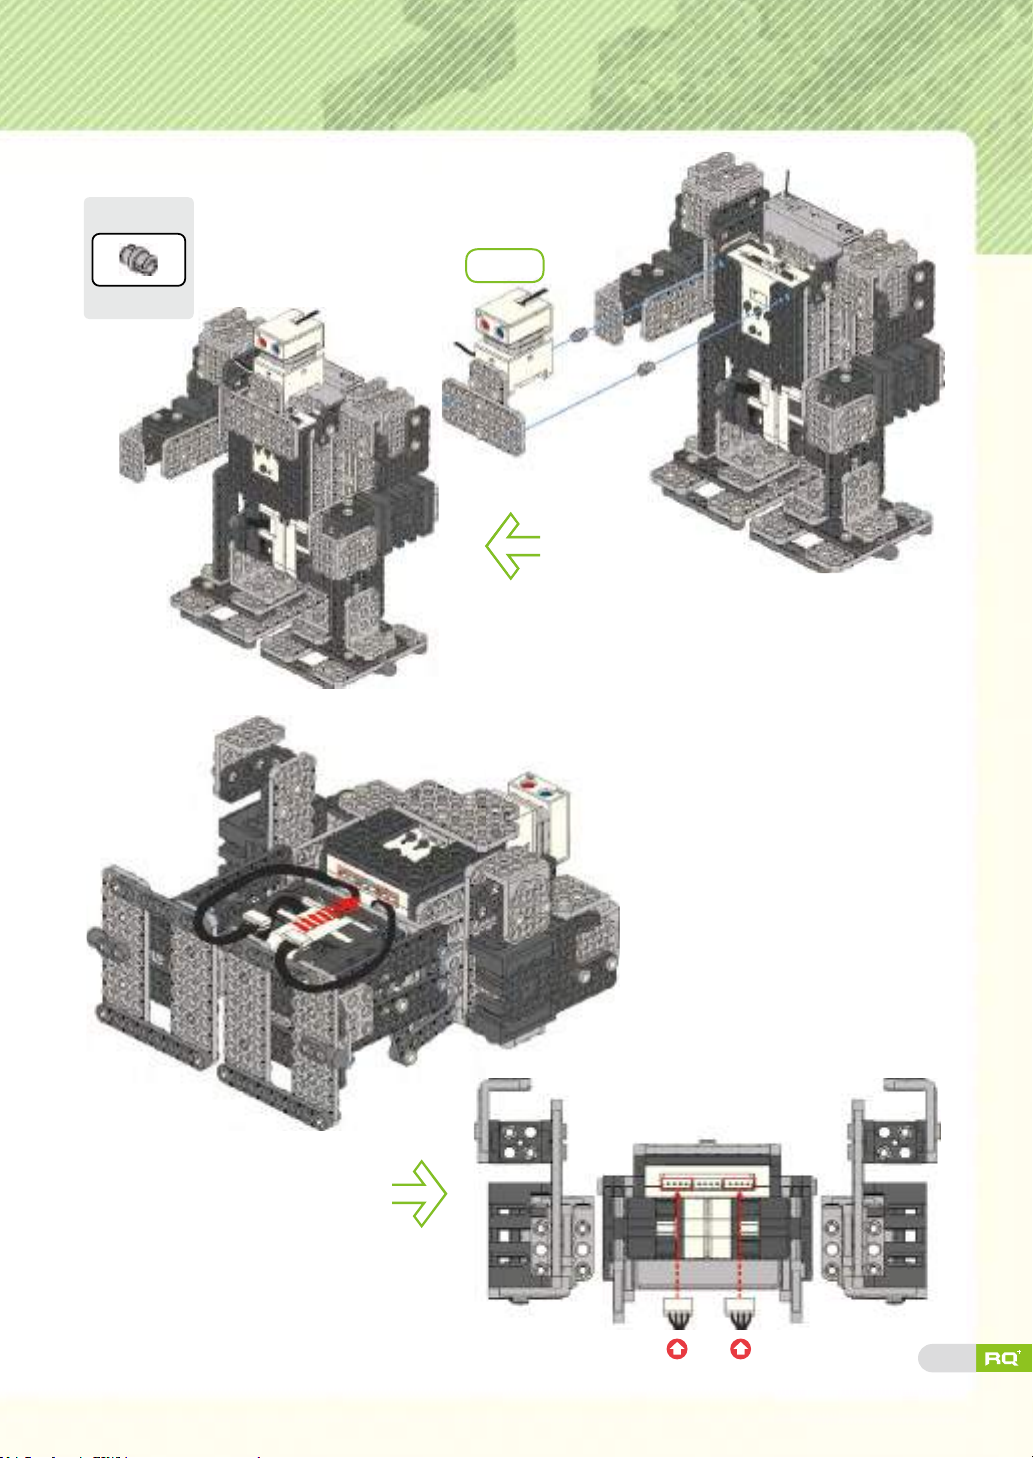
Step 25
Tip
Double rivet X2
Step 26
Step 23
Smart servo (ID01)
Smart servo (ID00)
58
Page 57
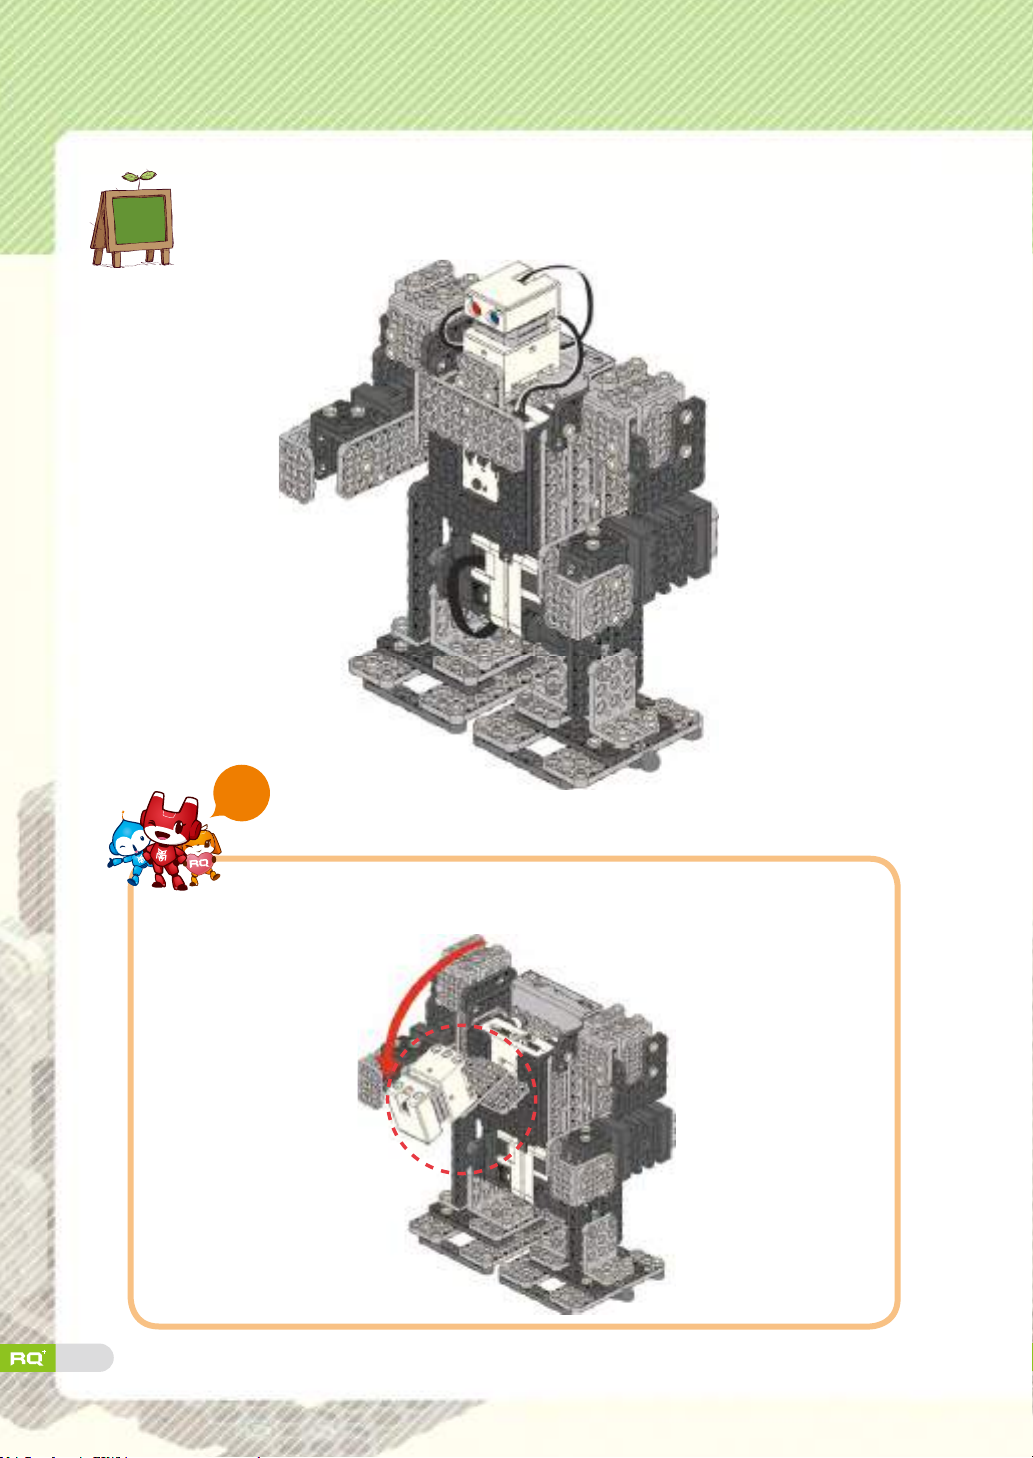
completion
'Walking Bot' is ready!
★
★
59
Tip
Separate the head-chest part to turn on/off the power S/W.
Page 58
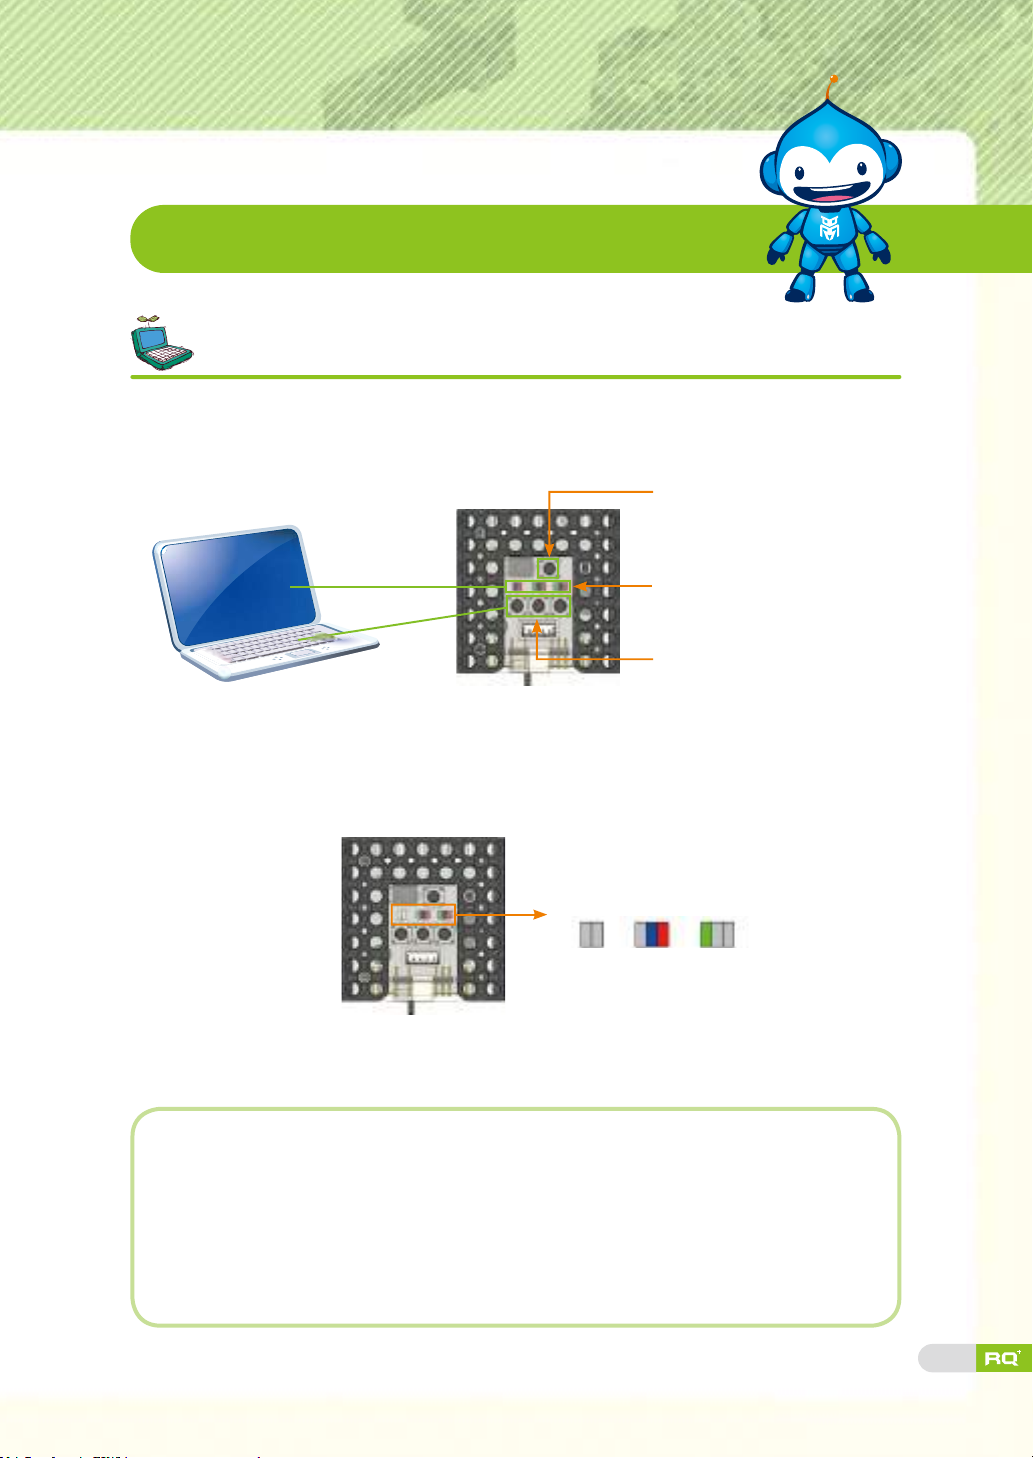
Robot Experience
Set-up 'Walking Bot' robot model.
There are various LEDs and buttons in smart controller. LED indicates input
or output value like monitor while buttons work as the keyboard for PC.
Button P
LED1, LED2, LED3
from left side
Button 1, 2, 3 from left side
First : Turn on the smart controller to enter <set-up mode>.
Second
:
Press button 2 or button 3 on smart controller to set-up
'Walking Bot' robot model. The buttons work as a keyboard for PC.
Program the robot for proper operation.
LED1 LED2 LED3
Third : Press button P on smart controller to enter <standby mode>.
Check the following when the robot is not working properly and reassemble.
1. When Walking Bot is not moving :
▶ Check power connection and Walking Bot robot model set-up.
2. When Walking Bot's walking motion is abnormal :
▶ See the assembly guide again to check smart servo ID and 3×8 slide frame.
▶ Check connection for electronics parts with the smart controlleer.
60
Page 59
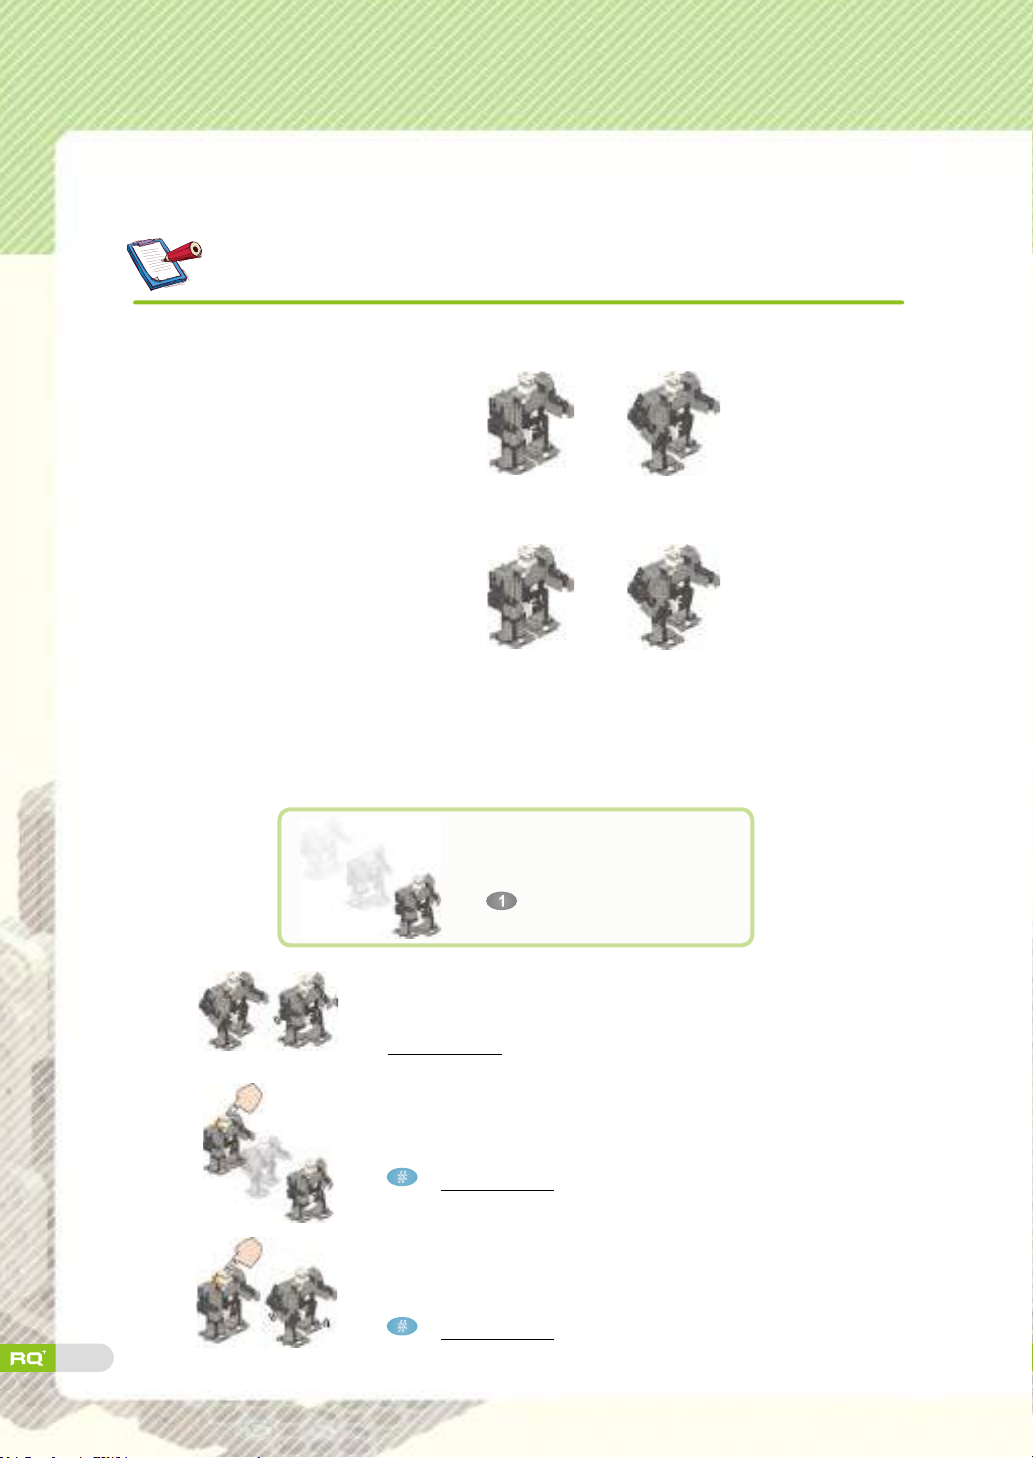
Check movement and assembly.
1. Read the below, and circle the correct answer.
'A' button : Walking Bot takes the ( , ) motion,
Basic Posture
'B' button : Walking Bot takes the ( , ) motion.
Basic Posture
Walking Posture
Walking Posture
2. For running below motions, which button of IR remote controller should
you press?
Robot moves forward.
button
Robot moves left leg and then right leg like dancing.
ⓐ
( button )
61
ⓑ
ⓒ
If touch sensor is detected, it move forward.
#
+ button )
(
If touch sensor is detected, dance tricks with melody .
#
+ button )
(
Page 60

Robot Play
Hide-and seek
Play hide-and-seek with your Walking Bot robot. In this game, one player is 'it'
running after the other player.
•
Decide who is going to be 'it'.
•
Have the 'it' go after other Walking Bot.
•
Whoever is tagged or gets out of game panel, that robot is out for the game.
•
Whoever tags the other player more within 3 minutes wins the game.
You can adjust the
game panel size to
t more players.
Describe your 'Walking Bot' robot.
◈
• Robot level?
• What was the most fun about it?
• What was the most difcult thing?
• Check your robot with your teacher.
Very easy Easy Average Difficult
Ver y
difficult
62
Page 61

4. Sidecar
Vroom, Vroom~
Step aside!
Sidecar is coming.
Smart servo (servo motor)
Thanks to the
smart servo in
the handlebar!
Smart servo
Rotation
motor
Huh? How does can it turn left and
right with just one rotation motor?
Aren't both just motors?
Not close!
Smart servo has much
more functions.
So it can be used in sidecar
handlebar, walking robot, bird's
wing or catapult.
Sidecar is motorcycle robot that
uses both rotation motor and
smart servo!
Rotation motor rotates itself and
is used as a wheel or to rotate a
fan.
Smart servo can turn and even rotate by
different size of angles
, 20 and 30 .
like 10
Wow, smart servo is all-powerful
like me! Tell me more about its
functions!
63
Besides, smart servo has a LED
inside so it can blink and move at
the same time!
Before that, let's play a race
game with our sidecar! I have been
waiting long time for this.
Page 62

Today's Robot Class
Smart servos and rotation motors are used together
in the Sidecar robot. Rotation motors are used for
rotating wheels while smart servos are used to control
directions. You can easily notice the difference between
smart servo and rotation motor. Rotation motor is
used as a wheel and smart servo is used to switch the
position angles by 10°, 20° and 30° so you can move
the Sidecar to desired direction.
Side car is attached beside a motorcycle.
Motorcycle is practical and usable
transportation, but you can not load
big luggage or people. And that's
when side car comes into play.
I am a Sidecar!
I can load human
or a luggage.
64
Page 63
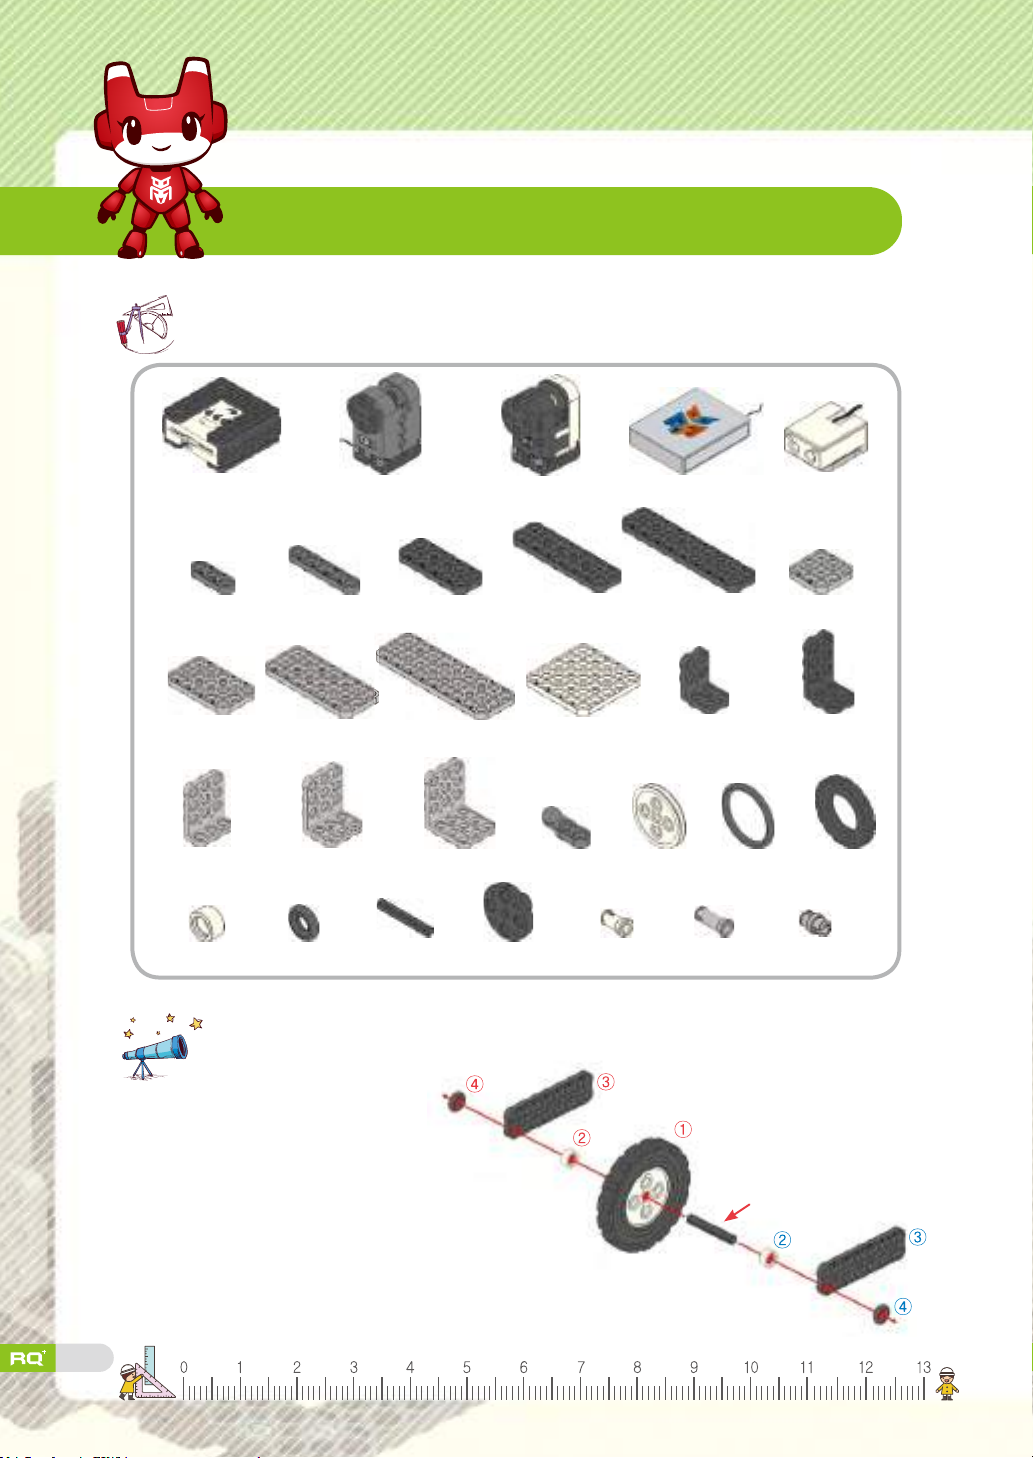
Robot Assembly
Prepare robot parts.
Smart controller
1×3 frame
3×5 frame
3×4 L frame
Spacer X5
X1
X6
X4
Locking ring X4 Small axis X2
Tips.
X1
R. motor (ID30) X1 Smart servo (ID00) X1
1×5 frame
3×7 frame X5 3×9 frame X6 5×5 frame X4 2×4 L frame X6 2×5 L frame X2
3×5 L frame X8 3×6 L frame X2 Ball frame X1 Wheel X3
X2
2×5 frame
X4
2×7 frame
Front horn X1
2s rivet X100 3s rivet X11
X4
Battery case
2×9 frame
X1
X4
3×3 frame
Rubber ring X1 Tire X2
Double rivet X20
LED
X2
X2
Use small axis part in STEP3
and STEP7.
Assemble the parts in order of number
as shown in the image on the right.
65
Small axis
Page 64
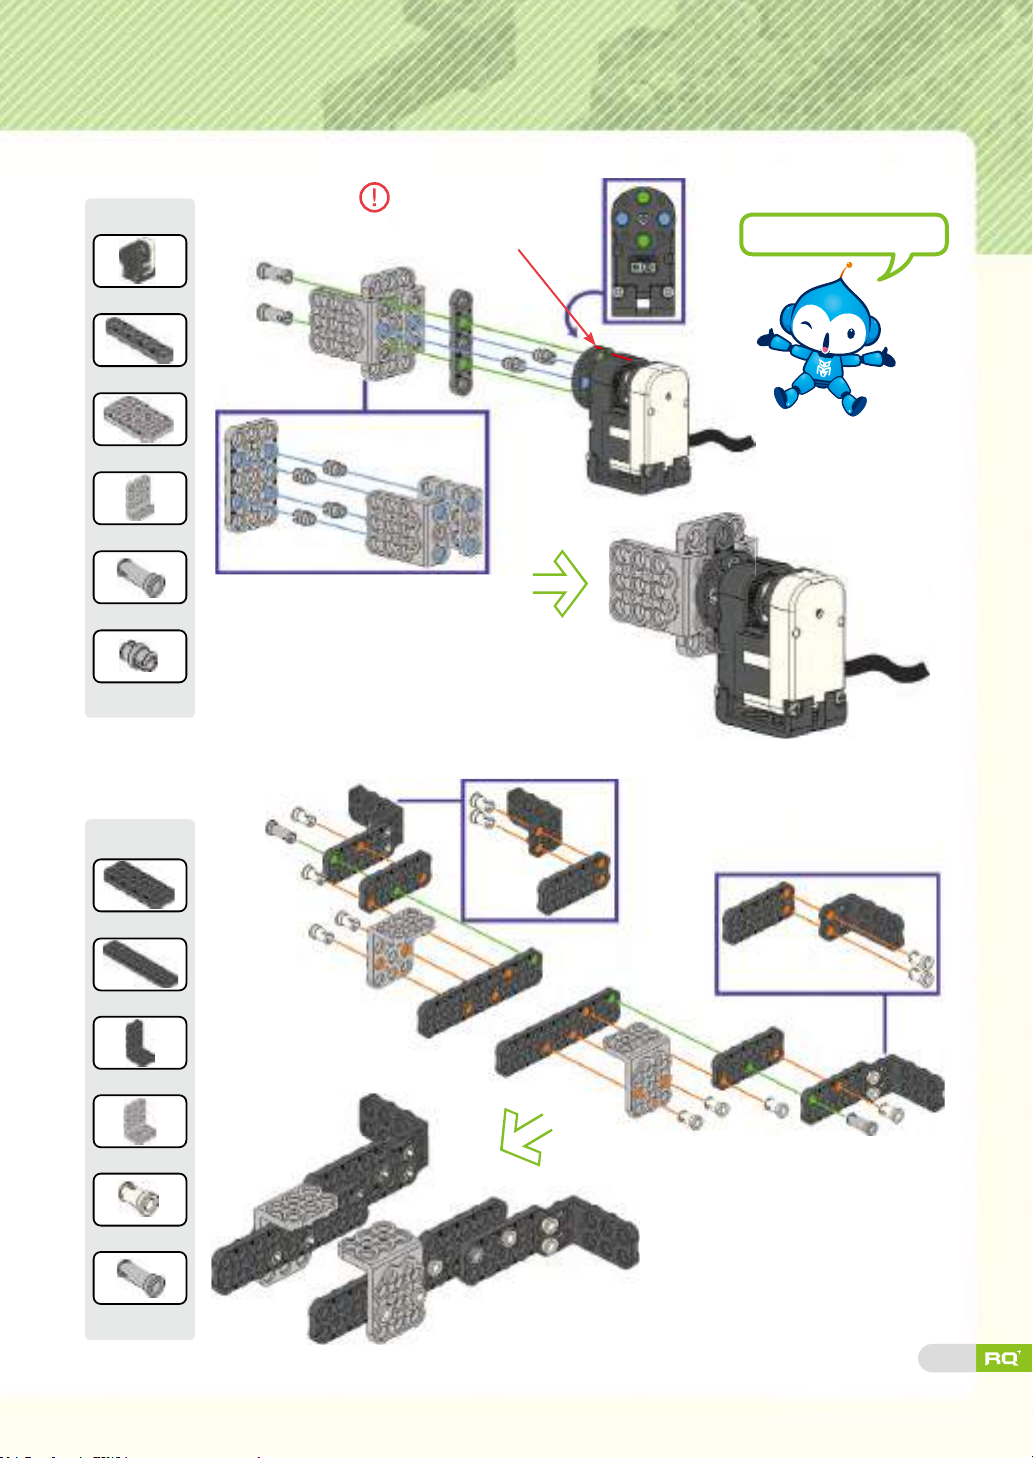
Step 1
Tip
Smart servo(ID00) X1
1×5 frame X1
3×5 frame X1
3×4 L frame X2
3s rivet X2
Double rivet X6
Match 'home' mark to
the 12 o'clock direction.
Use smart servo ID00.
Step 2
Tip
2×5 frame X4
2×9 frame X2
2×5 L frame X2
3×5 L frame X2
2s rivet X12
3s rivet X2
66
Page 65
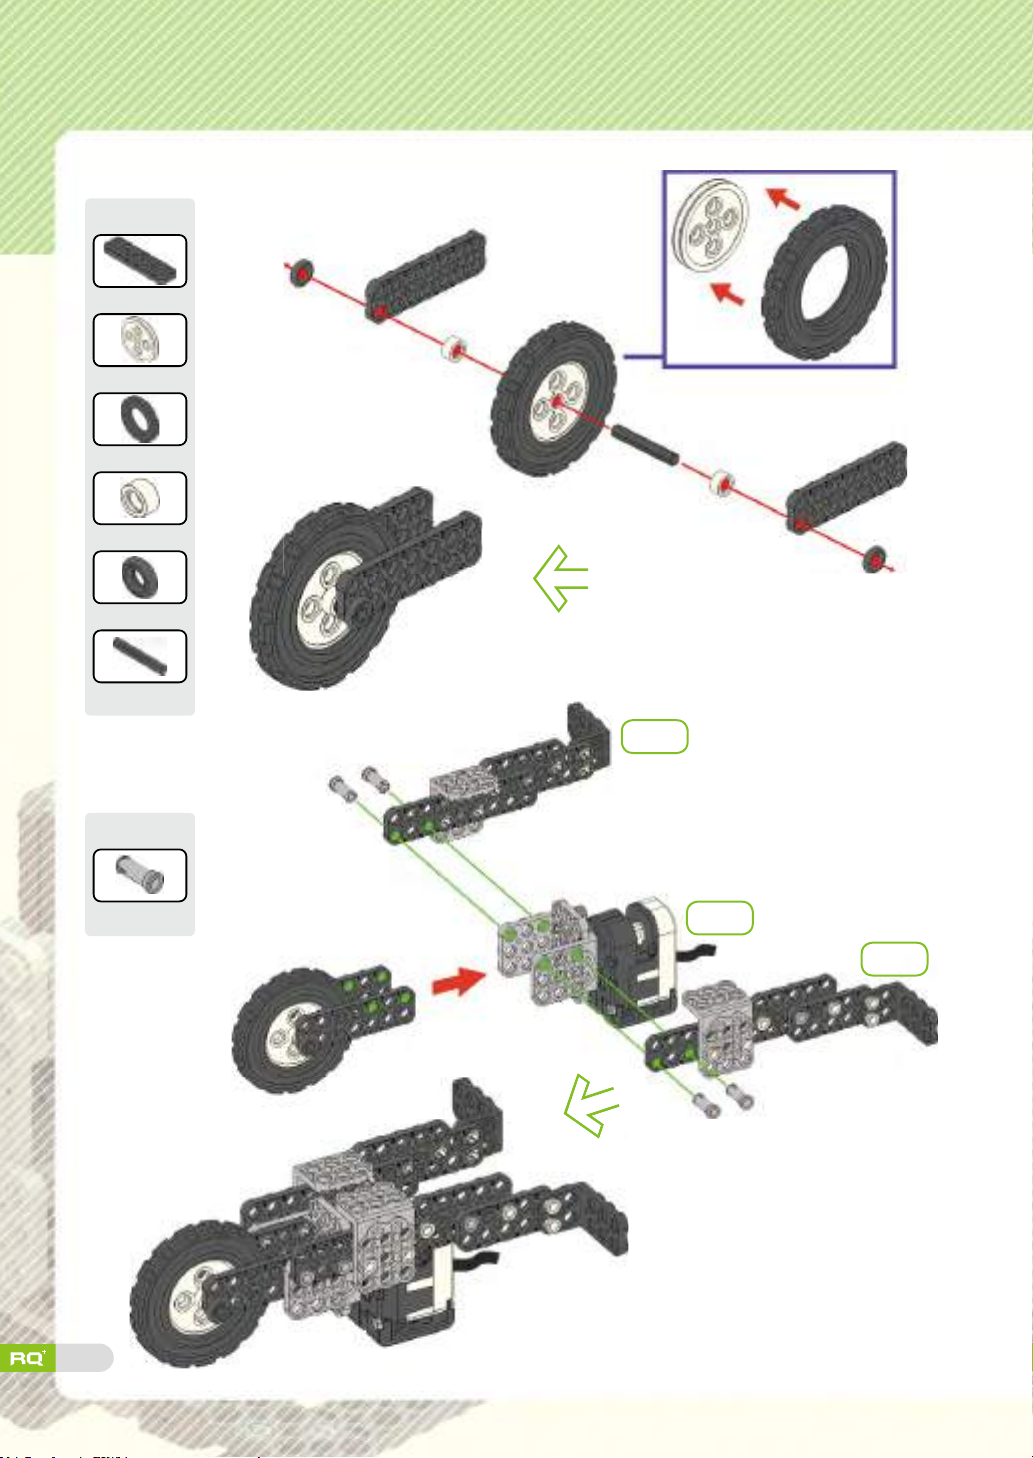
Step 3
Tip
2×7 frame X2
Wheel X1
Tire X1
Spacer X2
Locking ring X2
Small axis X1
Step 2
Step 4
3s rivet X4
67
Tip
Step
1
Step
2
Page 66
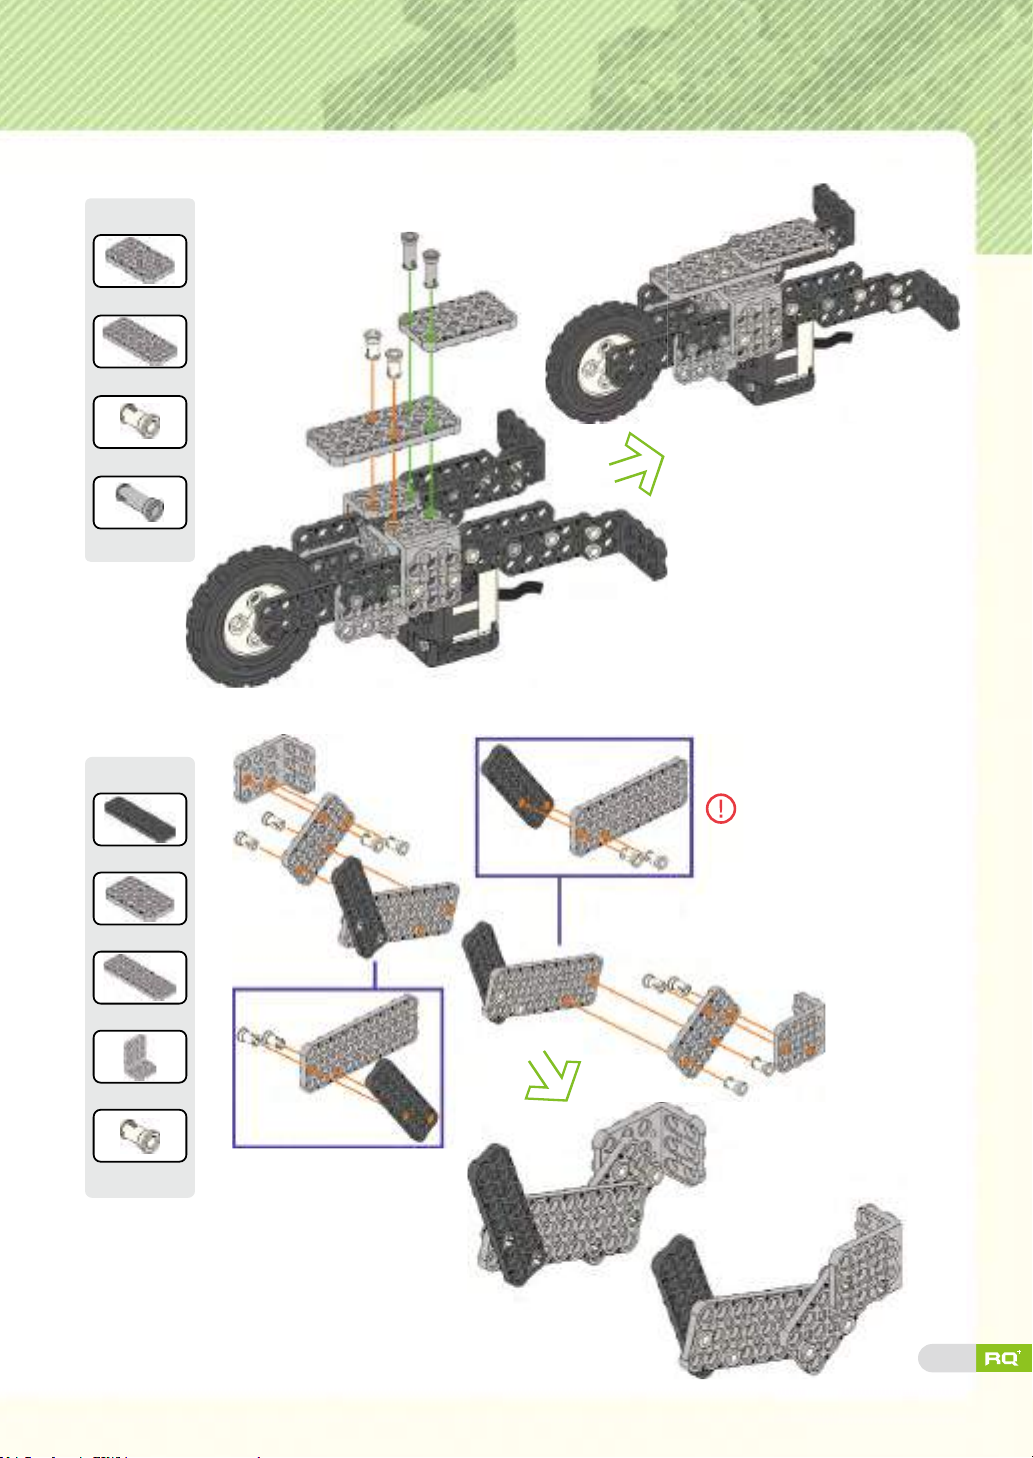
Step 5
Tip
3×5 frame X1
3×7 frame X1
2s rivet X2
3s rivet X2
Step 6
Tip
2×7 frame X2
3×5 frame X2
3×9 frame X2
3×5 L frame X2
2s rivet X12
Pay attention when
inserting the 2s rivets.
68
Page 67
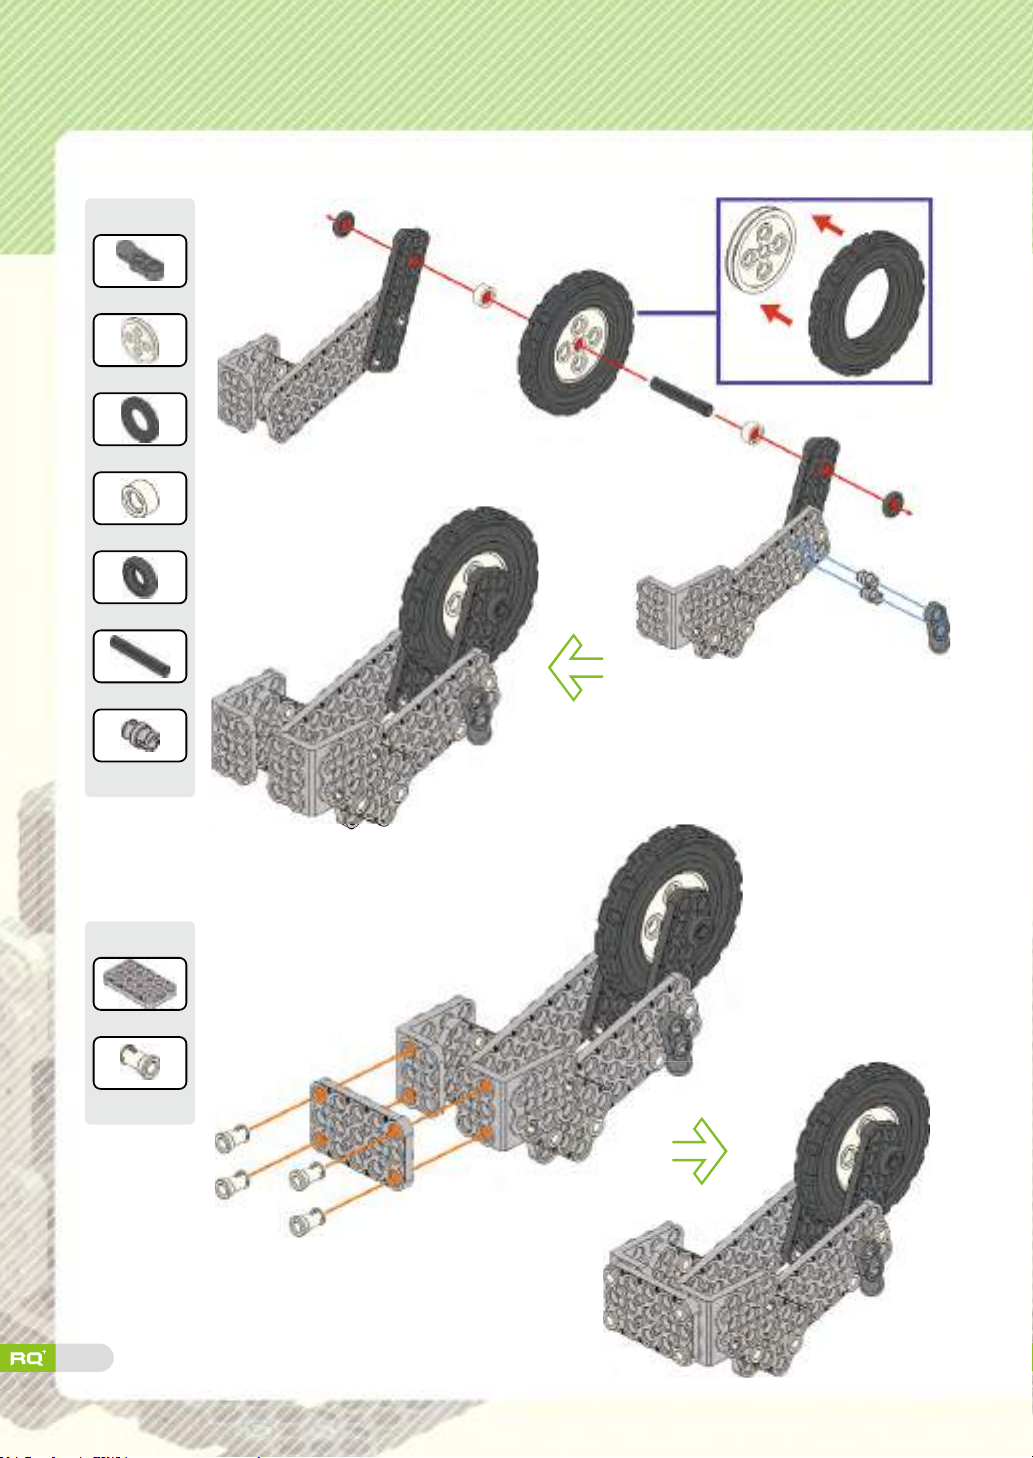
Step 7
Tip
Ball frame X1
Wheel X1
Tire X1
Spacer X2
Locking ring X2
Small axis X1
Double rivet X2
Step 8
Tip
3×5 frame X1
2s rivet X4
69
Page 68

Step 9
Tip
2s rivet X2
Use rivet tool to
insert rivet parts!
Step 10
Tip
3×3 frame X2
3×5 frame X1
3×5 L frame X2
2s rivet X4
Double rivet X4
X2
70
Page 69

Step 11
Tip
R. motor (ID30) X2
2×9 frame X1
3×9 frame X1
Front horn X1
2s rivet X6
Step 12
Tip
Use rotation motor
ID30.
Smart controller X1
LED X2
1×3 frame X1
1×5 frame X1
Spacer X1
2s rivet X3
3s rivet X1
Double rivet X5
71
Page 70
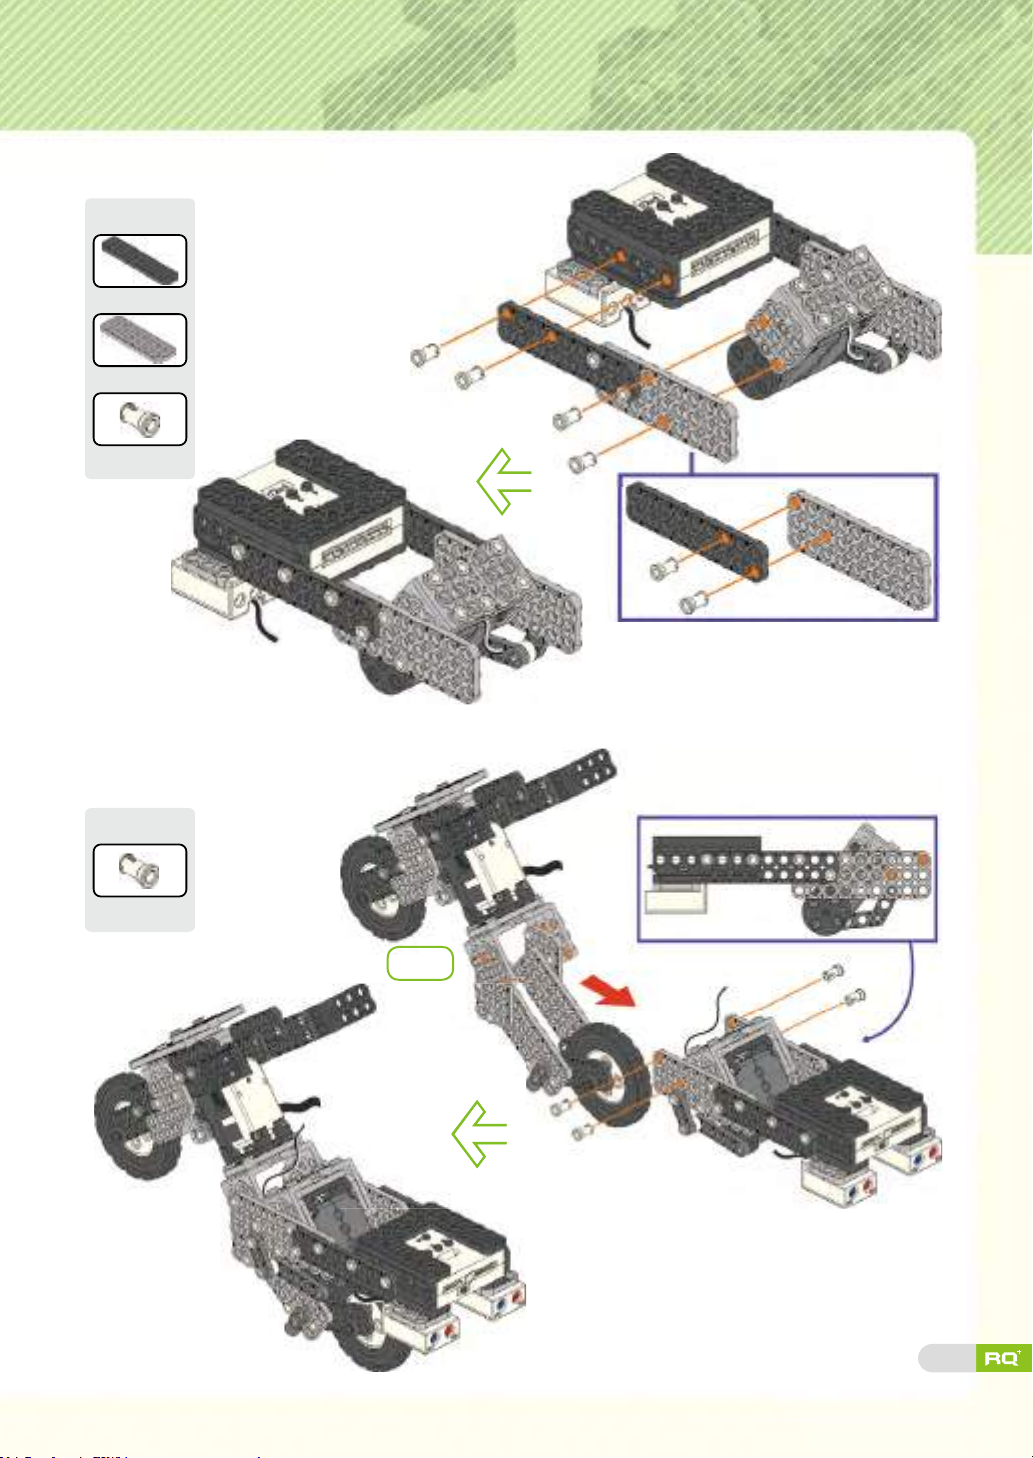
Step 13
Tip
2×9 frame X1
3×9 frame X1
2s rivet X6
Step 14
Tip
2s rivet X4
Step 9
72
Page 71
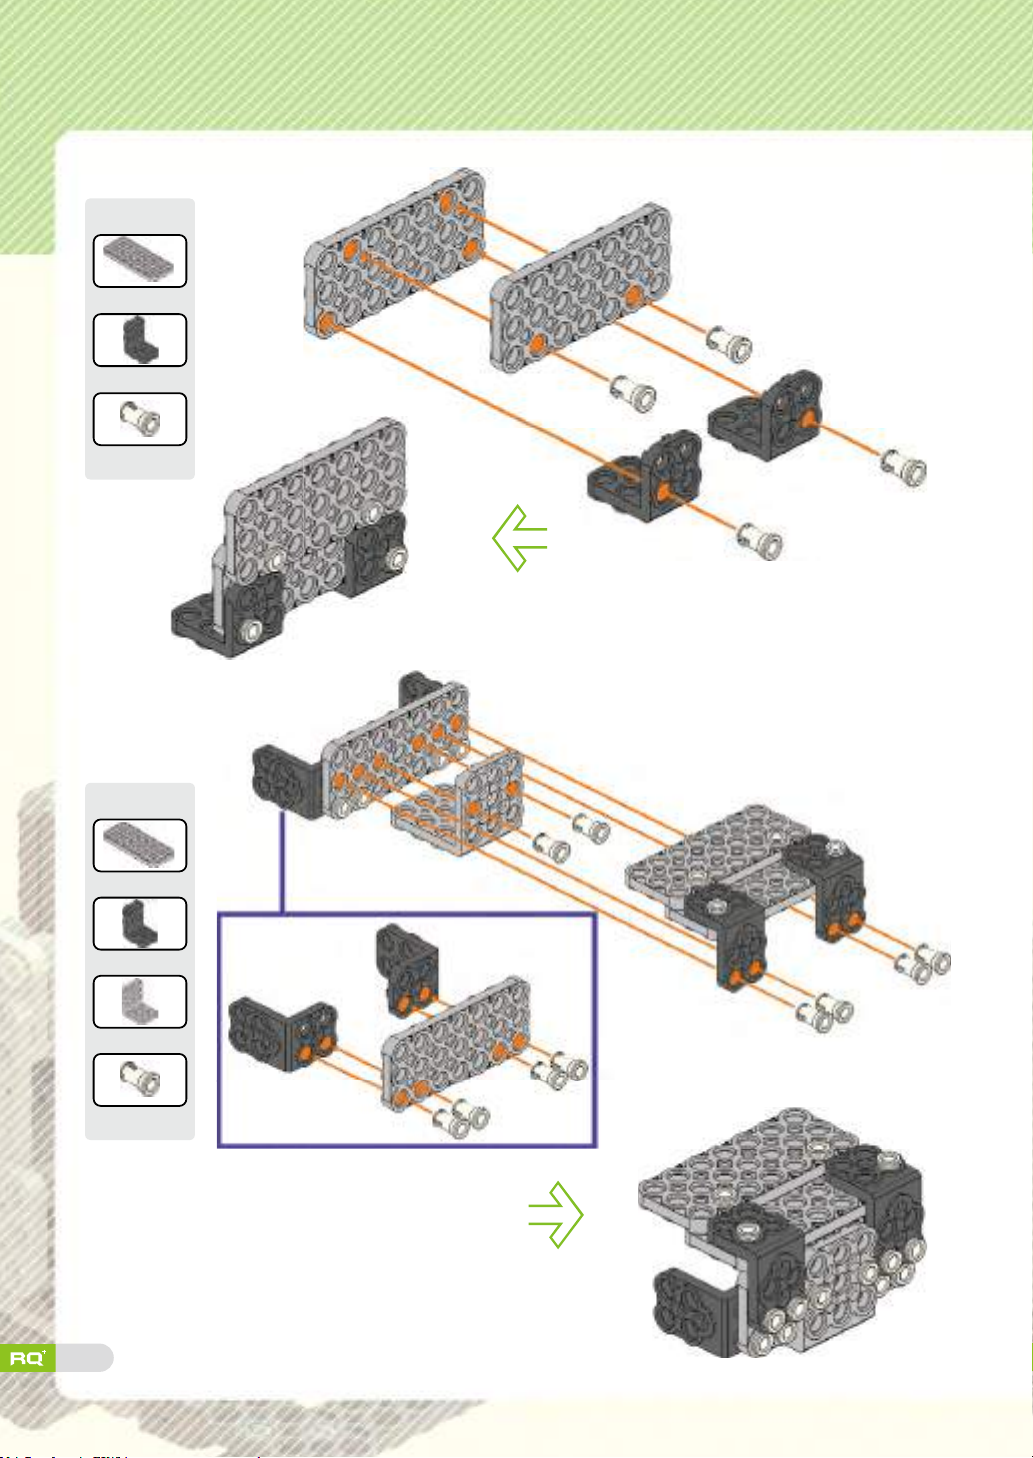
Step 15
Tip
3×7 frame X2
2×4 L frame X2
2s rivet X4
Step 16
Tip
3×7 frame X1
2×4 L frame X2
3×6 L frame X1
2s rivet X10
73
Page 72
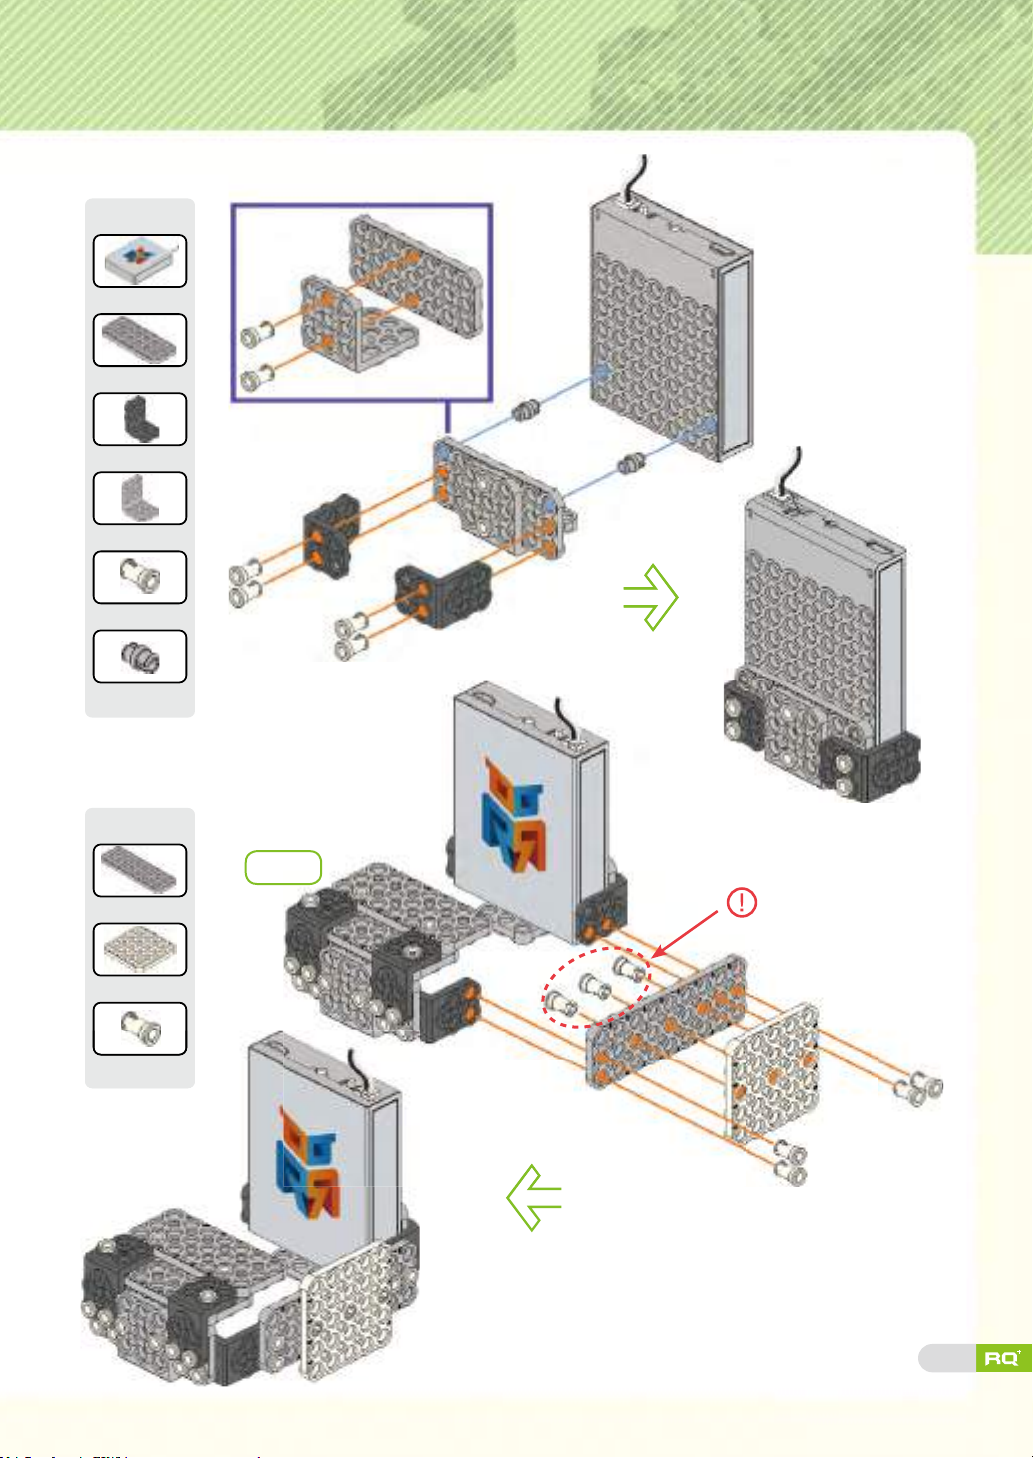
Step 17
Tip
Battery case X1
3×7 frame X1
2×4 L frame X2
3×6 L frame X1
2s rivet X6
Double rivet X2
Step 18
Tip
3×9 frame X1
5×5 frame X1
2s rivet X7
Step 16
Insert 2s rivets rst.
74
Page 73

Step 19
Tip
3×9 frame X1
3×4 L frame X1
Wheel X1
Rubber ring X1
2s rivet X6
Double rivet X1
Step 20
Tip
5×5 frame X3
3×4 L frame X1
2s rivet X10
75
Page 74
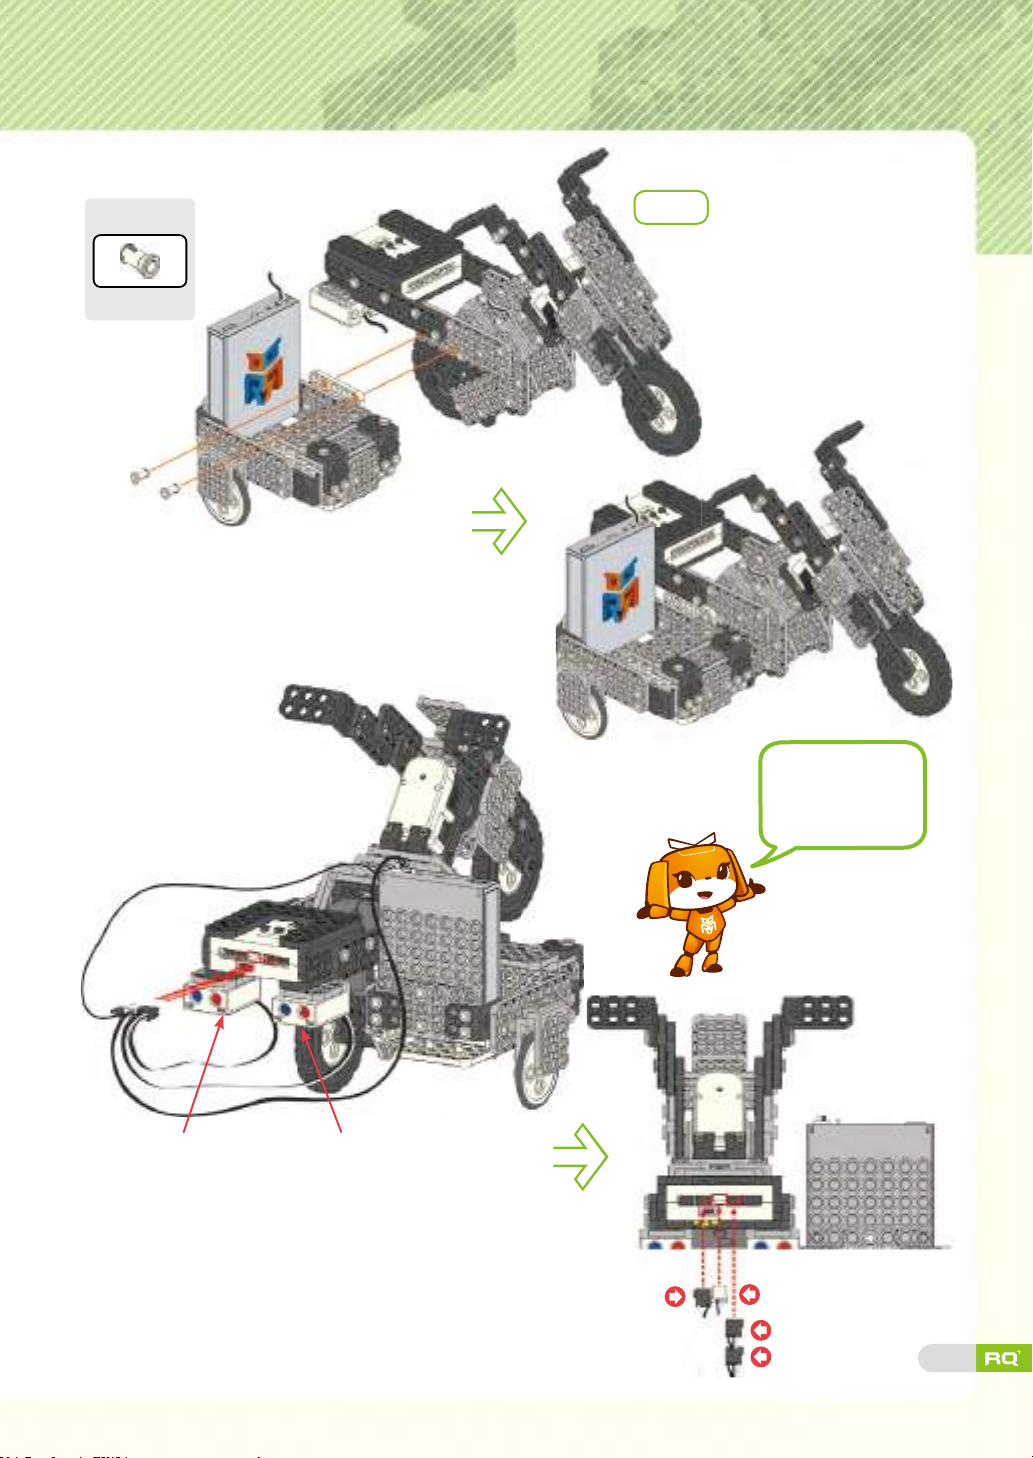
Step 21
Tip
2s rivet X2
Step 14
Pay attention to
cable connection
and direction.
LED2
LED1
R. motor (ID30)
Power
LED1
LED2
76
Page 75
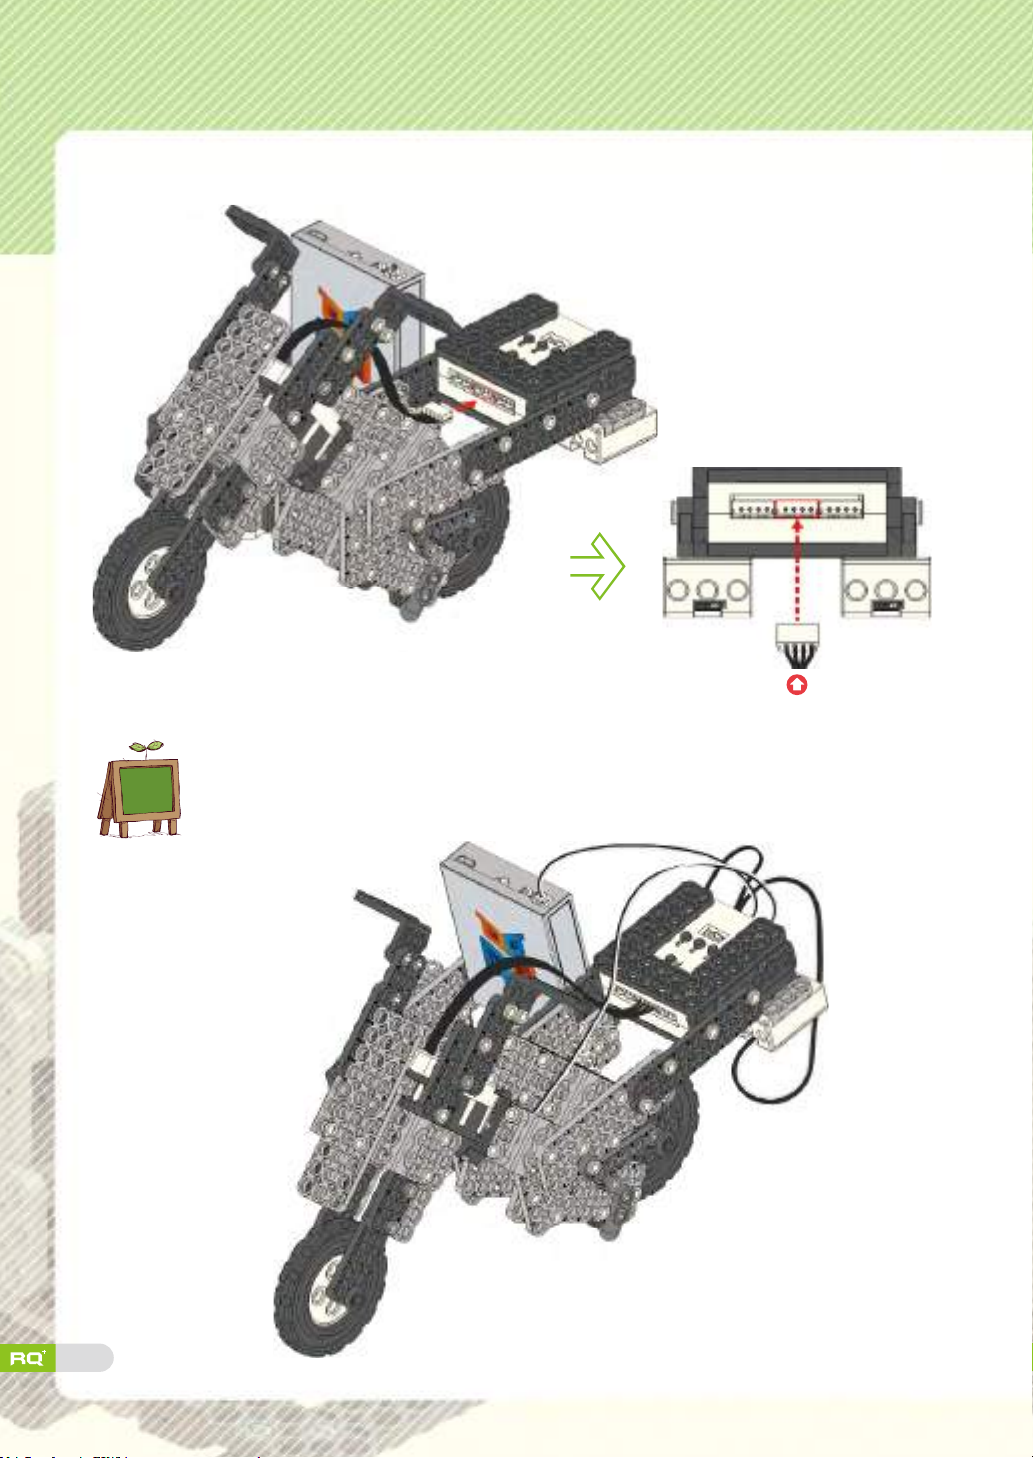
Step 23
Smart servo (ID00)
77
completion
'Sidecar' is ready!
★
★
Page 76
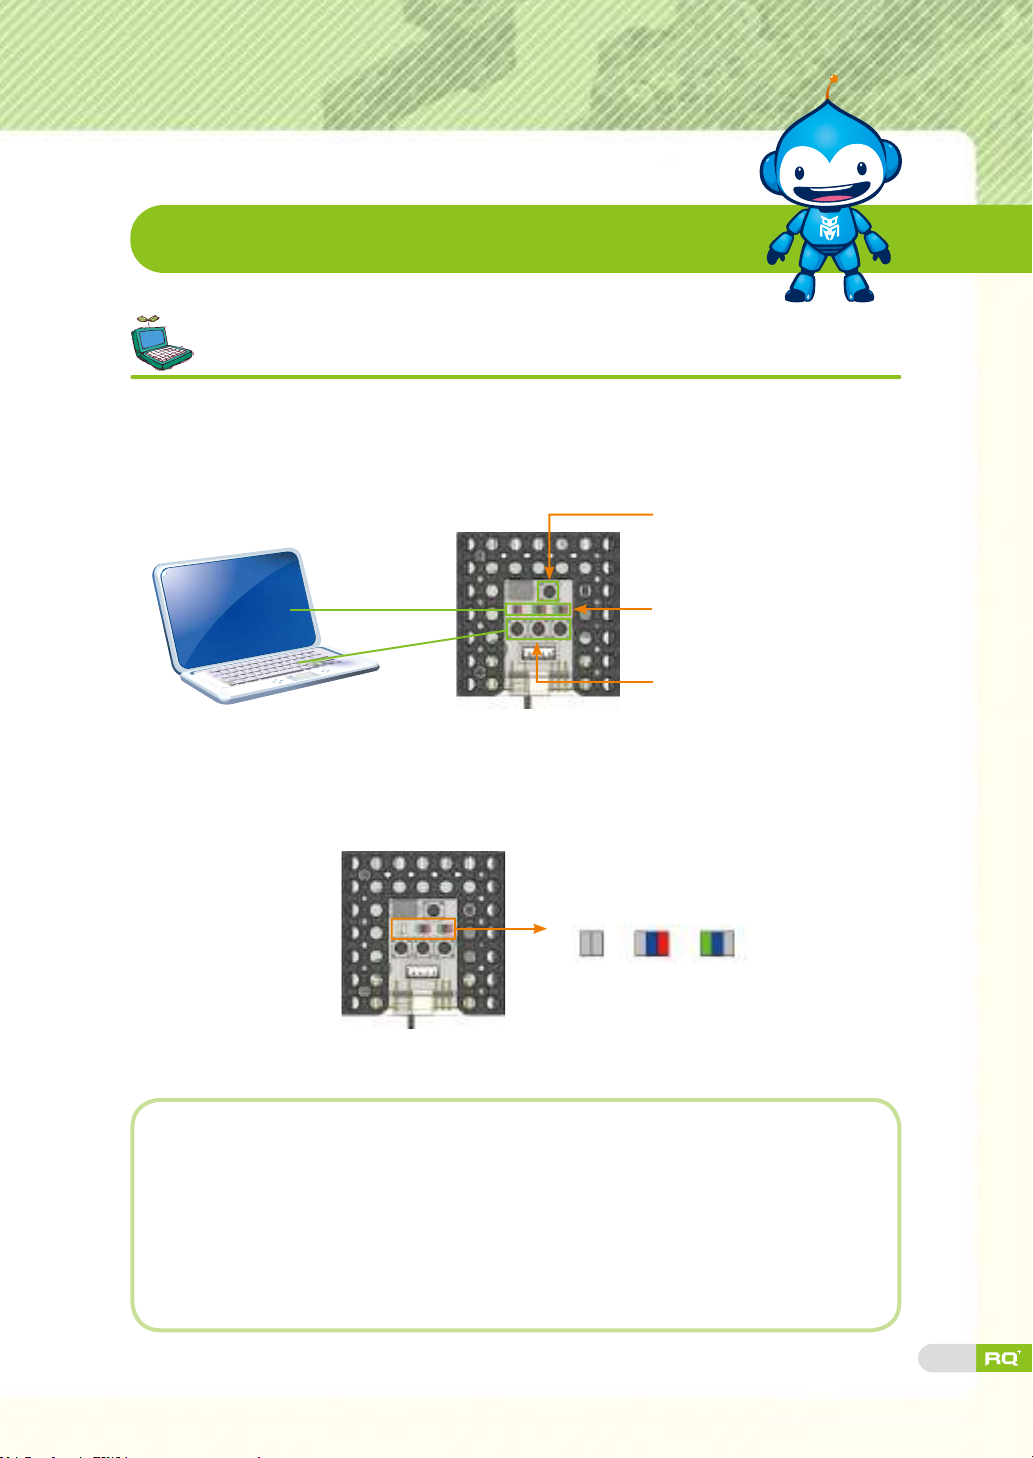
Robot Experience
Set-up 'Sidecar' robot model.
There are various LEDs and buttons in smart controller. LED indicates input
or output value like monitor while buttons work as the keyboard for PC.
Button P
LED1, LED2, LED3
from left side
Button 1, 2, 3 from left side
First : Turn on the smart controller to enter <set-up mode>.
Second
:
Press button 2 or button 3 on smart controller to set-up
'Sidecar' robot model. The buttons work as a keyboard for PC.
Program the robot for proper operation.
LED1 LED2 LED3
Third : Press button P on smart controller to enter <standby mode>.
Check the following if the robot is not working and reassemble.
1. When moving forward and backward reversely :
▶ Refer to STEP11, and see the rotation motor ID carefully.
2. When you cannot control the direction :
▶ Check smart serevo ID and assembled position.
78
Page 77
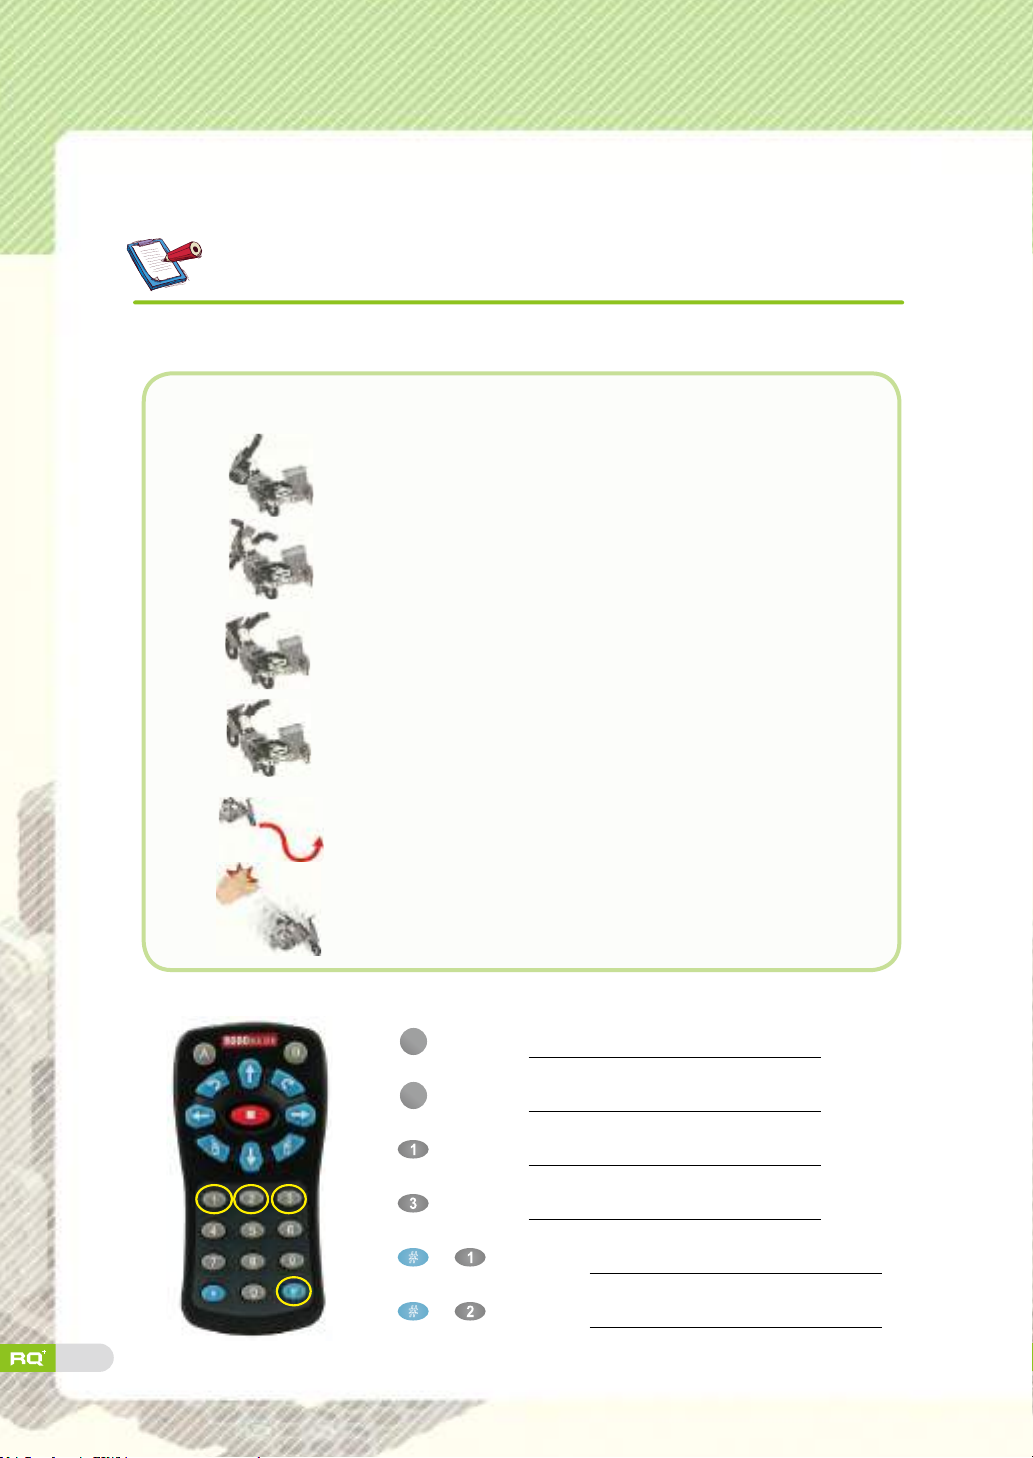
Check movement and assembly.
1. Match the button on the IR remote controller with the corresponding action.
Examples
★
★
ⓐ
ⓑ
ⓒ
ⓓ
ⓔ
ⓕ
Sidecar moves to the left.
Sidecar moves to the right.
Sidecar's left LED blinks.
Sidecar's right LED blinks.
Sidecar moves in S shape and then stops.
Sidecar moves forward when sound is detected.
A
(1)
button :
79
B
(2)
(3)
button :
button :
(4) button :
#
(5)
+ button :
(6) # + button :
Page 78
Robot Play
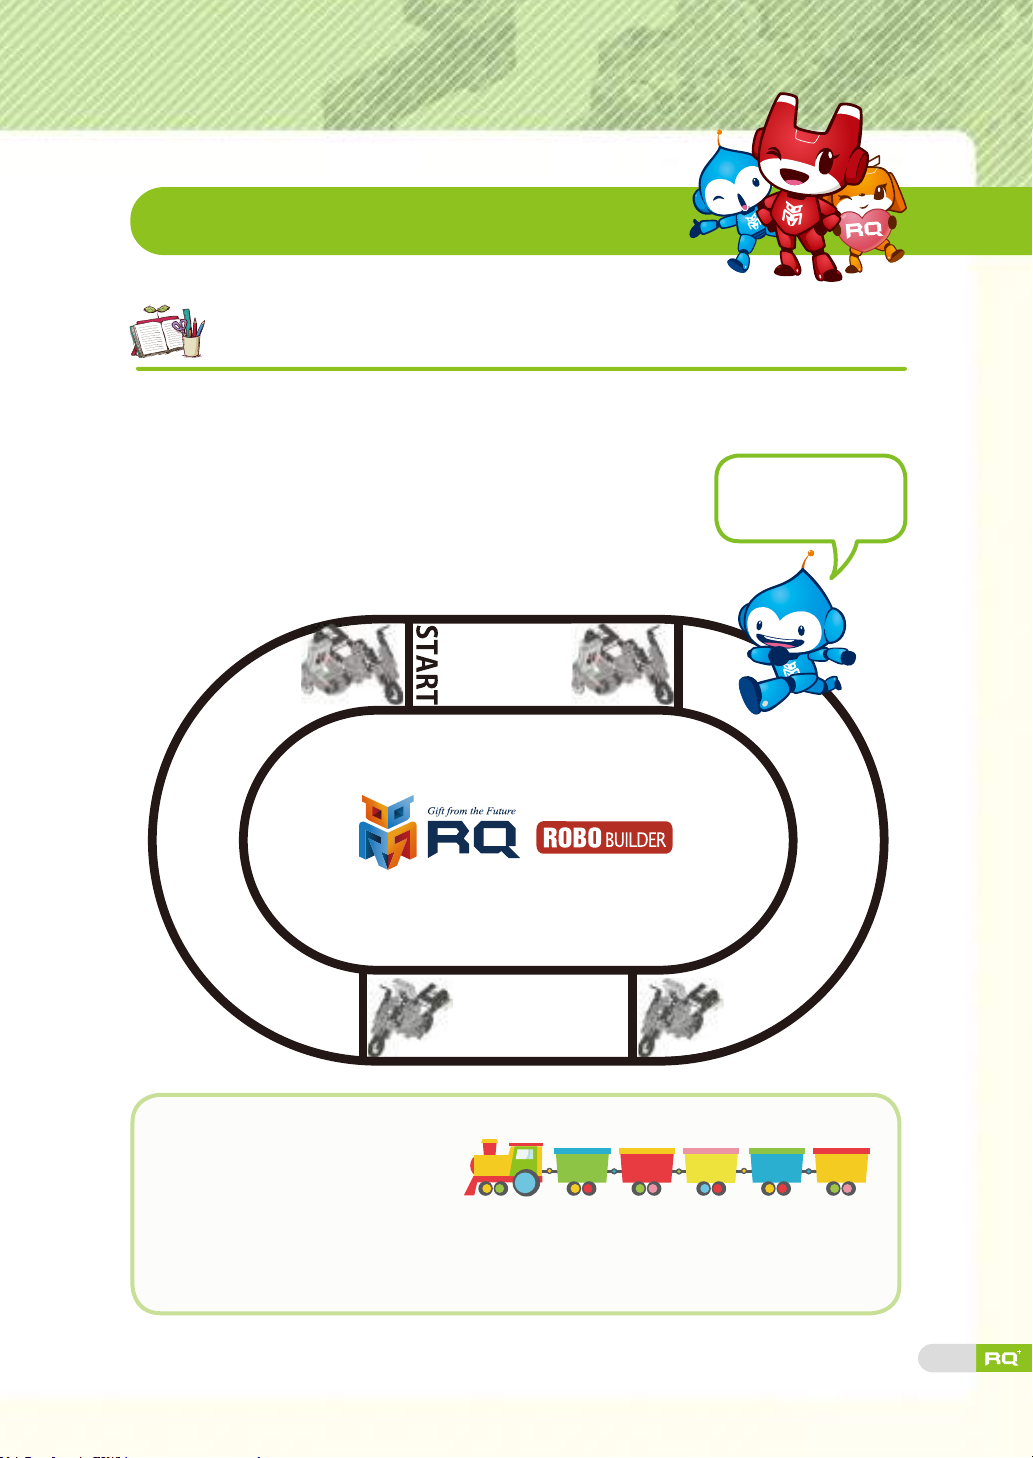
Play relay race game.
Make a team with 4 persons to play a relay race. Whoever arrives to the
nishline rst wins the game.
• Make a team, and place robots as below on the track.
• Start from 'START' position for running a lap and pass a baton.
• Whoever arrives to the nish line rst wins the game.
• Discuss the game rules for more exciting race.
Do not get out of
track during the race!
Describe your 'Sidecar' robot.
◈
• Robot level?
• What was the most fun about it?
• What was the most difcult thing?
• Check your robot with your teacher.
Very easy Easy Average Difficult
Ver y
difficult
80
Page 79
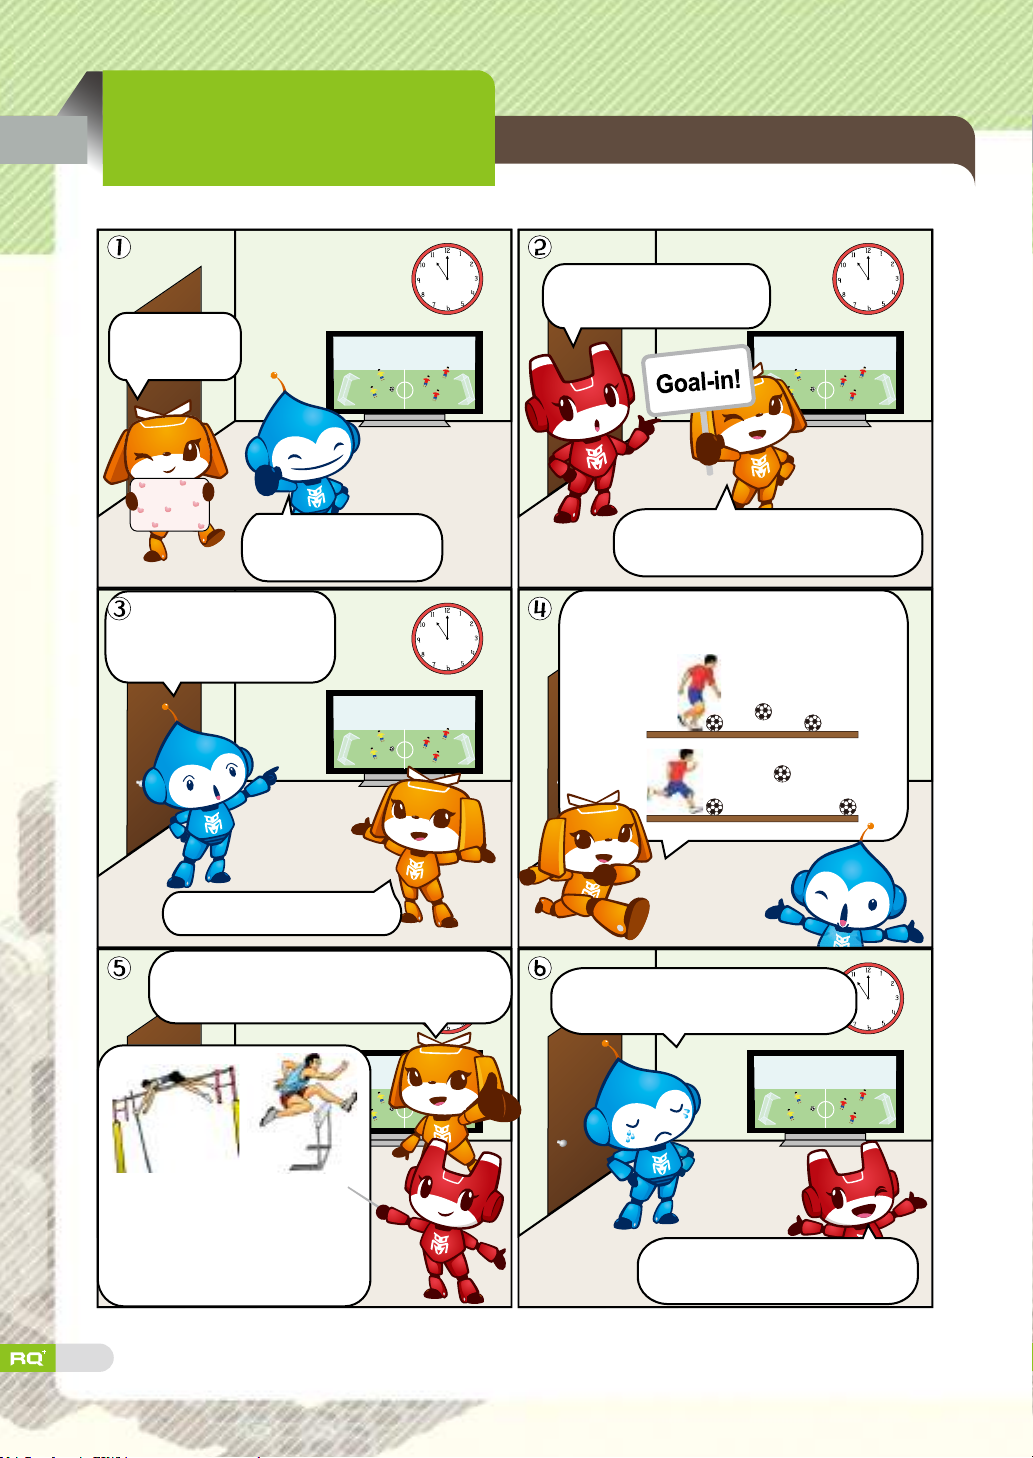
5. Soccer Bot
Go~ Red team!
Go, go, go!
Generate driving force.
What? Ended in a tie in
overtime?
Way to go, Red team!
Go~ Red team!
Eh? Players run from a
distant place to kick a ball.
It's for doing a run-up.
kinetic energy is generated when you run,
and it makes driving force!
Please... Make a goal, goal, goal in
penalty shoot-out.
They do that to kick with more power
to a farther position.
No wonder I am not good at
kicking a ball...
Jump over
obstacle
People do a run-up to jump
over obstacles or a hurdle.
81
Hurdle race
Hey~, it's our player's turn.
Go~, go! Shoot! Goal!!!
Page 80
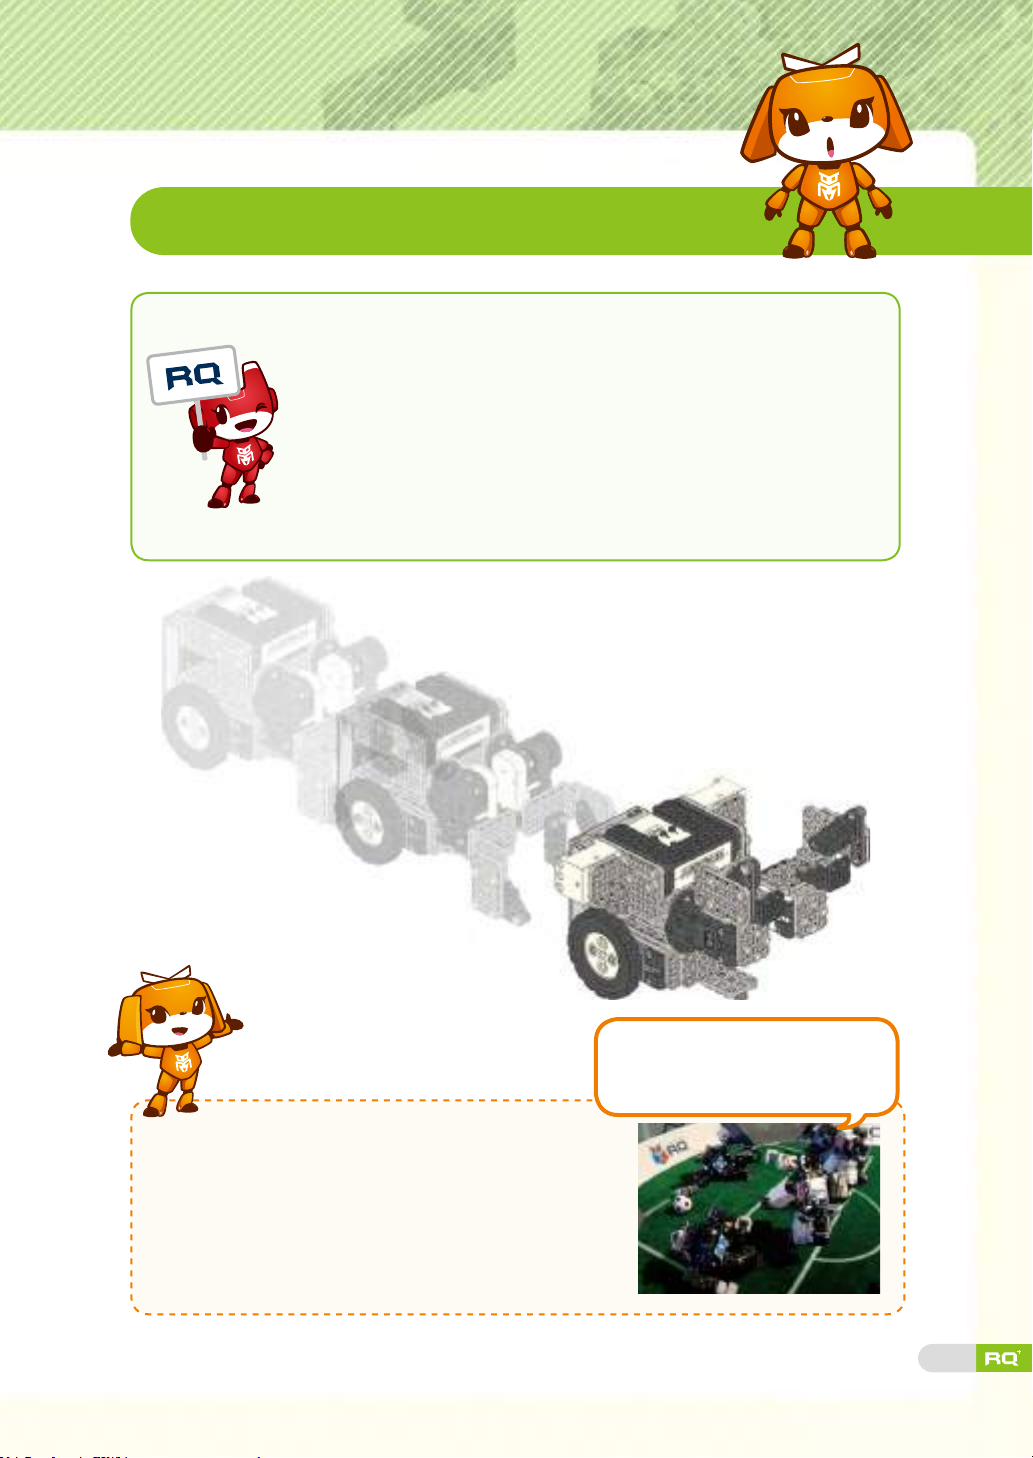
Today's Robot Class
Shoot~ Goal! Let's start a soccer competition with the Soccer
Bot. Robot soccer competition is just like the human robot
competition - it's about the number of goals you make within the
game time. Your robot needs to take various motions such as
going forward and backward, rotating, and some basic attack and
defense motions. Rotation motors and smart servos are used in
Soccer Bot. Kicking and blocking a ball and with smart servo and
also you can make other player to stand for team cooperation!
My Soccer Bot in playing in the
robot competition. It's so competitive
Robot soccer competition is world's state-of-the-
art science technology robot competition.
In each team there are 3 robots. The robots kick a
ball to the opposite team's goal line to get a point.
Soccer robots are pre-programmed for soccer
games.
like the World Cup game!
82
Page 81
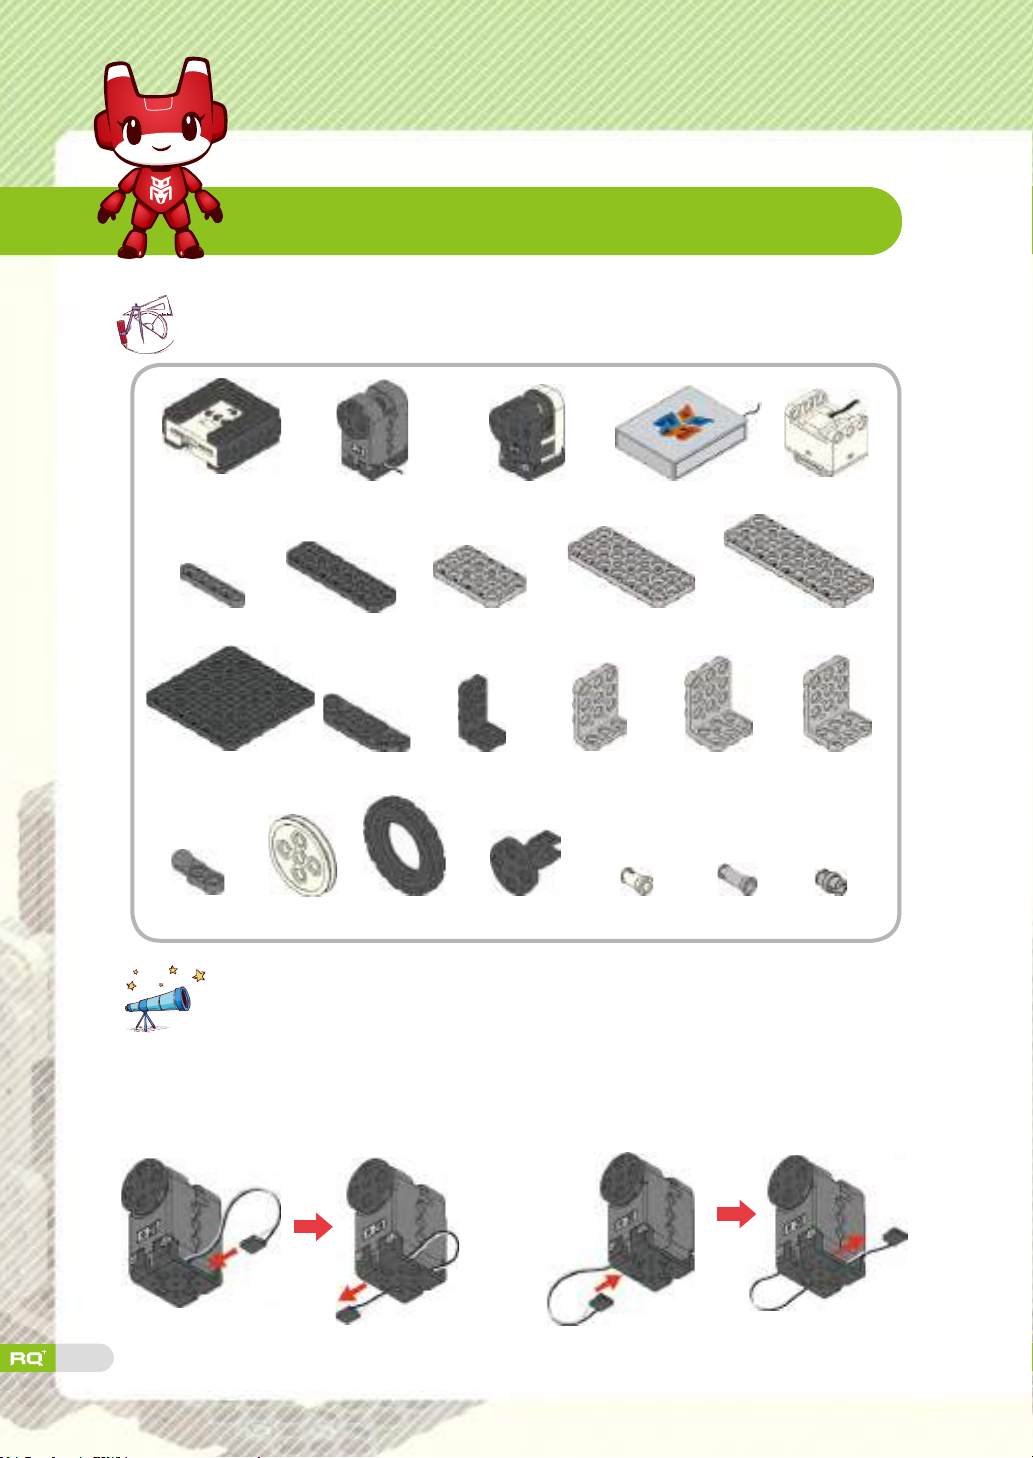
Robot Assembly
Prepare robot parts.
Smart controller X1
1×5 frame
7×7 frame
Ball frame X2Wheel X2 Tire X2 Joint frame X2 2s rivet X47 3s rivet X28
X1
R. motor (ID29,30) X2 Smart servo (ID00,01) X2
X2
2×7 frame
X2
Opposite angle
frame X2
3×5 frame
2×5 L frame X2
Battery case
X4
3×7 frame
3×4 L frame X2 3×5 L frame X5 3×6 L frame X6
X6
X1 Touch sensor X2
3×9 frame
X1
Double rivet X38
Tips.
Arrange rotation motor ID29 an ID30 cable as below to prevent tangling
during the assembly.
(For other robot assembly, leave the cables as it was.)
83
R. motor (ID29) R. motor (ID30)
Page 82
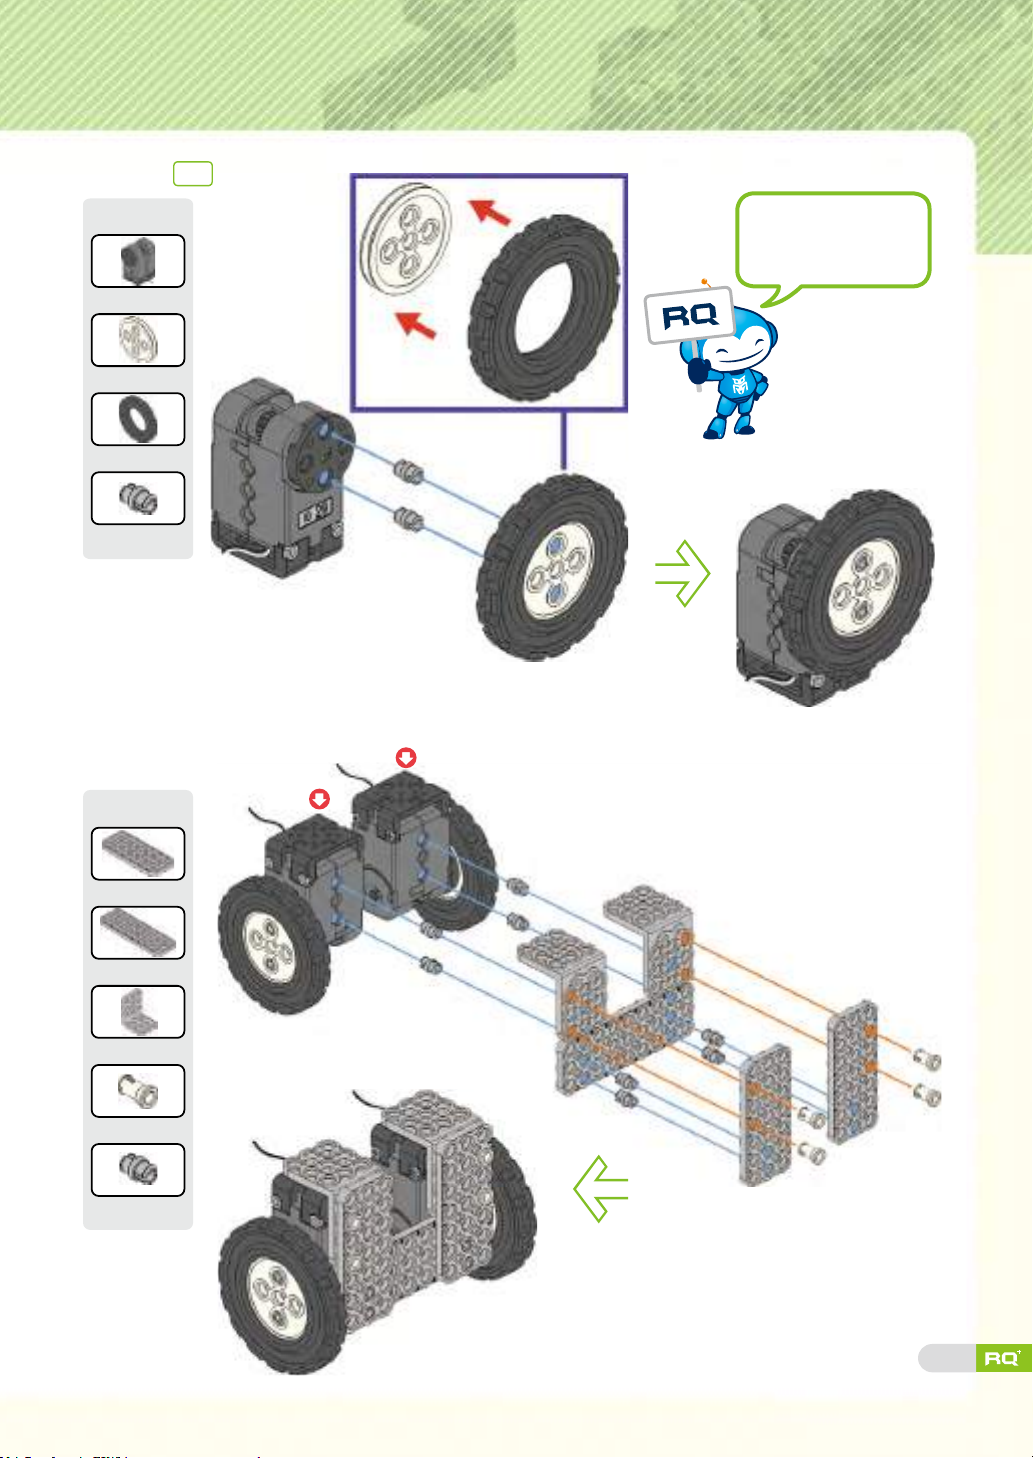
Step 1
X2
Tip
R. motor (ID29) X1
Wheel X1
Tire X1
Double rivet X2
Step 2
Tip
Assemble rotation
motor ID30 in the
same way.
R. motor
(ID29)
R. motor
(ID30)
3×7 frame X2
3×9 frame X1
3×6 L frame X2
2s rivet X4
Double rivet X8
84
Page 83

Step 3
Tip
3×7 frame X1
3×5 L frame X1
Ball frame X1
2s rivet X1
3s rivet X4
Double rivet X2
Step 4
Tip
3×7 frame X1
3×5 L frame X2
Insert 2s rivets rst.
3×6 L frame X2
Joint frame X2
2s rivet X6
3s rivet X4
85
X2
Page 84
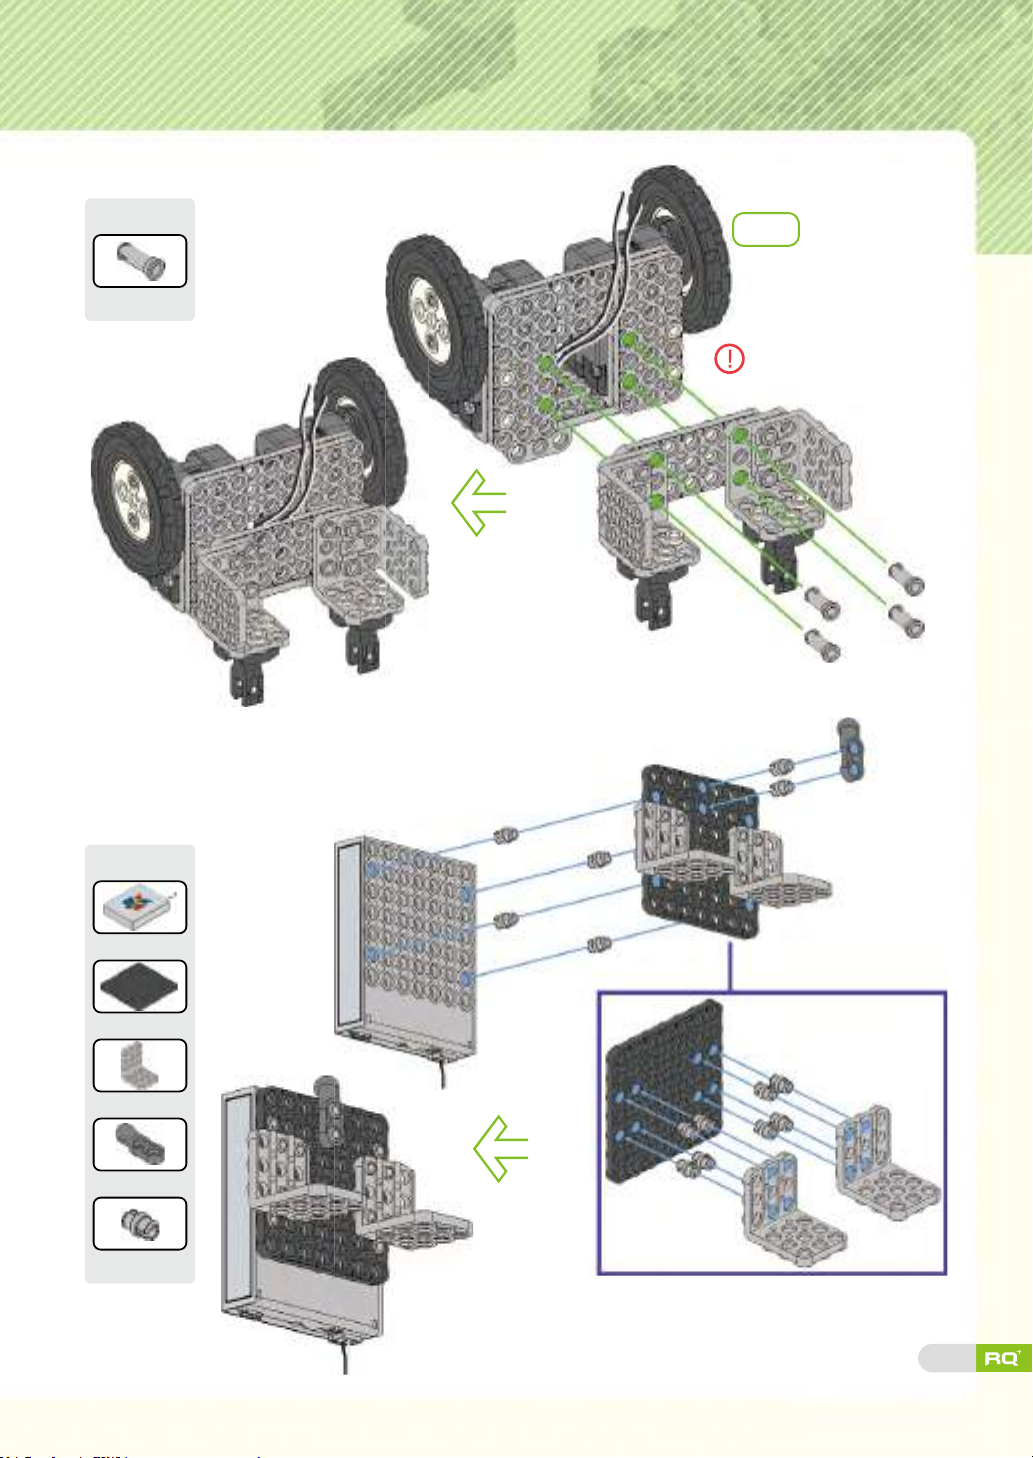
Step 5
Tip
3
s rivet X4
Step 3
Use rivet tool to
insert rivet.
Step 6
Tip
Battery case
7×7 frame
3×6 L frame
Ball frame
Double rivet
X1
X1
X2
X1
X14
86
Page 85
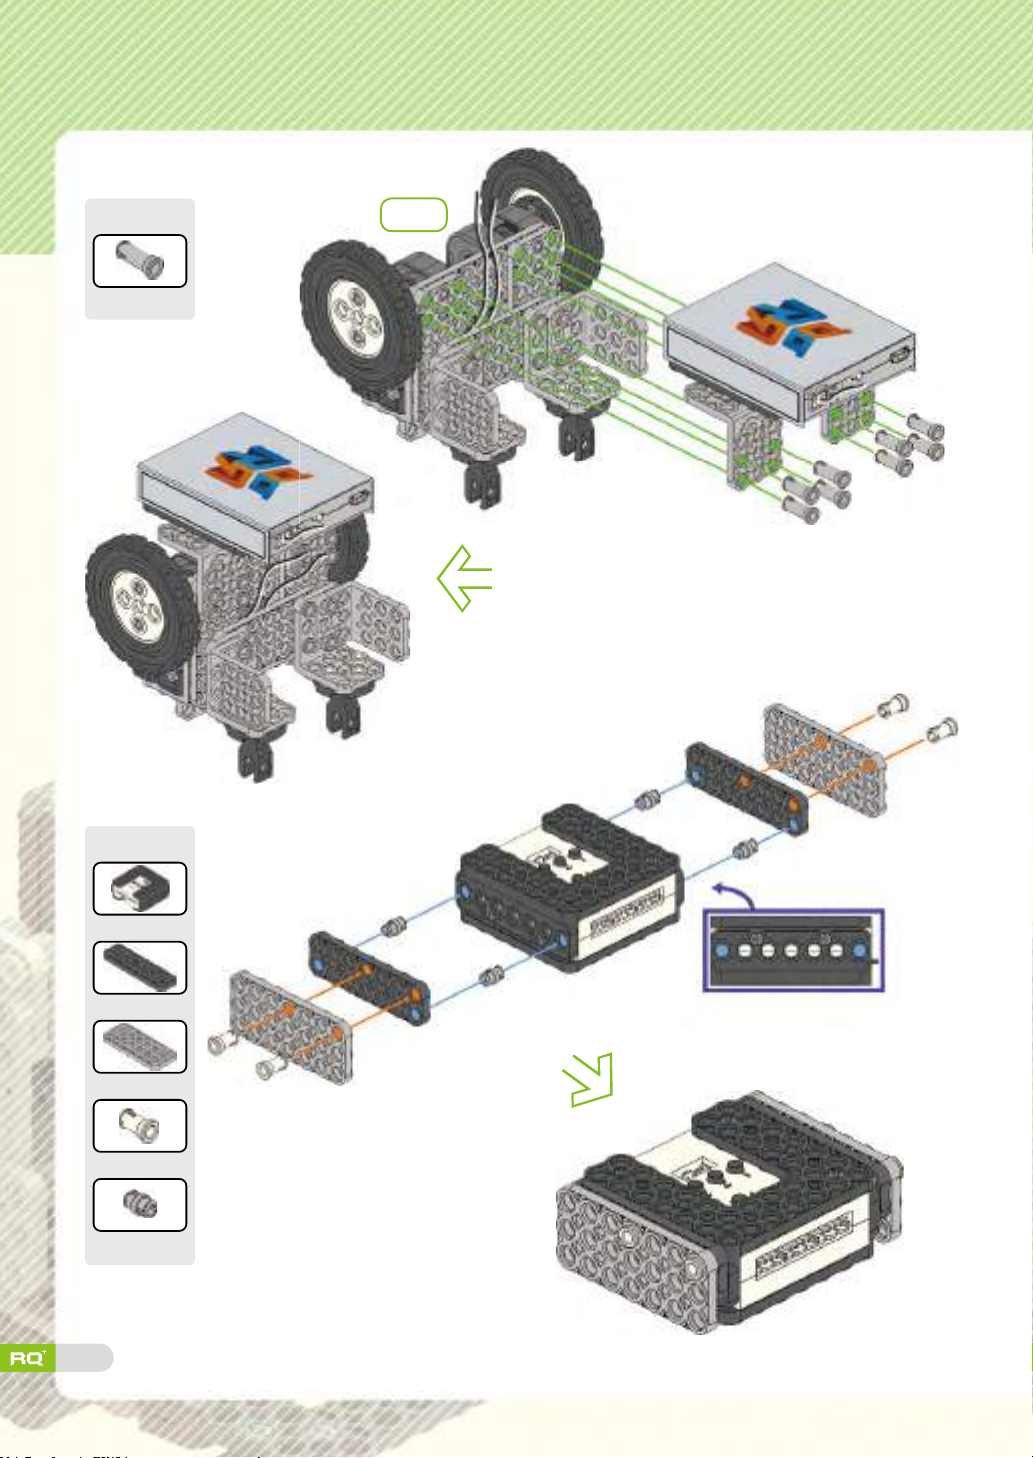
Step 7
Tip
3
s rivet X8
Step 5
Step 8
Tip
Smart controller X1
2×7 frame X2
3×7 frame X2
2s rivet X4
Double rivet X4
87
Page 86

Step 9
Tip
2
s rivet X4
Step 10
Step 7
Tip
1×5 frame
3×5 frame
2×5 L frame
3×4 L frame
3×5 L frame
X9
2s rivet
X2
3s rivet
X1
X2
X1
X1
X1
88
Page 87

Step 11
Tip
Opposite angle frame
2
s rivet X1
3
s rivet X1
Step 12
Tip
Smart servo (ID00) X1
X1
89
2
s rivet X4
Use smart servo
ID00.
Page 88
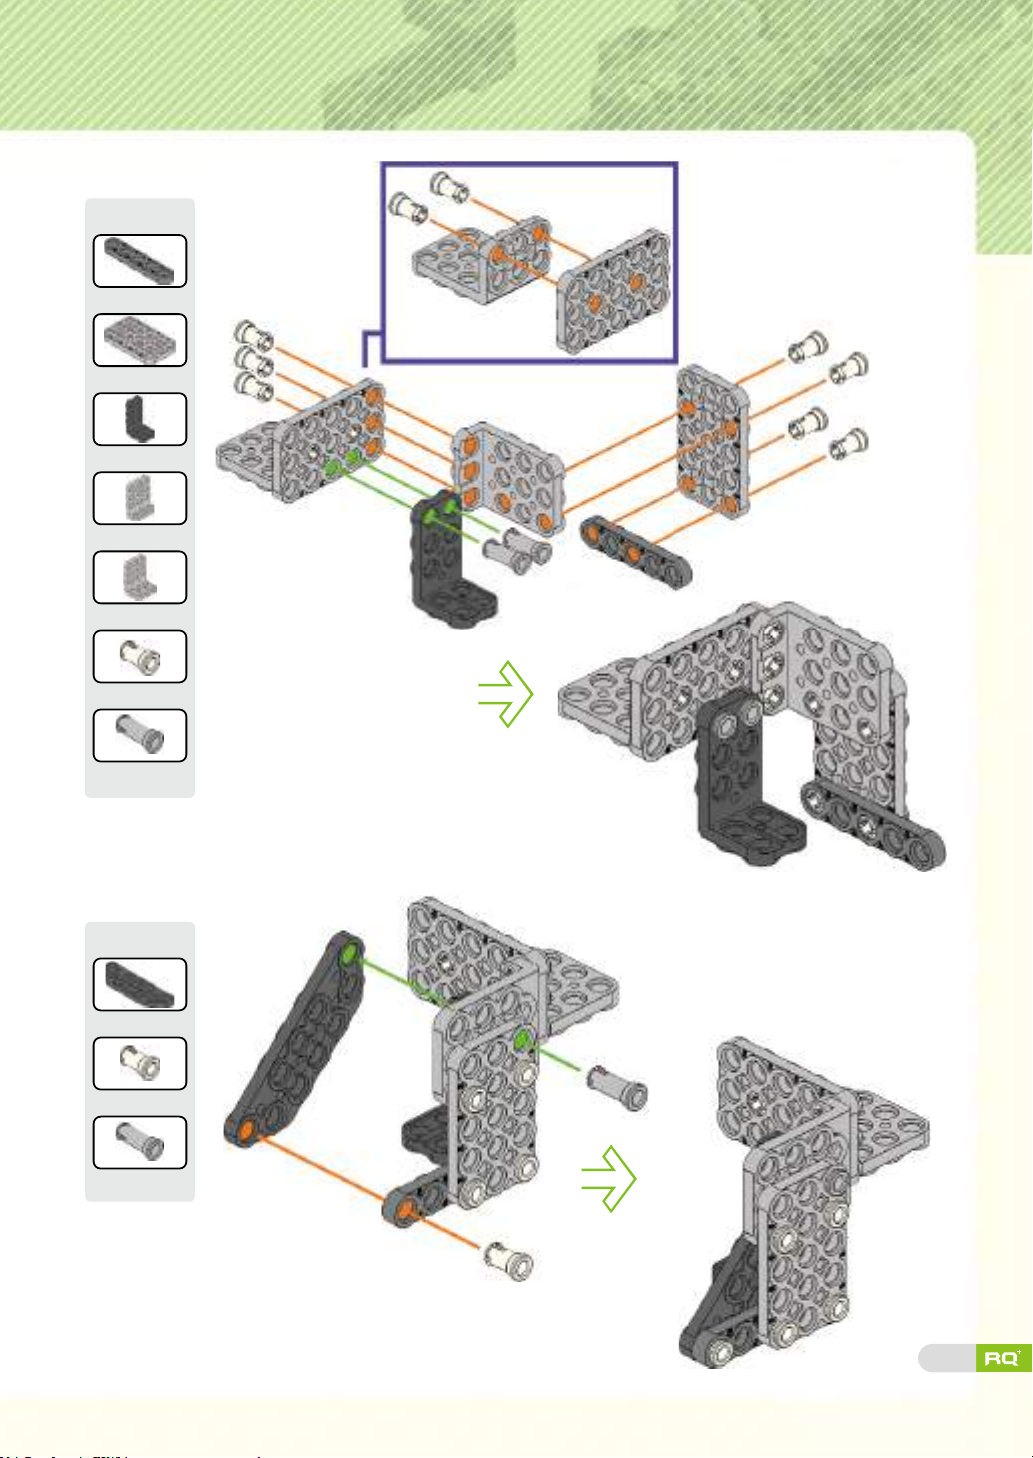
Step 13
Tip
1×5 frame X1
3×5 frame X2
2×5 L frame X1
3×4 L frame X1
3×5 L frame X1
2s rivet X9
3s rivet X2
Step 14
Tip
Opposite angle frame
2s rivet X1
3s rivet X1
X1
90
Page 89
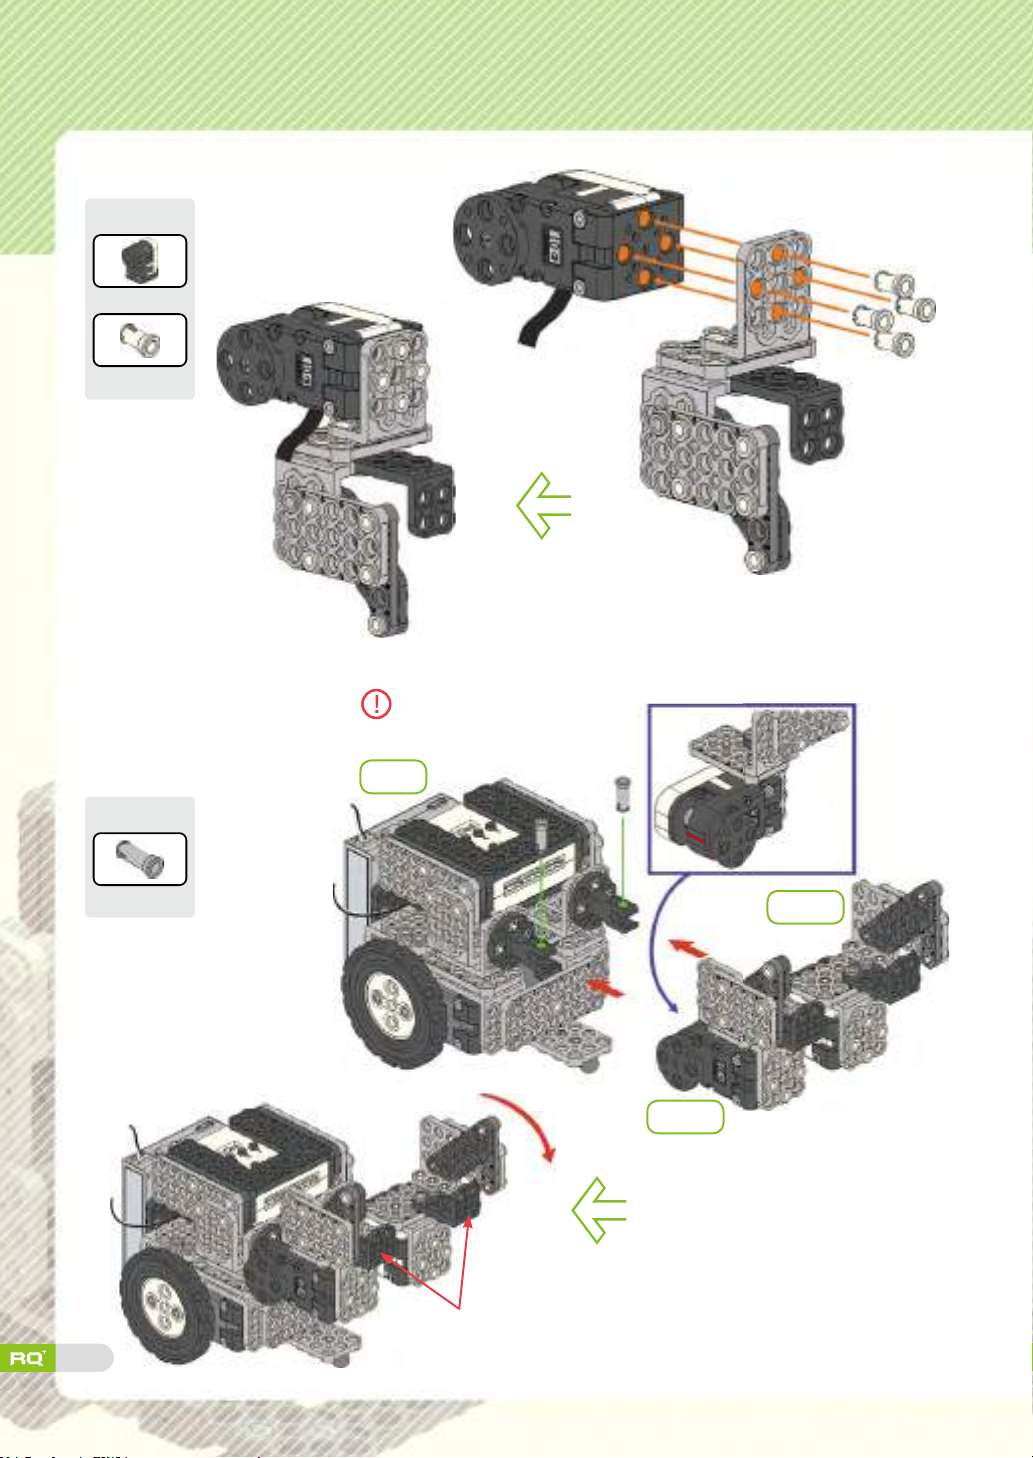
Step 15
Tip
Smart servo (ID01) X1
2s rivet X4
Match 'home' mark in smart
servo to 12 o'clock direction.
Step 16
Tip
3
s rivet X2
91
Step 9
Soccer Bot shoot boards.
Lower two boards to the bottom.
Step
12
Step
15
Page 90
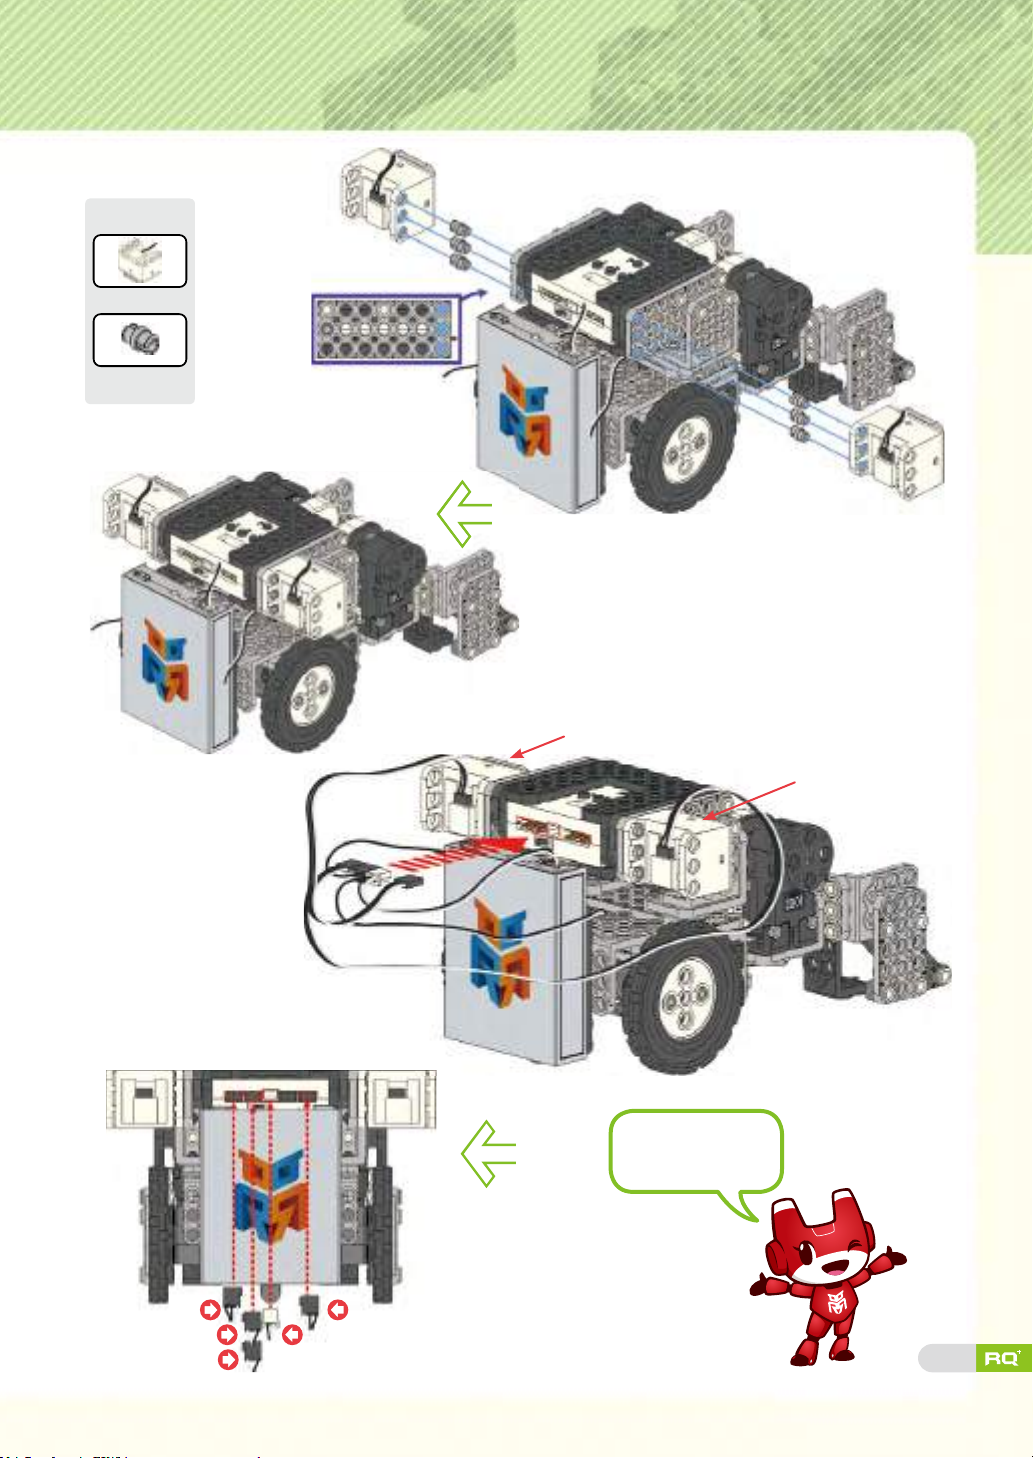
Step 17
Tip
Touch sensor X2
Double rivet X6
Touch sensor3
Step 18
Touch sensor1
R. motor (ID29)
R. motor (ID30)
Power
Touch sensor1
Pay attention to
cable connection
and direction!
Touch sensor3
92
Page 91
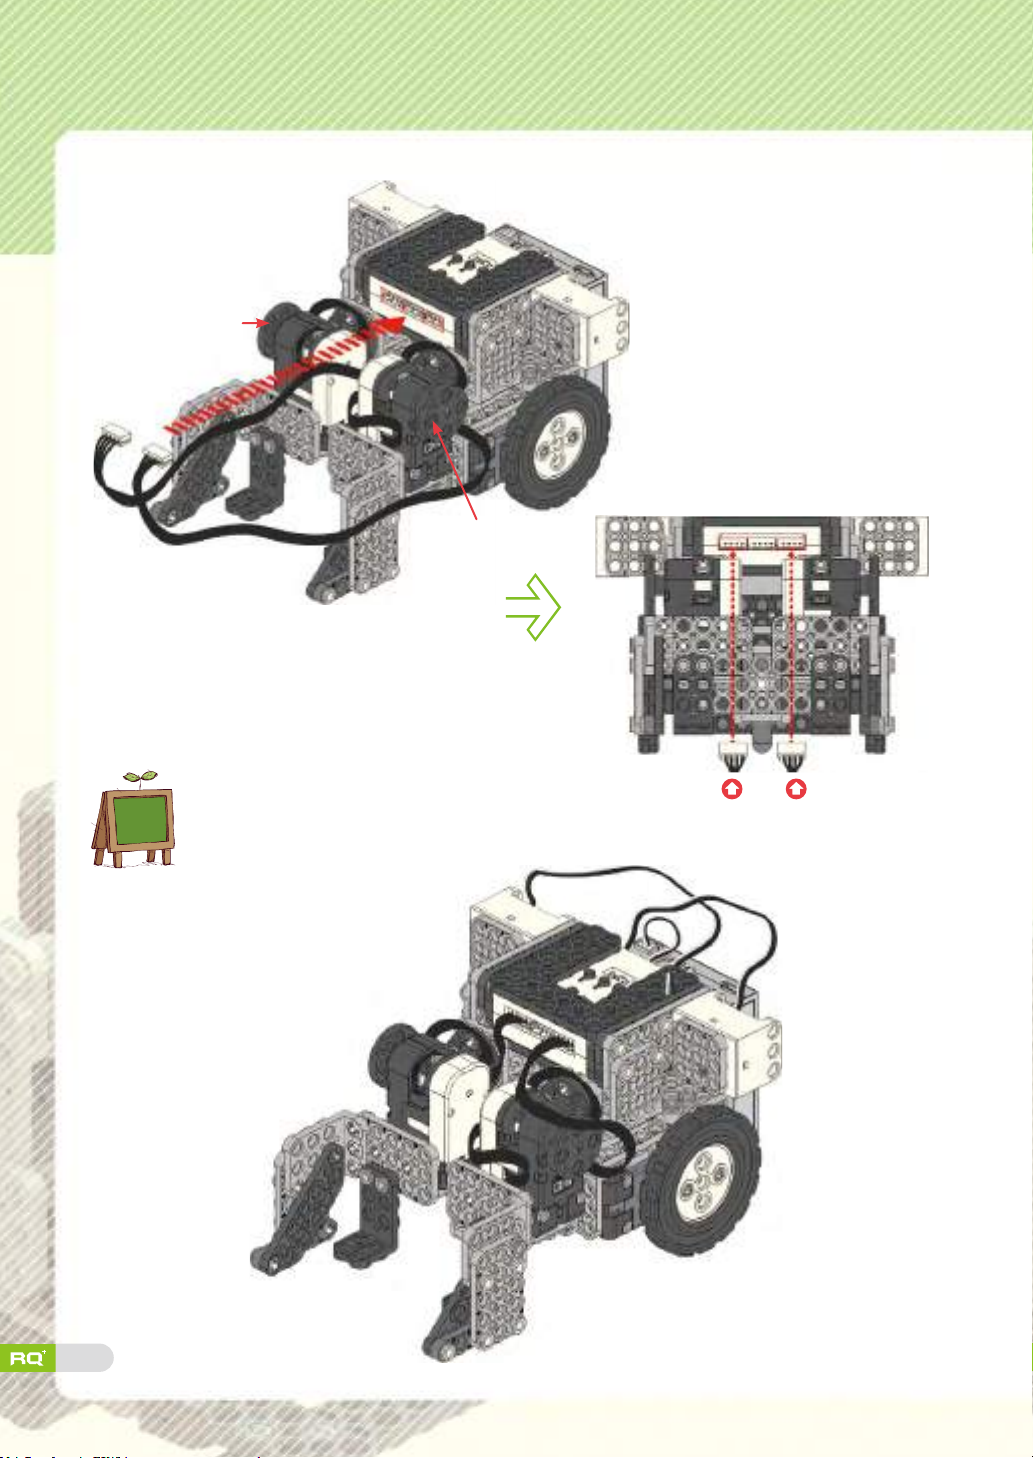
Step 19
Smart servo (ID00)
Smart servo (ID01)
93
completion
'Soccer Bot' is ready!
★
Smart servo (ID00) Smart servo (ID01)
★
Page 92
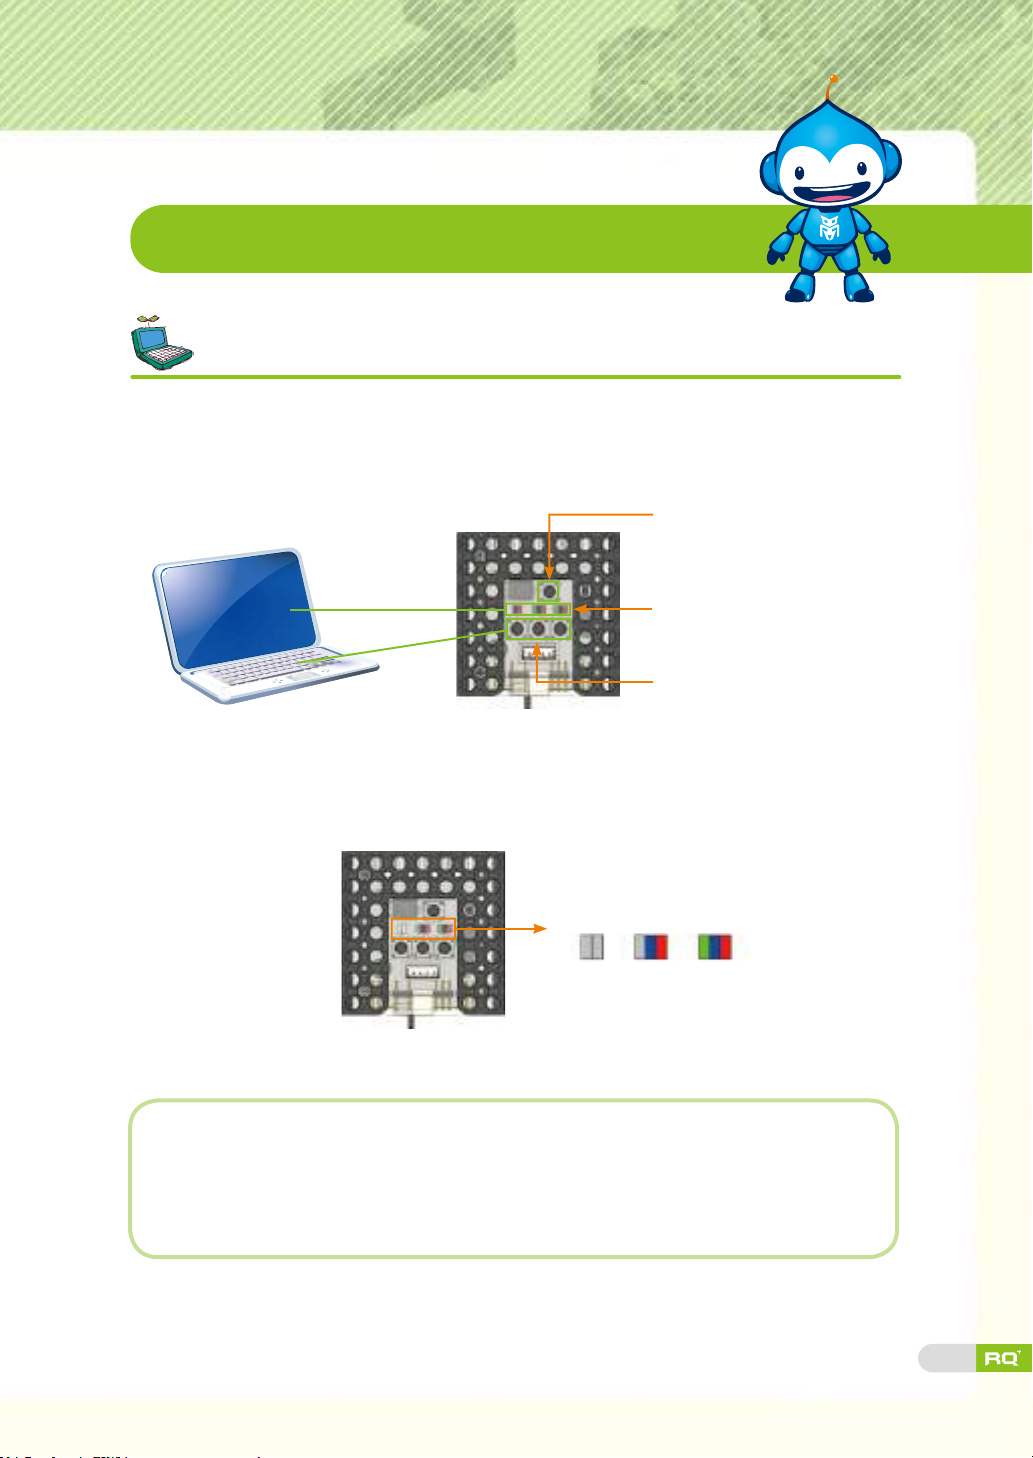
Robot Experience
Set-up 'Soccer Bot' robot model.
There are various LEDs and buttons in smart controller. LED indicates input
or output value like monitor while buttons work as the keyboard for PC.
Button P
LED1, LED2, LED3
from left side
Button 1, 2, 3 from left side
First : Turn on the smart controller to enter <set-up mode>.
Second
robot model. The buttons work as a keyboard for PC.
Program the robot for proper operation.
Third : Press button P on smart controller to enter <standby mode>.
:
Press button 2 or button 3 on smart controller to set-up
LED1 LED2 LED3
Check the following when robot is not working and reassemble.
1. When Soccer Bot boards are not working :
▶ Refer to STEP19 to check smart servo ID and cable connections.
'Soccer bot'
94
Page 93
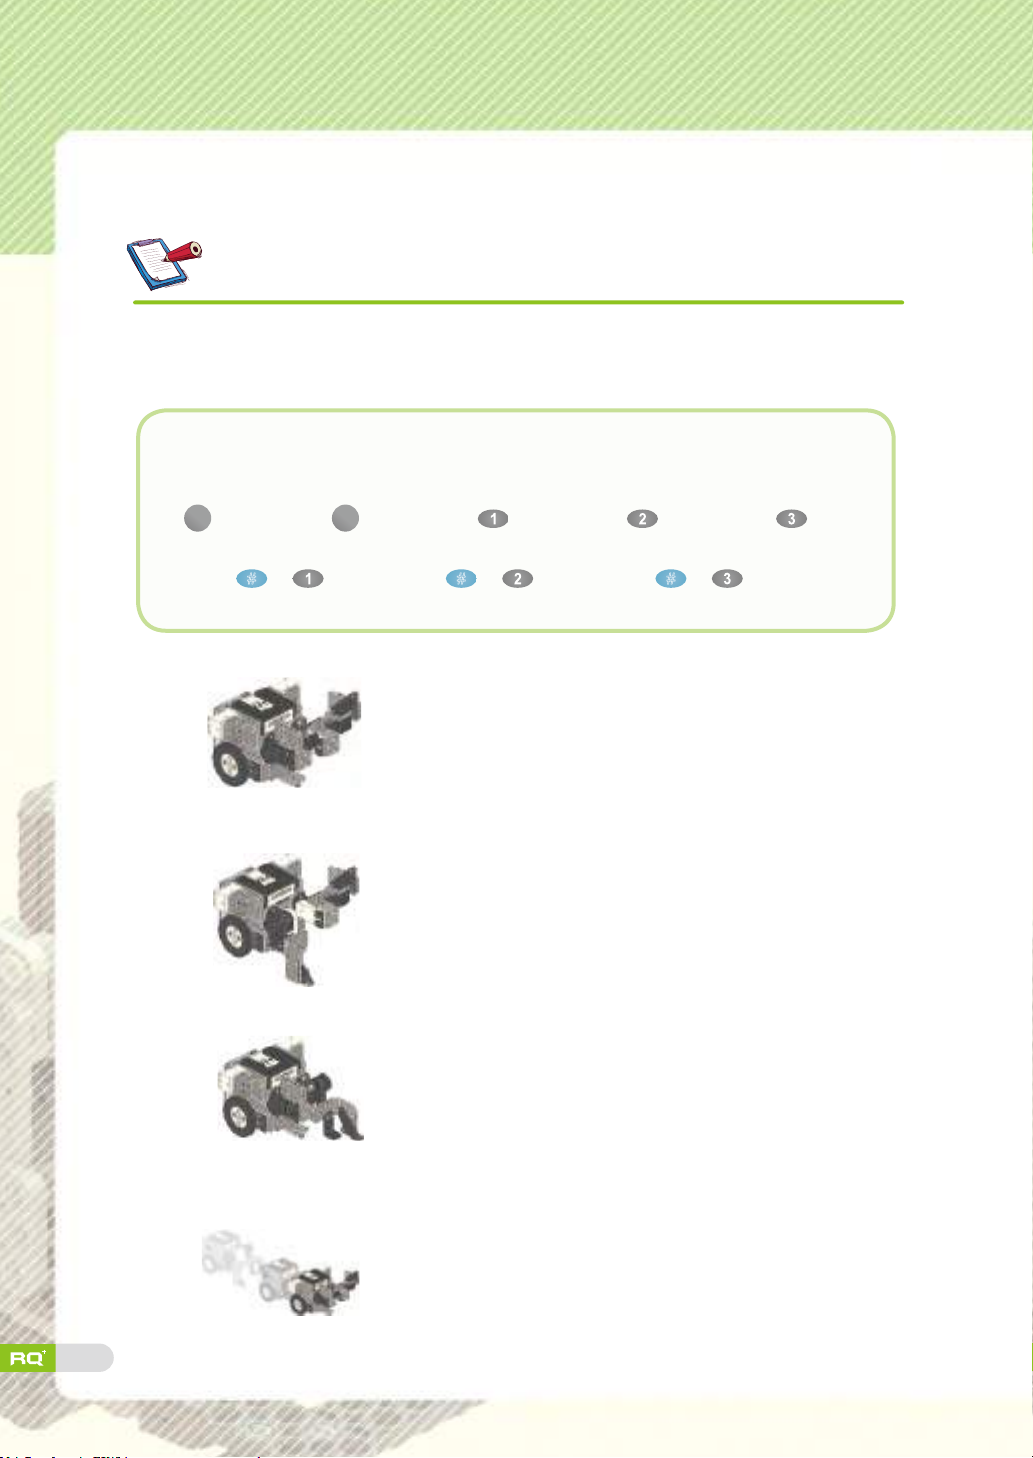
Check movement and assembly.
1. Which IR remote controller button should you pressed for following motions?
Choose and write the correct answers from examples.
Examples
★
★
ⓐ
A button
ⓕ
(1)
(2)
(3)
ⓑ
B buttonⓒ buttonⓓ buttonⓔ button
# + button
Kick a ball with two boards. ( )
Kick a ball with the left boards. ( )
Kick a ball with the right boards. ( )
ⓖ
# + button
ⓗ
# + button
95
(4)
Go forward slowly, and kick the ball. ( )
Page 94
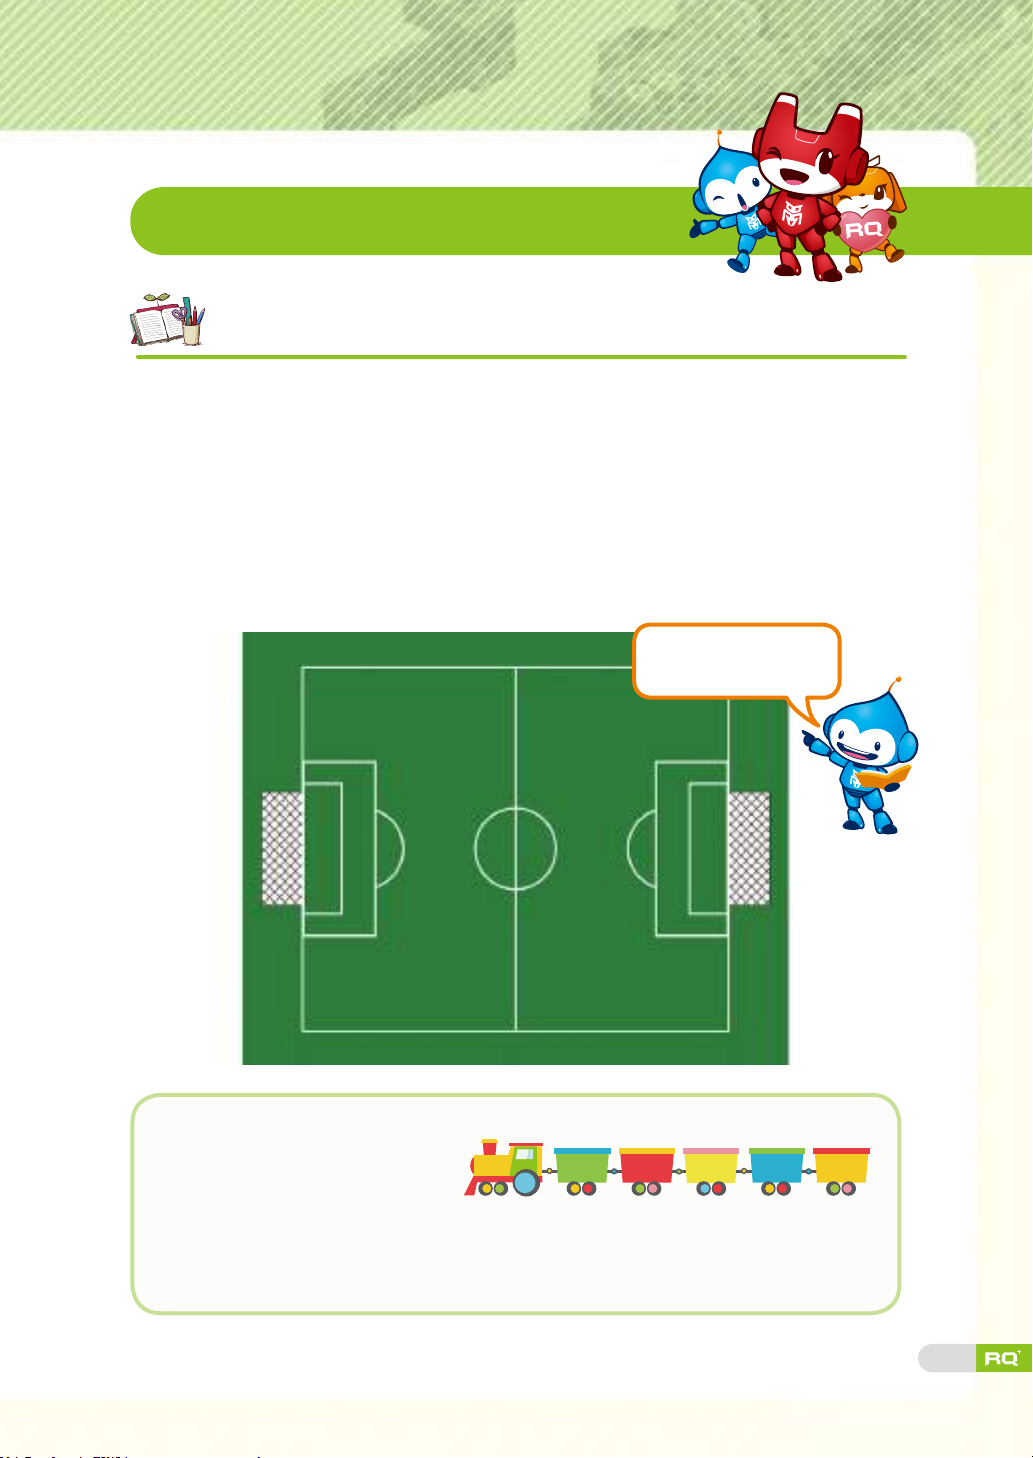
Robot Play
Shoot~ Goal! Robot soccer competition.
Play a robot soccer game with your Soccer Bot. This robot can kick and make
basic movements. Discuss the number of players and game rules to make the
game more exciting.
• Make a team and play 3 vs. 3, or 4 vs. 4.
• Control the robot to kick a ball or defense.
First half and second half of the game is 3 minutes each. Whoever scores more wins the game.
•
• Change the position for the second half.
• Decide the game rules including maximum dribble distance and number of pass.
You can shoot with left,
right, or even with both!
Describe your 'Soccer Bot'.
◈
• Robot level?
• What was the most fun about it?
• What was the most difcult thing?
• Check your robot with your teacher.
Very easy Easy Average Difficult
Ver y
difficult
96
Page 95
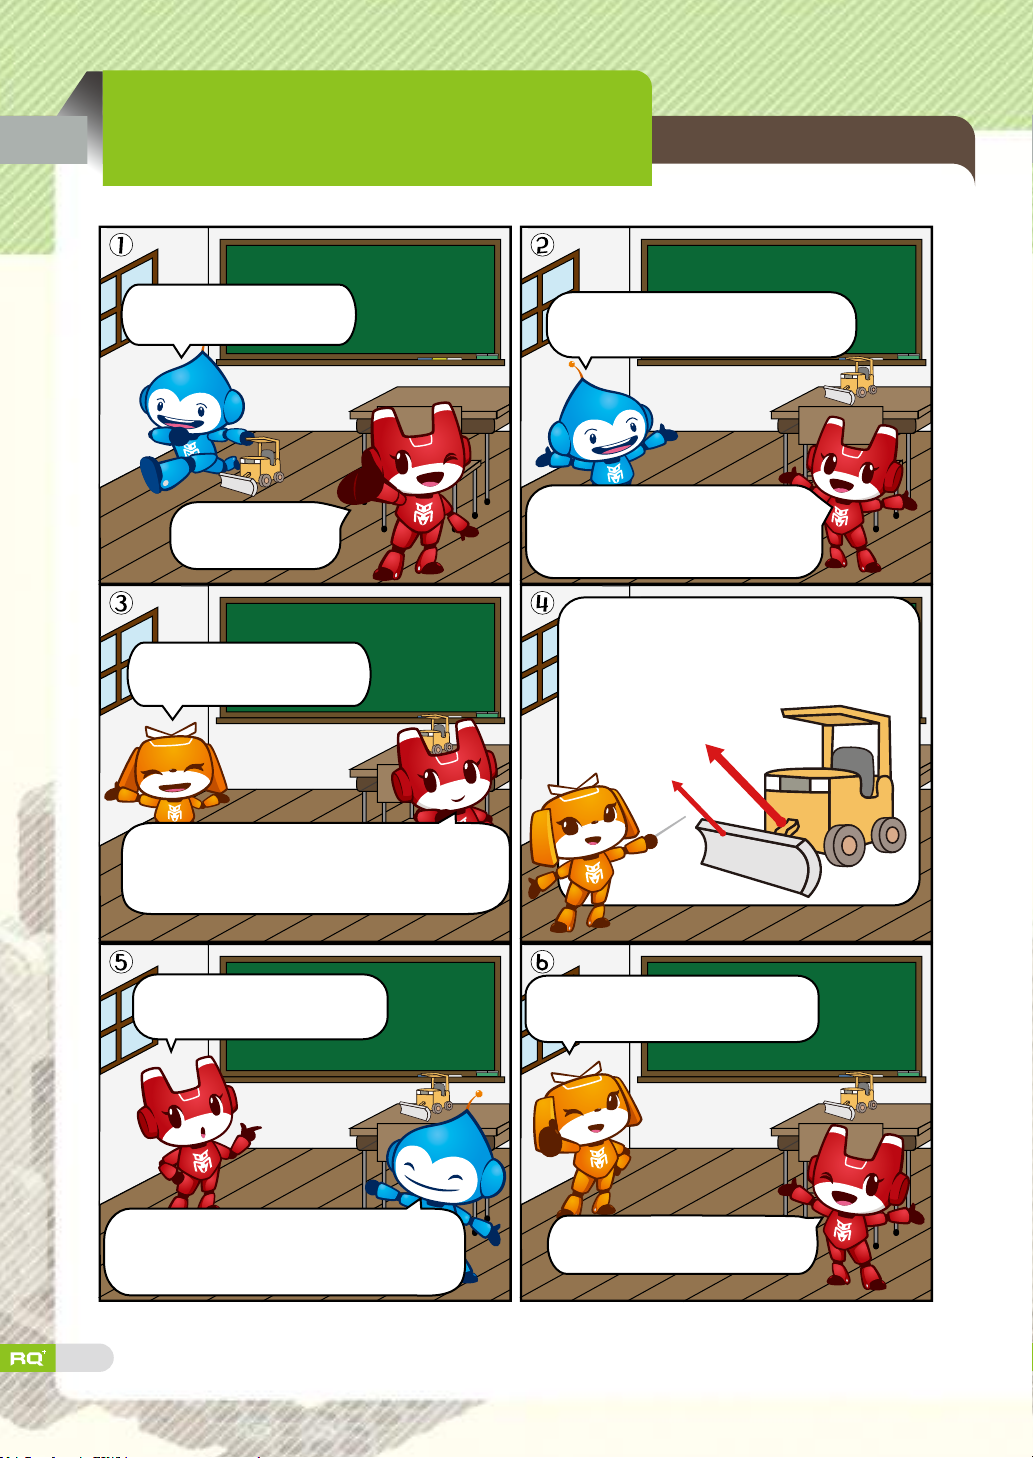
6. Imaginary Robot.
My own robot PART1
Wait a minute!
A bulldozer is coming~
It's a toy car!
I like bulldozer.
Ah! Why don't we build a
builldozer robot?
Good idea!
Let's take a look at it first and think about
what kind of parts we need.
Not long ago, I saw a bulldozer at a
construction site.
Bulldozer pushes the soil and sand
to make the ground flat.
It's cool.
Hmm... Bulldozer needs blade plate and a
device to lift it.
Put a wheel and make it move!
Blade lift device
Blade plate
Use two rotation motors to
build wheels.
Robot can move forward, backward and turn
when you use two rotation motors.
97
Use smart servo to adjust position
angle for blade plate.
Oh yeah!
Let's hurry and make it!
Page 96

Creative Robot Class
Write a report on <My own robot PART1>.
★
My robot is called
Why did you
build this
robot?
How did you
build your
robot?
What kind of
function does
it have?
Problem /
Solution
Something you
learned while
building the
robot.
98
Page 97
Post the picture of your own robot below.
99
Describe your own robot.
◈
• Robot level?
• What was the most fun about it?
• What was the most difcult thing?
• Check your robot with your teacher.
Very easy Easy Average Difficult
Ver y
difficult
Page 98

.&.0
MEMO
100
Page 99
7. Bug Bot
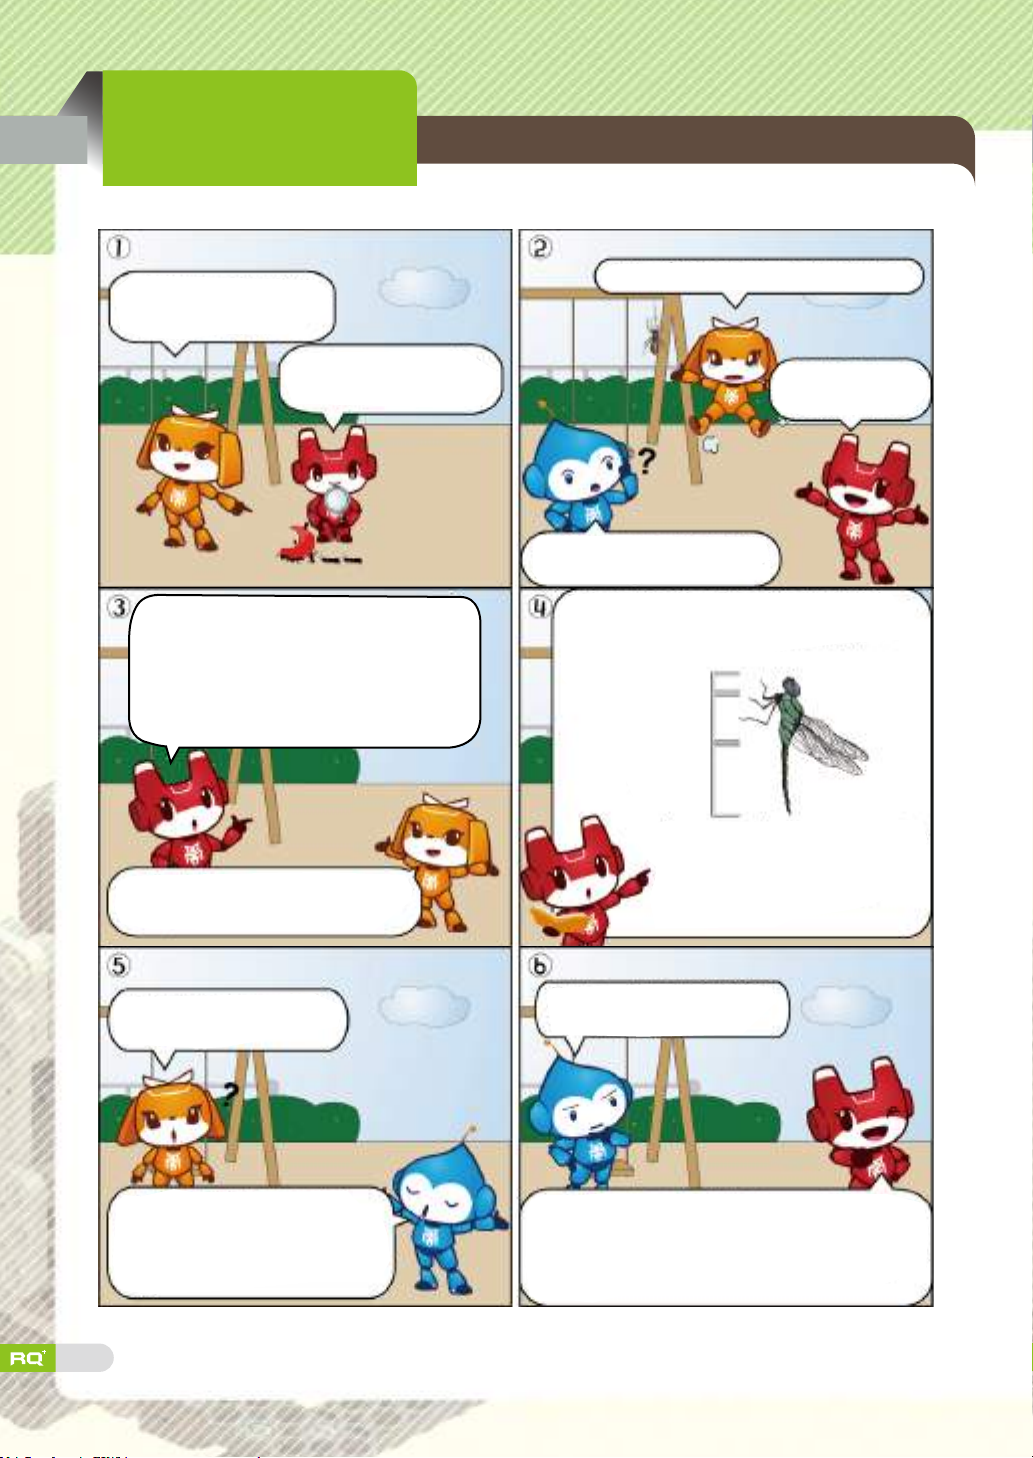
Characteristic of bug
Hardworking ants line up
to get food.
Left. Right. They're like
little soldiers.
There are different species for insect.
They look different and eat different
things depending on the environment.
However they share unique characteristics.
Hmm... Insects are divided into
head, thorax and abdomen.
Ah~ It's a spider. I hate insects.
What? Spider is
not an insect.
Spider is NOT an insect?
How come?
And, there are a pair of compound eyes, two
pairs of wings and three pairs of legs.
Head
Thorax
Abdomen
★
A compound eye may consist of
thousands of individual
photoreceptor units or ommatidia.
But worker ants don't
have wings!
In order to adapt to the
environmental change, some bugs
have wings and some do not.
101
Hmm... But the spider is
not a bug...
Spider's body is divided into cephalothorax and
abdomen, and it has 4 pairs of legs, no wing and
8 eyes. So it belongs to the spider species!
Page 100
Today's Robot Class
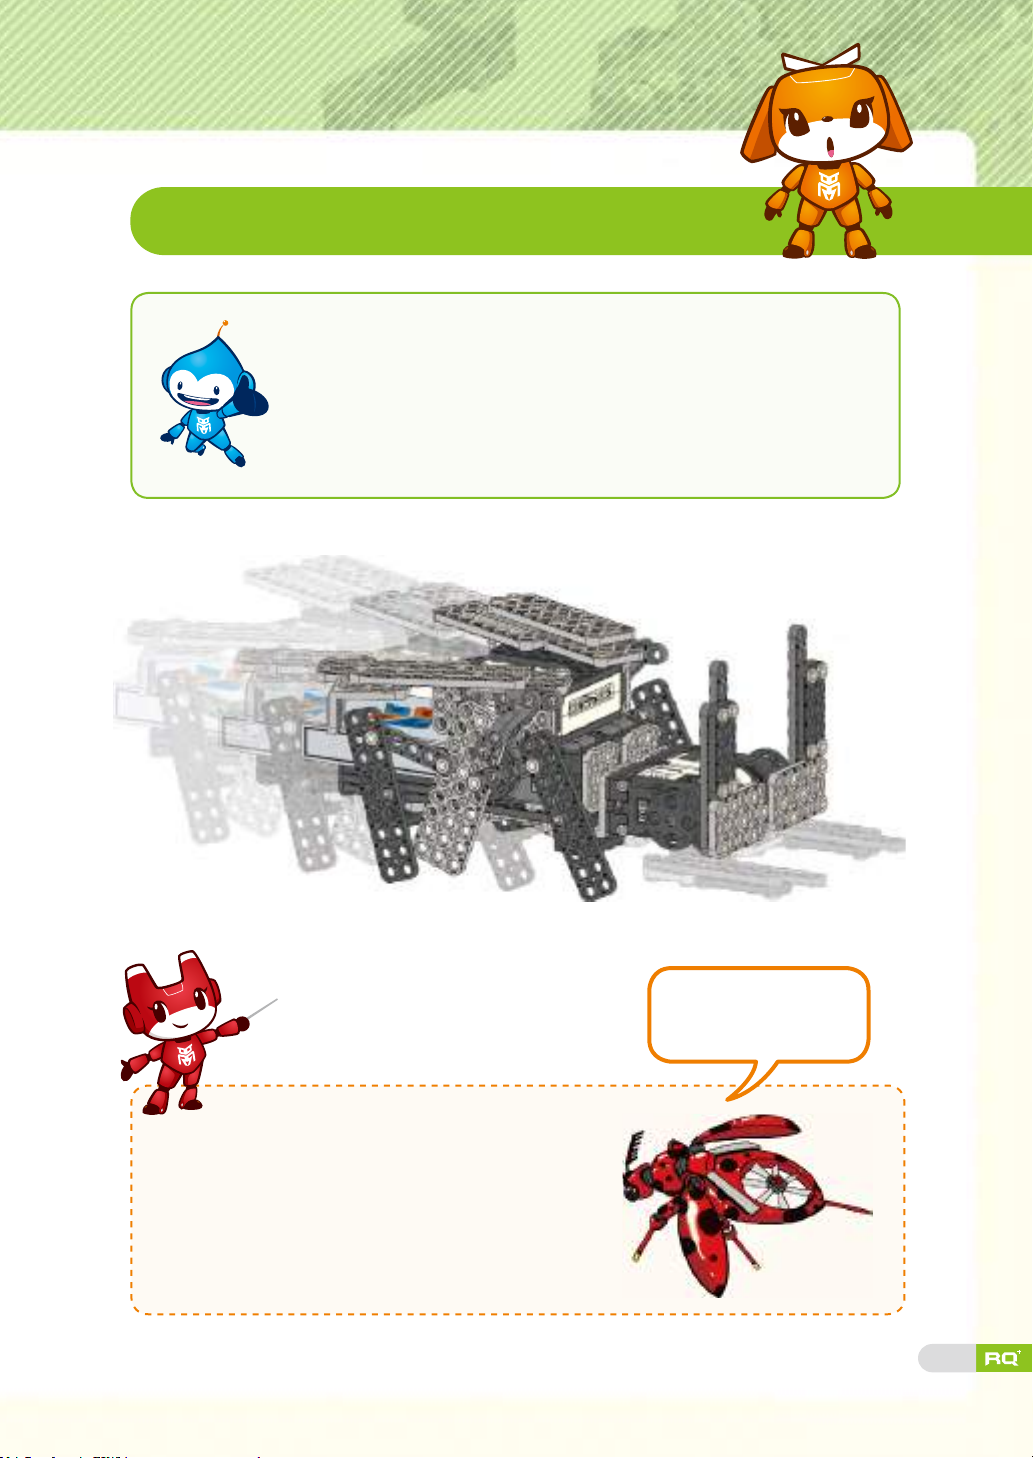
Bug Bot is based on stag beetle with wings and big jaw
(horn). Two smart servos are used to build a big jaw to
move up and down (lift up), or move left and right (pick
up). It can move up or attack opposite robot. Rotation
motors are used to freely move the 6 legs. Therefore, it
walks more stable than other bipedal or 4-legged robot.
Us Army and robot scientists have developed
a very small bug robot long time ago, which
can grasp enemy's status in secret.
It can be deployed in a dangerous place
such as area with bombs to search for or
rescue people.
Drosophila has sensitive
smell ability while wasp
has great vision.
102
 Loading...