

Page 1
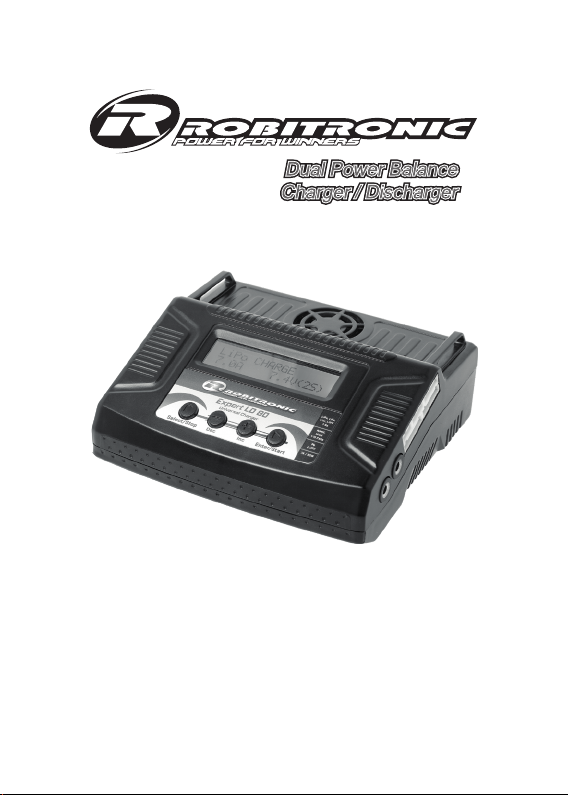
Expert LD 80
R01015
Für LiPo/LiFe/LiHv/LiIo/NiMH/NiCd/Pb-Akkus
Bedienungsanleitung / Manual
Vielen Dank, dass Sie sich für das Expert LD80 Balance-Ladegerät
entschieden haben. Dies ist ein computergesteuertes Mikroprozessor-Schnellladegerät / Entladegerät mit integriertem Balancer und
optimierter Betriebssoftware. Bitte lesen Sie diese Anleitung vor
Gebrauch vollständig und aufmerksam durch.
Page 2

Inhaltsverzeichnis
1. Features
2. Geräteansicht
3. Warnungen und Sicherheitshinweise
4. Menüdiagramm
5. Programmierung / Betrieb
6. Lithium-Akku Ladeprogramm (LiIo/LiPo/LiFe/LiHv)
6.1 Lithium-Akkus im Charge Modus laden
6.2 Lithium-Akkus im Balance Modus laden
6.3 Schnellladen von Lithium-Akkus
6.4 Storage (Lagerung) Ladung/Entladung von Lithium-Akkus
6.5 Entladen von Lithium-Akkus
6.6 Informationen während des Entladens
7. NiMH/NiCd-Akku Ladeprogramm
7.1 Laden von NiMH/NiCd Akkus
7.2 Entladen von NiMH/NiCd Akkus
7.3 Zyklisches Laden/Entladen von NiMH/NiCd Akkus
8. Pb (Blei)-Akku Ladeprogramm
8.1 Laden von PB (Blei) Akkus
8.2 Entladen von PB (Blei) Akkus
9. Akku-Innenwiderstand-Messfunktion
10. Speichern der Ladeparameter
11. Laden der Ladeparameter
12. Informationen während der Prozesse
13. Warn- und Fehlermeldungen
14. Spezifikationen
2
4
5
7
8
10
10
11
12
12
13
13
14
14
14
15
15
15
16
16
17
18
18
19
20
Page 3

1. Features
Optimierte Software
Beim Laden oder Entladen verfügt der Expert Lader über eine 'AUTO ' Funktion,
die den Ladestrom automatisch einstellt. Diese Funktion verhinder t ein
Überladen der Akkus aufgrund eines Anwenderfehlers, was im schlimmsten Fall
zu Feuer oder einer E xplosion führen kann, insbesondere bei Lithium-Akkus. Es
ist in der Lage den Lade-/ oder Entladevorgang automatisch zu stoppen, damit
eine maximale Sicherheit gewährleistet ist. Diese können nach Benut zeroption
festgelegt werden.
High-Power- und High-Performance-Schaltung
Der Lader bietet eine Ausgangsleistung von 80W. Dadurch kann er bis zu 15
Zellen NiMH/NiCd oder 6 Zellen Lithium-Akkus mit einem maximalen Strom von
7A laden. Das Kühlsystem ist so effizient, dass es diese Le istung ohne Probleme
dauerhaft liefern kann.
Integrierter Balancer für Lithium-Akkus
Ihr Lader besit zt einen integrierten Balancer. Es ist nicht not wendig einen
externen Balancer beim Laden von Lithium-A kkus (LiIo/LiHv/LiPo/LiFe) an das
Gerät anzuschließen.
Balancen von Einzelzellen während des Lade-/Entladevorgangs
Während des Lade-/Entladevorgangs wird jede einzelne Zelle eines
Lithium-Akkus individuell balanciert (angeglichen/abgeglichen) und deren
Einzelspannungen auf dem Display angezeigt. Falls eine Zelle eine stark
abweichende Spannung haben sollte, wird eine Fehlermeldung auf dem Display
angezeigt und der Lade-/ bzw. Entladevorgang automatisch gestoppt.
Lithium Akku Typen
Ihr Lader eignet sich zum Laden und Entladen aller gängigen Lithium -Akkus,
wie LiIo, LiHV, LiPo und LiFe. Diese Akkutypen haben unterschiedliche
Eigenschaften durch ihre chemische Zusammensetzung. Wählen Sie die
entsprechende Ladefunktion im Menü aus. Die technischen Daten finden Sie im
Abschnitt "Warnungen und Sicherheitshinweise".
Schnellladung und Lagerungsladung von Lithiumakkus
Die Schnellladung verkürzt die Lade zeit der Akkus und ist für den unmittelbaren
Gebrauch der Akkus vorgesehen. Die Lagerungsladung lädt oder entlädt,
jenach Zustand des Akkus, die einzelnen Zellen auf die für eine längere
Aufbewahrung am besten geeignete Spannung.
-2-
Page 4

Maximale Sicherheit
Delta-Peak Empfindlichkeit für NiMH / NiCd-Akku: Das automatische Abschaltprogramm basiert auf dem Prinzip der Delta-Peak Spannungserkennung.
Auto-Ladestromgrenze: Sie können den oberen Grenzwert des Ladestroms bei
der Aufladung begrenzen. Meist verwendet bei NiMH oder NiCd-Akkus. Bei
NiMH Zellen die über einen niedrigen Innenwiderstand und Kapazität verfügen,
empfiehlt sich der "AUTO" Lademodus.
Kapazitätsgrenze: Die Ladekapazität wir d immer über den La destrom multipliziert
mit der Zeit berechnet. Wenn die Ladekapazität den Grenzwert überschreitet,
wird der Prozess automatisch beendet. Der Benut zer kann den max. Wert selbst
einstellen.
Temperaturgrenze: Chemische Reaktionen der Zellen bewirken beim Laden/Entladen eine Erhöhung der Temperatur. Wenn der Grenzwert erreicht ist, wird der
Prozess beendet (Temperaturfühler optional).
Prozesszeit Limit: Sie können die maximale Prozesszeit beschränken, um
Defekte auszuschließen.
Eingangsspannungsüberwachung: Um den Akku (z.B. Autobatterie), der als
Spannungsquelle dient, vor Tiefentladung zu schützen, wird die Spannung stets
überwacht. Wenn die Untergrenze unters chritten wir d, wird der Vorgang au tomatisch beendet.
Automatischer Lüfter: Der elektrische Lüfter wird nur dann automatisch aktiviert,
wenn die Innentemperatur des Geräts sich erhöht.
Daten s peichern / l aden
Der Lader ermöglicht dem Anwender Daten für maximal 5 Akkutypen zu
speichern. Sie können festlegen, welche Daten die Programmeinstellung des
jeweiligen Akkus enthalten soll, um geladen oder entladen zu werden. Diese
Daten können Sie danach jederzeit abrufen und Akkus laden oder entladen,
ohne die gesamten Ladeparameter erneut auswählen zu müssen.
Zyklisches Laden / Entladen
Möglichkeit das Laden/Entladen in einem Zyklus von 1-5 dynamisch zu
wiederholen. Dies dient zum Auffrischen der Akkus und zur Harmonisierung der
einzelnen Zellenspannungen.
-3-
Page 5
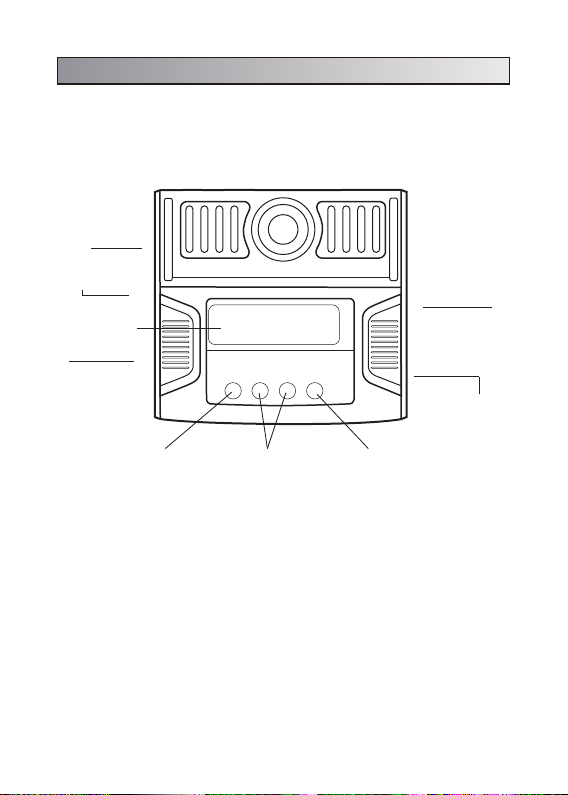
2. Geräteansicht
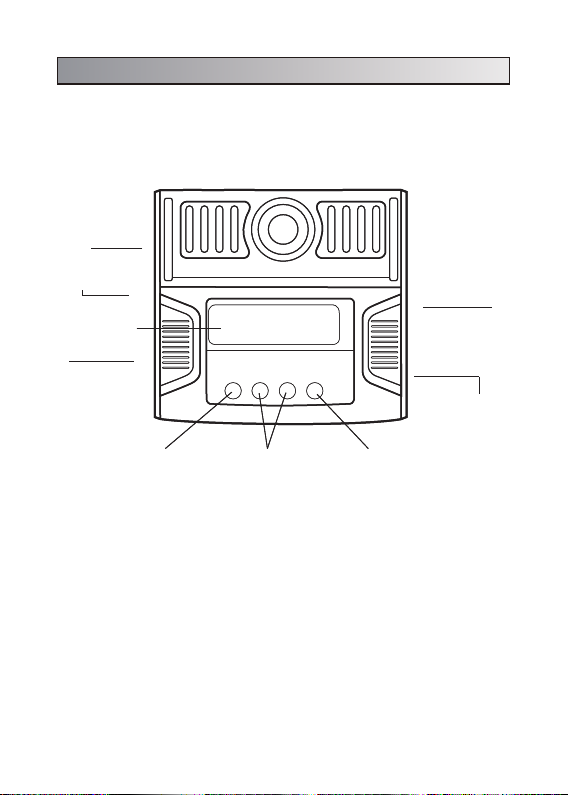
AC Eingang
AC 100 -240V
DC Eingang
DC 11~ 18V
LCD Display
(16 Zeichen, 2 Zeilen)
Temperatursensorbuchse
SELECT / STOPP
Hauptprogramm wählen
Vorgang abbrechen
DEC / INC
Unterprogramm wählen
Wert ändern
-4-
START / ENTER
Vorgang st arten bzw.
weiterführen
5 getrennte
Balancer-
Anschlüsse
Ladeausgang
(4mm Buchse)
Page 6

3. Warnungen und Sicherheitshinweise
• Lassen Sie das La degerät niemals unbeau fsichtigt so lange es an geschlossen
ist. Im Falle einer Fehlfunktion stoppen Sie umgehend den Lade- oder Entladeprozess und folgen Sie der Fehlersuche dieser Anleitung.
• Halten Sie das Gerät von Staub, Feuchtigkeit, Regen, direkter Sonneneinstrahlung und Vibrationen fern. Lassen Sie es nicht fallen.
• Die zulässige AC Eingangsspannung beträgt 100-240V AC.
• Die zulässige DC Eingangsspannung beträgt 10-18V DC.
• Die Nutzung des Laders und der Akkus sollte auf einer feuerfesten, ebenen
und nicht leitenden Unterlage erfolgen. Niemals auf einem Autositz, Teppichboden oder ähnlichen Materialien betreiben. Brennbares oder leicht entflammbares Material aus der Arbeitsumgebung fernhalten.
• Versuchen Sie nicht, den Akku zu zerlegen oder mechanisch zu öffnen.
Nominalspannung: 1.2V/Zelle
NiMH/NiCd
LiIo
LiPo
LiHv
Life
Pb
Max. Schnellladung: 1C~2C, abhängig vom Akkutyp
Min. Entladeschlussspg.: 0.85V/Zelle(NiCd), 1.0V/Zelle(NiMH)
Nominalspannung: 3.6V/Zelle
Max. Ladespannung: 4.1V/Zelle
Max. Schnellladung: 1C oder weniger
Min. Entladeschlussspg.: 2.5V/Zelle oder höher
Nominalspannung: 3.7V/Zelle
Max. Ladespannung: 4.2V/Zelle
Max. Schnellladung: 1C oder weniger
Min. Entladeschlussspg: 3.0V/Zelle oder höher
Nominalspannung: 3.8V/Zelle
Max. Ladespannung: 4.35V/Zelle
Max. Schnellladung: 1C oder weniger
Min. Entladeschlussspg: 3.0V
Nominalspannung: 3.3V/Zelle
Max. Ladespannung: 3.6V/Zelle
Max. Sc hnellladung: 4C od er wenig er (vgl. A123M1)
Min. Entladeschlussspg: 2.0V/Zelle oder höher
Nominalspannung: 2.0V/Zelle
Max. Ladespannung: 2.46V/Zelle
Max. Schnellladung: 0.4C oder weniger
Min. Entladeschlussspg: 1.5V/Zelle oder höher
-5-
Page 7

• Stellen Sie sicher, dass die A kku- Spezifikationen für Laden und Entladen mit
den entsprechenden Anforderungen des Laders übereinstimmen. Sollte ein
falsches Setup oder Programm verwendet werden, wird das Ladegerät und der
Akku eventuell beschädigt oder zerstör t. Hierbei kann es durch Überladung zu
Feuer führen.
• Um Kurzschlüsse zwischen dem Ladekabel zu vermeiden, verbinden Sie das
Ladekabel immer zuerst mit dem Gerät und er st dann mit dem Akku, der geladen
oder entladen werden soll. Umkehr der Reihenfolge beim Trennen.
• Beachten Sie, dass Lithium-A kkus parallel oder in Reihe geschaltet sein
können. In der Parallelschaltung wird die Akkukapazität durch Multiplizieren der
Einzelzellenkapazität mal der Anzahl der Zellen errechnet. Eine falsch
eingestellte Spannung kann Brand oder Explosion verursachen.
Entladen
• Der Hauptzweck der Entladung ist, die Restkapazität zu entladen und die
Akkuspannung auf einen definierten Wert zu reduzieren. Wenden Sie die
gleiche Aufmerksamkeit auf den Entladevorgang wie auch dem Ladevorgang an.
Die Entladeschlussspannung sollte korrekt definiert und programmiert sein, um
Tiefentladung zu vermeiden. Lithiumakkus können und dür fen nicht niedriger als
die minimale Spannung entladen werden, andernfalls entsteht ein schneller
Kapazitätsverlust oder ein Totalausfall der Zellen. Im Normalfall müssen
Lithium-Akkus nicht entladen werden. Beachten Sie immer die minimale
Spannung des Lithium- Akkus, um die Akkus zu schützen.
• Einige Akkus ver fügen über einen Memory- Effekt. Wenn sie teilweise
verwendet und wieder aufgeladen werden, bevor die ganze Ladung entnommen
wurde, nennt man das Memor y-Effekt. Der Akku „erinner t" sich an den letzten
Ladestand und wird nur den Teil dieser Kapazität das nächste Mal verwenden.
Meist treten diese Effekte bei NiMH- und NiCd-Akkus auf. NiCd neigt eher zum
Memor y-Effekt als NiMH.
• Der Lithium-Akku bevorzugt eine teilweise statt einer vollständigen
Entladung. Häuf ige, vollständige Entladung sollte nach Möglichkeit vermieden
werden. Laden Sie stattdessen den Akku häufiger auf oder verwenden Sie einen
größeren Akku.
• Ein neuer NiMH/NiCd-Akku-Pack liefert erst die volle Kapazität nachdem er
10 oder mehr Ladezyklen unterzogen wurde. Der zyklische Prozess des Ladens
und Entladens führt dazu, die Kapazität des Akku-Packs zu optimieren.
Diese Warnungen un d Sicherheitshinweise sind b esond ers wichti g. Bit te
folge n Sie de n Anwei sung en für ei ne maximal e Sich erhe it. Ander nfalls
können d as Lad egerät und d er Akk u star k besc hädigt werd en. Es k ann
auch zu Feuer führen, Personen verletzen oder Sachbeschädigungen
verursachen.
-6-
Page 8
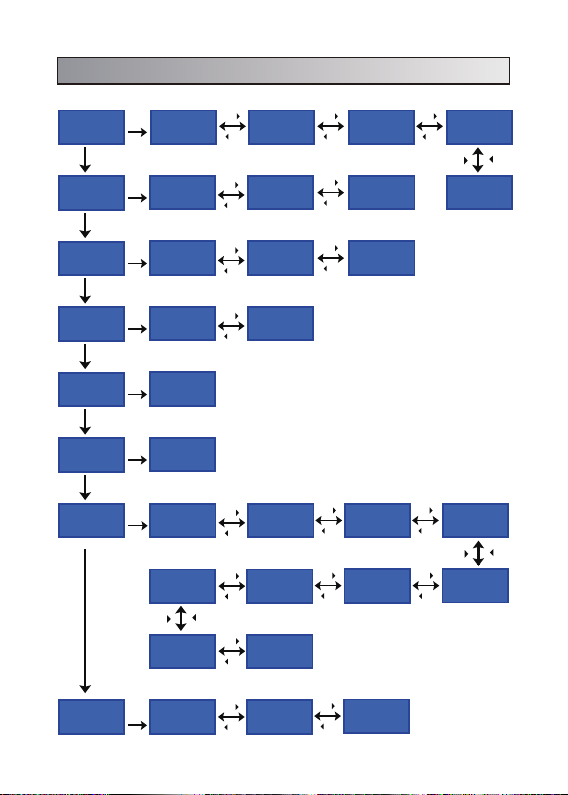
4. Menüdiagramm
PRO GRA M SEL ECT
LIX X B ATT
SELECT
STOP
PRO GRA M SEL ECT
NiM H B ATT
SELECT
STOP
PRO GRA M SEL ECT
Nic d BATT
SELECT
STOP
PRO GRA M SEL ECT
Pb BAT T
SELECT
STOP
PRO GRA M SEL ECT
SAVE DATA
SELECT
STOP
PRO GRA M SEL ECT
LOA D DATA
SELECT
STOP
USE R S ET
PRO GRA M
SELECT
STOP
START
ENTER
LIX X CHARGE LIX X BALANCE
START
NiM H C HARGE
ENTER
'Au t' / 'Man '
START
N
icd
ENTER
'Au t' / 'Man '
START
ENTER
Pb CHARGE
START
ENTER
SAVE DATA
START
ENTER
LOA D DATA
START
LiPo
ENTER
V.Type
Cap aci ty Cu t-O ff
INC
Key Be ep
Buz zer
CHA RGE
.
3.7V
INC
DEC
INC
DEC
INC
DEC
INC
DEC
INC
DEC
INC
DEC
DEC
INC
ON
DEC
ON
NiM H DIS CHARG E
icd
N
DI SCHAR GE
Pb DISCH ARGE
Lil o / Li Po / L iFe
CHK Time
5min
Saf ety Tim er
ON 240minON 10000min
Inp ut Po wer Low
Cu t- Off
10.0V
INC
LIX X FAST CH G LIX X STORA GE
DEC
INC
NiM H CYC LE
DEC
INC
Nic d CYC LE
DEC
INC
NiM H S ensit ivi ty
D. Pea k
DEC
INC
Was te T ime
CHG>DCH G
DEC
Default
5min
INC
DEC
INC
DEC
INC
DEC
INC
LIX X DISC HARGE
Nic d Sen sitiv it y
D. Peak
Default
INC
Saf ety
Temp
Temp C ut-Off
DEC
DEC
80C
Tes t L iXX Inte rna l
Res ist ance
START
ENTER
Meas uring IR
WAIT PLEA SE...
INC
DEC
1:0 26 05 0 0 44
4:0 39 04 2 0 44
-7-
INC
Bat tery Pa ck IR
mΩ
mΩ
231 mΩ
DEC
Page 9
5. Programmierung / Betrieb
Das Gerät startet beim Einschalten mit den Standardwerten der wesentlichen
Benutzereinstellungen sobald es zum ersten Mal mit einer Stromquelle
verbunden wird. Der Bildschirm zeigt nacheinander die folgenden Informationen
an und der Benutzer kann den Wert der Parameter änder n.
Wenn Sie den Parameterwert im Programm ändern möchten, drücken Sie die
START/ENTER-Taste, um den Wert zum Blinken zu bri ngen, und ändern Sie den
Wert mit der Taste INC oder DEC. Der Wert wird durch einmaliges Drücken der
START/ENTER-Taste gespeichert.
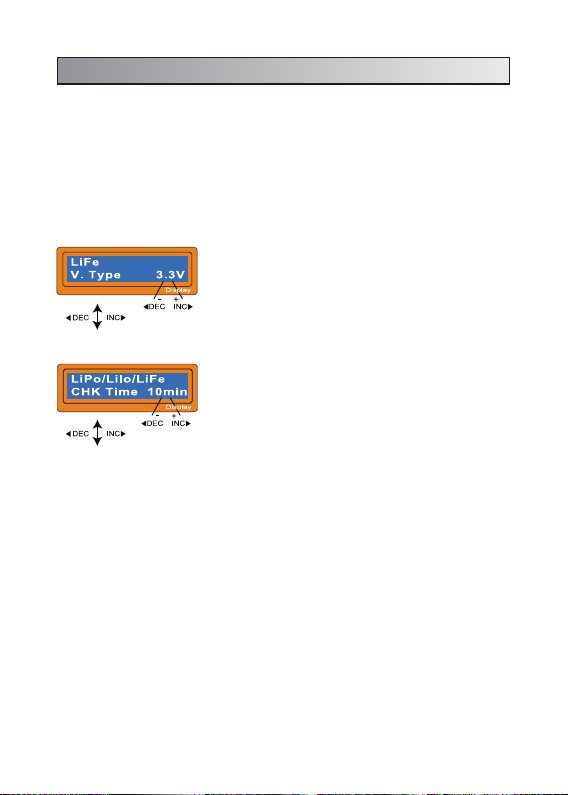
Dieser Bildschirm zeigt die Nominalspannung des
Lithium-Akkus an. Es gibt insgesamt vier Arten von
Lithium-Akkus: LiFe (3,3V), LiIo (3,6V), LiPo (3,7V)
und LiHv (3,8V). Eine an den Akku angepasste
Einstellung ist daher sehr wichtig. Wenn die Werte
zu sehr abweichen, ist nicht auszuschließen, dass
der Akku explodiert.
Der Lader erkennt die Zellenzahl des LithiumAkkus automatisch zu Beginn des Lade- oder
Entladevorgangs, um eine fehlerhafte Einstellung
durch den Benutzer zu vermeiden. Tief entladene
Akkus können jedoch falsch wahrgenommen
werden. Um den Fehler zu vermeiden, können Sie
den Zeitpunkt festlegen, wann die Zellenanzahl
durch den Prozessor überprüft wird. Normalerweise sind 10 Minuten ausreichend, um die Zellenzahl
korrek t zu erkennen. Für Akkus mit hoher Kapa zität
können Sie die Zeit verlängern. Wenn Sie jedoch
den Zeitpunkt für Akkus mit geringer Kapazität zu
lang einstellen, kann der Lade- oder Entladevorgang mit der fehlerhaften Zellenzahl im Zeitablauf
abgeschlossen sein und falsche Ergebnisse
verursachen. Wenn der Prozessor die Zellenanzahl zu Beginn des L ade- oder Entladevorgangs
falsch erkennt, können Sie die Zeit verändern.
Andernfalls sollten Sie besser den Standard
verwenden.
-8-
Page 10
Safety temp
10
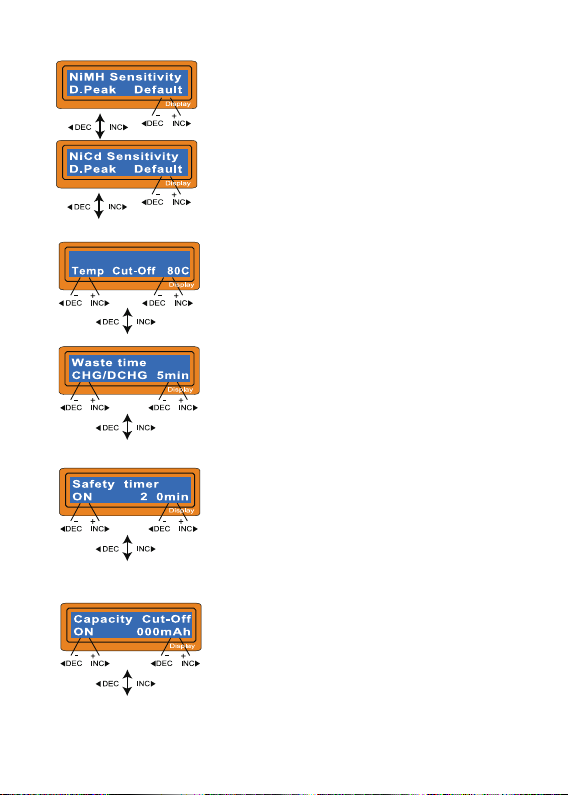
Dieser Bildschirm zeigt die Auslösespannung für
die automatische Ladebeendigung (Delta-Peak
Einstellung) von NiM H- und NiCd-Akkus. Der
effektive Wer t liegt zwischen 5 und 20 mV pro Zelle.
Wenn die Auslösespannung höher eingestellt wird,
besteht die Gefahr, dass die Batterie überladen
wird. Wenn es niedriger gesetzt wird, besteht die
Möglichkeit, dass der Akku nicht voll geladen wird.
Bitte beachten Sie die technische Spezifikation des
Akkus.
(NiCd Standard: 12mV, NiMH Standard: 7mV)
Sie können die maximale Temperatur einstellen,
welche der Akku während des Ladevorgangs
erreichen dar f. Sobald ein Akku während des
Ladens diese Temperatur erreicht, wird der Prozess
zum Schutz des Akkus beendet (mit optionalem
externen Temperatursensor)
Der Akku kann nach dem zyklischen Prozess des
Ladens und Entladens warm werden. Das
Programm kann eine Zeitverzögerung nach jedem
Lade- und Entladevorgang einfü gen, damit der Akku
ausreichend Zeit hat, sich abzukühlen, bevor dieser
dem nächsten Prozess unterzogen wird. Der Wert
liegt zwischen 1 und 60 Minuten.
Wenn Sie einen Ladevorgang starten, wird
4
automatisch der integrierte Sicherheits-Timer
gestartet. Dieser verhindert ein Überladen des
Akkus, wenn dieser fehlerhaft ist oder wenn das
Programm den Akku nicht r ichtig erkennen kann.
Der Wert für den Sicherheits-Timer sollte großzügig
genug sein, um eine vollständige Ladung des Akkus
zu ermöglichen.
Hier bestimmen Sie die ma ximale Ladekapazität,
die während des Ladevorgangs an den Akku
geliefe rt wird. Wenn die D elta-Peak- Spannung nicht
erkannt wird oder der Sicherheits-Timer nicht
auslöst, stoppt diese Funktion den Prozess automatisch bei Erreichen des ausgewählten Kapazitätswertes.
-9-
Page 11
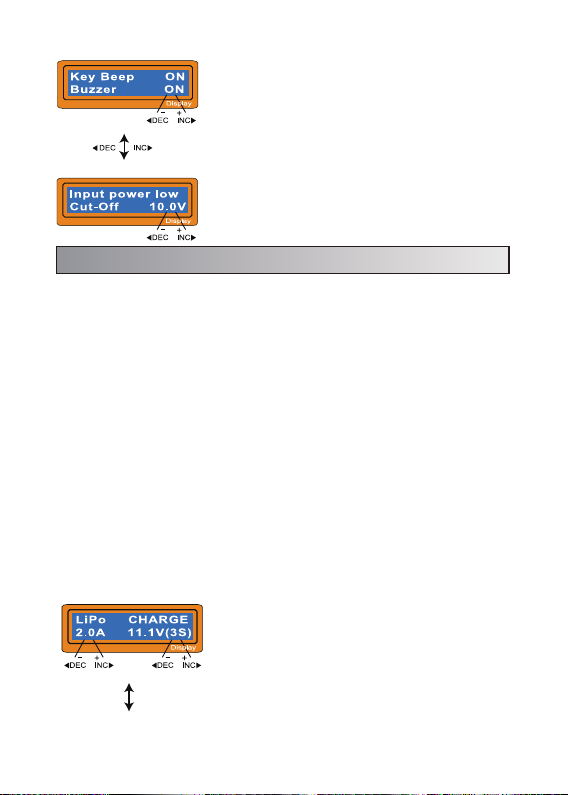
Der Piepton ertönt jedes Mal, wenn Sie die Tasten
drücken, um Ihre Aktion zu bestätigen. Der Piepton
oder die Melodie ertönen bei verschiedenen
Aktionen während des Betriebs, um verschiedene
Alarme zu geben wenn Prozesse fer tig sind oder
falsch eingestellt wurden. Diese Töne können ein
oder ausgeschaltet werden.
Dieses Programm überwacht die Eingangsspan-
nung. Wenn die Spannung unter den eingestellten
Wert fällt, wird der Vorgang automatisch abgebrochen, um den Akku vor Schäden zu schützen.
6. Lithium-Akku Ladeprogramm (LiIo/LiPo/LiFe/LiHv)
Verwenden Sie dieses Programm nur, wenn Sie einen Lithium-Akku (LiIo/LiPo/
LiHv/LiFe) mit einer Nennspannung von 3,6V, 3,7V, 3,8V oder 3,3V pro Zelle
laden. Der Ladestrom hängt vom Lithium-Akku-Typ ab, daher ist es SEHR
WICHTIG, dass Sie den richtigen Akkutyp auswählen. Die Endspannung der
Ladung ist ebenfalls wichtig, da sie bei allen vier Typen variiert: 4,1V für LiIo,
4,2V für LiPo, 4,35V für LiHV und 3,6V für LiFe. Der Ladestrom (Ampere) und die
Nennspannung (richtige Spannung für die Zellenzahl des Akkus, den Sie
aufladen) müssen korrekt sein, damit der Akku korrekt geladen werden kann.
Um die Einstellungen zu ändern, drücken Sie die START/ENTER-Taste, um den
ausgewählten Wer t zum Blinken zu bringen. Stellen Sie mit den Tasten zum
Erhöhen und Verringern die gewünschte Stromst ärke ein und drücken Sie dann
STA RT/E NT E R, um die Einstellung zu speichern. Sie werden danach aufgefordert, die Nennspannung/Zellenzahl auszuwählen. Verwenden Sie die Tasten
zum Erhöhen/ Verringern erneut, für die gewünschte Einstellung und drücken
Sie die Taste S TAR T/ EN TER , um zu bestätigen und zu speichern. Wenn Sie den
Parameterwert im Programm ändern möchten, drücken Sie die
START/ENTER-Taste, um den Wert zum Blinken zu bringen, und ändern Sie
diesen mit der Taste INC oder DEC. Der Wert wird durc h einmaliges Dr ücken der
START/ENTER-Taste gespeichert.
6.1 Lithium-Akkus im Charge Modus laden
START
SELECT
STOP
ENTER
‘> 3 Sekunde n’
Linke Seite erste Zeile zeigt den Akkutyp an, den
Sie in den Benutzereinstellungen ausgewählt
haben. Der Wert auf der linken Seite der zweiten
Zeile legt den Ladestrom fest und der Wert auf der
rechten Seite der zweiten Zeile legt die Spannung
des Akkus fest. Nach Einstellung von Strom und
Spannung drücken Sie die START/ENTER-Taste
länger als 3 Sekunden, um den Vorgang zu starten.
(Ladestrom: 0.1 ~ 6.0A, Spannung: 1~ 6S).
-10-
Page 12
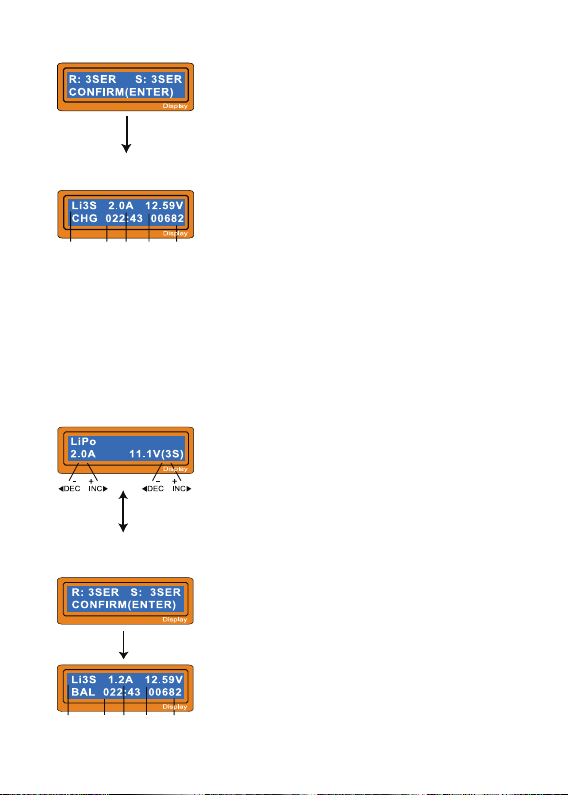
Der Lader prüf t die Zellen. Der Wert R zeigt die
Zellenanzahl, die der Lader gefunden hat und S die
Zellenanzahl, die Sie vorher eingegeben haben.
Stimmen beide Werte nicht überein, brechen Sie
den Vorgang ab und kehren Sie zum vorherigen
Menü zurück, um die Zellenzahl anzupassen, bevor
Sie for tfahren. Sind die Werte R und S identisch,
drücken Sie STAR T/ EN TE R , um den Ladevorgang
zu starten.
Während des Ladevorgangs wird in Echtzeit der
Status angezeigt. Drücken Sie SELECT/STOP um
Geladene
den Ladevorgang manuell zu stoppen.
Kapazität
Zellenanzahl
Lade-
START
ENTER
Lade-
Akku-
strom
zeit
spannung
6.2 Lithium-Akkus im Balance Modus laden
Dies dient zum Ausgleich der Spannungen von Lithium-Akkus des zu ladenden
Akkupacks. Der zu ladende Akkupack wird an den Balancer- Port auf der
Vorderseite des Ladegerätes angeschlossen. Verbinden Sie den Akku-Stecker
mit dem Ausgang des Ladegeräts. In diesem Modus unterscheidet sich der
Ladevorgang vom normalen Lademodus. Der interne Prozessor des Ladegeräts
überwacht die Spannungen jeder Zelle des Akkupacks und steuer t den
Ladestrom der an jeder Zelle anliegt, um die Spannungen anzugleichen.
Links oben wird der Akkut yp angezeigt, den Sie in
den Benutzereinstellungen ausgewählt haben. Der
Wert auf der linken Seite der z weiten Zeile legt den
Ladestrom fest und der Wer t auf der rechten Seite
der zweiten Zeile legt die Spannung des Akkus fest.
Nach Wahl von Strom und Spannung drücken Sie
die START/ENTER-Taste länger als 3 Sek., um den
Vorgang zu starten.
(Ladestrom: 0.1~7.0A, Spannung: 1~6S)
Der Lader prüf t die Zellen. Der Wert R zeigt die
Zellenanzahl, die der Lader gefunden hat und S die
Zellenanzahl, die Sie vorher eingegeben haben.
Stimmen beide Werte nicht überein, brechen Sie
den Vorgang ab und kehren Sie zum vorherigen
Menü zurück, um die Zellenzahl anzupassen bevor
Sie for tfahren. Sind die Werte R und S identisch,
drücken Sie STAR T/ EN TE R um den Ladevorgang
zu starten. Während des Ladevorgangs wird in
Echtzeit der Status angezeigt. Drücken Sie
Geladene
Kapazität
SELECT/STOP, um den Ladevorgang manuell zu
stoppen.
Zellenanzahl
SELECT
Ladezeit
STOP
Balance
START
ENTER
START
ENTER
Lade-
Akku-
strom
spannung
‘> 3 Sekunde n’
-11-
Page 13
6.3 Sch nellladen von Lith ium- Akku s
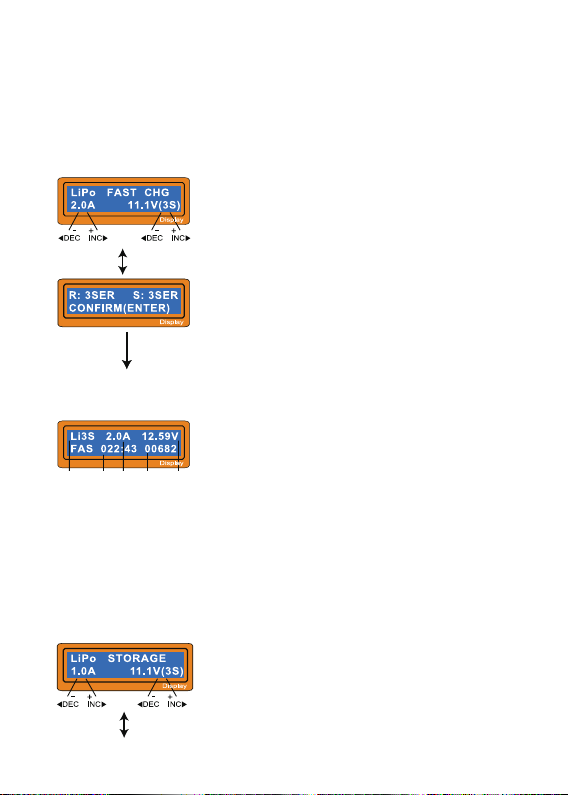
Der Ladestrom wird gegen Ende der Ladung immer geringer Dieser Modus hält
den Ladestrom auch gegen Ende der Ladung höher. Tatsächlich wird der
Ladestrom vom Anfangswert auf 1/5 gehen, um den Prozess zu beenden,
während der Ladestrom beim normalen Ladeprozess auf 1/10 während der
CV-Ladung geht . Die Ladekapazität kann etwas geringer sein als beim normalen
Laden, aber die Prozesszeit wird reduziert.
START
Zellenanzahl
SELECT
STOP
Verstriche-
ne Zeit
Ladestrom
ENTER
START
ENTER
Gelieferte
Kapazität
‘> 3 Sekunde n’
Sie können den Ladestrom und die Spannung des
zu ladenden Akkus wählen. Wenn Sie die
START/ENTER-Taste drücken, wird die Auswahl
angezeigt. Wenn Sie die Spannung und den Strom
bestätigen, dr ücken Sie die START/ENTER-Taste
erneut, um den Ladevorgang zu starten.
Der Lader prüf t die Zellen. Der Wert R zeigt die
Zellenanzahl, die der Lader gefunden hat und S die
Zellenanzahl, die Sie vorher eingegeben haben.
Stimmen beide Werte nicht überein, brechen Sie
den Vorgang ab und kehren Sie zum vorherigen
Menü zurück, um die Zellenzahl anzupassen bevor
Sie for tfahren. Sind die Werte R und S identisch,
drücken Sie STA RT/E NT ER um den Ladevorgang
zu starten.
Der Bildschirm zeigt den momentanen Zustand
des "Schnellladens". Um den Ladevorgang manuell
abzubrechen, drücken Sie einmal die
Akku-
SELECT/STOP-Taste.
spannung
6.4 Storage (Lagerung) Ladung/Entladung von Lithium-Akkus
Dies ist zum Laden oder Entladen von Lithium -Akkus, die längere Zeit nicht
verwendet werden. Das Programm bestimmt, abhängig vom A kkutyp und von
der Spannung des Akkus in der Anfangsphase, auf eine bestimmte Spannung zu
laden oder zu entladen. Der Wert unterscheiden sich von der Art des Akkus,
3.70V für LiIo, 3.80V für LiPo, 3.85V für LiHv und 3.3V für LiFe pro Zelle. Wenn
die Spannung des Akkus im Anfangsstadium über dem Spannungspegel liegt,
beginnt das Programm zu entladen.
Sie können den Strom und die Spannung des zu
ladenden/geladenen Akkus einstellen. Der Prozess
wird zum Laden oder Entladen des Akkus
verwendet, um den Spannungspegel der
SELECT
STOP
START
ENTER
‘> 3 Sekunde n’
Lagerspannung zu erreichen.
-12-
Page 14
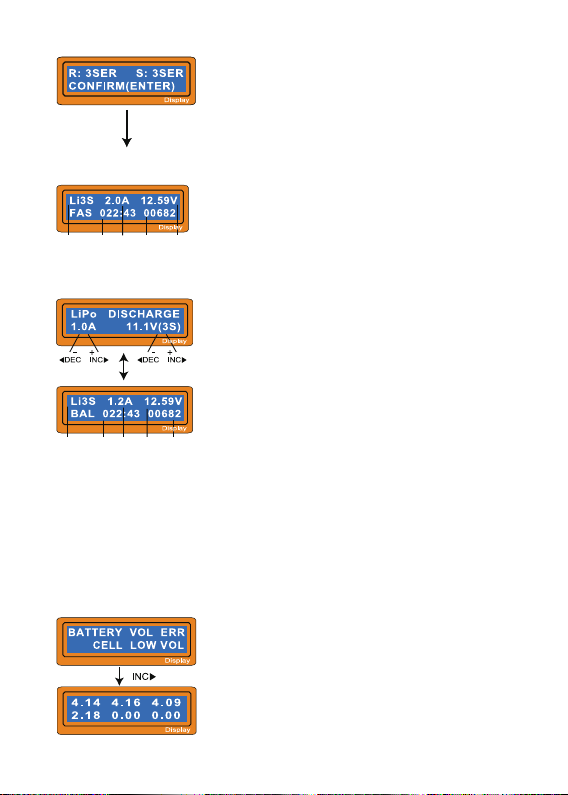
Der Lader prüf t die Zellen. Der Wert R zeigt die
Zellenanzahl, die der Lader gefunden hat und S die
Zellenanzahl, die Sie vorher eingegeben haben.
Stimmen beide Werte nicht überein, brechen Sie
den Vorgang ab und kehren Sie zum vorherigen
Menü zurück, um die Zellenzahl anzupassen bevor
Sie for tfahren. Sind die Werte R und S identisch,
drücken Sie STA RT/E NT ER um den Ladevorgang
zu starten.
Der Bildschirm zeigt den momentanen Zustand
während des Lade-/Entladevorgangs. Um den
Akku-
spannung
Storage-Vorgang manuell abzubrechen, drücken
Sie die Taste SELECT/STOP einmal.
Zellenanzahl
Verstriche-
ne Zeit
Lade-/
Entladestrom
START
ENTER
Gelieferte
Kapazität
6.5 Entladen von Lithium-Akkus
Der Wert des Entladestroms links im Display sollte
1C nicht übersteigen. Die Entladeschlussspannung
ist vom Gerät vorgegeben
Um mit dem Entladen zu beginnen, drücken Sie die
STA RT/E NT E R-Taste länger als 3 Sekunden.
Dieser Bildschirm zeigt den aktuellen Entladezu-
stand an. Um die Entladung manuell abzubrechen,
drücken Sie einmal die Taste SELECT/STOP.
Entladene
Kapazität
Zellenanzahl
SELECT
STOP
Verstriche-
ne Zeit
Entladestrom
START
ENTER
Akku-
spannung
‘> 3 Sekunde n’
6.6 Balancen und Monitoring beim Entladen von Lithium-Akkus
Der Prozess über wacht die Spannung jeder Einzelzelle während des "Storage"
und "Entlade" Prozesses bei Lithium-Akkus und gleicht die Spannungen an. Für
diese Funk tion muss der Balancer-Stecker des Akkus an den individuellen
Anschluss des L adegeräts angeschlossen werden. Wenn die Spannung von
einer oder mehreren Zellen während des Prozesses abnormal variiert, beendet
der Lader den Prozess und gibt eine Fehlermeldung aus. Ist dies der Fall, enthält
das Akku-Pack eine fehlerhafte Zelle oder es besteht eine schlechte Verbindung
des Kabels. Sie können leicht erkennen, welche Zelle defek t ist, indem Sie beim
Anzeigen der Fehlermeldung die INC-Taste drücken.
Der Prozessor erkannte, dass eine Zellenspan-
nung zu ger ing ist.
In diesem Fall ist die Zelle 4 defekt, bz w. die
Kabelverbindung zu Zelle 4, und zeigt daher 2,18V
an.
-13-
Page 15
7. NiMH/NiCd-Akku Ladeprogramm
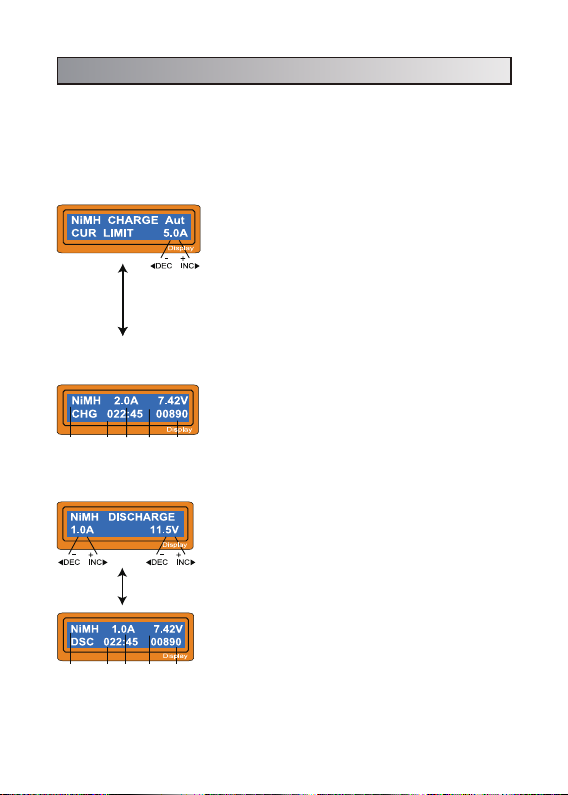
Dieses Ladeprogramm ist zum Laden von NiMH/NiCd Akkus für Modellbauanwendungen vorgesehen. Drücken Sie START/EN TE R, der aktuelle Wer t beginnt
zu blinken. Wählen Sie mit INC und DEC den gewünschten Wer t und bestätigen
Sie diesen durch Drücken von STA RT/E NT ER . Halten Sie S TART/ E NT ER für
mehr als 3 Sekunden gedrückt um den Ladeprozess zu starten.
7.1 Lade n von NiMH/NiCd Akku s
NiMH - und NiCd-A kkus werden mit de m eingestellten Strom geladen. Im „Aut“-Lademodus erkennt
der Prozessor den Zustand des Akkus, welc her mit
dem Ladegerät verbunden ist, und lädt den Akku
automatisch. Legen Sie eine Obergrenze für den
SELECT
STOP
Akkutyp Verstriche-
ne Zeit
Ladestrom
START
ENTER
spannung
‘> 3 Sekunde n’
Akku-
Ladestrom fest, um Schäden an Akkus zu
vermeiden. Der erlaubte Ladestrom bei NiXX-Akkus
beträgt max. 1-2C. Im "Man"-Modus wird der Akku
mit dem Ladestrom aufgeladen, den Sie am Display
eingestellt haben. Der Modus kann durch gleichzeitiges Drücken der Tasten INC und DEC umgeschaltet werden, wenn das aktuelle Feld blinkt. Das nun
folgende Display zeigt den Echtzeitstatus während
des Ladeprozesses. Mit der SELECT/STOP-Taste
können Sie das Programm manuell unterbrechen.
Ein Signalton signalisiert das Ende des Ladepro-
Geladene
Kapazität
zesses.
7.2 Entladen von NiMH/NiCd-Akkus
Stellen Sie den Ent ladestrom links und die Entlade endspannung rechts ein. Der Entladestrom kann
von 0,1 bis 1,0 A und die Endspannung von 0,1 bis
25,0V gewählt werden. Um den Vorgang zu starten,
SELECT
STOP
Akkutyp Verstriche-
ne Zeit
Entladestrom
START
ENTER
‘> 3 Sekunde n’
Akku-
spannung
drücken Sie die START/ENTER-Taste länger als 3
Sekunden. Der Bildschirm zeigt den aktuellen
Entladezustand an. Sie können den Entladestrom
ändern, indem Sie während des Vorgangs die
START/ENTER-Taste drücken. Nachdem Sie den
aktuellen Wer t geändert haben, speichern Sie ihn
durch erneutes Drücken der START/ENTER-Taste.
Entladene
Um den Entladevorgang zu beenden, drücken Sie
Kapazität
einmal die Taste SELECT/STOP. Ein Signalton
signalisiert das Ende des Entladeprozesses.
-14-
Page 16
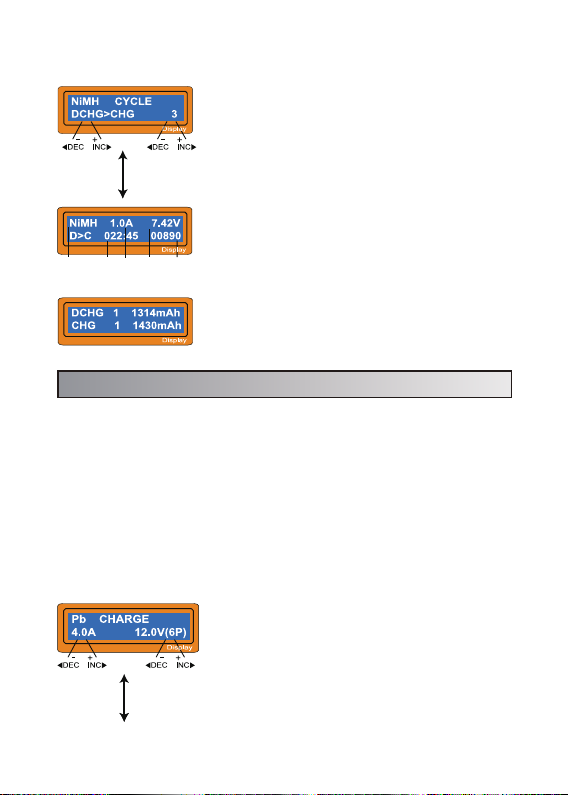
7.3 Zyklisches Laden/Entladen von NiMH/NiCd-Akkus
Stellen Sie die Reihenfolge auf der linken Seite und
die Anzahl der Zyklen auf der rechten Seite ein. Sie
können diese Funktion zum Balancen, Auffrischen
und Formatieren der Akkus verwenden. Um eine
Temperaturerhöhung der Akkus zu vermeiden, wird
START
SELECT
STOP
Akkutyp Verstriche-
ne Zeit
Lade-/
Entladestrom
ENTER
‘> 3 Sekunde n’
Akku-
spannung
8. PB (Blei)-Akku Ladeprogramm
Dieses Programm ist nur bei Bleiakkus zu verwenden, welc he eine Nominalspannung von 2-20 V haben. Bleiakkus untersc heiden sich gänzlich von NiCd
oder NiMH-Akkus. Sie können nur mit einer, zu ihrer Kapazität vergleichsweise,
sehr geringen Laderate geladen werden. Das Gleiche gilt für das Entladen.
Bleiakkus sind nicht schnellladefähig. Der empfohlene Ladestrom liegt bei 1/10
der Kapazität. Bitte beachten Sie unbedingt auch die Hinweise des Herstellers.
Wenn Sie den Parameterwert im Programm ändern möchten, drücken Sie die
START/ENTER-Taste, um den Wert zum Blinken zu bringen, und ändern Sie
diesen mit der Taste INC oder DEC. Der Wert wird durc h einmaliges Dr ücken der
START/ENTER-Taste gespeichert.
nach jedem Lade - und Entladevorgang eine kurze
"Cool-O ff" -Periode eingestellt, die b ereits bei "Us er
setting" festgelegt ist. Mit der START/ENTER-Taste
können Sie den Ladestrom verändern. Die
Zyklenzahl kann von 1 bis 5 gewählt werden.
Um den Prozess zu beenden, drücken Sie einmal
Geladene/
die Taste SELECT/STOP. Ein Signalton signalisiert
Entladene
Kapazität
das Ende des Prozesses.
Ist der Prozess beendet, können Sie sich die
eingeladene- bzw. entladene Kapazität anzeigen
lassen. Mit INC oder DEC können Sie die einzelne
Zyklen wählen.
8.1 Laden von PB (Blei) Akkus
Stellen Sie den Ladestr om links und die Nennspannung - die mit dem Akku übereinstimmen muss rechts ein. Der Ladestrom kann von 0,1 bis 7,0A
gewählt werden.
SELECT
STOP
START
ENTER
‘> 3 Sekunde n’
Um den Vorgang zu star ten, drücken Sie die
START/ENTER-Taste länger als 3 Sekunden.
-15-
Page 17
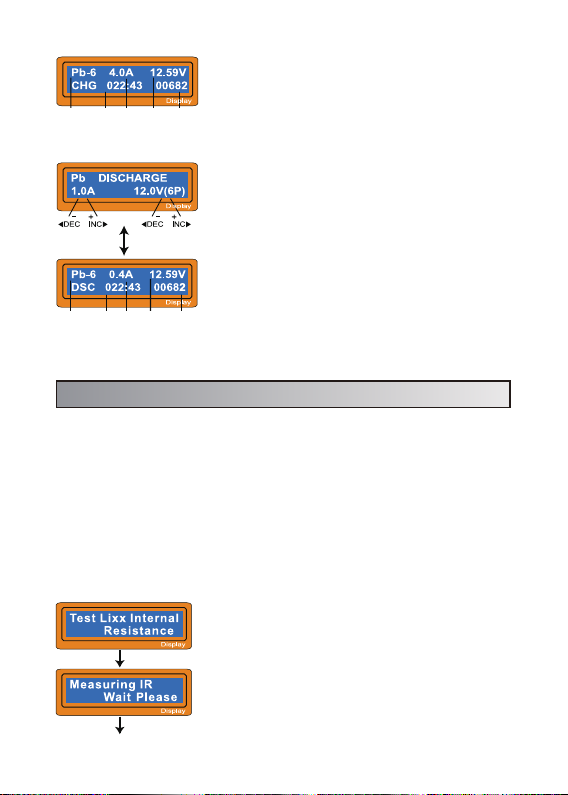
Das nun folgende Display zeigt den Echtzeitstatus
während des Ladeprozesses. Mit der
SELECT/STOP-Taste können Sie das Programm
Akkutyp Verstriche-
ne Zeit
Ladestrom
Akku-
spannung
manuell unterbrechen. Ein Signalton signalisiert
Geladene
Kapazität
das Ende des Ladeprozesses.
8.2 Entlad en von PB (Blei) Ak kus
Stellen Sie den Ent ladestrom links und die Entlade endspannung rechts ein. Der Entladestrom kann
von 0,1 bis 1,0A gewählt werden. Um den Vorgang
zu starten, drücken Sie die START/ENTER-Taste
SELECT
STOP
Akkutyp Verstriche-
ne Zeit
Entladestrom
START
ENTER
Akku-
spannung
‘> 3 Sekunde n’
länger als 3 Sekunden.
Der Bildschirm zeigt den aktuellen Entladezustand
an. Sie können den Entladest rom ändern, indem Sie
während des Vorgangs die START/ENTER-Taste
drücken. Nachdem Sie den aktuellen Wer t geändert
haben, speichern Sie ihn durch erneutes Drücken
Entladene
der START/ENTER-Taste. Um den Entladevorgang
Kapazität
zu beenden, drücken Sie einmal die Taste
SELECT/STOP. Ein Signalton signalisiert das Ende
des Entladeprozesses.
9. Akku-Innenwiderstand-Messfunktion
Der Innenwiderstand des Lithiumakkus ist einer der wichtigsten Faktoren für
die Kapazität und Effizienz. Sie können die Akkuleistung und die Übereinstim mung der einzelnen Zellen ermitteln, indem Sie den Akkuinnenwiderstandswert
ermitteln. Der interne Widerstandswert des Lithiumakkus, der von diesem
Ladegerät getestet wird, ist relativ (nicht absolut), welcher unter einer bestimmten Prüfspannung getestet wird. Dies ergibt eine Annäherung, die aber einen
Vergleich ermöglicht. Wollen Sie Akkus miteinander vergleichen, so muss dies
unter gleichen Spannungen erfolgen um möglichst genaue Ergebnisse zu
erhalten. Um beispielsweise zwei 3-Zellen-Akkus zu vergleichen, sollten Sie
sicher stellen, dass die Gesamtspannung gleich ist und die Einzelspannungen
4.20V betragen. Die Testdaten der Akkuleistung sind dadurch genauer und
können besser verglichen werden.
Bildschirm der Innenwiderstandsmessfunktion.
START
ENTER
START
ENTER
Drücken Sie S TAR T/ EN TER für das Lithium-AkkuInnenwiderstands-Messprogramm. Zeigt die Daten
des Innenwiderstandes des Akkus.
-16-
Page 18
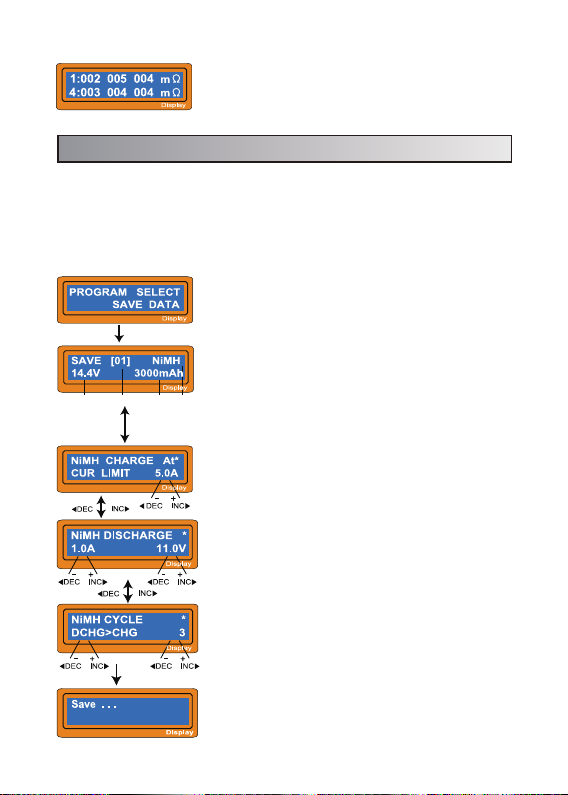
Drücken Sie 'INC', um den Gesamtinnenwiderstand
des Akkupacks anzuzeigen.
(Drücken Sie 'INC' nochmals, um die Innenwiderstände der Einzelzellen anzuzeigen)
10. Speichern der Ladeparameter
Mit dieser Funktion können Sie Einstellungen auf 5 Speicherplät ze sichern, die
den individuellen Spezifikationen Ihres verwendeten Akkus entsprechen. Sie
können für den Lade- oder Entladevorgang sofort aufgerufen werden, ohne das
Programm erneut einrichten zu müssen. Um die Einstellungen anzupassen,
drücken Sie die START/ENTER-Taste, um so den ausgewählten Wert zum
Blinken zu bringen. Ändern Sie nun den Wert mit der INC- oder D EC -Ta s te .
Programmauswahl
START
Spannung Kapazität Akkut ypDatennr.
SELECT
STOP
ENTER
START
ENTER
START
ENTER
‘> 3 Sekunde n’
Der hier angegebene Parameter steht für den
aktuellen Speicherstand mit den Akku-Basisdaten
und hat keinen Einfluss auf das Laden oder
Entladen. Im Beispiel wird ein NiMH-Akku mit 12
Zellen und 300 0mA h Kapazität ver wendet.
‘> 3 Sekunde n’
Legen Sie den Ladestrom für den manuellen
Charge Modus oder die Grenze im automatischen
Charge M odus fest. Blinkt das Fel d, kann der Modus
bzw. die Grenze durch gleichzeitiges Drücken von
INC und DEC verändert werden.
Stellen Sie den Entladestrom sowie die Endspannung ein.
Wählen Sie die Sequenz aus Laden und Entladen
aus und legen Sie die Anzahl der Zyklen fest.
Speichern der Daten.
-17-
Page 19
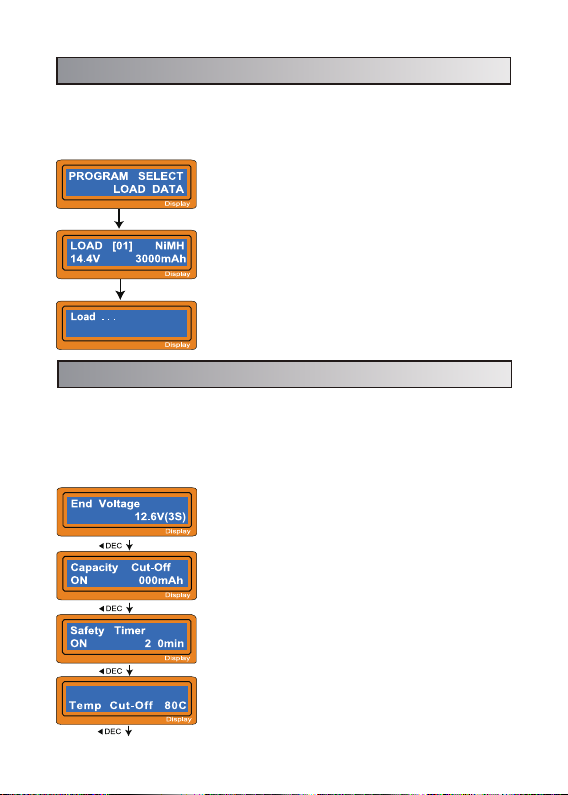
11. Laden der Ladeparameter
Mit dieser Funktion laden Sie die Speicherstände aus dem “Save Data”-Menüpunkt. Drücken Sie die START/ENTER-Taste, um die Auswahl zum Blinken zu
bringen. Ändern Sie den Wert mit der INC- oder DEC -Ta st e. Drücken Sie erneut
STA RT/E NT E R für 3 Sekunden, um den Vorgang abzuschließen.
Programmauswahl
START
‘> 3 Sekunde n’
ENTER
START
ENTER
‘> 3 Sekunde n’
Wählen Sie die Nummer des Speicherstandes aus,
den Sie laden möchten. Die dazu gespeicherten
Daten werden am Bildschirm angezeigt.
Daten werden geladen.
12. Informationen während der Prozesse
Während des Lade- oder Entladevorgang können Sie sich verschiedene
Informationen anzeigen lassen. Durch Drücken der Tasten DEC werden die
verschiedenen Information angezeigt. Durch Drücken der Tasten INC wird bei
Lithium-Akkus bei angeschlossenem Balancer die Zellenspannung jeder
Einzelzelle angezeigt.
Abschaltspannung bei Lithium-Akkus.
Sicherheits-Kapazitätslimit eingeschalten und Wert
10
4
sefety temp
wählbar.
Sicherheitstimer eingeschalten und Zeit wählbar.
Sicherheits-Temperaturabschaltung ist aktiviert.
-18-
Page 20
Int.Temp 31C
0
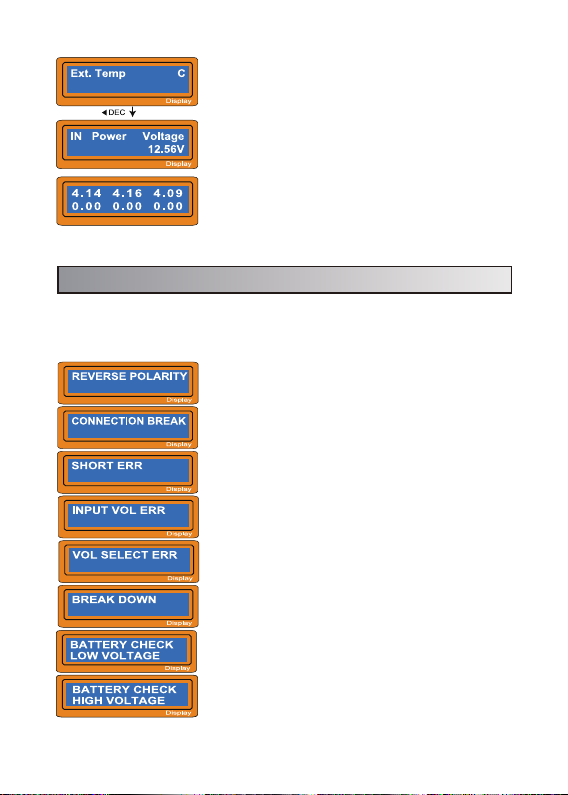
Zeigt die Akkutemperatur (mit optionalem Temperatursensor) und interne Ladertemperatur an.
Aktuelle Eingangsspannung
Bei Nutzung des Balancer, können Sie sich bei LiXX
Akkus die Einzelspannungen der Zellen (max. 6)
anzeigen lassen.
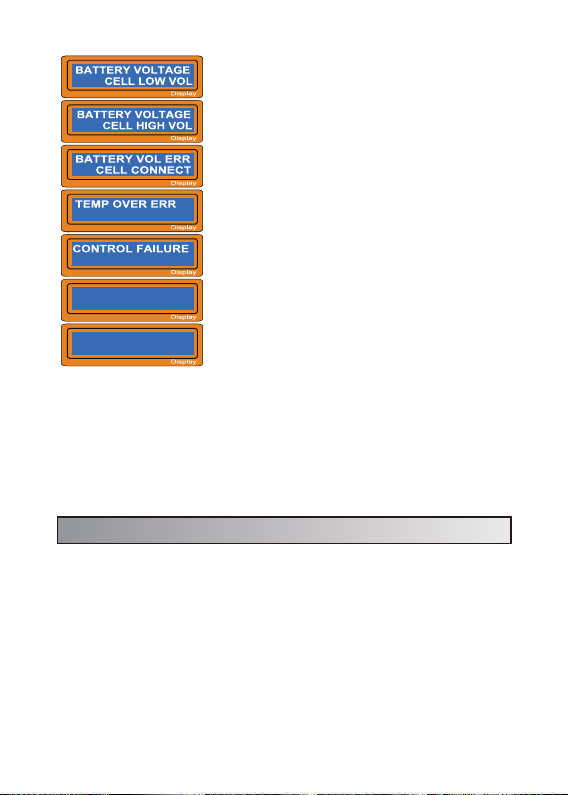
13. Warn- und Fehlermeldungen
Das Ladegerät berücksichtigt eine Reihe von möglichen Fehlfunktionen, zeigt
diese beim Auftreten an und gibt ein akustisches Warnsignal aus.
Verpolung
Verbindung zum Akku wurde unterbrochen.
Kurzschluss des Ladeausganges.
Falsche Eingangsspannung
Die Spannung/ Zellenzahl des Akkus ist nicht
korrekt.
Der Lader hat eine Fehlfunktion. Bringen Sie das
Gerät zu einer Servicestelle.
Die Spannung/ Zellenzahl des Akkus ist zu nieder,
nicht korrekt!
Die Spannung/ Zellenzahl des Akkus ist zu hoch,
nicht korrekt!
-19-
Page 21
Bat t e r y Pa c k IR
0m Ω
1 : - - - - - - - - - m Ω
4 : - - - - - - - - - m Ω
Die Spannung einer Einzelzelle im A kkupack ist zu
gering.
Die Spannung einer Einzelzelle im Akkupack ist zu
hoch.
Falsche Verbindung des Balancer-Steckers
erkannt, prüfen Sie Stecker und Kabel.
Interne Temperatur des Gerätes ist zu hoch.
Der Prozessor kann den Ladestrom nicht korrekt
einstellen.
Balancer Anschluss oder Ladekabelanschluss nicht
korrekt.
14. Spezifikationen
Eingangsspannung:
Ladeleistung:
Entladeleistung:
Ladestrom:
Entladestrom:
Balancerstrom:
Akkutypen/Zellenzahl:
Gewicht:
Abmessungen:
AC: 100.0 - 240.0 Volt
DC: 11.0 - 18.0 Volt
max. 80W
max. 5W
0.1 ~7.0 A
0.1 ~1 .0A
300mAh/Zelle
NiMH/NiCd: 1~15 Zellen
LiPo/LiFe/LiHv/LiIo: 1~6s
Pb: 2-20V
400g
136x127x56mm
-20-
Page 22

Konformitätserklärung
Hiermit erklärt der Hersteller, dass sich das Produkt in Übereinstimmung mit
den grundlegenden Anforderungen und den übrigen einschlägigen Bestimmungen der EU Richtlinien bef indet. Die Konformitätserklärung kann unter folgender
Adresse angefordert werden: www.robitronic.com.
Haftungsausschluss
Da die Einhaltung der Bedienungsanleitung, sowie der Betrieb und die
Bedingungen bei Verwendung des Produktes zu keiner Zeit vom Hersteller
überwacht werden kann, übernimmt der Hersteller keinerlei Haftung für
Schäden, Kosten und/oder Verluste, die sich aus falscher Verwendung und/oder
fehlerhaftem Betrieb ergeben oder in irgendeiner Weise damit zusammenhängen.
Batterien / Akkus
Als Endverbraucher sind Sie gesetzlich zur Rückgabe aller leeren/ defekten
Batter ien und Akkus ver pflichtet (Batterieverordnung). Eine Entsorgung über den
Hausmüll ist verboten! Schadstoffhaltige Batterien/Akkus sind mit Symbolen
gekennzeichnet, die auf das Verbot der Entsorgung über den Hausmüll
hinweisen. Die Bezeichnungen für das ausschlaggebende Schwermetall sind:
Cd=Cadmium, Hg=Quecksilber, Pb=Blei.
Ihre leeren/defekten Batterien/Akkus können Sie unentgeltlich bei den Sammelstellen Ihrer Gemeinde oder überall dort abgeben, wo Batterien/Akkus verkauft
werden.
Entsorgung
Elektronische Altgeräte sind Rohstoffe und gehören nicht in den
Hausmüll. Ist das Produkt am Ende seiner Lebensdauer, so
entsorgen Sie dieses gemäß den geltenden gesetzlichen Vorschriften bei Ihren kommunalen Sammelstellen. Eine Entsorgung über den
Hausmüll ist verboten.
Page 23
Verwenden Sie das Ladegerät niemals unbeaufsichtigt
● Bei unsachgemäßer Handhabung von Batterien besteht SCHWERE Brandgefahr.
● Lesen Sie die gesamte Bedienungsanleitung, bevor Sie das Ladegerät verwenden.
● Dieses Ge rät kann während des Ge brauchs Wärme abg eben.
● Nehmen Sie d ieses Gerä t nur in einem kü hlen, belü fteten Ber eich, entf ernt von
brennbaren Gegenständen, in Betrieb.
● Die Nichtb eachtung vo n Sicherh eitsmaßna hmen kann zu Sa ch- oder
Personenschäden führen.
Page 24

Contents
1. Features
2. Exterior of the unit
3. Warnings and safety notes
4. Program flow chart
5. Initial parameter set up (users’ set up)
6. Lithium battery (Lilo/LiPo/LiFe/LiHv) program
6.1 Charging Lithium battery
6.2 Charging Lithium battery in balance mode
6.3 ‘FAST’ charging Lithium battery
6.4 ‘STORAGE’ control Lithium battery
6.5 Discharging Lithium battery
6.6 Voltage balancing and monitoring during the discharge
7. NiMH/NiCd battery program
7.1 Charging NiMH/NiCd battery
7.2 Discharging NiMH/NiCd battery
7.3 Charge-to-Discharge & Discharge-to-Charge cycle NiMH/NiCd battery
8. Pb (lead-sulphuric acid) battery program
8.1 Charging Pb battery
8.2 Discharging Pb battery
9. Battery internal resistance testing system
10. Save data program
11. Load data program
12. Various information during the process
13. Warnings and error messages
14. Specifications
24
26
27
29
30
32
32
33
34
34
35
35
36
36
36
37
37
37
38
38
39
40
40
41
42
Page 25

1. FEATUR ES
Optimised operating software
When charging or discharging, it has an 'AUTO' function that sets the feeding
current automatically. Especially for Lithium batteries, it can prevent the
ver-charging can lead to an explosion by users fault. Every program in the unit is
controlled with mutual links and communication for every possible error so it
introduces a maximum safety. These can be set at users option.
Special recharge plugsport for receiver, transmitter and igniter charger. And for
frequently used charger port such as multi purpose crocodile pin etc.
It provides most convenient balance charge por t for Lithium bat teries, with
separated 2,3,4,5,6 charge port, and external reverse connector.
High-power and high-performance circuit
It employs the circuit that has maximum output power of 80W. As a result it can
charge o r discharge up to 15 cells of NiMH/NiCd and 6 series of Lithium batteries
with maximum current of 7.0A. Furthermore the cooling system is so ef ficient
that can hold such a power without any trouble of running the CPU or the
operating program.
Individual voltage balancer for Lithium batteries inside
It has an individual-cell-voltage balancer inside.This does not require any extra
balancer separately when charging Lithium batteries(Lilo/LiHv/LiPo/LiFe) for cell
voltage balancing.
Balance individual cells on charge/discharge
It also can monitor and balance individual cells of the Lithium battery pack
during the charge/discharge process. If the voltage of any one cell varies
abnormally, the process will be stopped with the error message.
Accept various types of Lithium battery
It can accept three types of Lithium batterles- Lilo, LiHv,LiPo and LiFe. They
have different characteristics by their chemistry. You can select any one of them
that you are going to process before the job. For their specif ications, refer
'Warnings and safety notes' section.
Lithium battery 'Fast' and 'Storage' mode
You can charge Lithium battery for special purposes. 'Fast' charge reduces the
charging time of Lithium batter y and 'Storage' mode controls the final voltage of
the battery to be suit for long time storage.
-24-
Page 26

Maximum safety
Delta-peak sensitivity: The automatic charge termination program works on the
principle of the Delta -peak voltage detection.(NiMH/ NiCd)
Auto-charge current limit: When charging NiCd or NiMH at 'AUTO' current mode,
you can set the upper limit of change current to avoid from high current charging.
This is ver y useful when charging the low impedance and small capacity NiMH
batter y in 'AUTO' mode.
Capacity limit: The changing capacity always calculated by multiple of the
charging current and time. If the charging capacity exceeds the limit the
process will be terminated automatically when you set the maximum value.
Temperature limit: The temperature of the bat tery on charging will rise by its
internal chemical reaction. If you set the limit of temperature the process will be
expired forcibly when the limit has reached.
Processing time limit: you can also restrain the maximum process time to prevent
from any possible defect.
Input power monitor: To protect the car battery using as input power from being
damaged the voltage of it always monitored. If it dorps below the lower limit the
process will be ended automatically.
Automatic cooling fan: The electric cooling fan comes into action automatically
only when the internal temperature of the unit is raised.
Data store/load
For users convenience it c an store maximum 5 data of different batteries. You
can establish the data contains program setting of the batter y to charge or
discharge continually. These data can be c alled out at any time you need and the
process can be executed without program setting.
Cyclic charging/discharging
Perform 1 to 5 cycles of charge>discharge or discharge>charge continually for
battery refreshing and balancing.
-25-
Page 27
2. Exterior of the unit
Input power cable
AC 100 -240V
Input power cable
DC 11~ 18V
LCD Scre en
(16 chr., 2 rows)
3-pi n port for
temperature
Individual cell
connector port
Charging lead connector
(4mm banana female)
SELECT / STOP
To select main program
To stop the operation
DEC / INC
To select sub program
to alter the value
-26-
START / ENTER
To resume or start the
operation
Page 28

3. Warnings and safety notes
• Never leave the charger unsupervised when it is connected to its power
supply. If any malfunction is obser ved immediately terminate the process and
refer to the operation manual.
• Keep away the unit from dust, damp, rain, heat direct sunshine and vibration.
Do not drop it.
• The circuit of the unit is designed to be powered by a 10-18V DC only.
• This unit and the battery to charge or discharge should be set up on a
headresistant, non-inflammable and non-conductive surface. Never place them
on a car seat, carpet or similar. Keep all the inflammable volatile materials well
away from operating area.
• Be sure to understand the information of the battery to be charged or
discharged accurately. If the program is set up incorrectly the battery can
severely be damaged. Especially Lithium batter y can cause a fire or an
explosion by over-charging.
Voltage level: 1.2V/cell
NiMH/NiCd
LiIo
LiPo
LiHv
Life
Pb
Allowable fast charge current: 1C~2C, depend s on the
Performance of cell discharg e voltage cut off l evel:
0.85V/cell (NiCd), 1.0V/cell (NiMH)
Voltage level: 3.6V/cell
Max. charge volt age: 4.1V/cell
Allowable fast charge current: 1C or l ess
Min. Entladeschlussspg: 2.5V/cell or higher
Voltage level: 3.7V/cell
Max. charge volt age: 4.2 V/cell
Allowable fast charge current: 1C or l ess
Min. disc harge vo ltage cut off leve l: 3.0V/cell or higher
Voltage level: 3.8V/cell
Max. charge volt age: 4.35V/cell
Allowable fast charge current: 1C or l ess
Min. disc harge vo ltage cut off leve l: 3.0V
Voltage level: 3.3V/cell
Max. charge volt age: 3.6V/c ell
Allowable fast charge current: 4C or less (e.g. A123M1)
Min. disc harge vo ltage cut off leve l: 2.0V/cell or higher
Voltage level: 2.0V/cell
Max. charge volt age: 2.4 6V/cell
Allowable fast charge current: 0. 4C or les s
Min. disc harge vo ltage cut off leve l: 1.5V/cell o r higher
-27-
Page 29

• To avoid short-circuits between the charge lead, always connect the charge
cable to the unit first and only then to the battery to be charged or discharged.
Reverse the hsequence when disconnecting.
• Do not attempt to disassemble the batter y pack arbitrarily. You have to pay
attention to verify the capacity and the voltage of the Lithium batter y pack. It may
be composed of parallel and series connection mixed. In parallel link the
capacity of the battery pack is multiplied by the number of cells but the voltage
remains same. That kind of voltage imbalance causes a fire or explosion during
charge process. We recommend you compose the Lithium batter y pack in series
onl y.
Discharge
• The typical purpose of discharge is to determine the residual capacity of the
batter y, or to lower the voltage of battery to a defined level. When you discharge
the battery you also have to pay attention on the process same as charging. To
avoid the batter y becoming deep-discharged, set the final discharge voltage
correctly. Lithium batteries should not be deep-discharged to lower than the
minimum voltage, as this leads to a rapid loss of capacity or a total failure.
Generally, you do not need to discharge Lithium battery voluntarily.
• Some rec hargeable bat teries are said to have a memory ef fect. If they are
partly used and recharged before the whole charge is drawn out, they‘remember’ this and next time will only use that part of their capacity. This is a ‘memory
effect’. NiCd and NiMH batteries are said to suf fer from memory effect. They
prefer complete cycles; fully charge then use until empty, do not recharge before
storage-allow them to selfdischarge during storage. NiMH batteries have less
memor y effect than NiCd.
• The Lithium battery prefers a partial rather than a full discharge. Frequent full
discharges should be avoided if possible. Instead, charge the bat tery more often
or use a larger battery.
• The bran d-new NiCd batter y pack is partially usef ul with its capacity until it has
beeen subjected to 10 or more charge cycles in any case. The cyclic process of
charge and discharge will lead to optimise the capacity of battery pack.
Those warnin gs and s afet y note s are pa rti cularly impor tant . Please
follow the ins tructions for a maximum safe ty; ot her wise t he cha rger a nd
the batter y can be damag ed violentl y. And als o it can c ause a f ire to injure
a human b ody or t o lose the prop erty.
-28-
Page 30
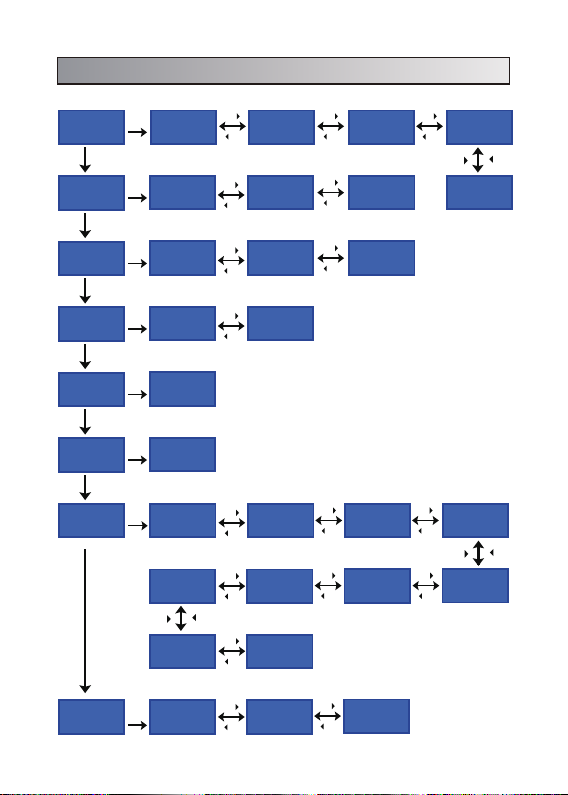
4. Programm flow chart
PRO GRA M SEL ECT
LIX X B ATT
SELECT
STOP
PRO GRA M SEL ECT
NiM H B ATT
SELECT
STOP
PRO GRA M SEL ECT
Nic d BATT
SELECT
STOP
PRO GRA M SEL ECT
Pb BAT T
SELECT
STOP
PRO GRA M SEL ECT
SAVE DATA
SELECT
STOP
PRO GRA M SEL ECT
LOA D DATA
SELECT
STOP
USE R S ET
PRO GRA M
SELECT
STOP
START
ENTER
LIX X CHARGE LIX X BALANCE
START
NiM H C HARGE
ENTER
'Au t' / 'Man '
START
N
icd
ENTER
'Au t' / 'Man '
START
ENTER
Pb CHARGE
START
ENTER
SAVE DATA
START
ENTER
LOA D DATA
START
LiPo
ENTER
V.Type
Cap aci ty Cu t-O ff
INC
Key Be ep
Buz zer
CHA RGE
.
3.7V
INC
DEC
INC
DEC
INC
DEC
INC
DEC
INC
DEC
INC
DEC
DEC
INC
ON
DEC
ON
NiM H DIS CHARG E
icd
N
DI SCHAR GE
Pb DISCH ARGE
Lil o / Li Po / L iFe
CHK Time
5min
Saf ety Tim er
ON 240minON 10000min
Inp ut Po wer Low
Cu t- Off
10.0V
INC
LIX X FAST CH G LIX X STORA GE
DEC
INC
NiM H CYC LE
DEC
INC
Nic d CYC LE
DEC
INC
NiM H S ensit ivi ty
D. Pea k
DEC
INC
Was te T ime
CHG>DCH G
DEC
Default
5min
INC
DEC
INC
DEC
INC
DEC
INC
LIX X DISC HARGE
Nic d Sen sitiv it y
D. Peak
Default
INC
Saf ety
Temp
Temp C ut-Off
DEC
DEC
80C
Tes t L iXX Inte rna l
Res ist ance
START
ENTER
Meas uring IR
WAIT PLEA SE...
INC
DEC
1:0 26 05 0 0 44
4:0 39 04 2 0 44
-29-
INC
Bat tery Pa ck IR
mΩ
mΩ
231 mΩ
DEC
Page 31
5. Initial parameter set up (user ’s set up)
It will be operated with the default value of the essential user settings when
it is connected to a power source for the first time. The screen displays the
following information in sequence and the user can change the value of
parameter on each screen.
When you are willing to alter the parameter value in the program, press
STA RT/E NT E R key to make it blink then change the value with INC or DEC key.
The value will be stored by pressing S TART/ ENTE R key once.
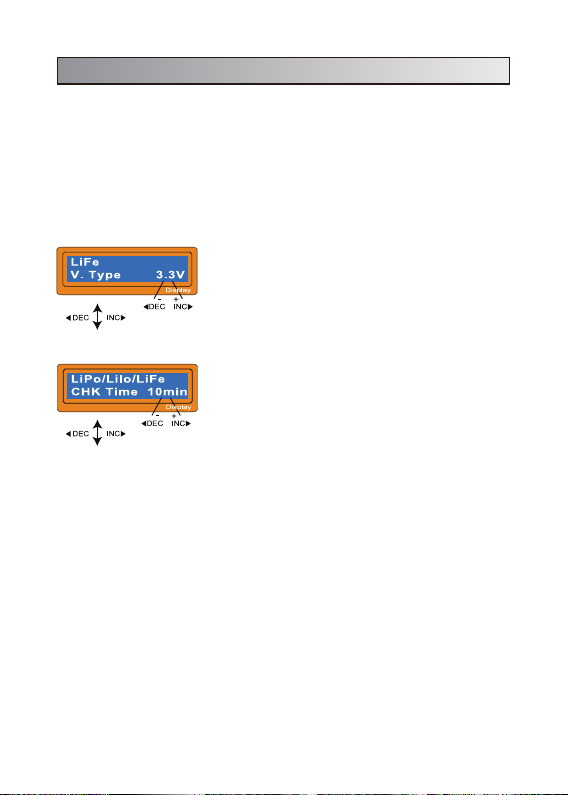
The screen displays the nominal voltage of
Lithium batter y. There are three kinds of Lithium
batter y; LiFe (3.3V), Lilo (3.6V), LiPo (3.7V) or LiHv
(3.8V). This is ver y important so you have to check
the battery carefully and set it up correctly. If it is
different from correct value the bat tery can explode
during charge process.
It recognise the cell count of Lithium bat tery
automatically at the beginning of charge or
discharge process to avoid from erroneous setting
by user. But deeply discharged battery can be
perceived incorrectly.
To prevent the error, you can set the time term to
verify the cell count by the proc essor. Normally, 10
minutes are enough to perceive the c ell count
correctly. For the battery of larger capacity, you
may extend the time term. But if you set the time
term too long for the battery of smaller c apacity, the
charge or discharge process can be finished within
the time term with the erroneous cell count. This
may cause the fatal result. If the processor
recognises the cell count inc orrectly at the
beginning of charge or discharge process, you may
extend the time. O therwise, you had better use with
the default value.
-30-
Page 32
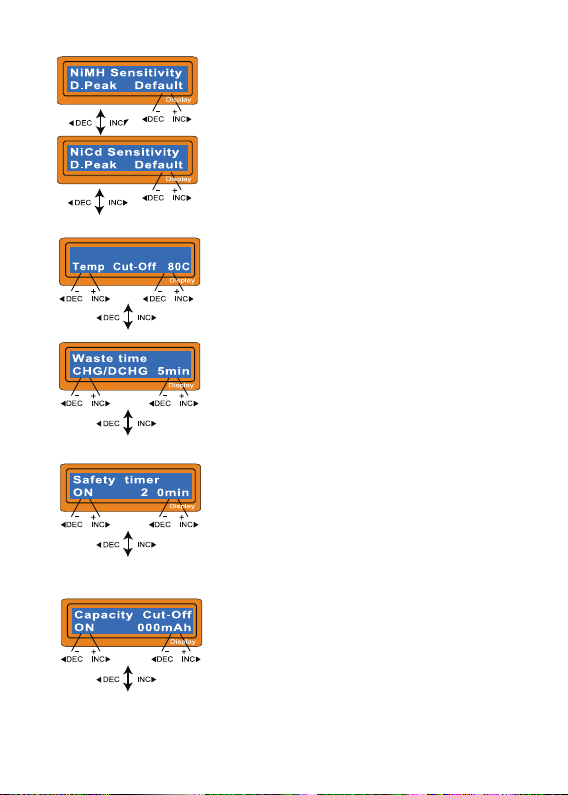
This shows the tr igger voltage for automatic cha rge
termination of NiMH and NiCd battery. The effective
value ranges from 5 to 20mV per cell. If the trigger
voltage is set higher, there is a danger of overcharging the battery; if it is set lower, there is a possibilit y
of premature termination. Please refer the technical
specification of the battery.
(NiCd default: 12mV, NiMH default: 7mV)
Safety temp
10
You can set the maximum temperature at which the
charge r should allow bat tery to reach dur ing charge.
Once a battery reaches this temperature during
charge, the process will be terminated to protect the
bat te r y.
The battery is on the cyclic process of charge and
discharge can often become warm after charge or
discharge period. The program can insert a time
delay to occur after each charge and discharge
process to allow the battery adequate time to cool
down before being subjected to the next process.
The value ranges from 1 to 60 minutes.
When you start a charge process, the integral
4
safety timer automatic ally starts running at the
same time. This is programmed to prevent
overcharge the batter y if it proves to be faulty, or if
the termination circuit cannot detect the battery full.
The value for the safety timer should be generous
enough to allow a full charge of the battery.
This program sets the maximum charge capacity
that will be supplied to the batter y during charge. If
the delta-pack voltage is not detected nor the safety
timer expired by any reason, this feature will
automatically stop the process at the selected
capacity value.
-31-
Page 33
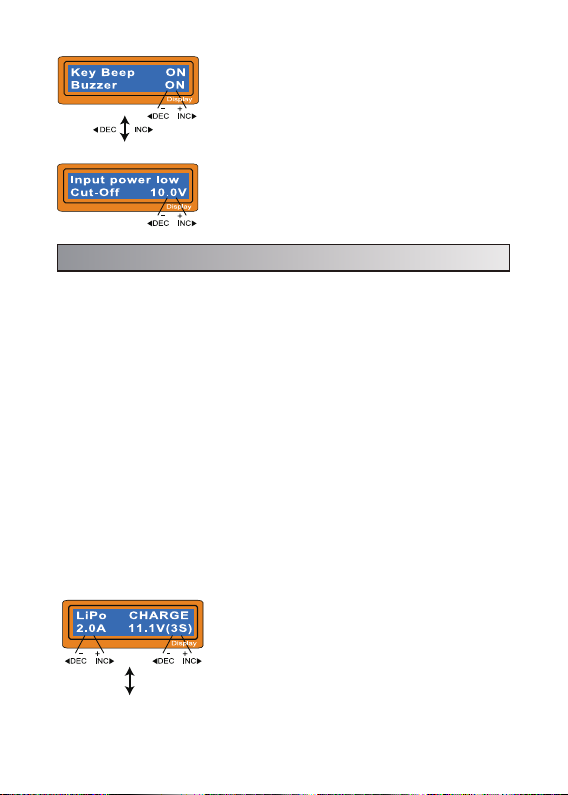
The beep sounds at every time pressing the
buttons to conf irm your action. The beep or melody
sounded at various times during operation to alert
different mode changes. These audible sounds can
be on or off.
This program monitors the voltage of input battery.
If the voltage drops below the value you set the
operation forcibly terminated to protect the input
bat te r y.
6. Lithium Battery (LiIo/LiPo/LiFe/LiHv) program
Use these programs only when charging a lithium battery (Lilo/LiPo/LiHV/LiFe)
with a nominal voltage of 3.6V, 3.7V, 3.8V or 3.3V per cell, respectively. The
charge current going into the bat tery will var y depending on the chemistry type
so it is VERY IMPORTANT that you select the correct type for your battery. The
ending voltage of the charge is also impor tant as it varies for all four types: 4.1V
for Lilo, 4.2V for LiPo, 4.35V for LiHV and 3.6V for LiFe. The charge current (how
many Amps you are put ting into the pack) and nominal voltage (Proper voltage
for the cell count of the bat tery you are charging) must be correct for the battery
to be charged. To change these settings, press the START/ENTER key to make
the selected value blink. Using the increase and decrease buttons, set you
desired amperage, then press START/ENTER to save the setting. You will then
be asked to select your nominal voltage/cell count. Again, use the increase/decrease buttons to reach your desired setting and press the START/ENTER
button to confirm and save.
When you are willing to alter the parameter value in the program, press
STA RT/E NT E R key to make it blink then change the value with INC or DEC key.
The value will be stored by pressing S TART/ ENTE R key once.
6.1 Charging Lithium Battery
The left side of the first line shows the type of
batter y you select at the users setting. The value on
the left side of second line sets a charge current and
the value on the right side of second line sets the
SELECT
STOP
START
ENTER
voltage of the battery pack.
‘> 3 seconds ’
After setting the current and voltage press
STA RT/E NT E R key for more than 3 sec onds to start
the process.
(Charge current: 0.1~6.0A, Voltage: 1~ 6 series)
-32-
Page 34
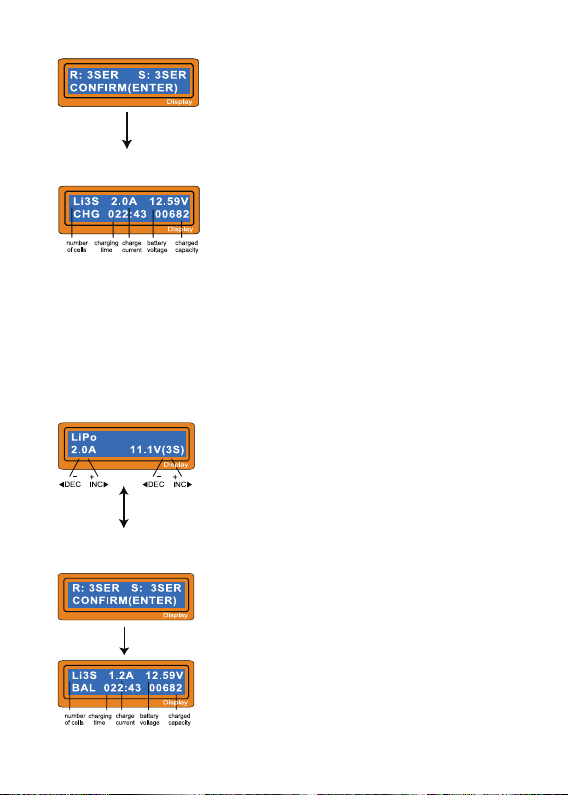
This shows the number of cells you set up and the
processor detects. ' R: ' shows the number of cells
found by the charger and ' S:' is the number of cells
SELECT
STOP
START
ENTER
selected by you at the previous screen. If both
‘> 3 seconds ’
numbers are identical you can start charging by
press STA RT /E NT E R button. If not, press
SELECT/STOP button to go back to previous
screen. Then carefully check the number of cells of
the battery pack to charge again.
The screen shows the present situation during
charge process. To stop charging press
SELECT/STOP key once.
6.2 Charging Lithium battery at balance mode
This is for balancing the voltages of Lithium batteries of the battery park to be
charged. The bat tery pack to be charged should be connected to the suitable
balance port at the right side of the charger. And also, you need to connect the
batter y output plug to the output of charger. In this mode, the charging process
will be different from ordinar y charging mode. The internal processor of the
charger will monitor the voltages of each cell of the battery pac k and controls
charging current that is feeding to each cell to normalise the voltage.
Balance
SELECT
STOP
START
ENTER
START
ENTER
‘> 3 seconds ’
The value on the lef t side of second line sets a
charge current and the value on the right side of
second line sets the voltage of the batter y pack.
After setting the current and voltage press S TART/
ENTER key for more than 3 seconds to st art the
process.
(Charge current: 0.1~7.0A, Voltage: 1~6 series)
This shows the number of cells you set up and the
processor detects.' R: ' shows the number of c ells
found by the charger and ' S:' is the number of cells
selected by you at the previous screen. If both
numbers are identical you can start charging by
press STA RT/E NT E R button. If not, press
SELECT/STOP button to go back to previous
screen. Then carefully check the number of cells of
the battery pack to charge again.
The screen shows the present situation during
charge process. To stop charging press
SELECT/STOP key once.
-33-
Page 35
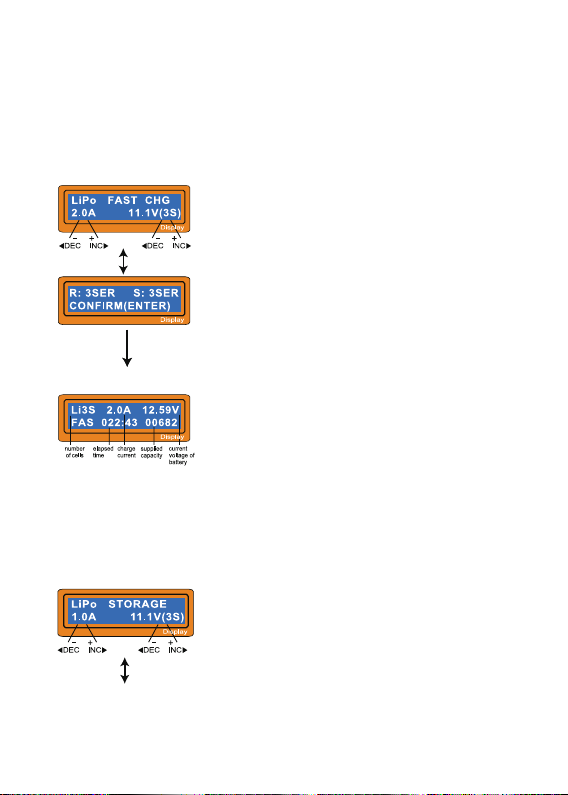
6.3 'FAST ' char ging Li thiu m batt ery
The char ging current is getting smaller as the process goes to the near end term
of Lithium battery charging. To finish charging process earlier, this program
eliminate certain term of CV process. Actually, the charging current will goes to
1/5 from the initial value to en d the process while the normal c haging goes to 1/10
during CV term. The charging capacity may be a bit smaller than normal charging
but the process time will be reduced.
START
SELECT
STOP
SELECT
STOP
ENTER
START
ENTER
‘> 3 seconds ’
‘> 3 seconds ’
You can set up the c harging curr ent and the voltage
of the battery pack being charged. As you press
STA RT/E NT E R button the voltage confirmation will
be displayed. And then, if you confirm the voltage
and current, press STAR T/ EN TE R button again to
start charging.
This shows the number of cells you set up and the
processor detects. ' R: ' shows the number of cells
found by the charger and ' S:' is the number of cells
selected by you at the previous screen. If both
numbers are identical you can start charging by
press STA RT/E NT E R button. If not, press
SELECT/STOP button to go back to previous
screen. Then carefully check the number of cells of
the battery pack to charge again.
This shows the pre sent state of 'FAST' charging. To
stop charging arbitrary, press SELECT/STOP key
once.
6.4 'STORAG E' con trol Li thiu m battery
This is for charging or discharging Lithium battery not to be used for the time
being. The program will determine to charge or discharge the battery to the
certain voltage depending on the voltage of the battery at its initial stage. They
are different from the t ype of the battery, 3.70V for Lilo, 3.80V for LiPo, 3.85V for
LiHv and 3.3V for LiFe per cell. If the voltage of batter y at its initial stage is over
the voltage level to storage, the program will star t to discharge.
You can set up the current and the voltage of the
batter y pack to be charged. The current will be used
for charge or discharge the battery to reach the
'storage' level of voltage.
START
SELECT
STOP
ENTER
‘> 3 seconds ’
-34-
Page 36
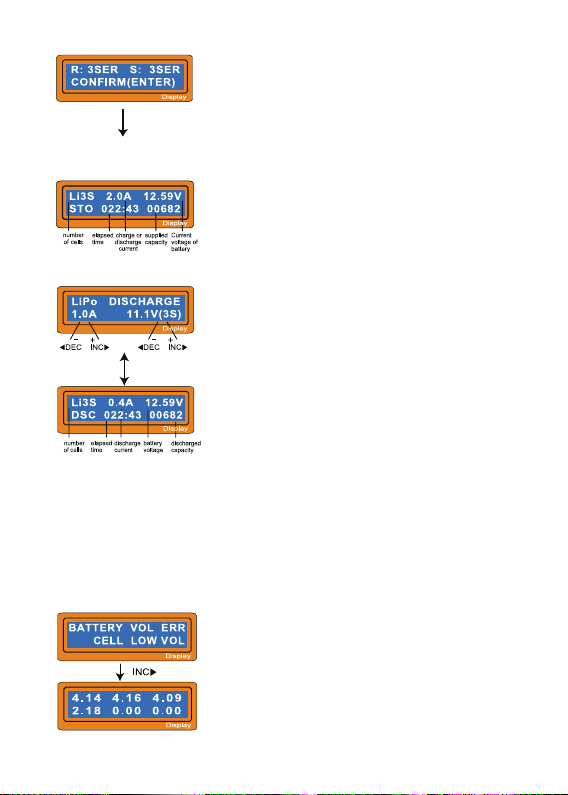
This shows the number of cells you set up and the
processor detects.' R: ' shows the number of cells
START
ENTER
found by the charger and ' S:' is the number of cells
selected by you at the previous screen. If both
numbers are identical you can start charging by
press STA RT /E NT E R button. If not, press
SELECT/STOP button to go back to previous
screen. Then carefully check the number of cells of
the battery pack to charge again.
The screen shows the present situation during
charge process. To stop charging press
SELECT/STOP key once.
6.5 Discharging Lithium battery
The value of discharge cur rent on the left side of
screen may not exceed 1C for a maximum safety
and the f inal voltage on th e right should not be under
the voltage level that is rec ommended by the batter y
SELECT
STOP
START
ENTER
‘> 3 seconds ’
manufacturer to avoid deep discharging. To start to
discharge, press STAR T/ EN TE R key for more than
3 seconds.
This shows the present state of discharge. To stop
discharging press SELECT/STOP key once.
6.6 Voltage balancing and monitoring during the discharge
The processor monitors the voltage of individual cells during 'storage- mode'
and 'discharge' of Lithium batter y pack. It tries to normalise the voltages to be
equal. For this feature, the individual plug of the battry pack should be connected
to the individual port of the charger. If the voltage of any one or more cells varies
abnormally during the procedure, It terminates the process forcibly with the error
massage. If this happens, the battery pack contains the bad cell, or the bad
connection of the cable plug. You can easily know which one cell is bad by
pressing INC button at time of showing the error message.
The processor found that the voltage of one of the
cell in the Lithium battery pack is too low.
In this case, the 4th cell is bad. If there happens the
connection -break of th cable or plug, the voltage
value may show 2.18.
-35-
Page 37
7. NiMH/NiCd battery program
These programs are for charging or discharging NiMH (Nickel-Metal-Hydride)
or NiCd (Nickel -Cadmium) battery commonly used for R/C model aplications. To
alter the value at the display, press STA RT/E NT ER to make it blink then change
the value using INC or DEC key. The value will be stored by pressing
STA RT/ENTER key once. To start, press S TAR T/ ENT ER button for more than 3
seconds.
7.1 Charging NiM H/Ni Cd bat ter y
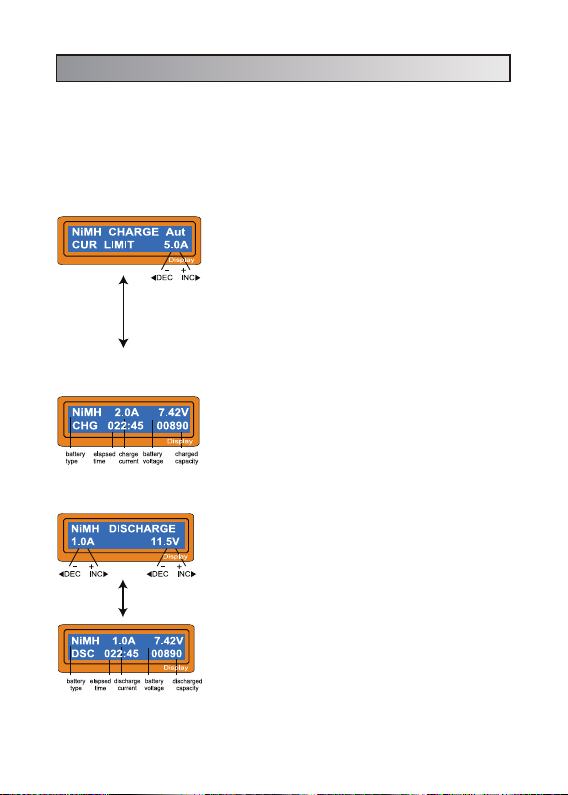
This program simply charge the batter y using the
current you set. In 'Aut' mode, you need to set the
upper limit of charge current to avoid from higher
feeding current that may damage the battery.
Because some batteries of low impedance and
SELECT
STOP
START
ENTER
‘> 3 seconds ’
small capacity can lead to the higher charge current
by the processor at automatic charge mode. But in
'Man' m ode, it will charge the bat tery with the c harge
current you set at the display. Each mode c an be
switched by pressing INC and DEC button
simultaneously when the current field is blinking.
The screen displays the current state of charging.
To stop the process, press SELECT/STOP key
once. The audible sound indicates you the end of
process.
7.2 Discharging NiMH/NiCd battery
Set discharge current on the lef t and final voltage
on the right. The discharge current ranges from 0.1
to 1.0A and the f inal voltage ranges from 0.1 to
25.0V). To start the process, press STA RT /E NTE R
SELECT
STOP
START
ENTER
‘> 3 seconds ’
key more than 3 seconds.
The screen displays the current state of discharge.
You can alter the discharge current by pressing
STA RT/E NT E R key during the process. Once you
change the current value, store it by pressing
STA RT/E NT E R button again. To stop discharging
press SELECT/STOP key once. The audible sound
indicated you at the end of process.
-36-
Page 38
7.3 Charge -to -di scharge & dischar ge- to- charge cycle NiMH /NiC d batt ery
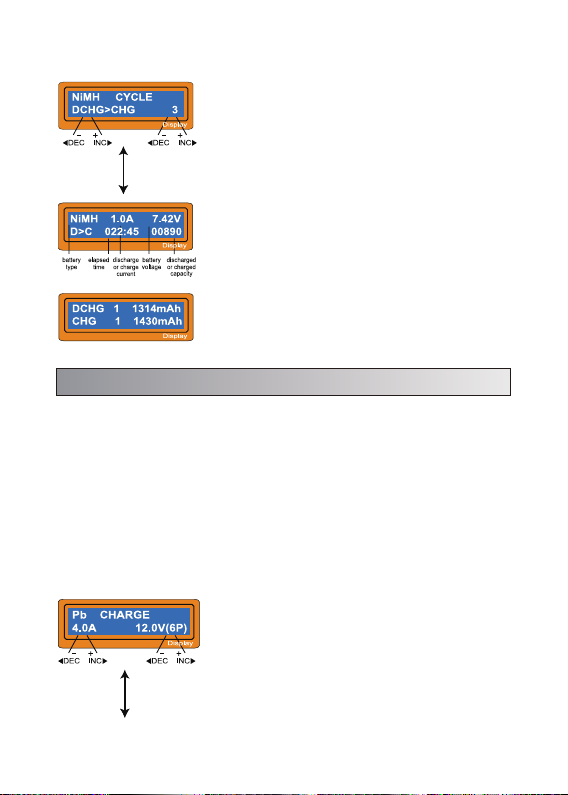
Set the sequence on the lef t and the number of
cycle on the right. You can use this function for
balancing, refreshing and break-in the battery. To
avoid rising temperture of the battery, there will a
SELECT
STOP
START
ENTER
‘> 3 seconds ’
brief cool- off period that already fixed at 'User
setting' after each charge and discharge process.
The cycling number ranges from 1 to 5.
To stop the proc ess, press SELECT/STOP key
once. You can change the discharge or charge
current by pressing STAR T/ EN TER key once during
the process. The audible sound indicates you the
end of process.
At the end of the process, you can see c harged or
discharged electric capacities of the battery at each
cyclic process. By pressing INC or DEC button, the
screen shows the result of each cycle in order.
8. Pb (lead-sulphuric acid) battery program
This is programmed for charging Pb (lead-sulphuric acid) battery with nominal
voltage from 2 to 20V. Pb batteries are totally dif ferent from NiCd or NiMH
batteries. They can only deliver relatievely lower current compare to their
capacity, and similar restrictions definitely apply to charge. So the optimal
charge current will be 1/10 of the capacity. Pb batteries must not be charged
rapidly. Always follow the instruction is supplied by the manufacturer of bat tery.
When you are willing to alter the parameter value in the program, press
STA RT/E NT E R key to make it blink then change the value with INC or DEC key.
The value will be stored by pressing S TART/ ENTE R key once.
8.1 Chargin g Pb Bat ter y
Set up the charge current on the lef t and the
nominal voltage of the bat tery on the right. The
charge current ranges from 0.1 to 7.0A and the
voltage should be matched with the battery being
charged.
SELECT
STOP
START
ENTER
‘> 3 seconds ’
Start the charge process by pressing
STA RT/E NT E R key for more than 3 seconds.
-37-
Page 39
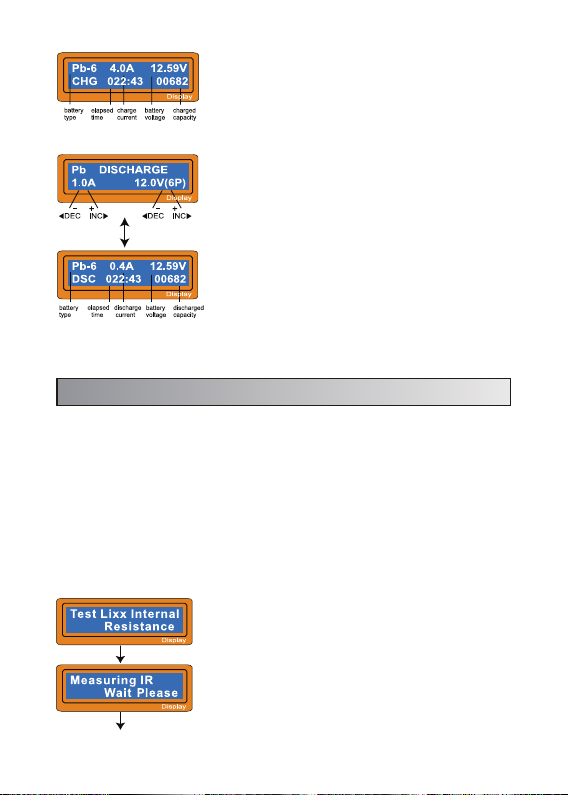
The screen displays the state of charging process.
To stop charging forcibly, press SELECT/STOP key
once. The audible sound indicates you at the end of
process.
8.2 Di scharging Pb b attery
Set discharge current on the left and final voltage
on the right. The discharge current ranges from 0.1
to 1.0A. To start the process, press S TART/ ENTE R
SELECT
STOP
START
ENTER
‘> 3 seconds ’
key for more than 3 seconds.
The screen displays the current state of discharge.
You can alter the discharge current by pressing
STA RT/E NT E R key during the process. Once you
change the current value, store it by pressing
STA RT/E NT E R button again. To stop discharging
press SELECT/STOP key once. The audible sound
indicates you at the end of process.
9. Battery inter nal resistance testing system
Lithium batter y inter nal resistance is one of the important index about battery
discharge capacity and eff iciency. We can know battery performance and the
matching of each batter y by getting the batter y resistance value. The lithium
batter y inter nal resistance value tested by this charger is relative (not absolute),
which is tested under the testing voltage. But it can also know the battery
performance and matching through the relative value. If you want more battery
performance comparison, you had better put them under the same voltage to
detect. For example, to compare two 3-c ells batteries, you should ensure that
the total voltage is consistent. Testing in the single voltage of 4.20V, the test data
is smaller the performance better and the data more close to the battery the
better matching nature.
Interface of the Internal Resistance Testing.
START
ENTER
Press “STA RT /E NT E R” to enter into it.
START
ENTER
Show the data of Bat tery Pack IR.
-38-
Page 40
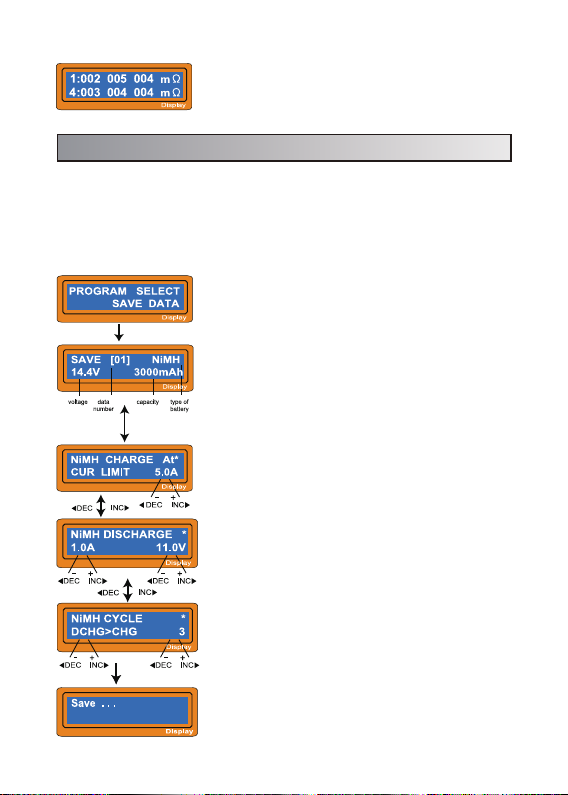
Press ‘INC’ to check the total data of the Battery Pack
IR (Press ‘INC’ again to back to show the data of the
single cell IR.)
10. Save data program
It has a data storage and load program for your convenience. This feature can
store up to 5 batter y data by number that represent the individual specification of
batteries you are using. They can be called back for the proc ess of charging or
discharging without setting up the program again. To set up the parameter value
in the program, press S TAR T/ EN T ER key to make it blink then change the value
with INC or DEC key.
Program select.
The parameter value setting up in this screen does
not affect charge or discharge process. They only
represent the specification of the batter y. The
following screens will automatically be displayed
exactly matched batter y type you set up. The
example shows the batter y pack of NiMH, 12cells
and 3000mAh of capacity.
Set up the charge current for manual charge mode,
or the current limit for automatic charge mode. Each
mode can be switched by pressing INC and DEC
button at the same time when the cur rent field is
blinking.
SELECT
STOP
START
ENTER
START
ENTER
‘> 3 seconds ’
Set up discharge current and final voltage.
Set up the sequence of charge and discharge, and
the cycling number.
START
‘> 3 seconds ’
ENTER
Saving the data.
-39-
Page 41
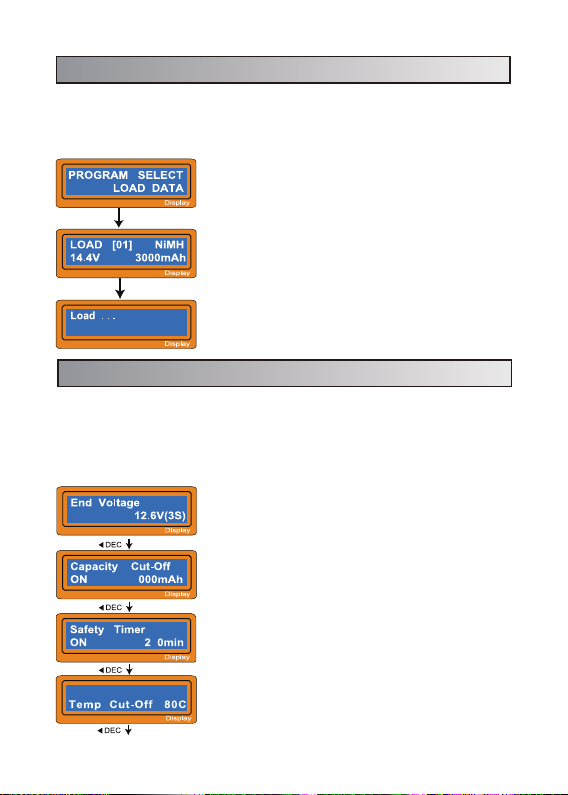
11. Load data program
This program calls back the data that was stored at 'Save Data' program.To load
the data, press S TART/ ENTE R key once to blink the dat a number field and selec t
the number using INC or DEC key then press S TA RT/E NT ER key for more than
3 seconds.
Program select
START
ENTER
Select the data number to be called back.
The data matched with the number will be displayed
START
ENTER
‘> 3 seconds ’
at this time.
Loading the data.
12. Various information during the process
You can inquire various information on LCD screen during charging or discharging mprocess. When you press DEC button the charger shows the establishment
of user set tings. And also you can monitor the voltage of individual cell by
pressing INC button when the individual connection c able is linked to the Lithium
battery being processed.
It comes to the final voltage when the program
ended.
10
4
safety temp
Displayed capacity cut-of f function is turn on and
the setting value of capacity.
Displayed safety timer is turn on and duration of
time in minutes.
Displayed temperature cut-off function is turn on.
-40-
Page 42
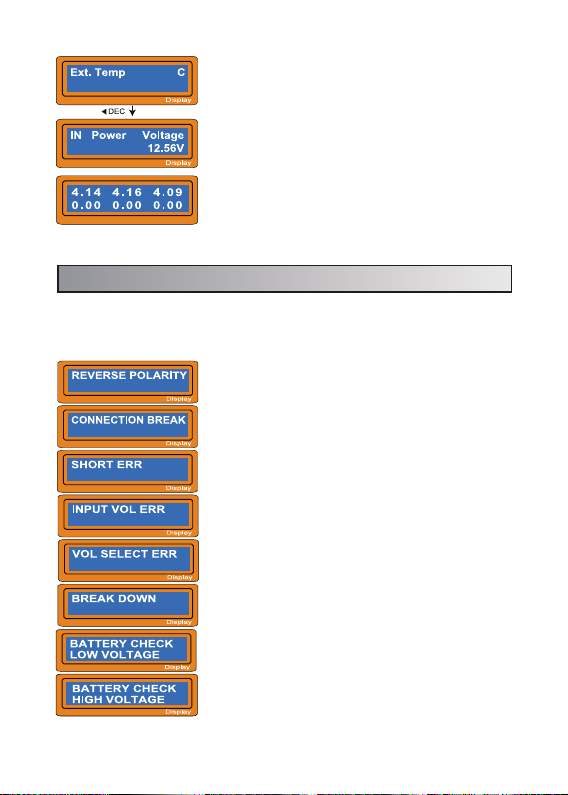
Int.Temp 31C
0
The external temperature is displayed when the
temperature probe is used. Int temperature is
displayed the internal temperature of changer.
Present input voltage.
The battery is connected with each port through
cable; you can check voltage of each cell in the
batter y pack. When the cable is connected with the
ports on the charger, the program will display
voltage of up to 6 batteries.
13. Warnings and error messages
It incorporates a various functions of protec tive and monitoring the system to
verify functions and the state of its electronics. In any case of occurring error, the
screen displays the cause of error that is self- explanator y with audible sound.
Incorrect polarity connected.
Battery connection is interrupted.
Short-circuit of the output termination.
Input voltage wrong.
The voltage of the batter y pack has been selected
incorrectly!
The charger has malfunctioned for some reason.
Seek professional advice.
The voltage is lower than which is set. Please check
the number of cells in the battery pack.
The voltage is higher than which is set. Please
check the number of cells in the bat tery pack.
-41-
Page 43
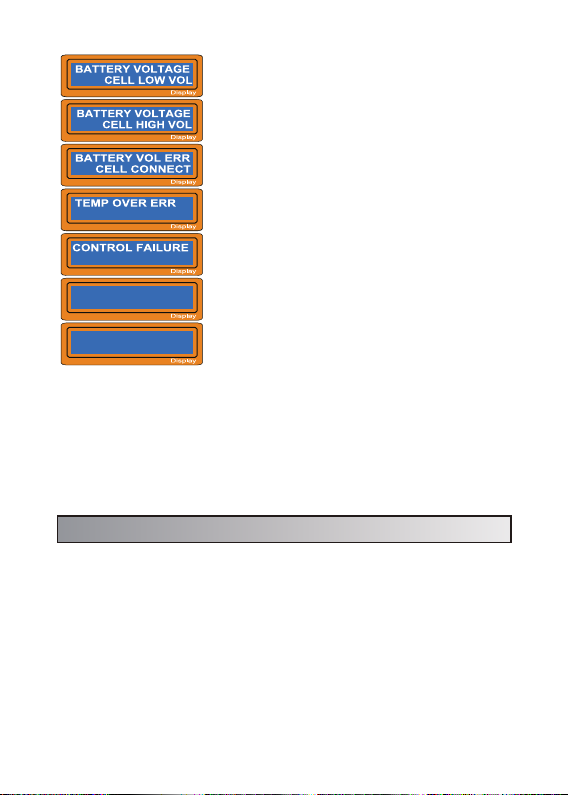
Bat t e r y Pa c k IR
0m Ω
1 : - - - - - - - - - m Ω
4 : - - - - - - - - - m Ω
Voltage of one cell in the battery pack is too low,
please check the voltage of each cell.
Voltage of one cell in the battery pack is too high;
please check the voltage of each cell.
Wrong connection of the connector detected;
please check the connector and cable.
The inter nal temperature of the unit goes too high.
Cool down the unit.
The processor cannot control the feeding current,
please repair it.
The battery balance port or the power line to
connect incorrect.
14. Specifications
Operating voltage range:
Charging power:
Discharging power:
Charge current range:
Discharge current range:
Current drain for balancing LiPo:
NiMH/NiCd battery cell count:
Lithium battery cell count:
Pb battery voltage:
Weight:
Dimension:
AC: 100.0-240.0 Volt
DC: 10.0~18.0 Volt
max. 80W
max. 5W
0.1 ~7.0 A
0.1 ~1 .0A
300mAh/cell
1~15 cells
1~6 series
2 to 20V
400g
136x127x56mm
-42-
Page 44

Declaration of Conformity (DOC)
Hereby, the manufacturer declares that this product is in compliance with the
essential requirements and other relevant provisions of EU Directives. The
declaration of conformity may be consulted at w ww.robitronic.com
Disclaimer
As compliance with the instructions, the operations and conditions when using
the devic e at no time can be monitored by the manufacturer; the manufacturer
assumes no liability for damages, costs and / or losses arising from incorrect use
and / or incorrect operation or in any way connected.
Batteries
As an end user, you are legally obliged to return all empty / defective batteries
and rechargeable batteries (Battery Ordinance). Disposal in the household
garbage is prohibited! Contaminated batteries / rechargeable batteries are
marked with symbols that indicate the prohibition of disposal in the household
waste. The designations for the cr ucial heavy metal are: Cd = cadmium, Hg =
mercur y, Pb = lead.
You can return your empt y / defective batteries / rechargeable batteries free of
charge to the collection points of your municipality or wherever batteries /
rechargeable batteries are sold.
Dispo sal of Elect ronic
Waste Electronic waste is a commodity and must be disposed
through special electronic waste sites. Please inform yourself about
adequate facilities in your community area. Disposal of this product
through domestic waste is illegal.
Page 45
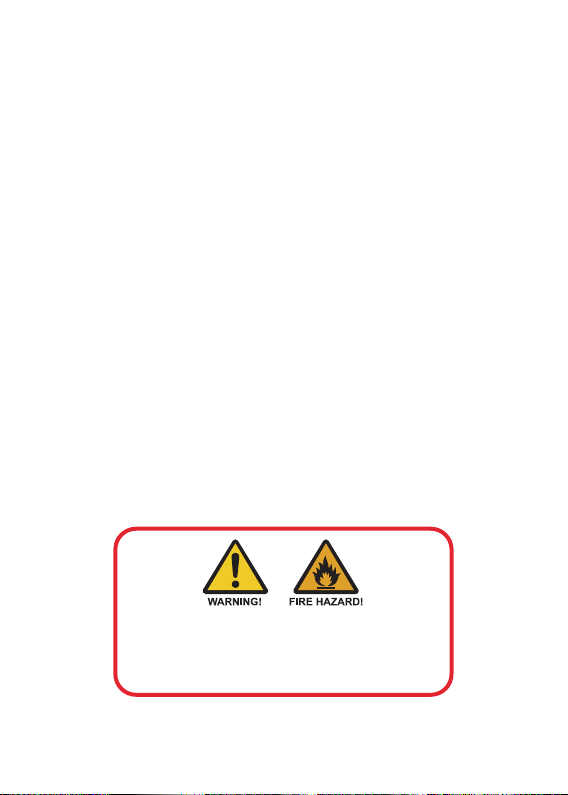
Never use charger unsupervised
● Batterie s pose a SEVERE ri sk of fire if not prope rly handled.
● Read entire operation manual before using charger.
● This unit may emit heat during use.
● Only opera te this device in a coo l ventilated area away f rom flammable obj ects.
● Failure to obs erve safety proc edures may cause dam ages to propert y or injury.
Page 46

Technische Änderungen sowie Änderungen in
Ausstattung und Design vorbehalten.
Technical specifications, features and design are subject to change.
Robitronic Electronic Ges.m.b.H.
Pfarrgasse 5 0, 1230 Vienna
Austria
Tel.:+43 (0)1-982 09 20
Fax.: +43 (0)1-98 209 21
www.robitronic.com
 Loading...