

Page 1
User Guide
Robin RS 1100
Scanner
Page 2

.by robin Auto-ID Tech. Co., Ltd. All rights reserved 2012 ©
Revrsion
Description
Change Date
Ver 1.0
Initial Version
2011-12-25
Ver 1.1
Modify text mistakes,Adjust the format of Start/Exit Setup
2012-08-10
Please carefully read the manual before use the product, andeffectively to protect the safety of products operation. Please keep
this manual after reading properly and save for the next reading.
Do not disassemble the device or tearing the seal label on the device. Otherwise, FuJian robin Auto-ID Tech. Co., Ltd. does not
.assume responsibility for the warranty or replacement
The pictures in this manual are for reference only. If the individual picture from the actual product was different with this manual,
please refer to actual product. Regarding to the product modification and update, FuJianNewland Auto-ID Tech. Co., Ltd.
reserves the right to make changes to any software or product to improve reliability, function, or design at any time without notice.
This manual contains all the information is protected by copyright. Any Company and individuals should not in any way or reason
for any form of extract, copy, sell all or part of this document without written permission.
Revision History
Changes to the original manual are listed below:
Page 3

Table of Contects
Preface ............................................................................................................................................................................................................... 1
Introduction ................................................................................................................................................................................................ 1
Chapter Descriptions ............................................................................................................................................................................... 1
Document Set ........................................................................................................................................................................................... 1
Chapter 1 Getting Started ............................................................................................................................................................................... 2
Introduction ................................................................................................................................................................................................ 2
Unpacking .................................................................................................................................................................................................. 2
Product OverView..................................................................................................................................................................................... 2
Interface ..................................................................................................................................................................................................... 3
Communication Port................................................................................................................................................................................. 4
UsingUSB Cable ............................................................................................................................................................................... 5
Using RS232 Cable .......................................................................................................................................................................... 5
Using PS/2 Cable ............................................................................................................................................................................. 6
Remove the Communication Cable ....................................................................................................................................................... 6
Power-on, Power-off, Sleep, Reboot ..................................................................................................................................................... 7
Power-on ........................................................................................................................................................................................... 7
Power-off............................................................................................................................................................................................ 7
Sleep .................................................................................................................................................................................................. 7
Reboot ................................................................................................................................................................................................ 7
Reading Window Maintenance ............................................................................................................................................................... 7
Reading Depth of Field ............................................................................................................................................................................ 8
Specification .............................................................................................................................................................................................. 9
Overview .................................................................................................................................................................................................. 10
Left View .......................................................................................................................................................................................... 10
Front View ........................................................................................................................................................................................ 10
Vertical View .................................................................................................................................................................................... 10
Barcode Reading .....................................................................................................................................................................................11
Chapter 2 General Configuration ................................................................................................................................................................. 12
Introduction .............................................................................................................................................................................................. 12
Setting Barcode .............................................................................................................................................................................. 12
Setting Command ........................................................................................................................................................................... 12
Format of Setup Barcode ................................................................................................................................................................ ...... 12
Use the Setting Barcodes ..................................................................................................................................................................... 13
Use the Setup Command ...................................................................................................................................................................... 13
Setup State ...................................................................................................................................................................................... 13
Setup Protocol ................................................................................................................................................................................ 14
SetupProcess Flow ........................................................................................................................................................................ 15
Default Setup .......................................................................................................................................................................................... 16
Page 4

Factory Default Setting .................................................................................................................................................................. 16
Work Mode Selection ............................................................................................................................................................................. 16
Reading Mode ......................................................................................................................................................................................... 16
Manual Scanning Mode ................................................................................................................................................................. 16
Auto Scanning Mode ...................................................................................................................................................................... 17
Intermittent Reading Mode ................................ ................................ ................................................................ ............................ 18
Sense Reading Mode .................................................................................................................................................................... 18
Continuous Reading Mode ............................................................................................................................................................ 19
Extended Sense Reading Mode ................................................................................................................................................... 20
Command Triggered Reading Mode ............................................................................................................................................ 20
Security Level Setup .............................................................................................................................................................................. 21
Decoding Sound Setup .......................................................................................................................................................................... 21
Other Setup ............................................................................................................................................................................................. 22
Activate/Abort Temporary Mute .................................................................................................................................................... 22
Chaper 3 Inquiry Command .......................................................................................................................................................................... 23
Introduction .............................................................................................................................................................................................. 23
Chapter 4 Communication Setup ................................................................................................................................................................. 24
Serial Port Setup .................................................................................................................................................................................... 24
Baud Rate Setup ............................................................................................................................................................................ 24
Check Setup .................................................................................................................................................................................... 25
Stop Bit ............................................................................................................................................................................................. 25
Flow Control Setup ......................................................................................................................................................................... 25
Data Bit ............................................................................................................................................................................................ 25
USB Function Setup .............................................................................................................................................................................. 26
USB Virtual Keyboard Function .................................................................................................................................................... 26
USB Virtual Serial Port Function .................................................................................................................................................. 27
Keyboard Function Setup ...................................................................................................................................................................... 28
Keyboard Layout............................................................................................................................................................................. 28
Set the Delay between Characters .............................................................................................................................................. 28
Character Conversion .................................................................................................................................................................... 29
Chapter 5 Data Format Setup ...................................................................................................................................................................... 30
Introduction .............................................................................................................................................................................................. 30
Prefix Sequence Setup .......................................................................................................................................................................... 30
Custom Prefix ......................................................................................................................................................................................... 30
Add Custom Prefix or Not .............................................................................................................................................................. 30
Define the Custom Prefix .............................................................................................................................................................. 31
AIM ID Prefix ........................................................................................................................................................................................... 31
Code ID Prefix ......................................................................................................................................................................................... 31
Custom Suffix .......................................................................................................................................................................................... 32
Add Custom suffix or Not ............................................................................................................................................................... 32
Page 5

Define the Custom suffix ............................................................................................................................................................... 32
End Mark Suffix ...................................................................................................................................................................................... 33
Add End Mark Suffix or Not ........................................................................................................................................................... 33
Define the End Mark Suffix ........................................................................................................................................................... 33
Chapter 6 Barcode Parameter Setup .......................................................................................................................................................... 35
Introduction .............................................................................................................................................................................................. 35
Code 128 ................................................................................................................................................................................................. 35
Restore Default Value .................................................................................................................................................................... 35
Allow to Read Code 128 or not ..................................................................................................................................................... 35
Code ID Setup ................................................................................................................................................................................ 35
Set the Barcode Reading Length Limit ........................................................................................................................................ 36
UCC/EAN-128 ......................................................................................................................................................................................... 37
Restore Default Value .................................................................................................................................................................... 37
Allow to Read UCC/EAN-128 or not ............................................................................................................................................ 37
Code ID Setup ................................................................................................................................................................................ 37
Set the Barcode Reading Length ................................................................................................................................................. 37
AIM 128 .................................................................................................................................................................................................... 38
Restore Default Value .................................................................................................................................................................... 38
AIM 128 Allow to Read AIM-128 or not ....................................................................................................................................... 38
Code ID Setup ................................................................................................................................................................................ 39
Set the Barcode Reading Length ................................................................................................................................................. 39
EAN-8 ....................................................................................................................................................................................................... 40
Restore Default Value .................................................................................................................................................................... 40
Allow to Read EAN-8 or not .......................................................................................................................................................... 40
Code ID Setup ................................................................................................................................................................................ 40
Set Whether or not to Read 2-Digit Extracode ........................................................................................................................... 40
Set Whether or not to Read 5-Digit Extracode ........................................................................................................................... 41
Set Whether or not to Send the Check Digit ............................................................................................................................... 41
EAN-13 .................................................................................................................................................................................................... 42
Restore Default Value .................................................................................................................................................................... 42
Allow to Read EAN-13 or not ........................................................................................................................................................ 42
Set Whether or not to Send the Check Digit ............................................................................................................................... 42
Code IDSetup .................................................................................................................................................................................. 42
Set Whether or not to Read 2-Digit Extracode ........................................................................................................................... 43
Set Whether or not to Read 5-Digit Extracode ........................................................................................................................... 43
Extended Setup .............................................................................................................................................................................. 43
ISSN ......................................................................................................................................................................................................... 44
Restore Default Value .................................................................................................................................................................... 44
Allow to Read ISSN or not............................................................................................................................................................. 44
CodeID Setup .................................................................................................................................................................................. 44
Page 6

ISBN ......................................................................................................................................................................................................... 45
Restore Default Value .................................................................................................................................................................... 45
Allow to Read ISBN or not............................................................................................................................................................. 45
ISBN Data Length Setup ............................................................................................................................................................... 45
CodeIDSetup ................................................................................................................................................................................... 45
UPC-E ...................................................................................................................................................................................................... 46
Restore Default Value .................................................................................................................................................................... 46
Allow to Read UPC-E or not ......................................................................................................................................................... 46
Set Whether or not to Send the Check Digit ............................................................................................................................... 46
CodeID Setup .................................................................................................................................................................................. 46
Set Whether or not to Read 2-Digit Extracode ........................................................................................................................... 47
Set Whether or not to Read 5-Digit Extracode ........................................................................................................................... 47
Set Whether or not to Transmit the System Character “0” ....................................................................................................... 48
Extension Setup .............................................................................................................................................................................. 48
UPC-A ...................................................................................................................................................................................................... 48
Restore Default Value .................................................................................................................................................................... 48
Allow to Read UPC-A or not .......................................................................................................................................................... 49
CodeID Setup .................................................................................................................................................................................. 49
Set Whether or not to Transimit the Check Digit ........................................................................................................................ 49
Set Whether or not to Transmit the System Digit “0” ................................................................................................................. 49
Set Whether or not to Read 2-Digit Extracode ........................................................................................................................... 50
Set Whether or not to Read 5-Digit Extracode ........................................................................................................................... 50
Interleaved 2 of 5 .................................................................................................................................................................................... 51
Restore Default Value .................................................................................................................................................................... 51
Allow to Read Interleaved 2 of 5 or not ....................................................................................................................................... 51
Code ID Setup ................................................................................................................................................................................ 51
Set Whether or not to Transmit the Check Character ............................................................................................................... 51
Set the Barcode Reading Length ................................................................................................................................................. 52
ITF-6 ................................................................................................................................................................................................ ......... 53
Code ID Setup ................................................................................................................................................................................ 53
ITF-14 ....................................................................................................................................................................................................... 54
CodeIDSetup ................................................................................................................................................................................... 54
Deutsche 14 ............................................................................................................................................................................................ 55
Restore the Default Value ............................................................................................................................................................. 55
Allow to Read Deutsche14 or not ................................................................................................................................................. 55
CodeID Setup .................................................................................................................................................................................. 55
Deutsche 12 ............................................................................................................................................................................................ 56
Restore the Default Value ............................................................................................................................................................. 56
Deutsche 12 Allow to Read Deutsche 12 or not ......................................................................................................................... 56
CodeID Setup .................................................................................................................................................................................. 56
Page 7

COOP 25(Japanese Matrix 2 of 5) ....................................................................................................................................................... 57
Restore the Default Value ............................................................................................................................................................. 57
Allow to Read COOP 25 or not ..................................................................................................................................................... 57
CodeID Setup .................................................................................................................................................................................. 57
Check Setup .................................................................................................................................................................................... 58
Set the Barcode Reading Length ................................................................................................................................................. 58
Matrix 2 of 5 (European Matrix 2 of 5) ................................................................................................................................................. 59
Restore the Default Value ............................................................................................................................................................. 59
Restore the Default Setup Value of Matrix2 of 5 ........................................................................................................................ 59
CodeID Setup .................................................................................................................................................................................. 59
Check Setup .................................................................................................................................................................................... 60
Set the Barcode Reading Length ................................................................................................................................................. 60
Industrial 25 ............................................................................................................................................................................................. 61
Restore the Default Value ............................................................................................................................................................. 61
Allow to Read Deutsche 12 or not ................................................................................................................................................ 61
CodeID Setup .................................................................................................................................................................................. 61
Check Setup .................................................................................................................................................................................... 62
Set the Barcode Reading Length ................................................................................................................................................. 62
Standard 25 ............................................................................................................................................................................................. 63
Restore the Default Value ............................................................................................................................................................. 63
Allow to Read Standard 25 or not ................................................................................................................................................ 63
CodeID Setup .................................................................................................................................................................................. 63
Check Setup .................................................................................................................................................................................... 64
Set the Barcode Reading Length ................................................................................................................................................. 64
Code 39 ................................................................................................................................................................................................... 65
Restore the Default Value ............................................................................................................................................................. 65
Allow to Read Code 39 or not ....................................................................................................................................................... 65
CodeID Setup .................................................................................................................................................................................. 65
Check Setup .................................................................................................................................................................................... 66
Set whether to Send the start and stop character or not .......................................................................................................... 66
Set the Reading Range of ASCII Code ....................................................................................................................................... 66
Set the Barcode Reading Length ................................................................................................................................................. 67
Codabar ................................................................................................................................................................................................... 67
Restore the Default Value ............................................................................................................................................................. 67
Allow to Read Codabar or not ....................................................................................................................................................... 68
CodeID Setup .................................................................................................................................................................................. 68
Check Setup .................................................................................................................................................................................... 68
Start and Stop Character Setup .................................................................................................................................................... 69
Set the Barcode Reading Length ................................................................................................................................................. 69
Code 93 ................................................................................................................................................................................................... 70
Page 8

Restore the Default Value ............................................................................................................................................................. 70
Allow to Read Code 93 or not ....................................................................................................................................................... 70
CodeID Setup .................................................................................................................................................................................. 71
Check Setup .................................................................................................................................................................................... 71
Set the Barcode Reading Length ................................................................................................................................................. 72
Code 11 .................................................................................................................................................................................................... 72
Restore the Default Value ............................................................................................................................................................. 72
Allow to Read Code 11 or not ....................................................................................................................................................... 72
CodeID Setup .................................................................................................................................................................................. 73
Check Setup .................................................................................................................................................................................... 73
Set the Barcode Reading Length ................................................................................................................................................. 74
Plessey .................................................................................................................................................................................................... 75
Restore the Default Value ............................................................................................................................................................. 75
Allow to Read Plessey or not ........................................................................................................................................................ 75
CodeID Setup .................................................................................................................................................................................. 75
Check Setup .................................................................................................................................................................................... 75
Set the Barcode Reading Length ................................................................................................................................................. 76
MSI-Plessey ............................................................................................................................................................................................ 76
Restore the Default Value ............................................................................................................................................................. 76
Allow to Read MSI-Plessey or not ................................................................................................................................................ 77
CodeID Setup .................................................................................................................................................................................. 77
Check Setup .................................................................................................................................................................................... 77
Set the Barcode Reading Length ................................................................................................................................................. 78
GS1 Databar ........................................................................................................................................................................................... 79
Restore the Default Value ............................................................................................................................................................. 79
Allow to Read GS1 Databar or not ............................................................................................................................................... 79
CodeID Setup .................................................................................................................................................................................. 79
PDF417 .................................................................................................................................................................................................... 79
Restore the Default Value ............................................................................................................................................................. 79
Allow to Read PDF417 or not ....................................................................................................................................................... 80
CodeID Setup .................................................................................................................................................................................. 80
MicroPDF417 .................................................................................................................................................................................. 80
Restore the Default Value ............................................................................................................................................................. 80
Allow to Read MicroPDF417 or not .............................................................................................................................................. 80
CodeID Setup .................................................................................................................................................................................. 81
Chapter 7 Appendix ....................................................................................................................................................................................... 82
Default Setup Table ................................................................................................................................................................................ 82
AIM ID Table ................................................................................................ ................................................................ ............................ 90
CodeID Table .......................................................................................................................................................................................... 92
Data Barcode .......................................................................................................................................................................................... 93
Page 9

Save and Abort the Setup ..................................................................................................................................................................... 94
Page 10

Page 11

Preface
Introduction
This manual provides information about using theNLS-HR15 series1D barcode cordedscanner:NLS-HR15XX-3E.
(Hereinafter refer to as “HR15 corded scanner”)
Chapter Descriptions
Chapter1,Getting Started :Generaldescription of HR15 corded scanner includeding all the parameters
of HR15 corded scanner.
Chapter2, General Configuration : This chapter introduces the method of how to set the HR15 corded scanner.
There are two methods, setup barcode and setup command.
Chapter3, Inquiry Command : This chapter introduces how to inquiry and obtain the information of HR15
corded scanner by scanning the setup barcode.
Chapter4, Communication Setup : Serial port parameter setup and USB function setup have been introduced
in this chapter.
Chapter5, Data Format : Introduces how to use the prefix and suffix to satisfy the customers’
requirement to obtaining more barcode data.
Chapter6, Barcode Parameter Setup : In this chapter, all the barcodes which HR15 scanner supports have been
listed, and the revelant parameter setup barcodes have been provided.
Document Set
The documentation set for the NLS-HR15 corded scanner provides information for specific user needs and includes:
NLS-HR15XX-3E Quick Start Guide : Description how to get the HR15 corded scanner up and basic operation.
NLS-HR15XX-3E UserGuide : This is the manual, description how to use and set the HR15 corded
scanner.
Software Utilities User Guide : Description how to use the Newland’s scanner utilities software developed
tool.
1
Page 12
Chapter 1 Getting Started
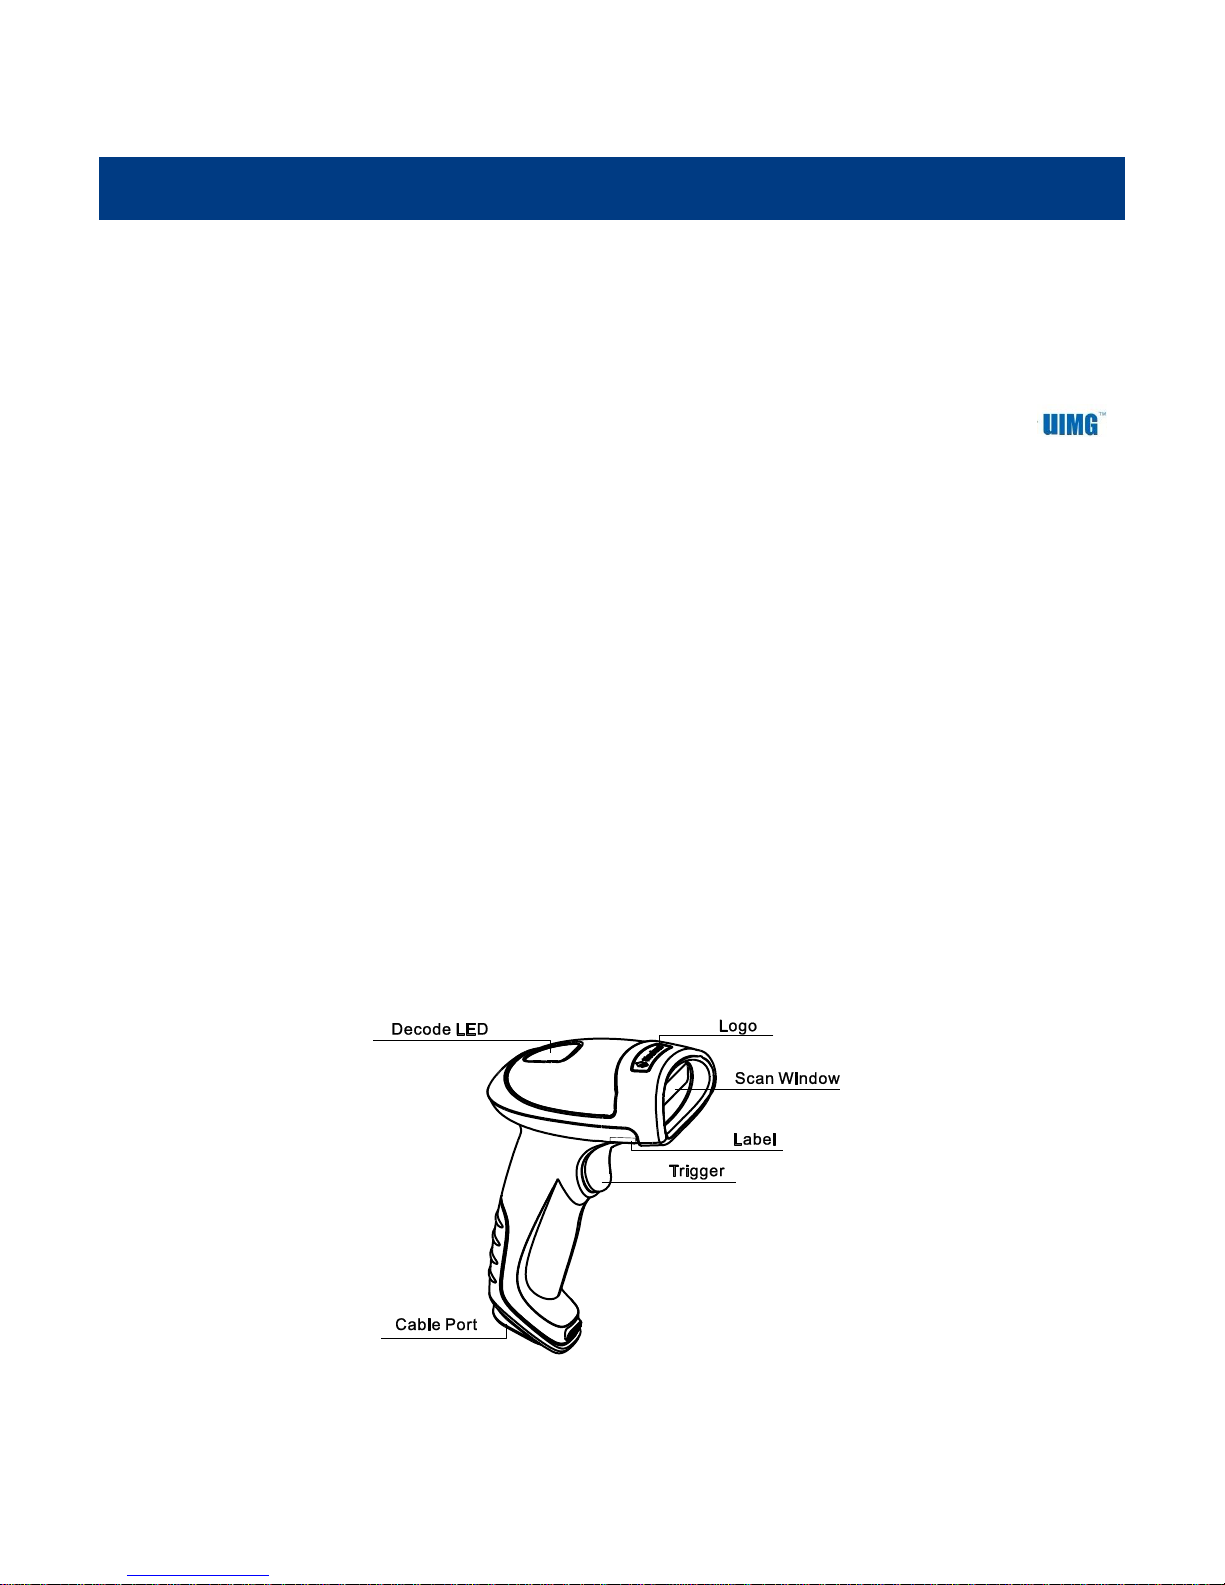
Indicator Description
Red LED : Power Indicator
Green LED : Good read indicator
Introduction
HR15 corded scanner is a type of 1D barcode scanner with excellent performance, except for all the normal 1D barcode, it also
can read the stacked 2D barcode such as PDF417 and the MicroPDF17. Based on the self-independent technology of
robin, HR15 corded scanner is able to perform rapid image acquisitionand and accurate decoding; it can provide the customers
with best service. HR15 corded scanner is designed in accordance with the human engineering, which makes it easier and
.more comfortable to use
The introduction of how to use the HR15 corded scanner is included in this chapter with several pictures, if your have a HR15
corded scanner in your hand, please compare the real scanner with this manual, which will help you to understand this
manulbetter.This chapter is applicable to normal users, maintenance staff and software developer.
Unpacking
Open the package and take out HR15 corded scanner and its accessories. Please check the completeness of all the items
according to the package list, and make sure there are no damaged parts. If any contents are damaged or missing, please keep
the original package and contact your dealer immediately for after-sale service.
Product OverView
The main parts of HR15 are shown in the following picture
2
Page 13
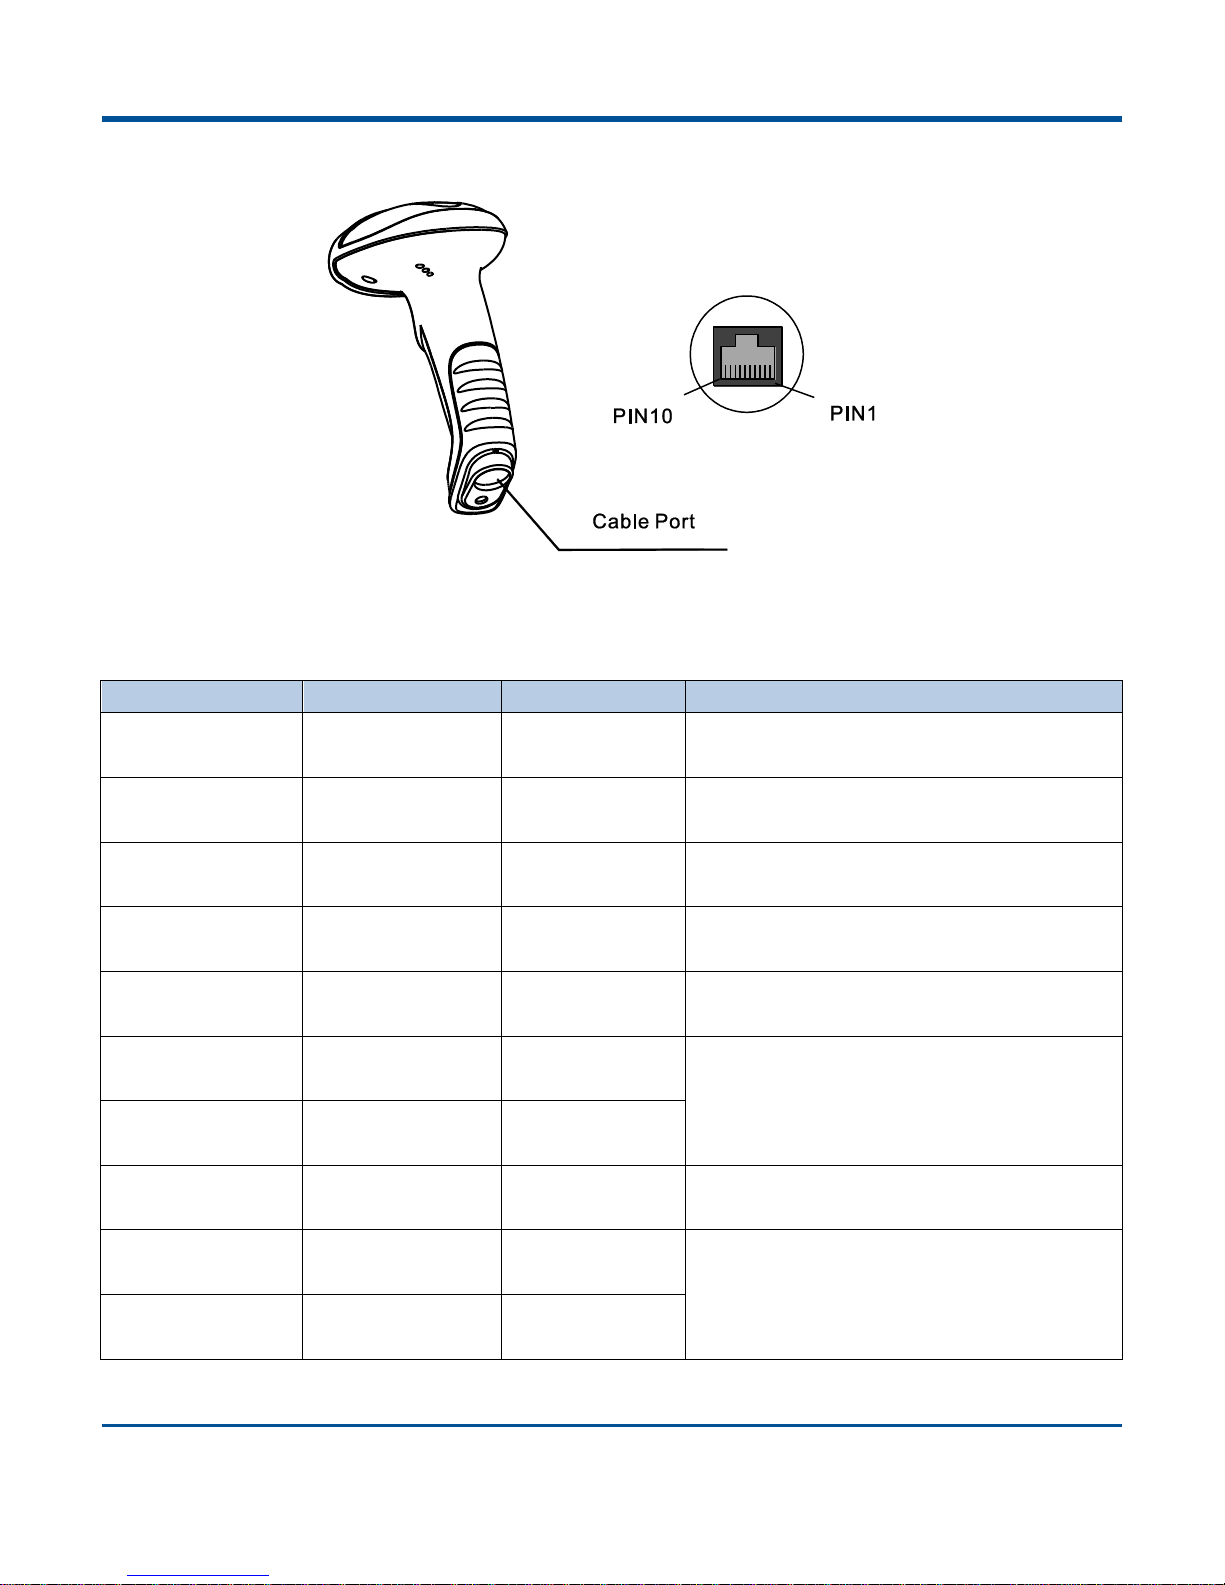
Interface
PIN
Definition
Type
Description
1
N
C -
Null
2
N
C
-
Null
3
V
CC P
Power : +5V
4
T
XD O
RS232 Output
5
R
XD I
RS232 Input
6
CT
S I
Stream Control Signal
7
RT
S O
8
GND P
Ground
9
D- I/O
USB Signal
10
D
+ I/O
Pin assigmentDefinition 1 of HR15 connector (factory default)
3
Page 14
Pin assigmentDefinition 2 of HR15 connector
PIN
Definition
Type
Description
1
CL
K1
I/O Keyboard Clock Signal
2
DATA1
I/O Keyboard Data Signal
3
V
CC P
Power : +5V
4
T
XD O
RS232 Output
5
R
XD I
RS232 Input
6
CL
K2
I/O
PC Clock Signal
7
DATA2
I/O
PC Keyboard Signal
8
GND P
Ground
9
D- I/O
USB Signal
10
D
+ I/O
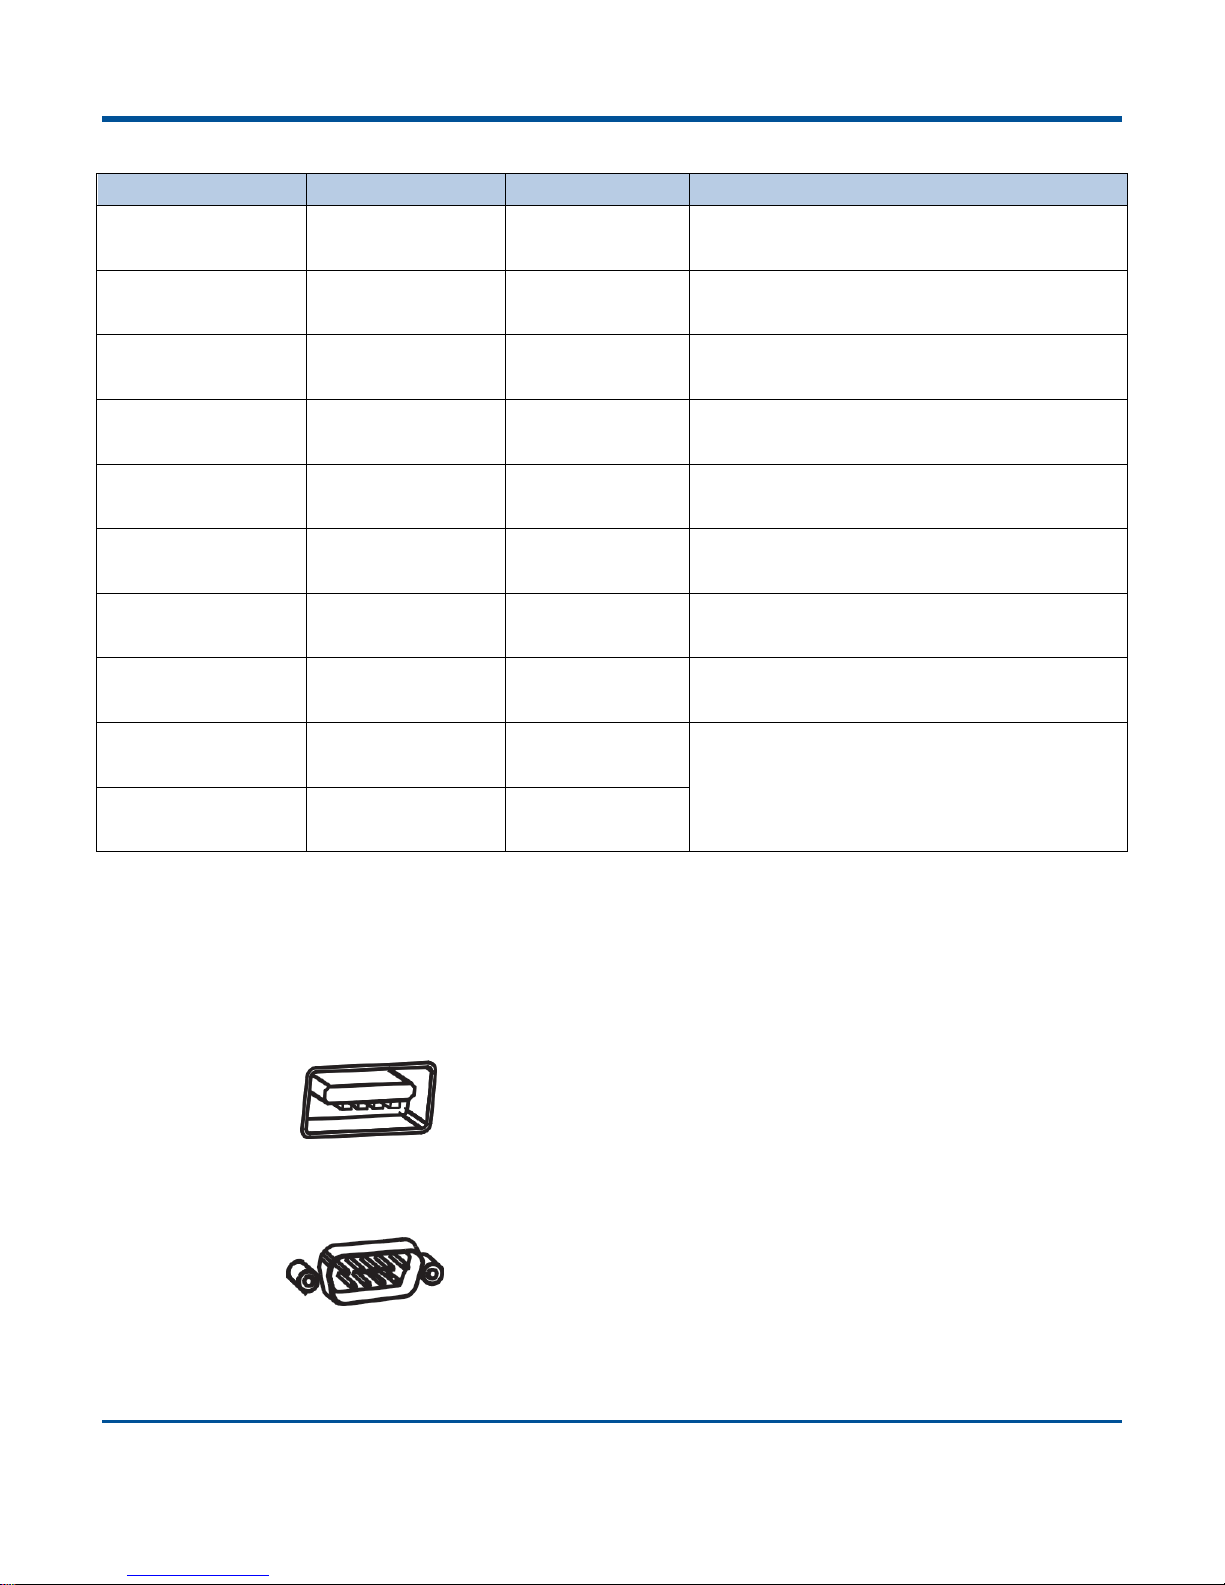
Communication Port
HR15 must be connected with a host for further operation, such as PC, POS.or any intelligent terminal with USB, RS232 or PS/2
interface.
USB
USB interface on the host
RS232
RS232 interface on the host
4
Page 15
PS/2
PS/2 interface on the host
Please check the port on the host and purchase the right cable.
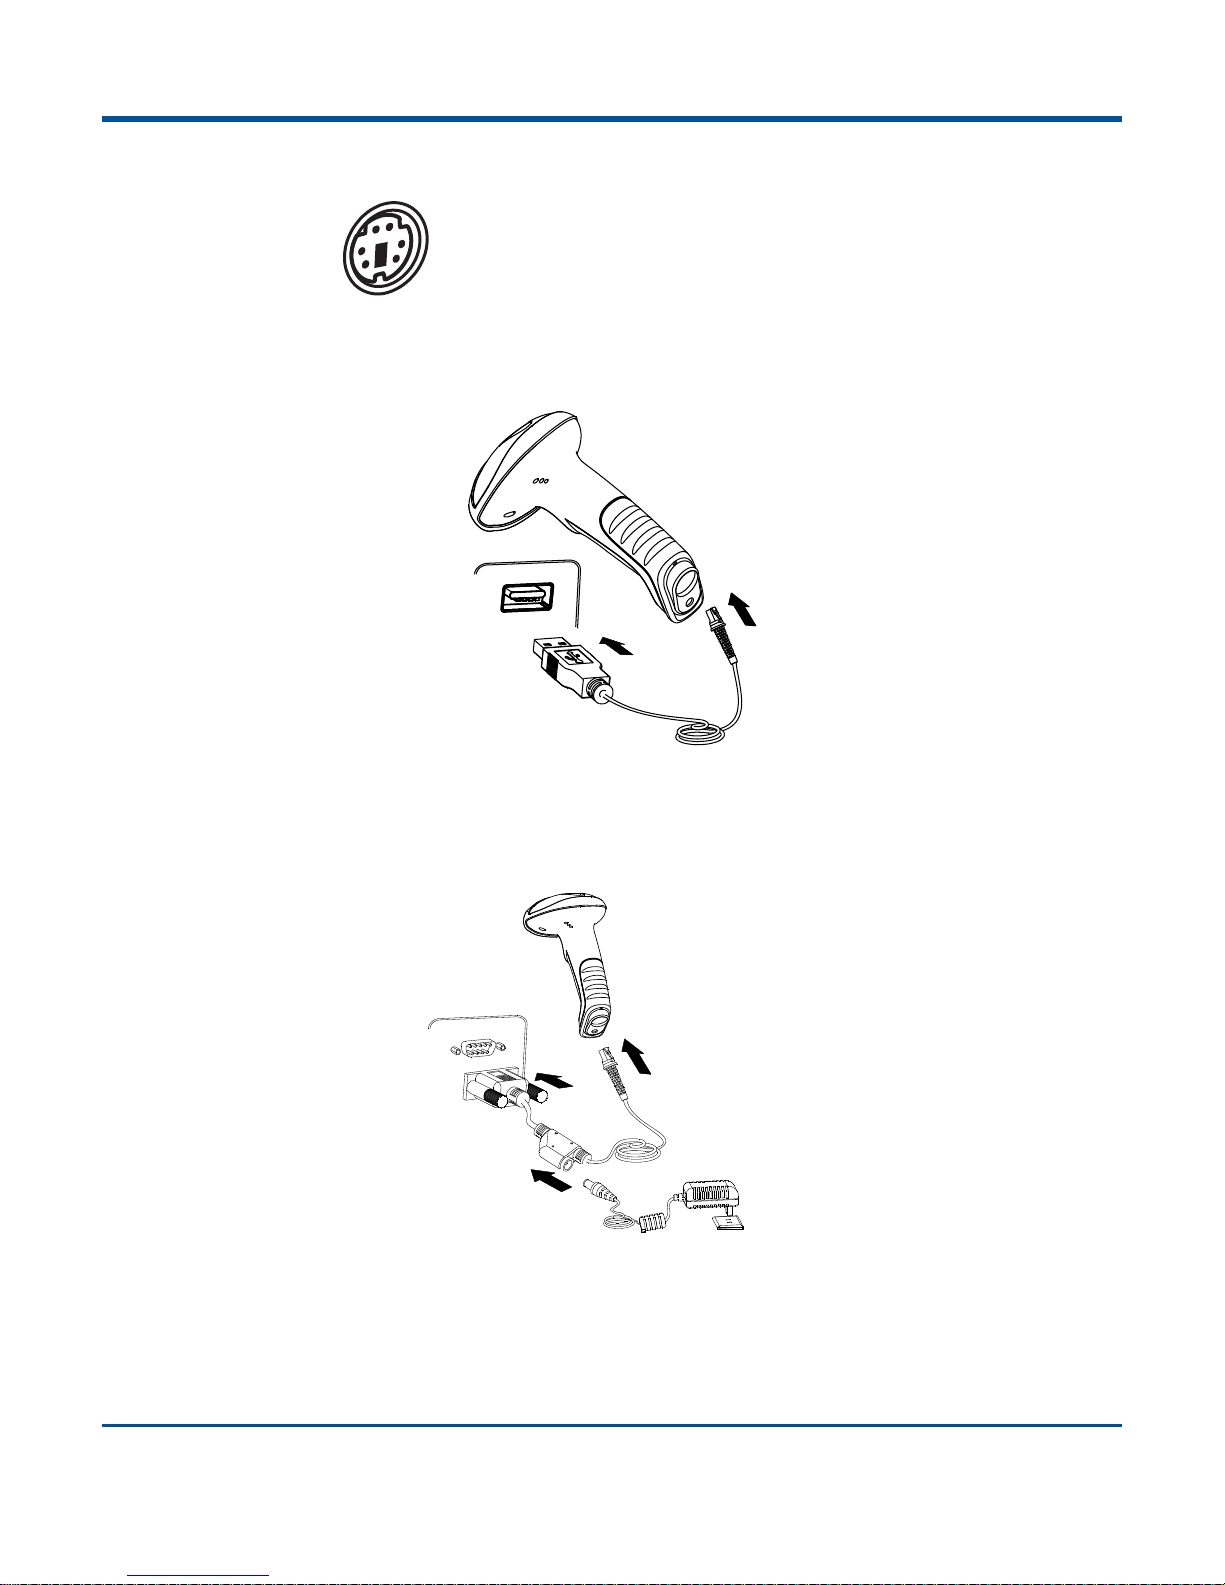
UsingUSB Cable
Connecting the HR15 corded scanner with host through USB cable:
1 Plug the RJ45 connector into HR15 scanner.
2 Plug the USB connector into Host.
Using RS232 Cable
Connecting the HR15 corded scanner with host through RS232 cable:
1 Plug the RJ45 connector into HR15 scanner.
2 Plug the RS232 connector into Host.
3 Connect the RS232 cable with power adapter.
5
Page 16
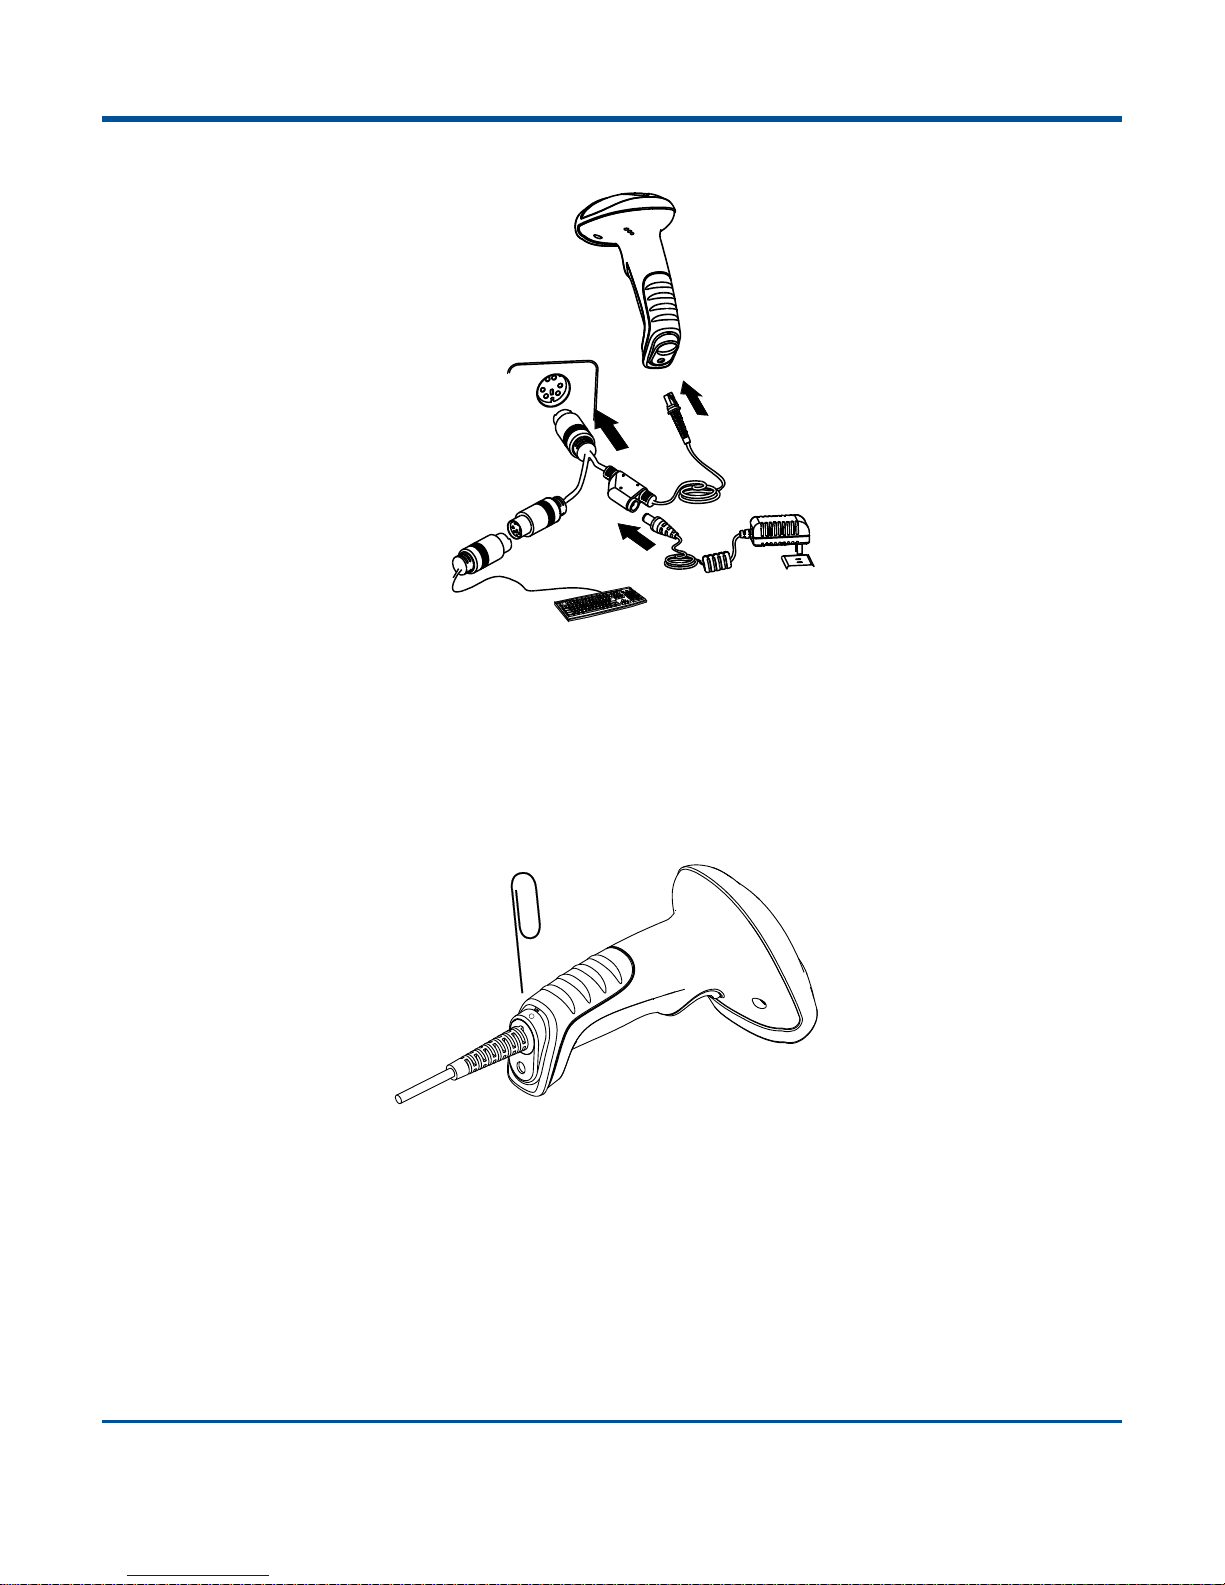
Using PS/2 Cable
Only the HR15XX-33 corded scanner support the PS/2 interface,
1 Plug the RJ45 connector into HR15 scanner.
2 Plug the PS/2 connector into Host.
3 If necessary, please connect the PS/2 cable with power adapter.
4 If necessary, please connect the normal keyboard with PS/2 cable.
Remove the Communication Cable
Follow the figure instruction, use a paper clip or spicule to push into the disassemble hole to remove the cable from HR15.
1 Please remove the power adapter first, if use RS232 or PS/2 cable connects with.
2 Insert and push the spicule into the disassemble hole.
3 Pull out the cable and remove the spicule form the hold.
6
Page 17

Power-on, Power-off, Sleep, Reboot
Power-on
Connect the HR15 with the host, the HR15 will power on automatically (factory default).
Power-off
There is three ways to turn off the scanner :
Remove the cable connected from the HR15.
Remove the cable connected from the Host PC.
Remove the power adapter connected from the RS232 cable.
Sleep
The scanner will become into sleep mode if no scanning is carried out in a period of time.
Reboot
If the HR15 no response or abnormal, please pull out the cable from Host PC then plug again to reboot the HR15.
Reading Window Maintenance
The scanning window should keep clean.
Avoid hard and rough objects to clean the reading window that will easy to cause the damage or scratch.
Use soft brush to remove the stain on the scanning window.
Please use the soft cloth to clean the window, such as glassed cleaning cloth.
It is prohibited to spray liquid on the scanning window.
It is prohibited to use any detergent except for water.
7
Page 18
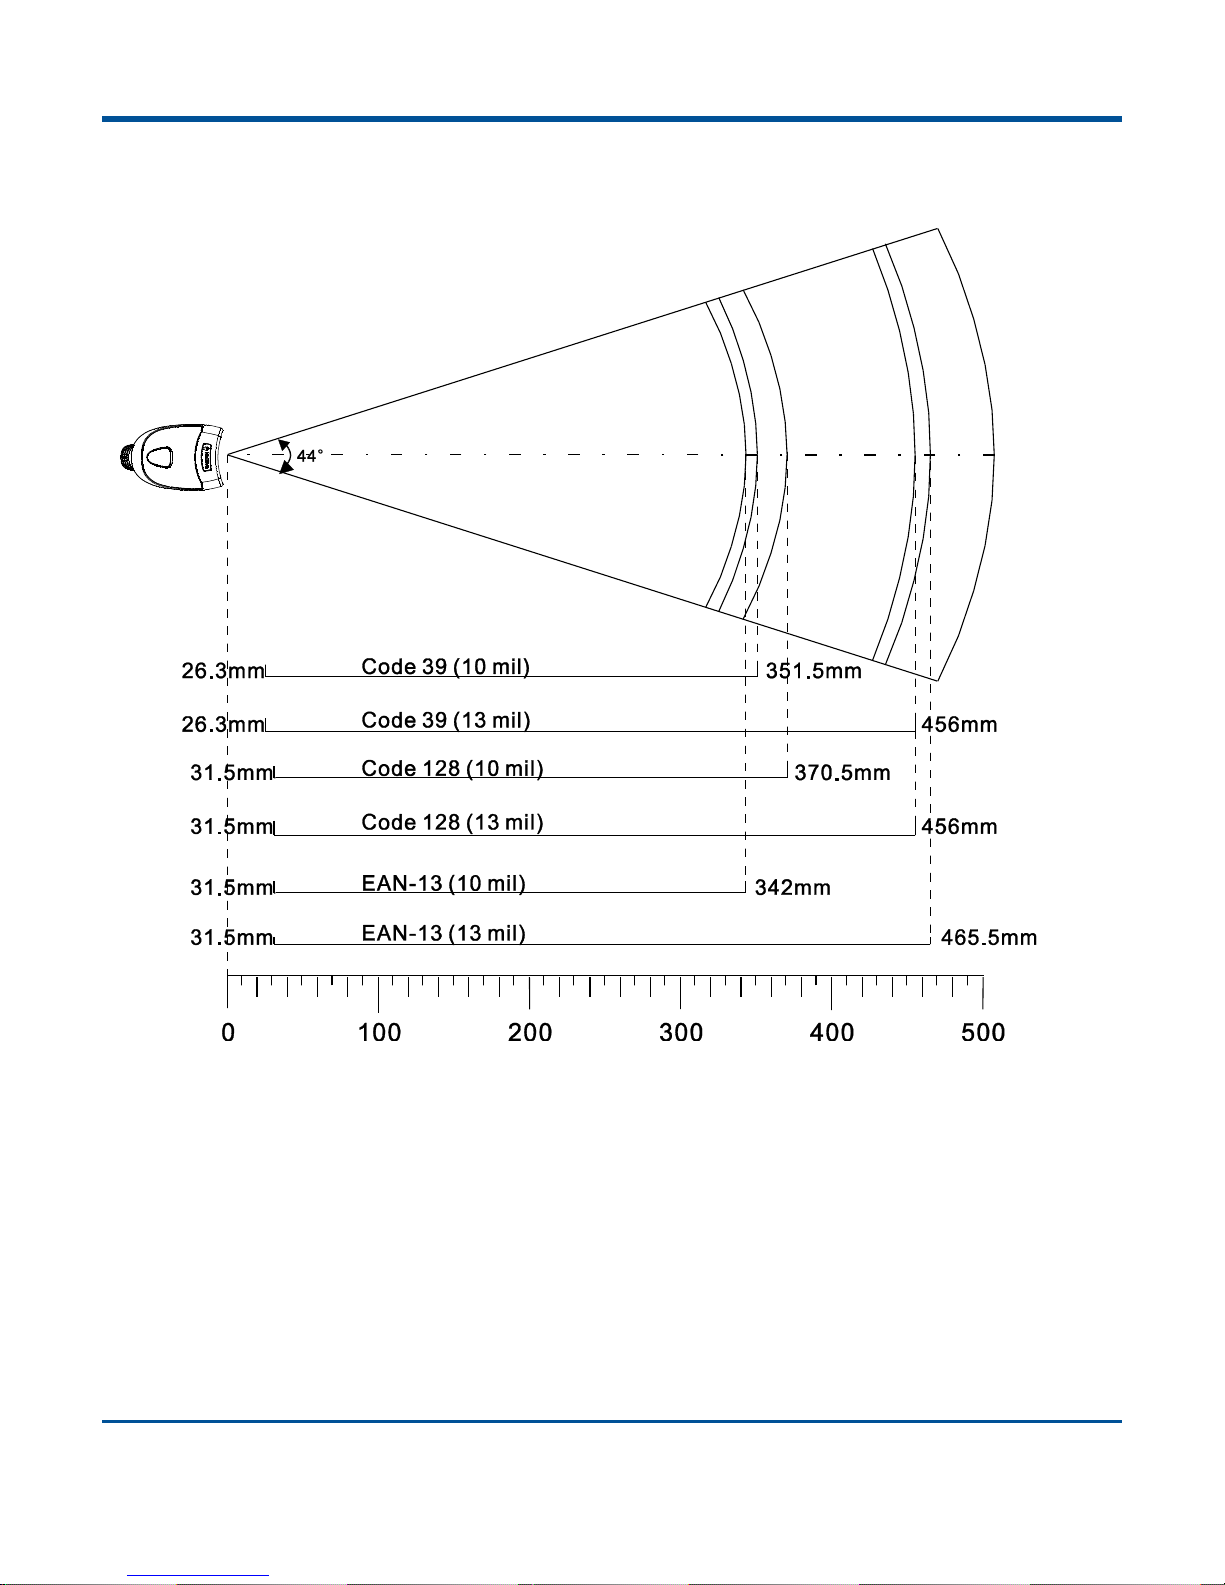
Reading Depth of Field
8
Page 19

Specification
Performance
Light Source
620nm Visible Red LED
Scan Pattern
CCD linear image
Symbologies
Code128, EAN-13, EAN-8, Code39, UPC-A, UPC-E, Codabar, Interleaved 2 of 5,
ISBN, Code 93, UCC/EAN-128, GS1 Databar, PDF417, MicroPDF417, etc.
Resolution
≥ 4 mil
Scan Angle
44°
Reading Angle
44°
Scan Rate
300 scans per second
Minimum Symbol Contrast
20%
Reminder
Beep and LED indicator
Interface
RS-232, USB 1.1, PS2
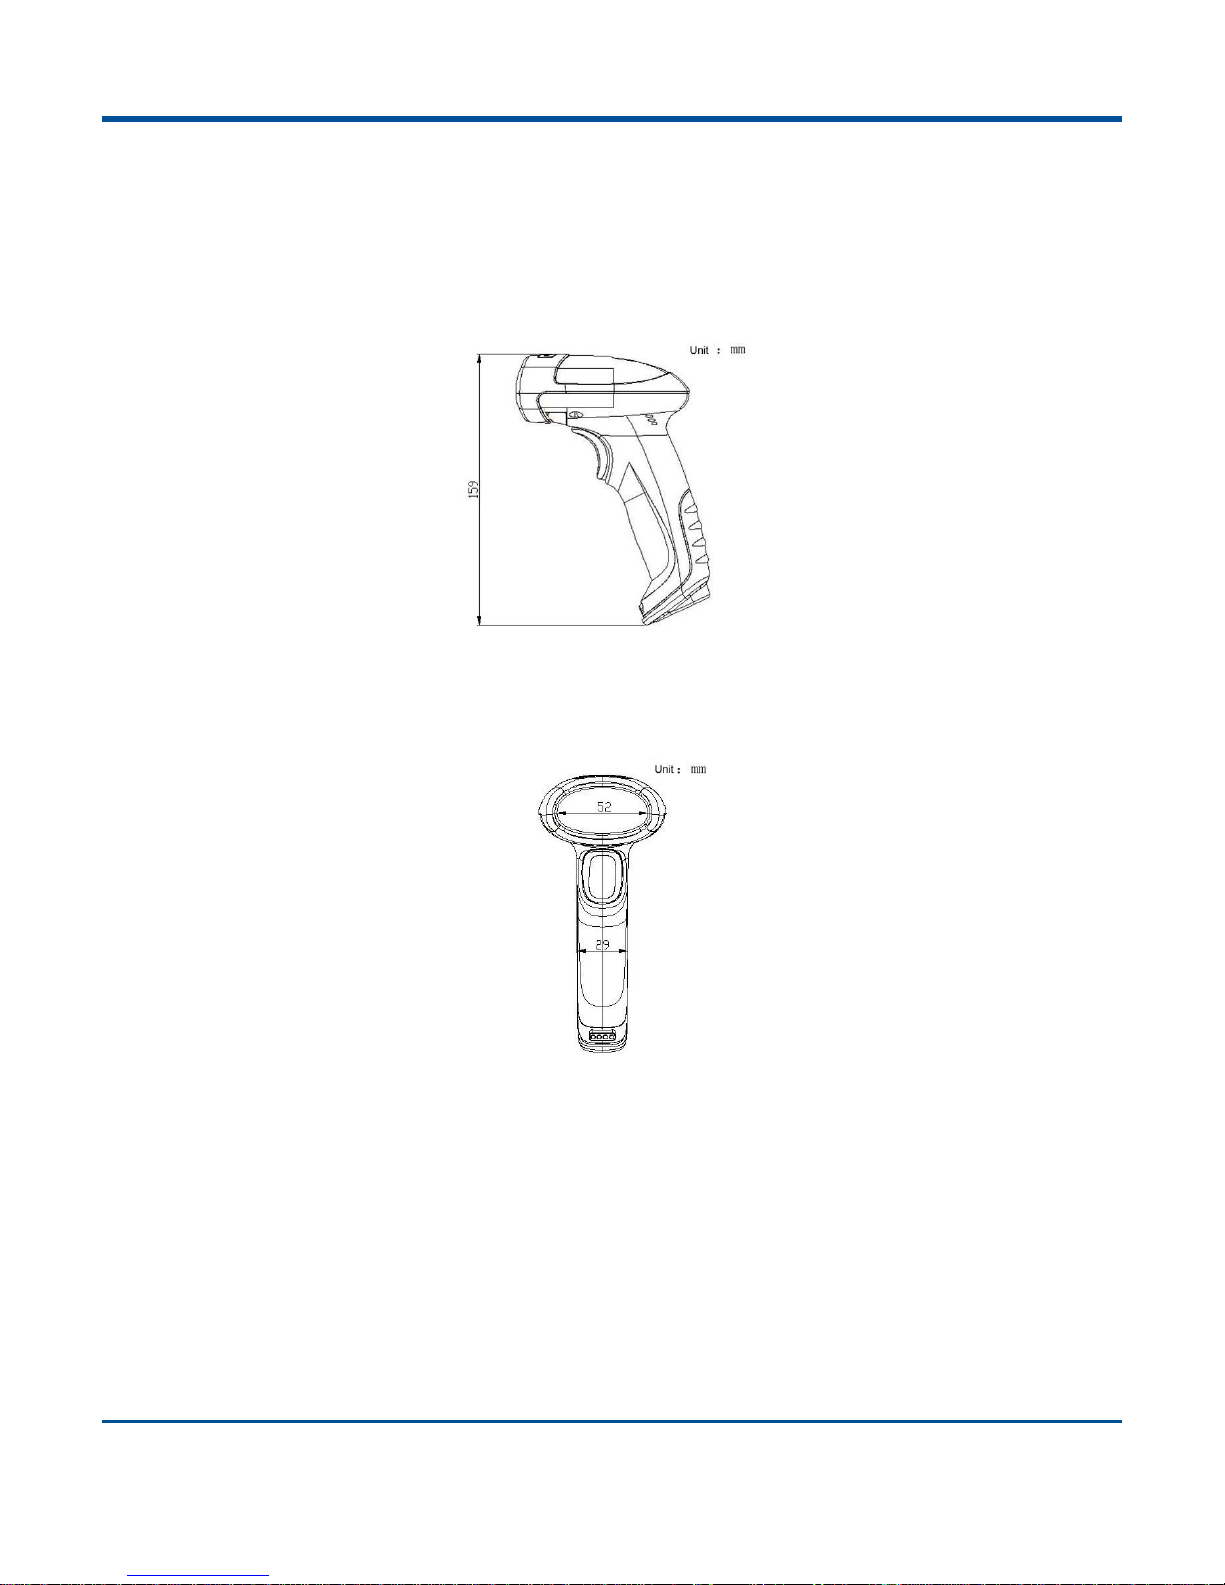
Mechanical
Dimensions of Scanner(L x W x H)
113.5 x 73 x 159 mm
Dimensions of Cradle(L x W x H)
195 x 82.5 x 47 mm
Weight of Corded Scanner
152 g
Reminder
Beep and LED indicator
Power Adaptor
Output: DC5V, ≥1.5A, Input: AC 100~240V, 50~60Hz
Environmental
Operation Temperature
-10°C to 50°C (14°F to 122°F)
Storage Temperature
-20°C to 60°C (-4°F to 140°F)
Humidity
5% ~ 95% (non-condensing)
Static Discharge
±12 kV (Air discharge), ±8 kV (Direct discharge)
Drop
1.5 m drop to concrete
Sealing
IP54
Certificates
FCC Part15 Class B, CE EMC Class B, CCC
Test condition:
Code39, Data length=3bytes,Minimum space width=10mil, Width radio=2.5:1, PCS=0.8, Barcode height=11mm,
Testing distance=120mm,Envirmenttemperature =23℃, Envirment light Illumination = 200 LUX
9
Page 20
Overview
Left View
The picture below is the left view of HR15 scanner.
Front View
The picture below is the front view of HR15 scanner.
Vertical View
The picture below is the vertical view of HR15 scanner.
10
Page 21
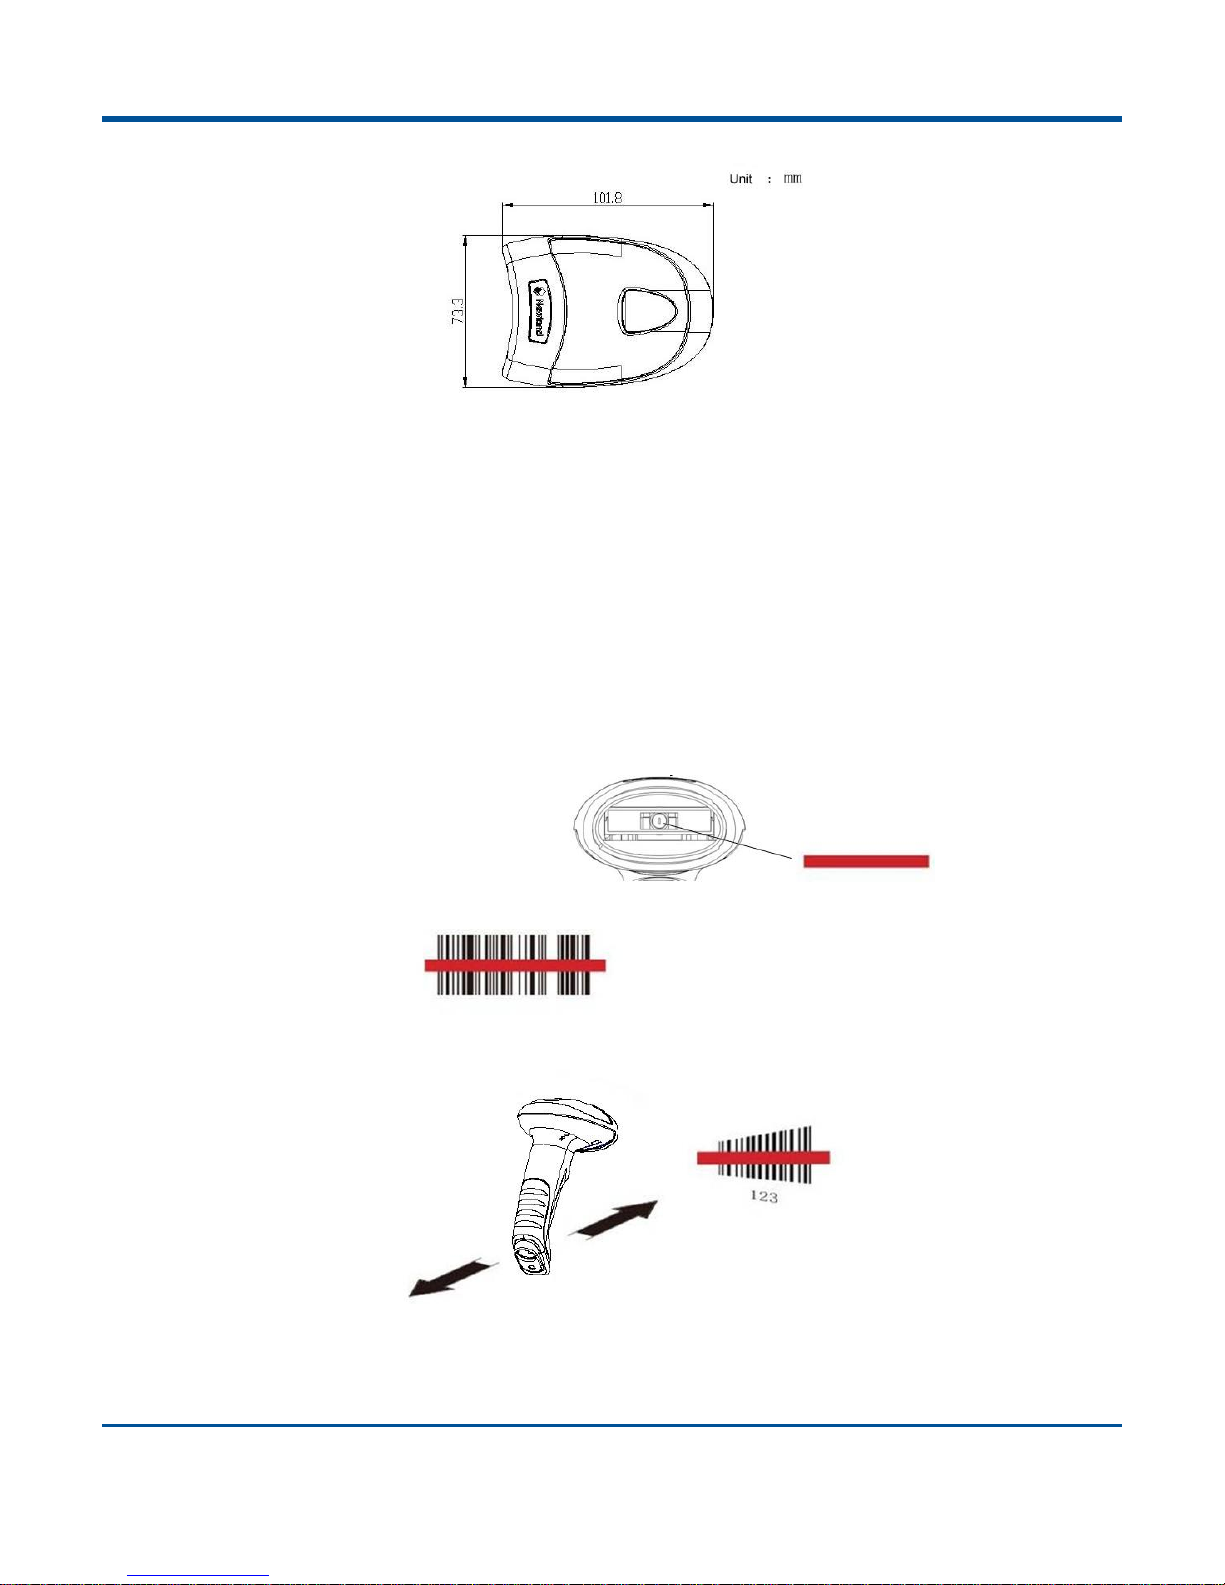
Barcode Reading
Make sure the scanner, data cable and power are properly connectedbefore turn on the power.
Pressing the trigger to activate the illumination light, then the red illuminating line will appear.
For the same batch of barcode, the scanner will keep a very high success ratio in certain distance, which can be
regarded as the optimal scanning distance.order to find the optimal scanning distance.
When the scanner respond with a beep and the red illuminating line goes off, it means the barcode reading is
successful, and the scanner will send the data to the host.
Note: For the same batch of barcode, the scanner will keep a very high success ratio in certain distance, which can be
regared as the optimal scanning distance.
11
Page 22
【Start Setup】
Chapter 2 General Configuration
Introduction
There are two ways to setup the barcode engine.
Setting Barcode
To used reading a series of special barcode to setting the barcode engine. In the following sections, we will introduce the
available set of options and features and provide a corresponding setting code.
Setting Command
To used PC to send the setting command string to setting the barcode engine. In the following chapters, in addition to
setting code, we will introduce the setting of the command string.
Notice: All the setting command will keep in barcode engine except a few temporary setting commands will
disappear after reboot or power off.
Format of Setup Barcode
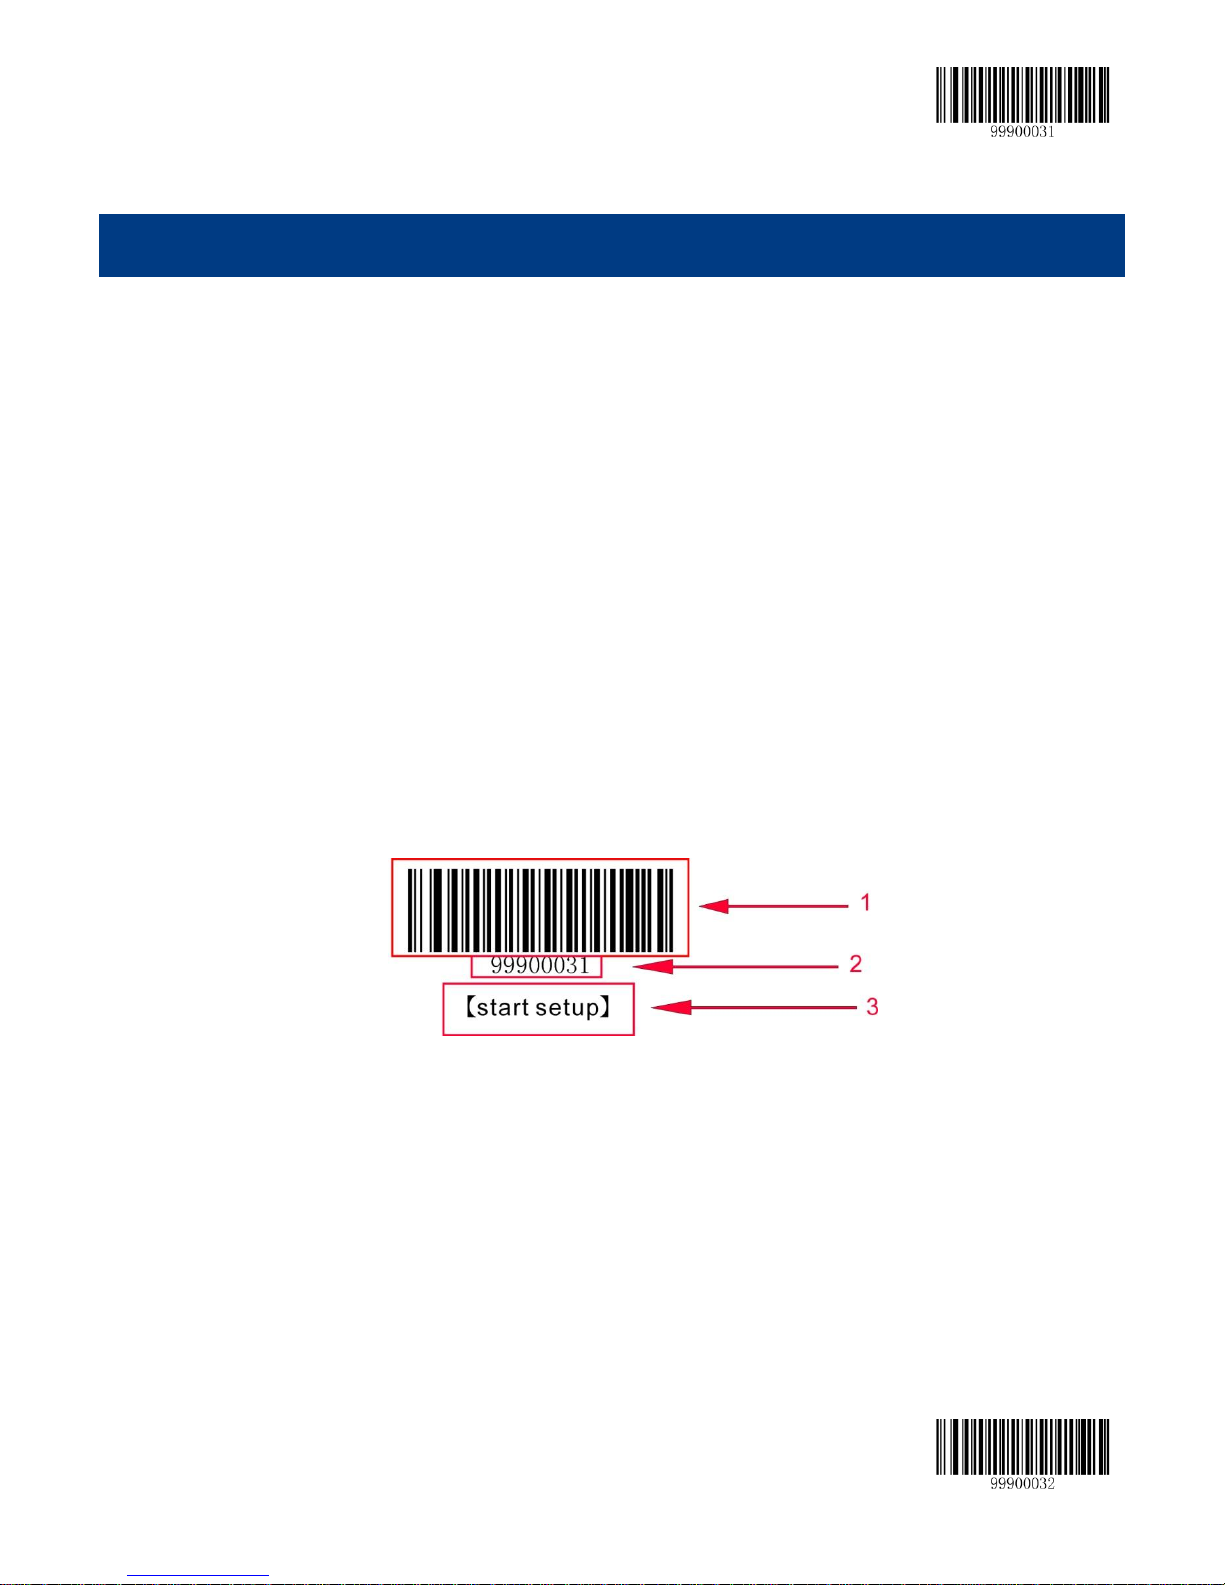
This is the sample of setup barcode.
The setup barcode label is consisted of three parts:
1、 The barcode portion of the setup barcode.
2、 The command description or code string of corresponding to the setup barcode.
3、 The name of the setup barcode or function, such as the function of turn off setup code.
12 【Exit Setup】
Page 23

【Start Setup】
【Send the SettingCommand】
【Do not Send the SettingCommand】
Use the Setting Barcodes
The setup function will be activated by reading the “Start Setup” barcode.The procedure of configurating can be done
by reading more than one setup barcodes.
If any itme or function needs more parameters, such as check byte, please see the last section in this chapter.
The current settingcommand can be send to the host. Accoring to the factory default setting is not able to send the
current setting command to the host.By scanning the barcode:”Send the setting command”, the scanner will enable
the function to send the setting command to the host.
The start setup function is activated in the fartory default setting. Only a small possibility that the data barcode is the
same with the settingcommand, thus,it is not necessary to scan the “Exit Setup” barcode to close the setup mode, to
keep it will not effect the normal operation.
Some functions may adjust the working parameters; the numeric system of parameter is decimal or hexadecimal,
these values are entered by setting barcodes.The data code in the appendix includes all the necessary numerical
values.
In the default mode, the scanner will not send the current settingcommand to the host; in case of a special need, the
customer can set the scanner tosend the setting cpmmand to the host. The function of setup will not be affected
whether the setting command are sending or not. But the setup of “Send the setting command” is only temporarily
effective; the scanner will restore to the state of “do not send the setting command” after reboot or power-off.
Use the Setup Command
The setup command is based on the communication serial port; it is meant to use the visible charaters from 0x20 to 0x7D to
describe all the content.
Setup State
When the function setup is carried out through serial communication mode, the device must be set into the “setup state”; in
such state, the device only accept, process and respond the command from serial communication.
By sending a specified command can let the device enter to the set state. In the setup state to sending the specified
command also allows to exit, the device will self exit from the setup state within 5 seconds did not received any new
【Exit Setup】 13
Page 24

【Start Setup】
command.
Setup Protocol
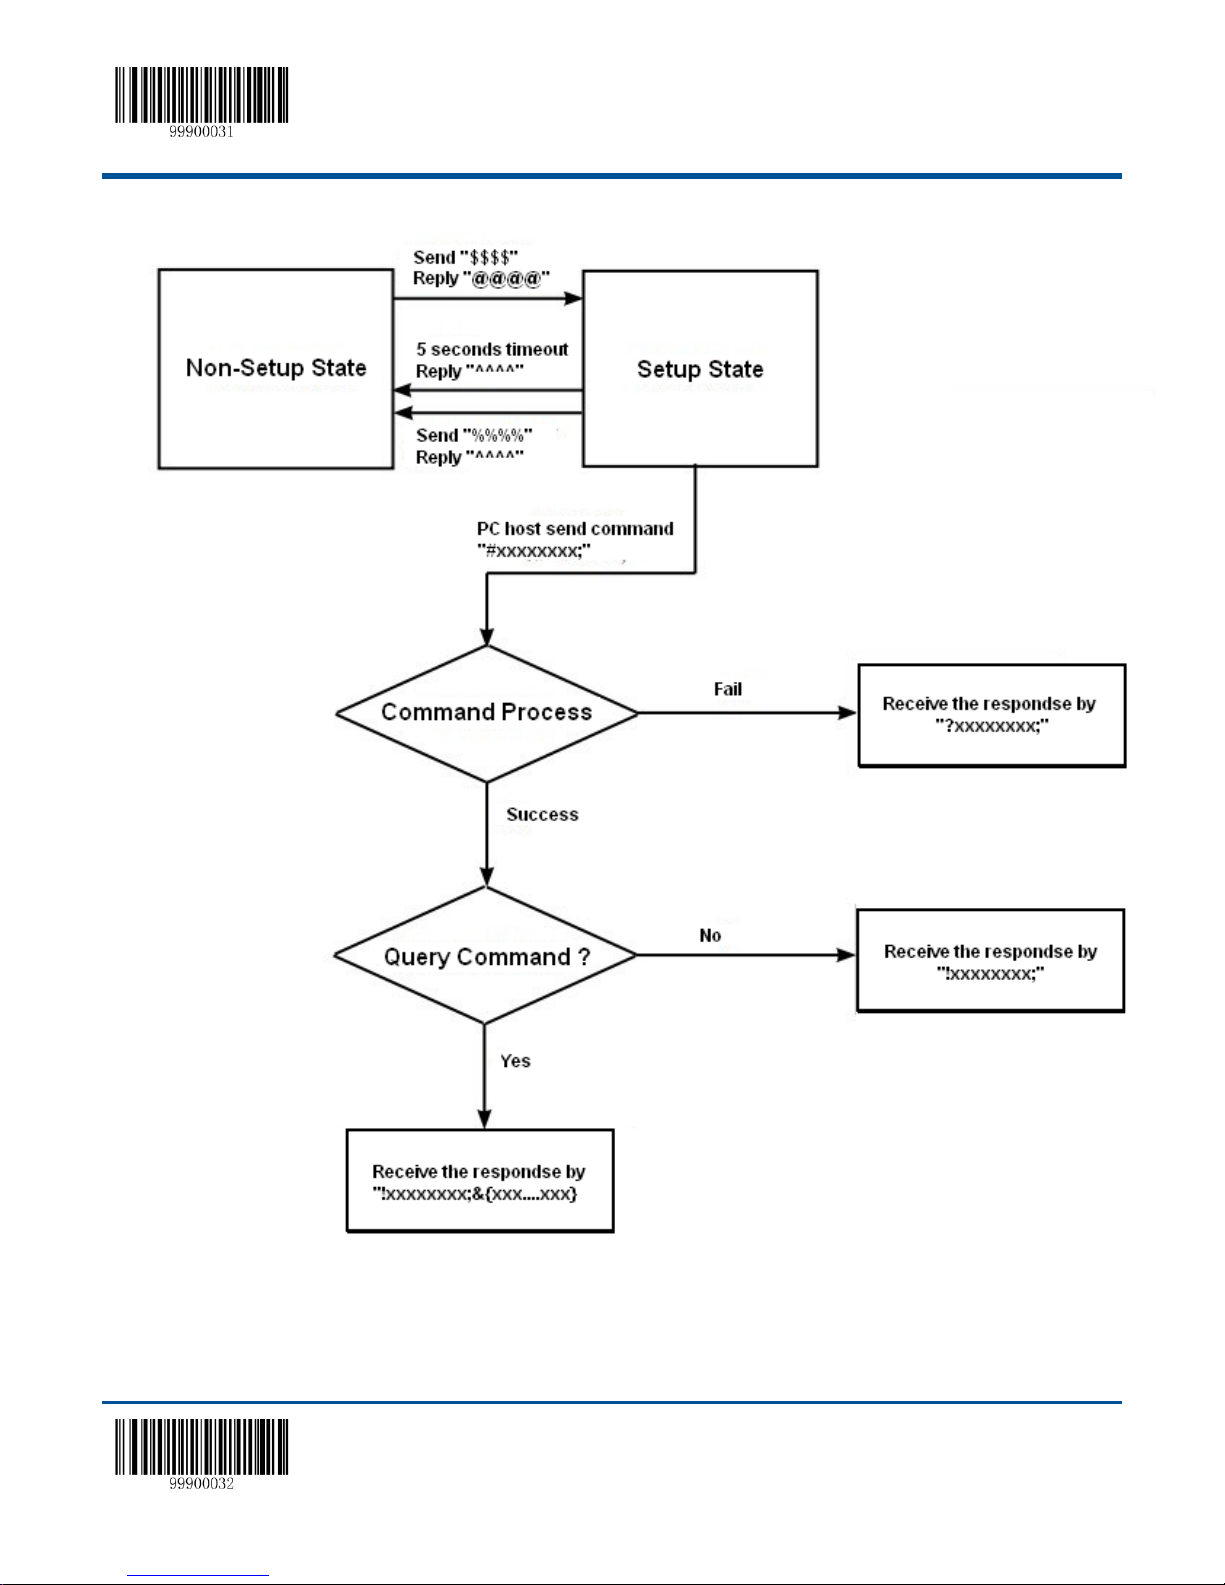
1. Enter to setup state: To send“$$$$”to the scanner,reply“@@@@” when success.
2. Exit fromsetup state: To send“%%%%” to the scanner,reply“^^^^”when success.
3. If you received “^^^^” reply from scanner, that mean the scanner was exit from setup state.
4. The format of command is to add“#”in front of each command, and end by“;”.
For example:“#99900030;”.
5. The scanner will reply a success message, by add “!” in front of setting command and end by “;”.
For example: “!99900030;”.
6. The scanner also will reply anerror message, by add “?” in front of setting command and end by “;”.
For example: “?99900030;”
7. The scanner will reply “!xxxxxxxx;” and contains in "&{" and "}" the query results, when you sending a query command.
For example:
Sending “#99900301;” query command for asking the firmware version.
Received “!99900301;&{Firmware v1.7.5;Decoder v1.00.023.C6;|FD25430B}”.
Description:
The “Firmware v1.7.5;Decoder v1.00.023.C6;|FD25430B” among in "&{" and "}" is the query results. And
“|FD25430B” is the data string CRC32 checksum value.
By definition, if the feedback may contain the invisible character, it will be shown as hexadecimal characters, every two
characters indicate one character value. Such as:
“&{AAAA100423C5008001FF400001FF400001FF400001FF400001FF40000000408000004080000040000000408000
0040800000408006FF40000000408000004080000040800000408006FF400006FF400006FF400006FF400004FF400004F
F400002FF400004FF400004FF400004FF400001FF400000000000006A75667467646E426863657271776C6F766973626
1797A706D5-2000000000000000000000000000000000000000000000000000000000000000000600000FEB2A2F4CCCF
D390ADC8D38FF5E6D99DAA|E1DFA587}”
8. If the setting command contains parameters, then the command will be combined according to the command system
definition.
For example: The combined command string which is stop by 0x0D and 0x0A. The combined sending commands are:
“#99904112;#99900000;#99900015;#99900000;#99900012;#99900020;”.
14 【Exit Setup】
Page 25
【Start Setup】
SetupProcess Flow
【Exit Setup】 15
Page 26

【Start Setup】
【Restore to Factory Default】
【Power Off】
【Reboot】
【Test mode】
Default Setup
Factory Default Setting
All the scanners have the factory default setting, by reading the “Restore to Factory Default” barcode, the scanner will
restore the factory default.
Work Mode Selection
Note:
1. Wake up the scanner please pressing trigger.
2. The work mode is a temporarily setting, the device will restore to the previous mode after reboot or power off.
Reading Mode
Manual Scanning Mode
Default setting, the scanner will begin to read the barcode after the trigger is pressed, it will stop after successful reading or
if the trigger is loosed.
16 【Exit Setup】
Page 27

【Start Setup】
【Manual Scanning】
【Set the Reading Time】
【Auto Scanning Mode】
【Set Barcode Reading Time】
【Not allowed to read the same barcoderepeatedly】
【Allowed to read the same barcoderepeatedly】
【Recounting after the read】
The scanner can set the reading time in the manual scanning mode.
Note: In the manual scanning mode, the unit of barcode scanning time is 1 second. The parameter range from 0 to15
second. 0 means continue scan.
Auto Scanning Mode
Press the trigger after setup, the scanner will automatically startthe next scan after finish a successful reading; the scanner
will stop until the trigger is pressed again. In the default mode, it is not allowed to repeatedly read the same barcode.
In the auto scanning mode, the unit of barcode scanning time is 1 second. The parameter range from 0 to15 second. 0
means continue scan. It is also can set to allowed to scanning barcode repeatedly.
Allowed to Read the Same Barcode Repeatedly
The scanner will begin the next barcode reading automatically after successful reading, until the scanner trigger is
pressed again.
Not Allowed to Read the Same Barcode Repeatedly
【Exit Setup】 17
Page 28

【Start Setup】
【Intermittent Reading】
【Set the Scanning Time Interval】
【Sense Reading】
The scanner will begin the next barcode reading automatically after a successful reading, if the next barcode is same
with last one, the scanner will discard the barcode, and waiting for the next different barcode. This setting can be stop
when the scanner trigger be pressed again.
Recounting After Successful Reading
Setup the scanner recount the reading timer after successful a barcode reading.
Intermittent Reading Mode
Device will intermittent reading the barcode. Whether reading successful or not, the reading twice intervals are fixed,
intermittent time default value is 1sec, this value can be change. The length of reading time is fixed on 100 ms.
Note: The time interval is counted in units of 500ms, which can be set in 15 levels (from 01-15). For example
Example:
The steps of set the time interval to 5000ms.
1. Read the “Start Setup” barcode.
2. Read the “Set the Scanning Time Interval” barcode.
3. Read the numeric “1” and ’0” barcode.
4. Read the “Exit Setup” barcode.
Sense Reading Mode
The device do not need to trigger the scan, and will auto detecting the scan environment changed to start to reading. The
reading finished, device will turn to monitoring state to waiting for the next changes in the environment. The surrounding
environment sensor sensitivity can be setup. During this mode, click the trigger button can also start reading..
18 【Exit Setup】
Page 29

【Start Setup】
【Set the Barcode Reading Time】
【Set the Scanning Time Intervals】
【High Sensitivity】
【Low Sensitivity】
【Medium Sensitivity】
【Custom Sensitivity】
In the sensing reading mode, the scanner can set the reading time. in the unit of 1 second, the parameter rangs from
0-15sec, 0 means non-stop. The scanner also can set the time interval in the interval reading mode (stable sensing reading
time). Interval time is in the unit of 500ms, which can be set in 15 levels (from 01-15).
The customer can select the sensitity according to the environmrnt, in order to increase the reading efficiency.
Sensitivity Setup in the Sense Mode
It can be set in 16 levels from 0 to F, the samller the value, the higher the sensibility.
Example:
The steps of set the sensibility to level 5.
1. Read the “Start Setup”barcode.
2. Read the “Custom Sensibility” barcode.
3. Read the numeric “5” barcode.
4. Read the “Exit Setup” barcode.
Continuous Reading Mode
The device going to continuous reading without triggered. After successful barcode reading, the scanner will become
standby, and keep doing same loop.
【Exit Setup】 19
Page 30

【Start Setup】
【Continuous Reading】
【Time Interval of Scanning】
【Extended Sense Reading】
【Set the Barcode Reading Time】
【Set the Scanning Time Intervals】
The scanner can set the time interval of scanning in the continuous reading mode.
Note:In the continuous reading mode, the time interval of scanning is in unit of 500ms, the parameter ranges from 0 to
7500ms
Extended Sense Reading Mode
The device will to check the environmental change in front of the scanning window. It will delay 200ms before the scanner
begin to read. After reading the barcode, the scanner will stop and stay in the checking mode, waitng for the next
environment change.
In the extended sense reading mode, the scanner can set the barcode reading time and the time intervals.
In the extended sense reading mode, the barcode reading time takes 2sec as the unit, the parameter range is 0-30sec, 0
means non-stop.The time interval takes 200ms as the unit, the parameter ranges from 0 to 300ms.
Command Triggered Reading Mode
After setup, to begin triggered scanning by sending the stop command in the terminal (such as PC) or reading the “Begin
Simulating Trigger”. If scanning is successful, then the data will be sent back. The scanner will stop automatically. If it is not
successful, the scanner will keep scanning, until the command of stop scanning is received.
To stop barcode scanning by sending the stop command in the terminal (such as PC) or reading the “Stop Simulating
Trigger”, and require a 2-Digit character passback(such as 0A,0X,etc.,)
20 【Exit Setup】
Page 31

【Start Setup】
【Begin Simulating Trigger】
【Commnad Triggered Scanning】
【Stop Simulating Trigger】
【Set the Character to Describe Unsuccessful Reading】
【Set Security Level to 1】
【Set Security Level to 3】
【Set Security Level to 2】
【Set Security Level to 4
【Turn off Decoding Audio】
【Intermediate Frequency - Weak】
If the reading fails, the scanner will send a symbol to describe that the reading is not successful. Customer can set this
symbol.
Security Level Setup
This value indicates the number of times to decode before correct reading of the confirmation code, the higher value
indicated the wrong decoded rate is lower and slower decode speed, on the contrary, faster the decode speed.
Decoding Sound Setup
【Exit Setup】 21
Page 32

【Start Setup】
【High Frequency - Laud】
【Low Frequency - Laud】
【High Frequency - Median】
【Low Frequency - Weak】
【High Frequency - Weak】
【150ms Sound Length】
【Intermediate Frequency - Laud】
【100ms Sound Length】
【Intermediate Frequency - Median】
【50ms Sound Length】
【Active Temporary Mute】
【Exit Temporary Mute】
Other Setup
Activate/Abort Temporary Mute
22 【Exit Setup】
Page 33

【Start Setup】
【Inquire all the Information】
【Inquire the Release Date】
【Inquire the Firmware Information】
【Inquire the Product Name】
【Inquire the Serial Number】
Chapter 3 Inquiry Command
Introduction
In order to inquire, the HR15 cradle information can feed back to the host by reading the setup barcode.
【Exit Setup】 23
Page 34

【Start Setup】
【9600】
【1200】
【2400】
【4800】
【14400】
【19200】
【38400】
【57600】
【115200】
Chapter 4 Communication Setup
Serial Port Setup
Baud Rate Setup
When the scanner connects with host by serial port, both sides should set the same parameters in order to guarantee the
smooth communication, the baud reta (transmission speed) of communication is necessary.
24 【Exit Setup】
Page 35

【Start Setup】
【No Check】
【Even Check】
【Odd Check】
【1 Stop Bit】
【2 Stop bits】
No Flow Control
CTS Flow Control
RTS Flow Control
RTS_CTS Flow Control
8 Data Bits
Check Setup
Stop Bit
Flow Control Setup
Data Bit
【Exit Setup】 25
Page 36
【Start Setup】
USB Virtual Keyboard Function
8 Data Bits, no Check, 2 Stop Bit
8 Data Bits, no Check, 1 Stop Bit
8 Data Bits, Even Check, 2 Stop Bit
8 Data Bits, Even Check, 1 Stop Bit
8 Data Bits, Odd Check, 2 Stop Bit
8 Data Bits, Odd Check, 1 Stop Bit
7 Data Bits, Even Check, 2 Stop Bit
7 Data Bits
7 Data Bits, Odd Check, 2 Stop Bit
7 Data Bits, Even Check, 1 Stop Bit
7 Data Bits, Odd Check, 2 Stop Bit
USB Function Setup
USB Virtual Keyboard Function
26 【Exit Setup】
Page 37

【Start Setup】
USB Virtual Serial Port Function
USB Virtual Serial Port Function
【Exit Setup】 27
Page 38

【Start Setup】
1st American English
7th Italy
2nd Japanese
8th Norway
3rd Danish
9th Spanish
4th Finland
10th Turkey Q
5th France
11st Britain
6th Turkey F
Keyboard Function Setup
Keyboard Layout
Set the Delay between Characters
The range of the delay time between characters is from 0 to 75 ms, it takes 5ms as one level, totally 15 levels. The default
value is 0ms.
28 【Exit Setup】
Page 39

【Start Setup】
Delay Setup Between Characters
No Conversion
All Lowercase Letter
All Capital Letter
Case the Opposite
Character Conversion
【Exit Setup】 29
Page 40

【Start Setup】
CodeID+Custom+AIMID
Custom+CodeID+AIMID
Chapter 5 Data Format Setup
Introduction
After successful barcode reading, the customer will receive a string of data which can be numbers, English characters
symbols and so on, this string of data is the data information included in the barcode.
The barcode data information may not be enough in the application, or the data included in the barcode can not meet your
requirement.If you want to know from which type of barcode comes out this string of data, or in which date the barcode
data is scanned, or you hope that the text in which the barcode is recorded can perform automatical change lines after one
barcode scanning is finished, but these information may not be included in the barcode data.
Adding these information into the barcode will increase the barcode length and make it unflexible, thus, this method does
not deserve recommendation. Then we thought about to add something before or after the barcode data, which can be
added or shielded according to the requirement. The things we add are the prefix and suffix of barcode data. This method
can help to meet the requirement and it is not necessary to change the barcode.
Note: the barcode processing step: to add prefix and suffix first (except for the end mark suffix), then the end mark suffix.
Prefix Sequence Setup
Custom Prefix
Add Custom Prefix or Not
The custom prefix will add the customer-defined character string before the decoding information, the length of character
string should not more than 10.
For example, it is allowed to add custom prefix and set the prefix to character string “AB”, by reading the barcode with data
“123”, the scanner adds ”AB” before “123, and the host will receive “AB123”.
30 【Exit Setup】
Page 41

【Start Setup】
It is not Allow to Add Custom Prefix
Allow to Add Custom Prefix
Set custom prefixes
It is not Allow to Add AIMID Prefix
Allow to Add AIMID Prefix
Define the Custom Prefix
Read the “Set the Custom Prefix” first, and then read the hexadecimal value of every byte of the prefix character string
which will be set according to priority.
For example: set the custome prefix to “CODE” (the hexadecimal value is 0x43/0x4F/0x44/0x45)
1. Read the “Start Setup” barcode.
2. Read the ”Set the Custom Prefix” barcode.
3. Read the following number code:“4”,“3”,“4”,“F”,“4”,“4”,“4”,“5”
4. Read the “Save” barcode.
5. Read the “Exit Setup”barcode.
After the setup of “it is allowed to add custom profix”is finished, by reading any barcode, the scanner will add custom prefix
character string “CODE” before the data.
AIM ID Prefix
AIM is abbreviation of”Automatic Identification Manufacturers”, AIMID defines the identifier for every kind of standard
barcode, see the appendix. After decoding, the scanner can add the identifier before the barcode data, which can be
regarded as AIMID prefix.
Code ID Prefix
Except for using AIM prefix to identify different barcode, the customers also can use CodeID prefix to perform the same
function. Different from the AIM prefix, the customer can define the CodeId prefix corresponding to every kind of barcode.
The CodeID of all the barcodes includes one or two characters, which must be alphabet and can not be set as
【Exit Setup】 31
Page 42

【Start Setup】
It is not Allow to Add CodeID Prefix
Restore the Default CodeID
Allow to Add CodeID Prefix
It is not Allow to Add Custom Suffix
Allow to Add Custom Suffix
Set the Custom suffix
numbers, invisible character or interpunction.
Custom Suffix
Add Custom suffix or Not
The custom suffix will add the customer-defined character string after the decoding information.
For example, it is allowed to add custom suffix and set the suffix to character string “AB”, by reading the barcode with data
“123”, the scanner adds ”AB” after “123, and the host will receive “AB123”
Define the Custom suffix
Read the “Set the Custom suffix” first, and then read the hexadecimal value of every byte of the suffix character string
which will be set, according to priority.
For example: Set the custome suffix to “AGE” (the hexadecimal value is 0x41/0x47/0x45)
1. Read the “Start Setup” barcode.
2. Read the “Set the Custom Suffix” barcode.
3. Read the following number code:“4”“1”“4”“7”“4”“5”
4. Read the “Save” barcode.
5. Read the “Exit Setup” barcode.
32 【Exit Setup】
Page 43

【Start Setup】
It is not Allow to Add End Mark Suffix
Allow to Add End Mark Suffix
Set the end mark suffix to 0x0D, ,and make it can be
sent
Set the End Mark Suffix
Set the end mark suffix to 0x0D,0x0A ,and make it
can be sent
After the setup of “it is allowed to add custom suffix”is finished, by reading any barcode, the scanner will add custom suffix
character string “AGE” after the data.
End Mark Suffix
Add End Mark Suffix or Not
End mark suffix is used to declear the end of a intact data information, which must be the last part of the data, no other
data will be added behind it.
The content, decoding informatuon and prefix of custom suffix can be formated, but the end mark suffix can not, and this is
the fundamental differences between end mark suffix and custom suffix.
Define the End Mark Suffix
Read the “Define the End Mark Suffix” first, and then read the hexadecimal value of every byte of the suffix character
string which will be set, according to priority.
For Example: Set the end mark of Windows Operation System to “newline”
1. Read the “Start Setup” barcode.
2. Read the ”Set the End Mark Suffix” barcode.
3. Read the “Set the end mark suffix to 0x0D,0x0A ,and make it can be sent”.
4. Read the “Save” barcode.
5. Read the “Exit Setup” barcode.
【Exit Setup】 33
Page 44

【Start Setup】
After setup of ”it is allowed to add end mark suffix” is finished, by reading any barcode, the scanner will add newline after
the final data.
34 【Exit Setup】
Page 45

【Start Setup】
Restore the Default Setup Value of Code 128
Allow to Read Code 128
Prohibit Reading Code 128
CodeID Setup
Chapter 6 Barcode Parameter Setup
Introduction
Every kind of barcode has its own special character; the customer can adjust the scanner to suit the character changes by
the setup barcode introduced in this chapter. The customer can also forbid the scanner to read the barcode types which
are not used in order to enhance its working performance.
Code 128
Restore Default Value
By reading the barcode, the parameter setup of Code 128 will be restored to the factory default state.
Allow to Read Code 128 or not
Note:the scanner will become unable to read Code 128 by reading the setup barcode “Prohibit Reading Code 128”, thus, if
the scanner is unable to read the Code128, please try to read the setuo barcode “allow to read code 128”.
Code ID Setup
To activate the setup function by reading “CodeID setup”, then read the hexadcimal value inaccordance with the character
which will be set to the CodeID.
【Exit Setup】 35
Page 46

【Start Setup】
Set the Minimum Length Limit
Set the Maximum Length Limit
Example: Set the CodeID of Code 128 to “p” (the hexadcimal value is 0x70):
1. Read the “Start Setup” barcode.
2. Read the “CodeID Setup” barcode.
3. Read the numeric barcode “7”, “0” (see the appendix—numeric barcode)
4. Read the ”Save” (see the appendix—numeric barcode)
5. Read the “Exit Setup” barcode.
Set the Barcode Reading Length Limit
The scanner is only able to read the Code 128 with tramsmission content length falls in the limited range, the range is
consisted of the maximum value and minimum value in units of byte (the maximum value and minimum value also
included), the Code 128 exceeds the range can not be read or transmitted.
Read the barcode of “Set the Minimum Length Limit” to adjust the minimum length limit
Read the barcode of “Set the Maximum Length Limit” to adjust the maximum length limit
Note:the maximum length limit of any 1D barcode must not exceed 255, if the maximum length is shorter than the
minimum length, then the scanner is only able to read the barcodes with the minimum length and the the
maximum length; if the maximum length equals to the minimum length, then the scanner is only able to read the
barcode with such length.
Example: Set the scanner read the Code128 with barcode length between 8 to 12 characters.
1. Read the “Stat Setup” barcode.
2. Read the barcode of “Set the Minimum Length Limit”.
3. Read the numeric barcode “8”, (see the appendix—numeric barcode)
4. Read the ”Save” barcode.(see the appendix—numeric barcode)
5. Read the barcode of “Set the Maximum Length Limit”.
6. Read the numeric barcode “1”.
7. Read the numeric barcode “2”.
8. Read the ”Save” barcode.(see the appendix—numeric barcode)
9. Read the “Exit Setup” barcode.
36 【Exit Setup】
Page 47

【Start Setup】
Restore the Default Setup Value of UCC/EAN-128
Allow to Read UCC/EAN-128
Prohibit Reading UCC/EAN-128
CodeID Setup
UCC/EAN-128
Restore Default Value
By reading the barcode, the parameter setup of UCC/EAN-128 will be restored to the factory default state.
Allow to Read UCC/EAN-128 or not
Note: the scanner will become unable to read UCC/EAN-128 by reading the setup barcode “Prohibit Reading
UCC/EAN-128”, thus, if the scanner is unable to read the UCC/EAN-128, please try to read the setuo barcode “allow to
read UCC/EAN-128”.
Code ID Setup
To activate the setup function by reading “CodeID setup”, then read the hexadcimal value inaccordance with the character
which will be set to the CodeID.
Example: Set the CodeID of UCC/EAN-128 to “p” (the hexadcimal value is 0x70):
1. Read the “Start Setup” barcode.
2. Read the “CodeID Setup” barcode.
3. Read the numeric barcode “7”, “0” (see the appendix—numeric barcode)
4. Read the “Save” barcode.(see the appendix—numeric barcode)
5. Read the “Exit Setup” barcode.
Set the Barcode Reading Length
The scanner is only able to read the UCC/EAN-128 whose tramsmission content length is in the limited range, the range is
consisted of the maximum value and minimum value in units of character (the maximum value and minimum value also
included), The UCC/EAN-128 exceeds the range can not be read or transmitted.
【Exit Setup】 37
Page 48

【Start Setup】
Set the Maximum Length Limi
Set the Minimum Length Limit
Restore the Default Setup Value of UCC/EAN-128
Allow to Read AIM-128
Prohibit Reading AIM-128
Read the barcode of “Set the Minimum Length Limit” to adjust the minimum length limit
Read the barcode of “Set the Maximum Length Limit” to adjust the maximum length limit
Note:the maximum length limit of any 1D barcode must not exceed 255, if the maximum length is shorter than the
minimum length, then the scanner is only able to read the barcodes with the minimum length and the the maximum length;
if the maximum length equals to the minimum length, then the scanner is only able to read the barcode with such length.
Example: Set the scannerread the UCC/EAN-128 with barcode length between 8 to 12 characters.
1. Read the “Start Setup” barcode.
2. Read the barcode of “Set the Minimum Length Limit”.
3. Read the numeric barcode “8”, (see the appendix—numeric barcode)
4. Read the “Save” barcode. (see the appendix—numeric barcode)
5. Read the barcode of “Set the Maximum Length Limit”.
6. Read the numeric barcode “1”.
7. Read the numeric barcode “2”.
8. Read the “Save” barcode.(see the appendix—numeric barcode)
9. Read the “Exit Setup” barcode.
AIM 128
Restore Default Value
By reading the barcode, the parameter setup of UCC/EAN-128 will be restored to the factory default state.
AIM 128 Allow to Read AIM-128 or not
Note:the scanner will become unable to read AIM-128 by reading the setup barcode “Prohibit Reading AIM-128”, thus, if
the scanner is unable to read the AIM-128, please try to read the setuo barcode “allow to read AIM-128”.
38 【Exit Setup】
Page 49

【Start Setup】
CodeID Setup
Set the Maximum Length Limi
Set the Minimum Length Limit
Code ID Setup
To activate the setup function by reading “CodeID setup”, then read the hexadcimal value inaccordance with the character
which will be set to the CodeID.
Example: Set the CodeID of AIM-128 to “p” (the hexadcimal value is 0x70):
1. Read the “Start Setup” barcode.
2. Read the “CodeID Setup” barcode.
3. Read the numeric barcode “7”, “0” (see the appendix—numeric barcode)
4. Read the “Save” barcode.(see the appendix—numeric barcode)
5. Read the “Exit Setup” barcode.
Set the Barcode Reading Length
The scanner is only able to read the AIM-128 whose tramsmission content length is in the limited range, the range is
consisted of the maximum value and minimum value in units of character (the maximum value and minimum value also
included), The AIM-128 exceeds the range can not be read or transmitted.
Read the barcode of “Set the Minimum Length Limit” to adjust the minimum length limit.
Read the barcode of “Set the Maximum Length Limit” to adjust the maximum length limit
Note:the maximum length limit of any 1D barcode must not exceed 255, if the maximum length is shorter than the
minimum length, then the scanner is only able to read the barcodes with the minimum length and the the maximum length;
if the maximum length equals to the minimum length, then the scanner is only able to read the barcode with such length
Example: Set the scanner read the AIM128 with barcode length between 8 to 12 characters.
1. Read the “Start Setup” barcode.
2. Read the barcode of “Set the Minimum Length Limit”.
3. Read the numeric barcode “8”, (see the appendix—numeric barcode)
4. Read the ‘Save” barcode.(see the appendix—numeric barcode)
5. Read the barcode of “Set the Maximum Length Limit”
6. Read the numeric barcode “1”.
7. Read the numeric barcode “2”.
【Exit Setup】 39
Page 50

【Start Setup】
Restore the Default Setup Value of EAN-8
Allow to Read EAN-8
Prohibit Reading EAN-8
CodeID Setup
8. Read the ‘Save” barcode.(see the appendix—numeric barcode)
9. Read the “Exit Setup” barcode.
EAN-8
Restore Default Value
By reading the barcode, the parameter setup of EAN-8 will be restored to the factory default state.
Allow to Read EAN-8 or not
Note:the scanner will become unable to read EAN-8 by reading the setup barcode “Prohibit Reading EAN-8”, thus, if the
scanner is unable to read the EAN-8, please try to read the setuo barcode “allow to read EAN-8”.
Code ID Setup
To activate the setup function by reading “CodeID setup”, then read the hexadcimal value inaccordance with the character
which will be set to the CodeID.
Example: Set the CodeID of EAN-8 to “p” (the hexadcimal value is 0x70).
1. Read the “Start Setup” barcode.
2. Read the “CodeID Setup” barcode.
3. Read the numeric barcode “7”, “0” (see the appendix—numeric barcode)
4. Read the “Save” barcode.(see the appendix—numeric barcode)
5. Read the “Exit Setup” barcode.
Set Whether or not to Read 2-Digit Extracode
2-Digit extended code means to add 2-digit numeric barcode behind the normal barcode.
40 【Exit Setup】
Page 51
【Start Setup】
Do not read the 2-Digit Extracode
Allow to Read 2-Digit Extracode
The Barcode Must Include 2-Digit Extracode,
Do not read the 5-Digit Extracode
Allow to Read 5- Digit Extracode
The Barcode Must Include 5-Digit Extracode
Transmit the Check Bit
Do not Transmit the Check Digit
Set Whether or not to Read 5-Digit Extracode
5-Digit extended code means to add 5-Digit numeric barcode behind the normal barcode.
Note:
By setting “Allow to Read 2-Digit Extracode”, the scanner can read the new barcode consisted of normal barcode and
extracode, and the normal barcode without extracode.
By setting “Do not read the 2-Digit Extracode”, the scanner can only read the normal barcode part of the new barcode,
the additional part of the new barcode which combines the normal barcode and extended barcode can not be read.
By setting “The Barcode Must Include 2-Digit Extracode,the scanner is only able to read the 2-digits extracode.
Set Whether or not to Send the Check Digit
The barcode data of EAN-8 is fixed in 8 characters, the 8th digit is the check digit for checking the correctness of the 8
characters.
【Exit Setup】 41
Page 52

【Start Setup】
Restore the Default Setup Value of EAN-13
Send the Check Digit
Send the Check Digit
CodeID Setup
Allow to Read EAN-13
Prohibit Reading EAN-13
EAN-13
Restore Default Value
By reading the barcode, the parameter setup of EAN-13 will be restored to the factory default state.
Allow to Read EAN-13 or not
Note:the scanner will become unable to read EAN-13 by reading the setup barcode “Prohibit Reading EAN-13”, thus, if the
scanner is unable to read the EAN-13, please try to read the setuo barcode “allow to read EAN-13”.
Set Whether or not to Send the Check Digit
The data of EAN-13 barcode is fixed 13 digit, the 13rd bit is the check bit which is used in checking the correctness of alll
the 13 digit.
Code IDSetup
To activate the setup function by reading “CodeID Setup”, then read and save the hexadcimal value inaccordance with the
character which will be set to the CodeID.
Example: Set the CodeID of EAN-13 to “p” (the hexadcimal value is 0x70).
1. Read the “Start Setup” barcode.
2. Read the “CodeID Setup” barcode.
3. Read the numeric barcode “7”, “0” (see the appendix—numeric barcode)
42 【Exit Setup】
Page 53

【Start Setup】
Do not read the 2-Digit Extracode
Allow to Read 2-Digit Extracode
The Barcode Must Include 2-Digit Extracode
Do not read the 5-Digit Extracode
Allow to Read 5-Digit Extracode
The Barcode Must Include 5-Digit Extracode
4. Read the “Save” barcode.(see the appendix—numeric barcode)
5. Read the “Exit Setup” barcode.
Set Whether or not to Read 2-Digit Extracode
2-Digit extended code means to add 2-digit numeric barcode behind the normal barcode.
Set Whether or not to Read 5-Digit Extracode
5-Digit extended code means to add 5-Digit numeric barcode behind the normal barcode.
Note:
By setting “Allow to Read 2-Digit Extracode”, the scanner can read the new barcode consisted of normal barcode and
extracode, and the normal barcode without extracode.
By setting “Do not read the 2-Digit Extracode”, the scanner can only read the normal barcode part of the new barcode,
the additional part of the new barcode which combines the normal barcode and extended barcode can not be read.
By setting “The Barcode Must Include 2-Digit Extracode,the scanner is only able to read the 2-digits extracode.
Extended Setup
Do not extend the barcode into 13-digit EAN-13, means to keep the original type and data length.
Extend the Barcode into 13-Digits EAN-13, and lead by 0, means extend the data length but keep the barcode type
【Exit Setup】 43
Page 54

【Start Setup】
Restore the Default Setup Value of ISSN
Allow to Read ISSN
Prohibit Reading ISSN
CodeID Setup
Do not Extend the Barcode into 13-Digit EAN-13
Extend the Barcode into 13-Digit EAN-13, and lead by 0
Extend the Barcode and Transfer into EAN-13
unchanged.
Extend the Barcode and Transfer into EAN-13, means extend the barcode type and data length.
ISSN
Restore Default Value
By reading the barcode, the parameter setup of ISSN will be restored to the factory default state.
Allow to Read ISSN or not
CodeID Setup
To activate the setup function by reading “CodeID setup”, then read and save the hexadcimal value inaccordance with the
character which will be set to the CodeID.
Example: Set the CodeID of ISSN to “p” (the hexadcimal value is 0x70).
1. Read the “Start Setup” barcode.
2. Read the “CodeID Setup” barcode.
44 【Exit Setup】
Page 55

【Start Setup】
Restore the Default Setup Value of ISSN
Allow to Read ISBN
Prohibit Reading ISBN
Adopt 13 Characters
Adopt 10 Characters
CodeID Setup
3. Read the numeric barcode “7”, “0” (see the appendix—numeric barcode)
4. Read the “Save” barcode.(see the appendix—numeric barcode)
5. Read the “Exit Setup” barcode.
ISBN
Restore Default Value
By reading the barcode, the parameter setup of ISBN will be restored to the factory default state.
Allow to Read ISBN or not
Note:the scanner will become unable to read ISBN by reading the setup barcode “Prohibit Reading ISBN”, thus, if the
scanner is unable to read the ISBN, please try to read the setuo barcode “allow to read ISBN”.
ISBN Data Length Setup
CodeIDSetup
To activate the setup function by reading “CodeID setup”, then read and save the hexadcimal value inaccordance with the
character which will be set to the CodeID.
Example: Set the CodeID of ISBN to “p” (the hexadcimal value is 0x70).
1. Read the “Start Setup” barcode.
2. Read the “CodeID Setup” barcode.
【Exit Setup】 45
Page 56

【Start Setup】
Restore the Default Setup Value of UPC-E
Allow to Read UPC-E
Prohibit Reading UPC-E
Send the Check Digit
Do not Send the Check Digit
3. Read the numeric barcode “7”, “0” (see the appendix—numeric barcode)
4. Read the “Save” barcode.(see the appendix—numeric barcode)
5. Read the “Exit Setup” barcode.
UPC-E
Restore Default Value
By reading the barcode, the parameter setup of UPC-E will be restored to the factory default state.
Allow to Read UPC-E or not
Note:the scanner will become unable to read UPC-E by reading the setup barcode “Prohibit Reading UPC-E”, thus, if the
scanner is unable to read the UPC-E, please try to read the setuo barcode “allow to read UPC-E”.
Set Whether or not to Send the Check Digit
The data of UPC-E barcode is fixed 8 digit, the 8st bit is the check bit which is used in checking the correctness of alll the 8
digit.
CodeID Setup
To activate the setup function by reading “CodeID setup”, then read and save the hexadcimal value inaccordance with the
character which will be set to the CodeID.
46 【Exit Setup】
Page 57

【Start Setup】
CodeID Setup
Do not read the 2-Digit Extracode
Allow to Read 2-Digit Extracode
The Barcode Must Include 2-Digit Extracode,
Do not read the 5-Digit Extracode
Allow to read the 5-Digit Extracode
The Barcode Must Include 5-Digit Extracode
Example: Set the CodeID of UPC-Eto “p” (the hexadcimal value is 0x70).
1. Read the “Start Setup” barcode.
2. Read the “CodeID Setup” barcode.
3. Read the numeric barcode “7”, “0” (see the appendix—numeric barcode)
4. Read the “Save” barcode.(see the appendix—numeric barcode)
5. Read the “Exit Setup” barcode.
Set Whether or not to Read 2-Digit Extracode
2-Digit extended code means to add 2-Digit numeric barcode behind the normal barcode.
Set Whether or not to Read 5-Digit Extracode
5-Digit extended code means to add 5-Digit numeric barcode behind the normal barcode.
Note:
By setting “Allow to Read 2-Digit Extracode”, the scanner can read the new barcode consisted of normal barcode and
extracode, and the normal barcode without extracode.
By setting “Do not read the 2-Digit Extracode”, the scanner can only read the normal barcode part of the new barcode,
the additional part of the new barcode which combines the normal barcode and extended barcode can not be read.
【Exit Setup】 47
Page 58

【Start Setup】
Do not Extend the Barcode Infornmation
Extend the Barcode Infornmation into UPC-A
Extend the Barcode Infornmation and Type into UPC-A
Restore the Default Setup Value of UPC-A
Do not Transmit System Character “0”
Transmit System Character “0”
By setting “The Barcode Must Include 2-Digit Extracode,the scanner is only able to read the 2-digits extracode.
Set Whether or not to Transmit the System Character “0”
The first character of UPC-E barcode is the system character, the fixed value is “0”.
Extension Setup
“Do not Extend the Barcode Infornmation” means keep the original barcode type and data bit,
“Extend the Barcode Infornmation into UPC-A” means extend the data bit and leave the barcode type unchanged.
“Extend the Barcode Infornmation and Type into UPC-A” means extend the barcode type and data bit.
UPC-A
Restore Default Value
By reading the barcode, the parameter setup of UPC-A will be restored to the factory default state.
48 【Exit Setup】
Page 59

【Start Setup】
Allow to Read UPC-A
Prohibit Reading UPC-A
CodeID Setup
Send the Check Digit
Do not Send the Check Digit
Allow to Read UPC-A or not
Note:the scanner will become unable to read UPC-A by reading the setup barcode “Prohibit Reading UPC-A”, thus, if the
scanner is unable to read the UPC-A, please try to read the setuo barcode “allow to read UPC-A”.
CodeID Setup
To activate the setup function by reading “CodeID setup”, then read the hexadcimal value inaccordance with the character
which will be set to the CodeID.
Example: Set the CodeID of UPC-Ato “p” (the hexadcimal value is 0x70).
1. Read the “Start Setup” barcode.
2. Read the “CodeID Setup” barcode.
3. Read the numeric barcode “7”, “0” (see the appendix—numeric barcode)
4. Read the “Save” barcode.(see the appendix—numeric barcode)
5. Read the “Exit Setup” barcode.
Set Whether or not to Transimit the Check Digit
The barcode data of UPC-A is fixed of 13 digit, the 13rd digit is the check digit.
Set Whether or not to Transmit the System Digit “0”
The first character of UPC-E barcode is the system Digit, the value is “0”.
【Exit Setup】 49
Page 60

【Start Setup】
Do not Transmit System Character “0”
Transmit System Character “0”
Do not read the 2-Digit Extracode
Allow to Read 2-Digit Extracode
The Barcode Must Include 2-Digit Extracode
Do not read the 5-Digit Extracode
Allow to Read 5-Digit Extracode
The Barcode Must Include 5-Digit Extracode
Set Whether or not to Read 2-Digit Extracode
2-Digit extended code means to add 2-digit numeric barcode behind the normal barcode.
Set Whether or not to Read 5-Digit Extracode
5-Digit extended code means to add 5-digit numeric barcode behind the normal barcode
Note:
By setting “Allow to Read 2-Digit Extracode”, the scanner can read the new barcode consisted of normal barcode and
extracode, and the normal barcode without extracode.
By setting “Do not read the 2-Digit Extracode”, the scanner can only read the normal barcode part of the new barcode,
the additional part of the new barcode which combines the normal barcode and extended barcode can not be read.
By setting “The Barcode Must Include 2-Digit Extracode”,the scanner is only able to read the 2-digit extracode.
50 【Exit Setup】
Page 61

【Start Setup】
Restore the Default Setup Value of Interleaved 2 of 5
Allow to Read Interleaved 2 of 5
Prohibit Reading Interleaved 2 of 5
CodeID Setup
Interleaved 2 of 5
Restore Default Value
By reading the barcode, the parameter setup of Interleaved 2 of 5 will be restored to the factory default state.
Allow to Read Interleaved 2 of 5 or not
Note:the scanner will become unable to read Interleaved 2 of 5 by reading the setup barcode “Prohibit Reading
Interleaved 2 of 5”, thus, if the scanner is unable to read the Interleaved 2 of 5, please try to read the setuo barcode “allow
to read Interleaved 2 of 5”.
Code ID Setup
To activate the setup function by reading “CodeID setup”, then read the hexadcimal value inaccordance with the character
which will be set to the CodeID.
Example: Set the CodeID ofInterleaved2 of 5 to “p” (the hexadcimal value is 0x70).
1. Read the “Start Setup” barcode.
2. Read the “CodeID Setup” barcode.
3. Read the numeric barcode “7”, “0” (see the appendix—numeric barcode)
4. Read the “Save” barcode.(see the appendix—numeric barcode)
5. Read the “Exit Setup” barcode.
Set Whether or not to Transmit the Check Character
Interleaved 2of 5 barcode data does not compulsively include the check digit, if check digit exists, then it is the last
character. Check digit is calculated according to all the datas, for checking if the data is correct or not.
Set “No Check”, the scanner will transmit all the barcode data.
【Exit Setup】 51
Page 62

【Start Setup】
No Check
Check but do not Transmit the Check Character
Check and Transmit Check Character
Set the Minimum Length Limit
Set the Maximum Length Limit
Set “Check but do not Send Check Digit”, the scanner will check according to the last bit, if successful, all the data
except for the check digit will be transmitted, if failed, then the scanner will indicate “barcode reading failed”.
Set “Check and Send Check Digit” the scanner will check according to the last bit, if successful, all the data including
the check digit will be transmitted, the check digit will be treated as the last bit of the normal data; if failed, then the
scanner will indicate “barcode reading failed”.
Note: by setting “do not send the check digit”, if the data length except for the 1 character check digit is less than the
minimum barcode reading limit, the barcode reading will be failed. (For example: the scanner set the the minimum barcode
reading length of Interleaved2 of 5 to 4 characters and “do not send check digit”, in such circumstances,the scanner is not
able to read the Interleaved2 of 5 with 4 characters. )
Set the Barcode Reading Length
The scanner is only able to read the Interleaved2 of 5 with tramsmission content length falls in the limited range, the range
is consisted of the maximum value and minimum value in units of character (the maximum value and minimum value also
included), the Interleaved2 of 5 exceeds the range can not be read or transmitted.
Read the barcode of “Set the Minimum Length Limit” to adjust the minimum length limit.
Read the barcode of “Set the Maximum Length Limit” to adjust the maximum length limit
Note:the maximum length limit of any 1D barcode must not exceed 255, if the maximum length is shorter than the
minimum length, then the scanner is only able to read the barcodes with the minimum length and the the maximum length;
if the maximum length equals to the minimum length, then the scanner is only able to read the barcode with such length.
52 【Exit Setup】
Page 63

【Start Setup】
Restore the Default Setup Value of ITF-6
Prohibit Reading ITF-6
Allow to Read ITF-6, but do not Transmit the Check Digit
Allow to Read ITF-6 and Transmit the Check Digit
CodeID Setup
ITF-6
TIF-6 is a knid of special Interleaved2 of 5 barcode with the barcode length of 6 characters and the last character as the
check character. By default, no special processing is performed on ITF-6, its setup is the same with the normal
Interleaved2 of 5.
TF-6 priority principle: if the setup of ITF-6 has been changed, then the setup of all the Interleaved2 of 5 barcode with the
barcode length of 6 characters and the last character as the check character should be in accordance with ITF-6.
Note: if the setup of ITF-6 confilits with the setup of Interleaved2 of 5.for example, reading ITF-6 is allowed, but
reading Interleaved2 of 5 is not, according to the priority principle of ITF-6, the Interleaved2 of 5 with the barcode
length of 6 characters and the last character as the check character can be read, but other Interleaved2 of 5
barcodes can not be read.
Code ID Setup
To activate the setup function by reading “CodeID setup”, then read the hexadcimal value inaccordance with the character
which will be set to the CodeID.
Example: Set the CodeID ofITF-6to “p” (the hexadcimal value is 0x70).
1. Read the “Start Setup” barcode.
2. Read the “CodeID Setup” barcode.
3. Read the numeric barcode “7”, “0” (see the appendix—numeric barcode)
【Exit Setup】 53
Page 64

【Start Setup】
Restore the Default Setup Value of ITF-14
Allow to Read ITF-14, but do not Transmit the Check Digit
Prohibit Reading ITF-14
Allow to Read ITF-14 and Transmit the Check Digit
CodeID Setup
4. Read the “Save” barcode.(see the appendix—numeric barcode)
5. Read the “Exit Setup” barcode.
ITF-14
TIF-14 is a knid of special Interleaved2 of 5 barcode with the barcode length of 14 characters and the last character as the
check character. By default, no special processing is performed on ITF-14, its setup is the same with the normal
Interleaved2 of 5.
ITF-14 priority principle: if the setup of ITF-14 has been changed, then the setup of all the Interleaved2 of 5 barcode with
the barcode length of 14 characters and the last character as the check character should be in accordance with ITF-14.
Note: if the setup of ITF-14confilits with the setup of Interleaved2 of 5, for example, reading ITF-14 is allowed, but
reading Interleaved2 of 5 is not; according to the priority principle of ITF-14, the Interleaved2 of 5 with the barcode
length of 14 characters and the last character as the check character can be read, but other Interleaved2 of 5
barcodes can not be read. If the ITF-14 confilits with Deutsch14 the ITF-14 will have priority to read.
CodeIDSetup
To activate the setup function by reading “CodeID setup”, then read the hexadcimal value inaccordance with the character
which will be set to the CodeID.
Example: Set the CodeID ofITF-14to “p” (the hexadcimal value is 0x70).
1. Read the “Start Setup” barcode.
2. Read the “CodeID Setup” barcode.
3. Read the numeric barcode “7”, “0” (see the appendix—numeric barcode)
4. Read the “Save” barcode.(see the appendix—numeric barcode)
54 【Exit Setup】
Page 65

【Start Setup】
Restore the Default Setup Value of Deutsche14
Allow to Read Deutsche14,but do not send the check digit
Prohibit Reading Deutsche14
Allow to Read Deutsche14 and send the check digit
CodeID Setup
5. Read the “Exit Setup” barcode.
Deutsche 14
Restore the Default Value
By reading the barcode, the parameter setup of Deutsche14 will be restored to the factory default state.
Allow to Read Deutsche14 or not
Note: the scanner will become unable to read Deutsche14 by reading the setup barcode “Prohibit Reading Deutsche14”,
thus, if the scanner is unable to read the Deutsche14, please try to read the setuo barcode “allow to read Deutsche14”.
Deutsche 14 uses the same coding method as ITF-14 and normal ITF, so if all these are used at the same time, the
misunderstanding of function setup and decoding will easily occure, thus, it is suggested to turn off the Deutsche 14 if it is
not in use.
CodeID Setup
To activate the setup function by reading “CodeID setup”, then read the hexadcimal value inaccordance with the character
which will be set to the CodeID.
Example: Set the CodeID ofDeutsche14 to “p” (the hexadcimal value is 0x70).
1. Read the “Start Setup” barcode.
2. Read the “CodeID Setup” barcode.
【Exit Setup】 55
Page 66

【Start Setup】
Restore the Default Setup Value of Deutsche12
Allow to Read Deutsche12,but do not send the check digit
Prohibit Reading Deutsche12
Allow to Read Deutsche12 and send the check digit
3. Read the numeric barcode “7”, “0” (see the appendix—numeric barcode)
4. Read the “Save” barcode.(see the appendix—numeric barcode)
5. Read the “Exit Setup” barcode.
Deutsche 12
Restore the Default Value
By reading the barcode, the parameter setup of Deutsche12 will be restored to the factory default state.
Deutsche 12 Allow to Read Deutsche 12 or not
Note: the scanner will become unable to read Deutsche12 by reading the setup barcode “Prohibit Reading Deutsche12”,
thus, if the scanner is unable to read the Deutsche12, please try to read the setuo barcode “allow to read Deutsche12”.
Deutsche 12 uses the same coding method as ITF-12 and normal ITF, so if all these are used at the same time, the
misunderstanding of function setup and decoding will easily occure, thus, it is suggested to turn off the Deutsche 12 if it is
not in use.
CodeID Setup
To activate the setup function by reading “CodeID setup”, then read the hexadcimal value inaccordance with the character
which will be set to the CodeID.
56 【Exit Setup】
Page 67

【Start Setup】
CodeID Setup
Restore the Default Setup Value of COOP25
Allow to Read COOP25
Prohibit Reading COOP25
Example: Set the CodeID ofDeutsche12to “p” (the hexadcimal value is 0x70).
1. Read the “Start Setup” barcode.
2. Read the “CodeID Setup” barcode.
3. Read the numeric barcode “7”, “0” (see the appendix—numeric barcode)
4. Read the “Save” barcode.(see the appendix—numeric barcode)
5. Read the “Exit Setup” barcode.
COOP 25(Japanese Matrix 2 of 5)
Restore the Default Value
By reading the barcode, the parameter setup of COOP25 will be restored to the factory default state
Allow to Read COOP 25 or not
Note: the scanner will become unable to read COOP25 by reading the setup barcode “Prohibit Reading UCC/EAN-128”,
thus, if the scanner is unable to read the COOP25, please try to read the setuo barcode “allow to read COOP25”.
CodeID Setup
To activate the setup function by reading “CodeID setup”, then read the hexadcimal value inaccordance with the character
which will be set to the CodeID.
Example: Set the CodeID ofCOOP25to “p” (the hexadcimal value is 0x70).
1. Read the “Start Setup” barcode.
【Exit Setup】 57
Page 68

【Start Setup】
No Check
Check and Send Check Digit
Check but do not Send Check Digit
2. Read the “CodeID Setup” barcode.
3. Read the numeric barcode “7”, “0” (see the appendix—numeric barcode)
4. Read the “Save” barcode.(see the appendix—numeric barcode)
5. Read the “Exit Setup” barcode.
Check Setup
COOP25 barcode data does not compulsively include the check digit, if check digit exists, then it is the last character.
Check digit is calculated according to all the datas, for checking if the data is correct or not.
Set “No Check”, the scanner will transmit all the barcode data.
Set “Check but do not Send Check digit”, the scanner will check according to the last bit, if successful, all the data
except for the check digit will be transmitted, if failed, then the scanner will indicate “barcode reading failed”
Set “Check and Send Check digit” the scanner will check according to the last bit, if successful, all the data including
the check digit will be transmitted, the check digit will be treated as the last bit of the normal data; if failed, then the
scanner will indicate “barcode reading failed”
Note: by setting “do not send the check digit”, if the data length except for the 1 character check digit is less than the
minimum barcode reading limit, the barcode reading will be failed. (For example: the scanner set the the minimum barcode
reading length of COOP25(JapaneseMatrix2 of 5) to 4 characters and “do not send check digit”, in such circumstances,the
scanner is not able to read the Deutsch12 with 4 characters. )
Set the Barcode Reading Length
The scanner is only able to read the COOP25 with tramsmission content length falls in the limited range, the range is
consisted of the maximum value and minimum value in units of character (the maximum value and minimum value also
included), the COOP25 exceeds the range can not be read or transmitted.
Read the barcode of “Set the Minimum Length Limit” to adjust the minimum length limit.
Read the barcode of “Set the Maximum Length Limit” to adjust the maximum length limit.
58 【Exit Setup】
Page 69

【Start Setup】
99911706
Set the Minimum Length Limit
99911707
Set the Maximum Length Limit
Restore the Default Setup Value of Matrix2 of 5
Allow to Read Matrix2 of 5
Prohibit Reading Matrix2 of 5
Note:the maximum length limit of any 1D barcode must not exceed 255, if the maximum length is shorter than the
minimum length, then the scanner is only able to read the barcodes with the minimum length and the the maximum length;
if the maximum length equals to the minimum length, then the scanner is only able to read the barcode with such length.
Matrix 2 of 5 (European Matrix 2 of 5)
Restore the Default Value
By reading the barcode, the parameter setup of Matrix2 of 5 will be restored to the factory default state.
Restore the Default Setup Value of Matrix2 of 5
Note: the scanner will become unable to read Matrix2 of 5 by reading the setup barcode “Prohibit Reading Matrix2 of 5”,
thus, if the scanner is unable to read the Matrix2 of 5, please try to read the setuo barcode “allow to read Matrix2 of 5”.
CodeID Setup
To activate the setup function by reading “CodeID setup”, then read the hexadcimal value inaccordance with the character
which will be set to the CodeID.
【Exit Setup】 59
Page 70

【Start Setup】
Code ID Setup
No Check
Check and Send Check digit
Check but do not Send Check digit
Example: Set the CodeID ofMatrix 2 of 5 to “p” (the hexadcimal value is 0x70).
1. Read the “Start Setup” barcode.
2. Read the “CodeID Setup” barcode.
3. Read the numeric barcode “7”, “0” (see the appendix—numeric barcode)
4. Read the “Save” barcode.(see the appendix—numeric barcode)
5. Read the “Exit Setup” barcode.
Check Setup
Matrix 2of 5 barcode data does not compulsively include the check digit, if check digit exists, then it is the last character.
Check digit is calculated according to all the datas, for checking if the data is correct or not.
Set “No Check”, the scanner will transmit all the barcode data
Set “Check but do not Send Check digit”, the scanner will check according to the last bit, if successful, all the data
except for the check digit will be transmitted, if failed, then the scanner will indicate “barcode reading failed”
Set “Check and Send Check digit” the scanner will check according to the last bit, if successful, all the data including
the check digit will be transmitted, the check digit will be treated as the last bit of the normal data; if failed, then the
scanner will indicate “barcode reading failed”
Note: by setting “do not send the check digit”, if the data length except for the 1 character check digit is less than
the minimum barcode reading limit, the barcode reading will be failed. (For example: the scanner set the the
minimum barcode reading length of Matrix2 of 5 to 4 characters and “do not send check digit”, in such
circumstances,the scanner is not able to read the Matrix2 of 5 with 4 characters. )
Set the Barcode Reading Length
The scanner is only able to read the Matrix2of 5 with tramsmission content length falls in the limited range, the range is
consisted of the maximum value and minimum value in units of character (the maximum value and minimum value also
60 【Exit Setup】
Page 71

【Start Setup】
Set the Minimum Length Limit
Set the Maximum Length Limit
Restore the Default Setup Value of Industrial 25
Allow to Read Industrial 25
Prohibit Reading Industrial 25
Code ID Setup
included), the Matrix2of 5 exceeds the range can not be read or transmitted.
Read the barcode of “Set the Minimum Length Limit” to adjust the minimum length limit.
Read the barcode of “Set the Maximum Length Limit” to adjust the maximum length limit.
Note:the maximum length limit of any 1D barcode must not exceed 255, if the maximum length is shorter than the
minimum length, then the scanner is only able to read the barcodes with the minimum length and the the maximum length;
if the maximum length equals to the minimum length, then the scanner is only able to read the barcode with such length.
Industrial 25
Restore the Default Value
By reading the barcode, the parameter setup of Industrial 25 will be restored to the factory default state.
Allow to Read Deutsche 12 or not
Note: the scanner will become unable to read Industrial 25 by reading the setup barcode “Prohibit Reading Industrial 25”,
thus, if the scanner is unable to read the Industrial 25, please try to read the setuo barcode “allow to read Industrial 25”.
CodeID Setup
To activate the setup function by reading “CodeID setup”, then read the hexadcimal value inaccordance with the character
which will be set to the CodeID.
【Exit Setup】 61
Page 72

【Start Setup】
No Check
Check and Send Check digit
Check but do not Send Check digit
Example: Set the CodeID ofIndustrial 25to “p” (the hexadcimal value is 0x70).
1. Read the “Start Setup” barcode.
2. Read the “CodeID Setup” barcode.
3. Read the numeric barcode “7”, “0” (see the appendix—numeric barcode)
4. Read the “Save” barcode.(see the appendix—numeric barcode)
5. Read the “Exit Setup” barcode.
Check Setup
Industrial 25 barcode data does not compulsively include the check digit, if check digit exists, then it is the last character.
Check digit is calculated according to all the datas, for checking if the data is correct or not.
Set “No Check”, the scanner will transmit all the barcode data
Set “Check but do not Send Check digit”, the scanner will check according to the last bit, if successful, all the data
except for the check digit will be transmitted, if failed, then the scanner will indicate “barcode reading failed”
Set “Check and Send Check digit” the scanner will check according to the last bit, if successful, all the data including
the check digit will be transmitted, the check digit will be treated as the last bit of the normal data; if failed, then the
scanner will indicate “barcode reading failed”
Note: by setting “do not send the check digit”, if the data length except for the 1 character check digit is less than
the minimum barcode reading limit, the barcode reading will be failed. (For example: the scanner set the the
minimum barcode reading length of Industrial 25 to 4 characters and “do not send check digit”, in such
circumstances,the scanner is not able to read the Industrial 25 with 4 characters. )
Set the Barcode Reading Length
The scanner is only able to read the Industrial 25 with tramsmission content length falls in the limited range, the range is
consisted of the maximum value and minimum value in units of character, the Industrial 25 exceeds the range can not be
read or transmitted.
Read the barcode of “Set the Minimum Length Limit” to adjust the minimum length limit.
Read the barcode of “Set the Maximum Length Limit” to adjust the maximum length limit.
62 【Exit Setup】
Page 73

【Start Setup】
Set the Minimum Length Limit
Set the Maximum Length Limit
Restore the Default Setup Value of Standard 25
Allow to Read Standard 25
Prohibit Reading Standard 25
Code ID Setup
Note:the maximum length limit of any 1D barcode must not exceed 255, if the maximum length is shorter than the
minimum length, then the scanner is only able to read the barcodes with the minimum length and the the maximum length;
if the maximum length equals to the minimum length, then the scanner is only able to read the barcode with such length.
Standard 25
Restore the Default Value
By reading the barcode, the parameter setup of Standard 25 will be restored to the factory default state.
Allow to Read Standard 25 or not
Note: the scanner will become unable to read Standard 25 by reading the setup barcode “Prohibit Reading
Standard 25”, thus, if the scanner is unable to read the Standard 25, please try to read the setuo barcode “allow to
read Standard 25”.
CodeID Setup
To activate the setup function by reading “CodeID setup”, then read the hexadcimal value inaccordance with the character
which will be set to the CodeID.
Example: Set the CodeID ofStandard 25to “p” (the hexadcimal value is 0x70).
1. Read the “Start Setup” barcode.
【Exit Setup】 63
Page 74

【Start Setup】
No Check
Check and Send Check digit
Check but do not Send Check digit
2. Read the “CodeID Setup” barcode.
3. Read the numeric barcode “7”, “0” (see the appendix—numeric barcode)
4. Read the “Save” barcode.(see the appendix—numeric barcode)
5. Read the “Exit Setup” barcode.
Read “Exit Setup Barcode”
Check Setup
Standard 25 barcode data does not compulsively include the check digit, if check digit exists, then it is the last character.
Check digit is calculated according to all the datas, for checking if the data is correct or not.
Set “No Check”, the scanner will transmit all the barcode data
Set “Check but do not Send Check digit”, the scanner will check according to the last bit, if successful, all the data
except for the check digit will be transmitted, if failed, then the scanner will indicate “barcode reading failed”
Set “Check and Send Check digit” the scanner will check according to the last bit, if successful, all the data including
the check digit will be transmitted, the check digit will be treated as the last bit of the normal data; if failed, then the
scanner will indicate “barcode reading failed”
Note: by setting “do not send the check digit”, if the data length except for the 1 character check digit is less than the
minimum barcode reading limit, the barcode reading will be failed. (For example: the scanner set the the minimum
barcode reading length of Standard 25 to 4 characters and “do not send check digit”, in such circumstances,the scanner is
not able to read the Standard 25 with 4 characters. )
Set the Barcode Reading Length
The scanner is only able to read the Standard 25 with tramsmission content length falls in the limited range, the range is
consisted of the maximum value and minimum value in units of character, the Standard25 exceeds the range can not be
read or transmitted.
Read the barcode of “Set the Minimum Length Limit” to adjust the minimum length limit
Read the barcode of “Set the Maximum Length Limit” to adjust the maximum length limit
64 【Exit Setup】
Page 75

【Start Setup】
Set the Minimum Length Limit
Set the Maximum Length Limit
Restore the Default Setup Value of Code 39
Allow to Read Code 39
Prohibit Reading Code 39
Code ID Setup
Note:the maximum length limit of any 1D barcode must not exceed 255, if the maximum length is shorter than the
minimum length, then the scanner is only able to read the barcodes with the minimum length and the the
maximum length; if the maximum length equals to the minimum length, then the scanner is only able to read the
barcode with such length.
Code 39
Restore the Default Value
By reading the barcode, the parameter setup of Code 39 will be restored to the factory default state.
Allow to Read Code 39 or not
Note: the scanner will become unable to read Code 39 by reading the setup barcode “Prohibit Reading Code 39”, thus, if
the scanner is unable to read the Code 39, please try to read the setuo barcode “allow to read Code 39”.
CodeID Setup
To activate the setup function by reading “CodeID setup”, then read the hexadcimal value inaccordance with the character
which will be set to the CodeID.
Example: Set the CodeID ofCode39to “p” (the hexadcimal value is 0x70).
1. Read the “Start Setup” barcode.
2. Read the “CodeID Setup” barcode.
3. Read the numeric barcode “7”, “0” (see the appendix—numeric barcode)
【Exit Setup】 65
Page 76

【Start Setup】
No Check
Check and Send Check digit
Check but do not Send Check digit
Send the Start and the Stop Character
Do not Send the Start and the Stop Character
4. Read the “Save” barcode.(see the appendix—numeric barcode)
5. Read the “Exit Setup” barcode.
Check Setup
Code 39 barcode data does not compulsively include the check digit, if check digit exists, then it is the last character.
Check digit is calculated according to all the datas, for checking if the data is correct or not.
Set “No Check”, the scanner will transmit all the barcode data
Set “Check but do not Send Check digit”, the scanner will check according to the last bit, if successful, all the data
except for the check digit will be transmitted, if failed, then the scanner will indicate “barcode reading failed”
Set “Check and Send Check digit” the scanner will check according to the last bit, if successful, all the data including
the check digit will be transmitted, the check digit will be treated as the last bit of the normal data; if failed, then the
scanner will indicate “barcode reading failed”
Note: by setting “do not send the check digit”, if the data length except for the 1 character check digit is less than the
minimum barcode reading limit, the barcode reading will be failed. (For example: the scanner set the the minimum barcode
reading length of Code 39 to 4 characters and “do not send check digit”, in such circumstances,the scanner is not able to
read the Code 39 with 4 characters. )
Set whether to Send the start and stop character or not
There are two characters of “*”before and after the Code39 barcode data as the start and stop character. The system can
set whether or not to send the start and stop character after successful barcode reading.
Set the Reading Range of ASCII Code
Code 39 can consist all the ASCII character, by default, the scanner is only able to read part of the ASCII character, by
setting, the scanner can activiate the function of reading the intact ASCII character.
66 【Exit Setup】
Page 77

【Start Setup】
Turn off the Function of Reading Full ASCII
Turn on the Function of Reading Full ASCII
Set the Minimum Length Limit
【Code:99912412】
Set the Maximum Length Limit
【Code:99912413】
Set the Barcode Reading Length
The scanner is only able to read the Code 39 with tramsmission content length falls in the limited range, the range is
consisted of the maximum value and minimum value in units of character, the Code 39 exceeds the range can not be read
or transmitted.
Read the barcode of “Set the Minimum Length Limit” to adjust the minimum length limit.
Read the barcode of “Set the Maximum Length Limit” to adjust the maximum length limit.
Note:the maximum length limit of any 1D barcode must not exceed 255, if the maximum length is shorter than the
minimum length, then the scanner is only able to read the barcodes with the minimum length and the the
maximum length; if the maximum length equals to the minimum length, then the scanner is only able to read the
barcode with such length.
Example: The steps of set the scanner read the Code 39 with barcode length between 8 to 12 characters.
1. Read the “Start Setup” barcode.
2. Read the barcode of “Set the Minimum Length Limit”.
3. Read the numeric barcode “8”, (see the appendix—numeric barcode)
4. Read the “Save” barcode.(see the appendix—numeric barcode)
5. Read the barcode of “Set the Maximum Length Limit”.
6. Read the numeric barcode “1”.
7. Read the numeric barcode “2”.
8. Read the “Save” barcode.(see the appendix—numeric barcode)
9. Read the “Exit Setup” barcode.
Codabar
Restore the Default Value
By reading the barcode, the parameter setup of Codabar will be restored to the factory default state.
【Exit Setup】 67
Page 78

【Start Setup】
Restore the Default Setup Value of Codabar
Allow to Read Codabar
Prohibit Reading Codabar
Code ID Setup
Allow to Read Codabar or not
Note: the scanner will become unable to read Codabar by reading the setup barcode “Prohibit Reading Codabar”, thus, if
the scanner is unable to read theCodabar, please try to read the setuo barcode “allow to read Codabar”.
CodeID Setup
To activate the setup function by reading “CodeID setup”, then read the hexadcimal value inaccordance with the character
which will be set to the CodeID.
Example: Set the CodeID ofCodabarto “p” (the hexadcimal value is 0x70).
1. Read the “Start Setup” barcode.
2. Read the “CodeID Setup” barcode.
3. Read the numeric barcode “7”, “0” (see the appendix—numeric barcode)
4. Read the “Save” barcode.(see the appendix—numeric barcode)
5. Read the “Exit Setup” barcode.
Check Setup
Codabar barcode data does not compulsively include the check digit, if check digit exists, then it is the last character.
Check digit is calculated according to all the datas, for checking if the data is correct or not.
Set “No Check”, the scanner will transmit all the barcode data
Set “Check but do not Send Check digit”, the scanner will check according to the last bit, if successful, all the data
except for the check digit will be transmitted, if failed, then the scanner will indicate “barcode reading failed”
Set “Check and Send Check digit” the scanner will check according to the last bit, if successful, all the data including
the check digit will be transmitted, the check digit will be treated as the last bit of the normal data; if failed, then the
scanner will indicate “barcode reading failed”
68 【Exit Setup】
Page 79

【Start Setup】
No Check
Check and Send Check Digit
Check but do not Send Check Digit
Do not Send the Start and Stop Character
Send the Start and Stop Character
Set “ABCD/ABCD” as the Start and Stop Character
Set “ABCD/TN*E” as the Start and Stop Character
Set “abcd/abcd” as the Start and Stop Character
Set “abcd/tn*e” as the Start and Stop Character
Note: by setting “do not send the check digit”, if the data length except for the 1 character check digit is less than the
minimum barcode reading limit, the barcode reading will be failed. (For example: the scanner set the the minimum
barcode reading length of Codabar to 4 characters and “do not send check digit”, in such circumstances,the scanner is not
able to read the Codabar with 4 characters. )
Start and Stop Character Setup
Set the Barcode Reading Length
The scanner is only able to read the Codabar with tramsmission content length falls in the limited range, the range is
consisted of the maximum value and minimum value in units of character, the Codabar exceeds the range can not be read
or transmitted.
Read the barcode of “Set the Minimum Length Limit” to adjust the minimum length limit.
Read the barcode of “Set the Maximum Length Limit” to adjust the maximum length limit.
【Exit Setup】 69
Page 80

【Start Setup】
Set the Minimum Length Limit
Set the Maximum Length Limit
Restore the Default Setup Value of Code 93
Allow to Read Code 93
Prohibit Reading Code 93
Note:the maximum length limit of any 1D barcode must not exceed 255, if the maximum length is shorter than the
minimum length, then the scanner is only able to read the barcodes with the minimum length and the the maximum length;
if the maximum length equals to the minimum length, then the scanner is only able to read the barcode with such length.
Example: The steps of set the scanner read the Codabarwith barcode length between 8 to 12 characters.
1. Read the “Start Setup” barcode.
2. Read the barcode of “Set the Minimum Length Limit”.
3. Read the numeric barcode “8”, (see the appendix—numeric barcode)
4. Read the “Save” barcode.(see the appendix—numeric barcode)
5. Read the barcode of “Set the Maximum Length Limit”.
6. Read the numeric barcode “1”.
7. Read the numeric barcode “2”.
8. Read the “Save” barcode.(see the appendix—numeric barcode)
9. Read the “Exit Setup” barcode.
Code 93
Restore the Default Value
By reading the barcode, the parameter setup of Code 93 will be restored to the factory default state.
Allow to Read Code 93 or not
Note: the scanner will become unable to read Code 93 by reading the setup barcode “Prohibit Reading Code 93”, thus, if
the scanner is unable to read the Code 93, please try to read the setuo barcode “allow to read Code 93”.
70 【Exit Setup】
Page 81

【Start Setup】
Code ID Setup
No Check
Check and Send Check Digit
Check but do not Send Check Digit
CodeID Setup
To activate the setup function by reading “CodeID setup”, then read the hexadcimal value inaccordance with the character
which will be set to the CodeID.
Example: Set the CodeID ofCode 93to “p” (the hexadcimal value is 0x70).
1. Read the “Start Setup” barcode.
2. Read the “CodeID Setup” barcode.
3. Read the numeric barcode “7”, “0” (see the appendix—numeric barcode)
4. Read the “Save” barcode.(see the appendix—numeric barcode)
5. Read the “Exit Setup” barcode.
Check Setup
Code 93 barcode data does not compulsively include the check digit, if check digit exists, then it is the last character.
Check digit is calculated according to all the datas, for checking if the data is correct or not.
Set “No Check”, the scanner will transmit all the barcode data
Set “Check but do not Send Check digit”, the scanner will check according to the last bit, if successful, all the data
except for the check digit will be transmitted, if failed, then the scanner will indicate “barcode reading failed”
Set “Check and Send Check digit” the scanner will check according to the last bit, if successful, all the data including
the check digit will be transmitted, the check digit will be treated as the last bit of the normal data; if failed, then the
scanner will indicate “barcode reading failed”
Note: by setting “do not send the check digit”, if the data length except for the 1 character check digit is less than the
minimum barcode reading limit, the barcode reading will be failed. (For example: the scanner set the the minimum
barcode reading length of Code 93 to 4 characters and “do not send check digit”, in such circumstances,the scanner is not
【Exit Setup】 71
Page 82

【Start Setup】
Set the Minimum Length Limit
Set the Maximum Length Limit
Restore the Default Setup Value of Code 11
Allow to Read Code 11
Prohibit Reading Code 11
able to read the Code 93 with 4 characters. )
Set the Barcode Reading Length
The scanner is only able to read the Code 93 with tramsmission content length falls in the limited range, the range is
consisted of the maximum value and minimum value in units of character (the maximum value and minimum value also
included), the Code 93 exceeds the range can not be read or transmitted.
Read the barcode of “Set the Minimum Length Limit” to adjust the minimum length limit.
Read the barcode of “Set the Maximum Length Limit” to adjust the maximum length limit.
Note:the maximum length limit of any 1D barcode must not exceed 255, if the maximum length is shorter than the
minimum length, then the scanner is only able to read the barcodes with the minimum length and the the maximum length;
if the maximum length equals to the minimum length, then the scanner is only able to read the barcode with such length.
Code 11
Restore the Default Value
By reading the barcode, the parameter setup of Code 11 will be restored to the factory default state.
Allow to Read Code 11 or not
Note: the scanner will become unable to read Code 11 by reading the setup barcode “Prohibit Reading Code 11”, thus, if
the scanner is unable to read the Code 11, please try to read the setuo barcode “allow to read Code 11”.
72 【Exit Setup】
Page 83

【Start Setup】
Code ID Setup
No Check
One Digit Check, MOD11
Two Digits Check, MOD11/MOD11
Two Digits Check, MOD11/MOD9
MOD11 Single Check (Len<=10)
MOD11/MOD11 Double Check(Len>10)
MOD11 Single Check (Len<=10)
MOD11/MOD9 Double Check(Len>10)
CodeID Setup
To activate the setup function by reading “CodeID setup”, then read the hexadcimal value inaccordance with the character
which will be set to the CodeID.
Example: Set the CodeID ofCode 11to “p” (the hexadcimal value is 0x70).
1. Read the “Start Setup” barcode.
2. Read the “CodeID Setup” barcode.
3. Read the numeric barcode “7”, “0” (see the appendix—numeric barcode)
4. Read the “Save” barcode.(see the appendix—numeric barcode)
5. Read the “Exit Setup” barcode.
Check Setup
Code 11 barcode data does not compulsively include the check digit, if check digit exists, then it is the last character.
Check digit is calculated according to all the datas, for checking if the data is correct or not.
Set “No Check”, the scanner will transmit all the barcode data.
【Exit Setup】 73
Page 84

【Start Setup】
Do not Send the Check Digit
Send the Check Digit
Set the Minimum Length Limit
Set the Minimum Length Limit
Note: by setting “do not send the check digit”, if the data length except for the 1 character check digit is less than the
minimum barcode reading limit, the barcode reading will be failed. (For example: the scanner set the the minimum barcode
reading length of Code 11 to 4 characters and “do not send check digit”, in such circumstances,the scanner is not able to
read the Code 11 with 4 characters. )
Set the Barcode Reading Length
The scanner is only able to read the Code 11 with tramsmission content length falls in the limited range, the range is
consisted of the maximum value and minimum value in units of character (the maximum value and minimum value also
included), the Code 11 exceeds the range can not be read or transmitted.
Read the barcode of “Set the Minimum Length Limit” to adjust the minimum length limit.
Read the barcode of “Set the Maximum Length Limit” to adjust the maximum length limit.
Note:the maximum length limit of any 1D barcode must not exceed 255, if the maximum length is shorter than the
minimum length, then the scanner is only able to read the barcodes with the minimum length and the the maximum length;
if the maximum length equals to the minimum length, then the scanner is only able to read the barcode with such length.
Example: The steps of set the scanner read the Code 11 with barcode length between 8 to 12 characters.
1. Read the “Start Setup” barcode.
2. Read the barcode of “Set the Minimum Length Limit”.
3. Read the numeric barcode “8”, (see the appendix—numeric barcode)
4. Read the “Save” barcode.(see the appendix—numeric barcode)
5. Read the barcode of “Set the Maximum Length Limit”.
6. Read the numeric barcode “1”.
7. Read the numeric barcode “2”.
8. Read the “Save” barcode.(see the appendix—numeric barcode)
9. Read the “Exit Setup” barcode.
74 【Exit Setup】
Page 85

【Start Setup】
Restore the Default Setup Value of Plessey
Allow to Read Plessey
Prohibit Reading Plessey
Code ID Setup
Plessey
Restore the Default Value
By reading the barcode, the parameter setup of Plessey will be restored to the factory default state.
Allow to Read Plessey or not
Note: the scanner will become unable to read Plessey by reading the setup barcode “Prohibit Reading Plessey”, thus, if
the scanner is unable to read the Plessey, please try to read the setuo barcode “allow to read Plessey”.
CodeID Setup
To activate the setup function by reading “CodeID setup”, then read the hexadcimal value inaccordance with the character
which will be set to the CodeID.
Example: Set the CodeID ofPlesseyto “p” (the hexadcimal value is 0x70).
1. Read the “Start Setup” barcode.
2. Read the “CodeID Setup” barcode.
3. Read the numeric barcode “7”, “0” (see the appendix—numeric barcode)
4. Read the “Save” barcode.(see the appendix—numeric barcode)
5. Read the “Exit Setup” barcode.
Check Setup
Plessey barcode data does not compulsively include the check digit, if check digit exists, then it is the last character.
Check digit is calculated according to all the datas, for checking if the data is correct or not.
Set “No Check”, the scanner will transmit all the barcode data
Set “Check but do not Send Check digit”, the scanner will check according to the last bit, if successful, all the data
except for the check digit will be transmitted, if failed, then the scanner will indicate “barcode reading failed”
【Exit Setup】 75
Page 86

【Start Setup】
Set the Minimum Length Limit
Set the Maximum Length Limit
No Check
Check and Send Check digit
Check but do not Send Check digit
Set “Check and Send Check digit” the scanner will check according to the last bit, if successful, all the data including
the check digit will be transmitted, the check digit will be treated as the last bit of the normal data; if failed, then the
scanner will indicate “barcode reading failed”
Note: by setting “do not send the check digit”, if the data length except for the 1 character check digit is less than the
minimum barcode reading limit, the barcode reading will be failed. (For example: the scanner set the the minimum
barcode reading length of Plessey to 4 characters and “do not send check digit”, in such circumstances,the scanner is not
able to read the Plessey with 4 characters. )
Set the Barcode Reading Length
The scanner is only able to read the Plessey with tramsmission content length falls in the limited range, the range is
consisted of the maximum value and minimum value in units of character, the Plessey exceeds the range can not be read
or transmitted.
Read the barcode of “Set the Minimum Length Limit” to adjust the minimum length limit.
Read the barcode of “Set the Maximum Length Limit” to adjust the maximum length limit.
Note:the maximum length limit of any 1D barcode must not exceed 255, if the maximum length is shorter than the
minimum length, then the scanner is only able to read the barcodes with the minimum length and the the maximum length;
if the maximum length equals to the minimum length, then the scanner is only able to read the barcode with such length.
MSI-Plessey
Restore the Default Value
By reading the barcode, the parameter setup ofMSI-Plessey will be restored to the factory default state.
76 【Exit Setup】
Page 87

【Start Setup】
Restore the Default Setup Value of MSI-Plessey
Allow to Read MSI-Plessey
Prohibit Reading MSI-Plessey
Code ID Setup
Allow to Read MSI-Plessey or not
Note: the scanner will become unable to read MSI-Plessey by reading the setup barcode “Prohibit Reading MSI-Plessey”,
thus, if the scanner is unable to read the MSI-Plessey, please try to read the setuo barcode “allow to read MSI-Plessey”.
CodeID Setup
To activate the setup function by reading “CodeID setup”, then read the hexadcimal value inaccordance with the character
which will be set to the CodeID.
Example: Set the CodeID ofMSI-Plesseyto “p” (the hexadcimal value is 0x70).
1. Read the “Start Setup” barcode.
2. Read the “CodeID Setup” barcode.
3. Read the numeric barcode “7”, “0” (see the appendix—numeric barcode)
4. Read the “Save” barcode.(see the appendix—numeric barcode)
5. Read the “Exit Setup” barcode.
Check Setup
MSI-Plessey barcode data does not compulsively include the check digit, if check digit exists, then it is the last character.
Check digit is calculated according to all the datas, for checking if the data is correct or not.
Set “No Check”, the scanner will transmit all the barcode data
【Exit Setup】 77
Page 88

【Start Setup】
No Check
Single Check MOD10
Double Check MOD10/MOD10
Double Check MOD10/MOD11
Do not Send the Check Digit
Send the Check Digit
Set the Minimum Length Limit
Set the Maximum Length Limit
Note: by setting “do not send the check digit”, if the data length except for the 1 character check digit is less than
the minimum barcode reading limit, the barcode reading will be failed. (For example: the scanner set the the
minimum barcode reading length of MSI-Plessey to 4 characters and “do not send check digit”, in such
circumstances,the scanner is not able to read the MSI-Plessey with 4 characters. )
Set the Barcode Reading Length
The scanner is only able to read the MSI-Plessey with tramsmission content length falls in the limited range, the range is
consisted of the maximum value and minimum value in units of character, the MSI-Plessey exceeds the range can not be
read or transmitted.
Read the barcode of “Set the Minimum Length Limit” to adjust the minimum length limit
Read the barcode of “Set the Maximum Length Limit” to adjust the maximum length limit
Note:the maximum length limit of any 1D barcode must not exceed 255, if the maximum length is shorter than the
minimum length, then the scanner is only able to read the barcodes with the minimum length and the the
maximum length; if the maximum length equals to the minimum length, then the scanner is only able to read the
barcode with such length.
78 【Exit Setup】
Page 89

【Start Setup】
Restore the Default Setup Value of GS1 Databar
Allow to Read GS1 Databar
Prohibit Reading GS1 Databar
Code ID Setup
GS1 Databar
Restore the Default Value
By reading the barcode, the parameter setup of GS1 Databar will be restored to the factory default state.
Allow to Read GS1 Databar or not
Note: the scanner will become unable to read GS1 Databar by reading the setup barcode “Prohibit Reading GS1 Databar”,
thus, if the scanner is unable to read the GS1 Databar, please try to read the setuo barcode “allow to read GS1 Databar”.
CodeID Setup
To activate the setup function by reading “CodeID setup”, then read the hexadcimal value inaccordance with the character
which will be set to the CodeID.
Example: Set the CodeID ofGS1 Databarto “p” (the hexadcimal value is 0x70).
1. Read the “Start Setup” barcode.
2. Read the “CodeID Setup” barcode.
3. Read the numeric barcode “7”, “0” (see the appendix—numeric barcode)
4. Read the “Save” barcode.(see the appendix—numeric barcode)
5. Read the “Exit Setup” barcode.
PDF417
Restore the Default Value
By reading the barcode, the parameter setup of PDF417 will be restored to the factory default state.
【Exit Setup】 79
Page 90

【Start Setup】
Restore the Default Setup Value of PDF417
Allow to Read PDF417
Prohibit Reading PDF417
Code ID Setup
Restore the Default Setup Value of MicroPDF417
Allow to Read PDF417 or not
Note: the scanner will become unable to read PDF417 by reading the setup barcode “Prohibit Reading PDF417”,
thus, if the scanner is unable to read the PDF417, please try to read the setuo barcode “allow to read PDF417”.
Note: PDF417 can support the barcode with maximum 48 lines x 18 rows.
CodeID Setup
To activate the setup function by reading “CodeID setup”, then read the hexadcimal value inaccordance with the character
which will be set to the CodeID.
Example: Set the CodeID ofPDF417to “p” (the hexadcimal value is 0x70).
1. Read the “Start Setup” barcode.
2. Read the “CodeID Setup” barcode.
3. Read the numeric barcode “7”, “0” (see the appendix—numeric barcode)
4. Read the “Save” barcode.(see the appendix—numeric barcode)
5. Read the “Exit Setup” barcode.
MicroPDF417
Restore the Default Value
By reading the barcode, the parameter setup of MicroPDF417 will be restored to the factory default state.
Allow to Read MicroPDF417 or not
80 【Exit Setup】
Page 91

【Start Setup】
Allow to Read MicroPDF417
Prohibit Reading MicroPDF417
Code ID Setup
Note: the scanner will become unable to read MicroPDF417 by reading the setup barcode “Prohibit Reading
MicroPDF417”, thus, if the scanner is unable to read the MicroPDF417, please try to read the setuo barcode
“allow to read MicroPDF417”.
Note: MicroPDF417 support the barcode with maximum 255 bytes.
CodeID Setup
To activate the setup function by reading “CodeID setup”, then read the hexadcimal value inaccordance with the character
which will be set to the CodeID.
Example: Set the CodeID ofMicroPDF417to “p” (the hexadcimal value is 0x70).
1. Read the “Start Setup” barcode.
2. Read the “CodeID Setup” barcode.
3. Read the numeric barcode “7”, “0” (see the appendix—numeric barcode)
4. Read the “Save” barcode.(see the appendix—numeric barcode)
5. Read the “Exit Setup” barcode.
【Exit Setup】 81
Page 92
【Start Setup】
82 【Exit Setup】
Chapter 7 Appendix
Default Setup Table
Parameters
Default Setup
Remark
General Setup
Setup Barcode Function
On
Send Setup Barcode
Off
Working Mode
Manual Reading
Wireless Comminication Mode
Asynchronized Mode
Set the Barcode Reading Tiem
15 Seconds
Range: 0-15sec, 0 means non-stop
Set the Time Interval between Scanning
1 second
Range: 0-7.5sec
Sensitivity Level
High Sensibility
Effective in Sensitivity Mode
Security Level
Level 1
Decoding Sound
Intermediate Frequency-Loud,(150ms)
Tone fo Successful Reading
Read the Same Barcode successivly
Off
Effective in Auto-Mode
Re-Timing after Successful Reading
On
Effective in Auto-Mode
Communication Setup
Baud Rate
9600
Serial Port Data Check
No Check
Stop Bit
1 bit Flow Control
Off
Data Bits
8 bits
USB Virtual Keyboard
On
Page 93

【Start Setup】
【Exit Setup】 83
Parameters
Default Setup
Remark
Virtual Keyboard Layout
The First, American English keyboard
Delay between Characters
0ms
0~75ms
Character Conversion
No conversion
Number Lockup
Off
Data Format Setup
Setup of the Prefix sequence
CodeID+Custom+AIMID
CodeID+Prefix+(AIMID+Data)
+Suffix+Terminal
Add AIMID Prefix
Off
]Cm Symbol
Add CodeID
Off
1 or 2 Character, Captital or
Lowercase Letter
Add Custom Prefix
Off
The Maximum is 11 characters
Add Custom Suffix
Off
The Maximum is 11 characters
Barcode Parameter Setup
Code128
Enable
On
Maximum Length
255
Minmum Length
1
UCC/EAN-128
Enable
On
Maximum Length
255
Minmum Length
1
AIM128
Enable
Off
Minmum Length
1
EAN-8
Page 94

【Start Setup】
84 【Exit Setup】
Parameters
Default Setup
Remark
Enable
On
Send the Check Character
On
Read 2-Digits Extracode
Off
Read 5-Digits Extracode
Off
Extracode is Required, 2-digits
Off
Extracode is Required, 5-digits
Off
Extend to EAN-13
Off
Type is EAN-13 when Extend
Off
EAN-13
Enable
On
Send the Check Character
On
Read 2-Digits Extracode
Off
Read 5-Digits Extracode
Off
Extracode is Required, 2-digits
Off
Extracode is Required, 5-digits
Off
ISSN
Enable
Off
ISBN
Enable
Off
Use 10 digits ISBN
Off
UPC-E
Enable
On
Send the Check Character
On
Read 2-Digits Extracode
Off
Page 95

【Start Setup】
【Exit Setup】 85
Parameters
Default Setup
Remark
Read 5-Digits Extracode
Off
Extracode is Required, 2-digits
Off Extracode is Required, 5-digits
Off
Extend to UPC-A
Off
Type is UPC-A when Extend
Off Send the System Digit “0”
UPC-A
Enable
On
Send the Check Character
On Read 2-Digits Extracode
Off
Read 5-Digits Extracode
Off
Extracode is Required, 2-digits
Off Extracode is Required, 5-digits
Off
Send the System Digit “0”
Interleaved 2 of 5
Enable
On
Check
On
Send Check Character
Off Maximum Length
255
Minmum Length
6
ITF-6
Enable
Off Send Check Character
On
ITF-14
Page 96

【Start Setup】
86 【Exit Setup】
Parameters
Default Setup
Remark
Enable
Off
Send Check Character
On
Deutshe 14
Enable
Off Send Check Character
On
Deutshe 12
Enable
Off Send Check Character
On
COOP25 (JapaneseMatrix 2 of 5)
Enable
Off
Check
Off Send Check Character
Off
Maximum Length
255
Minmum Length
6
Matrix 2 of 5(European Matrix 2 of 5)
Enable
On
Check
Off Send Check Character
Off
Maximum Length
255
Minmum Length
6
At less 3
Industrial 25
Enable
?
Check
? Send Check Character
?
Page 97
【Start Setup】
【Exit Setup】 87
Parameters
Default Setup
Remark
Maximum Length
?
Minmum Length
? Standard 25
Enable
On
Check
Off Send Check Character
Off
Maximum Length
255
Minmum Length
6
At less 4
Code 39
Enable
On
Check
Off Send Check Character
Off
Do not Send Start and Stop Character
Off
Support Full ASCII
On Maximum Length
255
Minmum Length
4
Codabar
Enable
On Check
Off
Send Check Character
Off
Do not Send Start and Stop Character
Off
Select one
ABCD/ABCD as the Start and Stop
Character
On
Page 98
【Start Setup】
88 【Exit Setup】
Parameters
Default Setup
Remark
ABCD/TN*E as the Start and Stop
Character
Off
abcd/abcd as the Start and Stop Character
Off
abcd/tn*e as the Start and Stop Character
Off
Maximum Length
255
Minmum Length
4
At less 2
Code 93
Enable
On
Check
On Send Check Character
Off
Maximum Length
255
Minmum Length
2
At less 1
Code 11
Enable
Off
Check
Off
Send Check Character
On
1 Digit MOD10 Check
On
2 Digits MOD10/MOD10 Check
Off
2 Digits MOD10/MOD11 Check
Off
Auto 2 Digits MOD11/MOD11
Off
Auto 2 Digits MOD11/MOD9
Off
Maximum Length
255
Minmum Length
4
At less 3
Plessey
Page 99
【Start Setup】
【Exit Setup】 89
Parameters
Default Setup
Remark
Enable
Off
Check
On
Send Check Character
Off Maximum Length
255
Minmum Length
4
At less 4
MSI-Plessey
Enable
Off Check
Off
Send Check Character
On
1 Digit MOD10 Check
Off
2 Digits MOD10/MOD10 Check
Off
2 Digits MOD10/MOD11 Check
Off Maximum Length
255
Minmum Length
4
At less 3
GS1 Databar
Enable
On
PDF417
Enable
On
MicroPDF417
Enable
On
Page 100

【Start Setup】
90 【Exit Setup】
AIM ID Table
Barcode
AIM ID
Possible AIM ID Parameters
Code 128
]C0 UCC/EAN-128
]C1 AIM 128
]C2 ISBT 128
]C4 EAN-8
]E4 EAN-13
]E0 EAN-13 with Addon
]E3 ISSN
]X0 ISBN
]X0
UPC-E
]E0
UPC-E with Addon
]E3 UPC-A
]E0 UPC-A with Addon
]E3 Interleaved 2 of 5
]Im
0,1,3
ITF-6
]Im
1,3
ITF-14
]Im
1,3
Deutsche 14
]X0
Deutsche 12
]X0
COOP 25(Japanese Matrix 2 of 5)
]X0 Matrix 2 of 5(European Matrix 2 of 5)
]X0 Industrial 25
]S0
 Loading...