

Page 1
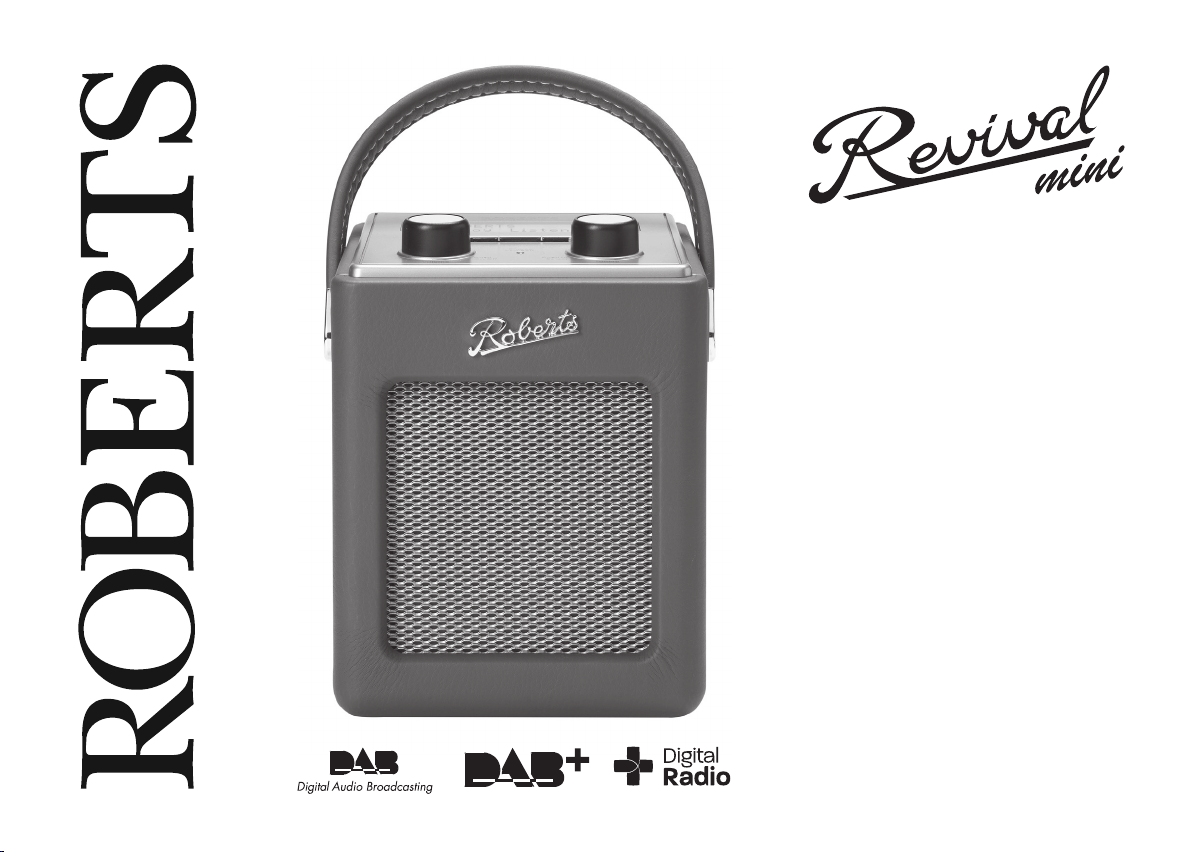
DAB / DAB+ / FM RDS
digital radio
Please read this manual before use
Page 2

Contents
Controls .......................................................................2-3
Battery operation using alkaline batteries.......................4
Battery operation using rechargeable batteries .............. 5
Using the AC adaptor .....................................................6
Operating your radio - DAB ............................................7
Selecting a station - DAB................................................8
Display options - DAB.....................................................9
Finding new stations - DAB ..........................................10
Secondary services - DAB............................................10
Manual tuning - DAB .................................................... 11
Signal strength display - DAB ....................................... 11
Dynamic range control (DRC) settings - DAB ..............12
Prune stations - DAB .................................................... 13
Operating your radio - Search tuning FM .....................14
Manual tuning - FM.......................................................15
Display options - FM ..................................................... 16
Scan sensitivity - FM ....................................................17
FM stereo/mono (headphones only).............................18
Preset stations DAB and FM ........................................19
Favourite button............................................................20
Recalling your favourite station ....................................20
Software version ........................................................... 21
Software upgrades .......................................................21
Language function ........................................................ 22
System reset.................................................................23
Electro-magnetic compatibility advice ...............................23
Product markings...............................................................23
Headphone socket........................................................24
Auxiliary input socket .................................................... 24
A few words about batteries ....................................25-26
Display backlight...........................................................27
General ......................................................................... 28
Specications ...............................................................29
Circuit features .............................................................29
Guarantee.....................................................................30
1
Page 3
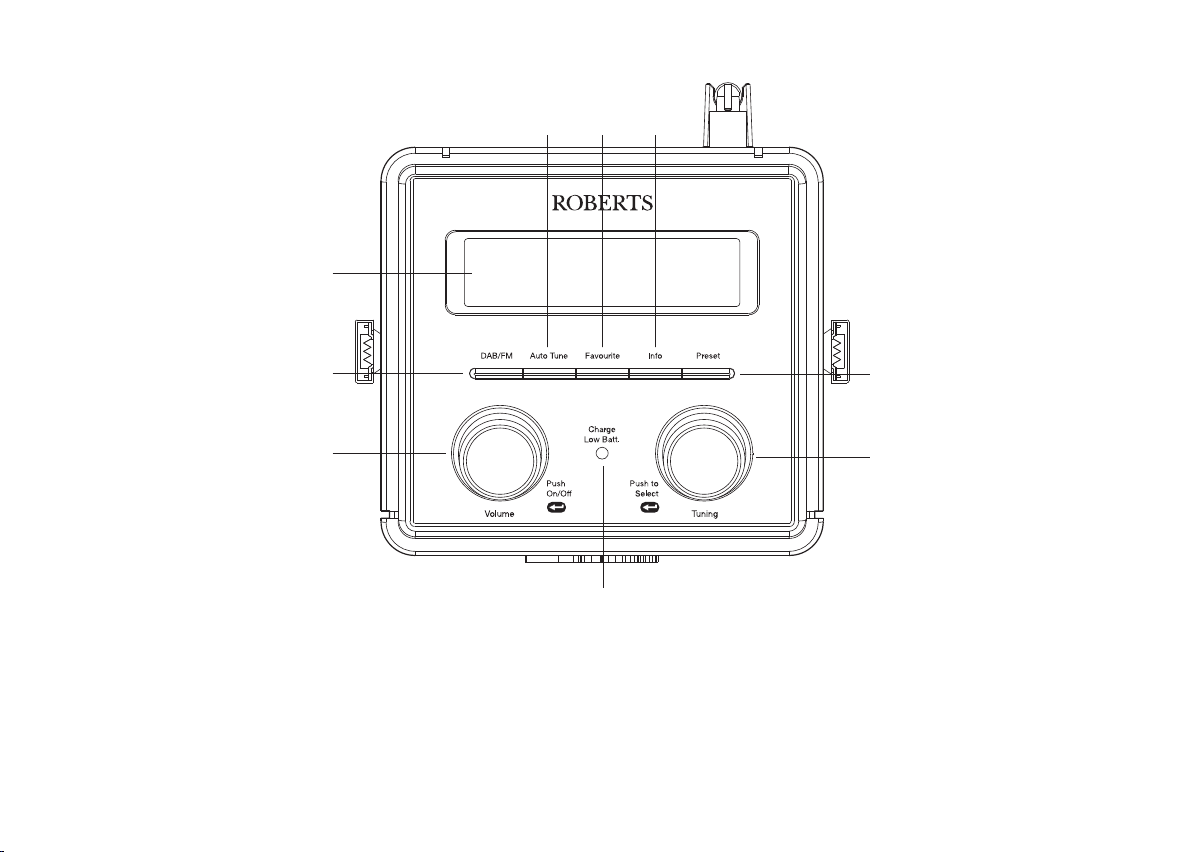
Controls
(Top)
5
4
3
1. Tuning / Select control
2. Charge / Low battery indicator
3. On / Off / Volume control
4. DAB / FM button
5. LCD display
6 7 8
9
1
2
6. Auto Tune button
7. Favourite button
8. Info button
9. Preset button
2
Page 4
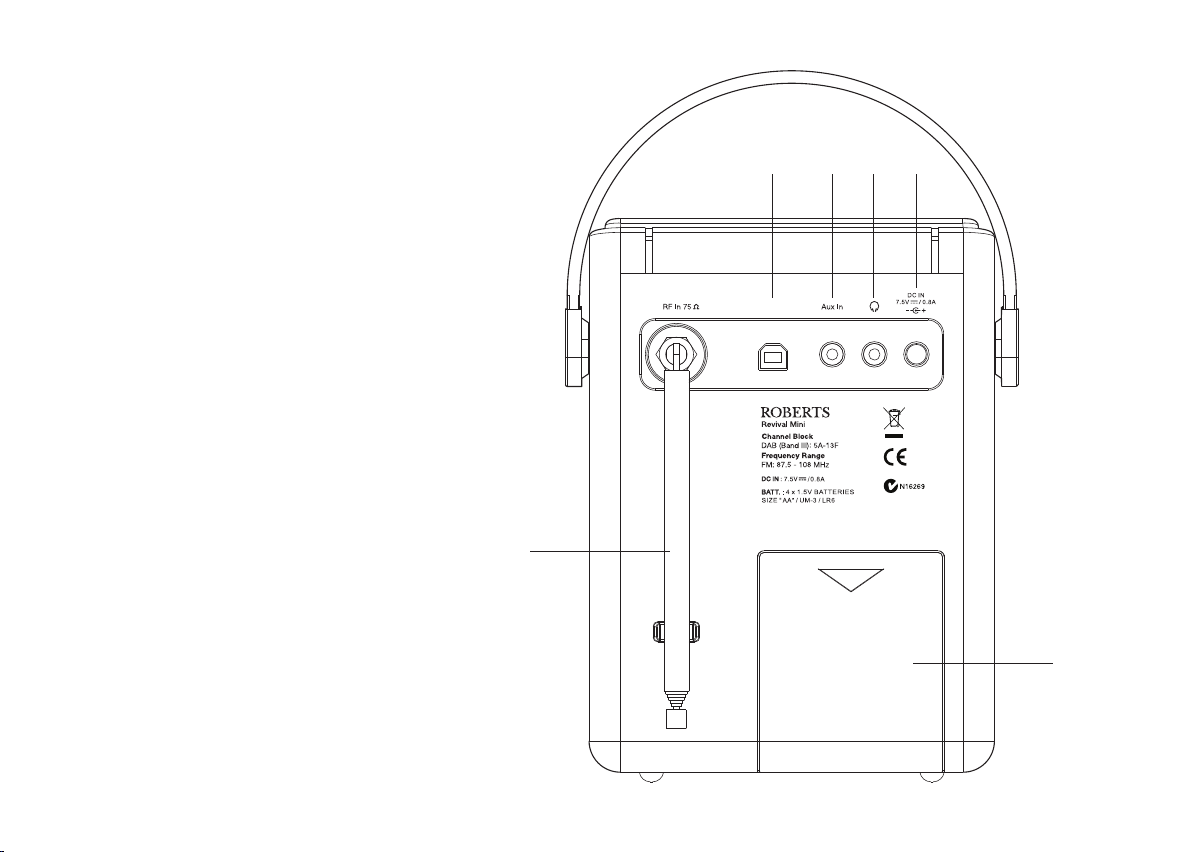
Controls
(Rear)
10. Telescopic aerial
11. USB socket (for service use only)
12. Auxiliary input socket
13. Headphone socket
14. DC in socket
15. Battery compartment
10
11
Service
12 13 14
15
3
Page 5
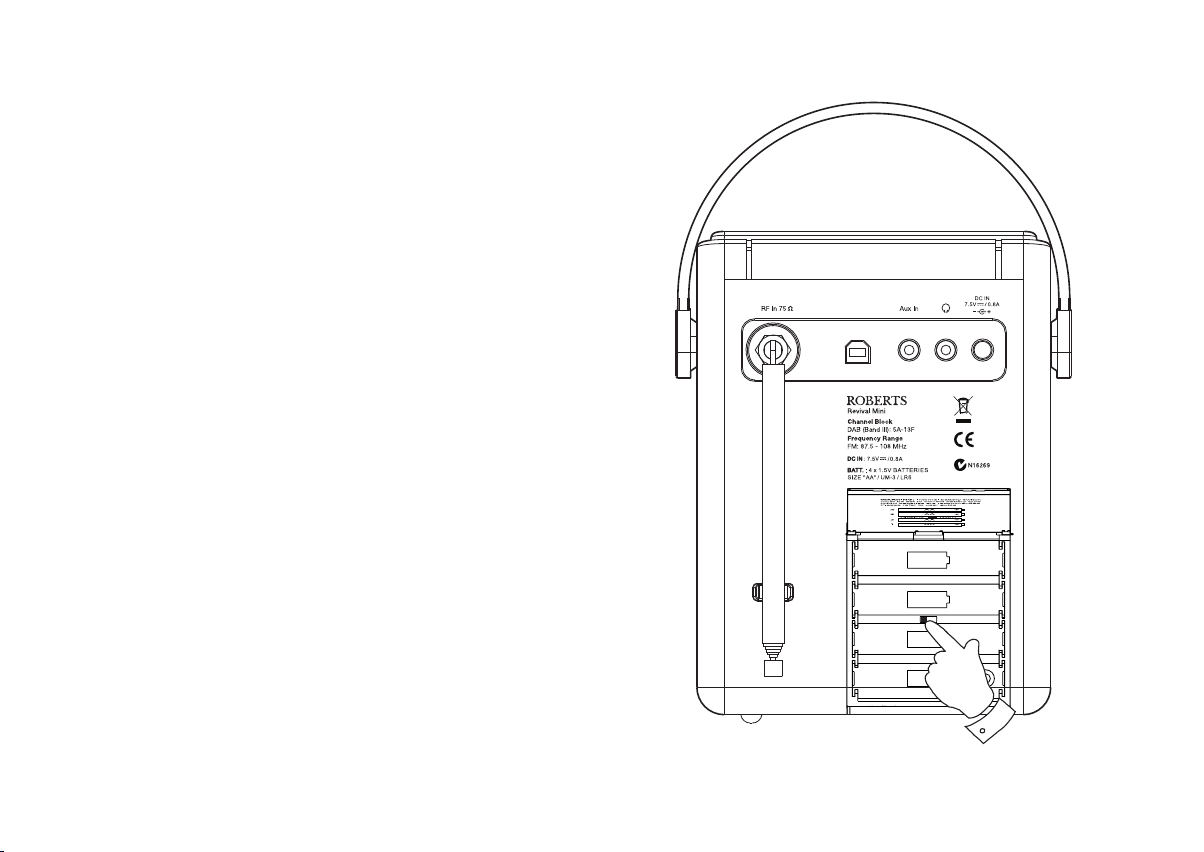
Battery operation using alkaline batteries
(also see page 25)
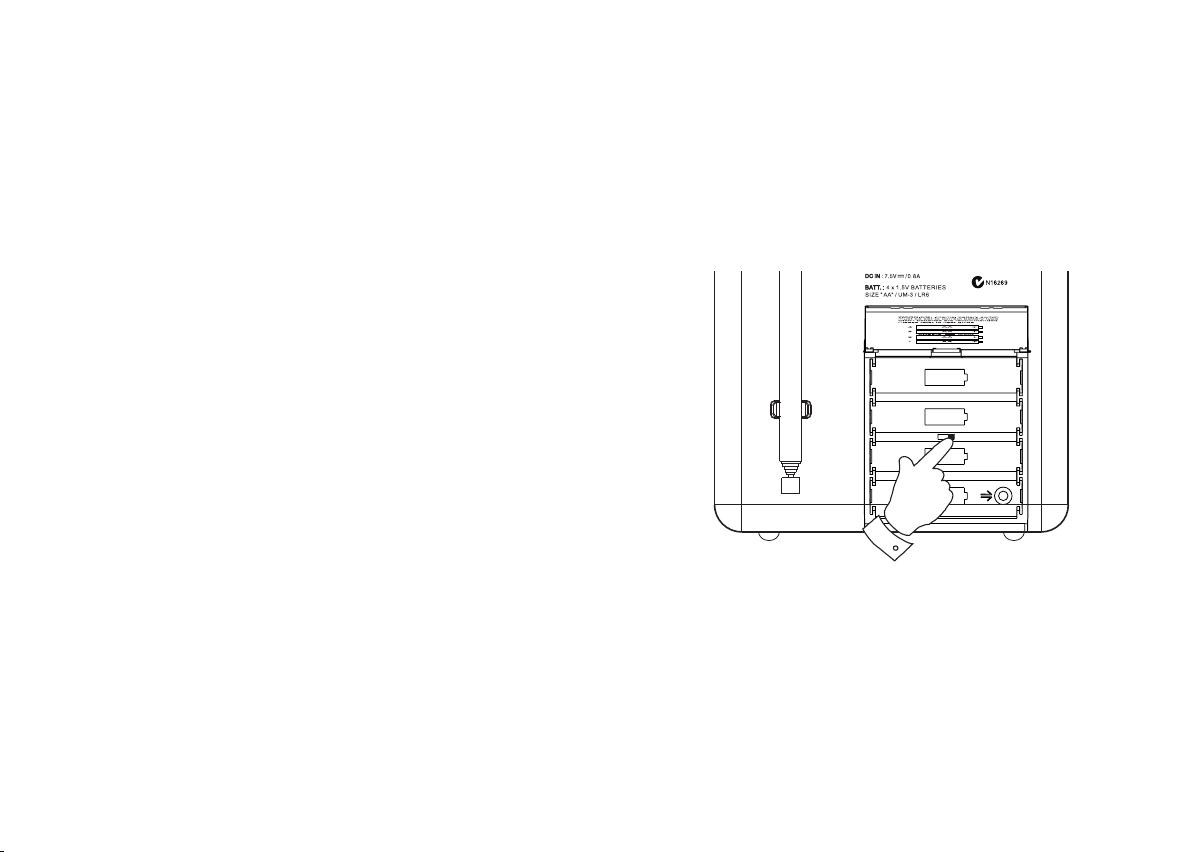
1. Remove the battery cover on the back of the unit by pushing the battery
door in slightly and then downwards in the direction of the arrow.
2. Slide the switch inside the battery compartment to the Alkaline
position.
3. Insert four LR6 (AA size) Alkaline batteries into the spaces in the
compartment. Take care to ensure all batteries are inserted with the
correct polarity as shown inside the battery compartment. Then replace
the battery cover.
• Important: when using Alkaline batteries the battery switch must
be placed in the Alkaline position. Failure to do so could result
in serious damage to the batteries or radio.
• When the batteries are exhausted, the charge/low battery indicator
will show red for a short while. The radio will then switch itself off. It
may not be possible to switch the radio back on until the batteries are
replaced, or until the radio is connected to the mains adaptor.
• If the radio is not to be used for any extended period of time it is
recommended that the batteries are removed from the radio.
• We would recommend for economy that the Revival Mini is used via
the AC adaptor whenever possible with battery operation for occasional
use only. If extended listening using batteries is anticipated, then the
use of rechargeable batteries is recommended.
IMPORTANT: The batteries should not be exposed to excessive heat
such as sunshine, re or the like. After use, disposable batteries should
if possible be taken to a suitable recycling centre. On no account
should batteries be disposed of by incineration.
Service
Size AA
Size AA
Alkaline NiMH
Size AA
Size AA
1
Caution: Replace batteries only with the same or equivalent type. Danger
of explosion if the batteries are incorrectly replaced.
4
Page 6
Battery operation using rechargeable batteries
Service
(also see page 25)
The rst few times that you charge a new set of batteries, you may nd that the charge and play times are very short. Normal operation
should be achieved after 3 or 4 charge - discharge cycles.
Batteries are only charged while the radio is connected to the mains supply via its adaptor and it is switched off using the On/Off button.
1. Remove the battery cover on the back of the unit by pushing the battery
door in slightly and then downwards in the direction of the arrow.
2. Slide the switch inside the battery compartment to the NiMH
position.
3. Insert four Rechargeable LR6 (AA size) batteries into the spaces in the
compartment. Take care to ensure all batteries are inserted with the correct
polarity as shown inside the battery compartment. The radio is designed
to be used with Nickel Metal Hydride (NiMH) rechargeable batteries. Then
replace the battery cover.
4. Plug the mains adaptor into your radio and then plug the adaptor into the
mains.
5. The Charge light will ash green indicating that the batteries are charging.
Batteries will be fully charged in around 3 - 7 hours depending on their
capacity. The charge light shows a steady green light when the battery
charging is complete. The display will show "Battery Full".
6. Under some conditions the charging indicator light may switch off after
ashing only briey. This may happen if the batteries are already freshly
charged, or if the radio detects that you may be attempting to recharge
alkaline batteries. In these cases the charging will be stopped.
If the charge process stops after only a short while this may be due to
a faulty battery. In this case the display will show "Battery Fail" and the
battery number 1-4, corresponding to the numbering printed inside the
battery cover.
If this happens, try charging the batteries a second time by removing and
reconnecting the AC power adaptor. If the message is repeated, then it is
likely that the batteries are old and should be replaced.
Note: You should never attempt deliberately to recharge alkaline
batteries in the radio. Attempted recharging of alkaline batteries
can be dangerous.
• Important: when using rechargeable batteries the battery
switch must be placed in the NiMH position. Batteries
will only be charged when the radio is switched off and
connected to the AC adaptor.
Size AA
Size AA
Alkaline NiMH
Size AA
Size AA
1
5
Page 7
Battery operation using rechargeable batteries cont.
• When the batteries are exhausted, the charge/low battery indicator
light will show red for a short while. The radio will then switch itself off.
It may not be possible to switch the radio back on until the batteries
are recharged, or until the radio is connected to the mains adaptor.
• If the radio is not to be used for any extended period of time it is
recommended that the batteries are removed from the radio.
Using the AC adaptor
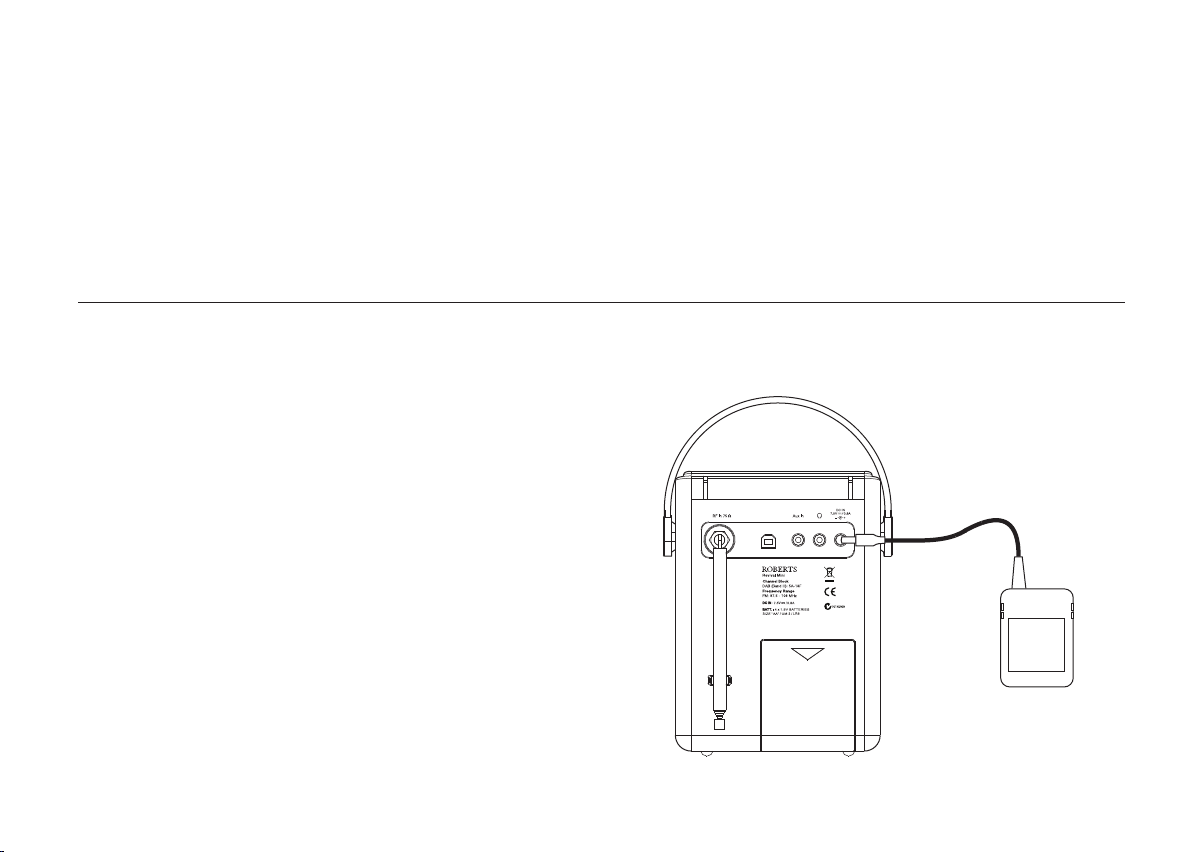
1. Insert the adaptor plug into the DC in socket on the rear of your radio.
2. Plug the adaptor into a standard mains socket outlet. Whenever the
adaptor is plugged in to the radio and switched on at the mains the
batteries are automatically disconnected. If the adaptor is plugged in to
the radio but not switched on then the radio will run from the batteries
if tted.
The AC adaptor should be disconnected from the mains supply and
the radio when not in use.
IMPORTANT: The mains adaptor is used as the means of connecting the
product to the mains supply. The mains socket and any multi-way mains
block used for the product must remain accessible during normal use. In
order to disconnect the product from the mains, the mains adaptor should
be removed from the mains socket completely.
Use only the mains adaptor provided with the product, or a genuine
replacement provided by Roberts Radio. The use of alternative adaptors
will invalidate the guarantee.
IMPORTANT: The batteries should not be exposed to excessive heat
such as sunshine, re or the like. After use, disposable batteries should
if possible be taken to a suitable recycling centre. On no account
should batteries be disposed of by incineration.
Caution: Replace batteries only with the same or equivalent type. Danger
of explosion if the batteries are incorrectly replaced.
Service
6
Page 8
Operating your radio - DAB
1. Carefully extend the telescopic aerial fully.
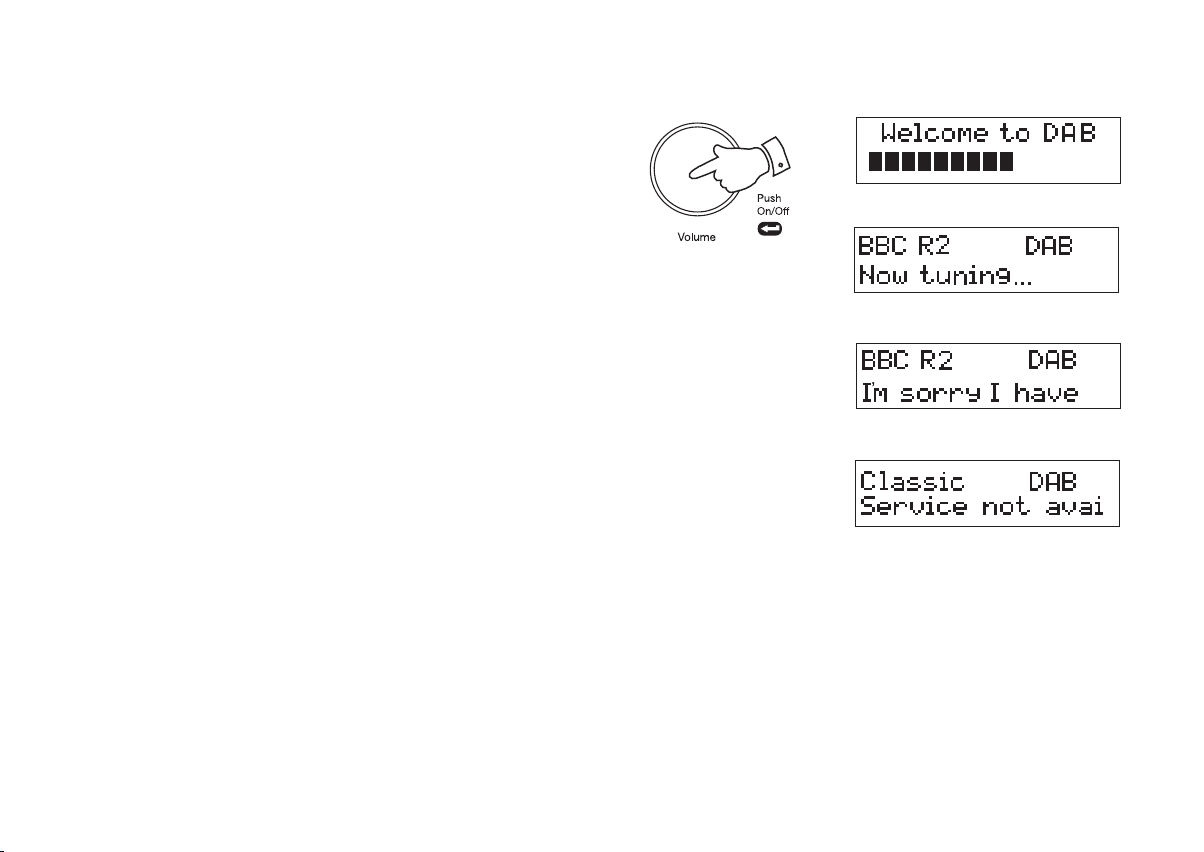
2. Press and release the On/Off control to switch on your radio. The
display will show 'Welcome to DAB'. When rst switched on, the radio
will be in DAB mode. After each use the radio will remember the mode
used and then switch on in that mode the next time that it is used.
3. If this is the rst time the radio is used a scan of the Band III DAB
channels will be carried out. If the radio has been used before the last
used station will be selected.
4. During the scanning process, the lower line of the display shows a
bar-graph indicating progress of the scan.
5. When the scanning is completed the rst station (in numeric-alpha
order 0...9...A....Z) will be selected. The rst station in the list of stations
found during scanning will be played. The display will show the station
name.
6. If the station list is still empty after the scan your radio will display
'Service not available'.
7. If no signals are found it may be necessary to relocate your radio to
a position giving better reception. Then, either switch your radio off
and on again, or press and release the Auto Tune button to repeat
the scan.
2
7
Page 9
Selecting a station - DAB
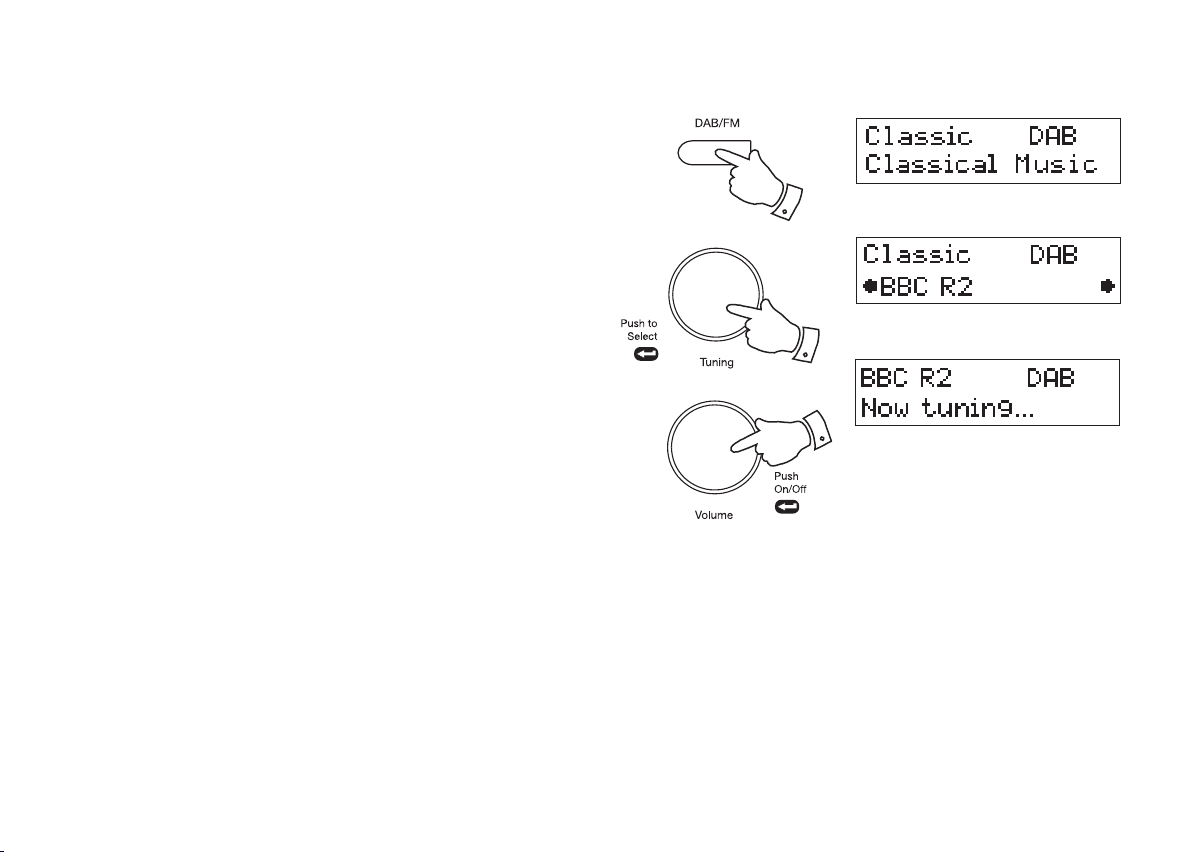
1. The top line of the display shows the name of the station currently
selected.
2. Press and release the DAB/FM button until the DAB mode is selected.
3. Rotate the Tuning control to scroll through the list of available stations
on the lower line of the display. Stop rotating the Tuning control when
you nd the station that you wish to hear.
4. Press and release the Tuning control to select the station. The display
may show 'Now tuning...' while your radio nds the new station.
5. Adjust the Volume control to the required setting.
Note: If after selecting a station the display shows 'Service not available' it
may be necessary to relocate your radio to a position giving better reception.
The use of radio station presets for selecting your preferred radio stations
is described on page 19.
2
3,4
5
8
Page 10
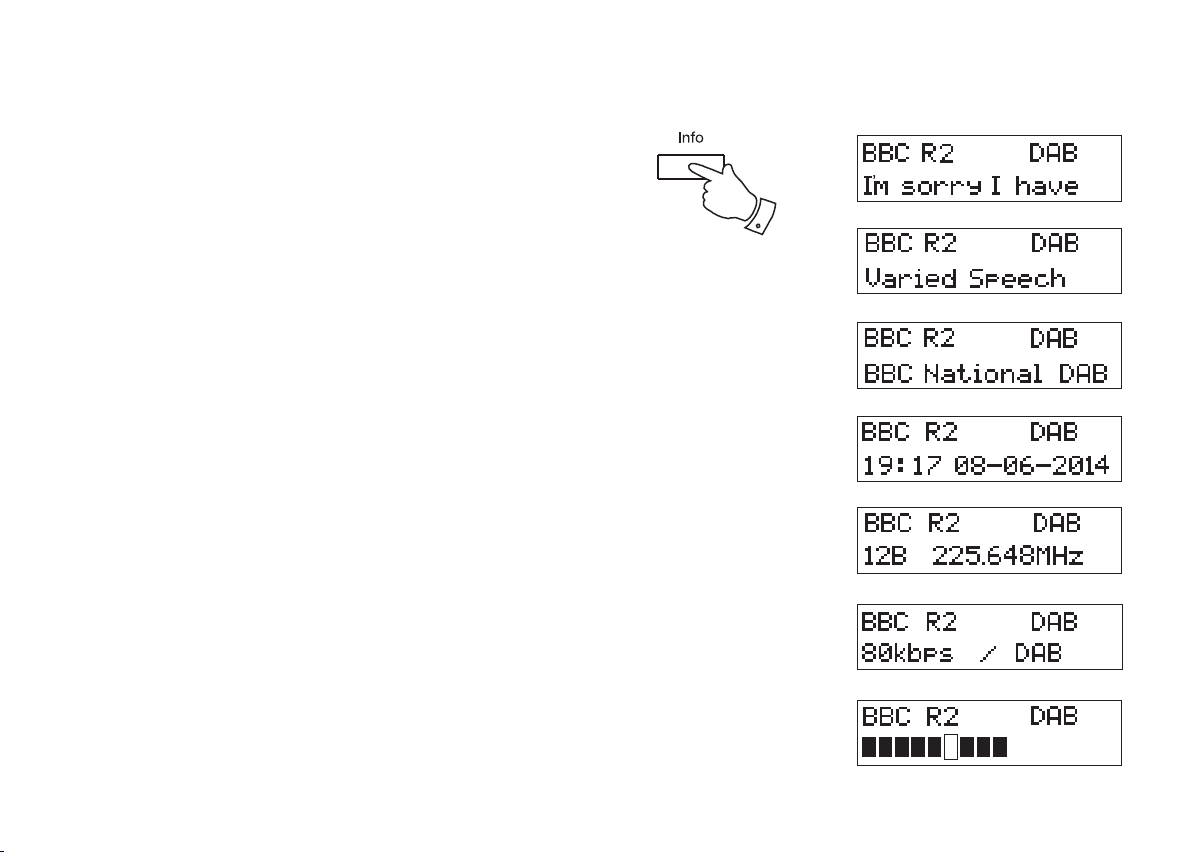
Display options - DAB
Your radio has a range of display options in DAB mode.
1. Press and release the Info button to cycle through the various options.
a. Scrolling text Displays scrolling text messages such as
artist/track name, phone in number etc.
b. Program Type Displays the type of station being listened
to e.g. Pop, Classic, News etc.
c. Multiplex Name Displays the name of DAB multiplex to
which the current station belongs.
d. Time and date Displays the current time and date.
e. Frequency Displays the frequency of the DAB
multiplex for the station listened to.
f. Bit rate & audio type Displays the digital bit rate & audio type
for the station being listened to.
g. Signal Strength Displays a graph showing the signal
strength for the station being received.
The clear unlled rectangle indicates
the minimum signal level required for
satisfactory DAB reception.
a
1
b
c
d
e
f
g
9
Page 11
Finding new radio stations - DAB
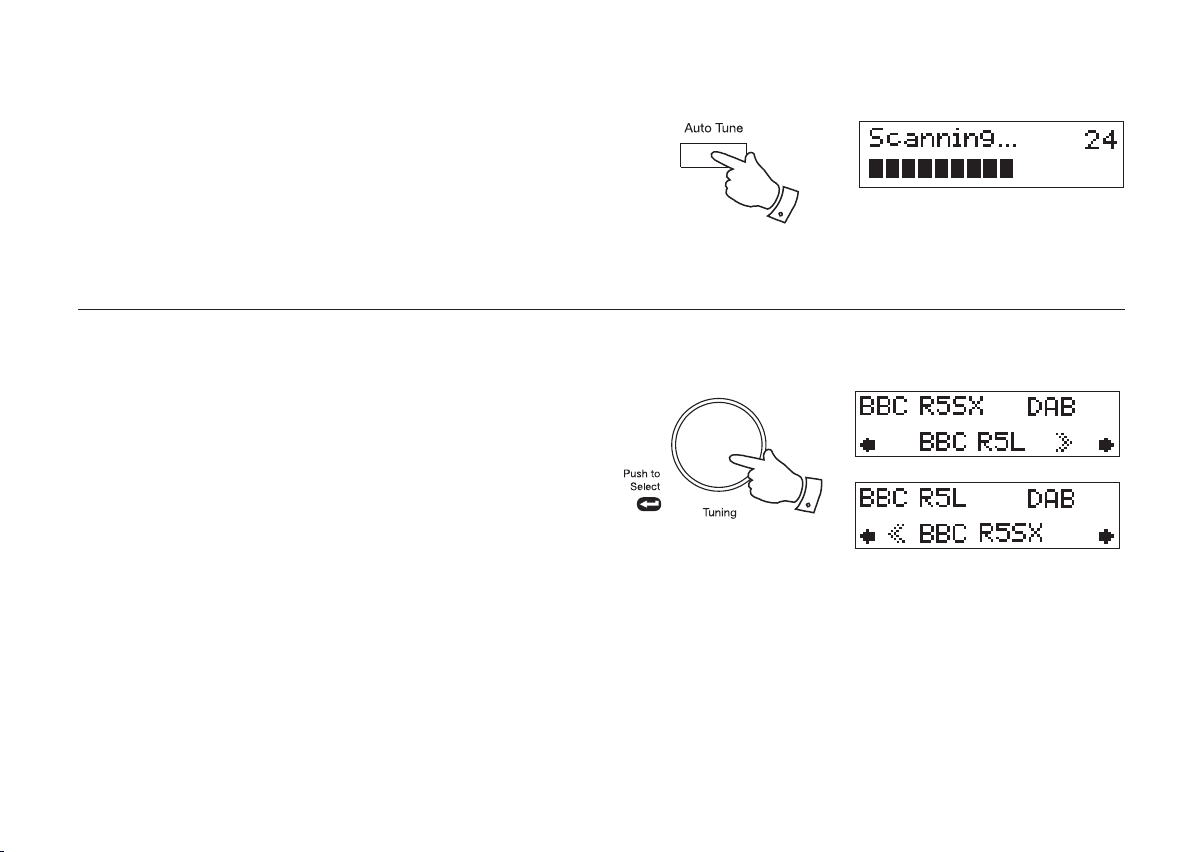
As time passes new stations may become available. To nd new stations
proceed as follows:-
1. Press and release the Auto Tune button. The display will show
'Scanning...' and your radio will perform a scan of the Band III DAB
channels. As new radio stations are found the station counter on the
right-hand side of the display will increase and the radio stations will
be added to the list stored in the radio.
Secondary services - DAB
1. Certain radio stations have one or more secondary services associated
with them. If a radio station has a secondary service associated with
it the display will show '>>' next to the station name on the station list.
The secondary service will then appear immediately after the primary
service as you rotate the tuning control clockwise.
2. Press and release the Tuning control to select the station.
3. When the secondary service shuts down, your radio will automatically
switch back to the main radio station (or primary service) if it is
available.
1
1,2
10
Page 12
Manual tuning - DAB
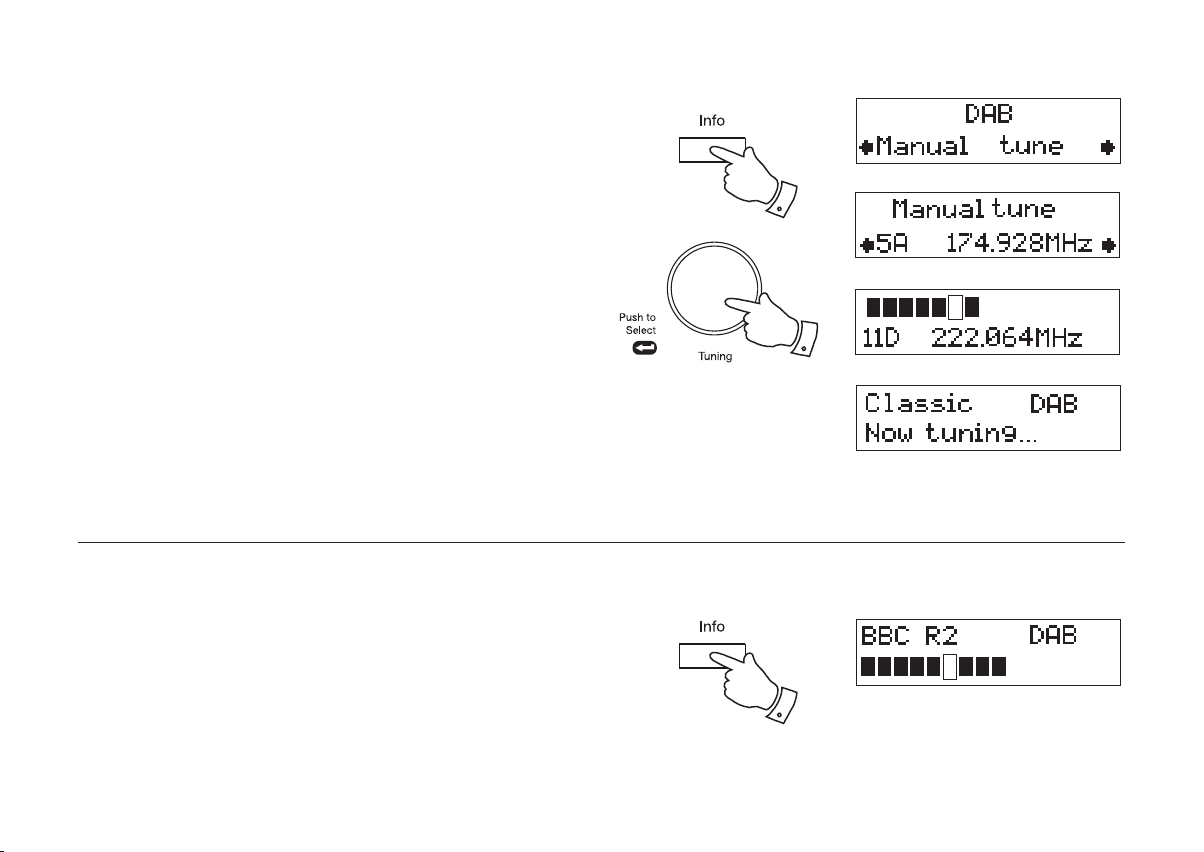
Manual tuning allows you to tune directly to the various DAB Band III
channels. UK DAB stations located in the range 11B to 12D.
1. Press and hold the Info button. The DAB menu will show on the display.
2. Rotate the Tuning control until the display shows 'Manual tune'. Press
and release the Tuning control.
3. Rotate the Tuning control to select the required DAB channel.
1
4. Press and release the Tuning control to select the desired channel. The
graph will indicate the signal strength, and the lower line will show the
name of the DAB Multiplex (group of radio stations). The clear unlled
rectangle indicates the minimum signal level required for satisfactory
DAB reception. Any stations found will be added to the stored list in
the radio.
5. Press and release the Tuning control to return to the normal tuning
mode.
Signal strength display - DAB
1. Repeatedly press and release the Info button until the lower line of
the display shows signal strength.
2. Position your radio and try moving the aerial so as to give maximum
number of black rectangles on signal strength display. Normally, the
best reception will be found with the aerial vertical and fully extended.
3. The clear unlled rectangle indicates minimum signal level required
for satisfactory reception.
11
2-5
1
Page 13
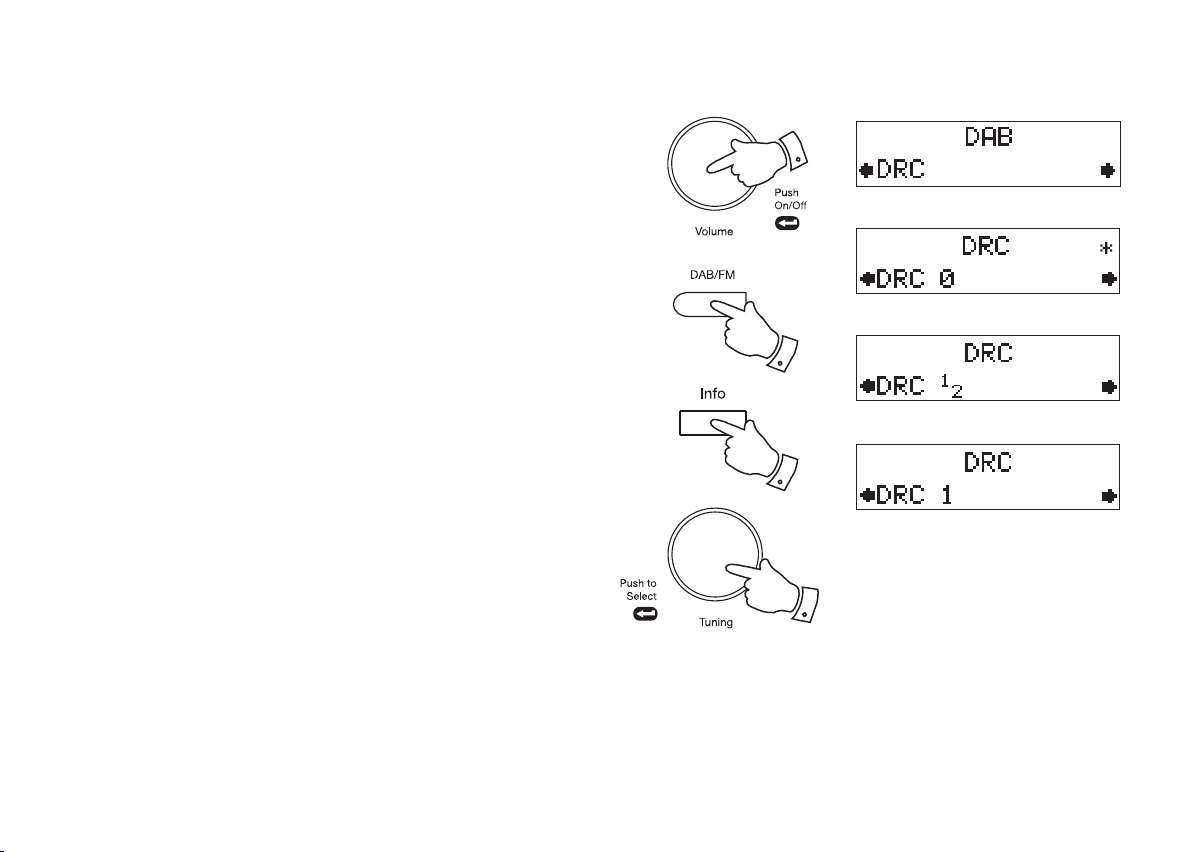
Dynamic Range Control settings - DAB
Dynamic Range Control (also known as DRC) can make quieter sounds
easier to hear when your radio is used in a noisy environment.
1. Press and release the On/Off control to switch on your radio.
2. Press and release the DAB/FM button until the DAB mode is selected.
3. Press and hold the Info button. The DAB menu will show on the display.
1
4. Rotate the Tuning control until the display shows 'DRC'.
5. Press and release the Tuning control to enter the adjustment mode.
6. Rotate the Tuning control to select the required DRC setting (the
default is 0).
DRC 0 - DRC is switched off, Broadcast DRC will be ignored.
DRC 1/2 - DRC level is set to 1/2 that sent by broadcaster.
DRC 1 - DRC level is used as sent by broadcaster.
7. Press and release the Tuning control to conrm the setting. The
display will return to normal tuning mode.
Note: Not all DAB broadcasts are able to use the DRC function. If the
broadcast does not support DRC, then the DRC setting in the radio will
have no effect.
2
3
4-7
12
Page 14
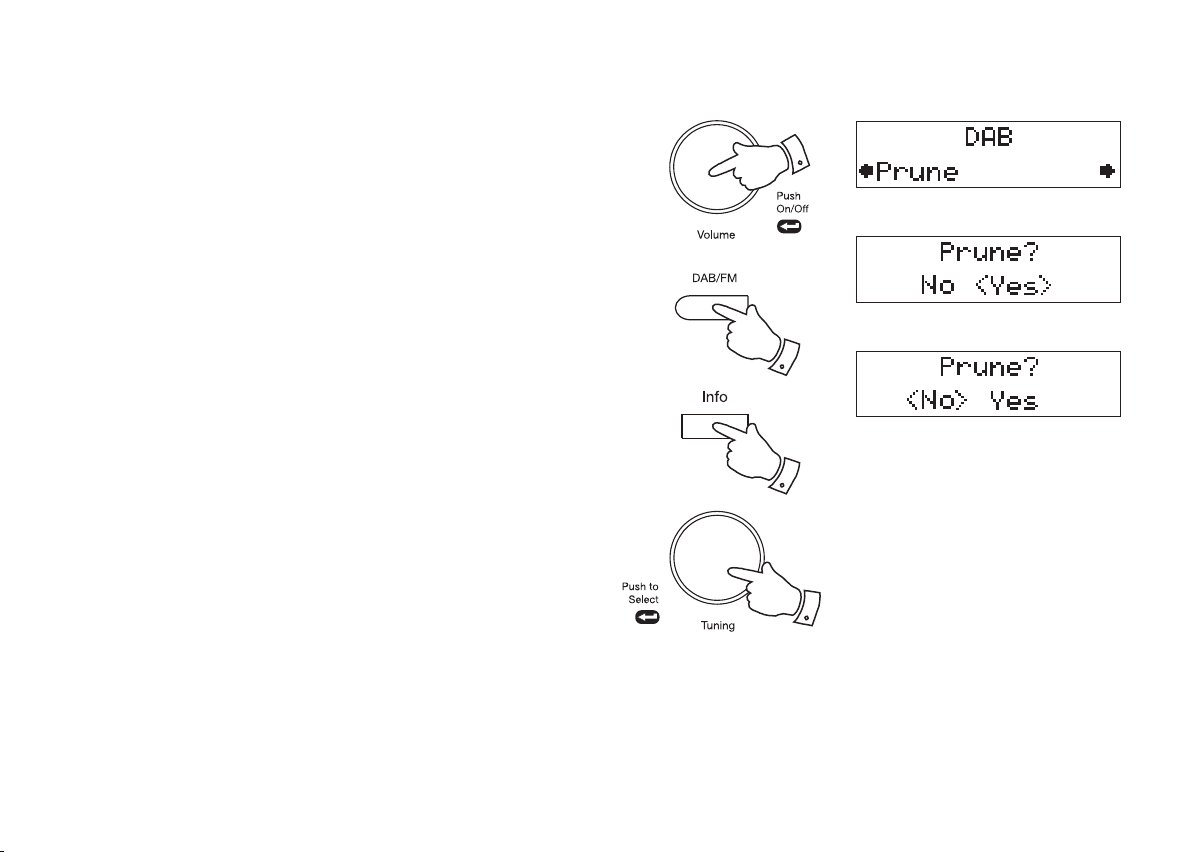
Prune stations - DAB
Over time, some DAB services may stop broadcasting, or may change
location and then not be able to receive a station. In order to remove such
stations from the DAB station list, the Prune stations function will delete
the DAB stations from your station list that can no longer be received.
Stations which cannot be found or which have not been received for a very
long time are shown in the station list with a question mark.
1. Press and release the On/Off control to switch on your radio.
1
2. Press and release the DAB/FM button until the DAB mode is selected.
3. Press and hold the Info button. The DAB menu will show on the display.
4. Rotate the Tuning control until 'Prune' appears on the display. Press
and release the Tuning control.
5. Rotate the Tuning control to select 'Yes'. Press and release the Tuning
control to cause the stations list to be pruned, eliminating unavailable
stations.
6. If you do not wish to prune stations select 'No' in step 5 and then press
and release the Tuning control. The display will revert back to the
previous display.
Note: If you have moved to a different part of the country you should
also carry out a search for new stations (please see the section 'Finding
new stations' on page 10).
13
2
3
4-6
Page 15
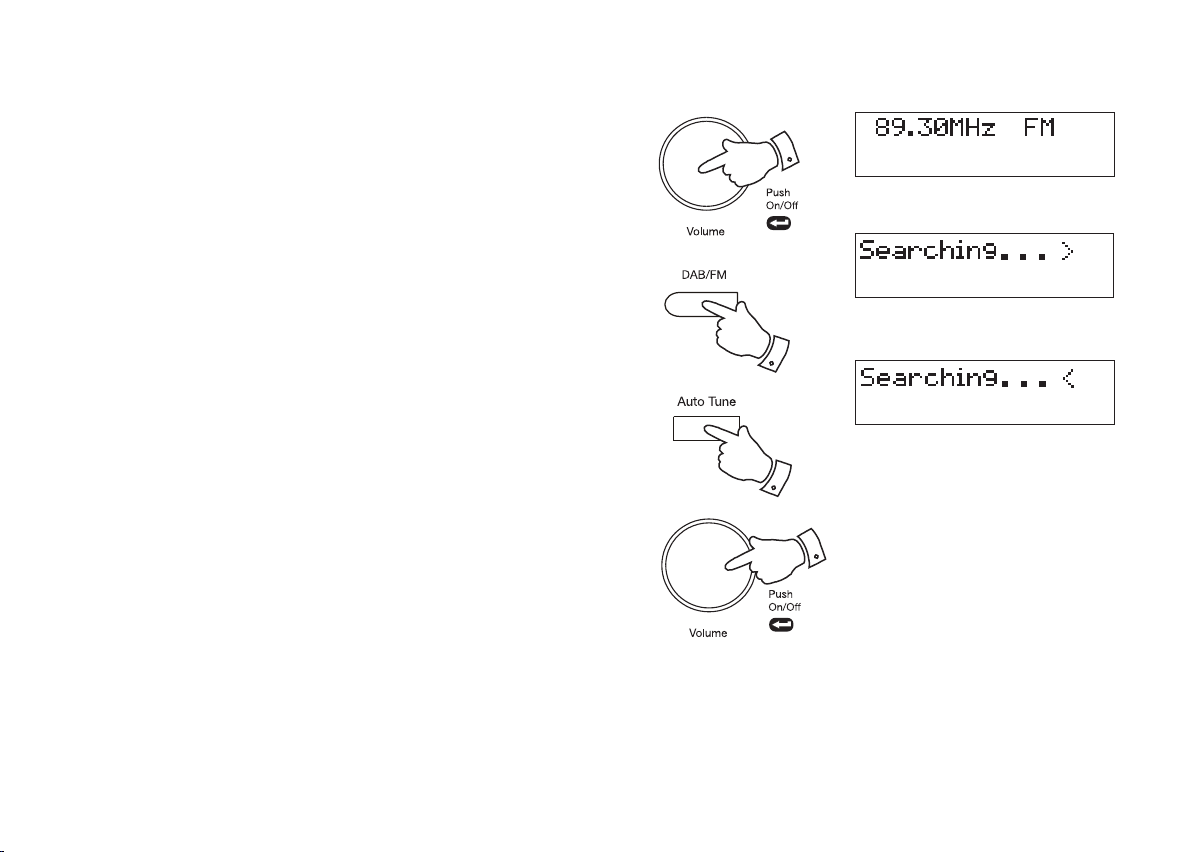
Operating your radio - Search tuning FM
1. Carefully extend the telescopic aerial fully.
2. Press and release the On/Off control to switch on your radio.
3. Press and release the DAB/FM button until the FM mode is selected.
4. Press and immediately release the Auto tune button, your radio will
scan in an upwards direction (low frequency to high frequency) and
stop automatically when it nds a station of sufcient strength.
5. After a few seconds the display will update. The display will show the
frequency of the signal found. If the signal is strong enough and there
is RDS data present then the radio may display the station name.
6. To nd other stations, press and release the Auto tune button as
before.
7. To scan the FM band in a downwards direction (high frequency to low
frequency) press and hold down the Auto tune button for 2 seconds
and then release.
8. When the waveband end is reached your radio will recommence tuning
from the opposite waveband end.
9. Adjust the Volume control to the required setting.
The use of radio station presets for selecting your preferred radio stations
is described on page 19.
2
3
4-7
9
If you nd that an FM broadcast has a lot of background hiss, this may
often be reduced by setting the radio into Mono reception mode for the
current FM station. Please refer to the section 'Stereo / Mono setting - FM'
on page 18 for further details.
14
Page 16
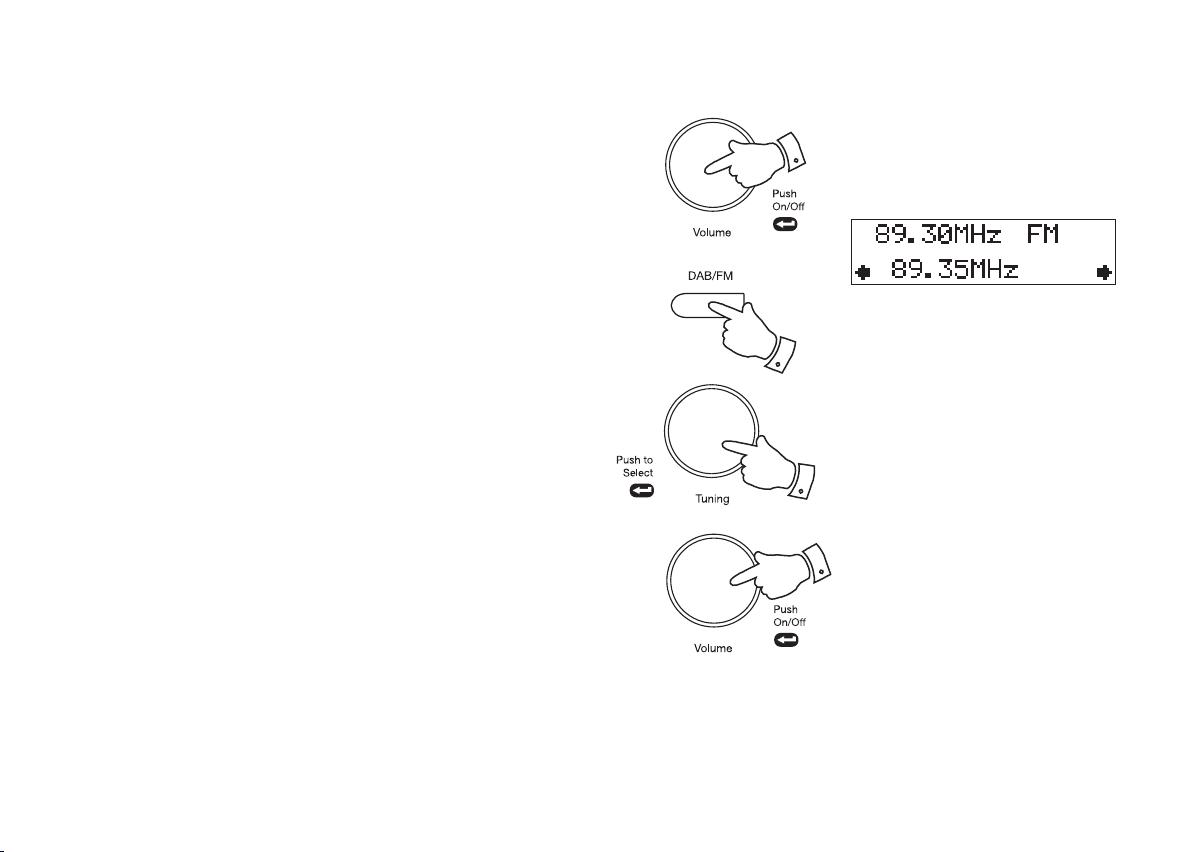
Manual tuning - FM
1. Press and release the On/Off control to switch on your radio.
2. Press and release the DAB/FM button until the FM mode is selected.
Carefully extend the telescopic aerial fully for FM reception.
3. Rotate the Tuning control to tune to a station. With each click of the
control the frequency will change up or down by 50 kHz.
4. When the waveband end is reached the radio will recommence tuning
from the opposite waveband end.
5. Set the Volume control to the desired settings.
6. To switch off your radio press and release the On/Off button.
If you nd that an FM broadcast has a lot of background hiss, this may
often be reduced by setting the radio into Mono reception mode for the
current FM station. Please refer to the section 'Stereo / Mono setting - FM'
on page 18 for further details.
1,6
2
3
5
15
Page 17
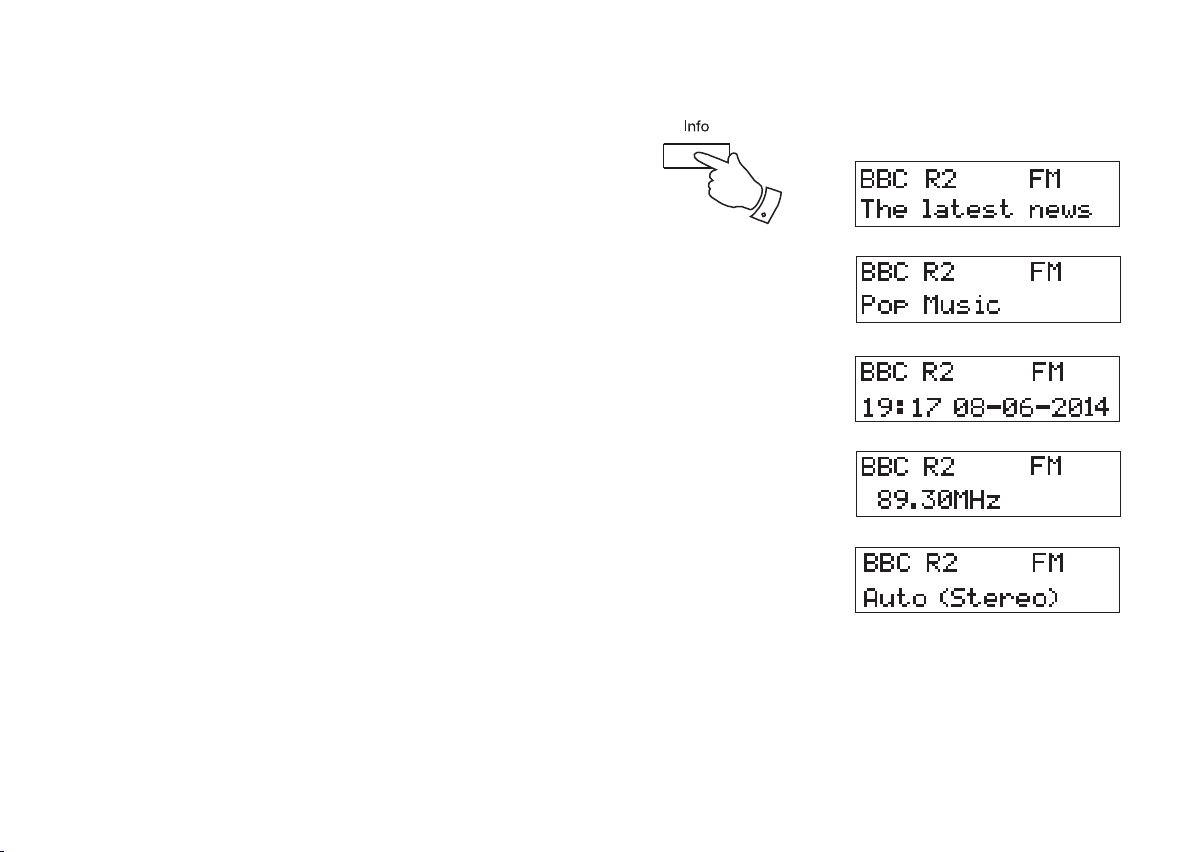
Display options - FM
Your radio has a range of display options in FM mode.
The Radio Data System (RDS) is a system in which inaudible digital
information is transmitted in addition to the normal FM radio programme.
RDS offers several useful features. The following are available on your radio.
1. Press and release the Info button to cycle through each of the options.
a. Scrolling text Displays scrolling text messages such
as artist/track name, phone in number
etc.
b. Program type Displays type of station being listened to
e.g. Pop, Classic, News, etc.
c. Time and date Displays the current time and date.
d. Frequency Displays frequency of the station being
listened to.
e. Audio mode Display shows Auto (stereo) or Mono.
Note: Your radio will display "No RadioText" on the lower line of the
display if there is no scrolling text available and "No PTY" if there is no
programme type information.
1
a
b
c
d
e
16
Page 18
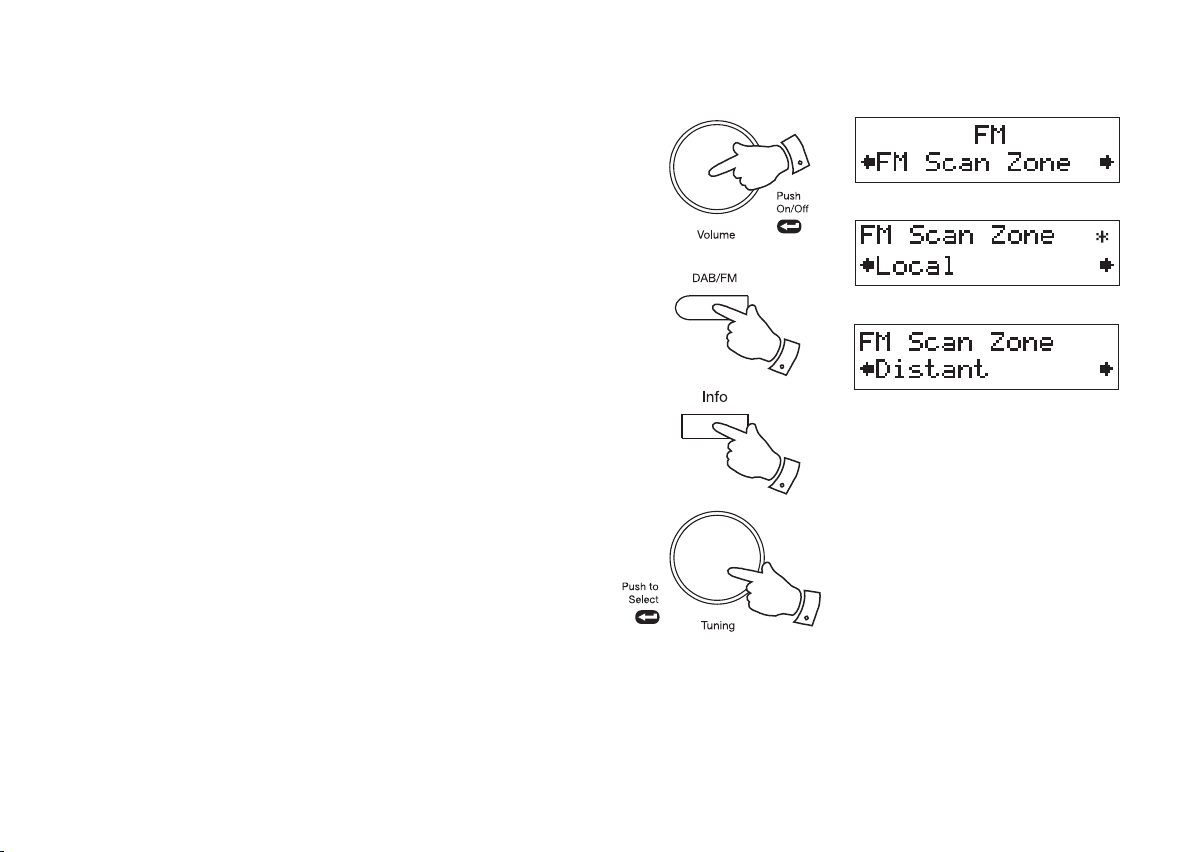
Scan sensitivity setting - FM
Your radio will normally scan for FM broadcasts which are strong enough
to give good reception. However, you may wish the Auto-scan function
to also be able to nd weaker signals, possibly from more distant radio
transmitters. Your radio includes a local / distant option for the Auto-scan
function.
1. Press and release the On/Off control to switch on your radio.
2. If needed, press and release the DAB/FM button to select the FM
mode.
3. Press and hold the Info button to enter the FM menu.
4. Rotate the Tuning control until the display shows 'FM Scan Zone' then
press and release the Tuning control to enter the scan zone selection
menu. The current setting will be marked with an asterisk.
5. Rotate the Tuning control to switch between Local and Distant options
on the lower line of the display. The Distant option will allow the radio
to nd weaker signals when scanning.
1
2
3
6. Press and release the Tuning control to conrm your selection. The
radio will then revert to the normal information display. The Local or
Distant setting is stored in the radio and remains in force until changed
or until a System Reset.
Note: The initial setting (out of the box, or after a System Reset) causes
the radio to ignore weaker (or more distant) signals.
17
4-6
Page 19
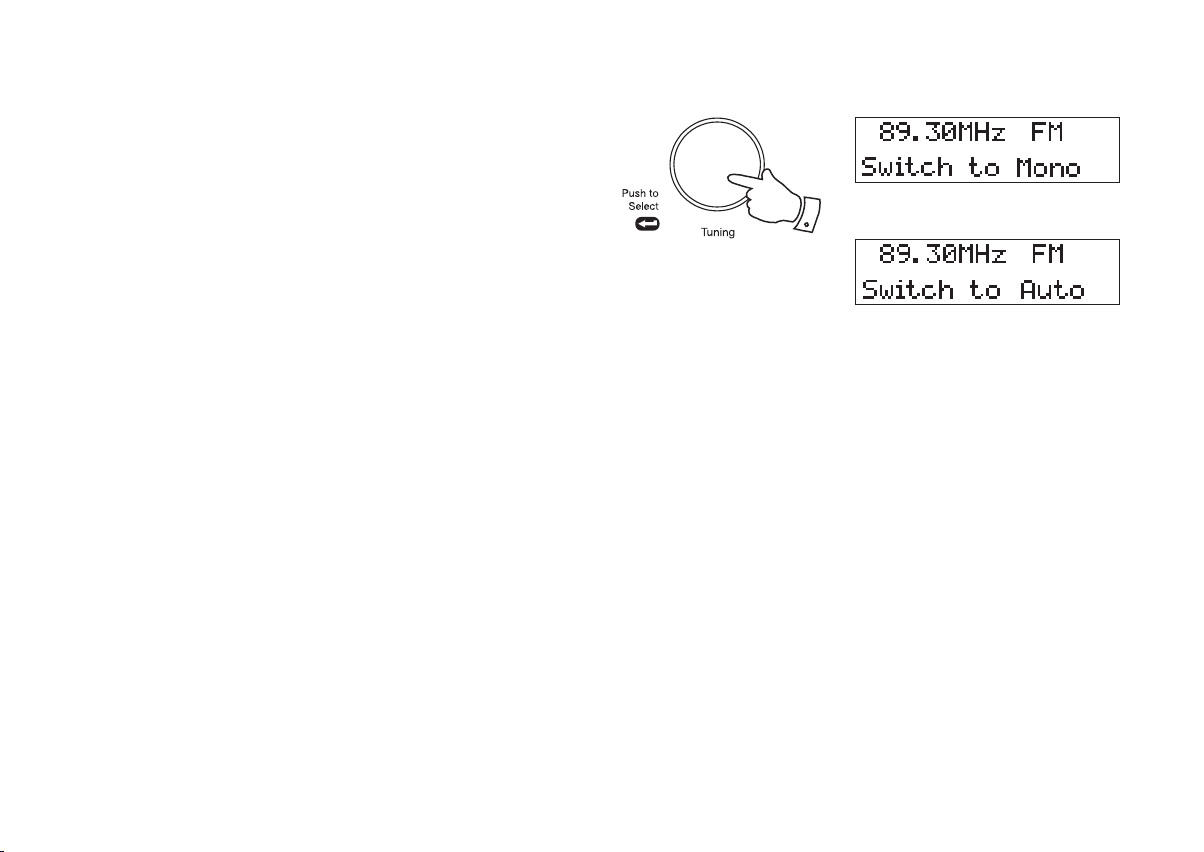
FM Stereo/Mono (Headphones only)
1. If an FM station being received is weak some hiss may be audible. To
reduce this, press and release the Tuning control so that the display
shows 'Switch to Mono'. Your radio will switch to mono mode.
2. To return to stereo mode press and release the Tuning control so
that the display shows 'Switch to Auto'. Your radio will switch to stereo
mode.
Note: Stereo listening is only available when listening via headphones.
1
18
Page 20
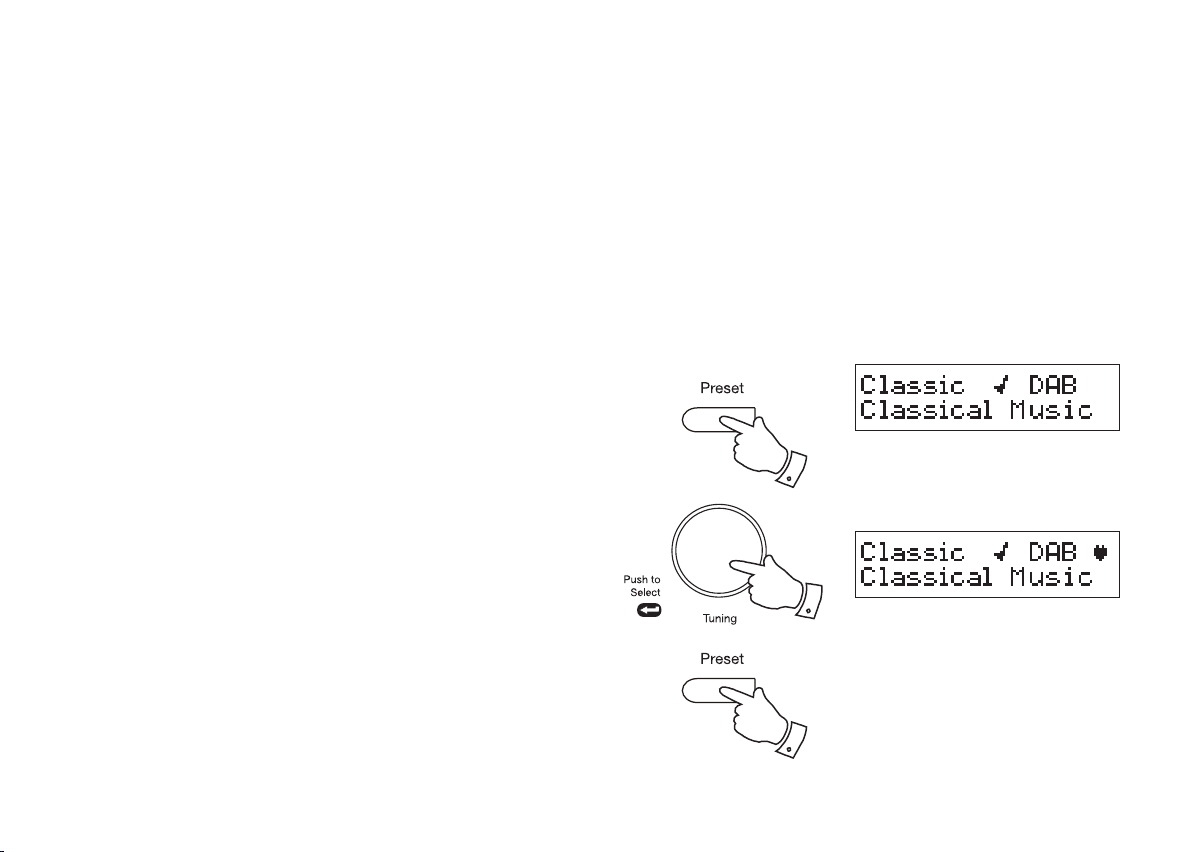
Preset stations - DAB and FM
To make it easier for you to tune your radio to the stations that you prefer,
you may store selected radio stations as presets. Your radio holds presets
separately for DAB and FM radio modes.
You may set as many or as few presets as you like in each mode.
You can easily switch between displaying all DAB stations (or all FM
frequencies) and displaying only those that you have set as presets.
Any station or frequency which has been marked as a preset can easily
have the mark cancelled should your preferences or needs change.
Presets are retained when your radio is switched off.
1. To setup your preset stations, tune into the required station.
2. Press and hold down the Preset button until the displays shows a tick
symbol next to the radio station name or frequency. This indicates that
the radio station is marked as a preset. To cancel the preset mark,
press and hold the Preset button again.
3. Repeat steps 1 and 2 as needed for any other stations that you want
as presets.
4. To view only the preset stations for the currently selected waveband
when tuning, press and release the Preset button so that the heart
symbol shows in the display.
5. To listen to one of the preset radio stations, rotate the Tuning control
until the required radio station is displayed. Press and release the
Tuning control to select and tune to that station.
2,4
5
6. To cancel the preset stations view, press and release the Preset button
so that the heart symbol disappears from the display. Your radio will
then be able to access the full station list using the Tuning control.
19
6
Page 21
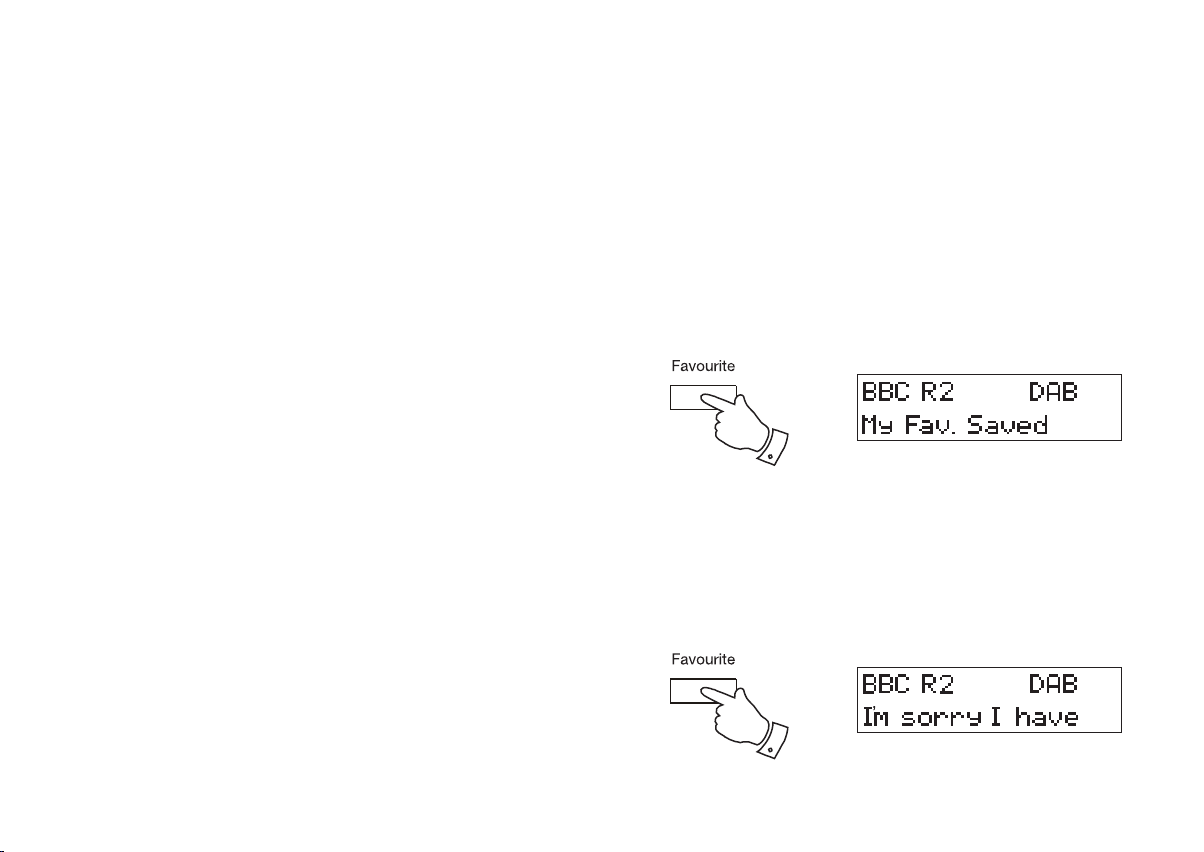
Favourite button
Your radio is tted with a button which when pressed will automatically
select the required waveband and tune to your Favourite radio station.
With this button you can store one favourite station from either the DAB
or FM wavebands.
To set up your favourite station, follow these steps:
1. Carefully extend the telescopic aerial and switch on your radio.
2. Select the desired waveband (DAB or FM) and tune into the required
radio station as described on the preceding pages.
3. Press and hold down the Favourite button (for 5 seconds) until the
display shows 'My Fav. Saved'.
Recalling your favourite station
1. Carefully extend the telescopic aerial and switch on your radio.
If your radio is in Auxiliary Input mode, press and release the
DAB/FM button to select normal radio operation.
3
2. Momentarily press the Favourite button, your radio will automatically
select the DAB or FM waveband as needed and then tune to the radio
station stored in the favourite memory.
2
20
Page 22
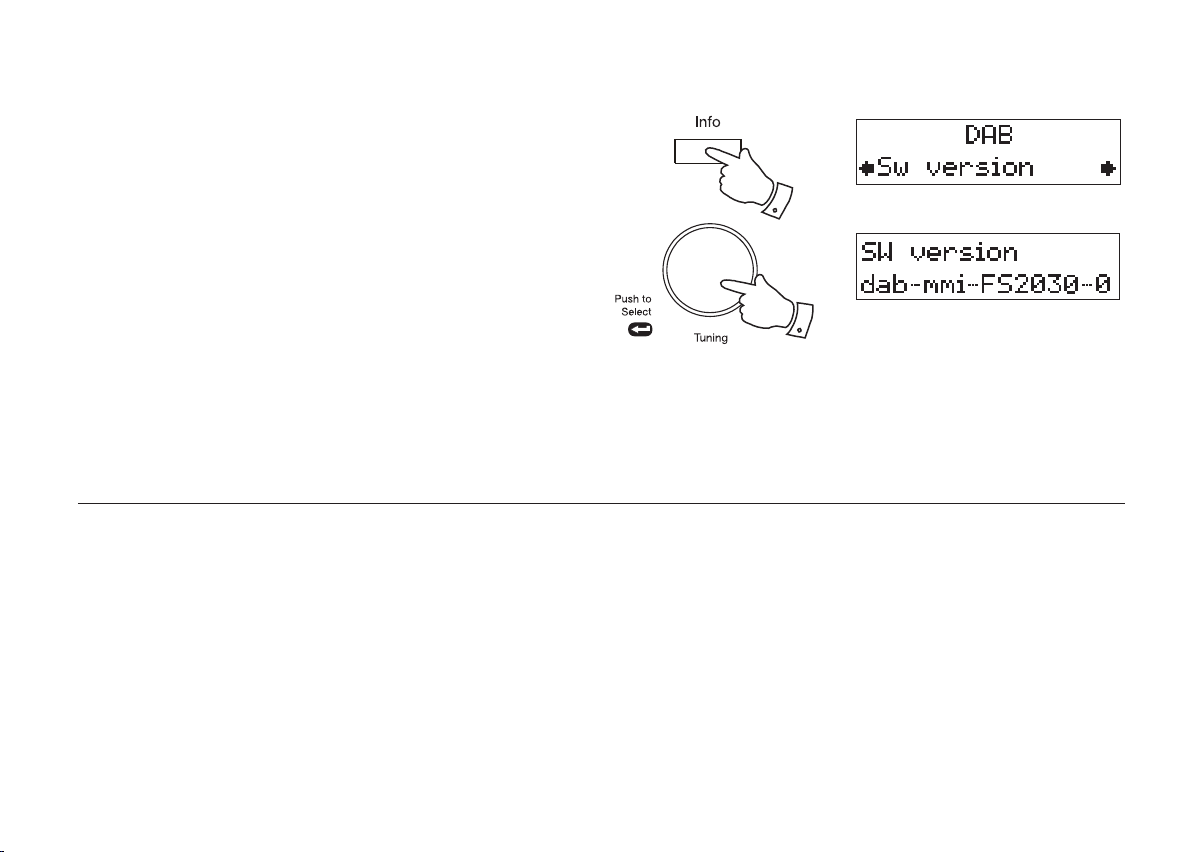
Software version
The software display cannot be altered and is just for your reference.
1. To view the software version on the display, ensure your radio is in
DAB mode and press and hold the Info button for 2 seconds.
2. Rotate the Tuning control until the display shows 'SW version'. Press
the Tuning control the software version will appear on the display.
3. Press the Info button to revert to the normal display mode.
Software upgrades
In the event that any software update is made available for your radio,
information on how to update your radio will be made available via our
website at http://www.robertsradio.com
1,3
2
21
Page 23
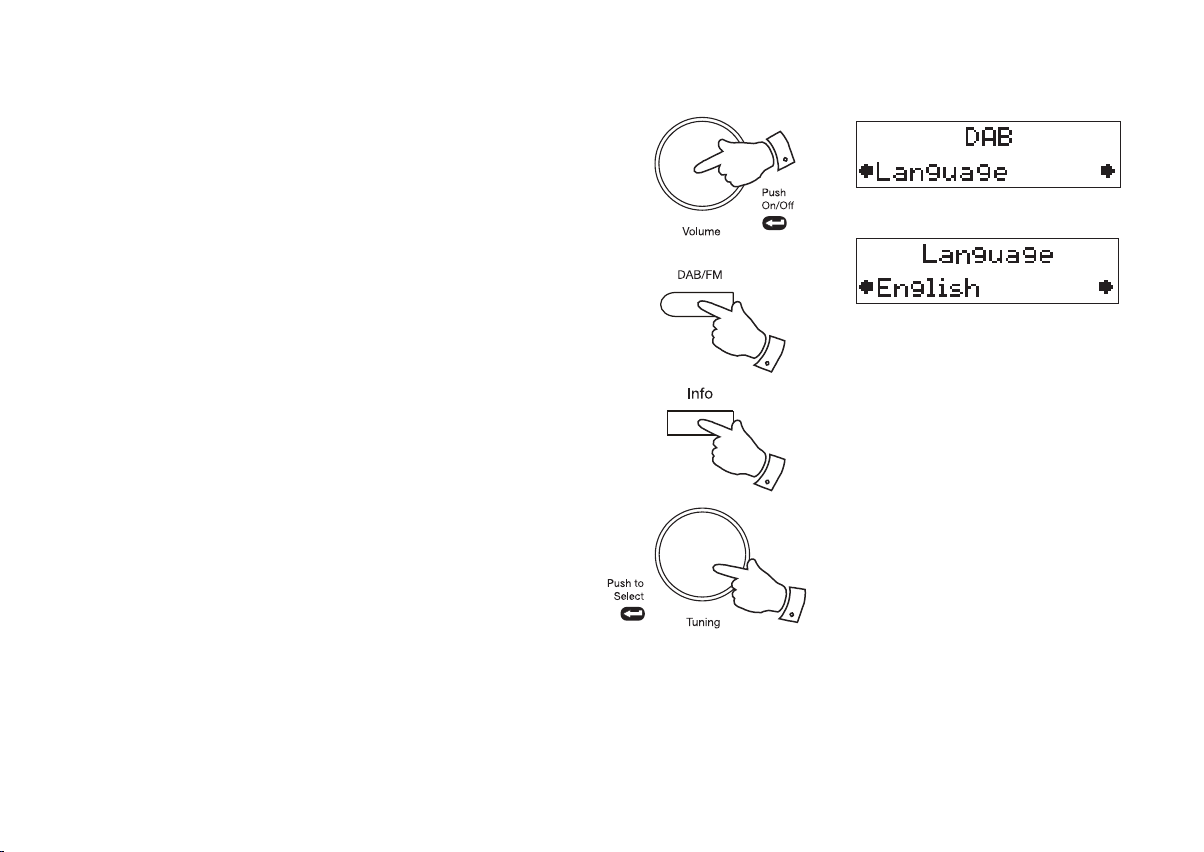
Language function
Your radio can be congured to a different language.
1. Press and release the On/Off control to switch on your radio.
2. Press and release the DAB/FM button until the DAB mode is selected.
3. Press and hold the Info button to enter the DAB menu.
4. Rotate the Tuning control until the display shows 'Language'.
5. Press and release the Tuning control to enter the language adjustment
mode. The current setting will be marked with an asterisk.
6. Rotate the Tuning control until your desired language appears on the
display.
7. Press and release the Tuning control to conrm your choice. The
display will change to the chosen language.
1
*
2
3
4-7
22
Page 24
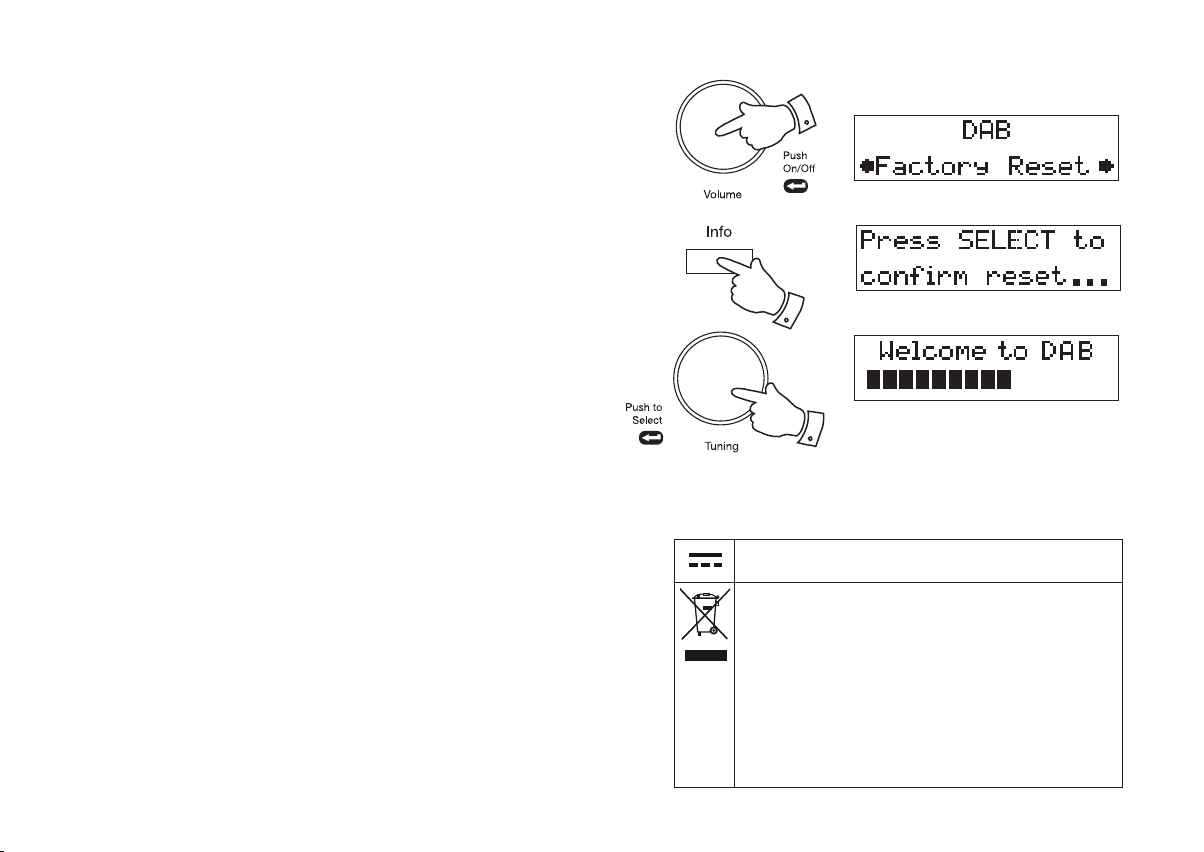
System reset
If your radio fails to operate correctly, or some digits on the display are
missing or incomplete, it may be possible to restore normal operation by
carrying out a System Reset operation on your radio. This will restore the
radio's settings to their factory defaults. No presets will be stored, and the
list of DAB radio stations will be empty. If you have moved to a different part
of the country and you wish to erase local DAB radio stations that are no
longer available from the stored list, then you may carry out this procedure.
Your radio will automatically re-scan for the DAB stations available at your
current location when it restarts.
1. Press and release the On/Off control to switch on your radio and ensure
your radio is in the DAB or FM mode.
2. Press and hold down the Info button for 2 seconds.
3. Rotate the Tuning control until the display shows 'Factory Reset', then
press and release the Tuning control.
4. If you wish to perform the reset operation, press and release the Tuning
control one more time. A full reset of your radio will be performed. All
presets and station lists will be erased.
5. After a system reset a scan of the DAB band will be performed.
If a problem persists please refer to the guarantee section at the back of
this book which explains how to obtain support for your radio.
Electro-magnetic compatibility advice
In the event of a malfunction due to electrostatic discharge, mains power
supply transients or short interruptions, reset the product as above to resume
normal operation. If you are not able to perform the reset operation as above,
removal and reconnection of the power supply and batteries may be required.
If the product is used in an environment with any ESD Immunity / Radiated
Immunity / Conducted Immunity disturbance, the product may malfunction.
It will automatically recover to normal when the ESD Immunity / Radiated
Immunity / Conducted Immunity disturbance is stopped.
1
2
3,4
Product markings
DC Voltage
Power input 7.5V / 0.8A
Recycling
This product bears the selective sorting symbol for
Waste Electrical and Electronic Equipment (WEEE).
This means that this product must be handled
pursuant to European directive 2012/19/EU in order
to be recycled or dismantled to minimize its impact on
the environment.
The user has the choice to give the product to a
competent recycling organization or to the retailer
when buying a new electrical or electronic equipment.
23
Page 25
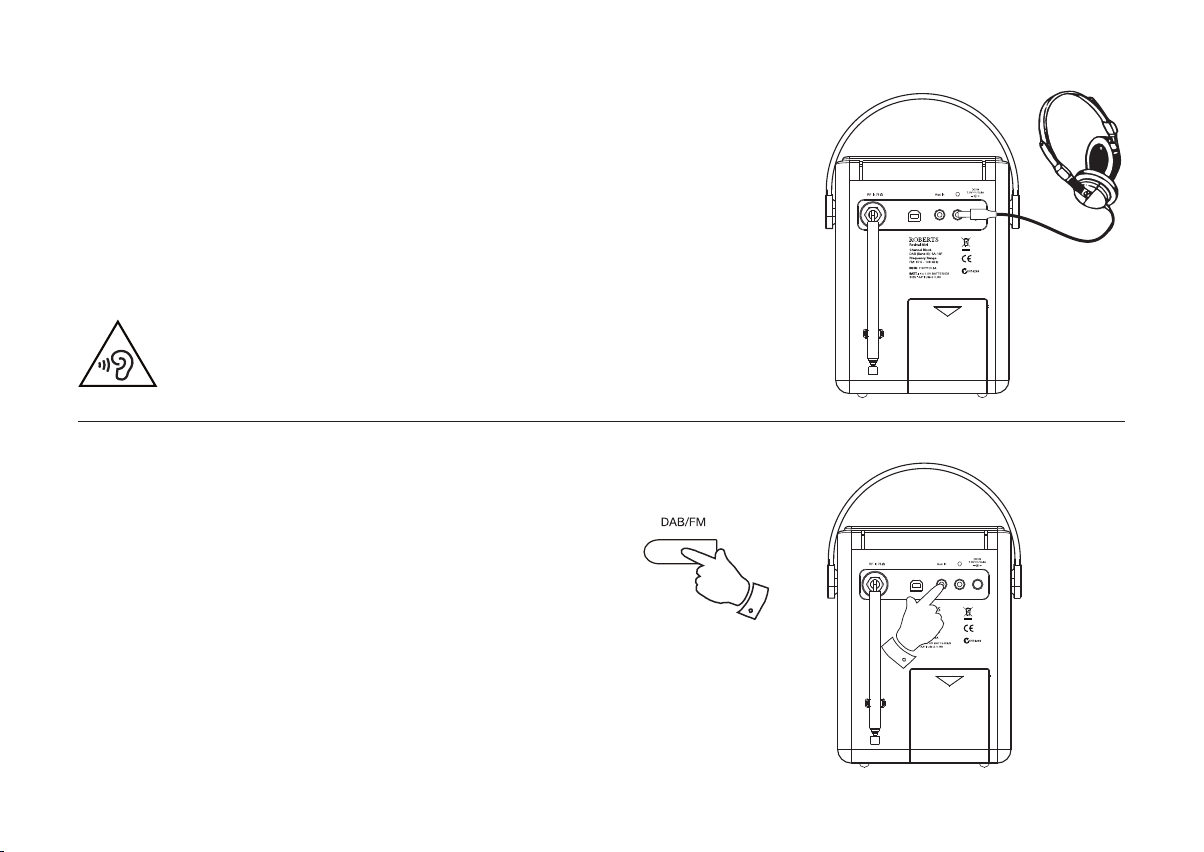
Headphone socket
A 3.5mm Headphone Socket located on the rear of your radio is provided
for use with either headphones or an earpiece. Inserting a plug automatically mutes the internal loudspeaker.
Please be aware that the sensitivity of headphones can vary widely. We
therefore recommend setting the volume to a low level before connecting
headphones to the radio.
IMPORTANT: Excessive sound pressure from earphones and headphones
can cause hearing loss.
To prevent possible hearing damage, do not listen at high
volume levels for long periods.
Auxiliary input socket
1. Connect a stereo or mono audio source (i.e. CD player, MP3 player,
etc.) to the Auxiliary input socket.
2. Press and release the On/Off control to switch on the radio. Press
and release the DAB/FM button until the display shows 'AUX IN'.
Service
Service
2
Note: that the Auxiliary Input mode can only be selected when a plug
is inserted in the socket.
3. Adjust the Volume control on your player and on the radio for comfortable
listening.
4. Remove the cable from the Auxiliary input socket or press and release
the DAB/FM button to cancel Auxiliary Input mode.
1
24
Page 26

A Few Words about Batteries…
Rechargeable batteries
Your Roberts Revival Mini radio has been designed to use a choice of
power sources. You may plug it into the mains using the supplied high-
efciency adaptor, or for listening away from the mains you may use
either alkaline or rechargeable batteries. We do not recommend the use
of carbon-zinc or zinc-chloride batteries.
It is very important that you read the advice and warnings given
below.
1) Whichever type of batteries you choose to use, it is very important
that the battery selection switch under the cover is set to the correct
type.
a. If no batteries are tted, then set the switch to the Alkaline position.
This position minimises the power consumption when the radio is
powered from the mains.
b. If Alkaline batteries are tted, then set the switch to the Alkaline
position.
c. If Rechargeable batteries are tted, then set the switch to the
NiMH position. Your radio is designed to use Nickel-Metal-Hydride
rechargeable batteries. No other type of rechargeable battery should
be used in the radio.
2) NEVER mix old and new Alkaline batteries. The old batteries may
suffer damage and leak which will damage your radio and whatever
the radio is standing on.
3) NEVER mix old and new Rechargeable batteries. This may
result in unreliable charging and shortened battery life. Never mix
Rechargeable batteries of different types or capacities even if they
are new.
4) NEVER mix Alkaline and Rechargeable batteries. The recharging of
Alkaline batteries can be very dangerous.
Your Revival Mini radio uses a range of methods to ensure correct and
safe charging of Rechargeable Nickel-Metal-Hydride batteries. These
work to protect your batteries from excessive charge and discharge.
These protections can only work properly if the advice above is followed.
In particular, the radio will not be able to correctly charge batteries if they
are a mixture of different brands, or different ages, or different capacities.
We recommend that all the rechargeable batteries used in your radio
are bought together as a set. They should always be charged together
and discharged together and not “borrowed” from time to time for other
applications. This will ensure that they give their optimum performance
in your radio.
We recommend that the rechargeable batteries that you use should
be from a quality brand, and should be of at least 2500mAh capacity.
Batteries of this capacity should power your radio for between 15 and
20 hours depending upon the volume of the radio, whether DAB or FM
mode is used (DAB mode uses slightly less power than FM), and also
depending on the condition of the batteries. Higher capacity batteries are
available and will give longer life, but will generally be more expensive.
Before you rst install a new set of rechargeable batteries into your
radio you should rst make sure that the battery type switch beneath the
battery cover is in the NiMH position. Install the batteries arranging them
as shown inside the battery compartment. Plug the mains adaptor into the
radio and then into the mains socket. While the batteries are charging the
charge indicator should show a ashing green light. When the batteries
are fully charged the indicator will stop ashing and will show a steady
green light. The time taken to charge the batteries will depend on how
much charging they require. New batteries may be partly charged when
rst tted, but it is normal for a set of batteries to take several hours to
charge fully (this can be between 3 and 7 hours depending on the battery
capacity and their initial state of charge).
25
Page 27

Your radio will display a message at the end of the charging process. If
the charging is successful, or if the batteries are nearly fully charged, the
display will show "Battery Full".
If the charge process stops after only a short while this may be due to
a faulty battery. In this case the display will show "Battery Fail" and the
battery number 1-4, corresponding to the numbering printed inside the
battery cover.
If this happens, try charging the batteries a second time by removing and
reconnecting the AC power adaptor. If the message is repeated, then it is
likely that the batteries are old and should be replaced.
If you use the radio powered from the batteries, the charge/low battery
indicator light will be off until the batteries are exhausted. The charge/
low battery indicator light will then show red for a short while before the
radio switches itself off. It does this in order that the batteries are not
excessively discharged. This would otherwise damage the batteries and
shorten their life.
If you use the radio powered from the mains with rechargeable batteries
tted, the charging process is suspended until you switch off the radio.
When you switch off the radio using its On/Off button charging will then
resume. If the batteries have already been charged then they will only
charge for a few more minutes before the charge indicator stops ashing.
If you only listen to your radio for short periods, you do not need to
connect your radio to the mains to charge the batteries every time that
you use it. However, if the radio is not to be used for a few weeks, then
we recommend that the batteries are fully charged (charge light shows
steady green) before the radio is put to one side.
If you intend not to use your radio for some months, then we recommend
that the batteries are removed and put away, keeping them in a cool
place out of reach of children, away from moisture and such that no metal
object can contact the battery terminals.
With care, rechargeable batteries can last a long time and can operate for
many hundreds of charge and discharge cycles. When your rechargeable
batteries can no longer power your radio adequately, please dispose of
them responsibly using a local battery recycling facility.
To avoid danger and risk of injury, please follow
these guide lines
Improper use of batteries may result in leakage of uid, overheating
or explosion. Battery uid is corrosive and may also be toxic. Battery
uid can cause skin burns, can damage the eyes, and can be harmful if
swallowed.
1. Keep batteries out of the reach of children.
2. Do not heat, open, puncture, mutilate or dispose of batteries by
burning.
3. Do not mix different battery types or old and new batteries. Always
replace all the batteries at the same time.
4. Do not carry or store batteries such that metal objects may contact
the end caps.
5. Remove batteries from the radio if they are worn out or if you are
storing it for a long time.
6. Remove old or worn out batteries promptly, and recycle or dispose of
them according to the regulations applicable to your location.
7. If a battery does leak, remove all batteries from the product, taking
care to avoid directly touching the leaked uid. If the uid contacts
skin or clothes wash with water immediately. Before inserting new
batteries, thoroughly clean the battery compartment with a damp
paper towel, or follow the battery manufacturer’s advice for clean up.
26
Page 28
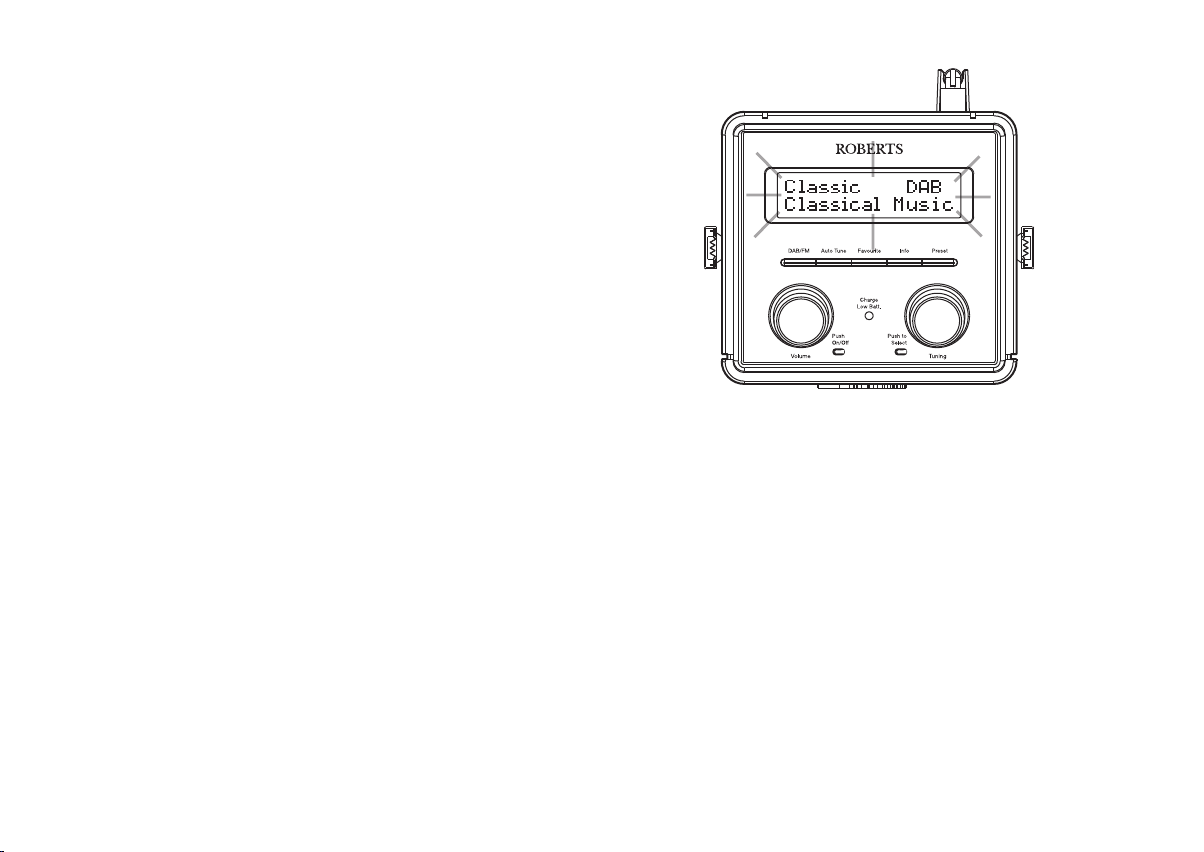
Display backlight
1. When using the radio powered from batteries, the display backlight
will be switched on for approximately 12 seconds when any button is
pressed.
2. When your radio is powered by the AC mains using the supplied mains
adaptor the display backlight will always be on whenever the radio is
switched on.
3. The display backlight will also be on when a battery message is
displayed (see page 5).
27
Page 29
General
Do not allow this radio to be exposed to water, steam or sand. Do not
leave your radio where excessive heat could cause damage such as in
a parked car where the heat from the sun can build up even though the
outside temperature may not seem too high. It is recommended that the
DAB band be used wherever possible as better results in terms of quality
and freedom from interference will usually be obtained than on the FM band.
The name plate is located on the the rear of your radio.
Please handle with care. The leather-cloth nish may be susceptible to
damage if mistreated. Avoid all contact with any abrasive material, chemical
substances or cleaning solutions. Your radio may be wiped with a clean
lightly damp cloth.
Please ensure that the product is unplugged from the mains socket
outlet before attempting this procedure.
• Your radio should not be exposed to dripping or splashing and that no
objects lled with liquids, such as vases, shall be placed on the radio.
• It is recommended to operate the product such that there is a minimum
distance (10cm recommended) to adjacent objects in order to ensure
good ventilation.
• The ventilation of the product should not be restricted by covering it or
its ventilation openings with items such as newspapers, tablecloths,
curtains etc.
• No naked ame sources such as lighted candles should be placed on
the product.
• It is recommended to avoid using or storing the product at extremes
of temperature. Avoid leaving the unit in cars, on window sills, in direct
sunlight etc.
• The product must be used in a moderate climate.
• There are no user serviceable parts inside this product.
• Do not attempt to disassemble any part of the product.
28
Page 30

Specications
Circuit Features
Power Requirements
Mains AC 100 - 240 volts, 50 - 60 Hz
Batteries 4 x LR6 (AA size)
Battery Life
Approx. 20 hours of listening for 4 hours a day
at normal volume using alkaline cells.
Frequency Coverage
FM 87.5-108MHz
DAB 174.928 - 239.200MHz
The Company reserves the right to amend the specication without notice.
only (adaptor)
Loudspeaker 75mm full range
Output Power 1.0 Watt
Headphone socket 3.5mm dia.
Auxiliary Input socket 3.5mm dia.
Aerial System FM Telescopic aerial
DAB Telescopic aerial
29
Page 31

Guarantee
This product is guaranteed for twenty four months from the date of purchase by the original owner against failure due to faulty workmanship or component breakdown, subject to the procedure stated below. Should any component or part fail during this guarantee period it will be repaired or replaced
free of charge.
The guarantee does not cover:
1. Damage resulting from incorrect use.
2. Consequential damage.
3. Product with removed or defaced serial numbers.
N.B. Damaged or broken telescopic aerials will not be replaced under guarantee.
Procedure:
Any claim under this guarantee should be made through the dealer from whom the product was purchased. It is likely that your Roberts dealer will be
able to attend to any defect quickly and efciently, but should it be necessary the dealer will return the product to the company’s service department
for attention. In the event that it is not possible to return the product to the Roberts dealer from whom it was purchased, please contact Roberts Radio
using the contact details on the www.robertsradio.com website.
For product repairs falling outside the guarantee period, please refer to the “customer care” tab on the www.robertsradio.com website.
These statements do not affect the statutory rights of a consumer.
30
Page 32

ROBERTS RADIO LIMITED
PO Box 130
Mexborough
South Yorkshire
S64 8YT
Website: http://www.robertsradio.com
Issue 3
2017-11-21
© 2017 Roberts Radio Limited
 Loading...