

Page 1
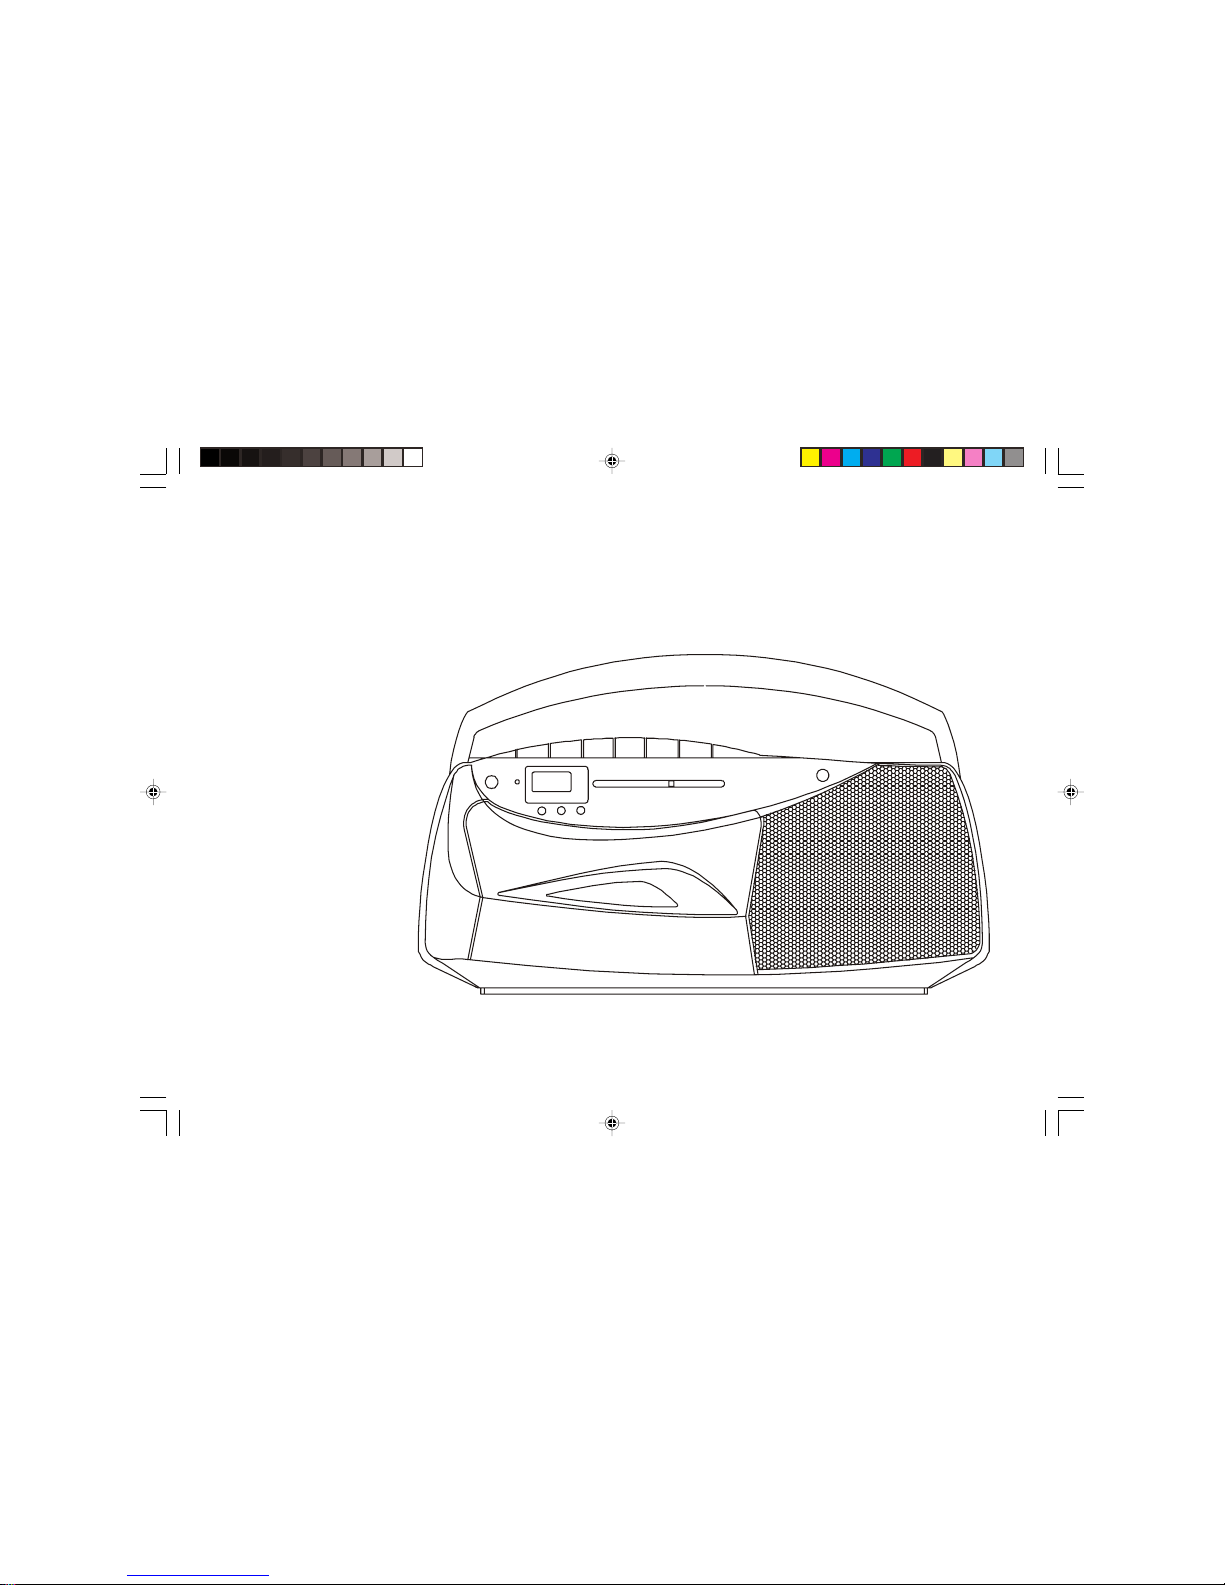
RC9907
3 Band Radio Cassette
Recorder
Please read this manual before use
ROBERTS
Sound for Generations
Mains
540
150
600
180160 200
800
220 240
1000
260
1200 1600
kHz
kHz
MW
LW
FM
88 94 96 100 104 106 108
MHz
Alarm off Mode Set
3 Band Radio Cassette Re corder
with Programmable Clock Alarm
RC 9907
ROBERTS
RC9907 Issue 3.pmd 1/26/2007, 1:35 PM1
Page 2
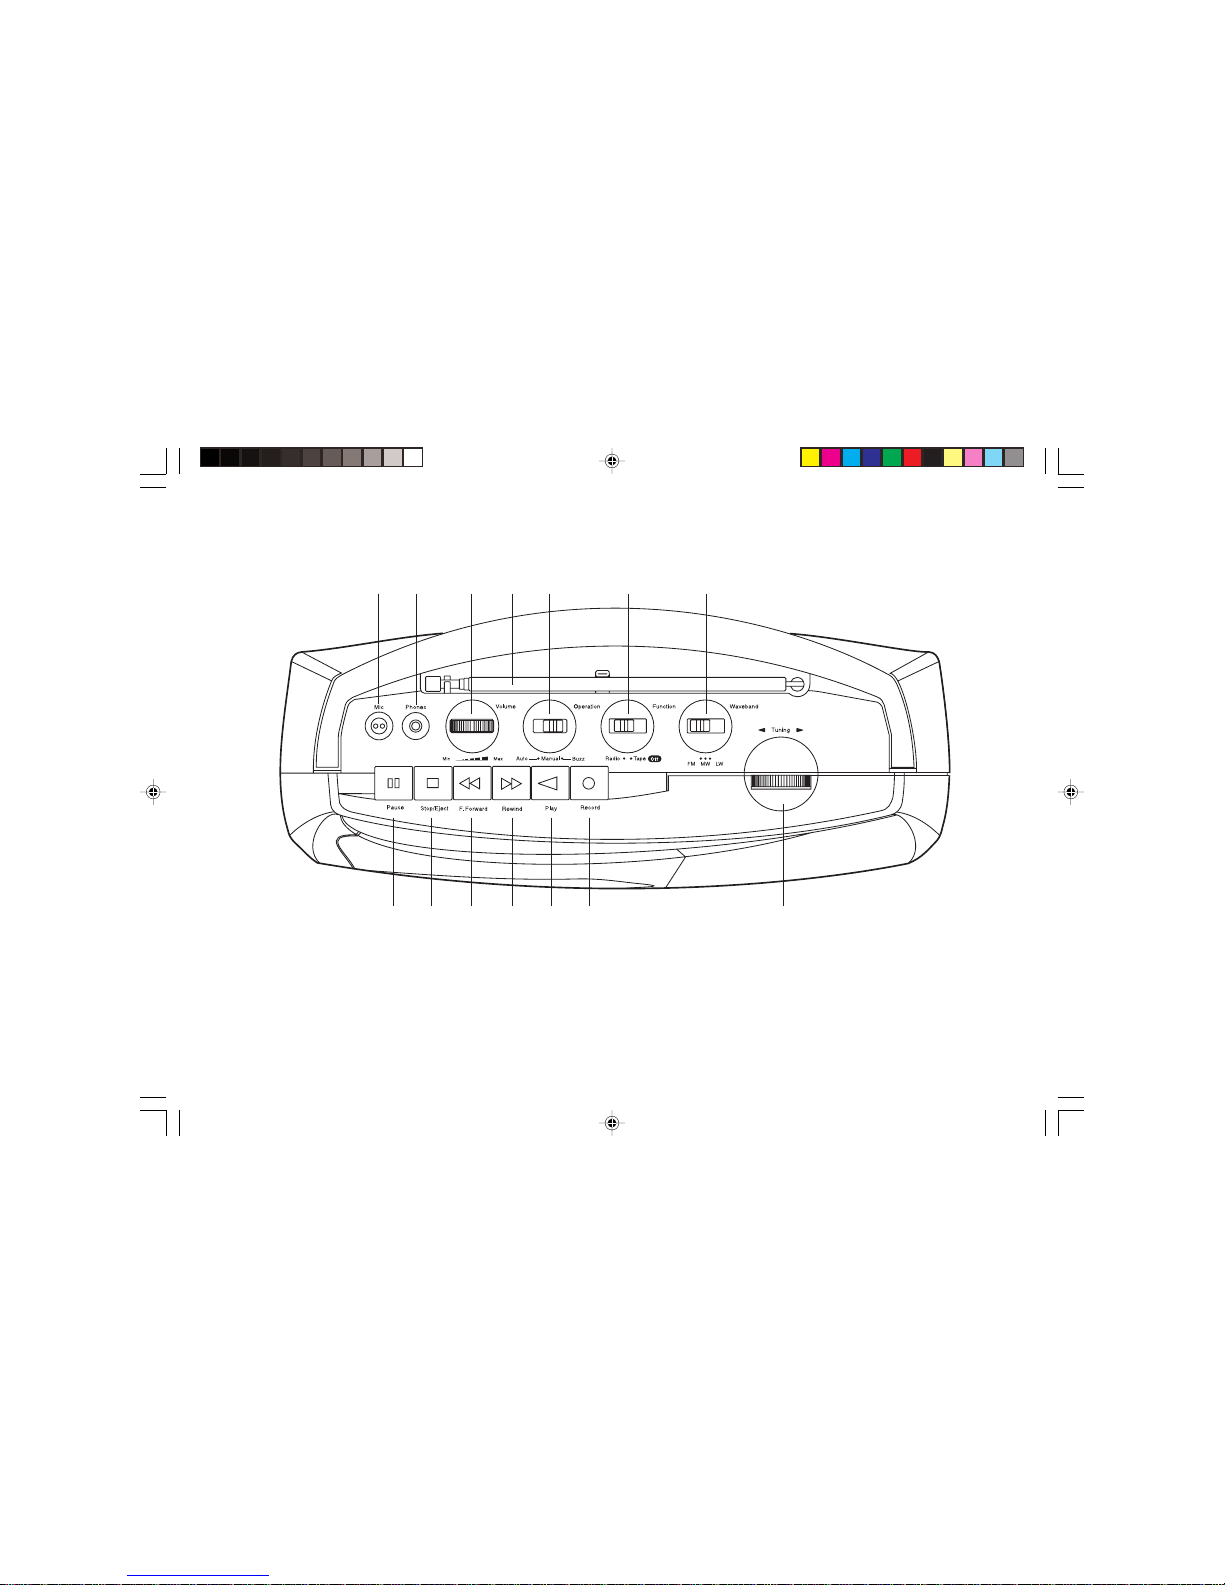
Controls
1. Microphone
2. Headphone socket
3. Volume control
4. Telescopic aerial
5. Operation switch
11. Rewind button
12. Fast forward button
13. Stop/eject button
14. Pause button
(Right side)
(Top)
1
1
6. Function switch
7. Waveband switch
8. Tuning control
9. Record button
10. Play button
2345 6 7
891011121314
RC9907 Issue 3.pmd 1/26/2007, 1:35 PM2
Page 3
If you need any further advice, please call our Technical Helpline on :-
0208 758 0338 (Mon-Fri)
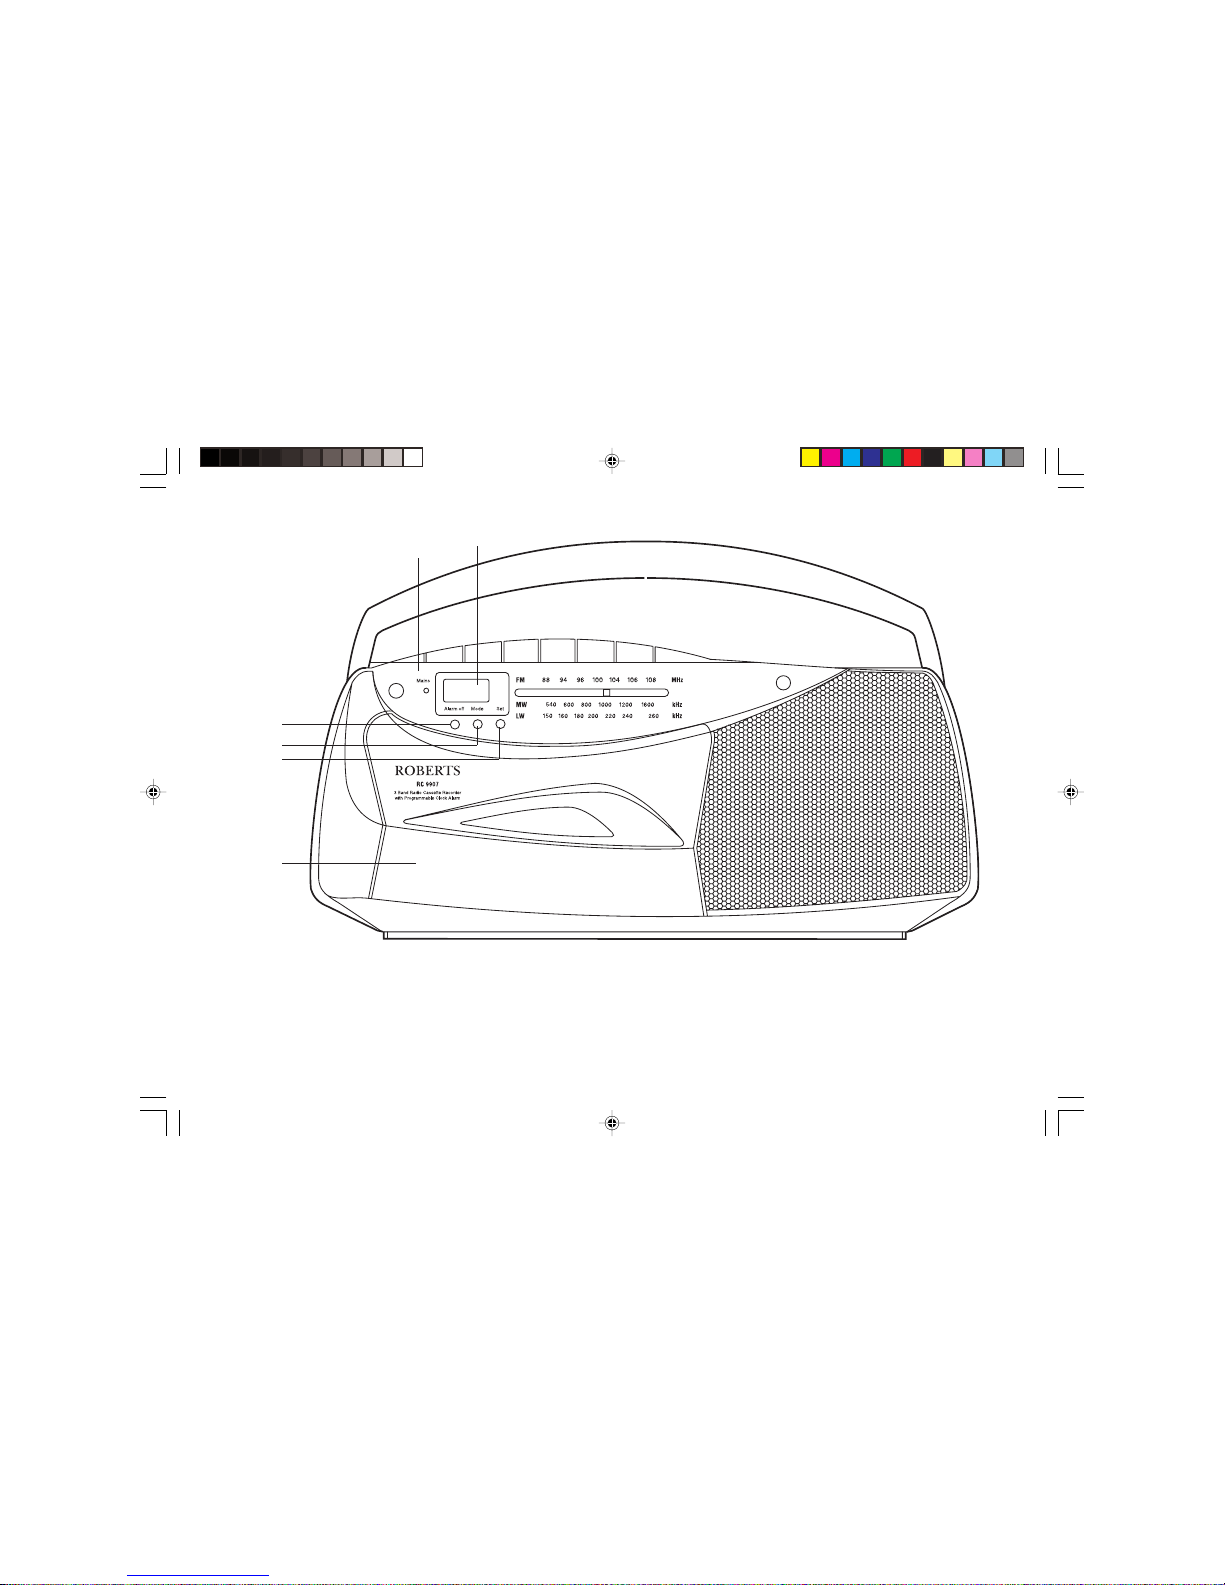
Controls (Front)
15. Cassette door
16. Set button
17. Mode button
18. Alarm off button
19. Mains indicator
20. Clock display.
2
18
17
16
19
20
15
RC9907 Issue 3.pmd 1/26/2007, 1:35 PM3
Page 4
Battery operation
IMPORTANT - The LR6 (AA size battery) must be fitted at all times to
provide power for the clock.
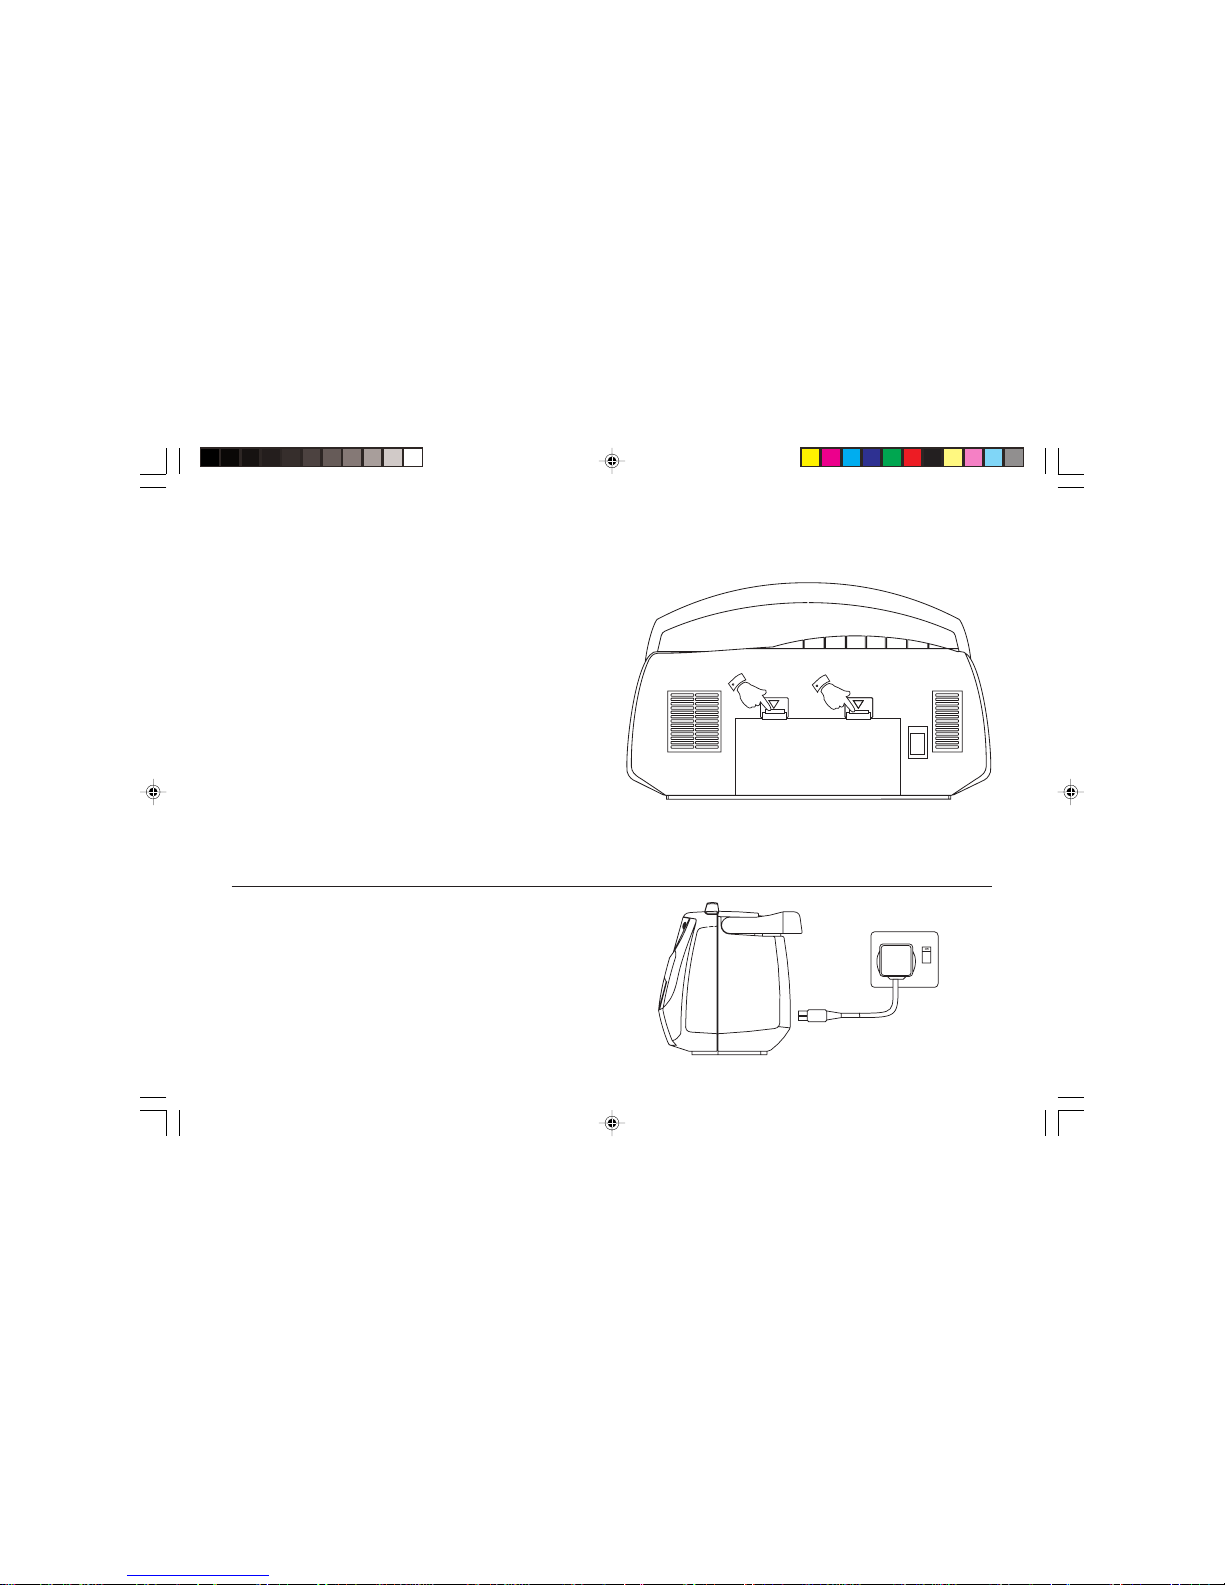
1. Remove the Battery cover on the rear of the unit by pushing the
catches in the direction of the arrow.
2. Insert one LR6 (AA size) battery into the small space in the battery
compartment. The clock display will now appear. The LR6 (AA size)
battery provides power for the clock and must remain fitted
at all times.
3. Insert four LR14 (C size) batteries into the remaining spaces in the
battery compartment. Take care to ensure all batteries are inserted
with the correct polarity as shown inside the battery compartment.
Replace the battery cover.
4. Reduced power, distortion, and a ‘stuttering’ sound are all signs that
the batteries may need replacing.
5. If your radio cassette is not to be used for any extended period of
time it is recommended that the batteries are removed from the radio.
We would recommend for economy, that the RC9907 is used on the
mains whenever possible with battery operation for occasional or
stand-by use only.
IMPORTANT: The batteries should not be exposed to excessive
heat such as sunshine, fire or the like. After use, disposable
batteries should if possible be taken to a suitable recycling centre.
On no account should batteries be disposed of by incineration.
Mains operation
1. Place your radio cassette on a flat surface.
2. Plug the mains lead into the Mains socket located on the rear of your
radio cassette ensuring that the plug is pushed fully into the socket.
3. Plug the other end into a wall socket and switch on. The Mains
indicator will light up indicating that the radio is connected to the
mains supply. The batteries will be automatically disconnected.
3
1
1
RC9907 Issue 3.pmd 1/26/2007, 1:35 PM4
Page 5
If you need any further advice, please call our Technical Helpline on :-
0208 758 0338 (Mon-Fri)
IMPORTANT: The mains plug is used as the means of connecting
the radio to the mains supply. The mains socket used for the radio
must remain accessible during normal use. In order to disconnect the
radio from the mains completely, the mains plug should be removed
from the mains socket outlet completely.
4. When the mains LED is off, it indicates that the radio is completely
disconnected from the mains.
Listening to the radio
FM operation
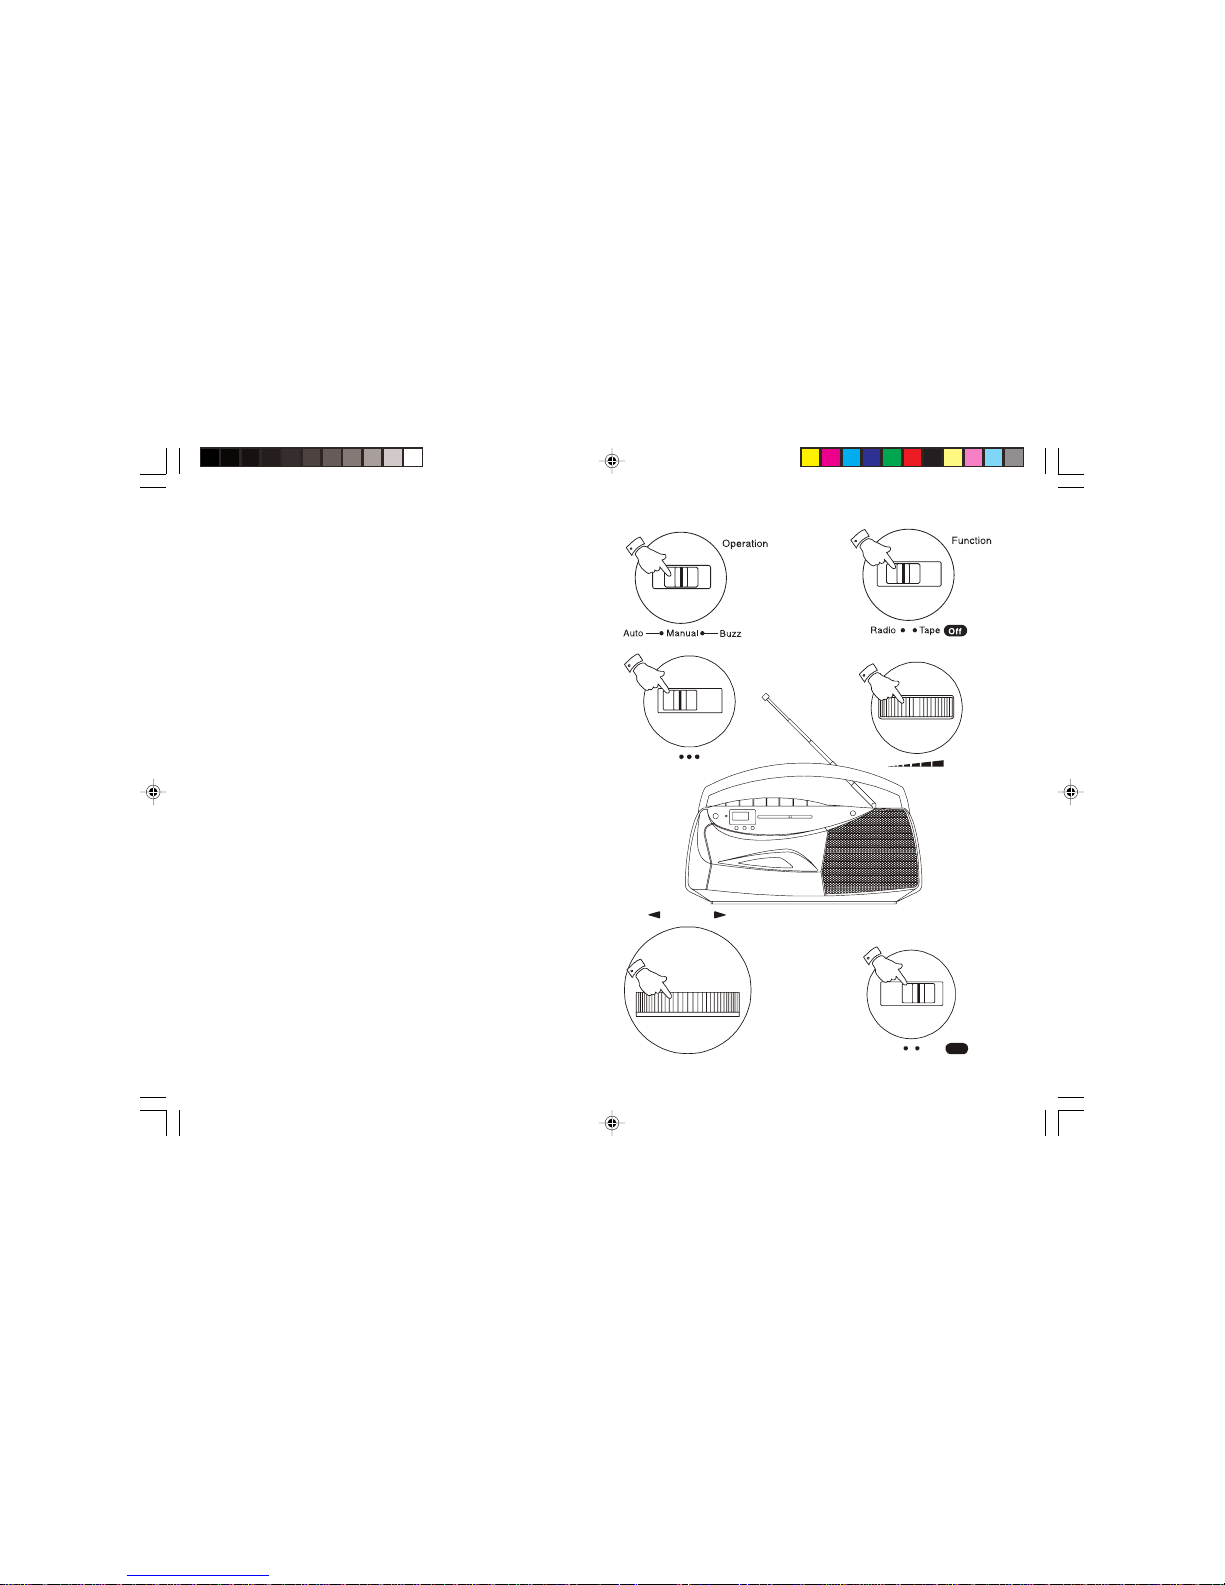
1. Ensure that the Operation switch is in the 'Manual' position.
2. Set the Function switch to the 'Radio' position.
3. Select 'FM' using the Waveband switch.
4. Adjust the Volume control until a hissing sound is heard.
5. The Telescopic aerial (17) which is only operational on FM, should
be fully extended.
6. Carefully tune to the desired station using the Tuning control.
7. Angle and rotate the Telescopic aerial to a position giving the best
reception. A knuckle joint at the base of the aerial allows this movement
and an angle of 45 degrees will usually be satisfactory. The FM band is
marked in Megahertz (MHz).
8. To switch off the radio set the Function switch to the 'Tape Off '
position.
FM MW LW
Waveband
Volu me
MaxMi
n
Tuning
Function
Radio
Tap e
Off
Power
540
150
600
180160 200
800
220 240
1000
260
1200 160 0
kHz
kHz
MW
LW
FM
88 94 96 100 104 106 108
MHz
Alarm off Mode Set
3 Band Radio Cassette Recorder
with Programmable Clock Alarm
RC 9907
ROBERTS
4
RC9907 Issue 3.pmd 1/26/2007, 1:35 PM5
Page 6
5
Medium and long wave operation
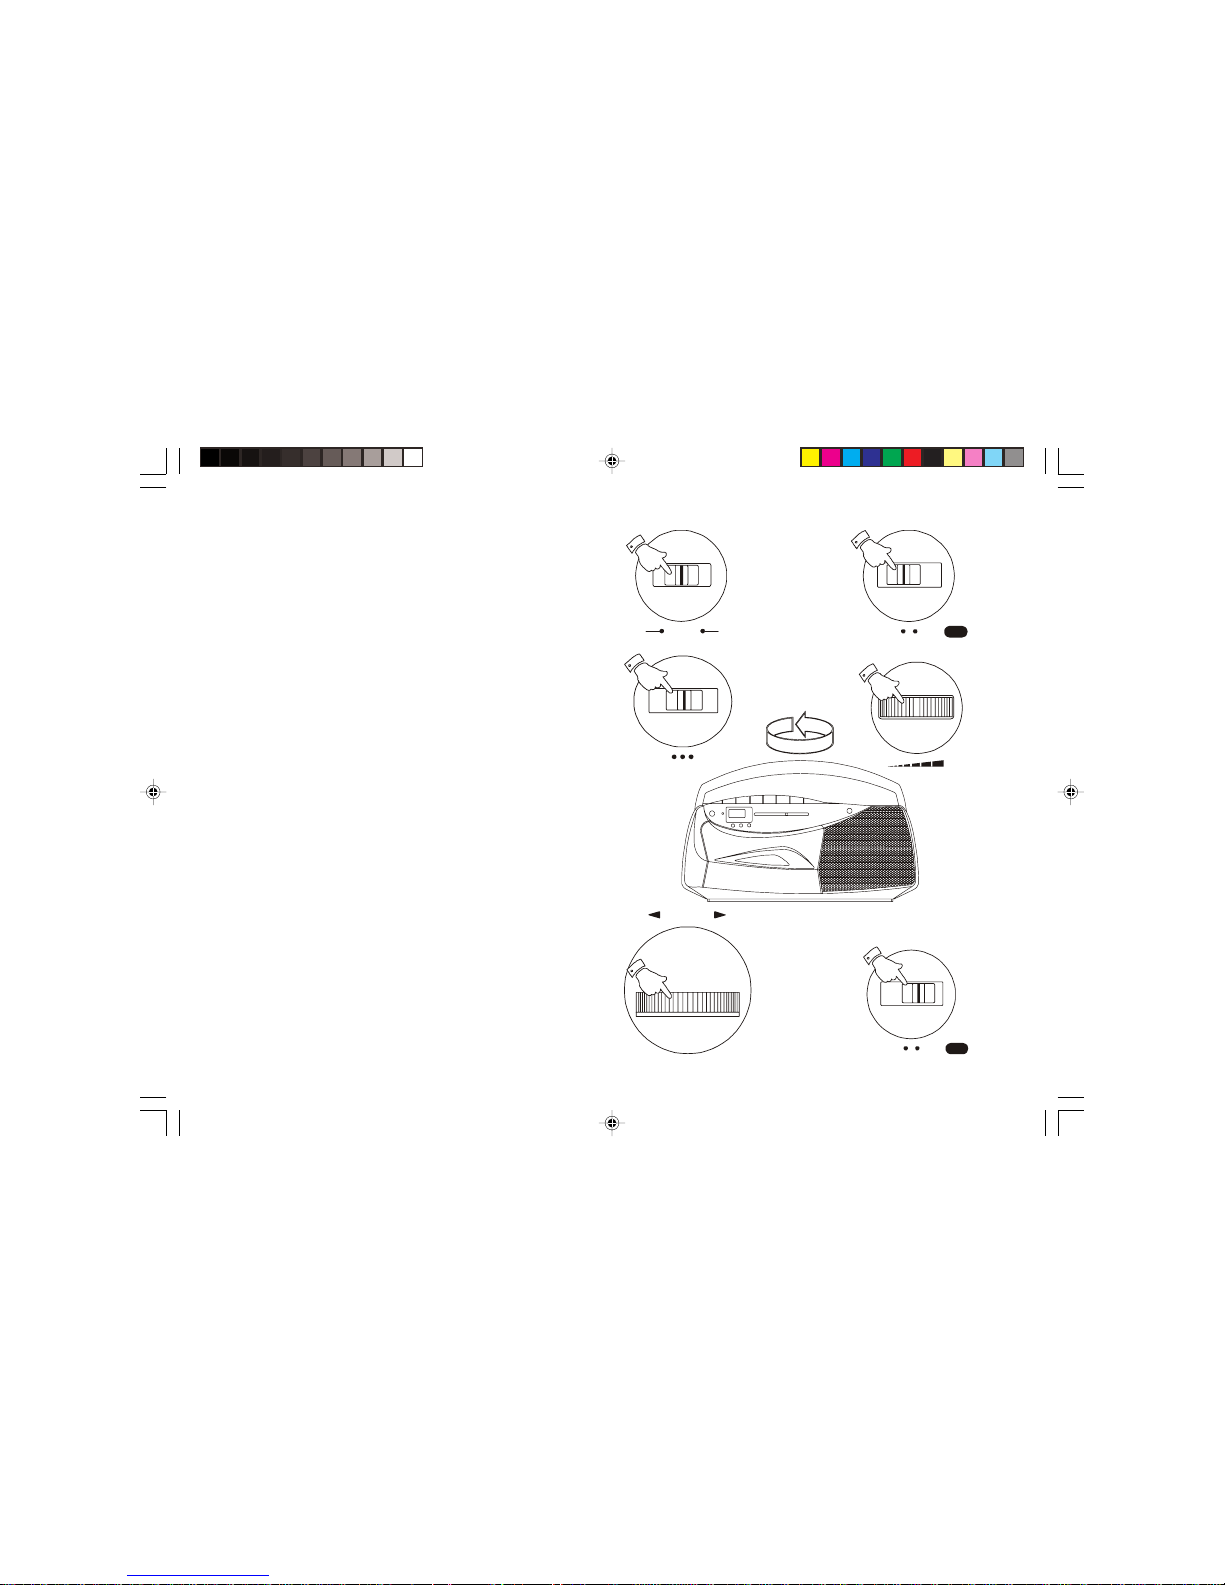
1. Ensure that the Operation switch is in the 'Manual' position.
2. Set the Function switch to the 'Radio' position.
3. Select 'MW' or 'LW' using the Waveband switch.
4. Adjust the Volume control until a hissing sound is heard.
5. Carefully tune to the desired station using the Tuning control.
6. Rotate your radio cassette for optimum reception.
7. The MW and LW bands are marked in kilohertz (kHz).
8. To switch off the radio set the Function switch to the 'Tape Off '
position.
Operati on
Auto
Buzz
Manual
Function
Radio
Tap e
Off
FM MW LW
Waveband
Volu me
MaxMi
n
Tuning
Function
Radio
Tap e
Off
Power
540
150
600
180160 200
800
220 240
1000
260
1200 160 0
kHz
kHz
MW
LW
FM
88 94 96 100 104 106 108
MHz
Alarm off M ode Set
3 Band Radio Cassette Recorder
with Programmable Clock Alarm
RC 9907
ROBERTS
RC9907 Issue 3.pmd 1/26/2007, 1:35 PM6
Page 7
If you need any further advice, please call our Technical Helpline on :-
0208 758 0338 (Mon-Fri)
Listening to cassette tapes
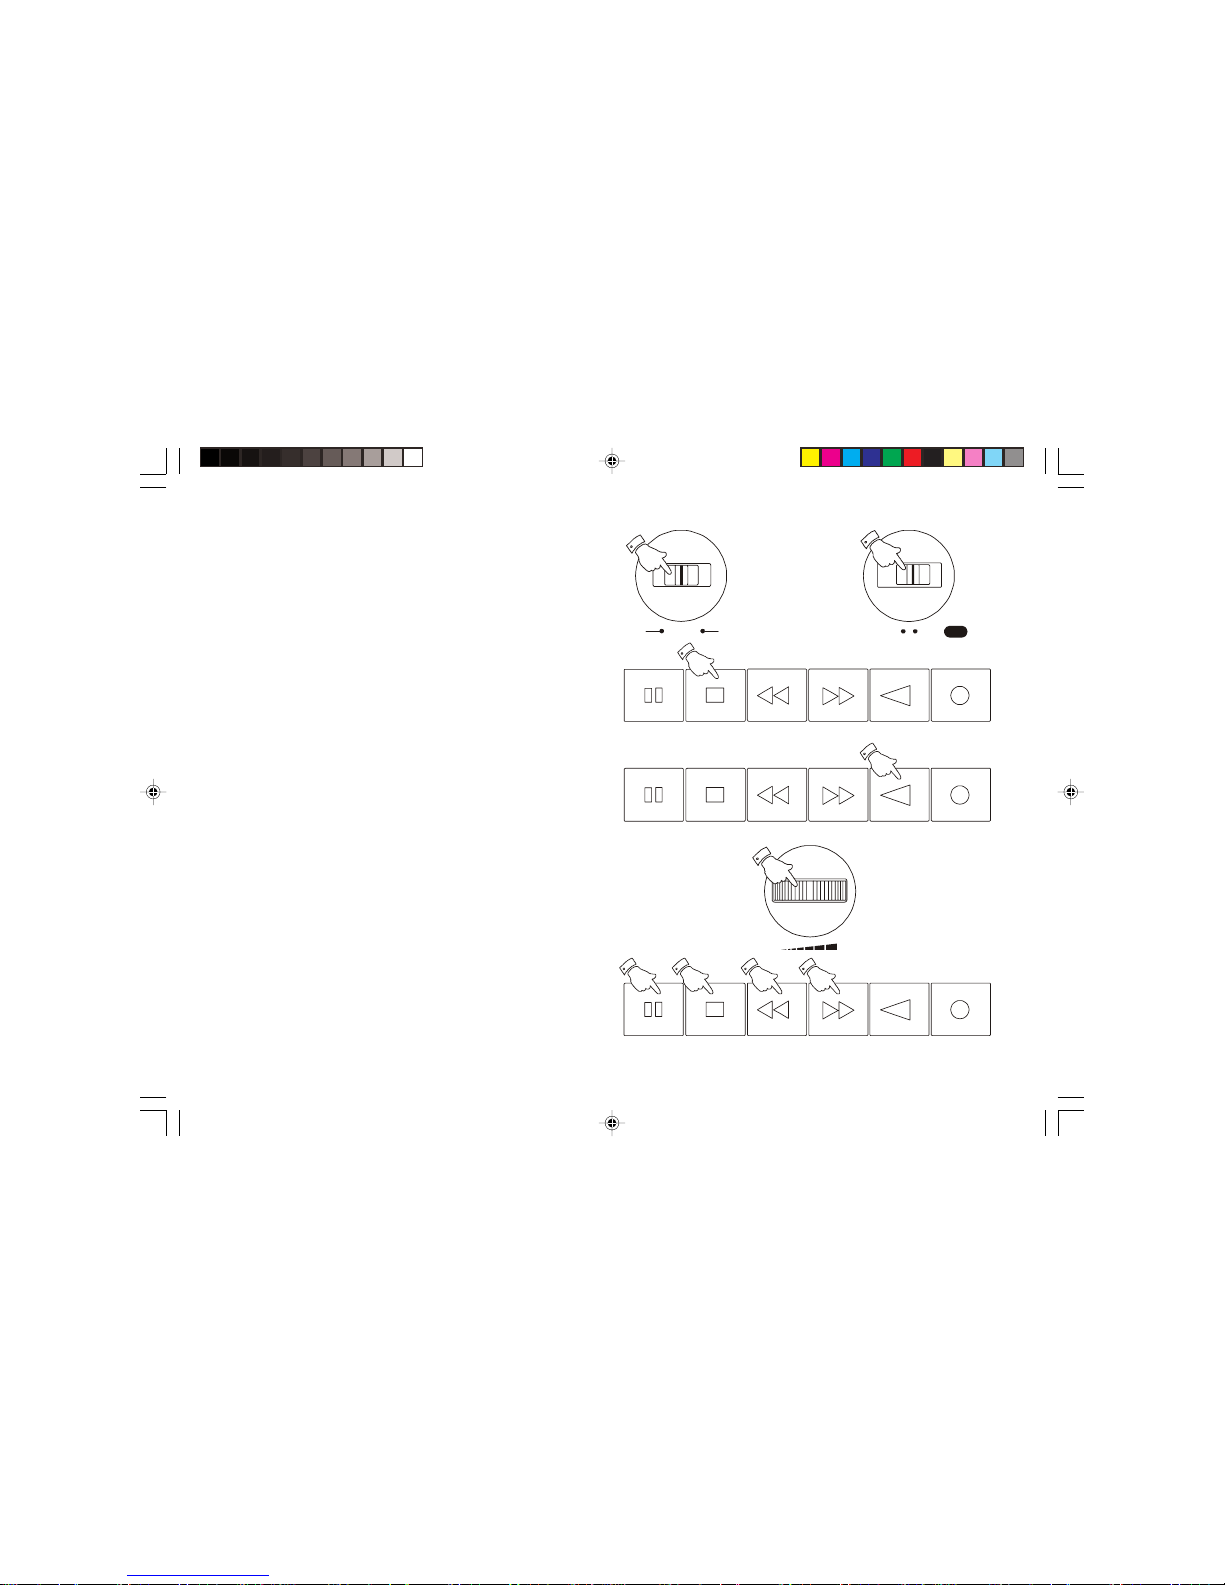
1. Ensure that the Operation switch is in the 'Manual' position.
2. Set the Function switch to the 'Tape' position.
3. Press the Stop eject button to open the Cassette compartment .
4. Insert a pre-recorded cassette with the tape surface uppermost and the
side with the desired recording facing towards you.
5. Close the Cassette compartment.
6. Depress the Play button and adjust the Volume control to suit your
personal taste.
7. Use the Fast forward or Rewind buttons to locate a specific part of
the tape.
8. If you wish to temporarily stop the playback depress the Pause button.
When you are ready to resume playback press the Pause button a
second time.
9. To stop the tape and switch off your radio cassette press the Stop/Eject
button.
Operati on
Auto
Buzz
Manual
Function
Radio
Tap e
Off
Volu me
Max
Min
Play
RewindF. F orw ar d
Record
Stop/E ject
Pause
Play
RewindF. For wa rd
Record
Stop/E ject
Pause
Play
RewindF. Fo rw ar d
Record
Stop/Eje ct
Pause
6
RC9907 Issue 3.pmd 1/26/2007, 1:35 PM7
Page 8

7
Recording from the Radio
1. Ensure that the Operation switch is in the 'Manual' position.
2. Set the Function switch to the 'Radio' position.
3. Tune in to the desired station.
4. Adjust the Volume control to suit your requirements.
6. Insert a blank cassette with the tape surface uppermost.
7. Depress the Record button to commence recording.
8. The recording level is set automatically and is not affected by the
setting of the Volume control.
9. To stop the recording press the Stop/Eject button.
Beat cut switch
When making a recording from MW and LW broadcasts, there may be
a lot of background noise. Set the Beat cut switch located at the back
of the cabinet to position 0, 1, or 2 in which noise is less prominent.
Operati on
Auto
Buzz
Manual
Function
Radio
Tap e
Off
Tuning
Volu me
Max
Min
Play
RewindF. For wa rd
Record
Stop/Eje ct
Pause
Play
RewindF. For wa rd
Record
Stop/Eje ct
Pause
RC9907 Issue 3.pmd 1/26/2007, 1:35 PM8
Page 9
If you need any further advice, please call our Technical Helpline on :-
0208 758 0338 (Mon-Fri)
Recording from the Internal Microphone
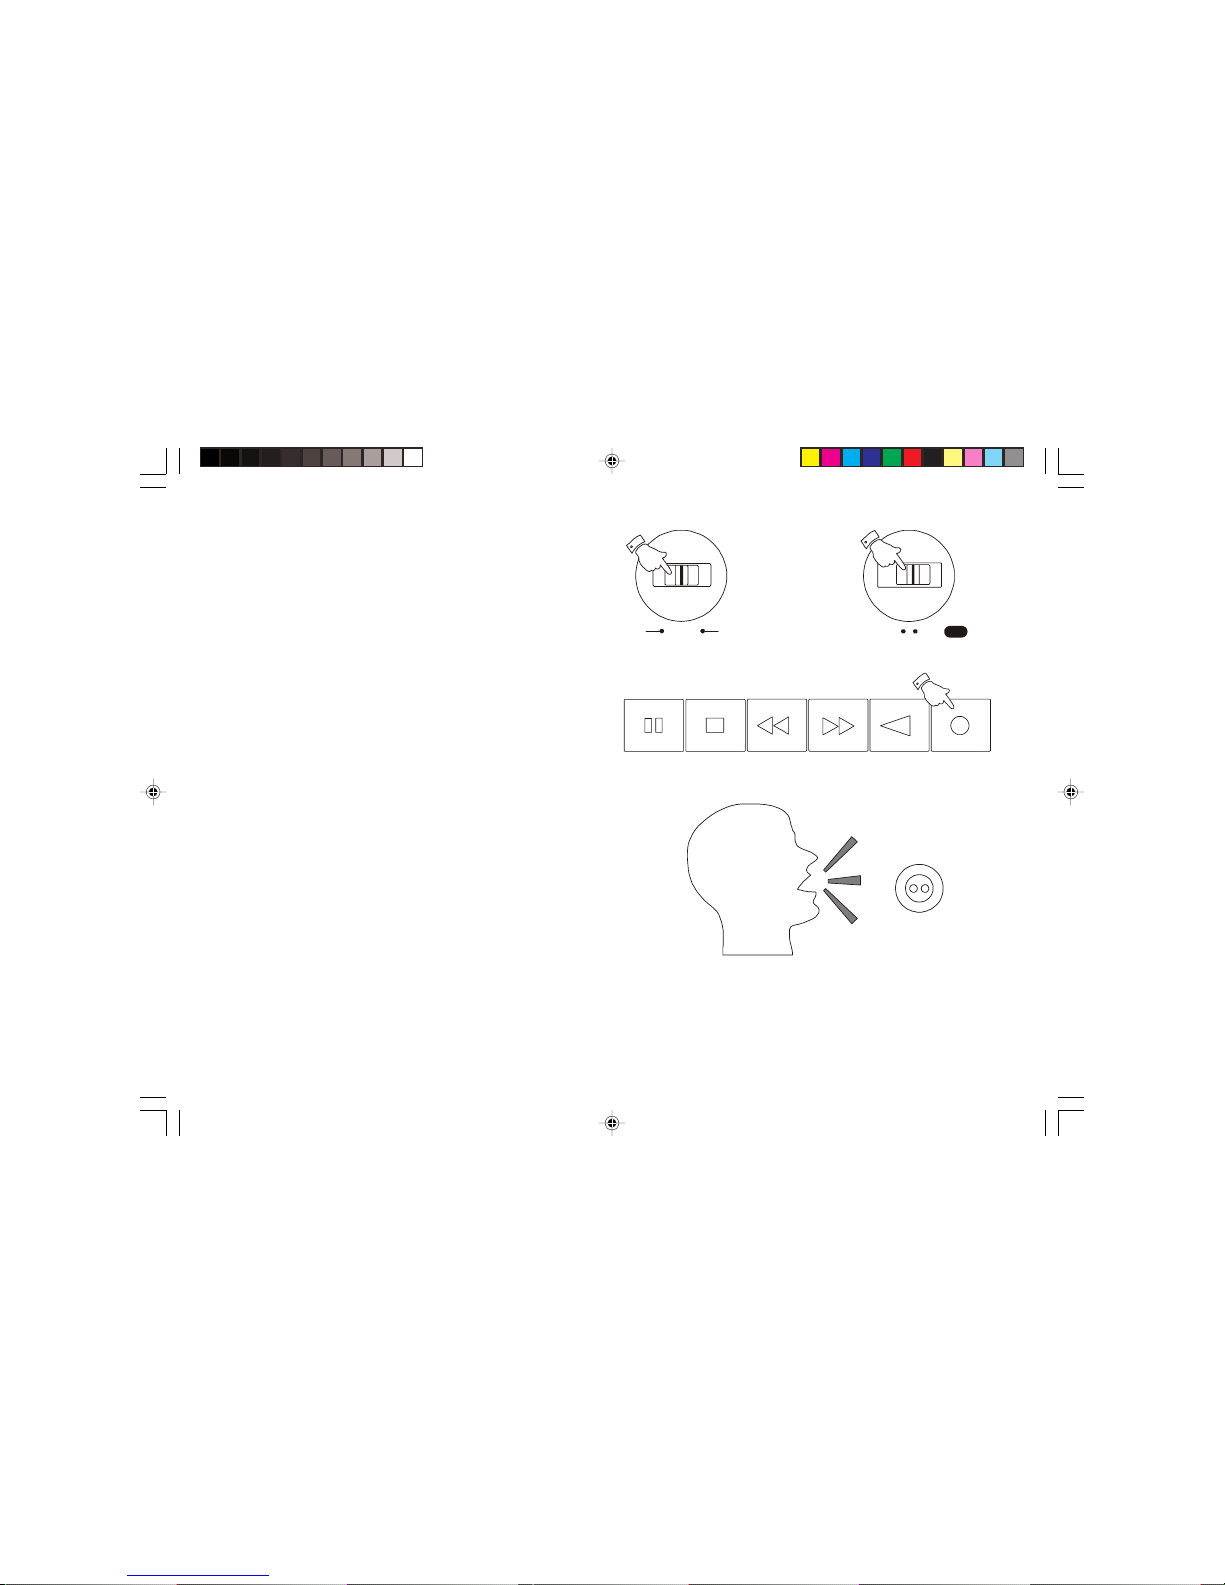
1. Ensure that the Operation switch is in the 'Manual' position.
2. Set the Function switch to the 'Tape' position.
3. Insert a blank cassette with the tape surface uppermost.
4. Press the Record button to commence recording.
Note : to reduce background noise it is important to speak as close as
possible to the Internal microphone .
Operati on
Auto
Buzz
Manual
Function
Radio
Tape
Off
Play
RewindF. F orw ar d
Record
Stop/E ject
Pause
Mic
8
RC9907 Issue 3.pmd 1/26/2007, 1:35 PM9
Page 10

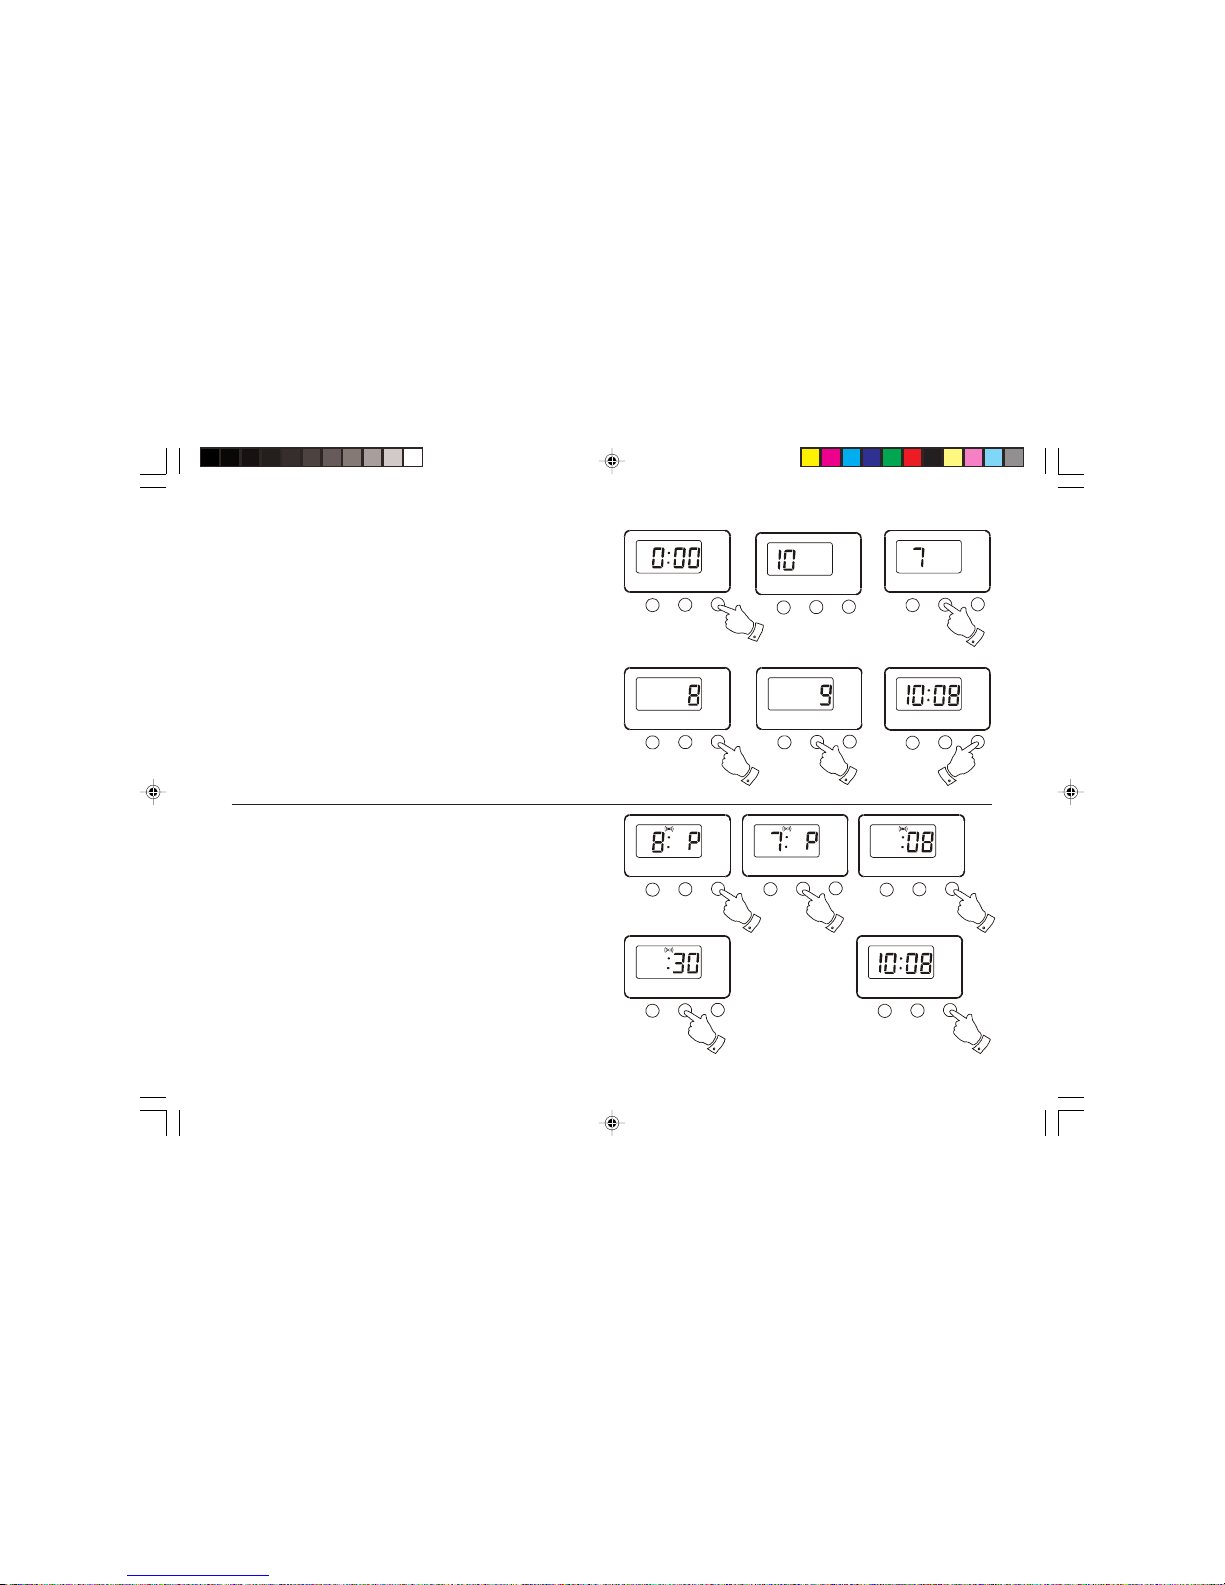
Setting the clock
1. Press the Set button six times, the display will show the hours digit.
2. Press the Mode button until the required hour is displayed.
3. Press the Set button, the display will show the minutes digit.
4. Press the Mode button until the required minute is displayed.
5. Press the Set button to return to the normal clock display.
6. Press the Mode button to start the clock at the selected time. The colon
between the hours and minutes digit will flash showing that the clock is
running.
Note : When setting the hours digit pressing and holding down the mode
button until the hours digit has gone through midnight will change the
clock to 24hr mode, this is indicated by the letter 'H' after the hours digit.
To change back to 12hr mode repeat the procedure. 12hr mode is
indicated by the letter 'A' for AM or 'P' for PM after the hours digit.
Alarm off
Mode Set
Alarm off Mode Set
Alarm off
Mode Set
Alarm off
Mode Set
Alarm off
Mode Set
Alarm off
Mode Set
Alarm off
Mode Set
9
RC9907 Issue 3.pmd 1/26/2007, 1:35 PM10
Page 11
If you need any further advice, please call our Technical Helpline on :-
0208 758 0338 (Mon-Fri)
Setting the date
1. Press the Set button four times, the display will show the months digit.
2. Press the Mode button until the required month is displayed.
3. Press the Set button, the display will show the day of the month digit.
4. Press the Mode button until the required day of the month is displayed.
5. Press the Set button three times to return to the normal clock display.
Alarm off Mode Set
Alarm off
Mode Set
Alarm off
Mode Set
Alarm off
Mode Set
Alarm off
Mode Set
Alarm off
Mode Set
Setting the alarm time
1. Press the Set button twice, the display will show the hours digit .
2. Press the Mode button until the required hour is displayed.
3. Press the Set button the display will show the minutes digit.
4. Press the Mode button until the required minute is displayed.
5. Press the Set button to return to the normal clock display.
Alarm off
Mode Set
AL
Alarm off
Mode Set
AL
Alarm off
Mode Set
AL
Alarm off
Mode Set
AL
10
Alarm off
Mode Set
RC9907 Issue 3.pmd 1/26/2007, 1:35 PM11
Page 12
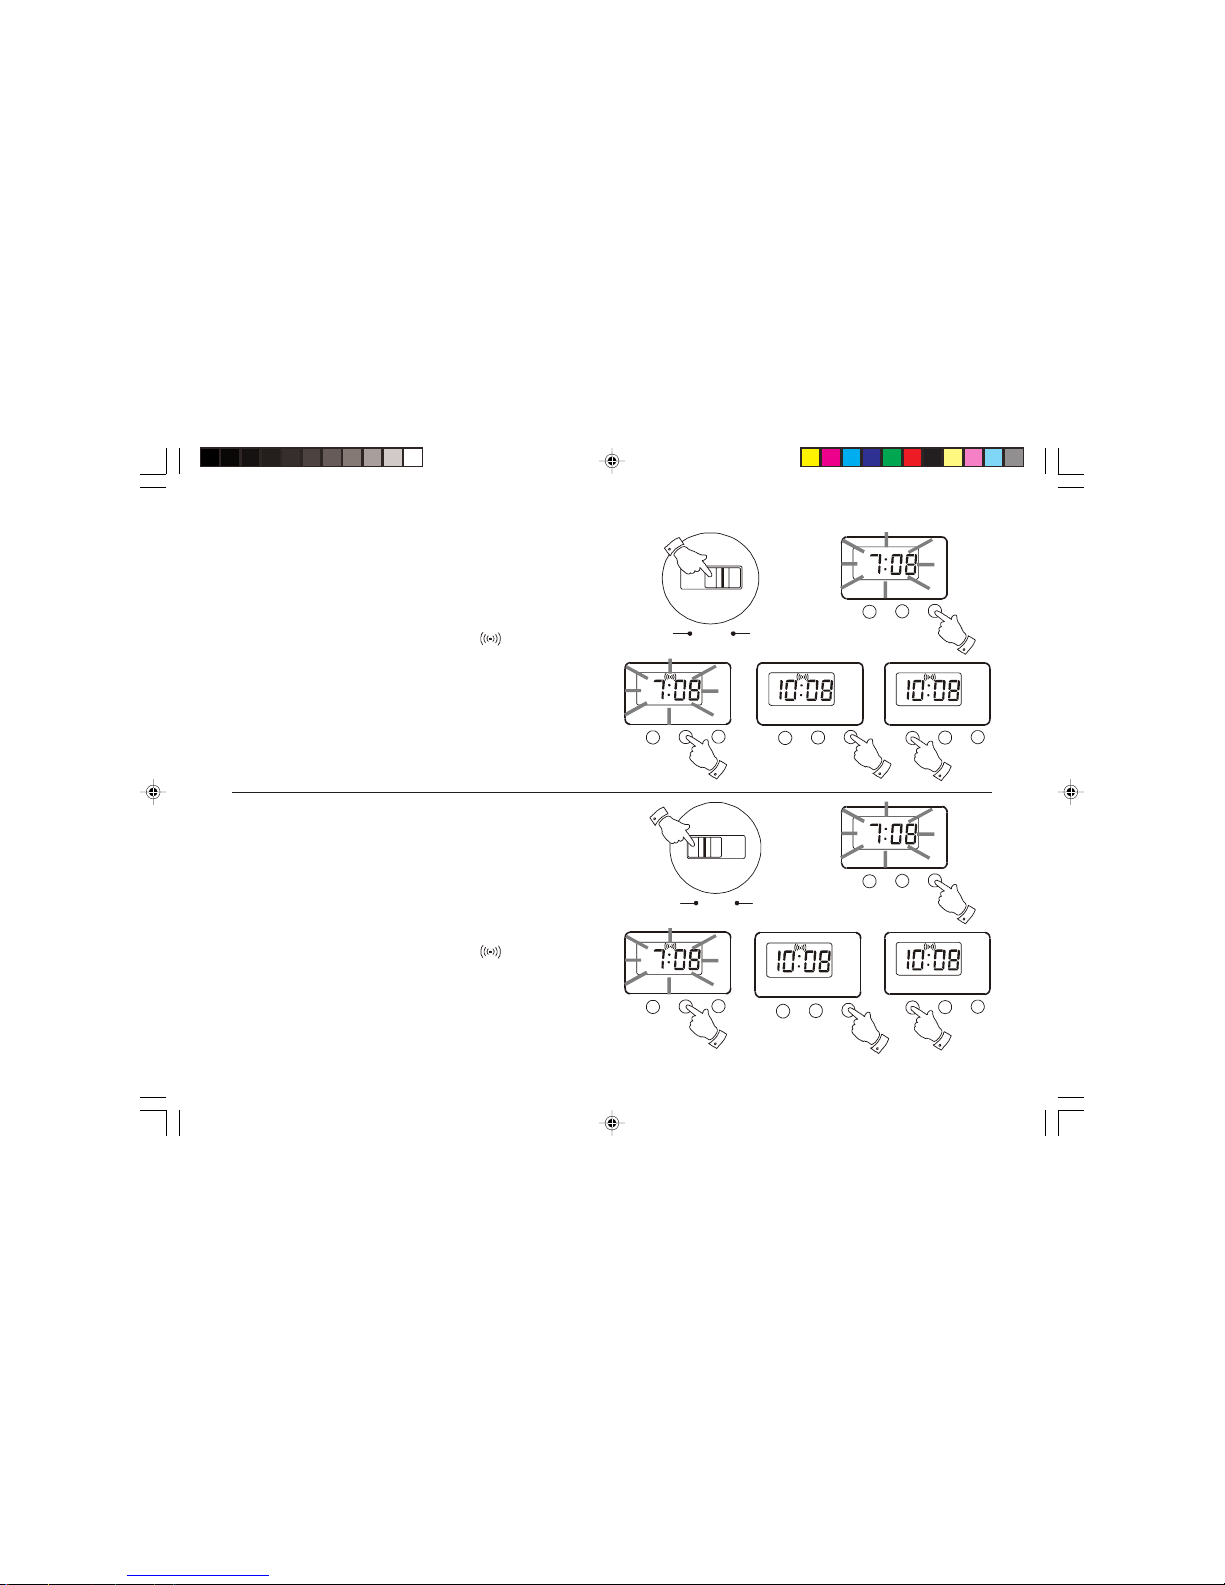
Setting the alarm to wake to radio
1. Set the alarm as previously described.
2. Tune in to the desired station, and adjust the volume to the required
level.
3. Set the Operation switch to the 'Auto' position.
4. Press the Set button the hours and minutes digits will flash.
5. Repeatedly press the Mode button until the
symbol is showing.
6. Press the Set button three times to return to the normal clock display.
The radio will now turn on at the selected alarm time.
7. To cancel the alarm whilst the alarm is sounding press the Alarm off
button.
Alarm off
Mode Set
Alarm off
Mode Set
Alarm off
Mode Set
Alarm off
Mode Set
Setting the alarm to wake to buzzer
1. Set the alarm as previously described.
2. Set the Operation switch to the 'Buzz' position.
3. Press the Set button the hours and minutes digits will flash.
4. Repeatedly press the Mode button until the
symbol is showing.
5. Press the Set button three times to return to the normal clock display.
The radio will now turn on at the selected alarm time.
6. To cancel the alarm whilst the alarm is sounding press the Alarm off
button.
Alarm off
Mode Set
Alarm off
Mode Set
Alarm off
Mode Set
Alarm off
Mode Set
Operation
Auto
Buzz
Manual
Operation
Auto
Buzz
Manual
11
RC9907 Issue 3.pmd 1/26/2007, 1:35 PM12
Page 13
If you need any further advice, please call our Technical Helpline on :-
0208 758 0338 (Mon-Fri)
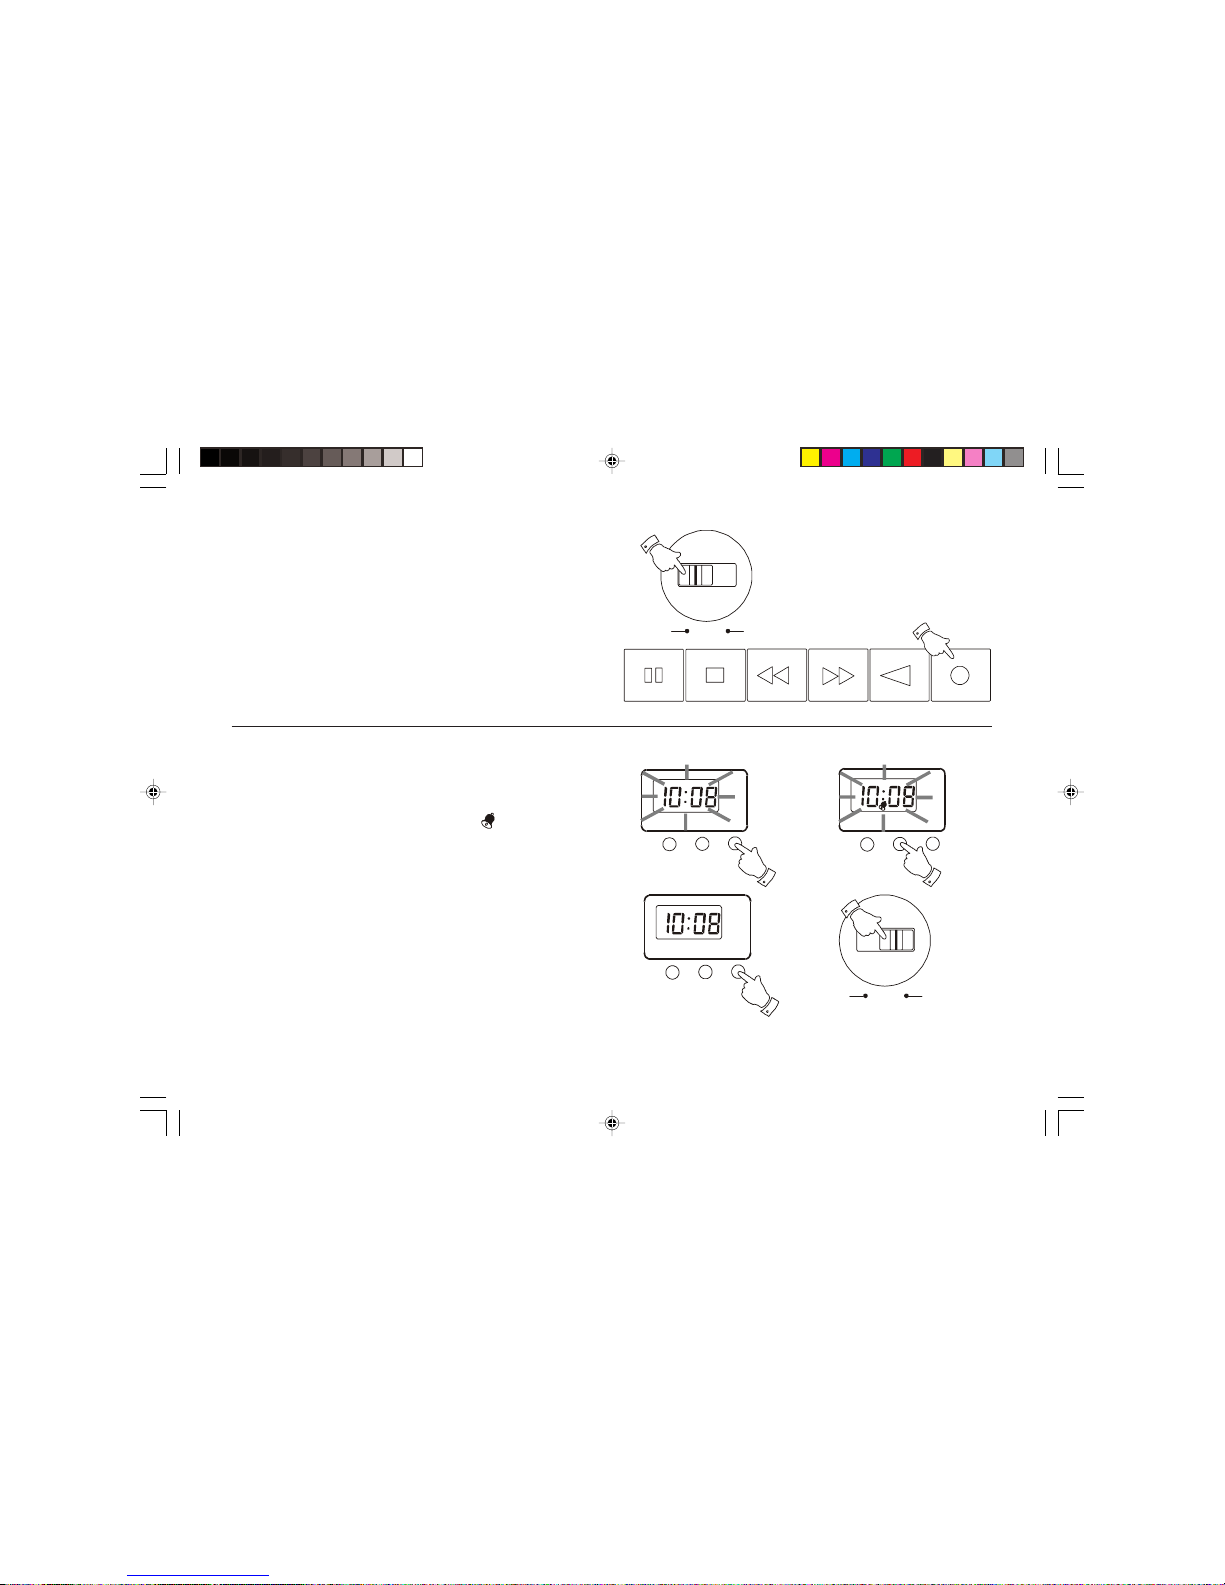
Activating the hourly alarm
1. Press the Set button, the hours and minutes digits will flash.
2. Repeatedly press the Mode button until the
symbol is showing.
3. Press the Set button three times to return to the normal clock display.
4. Set the Operation switch to the Buzz position. The alarm will now
bleep on each hour.
Note : this function is not available if either the radio or tape functions
are being used.
Alarm off
Mode Set
Alarm off
Mode Se t
Alarm off
Mode Set
Operati on
Auto
Buzz
Manual
Making a timed recording
1. Tune in the station you wish to record at the preset time
2. Set the alarm to wake to radio as previously described.
3. Insert a blank cassette into the Cassette compartment.
4. Ensure that the Operation switch is set to the 'Auto' position
5. Press the Record button.
6. The radio will turn on at the preset alarm time. The tape will stop when
tape end is reached.
Operation
Auto
Buzz
Manual
Play
RewindF. F orw ar d
Record
Stop/E ject
Pause
12
RC9907 Issue 3.pmd 1/26/2007, 1:35 PM13
Page 14
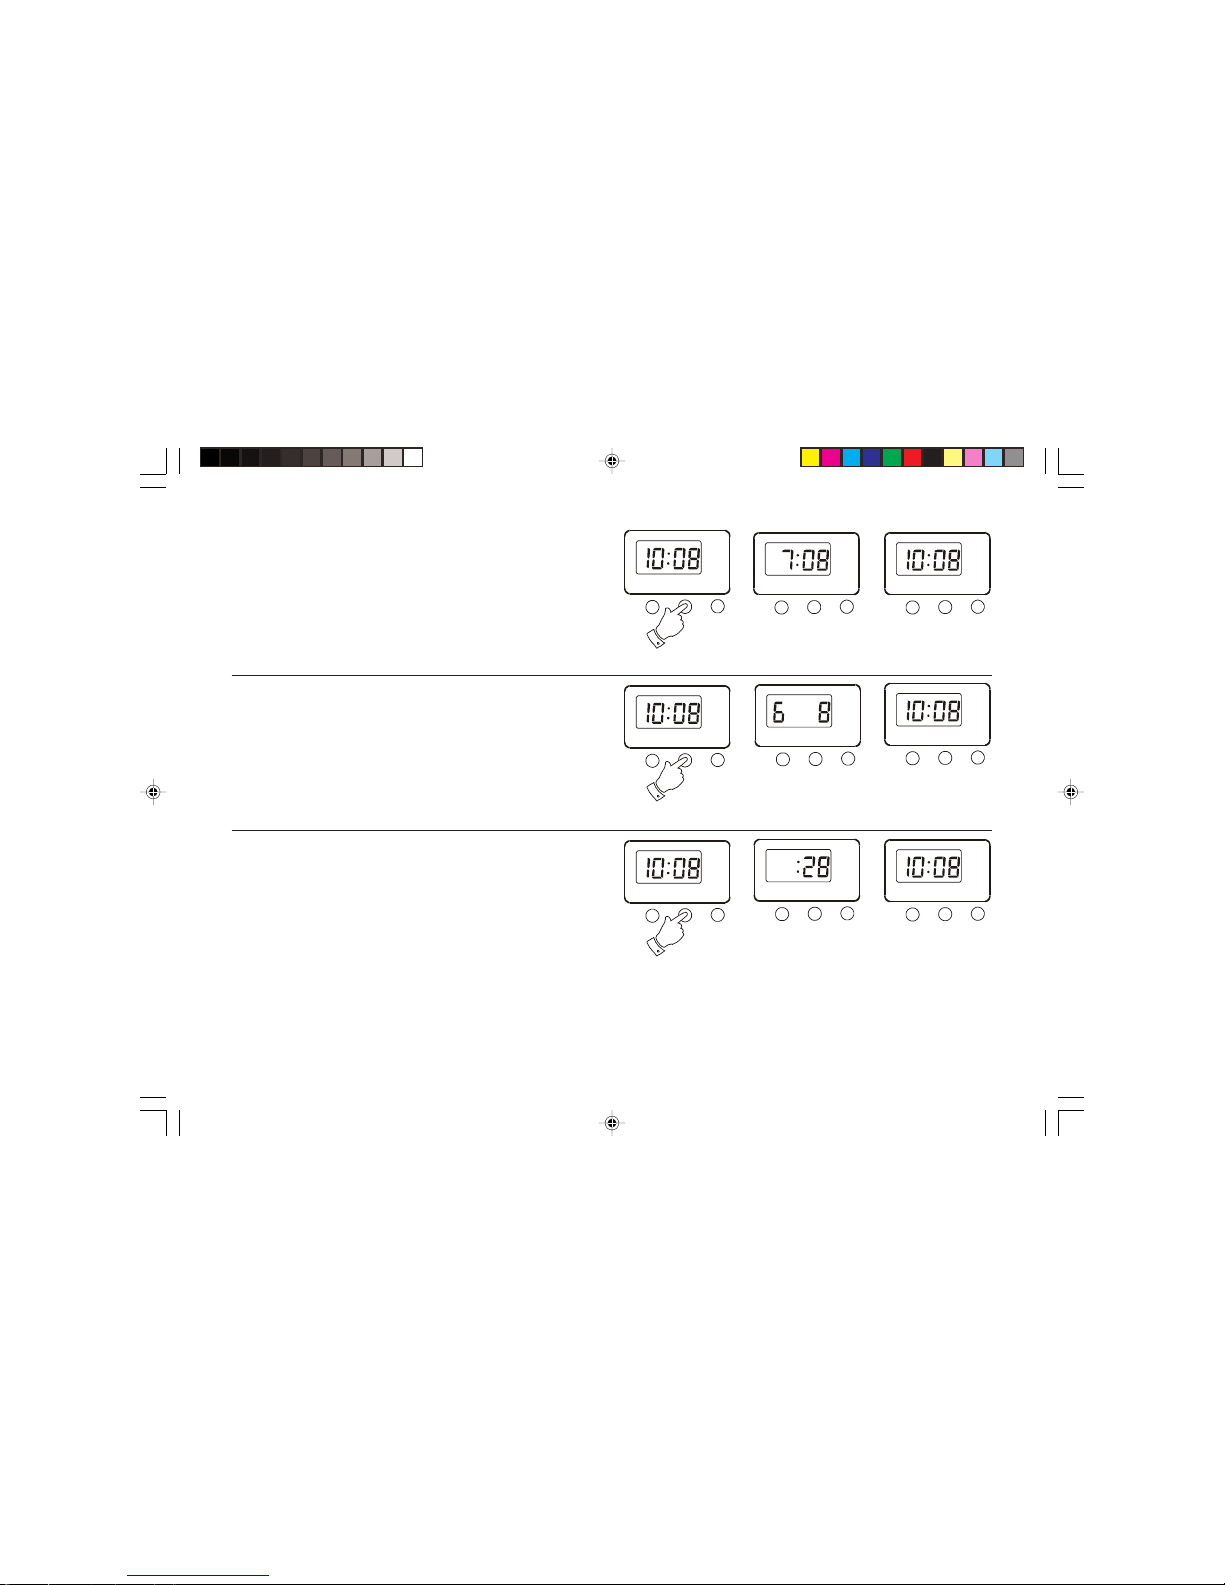
Displaying the alarm time
1. Whilst the current time is displayed press the mode button once.
The alarm time stored will be displayed; after approximately two
seconds the display will automatically switch back to current time.
Displaying the date
1. Whilst the current time is displayed press the Mode button twice.
The date will be displayed; after approximately two seconds the
display will automatically switch back to current time.
Displaying the seconds
1. Whilst the current time is displayed press the Mode button three
times. The seconds will be displayed.
2. Press the Mode button to switch back to current time.
Alarm off
Mode Se t
Alarm off
Mode Set
AL
Alarm off
Mode Set
Alarm off
Mode Set
Alarm off
Mode Set
Alarm off
Mode Set
Alarm off
Mode Set
Alarm off
Mode Set
Alarm off
Mode Set
13
RC9907 Issue 3.pmd 1/26/2007, 1:35 PM14
Page 15
If you need any further advice, please call our Technical Helpline on :-
0208 758 0338 (Mon-Fri)
Play
Rewind
F. Forward
Record
Stop/Eject
Pause
Tuning
FM MW LW
WavebandFunctionOperationVolume
Radio
Auto
Buzz
MaxMin
Mic Phones
Manual
Tape
Off
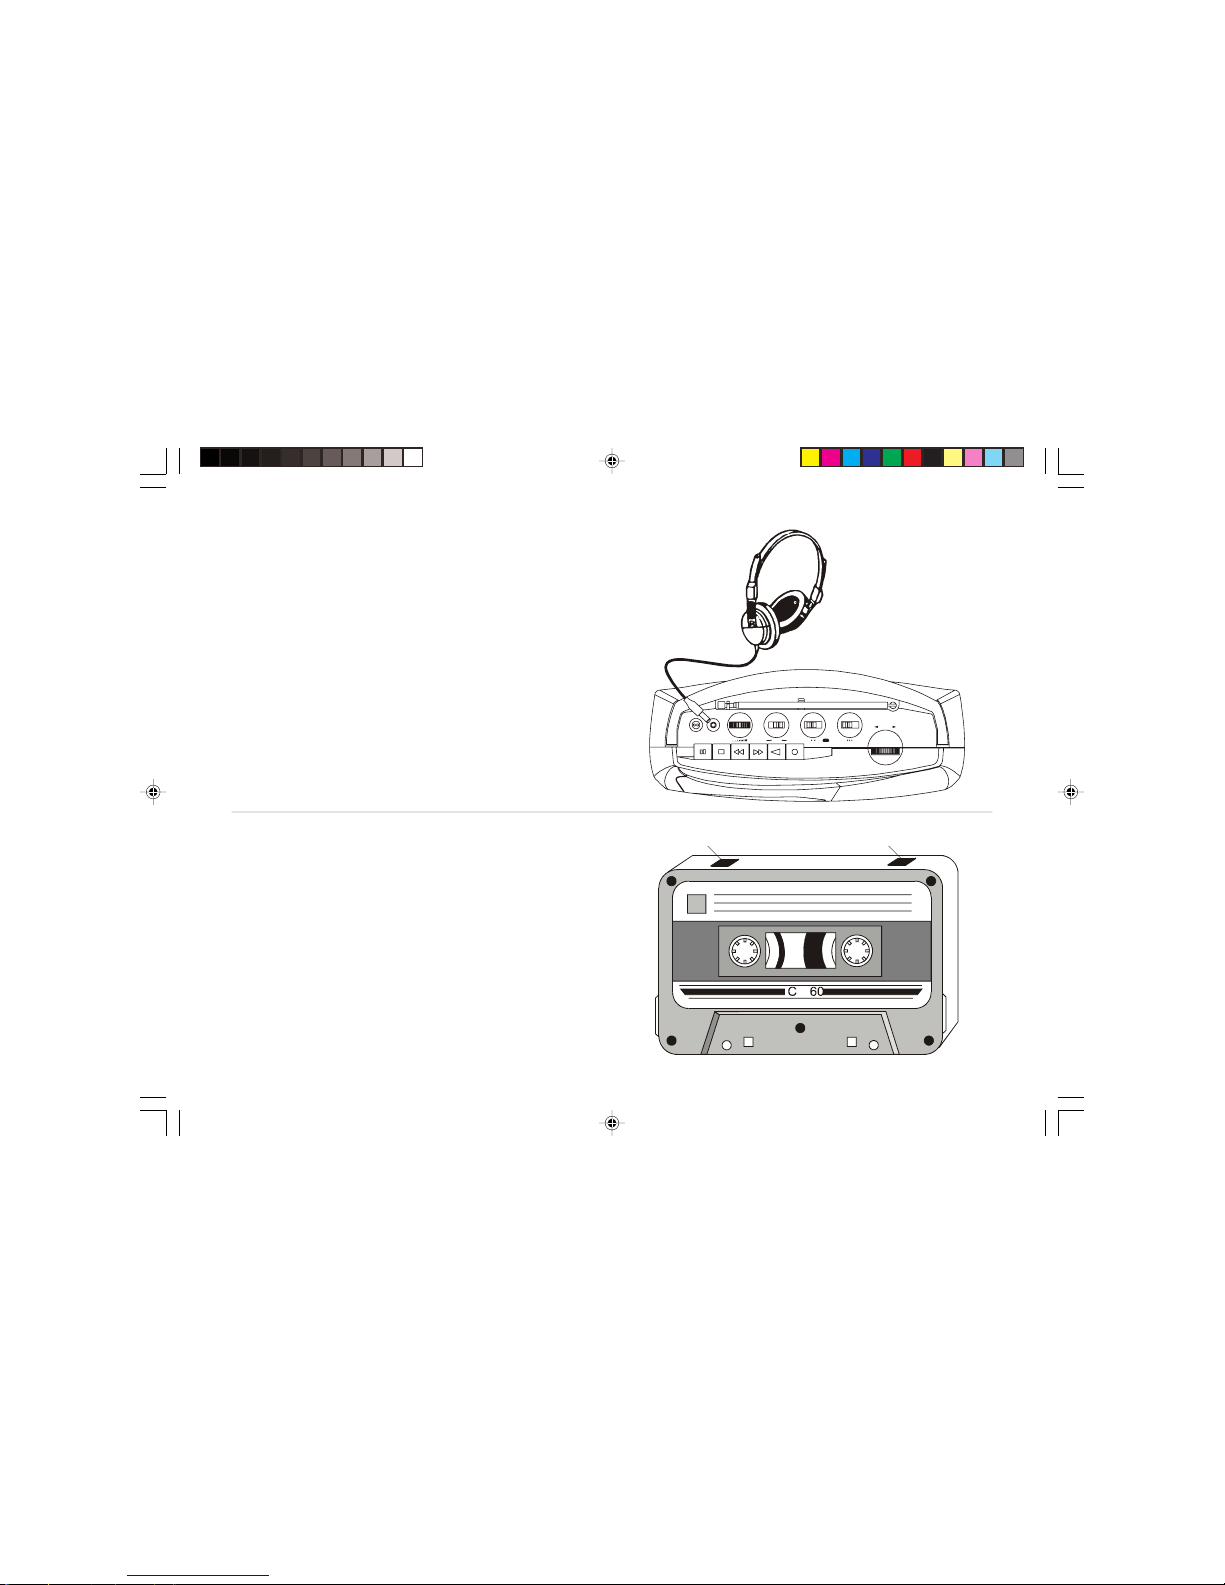
Headphones socket
A 3.5mm Headphone Socket located on the top of your radio cassette
is provided for use with either headphones or an earpiece. Inserting a
plug into the socket automatically mutes the internal loudspeaker.
IMPORTANT: Excessive sound pressure from earphones and
headphones can cause hearing loss.
Preventing accidental erasure
To safeguard your recordings against accidental erasure, break off the
appropriate tab on the cassette as shown . There is one tab for each side of
the cassette. This will prevent the Record button from being pressed. To
restore the cassette to normal, seal the tab openings with a small piece of
self-adhesive tape.
A
Safety tab side A Safety tab side B
14
RC9907 Issue 3.pmd 1/26/2007, 1:35 PM15
Page 16
15
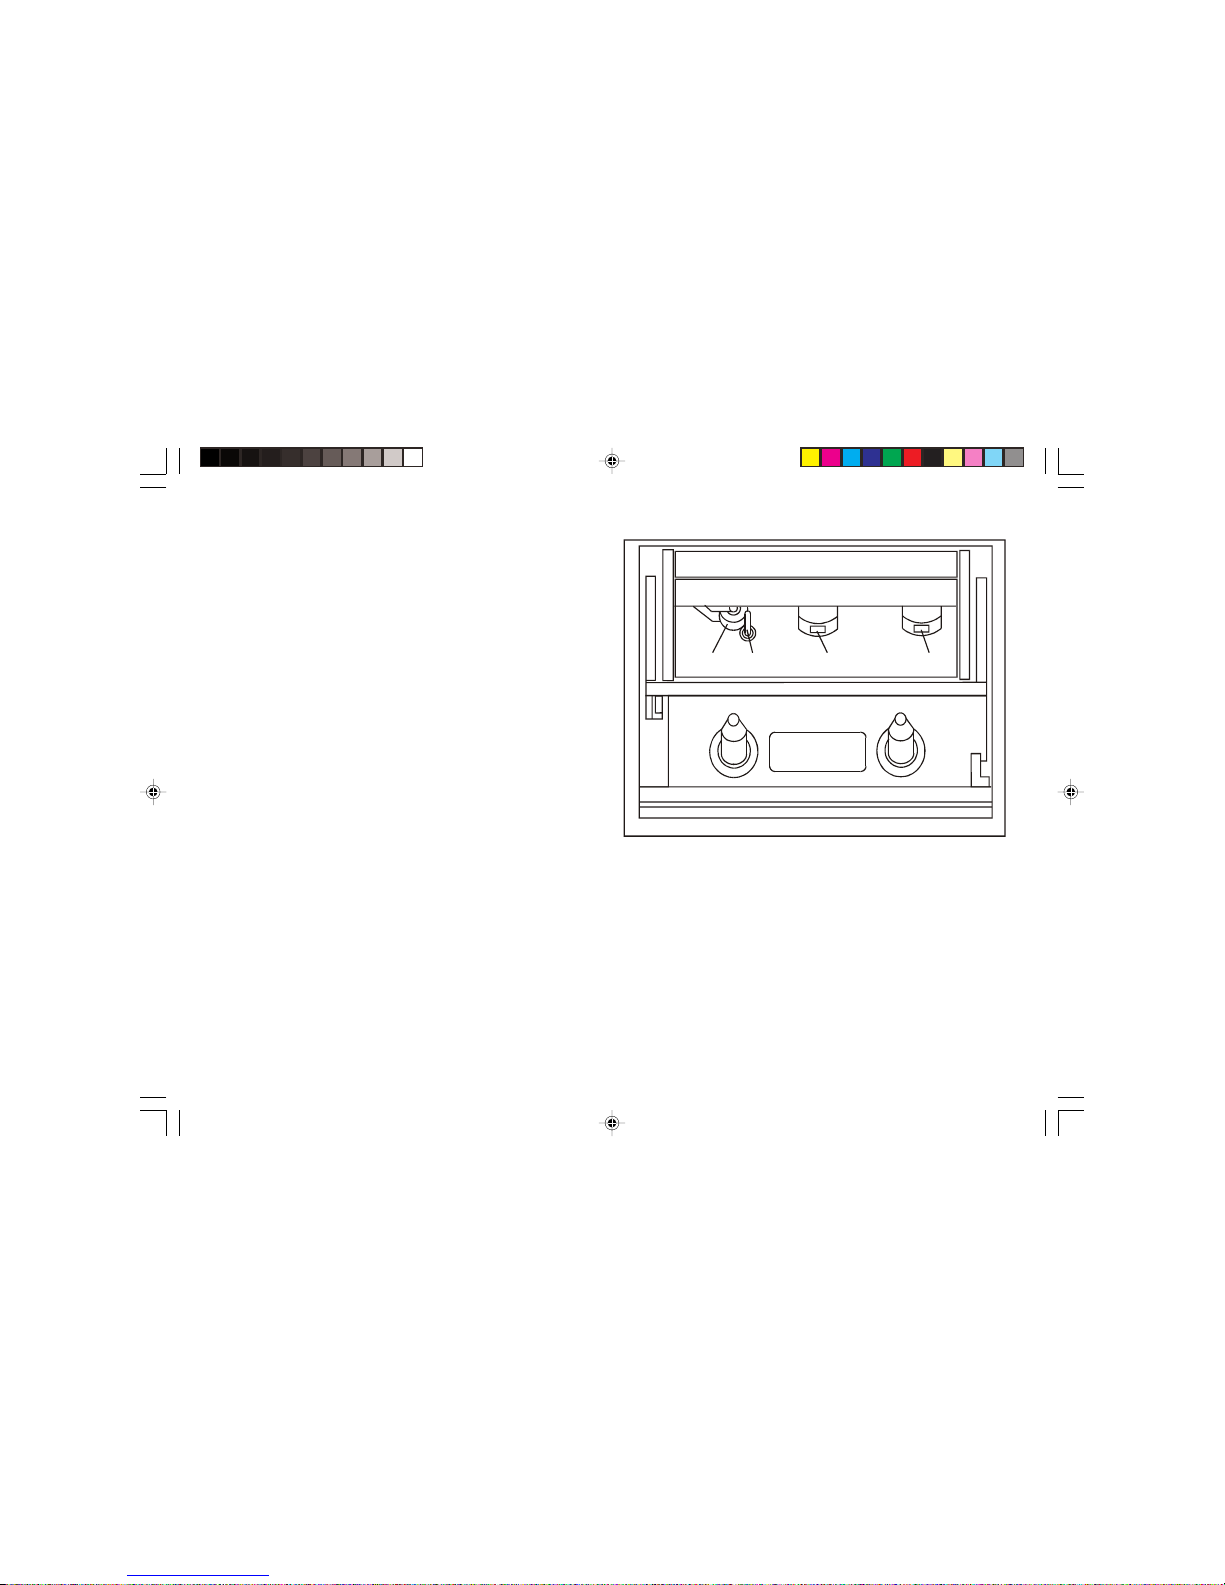
Cleaning the Heads
The binder and oxide from magnetic tapes can accumulate on the pinch
roller (A) the capstan shaft (B) and also the heads (C and D). This will impair
the sound quality.
To clean these parts proceed as follows:-
1. Turn off the power to the unit.
2. Press the Stop/Eject button (3).
3. Press the Play button (6) and the heads will be clearly seen.
4. Clean the surfaces (A, B, C, D) with a lint free rag or cotton swab soaked
in alcohol. Press the stop/eject button as soon as cleaning is over.
General
Do not allow this unit to be exposed to dripping or splashing, water or
steam. It is recommended that the FM band be used wherever possible
as better results in terms of quality and freedom from interference will
usually be obtained than on the MW or LW bands.
• The name plate is located at the underside of the radio cassette
recorder.
A
BCD
• No objects filled with liquids such as vases, shall be placed on
the radio.
• It is recommended to operate the product such that there is a minimum
distance (10cm recommended) to adjacent objects in order to
ensure good ventilation.
• The ventilation of the product should not be restricted by covering
it or its ventilation openings with items such as newspapers, tablecloths, curtains etc.
• No naked flame sources such as lighted candles should be placed
on the product.
• It is recommended to avoid using or storing the product at extremes
of temperature. Avoid leaving the unit in cars, on window sills in
direct sunlight etc.
RC9907 Issue 3.pmd 1/26/2007, 1:35 PM16
Page 17
16
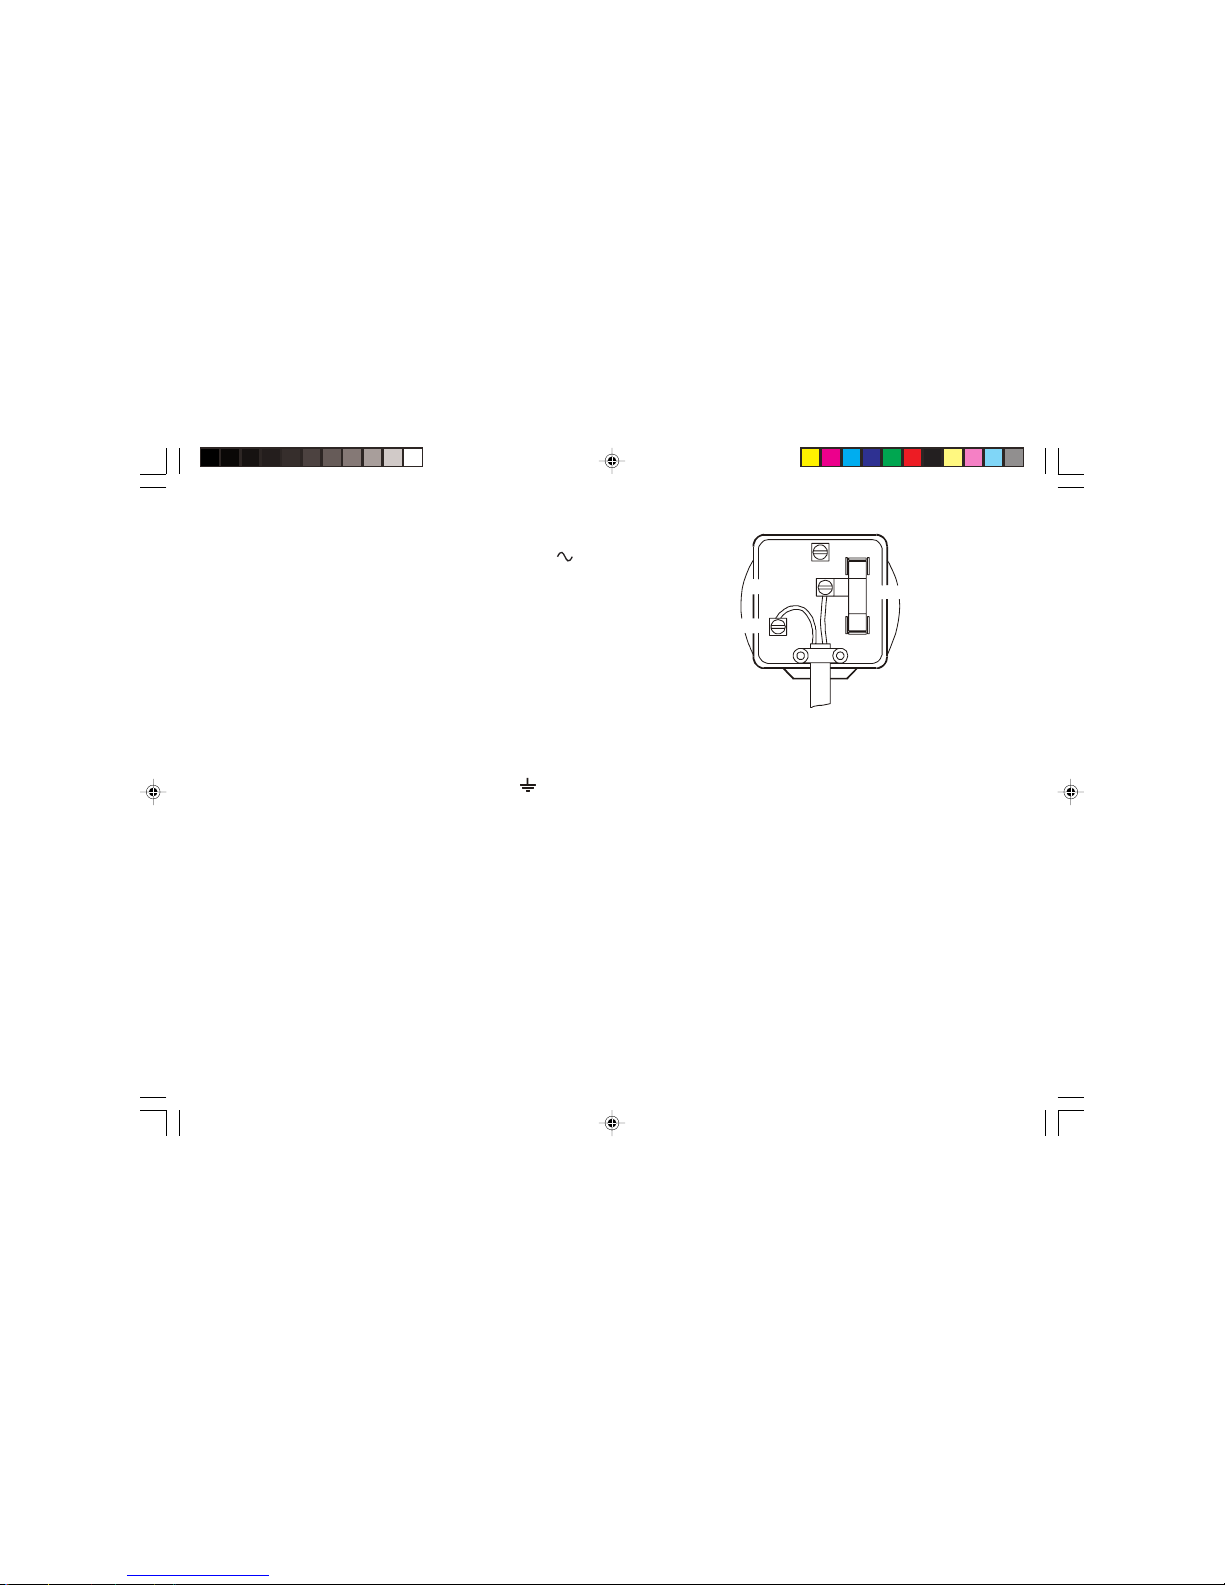
The wire coloured BLUE must be connected to the terminal marked N or
coloured BLACK.
The wire coloured BROWN must be connected to the terminal marked L or
coloured RED.
Mains supply
The RC9907 will operate from a supply of AC 230 volts, 50Hz only.
DO NOT cut off the mains plug from this equipment. If the plug
fitted is not suitable for the power points in your home or the cable is too
short to reach a power point, then obtain an appropriate safety approved
extension lead or adaptor. If in doubt consult your dealer.
If nonetheless the mains plug is cut off, remove the fuse and dispose
of the plug immediately, to avoid a possible shock hazard by inadvertent
connection to the mains supply.
If this product is not supplied with a mains plug, or one has to be fitted,
then follow the instructions given below:
IMPORTANT. DO NOT make any connection to the larger terminal which
is marked with the letter E or by the safety earth symbol
or coloured
Green or Green-and-yellow.
The wires in the mains lead are coloured in accordance with the following
codes :-
BLUE - NEUTRAL BROWN - LIVE
E
L
N
3 amp
Brown
Blue
(Live)
(Neutral)
(Earth)
Cord
Fuse
When replacing the fuse only a 3A ASTA approved to BS1362 type
should be used and be sure to re-fit the fuse cover.
IF IN DOUBT - CONSULT A QUALIFIED ELECTRICIAN.
Replacement fuse holders are available from Roberts Radio Technical
Services Department at the address shown on the rear of this manual.
Trouble shooting
In case of malfunction due to electrostatic discharge, it may be necessary
to reset the product to resume normal operation. This may generally be
performed by turning the unit off and on. In some cases a more complete
reset may be needed, by removing all sources of power (battery and
mains) when turned off.
RC9907 Issue 3.pmd 1/29/2007, 11:48 AM17
Page 18

The Company reserves the right to amend the specification without notice.
Specifications
Power Requirements
Mains: AC 230 volts, 50Hz
only
Batteries: Radio/Cassette 4 x LR14 (C size)
Clock Battery 1 x LR6 (AA size)
Frequency Coverage
FM 87.5 - 108MHz
MW 525 - 1610kHz
LW 150 - 260kHz
Circuit Features
Loudspeaker 75mm diameter
Output power 700mW
Aerial System FM Wire Aerial
MW Built-in Ferrite aerial
LW Built-in Ferrite aerial
ROBERTS RADIO LIMITED
PO BOX 130
MEXBOROUGH
SOUTH YORKSHIRE
S64 8YT
17
RC9907 Issue 3.pmd 1/26/2007, 1:35 PM18
Page 19

Guarantee
This instrument is guaranteed for twelve months from the date of delivery to the original owner against failure due to faulty workmanship or component
breakdown, subject to the procedure stated below. Should any component or part fail during this guarantee period it will be repaired or replaced free of charge.
The guarantee does not cover:
1. Damage resulting from incorrect use.
2. Consequential damage.
3. Receivers with removed or defaced serial numbers.
N.B. Damaged or broken telescopic aerials will not be replaced under guarantee.
Procedure:
Any claim under this guarantee should be made through the dealer from whom the instrument was purchased. It is likely that your Roberts' dealer will be
able to attend to any defect quickly and efficiently but should it be necessary the dealer will return the instrument to the Company’s service department
for attention. In the event that it is not possible to return the instrument to the Roberts' dealer from whom it was purchased, please contact Roberts
Radio Technical Services department at the address shown on the rear of this manual before taking further action.
These statements do not affect the statutory rights of a consumer.
RC9907 Issue 3.pmd 1/26/2007, 1:35 PM19
Page 20
ROBERTS RADIO TECHNICAL SERVICES DEPARTMENT
97-99 Worton Road
Isleworth Middlesex
TW7 6EG
Technical Helpline:- 0208 758 0338 (Mon-Fri)
Website: http://www.robertsradio.co.uk
Issue 3
RC9907 Issue 3.pmd 1/26/2007, 1:35 PM20
 Loading...