

Page 1
R9917
3-band digital RDS preset stereo radio
ROBERTS
Sound for Generations
Please read this manual before use
Page 2

Contents
Features ........................................... 1
Controls ........................................... 2
Display.............................................. 5
Installing batteries .......................... 6
Battery replacement........................ 7
Setting the clock automatically ..... 8
Setting the clock manually ........... 10
Setting the alarm time .................. 13
Wake to alarm................................. 15
Search tuning ................................. 16
Manual tuning................................. 17
MW (AM) tuning step size ............. 18
Presetting stations......................... 20
Recalling a preset station ............. 22
Changing preset station order ..... 23
Deleting preset stations ................ 24
Radio Data System (RDS.............. 25
Operating your radio using RDS . 27
Alternate Frequency (AF) ............. 28
Traffic Announcement s (T A)......... 29
ATS (Automatic Tuning System).. 31
Sleep timer..................................... 33
Display Modes/Backlight ............. 34
Lock Switch ................................... 35
Earphones...................................... 36
Headphone socket ........................ 37
AC Adaptor (not included)............ 38
Mono button .................................. 39
Troubleshooting/Reset button..... 40
Specifications................................ 41
Guarantee ...................................... 42
Page 3

Features
z Auto rewind earphones.
z Station name display (RDS).
z Auto time set via RDS.
z Traffic information (TA).
z Alternate frequency function (AF).
z Automatically finds and stores BBC
z Full clock/alarm functions
z Adjustable sleep timer allows you to fall
z ATS (Auto Tuning System) which will
z FM stereo via earphones.
z Scan and manual tuning modes.
national FM stations.
z Thirty memory presets offer instant
access to your favourite stations on LW,
MW and FM.
If you need any further advice, please call our Technical Helpline on :020 8758 0338 (Mon-Fri)
asleep to music.
scan and automatically preset stations.
1
Page 4
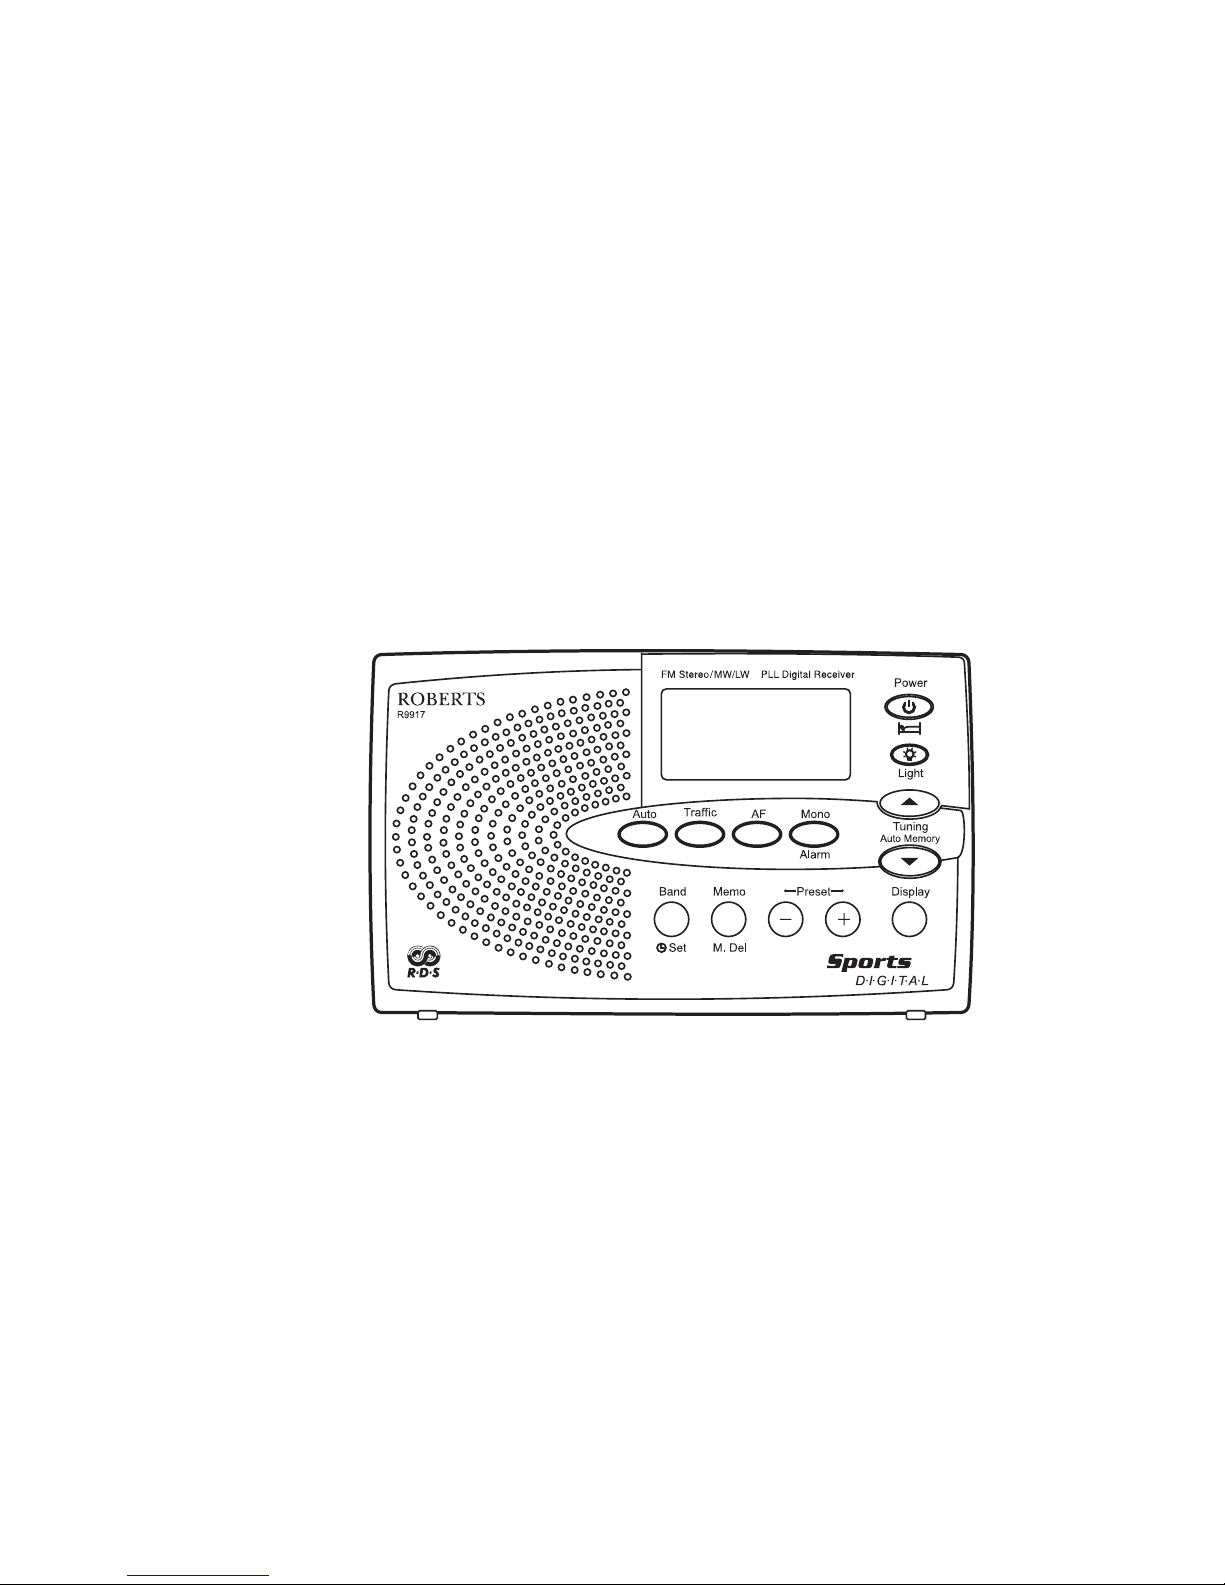
Controls
1. Auto time button
2. Traffic button
3. AF button
4. Mono/Alarm button
5. Power button
6. Light button
7. Tuning up button
8. Tuning down button
9. Display button
10. Preset up button
11. Preset down button
12. Memory/ Mem delete
13. Band/Time set button
3
1 234 5
6
7
8
9
10111213
Page 5

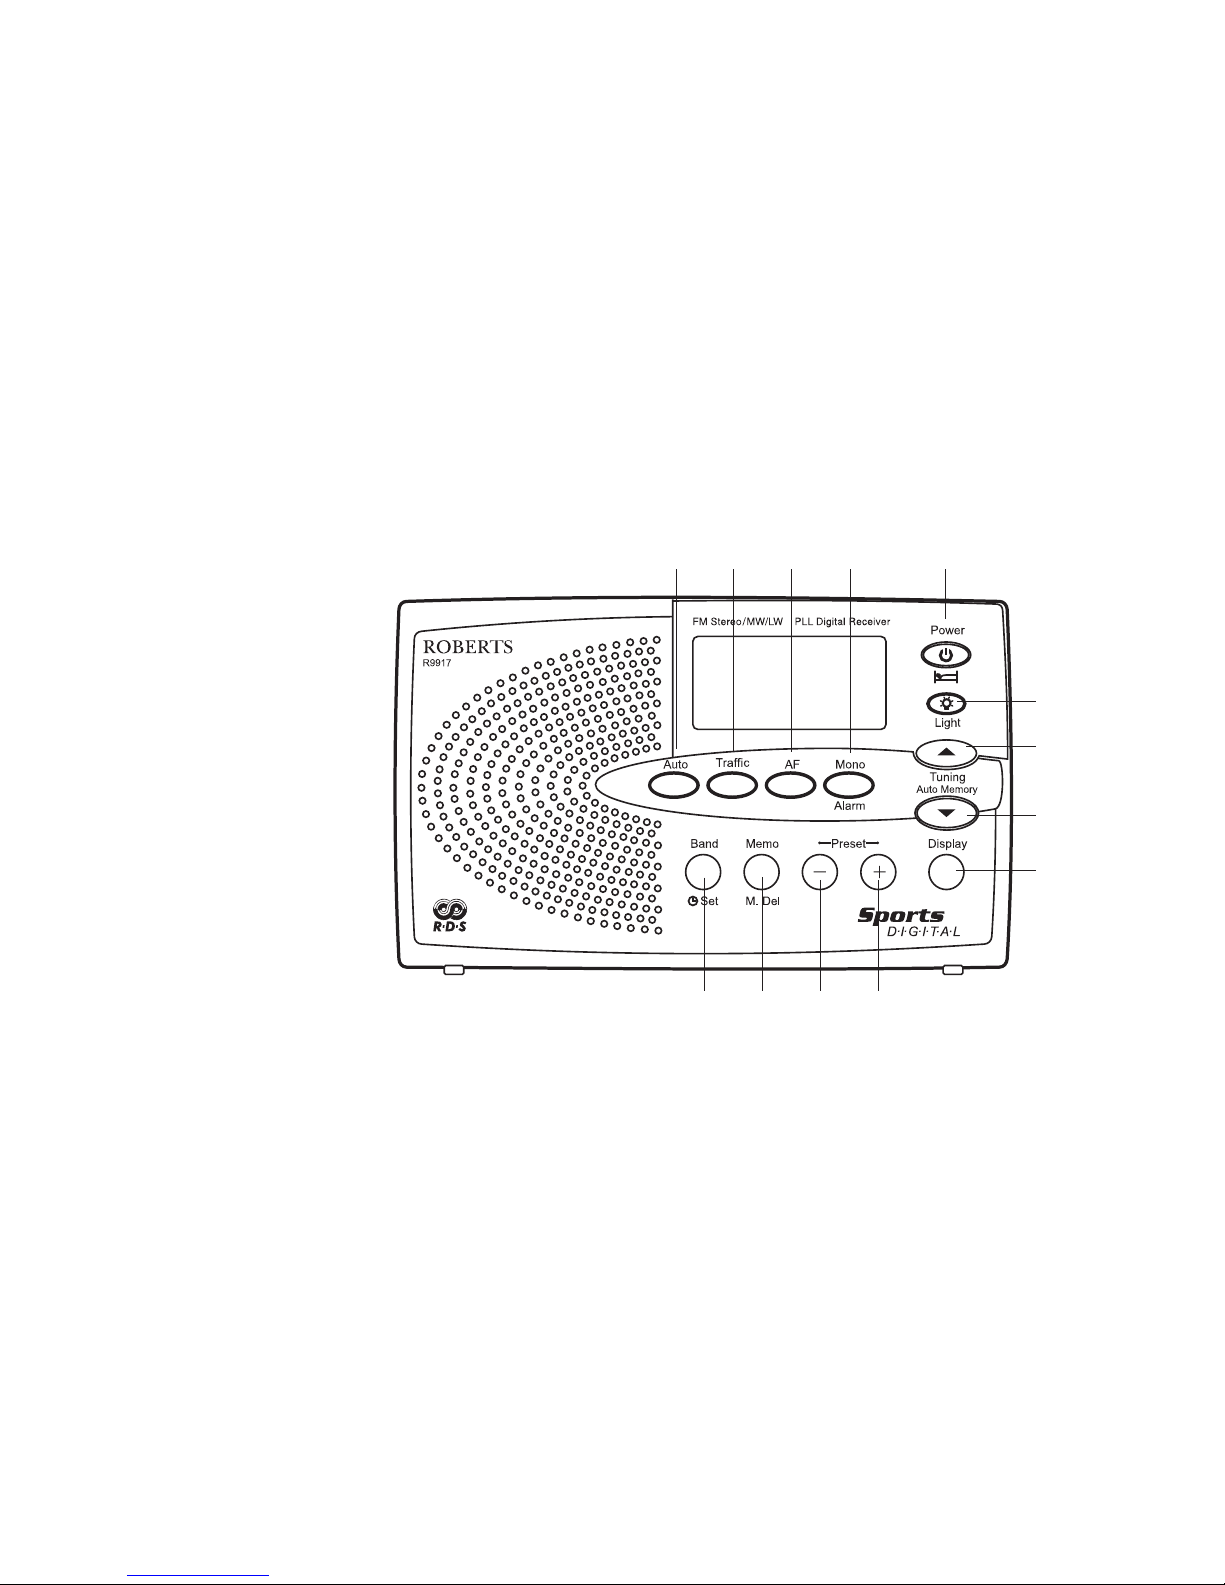
14. Volume control
15. Loudspeaker/Headphone switch
16. Headphone socket
19
17. DC input socket
18. Lock switch
19. Telescopic Aerial
20. Earphones
If you need any further advice, please call our Technical Helpline on :020 8758 0338 (Mon-Fri)
14
15
16
17
18
20
4
Page 6
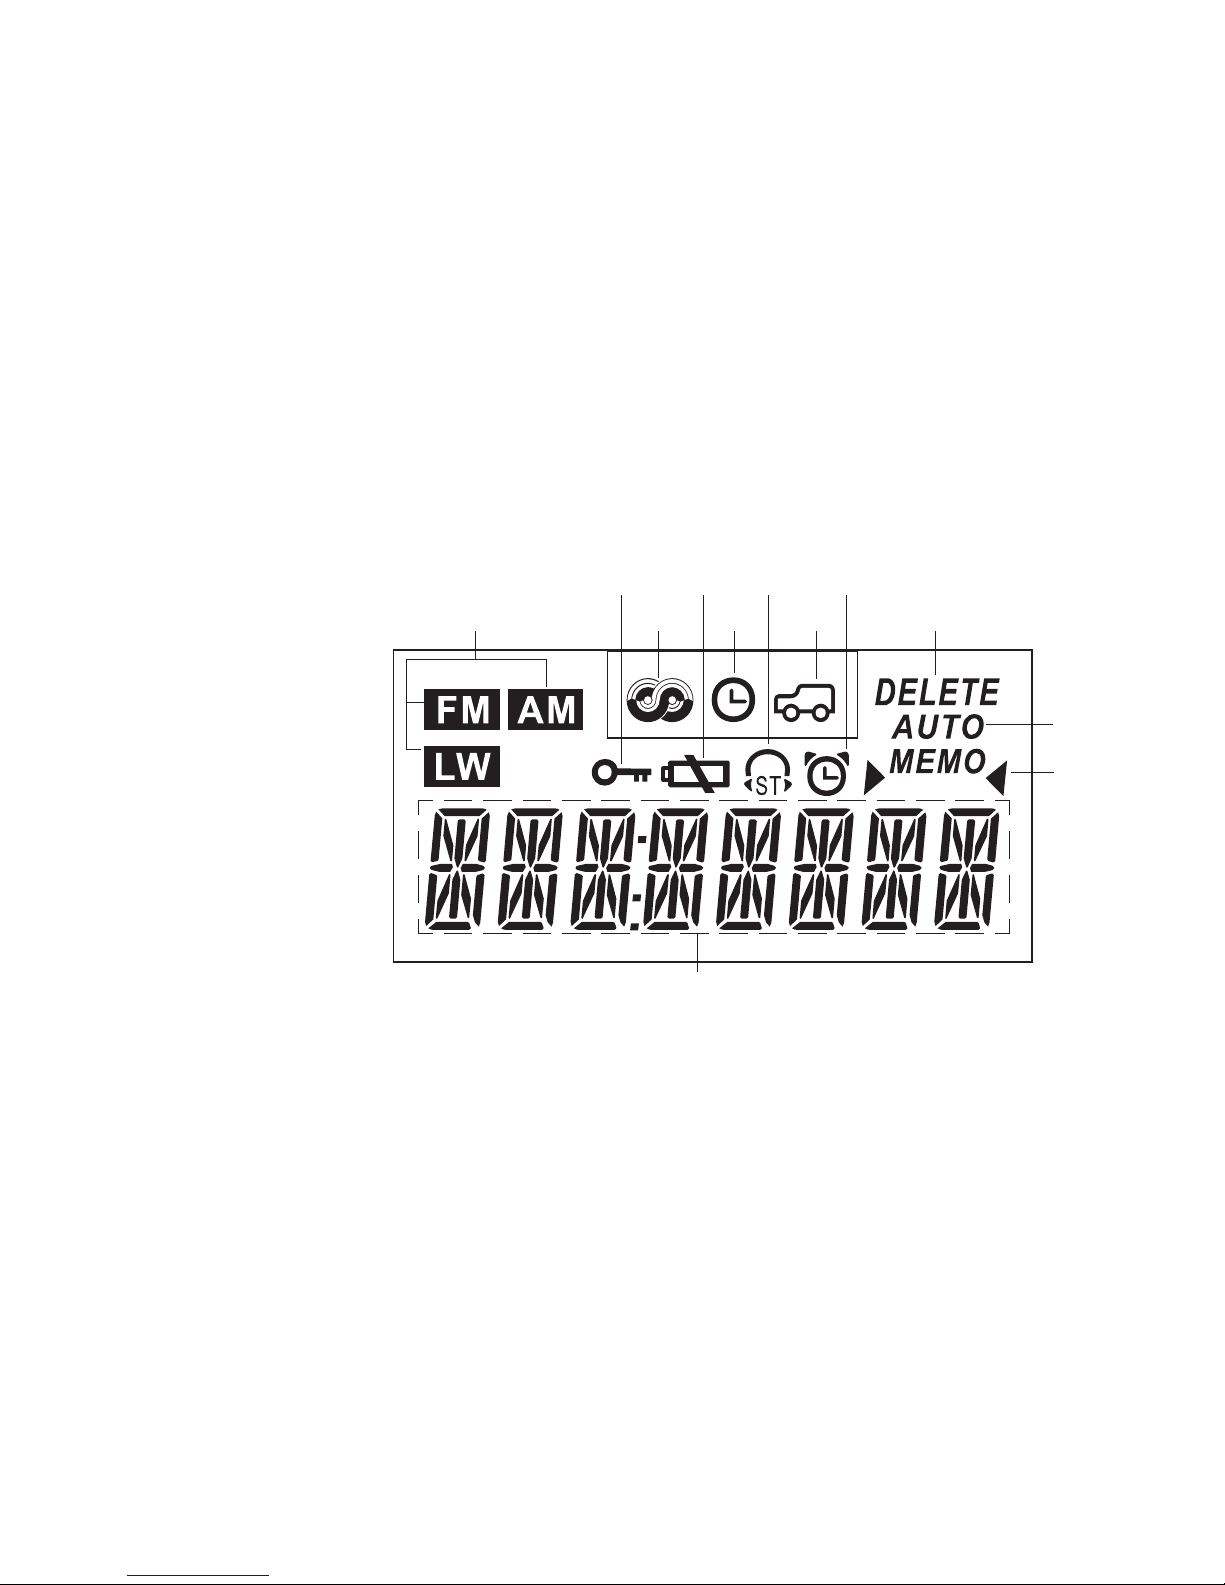
Display
A. Waveband indicators
B. Key lock indicator
C. RDS indicator
D. Low battery indicator
E. Time indicator
F. Stereo indicator
G. Traffic indicator
H. Alarm indicator
I. Memory delete indicator
J. Auto preset indicator
K. Memory set indicator
L. Frequency/time/station
display
5
B
A
C
D
F
E
G
H
I
J
K
L
Page 7
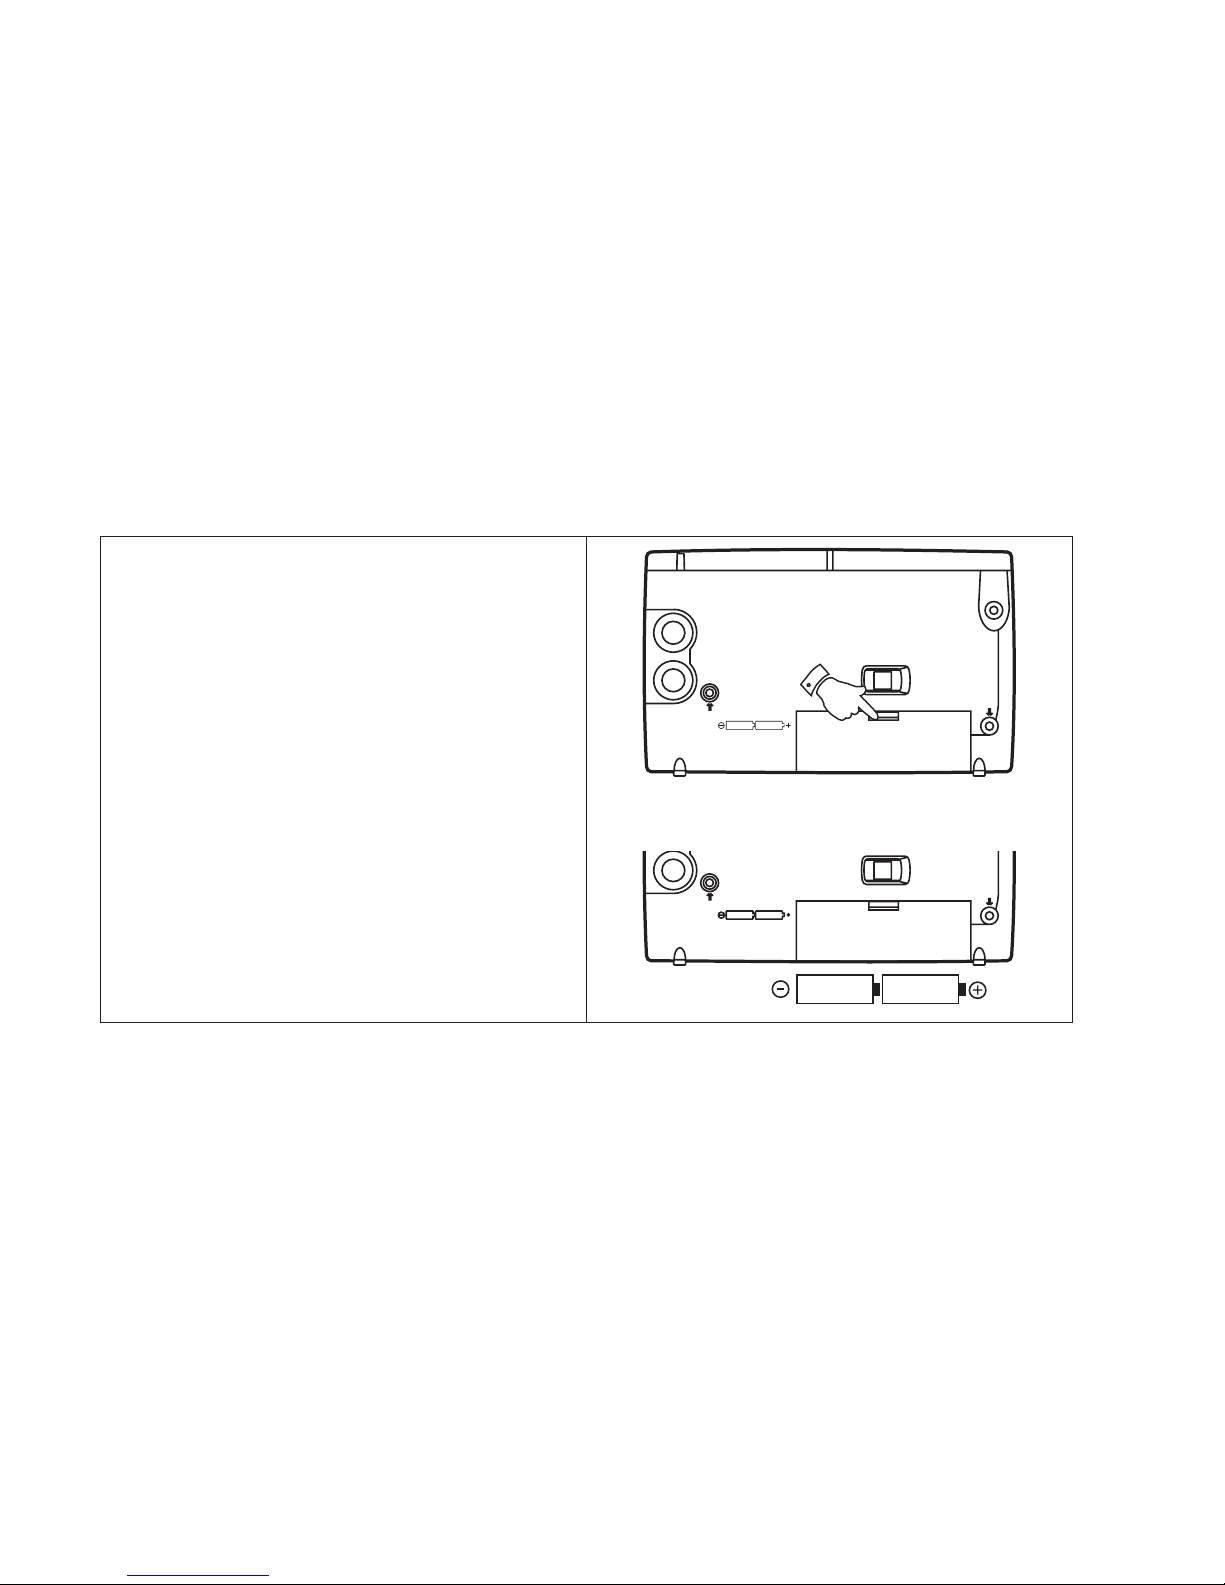
Installing batteries
1. Position the radio face down.
2. Press the catch as shown and slide in the
direction of the arrow.
3. Lift up the battery cover
4. Insert 2 x LR6 (AA) size batteries as shown
in the diagram.
If you need any further advice, please call our Technical Helpline on :020 8758 0338 (Mon-Fri)
6
Page 8

4. Replace the battery cover.
Battery replacement
The battery indicator will appear in the display
when the batteries are in need of replacement.
After removing the batteries you have
approximately 3 minutes to replace the
batteries after which clock and memory
information will be lost.
7
Page 9
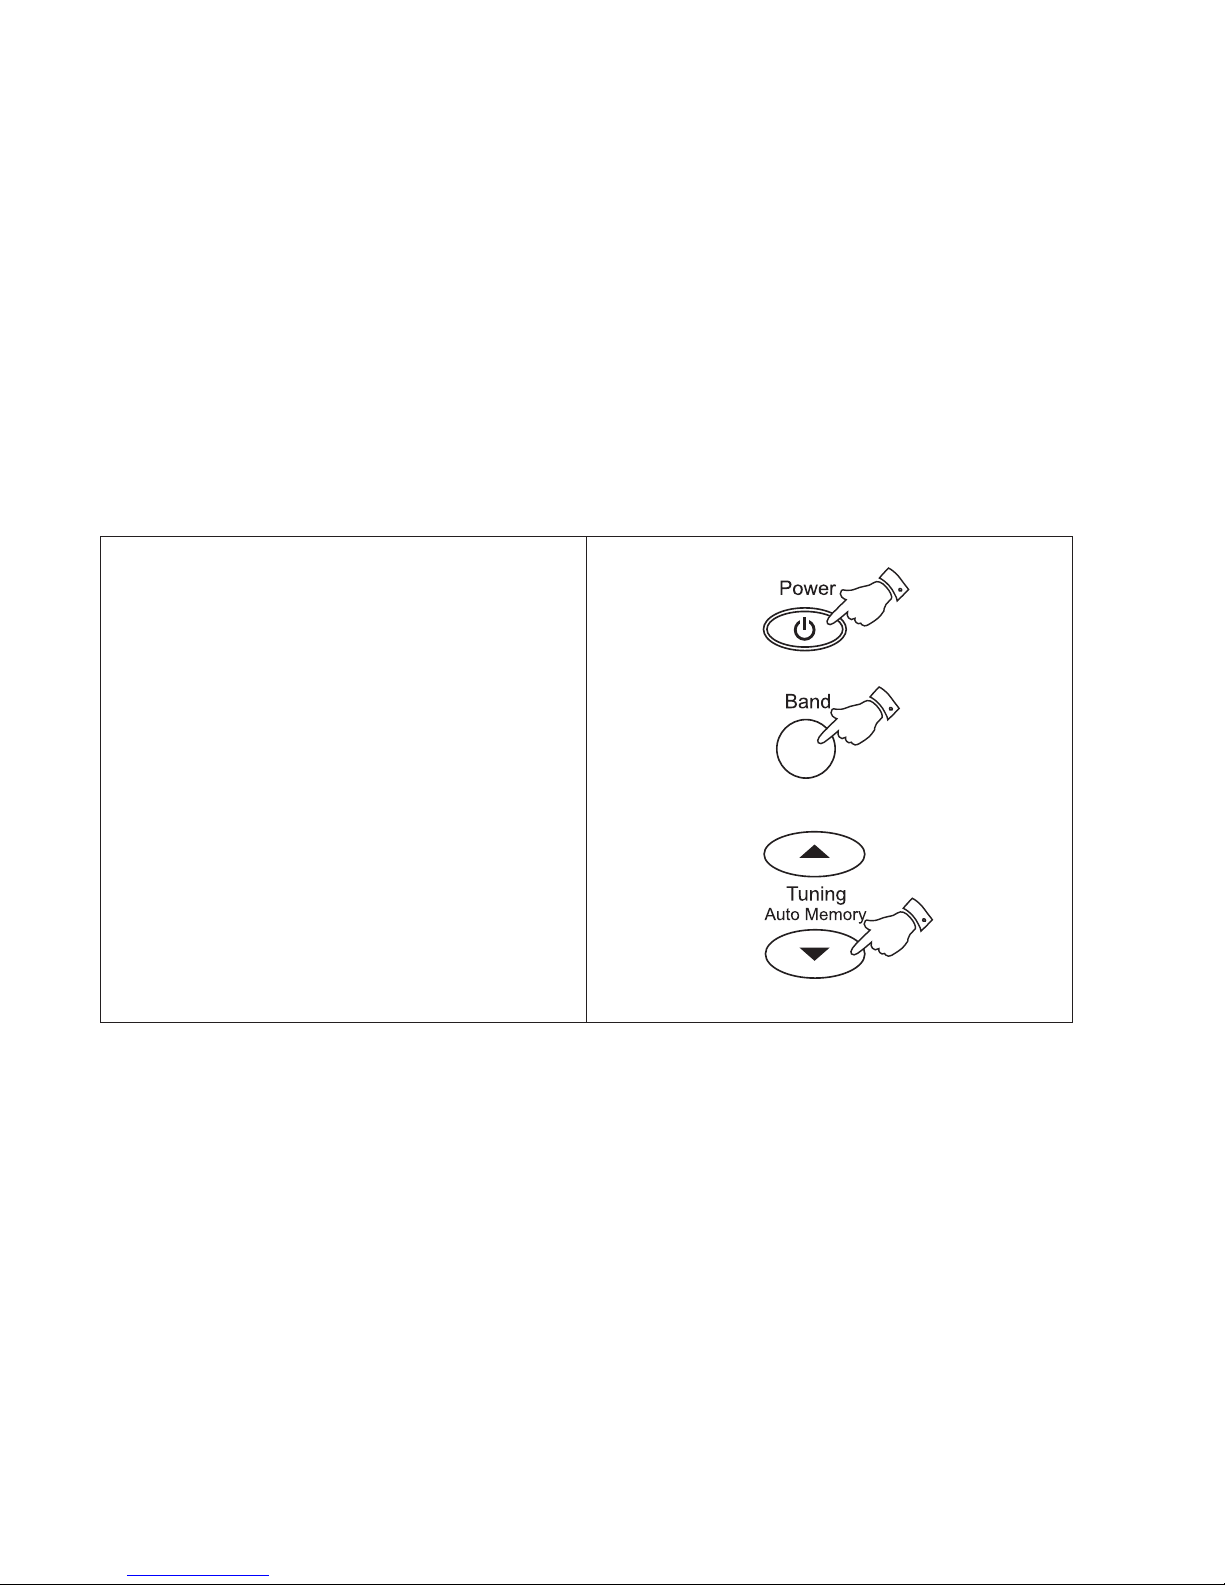
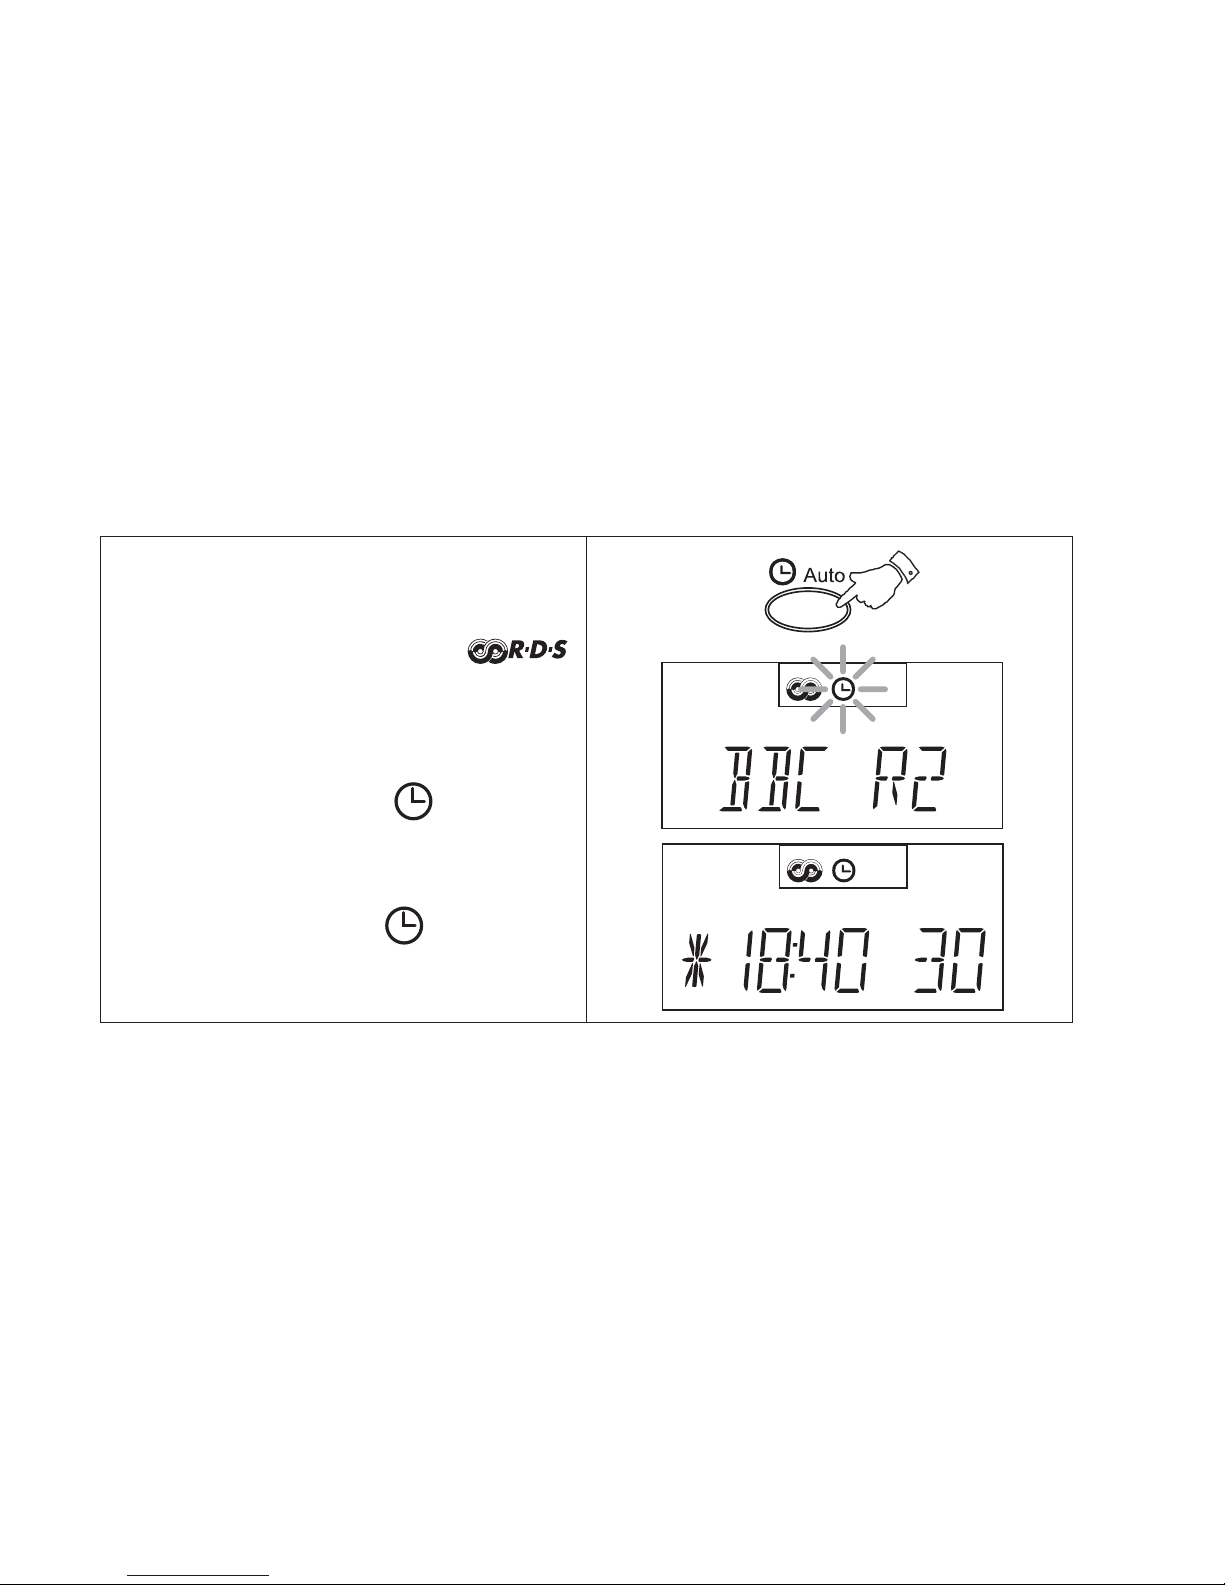
Setting the clock automatically
The clock time can be set automatically when
receiving an RDS station that transmits clock
time (CT). The CT information is transmitted
once every minute. If the station has sufficient
signal strength the clock will set within one or
two minutes.
1. Switch on the radio with the Power button.
2. Select the FM waveband by repeat pressing
of the Band button.
3. Fully extend the Telescopic aerial.
4. Press and hold down the Tuning up or
down buttons until the frequency in the
display begins to change rapidly , release the
button.
If you need any further advice, please call our Technical Helpline on :020 8758 0338 (Mon-Fri)
8
Page 10
5. The radio will now start to search the FM
waveband and will stop when it finds a
station of sufficient strength. If the station
is of sufficient strength the
symbol will light up in the liquid crystal
display.
6. Press the Auto time set button.
7. The auto time indicator will flash in
the liquid crystal display indicating that the
radio is waiting for the RDS time signal.
When the time is set the display will briefly
show the time and the indicator will
stop flashing. If the clock does not set within
three to four minutes, the radio station may
not be transmitting clock time (CT)
information - try another radio station.
9
Page 11

Setting the clock time manually
The clock will start running when the 2 LR6
(AA) size batteries are installed. When
batteries are installed for the first time the
display will show 0:00. The seconds display
will start to count as soon as batteries are
installed.
Note: Time can only be set with the radio
switched off.
If you need any further advice, please call our Technical Helpline on :020 8758 0338 (Mon-Fri)
10
Page 12
1. Ensure that the radio is switched off.
2. Press and hold down the Time set button
until the hours digit begins to flash in the
display.
3. Whilst the hours digit is flashing adjust the
hours using the Tuning up/down buttons.
11
Page 13
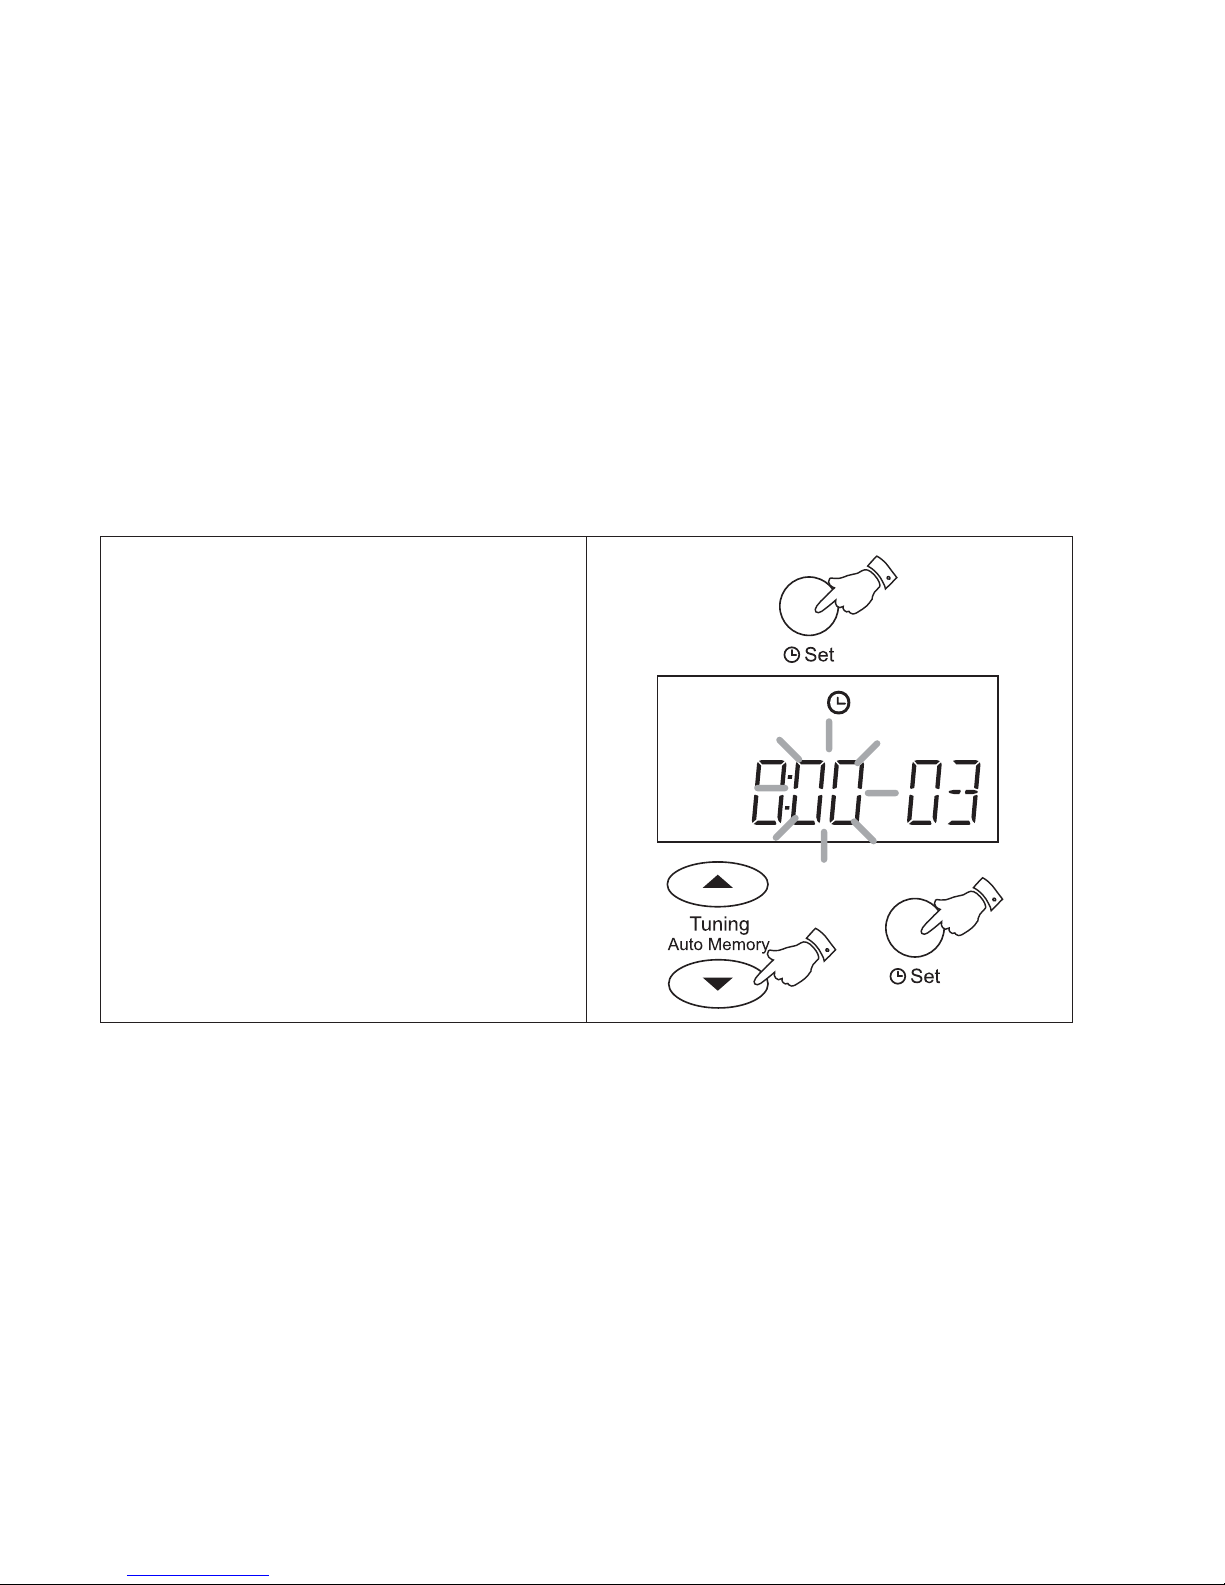
4. Press the Time set button, the minute digit
begins to flash in the display.
5. Whilst the minute digit is flashing adjust the
minutes using the Tuning up/down
buttons.
6. Press the Time set button to complete time
setting
If you need any further advice, please call our Technical Helpline on :020 8758 0338 (Mon-Fri)
12
Page 14
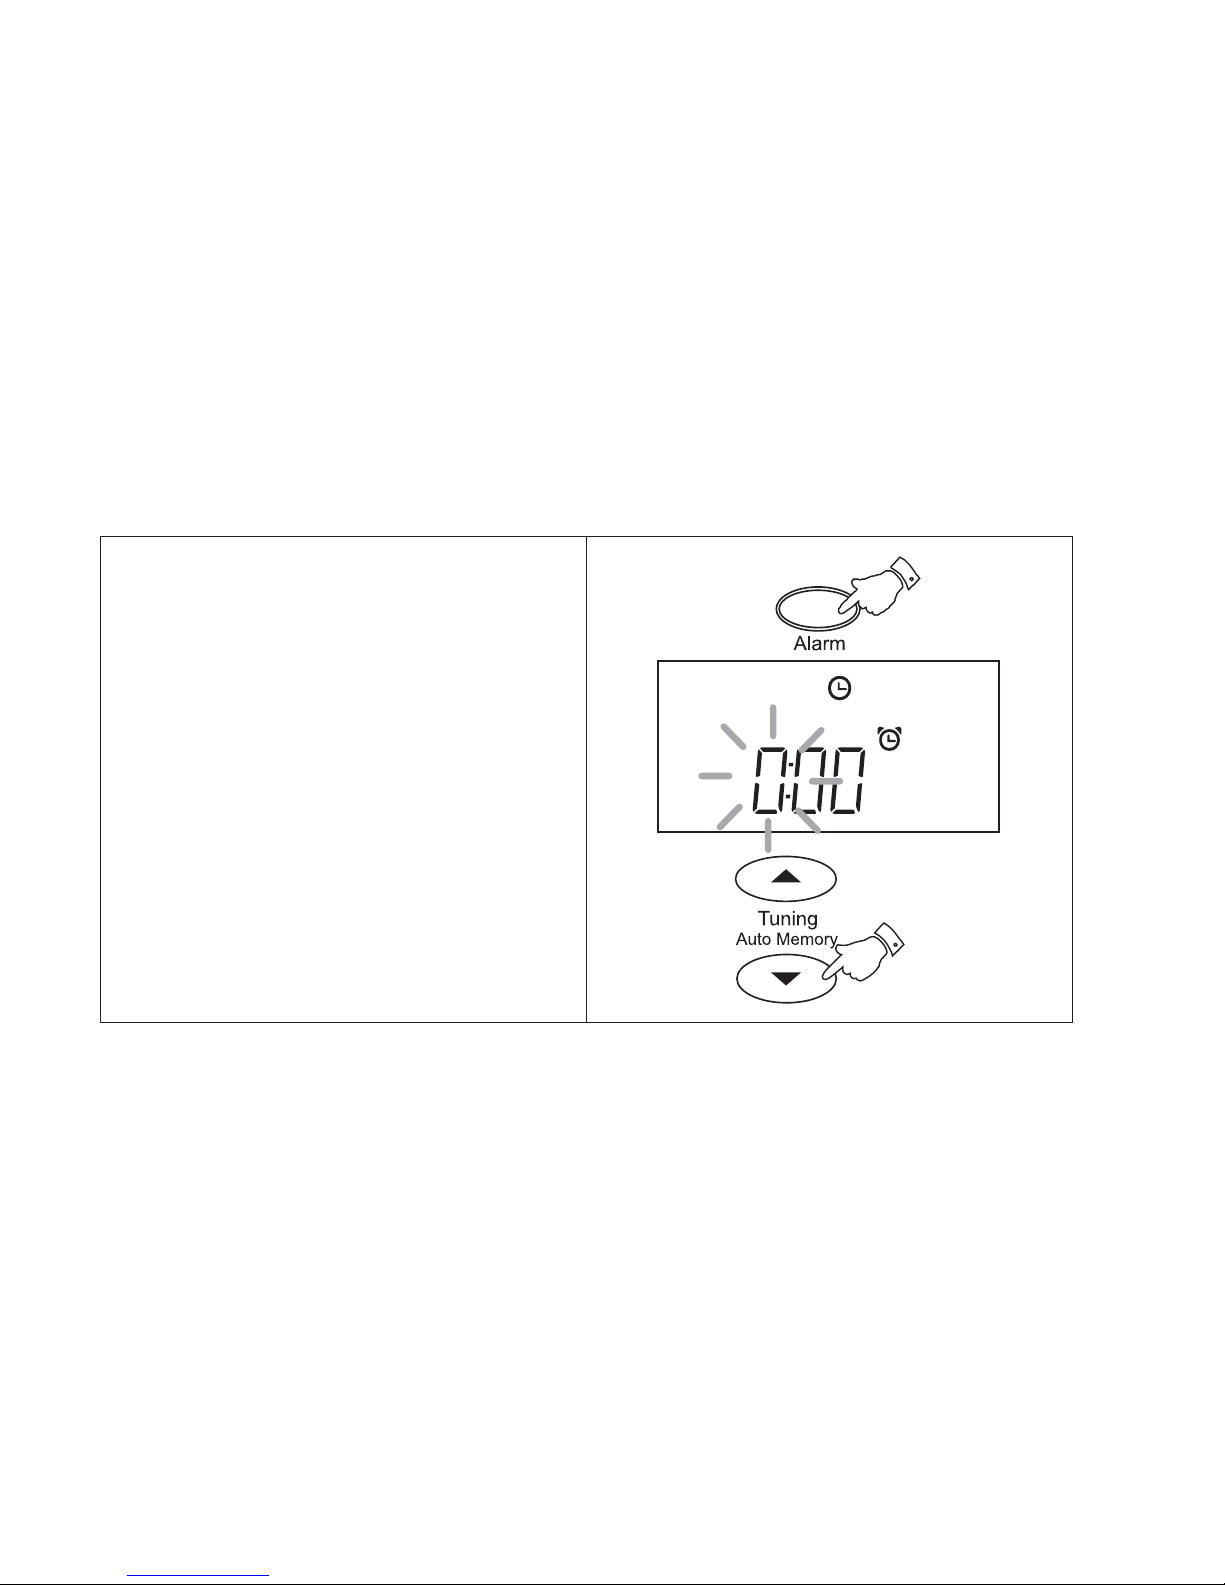
Setting the alarm time
1. Ensure that the radio is switched off.
2. Press and hold down the Alarm button until
the hours digit begins to flash in the display .
3. Whilst the hours digit is flashing adjust the
hours using the Tuning up/down buttons.
13
Page 15

4. Press the Alarm button, the minute digit
begins to flash in the display.
5. Whilst the minute digit is flashing adjust the
minutes using the Tuning up/down
buttons.
6. Press the Alarm button to complete alarm
time setting
If you need any further advice, please call our Technical Helpline on :020 8758 0338 (Mon-Fri)
14
Page 16

Wake to alarm
1. Set the alarm time as previously described.
2. Switch off your radio using the Power
Button. Repeatedly press and release the
Alarm button until the symbol appears
in the display.
3. At the preselected time the alarm will sound.
The alarm may be turned off for 24 hours
by pressing any button. The alarm will
switch off automatically after 3 minutes.
4. To permanently cancel the buzzer alarm
repeatedly press and release the Alarm
button until the symbol is removed
from the display.
15
Page 17

Operating your radio - search tuning
1. Switch on your radio by pressing the Power
button.
2.Select the required waveband by repeat
pressing of the Band button. The
waveband selected will appear in the
display . On FM fully extend the Telescopic
aerial. On MW and L W rotate your radio for
best reception.
3. Press and hold down either the Tuning +
or - buttons until the frequency in the
display begins to change rapidly. Release
the button.
4. Y our radio will scan the selected waveband,
stopping each time it finds a station of
sufficient strength. Adjust the Volume
control to the required level.
If you need any further advice, please call our Technical Helpline on :020 8758 0338 (Mon-Fri)
16
Page 18

Operating your radio - manual tuning
1. Switch on your radio by pressing the Power
button.
2. Select the desired waveband using the
Band button. The waveband selected will
appear in the display. On FM fully extend
the Telescopic aerial. On MW and LW
rotate your radio for best reception.
3. A single press on either the Tuning + or -
buttons will change the frequency up or
down. The frequency steps are:- FM 50kHz,
MW 9kHz and L W 9kHz. Adjust the Volume
control to the required level.
17
Page 19

MW (AM) tuning step size
In Europe and other parts or the world MW
tuning steps are 9kHz, in America the MW
tuning step size is 10kHz.
T o change the MW tuning step size from 9KHz
to 10KHz proceed as follows:-
1. Switch on your radio and select the MW
(AM) waveband.
2. Press and hold down both the Preset + and
Preset - buttons until the display shows
AM --} 9k.
3. Press the T uning up button to select 10kHz
step size. Press the tuning up button a
second time to confirm the setting.
If you need any further advice, please call our Technical Helpline on :020 8758 0338 (Mon-Fri)
18
Page 20

MW (AM) tuning step size (continued)
1. To change back to 9kHz step size press
and hold down both the Preset + and
Preset - buttons until the display shows
AM --} 10k.
2. Press the Tuning down button to select
9kHz step size. Press the Tuning down
button a second time to confirm the setting.
19
Page 21

Presetting stations
You may store up to 16 stations on FM, 9 on
MW and 5 on LW giving a total of 30 preset
stations.
1. Tune into the required station using one of
the tuning methods previously described.
2. Press and release the Memo button, the
word 'Memo' will flash in the display.
3. Whilst 'Memo' is flashing press one of the
Preset up or down button to select the
preset under which you wish to store the
station.
4. Press and release the Memo button to
store the station. The preset number will
now appear alongside 'M' in the display.
If you need any further advice, please call our Technical Helpline on :020 8758 0338 (Mon-Fri)
20
Page 22

Presetting stations (continued)
7. Repeat the procedure for the remaining
presets.
Note: Presetting of stations can only be
carried out whilst 'Memo' is flashing in the
display (5 seconds).
8. If all the preset memory locations are full
pushing the Memo button will cause the
display to show ‘FUL.’ (FM) or 'FULL' (MW
and LW). If you still want to store a new
station press the Memo button , the new
station will replace the station stored in the
preset location shown in the display.
21
Page 23

Recalling a preset station
1. Switch on your radio using the Power
button.
2. Select the desired waveband using the
Band button.
3. Press Preset + or - buttons to cycle
through the available preset stations.
Your radio is also equipped with a Memory
scan facility.
1. Press and hold down either the Preset +
and - buttons to start memory scan. Your
radio will scan the available memories
pausing for a few seconds on each. To stop
memory scan press either the Preset + or -
buttons when the required preset is
reached.
If you need any further advice, please call our Technical Helpline on :020 8758 0338 (Mon-Fri)
22
Page 24

Changing preset station order
e.g. exchanging preset station 2 with preset
station 5.
1. Turn on your radio and select the required
waveband.
2. Select preset memory 2 using the Preset +
or - buttons.
3. Press the Memo button, Memo and preset
2 will flash in the display.
4. Select preset 5 using the Preset + or -
buttons.
5. Press the Memo button to complete the
operation
23
Page 25

Deleting preset stations
1. Switch on your radio and select the preset
station to be deleted using the Preset + or
- buttons.
2. Press and hold down the Memo button until
'Memo' and 'Delete' flash in the display.
3. Press the Memo button to confirm the
deletion.
If you need any further advice, please call our Technical Helpline on :020 8758 0338 (Mon-Fri)
24
Page 26

Radio Data System (RDS)
The Radio Data System (RDS) is a system in which inaudible digital information is transmitted
in addition to the normal FM radio programme. RDS offers several useful features, the following
are available on your radio:-
Programme Service (PS) name
The Programme Service name is a text usually
consisting of not more than eight alphanumeric
characters. It indicates information about the
programme being broadcast. A station name
or an abbreviation is shown in the display
instead of the tuned frequency (Example: BBC
R4).
25
Enhanced Other Network (EON)
Additional information about other
programmes within the same network is
transmitted when your broadcasting station is
using an Enhanced Other Network. You will
hear traffic flashes of other programmes within
the network automatically if the Traffic
Announcement function is switched on.
Page 27

Traffic Information System
The Traffic Programme identification (TP)
indicates which RDS stations provide Traffic
information. The Traffic Announcement
identification (TA) indicates T raffic information
is being broadcast. When TA is received, the
symbol will flash in the display.
Clock Time (CT) automatic adjustment
The Clock Time information transmitted from
the broadcasting station can be used for
setting and synchronising the clock of your
radio automatically. The Auto-Time function
can be enabled or disabled by the user.
Alternative Frequencies (AF)
This feature provides a list of Alternative
Frequencies for the station being received.
Y ou can switch to those frequencies directly if
desired.
If you need any further advice, please call our Technical Helpline on :020 8758 0338 (Mon-Fri)
26
Page 28

Operating your radio using RDS (Radio data system)
1. Switch on your radio and select the FM
waveband.
2. Tune into a station, the display will indicate
frequency for a few seconds and then
change to show the station name. The
symbol will appear in the display
3.If the station does not carry RDS
information only the station frequency will
be shown.
Note: the indicator will flash if the
signal is too weak for RDS operation.
27
Page 29

Alternate Frequency (AF)
The RDS system provides a list of alternative
frequencies for the station you are tuned to.
1. Switch on your radio and select the FM
waveband. T une into a station carrying RDS
information.
2. Press the AF button, your radio will scan
the list of alternate frequencies and select
the one giving best reception. If AF
information has not yet been received or is
not provided by the station you are listening
to, the radio will remain at the current
frequency and the display will indicate 'NO
AF'
If you need any further advice, please call our Technical Helpline on :020 8758 0338 (Mon-Fri)
28
Page 30

Traffic Announcement s (T A)
1. Switch on the radio select the FM waveband
and tune to an RDS station. The
symbol will appear in the display.
2. Press the Traffic button once. If the station
provides traffic information the symbol
will appear in the display.
3.If the station does not provide traffic
information the symbol will not appear
and the radio will beep indicating that no
traffic information is available.
4. During traffic announcements the
symbol will flash in the display.
29
Page 31

5. If the radio is tuned to a national station
such as BBC Radio 4, it will automatically
re-tune to any BBC local station
broadcasting traffic announcements. When
the traffic announcement is finished the
radio will re-tune to the previously selected
station. There may be occasions when the
station to which you are listening tells the
radio to re-tune to a traffic announcement
on a local station that is not receivable at
your location. Under these circumstances
there will be some hiss before the radio retunes back to the previously selected
station.
6. To turn off traffic information press the
Traffic button, the symbol will be
removed from the display.
If you need any further advice, please call our Technical Helpline on :020 8758 0338 (Mon-Fri)
30
Page 32

ATS (Automatic Tuning System)
The automatic tuning system will scan the
selected waveband and automatically store
stations in the memory presets. Up to
16stations can be stored on the FM band, 9
on the MW (AM) band and 5 on LW. note:
activating the ATS function will overwrite any
stations previously stored in the memory
presets
1. Select the required waveband by pressing
the Band button.
2. Press and hold down both the Tuning up
and Tuning down buttons until the display
shows ‘AUTO MEMO’. Your radio will scan
the selected waveband and automatically
store stations in memory presets until the
memories are full.
31
Page 33

3. On FM and where signals are of sufficient
strength your radio will automatically store
BBC Radio 1 in preset memory 1, BBC
Radio 2 in preset memory 2, BBC Radio 3
in preset memory 3 and BBC Radio 4 in
preset memory 4
If you need any further advice, please call our Technical Helpline on :020 8758 0338 (Mon-Fri)
32
Page 34

Sleep timer
Your radio can be set to turn off after a preset
time has elapsed.
1. Ensure that your radio is switched off.
2. Press and hold down the Power button until
the desired time is reached (maximum 90
minutes in 30 minute steps). The radio will
switch off after the sleep time has elapsed.
3. To cancel the sleep function before the
preset time has expired, press the Power
button.
33
Page 35

Display Modes
1. Whilst tuned to a station you can change
between station name/frequency , alarm and
normal time display by repeated pressing
of the Display button.
Display backlight
1. Pressing the Light button will switch on
the display backlight and illuminate the
display for approximately 7 seconds.
If you need any further advice, please call our Technical Helpline on :020 8758 0338 (Mon-Fri)
34
Page 36

Lock Switch
The Lock switch located on the right side of
your radio is used to prevent unintentional
operation.
1. Slide the Lock switch to the up 'locked'
position, the symbol will appear in
the display . The Power and all other buttons
will be disabled. This will prevent accidental
operation when the radio is packed in a
suitcase. T o release the Lock switch move
the switch to the down 'unlocked' position,
the symbol will be removed from the
display.
35
Page 37

Earphones
The earphone fitted to your radio are equipped
with an auto rewind system to allow for easy
storage.
1. Gently pull out the earphones from the right
hand side of the radio.
2.Slide the Loudspeaker/Headphone
switch to the 'Headphone' position the
loudspeaker will mute.
3. To retract the earphones slide the switch
on the rear of the cabinet. Hold onto the
earphones while they rewind into the
cabinet.
4.Slide the Loudspeaker/Headphone
switch to the 'Loudspeaker' position to
return to normal operation.
If you need any further advice, please call our Technical Helpline on :020 8758 0338 (Mon-Fri)
36
Page 38

Headphone socket (on the left hand end)
In addition to the built in earphones your radio
is provided with a Headphone Socket. This
allows you to use different types of ear or
headphones with your radio.
1. To use external headphones slide the
Loudspeaker/Headphone switch to the
position and plug the headphones into
the Headphone socket.
2. Slide the Loudspeaker/Headphone switch
to the position to return to normal
operation.
37
Page 39

AC Adaptor (not included)
The AC adaptor for use with the R9917 should
provide 3volts DC output at 250mA centre pin
negative.
Insert the adaptor plug into the DC socket on
the left side of your radio. Plug the adaptor
into a standard 13A mains socket outlet.
Whenever the adaptor is used the batteries
are automatically disconnected.
The AC adaptor should be disconnected from
the mains supply and the radio when not in
use.
If you need any further advice, please call our Technical Helpline on :020 8758 0338 (Mon-Fri)
38
Page 40

Mono button (FM only)
1. If the station being received is weak some
hiss may be audible, to reduce the hiss
press the Mono button to switch to mono
mode. The stereo indicator will be removed
from the display.
2. Press the Mono button to return to FM
stereo operation.
Note: FM stereo is only available when
using earphone/headphones
39
Page 41

Troubleshooting/Reset button
If your radio fails to operate correctly , or some
digits on the display are missing or incomplete
carry out the following procedure.
1. Switch off the radio and remove the
batteries.
2. With the aid of a suitable implement (the
end of a paper clip) press the reset button
located on the underside of your radio for
at least 2 seconds, this will reset the
microprocessor, clock time and clear all
stations stored in preset memory.
If a problem persists our technical staff would
be pleased to help offer any assistance on
operating the radio. Our technical helpline
number is, 020 8758 0338.
If you need any further advice, please call our Technical Helpline on :020 8758 0338 (Mon-Fri)
40
Page 42

Specifications
Power requirements
DC 3.0V @ 300mA
centre pin negative
Batteries 2 x IEC size LR6
(AAsize)
Battery Life Approx. 20hrs of
listening when used for
4 hours a day at normal
volume using alkaline
batteries.
The company reserves the right to amend the specification without notice.
41
Output power: 100mW.
Sockets
Headphone socket 3.5mm dia stereo.
DC input socket 3.0 volts centre pin
negative.
ROBERTS RADIO LIMITED
PO BOX 130
MEXBOROUGH
SOUTH YORKSHIRE
S64 8YT
http://www.robertsradio.co.uk
Page 43

Guarantee
This radio is guaranteed for twelve months from the date of delivery to the original owner against
failure due to faulty workmanship or component breakdown, subject to the procedure stated below.
Should any component or part fail during this guarantee period it will be repaired or replaced free of
charge.
The guarantee does not cover:
1. Damage resulting from incorrect use.
2. Consequential damage.
3. Receivers with removed or defaced serial numbers.
N.B. Damaged or broken telescopic aerials will not be replaced under guarantee.
Procedure: Any claim under this guarantee should be made through the dealer from whom the instrument
was purchased It is likely that your Roberts' dealer will be able to attend to any defect quickly and
efficiently but should it be necessary the dealer will return the instrument to the company’s service
department for attention. In the event that it is not possible to return the instrument to the Roberts'
dealer from whom it was purchased, please contact Roberts Radio service department at the address
shown on the rear of this manual before taking further action.
These statements do not affect the statutory rights of a consumer.
If you need any further advice, please call our Technical Helpline on :020 8758 0338 (Mon-Fri)
42
Page 44

Issue 2
ROBERTS RADIO TECHNICAL SERVICES DEPARTMENT
97-99 Worton Road
Isleworth Middlesex
TW7 6EG
Technical Helpline :- 020 8758 0338 (Mon-Fri during office hours)
 Loading...