

Page 1
ROBERTS
Sound for Generations
Please read this manual before use
R876
Multi-band digital preset stereo world radio
bbbbbbbbbbbbbbbbbbbbbbbbbbbbbbbbbbbbbbbbbbb
b
b
b
bbbbbbbbbbbbbbbbbbbbbbbbbbbbbbbbbbbbbbbbbbb
b
b
b
bbbbbbbbbbbbbbbbbbbbbbbbbbbbbbbbbbbbbbbbbbb
b
b
b
bbbbbbbbbbbbbbbbbbbbbbbbbbbbbbbbbbbbbbbbbbb
b
b
b
bbbbbbbbbbbbbbbbbbbbbbbbbbbbbbbbbbbbbbbbbbb
b
b
b
bbbbbbbbbbbbbbbbbbbbbbbbbbbbbbbbbbbbbbbbbbb
b
b
b
bbbbbbbbbbbbbbbbbbbbbbbbbbbbbbbbbbbbbbbbbbb
b
b
b
bbbbbbbbbbbbbbbbbbbbbbbbbbbbbbbbbbbbbbbbbbb
b
b
b
bbbbbbbbbbbbbbbbbbbbbbbbbbbbbbbbbbbbbbbbbbb
b
b
b
bbbbbbbbbbbbbbbbbbbbbbbbbbbbbbbbbbbbbbbbbbb
b
b
b
bbbbbbbbbbbbbbbbbbbbbbbbbbbbbbbbbbbbbbbbbbb
b
b
b
bbbbbbbbbbbbbbbbbbbbbbbbbbbbbbbbbbbbbbbbbbb
b
b
b
bbbbbbbbbbbbbbbbbbbbbbbbbbbbbbbbbbbbbbbbbbb
b
b
b
bbbbbbbbbbbbbbbbbbbbbbbbbbbbbbbbbbbbbbbbbbb
b
b
b
bbbbbbbbbbbbbbbbbbbbbbbbbbbbbbbbbbbbbbbbbbbbb
b
ddddddddddddddddddddddddddddddddddddddddddd
d
d
d
ddddddddddddddddddddddddddddddddddddddddddd
d
d
d
ddddddddddddddddddddddddddddddddddddddddddd
d
d
d
ddddddddddddddddddddddddddddddddddddddddddd
d
d
d
ddddddddddddddddddddddddddddddddddddddddddd
d
d
d
ddddddddddddddddddddddddddddddddddddddddddd
d
d
d
ddddddddddddddddddddddddddddddddddddddddddd
d
d
d
ddddddddddddddddddddddddddddddddddddddddddd
d
d
d
ddddddddddddddddddddddddddddddddddddddddddd
d
d
d
ddddddddddddddddddddddddddddddddddddddddddd
d
d
d
ddddddddddddddddddddddddddddddddddddddddddd
d
d
d
ddddddddddddddddddddddddddddddddddddddddddd
d
d
d
ddddddddddddddddddddddddddddddddddddddddddd
d
d
d
ddddddddddddddddddddddddddddddddddddddddddd
d
d
d
ddddddddddddddddddddddddddddddddddddddddddddd
d
aaaaaaaaaaaaaaaaaaaaaaaaaaaaaaaaaaaaaaaaaaa
a
a
a
aaaaaaaaaaaaaaaaaaaaaaaaaaaaaaaaaaaaaaaaaaa
a
a
a
aaaaaaaaaaaaaaaaaaaaaaaaaaaaaaaaaaaaaaaaaaa
a
a
a
aaaaaaaaaaaaaaaaaaaaaaaaaaaaaaaaaaaaaaaaaaa
a
a
a
aaaaaaaaaaaaaaaaaaaaaaaaaaaaaaaaaaaaaaaaaaa
a
a
a
aaaaaaaaaaaaaaaaaaaaaaaaaaaaaaaaaaaaaaaaaaa
a
a
a
aaaaaaaaaaaaaaaaaaaaaaaaaaaaaaaaaaaaaaaaaaa
a
a
a
aaaaaaaaaaaaaaaaaaaaaaaaaaaaaaaaaaaaaaaaaaa
a
a
a
aaaaaaaaaaaaaaaaaaaaaaaaaaaaaaaaaaaaaaaaaaa
a
a
a
aaaaaaaaaaaaaaaaaaaaaaaaaaaaaaaaaaaaaaaaaaa
a
a
a
aaaaaaaaaaaaaaaaaaaaaaaaaaaaaaaaaaaaaaaaaaa
a
a
a
aaaaaaaaaaaaaaaaaaaaaaaaaaaaaaaaaaaaaaaaaaa
a
a
a
aaaaaaaaaaaaaaaaaaaaaaaaaaaaaaaaaaaaaaaaaaa
a
a
a
aaaaaaaaaaaaaaaaaaaaaaaaaaaaaaaaaaaaaaaaaaa
a
a
a
aaaaaaaaaaaaaaaaaaaaaaaaaaaaaaaaaaaaaaaaaaaaa
a
ccccccccccccccccccccccccccccccccccccccccccc
c
c
c
ccccccccccccccccccccccccccccccccccccccccccc
c
c
c
ccccccccccccccccccccccccccccccccccccccccccc
c
c
c
ccccccccccccccccccccccccccccccccccccccccccc
c
c
c
ccccccccccccccccccccccccccccccccccccccccccc
c
c
c
ccccccccccccccccccccccccccccccccccccccccccc
c
c
c
ccccccccccccccccccccccccccccccccccccccccccc
c
c
c
ccccccccccccccccccccccccccccccccccccccccccc
c
c
c
ccccccccccccccccccccccccccccccccccccccccccc
c
c
c
ccccccccccccccccccccccccccccccccccccccccccc
c
c
c
ccccccccccccccccccccccccccccccccccccccccccc
c
c
c
ccccccccccccccccccccccccccccccccccccccccccc
c
c
c
ccccccccccccccccccccccccccccccccccccccccccc
c
c
c
ccccccccccccccccccccccccccccccccccccccccccc
c
c
c
ccccccccccccccccccccccccccccccccccccccccccccc
c
Page 2

Contents
Features................................................................1
Control locations .................................................2
Display information .............................................6
Installing batteries ...............................................7
Battery replacement ............................................9
Low battery warnings ........................................10
Using the AC adaptor ........................................12
Setting the clock ................................................13
Setting dual time ................................................15
Zero seconds set ...............................................1 9
Waveband selection ..........................................20
Tuning .................................................................23
Direct tuning.......................................................25
Manual tuning ....................................................29
Scan tuning ........................................................31
Memory tuning...................................................34
Recalling a station from preset memory..........38
Cancelling a preset station ...............................39
Changing preset station order..........................40
ATS (Auto Tuning System)................................42
Memory scan......................................................45
Setting the alarm................................................46
Setting the radio alarm (Standby) ....................47
Setting the HWS alarm ......................................50
Setting the count down timer ...........................51
Setting the sleep timer ......................................55
Mono/Stereo and DX/Local Switch ...................57
Headphones .......................................................5 8
Lock switch and light ........................................59
Portable shortwave aerial .................................60
MW step size switch ..........................................60
Troubleshooting/Reset button..........................61
Care and maintenance.......................................62
Specifications ....................................................63
Page 3

If you need any further advice, please call our Technical Helpline on :0181 758 0338 (Mon-Fri)
1
Continuous gap free tuning of LW, MW and SW
bands
Large easy to read Liquid crystal display (LCD) show-
ing station frequency , dual time, memory location and
function status.
Direct frequency entry by keypad allowing instant ac-
cess to any station.
Fifty four memory presets offer instant access to your
favourite stations on L W , MW , FM and SW .
Dual time facility allows you to preset your local time
or UTC time, or any two time zones with instant recall.
Scanning circuit allows you to search for active sta-
tions.
Cancel button allows you to instantly change incor-
rect information keyed into the microprocessor.
SW metre buttons offer instant selection of any de-
sired SW band.
Dual Alarm Feature allows presetting of two alarm
wake-up times.
A TS (Auto T uning System) which will automatically
scan LW, MW, and SW frequencies selecting presets based on station signal strength.
Adjustable sleep timer allows you to fall asleep to
music.
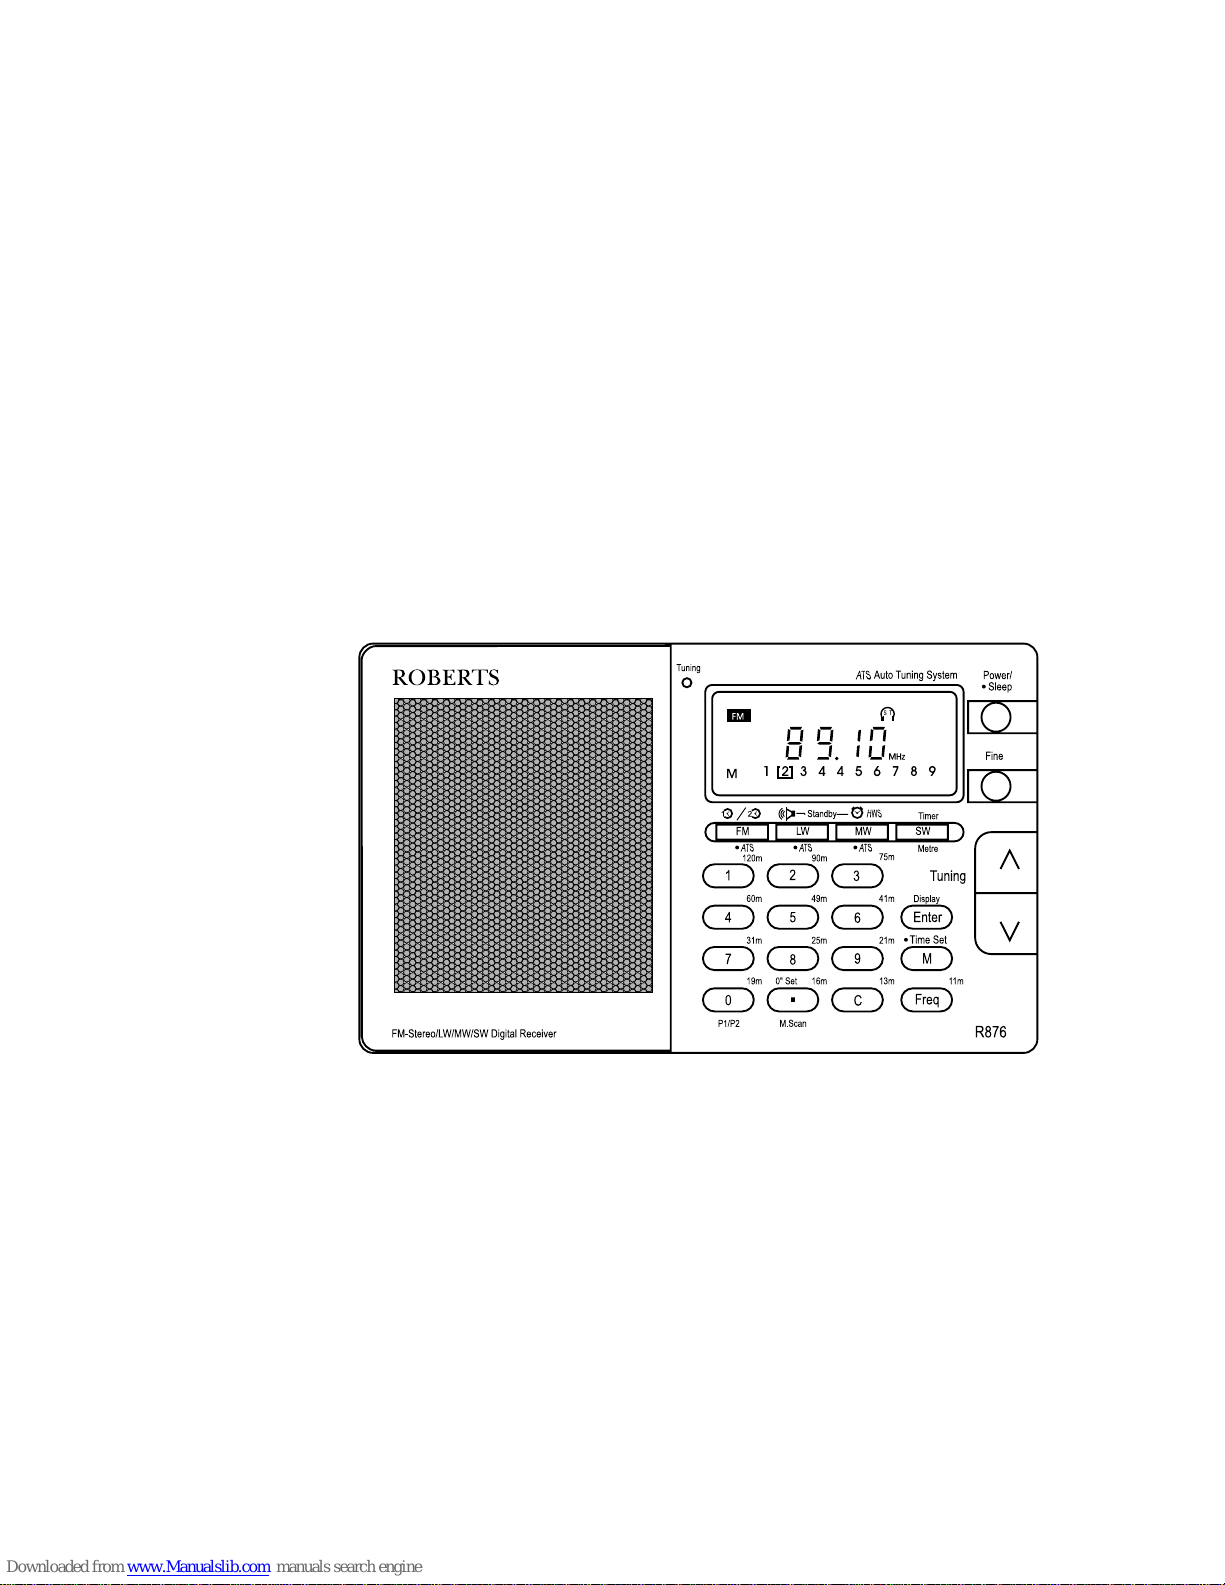
Features
Page 4

2
1. Power on/off and sleep button.
2. Fine tune button.
3. Manual/auto scan tuning buttons.
4. Enter and display button.
5. Memory and time set button.
6. Frequency select button.
7. Cancel button.
8. Decimal point and zero set button.
9. 0 digit, P1/P2 memory and SW metre button.
10. FM band, FM A TS and real/dual time button.
11. LW band, L W ATS and radio standby button.
12. MW band, MW ATS and HWS standby button.
13. SW band, SW metre band and count down timer
button.
14. Liquid crystal display .
15. Light button (on top).
16. Tuning indicator .
Control locations
Page 5
If you need any further advice, please call our Technical Helpline on :0181 758 0338 (Mon-Fri)
3
10 1 1 12 13 14 15
1
2
3
4
5
6
16
789
Page 6
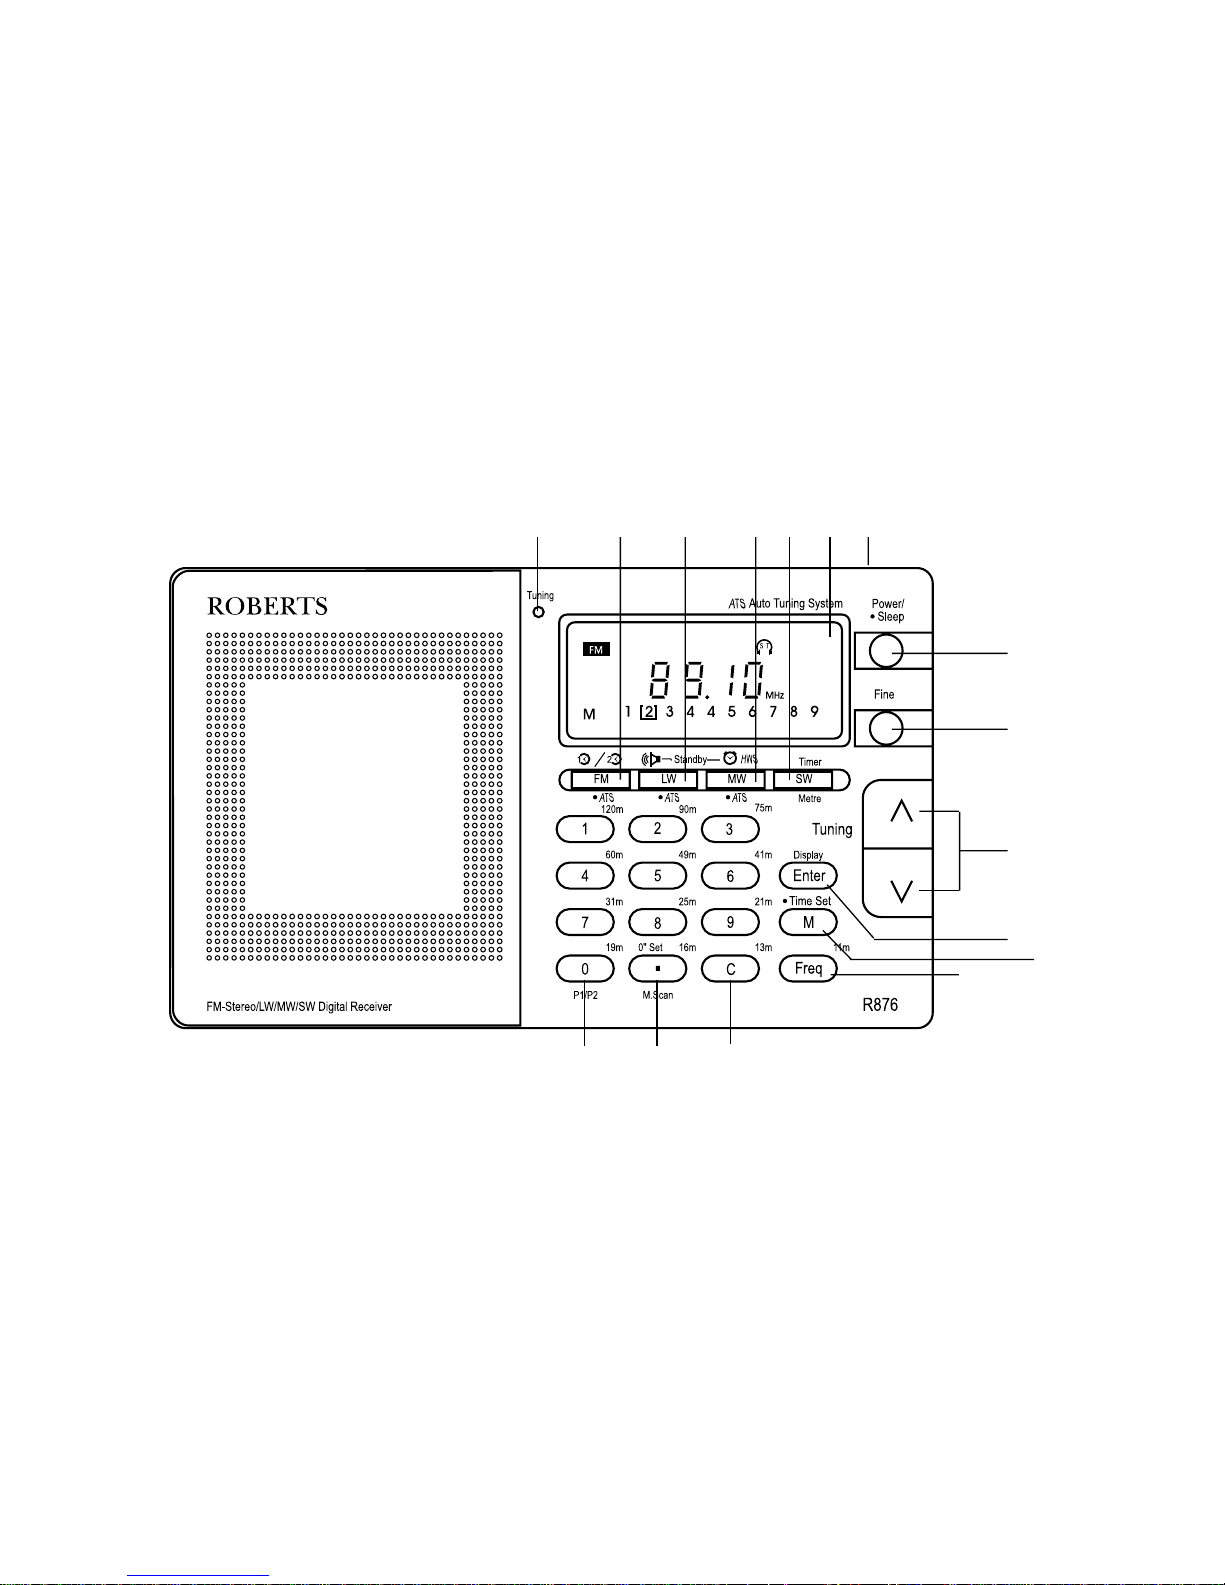
17. Earphone socket.
18. DC input socket.
19. AM external aerial socket.
20. FM Mono/stereo and AM DX/Local switch.
21. Telescopic aerial.
22. Volume control.
23. Lock switch.
24. Folding stand.
21
4
19
17
18
24
22
23
20
Page 7
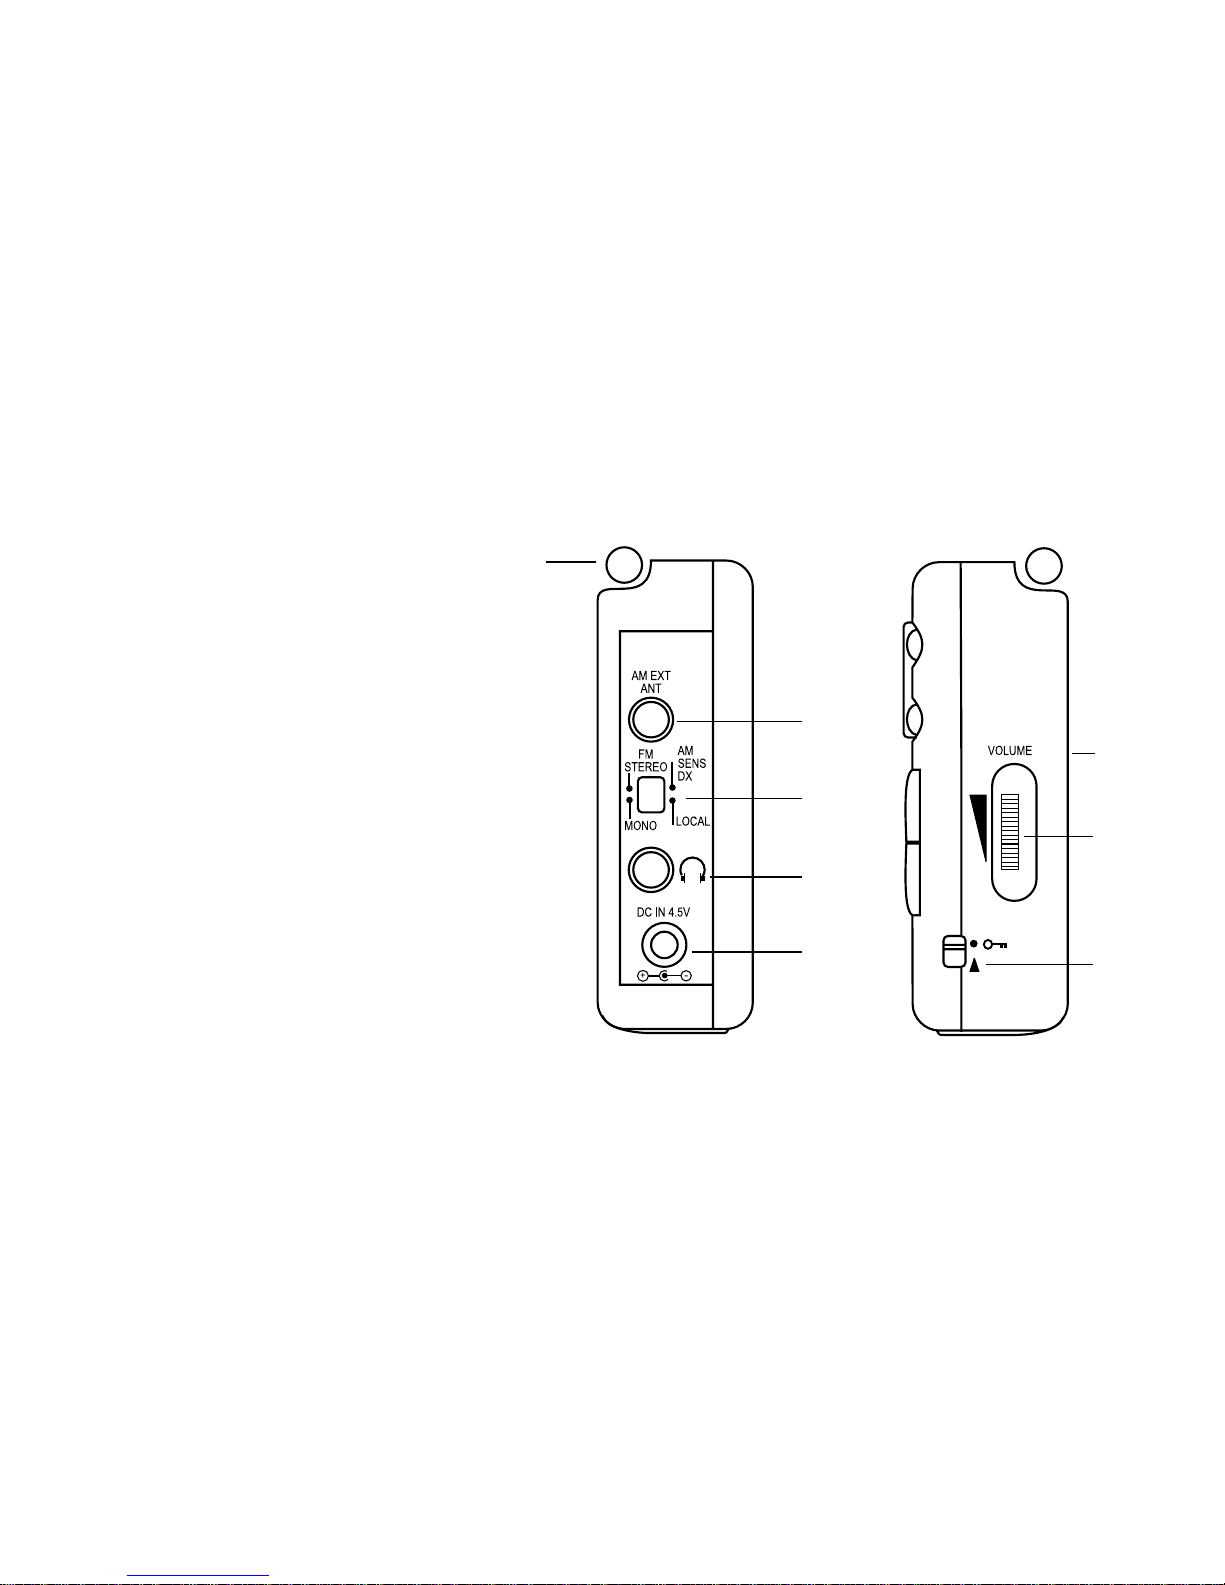
If you need any further advice, please call our Technical Helpline on :0181 758 0338 (Mon-Fri)
26 25 27
28
25. Reset button.
26. 9/10kHz MW step switch.
27. Battery compartment.
28. Battery cover.
5
Page 8
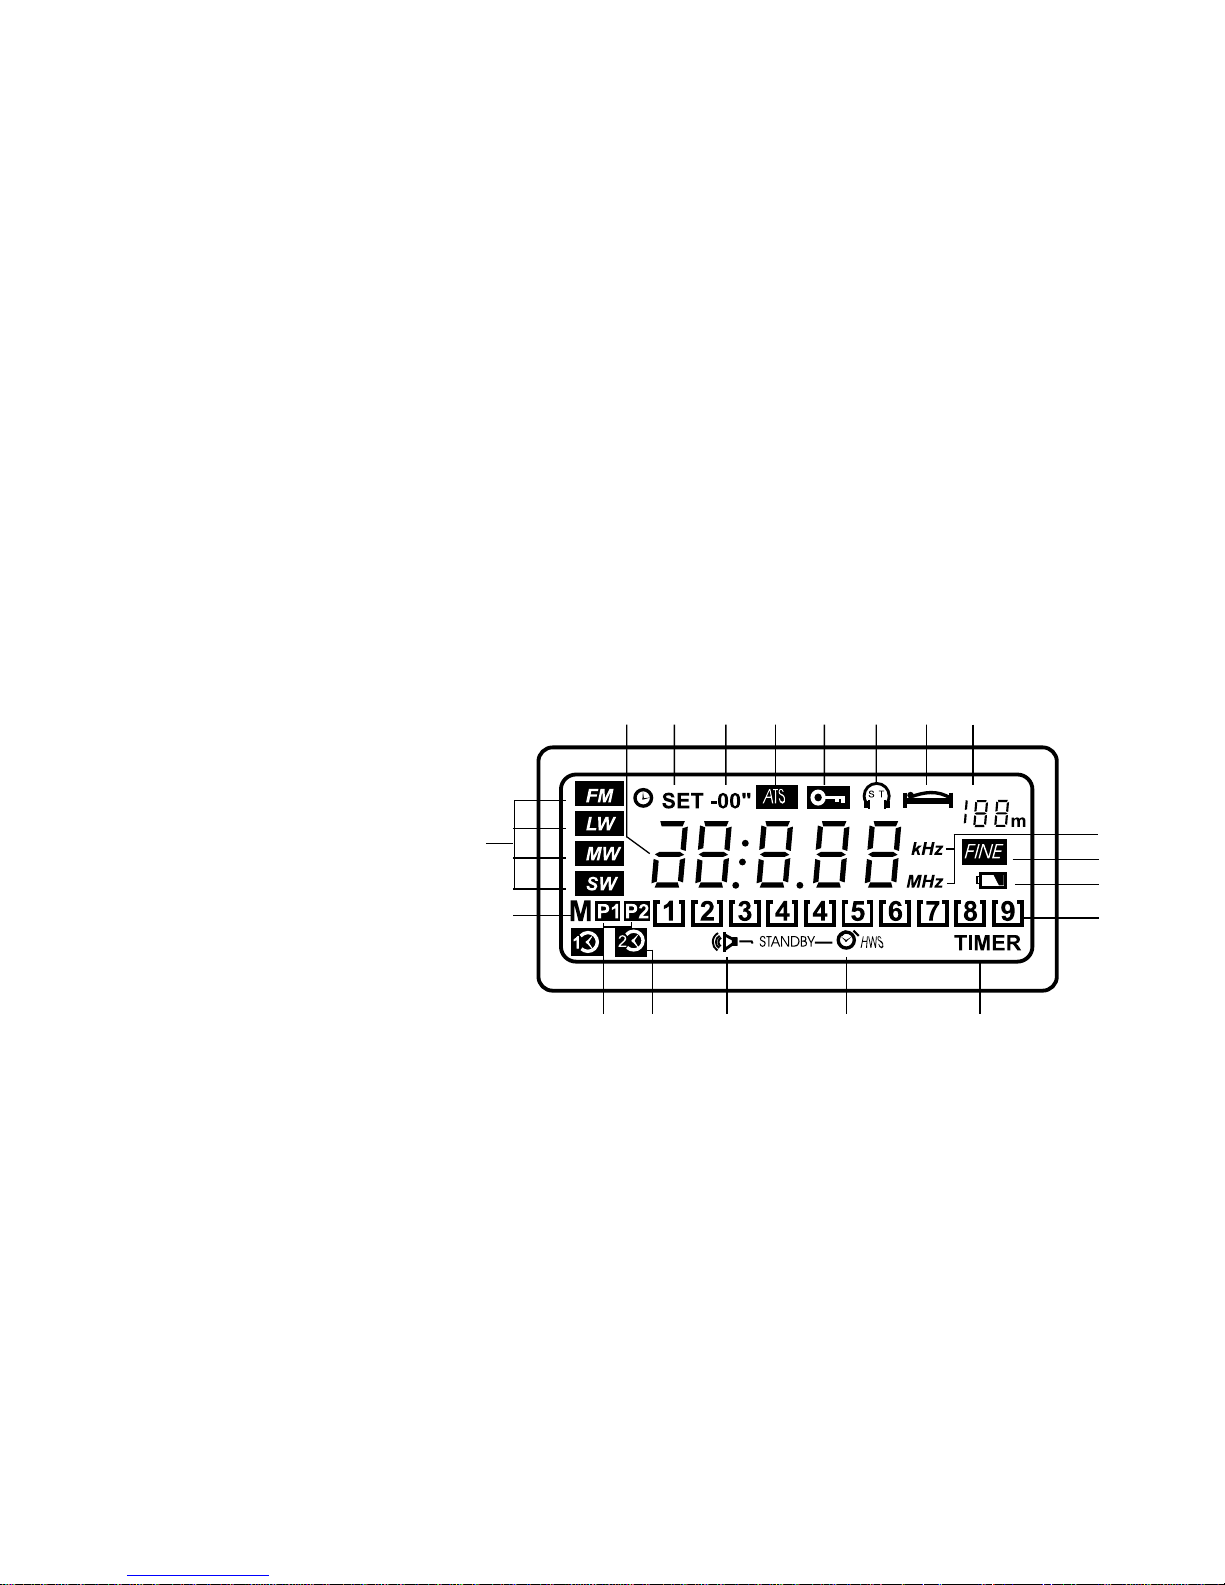
1. W aveband indicators.
2. T ime set status.
3. Zero second set indication.
4. Memory indicator .
5. Memory page indicator .
6. Lock switch indicator .
7. FM stereo indicator .
8. Sleep function indicator .
9. SW metre band indicator .
10. Auto Tuning System indicator.
1 1. Low battery indicator.
12. Frequency units indicator.
13. Frequency and time display
14. Dual time indicator.
15. Radio standby indicator .
16. HWS standby indicator.
17. Count down timer indicator.
18. Memory preset, battery strength and A TS
scanning indicator.
19. Fine tune indicator .
Display information
367913 2 8
4
171615145
6
12
19
11
18
1
10
Page 9
If you need any further advice, please call our Technical Helpline on :0181 758 0338 (Mon-Fri)
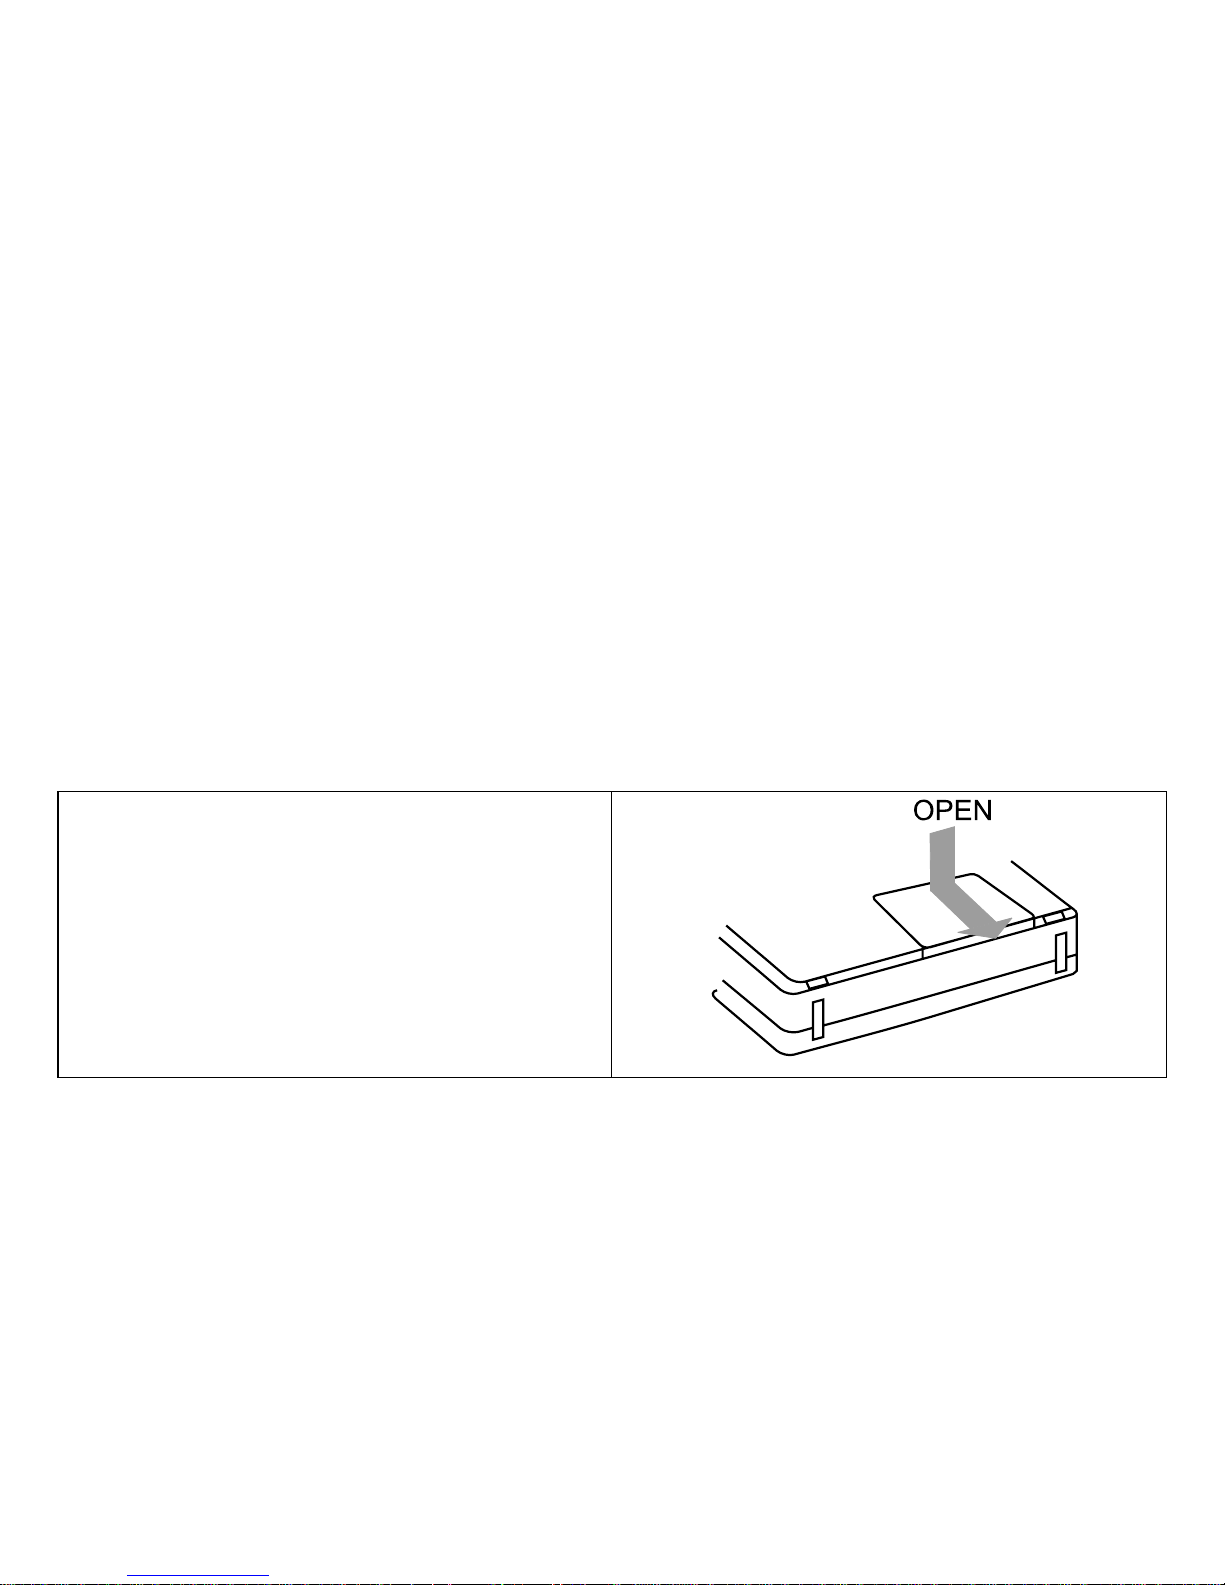
1. Position the radio face down.
2. Press the catch marked "OPEN" and slide in the
direction shown.
7
This radio can be operated using:3 Alkaline LR6 (AA size) batteries.
AC adaptor (supplied).
Installing batteries
Page 10

8
3. Insert the 3 LR6 (AA) size batteries as shown in the
diagram.
4. Replace the battery cover as shown in the diagram.
Page 11

If you need any further advice, please call our Technical Helpline on :0181 758 0338 (Mon-Fri)
9
The battery indicator will display the battery condition for
approx. 7 seconds after the radio is switched off. If the
indicator falls below "2" the batteries should be replaced.
After removing the batteries you have approximately 3
minutes to replace the batteries after which clock and
memory information will be lost.
Battery replacement
Page 12
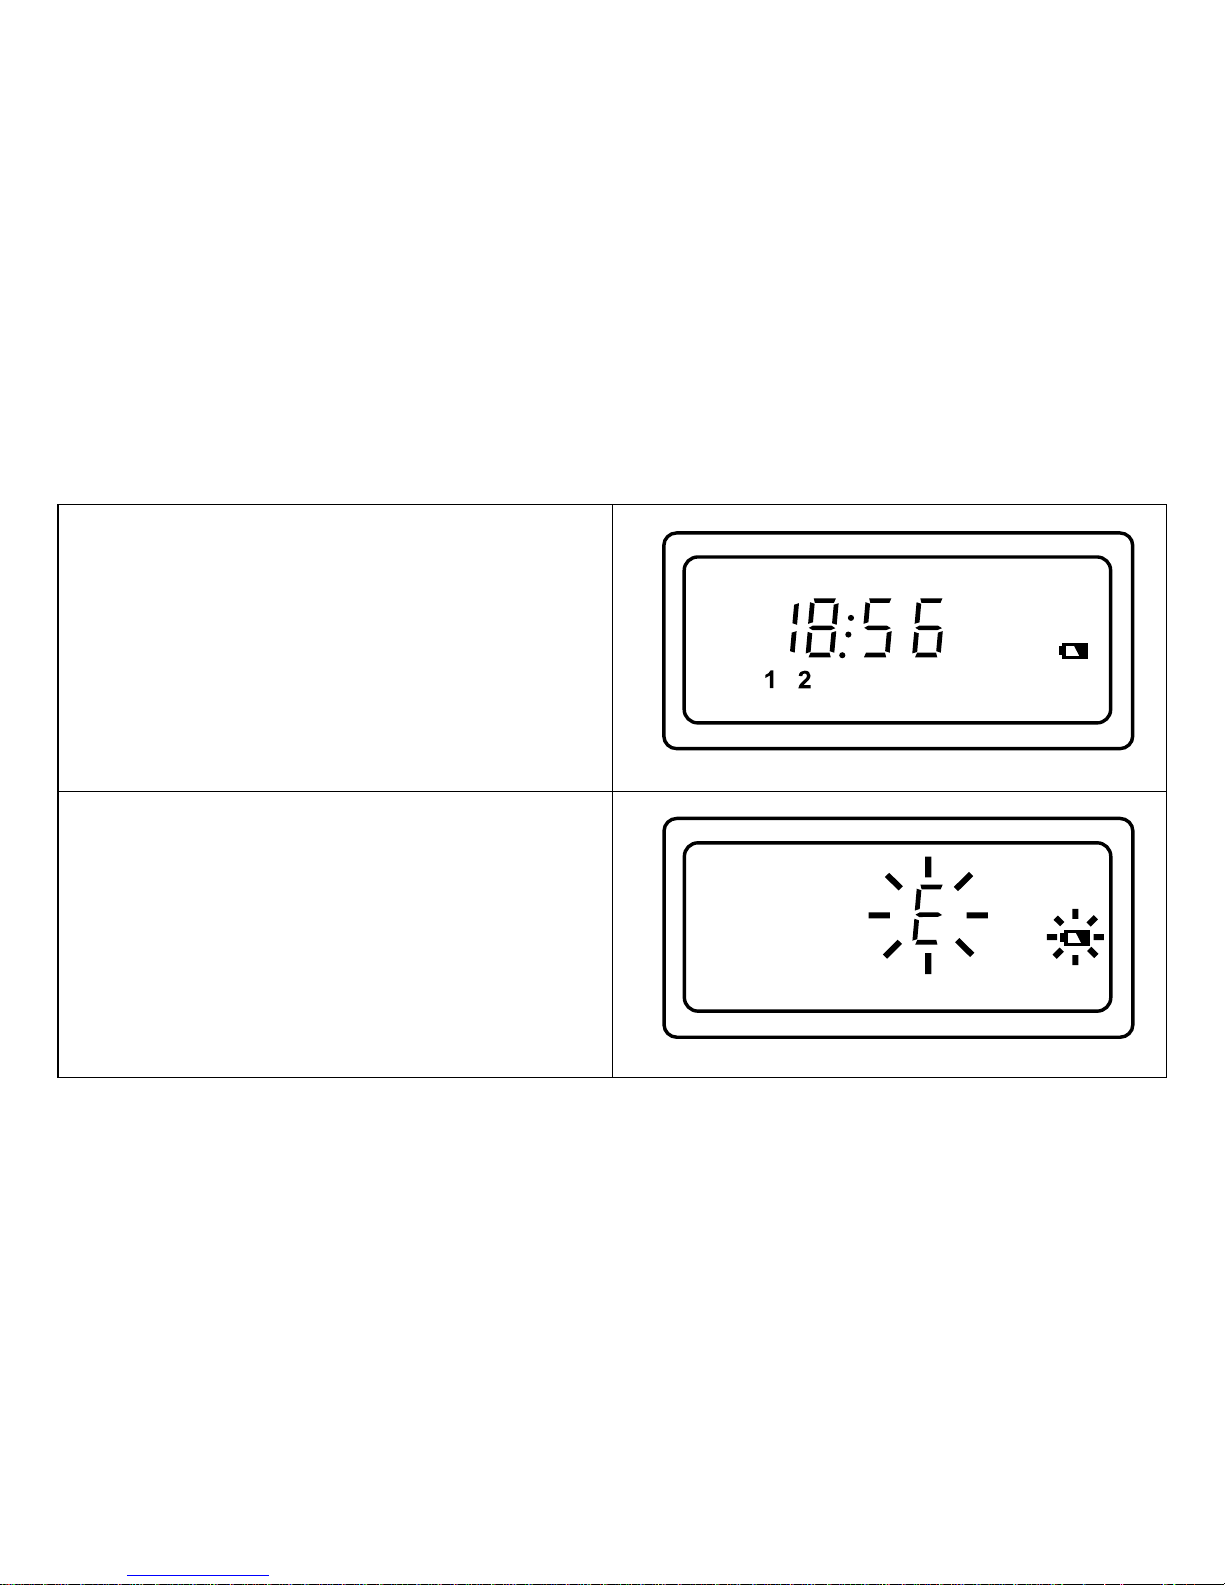
10
1. Replace batteries if the battery indicator falls below
"2"
2. Replace batteries if "E" and the low battery indicator
flash in the display .
Low battery warnings
Page 13
If you need any further advice, please call our Technical Helpline on :0181 758 0338 (Mon-Fri)
11
3. Whenever the low battery symbol appears on the
display the batteries should be replaced.
Page 14
12
The AC adaptor supplied with this radio is an auto-switching type and will operate from either a 1 10volt or 230volt
AC supply .
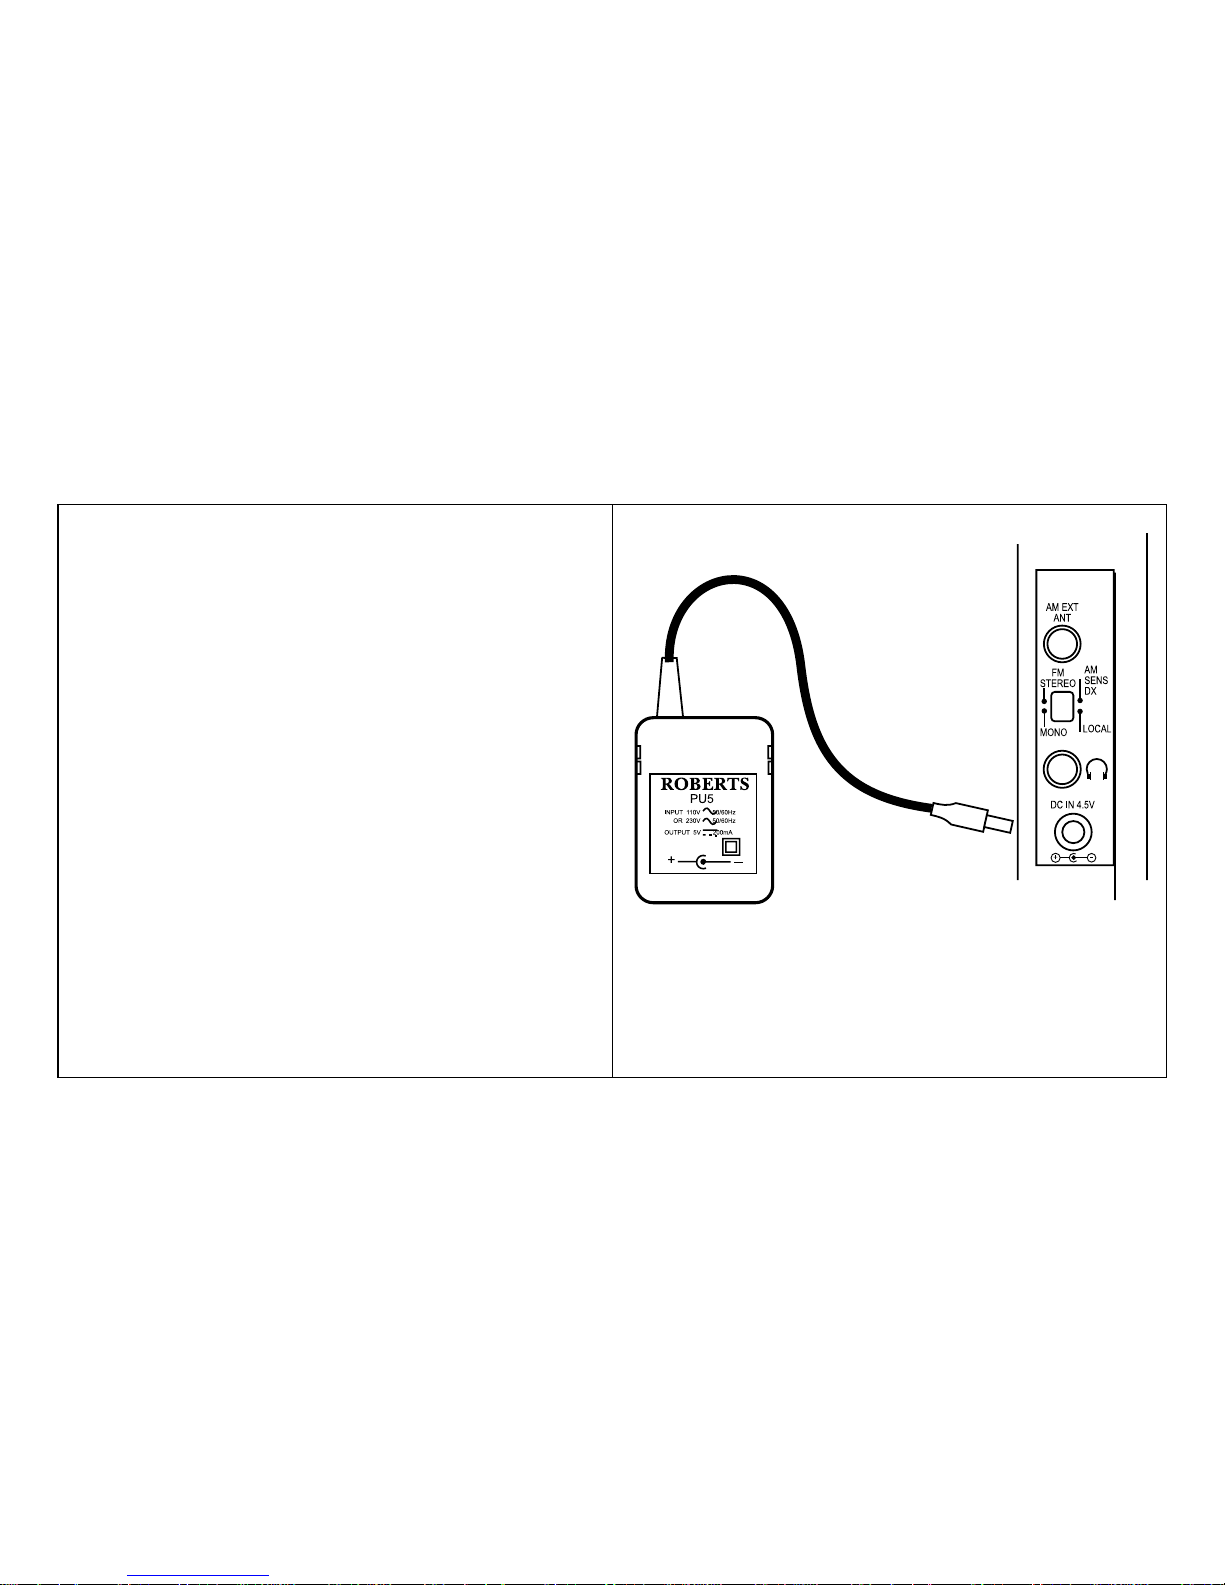
Insert the adaptor plug into the socket marked DC IN 4.5V
on the left side of the radio. Plug the adaptor into a standard 13A mains socket outlet. Whenever the adaptor is used
the batteries are automatically disconnected.
The mains adaptor should be disconnected from the mains
supply when not in use.
We would recommend for economy that the R876 be
used via the AC adaptor wherever possible with battery operation for occasional or stand-by use only .
Using the AC adaptor
Page 15
If you need any further advice, please call our Technical Helpline on :0181 758 0338 (Mon-Fri)
13
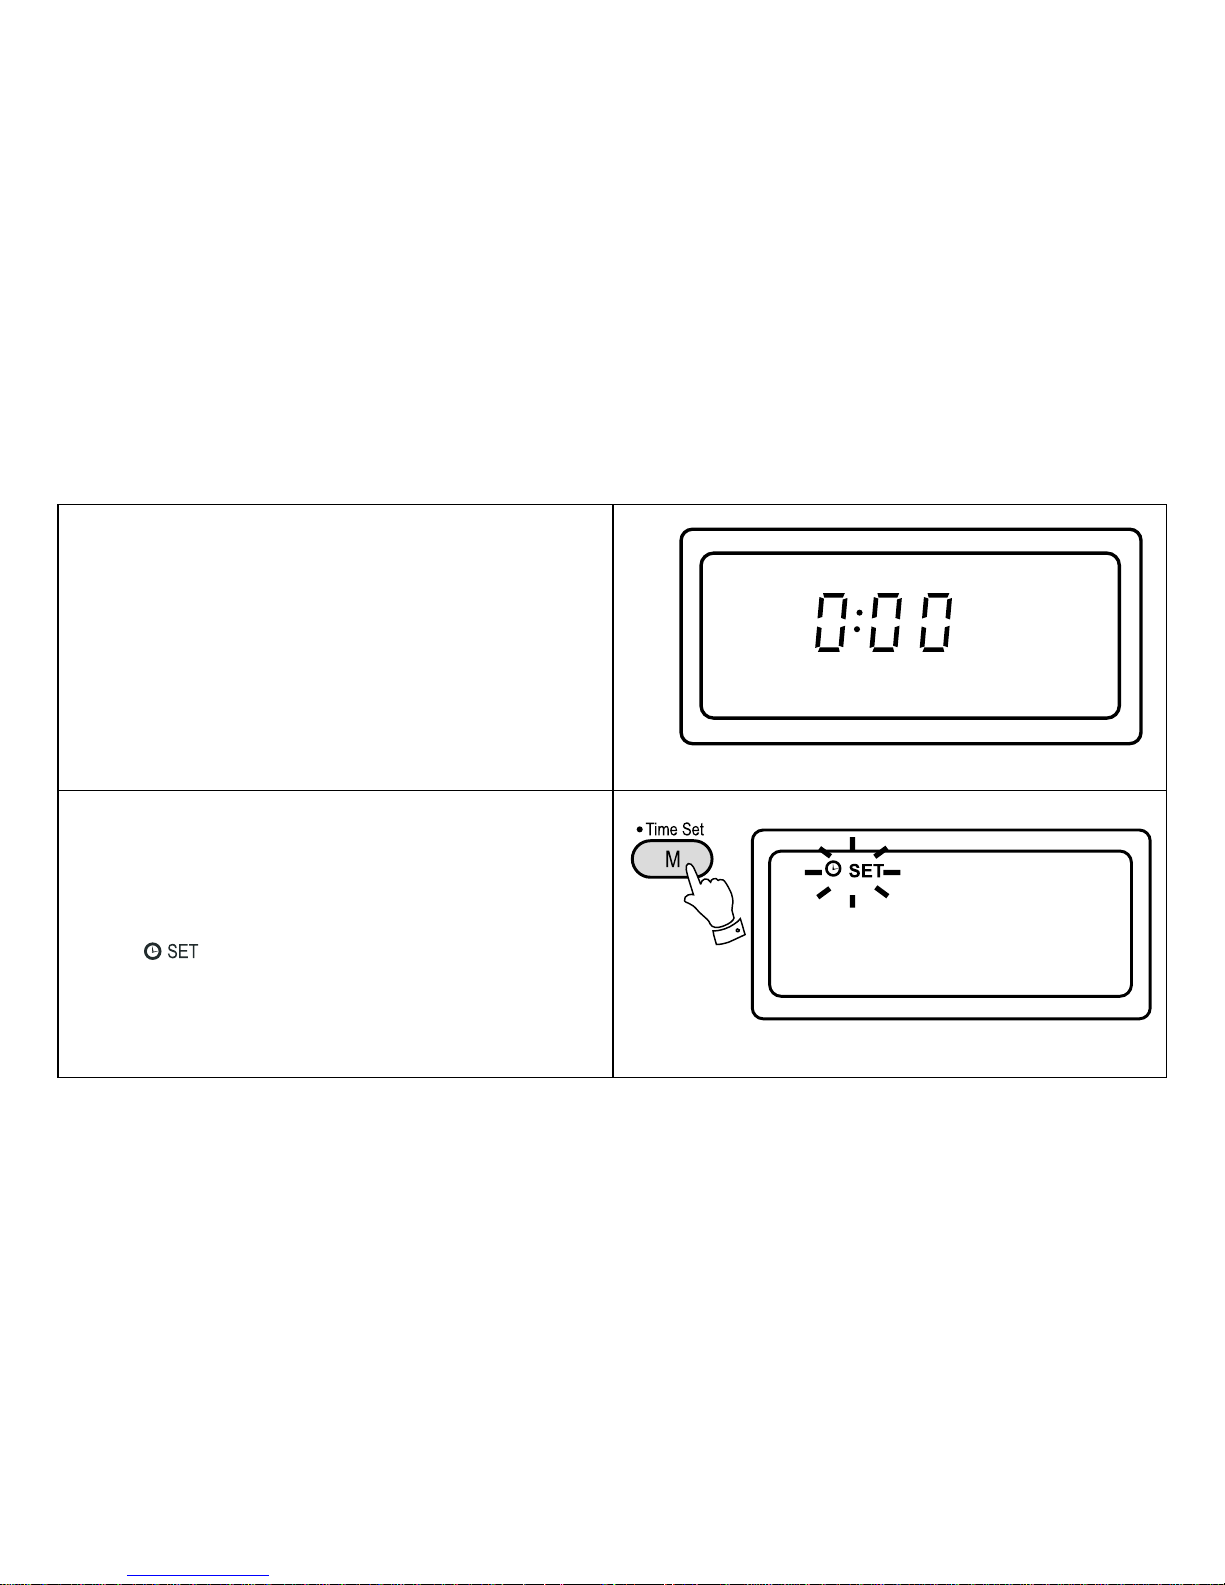
The clock will start running when the 3 LR6 (AA) size
batteries are installed. The display will show "0:00".
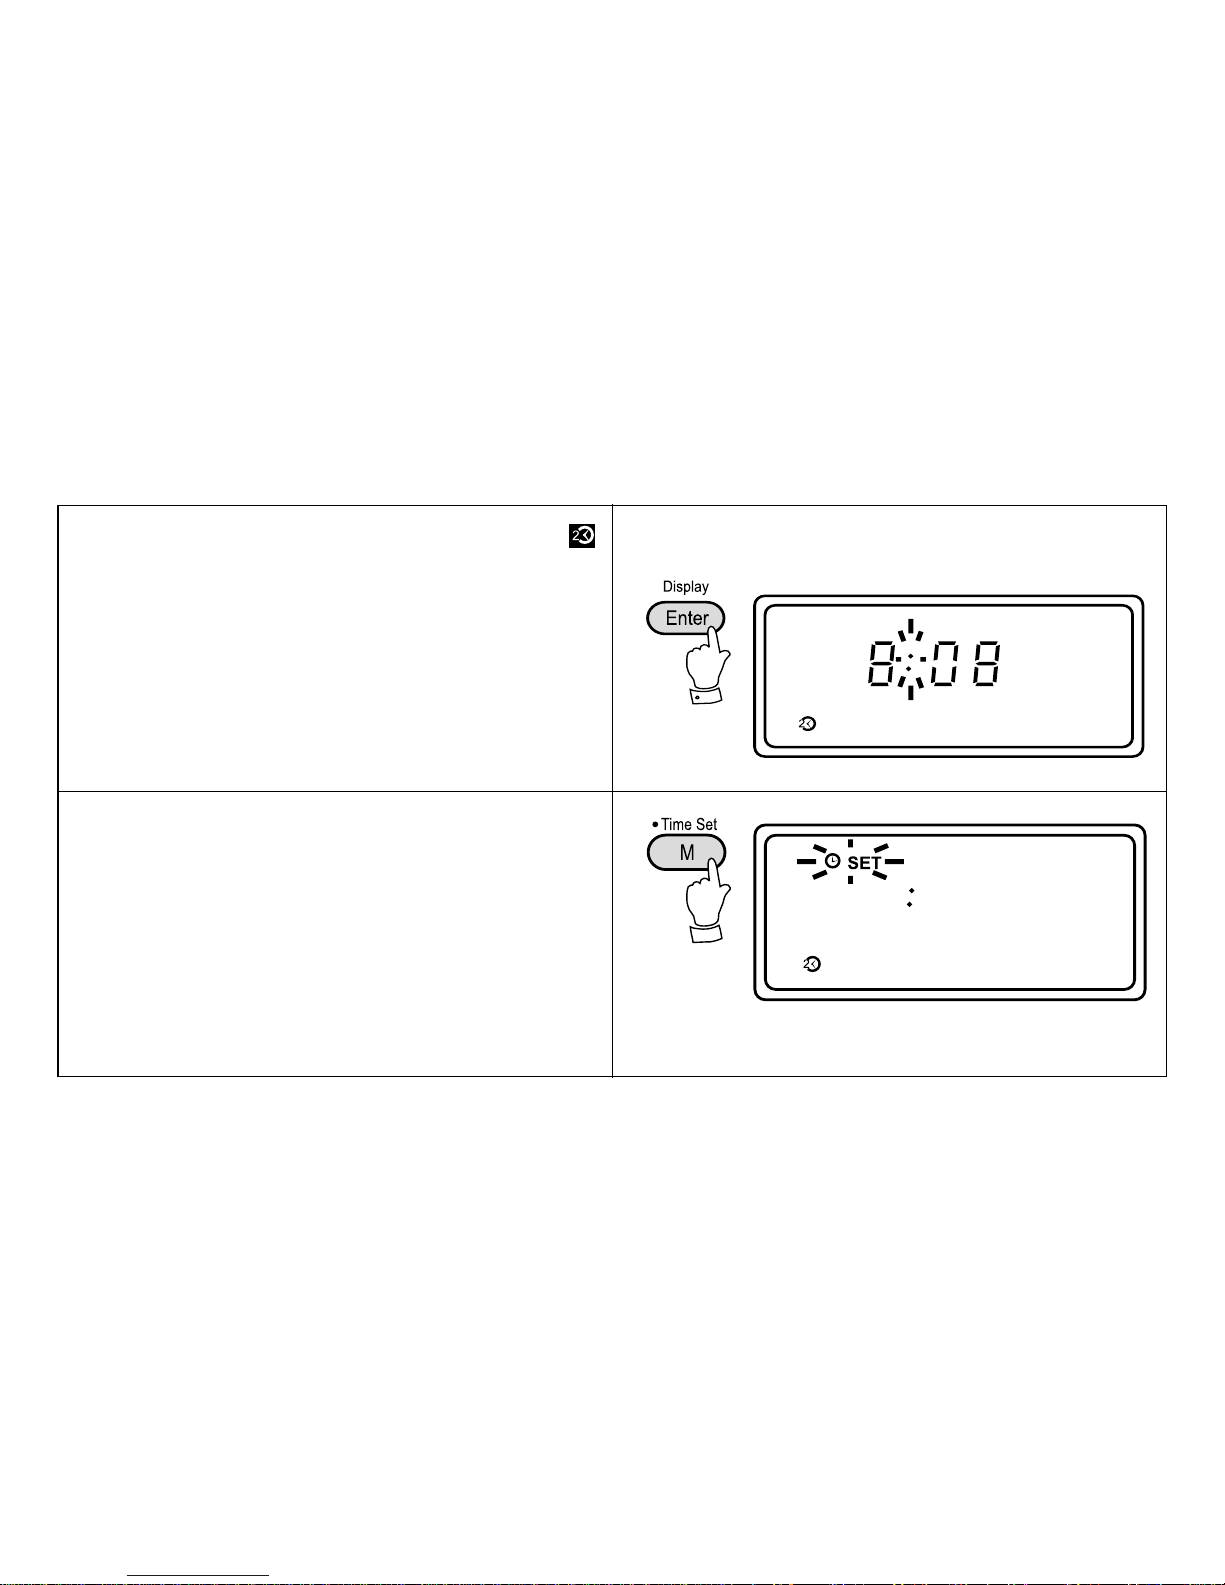
The clock can be set with the radio power on or off.
1. If the radio is switched on press the "Display" button to
display the time.
2. Press the "Time Set" button for more than 2 seconds,
the " " symbol will flash in the display
Setting the clock
Page 16
14
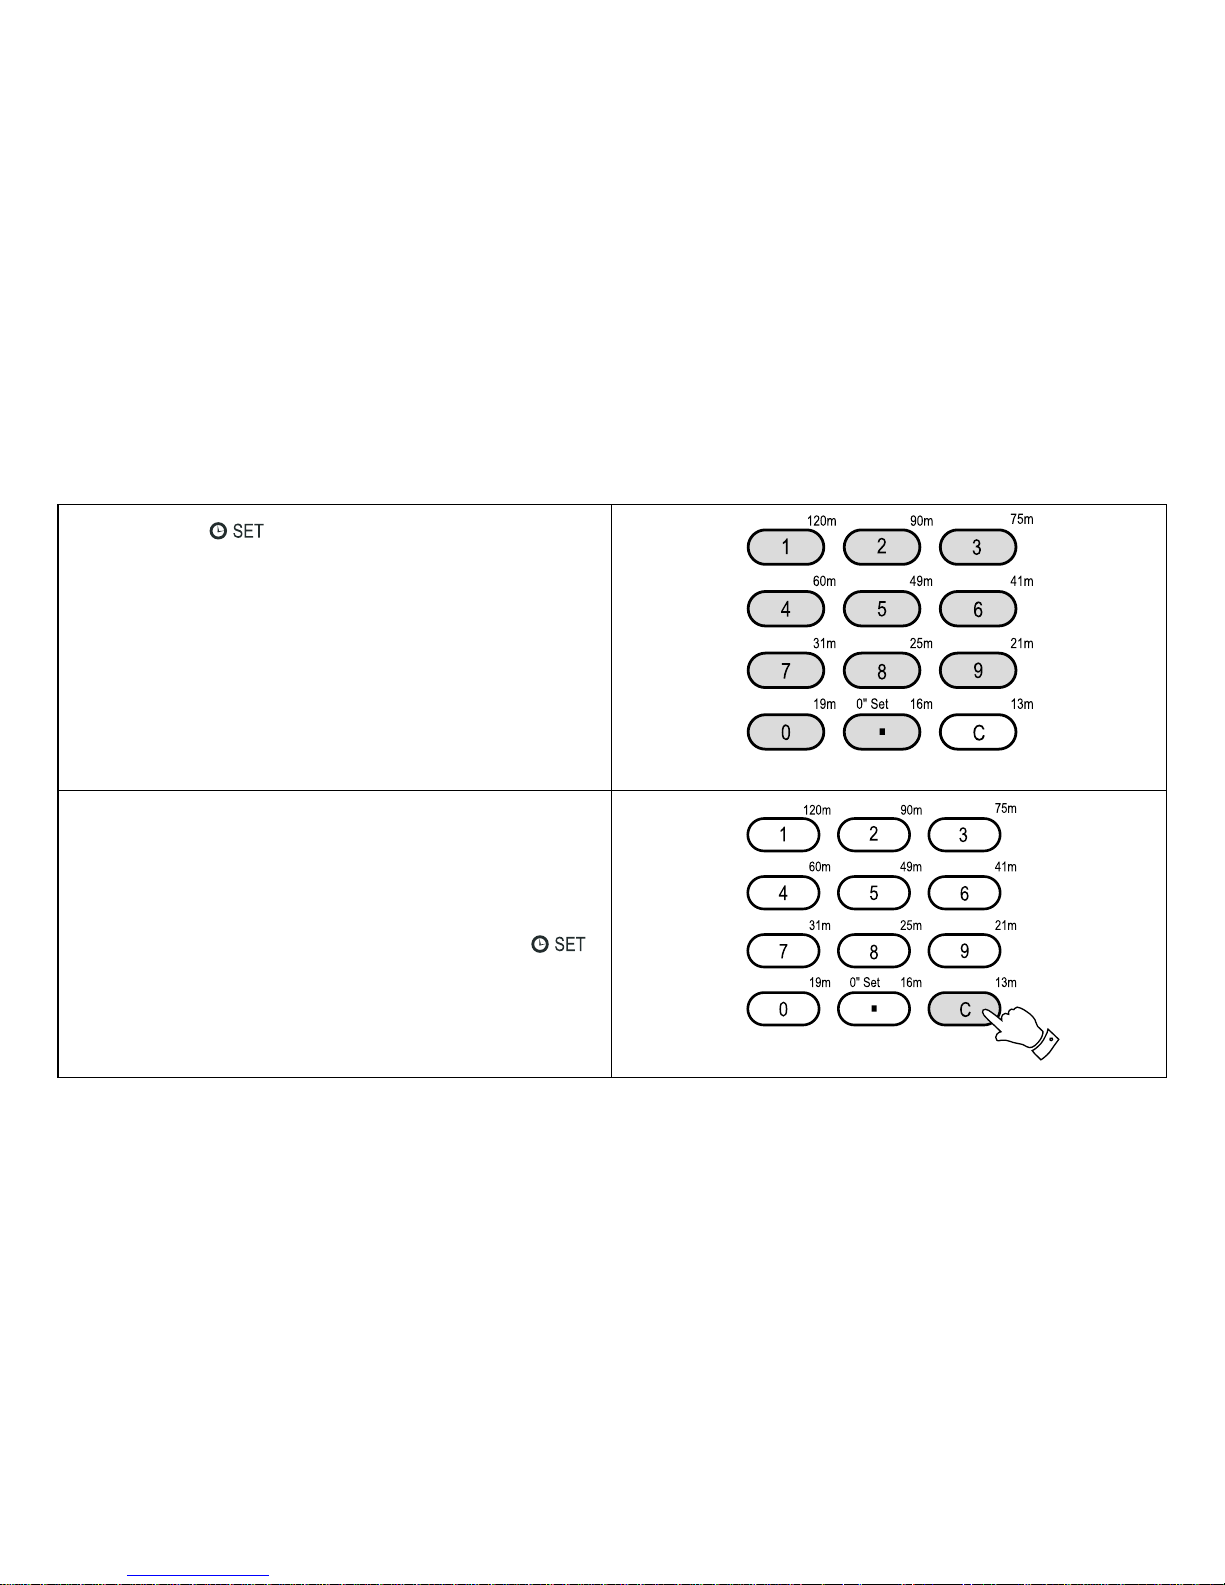
3. Whilst the " " symbol is flashing, set the correct
time by pressing the numbered buttons. As you press
each button the corresponding number will show on the
display.
Note: Time can only be adjusted whilst the " "
symbol is flashing in the display .
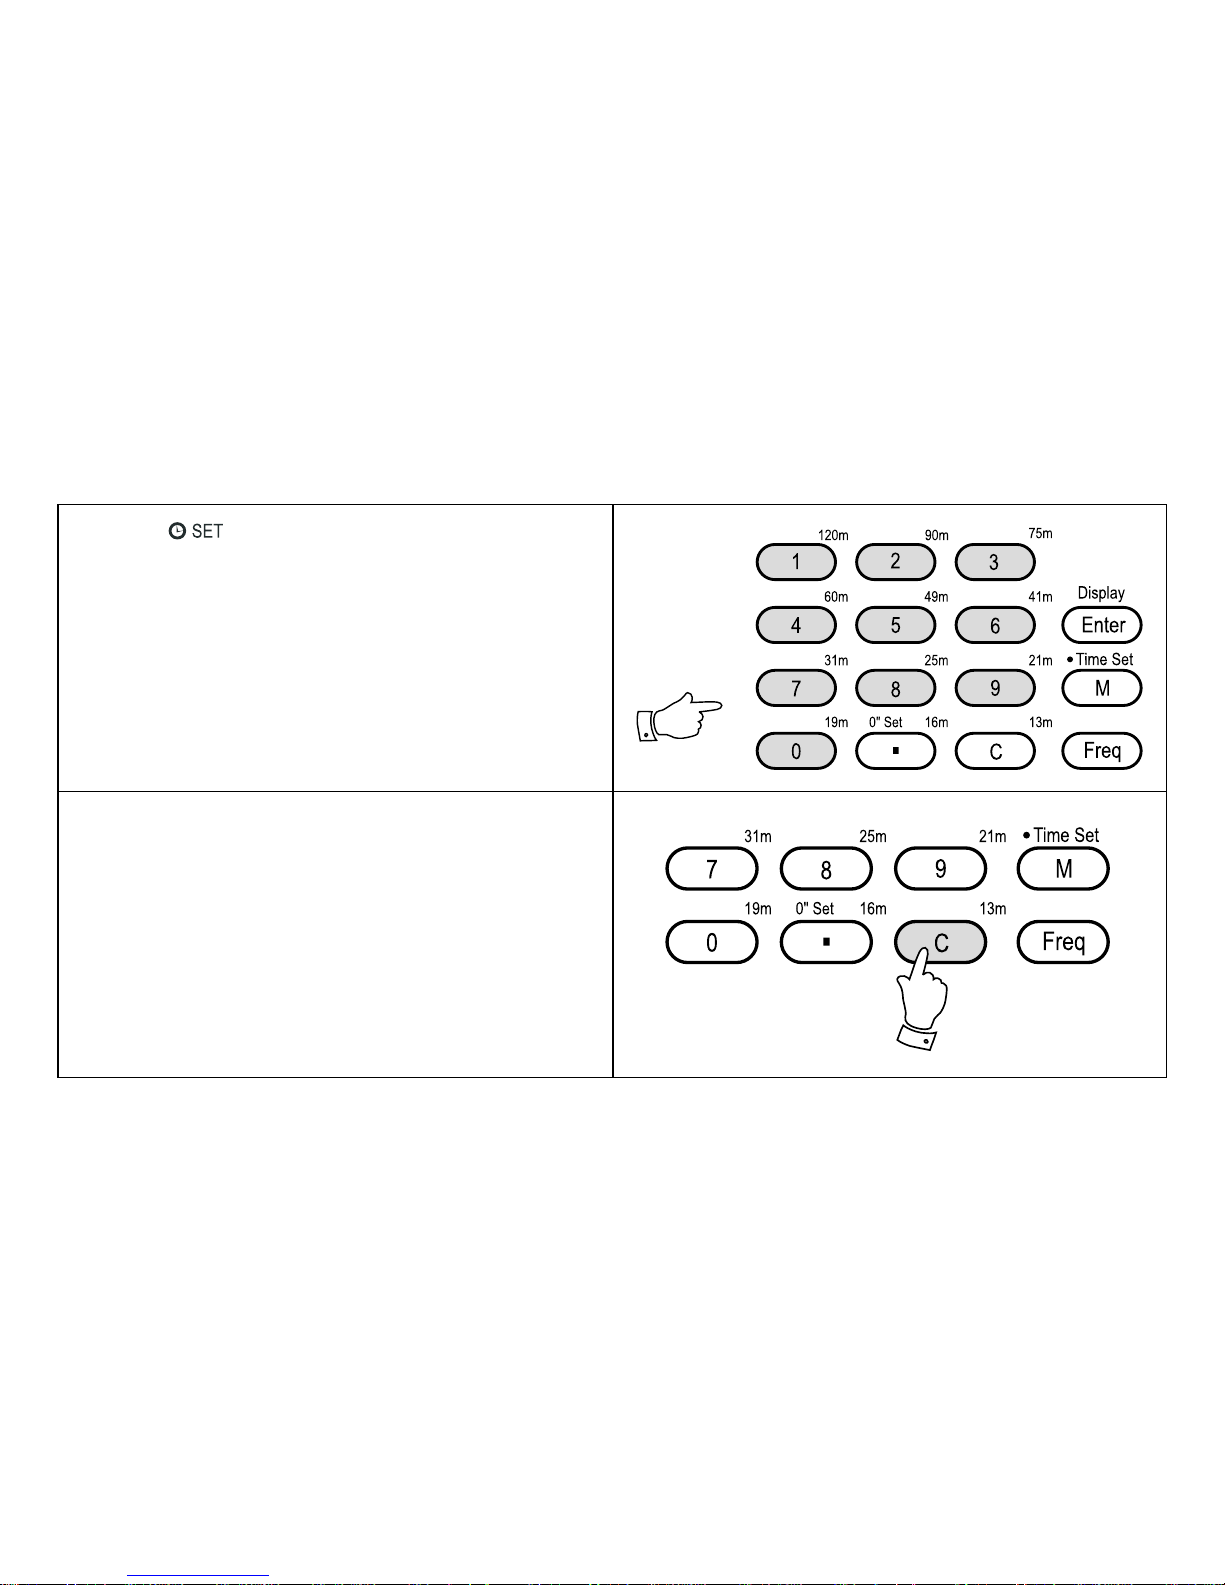
4. If you press the wrong number, press the "C" (cancel)
button which will delete one number at a time.
Page 17
If you need any further advice, please call our Technical Helpline on :0181 758 0338 (Mon-Fri)
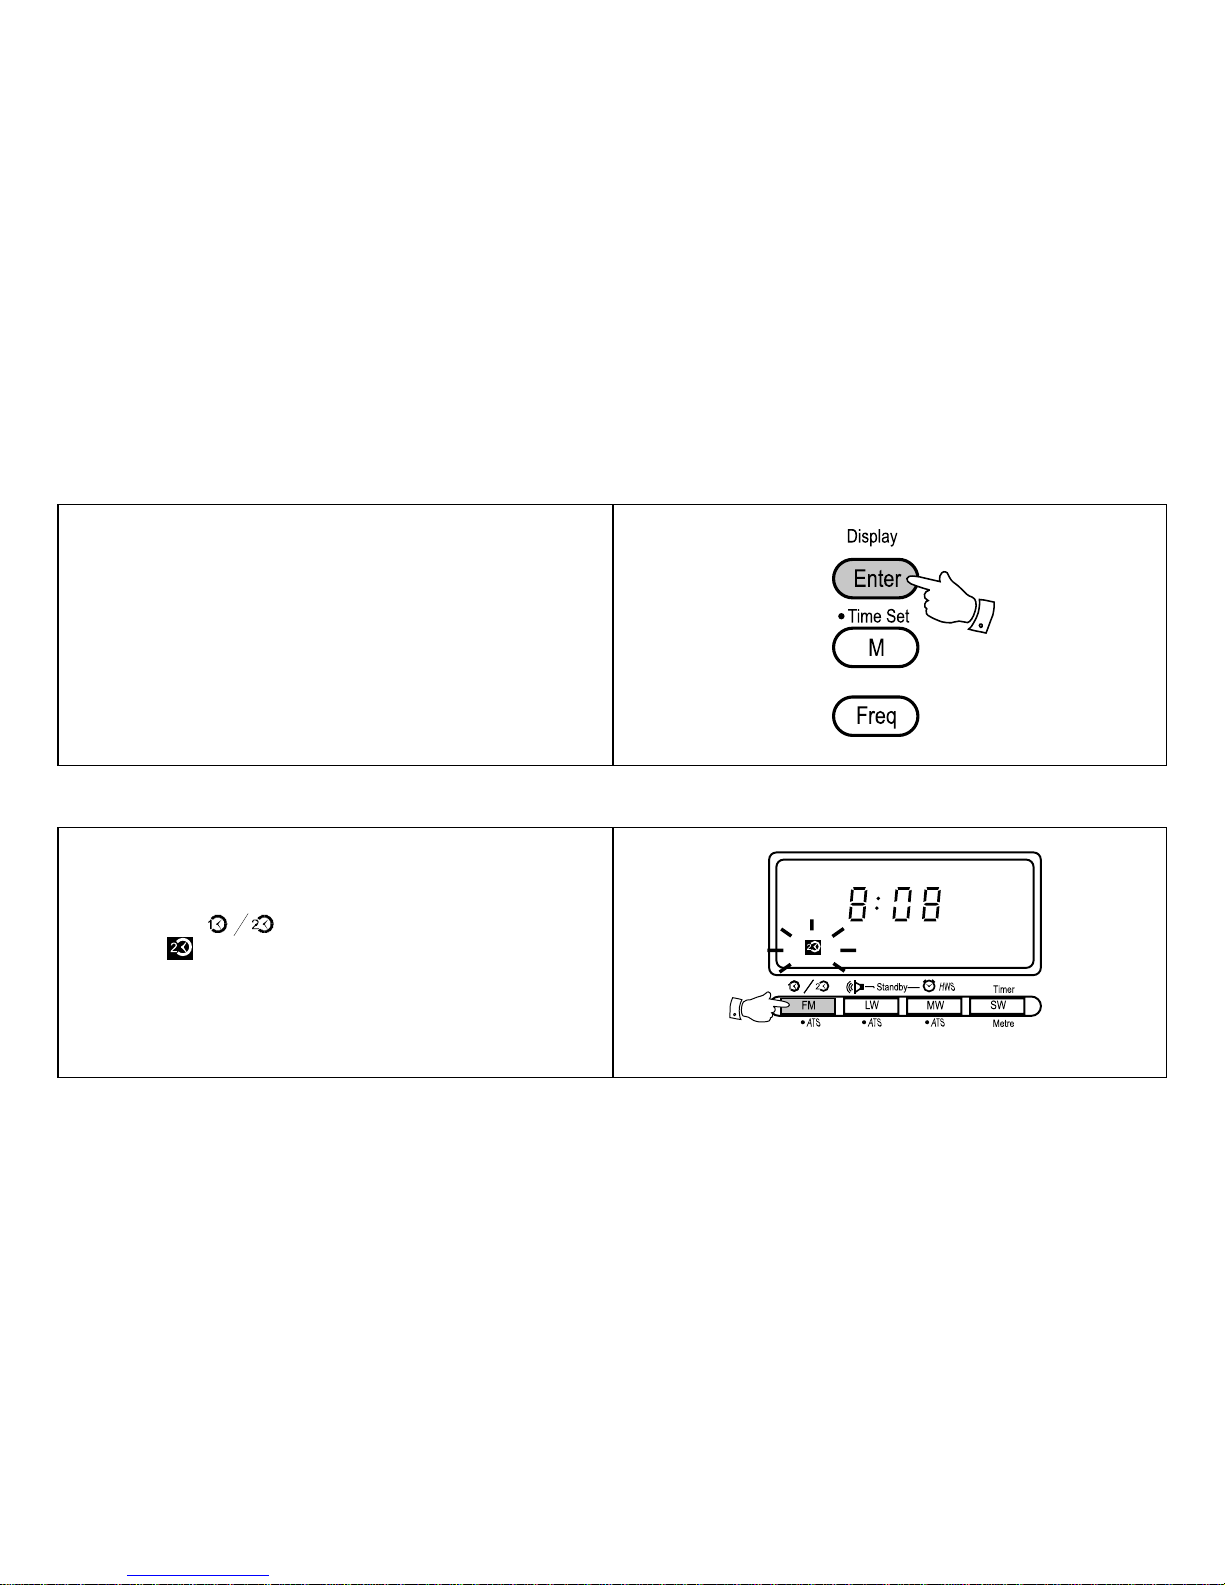
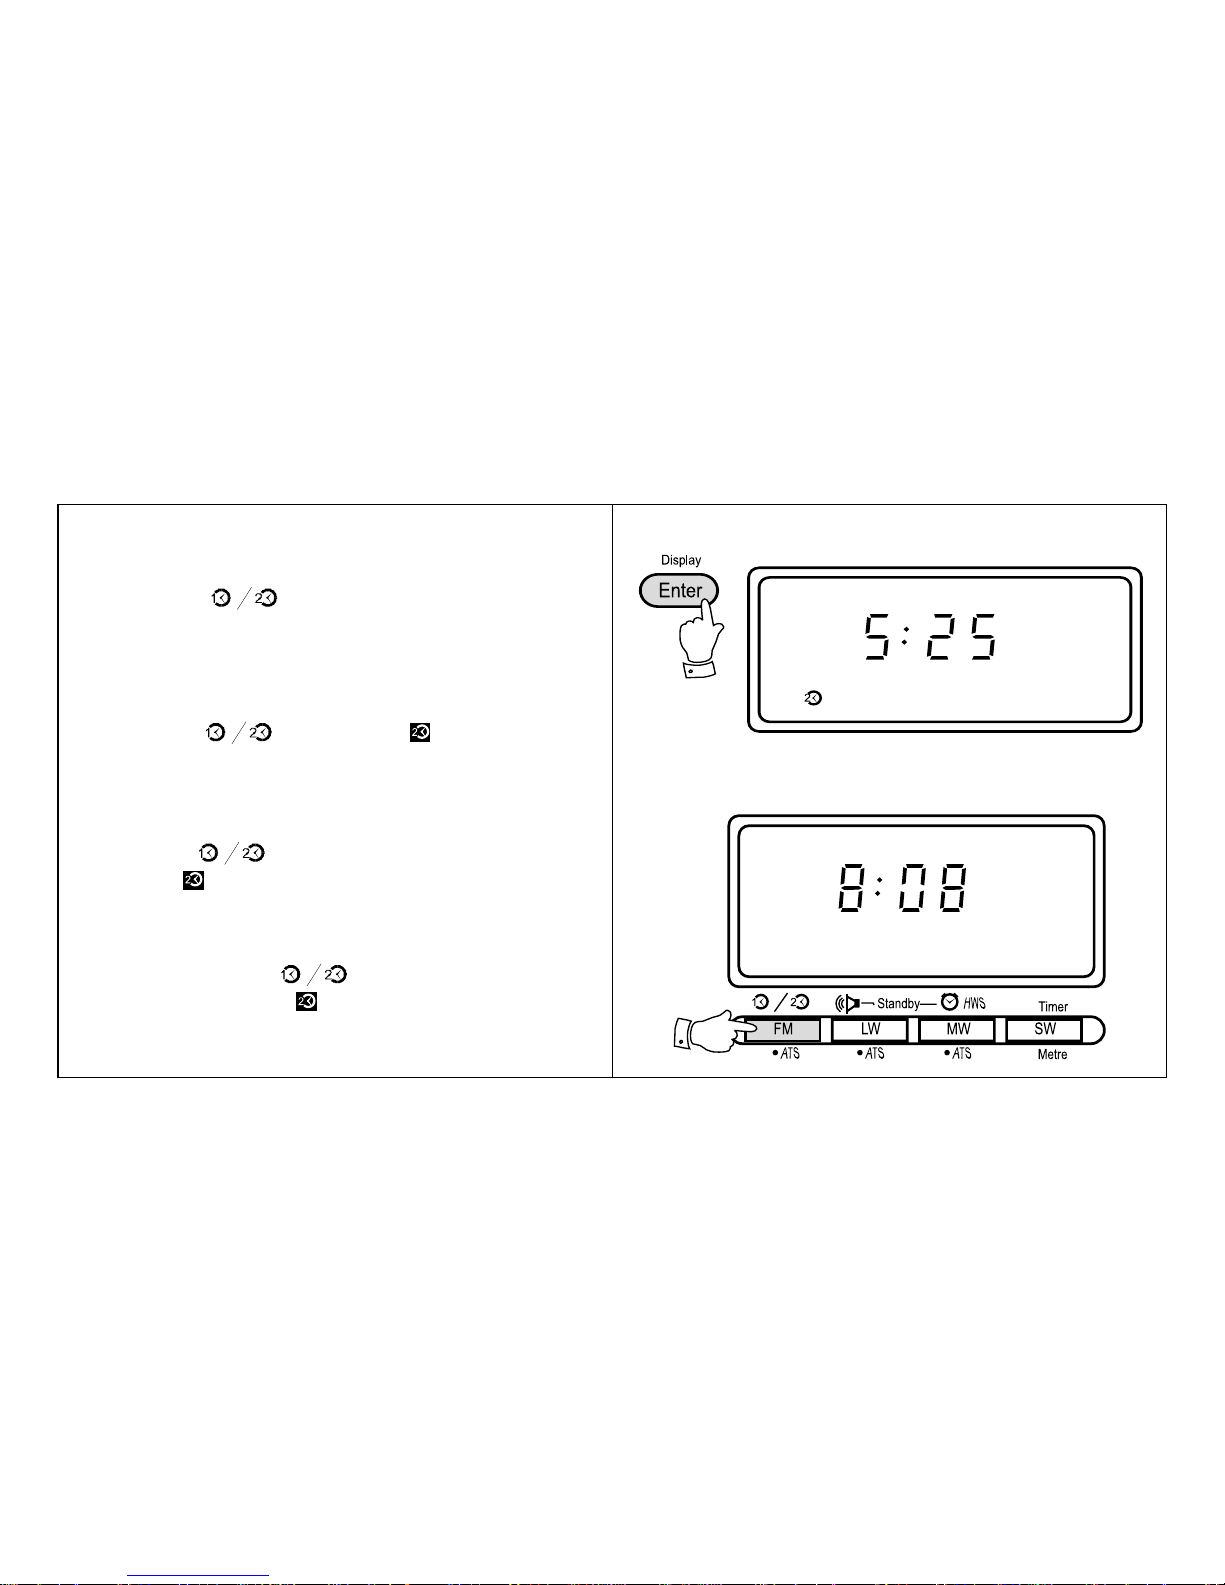
In addition to real time a second time zone can be programmed into this radio.
1. Press the " " button the display will show and
flash " ".
15
5. Press the "Enter" button to complete setting the clock,
the display will now show the correct time.
Note: Time should be entered in 24Hr format e.g. 3:00pm
would be entered as 15:00.
Setting dual time
Page 18
3. Press and hold down the "Time Set" button for more
than 2 seconds, the display "Set" will flash.
16
2. Press "Enter " button within 3 seconds, the display
will stop flashing.
Page 19
If you need any further advice, please call our Technical Helpline on :0181 758 0338 (Mon-Fri)
5. If you press the wrong number, press the "C" (cancel)
button which will delete one number at a time.
17
4. While " " symbol is flashing, set the correct time
by pressing the numbered buttons. As you press each
button the corresponding number will show on the display .
Page 20
18
6. Press the "Enter" button to complete setting the dual
time, the display will now show the correct dual time.
7. Press the " " button followed by the "Enter"
button to return the display to real time.
Note:
a. T o temporarily change between real and dual time mode
press the " " button, the symbol and dual
time will be shown in the display . After approximately 3
seconds the display will return to showing real time.
b. T o permanently change the display to dual time mode
press the " " button followed by the "Enter" button. The symbol in the display indicating dual time
mode.
c. To permanently change the display back to real time
mode press the " " button followed by the
"Enter" button. The symbol will be removed from
the display .
Page 21

If you need any further advice, please call our Technical Helpline on :0181 758 0338 (Mon-Fri)
19
Press the "Time Set" button for more than 2 seconds,
the " " symbol will flash in the display. Press the "0
set" button, the display will show and flash "Set-00". Press
the "Enter" button to reset seconds to 0.
Zero seconds set
Page 22

20
Waveband selection
There are four waveband selection buttons located below the Liquid crystal display .
Waveband Frequency coverage
FM 87.5-108 MHz
LW 153-513 kHz
MW 520-1710 kHz
SW 1.71 1-29.999 MHz
Page 23

If you need any further advice, please call our Technical Helpline on :0181 758 0338 (Mon-Fri)
21
2. Press one of the four waveband select buttons, the
last frequency used on the selected waveband will be
recalled and appear on the display.
1. Turn on the radio by pressing the "Power/Sleep" button. The display will show the last waveband and frequency selected.
Page 24

22
Note:
If the SW band is selected pressing the "SW/Metre"
button a second time will display a flashing "m" indicating that a SW metre band may now be selected. For example pressing the "6/41m" button will allow direct access to the 41 metre band.
Page 25

If you need any further advice, please call our Technical Helpline on :0181 758 0338 (Mon-Fri)
23
MW 520-1710kHz
Band
INTERNAL
Rotate for best reception
LW 153-513kHz
INTERNAL
Rotate for best reception
IllustrationAerial TypeFrequency Range
Tuning
Page 26

24
FM 87.5 - 108MHz
Band
IllustrationAerial T ypeFrequency Range
TELESCOPIC
Fully extend the aerial, angle and rotate for best reception.
SW 1.711-29.999MHz
TELESCOPIC
Fully extend the aerial, for best reception
Page 27

If you need any further advice, please call our Technical Helpline on :0181 758 0338 (Mon-Fri)
25
Stations may be selected by using any one of the five dif ferent available tuning methods:
Direct Tuning • Manual Tuning • Scan Tuning • Memory Recall Tuning • ATS Tuning on LW, MW and FM bands.
Example: To tune to 100.70 MHz on the FM band.
1. Press the "Power/Sleep" button to turn on the radio.
2. Press the button marked "Freq" (Frequency)
Direct tuning
Page 28

26
3. Press the buttons marked [1] [0] [0] [.] [7] [0].
Note: If a mistake is made during entry press the "C"
button to clear the last digit entered.
4. Press the button marked "Enter", the frequency and
waveband will now appear in the display .
Note: Make sure that you enter the decimal point [.] in
100.70 MHz otherwise the display will show "SW" [10.070
MHz].
Page 29

If you need any further advice, please call our Technical Helpline on :0181 758 0338 (Mon-Fri)
27
5. Extend the aerial fully and rotate for best FM reception.
6. Adjust the Volume control for comfortable listening.
Page 30

28
7. When selecting a stereo FM station, and using stereo
earphones, make sure that the FM mode switch is in
the STEREO position.
Page 31

If you need any further advice, please call our Technical Helpline on :0181 758 0338 (Mon-Fri)
29
1. Press the "Power/Sleep" button to turn on the radio.
2. Select a waveband.
Manual tuning
Page 32

30
3. A single press on the either the [ ] or [ ] down
buttons will change the frequency up or down.
4. T o select fine tuning steps , press the "Fine" button to
select fine tune mode, the symbol will appear in the
display . Frequency steps will be as shown below .
5. To return to normal tuning steps press the "Fine" button to remove the symbol from the display .
Note: Each press of the [ ] or [ ] buttons will change
the frequency in increments of:
FM: 50kHz (Fine) or 100kHz (Normal)
LW: 1kHz (Fine) or 9kHz (Normal)
MW: 1kHz (Fine) or 9kHz/10kHz (Normal)
SW: 1kHz (Fine) or 5kHz (Normal)
Page 33

If you need any further advice, please call our Technical Helpline on :0181 758 0338 (Mon-Fri)
31
1. Turn on the radio by pressing the "Power/Sleep" button.
2. Select a waveband.
Scan tuning
Page 34

32
4. Press and hold down either the tuning [ ] or [ ]
buttons for more than half a second to commence scan
tuning. The radio will scan all frequencies in the selected band and stop automatically each time it finds
an active station.
Page 35

If you need any further advice, please call our Technical Helpline on :0181 758 0338 (Mon-Fri)
33
6. Adjust the Volume control for comfortable listening.
5. Press and hold down either the tuning [ ] or [ ]
buttons for more than half a second to resume scan
tuning. When the waveband end is reached the radio
will beep and continue tuning from the opposite waveband end.
Page 36

34
Y ou may store up to 54 preset stations in memory, 18 on
SW , 18 on FM, 9 on L W and 9 on MW. T o store a station in
preset memory proceed as follows.
1. Turn on the radio by pressing the "Power/Sleep" button.
2. Tune to the desired frequency using one of the previously described tuning methods.
Memory tuning
Page 37

If you need any further advice, please call our Technical Helpline on :0181 758 0338 (Mon-Fri)
35
3. Press the button marked "M" (memory), the memory
symbol "M" together with a suggested preset number
will flash in the display for 12 seconds.
Note: If some of the presets have already been used the
radio will suggest the next available preset location.
4. Press the "Enter" button and your station will be stored
in the suggested memory preset.
Page 38

6. The FM and SW bands have 18 presets. Presets 1-9
are set in the normal manner. When presets 1-9 are full
selecting another station to be preset will cause the display to show "P2". An additional 9 presets can now be
stored.
36
5. Preset stations may be exchanged easily and at any
time. Select the preset that is to be changed by pressing the corresponding numbered button, press the "M"
button, "M" and current preset location will flash in the
display, whilst the display is flashing select the new
preset location using one of the numbered buttons.
Page 39

If you need any further advice, please call our Technical Helpline on :0181 758 0338 (Mon-Fri)
37
Note:
1. If all the preset memory locations are full pushing the
"M" button will cause the display to show "FULL". If
you still want to store a new station press any button
1-9 for more than 2 seconds, the new station will be
stored in the selected memory location, the original
station in this location will be cancelled.
2. Selecting a station or frequency that is already stored
in preset memory will cause the display to show "[ ]"
together with the stations preset memory location.
The symbol "[ ]" indicates that the frequency has already been stored.
Page 40

38
1. Turn on the radio by pressing the "Power/Sleep" button.
2. Select the waveband for the station required.
Recalling a station from preset memory
Page 41

If you need any further advice, please call our Technical Helpline on :0181 758 0338 (Mon-Fri)
39
3. Press the button corresponding to the preset memory
location for the required station. The radio will instantly
tune to the station and the display will show its frequency
and memory location. If you wish to select another preset station press any one of the numbered buttons for
instant access. On SW and FM access to a further group
of 9 presets can be obtained by pushing the "P1/P2"
button until the "P2" symbol appears in the display. Press
the button corresponding to the preset memory location
for the required station.
only for FM and SW
1. Recall the preset station, push the "M" button. The
preset location and "M" will flash in the display, push
"C" to cancel the preset station.
Cancelling a preset station
Page 42

40
e.g. exchanging preset station 2 with preset station 7.
1. Recall preset 2.
2. Push the button "M", preset 2 and "M" will flash in the
display.
Changing preset station order
Page 43

If you need any further advice, please call our Technical Helpline on :0181 758 0338 (Mon-Fri)
41
3. Push button "7". Presets 2 and 7 will now be exchanged.
Page 44

42
This radio provides an easy to use feature called ATS
(Auto Tuning System) which operates on FM, LW and
MW bands.
1. Turn on the radio by pressing the "Power/Sleep" button.
2. Push any one of the FM/L W/MW band buttons for more
than 2 seconds. The radio will beep and the display
will flash "ATS" indicating the radio is in ATS mode.
3. The radio will then scan from the lowest frequency on
the selected waveband, automatically storing stations in
preset memory 1-9 based on signal strength order . On
FM a further 9 stations will be stored in memory page 2.
Memory page 2 is selected by pressing the "P1/P2"
button until the display shows "P2"
ATS (Auto Tuning System)
Page 45

If you need any further advice, please call our Technical Helpline on :0181 758 0338 (Mon-Fri)
43
4. After scanning is complete, a beep will be heard. The
display will show "M [1]" and the station with the strongest signal for your area will be selected.
5. If during ATS operation no stations are found the display will show "- - - - -" for 2 seconds before returning
to the last frequency used prior to commencement of
A TS operation.
Page 46

44
Note:
1. The maximum number of presets on MW and LW is 9,
if during A TS operation more than 9 st ations are found
only the 9 strongest stations will be stored in the preset
memories. On FM the maximum number of presets is
18, if during ATS operation more than 18 stations are
found only the 18 strongest stations will be stored in the
preset memories.
2. If the number of stations found during A TS operation is
less than 9 the display will show the actual number of
stations found. For example, if only 5 stations are found,
the display will show "[1] 2 3 4 5, when scanning is
complete.
3. The SW band has no A TS function.
4. All previously stored preset stations will be erased when
A TS operation commences.
5. ATS operation can be cancelled by pressing the "Power/
Sleep" button.
Page 47

If you need any further advice, please call our Technical Helpline on :0181 758 0338 (Mon-Fri)
45
Memory Scan
This radio provides a feature called Memory Scan which
when activated will scan the preset memories.
1. Turn on the radio by pressing the "Power/Sleep" button. Select the required waveband.
2. Push the "Memory Scan" button for more than 1 second, the radio will scan each preset memory in turn pause for 5 seconds on each memory before continuing
on to the next memory . When the required preset/station is reached press the "Memory Scan" button to
stop memory scan.
Page 48

Setting the alarm
The alarm can be set with the radio power on or off.
1. If the radio is switched on press the "Display" button
to display the time.
46
Page 49

If you need any further advice, please call our Technical Helpline on :0181 758 0338 (Mon-Fri)
1. Press the button the display will flash
and show the last alarm time set, (this will
be "0:00" the first time the alarm is set).
Setting the radio alarm (Standby)
47
Page 50

2. Press the numbered buttons to set the alarm on time.
e.g. to set an alarm time of 13:30, press the buttons
"[1] [3] [3] [0]". If a wrong number was keyed in, pressing the "C" button will delete one digit for each press.
Press the "Enter" button, the display will show "13:30"
and "Standby" will stop flashing indicating that the
alarm has been set to 13:30.
If the time keyed in is not valid i.e. 25:30, the display will
show "E" for about 2 seconds and then revert to showing real time.
48
Page 51

If you need any further advice, please call our Technical Helpline on :0181 758 0338 (Mon-Fri)
3. When the alarm time is set, the display will return to
showing real time and the colon will start to flash.
4. T o verify the alarm time press the " " button
to display the alarm time followed by the "Enter" button to return to real time mode.
49
Page 52

50
Setting the HWS (Humane Wake System) alarm
5. To cancel the alarm time, press the " " button, the display will flash " ", press the "C"
button to cancel the alarm time.
Note:
1. When the alarm is sounding, press the "Power/Sleep"
button to turn off the alarm for 24 hrs.
2. The radio alarm will last for one hour if not turned off
by pushing the "Power/Sleep" button.
3. Tune the radio to the required station before setting
the alarm. When the alarm operates the radio will play
the last station selected.
A repeating beep tone will sound when using the HWS alarm. The alarm beep will increase in volume every 15 seconds
for 1 minute followed by 1 minutes silence before repeating the cycle. The HWS alarm will sound for 30 minutes unless
turned off by pushing the "Power/Sleep" button.
Page 53

If you need any further advice, please call our Technical Helpline on :0181 758 0338 (Mon-Fri)
1. The HWS alarm is set in the same way as the radio
alarm except instead of pushing the " " button the " " button is used instead.
The HWS alarm may be turned off by pressing the
"Power/Sleep" button.
Note: The HWS alarm can be set independently from
the buzzer alarm enabling 2 alarm times to be set,
one for the radio alarm and one for the HWS alarm.
Setting the count down timer
The radio has a count down timer which can be set to
beep when the time set has elapsed. The count down
timer can be set with the radio power on or off.
1. If the radio is switched on press the "Display" button
to display the time.
2. Press the "Timer" button, the display will flash
"Timer".
51
Page 54

52
3. Enter the required time in hours and minutes (max 23
hours and 59 minutes) using the numbered buttons.
e.g. to enter 1 hour and 30 minutes, press the buttons
marked [1], [3], [0].
4. Press the "Enter" button, "Timer" in the display will
stop flashing indicating that the count down timer has
been set. After approximately 5 seconds the display
will revert to showing real time.
Page 55

If you need any further advice, please call our Technical Helpline on :0181 758 0338 (Mon-Fri)
4. While the count down timer is active the time remaining may be checked by pressing "Timer" button, press
the "Timer" button to continue with the time remaining or press the "Enter" button to restart the count
down timer.
5. The count down buzzer will sound for 1 minute and
then turn off. The count down buzzer can be turned of f
at any time by pressing the "Power/Sleep" button.
53
Page 56

54
6. T o cancel the count down timer press the "Timer" button, and then press the "C" button, "Timer" on the
display will disappear and the display will revert to
showing real time.
Note:
1. When the count down alarm is active, press the
"Power/Sleep" button to turn off the alarm.
2. The count down alarm will sound for 1 minute unless
turned off by pushing the "Power/Sleep" button.
3. If an incorrect time is entered e.g. 25.30 the display
will show "E" for about 2 seconds before reverting to
showing real time.
Page 57

If you need any further advice, please call our Technical Helpline on :0181 758 0338 (Mon-Fri)
The sleep timer will automatically switch off the radio af-
ter a preset time has elapsed.
1. Press and continue to hold down the "Power/Sleep"
button the display will cycle through the available sleep
times in the order 60-45-30-15-60. Release the
"Power/Sleep" button when the required sleep time
appears in the display .
Setting the sleep timer
55
Page 58

56
2. The symbol together with the sleep time set will
appear in the display for 2 seconds after which the
display will revert to showing frequency .
3. T o cancel the sleep function, press the "Power/Sleep"
button, the symbol will disappear and the display
will revert to showing real time.
Page 59

If you need any further advice, please call our Technical Helpline on :0181 758 0338 (Mon-Fri)
1. T o listen to FM stereo broadcasts, tune to the required
station, plug in headphones and set the "Mono/Stereo
switch located on the left side of the radio to the
"Stereo" position. If the station being received is weak
some hiss may be audible, to reduce the hiss set the
"Mono/Stereo" switch to the "Mono" position to return to mono operation.
Note: FM stereo is only available via headphones.
2. When listening to AM (MW/LW/SW) broadcasts, the
"DX/Local" switch adjusts the radios sensitivity . If you
are listening to a strong station and the signal is distorted, set the "DX/Local" switch to the "Local" posi-
tion for best reception. For normal or weak stations set
the "DX/Local" switch to the "DX" position for maximum sensitivity .
Mono/Stereo and DX/Local switch
57
Page 60

58
Headphones for use with this radio should be stereo and
fitted with a 3.5mm stereo jack plug. Insert the headphone
plug into the socket marked on the left side of the radio.
When the headphones are plugged in the loudspeaker
is automatically disconnected.
Headphones
Page 61

If you need any further advice, please call our Technical Helpline on :0181 758 0338 (Mon-Fri)
The "Lock" switch is use to prevent unintentional operation of the radio.
1. Set the "Lock" switch located on the right side of the
radio to the up position, the symbol will appear in the display. The "Power/Sleep" and all other
buttons will be disabled. This will prevent accidental
operation when the radio is packed in a suitcase or
carrying pouch. To release the "Lock" switch move
the switch down, the symbol will be removed
from the display .
Lock switch
Light
Pressing the light button located on the top of the radio will
turn on the light and illuminate the display for approximately
15 seconds.
59
Page 62

60
Portable shortwave aerial
MW step size switch
1. This switch located inside the battery compartment
provides a means of changing the MW step size from
9kHz to 10kHz. In Europe and most other parts of the
world set the switch to the 9kHz position. For the USA
and Canada set the switch to the 10kHz position.
1. Pull out the jack plug from the aerial reel and plug into
the socket marked "AM EXT . ANT" located on the lef t
side of the radio. Uncoil the aerial to a convenient length
and attach the reel clip to a suitable support point.
Page 63

If you need any further advice, please call our Technical Helpline on :0181 758 0338 (Mon-Fri)
Troubleshooting/Reset button
The Roberts R876 offers many new features which are
unavailable on most radios.
If the radio fails to operate correctly , or some digits on the
display are missing or incomplete carry out the following
procedure.
1. Switch off the radio and remove the batteries.
2. With the aid of a suitable implement (the end of a paper
clip) press the reset button located in the battery compartment for at least 5 seconds, this will reset the microprocessor, clock time and clear all stations stored in preset memory (except SW).
If a problem persists our technical staff would be pleased
to help offer any assistance on operating the radio. Our
technical helpline number is, 0181 758 0338.
61
Page 64

62
Do not allow this radio to be exposed to water, steam or
sand. Do not leave the radio where excessive heat could
cause damage such as in a parked car where the heat
from the sun can build up even though the outside temperature may not seem too high.
Care and maintenance
Page 65

If you need any further advice, please call our Technical Helpline on :0181 758 0338 (Mon-Fri)
Frequency range:
FM 87.5 - 108MHz
LW 153 - 513kHz
MW 520 - 1710 or 522 - 1710kHz
(dependent on position of MW step size switch)
SW 1.711 - 29.999MHz
120m 2.300 - 2.495MHz
90m 3.200 - 3.400MHz
75m 3.900 - 4.000MHz
60m 4.750 - 5.060MHz
49m 5.900 - 6.200MHz
41m 7.100 - 7.350MHz
31m 9.400 - 9.990MHz
25m 1 1.600 - 12.100MHz
21m 13.570 - 13.870MHz
19m 15.100 - 15.800MHz
16m 17.480 - 17.900MHz
13m 21.450 - 21.750MHz
1 1m 25.600 - 26.100MHz
Specifications
63
Page 66

Power requirements 4.5V
Batteries 3 x IEC size LR6 (AA size)
Battery Life Approx. 16-20hrs of listening
when used for 4 hours a day at
normal volume using alkaline batteries.
Circuit features
Semiconductors: 1 LSI, 10 IC's, 8 FET, 24 transis-
tors, 25 diodes, 2 LED
Aerial system L W Built in ferrite aerial
MW Built in ferrite aerial
SW Telescopic aerial
FM Telescopic aerial
Output power: 180mW.
Sockets
Headphone socket 3.5mm dia stereo.
AM external aerial 3.5mm.
DC in 4.5volts centre pin negative.
Accessories: Carrying pouch, Stereo ear-
phones, AC adaptor, Portable
shortwave aerial.
The company reserves the right to amend the specification without notice.
Specifications cont.
64
Page 67

If you need any further advice, please call our Technical Helpline on :0181 758 0338 (Mon-Fri)
Guarantee
This radio is guaranteed for twelve months from the date of delivery to the original owner against failure due to faulty
workmanship or component breakdown, subject to the procedure stated below. Should any component or part fail
during this guarantee period it will be repaired or replaced free of charge.
The guarantee does not cover:
1. Damage resulting from incorrect use.
2. Consequential damage.
3. Receivers with removed or defaced serial numbers.
N.B. Damaged or broken telescopic aerials will not be replaced under guarantee.
Procedure:
Any claim under this guarantee should be made through the dealer from whom the instrument was purchased It is
likely that your Roberts dealer will be able to attend to any defect quickly and efficiently, but should it be necessary
the dealer will return the instrument to the company’s service department for attention. In the event that it is not
possible to return the instrument to the Roberts dealer from whom it was purchased, please contact Roberts Radio
service department at the address shown on the back page of this manual before taking further action.
These statements do not affect the statutory rights of a consumer.
Page 68

ROBERTS RADIO TECHNICAL SERVICES DEPARTMENT
97-99 Worton Road
Isleworth Middlesex
TW7 6EG
T echnical Helpline :- 0181 758 0338
Issue 3
Imported by:-
ROBERTS RADIO LIMITED
PO BOX 130
MEXBOROUGH
SOUTH YORKSHIRE
S64 8YT
 Loading...