

Page 1

Page 2

Bring back the
groove to eurorack.
About SWT16
The Robaux SWT16 is a 16-track eurorack trigger sequencer with
up to 16 steps per track.
Programmable like a classic TR machine, the SWT16 can be used
not only for triggering drum sounds, but also for Envelopes, S‘n‘Hs
or resetting LFOs.
The SWT16 is polymetric - each track can have a different length,
from 1 to 16 steps. Even more complex rhythms succeed with the
individual clock divider per track.
The SWT16 has an intuitive user interface. All operation is via the
illuminated 4x4 keypad. From the main screen, you can access
the 16 different modes of the sequencer. The buttons adapt to the
selected mode. With the back button, you can quickly return to the
main screen.
Each track has its own trigger output. In addition, the triggers are
also sent via MIDI notes (requires an adapter).
Installation
SWT16 requires a -12 / +12V power supply (2x5-pin connector). The red
strip of the ribbon cable (-12V side) must be oriented on the same side as
the „Red Stripe“ mark on the board. The module draws about 120mA from
the + 12V rail.
Page 3
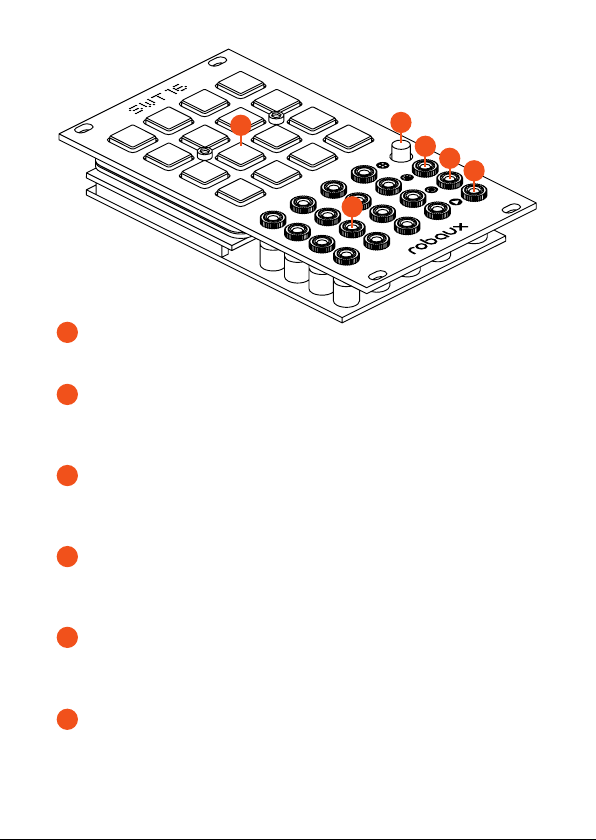
B
C
D
E
F
A
4x4 Buttons
A
The 4x4 buttons are the interface and display of the SWT16.
B
Home Button
Via the home button you will get back to the start screen.
In addition, the button displays the current tempo.
C
MIDI Output
All triggers are also output as MIDI notes. Connect a Jack-to-DIN
adapter here.
D
Reset In
This trigger input is intended for a reset signal. When the trigger is
hot, the sequencer goes back to the rst step.
E
Clock In
This is the clock input. The sequencer will be in sync with the external clock source provided through this input.
F
Trigger Outputs
These 16 plugs output the individual trigger patterns. Each jack
stands for a track, starting from the rst track on the top left.
Page 4

Step
In step mode, you can program your trigger tracks like a
classic drum computer. Select the track you want to edit
by pressing one of the 16 buttons. Then you can set the
steps to create your patterns or override the steps.
Tap
In Tap mode, you can program your patterns on the y.
Each of the 16 keys represents one track. Play the keys
while the sequencer is running to program your pattern.
Random
In this mode, you can ll the sequencer memory with random patterns. Each button represents a track. Pressing
a track button replaces the tracks current pattern with a
random pattern.
Delete
If you want to delete a track, you can clear all steps in
your pattern in this mode. Each button represents a track.
Press the corresponding button to delete the pattern.
Mute
In this mode, you can mute your tracks and unmute them.
Each of the 16 buttons represents a trigger track that can
be activated or deactivated by pressing.
Fill
In this mode, you can add continuous triggers. Each of
the 16 keys represents a trigger track. Hold down the corresponding key to temporarily replace the current pattern
with continuous triggers.
Page 5

Invert
In this mode, you can invert the programmed triggers for
each track. Each of the 16 keys represents a trigger track.
Hold the corresponding button to invert the triggers.
Perform
This mode combines many modes into one. Perfect for
live situations. Here you have access to four tracks at
once. Each column represents one track.
Mode A
The rst line mutes a track. Press 1-4 to mute the corresponding tracks.
In the second line, you can temporarily replace the pattern
with continuous triggers. Perfect for adding drum rolls.
The third line changes from mode A to mode B or vice
versa for each track.
Mode B
In mode B, the rst line becomes a tap mode, where you
can program your patterns on the y.
Did you miss a beat? You can simply delete the track in
mode B from the button in the second row and then play
it again.
Switch Tracks
There is pagination in the fourth line to switch between
tracks 1-4, 5-8, 9-12, and 13-16.
Page 6

Length
In this mode, you can set the length of each track individually. Select a track by pressing the corresponding button.
Then you can adjust the length by pressing one of the 16
buttons to set the step length. The 5 button sets the length
to 5 steps, the 12 button to 12 steps and so on.
Length Reset
Too many polyrhythms? Activating the length reset re-
starts the pattern every rst step of the master clock. For
example, a 5-step pattern is played 3.2 times in a beat.
Each of the 16 keys represents a trigger track. To toggle
the length reset, select or deselect one of them.
Gate
In this mode, you can choose to combine two or more
consecutive steps into one long gate or retrigger them at
each step. Press the corresponding button to select the
retrigger behavior. When it lights up, it res again. When
the button is off, the triggers are combined into a gate.
Clock
By default, each trigger track res when it reaches a new
clock signal. By setting the clock divider for each track,
you can extend your patterns up to 16 steps to the master
clock.
Select a track by pressing the corresponding button. Then
you can adjust the division by pressing one of the 16 buttons. Knob 1 means that it is in sync with the master clock,
button 4 divides the clock by four and so on.
Page 7

Autoclock
By default, the sequencer requires a clock signal to operate. It is also possible to use it as a standalone sequencer.
In autoclock mode, you can switch between internal and
external clock.
Select one of the buttons in the bottom lines to switch
between internal and external clock. When the buttons in
the lower left corner light up, the autoclock is enabled.
If the buttons in the lower right corner are lit, Autoclock is
disabled and you need to trigger the sequencer with an
external clock.
If the auto clock is activated, you can control the internal
clock of the sequencer. Press the 1 button to start and
stop the sequencer. Press the 2 button to reset the
sequencer while it is playing. Button 3 and 4 is used for
speed control. Decrease the clock tempo by pressing the
3 button and increase it by pressing the 4 button.
Notes
The triggers are also sent via midi. You can choose for
each track which Midi channel should send these triggers.
Select a track by pressing the corresponding button. Then
you can adjust the midi channel by pressing one of the 16
buttons. So buttons 3 set it to channel 3, buttons 8 set it to
channel 8 and so on.
Write
There you can save all your current patterns and settings
in the memory of the sequencer.
Page 8

Util
In util mode, you can enable and disable functions of the
sequencer.
Disable animations
Press the 1 button to enable/disable the animations that
will be displayed when entering a new mode. But nobody
really wants that.
Factory Reset
You have lost control of the sequencer? You can restore
his virginity by pressing the 4 key - but be aware - you will
lose all your funky rhythms.
is designed, engineered and assembled in Hamburg, Germany.
 Loading...