

Page 1
User Manual
Model: R5360
5100500XXXX V01
Roav Bolt
Page 2

Table of Content
Important Safety
Important Safety Instructions 01
Consignes de sécurité importantes 01
What’s Included 05
At a Glance 05
Button Controls 06
Getting Started 08
Setting up the Google Assistant 09
Using the Google Assistant 14
Charging Your Devices 15
Specifications 15
Troubleshooting 16
Notice 17
Trademark 21
Customer Service 22
Instructions
SAVE THESE INSTRUCTIONS – This manual contains important
safety and operating instructions for the car charger of Roav Bolt
(Model R5360).
Please read and understand all instructions before using this
product. If damage is caused by failure to follow the instructions,
the warranty does not apply.
• Read all instructions and cautionary markings before using this
product.
• Do not expose to rain, moisture, or snow.
• Use of an attachment not sold by the manufacturer is not
recommended and may result in a risk of fire, electric shock, or
injury to persons.
• Do not operate this car charger if it has received a sharp blow,
been dropped, or otherwise damaged in any way; take it to a
qualified service person.
• Do not disassemble this car charger; take it to a qualified service
person when service or repair is required. Incorrect reassembly
may result in a risk of electric shock or fire.
English 01
Page 3

• To reduce risk of electric shock, unplug this car charger before
attempting any maintenance or cleaning. Turning o controls will
not reduce this risk.
• To reduce risk of fire or electric shock, do not interconnect
output terminations.
• Avoid long exposure to direct sunlight, which may cause damage
to the device.
• Exposing this product to open flames may cause it to explode.
• Do not use this product in strong magnetic fields.
• Use a dry, soft lint-free cloth to clean. Do not use any corrosive
cleaner or oil to clean.
• CAUTION - For continued protection against risk of fire, replace
only with the same type and ratings of fuse, fuse rating is
32V DC / 7A.
02 English English 03
Consignes de sécurité
importantes
CONSERVEZ CES CONSIGNES - Ce manuel contient d'importantes
instructions de sécurité et d'utilisation relatives au chargeur de
voiture modèle R5360.
Veuillez lire et comprendre toutes les instructions avant d'utiliser ce
produit. Si le non-respect des instructions entraîne des dommages,
la garantie ne s'appliquera pas.
• Lisez toutes les instructions et les mises en garde avant d'utiliser
ce produit.
• Ne pas exposer à la pluie, l'humidité ou la neige.
• L'utilisation d'un accessoire non recommandé ou vendu par le
fabricant peut entraîner un risque d'incendie, de choc électrique
ou de blessure.
• Ne pas utiliser ce chargeur de voiture s'il a reçu un coup violent,
s'il est tombé ou s'il a été endommagé de quelque façon que ce
soit ; l’apporter à un technicien qualifié.
• Ne pas démonter ce chargeur de voiture ; l’apporter à un
technicien qualifié lorsqu’une réparation est nécessaire. Un
réassemblage incorrect peut entraîner un risque d'électrocution
ou d'incendie.
Page 4
• Pour réduire les risques d'électrocution, débrancher le chargeur
de voiture avant d'eectuer toute opération d'entretien ou de
nettoyage. La désactivation des commandes ne réduit pas ce
risque.
• Pour réduire les risques d'incendie ou d'électrocution, ne pas
interconnecter les terminaisons de sortie.
• Éviter toute exposition prolongée à la lumière directe du soleil,
qui pourrait endommager l'appareil.
• L'exposition de ce produit à des flammes nues peut provoquer
son explosion.
• Ne pas utiliser ce produit dans des champs magnétiques
puissants.
• Utiliser un chion sec, doux et non pelucheux pour le nettoyage.
Ne pas utiliser de nettoyant corrosif ni d'huile.
• ATTENTION - Pour une protection continue contre les risques
d'incendie, ne remplacer le fusible que par un fusible de même
type et de même spécification. Le fusible utilisé est de
32V DC / 7A.
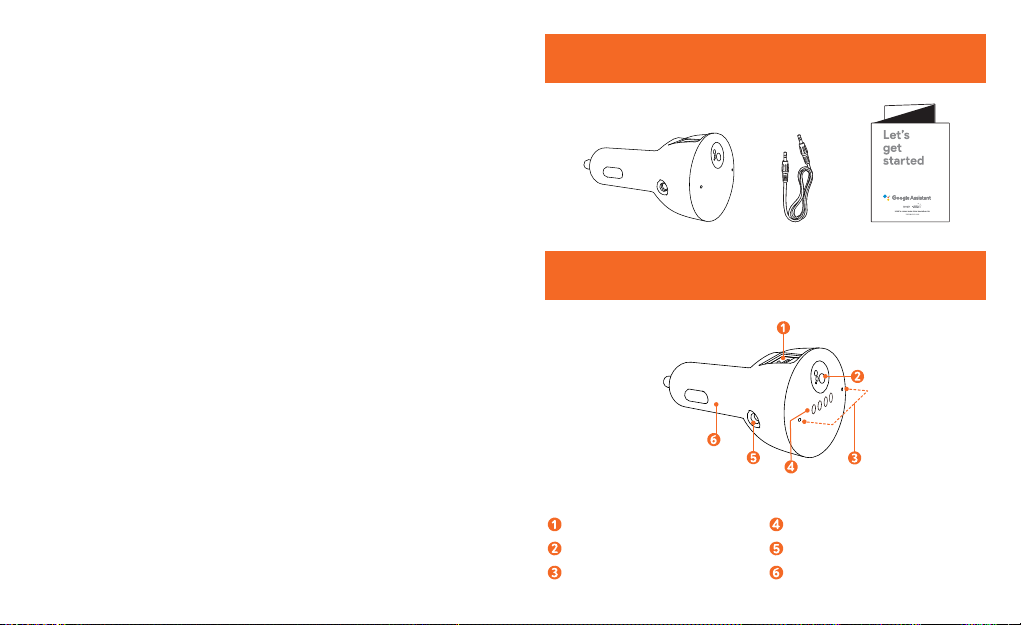
USB charging port LED indicator
Multifunction button AUX out socket
Microphones Adapter
04 English English 05
What’s Included
At a Glance
Figure 1
Page 5
Button Controls
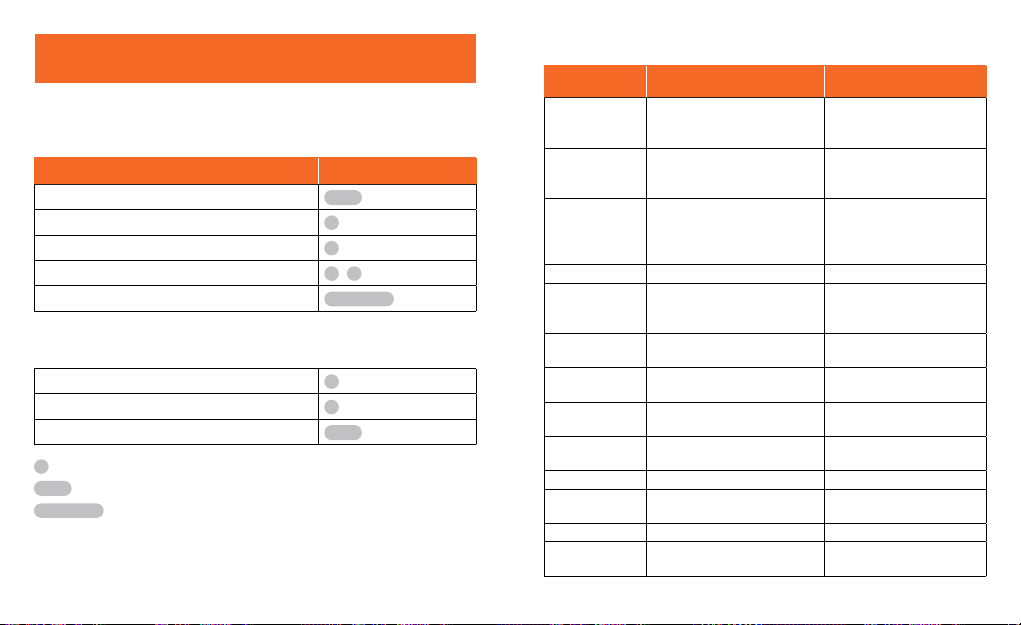
LED Indications
Status LED Ring Indicator Description
Disconnected
Interactions
Action Gesture
Talk to the Google Assistant
Stop the Google Assistant
from the device
Pairing Lights alternately and
Connected to
device
Get notifications
Mute/Unmute microphone
Reset and forget all pairing
Call Mode
Answer an incoming call
End an active call
Ignore an incoming call
Single press
Short press (0.5 sec)
Long press (12 sec)
Idle Lights are o Enter standby mode
Hotword,
hotword
timeout
Listening All lights simultaneously
Thinking Lights alternately and
Responding Lights simultaneously pulse
Non-VUI
response
During call Lights are a solid green During a phone call
Notifications Lights alternately dim a white
Mic o Lights are a solid dim orange Microphone o
Reset Lights alternately glow
06 English English 07
Lights alternately dim orange
and fade out
repeatedly glow and dim blue
from left to right
Lights alternately blink a
dim white, then all lights
simultaneously flash and
glow white
Lights simultaneously pulse
white
pulse white
circularly flash dim white
white
Lights simultaneously flash
white
light and fade out
orange for 12 seconds
The Google Assistant app
has disconnected from the
device.
Preparing for pairing
The Google Assistant app
is connected to the device.
Hotword is detected,
listening for more
commands
Listening for commands
Commands are detected,
searching for answers
Responding to query
No voice response
Notifications are detected
Reset all the pairing
Page 6
Getting Started
Setting up the Google Assistant
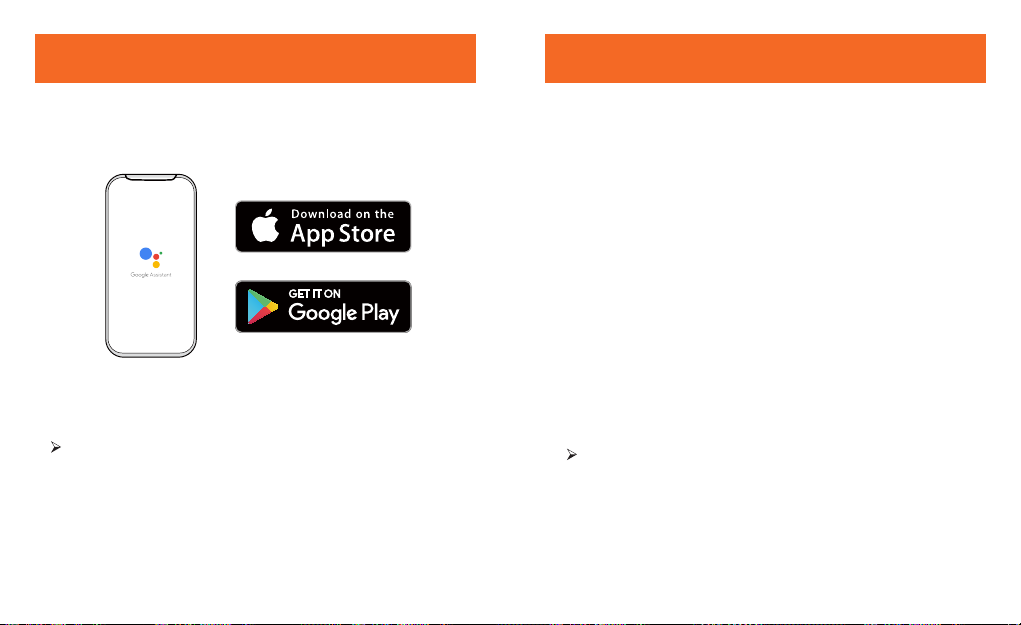
1. Download the Google Assistant app from the App Store or on
Google Play.
Figure 2
2. Plug Roav Bolt into your vehicle’s cigarette lighter socket and
then start the engine.
Roav Bolt will show an animated blue light.
08 English English 09
• Setting up Roav Bolt on Your Android Device
1. Go to your phone’s Bluetooth settings to pair your phone with
Roav Bolt.
2. After your phone is successfully paired with Roav Bolt, The
Google Assistant app will show automatically, prompting to set
up the Google Assistant. Tap Next.
3. Follow the on-screen instructions on the Google Assistant to set
up the Google Assistant.
Set up the Google Assistant on your Android device
There are two options to set up the Google Assistant according to
your car’s capability.
Option A. Use AUX cable:
① Tap “ Use AUX” to play audio through your car’s speakers.
A “Preparing your Roav Bolt” screen shows automatically.
This process takes a few seconds to complete.
Page 7
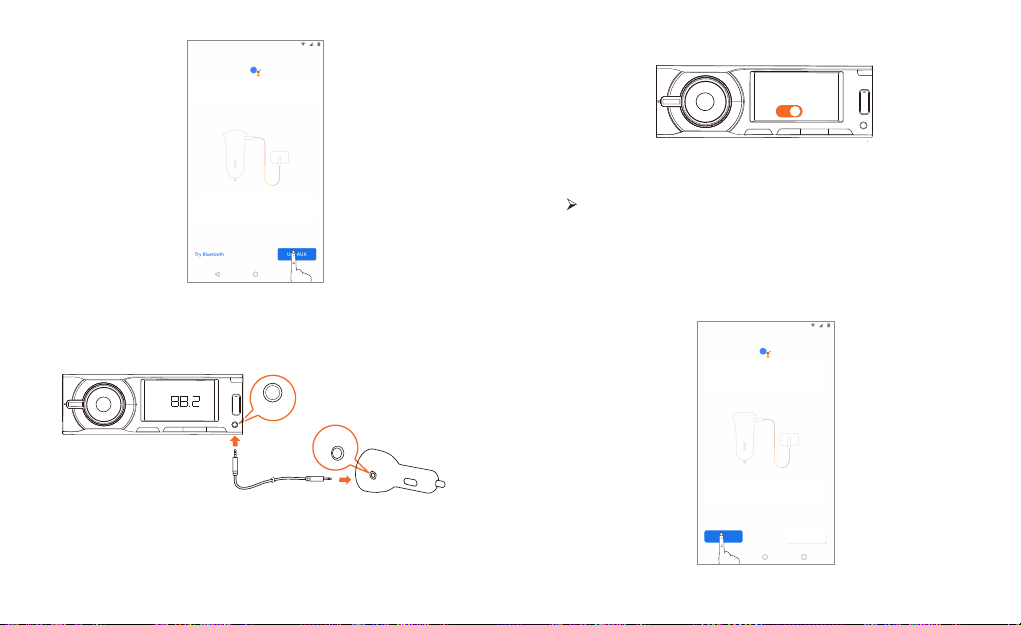
Figure 3
② Use the AUX cable to connect Roav Bolt to your car.
③ Switch your car stereo to AUX mode.
AUX
ON
Figure 5
④ Test your car’s stereo.
You’ll hear a tone to test the connection.
⑤ Tap “Next” to update Roav Bolt. Once the firmware is
successfully updated, the Google Assistant is set up.
Option B. Use Bluetooth
① Tap “Try Bluetooth” to play audio from your car’s speakers.
FM
AUX IN
Figure 4
Try Bluetooth Use AUX
Figure 6
10 English English 11
Page 8
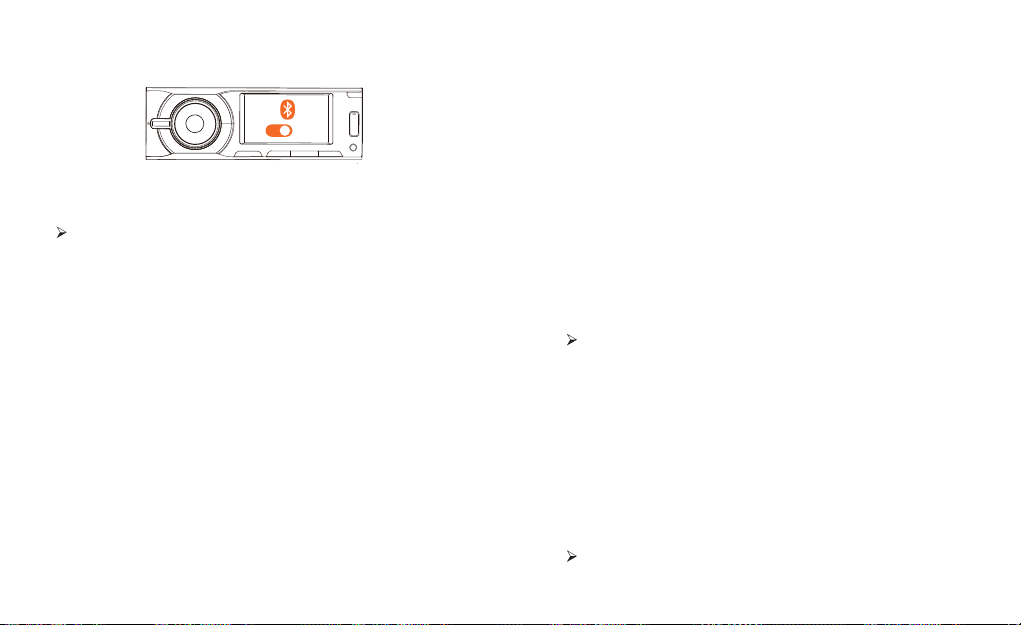
② Go back to Bluetooth settings to pair your phone with your car.
③ Switch your car stereo to Media/Bluetooth.
Set up the Google Assistant on your iOS Device
There are two options to set up the Google Assistant according to
your car’s capability.
Option A. Use Aux cable
ON
① Tap “Use AUX” to play audio from your car’s speakers. See
Figure 3.
Figure 7
④ Test your car’s stereo.
You’ll hear a tone to test the connection.
⑤ Tap Next to update Roav Bolt. Once the firmware is successfully
updated, the Google Assistant is set up.*
• Setting up Roav Bolt on Your iOS Device
Before you start, make sure your phone’s Bluetooth is turned on.
1. Open the Google Assistant app, wait until the setup card shows,
and then tap the setup card.
2. Swipe through the cards, and tap “Next”.
3. A “Bluetooth pairing request” pops up, requiring you to pair your
phone with Roav Bolt. Tap “Yes”. It may take a few seconds to
complete the Bluetooth pairing process.
4. After pairing is complete, Roav Bolt automatically starts
updating.*
5. Follow the on-screen instructions to set up the Google Assistant.
② Go back to your phone’s Settings > Bluetooth to search for
another Roav Bolt’s Bluetooth Roav Bolt
XXXX, and then connect. Both “Roav Bolt xxxx” and “Roav Bolt
xxxx-_LE” should be connected.
③
Use the AUX cable to connect Roav Bolt to your car. See Figure 4.
④ Switch your car stereo to AUX mode. See Figure 5.
⑤ Test your car’s stereo.
You’ll hear a tone to test the connection.
Once the testing is complete, the Google Assistant is set up.
Option B. Use Bluetooth
① Tap “Try Bluetooth” to play audio from your car’s speakers. See
Figure 6.
② Go back to your phone’s Settings > Bluetooth to search for your
car’s Bluetooth.
③ Switch your car to Media/Bluetooth. See Figure 7.
④ Test your car’s stereo.
You’ll hear a tone to test the connection.
*The firmware update may be not necessary for later versions.
12 English English 13
Page 9
Using the Google Assistant
Charging Your Devices
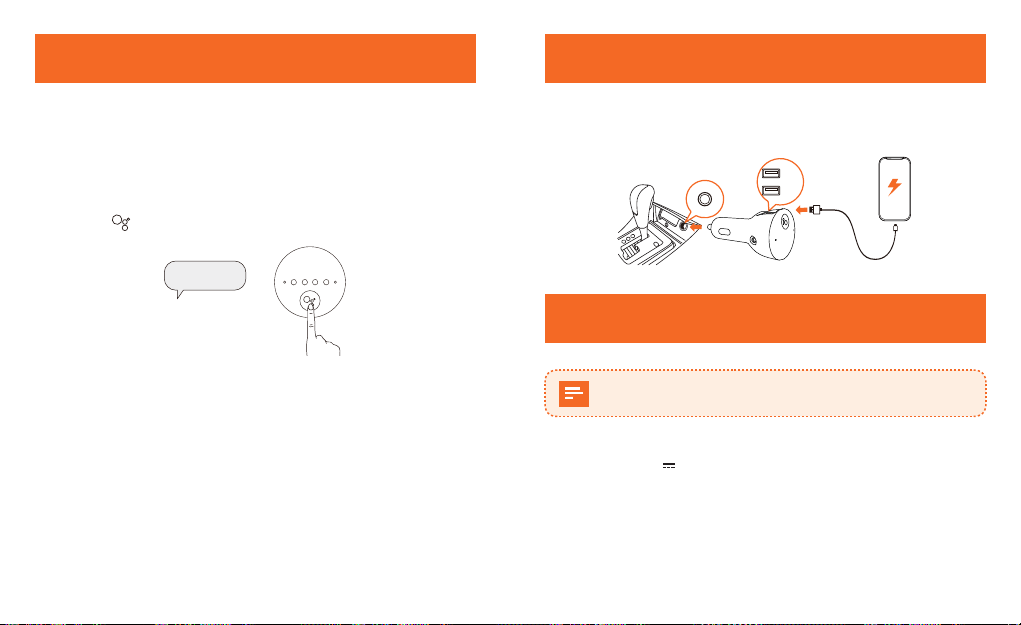
The Google Assistant helps you get things done with just your
voice. You can play music, get turn-by-turn navigation, call,
message, manage everyday tasks, and easily control smart devices
by using your voice.
To use the Google Assistant, say “OK Google” or “Hey Google”, or
Roav Bolt has two USB charging ports. You can charge two devices
at the same time with a maximum output of 5V / 4.8A.
2.4 A
2.4 A
short press for 0.5 seconds.
OK Google......
or
Specifications
- Roav Bolt will respond instantly.
- Visit assistant.google.com/ for more information, or download
the Google Assistant app on your iOS/Android device.
- To enable more functions on your device, please visit the "What it
can do" page on assistant.google.com/ .
14 English English 15
Specifications are subject to change without notice.
DC input: 12V - 24V
Power output: 5V 4.8A max
Bluetooth: V4.2
Bluetooth transmission distance: 33ft / 10m
AUX out: 3.5 mm audio output
Operating temperature range: -4°F to 104°F / -20°C to 40°C
Storage temperature range: -40°F to 185°F / -40°C to 85°C
Page 10
Troubleshooting
Notice
Roav Bolt cannot connect to your phone.
• Unplug your Roav Bolt, and then plug it back in.
• On your phone, turn o Bluetooth, and then turn it on.
• On your phone’s Bluetooth settings, remove the Roav Bolt.
Roav Bolt won’t respond.
• If your Roav Bolt won’t respond to your voice, press the Google
Assistant button on the device.
• If you don’t hear a response after pressing the Google Assistant
button, turn up the car volume.
• If your Roav Bolt still doesn’t respond, reset your device.
No AUX output or Bluetooth.
• Try connecting Roav Bolt to an FM transmitter or a cassette
adapter with a 3.5mm cable.
• Choose the AUX option during setup.
• To use a cassette adapter, your car must have a cassette player.
16 English English 17
This product complies with the radio interference
requirements of the European Community.
Declaration of Conformity
Hereby, Anker Innovations Limited declares that this device is in
compliance with the essential requirements and other relevant
provisions of Directive 2014/53/EU.For the declaration of
conformity, visit the Web site www.goroav.com.
This product can be used across EU member states.
The product shall only be connected to a USB Interface of version
2.0 or higher.
The device complies with RF specifications when the device used at
20mm from your body.
BT Operating Frequency Range: 2402-2480 MHz; Bluetooth Max
Output Power:8.79dBm
The following importer is the responsible party (contact for EU
matters only)
Importer:Anker Technology (UK) Ltd
Importer Address:Suite B, Fairgate House, 205 Kings Road, Tyseley,
Birmingham, B11 2AA, United Kingdom
This product is designed and manufactured with high quality
materials and components, which can be recycled and
reused.
Page 11

This symbol means the product must not be discarded as
household waste, and should be delivered to an appropriate
collection facility for recycling. Proper disposal and recycling
helps protect natural resources, human health and the
environment. For more information on disposal and recycling
of this product, contact your local municipality, disposal
service, or the shop where you bought this product.
will not occur in a particular installation. If this equipment does
cause harmful interference to radio or television reception, which
can be determined by turning the equipment o and on, the user is
encouraged to try to correct the interference by one or more of the
following measures: (1) Reorient or relocate the receiving antenna.
(2) Increase the separation between the equipment and receiver.
(3) Connect the equipment into an outlet on a circuit dierent from
that to which the receiver is connected. (4) Consult the dealer or
an experienced radio/TV technician for help.
FCC Radio Frequency Exposure Statement
FCC Statement
This device complies with Part 15 of the FCC Rules. Operation
is subject to the following two conditions: (1) this device may
not cause harmful interference, and (2) this device must accept
any interference received, including interference that may cause
undesired operation.
Warning: Changes or modifications not expressly approved by the
party responsible for compliance could void the user's authority to
operate the equipment.
Note: This equipment has been tested and found to comply with
the limits for a Class B digital device, pursuant to Part 15 of the FCC
Rules. These limits are designed to provide reasonable protection
against harmful interference in a residential installation.
This equipment generates uses and can radiate radio frequency
energy and, if not installed and used in accordance with
the instructions, may cause harmful interference to radio
communications. However, there is no guarantee that interference
18 English English 19
The device has been evaluated to meet general RF exposure
requirements. The device can be used in fixed/mobile exposure
condition. The min separation distance is 20cm.
The following importer is the responsible party.
Company Name: Fantasia Trading LLC
Address: 9155 Archibald Avenue, Suite 202, Rancho Cucamonga,
CA, 91730, US
Telephone: +1 (909) 484 1530
IC Statement
This device complies with Industry Canada licence-exempt RSS
standard(s). Operation is subject to the following two conditions:
(1) this device may not cause interference, and
(2) this device must accept any interference, including interference
that may cause undesired operation of the device."
Le présent appareil est conforme aux CNR d'Industrie Canada
Page 12
applicables aux appareils radio exempts de licence. L'exploitation
est autorisée aux deux conditions suivantes:
(1) l'appareil nedoit pas produire de brouillage, et
(2) l'utilisateur de l'appareil doit accepter tout brouillage
radioélectrique subi, même si le brouillage est susceptible d'en
compromettre le fonctionnement."
This Class B digital apparatus complies with Canadian ICES-003.
Cet appareil numérique de la classe B est conforme à la norme
NMB-003 du Canada.
IC RF Statement:
When using the product, maintain a distance of 20 cm from the
body to ensure compliance with RF exposure requirements.
Lors de l'utilisation du produit, maintenez une distance de 20
cm du corps afin de vous conformer aux exigences en matière
d'exposition RF.
20 English English 21
Google, Google Play, Android, and related marks and logos
are trademarks of Google LLC. The Google Assistant is not
available in certain languages and countries. Requires pairing
with eligible phone and Internet connection. Requires Internet
connection. Availability of services varies by country and language.
Subscriptions for services may be required.
Apple and the Apple logo are trademarks of Apple Inc., registered
in the U.S. and other countries.
“Android” is a registered trademark of Google LLC in the United
States and other countries.
“iOS” is a registered trademark of Apple Inc. in the United States
and other countries.
The Bluetooth® word mark and logos are registered trademarks
owned by Bluetooth SIG, Inc.
Other trademarks and trade names are those of their respective
owners.
Trademark
Page 13
Customer Service
12-month limited warranty
Lifetime technical support
(US) +1 (800) 988 7973 Mon-Fri 9:00am-5:00pm (PT)
Anker Innovations Limited
Room 1318-19, Hollywood Plaza, 610 Nathan Road, Mongkok,
Kowloon, Hong Kong
© Anker Innovations Limited. All rights reserved. ROAV and the
ROAV logo are trademarks of Anker Innovations Limited, registered
in the United States and other countries.
22 English
Page 14

 Loading...