

Page 1
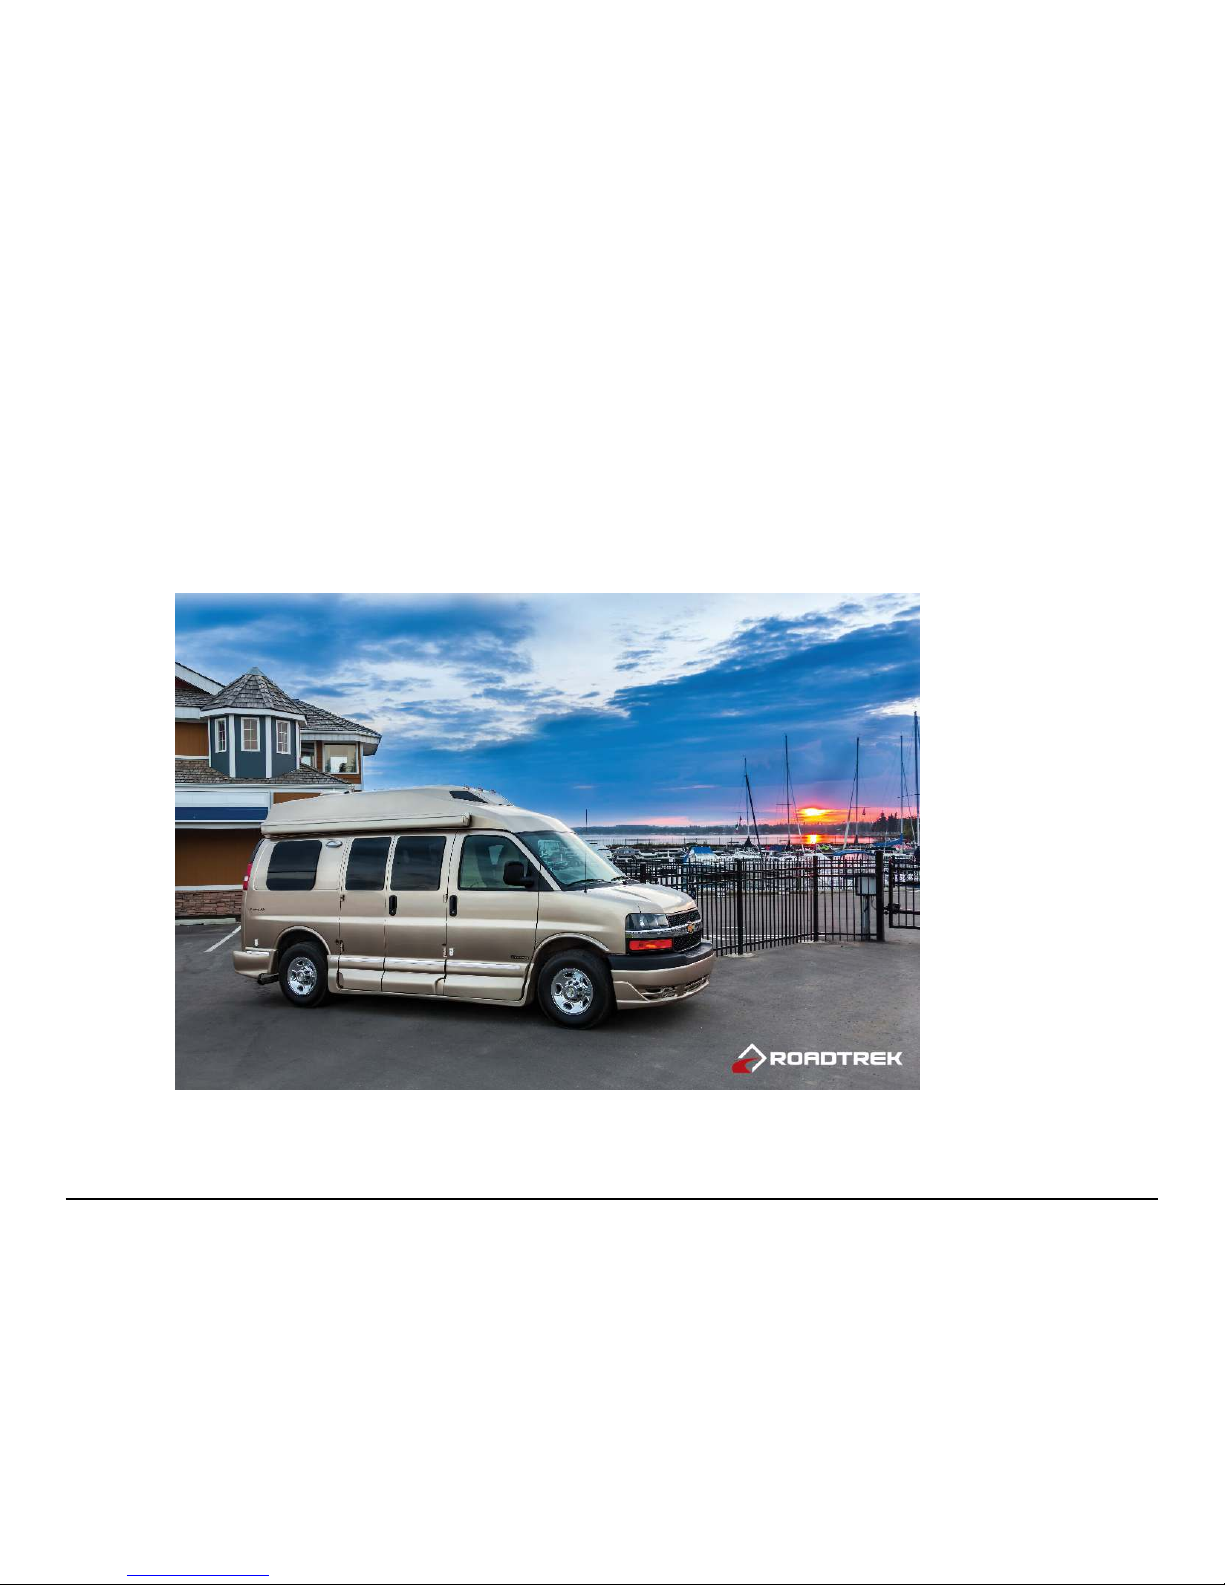
Roadtrek, Inc.
PDF generated at: Thu, 04 Sep 2014 13:59:53 EDT
Owner's Manual
170 Versatile
Page 2

Contents
Articles
Introduction 1
Copyright 2
Do's and Don'ts 3
Before you head out 8
Coming Home 9
Interior Living Space 11
Sleeping Facilities 22
Bathroom Facilities 25
Appliances 27
Outside your Roadtrek 31
Utilities 37
Propane System 40
Heating and Cooling 44
Electrical System 47
Monitor Panel 53
Distribution Panel 58
Alarms and Warnings 59
Page 3

Maintenance 61
Spare Tire Storage 65
Obtaining Service 67
Specifications 68
Warranty 69
Registration 73
Regulatory Notices 75
HOWTO: Monitor Panel 76
HOWTO: Setting Up Your Campsite 82
HOWTO: Shore Power 86
HOWTO: Potable Water Use 90
HOWTO: Waste Water Dumping 93
HOWTO: Cable and TV Reception 101
HOWTO: Propane System 106
HOWTO: Water System Winterizing 113
HOWTO: De-Winterizing 120
Page 4

Introduction
1
© 2014 by Roadtrek, Inc.
Introduction
Congratulations on the purchase of your Roadtrek and welcome to the Roadtreking family. The information included in this
manual is meant to help and guide you through the use of your vehicle so that you know how to properly use the many
functions your Roadtrek has to offer.
Please keep this manual in your vehicle as a reference for when you are travelling. If you have any questions or comments on
information found in this document please contact us at [email protected]
[1]
or 1-888-ROADTREK.
References
[1] mailto:manuals@roadtrek. com
Page 5

Copyright
2
© 2014 by Roadtrek, Inc.
Copyright
This manual is released under a Creative Commons Attribution-NonCommercial-NoDerivatives 4.0
International License
[1]
.
In summary, you may:
•• Copy any portion of this manual in any form for personal use;
•• Distribute this manual complete with all of its original unmodified content;
•• Modify this manual for your own personal, non-commercial use.
You may not:
•• Use this manual for any commercial use whatsoever;
•• Modify this manual except as provided for in the full license and then distribute the resulting work;
•• Charge for this manual other than reasonable media and shipping costs.
All images used in this manual remain the property of Roadtrek, Inc. They are for illustrative purposes only and may or may
not be representative of the upfits in your Roadtrek.
Contact Roadtrek, Inc. for alternate licensing arrangements if you want to use or distribute this manual commercially.
References
[1] http:/ / creativecommons. org/ licenses/ by-nc-nd/ 4. 0/
Page 6
Do's and Don'ts
3
© 2014 by Roadtrek, Inc.
Do's and Don'ts
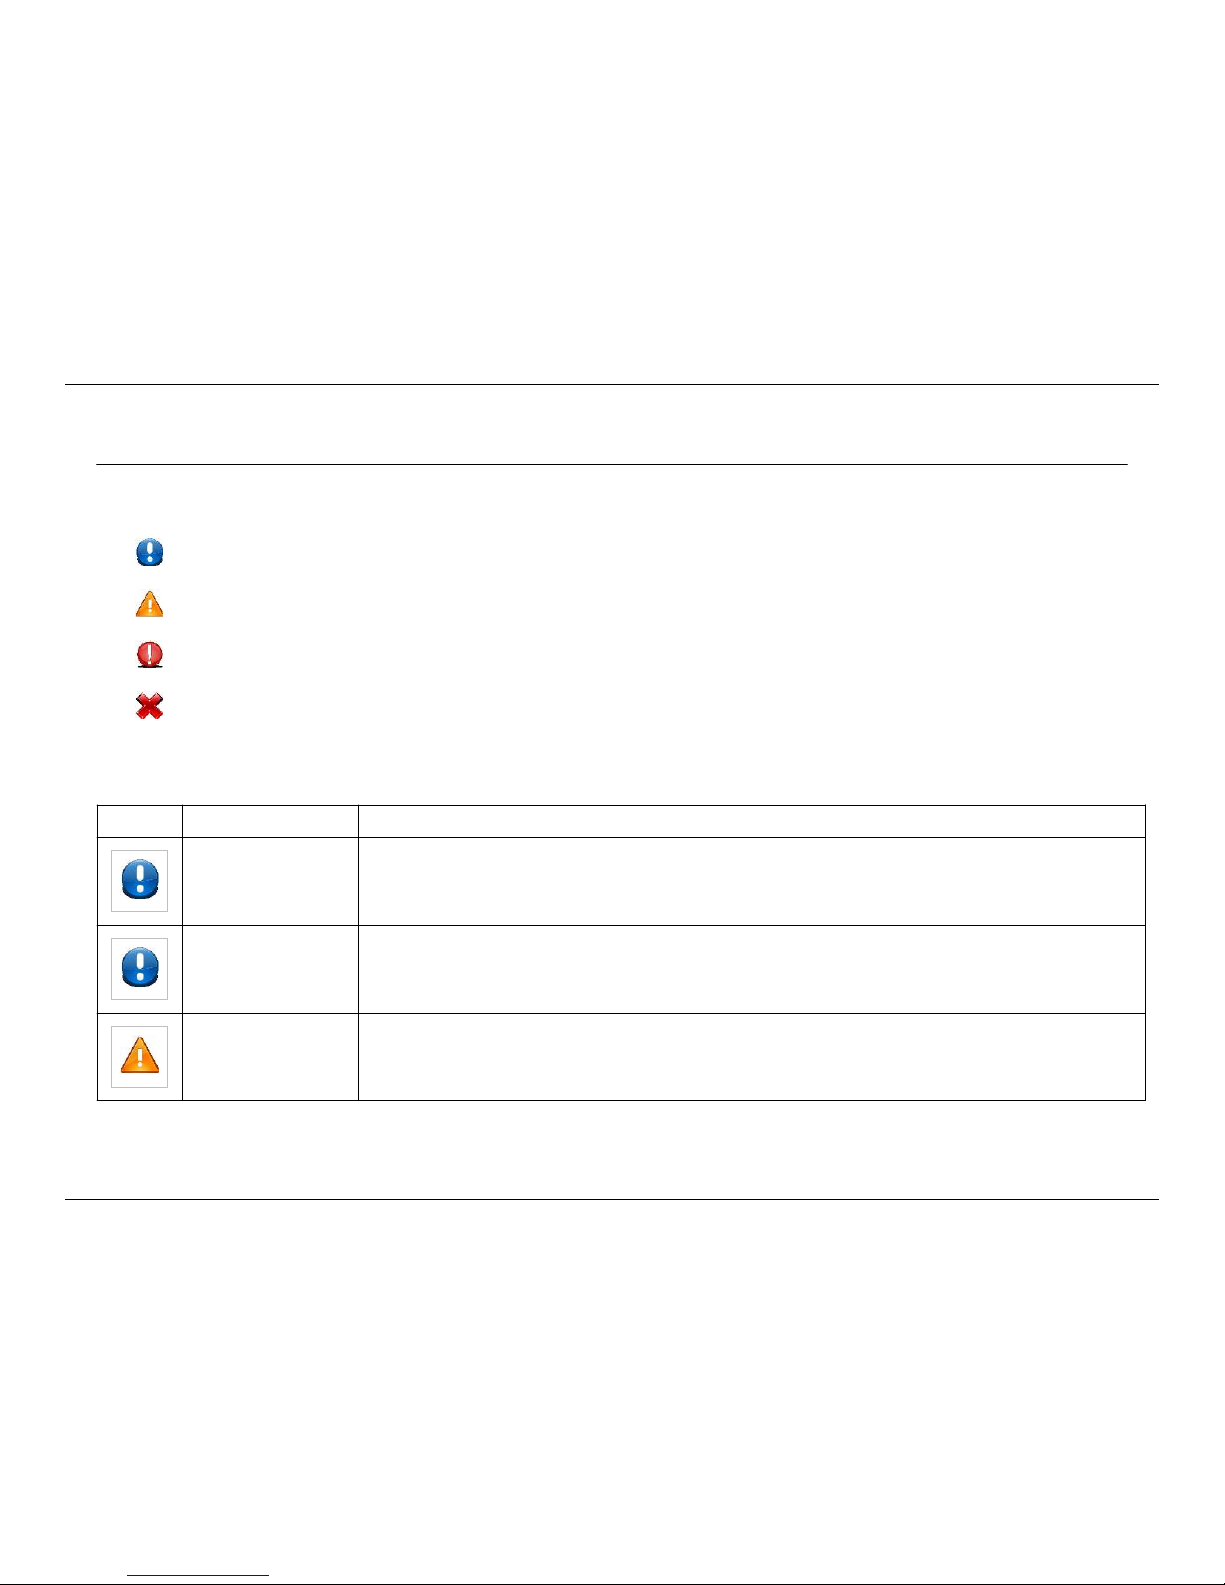
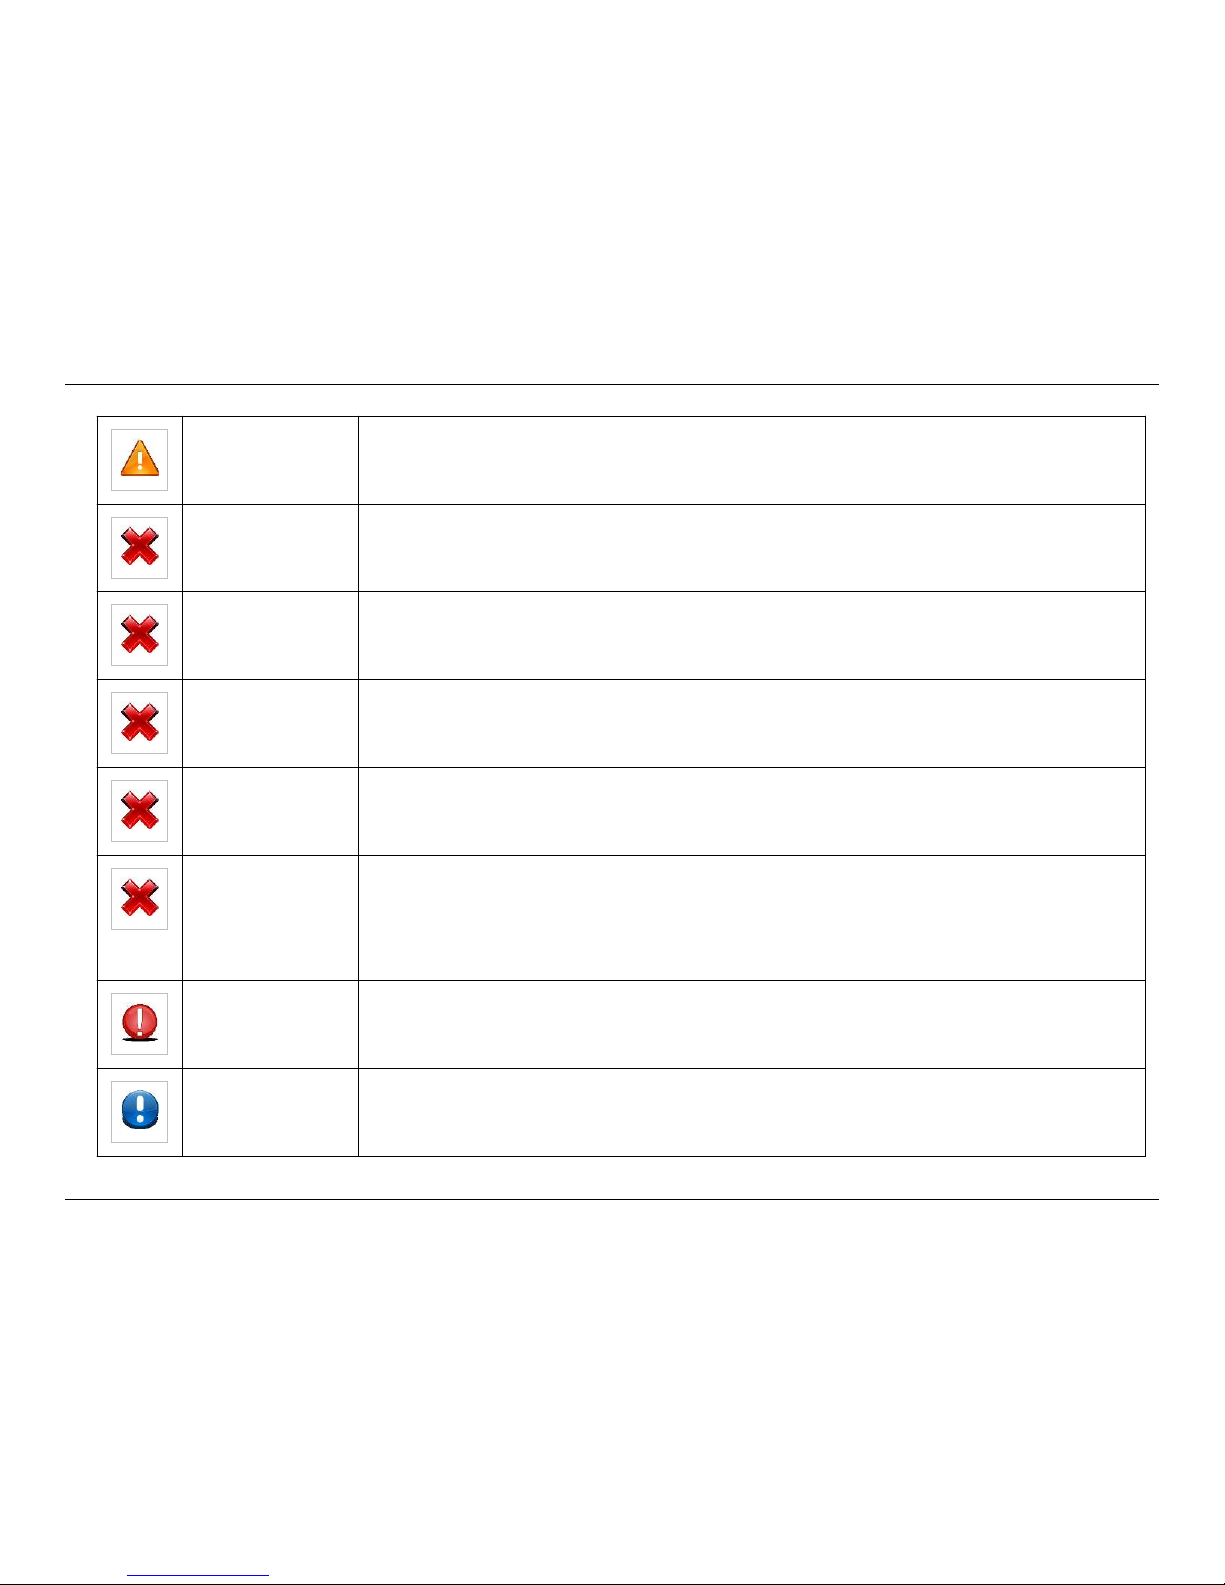
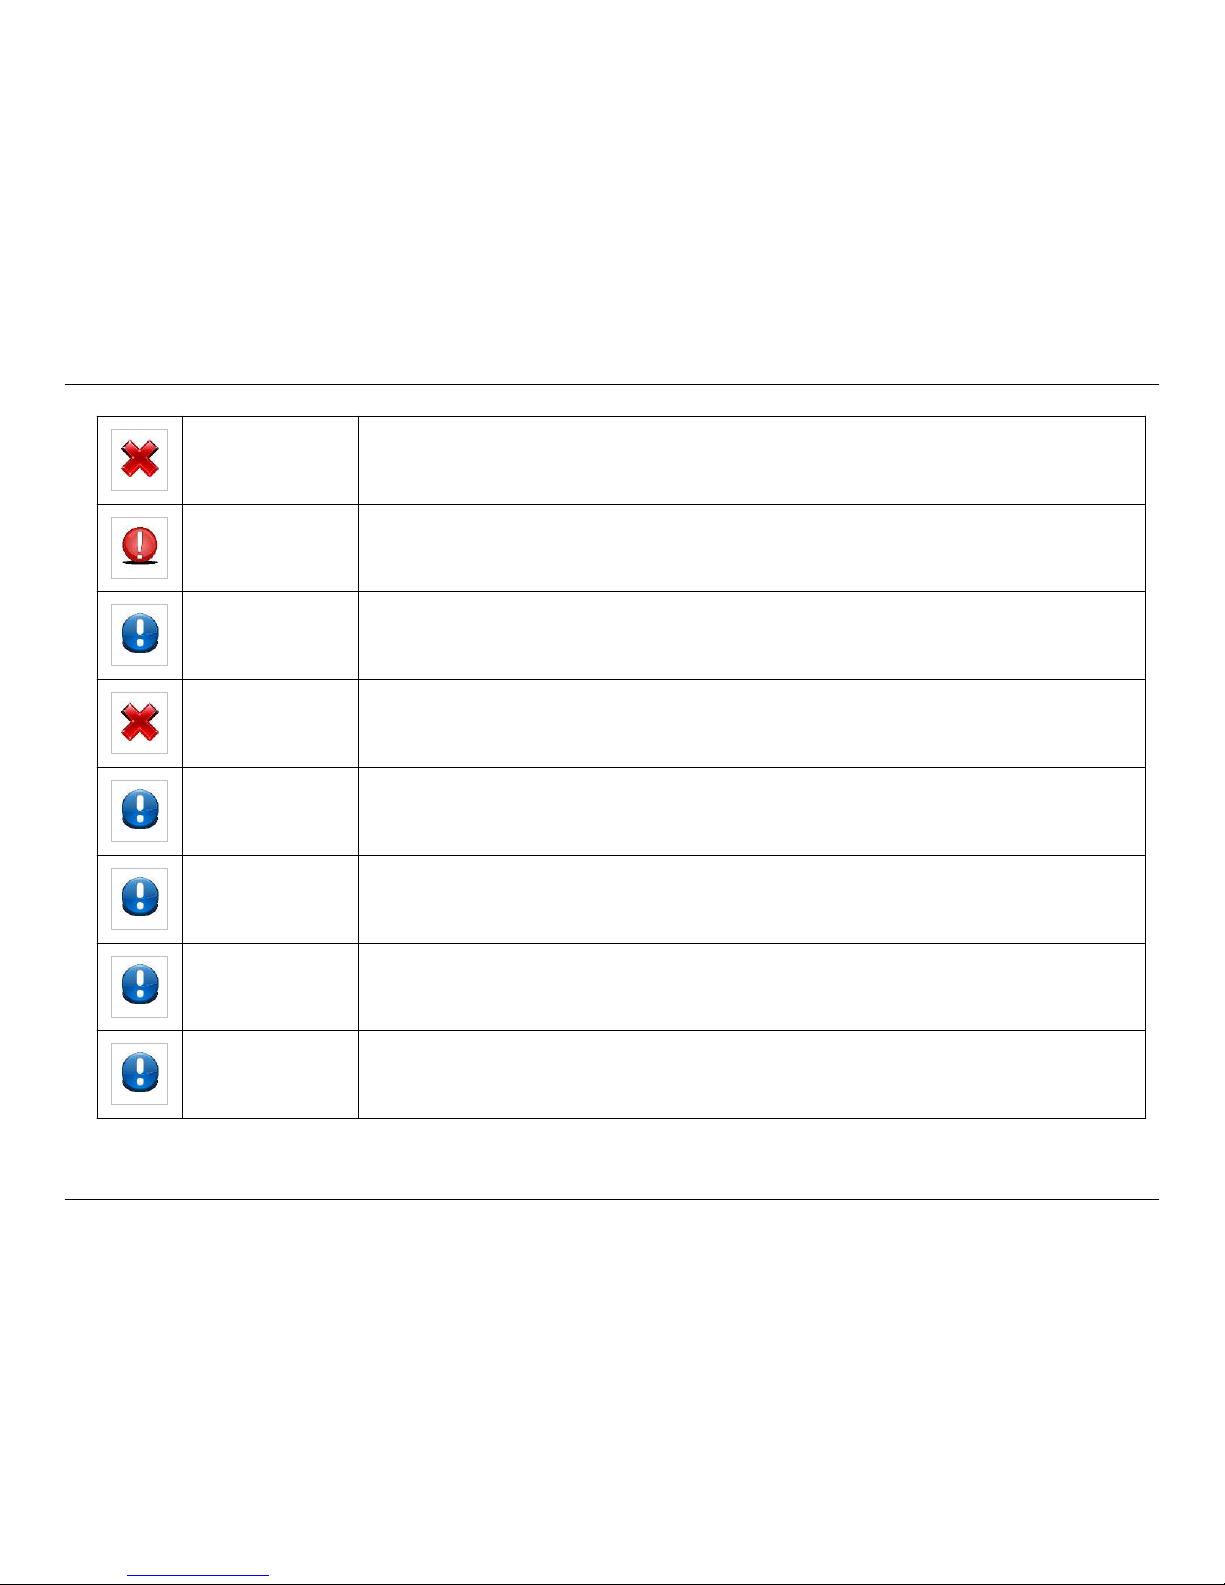
Symbol Legend
For your information. May be useful information to know.
Warning. Not following this can lead to bad results.
Caution. You really should follow this to avoid bad results.
Don't do it. Doing this can result in injury, severe damage, or death.
Information, cautions, and warnings
Level Item Comment
SEAT BELTS Use only forward facing seats equipped with factory installed seat belts while the vehicle is in
motion. All passengers must be seated in these seats only, with the seat belts fastened while
the vehicle is in motion.
TV Turn the TV off and stow it while the vehicle is in motion.
TV The flat screen TV should not be stored inside the Roadtrek in cold temperatures. Remove it to
reduce the chance of damage from the cold. Check the Owner's Manual for the TV for storage
and operating temperatures.
Page 7
Do's and Don'ts
4
© 2014 by Roadtrek, Inc.
TV To remove the TV, remove the four mounting bolts on the back of the TV mounting bracket
and remove the RCA cables, power supply cable and antenna cable.
PROPANE Do not store propane tanks inside your vehicle. Propane tanks are equipped with safety
devices which relieve excessive pressure by discharging gas to the atmosphere.
PROPANE Do not refuel the propane tank to more than 80% of its capacity.
PROPANE The propane tank valve must be closed and ALL PILOT LIGHTS, APPLIANCES, AND THEIR
IGNITERS, MUST BE TURNED OFF during refueling of the motor fuel tank and/or the propane
fuel tank. Only qualified personnel should refuel your propane tank.
PROPANE Purchase propane from a reputable propane facility. Contaminated propane is a common
cause of system failure and is not covered under any warranty.
PROPANE The BBQ quick disconnect is regulated to 10 P.S.I. Please ensure that all devices connected to
this are either rated for “high pressure” or have their own regulator. Many grills sold in the
United States are "low pressure" (1/2 P.S.I.) and will require an additional regulator to step the
pressure down to a useable level. If hooked directly to the BBQ quick disconnect they will be a
severe fire hazard.
PROPANE LEAK
DETECTOR
Do not block the air circulation in the area where the Propane Leak Detector is located.
PROPANE LEAK
DETECTOR
Battery disconnect switch must be in the “ON” position for the propane detector to function.
Page 8
Do's and Don'ts
5
© 2014 by Roadtrek, Inc.
FLAMMABLE
LIQUIDS AND
GASSES
Do not store gasoline or other flammable liquids inside your vehicle.
HEATING Never use cooking appliances or unvented propane heaters for space heating purposes. They
need fresh air for safe operation.
HEATING The heating furnace provides its own outside combustion air and exhausts to the outside.
HEATING Portable fuel burning equipment, including wood, charcoal, and liquid fuel grills and stoves,
should not be used inside your vehicle. Use of this type of equipment inside your vehicle may
cause a fire or asphyxiation.
CARBON MONOXIDE
LEAK DETECTOR
Do not block the air circulation in the area where the Carbon Monoxide Leak Detector is
located
CARBON MONOXIDE
LEAK DETECTOR
Battery disconnect switch must be in the “ON” position for the Carbon Monoxide Leak Detector
to function.
110 VOLT
ELECTRICAL
SERVICING
Prior to servicing the 110 volt Galley GFCI & Audio/Video cabinet interior receptacles, unplug
the output lead from the power inverter.
EXTERIOR ACCESS
DOORS
Ensure the shore power cord and city water supply lines are disconnected and in their stored
positions before the vehicle is put in motion.
Page 9
Do's and Don'ts
6
© 2014 by Roadtrek, Inc.
AWNINGS Close the sliding side door prior to opening or closing the awning.
CLOVERLEAF
DINING TABLE
The cloverleaf dining table is heavy. Use proper lifting techniques.
EXTRA COUNTER
SPACE
Make sure the stove is off and has cooled prior to lowering the stove cover.
BATTERY Battery acid can burn your skin and damage clothing. Protective eye wear and gloves should
be worn while handling batteries. Effective June 2010 all Roadtrek installed batteries
are sealed AGM batteries that do no require the addition of water.
BATTERY Disconnect the inverter/charger prior to disconnecting the auxiliary battery.
GENERATOR Never submerge the generator. Use a spotter when launching a boat or crossing streams.
GENERATOR When using the generator as the main power source to run the appliances, refer to the
generator owner’s manual for proper use and maintenance.
GENERATOR The generator cannot run all the appliances at the same time.
Page 10
Do's and Don'ts
7
© 2014 by Roadtrek, Inc.
WASTE WATER
STORAGE AND
DUMPING SYSTEM
Close both the black and gray water gate valves before using the waste water system.
FREEZING Under moderate subfreezing conditions, antifreeze is required in the exterior fresh water tank,
black and gray waste water tanks. Use RV antifreeze in accordance with the manufacturer's
instructions.
ELECTRICAL
SERVICING
This unit has 12 volt, 110 volt and potentially 36 volt solar system. These systems need to be
disconnected before working on them.
GENERATOR The generator is not compatible with E-85 fuel. If the vehicle is equipped with a generator,
avoid the use of E-85 fuel.
ENGINE BATTERY The Chevrolet engine battery will be drawn down by the GM electronics to a no-start condition
if left unattended for extended periods. Plug the vehicle in, drive the vehicle for at least three
hours every two weeks to keep the engine and auxiliary batteries charged, or disconnect the
engine battery to keep it in good condition. Battery maintenance is the vehicle owner’s
responsibility.
Page 11

Before you head out
8
© 2014 by Roadtrek, Inc.
Before you head out
Your new Roadtrek is ready to go with just a little bit of preparation.
To prepare for your first trip, you should:
•• Read this manual.
•• Contact your dealer with any questions.
•• Plan your trip.
Then use this quick checklist.
•• The day before your trip:
•• charge your batteries by plugging in overnight
•• cool your refrigerator by turning it on
•• chill any beverages in your home refrigerator
•• fill your fresh water tank with clean tap water
•• The day of the trip:
•• Load the refrigerator with cold food (from your home refrigerator)
Page 12
Coming Home
9
© 2014 by Roadtrek, Inc.
Coming Home
When you come home, there are a few maintenance tasks you should do to get your Roadtrek ready to go for next time.
Refer to other sections in this manual for the procedures listed here.
• On your way home, dump the gray and black tanks at a convenient facility. See the HOWTO: Waste Water Dumping section
for a concise description of the procedure to do this. Some RV parks and gas stations will let you dump for a fee, some city
wastewater plants will let you dump for free, but there is no real pattern, so local knowledge is vital in locating dump
stations. The website http:/ / www. sanidumps. com is a good resource. The maps for each state and province are
especially helpful: http:/ / www. sanidumps. com/ maps/ help. php
•• At home, flush the water tank and fill it with fresh chlorinated water if you will be using it in the next few days. Otherwise,
drain the tank. Don't let water you are planning to use sit in your tank for more than a week or so, and don't let ANY water
sit in your tank for more than two weeks, whether you plan on using it or not. Over time, the chlorine goes away, and the
microbes come out to play.
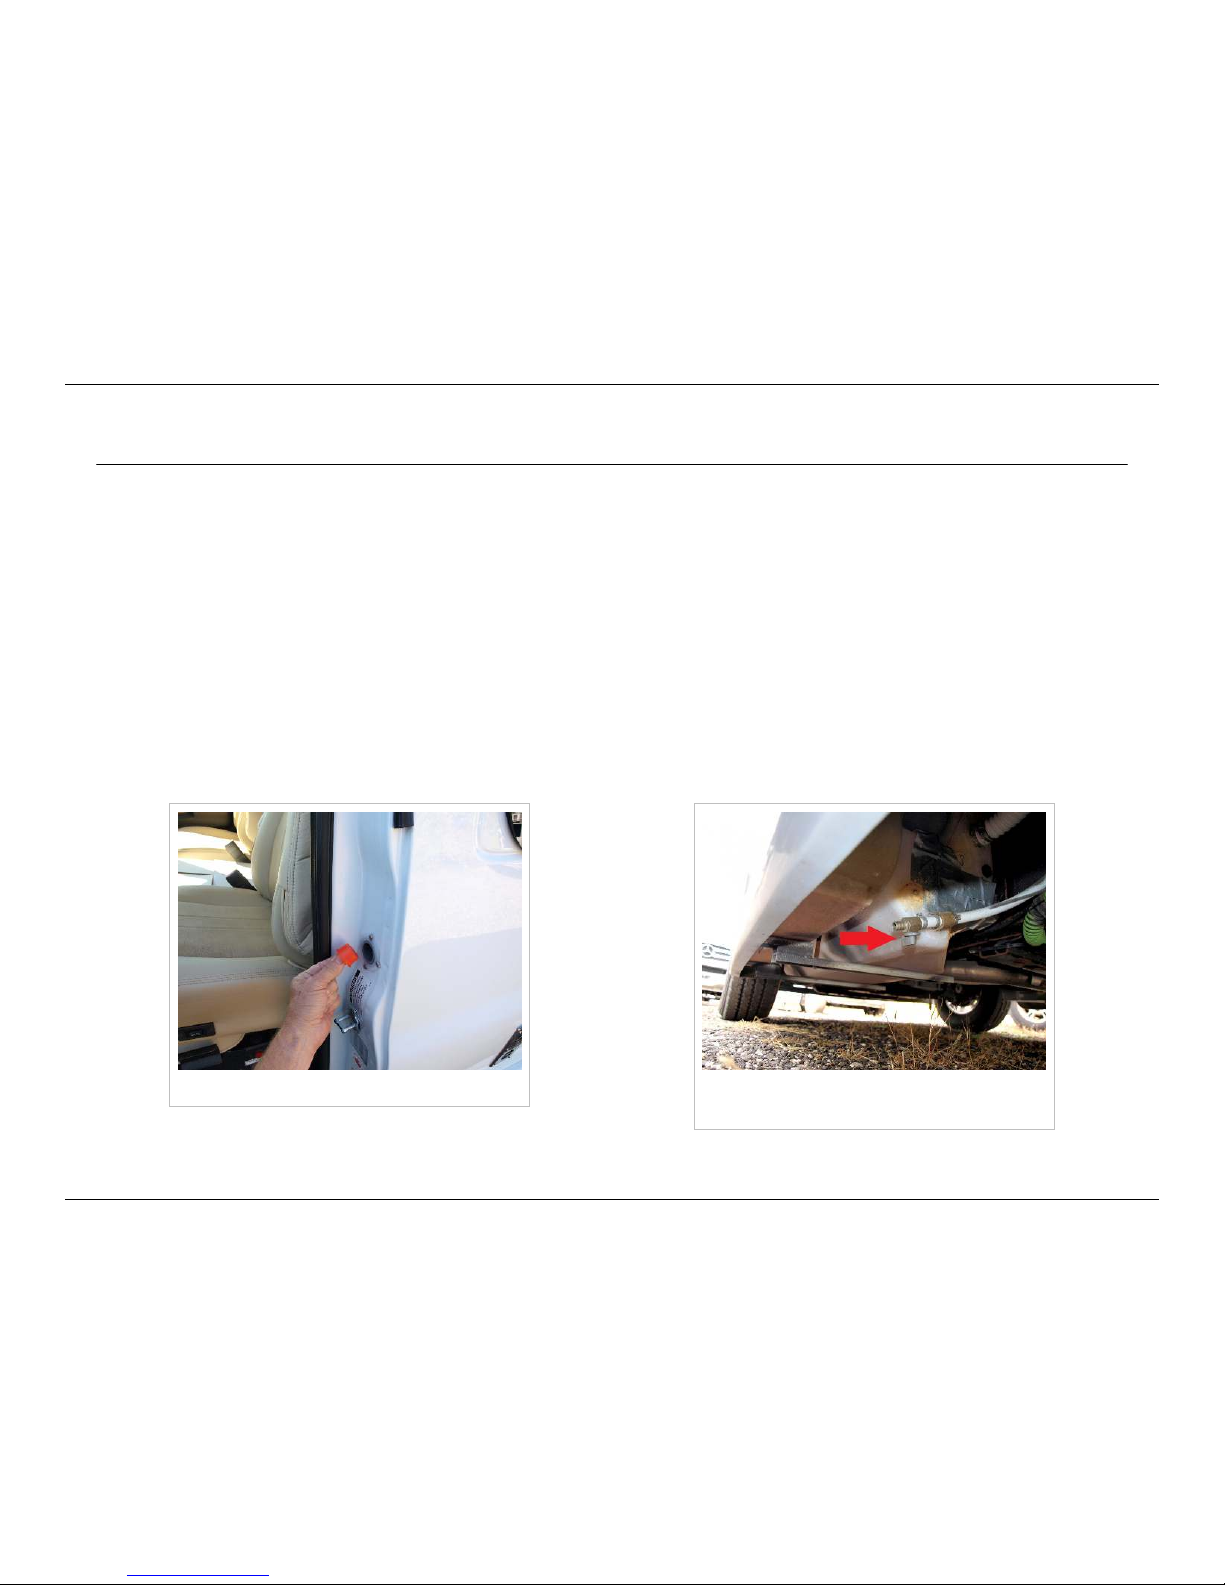
•• To flush the tank, fill it using the gravity fill in the driver's doorframe, and open the fresh water tank drain under the rear of
the driver's doorstep.
Gravity fill in driver's doorframe Fresh water tank drain, under driver's
doorstep
Page 13
Coming Home
10
© 2014 by Roadtrek, Inc.
•• Plug in overnight to fully charge batteries.
•• Turn off and clean out the refrigerator and prop the door open to let it air out
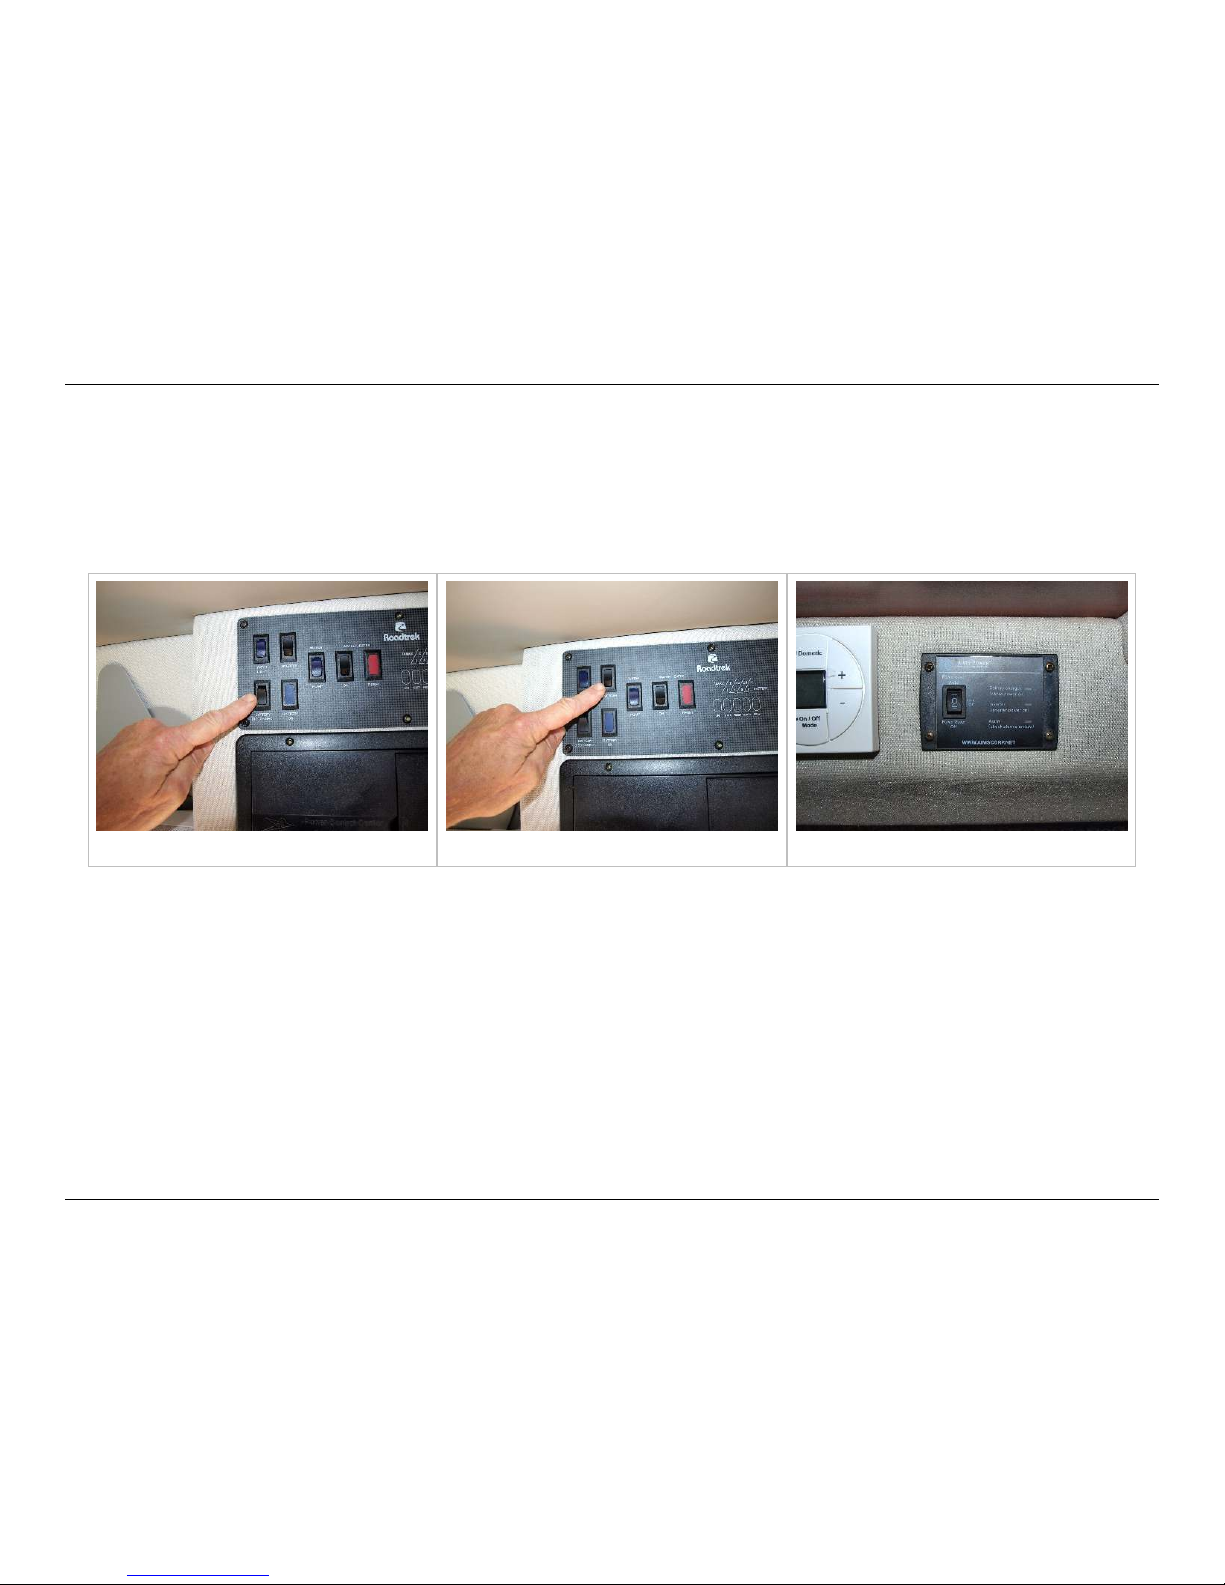
•• Turn off two important switches to keep from draining your batteries
•• the battery disconnect switch on your monitor panel
•• the inverter switch, either on your monitor panel with the standard inverter, or just to the left of it on the separate
inverter switch if you have a big inverter
Battery disconnect switch Standard inverter switch Inverter switch for big inverter
•• If you turn everything off and you have solar panels, the panels will keep your coach batteries topped up while your
Roadtrek is parked. If you don't have solar panels, it would be prudent to check your coach battery state of charge every
month or so and charge them if necessary. If you don't turn everything off, even with solar panels, you will probably come
back to dead batteries.
That's it! You're ready for the next trip.
Page 14
Interior Living Space
11
© 2014 by Roadtrek, Inc.
Interior Living Space
Cabinets
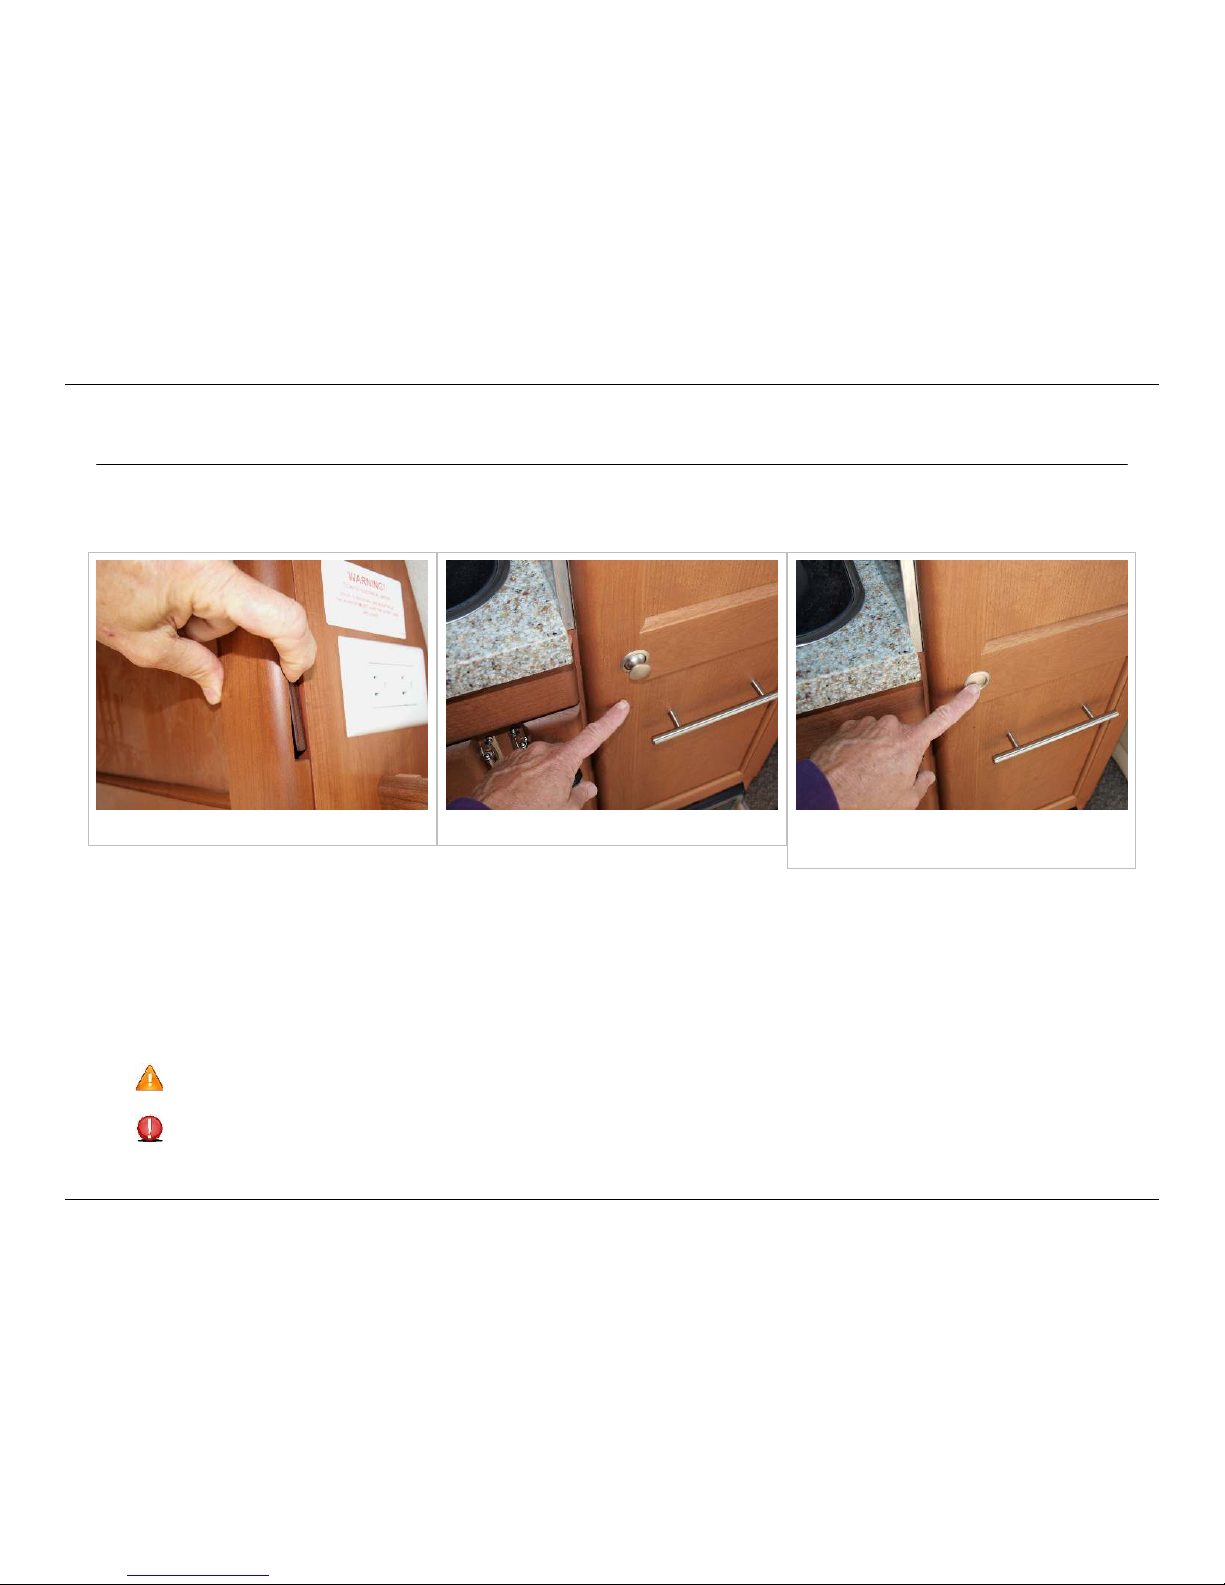
Hidden latch along edge of cabinet door Pushbutton latch on cabinet door Locked pushbutton latch on cabinet
door
Cabinet latches in your Roadtrek are different from the ones in your home and more like those on boats - they have to stay
closed when the vehicle is in motion. The cabinet doors are secured with latches located along the edge of the cabinet door.
Run your fingers along the edge and you will find the latch. Press the latch in and open the door.
The cabinet behind the driver's seat uses a pushbutton latch. Press the pushbutton in to latch the door securely; press again
to release the latch so that you can pull the door open.
To close a cabinet door, shut it gently until you hear the latch click shut. You may need to press on the latch to get it to latch
closed.
Do not slam the cabinet door in order to latch it - this will damage the latch.
Do not store large, round, and/or heavy objects in a cabinet unsecured - they will roll around and apply excessive
pressure to the inside of the cabinet doors as you drive. Even if the force of such objects doesn't break the latch, they
Page 15
Interior Living Space
12
© 2014 by Roadtrek, Inc.
can shift position with vehicle motion and be leaning against the inside of the cabinet door, waiting to fall when you open
the cabinet. For this reason, Roadtrek recommends that you not store anything in the overhead cabinets that you
wouldn't want to get hit over the head with.
Galley Counter and Cabinets
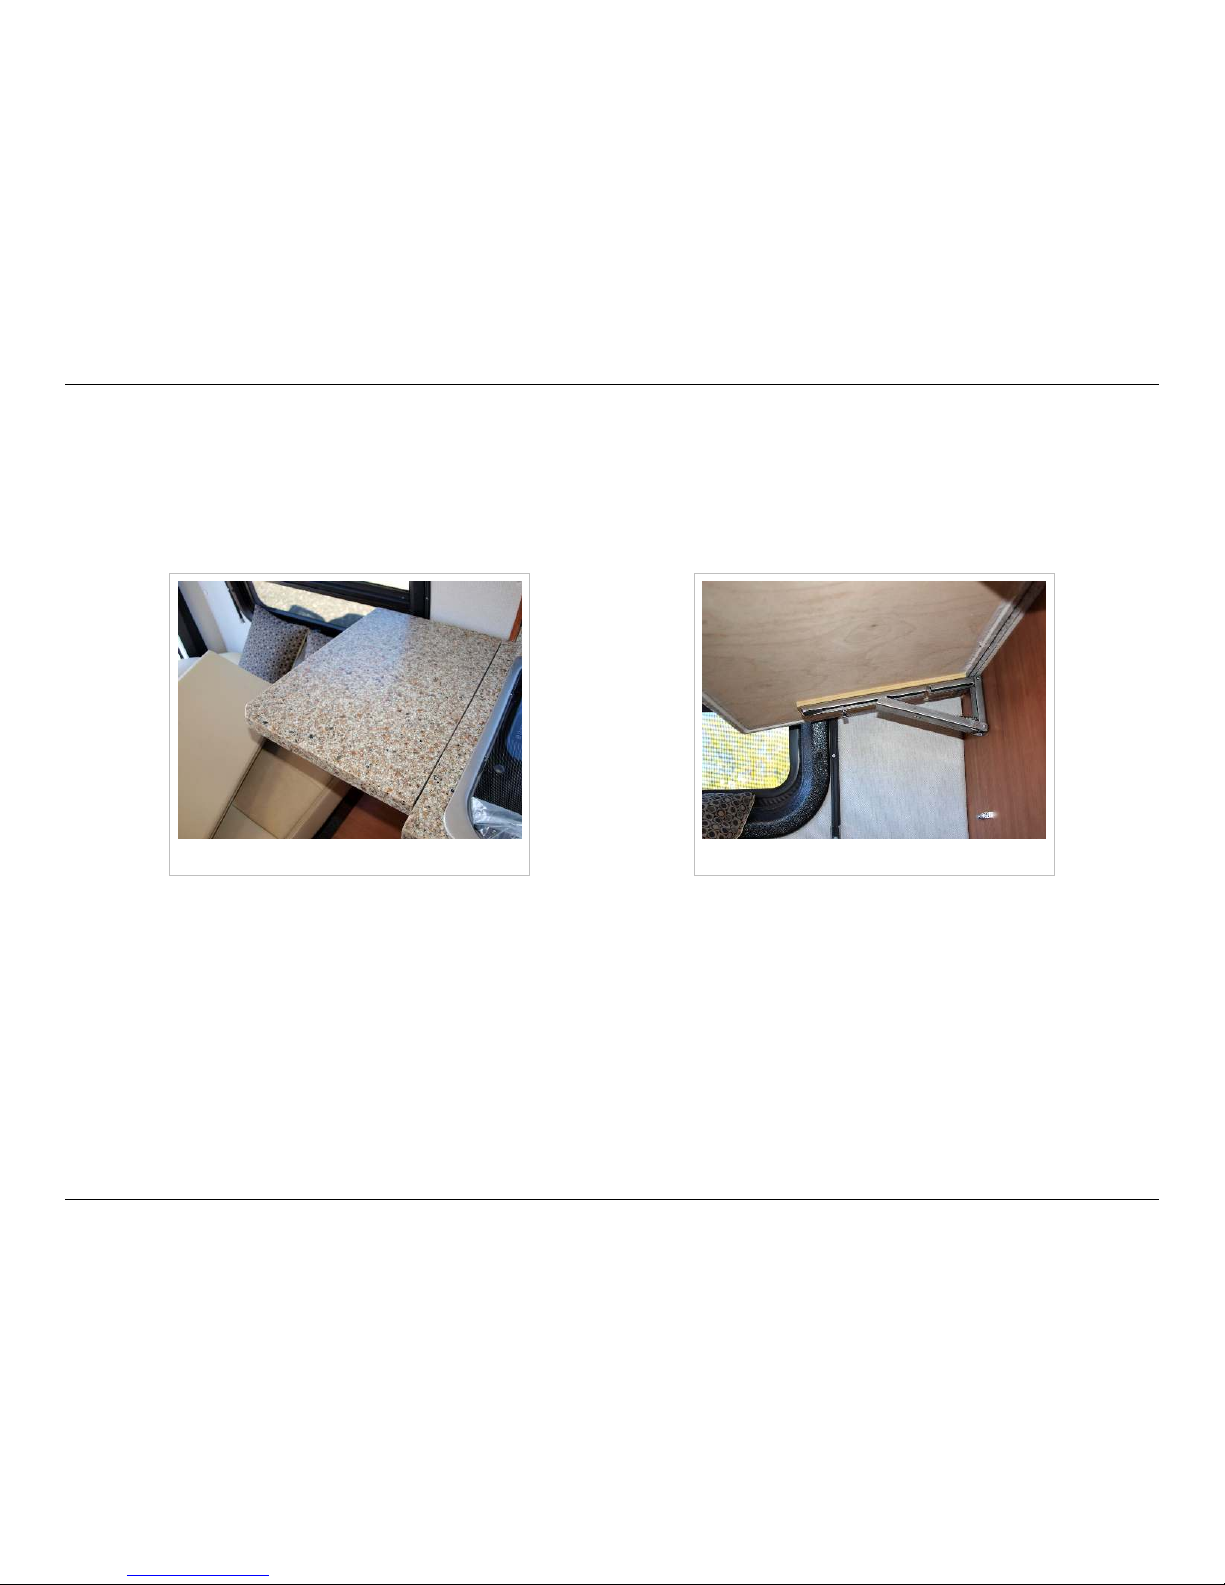
Galley counter extension Galley counter extension support
You can extend the galley counter by flipping up the galley counter extension. Use the support brackets at each end to hold it
up. To re-stow the extension in the down position, pull up with one hand while slipping the two supports out of the notches in
the track on the extension top.
Beneath the galley countertop there are drawers to the left and right of the food preparation surface to hold silverware and
cooking utensils. The center panel is fixed, and is not a drawer.
Page 16
Interior Living Space
13
© 2014 by Roadtrek, Inc.
Lights
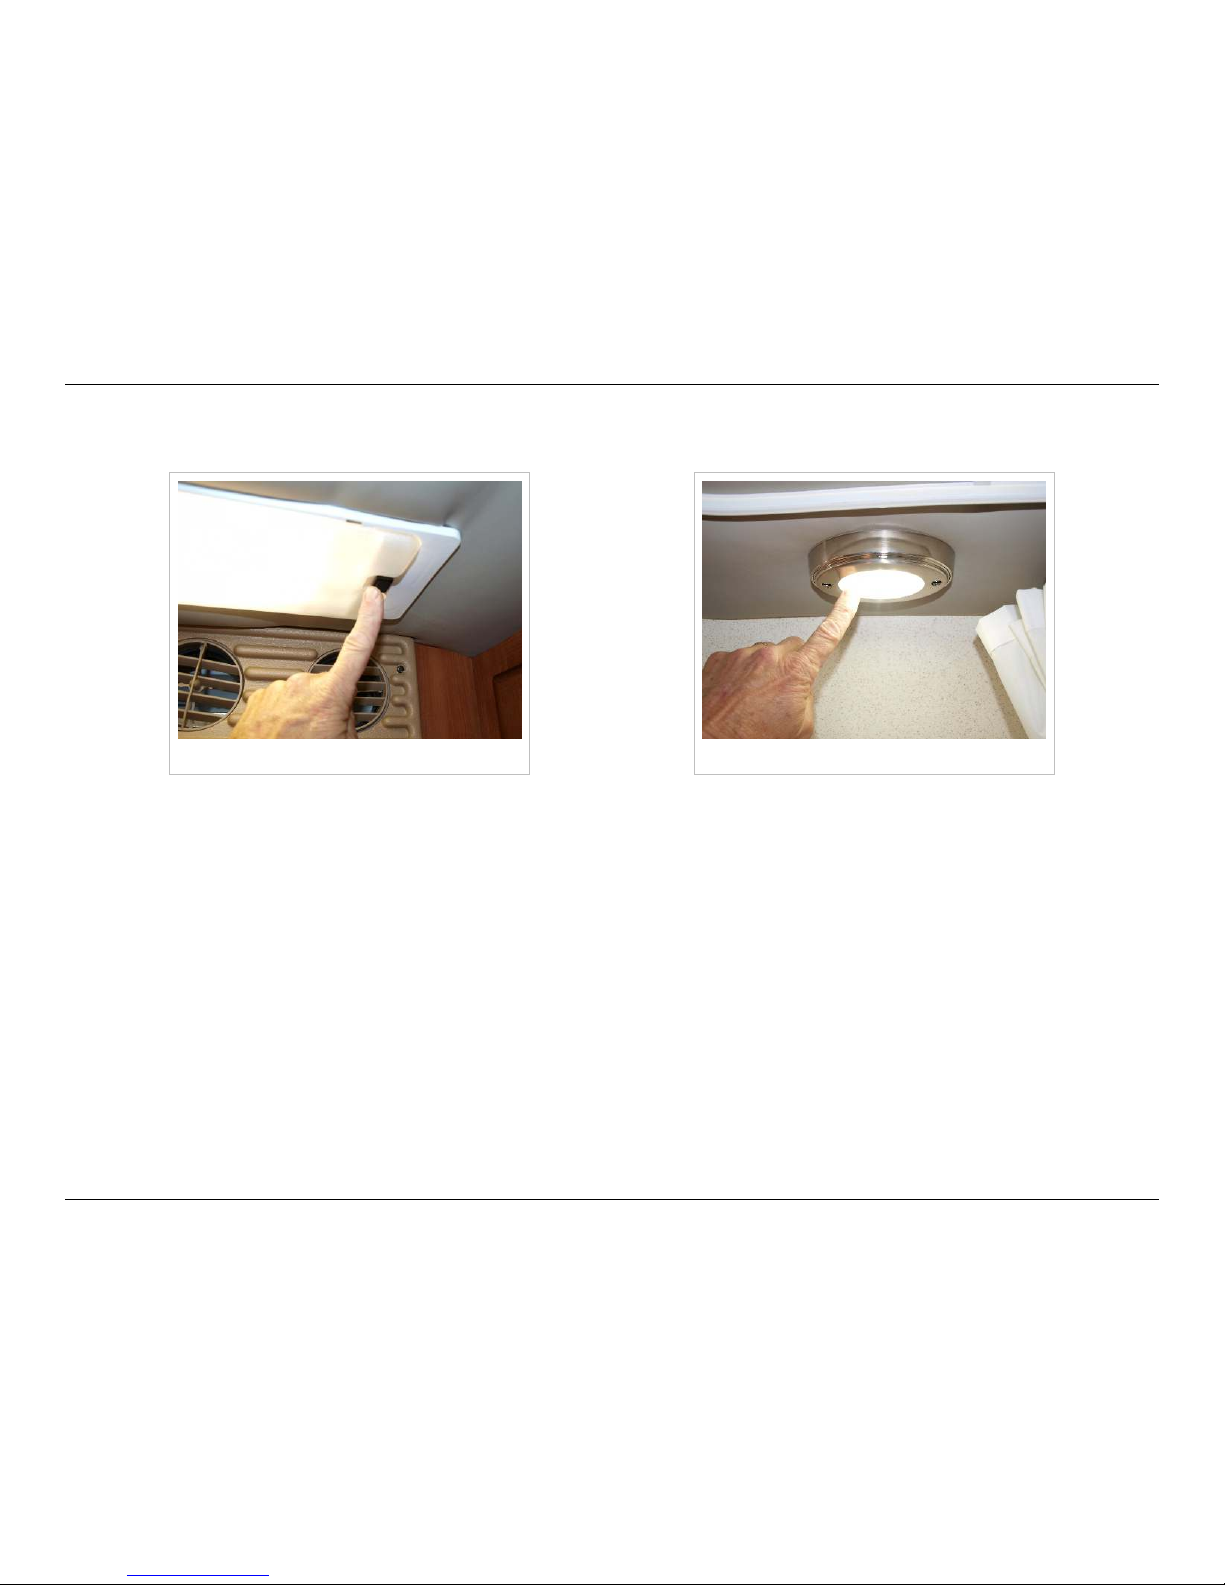
Fluorescent light LED tap light
The battery disconnect switch must be on for any of the lights to work.
The fluorescent lights turn on and off with the integrated switch.
The oval ceiling lights are all individually controlled, and are tap lights - to turn them off or on, press on the lens area.
Page 17
Interior Living Space
14
© 2014 by Roadtrek, Inc.
Tables
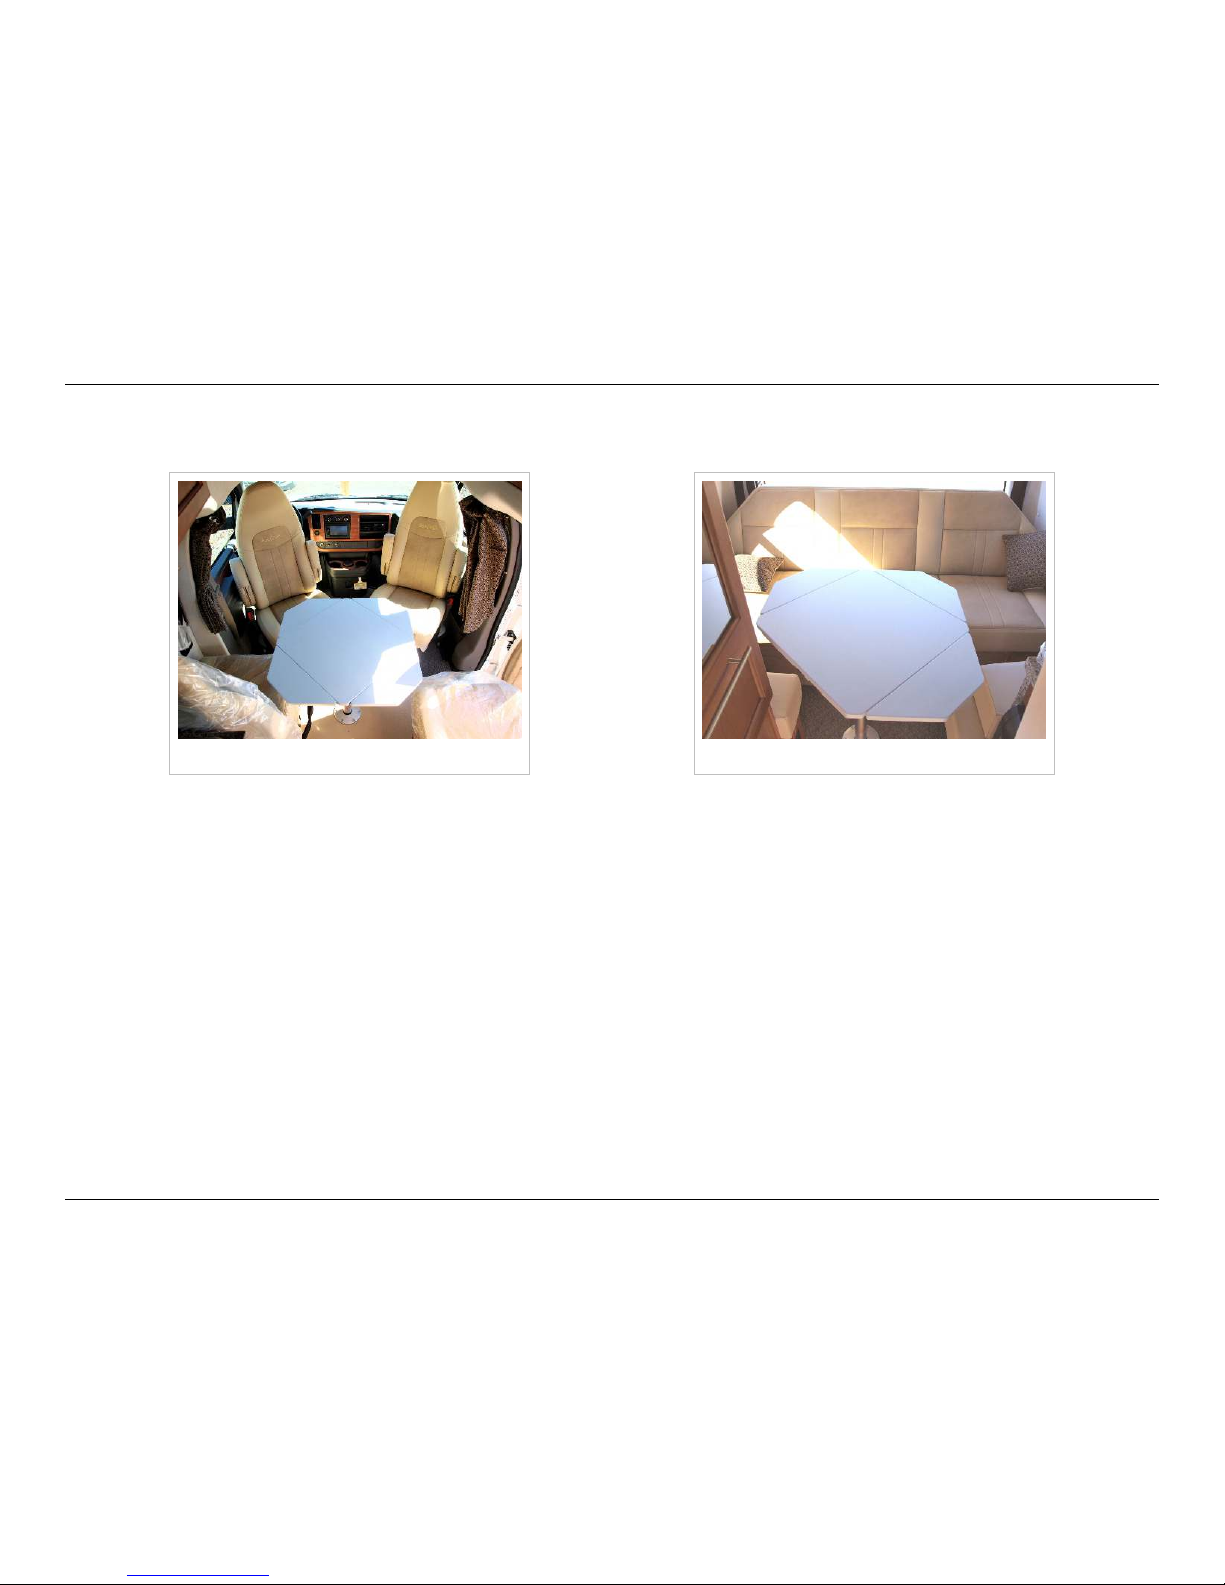
Front table in place Rear seating area with table
There is one table for use either in the front or rear lounge areas for dining, playing cards, or computer use.
Page 18
Interior Living Space
15
© 2014 by Roadtrek, Inc.
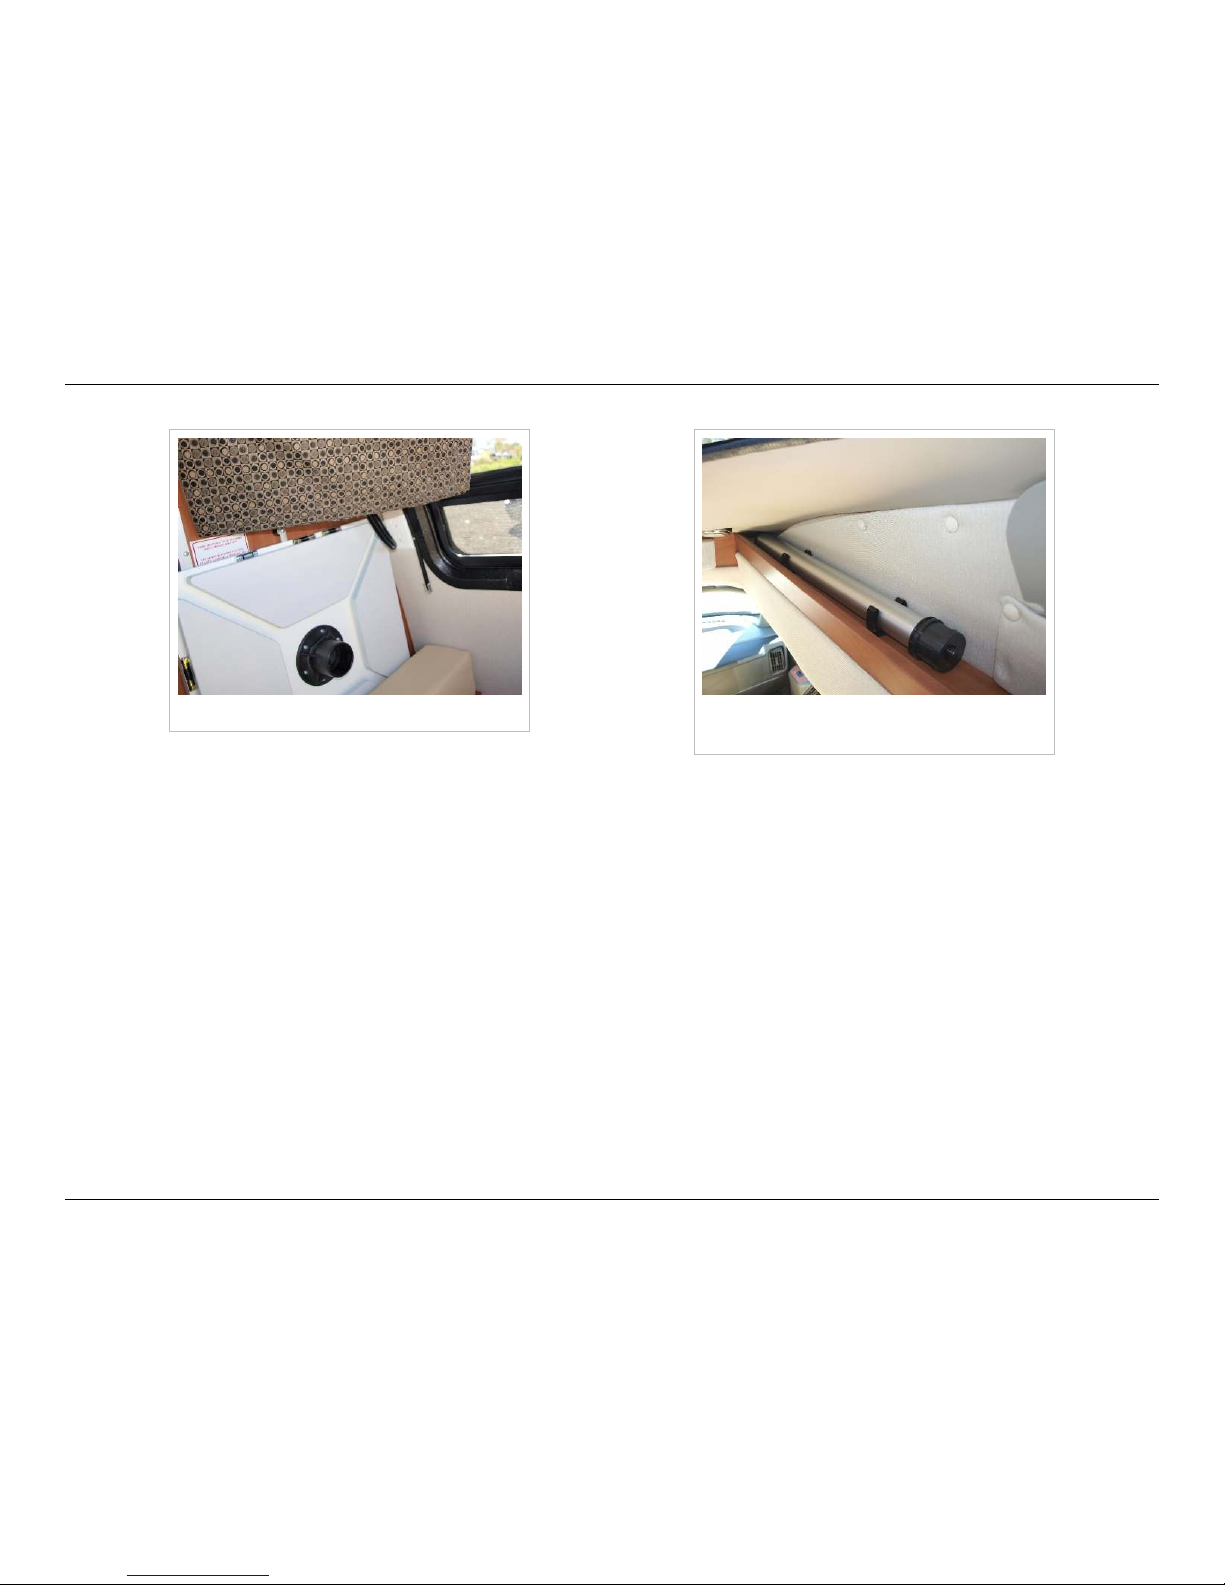
Table stowed under TV Table leg stowed in recess above side
door
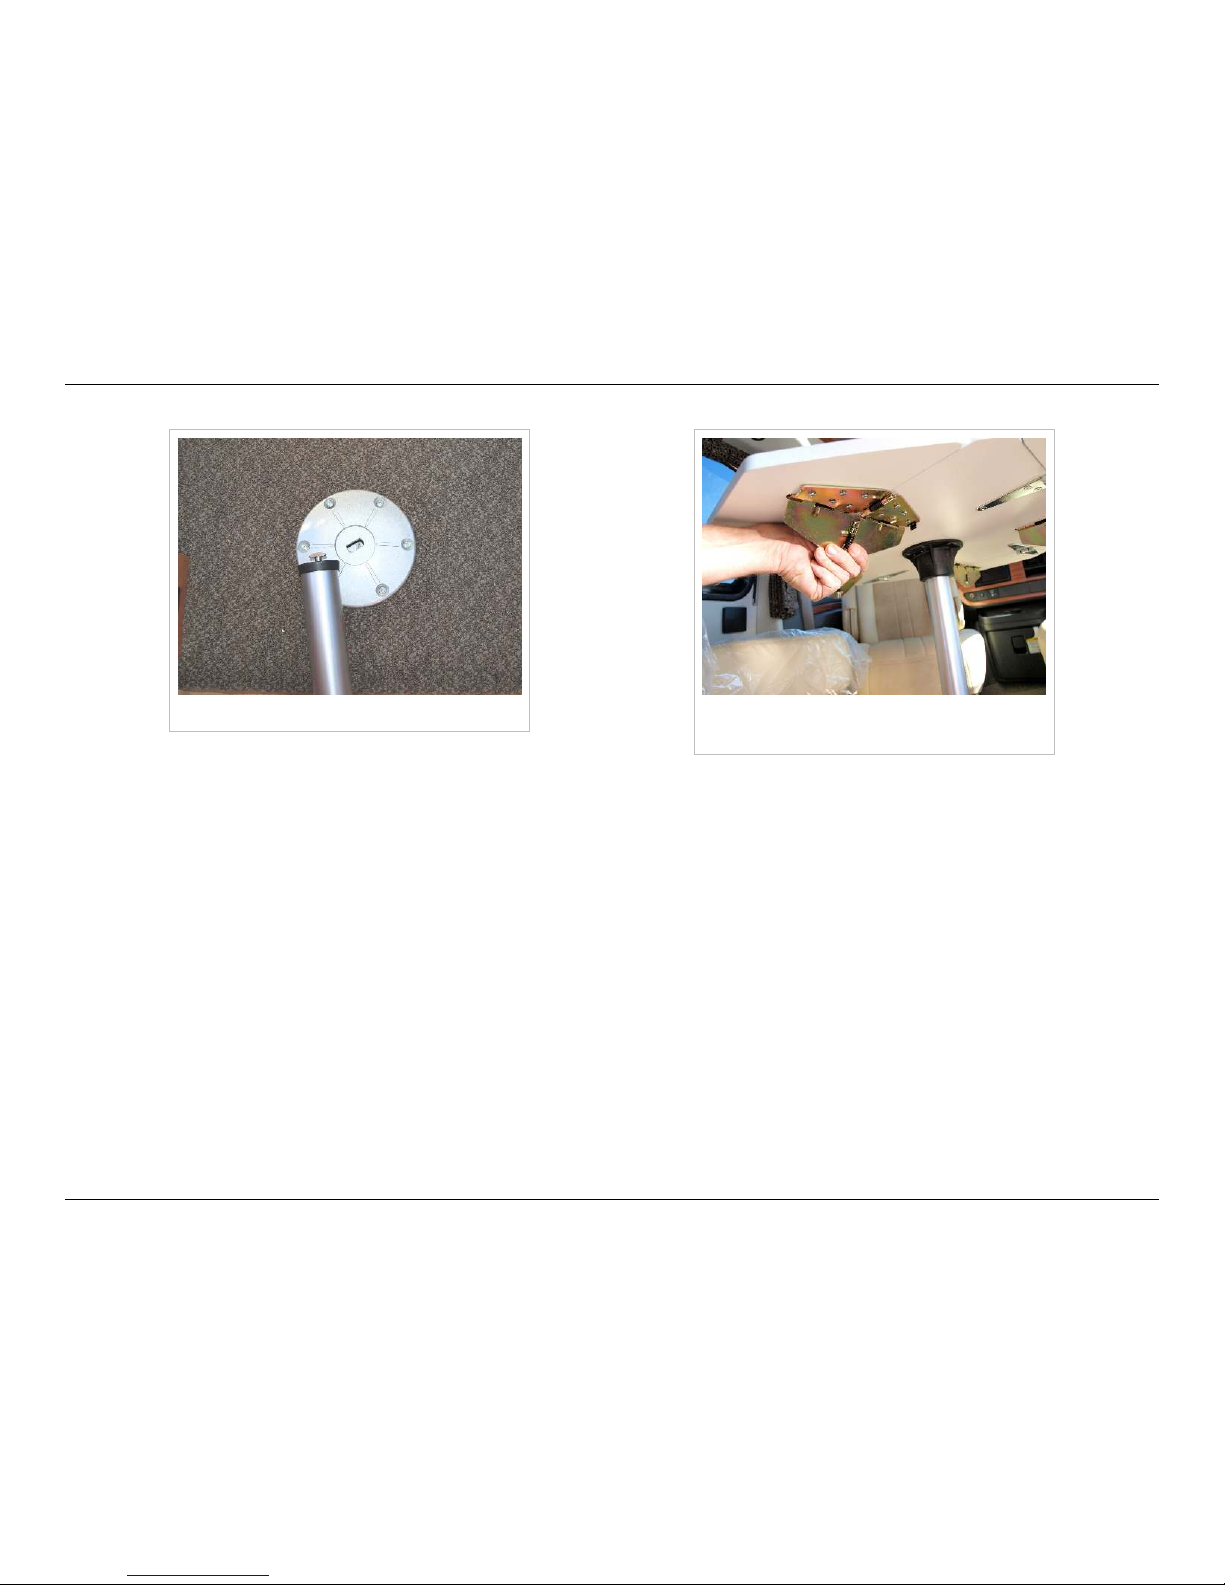
Unscrew the T-nut on the end of the leg fully. Insert the table leg into the front T-Nut base. Rotate the leg clockwise until you
feel it tighten. Pull on it to check that is is secured. If not, extend the T-nut fully by unscrewing it, and try again. Place table
top on leg so that top of leg fits into socket underneath table. Unfold the table leaves until the spring-loaded portion of the
hinge pops into position, locking the leaves in the open position.
Page 19
Interior Living Space
16
© 2014 by Roadtrek, Inc.
Table leg base and leg with T-Nut Fold the hinge flat to put the leaf back
into storage position
To stow the front table, fold the locking hinge component for each leaf back against the table top, which will allow the leaf to
fold against the main part of the table top. Stow the table top under the TV and the leg above the passenger seat.
Page 20
Interior Living Space
17
© 2014 by Roadtrek, Inc.
Front and Second Row Seats
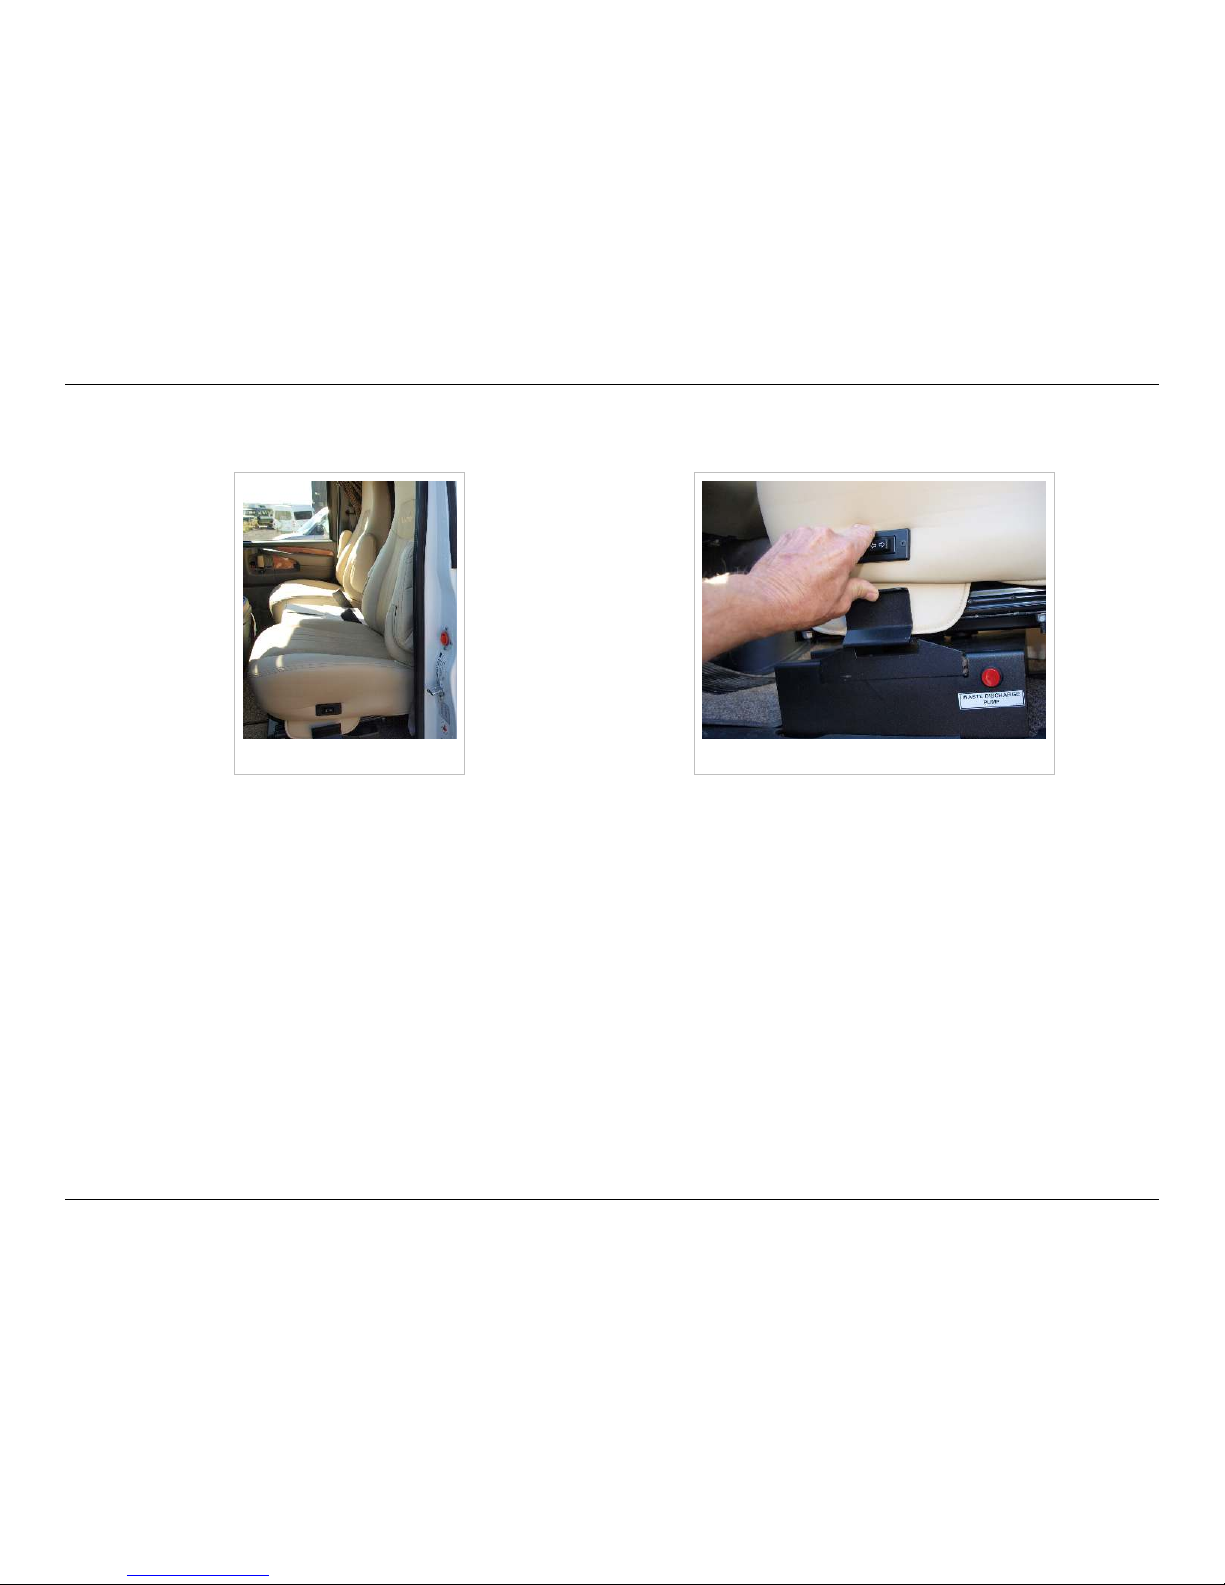
Front seats Front seat swivel lever
The two captain's seats in the front of your 170V are adjustable fore and aft by pulling up on the bar under the front of the
seat, and will swivel when the swivel lever - the black metal bar on the side of the chair base - is pressed up. Always return
the seats to the forward-facing position when driving. They will lock into this position, and stay locked until the swivel lever is
raised again.
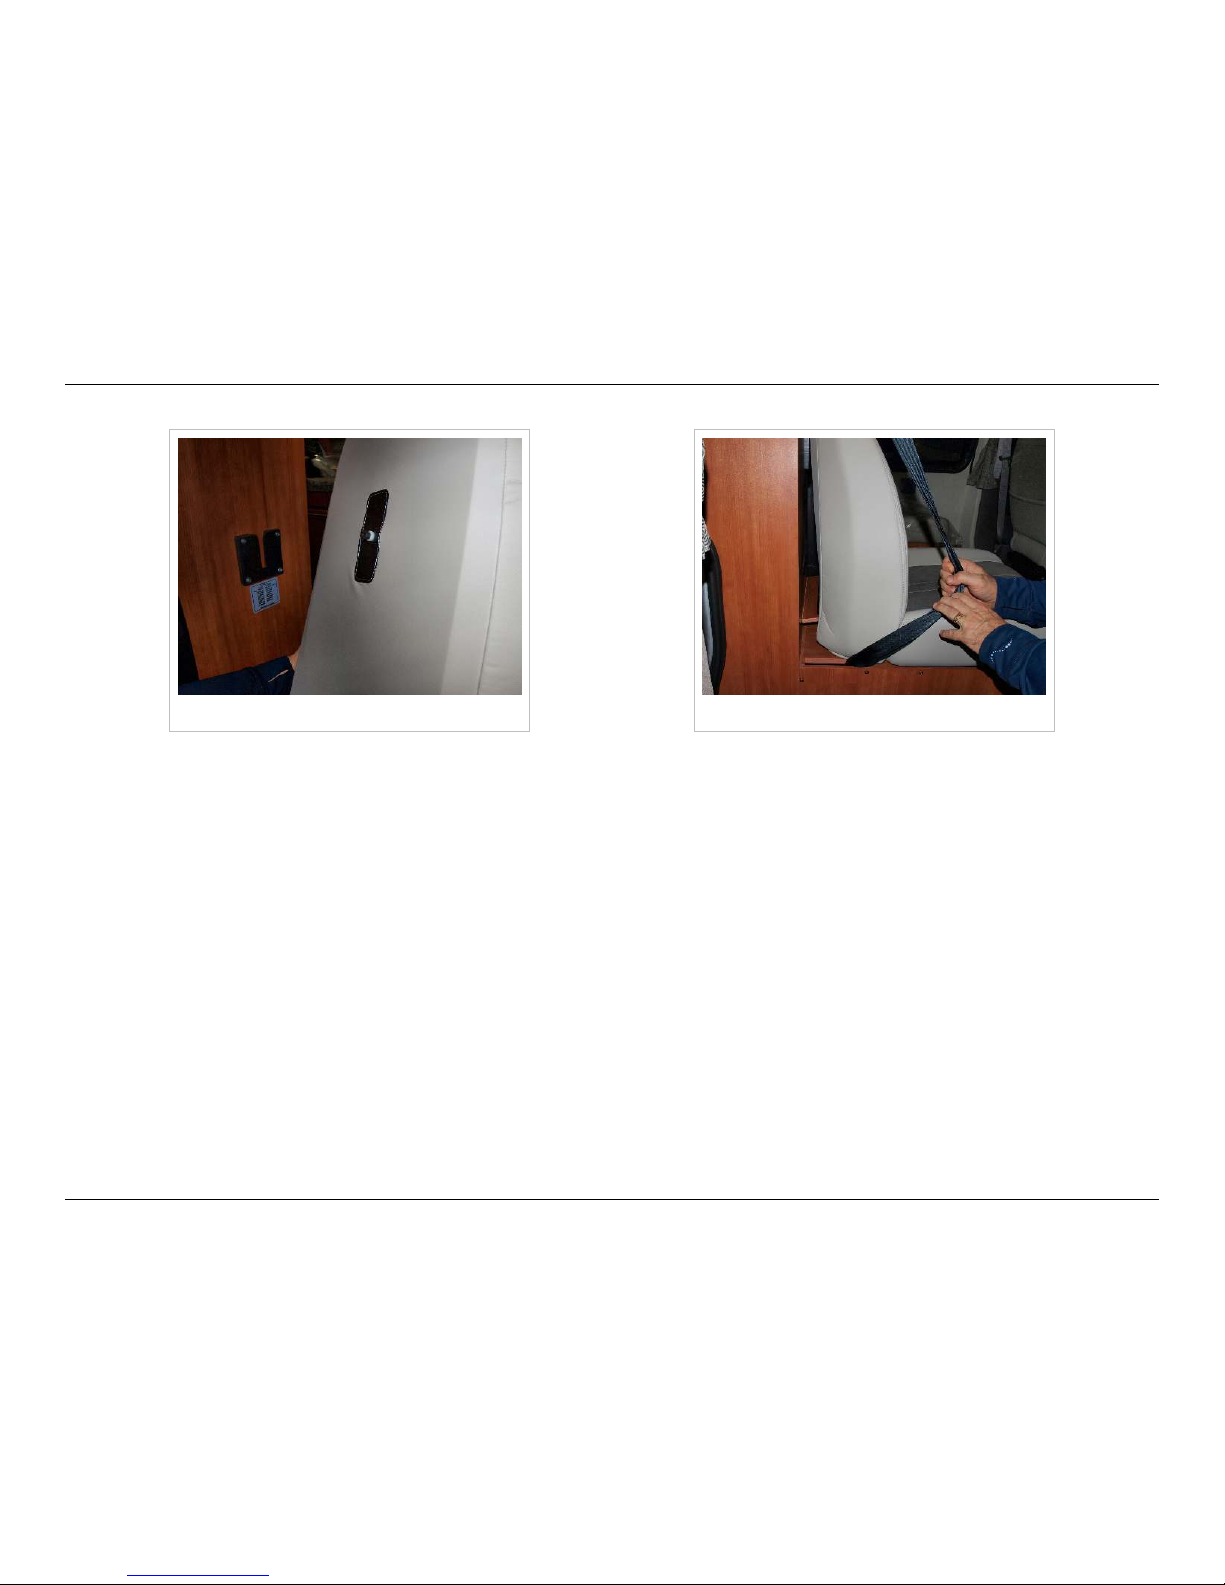
The second row seats have an adjustment to the seat back and bottom cushion to change the seat back angle for more
comfortable seating. The backs lift up and are held by a pin in a slot (see photo below). The seat bottom cushions can be
lifted and moved forward approximately three inches (8 cm) because they are eccentrically mounted on a rod. Moving the
bottom cushion forward and flipping the small panel at the base of the seat back out will configure the second row seats in a
more reclined position.
Page 21
Interior Living Space
18
© 2014 by Roadtrek, Inc.
Second row seat back pin and slot Back seat configured in reclined position
To create a front lounge area by rotating the two front seats to face the back, first ensure that the seats are fully upright by
loosening the recline adjustment and bringing the backs of the seats forward. Do not attempt to pivot a reclined seat. Use the
fore-and-aft adjustment while pivoting the seats to allow the sides of the chairs to clear the armrests on the vehicle doors, the
engine cover, and other obstructions. Do not force the seats around. Swiveling the driver's seat may require you to loosen the
tilt steering wheel adjustment and move the steering wheel as far forward and up as possible.
Page 22
Interior Living Space
19
© 2014 by Roadtrek, Inc.
Ventilation
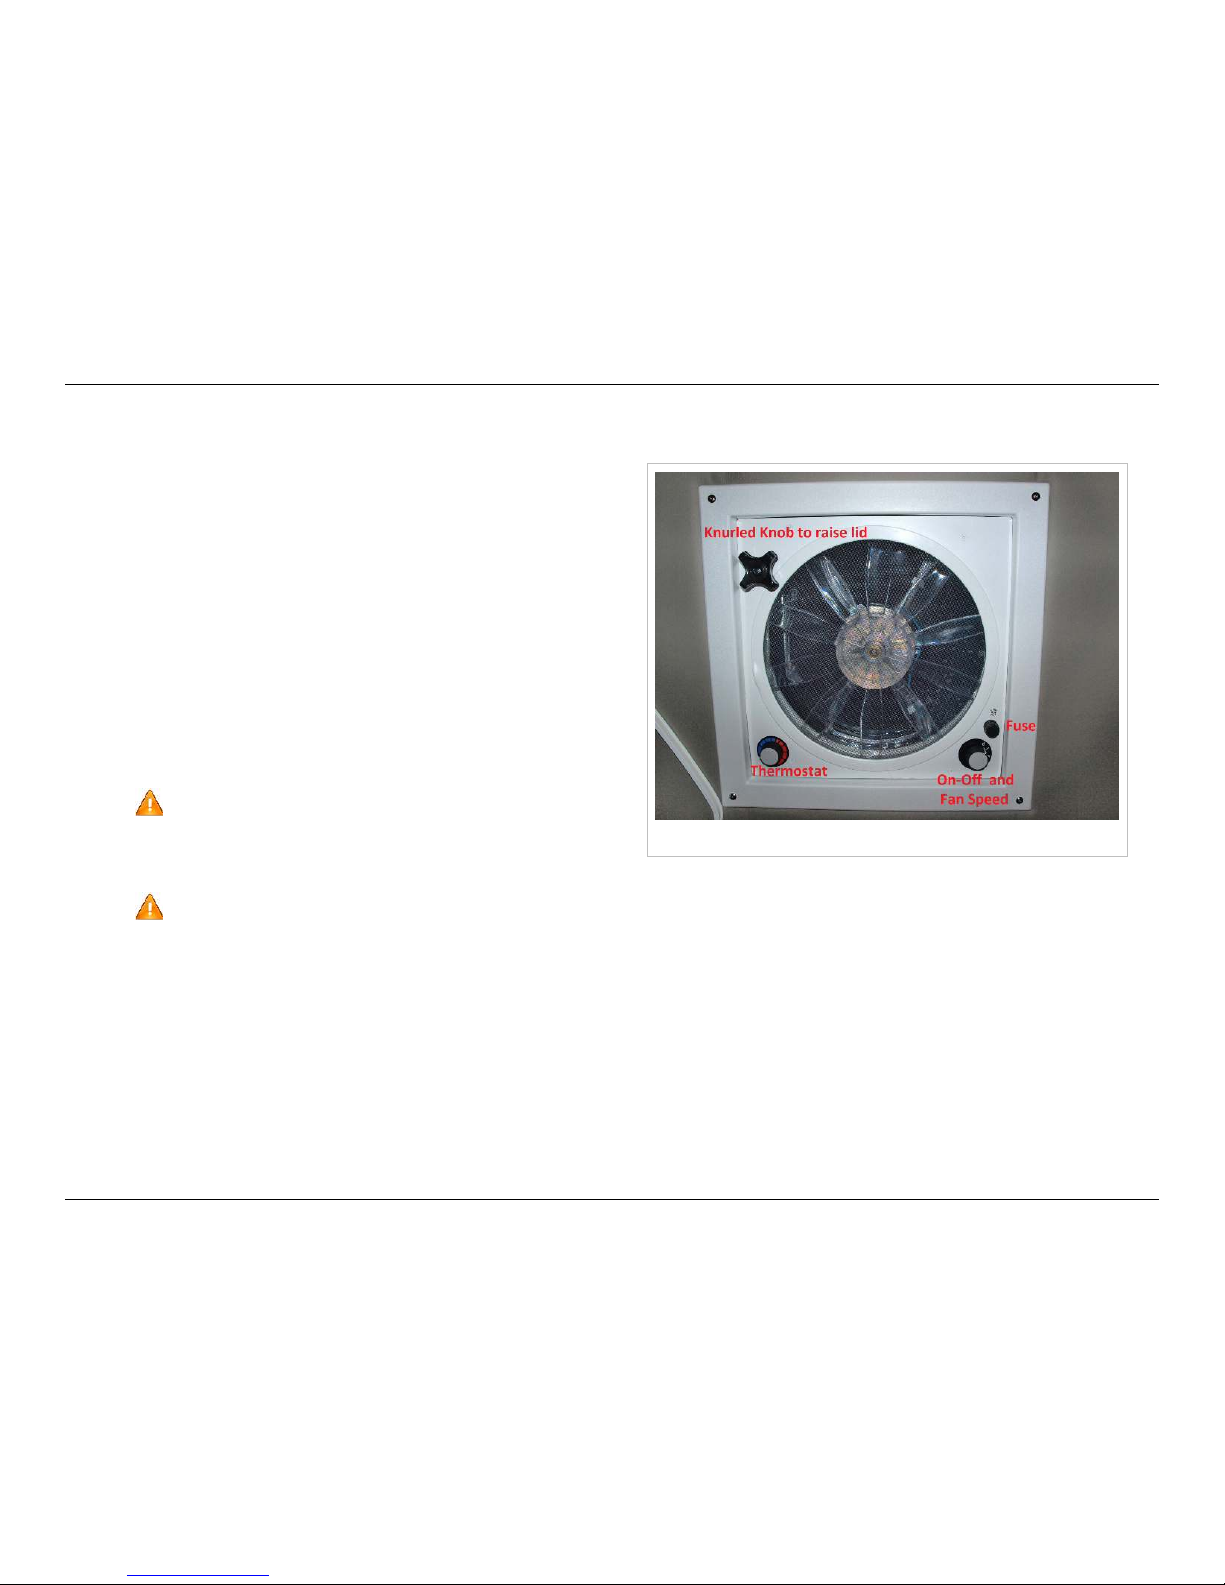
Exhaust fan
Your Roadtrek is equipped with a ceiling mounted ventilation
fan.
The fan has a cover that must be raised by turning the large
knurled knob before the fan will operate. Raise the cover, then
turn the switch to the desired speed.
The fan also has a thermostat, which will allow you to set the
temperature at which the fan comes on. If you want the fan to
operate at all temperatures, turn the thermostat all the way
toward the blue section of the dial.
There is also a fuse in the body of the fan, in addition to the fuse
in the distribution panel. Check both this fuse and the one on the
12 volt fuse panel if your fan stops working.
For more details, please refer to the Fantastic Fan manual.
Turn the fan off and close the cover completely before
driving. The cover will rattle and might be damaged by wind
pressure if you drive with it open.
When using the aisle shower, leave the fan off, or the shower curtain will be sucked in and stick to you.
Page 23
Interior Living Space
20
© 2014 by Roadtrek, Inc.
Window Treatments
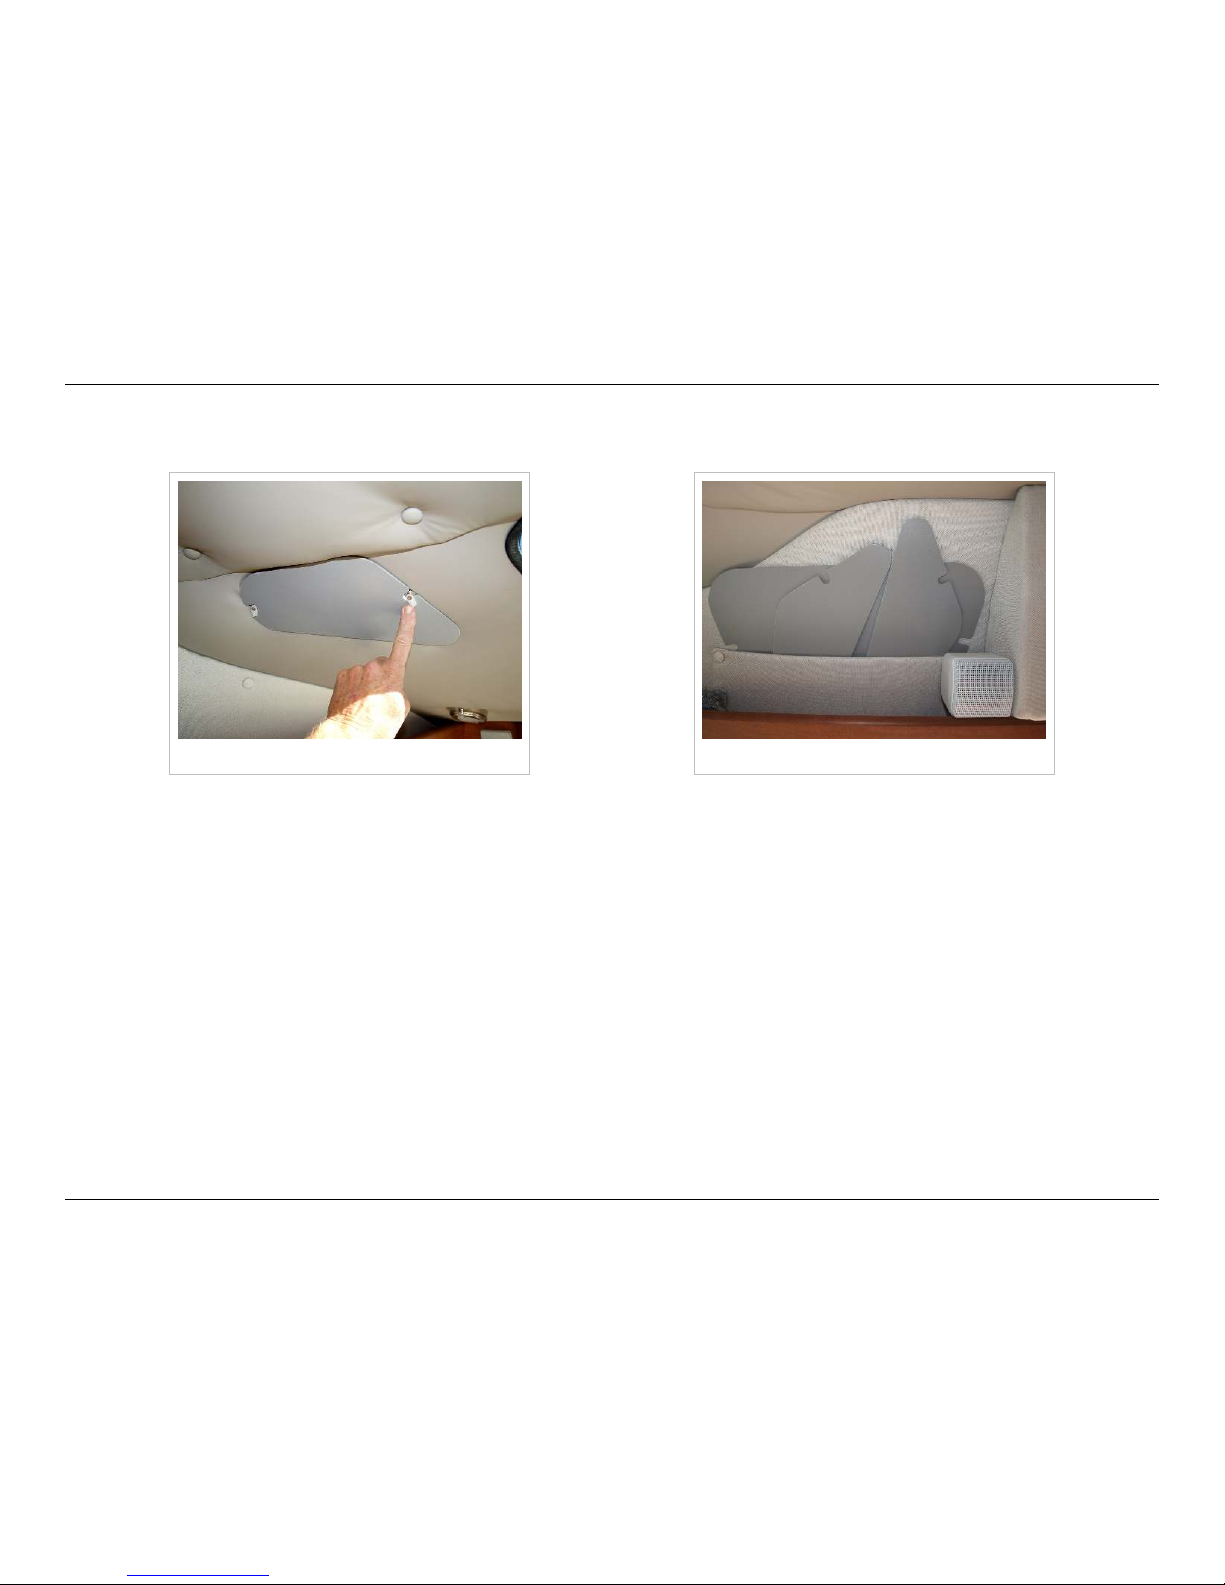
Roof window covers Skylight cover storage
The roof windows in the 170 can be covered using the covers stored in a pouch above the side door. Place the cover against
the glass and use the locking tabs to hold it in place.
Page 24
Interior Living Space
21
© 2014 by Roadtrek, Inc.
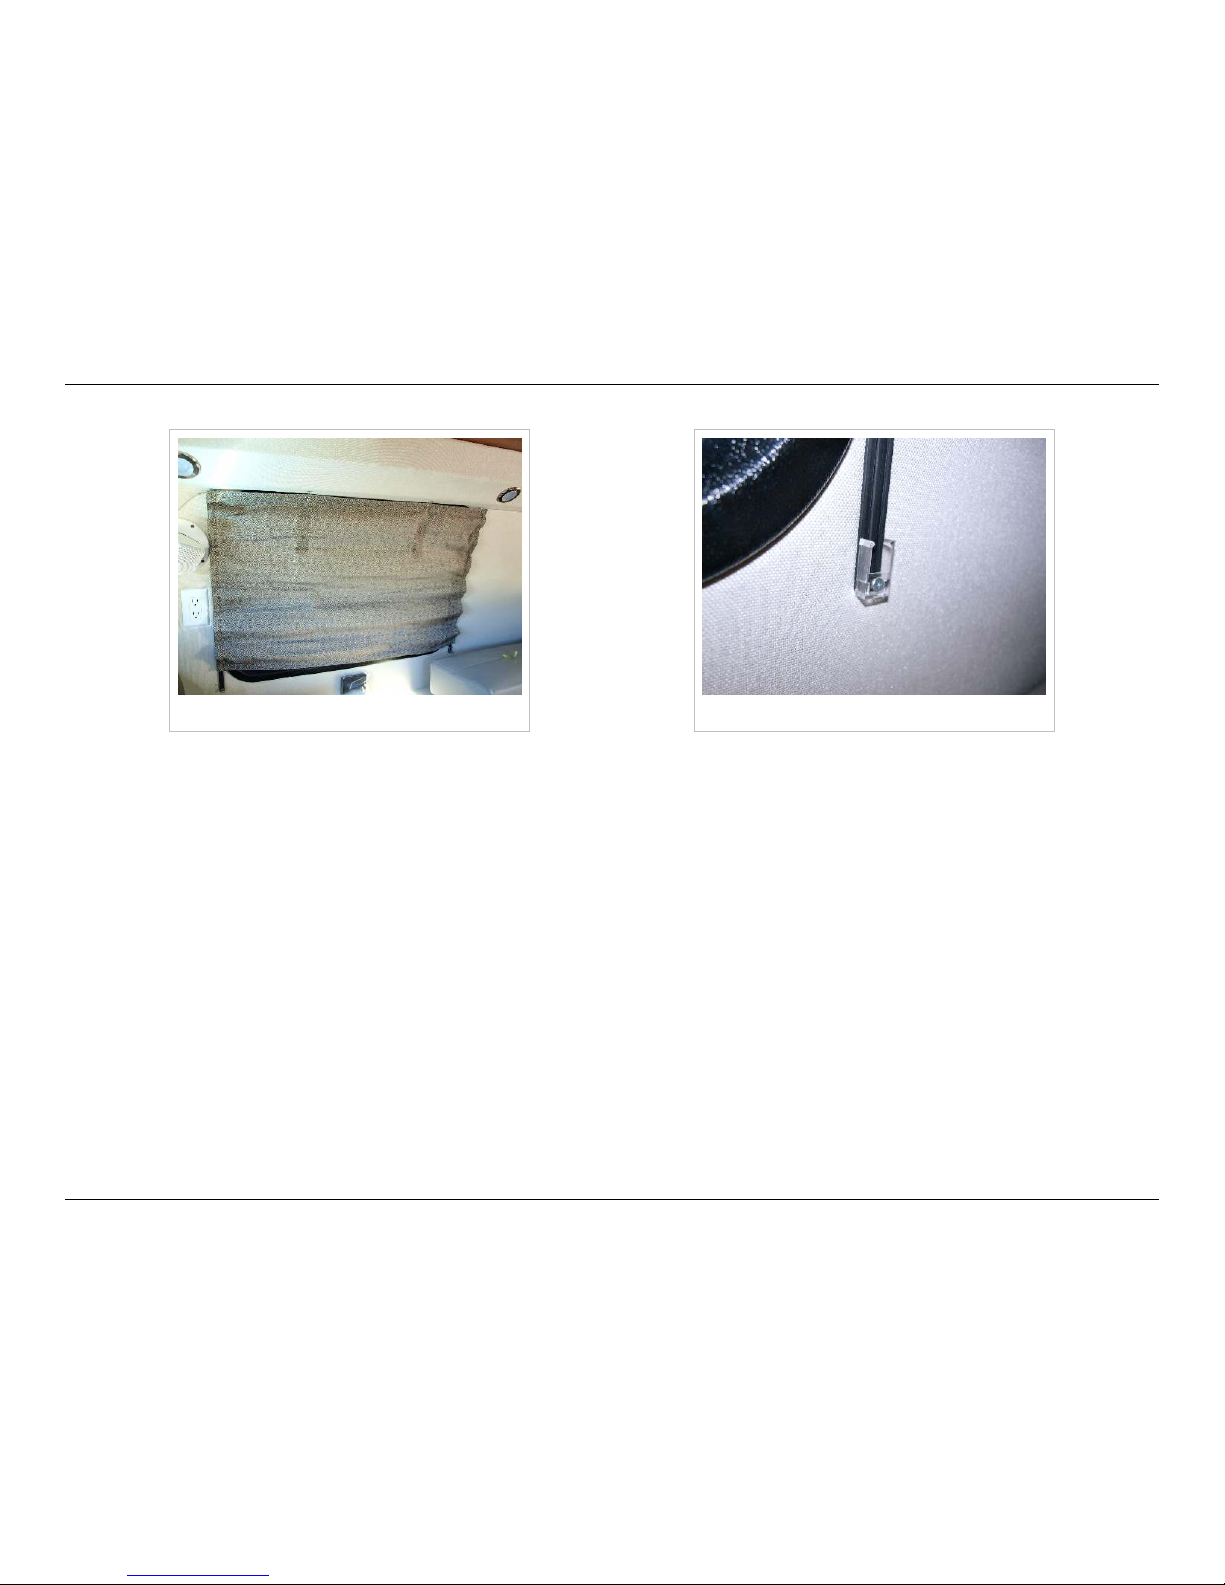
Curtains Curtain track and end clip
The window curtains for the regular windows slide on tracks. It's best to use two hands, one at each track, to pull curtains
closed and open.
The curtains have snaps and clips at the end of the track to hold them in place.
Page 25
Sleeping Facilities
22
© 2014 by Roadtrek, Inc.
Sleeping Facilities
Your Roadtrek 170 Versatile has a bed that can be a seating area during the day or while driving, and converts into a bed at
night.
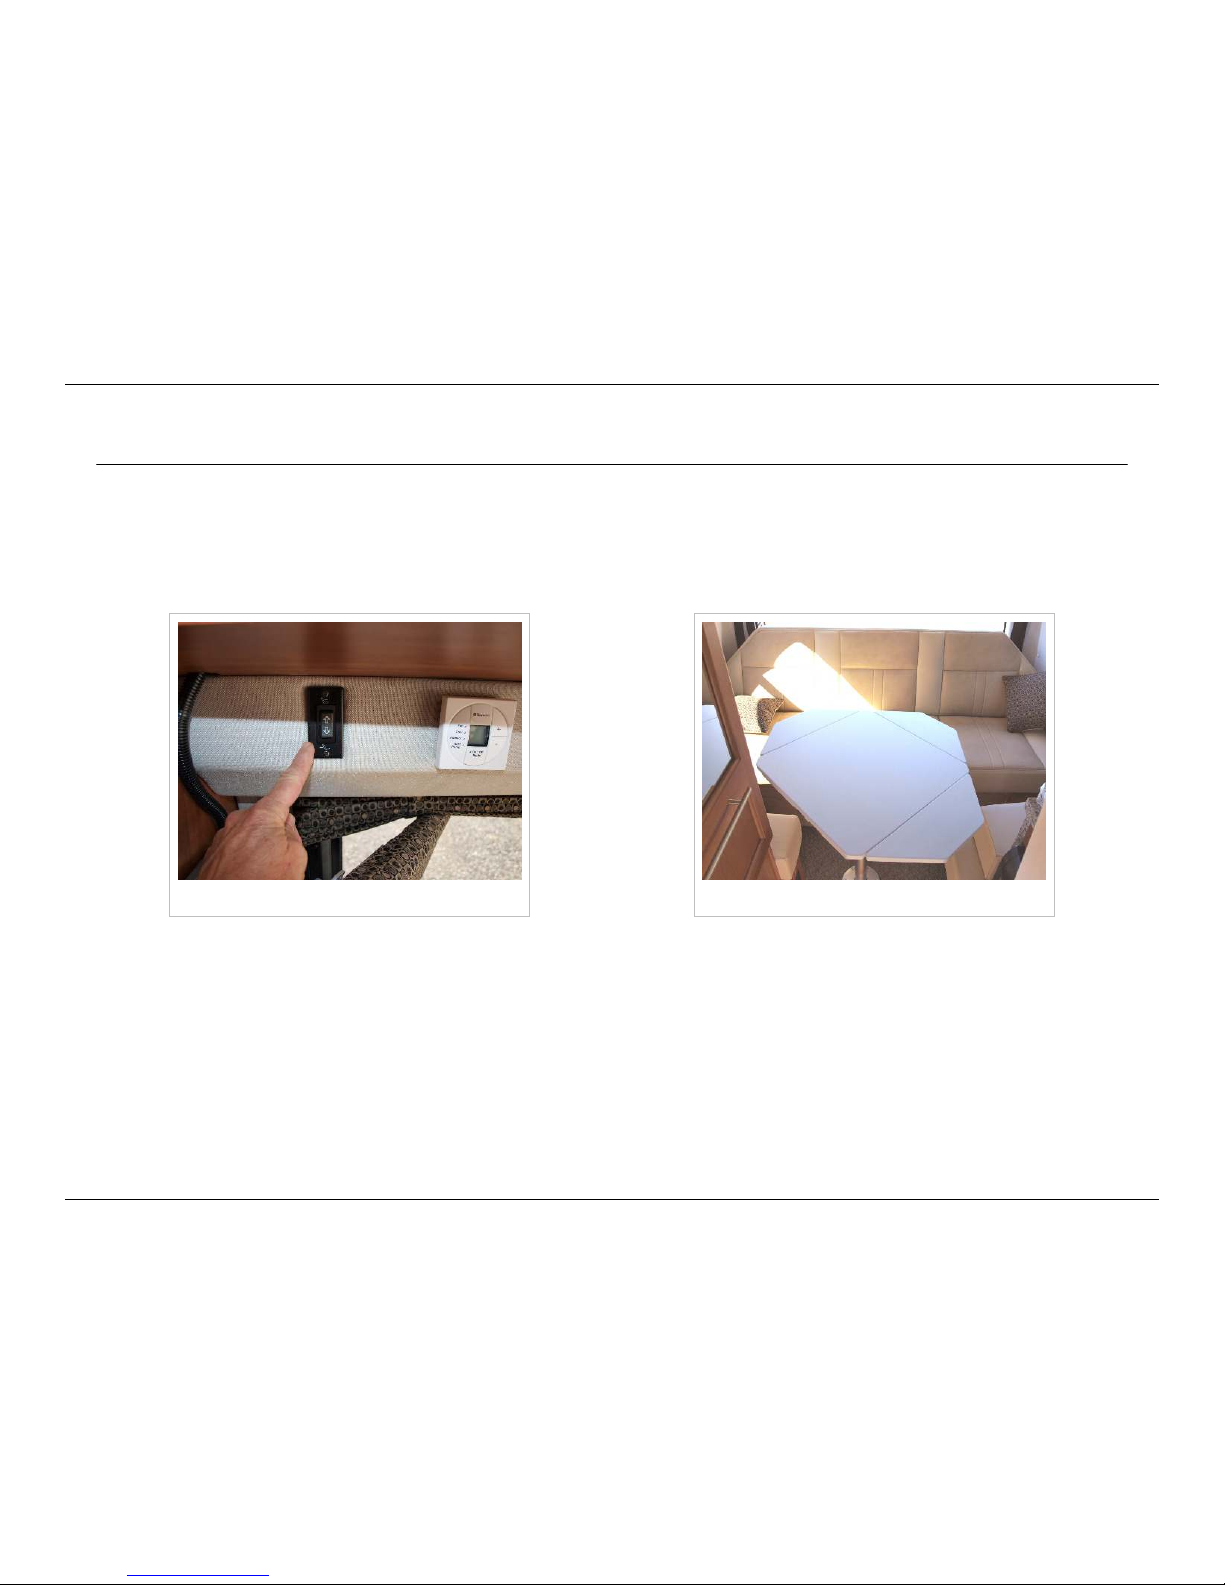
Power Sofa
Power sofa switch Power sofa
The switch to lower the sofa into the bed position is located next to the thermostat on the passenger side in the rear.
The seatbelts for the power sofa are attached to the floor behind the power sofa. In order to use the power sofa as a seating
position while driving, these seat belts must be threaded up through the gap between the seat back and bottom and used
together with the shoulder belts to secure passengers in these seating positions.
Page 26
Sleeping Facilities
23
© 2014 by Roadtrek, Inc.
Bed
Bed Making the bed Bed support stowed
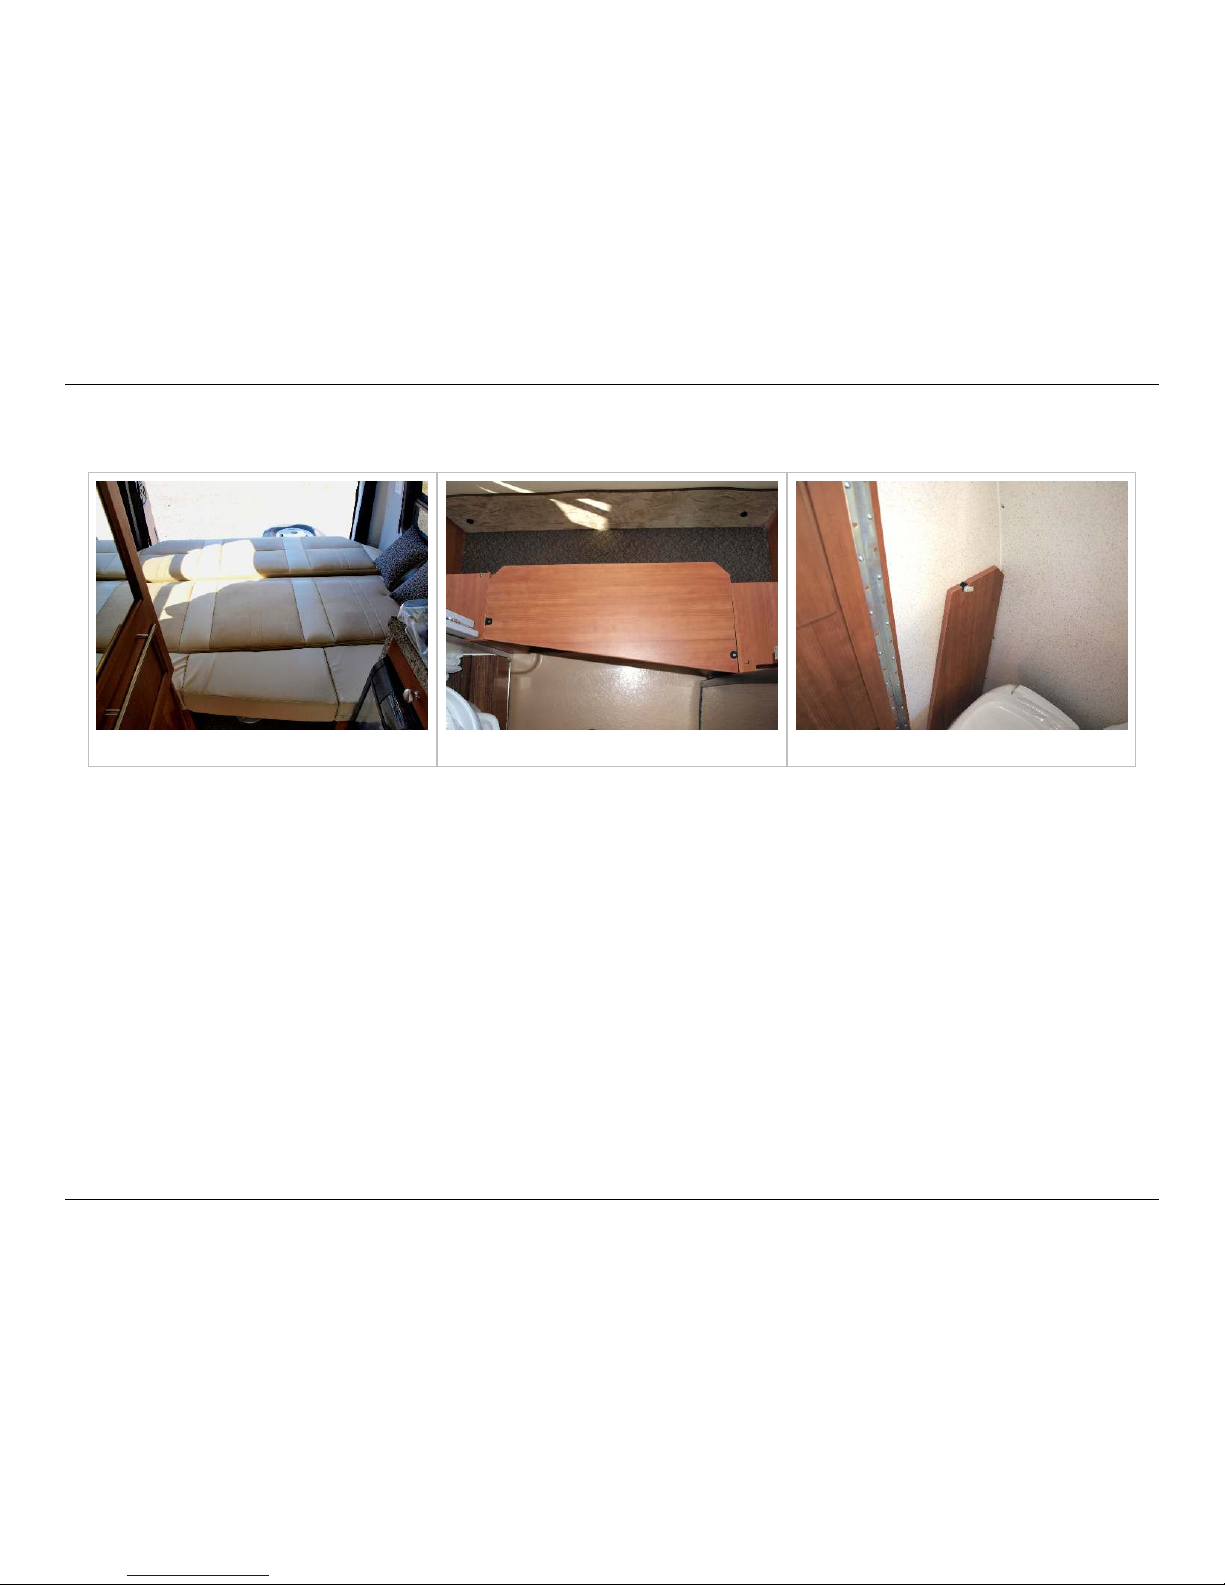
To make the bed, remove the bed support panel from inside the toilet enclosure and place it into the open space between the
two bench seats. Secure the panel into the notches on the two inner surfaces of the bench seat bases. Move the bottom
cushion for the bench seats together over this panel, and place the vertical cushions for the bench seats between these and
the outer walls of the 170.
Page 27
Sleeping Facilities
24
© 2014 by Roadtrek, Inc.
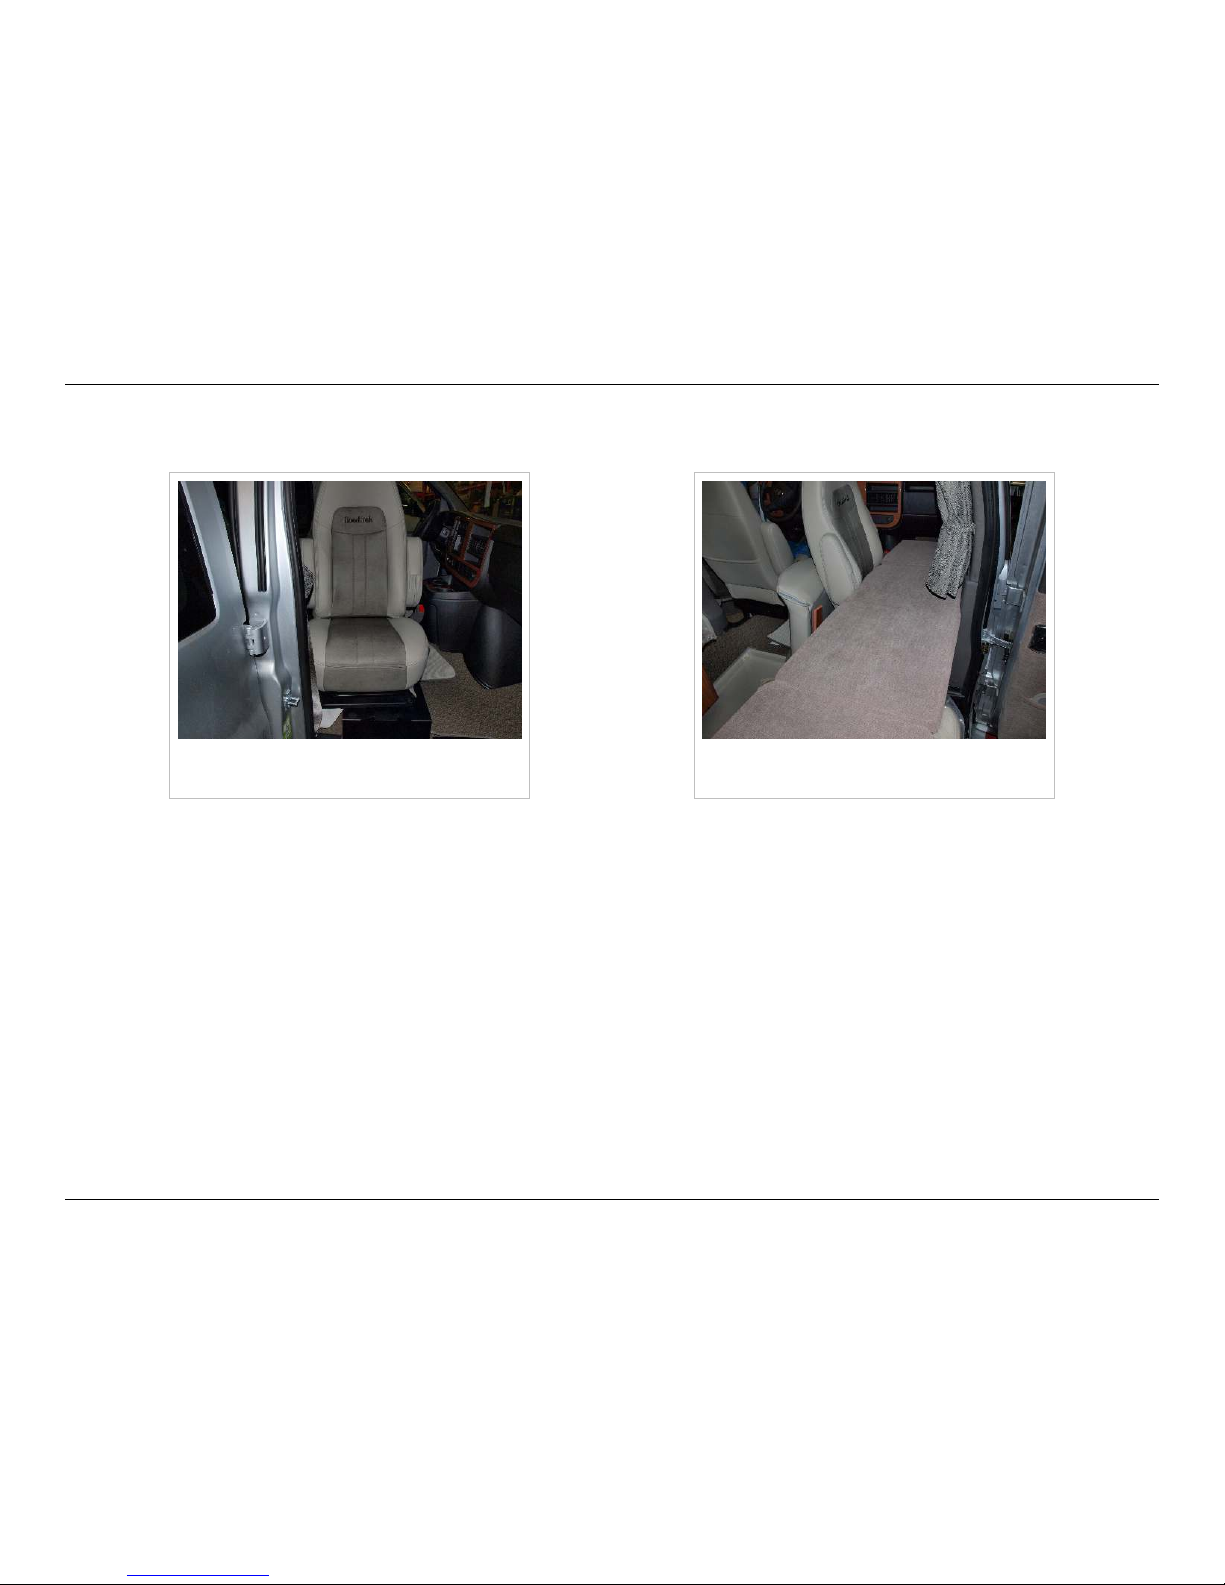
Optional Folding Mattresses for Front Seat Beds
Front captain's seat in position for folding
mattress
Passenger side folding mattress in
position
It is possible to set up two front beds by turning the front captain's seats so that they are facing outward toward the front
doors, removing the second row seat backs by lifting them up, and placing the optional folding mattresses on the front and
second row seat bottom cushions.
The driver side front seat must be swiveled 270 degrees clockwise to reach the proper position facing the driver's door - it will
not turn 90 degrees counterclockwise. Move the steering wheel up and the armrests up and down as necessary to clear the
armrest, steering wheel, and engine housing. Slide the seat back and forth as necessary to clear these obstacles. Do not
force the seat around. When in position facing the door, slide both front seats as far back (toward the center aisle) as possible
to accommodate the folding mattress.
Page 28
Bathroom Facilities
25
© 2014 by Roadtrek, Inc.
Bathroom Facilities
Aisle Shower
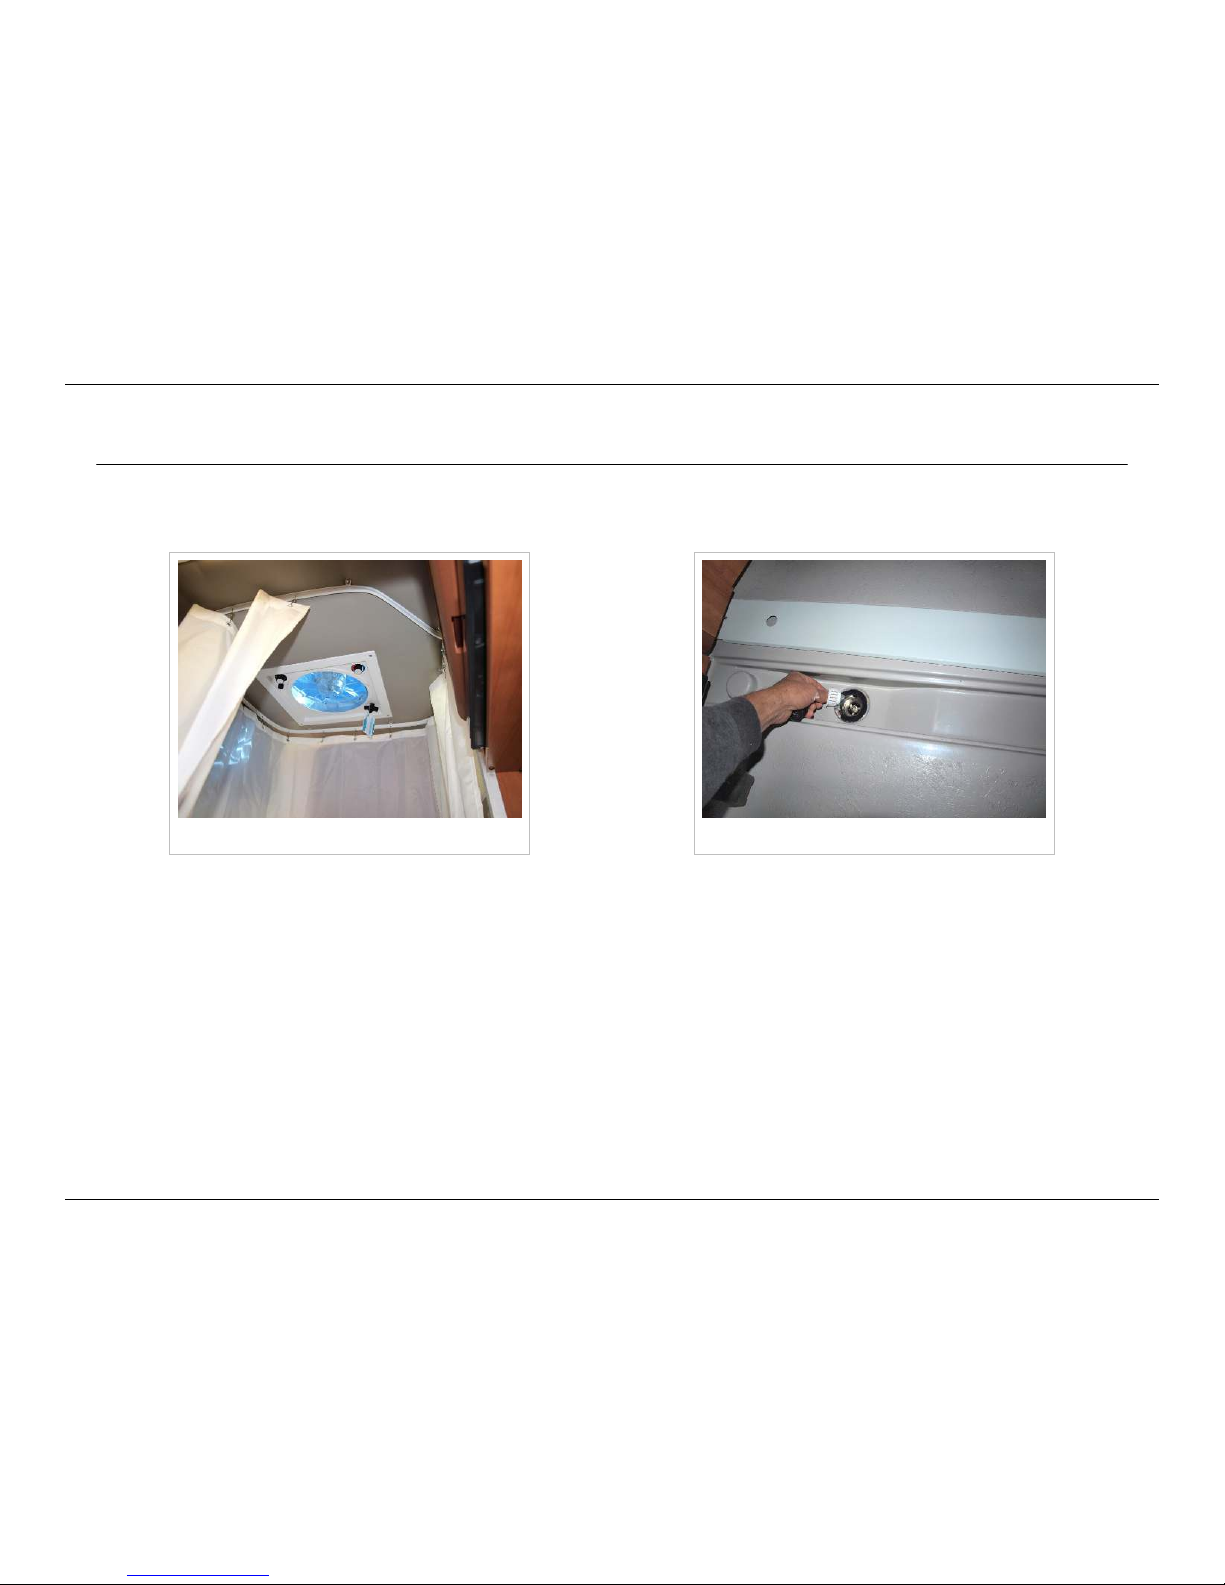
Aisle shower Aisle shower drain
To set up the stand-up aisle shower:
•• Remove the lowered floor carpet to expose the floor drain.
•• Remove floor drain cover from floor and loosen the drain plug/strainer.
•• For privacy extend the bathroom door and close the galley, side door, and windshield curtains.
•• Release the hook and loop retention straps from the shower curtain and move the hand held shower from its storage
position to the shower position.
•• Draw the shower curtain until you are completely surrounded.
•• Using the hook and loop connectors, secure the edges of the curtain to the inside edges of the door.
•• When adjusting the water temperature, be sure to allow enough time for the temperature adjusted water to exit the
shower head before making further adjustments.
•• Roof vent or the bathroom vent may be used on low speed to remove steam and moisture. However, the roof fan set on
exhaust will suck the curtain inward and interfere with showering.
Page 29
Bathroom Facilities
26
© 2014 by Roadtrek, Inc.
To put away the stand-up shower:
•• Rinse the shower curtain after use and before you leave the shower.
•• If possible allow the curtain to air dry completely, or towel it off and air dry. Run the power roof vent or the power
bathroom vent for faster drying.
•• Replace drain plug and floor drain cover when you are finished.
To prevent the grey water tank contents from spilling onto the floor while driving, keep the drain plug secured when not in
use.
Toilet
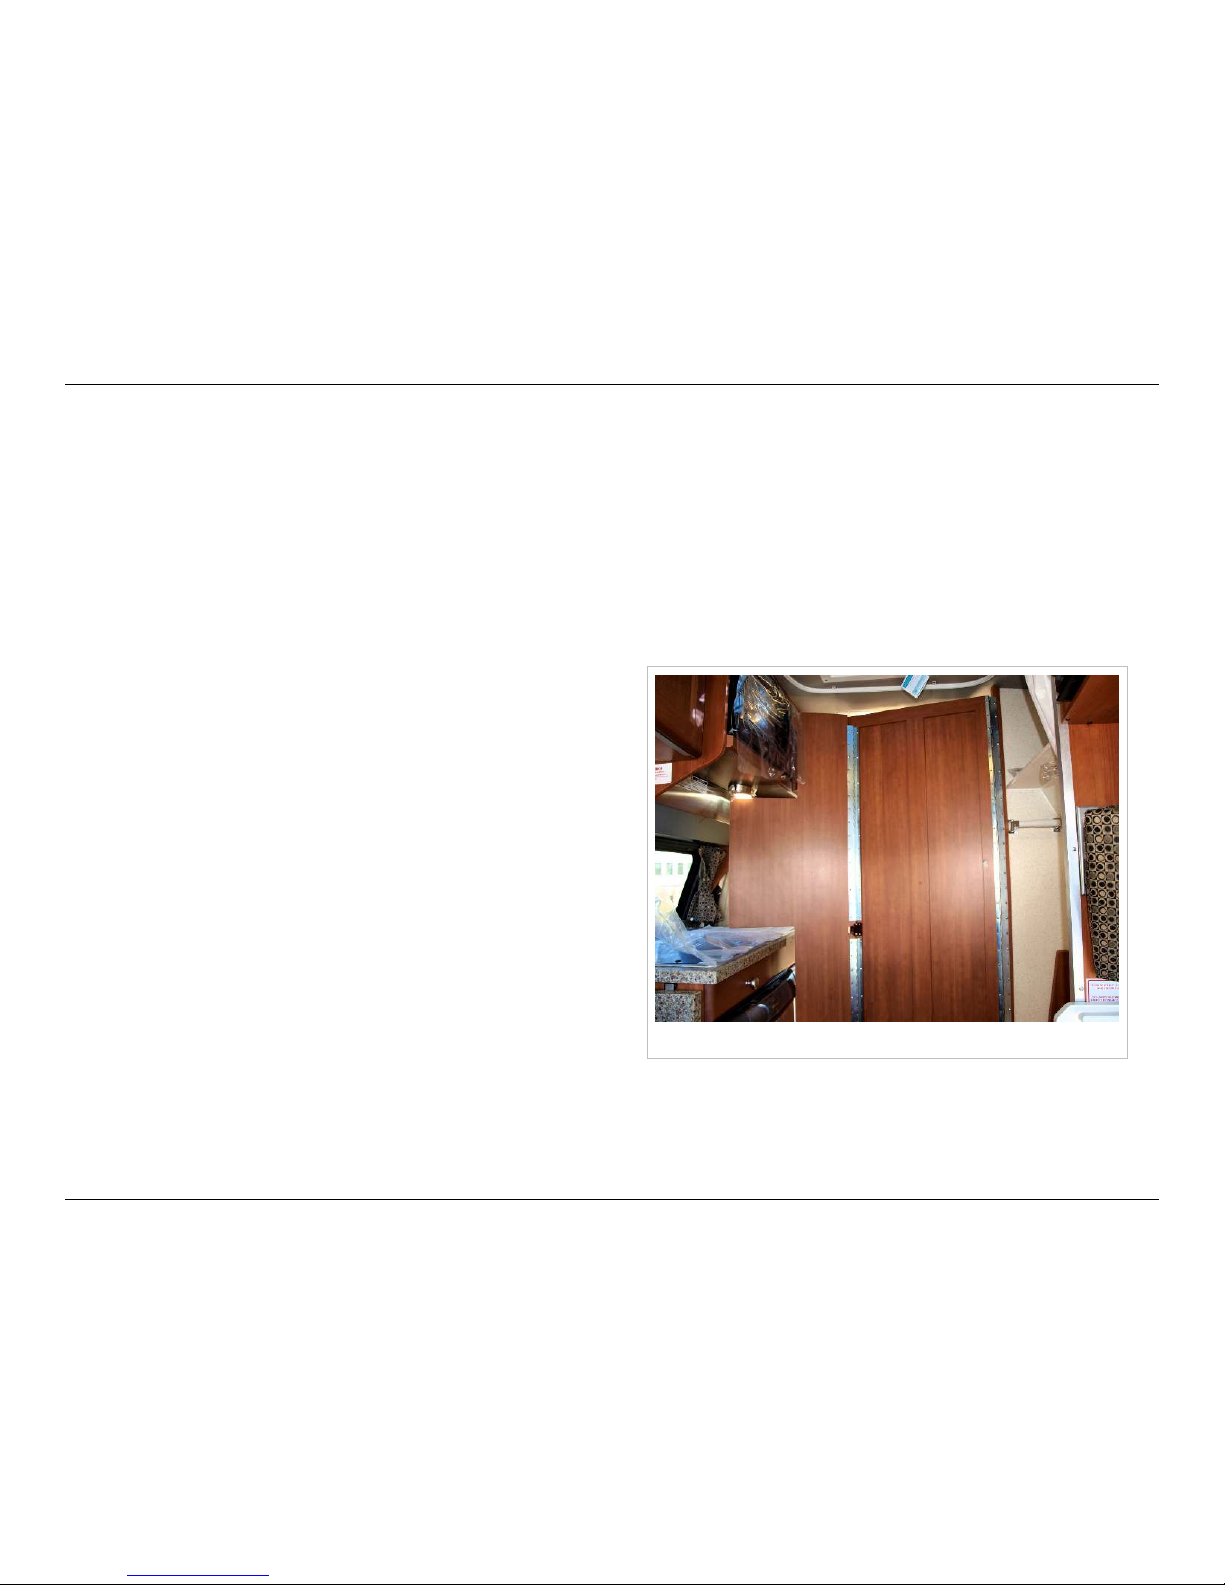
Door extended into privacy position
The aisle toilet is configured so that the doors of the closet and
the toilet can create privacy screens.
Open the doors, unlatch the inner partition, and secure the door
against the other side of the aisle.
The toilet is a marine toilet that has a single flush pedal. After
use, step on the pedal to flush.
Outside Shower
The outside shower faucet is located on the driver's side, in the
small driver's side storage compartment just in front of the rear
wheel. See Outside your Roadtrek for more details on location.
Page 30
Appliances
27
© 2014 by Roadtrek, Inc.
Appliances
TV and DVD player
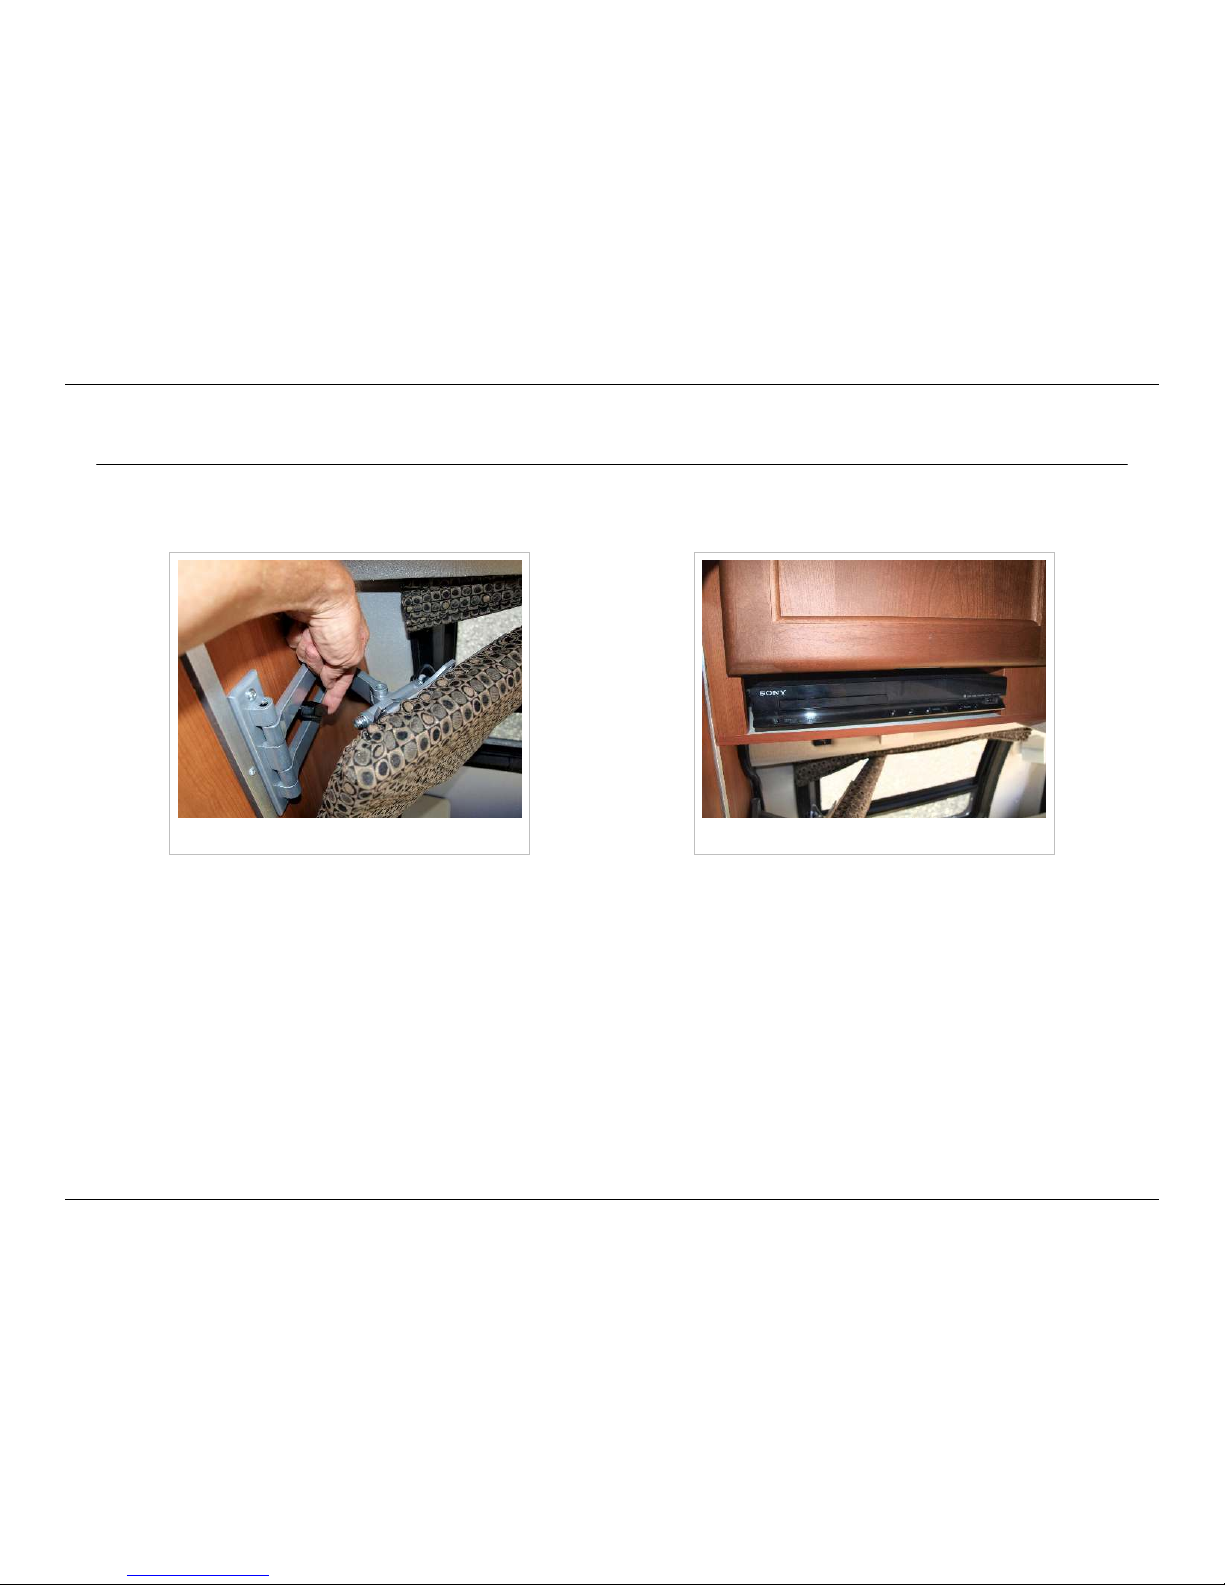
TV Bracket release DVD player
The TV and DVD player are located in the rear on the passenger side. Both the television and the DVD player use 120 volt
current, so the inverter, generator, or shore power must be used. They are supplied with remote controls.
For more information see HOWTO: Cable and TV Reception.
Page 31
Appliances
28
© 2014 by Roadtrek, Inc.
Antenna and Cable Connections
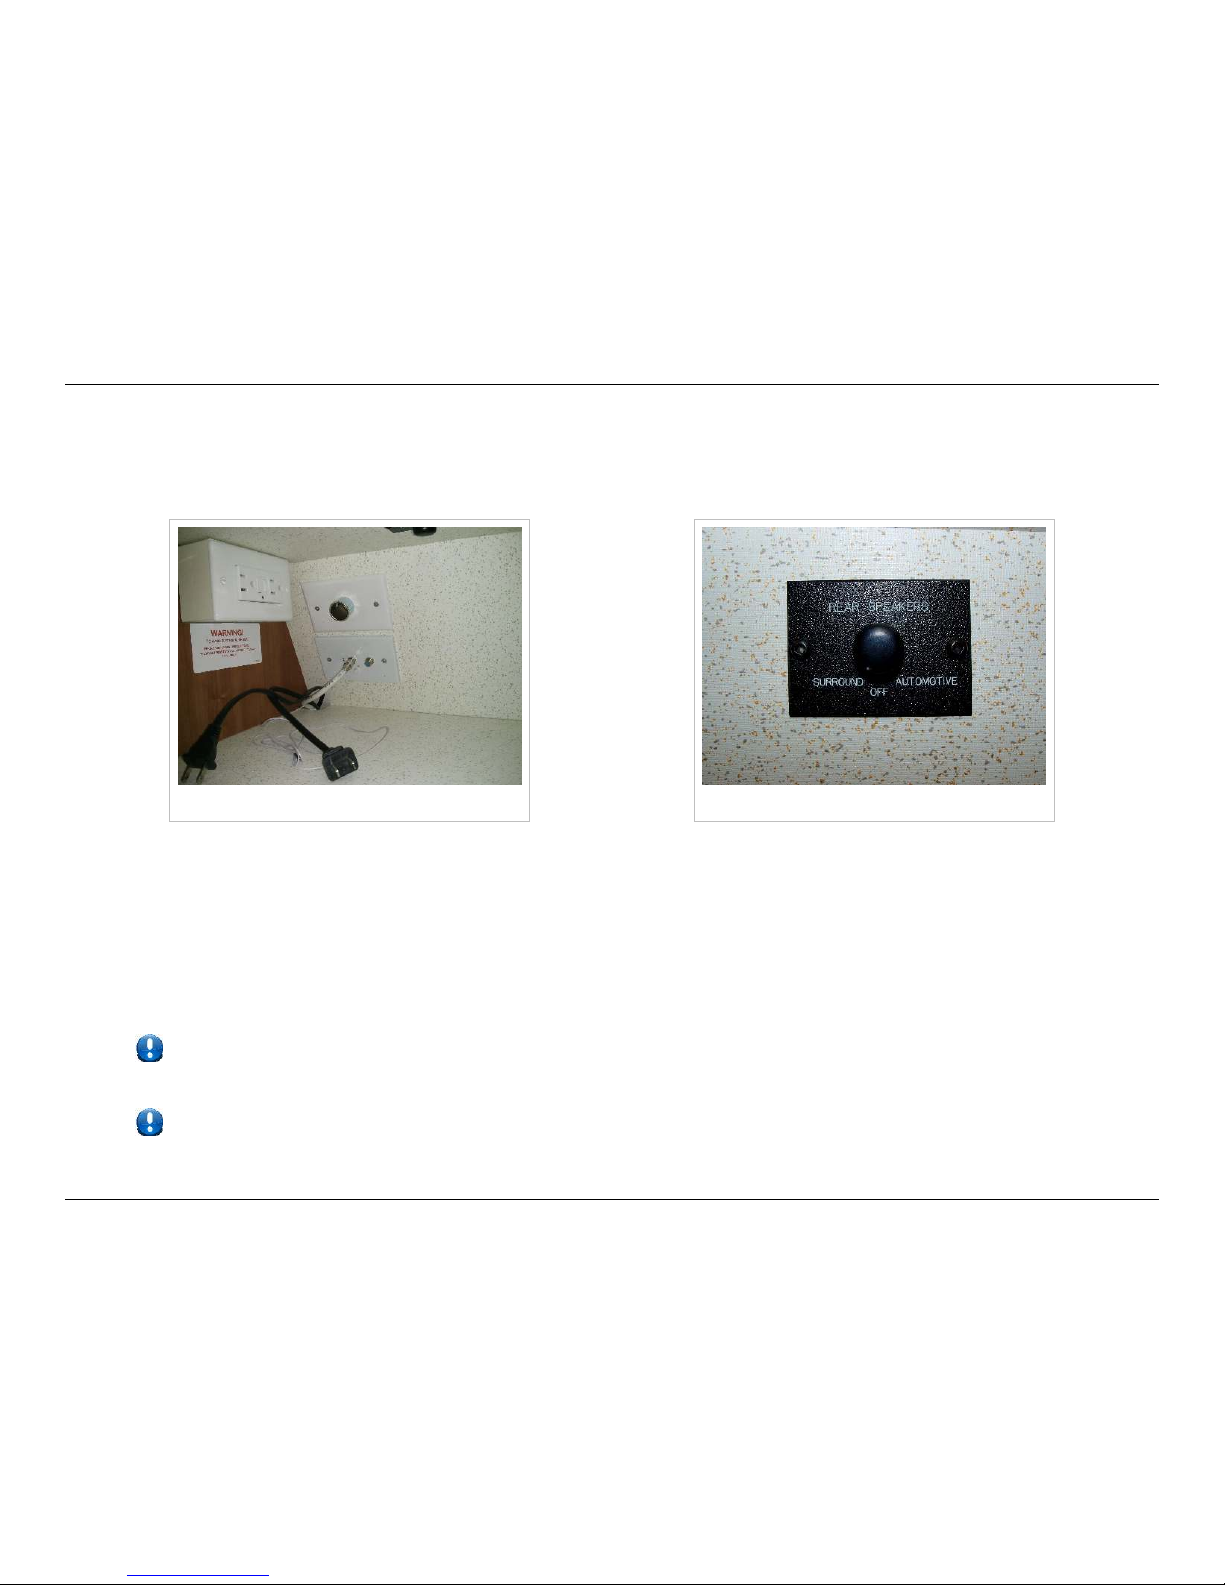
There are two antenna connections in the cabinet above the DVD player. One is labeled for the antenna, the other for cable
TV. Connect the cable to the appropriate jack.
TV antenna and cable connections Rear speaker control switch
Controlling the Rear Speakers
The surround sound system offered in your Roadtrek allows you to control the rear speaker sound in your vehicle. Locate the
speaker switch in the cabinet above the home theater system.
•• Surround Setting: Allows back speakers to function as part of the TV/home theater system
•• Off Setting: Turns the rear speakers off
•• Automotive Setting: Connects the rear speakers to the front dash radio
If you are experiencing problems with your TV reception while using the over-the-air antenna, check to ensure the
connection to the antenna signal booster located in the cabinet above the home theater system is plugged in.
To ensure power is getting to the antenna, check to see if the blue indicator light on the antenna is illuminated, and
that the indicator light on the power injector in the cabinet above the TV is illuminated.
Page 32

Appliances
29
© 2014 by Roadtrek, Inc.
Hot Water
The 170 Versatile is equipped with a 6 gallon water heater. The heater requires both 12VDC and propane for proper
operation. See Monitor Panel for location and operation of the switch for the heater.
Refer to the Owner's Manual for the heater for details about the heater itself.
Refrigerator
The refrigerator is a 3-way electric and propane model which that can run on DC (battery) power, AC (shore / generator)
power, or propane. Propane operation allows you to operate your refrigerator for weeks on one tank of propane while
boondocking, but cannot be used while the vehicle is in motion. While driving, operate the refrigerator on DC 12 volt power the vehicle alternator generates more than enough power to run the refrigerator and keep your batteries charged while
driving. You can use AC when plugged into shore power when you don't want to use propane unnecessarily.
Never run your refrigerator on propane while at a gas station. Shut the refrigerator off while at a gas station, and
turn it back on after pulling away from the pumps. To ensure that neither your hot water heater nor your refrigerator
generate dangerous open flames while handling fuel, always turn the battery disconnect switch OFF when refueling.
Refer to the refrigerator owner's manual for details of operation.
Page 33
Appliances
30
© 2014 by Roadtrek, Inc.
Oven
The oven is a standard microwave / convection oven. It operates much the same as the microwave at your house. It is
probably lower powered, so cooking may take a bit longer.
You must be connected to shore power or have the generator running to use the microwave.
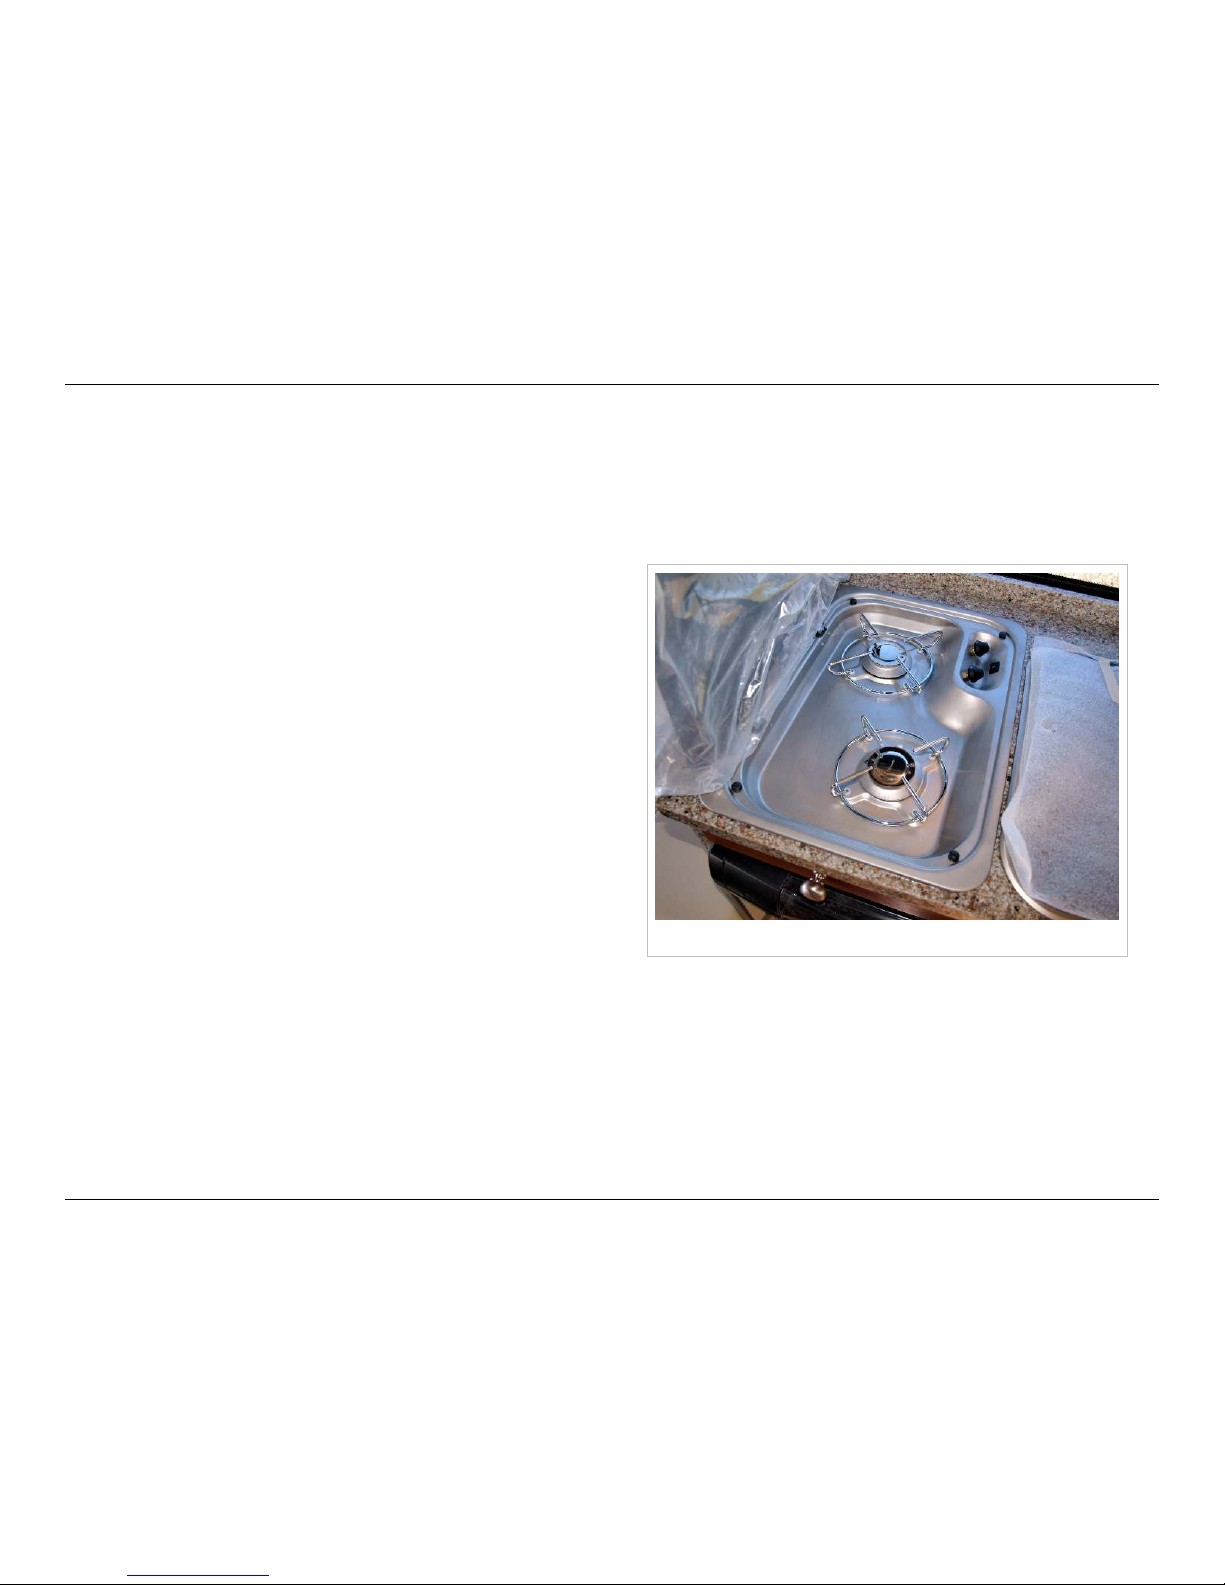
Galley stove
Cooktop
The two-burner propane cooktop needs fresh air for its safe
operation. Make sure to open a window and open and/or turn on
the overhead fan for proper ventilation. The burner igniters
require 12 volt power to work, so turn on the battery disconnect
switch to use them.
Refer to the cooktop owner's manual for details of operation.
Page 34
Outside your Roadtrek
31
© 2014 by Roadtrek, Inc.
Outside your Roadtrek
Awning
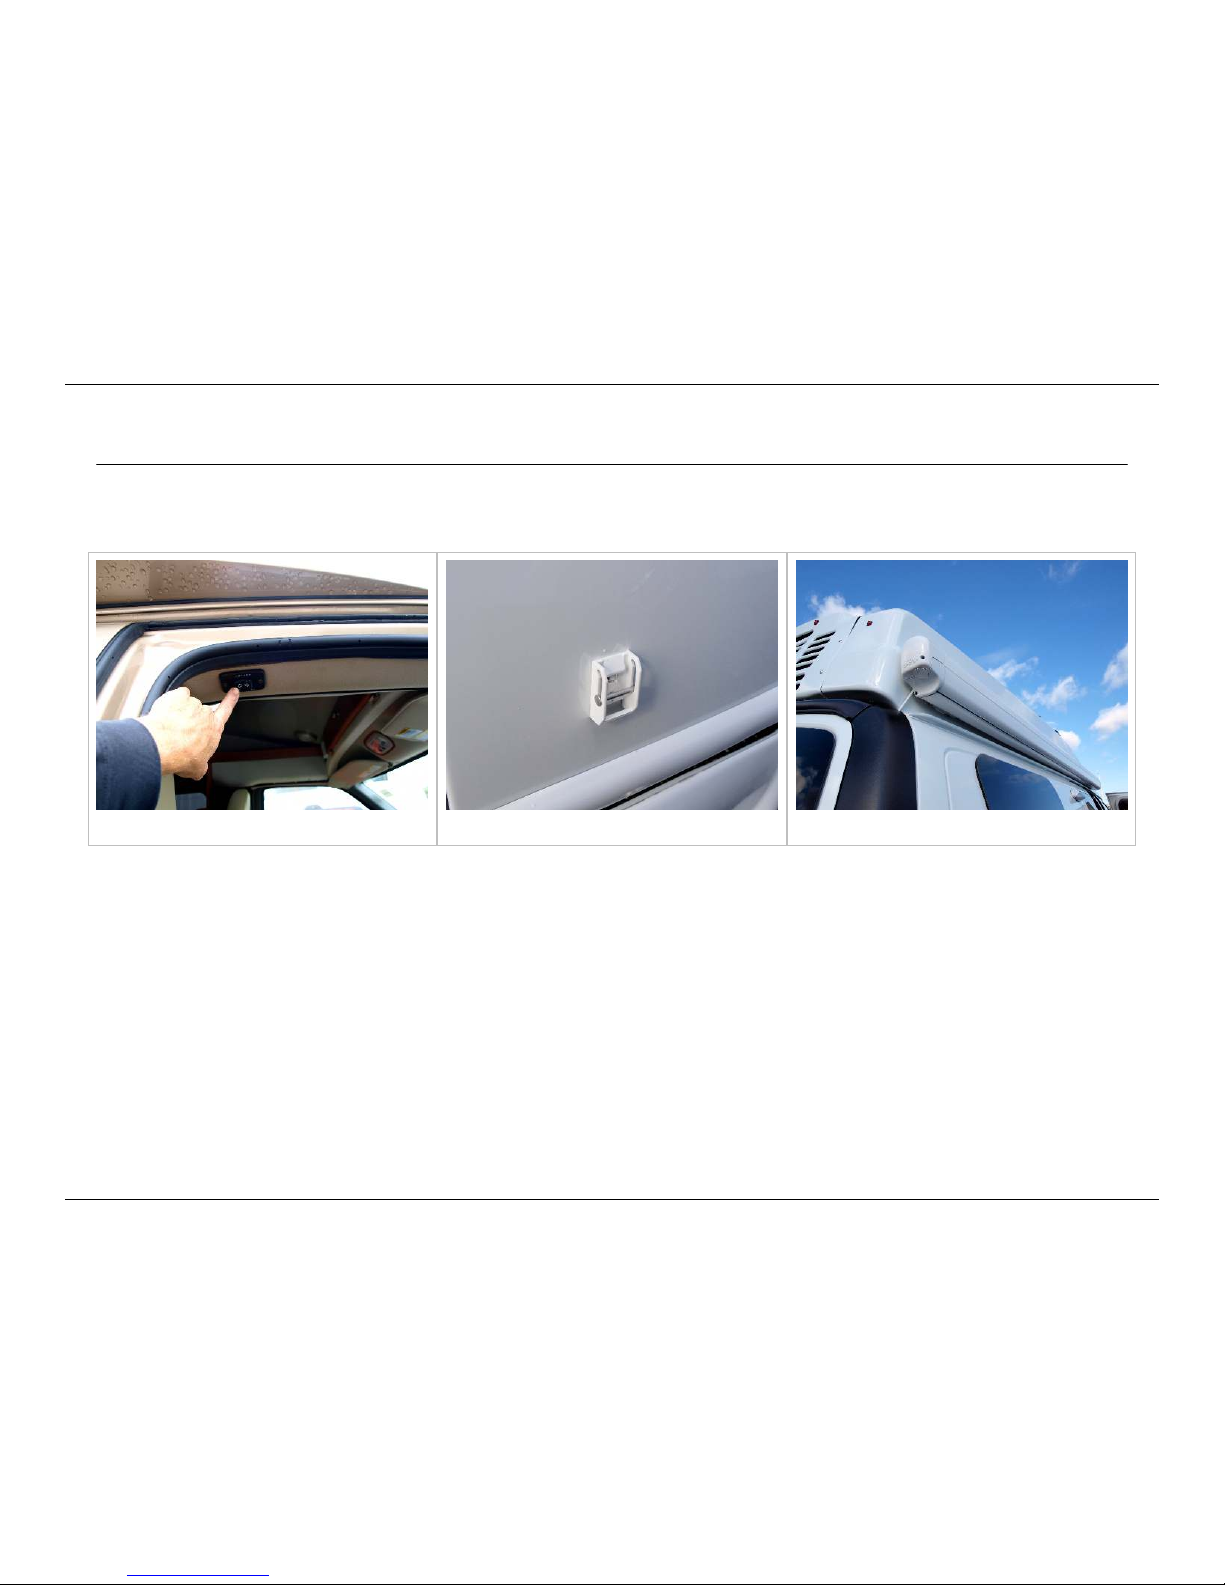
Awning power switch Awning attachment Stowed awning
Your Roadtrek has an electric roll up awning. The control for the awning is located above the passenger door on the inside.
To open the awning push the rocker switch and the awning will extend. Lower the supports on each side and secure them to
the two attachment points on the side of the Roadtrek. Refer to the awning manual for the proper way of securing the awning
supports to the attachments. To stow the awning, detach the supports, stow them in the awning housing, and retract the
awning. Electrical awnings have the switch inside the passenger door above the side window.
Awnings are susceptible to damage from wind, and for this reason should never be left extended when you are away from the
vehicle. If a thunderstorm or other windy weather is imminent, stow your awning until the wind calms down.
Page 35
Outside your Roadtrek
32
© 2014 by Roadtrek, Inc.
Exterior access doors and hatches
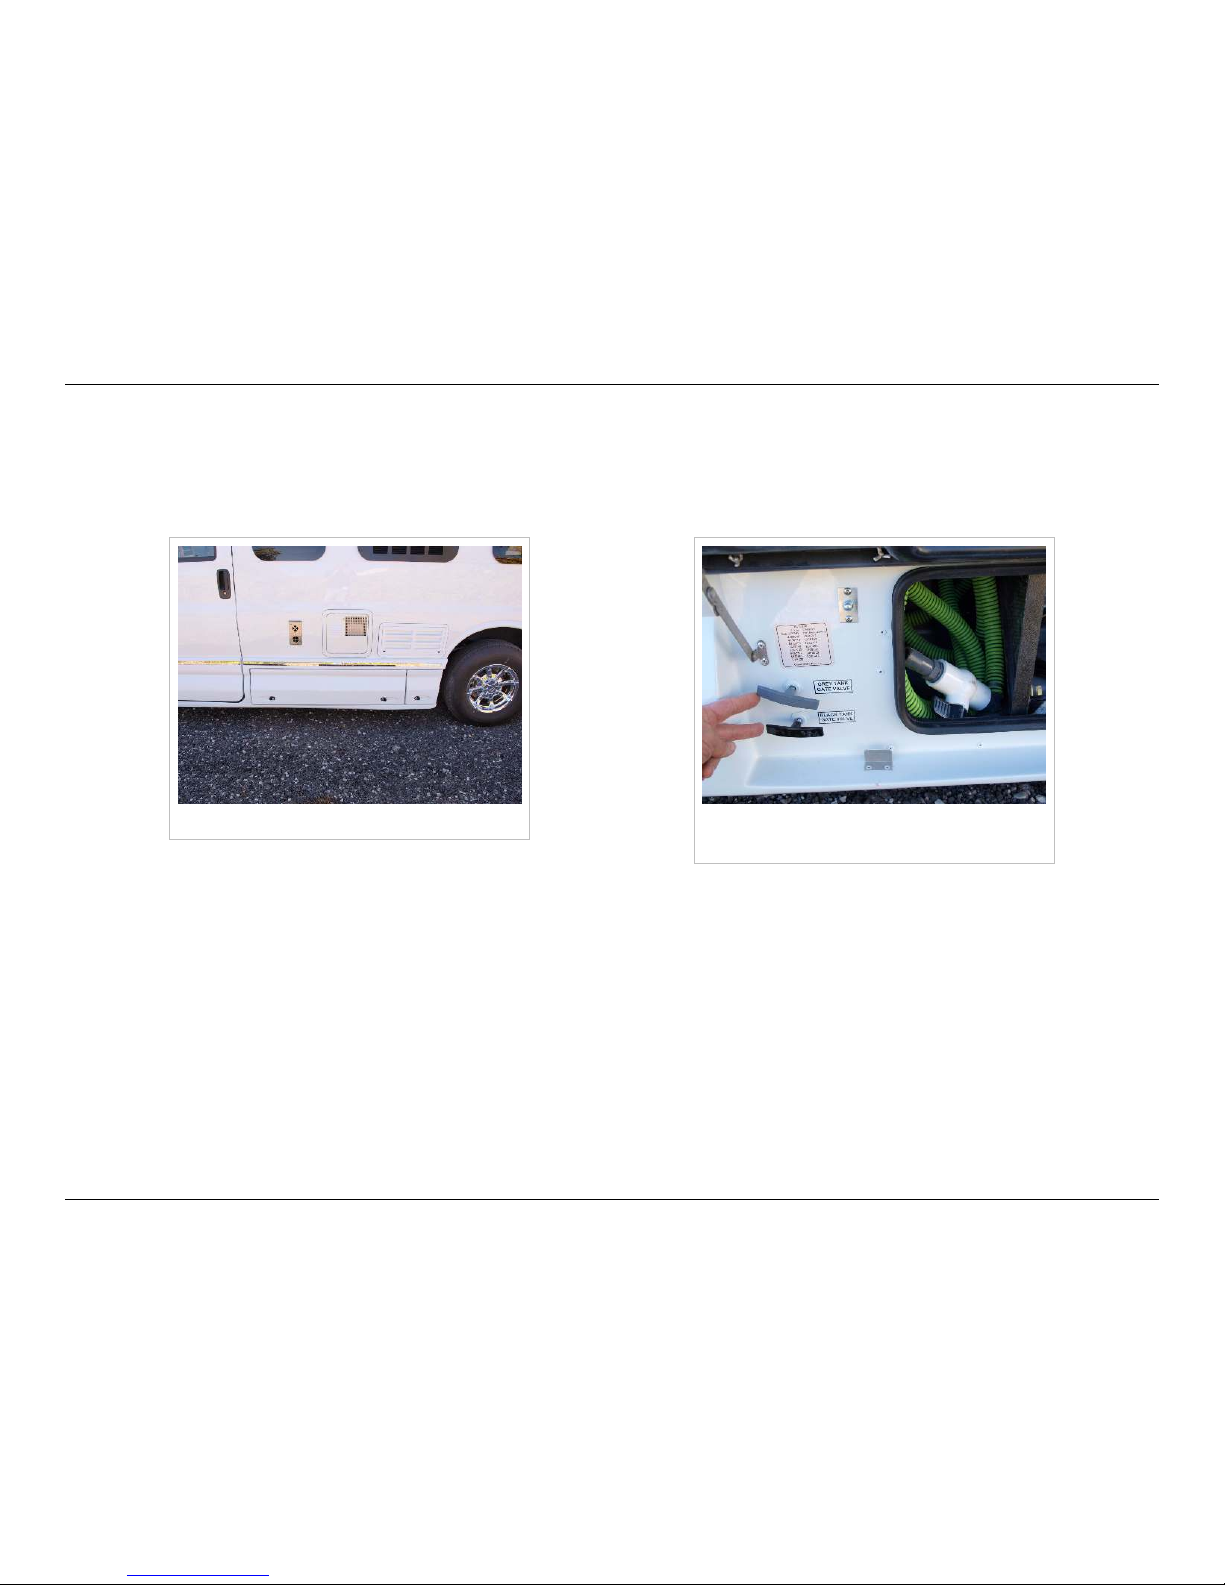
Driver's Side Doors
Driver's side access doors Driver's side front access door showing
tank dump valves and waste water hose
Page 36
Outside your Roadtrek
33
© 2014 by Roadtrek, Inc.
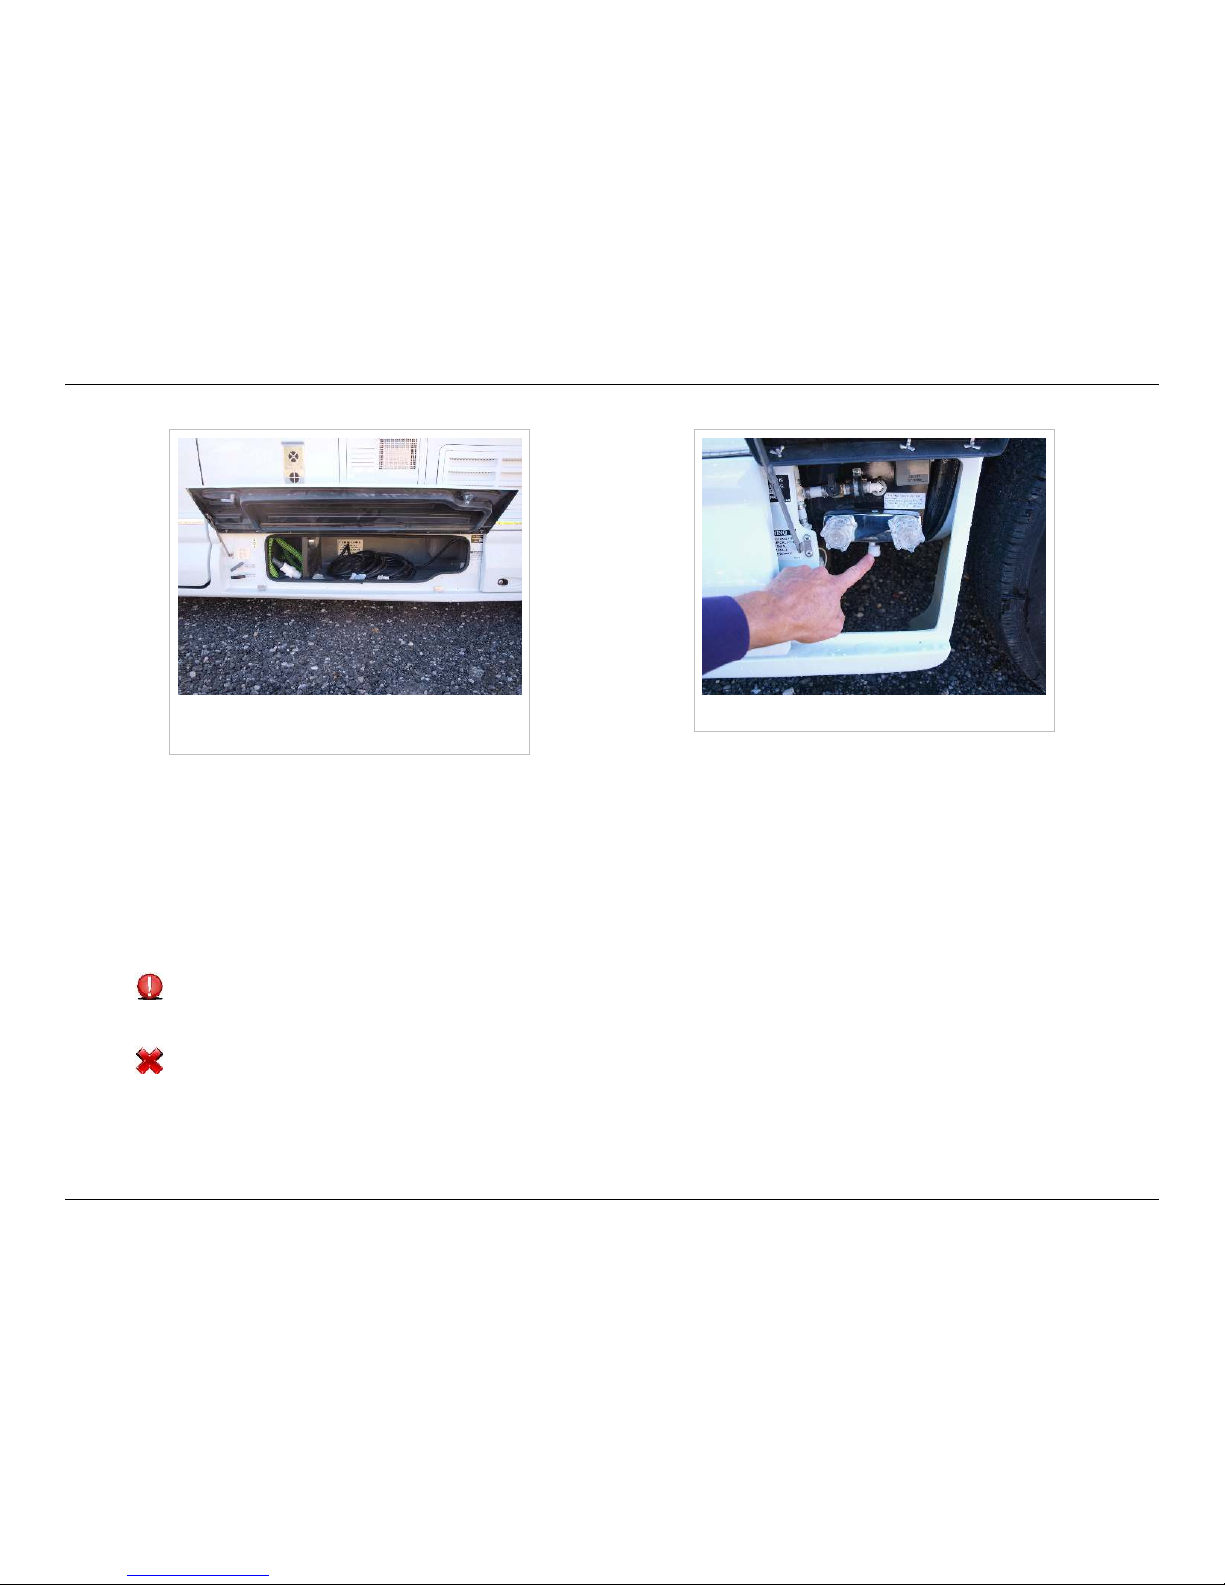
Driver's side access door houses power
cord and waste water hose
Driver's side rear access door
On the driver's side, there are two doors that house items that you will use.
The large access door directly behind the driver's door has the dump valves for the gray and black tanks, a storage area for
the macerator hose, and the shore power cord. The smaller door just in front of the rear tire has the outside shower, city
water connection point and valve, and the cable TV connection.
Directly above the center access door and below the galley window you will see two vent hatches. The rectangular one is for
the refrigerator and the square one is for the water heater. The water heater will vent hot gasses when the water heater is
running. The chrome one forward of the water heater is the furnace vent and air intake, which will also vent hot gasses when
the furnace is running.
Do not block any of these vents. They need to remain unobstructed to prevent dangerous fumes from entering the
interior space.
Since all these sources of open flame are near the fuel fill door on the driver's side, please ensure that all propane
appliances are off when refueling your Roadtrek. In addition to making sure your main propane tank valve is shut
whenever the vehicle is stored or in motion, turn the battery disconnect switch off when refueling - this will disable the
water heater igniter, the refrigerator igniter, and the furnace.
Page 37
Outside your Roadtrek
34
© 2014 by Roadtrek, Inc.
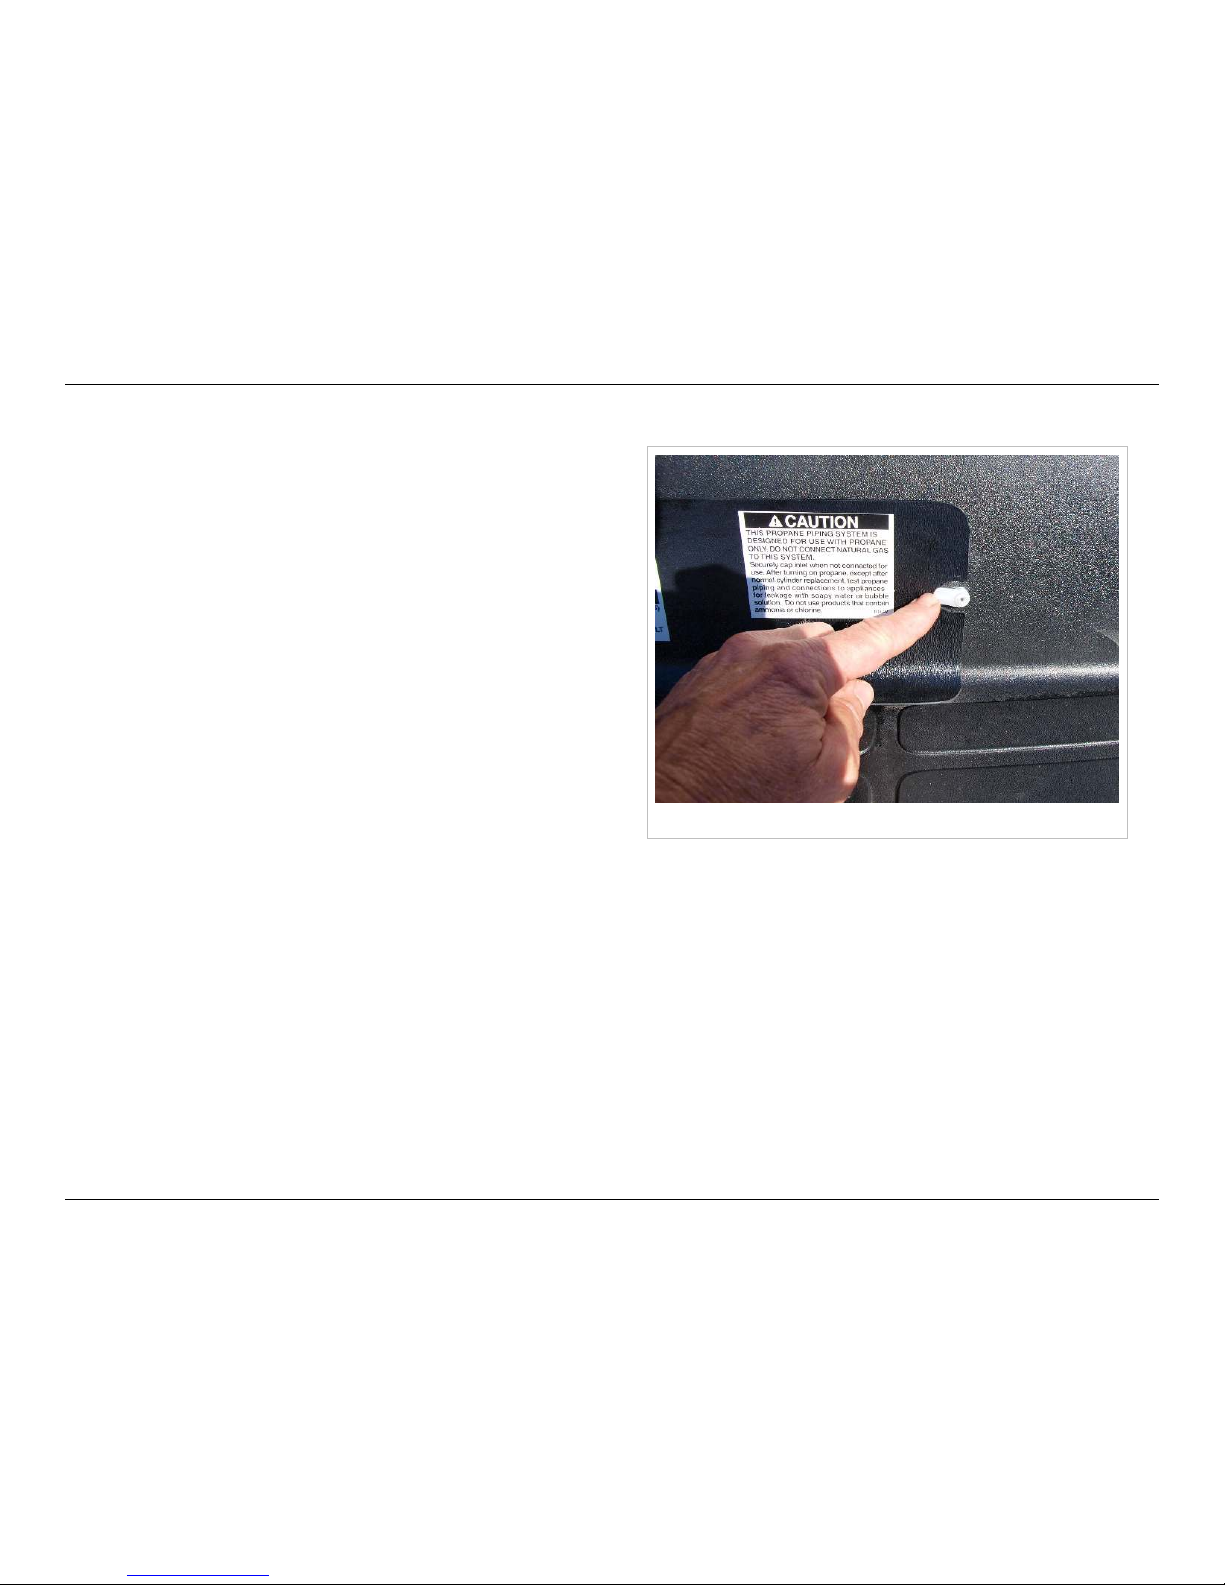
Propane access cover
Propane Access Panel
The propane access cover is located in the rear, at the center of
the bumper. Flip the side latches to expose the tank valve and
filler.
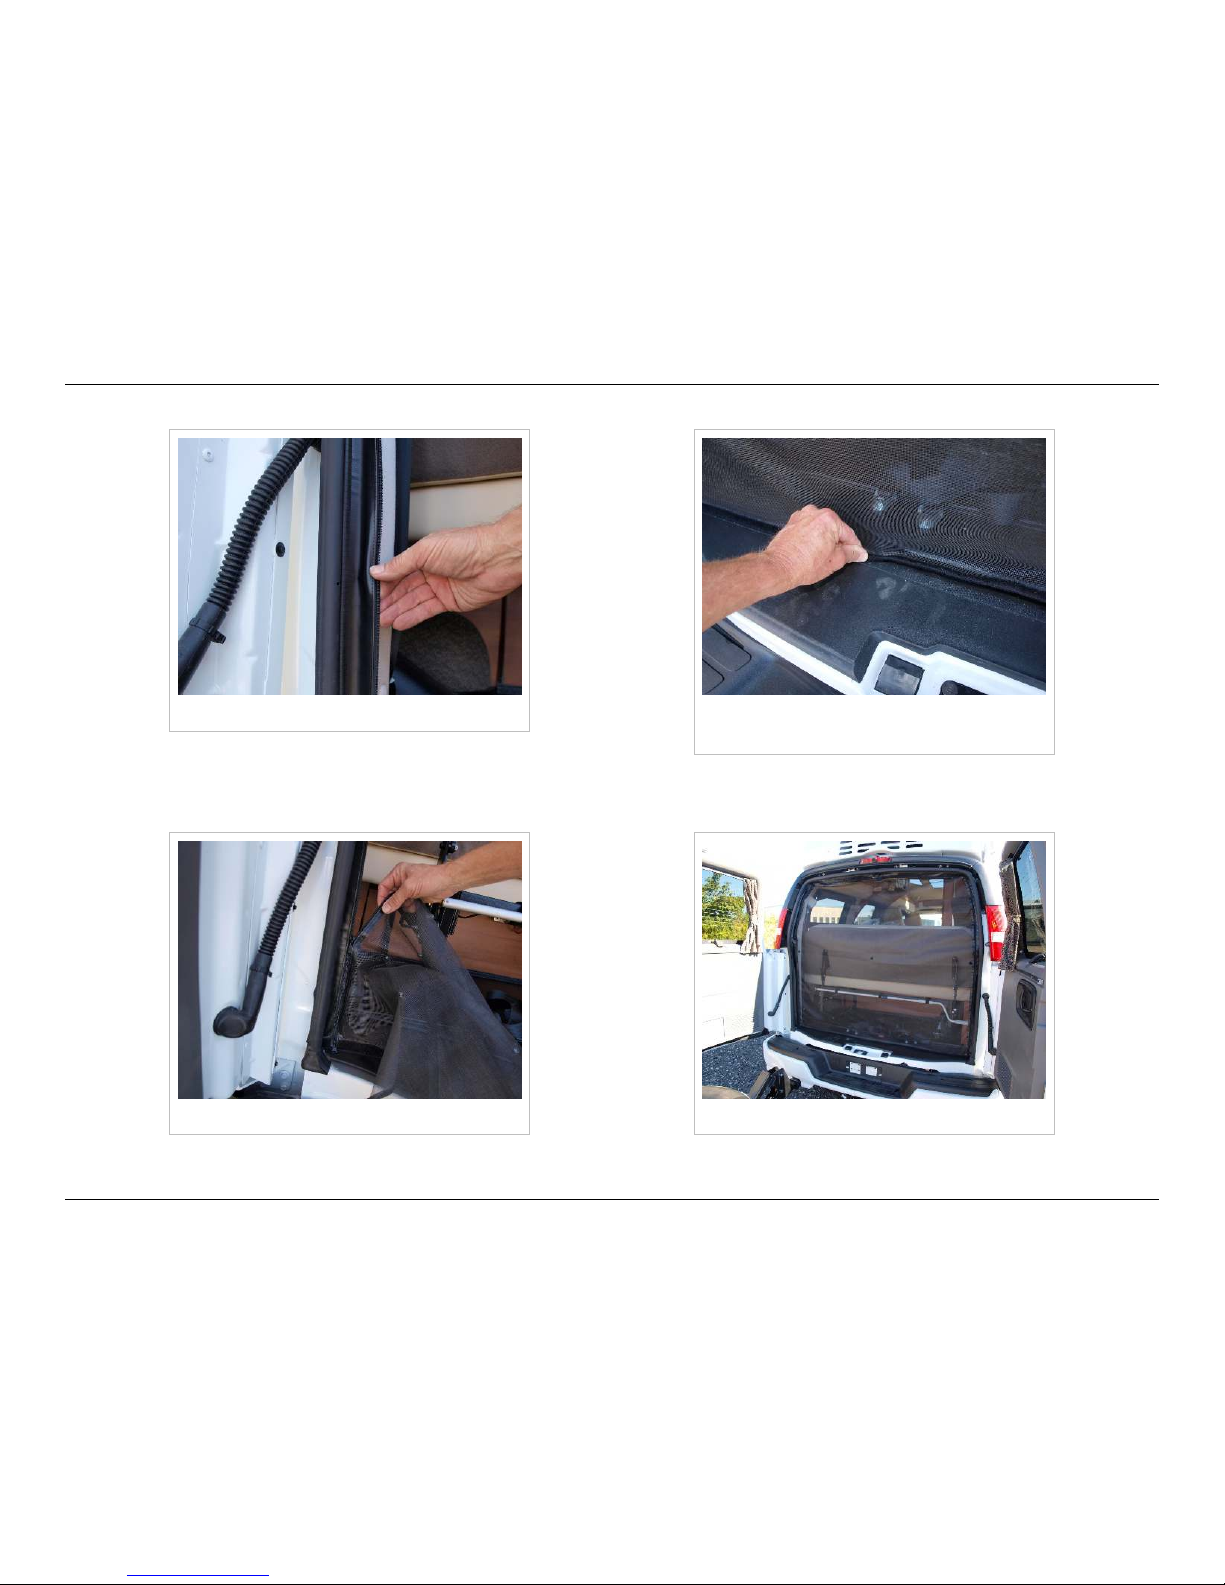
Optional Rear Door Screen
Roadtreks have an optional rear screen which allows you to open
the rear doors and get fresh air and a better view, without bugs
coming in or (attended) pets going out. If you ordered this
option, look for this screen in the white box that comes with your
new Roadtrek. The screen attaches to the rear door frame and
cargo area floor with a zipper and hook-and-loop fasteners.
Page 38
Outside your Roadtrek
35
© 2014 by Roadtrek, Inc.
Surround with zipper Hook and loop fastener for bottom edge
of screen
Open the screen and locate the edge with hook and loop material along it. This edge is the bottom, so use the hook-and-loop
strips on the screen to attach it across the bottom of the door opening.
Start the zipper on the left side Installed screen
Page 39

Outside your Roadtrek
36
© 2014 by Roadtrek, Inc.
Start the zipper at each bottom corner by pushing the bottom stop (the metal end) of the zipper into the two back-to-back
zipper sliders, and zipping the top slider upward.
At the top, close the flap with the hook-and-loop fastener strip where the zippers meet.
Use the double slider to unzip the bottom of the screen to allow access to the underbed storage area in the back of the
Roadtrek without disturbing the top section.
To remove and stow the screen, unzip it from the top down. Unzipping it from the bottom will not allow you to remove it from
the doorframe surround.
Optional Side Door Screen
In addition to the rear door screen, there is also an optional side door screen which will allow you to keep the side door open
for ventilation without admitting insects. There is a zipper in the screen so you can enter and exit without removing the
screen.
Locate the screen in the white box that comes with your new Roadtrek, and shake it out. To orient the screen correctly, look
for the zipper in the screen - hold the screen so that the zipper goes across near the top and then down the right side. Start
the hook and loop fastener at a convenient corner and work your way around the perimeter until the screen is secured.
To enter or exit the vehicle through the side door while the screen is installed, unzip the opening and step through. While
sturdy enough to keep insects out, neither this screen nor the rear screen are designed to resist repeated and persistent
attempts by pets to get out of the vehicle. Do not leave your pets unattended with the screen in place and the door open.
Page 40
Utilities
37
© 2014 by Roadtrek, Inc.
Utilities
Just like your house, your 170 Versatile has fresh water, electricity, waste water disposal, heating, and cooling systems. In the
170 Versatile, these systems are self contained and travel with you.
Your vehicle should be reasonably level to allow normal operation of the system.
Fresh Water
Exterior tank fill location City water connection
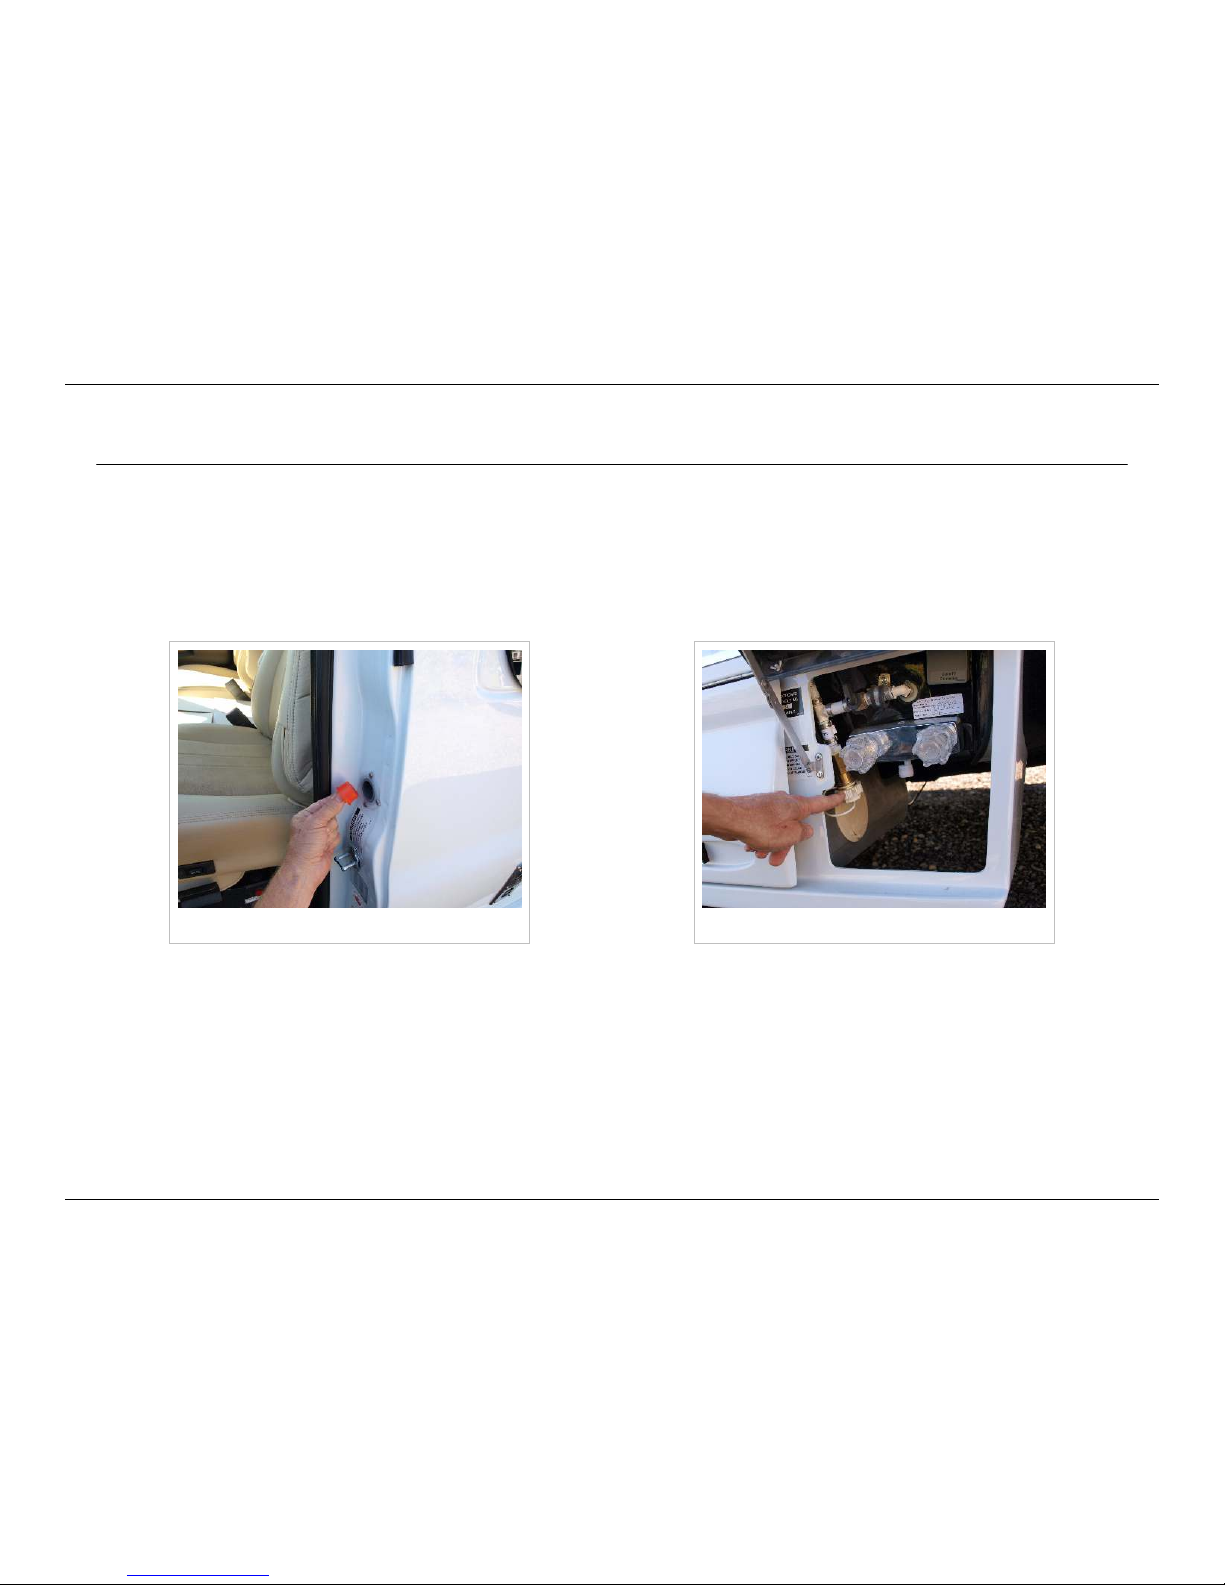
Fresh water is contained a tank underneath the vehicle's driver seat. The fill location is located on the driver's door near the
door handle latch. Look for the orange plug in the fill port.
Page 41

Utilities
38
© 2014 by Roadtrek, Inc.
City Water
Your Roadtrek can operate in either fully self-contained mode, or can be connected to a water supply such as a campsite's
faucet.
Campgrounds and municipalities vary greatly in supplied water pressure. Before connecting to external water
supplies, purchase and install a pressure regulator inline with the water connection.
You can fill your tanks using the gravity fills.
The city water inlet connection is located in the small compartment just in front of the driver's side rear tire.
Roadtrek recommends that you use a dedicated single purpose potable-water hose. These are usually white in color.
Buy a new one and use it only for filling your tanks and connecting to city water. View any hose lying around a
campground with extreme skepticism, especially it there's a wastewater dump nearby. Large RVs use hoses to flush
their wastewater system.
To connect the Roadtrek's water system to an outside source refer to the HOWTO: Potable Water Use section of this manual.
Tanks
You can fill the fresh water tank from a convenient water spigot.
To fill the tank with fresh water, open the drivers side front door and remove the orange plug in the fresh water fill port. Fill
until water comes out the hole.
Water Pump
To use the water in the tank, you need to turn on the water pump. See Monitor Panel for switch location.
Page 42

Utilities
39
© 2014 by Roadtrek, Inc.
Waste Water
Gray Tank
Galley sink, bathroom sink and shower drain water drains into the gray water tank. The shower and sink have traps to
prevent tank odors from entering the living space. Be sure to replace the screw-in plug in the shower floor after use to
prevent gray water from sloshing up into the shower pan from the gray water tank while driving.
Black Tank
The black water tanks contains toilet waste. Please refer to the HOWTO: Waste Water Dumping for information about what
materials you can and cannot flush down the toilet, and a concise guide to the procedure for dumping your wastewater tanks.
Indicators
The gray and black water tank level indicators on the control panel will give you an approximate indicator of your tank levels.
When the gray water tank is full to capacity, water will no longer drain down the shower and sink drains, and you need to
dump the tanks before running any more water. If you see fluid below the toilet valve in the bowl of the toilet, your black
water tank is full and also needs to be emptied before further use.
See Monitor Panel for more information.
Close both the black and grey water gate valves before using the waste water system. It is possible for the valves to
open slightly especially after extensive driving. Black and grey water dump valves are accessed through the driver side
storage door.
Page 43
Propane System
40
© 2014 by Roadtrek, Inc.
Propane System
Your vehicle is equipped with a propane system which, when properly handled and maintained, will provide trouble and worry
free operation of your propane fueled appliances.
Many jurisdictions place restrictions on propane on highways, in tunnels, on ferries, and on bridges. Please follow all local
restrictions in all the jurisdictions along your trip. Some bridges/tunnels/ferries require you to have your main tank valve
closed. This valve must be closed whenever the vehicle is in motion in any case, not just in certain areas. Other
bridge/tunnels/ferries ban vehicles with propane tanks entirely. Plan ahead and take an alternate route if passing through
areas where vehicles with propane are prohibited.
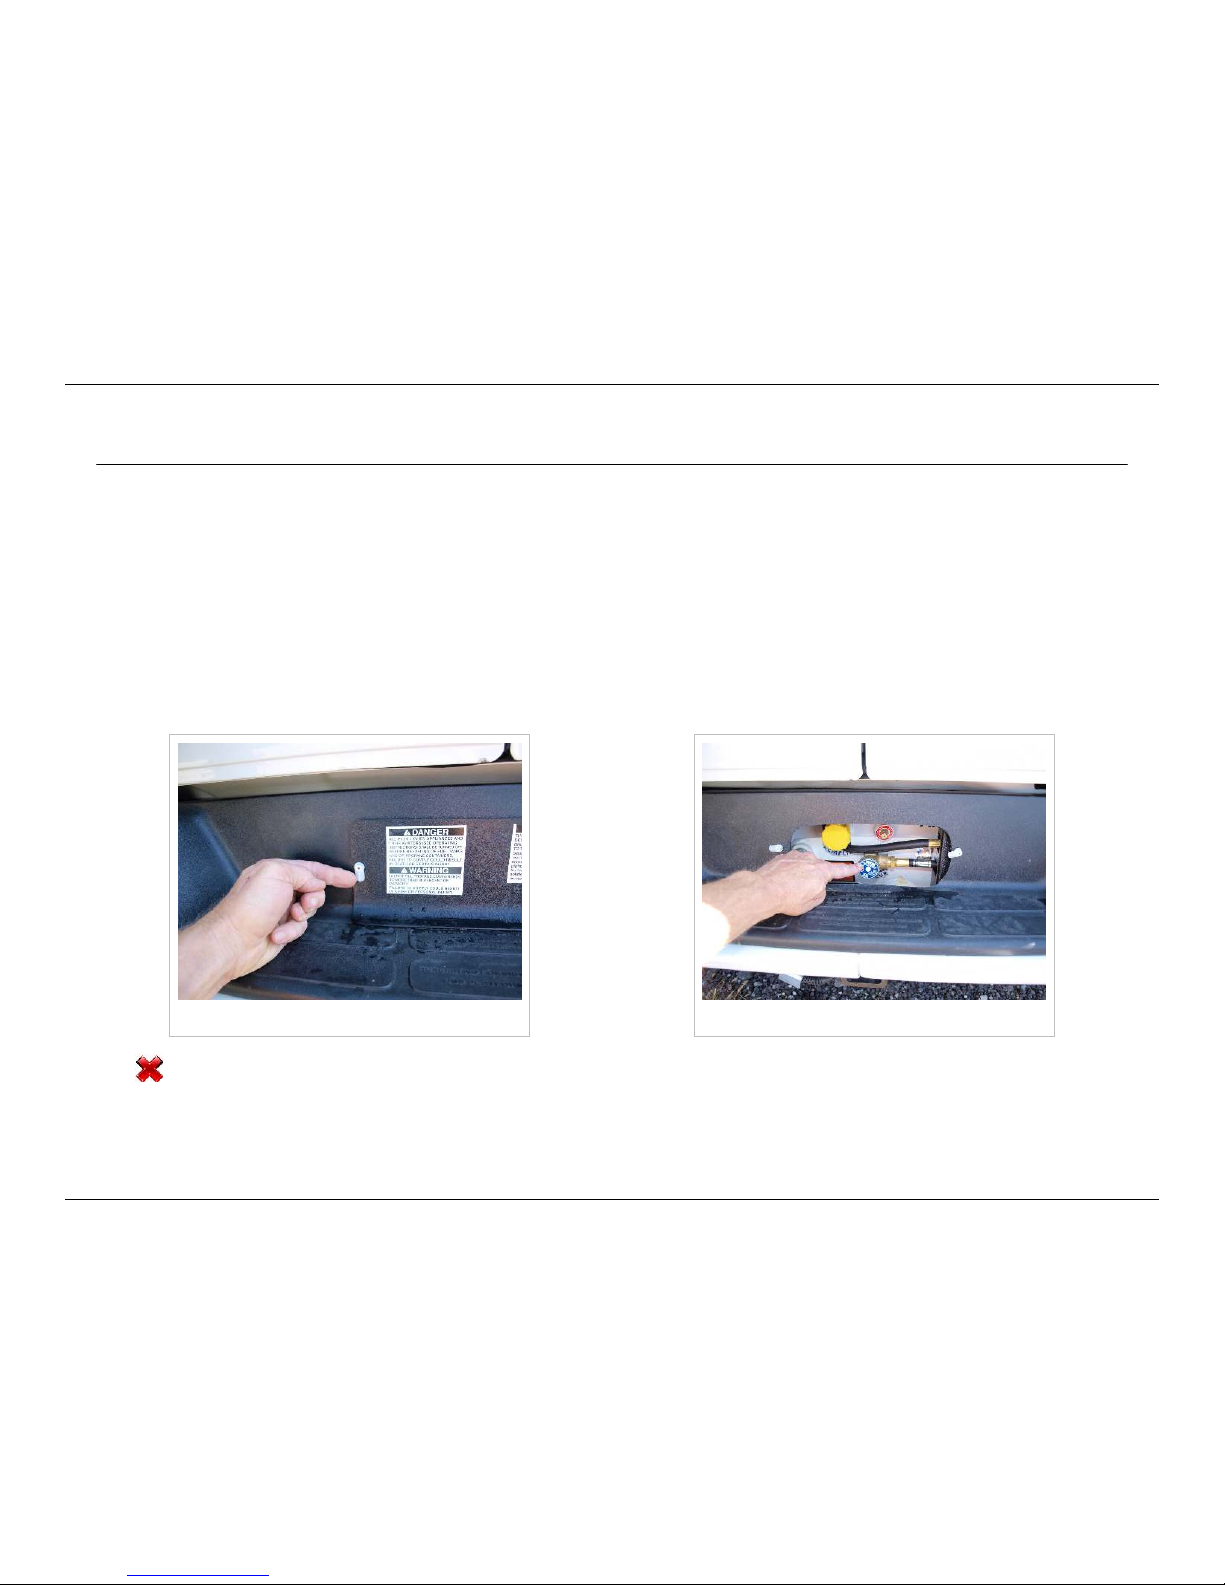
The propane tank is located across the rear of the vehicle. To access the tank for filling and to turn the manual tank shutoff
valve off and on, turn the two retaining tabs on either side of the access cover, located in the center of the rear bumper, and
remove the access cover.
Propane tank cover Propane tank main shutoff
You must close the tank shutoff valve when the vehicle is not in daily use. Further, you must close the shutoff valve
when the vehicle is traveling. Never operate any propane appliance while the vehicle is in motion.
Page 44
Propane System
41
© 2014 by Roadtrek, Inc.
In general, the propane system is set up at the factory and requires little to no adjustments or regular maintenace on your
part.
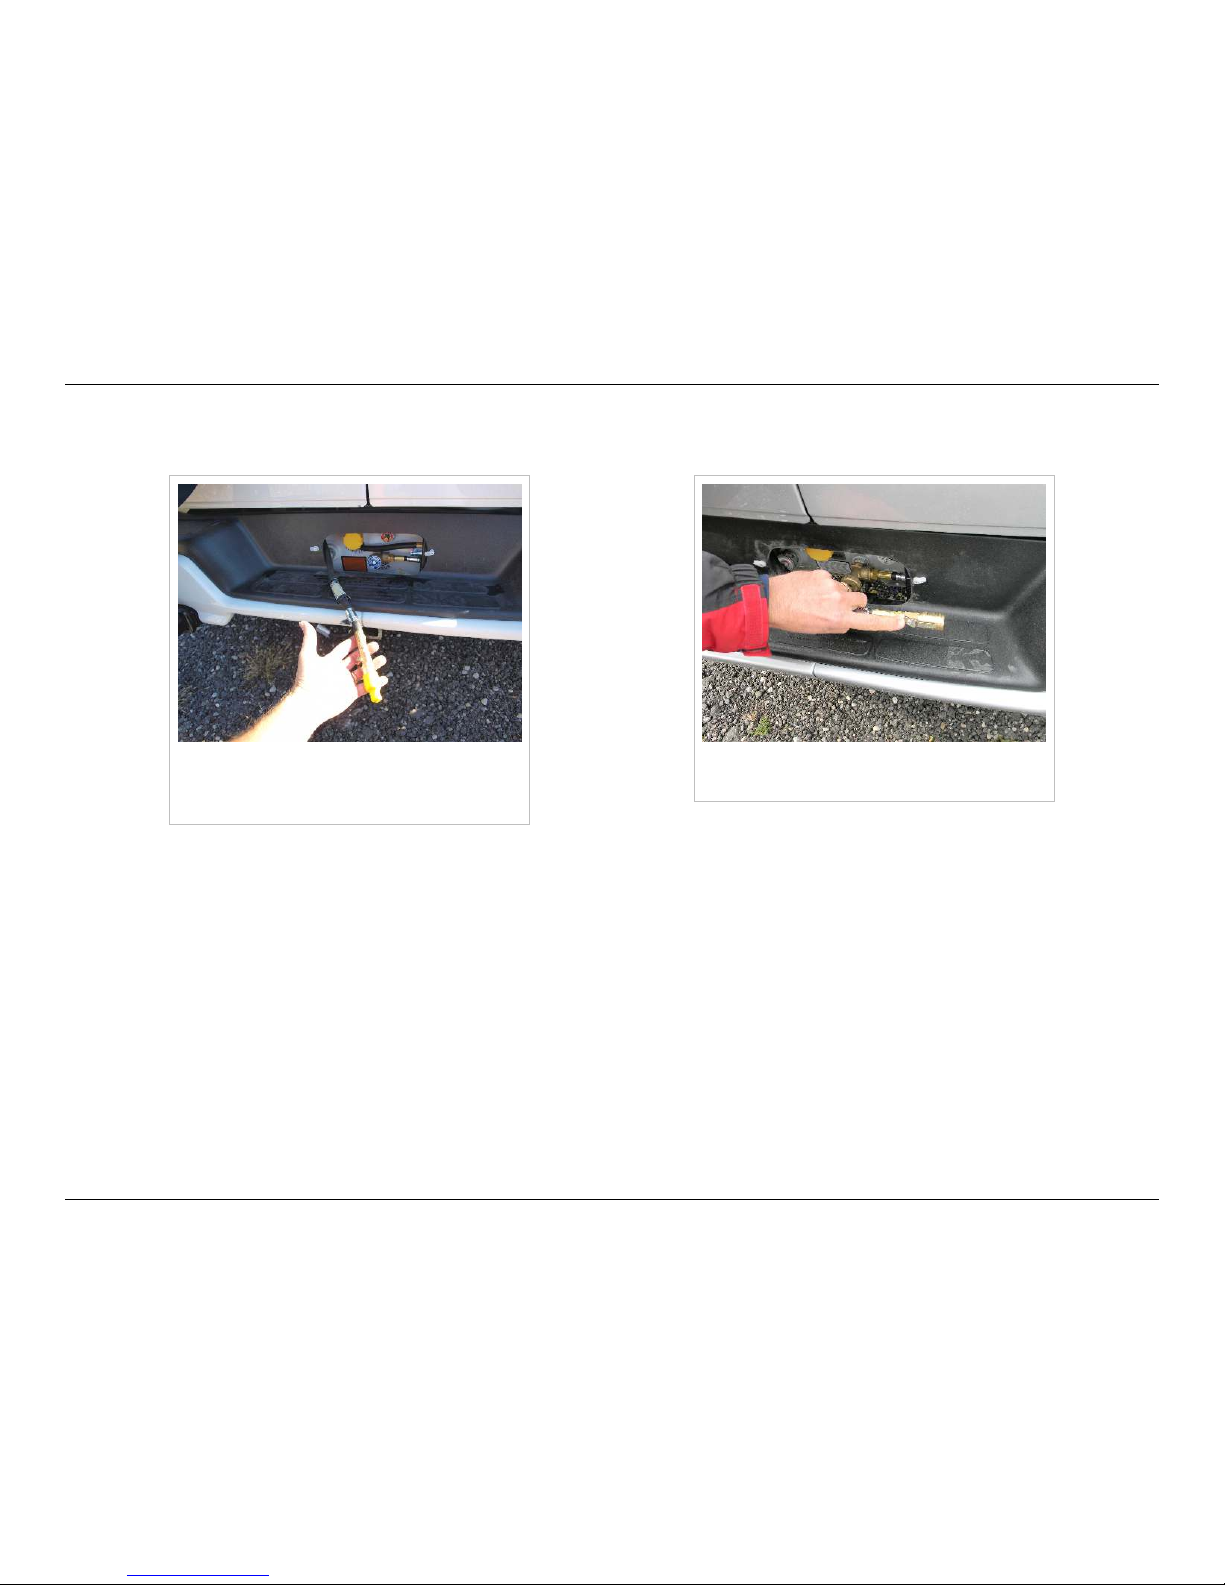
High pressure BBQ pigtail, shown with
yellow dustcap and valve in closed
position
Propane pigtail with dustcap removed
and valve in open position
The propane system has a high-pressure auxiliary BBQ takeoff. Locate the hose behind the access panel. The hose has a
yellow dustcap, and an integral cutoff valve. This provides 15PSI regulated propane to appliances that have their own
regulators or are built to use high-pressure propane.
Page 45
Propane System
42
© 2014 by Roadtrek, Inc.
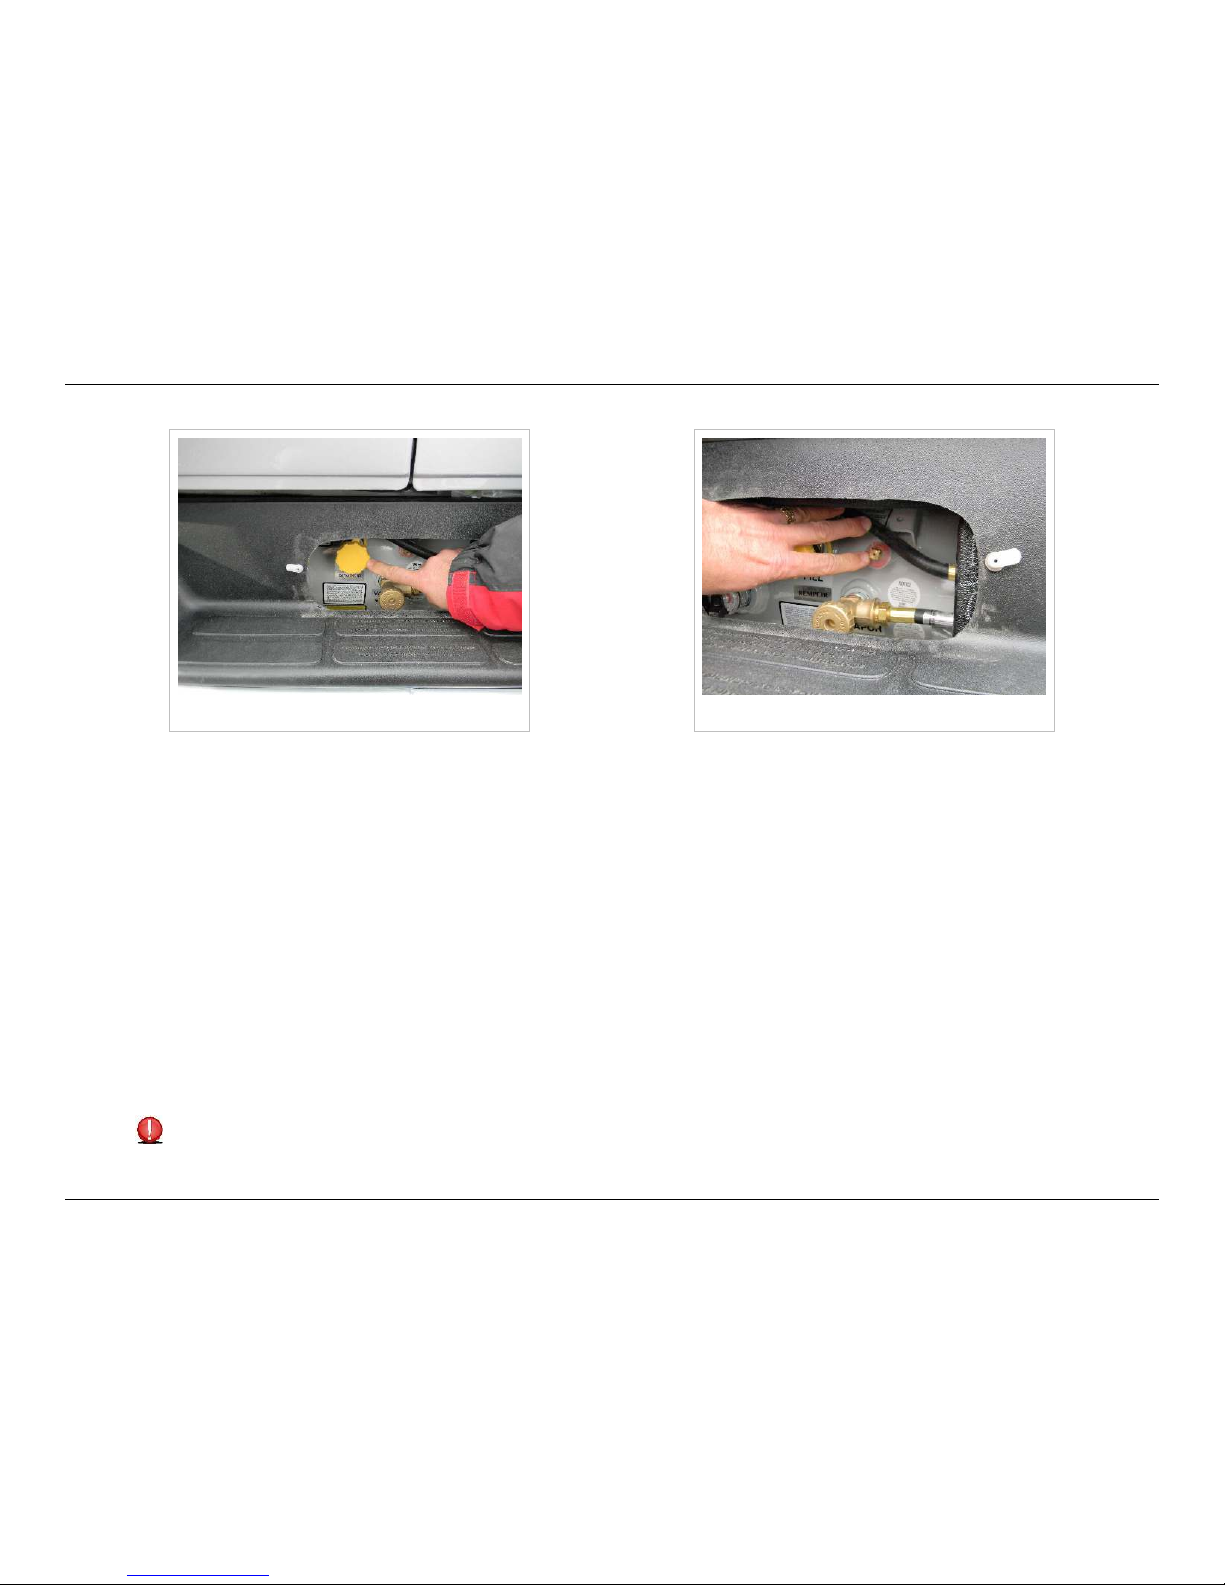
Propane fill valve Propane bleed
Roadtrek recommends that you take your van to a qualified LPG retailer to fill the tank. While filling, turn off all propane
appliances, then turn off the tank shutoff valve.
We recommend that you use only propane from certified LPG retailers.
If you smell propane or your propane detector sounds, immediately get all occupants out of the vehicle and turn the manual
shutoff valve off. Wait for the propane to dissipate. Once the smell is gone, take the vehicle to a qualified repair facility to find
and fix the problem before using the propane system again. If closing the manual shutoff valve does not stop the propane
leak and you still smell propane, do not attempt to start, drive, occupy or otherwise use the vehicle in the presence of a
propane smell.
Under no circumstances should anyone fill the tank to more than 80% capacity; doing so can cause liquid propane to flow into
the regulators. If this happens the regulators will have to be replaced. The relief valve with the blue plastic cover will
automatically vent propane if the tank is overfilled or overheats. This is not a user-serviceable item; never attempt to remove
the cover, test, or otherwise interfere with the operation of this valve. Sometimes an overfilled tank will not start venting until
the temperature rises. If this valve should open, it is best to remove all sources of ignition and expeditiously leave the area
until propane odor is no longer detectable. Venting unburned propane is a slightly more advantageous situation than a tank
explosion, which is what this valve is designed to prevent.
Propane tanks shall not be placed or stored inside your vehicle. Propane tanks are equipped with safety devices
which relieve excessive pressure by discharging gas to the atmosphere.
Page 46

Propane System
43
© 2014 by Roadtrek, Inc.
To reduce the danger of fire or explosion do not store gasoline or other flammable liquids inside your vehicle.
Purchase propane from a reputable propane facility. Contaminated propane is a common cause of system failure.
The auxiliary BBQ outlet is regulated to 15 P.S.I. If you are using an external grill with this hookup, ensure that the
appliance is rated for that pressure or has its own regulator for lower pressure.
The auxiliary BBQ male connector to connect to your BBQ pigtail is Cast Products part # 829000 or 829120. The
hose assembly in varying lengths is available as MB Sturgis part no. 100476.
Page 47
Heating and Cooling
44
© 2014 by Roadtrek, Inc.
Heating and Cooling
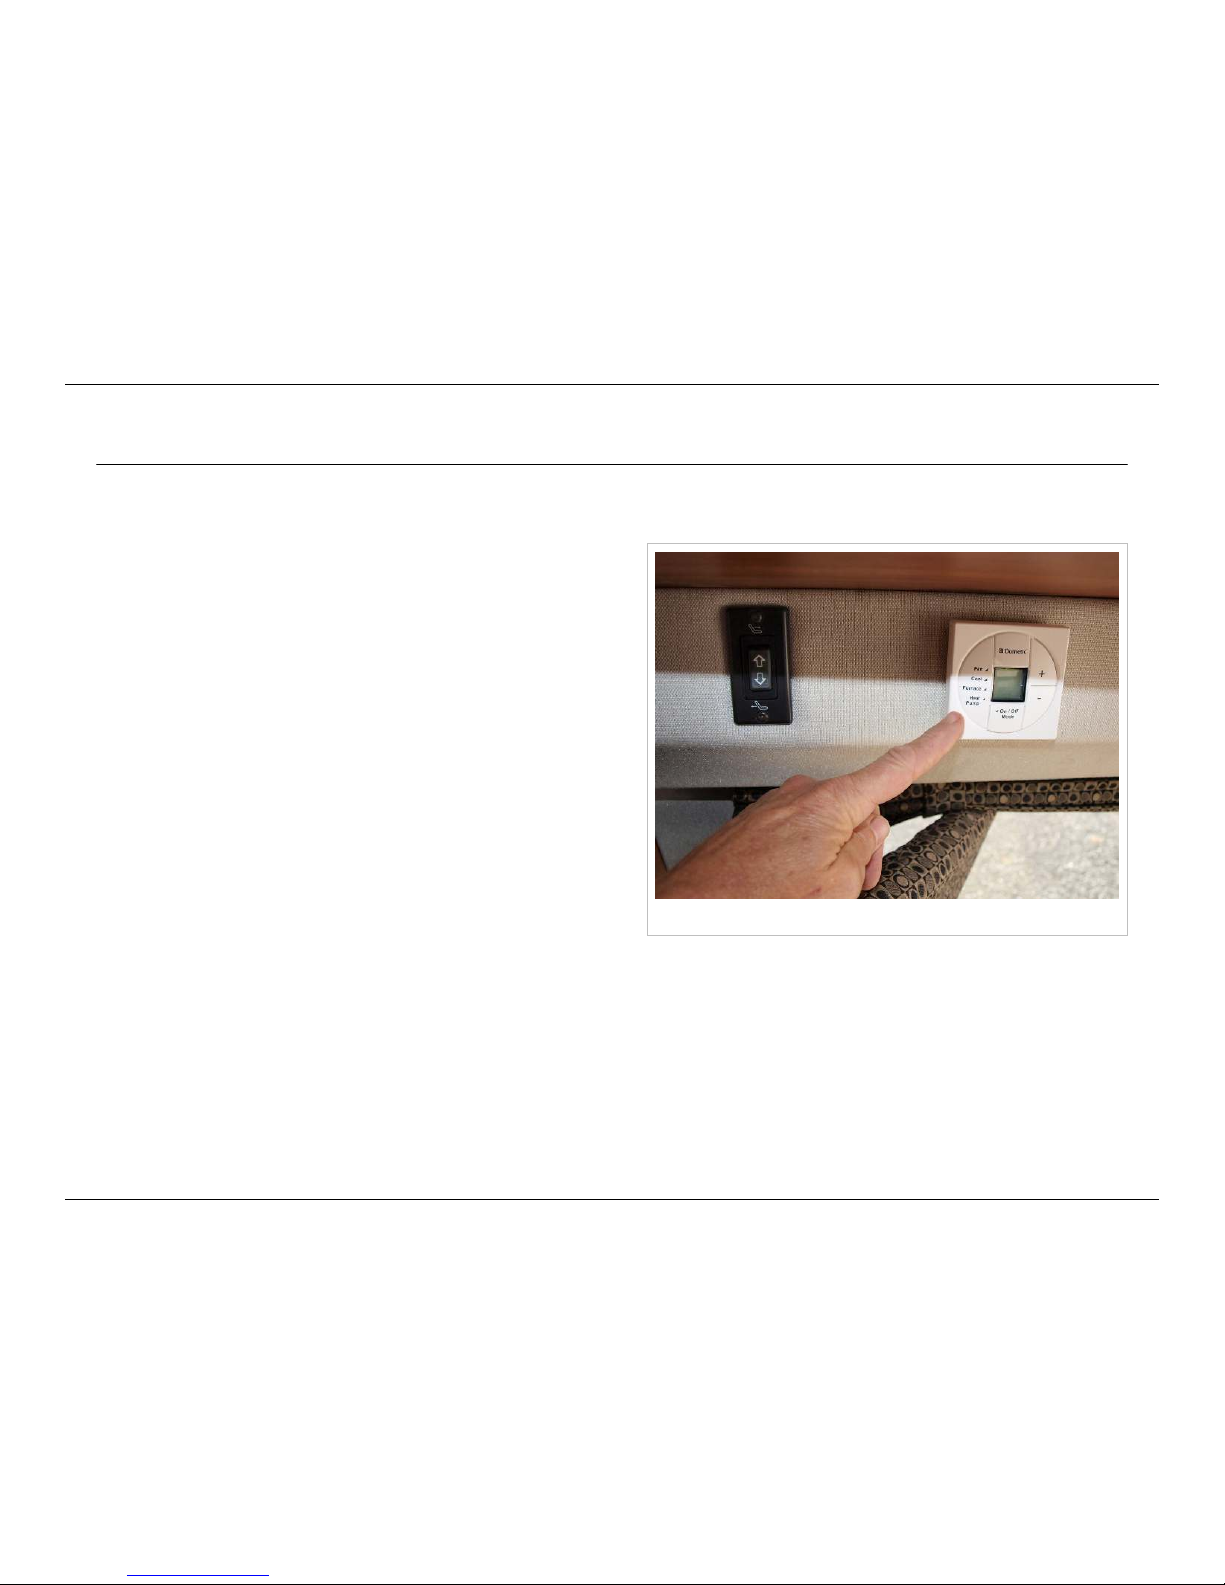
Thermostat
Thermostat
The thermostat controls the air conditioning unit. Set the
thermostat on "cool" and set the desired temperature.
Some models also have a small heat strip in the air conditioning
which will blow warm air, but this produces heat directly from
electricity and is not recommended for heating the cabin for
extended periods of time unless you are attached to shore
power or running the engine. For all other circumstances, use
the regular heating system to heat the cabin. If your unit has the
heat strip option, you can operate it by turning the thermostat to
"furnace" and setting the desired temperature.
The third setting, "fan", recirculates cabin air using the fan inside
the air conditioning unit.
Page 48
Heating and Cooling
45
© 2014 by Roadtrek, Inc.
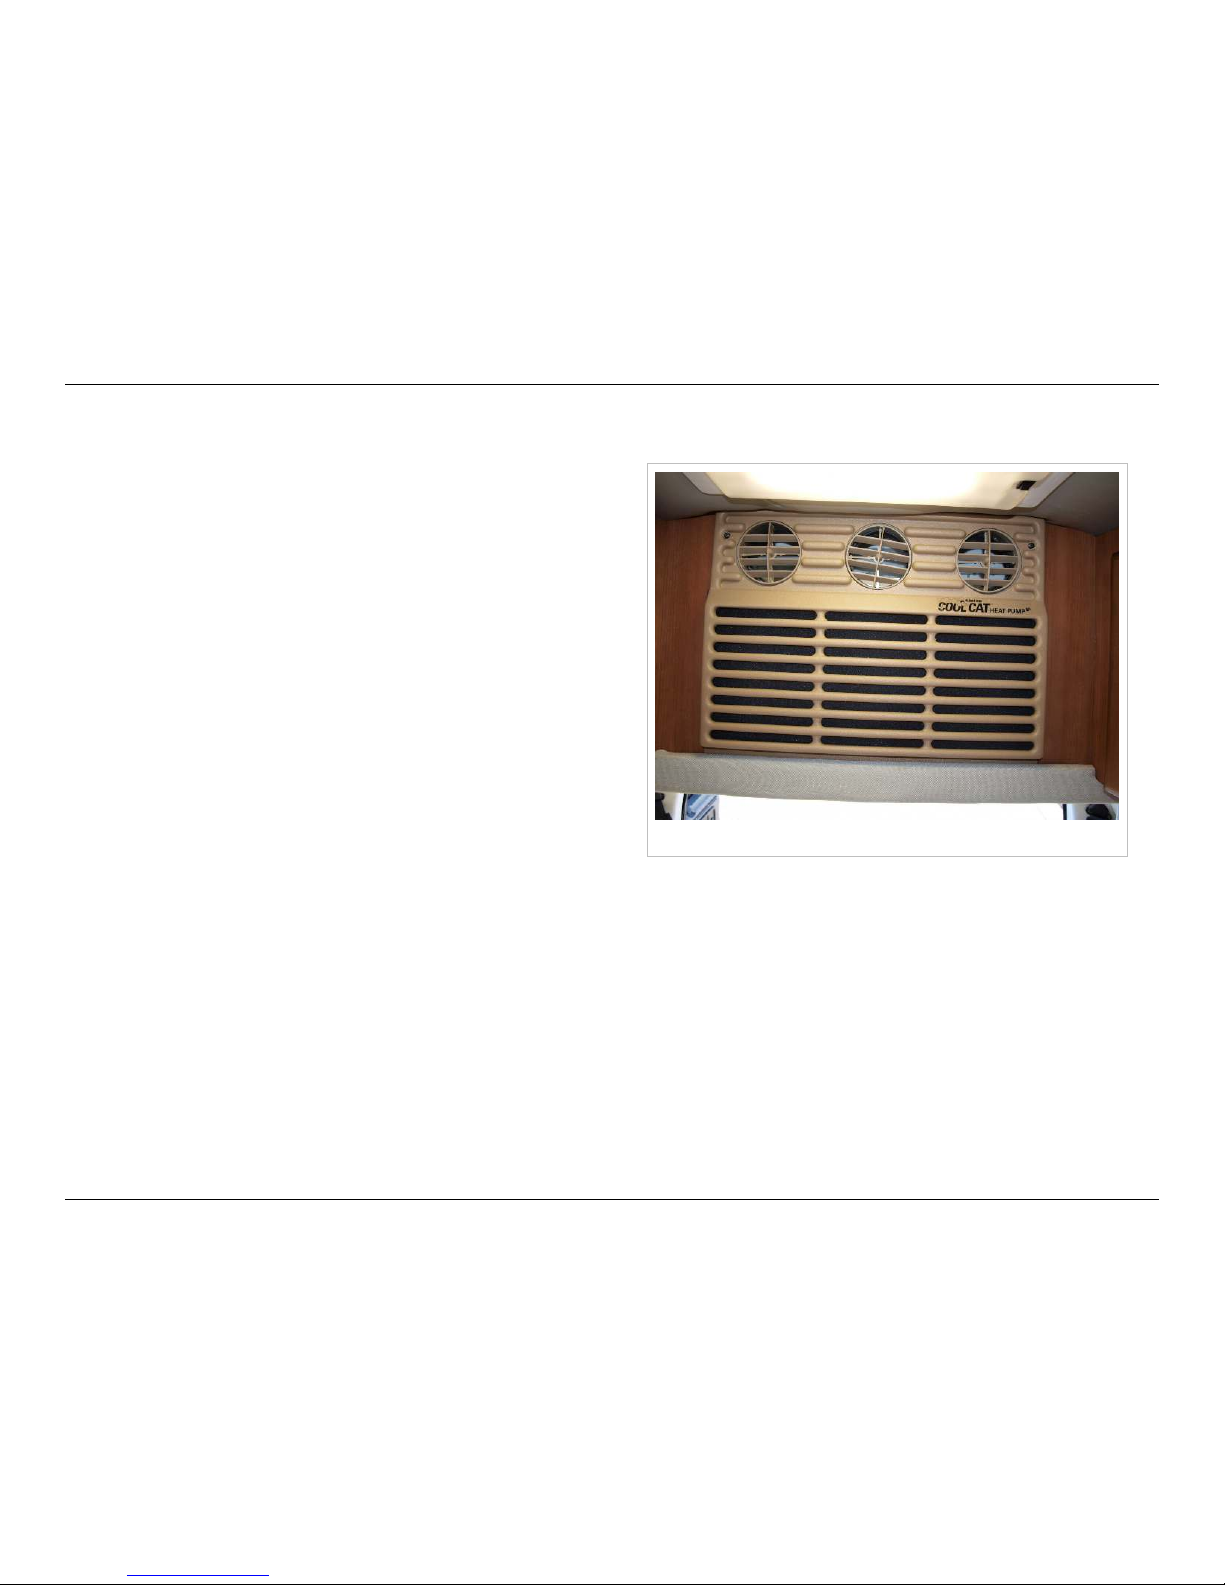
Heat Pump
Heat pump
The heat pump can provide both heating and cooling for your
Roadtrek using electric shore power or generator power. The
heat pump gives you the advantage of heating your unit with
electricity if you would prefer to use electricity rather than the
propane the furnace uses.
The heat pump can be operated normally when you are plugged
in to shore power.
If you are running the heat pump using the generator, please
follow the following steps.
• Set the battery disconnect switch on the monitor panel to the
“ON” position.
•• Start the generator and run for several minutes until warm.
•• Set thermostat setting above ambient temperature.
• Turn thermostat control to the “low cool” position.
•• Turn fan to the ON position.
•• Adjust the thermostat on the unit for the desired temperature.
The compressor should start automatically.
• Your vehicle should be parked as close to level as possible to maximize the air conditioner’s efficiency. If you are parked
very much off-level, it is possible for condensate to leak into the living space. If this happens park in a more level location.
You can use the heat pump to warm the motorhome on cool nights. For colder temperatures, below 40°F (4°C), you should
use the propane furnace.
Page 49
Heating and Cooling
46
© 2014 by Roadtrek, Inc.
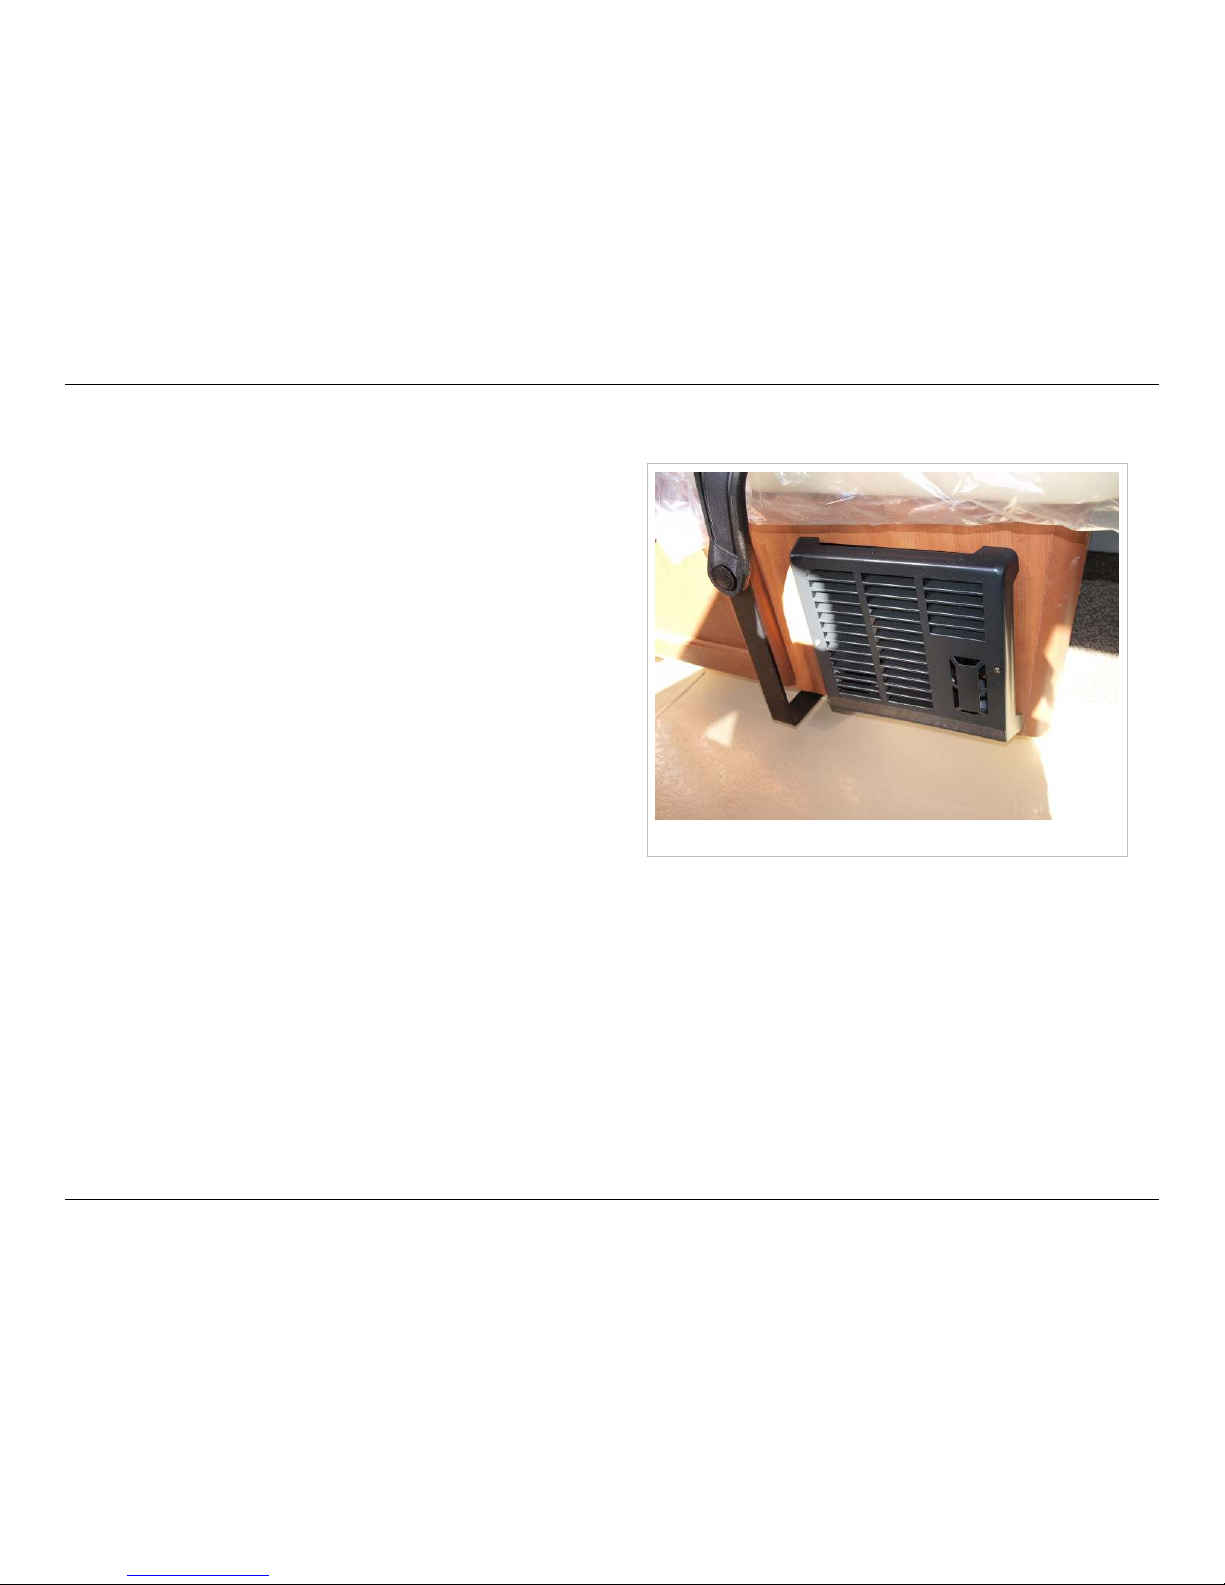
Furnace
Propane furnace
The furnace is controlled by the combination thermostat located
above the rear bed. The furnace requires propane and 12 volt
power. The furnace uses much less electricity compared to the
heat pump, and can be used without shore power or generator
use.
The fan on the furnace is thermostatically controlled, and will
continue to run for a minute or so after you turn it off until the
firebox cools down.
Keep the aisle in front of the furnace clear of any obstructions
when using the furnace to allow air circulation.
The furnace can operate when outside temperatures are below
freezing.
Page 50
Electrical System
47
© 2014 by Roadtrek, Inc.
Electrical System
Coach Battery
The coach battery in your Roadtrek is a sealed AGM battery. Do not attempt to open it. There is no user maintenance possible
on this battery.
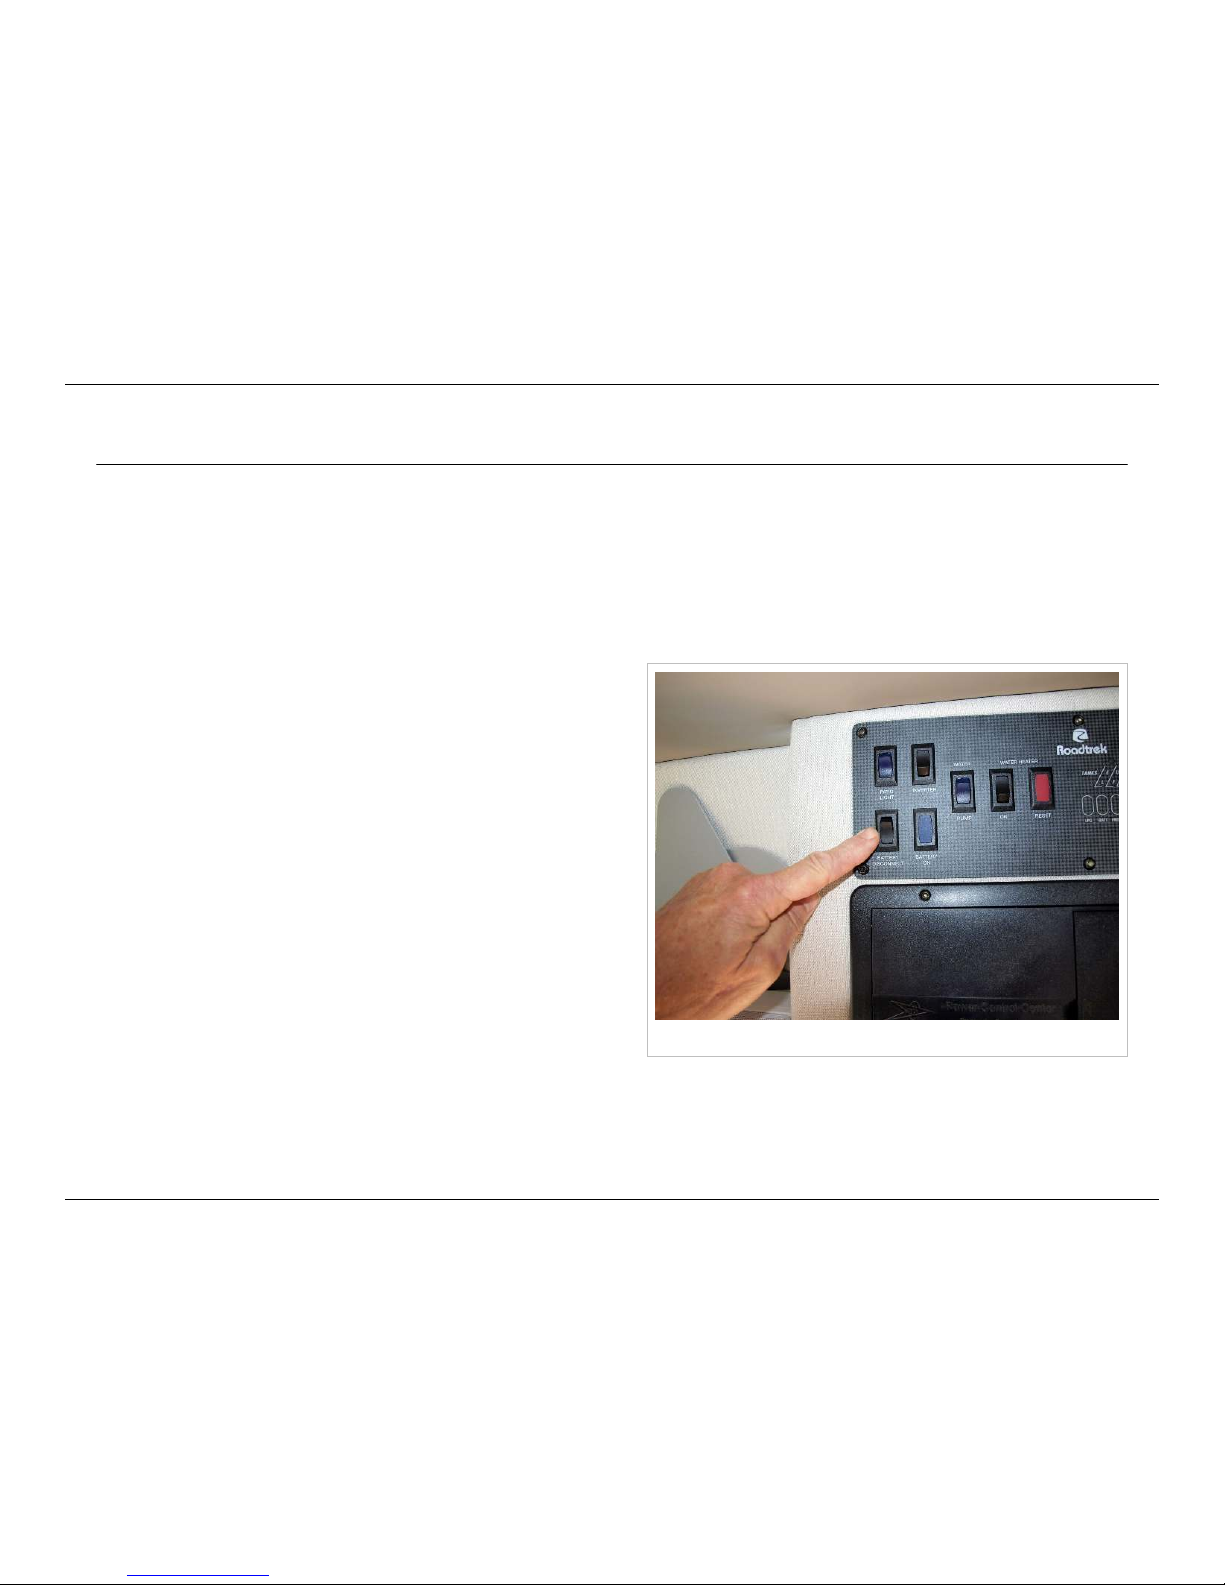
Battery Disconnect Switch
Battery disconnect switch
The battery disconnect switch provides power to all 12 volt
appliances, such as the water pump, the refrigerator, and so
forth. Even the propane cooktop uses 12 volt power to run the
burner igniters. This switch should be off when you are not using
your Roadtrek, and on whenever you are driving or camping. The
"Battery On" light next to it will indicate the position of the
switch.
Charging your batteries
Inverter-Charger
Your Roadtrek is equipped with a inverter-charger which
converts 120 volt AC (household current) to 12 volts DC when
you are connected to shore power or running the optional
gasoline generator. This 120 volt power is used to power your
12VDC appliances as well as charge your batteries. Whenever you are receiving either source of 120 volt power, you are
charging your batteries.
Page 51
Electrical System
48
© 2014 by Roadtrek, Inc.
Standard Alternator Charger and Battery Isolator
While driving, your Roadtrek will also charge the coach batteries from the vehicle alternator through an isolator. The isolator
allows extra vehicle alternator-produced electricity to charge your coach batteries in addition to keeping your engine
(chassis) battery charged. When the vehicle engine is not running, it breaks the electrical connection between your coach
batteries and your engine battery, so your engine battery remains charged to start your engine even though you are using
coach battery power while camped. This is all automatic - there are no user adjustments possible to the isolator.
Optional Engine Generator
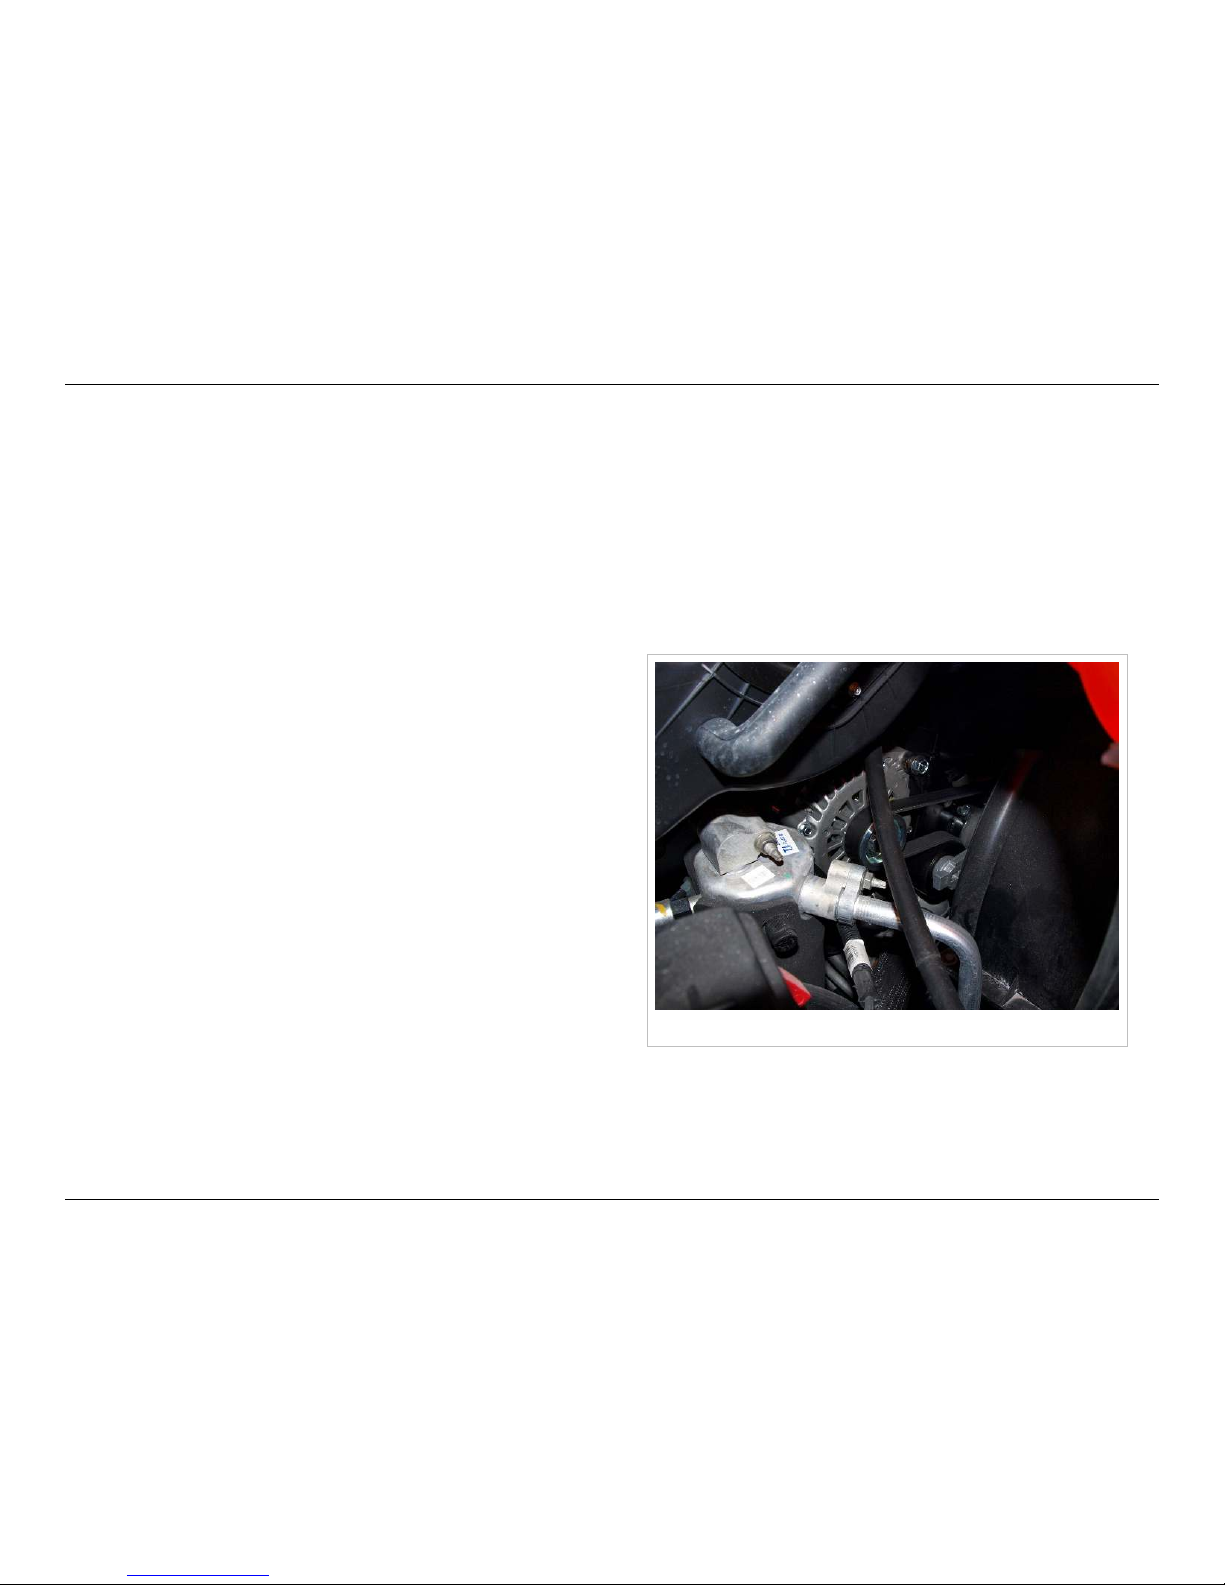
Engine generator
Your vehicle may be equipped with an engine generator. The
engine generator is mounted on the vehicle engine and is
operated by idling the vehicle engine. If your coach batteries are
low, start the vehicle engine and let it idle until the batteries are
sufficiently charged. Usually 30 minutes of idling are enough to
restore moderately depleted coach batteries to a useful level of
charge.
As with a conventional generator, always close the rear windows
of the vehicle and turn off the roof ventilation fan when the
engine generator is charging the batteries to avoid exhaust
entering the vehicle's interior.
The engine generator is charging the coach batteries whenever
the vehicle's engine is in operation, which means you are also
charging them as you drive. You will arrive at your camping
destination with fully charged coach batteries.
There is no required maintenance for the engine generator.
Note, however, that your vehicle's serpentine belt (the belt
which drives the vehicle's alternator, water pump, power steering, etc.) will be different than the one for similar vehicles
without the engine generator, so carrying a spare belt may be prudent in case you have a serpentine belt failure while
traveling.
Page 52
Electrical System
49
© 2014 by Roadtrek, Inc.
Optional Solar Panels
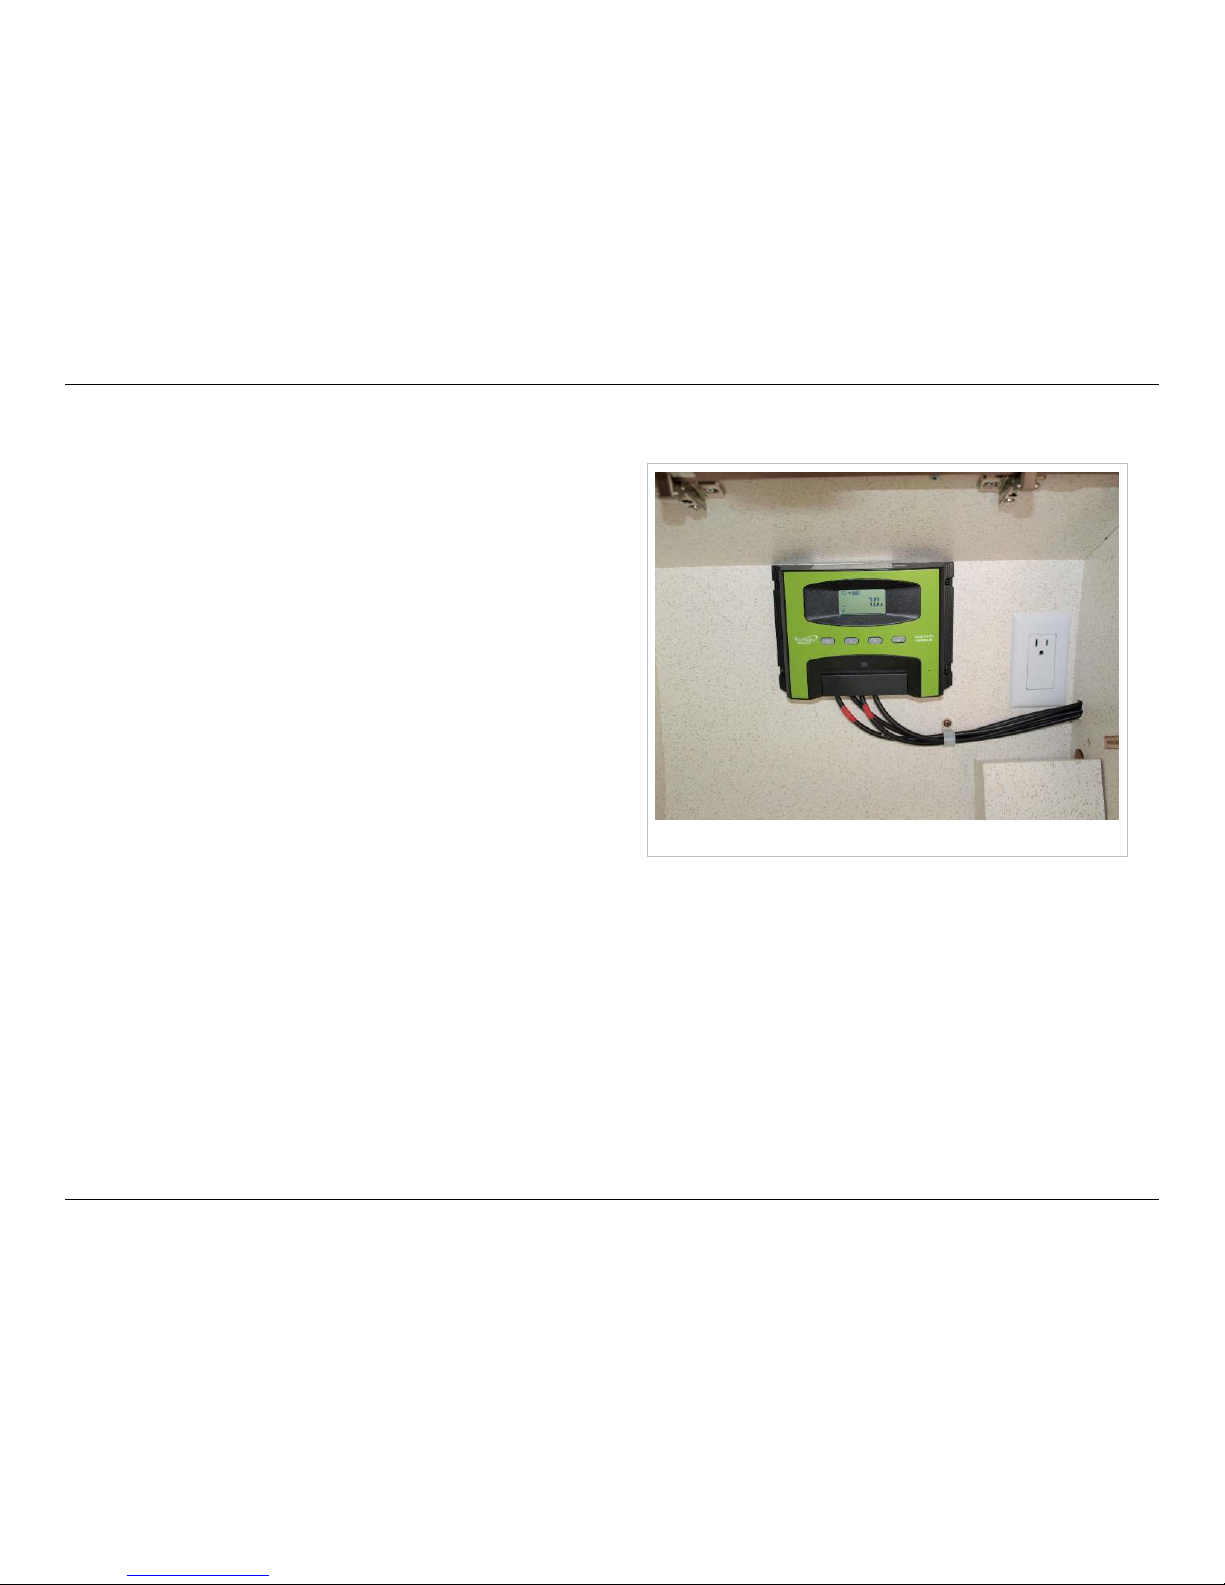
Solar charge controller
The optional solar panels will charge your batteries when
sufficient sunlight is available. The solar charge controller is
installed at the factory for the type of panels and batteries
installed on your vehicle, and Roadtrek strongly recommends
that you make no adjustments or changes to the charge
controller or its programming. The charge controller usually
displays either system voltage or amperes generated by the
panels.
On board 120 Volt AC power
Standard 750W Inverter
The standard configuration includes a 750W inverter. This
inverter provides 120VAC (household current) for a few of the
outlets in your Roadtrek; primarily the ones running the TV and
the DVD player. It is not powerful enough to operate the air conditioner or the microwave.
The inverter is configured at the factory for the batteries and power sources in your Roadtrek. Please do not change any
settings without consulting the factory.
Page 53
Electrical System
50
© 2014 by Roadtrek, Inc.
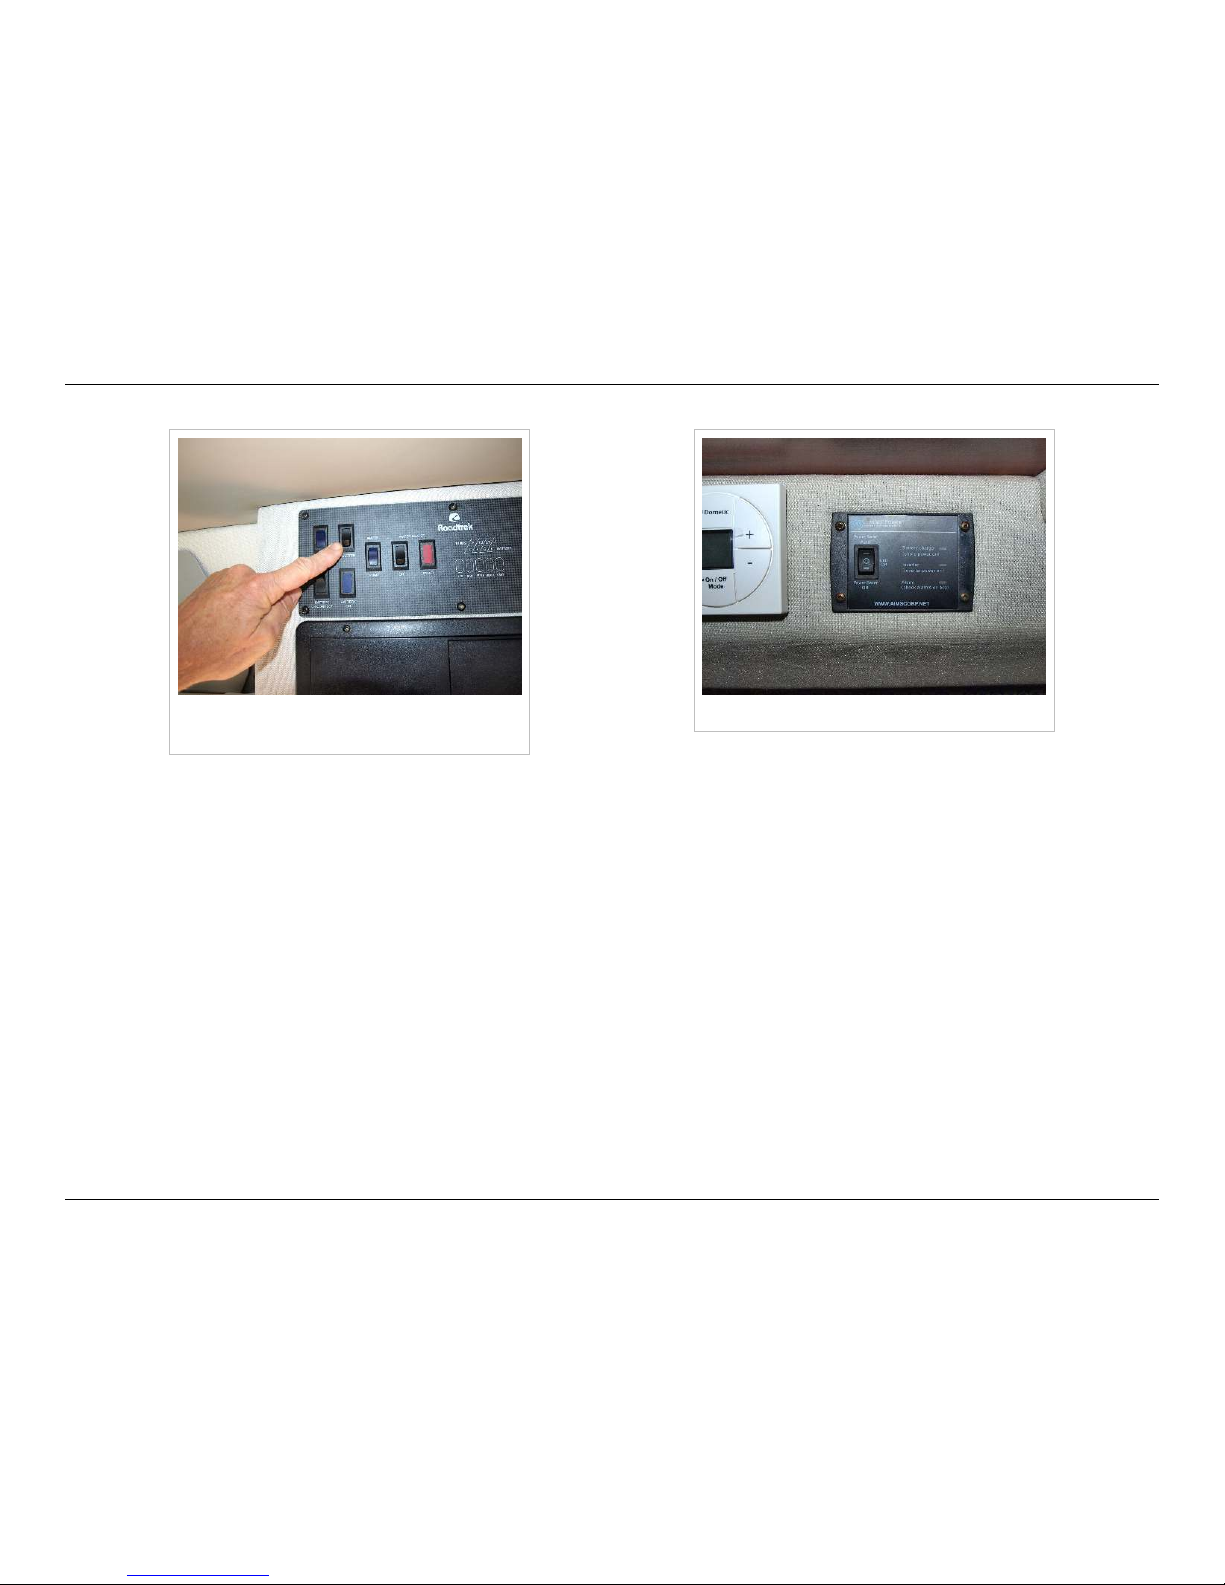
Inverter switch with standard 750 watt
inverter
2500 watt inverter switch
Optional 2500 Watt Inverter
If your vehicle has the engine generator option, you also have a 2500 watt inverter. This is sufficient to run all your
appliances. However, running large, high-energy appliances such as microwave ovens, air conditioning, toasters, etc. drains
your batteries very quickly. If you operate these appliances do so for a limited time unless you also have additional sources of
power.
Instead of the regular inverter switch on the monitor panel, your inverter switch will be on its own smaller panel back just to
the right of the thermostat on the passenger side of the rear lounge area. The switch has three positions: off in the middle
position, power save auto in the top position, and power save off in the bottom position.
In the power save auto setting, when you're not using anything with 120 volt power, the inverter will put itself to sleep. In this
mode, it still uses a small amount of power. If you turn on a 120 volt appliance, it senses a load and will come back on in
about 20 seconds. If you select power save auto you'll reduce the electricity it takes to keep the inverter powered, and your
batteries will require less recharging.
Pressing the bottom of the switch selects power save off. When this setting is selected, the inverter will be on continuously.
Page 54
Electrical System
51
© 2014 by Roadtrek, Inc.
There is a shore power indicator light to the right of the switch to tell you the system is receiving shore power. There is also a
battery charging indicator light to tell you when the batteries are being charged by shore power.
Your refrigerator will run on either 12 volt battery power or 120 volt inverter power, or propane if you wish to save electricity.
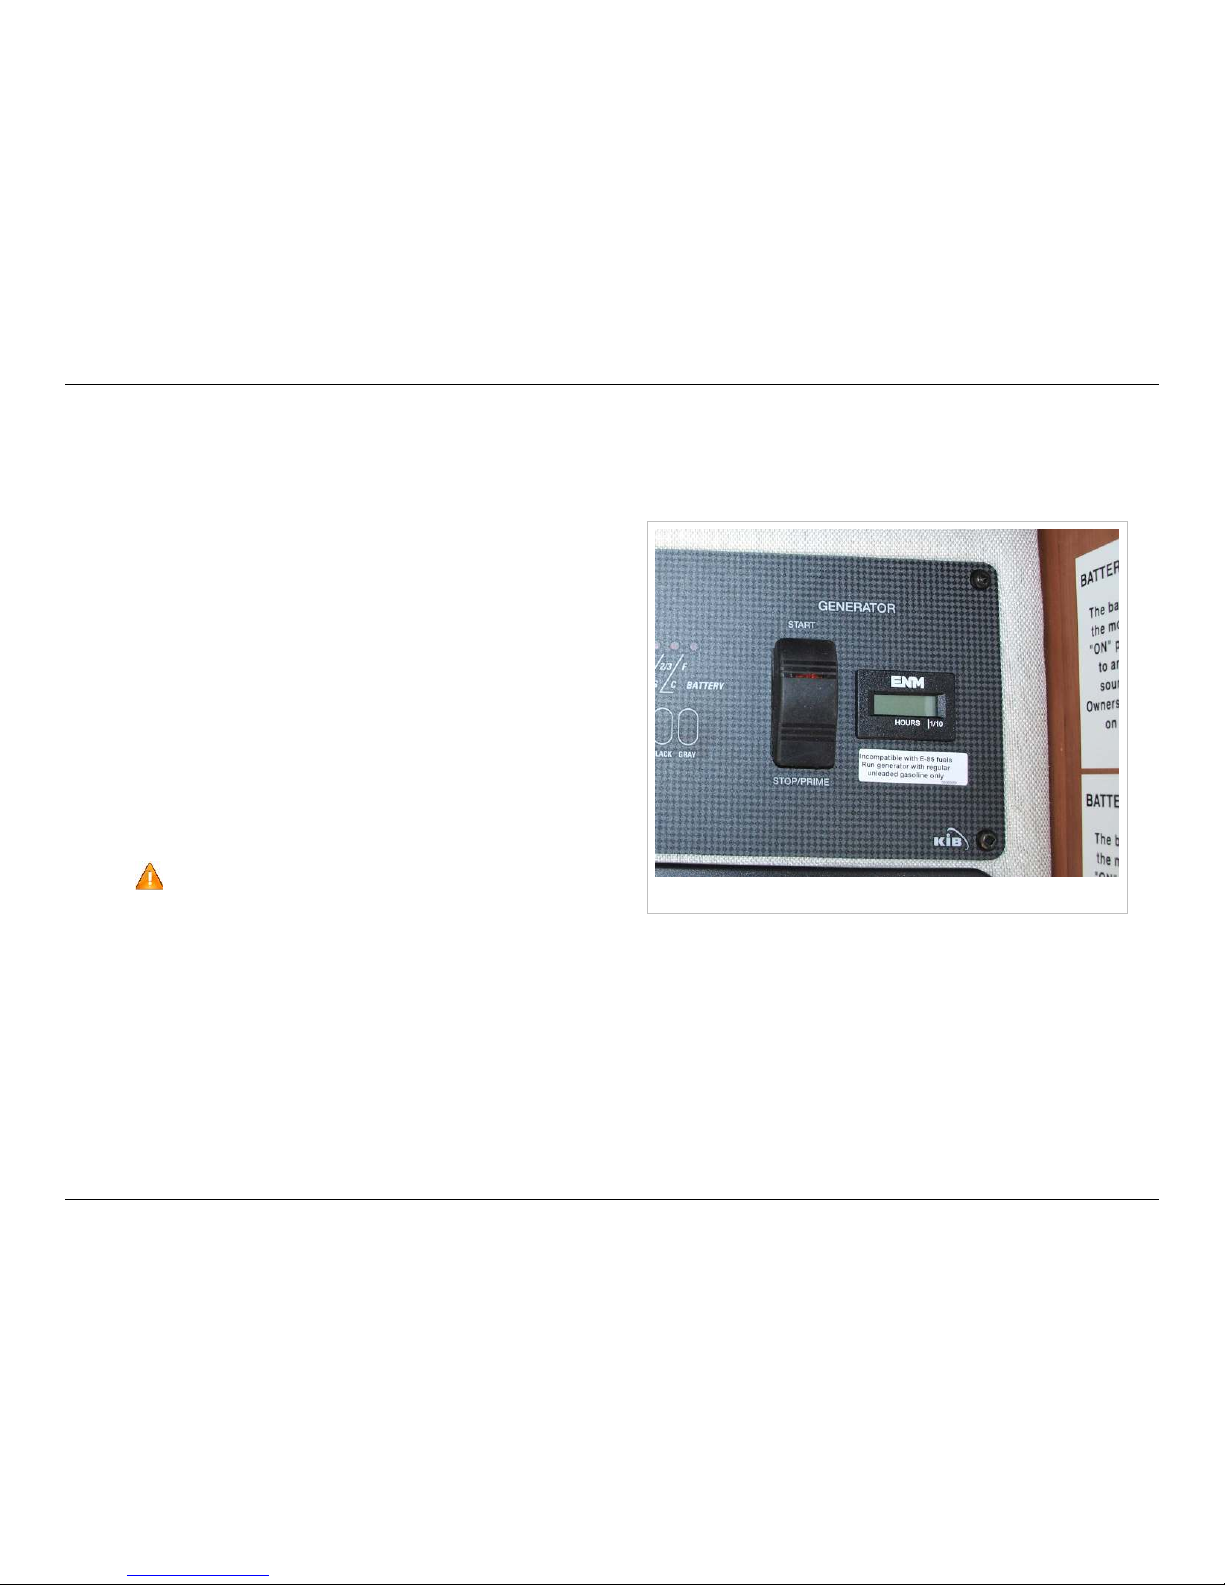
Generator switch and hour meter
Optional Gasoline Generator
The gasoline powered generator provides up to 2800 watts of
120 volt household current, enough to run all your appliances
and recharge your batteries. Please refer to the Onan Generator
manual for operation and maintenance.
Always close the rear windows of the vehicle and turn off the
roof ventilation fan to avoid exhaust entering the vehicle's
interior.
There is an hour meter to the right of the switch which displays
hours of generator use. Maintenance on the generator is
scheduled according to hours of use. There is a break-in oil
change scheduled after 20 to 50 hours of generator use, so
check your Onan manual for particulars.
Please be sure to operate the generator at half load or
more (at least 1200 watts, either the heat pump or an
electric heater) for one hour every month. Failure to do this
can lead to internal corrosion, gumming up of the float bowl, and eventual failure.
Page 55
Electrical System
52
© 2014 by Roadtrek, Inc.
Shore Power
The shore power connection is through the shore power cord, stored in the driver's side large compartment. See Outside your
Roadtrek for location. The switchover from shore power to inverter is automatic.
To connect to external (shore) power, open the side compartment and remove the power cord. Plug the power cord into the
campsite 30A power source. See HOWTO: Shore Power for a concise guide on how to connect and disconnect to shore power.
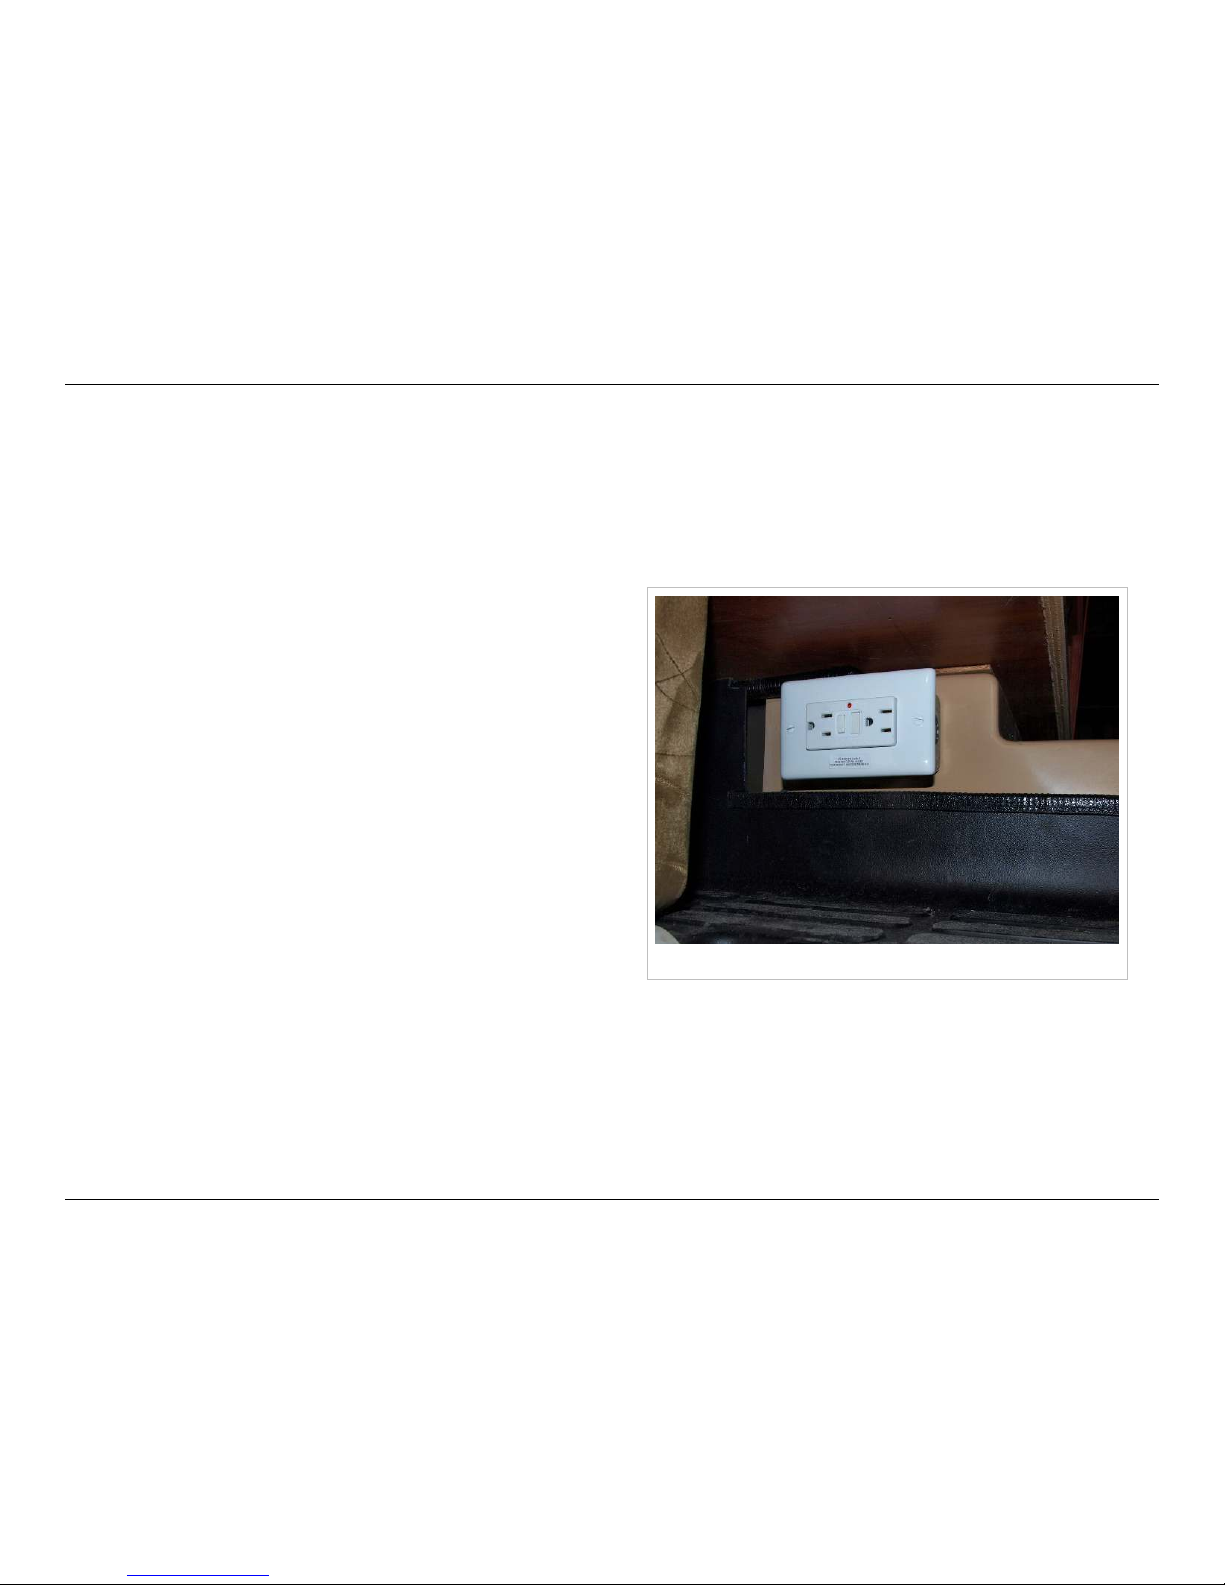
GFCI outlet under rear passenger side seat
Outlets
The outlets are operated from the inverter, generator, or shore
power. Further, the outlets are protected by GFCI. Only some of
the outlets are powered by the standard 750 watt inverter.
The electrical outlets above the galley and under the passenger
side rear captain's seat have ground fault circuitry (GFCI) - the
button in the middle of the outlet pops out when they sense an
anomaly or sometimes when the circuit undergoes transitional
conditions. If you are not getting power from an outlet, check
and reset this button if needed. The outlet under the passenger
side chair powers the TV and DVD player, so check it if your TV is
not receiving power.
Page 56
Monitor Panel
53
© 2014 by Roadtrek, Inc.
Monitor Panel
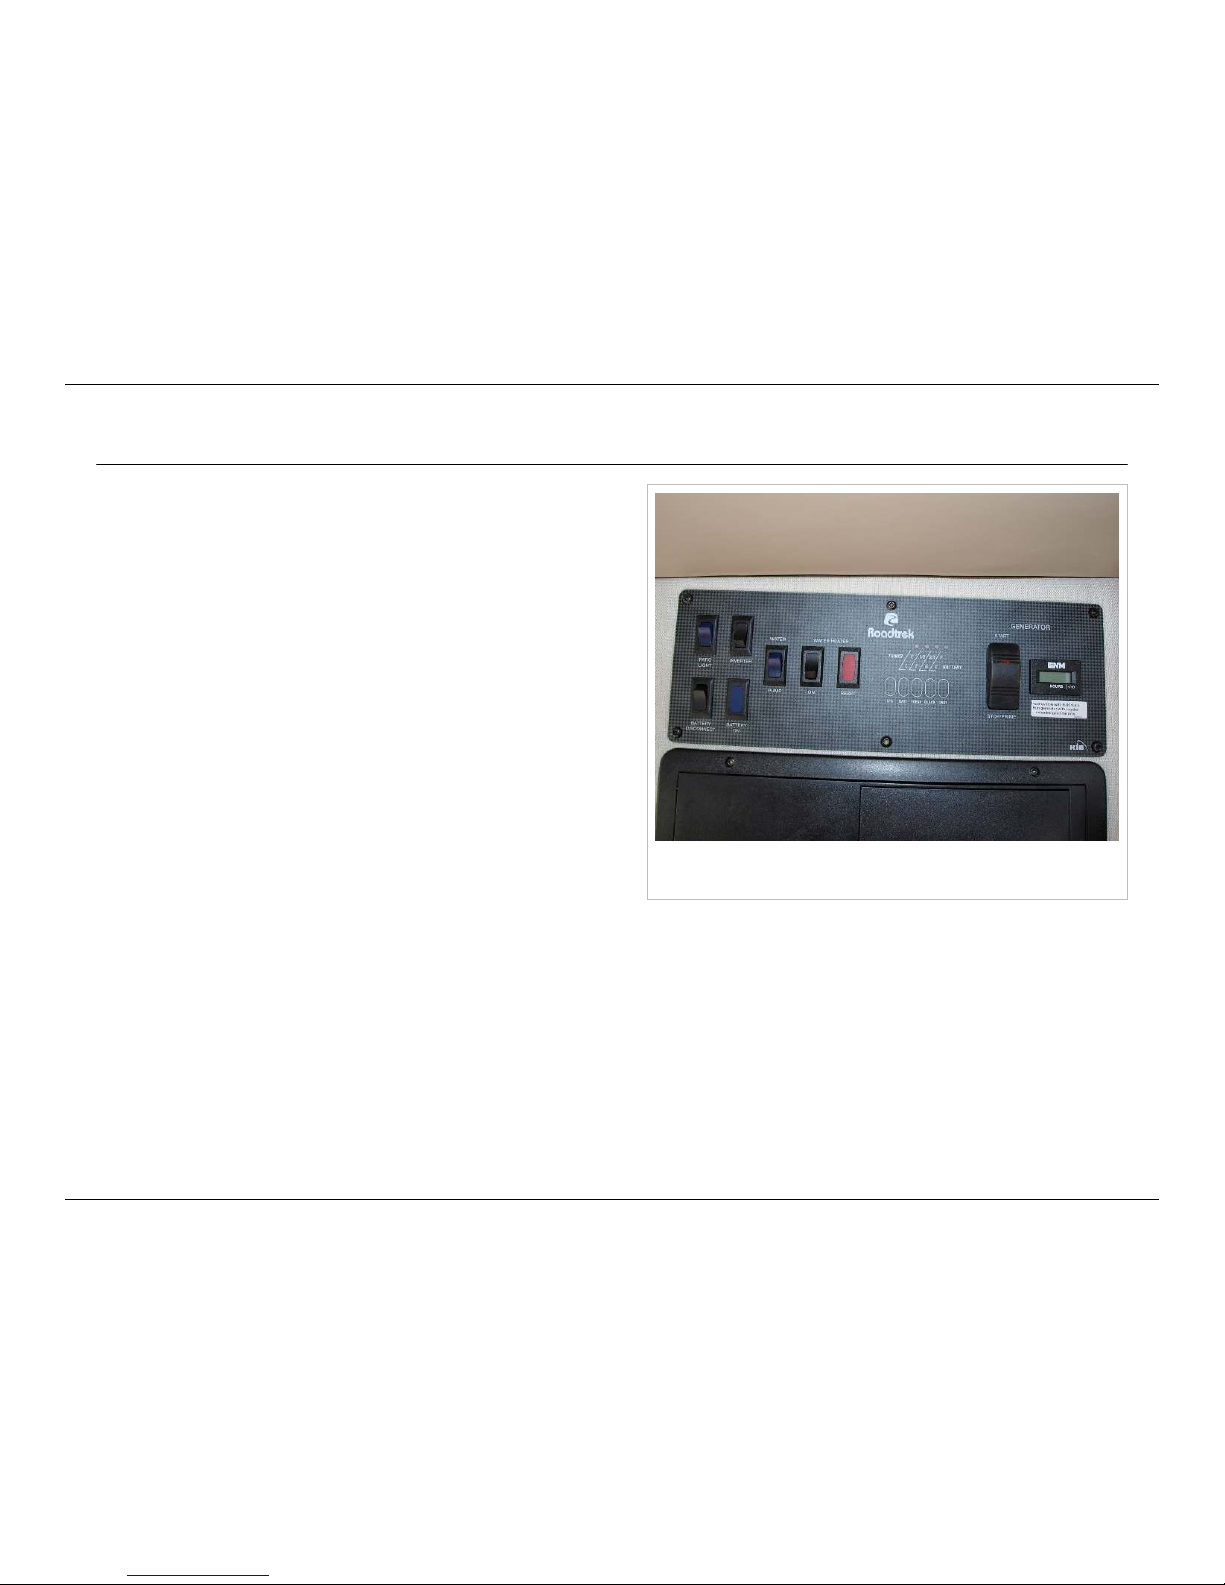
Monitor Panel with standard 750 watt inverter and
optional gasoline generator
The monitor panel is located inside the side door, above the
passenger side rear captain's seat.
Power Sources
The monitor panel controls 2 separate power sources; the 12
volt DC power and the 120 volt AC power via the inverter, shore
power, or optional generator.
12 Volt DC Power
The power to the 12 volt DC outlets and appliances is controlled
by the battery disconnect switch to the lower left.
On the bottom left is the battery disconnect switch, which
supplies 12 volt battery power to the 12 volt light and other
cabin appliances. This switch must be on for any of the 12 volt
electrical devices to work. Remember to turn off two switches the inverter switch and the battery disconnect switch when your
Roadtrek is not being used to avoid discharging the batteries.
The battery disconnect switch has a blue indicator light to the right of it to show you when the battery power is on.
Page 57
Monitor Panel
54
© 2014 by Roadtrek, Inc.
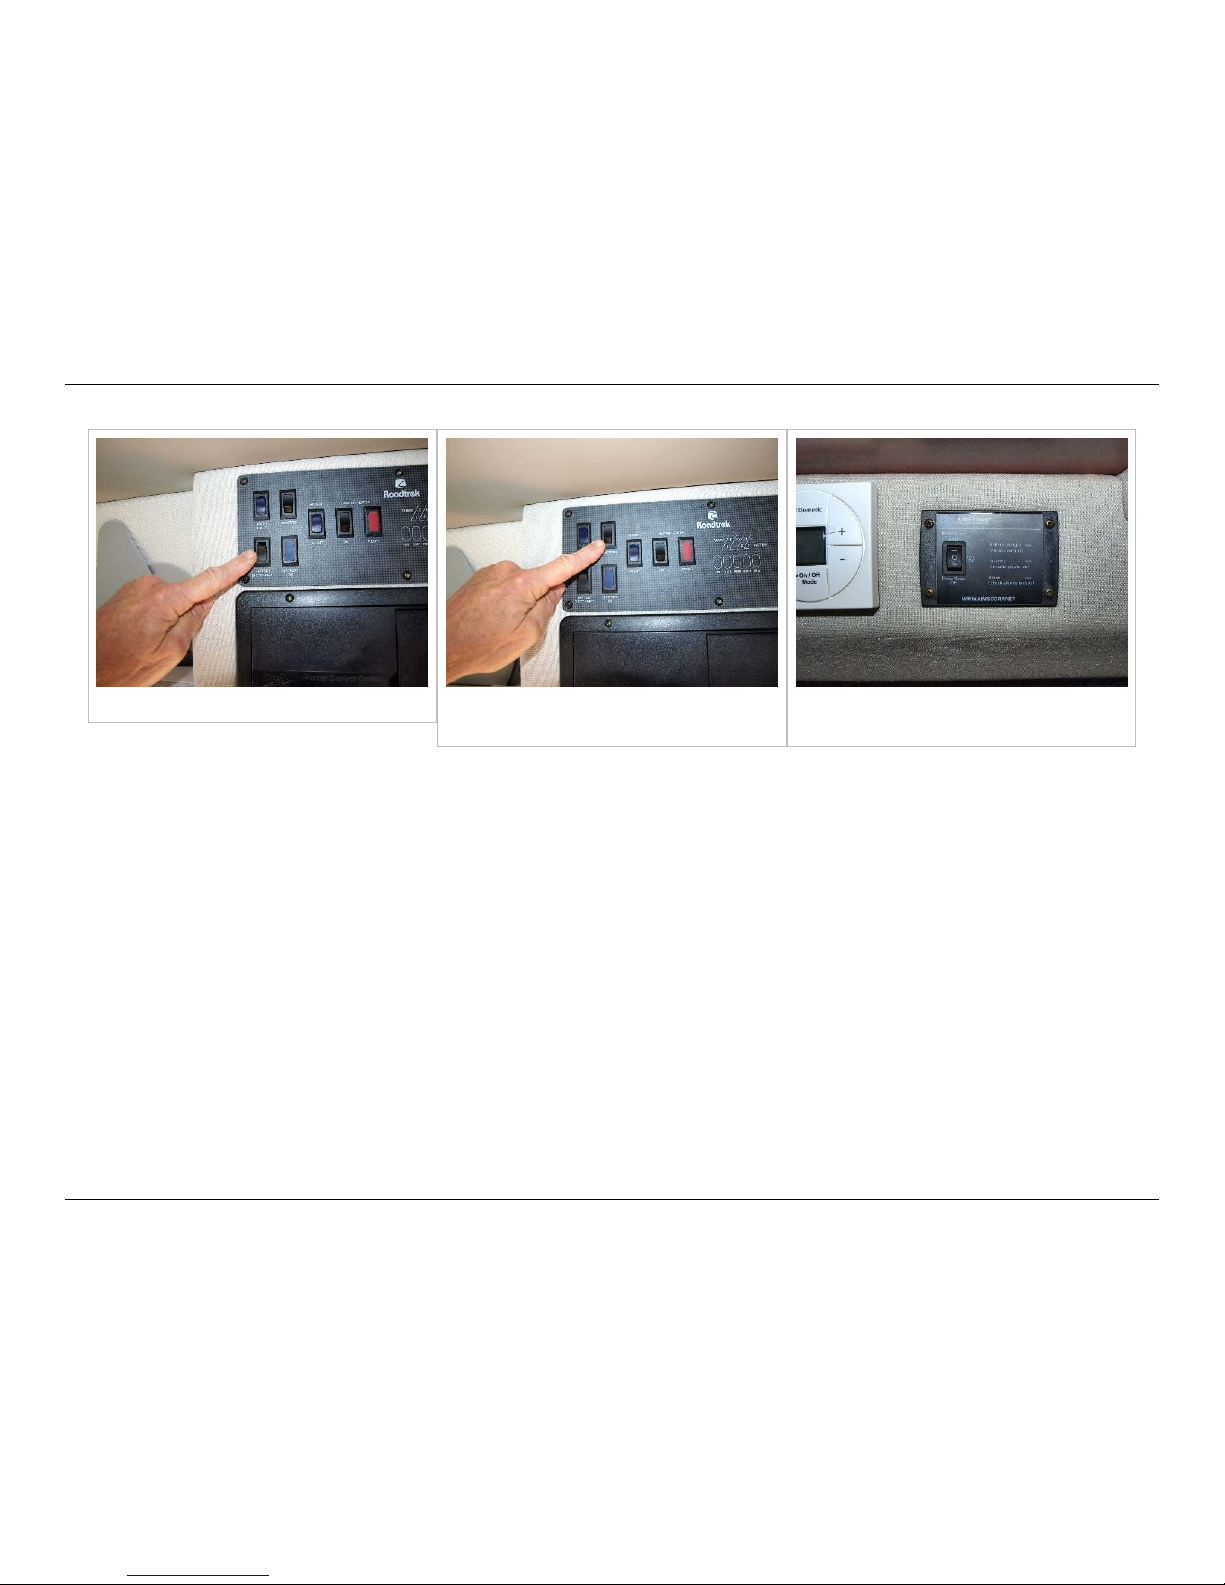
Battery Disconnect Inverter switch for standard 750 watt
inverter
Inverter switch for optional 2500 watt
inverter
Inverter
The inverter provides 120 volt AC (household current) to the 120 volt appliances and wall outlets. If you have the optional
engine generator and 2500 watt inverter, your inverter switch is back by the thermostat on the passenger side of the rear
lounge area. See the Optional Engine Generator and 2500 Watt Inverter portion of the Electrical System section for further
information.
Page 58
Monitor Panel
55
© 2014 by Roadtrek, Inc.
Shore Power
Shore power is the name for power supplied by a utility company that you plug into to provide power to your Roadtrek. See
HOWTO: Shore Power for a concise guide to plugging in and unplugging from shore power.
Other Switches
Patio Light
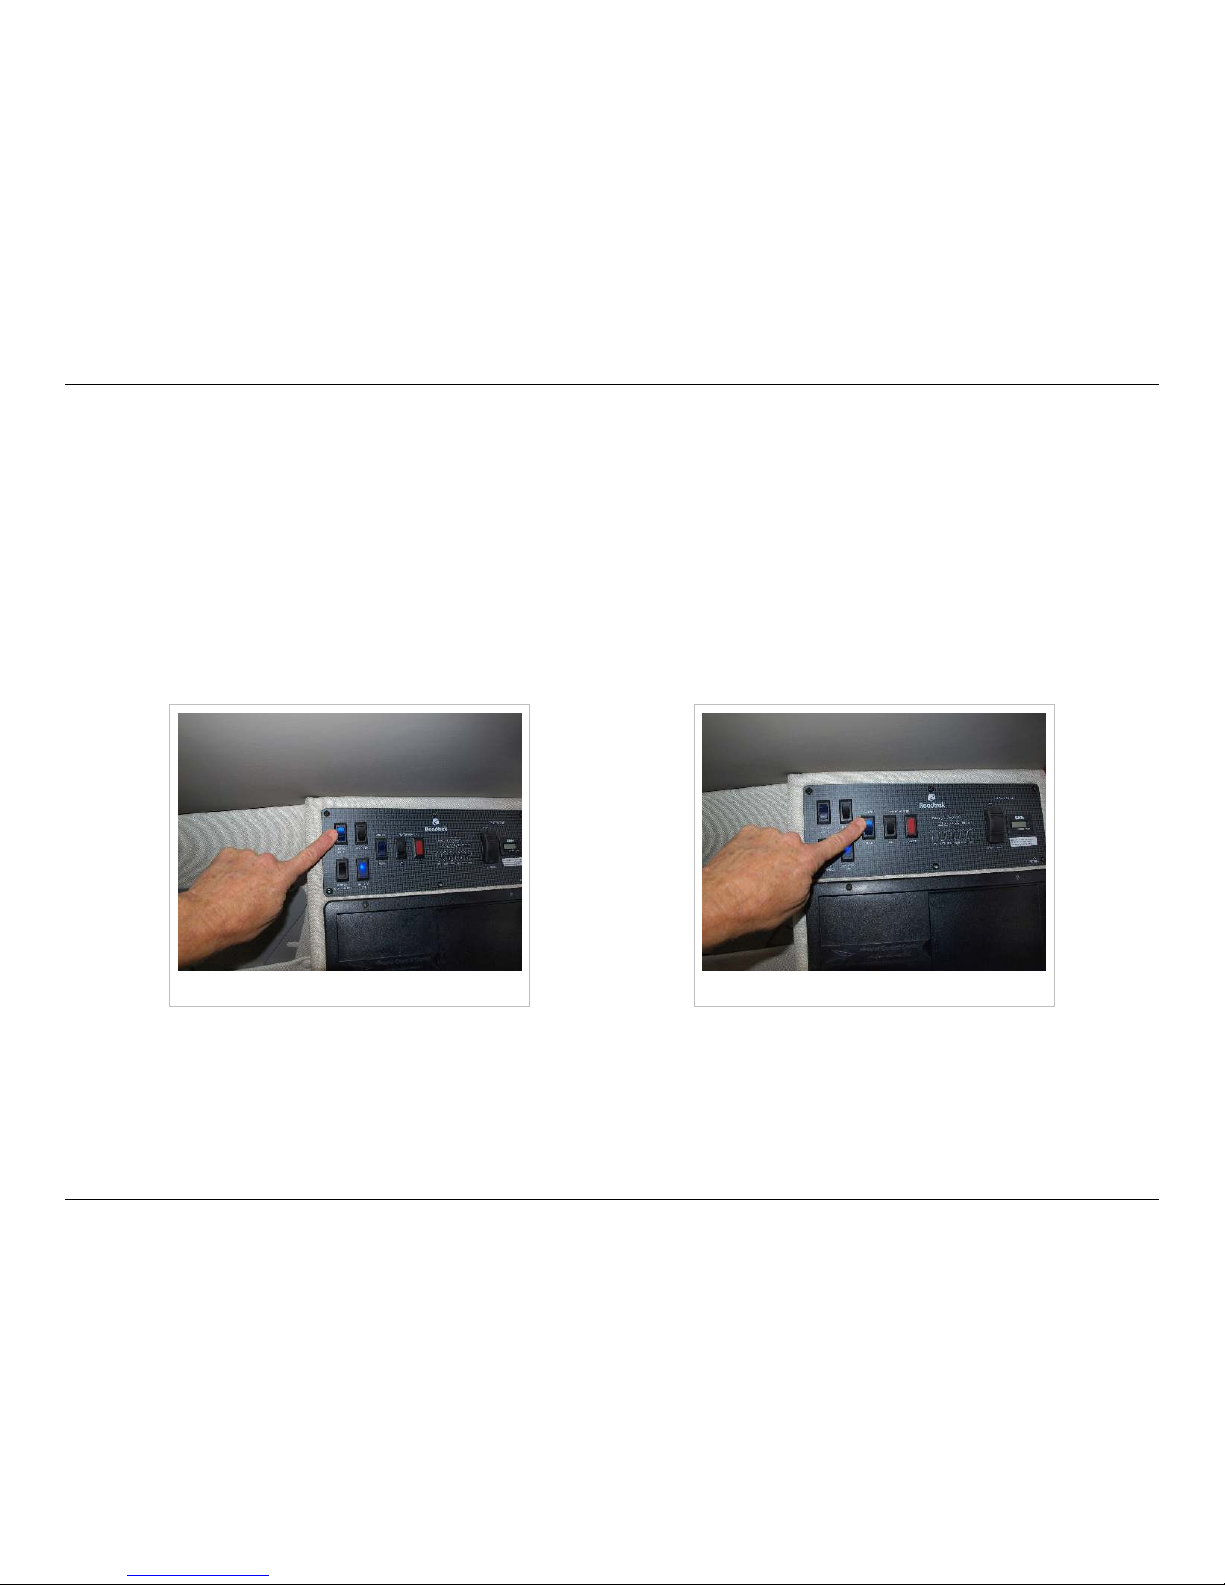
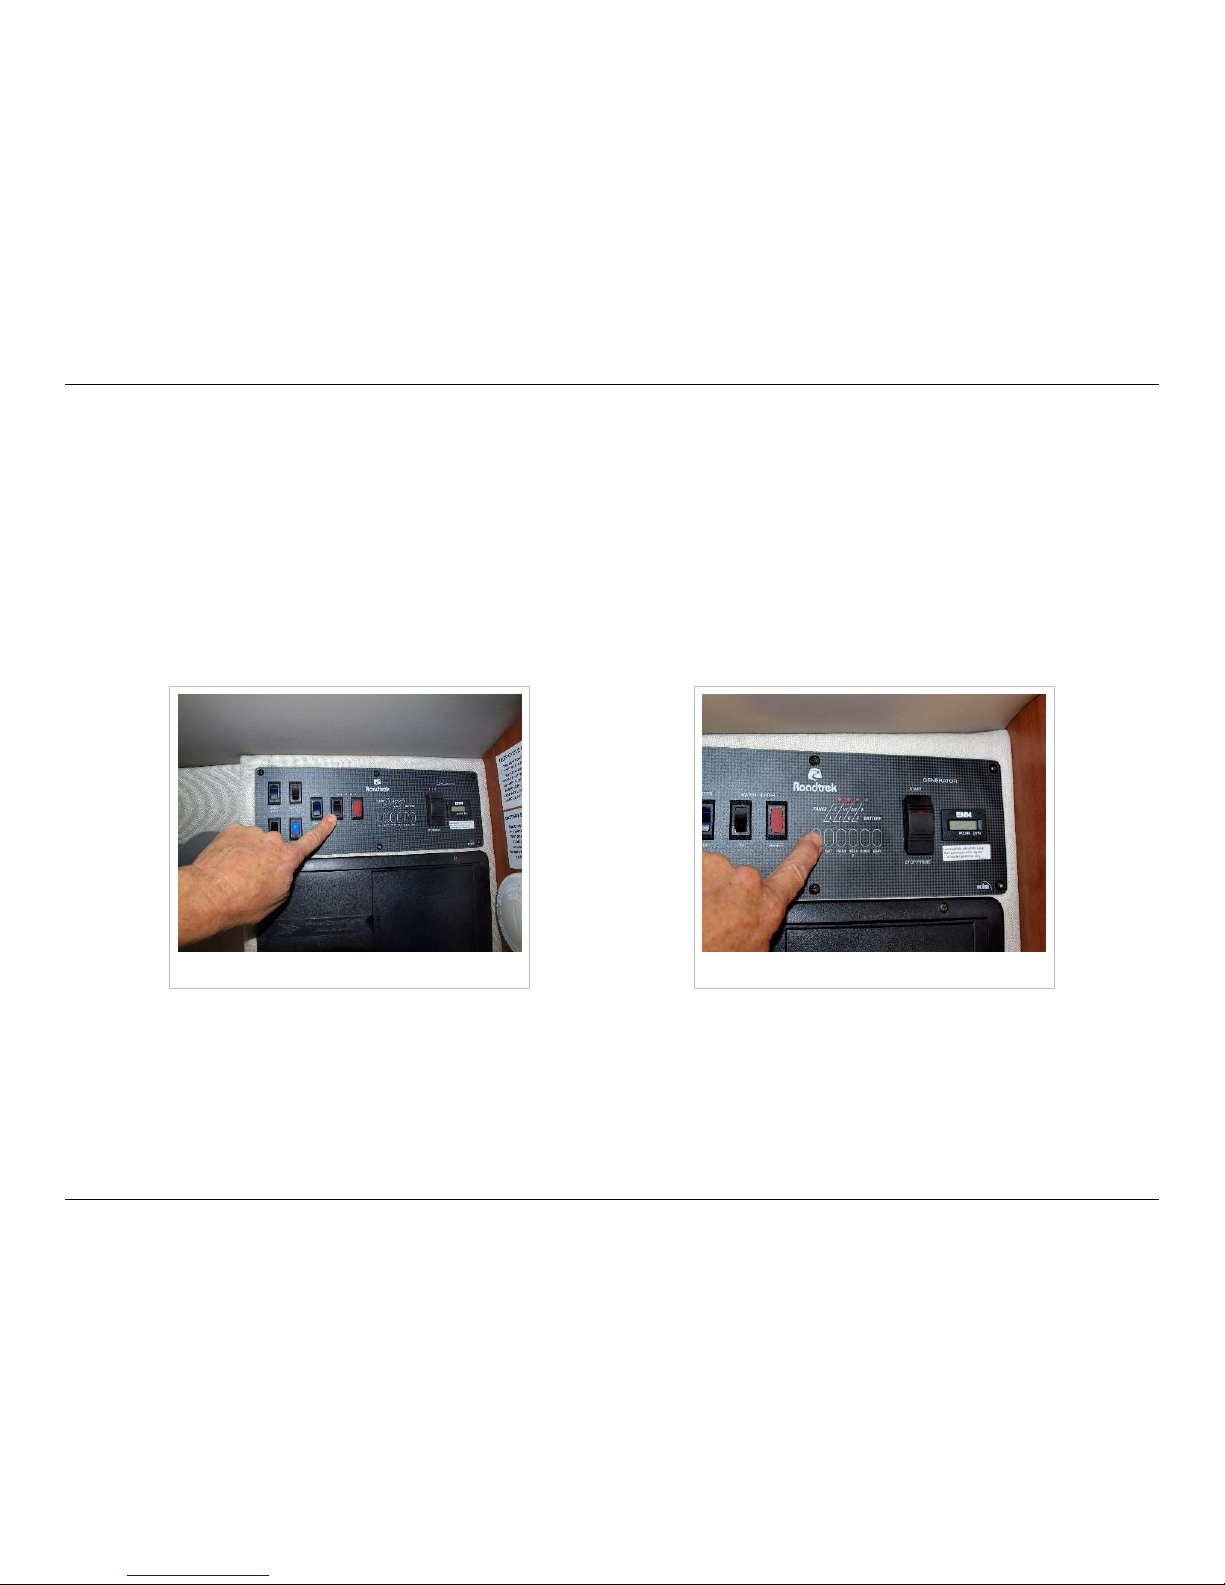
On the monitor panel, the top left switch is the patio lights switch. Press the top of the button to turn the lights on, and the
bottom to turn them off. These are LED lights and use very little power.
Patio light switch Water pump switch
Page 59
Monitor Panel
56
© 2014 by Roadtrek, Inc.
Water Pump Switch
The centered switch to the right of the leftmost four switches is the water pump switch. It should be on only when you have
water in the fresh water tanks and wish to use the sinks, showers, or toilet. The pump should not be run without water. As
with the patio light switch, pressing the top of the button turns the pump on, and pressing the bottom turns it off.
Water Heater Switch
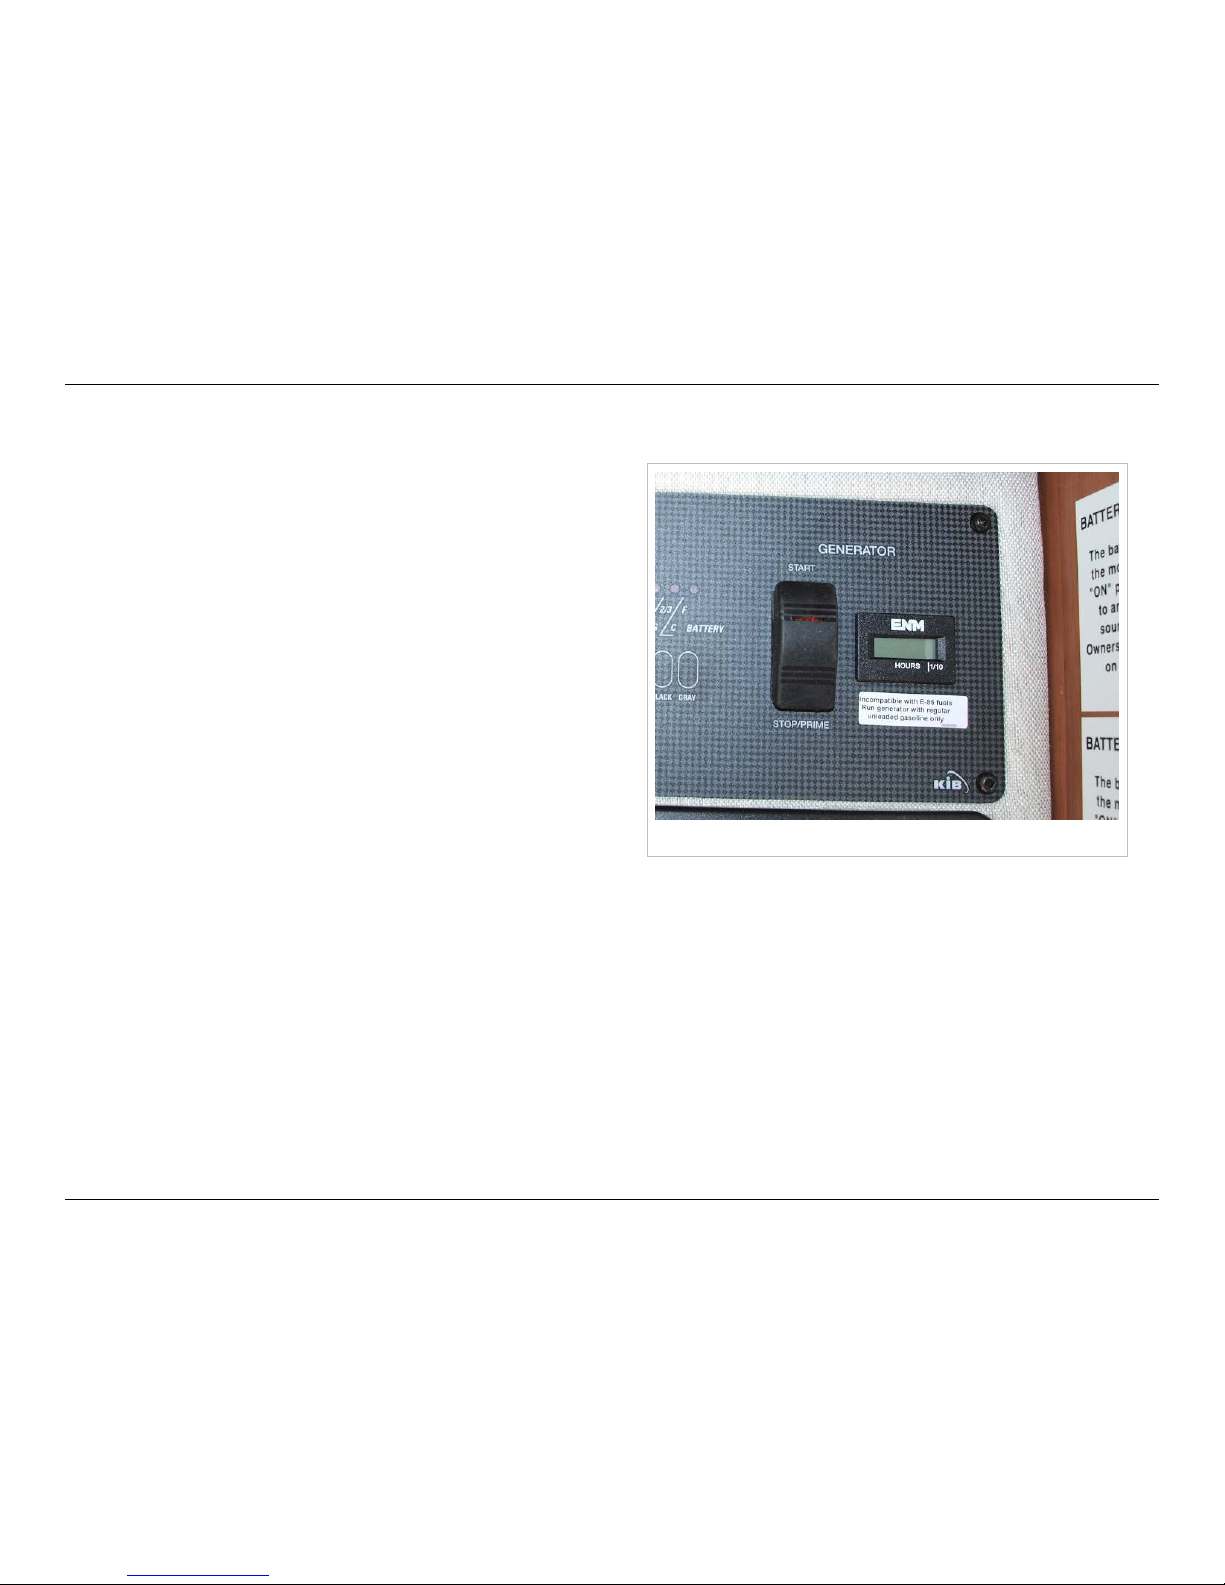
The water heater switch is to the right of the water pump switch. As with all the other switches on the monitor panel, the
battery disconnect switch must be on for the water heater to work. Even though the water heater uses propane to heat the
water, all the igniters and controls are electrical.
Water heater switch Tank status lights
Page 60
Monitor Panel
57
© 2014 by Roadtrek, Inc.
Tank and charge indicators
Generator switch and hour meter
To the right of the monitor panel are the indicator lights for the
the battery charge level, the fresh water tank level, and the
black and gray water tank levels. The battery disconnect switch
has to be on for this display to work. Press the button for each to
see the display. These will give you an approximate reading, to
the nearest third, of how much is in each tank. The four indicator
lights for the battery are low, fair, good, and charging.
Optional Generator Switch and Hour
Meter
If you have the optional 2800 watt gasoline generator, the
switch is to the right of the tank and charge indicators. Press the
bottom of the switch for about five seconds to prime the
generator, then the top to start. Press the bottom again to turn it
off.
The hour meter to the right of the switch keeps track of how
many hours your generator has been running. There is a break-in oil change after 20 to 50 hours of operation, and other
required maintenance at other intervals later on - see the generator manual for details.
Page 61
Distribution Panel
58
© 2014 by Roadtrek, Inc.
Distribution Panel
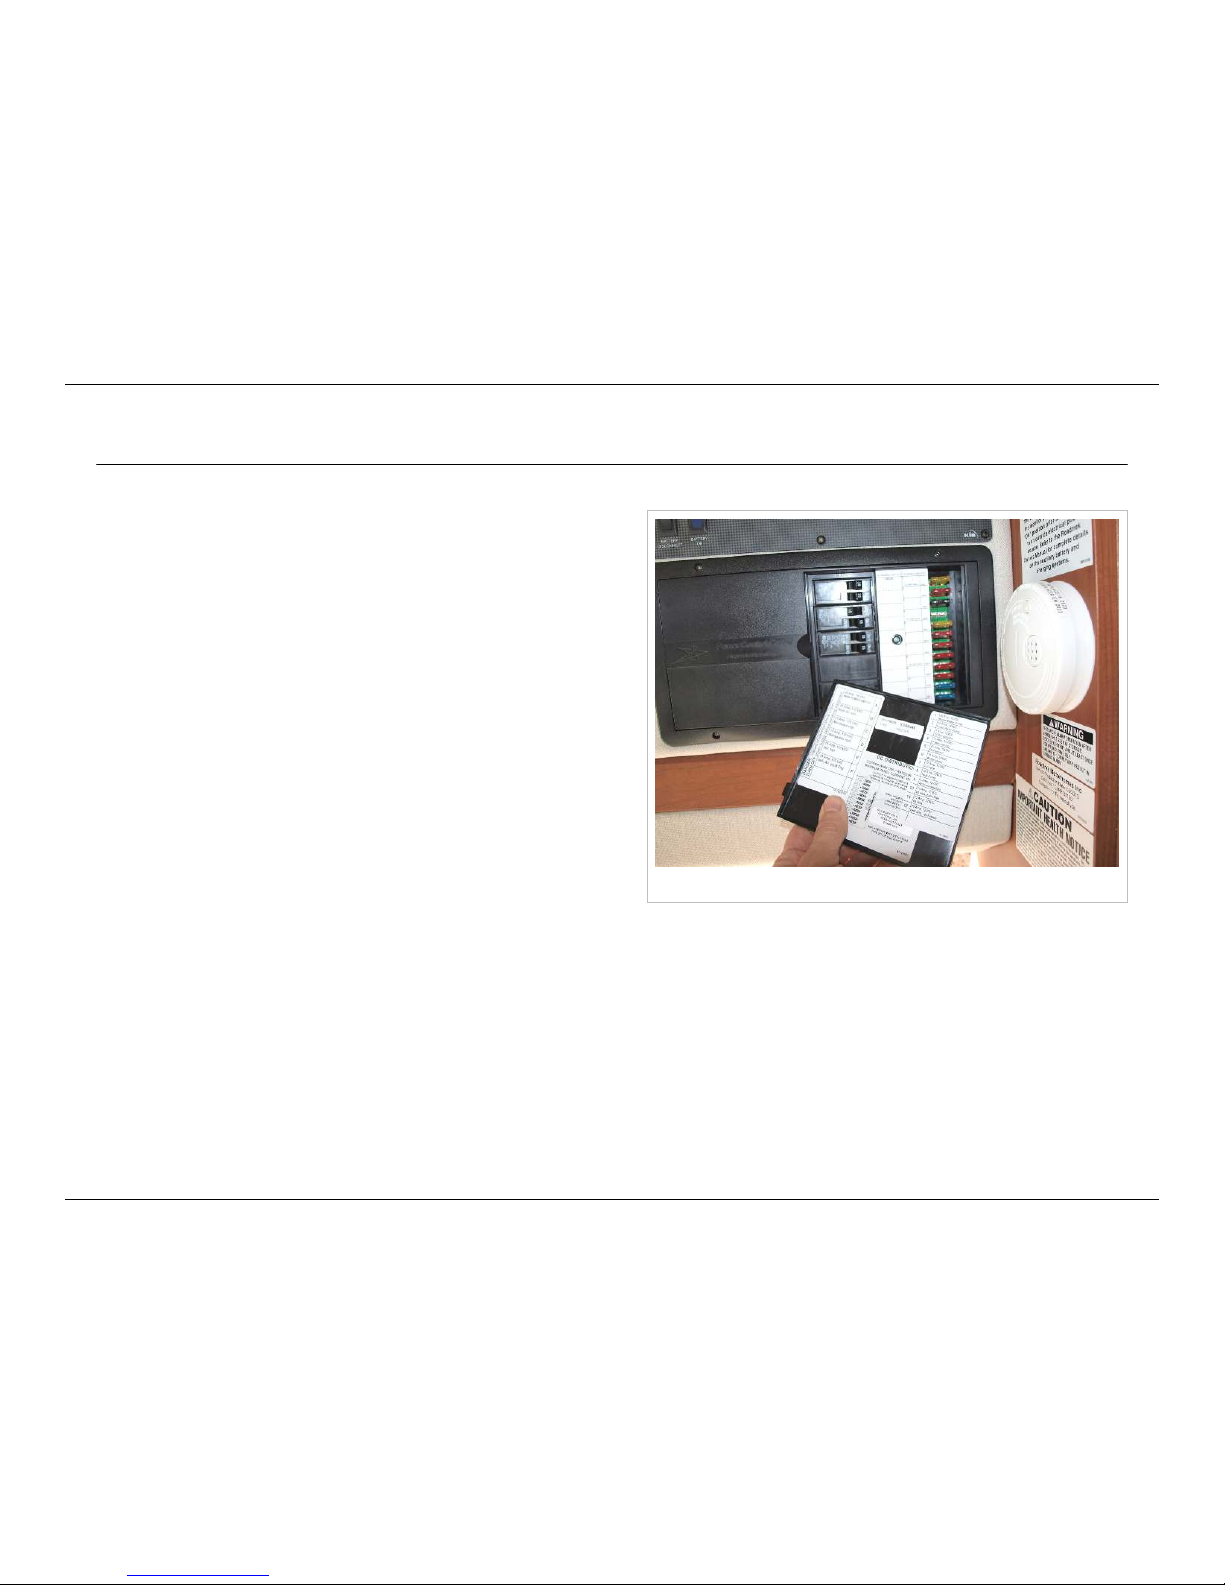
120 volt AC breaker panel and 12 volt fuses
AC Breaker Panel
The 120 volt breakers are located above the side door, just
below the monitor panel, behind a black plastic cover. Flip the
cover to the right and note the label under the cover with the
identifying information on each breaker, telling you what each
circuit breaker supplies power to. When storing the Roadtrek for
the winter, turn off the battery disconnect switch and all circuit
breakers in this panel.
12 Volt Fuse Panel
The 12 volt fuses are located to the right of the 120 volt AC
breakers. The label on the inside of the cover has identifying
information for each fuse, telling you which light or appliance it
supplies power to.
Page 62
Alarms and Warnings
59
© 2014 by Roadtrek, Inc.
Alarms and Warnings
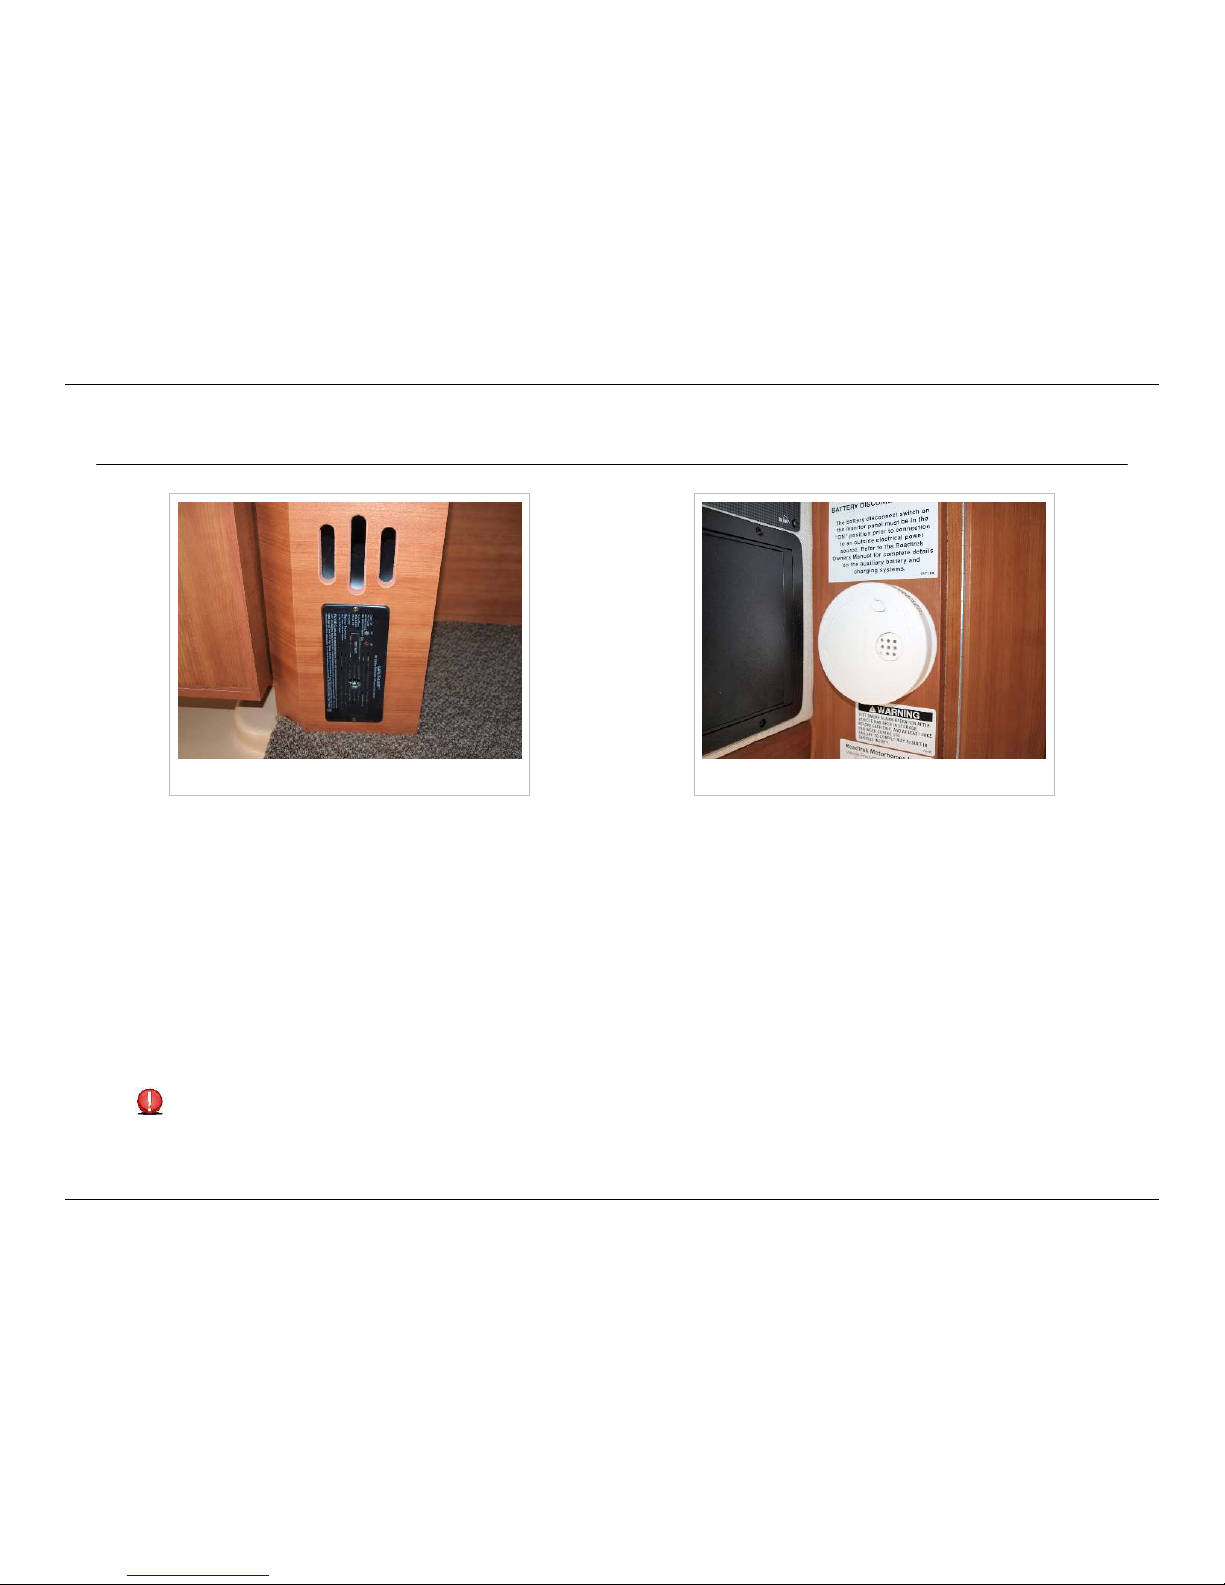
Propane and CO alarm Smoke detector
Propane and CO alarm
Your vehicle has been equipped with a combination propane leak and carbon monoxide detection device for your protection.
It is located slightly above floor level directly behind the rear bathroom door on the passenger side of the vehicle.
Be sure the detector is operating while using your vehicle, especially when you are asleep inside it.
When storing things on the floor, do not block air circulation to the propane leak detector. You should be able to see it at all
times from the front of the vehicle.
The detector runs on 12 volt power, and is operational whenever the battery disconnect switch is on. There is no separate
switch for the detector. There is an indicator light on the detector so that you can tell whether it's working or not. For this
reason, whenever the vehicle is occupied the battery disconnect switch should be on the "on" position.
Coach power on the Monitor Panel must be on for detector operation. Make sure your battery disconnect switch is
on.
Page 63
Alarms and Warnings
60
© 2014 by Roadtrek, Inc.
Do not disable, unplug, or otherwise hinder the operation of this detector.
The detector has a useful service life, beyond which it needs to be replaced. See Manufacturer’s Owner’s Manual for
other operating instructions, or look for the sticker which is sometimes placed on the detector to see the replacement
date.
The detector may chirp if the coach batteries are running low.
These detectors have a service life, beyond which point they need to be replaced. The detector requires no maintenance
other than periodic replacement. See User Manual supplied with the unit for replacement intervals.
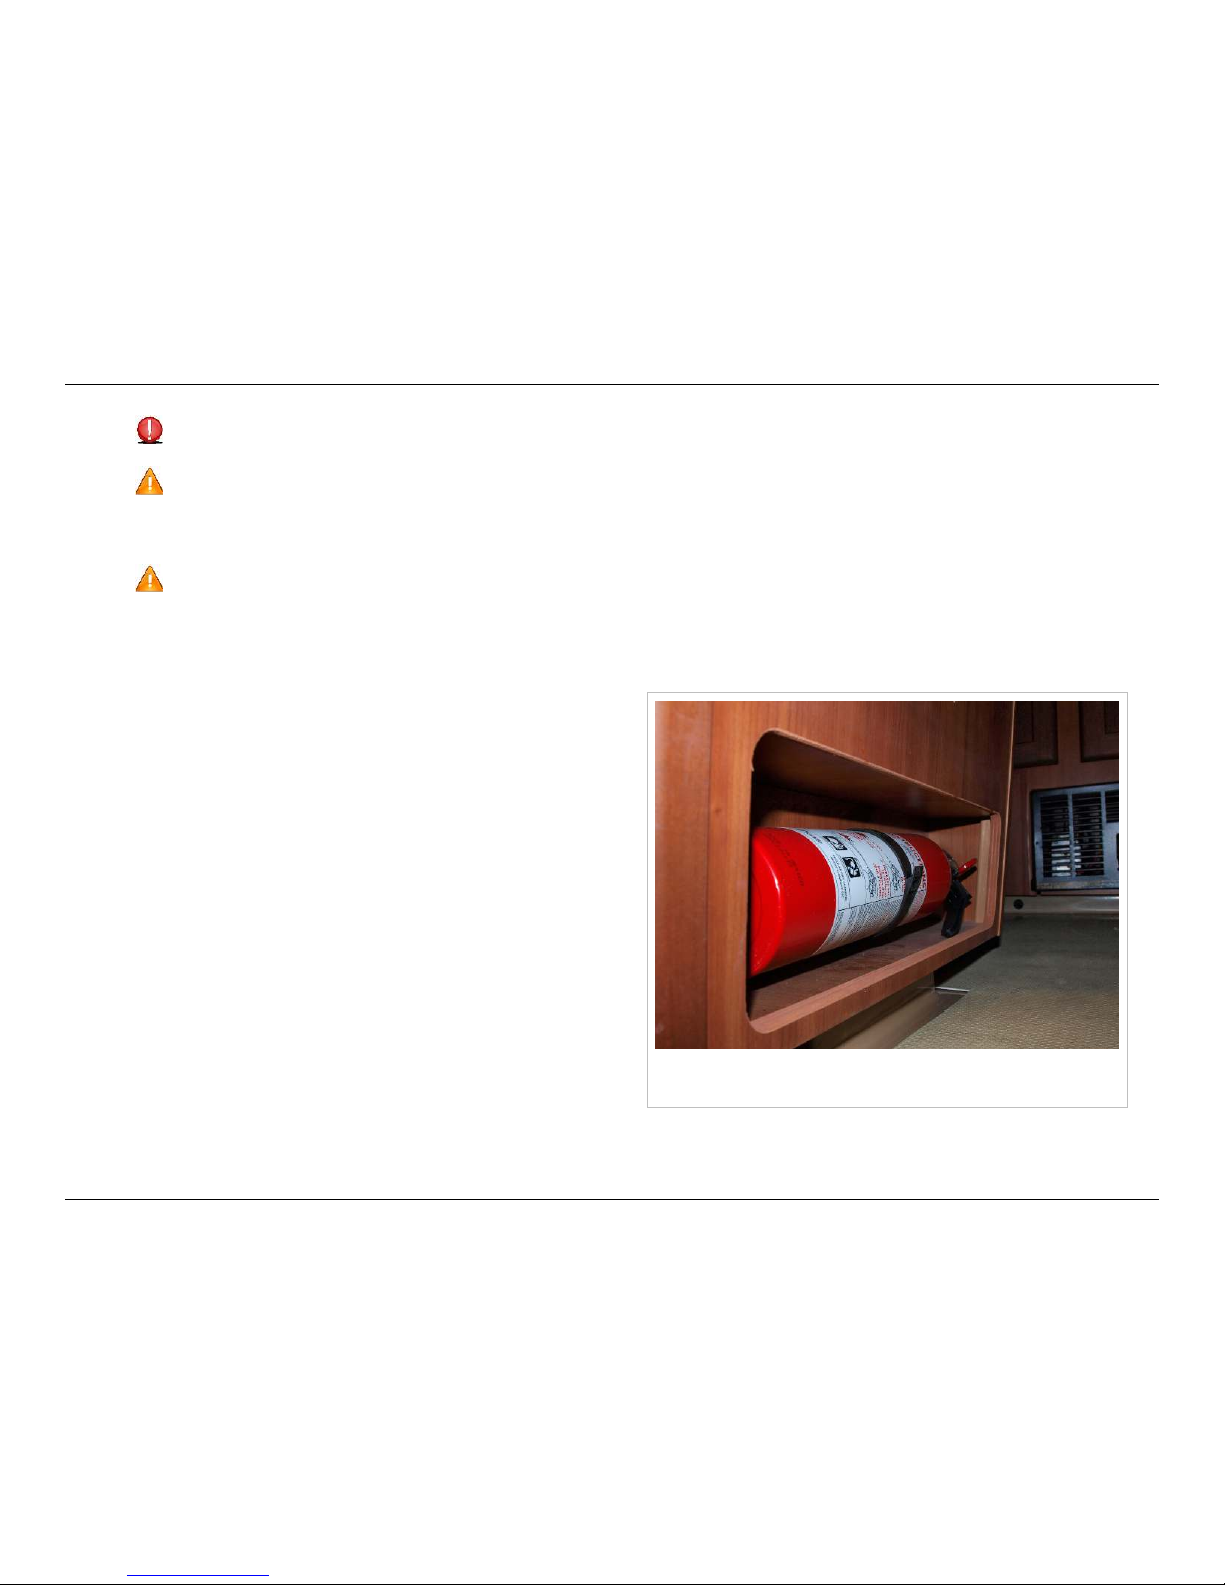
Fire extinguisher located under second row passenger
side seat
Smoke Detector
The smoke detector is located to the right of the Monitor Panel.
It requires a commonly available 9 volt battery and periodic
replacement for both the battery and the unit as a whole. Please
refer to the Owner's Manual of the unit in your vehicle.
Fire Extinguisher
Your Roadtrek comes equipped with a dry chemical fire
extinguisher suitable for all fires. Before every trip, check to see
that the needle on the dial is in the green range. If not, replace
the fire extinguisher. DO NOT test your fire extinguisher by
discharging it - total discharge time is 8 to 12 seconds, so it will
become rapidly depleted if you test it this way. Service life on
fire extinguishers currently supplied is 12 years; replace the fire
extinguisher if it is more than 12 years past the year of
manufacture stamped on the base of the cylinder.
Page 64

Maintenance
61
© 2014 by Roadtrek, Inc.
Maintenance
Tires
See the automotive chassis manufacturer's owner's manual and documents for tire warranty information. Inflation pressure
information is on the sticker inside the galley cabinet door. The current Chevrolet Express manual recommends checking tire
pressures regularly - at least every month, and definitely before a long trip. Tire rotation intervals depend on wear and other
factors, but the current Chevrolet Express manual recommends tires should be rotated at least every maintenance interval every 12,000 km/7500 miles. Follow the tire rotation pattern in your owner's manual.
Cargo Carrying Capacity
See the information labels attached to the driver door post, and the inside of the lower galley cabinet door.
Owner Maintenance Checks
Listed below are vehicle maintenance checks and inspections that should be performed by the owner or qualified service
technician at the indicated intervals. Any adverse conditions should be brought to the attention of your dealer or qualified
service technician for expert service advice as soon as possible. The owner maintenance checks are generally not covered by
warranties and you may be charged for labor, parts and supplies used.
Page 65

Maintenance
62
© 2014 by Roadtrek, Inc.
When You Stop for Fuel, or Weekly
Check engine oil level.
Look for low or underinflated tires.
At Least Monthly
Check tire pressure, including your spare.
Check coolant level in the coolant recovery reservoir.
Check windshield washer fluid, brake fluid and power steering fluid levels.
Check operation of all exterior lamps, including brake lamps, turn signals and hazard warning flashers.
At Least Every Three Months
Flush black water holding tank. Use a hose or bucket to fill the tank through the toilet, and dump.
Flush grey water holding tank. Use a hose or bucket to fill the tank through the galley sink, and dump.
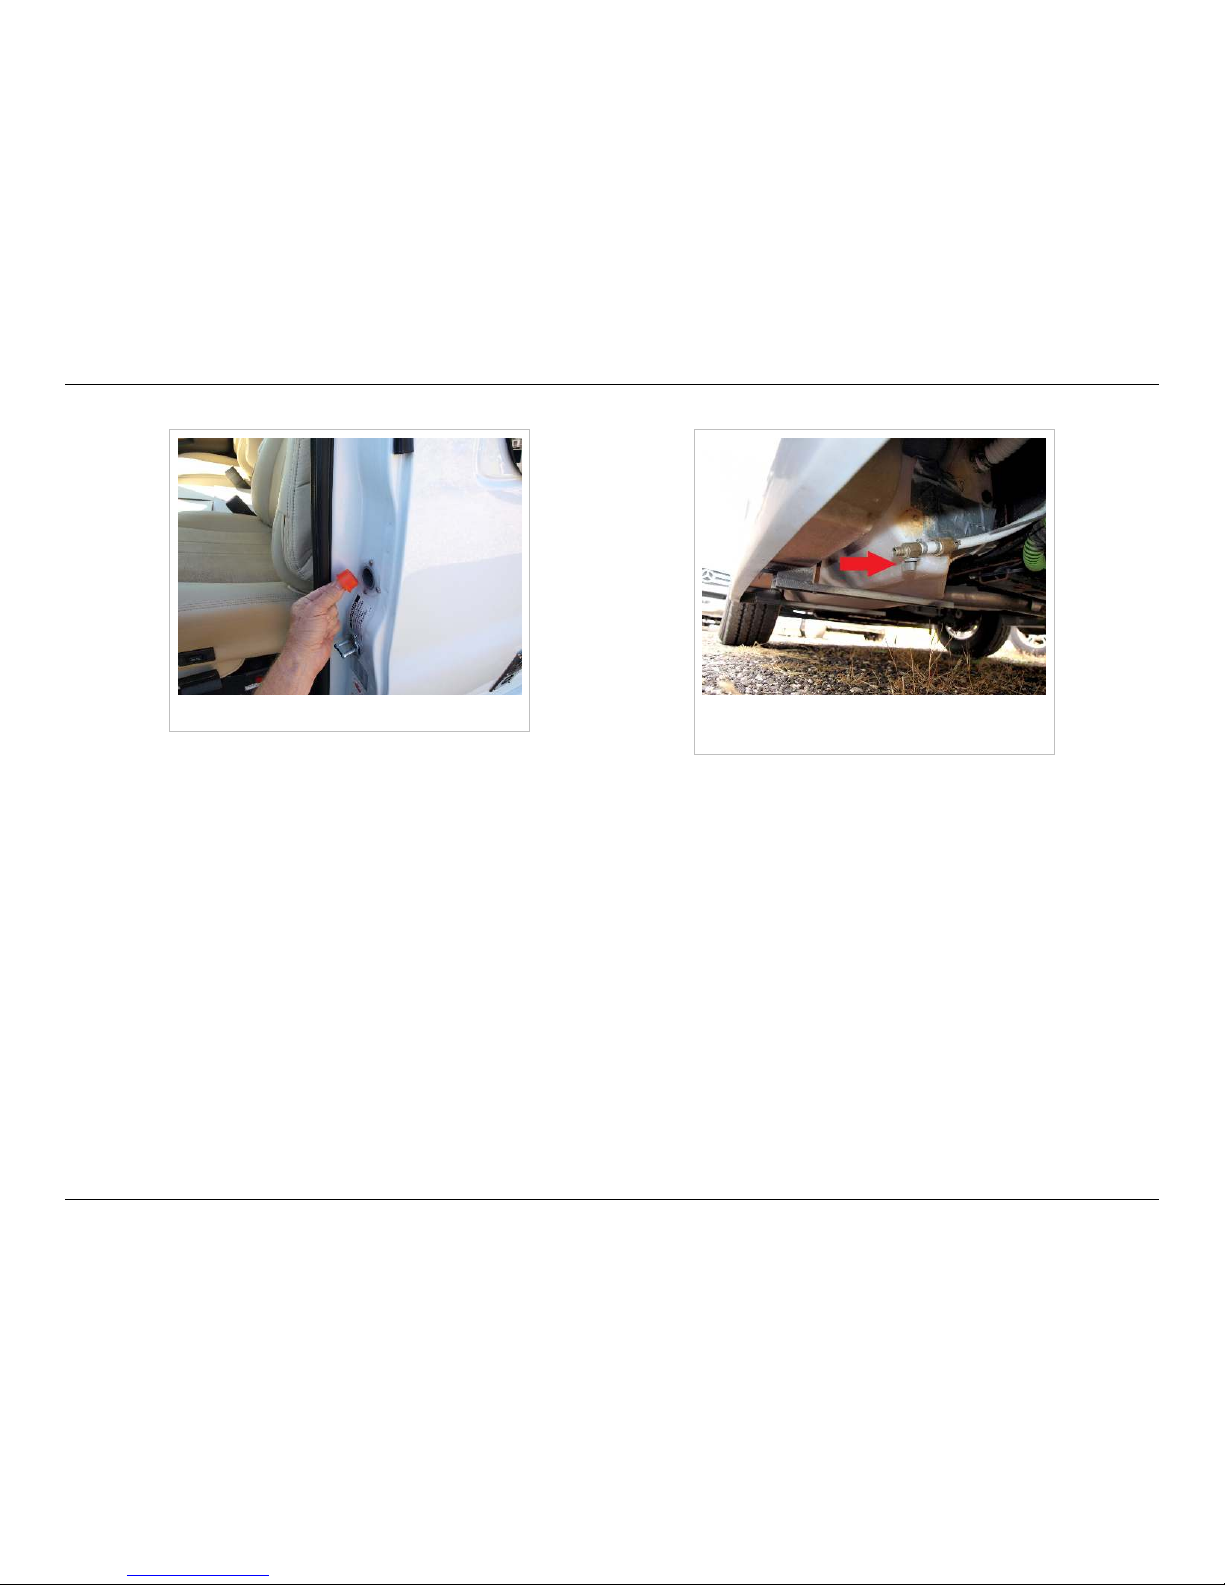
Flush and sanitize fresh water tank. To flush the tank, fill it completely using the gravity fill, and drain using the freshwater
tank drain underneath the right side of the driver's doorsill. Sanitize by adding 1/2 cup chlorine bleach to the tank, fill with
water, let sit for at least two hours, and drain. 1/2 cup vinegar added to the next tankfull, which will also be drained before
filling with fresh water for use, will help dissipate the chlorine smell.
Page 66
Maintenance
63
© 2014 by Roadtrek, Inc.
Gravity fill, on driver's doorpost Freshwater tank drain, under drivers
doorstep
At Least Twice A Year
Check windshield wiper operation. Clean wiper blades with clean cloth dampened with washer fluid. Wiper blades should be
replaced at least once a year.
Check radiator, heater and air-conditioning hoses for leaks or damage.
Check for worn tires and loose wheel lug nuts.
Check parking brake system.
Check head lamp alignment - shine your low beam headlights on a wall. The light patterns should be the same height.
Measure headlight height at the vehicle with a yardstick - the light patterns should be the almost same height or slightly less
with your vehicle level. If not, get the headlights aligned.
Check lap and shoulder belts for wear and function. Replace any belts with frayed spots or that do not smoothly retract into
their holders.
Inspect appliance vents to ensure they are free from dirt, insects, spider webs and/or nests.
Page 67

Maintenance
64
© 2014 by Roadtrek, Inc.
Inspect black water tank vent and remove any debris or other obstructions. The black water tank vent is on the roof,
passenger side, in the bathroom area.
Clean air conditioner filter. See air conditioner manual for details.
Thoroughly clean and wax the roof of the van. To wash the solar panel, use a garden hose to rinse dirt off the panel. Do not
scrub it with a brush or otherwise apply any abrasive material to the solar panel surface. Rinsing the panel two or three times
a year to remove excess dirt is all you need to do to keep the panel operating at full output.
At Least Once a Year
Lubricate all door hinges, locks and latches, especially the exposed hinges on exterior doors. These will freeze up and cause
damage to the doors if neglected.
Have appliances tested and cleaned.
Wax & polish and protect exterior surfaces. The wheels are coated aluminum - there is no bare aluminum on the vehicle, so
do not use aluminum polish on any surface of your Roadtrek. The wheel center caps are chrome.
To prevent water from entering your vehicle, avoid spraying water directly into exterior vents or grills. Do not use a power
washer to clean your Roadtrek - damage to the paint, removal of decals, and water leaks will result. Hand washing or
commercial car washes accommodating large vehicles are the best way to keep your Roadtrek clean and shiny.
Page 68
Spare Tire Storage
65
© 2014 by Roadtrek, Inc.
Spare Tire Storage
Rear Door Spare Tire
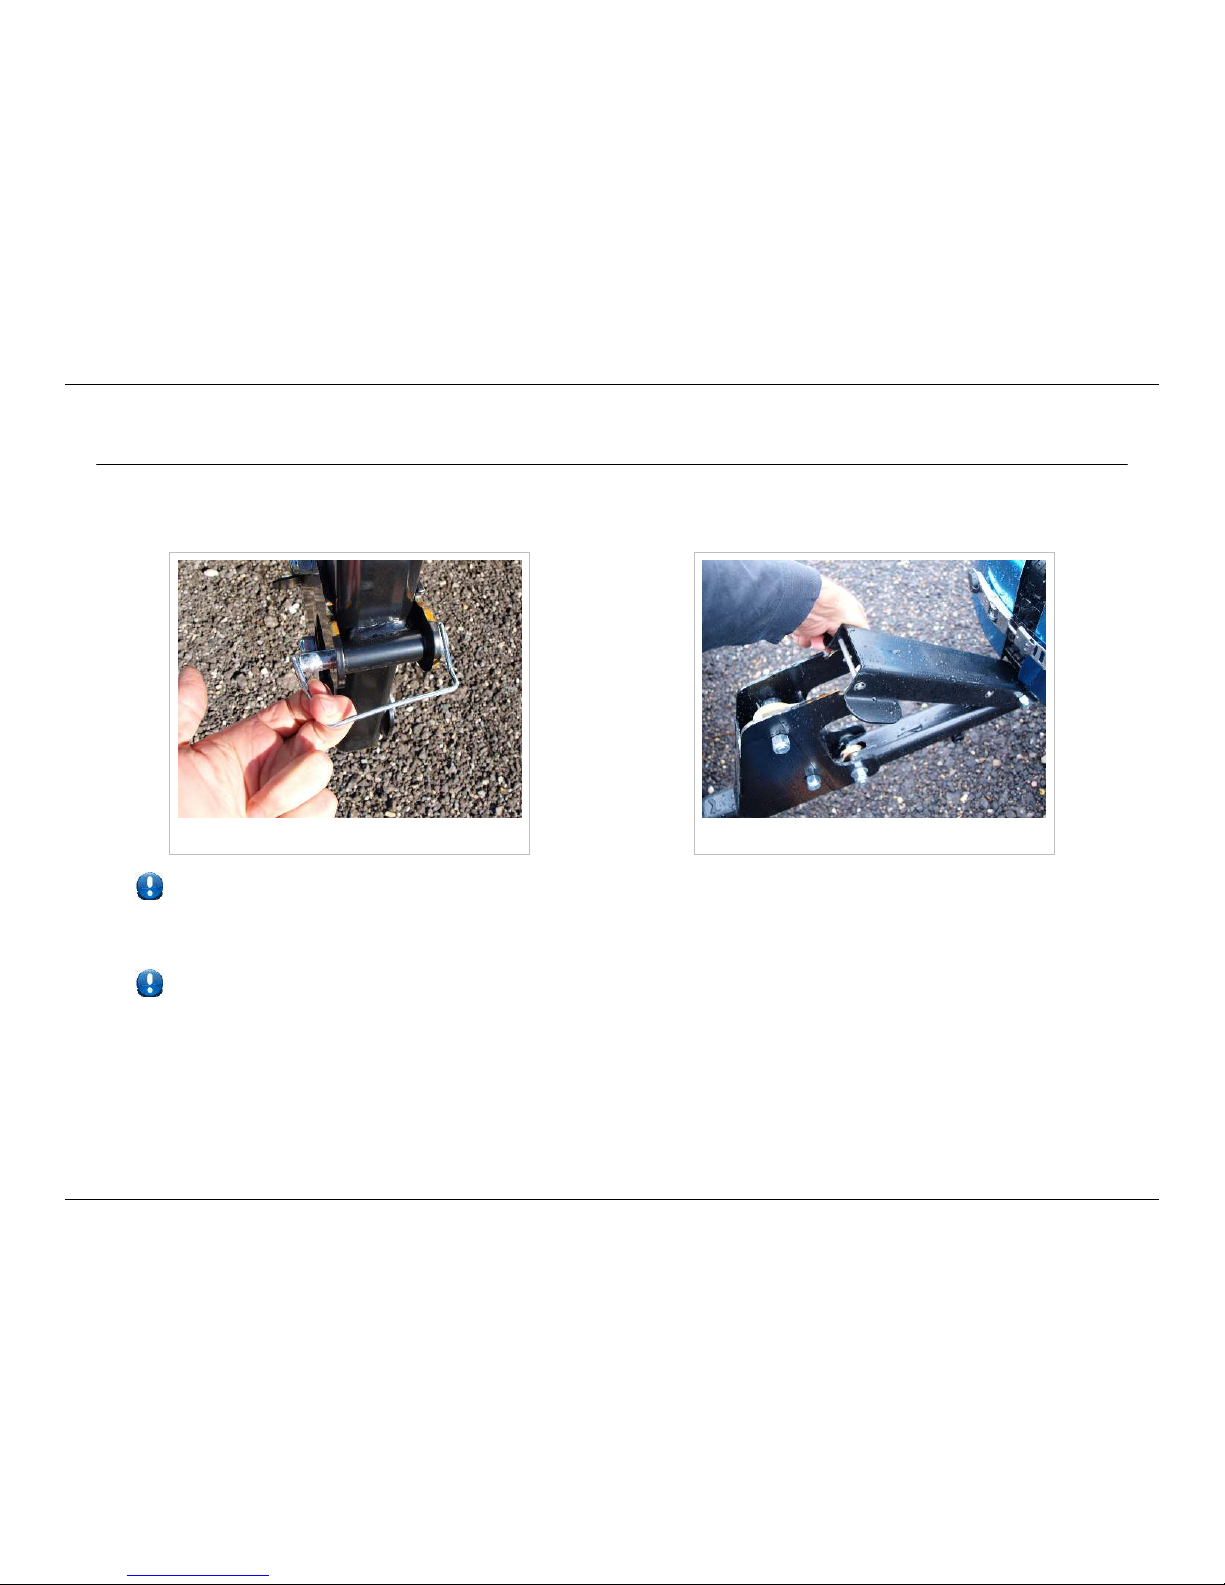
Spare tire retaining pin Spare tire lift latch
Supplied with your new Roadtrek are two types of small keys. One is for the storage compartments, and the other is
to unlock the chrome surround on your spare tire. Find both keys, put one of each on your key ring, and carry them with
you whenever you drive your Roadtrek. If you ever need to change a tire, you will need this key.
If your new Roadtrek still has the blue protective coating on the chrome spare tire cover, remove it as soon as you
can. If left on for an extended period of time, particularly in the hot sun, it will become very difficult to remove.
In order to open the driver's side rear door you must lower the spare tire.
To lower the continental kit spare tire and gain access to the driver's side rear door of the Roadtrek, unlatch the retaining
spring and pull the pin out while supporting the top of the tire with your other hand. It helps to wiggle the tire back and forth
to allow the pin to slide out. Place the pin where you won't lose it, and grasp the top of the tire with both hands. Lower it into
a horizontal position to allow the driver's side rear door to open freely. The tire will latch when horizontal.
Page 69

Spare Tire Storage
66
© 2014 by Roadtrek, Inc.
While the tire is spring loaded it is still fairly heavy. Use proper lifting technique or get help.
To raise the spare tire back into position, lift the guard over the cable mechanism enough for the catch to clear and allow the
tire to be raised. Raise the tire back up into position, and insert the pin. Flip the retaining spring over the end of the pin to
secure it.
To use the spare tire, lower the tire, unlock the chrome surround with the key supplied with your Roadtrek, unbolt the tire
from the carrier with your lug wrench, and lift the tire off the carrier. Follow the Chevrolet manual for instructions on the use
of the jack and other tire change procedures. Install the flat tire on the spare tire carrier and reattach the chrome surround.
Do not attempt to raise an empty tire carrier - if you change the tire, put the flat on the carrier before attempting to
raise it. NEVER release the latch on a tire carrier without a tire on it. The spring will move the arm of the carrier upward
with great force and speed.
Page 70
Obtaining Service
67
© 2014 by Roadtrek, Inc.
Obtaining Service
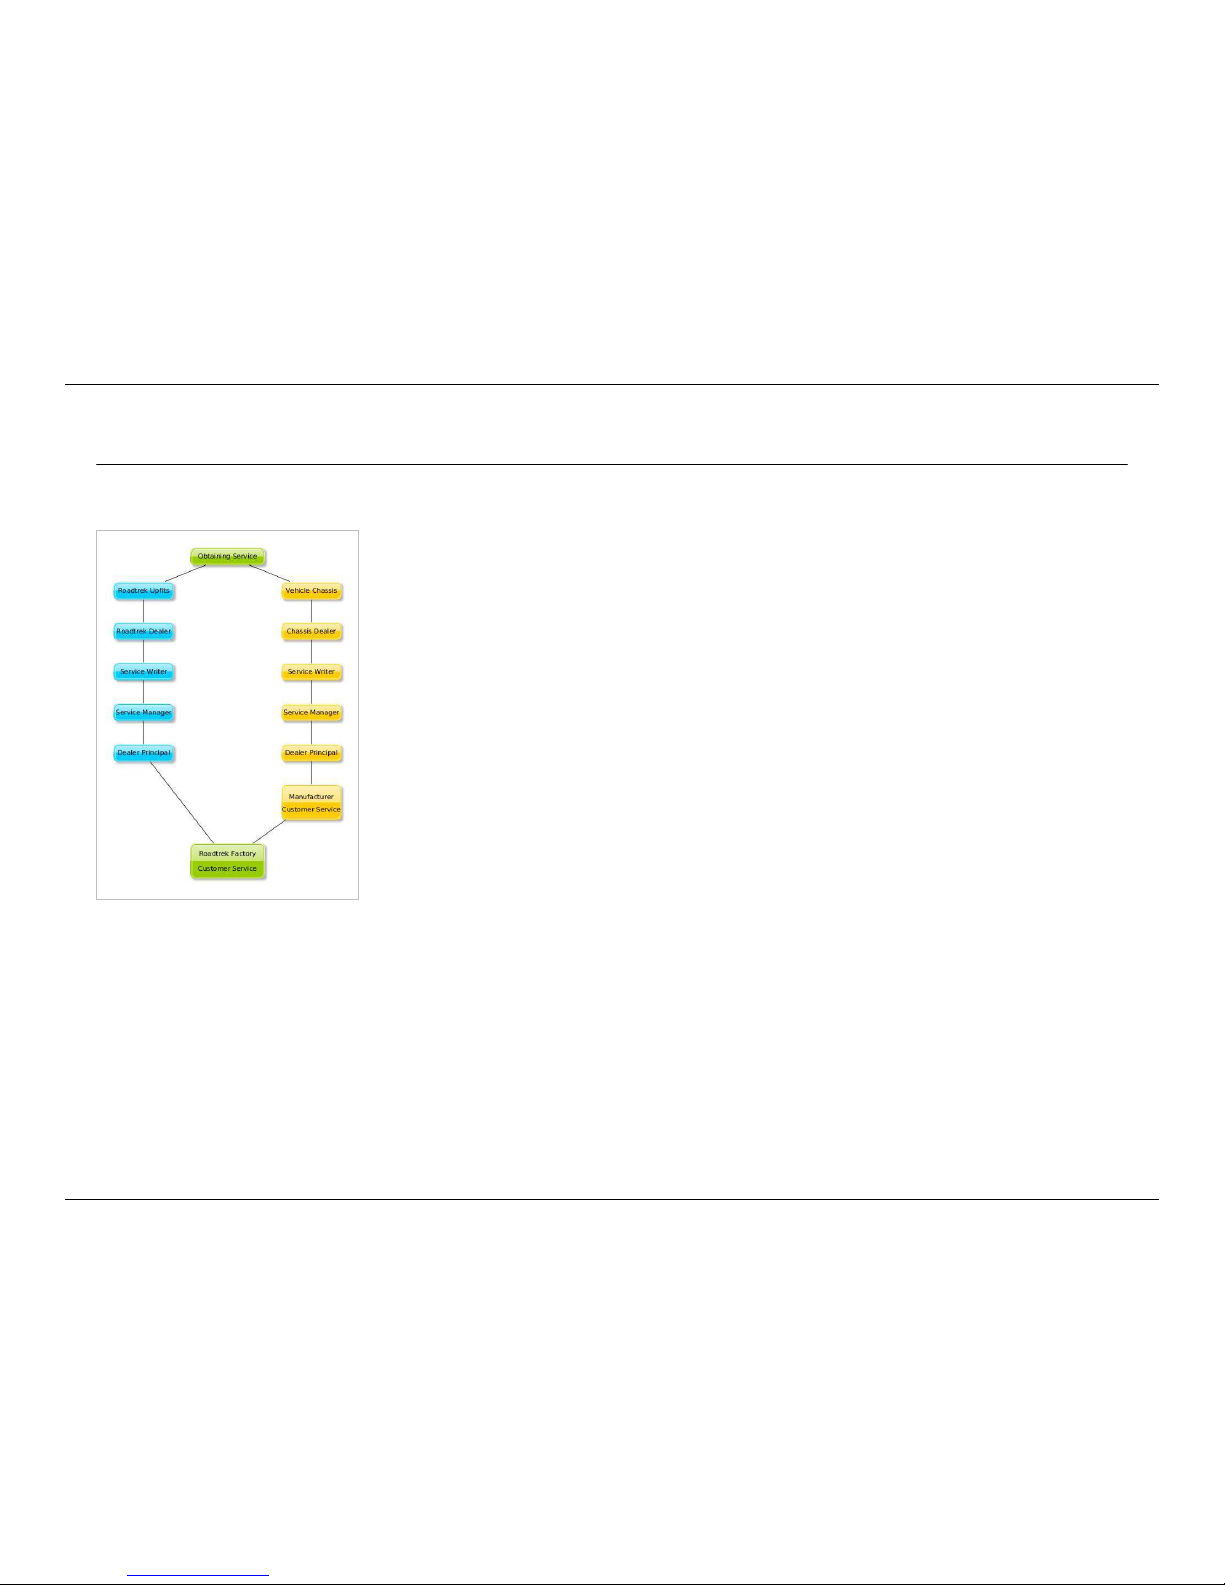
When your Roadtrek needs service, determine if the issue is with the Roadtrek upfits or the Chevrolet chassis. For Roadtrek
upfits, contact your Roadtrek dealer.
For chassis-related issues, contact GM / Chevrolet service. Advise the service writer that
you have a Chevrolet Express 2500 3/4 ton van, rather than a "motorhome". Some GM
dealerships do not want to work on motorhomes, but most can service a 3/4 ton van.
Page 71

Specifications
68
© 2014 by Roadtrek, Inc.
Specifications
For general chassis specifications, please refer to the GM manual. For specifications relating to your vehicle, including
occupancy, weight rating, tire size, inflation, and so on refer to the sticker on the driver's side B pillar (right side of the door
frame, near the latch). This specification refers to the Roadtrek upfits.
Roadtrek upfits only
Total fresh water capacity (includes water heater) 20 gallons/ 76ƒliters
Fresh water tank capacity 14 gallons/ 53ƒliters
Gray water tank capacity 23 gallons/ 85ƒliters
Black water tank capacity 8 gallons/ 30ƒliters
Battery type AGM, maintenance free
Battery Capacity 95 amp hours (standard) 190 amp hours (optional)
Propane tank size 10 gallons/ 38ƒliters
Propane tank capacity at 80% 8 gallons/ 30ƒliters
Water heater capacity 6 gallons/ 28.5ƒliters
Furnace 16,000 BTUs/hour
Refrigerator 3-way (propane, 12VDC, 120VAC)
Air Conditioner 10,200 BTUs/hour
Page 72

Warranty
69
© 2014 by Roadtrek, Inc.
Warranty
Chassis Manufacturer's Warranty
The automotive Chassis is warranteed by General Motors. Please refer to the Chevrolet Warranty Information booklet for
details.
All automotive service, maintenance and repairs are to be performed by any Chevrolet dealer. See the Chevrolet Warranty
Information booklet for details. Such items are not warranted by Roadtrek. Roadtrek will pay for the removal and
reinstallation of motorhome components necessary to perform automotive recalls and warranty for the duration of the
original manufacturer's warranty. After this period such costs are considered to be inherent in the ownership of such a vehicle
and Roadtrek will not pay for the removal and reinstallation of motorhome components necessary to perform automotive
service or maintenance.
Roadtrek Motorhomes 5 Year Upfit Warranty
Roadtrek Motorhomes warrants to the Purchaser that the Vehicle is free from defects in material and workmanship on the
portion manufactured by Roadtrek Motorhomes, under normal use and service, for five (5) years, from date of purchase by
the first Purchaser or the date the Vehicle was first put into service (for example, as a demo or rental), whichever is earlier.
This warranty shall be fulfilled at a Roadtrek Motorhomes Dealer or authorized Roadtrek repair facility. For in transit
emergency repairs, you may choose to deal with a non-authorized RV service facility. However all warranty repairs at
non-authorized RV service facilities must be preauthorized by Roadtrek Motorhomes. Roadtrek Motorhomes will, at its option,
replace or repair free of charge (including related labor) any defective part, about which the Purchaser shall notify their
Roadtrek Dealer within the warranty period. The obligation of Roadtrek Motorhomes under this warranty is expressly limited
to such replacement or repair.
The provisions of this limited warranty shall not apply to the following:
1.1. Accident.
2.2. Unauthorized repairs or alterations.
3.3. Normal maintenance.
4.4. Changes made to other units manufactured after this Vehicle was manufactured. (This is not an engineer upgrade
warranty.)
Page 73

Warranty
70
© 2014 by Roadtrek, Inc.
5.5. Incidental damages connected with the failure of the Vehicle such as lost time, inconvenience, loss of use of the Vehicle,
cost of rental cars, gasoline, telephone, travel or lodging.
6.6. Damages caused by environmental factors including, but not limited to, hailstorms, tornadoes, sandstorms, stone chips,
lightning, floods, earthquakes, airborne fallout, chemicals, tree sap, ocean spray, road hazards.
7.7. Vehicle that has been declared a total loss by an insurance company (demolished) or a Vehicle whose title indicates that it
is designated as "salvage", "junk", or "rebuilt" or words of similar impact.
8.8. Exterior side storage compartments may not be moisture free. It is advised that you store items accordingly. Roadtrek
Motorhomes is not responsible for goods damaged while stored in exterior storage compartments.
9.9. There will be no allowance for emergency road repair, towing, labor, meals accommodations, etc. Such will not be
accepted if claimed under warranty.
10.10. Aluminum wheels are not warranted against corrosion that is a result of road salt, sea salt, cleaning chemicals or harsh
driving conditions.
The provisions of this limited warranty shall not apply to deterioration due to wear and exposure beyond the following
limitations:
1.1. For ninety (90) days after the "QualityCare" Pre-Delivery Report is completed by the dealer for appliance adjustments,
door latch adjustments, light bulbs, fuses, battery in the smoke detector and window screens. After 90 days these items
are considered part of normal maintenance.
2.2. For one (1) year from the date of original purchase sewage hose, curtain fabric, seating fabric, carpet, cup holders,
exterior stripping and decals, running board trim, propane regulators and black and grey water tank valves. After one year,
these items are considered part of normal wear and tear, and maintenance.
Roadtrek Motorhomes Limited Motorhome Warranty is void unless the following conditions are adhered to:
1.1. Warranty Card on Vehicle must be completed by the Dealer and faxed to Roadtrek Motorhomes within 48 hours of date of
retail delivery. When warranty applications are made and Warranty Card is not on file at Roadtrek Motorhomes,
reimbursement of claim will be delayed until proof of original purchase is submitted to Roadtrek Motorhomes.
2.2. Warranty claims and authorization requests should be submitted using the Electronic Warranty Management system found
on the Dealer Website. Including the last 8 digits of the Vehicle Identification Number (V.I.N.) and odometer reading. All
claims must be submitted within 30 days of the date of repair.
3.3. Warranty work that will exceed $200 must first be authorized by Roadtrek Motorhomes before proceeding with such work.
The authorization number issued by Roadtrek Motorhomes must be noted on the warranty claim. See item #2 above.
4.4. Roadtrek Motorhomes reserves the right to inspect defective parts that have been replaced under warranty. Dealer is
expected to hold selected parts for a period of not to exceed 60 days. (See below).
Page 74

Warranty
71
© 2014 by Roadtrek, Inc.
5.5. Only parts and accessories and other material, available through Roadtrek Motorhomes are to be used in the performance
of warranty service. Express shipping costs are not covered by this warranty policy.
6.6. Warranty repairs performed a second time by a Dealer (due to incorrect or inadequate diagnosis, improper assembly or
repair, or lack of proper testing when the original warranty repair was performed) are considered as shop comebacks and
are not reimbursable. Costs of such repairs must be adsorbed by the Dealer.
7.7. Purchasers are responsible for presenting their vehicle to a Roadtrek Dealer as soon as problem exists. The warranty
repairs should be completed in a reasonable amount of time from date of authorization.
This limited warranty is expressly in lieu of any other expressed or implied warranty, including any implied warranty of
merchantability or fitness for a particular purpose and of any other obligations or liabilities on Roadtrek Motorhomes which
neither assumes nor authorizes any other person to assume for it any other liability in connection with Vehicle manufactured
by it.
Appliance Warranty
The following are not warranted by Roadtrek Motorhomes, but are covered by individual warranties offered by their
respective manufacturers to which terms both Purchaser and Dealer must comply:
•• air conditioner
•• electrical inverter/charger
•• electronic equipment (TV, DVD player, in-dash radio, etc.)
•• furnace or other heating system
•• hydronic heating system
•• microwave oven
•• refrigerator
•• stove
•• toilet
•• water pump
•• macerator
•• water heater.
While still within the terms of the appliance warranty Purchaser and/or Dealer are required to deal directly with the nearest
service center for such manufactured components and abide by the warranty policy as allowed by such component
manufacturers.
Page 75

Warranty
72
© 2014 by Roadtrek, Inc.
Propane or Gasoline Generator
The generator is covered by the manufacturer's warranty.
1.1. The generator warranty may be voided if the manufacturer's maintenance and run requirements are not met.
AGM Battery Warranty
Batteries are warranted by the battery manufacturer for one year from the "In Service Date" of the Roadtrek.
1.1. Warranty is voided if AGM batteries are tampered with, topped off with distilled water or allowed to sulfate or freeze due to
lack of charge.
Warranty Intent
The intent of this extended warranty is to assure the new owner of a Roadtrek that it is worry free from manufacturer caused
defects for the first five (5) years of use. The first owners of this unit can feel comfortable that Roadtrek is behind them for
five (5) years.
Page 76
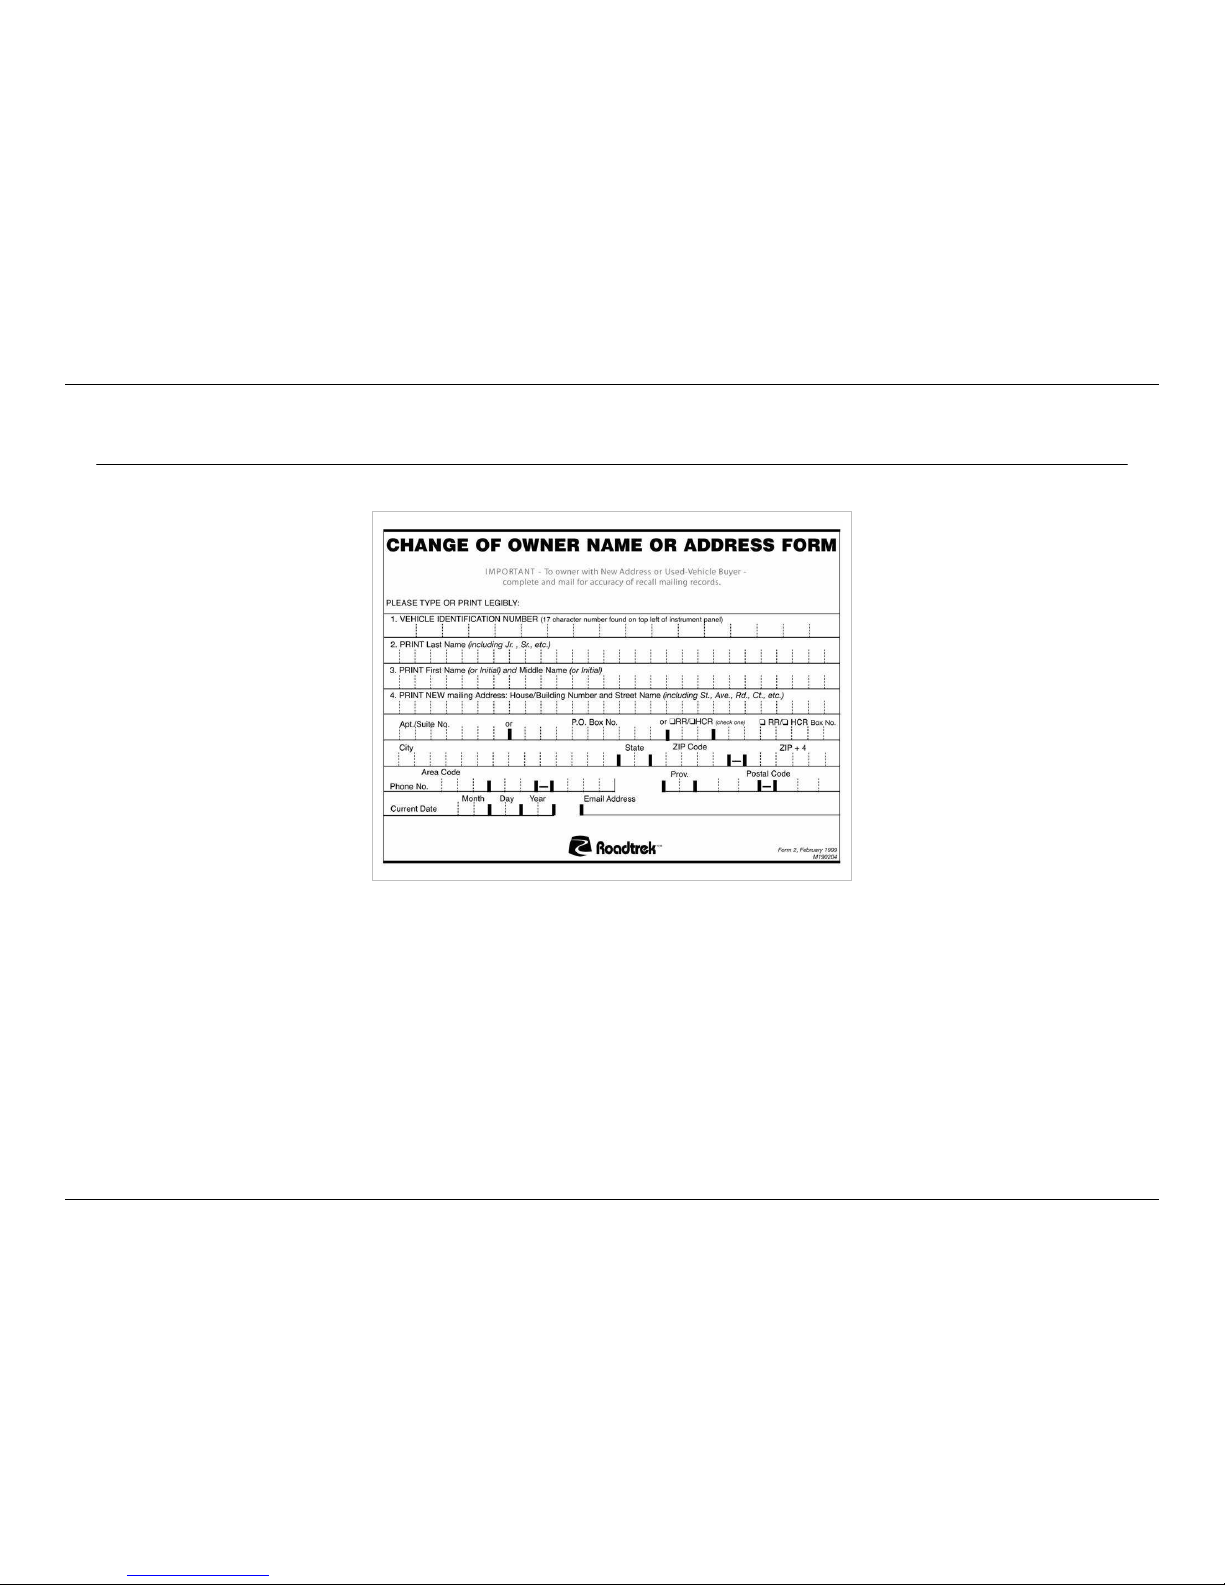
Registration
73
© 2014 by Roadtrek, Inc.
Registration
Please send this form in or email the information to [email protected]
[1]
when you purchase your Roadtrek.
Page 77
Registration
74
© 2014 by Roadtrek, Inc.
References
[1] mailto:sales@roadtrek. com
Page 78

Regulatory Notices
75
© 2014 by Roadtrek, Inc.
Regulatory Notices
If you believe that your vehicle has a defect which could cause a crash or could cause injury or death, you should
immediately inform the National Highway Traffic Safety Administration, (NHTSA) in addition to notifying Roadtrek
Motorhomes.
If NHTSA receives similar complaints, it may open an investigation, and if it finds that a safety defect exists in a group of
vehicles, it may order a recall and remedy campaign. However, NHTSA cannot become involved in individual problems
between you, your dealer, and/or Roadtrek Motor Homes.
To contact NHTSA, you may call the Auto Safety Hotline toll-free at 1-888-327-4236, (or 366-0123 in Washington, DC area) or
write to:
NHTSA
U.S. Department of Transportation
Washington, DC 20590
You can also obtain other information about motor vehicle safety from the Hotline.
Page 79
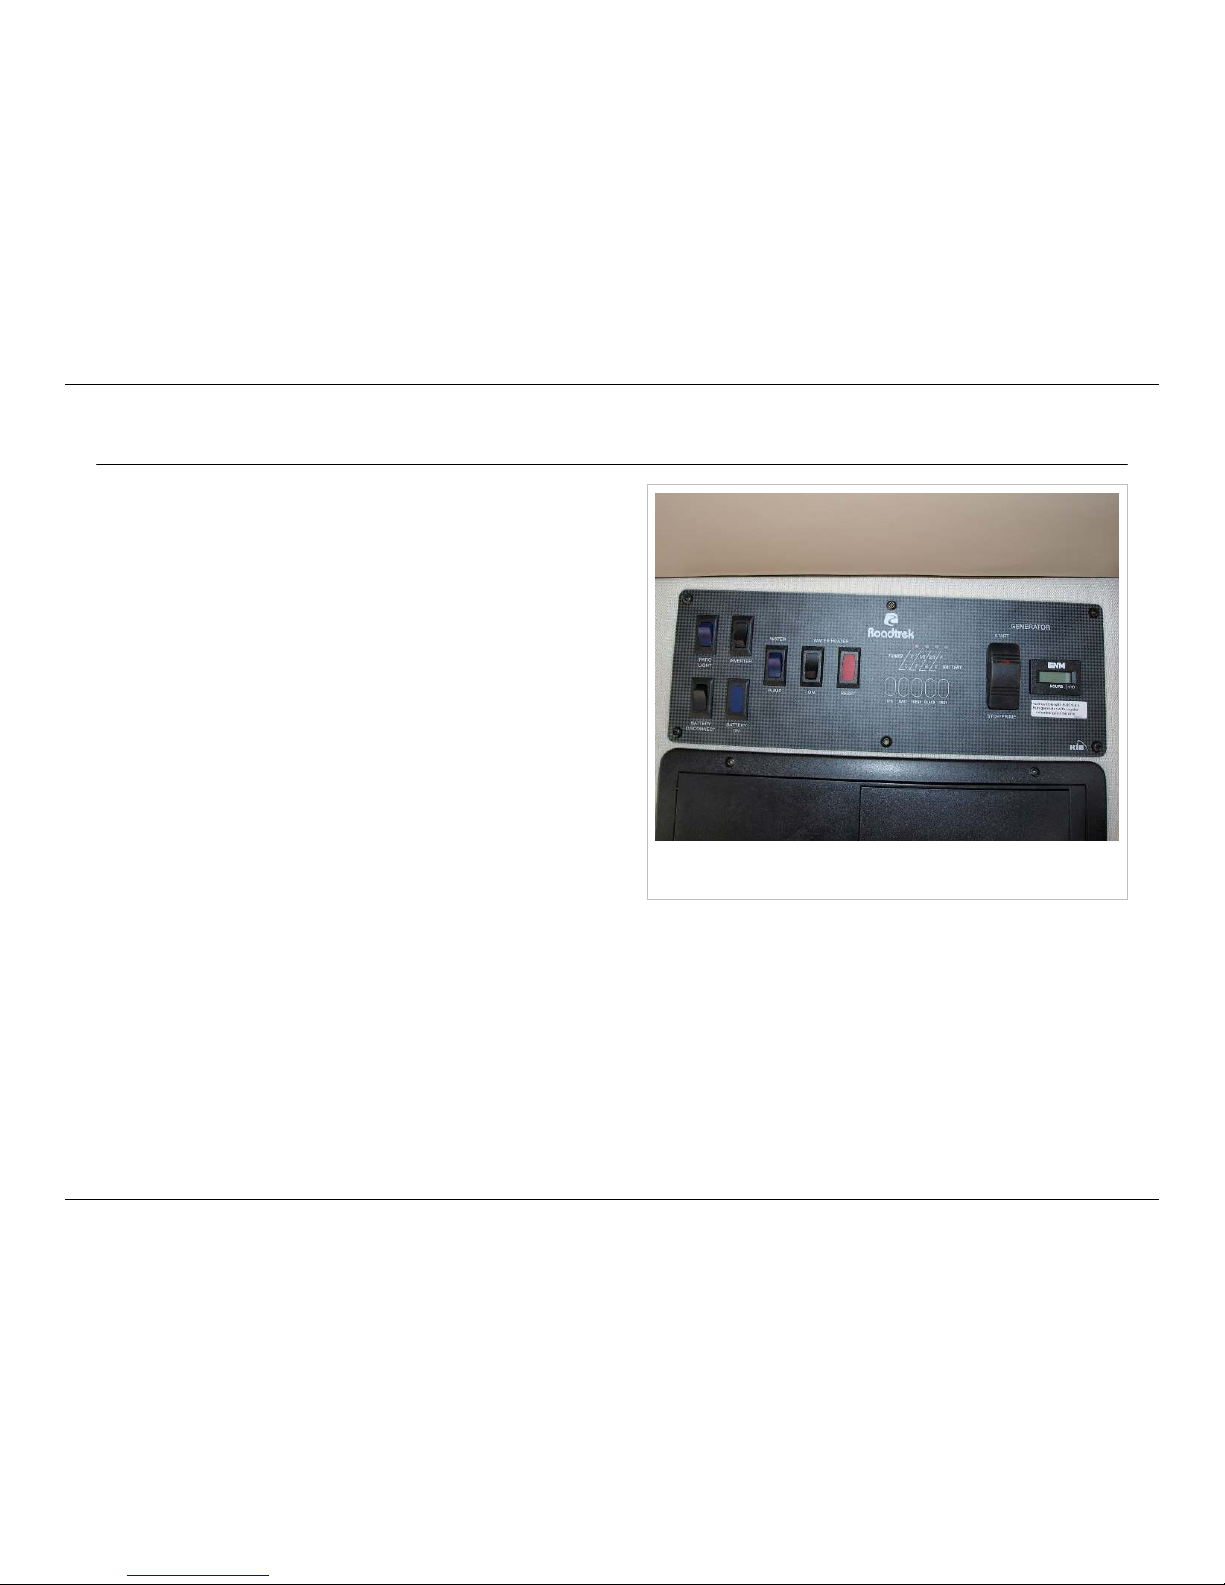
HOWTO: Monitor Panel
76
© 2014 by Roadtrek, Inc.
HOWTO: Monitor Panel
Monitor Panel with standard inverter and optional
gasoline generator
The monitor panel is located inside the side door, above the
doorframe. Depending on the options you have, there may be a
gasoline generator starter switch and hour run meter to the
right.
Battery Disconnect Switch
The battery disconnect switch turns the coach battery power off
and on. When off, it prevents your coach batteries from being
drained while the Roadtrek is not in use. The lights, the water
pump, the fan, the refrigerator control board, even the igniters
for the propane cooktop need 12 volt power from the batteries. If
something electrical in your Roadtrek doesn't work, the first
thing to check is to make sure the battery disconnect switch is
on.
The battery disconnect switch is on the bottom left corner of the
monitor panel. To its immediate right is a blue indicator light
which illuminates to show you when the switch is on.
Page 80
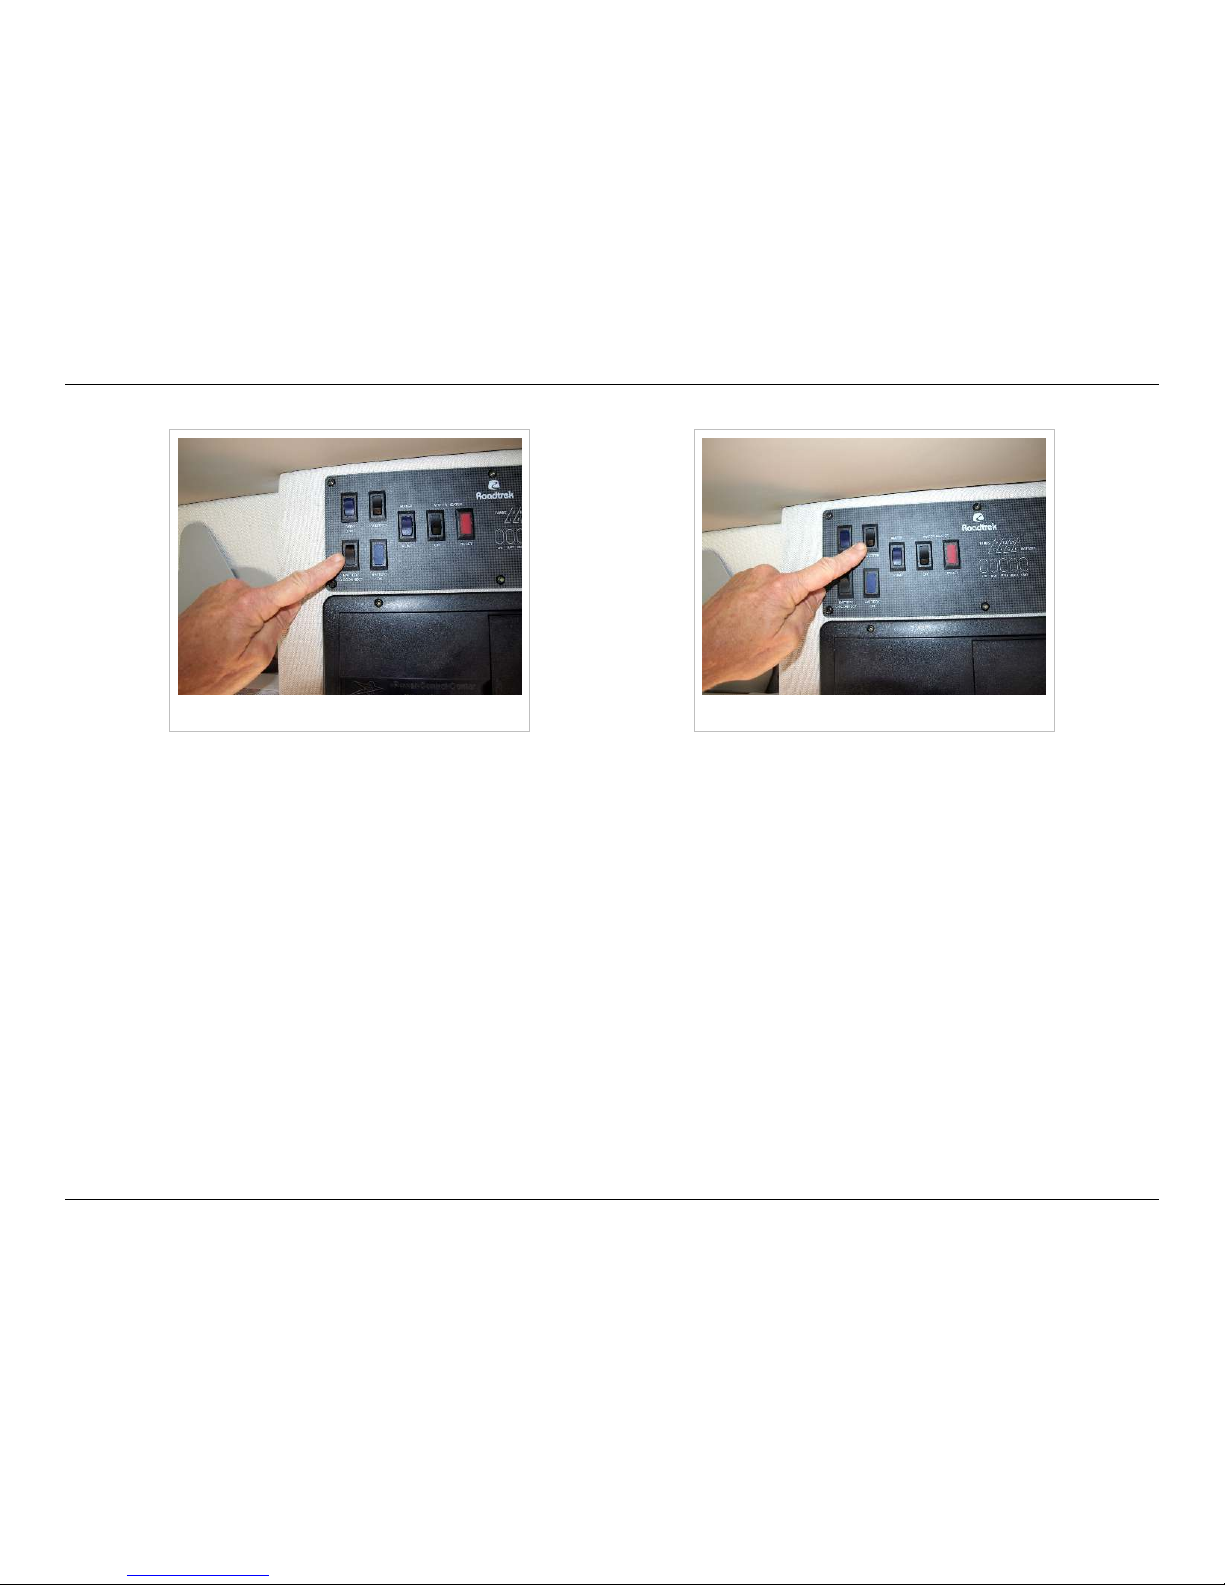
HOWTO: Monitor Panel
77
© 2014 by Roadtrek, Inc.
Battery disconnect switch Standard inverter switch
You will hear a "clunk" as the battery disconnect switch is pressed - this is a big relay connecting the coach batteries to the
electrical loads.
If you hear a clunk-clunk, or nothing at all, it's possible that your batteries are depleted to the point where they cannot drive
the relay. The best way to charge your batteries in this situation is to start your vehicle engine and try again after it has
charged for a while. Once the relay is working, you can continue to charge with the generator or shore power.
Inverter Switch
Just as the battery disconnect switch powers the lights, fan, and other 12 volt electrical loads, the standard inverter takes 12
volt power from your coach batteries and changes it into 120 volt electricity. It powers some of the smaller 120 volt
alternating current loads, such as the TV and DVD player. This is the regular electricity you have in your house. With this
inverter, you can watch television or play a DVD while you are camping, without the need to plug into shore power or run
your generator.
The inverter is rated for 750 watts maximum output. Larger loads such as the air conditioner or microwave are too big to run
on the power produced by the inverter, and will not operate unless you plug in to shore power or start your generator. The
inverter will shut off if you try to draw too much power through it.
Page 81
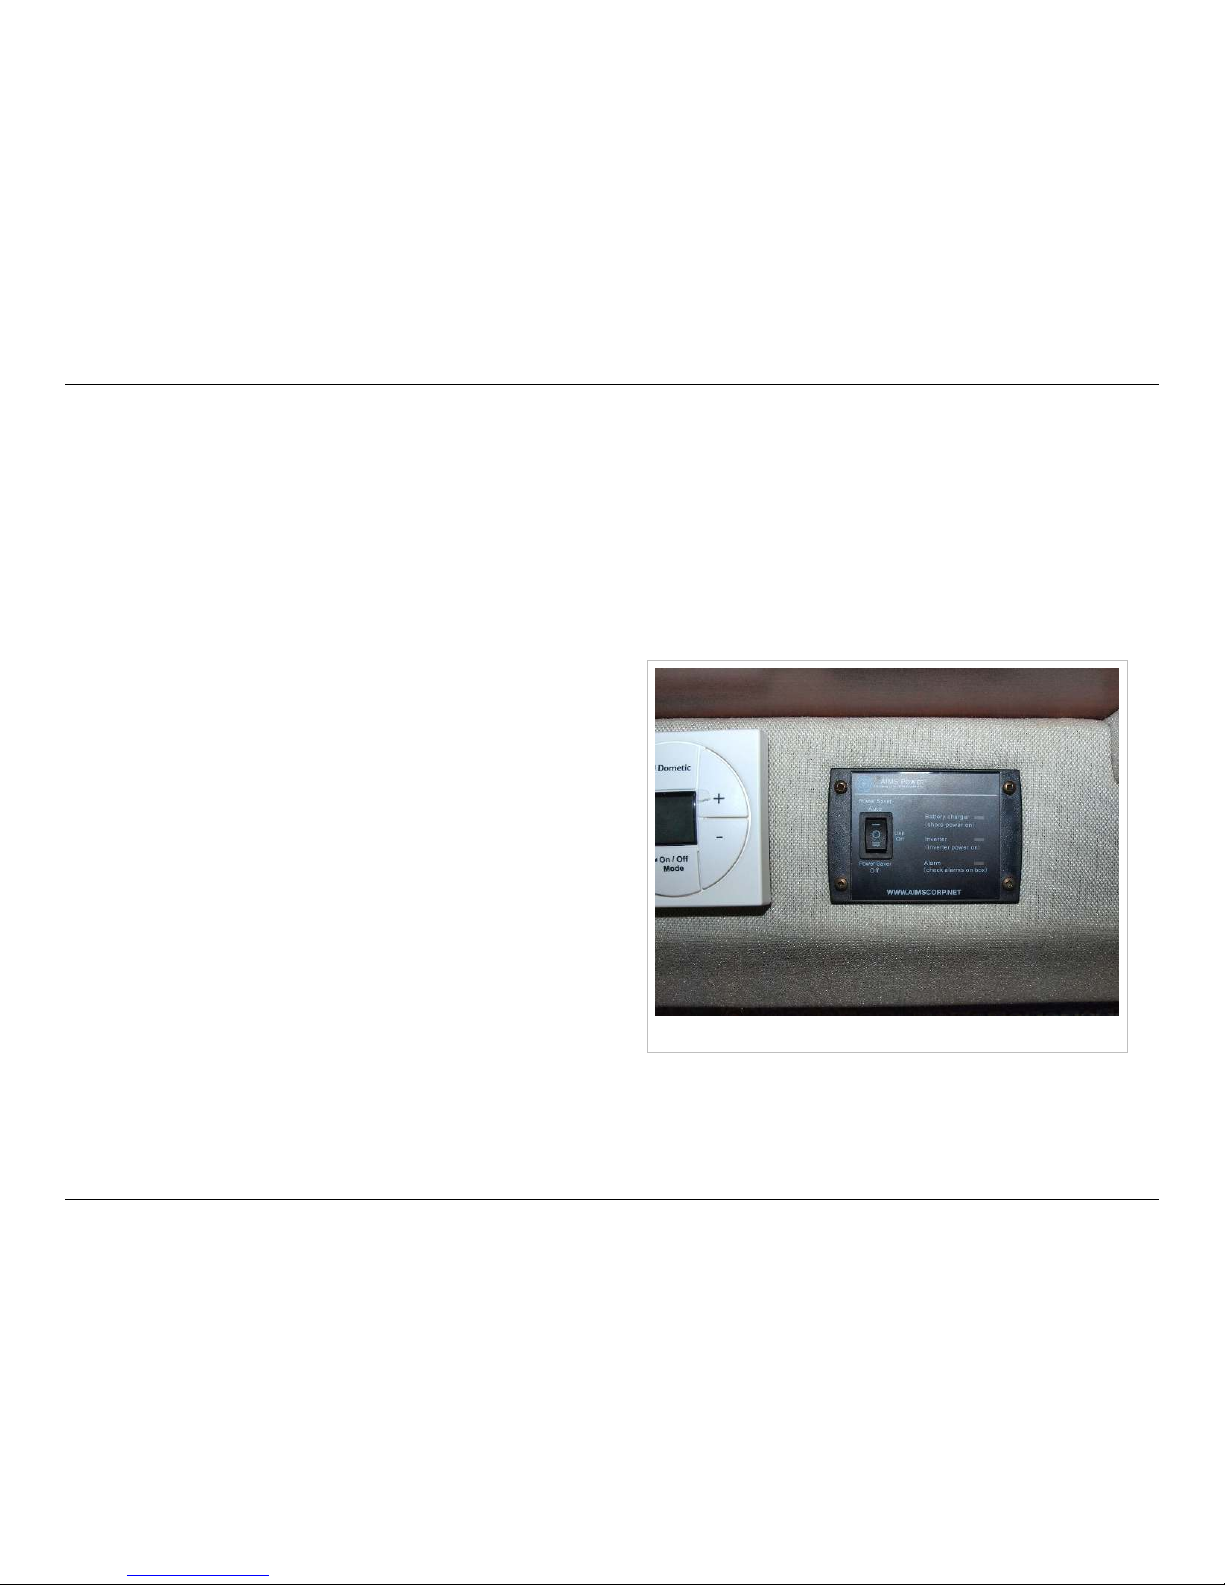
HOWTO: Monitor Panel
78
© 2014 by Roadtrek, Inc.
The inverter switch is on the left side of the monitor panel, above and to the right of the battery disconnect switch. It has an
indicator light inside it that comes on to let you it's on. If you are not using any 120 volt electricity, turn the inverter off to
conserve battery power, since it uses a small amount of electricity even when it's not powering any appliances.
The inverter will also shut off if the battery voltage falls below a certain level. This is to protect your batteries, wiring, and the
inverter itself from damage. Your battery voltage drops under load, so it is possible to have the inverter cut off under high
load when the battery voltage is normal with no load. If this happens, try turning off any power-hungry appliances and trying
again. Things like electric toasters, electric curlers and hair dryers, or anything else that produces heat are usually energy
hogs. Most appliances have the wattage indicated on a label somewhere on the appliance. With practice, you will learn what
you can and can't run within the 750 watt limit.
2500 watt inverter switch
Inverter Switch With Optional Engine
Generator and 2500 Watt Inverter
Instead of the regular inverter switch on the monitor panel, your
inverter switch will be back in the rear lounge area on the
passenger side, just to the right of the thermostat. The switch
has three positions: off in the middle position, power save auto
in the top position, and power save off in the bottom position.
In the power save auto setting, when you're not using anything
with 120 volt power, the inverter will put itself to sleep. In this
mode, it still uses a small amount of power. If you turn on a 120
volt appliance, it senses a load and will come back on in about
20 seconds. If you select power save auto you'll reduce the
electricity it takes to keep the inverter powered, and your
batteries will require less recharging.
Pressing the bottom of the switch selects power save off. When
this setting is selected, the inverter will be on continuously.
There is a shore power indicator light to the right of the switch to tell you the system is receiving shore power. There is also a
battery charging indicator light to tell you when the batteries are being charged by shore power.
Page 82
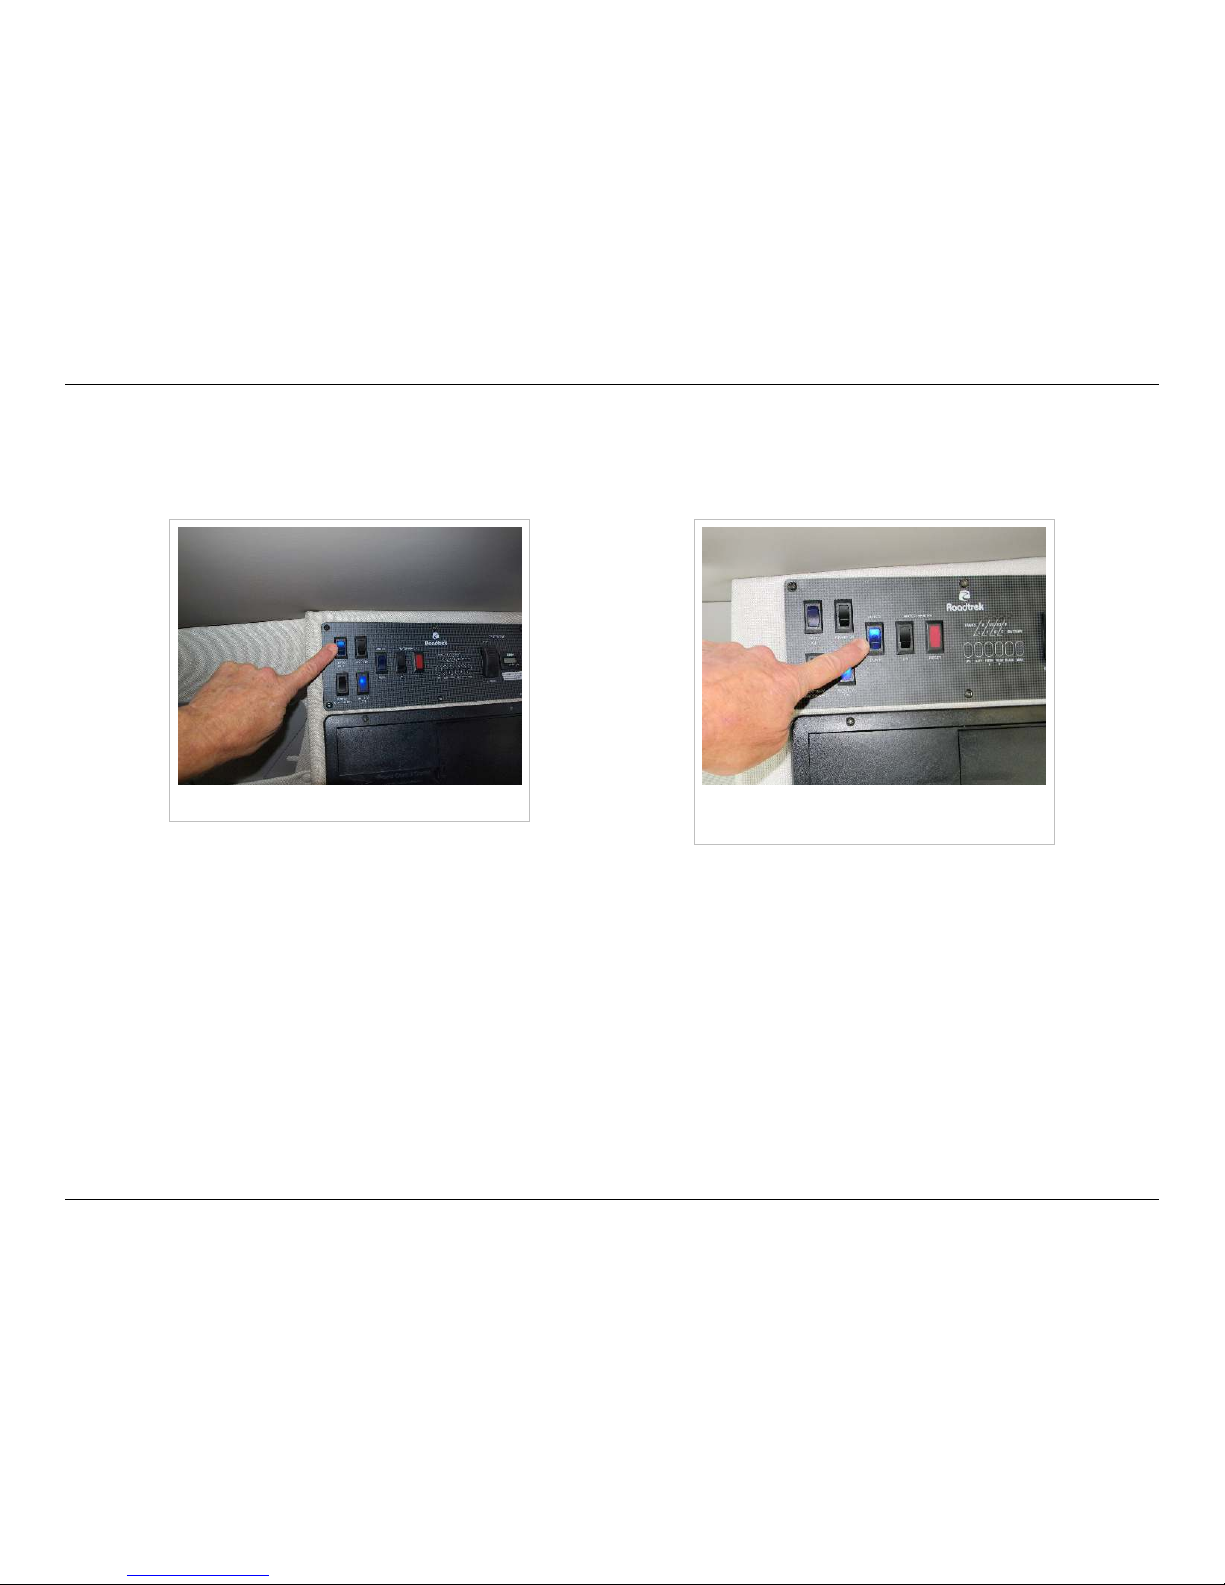
HOWTO: Monitor Panel
79
© 2014 by Roadtrek, Inc.
Patio Light
On the monitor panel, the top left switch is the patio light switch. Press the top of the button to turn the lights on, and the
bottom to turn them off. These are LED lights and use very little power.
Patio light switch Water pump switch on (blue indicator
light lit)
Water Pump Switch
The centered switch to the right of the leftmost four switches is the water pump switch. It should be on only when you have
water in the fresh water tanks and wish to use the sinks, showers, or toilet. The pump should not be run without water. As
with the patio light switch, pressing the top of the button turns the pump on, and pressing the bottom turns it off.
Water Heater Switch
The water heater switch is to the right of the water pump switch. As with all the other switches on the monitor panel, the
battery disconnect switch must be on for the water heater to work. Even though the water heater uses propane to heat the
water, all the igniters and controls are electrical. Be sure that the water heater is full of water before turning it on - if water
Page 83
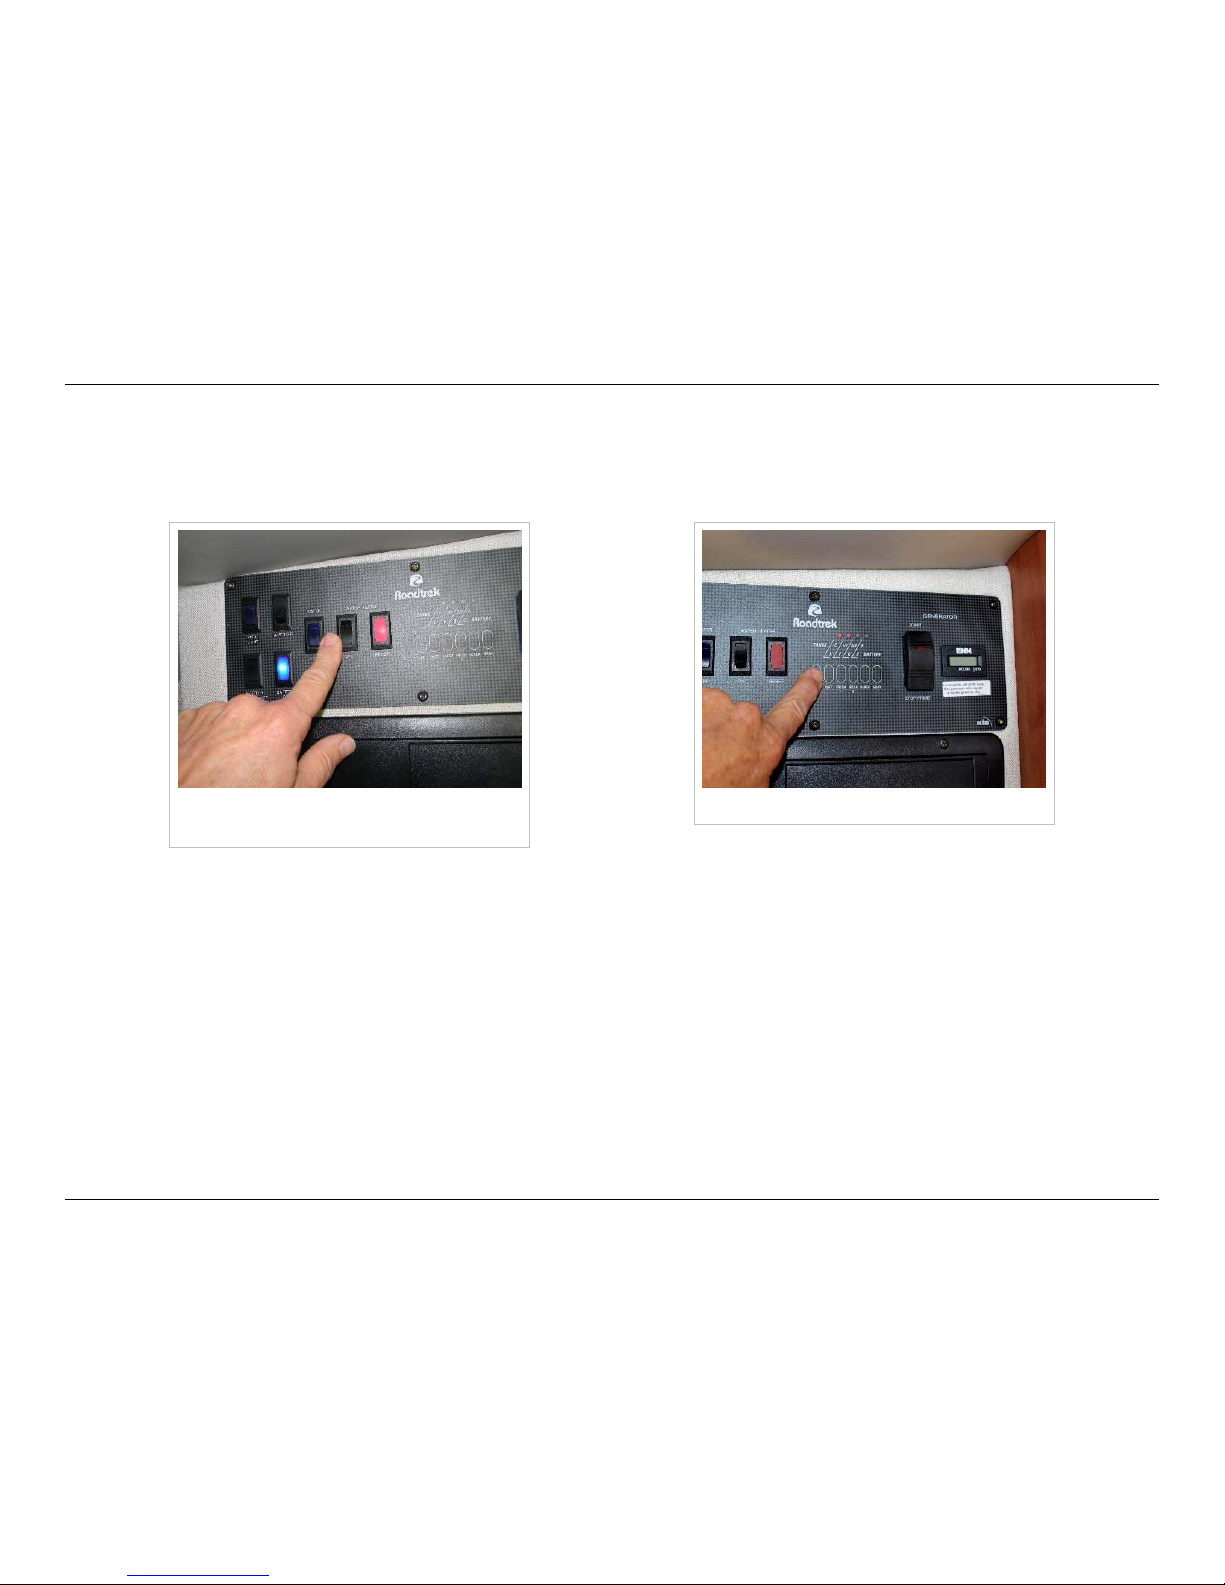
HOWTO: Monitor Panel
80
© 2014 by Roadtrek, Inc.
comes out of the hot water faucets when they are opened, the water heater has water in it. After turning it on, the red light to
the right of the switch will come on for a few seconds, than go off as the burner ignites. If the light keeps going off and on,
your burner is not lighting. Make sure that you have propane in your propane tank and that the main valve is open. If the
stove burners light, your propane supply is good.
Water heater switch and red indicator
light
Tank level indicators
Tank Levels and Battery Charge Indicator
To the right of the monitor panel switches are the indicator lights for the battery charge level, the propane tank level, the
fresh water tank level, and the black and gray water tank levels. Press the button for each to see the display. These will give
you an approximate reading, to the nearest third, of how much is in each tank.
Roadtrek recommends that you keep a small amount of water in your gray and black tanks at all times. This will reduce the
likelihood of material sticking to the inside of the tank.
The four indicator lights for the battery are low, fair, good, and charging. Battery voltage dips under load; the greater the load
the greater the voltage dip. A battery under heavy load will show much lower state than one at rest.
The propane indicators will show full when the tank is at it maximum capacity. Because of the safety-related need for a vapor
space at the top of the propane tank, the maximum fill capacity is 80% of the volume of the tank. Your 38 liter/10 gallon
Page 84
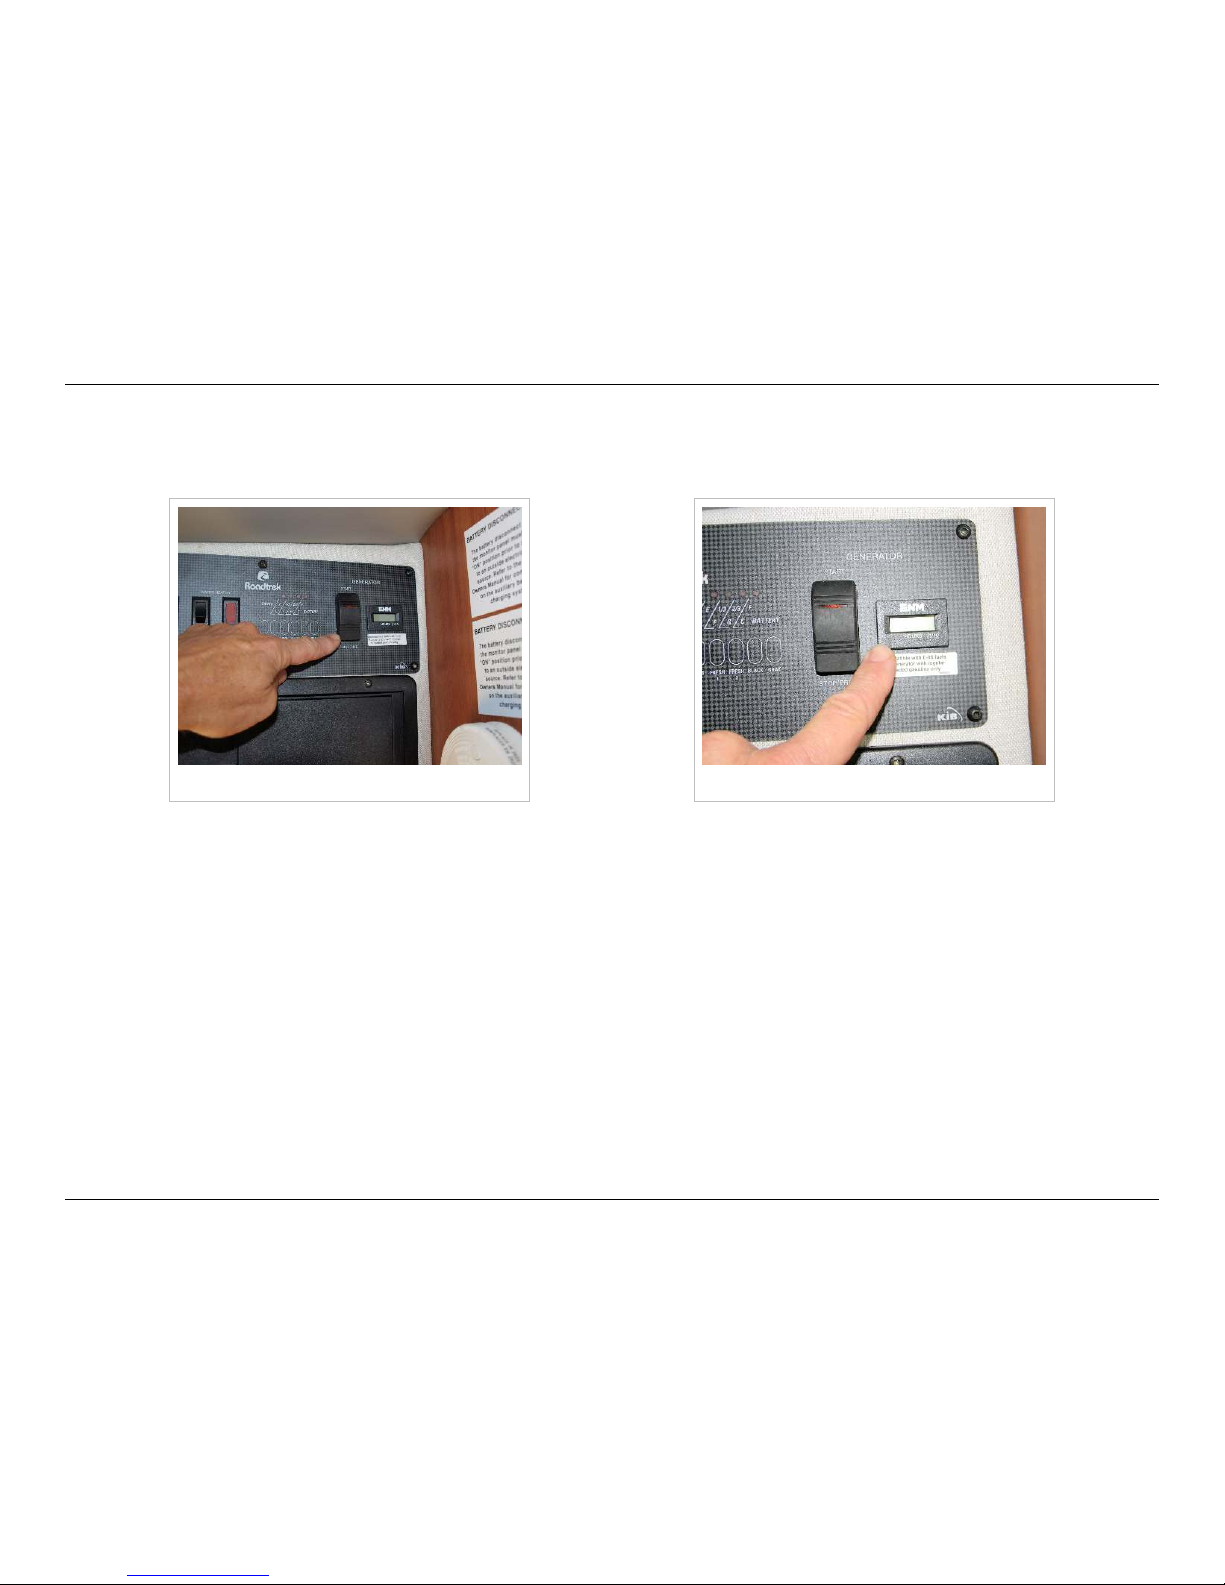
HOWTO: Monitor Panel
81
© 2014 by Roadtrek, Inc.
propane tank is full when it holds 30.4 liters/8 gallons of propane. There is another gauge directly on the tank that you can
see behind the propane fill door on the back bumper. This gauge has finer gradations and will give you more information
about your propane level than the indicator light display will.
Generator switch, prime/off position Generator hour meter
Optional Gasoline Generator Switch and Hour Meter
To start the generator, first push the bottom of the rocker switch for 5 seconds to PRIME, then push the top of the switch to
START. Allow the generator to run for a couple of minutes before turning on heavy loads such as the air conditioner.
To stop the generator, first shut down all heavy loads, let the generator run for a few minutes to cool down, then press the
STOP (bottom) side of the rocker switch.
The hour meter keeps track of how many hours your generator has been running. This is important for servicing intervals
such as oil changes, etc. See your Cummings/Onan generator service manual for details. There is a break-in oil change after
the first 20 to 50 hours of use. You also need to exercise your generator every month by running it for an hour under
moderate load.
Page 85
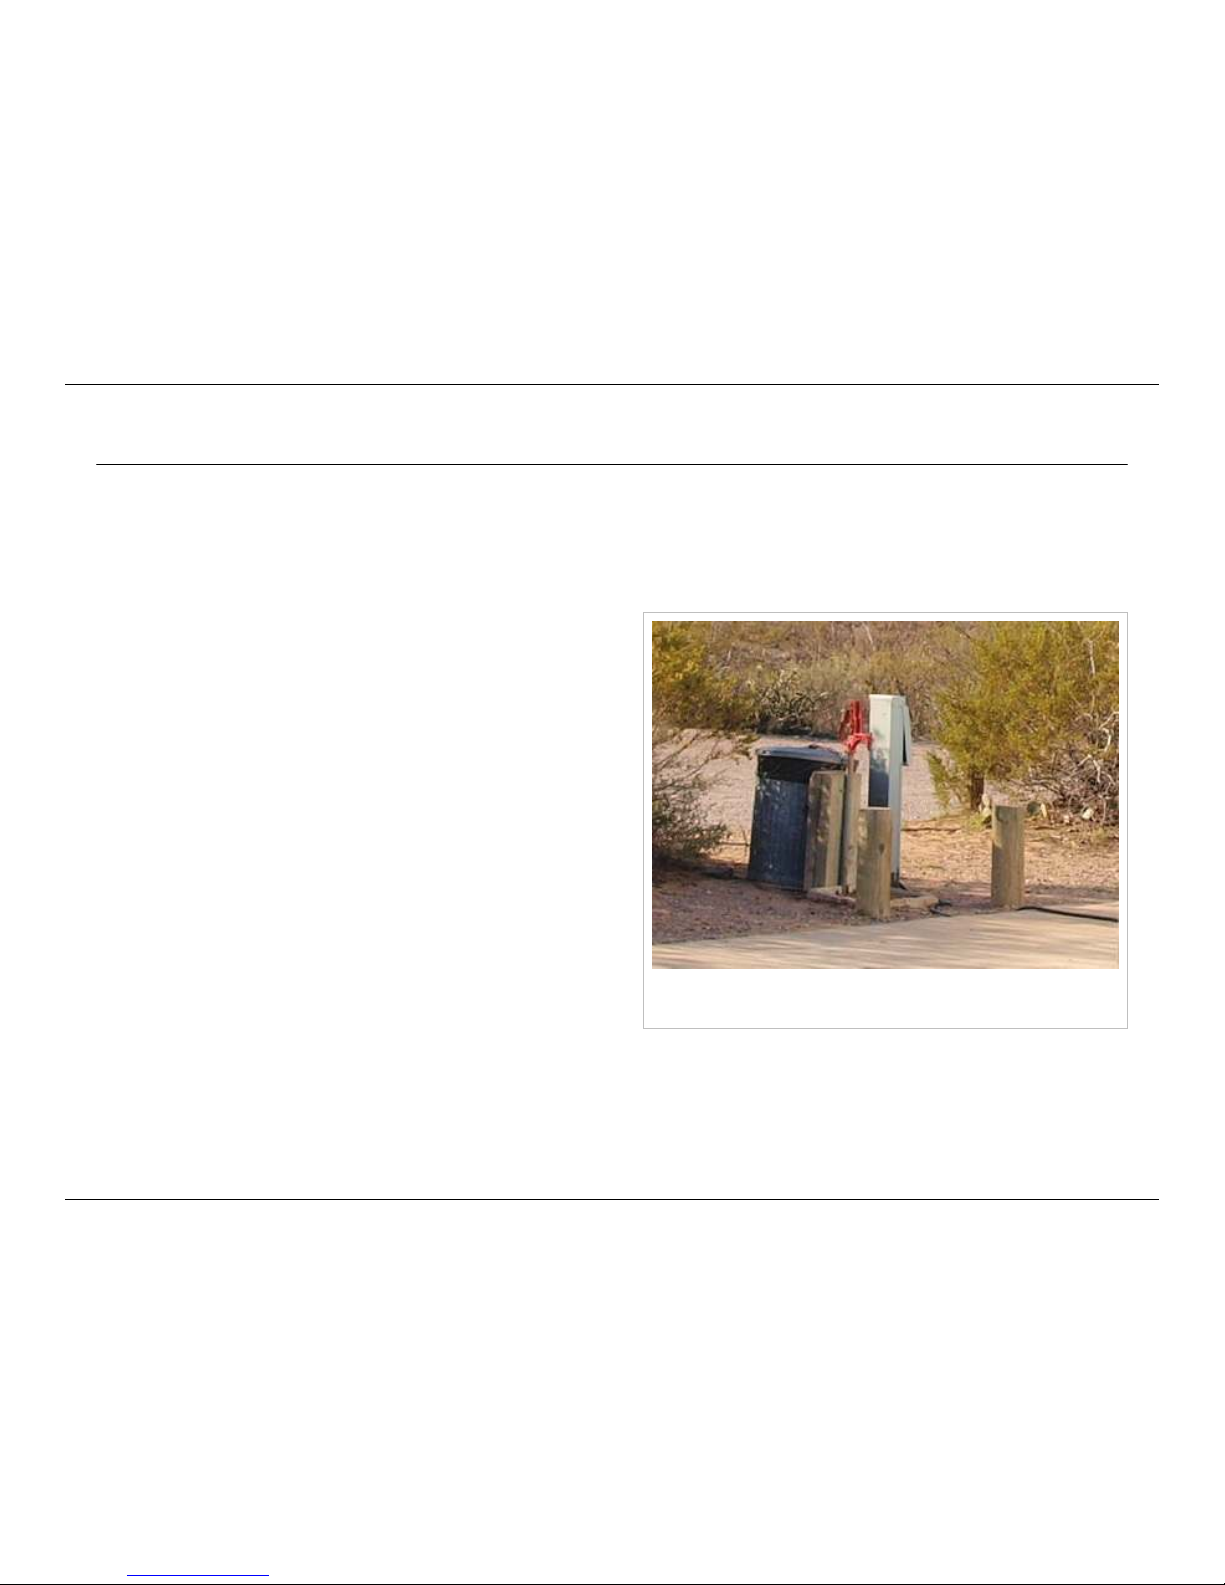
HOWTO: Setting Up Your Campsite
82
© 2014 by Roadtrek, Inc.
HOWTO: Setting Up Your Campsite
What Do You Need To Hook Up?
In a Roadtrek, the answer to this question is - a lot less than you think. Rather than slog through the setup ordeal that Class
As and fifth wheels and other trailers go through, Class Bs are much more nimble. We travel light and can set up and pack up
in minutes. Let's look at the differences in these different types of units and see why.
Full hookups - electric, water, and sewer - plus lots of
company
Most big rigs and trailers don't really have a self-contained
philosophy - they're basically like sticks and bricks homes on
wheels, which require what campgrounds call "full hookups"
(electricity, water, and sewer connections at each campsite) to
function. Roadtreks have big fresh water and holding tanks that
the other types of RVs lack, so it's usually easier just to plug into
the electricity, and not bother with the water and sewer
hookups. This makes your hookup procedure a five minute
process - park in a level spot and plug in. Maybe hook up the
cable TV, too, if they have it at the campsite, but that's about it.
It's a different philosophy because most large RVs plunk down
and don't move once they get to a campsite. They have a towed
vehicle - or the truck they haul their trailer with - to take short
trips around the area. Since you don't have a tow vehicle like
the big rigs, you need to be able to head out to the store or go
sightseeing in your Roadtrek, so the less elaborate the set-up
and pack-up procedures, the better.
Page 86
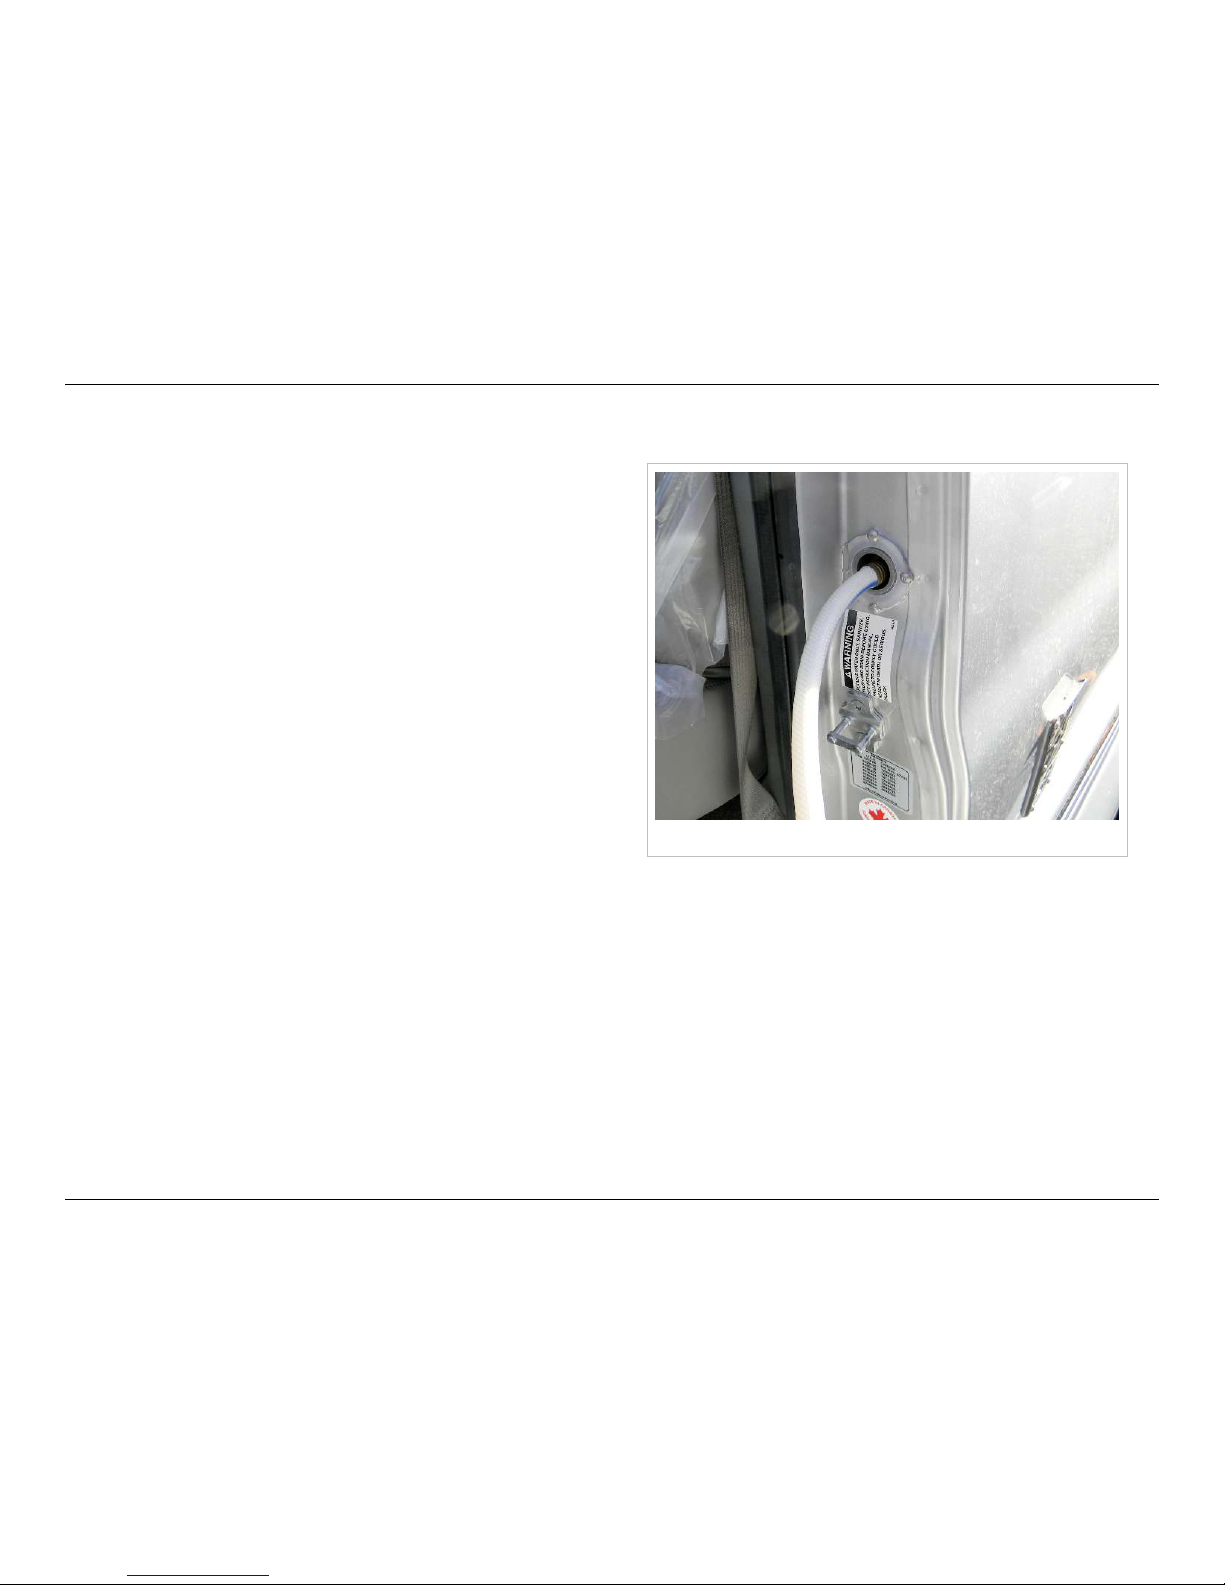
HOWTO: Setting Up Your Campsite
83
© 2014 by Roadtrek, Inc.
Connected Fresh Water vs. Using your Tanks
Filling your tanks
There's no real advantage to leaving the water hooked up all the
time - it's easier just to get your hose out and fill your tanks, and
then put the hose away. No leaks, no hose to trip over, no need
to disassemble and store all that stuff when it's time to hit the
road again. In a campground with shower facilities, your water
supply will last for days, and when it runs out you just get the
hose back out, fill it up again, and you're ready for another few
days.
Sewer Hookup vs. Dumping
The advantage of using your tanks for fresh water over a more
permanent water hookup is that you're automatically reminded
of when your waste water tanks are full. When you're close to
running out of fresh water, that means it's time to dump your
wastewater tanks. With a more permanent hookup, the reminder
may be waste water backing up in your sink or toilet, which is
not nearly as pleasant. The tank level indicators only tell you to the nearest third what your tank levels are.
Since you have a waste water discharge pump, the big rig's semi-permanent giant sewer hose on an inclined pathway to the
dump won't work for you - you have to run the pump anyway, so why not just dispense with all that unsightly and potentially
hazardous plumbing? Full hookup sites have a handy sewer dump right at your campsite. When your fresh water runs low,
refill your fresh water tanks, dump your waste water holding tanks, and you're good to go, plus you can drive off anytime
merely by stowing your electrical cord.
Page 87
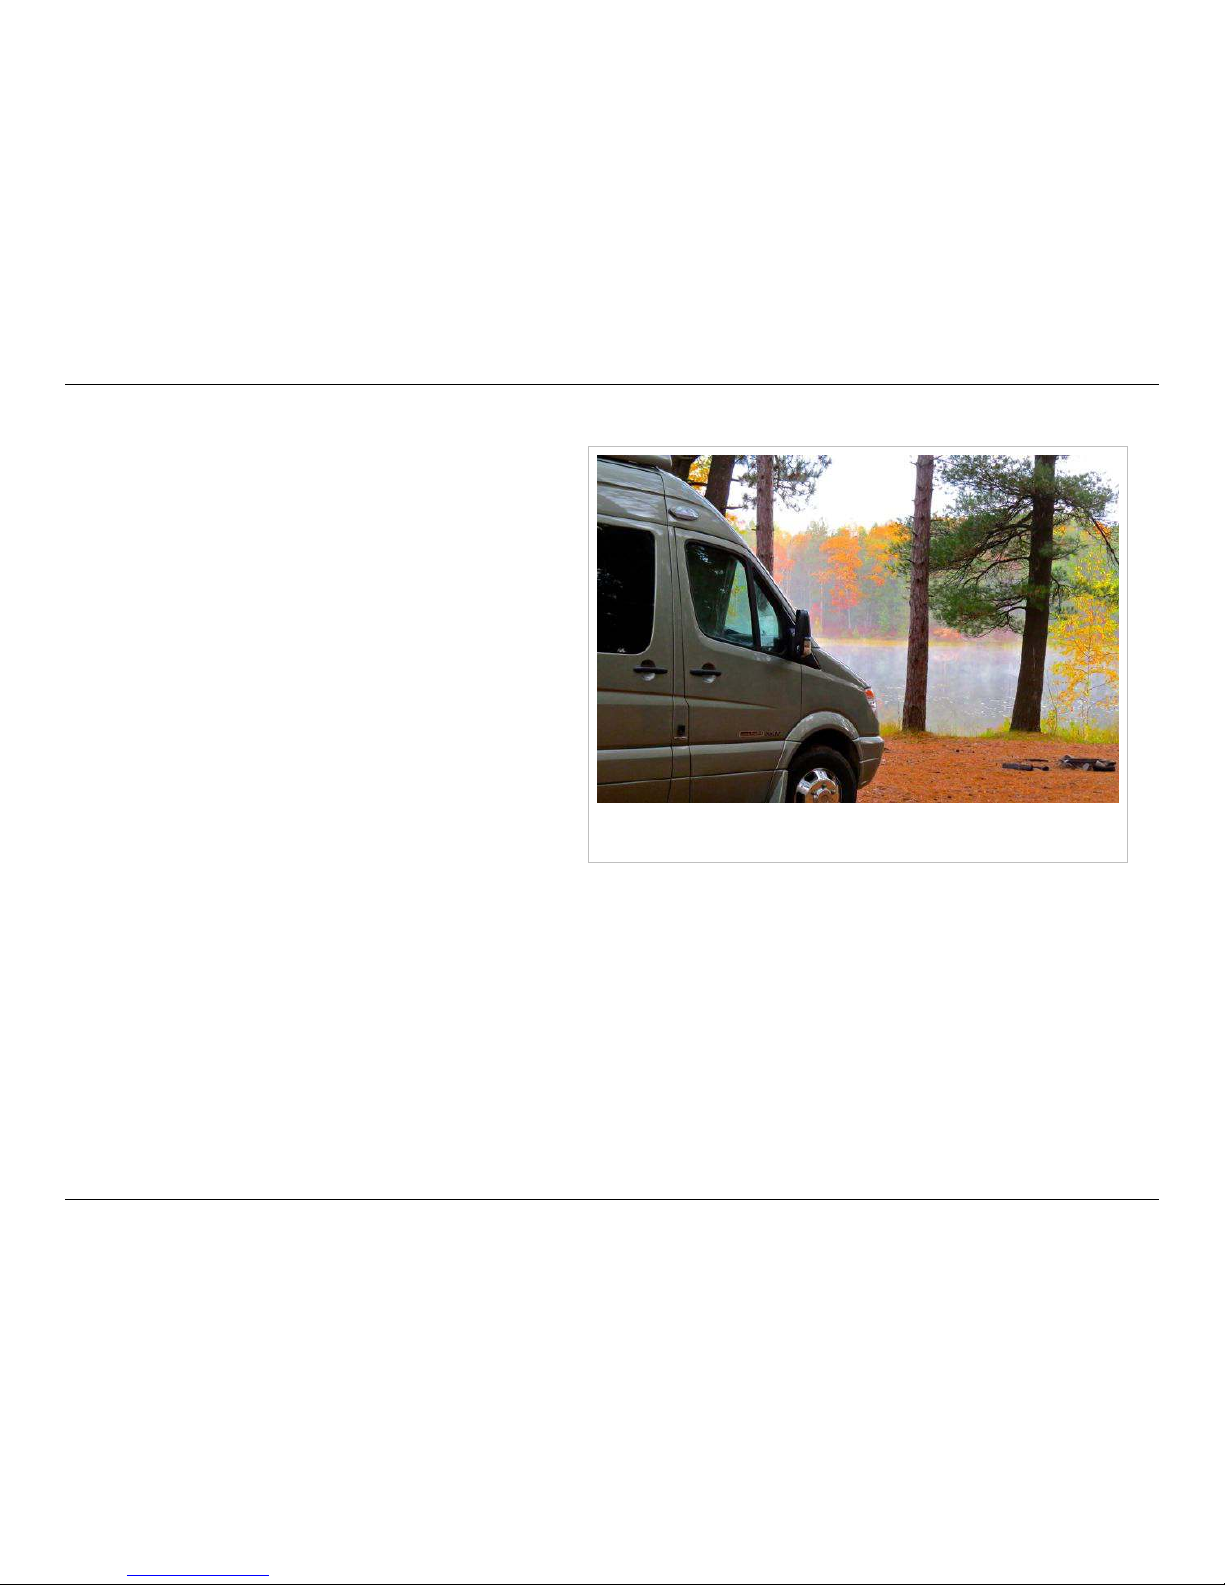
HOWTO: Setting Up Your Campsite
84
© 2014 by Roadtrek, Inc.
Why drive all the way back to town just to smell someone
else's woodsmoke? Camp where you are.
Simplify, Simplify
Campgrounds capitalize on the helplessness of
non-self-contained RVs by charging a premium for full
hookup sites. You aren't helpless. With an electric-only
hookup, you drive a short distance to the campground's
fresh water source and waste water dump every few
days. Do it on the way to the store or other trip that
you're going to take anyway, and it's no bother. In
addition to saving money, you'll also have a choice of
more campsites, since not all of them have full hookups,
or the even better choice of no campsite at all if you have
extra batteries and solar or generator capability, or are
just careful about your electricity use.
Freedom from hookups also opens up a whole range of
national and provincial forest campgrounds with limited
or no hookups to you. There is also dispersed camping in
national forests and crown lands and other boondocking
options, where you find your own campsite. There are
rules for where you can and can't boondock, so check the forest websites or drop in the ranger station for information. Once
you're out there, don't look around for those big rigs who are dependent on hookups - they're all back in town. It's just you
and nature, with the occasional backpacker.
Page 88
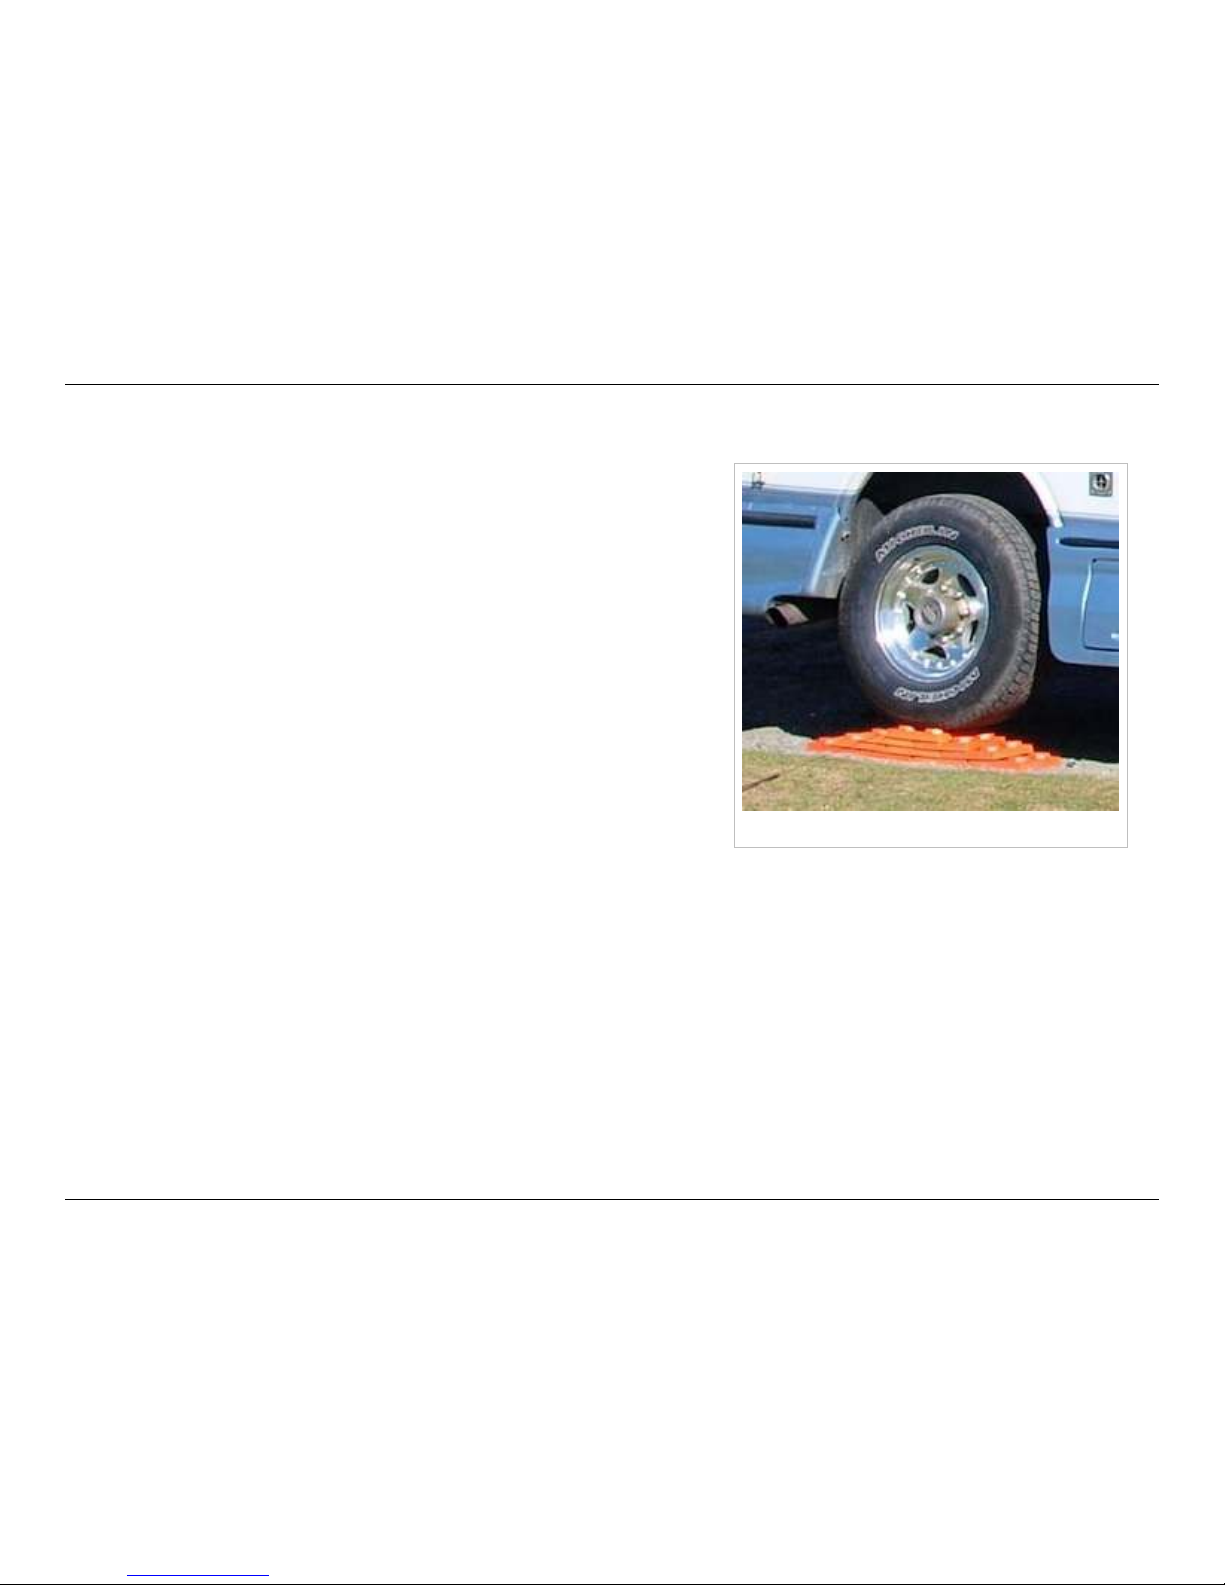
HOWTO: Setting Up Your Campsite
85
© 2014 by Roadtrek, Inc.
Leveling your Roadtrek
Leveling blocks
Roadtreks don't have or need the built-in leveling jacks and stands large
RVs have - it's usually easy enough to move back and forth in your
campsite until you're reasonably level. However, many Roadtrek owners
buy and carry leveling blocks for those places where finding a level spot is
difficult. These are available in most camping supply stores or can be
ordered online. They go under your tires, and can be stacked in various
combinations to lift the low corner or end of your vehicle enough to get
comfortable. Many Roadtrek owners install a small bubble level in an
inconspicuous place visible from the driver's seat to assist with the leveling
process.
How level is level? Refrigerators that run on propane require a fairly level
setting to operate properly, since the refrigerant relies on gravity to
circulate. Your unit has such a refrigerator. Check the manual for the
specific leveling requirements for your unit, but in general, if it's level
enough to be comfortable for you, it's probably good enough for your
refrigerator. Front-to-back leveling is more important than side-to-side
leveling. If you have a choice, it's better to have the front of the Roadtrek
very slightly higher than the back both for shower drainage and heat pump condensate drainage.
Page 89
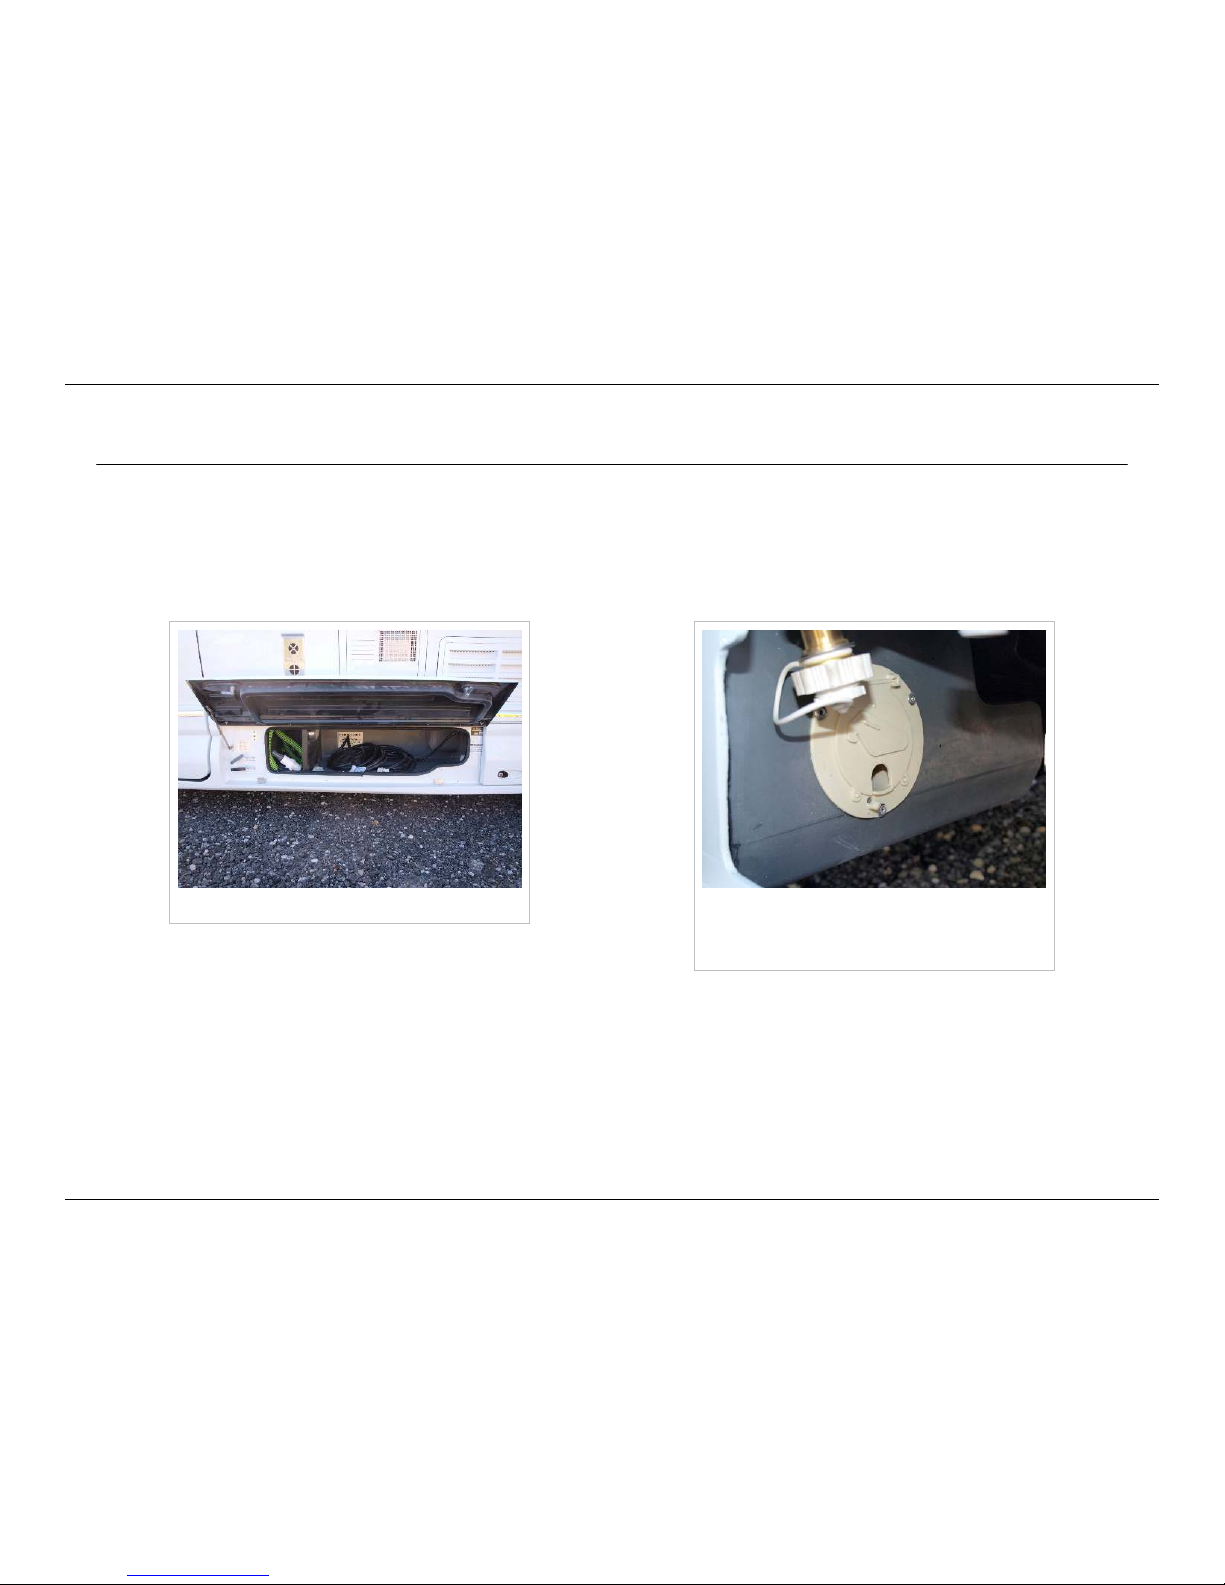
HOWTO: Shore Power
86
© 2014 by Roadtrek, Inc.
HOWTO: Shore Power
Connecting To Shore Power
Your Roadtrek has a shore power cord, which is permanently attached inside the driver's side storage compartment. Open
this compartment and pull the cord out to attach to the campsite or house electrical outlet. There is a "mousehole" in the rear
of the storage compartment to thread the cable through if you wish to close the compartment while plugged in.
Driver's side storage compartment "Mousehole" with small opening for cord
opened. The larger hinged plastic door
opens to allow the plug through.
Page 90
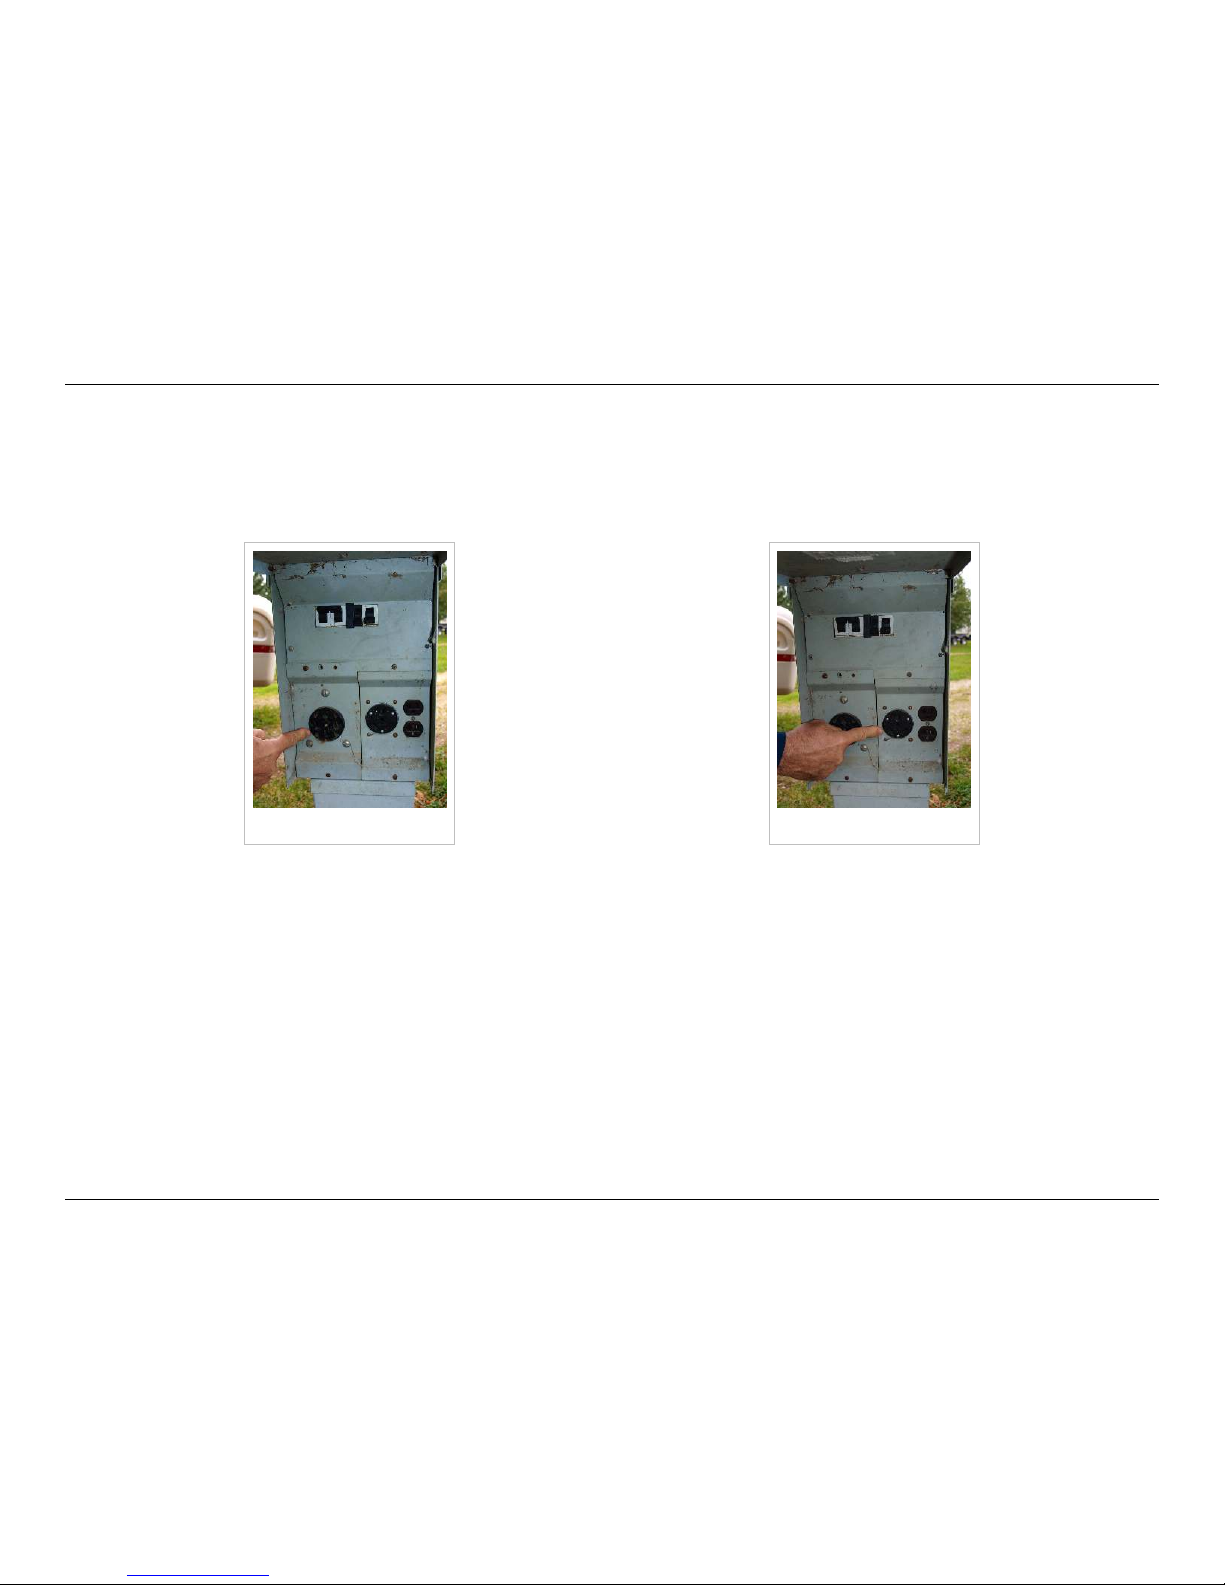
HOWTO: Shore Power
87
© 2014 by Roadtrek, Inc.
Campsite Connections
Most RV parks and campgrounds have AC power of various voltages and amperages available at each site. The power will
typically be in a pedestal with a cover that flips up. If you cannot find your power pedestal or you're not sure how to open it,
ask the campground personnel.
50A outlet 30A outlet
Page 91
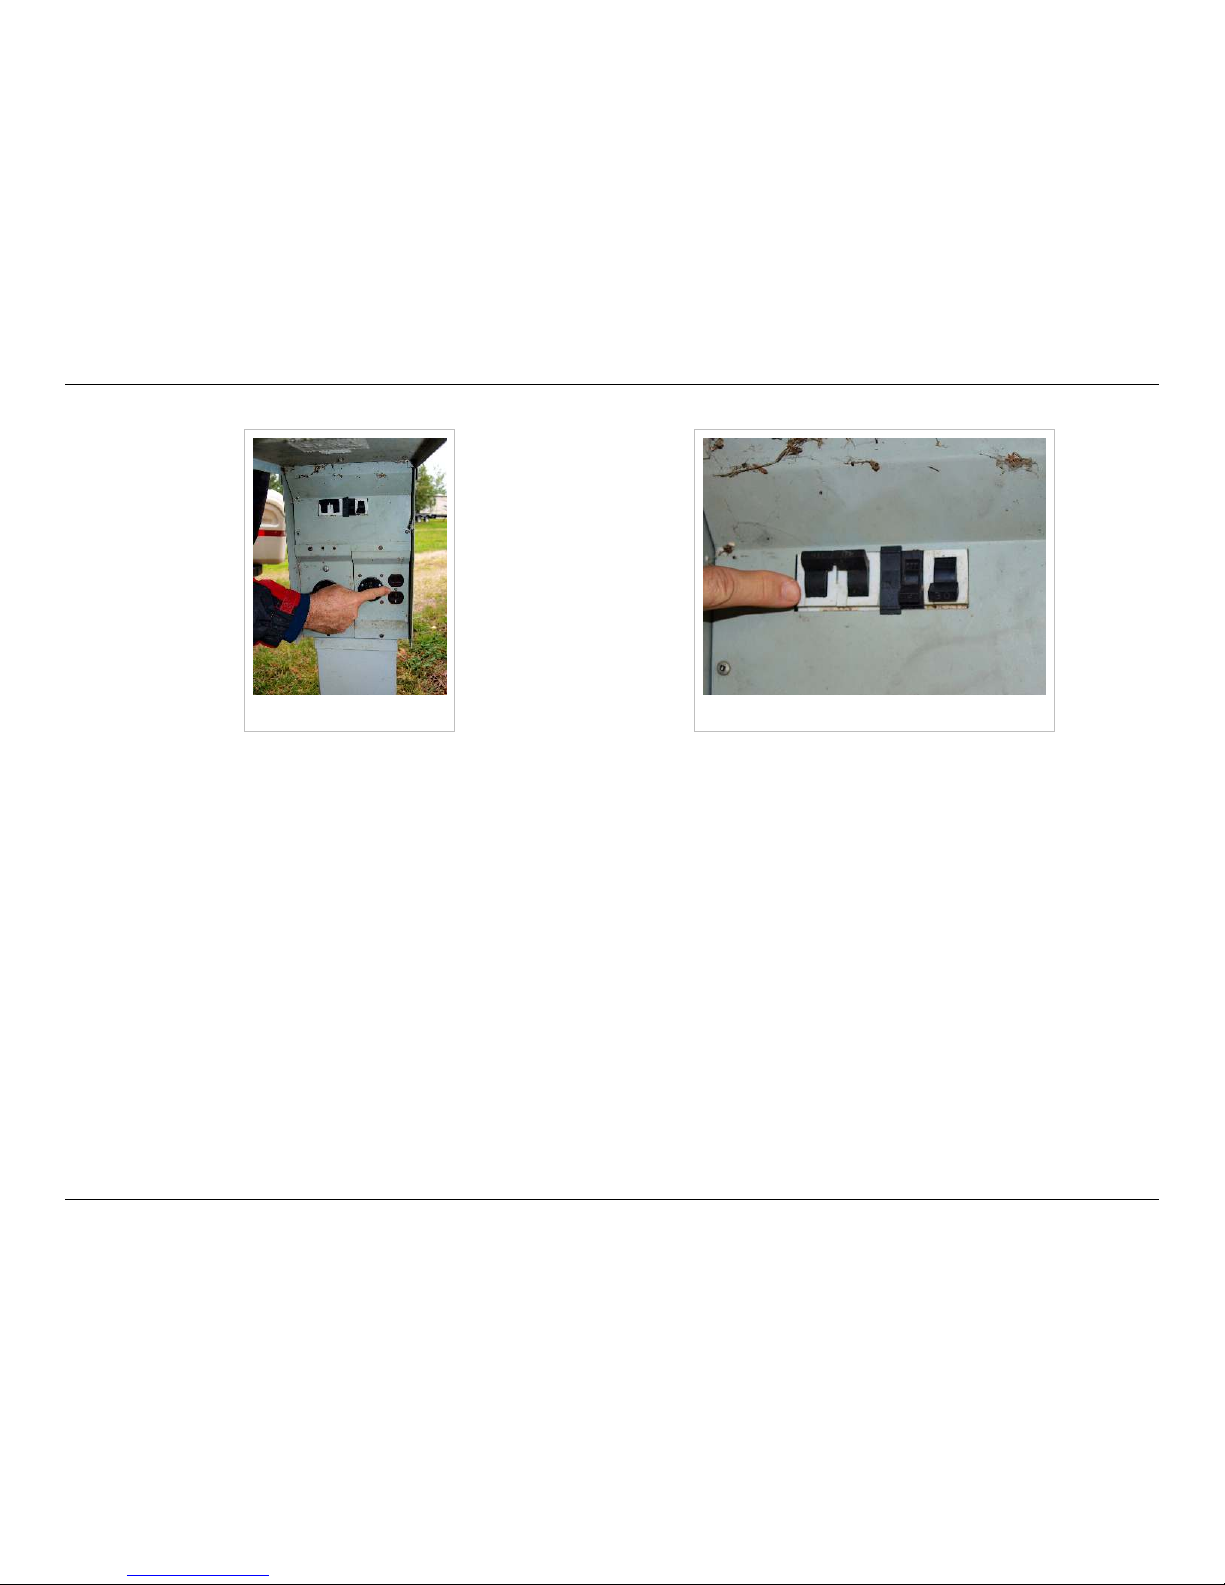
HOWTO: Shore Power
88
© 2014 by Roadtrek, Inc.
15A outlet Breakers
A typical campsite’s power pedestal will have three types of plug-in receptacles: 15 amp, 30 amp and 50 amp. The 15A
receptacle is typically the same as you would find in your home. The 30A and 50A receptacles are specific to the RV industry.
Other receptacles look similar but may not be wired the same. If in doubt, check with campground personnel.
The pedestal will also typically have individual breakers for the 15A, 30A, and 50A services. Many campgrounds turn off
unused breakers so check that the breaker for the plug you will be using is turned on.
Your Roadtrek is equipped with a 30 Amp cord. Most power pedestals have a 30 amp receptacle.
Page 92
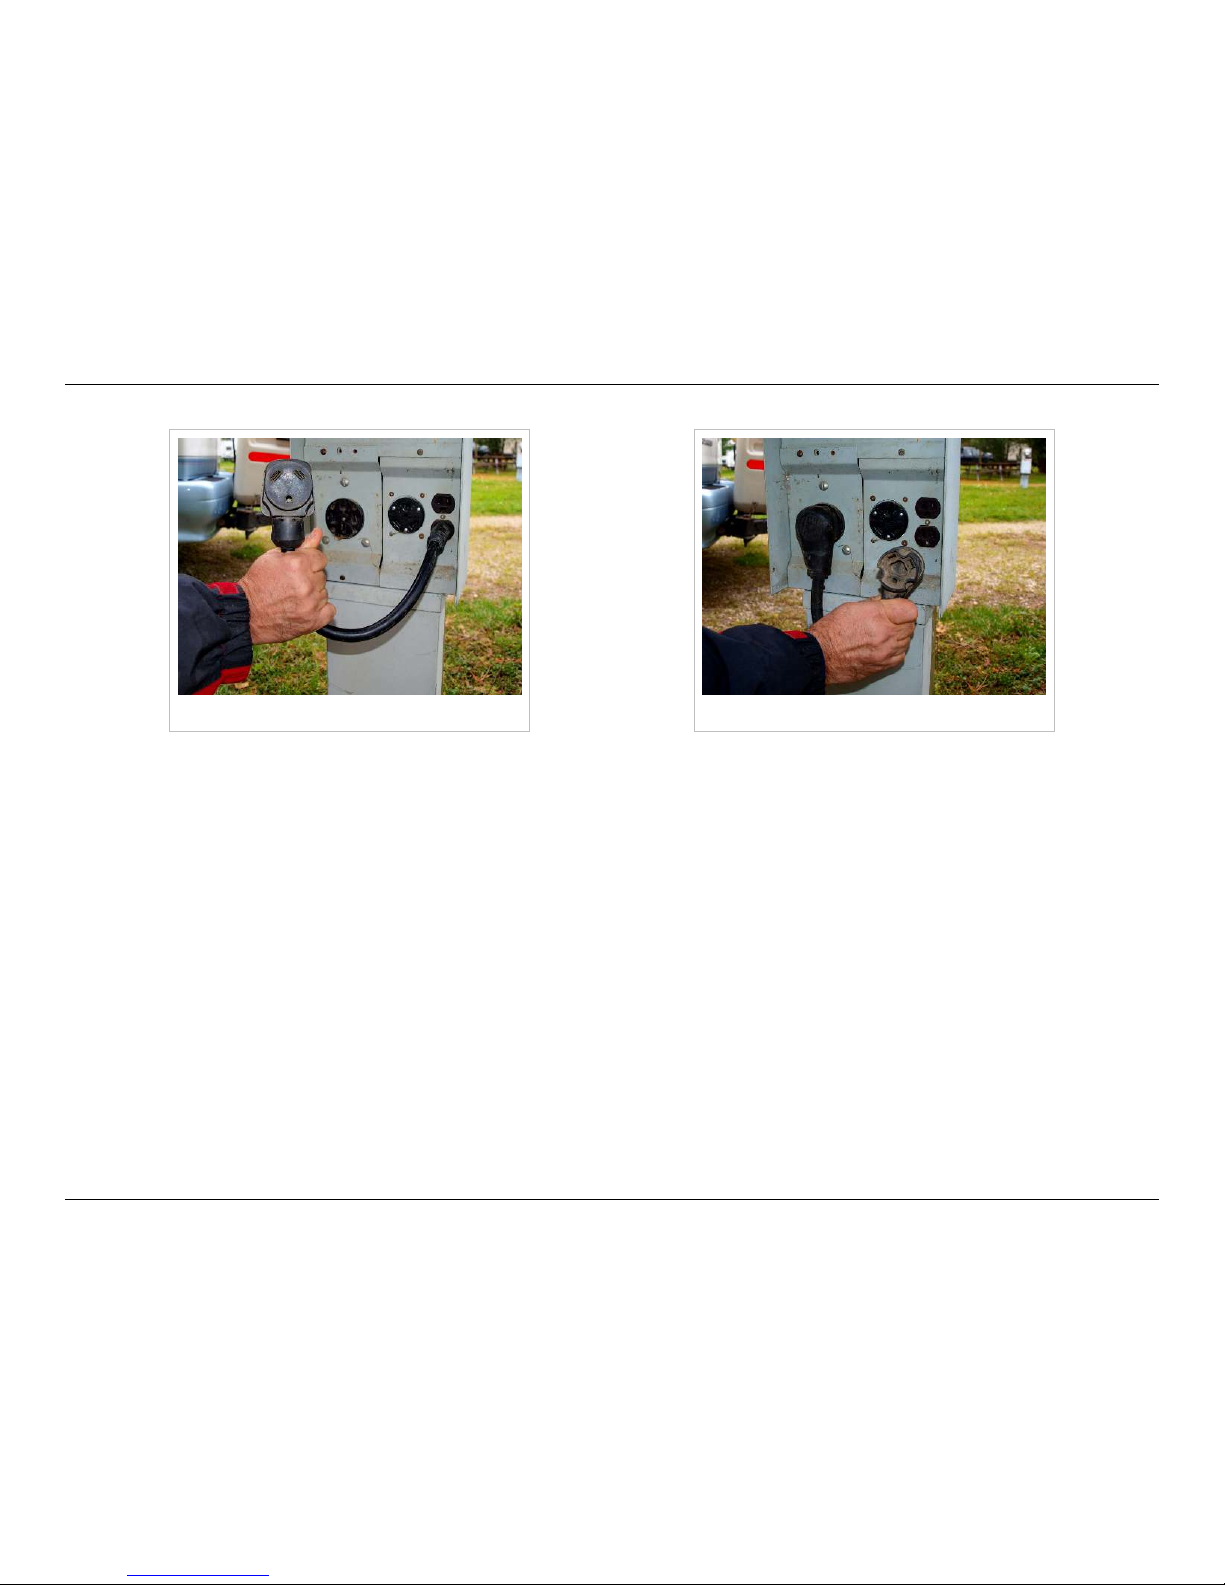
HOWTO: Shore Power
89
© 2014 by Roadtrek, Inc.
15A to 30A adapter 50A to 30A adapter
It is possible that a campground (or perhaps a friend's driveway) will not have a 30A receptable available for your use. You
can purchase a 15A to 30A adapter and connect to an ordinary 15A household outlet.
Be aware that in those situations, you will have limited power compared to a 30A circuit. You will be able to run a single large
appliance at a time; you may need to turn off your air conditioner if you want to use the microwave, for example.
If you exceed the current capacity of the receptacle you may pop the breakers in the pedestal. If this happens, turn off some
appliances and reset the breaker.
It is also possible that you will find a 50A receptacle. Again, you can purchase a 50A to 30A adapter. In this case your power
should not be limited as you will have the full 30 amps available. Although you are connected to a 50A service, you can only
draw 30A; there is no advantage to connecting to a 50A service if a 30A service is available.
Page 93
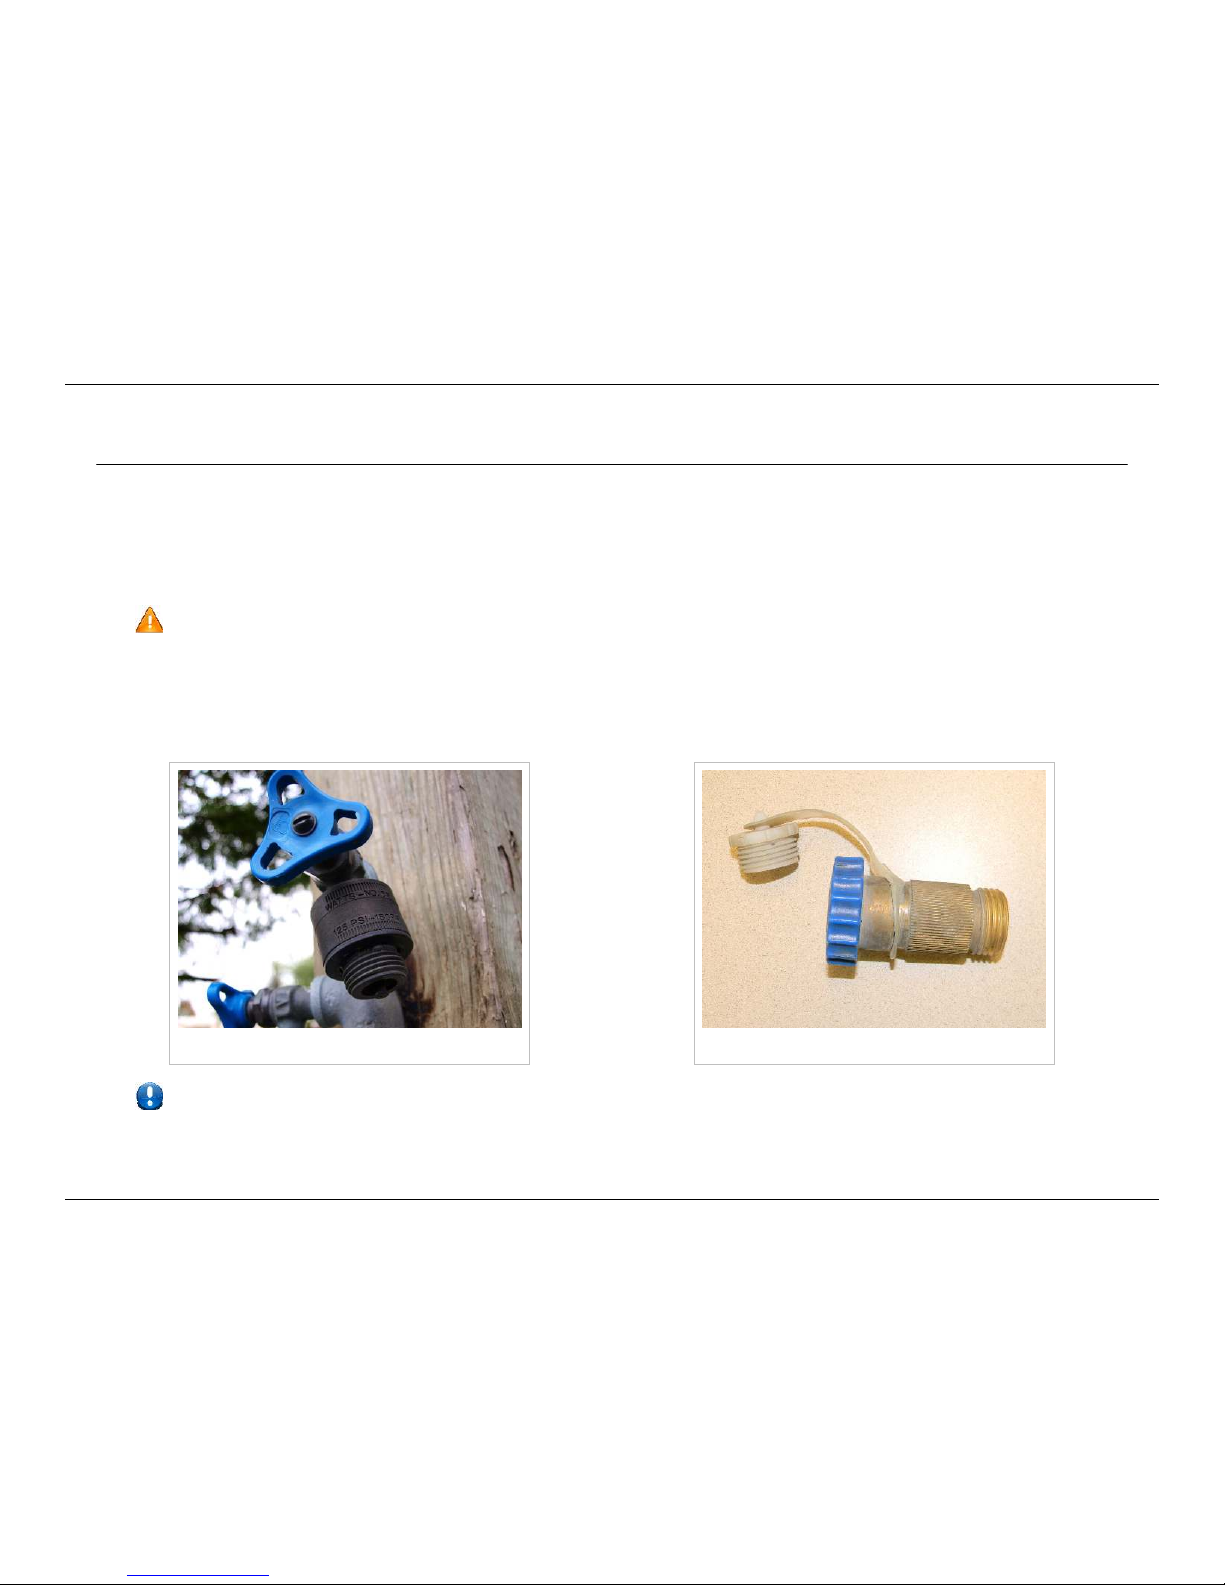
HOWTO: Potable Water Use
90
© 2014 by Roadtrek, Inc.
HOWTO: Potable Water Use
Your Roadtrek can operate in either fully self-contained mode, or can be connected to a water supply such as a campsite's
faucet.
The city water connection is in the driver's side rearmost compartment. Unscrew the white plastic protective cap and connect
your clean hose to the water faucet and this connection point. Turn the faucet on and check for leaks, tightening the
connections as necessary.
Campgrounds and municipalities vary greatly in supplied water pressure. Before connecting to external water
supplies, purchase and install a pressure regulator inline with the water connection.
In a typical campground you may see the faucet with a backflow preventer attached. These look similar to a pressure
regulator but do not affect the pressure. The backflow preventor is there to protect the campground. You need the pressure
regulator to protect yourself from excess pressure.
Backflow preventer Typical water pressure regulator)
You can fill your tanks using the gravity fills.
Page 94
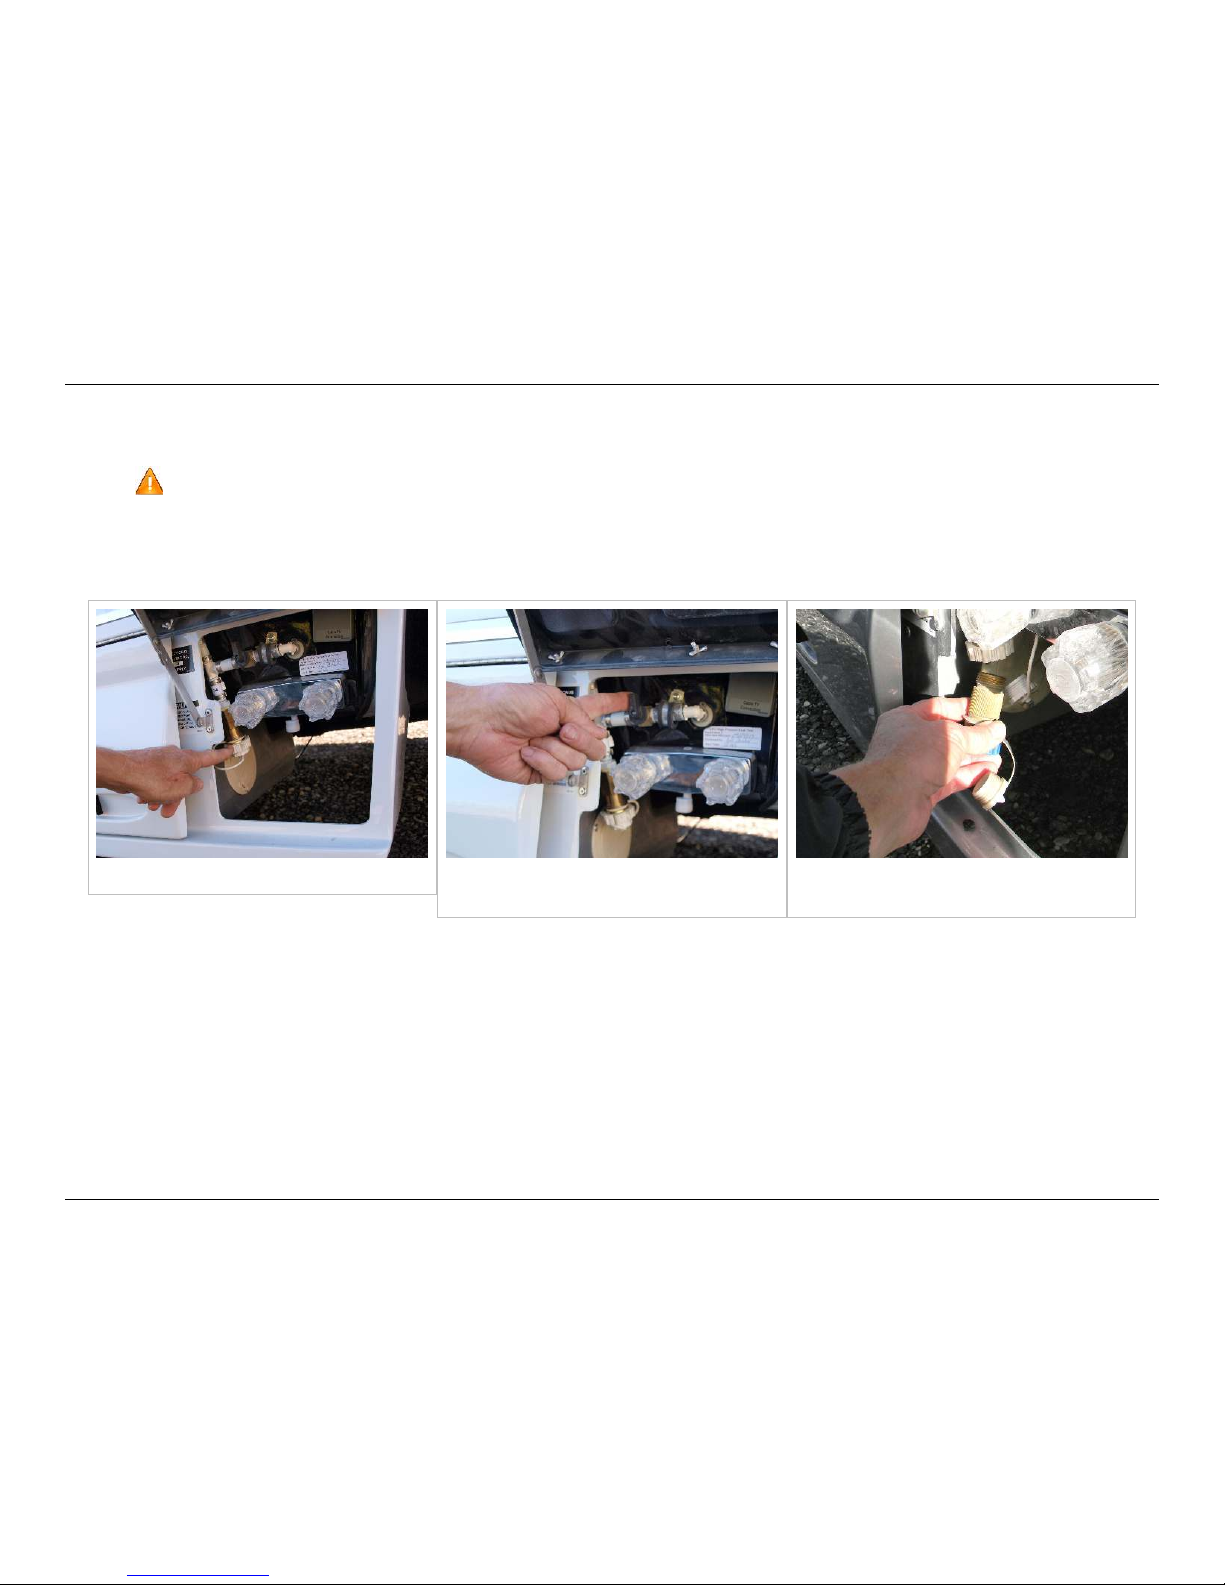
HOWTO: Potable Water Use
91
© 2014 by Roadtrek, Inc.
You can connect to a city water connection whenever your Roadtrek is not winterized. The city water inlet connection is
located in the small compartment just in front of the driver's side rear tire.
Roadtrek recommends that you use a dedicated single purpose potable-water hose. These are usually white in color.
Buy a new one and use it only for filling your tanks and connecting to city water. View any hose lying around a
campground with extreme skepticism, especially it there's a wastewater dump nearby. Large RVs use hoses to flush
their wastewater system.
City water fill location City water valve in closed (handle
vertical) position
Attaching pressure regulator to city
water fill location
To connect the Roadtrek's water system to an outside source:
•• Turn the water pump off.
•• Close the city tank fill valve by turning the handle to the vertical position.
•• Close all interior faucets.
•• Flush old water and any contaminants out of the water supply faucet.
•• Connect your fresh water hose to the faucet.
•• Attach your pressure regulator to the Roadtrek's city water connection.
•• Attach a fresh water hose to the the pressure regulator.
•• Slowly open the faucet of the city water source.
Page 95
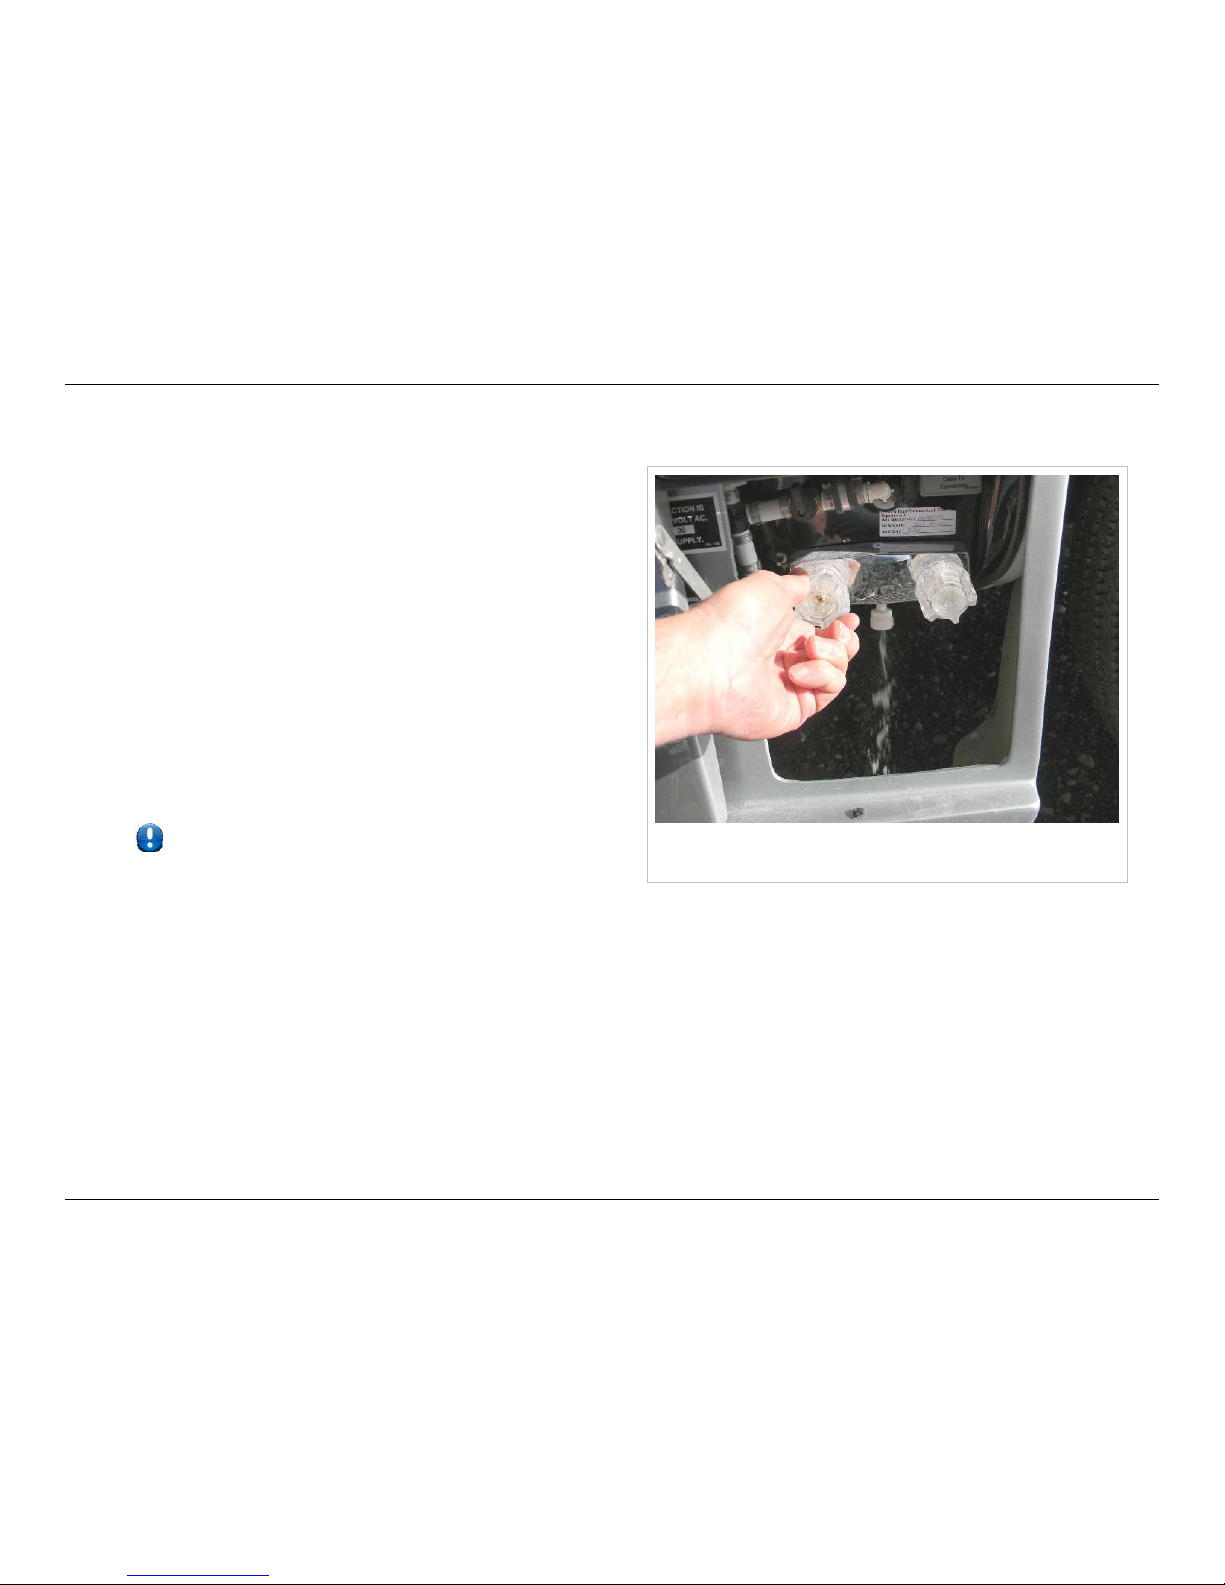
HOWTO: Potable Water Use
92
© 2014 by Roadtrek, Inc.
•• The city water connection by-passes the water pump and fresh water tank. Therefore, the use of these items is not
necessary when connected directly to an external water source.
Relieving water pressure by opening outside shower
faucet
To disconnect the city water connection:
•• Turn off the external water source.
•• Open a faucet to relieve the pressure in the system. Failure to
do so will not damage your vehicle, but may result in an
unexpected shower when you disconnect the hose. The
outside shower faucet next to the city water connection is a
convenient place to do this.
•• Make sure the the city tank fill valve is closed (handle
vertical).
•• Remove the hose from the city water connection, and replace
the cap on the fill connection.
•• Disconnect the hose from the supply faucet and stow it in your
storage compartment. Connecting the ends is a handy way to
prevent dirt or other contaminants from entering the hose
while stored.
If you hear your pump running and water pressure is
low inside the vehicle after disconnecting from an external
water source, it is because you have not properly positioned
the city water valve. Make sure the black plastic handle is
vertical, and perpendicular to the water line when your water system is in self-contained mode.
Page 96

HOWTO: Waste Water Dumping
93
© 2014 by Roadtrek, Inc.
HOWTO: Waste Water Dumping
Wastewater storage and dumping
Your house is permanently connected to your septic system or a municipal sewer; you don't have to worry about the
wastewater you generate because gravity takes it away. Your Roadtrek doesn't have that connection, and has to hold any
wastewater until you have the opportunity to dump it at an approved dump station.
Most municipalities have severe penalties for improper disposal of human waste, especially into a watershed - fines
can be several thousand dollars, and it's often a felony. Even if it's "just gray water", it will still flunk a coliform bacteria
test because of the common discharge hose, which is difficult to explain to a judge. Never dispose of wastewater unless
you're sure you are at an approved dump station.
Tanks
Your vehicle is equipped with a gray holding tank and a black holding tank. The gray tank holds the sink and shower water.
The black tank holds the toilet waste. As a result the black tank is a lot nastier than the gray tank.
Waste Water Discharge Pump
Your Roadtrek is equipped with a waste water discharge pump to make dumping your tanks easier and cleaner. The
macerator in this pump grinds up any solids in the system and pumps the resulting wastewater out to the dump station.
Do not throw any paper towels, personal wipes, rags, baby wipes, tampons, hairballs, etc. into the toilet. The
macerator is not capable of handling these types of solids and may jam or be damaged. Use toilet paper intended for
RVs or septic systems.
If in doubt, take a tissue, and leave it in a glass of water. Stir with a spoon a couple of times. If it falls apart into a
gooey slurry after a few minutes it`s safe for your tank. If it stays together, swells up, or clumps into a solid mass, it`s
not safe and should be disposed of in the trash and not down the toilet.
Page 97
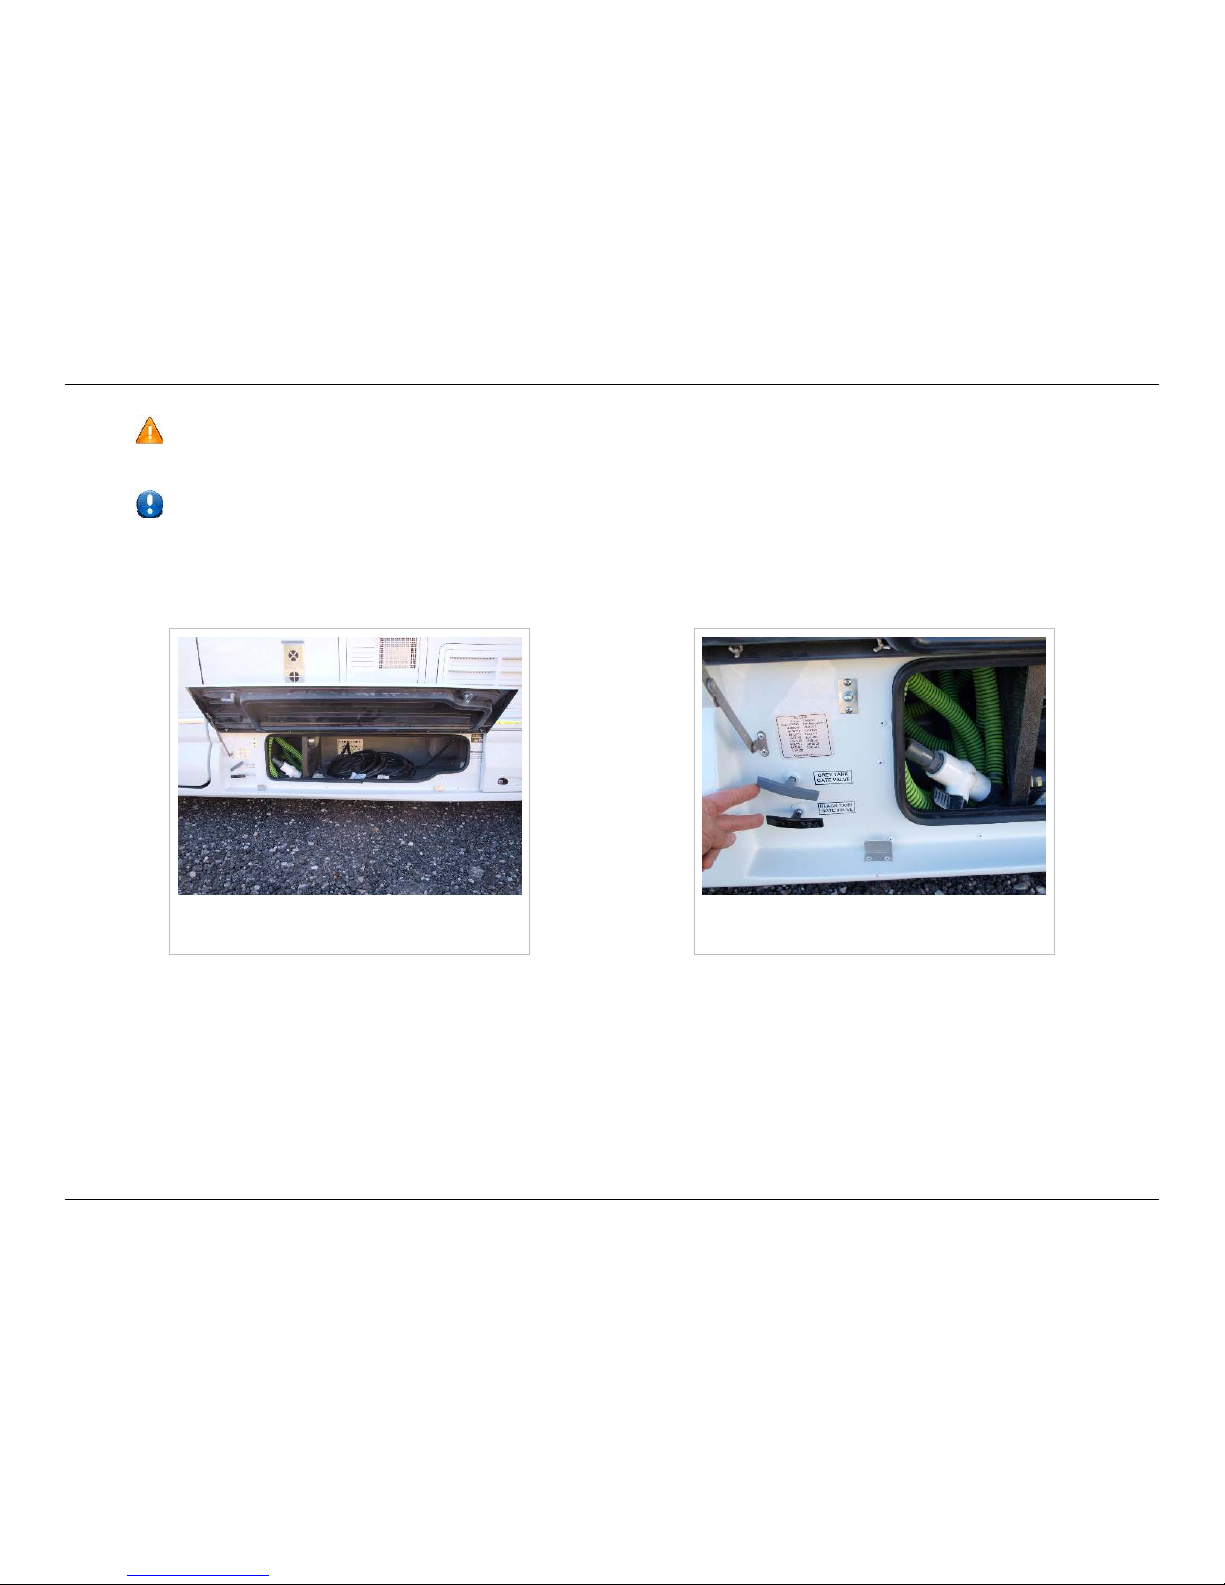
HOWTO: Waste Water Dumping
94
© 2014 by Roadtrek, Inc.
If possible, you want to dump the tanks after driving as the movement of the vehicle will have sloshed the water in
the tanks, loosening any solids.
You should dump the black tank first, then the gray tank. The water in the gray tank is considerably cleaner, and will
rinse any remaining solids from the hose and the macerator. You should dump both tanks in sequence if possible.
Dumping the tanks
Compartment with waste water discharge
hose
Waste water discharge hose with black
and gray water valves
•• Open the access door just to the rear of the driver`s side door. This will expose the black and gray water valves. Support
the door in the open position by using the support arm.
Page 98
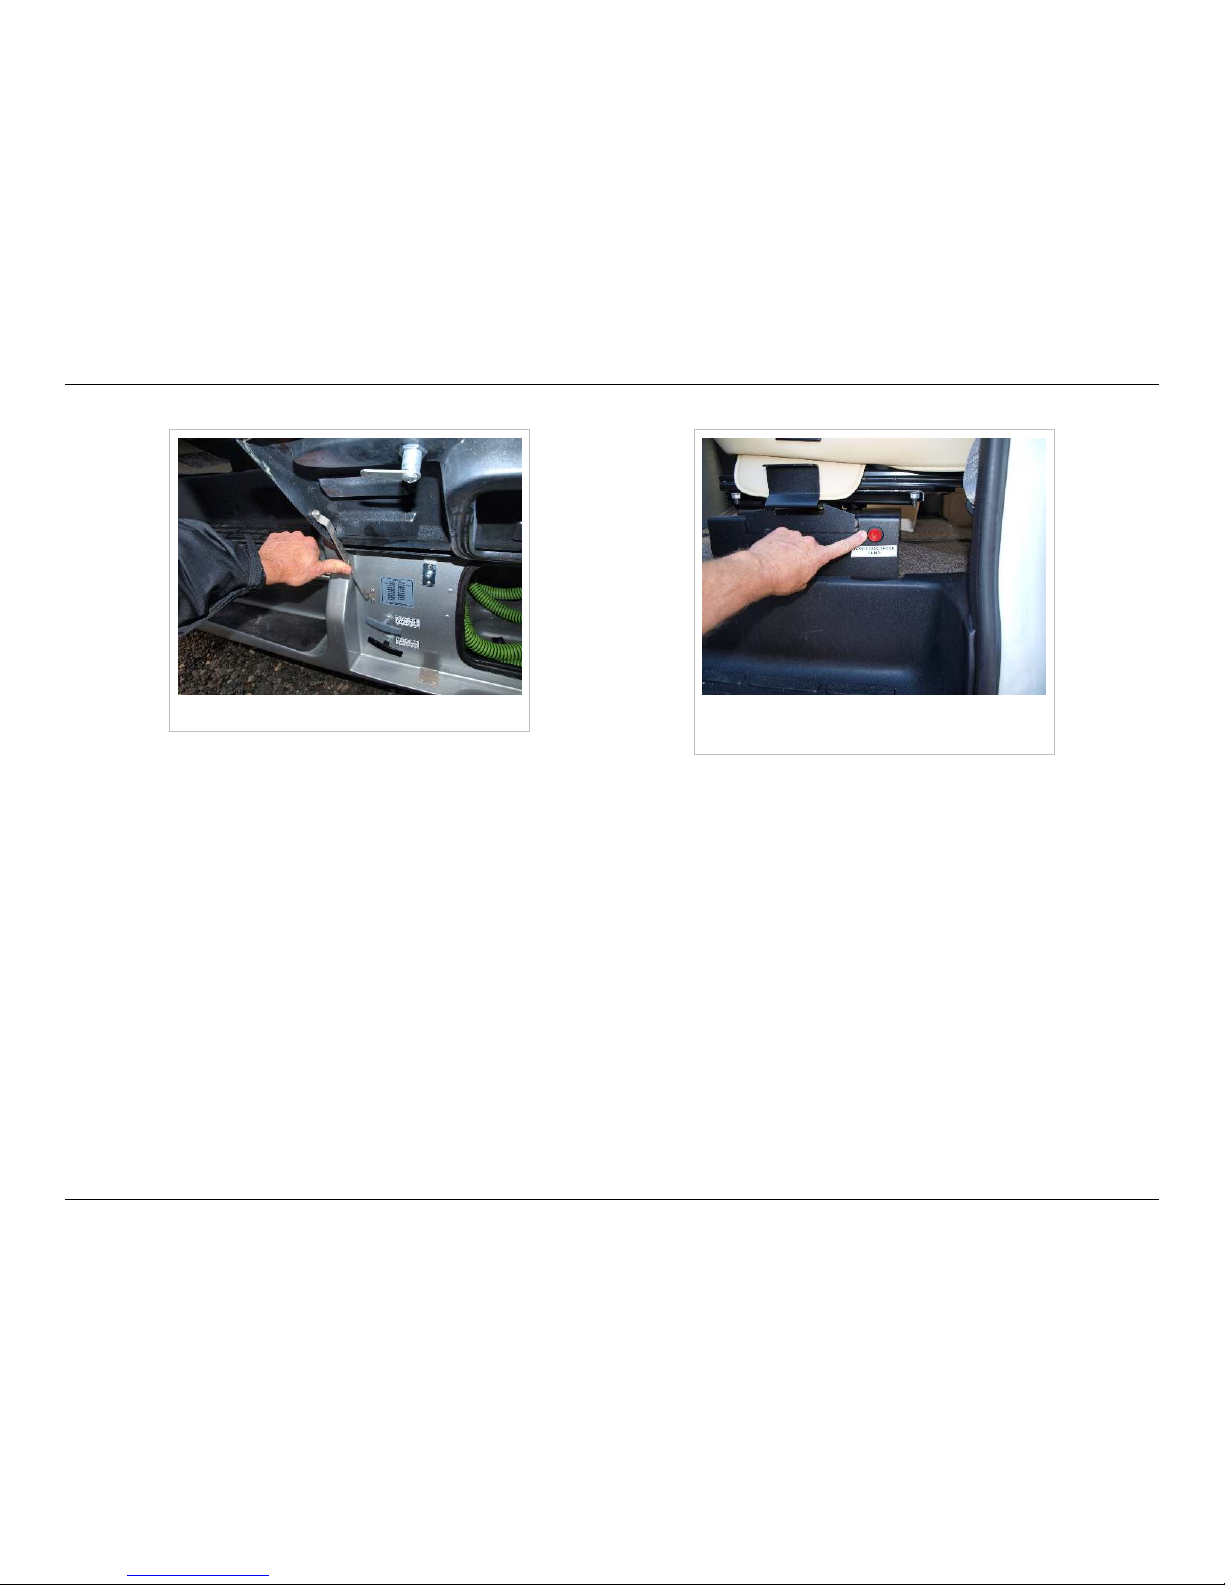
HOWTO: Waste Water Dumping
95
© 2014 by Roadtrek, Inc.
Support arm for access door Waste water pump button on base of
driver's seat
•• Open the long compartment behind the driver. This will expose the waste water discharge hose. Support the door in the
open position by using the support arm.
Page 99
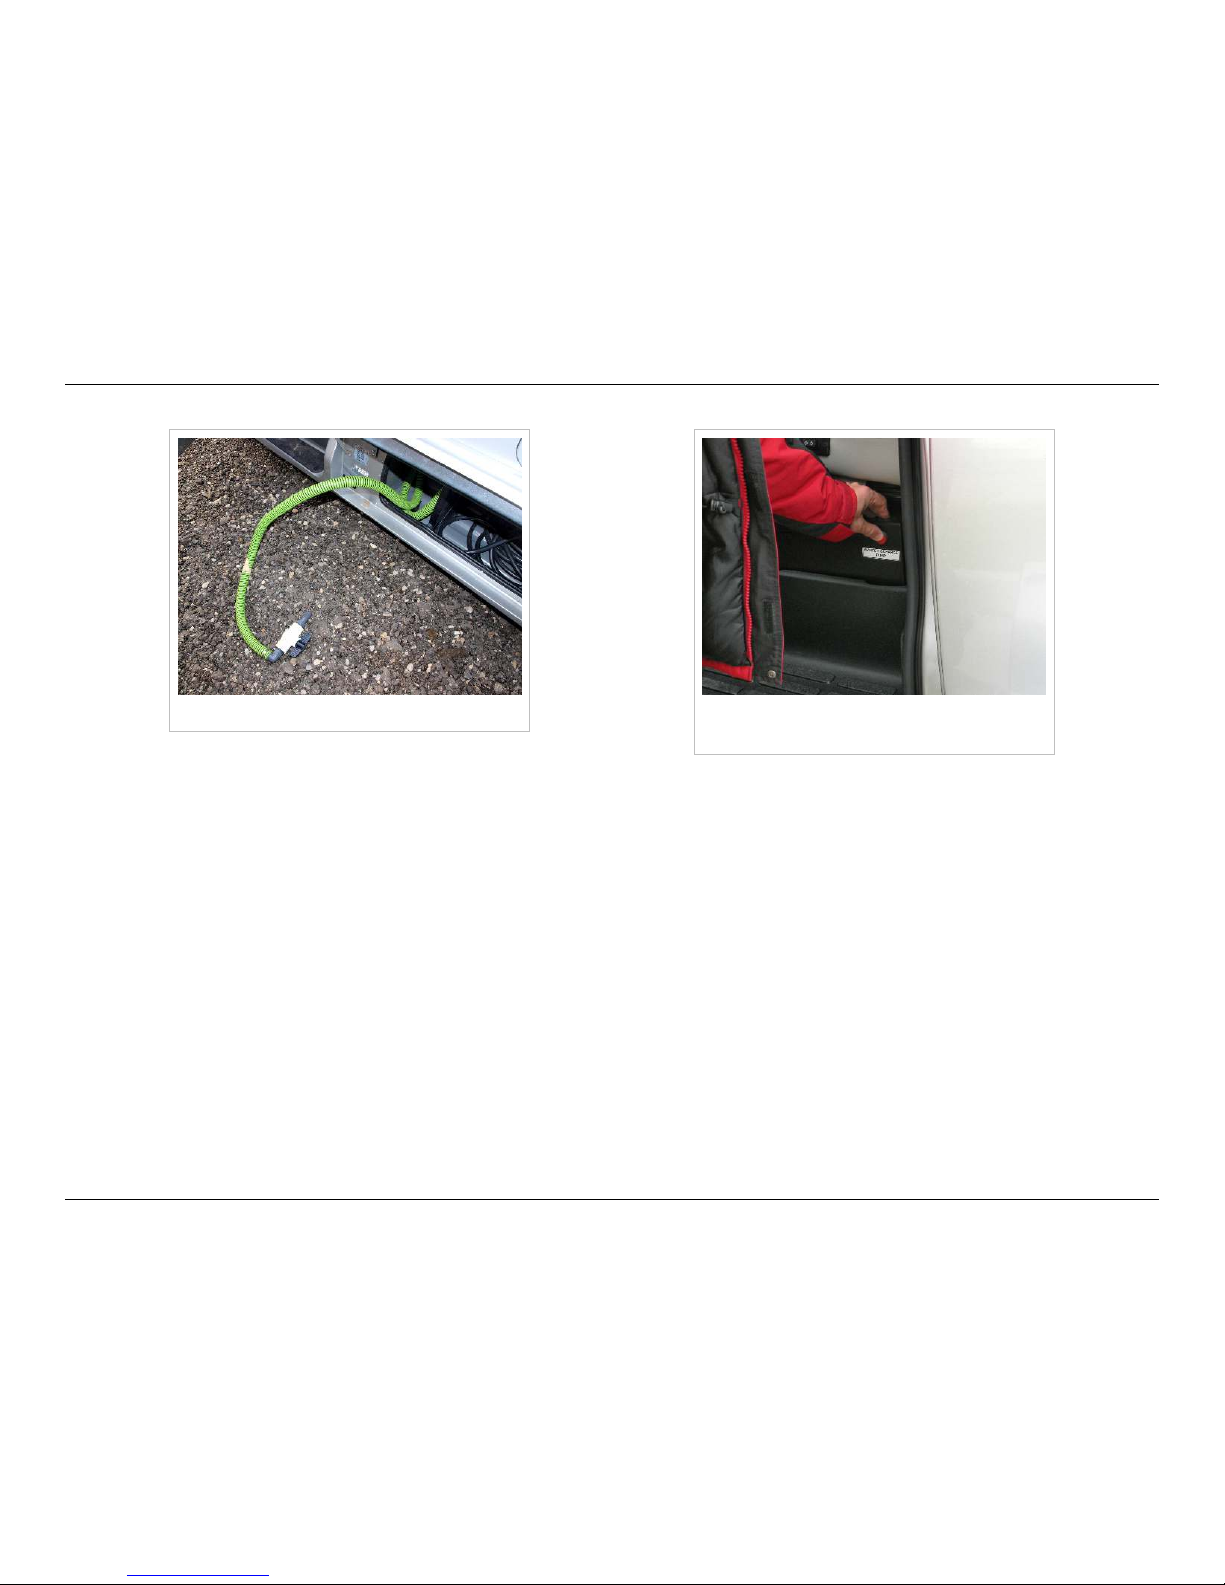
HOWTO: Waste Water Dumping
96
© 2014 by Roadtrek, Inc.
Extending the hose Press and hold the button to activate the
pump
• Open the driver’s door and locate the waste water pump switch. It is a red pushbutton located on the driver's seat base.
•• Remove the waste water discharge hose from storage.
Page 100
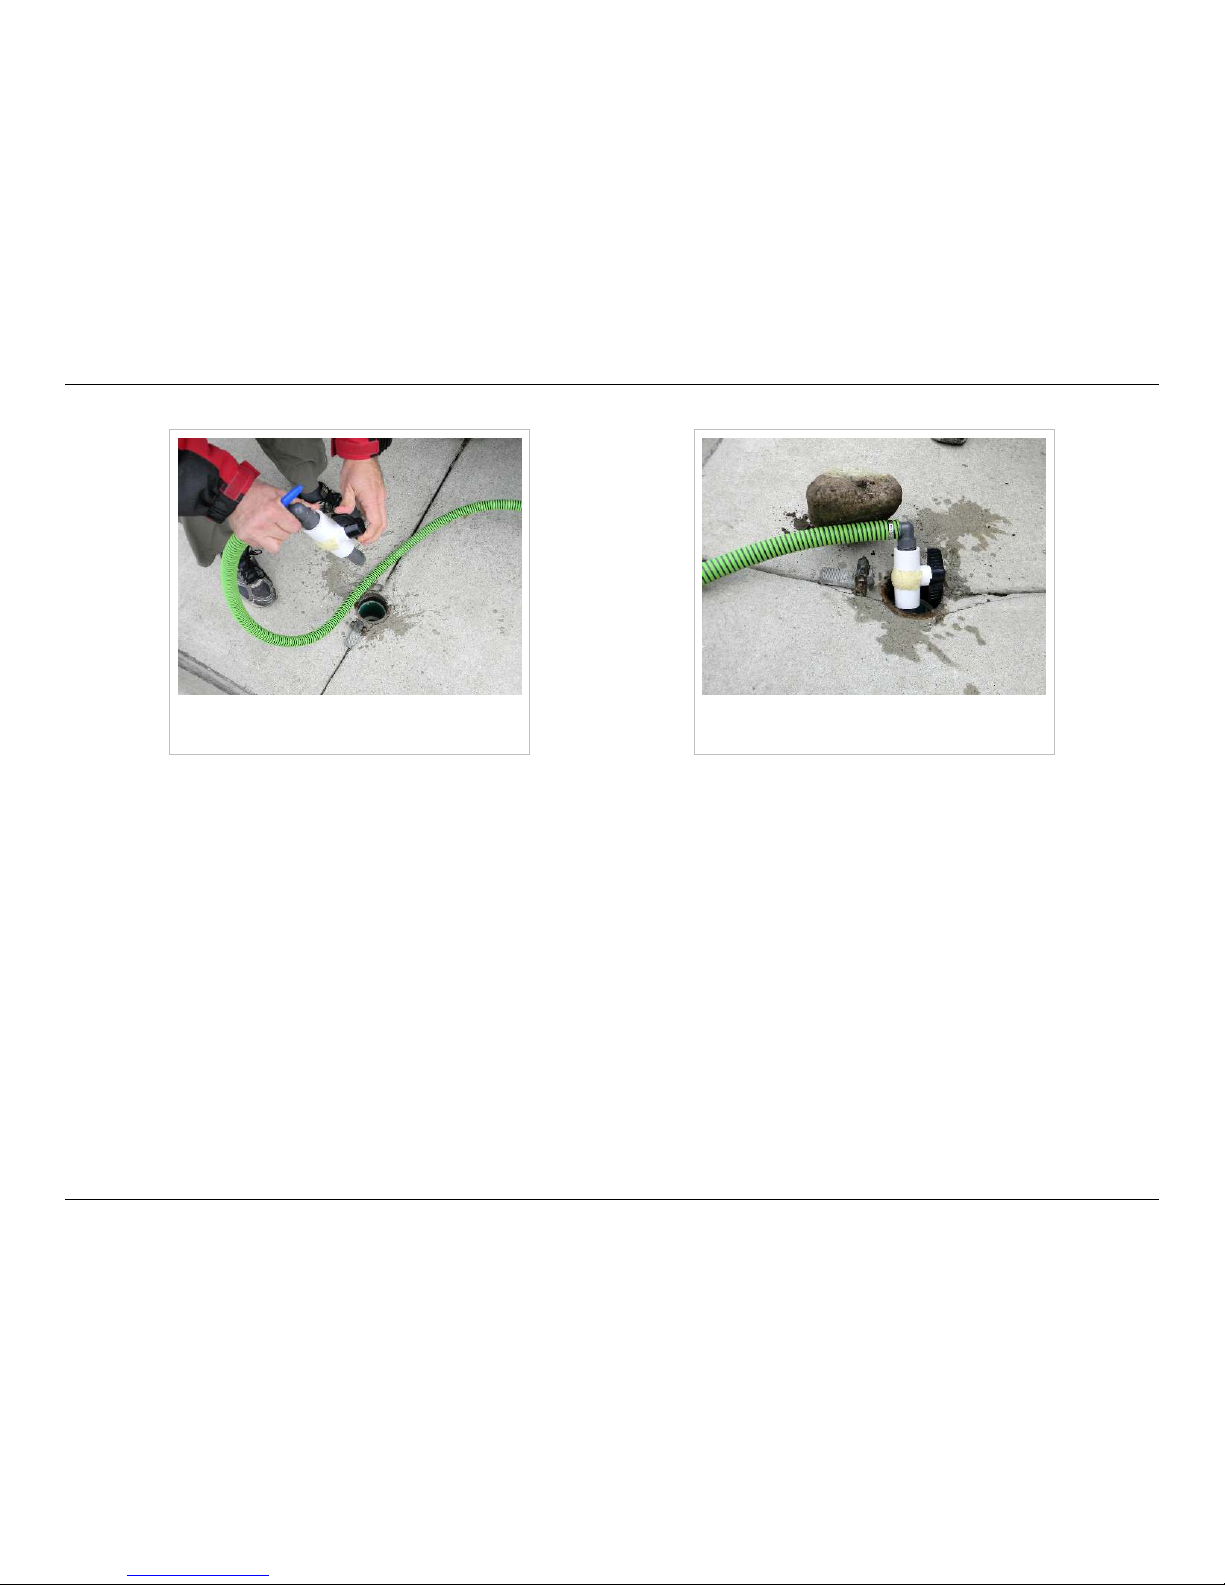
HOWTO: Waste Water Dumping
97
© 2014 by Roadtrek, Inc.
Open the waste water discharge hose
valve
Weigh the hose down to prevent
accidents
 Loading...