

Page 1

www.roadstar.com
TTR-8634
User manual
Bedienungsanleitung
Manuel d’instructions
Manuale d’istruzioni
Manual de instrucciones
Manual de instruções
Gebruiksaanwijzing
Návod k použití
Návod na použitie
Instrukcja obsługi
Page 2

INDEX
English Page 1
Deutsch Seite 3
Francais Page 5
Italiano Pagina 7
Español Página 9
Português Página 11
Nederlands Pagina 13
Čeština Strana 15
Slovenský Strana 17
Polski Strona 19
• Your new unit was manufactured and assembled under strict ROADSTAR quality control.
Thank-you for purchasing our product for
your music enjoyment. Before operating the
unit, please read this instruction manual carefully. Keep it also handy for further future
references.
• Votre nouvel appareil a été fabriqué et monté
en étant soumis aux nombreaux tests ROAD-
STAR. Nous espérons que cet appareil vous
donnera entière satisfaction. Avant de vous
adonner à ces activités, veuillez lire attentivement ce manuel d’instructions. Conservez-le
à portée de main à fin de référence ultérieure.
• Vuestro nuevo sistema ha sido construido
según las normas estrictas de control de cali-
dad ROADSTAR. Le felicitamos y le damos
las gracias por su elección de este aparado.
Por favor leer el manual antes de poner en
funcionamiento el equipo y guardar esta documentación en case de que se necesite
nuevamente.
• Ihr neues Gerät wurde unter Beachtung der
strengen ROADSTAR Qualitätsvorschriften
gefertigt. Wir danken Ihnen für den Kauf unse-
res Produktes und wünschen Ihnen optimalen
Hörgenuss. Bitte lesen Sie diese Bedienungsanleitung durch, und heben Sie sie auf, um
jederzeit darin nachschlagen zu können.
• Il vostro nuovo apparecchio é stato prodotto
ed assemblato sotto lo stretto controllo di qualità ROADSTAR. Vi ringraziamo di aver acquistato un nostro prodotto per il vostro piacere
d’ascolto. Prima di procedere all'utilizzo
dell'apparecchio, leggete attentamente il manuale d’istruzioni e tenetelo sempre a portata
di mano per futuri riferimenti.
• Seu novo aparelho foi construido e montado
sob o estrito controle de qualidade da ROADSTAR. Agradecemos por ter comprado nosso
produto para a sua diversão. Antes de usar
esta unidade é necessário ler com atençâo
este manual de instruções pare que possa ser
usada apropriadamente; mantenha o manual
ao seu alcance para outras informações.
Page 3
TTR-8634
FRONT
TOP
REAR
20
Page 4

ENERGY SAVING
If there is no audio signal from turntable for over 10 minutues, the unit will automatically switch to stanby mode for energy saving. Switch off and on again in order to reactivate the unit.
ENERGIEEINSPARUNG
Wenn über 10 Minuten lang kein Audiosignal vom Plattenspieler anliegt, schaltet das
Gerät automatisch in den Standby-Modus, um Energie zu sparen. Schalten Sie das
Gerät aus und wieder ein, um es wieder zu aktivieren.
ÉCONOMIES D'ÉNERGIE
S'il n'y a pas de signal audio provenant du tourne-disque pendant plus de 10 minutes,
l'appareil passe automatiquement en mode veille pour économiser l'énergie. Éteignez
et rallumez l'appareil afin de le réactiver.
RISPARMIO ENERGETICO
Se non c'è segnale audio dal giradischi per oltre 10 minuti, l'unità passa automaticamente in modalità stanby per il risparmio energetico. Spegnere e riaccendere l'apparecchio per riattivarlo.
AHORRO DE ENERGÍA
Si no hay señal de audio del tocadiscos durante más de 10 minutos, la unidad pasará
automáticamente al modo de espera para ahorrar energía. Apagar y encender de
nuevo para reactivar la unidad.
ECONOMIA ENERGÉTICA
Se não houver sinal áudio da mesa rotativa durante mais de 10 minutos, a unidade
mudará automaticamente para o modo de espera para poupar energia. Desligue e
volte a ligar para reactivar a unidade.
ENERGIEBESPARING
Als er gedurende meer dan 10 minuten geen audiosignaal van de platenspeler is,
schakelt het apparaat automatisch over naar de standbymodus om energie te besparen. Schakel het apparaat uit en weer in om het opnieuw te activeren.
ÚSPORA ENERGIE
Pokud po dobu více než 10 minut není z gramofonu žádný zvukový signál, jednotka
se automaticky přepne do úsporného režimu. Vypněte a znovu zapněte, aby se
jednotka znovu aktivovala.
VARČEVANJE Z ENERGIJO
Če več kot 10 minut ne zaslišite zvočnega signala z gramofona, bo enota za varčevanje z energijo samodejno prešla v stanje pripravljenosti. Izklopite in ponovno vklopite,
da ponovno aktivirate enoto.
OSZCZĘDZANIE ENERGII
Jeśli przez ponad 10 minut nie będzie sygnału audio z gramofonu, urządzenie automatycznie przełączy się w tryb gotowości w celu oszczędzania energii. Wyłącz i włącz
ponownie, aby ponownie włączyć urządzenie.
Page 5

1 English
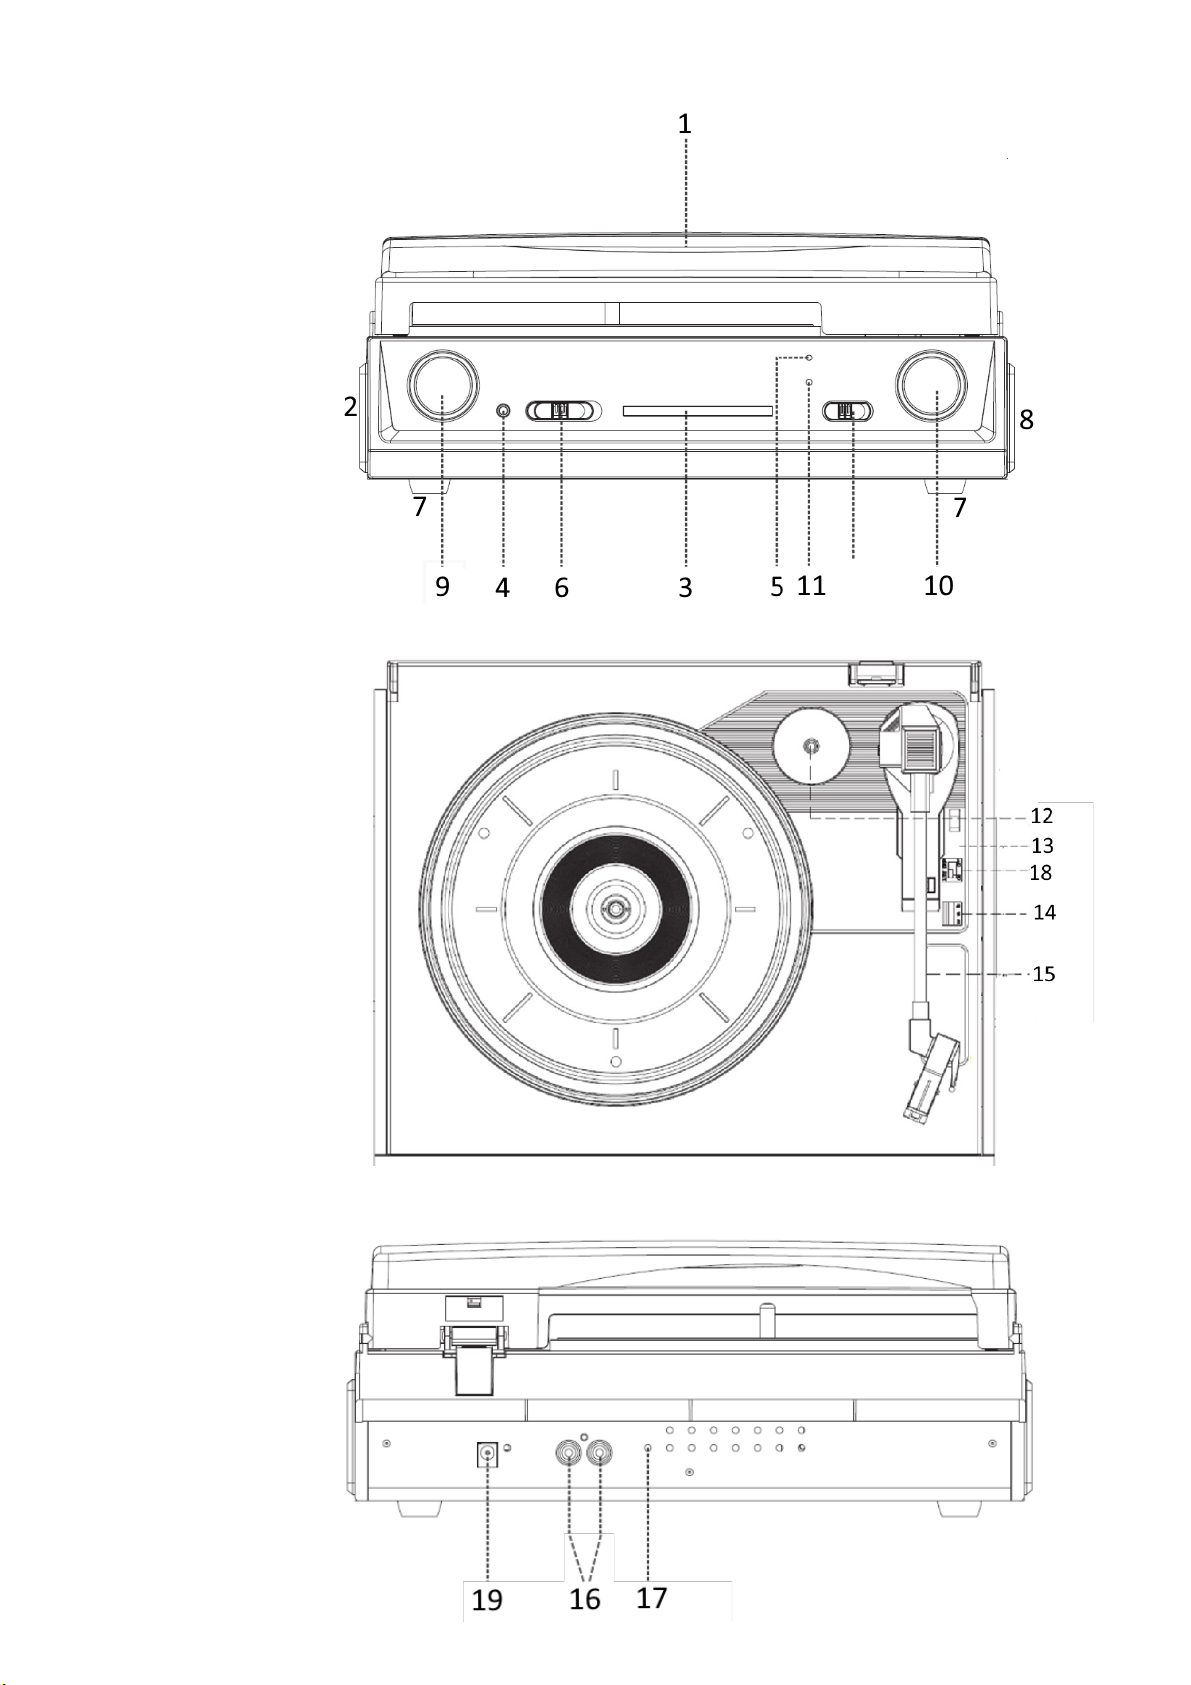
LOCATION OF CONTROLS
1. DUST COVER
2. LEFT SPEAKER
3. DIAL POINTER
4. 3.5MM HEADPHONE JACK
5. POWER LED INDICATOR
6. FUNCTION SELECTOR (OFF/PHONO/TUNER)
7. RUBBER FEETS
8. RIGHT SPEAKER
9. VOLUME KNOB
10. TUNING KNOB
11. FM-STEREO INDICATOR
12. SPINDLE ADAPTOR
13. TONEARM LEVER
14. 33/45/78 RPM SPEED SELECTOR
15. PICK-UP HOLDER
16. AUDIO-OUT
17. FM ANTENNA
18. ON/OFF PHONO
19. DC INPUT
20. MONO/STEREO SELECTOR
POWER SOURCES
You can power your portable stereo system by plugging the power AC/DC adaptor into a wall AC power outlet. Check that the rated voltage of your appliance matches
your local volt.
FM RADIO OPERATION
1. Set the Function Selector (6) to the TUNER position. The red Power Indicator (5)
will light up.
2. Tune to the desired radio station by turning the Tuning control (10).
3. Adjust the volume control (9) to the desired level.
4. Switch FM RADIO MONO & STEREO selector (18) to choose between mono and
stereo mode.
5. To switch off the radio set the Function Selector (6) to the OFF position.
ANTENNA
For FM reception there is a built-in FM antenna wire (17) at the rear of the unit. Move
the wire around to obtain the best reception.
TURNTABLE OPERATION
1. Set the Function Selector (6) to the PHONO position. Place a record on the turn-
table, over the central spindle. Place the EP adapter over the central spindle
when playing 17cm EP records. Set the Speed Selector (14) to 33/45/78 .
2. Release the tonearm clamp, and remove the protective cap from the stylus.
3. Lift the Tonearm with the Tonearm Lift Lever (13).
4. Move the tonearm to the beginning of the record.
5. Gently lower the arm onto the record with the Tonearm Lift lever to start playing.
6. When the record is finished the tonearm will automatically stop. Lift the tonearm
from the record and return it to the rest.
Page 6
2 English
Notes:
• To stop manually, lift the tonearm from the record and return it to the rest.
• Do not stop or turn the platter manually.
• Moving or jarring the turntable without securing the Tonearm clamp could result in
damage to the Tonearm.
• Replace the protective cap on the stylus when not in use.
HEARPHONE JACK & LINE OUT SOCKET
This system can be connected with headphone (4) or external amplifier/speaker by
3.5mm earhpone jack.
This system can be connected with external device (eg amplifier and speaker) by lineout socket (16) at rear cabinet.
TECNICAL SPECIFICATIONS
Power Supply: AC/DC Adaptor (230VAC 50 Hz/12VDC 1A)
Radio Frequency Coverage FM: 87.5 - 108 MHz.
Speakers Output Power: 2 x 1.5 Wrms.
General
Line Out: RCA plugs (pre-amplified)
Earphone: 3.5mm Jack
Specifications and design are subject to possible modifications without notice due to
improvement.
This marking shown on the product or its literature, indicates that it should not be disposed with other household wastes at
the end of its working life. To prevent possible harm to the environment or human health from uncontrolled waste disposal,
please separate this from other types of wastes and recycle it responsibly to promote the sustainable reuse of material
resources. Household users should contact the retailer where they purchased this product, or their local government office,
for details of where and how they can take this item for environmentally safe recycling. Business users should contact their
supplier and check the terms and conditions of the purchase contract. This product should not be mixed with other commercial wastes for disposal.
CORRECT DISPOSAL OF THIS PRODUCT
(Waste Electrical & Electronic Equipment)
WARNINGS
The exclamation point within the triangle is a warning sign alerting the user of important instructions accompanying the
product.
The lightening flash with arrowhead symbol within the triangle is a warning sign alerting the user of “dangerous voltage”
inside the unit.
To reduce the risk of electric shock, do not remove the cover. No user serviceable parts inside the unit. Refer all servicing
to qualified personnel.
This unit operates on 230V ~ 50Hz. If the unit is not used for a long period of time, remove the plug from the AC mains.
Ensure all connections are properly made before operating the unit.
This unit must not be exposed to moisture or rain.
This unit should be positioned so that it is properly ventilated. Avoid placing it, for example, close to curtains, on the ca rpet or in a built-in installation such as a bookcase.
Do not expose this unit to direct sunlight or heat radiating sources.
Page 7

3 Deutsch
LAGE DER BEDIENUNGSELEMENTE
1. ABDECKUNG
2. LAUTSPRECHER LINKS
3. ABSTIMMSKALA
4. KOPFHÖRER
5. EIN-ANZEIGE
6. FUNKTION-WAHLSCHALTER (OFF/PHONO/TUNER)
7. KUMMERFÜSSE
8. LAUTSPRECHER RECHTS
9. LAUTSTÄRKE-REGLER
10. ABSTIMM-KNOPF
11. UKW-STEREO-ANZEIGE
12. 45-DISC-ADAPTER
13. TONARM-HEBEL
14. 33/45/78 U./MIN. GESCHWINDIGKEITSCHALTER
15. TONARM-ABLAGE
16. VORVERSTÄRKTEAUSGANG (AUDIO-OUT)
17. UKW-ANTENNE
18. ON/OFF PHONO
19. DC-EINGANG
20. MONO-/STEREO-WAHLSCHALTER
STROMQUELLEN
Sie können Ihr tragbares Stereosystem mit Strom versorgen, indie Steckdose an der
Wand stecken. Prüfen Sie, dass die Nennspannung des Geräts mit Ihrer lokalen
Spannung übereinstimmt.
RADIOBETRIEB
1. Stellen Sie den Funktionswahlsc. (6) auf TUNER. Die EIN-Anzeige erleuchtert (5).
2. Stimmen Sie die gewünschte Radiostation mit dem Abstimmregler (10) ab.
3. Stellen Sie den Lautstärkeregler (9) auf die gewünschte Stufe ein.
4. Schalten Sie den FM RADIO MONO & STEREO-Wahlschalter (18), um zwischen
Mono- und Stereomodus zu wählen.
Antenne: Für den UKW-Empfang befindet sich auf der Rückseite des Gerätes ein
eingebauter UKWAntennendraht (17). Bewegen Sie den Draht hin und her, bis der
beste Empfang erreicht wird.
PLATTENSPIELER BETRIEB
1. Stellen Sie den Funktionswahlschalter (6) auf PHONO.
2. Legen Sie eine Schallplatte auf die mittlere Spindel des Plattentellers. Legen Sie
den EP- Adapter auf die mittlere Spindel, wenn Sie 17 cm-EP-Platten abspielen.
3. Stellen Sie die Drehzahl-Wahlschalter (14) auf 33 oder 45 oder 78 U./Min., en-
tsprechend der Schallplatte.
4. Entriegeln Sie die Tonarm-Klemme und entfernen Sie die Schutzklappe von der
Wiedergabenadel.
5. Heben Sie den Tonarm mit dem Tonarm-Hebel (13) an.
6. Bewegen Sie den Tonam an den Anfang der Plane oder eines bestimmten Titels.
7. Senken Sie den Tonarm vorsichtig mit dem Tonarm-Hebel auf die Platte, um die
Wiedergabe zu starten.
Page 8
4 Deutsch
8. Am Ende der Platte, heben Sie den Tonarm und bringen Sie es zum Rest.
Hinweise:
• Wenn Sie die Platte während der Wiedergabe stoppen wollen, den Tonarm von der
Platte heben und zur Ruhe zurückbringen.
• Drehen oder stoppen Sie den Plattenteller nicht manuell.
• Wenn Sie den Plattenteller bewegen oder anstossen, ohne den Tonarm mit der
Klemme gesichert zu haben, konnte der Tonarm beschadigt werden Stecken Sie die
Schutzkappe auf die Wiedergabenadel, wenn das Gerät nicht benutzt wird.
REARPHONE JACK & LINE OUT SOCKET
• Dieses system kann mit dem kopfhorer oder exteren verstarker/lautsprecher uber
3.5mm (4) earphone jack verbunden werden.
Dieses system kann mit einem externene gerat (zb verstarker und lautsprecher) (16)
uber einen leitungsanschluss am hinteren schrank verbunden werden.
TECHNISCHE DATEN
Stromversorgung: AC/DC Adaptor (230VAC 50 Hz/12VDC 1A)
Radiofrequenzbereich FM: 87.5 - 108 MHz.
Lautsprecher ausgangsleistung: 2 x 1.5 Wrms
Allgemeine
Audio Ausgang: Cinch– Büchse (vorverstärkt)
ERDHÖRHÖRER 3.5mm Jack
Earphone: 3.5mm Jack
Ausführung und Spezifikationen unterliegen unangekündigten Änderungen.
Die Kennzeichnung auf dem Produkt bzw. auf der dazugehörigen Literatur gibt an, dass es nach seiner Lebensdauer nicht zusammen mit dem normalen HaushaltsmüIl entsorgt werden darf. Entsorgen Sie dieses Gerat bitte
getrennt von anderen Abfallen, um der Umwelt bzw. der menschl i chen Gesundhei t ni cht durch unkontrol l i
erte Mül l besei ti gung zu schaden. Recycel n Si e das Gerät, um di e nachhaltige Wiederverwertung von stofflichen Ressourcen zu fördern. Private Nutzer sollten den Händler, bei dem das Produkt gekauft wurde, oder die
zuständigen Behörden kontaktieren, um in Erfahrung zu bringen, wie sie das Gerät auf umweltfreundliche Weise
recyceln können. Gewerbliche Nutzer sollten sich an Ihren Lieferanten wenden und die Bedingungen des Verkaufsvertrags konsultieren. Dieses Produkt darf nicht zusammen mit anderem Gewerbemüll entsorgt werden.
KORREKTE ENTSORGUNG DIESES PRODUKTS (Elektromüll)
SICHERHEITSHINWEISE
Das Ausrufszeichen im Dreieck weist den Benutzer auf wichtige Bedienungs- und Wartungsanweisungen
(Service) in diesem Handbuch hin, die unbedingt zu befolgen sind.
Um die Gefahr elektrischer Schläge auszuschliessen, Gehäuse auf keinen Fall abnehmen.
Im Innem befinden sich keine vom Benutzer selbst instandsetz-baren Teile. Reparaturen dürfen nur von
einer autorisierten Fachwerkstatt durchgeführt werden.
Dieses Gerät ist für 230V ~ 50Hz Netzspannung ausgelegt. Bei längerer Nichtbenutzung des Geräts ziehen Sie den Stecker aus der Steckdose.
Setzen Sie das Gerät weder Feuchtigkeit noch Regen aus.
Schalten Sie das System erst dann ein, wenn Sie alle Verbindungen genau geprüft haben.
Stellen Sie das Gerät so auf, dass immer eine ungestörte Frischluftzufuhr sichergestellt ist. Es ist zum
beispiel keinesfalls auf Teppiche und in der Nähe von Gardinen zu stellen oder in Bücherregale einzubauen.
Setzen Sie das Gerät weder direkter Sonneneinstrahlung noch Wärmequellen aus.
Page 9

5 Français
POSITIONNEMENT DES COMMANDES
1. COUVERCLE
2. HAUT-PARLEUR GAUCHE
3. ECHELLE SYNTONIE
4. ENTREE CASQUES
5. INDICATEUR DE MARCHE
6. SÉLECTEUR DE FUNCTION (OFF/PHONO/TUNER)
7. PIEDS EN CAOUTCHOUC
8. HAUT-PARLEUR DROITE
9. CONTRÔLE VOLUME
10. CONTRÔLE SYNTONIE
11. INDICATEUR FM-STÉRÉO
12. ADAPTATEUR DISQUES 45 TPM
13. MANETTE DE LEVEE DU BRAS DE LECTURE
14. SÉLECTEUR VITESSE 33/45/78 TPM
15. SUPPORT BRAS DE LECTURE
16. SORTIE AMPLIFIEE (AUDIO-OUT)
17. ANTENNE FM
18. ON/OFF PHONO
19. ENTRÉE DC
20. SÉLECTEUR MONO/STÉRÉO
SOURCES D'ALIMENTATION
Pour alimenter la chaîne stéréo portative, il suffit de brancher le cordon d'alimentation
AC/DC adapteur dans la prise de courant CA murale. Vérifier que la tension nominale
de l`appareil correspond à la tension locale.
FONCTIONNEMENT DE LA RADIO
1. Placer le Sélecteur de Fonctions (6) sur la position TUNER. L’indicateur de Mar-
che (5) s’allume.
2. A l’aide du Sélecteur de Recherche des Stations (10), intercepter la station émet-
trice souhaitée.
3. Régler la commande de volume (9) au niveau désiré.
4. Passez le sélecteur FM RADIO MONO & STEREO (18) pour choisir entre le mo-
de mono et le mode stéréo.
Antenne: Pour la réception en FM il y a une antenne FM incorporée (17) dont le câble est placé à l’arrière de l’appareil. Orienter le câble de manière à ce que la qualité
de la réception soit la meilleure possible.
FONCTIONNEMENT DU TOURNE-DISQUES
1. Placer le Sélecteur de Fonctions (6) sur la position PHONO.
2. Placer un disque sur la platine, au-dessus de l'axe central. Placer l'adaptateur EP
audessus de l'axe central quand on veut ecouter des disques EP 17cm.
3. Placer le bouton de sélection vitesse (14) sur 33 ou 45 ou 78 tours/min, selon le
disque.
4. Dégager le bras de lecture de son agrafe, et enlever le capuchon de protection de
la pointe de lecture.
5. Soulever le bras de lecture à l'aide de la manette de levée du bras de lecture (13).
6. Placer le bras de lecture au début du disque ou au début d'une piste précise.
Page 10

6 Français
7. Baisser doucement le bras de lecture sur le disque à l'aide de la manette de levée
du bras de lecture pour commencer la lecture de la piste.
8. A la fin du disque la platine s'arrête. Lever le bras et posez-le sur le support.
Remarques:
• Pour arrêter le disque pendant la lecture, soulever le bras de lecture du disque et
posez-le sur le support.
• Ne pas faire tourner et ne pas arrêter le disque manuellement.
• Faire tourner ou heurter la platine tourne-disques sans avoir fixé l'agrafe au bras de
lecture peut causer des dommages au bras de lecture.
• Remettre la protection sur la pointe de lecture quand l'appareil n'est pas utilisé.
PRISE D'ÉCOUTE JACK & LINE OUT
ce système peut être connecté avec un casque ou un amplificateur / haut-parleur externe par une prise d'écoute de 3,5 mm (4)
ce système peut être connecté à un dispositif externe (ex. amplificateur et hautparleur) par une prise de ligne au bac arrière (16)
CARACTERISTIQUES TECHNIQUES
Source d’énergie: AC/DC Adaptor (230VAC 50 Hz/12VDC 1A)
Couverture de radiofréquence FM: 87.5 - 108 MHz.
Puissance Haut-parleur: 2 x 1.5 Wrms
Général
Sortie Audio: prises RCA (pré-amplifié).
EARPHONE 3.5mm jack
Les spécifications peuvent êtres modifiées sans avis préalable.
Ce symbole sur le produit ou sa documentation indique qu'il ne doit pas être éliminé en fin de vie avec les autres déchets
ménagers. L' élimination incontrôlée des déchetspouvant porter préjudice a l'environnement ou a la santé humaine, veuillez le séparer des autres types de déchets et le recycler defaçon responsable. Vous favoriserez ainsi la réutilisation durable desressources matérielles. Les particuliers sont invites a contacter le distributeur leur ayant vendu le produit ou a
se renseigner auprès de leur mairie pour savoir ou et comment ils peuvent se débarrasser de ce produit afin qu'il soit
recycle en respectant l'environnement. Les entreprises sont invitées a contacter leurs fournisseurs et aconsulter les conditions de leur contrat de vente. Ce produit ne doit pas être éliminé avec les autres déchets commerciaux.
COMMENT ÉLIMINER CE PRODUIT
ATTENTION
Le symbole “point d’exclamation” à l’intérieur d’un triangle avertit l’utilisateur que d’importantes instructions d’utilisa-
tion et de maintenance sont contenues dans le mode d’emploi.
Le symbole “éclair” à l’intérieur d’un triangle sert à avertir l’utilisateur de la présence du courant à l’intérieur du l’appareil qui pourrait constituer un risque.
Afin de minimiser les risques, ne pas ouvrir le boîtier ni ôter le dos de l’appareil. En case de panne, faites appel aux
techniciens qualifiés pour les réparations. L’appareil ne renferme aucune pièce reparable par l’utilisateur.
Cet appareil a été conçu pour une tension d’alimentation de 230V ~ 50Hz. Débranchez la prise de courant quand on
prévoit de ne pas utiliser l’appareil pendant un certain temps.
Mettez l’appareil sous tension seulement après avoir vérifié que tous les raccordements soient corrects.
L’unité ne doit pas être exposée à l’humidité ou à la pluie.
L’appareil doit être gardé dans un endroit suffisamment ventilé. Ne le gardez jamais par exemple près des rideaux,
sur un tapis ou dans des meubles, tels qu’une bibliothèque.
L’unité ne doit pas être exposée à la lumière directe du soleil ou à des sources de chaleur.
Page 11

7 Italiano
LOCALIZZAZIONE DEI CONTROLLI
1. COPERCHIO
2. ALTOPARLANTE SINISTRO
3. SCALA SINTONIA
4. INGRESSO CUFFIE
5. INDICATORE ACCENSIONE
6. SELETTORE FUNZIONE (OFF/PHONO/TUNER)
7. PIEDINI GOMMA
8. ALTOPARLANTE DESTRO
9. MANOPOLA VOLUME
10. MANOPOLA SINTONIA
11. INDICATORE FM-STEREO
12. ADATTATORE 45 GIRI
13. LEVETTA DEL BRACCIO DI LETTURA
14. SELETTORE VELOCITA’ 33/45/78 RPM
15. SUPPORTO PICK-UP
16. USCITA AMPLIFICATA (AUDIO-OUT)
17. ANTENNA FM
18. ON/OFF GIRADISCHI
19. INGRESSO ALIMENTAZIONE DC
20. SELETTORE MONO/STEREO
FONTI DI ALIMENTAZIONE
Puoi alimentare la radio portatile connettendo l’alimentatore alla presa elettrica. Verifica che il voltaggio della radio corrisponda a quello della tua rete di alimentazione.
UTILIZZO DELLA RADIO
1. Regolare il Selettore Funzione (6) sulla posizione TUNER.
2. Sintonizzare la stazione radio desiderata girando il controllo Sintonia (10).
3. Regolare il controllo Volume (9) al livello desiderato.
4. Selezionare MONO o STEREO (18) per scegliere la ricezione radio MONO o
STEREO.
Antenna: Per la ricezione in FM, é incorporata sul lato posteriore dell’apparecchio
un’antenna a filo (17). Muovere il filo fino a raggiungere la migliore ricezione.
UTILIZZO DEL GIRADISCHI
1. Regolare il Selettore Funzione (6) sulla posizione PHONO.
2. Posizionare un disco sul giradischi, sul perno centrale. Posizionare l'adattatore
EP sul perno centrale quando si ascoltino dischi EP di 17 cm (45 giri).
3. Regolare il selezione velocità (14) su 33 o 45 o 78 giri, a seconda del disco utiliz-
zato.
4. Rilasciare la chiusura del braccio della testina di lettura, e rimuovere il cappuccio
di protezione dalla puntina.
5. Sollevare il braccio di lettura con la levetta del braccio (13).
6. Posizionare il braccio di lettura sull'inizio del disco o di un brano particolare.
7. Abbassare con delicatezza il braccio sul disco con la levetta del braccio per ini-
ziare la lettura.
8. Quando il disco giunge alla fine, il giradischi si fermerà. Alzare il braccio di lettura
e riportarlo sull’appoggio.
Note:
Page 12

8 Italiano
• Per fermare il disco durante la lettura, alzare il braccio di lettura e riportarlo sull’ap-
poggio. il giradischi si fermerà.
• Non girare il piatto manualmente.
• Muovere o scuotere il giradischi senza la protezione della puntina e della chiusura
del braccio di lettura lo potrebbe danneggiare. Mettere il cappuccio di protezione
sulla puntina quando non verrà utilizzata.
CUFFIE E UCITA LINE OUT
Questo sistema puo’ essere collegato con cuffie o amplificatori / altoparlanti esterni
tramite presa earphone da 3,5 mm (4).
Questo sistema puo’ essere collegato con dispositivo esterno (es. amplificatore e altoparlante) tramite presa rca sul vano posteriore (16).
SPECIFICHE TECNICHE
Alimentazione: AC/DC Adaptor (230VAC 50 Hz/12VDC 1A)
Copertura radiofrequenze FM: 87.5 - 108 MHz.
Potenza d’uscita altoparlante: 2 x 1.5 Wrms.
Generali
Uscita Audio: RCA (preamplificata).
Cuffie: 3.5mm Jack
Le specifiche e il design sono soggetti a possibili modifiche senza preavviso a causa
di miglioramenti.
II marchio riportato sul prodotto e sulla sua documentazione indica che il prodotto non deve essere smaltito
can altri rifiuti domestici al termine del ciclo di vita. Per evitare eventuali danni all'ambiente o alla salute
causati dall'inopportuno smaltimento dei rifiuti, si invita l'utente a separare questo prodotto da altri tipi di
rifiuti e di riciclarlo in maniera responsabile per favorire il riutilizzo sostenibile delle risorse materiali. Gli
utenti domestici sono invitati a contattare il rivenditore presso il quale e stato acquistato il prodotto a l'ufficio
locale preposto per tutte le informazioni relative alla raccolta differenziata e al riciclaggio per questo tipo di
prodotto. Gli utenti aziendali sono invitati a contattare il proprio fornitore e verificare i termini e le condizioni
del contratto di acquisto. Questo prodotto non deve essere smaltito unitamente ad altri rifiuti commerciali.
CORRETTO SMALTIMENTO DEL PRODOTTO
(rifiuti elettrici ed elettronici)
ATTENZIONE
Il punto esclamativo all’interno di un triangolo avverte l’utente che il libretto d’istruzioni contiene delle importanti istruzioni per l’uso e la manutenzione.
Il simbolo del fulmine all’interno di un triangolo avverte l’utente della presenza di una pericolosa tensione
all’interno dell’apparecchio.
Per ridurre i rischi di scosse elettriche, non aprire l’apparecchio. L’apparecchio non contiene parti riparabili
dall’utente. In caso di guasto fare appello a tecnici qualificati per le riparazioni.
Questo apparecchio è stato progettato per funzionare a 230V ~ 50Hz. Se non si intende utilizzare l’apparecchio per un lungo periodo di tempo, rimuovere la spina dalla presa di corrente.
Utilizzare l’apparecchio solo dopo aver verificato che tutte le connessioni siano state eseguite correttamente.
Non esporre l’apparecchio alla pioggia o all’umidità.
Posizionare l’apparecchio in un luogo sufficientemente ventilato. Evitare di sistemarlo vicino a tende, sul
tappeto o all’interno di un mobile quale, ad esempio, una libreria.
Non esporre l’apparecchio alla luce diretta del sole o a fonti di calore.
Page 13

9 Español
LOCALIZACIÓN DE LOS CONTROLES
1. TAPA
2. ALTAVOZ ISQUIERDA
3. ESCALA SINTONÍA
4. ENTRADA AURICULARES
5. INDICADOR ENCENDIDO
6. SELECTOR FUNCION (OFF/PHONO/TUNER)
7. PATAS DE GOMA
8. ALTAVOZ DERECHO
9. CONTROL VOLUMEN
10. CONTROL SINTONÍA
11. INDICADOR FM-ESTÉREO
12. ADAPTADOR EP (45 RPM)
13. PALANCA LEVANTADORA DEL BRAZO DE LECTURA
14. SELECTOR VELOCIDAD 33 / 45 / 78 rpm
15. APOYO BRAZO DE LECTURA
16. SALIDA AUDIO
17. ANTENA FM
18. SELECTOR ON/OFF PHONO
19. CABLE ALIMENTACIÓN DC
20. SELECTOR MONO/STEREO
FUENTES DE ENERGÍA
Puede encender su equipo estéreo portátil conectando el DC cable de corriente a
una toma CA en la pared.
Compruebe que la tensión de su aparato sea la misma que la que se usa en su zona
FUNCIONAMIENTO DE LA RADIO
1. Colocar el Selector Función (6) en la posición TUNER. El indicador POWER se
enciende (5).
2. Sintonizar la estación radio deseada girando el control Sintonización (10).
3. Regular el control Volumen (9) al nivel deseado.
4. Cambie el selector FM RADIO MONO Y ESTÉREO (18) para elegir entre el mo-
do mono y estéreo.
Antena: Para la recepción en FM se encuentra incorporada una antena (17) en la
parte posterior. Mover el hilo hasta cuando se alcance la mejor recepción.
FUNCIONAMIENTO DEL TOCADISCOS
1. Colocar el Selector Función (6) en la posición PHONO.
2. Colocar un disco sobre el tocadiscos, sobre el eje central. Colocar el adaptador
EP sobre el eje central cuando se escuchen discos EP de 17 cm (45 RPM).
3. Colocar el Selector Velocidad (14) en 33 o 45 RPM segun el disco utilizado.
4. Soltar el cierre del brazo de lectura, y extraer la tapa de protección de la aguja.
5. Levantar el brazo de lectura con la palanca levantadora del brazo (13).
6. Colocar el brazo de lectura en el inicio del disco o de una melodía particular.
7. Bajar con delicadeza el brazo sobre el disco con la palanca levantadora del bra-
zo de lectura para iniciar la lectura.
8. Cuando la lectura del disco finalizará el tocadiscos se para. Retornar el brazo al
apoyo.
Notas:
Page 14

10 Español
• Para detener el disco durante la lectura, alce el brazo y devuélvalo al apoyo.
• No girar el Plato manualmente.
• Mover o sacudir el tocadiscos sin la protección del cierre del brazo de lectura podría
dañar el brazo de lectura. Colocar la tapa de protección sobre la aguja cuando no
se utilizará.
AURICULARES I SALIDA AUDIO
Este sistema puede conectarse con auriculares o amplificador / altavoz externo por
toma de auriculares de 3,5 mm (4).
Este sistema puede conectarse con un dispositivo externo (por ejemplo, amplificador
y altavoz) por el enchufe de salida de linea en el gabinete trasero (16).
ESPECIFICACIONES TÉCNICAS
Fuente de alimentacion: AC/DC Adaptor (230VAC 50 Hz/12VDC 1A)
Cobertura de radiofrecuencia FM: 87.5 - 108 MHz.
Potencia de salida altavoz: 2 x 1.5 Wrms
General
Salida Audio: RCA (preamplificado).
AURICULAR 3.5mm Jack
Las características tecnicas estan sujetas a cambios sin aviso previo.
La presencia de esta marca en el producto o en el materiál informativo que lo acompaña, indica que al finali-
zar su vida útil no deberá eliminarse junto con otros residuos domésticos. Para evitar los posi bl es daños al
medi o ambi ente o a l a sal ud humane que representa la eliminación incontrolada de residuos, separe este
producto de otros tipos de residuos y reciclelo correctamente para promover la reutilización sostenible de recursos materiales. Los usuarios particulares pueden contactar con el establecimiento donde adqui ri eron el
producto, o con l as autori dades l ocal es pertinentes, para informarse sobre cómo y dónde pueden lIevario
para que sea sometido a un reciclaje ecológico y seguro. Los usuarios comerciales pueden contactar con su
proveedor y consultar las condiciones del contrato de compra. Este produco no debe eliminarse mezclado con
otros residuos comerciales.
ELIMINACIÓN CORRECTA DE ESTE PRODUCTO
(material electrico y electrónico de descarte)
El símbolo de exclamación dentro un triángulo tiene el objeto de advertir al usuario de la presencia de
instrucciones importantes de funcionamiento y mantenimiento en la documentación adjunta con el equipo.
El símbolo del rayo con punta de flecha dentro de un triángulo adverte al usuario de la presencia de tensiones peligrosas en el equipo.
Para reducir los riesgos de descargas eléctricas, no retire la cubierta. La unidad no hay en su enterior
componentes que pueda manipular el usuario. Encargue su reparación a personal cualificado.
Esta unidad funciona con 230V ~ 50Hz. Cuando el equipo vaya a estar un tiempo prolongado sin utilizarse, desenchufar el cable de alimentación.
No conecte la unidad hasta que no se hayan efectuado todas las otras conexiones.
La unidad no debería ser expuesta a lluvia o humedad.
La unidad se debe instalar de forma que su posición no le impida tener ventilación adecuada. Por ejemplo, el equipo no se debe colocar cerca de cortinas o sobre el tapete, ni en una instalación como puede
ser un armario.
La unidad no debería ser expuesta a la luz solar directa ni a fuentes emisora de calor.
ATTENTIÓN
Page 15

11 Português
LOCALIZAÇÃO DOS COMANDOS
1. TAMPA
2. ALTOFALANTE ESQUERDO
3. SCALA SINTONÍA
4. SAIDA FONES DE OUVIDO
5. INDICADOR LIGADO
6. SELECTOR FUNÇÃO (OFF/PHONO/TUNER)
7. PÉS DE BORRACHA
8. ALTOFALANTE DIREITO
9. CONTROLO VOLUME
10. CONTROLO SINTONÍA
11. INDICADOR FM-STÉREO
12. ADAPTADOR DISCOS 45 RPM
13. ALAVANCA DE LEVANTAMENTO
14. SELECTOR VELOCIDADE 33/45/78 RPM
15. APOIO PICK-UP
16. SAÍDA AMPLIFICADA (AUDIO-OUT)
17. ANTENAFM
18. SELETOR MONO/STEREO
19. CABO ALIMENTAÇÃO DC
ALIMENTAÇÃO
Você pode alimentar o seu sistema estéreo portátil conectando o cabo de
alimentação em uma tomada CA de parede.Verifique que a voltagem nominal do seu
aparelho corresponde à sua voltagem local.
FUNÇÃO DE RÁDIO
1. Posicione o seletor de Função (6) na posição TUNER. O indicador Ligado (5) se
iluminará.
2. Sintonize a estação desejada com o controle de sintonia (10).
3. Ajuste o volume (9) em sua intensidade desejada.
4. FM RADIO MONO & STEREO selector (18) para escolher entre o modo mono e
estéreo.
Antena: Para a recepção em FM, há incorporada na parte posterior do aparelho uma
antena com fio (17). Desloque este fio até obter a melhor recepção.
FUNÇÃO TOCA-DISCOS
1. Posicione o seletor de Função (6) na posição PHONO.
2. Coloque um disco sobre o prato, enfiado no pino central. Coloque o adaptador
EP no pino central se for tocar um disco EP de 17 cm.
3. Regule o botão de selecção da velocidade (14) em 33 ou 45 ou 78 rotações, em
função do disco.
4. Solte o grampo do braço e retire a tampa de protecção da agulha.
5. Erga o braço pela respectiva alavanca de levantamento.
6. Coloque o braço sobre o começo do disco ou o início da faixa que desejar.
7. Abaixe delicadamente o braço sobre o disco, mediante a respectiva alavanca de
levantamento (13), para começar a tocar.
8. Quando terminar o disco, o toca-discos pára. Erga o braço e devolva ao apoio.
Observações:
Page 16

12 Português
• Para parar um disco que estiver a tocar, erga o braço e devolva ao apoio.
• Não pare nem gire manualmente o prato.
• Não mova nem agite o toca-discos sem ter antes preso o braço com o respectivo
grampo, para não causar danos ao braço.
• Coloque a tampa de protecção quando a agulha não estiver a ser usada.
TOMADA DE TELEFONE E SOQUETE DE LINHA
Este sistema pode ser conectado com o fone de ouvido ou o amplificador / altofalante externo por jack de fonte de 3.5mm (4).
Este sistema pode ser conectado a um dispositivo externo (amplificador e altofalante) por tomada de saída de linha no armário traseiro (16).
ESPECIFICAÇÕES TÉCNICAS
Alimentação: AC/DC Adaptor (230VAC 50 Hz/12VDC 1A)
Cobertura de radiofrequência FM: 87.5 - 108 MHz.
Potência de saída alto-falante: 2 x 1.5 Wrms.
Geral
Saida audio: RCA (pré-amplificado).
EARPHONE 3.5mm Jack
As especificações e o design estão sujeitos a possíveis modificações sem aviso devi-
do a melhorias.
Esta marca, apresentada no produto ou na sua literatura indica que ele não deverá ser eliminado juntamente
com os residuos domésticos indiferenciados no final do seu periodo de vida útil. Para impedir danos ao ambiente
e á saúde humana causados pela eliminação incontrolada de resíduos deverá separar este equipamento de
outros tipos de residuos e reciclá-lo de forma responsável, para promover uma reutilização sustentável dos recursos materiais. Os utilizadores domesticos deverão contactar ou o estabelecimento onde adquiriram este produto ou as entidades oficiais locais para obterem informaçães sobre onde e de que forma podem levar este produto para permitir efectuar uma reciclagem segura em termos ambientais. Os utilizadores profissionais deverão
contactar o seu fornecedor e consultar os termos e condições do contrato de compra. Este produto não devera
ser misturado com outros residuos comerciais para eliminação.
ELIMINAÇAO CORRECTA DESTE PRODUTO
(Resíduo de Equipamentas Eléctricos e Electrónicos)
ATENÇÃO
O ponto de exclamação dentro de um triângulo avisa o utilizador que no livrete de instruções
há importantes informações para a utilização e a manutenção.
O símbolo com o raio dentro de um triângulo avisa o utilizador que há tensão perigosa no
interior do aparelho.
Para reduzir o risco de choque eléctrico, não abra o aparelho. O aparelho não contém peças
que podem ser reparadas pelo utilizador. Em caso de defeitos, para a reparação, contacte
um técnico qualificado.
Este aparelho foi projectado para funcionar com 230 V. ~ 50 Hz. Se o aparelho não for utilizado durante muito tempo, tire a ficha eléctrica da tomada de corrente.
Não exponha o aparelho à chuva nem à humidade.
Coloque o aparelho num local suficientemente ventilado. Evite colocá-lo perto de cortinas,
em cima de alcatifas ou dentro de quaisquer móveis como por exemplo uma estante.
Não exponha o aparelho directamente à luz do sol nem a fontes de calor.
Page 17

13 Nederlands
LAGE DER BEDIENELEMENTE
1. STOFKAP
2. SPEAKERS
3. DIAL POINTER
4. EARPHONE OUT
5. POWER LED
6. FUNCTIEKEUZE
7. RUBBER FEETS
8. SPEAKERS
9. VOLUMEKNOP
10. AFSTELKNOP
11. FM STEREO
12. AS ADAPTOR
13. TONE ARM
14. 33/45/78 TOEREN KIEZER
15. PICK-UP HOUDER
16. LINE OUT
17. FM ANTENNE
18. ON/OFF PHONO SELECTOR
19. DC SNOER
20. MONO/STEREO SELECTOR
STROOMBRONNEN
U kunt uw draagbare stereosysteem van stroom DC voorzien door het netsnoer op
een stopcontact aan te sluiten. Controleer of de nominale spanning van uw apparaat
overeenkomt met uw lokale voltage.
DE RADIO GEBRUIKEN
1. Kies TUNER mode door FUNCTIEKEUZE (6) te gebruiken. De LED zal oplichten.
2. Draai AFSTELKNOP (10) om je favoriete radiostation te kiezen.
3. Draai VOLUMEKNOP (9) om het volume bij te stellen.
4. Schakel FM RADIO MONO & STEREO selector (18) om te kiezen tussen mono-
en stereomodus.
Antenne: Voor FM-ontvangst is er een ingebouwde antenne. Het kan nodig zijn om
de positie van de antenne aan te passen om een optimale ontvangst te krijgen.
PLATTENSPIELER GEBRUIKEN
1. Stel de functieselectieknop (6) in op de PHONO-positie.
2. Plaats een record op de draaitafel, over de centrale spil. Plaats de EP-adapter
op de centrale spil wanneer u 17-cm EP-records afspeelt.
3. Stel de snelheidskeuze (14) in op 33 of 45 of 78 rpm volgens het record.
4. Maak de toonarmklem los en verwijder de beschermkap van de pen.
5. Til de toonarm omhoog met de toonarmhendel (13).
6. Verplaats de toonarm naar het begin van de record.
7. Laat de arm voorzichtig op de plaat zakken met de toonarmhendel om te begin-
nen met spelen.
8. Wanneer het record klaar is, stopt de toonarm automatisch. Til de toonarm uit
de plaat en breng deze terug naar de rest.
Hinweis:
• Laat de arm uiterst voorzichtig op de plaat zakken met de hendel van de arm om te
Page 18

14 Nederlands
beginnen met het afspelen.
• De plaat niet handmatig draaien.
• Het verplaatsen of schudden van de platenspeler zonder de beschermkap van de
punt en de sluiting van de afspeelarm, kan leiden tot schade aan het apparaat.
• Plaats de beschermkap op de punt, wanneer deze niet in gebruik is.
OORTELEFOONJACK & LINE OUT-AANSLUITING
Dit systeem kan worden aangesloten op een hoofdtelefoon of externe versterker /
luidspreker met een 3,5 mm earphone-jack (4).
Dit systeem kan worden aangesloten op een extern apparaat (bijv. versterker en luidspreker) met een line-out-aansluiting aan de achterkast (16).
TECHNISCHE SPEZIFIKATIONEN
Stroomvoorziening: AC/DC Adaptor (230VAC 50 Hz/12VDC 1A)
Dekking van radiofrequentie FM: 87.5 - 108 MHz.
Luidspreker Uitgangsvermogen: 2 x 1.5 Wrms.
Algemeen
Audio-Uitgang: RCA (pre-amplified).
EARPHONE 3.5mm Jack
Kenmerken zijn zonder voorafgaande kennisgeving onderhevig aan veranderingen.
Dit symbool dat staat weergegeven op het product en in de documentatie ervan, duidt erop dat het product
niet kan worden weggegooid met het gewone huisvuil aan het einde van de levensduur. Om schade aan het
milieu of aan de gezondheid door ongepaste afvalverwijdering te voorkomen, dient de gebruiker dit product te
scheiden van andere soorten afval op verantwoorde wijze ter bevordering van duurzaam hergebruik van de
materiële hulpbronnen. De thuisgebruiker dient contact op te nemen met de verkoper van het apparaat of met
de lokale gemeente voor informatie met betrekking tot het scheiden en recyclen van dit type product. Zakelijke gebruikers dienen contact op te nemen met hun leverancier en de algemene voorwaarden van de verkoopovereenkomst te raadplegen. Dit product dient niet te worden gemengd met ander bedrijfsafval voor de
verwijdering.
CORRECTE AFVALVERWERKING VAN HET PRODUCT
(elektrisch en elektronisch afval)
WAARSCHUWING
Het uitroepteken in een gelijkzijdige driehoek is bedoeld om de gebruiker erop attent te maken dat de
gebruikershandleiding belangrijke instructies bevat voor het gebruik en het onderhoud.
De bliksemschicht in een gelijkzijdige driehoek is bedoeld om de gebruiker te waarschuwen voor de
aanwezigheid van gevaarlijke spanning binnen in het apparaat.
Om het risico op elektrische schokken te reduceren, dient het apparaat niet te worden geopend. Het
apparaat bevat geen onderdelen die gerepareerd kunnen worden door de gebruiker. In het geval van
een defect dient contact opgenomen te worden met een gekwalificeerde technicus voor de reparatie.
Dit apparaat is ontworpen om te werken op 230v~ 50Hz. Als het apparaat voor een langere tijd niet
gebruikt gaat worden, dient de stekker uit het stopcontact te worden gehaald.
Stel het apparaat niet bloot aan regen of vocht.
Gebruik het apparaat uitsluitend nadat is gecontroleerd dat alle aansluitingen correct zijn uitgevoerd.
Plaats het apparaat op een voldoende geventileerde plek. Plaats het apparaat niet in de buurt van
gordijnen, op het tapijt of in in een stuk meubilair, zoals bijvoorbeeld een boekenkast.
Stel het apparaat niet bloot aan direct zonlicht of aan warmtebronnen.
Page 19

15 Čeština
JEDNOTLIVÉ ČÁSTI PŘÍSTROJE
1. Kryt gramofonu.
2. Levý reproduktor.
3. Stupnice ladění s ukazatelem.
4. 3,5 mm sluchátka ven
5. Červená LED napájení POWER.
6. Přepínač FUNCTION pro zapnutí / vypnutí přístroje a výběr zdroje signálu s polohami
OFF / PHONO / TUNER. Nastavením přepínače do polohy OFF bude
7. Gumové nožičkyi
8. Pravý reproduktor.
9. Regulátor hlasitosti VOLUME.
10. Knoflík ladění TUNING.
11. Adaptér hřídele talíře gramofonu (pro přehrání EP desek o průměru 17 cm).
12. LED FM STEREO - indikuje stereofonní příjem FM rozhlasu.
13. Páčka pro zvednutí / usazení tónového raménka gramofonu.
14. Přepínač rychlosti otáčení talíře gramofonu (33 popř. 45 78 ot / min.).
15. Držák přenosky.
16. Výstupní konektory AUDIO OUT (L/R).
17. Drátová FM anténa.
18. ON/OFF PHONO
19. DC INPUT
20. VÝBĚR MONO / STEREO
ZDROJE ELEKTRICKÉHO NAPÁJENÍ
Stereo zařízení můžete napájet připojením jednoho konce napájecího
stejnosměrného kabelu do elektrické zásuvky. Zkontrolujte, zda jmenovité napětí
vašeho přístroje odpovídá místnímu síťovému napětí.
POUŽITÍ RÁDIA
1. Přepněte přepínač FUNCTION do polohy TUNER – přístroj tak bude zapnut a
přepnut na příjem rozhlasu, na přístroji se rozsvítí červená LED POWER.
2. Knoflíkem ladění TUNING nalaďte požadovaný vysílač.
3. Regulátorem hlasitosti VOLUME upravte hlasitost.
4. Přepněte volič FM RADIO MONO & STEREO (18) na výběr mezi mono a stereo
režimem.
ANTÉNY: Pro příjem FM rozhlasu přístroj používá drátovou FM anténu. Anténu
rozviňte, pro příjem požadovaných vysílačů je nutno vyhledat její vhodnou polohu.
POUŽITÍ GRAMOFON
1. Přepněte přepínač FUNCTION do polohy PHONO – přístroj tak bude zapnut a
přepnut na použití gramofonu, na přístroji se rozsvítí červená LED POWER.
2. Umístěte záznam na otočný talíř přes centrální vřeteno. Umístěte adaptér EP na
centrální vřeteno při přehrávání 17cm EP záznamů.
3. Nastavte volič rychlosti (14) na 33 nebo 45 nebo 78 ot / min podle záznamu.
4. Uvolněte svorku raménka a vyjměte ochranný kryt z pera.
5. Zvedněte ozubenou kolečko pomocí páčky zdvihu (13).
6. Přesuňte rampu na začátek záznamu.
7. Opatrně spusťte paži do záznamu pomocí páčky Tonearm Lift, čímž začnete
přehrávat.
8. Po dokončení záznamu se přístroj automaticky zastaví. Zvedněte rampu ze záz-
namu a vraťte ji do zbytku.
Page 20

16 Čeština
Doplňující informace
• Chcete-li zastavit ručně, zvedněte rampu z nahrávky a vraťte ji do zbytku.
• Před přenášením přístroje zajistěte raménko a na hrot přenosky umístěte kryt – oba
tyto díly tak budou chráněny před poškozením.
• V žádném případě neomezujte rychlost otáčení talíře popř. nezastavujte talíř rukou.
SLUCHÁTKA
Tento systém může být připojeno s sluchátkou nebo vnějším zosilňovačem / reproduktorem 3,5m earphone jack (4.
Tento systém může být propojen s externím zařízením (např. zesilovač a reprosoustava) line-out socket na zadní skříně(16)-
TECHNICKÉ ÚDAJE
Zdroj napájení: AC/DC Adaptor (230VAC 50 Hz/12VDC 1A)
Rádiové kmitočty FM: 87.5 - 108 MHz.
Reproduktorů Výstupní výkon: 2 x 1.5 Wrms.
Výstupní konektory : RCA předem zesílená.
SLUCHÁTKO 3.5mm Jack
Změny designu a technických údajů vyhrazeny bez předchozího oznámení.
Tento symbol na výrobku, jeho příslušenství nebo obalu označuje, že při pozdější likvidaci výrobku (z jakýchkoliv důvodů) nesmí být s výrobkem zacházeno jako s domovním odpadem. Výrobek zlikvidujte jeho
předáním na sběrné místo pro likvidaci použitých elektrických a elektronických zařízení šetrnou
k životnímu prostředí. Zajištěním jejich správné likvidace zabráníte vzniku potenciálních rizik pro životní
prostředí a lidské zdraví, která by mohla vzniknout nesprávným zacházením s odpady. Kromě toho recyklace odpadových materiálů napomáhá udržení přírodních zdrojů surovin pro příští generace. Podrobné
informace k likvidaci tohoto výrobku šetrné k životnímu prostředí získáte u pracovníka ochrany životního
prostředí místního (městského nebo obvodního) úřadu nebo v prodejně, ve které jste výrobek zakoupili.
POKYNY PRO SPRÁVNOU LIKVIDACI VÝROBKU
(likvidaci použitých elektrických a elektronických zařízení)
UPOZORNĚNÍ
Vykřičník uvnitř trojúhelníka na zadní straně skříňky přístroje upozorňuje uživatele na důležité pokyny pro obsluhu a
ošetřování přístroje, uvedené v jeho doprovodné dokumentaci. čeština
Symbol blesku uvnitř trojúhelníka na zadní straně skříňky přístroje upozorňuje uživatele na existenci životu nebezpečného napětí na některých dílech uvnitř skříňky přístroje.
Nevyjímejte přístroj ze skříňky – riziko úrazu elektrickým proudem. Uvnitř skříňky nejsou díly, které by mohl opravit
nebo seřídit jeho uživatel bez odpovídajícího vybavení a kvalifikace. Bude-li přístroj vyžadovat seřízení nebo opra-
vu kontaktujte odborný servis. Zásahem do přístroje v době platnosti záruky se vystavujete riziku ztráty event.
záručních plnění.
Přístroj je konstruován pro napájení střídavým napětím 230 V / 50 Hz z elektrické sítě. Pokud nebudete přístroj
delší dobu používat odpojte jej od elektrické sítě vyjmutím vidlice síťového kabelu přístroje ze síťové zásuvky.
Chraňte přístroj před zmoknutím, postříkáním nebo politím jakoukoliv kapalinou.
Vypnutím přístroje není přístroj odpojen od elektrické sítě. Pro odpojení přístroje od elektrické sítě vyjměte vidlici
síťového kabelu přístroje ze síťové zásuvky. Před zapnutím přístroje překontrolujte všechna připojení k přístroji.
Okolo přístroje ponechejte na všech stranách dostatečný volný prostor, nutný pro cirkulaci vzduchu okolo přístroje.
Je tak odváděno teplo vznikající během jeho provozu.
Neumísťujte přístroj na přímém slunci nebo v blízkosti zdrojů tepla. Vysokými teplotami je významně zkracována
životnost elektronických dílů přístroje.
Page 21

17 Slovenský
JEDNOTLIVÉ ČÁSTI PŘÍSTROJE
1. Kryt gramofónu.
2. Ľavý reproduktor.
3. Stupnica ladenia s ukazovateľom.
4. 3,5 mm slúchadlá von
5. LED napájania POWER.
6. Prepínač FUNCTION pre zapnutie / vypnutie prístroja a výber zdroja signálu s po-
lohami OFF / PHONO / TUNER. Nastavením prepínača do polohy OFF bude prístroj
vypnutý.
7. gumové nožičky.
8. Pravý reproduktor.
9. Regulátor hlasitosti VOLUME.
10. Gombík ladenia TUNING.
11. Adaptér hriadeľa taniera gramofónu (pre prehranie EP platní s priemerom 17 cm).
12. LED FM STEREO - indikuje stereofónny príjem FM rozhlasu.
13. Páčka pre zdvihnutie / usadenie tónového ramienka gramofóna.
14. Prepínač rýchlosti otáčania taniera gramofónu (33 príp. 45 ot / min.).
15. Držiak prenosky.
16. Výstupné konektory AUDIO OUT (L/R)
17. Drôtová FM anténa.
18. ON/OFF PHONO
19. DC INPUT
20. VÝBER MONO / STEREO
ZDROJE ELEKTRICKÉHO NAPÁJANIA
Ak chcete pripojiť vaše stereofónne zariadenie, zapojte jeden koniec napájacieho
kábla jednosmerného prúdu do elektrickej zásuvky na stene. Skontrolujte, či sa
menovité napätie vášho zariadenia zhoduje s napätím v miestnej sieti.
PRÍJEM ROZHLASU
1. Prepnite prepínač FUNCTION do polohy TUNER – prístroj tak bude zapnutý a
prepnutý na príjem rozhlasu, na prístroji sa rozsvieti červená LED POWER.
2. Gombíkom ladenia TUNING nalaďte požadovaný vysielač.
3. Regulátorom hlasitosti VOLUME upravte hlasitosť.
4. Prepnite prepínač FM RADIO MONO & STEREO (18) na výber medzi mono a stereo
režimom.
ANTÉNY: Pre príjem FM rozhlasu prístroj používa drôtovú FM anténu. Anténu rozviňte,
pre príjem požadovaných vysielačov je nutné vyhľadať jej vhodnú polohu.
POUŽITIE GRAMOFÓNU
1. Prepnite prepínač FUNCTION do polohy PHONO – prístroj tak bude zapnutý a
prepnutý na použitie gramofónu, na prístroji sa rozsvieti červená LED POWER.
2. Umiestnite záznam na otočný tanier cez stredové vreteno. Pri prehrávaní 17 cm
EP záznamov umiestnite adaptér EP na centrálne vreteno.
3. Nastavte volič rýchlosti (14) na 33 alebo 45 alebo 78 ot / min podľa záznamu.
4. Uvoľnite svorku ramena a odstráňte ochranný kryt z pera.
5. Zdvihnite zvonenie pomocou páčky zdvíhacieho zariadenia (13).
6. Posuňte rampu na začiatok záznamu.
7. Jemne spustite pažu do záznamu pomocou páčky Tonearm Lift, čím začnete
prehrávať.
Page 22

18 Slovenský
8. Po dokončení záznamu sa prístroj automaticky zastaví. Zdvihnite rampu zo záz-
namu a vráťte ju do zvyšku.
Doplňujúce informácie
• Ak chcete zastaviť ručne, zdvihnite rampu zo záznamu a vráťte ju do zvyšku.
• Pred prenášaním prístroja zaistite ramienko a na hrot prenosky umiestnite kryt –
oba tieto diely tak budú chránené pred poškodením.
• V žiadnom prípade neobmedzujte rýchlosť otáčania taniera príp. nezastavujte tanier
rukou.
JAKNA IN LINIJA IZ NOGA
Ta sistem lahko povezuje z glavnim ali zunanjim ojačalnikom / zvičnikom s 3,5-milimetrskim
priključkom za ušesa (4).
Ta sistem se lahko povezuje z zunanjo napravo (eg. ojačalec in zvičnik) z leto izvršeno kotino
na zadnji kabineti (16).
TECHNICKÉ ÚDAJE
Zdroj: AC/DC Adaptor (230VAC 50 Hz/12VDC 1A)
Rádiové frekvenčné pokrytie FM: 87.5 - 108 MHz.
Reproduktorov Výstupný výkon: 2 x 1.5 Wrms.
Vypnutie slúchadiel: 3.5mm jack sviečka.
EARPHONE 3.5mm Jack
Zmeny dizajnu a technických údajov vyhradené bez predchádzajúceho oznámenia.
OPOZORILO
Výkričník vo vnútri trojuholníka na skrinke prístroja upozorňuje užívateľa na existenciu dôležitých pokynov pre jeho obsluhu uvedených v návode.
Symbol blesku vo vnútri trojuholníka upozorňuje užívateľa na nebezpečné napätie na niektorých dieloch vo vnútri skrinky prístroja.
Nevyberajte prístroj zo skrinky - riziko úrazu elektrickým prúdom. Vo vnútri skrinky prístroja nie sú diely
ktoré by mohol opraviť alebo nastaviť jeho užívateľ bez zodpovedajúceho vybavenia a kvalifikácie. Ak
bude prístroj vyžadovať nastavenie alebo opravu kontaktujte odborný servis. Zásahom do prístroja v
dobe platnosti záruky sa vystavujete riziku straty príp. záručných plnení.
Chráňte prístroj pred zmoknutím, postriekaním alebo poliatím akoukoľvek kvapalinou - riziko úrazu
lektrickým prúdom. Nepoužívajte prístroj mimo miestnosti.
Pre odpojenie prístroja od elektrickej siete vyberte vidlicu sieťového kábla prístroja zo sieťovej zásuvky.
Prístroj umiestenie na dobre vetranom mieste. Nezakrývajte vetracie otvory skrinky prístroja - riziko
jeho prehriatia a poškodenia.
Chráňte prístroj pred priamym slnkom, neumiestňujte prístroj v blízkosti zdrojov tepla. Vysokými teplotami je výrazne skracovaná životnosť elektronických komponentov prístroja.
Tento symbol na výrobku, jeho příslušenství nebo obalu označuje, že při pozdější likvidaci výrobku (z jakýchkoliv důvodů) nesmí být s výrobkem zacházeno jako s domovním odpadem. Výrobek zlikvidujte jeho
předáním na sběrné místo pro likvidaci použitých elektrických a elektronických zařízení šetrnou
k životnímu prostředí. Zajištěním jejich správné likvidace zabráníte vzniku potenciálních rizik pro životní
prostředí a lidské zdraví, která by mohla vzniknout nesprávným zacházením s odpady. Kromě toho recyklace odpadových materiálů napomáhá udržení přírodních zdrojů surovin pro příští generace. Podrobné
informace k likvidaci tohoto výrobku šetrné k životnímu prostředí získáte u pracovníka ochrany životního
prostředí místního (městského nebo obvodního) úřadu nebo v prodejně, ve které jste výrobek zakoupili.
POKYNY PRO SPRÁVNOU LIKVIDACI VÝROBKU
(likvidaci použitých elektrických a elektronických zařízení)
Page 23

19 Polski
OPIS ELEMENTÓW
1. Pokrywa przeciwkurzowa
2. Lewy głośnik
3. Wskaźnik strojenia
4. Złącze słuchawkowe 3.5 mm
5. Wskaźnik zasilania LED
6. Przełącznik funkcji (OFF/PHONO/TUNER)
7. gumowe nóżki
8. Prawy głośnik
9. Pokrętło głośności
10. Pokrętło strojenia
11. Wskaźnik FM-STEREO
12. Adapter płyt
13. Dźwignia ramienia
14. Przełącznik prędkości obrotów 33/45/78 rpm
15. Podpórka ramienia
16. Wyjście audio-out
17. Antena FM
18. ON/OFF PHONO
19. WEJŚCIE DC
20. WYBÓR MONO / STEREO
ŹRÓDŁA ENERGII
Przenośny zestaw stereo można zasilać, podłączając przewód zasilający prądu
stałego do gniazda ściennego. Sprawdź, czy napięcie znamionowe urządzenia odpowiada napięciu lokalnemu.
RADIO FM
OBSŁUGA
1. Ustawić przełącznik funkcji (6) w pozycji TUNER. Zaświeci się czerwony
wskaźnik zasilania (5).
2. Wyszukać żądaną stację radiową za pomocą pokrętła strojenia (10).
3. Ustaw regulator głośności (9) na żądanym poziomie.
4. Za pomocą przełącznika FM RADIO MONO i STEREO (18) wybierz tryb mono
lub stereo.
ANTENA: W urządzenie została wbudowana kablowa antena (17), pozwalająca na odbiór
stacji FM. Znajduje się ona z tyłu urządzenia. Poruszać anteną i zmieniać jej pozycję, aby
uzyskać najlepszy odbiór stacji radiowych.
OBSŁUGA GRAMOFONU
1. Ustawić przełącznik funkcji (6) w pozycji PHONO.
2. Umieścić płytę na talerzu obrotowym na środkowej osi. Jeśli odtwarzane są płyty 17
cm EP, należy umieścić na osi także adapter płyt.
3. W zależności od typu płyty, ustawić przełącznik prędkości obrotów (14) na 33lub 45
lub 78.
4. Zwolnić zabezpieczenia ramienia i zdjąć osłonę igły.
5. Unieść ramię posługując się dźwignią ramienia (13).
6. Przesunąć ramię gramofonu nad początek płyty lub nad wybrany utwór.
7. Używając dźwigni ramienia delikatnie opuścić ramię na płytę, żeby rozpocząć odt-
warzanie.
8. Po zakończeniu odtwarzania płyty ramię zatrzyma się automatycznie. Należy zdjąć
Page 24

20 Polski
je z płyty i przełożyć na podpórkę.
UWAGA:
• Aby ręcznie zatrzymać odtwarzanie, należy zdjąć ramię z płyty i przełożyć na
podpórkę.
• Nie zatrzymywać ani nie obracać talerza ręcznie. Przesuwanie lub wstrząsy mogą
spowodować uszkodzenie ramienia, należy zawsze odkładać je na podpórkę i za-
bezpieczać zatrzaskiem. Jeśli urządzenie nie jest używane, należy ponownie
nałożyć osłonę na igłę.
GNIAZDO SŁUCHAWKOWE I GNIAZDO LINE OUT
- ten system może być podłączony ze słuchawkiem lub zewnętrznym wzmacniaczem /
głośnikiem pod gniazdem 3,5mm (4).
- ten system można podłączyć z urządzeniem zewnętrznym (np. wzmacniacz i głośnik)
przez gniazdo liniowe w tylnej szafce (16).
SPECYFIKACJA
Zasilanie: AC/DC Adaptor (230VAC 50 Hz/12VDC 1A)
Zasięg radiowy FM: 87,5 - 108 MHz.
Głośniki Moc wyjściowa: 2 x 1,5 Wrms.
SŁUCHAWKA 3.5mm jack
LINE OUT RCA
Zmiana specyfikacji technicznej produktu zastrzeżona przez producenta.
Ten symbol znajdujący się na produkcie, jego wyposażeniu lub opakowaniu oznacza, że z produktem nie można obchodzić się
jak ze zwykłymi odpadami domowymi. Kiedy urządzenie lub bateria/akumulator będą nadawały się do wyrzucenia prosimy, aby
Państwo przewieźli ten produkt na odpowiednie miejsce zbiorcze, gdzie zostanie przeprowadzona jego utylizacja. Na terenie
Unii Europejskiej oraz w innych europejskich krajach znajdują się miejsc zbiówki zużytych urządzeń elektrycznych i elektronicznych oraz baterii i akumulatorów. Dzięki zapewnieniu właściwej utylizacji produktów mogą Państwo zapobiec możliwym
negatywnym skutkom dla środowiska naturalnego i ludzkiego zdrowia. Mogłyby one wystąpić w wypadku nieodpowiedniego
postępowania z odpadami elektrycznymi i elektronicznymi lub zużytymi bateriami i akumulatorami. Utylizacja materiałów pozwala
chronić źródła naturalne. Z tego powodu prosimy nie wyrzucać starych elektrycznych oraz elektronicznych urządzeń oraz akumulatorów i baterii wraz z odpadami domowymi . Aby uzyskać więcej informacji o sposobach utylizacji starych urządzeń, należy
skontaktować się z władzami lokalnymi, przedsiębiorstwem zajmującym się utylizacją odpadów lub sklepem, w którym produkt
został zakupiony.
Likwidacja zużytego sprzętu elektrycznego/elektronicznego
UWAGA
SYMBOL WYKRZYKNIKA w trójkącie równobocznym, służy zwróceniu uwagi użytkownika na fakt, że instrukcja
obsługi zawiera bardzo istotne dla bezpieczeństwa informacjedotyczące obsługi, utrzymania i serwisowania urządzenia.
SYMBOL BŁYSKAWICY ZE STRZAŁKĄ w trójkącie równobocznym służy ostrzeżeniu użytkownika przed obecnością
niebezpiecznych, nieizolowanych elementów pod napięciem, które grozi ryzykiem porażenia.
Aby zminimalizować ryzyko porażenia prądem, nie należy zdjemować pokrywy. Nie należy samodzielnie podejmować
prób naprawy.
Urządzenie działa pod napięciem 230V ~ 50Hz. Jeżeli nie jest używane należy odłączyć wtyczkę od źródła zasilania.
Przed użyciem należy upewnić się, że wszystko jest prawidłowo podłączone.
Urządzenie nie powinno być wystawione na działanie wilgoci lub deszczu.
To urządzenie powinno być ustawione w miejscu przewiewnym. Unikać miejsc niewentylowanych, blisko zasłon lub
na dywanie.
Nie wystawiać na bezpośrednie działanie promieni słonecznych lub źródeł ciepła.
Page 25

Hereby, Roadstar Management SA declares that the radio equipment type TTR-8634 is in compliance with Directive 2014/53/EU.The full text of the
EU declaration of conformity is available at the following internet address: http://roadstar.com/images/ce/TTR-8634.pdf or by scanning the following
QR Code.
Roadstar Management SA erklärt hiermit, dass das Funkgerät vom Typ TTR-8634 der Richtlinie 2014/53 / EU entspricht.Der vollständige Text der EU
-Konformitätserklärung ist unter der folgenden Internetadresse verfügbar: http://roadstar.com/images/ce/TTR-8634.pdf oder durch Scannen des
folgenden QR-Codes.
Nous, soussignés Roadstar Management SA, déclarons que l’équipement radio de type TTR-8634 est conforme aux exigences de la directive
2014/53/EU.Le texte complet de cette déclaration de conformité EU est disponible à l’adresse internet suivante: http://roadstar.com/images/ce/TTR
-8634.pdf ou en scannant le code QR suivant.
Con la presente, Roadstar Management SA dichiara che l'apparecchiatura radio del tipo TTR-8634 è conforme alla Direttiva 2014/53 / UE.Il testo
completo della dichiarazione di conformità UE è disponibile al seguente indirizzo Internet: http://roadstar.com/images/ce/TTR-8634.pdf o eseguen-
do la scansione del seguente codice QR.
Por la presente, Roadstar Management SA declara que el equipo de radio tipo TTR-8634 cumple con la Directiva 2014/53 / EU.El texto completo de
la declaración de conformidad UE está disponible en la siguiente dirección de Internet: http://roadstar.com/images/ce/TTR-8634.pdf o escaneando
el siguiente código QR.
Por este meio, a Roadstar Management SA declara que o tipo de equipamento de rádio TTR-8634 está em conformidade com a Diretiva 2014/53 /
UE.O texto completo da declaração de conformidade UE está disponível no seguinte endereço de internet: http://roadstar.com/images/ce/TTR-
8634.pdf ou digitalizando o seguinte QR Code.
Wij, ondergetekende Roadstar Management SA, verklaren dat radioapparatuur van het type TTR-8634 voldoet aan de vereisten van Richtlijn
2014/53 / EU.De volledige tekst van deze EU-conformiteitsverklaring is beschikbaar op het volgende internetadres: http://roadstar.com/images/ce/
TTR-8634.pdf of door de volgende QR-code te scannen.
Společnost Roadstar Management SA tímto prohlašuje, že rádiové zařízení typu TTR-8634 je v souladu se směrnicí 2014/53 / EU.Úplné znění
prohlášení o shodě EU je k dispozici na této internetové adrese:http://roadstar.com/images/ce/TTR-8634.pdf nebo skenováním následujícího QR
kódu.
Roadstar Management SA týmto vyhlasuje, že rádiové zariadenie typu TTR-8634 je v súlade so smernicou 2014/53 / EÚ.Úplné znenie vyhlásenia o
zhode EÚ je k dispozícii na tejto internetovej adrese:http://roadstar.com/images/ce/TTR-8634.pdf alebo skenovaním nasledujúceho kódu QR.
Niniejszym Roadstar Management SA oświadcza, że urządzenie radiowe typu TTR-8634 jest zgodne z dyrektywą 2014/53 / UE.Pełny tekst deklaracji
zgodności UE dostępny jest pod następującym adresem internetowym:
http://roadstar.com/images/ce/TTR-8634.pdf lub skanując poniższy kod QR.
TEST REPORT - Energy Eciency Regulaons
Energy Ecieny of External Power Suppliers
Nameplate Informaon Value and precsion Unit
Verdict
(PASS/
FAIL)
Manufacturer's name or trade mark, commercial registraon mumber and address
Shenzen Tianhangxing Electronics Co., Ltd. 5/F, Building 10,
Zhengzhong Industrial Park, Quiaotou Village, Fuyong Town,
Baoan district, Shenzhen, Guangdong 518103 P.R. China
-- --
Model idener THX-120100KDV -- --
Input voltage 100-240V V -Input AC frequency 50/60Hz Hz --
Output voltage 12 V -Output current 1 A --
Output power 12 W --
Average acve eciency
84.22 % --
Eciency at load 10% 78.28 % --
No-load power consumpon
0.069 W --
Page 26

INTERNATIONAL WARRANTY - INTERNATIONALE GARANTIE
GARANTIE INTERNATIONALE - GARANZIA INTERNAZIONALE
GARANTIA INTERNACIONAL - GARANTIA INTERNACIONAL
ΔΙΕΘΝΗΣ ΕΓΓΥΗΣΗ
is a registered Trademark of Roadstar S.A. - Switzerland. All rights reser-
ved.
Purchas e date
Kaufdatum
Date d'achat
Data d'acquisto
Fecha de compra
Data de compra
Ημερομηνία αγοράς
Type of set Geräte
Type d'appareil
Tipo d'apparecchio
Tipo de aparato
Tipo de aparelho
Τύπος συσκευής
Roadstar- by means of its sales organisation, representative or distributor - will take
the necessary actions to restore the perfect functioning of the product. To repair or to
replace is at discretion of Roadstar or it’s reppresentative or distributor.
The warranty period is in accordance with directive 99/44/ CE of the European
Union. For all non EU members, please refer to the local law of each country.
This warranty does not cover normal wear and tear of the product and/or its parts,
any damage, failure, or loss caused by accident, misuse, and any other failure not
directly related to a defect of the product.
This warranty does not void consumer's rights in accordance with EU Directive99/44/
CE. For further information please visit the website www.roadstar.com, or write to
aftersales@roadstar.com.
DEUTSC H
Allgemeine "Roadstar" Garantiebedingungen
Die Firma "Roadstar" garantiert - durch die eigene Organisation und mit den hier
nachstehend im Detail aufgeführten Modalitäten - die korrekte Funktionsweise und
die EinwandfreiheitderProdukte mitder Markenbezeichnung "Roadstar".
Sollte ein Produkt nicht korrekt funktionieren oder Herstellungsfehleraufweisen,wird
"Roadstar"mit dem eigenen Vertriebsnetz oder durch den eigenen Vertrieb für die
Reparatursorgenoderwenn nicht möglich, fürden Ersatz des Produktes.
Die Garantiezeit ist in Übereinstimmung mit der Direktive 99/44/CEder Euro-
päischen Union. Für alle nicht Mitgliedsstaaten der EU, gilt die jeweils lokale gesetzlich vorgeschriebene Garantiezeit.
Ausgeschlossen von der Garantie sind Verschleißteile, ästhetische Teile, Produkte
mitbeschädigtem Garantiesiegel oder nicht lesbarerSeriennummer, sowie die Schäden,
die zufällig durch Fahrlässigkeit, unzulässigen Gebrauch, durch den Gebrauch von nicht
originalenErsatzteilen, ungeeigneter Verpackung oder ausirgen deinem Grundverursacht werden, der den "Roadstar" Produkten nicht zu zuschreiben sind.
Diese "Garantie" beeinträchtigt nicht die Rechte des Verbrauchers gemässderDirektive 99/44/ CE.
Weitere Informationen finden Sie im Internet unterderAdresse www.roadstar.com
oder richten Sie Ihre Anfragen bitte an die E-Mail Adresse aftersa-
les@roadstar.com.
ESPAÑOL
Condiciones generales de garantía Roadstar
Por medio de su organización con las modalidades precisadas a continuación, Roadstar garantiza el buen funcionamiento y la ausencia de defectos de fabricación en los
productos con marca Roadstar durante el periodo de garantía.
En caso de malfuncionamiento o defecto de fabricación del producto, Roadstar proce-
derá a su reparación y cuando esto no fuese posible, a su sustitución, por medio de su
organización de venta o de su distribuidores.
El período de garantía es el establecido en la Ley9 9/ 44/CEde la Unión Europea.
Para todos los miembros no pertenecientes a la Unión Europea, por favor seguir las
indicaciones marcadas por cada país.
No están cubiertas porla garantía las partes sujetas a desgaste, las partes estéticas, los productos con sello de garantía dañado o número de serie ilegible, además que
los daños provocados por casos fortuitos, negligencias, usos incorrectos, uso de
piezas de recambio no originales, embalajes no adecuados, o cualquier otra causa no
atribuible a defectos del producto Roadstar.
La presente garantía no perjudica los derechos del consumidor según la directiva
99/44/ CE.
Para mayores informaciones consulte el sitio www.roadstar.com o solicite informacio-
nes a la dirección email aftersales@roadstar.com
PORTUGUES
Condições Gerais da Garantia Roadstar
Roadstar- mediantea própria organizaçãoe nas formas logo a seguir pormenorizadas
- garante um bom funcionamento e a ausência de defeitos de fabricação para os
produtos da marca Roadstar durante o prazo de garantia.
No caso demau funcionamento ou de defeito de fabricação o consumidor deverá contactar oDistribuidor Da Roadstar do próprio país, que se encontramediante consulta do
sito www.roadstar.com
O período de garantia está de acordo com a directiva 99/ 44/CEda União Europeia.
Para os que não são membros da UE, por favor consulte a lei em vigor respeitante a
cada país.
Não estão cobertos pela garantia: as peças sujeitas a desgaste, as peças de
enfeite, os Produtos com lacre degarantia danificado ou número desérie ilegível, além
dos danos provocados por caso fortuito, negligências, utilização imprópria, emprego
de peças de reposição não originais, embalagens impróprias ou de quaisquer outras
causas não imputáveis a defeitos do produto da Roadstar.
A presente "garantia" não prejudica os direitos a que consumidor é titular nos termos
da directiva 99/44/CE.
Para maiores informações consulte o sito www.roadstar.com ou solicite-os ao
endereço de correio electrónico: aftersales@roadstar.com.
ΕΛΛΗΝΙΚΑ
Γενικοί Οροι Εγγύησης Roadstar
Η Εταιρεία (Roadstar) εγγυάται για τα προϊόντα της για τυχόν κατασκευαστικά λάθη,
στα υλικά και / ή στην εργασία κατά την διάρκεια της περιόδου που ισχύει η εγγύηση,
όπως καθορίζεται στο κεφάλαιο (4).
Εάν το προϊόν δεν λειτουργεί σωστά ή έχει κάποιο κατασκευαστικό πρόβλημα και
βρίσκεται εντός εγγυήσεως, όπως περιγράφεται στο κεφάλαιο (4),
η εταιρεία θα λάβει τα απαραίτητα μέτρα για να αποκαταστήσει την σωστή λειτουργία
της συσκευής. Η επιδιόρθωση ή η αντικατάσταση της συσκευής είναι στην κρίση της
εταιρείας. Εάν το προϊόν δεν λειτουργεί σωστά ή έχει κάποιο κατασκευαστικό
πρόβλημα, ο καταναλωτής θα πρέπει να επικοινωνήσει με τον εξουσιοδοτημένο
αντιπρόσωπο.
Η λίστα με τους αντιπροσώπους ανά χώρα μπορεί να αναζητηθεί στην ιστοσελίδα
www.roadstar.com.
Η χρονική διάρκεια της εγγύησης ισχύει σύμφωνα με την οδηγία 99/44/CE της
Ευρωπαϊκής Ένωσης. Για όλες τις χώρες που δεν ανήκουν στην Ευρωπαϊκή
Ένωση, παρακαλώ αναφερθείτε στη νομοθεσία της κάθε χώρας.
Αυτή η εγγύηση δεν καλύπτει την φυσιολογική φθορά της συσκευής και/ ή μέρη
αυτής, οποιαδήποτε ζημιά που έχει προκληθεί από ατύχημα, από κακή χρήση και
κάθε άλλη ζημιά η οποία δεν έχει άμεση σχέση με ελάττωμα της συσκευής.
Αυτή η εγγύηση δεν θίγει τα δικαιώματα του καταναλωτή, σύμφωνα με τον κανονισμό
99/44/CE της Ευρωπαϊκής Ένωσης.
Για περισσότερες πληροφορίες επισκεφθείτε την ιστοσελίδα www.roadstar.com
ή γράψτε στην ηλεκτρονική διεύθυνση aftersales@roadstar.com .
FRANÇAIS
Conditions Générales de Garantie Roadstar
La société Roadstar par le biais de sa propre organisation et avec les modalités indiquées cidessous - garantit le bon fonctionnement et l'absence de défauts de fabrication des produits ayant
la marque Roadstar, pendant la période de garantie. En cas de dysfonctionnement ou de défaut de
fabrication du produit, la société Roadstar, par le biais de son organisation de vente ou de ses
propres distributeurs, prendra à sa charge la réparation et, au cas où cela ne serait pas possible, le
remplacement du produit. La reparation ou le remplacement du produit est a la discretion de Roadstar or de son distributeur.
Le délai de Garantie est conforme à la directive 99/44/CE de l'Union Européenne. Pour les autres
Pays, veuillez vous référer aux lois en vigueur dans chacun d'eux.
Ne sont pas couvertes par la garantie les parties sujettes à usure, les parties esthétiques, les produits ayant un cachet de garantie endommagé ou un numéro de série illisible, ainsi que les dommages provoqués par un cas fortuit, des négligences, un usage impropre, l'emploi de pièces de
rechange non d'origine, ou n'importe quelle autre cause pouvant être attribuée à des défauts du
produit Roadstar.
La présente "garantie" ne préjudicie pas les droits du consommateur énoncés dans la directive
99/44/CE.
Pour toute information supplémentaire, consultez le site www.roadstar.com ou adressez votre
demande par e-mail aftersales@roadstar.com.
ITALIANO
Condizioni Generali Garanzia Roadstar
Roadstar- per mezzo della propria organizzazione e con le modalità qui di seguito precisate garantisce il buon funzionamento e l'assenza di difetti di fabbricazione per i prodotti con marchio Roadstar, durante il periodo di garanzia.
In caso di malfunzionamento o di difetto di fabbricazione del prodotto la Roadstar provvederà,
con la propria organizzazione o il proprio Distributore, alla riparazione e, ove ciò non fosse
possibile, alla sostituzione del prodotto. La riparazione o la sostituzione è a discrezione della
Roadstar o del suo Distributore.
Il periodo di Garanzia segue quanto riportato nella direttiva 99/44/CE dell'Unione Europea.
Per tutti i Paesi non membri della UE, si fà riferimento alle leggi vigenti del paese di appartenenza. La garanzia ha validità solo se il presente certificato è stato compilato in ogni sua parte e accompagnato da idonea prova di acquisto, fiscalmente valida.
Non sono coperti da garanzia le parti soggette ad usura, le parti estetiche, i Prodotti con sigillo
di garanzia danneggiato o numero di serie illeggibile, nonché i danni provocati da caso fortuito,
negligenze, uso improprio, uso di ricambi non originali, imballaggi impropri, o da qualunque altra
causa non imputabile a difetti del prodotto della Roadstar.
La presente "garanzia" non pregiudica i diritti di cui il consumatore è titolare secondo la direttiva
99/44/CE.
Per ulteriori informazioni consultare il sito www.roadstar.com, o inviare richieste all'indirizzo
email aftersales@roadstar.com.
ENGLISH
Roadstar Warranty Terms and Conditions
Roadstar- by means of its sales organisation, representative or distributor- guarantees its
products against manufacturing defects in material and/or workmanship throughout the period of
warranty.
Should the product fail to work or shows manufacturing defect within the warranty period,
Dealer's Stamp / Hàndlerstampel / Timbre du négociant / Timbro del negoziante / Sello del
establecimento vendedor / Carimbo da loja de Venda / Σφραγίδα του καταστήματος
Serial No.
Serien Nr.
No. de série
No. di serie
No. de serie
No. de série
ΑΡΙΘΜΟΣ ΣΕΙΡΑ
Page 27

is a registered Trademark of Roadstar S.A. - Switzerland All rights reserved
Roadstar Management SA, via Passeggiata 7 CH 6883 Novazzano (Switzerland)
VER.1.0
22.06.2020
 Loading...