

Roadstar RCR-777UD+ User Manual

www.roadstar.com
RCR-777UD+
Portable Stereo System
User manual
Bedienungsanleitung
Manuel d’instructions
Manuale d’istruzioni
Manual de instrucciones
Gebruiksaanwijzing

INDEX
English Page 1
Deutsch Seite 7
Français Page 13
Italiano Pagina 19
Español Página 25
Nederlands Pagina 31
Your new unit was manufactured and assem-
bled under strict ROADSTAR quality control.
Thank you for purchasing our product for your
music enjoyment. Before operating the unit,
please read this instruction manual carefully.
Keep it also handy for further future referen-
ces.
Votre nouvel appareil a été fabriqué et monté
en étant soumis aux nombreaux tests ROADSTAR. Nous espérons que cet appareil vous
donnera entière satisfaction. Avant de vous
adonner à ces activités, veuillez lire attentivement ce manuel d’instructions. Conservez-le à
portée de main à fin de référence ultérieure.
Vuestro nuevo sistema ha sido construido
según las normas estrictas de control de calidad ROADSTAR. Le felicitamos y le damos
las gracias por su elección de este aparado.
Por favor leer el manual antes de poner en
funcionamiento el equipo y guardar esta documentación en case de que se necesite nuevamente.
Ihr neues Gerät wurde unter Beachtung der
strengen ROADSTAR Qualitätsvorschriften gefertigt. Wir danken Ihnen für den Kauf unseres
Produktes und wünschen Ihnen optimalen Hörgenuss. Bitte lesen Sie diese Bedienungsanleitung durch, und heben Sie sie auf, um jederzeit
darin nachschlagen zu können.
Il vostro nuovo apparecchio é stato prodotto ed
assemblato sotto lo stretto controllo di qualità
ROADSTAR. Vi ringraziamo di aver acquistato
un nostro prodotto per il vostro piacere d’ascolto. Prima di procedere all'utilizzo dell'apparecchio, leggete attentamente il manuale d’istruzioni e tenetelo sempre a portata di mano per futuri
riferimenti.
Seu novo aparelho foi construido e montado sob
o estrito controle de qualidade da ROADSTAR.
Agradecemos por ter comprado nosso produto
para a sua diversão. Antes de usar esta unidade
é necessário ler com atençâo este manual de
instruções pare que possa ser usada apropriadamente; mantenha o manual ao seu alcance
para outras informações.
RCR-777UD+
TOP
FRONT
REAR

1 English
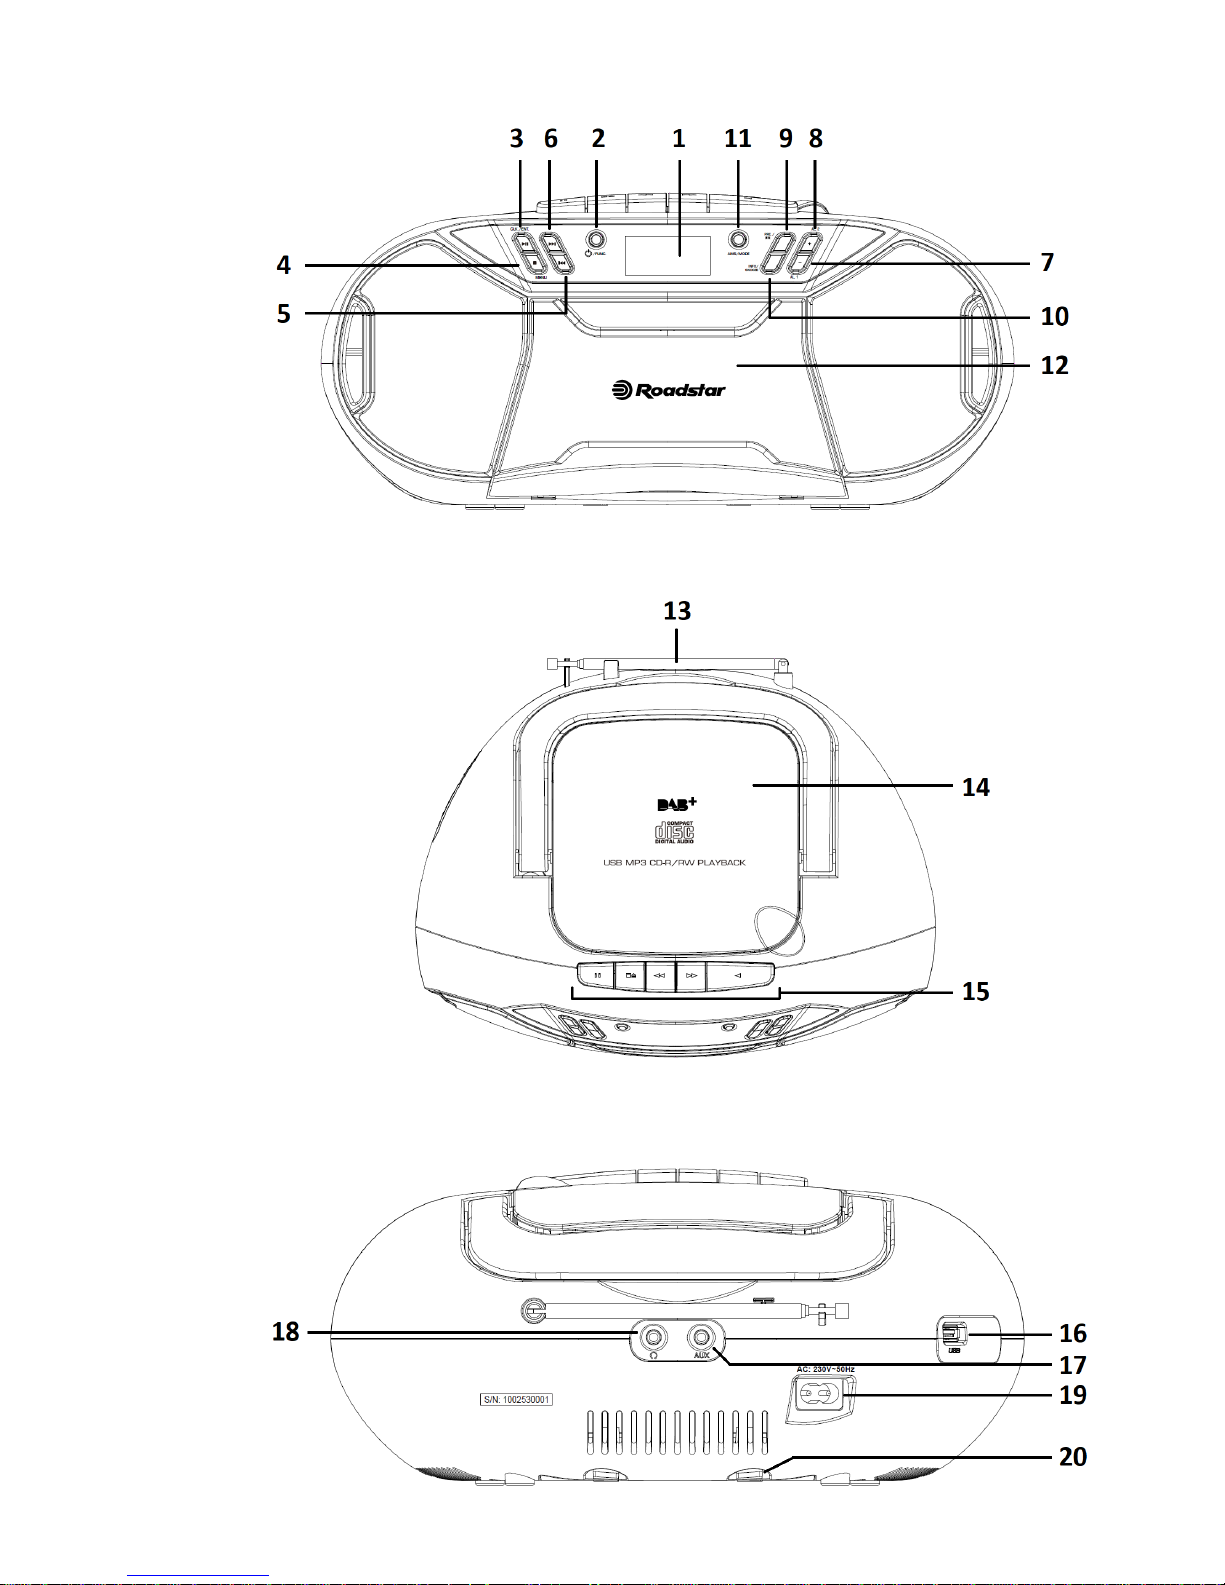
LOCATION OF CONTROLS
1. LCD DISPLAY
2. POWER / FUNCTION BUTTON
3. PLAY-PAUSE / CLOCK / ENTER: Press to play. When it plays, press to stop
playback temporarily and press again to resume playback.
4. STOP: Press when you want to finish playback.
5. BACK / TUNE -: Press to go to the previous track, press & hold to go back fast.
6. NEXT / TUNE +: press to go to the next track, press & hold to go fast forward.
7. VOLUME - / ALARM 1
8. VOLUME + / ALARM 2
9. PRESET / FOLDER
10. INFO / SNOOZE
11. AUTOMATIC SEARCH / MODE
12. CASSETTE DOOR
13. ANTENNA
14. CD DOOR
15. CASSETTE CONTROLS (FROM LEFT TO RIGHT)
1. PAUSE
2. STOP / EJECT
3. FAST FORWARD
4. REWIND
5. PLAY
16. USB SOCKET
17. AUX-IN SOCKET
18. HEADPHONES OUT
19. AC PLUG
20. BATTERY COMPARTMENT

2 English
PRECAUTION
INSTRUCTIONS - All the safety and operating instructions should be read before
the radio is operated. The manual should be retained for future reference.
HEED WARNINGS - All warnings on the appliance and in the operating instruc-
tions should be adhered to.
WATER AND MOISTURE - The appliance should not be used near liquids or in
rooms with a high level of humidity.
VENTILATION - The appliance should be situated so that its location or position
does not interfere with its proper ventilation.
HEAT - The appliance should be situated away from heat sources such as radia-
tors, stoves or other appliances that produce heat.
POWER SOURCE - The radio should be connected to power supply only of the
type described in the operating instructions or as marked on the appliance.
POWER CORD PROTECTION - Power supply cords should be routed so that they
are not likely to be walked on or pinched by items placed upon/against them.
OBJECT AND LIQUID ENTRY - Care should be taken so that objects do not fall
and liquids are not spilled into the enclosure through openings.
DAMAGE REQUIRING SERVICE
The appliance should be serviced by qualified service personnel when:
- The power supply cord or plug has been damaged;
- Objects have fallen into or liquids has been spilled into the radio;
- The appliance has been exposed to rain;
- The appliance has been dropped or the enclosure damaged;
- The appliance does not appear to operate normally.
SERVICING - The user should not attempt to service the appliance beyond that
descrive in the user operating instructions. All the servicing should be referred to
qualified service personnel
Note: If the display does not function properly or no reaction to operation of
any control may due to the electrostatic discharge. Switch off and disconnect the AC
cord and remove all the batteries, then turn the power back on after a few seconds.
POWER SOURCES
AC POWER: You can power your portable stereo system by plugging the AC po-
wer cord into the AC plug (19) at the back of the unit and into a wall AC power outlet.
Check that the rated voltage of your appliance matches your local voltage.
Make sure that the AC power cord is fully inserted into the appliance.
BATTERY POWER: To use the radio with batteries, disconnect the AC power cord
and insert 6 × “LR14” batteries into the compartment (20).
Be sure that the batteries are inserted correctly to avoid damage to the appliance.
Remove the batteries when the radio will not be used for a long period of time, as this
will cause leakage to the batteries and subsequently damage to your radio.

3 English
CLOCK AND DATE SETTING
In stand-by mode:
1. Press and hold the [CLOCK/ENTER] button (3) until the display shows "12/24
Hr";
2. Press the [SKIP -/+] buttons (5/6) to choose 12 or 24 hour format;
3. Confirm with the [CLOCK/ENTER] button (3);
4. Press the [SKIP -/+] buttons (5/6) to adjust the hour;
5. Confirm with the [CLOCK/ENTER] button (3);
6. Press the [SKIP -/+] buttons (5/6) to adjust the minutes;
7. Confirm with the [CLOCK/ENTER] button (3);
8. Repeat steps 2 and 3 to set the date.
ALARM SETTING
In stand-by mode:
1. Press and hold the [ALARM 1] button (7) to enter into the Alarm setting.
2. Press the [SKIP -/+] buttons (5/6) to adjust the hour;
3. Confirm with the [ALARM 1] button (7);
4. Press the [SKIP -/+] buttons (5/6) to adjust the minutes;
5. Confirm with the [ALARM 1] button (7);
6. Press the [SKIP -/+] buttons (5/6) to choose the alarm mode (Buzzer, FM, DAB,
CD or USB);
7. Confirm with the [ALARM 1] button (7);
8. Press the [SKIP -/+] buttons (5/6) to adjust the volume;
9. Confirm with the [ALARM 1] button (7).
To set the second Alarm, repeat all the steps with [ALARM 2] (8) instead of [ALARM
1].
Note: To deactivate the Alarm, press the [ALARM 1] button (7) (the alarm will
stop, but the setting will remain). To remove the settings, in stand-by mode, press repeatedly the [ALARM 1] button (7) until you see “Alarm off”.
TO USE THE RADIO
1. Press the [POWER] button (2) to power on the unit;
2. Select the desired audio source;
3. (Please see detailed instructions for each Source in the following chapters);
4. Adjust the volume with the [VOLUME -/+] buttons (7/8) to the desired level;
5. Press & hold the [POWER] button (2) to turn OFF the unit.
DAB RADIO OPERATION
1. Select “DAB” mode by pressing the [FUNCTION] button (2);
2. (The first time you select this function, the radio will scan the DAB radio stations
automatically. It will display and play the first station after the scan is done);
3. In case the display shows “No DAB Service”, press & hold the [AMS] button (11)
to start automatic scan;
4. To select the desired radio station press repeatedly the [SKIP -/+] buttons (5/6).
PRESET
You can program a maximum of 30 preset radio stations.

4 English
1. Select your favourite station as explained before;
2. Press [AMS/MODE] button (11). “Preset Store” will appear on display;
3. Press [SKIP -/+] (5/6) to select the preset number;
4. Press [ENTER] (3) to confirm.
To recall a preset station press repeatedly the [PRESET] button (9).
FM RADIO OPERATION
1. Select “FM” mode by pressing the [FUNCTION] button (2);
2. Adjust radio frequency to your desired station as follows:
MANUAL SCAN: Use the [SKIP -/+] buttons (5/6) to fine tune your desired station in
a step of 0.05 MHz or press and hold the [SKIP -/+] buttons (5/6) to scan the next/
previous available station.
AUTO SCAN: Press & Hold [AMS] button (11) to start automatic scan.
PRESET
The PROGRAMMING operation is the same as that of DAB Preset.
Note: For a better reception, reorient the antenna (13).
TAPE OPERATION
1. Select “TAPE” mode by pressing the [FUNCTION] button (2);
2. Press [STOP/EJECT] (15.2) to open the cassette door (12) and insert your tape;
3. Close the cassette door (12);
4. Press [PLAY](15.5) to start playing tape.
Press PAUSE (15.1) when you want to stop playing tape operation temporarily,
press again to resume tape operation.
Press STOP/EJECT (15.2) when finished, press again to open the cassette door.
Press F.FWD (15.3) or RWD (15.4) to start rapid tape winding either forward or re-
verse direction.
CD-MP3 OPERATION
1. Select “CD” mode by pressing the [FUNCTION] button (2);
2. Open the CD door (14) and place a CD-MP3 disc with the label up in the CD com-
partment.
3. Close the CD door (14). Focus search is performed and playback will start auto-
matically from the first track.
PROGRAMMING
Up to 20 tracks can be programmed for disc play in any order.
1. Stop the playback by pressing [STOP] (4);
2. Press [AMS/MODE] (11), the display (1) will show “P01” and flash;
3. Select desired track by using [SKIP -/+] buttons (5/6);
4. Press [AMS/MODE] (11) again to confirm desired track into the program
memory;
5. Repeat step 3 and 4 to enter additional tracks into the program memory;
6. When all the desired tracks have been programmed, press [PLAY] (3) to play the
disc in the order you have programmed;

5 English
7. Press [STOP] (4) twice to terminate programmed play.
USB OPERATION
1. Select “CD” mode by pressing the [FUNCTION] button (2);
2. Plug an USB device into the USB socket (16);
3. Playback will start automatically from the first track.
PROGRAMMING
The PROGRAMMING operation is the same as that of CD-MP3.
Note: Some mp3 player may not be able to play via the usb socket. this is not a
maul-function of the system.
Note: To avoid damage to USB memory, remove it only when the radio is turned
off.
REPEAT - RANDOM
Press repeatedly [AMS/MODE] button (11) to select the desired playback mode (only
for CD and USB mode).
AUX IN OPERATION
1. Select “AUX” mode by pressing the [FUNCTION] button (2);
2. Use one male to male 3.5mm jack cable (not included) to connect any external
audio device to the AUX-IN socket (17).
Note: Music control (play, pause, etc) must be done from your external device.
6 English
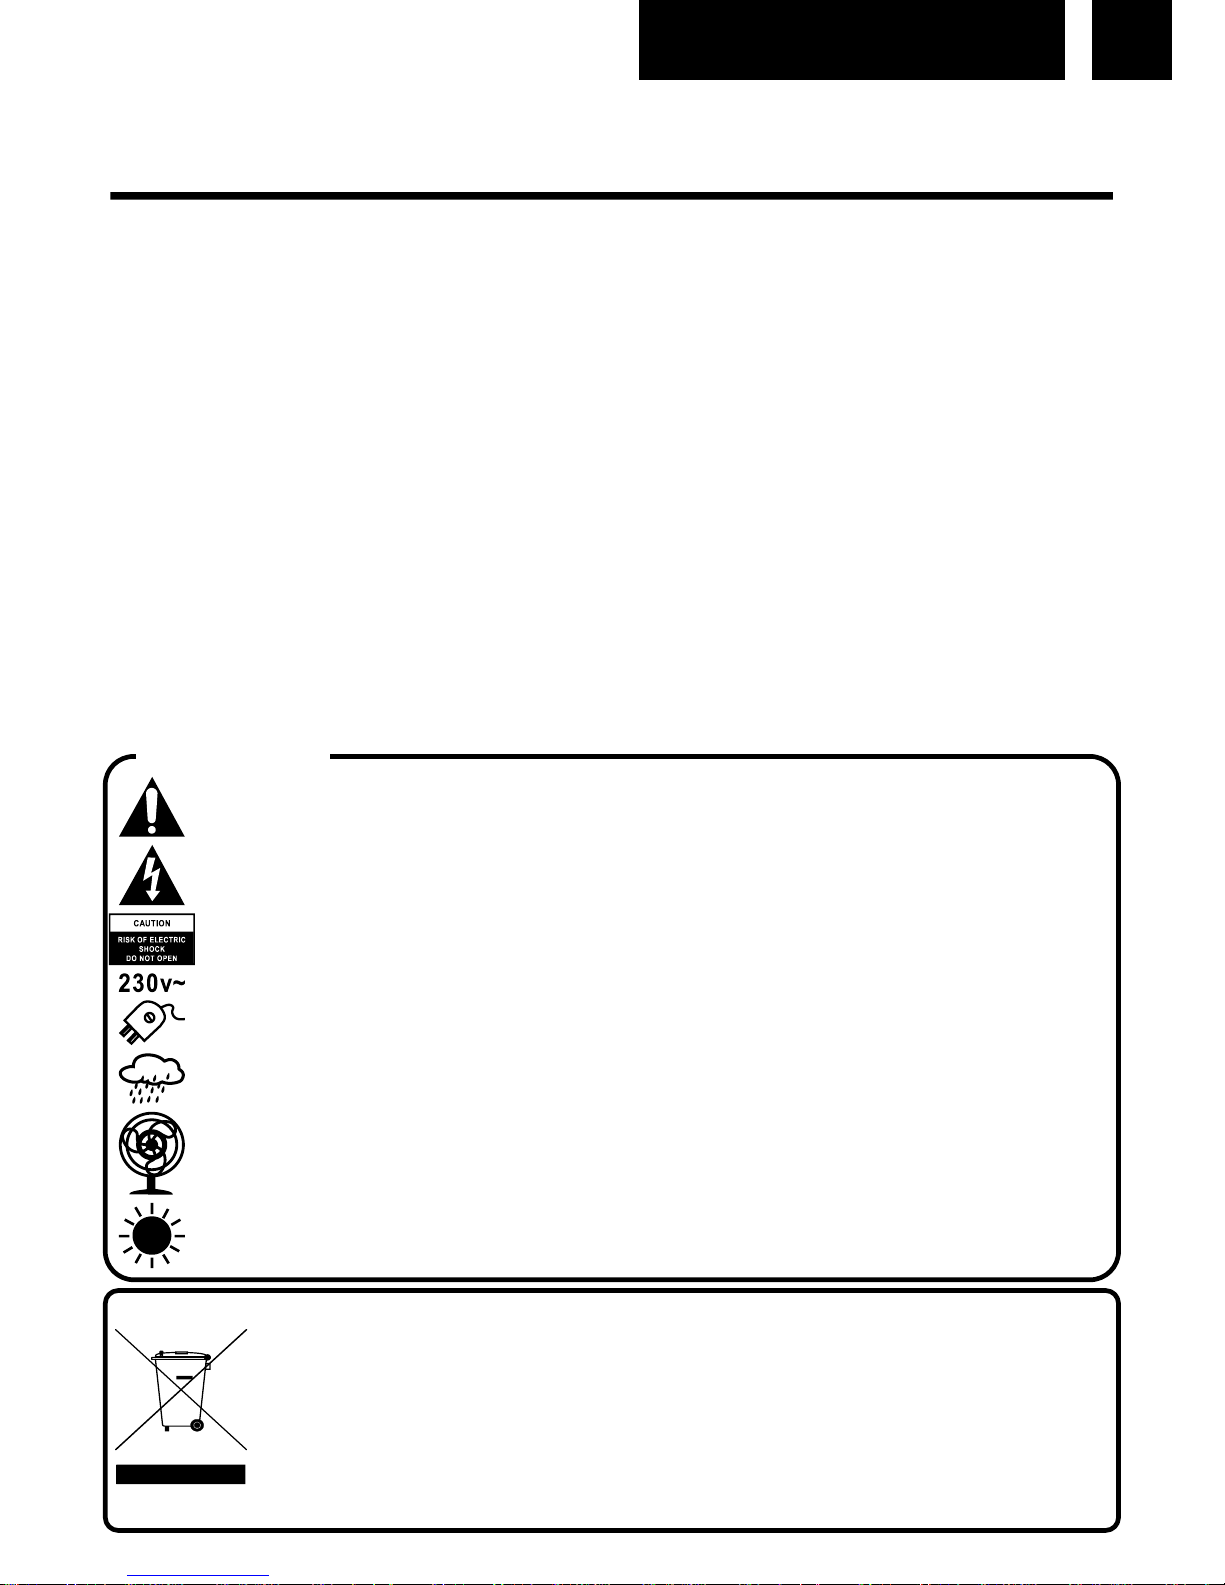
This marking shown on the product or its literature, indicates that it should not be disposed with other household wastes at the end of its working life. To prevent possible harm to the environment or human health from
uncontrolled waste disposal, please separate this from other types of wastes and recycle it responsibly to
promote the sustainable reuse of material resources. Household users should contact the retailer where
they purchased this product, or their local government office, for details of where and how they can take this
item for environmentally safe recycling. Business users should contact their supplier and check the terms
and conditions of the purchase contract. This product should not be mixed with other commercial wastes for
disposal.
CORRECT DISPOSAL OF THIS PRODUCT
(Waste Electrical & Electronic Equipment)
WARNINGS
The exclamation point within the triangle is a warning sign alerting the user of important instructions accompanying the product.
The lightening flash with arrowhead symbol within the triangle is a warning sign alerting the user
of “dangerous voltage” inside the unit.
To reduce the risk of electric shock, do not remove the cover. No user serviceable parts inside
the unit. Refer all servicing to qualified personnel.
This unit operates on 230V ~ 50Hz. If the unit is not used for a long period of time, remove the
plug from the AC mains.
Ensure all connections are properly made before operating the unit.
This unit must not be exposed to moisture or rain.
This unit should be positioned so that it is properly ventilated. Avoid placing it, for example, close
to curtains, on the carpet or in a built-in installation such as a bookcase.
Do not expose this unit to direct sunlight or heat radiating sources.
TECNICAL SPECIFICATIONS
Power Supply: AC 230V ~ 50Hz.
DC 9V = (6 x “LR14” Batteries).
Radio Frequency Coverage
DAB+/DAB: BAND III 174.928 - 239.200 MHz.
FM: 87.5 - 108 MHz.
Speaker
Output Power: 2 x 2 Wrms.
General
Headphones Out: 3.5mm jack plug.
Aux-In: 3.5mm jack plug.
Specifications and design are subject to possible modifications without notice due to
improvement.

7 Deutsch
ORT DER BEDIENELEMENTE
1. LCD-ANZEIGE
2. POWER / FUNCTION (EIN-AUS / FUNKTIONSREGLER)
3. PLAY-PAUSE / CLOCK (UHR) / ENTER (EINGABE): Drücken für die Wiederga-
be. Drücken Sie zum vorübergehenden Anhalten während der Wiedergabe auf
diese Taste, und drücken Sie die Taste erneut, um die Wiedergabe fortzusetzen.
4. STOP: Drücken Sie diese Taste, um die Wiedergabe zu beenden.
5. BACK / FREQUENZ -: Drücken Sie diese Taste, um zum vorherigen Track zu
wechseln, und halten Sie diese Taste gedrückt, um zurückzuspulen.
6. NEXT / FREQUENZ +: Drücken Sie diese Taste, um zum nächsten Track zu
wechseln, und halten Sie diese Taste gedrückt, um vorzuspulen.
7. LAUTSTÄRKE - / ALARM 1
8. LAUTSTÄRKE + / ALARM 2
9. PRESET (VOREINSTELLUNGEN) / ALBUM
10. INFO / SNOOZE
11. AMS / MODE (AUTOMATISCHER SCAN / MODUS)
12. KASSETTENFACH
13. ANTENNE
14. CD-TÜR
15. KASSETTEN-KONTROLLEN (VON LINKS NACH RECHTS)
1. PAUSE
2. STOP / EJECT
3. FAST FORWARD
4. REWIND
5. PLAY
16. USB-BUCHSE
17. AUX-IN-BUCHSE
18. KOPFHÖRER AUSGANG
19. NETZSTECKER
20. BATTERIEFACH

8 Deutsch
SICHERHEITSHINWEISE
ANWEISUNGEN - Alle Sicherheits- und Betriebshinweise sollten sorgfältig
durchgelesen werden, bevor Sie das Radio in Betrieb nehmen.
WARNHINWEISE BEACHTEN - Alle Warnhinweise am Gerät und in den Be-
triebshinweisen sollten befolgt werden.
WASSER UND FEUCHTIGKEIT - Das Gerät sollte nicht in der Nähe von Flüs-
sigkeiten oder in Räumen mit hoher Luftfeuchtigkeit benutzt werden.
BELÜFTUNG - Das Gerät sollte so aufgestellt werden, dass die Luftzirkulation
nicht beeinträchtigt wird.
WÄRME - Das Gerät darf nicht in der Nähe von Wärmequellen, wie Heizkörpern,
Öfen oder anderen Geräten platziert werden, die Wärme erzeugen.
STROMQUELLE - Das Gerät sollte nur an die Stromversorgung angeschlossen
werden, die in der Bedienungsanleitung oder auf dem Gerät angegeben ist.
NETZKABELSCHUTZ - Netzkabel sollten so verlegt werden, dass man nicht auf
sie tritt und so, dass sie nicht durch Gegenstände eingeklemmt werden.
EINTRITT VON FREMDKÖRPERN UND FLÜSSIGKEIT - Es ist darauf zu ach-
ten, dass keine Objekte auf das Gerät fallen und dass keine Flüssigkeiten durch
Öffnungen in das Gehäuse dringen.
BESCHÄDIGUNGEN, BEI DENEN WARTUNG ERFORDERLICH IST
Das Gerät sollte von qualifiziertem Wartungspersonal gewartet werden, wenn:
- Das Netzkabel oder der Netzstecker beschädigt wurde;
- Gegenstände auf das Radio gefallen oder Flüssigkeiten eingedrungen sind; -
Das Gerät Regen ausgesetzt worden ist;
- Das Gerät heruntergefallen oder das Gehäuse beschädigt ist;
- Das Gerät scheinbar nicht normal funktioniert.
WARTUNG - Der Benutzer sollte nicht versuchen, das Gerät anders, als in der
Bedienungsanleitung beschrieben, zu benutzen. Alle Wartungsarbeiten müssen
von qualifizierten Servicemitarbeitern durchgeführt werden
Hinweis: Wenn das Display funktioniert nicht ordnungsgemäß oder reagiert
nicht auf die Betätigung der Kontrolle, aufgrund einer elektrostatischen Entladung.
Ziehen Sie das Netzkabel und entfernen Sie die Batterien, dann und schließen Sie die
Stromversorgung einige Sekunden später wieder an.
STROMQUELLEN
WECHSELSTROM: Sie können Ihr tragbares Stereosystem mit Strom versorgen, in-
dem Sie das Netzkabel in den Netzstecker (19) an der Rückseite des Gerätes und
dann in die Steckdose an der Wand stecken.
Prüfen Sie, dass die Nennspannung des Geräts mit Ihrer lokalen Spannung übereinstimmt. Stellen Sie sicher, dass das Netzkabel vollständig in das Gerät eingesetzt ist.
BATTERIESTROM: Um das Radio mit Batterien zu verwenden, ziehen Sie das
Netzkabel ab und legen Sie 6 × „LR14“-Batterien in das Batteriefach (20) ein.
Stellen Sie sicher, dass die Batterien richtig eingelegt sind, um Schäden am Gerät zu
vermeiden. Entfernen Sie die Batterien, wenn das Gerät für längere Zeit nicht verwendet wird, da dies zu einer Leckage an den Batterien führen und in der Folge zu Ihr
Radio beschädigen kann.

9 Deutsch
UHREINSTELLUNG
Im Standby-Modus:
1. Drücken und halten Sie die Taste [CLOCK/ENTER] (3) "12/24 Hr" auf dem Di-
splay blinde;
2. Drücken Sie die Tasten [SKIP -/+] (5/6), um die richtige Stunde einzustellen;
3. Drücken Sie die Taste [CLOCK/ENTER] (3) um zu bestätigen;
4. Die Stundenanzeige auf dem Display blinkt. Drücken Sie die Tasten [SKIP -/+]
(5/6), um die richtige Stunde einzustellen;
5. Drücken Sie die Taste [CLOCK/ENTER] (3) um zu bestätigen;
6. Die Minutenanzeige auf dem Display beginnt zu blinken. Drücken Sie die Tasten
[SKIP -/+] (5/6) um die richtige Minute einzustellen;
7. Drücken Sie die [CLOCK/ENTER] (3) um zu bestätigen;
8. Wiederholen Sie Schritt 2 und 3, um das Datum anzupassen.
ALARMEINSTELLUNG
Im Standby-Modus:
1. Drücken und halten Sie die Taste [ALARM 1] (7);
2. Die Stundenanzeige auf dem Display blinkt. Drücken Sie die Tasten [SKIP -/+]
(5/6), um die richtige Stunde einzustellen;
3. Drücken Sie die Taste [ALARM 1] (7) um zu bestätigen;
4. Die Minutenanzeige auf dem Display beginnt zu blinken. Drücken Sie die Tasten
[SKIP -/+] (5/6) um die richtige Minute einzustellen;
5. Drücken Sie die [ALARM 1] (7) um zu bestätigen;
6. Drücken Sie die Tasten [SKIP -/+] (5/6), um die richtige Alarm-Modus einzustellen
(Buzzer, FM, DAB, CD or USB);
7. Drücken Sie die [ALARM 1] (7) um zu bestätigen;
8. Ändern Sie die Lautstarke mit die Tasten [SKIP -/+] (5/6) auf die gewünschte Pe-
gel;
9. Drücken Sie die [ALARM 1] (7) um zu bestätigen;
Um den zweiten Alarm einzustellen, wiederholen Sie die obigen Schritte mit [ALARM
2] (8) anstelle von [ALARM 1].
Hinweis: Um den Alarm zu deaktivieren, drücken Sie die Taste [ALARM 1] (7)
(der Alarm stoppt, aber die Einstellung bleibt bestehen). Um die Einstellungen zu entfernen, drücken Sie im Standby-Modus wiederholt die Taste [ALARM 1] (7) , bis
"Alarm off" (“Alarm aus”) angezeigt wird.
RADIO BENUTZEN
1. Drücken Sie zum Einschalten die Taste [POWER] (2);
2. Wählen Sie die gewünschte Audioquelle;
3. (Bitte beachten Sie detaillierte Anweisungen für jede Quelle in den folgenden Ka-
piteln);
4. Ändern Sie die Lautstarke mit die Tasten [LAUTSTÄRKE -/+] (7/8) auf die gewün-
schte Pegel;
5. Drücken und halten Sie die Taste [POWER] (2) zum Ausschalten des Radios ge-
drückt.

10 Deutsch
DAB RADIOBETRIEB
1. Wählen Sie den "DAB" -Modus durch Drücken die Taste [FUNKTION] (2);
2. (Wenn Sie das DAB Radio zum ersten Mal auswählen, sucht das Gerät automa-
tisch nach DAB-Radiosendern. Wenn die Suche abgeschlossen ist, wird der erste
Sender angezeigt und gespielt);
3. Wenn die Anzeige „No DAB Service“ („Kein DAB-Service“) anzeigt, halten Sie die
Taste [AMS] (11) lange gedrückt, um den Scan-Vorgang zu starten;
4. Drücken Sie die Tasten [SKIP -/+] (5/6), um den Radiokanal zu wählen.
PRESET
Sie können auf maximal 30 voreingestellten Stationen aufs Programm setzen.
1. Wählen Sie Ihre Lieblings-Radiosender im manuellen oder automatischen Modus.
2. Drücken Sie die Taste [AMS/MODE] (11). “Preset Store” wird auf dem Bildschirm
erscheinen.
3. Drücken Sie die Tasten [SKIP -/+] (5/6) die Vorwahlnummer auszuwählen;
4. Drücken Sie die Taste [ENTER] (3) um zu bestätigen.
Drüken Sie die Taste [PRESET] (9), um einen voreingestellten Sender aufzurufen.
FM RADIOBETRIEB
1. Wählen Sie den "FM" -Modus durch Drücken die Taste [FUNKTION] (2);
2. Wählen Sie den gewünschte Station wie folgt:
MANUALLER SCAN: Verwenden Sie die Tasten [SKIP -/+] (5/6), um den gewün-
schten Sender in Schritten von 0,05 MHz abzustimmen, oder halten Sie die Tasten
[SKIP -/+] (5/6) gedrückt, um den nächsten / vorherigen Funkstation.
AUTO SCAN: Drücken und halten Sie die Taste [AMS](11), um den automatischen
Suchlauf zu starten.
PRESET
Der PROGRAMMIER-Vorgang ist der gleiche wie DAB Preset.
Hinweis: Richten Sie die Antenne (13) für einen besseren Empfang aus.
KASSETTENBETRIEB
1. Wählen Sie den "TAPE" („KASSETTE“) -Modus durch Drücken die Taste
[FUNKTION] (2);
2. Drücken Sie die Taste [STOP/EJECT] (15.2), um das Kassettenfach (12) zu öff-
nen und Ihre Kassette einzulegen;
3. Schließen Sie das Kassettenfach (12);
4. Drücken Sie die Taste [PLAY] (15.5), um die Wiedergabe zu starten.
Drücken die Taste PAUSE (15.1), wenn die Wiedergabe der Kassette vorüberge-
hend anhalten möchten. Drücken erneut, um die Wiedergabe fortzusetzen.
Drücken Sie die Taste STOP/EJECT (15.2). Wenn Sie fertig sind, drücken Sie die
Taste erneut, um das Kassettenfach zu öffnen.
Drücken Sie die Taste F.FWD (15.3) oder RWD (15.4), um die Kassette entweder
schnell vorwärts oder rückwärts zu spulen.
 Loading...