

Roadstar RCR-3750UMP Instruction Manual

is a registered Trademark of Roadstar S.A. - Switzerl and All rights reserved
www.roadstar.com
RCR-3750UMP
Instruction manual
Bedienungsanleitung
Manuel d’instructions
INDEX
Your new unit was manufactured and assembled under strict
ROADSTAR quality control. Thank-you for purchasing our pro-
duct for your music enjoyment. Before operating the unit, please
read this instruction manual carefully. Keep it also handy for further future references.
Votre nouvel appareil a été fabriqué et monté en étant soumis
aux nombreaux tests ROADSTAR. Nous espérons que cet appareil vous donnera entière satisfaction. Avant de vous adonner à
ces activités, veuillez lire attentivement ce manuel d’instructions.
Conservez-le à portée de main à fin de référence ultérieure.
Ihr neues Gerät wurde unter Beachtung der strengen ROAD-
STAR-Qualitätsvorschriften gefertigt. Wir danken Ihnen für den
Kauf unseres Produktes und wünschen Ihnen optimalen Hörgenuss. Bitte lesen Sie diese Bedienungsanleitung durch, und heben Sie sie auf, um jederzeit darin nachschlagen zu können.
English Page 1
Deutsch Seite 11
Francais Page 21
4
5
6
1
2
3
7 8 9
10
11
12
13
14
15
16
17
18
19
20 21 22 23 24
English English 1
2
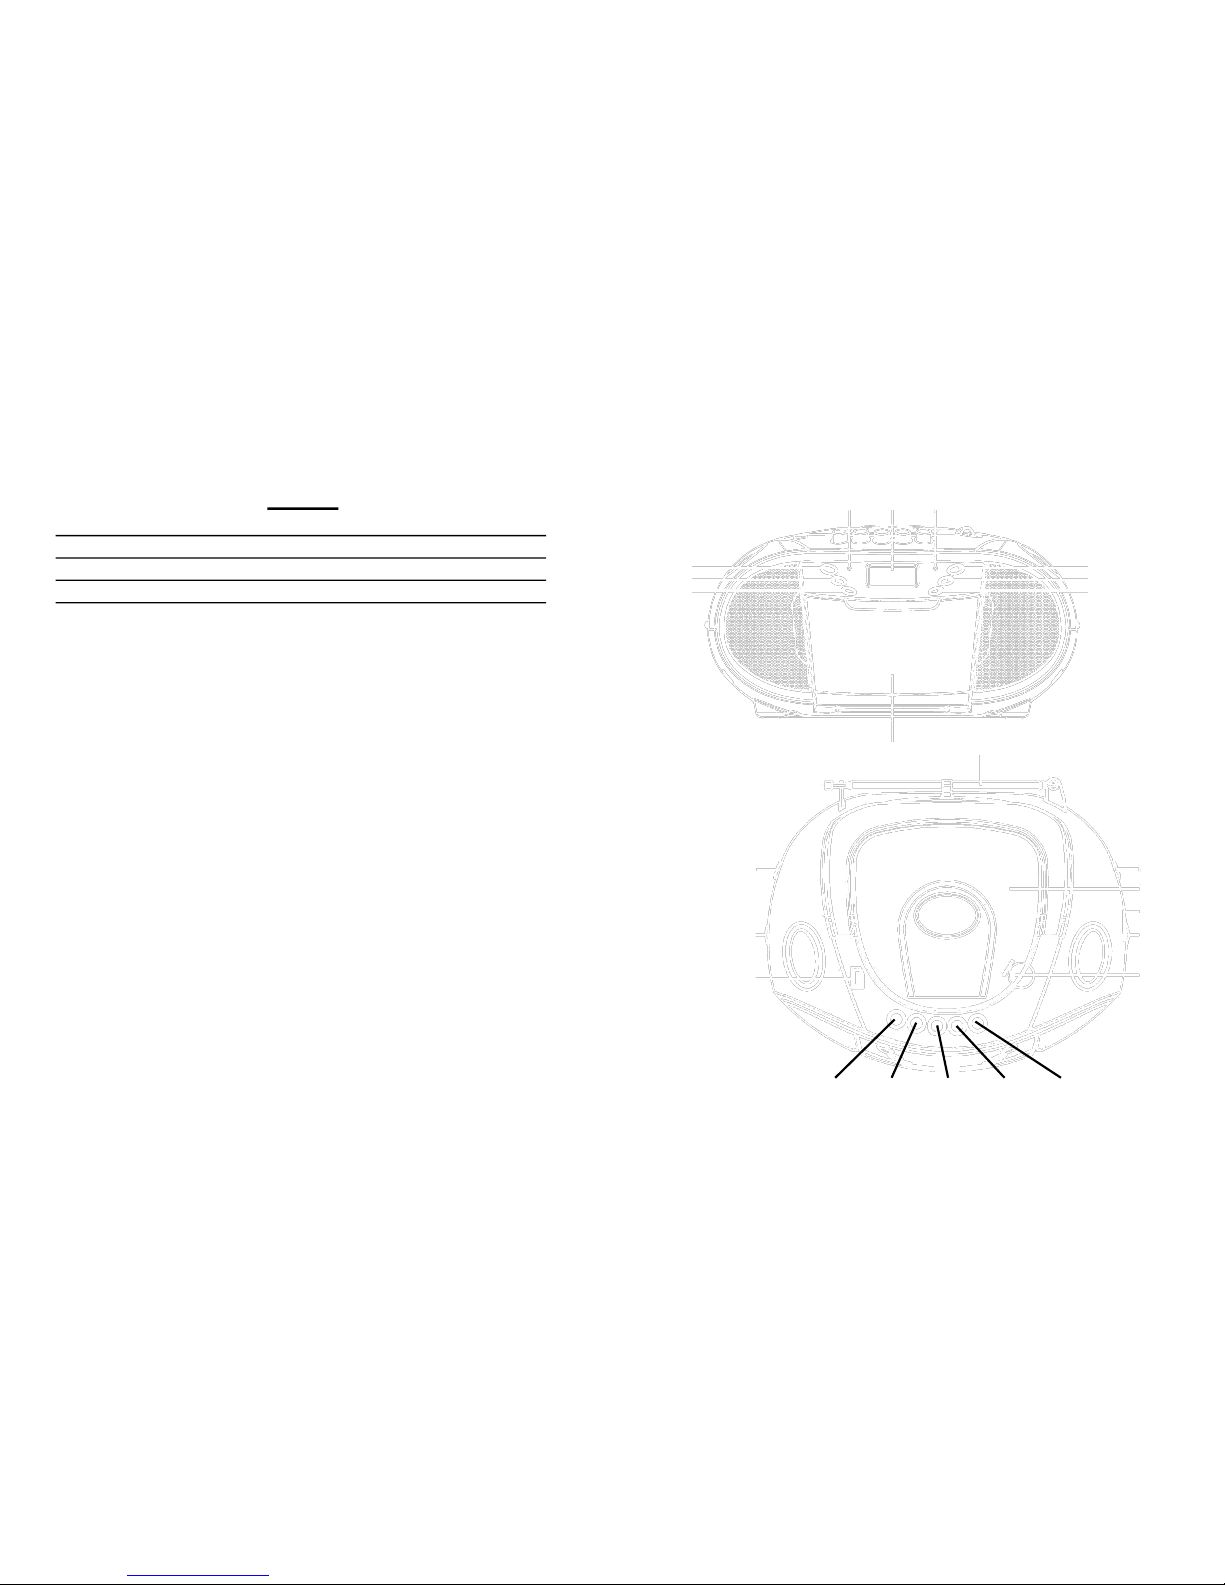
LOCATION OF CONTROLS
1. SKIP + BUTTON
2. SKIP - BUTTON
3. MODE BUTTON
4. PLAY / PAUSE BUTTON
5. STOP BUTTON
6. ALBUM BUTTON
7. POWER INDICATOR
8. LCD DISPLAY
9. FM STEREO INDICATOR
10. CASSETTE DOOR
11. FM ANTENNA
12. FUNCTION SELECTOR
13. VOLUME CONTROL
14. USB SLOT
15. BAND SELECTOR
16. CD DOOR
17. DIAL POINTER
18. TUNING CONTROL
19. CD OPEN / CLOSE
20. TAPE PAUSE BUTTON
21. TAPE STOP / EJECT BUTTON
22. TAPE FAST FORWARD BUTTON
23. TAPE REWIND BUTTON
24. TAPE PLAY BUTTON
AC POWER
You can power your portable system by plugging the detachable AC power
cord into the AC inlet at the back of the unit and into a wall AC power outlet.
Check that the rated voltage of your appliance matches your local voltage.
Make sure that the AC power cord is fully inserted into the appliance.
WARNINGS
The exclamation point within the triangle is a warning sign alerting
the user of important instructions accompanying the product.
The lightening flash with arrowhead symbol within the triangle is a
warning sign alerting the user of “dangerous voltage” inside the unit.
To reduce the risk of electric shock, do not remove the cover. No
user serviceable parts inside the unit. Refer all servicing to qualified personnel.
This unit operates on 230V ~ 50Hz. If the unit is not used for a
long period of time, remove the plug from the AC mains.
Ensure all connections are properly made before operating the
unit.
This unit must not be exposed to moisture or rain.
This unit should be positioned so that it is properly ventilated.
Avoid placing it, for example, close to curtains, on the carpet or in
a built-in installation such as a bookcase.
Do not expose this unit to direct sunlight or heat radiating sources.

English English 3 4
BATTERY POWER
Insert 8 x UM2 size batteries into the battery compartment. Be sure that the
batteries are inserted correctly to avoid damage to the appliance. Always
remove the batteries when appliance will not be used for a long period of
time, as this will cause leakage to the batteries and subsequently damage
to your set.
Notes:
Use batteries of the same type. Never use different types of batteries
together.
To use the appliance with batteries, disconnect the AC power cord from
it.
IMPORTANT: this unit is equipped wit h ErP circuit (Stand -By power
Management) when not operative for some time it switch OFF automathically. To re-activate the unit, move the Function Selector to TAPE/OFF then
move it again to CD / Radio mode.
RADIO OPERATIONS
1. Set the FUNCTION SELECTOR (12) to “RADIO” mode.
2. Select desired band by using the BAND SELECTOR (15).
3. Adjust radio frequency to your desired station by using the TUNING
CONTROL (18).
4. Adjust the VOLUME CONTROL (13) to the desired level.
FM / FM-STEREO RECEPTION
Set the BAND SELECTOR (15) to FM mode for MONO reception.
Set the BAND SELECTOR (15) to FM ST. mode for FM STEREO recep-
tion. The Stereo indicator light up to show FM ST. mode.
FOR BETTER RECEPTION
Reorient the FM ANTENNA (11) for better reception.
Reorient the appliance to get better AM reception.
TAPE OPERATIONS
1. Set the FUNCTION SELECTOR (12) to “TAPE” mode.
2. Press the TAPE STOP/EJ BUTTON (21) to open the cassette door and
insert your tape.
3. Close the CASSETTE DOOR (10).
4. Press the TAPE PLAY BUTTON (24) to start playing tape.
5. Adjust the VOLUME CONTROL (13) to the desired level.
6. Press TAPE FFW BUTTON (22)/TAPE RW BUTTON (23) to start rapid
tape winding either forward or reverse direction. Press TAPE PLAY
BUTTON (24) to start playing tape.
7. Press the TAPE PAUSE BUTTON (20) when you want to stop playing
tape operation temporarily.
8. Press the TAPE STOP/EJ BUTTON (21) when finished. Press again to
open the cassette door after the tape spools stop turning.
CD PLAYBACK
1. Set the FUNCTION SELECTOR (12) to “CD/MP3/USB” mode.
2. Open the CD DOOR (16) and place a CD/MP3 disc with the label up on
the CD compartment.
3. Close the CD DOOR (16).
4. Focus search is performed if disc is inside. Total number of tracks is
read and appears on the display.
5. Playback will start automatically from the first track.
6. Press SKIP +/- BUTTON (3) to go to the next track or back to the pre-
vious track. Press and hold while playing until you find the point of the
sound.
7. Adjust the VOLUME CONTROL (13) to the desired level.
8. Press the PLAY/PAUSE BUTTON (4) again when you want to stop play-
back temporarily.
9. Press the STOP BUTTON (5) when finished.
 Loading...